Using Storybook Template
11
Using the Electronic Storybook Template Tutorial Copyright 2002, IntelliTools, Inc. Note: This tutorial requires that you have installed IntelliPics Studio. Authoring features necessar y to complete this tutorial are not available when using IntelliPics Studio Player.
Transcript of Using Storybook Template
Using the Electronic Storybook
Template Tutorial
Copyright 2002, IntelliTools, Inc.
Note: This tutorial requires that you have installed IntelliPics Studio. Authoring featuresnecessary to complete this tutorial are not available when using IntelliPics Studio Player.
Copyright Notice
© 2002 IntelliTools, Inc. All rights reserved. The distribution and sale of this software and manual are authorized forthe original purchaser only. Unauthorized duplication is a violation of federal copyright law.
Images that appear in IntelliPics Studio may not be used in any commercial application without the prior consent ofIntelliTools, Inc.
Trademarks and Acknowledgments
IntelliTools, IntelliPics, IntelliKeys, IntelliTalk II, and Overlay Maker, and their respective logos are registeredtrademarks of IntelliTools, Inc. IntelliMathics, IntelliCritters, IntelliMation, IntelliQuiz, Overlay Printer, and OverlaySender are trademarks of IntelliTools, Inc.
Adobe and Acrobat Reader are registered trademarks or trademarks of Adobe Systems Incorporated, registered inthe United States and/or other countries. Macintosh, QuickTime, and QuickTime logo are registered trademarks ortrademarks of Apple Computer, Inc., registered in the U.S.A. and other countries. Windows 95, Windows 98,Windows 2000, and Windows ME are registered trademarks or trademarks of Microsoft Corporation, registered inthe U.S.A. and other countries. Other brand and product names mentioned herein are trademarks, registeredtrademarks, or trade names of their respective holders and are hereby acknowledged.
Some photographic images included with this program are from the CD-ROM, “Picture This... Professional Edition”and are the copyright of Silver Lining Multimedia, Inc. If you would like to obtain more images that can be importedinto IntelliTools products, please visit the Silver Lining Multimedia Web site: http://www.silverliningmm.com.
Over 90 of the images supplied with IntelliPics Studio are Picture Communication Symbols from the Boardmakersoftware, ©1981–2001 Mayer-Johnson, Inc. and are used with permission. Boardmaker has 3,000+ additional imagesthat can be imported into IntelliTools products. For additional information about Boardmaker images, please visit theMayer-Johnson Web site: http://www.mayer-johnson.com.
Credits
IntelliPics Studio was produced through the collaborative efforts of many staff members at IntelliTools. Design: ArjanKhalsa, Scott Schafer; Project Management: David Robertshaw; Content Development: Suzanne Feit, Arjan Khalsa,Lucinda Ray, Patty Kilroy; Software Engineering: Scott Schafer, Paul Archibald, Fred Ross-Perry; User’s Guide: AlanRhody; Teacher’s Guide: Lucinda Ray; Tutorial: Karen Sheehan; Additional Development: Philip Nittenberg, JeremyBolan, Linda Finley, Meida Pang, Steve Gensler; Testing: Dale Goetsch, Lisa Carr, Mike Burns, Meida Pang, ChrisFinley; Artwork: Patty Kilroy, Chris Santeramo, Michelle Graham, Mary Ann Zapalac, Jeremy Bolan; SupportServices: Linda Finley; Packaging: Patty Kilroy.
Technical SupportHours: 8 a.m.– 5 p.m. Pacific Time, Monday through FridayPhone: (800) 899-6687 (U.S. and Canada)
(707) 773-2000 (local and international)Fax: (707) 773-2001Email: [email protected] (for technical information)
[email protected] (for general information)World Wide Web: http://www.intellitools.com
Important note: To insure that returns are handled correctly and without delays, please call us for a ReturnMerchandise Authorization (RMA) before returning any item.
MNL-IPS-T&T Electronic Storybook Printed in U.S.A. 10/02
Using the Electronic Storybook Template 1
Table of Contents and Introduction
Table of ContentsIntroduction .....1
Universal DesignCopyright Issues
Part 1: Gather Resources .....2
Locate PicturesLocate Text
Part 2: Title Page Picture .....3
Open the TemplateAdd a Background Picture
Part 3: Title Page Sound .....4
Record Sound
Part 4: Title Page Text .....5
Add TextModify Text
Part 5: Additional Pages .....6
Add a Background PictureRecord SoundAdd Text
Part 6: More About Sound .....7
Listening to Text SoundsAdding Imported SoundsAdding Imported Sounds to Pages
Part 7: More about Pages .....9
Deleting Pages from the TemplateAdding Pages to the Template
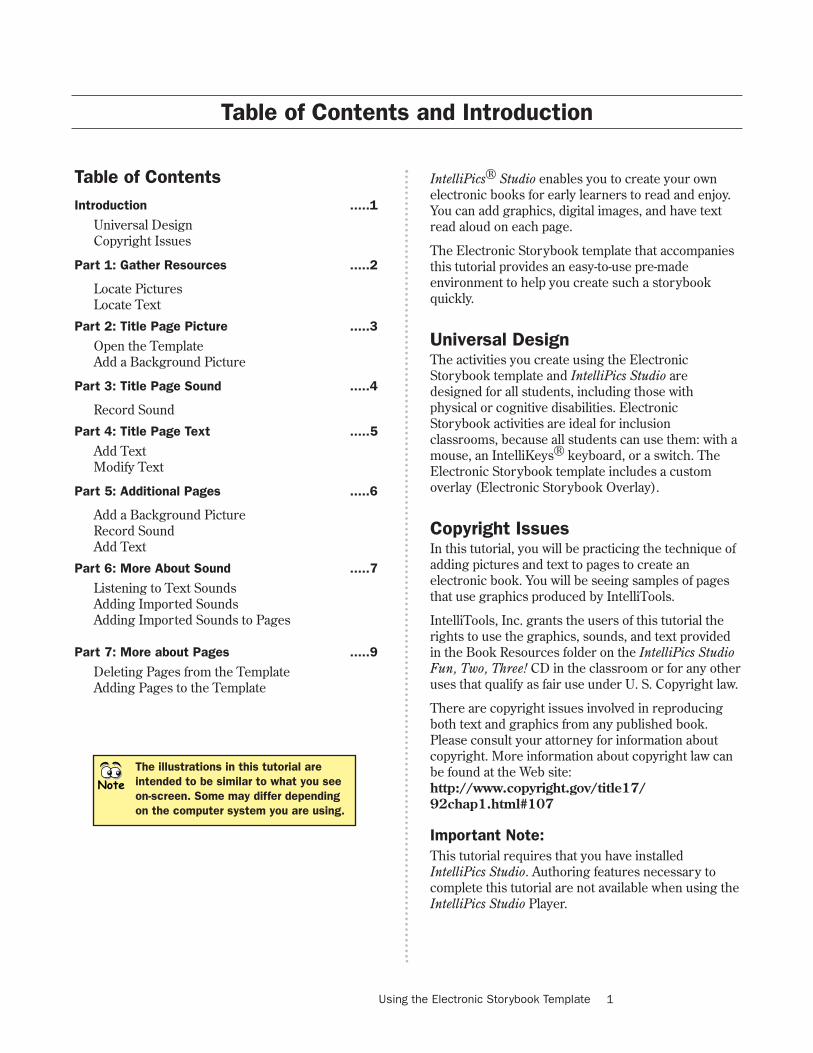
IntelliPics® Studio enables you to create your ownelectronic books for early learners to read and enjoy.You can add graphics, digital images, and have textread aloud on each page.
The Electronic Storybook template that accompaniesthis tutorial provides an easy-to-use pre-madeenvironment to help you create such a storybookquickly.
Universal DesignThe activities you create using the ElectronicStorybook template and IntelliPics Studio aredesigned for all students, including those withphysical or cognitive disabilities. ElectronicStorybook activities are ideal for inclusionclassrooms, because all students can use them: with amouse, an IntelliKeys® keyboard, or a switch. TheElectronic Storybook template includes a customoverlay (Electronic Storybook Overlay).
Copyright IssuesIn this tutorial, you will be practicing the technique ofadding pictures and text to pages to create anelectronic book. You will be seeing samples of pagesthat use graphics produced by IntelliTools.
IntelliTools, Inc. grants the users of this tutorial therights to use the graphics, sounds, and text providedin the Book Resources folder on the IntelliPics StudioFun, Two, Three! CD in the classroom or for any otheruses that qualify as fair use under U. S. Copyright law.
There are copyright issues involved in reproducingboth text and graphics from any published book.Please consult your attorney for information aboutcopyright. More information about copyright law canbe found at the Web site:http://www.copyright.gov/title17/92chap1.html#107
Important Note:This tutorial requires that you have installedIntelliPics Studio. Authoring features necessary tocomplete this tutorial are not available when using theIntelliPics Studio Player.
The illustrations in this tutorial areintended to be similar to what you seeon-screen. Some may differ dependingon the computer system you are using.
Note
IntelliPics Studio Tutorial2
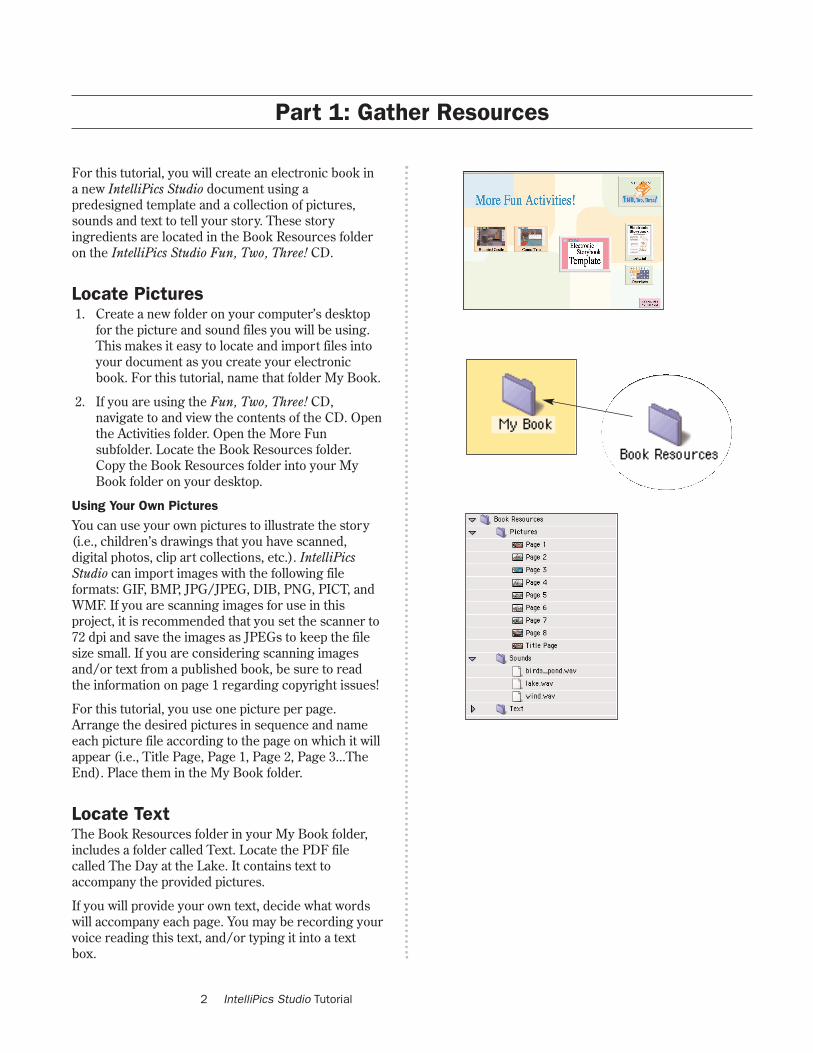
For this tutorial, you will create an electronic book ina new IntelliPics Studio document using apredesigned template and a collection of pictures,sounds and text to tell your story. These storyingredients are located in the Book Resources folderon the IntelliPics Studio Fun, Two, Three! CD.
Locate Pictures1. Create a new folder on your computer’s desktop
for the picture and sound files you will be using.This makes it easy to locate and import files intoyour document as you create your electronicbook. For this tutorial, name that folder My Book.
2. If you are using the Fun, Two, Three! CD,navigate to and view the contents of the CD. Openthe Activities folder. Open the More Funsubfolder. Locate the Book Resources folder.Copy the Book Resources folder into your MyBook folder on your desktop.
Using Your Own Pictures
You can use your own pictures to illustrate the story(i.e., children’s drawings that you have scanned,digital photos, clip art collections, etc.). IntelliPicsStudio can import images with the following fileformats: GIF, BMP, JPG/JPEG, DIB, PNG, PICT, andWMF. If you are scanning images for use in thisproject, it is recommended that you set the scanner to72 dpi and save the images as JPEGs to keep the filesize small. If you are considering scanning imagesand/or text from a published book, be sure to readthe information on page 1 regarding copyright issues!
For this tutorial, you use one picture per page.Arrange the desired pictures in sequence and nameeach picture file according to the page on which it willappear (i.e., Title Page, Page 1, Page 2, Page 3...TheEnd). Place them in the My Book folder.
Locate TextThe Book Resources folder in your My Book folder,includes a folder called Text. Locate the PDF filecalled The Day at the Lake. It contains text toaccompany the provided pictures.
If you will provide your own text, decide what wordswill accompany each page. You may be recording yourvoice reading this text, and/or typing it into a textbox.
Part 1: Gather Resources
Using the Electronic Storybook Template 3
Open the Template
Beginning from IntelliPics Studio
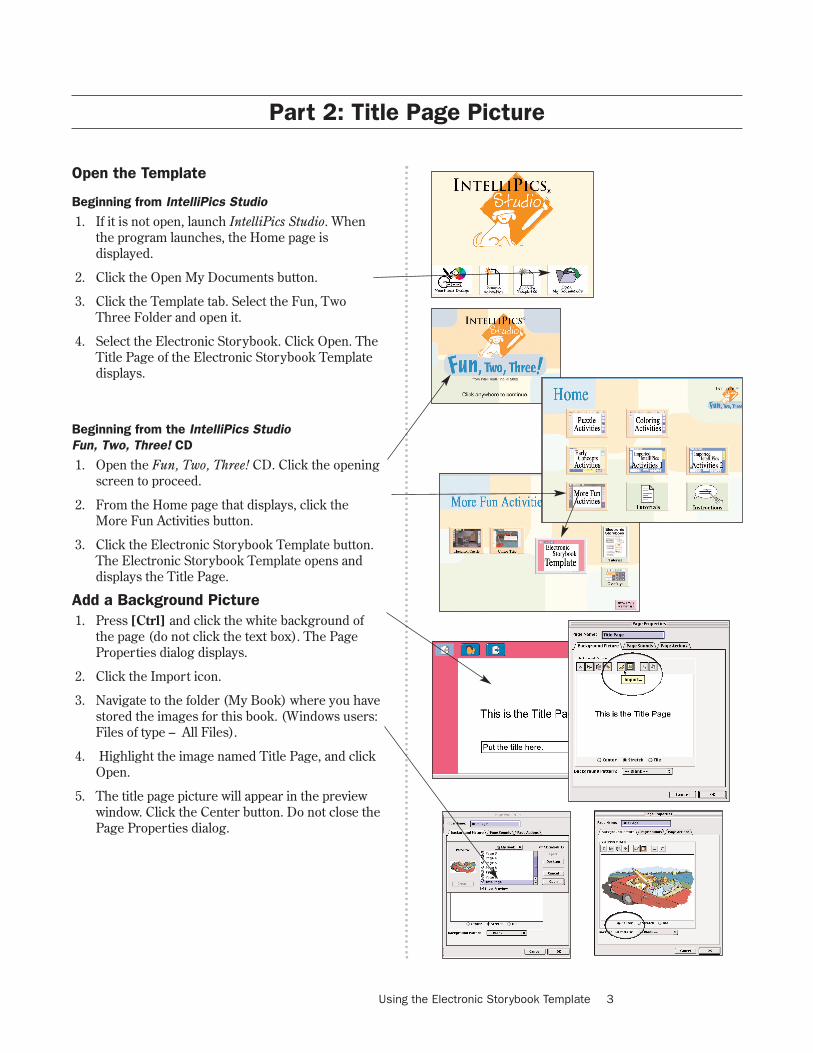
1. If it is not open, launch IntelliPics Studio. Whenthe program launches, the Home page isdisplayed.
2. Click the Open My Documents button.
3. Click the Template tab. Select the Fun, TwoThree Folder and open it.
4. Select the Electronic Storybook. Click Open. TheTitle Page of the Electronic Storybook Templatedisplays.
Beginning from the IntelliPics Studio Fun, Two, Three! CD
1. Open the Fun, Two, Three! CD. Click the openingscreen to proceed.
2. From the Home page that displays, click theMore Fun Activities button.
3. Click the Electronic Storybook Template button.The Electronic Storybook Template opens anddisplays the Title Page.
Add a Background Picture 1. Press [Ctrl] and click the white background of
the page (do not click the text box). The PageProperties dialog displays.
2. Click the Import icon.
3. Navigate to the folder (My Book) where you havestored the images for this book. (Windows users:Files of type – All Files).
4. Highlight the image named Title Page, and clickOpen.
5. The title page picture will appear in the previewwindow. Click the Center button. Do not close thePage Properties dialog.
Part 2: Title Page Picture
IntelliPics Studio Tutorial4
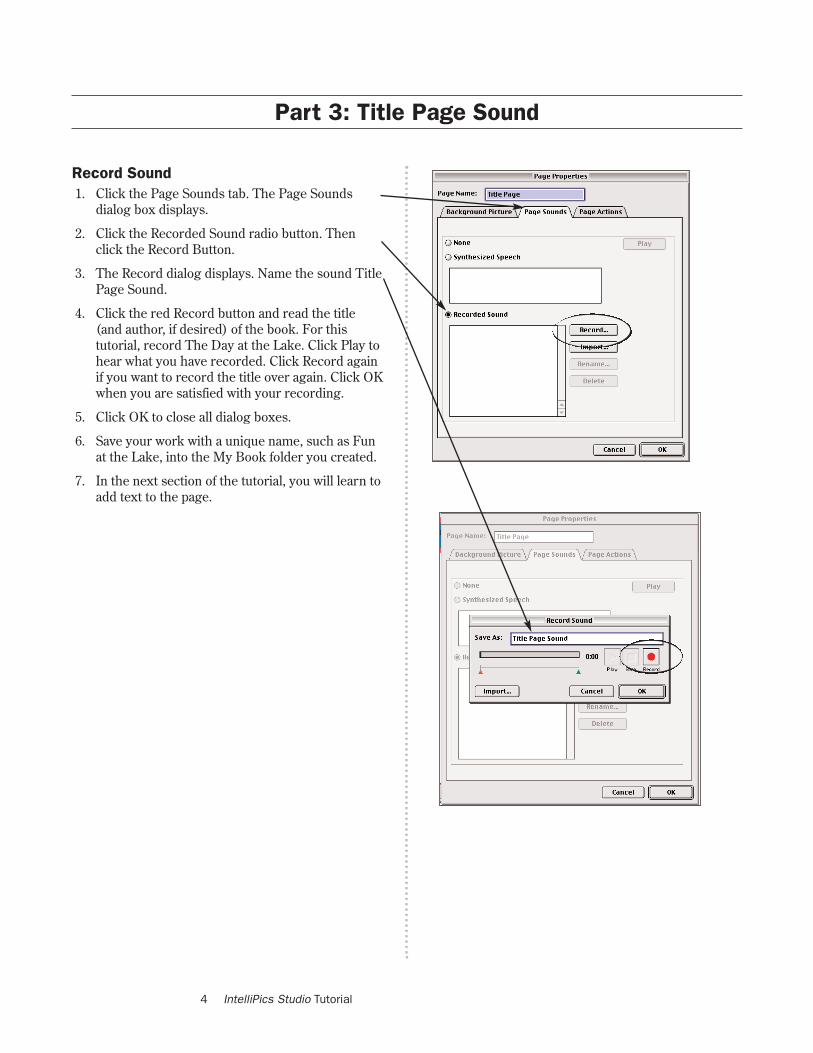
Record Sound 1. Click the Page Sounds tab. The Page Sounds
dialog box displays.
2. Click the Recorded Sound radio button. Thenclick the Record Button.
3. The Record dialog displays. Name the sound TitlePage Sound.
4. Click the red Record button and read the title(and author, if desired) of the book. For thistutorial, record The Day at the Lake. Click Play tohear what you have recorded. Click Record againif you want to record the title over again. Click OKwhen you are satisfied with your recording.
5. Click OK to close all dialog boxes.
6. Save your work with a unique name, such as Funat the Lake, into the My Book folder you created.
7. In the next section of the tutorial, you will learn toadd text to the page.
Part 3: Title Page Sound
Using the Electronic Storybook Template 5
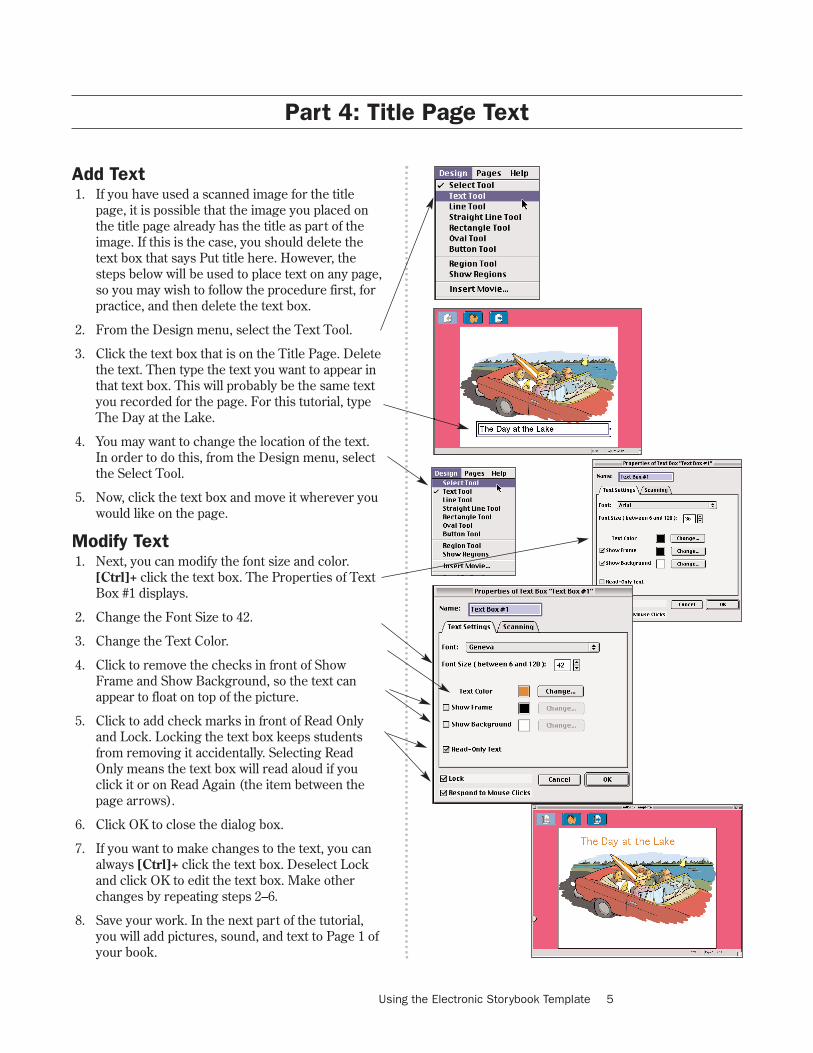
Add Text1. If you have used a scanned image for the title
page, it is possible that the image you placed onthe title page already has the title as part of theimage. If this is the case, you should delete thetext box that says Put title here. However, thesteps below will be used to place text on any page,so you may wish to follow the procedure first, forpractice, and then delete the text box.
2. From the Design menu, select the Text Tool.
3. Click the text box that is on the Title Page. Deletethe text. Then type the text you want to appear inthat text box. This will probably be the same textyou recorded for the page. For this tutorial, typeThe Day at the Lake.
4. You may want to change the location of the text.In order to do this, from the Design menu, selectthe Select Tool.
5. Now, click the text box and move it wherever youwould like on the page.
Modify Text1. Next, you can modify the font size and color.
[Ctrl]+ click the text box. The Properties of TextBox #1 displays.
2. Change the Font Size to 42.
3. Change the Text Color.
4. Click to remove the checks in front of ShowFrame and Show Background, so the text canappear to float on top of the picture.
5. Click to add check marks in front of Read Onlyand Lock. Locking the text box keeps studentsfrom removing it accidentally. Selecting ReadOnly means the text box will read aloud if youclick it or on Read Again (the item between thepage arrows).
6. Click OK to close the dialog box.
7. If you want to make changes to the text, you canalways [Ctrl]+ click the text box. Deselect Lockand click OK to edit the text box. Make otherchanges by repeating steps 2–6.
8. Save your work. In the next part of the tutorial,you will add pictures, sound, and text to Page 1 ofyour book.
Part 4: Title Page Text
IntelliPics Studio Tutorial6
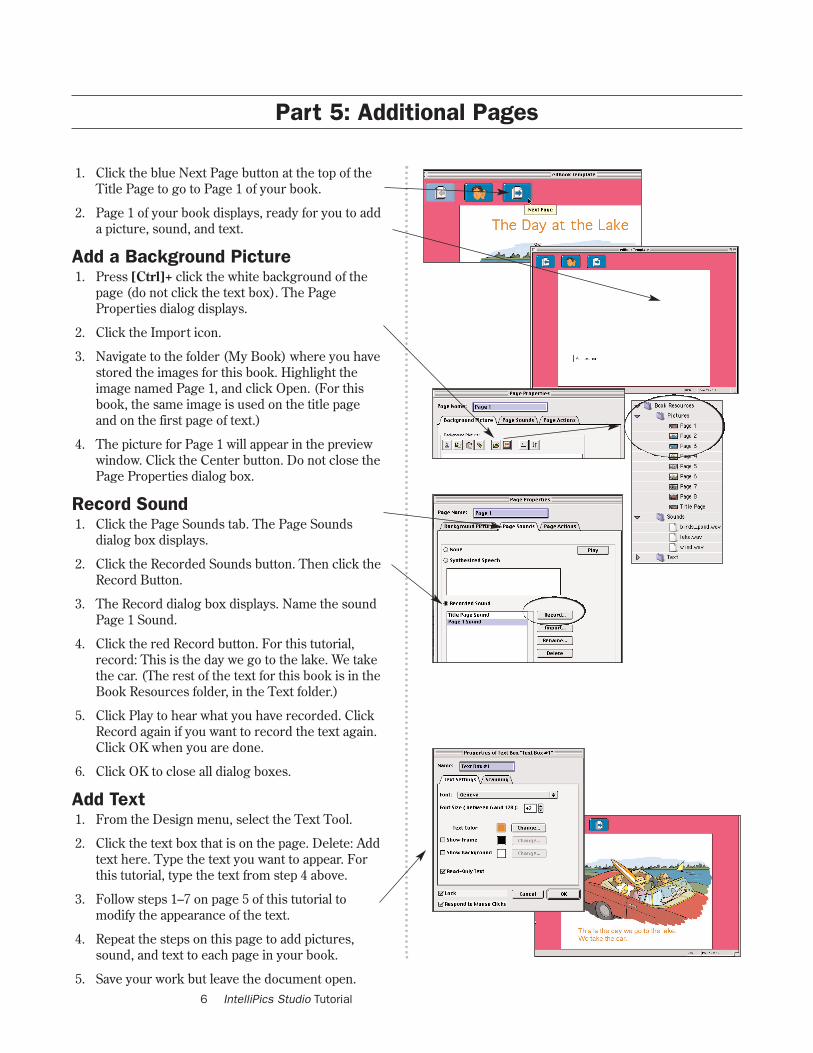
1. Click the blue Next Page button at the top of theTitle Page to go to Page 1 of your book.
2. Page 1 of your book displays, ready for you to adda picture, sound, and text.
Add a Background Picture1. Press [Ctrl]+ click the white background of the
page (do not click the text box). The PageProperties dialog displays.
2. Click the Import icon.
3. Navigate to the folder (My Book) where you havestored the images for this book. Highlight theimage named Page 1, and click Open. (For thisbook, the same image is used on the title pageand on the first page of text.)
4. The picture for Page 1 will appear in the previewwindow. Click the Center button. Do not close thePage Properties dialog box.
Record Sound1. Click the Page Sounds tab. The Page Sounds
dialog box displays.
2. Click the Recorded Sounds button. Then click theRecord Button.
3. The Record dialog box displays. Name the soundPage 1 Sound.
4. Click the red Record button. For this tutorial,record: This is the day we go to the lake. We takethe car. (The rest of the text for this book is in theBook Resources folder, in the Text folder.)
5. Click Play to hear what you have recorded. ClickRecord again if you want to record the text again.Click OK when you are done.
6. Click OK to close all dialog boxes.
Add Text1. From the Design menu, select the Text Tool.
2. Click the text box that is on the page. Delete: Addtext here. Type the text you want to appear. Forthis tutorial, type the text from step 4 above.
3. Follow steps 1–7 on page 5 of this tutorial tomodify the appearance of the text.
4. Repeat the steps on this page to add pictures,sound, and text to each page in your book.
5. Save your work but leave the document open.
Part 5: Additional Pages
Using the Electronic Storybook Template 7
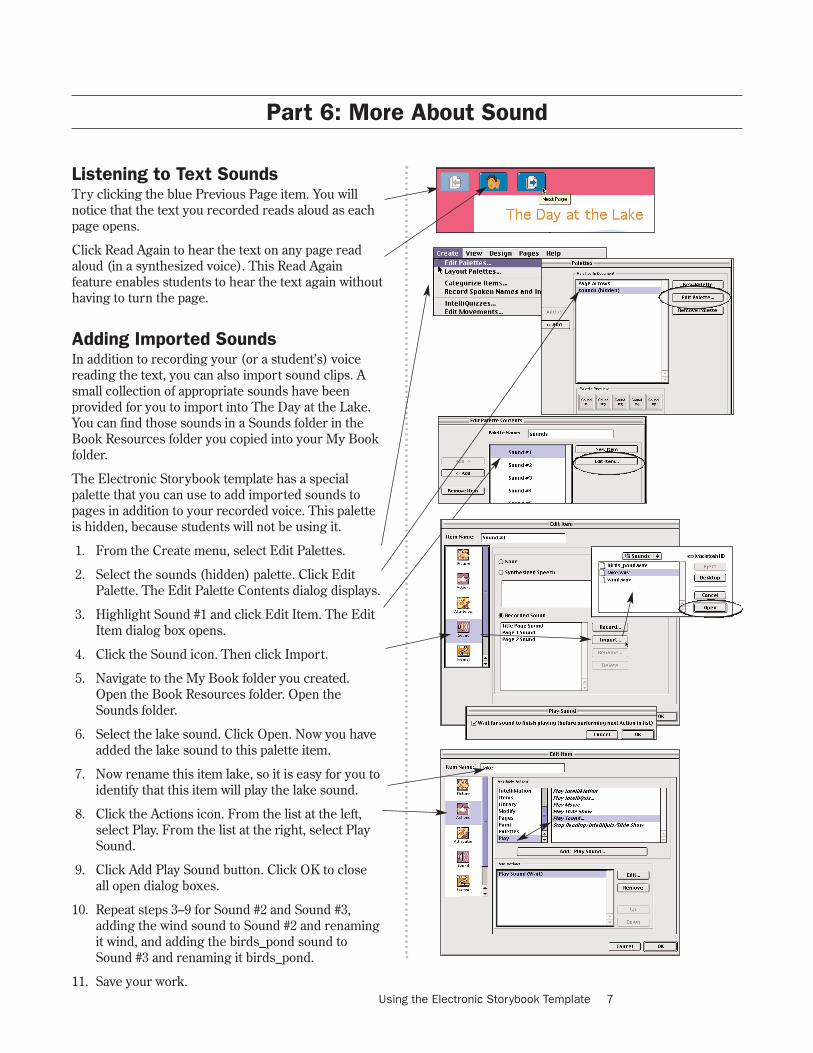
Listening to Text SoundsTry clicking the blue Previous Page item. You willnotice that the text you recorded reads aloud as eachpage opens.
Click Read Again to hear the text on any page readaloud (in a synthesized voice). This Read Againfeature enables students to hear the text again withouthaving to turn the page.
Adding Imported SoundsIn addition to recording your (or a student’s) voicereading the text, you can also import sound clips. Asmall collection of appropriate sounds have beenprovided for you to import into The Day at the Lake.You can find those sounds in a Sounds folder in theBook Resources folder you copied into your My Bookfolder.
The Electronic Storybook template has a specialpalette that you can use to add imported sounds topages in addition to your recorded voice. This paletteis hidden, because students will not be using it.
1. From the Create menu, select Edit Palettes.
2. Select the sounds (hidden) palette. Click EditPalette. The Edit Palette Contents dialog displays.
3. Highlight Sound #1 and click Edit Item. The EditItem dialog box opens.
4. Click the Sound icon. Then click Import.
5. Navigate to the My Book folder you created.Open the Book Resources folder. Open theSounds folder.
6. Select the lake sound. Click Open. Now you haveadded the lake sound to this palette item.
7. Now rename this item lake, so it is easy for you toidentify that this item will play the lake sound.
8. Click the Actions icon. From the list at the left,select Play. From the list at the right, select PlaySound.
9. Click Add Play Sound button. Click OK to closeall open dialog boxes.
10. Repeat steps 3–9 for Sound #2 and Sound #3,adding the wind sound to Sound #2 and renamingit wind, and adding the birds_pond sound toSound #3 and renaming it birds_pond.
11. Save your work.
Part 6: More About Sound
IntelliPics Studio Tutorial8
Part 6: More About Sounds
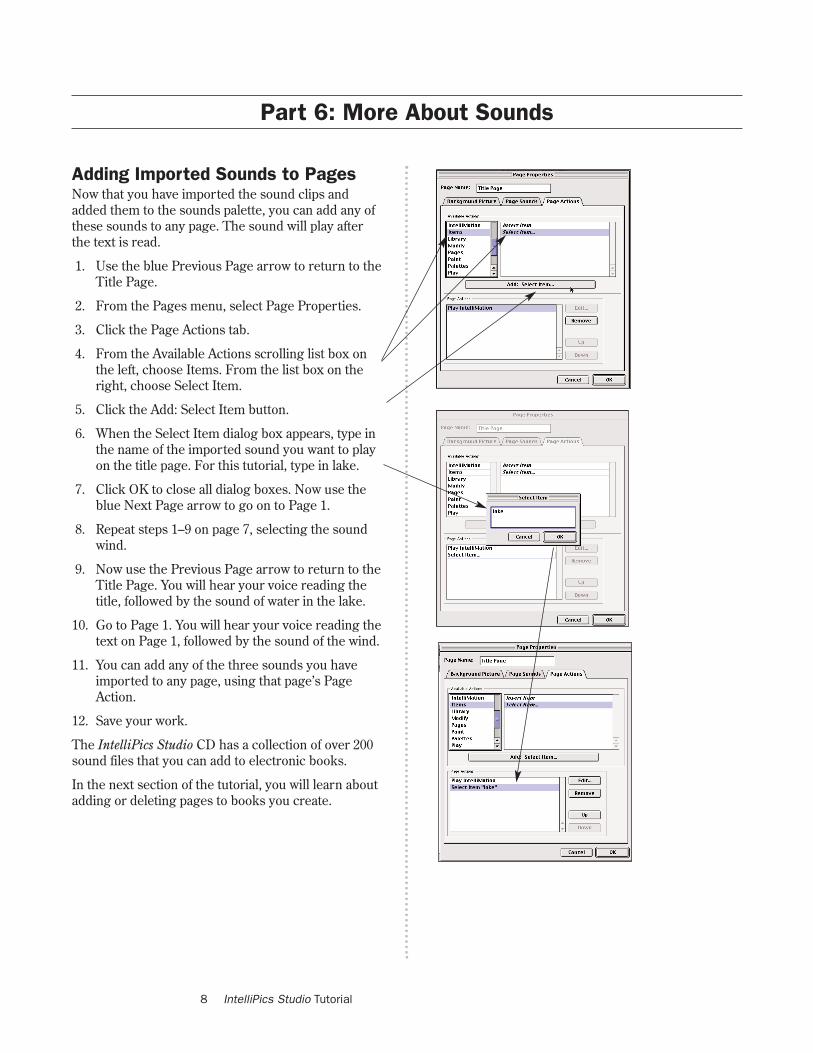
Adding Imported Sounds to PagesNow that you have imported the sound clips andadded them to the sounds palette, you can add any ofthese sounds to any page. The sound will play afterthe text is read.
1. Use the blue Previous Page arrow to return to theTitle Page.
2. From the Pages menu, select Page Properties.
3. Click the Page Actions tab.
4. From the Available Actions scrolling list box onthe left, choose Items. From the list box on theright, choose Select Item.
5. Click the Add: Select Item button.
6. When the Select Item dialog box appears, type inthe name of the imported sound you want to playon the title page. For this tutorial, type in lake.
7. Click OK to close all dialog boxes. Now use theblue Next Page arrow to go on to Page 1.
8. Repeat steps 1–9 on page 7, selecting the soundwind.
9. Now use the Previous Page arrow to return to theTitle Page. You will hear your voice reading thetitle, followed by the sound of water in the lake.
10. Go to Page 1. You will hear your voice reading thetext on Page 1, followed by the sound of the wind.
11. You can add any of the three sounds you haveimported to any page, using that page’s PageAction.
12. Save your work.
The IntelliPics Studio CD has a collection of over 200sound files that you can add to electronic books.
In the next section of the tutorial, you will learn aboutadding or deleting pages to books you create.
Using the Electronic Storybook Template 9
Part 7: More About Pages
You can add or remove pages from the ElectronicStorytbook template. The template provides a TitlePage, ten pages for the story, and a The End page.
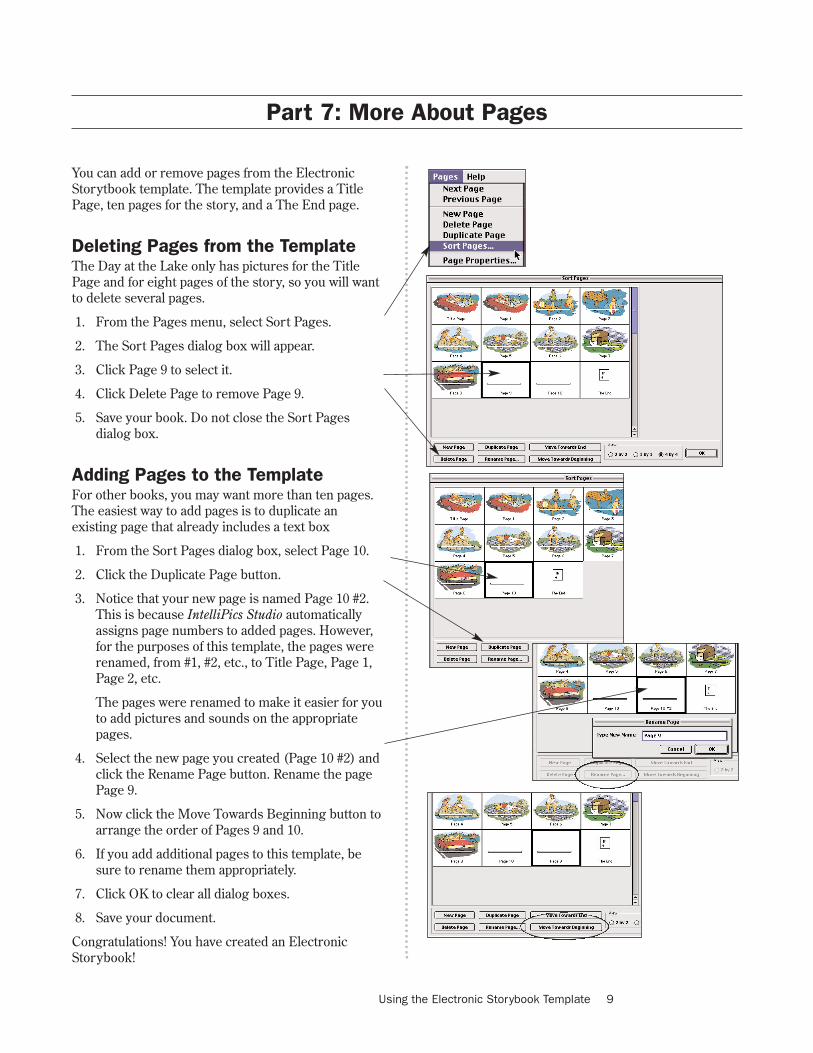
Deleting Pages from the TemplateThe Day at the Lake only has pictures for the TitlePage and for eight pages of the story, so you will wantto delete several pages.
1. From the Pages menu, select Sort Pages.
2. The Sort Pages dialog box will appear.
3. Click Page 9 to select it.
4. Click Delete Page to remove Page 9.
5. Save your book. Do not close the Sort Pagesdialog box.
Adding Pages to the TemplateFor other books, you may want more than ten pages.The easiest way to add pages is to duplicate anexisting page that already includes a text box
1. From the Sort Pages dialog box, select Page 10.
2. Click the Duplicate Page button.
3. Notice that your new page is named Page 10 #2.This is because IntelliPics Studio automaticallyassigns page numbers to added pages. However,for the purposes of this template, the pages wererenamed, from #1, #2, etc., to Title Page, Page 1,Page 2, etc.
The pages were renamed to make it easier for youto add pictures and sounds on the appropriatepages.
4. Select the new page you created (Page 10 #2) andclick the Rename Page button. Rename the pagePage 9.
5. Now click the Move Towards Beginning button toarrange the order of Pages 9 and 10.
6. If you add additional pages to this template, besure to rename them appropriately.
7. Click OK to clear all dialog boxes.
8. Save your document.
Congratulations! You have created an ElectronicStorybook!