Developed By Roberta Rios, RAC Extension Home Economist. Revised 2005.
description

Using Serviceguard Extension for RACVersion A.11.20
HP Part Number: 5900-1887Published: August 2011
Legal Notices
© Copyright 2011 Hewlett-Packard Development Company, L.P.
Confidential computer software. Valid license from HP required for possession, use, or copying. Consistent with FAR 12.211 and 12.212, CommercialComputer Software, Computer Software Documentation, and Technical Data for Commercial Items are licensed to the U.S. Government undervendor’s standard commercial license.
The information contained herein is subject to change without notice. The only warranties for HP products and services are set forth in the expresswarranty statements a-ccompanying such products and services. Nothing herein should be construed as constituting an additional warranty. HPshall not be liable for technical or editorial errors or omissions contained herein.
Oracle® is a registered trademark of Oracle Corporation.
UNIX® is a registered trademark in the United States and other countries, licensed exclusively through The Open Group.
VERITAS® is a registered trademark of VERITAS Software Corporation.
VERITAS File System™ is a trademark of VERITAS Software Corporation.
ContentsAdvantages of using SGeRAC.........................................................................8User Guide Overview....................................................................................9Where to find Documentation on the Web......................................................111 Introduction to Serviceguard Extension for RAC............................................12
What is a Serviceguard Extension for RAC Cluster? ...................................................................12Group Membership............................................................................................................13Using Packages in a Cluster ...............................................................................................13
Serviceguard Extension for RAC Architecture..............................................................................14Group Membership Daemon...............................................................................................14
Overview of SGeRAC and Cluster File System (CFS)/Cluster Volume Manager (CVM).....................14Package Dependencies.......................................................................................................15Storage Configuration Options............................................................................................15About Veritas CFS and CVM from Symantec..........................................................................15
Overview of SGeRAC and Oracle 10g, 11gR1, and 11gR2 RAC...................................................16Overview of SGeRAC Cluster Interconnect Subnet Monitoring ......................................................17
How Cluster Interconnect Subnet Works................................................................................17Configuring Packages for Oracle RAC Instances.........................................................................18Configuring Packages for Oracle Listeners..................................................................................18Node Failure.........................................................................................................................19Larger Clusters ......................................................................................................................20
Up to Four Nodes with SCSI Storage....................................................................................20Point-to-Point Connections to Storage Devices ........................................................................21
Extended Distance Cluster Using Serviceguard Extension for RAC.................................................22GMS Authorization.................................................................................................................22Overview of Serviceguard Manager.........................................................................................23
Starting Serviceguard Manager...........................................................................................23Monitoring Clusters with Serviceguard Manager....................................................................23Administering Clusters with Serviceguard Manager................................................................23Configuring Clusters with Serviceguard Manager...................................................................24
2 Serviceguard Configuration for Oracle 10g, 11gR1, or 11gR2 RAC.................25Interface Areas.......................................................................................................................25
Group Membership API (NMAPI2).......................................................................................25SGeRAC Detection.............................................................................................................25Cluster Timeouts.................................................................................................................25
Serviceguard Cluster Timeout..........................................................................................25CSS Timeout.................................................................................................................26RAC IMR Timeout..........................................................................................................26
Oracle Cluster Software......................................................................................................26Automated Oracle Cluster Software Startup and Shutdown.................................................26Monitoring...................................................................................................................26Allowed Characters for Oracle 10g/11gR1/11gR2 RAC Cluster Names...............................26
Shared Storage.................................................................................................................26Multipathing ................................................................................................................27OCR and Vote Device....................................................................................................27Mirroring and Resilvering...............................................................................................27Shared Storage Activation..............................................................................................27
Listener.............................................................................................................................27Automated Startup and Shutdown...................................................................................27Manual Startup and Shutdown........................................................................................28
Contents 3

Network Monitoring...........................................................................................................28SGeRAC Heartbeat Network..........................................................................................28CSS Heartbeat Network.................................................................................................28RAC Cluster Interconnect................................................................................................28Public Client Access.......................................................................................................28
RAC Instances........................................................................................................................28Automated Startup and Shutdown........................................................................................28Manual Startup and Shutdown............................................................................................29Shared Storage.................................................................................................................29
Network Planning for Cluster Communication.............................................................................29Planning Storage for Oracle Cluster Software.............................................................................30Planning Storage for Oracle 10g/11gR1/11gR2 RAC..................................................................30
Volume Planning with SLVM................................................................................................31Storage Planning with CFS..................................................................................................31Volume Planning with CVM.................................................................................................31
Installing Serviceguard Extension for RAC .................................................................................33Veritas Cluster Volume Manager (CVM) and Cluster File System (CFS)...........................................33Veritas Storage Management Products.......................................................................................33
About Multipathing............................................................................................................33About Device Special Files.......................................................................................................33
About Cluster-wide Device Special Files (cDSFs).....................................................................34Configuration File Parameters...................................................................................................35Cluster Communication Network Monitoring..............................................................................35
Single Network for Cluster Communications..........................................................................36Alternate Configuration—Fast Reconfiguration with Low Node Member Timeout.........................37Alternate Configuration—Multiple RAC Databases.................................................................38Guidelines for Changing Cluster Parameters..........................................................................39
When Cluster Interconnect Subnet Monitoring is used........................................................39When Cluster Interconnect Subnet Monitoring is not Used..................................................39
Limitations of Cluster Communication Network Monitor...........................................................40Cluster Interconnect Monitoring Restrictions.......................................................................40
Creating a Storage Infrastructure with LVM.................................................................................40Building Volume Groups for RAC on Mirrored Disks...............................................................41
Creating Volume Groups and Logical Volumes .................................................................41Selecting Disks for the Volume Group..........................................................................41Creating Physical Volumes.........................................................................................41Creating a Volume Group with PVG-Strict Mirroring......................................................42
Building Mirrored Logical Volumes for RAC with LVM Commands.............................................42Creating Mirrored Logical Volumes for RAC Redo Logs and Control Files..............................42Creating Mirrored Logical Volumes for RAC Data Files.......................................................43
Creating RAC Volume Groups on Disk Arrays .......................................................................44Creating Logical Volumes for RAC on Disk Arrays..................................................................45Oracle Demo Database Files ..............................................................................................45
Displaying the Logical Volume Infrastructure ..............................................................................46Exporting the Logical Volume Infrastructure ...........................................................................46
Exporting with LVM Commands ......................................................................................46Installing Oracle Real Application Clusters.................................................................................47Creating a Storage Infrastructure with CFS.................................................................................47
Creating an SGeRAC Cluster with CFS for Oracle 11gR1 or 11gR2...........................................48Initializing the Veritas Volume Manager................................................................................48Deleting CFS from the Cluster..............................................................................................51
Creating a Storage Infrastructure with CVM................................................................................52Initializing the Veritas Volume Manager................................................................................52Using CVM 5.x or later......................................................................................................53
Preparing the Cluster and the System Multi-node Package for use with CVM 5.x or later.........53
4 Contents

Mirror Detachment Policies with CVM..........................................................................55Using CVM 5.x.................................................................................................................55
Preparing the Cluster for Use with CVM 5.x......................................................................55Starting the Cluster and Identifying the Master Node....................................................56Converting Disks from LVM to CVM............................................................................56Initializing Disks for CVM..........................................................................................56Creating Disk Groups for RAC...................................................................................56
Creating Volumes...................................................................................................................57Mirror Detachment Policies with CVM...................................................................................57
Oracle Demo Database Files ...................................................................................................57Adding Disk Groups to the Cluster Configuration........................................................................58Prerequisites for Oracle 10g, 11gR1, or 11gR2 (Sample Installation)...............................................59Installing Oracle 10g, 11gR1, or 11gR2 Cluster Software..............................................................62
Installing on Local File System..............................................................................................62Installing Oracle 10g/11gR1/11gR2 RAC Binaries......................................................................62
Installing RAC Binaries on a Local File System........................................................................62Installing RAC Binaries on Cluster File System........................................................................63
Creating a RAC Demo Database..............................................................................................63Creating a RAC Demo Database on SLVM or CVM................................................................63Creating a RAC Demo Database on CFS..............................................................................64
Verifying Oracle Disk Manager is Configured............................................................................64Configuring Oracle to Use Oracle Disk Manager Library.............................................................65Verify that Oracle Disk Manager is Running...............................................................................65Configuring Oracle to Stop Using Oracle Disk Manager Library...................................................66Using Serviceguard Packages to Synchronize with Oracle 10g/11gR1/11gR2 RAC.........................67
Preparing Oracle Cluster Software for Serviceguard Packages.................................................67Configure Serviceguard Packages........................................................................................67
3 Support of Oracle RAC ASM with SGeRAC.................................................69Introduction............................................................................................................................69SG/SGeRAC Support for ASM on HP-UX 11i v2.........................................................................69
Overview..........................................................................................................................69Why ASM over SLVM?.......................................................................................................69Configuring SLVM Volume Groups for ASM Disk Groups.........................................................70
SG/SGeRAC Support for ASM on HP-UX 11i v3.........................................................................73Overview..........................................................................................................................73ASM over SLVM................................................................................................................73Configuring SLVM Volume Groups for ASM Disk Groups.........................................................74
Sample Command Sequence for Configuring SLVM Volume Groups....................................75ASM over Raw disk............................................................................................................76Configure Raw Disks/Disk Array Logical Units for ASM Disk Group..........................................77
Additional Hints on ASM Integration with SGeRAC.....................................................................77Consider using the MNP/Simple Dependency-based SGeRAC Toolkit’s Framework....................77ASM Halt is needed to ensure disconnect of ASM from SLVM Volume Groups............................77ASM may require Modified Backup/Restore Procedures..........................................................78Installation, Configuration, Support, and Troubleshooting........................................................78Additional Documentation on the Web and Scripts.................................................................79
4 SGeRAC Toolkit for Oracle RAC 10g or later...............................................80Introduction ...........................................................................................................................80Background...........................................................................................................................80
Coordinating the Oracle RAC/Serviceguard Extension for RAC stack.......................................80Serviceguard/Serviceguard Extension for RAC multi-node packages and simple packagedependencies ...................................................................................................................82
Why use multi-node packages/simple package dependencies for Oracle RAC integration...............83Serviceguard Extension for RAC Toolkit operation ......................................................................84
Contents 5

Startup and shutdown of the combined Oracle RAC-SGeRAC stack .........................................85How Serviceguard Extension for RAC starts, stops and checks Oracle Clusterware ....................86How Serviceguard Extension for RAC Mounts, dismounts and checks ASM disk groups...............86How Serviceguard Extension for RAC Toolkit starts, stops, and checks the RAC databaseinstance............................................................................................................................87How Serviceguard Extension for RAC Toolkit interacts with storage management subsystems........87
Use Case 1: Oracle Clusterware storage and database storage in SLVM/CVM ....................87Use Case 2: Oracle Clusterware storage and database storage in CFS ...............................88Use case 3: Database storage in ASM over SLVM.............................................................88
How to create a Serviceguard Extension for RAC modular package..........................................89How Serviceguard Extension for RAC Toolkit maintenance mode works....................................89
Use Case 1: Performing maintenance with Oracle Clusterware............................................89Use Case 2: performing maintenance with ASM disk groups..............................................89Use Case 3: performing maintenance with Oracle RAC database instance...........................90
Serviceguard Extension for RAC Toolkit internal file structure.........................................................90Support for the SGeRAC Toolkit................................................................................................92Conclusion..........................................................................................................................112Additional Documentation on the Web....................................................................................112
5 Maintenance.........................................................................................113Reviewing Cluster and Package States with the cmviewcl Command............................................113
Types of Cluster and Package States...................................................................................113Examples of Cluster and Package States.........................................................................113Types of Cluster and Package States..............................................................................115Cluster Status .............................................................................................................116Node Status and State ................................................................................................116Package Status and State ............................................................................................116Package Switching Attributes........................................................................................117Status of Group Membership........................................................................................117Service Status ............................................................................................................117Network Status...........................................................................................................118Failover and Failback Policies.......................................................................................118
Examples of Cluster and Package States .............................................................................118Normal Running Status................................................................................................118Quorum Server Status..................................................................................................119CVM Package Status...................................................................................................119Status After Moving the Package to Another Node...........................................................120Status After Package Switching is Enabled......................................................................121Status After Halting a Node.........................................................................................121Viewing Data on Unowned Packages.............................................................................121
Checking the Cluster Configuration and Components................................................................122Checking Cluster Components...........................................................................................123Setting up Periodic Cluster Verification................................................................................125
Example....................................................................................................................125Limitations.......................................................................................................................126
Online Reconfiguration..........................................................................................................126Online Node Addition and Deletion...................................................................................126
Managing the Shared Storage...............................................................................................127Making LVM Volume Groups Shareable..............................................................................127
Making a Volume Group Unshareable ..........................................................................128Activating an LVM Volume Group in Shared Mode...............................................................128
Deactivating a Shared Volume Group ...........................................................................128Making Offline Changes to Shared Volume Groups.............................................................128Adding Additional Shared LVM Volume Groups ..................................................................130Changing the CVM Storage Configuration .........................................................................130
6 Contents

Removing Serviceguard Extension for RAC from a System..........................................................130Monitoring Hardware ...........................................................................................................131
Using Event Monitoring Service..........................................................................................131Using EMS Hardware Monitors..........................................................................................131
Adding Disk Hardware .........................................................................................................131Replacing Disks....................................................................................................................132
Replacing a Mechanism in a Disk Array Configured with LVM...............................................132Replacing a Mechanism in an HA Enclosure Configured with Exclusive LVM............................132Online Replacement of a Mechanism in an HA Enclosure Configured with Shared LVM (SLVM)...133Offline Replacement of a Mechanism in an HA Enclosure Configured with Shared LVM (SLVM)...134Replacing a Lock Disk.......................................................................................................134Online Hardware Maintenance with Inline SCSI Terminator ..................................................134
Replacement of I/O Cards.....................................................................................................136Replacement of LAN Cards....................................................................................................136
Offline Replacement.........................................................................................................136Online Replacement.........................................................................................................136After Replacing the Card..................................................................................................136
Monitoring RAC Instances......................................................................................................1376 Troubleshooting......................................................................................138A Software Upgrades ...............................................................................139
Rolling Software Upgrades....................................................................................................139Upgrading Serviceguard to SGeRAC cluster........................................................................140
Upgrading from an existing SGeRAC A.11.19 cluster to HP-UX 11i v3 1109HA-OE/DC-OE...........................................................................................................140Upgrading from an existing Serviceguard A.11.19 cluster to HP-UX 11i v3 1109 HA-OE/DC-OEalong with SGeRAC....................................................................................................140
Upgrading from an existing Serviceguard A.11.19 cluster to HP-UX 11i v3 1109HA-OE/DC-OE along with SGeRAC (Alternative approach).........................................141
Upgrading from Serviceguard A.11.18 cluster to HP-UX 11i v3 1109 HA-OE/DC-OE alongwith SGeRAC.............................................................................................................141Upgrading from Serviceguard A.11.20 cluster to HP-UX 11i v3 1109 HA-OE/DC-OE alongwith SGeRAC.............................................................................................................142
Steps for Rolling Upgrades ...............................................................................................142Keeping Kernels Consistent...........................................................................................143
Example of Rolling Upgrade .............................................................................................143Step 1. ......................................................................................................................144Step 2. .....................................................................................................................144Step 3. .....................................................................................................................145Step 4. .....................................................................................................................146Step 5. .....................................................................................................................146
Limitations of Rolling Upgrades .........................................................................................147Non-Rolling Software Upgrades.............................................................................................148
Limitations of Non-Rolling Upgrades ..................................................................................148Migrating an SGeRAC Cluster with Cold Install....................................................................148
Upgrade Using DRD.............................................................................................................149Rolling Upgrade Using DRD..............................................................................................149Non-Rolling Upgrade Using DRD.......................................................................................149Restrictions for DRD Upgrades...........................................................................................149
B Blank Planning Worksheets......................................................................151LVM Volume Group and Physical Volume Worksheet.................................................................151Oracle Logical Volume Worksheet..........................................................................................151
Index.......................................................................................................153
Contents 7
Advantages of using SGeRACHP Serviceguard Extension for RAC (SGeRAC) amplifies the availability and simplifies themanagement of Oracle Real Application Cluster (RAC). SGeRAC allows you to integrate OracleRAC into a Serviceguard cluster while also easily managing the dependency between OracleClusterware and Oracle RAC with a full range of storage management options.Built on the functionality of HP Serviceguard, SGeRAC uses a networked group of HP Integrityservers to create highly available clusters that support Oracle RAC. Integrated tightly, these twoproducts provide the best features of HP enterprise clusters and Oracle relational database servers.You gain high availability, data integrity, flexibility, and scalability in your Oracle RACenvironment—all of which are essential to protect your infrastructure and enhance business uptime.Business OutcomesServiceguard Extension for RAC ensures that you do not have a single point of failure within theentire Oracle RAC cluster. Not only that, the unique architecture of SGeRAC leverages the fullaggregate processing power of up to 16 nodes to access the database. This can increase theoverall throughput for query-intensive applications, that generate random reads and writes to verylarge databases, and applications that access separate partitions of the database. SGeRAC evenprovides extra protection for database integrity.SGeRAC works together with Oracle Clusterware to provide an improved high-availability solutionthat can address your concerns over unplanned downtime. The availability of your applications isimproved with rapid automatic detection and recovery from a wide range of hardware, software,network, and storage errors. SGeRAC also provides a superior level of protection by enabling youto withstand multiple node failures. Serviceguard solutions are integrated with HP Matrix OperatingEnvironment for HP-UX so that you can maintain service level objectives during planned andunplanned downtime.The tight integration between SGeRAC and Oracle RAC also enables faster detection and failover,and you can even achieve nearly continuous application availability by implementing a fully-disastertolerant solution.SGeRAC uses advanced clustering mechanisms and robust volume managers to eliminate datacorruption and preserve data integrity. You’ll also benefit from data integrity protection amongnodes, both inside and outside of the cluster. Flexibility is paramount, so SGeRAC supports fourstorage management options for Oracle RAC: Cluster file system (CFS), Shared Logical VolumeManager (SLVM), Cluster Volume Manager (CVM) and Automated Storage Management (ASM)on SLVM and raw volumes.
8

User Guide OverviewThis user guide covers how to use Serviceguard Extension for RAC (Oracle Real Application Cluster)to configure Serviceguard clusters for use with Oracle Real Application Cluster software, on HPHigh Availability clusters running the HP-UX operating system.• Chapter 1— Introduction to Serviceguard Extension for RAC
Describes a Serviceguard cluster and provides a roadmap for using this guide. This chaptershould be used as a supplement to Chapters 1–3 of the Managing Serviceguard user’s guide.
• Chapter 2 — Serviceguard Configuration for Oracle 10g, 11gR1, or 11gR2 RACDescribes the additional steps you need to take to use Serviceguard with Real ApplicationClusters when configuring Oracle 10g/11gR1/11gR2 RAC. This chapter should be used asa supplement to Chapters 4–6 of the Managing Serviceguard user’s guide.
• Chapter 3 — Oracle Automatic Storage Management (ASM)Discusses the use of the Oracle 10g database server feature called Automatic StorageManagement (ASM) in configurations of HP Serviceguard for single database instance failover.
• Chapter 4 — SGeRAC Toolkit for Oracle RAC 10g or laterDiscusses how Serviceguard Extension for RAC Toolkit enables a new framework for theintegration of Oracle 10g Release 2 (10.2.0.1) or later version of Real Application Clusters(Oracle RAC1) with HP Serviceguard Extension for Real Application Clusters A.11.17 or later(SGeRAC2).
• Chapter 5 — MaintenanceDescribes tools and techniques necessary for ongoing cluster operation. This chapter shouldbe used as a supplement to Chapters 7–8 of the Managing Serviceguard user’s guide.
• Chapter 6 — TroubleshootingLists where to find troubleshooting information.
• Appendix A — Software UpgradesDescribes rolling, non-rolling, and migration with cold install upgrade procedures for SGeRACclusters.
• Appendix B — Blank Planning WorksheetsContains planning worksheets for LVM, and Oracle Logical Volume.
To view the following documents, go to www.hp.com/go/hpux-core-docs and www.hp.com/go/hpux-serviceguard-docs.• VERITAS Volume Manager Administrator’s Guide (includes a glossary of VERITAS terminology).
• VERITAS Volume Manager Storage Administrator Administrator’s Guide.
• VERITAS Volume Manager Reference Guide.
• VERITAS Volume Manager Migration Guide.
• VERITAS Volume Manager for HP-UX Release Notes.
• VERITAS Storage Foundation for Oracle RAC. HP Serviceguard Storage Management SuiteConfiguration Guide Extracts.
• VERITAS Storage Foundation for Oracle RAC. HP Serviceguard Storage Management SuiteAdministration Guide Extracts.
9
If you will be using Veritas Cluster Volume Manager (CVM) and Veritas Cluster File System (CFS)from Symantec with Serviceguard refer to the HP Serviceguard Storage Management Suite VersionA.03.01 for HP-UX 11i v3 Release Notes.These release notes describe suite bundles for the integration of HP Serviceguard A.11.20 onHP-UX 11i v3 with Symantec’s Veritas Storage Foundation.
Problem ReportingIf you have any problems with the software or documentation, please contact your localHewlett-Packard Sales Office or Customer Service Center.
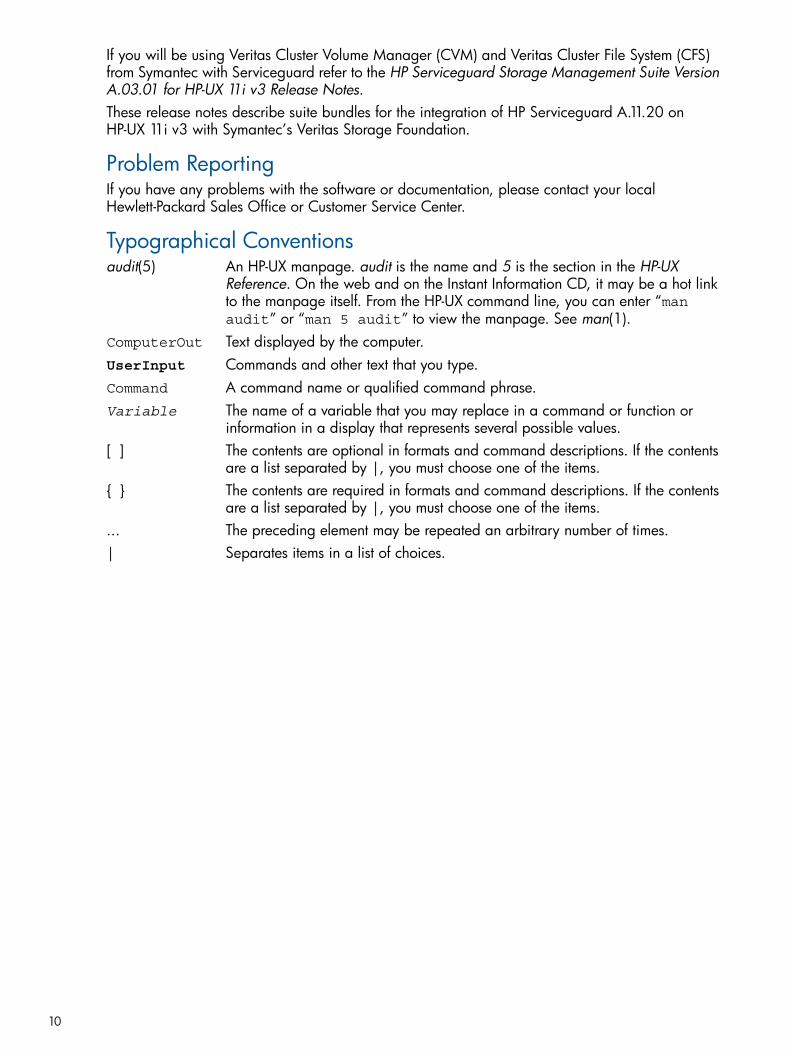
Typographical Conventionsaudit(5) An HP-UX manpage. audit is the name and 5 is the section in the HP-UX
Reference. On the web and on the Instant Information CD, it may be a hot linkto the manpage itself. From the HP-UX command line, you can enter “manaudit” or “man 5 audit” to view the manpage. See man(1).
ComputerOut Text displayed by the computer.UserInput Commands and other text that you type.Command A command name or qualified command phrase.Variable The name of a variable that you may replace in a command or function or
information in a display that represents several possible values.[ ] The contents are optional in formats and command descriptions. If the contents
are a list separated by |, you must choose one of the items.{ } The contents are required in formats and command descriptions. If the contents
are a list separated by |, you must choose one of the items.... The preceding element may be repeated an arbitrary number of times.| Separates items in a list of choices.
10

Where to find Documentation on the Web• SGeRAC Documentation
Go to www.hp.com/go/hpux-serviceguard-docs, and then click HP ServiceguardExtension for RAC.
• Related DocumentationGo to www.hp.com/go/hpux-serviceguard-docs, www.hp.com/go/hpux-core-docs, and www.hp.com/go/hpux-ha-monitoring-docs.The following documents contain additional useful information:
◦ Clusters for High Availability: a Primer of HP Solutions. Hewlett-Packard ProfessionalBooks: Prentice Hall PTR, 2001 (ISBN 0-13-089355-2)
◦ Serviceguard Extension for RAC Version A.11.20 Release Notes
◦ HP Serviceguard Version A.11.20 Release Notes
◦ Managing Serviceguard Eighteenth Edition
◦ HP Serviceguard Storage Management Suite Version A.02.01 for HP-UX 11i v3 ReleaseNotes
◦ Using High Availability Monitors
◦ Using the Event Monitoring Service
◦ Using Advanced Tape Services
◦ Managing Systems and Workgroups
◦ Managing Serviceguard NFS
◦ HP-UX System Administrator's Guide: Logical Volume Management HP-UX 11i Version3
11
1 Introduction to Serviceguard Extension for RACServiceguard Extension for RAC (SGeRAC) enables the Oracle Real Application Cluster (RAC),formerly known as Oracle Parallel Server RDBMS, to run on HP high availability clusters under theHP-UX operating system. This chapter introduces Serviceguard Extension for RAC and shows whereto find different kinds of information in this book. The following topics are presented:• “What is a Serviceguard Extension for RAC Cluster? ” (page 12)
• “Serviceguard Extension for RAC Architecture” (page 14)
• “Overview of SGeRAC and Cluster File System (CFS)/Cluster Volume Manager (CVM)” (page14)
• “Overview of SGeRAC and Oracle 10g, 11gR1, and 11gR2 RAC” (page 16)
• “Overview of SGeRAC Cluster Interconnect Subnet Monitoring ” (page 17)
• “Node Failure” (page 19)
• “Larger Clusters ” (page 20)
• “Extended Distance Cluster Using Serviceguard Extension for RAC” (page 22)
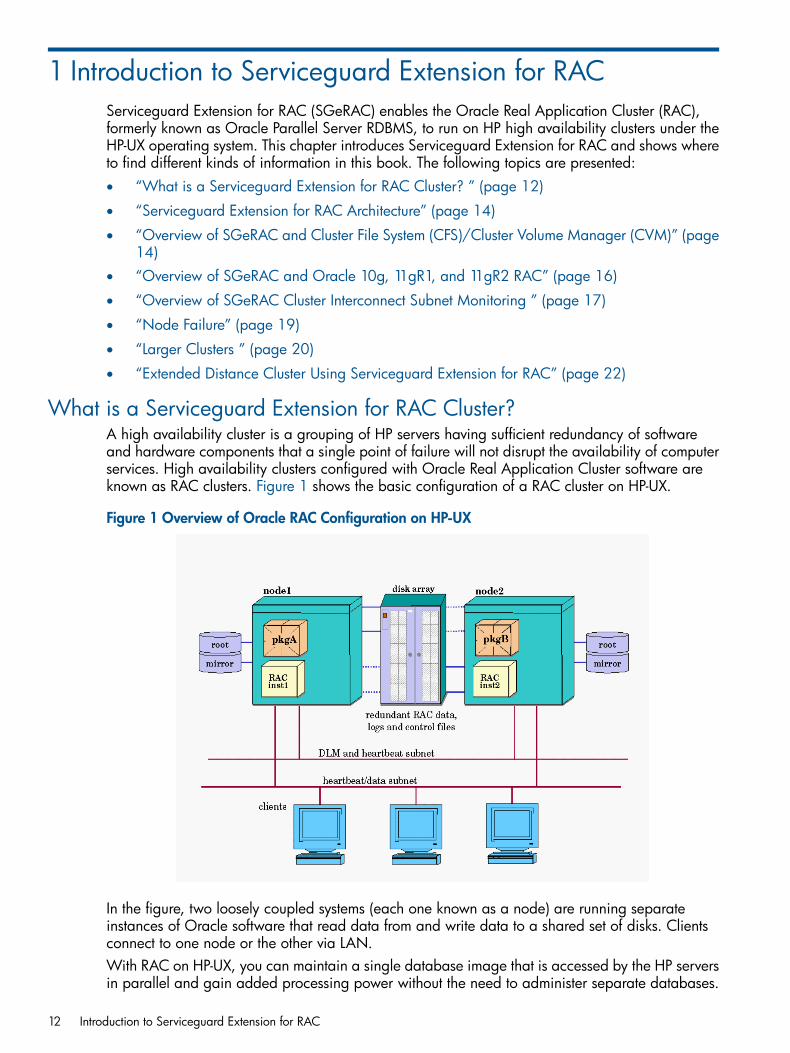
What is a Serviceguard Extension for RAC Cluster?A high availability cluster is a grouping of HP servers having sufficient redundancy of softwareand hardware components that a single point of failure will not disrupt the availability of computerservices. High availability clusters configured with Oracle Real Application Cluster software areknown as RAC clusters. Figure 1 shows the basic configuration of a RAC cluster on HP-UX.
Figure 1 Overview of Oracle RAC Configuration on HP-UX
In the figure, two loosely coupled systems (each one known as a node) are running separateinstances of Oracle software that read data from and write data to a shared set of disks. Clientsconnect to one node or the other via LAN.With RAC on HP-UX, you can maintain a single database image that is accessed by the HP serversin parallel and gain added processing power without the need to administer separate databases.
12 Introduction to Serviceguard Extension for RAC
When properly configured, Serviceguard Extension for RAC provides a highly available databasethat continues to operate even if one hardware component fails.
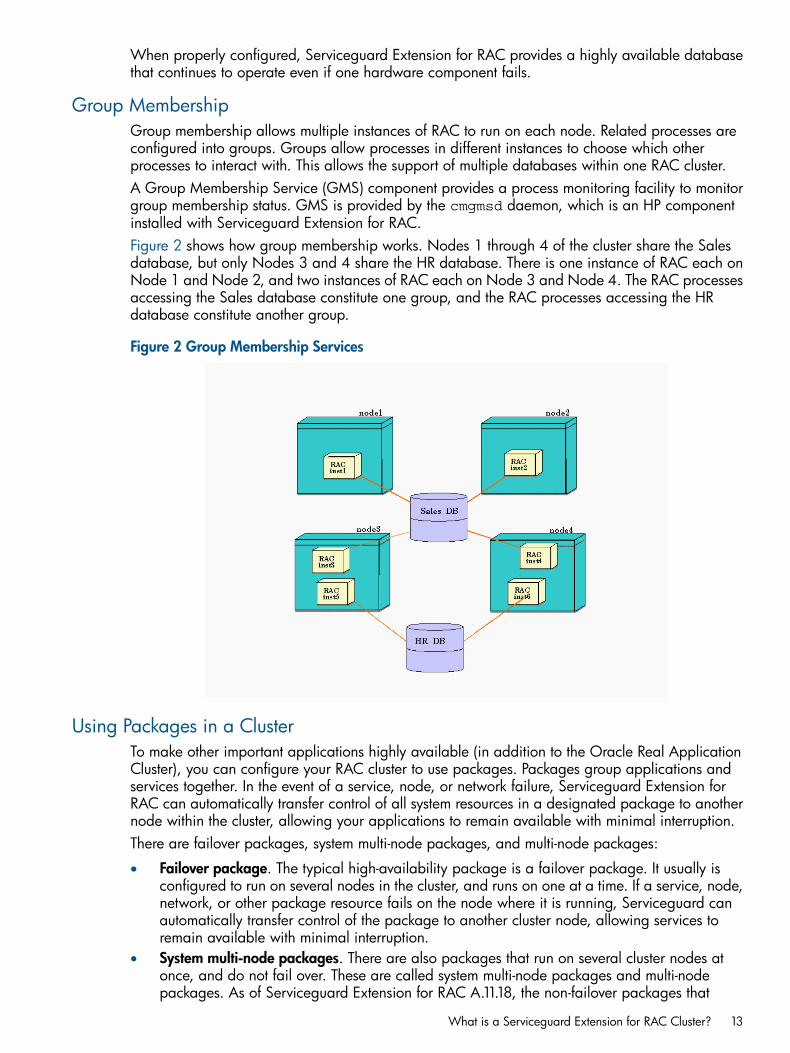
Group MembershipGroup membership allows multiple instances of RAC to run on each node. Related processes areconfigured into groups. Groups allow processes in different instances to choose which otherprocesses to interact with. This allows the support of multiple databases within one RAC cluster.A Group Membership Service (GMS) component provides a process monitoring facility to monitorgroup membership status. GMS is provided by the cmgmsd daemon, which is an HP componentinstalled with Serviceguard Extension for RAC.Figure 2 shows how group membership works. Nodes 1 through 4 of the cluster share the Salesdatabase, but only Nodes 3 and 4 share the HR database. There is one instance of RAC each onNode 1 and Node 2, and two instances of RAC each on Node 3 and Node 4. The RAC processesaccessing the Sales database constitute one group, and the RAC processes accessing the HRdatabase constitute another group.
Figure 2 Group Membership Services
Using Packages in a ClusterTo make other important applications highly available (in addition to the Oracle Real ApplicationCluster), you can configure your RAC cluster to use packages. Packages group applications andservices together. In the event of a service, node, or network failure, Serviceguard Extension forRAC can automatically transfer control of all system resources in a designated package to anothernode within the cluster, allowing your applications to remain available with minimal interruption.There are failover packages, system multi-node packages, and multi-node packages:
• Failover package. The typical high-availability package is a failover package. It usually isconfigured to run on several nodes in the cluster, and runs on one at a time. If a service, node,network, or other package resource fails on the node where it is running, Serviceguard canautomatically transfer control of the package to another cluster node, allowing services toremain available with minimal interruption.
• System multi-node packages. There are also packages that run on several cluster nodes atonce, and do not fail over. These are called system multi-node packages and multi-nodepackages. As of Serviceguard Extension for RAC A.11.18, the non-failover packages that
What is a Serviceguard Extension for RAC Cluster? 13

are supported are those specified by Hewlett-Packard, and you can create your own multi-nodepackages. For example, the packages HP supplies for use with the Veritas Cluster VolumeManager (CVM) and the Veritas Cluster File (CFS) System (on HP-UX releases that supportVeritas CFS and CVM. Also, see “About Veritas CFS and CVM from Symantec” (page 15)).
• Multi-node package. A system multi-node package must run on all nodes that are active inthe cluster. If it fails on one active node, that node halts. A multi-node package can beconfigured to run on one or more cluster nodes. It is considered UP as long as it is runningon any of its configured nodes.
NOTE: In RAC clusters, you create packages to start and stop Oracle Clusterware and RAC itselfas well as to run applications that access the database instances. For details on the use of packageswith Oracle Clusterware and RAC, refer to “RAC Instances” (page 28)
Serviceguard Extension for RAC ArchitectureThis chapter discusses the main software components used by Serviceguard Extension for RAC.The following is a list of components:
• Oracle Components◦ Custom Oracle Database
• Serviceguard Extension for RAC Components◦ Group Membership Services (RAC)
• Serviceguard ComponentsPackage Manager◦
◦ Cluster Manager
◦ Network Manager
• Operating SystemVolume Manager Software◦
◦ HP-UX Kernel
Group Membership DaemonIn addition to the Serviceguard daemon processes mentioned in Chapter 3 of the ManagingServiceguard user’s guide, there is another daemon that is used by Oracle to enable communicationwith Serviceguard Extension for RAC:• cmgmsd—Group Membership Daemon for RAC 10g or laterThis HP daemon provides group membership services for Oracle Real Application Cluster 10 g orlater. Group membership allows multiple Oracle instances to run on the same cluster node. GMSis illustrated in Figure 2 (page 13).
Overview of SGeRAC and Cluster File System (CFS)/Cluster VolumeManager (CVM)
SGeRAC supports Veritas Cluster File System (CFS)/Cluster Volume Manager (CVM) from Symantecthrough Serviceguard. CFS and CVM are not supported on all versions of HP-UX (on HP-UX releasesthat support Veritas CFS and CVM). For more information, see “About Veritas CFS and CVM fromSymantec” (page 15)).For information on configuring CFS and CVM with Serviceguard, refer to the latest edition of theManaging Serviceguard user’s guide at www.hp.com/go/hpux-serviceguard-docs —>HP Serviceguard.
14 Introduction to Serviceguard Extension for RAC
Package DependenciesWhen CFS is used as shared storage, the application and software using the CFS storage shouldbe configured to start and stop using Serviceguard packages. These application packages shouldbe configured with a package dependency on the underlying multi-node packages, which managesthe CFS and CVM storage reserves.Configuring the application to be start/stop through Serviceguard package is to ensure thesynchronization of storage activation/deactivation and application startup/shutdown.With CVM configurations using multi-node packages, CVM shared storage should be configuredin Serviceguard packages with package dependencies.Refer to the latest edition of the Managing Serviceguard user’s guide for detailed information onmulti-node packages.
Storage Configuration OptionsCFS provides SGeRAC with additional options, such as improved manageability. When planninga RAC cluster, application software could be installed once and be visible by all cluster nodes. Acentral location is available to store runtime logs, for example, RAC alert logs.Oracle RAC data files can be created on a CFS, allowing the database administrator or Oraclesoftware to create additional data files without the need of root system administrator privileges.The archive area can be on a CFS. Oracle instances on any cluster node can access the archivearea when database recovery requires the archive logs.
About Veritas CFS and CVM from SymantecVeritas Cluster File System (CFS) and Cluster Volume Manager (CVM) are supported on some, butnot all current releases of HP-UX. Check the latest Release Notes for your version of Serviceguardfor up-to-date information at www.hp.com/go/hpux-serviceguard-docs —> HPServiceguard Extension for RAC.
CAUTION: Once you create the disk group and mount point packages, you must administer thecluster with CFS commands, including cfsdgadm, cfsmntadm, cfsmount, and cfsumount.You must not use the HP-UX mount or umount command to provide or remove access to a sharedfile system in a CFS environment. Using these HP-UX commands under these circumstances is notsupported. Use cfsmount and cfsumount instead.If you use the HP-UX mount and umount commands, serious problems could occur, such as writingto the local file system instead of the cluster file system. Non-CFS commands could cause conflictswith subsequent CFS command operations on the file system or the Serviceguard packages, andwill not create an appropriate multi-node package, which means cluster packages will not beaware of file system changes.
IMPORTANT: To avoid cluster wide panics and/or database failures, Storage Foundation forOracle RAC (SFRAC/SFCFS for RAC) installations using Cluster Volume Manager (CVM) shareddisk groups must have a dgfailpolicy of "leave". For additional details, read the latest version ofthis technote atwww.symantec.com/business/support/index?page=content&id=TECH144672
Overview of SGeRAC and Cluster File System (CFS)/Cluster Volume Manager (CVM) 15
NOTE: Beginning with HP-UX 11i v3 1109 HA-OE/DC-OE, SGeRAC is included as a licensedbundle at no additional cost. To install SGeRAC A.11.20 on your system during 1109HA-OE/DC-OE installation, you must select T1907BA (SGeRAC) in the Software tab.If you are using any one of the bundles namely, T2771DB, T2773DB, T2774DB, T2775DB,T8684DB, T8694DB, T8685DB, T8695DB, T2774EB, T8684EB, or T8694EB) and if you selectSGeRAC during upgrade from HP Serviceguard Storage Management Suite (SMS) cluster, thenthis configuration is supported only if Oracle RAC is deployed over SLVM. This happens becausethese Serviceguard SMS bundles either contain only VxVM which cannot be used for Oracle RACor they are not Oracle specific bundles.If SGeRAC is not installed as a part of HP-UX 11i v3 1109 HA-OE/DC-OE, it is automaticallyinstalled during the installation of Serviceguard SMS bundles (T2777DB, T8687DB, T8697DB,T2777EB, T8687EB, T8697EB).If SGeRAC is installed with HP-UX 11i v3 1109 HA-OE/DC-OE, then depending upon the availableversion of Serviceguard and SGeRAC in the SMS bundle, the installation of Serviceguard SMSmay succeed or fail.The table below discusses the different installation scenarios for Serviceguard SMS bundles:
Impact on Serviceguard SMS installationSMS bundle
Continues the installation of Serviceguard SMS byskipping the installation of Serviceguard andSGeRAC.
Install SMS bundle 7 which has the same version of Serviceguardand SGeRAC version available on the 1109 HA-OE/DC-OE.
Installation of Serviceguard SMS follows installationof a higher version of Serviceguard and SGeRAC.
Install Serviceguard SMS bundle 7 which has a higher versionof Serviceguard and SGeRAC version available on the 1109HA-OE/DC-OE.
Installation of Serviceguard SMS fails indicating thathigher Serviceguard version is already available onthe system.
Install SMS bundle 7 which has a lower version of Serviceguardand SGeRAC version available on the 1109 HA-OE/DC-OE.
Overview of SGeRAC and Oracle 10g, 11gR1, and 11gR2 RACStarting with Oracle 10g RAC, Oracle has bundled its own cluster software. The initial release iscalled Oracle Cluster Ready Service (CRS). CRS is used both as a generic term referring to theOracle Cluster Software and as a specific term referring to a component within the Oracle ClusterSoftware. At subsequent release, Oracle generic CRS is renamed to Oracle Clusterware. OracleClusterware is the generic term referring to the Oracle Cluster Software.The Oracle Cluster Software includes the following components: Cluster Synchronization Services(CSS), Cluster Ready Service (CRS), and Event Management (EVM).CSS manages the Oracle cluster membership and provides its own group membership service toRAC instances. When installed on an SGeRAC cluster, CSS utilizes the group membership serviceprovided by SGeRAC.CRS manages Oracle's cluster resources based on configuration—including start, stop, and monitor,and failover of the resources.EVM publishes events generated by CRS and may run scripts when certain events occur.When installed on an SGeRAC cluster, both the Oracle Cluster Software and RAC can continueto rely on the shared storage capability, networking monitoring, as well as other capabilitiesprovided through Serviceguard and SGeRAC.
16 Introduction to Serviceguard Extension for RAC

Oracle 10g/11gR1/11gR2 RAC uses the following two subnets for cluster communication purposes:• CSS Heartbeat Network (CSS-HB)—Oracle Clusterware running on the various nodes of the
cluster communicate among themselves using this network.• RAC Cluster Interconnect Network (RAC-IC)—Database instances of a database use this
network to communicate among themselves.
NOTE: In this document, the generic terms CRS and Oracle Clusterware will subsequently bereferred to as Oracle Cluster Software. The use of the term CRS will still be used when referringto a sub-component of Oracle Cluster Software.
For more detailed information on Oracle 10g/11gR1/11gR2 RAC, refer to Chapter 2:“Serviceguard Configuration for Oracle 10g, 11gR1, or 11gR2 RAC”.
Overview of SGeRAC Cluster Interconnect Subnet MonitoringIn SGeRAC, the Cluster Interconnect Subnet Monitoring feature is used to monitor clustercommunication subnets. This feature requires the use of a package configuration parameter knownas the CLUSTER_INTERCONNECT_SUBNET. It can be set up to monitor certain subnets used byapplications that are configured as Serviceguard multi-node packages.The following describes the characteristics of subnets that can be monitored by using theCLUSTER_INTERCONNECT_SUBNET parameter:• A subnet used only for the communications among instances of an application configured as
a multi-node package.• A subnet whose health does not matter if there is only one instance of an application (package)
running in the cluster. The instance is able to provide services to its clients regardless of whetherthe subnet is “up” or “down” on the node where the only instance of the package is running.
A failure of the cluster interconnect subnet on all nodes of the cluster, where the multi-node packageis running, is handled by bringing down all but one instance of the multi-node package.In certain 10g/11gR1/11gR2 RAC configurations, this parameter can be used to monitor OracleCluster Synchronization Services (CSS-HB) and/or RAC cluster interconnect subnet when OracleClusterware and RAC Database instances are configured as Serviceguard multi-node packages.Cluster Interconnect Subnet Monitoring provides the following benefits:• Better availability by detecting and resolving RAC-IC subnet failures quickly in certain
configurations. (For example, in configurations where Oracle CSS-HB subnet and the RAC-ICsubnet are not the same. This configuration helps avoid one RAC database (RAC-IC) trafficfrom interfering with another.)
• Assists in providing services (on one node) when Oracle CSS-HB/RAC-IC subnet fails on allnodes.
• Facilitates fast and reliable reconfiguration with use of multiple SG-HB networks.
• Allows separation of SG-HB and Oracle RAC-IC traffic (recommended when RAC-IC trafficmay interfere with SG-HB traffic).
How Cluster Interconnect Subnet WorksThe CLUSTER_INTERCONNECT_SUBNET parameter works similar to the existing SUBNET packageconfiguration parameter. The most notable difference is in the failure handling of the subnetsmonitored using these individual parameters.While the failure of subnets monitored using SUBNET package configuration parameter is handledby halting the instance of the package on the node where the subnet has failed, the failure ofsubnets monitored using CLUSTER_INTERCONNECT_SUBNET package configuration parameteris handled by ensuring at least one instance of the multi-node package remains running in thecluster.
Overview of SGeRAC Cluster Interconnect Subnet Monitoring 17
For example, when a multi-node package (pkgA) is configured to run on all nodes of the cluster,and configured to monitor a subnet (SubnetA) using the CLUSTER_INTERCONNECT_SUBNETparameter:
• If more than one instance of pkgA is running in the cluster and SubnetA fails on one of thenodes where the instance of pkgA is running, the failure is handled by halting the instance ofpkgA on the node where the subnet has failed.
• If pkgA is running on only one node of the cluster and SubnetA fails on that node, pkgA willcontinue to run on that node after the failure.
• If pkgA runs on all nodes of the cluster and SubnetA fails on all nodes of the cluster, thefailure is handled by halting all but one instance of pkgA. Where the instance of pkgA willbe left running is randomly determined.
The following describes the behavior of cluster interconnect subnet monitoring feature under thefollowing scenarios:• For a multi-node package with CLUSTER_INTERCONNECT_SUBNET configured, upon an
explicit request to start the package on a node, no attempt to start the package instance onthat node will be made if the subnet is not up on that node.
• If a multi-node package with CLUSTER_INTERCONNECT_SUBNET configured is running ononly one node of the cluster, with the subnet that it monitors is down on all nodes of the cluster,the restoration of the subnet on any other node does not affect the running instance. No attemptwill be made automatically to start the package instance on the restored node. An attempt tostart the instance of the package on the restored node will be made, if the user explicitly triesto start the package instance.
• If a multi-node package with CLUSTER_INTERCONNECT_SUBNET is running on more thanone node of the cluster, upon a failure of the subnet on all nodes where the package is running,all but one package instance will be halted one by one. Additionally, ifNODE_FAIL_FAST_ENABLED is set to “YES” for such a package, all but one node will bebrought down one by one. For example, one node will be brought down, cluster reformationwill happen, another node will be brought down, and cluster reformation will happen untilone node remains in the cluster.
NOTE: The CLUSTER_INTERCONNECT_SUBNET parameter is available only for use withmulti-node packages.
For more information on the Cluster Interconnect Subnet Monitoring feature, refer to chapter 2,section “Cluster Communication Network Monitoring” (page 35). This section describes variousnetwork configurations for cluster communications in SGeRAC/10g or 11gR1/11gR2 RAC cluster,and how the package configuration parameter CLUSTER_INTERCONNECT_SUBNET can be usedto recover from Oracle Cluster Communications network failures.
Configuring Packages for Oracle RAC InstancesOracle instances can be configured as packages with a single node in their node list.
NOTE: Packages that start and halt Oracle instances (called instance packages) do not fail overfrom one node to another, they are single-node packages. You should include only one NODE_NAMEin the package ASCII configuration file. The AUTO_RUN setting in the package configuration filewill determine whether the RAC instance will start up as the node joins the cluster. Your clustermay include RAC and non-RAC packages in the same cluster.
Configuring Packages for Oracle ListenersOracle listeners can be configured as packages within the cluster (called listener packages). Eachnode with a RAC instance can be configured with a listener package. Listener packages are
18 Introduction to Serviceguard Extension for RAC
configured to automatically fail over from the original node to an adoptive node. When the originalnode is restored, the listener package automatically fails back to the original node.In the listener package ASCII configuration file, the FAILBACK_POLICY is set to AUTOMATIC.The SUBNET is a set of monitored subnets. The package can be set to automatically startup withthe AUTO_RUN setting.Each RAC instance can be configured to be registered with listeners that are assigned to handleclient connections. The listener package script is configured to add the package IP address andstart the listener on the node.For example, on a two-node cluster with one database, each node can have one RAC instanceand one listener package. Oracle clients can be configured to connect to either package IP address(or corresponding hostname) using Oracle Net Services. When a node failure occurs, existingclient connection to the package IP address will be reset after the listener package fails over andadds the package IP address. For subsequent connections for clients configured with basic failover,clients would connect to the next available listener package's IP address and listener.
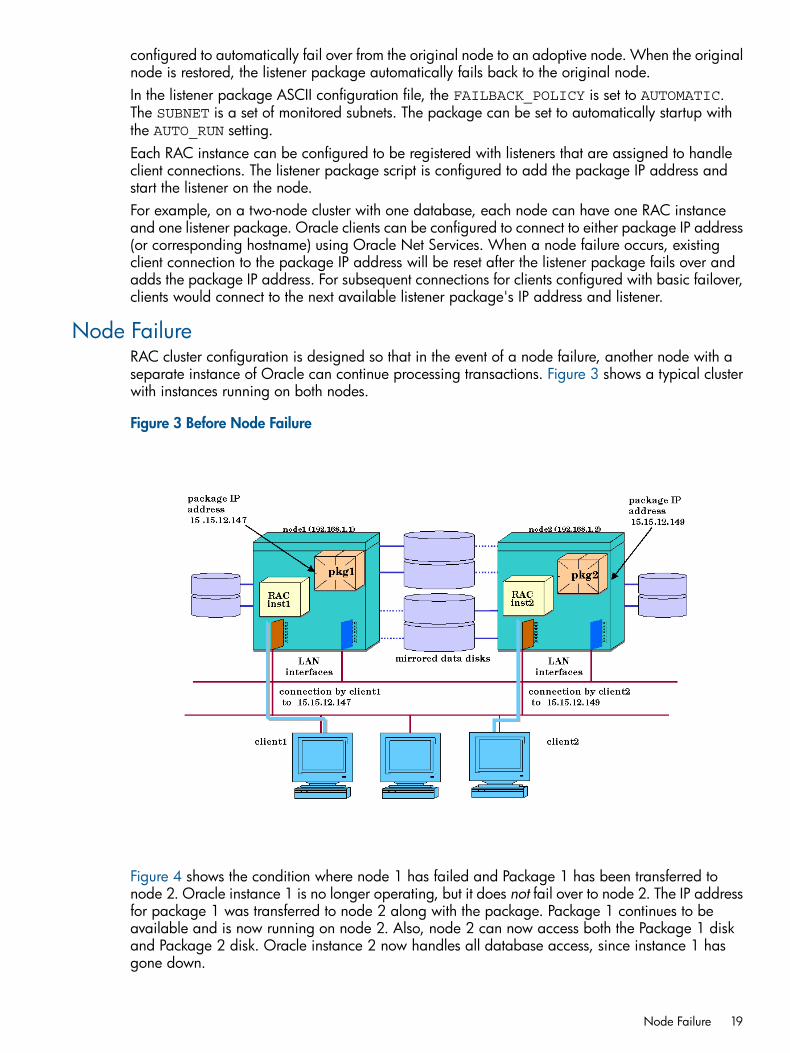
Node FailureRAC cluster configuration is designed so that in the event of a node failure, another node with aseparate instance of Oracle can continue processing transactions. Figure 3 shows a typical clusterwith instances running on both nodes.
Figure 3 Before Node Failure
Figure 4 shows the condition where node 1 has failed and Package 1 has been transferred tonode 2. Oracle instance 1 is no longer operating, but it does not fail over to node 2. The IP addressfor package 1 was transferred to node 2 along with the package. Package 1 continues to beavailable and is now running on node 2. Also, node 2 can now access both the Package 1 diskand Package 2 disk. Oracle instance 2 now handles all database access, since instance 1 hasgone down.
Node Failure 19

Figure 4 After Node Failure
In the above figure, pkg1 and pkg2 are not instance packages. They are shown to illustrate themovement of the packages.
Larger ClustersServiceguard Extension for RAC supports clusters of up to 16 nodes. The actual cluster size islimited by the type of storage and the type of volume manager used.
Up to Four Nodes with SCSI StorageYou can configure up to four nodes using a shared F/W SCSI bus; for more than four nodes,FibreChannel must be used. An example of a four-node RAC cluster appears in the following figure.
20 Introduction to Serviceguard Extension for RAC

Figure 5 Four-Node RAC Cluster
In this type of configuration, each node runs a separate instance of RAC and may run one or morehigh availability packages as well.The figure shows a dual Ethernet configuration with all four nodes connected to a disk array (thedetails of the connections depend on the type of disk array). In addition, each node has a mirroredroot disk (R and R). Nodes may have multiple connections to the same array using alternate links(PV links) to take advantage of the array's use of RAID levels for data protection.
Point-to-Point Connections to Storage DevicesSome storage devices allow point-to-point connection to a large number of host nodes withoutusing a shared SCSI bus. An example is shown in Figure 6, a cluster consisting of eight nodeswith a FibreChannel interconnect. (Client connection is provided through Ethernet.) The nodesaccess shared data on an HP StorageWorks EVA or XP series or EMC disk array configured with16 I/O ports. Each node is connected to the array using two separate Fibre channels configuredwith PV Links. Each channel is a dedicated bus—there is no daisy-chaining.
Larger Clusters 21
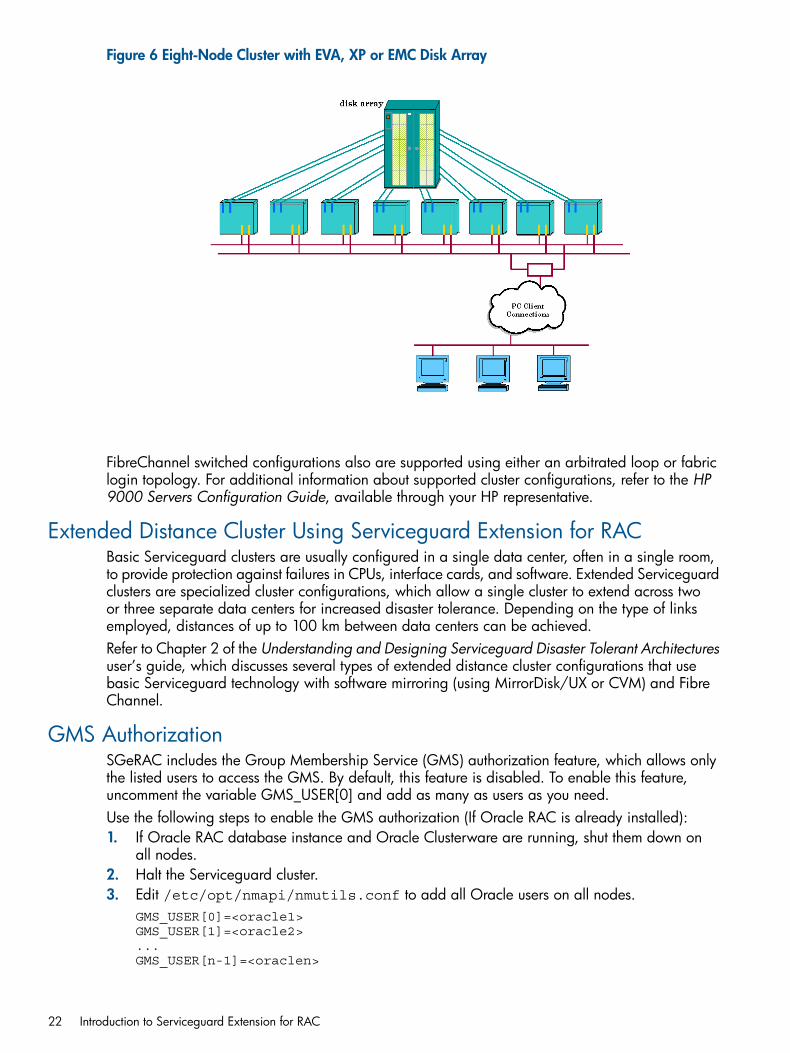
Figure 6 Eight-Node Cluster with EVA, XP or EMC Disk Array
FibreChannel switched configurations also are supported using either an arbitrated loop or fabriclogin topology. For additional information about supported cluster configurations, refer to the HP9000 Servers Configuration Guide, available through your HP representative.
Extended Distance Cluster Using Serviceguard Extension for RACBasic Serviceguard clusters are usually configured in a single data center, often in a single room,to provide protection against failures in CPUs, interface cards, and software. Extended Serviceguardclusters are specialized cluster configurations, which allow a single cluster to extend across twoor three separate data centers for increased disaster tolerance. Depending on the type of linksemployed, distances of up to 100 km between data centers can be achieved.Refer to Chapter 2 of the Understanding and Designing Serviceguard Disaster Tolerant Architecturesuser’s guide, which discusses several types of extended distance cluster configurations that usebasic Serviceguard technology with software mirroring (using MirrorDisk/UX or CVM) and FibreChannel.
GMS AuthorizationSGeRAC includes the Group Membership Service (GMS) authorization feature, which allows onlythe listed users to access the GMS. By default, this feature is disabled. To enable this feature,uncomment the variable GMS_USER[0] and add as many as users as you need.Use the following steps to enable the GMS authorization (If Oracle RAC is already installed):1. If Oracle RAC database instance and Oracle Clusterware are running, shut them down on
all nodes.2. Halt the Serviceguard cluster.3. Edit /etc/opt/nmapi/nmutils.conf to add all Oracle users on all nodes.
GMS_USER[0]=<oracle1> GMS_USER[1]=<oracle2>...GMS_USER[n-1]=<oraclen>
22 Introduction to Serviceguard Extension for RAC

4. Restart the Serviceguard cluster.5. Restart Oracle Clusterware (for Oracle 10g, 11gR1, and 11gR2) and Oracle RAC database
instance on all nodes.Use the following steps to disable the GMS authorization:
1. If Oracle RAC database instance and Oracle Clusterware (for Oracle 10g, 11gR1, and11gR2) are running, shut them down on all nodes.
2. Halt the Serviceguard cluster.3. Edit /etc/opt/nmapi/nmutils.conf and comment the GMS_USER[] settings on all
nodes.4. Restart the Serviceguard cluster.5. Restart Oracle Clusterware (for Oracle 10g, 11gR1, and 11gR2) and Oracle RAC database
instance on all nodes.
Overview of Serviceguard ManagerNOTE: For more-detailed information, see the section on Serviceguard Manager in the latestversion of the Serviceguard Release Notes. Check the Serviceguard/SGeRAC/SMS/ServiceguardManager Plug-in Compatibility and Feature Matrix and the latest Release Notes for up-to-dateinformation about Serviceguard Manager compatibility. You can find both documents atwww.hp.com/go/ hpux-serviceguard-docs —> HP Serviceguard.
Serviceguard Manager is the graphical user interface for Serviceguard. It is available as a “plug-in”to the System Management Homepage (SMH). SMH is a web-based graphical user interface (GUI)that replaces SAM as the system administration GUI as of HP-UX 11i v3 (you can still run the SAMterminal interface).You can use Serviceguard Manager to monitor, administer, and configure Serviceguard clusters.
• You can see properties, status, and alerts of clusters, nodes, and packages.
• You can do administrative tasks such as run or halt clusters, cluster nodes, and packages.
• You can create or modify a cluster and its packages.
Starting Serviceguard ManagerTo start the Serviceguard Manager plug-in in your web browser from the System ManagementHomepage, click on the link to Serviceguard Cluster or a particular cluster. Then select acluster, node, or package, and use the drop-down menus below Serviceguard Manager to navigateto a task.Use Serviceguard Manager’s built-in help to guide you through the tasks; this manual will tell youif a task can be done in Serviceguard Manager but does not duplicate the help.
Monitoring Clusters with Serviceguard ManagerFrom the main page of Serviceguard Manager, you can see status and alerts for the cluster, nodes,and packages. You can also drill down to see the configuration and alerts of the cluster, nodes,and packages.
Administering Clusters with Serviceguard ManagerServiceguard Manager allows you administer clusters, nodes, and packages if access controlpolicies permit:
• Cluster: halt, run
• Cluster nodes: halt, run
• Package: halt, run, move from one node to another, reset node- and package-switching flags
Overview of Serviceguard Manager 23
Configuring Clusters with Serviceguard ManagerYou can configure clusters and packages in Serviceguard Manager. You must have root (UID=0)access to the cluster nodes.
24 Introduction to Serviceguard Extension for RAC
2 Serviceguard Configuration for Oracle 10g, 11gR1, or11gR2 RAC
This chapter shows the additional planning and configuration that is needed to use Oracle RealApplication Clusters 10g/11gR1/11gR2 with Serviceguard. The following topics are presented:• “Interface Areas” (page 25)
• “Oracle Cluster Software” (page 26)
• “Planning Storage for Oracle Cluster Software” (page 30)
• “Planning Storage for Oracle 10g/11gR1/11gR2 RAC” (page 30)
• “Installing Serviceguard Extension for RAC ” (page 33)
• “Installing Oracle Real Application Clusters” (page 47)
• “Cluster Communication Network Monitoring” (page 35)
• “Creating a Storage Infrastructure with LVM” (page 40)
• “Creating a Storage Infrastructure with CFS” (page 47)
• “Creating a Storage Infrastructure with CVM” (page 52)
• “Installing Oracle 10g, 11gR1, or 11gR2 Cluster Software” (page 62)
Interface AreasThis section documents interface areas where there is expected interaction between SGeRAC,Oracle 10g/11gR1/11gR2 Cluster Software, and RAC.
Group Membership API (NMAPI2)The NMAPI2 client links with the SGeRAC provided NMAPI2 library for group membership service.The group membership is layered on top of the SGeRAC cluster membership where all the primarygroup members are processes within cluster nodes. Cluster membership has node names and groupmembership has process names. Upon an SGeRAC group membership change, SGeRAC deliversthe new group membership to other members of the same group.
SGeRAC DetectionWhen Oracle 10g/11gR1/11gR2 Cluster Software is installed on an SGeRAC cluster, OracleCluster Software detects the existence of SGeRAC, and CSS uses SGeRAC group membership.
Cluster TimeoutsSGeRAC periodically check heartbeat member timeouts to determine when any SGeRAC clustermember has failed or when any cluster member is unable to communicate with the other clustermembers. CSS uses a similar mechanism for CSS memberships. Each RAC instance groupmembership also has a member timeout mechanism, which triggers Instance Membership Recovery(IMR).
NOTE: HP and Oracle support SGeRAC to provide group membership to CSS.
Serviceguard Cluster TimeoutThe Serviceguard cluster heartbeat timeout is set according to user requirements for availability.The Serviceguard cluster reconfiguration time is determined by the cluster timeout, configuration,the reconfiguration algorithm, and activities during reconfiguration.
Interface Areas 25
CSS TimeoutWhen SGeRAC is on the same cluster as Oracle Cluster Software, the CSS timeout is set to adefault value of 600 seconds (10 minutes) at Oracle software installation.This timeout is configurable with Oracle tools and should not be changed without ensuring thatthe CSS timeout allows enough time for Serviceguard Extension for RAC (SGeRAC) reconfigurationand to allow multipath (if configured) reconfiguration to complete.On a single point of failure, for example a node failure, Serviceguard reconfigures first and SGeRACdelivers the new group membership to CSS via NMAPI2. If there is a change in group membership,SGeRAC updates the members of the new membership. After receiving the new group membership,CSS initiates its own recovery action as needed, and propagates the new group membership tothe RAC instances.
RAC IMR TimeoutRAC instance IMR timeout is configurable. RAC IMR expects group membership changes to occurwithin this time or IMR will begin evicting group members. The IMR timeout must be above theSGeRAC reconfiguration time and adhere to any Oracle-specified relation to CSS reconfigurationtime.
NOTE: IMR timeout as a configurable parameter has been deprecated in Oracle 11gR1 andlater.
Oracle Cluster SoftwareOracle Cluster Software should be started after activating its required shared storage resources.Shared storage resources can be activated after SGeRAC completes startup. Oracle Cluster Softwareshould not activate any shared storage. Similarly, for halting SGeRAC at run level 3 and removingshared storage resources from Oracle Cluster Software, Oracle Cluster Software must be haltedfirst.
Automated Oracle Cluster Software Startup and ShutdownThe preferred mechanism that allows Serviceguard to notify Oracle Cluster Software to start andto request Oracle Cluster Software to shutdown is the use of Serviceguard packages using SGeRACtoolkit.
MonitoringOracle Cluster Software daemon monitoring is performed through programs initiated by the HP-UXinit process. SGeRAC monitors Oracle Cluster Software to the extent that CSS is a NMAPI2 groupmembership client and group member. SGeRAC provides group membership notification to theremaining group members when CSS enters and leaves the group membership.
Allowed Characters for Oracle 10g/11gR1/11gR2 RAC Cluster NamesOracle Clusterware uses SGeRAC Group Membership Service to get the node status, it registersa group in SGeRAC cmgmsd daemon with Oracle cluster name. Since the valid group name inSGeRAC only allows alpha letter (a-z, A-Z), decimal digital (0-9), underscore (_), dollar sign ($)and number sign(#), only these characters are allowed in Oracle 10g/11gR1/11gR2 Clusterwarecluster name.
Shared StorageSGeRAC supports shared storage using HP Shared Logical Volume Manager (SLVM), Cluster FileSystem (CFS), Cluster Volume Manager (CVM), and ASM (ASM/SLVM in 11i v2/v3 and ASMover raw disks in 11i v3). CFS and CVM are not supported on all versions of HP-UX (on HP-UXreleases that support them). See “About Veritas CFS and CVM from Symantec” (page 15).
26 Serviceguard Configuration for Oracle 10g, 11gR1, or 11gR2 RAC

The file /var/opt/oracle/oravg.conf must not be present so Oracle Cluster Software willnot activate or deactivate any shared storage.
MultipathingMultipathing is automatically configured in HP-UX 11i v3 (this is often called native multipathing).Multipathing is supported through either SLVM pvlinks or CVM Dynamic Multipath (DMP). In someconfigurations, SLVM or CVM does not need to be configured for multipath as the multipath isprovided by the storage array. Since Oracle Cluster Software checks availability of the shareddevice for the vote disk through periodic monitoring, the multipath detection and failover time mustbe less than CRS's timeout specified by the Cluster Synchronization Service (CSS) MISSCOUNT.On SGeRAC configurations, the CSS MISSCOUNT value is set to 600 seconds. Multipath failovertime is typically between 30 to 120 seconds. For information on Multipathing and HP-UX 11i v3,see “About Multipathing” (page 33).
OCR and Vote DeviceShared storage for the OCR and Vote device should be on supported shared storage volumemanagers with multipath configured and with either the correct multipath failover time or CSStimeout.
Mirroring and ResilveringOn node and cluster wide failures, when SLVM mirroring is used and Oracle resilvering is available,the recommendation for the logical volume mirror recovery policy is set to either full mirrorresynchronization (NOMWC) or fast resynchronization (MWC) for control and redo files and nomirror resynchronization (NONE) for the datafiles since Oracle would perform resilvering on thedatafiles based on the redo log.
NOTE: If Oracle resilvering is not available, the mirror recovery policy should be set to eitherfull mirror resynchronization (NOMWC) or fast resynchronization (MWC) of all control, redo, anddatafiles.Contact Oracle to determine if your version of Oracle RAC allows “resilvering” and to appropriatelyconfigure the mirror consistency recovery policy for your logical volumes.For more information on using NOMWC and MWC, refer to the HP-UX System Administrator'sGuide: Logical Volume Management HP-UX 11i Version 3 at www.hp.com/go/hpux-core-docs—> HP-UX 11i V3.
Shared Storage ActivationDepending on your version of Oracle Cluster Software, the default configuration for activation ofthe shared storage for Oracle Cluster Software may be controlled by the /var/opt/oracle/oravg.conf file. For the default configuration where the shared storage is activated by SGeRACbefore starting Oracle Cluster Software or RAC instance, the oravg.conf file should not bepresent.
Listener
Automated Startup and ShutdownCRS can be configured to automatically start, monitor, restart, and halt listeners.If CRS is not configured to start the listener automatically at Oracle Cluster Software startup, thelistener startup can be automated with supported commands, such as srvctl and lsnrctl,through scripts or SGeRAC packages. If the SGeRAC package is configured to start the listener,the SGeRAC package would contain the virtual IP address required by the listener.
Interface Areas 27
Manual Startup and ShutdownManual listener startup and shutdown is supported through the following commands: srvctl andlsnrctl.
Network MonitoringSGeRAC cluster provides network monitoring. For networks that are redundant and monitored byServiceguard cluster, Serviceguard cluster provides local failover capability between local networkinterfaces (LAN) that is transparent to applications utilizing User Datagram Protocol (UDP) andTransport Control Protocol (TCP).Virtual IP addresses (floating or package IP address) in Serviceguard provide remote failovercapability of network connection endpoints between cluster nodes, and transparent local failovercapability of network connection endpoints between redundant local network interfaces.
NOTE: Serviceguard cannot be responsible for networks or connection endpoints that it is notconfigured to monitor.
SGeRAC Heartbeat NetworkServiceguard supports multiple heartbeat networks, private or public. Serviceguard heartbeatnetwork can be configured as a single network connection with redundant LAN or multipleconnections with multiple LANs (single or redundant).
CSS Heartbeat NetworkThe CSS IP addresses for peer communications are fixed IP addresses. When CSS heartbeats areon a single network connection it does not support multiple heartbeat networks. To protect againsta network single point of failure, the CSS heartbeat network should be configured with redundantphysical networks under SGeRAC monitoring. Since SGeRAC does not support heartbeat overHyperfabric (HF) networks, the preferred configuration is for CSS and Serviceguard to share thesame cluster interconnect.
RAC Cluster InterconnectEach set of RAC instances maintains peer communications on a single connection and may notsupport multiple connections on HP-UX with SGeRAC. To protect against a network single point offailure, the RAC cluster interconnect should be configured with redundant networks underServiceguard monitoring and for Serviceguard to take action (either a local failover or an instancepackage shutdown, or both) if the RAC cluster interconnect fails. Serviceguard does not monitorHyperfabric networks directly (integration of Serviceguard and HF/EMS monitor is supported).
Public Client AccessWhen the client connection endpoint (virtual or floating IP address) is configured using Serviceguardpackages, Serviceguard provides monitoring, local failover, and remote failover capabilities.When Serviceguard packages are not used, Serviceguard does not provide monitor or failoversupport.
RAC Instances
Automated Startup and ShutdownCRS can be configured to automatically start, monitor, restart, and halt RAC instances. If CRS isnot configured to automatically start the RAC instance at Oracle Cluster Software startup, the RACinstance startup can be automated through scripts using supported commands—such as srvctlor sqlplus, in an SGeRAC package to start and halt RAC instances.
NOTE: srvctl and sqlplus are Oracle commands.
28 Serviceguard Configuration for Oracle 10g, 11gR1, or 11gR2 RAC

Manual Startup and ShutdownManual RAC instance startup and shutdown is supported through the following commands: srvctlor sqlplus.
Shared StorageIt is expected the shared storage is available when the RAC instance is started. Since the RACinstance expects the shared storage to be available, ensure the shared storage is activated. ForSLVM, the shared volume groups must be activated and for CVM, the disk group must be activated.For CFS, the cluster file system must be mounted.Oracle Cluster Software requires shared storage for the Oracle Cluster Registry (OCR) and a votedevice. Automatic Storage Management (ASM) can not be used for the OCR and vote device inprior Oracle 11gR2 versions since these files must be accessible before Oracle Cluster Softwarestarts.For Oracle 10g, the minimum required size for each copy of the OCR is 100 MB, and for eachvote disk it is 20 MB. For Oracle 11gR2, the minimum required size for each copy of the OCR is300 MB, and for each vote disk it is 300 MB.The Oracle OCR and vote device can be created on supported shared storage, including SLVMlogical volumes, CVM raw volumes, and CFS file systems. Oracle 11gR2 supports OCR and votedevice on ASM over SLVM, ASM over raw device files, and Cluster File System (CFS).
Network Planning for Cluster CommunicationThe network for cluster communication is used for private internal cluster communications. Althoughone network adapter per node is sufficient for the private network, it is recommended that aminimum of two network adapters for each network to be used for higher availability.
NOTE: Starting with SGeRAC A.11.20, Oracle Grid Infrastructure 11.2.0.2 HAIP feature canbe configured and used in an SGeRAC cluster. All recommended network configuration of SGeRACcluster are not supported when using HAIP. For information about most recommended networkconfiguration of SGeRAC, see “Cluster Communication Network Monitoring” (page 35) section.
The following are the major categories of inter-cluster traffic in an SGeRAC environment:• Serviceguard HeartBeat (SG-HB)—Serviceguard heartbeat and communications traffic. SG-HB
is supported over single or multiple subnet networks.• Cluster Synchronization Services Heartbeat (CSS-HB)—CSS heartbeat traffic and communications
traffic for Oracle Clusterware. CSS-HB uses a single logical connection over a single subnetnetwork.
• RAC Interconnect (RAC-IC)—RAC instance peer-to-peer traffic and communications for GlobalCache Service (GCS) and Global Enqueue Service (GES), formally Cache Fusion (CF) andDistributed Lock Manager (DLM). Network HA is provided by the HP-UX platform (Serviceguardor Auto Port Aggregation (APA)).
• Automatic Storage Management Interconnect (ASM-IC) (only when using ASM, AutomaticStorage Management)—ASM instance peer-to-peer traffic. When it exists, ASM-IC should beon the same network as CSS-HB. Network HA is required either through Serviceguard failoveror HP APA .
• Global Atomic Broadcast/Link Level Traffic (GAB/LLT) (only when using CFS/CVM)—Symanteccluster heartbeat and communications traffic. GAB/LLT communicates over link level protocol
Network Planning for Cluster Communication 29

(DLPI) and supported over Serviceguard heartbeat subnet networks, including primary andstandby links.
• Highly available virtual IP (HAIP) (only when using Oracle Grid Infrastructure 11.2.0.2) — IPaddresses, which Oracle Database and Oracle ASM instances use to ensure highly availableand load balanced across the provided set of cluster interconnect interfaces.The most common network configuration is to have all interconnect traffic for clustercommunications to go on a single heartbeat network that is redundant so that Serviceguardmonitors the network and resolves interconnect failures by cluster reconfiguration.
The following are situations when it is not possible to place all interconnect traffic on a singlenetwork:• RAC GCS (cache fusion) traffic may be very high, so an additional dedicated heartbeat
network for Serviceguard needs to be configured.• Some networks, such as Infiniband, are not supported by CFS/CVM, so the CSS-HB/RAC-IC
traffic may need to be on a separate network that is different from SG-HB network.• Certain configurations for fast re-configurations requires a dual Serviceguard heartbeat network,
and CSS-HB/RAC-IC does not support multiple networks for HA purposes.• In a multiple database configuration, RAC-IC traffic of one database may interfere with RAC-IC
traffic of another database; therefore, the RAC-IC traffic of databases may need to beseparated.
In the above cases, you will see a longer time to recover some network failures beyond thoseprotected by primary and standby, unless Serviceguard is configured to monitor the network.A failure of CSS-HB/RAC-IC network in such configuration does not force Serviceguard to reformthe cluster. If Serviceguard is not configured to monitor the network, Oracle will take at least CSSmisscount time interval to resolve the network failure. The default value of CSS misscount in SGeRACconfigurations is 600 seconds.To avoid longer recovery times, manage Oracle Clusterware and RAC-DB instances usingServiceguard multi-node packages. In addition, configure the CLUSTER_INTERCONNECT_SUBNETpackage configuration parameter (as done with a standard SUBNET package configurationparameter) in the respective multi-node packages to monitor the CSS-HB/RAC-IC networks.
Planning Storage for Oracle Cluster SoftwareOracle Cluster Software requires shared storage for the Oracle Cluster Registry (OCR) and a votedevice. Automatic Storage Management cannot be used for the OCR and vote device in priorOracle 11gR2 versions because these files must be accessible before Oracle Cluster Softwarestarts.For Oracle 10g, the minimum required size for each copy of the OCR is 100 MB and for eachvote disk it is 20 MB. For Oracle 11gR1, the minimum required size for each copy of the OCR is300 MB, and for each vote disk it is also 300 MB.The Oracle OCR and vote device can be created on supported shared storage, including SLVMlogical volumes, CVM raw volumes, and CFS file systems (on HP-UX releases that support VeritasCFS and CVM). See “About Veritas CFS and CVM from Symantec” (page 15). Oracle 11gR2supports OCR and vote device on ASM over SLVM, ASM over raw device files, and Cluster FileSystem (CFS).
Planning Storage for Oracle 10g/11gR1/11gR2 RACNOTE: The Oracle 11gR2 OUI allows only ASM over SLVM, ASM over raw device files, ClusterFile System for Clusterware files, and Database files.
30 Serviceguard Configuration for Oracle 10g, 11gR1, or 11gR2 RAC
Volume Planning with SLVMStorage capacity for the Oracle database must be provided in the form of logical volumes locatedin shared volume groups. The Oracle software requires at least two log files for each Oracleinstance, several Oracle control files and data files for the database itself. For all these files,Serviceguard Extension for RAC uses HP-UX raw logical volumes located in volume groups thatare shared between the nodes in the cluster. High availability is achieved by using high availabilitydisk arrays in RAID modes. The logical units of storage on the arrays are accessed from each nodethrough multiple physical volume links (PV links, also known as alternate links), which provideredundant paths to each unit of storage. Fill out a Logical Volume worksheet to provide logicalvolume names for logical volumes that you will create with the lvcreate command. The OracleDBA and the HP-UX system administrator should prepare this worksheet together. Create entriesfor shared volumes only. For each logical volume, enter the full pathname of the raw logical volumedevice file. Be sure to include the desired size in MB. Following is a sample worksheet filled out.However, this sample is only representative. For different versions of the Oracle database, the sizeof files are different. Refer to Appendix B: “Blank Planning Worksheets”, for samples of blankworksheets. Make as many copies as you need. Fill out the worksheet and keep it for futurereference.
Storage Planning with CFSWith CFS, the database software, database files (control, redo, data files), and archive logs mayreside on a cluster file system visible by all nodes. Also, the OCR and vote device can reside onCFS directories.The following software needs to be installed in order to use this configuration:
• SGeRAC
• CFSCFS and CVM are not supported on all versions of HP-UX (on HP-UX releases that support them.See “About Veritas CFS and CVM from Symantec” (page 15)).
CAUTION: Once you create the disk group and mount point packages, you must administer thecluster with CFS commands, including cfsdgadm, cfsmntadm, cfsmount, and cfsumount.You must not use the HP-UX mount or umount command to provide or remove access to a sharedfile system in a CFS environment. Using these HP-UX commands under these circumstances is notsupported. Use cfsmount and cfsumount instead.If you use the HP-UX mount and umount commands, serious problems could occur, such as writingto the local file system instead of the cluster file system. Non-CFS commands could cause conflictswith subsequent CFS command operations on the file system or the Serviceguard packages, andwill not create an appropriate multi-node package, which means cluster packages will not beaware of file system changes.
NOTE: For specific CFS Serviceguard Storage Management Suite product information refer toyour version of the HP Serviceguard Storage Management Suite Release Notes.
Volume Planning with CVMStorage capacity for the Oracle database must be provided in the form of volumes located inshared disk groups. The Oracle software requires at least two log files for each Oracle instance,several Oracle control files, and data files for the database itself. For all these files, ServiceguardExtension for RAC uses HP-UX raw volumes, which are located in disk groups that are sharedbetween the nodes in the cluster. High availability is achieved by using high availability disk arraysin RAID nodes. The logical units of storage on the arrays are accessed from each node throughmultiple physical volume links via DMP (Dynamic Multipathing) that provides redundant paths toeach unit of storage.
Planning Storage for Oracle 10g/11gR1/11gR2 RAC 31
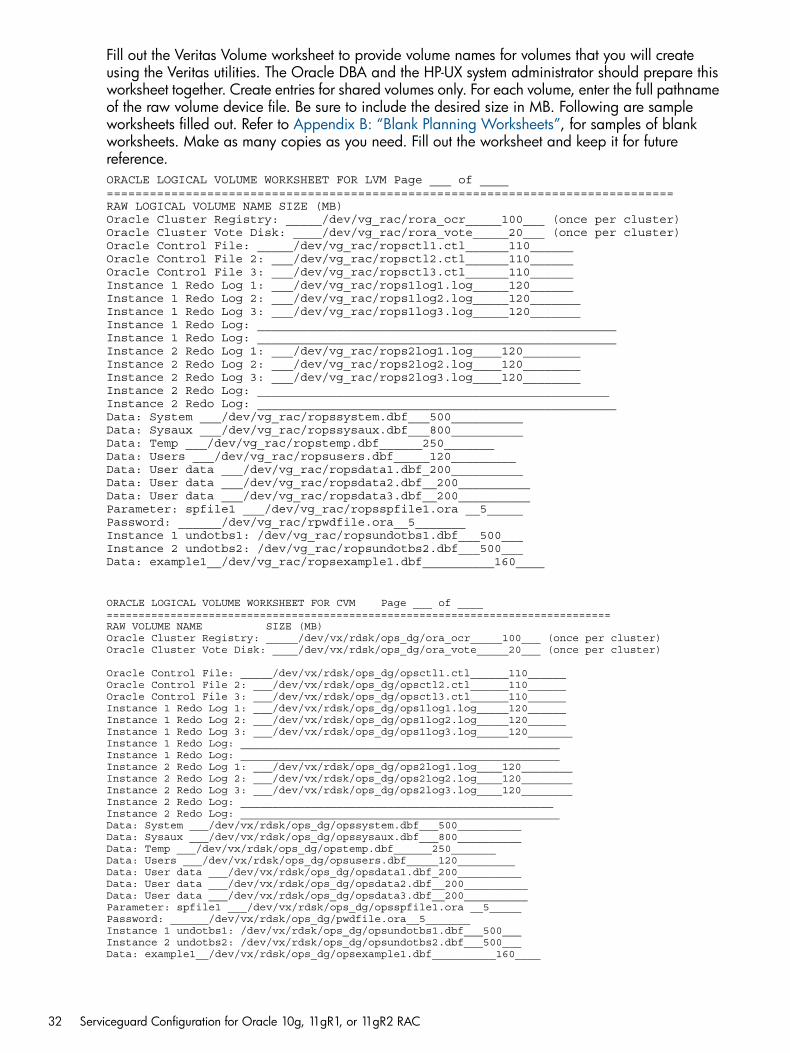
Fill out the Veritas Volume worksheet to provide volume names for volumes that you will createusing the Veritas utilities. The Oracle DBA and the HP-UX system administrator should prepare thisworksheet together. Create entries for shared volumes only. For each volume, enter the full pathnameof the raw volume device file. Be sure to include the desired size in MB. Following are sampleworksheets filled out. Refer to Appendix B: “Blank Planning Worksheets”, for samples of blankworksheets. Make as many copies as you need. Fill out the worksheet and keep it for futurereference.ORACLE LOGICAL VOLUME WORKSHEET FOR LVM Page ___ of ____===============================================================================RAW LOGICAL VOLUME NAME SIZE (MB)Oracle Cluster Registry: _____/dev/vg_rac/rora_ocr_____100___ (once per cluster)Oracle Cluster Vote Disk: ____/dev/vg_rac/rora_vote_____20___ (once per cluster)Oracle Control File: _____/dev/vg_rac/ropsctl1.ctl______110______Oracle Control File 2: ___/dev/vg_rac/ropsctl2.ctl______110______Oracle Control File 3: ___/dev/vg_rac/ropsctl3.ctl______110______Instance 1 Redo Log 1: ___/dev/vg_rac/rops1log1.log_____120______Instance 1 Redo Log 2: ___/dev/vg_rac/rops1log2.log_____120_______Instance 1 Redo Log 3: ___/dev/vg_rac/rops1log3.log_____120_______Instance 1 Redo Log: __________________________________________________Instance 1 Redo Log: __________________________________________________Instance 2 Redo Log 1: ___/dev/vg_rac/rops2log1.log____120________Instance 2 Redo Log 2: ___/dev/vg_rac/rops2log2.log____120________Instance 2 Redo Log 3: ___/dev/vg_rac/rops2log3.log____120________Instance 2 Redo Log: _________________________________________________Instance 2 Redo Log: __________________________________________________Data: System ___/dev/vg_rac/ropssystem.dbf___500__________Data: Sysaux ___/dev/vg_rac/ropssysaux.dbf___800__________Data: Temp ___/dev/vg_rac/ropstemp.dbf______250_______Data: Users ___/dev/vg_rac/ropsusers.dbf_____120_________Data: User data ___/dev/vg_rac/ropsdata1.dbf_200__________Data: User data ___/dev/vg_rac/ropsdata2.dbf__200__________Data: User data ___/dev/vg_rac/ropsdata3.dbf__200__________Parameter: spfile1 ___/dev/vg_rac/ropsspfile1.ora __5_____Password: ______/dev/vg_rac/rpwdfile.ora__5_______Instance 1 undotbs1: /dev/vg_rac/ropsundotbs1.dbf___500___Instance 2 undotbs2: /dev/vg_rac/ropsundotbs2.dbf___500___Data: example1__/dev/vg_rac/ropsexample1.dbf__________160____
ORACLE LOGICAL VOLUME WORKSHEET FOR CVM Page ___ of ____===============================================================================RAW VOLUME NAME SIZE (MB)Oracle Cluster Registry: _____/dev/vx/rdsk/ops_dg/ora_ocr_____100___ (once per cluster)Oracle Cluster Vote Disk: ____/dev/vx/rdsk/ops_dg/ora_vote_____20___ (once per cluster)
Oracle Control File: _____/dev/vx/rdsk/ops_dg/opsctl1.ctl______110______Oracle Control File 2: ___/dev/vx/rdsk/ops_dg/opsctl2.ctl______110______Oracle Control File 3: ___/dev/vx/rdsk/ops_dg/opsctl3.ctl______110______Instance 1 Redo Log 1: ___/dev/vx/rdsk/ops_dg/ops1log1.log_____120______Instance 1 Redo Log 2: ___/dev/vx/rdsk/ops_dg/ops1log2.log_____120______Instance 1 Redo Log 3: ___/dev/vx/rdsk/ops_dg/ops1log3.log_____120_______Instance 1 Redo Log: __________________________________________________Instance 1 Redo Log: __________________________________________________Instance 2 Redo Log 1: ___/dev/vx/rdsk/ops_dg/ops2log1.log____120________Instance 2 Redo Log 2: ___/dev/vx/rdsk/ops_dg/ops2log2.log____120________Instance 2 Redo Log 3: ___/dev/vx/rdsk/ops_dg/ops2log3.log____120________Instance 2 Redo Log: _________________________________________________Instance 2 Redo Log: __________________________________________________Data: System ___/dev/vx/rdsk/ops_dg/opssystem.dbf___500__________Data: Sysaux ___/dev/vx/rdsk/ops_dg/opssysaux.dbf___800__________Data: Temp ___/dev/vx/rdsk/ops_dg/opstemp.dbf______250_______Data: Users ___/dev/vx/rdsk/ops_dg/opsusers.dbf_____120_________Data: User data ___/dev/vx/rdsk/ops_dg/opsdata1.dbf_200__________Data: User data ___/dev/vx/rdsk/ops_dg/opsdata2.dbf__200__________Data: User data ___/dev/vx/rdsk/ops_dg/opsdata3.dbf__200__________Parameter: spfile1 ___/dev/vx/rdsk/ops_dg/opsspfile1.ora __5_____Password: ______/dev/vx/rdsk/ops_dg/pwdfile.ora__5_______Instance 1 undotbs1: /dev/vx/rdsk/ops_dg/opsundotbs1.dbf___500___Instance 2 undotbs2: /dev/vx/rdsk/ops_dg/opsundotbs2.dbf___500___Data: example1__/dev/vx/rdsk/ops_dg/opsexample1.dbf__________160____
32 Serviceguard Configuration for Oracle 10g, 11gR1, or 11gR2 RAC

Installing Serviceguard Extension for RACInstalling Serviceguard Extension for RAC includes updating the software and rebuilding the kernelto support high availability cluster operation for Oracle Real Application Clusters.Prior to installing Serviceguard Extension for RAC, the following must be installed:
• Correct version of HP-UX
• Correct version of ServiceguardTo install Serviceguard Extension for RAC, use the following steps for each node:
NOTE: All nodes in the cluster must be either SGeRAC nodes or Serviceguard nodes. For theup-to-date version compatibility for Serviceguard and HP-UX, see the SGeRAC release notes foryour version.
1. Mount the distribution media in the tape drive, CD, or DVD reader.2. Run Software Distributor, using the swinstall command.3. Specify the correct input device.4. Choose the following bundle from the displayed list:
Serviceguard Extension for RAC
5. After choosing the bundle, select OK to install the software.
Veritas Cluster Volume Manager (CVM) and Cluster File System (CFS)CVM (and CFS – Cluster File System) are supported on some, but not all current releases of HP-UX.See the latest release notes for your version of Serviceguard atwww.hp.com/go/hpux-serviceguard-docs.
NOTE: The HP-UX 11i v3 I/O subsystem provides multipathing and load balancing by default.This is often referred to as native multipathing. When CVM is installed on HP-UX 11i v3, DMP isthe only supported multipathing solution, and is enabled by default.
Veritas Storage Management Products
About MultipathingMultipathing is automatically configured in HP-UX 11i v3 (this is often called native multipathing),or in some cases can be configured with third-party software such as EMC Powerpath.
NOTE: The HP-UX 11i v3 I/O subsystem provides multipathing and load balancing by default.This is often referred to as native multipathing. When CVM is installed on HP-UX 11i v3, DMP isthe only supported multipathing solution, and is enabled by default.
For more information about multipathing in HP-UX 11i v3, see the white paper HP-UX 11i v3 NativeMultipathing for Mass Storage, and the Logical Volume Management volume of the HP-UX SystemAdministrator’s Guide at www.hp.com/go/hpux-core-docs —> HP-UX 11i v3.
About Device Special FilesHP-UX releases up to and including 11i v2 use a naming convention for device files that encodestheir hardware path. For example, a device file named /dev/dsk/c3t15d0 would indicate SCSIcontroller instance 3, SCSI target 15, and SCSI LUN 0. HP-UX 11i v3 introduces a new nomenclaturefor device files, known as agile addressing (also called persistent LUN binding). Under the agileaddressing convention, the hardware path name is no longer encoded in a storage device’sname—each device file name reflects a unique instance number, for example /dev/[r]disk/disk3, that does not need to change when the hardware path changes. Agile addressingis the default on new 11i v3 installations, but the I/O subsystem still recognizes the pre-11i v3
Installing Serviceguard Extension for RAC 33
nomenclature. You are not required to migrate to agile addressing when you upgrade to 11i v3,though you should seriously consider its advantages. It is possible, though not a best practice, tohave legacy DSFs on some nodes and agile addressing on others—this allows you to migrate thenames on different nodes at different times, if necessary.
NOTE: The examples in this document use legacy naming conventions.
About Cluster-wide Device Special Files (cDSFs)Under agile addressing on HP-UX 11i v3, each device has a unique identifier as seen from a givenhost; this identifier is reflected in the name of the Device Special File (DSF).Because DSF names may be duplicated between one host and other, it is possible for differentstorage devices to have the same name on different nodes in a cluster, and for the same piece ofstorage to be addressed by different names. Cluster-wide device files (cDSFs), available as of theSeptember 2010 HP-UX Fusion Release, ensure that each storage device used by the cluster hasa unique device file name.
IMPORTANT: Check the latest version of the release notes (at the address given in the prefaceto this manual) for information about Serviceguard support for cDSFs.
HP recommends that you use cDSFs for the storage devices in the cluster because this makes itsimpler to deploy and maintain a cluster, and removes a potential source of configuration errors.For more information, see Creating Cluster-wide Device Special Files (cDSFs) in the ManagingServiceguard, Eighteenth Edition manual at www.hp.com/go/hpux-serviceguard-docs —>HP Serviceguard .Points to Note
• cDSFs can be created for any group of nodes that you specify, provided that ServiceguardA.11.20 is installed on each node.Normally, the group should comprise the entire cluster.
• cDSFs apply only to shared storage; they will not be generated for local storage, such as root,boot, and swap devices.
• Once you have created cDSFs for the cluster, HP-UX automatically creates new cDSFs whenyou add shared storage.
• HP recommends that you do not mix cDSFs with persistent (or legacy DSFs) in a volume group,and you cannot use cmpreparestg (1m) on a volume group in which they are mixed.For more information about cmpreparestg, see About Easy Deployment in the ManagingServiceguard, Nineteenth Edition manual at www.hp.com/go/hpux-serviceguard-docs—> HP Serviceguard .
Where cDSFs ResidecDSFs reside in two new HP-UX directories, /dev/cdisk for cluster-wide block device files and/dev/rcdisk for cluster-wide character devicefiles. Persistent DSFs that are not cDSFs continueto reside in /dev/disk and /dev/rdisk, and legacy DSFs (DSFs using the naming conventionthat was standard before HP–UX 11i v3) in /dev/dsk and /dev/rdsk. It is possible that astorage device on an 11i v3 system could be addressed by DSFs of all three types of device —but if you are using cDSFs, you should ensure that you use them exclusively as far as possible.
NOTE: Software that assumes DSFs reside only in /dev/disk and /dev/rdisk will not findcDSFs and may not work properly as a result.
34 Serviceguard Configuration for Oracle 10g, 11gR1, or 11gR2 RAC

Limitations of cDSFs
• cDSFs are supported only within a single cluster; you cannot define a cDSF group that crossescluster boundaries.
• A node can belong to only one cDSF group.
• cDSFs are not supported by CVM, CFS, or any other application that assumes DSFs resideonly in /dev/disk and /dev/rdisk.
• cDSFs do not support disk partitions.Such partitions can be addressed by a device file using the agile addressing scheme, but notby a cDSF.
For more information about Cluster-wide Device Special Files (cDSFs), see the ManagingServiceguard, Eighteenth Edition manual at www.hp.com/go/hpux-serviceguard-docs —>HP Serviceguard .
Configuration File ParametersYou need to code specific entries for all the storage groups that you want to use in an Oracle RACconfiguration. If you are using LVM, the OPS_VOLUME_GROUP parameter is included in the clusterASCII file. If you are using Veritas CVM, the STORAGE_GROUP parameter is included in the packageASCII file. Details are as follows:OPS_VOLUME_GROUP The name of an LVM volume group whose disks are attached to at least
two nodes in the cluster. The disks will be accessed by more than onenode at a time using SLVM with concurrency control provided by OracleRAC. Such disks are considered cluster aware.Volume groups listed under this parameter are marked for activation inshared mode. The entry can contain up to 40 characters.
STORAGE_GROUP This parameter is used for CVM disk groups. Enter the names of all theCVM disk groups the package will use.In the ASCII package configuration file, this parameter is calledSTORAGE_GROUP.
Unlike LVM volume groups, CVM disk groups are not entered in the cluster configuration file, theyare entered in the package configuration file.
NOTE: CVM 5.x or later with CFS does not use the STORAGE_GROUP parameter because thedisk group activation is performed by the multi-node package. CVM 5.x and later without CFSuses the STORAGE_GROUP parameter in the ASCII package configuration file in order to activatethe disk group (on HP-UX releases that support Veritas CFS and CVM). See “About Veritas CFSand CVM from Symantec” (page 15).Do not enter the names of LVM volume groups in the package ASCII configuration file.
Cluster Communication Network MonitoringThis section describes the various network configurations for cluster communications inSGeRAC/10g/11gR1/11gR2 RAC cluster, and how the package configuration parameterCLUSTER_INTERCONNECT_SUBNET can be used to recover from Oracle cluster communicationsnetwork failures in certain configurations.Support for the Oracle Grid Infrastructure 11.2.0.2 HAIP with SGeRAC A.11.20The following network configuration requirements must be met to use the Oracle Grid Infrastructure11.2.0.2 HAIP feature in an SGeRAC cluster:1. Any networks in the SGeRAC A.11.20 cluster configured for heartbeat must also be configured
as Oracle cluster interconnect network in the Oracle Grid Infrastructure 11.2.0.2. Similarly
Configuration File Parameters 35

any network configured for Oracle cluster interconnect must also be configured as SGeRACA.11.20 heartbeat network.
NOTE: Do not configure Serviceguard heartbeat and Oracle cluster interconnect in mutuallyexclusive networks.
2. Serviceguard standby interfaces must not be configured for the networks used for Serviceguardheartbeat and Oracle cluster interconnect.
For Oracle Grid Infrastructure 11.2.0.2 HAIP feature to work properly in an SGeRAC cluster andto have a resilient network configured for Serviceguard heartbeat and Oracle cluster interconnect,use one of the following network configurations:1. Configure one or more networks, each using one HP Auto Port Aggregation (APA) interface
for Oracle cluster interconnect and Serviceguard heartbeat. The APA interfaces must containtwo or more physical network interfaces in hot standby mode or in LAN monitor mode.
NOTE: APA interfaces on all the cluster nodes in the same network must use the same APAmode (LAN monitor or hot standby). Since these monitoring and failover functions workdifferently and do not communicate with each other, unexpected failover can occur.
2. Configure two or more networks on different interfaces without any standby interface for bothOracle cluster interconnect and Serviceguard heartbeat.
Single Network for Cluster CommunicationsThe single network configuration is the most common configuration for network installations. In thisconfiguration, there is sufficient bandwidth for all cluster communications traffic to go through onenetwork. If there are multiple databases, all database traffic goes through the same network.As shown in Figure 2-1, both CSS-HB and SG-HB are on the same network. The primary andstandby interface pair protects against a single network interface failure. Serviceguard monitorsthe network and will perform a local LAN failover (transparent to CSS and RAC) if the primaryinterface fails.
NOTE: A package with the CLUSTER_INTERCONNECT_SUBNET parameter is available for bothModular and Legacy packages. A package with this parameter can be configured only when allnodes of the cluster are running SGeRAC version A.11.18 or higher. For more information, seethe latest edition of the Managing Serviceguard Eighteenth Edition user guide atwww.hp.com/go/hpux-serviceguard-docs —> HP Serviceguard.
Figure 7 Single Network for Cluster Communications
36 Serviceguard Configuration for Oracle 10g, 11gR1, or 11gR2 RAC

Alternate Configuration—Fast Reconfiguration with Low Node Member TimeoutHigh RAC-IC traffic may interfere with SG-HB traffic and cause unnecessary member timeout ifServiceguard cluster configuration parameter MEMBER_TIMEOUT is low. If MEMBER_TIMEOUTcannot be increased, use of an additional network dedicated for SG-HB alone avoids unnecessarymember timeouts when RAC-IC traffic is high. This configuration is for a cluster with two or morenodes that have high RAC-IC traffic and/or need faster failover (a low value for Serviceguardconfiguration parameter MEMBER_TIMEOUT).
NOTE: Starting with Serviceguard A.11.19, the faster failover capability is in core Serviceguard.This configuration can be used for faster failover.
Figure 8 SG-HB/RAC-IC Traffic Separation
Each primary and standby pair protects against a single failure. With the SG-HB on more thanone subnet, a single subnet failure will not trigger a Serviceguard reconfiguration. If the subnetwith CSS-HB fails, unless subnet monitoring is used, CSS will resolve the interconnect subnet failurewith a CSS cluster reconfiguration. It will wait for the CSS misscount time interval before handlingthe CSS-HB subnet failure (by bringing down the node on which the CSS-HB subnet has failed).The default value of CSS misscount in SGeRAC configurations is 600 seconds.As shown in Figure 8, CLUSTER_INTERCONNECT_SUBNET can be used in conjunction with theNODE_FAIL_FAST_ENABLED package configuration parameter to monitor the CSS-HB network.A failure of CSS-HB subnet on a node should be handled by bringing down that node. Therefore,set NODE_FAIL_FAST_ENABLED to YES for the package monitoring the CSS-HB subnet. If themonitored subnet fails, the failure of the CSS-HB subnet on a node will bring down the instance ofthe multi-node package and the node where the subnet has failed (When Oracle Clusterware isconfigured as a multi-node package and CLUSTER_INTERCONNECT_SUBNET is used to monitorthe CSS-HB subnet).A failure of CSS-HB subnet on all nodes will result in the multi-node package failing on the nodesone by one (resulting in that node going down), and one instance of the multi-node package andnode will remain providing services to the clients.Use a separate package to monitor only the CSS-HB subnet and have Oracle Clusterware multi-nodepackage depend on the package monitoring the CSS-HB subnet. The NODE_FAIL_FAST_ENABLEDparameter is set to NO for the Oracle Clusterware package, and is set to YES for the package
Cluster Communication Network Monitoring 37
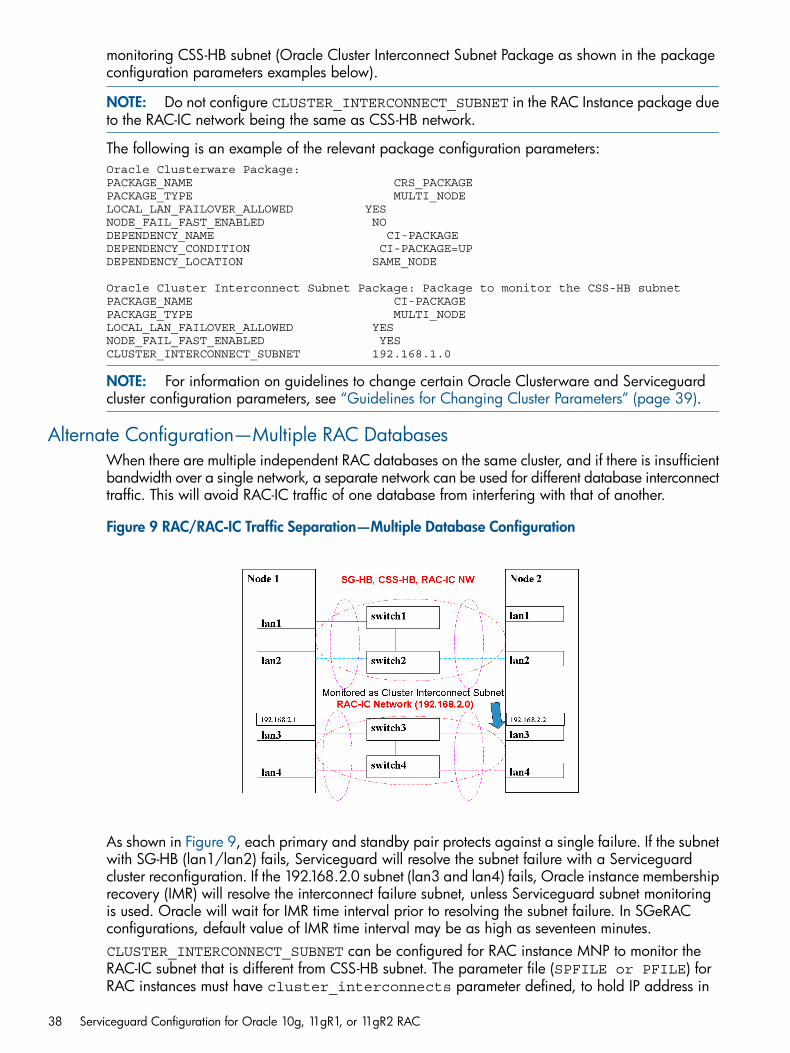
monitoring CSS-HB subnet (Oracle Cluster Interconnect Subnet Package as shown in the packageconfiguration parameters examples below).
NOTE: Do not configure CLUSTER_INTERCONNECT_SUBNET in the RAC Instance package dueto the RAC-IC network being the same as CSS-HB network.
The following is an example of the relevant package configuration parameters:Oracle Clusterware Package:PACKAGE_NAME CRS_PACKAGEPACKAGE_TYPE MULTI_NODELOCAL_LAN_FAILOVER_ALLOWED YESNODE_FAIL_FAST_ENABLED NODEPENDENCY_NAME CI-PACKAGEDEPENDENCY_CONDITION CI-PACKAGE=UPDEPENDENCY_LOCATION SAME_NODE
Oracle Cluster Interconnect Subnet Package: Package to monitor the CSS-HB subnetPACKAGE_NAME CI-PACKAGEPACKAGE_TYPE MULTI_NODELOCAL_LAN_FAILOVER_ALLOWED YESNODE_FAIL_FAST_ENABLED YESCLUSTER_INTERCONNECT_SUBNET 192.168.1.0
NOTE: For information on guidelines to change certain Oracle Clusterware and Serviceguardcluster configuration parameters, see “Guidelines for Changing Cluster Parameters” (page 39).
Alternate Configuration—Multiple RAC DatabasesWhen there are multiple independent RAC databases on the same cluster, and if there is insufficientbandwidth over a single network, a separate network can be used for different database interconnecttraffic. This will avoid RAC-IC traffic of one database from interfering with that of another.
Figure 9 RAC/RAC-IC Traffic Separation—Multiple Database Configuration
As shown in Figure 9, each primary and standby pair protects against a single failure. If the subnetwith SG-HB (lan1/lan2) fails, Serviceguard will resolve the subnet failure with a Serviceguardcluster reconfiguration. If the 192.168.2.0 subnet (lan3 and lan4) fails, Oracle instance membershiprecovery (IMR) will resolve the interconnect failure subnet, unless Serviceguard subnet monitoringis used. Oracle will wait for IMR time interval prior to resolving the subnet failure. In SGeRACconfigurations, default value of IMR time interval may be as high as seventeen minutes.CLUSTER_INTERCONNECT_SUBNET can be configured for RAC instance MNP to monitor theRAC-IC subnet that is different from CSS-HB subnet. The parameter file (SPFILE or PFILE) forRAC instances must have cluster_interconnects parameter defined, to hold IP address in
38 Serviceguard Configuration for Oracle 10g, 11gR1, or 11gR2 RAC
the appropriate subnet if the RAC Instances use a RAC-IC network different from CSS-HB network.No special subnet monitoring is needed for CSS-HB Subnet because Serviceguard monitors thesubnet (heartbeat) and will handle failures of the subnet.The database instances that use 192.168.2.0 must have cluster_interconnects defined intheir SPFILE or PFILE as follows:orcl1.cluster_interconnects=’192.168.2.1’orcl2.cluster_interconnects=’192.168.2.2’
NOTE: Do not configure CLUSTER_INTERCONNECT_SUBNET in the RAC instance package ifthe RAC-IC network is the same as CSS-HB network.
The following is an example of the relevant package configuration parameters:Oracle RAC Instance PackagePACKAGE_NAME RAC_PACKAGEPACKAGE_TYPE MULTI_NODELOCAL_LAN_FAILOVER_ALLOWED YESNODE_FAIL_FAST_ENABLED NOCLUSTER_INTERCONNECT_SUBNET 192.168.2.0
NOTE: For information on guidelines to change certain Oracle Clusterware and Serviceguardcluster configuration parameters, see “Guidelines for Changing Cluster Parameters” (page 39)
Guidelines for Changing Cluster ParametersThis section describes the guidelines for changing the default values of certain Oracle clusterwareand Serviceguard cluster configuration parameters.The guidelines vary depending on whether clustering interconnect subnet monitoring is used tomonitor the CSS HB subnet or not.
When Cluster Interconnect Subnet Monitoring is usedThe Cluster Interconnect Subnet Monitoring feature is used to monitor the CSS-HB network.If the Serviceguard cluster configuration parameter MEMBER_TIMEOUT is changed, then it isnecessary to also change the Oracle Clusterware parameter CSS miscount.To change the CSS miscount, use the following guidelines:The CSS miscount parameter should be greater than the following:
• For SLVM: (number of nodes – 1) times (F + SLVM timeout) + 15 seconds
• For CVM/CFS: (two * number of nodes – 1) times F + 15 seconds
• When both SLVM and CVM/CFS are used, then take the max of the above two calculations.
When Cluster Interconnect Subnet Monitoring is not UsedThe Cluster Interconnect Monitoring is not used to monitor the CSS HB subnet.If the Serviceguard cluster configuration parameter MEMBER_TIMEOUT is changed, then it isnecessary to also change the Oracle Clusterware parameter CSS miscount.To change the CSS miscount, use the following guidelines:The CSS miscount parameter should be greater than the following:
• For SLVM: F + SLVM timeout + 15 seconds
• For CVM/CFS: 3 times F + 15 seconds
• When both SLVM and CVM/CFS are used, then take the max of the above two calculations.
Cluster Communication Network Monitoring 39

NOTE:1. The “F” represents the Serviceguard failover time as given by the
max_reformation_duration field of cmviewcl –v –f line output.2. SLVM timeout is documented in the whitepaper, LVM link and Node Failure Recovery Time.
Limitations of Cluster Communication Network MonitorIn Oracle Grid Infrastructure 11.2.0.2, using HAIP feature, Oracle allows to use a subnet forOracle Clusterware (CSS-HB) and RAC interconnect (RAC-IC) communication which is not configuredin SGeRAC cluster. So beginning with Oracle Grid Infrastructure 11.2.0.2 version,CLUSTER_INTERCONNECT_SUBNET parameter must not be used in SGeRAC A.11.20 toolkitOracle Clusterware Multi-node and Oracle RAC database Multi-node packages.CLUSTER_INTERCONNECT_SUBNET requires the subnet to be configured within the SGeRACcluster.The Cluster Interconnect Monitoring feature does not coordinate with any feature handling subnetfailures (including self). The failure handling of multiple subnet failures may result in a loss ofservices, for example:
• A double switch failure resulting in the simultaneous failure of CSS-HB subnet and SG-HBsubnet on all nodes of a two-node cluster. (Assuming the CSS-HB subnet is different from SG-HBsubnet). Serviceguard may choose to retain one node while the failure handling of interconnectsubnets might choose to retain the other node to handle CSS-HB network failure. As a result,both nodes will go down.
NOTE: To reduce the risk of failure of multiple subnets simultaneously, each subnet musthave its own networking infrastructure (including networking switches).
• A double switch failure resulting in the simultaneous failure of CSS-HB subnet and RAC-ICnetwork on all nodes may result in loss of services (Assuming the CSS-HB subnet is differentfrom RAC-IC network). The failure handling of interconnect subnets might choose to retain onenode for CSS-HB subnet failures and to retain RAC instance on some other node for RAC-ICsubnet failures. Eventually, the database instance will not run on any node as the databaseinstance is dependent on clusterware to run on that node.
Cluster Interconnect Monitoring RestrictionsIn addition to the above limitations, the Cluster Interconnect Monitoring feature has the followingrestriction:
• Cluster Lock device/Quorum Server/Lock Lun must be configured in the cluster.
Creating a Storage Infrastructure with LVMIn addition to configuring the cluster, you create the appropriate logical volume infrastructure toprovide access to data from different nodes. This is done with Logical Volume Manager (LVM) orVeritas Cluster Volume Manager (CVM). LVM configuration is done before cluster configuration,and CVM configuration is done after cluster configuration.This section describes how to create LVM volume groups for use with Oracle data. Before configuringthe cluster, you create the appropriate logical volume infrastructure to provide access to data fromdifferent nodes. This is done with Logical Volume Manager. Separate procedures are given forthe following:
• Building Volume Groups for RAC on Mirrored Disks
• Building Mirrored Logical Volumes for RAC with LVM Commands
40 Serviceguard Configuration for Oracle 10g, 11gR1, or 11gR2 RAC

• Creating RAC Volume Groups on Disk Arrays
• Creating Logical Volumes for RAC on Disk ArraysThe Event Monitoring Service HA Disk Monitor provides the capability to monitor the health ofLVM disks. If you intend to use this monitor for your mirrored disks, you should configure them inphysical volume groups. For more information, refer to the manual Using HA Monitors.
NOTE: When using LVM version 2.x, the volume groups are supported with Serviceguard. Thesteps shown in the following section are for configuring the volume groups in Serviceguard clustersLVM version 1.0.For more information on using and configuring LVM version 2.x, see the HP-UX 11i Version 3:HP-UX System Administrator's Guide: Logical Volume Management located at www.hp.com/go/hpux-core-docs —> HP-UX 11i v3.
For LVM version 2.x compatibility requirements see the Serviceguard/SGeRAC/SMS/ServiceguardMgr Plug-in Compatibility and Feature Matrix at www.hp.com/go/hpux-serviceguard-docs—> HP Serviceguard Extension for RAC.
NOTE: For more information, see the Serviceguard Version A.11.20 Release Notes atwww.hp.com/go/hpux-serviceguard-docs —> HP Serviceguard Extension forRAC.
NOTE: The Oracle 11gR2 OUI allows only ASM over SLVM, ASM over raw device files, ClusterFile System for Clusterware files, and Database files.
Building Volume Groups for RAC on Mirrored DisksThe procedure described in this section uses physical volume groups for mirroring of individualdisks to ensure that each logical volume is mirrored to a disk on a different I/O bus. This kind ofarrangement is known as PVG-strict mirroring. It is assumed that your disk hardware is alreadyconfigured so that the disk can be used as a mirror copy, which is connected to each node on adifferent bus other than the bus that is used for the other (primary) copy.
Creating Volume Groups and Logical VolumesIf your volume groups have not been set up, use the procedure in the next sections. If you havealready done LVM configuration, skip ahead to the section “Installing Oracle Real ApplicationClusters” (page 47).
Selecting Disks for the Volume GroupObtain a list of the disks on both nodes and identify which device files are used for the same diskon both. Use the following command on each node to list available disks as they are known toeach system:# lssf /dev/dsk/*
In the following examples, we use /dev/rdsk/c1t2d0 and /dev/rdsk/c0t2d0, which arethe device names for the same disks on both ftsys9 and ftsys10. In the event that the devicefile names are different on the different nodes, make a careful note of the correspondences.
Creating Physical VolumesOn the configuration node (ftsys9), use the pvcreate command to define disks as physicalvolumes. This only needs to be done on the configuration node. Use the following commands tocreate two physical volumes for the sample configuration:# pvcreate -f /dev/rdsk/c1t2d0# pvcreate -f /dev/rdsk/c0t2d0
Creating a Storage Infrastructure with LVM 41

Creating a Volume Group with PVG-Strict MirroringUse the following steps to build a volume group on the configuration node (ftsys9). Later, thesame volume group will be created on other nodes.1. Set up the group directory for vgops:
# mkdir /dev/vg_rac
2. Create a control file named group in the directory /dev/vg_rac, as follows:# mknod /dev/vg_rac/group c 64 0xhh0000
The major number is always 64, and the hexadecimal minor number has the form0xhh0000
where hh must be unique to the volume group you are creating. Use the next hexadecimalnumber that is available on your system, after the volume groups that are already configured.Use the following command to display a list of existing volume groups:# ls -l /dev/*/group
3. Create the volume group and add physical volumes to it with the following commands:# vgcreate -g bus0 /dev/vg_rac /dev/dsk/c1t2d0
# vgextend -g bus1 /dev/vg_rac /dev/dsk/c0t2d0
The first command creates the volume group and adds a physical volume to it in a physicalvolume group called bus0. The second command adds the second drive to the volume group,locating it in a different physical volume group named bus1. The use of physical volumegroups allows the use of PVG-strict mirroring of disks and PV links.
4. Repeat this procedure for additional volume groups.
Building Mirrored Logical Volumes for RAC with LVM CommandsAfter you create volume groups and define physical volumes for use in them, you define mirroredlogical volumes for data, logs, and control files. It is recommended that you use a shell script toissue the commands described in the next sections. The commands you use for creating logicalvolumes vary slightly depending on whether you are creating logical volumes for RAC redo logfiles or for use with Oracle data.
Creating Mirrored Logical Volumes for RAC Redo Logs and Control FilesCreate logical volumes for use as redo log and control files by selecting mirror consistency recovery.Use the same options as in the following example:# lvcreate -m 1 -M n -c y -s g -n redo1.log -L 408 /dev/vg_rac
• -m 1—Specifies single mirroring.
• -M n—Ensures that mirror write cache recovery is set off.
• -c y—Mirror consistency recovery is enabled.
• -s g—Mirroring is PVG-strict. It occurs between different physical volume groups.
• -n redo1.log—Specify the name of the logical volume.
• -L 28—allocates 28 megabytes.
NOTE: Use the -c y options for both redo logs and control files. These options allow the redolog files to be resynchronized by SLVM following a system crash before Oracle recovery proceeds.If these options are not set correctly, you may not be able to continue with database recovery.
If the command is successful, the system will display messages like the following:
42 Serviceguard Configuration for Oracle 10g, 11gR1, or 11gR2 RAC

Logical volume “/dev/vg_rac/redo1.log” has been successfully createdwith character device “/dev/vg_rac/rredo1.log”Logical volume “/dev/vg_rac/redo1.log” has been successfully extended
NOTE: With LVM 2.1 and above, mirror write cache (MWC) recovery can be set to ON forRAC Redo Logs and Control Files volumes. Example:# lvcreate -m 1 -M y -s g -n redo1.log -L 408 /dev/vg_rac
NOTE: The character device file name (also called the raw logical volume name) is used by theOracle DBA in building the RAC database.
Creating Mirrored Logical Volumes for RAC Data FilesFollowing a system crash, the mirrored logical volumes need to be resynchronized, which is knownas “resilvering.”On node and cluster-wide failures, when SLVM mirroring is used and Oracle resilvering is available,the recommendation is no mirror resynchronization (NONE) for the datafiles because Oracle wouldperform resilvering on the datafiles based on the redo log.If Oracle resilvering is not available, the mirror recovery policy should be set to either full mirrorresynchronization (NOMWC) or fast resynchronization (MWC) . For more information on usingNOMWC and MWC, refer to the HP-UX System Administrator's Guide: Logical Volume ManagementHP-UX 11i Version 3 on www.hp.com/go/hpux-core-docs —> HP-UX 11i v3.In the case Oracle “resilvering” is not available, create logical volumes for use as Oracle datafiles by using the same options as in the following:Example for “NOMWC”:# lvcreate -m 1 -M n -c y -s g -n system.dbf -L 408 /dev/vg_rac
• -m 1—Specifies single mirroring.
• -M n—Ensures that mirror write cache recovery is set to OFF.
• -c y—Mirror consistency recovery is enabled.
• -s g—Mirroring is PVG-strict. It occurs between different physical volume groups.
• -n system.dbf—Specify the name of the logical volume.
• -L 408—Allocates 408 megabytes.Example for “MWC”# lvcreate -m 1 -M y -s g -n system.dbf -L 408 dev/vg_rac
The -M y option ensures that mirror write cache recovery is set ON.
NOTE: Contact Oracle to determine if your version of Oracle RAC allows “resilvering” and toappropriately configure the mirror consistency recovery policy for your logical volumes.
In the case Oracle “resilvering” is available, create logical volumes for use as Oracle data filesby using the same options as in the following example:# lvcreate -m 1 -M n -c n -s g -n system.dbf -L 408 /dev/vg_rac
• -m 1—Specifies single mirroring.
• -M n—Ensures that mirror write cache recovery is set to OFF.
• -c n—Mirror consistency recovery is disabled.
• -s g—Mirroring is PVG-strict. It occurs between different physical volume groups.
• -n system.dbf—Specify the name of the logical volume.
• -L 408—Allocates 408 megabytes.If the command is successful, the system will display messages like the following:
Creating a Storage Infrastructure with LVM 43
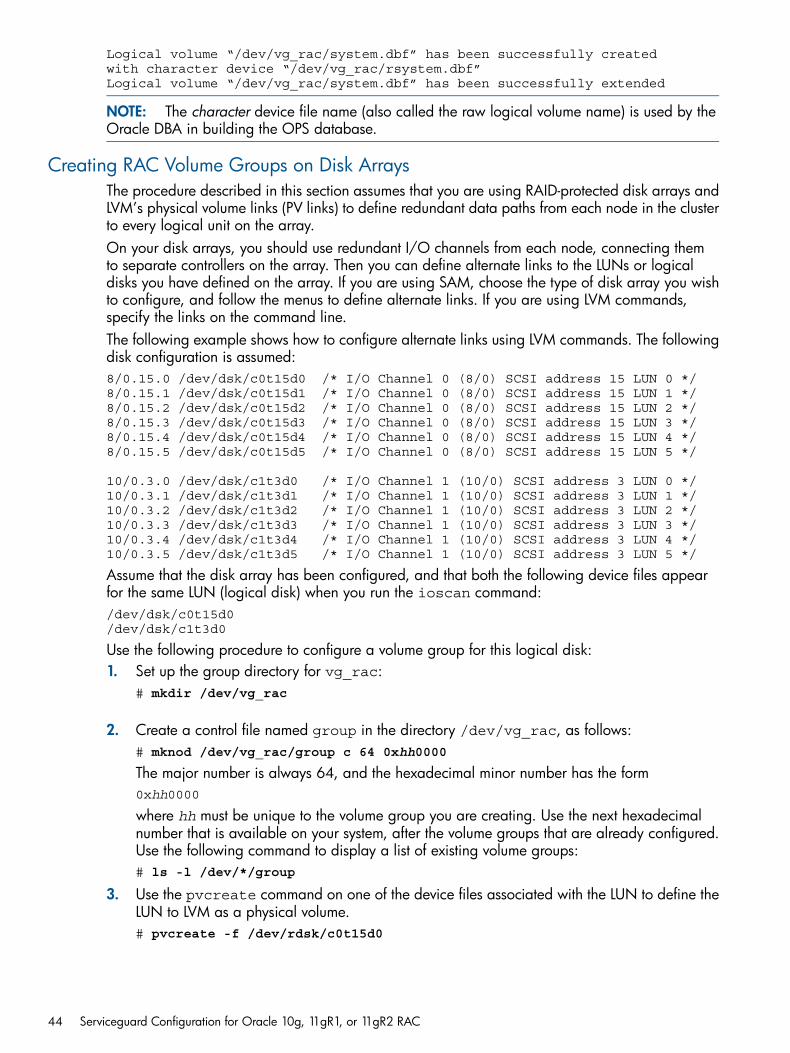
Logical volume “/dev/vg_rac/system.dbf” has been successfully createdwith character device “/dev/vg_rac/rsystem.dbf”Logical volume “/dev/vg_rac/system.dbf” has been successfully extended
NOTE: The character device file name (also called the raw logical volume name) is used by theOracle DBA in building the OPS database.
Creating RAC Volume Groups on Disk ArraysThe procedure described in this section assumes that you are using RAID-protected disk arrays andLVM’s physical volume links (PV links) to define redundant data paths from each node in the clusterto every logical unit on the array.On your disk arrays, you should use redundant I/O channels from each node, connecting themto separate controllers on the array. Then you can define alternate links to the LUNs or logicaldisks you have defined on the array. If you are using SAM, choose the type of disk array you wishto configure, and follow the menus to define alternate links. If you are using LVM commands,specify the links on the command line.The following example shows how to configure alternate links using LVM commands. The followingdisk configuration is assumed:8/0.15.0 /dev/dsk/c0t15d0 /* I/O Channel 0 (8/0) SCSI address 15 LUN 0 */8/0.15.1 /dev/dsk/c0t15d1 /* I/O Channel 0 (8/0) SCSI address 15 LUN 1 */8/0.15.2 /dev/dsk/c0t15d2 /* I/O Channel 0 (8/0) SCSI address 15 LUN 2 */8/0.15.3 /dev/dsk/c0t15d3 /* I/O Channel 0 (8/0) SCSI address 15 LUN 3 */8/0.15.4 /dev/dsk/c0t15d4 /* I/O Channel 0 (8/0) SCSI address 15 LUN 4 */8/0.15.5 /dev/dsk/c0t15d5 /* I/O Channel 0 (8/0) SCSI address 15 LUN 5 */
10/0.3.0 /dev/dsk/c1t3d0 /* I/O Channel 1 (10/0) SCSI address 3 LUN 0 */10/0.3.1 /dev/dsk/c1t3d1 /* I/O Channel 1 (10/0) SCSI address 3 LUN 1 */10/0.3.2 /dev/dsk/c1t3d2 /* I/O Channel 1 (10/0) SCSI address 3 LUN 2 */10/0.3.3 /dev/dsk/c1t3d3 /* I/O Channel 1 (10/0) SCSI address 3 LUN 3 */10/0.3.4 /dev/dsk/c1t3d4 /* I/O Channel 1 (10/0) SCSI address 3 LUN 4 */10/0.3.5 /dev/dsk/c1t3d5 /* I/O Channel 1 (10/0) SCSI address 3 LUN 5 */
Assume that the disk array has been configured, and that both the following device files appearfor the same LUN (logical disk) when you run the ioscan command:/dev/dsk/c0t15d0/dev/dsk/c1t3d0
Use the following procedure to configure a volume group for this logical disk:1. Set up the group directory for vg_rac:
# mkdir /dev/vg_rac
2. Create a control file named group in the directory /dev/vg_rac, as follows:# mknod /dev/vg_rac/group c 64 0xhh0000
The major number is always 64, and the hexadecimal minor number has the form0xhh0000
where hh must be unique to the volume group you are creating. Use the next hexadecimalnumber that is available on your system, after the volume groups that are already configured.Use the following command to display a list of existing volume groups:# ls -l /dev/*/group
3. Use the pvcreate command on one of the device files associated with the LUN to define theLUN to LVM as a physical volume.# pvcreate -f /dev/rdsk/c0t15d0
44 Serviceguard Configuration for Oracle 10g, 11gR1, or 11gR2 RAC

It is only necessary to do this with one of the device file names for the LUN. The -f option isonly necessary if the physical volume was previously used in some other volume group.
4. Use the following to create the volume group with the two links:# vgcreate /dev/vg_rac /dev/dsk/c0t15d0 /dev/dsk/c1t3d0
LVM will now recognize the I/O channel represented by/dev/dsk/c0t15d0 as the primary linkto the disk. If the primary link fails, LVM will automatically switch to the alternate I/O channelrepresented by /dev/dsk/c1t3d0. Use the vgextend command to add additional disks to thevolume group, specifying the appropriate physical volume name for each PV link.Repeat the entire procedure for each distinct volume group you wish to create. For ease of systemadministration, you may wish to use different volume groups to separate logs from data and controlfiles.
NOTE: The default maximum number of volume groups in HP-UX version 2.0 is 10. If you intendto create enough new volume groups that the total exceeds 10, you must increase the maxvgssystem parameter and then reboot the system. Use the kctune utility to change kernel parameterarea, then choose Configurable Parameters, maxvgs appears on the list.
Creating Logical Volumes for RAC on Disk ArraysAfter you create volume groups and add PV links to them, you define logical volumes for data,logs, and control files. The following are some examples:# lvcreate -n ops1log1.log -L 4 /dev/vg_rac# lvcreate -n opsctl1.ctl -L 4 /dev/vg_rac# lvcreate -n system.dbf -L 28 /dev/vg_rac# lvcreate -n opsdata1.dbf -L 1000 /dev/vg_rac
Oracle Demo Database FilesThe following set of files is required for the Oracle demo database that can be created during theinstallation process.
Table 1 Required Oracle File Names for Demo Database
Oracle FileSize (MB)*
Raw Logical Volume Path NameLV Size(MB)
Logical Volume Name
110/dev/vg_rac/ropsctl1.ctl118opsctl1.ctl
110/dev/vg_rac/ropsctl2.ctl118opsctl2.ctl
110/dev/vg_rac/ropsctl3.ctl118opsctl3.ctl
120/dev/vg_rac/rops1log1.log128ops1log1.log
120/dev/vg_rac/rops1log2.log128ops1log2.log
120/dev/vg_rac/rops1log3.log128ops1log3.log
120/dev/vg_rac/rops2log1.log128ops2log1.log
120/dev/vg_rac/rops2log2.log128ops2log2.log
120/dev/vg_rac/rops2log3.log128ops2log3.log
400/dev/vg_rac/ropssystem.dbf408opssystem.dbf
800/dev/vg_rac/ropssysaux.dbf808opssysaux.dbf
250/dev/vg_rac/ropstemp.dbf258opstemp.dbf
120/dev/vg_rac/ropsusers.dbf128opsusers.dbf
200/dev/vg_rac/ropsdata1.dbf208opsdata1.dbf
Creating a Storage Infrastructure with LVM 45

Table 1 Required Oracle File Names for Demo Database (continued)
Oracle FileSize (MB)*
Raw Logical Volume Path NameLV Size(MB)
Logical Volume Name
200/dev/vg_rac/ropsdata2.dbf208opsdata2.dbf
200/dev/vg_rac/ropsdata3.dbf208opsdata3.dbf
5/dev/vg_rac/ropsspfile1.ora5opsspfile1.ora
5/dev/vg_rac/rpwdfile.ora5pwdfile.ora
500/dev/vg_rac/ropsundotbs1.log508opsundotbs1.dbf
500/dev/vg_rac/ropsundotbs2.log508opsundotbs2.dbf
160/dev/vg_rac/ropsexample1.dbf168example1.dbf
The size of the logical volume is larger than the Oracle file size because Oracle needs extra spaceto allocate a header in addition to the file's actual data capacity.Create these files if you wish to build the demo database. The three logical volumes at the bottomof the table are included as additional data files, that you can create as needed, supplying theappropriate sizes. If your naming conventions require, you can include the Oracle SID and/or thedatabase name to distinguish files for different instances and different databases. If you are usingthe ORACLE_BASE directory structure, create symbolic links to the ORACLE_BASE files from theappropriate directory. Example:# ln -s /dev/vg_rac/ropsctl1.ctl/u01/ORACLE/db001/ctrl01_1.ctl
After creating these files, set the owner to oracle and the group to dba with a file mode of 660.The logical volumes are now available on the primary node, and the raw logical volume namescan now be used by the Oracle DBA.
Displaying the Logical Volume InfrastructureTo display the volume group, use the vgdisplay command:# vgdisplay -v /dev/vg_rac
Exporting the Logical Volume InfrastructureBefore the Oracle volume groups can be shared, their configuration data must be exported to othernodes in the cluster. This is done either in Serviceguard Manager or by using HP-UX commands,as shown in the following sections.All volume and file system related functions are in the Disks and File Systems (fsweb) tool that isalso a plugin for the HP-UX System Management Homepage (HP SMH). It can be launched fromthe HP SMH. Serviceguard Manager provides a link to fsweb tool and launches the fsweb tool forall disk and file system (LVM) related configurations. For CVM/CFS related configurations, thefsweb tool launches the Veritas Enterprise Administrator (VEA) tool.
NOTE: Serviceguard Manager is the graphical user interface for Serviceguard. It is available asa “plug-in” to the System Management Homepage (SMH). SMH is a web-based graphical userinterface (GUI) that replaces SAM as the system administration GUI as of HP-UX 11i v3 (but, youcan run the SAM terminal interface). See “Using SAM” in the latest edition of the ManagingServiceguard user’s guide.
Exporting with LVM CommandsUse the following commands to set up the same volume group on another cluster node. In thisexample, the commands set up a new volume group on a system known as ftsys10. This volumegroup holds the same physical volume that was created on a configuration node known as ftsys9.To set up the volume group on ftsys10 (and other nodes), use the following steps:
46 Serviceguard Configuration for Oracle 10g, 11gR1, or 11gR2 RAC

1. On ftsys9, copy the mapping of the volume group to a specified file.# vgexport -s -p -m /tmp/vg_rac.map /dev/vg_rac
2. Still on ftsys9, copy the map file to ftsys10 (and to additional nodes as necessary.)# rcp /tmp/vg_rac.map ftsys10:/tmp/vg_rac.map
3. On ftsys10 (and other nodes, as necessary), create the volume group directory and thecontrol file named group.# mkdir /dev/vg_rac# mknod /dev/vg_rac/group c 64 0xhh0000
For the group file, the major number is always 64, and the hexadecimal minor number hasthe form0xhh0000
where hh must be unique to the volume group you are creating. If possible, use the samenumber as on ftsys9. Use the following command to display a list of existing volume groups:# ls -l /dev/*/group
4. Import the volume group data using the map file from node ftsys9. On node ftsys10 (andother nodes, as necessary), enter:# vgimport -s -m /tmp/vg_rac.map /dev/vg_rac
Installing Oracle Real Application ClustersNOTE: Some versions of Oracle RAC requires installation of additional software. Refer to yourversion of Oracle for specific requirements.
Before installing the Oracle Real Application Cluster software, make sure the storage cluster isrunning. Login as the oracle user on one node and then use the Oracle installer to install Oraclesoftware and to build the correct Oracle runtime executables. When executables are installed toa local file system on each node, the Oracle installer copies the executables to the other nodes inthe cluster.For details on Oracle installation, refer to the Oracle installation documentation. As part of thisinstallation, the Oracle installer installs the executables and optionally, the Oracle installer canbuild an Oracle demo database on the primary node. The demo database files can be the character(raw) device files names for the logical volumes create earlier.For a demo database on SLVM or CVM, create logical volumes as shown in Table 1: “RequiredOracle File Names for Demo Database ”. As the installer prompts for the database file names,either the pathnames of the raw logical volumes instead of using the defaults. If you do not wishto install the demo database, select install software only.
Creating a Storage Infrastructure with CFSIn addition to configuring the cluster, you create the appropriate logical volume infrastructure toprovide access to data from different nodes. This is done with Logical Volume Manager (LVM) orVeritas Cluster Volume Manager (CVM).You can also use a mixture of volume types, depending on your needs. LVM configuration is donebefore cluster configuration, and CVM configuration is done after cluster configuration. (Note forHP-UX releases that support Veritas CFS and CVM. See “About Veritas CFS and CVM fromSymantec” (page 15))This section has information about configuring a cluster that uses the Veritas cluster file system(CFS) with Veritas Cluster Volume Manager (CVM) 5.x or later. The next section (“Creating aStorage Infrastructure with CVM” (page 52)) has information about configuring the Veritas ClusterVolume Manager (CVM) with other filesystems, not CFS.
Installing Oracle Real Application Clusters 47
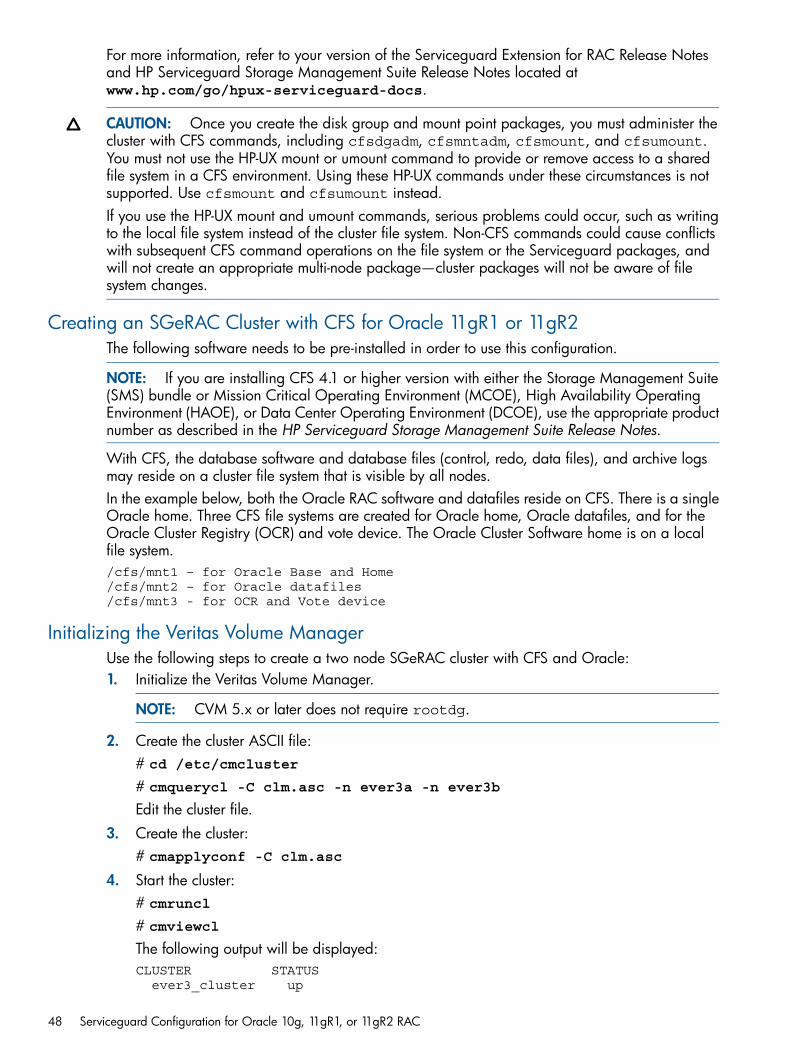
For more information, refer to your version of the Serviceguard Extension for RAC Release Notesand HP Serviceguard Storage Management Suite Release Notes located atwww.hp.com/go/hpux-serviceguard-docs.
CAUTION: Once you create the disk group and mount point packages, you must administer thecluster with CFS commands, including cfsdgadm, cfsmntadm, cfsmount, and cfsumount.You must not use the HP-UX mount or umount command to provide or remove access to a sharedfile system in a CFS environment. Using these HP-UX commands under these circumstances is notsupported. Use cfsmount and cfsumount instead.If you use the HP-UX mount and umount commands, serious problems could occur, such as writingto the local file system instead of the cluster file system. Non-CFS commands could cause conflictswith subsequent CFS command operations on the file system or the Serviceguard packages, andwill not create an appropriate multi-node package—cluster packages will not be aware of filesystem changes.
Creating an SGeRAC Cluster with CFS for Oracle 11gR1 or 11gR2The following software needs to be pre-installed in order to use this configuration.
NOTE: If you are installing CFS 4.1 or higher version with either the Storage Management Suite(SMS) bundle or Mission Critical Operating Environment (MCOE), High Availability OperatingEnvironment (HAOE), or Data Center Operating Environment (DCOE), use the appropriate productnumber as described in the HP Serviceguard Storage Management Suite Release Notes.
With CFS, the database software and database files (control, redo, data files), and archive logsmay reside on a cluster file system that is visible by all nodes.In the example below, both the Oracle RAC software and datafiles reside on CFS. There is a singleOracle home. Three CFS file systems are created for Oracle home, Oracle datafiles, and for theOracle Cluster Registry (OCR) and vote device. The Oracle Cluster Software home is on a localfile system./cfs/mnt1 – for Oracle Base and Home/cfs/mnt2 – for Oracle datafiles/cfs/mnt3 - for OCR and Vote device
Initializing the Veritas Volume ManagerUse the following steps to create a two node SGeRAC cluster with CFS and Oracle:1. Initialize the Veritas Volume Manager.
NOTE: CVM 5.x or later does not require rootdg.
2. Create the cluster ASCII file:# cd /etc/cmcluster
# cmquerycl -C clm.asc -n ever3a -n ever3b
Edit the cluster file.3. Create the cluster:
# cmapplyconf -C clm.asc
4. Start the cluster:# cmruncl
# cmviewcl
The following output will be displayed:CLUSTER STATUS ever3_cluster up
48 Serviceguard Configuration for Oracle 10g, 11gR1, or 11gR2 RAC
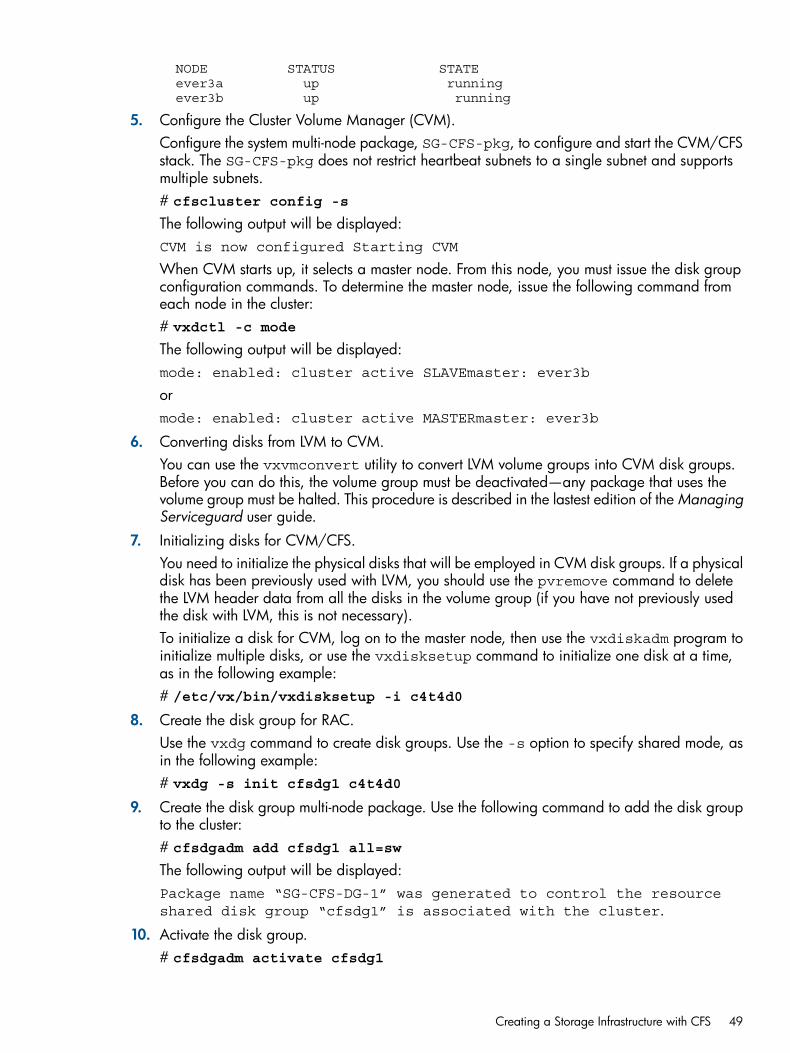
NODE STATUS STATE ever3a up running ever3b up running
5. Configure the Cluster Volume Manager (CVM).Configure the system multi-node package, SG-CFS-pkg, to configure and start the CVM/CFSstack. The SG-CFS-pkg does not restrict heartbeat subnets to a single subnet and supportsmultiple subnets.# cfscluster config -s
The following output will be displayed:CVM is now configured Starting CVM
When CVM starts up, it selects a master node. From this node, you must issue the disk groupconfiguration commands. To determine the master node, issue the following command fromeach node in the cluster:# vxdctl -c mode
The following output will be displayed:mode: enabled: cluster active SLAVEmaster: ever3b
ormode: enabled: cluster active MASTERmaster: ever3b
6. Converting disks from LVM to CVM.You can use the vxvmconvert utility to convert LVM volume groups into CVM disk groups.Before you can do this, the volume group must be deactivated—any package that uses thevolume group must be halted. This procedure is described in the lastest edition of the ManagingServiceguard user guide.
7. Initializing disks for CVM/CFS.You need to initialize the physical disks that will be employed in CVM disk groups. If a physicaldisk has been previously used with LVM, you should use the pvremove command to deletethe LVM header data from all the disks in the volume group (if you have not previously usedthe disk with LVM, this is not necessary).To initialize a disk for CVM, log on to the master node, then use the vxdiskadm program toinitialize multiple disks, or use the vxdisksetup command to initialize one disk at a time,as in the following example:# /etc/vx/bin/vxdisksetup -i c4t4d0
8. Create the disk group for RAC.Use the vxdg command to create disk groups. Use the -s option to specify shared mode, asin the following example:# vxdg -s init cfsdg1 c4t4d0
9. Create the disk group multi-node package. Use the following command to add the disk groupto the cluster:# cfsdgadm add cfsdg1 all=sw
The following output will be displayed:Package name “SG-CFS-DG-1” was generated to control the resourceshared disk group “cfsdg1” is associated with the cluster.
10. Activate the disk group.# cfsdgadm activate cfsdg1
Creating a Storage Infrastructure with CFS 49

11. Creating volumes and adding a cluster filesystem.# vxassist -g cfsdg1 make vol1 10240m
#vxassist -g cfsdg1 make vol2 10240m# vxassist -g cfsdg1 make vol3 600m
# newfs -F vxfs /dev/vx/rdsk/cfsdg1/vol1
The following output will be displayed:version 7 layout
10485760 sectors, 10485760 blocks of size 1024, log size 16384 blocks
largefiles supported
# newfs -F vxfs /dev/vx/rdsk/cfsdg1/vol2
The following output will be displayed:version 7 layout
10485760 sectors, 10485760 blocks of size 1024, log size 16384 blocks
largefiles supported
# newfs -F vxfs /dev/vx/rdsk/cfsdg1/vol3
The following output will be displayed:version 7 layout
614400 sectors, 614400 blocks of size 1024, log size 16384 blocks
largefiles supported
12. Configure mount point.# cfsmntadm add cfsdg1 vol1 /cfs/mnt1 all=rw
The following output will be displayed:Package name “SG-CFS-MP-1” was generated to control the resource.Mount point “/cfs/mnt1” was associated with the cluster.#cfsmntadm add cfsdg1 vol2 /cfs/mnt2 all=rwThe following output will be displayed:Package name “SG-CFS-MP-2” was generated to control the resource.Mount point “/cfs/mnt2” was associated with the cluster.# cfsmntadm add cfsdg1 vol3 /cfs/mnt3 all=rw
The following output will be displayed:Package name “SG-CFS-MP-3” was generated to control the resource.Mount point “/cfs/mnt3” that was associated with the cluster.
NOTE: The diskgroup and mount point multi-node packages (SG-CFS-DG_ID# andSG-CFS-MP_ID#) do not monitor the health of the disk group and mount point. They checkthat the application packages that depend on them have access to the disk groups and mountpoints. If the dependent application package loses access and cannot read and write to thedisk, it will fail. However, the DG or MP multi-node package will not fail.
13. Mount cluster filesystem.# cfsmount /cfs/mnt1
# cfsmount /cfs/mnt2
# cfsmount /cfs/mnt3
50 Serviceguard Configuration for Oracle 10g, 11gR1, or 11gR2 RAC
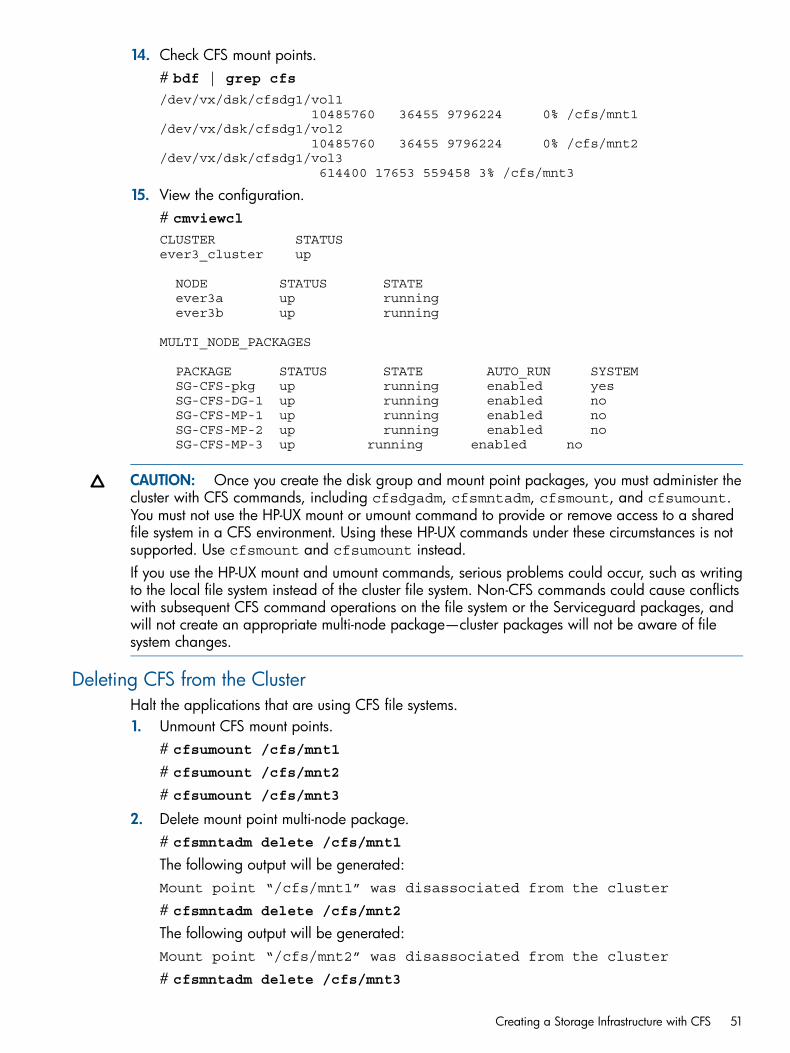
14. Check CFS mount points.# bdf | grep cfs
/dev/vx/dsk/cfsdg1/vol1 10485760 36455 9796224 0% /cfs/mnt1/dev/vx/dsk/cfsdg1/vol2 10485760 36455 9796224 0% /cfs/mnt2/dev/vx/dsk/cfsdg1/vol3 614400 17653 559458 3% /cfs/mnt3
15. View the configuration.# cmviewcl
CLUSTER STATUS ever3_cluster up
NODE STATUS STATE ever3a up running ever3b up running
MULTI_NODE_PACKAGES
PACKAGE STATUS STATE AUTO_RUN SYSTEM SG-CFS-pkg up running enabled yes SG-CFS-DG-1 up running enabled no SG-CFS-MP-1 up running enabled no SG-CFS-MP-2 up running enabled no SG-CFS-MP-3 up running enabled no
CAUTION: Once you create the disk group and mount point packages, you must administer thecluster with CFS commands, including cfsdgadm, cfsmntadm, cfsmount, and cfsumount.You must not use the HP-UX mount or umount command to provide or remove access to a sharedfile system in a CFS environment. Using these HP-UX commands under these circumstances is notsupported. Use cfsmount and cfsumount instead.If you use the HP-UX mount and umount commands, serious problems could occur, such as writingto the local file system instead of the cluster file system. Non-CFS commands could cause conflictswith subsequent CFS command operations on the file system or the Serviceguard packages, andwill not create an appropriate multi-node package—cluster packages will not be aware of filesystem changes.
Deleting CFS from the ClusterHalt the applications that are using CFS file systems.1. Unmount CFS mount points.
# cfsumount /cfs/mnt1
# cfsumount /cfs/mnt2
# cfsumount /cfs/mnt3
2. Delete mount point multi-node package.# cfsmntadm delete /cfs/mnt1
The following output will be generated:Mount point “/cfs/mnt1” was disassociated from the cluster
# cfsmntadm delete /cfs/mnt2
The following output will be generated:Mount point “/cfs/mnt2” was disassociated from the cluster
# cfsmntadm delete /cfs/mnt3
Creating a Storage Infrastructure with CFS 51
The following output will be generated:Mount point “/cfs/mnt3” was disassociated from the cluster Cleaningup resource controlling shared disk group “cfsdg1” Shared disk group“cfsdg1” was disassociated from the cluster.
NOTE: The disk group package is deleted if there is no dependency.
3. Delete disk group multi-node package.# cfsdgadm delete cfsdg1
The following output will be generated:Shared disk group “cfsdg1” was disassociated from the cluster.
NOTE: “cfsmntadm delete” also deletes the disk group if there is no dependent package.To ensure the disk group deletion is complete, use the above command to delete the diskgroup package.
4. De-configure CVM.# cfscluster stop
The following output will be generated:Stopping CVM...CVM is stopped
# cfscluster unconfig
The following output will be displayed:CVM is now unconfigured
Creating a Storage Infrastructure with CVMIn addition to configuring the cluster, you need to create the appropriate logical volume infrastructureto provide access to data from different nodes.This is done with Logical Volume Manager (LVM) or Veritas Cluster Volume Manager (CVM). LVMconfiguration is done before cluster configuration, and CVM configuration is done after clusterconfiguration (on HP-UX releases that support Veritas CFS and CVM). See “About Veritas CFS andCVM from Symantec” (page 15).This section shows how to configure storage using the Veritas Cluster Volume Manager (CVM).The examples show how to configure RAC disk groups. Also, you can create CVM disk groupsfor non-RAC use. For more information, including details about configuration of plexes (mirrors),multipathing, and RAID, refer to the HP-UX documentation for the Veritas Volume Manager.
NOTE: The Oracle 11gR2 OUI allows only ASM over SLVM, ASM over raw device files, ClusterFile System for Clusterware files, and Database files.
Initializing the Veritas Volume ManagerIf you are about to create disk groups for the first time, you need to initialize the Volume Manager.This is done by creating a disk group known as rootdg that contains at least one disk. Use thefollowing command after installing CVM on each node:# vxinstall
This displays a menu-driven program that steps you through the CVM initialization sequence. Fromthe main menu, choose the Custom option, and specify the disk you wish to include in rootdg.
IMPORTANT: Creating a rootdg disk group is only necessary the first time you use the VolumeManager. CVM 5.x or later does not require a rootdg.
52 Serviceguard Configuration for Oracle 10g, 11gR1, or 11gR2 RAC
Using CVM 5.x or laterThis section has information on how to set up the cluster and the system multi-node package withCVM—without the CFS filesystem, on HP-UX releases that support them. See “About Veritas CFSand CVM from Symantec” (page 15).
Preparing the Cluster and the System Multi-node Package for use with CVM 5.x or laterThe following steps describe how to prepare the cluster and the system multi-node package withCVM 5.x or later only.1. Create the cluster file.
# cd /etc/cmcluster
# cmquerycl -C clm.asc -n ever3a -n ever3b
Edit the cluster file.2. Create the cluster.
# cmapplyconf -C clm.asc
• Start the cluster.# cmruncl
# cmviewcl
The following output will be displayed:CLUSTER STATUS
ever3_cluster up
NODE STATUS STATE ever3a up running ever3b up running
3. Configure the Cluster Volume Manager (CVM).To configure and start the CVM stack, you need to configure the system multi-node package,SG-CFS-pkg. The SG-CFS-pkg does not restrict heartbeat subnets to a single subnet andsupports multiple subnets.Use the cmapplyconf command:# cmapplyconf -P /etc/cmcluster/cfs/SG-CFS-pkg.conf
# cmrunpkg SG-CFS-pkg
When CVM starts, it selects a master node. From this node, you must issue the disk groupconfiguration commands. To determine the master node, issue the following command fromeach node in the cluster:# vxdctl -c mode
The following output will be displayed:mode: enabled: cluster active SLAVEmaster: ever3b
ormode: enabled: cluster active MASTERmaster: ever3b
• Converting disks from LVM to CVM.Use the vxvmconvert utility to convert LVM volume groups into CVM disk groups. Beforeyou can do this, the volume group must be deactivated, which means that any package
Creating a Storage Infrastructure with CVM 53
that uses the volume group must be halted. This procedure is described in the ManagingServiceguard Eighteenth Edition user guide Appendix G.
• Initializing disks for CVM.It is necessary to initialize the physical disks that will be employed in CVM disk groups.If a physical disk has been previously used with LVM, you should use the pvremovecommand to delete the LVM header data from all the disks in the volume group (this isnot necessary if you have not previously used the disk with LVM).To initialize a disk for CVM, log on to the master node, then use the vxdiskadm programto initialize multiple disks, or use the vxdisksetup command to initialize one disk at atime, as in the following example:# /etc/vx/bin/vxdisksetup -i c4t4d0
• Create the disk group for RAC.Use the vxdg command to create disk groups. Use the -s option to specify shared mode,as in the following example:# vxdg -s init ops_dg c4t4d0
4. Creating volumes and adding a cluster filesystem.# vxassist -g ops_dg make vol1 10240m
#vxassist -g ops_dg make vol2 10240m# vxassist -g ops_dg make vol3 300m
5. View the configuration.# cmviewcl
CLUSTER STATUS ever3_cluster up
NODE STATUS STATE ever3a up running ever3b up running
MULTI_NODE_PACKAGES
PACKAGE STATUS STATE AUTO_RUN SYSTEM SG-CFS-pkg up running enabled yes
54 Serviceguard Configuration for Oracle 10g, 11gR1, or 11gR2 RAC

IMPORTANT: After creating these files, use the vxedit command to change the ownership ofthe raw volume files to oracle and the group membership to dba, and to change the permissionsto 660. Example:# cd /dev/vx/rdsk/ops_dg
# vxedit -g ops_dg set user=oracle *
# vxedit -g ops_dg set group=dba *
# vxedit -g ops_dg set mode=660 *
The logical volumes are now available on the primary node, and the raw logical volume namescan now be used by the Oracle DBA.
CAUTION: Once you create the disk group and mount point packages, you must administer thecluster with CFS commands, including cfsdgadm, cfsmntadm, cfsmount, and cfsumount.You must not use the HP-UX mount or umount command to provide or remove access to a sharedfile system in a CFS environment. Using these HP-UX commands under these circumstances is notsupported. Use cfsmount and cfsumount instead.If you use the HP-UX mount and umount commands, serious problems could occur, such as writingto the local file system instead of the cluster file system. Non-CFS commands could cause conflictswith subsequent CFS command operations on the file system or the Serviceguard packages, andwill not create an appropriate multi-node package—cluster packages will not be aware of filesystem changes.
Mirror Detachment Policies with CVMThe required CVM disk mirror detachment policy is "global"—as soon as one node cannot see aspecific mirror copy (plex), all nodes cannot see it as well. The alternate policy is "local"—if onenode cannot see a specific mirror copy, then CVM will deactivate access to the volume for thatnode only.This policy can be reset on a disk group basis by using the vxedit command, as follows:# vxedit set diskdetpolicy=global <DiskGroupName>
NOTE: The specific commands for creating mirrored and multipath storage using CVM aredescribed in the HP-UX documentation for the Veritas Volume Manager.
Using CVM 5.xThis section has information on how to prepare the cluster and the system multi-node package withCVM 5.x (on HP-UX releases that support them). See “About Veritas CFS and CVM from Symantec”(page 15).
Preparing the Cluster for Use with CVM 5.xTo use the Veritas Cluster Volume Manager (CVM) version 5.x, the cluster must be running with aspecial CVM package. Before you create disk groups, the cluster must be configured and running.
NOTE: Cluster configuration is described in the previous section.
To prepare the cluster for CVM disk group configuration, you need to ensure that only one heartbeatsubnet is configured. Then, use the following command, which creates the special package thatcommunicates cluster information to CVM:# cmapplyconf -P /etc/cmcluster/cvm/VxVM-CVM-pkg.conf
WARNING! The above file should never be edited.
Creating a Storage Infrastructure with CVM 55
After the above command completes, start the cluster and create disk groups for shared use asdescribed in the following sections.
Starting the Cluster and Identifying the Master NodeRun the cluster to activate the special CVM package:# cmruncl
After the cluster is started, it will run with a special system multi-node package namedVxVM-CVM-pkg that is on all nodes. This package is shown in the following output of the cmviewcl-v command:CLUSTER STATUS bowls up
NODE STATUS STATE spare up running split up running strike up running
SYSTEM_MULTI_NODE_PACKAGES:
PACKAGE STATUS STATE VxVM-CVM-pkg up running
When CVM starts up, it selects a master node. From this node, you must issue the disk groupconfiguration commands. To determine the master node, issue the following command from eachnode in the cluster:# vxdctl -c mode
One node will identify itself as the master. Create disk groups from this node.
Converting Disks from LVM to CVMYou can use the vxvmconvert utility to convert LVM volume groups into CVM disk groups. Beforeyou can do this, the volume group must be deactivated—any package that uses the volume groupmust be halted. This procedure is described in the latest edition of the Managing Serviceguarduser guide, Appendix G.
Initializing Disks for CVMYou need to initialize the physical disks that will be employed in CVM disk groups. If a physicaldisk has been previously used with LVM, you should use the pvremove command to delete theLVM header data from all the disks in the volume group (this is not necessary if you have notpreviously used the disk with LVM).To initialize a disk for CVM, log on to the master node, then use the vxdiskadm program toinitialize multiple disks, or use the vxdisksetup command to initialize one disk at a time, as inthe following example:# /usr/lib/vxvm/bin/vxdisksetup -i /dev/dsk/c0t3d2
Creating Disk Groups for RACUse the vxdg command to create disk groups. Use the -s option to specify shared mode, as in thefollowing example:# vxdg -s init ops_dg c0t3d2
Verify the configuration with the following command:# vxdg list
NAME STATE ID
rootdg enabled 971995699.1025.node1ops_dg enabled,shared 972078742.1084.node2
56 Serviceguard Configuration for Oracle 10g, 11gR1, or 11gR2 RAC

Creating VolumesUse the vxassist command to create logical volumes. The following is an example:# vxassist -g ops_dg make log_files 1024m
This command creates a 1024MB volume named log_files in a disk group named ops_dg.The volume can be referenced with the block device file /dev/vx/dsk/ops_dg/log_filesor the raw (character) device file /dev/vx/rdsk/ops_dg/log_files.Verify the configuration with the following command:# vxdg list
IMPORTANT: After creating these files, use the vxedit command to change the ownership ofthe raw volume files to oracle and the group membership to dba, and to change the permissionsto 660. Example:# cd /dev/vx/rdsk/ops_dg
# vxedit -g ops_dg set user=oracle *
# vxedit -g ops_dg set group=dba *
# vxedit -g ops_dg set mode=660 *
The logical volumes are now available on the primary node, and the raw logical volume namescan now be used by the Oracle DBA.
Mirror Detachment Policies with CVMThe required CVM disk mirror detachment policy is “global”—as soon as one node cannot see aspecific mirror copy (plex), all nodes cannot see it as well. The alternate policy is “local”—if onenode cannot see a specific mirror copy, then CVM will deactivate access to the volume for thatnode only.This policy can be re-set on a disk group basis by using the vxedit command, as follows:# vxedit set diskdetpolicy=global <DiskGroupName>
NOTE: The specific commands for creating mirrored and multipath storage using CVM aredescribed in the HP-UX documentation for the Veritas Volume Manager.
Oracle Demo Database FilesThe following set of volumes is required for the Oracle demo database which you can create duringthe installation process.
Table 2 Required Oracle File Names for Demo Database
Oracle File Size(MB)
Raw Device File NameSize (MB)Volume Name
110/dev/vx/rdsk/ops_dg/opsctl1.ctl118opsctl1.ctl
110/dev/vx/rdsk/ops_dg/opsctl2.ctl118opsctl2.ctl
110/dev/vx/rdsk/ops_dg/opsctl3.ctl118opsctl3.ctl
120/dev/vx/rdsk/ops_dg/ops1log1.log128ops1log1.log
120/dev/vx/rdsk/ops_dg/ops1log2.log128ops1log2.log
120/dev/vx/rdsk/ops_dg/ops1log3.log128ops1log3.log
120/dev/vx/rdsk/ops_dg/ops2log1.log128ops2log1.log
120/dev/vx/rdsk/ops_dg/ops2log2.log128ops2log2.log
Creating Volumes 57
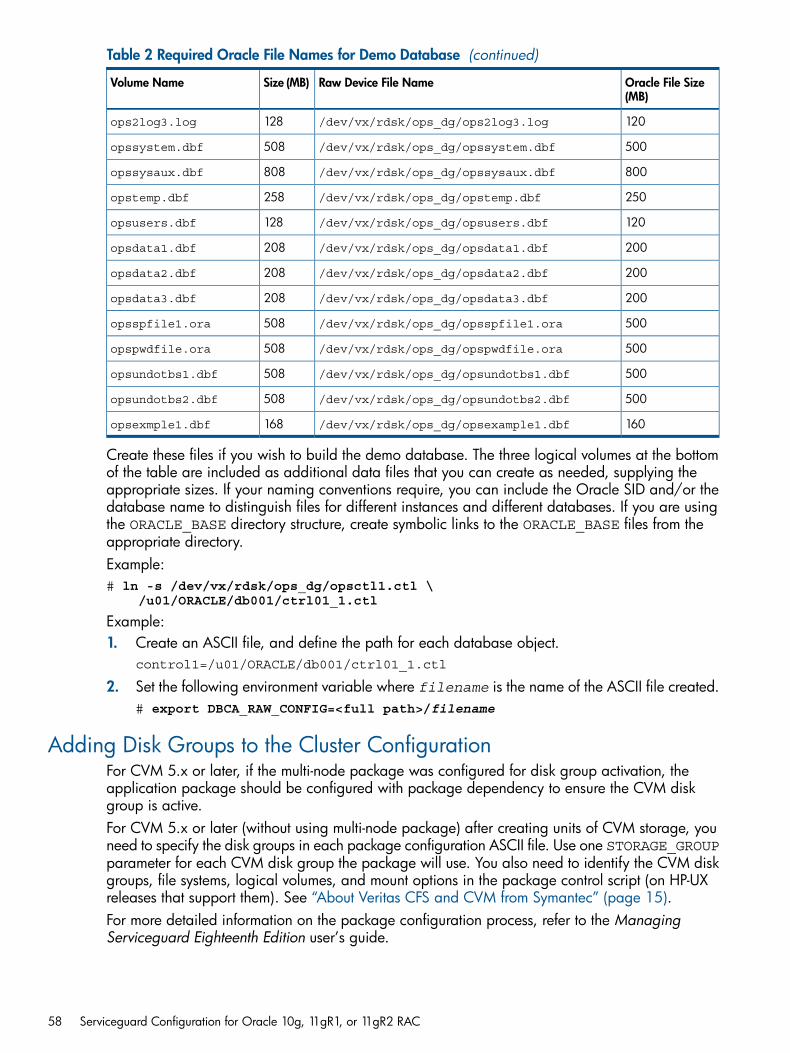
Table 2 Required Oracle File Names for Demo Database (continued)
Oracle File Size(MB)
Raw Device File NameSize (MB)Volume Name
120/dev/vx/rdsk/ops_dg/ops2log3.log128ops2log3.log
500/dev/vx/rdsk/ops_dg/opssystem.dbf508opssystem.dbf
800/dev/vx/rdsk/ops_dg/opssysaux.dbf808opssysaux.dbf
250/dev/vx/rdsk/ops_dg/opstemp.dbf258opstemp.dbf
120/dev/vx/rdsk/ops_dg/opsusers.dbf128opsusers.dbf
200/dev/vx/rdsk/ops_dg/opsdata1.dbf208opsdata1.dbf
200/dev/vx/rdsk/ops_dg/opsdata2.dbf208opsdata2.dbf
200/dev/vx/rdsk/ops_dg/opsdata3.dbf208opsdata3.dbf
500/dev/vx/rdsk/ops_dg/opsspfile1.ora508opsspfile1.ora
500/dev/vx/rdsk/ops_dg/opspwdfile.ora508opspwdfile.ora
500/dev/vx/rdsk/ops_dg/opsundotbs1.dbf508opsundotbs1.dbf
500/dev/vx/rdsk/ops_dg/opsundotbs2.dbf508opsundotbs2.dbf
160/dev/vx/rdsk/ops_dg/opsexample1.dbf168opsexmple1.dbf
Create these files if you wish to build the demo database. The three logical volumes at the bottomof the table are included as additional data files that you can create as needed, supplying theappropriate sizes. If your naming conventions require, you can include the Oracle SID and/or thedatabase name to distinguish files for different instances and different databases. If you are usingthe ORACLE_BASE directory structure, create symbolic links to the ORACLE_BASE files from theappropriate directory.Example:# ln -s /dev/vx/rdsk/ops_dg/opsctl1.ctl \ /u01/ORACLE/db001/ctrl01_1.ctl
Example:1. Create an ASCII file, and define the path for each database object.
control1=/u01/ORACLE/db001/ctrl01_1.ctl
2. Set the following environment variable where filename is the name of the ASCII file created.# export DBCA_RAW_CONFIG=<full path>/filename
Adding Disk Groups to the Cluster ConfigurationFor CVM 5.x or later, if the multi-node package was configured for disk group activation, theapplication package should be configured with package dependency to ensure the CVM diskgroup is active.For CVM 5.x or later (without using multi-node package) after creating units of CVM storage, youneed to specify the disk groups in each package configuration ASCII file. Use one STORAGE_GROUPparameter for each CVM disk group the package will use. You also need to identify the CVM diskgroups, file systems, logical volumes, and mount options in the package control script (on HP-UXreleases that support them). See “About Veritas CFS and CVM from Symantec” (page 15).For more detailed information on the package configuration process, refer to the ManagingServiceguard Eighteenth Edition user’s guide.
58 Serviceguard Configuration for Oracle 10g, 11gR1, or 11gR2 RAC
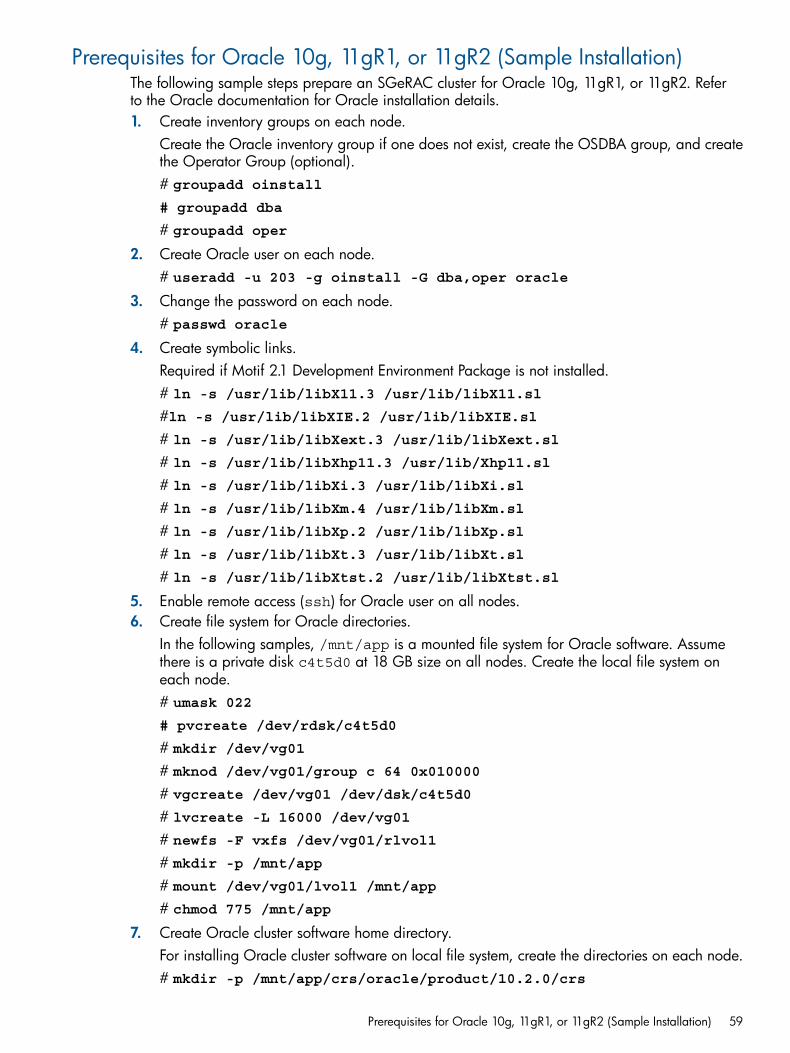
Prerequisites for Oracle 10g, 11gR1, or 11gR2 (Sample Installation)The following sample steps prepare an SGeRAC cluster for Oracle 10g, 11gR1, or 11gR2. Referto the Oracle documentation for Oracle installation details.1. Create inventory groups on each node.
Create the Oracle inventory group if one does not exist, create the OSDBA group, and createthe Operator Group (optional).# groupadd oinstall
# groupadd dba
# groupadd oper
2. Create Oracle user on each node.# useradd -u 203 -g oinstall -G dba,oper oracle
3. Change the password on each node.# passwd oracle
4. Create symbolic links.Required if Motif 2.1 Development Environment Package is not installed.# ln -s /usr/lib/libX11.3 /usr/lib/libX11.sl
#ln -s /usr/lib/libXIE.2 /usr/lib/libXIE.sl# ln -s /usr/lib/libXext.3 /usr/lib/libXext.sl
# ln -s /usr/lib/libXhp11.3 /usr/lib/Xhp11.sl
# ln -s /usr/lib/libXi.3 /usr/lib/libXi.sl
# ln -s /usr/lib/libXm.4 /usr/lib/libXm.sl
# ln -s /usr/lib/libXp.2 /usr/lib/libXp.sl
# ln -s /usr/lib/libXt.3 /usr/lib/libXt.sl
# ln -s /usr/lib/libXtst.2 /usr/lib/libXtst.sl
5. Enable remote access (ssh) for Oracle user on all nodes.6. Create file system for Oracle directories.
In the following samples, /mnt/app is a mounted file system for Oracle software. Assumethere is a private disk c4t5d0 at 18 GB size on all nodes. Create the local file system oneach node.# umask 022
# pvcreate /dev/rdsk/c4t5d0
# mkdir /dev/vg01
# mknod /dev/vg01/group c 64 0x010000
# vgcreate /dev/vg01 /dev/dsk/c4t5d0
# lvcreate -L 16000 /dev/vg01
# newfs -F vxfs /dev/vg01/rlvol1
# mkdir -p /mnt/app
# mount /dev/vg01/lvol1 /mnt/app
# chmod 775 /mnt/app
7. Create Oracle cluster software home directory.For installing Oracle cluster software on local file system, create the directories on each node.# mkdir -p /mnt/app/crs/oracle/product/10.2.0/crs
Prerequisites for Oracle 10g, 11gR1, or 11gR2 (Sample Installation) 59

# chown -R oracle:oinstall /mnt/app/crs/oracle/product/10.2.0/crs
# chmod -R 775 /mnt/app/crs/oracle/product/10.2.0/crs
8. Create Oracle base directory (for RAC binaries on local file system).If installing RAC binaries on local file system, create the oracle base directory on each node.# mkdir -p /mnt/app/oracle
# chown -R oracle:oinstall /mnt/app/oracle
# chmod -R 775 /mnt/app/oracle
# usermod -d /mnt/app/oracle oracle
9. Create Oracle base directory (for RAC binaries on cluster file system).If installing RAC binaries on Cluster File System, create the oracle base directory once, becausethis is a CFS directory visible by all nodes. The CFS file system used is /cfs/mnt1.# mkdir -p /cfs/mnt1/oracle
# chown -R oracle:oinstall /cfs/mnt1/oracle
# chmod -R 775 /cfs/mnt1/oracle
# chmod 775 /cfs
# chmod 775 /cfs/mnt1
Modify oracle user to use new home directory on each node.# usermod -d /cfs/mnt1/oracle oracle
10. Prepare shared storage on SLVM.This section assumes the OCR, vote device, and database files are created on SLVM volumegroup vg_rac.
NOTE: Step 10 is only applicable up to Oracle 11gR1. If you prefer to use SLVM storagefor Oracle 11gR2, see Oracle Database 11g Release 2 Real Application Clusters withSLVM/RAW on HP-UX Installation Cookbook http://h18006.www1.hp.com/storage/pdfs/4AA2-7668ENW.pdf.
a. Change permission of Shared Logical Volume group.This section assumes the OCR, vote device, and database files are created on SLVMvolume group vg_rac.# chmod 755 /dev/vg_rac
b. Change permission and ownership of Oracle cluster software vote device and databasefiles.# chown oracle:oinstall /dev/vg_rac/r*
# chmod 660 /dev/vg_rac/r*
c. Change Permission of OCR device.# chown root:oinstall /dev/vg_rac/rora_ocr
# chmod 640 /dev/vg_rac/rora_ocr
d. Create raw device mapping file for Oracle Database Configuration Assistant.In this example, the database name is “ver10”# ORACLE_BASE=/mnt/app/oracle; export ORACLE_BASE
# mkdir -p $ORACLE_BASE/oradata/ver10
# chown -R oracle:oinstall $ORACLE_BASE/oradata
# chmod -R 755 $ORACLE_BASE/oradata
60 Serviceguard Configuration for Oracle 10g, 11gR1, or 11gR2 RAC

The following is a sample of the mapping file for DBCA:system=/dev/vg_rac/ropssystem.dbf sysaux=/dev/vg_rac/ropssysaux.dbfundotbs1=/dev/vg_rac/ropsundotbs01.dbfundotbs2=/dev/vg_rac/ropsundotbs02.dbfexample=/dev/vg_rac/ropsexample1.dbfusers=/dev/vg_rac/ropsusers.dbfredo1_1=/dev/vg_rac/rops1log1.logredo1_2=/dev/vg_rac/rops1log2.logredo2_1=/dev/vg_rac/rops2log1.logredo2_2=/dev/vg_rac/rops2log2.logcontrol1=/dev/vg_rac/ropsctl1.ctlcontrol2=/dev/vg_rac/ropsctl2.ctlcontrol3=/dev/vg_rac/ropsctl3.ctltemp=/dev/vg_rac/ropstmp.dbfspfile=/dev/vg_rac/ropsspfile1.ora
In this sample, create the DBCA mapping file and place at:/mnt/app/oracle/oradata/ver10/ver10_raw.conf.
11. Prepare shared storage on CFS.This section assumes the OCR, Vote device, and database files are created on CFS directories.The OCR and vote device reside on /cfs/mnt3 and the demo database files reside on/cfs/mnt2.a. Create OCR and vote device directories on CFS.
Create OCR and vote device directories on Cluster File System. Run commands only onone node.# chmod 775 /cfs
# chmod 755 /cfs/mnt3
# cd /cfs/mnt3
# mkdir OCR
# chmod 755 OCR
# mkdir VOTE
# chmod 755 VOTE
# chown -R oracle:oinstall /cfs/mnt3
b. Create directory for Oracle demo database on CFS.Create the CFS directory to store Oracle database files. Run commands only on onenode.# chmod 775 /cfs
# chmod 775 /cfs/mnt2
# cd /cfs/mnt2
# mkdir oradata
# chown oracle:oinstall oradata
# chmod 775 oradata
Prerequisites for Oracle 10g, 11gR1, or 11gR2 (Sample Installation) 61
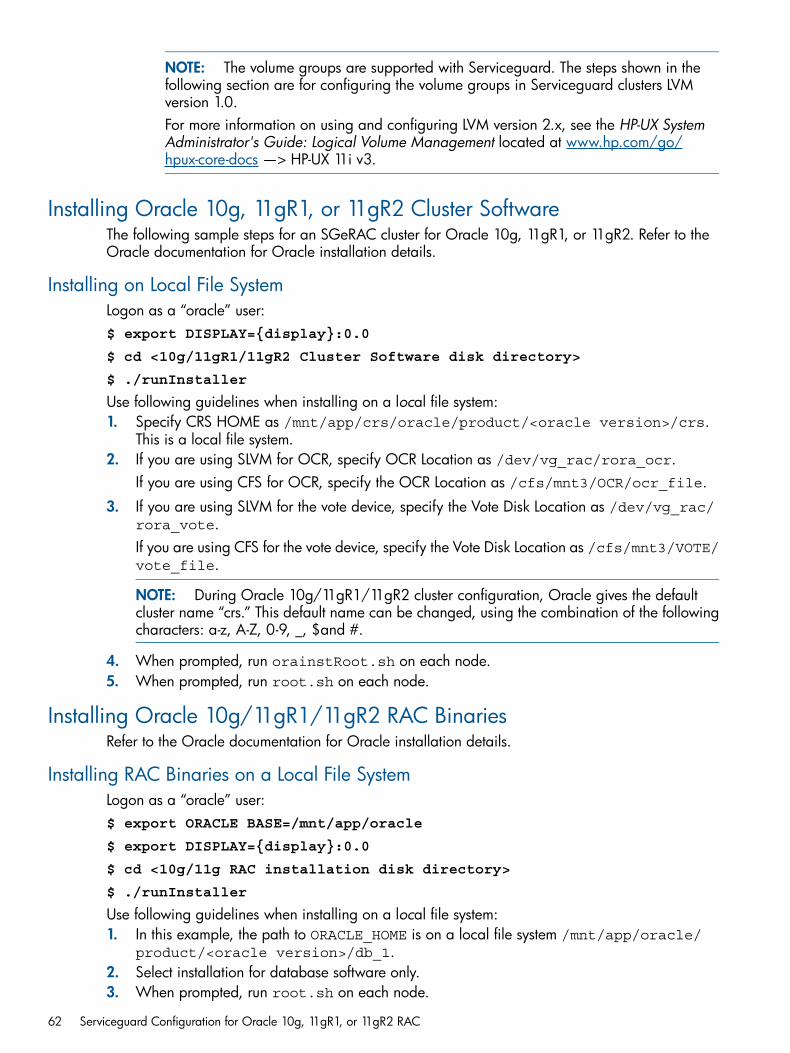
NOTE: The volume groups are supported with Serviceguard. The steps shown in thefollowing section are for configuring the volume groups in Serviceguard clusters LVMversion 1.0.For more information on using and configuring LVM version 2.x, see the HP-UX SystemAdministrator's Guide: Logical Volume Management located at www.hp.com/go/hpux-core-docs —> HP-UX 11i v3.
Installing Oracle 10g, 11gR1, or 11gR2 Cluster SoftwareThe following sample steps for an SGeRAC cluster for Oracle 10g, 11gR1, or 11gR2. Refer to theOracle documentation for Oracle installation details.
Installing on Local File SystemLogon as a “oracle” user:$ export DISPLAY={display}:0.0
$ cd <10g/11gR1/11gR2 Cluster Software disk directory>
$ ./runInstaller
Use following guidelines when installing on a local file system:1. Specify CRS HOME as /mnt/app/crs/oracle/product/<oracle version>/crs.
This is a local file system.2. If you are using SLVM for OCR, specify OCR Location as /dev/vg_rac/rora_ocr.
If you are using CFS for OCR, specify the OCR Location as /cfs/mnt3/OCR/ocr_file.
3. If you are using SLVM for the vote device, specify the Vote Disk Location as /dev/vg_rac/rora_vote.If you are using CFS for the vote device, specify the Vote Disk Location as /cfs/mnt3/VOTE/vote_file.
NOTE: During Oracle 10g/11gR1/11gR2 cluster configuration, Oracle gives the defaultcluster name “crs.” This default name can be changed, using the combination of the followingcharacters: a-z, A-Z, 0-9, _, $and #.
4. When prompted, run orainstRoot.sh on each node.5. When prompted, run root.sh on each node.
Installing Oracle 10g/11gR1/11gR2 RAC BinariesRefer to the Oracle documentation for Oracle installation details.
Installing RAC Binaries on a Local File SystemLogon as a “oracle” user:$ export ORACLE BASE=/mnt/app/oracle
$ export DISPLAY={display}:0.0
$ cd <10g/11g RAC installation disk directory>
$ ./runInstaller
Use following guidelines when installing on a local file system:1. In this example, the path to ORACLE_HOME is on a local file system /mnt/app/oracle/
product/<oracle version>/db_1.2. Select installation for database software only.3. When prompted, run root.sh on each node.
62 Serviceguard Configuration for Oracle 10g, 11gR1, or 11gR2 RAC
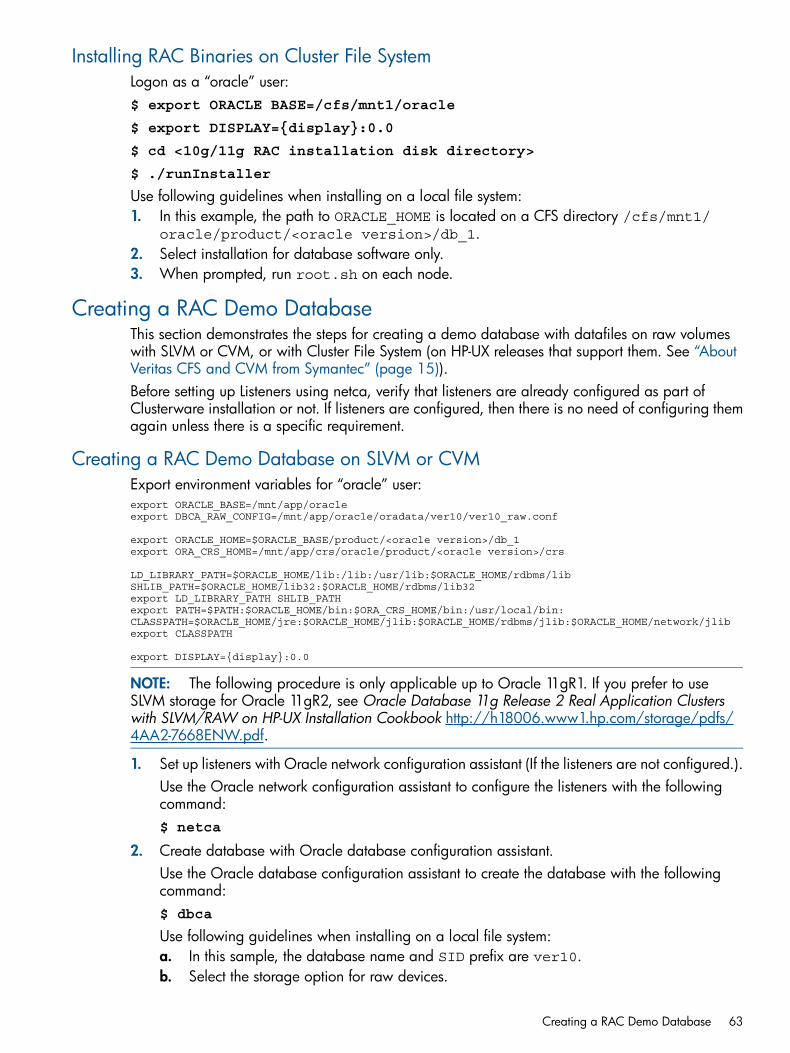
Installing RAC Binaries on Cluster File SystemLogon as a “oracle” user:$ export ORACLE BASE=/cfs/mnt1/oracle
$ export DISPLAY={display}:0.0
$ cd <10g/11g RAC installation disk directory>
$ ./runInstaller
Use following guidelines when installing on a local file system:1. In this example, the path to ORACLE_HOME is located on a CFS directory /cfs/mnt1/
oracle/product/<oracle version>/db_1.2. Select installation for database software only.3. When prompted, run root.sh on each node.
Creating a RAC Demo DatabaseThis section demonstrates the steps for creating a demo database with datafiles on raw volumeswith SLVM or CVM, or with Cluster File System (on HP-UX releases that support them. See “AboutVeritas CFS and CVM from Symantec” (page 15)).Before setting up Listeners using netca, verify that listeners are already configured as part ofClusterware installation or not. If listeners are configured, then there is no need of configuring themagain unless there is a specific requirement.
Creating a RAC Demo Database on SLVM or CVMExport environment variables for “oracle” user:export ORACLE_BASE=/mnt/app/oracleexport DBCA_RAW_CONFIG=/mnt/app/oracle/oradata/ver10/ver10_raw.conf
export ORACLE_HOME=$ORACLE_BASE/product/<oracle version>/db_1export ORA_CRS_HOME=/mnt/app/crs/oracle/product/<oracle version>/crs
LD_LIBRARY_PATH=$ORACLE_HOME/lib:/lib:/usr/lib:$ORACLE_HOME/rdbms/libSHLIB_PATH=$ORACLE_HOME/lib32:$ORACLE_HOME/rdbms/lib32export LD_LIBRARY_PATH SHLIB_PATHexport PATH=$PATH:$ORACLE_HOME/bin:$ORA_CRS_HOME/bin:/usr/local/bin:CLASSPATH=$ORACLE_HOME/jre:$ORACLE_HOME/jlib:$ORACLE_HOME/rdbms/jlib:$ORACLE_HOME/network/jlibexport CLASSPATH
export DISPLAY={display}:0.0
NOTE: The following procedure is only applicable up to Oracle 11gR1. If you prefer to useSLVM storage for Oracle 11gR2, see Oracle Database 11g Release 2 Real Application Clusterswith SLVM/RAW on HP-UX Installation Cookbook http://h18006.www1.hp.com/storage/pdfs/4AA2-7668ENW.pdf.
1. Set up listeners with Oracle network configuration assistant (If the listeners are not configured.).Use the Oracle network configuration assistant to configure the listeners with the followingcommand:$ netca
2. Create database with Oracle database configuration assistant.Use the Oracle database configuration assistant to create the database with the followingcommand:$ dbca
Use following guidelines when installing on a local file system:a. In this sample, the database name and SID prefix are ver10.b. Select the storage option for raw devices.
Creating a RAC Demo Database 63

Creating a RAC Demo Database on CFSExport environment variables for “oracle” user:export ORACLE_BASE=/cfs/mnt1/oracle
export ORACLE_HOME=$ORACLE_BASE/product/<oracle version>/db_1export ORA_CRS_HOME=/mnt/app/crs/oracle/product/<oracle version>/crs
LD_LIBRARY_PATH=$ORACLE_HOME/lib:/lib:/usr/lib:$ORACLE_HOME/rdbms/libSHLIB_PATH=$ORACLE_HOME/lib32:$ORACLE_HOME/rdbms/lib32export LD_LIBRARY_PATH SHLIB_PATHexport \ PATH=$PATH:$ORACLE_HOME/bin:$ORA_CRS_HOME/bin:/usr/local/bin:CLASSPATH=$ORACLE_HOME/jre:$ORACLE_HOME/jlib:$ORACLE_HOME/rdbms/jlib:$ORACLE_HOME/network/jlibexport CLASSPATH
export DISPLAY={display}:0.0
1. Set up listeners with Oracle network configuration assistant (if the listeners are not configured).Use the Oracle network configuration assistant to configure the listeners with the followingcommand:$ netca
2. Create database with database configuration assistant.Use the Oracle database configuration assistant to create the database with the followingcommand:$ dbca
Use following guidelines when installing on a local file system:a. In this sample, the database name and SID prefix are ver10.b. Select the storage option for cluster file system.c. Enter /cfs/mnt2/oradata as the common directory.
Verifying Oracle Disk Manager is ConfiguredNOTE: The following steps are specific to CFS 4.1 or later.
1. Check the license for CFS 4.1 or later.#/opt/VRTS/bin/vxlictest -n "VERITAS Storage Foundation for Oracle"-f "ODM"
output: ODM feature is licensed
2. Check that the VRTSodm package is installed:#swlist VRTSodmoutput for CFS 4.1: VRTSodm 4.1m VERITAS Oracle Disk ManagerVRTSodm.ODM-KRN 4.1m VERITAS ODM kernel files VRTSodm.ODM-MAN 4.1mVERITAS ODM manual pages VRTSodm.ODM-RUN 4.1m VERITAS ODM commands
output for CFS 5.0: VRTSodm 5.0.01.01 Veritas Oracle Disk ManagerVRTSodm.ODM-KRN 5.0.01.01 Veritas ODM kernel files VRTSodm.ODM-MAN5.0.01.01 Veritas ODM manual pages VRTSodm.ODM-RUN 5.0.01.01 VeritasODM commandsVRTSodm 5.0.31.5 Veritas Oracle Disk ManagerVRTSodm.ODM-KRN 5.0.31.5 Veritas ODM kernel files VRTSodm.ODM-MAN5.0.31.5 Veritas ODM manual pages VRTSodm.ODM-RUN 5.0.31.5 VeritasODM commands
3. Check that libodm.sl is present
64 Serviceguard Configuration for Oracle 10g, 11gR1, or 11gR2 RAC
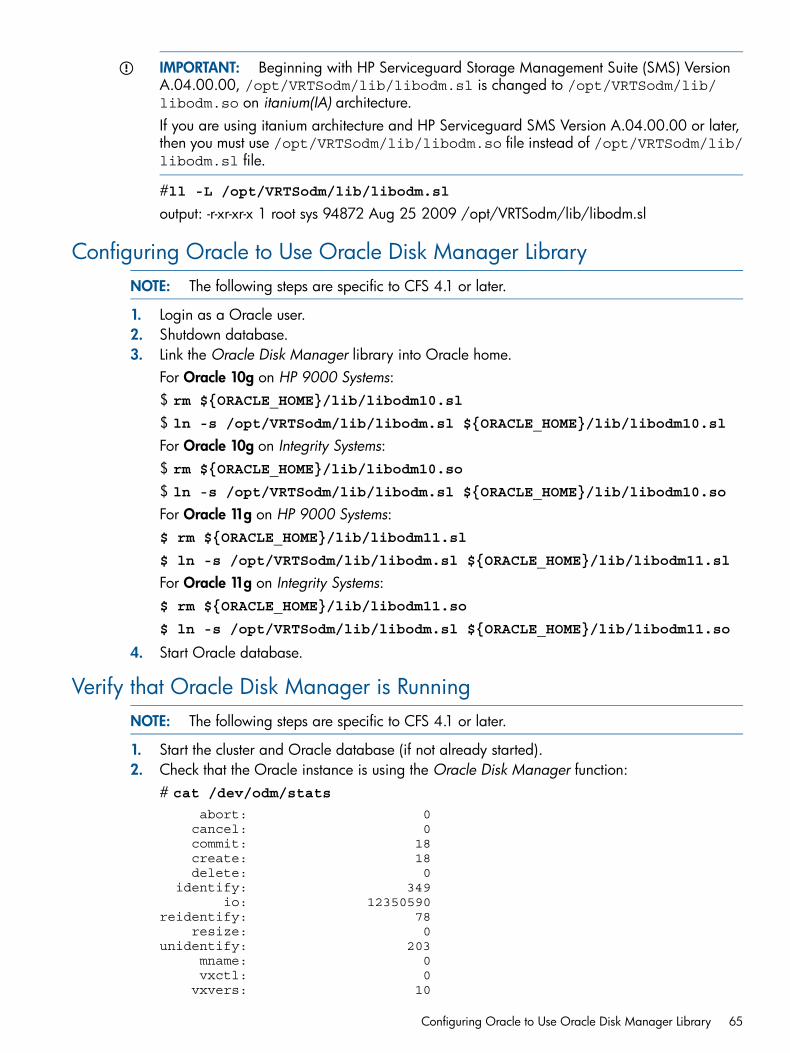
IMPORTANT: Beginning with HP Serviceguard Storage Management Suite (SMS) VersionA.04.00.00, /opt/VRTSodm/lib/libodm.sl is changed to /opt/VRTSodm/lib/libodm.so on itanium(IA) architecture.If you are using itanium architecture and HP Serviceguard SMS Version A.04.00.00 or later,then you must use /opt/VRTSodm/lib/libodm.so file instead of /opt/VRTSodm/lib/libodm.sl file.
#ll -L /opt/VRTSodm/lib/libodm.sloutput: -r-xr-xr-x 1 root sys 94872 Aug 25 2009 /opt/VRTSodm/lib/libodm.sl
Configuring Oracle to Use Oracle Disk Manager LibraryNOTE: The following steps are specific to CFS 4.1 or later.
1. Login as a Oracle user.2. Shutdown database.3. Link the Oracle Disk Manager library into Oracle home.
For Oracle 10g on HP 9000 Systems:$ rm ${ORACLE_HOME}/lib/libodm10.sl
$ ln -s /opt/VRTSodm/lib/libodm.sl ${ORACLE_HOME}/lib/libodm10.sl
For Oracle 10g on Integrity Systems:$ rm ${ORACLE_HOME}/lib/libodm10.so
$ ln -s /opt/VRTSodm/lib/libodm.sl ${ORACLE_HOME}/lib/libodm10.so
For Oracle 11g on HP 9000 Systems:$ rm ${ORACLE_HOME}/lib/libodm11.sl
$ ln -s /opt/VRTSodm/lib/libodm.sl ${ORACLE_HOME}/lib/libodm11.sl
For Oracle 11g on Integrity Systems:$ rm ${ORACLE_HOME}/lib/libodm11.so
$ ln -s /opt/VRTSodm/lib/libodm.sl ${ORACLE_HOME}/lib/libodm11.so
4. Start Oracle database.
Verify that Oracle Disk Manager is RunningNOTE: The following steps are specific to CFS 4.1 or later.
1. Start the cluster and Oracle database (if not already started).2. Check that the Oracle instance is using the Oracle Disk Manager function:
# cat /dev/odm/stats
abort: 0 cancel: 0 commit: 18 create: 18 delete: 0 identify: 349 io: 12350590reidentify: 78 resize: 0unidentify: 203 mname: 0 vxctl: 0 vxvers: 10
Configuring Oracle to Use Oracle Disk Manager Library 65
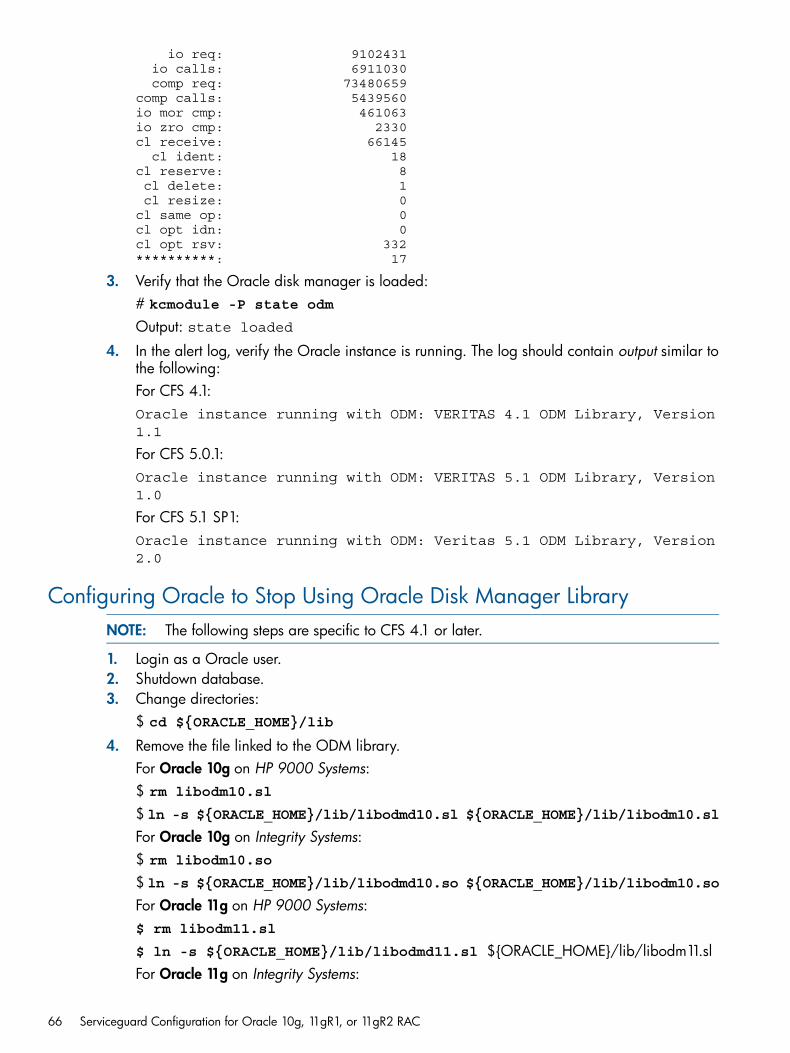
io req: 9102431 io calls: 6911030 comp req: 73480659comp calls: 5439560io mor cmp: 461063io zro cmp: 2330cl receive: 66145 cl ident: 18cl reserve: 8 cl delete: 1 cl resize: 0cl same op: 0cl opt idn: 0cl opt rsv: 332**********: 17
3. Verify that the Oracle disk manager is loaded:# kcmodule -P state odm
Output: state loaded
4. In the alert log, verify the Oracle instance is running. The log should contain output similar tothe following:For CFS 4.1:Oracle instance running with ODM: VERITAS 4.1 ODM Library, Version1.1
For CFS 5.0.1:Oracle instance running with ODM: VERITAS 5.1 ODM Library, Version1.0
For CFS 5.1 SP1:Oracle instance running with ODM: Veritas 5.1 ODM Library, Version2.0
Configuring Oracle to Stop Using Oracle Disk Manager LibraryNOTE: The following steps are specific to CFS 4.1 or later.
1. Login as a Oracle user.2. Shutdown database.3. Change directories:
$ cd ${ORACLE_HOME}/lib
4. Remove the file linked to the ODM library.For Oracle 10g on HP 9000 Systems:$ rm libodm10.sl
$ ln -s ${ORACLE_HOME}/lib/libodmd10.sl ${ORACLE_HOME}/lib/libodm10.slFor Oracle 10g on Integrity Systems:$ rm libodm10.so
$ ln -s ${ORACLE_HOME}/lib/libodmd10.so ${ORACLE_HOME}/lib/libodm10.soFor Oracle 11g on HP 9000 Systems:$ rm libodm11.sl
$ ln -s ${ORACLE_HOME}/lib/libodmd11.sl ${ORACLE_HOME}/lib/libodm11.slFor Oracle 11g on Integrity Systems:
66 Serviceguard Configuration for Oracle 10g, 11gR1, or 11gR2 RAC

$ rm libodm11.so
$ ln -s ${ORACLE_HOME}/lib/libodmd11.so ${ORACLE_HOME}/lib/libodm11.so
5. Restart the database.
Using Serviceguard Packages to Synchronize with Oracle10g/11gR1/11gR2 RAC
It is recommended to start and stop Oracle Cluster Software in a Serviceguard package—theOracle Cluster Software will start after SGeRAC is started, and will stop before SGeRAC is halted.Serviceguard packages should also be used to synchronize storage activation and deactivationwith Oracle Cluster Software and RAC instances.
Preparing Oracle Cluster Software for Serviceguard PackagesCRS starts all RAC instances by default. You must disable CRS from starting up RAC instanceswhen you configure your RAC instances in SGeRAC packages.
• On each node of the cluster, disable the automatic startup of the Oracle Clusterware at boottime.Login as root and enter:: $ORA_CRS_HOME/bin/crsctl disable crs
(Check CRS logs or check for Oracle processes, ps -ef | grep ocssd.bin)
• On one node of the cluster, disable the Oracle RAC database and instances from being startedautomatically by the Oracle Clusterware.Login as the Oracle administrator and run the following command to set the databasemanagement policy to manual.For Oracle 10g:: $ORACLE_HOME/bin/srvctl modify database -d <dbname> -y manual
For Oracle 11g:: $ORACLE_HOME/bin/srvctl modify database -d <dbname> -y MANUAL
Configure Serviceguard PackagesA Serviceguard package is needed for each node to start and stop Oracle Cluster Software.
• Storage activation (SLVM).When the Oracle Cluster Software required storage is configured on SLVM volume groups,the Serviceguard package should be configured to activate and deactivate the required storagein the package control script.As an example, modify the control script to activate the volume group in shared mode andset VG in the package control script for SLVM volume groups.VG[0]=”vg_rac”
• Storage Activation (CVM)When the Oracle Cluster Software required storage is configured on CVM disk groups, theServiceguard package should be configured to activate and deactivate the required storagein the package configuration file and control script.In the package configuration file, specify the disk group with the STORAGE_GROUP key word.In the package controls script, specify the disk group with the CVM_DG variable.As an example, in the package configuration file should have the following:STORAGE_GROUP ops_dg
Using Serviceguard Packages to Synchronize with Oracle 10g/11gR1/11gR2 RAC 67

Modify the package control script to set the CVM disk group to “activate” for shared writeand to specify the disk group.CVM_DG[0]=”ops_dg”
• Storage Activation (CFS)When the Oracle Cluster Software required storage is configured on a Cluster File System(CFS), the Serviceguard package should be configured to depend on the CFS multi-nodepackage through package dependency. With package dependency, the Serviceguard packagethat starts Oracle Cluster Software will not run until its dependent CFS multi-node package isup and will halt before the CFS multi-node package is halted.Setup dependency conditions in Serviceguard package configuration file (SAMPLE).DEPENDENCY_NAME mp1DEPENDENCY_CONDITION SG-CFS-MP-1=UPDEPENDENCY_LOCATION SAME_NODE
DEPENDENCY_NAME mp2DEPENDENCY_CONDITION SG-CFS-MP-2=UPDEPENDENCY_LOCATION SAME_NODE
DEPENDENCY_NAME mp3DEPENDENCY_CONDITION SG-CFS-MP-3=UPDEPENDENCY_LOCATION SAME_NODE
• Start and stop Oracle Cluster Software.In the Serviceguard package control script, configure the Oracle Cluster Software start in thecustomer_defined_run_cmds function.For 10g 10.1.0.4 or later:/sbin/init.d/init.crs start
For 10g 10.2.0.1 or later:<CRS HOME>/bin/crsctl start crs
In the Serviceguard package control script, configure the Oracle Cluster Software stop in thecustomer_defined_halt_cmds function.For 10g 10.1.0.4 or later:/sbin/init.d/init.crs stop
For 10g 10.2.0.1 or later:<CRS HOME>/bin/crsctl stop crs
When stopping Oracle Cluster Software in a Serviceguard package, it may be necessary toverify that the Oracle processes have stopped and exited before deactivating storage orhalting CFS multi-node package. The verification can be done with a script that loops andchecks for the successful stop message in the Oracle Cluster Software logs or the existencesof Oracle processes that needed to be stopped, specifically the CSS daemon (ocssd.bin).For example, this script could be called by the Serviceguard package control script after thecommand to halt Oracle Cluster Software and before storage deactivation.
68 Serviceguard Configuration for Oracle 10g, 11gR1, or 11gR2 RAC

3 Support of Oracle RAC ASM with SGeRACIntroduction
This chapter discusses the use of the Oracle 10g Release 2 (10g R2) and11g Release 1 (11g R1)database server feature called Automatic Storage Management (ASM) in configurations of HPServiceguard Extension for Real Application Clusters (SGeRAC).We begin with a brief review of ASM—functionality, pros, cons, and method of operation. Then,we look in detail at how we configure ASM with SGeRAC (version A.11.17 or later is required).
SG/SGeRAC Support for ASM on HP-UX 11i v2
OverviewSupport for ASM with SG/SGeRAC commences with SGeRAC A.11.17. However, please notethat it has been possible to set up Oracle databases using ASM on HP-UX from the time Oracle10g became available on HP-UX, using the following configurations that do not requireSG/SGeRAC:
• Non-clustered single instance Oracle
• Oracle single instance and RAC databases running in a pure Oracle clusterware environmentThe following requirements/restrictions apply to SG/SGeRAC (A.11.17 or later) support of ASM(and are summarized in Table 3):
Table 3 ASM support with SG/SGeRAC A.11.17 or later
Not SupportedSupported
Oracle single instance database, with or without Oracleclusterware
Oracle RAC database
Raw disks/LUs or CVM Logical Volumes as ASM DiskGroup Members
SLVM Logical Volumes as ASM Disk Group Members
ASM configurations on SGeRAC using SGeRAC 11.16,Oracle 10g R1 RAC or HP-UX 11i v1
ASM configurations on SGeRAC using SGeRAC A.11.17or later, and Oracle 10g R2 RAC
Single instance Oracle database with ASM managedstorage running in Serviceguard cluster
ASM configurations on SGeRAC using SGeRAC A.11.17or later, and Oracle 11g R1
Single instance Oracle database with ASM-managedstorage in SGeRAC configuration wherein SGeRACprovides node membership to Oracle Clusterware
Maximum SGeRAC cluster size for ASM configurations is16
SGeRAC Toolkit framework based on Multi-Node Package(MNP) /Simple Package Dependency to manage ASMconfigurations on SGeRAC up to a maximum cluster sizeof 16
Why ASM over SLVM?As mentioned above, we require ASM disk group members in SGeRAC A.11.17 (or later)configurations to be raw logical volumes managed by SLVM.The main reason for this requirement is to expedite ASM support with SGeRAC. We leverageexisting HP-UX capabilities to provide multipathing for SLVM logical volumes, using either the PVLinks feature, or separate products such as HP StorageWorks Secure Path that provide multipathing
Introduction 69
for specific types of disk arrays. Other advantages of the "ASM-over-SLVM" configuration are asfollows:
• ASM-over-SLVM ensures that the HP-UX devices used for disk group members will have thesame names (the names of logical volumes in SLVM volume groups) on all nodes, easing ASMconfiguration.
• ASM-over-SLVM protects ASM data against inadvertent overwrites from nodes inside/outsidethe cluster. If the ASM disk group members are raw disks, there is no protection currentlypreventing these disks from being incorporated into LVM or VxVM volume/disk groups.
The disadvantages of the ASM-over-SLVM configuration are as follows:
• Additional configuration and management tasks are imposed by the extra layer of volumemanagement (administration of volume groups, logical volumes, physical volumes).
• There is a small performance impact from the extra layer of volume management.
• SLVM has some restrictions in the area of online reconfiguration, the impact of which will beexamined later in this chapter.
Configuring SLVM Volume Groups for ASM Disk GroupsIdeally, ASM disk group members should be raw disks or array logical units, but due to the lackof built-in multipathing we require them to be SLVM raw logical volumes in SGeRAC configurations.But we would still like these logical volumes presented to ASM to resemble raw disks, as far aspossible.Hence, each SLVM logical volume (LV) used as a member of an ASM disk group is required to belaid out to occupy the usable space, in contiguous fashion, of exactly one single physical volume(PV). This implies the following about LV:
• Contiguous
• Not striped or mirrored
• Does not span multiple PVs
• Does not share a PV with other LVsThe idea is that ASM provides the mirroring, striping, slicing, and dicing functionality as neededand SLVM supplies the multipathing functionality not provided by ASM. Figure 13 indicates this1-1 mapping between SLVM PVs and LVs used as ASM disk group members.Further, the default retry behavior of SLVM could result in an I/O operation on an SLVM LV takingan indefinitely long period of time. This behavior could impede ASM retry and rebalancecapabilities; hence, a finite timeout must be configured for each SLVM LV. For example, the timeoutcould be configured to the value (total number of physical paths to the PV * PV timeout), providingenough time for SLVM to try all available paths, if needed.4
The PVs used in an ASM disk group can be organized into SLVM volume groups as desired bythe customer. In the example shown in Figure 13, for each ASM disk group, the PVs correspondingto its members are organized into a separate SLVM volume group.
70 Support of Oracle RAC ASM with SGeRAC

Figure 10 1-1 mapping between SLVM logical and physical volumes for ASM configuration
4If the LVM patch PHKL_36745 (or equivalent) is installed in the cluster, a timeout equal to (2* PVtimeout) will suffice to try all paths.The SLVM volume groups are marked as shared volume groups and exported across the SGeRACcluster using standard SGeRAC procedures. As noted above, multiple physical paths to eachphysical volume should be configured using the LVM PV Links feature or a separate multipathingproduct such as HP StorageWorks Secure Path.Please note that, for the case in which the SLVM PVs being used by ASM are disk array LUs, therequirements in this section do not place any constraints on the configuration of the LUs. The LUsmay be configured with striping, mirroring and other characteristics at the array level, followingguidelines provided by Oracle and the array provider for use by ASM.
Sample Command Sequence for Configuring SLVM Volume GroupsThis section includes an example of a command sequence that can be used to prepare SLVMLogical Volumes for use by ASM to meet the requirements specified above.The scenario for our example is that we are preparing a new volume group named vgora_asmwith two PVs, each with two physical paths. The physical paths for the first PV are /dev/dsk/c9t0d1 and /dev/dsk/c10t0d1 and those for the second PV are /dev/dsk/c9t0d2 and/dev/dsk/c10t0d2.1. Create the volume group with the two PVs, incorporating the two physical paths for each
(choosing hh to be the next hexadecimal number that is available on the system, after thevolume groups that are already configured) :# pvcreate -f /dev/dsk/c9t0d1# pvcreate -f /dev/dsk/c9t0d2# mkdir /dev/vgora_asm# mknod /dev/vgora_asm/group c 64 0xhh0000# vgcreate /dev/vgora_asm /dev/dsk/c9t0d1# vgextend /dev/vgora_asm /dev/dsk/c9t0d2
SG/SGeRAC Support for ASM on HP-UX 11i v2 71

# vgextend /dev/vgora_asm /dev/dsk/c10t0d1# vgextend /dev/vgora_asm /dev/dsk/c10t0d2
2. For each of the two PVs, create a corresponding LV.• Create an LV of zero length.
• Mark the LV as contiguous.
• Extend each LV to the maximum size possible on that PV (the number of extents availablein a PV can be determined via vgdisplay -v <vgname>).
• Configure LV timeouts, based on the PV timeout and number of physical paths, asdescribed in the previous section. If a PV timeout has been explicitly set, its value can bedisplayed via pvdisplay -v. If not, pvdisplay will show a value of default, indicatingthat the timeout is determined by the underlying disk driver. For SCSI, in HP-UX 11i v2,the default timeout is 30 seconds.
• Null out the initial part of each LV to ensure ASM accepts the LV as an ASM disk groupmember.5 Note that we are zeroing out the LV data area, not its metadata. It is the ASMmetadata that is being cleared.
5See Oracle Metalink Doc ID: Note:268481.1 RE-CREATING ASM INSTANCES ANDDISKGROUPS at https://metalink.oracle.com/ (Oracle MetaLink account required)# lvcreate -n lvol1 vgora_asm# lvcreate -n lvol2 vgora_asm# lvchange -C y /dev/vgora_asm/lvol1# lvchange -C y /dev/vgora_asm/lvol2# Assume vgdisplay shows each PV has 2900 extents in our example# lvextend -l 2900 /dev/vgora_asm/lvol1 /dev/dsk/c9t0d1# lvextend -l 2900 /dev/vgora_asm/lvol2 /dev/dsk/c9t0d2# Assume a PV timeout of 30 seconds.# There are 2 paths to each PV, so the LV timeout value is 60 seconds# lvchange -t 60 /dev/vgora_asm/lvol1# lvchange -t 60 /dev/vgora_asm/lvol2# dd if=/dev/zero of=/dev/vgora_asm/rlvol1 bs=8192 count=12800# dd if=/dev/zero of=/dev/vgora_asm/rlvol1 bs=8192 count=12800
3. Export the volume group across the SGeRAC cluster and mark it as shared, as specified bySGeRAC documentation. Assign the right set of ownerships and access rights to the raw logicalvolumes on each node as required by Oracle (oracle:dba and 0660, respectively).
We can now use the raw logical volume device names as disk group members when configuringASM disk groups using the Oracle database management utilities. There are a number of waysof doing this described in Oracle ASM documentation, including the dbca database creationwizard as well as sqlplus.The same command sequence, with some modifications, can be used for adding new disks to analready existing volume group that is being used by ASM to store one or more RAC databases.If the database(s) should be up and running during the operation, we use the Single Node Onlinevolume Reconfiguration (SNOR) feature of SLVM.Step 1 of the above sequence is modified as follows:
• First, deactivate the volume group vgora_asm on all nodes but one, say node A. This requiresprior shutdown of the database(s) using ASM-managed storage and ASM itself, on all nodesbut node A. See the section ASM Halt is needed to ensure disconnect of ASM from SLVMVolume Groups to understand why it is not adequate to shut down only the database(s) usingthe volume group to be reconfigured, and why we must shut down ASM itself and thereforeall database(s) using ASM-managed storage, on all nodes but node A.
• Next, on node A, switch the volume group to exclusive mode, using SNOR.
• Initialize the disks to be added with pvcreate, and then extend the volume group withvgextend.
72 Support of Oracle RAC ASM with SGeRAC

Step 2 remains the same. Logical volumes are prepared for the new disks in the same way.In step 3, switch the volume group back to shared mode, using SNOR, and export the VG acrossthe cluster, ensuring that the right ownership and access rights are assigned to the raw logicalvolumes. Activate the volume group, and restart ASM and the database(s) using ASM-managedstorage on all nodes (they are already active on node A).
SG/SGeRAC Support for ASM on HP-UX 11i v3
OverviewSupport for ASM with SG/SGeRAC commences with SGeRAC A.11.17.01 on HP-UX 11i v3.SGeRAC support ASM where the member disk groups are either logical volumes managed by HPShared Logical Volume Manager (SLVM) or raw disks/disk array logical units(LUs).A new I/O infrastructure that enables the native built-in multipathing functionality is introduced inHPUX 11i v3. This feature offers users a continuous I/O access to a LUN or disk if any of the pathsfails. This feature is enabled in the operating system by default. In addition, new DSF(device specialfile) format is introduced in this operating system. An example of new DSF is /dev/disk/disk1,compare to the legacy DSF, /dev/rdsk/cxtydz.Please note that it has been possible to set up Oracle databases using ASM on HP-UX from thetime Oracle 10g became available on HP-UX, using the following configurations that do not requireSG/SGeRAC:
• Non-clustered single instance Oracle.
• Oracle single instance and RAC databases running in a pure Oracle clusterware environment.The following requirements/restrictions apply to SG/SGeRAC (A.11.17.01 or later) supportof ASM (summarized in Table 4):
Table 4 ASM support with SG/SGeRAC A.11.17.01 or later
Not SupportedSupported
Oracle single instance database, with or without Oracleclusterware
Oracle RAC database
CVM Logical Volumes as ASM Disk Group MembersSLVM Logical Volumes as ASM Disk Group Members
Single instance Oracle database with ASM managedstorage running in Serviceguard cluster
ASM configurations on SGeRAC using SGeRACA.11.17.01 or later, and Oracle 10g R2 RAC
Single instance Oracle database with ASM-managedstorage in SGeRAC configuration wherein SGeRACprovides node membership to Oracle Clusterware
ASM configurations on SGeRAC using SGeRACA.11.17.01 or later, and 11g R1 RAC
Maximum SGeRAC cluster size for ASM configurations is16
SGeRAC Toolkit3 framework based on Multi-Node Package(MNP) /Simple Package Dependency to manage ASMconfigurations on SGeRAC up to a maximum cluster sizeof 16
Raw disks/disk array LUs as ASM Disk Group Members
ASM over SLVMSGeRAC support for ASM-over-SLVM continues in HPUX 11i v3. SGeRAC 11.17.01 or later isrequired for ASM-over-SLVM configurations on HP-UX 11i v3.
SG/SGeRAC Support for ASM on HP-UX 11i v3 73

The advantages of the "ASM-over-SLVM" configuration are as follows:
• ASM-over-SLVM ensures that the HP-UX devices used for disk group members will have thesame names (the names of logical volumes in SLVM volume groups) on all nodes, easing ASMconfiguration.
• ASM-over-SLVM protects ASM data against inadvertent overwrites from nodes inside/outsidethe cluster. If the ASM disk group members are raw disks, there is no protection currentlypreventing these disks from being incorporated into VxVM volume/disk groups.
The disadvantages of the ASM-over-SLVM configuration are as follows:
• Additional configuration and management tasks are imposed by the extra layer of volumemanagement (administration of volume groups, logical volumes, physical volumes).
• There is a small performance impact from the extra layer of volume management.
• SLVM has some restrictions in the area of online reconfiguration, the impact of which will beexamined later in this chapter.
Configuring SLVM Volume Groups for ASM Disk GroupsWe would like the logical volumes presented to ASM to resemble raw disks, as far as possible.Hence, each SLVM logical volume (LV) used as a member of an ASM disk group is required to belaid out to occupy the usable space, in contiguous fashion, of exactly one single physical volume(PV). This implies the following about LV:
• Contiguous
• Not be striped or mirrored
• Does not span multiple PVs
• Does not share a PV with other LVsThe idea is that ASM provides the mirroring, striping, slicing, and dicing functionality as neededand SLVM supplies the multipathing functionality not provided by ASM. Figure 14 indicates this1-1 mapping between SLVM PVs and LVs used as ASM disk group members.Further, the default retry behavior of SLVM could result in an I/O operation on an SLVM LV takingan indefinitely long period of time. This behavior could impede ASM retry and rebalancecapabilities; hence a finite timeout must be configured for each SLVM LV. For example, the timeoutcould be configured to the value (total number of physical paths to the PV * PV timeout), providingenough time for SLVM to try all available paths, if needed.The PVs used in an ASM disk group can be organized into SLVM volume groups as desired bythe customer. In the example shown in Figure 14, for each ASM disk group, the PVs correspondingto its members are organized into a separate SLVM volume group.
74 Support of Oracle RAC ASM with SGeRAC

Figure 11 1-1 mapping between SLVM logical and physical volumes for ASM configuration
The SLVM volume groups are marked as shared volume groups and exported across the SGeRACcluster using standard SGeRAC procedures.Please note that, for the case in which the SLVM PVs being used by ASM are disk array LUs, therequirements in this section do not place any constraints on the configuration of the LUs. The LUsmay be configured with striping, mirroring, and other characteristics at the array level, followingguidelines provided by Oracle and the array provider for use by ASM.
Sample Command Sequence for Configuring SLVM Volume GroupsIn this section, we provide an example of a command sequence that can be used to prepare SLVMLogical Volumes for use by ASM. The example below demonstrates how volume group is createdusing new DSF format. HP-UX will automatically use the redundant path for the volume group inthe background.The scenario for our example is that we are preparing a new volume group named vgora_asm.The physical path for the first PV is /dev/rdisk/disk1 and the second PV is /dev/rdisk/disk2.1. Create the volume group with the two PVs (choosing hh to be the next hexadecimal number
that is available on the system, after the volume groups that are already configured):# pvcreate -f /dev/rdisk/disk1# pvcreate -f /dev/rdisk/disk2# mkdir /dev/vgora_asm# mknod /dev/vgora_asm/group c 64 0xhh0000# vgcreate /dev/vgora_asm /dev/disk/disk1# vgextend /dev/vgora_asm /dev/disk/disk2
2. For each of the two PVs, create a corresponding LV• Create an LV of zero length
• Mark the LV as contiguous
SG/SGeRAC Support for ASM on HP-UX 11i v3 75
• Extend each LV to the maximum size possible on that PV (the number of extents availablein a PV can be determined via vgdisplay -v <vgname>)
• Configure LV timeouts, based on the PV timeout and number of physical paths, asdescribed in the previous section. If a PV timeout has been explicitly set, its value can bedisplayed via pvdisplay -v. If not, pvdisplay will show a value of default, indicatingthat the timeout is determined by the underlying disk driver. For SCSI, in HP-UX 11i v3,the default timeout is 30 seconds.
• Null out the initial part of each LV to ensure ASM accepts the LV as an ASM disk groupmember. Note that we are zeroing out the LV data area, not its metadata. It is the ASMmetadata that is being cleared.# lvcreate -n lvol1 vgora_asm# lvcreate -n lvol2 vgora_asm# lvchange -C y /dev/vgora_asm/lvol1# lvchange -C y /dev/vgora_asm/lvol2# Assume vgdisplay shows each PV has 2900 extents in our example# lvextend -l 2900 /dev/vgora_asm/lvol1 /dev/disk/disk1# lvextend -l 2900 /dev/vgora_asm/lvol2 /dev/disk/disk2# Assume a PV timeout of 30 seconds.# There are 2 paths to each PV, so the LV timeout value is 60 seconds# lvchange -t 60 /dev/vgora_asm/lvol1# lvchange -t 60 /dev/vgora_asm/lvol2# dd if=/dev/zero of=/dev/vgora_asm/rlvol1 bs=8192 count=12800# dd if=/dev/zero of=/dev/vgora_asm/rlvol1 bs=8192 count=12800
3. Export the volume group across the SGeRAC cluster and mark it as shared, as specified bySGeRAC documentation. Assign the right set of ownerships and access rights to the raw logicalvolumes on each node as required by Oracle (oracle:dba and 0660, respectively).
We can now use the raw logical volume device names as disk group members when configuringASM disk groups using the Oracle database management utilities. There are a number of waysof doing this described in Oracle ASM documentation, including the dbca database creationwizard as well as sqlplus.The same command sequence, with some modifications, can be used for adding new disks to analready existing volume group that is being used by ASM to store one or more RAC databases.If the database(s) should be up and running during the operation, we use the Single Node Onlinevolume Reconfiguration (SNOR) feature of SLVM.Step 1 of the above sequence is modified as follows:
• First, deactivate the volume group vgora_asm on all nodes but one, say node A. This requiresprior shutdown of the database(s) using ASM-managed storage and ASM itself, on all nodesbut node A. See the section to understand why it is not adequate to shut down only thedatabase(s) using the volume group to be reconfigured, and why we must shut down ASMitself and therefore all database(s) using ASM-managed storage, on all nodes but node A.
• Next, on node A, switch the volume group to exclusive mode, using SNOR.
• Initialize the disks to be added with pvcreate, and then extend the volume group withvgextend.
Step 2 remains the same. Logical volumes are prepared for the new disks in the same way.In step 3, switch the volume group back to shared mode, using SNOR, and export the VG acrossthe cluster, ensuring that the right ownership and access rights are assigned to the raw logicalvolumes. Activate the volume group, and restart ASM and the database(s) using ASM-managedstorage on all nodes (they are already active on node A).
ASM over Raw diskAs mentioned above, a new I/O infrastructure that enables the native built-in multipathingfunctionality is included in HP-UX 11i v3. This feature offers users a continuous I/O access to aLUN or disk if any of the paths fails. This newly added functionality enables SGeRAC (11.17.01
76 Support of Oracle RAC ASM with SGeRAC
or later) to support ASM on raw disks/disk array LUs. In HP-UX 11i v3, new DSF is introduced.SGeRAC will support the DSF format that ASM support with the restriction that native multipathingfeature is enabled.The advantages for “ASM-over-raw” are as follows:
• There is a small performance improvement from one less layer of volume management.
• Online disk management (adding disks, deleting disks) is supported with ASM-over-raw.The disadvantages for “ASM-over-raw” are as follows:
• Might not see the HP-UX devices (raw disks/disk array LUs) used for disk group members asthe same names on all nodes.
• There is no protection to prevent the raw disks from being incorporated into VxVM volume/diskgroups.
Configure Raw Disks/Disk Array Logical Units for ASM Disk GroupOracle provides instructions on how to configure disks for ASM where the member disks are rawlogical volume. The instructions to configure raw disks/disk LUs are the following:
For Oracle 10g R2, please refer to Oracle Database Installation Guide 10g Release2 for hpux Itanium , Chapter 2, Preinstallation Tasks, section “Preparing Disk Groupfor an Automatic Storage Management Installation.”For 11g R1, please refers to Oracle Clusterware Installation Guide 11g Release 1(11.) for HP-UX, Chapter 5, Configuring Oracle Real Application Clusters Storage,section “Configuring Disks for Automatic Storage Management.”
Then, these raw devices can be used as disk group members to configure ASM disk group membersusing Oracle database management utilities.
Additional Hints on ASM Integration with SGeRACThis section includes some pointers that may be useful when deploying ASM in an SGeRACenvironment.
Consider using the MNP/Simple Dependency-based SGeRAC Toolkit’s FrameworkThe SGeRAC Toolkit which provides a framework to integrate Oracle 10g R2 RAC or 11g R1 RACwith SGeRAC and is based on the SGeRAC A.11.17 multi-node package and simple packagedependency features provides a uniform, intuitive and easy-to-manage method to co-ordinatebetween SGeRAC and Oracle Clusterware and manage all the storage options supported bySGeRAC, including ASM-over-SLVM and ASM-over-raw devices.
ASM Halt is needed to ensure disconnect of ASM from SLVM Volume GroupsThis section is specific to ASM-over-SLVM only.When an ASM disk group is dismounted on a node in the SGeRAC cluster, there is no guaranteethat processes in the ASM instance on that node and client processes of the ASM instance willclose their open file descriptors for the raw volumes underlying the members of that ASM diskgroup.Consider a configuration in which there are multiple RAC databases using ASM to manage theirstorage in an SGeRAC cluster. Assume each database stores its data in its own exclusive set ofASM disk groups.If we shut down the database instance for a specific RAC database on a node, and then dismountits ASM disk groups on that node, some Oracle processes may still hold open file descriptors tothe underlying raw logical volumes. Hence, an attempt at this point to deactivate the correspondingSLVM volume group(s) on the node may fail. The only way to ensure success of the deactivation
Additional Hints on ASM Integration with SGeRAC 77

of the volume groups is to first shut down the ASM instance and its clients (including all databasesthat use ASM based storage) on that node.The major implications of this behavior include the following:
• Many SGeRAC customers use SGeRAC packages to start and shut down Oracle RAC instances.In the startup and shutdown sequences, the package scripts activate and deactivate the SLVMvolume groups used by the instance.
• For the ASM environment, it is not appropriate to include SLVM volume group activation anddeactivation in the database instance package control script, since the deactivation may fail.In the SGeRAC Toolkit that is MNP/Simple Dependency-based, the SLVM volume groupsunderlying ASM disk groups are managed instead from the package control script for OracleClusterware.
• When there are multiple RAC databases using ASM to manage their storage in the cluster,online reconfiguration of SLVM volume groups for one database will impact the others, evenif each database is configured with its own set of ASM disk groups and underlying SLVMvolume groups.
• An SLVM volume group is reconfigured online, using the SLVM SNOR feature. This procedurerequires the volume group to be deactivated on all nodes but one. This in turn requires shuttingdown the ASM instance and all client database instances on all nodes but one.However, note that many storage reconfiguration operations can be confined to the ASMlayer. For example, if a new file has to be created in a disk group, there will be no SLVMoperation required, if the disk group has adequate free space. Adding disks to, and deletingdisks from, ASM disk groups may require SLVM reconfiguration (online disk addition isdiscussed in the section).
ASM, that the corresponding logical volume be created at the same time, to avoid the potentialimpact of a future online SLVM reconfiguration operation to create the logical volume. Note that,when adding one or more physical volumes in an SLVM configuration, one can avoid an onlineSLVM reconfiguration operation by creating a new volume group for the physical volume(s).
ASM may require Modified Backup/Restore ProceduresBackup/restore procedures for databases stored in ASM must make use of Oracle RecoveryManager (RMAN), per Oracle documentation. Customers wishing to deploy ASM should ensurethat their backup/restore tools/scripts/procedures are compatible with this ASM requirement.
Installation, Configuration, Support, and TroubleshootingOracle ASM is part of the Oracle database server installation (both 10g R2 and 11g R1). Noadditional software from HP is required to operate ASM in SGeRAC environment. Information onhow to use the optional MNP/Simple Dependency based SGeRAC Toolkit is separately documented.Oracle ASM and ASM disk groups may be configured at the time of creating a database or as aseparate step. These tasks are carried out using Oracle database management tools, for example,the database creation wizard dbca. In either case, ensure that SLVM volume groups and rawdisks/LUs have been prepared and activated prior to ASM disk group configuration orreconfiguration, as discussed in this section. For SLVM, use the names of raw LVs contained in theSLVM volume groups when Oracle commands and utilities require the specification of the namesof raw HP-UX devices for storing ASM disk groups.For troubleshooting, it may be useful to look at subdirectories for database and ASM instancesunder $ORACLE_BASE/admin/, where log and trace files for these instances are deposited.Oracle clusterware deposits log and trace information regarding its management of ASM anddatabase instances under $ORACLE_HOME/log/<hostname>/racg.
78 Support of Oracle RAC ASM with SGeRAC

Additional Documentation on the Web and Scripts• Oracle Clusterware Installation Guide 11g Release 1 (11.1) for HP-UX at www.oracle.com/
pls/db111/portal.portal_db?selected=11&frame= → HP-UX Installation Guides → ClusterwareInstallation Guide for HP-UX
• ASM related sections in Oracle Manuals◦ Oracle® Database Administrator's Guide 10g R2 (10.2) at www.oracle.com/pls/db102/
portal.portal_db?selected=4 → Guides → Administrator's Guide◦ Oracle® Database Oracle Clusterware and Oracle Real Application Clusters
Administration and Deployment Guide10g R2 (10.2) at www.oracle.com/pls/db102/portal.portal_db?selected=4→ High Availability → Oracle Clusterware and Oracle RealApplication Clusters Administration and Deployment Guide
◦ Oracle® Database Administrator's Guide 11g R1 at www.oracle.com/pls/db111/portal.portal_db?selected=4&frame=→ Supporting Documentation → Administrator'sGuide
◦ www.oracle.com/technology/products/database/asm/index.html
◦ www.oracle.com/pls/db111/portal.portal_db?selected=4&frame=→ Storage → StorageAdministrator’s Guide
Additional Hints on ASM Integration with SGeRAC 79

4 SGeRAC Toolkit for Oracle RAC 10g or laterIntroduction
This chapter discusses how Serviceguard Extension for RAC Toolkit enables a new framework forthe integration of Oracle 10g Release 2 (10.2.0.1) or later version of Real Application Clusters(Oracle RAC1) with HP Serviceguard Extension for Real Application Clusters A.11.17 or later(SGeRAC2).SGeRAC Toolkit leverages the multi-node package and simple package dependency featuresintroduced by HP Serviceguard (SG) A.11.17 to provide a uniform, easy-to-manage and intuitivemethod for coordinating the operation of the combined software stack across the full range ofstorage management options supported by SGeRAC.As background to the discussion of the Toolkit, the following is reviewed:
• The coordination issues, pertaining to the combined stack, that the toolkit addresses.
• The features in SGeRAC that enable the framework.The discussion of SGeRAC begins with the reasons why the Toolkit uses the SG/SGeRAC multi-nodepackage and simple package dependency features. Next, there is an outline of the flow of controlduring startup and shutdown of the combined stack using SGeRAC. This is followed by a descriptionof how the Toolkit interacts both with Oracle RAC and with the storage management subsystems.Then, the SGeRAC internal file structure is discussed. Lastly, the SGeRAC benefits are listed.HP recommends to use SGeRAC toolkit for the following reasons:The SGeRAC Toolkit ensures the following:• RAC database will not run unless the Oracle CRS is running.
• CRS package will not try to come up before it's required dependency package like SG CFSmount point and disk group packages comes up. That is how SGeRAC toolkit enforces theproper dependencies.
• The storage needed for the operation of Oracle Clusterware is activated before OracleClusterware processes are started.
• The storage needed for the operation of a RAC database instance is activated before the RACdatabase instance is started.
• Oracle Clusterware and the RAC database instance are halted before deactivating the storageneeded by these two entities, while halting these packages or SGeRAC nodes.
Background
Coordinating the Oracle RAC/Serviceguard Extension for RAC stackThe Oracle 10g and later database server offers a built-in feature called Oracle Clusterware whichbuilds highly available RAC and single instance databases in clustered configurations. Since therelease of Oracle 10g, HP has recommended a combined SGeRAC/Oracle Clusterwareconfiguration for RAC deployments on HP-UX 11i.3 In this combined environment, the responsibilitiesof SGeRAC include the following:
• Provide cluster membership information to the Oracle Clusterware CSS (Cluster SynchronizationService) daemon.
• Provide clustered storage to meet the needs of Oracle Clusterware and RAC database instances.
• The Oracle Clusterware quorum voting and registry devices can be configured as shared rawlogical volumes managed by SGeRAC using Shared Logical Volume Manager (SLVM) orCluster Volume Manager (CVM) or, beginning with SGeRAC A.11.17, as shared files managedby SGeRAC using the Cluster File System (CFS). Beginning with Oracle 11gR2 release, Oracle
80 SGeRAC Toolkit for Oracle RAC 10g or later

Clusterware voting and registry devices can also be configured using oracle ASM (AutomaticStorage Management) disk groups. The members of disk groups are configured as raw devices(on HP-UX 11i v3). Oracle 11gR2 is supported only on HP-UX 11i v3 (11.31) with SGeRACA.11.19 or later.
• The RAC database files can be configured as shared raw logical volumes managed by SGeRACusing SLVM or CVM. Beginning with SGeRAC A.11.17, the RAC database files may beconfigured as shared files managed by SGeRAC using CFS. Also, beginning with Oracle 10gR2 and SGeRAC A.11.17, the RAC database files may also be configured as files in OracleASM (Automatic Storage Management) Disk Groups. The members of the ASM Disk Groupsare configured as raw devices.
The responsibilities of Oracle Clusterware in this combined environment include the following:
• Management of the database and associated resources (database instances, services, virtualIP addresses (VIPs), listeners, etc.).
• Management of Oracle ASM instances, if configured.All pieces of the combined stack must start up and shut down in the proper sequence and we needto be able to automate the startup and shutdown sequences, if desired. In particular, the storageneeded for the operation of Oracle Clusterware must be activated up before the Oracle Clusterwareprocesses are started, and the storage needed for the operation of a RAC database instance mustbe activated before the instance is started. On shutdown, the sequence is reversed—OracleClusterware and the RAC database instance must be halted before deactivating the storage neededby these two entities.Traditionally, in the SG and SGeRAC environment, these ordering requirements have been metusing a package to encapsulate the startup and shutdown of an application as well as the startupand shutdown of storage needed by that application. In SG and SGeRAC, a different model isintroduced for the case where the storage needs of an application are met by using a CFS. Herethe CFS is started up and shutdown in a separate package from the one that starts up and shutsdown the application. Beginning with patches PHSS_40885/PHSS_40886 SGeRAC has introducednew MNP in to existing SGeRAC toolkit namely ASMDG MNP. In SGeRAC, a different model isrecommended for the case where the storage needs of an application are met by using OracleASM. Here ASM disk groups are mounted, dismounted, and monitored using a separate MNPpackage. It also activates and deactivates the shared volume groups needed by the ASM diskgroups if ASM is configured over SLVM. The ordering requirement is met by using the SGeRACfeature of simple package dependencies, discussed later in this chapter.Can we manage the storage needs of Oracle Clusterware and RAC database instances in OracleRAC, using SGeRAC packages in the ways just discussed? Starting in Oracle 10.1.0.4, Oraclemade the following improvements in coordination between Oracle Clusterware and platformclusterware, enabling such use of SGeRAC packages.Support for on-demand startup and shutdown of Oracle Clusterware and RAC database instances
• In addition to starting up and shutting down Oracle Clusterware automatically as HP-UX 11iis taken up to init level 3 and taken down to a lower level respectively, Oracle Clusterwarecan be start up and shut down on demand.
• To disable the automatic startup of Oracle Clusterware on entering init level 3, we use thecrsctl disable crs command. Oracle Clusterware may thereafter be started up andshut down on demand using the commands crsctl start crs and crsctl stop crsrespectively.
• In addition to starting up and shutting down the RAC database instance automatically asOracle Clusterware itself is started up and shut down, we can start up and shut down the RACdatabase instance on demand.
• To disable the automatic startup of the RAC database instance with the startup of OracleClusterware, we follow the procedures described by Oracle to remove auto-start for theinstance. The RAC database instance may thereafter be started up and shut down on demand
Background 81
by, for example, using the command srvctl start instance... and srvctl stopinstance... respectively.
NOTE: The above mentioned steps are the mandatory prerequisite steps to be performed beforeyou configure SGeRAC toolkit for CRS, ASMDG (if storage is ASM/SLVM), and RAC MNP’s.
Support for invocation of Oracle Clusterware commands from customer-developed scriptsThis includes invocation of such commands from SGeRAC package control scripts or module scripts;therefore, SGeRAC packages can invoke commands to start up and shutdown Oracle Clusterwareand/or RAC database instances.With these improvements, it became possible, using SGeRAC packages, to meet the sequencingrequirements mentioned above for the startup and shutdown of Oracle Clusterware and RACdatabase instances with respect to the SGeRAC-managed storage used by these entities.
Serviceguard/Serviceguard Extension for RAC multi-node packages and simplepackage dependencies
The new features in SG/SGeRAC that enable the framework provided by are multi-node packages(MNPs) and simple package dependencies.Configuring an SGeRAC package via the PACKAGE_TYPE attribute to be of type MULTI-NODEallows the package to run on more than one node at once. MNPs have the following features:
• Each instance of an MNP behaves as a normal package but does not failover.
• FAILOVER_POLICY and FAILBACK_POLICY configuration attributes cannot be specifiedfor an MNP.
• Relocatable IP addresses cannot be configured for MNPs.
• Failures of package components such as services, EMS resources or subnets, will cause theMNP to be halted only on the node on which the failure occurred. Unlike failover packages,when an instance of an MNP fails, only node switching is set to disabled, rather than theglobal AUTO_RUN.
• SG/SGeRAC Package Manager commands have been enhanced to manage MNPs:cmviewcl has been enhanced to show the overall package status as a summary of thestatus of package instances. If not all the configured instances of an MNP are running,
◦
a qualifier is added to the STATUS field of the form (<running>/<configured>) where<running> indicates the number of instances running and <configured> indicatesthe total number of configured instances. The status of each instance can also be displayed.
◦ cmrunpkg/cmhaltpkg have been enhanced to allow multiple -n parameters to bespecified to indicate the nodes to which the command is to be applied. Using thesecommands, the instances of the MNP can be started and stopped independently. MNPscan be started automatically by setting AUTO_RUN to YES.
Simple package dependencies are used to describe the dependency relationship between packages.To configure package A with a simple package dependency on package B, we set the followingthree attributes of package A:
• DEPENDENCY_NAME: Each dependency must have a unique name within the package whichis used to identify it.
• DEPENDENCY_CONDITION: Expression describing what must be true for the dependency tobe satisfied. The syntax is: <package name> = UP, where <package name> is the packagebeing depended on (B in this case).
• DEPENDENCY_LOCATION: Describes where the condition must be satisfied. For SGeRAC, theonly possible value for this attribute is SAME_NODE.
82 SGeRAC Toolkit for Oracle RAC 10g or later

Simple package dependencies have the following features/restrictions:
• cmrunpkg will fail if the user attempts to start a package that has a dependency on anotherpackage that is not running. The package manager will not attempt to start a package if itsdependencies are not met. If multiple packages are specified to cmrunpkg, they will bestarted in dependency order. If the AUTO_RUN attribute is set to YES, the package managerwill start the packages automatically in dependency order.
• cmhaltpkg will fail if the user attempts to halt a package that has another package dependingon it that is still running. If multiple packages are specified to cmhaltpkg, they will be haltedin dependency order. During cmhaltcl or cmhaltnode, the package manager will haltpackages in dependency order.
• The output of cmviewcl shows the current state of each dependency on each node wherethe package is configured.
• A failover or multi-node package may define dependencies on multiple multi-node packages.Multiple failover or multi-node packages may depend on a multi-node package. Multi-leveldependencies can exist; for example, A depends on B which in turn depends on C, etc.
• If A depends on B and B fails, A (the appropriate instance, if A is of type multi-node) is halted.
Why use multi-node packages/simple package dependencies for OracleRAC integration
As mentioned previously, we want to use packages to manage the storage for Oracle Clusterwareand RAC database instances. To make the case for the use of the SGeRAC package managerenhancements, we need separate SGeRAC packages for Oracle Clusterware and the RAC databaseinstances.If we have a package only for Oracle Clusterware, then the storage for each RAC database inthe cluster as well as for Oracle Clusterware must be managed out of the Oracle Clusterwarepackage. This approach could potentially create both a single point of failure as well as amanagement bottleneck.For example, if the storage for one database fails to start up on a given node (for example, becausean SLVM volume group containing part of the database fails to start up), the Oracle Clusterwarepackage will fail to start up Oracle Clusterware, and consequently none of the RAC databaseinstances will start up on that node. For some types of failure (for example, the SLVM volume groupis corrupt), the failure to start up the databases could be cluster-wide.Another example: if we are in a CFS environment with a CFS for each RAC database, then weneed packages for each of the databases to properly model the dependency of a database instanceon its CFS. We cannot do this if there is only a package for Oracle Clusterware. Setting up thedependency as between Oracle Clusterware and each CFS will result in inappropriate systembehavior (for example, after shutting down a RAC database instance on a node, we will not beable to shut down its CFS on that node without shutting down Oracle Clusterware.)If ASM over SLVM or ASM over raw disk is used as storage for oracle RAC database, he canconfigure ASMDG MNP. This is a new enhancement to SGeRAC toolkit. This MNP decouples ASMDisk Group management from OC MNP Package and creates an independent MNP package forASM DG management.The VG for ASM Diskgroup will be specified in this new ASM DG Package configuration fileinstead of OC Package configuration file. This package will be responsible for activating the VGwhich contains the diskgroup for database and mounting and unmounting of the diskgroup. Thispackage will also monitor the state of diskgroup.Configuring this package is mandatory only in metrocluster environment. However, it is only arecommendation not mandatory in non metrocluster environment. You can configure CRS and RACMNP as suggested by the old toolkit.
Why use multi-node packages/simple package dependencies for Oracle RAC integration 83
An example of a bottleneck created if we only have a package for Oracle Clusterware is this: ifwe concentrate all storage management in the Oracle Clusterware package, then any time thereis a change in the storage configuration for one database (for example, an SLVM volume groupis added), we would have to modify the Oracle Clusterware package.These are the main arguments in favor of having separate packages for Oracle Clusterware andeach RAC database. But then the question arises: how do we ensure that these packages start andhalt in the proper order? Prior to version A.11.17, SG/SGeRAC did not provide a mechanism forpackage ordering.Two new features are introduced in SG/SGeRAC that help us solve this problem: MNPs and simplepackage dependencies. The combination of MNPs and simple package dependencies is a verygood fit for our problem of coordinating Oracle RAC and SGeRAC. We configure OracleClusterware as one MNP and each RAC database as another MNP and we set up the databaseMNPs to depend on the Oracle Clusterware MNP. This is the core concept of SGeRAC.Both Oracle Clusterware and the RAC database are multi-instance applications well suited to beingconfigured as MNPs. Further, the use of MNPs reduces the total package count and simplifiesSGeRAC package configuration and administration. Simple package dependencies enable us toenforce the correct start/stop order between the Oracle Clusterware MNP and RAC databaseMNPs.
Serviceguard Extension for RAC Toolkit operationIn this section, we first discuss how SGeRAC organizes the flow of control through the combinedstack. Then we deal with the interactions of the toolkit, first with Oracle RAC, and then with thestorage management subsystems.Figure 15 shows how the toolkit enables SGeRAC and Oracle Clusterware to work in harmonyand ensure proper sequencing between themselves and the resources they manage.It shows Oracle Clusterware and the resources it manages, via its Cluster Ready Services (CRS)component, in red and the SGeRAC package manager (PM) in blue, as well as the resources itmanages.Each resource manager starts up and shuts down the resources it manages, honoring thedependencies that it recognizes. The dependencies are shown in red or blue depending on whetherthey are Oracle Clusterware dependencies or SGeRAC dependencies.The storage packages (Oracle Clusterware Storage and Database Storage) and associateddependencies only exist for CFS, and the ASM instance and associated dependencies only existwhen ASM is being used.SGeRAC provides scripts for Oracle Clusterware MNP, ASMDG MNP, and RAC DB instanceMNP. The Oracle Clusterware MNP starts, stops, and checks the status of the Oracle Clusterware.The ASMDG MNP mounts dismounts and monitors the status of ASM Disk groups. The RAC DBinstance MNP starts, stops, and checks the status of the RAC instance. Oracle Clusterware andRAC instance auto-start have to be disabled (using Oracle specified commands and procedures,as previously discussed in this chapter).
84 SGeRAC Toolkit for Oracle RAC 10g or later

Figure 12 Resources managed by SGeRAC and Oracle Clusterware and their dependencies
Startup and shutdown of the combined Oracle RAC-SGeRAC stackThe combined stack is brought up in proper order by cmrunnode or cmruncl as follows.1. SGeRAC starts up.2. The SGeRAC package manager starts up Oracle Clusterware via the Oracle Clusterware
MNP, ensuring that the storage needed is made available first. This requires prior startup ofdisk group and mount point MNPs in the case of the storage needed by Oracle Clusterwarebeing managed by CFS.
3. On startup, Oracle Clusterware brings up the resources that it manages, that have been setto auto-start within the Oracle Clusterware registry. It brings up the node applications (this isan Oracle Clusterware term indicating resources configured per cluster node, such as theVirtual Internet Protocol address (VIP), Oracle listener, etc.) and the ASM instance if configured.Oracle Clusterware does not automatically bring up the RAC database instances (and theOracle services dependent on them) since we have turned off auto-start for the instances.
4. After the start of CRS, SGeRAC mounts the ASM disk groups which are configured for RACdatabases via ASMDG MNP packages.
5. Lastly, SGeRAC starts up the RAC database instance via the RAC database instance MNP,ensuring that the storage needed by it is made available first (this requires prior startup ofdisk group and mount point MNPs or ASM DG MNPs depending the kind of storage configuredfor RAC databases, either CFS or ASM disk groups respectively). It can do this since theSGeRAC dependency on the Oracle Clusterware MNP being up is met. So now the RACdatabase instances and dependent Oracle services start up.
The combined stack is brought down in proper order by cmhaltnode or cmhaltcl as follows.First, SGeRAC shuts down the RAC database via the RAC database instance MNP, followed byshutdown of the storage needed by it. This requires subsequent shutdown of mount point and diskgroup MNPs or ASMDG MNPs that are dependent on the particular RAC MNP in the case of thestorage needed by the RAC database being managed by CFS or ASM disk groups respectively.
Serviceguard Extension for RAC Toolkit operation 85
Next, SGeRAC package manager shuts down Oracle Clusterware via the Oracle ClusterwareMNP, followed by the storage needed by Oracle Clusterware (this requires subsequent shutdownof mount point and disk group MNPs in the case of the storage needed by Oracle Clusterwarebeing managed by CFS). It can do this since the dependent RAC database instance MNP is alreadydown. Before shutting itself down, Oracle Clusterware shuts down the ASM instance if configured,and then the node applications. Lastly, SGeRAC itself shuts down.Note that the stack can be brought up or down manually, package by package, by usingcmrunpkg/cmhaltpkg in the proper dependency order. To disable (partially or wholly) automaticstartup of the stack when a node joins the cluster, the AUTO_RUN attribute should be set to NO onthe packages that should not automatically be started.
How Serviceguard Extension for RAC starts, stops and checks Oracle ClusterwareHaving discussed how the toolkit manages the overall control flow of the combined stack duringstartup and shutdown, we will now discuss how the toolkit interacts with Oracle Clusterware andRAC database instances. We begin with the toolkit interaction with Oracle Clusterware.The MNP for Oracle Clusterware provides start and stop functions for Oracle Clusterware and hasa service for checking the status of Oracle Clusterware.The start function starts Oracle Clusterware using crsctl start crs. To ensure successfulstartup of Oracle Clusterware, the function, every 10 seconds, runs crsctl check until thecommand output indicates that the CSS, CRS, and EVM daemons are healthy. If Oracle Clusterwaredoes not start up successfully, the start function will execute the loop until the package start timerexpires, causing SGeRAC to fail the instance of the Oracle Clusterware MNP on that node.The stop function stops Oracle Clusterware using crsctl stop crs. Then, every 10 seconds,it runs ps until the command output indicates that the processes called evmd.bin, crsd.bin,and ocssd.bin no longer exist.The check function runs ps to determine process id of the process called ocssd.bin. Then, in acontinuous loop driven by a configurable timer, it uses kill -s 0 to check if this process exists.The other daemons are restarted by Oracle Clusterware, so they are not checked.When Oracle Clusterware MNP is in maintenance mode, the check function pauses the OracleClusterware health checking. Otherwise, if the check function finds that the process has died, itmeans that Oracle Clusterware has either failed or been inappropriately shut down—without usingcmhaltpkg. The service that invokes the function fails at this point and the SGeRAC packagemanager fails the corresponding Oracle Clusterware MNP instance.
How Serviceguard Extension for RAC Mounts, dismounts and checks ASM disk groupsWe discuss the toolkit interaction with the ASM disk groups.The MNP for the ASM diskgroups that are needed by RAC database provides mount and dismountfunctions for the ASM diskgroups and has a service for checking the status of those ASM diskgroupswhether they are mounted or not.The start function executes su to the Oracle software owner user id. It then determines the ASMinstance id on the current node for the specified diskgroup using crsctl status resourceora.asm. It is stored in variable and used for future references. Then it mounts the ASM diskgroups mentioned in that ASMDG MNP by connecting to ASM instance using sqlplus.The stop function executes su to the Oracle software owner user id. It unmounts the ASM diskgroupswhich are specified in that ASMDG MNP by connecting to ASM instance via sqlplus.The check function determines the status of the ASM disk groups that are mentioned in ASMDGMNP. When ASMDG MNP is in maintenance mode, the ASM diskgroup status checking is paused.Otherwise, in a continuous loop driven by a configurable timer, the check function monitors thestatus of the ASM diskgroups mentioned in that ASMDG MNP. If one or more ASM diskgroup isin a dismounted state, the check function will report failure—the ASM diskgroup is dismountedwithout using cmhaltpkg. The service that invokes the function fails at this point and the SGeRAC
86 SGeRAC Toolkit for Oracle RAC 10g or later
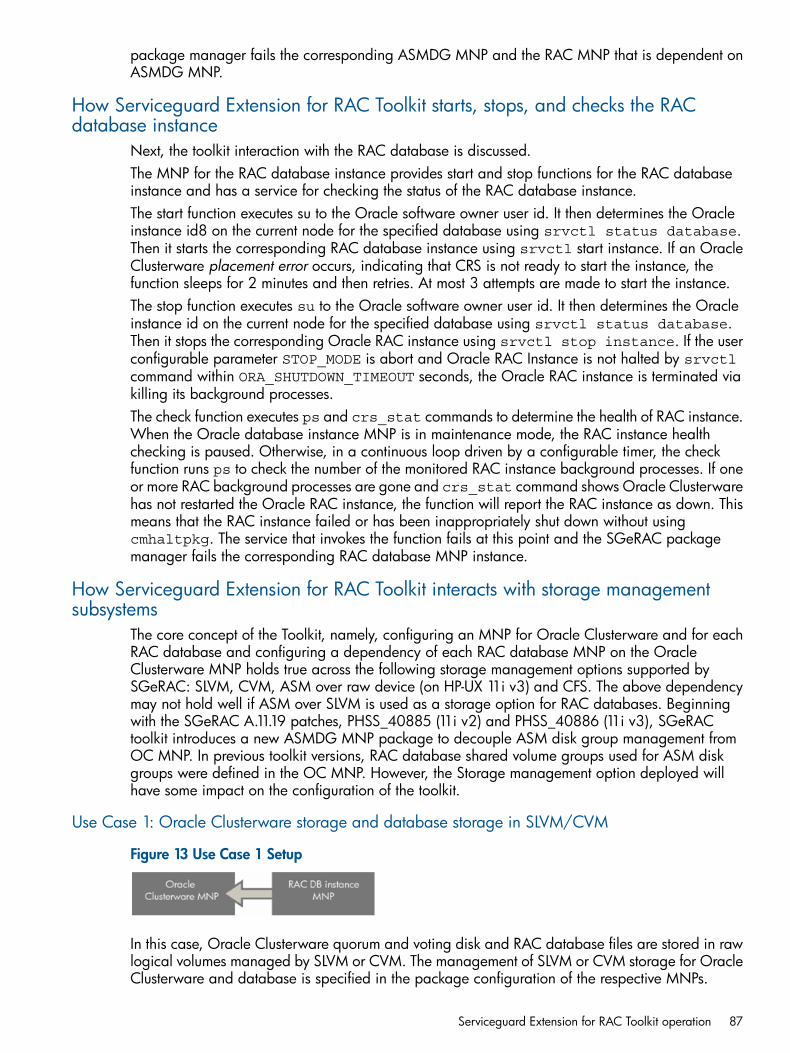
package manager fails the corresponding ASMDG MNP and the RAC MNP that is dependent onASMDG MNP.
How Serviceguard Extension for RAC Toolkit starts, stops, and checks the RACdatabase instance
Next, the toolkit interaction with the RAC database is discussed.The MNP for the RAC database instance provides start and stop functions for the RAC databaseinstance and has a service for checking the status of the RAC database instance.The start function executes su to the Oracle software owner user id. It then determines the Oracleinstance id8 on the current node for the specified database using srvctl status database.Then it starts the corresponding RAC database instance using srvctl start instance. If an OracleClusterware placement error occurs, indicating that CRS is not ready to start the instance, thefunction sleeps for 2 minutes and then retries. At most 3 attempts are made to start the instance.The stop function executes su to the Oracle software owner user id. It then determines the Oracleinstance id on the current node for the specified database using srvctl status database.Then it stops the corresponding Oracle RAC instance using srvctl stop instance. If the userconfigurable parameter STOP_MODE is abort and Oracle RAC Instance is not halted by srvctlcommand within ORA_SHUTDOWN_TIMEOUT seconds, the Oracle RAC instance is terminated viakilling its background processes.The check function executes ps and crs_stat commands to determine the health of RAC instance.When the Oracle database instance MNP is in maintenance mode, the RAC instance healthchecking is paused. Otherwise, in a continuous loop driven by a configurable timer, the checkfunction runs ps to check the number of the monitored RAC instance background processes. If oneor more RAC background processes are gone and crs_stat command shows Oracle Clusterwarehas not restarted the Oracle RAC instance, the function will report the RAC instance as down. Thismeans that the RAC instance failed or has been inappropriately shut down without usingcmhaltpkg. The service that invokes the function fails at this point and the SGeRAC packagemanager fails the corresponding RAC database MNP instance.
How Serviceguard Extension for RAC Toolkit interacts with storage managementsubsystems
The core concept of the Toolkit, namely, configuring an MNP for Oracle Clusterware and for eachRAC database and configuring a dependency of each RAC database MNP on the OracleClusterware MNP holds true across the following storage management options supported bySGeRAC: SLVM, CVM, ASM over raw device (on HP-UX 11i v3) and CFS. The above dependencymay not hold well if ASM over SLVM is used as a storage option for RAC databases. Beginningwith the SGeRAC A.11.19 patches, PHSS_40885 (11i v2) and PHSS_40886 (11i v3), SGeRACtoolkit introduces a new ASMDG MNP package to decouple ASM disk group management fromOC MNP. In previous toolkit versions, RAC database shared volume groups used for ASM diskgroups were defined in the OC MNP. However, the Storage management option deployed willhave some impact on the configuration of the toolkit.
Use Case 1: Oracle Clusterware storage and database storage in SLVM/CVM
Figure 13 Use Case 1 Setup
In this case, Oracle Clusterware quorum and voting disk and RAC database files are stored in rawlogical volumes managed by SLVM or CVM. The management of SLVM or CVM storage for OracleClusterware and database is specified in the package configuration of the respective MNPs.
Serviceguard Extension for RAC Toolkit operation 87

Use Case 2: Oracle Clusterware storage and database storage in CFS
Figure 14 Use Case 2 Setup
In this case, Oracle Clusterware quorum and registry device data is stored in files in a CFS. Oracledatabase files are also stored in a CFS.For each CFS used by Oracle Clusterware for its quorum and registry device data, there will bea dependency configured from the Oracle Clusterware MNP to the mount point MNP correspondingto that CFS. The mount point MNP has a dependency on the CFS system MNP (SMNP).Similarly, for each CFS used by the RAC database for database files, there will be a dependencyconfigured from the RAC database MNP to the mount point MNP corresponding to that CFS. Onlythe Oracle Clusterware and RAC DB Instance MNPs, and their dependencies, in this use case areto be configured and managed as described in this chapter. The rest of the multi-node packagesshown for this use case are created via the CFS subsystem. Configuration and administrationprocedures for these MNPs are specified in the SGeRAC user guide.
Use case 3: Database storage in ASM over SLVM
Figure 15 Use Case 3 Setup
The above diagram can be considered as one use case. Here we have one Oracle ClusterwareMNP, three ASMDG MNP, and four RAC database MNP. All the ASMDG MNPs should be made
88 SGeRAC Toolkit for Oracle RAC 10g or later

dependent on Oracle Clusterware MNP. Disk groups that are exclusively used by a RAC DB shouldbe managed in separate ASM DG MNP. If different RAC Database uses different ASM Disk groupsthen those, ASM DGs should not be configured in a single ASMDG MNP. As RAC DB InstanceMNP 3 and RAC DB Instance MNP 4 use completely different ASM diskgroups, they are madedependent on their respective ASMDG MNP(ASMDG MNP 2, ASMDG MNP 3). However, If twoRAC DB use same set of ASM Disk groups, then those ASM DG can be configured in a singleASMDG MNP. Then, both the RAC MNP is made dependent on the ASMDG MNP. RAC DBInstance MNP 1, RAC DB Instance MNP 2 makes use of same set of ASM diskgroups so bothMNPs are made dependent on ASMDG MNP 1.
How to create a Serviceguard Extension for RAC modular packageIn SGeRAC A.11.19, SGeRAC introduces modular package format. With this feature, the usercan use the single SGeRAC package interface to manage SGeRAC Toolkit to simplify Toolkitmanagement. For more information see, “Support for the SGeRAC Toolkit” (page 92) section.
How Serviceguard Extension for RAC Toolkit maintenance mode worksAs of SGeRAC A.11.18, SGeRAC Toolkit supports the maintenance mode, so the user can maintainOracle Clusterware and Oracle database instance without halting Oracle Clusterware MNP andOracle database instance MNP. Beginning with the SGeRAC A.11.19 patches, PHSS_40885(11i v2) and PHSS_40886 (11i v3), SGeRAC toolkit also supports the maintenance mode ofASMDG MNP—the user can maintain ASM DG included in ASMDG MNP without halting theMNP. The MAINTENANCE_FLAG parameter is specified in the respective toolkit configuration files.
Use Case 1: Performing maintenance with Oracle ClusterwareOracle Clusterware MNP, ASMDG MNP (if configured) and the Oracle database instance MNPgo into maintenance mode.1. Make sure the MAINTENANCE_FLAG parameter for Oracle Clusterware MNP, is set to yes
when these packages are created. If not, shutdown the MNPs first, set the MAINTENANCE_FLAGto yes, and then restart MNPs.
2. On the maintenance node, create a debug file called oc.debug in the Oracle ClusterwareMNP working directory. All the three MNPs on this node will go into maintenance mode. Themaintenance mode message will appear in the Toolkit package log files, e.g. “OC MNPpausing Oracle Clusterware checking and entering maintenance mode.”
3. The user can maintain the Oracle Clusterware, ASM disk groups, and Oracle Databaseinstance on that node while Toolkit package is still running.
4. After the maintenance work is completed, the user can remove the created oc.debug in step2 to bring the Toolkit package out of maintenance mode and resume normal monitoring byServiceguard. The Toolkit in maintenance mode message will appear in OC MNP packagelog files, e.g. “Starting Oracle Clusterware checking again after maintenance.”
Use Case 2: performing maintenance with ASM disk groupsOnly the Oracle ASMDG MNP goes into maintenance mode.1. Make sure the MAINTENANCE_FLAG parameter for ASMDG MNP is set to yes when this
package is created. If not, shutdown this MNP first, set the MAINTENANCE_FLAG to yes, andthen restart the MNP.
2. On the maintenance node, create a debug file called asm_dg.debug file in the OracleASMDG MNP working directory. The Oracle ASMDG MNP on this node will go intomaintenance mode. The maintenance mode message will appear in ASMDG MNP packagelog files, e.g. “ASM DG MNP pausing ASM DG instance checking and entering maintenancemode.”
Serviceguard Extension for RAC Toolkit operation 89
3. The user can maintain the Oracle ASM disk groups on that node while Oracle ASMDG MNPpackage is still running.
4. After the maintenance work is completed, the user can remove the created asm_dg.debugin step 2 to bring the Oracle ASMDG MNP package out of maintenance mode to resumenormal monitoring by Serviceguard. The maintenance mode message will appear in the Oracledatabase instance package log files, e.g. “Starting ASM DG MNP checking again aftermaintenance.”
Use Case 3: performing maintenance with Oracle RAC database instance1. Make sure the MAINTENANCE_FLAG parameter for Oracle database instance MNP is set to
yes when this packages is created. If not, shutdown this first, set the MAINTENANCE_FLAG toyes, and then restart MNP.
2. On the maintenance node, create a debug file called rac.debug file in the Oracle databaseinstance MNP working directory. The Oracle database instance MNP on this node will gointo maintenance mode. The maintenance mode message will appear in Oracle databaseinstance package log files, e.g. “RAC MNP pausing RAC instance checking and enteringmaintenance mode.”
3. The user can maintain the Oracle database instance on that node while Oracle databaseinstance package is still running.
4. After the maintenance work is completed, the user can remove the created rac.debug instep 2 to bring the Oracle database instance package out of maintenance mode to resumenormal monitoring by Serviceguard. The maintenance mode message will appear in the Oracledatabase instance package log files, e.g. “Starting RAC MNP checking again aftermaintenance.”
Serviceguard Extension for RAC Toolkit internal file structureThere is a set of files in SGeRAC that deal with SGeRAC specific configuration and logic, and adifferent set of files that deal with Oracle Clusterware, ASMDG MNP, and RAC specific logic,with a bridge in between.On the SGeRAC-specific side is the MNP ASCII configuration file and the control script (for legacypackages), or module script (for modular packages). The ASCII configuration file parameters arestored in the SGeRAC configuration database, at cmapplyconf time, and are used by the packagemanager in its actions on behalf of this package. The control script or module script invokes theOracle Clusterware specific functions for start, stop, and check through the bridge script.On the Oracle Clusterware specific side, there is a configuration file (oc.conf) that is sourcedby the start, stop and check script files (oc.sh and oc.check). The bridge script(toolkit_oc.sh) allows the start, stop, and check calls to remain unaffected by changes in theOracle Clusterware specific scripts. A similar set of files deals with RAC instance specific logic.Figure 19 shows the internal file structure of the toolkit for Oracle Clusterware. Figure 20 showsthe similar internal file structure of the toolkit for the ASMDG MNP. Figure 21 shows the similarinternal file structure of the toolkit for the RAC DB instance.
90 SGeRAC Toolkit for Oracle RAC 10g or later

Figure 16 Internal structure of SGeRAC for Oracle Clusterware
Figure 17 Internal structure of SGeRAC for ASMDG MNP
Serviceguard Extension for RAC Toolkit internal file structure 91
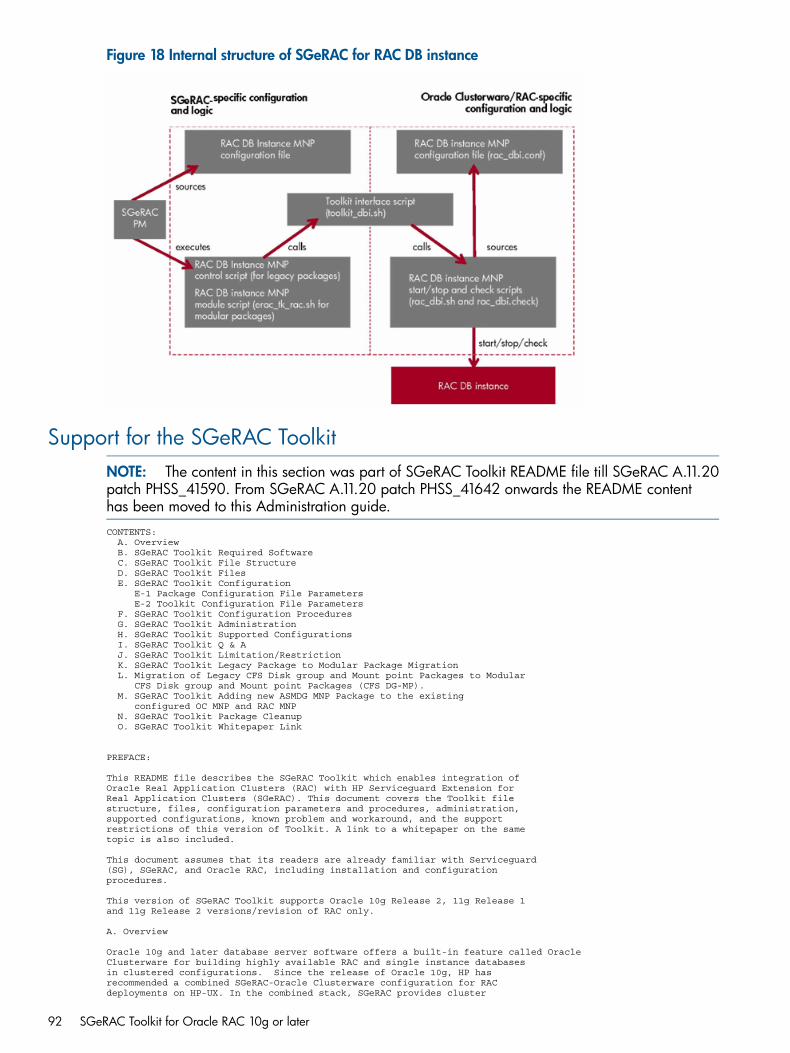
Figure 18 Internal structure of SGeRAC for RAC DB instance
Support for the SGeRAC ToolkitNOTE: The content in this section was part of SGeRAC Toolkit README file till SGeRAC A.11.20patch PHSS_41590. From SGeRAC A.11.20 patch PHSS_41642 onwards the README contenthas been moved to this Administration guide.CONTENTS: A. Overview B. SGeRAC Toolkit Required Software C. SGeRAC Toolkit File Structure D. SGeRAC Toolkit Files E. SGeRAC Toolkit Configuration E-1 Package Configuration File Parameters E-2 Toolkit Configuration File Parameters F. SGeRAC Toolkit Configuration Procedures G. SGeRAC Toolkit Administration H. SGeRAC Toolkit Supported Configurations I. SGeRAC Toolkit Q & A J. SGeRAC Toolkit Limitation/Restriction K. SGeRAC Toolkit Legacy Package to Modular Package Migration L. Migration of Legacy CFS Disk group and Mount point Packages to Modular CFS Disk group and Mount point Packages (CFS DG-MP). M. SGeRAC Toolkit Adding new ASMDG MNP Package to the existing configured OC MNP and RAC MNP N. SGeRAC Toolkit Package Cleanup O. SGeRAC Toolkit Whitepaper Link
PREFACE:
This README file describes the SGeRAC Toolkit which enables integration of Oracle Real Application Clusters (RAC) with HP Serviceguard Extension for Real Application Clusters (SGeRAC). This document covers the Toolkit file structure, files, configuration parameters and procedures, administration, supported configurations, known problem and workaround, and the support restrictions of this version of Toolkit. A link to a whitepaper on the same topic is also included.
This document assumes that its readers are already familiar with Serviceguard(SG), SGeRAC, and Oracle RAC, including installation and configuration procedures.
This version of SGeRAC Toolkit supports Oracle 10g Release 2, 11g Release 1 and 11g Release 2 versions/revision of RAC only.
A. Overview
Oracle 10g and later database server software offers a built-in feature called Oracle Clusterware for building highly available RAC and single instance databases in clustered configurations. Since the release of Oracle 10g, HP has recommended a combined SGeRAC-Oracle Clusterware configuration for RAC deployments on HP-UX. In the combined stack, SGeRAC provides cluster
92 SGeRAC Toolkit for Oracle RAC 10g or later
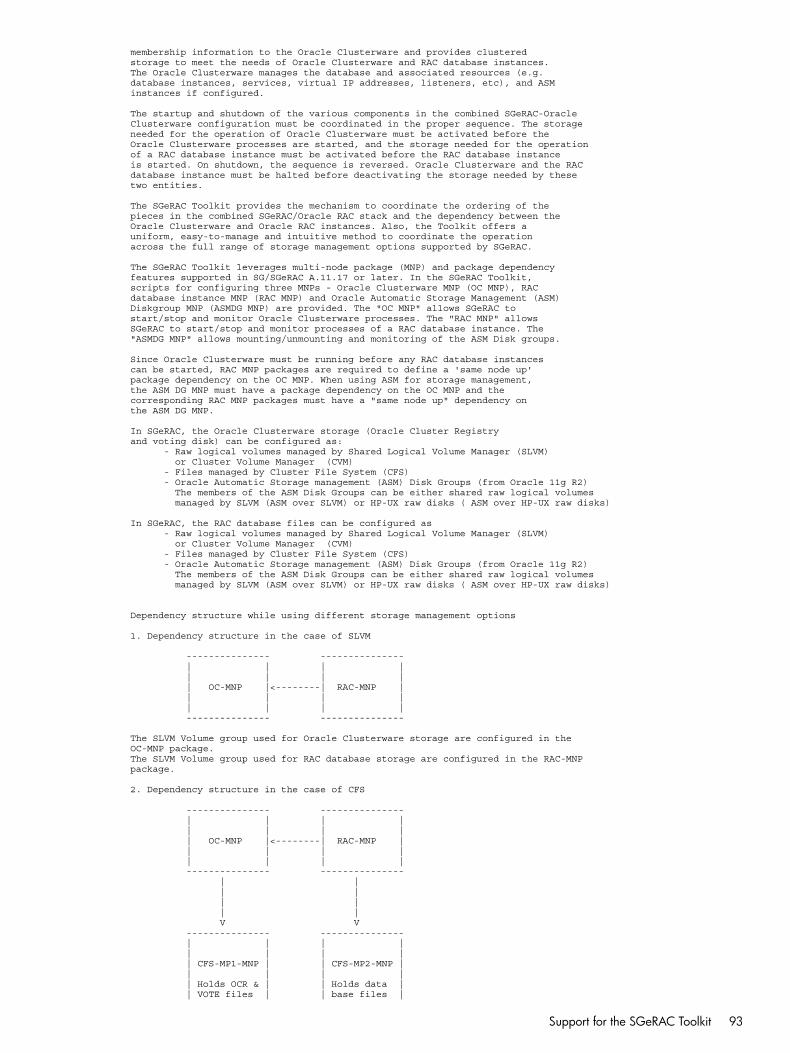
membership information to the Oracle Clusterware and provides clustered storage to meet the needs of Oracle Clusterware and RAC database instances. The Oracle Clusterware manages the database and associated resources (e.g. database instances, services, virtual IP addresses, listeners, etc), and ASM instances if configured.
The startup and shutdown of the various components in the combined SGeRAC-Oracle Clusterware configuration must be coordinated in the proper sequence. The storage needed for the operation of Oracle Clusterware must be activated before the Oracle Clusterware processes are started, and the storage needed for the operation of a RAC database instance must be activated before the RAC database instance is started. On shutdown, the sequence is reversed. Oracle Clusterware and the RAC database instance must be halted before deactivating the storage needed by thesetwo entities.
The SGeRAC Toolkit provides the mechanism to coordinate the ordering of the pieces in the combined SGeRAC/Oracle RAC stack and the dependency between the Oracle Clusterware and Oracle RAC instances. Also, the Toolkit offers a uniform, easy-to-manage and intuitive method to coordinate the operation across the full range of storage management options supported by SGeRAC.
The SGeRAC Toolkit leverages multi-node package (MNP) and package dependency features supported in SG/SGeRAC A.11.17 or later. In the SGeRAC Toolkit, scripts for configuring three MNPs - Oracle Clusterware MNP (OC MNP), RAC database instance MNP (RAC MNP) and Oracle Automatic Storage Management (ASM) Diskgroup MNP (ASMDG MNP) are provided. The "OC MNP" allows SGeRAC to start/stop and monitor Oracle Clusterware processes. The "RAC MNP" allows SGeRAC to start/stop and monitor processes of a RAC database instance. The "ASMDG MNP" allows mounting/unmounting and monitoring of the ASM Disk groups.
Since Oracle Clusterware must be running before any RAC database instancescan be started, RAC MNP packages are required to define a 'same node up' package dependency on the OC MNP. When using ASM for storage management, the ASM DG MNP must have a package dependency on the OC MNP and the corresponding RAC MNP packages must have a "same node up" dependency on the ASM DG MNP.
In SGeRAC, the Oracle Clusterware storage (Oracle Cluster Registry and voting disk) can be configured as: - Raw logical volumes managed by Shared Logical Volume Manager (SLVM) or Cluster Volume Manager (CVM) - Files managed by Cluster File System (CFS) - Oracle Automatic Storage management (ASM) Disk Groups (from Oracle 11g R2) The members of the ASM Disk Groups can be either shared raw logical volumes managed by SLVM (ASM over SLVM) or HP-UX raw disks ( ASM over HP-UX raw disks)
In SGeRAC, the RAC database files can be configured as - Raw logical volumes managed by Shared Logical Volume Manager (SLVM) or Cluster Volume Manager (CVM) - Files managed by Cluster File System (CFS) - Oracle Automatic Storage management (ASM) Disk Groups (from Oracle 11g R2) The members of the ASM Disk Groups can be either shared raw logical volumes managed by SLVM (ASM over SLVM) or HP-UX raw disks ( ASM over HP-UX raw disks)
Dependency structure while using different storage management options
1. Dependency structure in the case of SLVM
--------------- --------------- | | | | | | | | | OC-MNP |<--------| RAC-MNP | | | | | | | | | --------------- ---------------
The SLVM Volume group used for Oracle Clusterware storage are configured in the OC-MNP package.The SLVM Volume group used for RAC database storage are configured in the RAC-MNPpackage.
2. Dependency structure in the case of CFS
--------------- --------------- | | | | | | | | | OC-MNP |<--------| RAC-MNP | | | | | | | | | --------------- --------------- | | | | | | | | V V --------------- --------------- | | | | | | | | | CFS-MP1-MNP | | CFS-MP2-MNP | | | | | | Holds OCR & | | Holds data | | VOTE files | | base files |
Support for the SGeRAC Toolkit 93

--------------- --------------- | | | | | | V V --------------- --------------- | | | | | | | | | CFS-DG1-MNP | | CFS-DG2-MNP | | | | | | | | | --------------- --------------- | | | | | | V V --------------------------------------- | | | | | SG-CFS-pkg | | | | | ---------------------------------------
3. Dependency structure in the case of ASM over SLVM and ASM over HP-UX raw disks.
--------------- | | | | | RAC-MNP | | | | | --------------- | | | V --------------- | | | | | ASMDG-MNP | | | | | --------------- | | | V --------------- | | | | | OC-MNP | | | | | ---------------
In case of ASM over SLVM
The SLVM Volume groups used for Oracle Clusterware storage are configured in the OC-MNP package.
The SLVM Volume groups used for RAC database storage are configured in the ASMDG MNP package.
In case of ASM over HP-UX raw disks
Do not specify any HP-UX raw disks information either in OC-MNP package or in ASMDG MNP package.
B. SGeRAC Toolkit Required Software
To configure and run this version of SGeRAC Toolkit, the following software is required:
- HP-UX 11i v2 or HP-UX 11i v3 - SG and SGeRAC A.11.19 or later - Oracle 10g R2 RAC or 11g R1 RAC or 11g R2 RAC - CFS or CVM 5.0.1, or CFS or CVM 5.1 SP1 (if CVM/CFS is used for storage management) - The Oracle patches p7225720 and p7330611 must be installed, if you want to use the ASMDG MNP feature. An additional patch, p6967375 must be installed if you are using RAC 11gR1 on a PA-RISC system. In the case of 11gR2 installations no Oracle patches are required.
NOTE: Oracle patches p7225720 and p7330611 are not availabe on Oracle RAC 10.2.0.4 for IA. Upgrade to Oracle RAC 10.2.0.5 to use ASMDG MNP feature on 10.2.0.4 on IA.
C. SGeRAC Toolkit File Structure
From SG/SGeRAC version A.11.19 and later, the SGeRAC Toolkit uses Modular Packages to implement OC MNP, ASMDG MNP and RAC MNP.
94 SGeRAC Toolkit for Oracle RAC 10g or later
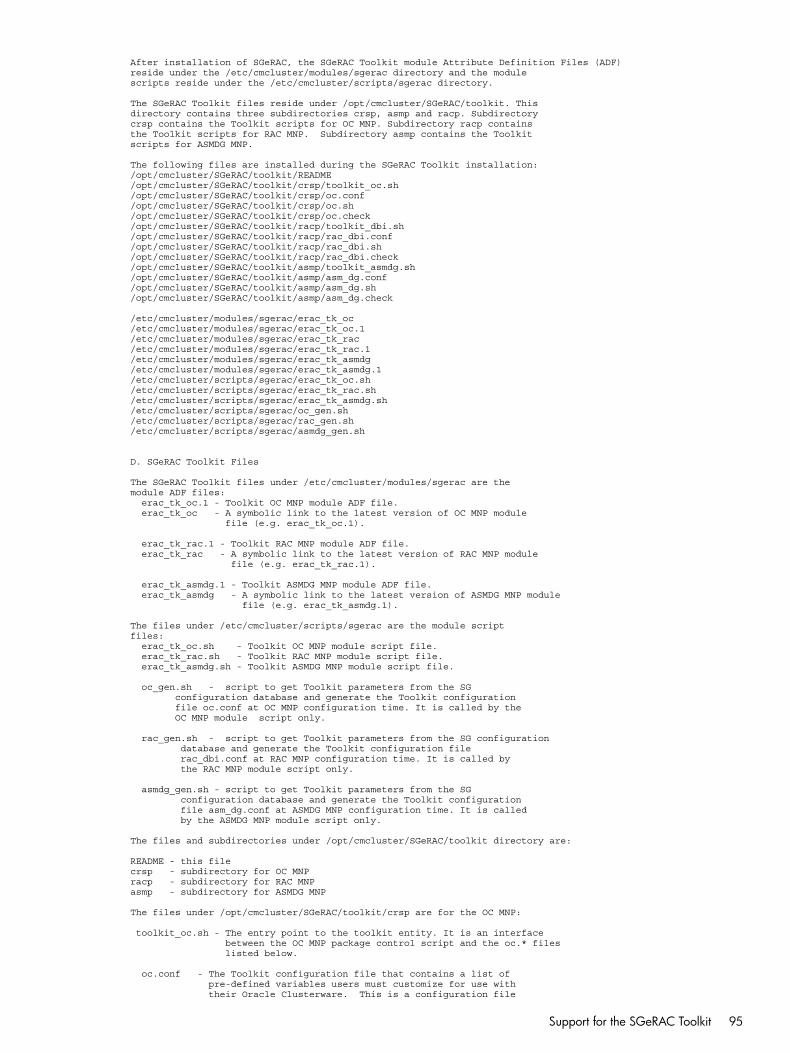
After installation of SGeRAC, the SGeRAC Toolkit module Attribute Definition Files (ADF) reside under the /etc/cmcluster/modules/sgerac directory and the module scripts reside under the /etc/cmcluster/scripts/sgerac directory.
The SGeRAC Toolkit files reside under /opt/cmcluster/SGeRAC/toolkit. This directory contains three subdirectories crsp, asmp and racp. Subdirectory crsp contains the Toolkit scripts for OC MNP. Subdirectory racp contains the Toolkit scripts for RAC MNP. Subdirectory asmp contains the Toolkit scripts for ASMDG MNP.
The following files are installed during the SGeRAC Toolkit installation: /opt/cmcluster/SGeRAC/toolkit/README /opt/cmcluster/SGeRAC/toolkit/crsp/toolkit_oc.sh /opt/cmcluster/SGeRAC/toolkit/crsp/oc.conf /opt/cmcluster/SGeRAC/toolkit/crsp/oc.sh /opt/cmcluster/SGeRAC/toolkit/crsp/oc.check /opt/cmcluster/SGeRAC/toolkit/racp/toolkit_dbi.sh /opt/cmcluster/SGeRAC/toolkit/racp/rac_dbi.conf /opt/cmcluster/SGeRAC/toolkit/racp/rac_dbi.sh /opt/cmcluster/SGeRAC/toolkit/racp/rac_dbi.check /opt/cmcluster/SGeRAC/toolkit/asmp/toolkit_asmdg.sh /opt/cmcluster/SGeRAC/toolkit/asmp/asm_dg.conf /opt/cmcluster/SGeRAC/toolkit/asmp/asm_dg.sh /opt/cmcluster/SGeRAC/toolkit/asmp/asm_dg.check
/etc/cmcluster/modules/sgerac/erac_tk_oc /etc/cmcluster/modules/sgerac/erac_tk_oc.1 /etc/cmcluster/modules/sgerac/erac_tk_rac /etc/cmcluster/modules/sgerac/erac_tk_rac.1 /etc/cmcluster/modules/sgerac/erac_tk_asmdg /etc/cmcluster/modules/sgerac/erac_tk_asmdg.1 /etc/cmcluster/scripts/sgerac/erac_tk_oc.sh /etc/cmcluster/scripts/sgerac/erac_tk_rac.sh /etc/cmcluster/scripts/sgerac/erac_tk_asmdg.sh /etc/cmcluster/scripts/sgerac/oc_gen.sh /etc/cmcluster/scripts/sgerac/rac_gen.sh /etc/cmcluster/scripts/sgerac/asmdg_gen.sh
D. SGeRAC Toolkit Files
The SGeRAC Toolkit files under /etc/cmcluster/modules/sgerac are the module ADF files: erac_tk_oc.1 - Toolkit OC MNP module ADF file. erac_tk_oc - A symbolic link to the latest version of OC MNP module file (e.g. erac_tk_oc.1).
erac_tk_rac.1 - Toolkit RAC MNP module ADF file. erac_tk_rac - A symbolic link to the latest version of RAC MNP module file (e.g. erac_tk_rac.1).
erac_tk_asmdg.1 - Toolkit ASMDG MNP module ADF file. erac_tk_asmdg - A symbolic link to the latest version of ASMDG MNP module file (e.g. erac_tk_asmdg.1).
The files under /etc/cmcluster/scripts/sgerac are the module script files: erac_tk_oc.sh - Toolkit OC MNP module script file. erac_tk_rac.sh - Toolkit RAC MNP module script file. erac_tk_asmdg.sh - Toolkit ASMDG MNP module script file.
oc_gen.sh - script to get Toolkit parameters from the SG configuration database and generate the Toolkit configuration file oc.conf at OC MNP configuration time. It is called by the OC MNP module script only.
rac_gen.sh - script to get Toolkit parameters from the SG configuration database and generate the Toolkit configuration file rac_dbi.conf at RAC MNP configuration time. It is called by the RAC MNP module script only.
asmdg_gen.sh - script to get Toolkit parameters from the SG configuration database and generate the Toolkit configuration file asm_dg.conf at ASMDG MNP configuration time. It is called by the ASMDG MNP module script only.
The files and subdirectories under /opt/cmcluster/SGeRAC/toolkit directory are:
README - this file crsp - subdirectory for OC MNP racp - subdirectory for RAC MNP asmp - subdirectory for ASMDG MNP
The files under /opt/cmcluster/SGeRAC/toolkit/crsp are for the OC MNP:
toolkit_oc.sh - The entry point to the toolkit entity. It is an interface between the OC MNP package control script and the oc.* files listed below.
oc.conf - The Toolkit configuration file that contains a list of pre-defined variables users must customize for use with their Oracle Clusterware. This is a configuration file
Support for the SGeRAC Toolkit 95
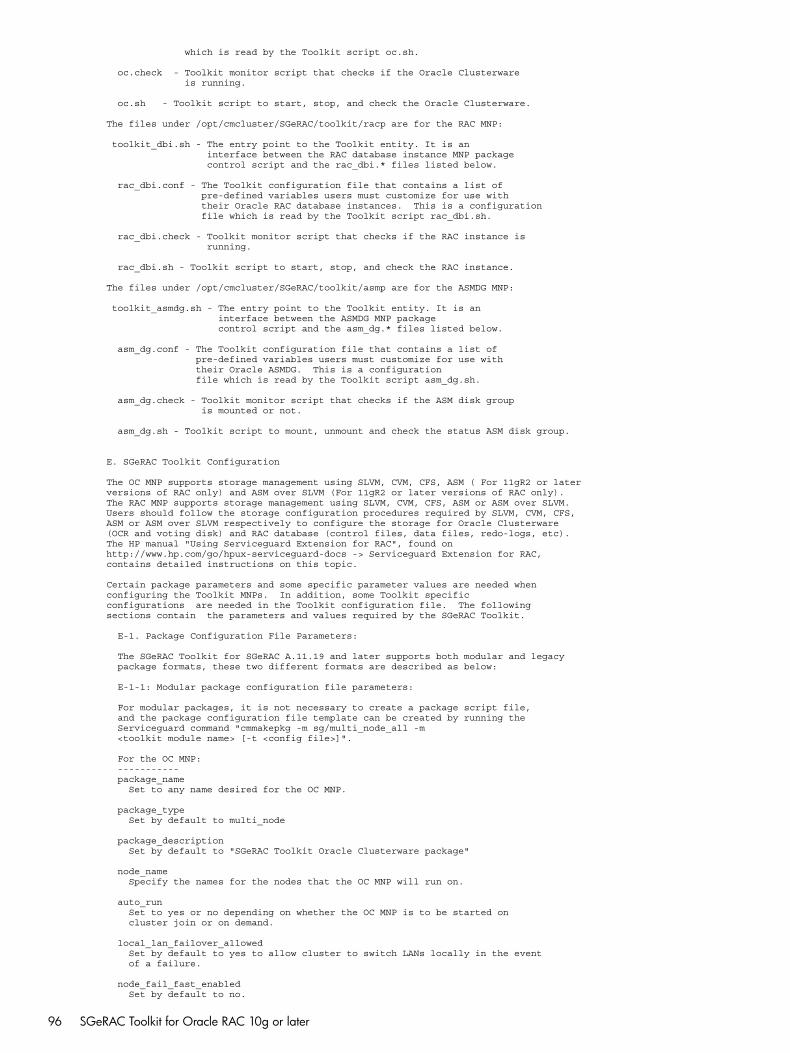
which is read by the Toolkit script oc.sh.
oc.check - Toolkit monitor script that checks if the Oracle Clusterware is running.
oc.sh - Toolkit script to start, stop, and check the Oracle Clusterware.
The files under /opt/cmcluster/SGeRAC/toolkit/racp are for the RAC MNP:
toolkit_dbi.sh - The entry point to the Toolkit entity. It is an interface between the RAC database instance MNP package control script and the rac_dbi.* files listed below.
rac_dbi.conf - The Toolkit configuration file that contains a list of pre-defined variables users must customize for use with their Oracle RAC database instances. This is a configuration file which is read by the Toolkit script rac_dbi.sh.
rac_dbi.check - Toolkit monitor script that checks if the RAC instance is running.
rac_dbi.sh - Toolkit script to start, stop, and check the RAC instance.
The files under /opt/cmcluster/SGeRAC/toolkit/asmp are for the ASMDG MNP:
toolkit_asmdg.sh - The entry point to the Toolkit entity. It is an interface between the ASMDG MNP package control script and the asm_dg.* files listed below.
asm_dg.conf - The Toolkit configuration file that contains a list of pre-defined variables users must customize for use with their Oracle ASMDG. This is a configuration file which is read by the Toolkit script asm_dg.sh.
asm_dg.check - Toolkit monitor script that checks if the ASM disk group is mounted or not.
asm_dg.sh - Toolkit script to mount, unmount and check the status ASM disk group.
E. SGeRAC Toolkit Configuration
The OC MNP supports storage management using SLVM, CVM, CFS, ASM ( For 11gR2 or later versions of RAC only) and ASM over SLVM (For 11gR2 or later versions of RAC only). The RAC MNP supports storage management using SLVM, CVM, CFS, ASM or ASM over SLVM. Users should follow the storage configuration procedures required by SLVM, CVM, CFS, ASM or ASM over SLVM respectively to configure the storage for Oracle Clusterware(OCR and voting disk) and RAC database (control files, data files, redo-logs, etc). The HP manual "Using Serviceguard Extension for RAC", found on http://www.hp.com/go/hpux-serviceguard-docs -> Serviceguard Extension for RAC, contains detailed instructions on this topic.
Certain package parameters and some specific parameter values are needed when configuring the Toolkit MNPs. In addition, some Toolkit specific configurations are needed in the Toolkit configuration file. The following sections contain the parameters and values required by the SGeRAC Toolkit.
E-1. Package Configuration File Parameters:
The SGeRAC Toolkit for SGeRAC A.11.19 and later supports both modular and legacy package formats, these two different formats are described as below:
E-1-1: Modular package configuration file parameters:
For modular packages, it is not necessary to create a package script file, and the package configuration file template can be created by running the Serviceguard command "cmmakepkg -m sg/multi_node_all -m <toolkit module name> [-t <config file>]".
For the OC MNP: ----------- package_name Set to any name desired for the OC MNP.
package_type Set by default to multi_node
package_description Set by default to "SGeRAC Toolkit Oracle Clusterware package"
node_name Specify the names for the nodes that the OC MNP will run on.
auto_run Set to yes or no depending on whether the OC MNP is to be started on cluster join or on demand.
local_lan_failover_allowed Set by default to yes to allow cluster to switch LANs locally in the event of a failure.
node_fail_fast_enabled Set by default to no.
96 SGeRAC Toolkit for Oracle RAC 10g or later
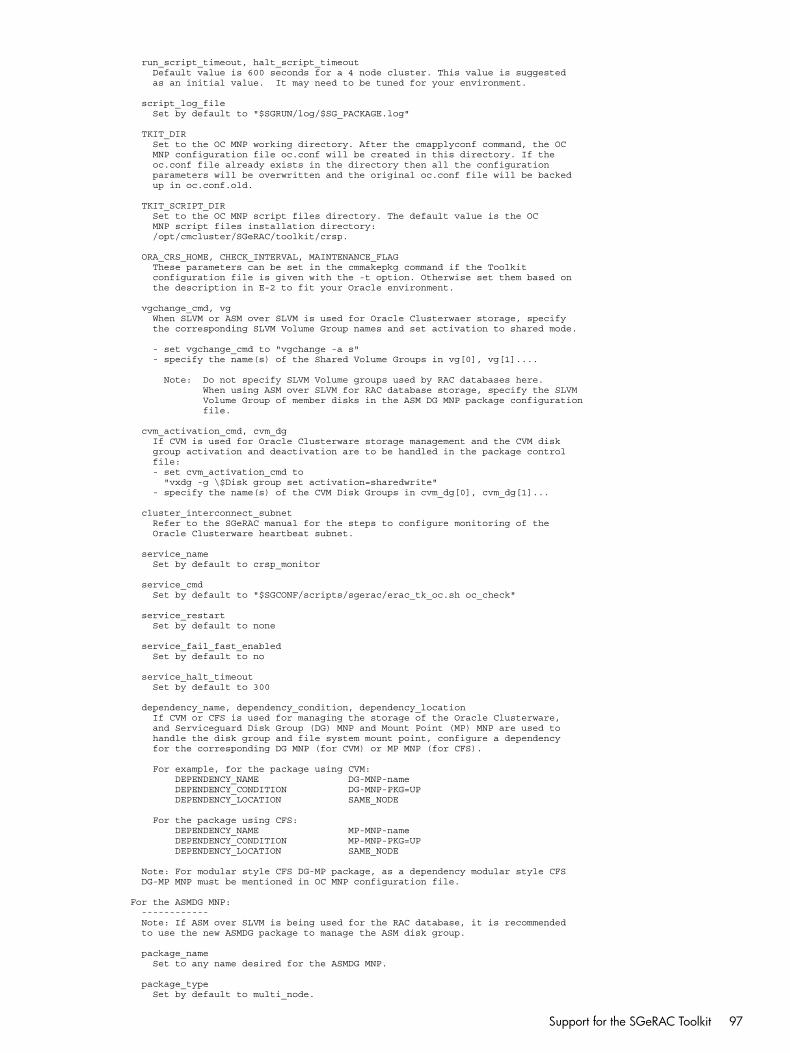
run_script_timeout, halt_script_timeout Default value is 600 seconds for a 4 node cluster. This value is suggested as an initial value. It may need to be tuned for your environment.
script_log_file Set by default to "$SGRUN/log/$SG_PACKAGE.log"
TKIT_DIR Set to the OC MNP working directory. After the cmapplyconf command, the OC MNP configuration file oc.conf will be created in this directory. If the oc.conf file already exists in the directory then all the configuration parameters will be overwritten and the original oc.conf file will be backed up in oc.conf.old.
TKIT_SCRIPT_DIR Set to the OC MNP script files directory. The default value is the OC MNP script files installation directory: /opt/cmcluster/SGeRAC/toolkit/crsp.
ORA_CRS_HOME, CHECK_INTERVAL, MAINTENANCE_FLAG These parameters can be set in the cmmakepkg command if the Toolkit configuration file is given with the -t option. Otherwise set them based on the description in E-2 to fit your Oracle environment.
vgchange_cmd, vg When SLVM or ASM over SLVM is used for Oracle Clusterwaer storage, specify the corresponding SLVM Volume Group names and set activation to shared mode.
- set vgchange_cmd to "vgchange -a s" - specify the name(s) of the Shared Volume Groups in vg[0], vg[1]....
Note: Do not specify SLVM Volume groups used by RAC databases here. When using ASM over SLVM for RAC database storage, specify the SLVM Volume Group of member disks in the ASM DG MNP package configuration file.
cvm_activation_cmd, cvm_dg If CVM is used for Oracle Clusterware storage management and the CVM disk group activation and deactivation are to be handled in the package control file: - set cvm_activation_cmd to "vxdg -g \$Disk group set activation=sharedwrite" - specify the name(s) of the CVM Disk Groups in cvm_dg[0], cvm_dg[1]...
cluster_interconnect_subnet Refer to the SGeRAC manual for the steps to configure monitoring of the Oracle Clusterware heartbeat subnet.
service_name Set by default to crsp_monitor
service_cmd Set by default to "$SGCONF/scripts/sgerac/erac_tk_oc.sh oc_check"
service_restart Set by default to none
service_fail_fast_enabled Set by default to no
service_halt_timeout Set by default to 300
dependency_name, dependency_condition, dependency_location If CVM or CFS is used for managing the storage of the Oracle Clusterware, and Serviceguard Disk Group (DG) MNP and Mount Point (MP) MNP are used to handle the disk group and file system mount point, configure a dependency for the corresponding DG MNP (for CVM) or MP MNP (for CFS).
For example, for the package using CVM: DEPENDENCY_NAME DG-MNP-name DEPENDENCY_CONDITION DG-MNP-PKG=UP DEPENDENCY_LOCATION SAME_NODE
For the package using CFS: DEPENDENCY_NAME MP-MNP-name DEPENDENCY_CONDITION MP-MNP-PKG=UP DEPENDENCY_LOCATION SAME_NODE
Note: For modular style CFS DG-MP package, as a dependency modular style CFS DG-MP MNP must be mentioned in OC MNP configuration file.
For the ASMDG MNP: ------------ Note: If ASM over SLVM is being used for the RAC database, it is recommended to use the new ASMDG package to manage the ASM disk group.
package_name Set to any name desired for the ASMDG MNP.
package_type Set by default to multi_node.
Support for the SGeRAC Toolkit 97

package_description Set by default to "SGeRAC Toolkit Oracle ASMDG package"
node_name Specify the names for the nodes that the ASMDG MNP will run on.
auto_run Set to yes or no depending on whether the ASMDG MNP is to be started on cluster join or on demand.
local_lan_failover_allowed Set by default to yes to allow the cluster to switch LANs locally in the event of a failure.
node_fail_fast_enabled Set by default to no.
script_log_file Set by default to "$SGRUN/log/$SG_PACKAGE.log"
TKIT_DIR Set to the ASMDG MNP working directory. After the cmapplyconf command, the ASMDG MNP configuration file asm_dg.conf will be created in this directory. If The asm_dg.conf file already exists in the directory then all the configuration parameters will be overwritten, and the original asm_dg.conf file will be backed up in asm_dg.conf.old.
TKIT_SCRIPT_DIR Set to the ASMDG MNP script files directory. The default value is the ASMDG MNP script files installation directory: /opt/cmcluster/SGeRAC/toolkit/asmp
ORACLE_HOME, CHECK_INTERVAL...MAINTENANCE_FLAG These parameters can be set in the cmmakepkg command if the Toolkit configuration file is given with -t option. Otherwise set them based on the description in E-2 to fit your Oracle environment.
ORA_CRS_HOME, OC_TKIT_DIR It is not required to set these values, the cmapplyconf command will automatically set them at package configuration time based on the setting in the OC MNP. Set by default to "<set by cmapplyconf>". Refer to E-2 for the descriptions.
vgchange_cmd, vg - set vgchange_cmd to "vgchange -a s". When using ASM over HP-UX raw disks, ignore this step. - specify the name(s) of the Shared Volume Groups in vg[0], vg[1]... When using ASM over HP-UX raw disks, ignore this step.
run_script_timeout, halt_script_timeout Default value is 600 seconds for a 4 node cluster. This value is suggested as an initial value. It may need to be tuned for your environment.
service_name Set by default to asmdg_monitor, if multiple ASMDG MNPs are configured, you need to set a different service_name for each ASMDG MNP.
service_cmd Set by default to "$SGCONF/scripts/sgerac/erac_tk_asmdg.sh asmdg_check"
service_restart Set by default to none
service_fail_fast_enabled Set by default to no
service_halt_timeout Default value is 300
dependency_name, dependency_condition, dependency_location Configure a dependency on the OC MNP.
For example, DEPENDENCY_NAME OC-MNP-name DEPENDENCY_CONDITION OC-MNP-PKG=UP DEPENDENCY_LOCATION SAME_NODE
For the RAC MNP: ------------ package_name Set to any name desired for the RAC MNP.
package_type Set by default to multi_node.
package_description Set by default to "SGeRAC Toolkit RAC Instance package"
node_name Specify the names for the nodes that the RAC MNP will run on.
auto_run
98 SGeRAC Toolkit for Oracle RAC 10g or later

Set to yes or no depending on whether the RAC MNP is to be started on cluster join or on demand.
local_lan_failover_allowed Set by default to yes to allow the cluster to switch LANs locally in the event of a failure.
node_fail_fast_enabled Set by default to no.
script_log_file Set by default to "$SGRUN/log/$SG_PACKAGE.log"
TKIT_DIR Set to the RAC MNP working directory. After the cmapplyconf command, the RAC MNP configuration file rac_dbi.conf will be created in this directory. If the rac_dbi.conf file already exists in the directory then all the configuration parameters will be overwritten, and the original rac_dbi.conf file will be backed up in rac_dbi.conf.old.
TKIT_SCRIPT_DIR Set to the RAC MNP script files directory. The default value is the RAC MNP script files installation directory: /opt/cmcluster/SGeRAC/toolkit/racp
ORACLE_HOME, CHECK_INTERVAL...MAINTENANCE_FLAG These parameters can be set in the cmmakepkg command if the Toolkit configuration file is given with -t option. Otherwise set them based on the description in E-2 to fit your Oracle environment.
ORA_CRS_HOME, OC_TKIT_DIR It is not necessary to set the values, the cmapplyconf command will automatically set them at package configuration time based on the setting in the OC MNP. Set by default to "<set by cmapplyconf>". Refer to E-2 for the descriptions.
vgchange_cmd, vg If SLVM logical volumes are used for the Oracle RAC database storage management, in the package control file: - set vgchange_cmd to "vgchange -a s" - specify the name(s) of the Shared Volume Groups in vg[0], vg[1]...
cvm_activation_cmd, cvm_dg If CVM is used for the RAC database storage management and the CVM disk group activation and deactivation are to be handled in the package control script: - set cvm_activation_cmd to "vxdg -g \$Disk group set activation=sharedwrite" - specify the name(s) of the CVM Disk Groups in cvm_dg[0], cvm_dg[1]...
run_script_timeout, halt_script_timeout Default value is 600 seconds for a 4 node cluster. This value is suggested as an initial value. It may need to be tuned for your environment.
cluster_interconnect_subnet Set this parameter if you want to monitor the Oracle RAC interconnect network.
service_name Set by default to racp_monitor, if multiple RAC MNPs are configured, need to set different service_name for each RAC MNP.
service_cmd Set by default to "$SGCONF/scripts/sgerac/erac_tk_rac.sh rac_check"
service_restart Set by default to none
service_fail_fast_enabled Set by default to no
service_halt_timeout Default value is 300
dependency_name, dependency_condition, dependency_location Configure a dependency on the OC MNP. If CVM or CFS is used for managing the database files, and Serviceguard Disk Group (DG) MNP and Mount Point (MP) MNP are used to handle the disk group and file system mount point, add one more dependency for the corresponding DG MNP (for CVM) or MP MNP (for CFS).
For example, for the package using CVM: DEPENDENCY_NAME OC-MNP-name DEPENDENCY_CONDITION OC-MNP-PKG=UP DEPENDENCY_LOCATION SAME_NODE
DEPENDENCY_NAME DG-MNP-name DEPENDENCY_CONDITION DG-MNP-PKG=UP DEPENDENCY_LOCATION SAME_NODE
For the package using CFS: DEPENDENCY_NAME OC-MNP-name
Support for the SGeRAC Toolkit 99

DEPENDENCY_CONDITION OC-MNP-PKG=UP DEPENDENCY_LOCATION SAME_NODE
DEPENDENCY_NAME MP-MNP-name DEPENDENCY_CONDITION MP-MNP-PKG=UP DEPENDENCY_LOCATION SAME_NODE Note: For modular style CFS DG-MP package, as a dependency OC MNP and modular style CFS DG-MP MNP must be mentioned in RAC MNP configuration file. When ASMDG package is configured:
DEPENDENCY_NAME ASMDG-MNP-name DEPENDENCY_CONDITION ASMDG-MNP-PKG=UP DEPENDENCY_LOCATION SAME_NODE
Note: When ASMDG MNP is configured, make sure you configure the dependency on the ASMDG MNP which is managing the disk group of the current RAC MNP. Since ASMDG MNP is already configured with a dependency on OC MNP, there is no need to configure a dependency on OC MNP for this RAC MNP.
E-1-2. Legacy Package Configuration File Parameters:
For legacy packages, the package configuration file template can be created by running the Serviceguard command "cmmakepkg -p".
For the OC MNP: ----------- PACKAGE_NAME Set to any name desired for the OC MNP.
PACKAGE_TYPE Set to MULTI_NODE.
FAILOVER_POLICY, FAILBACK_POLICY Comment out.
NODE_NAME Specify the names for the nodes that the OC MNP will run on.
AUTO_RUN Set to YES or NO depending on whether the OC MNP is to be started on cluster join or on demand.
LOCAL_LAN_FAILOVER_ALLOWED Set by default to YES to allow cluster to switch LANs locally in the event of a failure.
NODE_FAIL_FAST_ENABLED Set by default to NO.
RUN_SCRIPT, HALT_SCRIPT Set to the package control script.
RUN_SCRIPT_TIMEOUT, HALT_SCRIPT_TIMEOUT Default value is 600 seconds for a 4 node cluster. This value is suggested as an initial value. It may need to be tuned for your environment.
STORAGE_GROUP If the Oracle Clusterware registry and vote devices are stored in a CVM disk group, specify it using this parameter.
DEPENDENCY_NAME, DEPENDENCY_CONDITION, DEPENDENCY_LOCATION If CVM or CFS is used for managing the storage of the Oracle Clusterware, and Serviceguard Disk Group (DG) MNP and Mount Point (MP) MNP are used to handle the disk group and file system mount point, configure a dependency for the corresponding DG MNP (for CVM) or MP MNP (for CFS).
For example, for the package using CVM: DEPENDENCY_NAME DG-MNP-name DEPENDENCY_CONDITION DG-MNP-PKG=UP DEPENDENCY_LOCATION SAME_NODE
For the package using CFS: DEPENDENCY_NAME MP-MNP-name DEPENDENCY_CONDITION MP-MNP-PKG=UP DEPENDENCY_LOCATION SAME_NODE
SERVICE_NAME Specify a single SERVICE_NAME, corresponding to the service definition in the control script. This service invokes Toolkit script "toolkit_oc.sh check".
SERVICE_HALT_TIMEOUT Default value is 300 seconds for a 4 node cluster. This value is suggested as an initial value. It may need to be tuned for your environment.
For the ASMDG MNP: ------------ Note: If ASM over SLVM is being used for RAC database, it is recommended to use the new ASM DG package to manage the ASM disk group.
PACKAGE_NAME Set to any name desired for the ASMDG MNP.
100 SGeRAC Toolkit for Oracle RAC 10g or later

PACKAGE_TYPE Set to MULTI_NODE.
FAILOVER_POLICY, FAILBACK_POLICY Comment out.
NODE_NAME Specify the names for the nodes that the ASMDG MNP will run on.
AUTO_RUN Set to YES or NO depending on whether the ASMDG MNP is to be started on cluster join or on demand.
LOCAL_LAN_FAILOVER_ALLOWED Set by default to YES to allow cluster to switch LANs locally in the event of a failure.
NODE_FAIL_FAST_ENABLED Set by default to NO.
RUN_SCRIPT, HALT_SCRIPT Set to the package control script.
RUN_SCRIPT_TIMEOUT, HALT_SCRIPT_TIMEOUT Default value is 600 seconds for a 4 node cluster. This value is suggested as an initial value. It may need to be tuned for your environment.
DEPENDENCY_NAME, DEPENDENCY_CONDITION, DEPENDENCY_LOCATION Configure a dependency on the OC MNP.
For example, for the package using CVM: DEPENDENCY_NAME OC-MNP-name DEPENDENCY_CONDITION OC-MNP-PKG=UP DEPENDENCY_LOCATION SAME_NODE
SERVICE_NAME Specify a single SERVICE_NAME, corresponding to the service definition in the control script. This service invokes Toolkit script "toolkit_asmdg.sh check".
SERVICE_HALT_TIMEOUT Default value is 300 seconds for a 4 node cluster. This value is suggested as an initial value. It may need to be tuned for your environment.
For the RAC MNP: ------------ PACKAGE_NAME Set to any name desired for the RAC MNP.
PACKAGE_TYPE Set to MULTI_NODE.
FAILOVER_POLICY, FAILBACK_POLICY Comment out.
NODE_NAME Specify the names for the nodes that the RAC MNP will run on.
AUTO_RUN Set to YES or NO depending on whether the RAC MNP is to be started on cluster join or on demand.
LOCAL_LAN_FAILOVER_ALLOWED Set by default to YES to allow cluster to switch LANs locally in the event of a failure.
NODE_FAIL_FAST_ENABLED Set by default to NO.
RUN_SCRIPT, HALT_SCRIPT Set to the package control script.
RUN_SCRIPT_TIMEOUT, HALT_SCRIPT_TIMEOUT Default value is 600 seconds for a 4 node cluster. This value is suggested as an initial value. It may need to be tuned for your environment.
STORAGE_GROUP If the database is stored in a CVM disk group, specify it using this parameter.
DEPENDENCY_NAME, DEPENDENCY_CONDITION, DEPENDENCY_LOCATION Configure a dependency on the OC MNP. If CVM or CFS is used for managing the database files, and Serviceguard Disk Group (DG) MNP and Mount Point (MP) MNP are used to handle the disk group and file system mount point, add one more dependency for the corresponding DG MNP (for CVM) or MP MNP (for CFS).
For example, for a package using CVM: DEPENDENCY_NAME OC-MNP-name DEPENDENCY_CONDITION OC-MNP-PKG=UP DEPENDENCY_LOCATION SAME_NODE
Support for the SGeRAC Toolkit 101

DEPENDENCY_NAME DG-MNP-name DEPENDENCY_CONDITION DG-MNP-PKG=UP DEPENDENCY_LOCATION SAME_NODE
For a package using CFS: DEPENDENCY_NAME OC-MNP-name DEPENDENCY_CONDITION OC-MNP-PKG=UP DEPENDENCY_LOCATION SAME_NODE
DEPENDENCY_NAME MP-MNP-name DEPENDENCY_CONDITION MP-MNP-PKG=UP DEPENDENCY_LOCATION SAME_NODE
When ASMDG package is configured:
DEPENDENCY_NAME ASMDG-MNP-name DEPENDENCY_CONDITION ASMDG-MNP-PKG=UP DEPENDENCY_LOCATION SAME_NODE
Note: When ASMDG MNP is configured, make sure you configure the dependency on the ASMDG MNP which is managing the disk group of the current RAC MNP. Since ASMDG MNP is already configured with a dependency on OC MNP, there is no need to configure a dependency on OC MNP for this RAC MNP.
SERVICE_NAME Specify a single SERVICE_NAME, corresponding to the service definition in the control script. This service invokes Toolkit script "toolkit_dbi.sh check".
SERVICE_HALT_TIMEOUT Default value is 300 seconds for a 4 node cluster. This value is suggested as an initial value. It may need to be tuned for your environment.
E-1-3. The Legacy Package Control Script Parameters
The package control script template can be created by running the Serviceguard command "cmmakepkg -s" for a legacy package.
For the OC MNP: ----------- When SLVM or ASM over SLVM is used for Oracle Clusterwaer storage, specify the corresponding SLVM Volume Group names and set activation to shared mode.
- set VGCHANGE to "vgchange -a s" - specify the name(s) of the Shared Volume Groups in vg[0], vg[1]....
Note: Do not specify SLVM Volume groups used by RAC databases here. When using ASM over SLVM for RAC database storage, specify the SLVM Volume Group of member disks in the ASM DG MNP package configuration file.
If CVM is used for Oracle Clusterware storage management and the CVM disk group activation and deactivation are to be handled in the package control file: - set CVM_ACTIVATION_CMD to "vxdg -g \$Disk group set activation=sharedwrite" - specify the name(s) of the CVM Disk Groups in CVM_DG[0], CVM_DG[1]...
Configure one package service: - set SERVICE_NAME[0] to the name of service specified in the ASCII configuration file - set SERVICE_CMD[0] to "<OC MNP working directory>/toolkit_oc.sh check" - set SERVICE_RESTART[0] to ""
In the function customer_defined_run_cmds: - start Oracle Clusterware using the command: <OC MNP working directory>/toolkit_oc.sh start
In the function customer_defined_halt_cmds: - stop Oracle Clusterware using the command: <OC MNP working directory>/toolkit_oc.sh stop
For the RAC MNP: ------------ If SLVM volumes are used for the Oracle RAC database storage management, in the package control file: - set VGCHANGE to "vgchange -a s" - specify the name(s) of the Shared Volume Groups in VG[0], VG[1]...
If CVM is used for the RAC database storage management and the CVM disk group activation and deactivation are to be handled in the package control file: - set CVM_ACTIVATION_CMD to "vxdg -g \$DiskGroup set activation=sharedwrite" - specify the name(s) of the CVM Disk Groups in CVM_DG[0], CVM_DG[1]...
Configure one package service: - set SERVICE_NAME[0] to the name of service specified in the ASCII configuration file
102 SGeRAC Toolkit for Oracle RAC 10g or later
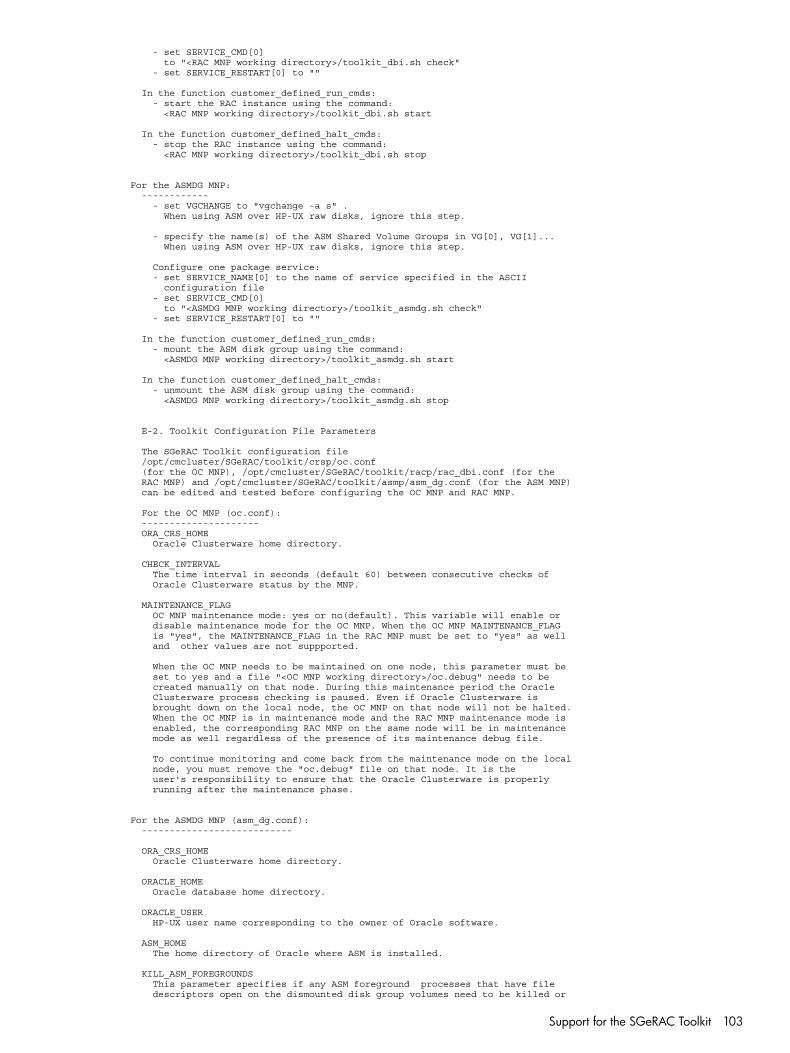
- set SERVICE_CMD[0] to "<RAC MNP working directory>/toolkit_dbi.sh check" - set SERVICE_RESTART[0] to ""
In the function customer_defined_run_cmds: - start the RAC instance using the command: <RAC MNP working directory>/toolkit_dbi.sh start
In the function customer_defined_halt_cmds: - stop the RAC instance using the command: <RAC MNP working directory>/toolkit_dbi.sh stop
For the ASMDG MNP: ------------ - set VGCHANGE to "vgchange -a s" . When using ASM over HP-UX raw disks, ignore this step.
- specify the name(s) of the ASM Shared Volume Groups in VG[0], VG[1]... When using ASM over HP-UX raw disks, ignore this step.
Configure one package service: - set SERVICE_NAME[0] to the name of service specified in the ASCII configuration file - set SERVICE_CMD[0] to "<ASMDG MNP working directory>/toolkit_asmdg.sh check" - set SERVICE_RESTART[0] to ""
In the function customer_defined_run_cmds: - mount the ASM disk group using the command: <ASMDG MNP working directory>/toolkit_asmdg.sh start
In the function customer_defined_halt_cmds: - unmount the ASM disk group using the command: <ASMDG MNP working directory>/toolkit_asmdg.sh stop
E-2. Toolkit Configuration File Parameters
The SGeRAC Toolkit configuration file /opt/cmcluster/SGeRAC/toolkit/crsp/oc.conf (for the OC MNP), /opt/cmcluster/SGeRAC/toolkit/racp/rac_dbi.conf (for the RAC MNP) and /opt/cmcluster/SGeRAC/toolkit/asmp/asm_dg.conf (for the ASM MNP) can be edited and tested before configuring the OC MNP and RAC MNP.
For the OC MNP (oc.conf): --------------------- ORA_CRS_HOME Oracle Clusterware home directory.
CHECK_INTERVAL The time interval in seconds (default 60) between consecutive checks of Oracle Clusterware status by the MNP.
MAINTENANCE_FLAG OC MNP maintenance mode: yes or no(default). This variable will enable or disable maintenance mode for the OC MNP. When the OC MNP MAINTENANCE_FLAG is "yes", the MAINTENANCE_FLAG in the RAC MNP must be set to "yes" as well and other values are not suppported.
When the OC MNP needs to be maintained on one node, this parameter must be set to yes and a file "<OC MNP working directory>/oc.debug" needs to be created manually on that node. During this maintenance period the Oracle Clusterware process checking is paused. Even if Oracle Clusterware is brought down on the local node, the OC MNP on that node will not be halted. When the OC MNP is in maintenance mode and the RAC MNP maintenance mode is enabled, the corresponding RAC MNP on the same node will be in maintenance mode as well regardless of the presence of its maintenance debug file.
To continue monitoring and come back from the maintenance mode on the local node, you must remove the "oc.debug" file on that node. It is the user's responsibility to ensure that the Oracle Clusterware is properly running after the maintenance phase.
For the ASMDG MNP (asm_dg.conf): ---------------------------
ORA_CRS_HOME Oracle Clusterware home directory.
ORACLE_HOME Oracle database home directory.
ORACLE_USER HP-UX user name corresponding to the owner of Oracle software.
ASM_HOME The home directory of Oracle where ASM is installed.
KILL_ASM_FOREGROUNDS This parameter specifies if any ASM foreground processes that have file descriptors open on the dismounted disk group volumes need to be killed or
Support for the SGeRAC Toolkit 103

not. This parameter can be set to either Yes or No(default Yes)
ASM_DISK GROUP ASM Disk groups used by the database instance
ASM_VOLUME_GROUP: Volume groups used in the ASM disk groups for this database instance.
CHECK_INTERVAL Time interval in seconds (default 60) between consecutive checks of ASM disk group status by the MNP.
MAINTENANCE_FLAG ASMDG MNP maintenance mode: yes or no(default). This variable will enable or disable maintenance mode for the ASMDG MNP. When the ASMDG MNP needs to be maintained on one node, then this parameter must be set to yes and a file "<ASMDG MNP working directory>/asm_dg.debug" must be created manually on that node. During this maintenance period Oracle ASM disk group checking is paused. Even if the Oracle ASM disk group is brought down on the local node, the ASMDG MNP on that node will not be halted. To continue monitoring and come back from the maintenance mode on one node, you must remove the "asm_dg.debug" file on that node. It is the user's responsibility to ensure that the Oracle ASM disk group is mounted properly after the maintenance phase.
OC_TKIT_DIR Set to OC MNP working directory. When the MAINTENANCE_FLAG is set to yes, ASMDG MNP uses this parameter to check the OC MNP's maintenance status: If the OC MNP MAINTENANCE_FLAG is set to yes and the oc.debug file is in the OC_TKIT_DIR directory, the ASMDG MNP knows the OC MNP on the same node is in maintenance mode. In this case, because of the dependency on the OC MNP, the ASMDG MNP will go into maintenance mode as well regardless of the presence of its debug file.
If MAINTENANCE_FLAG is no, OC_TKIT_DIR is not required, and ASMDG MNP will not check the OC MNP maintenance status.
For the RAC MNP (rac_dbi.conf): --------------------------- ORACLE_HOME Oracle database home directory.
ORA_CRS_HOME Oracle Clusterware home directory.
ORACLE_USER HP-UX user name corresponding to the owner of Oracle software.
ORACLE_DBNAME The database name.
START_MODE Mode of instance start: mount, nomount or open (default).
STOP_MODE Mode of instance stop: normal, transactional, immediate or abort (default).
If the RAC MNP fails, this Toolkit will use the "abort" option to halt the RAC instance for a quick package shutdown regardless of the STOP_MODE value. CHECK_INTERVAL Time interval in seconds (default 60) between consecutive checks of RAC instance status by the MNP.
ORA_RESTART_TIMEOUT Time interval in seconds (default 180) for the Toolkit script to wait for Oracle to restart an instance which is terminated prematurely before exiting the package.
ORA_SHUTDOWN_TIMEOUT Time interval in seconds (default 120) for the Toolkit script to wait for the Oracle abort to complete before killing the Oracle background processes. The ORA_SHUTDOWN_TIMEOUT variable is used to protect against a worst-case scenario where a hung database prevents the package halt script from completing. The value of ORA_SHUTDOWN_TIMEOUT must be less than the HALT_SCRIPT_TIMEOUT value set in the rac package configuration file.
MAINTENANCE_FLAG RAC MNP maintenance mode: yes or no (default). This variable will enable or disable maintenance mode for the RAC MNP.
When the RAC MNP needs to be maintained on one node, this parameter must be set to yes and a file "<RAC MNP working directory>/rac.debug" needs to be created manually on that node. During this maintenance period the Oracle RAC instance's process checking is paused. Even if the Oracle RAC instance is brought down on the local node, the RAC MNP on that node will not be halted.
To continue monitoring and come back from the maintenance mode on one node, you should remove the "rac.debug" file on that node. It is the user's responsibility to ensure that the Oracle RAC instance is properly running after the maintenance phase.
104 SGeRAC Toolkit for Oracle RAC 10g or later

OC_TKIT_DIR Set to the OC MNP working directory. When MAINTENANCE_FLAG is yes, the RAC MNP uses this parameter to check the OC MNP maintenance status: If the OC MNP MAINTENANCE_FLAG is set to yes and oc.debug is in the OC_TKIT_DIR directory, the RAC MNP knows the OC MNP on the same node is in maintenance mode. In this case, because of the dependency on the OC MNP, the RAC MNP will go into maintenance mode as well regardless of the presence of its debug file.
If the MAINTENANCE_FLAG is set to no, OC_TKIT_DIR is not required, and the RAC MNP will not check the OC MNP's maintenance status.
ASM_TKIT_DIR Note: this parameter should be set only if the new ASM DG MNP is being used. Set this to the ASM MNP working directory. When the MAINTENANCE_FLAG is yes, it is used to check the ASMDG MNP maintenance status.
F. SGeRAC Toolkit configuration Procedures
To use the SGeRAC Toolkit in an environment running with SGeRAC and Oracle 10g R2 or later version/revision of RAC, you must disable the automatic start feature for the Oracle Clusterware and the RAC instances which are configured and managed in the Toolkit MNP. Since both modular and legacy package formats are supported in SGeRAC A.11.19 and later, the guidelines for configuring and using the SGeRAC Toolkit in the combined stack environment are described in several steps.
The sequence for the modular package setup are F-1, F-2, F-4, F-5, F-8 and F-10. The sequence for the legacy package setup are F-1, F-3, F-4, F-9 and F-10.
The steps are as follows:
F-1. SGeRAC Toolkit pre-setup [For both modular and legacy packages]
1. Install and configure the SGeRAC cluster. Refer to the HP manual "Managing Serviceguard" for more details.
2. Prepare storage for Oracle Clusterware and RAC database. Refer to HP manual "Using Serviceguard Extension for RAC" for more details. For the configuration of ASM over SLVM logical volumes, refer to HP whitepaper "Support of Oracle RAC ASM with SGeRAC" for more information.
3. Install and configure Oracle Clusterware and RAC database instance. Refer to the Oracle Real Application Cluster Installation documents and "Oracle Real Application Clusters Administrator's Guide" for more details.
4. On each node of the cluster, disable the automatic startup of the Oracle Clusterware at boot time. Login as root and enter: : $ORA_CRS_HOME/bin/crsctl disable crs
5. On one node of the cluster, disable the Oracle RAC database and instances from being started automatically by the Oracle Clusterware.
Login as the Oracle administrator and run the following command to set the database management policy to manual.
For Oracle 10g: : $ORACLE_HOME/bin/srvctl modify database -d <dbname> -y manual
For Oracle 11g: : $ORACLE_HOME/bin/srvctl modify database -d <dbname> -y MANUAL
F-2. OC MNP creation procedures [For Modular Package]:
1. On one node of the cluster, create an OC MNP working directory under /etc/cmcluster.
The following step requires root privilege. : mkdir /etc/cmcluster/OCMNP-Dir
2. Go to step 3 if you don't want to test the oc.conf file before configuring OC MNP. Otherwise copy the OC MNP configuration file located in the Toolkit directory /opt/cmcluster/SGeRAC/toolkit/crsp to the OC MNP working directory. Then edit and test the configuration file oc.conf on one node based on the description in E-2 to fit your Oracle environment.
All the following steps require root privilege. : cd /etc/cmcluster/YourOwn-OCMNP-Dir : cp /opt/cmcluster/SGeRAC/toolkit/crsp/oc.conf .
3. Generate the OC MNP configuration file and edit the file based on the description in E-1-1. Then configure the OC MNP.
If oc.conf is configured and tested in step 2, use the following command to create the package configuration file: : cmmakepkg -m sg/multi_node_all -m sgerac/erac_tk_oc -t oc.conf pkgConfigFile.
Otherwise, create the package configuration file and set the Oracle
Support for the SGeRAC Toolkit 105

Clusterware parameters in this file directly: : cmmakepkg -m sg/multi_node_all -m sgerac/erac_tk_oc pkgConfigFile
Edit the package template files based on the description in E-1-1.
4. Now apply the package configuration file: : cmapplyconf -P pkgConfigFile
F-3. OC MNP creation procedures [For Legacy packages]:
1. On one node of the cluster, create an OC MNP working directory under /etc/cmcluster and copy the files in the Toolkit directory /opt/cmcluster/SGeRAC/toolkit/crsp.
All the following steps require root privilege. : mkdir /etc/cmcluster/YourOwn-OCMNP-Dir : cd /etc/cmcluster/OCMNP-Dir : cp /opt/cmcluster/SGeRAC/toolkit/crsp/* .
2. Edit the configuration file oc.conf based on the description in E-2 to suit your Oracle environment.
3. Generate the package configuration file and control script for the OC MNP.
: cmmakepkg -p pkgConfigFile : cmmakepkg -s pkgControlScript
Edit the package template files based on the description in E-1-2 and E-1-3 and make sure that the pkgControlScript is executable.
4. Create the OC MNP working directory on all other participating nodes. Distribute the edited package configuration file, package control script, and the Toolkit scripts created in steps 2 and 3 to all nodes. Then apply the package configuration file from one node:
: cmapplyconf -P pkgConfigFile
F-4. OC MNP startup procedures [For both Modular and Legacy Packages]:
1. On each node of the cluster, halt the Oracle Clusterware if it is running. : $ORA_CRS_HOME/bin/crsctl stop crs
2. On one node of the cluster, start the OC MNP via cmrunpkg. : cmrunpkg <OCMNP-package-name>
Use cmviewcl to check the package status. There should be only one OC MNP configured in the cluster.
3. After the package is up and running, verify that the Oracle Clusterware is running on each node of the cluster.
On each node, enter: : $ORA_CRS_HOME/bin/crsctl check crs
For Oracle 10g, messages like the following should be seen: CSS appears healthy CRS appears healthy EVM appears healthy
For Oracle 11g R1, messages like the following should be seen: Cluster Synchronization Services appears healthy Cluster Ready Services appears healthy Event Manager appears healthy
For Oracle 11g R2, messages like the following should be seen: CRS-4638: Oracle High Availability Services is online CRS-4537: Cluster Ready Services is online CRS-4529: Cluster Synchronization Services is online CRS-4533: Event Manager is online
The RAC instances should not be running.
Note: Steps F-5 to F-7 are required only if you are using ASM over SLVM for RAC database and if you are planning to use the ASMDG package to manage your ASM disk group.
F-5. ASMDG creation procedures [For Modular Packages]:
1. On one node of the cluster, create an ASMDG MNP working directory under /etc/cmcluster. : mkdir /etc/cmcluster/ASMDGMNP-Dir
2. Go to step 3 if you don't want to test the asm_dg.conf before configuring the ASMDG MNP. Otherwise copy the ASMDG MNP configuration file located in the Toolkit directory /opt/cmcluster/SGeRAC/toolkit/asmp to the ASMDG MNP working directory. Then edit and test the configuration file asm_dg.conf based on the description in E-2 to suit your Oracle environment.
: cd /etc/cmcluster/ASMDGMNP-Dir : cp /opt/cmcluster/SGeRAC/toolkit/asmp/asm_dg.conf .
106 SGeRAC Toolkit for Oracle RAC 10g or later
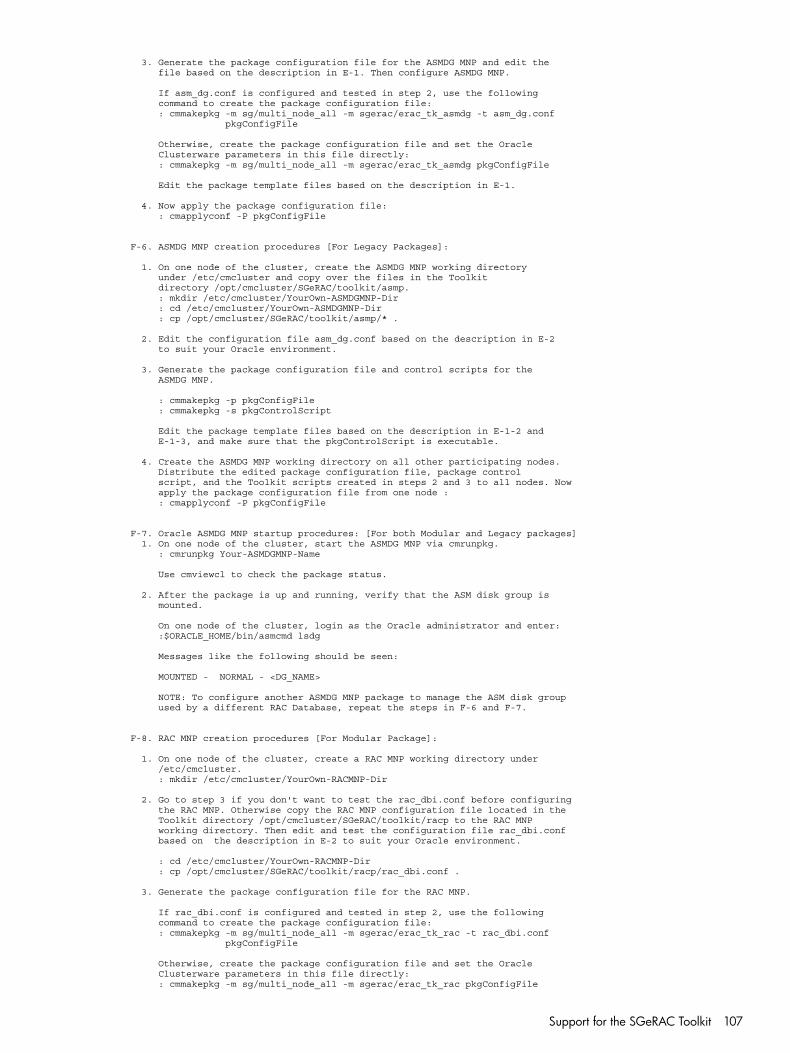
3. Generate the package configuration file for the ASMDG MNP and edit the file based on the description in E-1. Then configure ASMDG MNP.
If asm_dg.conf is configured and tested in step 2, use the following command to create the package configuration file: : cmmakepkg -m sg/multi_node_all -m sgerac/erac_tk_asmdg -t asm_dg.conf pkgConfigFile
Otherwise, create the package configuration file and set the Oracle Clusterware parameters in this file directly: : cmmakepkg -m sg/multi_node_all -m sgerac/erac_tk_asmdg pkgConfigFile
Edit the package template files based on the description in E-1.
4. Now apply the package configuration file: : cmapplyconf -P pkgConfigFile
F-6. ASMDG MNP creation procedures [For Legacy Packages]:
1. On one node of the cluster, create the ASMDG MNP working directory under /etc/cmcluster and copy over the files in the Toolkit directory /opt/cmcluster/SGeRAC/toolkit/asmp. : mkdir /etc/cmcluster/YourOwn-ASMDGMNP-Dir : cd /etc/cmcluster/YourOwn-ASMDGMNP-Dir : cp /opt/cmcluster/SGeRAC/toolkit/asmp/* .
2. Edit the configuration file asm_dg.conf based on the description in E-2 to suit your Oracle environment.
3. Generate the package configuration file and control scripts for the ASMDG MNP.
: cmmakepkg -p pkgConfigFile : cmmakepkg -s pkgControlScript
Edit the package template files based on the description in E-1-2 and E-1-3, and make sure that the pkgControlScript is executable.
4. Create the ASMDG MNP working directory on all other participating nodes. Distribute the edited package configuration file, package control script, and the Toolkit scripts created in steps 2 and 3 to all nodes. Now apply the package configuration file from one node : : cmapplyconf -P pkgConfigFile
F-7. Oracle ASMDG MNP startup procedures: [For both Modular and Legacy packages] 1. On one node of the cluster, start the ASMDG MNP via cmrunpkg. : cmrunpkg Your-ASMDGMNP-Name
Use cmviewcl to check the package status.
2. After the package is up and running, verify that the ASM disk group is mounted.
On one node of the cluster, login as the Oracle administrator and enter: :$ORACLE_HOME/bin/asmcmd lsdg
Messages like the following should be seen:
MOUNTED - NORMAL - <DG_NAME>
NOTE: To configure another ASMDG MNP package to manage the ASM disk group used by a different RAC Database, repeat the steps in F-6 and F-7.
F-8. RAC MNP creation procedures [For Modular Package]:
1. On one node of the cluster, create a RAC MNP working directory under /etc/cmcluster. : mkdir /etc/cmcluster/YourOwn-RACMNP-Dir
2. Go to step 3 if you don't want to test the rac_dbi.conf before configuring the RAC MNP. Otherwise copy the RAC MNP configuration file located in the Toolkit directory /opt/cmcluster/SGeRAC/toolkit/racp to the RAC MNP working directory. Then edit and test the configuration file rac_dbi.conf based on the description in E-2 to suit your Oracle environment.
: cd /etc/cmcluster/YourOwn-RACMNP-Dir : cp /opt/cmcluster/SGeRAC/toolkit/racp/rac_dbi.conf .
3. Generate the package configuration file for the RAC MNP.
If rac_dbi.conf is configured and tested in step 2, use the following command to create the package configuration file: : cmmakepkg -m sg/multi_node_all -m sgerac/erac_tk_rac -t rac_dbi.conf pkgConfigFile
Otherwise, create the package configuration file and set the Oracle Clusterware parameters in this file directly: : cmmakepkg -m sg/multi_node_all -m sgerac/erac_tk_rac pkgConfigFile
Support for the SGeRAC Toolkit 107

Edit the package template files based on the description in E-1.
4. Now apply the package configuration file: : cmapplyconf -P pkgConfigFile
F-9. RAC MNP creation procedures [For Legacy Packages]:
1. On one node of the cluster, create a RAC MNP working directory under /etc/cmcluster and copy over the files in the Toolkit directory /opt/cmcluster/SGeRAC/toolkit/racp. : mkdir /etc/cmcluster/YourOwn-RACMNP-Dir : cd /etc/cmcluster/YourOwn-RACMNP-Dir : cp /opt/cmcluster/SGeRAC/toolkit/racp/* .
2. Edit the configuration file rac_dbi.conf based on the description in E-2 to suit your Oracle environment.
3. Generate the package configuration file and control scripts for the RAC MNP.
: cmmakepkg -p pkgConfigFile : cmmakepkg -s pkgControlScript
Edit the package template files based on the description in E-1-2 and E-1-3, and make sure that the pkgControlScript is executable.
4. Create the RAC MNP working directory on all other participating nodes. Distribute the edited package configuration file, package control script, and the Toolkit scripts created in steps 2 and 3 to all nodes. Now apply the package configuration file from one node : : cmapplyconf -P pkgConfigFile
F-10 Oracle RAC MNP startup procedures: [For both Modular and Legacy packages]
1. On one node of the cluster, start the RAC MNP via cmrunpkg. : cmrunpkg Your-RACMNP-Name
Use cmviewcl to check the package status.
2. After the package is up and running, verify that the RAC instance is running.
On one node of the cluster, login as the Oracle administrator and enter:
:$ORACLE_HOME/bin/srvctl status instance -d $databaseName -i $instanceName
Messages like the following should be seen: Instance <InstanceName> is running on node <NodeName>
3. If more than one RAC database is configured in the cluster and the RAC instances are to be managed in the RAC MNP, repeat the steps in F-9 and steps 1 and 2 in F-10 for each RAC database.
G. SGeRAC Toolkit Administration
The Toolkit OC MNP and RAC MNP and ASMDG MNP are administrated using Serviceguard package commands. To start the MNP when the SG/SGeRAC cluster is up and running, use cmrunpkg or cmmodpkg to start all instances, or use cmrunpkg or cmmodpkg with the option "-n nodeName" to start a single instance on a specified node. To halt the MNP, use cmhaltpkg to halt all instances, or use cmhaltpkg with the option "-n nodeName" to halt a single instance on a specified node. If the package configuration parameter AUTO_RUN is set to yes, the MNP will be started automatically when the cluster starts up or when the node joins the cluster. After the Oracle Clusterware and RAC instances are started in the MNP packages, users should not manage (halt or restart) Oracle Clusterware and RAC instances outside of the package, otherwise the package could fail.
If a node is added to the cluster and will run a RAC instance, the OC MNP and ASMDG MNP and the corresponding RAC MNP must be modified and reapplied to add the node into the package configuration. If a node running the RAC instance is deleted from the cluster, the OC MNP and ASMDG MNP and the corresponding RAC MNP must be modified and reapplied to delete the node from the package configuration.
If TKIT_SCRIPT_DIR is not set to default value, copy the new OC MNP, ASMDG MNP and RAC MNP scripts to the TKIT_SCRIPT_DIR directory from the respective location of /opt/cmcluster/SGeRAC/toolkit/ when SGeRAC upgrade is done or when an SGeRAC patch is installed.
If a node running the OC MNP and RAC MNP is to be shutdown via command /etc/shutdown, users should run "cmhaltnode -f" first to cleanly halt the cluster before issuing the shutdown command.
If the Oracle Clusterware or RAC software is being upgraded then it is recommended to bring down the OC MNP, ASMDG MNP (if configured) and RAC MNP packages and start Oracle Clusterware and Database using Oracle commands crsctl and srvctl. After completion of the upgrade, update (if there are any changes) the configuration files of the above mentioned packages as needed and restart the packages.
108 SGeRAC Toolkit for Oracle RAC 10g or later
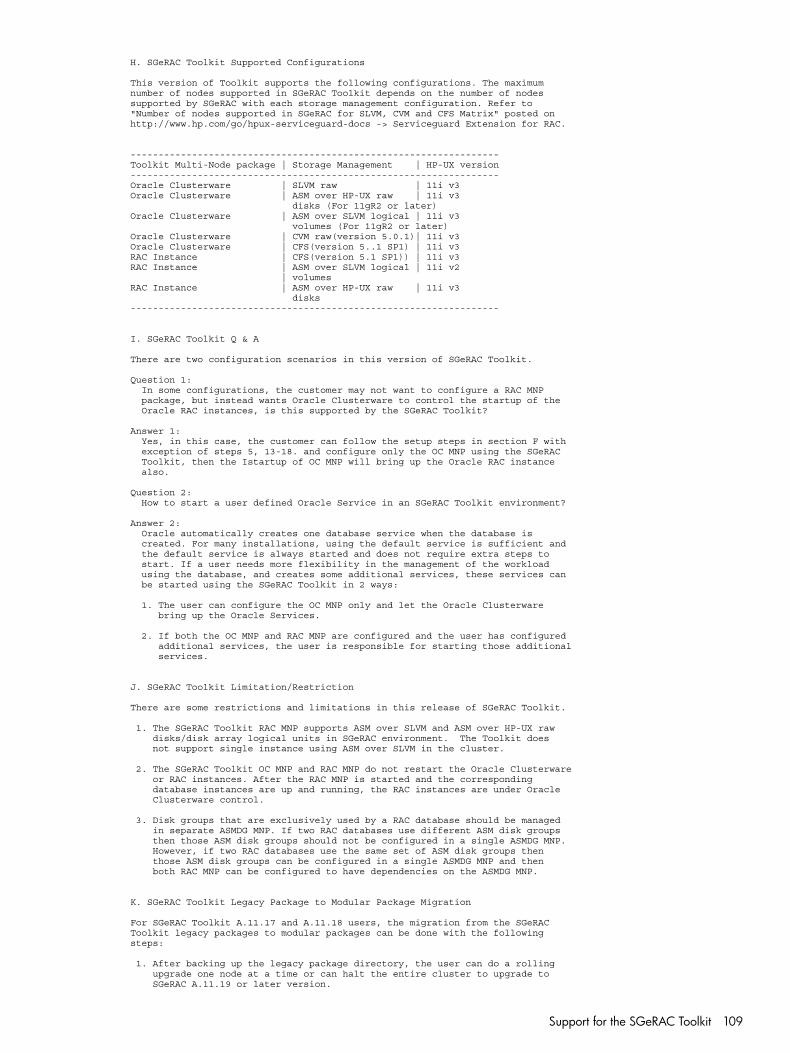
H. SGeRAC Toolkit Supported Configurations
This version of Toolkit supports the following configurations. The maximum number of nodes supported in SGeRAC Toolkit depends on the number of nodes supported by SGeRAC with each storage management configuration. Refer to "Number of nodes supported in SGeRAC for SLVM, CVM and CFS Matrix" posted on http://www.hp.com/go/hpux-serviceguard-docs -> Serviceguard Extension for RAC.
------------------------------------------------------------------ Toolkit Multi-Node package | Storage Management | HP-UX version ------------------------------------------------------------------ Oracle Clusterware | SLVM raw | 11i v3 Oracle Clusterware | ASM over HP-UX raw | 11i v3 disks (For 11gR2 or later) Oracle Clusterware | ASM over SLVM logical | 11i v3 volumes (For 11gR2 or later) Oracle Clusterware | CVM raw(version 5.0.1)| 11i v3 Oracle Clusterware | CFS(version 5..1 SP1) | 11i v3 RAC Instance | CFS(version 5.1 SP1)) | 11i v3 RAC Instance | ASM over SLVM logical | 11i v2 | volumes RAC Instance | ASM over HP-UX raw | 11i v3 disks------------------------------------------------------------------
I. SGeRAC Toolkit Q & A
There are two configuration scenarios in this version of SGeRAC Toolkit.
Question 1: In some configurations, the customer may not want to configure a RAC MNP package, but instead wants Oracle Clusterware to control the startup of the Oracle RAC instances, is this supported by the SGeRAC Toolkit?
Answer 1: Yes, in this case, the customer can follow the setup steps in section F with exception of steps 5, 13-18. and configure only the OC MNP using the SGeRAC Toolkit, then the Istartup of OC MNP will bring up the Oracle RAC instance also.
Question 2: How to start a user defined Oracle Service in an SGeRAC Toolkit environment?
Answer 2: Oracle automatically creates one database service when the database is created. For many installations, using the default service is sufficient and the default service is always started and does not require extra steps to start. If a user needs more flexibility in the management of the workload using the database, and creates some additional services, these services can be started using the SGeRAC Toolkit in 2 ways:
1. The user can configure the OC MNP only and let the Oracle Clusterware bring up the Oracle Services.
2. If both the OC MNP and RAC MNP are configured and the user has configured additional services, the user is responsible for starting those additional services.
J. SGeRAC Toolkit Limitation/Restriction
There are some restrictions and limitations in this release of SGeRAC Toolkit.
1. The SGeRAC Toolkit RAC MNP supports ASM over SLVM and ASM over HP-UX raw disks/disk array logical units in SGeRAC environment. The Toolkit does not support single instance using ASM over SLVM in the cluster.
2. The SGeRAC Toolkit OC MNP and RAC MNP do not restart the Oracle Clusterware or RAC instances. After the RAC MNP is started and the corresponding database instances are up and running, the RAC instances are under Oracle Clusterware control.
3. Disk groups that are exclusively used by a RAC database should be managed in separate ASMDG MNP. If two RAC databases use different ASM disk groups then those ASM disk groups should not be configured in a single ASMDG MNP. However, if two RAC databases use the same set of ASM disk groups then those ASM disk groups can be configured in a single ASMDG MNP and then both RAC MNP can be configured to have dependencies on the ASMDG MNP.
K. SGeRAC Toolkit Legacy Package to Modular Package Migration
For SGeRAC Toolkit A.11.17 and A.11.18 users, the migration from the SGeRAC Toolkit legacy packages to modular packages can be done with the following steps:
1. After backing up the legacy package directory, the user can do a rolling upgrade one node at a time or can halt the entire cluster to upgrade to SGeRAC A.11.19 or later version.
Support for the SGeRAC Toolkit 109

2. Shutdown the legacy RAC MNP if a RAC MNP is running. : cmhaltpkg <legacy RAC MNP>
3. Create a new RAC MNP package working directory on one node, then cd to the new package directory. : cd /etc/cmcluster/RACMNP-Dir
4. Use the cmmigratepkg command to migrate the legacy RAC MNP to modular format. : cmmigratepkg -p <legacy RAC MNP> -s -o <RAC MNP output>
5. Create a new modular RAC MNP ascii file. : cmmakepkg -i <RAC MNP output> -m sg/multi_node_all -m <toolkit module> -t <RAC MNP configuration file> <new RAC MNP ascii file>
6. Edit the new RAC MNP ascii file, set the Toolkit parameters, refer to section E-2 to verify and configure new modular RAC MNP parameters.
7. Now apply the package configuration file. : cmapplyconf -P <new RAC MNP ascii file>
8. Shutdown the legacy OC MNP if the OC MNP is running. : cmhaltpkg <legacy OC MNP>
9. Create a new OC MNP package working directory on one node, then cd to the new package directory. : cd /etc/cmcluster/OCMNP-Dir
10. Use the cmmigratepkg command to migrate the legacy OC MNP to modular format. : cmmigratepkg -p <legacy OC MNP> -s -o <OC MNP output>
11. Create a new modular OC MNP ascii file. : cmmakepkg -i <OC MNP output> -m sg/multi_node_all -m <toolkit module> -t <OC MNP configuration file> <new OC MNP ascii file>
12. Edit the new OC MNP ascii file, set the Toolkit parameters, refer to section E-2 to verify and configure the new modular OC MNP parameters.
13. Now apply the package configuration file : cmapplyconf -P <new OC MNP ascii file>
14. You may now start the new OC MNP and RAC MNP in the cluster using the cmrunpkg or cmmodpkg –e commands.
15. After verifying the successful operation of the new OC MNP and RAC MNP packages, you may delete the legacy packages using the cmdeleteconf command.
L. Migration of Legacy CFS Disk group and Mount point Packages to Modular CFS Disk group and Mount point Packages(CFS DG-MP).
Beginning with the SG A.11.20 patch PHSS_41628 and SG CFS A.11.20 patch PHSS_41674,new modular CFS Disk group and Mount point feature has been introduced. It will allow to consolidate all disk group and mount point packages for an applicationinto a single modular package. To migration from legacy CFS Disk group and Mount point MNPs to modular CFS Disk group and Mount point MNPs (CFS DG-MP) can be donewith the following steps:
1. Create modular CFS DG-MP MNP for Oracle Clusterware storage : cmmakepkg -m sg/cfs_all /etc/cmcluster/OC-DGMP/OC-DGMP.ascii
2. Edit the OC-DGMP.ascii file with package name,Diskgroup and mount point and other required package information For example cvm_disk_group < DiskGroup used for Oracle Clusterware storage > cvm_activation_mode "< node1 > =sw < node2 > =sw" cfs_mount_point < Mount Point location for CRS> cfs_volume < CFS volume > cfs_mount_options "< node1 > =cluster < node2 > =cluster" cfs_primary_policy ""
3. Create modular CFS DG-MP MNP for RAC database storage : cmmakepkg -m sg/cfs_all /etc/cmcluster/RAC-DGMP/RAC-DGMP.ascii
4. Edit the RAC-DGMP.ascii file with package name,Diskgroup and mount point and other required package information For example cvm_disk_group < DiskGroup used for RAC database storage > cvm_activation_mode "< node1 > =sw < node2 > =sw" cfs_mount_point < Mount Point location RAC> cfs_volume < CFS volume > cfs_mount_options "< node1 > =cluster < node2 > =cluster" cfs_primary_policy ""
5. Take a backup of OC MNP configuration file. : cmgetconf -p < OC MNP > < backup OC MNP package configuration file >
6. Edit the backup of OC MNP ascii file, remove the existing dependency on legacy MP and DG package and add modular CFS DG-MP package for Oracle Clusterware storage as a dependency. For example
110 SGeRAC Toolkit for Oracle RAC 10g or later

OC MNP ascii file with legacy style DG and MP package: DEPENDENCY_NAME DG-MNP-name DEPENDENCY_CONDITION DG-MNP-PKG=UP DEPENDENCY_LOCATION SAME_NODE
DEPENDENCY_NAME DG-MNP-name DEPENDENCY_CONDITION DG-MNP-PKG=UP DEPENDENCY_LOCATION SAME_NODE
OC MNP ascii file with modular style CFS DG-MP package : DEPENDENCY_NAME OC-DGMP-name DEPENDENCY_CONDITION OC-DGMP-PKG=UP DEPENDENCY_LOCATION SAME_NODE
7. Take backup of all RAC MNP configuration file. : cmgetconf -p < RAC MNP> < backup RAC MNP package configuration file >
8. Edit the backup of RAC MNP ascii file, remove the existing dependency on legacy MP and DG package and add modular CFS DG-MP package for Oracle RAC database storage as a dependency. For example RAC MNP ascii file with legacy style CFS DG and MP package: DEPENDENCY_NAME DG-MNP-name DEPENDENCY_CONDITION DG-MNP-PKG=UP DEPENDENCY_LOCATION SAME_NODE
DEPENDENCY_NAME DG-MNP-name DEPENDENCY_CONDITION DG-MNP-PKG=UP DEPENDENCY_LOCATION SAME_NODE
RAC MNP ascii file with modular style CFS DG-MP package : DEPENDENCY_NAME RAC-DGMP-name DEPENDENCY_CONDITION RAC-DGMP-PKG=UP DEPENDENCY_LOCATION SAME_NODE
9. Shutdown all the RAC MNP, if RAC MNPs is running. : cmhaltpkg < RAC MNP 1 > < RAC MNP 2 > ...
10. Shutdown the OC MNP, if the OC MNP is running. : cmhaltpkg < OC MNP >
11. Shutdown the legacy Disk group (SG-CFS-DG-id#) and Mount point MNPs (SG-MP-id#) : cmhaltpkg < SG-MP-id# > < SG-CFS-DG-id# >
12. Delete the OC MNP and all the RAC MNPs from cluster : cmdeleteconf -p < RAC MNP > : cmdeleteconf -p < OC MNP >
13. Delete all legacy style Disk group MNPs and Mount Point MNPs from cluster : cmdeleteconf -p < legacy MP MNP > : cmdeleteconf -p < legacy DG MNP >
14. Apply and run both modular CFS DG-MP packages for Oracle Clusterware and RAC database storage created in step number [1] and [3] : cmapplyconf -P < OC-DGMP-MNP configuration file > : cmapplyconf -P < RAC-DGMP-MNP configuration file > : cmrunpkg < OC-DGMP-MNP > < RAC-DGMP-MNP >
15. Apply the updated OC MNP configuration file which was modified in step number [6] : cmapplyconf -P < backup OC MNP configuration file >
16. Apply the updated RAC MNP configuration file which was modified in step number [8] : cmapplyconf -P < backup RAC MNP configuration file>
17. You may now start the OC MNP and RAC MNP in the cluster using the : cmrunpkg < OC MNP > < RAC MNP >
M. SGeRAC Toolkit Adding new ASMDG MNP Package to the existing configured OC MNP and RAC MNP
For ASM over SLVM:
1. Halt all the RAC MNPs. 2. Halt the OC MNP. 3. Remove all SLVM volume groups which are used for RAC Databases from the OC MNP configuration file or from OC MNP control script(in the case of a legacy OC MNP) except for the SLVM volume group used for the OCR/VOTING Disk. 4. Run cmapplyconf on the OC MNP configuration file. 5. Start the OC MNP. 6. Follow the instructions in the section E of this README and configure new ASMDG MNP package and run cmapplyconf on the ASMDG MNP configuration file. 7. Start ASMDG MNP. 8. Edit the RAC MNP configuration file, and add a dependency on its corresponding ASMDG MNP. 9. Run cmapplyconf on the RAC MNP configuration file. 10.Start the RAC MNP.
ASM over HP-UX raw disks (HP-UX 11i v3 only):
1. Halt all the RAC MNPs. 2. Following the instructions in the section E of this README, configure the new ASMDG MNP and run cmapplyconf on the ASMDG MNP.
Support for the SGeRAC Toolkit 111

3. Start the ASMDG MNP. 4. Edit the RAC MNP configuration script, and add a dependency on its corresponding ASMDG MNP. 5. Run cmapplyconf on the RAC MNP configuration file. 6. Start the RAC MNP.
N. SGeRAC Toolkit Package Cleanup
1. Shutdown the RAC MNP. : cmhaltpkg <RAC MNP name>
2. Delete the RAC MNP configuration. : cmdeleteconf -p <RAC MNP name>
3. Remove the RAC MNP working directory on all nodes : rm -rf /etc/cmcluster/RACMNP-Dir
NOTE: If more than one RAC MNPs are configured, step number 1 and 3 should be repeated for all the RAC MNPs. Step number 4 to 6 are required only if you have configured ASMDG MNP. If no ASMDG MNPs are configured, please proceed to step number 7
4. Shutdown the ASMDG MNP. : cmhaltpkg <ASMDG MNP name>
5. Delete the ASMDG MNP configuration. : cmdeleteconf -p <ASMDG MNP name>
6. Remove the ASMDG MNP working directory on all nodes : rm -rf /etc/cmcluster/ASMDGMNP-Dir
NOTE: If more than one ASMDG MNPs are configured, step number 4 to 6 should be repeated for all the ASMDG MNPs.
7. Shutdown the OC MNP. : cmhaltpkg <OC MNP name>
8. Delete the OC MNP configuration. : cmdeleteconf -p <OC MNP name>
9. Remove the OC MNP package working directory on all nodes. : rm -rf /etc/cmcluster/OCMNP-Dir
O. SGeRAC Toolkit Whitepaper Link
HP has published a whitepaper "Use of Serviceguard Extension For RAC Toolkit with Oracle RAC 10g Release 2 or later" that contains the SGeRAC Toolkit background and operation information. This whitepaper is posted on http://www.hp.com/go/hpux-serviceguard-docs -> Serviceguard Extension for RAC. Please note that this whitepaper has not been updated to include documentation for the new ASMDG MNP.
There is another white paper "Support of Oracle RAC ASM with SGeRAC" that contains details on ASM features and how to configure ASM with SGeRAC. This whitepaper is posted on http://www.hp.com/go/hpux-serviceguard-docs -> Serviceguard Extension for RAC.
ConclusionUsing SGeRAC Toolkit with multi-node packages and simple package dependencies provides auniform, intuitive, and easy-to-manage method to perform the following:
• Co-ordinate between SGeRAC and Oracle Clusterware
• Manage all the storage options supported by SGeRAC -CFS, SLVM, CVM , ASM over SLVMand ASM over raw device (on HP-UX 11i v3)
Although the concepts of resource dependency and resource aggregation delivered by SGeRACwith the multi-node package and simple package dependency features are present in some formor other in other clusterware products—including Oracle Clusterware—the framework providedby SGeRAC is unique due to the high level of multi-vendor (Oracle, Symantec, HP) and multi-storageplatform (CFS, SLVM, CVM, ASM over SLVM, ASM over raw device) integration it offers.
Additional Documentation on the Webwww.hp.com/go/serviceguardsolutionswww.hp.com/go/sgerac
112 SGeRAC Toolkit for Oracle RAC 10g or later
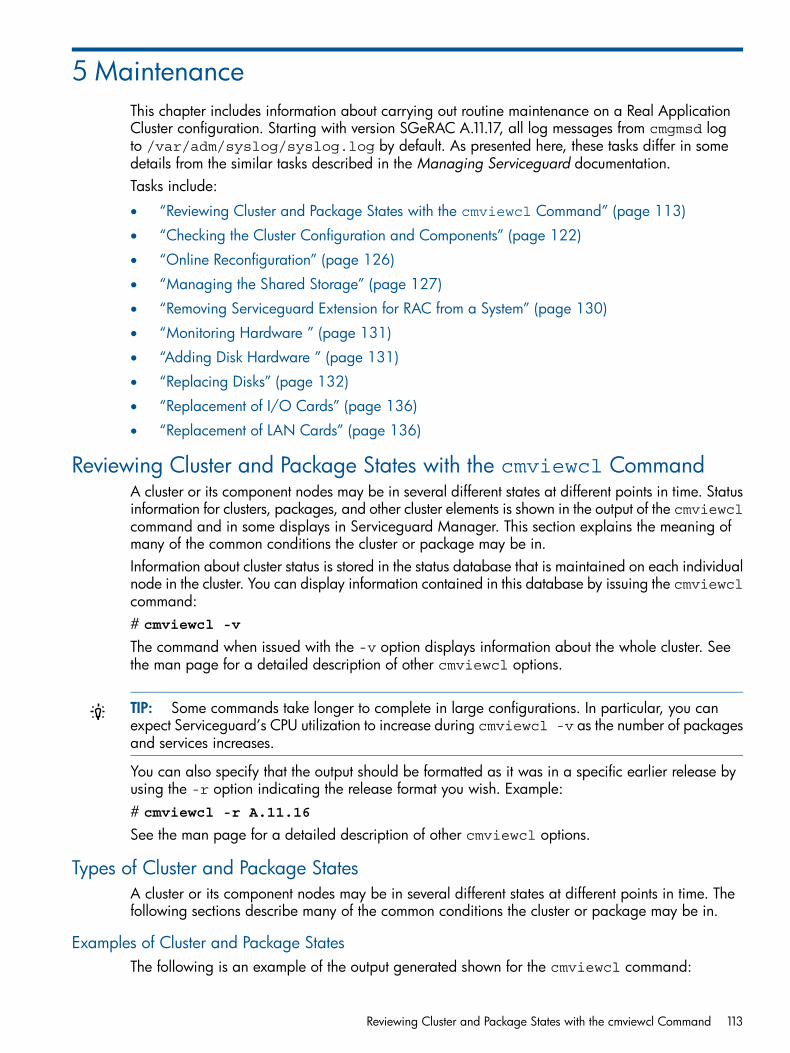
5 MaintenanceThis chapter includes information about carrying out routine maintenance on a Real ApplicationCluster configuration. Starting with version SGeRAC A.11.17, all log messages from cmgmsd logto /var/adm/syslog/syslog.log by default. As presented here, these tasks differ in somedetails from the similar tasks described in the Managing Serviceguard documentation.Tasks include:
• “Reviewing Cluster and Package States with the cmviewcl Command” (page 113)
• “Checking the Cluster Configuration and Components” (page 122)
• “Online Reconfiguration” (page 126)
• “Managing the Shared Storage” (page 127)
• “Removing Serviceguard Extension for RAC from a System” (page 130)
• “Monitoring Hardware ” (page 131)
• “Adding Disk Hardware ” (page 131)
• “Replacing Disks” (page 132)
• “Replacement of I/O Cards” (page 136)
• “Replacement of LAN Cards” (page 136)
Reviewing Cluster and Package States with the cmviewcl CommandA cluster or its component nodes may be in several different states at different points in time. Statusinformation for clusters, packages, and other cluster elements is shown in the output of the cmviewclcommand and in some displays in Serviceguard Manager. This section explains the meaning ofmany of the common conditions the cluster or package may be in.Information about cluster status is stored in the status database that is maintained on each individualnode in the cluster. You can display information contained in this database by issuing the cmviewclcommand:# cmviewcl -v
The command when issued with the -v option displays information about the whole cluster. Seethe man page for a detailed description of other cmviewcl options.
TIP: Some commands take longer to complete in large configurations. In particular, you canexpect Serviceguard’s CPU utilization to increase during cmviewcl -v as the number of packagesand services increases.
You can also specify that the output should be formatted as it was in a specific earlier release byusing the -r option indicating the release format you wish. Example:# cmviewcl -r A.11.16
See the man page for a detailed description of other cmviewcl options.
Types of Cluster and Package StatesA cluster or its component nodes may be in several different states at different points in time. Thefollowing sections describe many of the common conditions the cluster or package may be in.
Examples of Cluster and Package StatesThe following is an example of the output generated shown for the cmviewcl command:
Reviewing Cluster and Package States with the cmviewcl Command 113
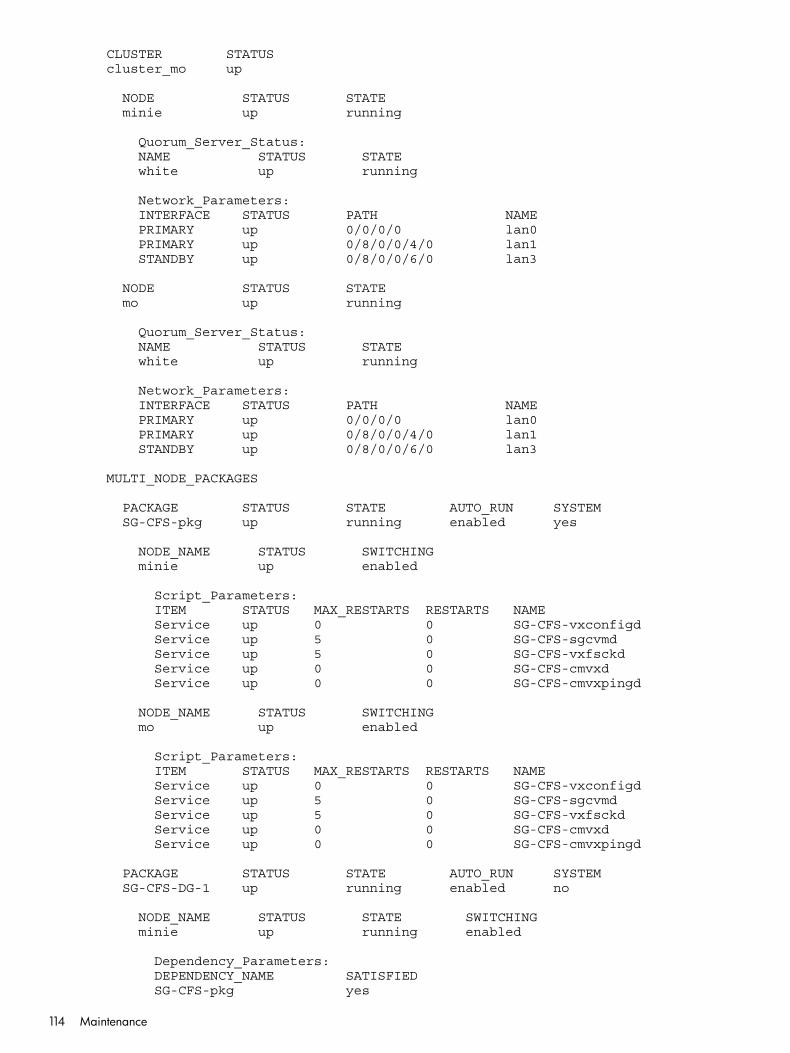
CLUSTER STATUScluster_mo up
NODE STATUS STATE minie up running
Quorum_Server_Status: NAME STATUS STATE white up running
Network_Parameters: INTERFACE STATUS PATH NAME PRIMARY up 0/0/0/0 lan0 PRIMARY up 0/8/0/0/4/0 lan1 STANDBY up 0/8/0/0/6/0 lan3
NODE STATUS STATE mo up running
Quorum_Server_Status: NAME STATUS STATE white up running
Network_Parameters: INTERFACE STATUS PATH NAME PRIMARY up 0/0/0/0 lan0 PRIMARY up 0/8/0/0/4/0 lan1 STANDBY up 0/8/0/0/6/0 lan3
MULTI_NODE_PACKAGES
PACKAGE STATUS STATE AUTO_RUN SYSTEM SG-CFS-pkg up running enabled yes
NODE_NAME STATUS SWITCHING minie up enabled
Script_Parameters: ITEM STATUS MAX_RESTARTS RESTARTS NAME Service up 0 0 SG-CFS-vxconfigd Service up 5 0 SG-CFS-sgcvmd Service up 5 0 SG-CFS-vxfsckd Service up 0 0 SG-CFS-cmvxd Service up 0 0 SG-CFS-cmvxpingd
NODE_NAME STATUS SWITCHING mo up enabled
Script_Parameters: ITEM STATUS MAX_RESTARTS RESTARTS NAME Service up 0 0 SG-CFS-vxconfigd Service up 5 0 SG-CFS-sgcvmd Service up 5 0 SG-CFS-vxfsckd Service up 0 0 SG-CFS-cmvxd Service up 0 0 SG-CFS-cmvxpingd
PACKAGE STATUS STATE AUTO_RUN SYSTEM SG-CFS-DG-1 up running enabled no
NODE_NAME STATUS STATE SWITCHING minie up running enabled
Dependency_Parameters: DEPENDENCY_NAME SATISFIED SG-CFS-pkg yes
114 Maintenance
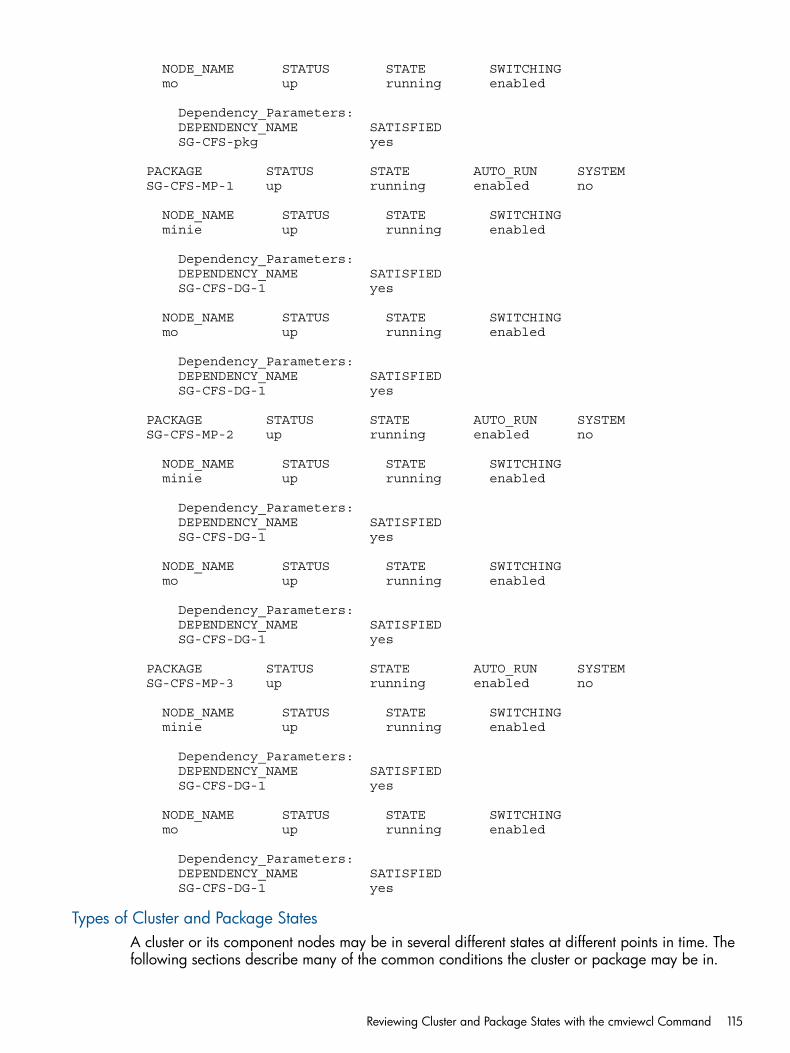
NODE_NAME STATUS STATE SWITCHING mo up running enabled
Dependency_Parameters: DEPENDENCY_NAME SATISFIED SG-CFS-pkg yes
PACKAGE STATUS STATE AUTO_RUN SYSTEM SG-CFS-MP-1 up running enabled no
NODE_NAME STATUS STATE SWITCHING minie up running enabled
Dependency_Parameters: DEPENDENCY_NAME SATISFIED SG-CFS-DG-1 yes
NODE_NAME STATUS STATE SWITCHING mo up running enabled
Dependency_Parameters: DEPENDENCY_NAME SATISFIED SG-CFS-DG-1 yes
PACKAGE STATUS STATE AUTO_RUN SYSTEM SG-CFS-MP-2 up running enabled no
NODE_NAME STATUS STATE SWITCHING minie up running enabled
Dependency_Parameters: DEPENDENCY_NAME SATISFIED SG-CFS-DG-1 yes
NODE_NAME STATUS STATE SWITCHING mo up running enabled
Dependency_Parameters: DEPENDENCY_NAME SATISFIED SG-CFS-DG-1 yes
PACKAGE STATUS STATE AUTO_RUN SYSTEM SG-CFS-MP-3 up running enabled no
NODE_NAME STATUS STATE SWITCHING minie up running enabled
Dependency_Parameters: DEPENDENCY_NAME SATISFIED SG-CFS-DG-1 yes
NODE_NAME STATUS STATE SWITCHING mo up running enabled
Dependency_Parameters: DEPENDENCY_NAME SATISFIED SG-CFS-DG-1 yes
Types of Cluster and Package StatesA cluster or its component nodes may be in several different states at different points in time. Thefollowing sections describe many of the common conditions the cluster or package may be in.
Reviewing Cluster and Package States with the cmviewcl Command 115

Cluster StatusThe status of a cluster may be one of the following:
• Up. At least one node has a running cluster daemon, and reconfiguration is not taking place.
• Down. No cluster daemons are running on any cluster node.
• Starting. The cluster is in the process of determining its active membership. At least onecluster daemon is running.
• Unknown. The node on which the cmviewcl command is issued cannot communicate withother nodes in the cluster.
Node Status and StateThe status of a node is either up (active as a member of the cluster) or down (inactive in the cluster),depending on whether its cluster daemon is running or not. Note that a node might be down fromthe cluster perspective, but still up and running HP-UX.Serviceguard Manager will display the alerts and status icon for the cluster, node, and packagehealth.A node may also be in one of the following states:
• Failed. A node never sees itself in this state. Other active members of the cluster will see anode in this state if that node was in an active cluster, but is no longer, and is not halted.
• Reforming. A node is in this state when the cluster is re-forming. The node is currently runningthe protocols which ensure that all nodes agree to the new membership of an active cluster.If agreement is reached, the status database is updated to reflect the new cluster membership.
• Running. A node in this state has completed all required activity for the last re-formation andis operating normally.
• Halted. A node never sees itself in this state. Other nodes will see it in this state after thenode has gracefully left the active cluster, for instance with a cmhaltnode command.
• Unknown. A node never sees itself in this state. Other nodes assign a node this state if it hasnever been an active cluster member.
Package Status and StateThe status of a package can be one of the following:
• Up. The package control script is active.
• Down. The package control script is not active.
• Unknown.A system multi-node package is up when it is running on all the active cluster nodes. A multi-nodepackage is up if it is running on any of its configured nodes.The state of the package can be one of the following:
• Starting. The start instructions in the control script are being run.
• Running. Services are active and being monitored.
• Halting. The halt instructions in the control script are being run.
116 Maintenance

Package Switching AttributesPackages also have the following switching attributes:
• Package Switching. Enabled—the package can switch to another node in the event offailure.
• Switching Enabled for a Node. Enabled—the package can switch to the referencednode. Disabled—the package cannot switch to the specified node until the node is enabledfor the package using the cmmodpkg command.Every package is marked Enabled or Disabled for each node that is either a primary oradoptive node for the package.For multi-node packages, node switching Disabled means the package cannot start on thatnode.
Status of Group MembershipThe state of the cluster for Oracle RAC is one of the following:
• Up. Services are active and being monitored. The membership appears in the output ofcmviewcl -l group.
• Down. The cluster is halted and GMS services have been stopped. The membership does notappear in the output of the cmviewcl -l group.
The following is an example of the group membership output shown in the cmviewcl command:# cmviewcl -l group
GROUP MEMBER PID MEMBER_NODEDGop 1 10394 comanche 0 10499 chinookDBOP 1 10501 comanche 0 10396 chinookDAALL_DB 0 10396 comanche 1 10501 chinookIGOPALL 2 10423 comanche 1 10528 chinook
where the cmviewcl output values are the following:
• GROUP—The name of a configured group.
• MEMBER—The ID number of a member of a group.
• PID—The Process ID of the group member.
• MEMBER_NODE—The Node on which the group member is running.
Service StatusServices have only status, as follows:
• Up—The service is being monitored.
• Down—The service is not running. It may have halted or failed.
• Uninitialized—The service is included in the package configuration, but it was not startedwith a run command in the control script.
• Unknown.
Reviewing Cluster and Package States with the cmviewcl Command 117

Network StatusThe network interfaces have only status, as follows:
• Up.
• Down.
• Unknown—Whether the interface is up or down cannot be determined. This can happenwhen the cluster is down. A standby interface has this status.
NOTE: Serial Line Status has been de-supported as of Serviceguard A.11.18.
Failover and Failback PoliciesPackages can be configured with one of two values for the FAILOVER_POLICY parameter:
• CONFIGURED_NODE—the package fails over to the next node in the node list in the packageconfiguration file.
• MIN_PACKAGE_NODE—the package fails over to the node in the cluster with the fewest runningpackages on it.
Packages can also be configured with one of two values for the FAILBACK_POLICY parameter:
• AUTOMATIC—a package following a failover returns to its primary node when the primarynode becomes available again.
• MANUAL—a package following a failover must be moved back to its original node by a systemadministrator.
Failover and failback policies are displayed in the output of the cmviewcl -v command.
Examples of Cluster and Package StatesThe following sample output from the cmviewcl -v command shows status for the cluster in thesample configuration.
Normal Running StatusEverything is running normally—both nodes in a two-node cluster are running, and each OracleRAC instance package is running as well. The only packages running are Oracle RAC instancepackages.CLUSTER STATUSexample up NODE STATUS STATE ftsys9 up running
Network_Parameters: INTERFACE STATUS PATH NAME PRIMARY up 56/36.1 lan0 STANDBY up 60/6 lan1
PACKAGE STATUS STATE AUTO_RUN NODE ops_pkg1 up running disabled ftsys9
Policy_Parameters: POLICY_NAME CONFIGURED_VALUE Start configured_node Failback manual
Node_Switching_Parameters: NODE_TYPE STATUS SWITCHING NAME Primary up enabled ftsys9 (current)
NODE STATUS STATE
118 Maintenance
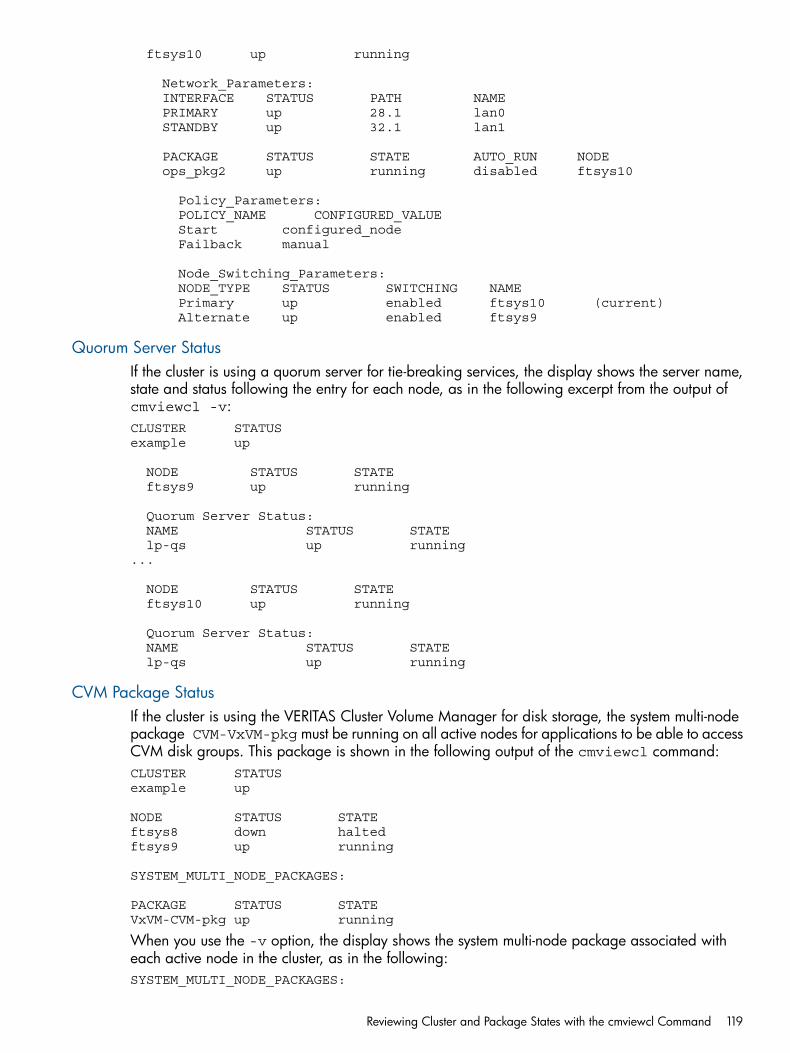
ftsys10 up running
Network_Parameters: INTERFACE STATUS PATH NAME PRIMARY up 28.1 lan0 STANDBY up 32.1 lan1
PACKAGE STATUS STATE AUTO_RUN NODE ops_pkg2 up running disabled ftsys10
Policy_Parameters: POLICY_NAME CONFIGURED_VALUE Start configured_node Failback manual
Node_Switching_Parameters: NODE_TYPE STATUS SWITCHING NAME Primary up enabled ftsys10 (current) Alternate up enabled ftsys9
Quorum Server StatusIf the cluster is using a quorum server for tie-breaking services, the display shows the server name,state and status following the entry for each node, as in the following excerpt from the output ofcmviewcl -v:CLUSTER STATUSexample up
NODE STATUS STATE ftsys9 up running
Quorum Server Status: NAME STATUS STATE lp-qs up running...
NODE STATUS STATE ftsys10 up running
Quorum Server Status: NAME STATUS STATE lp-qs up running
CVM Package StatusIf the cluster is using the VERITAS Cluster Volume Manager for disk storage, the system multi-nodepackage CVM-VxVM-pkg must be running on all active nodes for applications to be able to accessCVM disk groups. This package is shown in the following output of the cmviewcl command:CLUSTER STATUS example up
NODE STATUS STATE ftsys8 down haltedftsys9 up running
SYSTEM_MULTI_NODE_PACKAGES:
PACKAGE STATUS STATE VxVM-CVM-pkg up running
When you use the -v option, the display shows the system multi-node package associated witheach active node in the cluster, as in the following:SYSTEM_MULTI_NODE_PACKAGES:
Reviewing Cluster and Package States with the cmviewcl Command 119
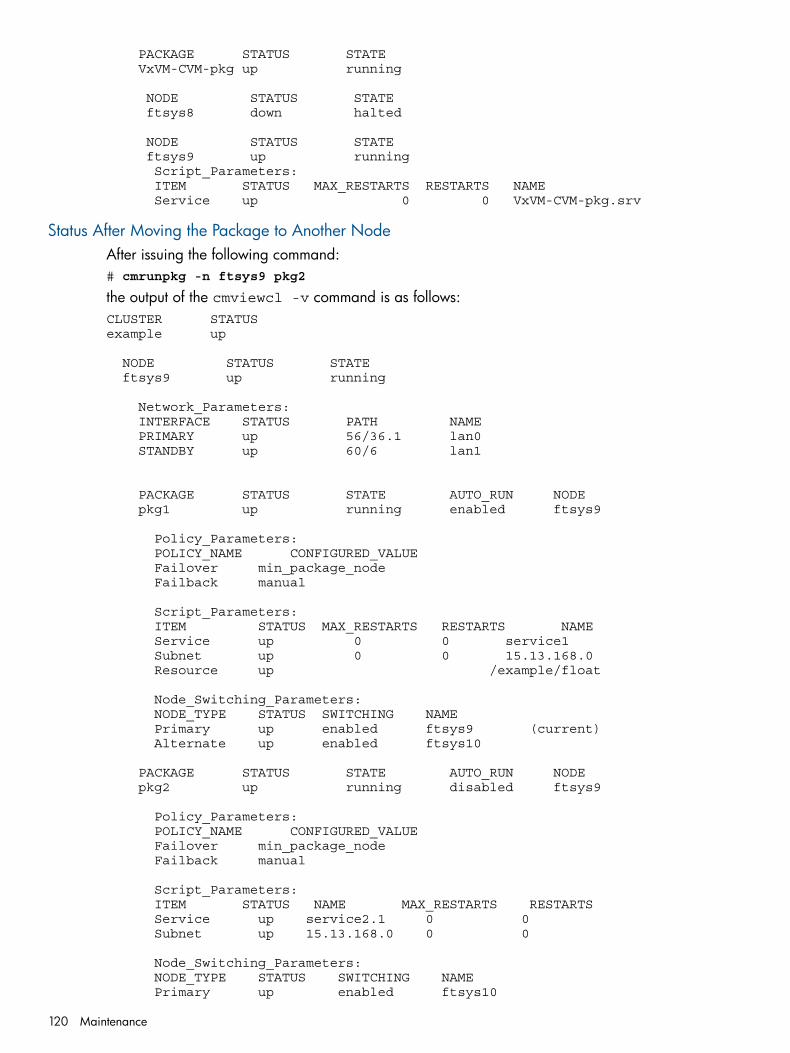
PACKAGE STATUS STATE VxVM-CVM-pkg up running
NODE STATUS STATE ftsys8 down halted
NODE STATUS STATE ftsys9 up running Script_Parameters: ITEM STATUS MAX_RESTARTS RESTARTS NAME Service up 0 0 VxVM-CVM-pkg.srv
Status After Moving the Package to Another NodeAfter issuing the following command:# cmrunpkg -n ftsys9 pkg2
the output of the cmviewcl -v command is as follows:CLUSTER STATUSexample up
NODE STATUS STATE ftsys9 up running
Network_Parameters: INTERFACE STATUS PATH NAME PRIMARY up 56/36.1 lan0 STANDBY up 60/6 lan1
PACKAGE STATUS STATE AUTO_RUN NODE pkg1 up running enabled ftsys9
Policy_Parameters: POLICY_NAME CONFIGURED_VALUE Failover min_package_node Failback manual
Script_Parameters: ITEM STATUS MAX_RESTARTS RESTARTS NAME Service up 0 0 service1 Subnet up 0 0 15.13.168.0 Resource up /example/float
Node_Switching_Parameters: NODE_TYPE STATUS SWITCHING NAME Primary up enabled ftsys9 (current) Alternate up enabled ftsys10
PACKAGE STATUS STATE AUTO_RUN NODE pkg2 up running disabled ftsys9
Policy_Parameters: POLICY_NAME CONFIGURED_VALUE Failover min_package_node Failback manual
Script_Parameters: ITEM STATUS NAME MAX_RESTARTS RESTARTS Service up service2.1 0 0 Subnet up 15.13.168.0 0 0
Node_Switching_Parameters: NODE_TYPE STATUS SWITCHING NAME Primary up enabled ftsys10
120 Maintenance

Alternate up enabled ftsys9 (current)
NODE STATUS STATE ftsys10 up running
Network_Parameters: INTERFACE STATUS PATH NAME PRIMARY up 28.1 lan0 STANDBY up 32.1 lan1
Now pkg2 is running on node ftsys9. Note that it is still disabled from switching.
Status After Package Switching is EnabledThe following command changes package status back to Package Switching Enabled:# cmmodpkg -e pkg2
The output of the cmviewcl command is now as follows:CLUSTER STATUSexample up
NODE STATUS STATE ftsys9 up running
PACKAGE STATUS STATE AUTO_RUN NODE pkg1 up running enabled ftsys9 pkg2 up running enabled ftsys9
NODE STATUS STATE ftsys10 up running
Both packages are now running on ftsys9 and pkg2 is enabled for switching. Ftsys10 isrunning the daemon and no packages are running on ftsys10.
Status After Halting a NodeAfter halting ftsys10, with the following command:# cmhaltnode ftsys10
the output of cmviewcl is as follows on ftsys9:CLUSTER STATUSexample up
NODE STATUS STATE ftsys9 up running
PACKAGE STATUS STATE AUTO_RUN NODE pkg1 up running enabled ftsys9 pkg2 up running enabled ftsys9
NODE STATUS STATE ftsys10 down halted
This output is seen on both ftsys9 and ftsys10.
Viewing Data on Unowned PackagesThe following example shows packages that are currently unowned—not running on any configurednode. Information on monitored resources is provided for each node. This information allows youto identify the cause of a failure and decide where to start the package up again.UNOWNED_PACKAGES
PACKAGE STATUS STATE AUTO_RUN NODEPKG3 down halted enabled unowned
Reviewing Cluster and Package States with the cmviewcl Command 121

Policy_Parameters:POLICY_NAME CONFIGURED_VALUEFailover min_package_nodeFailback automatic
Script_Parameters:ITEM STATUS NODE_NAME NAMEResource up manx /resource/randomSubnet up manx 192.8.15.0Resource up burmese /resource/randomSubnet up burmese 192.8.15.0Resource up tabby /resource/randomSubnet up tabby 192.8.15.0Resource up persian /resource/randomSubnet up persian 192.8.15.0
Node_Switching_Parameters:NODE_TYPE STATUS SWITCHING NAMEPrimary up enabled manxAlternate up enabled burmeseAlternate up enabled tabbyAlternate up enabled persian
Checking the Cluster Configuration and ComponentsServiceguard provides tools that allow you to check the soundness of the cluster configuration, andthe health of its components. In past releases, much of this was done by cmcheckconf (1m)and/or cmapplyconf (1m) and could be done only when you were changing the configurationof the cluster or packages.As of Serviceguard A.11.20, these commands perform additional checks, and a new command,cmcompare (1m) allows you to compare the contents and characteristics of cluster-wide files tomake sure they are consistent. In addition, you can check configuration of the cluster and all of itspackages at any time by running cmcheckconf (1m) without arguments (or with -v; see below).These checks help you to ensure that packages will start up and fail over successfully.Specifically, the following capabilities are new as of Serviceguard A.11.20.
122 Maintenance
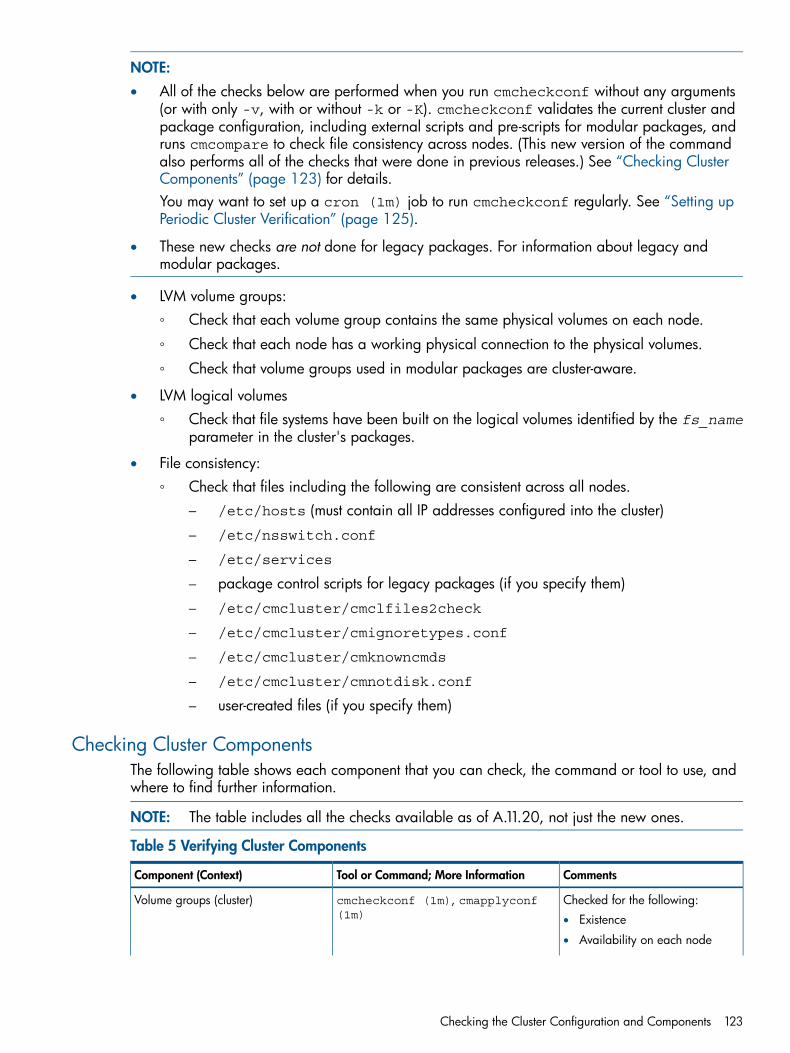
NOTE:• All of the checks below are performed when you run cmcheckconf without any arguments
(or with only -v, with or without -k or -K). cmcheckconf validates the current cluster andpackage configuration, including external scripts and pre-scripts for modular packages, andruns cmcompare to check file consistency across nodes. (This new version of the commandalso performs all of the checks that were done in previous releases.) See “Checking ClusterComponents” (page 123) for details.You may want to set up a cron (1m) job to run cmcheckconf regularly. See “Setting upPeriodic Cluster Verification” (page 125).
• These new checks are not done for legacy packages. For information about legacy andmodular packages.
• LVM volume groups:Check that each volume group contains the same physical volumes on each node.◦
◦ Check that each node has a working physical connection to the physical volumes.
◦ Check that volume groups used in modular packages are cluster-aware.
• LVM logical volumes◦ Check that file systems have been built on the logical volumes identified by the fs_name
parameter in the cluster's packages.
• File consistency:◦ Check that files including the following are consistent across all nodes.
– /etc/hosts (must contain all IP addresses configured into the cluster)
– /etc/nsswitch.conf
– /etc/services
– package control scripts for legacy packages (if you specify them)
– /etc/cmcluster/cmclfiles2check
– /etc/cmcluster/cmignoretypes.conf
– /etc/cmcluster/cmknowncmds
– /etc/cmcluster/cmnotdisk.conf
– user-created files (if you specify them)
Checking Cluster ComponentsThe following table shows each component that you can check, the command or tool to use, andwhere to find further information.
NOTE: The table includes all the checks available as of A.11.20, not just the new ones.
Table 5 Verifying Cluster Components
CommentsTool or Command; More InformationComponent (Context)
Checked for the following:cmcheckconf (1m), cmapplyconf(1m)
Volume groups (cluster)• Existence
• Availability on each node
Checking the Cluster Configuration and Components 123
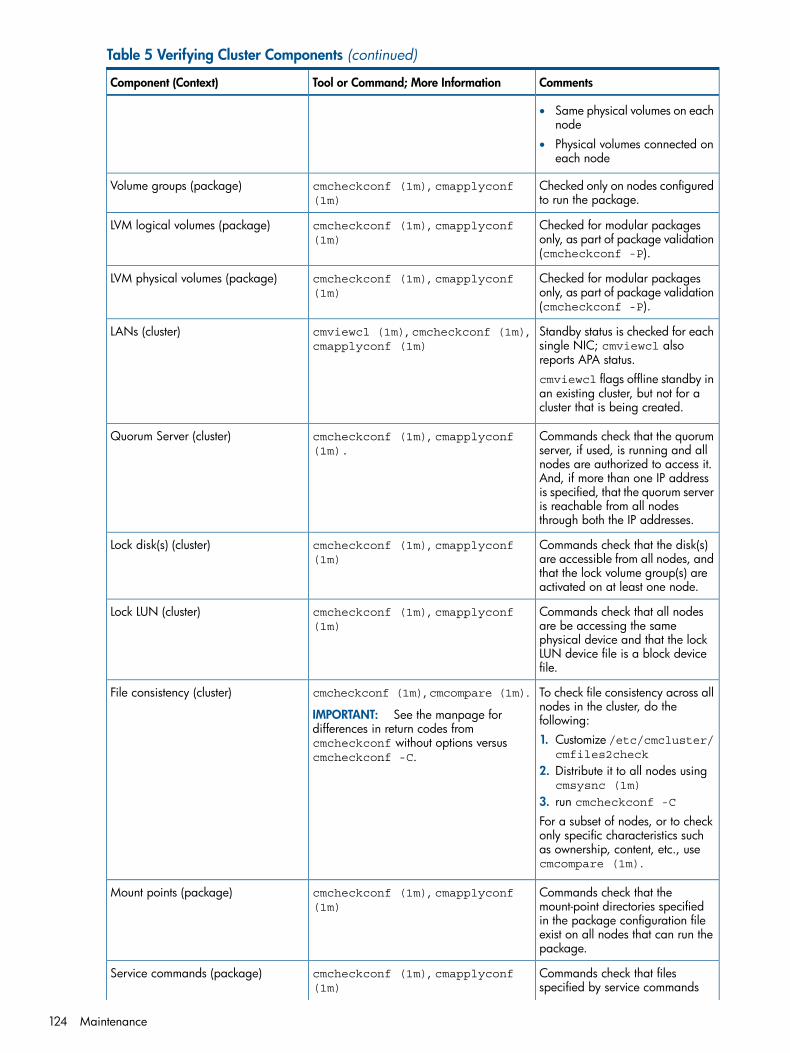
Table 5 Verifying Cluster Components (continued)
CommentsTool or Command; More InformationComponent (Context)
• Same physical volumes on eachnode
• Physical volumes connected oneach node
Checked only on nodes configuredto run the package.
cmcheckconf (1m), cmapplyconf(1m)
Volume groups (package)
Checked for modular packagesonly, as part of package validation(cmcheckconf -P).
cmcheckconf (1m), cmapplyconf(1m)
LVM logical volumes (package)
Checked for modular packagesonly, as part of package validation(cmcheckconf -P).
cmcheckconf (1m), cmapplyconf(1m)
LVM physical volumes (package)
Standby status is checked for eachsingle NIC; cmviewcl alsoreports APA status.
cmviewcl (1m), cmcheckconf (1m),cmapplyconf (1m)
LANs (cluster)
cmviewcl flags offline standby inan existing cluster, but not for acluster that is being created.
Commands check that the quorumserver, if used, is running and all
cmcheckconf (1m), cmapplyconf(1m).
Quorum Server (cluster)
nodes are authorized to access it.And, if more than one IP addressis specified, that the quorum serveris reachable from all nodesthrough both the IP addresses.
Commands check that the disk(s)are accessible from all nodes, and
cmcheckconf (1m), cmapplyconf(1m)
Lock disk(s) (cluster)
that the lock volume group(s) areactivated on at least one node.
Commands check that all nodesare be accessing the same
cmcheckconf (1m), cmapplyconf(1m)
Lock LUN (cluster)
physical device and that the lockLUN device file is a block devicefile.
To check file consistency across allnodes in the cluster, do thefollowing:
cmcheckconf (1m), cmcompare (1m).
IMPORTANT: See the manpage fordifferences in return codes fromcmcheckconf without options versuscmcheckconf -C.
File consistency (cluster)
1. Customize /etc/cmcluster/cmfiles2check
2. Distribute it to all nodes usingcmsysnc (1m)
3. run cmcheckconf -C
For a subset of nodes, or to checkonly specific characteristics suchas ownership, content, etc., usecmcompare (1m).
Commands check that themount-point directories specified
cmcheckconf (1m), cmapplyconf(1m)
Mount points (package)
in the package configuration fileexist on all nodes that can run thepackage.
Commands check that filesspecified by service commands
cmcheckconf (1m), cmapplyconf(1m)
Service commands (package)
124 Maintenance
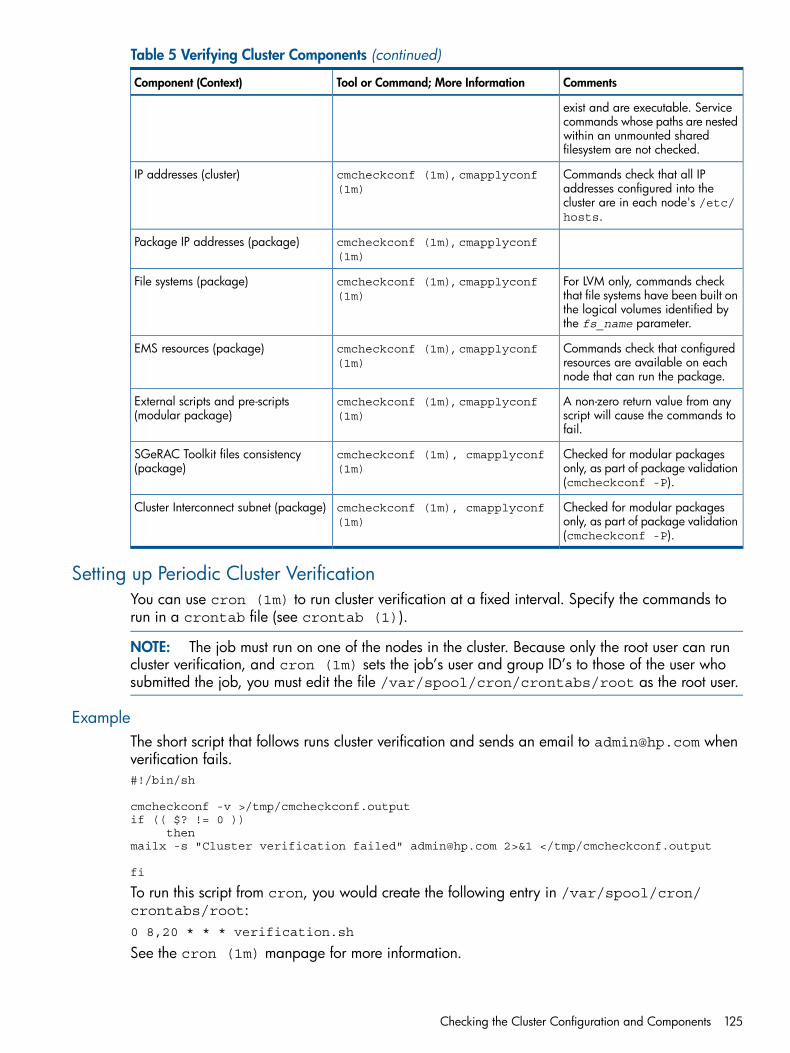
Table 5 Verifying Cluster Components (continued)
CommentsTool or Command; More InformationComponent (Context)
exist and are executable. Servicecommands whose paths are nestedwithin an unmounted sharedfilesystem are not checked.
Commands check that all IPaddresses configured into the
cmcheckconf (1m), cmapplyconf(1m)
IP addresses (cluster)
cluster are in each node's /etc/hosts.
cmcheckconf (1m), cmapplyconf(1m)
Package IP addresses (package)
For LVM only, commands checkthat file systems have been built on
cmcheckconf (1m), cmapplyconf(1m)
File systems (package)
the logical volumes identified bythe fs_name parameter.
Commands check that configuredresources are available on eachnode that can run the package.
cmcheckconf (1m), cmapplyconf(1m)
EMS resources (package)
A non-zero return value from anyscript will cause the commands tofail.
cmcheckconf (1m), cmapplyconf(1m)
External scripts and pre-scripts(modular package)
Checked for modular packagesonly, as part of package validation(cmcheckconf -P).
cmcheckconf (1m), cmapplyconf(1m)
SGeRAC Toolkit files consistency(package)
Checked for modular packagesonly, as part of package validation(cmcheckconf -P).
cmcheckconf (1m), cmapplyconf(1m)
Cluster Interconnect subnet (package)
Setting up Periodic Cluster VerificationYou can use cron (1m) to run cluster verification at a fixed interval. Specify the commands torun in a crontab file (see crontab (1)).
NOTE: The job must run on one of the nodes in the cluster. Because only the root user can runcluster verification, and cron (1m) sets the job’s user and group ID’s to those of the user whosubmitted the job, you must edit the file /var/spool/cron/crontabs/root as the root user.
ExampleThe short script that follows runs cluster verification and sends an email to [email protected] whenverification fails.#!/bin/sh
cmcheckconf -v >/tmp/cmcheckconf.outputif (( $? != 0 )) thenmailx -s "Cluster verification failed" [email protected] 2>&1 </tmp/cmcheckconf.output
fi
To run this script from cron, you would create the following entry in /var/spool/cron/crontabs/root:0 8,20 * * * verification.sh
See the cron (1m) manpage for more information.
Checking the Cluster Configuration and Components 125

LimitationsServiceguard does not check the following conditions:• Access Control Policies properly configured
• File systems configured to mount automatically on boot (that is, Serviceguard does not check/etc/fstab)
• Shared volume groups configured to activate on boot
• Volume group major and minor numbers unique
• Redundant storage paths functioning properly
• Kernel parameters and driver configurations consistent across nodes
• Mount point overlaps (such that one file system is obscured when another is mounted)
• Unreachable DNS server
• Consistency of settings in .rhosts and /var/admin/inetd.sec
• Consistency across cluster of major and minor numbers device-file numbers
• Nested mount points
• Staleness of mirror copies
Online ReconfigurationThe online reconfiguration feature provides a method to make configuration changes online to aServiceguard Extension for RAC (SGeRAC) cluster. Specifically, this provides the ability to addand/or delete nodes from a running SGeRAC Cluster, and to reconfigure SLVM Volume Group(VG) while it is being accessed by only one node.
Online Node Addition and DeletionOnline node addition enables the addition or deletion of nodes in an SGeRAC cluster to or fromanother running cluster. Node(s) can be added and/or deleted by changing the clusterconfiguration. This is done by editing the cluster specification file and re-applying the configurationto the already running cluster. For deleting online node(s), the node(s) needs to be halted beforedeleting them from the cluster.Use the following steps for adding a node using online node reconfiguration.1. Export the mapfile for the volume groups that needs to be visible in the new node ( vgexport
-s -m mapfile -p <sharedvg>).2. Copy the mapfile to the new node.3. Import the volume groups into the new node (vgimport -s -m mapfile <sharedvg>).4. Add node to the cluster online—edit the cluster configuration file to add the node details and
run cmapplyconf.After adding a new node to an SGeRAC cluster, where SGeRAC Oracle Clusterware-MNPor ASMDG-MNP, or RAC-MNP packages are already configured. Follow these steps beforeissuing the cmrunnode command:a. For Oracle Clusterware multi-node packages:
1) Create a directory for Oracle clusterware toolkit configuration file. This directorymust be the same as the one which is created on the existing cluster nodes.For example; mkdir /etc/cmcluster/<YourOwn-OC-multi-node package-Dir/
2) Copy oc.conf from Oracle clusterware multi node package directory from othernodes to the Oracle Clusterware multi node package directory of new node.
b. For Oracle RAC multi-node packages:
126 Maintenance

1) Create a directory for RAC toolkit configuration file. This directory should be sameas the one which is created on the existing cluster nodes.For example; mkdir /etc/cmcluster/<YourOwn-RACmulti-node package-Dir/
2) Copy the rac_dbi.conf from RAC multi node package directory from other nodesto the the RAC multi node package directory of new node.Step b1 and b2 must be repeated for all the RAC MNP packages in the cluster.
c. For oracle ASMDG multi-node packages1) Create a directory for ASMDG toolkit configuration file. This directory should be
same as the one which is created on the existing cluster nodes.For example; mkdir /etc/cmcluster/<YourOwn-ASMDGmulti-node package-Dir/
2) Copy asm_dg.conf from ASMDG multi node package directory from other nodesto the the ASMDG multi node package directory of new node.Step c1 and c2 must be repeated for all the ASMDG MNP packages in the cluster.
5. Make the new node join the cluster (cmrunnode) and run the services.Use the following steps for deleting a node using online node reconfiguration:1. Halt the node in the cluster by running cmhaltnode.2. Edit the cluster configuration file to delete a node(s).3. Run cmapplyconf.
Managing the Shared StorageThe following describes the confirmation process for Single Node Online volume Re-Configuration,in addition to procedures for configuring LVM version 1.0. There are differences between LVMversion 1 and version 2.
NOTE: When using LVM, the volume groups are supported with Serviceguard.For more information on using and configuring LVM version 2.x, see the HP-UX 11i Version 3:HP-UX System Administrator's Guide: Logical Volume Management located at www.hp.com/go/hpux-core-docs —> HP-UX 11iv3.
For LVM version 2 compatibility requirements, see the Serviceguard/SGeRAC/SMS/ServiceguardMgr Plug-in Compatibility and Feature Matrix at www.hp.com/go/hpux-serviceguard-docs —>HP Serviceguard.
NOTE: For more information, see the Serviceguard Version A.11.20 Release Notes atwww.hp.com/go/hpux-serviceguard-docs —> HP Serviceguard.
Making LVM Volume Groups ShareableNormally, volume groups are marked to be activated in “shared” mode when they are listed withthe OPS_VOLUME_GROUP parameter in the cluster configuration file or in Serviceguard Managerthat occurs when the configuration is applied. However, in some cases you may want to manuallymake a volume group sharable. For example, if you wish to add a new shared volume groupwithout shutting down the cluster, you can use the manual method to do it online. When convenient,it's a good practice to bring down the cluster and reconfigure it to include the new volume group.1. Use the vgchange command on each node to ensure that the volume group to be shared is
currently inactive on all nodes. Example:# vgchange -a n /dev/vg_rac
2. On the configuration node, use the vgchange command to make the volume group shareableby members of the cluster:
Managing the Shared Storage 127
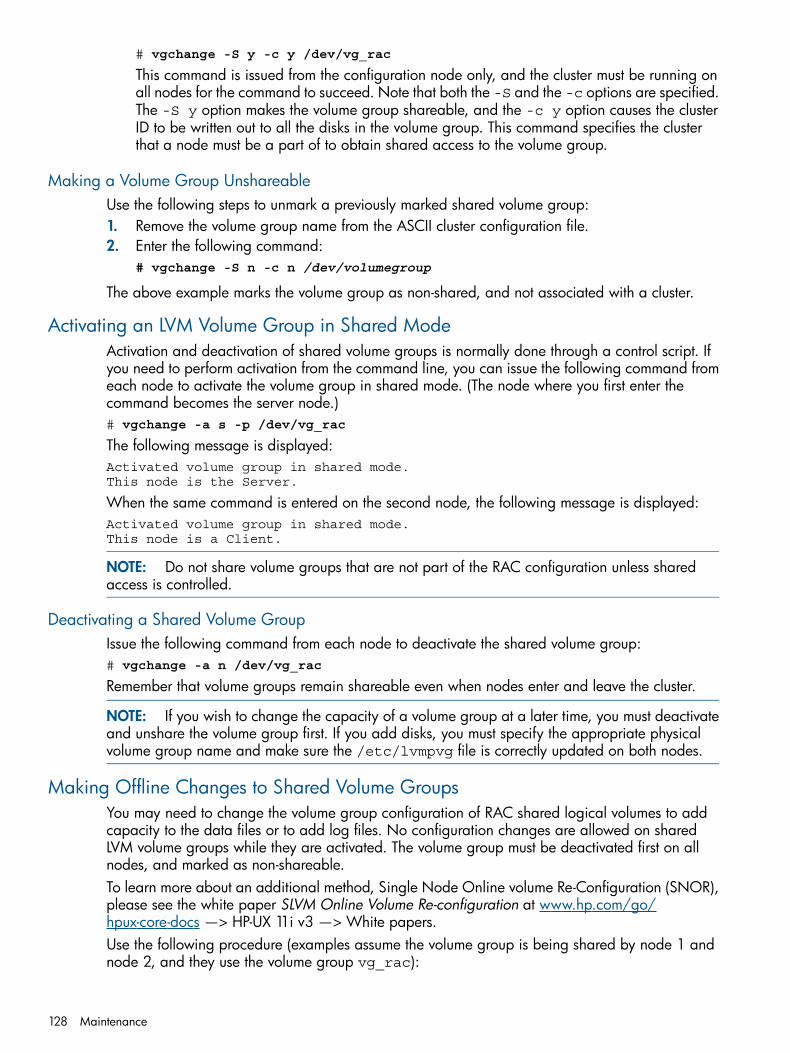
# vgchange -S y -c y /dev/vg_rac
This command is issued from the configuration node only, and the cluster must be running onall nodes for the command to succeed. Note that both the -S and the -c options are specified.The -S y option makes the volume group shareable, and the -c y option causes the clusterID to be written out to all the disks in the volume group. This command specifies the clusterthat a node must be a part of to obtain shared access to the volume group.
Making a Volume Group UnshareableUse the following steps to unmark a previously marked shared volume group:1. Remove the volume group name from the ASCII cluster configuration file.2. Enter the following command:
# vgchange -S n -c n /dev/volumegroup
The above example marks the volume group as non-shared, and not associated with a cluster.
Activating an LVM Volume Group in Shared ModeActivation and deactivation of shared volume groups is normally done through a control script. Ifyou need to perform activation from the command line, you can issue the following command fromeach node to activate the volume group in shared mode. (The node where you first enter thecommand becomes the server node.)# vgchange -a s -p /dev/vg_rac
The following message is displayed:Activated volume group in shared mode.This node is the Server.
When the same command is entered on the second node, the following message is displayed:Activated volume group in shared mode.This node is a Client.
NOTE: Do not share volume groups that are not part of the RAC configuration unless sharedaccess is controlled.
Deactivating a Shared Volume GroupIssue the following command from each node to deactivate the shared volume group:# vgchange -a n /dev/vg_rac
Remember that volume groups remain shareable even when nodes enter and leave the cluster.
NOTE: If you wish to change the capacity of a volume group at a later time, you must deactivateand unshare the volume group first. If you add disks, you must specify the appropriate physicalvolume group name and make sure the /etc/lvmpvg file is correctly updated on both nodes.
Making Offline Changes to Shared Volume GroupsYou may need to change the volume group configuration of RAC shared logical volumes to addcapacity to the data files or to add log files. No configuration changes are allowed on sharedLVM volume groups while they are activated. The volume group must be deactivated first on allnodes, and marked as non-shareable.To learn more about an additional method, Single Node Online volume Re-Configuration (SNOR),please see the white paper SLVM Online Volume Re-configuration at www.hp.com/go/hpux-core-docs —> HP-UX 11i v3 —> White papers.Use the following procedure (examples assume the volume group is being shared by node 1 andnode 2, and they use the volume group vg_rac):
128 Maintenance
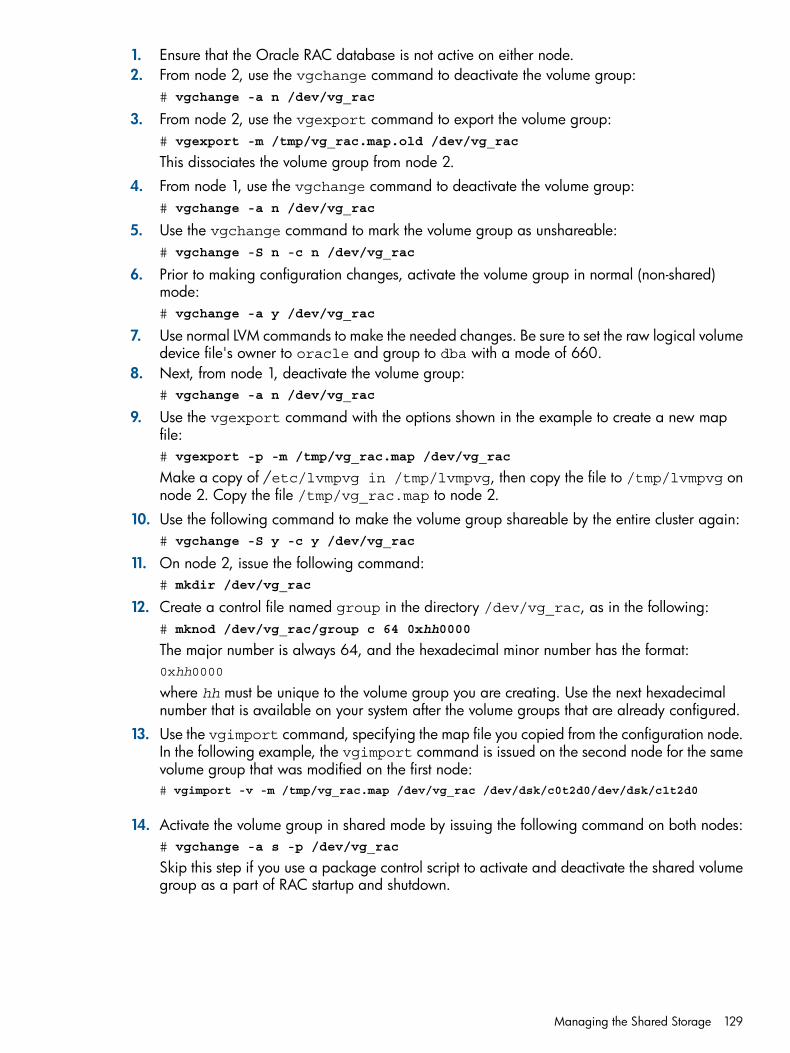
1. Ensure that the Oracle RAC database is not active on either node.2. From node 2, use the vgchange command to deactivate the volume group:
# vgchange -a n /dev/vg_rac
3. From node 2, use the vgexport command to export the volume group:# vgexport -m /tmp/vg_rac.map.old /dev/vg_rac
This dissociates the volume group from node 2.4. From node 1, use the vgchange command to deactivate the volume group:
# vgchange -a n /dev/vg_rac
5. Use the vgchange command to mark the volume group as unshareable:# vgchange -S n -c n /dev/vg_rac
6. Prior to making configuration changes, activate the volume group in normal (non-shared)mode:# vgchange -a y /dev/vg_rac
7. Use normal LVM commands to make the needed changes. Be sure to set the raw logical volumedevice file's owner to oracle and group to dba with a mode of 660.
8. Next, from node 1, deactivate the volume group:# vgchange -a n /dev/vg_rac
9. Use the vgexport command with the options shown in the example to create a new mapfile:# vgexport -p -m /tmp/vg_rac.map /dev/vg_rac
Make a copy of /etc/lvmpvg in /tmp/lvmpvg, then copy the file to /tmp/lvmpvg onnode 2. Copy the file /tmp/vg_rac.map to node 2.
10. Use the following command to make the volume group shareable by the entire cluster again:# vgchange -S y -c y /dev/vg_rac
11. On node 2, issue the following command:# mkdir /dev/vg_rac
12. Create a control file named group in the directory /dev/vg_rac, as in the following:# mknod /dev/vg_rac/group c 64 0xhh0000
The major number is always 64, and the hexadecimal minor number has the format:0xhh0000
where hh must be unique to the volume group you are creating. Use the next hexadecimalnumber that is available on your system after the volume groups that are already configured.
13. Use the vgimport command, specifying the map file you copied from the configuration node.In the following example, the vgimport command is issued on the second node for the samevolume group that was modified on the first node:# vgimport -v -m /tmp/vg_rac.map /dev/vg_rac /dev/dsk/c0t2d0/dev/dsk/c1t2d0
14. Activate the volume group in shared mode by issuing the following command on both nodes:# vgchange -a s -p /dev/vg_rac
Skip this step if you use a package control script to activate and deactivate the shared volumegroup as a part of RAC startup and shutdown.
Managing the Shared Storage 129
Adding Additional Shared LVM Volume GroupsTo add capacity or to organize your disk resources for ease of management, you may wish tocreate additional shared volume groups for your Oracle RAC databases. If you decide to useadditional shared volume groups, they must conform to the following rules:
• Volume groups should include different PV links to each logical unit on the disk array.
• Volume group names must be the same on all nodes in the cluster.
• Logical volume names must be the same on all nodes in the cluster.If you are adding or removing shared LVM volume groups, make sure that you modify the clusterconfiguration file and any package control script that activates and deactivates the shared LVMvolume groups.
Changing the CVM Storage ConfigurationTo add new CVM disk groups, the cluster must be running.If you are creating new CVM disk groups, be sure to determine the master node on which to dothe creation by using the following command:# vxdctl -c mode
One node will identify itself as the master. Create disk groups from this node.Similarly, you can delete CVM disk groups provided they are not being used by a cluster node atthe time.
NOTE: For CVM without CFS, if you are adding a disk group to the cluster configuration, makesure you also modify any package or create the package control script that imports and deportsthis disk group. If you are adding a CVM disk group, be sure to add the STORAGE_GROUP entryfor the disk group to the package ASCII file.For CVM with CFS, if you are adding a disk group to the cluster configuration, make sure you alsocreate the corresponding multi-node package. If you are adding a CVM disk group, be sure toadd to the packages the necessary package dependency that depend on the CVM disk group.If you are removing a disk group from the cluster configuration, make sure that you also modifyor delete any package control script that imports and deports this disk group. If you are removinga CVM disk group, be sure to remove the STORAGE_GROUP entries for the disk group from thepackage ASCII file.When removing a disk group that is activated and deactivated through a multi-node package,make sure to modify or remove any configured package dependencies to the multi-node package.
Removing Serviceguard Extension for RAC from a SystemIf you wish to remove a node from Serviceguard Extension for RAC operation, use the swremovecommand to delete the software. Note the following:• The cluster service should not be running on the node from which you will be deleting
Serviceguard Extension for RAC.• The node from which you are deleting Serviceguard Extension for RAC should not be in the
cluster configuration.• If you are removing Serviceguard Extension for RAC from more than one node, swremove
should be issued on one node at a time.
NOTE: After removing Serviceguard Extension for RAC, your cluster will still have Serviceguardinstalled. For information about removing Serviceguard, refer to the Managing Serviceguard userguide for your version of the product.
130 Maintenance
Monitoring HardwareGood standard practice in handling a high-availability system includes careful fault monitoring soas to prevent failures if possible, or at least to react to them swiftly when they occur.The following should be monitored for errors or warnings of all kinds.
• Disks
• CPUs
• Memory
• LAN cards
• Power sources
• All cables
• Disk interface cardsSome monitoring can be done through simple physical inspection, but for the most comprehensivemonitoring, you should examine the system log file (/var/adm/syslog/syslog.log) periodicallyfor reports on all configured HA devices. The presence of errors relating to a device will show theneed for maintenance.
Using Event Monitoring ServiceEvent Monitoring Service (EMS) allows you to configure monitors of specific devices and systemresources. You can direct alerts to an administrative workstation where operators can be notifiedof further action in case of a problem. For example, you could configure a disk monitor to reportwhen a mirror was lost from a mirrored volume group being used in a non-RAC package.For additional information, refer to www.hp.com/go/hpux-ha-monitoring-docs —> HP EventMonitoring Service.
Using EMS Hardware MonitorsA set of hardware monitors is available for monitoring and reporting on memory, CPU, and manyother system values. For additional information, refer to Online Diagnostics (EMS and STM)Administrator's Guide at www.hp.com/go/hpux-diagnostics-docs —> Diagnostics and MonitoringTools.
Adding Disk HardwareAs your system expands, you may need to add disk hardware. This also means modifying thelogical volume structure. Use the following general procedure:1. Halt packages.2. Ensure that the Oracle database is not active on either node.3. Deactivate and mark as unshareable any shared volume groups.4. Halt the cluster.5. Deactivate automatic cluster startup.6. Shutdown and power off system before installing new hardware.7. Install the new disk hardware with connections on all nodes.8. Reboot all nodes.9. On the configuration node, add the new physical volumes to existing volume groups, or create
new volume groups as needed.10. Start up the cluster.11. Make the volume groups shareable, then import each shareable volume group onto the other
nodes in the cluster.12. Activate the volume groups in shared mode on all nodes.
Monitoring Hardware 131

13. Start up the Oracle RAC instances on all nodes.14. Activate automatic cluster startup.
NOTE: As you add new disks to the system, update the planning worksheets (described inAppendix B: “Blank Planning Worksheets”), so as to record the exact configuration you are using.
Replacing DisksThe procedure for replacing a faulty disk mechanism depends on the type of disk configurationyou are using and on the type of Volume Manager software. For a description of replacementprocedures using CVM, refer to the chapter on “Administering Hot-Relocation” in the VERITASVolume Manager Administrator’s Guide. Additional information is found in the VERITAS VolumeManager Troubleshooting Guide.The following sections describe how to replace disks that are configured with LVM. Separatedescriptions are provided for replacing a disk in an array and replacing a disk in a high-availabilityenclosure.
Replacing a Mechanism in a Disk Array Configured with LVMWith any HA disk array configured in RAID 1 or RAID 5, refer to the array’s documentation forinstruction on how to replace a faulty mechanism. After the replacement, the device itselfautomatically rebuilds the missing data on the new disk. No LVM activity is needed. This processis known as hot swapping the disk.
NOTE: If your LVM installation requires online replacement of disk mechanisms, the use of diskarrays may be required, because software mirroring of JBODs with MirrorDisk/UX does not permithot swapping for disks that are activated in shared mode.
Replacing a Mechanism in an HA Enclosure Configured with Exclusive LVMNon-Oracle data that is used by packages may be configured in volume groups that use exclusive(one-node-at-a-time) activation. If you are using exclusive activation and software mirroring withMirrorDisk/UX and the mirrored disks are mounted in a high-availability disk enclosure, you canuse the following steps to hot plug a disk mechanism.1. Identify the physical volume name of the failed disk and the name of the volume group in
which it was configured. In the following examples, the volume group name is shown as/dev/vg_sg01 and the physical volume name is shown as/dev/c2t3d0. Substitute the volumegroup and physical volume names that are correct for your system.
2. Identify the names of any logical volumes that have extents defined on the failed physicalvolume.
3. On the node where the volume group is currently activated, use the following command foreach logical volume that has extents on the failed physical volume:# lvreduce -m 0 /dev/vg_sg01/lvolname /dev/dsk/c2t3d0
4. Remove the failed disk and insert a new one. The new disk will have the same HP-UX devicename as the old one.
5. On the node from where you issued the lvreduce command, issue the following commandto restore the volume group configuration data to the newly inserted disk:# vgcfgrestore /dev/vg_sg01 /dev/dsk/c2t3d0
132 Maintenance

6. Issue the following command to extend the logical volume to the newly inserted disk:# lvextend -m 1 /dev/vg_sg01 /dev/dsk/c2t3d0
7. Finally, use the lvsync command for each logical volume that has extents on the failedphysical volume. This synchronizes the extents of the new disk with the extents of the othermirror.# lvsync /dev/vg_sg01/lvolname
Online Replacement of a Mechanism in an HA Enclosure Configured with SharedLVM (SLVM)
If you are using software mirroring for shared concurrent activation of Oracle RAC data withMirrorDisk/UX and the mirrored disks are mounted in a high-availability disk enclosure, use thefollowing LVM command options to change/replace disks via OLR (On Line Replacement).
NOTE: This procedure supports either LVM or SLVM VG and is “online” (activated) and uses an“online disk replacement” mechanism. It is supported for SLVM; however, the PV being replacedmust be detached from each node. For example, running pvchange -a N /dev/dsk/ fromone node only detaches the disk from that node's perspective.
1. Detach the target PV by using one of the following commands on each node of the cluster:# pvchange -a n [pv path]
Use the pvchange command -a n [pv path] to detach only one path or replace a diskif the primary disk path is not performing well and you want to disable the path. The pvchange-a n command detaches the single specified PV Link (device path). (If the path was the pathin use, LVM will switch to any alternate PV Link that is still available.)—OR—# pvchange -a N [pv path]
Alternatively, use the pvchange -a N [pv path] command to detach a disk (all paths tothe disk) and close it. Use this to allow diagnostics or replace a multi-ported disk.
NOTE: If the volume group is mirrored, applications can continue accessing data on mirrorcopies after the commands above. If the volume is not mirrored, then any access attempts tothe device may hang indefinitely or time out. This depends upon the LV timeout value configuredfor the logical volume.
2. Replace new disk.The new disk size needs to be of equal or greater size. This is required whether or not thedisk replacement is online or offline.
3. Restore the LVM header to the new disk using the following command:# vgcfgrestore -n [vg name] [pv raw path]
It is only necessary to perform the vgcfgrestore operation once from any node on thecluster.
4. Attach PV or Activate the VG from each node of the cluster using the following commands:#pvchange -a y [pv path]—OR—# vgchange -a [y|e|s] [vg name]
The PV must be detached from all nodes and must be attached from each of the nodes tomake it usable. Alternatively, you can reactivate the VG from each of the nodes. (This commandcannot attach all the paths to the PV, therefore each PV link has to be attached as well.)
Replacing Disks 133

NOTE: After executing one of the commands above, any I/O queued for the device willrestart. If the device replaced in step #2 was a mirror copy, then it will begin theresynchronization process that may take a significant amount of time to complete. The progressof the resynchronization process can be observed using the vgdisplay(1M),lvdisplay(1M) or pvdisplay(1M) commands.
Offline Replacement of a Mechanism in an HA Enclosure Configured with SharedLVM (SLVM)
Hot plugging of disks is not supported for Oracle RAC data that is configured in volume groupswith Shared LVM (SLVM). If you need this capability, you should use disk arrays for your OracleRAC data.If you are using software mirroring for shared concurrent activation of Oracle RAC data withMirrorDisk/UX and the mirrored disks are mounted in a high-availability disk enclosure, use thefollowing steps to carry out offline replacement:1. Make a note of the physical volume name of the failed mechanism (for example, /dev/dsk/
c2t3d0).2. Deactivate the volume group on all nodes of the cluster:
# vgchange -a n vg_rac
3. Replace the bad disk mechanism with a good one.4. From one node, initialize the volume group information on the good mechanism using
vgcfgrestore(1M), specifying the name of the volume group and the name of the physicalvolume that is being replaced:# vgcfgrestore /dev/vg_rac /dev/dsk/c2t3d0
5. Activate the volume group on one node in exclusive mode, then deactivate the volume group:# vgchange -a e vg_rac
This will synchronize the stale logical volume mirrors. This step can be time-consuming,depending on hardware characteristics and the amount of data.
6. Deactivate the volume group:# vgchange -a n vg_rac
7. Activate the volume group on all the nodes in shared mode using vgchange - a s:# vgchange -a s vg_rac
Replacing a Lock DiskReplacing a failed lock disk mechanism is the same as replacing a data disk. If you are using adedicated lock disk (one with no user data on it), then you need to issue only one LVM command:# vgcfgrestore /dev/vg_lock /dev/dsk/c2t1d0
After doing this, wait at least an hour, then review the syslog file for a message showing that thelock disk is healthy again.
Online Hardware Maintenance with Inline SCSI TerminatorServiceguard allows online SCSI disk controller hardware repairs to all cluster nodes if you useHP’s inline terminator (C2980A) on nodes connected to the end of the shared FW/SCSI bus. Theinline terminator cable is a 0.5 meter extension cable with the terminator on the male end thatconnects to the controller card for an external bus. The inline terminator is used instead of thetermination pack that is attached to the controller card. The inline terminator makes it possible tophysically disconnect the node from the end of the F/W SCSI bus without breaking the bus'stermination. (Nodes attached to the middle of a bus using a Y cable also can be detached from
134 Maintenance

the bus without harm.) When using inline terminators and Y cables, ensure that all orange-socketedtermination packs are removed from the controller cards.
NOTE: You cannot use inline terminators with internal FW/SCSI buses on D and K series systems,and you cannot use the inline terminator with single-ended SCSI buses. You must not use an inlineterminator to connect a node to a Y cable.
Figure 19 shows a three-node cluster with two F/W SCSI buses. The solid line and the dotted linerepresent different buses, both of which have inline terminators attached to nodes 1 and 3. Ycables are also shown attached to node 2.
Figure 19 F/W SCSI Buses with Inline Terminators
The use of inline SCSI terminators allows you to do hardware maintenance on a given node bytemporarily moving its packages to another node and then halting the original node while itshardware is serviced. Following the replacement, the packages can be moved back to the originalnode.Use the following procedure to disconnect a node that is attached to the bus with an inline SCSIterminator or with a Y cable:1. Move any packages on the node that requires maintenance to a different node.2. Halt the node that requires maintenance. The cluster will reform, and activity will continue on
other nodes. Packages on the halted node will switch to other available nodes if they areconfigured to switch.
3. Disconnect the power to the node.4. Disconnect the node from the inline terminator cable or Y cable if necessary. The other nodes
accessing the bus will encounter no problems as long as the inline terminator or Y cableremains connected to the bus.
5. Replace or upgrade hardware on the node, as needed.6. Reconnect the node to the inline terminator cable or Y cable if necessary.7. Reconnect power and reboot the node. If AUTOSTART_CMCLD is set to 1 in the /etc/
rc.config.d/cmcluster file, the node will rejoin the cluster.8. If necessary, move packages back to the node from their alternate locations and restart them.
Replacing Disks 135

Replacement of I/O CardsAfter an I/O card failure, you can replace the card using the following steps. It is not necessaryto bring the cluster down to do this if you are using SCSI inline terminators or Y cables at eachnode.1. Halt the node by using Serviceguard Manager or the cmhaltnode command. Packages
should fail over normally to other nodes.2. Remove the I/O cable from the card. With SCSI inline terminators, this can be done without
affecting the disks or other nodes on the bus.3. Using SAM, select the option to do an online replacement of an I/O card.4. Remove the defective I/O card.5. Install the new card. The new card must be exactly the same card type, and it must be installed
in the same slot as the card you removed.6. In SAM, select the option to attach the new I/O card.7. Add the node back into the cluster by using Serviceguard Manager or the cmrunnode
command.The Administration menu of Serviceguard Manager contains all the administration operations.
Replacement of LAN CardsIf you have a LAN card failure that requires the LAN card to be replaced, you can replace it onlineor offline, depending on the type of hardware and operating system you are running. It is notnecessary to bring the cluster down to do this.
Offline ReplacementThe following steps show how to replace a LAN card offline. These steps apply to HP-UX 11i:1. Halt the node by using the cmhaltnode command.2. Shut down the system using /etc/shutdown, then power down the system.3. Remove the defective LAN card.4. Install the new LAN card. The new card must be exactly the same card type, and it must be
installed in the same slot as the card you removed.5. Power up the system.6. If necessary, add the node back into the cluster by using the cmrunnode command. (You
can omit this step if the node is configured to join the cluster automatically.)
Online ReplacementIf your system hardware supports hotswap I/O cards, and if the system is running HP-UX 11i(B.11.11 or later), you have the option of replacing the defective LAN card online. This willsignificantly improve the overall availability of the system. To do this, follow the steps provided inthe section “How to Online Replace (OLR) a PCI Card Using SAM” in the document ConfiguringHP-UX for Peripherals. The OLR procedure also requires that the new card must be exactly the samecard type as the card you removed to avoid improper operation of the network driver. Serviceguardwill automatically recover the LAN card once it has been replaced and reconnected to the network.
After Replacing the CardAfter the online or offline replacement of LAN cards has been done, Serviceguard will detect thatthe MAC address (LLA) of the card has changed from the value stored in the cluster binaryconfiguration file, and it will notify the other nodes in the cluster of the new MAC address. Thecluster will operate normally after this.It is also recommended that you update the new MAC address in the cluster binary configurationfile by re-applying the cluster configuration. Use the following steps for online reconfiguration:
136 Maintenance

1. Use the cmgetconf command to obtain a fresh ASCII configuration file, as follows:# cmgetconf config.ascii
2. Use the cmapplyconf command to apply the configuration and copy the new binary file toall cluster nodes:# cmapplyconf -C config.ascii
This procedure updates the binary file with the new MAC address and thus avoids data inconsistencybetween the outputs of the cmviewconcl and lanscan commands.
Monitoring RAC InstancesThe DB Provider provides the capability to monitor RAC databases. RBA (Role Based Access)enables a non-root user to have the capability to monitor RAC instances using ServiceguardManager.
Monitoring RAC Instances 137

6 TroubleshootingGo to www.hp.com/go/hpux-serviceguard-docs, and then click HP Serviceguard . In theUser Guide section, click on the latest Managing Serviceguard manual and see the “Troubleshootingyour Cluster” chapter.
NOTE: All messages from cmgmsd log to /var/adm/syslog/syslog.log by default.
138 Troubleshooting

A Software UpgradesServiceguard Extension for RAC (SGeRAC) software upgrades can be done in the two followingways:• rolling upgrade• non-rolling upgradeInstead of an upgrade, moving to a new version can be done with:• migration with cold installRolling upgrade is a feature of SGeRAC that allows you to perform a software upgrade on a givennode without bringing down the entire cluster. SGeRAC supports rolling upgrades on versionA.11.15 and later, and requires all nodes to be running on the same operating system revisionand architecture.During rolling upgrade the nodes can run on mixed version of HP-UX. Rolling upgrades are notintended as a means of using mixed release of HP-UX with in the same cluster. HP recommends toupgrade all the cluster nodes to the new release level at the earliest.Non-rolling upgrade allows you to perform a software upgrade from any previous revision to anyhigher revision or between operating system versions but requires halting the entire cluster.The rolling and non-rolling upgrade processes can also be used any time one system needs to betaken offline for hardware maintenance or patch installations. Until the upgrade process is completeon all nodes, you cannot change the cluster configuration files, and you will not be able to useany of the new features of the Serviceguard/SGeRAC release.There may be circumstances when, instead of doing an upgrade, you prefer to do a migrationwith cold install. The cold install process erases the preexisting operating system and data, andthen installs the new operating system and software. After a cold install, you must restore the data.The advantage of migrating with a cold install is that the software can be installed without regardfor the software currently on the system or concern for cleaning up old software.A significant factor when deciding to either do an upgrade or cold install is overall system downtime.A rolling upgrade will cause the least downtime. This is because only one node in the cluster isdown at any one time. A non-rolling upgrade may require more down time, because the entirecluster has to be brought down during the upgrade process.One advantage of both rolling and non-rolling upgrades versus cold install is that upgrades retainthe preexisting operating system, software, and data. Conversely, the cold install process erasesthe preexisting system—you must reinstall the operating system, software, and data. For thesereasons, a cold install may require more downtime.The sections in this appendix are as follows:• “Rolling Software Upgrades” (page 139)
“Steps for Rolling Upgrades ” (page 142)◦◦ “Example of Rolling Upgrade ” (page 143)◦ “Limitations of Rolling Upgrades ” (page 147)
• “Non-Rolling Software Upgrades” (page 148)◦ “Limitations of Non-Rolling Upgrades ” (page 148)
• “Migrating an SGeRAC Cluster with Cold Install” (page 148)
Rolling Software UpgradesSGeRAC version A.11.15 and later allow you to roll forward to any higher revision provided allof the following conditions are met.• The upgrade must be done on systems of the same architecture (HP 9000 or Integrity Servers).• All nodes in the cluster must be running on the same version of HP-UX.
Rolling Software Upgrades 139

• Each node must be running a version of HP-UX that supports the new SGeRAC version.• Each node must be running a version of Serviceguard that supports the new SGeRAC version.For more information on support, compatibility, and features for SGeRAC, refer to the ServiceguardCompatibility and Feature Matrix, located at www.hp.com/go/hpux-serviceguard-docs—> HP Serviceguard Extension for RAC.
Upgrading Serviceguard to SGeRAC clusterBeginning with HP-UX 11i v3 1109 HA-OE/DC-OE, SGeRAC is included as a licensed bundle atno additional cost. To install SGeRAC A.11.20 on your system during OE installation, you mustselect T1907BA (SGeRAC) in the Software tab.The following sections discuss the different scenarios for including SGeRAC while upgrading froman earlier OE to HP-UX 11i v3 1109 HA-OE/DC-OE in a Serviceguard environment.
Upgrading from an existing SGeRAC A.11.19 cluster to HP-UX 11i v3 1109 HA-OE/DC-OETo upgrade from an existing Serviceguard and SGeRAC A.11.19 deployment to HP-UX 11i v31109 HA-OE/DC-OE, you must select the licensed SGeRAC A.11.20 bundle available in theHP-UX 11i v3 1109 HA-OE/DC-OE media.
NOTE: You must select the product SGeRAC T1907BA when upgrading to HP-UX 11i v3 1109HA-OE/DC-OE, otherwise Serviceguard A.11.20 installation will fail.To perform rolling upgrade for an SGeRAC cluster with Oracle RAC configured, the HP-UX OSversion must be the same, that is, either 11i v2 or 11i v3. If you upgrade from 11i v2 to 11iv3,you can perform an offline upgrade or rolling upgrade. For more information see, “Non-RollingSoftware Upgrades” (page 148) section and “Steps for Rolling Upgrades ” (page 142).
NOTE: For all the scenarios discussed in the following sections, HP recommends that the methodused to upgrade from Serviceguard A.11.19 to Serviceguard A.11.20 and SGeRAC A.11.20must be an offline upgrade. Using Dynamic Root Disk (DRD) utilities can significantly reduce theplanned maintenance time to perform the upgrade.
If you want to perform a rolling upgrade that includes SGeRAC, then you must follow the proceduresdescribed in the scenario “ Upgrading from an existing Serviceguard A.11.19 cluster to HP-UX11i v3 1109 HA-OE/DC-OE along with SGeRAC” (page 140) onwards.To perform an offline upgrade1. Halt the cluster. Use the following command:
cmhaltcl -f
2. Upgrade all the nodes in the cluster to the new HP-UX release 1109 and select SGeRACA.11.20 during the upgrade.
3. Restart the cluster using the following command:cmruncl
Upgrading from an existing Serviceguard A.11.19 cluster to HP-UX 11i v3 1109 HA-OE/DC-OEalong with SGeRAC
To upgrade from Serviceguard A.11.9 cluster to HP-UX 11i v3 1109 HA-OE/DC-OE along withSGeRAC:1. Install Serviceguard A.11.19 patch PHSS_42216 on all the cluster nodes before upgrading
from Serviceguard A.11.19 to HP-UX 11i v3 1109 HA-OE/DC-OE, Serviceguard and SGeRACA.11.20. Otherwise, upgraded Serviceguard and SGeRAC A.11.20 node will not be ableto join the existing 11.19 cluster.
2. Select the licensed SGeRAC A.11.20 bundle. To upgrade the 1109 HA-OE/DC-OE:On the first node:a. Halt the node using the following command:
140 Software Upgrades
cmhaltnode <node_name>
b. Select the SGeRAC bundle T1907BA while upgrading the node to HP-UX 11i v3 1109HA-OE/DC-OE
3. After upgrading to HP-UX 11i v3 1109 HA-OE/DC-OE, Serviceguard, and SGeRAC A.11.20,you must install Serviceguard A.11.20 patch PHSS_42137 on the upgraded node. This patchallows an upgraded Serviceguard and SGeRAC A.11.20 node to join the existing ServiceguardA.11.19 cluster.
NOTE: If Serviceguard A.11.20 patch PHSS_42137 is not installed on the upgradedServiceguard and SGeRAC A.11.20 node, it cannot join the existing A.11.19 cluster.
4. Run the following command to join the upgraded Serviceguard and SGeRAC A.11.20 nodeto the existing Serviceguard A.11.19:cmrunnode <node_name>
NOTE: Please make sure that Serviceguard Extension for RAC is installed on all the nodesin the cluster and all nodes are up and running before attempting to deploy Oracle RAC inthis cluster.
5. Repeat steps 2 to 4 for all the nodes in the cluster to complete the upgrade.
Upgrading from an existing Serviceguard A.11.19 cluster to HP-UX 11i v3 1109 HA-OE/DC-OEalong with SGeRAC (Alternative approach)This is an alternative approach for upgrading from Serviceguard A.11.19 to Serviceguard andSGeRAC A.11.201. Perform a rolling upgrade of Serviceguard A.11.19 to HP-UX 11i v3 1109 HA-OE/DC-OE
with Serviceguard A.11.20 without selecting the SGeRAC licensed bundle.2. Install the Serviceguard A.11.20 patch PHSS_42137 on all cluster nodes.
NOTE: If Serviceguard A.11.20 patch PHSS_42137 is not installed on the upgradedServiceguard A.11.20 node, it cannot join the existing Serviceguard A.11.20 cluster whenyou install SGeRAC on that node.
3. Use the following steps to perform a rolling upgrade of Serviceguard A.11.20 to includeSGeRAC A.11.20 on each node:On the first node:a. Halt the node using the following command:
cmhaltnode <node_name>
b. Install SGeRAC bundle T1907BA available on the 1109 HA-OE/DC-OE media.4. Run the following command to join the upgraded node to the cluster:
cmrunnode <node_name>
The upgraded Serviceguard and SGeRAC A.11.20 node will be able to join the existingServiceguard A.11.20 cluster.
NOTE: Please make sure that Serviceguard Extension for RAC is installed on all the nodesin the cluster and all nodes are up and running before attempting to deploy Oracle RAC inthis cluster.
5. Repeat steps 3 and 4 for all the nodes in the cluster to complete the upgrade.
Upgrading from Serviceguard A.11.18 cluster to HP-UX 11i v3 1109 HA-OE/DC-OE along withSGeRAC
To upgrade from Serviceguard A.11.18 to HP-UX 11i v3 1109 HA-OE/DC-OE:
Rolling Software Upgrades 141

1. Perform a rolling upgrade to Serviceguard A.11.19.2. Perform a rolling or offline upgrade to HP-UX 11i v3 1109 HA-OE/DC-OE with SGeRAC.
Refer the procedures described in the scenario “ Upgrading from an existing ServiceguardA.11.19 cluster to HP-UX 11i v3 1109 HA-OE/DC-OE along with SGeRAC” (page 140) toperform rolling upgrade from Serviceguard A.11.19 to HP-UX 11i v3 1109 HA-OE/DC-OEwith SGeRAC.
NOTE: Using DRD utilities can significantly reduce the planned maintenance time to performthis upgrade.
Upgrading from Serviceguard A.11.20 cluster to HP-UX 11i v3 1109 HA-OE/DC-OE along withSGeRAC
To upgrade from Serviceguard A.11.20 to HP-UX 11i v3 1109 HA-OE/DC-OE:1. Install Serviceguard A.11.20 patch PHSS_42137 on all the cluster nodes before you start
upgrading to HP-UX 11i v3 1109 HA-OE/DC-OE.
NOTE: If Serviceguard A.11.20 patch PHSS_42137 is not installed on the upgradedServiceguard A.11.20 node, when you install SGeRAC on a node, it will not be able to jointhe existing Serviceguard A.11.20 cluster.
2. Select the licensed SGeRAC A.11.20 bundle to upgrade each node to HP-UX 11i v3 1109HA-OE/DC-OE. To upgrade to HP-UX 11i v3 1109 HA-OE/DC-OE:On the first node:a. Halt the node using the following command:
cmhaltnode <node_name>
b. Select the SGeRAC bundle T1907BA while upgrading the node to HP-UX 11i v3 1109HA-OE/DC-OE.
NOTE: In this state, if you try the commands like cmcheckconf and cmapplyconf on thecluster configuration file, no Error or Warning message related to the missing SGeRAC softwareare displayed.
3. Run the following command to join the upgraded node to the cluster:cmrunnode <node_name>
NOTE: Please make sure that Serviceguard Extension for RAC is installed on all nodes inthe cluster and all nodes are up and running before attempting to deploy Oracle RAC in thiscluster.
4. Repeat steps 2 to 3 for all then nodes in the cluster to complete the upgrade.
Steps for Rolling UpgradesUse the following steps when performing a rolling SGeRAC software upgrade:1. Halt Oracle (RAC, Clusterware) software on the local node (if running).2. Halt Serviceguard/SGeRAC on the local node by issuing the Serviceguard cmhaltnode
command.3. Edit the /etc/rc.config.d/cmcluster file to include the following line:
AUTOSTART_CMCLD = 0
4. Upgrade the HP-UX OS (if required), Serviceguard, and SGeRAC to the new release (SGeRACrequires the compatible version of Serviceguard and OS). For more information on how toupgrade HP-UX, see HP-UX Installation and Update Guide for the target version of HP-UX.
5. Edit the /etc/rc.config.d/cmcluster file, on the local node, to include the followingline:AUTOSTART_CMCLD = 1
142 Software Upgrades

NOTE: It is optional to set this parameter to “1.” If you want the node to join the cluster atboot time, set this parameter to “1”, otherwise set it to “0.”
6. Restart the cluster on the upgraded node (if desired). You can do this in Serviceguard Manager,or from the command line, issue the Serviceguard cmrunnode command.
7. Start Oracle (Clusterware, RAC) software on the local node.8. Repeat steps 1-7 on the other nodes, one node at a time until all nodes have been upgraded.
NOTE: Be sure to plan sufficient system capacity to allow moving the packages from nodeto node during the upgrade process, to maintain optimum performance.
If a cluster fails before the rolling upgrade is complete (perhaps because of a catastrophic powerfailure), the cluster could be restarted by entering the cmruncl command from a node that hasbeen upgraded to the latest revision of the software.
NOTE: HP recommends you to upgrade the Oracle RAC software either before SG/SGeRACrolling upgrade or after SG/SGeRAC rolling upgrade, if you are upgrading Oracle RAC softwarealong with SG/SGeRAC.Halt the SGeRAC toolkit packages before upgrading Oracle RAC. For more information on OracleRAC software upgrade, see Oracle documentation.
Keeping Kernels ConsistentIf you change kernel parameters or perform network tuning with ndd as part of doing a rollingupgrade, be sure to change the parameters to the same values on all nodes that can run the samepackages in a failover scenario. The ndd command allows the examination and modification ofseveral tunable parameters that affect networking operation and behavior.
Example of Rolling UpgradeThe following example shows a simple rolling upgrade on two nodes, each running standardServiceguard and RAC instance packages, as shown in Figure 20. (This and the following figuresshow the starting point of the upgrade as SGeRAC A.11.15 for illustration only. A roll to SGeRACversion A.11.16 is shown.)SGeRAC rolling upgrade requires the same operating system version on all nodes. However,during rolling upgrade the nodes can run on mixed version of HP-UX. The example assumes allnodes are running HP-UX 11i v2. For your systems, substitute the actual release numbers of yourrolling upgrade path.
NOTE: While you are performing a rolling upgrade, warning messages may appear while thenode is determining what version of software is running. This is a normal occurrence and not acause for concern.
Rolling Software Upgrades 143
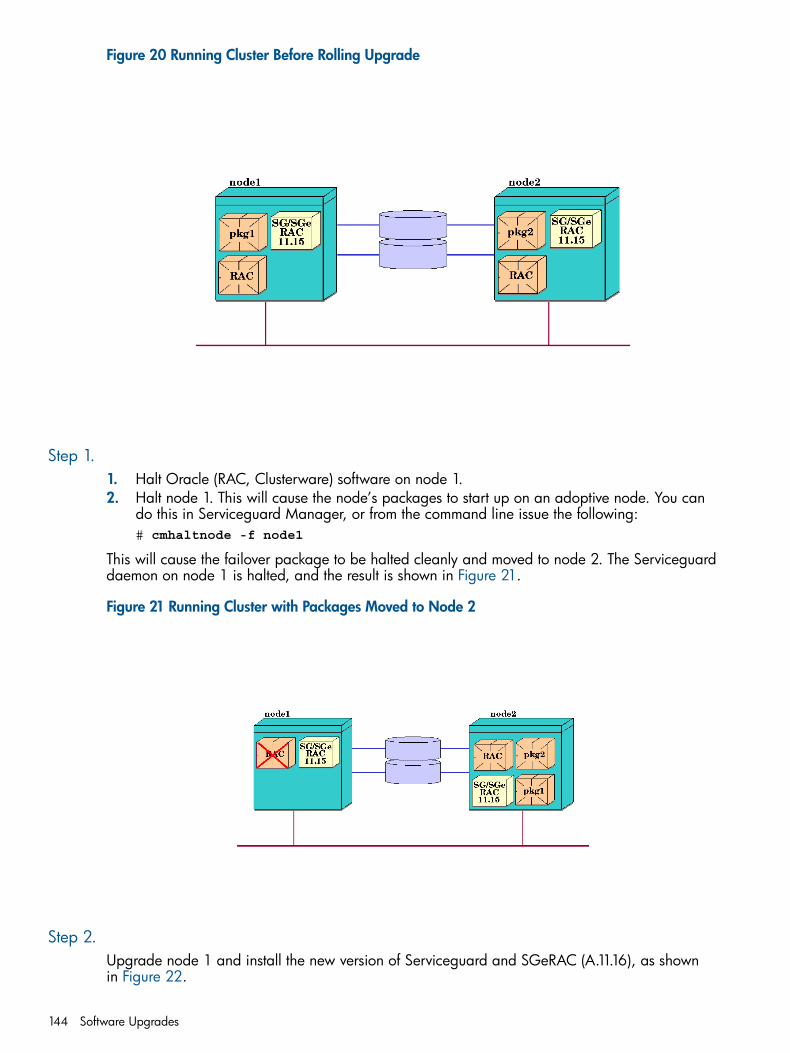
Figure 20 Running Cluster Before Rolling Upgrade
Step 1.1. Halt Oracle (RAC, Clusterware) software on node 1.2. Halt node 1. This will cause the node’s packages to start up on an adoptive node. You can
do this in Serviceguard Manager, or from the command line issue the following:# cmhaltnode -f node1
This will cause the failover package to be halted cleanly and moved to node 2. The Serviceguarddaemon on node 1 is halted, and the result is shown in Figure 21.
Figure 21 Running Cluster with Packages Moved to Node 2
Step 2.Upgrade node 1 and install the new version of Serviceguard and SGeRAC (A.11.16), as shownin Figure 22.
144 Software Upgrades

NOTE: If you install Serviceguard and SGeRAC separately, Serviceguard must be installed beforeinstalling SGeRAC.
Figure 22 Node 1 Upgraded to SG/SGeRAC 11.16
Step 3.1. If you prefer, restart the cluster on the upgraded node (node 1). You can do this in Serviceguard
Manager, or from the command line issue the following:# cmrunnode node1
2. At this point, different versions of the Serviceguard daemon (cmcld) are running on the twonodes, as shown in Figure 23.
3. Start Oracle (Clusterware, RAC) software on node 1.
Figure 23 Node 1 Rejoining the Cluster
Rolling Software Upgrades 145

Step 4.1. Halt Oracle (RAC, Clusterware) software on node 2.2. Halt node 2. You can do this in Serviceguard Manager, or from the command line issue the
following:# cmhaltnode -f node2
This causes both packages to move to node 1. See Figure A-5.3. Upgrade node 2 to Serviceguard and SGeRAC (A.11.16) as shown in Figure A-5.4. When upgrading is finished, enter the following command on node 2 to restart the cluster on
node 2:# cmrunnode node2
5. Start Oracle (Clusterware, RAC) software on node 2.
Figure 24 Running Cluster with Packages Moved to Node 1
Step 5.Move PKG2 back to its original node. Use the following commands:# cmhaltpkg pkg2
# cmrunpkg -n node2 pkg2# cmmodpkg -e pkg2
The cmmodpkg command re-enables switching of the package that is disabled by the cmhaltpkgcommand. The final running cluster is shown in Figure 25.
146 Software Upgrades
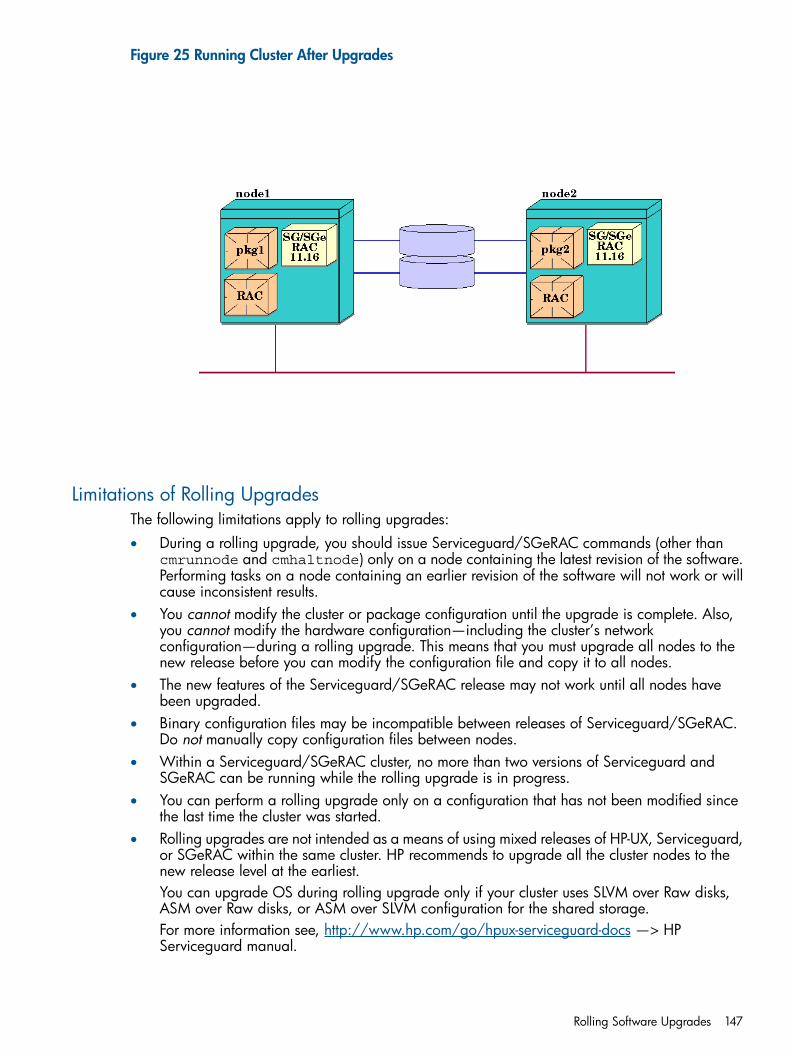
Figure 25 Running Cluster After Upgrades
Limitations of Rolling UpgradesThe following limitations apply to rolling upgrades:• During a rolling upgrade, you should issue Serviceguard/SGeRAC commands (other than
cmrunnode and cmhaltnode) only on a node containing the latest revision of the software.Performing tasks on a node containing an earlier revision of the software will not work or willcause inconsistent results.
• You cannot modify the cluster or package configuration until the upgrade is complete. Also,you cannot modify the hardware configuration—including the cluster’s networkconfiguration—during a rolling upgrade. This means that you must upgrade all nodes to thenew release before you can modify the configuration file and copy it to all nodes.
• The new features of the Serviceguard/SGeRAC release may not work until all nodes havebeen upgraded.
• Binary configuration files may be incompatible between releases of Serviceguard/SGeRAC.Do not manually copy configuration files between nodes.
• Within a Serviceguard/SGeRAC cluster, no more than two versions of Serviceguard andSGeRAC can be running while the rolling upgrade is in progress.
• You can perform a rolling upgrade only on a configuration that has not been modified sincethe last time the cluster was started.
• Rolling upgrades are not intended as a means of using mixed releases of HP-UX, Serviceguard,or SGeRAC within the same cluster. HP recommends to upgrade all the cluster nodes to thenew release level at the earliest.You can upgrade OS during rolling upgrade only if your cluster uses SLVM over Raw disks,ASM over Raw disks, or ASM over SLVM configuration for the shared storage.For more information see, http://www.hp.com/go/hpux-serviceguard-docs —> HPServiceguard manual.
Rolling Software Upgrades 147

For more information on support, compatibility, and features for SGeRAC, refer to theServiceguard and Serviceguard Extension for RAC Compatibility and Feature Matrix, locatedat www.hp.com/go/hpux-serviceguard-docs —> HP Serviceguard Extension for RAC .
• You cannot delete Serviceguard/SGeRAC software (via swremove) from a node while thecluster is in the process of a rolling upgrade.
Non-Rolling Software UpgradesA non-rolling upgrade allows you to perform a software upgrade from any previous revision toany higher revision or between operating system versions. For example, you may do a non-rollingupgrade from SGeRAC A.11.14 on HP-UX 11i v1 to A.11.16 on HP-UX 11i v2, given both arerunning the same architecture.The cluster cannot be running during a non-rolling upgrade, therefore it is necessary to halt theentire cluster in order to perform the upgrade.Use the following steps for a non-rolling software upgrade:1. Halt Oracle (RAC, Clusterware) software on all nodes in the cluster.2. Halt all nodes in the cluster.
# cmhaltcl -f
3. If necessary, upgrade all the nodes in the cluster to the new HP-UX release.4. Upgrade all the nodes in the cluster to the new Serviceguard/SGeRAC release.5. Restart the cluster. Use the following command:
# cmruncl
6. If necessary, upgrade all the nodes in the cluster to the new Oracle (RAC, CRS, Clusterware)software release.
7. Restart Oracle (RAC, Clusterware) software on all nodes in the cluster and configure theServiceguard/SGeRAC packages and Oracle as needed.
Limitations of Non-Rolling UpgradesThe following limitations apply to non-rolling upgrades:• Binary configuration files may be incompatible between releases of Serviceguard. Do not
manually copy configuration files between nodes.• It is necessary to halt the entire cluster when performing a non-rolling upgrade.
Migrating an SGeRAC Cluster with Cold InstallThere may be circumstances when you prefer a cold install of the HP-UX operating system ratherthan an upgrade. The cold install process erases the preexisting operating system and data, andthen installs the new operating system and software. After the cold install, you must then restorethe data.
CAUTION: The cold install process erases the preexisting software, operating system, and data.If you want to retain any existing software, make sure to back up that software before migrating.
Use the following process as a checklist to prepare the migration.1. Back up the required data, including databases, user and application data, volume group
configurations, etc.2. Halt cluster applications, including RAC, and then halt the cluster.3. Do a cold install of the HP-UX operating system. For more information on the cold install
process, see the HP-UX Installation and Update Guide located at www.hp.com/go/hpux-core-docs —> By OS Release —> Setup and install - general.
4. Install additional required software that did not come with your version of HP-UX OE.5. Install a Serviceguard/SGeRAC version that is compatible with the new HP-UX operating
system version. For more information on support, compatibility, and features for SGeRAC,
148 Software Upgrades

refer to the Serviceguard Compatibility and Feature Matrix, located at www.hp.com/go/hpux-serviceguard-docs —> HP Serviceguard Extension for RAC.
6. Recreate any user accounts needed for the cluster applications.7. Recreate the network and storage configurations (Set up stationary IP addresses and create
LVM volume groups and/or CVM disk groups required for the cluster).8. Recreate the SGeRAC cluster.9. Restart the cluster.10. Reinstall the cluster applications, such as RAC.11. Restore the data.
Upgrade Using DRDDRD stands for Dynamic Root Disk. Using a Dynamic Root Disk on HP-UX 11i v3 allows you toperform the update on a clone of the root disk, then halt the node and reboot it from the updatedclone root disk.You can obtain the DRD software free from www.software.hp.com — search for “DynRootDisk”.For more information, go to HP's Dynamic Root Disk Information Library at www.hp.com/go/drd.
IMPORTANT: Use the clone disk only on the system that it was created. Serviceguard does notsupport booting from a clone disk made on another system (sometimes referred to as DRDre-hosting).
Rolling Upgrade Using DRDA rolling upgrade using DRD is like a rolling upgrade, but is even less disruptive because eachnode is down for a shorter time. It is also very safe—if something goes wrong you can roll backto the original (pre-upgrade) state by rebooting from the original disk.This method is the least disruptive, but you need to make sure your cluster is eligible. See “Restrictionsfor DRD Upgrades” (page 149).If, after reading and understanding the restrictions, you decide to perform a rolling upgrade usingDRD, follow the instructions under “Performing a Rolling Upgrade Using DRD” in Appendix D ofthe latest edition of Managing Serviceguard, at www.hp.com/go/hpux-serviceguard-docs —> HPServiceguard.
Non-Rolling Upgrade Using DRDIn a non-rolling upgrade with DRD, you clone each node's root disk, apply the upgrade to theclone, halt the cluster, and then reboot each node from its updated clone root disk.This method involves much less cluster down time than a conventional non-rolling upgrade, and isparticularly safe because the nodes can be quickly rolled back to their original (pre-upgrade) rootdisks. But you must make sure your cluster is eligible. See “Restrictions for DRD Upgrades” (page 149).
Restrictions for DRD Upgrades• Before you proceed, read the sections Upgrading from an Earlier Serviceguard Release and
Rolling Upgrade in the latest version of the release notes for A.11.20.• Serviceguard A.11.20 is supported on HP–UX 11i v3 only. For more information, see HP-UX
11i v3 Installation and Update Guide at www.hp.com/go/ hpux-core-docs —> HP-UX 11iv3.
• You can perform a rolling upgrade from A.11.19 to a later release, or from an earlier releaseto A.11.19, but you cannot do a rolling upgrade from a pre-A.11.19 release to a post-A.11.19release.This is because A.11.19 is the only version of Serviceguard that will allow both the olderversion of the cluster manager and the new version (introduced in A.11.19) to coexist duringa rolling upgrade.If you are upgrading from a pre-A.11.19 release: Start by reading Upgrading from an EarlierServiceguard Release and Rolling Upgrade in the release notes. Then, if you decide to upgrade
Upgrade Using DRD 149

to A.11.19 in preparation for a rolling upgrade to A.11.20, continue with the followingsubsection that provides information on upgrading to A.11.19.
150 Software Upgrades

B Blank Planning WorksheetsThis appendix reprints blank planning worksheets used in preparing the RAC cluster. You canduplicate any of these worksheets that you find useful and fill them in as a part of the planningprocess.
LVM Volume Group and Physical Volume Worksheet VG and PHYSICAL VOLUME WORKSHEET Page ___ of ____
==========================================================================
Volume Group Name: ______________________________________________________ PV Link 1 PV Link2
Physical Volume Name:_____________________________________________________
Physical Volume Name:_____________________________________________________
Physical Volume Name:_____________________________________________________
Physical Volume Name: ____________________________________________________
Physical Volume Name: ____________________________________________________
Physical Volume Name: ____________________________________________________
Physical Volume Name: ____________________________________________________
Volume Group Name: _______________________________________________________
PV Link 1 PV Link2
Physical Volume Name: _____________________________________________________
Physical Volume Name:______________________________________________________
Physical Volume Name: _____________________________________________________
Physical Volume Name: _____________________________________________________
Physical Volume Name: _____________________________________________________
Physical Volume Name: _____________________________________________________
Physical Volume Name: _____________________________________________________
Oracle Logical Volume Worksheet NAME SIZE
Oracle Control File 1: _____________________________________________________
Oracle Control File 2: _____________________________________________________
Oracle Control File 3: _____________________________________________________
Instance 1 Redo Log 1: _____________________________________________________
Instance 1 Redo Log 2: _____________________________________________________
Instance 1 Redo Log 3: _____________________________________________________
Instance 1 Redo Log: _____________________________________________________
LVM Volume Group and Physical Volume Worksheet 151

Instance 1 Redo Log: _____________________________________________________
Instance 2 Redo Log 1: _____________________________________________________
Instance 2 Redo Log 2: _____________________________________________________
Instance 2 Redo Log 3: _____________________________________________________
Instance 2 Redo Log: _____________________________________________________
Instance 2 Redo Log: _____________________________________________________
Data: System _____________________________________________________
Data: Rollback _____________________________________________________
Data: Temp _____________________________________________________
Data: Users _____________________________________________________
Data: Tools _____________________________________________________
152 Blank Planning Worksheets
Index
Aactivation of volume groups
in shared mode, 128administration
cluster and package states, 113array
replacing a faulty mechanism, 132, 133, 134
Bbuilding a cluster
CVM infrastructure, 52building an RAC cluster
displaying the logical volume infrastructure, 46logical volume infrastructure, 40
building logical volumesfor RAC, 45
CCFS, 47, 51cluster
state, 118status options, 116
Cluster Communication Network Monitoring, 35cluster volume group
creating physical volumes, 41creating a storage infrastructure, 47CVM
creating a storage infrastructure, 52use of the CVM-pkg, 55
Ddeactivation of volume groups, 128deciding when and where to run packages, 18deleting from the cluster, 51deleting nodes while the cluster is running, 130demo database
files, 45, 57disk
choosing for volume groups, 41disk arrays
creating logical volumes, 44disk storage
creating the infrastructure with CVM, 52disks
replacing, 132Dynamic Root Disk (DRD), 140
Eeight-node cluster with disk array
figure, 22EMS
for preventive monitoring, 131enclosure for disks
replacing a faulty mechanism, 132Event Monitoring Service
in troubleshooting, 131exporting
shared volume group data, 46exporting files
LVM commands, 46
Ffigures
eight-node cluster with EMC disk array, 22node 1 rejoining the cluster, 145node 1 upgraded to HP-UX 111.00, 145running cluster after upgrades, 147running cluster before rolling upgrade, 144running cluster with packages moved to node 1, 146running cluster with packages moved to node 2, 144
HHAIP, 35hardware
adding disks, 131monitoring, 131
heartbeat subnet addressparameter in cluster manager configuration, 35
high availability clusterdefined, 12
Iin-line terminator
permitting online hardware maintenance, 134installing
Oracle RAC, 47installing software
Serviceguard Extension for RAC, 33IP address
switching, 19
Llock disk
replacing a faulty mechanism, 134logical volumes
blank planning worksheet, 151creating, 45creating for a cluster, 42, 56, 57creating the infrastructure, 40disk arrays, 44filled in planning worksheet, 31
lssfusing to obtain a list of disks, 41
LVMcreating on disk arrays, 44
LVM commandsexporting files, 46
Mmaintaining a RAC cluster, 113maintenance
153

adding disk hardware, 131making changes to shared volume groups, 128
monitoring hardware, 131
Nnetwork
status, 118node
halting status, 121in an RAC cluster, 12status and state, 116
non-rolling upgradeDRD, 149
Oonline hardware maintenance
by means of in-line SCSI terminators, 134Online node addition and deletion, 126Online reconfiguration, 126opsctl.ctl
Oracle demo database files, 45, 57opslog.log
Oracle demo database files, 45, 57Oracle
demo database files, 45, 57Oracle 10 RAC
installing binaries, 62Oracle 10g/11gR2 RAC
introducing, 25Oracle Disk Manager
configuring, 64Oracle RAC
installing, 47Oracle10g
installing, 62
Ppackage
basic concepts, 13moving status, 120state, 118status and state, 116switching status, 121
package configurationservice name parameter, 35
packagesdeciding where and when to run, 18
physical volumescreating for clusters, 41filled in planning worksheet, 151
planningworksheets for logical volume planning, 31worksheets for physical volume planning, 151
planning worksheetsblanks, 151
point to point connections to storage devices, 21PVG-strict mirroring
creating volume groups with, 42
RRAC
overview of configuration, 12status, 117
RAC clusterdefined, 12
removing Serviceguard Extension for RAC from a system,,130
replacing disks, 132rollback.dbf
Oracle demo database files, 45, 46, 58rolling software upgrades
example, 143steps, 142
rolling upgradeDRD, 149limitations, 147, 148
Sservice
status, 117service name
parameter in package configuration, 35SERVICE_NAME
parameter in package configuration, 35Serviceguard Extension for RAC
installing, 33introducing, 12
shared modeactivation of volume groups, 128deactivation of volume groups, 128
shared volume groupsmaking volume groups shareable, 127
sharing volume groups, 46SLVM
making volume groups shareable, 127state
cluster, 118node, 116of cluster and package, 113package, 116, 118
statuscluster, 116halting node, 121moving package, 120network, 118node, 116normal running RAC, 119of cluster and package, 113package, 116RAC, 117service, 117switching package, 121
Storage Management Suite (SMS) , 16switching IP addresses, 19system multi-node package
used with CVM, 55system.dbf
Oracle demo database files, 45, 58
154 Index
Ttemp.dbf
Oracle demo database files, 45, 58troubleshooting
monitoring hardware, 131replacing disks, 132
Uupgrade
DRD, 149upgrade restrictions
DRD, 149
Vvolume group
creating for a cluster, 42creating physical volumes for clusters, 41
volume groupsadding shared volume groups, 130displaying for RAC, 46exporting to other nodes, 46making changes to shared volume groups, 128making shareable, 127making unshareable, 128
Wworksheet
logical volume planning, 31worksheets
physical volume planning, 151worksheets for planning
blanks, 151
155