
Using Scriptor - · Web viewdialog select the profile ... it comes to invite users to join a...
82
USING SCRIPTOR Note : When it is written in italics, Scriptor refers webmaster, i.e. the person appointing all the powers of management software; otherwise, Scriptor refers to the software as such. It is therefore that administers Scriptor Scriptor. THE ADMINISTRATOR TOOL GENERAL PRINCIPLES FOR THE ADMINISTRATION OF SCRIPTOR Specified in this chapter are addressed particularly to Scriptor, i.e. to the webmaster. But it is not excluded that other users consult its content since Scriptor can delegate privileges administration software. Indeed, just a user to obtain sub-administrator status so that it becomes in turn responsible for the administration of certain parts of the software. Team leaders, project managers, managers of committees, teachers, Secretaries of direction, etc are all persons to whom the webmaster could delegate management privileges. However, it should be observed that a user who holds sub-administrator privileges can also bequeath it to other users by virtue of the principle of filiation: a parent can bequeath the privileges that he has to his descendants . It is important therefore to Scriptor carefully to ensure the award first privileges as it is true that he could lose control of the management of all: this will be a functional decentralization allows Scriptor traps. Conversely, Scriptor can also become a self-managed machine by its users both the greater flexibility of provisioning management. However, Scriptor at can intervene and remove its privileges to a reluctant user or assign others promoted user. CREATE USER PROFILES Creating user profiles (that can be also call profiles of users) is one of the most effective solutions for managing permissions and group privileges to a group of users. When a user is registered in Scriptor, registers of de facto to the default profile; however it can quickly be associated with another profile (class, workgroup, Department, etc.). The Administrator profile can then model the common characteristics of this group by setting batch permissions or privileges. In reality, a profile is a kind of administrative list that allows the Manager to quickly assign rights (permissions) read and write or management (privileges). COMPONENTS OF A PROFILE: CHARACTERISTICS
Transcript of Using Scriptor - · Web viewdialog select the profile ... it comes to invite users to join a...

USING SCRIPTOR
Note : When it is written in italics, Scriptor refers webmaster, i.e. the person appointing all the powers of management software; otherwise, Scriptor refers to the software as such. It is therefore that administers Scriptor Scriptor.
THE ADMINISTRATOR TOOL
GENERAL PRINCIPLES FOR THE ADMINISTRATION OF SCRIPTOR
Specified in this chapter are addressed particularly to Scriptor, i.e. to the webmaster. But it is not excluded that other users consult its content since Scriptor can delegate privileges administration software. Indeed, just a user to obtain sub-administrator status so that it becomes in turn responsible for the administration of certain parts of the software. Team leaders, project managers, managers of committees, teachers, Secretaries of direction, etc are all persons to whom the webmaster could delegate management privileges.
However, it should be observed that a user who holds sub-administrator privileges can also bequeath it to other users by virtue of the principle of filiation: a parent can bequeath the privileges that he has to his descendants. It is important therefore to Scriptor carefully to ensure the award first privileges as it is true that he could lose control of the management of all: this will be a functional decentralization allows Scriptor traps. Conversely, Scriptor can also become a self-managed machine by its users both the greater flexibility of provisioning management. However, Scriptor at can intervene and remove its privileges to a reluctant user or assign others promoted user.
CREATE USER PROFILES
Creating user profiles (that can be also call profiles of users) is one of the most effective solutions for managing permissions and group privileges to a group of users. When a user is registered in Scriptor, registers of de facto to the default profile; however it can quickly be associated with another profile (class, workgroup, Department, etc.). The Administrator profile can then model the common characteristics of this group by setting batch permissions or privileges. In reality, a profile is a kind of administrative list that allows the Manager to quickly assign rights (permissions) read and write or management (privileges).
COMPONENTS OF A PROFILE: CHARACTERISTICS
A profile brings together a group of individuals with common characteristics of users. The characteristics that can share a group of individuals in that profile are:
(A) READ PERMISSIONS Permission elements that you can handle for profile are:
• home page (can thus quickly change the homepage of any profile or give another instantly, this page may also enriched the DG or any other addition in the frame page navigation menu). • folders or subfolders in the DGs (Scriptor distributes exclusively read permissions to users selected).
(B) WRITING PRIVILEGES Privilege elements that you can handle for profile are:
• users status members (normal, moderator, sub-administrator user, administrator). • management documents (a document can be editable by several people, several users can share the management of portions of a page simultaneously);

• managing directories (a manager can create/delete directory and y drop/remove items). • users management (the sub-administrators can in turn register new users in Scriptor: colleagues, collaborators, customers, students, etc.); • newsgroups; management • blogs and publications management (the creator of a publication or blog may invite individuals to populate it, it can also create other publications and blogs).
DETERMINE THE STATUS OF A USER A user status determines the scope of its powers (of its privileges) Scriptor management. Whether you're single users or super administrator, Scriptor reserves room for manoeuvre which will simple reading responsabilisée and decentralized management of large sections of the software in each of the categories of users. Here are four possible statuses Scriptor subscribers in ascending order of liability:
(1) normal user (can read public pages and participate in a public discussion group);
(2) moderator (moderates a discussion groups);
(3) sub-administrator (administers profiles and newsgroups).
(4) administrator (can manage all parts of Scriptor);
(5) Scriptor (it is the first Manager, webmaster).
For a more complete definition of the different status of users, see list of rights and privileges.
LIST OF RIGHTS AND PRIVILEGES
The following are the rights and privileges recognized by Scriptor.
GENERAL RULES • Could not be delete yourself.
• Administrator has all rights.
• The sub-administrator can create or delete objects (page, message, publishing, profile, etc.) which he is
the author.
• The sub-administrator may assign rights other than those it has already.
• Could not delete the user/administrator Scriptor.
USER A regular user of Scriptor can read Scriptor pages and their content and, in the discussion group or blog can:
• add messages, subjects, pages, attached files. • edit his message, his subjects, its pages, its attached files. • remove his message, his subjects, its pages, its attached files.
MODERATOR The moderator has the same privileges as those of the user more:
• edit/delete messages, subjects, everyone in the Group (s) discussion private (s) with which he is the Manager and all the Group (s) newsgroup public files.

• add/remove guests in his (its) Group (s) discussion private (s). • add/remove moderators in his (its) Group (s) discussion private (s). SUB-ADMINISTRATOR The sub-administrator longer has the same privileges as those of Moderator:
• Add/Edit discussion groups (can delete a group in which he is the creator); • add/modify the privileges of the users belonging to one of its profiles; the sub-administrator deletes a user it has itself entered; • add/edit profiles; removes a profile with the author. • add/delete users of his (her) profile (s); • change permissions (except his own and those of Scriptor).
ADMINISTRATOR - SCRIPTOR Scriptor administrator has all rights: it can perform all the functions of the sub-administrators:
• modifies the creator of an object.
USERS
The first level administrative Scriptor is users. It is in this module there is the nerve centre of managing permissions (read) and privileges (write) to each of them. Webmaster determines all rights according to the privileges granted by following communications organisation management plan. Rights management can be done individually, or better, the webmaster may decide to manage batch, by group of users enrolled in bringing together individuals that share the same rights, profile and assign permissions and privileges to all members of the profile.
MANAGEMENT OF USERS
REGISTER USERS To register a new user in Scriptor, needed a sub-administrator privilege. The sub-administrator will always have access to the Scriptor menu bar. If the tab is not available, the question to Scriptor enable giving adequate privileges.
In the Scriptor menu bar, click the configuration button and then click users.

Continue clicking users management
Then Add a user in the users window.
The card user opens and enables you to enter information on this new user.


In the login form, complete all fields that seem appropriate. The fields with a red asterisk determine fields whose input is required.

Other fields are likely to carry more complex information in order to adequately pursue entry card user, it is important to review the comments below on the date of change of the password, the user, the alias connection, choose the profile of the user, the homepage as well as the status (active/inactive) user account picture.
DETERMINE THE DATE OF THE CHANGE OF PASSWORD
The responsible sub-administrator account created for the user and the user himself (at timely may seem it) may decide to change the password later. To do this, it shows in the date field on the change a date after the date of creation of the account by selecting the drop year-month-day.
When that date is reached, Scriptor will send a message to the user the advising that it is time to change his password.

The user then returns to consult his personal card by clicking on configuration and users in the menu
bar and then click Edit your record personal.
It changes itself the password in the change your personal profile window.
It should then save the changes by clicking Save at the bottom of the window; the change is instantaneous. Pressing the restore button fields will be emptied of their contents.
ADD THE PHOTO USER
Can you as a user add your picture in your personal profile. To do this, click Setup , and then click users
in the menu bar click Edit your record personal.

In the change your personal profile window, locate the Photo field, and then click the Browse button which borders.
Using tagging files of your operating system, locate the desired picture. Double click on the desired image.
The location of your image will be placed in the text box still. To exit this window, click Save at the bottom of the card owner's window to display the selected photo.
USE THE ALIAS CONNECTION
Connection alias is a shortcut to a user connection.

DESCRIPTION AND OPERATION OF CONNECTION ALIASES
If you created one or more connection aliases, you can start your access Scriptor choose access login as another user than yours.
Immediately after you be identified with your name and password, Scriptor will present a drop-down list that contains all aliases connection to which you are entitled. Choose the one that's right for you and you will penetrate in the chosen individual user profile.
Scriptor, or a sub-administrator are alone can create connection aliases. Refer to the administrator user account so it can add aliases that are needed. Tip : If you are a user who has subscribed to multiple profiles, you have several user accounts. In this case should ask the administrator user account you create multiple alias connection; this would allow you to move quickly to an identity - for a profile - to another without leaving your browser. To do this, simply click the sign out toolbar button.

When you click the logout button, Scriptor leaves the current session and again gives you choose the desired connection alias. The new connection will present a new doorway entirely redesigned to attributes of the selected user profile.
CREATE AN ALIAS CONNECTION
To create an alias for connection, simply edit the user profile. To do this, click Setup, and users in the
menu bar and then click the user management button.
In the users window, select the drop profile to choose the desired profile.

Click on the Magnifier icon to view all users of the chosen profile or click on the letter corresponding to the initial name of a specific user to choose this user.
Click the Edit button to the name of the user for which you want to create an alias for connection.
The card user appears on the screen. Locate the button select connection aliases... and click.
The alias for the user list window: shows available to this user aliases. To add a new alias, click the button Add alias.

Add alias to user window appears. Choose the profile that you want to extract the connection alias.
Click on the icon to display all names of the profile or a letter to search alphabetically among the members of the specified profile.
In the results window select the desired alias, select continue (all users by clicking the select all users) or discontinuous (by choosing a few users only).
Finally, click the button to confirm the choice of the alias. Click to close the window.
REMOVE AN ALIAS CONNECTION
To remove alias connection, repeat the same procedure as above (create alias connection) until the login for the user alias list window; select alias list you want to delete, and then click the bin icon.

CHOOSE USER PROFILE
To modify membership profile, simply edit the user profile. To do this, click on click Setup , and users in
the menu bar and then click the user management button.
In the users window, select the drop profile to choose the desired profile.
Click on the icon to view all users of the chosen profile or click on the letter corresponding to the initial name of a specific user to choose this user.
In the (search) result window, click the name of the user you want to change the profile button.
The card user appears on the screen. Locate the button select profiles and click.

ADD A PROFILE
In the user profiles dialog select the profile from the list of available profiles to the right of the window. Click the
assign profile in the center of the window button.
Click on the button to confirm your choice.
REMOVE A PROFILE
To remove a profile to a user, select the non-desired profile and press remove a profile in the center of the screen.
Click on the button to confirm your choice.
ASSIGN A HOME PAGE
To assign a specific to a user home page (this could be the user there own personal page itself creates with the Scriptor Web page editor), simply edit its profile by specifying the number of the page to be automatically
displayed when the user connects to the Scriptor. To do this, click Setup, and users in the menu bar and
then click the user management button.

In the users window, select the drop profile to choose the desired profile. Then, click on the icon to view all users of the chosen profile or click on the letter corresponding to the initial name of a specific user to choose this user.
In the (search) result window, click the icon before the name of the user you want to change the profile.
The card user appears on the screen. Locate the Search topic home button and click.
In the Add a Scriptor page, start searching to find the page you want to install as home (apply here the technique described such research chapter find document): click on the Magnifier icon to search through all documents or choose from the alphabetical letter that corresponds to the original document that you want to install in home.

Click home page selection (small button grey with the Chevron pointing to the right). The document number falls within the appropriate card login window text box.
Then click on the button Save at the bottom of the window of the card user. Next tour of the user, the chosen page will appear automatically opening, after verifying name and password.
SHOW/HIDE MENU BAR SCRIPTOR
You can show or hide the Scriptor menu bar by clicking on the keep management menu checkbox. If the checkbox is selected, the management menu will be displayed on the top of the page; if the checkbox is unchecked, Management menu will not be displayed on the top of the page, however menu user bar is available at the bottom of the pages, allowing the user to return to the homepage, receive alerts, to have access to the directory and his e-mail account, manage their profile, to refresh its bar user and access to information on Scriptor and closing session.

Check or uncheck the keep management menu, and then click the Save button.
User menu bar
ENABLE/DISABLE USER ACCOUNT
It is possible to disable the account of a user temporarily without removing its name from the registration database. A user account have been deactivated sees its temporarily suspended rights; therefore, it cannot access Scriptor both, and also that his account has not been reactivated. To disable a user account, click the off topic State account radio button. Then save the changes by clicking the Save button.
* Assign privileges and permissions
To continue, should be familiar with two major concepts for managing Scriptor: permissions and privileges. Note that could also appoint by the rights owner's expression all these permissions and privileges.
(1) Read permissions
Permissions are read selected document (web page, images, texts, annexed documents, folders, etc.) that user can read only absolute exclusive either exclusively restricted or shared with the members of a same profile or users of a same Group secure. These permissions can also be assigned to the user for any element of the DG: folder, subfolder, page Scriptor, Web page, document annexed, etc.
(2) Write privileges
Privileges shall designate any permission granted to the user to enable it to intervene directly in Scriptor, in real-time, to add or change content. Privileges include:
• creating and editing web pages Scriptor,. • DG, content management • management profiles of users (with possibility to add or delete new users and change their permissions and privileges). • managing directories. • managing newsgroups. • publications management.

When an individual has privileges management for each of the above mentioned and that he has himself obtained sub-administrator privileges, he can then bequeath it to other users and constitute an autonomous cell management in the Scriptor. To become familiar with the scope of the status of users, see list of rights and privileges.
PROCEDURES FOR ASSIGNING PERMISSIONS AND PRIVILEGES
Assigning permissions and privileges is done in two ways:
(1) individually by changing the card user. (2) collectively by modifying the properties of a profile.
(1) Individual allocation through editing card login
The sub-administrator and administrator are alone with Scritpor can change permissions and privileges of a user or a profile that they manage; if you have any of these articles, you can change the card user.
To change permissions and privileges for a user, click Setup , and then click users in the menu bar and
then click Manage users. In the users window, select the drop profile to choose the desired profile.
In the users window, select the appropriate profile and choose from the alphabetical letter that corresponds to
the original name of the user you want to change the permissions (permissions and/or privileges). Click the button to the name of the targeted user.

Card selected login window, click the Edit privileges of the user.
In the change of the privileges of the user window, click the permissions tab in the right menu.
The permissions window opens and you choose the permissions and privileges that you want to assign to the user, don't forget to click the Save button on exit.

To return to the card user, click on the icon card login at the top right window. Note : When it comes to give en shared management documents, publications or directories as well as when it comes to invite users to join a discussion group or choose a Moderator, you need to use the Scriptor search interface. To familiarize yourself with how it works, it would be useful to review the topic find document . Although this task is to search for documents, research technique is the same in all modules of Scriptor: you can so you learn each time it is necessary to initiate a search.
(2) Collective award through the profile management
The other procedure for assigning permissions and privileges is to use technology award by Managing profile attributes. To modify batch properties to a profile, use the technique described in: procedures for assigning properties to a profile.
Shared management
Scriptor provides perfect security of the documents produced by the users. As a general rule, the author of a document is to be able to edit it; in this sense, Scriptor protects the right of the authors of documents and does not interference by a third. However, a user can share management of certain objects with other road users when adequate sharing privileges assigns the sub-administrator it depends. For example, users could simultaneously edit the same Web page, they could manage the same directory, direct the same publication or moderate the same discussion group. Note : When two users simultaneously edit the same object, it is the last saved version takes precedence, this "crushing" the previous version. Sub-administrators which establish sharing privileges must therefore ensure the perfect complicity of users and ensure that the allocation of tasks of publishing on the site is subject to tight for teams working protocols. Otherwise you may see "erase" essential content consumers cutting back the territory"editorial" another user. Level of the publications, however, such encroachment is rather rare since "depositors" are usually not to interfere in the events produced by their colleagues; is rather in the case of documents (Web pages) that it will have to pay the greatest attention. Selection mode is done with assigning profiles, secure groups and aliases connection to each user.
Note : All sub-administrators can share documents that they are the authors or they share stewardship. However it is usually a Scriptor which fulfills this task since it is the only one to have access to all documents and, above all, because it is alone, as a webmaster, you can ensure the coherence of the whole structure.

PRIVILEGE MANAGEMENT
In the Scriptor menu bar, click Setup and then click users . Continue by clicking manage privileges
IDENTIFICATION OF THE WINDOW MANAGEMENT TOOLS
Window management privileges to control all the rights assignments in Scriptor. Even better, this window acts as a center of provisioning batch: you can choose a group of individuals (which is associated with a profile for example) and give them tools usage rights (Scriptor pages editor, editor of publication, the DG, directories, catalogs, etc.) and documents produced by these tools. The principle of conferral of rights is:
(1) only sub-administrators can assign rights. (2) only rights they can assign are those they have as a Manager (use an editor, directory, etc.) or edit specific content (pages Scriptor, elements of the DG, publications, etc.).
In other words, a sub-administrator may assign any sub-administrator rights on tools and documents that it manages already, because he himself created by being the author, or because it has inherited an another sub-administrator management. The window management consists of seven parts:
1 Object list: contains objects that you want to assign the management. 2 Area selection items: select the items to which you want to assign rights. 3. Add buttons in the list (the right of the window) let correspondence between users and the items they will be assigned by management (it is necessary to click on the icon in the center of the window to list the documents which will be assigned to selected users):
a) as Manager,b) such as drive c) as an element in the search engine topics.
4 Privileges area allows you to identify the privileges granted to Manager, drive and items to be entered in the search engine topics. 5 Level rights: to assign to each or all rights, a few items, or no right. (available for some items only) 6 The Users selection area: allows the selection of a user or several users or one or several groups who must give the same rights or privileges. 7 Editing buttons allow to apply rights, delete a selection or reset a query.

The window management tools enable you to determine the objects on which you want to assign privileges, select rights and assign them to users.
For more precision, we can identify detail 19 items. In this chapter, each number between parenthesis will exactly match tool designated in the privilege Management window. It should be noted that items 6, 7, 8 and 9 referring to the level of rights, here represent the level of duties for the Publications. Their wording changes as soon as it activates another item in the list of objects.
DESCRIPTION OF TOOLS
Privilege management page tools are:
1 View history button: displays the history.
2 Tabs: objects to assign list: displays the list of objects relating to the privileges assigned by giving access
to management for each of the 14 topics list window. Manager chooses one of the objects (publications,

electronic management of documents, Page Scriptor, directories, etc.) and therefore opens the window
management that is clean.
3 Tab managers: provides access to the list of publications for which you want to assign rights
management to users selected users list.
4 Playback tab: provides access to the list of publications for which you want to assign read permissions to
users selected users list.
5 Tab Finder: associate indexed data publications documents selected users list.
6 Select all button: allows rights management on all documents.
7 Button selection items: grants rights management elements only.
8 Select None button: no rights management, right of consultation (reading) only.
9 Add button in the list: searches in the database of publications and select the publications that you want
to assign rights.
10 Tab users: lists the users who you want to assign rights.
11 Groups tab: list of groups to which you want to assign rights.
12 Add button in the list: searches in the database user providing the list of the individuals to whom you
want to assign rights.
13 Section which appears the list of selected items: displays the list of documents (pages, publications,
directories, etc.) which will be assigned to users selected.
14 Section which appears the list of users selected.
15 Icon Delete selected items: deletes the items selected in the list of items.
16 Delete selected users icon: deletes the user selected in the list of users.
17 Apply button: confirms assigning the rights to selected users; this may be done only once, at the end of
session naming rights, when all items have been provisioning individuals to the list of users.
18 Delete button: deletes all selections of rights for each object.
19 Reset button: cancels all selections of privileges since the last backup.
PROCEDURES FOR THE AWARD: GENERAL PRINCIPLES
To assign privileges, use the following steps:
1 Select individuals to whom you wish to assign new rights, click the Add button in the list in the user selection area.

2 Search individuals and select relevant users (you can speed up the process by showing a profile individuals
simultaneously); choose the profile from the drop-down list, click the letter of the alphabet or to reveal users;
select those to whom you wish to assign privileges, and click.
The list of users to which you want to assign rights creates in the right area of the page (the user selection area).
Note : Privileges apply to all users of the list, even those whose name is not selected; this selection is valid only for deleting users from the list.
3 Select the object in the list of buttons to the left of the window publications, tree, page Scriptor, directories, etc.).
4 Click the Add button in the list in the selection of items area.

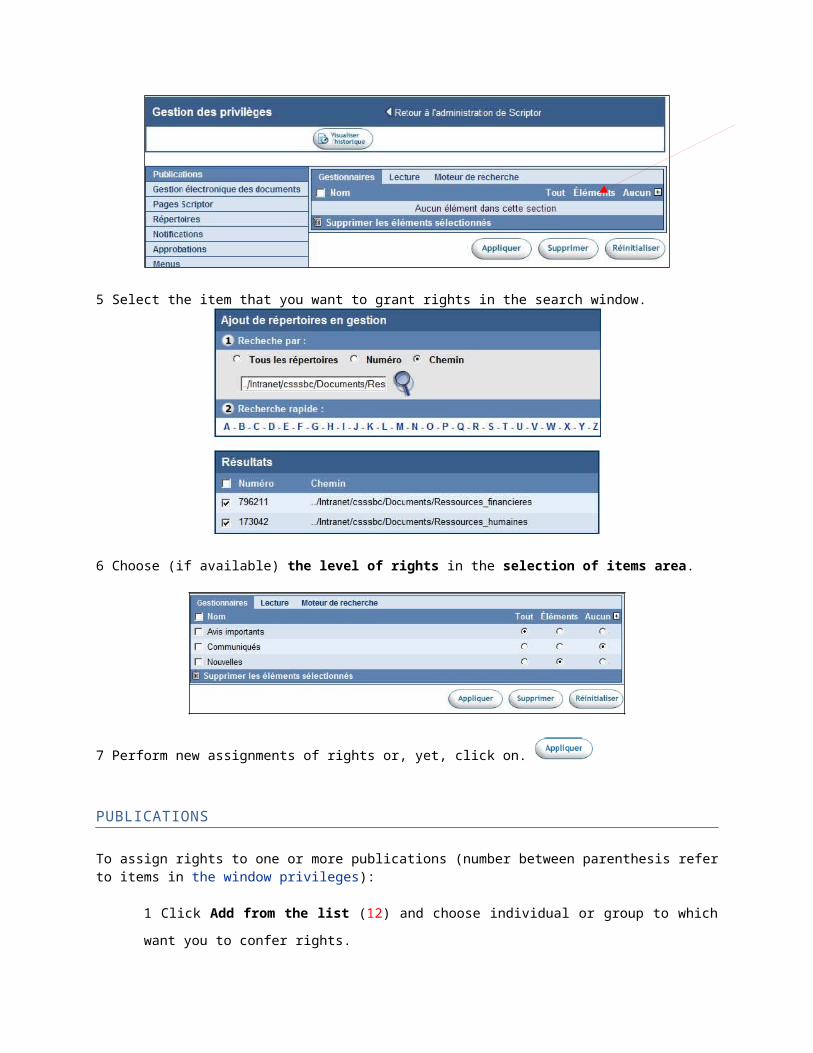
5 Select the item that you want to grant rights in the search window.
6 Choose (if available) the level of rights in the selection of items area.
7 Perform new assignments of rights or, yet, click on.
PUBLICATIONS
To assign rights to one or more publications (number between parenthesis refer to items in the window privileges):
1 Click Add from the list (12) and choose individual or group to which want you to confer rights.
2 Click the publications tab in the list of objects to assign (2).
3 Click Add from the list (9) and choose which publications you wish to grant rights.
4 Choose the type of privileges (3, 4 or 5):

a. Manager (3) assigns the full powers of management.
b. play (4) allows playback only.
c. Finder (5) combines the data referenced by the search engine users.
5 Determine the level of rights (6, 7 or 8):
a. all enables full management of the publication.
b. items allows publication elements only.
c. No grants as read only.
6 Click on keeping the changes.
N.B. Before closing, you can carry out other assignments of rights and not clicking apply only after all of the duties distributed users.
ELECTRONIC DOCUMENT MANAGEMENT
To assign rights to subfolders of the documentation centre:
1 Click Add from the list (12) and choose individual or group to which want you to confer rights.
2 Click electronic documents in the list of objects to assign (2).
3 Click Add from the list (9) button and choose the DGs which folders you want to grant rights.
4 Choose the type of privileges (3, 4 or 5):
a. Manager (3) assigns the full powers of management.
b. play (4) allows playback only.
c. Finder (5) combines the data referenced by the search engine users.

5 Determine the level of rights (6, 7 or 8):
a. full (6) assigns full power management on your chosen folder.
b. partial (7) allows adding or deleting items in the folder.
c. under folder (8) only allows access to the sub folders only.
6 Click on keeping the changes.
N.B. Before closing, you can carry out other assignments of rights and not clicking apply only after all of the duties distributed users.
PAGE SCRIPTOR
To determine the access rights to the Scriptor pages.
1 Click Add from the list (12) and choose individual or group to which want you to confer rights.
2 Click Page Scriptor tab in the list of objects to assign (2).
3 Click Add from the list (9) button and choose pages Scriptor on which you want to grant permissions.
4 Choose the type of privileges (3 or 4):
a. Manager (3) assigns the full powers of management.
b. play (4) allows playback only.
5 Determine the level of rights (6):

• administer (6) assigns the full powers of modification of the content of the page.
6 Click on keeping the changes.
N.B. Before closing, you can carry out other assignments of rights and not clicking apply only after all of the duties distributed users.
DIRECTORIES
To determine the access rights to directories.
1 Click Add from the list (12) and choose individual or group to which want you to confer rights.
2 Click the Directory tab in the list of objects to assign (2).
3 Click Add from the list (9) button and choose the directories that you want to grant rights.
4 Click on keeping the changes.
N.B. Before closing, you can carry out other assignments of rights and not clicking apply only after all of the duties distributed users.
NOTIFICATIONS
To assign rights to notification lists:
1 Click Add from the list (12) and choose individual or group to which want you to confer rights.
2 Click the notifications tab in the list of objects to assign (2).
3 Click Add from the list (9) button and choose on which you want to grant rights mailing lists.
4 Click

5 Choose the type of privileges:
a. Manager: assigns the full powers of list management.
b. subscription: to choose the format of the notice.
6 Choose the style of the notice:
a. HTML: sends the notice in the form of a Web page.
b. text: sends a notice in text format.
7 Click on keeping the changes.
N.B. Before closing, you can carry out other assignments of rights and not clicking apply only after all of the duties distributed users.

APPROVALS
To assign rights approval process:
1 Click Add from the list (12) and choose individual or group to which want you to confer rights.
2 Click approvals tab in the list of objects to assign (2).
3 Click Add from the list (9) and choose lists on which you want to grant rights approval.
4 Click on keeping the changes. N.B. Before closing, you can carry out other assignments of rights and not clicking apply only after all of the duties distributed users.
MENUS
1 Click Add from the list (12) and choose individual or group to which want you to confer rights.
2 Click the menus tab in the list of objects to assign (2).
3 Click Add from the list (9) button and choose the menu on which you want to grant rights.

4 Click on keeping the changes.
N.B. Before closing, you can carry out other assignments of rights and not clicking apply only after all of the duties distributed users.
SITE MAPS
1 Click Add from the list (12) and choose individual or group to which want you to confer rights management of site maps. 2 Click site map tab in the list of objects to assign (2). 3 Click Add from the list (9) button and choose plans site on which you want to grant rights.
4 Click
Click on keeping the changes. N.B. Before closing, you can carry out other assignments of rights and not clicking apply only after all of the duties distributed users.
PROFILES
To determine the rights of access to user profiles.
1 Click Add from the list (12) and choose individual or group to which want you to confer rights on the
management of profiles.
2 Click profiles in the list of objects to assign (2).
3 Click Add from the list (9) button and choose the profiles that you want to grant rights.
4 Choose the type of privileges (3 or 4):
a. Manager (3) assigns the full powers of management.
b. subscription (4) allows subscription profile only.

5 Determine the level of rights (6, 7 or 8):
• Tout (6) enables full management of profiles.
• Card (7) provides management card user.
• Add (8) to add individuals in a given profile.
6 Click on keeping the changes. N.B. Before closing, you can carry out other assignments of rights and not clicking apply only after all of the duties distributed users.
SECURE GROUPS
1 Click Add from the list (12) and choose individual or group to which want you to confer rights on secure
groups management.
2 Click trusted groups tab in the list of objects to assign (2).
3 Click Add from the list (9) button and choose trusted groups on which you want to grant rights.
4 Choose the type of privileges (3 or 4):
a. Manager (3) assigns the full powers of management.
b. subscription (4) allows subscription profile only.
5 Click on keeping the changes.

N.B. Before closing, you can carry out other assignments of rights and not clicking apply only after all of the duties distributed users.
Then, go to secure the Configuration user menu groups Management tab
In the secure groups window, click the button.
Finally in the secure Group Properties window, enter the name of the group as well as a short description to identify. Finally, exit window by clicking the Save button.
Note : If you want to group ceases to be recognized by Scriptor on navigation, select the off radio button. This manoeuvre would disable all users group permissions without destroy it so far. You can later enable it: instantly, users will find all the permissions that they had been granted previously.
NEWSGROUPS
1 Click Add from the list (12) and choose individual or group to which want you to give rights to
newsgroups.
2 Click the newsgroups tab in the list of objects to assign (2).
3 Click Add from the list (9) button and choose the discussion groups on which you want to grant rights.

4 Click 5 Choose the type of privileges (3 or 4):
a. Moderator (3) assigns the full powers of management.
b. guest (4) allows you to react to the words of an only private discussion groups.
6 Click on keeping the changes. N.B. Before closing, you can carry out other assignments of rights and not clicking apply only after all of the duties distributed users.
USER PERMISSIONS
1 Click Add from the list (12) and choose individual or group to which want you to confer rights.
2 Click the user permissions tab in the list of objects to assign (2).
3 Click Add from the list (9) the Rights Management window appears.

4 Click on keeping the changes. N.B. Before closing, you can carry out other assignments of rights and not clicking apply only after all of the duties distributed users.
CARD LOGIN
1 Click Add from the list (12) and choose individual or group to which want you to confer rights.
2 Click the user permissions tab in the list of objects to assign (2).
3 Click Add from the list (9) the Rights Management window appears.
4 Pick what card user you want to change.
5 Click on keeping the changes.

N.B. Before closing, you can carry out other assignments of rights and not clicking apply only after all of the duties distributed users.
CATALOGS
List of rights and privileges
Here is the list of rights and privileges recognized by Scriptor.
General rules • Could not be delete yourself. • Cannot remove that what was created. (Users, profiles, messages etc.). • A sub-administrator can give management the rights which it already has. • Could not delete the user/administrator Scriptor. User • Adds topics, messages, attached files. • Modifies his message, his subjects, its attached files. • Removes his message, his subjects, its attached files. Moderator Same privileges as those of the user more:
• Edits / deletes messages, subjects, all in the Group (s) discussion private (s) he is the Manager and public newsgroup files. • Adds / deletes guests in his (its) Group (s) discussion private (s). • Adds / deletes moderators in his (its) Group (s) discussion private (s). Sub-administrator Same as those of the moderator privileges most:
• Adds / changes focus groups (can delete a group in which he is the creator). • Adds / changes the privileges of users belonging to one of its profiles; removes a user it has itself entered. • Adds / changes profiles; removes a profile with the author. • Adds / deletes users of his (her) profile (s). • Modifies the permission (unless his own and those of Scriptor). Administrator - Scriptor • Has all the rights. • Modifies the creator of an object.
MANAGING TRUSTED GROUPS
Create secure groups
Secure group management allows control access secure pages of Scriptor: it is therefore one of the important machinery control security access and protection of the confidentiality of documents in the software. Because in addition to checking the identity of the users entry, Scriptor also controls the security access for the site

navigation. Indeed, when a Scriptor web page was associated with a secured group, the system locks the page both and also a long time that it fails to establish consistency between the identity of the user and the authorized secure group. A secure group allows exclusive access only individuals of group-specific documents. A secure group usually gathers users profile, but it is not excluded that other users just add both management groups is simple and flexible. Thus, could imagine that such proceedings, such as minutes, such Committee report will be unlocked whenever a user wanting to access will be recognized member of secure group. As Scriptor knows the identity of those circulating in its system, it will stop the navigation of a user who clicks a link to which he is not entitled if it detects in passing that this individual is not member of the Group secured the requested page. Note : It is possible to secure pages that belong to a public Web site where anyone can move freely. However, if the user clicks a link to a secure page, Scriptor checks immediately its access rights requesting his name and its password. If it is unable to properly identify, Scriptor refuse him access to this page which will remain locked. If the user is recognized by Scriptor, the page will be unlocked and the user will be able to become familiar with its contents. Scriptor will return during any session work, user identity session during which it will no longer to authenticate again. Secure access control therefore to build consumer hybrid sites with areas secured as if it was travelling in an intranet.
CREATE A SECURE GROUP
If you want to protect documents by linking them exclusively to a group of users in a secure group, you must follow these steps: (1) create secure group and name it. (2) appoint one or more managers to secure; group (3) associate users. (4) Finally, associate a Scriptor web page to the trusted group.
CREATE A SECURE GROUP AND NAME IT
To create a secure group, you click Setup then users from the menu bar then Managing secure groups.

In the secure groups window, click the button.
In the add trusted groups, secure group properties, enter the name and a brief description of the secure group and select the Active check box.
Then click the button.
APPOINT MANAGERS FOR SECURE GROUP
Back to secure groups management page, click the button Edit this secure group managers.

Secure group managers list page, then click the button.
Launch the search by choosing a profile in the profile drop-down list, click the icon to start a general search, or click the initial letter of the name of the user you want to add as a Manager. To familiarize yourself with how to search in Scriptor, you can see the topic find document; although the object of research is not the same, however, you can find interesting operation analogies.
Select the users in the list (you can select all users by clicking the select all users.) Click to confirm your selection.

ASSOCIATE USERS WITH SECURE GROUP
To ensure secure group is perfectly functional, we associate users. To associate users, click Edit users secure group in secure groups window.
In the list of secure group users page, click the button.
Launch the search by choosing a profile in the profile drop-down list, click the icon to start a general search, or click the initial letter of the name of the user you want to add as a Manager. To familiarize yourself with how to search in Scriptor, you can see the topic find document; although the object of research is not the same, however, you can find interesting operation analogies. Secure group is now ready to be associated with a document. You can also add other users to a secure group redoing such adding described here. If you want subtract users group, select them from the list of secure group
users window and click on the icon.
ASSOCIATE A SCRIPTOR WEB PAGE TO THE TRUSTED GROUP
Attach a Scriptor web page to a secure, is to deploy a security protocol that ensures its confidentiality around on this page. This means that only members of the secure group will be allowed to visit a secure page.

To associate a page with a secure group, see below How to associate a page group secure.
DELETE A TRUSTED GROUP
To delete a security group, select the group you want to delete, and then click the icon.
HOW TO ASSOCIATE A PAGE WITH A SECURE GROUP
If you want to protect a Scriptor web page data and removing it from the public eye, you will need to associate it with a secure group. This operation very simple routinely occurs at the time of constructing a Scriptor web page from the document editor. The effect of the manoeuvre is as follows: when a visitor clicks on a link to a secure page, Scriptor checks first if this visitor is a Scriptor user who has permission to view the said page. Here two situations are possible.
(a) the user is already a user of Scriptor who first identified at the beginning of session giving its name and its password, by clicking on the link, Scriptor checks if this user belongs to the Group secured page, if yes, Scriptor unlocks the page and displays, if not, Scriptor displays a message explaining that the user does not belong to group secure page and, accordingly, it is denied.
(b) the user is not a user registered in Scriptor software will ask the user to identify themselves to verify if it has good access rights; if so, Scriptor applies the same procedure as described above, if not, the page remains locked to any never prohibited to the general public.
Here is how to associate a Scriptor web page with a secure group. When you are in the content editor, click the Security page icon
PROFILE MANAGEMENT
Add a user profile

To add a profile to the profile list, click Setup , and users in the menu bar and then click the button profile management.
The profile management window appears: it indicates the available profiles. To add a new profile, click the Add a profile button.
Complete the fields name and Description and click on the button Save, then click Close.
EDIT A USER PROFILE
To edit an existing profile in the profile list, click Setup , and users in the menu bar and then click the
button profile management.

The profile management window appears: it indicates the available profiles. Locate the profile to edit from the
button.
Click Edit profile. Change the desired fields. It is also possible to change the creator by clicking on the button of the same name. Finally click on the button Save, then click Close.

EDIT USERS PROFILE
To change a profile in the list of profiles, users click the button Edit users of this profile.
In the list of users of the profile window check the users you want to delete and click the button. Or then
click the button to add a new.
CHANGE A PROFILE MANAGERS
To change managers a profile in the list of profiles, click the button Edit managers of this profile.
In the profile managers list window select the checkboxes for managers who you want to add or remove
management administrator profile and click the button or if you want to remove the selected Manager click
the button. You can also add a Profile Manager by clicking the button.

In the add profile managers select the managers you want.
Click the Save button to confirm your choice.
MANAGEMENT OF THE REGIONS
DEFINE THE REGION OF USERS
'Users area' means a specific field of card login to associate the user with a grouping any: group, country, branch office, a building, etc. This item becomes interesting when you want to make a selective search in directory for all users of same grouping. In the case of homonymous, region would differentiate between "good" Jean Tremblay.
ADD A REGION
To add a region to list of regions, click Setup , and users in the menu bar and then click the button regions management.

Regions window appears: it indicates the available regions. To add a new region, click the button.
Input the appropriate properties of the region. Those preceded by a red asterisk (*) are mandatory.
Click the Save button before closing .

CHANGE REGION SETTINGS
To change the settings of a region in the list of regions, click Setup , and users in the bar menu, then
press the button regions management.
Regional management window appears. To change the settings of an existing region, perform a search by clicking
on the button.
Choose the region you wish to make changes and click the Edit area to the left list.
The region properties window appears. Make changes to the desired fields and click the Save button to keep the changes , and then click Close.

EDITING YOUR PERSONAL PROFILE
In order to make changes to your personal profile, click Setup , and then click users in the menu bar and
click the Edit your record personal. icon finally

Your personal card window opens, allowing you to make any desired changes.
PREFERENCES
EDIT PREFERENCES
Single Scriptor and users who have administrator privilege can change the Preferences of the software. These preferences apply default settings required for each user upon their entry into the software; the user can however

change on route to suit its own requirements. Fine tuning of preferences can therefore help to standardize certain stylistic parameters etc. in order to harmonize the presentation of fonts, hyperlinks.
To change the Scriptor, software preferences click first configuration then Preferences in the bar menu. Several tabs are then available to you, allowing you to dictate your preferences on several levels.
GENERAL PREFERENCES
By clicking on the General Preferences menu icon Configuration preferences Management
preferences window opens where you can select or enter the characteristics that you want to see apply to all Scriptor.

Prior to leaving, don't forget to click the Save button.
MENU REFRESH RATE
When you work in Scriptor, software refreshes information homepage at regular intervals. In doing so, Scriptor will detect if you have received mail and display the receipt of mail window if necessary. You can choose the information refresh frequency by changing the figure timings in the drop-down list that appears in the topic "menu refresh time."
PASSWORD EXPIRATION
Scriptor can decide when all users will have to enter a new password from their personal card. This option allows you to thwart any attempts of containment of the password because it forces users to change from time to time. To predict the timing of this change, type in the box "Before the password expires time" a number that corresponds to the number of days after which the passwords of the users will become obsolete.

CHOICE OF THE STYLE SHEET
If you want that style sheet is available for creating Web pages, you must first implement the memory in the document editor. Click on the Search button which adjoins "Style sheet" section in the Preferences window. Select the document and Save to confirm your selection.
ZONE MANAGEMENT STYLES
The Manage Styles window allows adding new style sheets. Simply click on the button and the style properties window allows you to save a new. Simply enter its name and its style, and then click the Save button.
Then click the build file styles button in the window management styles.
CHOICE OF THE NUMBER OF SEARCH RESULTS DISPLAY
When performing a search, Scriptor displays a specified number of results per page. You can decide the number of results that will display Scriptor by changing the number in the number of search results display preference field. Thereafter, the user may modify itself this number, but some straight away is the registered number here, in the Preferences window different limit of displayed results. Select from the drop-down menu to choose to display 10, 25, 50, 75, 100 or 200 results when performing a search.

CHOOSING HOW TO SEARCH DOCUMENTS
When you perform a search in the documents (web pages Scriptor) editor, you can choose between two display modes: a) the standard mode that shows the results alphabetically by displaying the name of the pages found; b) tree view user building itself, which offers a thematic and selective documents that he created himself or which has granted it a privilege management tree.
Standard mode displays all documents. The tree view displays only the documents selected by the user himself by a personal theme grouping.
DEFAULT FONT
To determine the default font Scriptor (is that font to appear as the standard font in the document editor and each
text editors), click on Configuration preferences , and then click default font. Change the font properties to your graphic requirements: size, color, font, bold or italic character and text justification. To the choice of color, use the same technique as described in modify the color of the text.
Apply the same technique to customize links to two statements. Remember when leaving click the Save button.
DIRECTORY
Scriptor allows generous flexibility in creating directory. In fact, all the fields in the directory are fully editable: identification, work, security, additional information and personal contact information, etc. You will be a completely custom directory.

To enable Directory preferences window, click in the menu on the tab bar then preference and finally
Directory.
You can configure all of the items in the directory. Appoint administrators, the search items, items to view profile for each element. Finish by clicking Save to preserve settings.
EDITOR
To access the preferences Editor window, click the Editor button on the tab configuration preference. Then configure automatic backup and record keeping options according to your needs. Click the Save button to confirm your choice.

REGISTRATION MANAGEMENT
Clicking registration, management tab in the Configuration preferences menu Management registration window opens allowing you to add or remove profiles or secure groups, registration of new users preferences.
You will notice 3 hyperlinks at the bottom of the window, they allow you to: View and manage the list of new users to approve
On the view the log entries

To configure fields required for new registrations
Prior to leaving, don't forget to click the Save button.
CARD ORGANIZATION
By clicking the card organization, icon on the Setup preferences menu card organization properties
window will open allowing you to enter the relevant information about your organization. You also can insert your logo.

IP BLOCKER
By clicking on the IP blocker icon on the Setup preferences window menu of IP blocker opens allowing you to register the IP addresses you want to skip when taking data.
PAYPAL ® ACCOUNT MANAGEMENT
By clicking on the PayPal account management ®, Configuration preferences menu icon you have access to PayPal account management ®, from window you can access all already registered accounts or add new ones.
To add a new it just click on the button and in the next window information for the new account.
Finally, click Save to save the information.


SEARCH ENGINE
INDEXED SEARCH ENGINE
When Scriptor is equipped with a search engine, must be regularly index data in order to update new information identified by the search engine.
In the Scriptor menu bar, click the configuration button click Finder.
As it often is a custom installation, the technical services of Groupe EBI will indicate how indexing data. You can join our technicians at the following telephone number: (418) 780-8900, 506 post or by email at: [email protected]. Coveo management Opens the window giving access to the administration of Coveo. Management interfaces Coveo Opens the window giving access to administration interfaces of Coveo. Consult the summary of the indexed files Opens the window to see the summary of the generated HTML files.

Indexed pages Scriptor (for documents) Opens the window to generate HTML files that will be used to craft search pages Scriptor. Index the DG Opens the window to generate HTML files for the electronic management of documents search engine. Index publications Opens the window to generate HTML files for the publications search engine.
HISTORY OF ACTIVITY ON THE SYSTEM MANAGEMENT
In the Scriptor menu bar, click the configuration button and then click Management history of system
activities .

The research in the history of activities window directly, allowing you to perform a search in the chosen either criteria:
- By user: by clicking on the angle brackets you have access to the complete list of users that you can choose by checking the appropriate boxes. - Module: pull down list to choose the appropriate module - Start date and end date; you can choose the time space in which the activity in question took place - By keyword (s) (s): allows you to search on a word or phrase contained within the site.
The result of your search allows you to see all activities performed on your website starting with connection to the system until the removal of documents or pages. You can find out who did what and when it was done. Newsgroups
In the Scriptor menu bar, click the configuration button click newsgroup
MODIFY DISCUSSION GROUPS
By clicking on the buttons to the left of the discussion group you can edit the guest list or modify the list of moderators for this group. In both cases, by clicking the icon you have access to manage lists, window allowing you to modify them when needed.

MANAGEMENT OF LOCKED FILES
In the Scriptor menu bar, click configuration , and then click locked files
This will give access to the search window and then locked files list. You can change the status of each of these files
as you wish just by clicking the icon preceding each file.
DEFAULT HOMEPAGE
By clicking Setup and then click default , home you can choose the default homepage of your website.

Just register in the appropriate window by default, pages box the # of the desired opening your WEB site home page.