Using Network Manager to Deploy Firmware and Backup ... Deploy Firmware and Backup/ Restore...
34
November 17, 2003 Using Network Manager to Deploy Firmware and Backup/ Restore Configuration Files Dell™ OpenManage™ Network Manager Kyon Holman Software Engineer PowerConnect Engineering PowerConnect
Transcript of Using Network Manager to Deploy Firmware and Backup ... Deploy Firmware and Backup/ Restore...
November 17, 2003
Using Network Manager to Deploy Firmware and
Backup/ Restore Configuration Files
Dell™ OpenManage™ Network Manager
Kyon Holman Software Engineer
PowerConnect Engineering
PowerConnect
Nov-2003 Page 2 Dell PowerConnect
Contents Section 1 ..................................................................................................................................... 5
Introduction............................................................................................................................... 5
Section 2 ..................................................................................................................................... 6
Getting Started.......................................................................................................................... 6
Performing a Network Discovery ................................................................................... 6
Creating a Static Group..................................................................................................... 7
Configuring the Internal TFTP Server........................................................................... 8
Troubleshooting Backup, Deploy, and Restore ........................................................... 9
Section 3 ................................................................................................................................... 11
Backup ...................................................................................................................................... 11
Backing up a Configuration file from a Switch ......................................................... 11
Monitoring the Backup of a Configuration file from a Switch............................... 12
Backing up a Configuration File from Multiple Switches....................................... 13
Monitoring the Backup of a Configuration file from Multiple Switches............. 15
Section 4 ................................................................................................................................... 17
Restore ...................................................................................................................................... 17
Viewing, Comparing, and Editing a Configuration File(s) on a Single Switch... 17
Comparing Configuration Files between two different Switches ......................... 19
Restoring a Configuration File to a Switch................................................................. 20
Monitoring the Restoration of a Configuration file to a Switch............................. 22
Section 5 ................................................................................................................................... 24
Deploy ...................................................................................................................................... 24
Importing Firmware into Network Manager.............................................................. 24
Deploying Firmware to One Switch............................................................................. 26
Monitoring the Deployment of a Firmware file to one Switch............................... 27
Deploying Firmware to Multiple Switches ................................................................ 28
Creating a Dynamic Group ........................................................................................................... 29

Nov-2003 Page 3 Dell PowerConnect
Deploying Firmware to Multiple Switches ................................................................................. 30
Monitoring the Deployment of a Firmware file to Multiple Switches ................. 32
Section 6 ................................................................................................................................... 34
Conclusion ............................................................................................................................... 34
Nov-2003 Page 4 Dell PowerConnect
Figures Figure 1. Selecting equipment for static group........................................................................................ 8 Figure 2. Configuring the internal TFTP Server..................................................................................... 9 Figure 3. Backing up the configuration file of a PowerConnect 3348................................................ 12 Figure 4. Monitoring the backup of a configuration file from a 3348................................................ 13 Figure 5. Creating multi-switch configuration backup group operation........................................... 14 Figure 6. Configuring multi-switch configuration file backup group operation............................. 14 Figure 7. Options for multi-switch configuration file backup group operation .............................. 15 Figure 8. Monitoring the configuration file backup of multiple switches ........................................ 16 Figure 9. PowerConnect 3348 backed up configuration file operations ........................................... 18 Figure 10. Comparing two PowerConnect 3348 configuration files.................................................. 19 Figure 11. PowerConnect 3248 and 3348 backed up configuration file operations......................... 20 Figure 12. Setting a configuration file restore to a PowerConnect 3348............................................ 22 Figure 13. Monitoring the restoring of a configuration file to a PowerConnect 3348 ..................... 23 Figure 14. Importing firmware for a PowerConnect 3248 .................................................................. 25 Figure 15. Deploying a firmware upgrade to a PowerConnect 3248................................................. 27 Figure 16. Monitoring the deploying of firmware to a PowerConnect 3248.................................... 28 Figure 17. Specifying information for a dynamic group filter............................................................. 30 Figure 18. Creating multi-switch deployment group operation ........................................................ 31 Figure 19. Configuring multi-switch firmware deployment group operation ................................ 32 Figure 20. Monitoring a multi-switch firmware deployment group operation............................... 33

Nov-2003 Page 5 Dell PowerConnect
Section 1 Introduction
Dell’s OpenManage Network Manager is an enterprise class network management console for administrating, configuring and monitoring of Dell PowerConnect switches. One of its many virtues is its ability to remove the complexity of successfully managing configuration and firmware files on an enterprise network.
This document walks the reader through a scenario where a network administrator at a fictitious company named NetworkWeb Inc. utilizes Network Manager to backup, restore, and deploy configuration files and firmware to PowerConnect switches on an enterprise network.

Nov-2003 Page 6 Dell PowerConnect
Section 2 Getting Started
NetworkWeb Inc has several PowerConnect switches (PowerConnect 3248, 3348, and two 5224s) configured and running on their network as core switches. The network administrator would like to carry out the routine and time consuming tasks listed below by utilizing the integrated TFTP server, backup, deploy, and restore functionality of Network Manager.
• Setup a TFTP server to allow the PowerConnect switches to backup and restore configuration files and deploy firmware.
• Backup the configuration files of PowerConnect switches on the network to allow them to be restored in the event a switch fails or its configuration file is changed or corrupted.
• View and compare the backed up configuration files to ensure the switches have been correctly configured.
• Restore a backed up configuration file to a previously functioning switch to quickly re-establish lost network connectivity and services.
• Deploy the latest firmware to the PowerConnect switches to allow them to take advantage of the most recent features and bug fixes.
Performing a Network Discovery Before proceeding, a network discovery must be performed to allow the backup, deploy, and restore of configuration and firmware files to and from PowerConnect switches via Network Manager. The network administrator will follow the standard procedures listed below to perform the network discovery.
• Ensure Network Manager is correctly installed, configured, and has the required services up and running. Please reference your Network Manager Quick Start Guide for concerns or questions on this topic.
• Start Network Manager from the Start menu (Start->Programs->Dell OpenManage Applications->Network Manager->Network Manager).
• Click on the Equipment Discovery Wizard and supply the IP addresses or subnet(s) along with default community string(s) to allow Network Manager to discover the new switches. Telnet credentials will need to be provided for the PowerConnect switches during the discovery process. Continue through the Equipment Discovery Wizard providing appropriate information as detailed in the Network Manager Quick Start Guide.
Nov-2003 Page 7 Dell PowerConnect
• Wait for the discovery cycle to be completed.
• When the discovery process is complete, the switches will be added to the database and accessible via Equipment Manager.
Creating a Static Group The network administrator for NetworkWeb Inc is going to group their configured core switches into a static group to facilitate performing backup group operations to these switches. To create a static group, the network administrator will follow the steps listed below:
1. Select Equipment Group Manager from the navigation pane
2. Click on the New button located in the upper right corner
3. Select the text Static Group and click on the Ok button
4. Enter “PowerConnect Core Switches” in the Name field
5. Click on Membership located in the navigation tree on the left
6. Click on the Add button under the Equipment section in the upper right corner
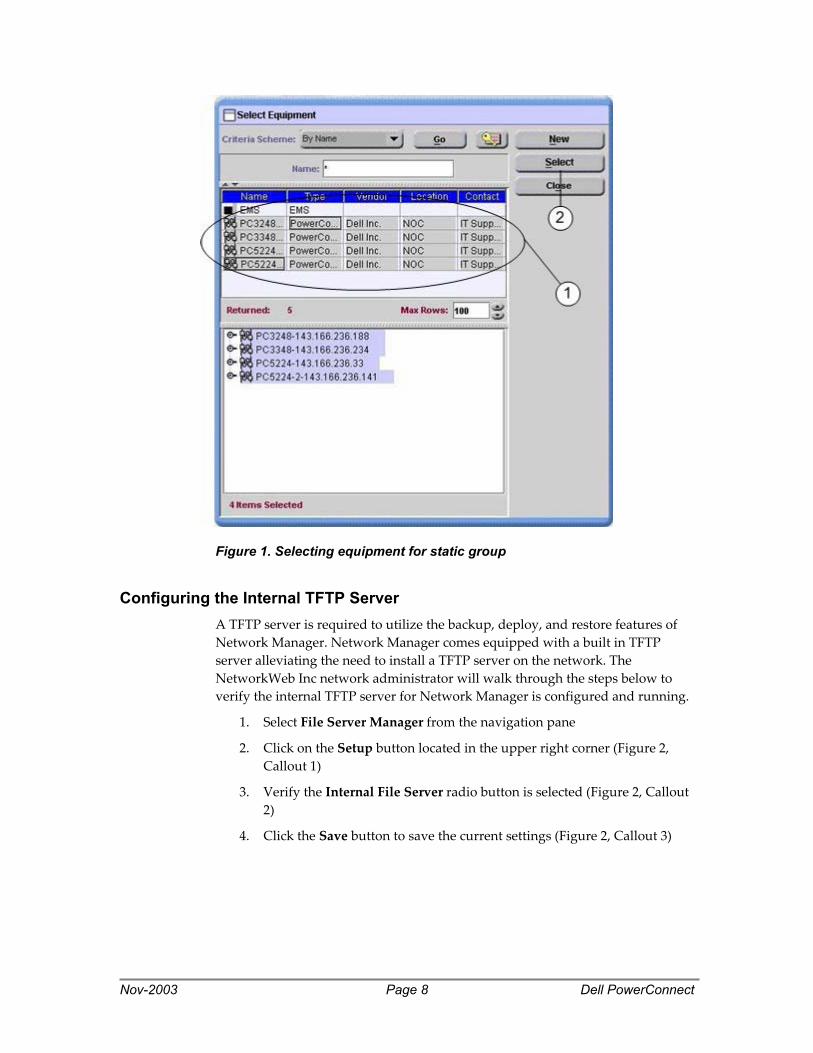
7. Select all of the PowerConnect switches (PowerConnect 3248, 3348, and two 5224s) using CTRL-click so they are highlighted (Figure 1, Callout 1) and click on the Select button on the right (Figure 1, Callout 2)
8. Verify the selected switches are listed under the Equipment section at the top and click on the Save button below the navigation pane in the Equipment Group Manager window
Nov-2003 Page 8 Dell PowerConnect
Figure 1. Selecting equipment for static group
Configuring the Internal TFTP Server A TFTP server is required to utilize the backup, deploy, and restore features of Network Manager. Network Manager comes equipped with a built in TFTP server alleviating the need to install a TFTP server on the network. The NetworkWeb Inc network administrator will walk through the steps below to verify the internal TFTP server for Network Manager is configured and running.
1. Select File Server Manager from the navigation pane
2. Click on the Setup button located in the upper right corner (Figure 2, Callout 1)
3. Verify the Internal File Server radio button is selected (Figure 2, Callout 2)
4. Click the Save button to save the current settings (Figure 2, Callout 3)

Nov-2003 Page 9 Dell PowerConnect
Figure 2. Configuring the internal TFTP Server
Note: To configure the use of an external TFTP Server. Click on the “New” button located in the upper right corner and fill out the required fields in the “Adding New File Server” view (See the Network Manager User Guide for more detailed information on how to configure an external TFTP Server). Be sure to verify the configuration of the new external TFTP server by clicking on the “Test” button located in the bottom right corner of the “Adding New File Server” view. It is IMPORTANT TO NOTE that the specified external TFTP server must reside on a machine also running a FTP server for backup, deploy, and restore functionality to work with Network Manager. If the machine running the external TFTP server is not also running a FTP server, then the backup, deploy, and restore features of Network Manager will not function.
Troubleshooting Backup, Deploy, and Restore If you are experiencing problems performing a backup, deploy, or restore to a PowerConnect switch, please verify the following conditions do not exist on your network or the machine running the Network Manager server:
• TFTP traffic is being filtered out on the local network.

Nov-2003 Page 10 Dell PowerConnect
• TFTP port (number 69) is being blocked on the Network Manager server by a firewall or other application.
• Another application is using the TFTP port for non TFTP traffic on the Network Manager server.
• Another instance of a TFTP server is running on the Network Manager server while the internal TFTP File server is configured to be in use.
The existence of any of these conditions could cause a “Mediation Exception occurred …” error, “Internal TFTP Server Timed-Out …” error, or other error(s) to occur during the execution of a backup, deploy, or restore operation(s). Backup, deploy, and restore functionality of Network Manager will not function properly if any of these conditions exist. If you encounter one of the errors mentioned above, you can obtain more information by reviewing the Application Server log by right clicking on the Network Manager icon in the system tray and selecting “Logs->Application Server”.

Nov-2003 Page 11 Dell PowerConnect
Section 3
Backup
Network Manager provides a seamless and simplified means for backing up configuration files from one or multiple PowerConnect switches on an enterprise network. This is an essential task that should be performed routinely to facilitate quickly deploying a backed up configuration to a miss-configured, maliciously changed, or corrupted switch to restore any loss of network connectivity or services that may have occurred because of this incident. When multiple switches are assembled into a group, a group operation to backup configuration files can be applied across this group of switches, resulting in a dramatic reduction in the administrative and management time it would take to perform this task in a one-to-one fashion. This section describes how NetworkWeb Inc network administrator will backup the configuration files from one or more switches on their network.
Backing up a Configuration file from a Switch The configuration file for a switch can be backed up on a per switch basis with a few mouse clicks. This allows for a quick and efficient means to backup a PowerConnect switch’s configuration data. The network administrator for NetworkWeb Inc will backup the configuration file of their PowerConnect 3348 switch by following the steps below.
1. Select Equipment Manager from the navigation pane
2. Select the PowerConnect 3348 switch so it becomes highlighted and click on the Backup button located on the right
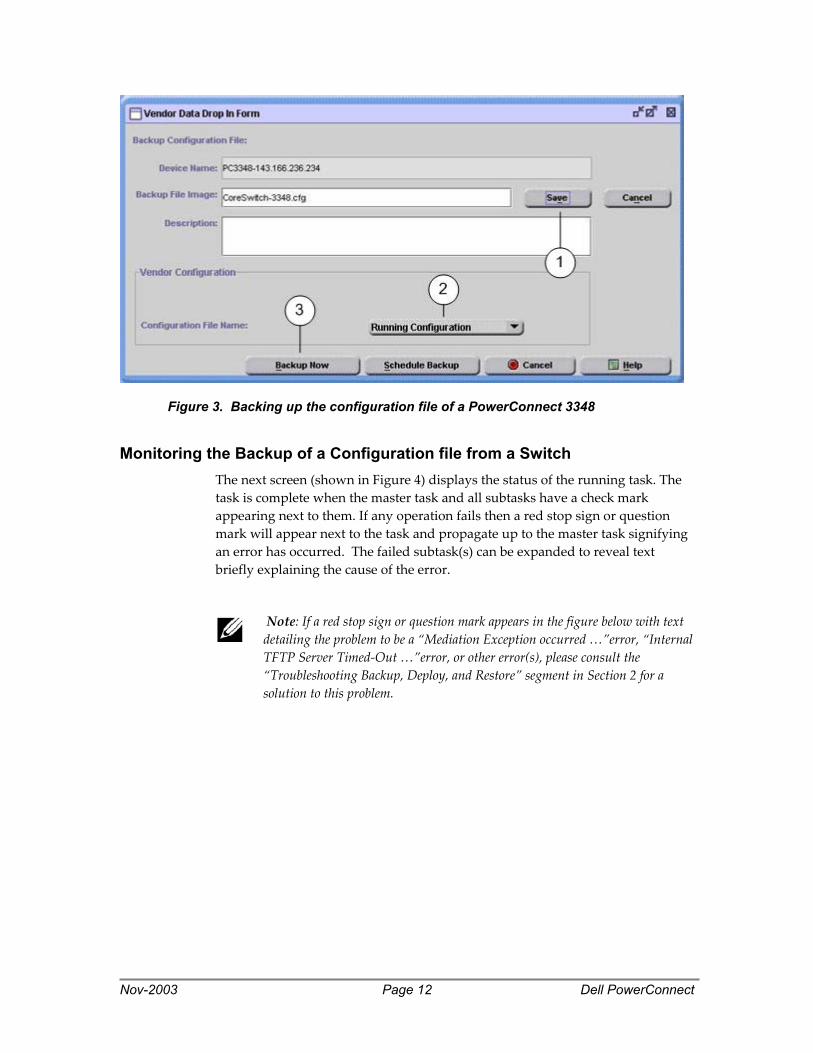
3. Click on the Add button and type “CoreSwitch-3348.cfg” in the Backup File Image text field
4. Click on the Save button to save this text as a backup file image (Figure 3, Callout 1)
5. Click on the Configuration File Name pop-up menu and select “Running Configuration” to backup the currently running configuration on the switch (Figure 3, Callout 2)
6. Click on the Backup Now button located at the bottom of the window to bring up the progress monitoring window for this operation (Figure 3, Callout 3)
Nov-2003 Page 12 Dell PowerConnect
Figure 3. Backing up the configuration file of a PowerConnect 3348
Monitoring the Backup of a Configuration file from a Switch The next screen (shown in Figure 4) displays the status of the running task. The task is complete when the master task and all subtasks have a check mark appearing next to them. If any operation fails then a red stop sign or question mark will appear next to the task and propagate up to the master task signifying an error has occurred. The failed subtask(s) can be expanded to reveal text briefly explaining the cause of the error.
Note: If a red stop sign or question mark appears in the figure below with text detailing the problem to be a “Mediation Exception occurred …”error, “Internal TFTP Server Timed-Out …”error, or other error(s), please consult the “Troubleshooting Backup, Deploy, and Restore” segment in Section 2 for a solution to this problem.

Nov-2003 Page 13 Dell PowerConnect
Figure 4. Monitoring the backup of a configuration file from a 3348
Backing up Configuration Files from Multiple Switches The configuration files of multiple PowerConnect switches can be backed up in a single action with a group operation. This provides a quick and easy method to backup the configuration data of all PowerConnect switches on a network without having to perform the time consuming task of interfacing with each PowerConnect switch and backing it up manually. The network administrator for NetworkWeb Inc will backup the configuration files of all their PowerConnect switches on the network by following the steps listed below.
1. Select Group Operations Manager from the navigation pane
2. Click on the New button located in the upper right corner
3. Enter “Backup PowerConnect Core Switches” in the Name field (Figure 5, Callout 1)
4. Enter “Backs up the PowerConnect Core Switches Configuration Files” in the Description field (Figure 5, Callout 2)
5. Select “PowerConnect Core Switches” from the Group pop-up menu (Figure 5, Callout 3)
6. Select NetConfig Operations -> Global -> Backup from the Operation field and click on the Next button (Figure 5, Callout 4 & 5)

Nov-2003 Page 14 Dell PowerConnect
Figure 5. Creating multi-switch configuration backup group operation
7. Enter “CoreSwitch.cfg” in the Backup Filename text field click on the Next button (Figure 6, Callout 1)
Figure 6. Configuring multi-switch configuration file backup group operation
8. Ensure all three options are checked under the Options section and click on the Next button to bring up the progress monitoring window for this operation (Figure 7, Callout 1)

Nov-2003 Page 15 Dell PowerConnect
Figure 7. Options for multi-switch configuration file backup group operation
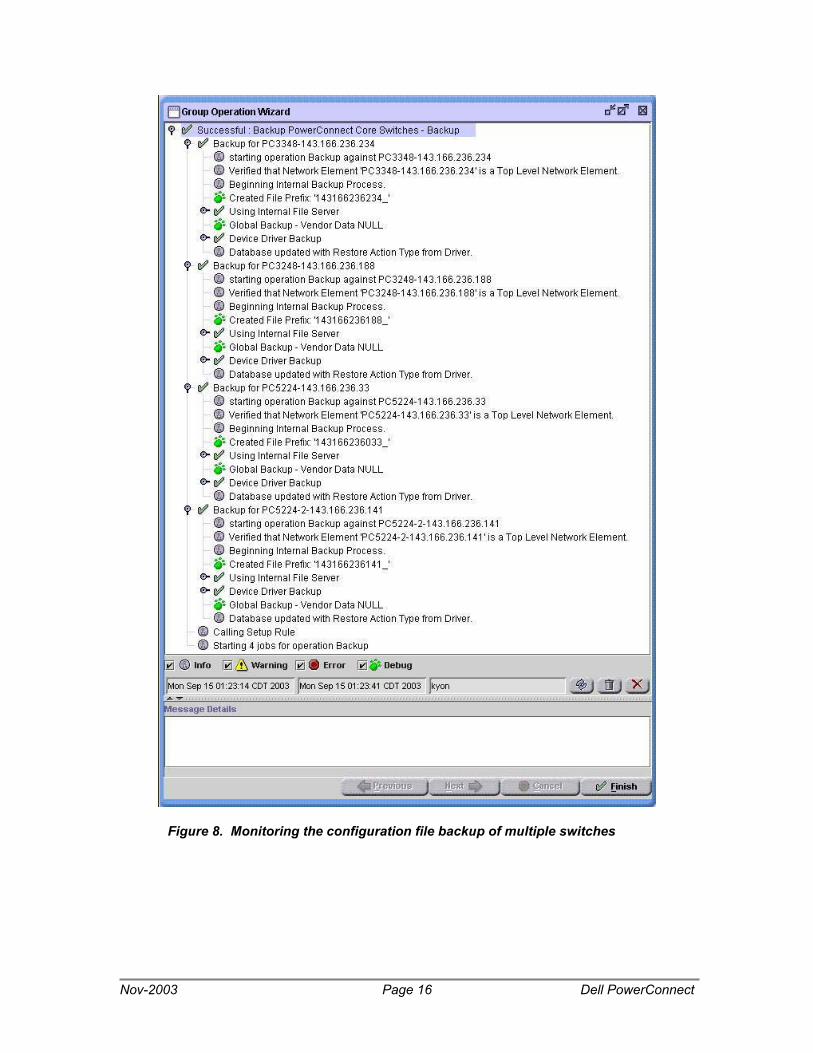
Monitoring the Backup of a Configuration file from Multiple Switches The next screen (shown in Figure 8) displays the status of the running group operation. The group operation is complete when the master task and all subtasks have a check mark appearing next to them. In this instance, a group operation was run against a mixed group of switches that all support this operation so it completes successfully. If any operation fails then a red stop sign or question mark will appear next to the task and propagate up to the master task signifying an error has occurred. The failed subtask(s) can be expanded to reveal text briefly explaining the cause of the error.
Note: If a red stop sign or question mark appears in the figure below with text detailing the problem to be a “Mediation Exception occurred …”error, “Internal TFTP Server Timed-Out …”error, or other error(s), please consult the “Troubleshooting Backup, Deploy, and Restore” segment in Section 2 for a solution to this problem.
Nov-2003 Page 16 Dell PowerConnect
Figure 8. Monitoring the configuration file backup of multiple switches

Nov-2003 Page 17 Dell PowerConnect
Section 4 Restore
Network Manager provides a simple means to view, compare, and edit a switch’s backed up configuration file(s) to ensure its validity before restoring the file to a PowerConnect switch. A side-by-side comparison can also be performed between the configuration files of two different switches to easily depict the difference in configuration settings of these devices. The network administrator for NetworkWeb Inc will verify the backed up configuration files from the section above are valid before restoring them to their PowerConnect switches.
Viewing, Comparing, and Editing a Configuration File(s) on a Single Switch The backed up configuration file(s) of a switch can be viewed, compared, and edited using Network Manager. This provides the NetworkWeb Inc local administrator a simple means to review and update any errors located in a switch’s backed up configuration file. The network administrator will perform the tasks listed here by following the steps detailed below.
1. Select Equipment Manager from the navigation pane
2. Select the PowerConnect3348 switch so it becomes highlighted and click on the Open button to bring up the one-to-one editing window for the switch
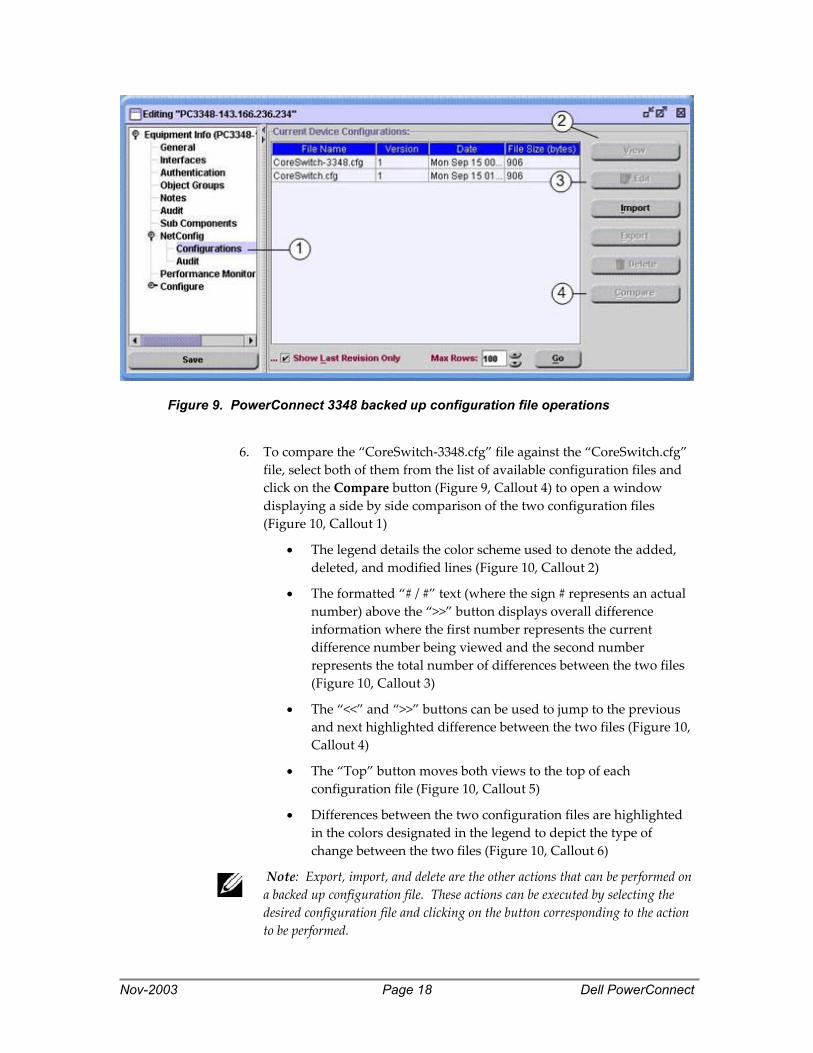
3. Click on Equipment Info ( … ) -> NetConfig - > Configurations navigation tree located to the left of this window to open the view listing the current device configuration files (Figure 9, Callout 1)
4. To view the “CoreSwitch-3348.cfg” file, select it from the list of available configuration files and click on the View button to open a window displaying the selected configuration file (Figure 9, Callout 2)
5. To edit the “CoreSwitch-3248.cfg” file, select it from the list of available configuration files and click on the Edit button to open an editing window for the selected configuration file (Figure 9, Callout 3)
Nov-2003 Page 18 Dell PowerConnect
Figure 9. PowerConnect 3348 backed up configuration file operations
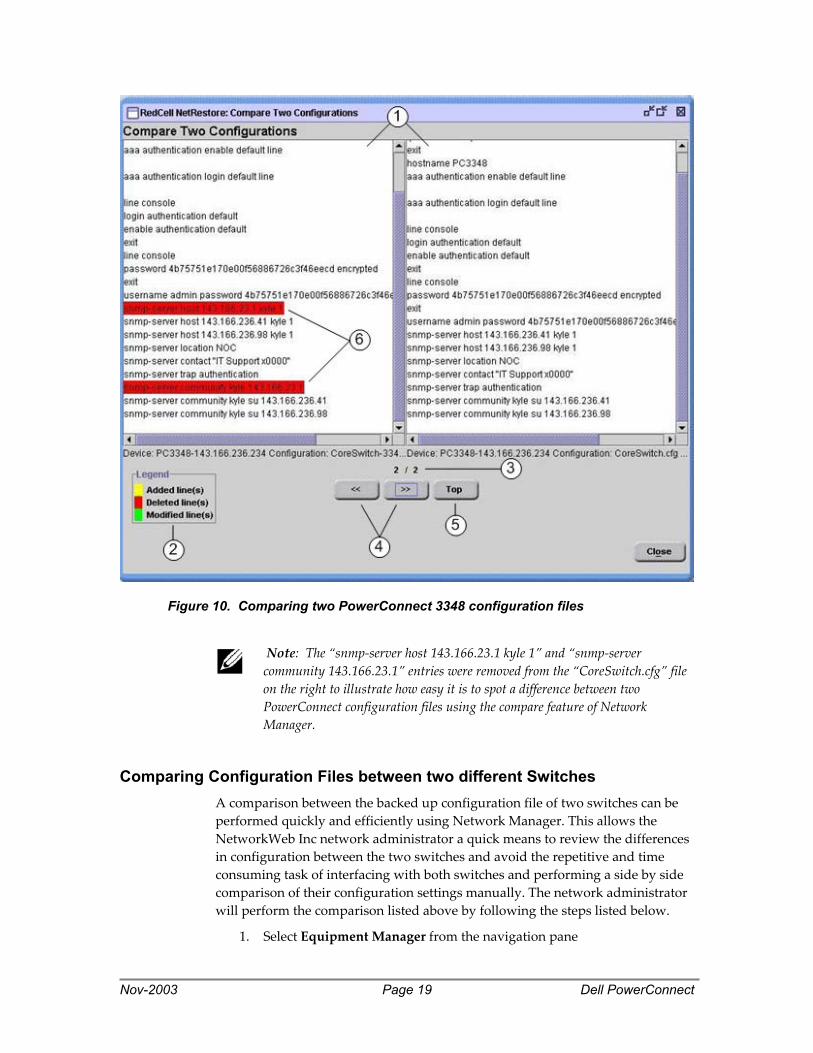
6. To compare the “CoreSwitch-3348.cfg” file against the “CoreSwitch.cfg” file, select both of them from the list of available configuration files and click on the Compare button (Figure 9, Callout 4) to open a window displaying a side by side comparison of the two configuration files (Figure 10, Callout 1)
• The legend details the color scheme used to denote the added, deleted, and modified lines (Figure 10, Callout 2)
• The formatted “# / #” text (where the sign # represents an actual number) above the “>>” button displays overall difference information where the first number represents the current difference number being viewed and the second number represents the total number of differences between the two files (Figure 10, Callout 3)
• The “<<” and “>>” buttons can be used to jump to the previous and next highlighted difference between the two files (Figure 10, Callout 4)
• The “Top” button moves both views to the top of each configuration file (Figure 10, Callout 5)
• Differences between the two configuration files are highlighted in the colors designated in the legend to depict the type of change between the two files (Figure 10, Callout 6)
Note: Export, import, and delete are the other actions that can be performed on a backed up configuration file. These actions can be executed by selecting the desired configuration file and clicking on the button corresponding to the action to be performed.
Nov-2003 Page 19 Dell PowerConnect
Figure 10. Comparing two PowerConnect 3348 configuration files
Note: The “snmp-server host 143.166.23.1 kyle 1” and “snmp-server community 143.166.23.1” entries were removed from the “CoreSwitch.cfg” file on the right to illustrate how easy it is to spot a difference between two PowerConnect configuration files using the compare feature of Network Manager.
Comparing Configuration Files between two different Switches A comparison between the backed up configuration file of two switches can be performed quickly and efficiently using Network Manager. This allows the NetworkWeb Inc network administrator a quick means to review the differences in configuration between the two switches and avoid the repetitive and time consuming task of interfacing with both switches and performing a side by side comparison of their configuration settings manually. The network administrator will perform the comparison listed above by following the steps listed below.
1. Select Equipment Manager from the navigation pane

Nov-2003 Page 20 Dell PowerConnect
2. Select the PowerConnect3248 and PowerConnect3348 switch so they are both highlighted and click on the Compare button to bring up the Compare Configuration Files window
3. Select the “CoreSwitch.cfg” configuration file from the PowerConnect 3248 and “CoreSwitch-3348.cfg” from the PowerConnect 3348 Configuration table (Figure 11, Callout 1 & 2)
4. Click on the Compare button to open a window displaying a side by side comparison of the two configuration files
Figure 11. PowerConnect 3248 and 3348 backed up configuration file operations
Note: Even though more than two switches can be selected in the Equipment Manager for comparison, this feature only supports comparison of configuration files between two switches. If more than two switches are selected, then the comparison will be performed on the first two switches in the selected group.
Restoring a Configuration File to a Switch After a configuration file has been backed up, it can be restored to a switch. Network Manager accomplishes this task with a few mouse clicks creating a quick and easy means to apply a designated configuration to a switch without having to setup a TFTP server and configuring the switch to manually restore it

Nov-2003 Page 21 Dell PowerConnect
from there. The network administrator for NetworkWeb Inc will perform the restore operation listed above by following the steps detailed below.
1. Select Equipment Manager from the navigation pane
2. Select the PowerConnect3348 switch so that it becomes highlighted and click on the Restore button to bring up the restore settings window
3. Click on the Configuration pop-up field and select “CoreSwitch.cfg” (Figure 12, Callout 1)
4. Select the top entry in the History table (Figure 12, Callout 2)
5. Click on the Destination File Name pop-up field and select “Startup Configuration” (Figure 12, Callout 3)
6. Click the Restore Now button to bring up the progress monitoring window for this operation (Figure 12, Callout 4)
Note: In this instance, the “Reboot device” check box is already checked and grayed out requiring the reboot of a switch after a configuration is restored to the device. It is recommended checking this setting for other switches that do not have it set by default to ensure the switch gets rebooted for the newly restored configuration file to take effect. Selecting this option will result in the overall restore operation taking several minutes as the switch reboots after the configuration file has been restored.

Nov-2003 Page 22 Dell PowerConnect
Figure 12. Setting a configuration file restore to a PowerConnect 3348
Monitoring the Restoration of a Configuration file to a Switch The next screen (shown in Figure 13) displays the status of the running task. The task is complete when the master task and all subtasks have a check mark appearing next to them. If any operation fails then a red stop sign or question mark will appear next to the task and propagate up to the master task signifying an error has occurred. The failed subtask(s) can be expanded to reveal text briefly explaining the cause of the error.
Note: If a red stop sign or question mark appears in the figure below with text detailing the problem to be a “Mediation Exception occurred …”error, “Internal TFTP Server Timed-Out …”error, or other error(s), please consult the “Troubleshooting Backup, Deploy, and Restore” segment in Section 2 for a solution to this problem.

Nov-2003 Page 23 Dell PowerConnect
Figure 13. Monitoring the restoring of a configuration file to a PowerConnect 3348

Nov-2003 Page 24 Dell PowerConnect
Section 5
Deploy Network Manager provides a centralized firmware management tool for PowerConnect switches. It enables firmware to be easily imported into the application and stored in its database allowing simple deployment to any PowerConnect switch on a network with a single operation. When multiple switches are categorized as a group, firmware can be deployed to all switches in the group, dramatically reducing the administrative and management time it would take to perform this task in a one-to-one fashion. This section describes how the network administrator for NetworkWeb Inc will import the latest firmware for his company’s PowerConnect switches into Network Manager and then deploy the updated firmware files to his PowerConnect switches.
Importing Firmware into Network Manager
Before firmware can be deployed to a switch, it must be imported into OS Manager. The OS Manager provides a centralized file manager for PowerConnect firmware. It keeps track of all imported firmware and correctly associates it with the appropriate PowerConnect model(s). The network administrator for NetworkWeb Inc will get the latest version of firmware for the PowerConnect 3248 switch from Dell’s support website (http://support.dell.com) before performing the steps listed below to deploy it to a PowerConnect switch.
1. Go to the Dell’s support website and download version 2.0.0.21 of the PowerConnect 3248 firmware to your hard drive
2. Select OS Manager from the navigation pane
3. Click on the New button located in the upper right corner
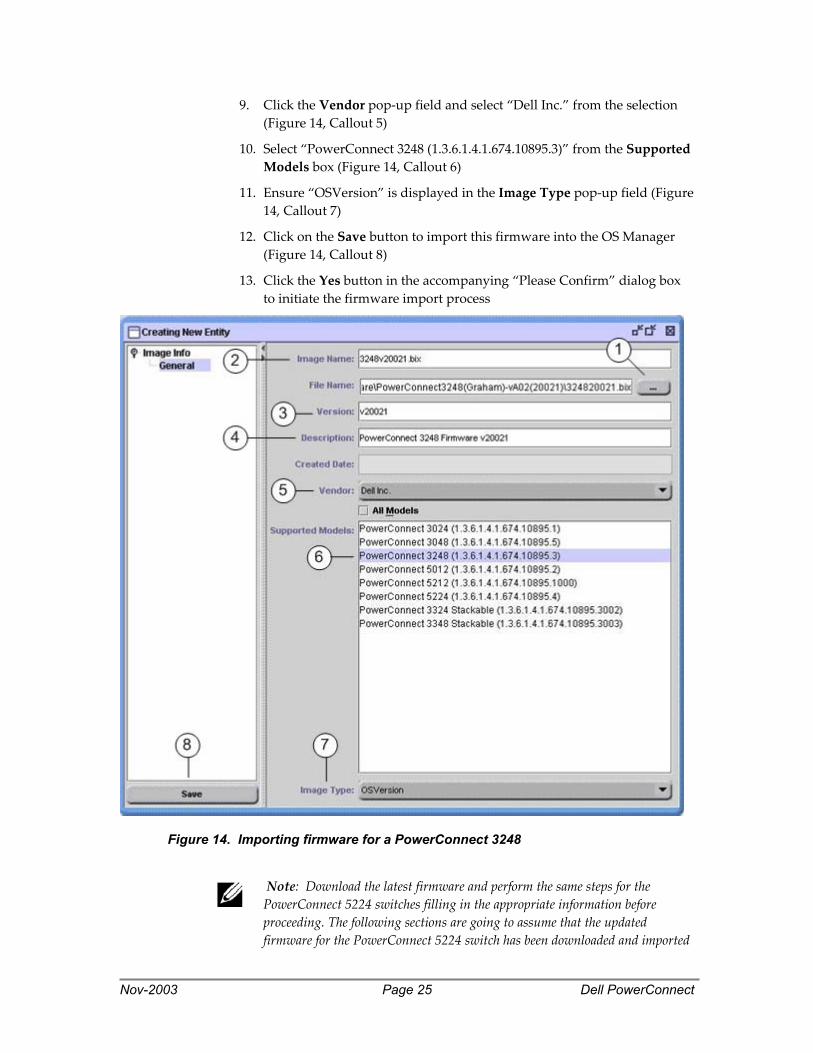
4. Click on the “…” button will to open up a browse dialog box field (Figure 14, Callout 1)
5. Navigate to the location where the firmware from step 1 was downloaded and stored on the hard drive, select it, and click on the Ok button
6. Enter “3248v20021.bix” in the Image Name text field (Figure 14, Callout 2)
7. Enter “v20021” in the Version text field (Figure 14, Callout 3)
8. Enter “PowerConnect 3248 Firmware v20021” in the Description text field (Figure 14, Callout 4)
Nov-2003 Page 25 Dell PowerConnect
9. Click the Vendor pop-up field and select “Dell Inc.” from the selection (Figure 14, Callout 5)
10. Select “PowerConnect 3248 (1.3.6.1.4.1.674.10895.3)” from the Supported Models box (Figure 14, Callout 6)
11. Ensure “OSVersion” is displayed in the Image Type pop-up field (Figure 14, Callout 7)
12. Click on the Save button to import this firmware into the OS Manager (Figure 14, Callout 8)
13. Click the Yes button in the accompanying “Please Confirm” dialog box to initiate the firmware import process
Figure 14. Importing firmware for a PowerConnect 3248
Note: Download the latest firmware and perform the same steps for the PowerConnect 5224 switches filling in the appropriate information before proceeding. The following sections are going to assume that the updated firmware for the PowerConnect 5224 switch has been downloaded and imported

Nov-2003 Page 26 Dell PowerConnect
into OS Manager so the steps in the following sections can be completed. Firmware for the PowerConnect 3248 switches should also be downloaded for future use, but will not used in any of the following examples.
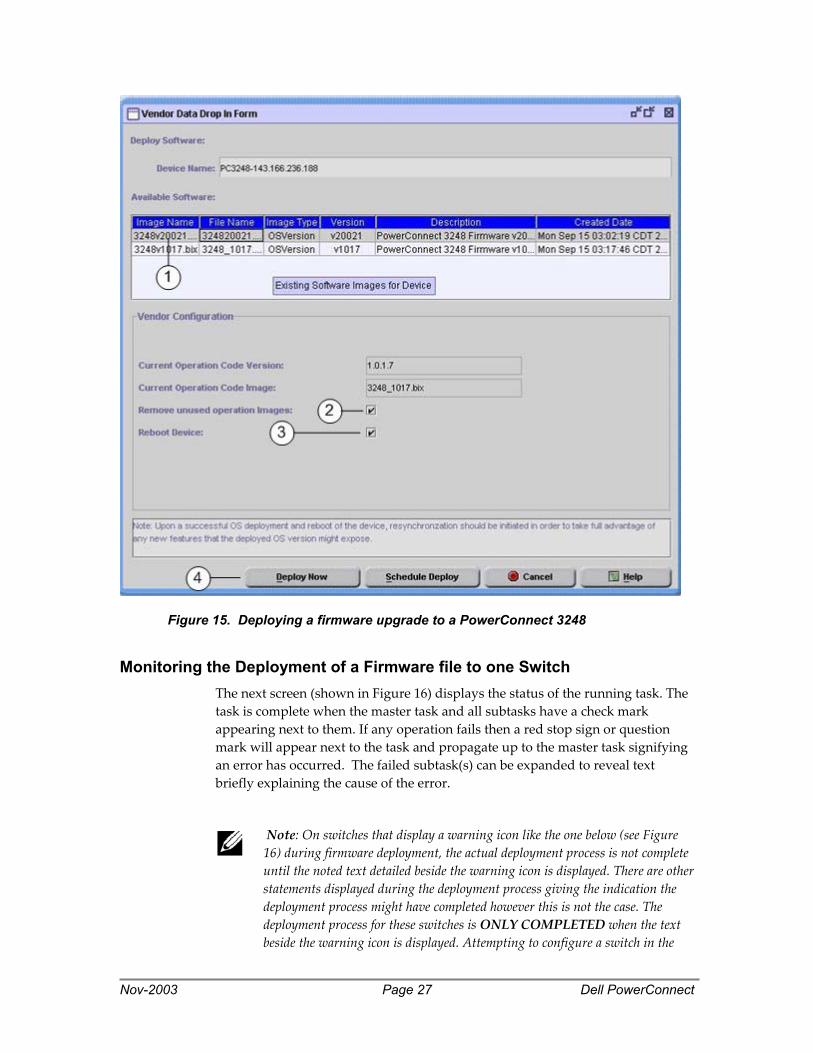
Deploying Firmware to One Switch After all the appropriate firmware has been imported into the OS Manager, it can be deployed to its corresponding PowerConnect switch. The PowerConnect 3248 on NetworkWeb Inc network has firmware version 1.0.17 and needs to be updated to version 2.0.0.21. The network administrator will walk through deploying the updated firmware to this switch.
1. Select Equipment Manager from the navigation pane
2. Select the PowerConnect3248 switch so that it becomes highlighted and click on the Deploy button to bring up the Vendor Data Drop in Form
3. Select the firmware image named “3248v2001” from the Available Software table (Figure 15, Callout 1)
4. Click on the Remove unused operation Images check box (Figure 15, Callout 2)
5. Click on the Reboot device check box (Figure 15, Callout 3)
6. Click the Deploy Now button to bring up the progress monitoring window for this operation (Figure 15, Callout 4)
Nov-2003 Page 27 Dell PowerConnect
Figure 15. Deploying a firmware upgrade to a PowerConnect 3248
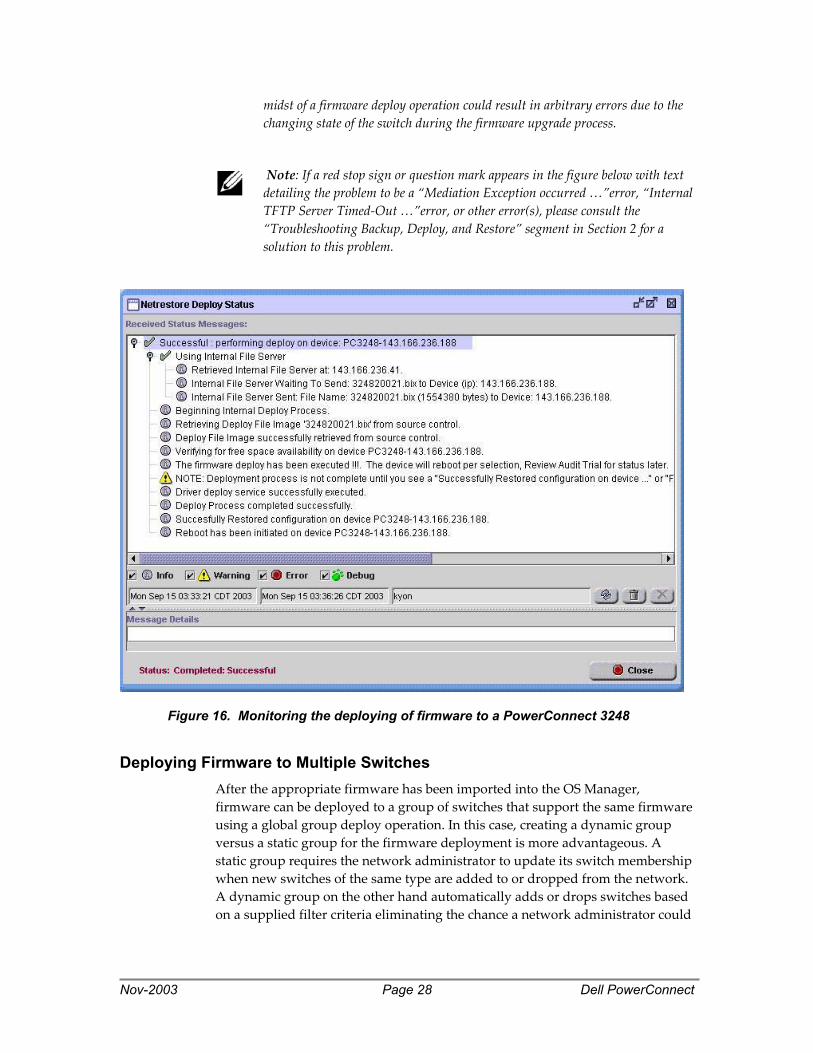
Monitoring the Deployment of a Firmware file to one Switch The next screen (shown in Figure 16) displays the status of the running task. The task is complete when the master task and all subtasks have a check mark appearing next to them. If any operation fails then a red stop sign or question mark will appear next to the task and propagate up to the master task signifying an error has occurred. The failed subtask(s) can be expanded to reveal text briefly explaining the cause of the error.
Note: On switches that display a warning icon like the one below (see Figure 16) during firmware deployment, the actual deployment process is not complete until the noted text detailed beside the warning icon is displayed. There are other statements displayed during the deployment process giving the indication the deployment process might have completed however this is not the case. The deployment process for these switches is ONLY COMPLETED when the text beside the warning icon is displayed. Attempting to configure a switch in the
Nov-2003 Page 28 Dell PowerConnect
midst of a firmware deploy operation could result in arbitrary errors due to the changing state of the switch during the firmware upgrade process.
Note: If a red stop sign or question mark appears in the figure below with text detailing the problem to be a “Mediation Exception occurred …”error, “Internal TFTP Server Timed-Out …”error, or other error(s), please consult the “Troubleshooting Backup, Deploy, and Restore” segment in Section 2 for a solution to this problem.
Figure 16. Monitoring the deploying of firmware to a PowerConnect 3248
Deploying Firmware to Multiple Switches After the appropriate firmware has been imported into the OS Manager, firmware can be deployed to a group of switches that support the same firmware using a global group deploy operation. In this case, creating a dynamic group versus a static group for the firmware deployment is more advantageous. A static group requires the network administrator to update its switch membership when new switches of the same type are added to or dropped from the network. A dynamic group on the other hand automatically adds or drops switches based on a supplied filter criteria eliminating the chance a network administrator could

Nov-2003 Page 29 Dell PowerConnect
forget to perform this task and ensuring that all switches satisfying this criteria on the network receive the firmware upgrade.
If you want to deploy firmware to a heterogeneous group of switches, a batch deploy operation rather than a group deploy operation is appropriate. The batch deploy allows you to select a different firmware file for download to each switch within the group. For more details on batch deploy, see the Batch Operations subsection of the Group Operations section in the Network Manager User’s Guide.
In the following subsections, the network administrator for NetworkWeb Inc will create a dynamic group called “PowerConnect 5224 Switches” for firmware deployment to his PowerConnect 5224 switches. After this is done, the network administrator will perform a global group deploy operation updating these switches firmware from version v1.0.1.2 to v2.0.0.27.
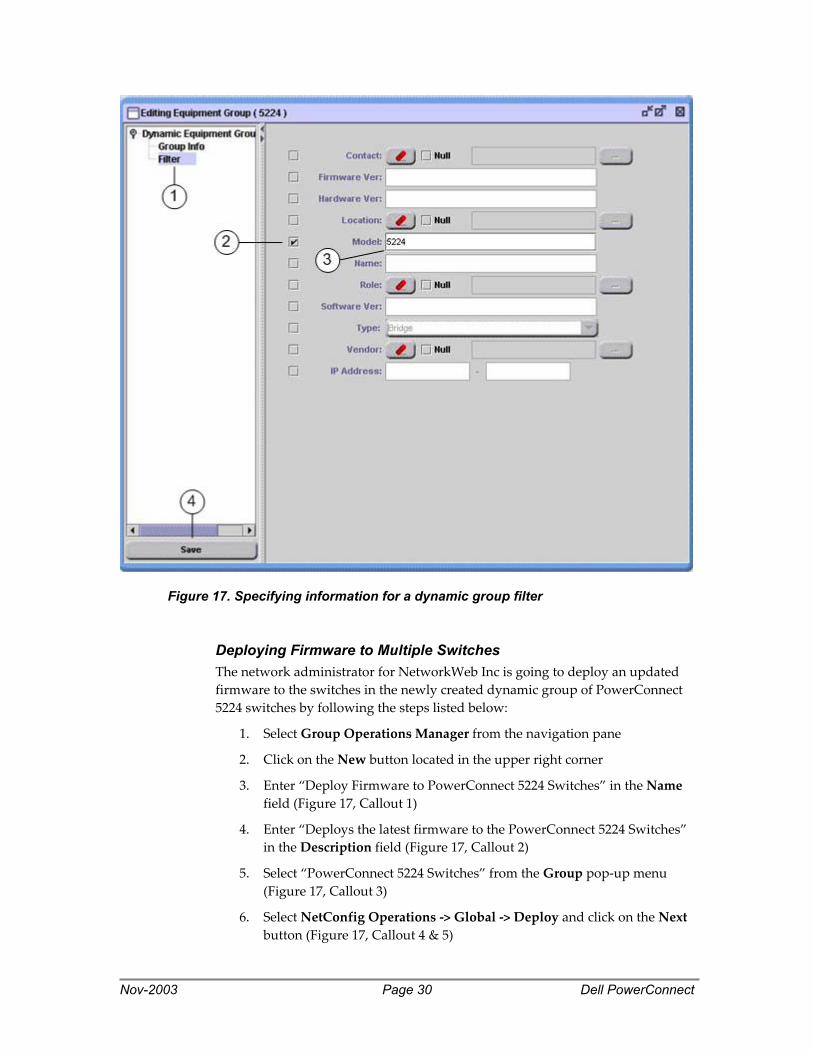
Creating a Dynamic Group The network administrator for NetworkWeb Inc is going to create a dynamic group of PowerConnect 5224 switches by following the steps listed below:
1. Select Equipment Group Manager from the navigation pane
2. Click on the New button located in the upper right corner
3. Select the text Dynamic Group and click on the Ok button
4. Enter “PowerConnect 5224 Switches” in the Name field
5. Click on Filter located in the navigation tree on the left (Figure 17, Callout 1)
6. Click on the Model check box (Figure 17, Callout 2)
7. Enter “5224” in the Model text field (Figure 17, Callout 3)
8. Click on the Save button below the navigation pane in the Equipment Group Manager window to save this newly created dynamic group (Figure 17, Callout 4)
Nov-2003 Page 30 Dell PowerConnect
Figure 17. Specifying information for a dynamic group filter
Deploying Firmware to Multiple Switches The network administrator for NetworkWeb Inc is going to deploy an updated firmware to the switches in the newly created dynamic group of PowerConnect 5224 switches by following the steps listed below:
1. Select Group Operations Manager from the navigation pane
2. Click on the New button located in the upper right corner
3. Enter “Deploy Firmware to PowerConnect 5224 Switches” in the Name field (Figure 17, Callout 1)
4. Enter “Deploys the latest firmware to the PowerConnect 5224 Switches” in the Description field (Figure 17, Callout 2)
5. Select “PowerConnect 5224 Switches” from the Group pop-up menu (Figure 17, Callout 3)
6. Select NetConfig Operations -> Global -> Deploy and click on the Next button (Figure 17, Callout 4 & 5)

Nov-2003 Page 31 Dell PowerConnect
Figure 18. Creating multi-switch deployment group operation
7. Select the firmware image named “5224v20027” from the Available Software table and click the Next button to continue (This will be the firmware you downloaded and imported into Network Manager from the Dell support website listed earlier. See Figure 19, Callout 1)

Nov-2003 Page 32 Dell PowerConnect
Figure 19. Configuring multi-switch firmware deployment group operation
8. Ensure all three options are checked under the Options section and click on the Next button to begin the deploy and bring up the progress monitoring window for this operation (Figure 7, Callout 1)
Monitoring the Deployment of a Firmware file to Multiple Switches
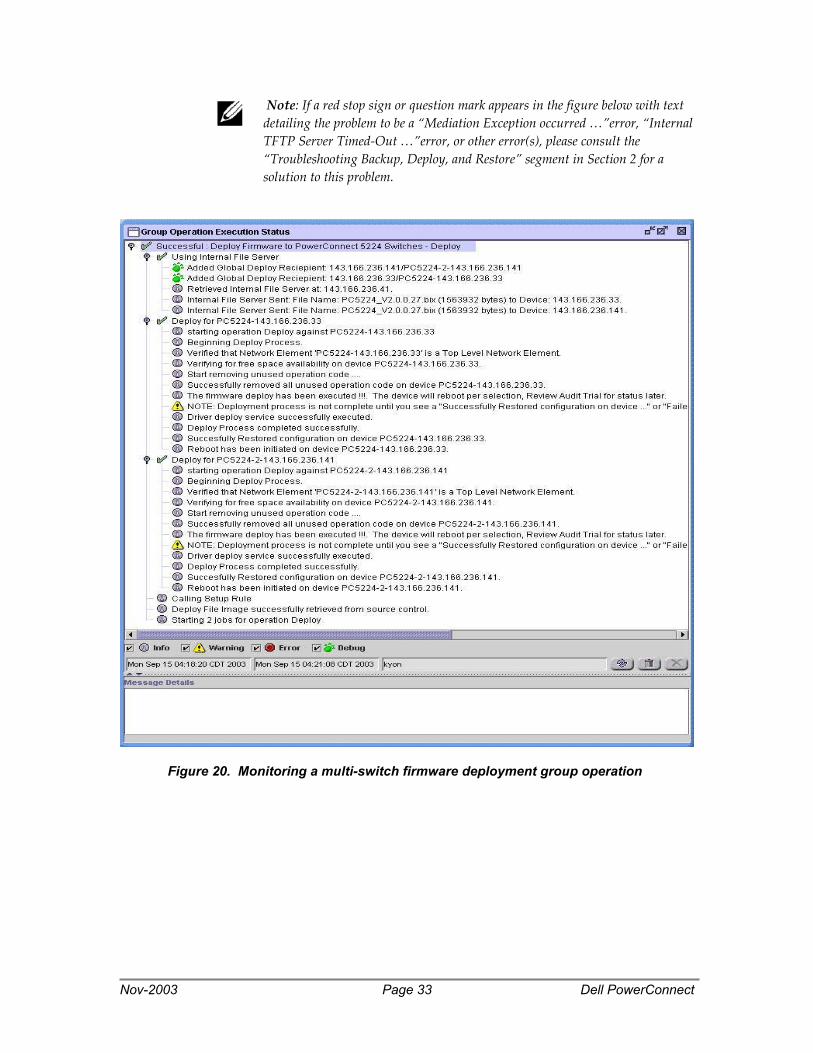
The next screen (shown in Figure 19) displays the status of the running group operation. The group operation is complete when the master task and all subtasks have a check mark appearing next to them. In this instance, a group operation was run against a mixed group of switches that all support this operation so it completes successfully. If any operation fails then a red stop sign or question mark will appear next to the task and propagate up to the master task signifying an error has occurred. The failed subtask(s) can be expanded to reveal text briefly explaining the cause of the error.
Note: On switches that display a warning icon like the one below (see Figure 19) during firmware deployment, the actual deployment process is not complete until text noted beside the warning icon is displayed on its own line. There are other statements displayed during the deployment process that may give the impression that the deployment process has completed however this is not the case. The deployment process for these switches is ONLY COMPLETED when the text noted by the warning icon is displayed. Attempting to configure a switch in the midst of a firmware deploy operation could result in arbitrary errors due to the changing state of the switch during the firmware upgrade process.
Nov-2003 Page 33 Dell PowerConnect
Note: If a red stop sign or question mark appears in the figure below with text detailing the problem to be a “Mediation Exception occurred …”error, “Internal TFTP Server Timed-Out …”error, or other error(s), please consult the “Troubleshooting Backup, Deploy, and Restore” segment in Section 2 for a solution to this problem.
Figure 20. Monitoring a multi-switch firmware deployment group operation
Nov-2003 Page 34 Dell PowerConnect
Section 6
Conclusion
After reviewing this document, you should have a fundamental understanding of the following tasks:
• How to backup configuration files from one or more switches
• How to view, compare, and edit backed up configuration file(s)
• How to restore a configuration file to a switch
• How to deploy firmware to one or more switches
Additionally, you should be able to comfortably apply these operations to the PowerConnect switches on your network. This will allow you to more effectively manage your network, drastically reducing the time and effort you spend configuring and administering these devices. More detailed information on the topics covered in this paper can be found in the Network Manager User’s Guide.
THIS HOW-TO GUIDE IS FOR INFORMATIONAL PURPOSES ONLY. IT MAY CONTAIN TYPOGRAPHICAL ERRORS AND TECHNICAL INACCURACIES. THE CONTENT IS PROVIDED AS IS, WITHOUT EXPRESS OR IMPLIED WARRANTIES OF ANY KIND.
Dell, OpenManage and PowerConnect are trademarks of Dell Inc. Other trademarks and trade names may be used in this document to refer to either the entities claiming the marks and names or their products. Dell disclaims proprietary interest in the marks and names of others.
©Copyright 2003 Dell Inc. All rights reserved. Reproduction in any manner whatsoever without the express written permission of Dell Inc. is strictly forbidden. For more information, contact Dell.
Information in this document is subject to change without notice.