Using IBM Rational Publishing Engine to generate ... IBM Rational Publishing Engine to ... Basic...
14
Page | 1 Using IBM Rational Publishing Engine to Using IBM Rational Publishing Engine to Using IBM Rational Publishing Engine to Using IBM Rational Publishing Engine to generate compliance relevant reports generate compliance relevant reports generate compliance relevant reports generate compliance relevant reports Basic Reporting for Basic Reporting for Basic Reporting for Basic Reporting for IBM IBM IBM IBM Rational DOORS Next Rational DOORS Next Rational DOORS Next Rational DOORS Next Generation Generation Generation Generation Dr. Einar W. Karlsen Solution Architect Draft Version 2015.03.01 Abstract: This article is the fifth in a series of several articles the use of IBM Rational Publishing Engine to generate compliance relevant reports. This article shows how to generate basic requirement management documentation extracting information from modules managed by IBM Rational DOORS Next Generation. It covers some basic techniques, whereas more advanced concepts will be covered by the next article.
Transcript of Using IBM Rational Publishing Engine to generate ... IBM Rational Publishing Engine to ... Basic...

Page | 1
Using IBM Rational Publishing Engine to Using IBM Rational Publishing Engine to Using IBM Rational Publishing Engine to Using IBM Rational Publishing Engine to
generate compliance relevant reportsgenerate compliance relevant reportsgenerate compliance relevant reportsgenerate compliance relevant reports
Basic Reporting for Basic Reporting for Basic Reporting for Basic Reporting for IBM IBM IBM IBM Rational DOORS Next Rational DOORS Next Rational DOORS Next Rational DOORS Next
GenerationGenerationGenerationGeneration
Dr. Einar W. Karlsen
Solution Architect
Draft Version
2015.03.01
Abstract: This article is the fifth in a series of several articles the use of IBM Rational
Publishing Engine to generate compliance relevant reports. This article shows how to
generate basic requirement management documentation extracting information from
modules managed by IBM Rational DOORS Next Generation. It covers some basic
techniques, whereas more advanced concepts will be covered by the next article.
Page | 2
Introduction Users of IBM® Rational® DOORS Next Generation (previously also know as IBM
Rational Requirements Composer) can have different requirements for document
generation although it frequently boils down to generating documents for stakeholder-,
system-, subsystem- and component requirements.
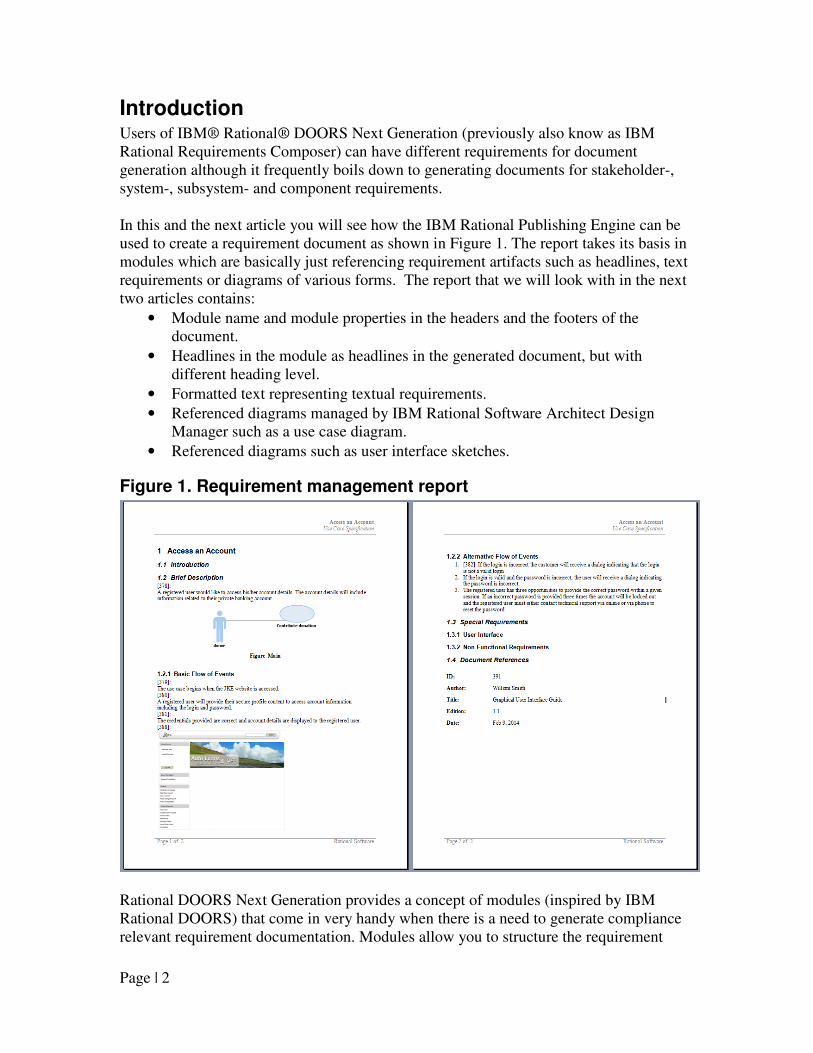
In this and the next article you will see how the IBM Rational Publishing Engine can be
used to create a requirement document as shown in Figure 1. The report takes its basis in
modules which are basically just referencing requirement artifacts such as headlines, text
requirements or diagrams of various forms. The report that we will look with in the next
two articles contains:
• Module name and module properties in the headers and the footers of the
document.
• Headlines in the module as headlines in the generated document, but with
different heading level.
• Formatted text representing textual requirements.
• Referenced diagrams managed by IBM Rational Software Architect Design
Manager such as a use case diagram.
• Referenced diagrams such as user interface sketches.
Figure 1. Requirement management report
Rational DOORS Next Generation provides a concept of modules (inspired by IBM
Rational DOORS) that come in very handy when there is a need to generate compliance
relevant requirement documentation. Modules allow you to structure the requirement

Page | 3
document appropriately using headlines and regular paragraphs referencing requirements.
It sorts of provide a “What You See Is What You Get” (WYSIWYG) approach to defining
requirement documentation (see Figure 2). You can incorporate existing requirements in
the module (or create new ones) and control where they should go in and in which order.
Figure 2. Rational DOORS Next Generation module
The resulting document will look almost the same when generated by Rational Publishing
Engine. However, using Rational Publishing Engine there are still many options available
to control the exact formatting of the document, for example, the section level can be
decreased to fit into the context in which the document is generated and the Word style for
headlines and paragraphs can be controlled by Rational Publishing Engine so that it
reflects corporate standards.
Rational Publishing Engine can therefore be used efficiently to ensure that the generated
requirement documents have a standardized look and feel – even in the context of a large

Page | 4
community of users. In the remainder of this article we shall therefore focus on aspects
relevant for generating documentation taking its basis in modules. This article will cover
basic module reporting incorporating headlines, functional requirements, headers and
footers incorporating information for the module and attributes. The article will also
introduce basic concepts relevant for loading the schemas and defining the data sources.
You will see more advanced techniques and tips and tricks in the second article, mainly
focusing on incorporating more linked artifacts such as diagrams in Rational DOORS
Next Generation or IBM Rational Design Manager or test cases managed by IBM Rational
Quality Manager.
Both articles will focus on generating Microsoft Word as output for one simple reason: the
generated documents are usually used to make up individual chapters in a larger
compliance relevant document, which will also contain title page, table of content, change
notices, approvals, and introduction – in other word – hand written content. So at the end,
the compliance relevant document will be a Microsoft Word master document referencing
affiliated documents – some of which may be generated by Rational Publishing Engine.
Resources and Schemas Rational DOORS Next Generation offers reporting through a Representational Stateless
Transfer (REST) API (see Resources) – just like the other Jazz based tools like Rational
Quality Manager and Rational Design Manager. However, the reportable REST service of
Rational DOORS Next Generation offers different schemas for different kind of artefact
types – be it text, modules or use case diagrams. The schema for text artifacts is for
example shown in the left part of Figure 3, whereas the schema for modules is shown in
the right part of Figure 3. The two schemas are similar in structure. Each artifact provides
access to the URL of the object (query about), the description, identifier and title of the
artifact.
Text artifacts have a query section called content that provides access to the rich text of
the requirement (richTextBody/div_value) whereas the schema for modules is equipped
with queries to extract the referenced artifacts of the module – the so-called module
context bindings (section moduleBindings). The important query for the module bindings
is the query about which returns the URL of the referenced module binding. Moreover
there are queries to extract the identifier and title for the referenced artifacts as well as a
query to determine if the artifact is a heading or not (isHeading). The schemas
furthermore provide access to custom attributes in section collaboration (more on this at
the end of the article), and links to linked resources such as design elements, test plans,
test suites, and test cases in query section traceability (more on this in the next article).
Rational DOORS Next Generation provides a number of basic URLs for accessing
artifacts and schemas. All data URLs have the form:
https://<server>:<port>/rm/publish/<artifact format>/*
where artifact format is one of the following: resources, text, collections, terms, reviews,
usecasediagrams, revisions, comments, linktypes, uisketches, storyboards,

Page | 5
screenflows, processes and last –but not least – modules. In other words, the following
URL will retrieve all modules for the clmserver available on port 9443:
https://clmserver:9443/rm/publish/modules/*
Figure 3. Text and module schema
The data source URLs that ends with “/*” will return all artifacts of the given type in the
repository. The REST service does however support filters to narrow the scope.
The scope can for example be limited to a single artifact by using the filter resourceURI:

Page | 6
https://server:port/rm/publish/[artifact_format]?resourceURI=id1,id2,id3
You may also decide to get hold on all elements of a given artifact kind in a specific
project using the following filter:
https://server:port/rm/publish /[artifact_format]?projectURI=id2
For more information on how to get hold on the URIs please see the Rational DOORS
Next Generation Reporting Service FAQ on Jazz.net (see Resources).
The schemas are all available using URLs of the form
https://<server>:<port>/rm/publish/<artifact format>?metadata=schema
Importing Schemas The first thing to do when you author templates for Rational DOORS Next Generation is
to import the required schema(s). Figure 4 shows how you can use the “Add a New Data Source Schema” wizard to add the schema for modules to the current template. Notice
that the schema is imported as a Generic XML schema and not as a REST schema. The
example shows how to import the schema for modules.
Figure 4. Importing schema

Page | 7
Modules and Requirements Having imported the schema you can now start template authoring. Figure 5 provides an
example for generating documentation for modules. The template extracts module
headlines and turns them into Word headlines. Text artifacts are rendered with text as well
as the requirement identifier in square brackets.
Figure 5. Simple template for extracting modules and requirements
The template starts by getting hold on the module artifact ($1). For this module it prints
out the title using heading style 1 in the first paragraph. The template then iterates over all
elements ($2) - or contextBindings as they are called in the schema. As already
mentioned, the schema for modules only contains a limited set of properties designating
the referenced artifact. In order to get hold on more information regarding the artifact it
becomes necessary to retrieve details for the element from the REST service using a
dynamic data source connection. This data source connection is assigned to the schema
“RRC Text”. Notice that the template assumes that all module context bindings are of
artifact format text. You will see in the next article how to report on other artifact formats
such as UI sketches.

Page | 8
Getting to the URI property for the data source connection requires some manipulation of
the URL provided by the REST service using the query about. These URL points to the
user interface and is on the form
https://clmserver:9443/rm/resources/_ab5ecbca8b3e4fd7ba94431251517833
The URL needs to be converted into a reportable URL on the following form:
https://clmserver:9443/rm/publish/text?resourceURI=_ab5ecbca8b3e4fd7ba94431251517
83
The conversion is done by the first Java script in Figure 5. It basically takes the about property and replaces the string “/resources/” with “publish/text?resourceURI=”. This
URL is then assigned the internal variable _ElementURL, which in turn defines the URI
property of the dynamic data source connection. It should be no surprise from the previous
articles that the data source connection for “RRC Text” inherits its properties (user
credentials, authentication method) from the schema “RRC Module”.
Having configured the data source, a query ($6) is introduced to get hold on the artifact.
Then, a test is performed whether the text element is a headline or not. In case that it is a
headline, the text is simply rendered. In case that it is not a headline, the identifier of the
requirement is printed together with the rich text body ($13). The only interesting thing
here is that the template computes the heading style as shown by the second Java script: it
basically extends the heading style with the value returned by the query depth with 1. The
heading offset is in turn defined using an external variable named HeadingOffset. This
way it is possible to control the heading styles so that they fit into the current context of
the overall consolidated requirement document. This completes the first simple template
for generating documentation for modules.
Document Specification You must create a document specification and configure it appropriately in a next step in
order to generate a document for the module. This task requires some more insight into the
URLs of Rational DOORS Next Generation. The following URL can be used to retrieve
information regarding all modules (see Resources):
https://<server>:<port>/rm/publish/modules/*
The template would work with this URL but it would generate a report containing all
modules in the current repository. In order to limit the scope to a single module you will
need a URL of the form:
https://<server>:<port>/rm/publish/modules?moduleURI=<moduleURI>
Figure 6 shows the final document specification with the URL in the required form and
with the URI at the end as it has been discovered using Rational DOORS Next
Generation.

Page | 9
Figure 6. Document specification
This in turn raises the question: how can you get access to the URI for the module at
hand? This is easily answered and can be done by using the web interface of Rational
DOORS Next Generation. Simply open the folder where the module is located, select the
module and select the Operation Show Permalink for this Object. Requirements
Composer will give you the entire URL for the module. The URI is the part of the URL
after the last “/” (i.e. “_” followed by a hexadecimal number).
Notice that to access information about a module and its artifacts from the Reporting API,
you can use either of these requests:
https://server:port/rm/publish/<artifact format>?moduleURI=moduleURI
https://server:port/rm/publish/modules?resourceURI=moduleURI
The main difference between the two requests is that the first filters the artifact type that is
returned. For example, you might retrieve text artifacts only using the following URL:
https://server:port/rm/publish/text?moduleURI=moduleURI
This URL yields the text artifacts that are inside the module, i.e. the module bindings as a
sequence of objects. The second URL returns the module, which in turn contains the
module bindings, which in turn can be used to access more detailed information regarding
each individual artifact as shown in Figure 5 – i.e. it yields one object with a hierarchical
Page | 10
structure. In this context it is important for you to know that if you import an artifact in a
module and submits a query for retrieving resources in the corresponding project you will
get two results for the artifact: one is the artifact itself (located in a folder), the other for
the module binding (located in the module).
Reporting on Module Views Typically, requirement management users would like to report on the views so that the
report will list only those artifacts that are in shown in the view in the order shown and
limited to the attributes in the view. The reportable REST API supports two filters for this
purpose taking either the view name or the view URI as parameter:
https://server:port/rm/publish/[artifact_format]?viewURI=id1&projectURI=id2
https://server:port/rm/publish/[artifact_format]?viewName=name1&projectURI=id2
The viewURI is the same as the FilterID that can be accessed in the user interface by
asking for the permalink of the view. Using this kind of URLs with artifact format
“modules” and either resourceURI or moduleURI as a third parameter does not (in the
moment of writing) yield useful output.
Fortunately, a URL like
https://server:port/rm/publish/[artifact_format]?viewName=name1&projectURI=id2&mod
uleURI=id3
delivers the list of resources that makes up the view of the module – and in the correct
order – provided that the view is shared (and not private). However, the implication of all
of this is that templates that should report on module views should be defined with this in
mind from the very beginning. Just taking a template for a module and changing the URL
of the data source in the document specification for the module so that it contains a view
filter will not do. The template in Figure 5 must consequently be rewritten to a certain
extend in order to allow reporting on module views.
One sample template for module views is shown in Figure 7. It starts with a module as
initial input as before, but before details about each context binding are accessed e.g. using
a dynamic data source connection, an intermediate step must be done – namely to connect
to a data source for resources with an URI as the one just shown above to retrieve all
resources of the view. This will ensure that only the resources in the view are reported on,
whereas querying the module context bindings would ignore the view and render all
artifacts.
The main logic of the template for module views is outlined in Figure 9. The module title
is rendered first. Then a Java Script has been defined to compute the URL for all resources
of the view. Notice that the name of the view has been defined using an external variable
called ViewName.

Page | 11
Figure 7. Template for Module Views
Next the resources of the view are fetched using a dynamic data source connection and an
iteration has been defined to retrieve each artifact of the view ($2). From here, it is quite
easy to retrieve the associated text artifacts ($30)– again using a dynamic data source
connection. Having done this the text artifact is rendered either as a heading or as a normal
text paragraph ($34).
Requirement Attributes Requirement management documents frequently include information regarding the
attributes of the requirement object. Retrieving attribute values for artifacts is quite
uniform – regardless what kind of artifact we are dealing with. The example will therefore
who you how attributes for a module can be retrieved.
The queries that are relevant for this are found in the schema in the section called
collaboration (see Figure 8). Each artifact may have a number of associated custom
attributes (query customAttribute). Each attribute has – in turn - a name and a value.

Page | 12
However, for enumeration values, the value query will just deliver an integer number (e.g.
1). If the literal is of interest (e.g. “Draft” for the module status) – and it usually is – then
the query literalName should be used in a template rather than the value query.
Figure 8. Schema for attributes
Some enumerations may be multi value enumerations. For these kind of attributes, the
customAttribute query will be returning results as many times as there are values for the
enumeration attribute. It may therefore be necessary to collect the various enumeration
values in a variable first, and then start printing all the values at once in a second step.
Figure 9. Template using attributes

Page | 13
The template in Figure 9 shows you how to extract information regarding e.g. the Name,
Type and Status of a module. It is quite trivial to incorporate this information directly in
the main section of the document. Frequently however there is a need to put information
coming from a data source into the headers or footers of the Word document.
Rational Publishing Engine offers a Document Property element that allows you to pass
information from the document generation to custom Microsoft Word field properties. The
template in Figure 8 shows how the module type property is assigned to the custom Word
property named ModuleType and the module status to the Word property named
ModuleStatus. The template iterates over all custom attributes several times (query $18,
$20) and uses a filter on the attribute name to get the appropriate attribute value assigned
to the document properties. Notice that for the enumeration (Status) the value is extracted
using the query named literalName rather than the query named value.
Handling the custom properties in Microsoft Word Having generated the document, you can open the resulting Microsoft Word file and view
the custom properties with values coming from the Rational DOORS Next Generation
module (see Figure 9). The field properties are then put into the headers or footers of the
document. You will need to make sure the field codes have been inserted in the .dot file
used for generating the output. Notice that the field code must be inserted as a
DocProperty field code (see right half of Figure 10).
Figure 10. Microsoft Word document properties with module data
An alternative solution would be to use Rational Publishing Engine regions and Microsoft
Word bookmarks. You can declare a bookmark in Microsoft Word and give it the name
ModuleStatus. You must then declare a region in the template and give it the same name
as the bookmark and then make sure that the template sends the output for the module

Page | 14
status attribute to the region named ModuleStatus. There is a crucial difference between
using bookmarks and document properties: bookmarks can only appear in one location of
the Word stylesheet whereas document properties may have several occurrences in the
stylesheet.
Conclusion The article has covered fundamental concepts of reporting for Rational DOORS Next
Generation like the schemas, the URLs and basic reporting for modules, including
extraction of headlines, requirement text and requirement attributes. It has also
demonstrated how Rational Publishing Engine can be used to pass information from
Rational DOORS Next Generation to Microsoft Word using Word document properties,
which in turn can be used in company specific headers and footers.
Acknowledgement I would like to thank Dragos Cojocari for pointing me to the solutions for passing
information from Rational Publishing Engine to the headers and footers of Microsoft
Word.
Resources
• Geoff Rosenthal: Rational Publishing Engine Extracting Data from Rational
DOORS Next Generation, Tutorial v3, developerWorks, Rational Publishing
Engine Wiki, Community,
https://www.ibm.com/developerworks/community/wikis/home?lang=en#!/wiki/Ra
tional%20Publishing%20Engine/page/Scenario%20-%20RPE%20-
%20RRC%203.0.1%20v3
• Rational DOORS Next Generation data sources, Jazz.net,
https://jazz.net/wiki/bin/view/Main/RRCReportableRestAPI?cover=print.
• Creating Rational Reporting for Document Generation reports about modules
• from the API without using templates, Jazz.net,
https://jazz.net/wiki/bin/view/Main/RRCCustomRRDGReportsWalkthrough
• Rational DOORS Next Generation Report Service FAQ, Jazz.net,
https://jazz.net/wiki/bin/view/Main/RRCReportServiceFAQ?cover=print.
• Find an entry point to more information at the developerWorks main page for the
“IBM Rational Publishing Engine”.
• To learn more about the IBM Rational Publishing Engine, visit the “IBM Rational
Publishing Engine Infocenter”.
• For tips, tricks and sample templates, visit the “Rational Publishing Engine
Community Wiki” at developer Works.
• For additional tips and tricks, visit “Rational Publishing Engine Actual”.
• Gather more information for the Reporting Area Web Publisher.