Using BIRT Spreadsheet Engine and API - OpenText
240
Using BIRT Spreadsheet Engine and API
Transcript of Using BIRT Spreadsheet Engine and API - OpenText

Using BIRT SpreadsheetEngine and API

This documentation has been created for software version 11.0.5. It is also valid for subsequent software versions as long as no new document version is shipped with the product or is published at https://knowledge.opentext.com.
Open Text Corporation275 Frank Tompa Drive, Waterloo, Ontario, Canada, N2L 0A1Tel: +1-519-888-7111Toll Free Canada/USA: 1-800-499-6544 International: +800-4996-5440Fax: +1-519-888-0677Support: https://support.opentext.comFor more information, visit https://www.opentext.com
Copyright © 2017 Actuate. All Rights Reserved.Trademarks owned by Actuate“OpenText” is a trademark of Open Text.
Disclaimer
No Warranties and Limitation of Liability
Every effort has been made to ensure the accuracy of the features and techniques presented in this publication. However, Open Text Corporation and its affiliates accept no responsibility and offer no warranty whether expressed or implied, for the accuracy of this publication.
Document No. 170215-2-961006 February 15, 2017

i
ContentsAbout Using BIRT Spreadsheet Engine and API . . . . . . . . . . . . . . . . . . . . .xi
Chapter 1About Actuate BIRT Spreadsheet Engine and API . . . . . . . . . . . . . . . . . . . 1About Actuate BIRT Spreadsheet Engine and API . . . . . . . . . . . . . . . . . . . . . . . . . . . . . . . . . . . . . . 2About Actuate BIRT Spreadsheet Engine and API documentation . . . . . . . . . . . . . . . . . . . . . . . . 3About the BIRT Spreadsheet API licensed features . . . . . . . . . . . . . . . . . . . . . . . . . . . . . . . . . . . . . 3
Accessing data sources . . . . . . . . . . . . . . . . . . . . . . . . . . . . . . . . . . . . . . . . . . . . . . . . . . . . . . . . . . . 4Exporting spreadsheet reports . . . . . . . . . . . . . . . . . . . . . . . . . . . . . . . . . . . . . . . . . . . . . . . . . . . . 4Creating a calculation engine . . . . . . . . . . . . . . . . . . . . . . . . . . . . . . . . . . . . . . . . . . . . . . . . . . . . . 4Separating responsibilities by area of expertise . . . . . . . . . . . . . . . . . . . . . . . . . . . . . . . . . . . . . . 4
About Actuate BIRT Spreadsheet Engine and API files . . . . . . . . . . . . . . . . . . . . . . . . . . . . . . . . . . 5Deploying Actuate BIRT Spreadsheet Engine . . . . . . . . . . . . . . . . . . . . . . . . . . . . . . . . . . . . . . . . 6About Actuate BIRT Spreadsheet report design files . . . . . . . . . . . . . . . . . . . . . . . . . . . . . . . . . . 6About Actuate BIRT Spreadsheet Engine examples . . . . . . . . . . . . . . . . . . . . . . . . . . . . . . . . . . 7
About the BIRT Spreadsheet API packages . . . . . . . . . . . . . . . . . . . . . . . . . . . . . . . . . . . . . . . . . . . . 7About the workbook classes . . . . . . . . . . . . . . . . . . . . . . . . . . . . . . . . . . . . . . . . . . . . . . . . . . . . . . 8About the utility classes . . . . . . . . . . . . . . . . . . . . . . . . . . . . . . . . . . . . . . . . . . . . . . . . . . . . . . . . . . 9About the classes that JBook accesses . . . . . . . . . . . . . . . . . . . . . . . . . . . . . . . . . . . . . . . . . . . . . 10About exceptions . . . . . . . . . . . . . . . . . . . . . . . . . . . . . . . . . . . . . . . . . . . . . . . . . . . . . . . . . . . . . . . 10About the API constants . . . . . . . . . . . . . . . . . . . . . . . . . . . . . . . . . . . . . . . . . . . . . . . . . . . . . . . . . 10
Chapter 2Working with workbooks and worksheets . . . . . . . . . . . . . . . . . . . . . . . . . 13About working with workbooks . . . . . . . . . . . . . . . . . . . . . . . . . . . . . . . . . . . . . . . . . . . . . . . . . . . . 14
Understanding the JBook class . . . . . . . . . . . . . . . . . . . . . . . . . . . . . . . . . . . . . . . . . . . . . . . . . . . 14Understanding the JBookApplet class . . . . . . . . . . . . . . . . . . . . . . . . . . . . . . . . . . . . . . . . . . . . . 14Understanding the BookModelImpl class . . . . . . . . . . . . . . . . . . . . . . . . . . . . . . . . . . . . . . . . . . 14Understanding the BookModel interface . . . . . . . . . . . . . . . . . . . . . . . . . . . . . . . . . . . . . . . . . . . 15
Accessing other components from a BookModel object . . . . . . . . . . . . . . . . . . . . . . . . . . . . 15Understanding BookModel method declarations . . . . . . . . . . . . . . . . . . . . . . . . . . . . . . . . . 15
Creating a workbook . . . . . . . . . . . . . . . . . . . . . . . . . . . . . . . . . . . . . . . . . . . . . . . . . . . . . . . . . . . . . . 16Writing a Java applet that displays a spreadsheet . . . . . . . . . . . . . . . . . . . . . . . . . . . . . . . . . . . 17
Compiling the HelloWorld applet . . . . . . . . . . . . . . . . . . . . . . . . . . . . . . . . . . . . . . . . . . . . . . 17Understanding the HTML code for displaying an applet . . . . . . . . . . . . . . . . . . . . . . . . . . 18Running the HelloWorld applet . . . . . . . . . . . . . . . . . . . . . . . . . . . . . . . . . . . . . . . . . . . . . . . . 19Embedding a worksheet in a web page without writing any code . . . . . . . . . . . . . . . . . . 19
Writing a Java Swing application that displays a spreadsheet . . . . . . . . . . . . . . . . . . . . . . . . . 20Creating a servlet or an application without a user interface . . . . . . . . . . . . . . . . . . . . . . . . . . 22

ii
Editing a workbook using BookModel interface objects . . . . . . . . . . . . . . . . . . . . . . . . . . . . . . . . .24Resetting a workbook to default settings . . . . . . . . . . . . . . . . . . . . . . . . . . . . . . . . . . . . . . . . . . .25Grouping workbooks . . . . . . . . . . . . . . . . . . . . . . . . . . . . . . . . . . . . . . . . . . . . . . . . . . . . . . . . . . . .25Attaching workbooks . . . . . . . . . . . . . . . . . . . . . . . . . . . . . . . . . . . . . . . . . . . . . . . . . . . . . . . . . . . .26Refreshing data in a workbook . . . . . . . . . . . . . . . . . . . . . . . . . . . . . . . . . . . . . . . . . . . . . . . . . . . .26
Managing multithreading issues . . . . . . . . . . . . . . . . . . . . . . . . . . . . . . . . . . . . . . . . . . . . . . . . . . . . .26Working with worksheets . . . . . . . . . . . . . . . . . . . . . . . . . . . . . . . . . . . . . . . . . . . . . . . . . . . . . . . . . . .27
Understanding selected worksheets . . . . . . . . . . . . . . . . . . . . . . . . . . . . . . . . . . . . . . . . . . . . . . .28Understanding the active worksheet . . . . . . . . . . . . . . . . . . . . . . . . . . . . . . . . . . . . . . . . . . . . . . .28Creating worksheets . . . . . . . . . . . . . . . . . . . . . . . . . . . . . . . . . . . . . . . . . . . . . . . . . . . . . . . . . . . . .29Inserting worksheets . . . . . . . . . . . . . . . . . . . . . . . . . . . . . . . . . . . . . . . . . . . . . . . . . . . . . . . . . . . .29Manipulating worksheets using the BookModel interface . . . . . . . . . . . . . . . . . . . . . . . . . . . . .29Manipulating worksheets through the Sheet interface . . . . . . . . . . . . . . . . . . . . . . . . . . . . . . . .30Deleting worksheets . . . . . . . . . . . . . . . . . . . . . . . . . . . . . . . . . . . . . . . . . . . . . . . . . . . . . . . . . . . . .31Hiding a worksheet . . . . . . . . . . . . . . . . . . . . . . . . . . . . . . . . . . . . . . . . . . . . . . . . . . . . . . . . . . . . .31
Chapter 3Working with worksheet elements . . . . . . . . . . . . . . . . . . . . . . . . . . . . . . . 33About worksheet elements . . . . . . . . . . . . . . . . . . . . . . . . . . . . . . . . . . . . . . . . . . . . . . . . . . . . . . . . . .34Working with a worksheet tab . . . . . . . . . . . . . . . . . . . . . . . . . . . . . . . . . . . . . . . . . . . . . . . . . . . . . . .34Working with rows and columns . . . . . . . . . . . . . . . . . . . . . . . . . . . . . . . . . . . . . . . . . . . . . . . . . . . .34
Setting the first row or column to display . . . . . . . . . . . . . . . . . . . . . . . . . . . . . . . . . . . . . . . . . . .35Hiding or showing a column or row . . . . . . . . . . . . . . . . . . . . . . . . . . . . . . . . . . . . . . . . . . . . . . .35Limiting visible rows and columns . . . . . . . . . . . . . . . . . . . . . . . . . . . . . . . . . . . . . . . . . . . . . . . .35Working with column widths . . . . . . . . . . . . . . . . . . . . . . . . . . . . . . . . . . . . . . . . . . . . . . . . . . . . .36
Setting the units of column width . . . . . . . . . . . . . . . . . . . . . . . . . . . . . . . . . . . . . . . . . . . . . . .36Using automatic column sizing . . . . . . . . . . . . . . . . . . . . . . . . . . . . . . . . . . . . . . . . . . . . . . . . .37Maintaining column width when importing data . . . . . . . . . . . . . . . . . . . . . . . . . . . . . . . . .37
Freezing a row or a column . . . . . . . . . . . . . . . . . . . . . . . . . . . . . . . . . . . . . . . . . . . . . . . . . . . . . . .37Determining the last row or column containing data . . . . . . . . . . . . . . . . . . . . . . . . . . . . . . . . .38
Working with headings . . . . . . . . . . . . . . . . . . . . . . . . . . . . . . . . . . . . . . . . . . . . . . . . . . . . . . . . . . . . .39Selecting a column or a row heading . . . . . . . . . . . . . . . . . . . . . . . . . . . . . . . . . . . . . . . . . . . . . . .40Getting and setting heading dimensions . . . . . . . . . . . . . . . . . . . . . . . . . . . . . . . . . . . . . . . . . . . .40Getting and setting heading text . . . . . . . . . . . . . . . . . . . . . . . . . . . . . . . . . . . . . . . . . . . . . . . . . .40Supplying a multiline column or row heading . . . . . . . . . . . . . . . . . . . . . . . . . . . . . . . . . . . . . .41Setting heading font . . . . . . . . . . . . . . . . . . . . . . . . . . . . . . . . . . . . . . . . . . . . . . . . . . . . . . . . . . . . .41Hiding row or column headings . . . . . . . . . . . . . . . . . . . . . . . . . . . . . . . . . . . . . . . . . . . . . . . . . .42
Working with cells . . . . . . . . . . . . . . . . . . . . . . . . . . . . . . . . . . . . . . . . . . . . . . . . . . . . . . . . . . . . . . . . .42Inserting cells into a worksheet . . . . . . . . . . . . . . . . . . . . . . . . . . . . . . . . . . . . . . . . . . . . . . . . . . .42Selecting a cell . . . . . . . . . . . . . . . . . . . . . . . . . . . . . . . . . . . . . . . . . . . . . . . . . . . . . . . . . . . . . . . . . .44
Making the active cell visible . . . . . . . . . . . . . . . . . . . . . . . . . . . . . . . . . . . . . . . . . . . . . . . . . . .45Selecting an entire row when selecting a cell . . . . . . . . . . . . . . . . . . . . . . . . . . . . . . . . . . . . . .45Making multiple, non-contiguous selections . . . . . . . . . . . . . . . . . . . . . . . . . . . . . . . . . . . . . .45

iii
Enabling users to move the active cell by pressing the Enter key . . . . . . . . . . . . . . . . . . . . 45Setting cell protection . . . . . . . . . . . . . . . . . . . . . . . . . . . . . . . . . . . . . . . . . . . . . . . . . . . . . . . . . . . 46Merging cells . . . . . . . . . . . . . . . . . . . . . . . . . . . . . . . . . . . . . . . . . . . . . . . . . . . . . . . . . . . . . . . . . . 47
Working with a range of cells . . . . . . . . . . . . . . . . . . . . . . . . . . . . . . . . . . . . . . . . . . . . . . . . . . . . . . . 47Accessing a range of cells . . . . . . . . . . . . . . . . . . . . . . . . . . . . . . . . . . . . . . . . . . . . . . . . . . . . . . . . 48Copying a range of cells from one worksheet to another . . . . . . . . . . . . . . . . . . . . . . . . . . . . . 48Clearing a range . . . . . . . . . . . . . . . . . . . . . . . . . . . . . . . . . . . . . . . . . . . . . . . . . . . . . . . . . . . . . . . . 48
Working with a worksheet outline . . . . . . . . . . . . . . . . . . . . . . . . . . . . . . . . . . . . . . . . . . . . . . . . . . 49Working with scroll bars . . . . . . . . . . . . . . . . . . . . . . . . . . . . . . . . . . . . . . . . . . . . . . . . . . . . . . . . . . . 50
Chapter 4Working with input and output . . . . . . . . . . . . . . . . . . . . . . . . . . . . . . . . . . 53Reading workbook data from a file . . . . . . . . . . . . . . . . . . . . . . . . . . . . . . . . . . . . . . . . . . . . . . . . . . 54
Using the Document class to open a file . . . . . . . . . . . . . . . . . . . . . . . . . . . . . . . . . . . . . . . . . . . 55About the Group parameter . . . . . . . . . . . . . . . . . . . . . . . . . . . . . . . . . . . . . . . . . . . . . . . . . . . 56About the DocumentOpenCallback parameter . . . . . . . . . . . . . . . . . . . . . . . . . . . . . . . . . . . 56
Creating a BookModel object from an Excel spreadsheet file . . . . . . . . . . . . . . . . . . . . . . . . . . 59Creating a JBook object from a Document object . . . . . . . . . . . . . . . . . . . . . . . . . . . . . . . . . . . . 59
Reading from an input stream . . . . . . . . . . . . . . . . . . . . . . . . . . . . . . . . . . . . . . . . . . . . . . . . . . . . . . 59Writing an output file . . . . . . . . . . . . . . . . . . . . . . . . . . . . . . . . . . . . . . . . . . . . . . . . . . . . . . . . . . . . . 60
About the file type parameter . . . . . . . . . . . . . . . . . . . . . . . . . . . . . . . . . . . . . . . . . . . . . . . . . . . . 61About the DocumentSaveCallback parameter . . . . . . . . . . . . . . . . . . . . . . . . . . . . . . . . . . . . . . 62Writing a range of cells . . . . . . . . . . . . . . . . . . . . . . . . . . . . . . . . . . . . . . . . . . . . . . . . . . . . . . . . . . 63Setting the code page type for an output file . . . . . . . . . . . . . . . . . . . . . . . . . . . . . . . . . . . . . . . 63Setting passwords for an output file . . . . . . . . . . . . . . . . . . . . . . . . . . . . . . . . . . . . . . . . . . . . . . 64Using a JBook to refresh an Excel document . . . . . . . . . . . . . . . . . . . . . . . . . . . . . . . . . . . . . . . . 64
Writing to an output stream . . . . . . . . . . . . . . . . . . . . . . . . . . . . . . . . . . . . . . . . . . . . . . . . . . . . . . . . 65Writing to an HTML file . . . . . . . . . . . . . . . . . . . . . . . . . . . . . . . . . . . . . . . . . . . . . . . . . . . . . . . . . . . 65
Setting the formatting options . . . . . . . . . . . . . . . . . . . . . . . . . . . . . . . . . . . . . . . . . . . . . . . . . . . . 66Writing an entire book as HTML . . . . . . . . . . . . . . . . . . . . . . . . . . . . . . . . . . . . . . . . . . . . . . . . . 67
Writing to an XML file . . . . . . . . . . . . . . . . . . . . . . . . . . . . . . . . . . . . . . . . . . . . . . . . . . . . . . . . . . . . . 67Including cell formatting information in the XML output file . . . . . . . . . . . . . . . . . . . . . . . . . 67Associating a style sheet with the XML output file . . . . . . . . . . . . . . . . . . . . . . . . . . . . . . . . . . 68Writing single or multiple cell ranges . . . . . . . . . . . . . . . . . . . . . . . . . . . . . . . . . . . . . . . . . . . . . 68Controlling the merge mode . . . . . . . . . . . . . . . . . . . . . . . . . . . . . . . . . . . . . . . . . . . . . . . . . . . . . 68Skipping empty cells . . . . . . . . . . . . . . . . . . . . . . . . . . . . . . . . . . . . . . . . . . . . . . . . . . . . . . . . . . . . 68Writing the XML output code . . . . . . . . . . . . . . . . . . . . . . . . . . . . . . . . . . . . . . . . . . . . . . . . . . . . 69
Saving window-specific information . . . . . . . . . . . . . . . . . . . . . . . . . . . . . . . . . . . . . . . . . . . . . . . . 70Understanding Excel file format limitations . . . . . . . . . . . . . . . . . . . . . . . . . . . . . . . . . . . . . . . . . . 70
Chapter 5Working with data sources . . . . . . . . . . . . . . . . . . . . . . . . . . . . . . . . . . . . . 71Using data sources . . . . . . . . . . . . . . . . . . . . . . . . . . . . . . . . . . . . . . . . . . . . . . . . . . . . . . . . . . . . . . . . 72

iv
Accessing a data source . . . . . . . . . . . . . . . . . . . . . . . . . . . . . . . . . . . . . . . . . . . . . . . . . . . . . . . . . .72Casting the Source object . . . . . . . . . . . . . . . . . . . . . . . . . . . . . . . . . . . . . . . . . . . . . . . . . . . . . .73Setting the properties of the data source . . . . . . . . . . . . . . . . . . . . . . . . . . . . . . . . . . . . . . . . .74
Creating and setting a query object . . . . . . . . . . . . . . . . . . . . . . . . . . . . . . . . . . . . . . . . . . . . . . . .74Creating a DataRange object and setting its query . . . . . . . . . . . . . . . . . . . . . . . . . . . . . . . . . . .75Setting up a detail section to contain data . . . . . . . . . . . . . . . . . . . . . . . . . . . . . . . . . . . . . . . . . . .75Using a cell entry to load data . . . . . . . . . . . . . . . . . . . . . . . . . . . . . . . . . . . . . . . . . . . . . . . . . . . .76Generating the workbook . . . . . . . . . . . . . . . . . . . . . . . . . . . . . . . . . . . . . . . . . . . . . . . . . . . . . . . .76Generating Excel output . . . . . . . . . . . . . . . . . . . . . . . . . . . . . . . . . . . . . . . . . . . . . . . . . . . . . . . . .76
Using a file data source . . . . . . . . . . . . . . . . . . . . . . . . . . . . . . . . . . . . . . . . . . . . . . . . . . . . . . . . . . . . .78Creating a connection to a file data source . . . . . . . . . . . . . . . . . . . . . . . . . . . . . . . . . . . . . . . . . .78Using a delimited text file data source . . . . . . . . . . . . . . . . . . . . . . . . . . . . . . . . . . . . . . . . . . . . .80Defining a fixed-width text file query . . . . . . . . . . . . . . . . . . . . . . . . . . . . . . . . . . . . . . . . . . . . . .81Using a URL to specify a file location . . . . . . . . . . . . . . . . . . . . . . . . . . . . . . . . . . . . . . . . . . . . . .81
Using the data set cache as a data source . . . . . . . . . . . . . . . . . . . . . . . . . . . . . . . . . . . . . . . . . . . . . .82
Chapter 6Working with data ranges . . . . . . . . . . . . . . . . . . . . . . . . . . . . . . . . . . . . . . 83About data ranges . . . . . . . . . . . . . . . . . . . . . . . . . . . . . . . . . . . . . . . . . . . . . . . . . . . . . . . . . . . . . . . . .84About the data range interfaces . . . . . . . . . . . . . . . . . . . . . . . . . . . . . . . . . . . . . . . . . . . . . . . . . . . . . .84
Understanding the DataRangeModel interface . . . . . . . . . . . . . . . . . . . . . . . . . . . . . . . . . . . . . .84Understanding the DataRange interface . . . . . . . . . . . . . . . . . . . . . . . . . . . . . . . . . . . . . . . . . . . .84
Updating an existing data range definition . . . . . . . . . . . . . . . . . . . . . . . . . . . . . . . . . . . . . . .85Creating a DataRangeDef object for a new data range . . . . . . . . . . . . . . . . . . . . . . . . . . . . . .85Getting the DataRangeDef object for an existing data range . . . . . . . . . . . . . . . . . . . . . . . .85Creating a Range object that is based on the current selection . . . . . . . . . . . . . . . . . . . . . . .86Formatting the data range . . . . . . . . . . . . . . . . . . . . . . . . . . . . . . . . . . . . . . . . . . . . . . . . . . . . .86
Understanding the DataRangeDef interface . . . . . . . . . . . . . . . . . . . . . . . . . . . . . . . . . . . . . . . . .86Understanding the Section interface . . . . . . . . . . . . . . . . . . . . . . . . . . . . . . . . . . . . . . . . . . . . . . .87Understanding data commands and report script . . . . . . . . . . . . . . . . . . . . . . . . . . . . . . . . . . . .88
Writing a Java class that contains data range functionality . . . . . . . . . . . . . . . . . . . . . . . . . . . . . . .88
Chapter 7Working with cell data . . . . . . . . . . . . . . . . . . . . . . . . . . . . . . . . . . . . . . . . . 91About cell data . . . . . . . . . . . . . . . . . . . . . . . . . . . . . . . . . . . . . . . . . . . . . . . . . . . . . . . . . . . . . . . . . . . .92Getting and setting cell content . . . . . . . . . . . . . . . . . . . . . . . . . . . . . . . . . . . . . . . . . . . . . . . . . . . . . .92
Getting the content of a cell . . . . . . . . . . . . . . . . . . . . . . . . . . . . . . . . . . . . . . . . . . . . . . . . . . . . . . .92Using BookModel.getCellText( ) and Sheet.getText( ) . . . . . . . . . . . . . . . . . . . . . . . . . . . . . .92Using BookModel.getEntry( ) and Sheet.getEntry( ) . . . . . . . . . . . . . . . . . . . . . . . . . . . . . . .92Using getFormula( ) and getNumber( ) . . . . . . . . . . . . . . . . . . . . . . . . . . . . . . . . . . . . . . . . . .93
Setting the content of a cell . . . . . . . . . . . . . . . . . . . . . . . . . . . . . . . . . . . . . . . . . . . . . . . . . . . . . . .94Understanding the setEntry( ) methods . . . . . . . . . . . . . . . . . . . . . . . . . . . . . . . . . . . . . . . . . .94Understanding methods that set the content of the active cell . . . . . . . . . . . . . . . . . . . . . . .94

v
Supplying the same value in a range of cells . . . . . . . . . . . . . . . . . . . . . . . . . . . . . . . . . . . . . . . 95Copying cell data to and from an array . . . . . . . . . . . . . . . . . . . . . . . . . . . . . . . . . . . . . . . . . . . . 95Copying cell data between ranges . . . . . . . . . . . . . . . . . . . . . . . . . . . . . . . . . . . . . . . . . . . . . . . . 96Loading cells from a tab-delimited string . . . . . . . . . . . . . . . . . . . . . . . . . . . . . . . . . . . . . . . . . . 96Setting a validation rule for a cell or a range . . . . . . . . . . . . . . . . . . . . . . . . . . . . . . . . . . . . . . . 97Displaying multiline data in a cell . . . . . . . . . . . . . . . . . . . . . . . . . . . . . . . . . . . . . . . . . . . . . . . . 97Entering concatenated strings and cell references . . . . . . . . . . . . . . . . . . . . . . . . . . . . . . . . . . . 98Referring to a cell in another workbook . . . . . . . . . . . . . . . . . . . . . . . . . . . . . . . . . . . . . . . . . . . 98Creating a hyperlink . . . . . . . . . . . . . . . . . . . . . . . . . . . . . . . . . . . . . . . . . . . . . . . . . . . . . . . . . . . . 98
Clearing, cutting, or deleting a cell or cell content . . . . . . . . . . . . . . . . . . . . . . . . . . . . . . . . . . . . . 99Clearing cell content in a JBook . . . . . . . . . . . . . . . . . . . . . . . . . . . . . . . . . . . . . . . . . . . . . . . . . . 100Using the editCut( ) method . . . . . . . . . . . . . . . . . . . . . . . . . . . . . . . . . . . . . . . . . . . . . . . . . . . . 100Understanding locking and protection . . . . . . . . . . . . . . . . . . . . . . . . . . . . . . . . . . . . . . . . . . . 100Deleting cells . . . . . . . . . . . . . . . . . . . . . . . . . . . . . . . . . . . . . . . . . . . . . . . . . . . . . . . . . . . . . . . . . 101
Copying and pasting cell data . . . . . . . . . . . . . . . . . . . . . . . . . . . . . . . . . . . . . . . . . . . . . . . . . . . . . 101Copying data . . . . . . . . . . . . . . . . . . . . . . . . . . . . . . . . . . . . . . . . . . . . . . . . . . . . . . . . . . . . . . . . . 101Pasting a value only . . . . . . . . . . . . . . . . . . . . . . . . . . . . . . . . . . . . . . . . . . . . . . . . . . . . . . . . . . . 102
Using a defined name . . . . . . . . . . . . . . . . . . . . . . . . . . . . . . . . . . . . . . . . . . . . . . . . . . . . . . . . . . . . 103Creating a defined name . . . . . . . . . . . . . . . . . . . . . . . . . . . . . . . . . . . . . . . . . . . . . . . . . . . . . . . 103Finding the number of defined names . . . . . . . . . . . . . . . . . . . . . . . . . . . . . . . . . . . . . . . . . . . . 103Deleting a defined name . . . . . . . . . . . . . . . . . . . . . . . . . . . . . . . . . . . . . . . . . . . . . . . . . . . . . . . 104Testing if a defined name exists . . . . . . . . . . . . . . . . . . . . . . . . . . . . . . . . . . . . . . . . . . . . . . . . . 104Getting cell coordinates of a defined name range . . . . . . . . . . . . . . . . . . . . . . . . . . . . . . . . . . 104Specifying constant coordinates in a defined name range . . . . . . . . . . . . . . . . . . . . . . . . . . . 105
Accessing cell data . . . . . . . . . . . . . . . . . . . . . . . . . . . . . . . . . . . . . . . . . . . . . . . . . . . . . . . . . . . . . . . 105Getting the text value of a formula . . . . . . . . . . . . . . . . . . . . . . . . . . . . . . . . . . . . . . . . . . . . . . . 105Finding out cell data type . . . . . . . . . . . . . . . . . . . . . . . . . . . . . . . . . . . . . . . . . . . . . . . . . . . . . . 105Getting a formatted cell reference . . . . . . . . . . . . . . . . . . . . . . . . . . . . . . . . . . . . . . . . . . . . . . . . 106
Sorting cell data . . . . . . . . . . . . . . . . . . . . . . . . . . . . . . . . . . . . . . . . . . . . . . . . . . . . . . . . . . . . . . . . . 106Using the sort and sort3 methods . . . . . . . . . . . . . . . . . . . . . . . . . . . . . . . . . . . . . . . . . . . . . . . . 106Sorting dates or numbers supplied as text . . . . . . . . . . . . . . . . . . . . . . . . . . . . . . . . . . . . . . . . 107
Chapter 8Working with formatting and display options . . . . . . . . . . . . . . . . . . . . . 109Formatting a cell or range of cells . . . . . . . . . . . . . . . . . . . . . . . . . . . . . . . . . . . . . . . . . . . . . . . . . . .110
Setting a pattern and color of a cell . . . . . . . . . . . . . . . . . . . . . . . . . . . . . . . . . . . . . . . . . . . . . . .110Setting vertical and horizontal alignment . . . . . . . . . . . . . . . . . . . . . . . . . . . . . . . . . . . . . . . . . .112Applying formatting to substrings . . . . . . . . . . . . . . . . . . . . . . . . . . . . . . . . . . . . . . . . . . . . . . . .113Hiding and locking a cell . . . . . . . . . . . . . . . . . . . . . . . . . . . . . . . . . . . . . . . . . . . . . . . . . . . . . . . .113Formatting numbers, dates, and times . . . . . . . . . . . . . . . . . . . . . . . . . . . . . . . . . . . . . . . . . . . . .114
Understanding locale-specific formatting . . . . . . . . . . . . . . . . . . . . . . . . . . . . . . . . . . . . . . .118Understanding setCustomFormatLocal( ) . . . . . . . . . . . . . . . . . . . . . . . . . . . . . . . . . . . . . . .118Displaying all digits of a large number . . . . . . . . . . . . . . . . . . . . . . . . . . . . . . . . . . . . . . . . . .119

vi
Formatting a date . . . . . . . . . . . . . . . . . . . . . . . . . . . . . . . . . . . . . . . . . . . . . . . . . . . . . . . . . . . . . . 119Formatting text . . . . . . . . . . . . . . . . . . . . . . . . . . . . . . . . . . . . . . . . . . . . . . . . . . . . . . . . . . . . . . . .120
Changing a font . . . . . . . . . . . . . . . . . . . . . . . . . . . . . . . . . . . . . . . . . . . . . . . . . . . . . . . . . . . . .120Setting font attributes . . . . . . . . . . . . . . . . . . . . . . . . . . . . . . . . . . . . . . . . . . . . . . . . . . . . . . . .120Setting text direction . . . . . . . . . . . . . . . . . . . . . . . . . . . . . . . . . . . . . . . . . . . . . . . . . . . . . . . . .121Getting formatted text from a cell . . . . . . . . . . . . . . . . . . . . . . . . . . . . . . . . . . . . . . . . . . . . . .122
Using a conditional format . . . . . . . . . . . . . . . . . . . . . . . . . . . . . . . . . . . . . . . . . . . . . . . . . . . . . . . . .122Understanding ConditionalFormat objects . . . . . . . . . . . . . . . . . . . . . . . . . . . . . . . . . . . . . . . . .123
Understanding condition types . . . . . . . . . . . . . . . . . . . . . . . . . . . . . . . . . . . . . . . . . . . . . . . .123Understanding the comparison operators . . . . . . . . . . . . . . . . . . . . . . . . . . . . . . . . . . . . . . .123Understanding the conditional formulas . . . . . . . . . . . . . . . . . . . . . . . . . . . . . . . . . . . . . . . .124Understanding the formula parameter . . . . . . . . . . . . . . . . . . . . . . . . . . . . . . . . . . . . . . . . . .125Understanding setEntry1( ), setEnty2( ), setFormula1Local( ),
and setFormula2Local( ) . . . . . . . . . . . . . . . . . . . . . . . . . . . . . . . . . . . . . . . . . . . . . . . . . . . . .125Understanding setFormula1( ) and setFormula2( ) . . . . . . . . . . . . . . . . . . . . . . . . . . . . . . . .125Understanding the row and column parameters . . . . . . . . . . . . . . . . . . . . . . . . . . . . . . . . .126
Understanding the conditional formatting process . . . . . . . . . . . . . . . . . . . . . . . . . . . . . . . . . .126Understanding custom display options . . . . . . . . . . . . . . . . . . . . . . . . . . . . . . . . . . . . . . . . . . . . . .127
Turning type markers on . . . . . . . . . . . . . . . . . . . . . . . . . . . . . . . . . . . . . . . . . . . . . . . . . . . . . . . .127Showing either a formula or its result . . . . . . . . . . . . . . . . . . . . . . . . . . . . . . . . . . . . . . . . . . . . .127
Chapter 9Working with graphical objects and charts . . . . . . . . . . . . . . . . . . . . . . 129Understanding the charting API . . . . . . . . . . . . . . . . . . . . . . . . . . . . . . . . . . . . . . . . . . . . . . . . . . . .130
Setting the chart type . . . . . . . . . . . . . . . . . . . . . . . . . . . . . . . . . . . . . . . . . . . . . . . . . . . . . . . . . . .130Assigning cell data to a chart . . . . . . . . . . . . . . . . . . . . . . . . . . . . . . . . . . . . . . . . . . . . . . . . . . . .132Finding a chart by name . . . . . . . . . . . . . . . . . . . . . . . . . . . . . . . . . . . . . . . . . . . . . . . . . . . . . . . .133Setting series, axes, and chart titles . . . . . . . . . . . . . . . . . . . . . . . . . . . . . . . . . . . . . . . . . . . . . . .134Creating a chart sheet . . . . . . . . . . . . . . . . . . . . . . . . . . . . . . . . . . . . . . . . . . . . . . . . . . . . . . . . . . .134Setting the series type . . . . . . . . . . . . . . . . . . . . . . . . . . . . . . . . . . . . . . . . . . . . . . . . . . . . . . . . . . .134Creating a 3D chart . . . . . . . . . . . . . . . . . . . . . . . . . . . . . . . . . . . . . . . . . . . . . . . . . . . . . . . . . . . . .135
Adding a picture to a worksheet . . . . . . . . . . . . . . . . . . . . . . . . . . . . . . . . . . . . . . . . . . . . . . . . . . . .137Adding a graphical object to a worksheet . . . . . . . . . . . . . . . . . . . . . . . . . . . . . . . . . . . . . . . . . . . .138
Chapter 10Working with print options . . . . . . . . . . . . . . . . . . . . . . . . . . . . . . . . . . . . 139About print options . . . . . . . . . . . . . . . . . . . . . . . . . . . . . . . . . . . . . . . . . . . . . . . . . . . . . . . . . . . . . . .140Printing a worksheet or a defined range of cells . . . . . . . . . . . . . . . . . . . . . . . . . . . . . . . . . . . . . . .141Setting print orientation . . . . . . . . . . . . . . . . . . . . . . . . . . . . . . . . . . . . . . . . . . . . . . . . . . . . . . . . . . .142Working with print scale . . . . . . . . . . . . . . . . . . . . . . . . . . . . . . . . . . . . . . . . . . . . . . . . . . . . . . . . . .142
Printing to a specific scale or number of pages . . . . . . . . . . . . . . . . . . . . . . . . . . . . . . . . . . . . .142Setting the print scale . . . . . . . . . . . . . . . . . . . . . . . . . . . . . . . . . . . . . . . . . . . . . . . . . . . . . . . . . . .143Scaling to fit-to-page horizontally only . . . . . . . . . . . . . . . . . . . . . . . . . . . . . . . . . . . . . . . . . . . .143

vii
Using fitToPage with multiple print ranges . . . . . . . . . . . . . . . . . . . . . . . . . . . . . . . . . . . . . . . 143Working with a print area . . . . . . . . . . . . . . . . . . . . . . . . . . . . . . . . . . . . . . . . . . . . . . . . . . . . . . . . . 144
Setting a print area . . . . . . . . . . . . . . . . . . . . . . . . . . . . . . . . . . . . . . . . . . . . . . . . . . . . . . . . . . . . 144Returning print area information . . . . . . . . . . . . . . . . . . . . . . . . . . . . . . . . . . . . . . . . . . . . . . . . 145Clearing a print area . . . . . . . . . . . . . . . . . . . . . . . . . . . . . . . . . . . . . . . . . . . . . . . . . . . . . . . . . . . 145
Printing in greyscale . . . . . . . . . . . . . . . . . . . . . . . . . . . . . . . . . . . . . . . . . . . . . . . . . . . . . . . . . . . . . 145Working with a print header, footer, or title . . . . . . . . . . . . . . . . . . . . . . . . . . . . . . . . . . . . . . . . . . 145
Setting a print title . . . . . . . . . . . . . . . . . . . . . . . . . . . . . . . . . . . . . . . . . . . . . . . . . . . . . . . . . . . . . 145Formatting a print header or a footer . . . . . . . . . . . . . . . . . . . . . . . . . . . . . . . . . . . . . . . . . . . . . 146Creating a multiline print header . . . . . . . . . . . . . . . . . . . . . . . . . . . . . . . . . . . . . . . . . . . . . . . . 147Printing a four-digit year in a header or a footer . . . . . . . . . . . . . . . . . . . . . . . . . . . . . . . . . . . 148Printing column and row headings . . . . . . . . . . . . . . . . . . . . . . . . . . . . . . . . . . . . . . . . . . . . . . 148Printing row or column titles on every page . . . . . . . . . . . . . . . . . . . . . . . . . . . . . . . . . . . . . . . 148
Printing with no borders or grid lines . . . . . . . . . . . . . . . . . . . . . . . . . . . . . . . . . . . . . . . . . . . . . . . 148
Chapter 11Working with pivot ranges . . . . . . . . . . . . . . . . . . . . . . . . . . . . . . . . . . . . . 149About pivot ranges . . . . . . . . . . . . . . . . . . . . . . . . . . . . . . . . . . . . . . . . . . . . . . . . . . . . . . . . . . . . . . 150Creating a pivot range . . . . . . . . . . . . . . . . . . . . . . . . . . . . . . . . . . . . . . . . . . . . . . . . . . . . . . . . . . . . 150Understanding the pivot range class organization . . . . . . . . . . . . . . . . . . . . . . . . . . . . . . . . . . . . 150
Understanding the PivotRangeModel object . . . . . . . . . . . . . . . . . . . . . . . . . . . . . . . . . . . . . . 150Understanding the PivotRange object . . . . . . . . . . . . . . . . . . . . . . . . . . . . . . . . . . . . . . . . . . . . 151Understanding the PivotRangeDef object . . . . . . . . . . . . . . . . . . . . . . . . . . . . . . . . . . . . . . . . . 152
Understanding the PivotRangeOptions object . . . . . . . . . . . . . . . . . . . . . . . . . . . . . . . . . . . 152Understanding the DataSourceInfo object . . . . . . . . . . . . . . . . . . . . . . . . . . . . . . . . . . . . . . 153
Understanding the Area objects . . . . . . . . . . . . . . . . . . . . . . . . . . . . . . . . . . . . . . . . . . . . . . . . . 153Understanding the Field objects . . . . . . . . . . . . . . . . . . . . . . . . . . . . . . . . . . . . . . . . . . . . . . . . . 153
Understanding the Item object . . . . . . . . . . . . . . . . . . . . . . . . . . . . . . . . . . . . . . . . . . . . . . . . 153Understanding row, column, and data field objects . . . . . . . . . . . . . . . . . . . . . . . . . . . . . . 154Understanding calculated fields . . . . . . . . . . . . . . . . . . . . . . . . . . . . . . . . . . . . . . . . . . . . . . 155Understanding the special data field object . . . . . . . . . . . . . . . . . . . . . . . . . . . . . . . . . . . . . 155Understanding the SummaryField object . . . . . . . . . . . . . . . . . . . . . . . . . . . . . . . . . . . . . . . 156Setting the format of a summary field . . . . . . . . . . . . . . . . . . . . . . . . . . . . . . . . . . . . . . . . . . 157
Understanding the FieldSettings object . . . . . . . . . . . . . . . . . . . . . . . . . . . . . . . . . . . . . . . . . . . 157Understanding the SummaryFieldSettings object . . . . . . . . . . . . . . . . . . . . . . . . . . . . . . . . . . 158Understanding the Range object . . . . . . . . . . . . . . . . . . . . . . . . . . . . . . . . . . . . . . . . . . . . . . . . . 159Understanding pivot field grouping . . . . . . . . . . . . . . . . . . . . . . . . . . . . . . . . . . . . . . . . . . . . . 159Formatting a pivot range . . . . . . . . . . . . . . . . . . . . . . . . . . . . . . . . . . . . . . . . . . . . . . . . . . . . . . . 161
Chapter 12Working with events . . . . . . . . . . . . . . . . . . . . . . . . . . . . . . . . . . . . . . . . . . 163About events . . . . . . . . . . . . . . . . . . . . . . . . . . . . . . . . . . . . . . . . . . . . . . . . . . . . . . . . . . . . . . . . . . . . 164Working with user editing . . . . . . . . . . . . . . . . . . . . . . . . . . . . . . . . . . . . . . . . . . . . . . . . . . . . . . . . 165
viii
Determining whether a worksheet has been modified . . . . . . . . . . . . . . . . . . . . . . . . . . . . . . .165Determining whether the user is in edit mode . . . . . . . . . . . . . . . . . . . . . . . . . . . . . . . . . . . . . .165Getting the most recent data entry . . . . . . . . . . . . . . . . . . . . . . . . . . . . . . . . . . . . . . . . . . . . . . . .166Maintaining cell format when the user enters a value . . . . . . . . . . . . . . . . . . . . . . . . . . . . . . .166Cancelling what a user types in a cell . . . . . . . . . . . . . . . . . . . . . . . . . . . . . . . . . . . . . . . . . . . . .167Initiating in-cell editing . . . . . . . . . . . . . . . . . . . . . . . . . . . . . . . . . . . . . . . . . . . . . . . . . . . . . . . . .167Getting a cell value before user editing begins . . . . . . . . . . . . . . . . . . . . . . . . . . . . . . . . . . . . . .168
Working with user key and mouse events . . . . . . . . . . . . . . . . . . . . . . . . . . . . . . . . . . . . . . . . . . . .168Determining which key the user pressed . . . . . . . . . . . . . . . . . . . . . . . . . . . . . . . . . . . . . . . . . .168Converting pixels to twips on mouse events . . . . . . . . . . . . . . . . . . . . . . . . . . . . . . . . . . . . . . .168Creating a shortcut key for copying or pasting . . . . . . . . . . . . . . . . . . . . . . . . . . . . . . . . . . . . .169Locating the active cell . . . . . . . . . . . . . . . . . . . . . . . . . . . . . . . . . . . . . . . . . . . . . . . . . . . . . . . . . .169
Working with user selection events . . . . . . . . . . . . . . . . . . . . . . . . . . . . . . . . . . . . . . . . . . . . . . . . .170Determining when a user changes cells . . . . . . . . . . . . . . . . . . . . . . . . . . . . . . . . . . . . . . . . . . .170Determining when a user changes worksheets . . . . . . . . . . . . . . . . . . . . . . . . . . . . . . . . . . . . .170
Restricting user access . . . . . . . . . . . . . . . . . . . . . . . . . . . . . . . . . . . . . . . . . . . . . . . . . . . . . . . . . . . . .171Restricting editing to a column . . . . . . . . . . . . . . . . . . . . . . . . . . . . . . . . . . . . . . . . . . . . . . . . . . .171Enabling users to delete values and formatting . . . . . . . . . . . . . . . . . . . . . . . . . . . . . . . . . . . . .171Allowing users to select an unprotected cell only . . . . . . . . . . . . . . . . . . . . . . . . . . . . . . . . . . .172Limiting the selection range . . . . . . . . . . . . . . . . . . . . . . . . . . . . . . . . . . . . . . . . . . . . . . . . . . . . .172Preventing users from typing data . . . . . . . . . . . . . . . . . . . . . . . . . . . . . . . . . . . . . . . . . . . . . . . .172Limiting characters users type in a cell . . . . . . . . . . . . . . . . . . . . . . . . . . . . . . . . . . . . . . . . . . . .173Validating edit data from code . . . . . . . . . . . . . . . . . . . . . . . . . . . . . . . . . . . . . . . . . . . . . . . . . . .174
Chapter 13Understanding BIRT Spreadsheet Engine performance . . . . . . . . . . . . 175Using memory efficiently . . . . . . . . . . . . . . . . . . . . . . . . . . . . . . . . . . . . . . . . . . . . . . . . . . . . . . . . . .176
Getting and releasing locks . . . . . . . . . . . . . . . . . . . . . . . . . . . . . . . . . . . . . . . . . . . . . . . . . . . . . .176Allocating row and column references . . . . . . . . . . . . . . . . . . . . . . . . . . . . . . . . . . . . . . . . . . . .177Understanding data structure and memory size . . . . . . . . . . . . . . . . . . . . . . . . . . . . . . . . . . . .177
Using a row reference . . . . . . . . . . . . . . . . . . . . . . . . . . . . . . . . . . . . . . . . . . . . . . . . . . . . . . . .178Using a cell reference . . . . . . . . . . . . . . . . . . . . . . . . . . . . . . . . . . . . . . . . . . . . . . . . . . . . . . . . .179Using a cell . . . . . . . . . . . . . . . . . . . . . . . . . . . . . . . . . . . . . . . . . . . . . . . . . . . . . . . . . . . . . . . . .179
Increasing or decreasing garbage collection . . . . . . . . . . . . . . . . . . . . . . . . . . . . . . . . . . . . . . . .179Understanding recalculation . . . . . . . . . . . . . . . . . . . . . . . . . . . . . . . . . . . . . . . . . . . . . . . . . . . . . . .180Maintaining speed when reading in data . . . . . . . . . . . . . . . . . . . . . . . . . . . . . . . . . . . . . . . . . . . .180
Chapter 14Integrating BIRT Spreadsheet Engine with Java applications . . . . . . . 181About BIRT Spreadsheet Engine and J2SE . . . . . . . . . . . . . . . . . . . . . . . . . . . . . . . . . . . . . . . . . . . .182Writing an application class that extends JFrame . . . . . . . . . . . . . . . . . . . . . . . . . . . . . . . . . . . . . .182Accessing the BIRT Spreadsheet API using JavaScript . . . . . . . . . . . . . . . . . . . . . . . . . . . . . . . . .184Using an add-in function . . . . . . . . . . . . . . . . . . . . . . . . . . . . . . . . . . . . . . . . . . . . . . . . . . . . . . . . . .186

ix
Understanding the FuncContext object . . . . . . . . . . . . . . . . . . . . . . . . . . . . . . . . . . . . . . . . . . . 187Understanding the Value object . . . . . . . . . . . . . . . . . . . . . . . . . . . . . . . . . . . . . . . . . . . . . . . . . 188About an example of an add-in function . . . . . . . . . . . . . . . . . . . . . . . . . . . . . . . . . . . . . . . . . . 189Making add-in functions determinant . . . . . . . . . . . . . . . . . . . . . . . . . . . . . . . . . . . . . . . . . . . . 189
Chapter 15Integrating BIRT Spreadsheet Engine with servlets and JSPs . . . . . . . 191About BIRT Spreadsheet Engine and J2EE . . . . . . . . . . . . . . . . . . . . . . . . . . . . . . . . . . . . . . . . . . . 192Using BIRT Spreadsheet Engine within a Java servlet . . . . . . . . . . . . . . . . . . . . . . . . . . . . . . . . . 192
Compiling and deploying a Java servlet that uses the BIRT Spreadsheet API . . . . . . . . . . 192Setting the MIME type . . . . . . . . . . . . . . . . . . . . . . . . . . . . . . . . . . . . . . . . . . . . . . . . . . . . . . . . . 192Writing to the servlet output stream . . . . . . . . . . . . . . . . . . . . . . . . . . . . . . . . . . . . . . . . . . . . . . 193Getting data . . . . . . . . . . . . . . . . . . . . . . . . . . . . . . . . . . . . . . . . . . . . . . . . . . . . . . . . . . . . . . . . . . 194
Using sample servlets . . . . . . . . . . . . . . . . . . . . . . . . . . . . . . . . . . . . . . . . . . . . . . . . . . . . . . . . . . . . 194Sending an Excel file to the browser . . . . . . . . . . . . . . . . . . . . . . . . . . . . . . . . . . . . . . . . . . . . . . 194Displaying a chart as an image . . . . . . . . . . . . . . . . . . . . . . . . . . . . . . . . . . . . . . . . . . . . . . . . . . 195Creating HTML output . . . . . . . . . . . . . . . . . . . . . . . . . . . . . . . . . . . . . . . . . . . . . . . . . . . . . . . . 198Passing parameters . . . . . . . . . . . . . . . . . . . . . . . . . . . . . . . . . . . . . . . . . . . . . . . . . . . . . . . . . . . . 199
Index . . . . . . . . . . . . . . . . . . . . . . . . . . . . . . . . . . . . . . . . . . . . . . . . . . . . . . 201

x
A b o u t U s i n g B I R T S p r e a d s h e e t E n g i n e a n d A P I xi
A b o u t U s i n g B I R TS p r e a d s h e e t E n g i n e
a n d A P I
Using BIRT Spreadsheet Engine and API provides concise discussions and code examples to answer common questions about using the BIRT Spreadsheet API.
Using BIRT Spreadsheet Engine and API includes the following chapters:
■ About Using BIRT Spreadsheet Engine and API. This chapter provides an overview of this guide.
■ Chapter 1. About Actuate BIRT Spreadsheet Engine and API. This chapter explains the Actuate spreadsheet products and technologies.
■ Chapter 2. Working with workbooks and worksheets. This chapter describes how to use the BIRT Spreadsheet API to create and manipulate worksheets, provides an overview of the classes and interfaces that represent workbooks and worksheets, and explains multithreading methods and best practices.
■ Chapter 3. Working with worksheet elements. This chapter explains how to use the BIRT Spreadsheet API to create and work with sheets, rows, columns, cells, headings, ranges, outlines, and scroll bars.
■ Chapter 4. Working with input and output. This chapter describes how to use BIRT Spreadsheet API read and write methods, including discussions about how to write BIRT Spreadsheet data into various output formats.
■ Chapter 5. Working with data sources. This chapter explains how to use the BIRT Spreadsheet API to create a database or file connection, set a data range, use a stylesheet, refresh source data, and configure connection information.
■ Chapter 6. Working with data ranges. This chapter describes how to use the BIRT Spreadsheet API to create or modify a data range and how to write a Java class that contains data range functionality.

xii U s i n g B I R T S p r e a d s h e e t E n g i n e a n d A P I
■ Chapter 7. Working with cell data. This chapter describes how to manage cell data and defined names using the BIRT Spreadsheet API.
■ Chapter 8. Working with formatting and display options. This chapter describes how to format cells and cell data using the BIRT Spreadsheet API.
■ Chapter 9. Working with graphical objects and charts. This chapter describes how to create and manipulate graphical objects and charts using the BIRT Spreadsheet API.
■ Chapter 10. Working with print options. This chapter describes how to manipulate common print settings using the BIRT Spreadsheet API.
■ Chapter 11. Working with pivot ranges. This chapter describes how to create and manipulate a pivot range using the BIRT Spreadsheet API.
■ Chapter 12. Working with events. This chapter describes how to handle Java events in Swing applications using the BIRT Spreadsheet API.
■ Chapter 13. Understanding BIRT Spreadsheet Engine performance. This chapter describes how to maximize the performance of the Actuate BIRT Spreadsheet Engine.
■ Chapter 14. Integrating BIRT Spreadsheet Engine with Java applications. This chapter describes how to integrate the Actuate BIRT Spreadsheet Engine into Java applications and applets.
■ Chapter 15. Integrating BIRT Spreadsheet Engine with servlets and JSPs. This chapter describes how to integrate the Actuate BIRT Spreadsheet Engine into servlets and JSPs.

C h a p t e r 1 , A b o u t A c t u a t e B I R T S p r e a d s h e e t E n g i n e a n d A P I 1
C h a p t e r
1Chapter 1About Actuate BIRTSpreadsheet Engine
and APIThis chapter contains the following topics:
■ About Actuate BIRT Spreadsheet Engine and API
■ About Actuate BIRT Spreadsheet Engine and API documentation
■ About the BIRT Spreadsheet API licensed features
■ About Actuate BIRT Spreadsheet Engine and API files
■ About the BIRT Spreadsheet API packages
2 U s i n g B I R T S p r e a d s h e e t E n g i n e a n d A P I
About Actuate BIRT Spreadsheet Engine and APIActuate BIRT Spreadsheet Engine and API is a collection of Java components that can control and edit spreadsheet reports. The technology can collectively design, securely distribute, and dynamically display spreadsheets as a Java Application, Applet, Java Server Page (JSP), or servlet. Any of these implementations can also provide a user interface whereby users can interact with the spreadsheets dynamically, redesign them, and redistribute them in a secure and versioned fashion. The report is interactive because it allows the user to enter data and formulas into the report, using familiar Excel spreadsheet controls. It is dynamic because it populates the report with data from one or more live data sources.
The BIRT Spreadsheet API consists of the following two logical components:
■ The BIRT Spreadsheet API (application programmer interface) is a Java class library for accessing and editing spreadsheet reports. You do not require a license to use the BIRT Spreadsheet API. This API supports the following actions:
■ Reading and writing an Excel 97 or Excel 2007 file
■ Accessing Excel charts
■ Accessing Excel pivot tables
■ VBA macro pass-through
The BIRT Spreadsheet API does not support creating or using spreadsheet object design (.sod) or spreadsheet object instance (.soi) files. You cannot access external data sources using this API. The API does not support printing or exporting Excel files to other formats such as PDF or HTML.
■ Actuate BIRT Spreadsheet Engine is a complimentary Java Class library to the BIRT Spreadsheet API that supports creating spreadsheet reports inside Java applications, applets, servlets, and JSPs.
Developing and deploying applications that use the Actuate BIRT Spreadsheet Engine requires a license file. For information about obtaining a license file, see Installing BIRT Spreadsheet Engine and API. For information about deploying the license file with an application, see the information in this book about creating an application as an applet, servlet, and so on.
For more information about the BIRT Spreadsheet API classes, see the API Javadoc. The default location of the Javadoc is:
<Install Dir>\espreadsheetengineandapi\javadoc
In addition, Actuate provides the Actuate BIRT Spreadsheet Designer, a design tool for creating spreadsheet object design (.sod) files. The user interface uses the BIRT Spreadsheet API extensively. For more information about the Actuate BIRT Spreadsheet Designer, see Designing Spreadsheets using BIRT Spreadsheet Designer.

C h a p t e r 1 , A b o u t A c t u a t e B I R T S p r e a d s h e e t E n g i n e a n d A P I 3
About Actuate BIRT Spreadsheet Engine and API documentation
In addition to the Javadoc, this manual and others describing the Actuate BIRT Spreadsheet products are included with Actuate BIRT Spreadsheet Engine and API. The default location of the Javadoc is:
<Install Dir>\espreadsheetengineandapi\manuals
About the BIRT Spreadsheet API licensed featuresThe BIRT Spreadsheet API contains licensed functionality that supports creating, editing, displaying and managing every aspect of a spreadsheet report, including:
■ One or more data sources and data sets with which to populate the report
■ Cell, column, and row formats
■ Formulas
■ Protection and visibility controls at cell, sheet, and workbook levels
■ Pivot ranges
■ Report parameters and query parameters
■ Hyperlinks
■ Charts that link to chart data ranges
■ VBA macro pass-through implementations
Through the BIRT Spreadsheet API, you can also import a file that defines any or all of the features of the spreadsheet report. Using the BIRT Spreadsheet API, you can import the following kinds of files:
■ Existing Excel spreadsheets
■ Spreadsheet object design (.sod) files
■ BIRT Spreadsheet report template (.vts) files from earlier releases
■ Comma-separated values (.csv) files
■ XML files

4 U s i n g B I R T S p r e a d s h e e t E n g i n e a n d A P I
Accessing data sourcesBy using functionality that is embedded in the BIRT Spreadsheet API, you can query database sources from several kinds of connections, including:
■ JDBC
■ Text file
■ Text data from a URL
■ SAP R/3 or BW
■ Actuate Information Object
■ Web service
You create a custom query on each data source that you use and specify a data range that the data populates. For more information about accessing data sources, see Designing Spreadsheets using BIRT Spreadsheet Designer.
Exporting spreadsheet reportsA user can view an embedded report and manipulate its data, using the familiar Excel spreadsheet interface. If the user makes changes to data in the report, the program can save the data to an Excel file, commit the changes to a database, or pass the data to another application in a number of different formats, including:
■ HTML
■ Excel
■ Spreadsheet object instance (.soi) file
■ Text
Creating a calculation engineYou can use BIRT Spreadsheet Engine on an application server as a calculation engine. When you embed BIRT Spreadsheet Engine in a J2EE project, you automate the process of accessing, updating, calculating, and extracting data from a company’s databases and other data sources.
Separating responsibilities by area of expertiseWith Actuate BIRT Spreadsheet Engine, Java developers can write the code to access and extract data from spreadsheets and databases while spreadsheet experts can write and maintain the business logic and calculations on Excel spreadsheets. In this way you apply human resources more appropriately.

C h a p t e r 1 , A b o u t A c t u a t e B I R T S p r e a d s h e e t E n g i n e a n d A P I 5
About Actuate BIRT Spreadsheet Engine and API filesThe set of files that accompanies BIRT Spreadsheet Engine includes files that contain the BIRT Spreadsheet Engine and files that contain documentation and sample code. Some of the files appear in both the espreadsheet and espreadsheetengineandapi directory trees. Table 1-1 lists the entire set of BIRT Spreadsheet Engine files.
Table 1-1 Actuate BIRT Spreadsheet Engine files
Type Name Description
Documentation \espreadsheetengineandapi\readme.txt
Contains information about BIRT Spreadsheet Engine and BIRT Spreadsheet Designer release notes.
JAR files \espreadsheetengineandapi\jars Contains the JAR files necessary for building reports in applets, applications, servlets, and JSPs.
API JAR file \espreadsheetengineandapi\jars\essd11.jar
Provides almost all the functionality of the BIRT Spreadsheet API classes. essd11.jar includes BIRT Spreadsheet Engine’s Java Swing-specific classes.
Secondary JAR, WAR, and EXE files
\espreadsheetengineandapi\jars\derby.jar
Provides classes that relate to the sample databases, including the Derby JDBC Driver. Required for Actuate Spreadsheet file formats, .sod and .soi.
\espreadsheetengineandapi\jars\HyperlinkHelper.exe
Helps with hyperlinks.
\espreadsheet\idapi.jar Provides classes for internal Actuate e.Spreasheet Engine operations.
\espreadsheetengineandapi\jars\JNIMethods.dll
Provides classes for creating PDF files.
\espreadsheetengineandapi\jars\iText.jar
Provides classes for creating PDF files.
Localization files
\espreadsheetengineandapi\local Provides localized language support for BIRT Spreadsheet Designer. Each supported locale has a separate .jar file of the form f1j11_xx.jar, where xx is a two-letter locale code.
(continues)

6 U s i n g B I R T S p r e a d s h e e t E n g i n e a n d A P I
Deploying Actuate BIRT Spreadsheet EngineTo use BIRT Spreadsheet Engine in an application or applet, you must include essd11.jar in the classpath of the application or applet and derby.jar in the classpath of the application or applet and derby.jar to support Actuate Spreadsheet file formats and Derby JDBC support. The relevant JAR files reside in the \espreadsheetengineandapi\jars folder. You must also deploy the license file, eselicense.xml, in the application’s classpath or with the applet.
About Actuate BIRT Spreadsheet report design filesBIRT Spreadsheet Engine can create, read, and save information about a workbook or worksheet in a report design file, called the spreadsheet object design file. A spreadsheet object design file has the .sod extension. You can create a report design file with either BIRT Spreadsheet Designer or the BIRT Spreadsheet API.
Localization files (continued)
\espreadsheetengineandapi\local (continued)
For example, f1j11_ja.jar provides Japanese language support. For more information about the languages that BIRT Spreadsheet Designer supports, see Designing Spreadsheets using BIRT Spreadsheet Designer.
API documentation
\espreadsheetengineandapi\javadoc
Contains API documentation for the BIRT Spreadsheet API in Javadoc format. The primary Javadoc file that links to all the other Javadoc files is index.html.
Documentation \espreadsheetengineandapi\manuals
Provides the user guides in PDF format.
Sample databases
\espreadsheetengineandapi\databases
Contains sample databases to which the BIRT Spreadsheet examples refer.
Examples \espreadsheetengineandapi\examples
Contains several sets of example code that shows how to use BIRT Spreadsheet code in applications and applets.
\espreadsheetengineandapi\Servlets
Contains the writeURL servlet.
Help \espreadsheetengineandapi\help Contains online help files in HTML format.
Table 1-1 Actuate BIRT Spreadsheet Engine files (continued)
Type Name Description

C h a p t e r 1 , A b o u t A c t u a t e B I R T S p r e a d s h e e t E n g i n e a n d A P I 7
About Actuate BIRT Spreadsheet Engine examplesBIRT Spreadsheet Engine provides several example programs that illustrate how
to integrate the product into applets, applications, JSPs, and servlets. The examples also illustrate some common analytical techniques that you can use in your own programs.
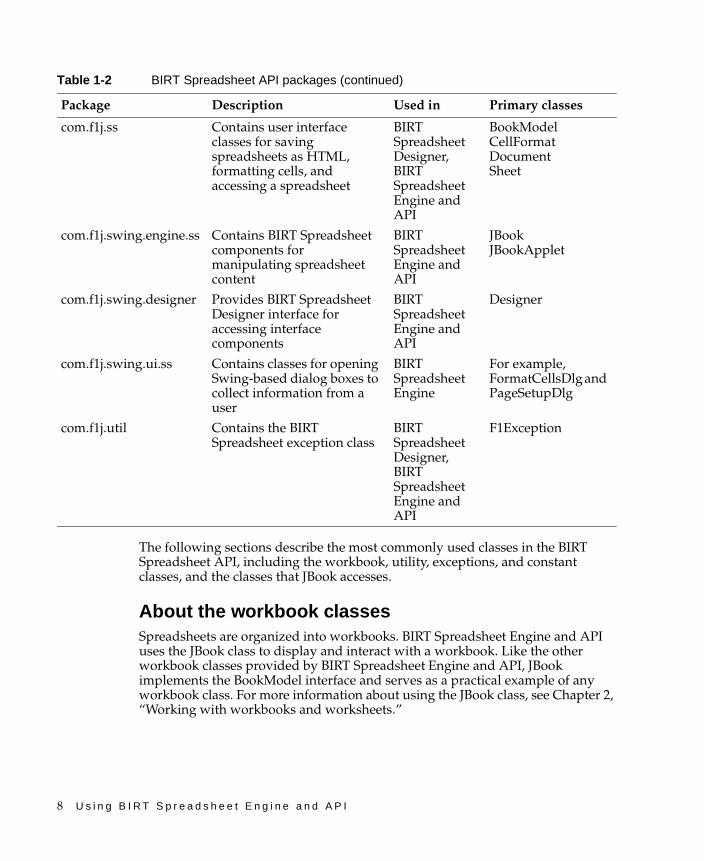
About the BIRT Spreadsheet API packagesThe BIRT Spreadsheet API is organized into several packages, all of which are available in essd11.jar. As shown in Table 1-2, some of the packages are used in BIRT Spreadsheet Designer in addition to BIRT Spreadsheet Engine and API.
Table 1-2 BIRT Spreadsheet API packages
Package Description Used in Primary classes
com.f1j.addin Contains the abstract class Func for creating a custom worksheet function accessible from the spreadsheet
BIRT Spreadsheet Engine and API
Func
com.f1j.chart Contains the charting API, which supports dynamically creating and altering BIRT Spreadsheet charts
BIRT Spreadsheet Designer, BIRT Spreadsheet Engine and API
ChartModel
com.f1j.data.* Contains the external data connection API for dynamically creating a data source, data query, and data range for creating a spreadsheet report
BIRT Spreadsheet Designer, BIRT Spreadsheet Engine and API
DataSet
com.f1j.mvc Contains the base interface for a model in the BIRT Spreadsheet Engine model-view-controller architecture
BIRT Spreadsheet Engine and API
ConstantsModels
(continues)
8 U s i n g B I R T S p r e a d s h e e t E n g i n e a n d A P I
The following sections describe the most commonly used classes in the BIRT Spreadsheet API, including the workbook, utility, exceptions, and constant classes, and the classes that JBook accesses.
About the workbook classesSpreadsheets are organized into workbooks. BIRT Spreadsheet Engine and API uses the JBook class to display and interact with a workbook. Like the other workbook classes provided by BIRT Spreadsheet Engine and API, JBook implements the BookModel interface and serves as a practical example of any workbook class. For more information about using the JBook class, see Chapter 2, “Working with workbooks and worksheets.”
com.f1j.ss Contains user interface classes for saving spreadsheets as HTML, formatting cells, and accessing a spreadsheet
BIRT Spreadsheet Designer, BIRT Spreadsheet Engine and API
BookModelCellFormatDocumentSheet
com.f1j.swing.engine.ss Contains BIRT Spreadsheet components for manipulating spreadsheet content
BIRT Spreadsheet Engine and API
JBookJBookApplet
com.f1j.swing.designer Provides BIRT Spreadsheet Designer interface for accessing interface components
BIRT Spreadsheet Engine and API
Designer
com.f1j.swing.ui.ss Contains classes for opening Swing-based dialog boxes to collect information from a user
BIRT Spreadsheet Engine
For example, FormatCellsDlg and PageSetupDlg
com.f1j.util Contains the BIRT Spreadsheet exception class
BIRT Spreadsheet Designer, BIRT Spreadsheet Engine and API
F1Exception
Table 1-2 BIRT Spreadsheet API packages (continued)
Package Description Used in Primary classes
C h a p t e r 1 , A b o u t A c t u a t e B I R T S p r e a d s h e e t E n g i n e a n d A P I 9
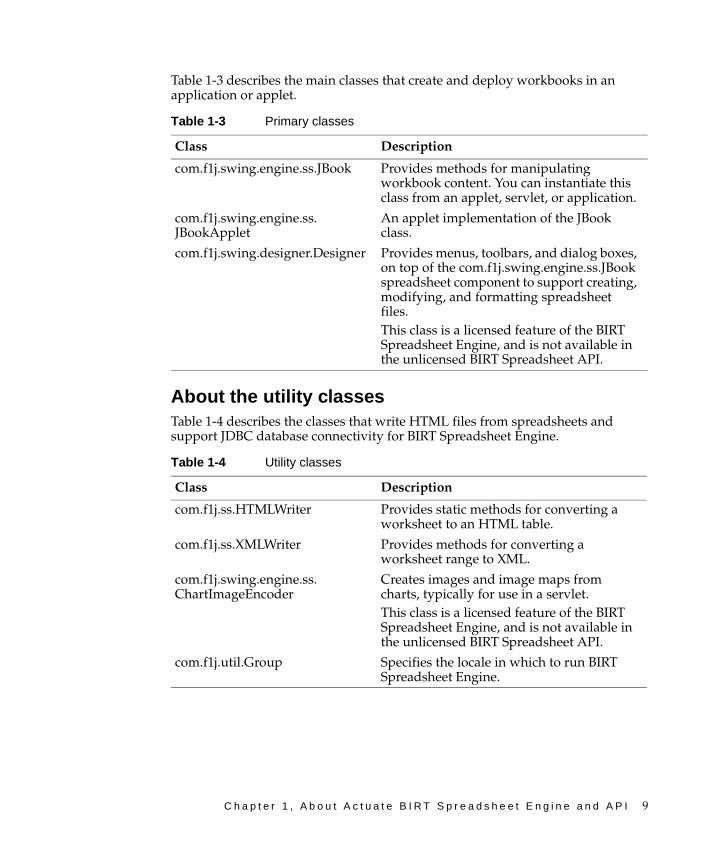
Table 1-3 describes the main classes that create and deploy workbooks in an application or applet.
About the utility classesTable 1-4 describes the classes that write HTML files from spreadsheets and support JDBC database connectivity for BIRT Spreadsheet Engine.
Table 1-3 Primary classes
Class Description
com.f1j.swing.engine.ss.JBook Provides methods for manipulating workbook content. You can instantiate this class from an applet, servlet, or application.
com.f1j.swing.engine.ss.JBookApplet
An applet implementation of the JBook class.
com.f1j.swing.designer.Designer Provides menus, toolbars, and dialog boxes, on top of the com.f1j.swing.engine.ss.JBook spreadsheet component to support creating, modifying, and formatting spreadsheet files.This class is a licensed feature of the BIRT Spreadsheet Engine, and is not available in the unlicensed BIRT Spreadsheet API.
Table 1-4 Utility classes
Class Description
com.f1j.ss.HTMLWriter Provides static methods for converting a worksheet to an HTML table.
com.f1j.ss.XMLWriter Provides methods for converting a worksheet range to XML.
com.f1j.swing.engine.ss.ChartImageEncoder
Creates images and image maps from charts, typically for use in a servlet. This class is a licensed feature of the BIRT Spreadsheet Engine, and is not available in the unlicensed BIRT Spreadsheet API.
com.f1j.util.Group Specifies the locale in which to run BIRT Spreadsheet Engine.
10 U s i n g B I R T S p r e a d s h e e t E n g i n e a n d A P I
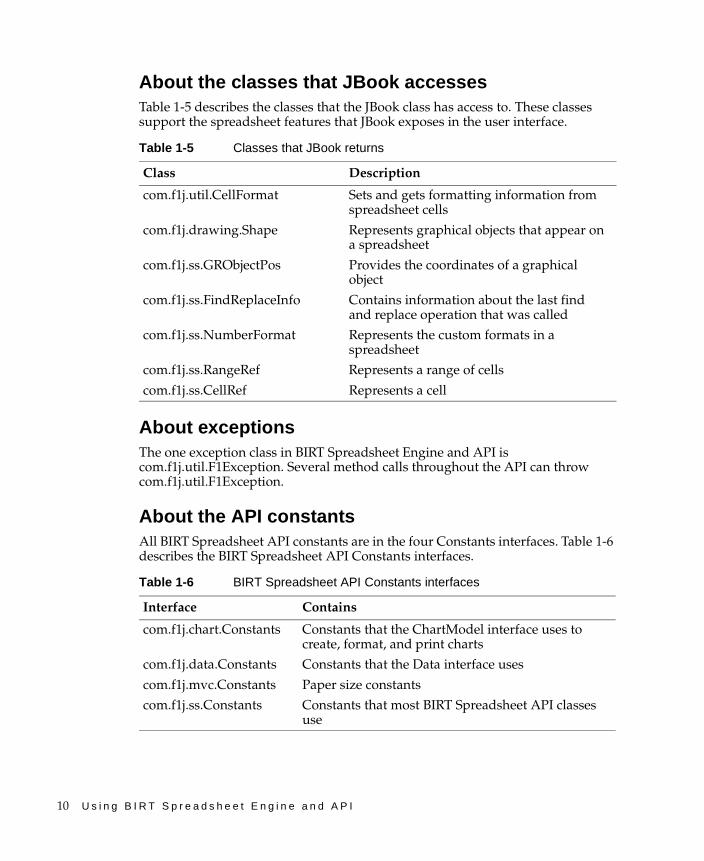
About the classes that JBook accessesTable 1-5 describes the classes that the JBook class has access to. These classes support the spreadsheet features that JBook exposes in the user interface.
About exceptionsThe one exception class in BIRT Spreadsheet Engine and API is com.f1j.util.F1Exception. Several method calls throughout the API can throw com.f1j.util.F1Exception.
About the API constantsAll BIRT Spreadsheet API constants are in the four Constants interfaces. Table 1-6 describes the BIRT Spreadsheet API Constants interfaces.
Table 1-5 Classes that JBook returns
Class Description
com.f1j.util.CellFormat Sets and gets formatting information from spreadsheet cells
com.f1j.drawing.Shape Represents graphical objects that appear on a spreadsheet
com.f1j.ss.GRObjectPos Provides the coordinates of a graphical object
com.f1j.ss.FindReplaceInfo Contains information about the last find and replace operation that was called
com.f1j.ss.NumberFormat Represents the custom formats in a spreadsheet
com.f1j.ss.RangeRef Represents a range of cells
com.f1j.ss.CellRef Represents a cell
Table 1-6 BIRT Spreadsheet API Constants interfaces
Interface Contains
com.f1j.chart.Constants Constants that the ChartModel interface uses to create, format, and print charts
com.f1j.data.Constants Constants that the Data interface uses
com.f1j.mvc.Constants Paper size constants
com.f1j.ss.Constants Constants that most BIRT Spreadsheet API classes use

C h a p t e r 1 , A b o u t A c t u a t e B I R T S p r e a d s h e e t E n g i n e a n d A P I 11
Importing any of these interfaces provides access to the BIRT Spreadsheet API constants that it contains. Referring to an individual class provides access to all the constants within that class.
Most BIRT Spreadsheet API classes implement the com.f1j.ss.Constants interface. You can access these constants using any BIRT Spreadsheet API class that implements the com.f1j.ss.Constants interface.

12 U s i n g B I R T S p r e a d s h e e t E n g i n e a n d A P I

C h a p t e r 2 , W o r k i n g w i t h w o r k b o o k s a n d w o r k s h e e t s 13
C h a p t e r
2Chapter 2Working with workbooks
and worksheetsThis chapter contains the following topics:
■ About working with workbooks
■ Creating a workbook
■ Editing a workbook using BookModel interface objects
■ Managing multithreading issues
■ Working with worksheets

14 U s i n g B I R T S p r e a d s h e e t E n g i n e a n d A P I
About working with workbooksThis chapter provides a foundation for understanding the workbook classes implemented by the BIRT Spreadsheet API. For a complete list and descriptions of all the methods in the workbook classes and interfaces, see the Javadoc.
The following three classes provide editing capabilities to a workbook and they all implement the BookModel interface:
■ com.f1j.swing.engine.ss.JBook provides user interface elements for displaying and editing a workbook.
■ com.f1j.swing.engine.ss.JBookApplet provides methods for displaying and editing a workbook as an applet.
■ com.f1j.ss.BookModelImpl provides methods for editing a workbook, but does not have a user interface.
Understanding the JBook classJBook is a fully functional Java Swing component that you use inside a Java Swing application to access and display a workbook. JBook extends the com.f1j.swing.common.Panel class, which supports adding a JBook object to a Java Swing pane. The JBook class contains an underlying spreadsheet data structure that you can access directly by requesting a com.f1j.ss.Bookmpl object from a JBook object.
The JBook class also implements the BookModel interface. All of the BIRT Spreadsheet functionality of the JBook class that does not pertain to the user interface resides in the methods declared by the BookModel interface.
Understanding the JBookApplet classJBookApplet is functionally identical to JBook, but it extends javax.swing.JApplet instead of javax.swing.JPanel. This makes it accessible from an HTML page.
Understanding the BookModelImpl classBookModelImpl is a generic class that provides editing functionality for workbook content and implements the BookModel interface. BookModelImpl only extends java.lang.object so does not include Swing functionality like JBook or JBookApplet. It does contain the view information associated with the other user interface implementations, such as current selection and visible rows and columns. The view information that BookModelImpl provides control over includes:
C h a p t e r 2 , W o r k i n g w i t h w o r k b o o k s a n d w o r k s h e e t s 15
■ The current selection
■ The first visible row and column, which specifies the view position
■ Split windows and frozen panes
■ All the options a user can set in Tools➛Option➛View in Excel
■ All the options a user can set in Tools➛Options➛General in BIRT Spreadsheet Designer
■ All the options a user can set in Format➛Sheet➛Properties➛View in BIRT Spreadsheet Designer
The above controls are in addition to those declared by the BookModel interface for editing workbook content.
Understanding the BookModel interfaceThe BookModel objects provide access and editing capabilities to workbooks and workbook content. The BookModel interface does not include methods that relate to the user interface, such as event handling and listener management, but the JBook and JBookApplet classes add this functionality.
Besides JBook, JBookApplet, and BookModelImpl, callback classes also use a BookModel object to provide access to the workbook. For more information about callback classes and examples, see Designing Spreadsheets using BIRT Spreadsheet Designer.
Accessing other components from a BookModel objectThe BookModel interface declares methods to get the components of a workbook, including:
■ Sheets
■ Cells
■ Data ranges
■ Data sources
■ Charts
■ Pivot ranges
■ Format objects
Understanding BookModel method declarationsThe BookModel interface declares methods to do the following tasks:
■ Operate on individual worksheets and sets of worksheets.

16 U s i n g B I R T S p r e a d s h e e t E n g i n e a n d A P I
■ Manage the following aspects of a workbook:
■ Selected cells, rows, columns, and sheets
■ Active cell, row, column, and sheet
■ Defined names
■ Specific cell content
■ Display characteristics, such as fonts, labels, and column and row sizes
■ File input and output
■ Password protection
■ Graphic objects
■ Transactions
■ Allowable user actions
■ Print settings
■ Attach and copy the workbook to another workbook.
■ Recalculate the workbook.
■ Manage the appearance of the workbook, including such features as:
■ The default font
■ The view scale
■ The visible area
■ The workbook border
Creating a workbook How you create a workbook depends on whether you are using the workbook in an environment that has a user interface. If you create a workbook in an environment where the user can interact with the workbook, you must use a JBook object because a JBook object contains functionality for managing user interface events. If you create a workbook in a servlet or that does not have a user interface, use a BookModelImpl object because it eliminates the extra overhead of user interface functionality. There is also an option to create and display the workbook in a web browser using JBookApplet, which requires no code.
The following sections detail examples of how to use each object. The applet examples involve the least code, so they appear first.

C h a p t e r 2 , W o r k i n g w i t h w o r k b o o k s a n d w o r k s h e e t s 17
Writing a Java applet that displays a spreadsheetThe following Java applet contains the minimum necessary code to create a spreadsheet using JBook that displays “Hello World”:
import java.awt.*;import javax.swing.*;import com.f1j.swing.engine.ss.*;
public class HelloWorld extends JApplet{
public void init(){
getContentPane().setLayout(null);JBook jbook1 = new JBook();jbook1.setSize(400, 400);jbook.setText(1, 0, "Hello World");getContentPane().add(jbook1);setVisible(true);
}}
This example illustrates a standard way of writing a Java applet, but there are two lines that require explanation.
The following line shows the creation of the primary object that provides access to the BIRT Spreadsheet API:
JBook jbook1 = new JBook();
This line:
getContentPane().add(jbook1);
illustrates how you add a spreadsheet to the content pane of the applet. You can add a JBook object to the content pane of an applet because the JBook class descends from javax.swing.JPanel.
Compiling the HelloWorld appletTo compile the HelloWorld Java source file as HelloWorld.java in a directory of your choice, use javac on the command line in a command window. To successfully compile the HelloWorld applet, you must include essd11.jar and the license file, eselicense.xml, in your classpath. You can temporarily add the JAR files to your classpath by specifying the JAR file’s path in the command line of the compile statement, as shown in the following example:
javac -classpath .;.\license\;C:\Program Files\Actuate11\espreadsheetengineandapi\jars\essd11.jarHelloWorld.java

18 U s i n g B I R T S p r e a d s h e e t E n g i n e a n d A P I
An easier alternative is to add the JAR and license files permanently to your classpath by adding them to your CLASSPATH environment variable. In this case, the compile statement is:
javac HelloWorld.java
Both of these javac statements assume that the current directory contains a Java source file named HelloWorld.java and that the license file is in the subdirectory, license. Successful compilation results in a file named HelloWorld.class, which javac creates in the current directory.
Understanding the HTML code for displaying an appletThe following HTML code uses the ARCHIVE attribute of the applet to locate the resources that the applet requires. This APPLET element contains the minimum necessary code to run the applet and display the spreadsheet in a browser that has a Java plug-in:
<HTML><BODY>
<APPLET CODE="HelloWorld.class" ARCHIVE="essd11.jar, license/" WIDTH="400" HEIGHT="400">
</APPLET></BODY>
</HTML>
This code assumes that essd11.jar is in the same directory as HelloWorld.class and that the license file, eselicense.xml, is in the license subdirectory. After you compile the HelloWorld applet, you can use this HTML file to verify that Actuate BIRT Spreadsheet Engine is properly installed on your machine and that you have a compatible browser using the latest Java virtual machine (JVM) on your system. To run a BIRT Spreadsheet Engine applet as a Java plug-in, you can use JavaScript code similar to the following lines:
document.writeln('<APPLET WIDTH="100%" HEIGHT="100%">');document.writeln('<PARAM NAME = scriptable VALUE = "false">');document.writeln('<PARAM NAME = codebase VALUE = "applet/">');document.writeln('<PARAM NAME = code VALUE =
"HelloWorld.class">');document.writeln('<PARAM NAME = cache_archive VALUE =
"essd11.jar">');document.writeln('<PARAM NAME = name VALUE = "f1">');document.writeln('<PARAM NAME = type VALUE =
"application/x-java-applet;version=1.5">');document.writeln('<PARAM NAME = workbook VALUE ="file.xls">');document.writeln('</APPLET>');
This code assumes that the license file, eselicense.xml, is in the codebase directory, applet. Depending on which browser you use, you need to write APPLET,

C h a p t e r 2 , W o r k i n g w i t h w o r k b o o k s a n d w o r k s h e e t s 19
EMBED, or OBJECT tags. Consult your browser’s documentation to check its requirements.
Running the HelloWorld appletTo run the applet, you must perform the following tasks:
■ Create a file containing the HTML code discussed in “Understanding the HTML code for displaying an applet,” earlier in this chapter.
■ Save the HTML file into the same directory as the HelloWorld.class file, naming it HelloWorld.html.
■ Copy essd11.jar into the same directory as HelloWorld.html and HelloWorld.class or insure that the three JAR files are in the classpath.
■ Open HelloWorld.html in a browser, such as Internet Explorer or Mozilla Firefox.
You see a spreadsheet appear in the browser window, similar to the one in Figure 2-1.
Figure 2-1 HelloWorld applet example
Embedding a worksheet in a web page without writing any codeThe BIRT Spreadsheet API includes a fully functional applet, JBookApplet, that displays a worksheet without requiring you to write any Java code. You can accomplish displaying a worksheet in a web page with one line of HTML code.
The following code creates an empty workbook in a web page:
<HTML><BODY>
<APPLET CODE="com.f1j.swing.engine.ss.JBookApplet" ARCHIVE="essd11.jar, license/" WIDTH=550 HEIGHT=375>
</APPLET></BODY>
</HTML>
This code assumes that essd11.jar is in the same directory as the HTML file and that the license file, eselicense.xml, is in the subdirectory, license. The JBookApplet class extends javax.swing.JApplet, which qualifies it as an applet.

20 U s i n g B I R T S p r e a d s h e e t E n g i n e a n d A P I
You can pass a parameter to JApplet that instructs JBookApplet to load a workbook into the spreadsheet. The following example illustrates how to load an Excel file from the same directory as the HTML file:
<HTML><BODY>
<APPLET CODE="com.f1j.swing.engine.ss.JBookApplet" ARCHIVE="essd11.jar, derby.jar, license/" WIDTH=550 HEIGHT=375><PARAM name="workbook" value="MyExcelSheet.xls">
</APPLET></BODY>
</HTML>
The key line in this code is:
<PARAM name="workbook" value="MyExcelSheet.xls">
The parameter name is workbook and the value you specify is a URL identifying the workbook you want to appear in the web page. When the workbook is in the same directory as the HTML file, you only need to specify the name of the workbook file. Besides being able to specify an Excel file, you can also specify a spreadsheet object design file (.sod file). If you specify a SOD file, the applet must be digitally signed and the JDBC driver and the database must be present on the client. A better approach is to set the workbench parameter to a servlet that uses a SOD file. With this approach, the applet does not have to be signed and the database and the JDBC driver remains on the server.
Writing a Java Swing application that displays a spreadsheetYou can write the application class to extend the Java Swing class JFrame to display a spreadsheet using the JBook class. In the HelloWorldApp example that follows, the main( ) method creates a JBook object and sets its visible property to true. The constructor prepares itself by performing standard Java Swing tasks, including:
■ Setting the layout method of the content pane
■ Setting the frame’s size and title
■ Creating a WindowAdapter object and passing it to the addWindowListener( ) method
The HelloWorldApp class constructor then does a few operations specific to the BIRT Spreadsheet API, including:
■ Instantiating a JBook object
■ Adding the JBook object to the frame’s content pane

C h a p t e r 2 , W o r k i n g w i t h w o r k b o o k s a n d w o r k s h e e t s 21
■ Passing the JBook object to the doSpreadsheetTasks( ) method that does all the spreadsheet-related tasks
import com.f1j.swing.engine.ss.*;import java.awt.*;import javax.swing.*;import java.awt.event.*;import com.f1j.ss.*;
public class HelloWorldApp extends JFrame{
public HelloWorldApp() {getContentPane().setLayout(null);setSize(450, 275);setTitle("Swing application");SimpleWindow sWindow = new SimpleWindow();addWindowListener(sWindow);// Create a JBook object, add it to the content pane
JBook jbook1 = new JBook();jbook1.setBounds(10,5,400,200);getContentPane().add(jbook1);// pass it to doSpreadsheetTasksdoSpreadsheetTasks(jbook1, new Object());
}public static void main(String args[ ]) {(new HelloWorldApp()).setVisible(true);
}
class SimpleWindow extends WindowAdapter{
public void windowClosing(WindowEvent event) {Object object = event.getSource();if(object == HelloWorldApp.this)
SimpleApp_WindowClosing(event);}
}
void SimpleApp_WindowClosing(WindowEvent event) {setVisible(false);dispose();System.exit(0);
}private void doSpreadsheetTasks(BookModel bk,Object obj) {
try{bk.setText(1, 0, "Hello World");
} catch(Exception e){}}
}

22 U s i n g B I R T S p r e a d s h e e t E n g i n e a n d A P I
The JBook class implements the BookModel interface. Therefore, you can pass a JBook object to any method that takes a BookModel argument. Almost all of the spreadsheet-specific functionality in JBook is also in the BookModel interface.
The doSpreadsheetTasks( ) method in the HelloWorldApp example takes a BookModel argument and an Object argument. This means that doSpreadsheetTasks( ) has the same signature as both the start method and the end method of a callback class. For more information about callback classes, see Designing Spreadsheets using BIRT Spreadsheet Designer. Using the same signature for doSpreadsheetTasks( ) as the signatures of the start( ) and end( ) methods of a callback class is useful for the following two reasons:
■ You can easily reuse your doSpreadsheetTasks( ) code in a callback class.
■ There are numerous examples of callback class code that apply equally well to applications and applets.
Compiling a Java application is no different than compiling a Java applet. When you compile either an applet or a Java application that accesses the BIRT Spreadsheet API, you must have essd11.jar in the classpath. You must also have the license file, eselicense.xml, in the classpath. Running a Java application that uses the BIRT Spreadsheet API also requires that these files be in the classpath.
How to compile and run the HelloWorldApp application
1 Ensure that essd11.jar and eselicense.xml are in your classpath, as explained in “Compiling the HelloWorld applet,” earlier in this chapter.
2 Compile the source program, HelloWorldApp.java:
javac HelloWorldApp.java
3 Execute the resulting HelloWorldApp.class file:
java HelloWorldApp
When you run the HelloWorldApp application, a window appears, similar to the one in Figure 2-2.
Figure 2-2 HelloWorldApp example application
Creating a servlet or an application without a user interfaceAny Java application use the BIRT Spreadsheet API BookModelImpl class to function as a spreadsheet calculation engine. When used this way, there is no

C h a p t e r 2 , W o r k i n g w i t h w o r k b o o k s a n d w o r k s h e e t s 23
need for the user interface overhead of a JBook object, so you can use BookModelImpl instead. The following code example illustrates a servlet that reads in a BIRT Spreadsheet Designer report design file named template.sod, adds a password to protect the workbook, and writes out a file in Excel format:
import java.io.*;import javax.servlet.*;import javax.servlet.http.*;import com.f1j.ss.*;
public class PasswordProtectServlet extends HttpServlet{
private static final long serialVersionUID = 1L;@Overridepublic void doGet(HttpServletRequest request,
HttpServletResponse response)throws ServletException, java.io.IOException
{/********************************************************** Tell the browser we are sending an Excel file*********************************************************/
response.setContentType("application/vnd.ms-excel");ServletOutputStream out = response.getOutputStream();Document doc = null;try{
/********************************************************** Populate the document from a spreadsheet report design*********************************************************/
File templateFile = new File("c:\\template.sod");doc = new Document(null, templateFile,
new DocumentOpenCallback());doc.getLock();
/********************************************************** Password protect the book*********************************************************/
BookModel bmi_book = BookModel.Factory.create(doc.getBook());
bmi_book.setBookProtection(true, "password", Constants.kProtectStructure);

24 U s i n g B I R T S p r e a d s h e e t E n g i n e a n d A P I
/********************************************************* Output the document to the output stream********************************************************/
doc.fileSaveAs(out, DocumentType.EXCEL_97_REPORT_VIEW, new DocumentSaveCallback());
}catch (Throwable e){
System.out.println(e.getMessage());}finally{
/******************************************************** Release the thread lock on the document********************************************************/
out.close();if (doc != null)
doc.releaseLock();doc.release();
}}
}
There are several BIRT Spreadsheet Engine and API classes used in PasswordProtectServlet, which include:
■ com.f1j.ss.Document: a wrapper for handling files on the file system. Document is used to lock template.sod, generate a Book object to access its content, load it into a BookModel object, and save the spreadsheet in another file format.
■ com.f1j.ss.BookModel.Factory: a class for creating BookModelImpl objects. Document provides the Book object using the getBook() method as input.
PasswordProtectServlet is only implementable using the licensed BIRT Spreadsheet Engine and API because it uses sophisticated file formats and implements security. In the Java Enterprise environment, the potential for JavaScript Engine and API servlet applications like this one is enormous. For examples of servlet applications spanning a wide array of functional topics, see Chapter 15, “Integrating BIRT Spreadsheet Engine with servlets and JSPs.”
Editing a workbook using BookModel interface objectsThe BookModel interface declares several required methods for handling generic tasks for workbooks. Use these methods from any BookModel object.
C h a p t e r 2 , W o r k i n g w i t h w o r k b o o k s a n d w o r k s h e e t s 25
Resetting a workbook to default settingsYou can reset a workbook loaded in any BookModel object to its initial default settings at any time with the following statement:
bm_book.initWorkbook( );
This method also clears the workbook of all content. You must call this method immediately after instantiating a new workbook object unless you are using the BookModel object to input a workbook from the disk or an input stream. The following code reads a workbook from the disk:
File templateFile = new File("c:\\template.sod");doc = new Document(null, templateFile, new
DocumentOpenCallback());doc.getLock();BookModel bm_book = BookModel.Factory.create(doc.getBook());
Grouping workbooksYou assign a workbook to a group by calling the setGroup( ) method, as in the following statement:
bm_book.setGroup(java.lang.String group);
When you group two or more workbooks, a formula in one workbook can reference a cell in another workbook of the same group.
Grouping workbooks also offers you the ability to:
■ Attach one workbook to another workbook.
■ Ensure that a single thread does background processing on all workbooks.
■ Save memory by having multiple workbooks share resources.
Do not use a workbook group if you are concerned about:
■ Lack of concurrency when manipulating multiple workbooksYou must acquire a lock on all workbooks in the group before modifying any workbook. Acquiring a lock on one workbook in a group automatically acquires a lock on all workbooks in the group.
■ Support for garbage collection within a workbookIf a workbook is part of a named group, you can only free the resources associated with the workbook by calling its destroy( ) method.
■ Support for each group having a thread for background processing as well as certain other resources used primarily for workbook formulas
The setGroup( ) method instantiates a new Group object if one does not exist but BookModel only references a group by its name. For more information on using Group objects directly, see “About the Group parameter” in Chapter 4, “Working
26 U s i n g B I R T S p r e a d s h e e t E n g i n e a n d A P I
with input and output.”
Attaching workbooksYou can attach one workbook to another so that a change to the value or formula of a cell in one of the workbooks appears as a change in the attached workbook. You typically use this technique in an application that has a user interface to dynamically change the user interface values displayed. For example, you can attach a hidden workbook to a visible workbook for the purpose of manipulating the visible workbook through the hidden one. Manipulating a visible workbook through a hidden workbook is useful when you need to change the selection, but you want the view of the visible worksheet to remain unchanged. You attach one workbook to another workbook by calling the attach( ) method from any BookModel object, as in the following statement:
bm_book.attach(otherWorkbookName);
The other workbook effectively becomes a copy of the workbook it is attached to, where all value manipulation done in one workbook is transferred to the other.
Refreshing data in a workbookIf a worksheet relies on external data from a database or external file, you can refresh the data by creating and saving a new Document object, as shown in the following code:
com.f1j.ss.Document d_doc = bm_book.getDocument();try {
d_doc.fileSaveAs(new java.io.File("report.xls"), com.f1j.ss.DocumentType.EXCEL_97_WORKBOOK, new com.f1j.ss.DocumentSaveCallback());
}finally {
d_doc.release();}
You must always call the Document.release( ) method after creating the document. If you do not call this method, the engine retains a lock on the output file. For more information about using the Document class, see Chapter 4, “Working with input and output.”
Managing multithreading issuesWhen you want to share a workbook across several clients, for example in a servlet, you must make the workbook thread-safe to maintain data integrity and state. You make a workbook thread-safe by calling the BookModel.getLock( ) method before any operation that alters the workbook or any of its components.

C h a p t e r 2 , W o r k i n g w i t h w o r k b o o k s a n d w o r k s h e e t s 27
The BookModel.getLock( ) method places a lock on the workbook and all of its components. From the time you call BookModel.getLock( ) until you call BookModel.releaseLock( ), any other thread trying to access the workbook object is suspended. You can nest calls to getLock( ), but you must call releaseLock( ) once for each getLock( ).
If you have code that modifies a workbook while inside a try-catch block, the safest place to put the releaseLock( ) is in the finally clause of the try-catch block. If the releaseLock( ) is not in the finally clause and an exception occurs, the releaseLock( ) will never be executed, and all threads waiting for access to the workbook will hang.
bm_book.getLock(); try {
...}catch(Throwable e) {
...}finally {
bm_book.releaseLock();}
In the proceeding example and throughout the book, the object with the name book is any object that implements the BookModel interface. It can be a JBook object, a BookModelImpl object, or an object passed to a callback class.
Working with worksheetsA workbook can have multiple worksheets. The Sheet interface represents a worksheet in the BIRT Spreadsheet API and is implemented by the SheetImpl class. It is common to use the terms sheet and worksheet interchangeably. Most methods that refer to a specific worksheet identify the worksheet by index number. Worksheets are indexed according to their positions in the set of worksheet tabs at the bottom of the workbook. The leftmost worksheet is worksheet 0 and the rightmost worksheet has an index number equal to the number of worksheets minus one.
The getSheetName method returns the name of the worksheet specified by index number. To get the name of the active worksheet, use the BookModel.getSheet method in place of the worksheet index number parameter. The following example shows how to return the name of the active worksheet:
String mySheet = bm_book.getSheetName(bm_book.getSheet());

28 U s i n g B I R T S p r e a d s h e e t E n g i n e a n d A P I
Understanding selected worksheetsA worksheet can be selected or deselected. There can be more than one selected worksheet in a workbook, but there is always at least one. In applications that have a user interface, selected worksheets are those whose tabs are highlighted. Also, certain operations apply to all selected worksheets. For more information about operations that apply to all selected worksheets, see “Operating on all selected worksheets,” later in this chapter. To select a worksheet, use the setSheetSelected( ) method, as in the following statement:
bm_book.setSheetSelected(0, true);
You deselect a worksheet by passing false to setSheetSelected( ), as in the following line of code:
bm_book.setSheetSelected(0, false);
This method does not deselect a worksheet if it is the only worksheet in the set of selected worksheets.
Understanding the active worksheetThere can only be one active worksheet. Certain operations apply just to the active worksheet. The active worksheet is the worksheet that is in view in an application that has a GUI. You can also make a worksheet active in an application that does not have a user interface.
To make a worksheet active, use setSheet( ), as in the following statement:
bm_book.setSheet(2);
When you make a worksheet the active worksheet, it automatically becomes a selected worksheet. However, if a worksheet is not selected when you make it active, all selected worksheets become deselected and only the new active worksheet is a selected worksheet. If a worksheet is already selected when you make it the active worksheet, the set of selected worksheets does not change. For more information about operations that apply to just the active worksheet, see “Operating on the active worksheet,” later in this chapter.
Do not confuse the active worksheet with the selected worksheet. There can be multiple selected worksheets, but only one active worksheet. Formally, when a worksheet is not the active worksheet, its name appears on the worksheet tab, but the worksheet is not visible. All methods of the BookModel interface that are specific to a single unspecified worksheet apply to the active worksheet and any currently selected worksheets. For example, the following statement clears all the cells in the range A1:E5 on the active and any selected worksheets:
bm_book.clearRange(0, 0, 4, 4, Constants.eClearAll);

C h a p t e r 2 , W o r k i n g w i t h w o r k b o o k s a n d w o r k s h e e t s 29
Creating worksheetsWhen you create a workbook, you can specify how many worksheets you want by calling setNumSheets( ), as in the following statement:
bm_book.setNumSheets(5);
You can call setNumSheets( ) at any time to either increase or decrease the number of worksheets in a workbook. Sheets are added or deleted at the end of the list of worksheets. If setSheets deletes the active worksheet, the worksheet at the end of the book becomes the active worksheet.
Inserting worksheetsYou use the insertSheets( ) method to insert worksheets. You specify how many worksheets to insert and where to insert them. The following statement inserts three worksheets in the sheet index position 5:
bm_book.insertSheets(5, 3);
When you insert worksheets, all the worksheet indexes above the point of insertion increase by the number of worksheets you insert. Therefore, in the preceding example, worksheet in index 6 moves to worksheet index 9 to accommodate the insertion of worksheets in indexes 5 through 8. In addition, the first worksheet inserted becomes the active worksheet.
Manipulating worksheets using the BookModel interfaceYou can perform many operations on worksheets directly through the BookModel interface without an explicit Sheet object. You can use any of several methods in the BookModel interface that allow you to specify the worksheet you want to change. There are also methods that only apply to the active worksheet, as well as a few methods that apply to all selected worksheets.
Operating on a specific worksheet
The BookModel interface contains numerous method declarations designated to perform operations on a worksheet that you specify by index. These operations include:
■ Adding a hyperlink
■ Getting an array of hyperlinks
■ Loading data from an array
■ Copying a range from one worksheet into another
■ Getting and setting the cell format for a specific cell
■ Getting a collection of ranges

30 U s i n g B I R T S p r e a d s h e e t E n g i n e a n d A P I
■ Getting and setting the content and formula and cell type of a specific cell
■ Getting and setting a worksheet name
■ Working with protection characteristics
■ Getting and setting the cell type for a specific cell
■ Working with selection characteristics
Operating on the active worksheet
There are also many method declarations of the BookModel interface designated to operate on the active worksheet. These operations include:
■ Copying, cutting, deleting, and pasting the selected range
■ Getting and setting the print controls
■ Printing the active worksheet
■ Working with the auto filters
■ Getting the active row and column
■ Getting and setting the content, formula, and cell type of the active cell
■ Getting and setting the maximum and minimum display row and column
Operating on all selected worksheets
There are several method declarations of the BookModel interface that operate on all selected worksheets. These operations include:
■ Deleting a range
■ Moving a range
■ Setting cell values and formulas
■ Setting header heights and widths
■ Setting the top left text
Manipulating worksheets through the Sheet interfaceSome sheet operations are only available using the Sheet interface. To get a Sheet object from a BookModel object, you must get a Book object from the BookModel object and get the Sheet object from the Book object. The following statement illustrates getting a Sheet object by index, starting with the BookModel object:
Sheet s_someSheet = bm_book.getBook().getSheet(1);
The Sheet interface has several method declarations designated for manipulating a worksheet that are not in the BookModel interface. It also duplicates some

C h a p t e r 2 , W o r k i n g w i t h w o r k b o o k s a n d w o r k s h e e t s 31
methods. You have a choice of which interface to use when the same functionality is in both interfaces.
■ Setting the worksheet nameYou can get and set the worksheet name through either interface, as in the following statements:
bm_book.setSheetName(2, "Expenses");s_worksheet.setName("Expenses");
■ Getting and setting cell content You can get and set cell content through either interface, as in the following statements:
bm_book.setText(row, col, "March");s_worksheet.setText("March");
The BookModel interface implementation sets text to the active worksheet and any selected worksheets.
■ Controlling outlining
■ Setting worksheet protection
■ Setting hidden state
■ Setting row and column names
■ Setting the worksheet type
■ Setting the top left text
For more information about using the Sheet interface, see Chapter 3, “Working with worksheet elements.”
Deleting worksheetsYou can delete any worksheet in a workbook unless there is only one. There must always be at least one worksheet in the book. To delete one or more worksheets, you select the worksheets and then call editDeleteSheets( ). The following statement illustrates how to delete worksheet number 3:
bm_book.setSheet(3);bm_book.editDeleteSheets();
Hiding a worksheetYou use the Sheet.setHiddenState( ) method to control whether a worksheet is hidden and whether the user can reveal it. Table 2-1 shows the effects of the three values you can pass to setHiddenState( ).

32 U s i n g B I R T S p r e a d s h e e t E n g i n e a n d A P I
You pass the following constants to control the visibility of a worksheet.
To hide a worksheet in the workbook, use a Sheet object as shown in the following code:
Sheet s_someSheet = bm_book.getBook().getSheet(1);//Hide a Sheet objects_someSheet.setHiddenState(Constants.eSheetVeryHidden);
Table 2-1 Constants that control the visibility of a worksheet
Constant Description
eSheetShown Make the worksheet visible.
eSheetHidden Hide the worksheet but allow a user to make it visible.
eSheetVeryHidden Hide the worksheet. Do not allow a user to make it visible.
C h a p t e r 3 , W o r k i n g w i t h w o r k s h e e t e l e m e n t s 33
C h a p t e r
3Chapter 3Working with worksheet
elementsThis chapter contains the following topics:
■ About worksheet elements
■ Working with a worksheet tab
■ Working with rows and columns
■ Working with headings
■ Working with cells
■ Working with a range of cells
■ Working with a worksheet outline
■ Working with scroll bars
34 U s i n g B I R T S p r e a d s h e e t E n g i n e a n d A P I
About worksheet elementsYou can use the BIRT Spreadsheet API to create or manipulate worksheets, rows, columns, row and column headings, cells, ranges, worksheet outlines, and scroll bars. For more information about using the BIRT Spreadsheet API to manipulate worksheet elements, see the Javadoc.
Working with a worksheet tabA worksheet tab displays a worksheet name. Use the setShowTabs( ) method to set the display status and position of the worksheet tabs on a workbook, as shown in the following statement:
bm_book.setShowTabs(Constants.eTabsBottom);
Table 3-1 describes the allowable values for the setShowTabs parameter.
When you create a new worksheet, the name of the worksheet is Sheetx by default, where x is a sequence number. The first sheet is Sheet1, the next one is Sheet2, and so forth. The newest worksheet appears to the left of the others and the rightmost worksheet is always Sheet1.
The numbering system for sheet names is different than that which the BIRT Spreadsheet API uses when assigning index numbers for worksheets. The worksheet index numbers start at 0 for the leftmost sheet and go to x-1 for the rightmost worksheet. When you insert or delete a sheet, the sheet indexes shift to accommodate the deletion or insertion. You use worksheet indexes to get specific worksheets, as shown in the following statement that gets the leftmost worksheet:
Sheet s_mySheet = bm_book.getBook().getSheet(0);
Working with rows and columnsThis section illustrates the following ways to manipulate rows and columns:
■ Setting the first row or column to display
Table 3-1 setShowTabs parameter values
Constant Description
eTabsOff Tabs hidden
eTabsBottom Tabs on bottom
eTabsTop Tabs on top

C h a p t e r 3 , W o r k i n g w i t h w o r k s h e e t e l e m e n t s 35
■ Hiding or showing a column or row
■ Working with column widths
■ Freezing a row or a column
■ Determining the last row or column containing data
Setting the first row or column to displayUse the setLeftCol( ) and setTopRow( ) methods to set the first row and column to display on the active sheet. You refer to columns by their index number. Column indexes start with 0 for column A and row indexes start with 0 for row 1. The following example shows how to set column E and row 6 as the upper left corner of the visible section of the active worksheet:
bm_book.setLeftCol(4); // column Ebm_book.setTopRow(5); // row 6
Hiding or showing a column or rowUse the setColHidden( ) and setRowHidden( ) methods to hide or show columns and rows on the selected sheets. There are two versions of both methods, to specify a single column or row, or a range of columns or rows. The following statements illustrate the various ways you can use these two methods:
bm_book.setColHidden(0, true); // hides column Abm_book.setColHidden(0, false); // shows column Abm_book.setRowHidden(0, true); // hides row 1bm_book.setRowHidden(0, false); // shows row 1bm_book.setColHidden(0, 3, true); // hides columns A-Dbm_book.setColHidden(0, 3, false); // shows column A-Dbm_book.setRowHidden(0, 3, true); // hides row 1-4bm_book.setRowHidden(0, 3, false); // shows row 1-4
Limiting visible rows and columnsUse BookModel’s setMinCol( ), setMaxCol( ), setMinRow( ), and setMaxRow( ) methods to set the visible rows and columns in the active worksheet. The following example shows how to limit the visible rows and columns in the active worksheet to the range D5:F7:
bm_book.setMinCol(3); // Set minimum visible column to Dbm_book.setMinRow(4); // Set minimum visible row to 5bm_book.setMaxCol(5); // Set maximum visible column to Fbm_book.setMaxRow(6); // Set maximum visible row to 7

36 U s i n g B I R T S p r e a d s h e e t E n g i n e a n d A P I
Working with column widthsThis section describes how to change default column width, get the column width in twips, maintain column width when importing data, and resize a column as data changes.
Setting the units of column widthThere are several BookModel methods to set the width of a column or columns on a worksheet. These methods all take a column width parameter. Table 3-2 lists all the methods you can use to set column widths.
For the first two methods in the table, the meaning of the column width parameter varies according to the most recent global setting of the column width units. You use setColWidthUnits( ) to change the units of the column width parameter. When you make a change to column width units, you change the meaning of the width parameter that you subsequently pass to either of the first two methods in the table. Table 3-3 lists the allowable constants that you can pass to setColWidthUnits( ).
Table 3-2 BookModel methods to use when setting column widths
Method to set column width Description
setColWidth(int col, int width) Sets the width of a single column on the active worksheet.
setColWidth(int col1, int col2, int width, boolean defaultWidth)
Sets the width of a range of columns on the active worksheet. If defaultWidth is true, this method also sets the default width to width.
setColWidthTwips(int col, int width) Sets the width of a single column in twips on the active worksheet.
setColWidthTwips(int col1, int col2,int width, boolean defaultWidth)
Sets the width of a range of columns in twips on the active worksheet. If defaultWidth is true, this method also sets the default width to width.
Table 3-3 Constants that can be passed to setColWidthUnits( )
setColWidthUnits constant Description
eColWidthUnitsNormal 1/256 of the width of character zero (0) in default font and font size
eColWidthUnitsTwips 1/20 of a printer’s point, or about 1/1440 inch
C h a p t e r 3 , W o r k i n g w i t h w o r k s h e e t e l e m e n t s 37
The default setting of column width units is eColWidthUnitsNormal, also called the normal setting. The alternate setting of column width units is eColWidthUnitsTwips. It is common to specify column widths in twips when there are constraints on the width of printed output. You can change column width units back and forth between the normal setting and twips at any time.
The following statement changes the column units to twips:
bm_book.setColWidthUnits(Constants.eColWidthUnitsTwips);
The following statement sets the width of a column to either 8 inches wide (11,520/1440 inches), or 45 times the width of the character 0 (11,520/256), depending on the most recent setting of column width units:
bm_book.setColWidth(col1, col2, 11520);
Using automatic column sizingUse BookModel.setColWidthAuto( ) to set a range of columns to either the default column width or to widths just large enough to accommodate the widest text in each column for the active sheet. You specify a range of cells and a parameter that indicates whether to use the greatest text width in the column or the default text width. If you specify greatest text width, and a column has no cells that have a width greater than the default width, setColWidthAuto( ) sets that column’s width to the default width.
bm_book.setColWidthAuto(r1, c1, r2, c2, false); // widest textbm_book.setColWidthAuto(r1, c1, r2, c2, true); // default width
If you select all rows, this method also considers the widths of the column headers when adjusting column widths to accommodate the widest text.
Maintaining column width when importing dataTo maintain column width when populating a data range with data, pass false to DataRange.setAdjustColWidth( ). If you do not pass it a true value, the incoming data determines the column width of all columns set for autowidth. The following statement shows how to maintain the column width when importing data:
dr_range.setAdjustColWidth(false);
For more information about importing data, see Chapter 5, “Working with data sources.”
Freezing a row or a columnFreezing rows and columns in the active worksheet causes the designated columns and rows to remain always visible. These frozen areas are sometimes called panes. To fix and unfix rows and columns, use the BookModel.freezePanes( ) method.
38 U s i n g B I R T S p r e a d s h e e t E n g i n e a n d A P I
To freeze rows, specify the top row of the frozen pane in the topRow parameter and set the splitRow parameter to the number of rows to be visible in the top pane. If you set the splitRow parameter to 0, the topRow parameter is ignored. To freeze columns, specify the left column of the frozen pane in the leftColumn parameter and set the splitColumn parameter to the number of columns to be visible in the left pane. If you set the splitColumn parameter to 0, the leftColumn parameter is ignored.
If a pane is frozen and there are unfrozen columns or rows to the left or above the frozen panes, then those columns and rows are no longer accessible. You cannot scroll to the left of a frozen column pane or above a frozen row pane. The splitView parameter of freezePanes( ) determines whether autoFreezePanes( ) and unfreezePanes( ) convert the frozen panes to a split view. If splitView is false, those methods convert the view to its default, unsplit, state.
The following statements show how to freeze a horizontal and vertical pane, where the horizontal pane includes rows 2 through 4 and the vertical pane includes columns 4 through 6:
int topRow=2;int splitRows=3;int leftCol=4;int splitCols=3;boolean splitView=false;bm_book.freezePanes(topRow, leftCol, splitRows, splitCols,
splitView);
If you save a workbook with frozen panes to a .xls file, you must use the following statement if you want the output file to also have frozen panes:
bm_book.saveViewInfo( );
Determining the last row or column containing dataThe Sheet and BookModel interfaces declare six methods that return the last row or column in a sheet containing data, as shown in Table 3-4. The BookModel methods gather this data from the active sheet. A cell that contains data is different from a non-empty cell. Non-empty cells include cells containing data, formatting, or validation rules, regardless of whether the cells contain data.
Table 3-4 Methods that return the last row or column containing data
Method Description
getLastRow( ) Returns the last row that contains a non-empty cell
getLastCol( ) Returns the last column that contains a non-empty cell
getLastColForRow( ) Returns the last filled column in the specified row
getLastDataRow( ) Returns the last row that contains data

C h a p t e r 3 , W o r k i n g w i t h w o r k s h e e t e l e m e n t s 39
The following example shows how to return the index number of the last row and column that contain data in the current worksheet, ignoring cells that contain only formatting:
int lastRowIndex = s_sheet.getLastDataRow();int lastColIndex = s_sheet.getLastDataCol();
Working with headingsAs the default behavior, row and column headings appear as gray cells containing numbers to the left of rows and letters above columns in a worksheet. You can modify the formatting and content of heading cells, but they can only contain text and formatting, not worksheet data such as formulas or values. The single heading cell that is at the intersection of the row headings and column headings is called the top left heading.
In addition to the heading-specific methods of BookModel, you can format and edit header cells using com.f1j.ss.CellFormat objects. The information presented in this section about cell formatting is covered in more detail in “Working with cells,” later in this chapter.
Providing a column or row heading is useful for reflecting the data in the row or column. A heading of Total Revenue is more informative than column H, for example. The headings are only useful for display purposes. Formulas still reference rows and columns by their numbers and letters. A heading can be up to 9 lines and 254 bytes. A CR (carriage return) and LF (line feed) combination are counted as two characters.
This section provides examples of how to programmatically select and format worksheet headings. For information about adding print headings and footers, see “Working with a print header, footer, or title,” in Chapter 10, “Working with print options.”
If you save a workbook to a .xls file, the worksheet headings do not appear in the resulting Excel file.
Selecting a column or a row headingUse the BookModel.setHeaderSelection( ) method to select column or row headings for selected sheets. This method takes three parameters, as shown in
getLastDataCol( ) Returns the last column that contains data
getLastDataColForRow( ) Returns the last column in the specified row that contains data
Table 3-4 Methods that return the last row or column containing data
Method Description
40 U s i n g B I R T S p r e a d s h e e t E n g i n e a n d A P I
Table 3-5.
The following example selects the top left heading and column headings, but not row headings:
bm_book.setHeaderSelection(true, false, true);
Getting and setting heading dimensionsYou can get and set row heading width and column heading height using the getHeaderWidth( ), getHeaderHeight( ), setHeaderWidth( ), and setHeaderHeight( ) methods.
The getHeaderWidth( ) and setHeaderWidth( ) methods get and set the row heading width in normal units. The getHeaderHeight( ) and setHeaderHeight( ) methods get or set the column heading height in twips. For more information about twips and normal units, see “Setting the units of column width,” earlier in this chapter.
Getting and setting heading textTable 3-6 describes the methods used for formatting heading text for all selected sheets. Retrieve column heading text using the getColText( ) method. Retrieve row heading text with getRowText( ). Set column and row heading text using the setColText( ), setRowText( ), and setTopLeftText( ) method.
Table 3-5 Parameters for the setHeaderSelection( ) method
Parameter Description
topLeftHeader Boolean that specifies whether the cell at the intersection of the row and column headings is selected
rowHeader Boolean that specifies whether the row headings are selected
colHeader Boolean that specifies whether the column headings are selected
Table 3-6 Methods that affect all selected sheets
Method Description
getColText( ) Gets the column heading text
setColText( ) Sets the column heading text
getRowText( ) Gets the row heading text
setRowText( ) Sets the row heading text
C h a p t e r 3 , W o r k i n g w i t h w o r k s h e e t e l e m e n t s 41
The following example shows how to add text to the first row and column headings, size the column to accommodate the text, and set the row heading width to match the column heading width:
// Adds text to the first row and column headers bm_book.setColText(0, "Column Name"); bm_book.setRowText(0, "Row Name");
// Sizes the column to display the text bm_book.setColWidthAuto(0, 0, bm_book.getMaxRow(), bm_book.getMaxCol(), false);
// Sizes the row header to be the same width as the column bm_book.setHeaderWidth(bm_book.getColWidth(0));
Setting the text for a heading to a null value resets the heading to the default heading text. The following example shows how to reset the first row and first column headings to default heading text:
bm_book.setColText(0, null);bm_book.setRowText(0, null);
Supplying a multiline column or row headingSupply multiline text in a column or row heading using the new line character, \n, to designate the beginning of a each new line.
The following example shows how to set two lines of text in the heading and increases the heading height to twice the specified heading height:
bm_book.setColText(0, "This is a \n new line");bm_book.setHeaderHeight(bm_book.getHeaderHeight()*2);
Like setColText, setHeaderHeight applies to all selected worksheets.
Setting heading fontTo format a heading row for all selected sheets, select the heading cells using setHeaderSelection, retrieve their format using a CellFormat object, then apply
getTopLeftText( ) Gets the top left heading corner text
setTopLeftText( ) Sets the top left heading corner text
Table 3-6 Methods that affect all selected sheets
Method Description
42 U s i n g B I R T S p r e a d s h e e t E n g i n e a n d A P I
the desired formatting using and the formatting methods of a CellFormat object. The following example shows how to select the headings and set their format:
bm_book.setHeaderSelection(true, true, true); CellFormat cf_cellFormat1 = bm_book.getCellFormat();AlignFormat af_aFormat = cf_cellFormat1.align();FontFormat ff_fontFormat = cf_cellFormat1.font( );af_aFormat.setHorizontalAlignment(AlignFormat.eHorizontalLeft);ff_fontFormat.setBold(false);ff_fontFormat.setItalic(true);ff_fontFormat.setSizeTwips(220);//or setSizePoints(11)ff_fontFormat.setName("Arial");bm_book.setCellFormat(cf_cellFormat1);
Hiding row or column headingsUse the BookModel.setShowRowHeading( ) or BookModel.setShowColHeading( ) methods to hide or reveal row or column headings for the active worksheet. The following example shows how to hide row and column headings:
bm_book.setShowRowHeading(false);bm_book.setShowColHeading(false);
Working with cellsThis section describes common ways to manipulate cells, including inserting cells, selecting a cell, setting cell protection, and merging cells.
Inserting cells into a worksheetUse BookModel.insertRange( ) or BookModel.editInsert( ) to insert cells into a range of cells that you specify or select. With insertRange( ), you specify a range of cells to insert using the method’s row1, col1, row2, and col2 parameters. Before you use editInsert( ), you must select a range of cells in which to insert new cells. The insertRange( ) or editInsert( ) methods insert the cells into all selected worksheets. With either method, the selected or specified range defines how many cells you insert into the worksheet and where.
The following example shows how to insert a range of cells beginning at C1, and ending at C12. Using eShiftHorizontal causes the range to shift one column to the right, replacing the range with empty cells:
bm_book.insertRange(0, 2, 13, 2, Constants.eShiftHorizontal);
The last parameter in the insertRange( ) method and the only parameter in the editInsert( ) method is the shiftType parameter. The shiftType parameter defines

C h a p t e r 3 , W o r k i n g w i t h w o r k s h e e t e l e m e n t s 43
how to handle the cells that initially occupy the range of cells you specify or select to insert cells into. There are two kinds of constants associated with the shiftType parameter. The first kind of constant specifies how to shift the data in the existing cells in the worksheet when inserting new cells. The second kind of constant specifies how to adjust formulas and defined names that refer to an area of the worksheet adjacent to the selection. You must specify one of the constants that describes how to shift data. You are not required to use a formula adjustment constant but if you do, you add it to the cell shift constant. Table 3-7 describes both kinds of constants.
Table 3-7 Constants for shiftType parameter
shiftType parameter constant Description
eShiftHorizontal Inserts a block of empty cells with the same coordinates as the selection. Shifts all cells in all rows of the selection, starting with the selection. Shifts cells to the right as many columns as there are in the selection. Cells in rows not in the selection are not affected.
eShiftColumns Inserts as many new columns as there are columns in the selection. Starting with the selected columns, shifts all columns to the right for as many columns as there are in the selection. Affects every row in the worksheet.
eShiftVertical Inserts a block of empty cells with the same coordinates as the selection. Shifts all cells in all columns of the selection, starting with the selection. Shifts cells down as many rows as there are in the selection. Cells in columns not in the selection are not affected.
eShiftRows Inserts as many new rows as there are in the selection. Starting with the selected rows, shifts all rows down for as many rows as there are in the selection. Affects every column in the worksheet.
eFixupPrepend Used in combination with one of the first four constants. Adjusts formulas and defined names that refer to an area adjacent to the selection. When used in combination with eShiftVertical or eShiftRows, expands any such reference whose first row is less than or equal to the top row of the selection. When used with eShiftColumns or eShiftHorizontal, expands any reference whose first column is the last column of the selection. Ranges in formulas and defined names expand upon row and column insertion without using this constant if any part of the insertion selection falls within the range.
(continues)

44 U s i n g B I R T S p r e a d s h e e t E n g i n e a n d A P I
The following example shows how to insert five rows and adjust appropriate formulas and defined names:
// Select D10:D15 and append 6 rowsbm_book.setSelection(9, 3, 14, 3);bm_book.editInsert((short)(Constants.eFixupAppend +
Constants.eShiftRows));
In the preceding example, the program inserts six rows at row 10, and rows 10-15 are shifted down six rows. The data that was in cell D10 is now in cell D16, and the data that was in cell D11 is now in D17, and so forth. Since the shiftType parameter included eFixupAppend, any formulas and defined names in the worksheet whose last row is immediately about the selection are changed. Therefore, if the worksheet had a formula before the insert operation, such as =sum(D14:D16), it would be changed to =sum(D14:D22) upon the completion of the insertion operation.
Selecting a cellThis section describes how to select worksheet cells, including how to set the active cell, select non-contiguous cells, locate the active cell, display the active cell, and move the active cell down when the user presses Enter. Each worksheet has an active cell specific to that worksheet.
Use the BookModel.setActiveCell( ) to set the active cell for all selected worksheets. You reference the cell by its row and then its column. The following example shows how to make the cell in the second row and second column the active cell:
bm_book.setActiveCell(1,1);
eFixupAppend A constant used in combination with one of the first four constants. Adjusts formulas and defined names that refer to an area near the selection. When used with eShiftVertical or eShiftRows, expands any such reference whose last row is immediately above the selection. When used with eShiftColumns or eShiftHorizontal, expands any such reference whose last column is immediately to the left of the selection. Ranges in formulas and defined names expand upon row and column insertion without using this constant if any part of the insertion selection falls within the range.
Table 3-7 Constants for shiftType parameter (continued)
shiftType parameter constant Description

C h a p t e r 3 , W o r k i n g w i t h w o r k s h e e t e l e m e n t s 45
Making the active cell visibleTo make the active cell visible in the displayed worksheet, use one of the following methods:
■ Use BookModel.showActiveCell( ). If the active cell does not appear in the visible portion of the window, showActiveCell( ) repositions the window so that the active cell is visible.
■ Use BookModel.setTopRow( ) and BookModel.setLeftCol( ) to position the active worksheet to show the active cell.
The following example shows how to position the worksheet to show the active cell:
bm_book.showActiveCell();
Selecting an entire row when selecting a cellThe BookModel.setRowMode( ) method selects the rows containing a selected cell for all cells currently selected on all selected worksheets. Passing true to setRowMode( ) makes cell selections select an entire row. Passing false makes cell selection select just the cell.
The following example shows how to select the rows containing any selected cells, including the active cell:
bm_book.setRowMode(true);
Making multiple, non-contiguous selectionsUse setSelection( ) to select multiple cell ranges on all selected sheets. To select multiple, non-contiguous ranges of cells, pass setSelection( ) a string containing the ranges separated with commas.
The following example shows how to select three separate non-contiguous cell ranges:
bm_book.setSelection("A1, B2:B4, C5");
Enabling users to move the active cell by pressing the Enter keyCall setEnterMovesDown( ) to indicate whether pressing the Enter key moves the active cell down or not.
The following example shows how to move the active cell down if the user presses Enter:
bm_book.setEnterMovesDown(true);

46 U s i n g B I R T S p r e a d s h e e t E n g i n e a n d A P I
Setting cell protectionWorksheets are either protected or unprotected and cells are either locked or unlocked. By default, all cells are locked and all worksheets are unprotected. The locked status of a cell is only relevant when its worksheet is protected. When a cell is locked and its worksheet is protected, it is not possible to alter the content of the cell. When a worksheet is unprotected, all its cells can be altered, even those that are flagged as locked.
The setSheetProtection( ) method controls whether a sheet is protected or not. It also determines what kinds of operations are allowed on the sheet. The setSheetProtection( ) parameter that enables and disables protection determines whether cells marked locked or hidden are really locked or hidden. The second parameter is the sum of all the protection features you want to allow for the sheet. Table 3-8 contains all the protection flags you can set. For more information about hiding rows or columns, see “Hiding or showing a column or row,” earlier in this chapter.
The following example shows how to activate locking and hiding for a worksheet and to set which other operations are allowed. The first parameter is the sheet index, the second parameter enables protection, the third parameter is a null object, which specifies no password protection, and the last parameter is the
Table 3-8 Cell protection options
Flag Protection
kAllowNone No operations allowed
kAllowEditObjects Allows editing of objects
kAllowFormatCells Allows formatting of cells
kAllowFormatColumns Allows formatting of columns
kAllowInsertRows Allows inserting rows
kAllowInsertColumns Allows inserting columns
kAllowInsertHyperlinks Allows inserting hyperlinks
kAllowDeleteColumns Allows deleting columns
kAllowDeleteRows Allows deleting rows
kAllowSelectLocked Allows selecting locked cells
kAllowSort Allows sorting
kAllowUseAutoFilter Allows auto filters
kAllowUsePivotRanges Allows adding pivot ranges
kAllowSelectUnlocked Allows selecting of unlocked cells
C h a p t e r 3 , W o r k i n g w i t h w o r k s h e e t e l e m e n t s 47
allowable operations flag. In this case, the only allowable operations that can be performed on this sheet are sorting and adding pivot ranges:
bm_book.setSheetProtection(sheet1, true, null, Constants.kAllowSort + Constants.kAllowUsePivotRanges);
The following example shows how to unlock all cells in the worksheet, lock the worksheet range A1:C2, then enable protection for the entire worksheet:
// Unlock cells.bm_book.setSelection(0, 0, bm_book.getMaxRow(), book.getMaxCol());CellFormat cf = bm_book.getCellFormat();cf.protection().setLocked(false);bm_book.setCellFormat(cf);// Locks desired range and enables protection.cf.protection().setLocked(true);bm_book.setCellFormat(cf, 0, 0, 1, 2);bm_book.setSheetProtection(bm_book.getSheet(), true, null,
bm_book.kAllowNone);
Merging cellsYou can merge any contiguous range of cells that forms a rectangle. When you merge cells, BIRT Spreadsheet Engine or BIRT Spreadsheet Designer removes cell borders within the range and deletes all data except the data in the top left cell. Merged cells function as a single cell on the worksheet, having a row and column reference of the top left cell in the merged range. All references to cells in the range also become references to that cell. For example, merging cells A1:B5 results in a single cell with the cell reference A1. Adjacent cell references do not change after merging.
To merge cells, first create a selection using the BookModel.setSelection( ) method, then pass true to the CellFormat.setMergeCells( ) method. Both methods operate on all selected sheets. The following example shows how to merge cells D1:E1 and D2:E3:
CellFormat cf = bm_book.getCellFormat();cf.align().setMergeCells(true);bm_book.setSelection(0, 3, 0, 4);bm_book.setCellFormat(cf); // Merges D1:E1 (horizontal)bm_book.setSelection(1, 3, 2, 4);bm_book.setCellFormat(cf); // Merges D2:E3 (horizontal & vertical)
Working with a range of cellsThis section shows how to work with ranges of cells, using examples of how to:
■ Get all the ranges of the current selection.
48 U s i n g B I R T S p r e a d s h e e t E n g i n e a n d A P I
■ Get the coordinates of a selection range.
■ Delete and copy a range.
Accessing a range of cellsThese examples use BookModel.getSelection( ) to return the cell reference of the selected cell range. The following example shows how to return the cell reference for the active selection. If more than one range is selected, this example returns a comma-separated list of all active ranges:
String s = bm_book.getSelection();
The following example shows how to get a Range object for the current selection:
Range r_range = bm_book.getSelectedRange();
If the current selection contains multiple non-contiguous blocks of cells, the Range object returned by BookModel.getSelectedRange( ) provides individual access to all the components. The BIRT Spreadsheet API refers to these blocks of cells as areas, but the method you use to get an area returns yet another Range object. You get an area from a range by passing its index number to the Range.getArea( ) method, as in the following statement:
Range r_firstSelectionBlock = r_range.getArea(0);
You can get the total number of areas in a range with the following statement:
int selectionCount = range.getAreaCount();
You can get the cell and row coordinates of a cell range with the following four statements:
int row1 = r_range.getRow1(); // Returns first row of rangeint row2 = r_range.getRow2(); // Returns last row of rangeint col1 = r_range.getCol1(); // Returns first column of rangeint col2 = r_range.getCol2(); // Returns last column of range
Copying a range of cells from one worksheet to anotherTo copy a range within the same worksheet or from one worksheet to another worksheet in a different workbook, use BookModel.copyRange( ). For an example of copying a range, see “Copying and pasting cell data,” in Chapter 7, “Working with cell data.”
Clearing a rangeYou use theBookModel.clearRange( ) method to clear a specified range of cells on all selected sheets. You pass this method a range of cells and a parameter that specifies what to clear. You can clear values, formats, or both. The Sheet class
C h a p t e r 3 , W o r k i n g w i t h w o r k s h e e t e l e m e n t s 49
version of clearRange clears the range without checking the protection status of cells within the range or checking for partial clearing of array-entered formulas. Table 3-9 identifies all the valid clear options.
The following example shows how to clear everything from the specified range:
bm_book.clearRange(row1, col1, row2, col2, Constants.eClearAll);
Working with a worksheet outlineA worksheet outline allows a user to expand or collapse sets of rows or columns on a worksheet to change the level of displayed content. A worksheet can use up to eight levels of outlining for rows and eight for columns.
To set up outlining on the active sheet, use the BookModel.setRowOutlineLevel( ) and BookModel.setColOutlineLevel( ) methods to arrange rows and columns into detail groups. The setColSummaryBeforeDetail( ) and setRowSummaryBeforeDetail( ) methods specify whether summary rows and columns appear before or after the row or column detail information. The setRowOutlineLevel( ) and setColOutlineLevel( ) methods establish the outline level by either setting it to a specific detail level or by incrementing the current outline level. To set a range of columns or rows to a specific outline level, use a statement like either of the following two lines:
bm_book.setColOutlineLevel(col1, col2, outlineLevel, false);bm_book.setRowOutlineLevel(row1, row2, outlineLevel, false);
In the preceding statements, you set the specified range of columns or rows to the value of outlineLevel, which must be between 0 and 7. The final parameter specifies that the specified level is not added to the current highest setting.
To set the outline level for range of columns or rows to an amount greater than the current highest level, use a statement like either of the following two lines:
bm_book.setColOutlineLevel(col1, col2, outlineLevel, true);bm_book.setRowOutlineLevel(row1, row2, outlineLevel, true);
In the preceding statements, you set the outline level to the current high level plus the value of outlineLevel. The resulting level must not exceed 7. To collapse or
Table 3-9 Options for specifying how to clear a range
Clear constant Effect
eClearContents Clears values and formulas but not formats
eClearFormats Clears formats but not values and formulas
eClearAll Clears values, formulas, and formats

50 U s i n g B I R T S p r e a d s h e e t E n g i n e a n d A P I
expand an outline level for a specific column or row, use statements like the following two lines:
s_sheet.setColOutlineCollapsed(col, true);s_sheet.setRowOutlineCollapsed(row, true);
The preceding statements collapse the outline level for the specified row or column. Passing false to either method expands the outline level for the specified row or column. You can control whether the summary precedes or follows the detail in a collapsed set of rows or columns. Passing true to either BookModel.setColSummaryBeforeDetail( ) or BookModel.setRowSummaryBeforeDetail( ) causes the summary to precede the detail. Passing false causes the summary to follow the detail. In the following statements, you cause the summary to follow the detail:
bm_book.setColSummaryBeforeDetail(false);bm_book.setRowSummaryBeforeDetail(false)
The following example shows how to add outlining by increasing the detail level to create groups of 11 rows, leaving each 12th row to hold summary information. It also creates a secondary row outline level within the initial levels and a column outline level that includes columns B through D and sets the column outline summary to appear before the detail columns:
//Group rows 1-11. Summary row = 12bm_book.setRowOutlineLevel(0,10,1,false);//Group rows 13-21. Summary row =22bm_book.setRowOutlineLevel(12,20,1,false);//Group rows 23-40. Summary row =41bm_book.setRowOutlineLevel(22,39,1,false); // Add secondary group from rows 1-6bm_book.setRowOutlineLevel(0,5,1,true); // Add secondary group from rows 8-10bm_book.setRowOutlineLevel(7,9,2,false); bm_book.setColOutlineLevel(1, 3, 1, false); // Group B:Dbm_book.setColSummaryBeforeDetail(true); //Put summary in col 0
The following example shows how to group rows 0 through 5 and collapse them, hiding them behind the summary level. Row 6 holds the subtotal:
Sheet s = bm_book.getBook().getSheet(0);s.setRowOutlineLevel(0, 5, 0, false);s.setRowOutlineCollapsed(6, true); // Group rows 0-5 with 6
Working with scroll barsThe information in this section explains how to scroll through a worksheet and how to control whether scroll bars are visible or hidden.

C h a p t e r 3 , W o r k i n g w i t h w o r k s h e e t e l e m e n t s 51
To scroll to the right of the worksheet, repeatedly call the BookModel.setLeftCol( ) method, increasing the column number with each call. To scroll to the bottom of the worksheet, repeatedly call the BookModel.setTopRow( ) method, increasing the row number with each call. To keep the scroll bar on continuously, call the BookModel.setShowVScrollBar( ) and BookModelsetShowHScrollBar( ) methods with eShowOn. The following example shows how to set the worksheet to scroll down one row and over one column:
int i = bm_book.getTopRow();bm_book.setTopRow(i+1);int j = bm_book.getLeftCol();bm_book.setLeftCol(j+1);
The following example shows how to display the vertical and horizontal scroll bars:
bm_book.setShowVScrollBar(Constants.eShowOn);bm_book.setShowHScrollBar(Constants.eShowOn);

52 U s i n g B I R T S p r e a d s h e e t E n g i n e a n d A P I

C h a p t e r 4 , W o r k i n g w i t h i n p u t a n d o u t p u t 53
C h a p t e r
4Chapter 4Working with input
and outputThis chapter contains the following topics:
■ Reading workbook data from a file
■ Reading from an input stream
■ Writing an output file
■ Writing to an output stream
■ Writing to an HTML file
■ Writing to an XML file
■ Saving window-specific information
■ Understanding Excel file format limitations

54 U s i n g B I R T S p r e a d s h e e t E n g i n e a n d A P I
Reading workbook data from a fileYou can populate the content of a BIRT Spreadsheet workbook by reading the data from an input file. The input file can be any of the following types:
■ BIRT Spreadsheet design (.sod and .vts)The BIRT Spreadsheet API supports opening a spreadsheet object design (.sod or .vts) file for any past or current version of BIRT Spreadsheet.
■ Excel spreadsheet (.xls)The BIRT Spreadsheet API supports opening any Excel spreadsheet created with any version of Excel, beginning with Excel-95. A spreadsheet (.xls) file having an associated VBA project file, with or without macro code, that is input using BIRT Spreadsheet Engine may cause a “This spreadsheet contains macros” message to appear. A user may see this message when opening the spreadsheet output using BIRT Spreadsheet Designer, Excel 2003, Excel 2007, or Excel 2010. For each application, default security options suffice to trigger the message.
■ Text file (.txt)The content of a text file must include logical column and row separators. In the absence of a properties file to specify separators, tab characters are assumed to be column separators and return characters are assumed to be row separators.
All of the BIRT Spreadsheet Engine and API methods that load file data into a workbook, all of which use the com.f1j.ss.Document class to access a file. These methods include the following:
■ BookModel.factory.create(Document.getBook( )), used in the servlet example, creates a generic BookModel object and loads the content of the file delivered by Document.getBook( ) into the spreadsheet.
■ JBook(Document.getBook( ), Group) constructs a new JBook, loads the content of the file delivered by Document.getBook() into the spreadsheet, and adds it to the Group specified by the Group argument.
■ JBook(Document) constructs a new JBook and loads the content of the Document object into the spreadsheet.
The Document object stores the data it loads from a file in a Book object. The Book interface has been largely deprecated but is still used to move information from a Document object to a BookModel object without using additional memory. As the previous examples illustrate, the Document.getBook( ) method returns a Book object and BookModel object constructors accept a Book object as an argument.
C h a p t e r 4 , W o r k i n g w i t h i n p u t a n d o u t p u t 55
Using the Document class to open a fileTo access data that was saved to a supported file type, create an instance of the Document class using one of the constructors that uses the file name as the file argument. The following Document constructor reads the data from a file:
Document(Group group, java.io.File file, DocumentOpenCallbackopenCallback)
where
■ Group is the group of workbooks to associate the data with. For more information on the group argument, see the Group argument discussion, later in this chapter.
■ java.io.file is a Java File object.
■ DocumentOpenCallback is a callback method that is called when the Document object is created. For more information about the DocumentOpenCallback parameter, see the DocumentOpenCallback argument discussion, later in this chapter.
When you use the Document object, it automatically locks the file it reads data from or writes data to until you release the lock. You can release the lock by closing the application or calling the Document.release( ) method as shown in the following code:
Document.release();
Failure to release a file results in the lock remaining until the application closes.
Be careful not to confuse a file lock with a thread lock. File locks prevent modification of the file until it is released. Thread locks prevent threads from modifying the same object simultaneously. The methods to make a Document object thread-safe are getLock( ) and releaseLock( ), and should be used following the thread-safe pattern shown below:
d_Doc.getLock(); try {
...}catch(Throwable e) {
...}finally {
d_Doc.releaseLock();}
The file lock can be released in the finally block or anytime afterwards to release the file but cannot be unlocked if the object is still thread locked.

56 U s i n g B I R T S p r e a d s h e e t E n g i n e a n d A P I
About the Group parameterThe Group argument that you pass to a Document constructor specifies the group to which the file data is to be included. Specifying different groups for different Documents isolates them from workbooks in other groups. Specifying the same group for two or more Documents gives workbooks in that group access to each of them.
The Group object has the following uses:
■ Specifies the locale for the user interface The Group class constructor has an argument that specifies the locale for the user interface. All workbooks in a group have the same user interface locale, maintaining that locale for all the file data in that Group.
■ Specifies the locale for number formatsNumber formats can use a different locale than the user interface uses. The Group class constructor has an argument that specifies the locale for number formats. All workbooks in a group have the same number format locale.
■ Provides a global context for thread lockingWhen an application has multiple tasks in a multi-threaded environment and all tasks need access to their respective workbooks simultaneously, if each task is in its own group none of the tasks will block any of the others unless an object is currently thread-locked.
■ Provides visibility between workbooksWorkbooks in the same group can externally reference one another, whereas workbooks in separate groups cannot.
About the DocumentOpenCallback parameterEvery Document constructor that reads data from a file has a DocumentOpenCallback parameter. You use the com.f1j.ss.DocumentOpenCallback object to specify parameters for opening the file. You can set the following parameters with the DocumentOpenCallback object:
■ The code page type that the file uses
■ A password that allows modifying the file
■ A password that allows opening the file
The DocumentOpenCallback class also has methods for notifying BIRT Spreadsheet Designer if the document is read-only, locked for editing, and the file format. There is also a method to provide the file’s globally unique identifier (GUID) to BIRT Spreadsheet Designer.

C h a p t e r 4 , W o r k i n g w i t h i n p u t a n d o u t p u t 57
Setting the code page type
The code page type determines the character set in use in a file. When creating a workbook by opening a BIRT Spreadsheet report design or an Excel file, the Document constructor determines the code page type based on the content of the file. When reading a text file, it is not always possible to make this determination. Your program may call setCodePage ( ) on the DocumentOpenCallback object before reading a text file. The following statement sets the code page to UTF8:
docOpenCallback.setCodePage(DocumentOpenCallback.CODEPAGE_UTF8);
The following list contains the set of supported code pages:
■ CODEPAGE_DEFAULT
■ CODEPAGE_DEFAULT_ANSI
■ CODEPAGE_UNICODE_BIGENDIAN
■ CODEPAGE_UNICODE_LITTLEENDIAN
■ CODEPAGE_ UTF8
■ CODEPAGE_ UTF16
■ CODEPAGE_UTF 16BE
■ CODEPAGE_WIN_ARABIC
■ CODEPAGE_WIN_BALTI
■ CODEPAGE_WIN_CENTRAL_EUROPE
■ CODEPAGE_WIN_CHINESE_SIMPLIFIED
■ CODEPAGE_WIN_CHINESE_TRADITIONAL
■ CODEPAGE_WIN_CYRILLIC
■ CODEPAGE_WIN_GREEK
■ CODEPAGE_WIN_HEBREW
■ CODEPAGE_WIN_JAPANESE
■ CODEPAGE_WIN_JOHAB
■ CODEPAGE_WIN_KOREAN
■ CODEPAGE_WIN_THAI
■ CODEPAGE_WIN_TURKISH
■ CODEPAGE_WIN_VIETNAMESE
■ CODEPAGE_WIN_WESTERN

58 U s i n g B I R T S p r e a d s h e e t E n g i n e a n d A P I
Setting the open password
Some files can only be opened after the user enters a password. When opening a protected file through the API, it is necessary for the program to specify the password. Use the setOpenPassword( ) method of the DocumentOpenCallback object to set the password for opening a password-protected file.
Setting the modify password
Some files can only be modified after the user enters a password. To open a file with modification protection, pass a string containing the password to the setModifyPassword( ) method of the DocumentOpenCallback object.
Getting the open password
There are two versions of the DocumentOpenCallback.getOpenPassword( ). One version has no arguments and returns the value of the password as set by the setOpenPassword( ) method. The other version of the getOpenPassword( ) method is designed to prompt the user for a password that you then submit to the operating system to allow the protected file to be opened. You implement it in a class that extends the DocumentOpenCallback class. The second version accepts two arguments, a String argument typically used for a userame and a DocumentOpenCallback.Password object, with which you can submit a password to the Java Virtual Machine to authenticate it.
A typical implementation of the getOpenPassword( ) method prompts the user for a password, attempts to submit it, and throws an exception if it is not accepted. The following example illustrates a possible implementation:
protected void getOpenPassword(String s_userName, Password p_password)
throws DocumentCancelException{
while (true){
try{
String s_pwd = JOptionPane.showInputDialog("Password to open the file:");
if (s_pwd != null){p_password.submitPassword(s_pwd);return;
} else{throw new DocumentCancelException( );
}}catch (com.f1j.ss.AccessDeniedException e){
JOptionPane.showMessageDialog(null, "Invalid password.");

C h a p t e r 4 , W o r k i n g w i t h i n p u t a n d o u t p u t 59
}}
}
Getting the modify password
There are two versions of the DocumentOpenCallback.getModifyPassword( ) method. One version has no arguments and returns the value of the password as set by the setModifyPassword( ) method. The other version of the getModifyPassword( ) method is designed to be implemented in a class that extends the DocumentOpenCallback class. You can use this method to prompt the user for a password that you then use to open the file. If you change the method name in the previous example to getModifyPassword( ), it serves as an example of a possible implementation of the getModifyPassword( ) method.
Creating a BookModel object from an Excel spreadsheet fileThe following example illustrates creating a BIRT Spreadsheet Book object by reading the data from an Excel spreadsheet:
java.util.Locale l_local = new java.util.Locale("en", "US");Group g_group = new Group(l_local);java.io.File f_file = new java.io.File("C:/myExcelSheet.xls");DocumentOpenCallback doc_OpenCb = new DocumentOpenCallback();doc_OpenCb.setOpenPassword("abracadabra");doc_OpenCb.setCodePage(DocumentOpenCallback.CODEPAGE_UTF8);Document d_bookDoc = new Document(g_group, f_file, doc_OpenCb);BookModel bm_book = BookModel.Factory.create( d_bookDoc.getBook(),
g_group);
While this example specifies a locale when creating a Group object, it is often not necessary. A group is automatically initialized according to the system’s locale settings, which is often sufficient.
Creating a JBook object from a Document objectTo create a JBook object from a Document object, use the constructor of JBook that takes a Document argument, as shown in the following statement:
JBook jb_book = new JBook(d_doc);
Reading from an input streamTo create a workbook, worksheet, or a partial worksheet from an input stream, use a Document constructor that has an InputStream parameter. The following example shows how to read a workbook from an input stream:

60 U s i n g B I R T S p r e a d s h e e t E n g i n e a n d A P I
java.io.File f_myFile = new java.io.File("C:\\mySerializedWorkbook.stt");
java.io.FileInputStream fis_inputStream = new java.io.FileInputStream(f_myFile);
DocumentOpenCallback doc_OpenCb = new DocumentOpenCallback();doc_OpenCb.setCodePage(DocumentOpenCallback.CODEPAGE_UTF8);Document d_bookDoc =
new Document( g_group, fis_inputStream, doc_OpenCb);BookModel bm_book = BookModel.factory.create(
d_bookDoc.getBook());
Writing an output fileUse the Document class to write a workbook to an output file. The Document class has several methods you can use to create an output file, including:
■ fileSave(DocumentSaveCallback saveCallback) Saves the document to the same location from which it was opened
■ fileSaveAs(java.io.File outputFile, DocumentType docType, DocumentSaveCallback saveCallback) Saves the document to any location
■ fileSaveCopyAs(java.io.File outputFile, DocumentType docType, DocumentSaveCallback saveCallback) Saves a copy of the document to any location
■ fileSaveCopyAs(java.io.OutputStream stream, DocumentType docType, DocumentSaveCallback saveCallback) Saves a copy of the document to any location
With the exception Document.fileSave( ), each of the preceding methods take three arguments, one to specify the output file or stream, one to specify the file type, and one to specify a callback class to handle special situations. The fileSave( ) method rewrites the document to the same file from which it was created.
You pass workbook data from a workbook to a Document object using the BookModel.getBook( ).getDocument( ) method. Additionally, if you are using a JBook object, you can use the JBook.getDocument( ) method to pass the workbook data into a Document object. The resulting Document object can be saved to a file using any of save methods. The following example illustrates the creation of a BIRT Spreadsheet workbook file that is compatible with the current version of BIRT Spreadsheet:
String fileName = pathToOutputFile + "\\saveWorkbook.sod";Document d_doc = bm_book.getBook().getDocument();

C h a p t e r 4 , W o r k i n g w i t h i n p u t a n d o u t p u t 61
try{d_doc.fileSaveAs(new java.io.File(fileName), com.f1j.ss.DocumentType.CURRENT_FORMAT, new com.f1j.ss.DocumentSaveCallback()); }
finally { d_doc.release();
}
As with opening a document, you use the Document.release( ) method to release the automatic file lock when the code is finished working with a file.
About the file type parameterYou use the DocumentType parameter to specify the type of file to write. You can create the following kinds of output files with the BIRT Spreadsheet API:
■ BIRT Spreadsheet report formats (.sod, .sox, or .soi)The BIRT Spreadsheet API supports writing a BIRT Spreadsheet report design, executable, and document files in the current BIRT Spreadsheet format but not in formats for earlier versions.
■ Excel spreadsheet (.xls)The BIRT Spreadsheet API supports writing an Excel spreadsheet formatted with any version of Excel from Excel-95 to present.
■ Tab-delimited text fileTab-delimited text files can contain either UNICODE or ASCII characters. A tab-delimited text file can include values and formatting information or just values.
■ HTMLHTML output can consist of a simple table with no formatting or it can be formatted with an external XSL file.
■ XMLXML output can be as simple as row elements containing a set of column elements, or it can refer to an external XSL file for more complex formatting.
The DocumentType class defines the file type constants in Table 4-1.
Table 4-1 File type constants defined by the DocumentType class
DocumentType constant Output file type
ACTUATE_10_REPORT_EXECUTABLE The Actuate 10 and 11 report executable format (.sox).
ACTUATE_10_REPORT_INSTANCE The Actuate 10 and 11 report instance format (.soi).
(continues)

62 U s i n g B I R T S p r e a d s h e e t E n g i n e a n d A P I
About the DocumentSaveCallback parameterThe DocumentSaveCallback class contains several methods to handle special situations that may occur when writing an output file. The methods include:
■ fileExists(boolean readOnly)Called if the save operation will overwrite an existing file
ACTUATE_10_REPORT_VIEW The Actuate 10 and 11 report view format (.sov). This format only saves the results of any queries present in the workbook.
ACTUATE_10_WORKBOOK The Actuate 10 and 11 workbook format (.sod).
CURRENT_FORMAT The current Actuate workbook file format.
EXCEL_5_WORKBOOK The Excel 5-95 workbook format (.xls).
EXCEL_97_REPORT_VIEW An Actuate 9 and higher report view in the Excel 97-2003 workbook format (.xls). Saving in this format executes the report and only saves the resulting output.
EXCEL_97_WORKBOOK The Excel 97-2003 workbook format (.xls).
HTML Default HTML format. For HTML options, use the HTMLWriter() class described in “Writing to an HTML file,” later in this chapter.
HTML_DATA_ONLY HTML format, showing plain cell data only.
OPEN_XML_MACRO_ENABLED_REPORT_VIEW
An Actuate 11 report view in Open XML (Excel 2007) workbook format (.xlsx) that enables Excel macros.
OPEN_XML_REPORT_VIEW An Actuate 11 report view in the Open XML (Excel 2007) workbook format (.xlsx).
OPEN_XML_WORKBOOK Open XML (Excel 2007) workbook format (.xlsx).
PDF PDF format.
PDF_REPORT_VIEW PDF format report view format.
TABBED_TEXT Text format, with columns tab-delimited.
TABBED_TEXT_VALUES_ONLY Text format, showing plain cell values only, with columns tab-delimited.
UNICODE_TEXT Unicode text format, with columns tab-delimited.
UNICODE_TEXT_VALUES_ONLY Unicode text format, showing plain cell values only, with columns tab-delimited.
Table 4-1 File type constants defined by the DocumentType class (continued)
DocumentType constant Output file type

C h a p t e r 4 , W o r k i n g w i t h i n p u t a n d o u t p u t 63
■ foreignFileFormatLosesData( ) Called if the save operation will lose data because the file is being written in a non-Actuate file format that does not support all of the workbook’s data
■ getCacheStream( )Returns a stream to which the data cache is to be written, instead of writing it to the workbook file itself
■ getSheet( )Called when the file format only supports saving a single sheet
■ getViewHandle( )Called to determine which view information to use when saving the file
■ notifyGUID(java.lang.String guid)Called by BIRT Spreadsheet Engine to provide the workbook file’s GUID to the application
If an application has no need to handle any of these situations, you can pass null to the Document method that writes the file.
Writing a range of cellsUse the Range class to write a range of sheets and cells to an output file. The following snippet illustrates creating a tabbed text file for a range of cells:
java.io.File f_file = new File(fileName);Range r_range = bm_book.getRange( startRow, startCol, endRow,
endCol); // works with the current worksheetr_range.write(f_file, DocumentType.TABBED_TEXT);
The main restriction on writing a range of cells is that the output file type can only be one of the following document types:
■ DocumentType.TABBED_TEXT
■ DocumentType.TABBED_TEXT_VALUES_ONLY
■ DocumentType.UNICODE_TEXT
■ DocumentType.UNICODE_TEXT_VALUES_ONLY
It is also possible to write to an output stream by substituting an OutputStream object for the File object in the last line of code in the previous example.
Setting the code page type for an output fileYou can set the Unicode type encoding for an output file using the DocumentSaveOptions.setCodePage( ) method and then passing that object to the Document.setDocumentSaveOptions( ) method. While you can specify a code page type for tabbed text files, you cannot specify one for BIRT Spreadsheet or
64 U s i n g B I R T S p r e a d s h e e t E n g i n e a n d A P I
Excel formats. If you do not specify a code page type for tabbed text, the Document.saveAs( ) method uses the default ANSI code page. The saveAs( ) method also uses the ANSI code page for Excel version 3 or 5 formats. For the newer BIRT Spreadsheet formats and for more recent Excel file formats, the saveAs( ) method uses the Unicode Little Endian code page.
The default code page for Unicode text files is Unicode Little Endian. Valid code pages for Unicode text files are Unicode Little Endian and Unicode Big Endian. If you specify any other code page for a Unicode text file, the saveAs( ) method ignores it and uses the default code page. The following snippet illustrates saving a workbook with the code page type set to Unicode Little Endian:
DocumentSaveOptions dso_docSO = d_doc.getDocumentSaveOptions();dso_docSO.setCodePage(
DocumentSaveOptions.CODEPAGE_UNICODE_LITTLEENDIAN);d_doc.setDocumentSaveOptions(dso_docSO);d_doc.fileSaveAs(new java.io.File("c:\\files\\example.sod"),
DocumentType.ACTUATE_10_REPORT_EXECUTABLE, null);
Setting passwords for an output fileWhen you output a BIRT Spreadsheet file, there are two kinds of passwords that you can set. The DocumentSaveOptions.setOpenPassword( ) methods sets a password that a user must enter to open the file. The setModifyPassword( ) method sets a password that a user must enter to save a modified version of the workbook. The following example shows how to save a workbook using the setOpenPassword( ) and setModifyPassword( ) methods to control fileaccess:
DocumentSaveOptions dso_docSO = d_doc.getDocumentSaveOptions( );
dso_docSO.getDesignProtectionOptions().setOpenPassword( "open sesame");
dso_docSO.getDesignProtectionOptions().setModifyPassword( "modify sesame");
d_doc.setDocumentSaveOptions(dso_docSO); d_doc.fileSaveAs(new java.io.File("c:\\files\\example.sod"),
DocumentType.CURRENT_FORMAT, null);
Using a JBook to refresh an Excel documentTo use a JBook object to refresh an XLS file, you pass the JBook object to the DocumentSaveCallback constructor when you save the document, as shown in the following code snippet:
JBook jb_jbook = new JBook(d_doc);try {
d_doc.fileSaveCopyAs(new java.io.File("myfile.xls"), com.f1j.ss.DocumentType.EXCEL_97_WORKBOOK, new com.f1j.ss.DocumentSaveCallback(jb_jbook));

C h a p t e r 4 , W o r k i n g w i t h i n p u t a n d o u t p u t 65
} finally {jb_jbook.destroy();
}
If you do not pass the JBook object to the DocumentSaveCallback constructor, a BookModelImpl object is used by default. A BookModelImpl object does not support character or cell sizing. For example, if the document uses auto column width sizing, the column sizing will not be correct with the default option.
Writing to an output streamYou can write the content of a workbook directly to an output stream by passing a java.io.OutputStream object to the appropriate Document.fileSaveAs( ) method.
The serialized BookModel object that this process creates can be read by the ObjectInputStream.readObject( ) method. The following code snippet illustrates writing to an output stream:
java.io.FileOutputStream fos_fileOutputStream = new java.io.FileOutputStream("c:\\file.srtm");
d_doc.fileSaveCopyAs( fos_fileOutputStream, DocumentType.CURRENT_FORMAT, null);
You are not limited to using a FileOutputStream object in the fileSaveCopyAs( ) method because it is only one of several subclasses of java.io.OutputStream. You can also use any of the following java.io classes:
■ BufferedOutputStream
■ ByteArrayOutputStream
■ DataOutputStream
■ FilterOutputStream
Writing to an HTML fileUse the com.f1j.ss.HTMLWriter class to save an entire workbook or a selected range of cells to an HTML file and specify how much and what kind of formatting the HTML file has. The data in the cells of the workbook appear in an HTML table.
How to write to an HTML file
To create an HTML file, you must perform the following steps:
1 Define a string containing the path to the file you want to write.
2 Instantiate a java.f1j.ss.HTMLWriter object.

66 U s i n g B I R T S p r e a d s h e e t E n g i n e a n d A P I
3 Instantiate a java.io.FileWriter object, passing the path to the file in the constructor.
4 Set formatting options, using the HTMLWriter.setFlags( ) method.
5 Pass the Writer object and workbook to the HTMLWriter.write( ) method. Additionally, you can specify a range of cells to write as needed.
6 Close the FileWriter object.
Setting the formatting optionsThe HTMlWriter.setFlags( ) method lets you determine which formatting attributes are taken from the workbook to use in setting formats for the HTML file. If you do not specify any options, HTMLWriter uses all the options except border. To select more than one option, add the options together. Table 4-2 lists the possible options you can set.
The following example creates an HTML file with three formatting options set and writes a range of cells to it:
HTMLWriter hw_Writer = new HTMLWriter();String filename = pathToOutput + "\\" + "htmlOutput.html";java.io.FileWriter fw_writer =
new java.io.FileWriter(filename);// Set three formatting options
Table 4-2 HTML formatting options
Formatting option Description
NONE No tags or value formatting.
VALUE_FORMATS Outputs cell values with value formats.
BORDER_TAG Turns on table border.
HEIGHT_TAG Uses the HTML HEIGHT tag to set row heights.
WIDTH_TAG Uses the HTML WIDTH tag to set the column widths.
BGCOLOR_TAG Uses the HTML BGCOLOR tag to set the background color of the cells.
FONT_TAG Uses the HTML FONT tag to set the font attributes.
COLSPAN_TAG Uses the HTML COLSPAN tag to display data that overlaps cells.
ALIGN_TAG Uses the HTML ALIGN tag to set the horizontal alignment.
VALIGN_TAG Uses the HTML VALIGN tag to set the vertical alignment.
ALL Default. Applies all flags except BORDER_TAG.
C h a p t e r 4 , W o r k i n g w i t h i n p u t a n d o u t p u t 67
hw_Writer.setFlags(hw_Writer.VALUE_FORMATS +hw_Writer.BORDER_TAG + hw_Writer.WIDTH_TAG);
// Write out a part of one sheet in the current bookhw_Writer.write(bm_book.getBook(), sheet1, startRow, startCol,
sheet2, endRow, endCol, fw_writer);fw_writer.close();
Writing an entire book as HTMLYou can also write out an entire book with a different version of the write( ) method. When you write the entire book, the HTML file contains a table for each sheet and the tables are separated by a blank line. The following line writes the entire book to an HTML file:
hw_htmlWriter.write(bm_book.getBook(), fw_fileWriter);
Writing to an XML fileUse the com.f1j.ss.XMLWriter class to create an XML file that contains the content of a workbook or a range of cells or multiple cell ranges with specific formatting options. Additionally, you can use XMLWriter to associate a style sheet with the output file.
Including cell formatting information in the XML output fileWhether you associate a style sheet or not, you can choose to include cell formatting information. The XMLWriter.setWriteFormatAttributes( ) method of XMLWriter determines whether the XML file should contain cell formatting information. If you pass true to this method, the write( ) method generates formatting tags in the output file based on the format content of each cell. Table 4-3 lists the formatting tags that can appear in the XML file.
Table 4-3 XML formatting tags
Tag Description
width-twips number (cell height in twips, e.g. 240 = 12 pt.)
hidden boolean (true = cell is hidden)
locked boolean (true = cell is locked)
keys (a list of all defined names referring to this cell)
alignment-horizontal string ("left," "center," "right")
alignment-vertical string ("top," "center," "bottom")
(continues)
68 U s i n g B I R T S p r e a d s h e e t E n g i n e a n d A P I
Associating a style sheet with the XML output fileXML style sheets are written in Extensible Stylesheet Language Transformations (XSLT). An XSLT file contains style information that describes how to format an XML file. For more information on creating a XSLT file, go to http://www.w3.org/TR/xslt.
To write an XML file formatted with an associated style sheet, create a FileInputStream object for the XSLT file and pass that object to one of the write( ) methods of XMLWriter that takes a FileInputStream parameter.
Writing single or multiple cell rangesThe XML output file can represent a single cell range or a series of ranges. You control the range selection by passing the write( ) method either an array of formula strings or a single formula string. The formula strings you pass contain a cell range expression such as Sheet1!C2:F5.
Controlling the merge modeIf you choose to write multiple ranges, you can control whether the ranges are merged or separated by white space. To merge the ranges, pass eMergeRangeRows to the XMLWriter.setMergeRangeType( ) method. Passing the parameter eMergeRangeNone causes the ranges to appear separately.
Skipping empty cellsCalling XMLWriter.setSkipEmptyCells( ) with a value of true causes the skip attribute to be included in <row> and <cell> tags for an output file and omit
font-bold boolean (true = bold)
font-italic boolean (true = italic)
font-color RGB value (e.g. 0XFF0000 = red)
font-size-twips number (e.g. 240 = 12 pt.)
merge-horizontal number (of cells merged to the right)
merge-vertical number (of cells merged down)
pattern-fg RGB value (e.g. 0XFF0000 = red)
skip number (of cells skipped. Rows with formatting are not skipped.)
wrap boolean (true = wrap cell text)
Table 4-3 XML formatting tags (continued)
Tag Description

C h a p t e r 4 , W o r k i n g w i t h i n p u t a n d o u t p u t 69
empty cells from the markup. The skip attribute indicates how many empty cells precede the cell with the skip attribute, indicated that they have been skipped if the XML is parsed later. Using this feature optimizes the output stream if the range contains many empty cells.
Writing the XML output codeThe process for writing XML output is almost the same regardless of whether you associate the file with a style sheet or not, specify one or more ranges, or choose to include cell formatting tags.
How to create an XML output file
To create an XML output file, you must perform the following steps:
1 Create a FileInputStream object, specifying the path to the XSLT file if you want to use a style sheet.
2 Create a FileOutputStream object using the path to the output file.
3 Get a Book object from the BookModel object.
4 Create an XMLWriter object by passing the Book object to the constructor of XMLWriter.
5 Optionally, call XMLWriter.setWriteFormatAttributes( ) to include cell formatting tags.
6 Optionally, call XMLWriter.setMergeRangeType( ) to merge ranges.
7 Optionally, call XMLWriter.setSkipEmptyCells( ) to skip empty cells.
8 Call XMLWriter.write() specifying the range or ranges of your workbook that you want to write.
The following example illustrates writing a workbook to an XML file using an XSLT file and merging two ranges:
FileInputStream fis_xsltInput = new FileInputStream(pathAndFileForXSLT);
FileOutputStream fos_myXMLStream = new FileOutputStream(pathAndFileForXML);
XMLWriter xw_xmlWriter = new XMLWriter(bm_book);xw_xmlWriter.setWriteFormatAttributes(true);xw_xmlWriter.setMergeRangeType(XMLWriter.eMergeRangeRows);String[ ] s_formulas = new String[2];s_formulas[0] = "Sheet1!A1:D9";s_formulas[1] = "Sheet2!B6:Z22";xw_xmlWriter.write(s_formulas, fis_xsltInput, fos_myXMLStream);

70 U s i n g B I R T S p r e a d s h e e t E n g i n e a n d A P I
Saving window-specific informationTo save window-specific information when writing a file, call the BookModel.saveViewInfo( ) method before writing the file. This method saves properties such as:
■ The active cell
■ The active sheet
■ Zoom percentage
■ Freeze panes
■ Split views
■ Grid lines
The following example shows how to call the saveViewInfo( ) method before writing files:
bm_book.setShowGridLines(false); bm_book.saveViewInfo(); try {
bm_book.getBook().getDocument().fileSaveAs(new java.io.File(fileName), com.f1j.ss.DocumentType.EXCEL_97_WORKBOOK,null);
}finally {
bm_book.release(); }
Understanding Excel file format limitationsOutput in any of the Excel file formats is subject to the same limitations as Excel, including the number of displayed significant digits and the number of columns and rows. Most versions of Excel prior to Office 2007 allow 15 significant digit display and 65,536 rows by 256 columns. A BIRT Spreadsheet workbook can contain significantly more rows and columns than Excel. When you save a workbook in Excel format, the portion of the workbook that exceeds Excel limitations is deleted. For more information on the differences between Excel and BIRT Spreadsheet, see Designing Spreadsheets using BIRT Spreadsheet Designer.

C h a p t e r 5 , W o r k i n g w i t h d a t a s o u r c e s 71
C h a p t e r
5Chapter 5Working with data sourcesThis chapter contains the following topics:
■ Using data sources
■ Using a file data source
■ Using the data set cache as a data source

72 U s i n g B I R T S p r e a d s h e e t E n g i n e a n d A P I
Using data sourcesYou can use the BIRT Spreadsheet API to connect to external data sources. You can connect to the following types of data sources:
■ Database. You can connect to relational databases such as Oracle, Access, or other database management systems (DBMS) that support the Java Database Connectivity interface standard (JDBC).
■ File. You can use character-delimited, fixed-width text, or extensible markup language (XML) formatted files.
■ SAP. You can use an SAP BW or SAP R/3 data source.
■ XML. You can access data stored in an XML document.
■ Actuate Information Object. You can use an Actuate Data Integration connection to access an information object.
■ Custom. To use a custom data source developed for your organization, you must define an open data access connection. For information about creating a custom data connection, see Designing Spreadsheets using BIRT Spreadsheet Designer.
To access a database as a data source, you must include the JDBC driver in your classpath. For example, BIRT Spreadsheet Engine and API provides the Derby JDBC Driver to connect to the sample databases. To connect to the sample databases used in the examples, add Derby.jar to your classpath.
A program that accesses a data source typically does the following tasks:
■ Generates a com.flj.data.source.Source object to access data sources
■ Casts and sets the properties of Source object to access a specific data source.
■ Generates a com.f1j.data.query.DataQuery object
■ Casts it as DatabaseQuery and sets its SQL string
■ Creates a com.f1j.ss.datarange.DataRange object to display the data
■ Associates the Query object with the DataRange object
■ Formats the DataRange
■ Recalculates the Workbook and saves it to a file, which runs all of the queries in the book
Accessing a data sourceTo connect to and use a data source, you create a com.f1j.data.source.Source object by using the BookModel.getDataSourceCollection.factory( ) method. A workbook automatically generates an empty DataSourceCollection object when you

C h a p t e r 5 , W o r k i n g w i t h d a t a s o u r c e s 73
construct it, so it does not need to be constructed explicitly. Starting from the BookModel object, this is a two-step process that you can combine into a single statement:
Source s_src = bm_book.getDataSourceCollection().factory(dataSrcName, com.f1j.data.DataSourceCollection.kFile);
where
■ getDataSourceCollection( ) generates a generic data source object and associates it with the BookModel object.
■ dataSrcName is a unique name for this data source as referenced from the data source collection.
■ com.f1j.data.DataSource.Collection.kFile is the type of data source created, which is dictated by one of the following data type constants. Table 5-1 lists the valid data source type constants and the type of class that the factory( ) method returns for each.
Casting the Source objectYou must cast the Source object that you get from the DataSourceCollection object into one of the data source classes listed in Table 5-1. The factory( ) method returns an object that corresponds to the constant you specify, but it remains generic until it is cast. For example, if you specify kJDBC to indicate that your data source is a JDBC data source, you must cast the Source object that factory( ) returns to a com.f1j.data.source.JDBC object, as in the following statement:
JDBC jdbc_dataSrc = (com.f1j.data.source.JDBC) s_src;
You can combine the casting operation in the same statement that gets the Source object, as in the following example:
JDBC jdbc_dataSrc = (com.f1j.data.source.JDBC) bm_book.getDataSourceCollection().factory(dataSrcName, com.f1j.data.DataSource.Collection.kJDBC);
Table 5-1 Data source type constants and data source classes
Constant Data source typeData source class returned
kFile A file File
kJDBC A JDBC database JDBC
kInputStream An input stream InputStream
kDOM A Document Object Model DOM
kOda3Connection An open data access (ODA) connection
OdaConnection
74 U s i n g B I R T S p r e a d s h e e t E n g i n e a n d A P I
Setting the properties of the data sourceAfter getting a data source object, you must set several of its properties to connect to a data source. These properties include the database driver and name, and a valid user name and password. The JDBC.set( ) method sets these properties for a JDBC data source, as shown in the following statement:
jdbc_dataSrc.set("org.apache.derby.jdbc.EmbeddedDriver", "jdbc:derby:classpath:ClassicModels", "admin", "password", false);
where
■ "org.apache.derby.jdbc.EmbeddedDriver" is a string defining the database driver to use.
■ "jdbc:derby:classpath:ClassicModels" is the database name.
■ "admin" is the database user name.
■ "password" is the password for the admin user name.
■ false is the metadata update flag, which if true runs all attached queries to update metadata when set( ) runs. Only set this argument to true when you know the metadata is outdated, such as checking it beforehand in an if-then block. For new data sources, passing null is the best practice.
The set( ) method is declared in the DataSource interface, so all of the other DataSource classes implement it with the same arguments.
Creating and setting a query objectYou create a com.f1j.data.query.DataQuery from a Source object by getting a com.f1j.data.DataQueryCollection object and calling its factory( ) method, as in the following statement:
DataQuery dq_dataQuery = jdbc_dataSrc.getDataQueryCollection().factory("query1");
The name you specify as the argument to the factory( ) method is a handle for the query. A data source object automatically generates an empty DataQueryCollection object when you construct it, so it does not need to be constructed explicitly. After you have the DataQuery object, you must set its data handler type and, if accessing a SQL database, its query string. The following statement sets the handler type:
dq_dataQuery.setDataHandlerType(com.f1j.data.handler.Handler.kJDBCResultSet);
You must cast the DataQuery object to a com.f1j.data.query.DatabaseQuery object in order to set the query string. You must do this because the DataQuery interface does not include a setQuery( ) method. The factory( ) method of DataQueryCollection obtains the connection type and returns an object that
C h a p t e r 5 , W o r k i n g w i t h d a t a s o u r c e s 75
implements the DatabaseQuery interface, though its stated return type is DataQuery. The following statement a dataQuery object as a DataBaseQuery object and adds a select statement to the query string:
((DatabaseQuery)dq_dataQuery).setQuery("select * from Sales",false);
where
■ "select * from Sales" is a string defining an SQL command.
■ false is a boolean indicating that the query string is not a stored procedure call.
Creating a DataRange object and setting its queryAfter connecting to a data source, setting the appropriate properties, and constructing a query, you must create a data range on a worksheet in which to display the queried data. You do this by calling the BookModel.getDataRangeModel( ).createDataRange( ) method for the target sheet. The following code demonstrates the createDataRange( ) method:
DataRange dr_r = book.getDataRangeModel().createDataRange(0, 0, 0, 1, 3, dq_jdbcQuery);
where
■ The first 0 is the index of the worksheet that contains the data range.
■ The next pair of zeros, 0, 0, are integers representing the starting row and column, in that order, for the data range. The indexes for rows and columns begin with 0.
■ 1, 3 are integers representing the ending row and column, in that order, for the data range.
■ dq_jdbcQuery is the DatabaseQuery object used to populate the data range with data.
Setting up a detail section to contain dataA data range requires report functions to acquire data from a data source using a query. You establish a report function for the data range by creating a section in the data range and assigning a report function to that section. For the purposes of this discussion, the detail report function provides direct access to the information in the data source. The following code sets up a detail section in a data range for the root row of the data:
Section s_section = dr_r.getRowRootSection().getChild(1).createParent("detail");
section.setCommands("detail()");
For more information about report functions, see Designing Spreadsheets using BIRT Spreadsheet Designer.

76 U s i n g B I R T S p r e a d s h e e t E n g i n e a n d A P I
Using a cell entry to load dataA data range can load any column from the data source. You set the column of data to load using BookModel.setEntry( ). For example, the following code sets the country column from the database table to the cell A2 on the first worksheet:
book.setEntry(0, 1, 0, "#write(country)");
where
■ The first 0 is the index of the worksheet that contains the data range.
■ 1, 0, are integers representing the cell in which to put the entry. This cell must be in a data range section that is connected to a data source.
■ "#write(country)" is the entry that is added to the cell. When the workbook is saved, this entry will populate the column of the assigned cell with data from the country column of the data source. The column is filled starting with the row of the assigned cell, which is A2 in this case.
Generating the workbookFinally, you generate the workbook generating a com.f1j.ss.Document object. You can refresh a workbook that relies on external data from a database or external file by creating and saving a new Document object, as shown in the following code:
com.f1j.ss.Document d_doc = bm_book.getBook().getDocument();try {
d_doc.fileSaveAs(new java.io.File("report.xls"), com.f1j.ss.DocumentType.EXCEL_97_WORKBOOK, new com.f1j.ss.DocumentSaveCallback());
}finally {
d_doc.release();}
You must always call the Document.release( ) method after creating the document. If you do not call this method, the engine retains a lock on the output file. For more information about using the Document class, see Chapter 4, “Working with input and output.”
Generating Excel outputFor a program to generate an Excel file containing information from a data source, the workbook must regenerate at least once to load the data into a data range before it is saved. This is accomplished by loading the content into a spreadsheet design file before saving the output into an Excel file. Using all the
C h a p t e r 5 , W o r k i n g w i t h d a t a s o u r c e s 77
thread locking and document locking mechanisms, the following code generates Excel output that contains data from a data source:
import java.io.File;import com.f1j.ss.*;import com.f1j.ss.datarange.*;import com.f1j.data.source.JDBC;import com.f1j.data.query.*;import com.f1j.data.DataSourceCollection;
public class MyTest {
public static void main (String args[]){
Document d_doc = new Document(null);BookModel bm_book = BookModel.Factory.create(d_doc.getBook());bm_book.getLock();
try{JDBC jdbc_dataSrc = (com.f1j.data.source.JDBC)bm_book.getDataSourceCollection().factory("test", com.f1j.data.DataSourceCollection.kJDBC);jdbc_dataSrc.set("org.apache.derby.jdbc.EmbeddedDriver", "jdbc:derby:classpath:ClassicModels", "", "", false);
//create the queryDataQuery dq_dataQuery = jdbc_dataSrc.getDataQueryCollection().factory("query1");dq_dataQuery.setDataHandlerType(com.f1j.data.handler.Handler.kJDBCResultSet);((DatabaseQuery)dq_dataQuery).setQuery("select * from \"Customers\"",false);
//Create the data rangeDataRange dr = bm_book.getDataRangeModel().createDataRange(0, 0, 0, 1, 3, dq_dataQuery);Section section = dr.getRowRootSection().getChild(1).createParent("detail"); section.setCommands("detail()");bm_book.setText(0, 0, 0, "COUNTRY");bm_book.setEntry(0, 1, 0, "#write(country)");
//Save the reporttry {
d_doc.fileSaveAs(new File("C:\\output.sod"), DocumentType.CURRENT_FORMAT, null);
d_doc.fileSaveAs(new File("C:\\output.xls"), DocumentType.EXCEL_97_REPORT_VIEW, null);}
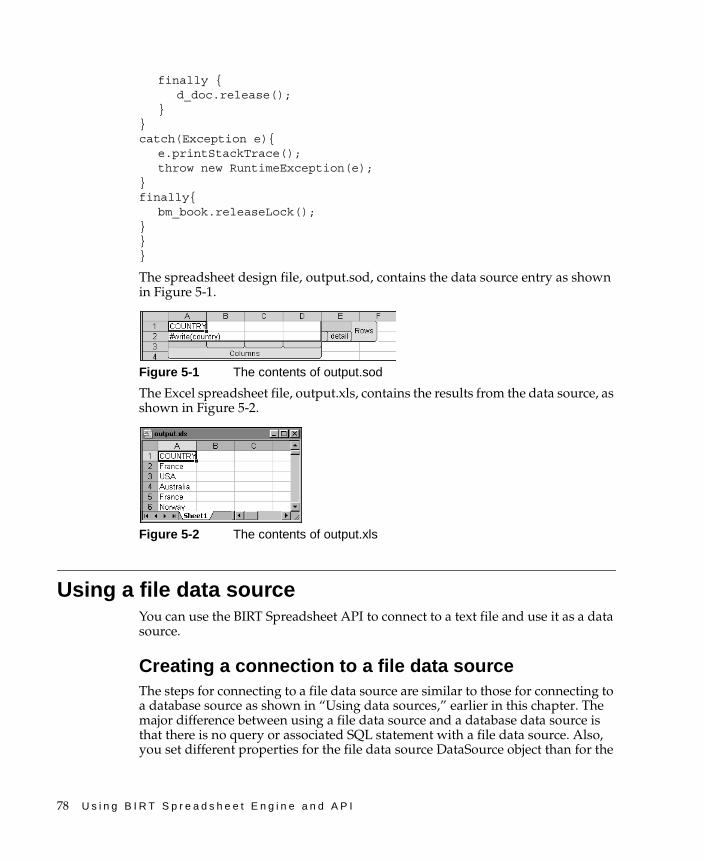
78 U s i n g B I R T S p r e a d s h e e t E n g i n e a n d A P I
finally {d_doc.release();
}}catch(Exception e){
e.printStackTrace();throw new RuntimeException(e);
}finally{
bm_book.releaseLock();}}}
The spreadsheet design file, output.sod, contains the data source entry as shown in Figure 5-1.
Figure 5-1 The contents of output.sod
The Excel spreadsheet file, output.xls, contains the results from the data source, as shown in Figure 5-2.
Figure 5-2 The contents of output.xls
Using a file data sourceYou can use the BIRT Spreadsheet API to connect to a text file and use it as a data source.
Creating a connection to a file data sourceThe steps for connecting to a file data source are similar to those for connecting to a database source as shown in “Using data sources,” earlier in this chapter. The major difference between using a file data source and a database data source is that there is no query or associated SQL statement with a file data source. Also, you set different properties for the file data source DataSource object than for the
C h a p t e r 5 , W o r k i n g w i t h d a t a s o u r c e s 79
database DataSource object. For example, you set the driver, database, user name, and password properties on the database DataSource object and you set the file path and data handler properties for the file DataSource object.
The following example illustrates connecting to a file data source:
// Use the kFile constant to set a file type for a data source.com.f1j.data.source.File f_fileSrc = (com.f1j.data.source.File)
bm_book.getDataSourceCollection().factory("salesPeople", DataSourceCollection.kFile);
f_fileSrc.setFilePath("c:\\shared\\SalesPeople.txt");f_fileSrc.setDataHandler(
com.f1j.data.handler.Handler.kDelimitedText);DelimitedText dt_FFDef = (DelimitedText)
f_fileSrc.getDataHandler();dt_FFDef.setStartRow(2);dt_FFDef.setDelimiters("\t");DataQuery dq_dataQuery =
f_fileSrc.getDataQueryCollection().factory("query1");
//Create the data rangeDataRange dr = bm_book.getDataRangeModel().createDataRange(0, 0,
0, 1, 3, dq_dataQuery); Section section =
dr.getRowRootSection().getChild(1).createParent("detail"); section.setCommands("detail()");bm_book.setText(0, 0, 0, "First Name");bm_book.setEntry(0, 1, 0,
"#write(" + dt_FFDef.getColumnName(0) + ")");try {
d_doc.fileSaveAs(new File("C:\\FFoutput.sod"), DocumentType.CURRENT_FORMAT, null);d_doc.fileSaveAs(new File("C:\\FFoutput.xls"), DocumentType.EXCEL_97_REPORT_VIEW, null);
}finally {
d_doc.release();}
To read a file properly, the appropriate file handler constant must be passed to the com.f1j.data.source.File.setDataHandler( ) method. Table 5-2 lists the file handler constants and the file formats they support.
Table 5-2 Options for file handlers
Constant Supported file format
kDelimitedText Character-delimited text
kPositionalText Positionally delimited text

80 U s i n g B I R T S p r e a d s h e e t E n g i n e a n d A P I
Using a delimited text file data sourceBefore defining a delimited text file query, you must create a File source object and set its path and handler, as in the following example:
com.f1j.data.source.File f_fileSrc = bm_book.getDataSourceCollection().factory("salesPeople", DataSourceCollection.kFile);
fileSrc.setFilePath("c:\\shared\\delimitedSP.txt");fileSrc.setDataHandler(
com.f1j.data.handler.Handler.kDelimitedText);
You must also get the handler for the file and cast it as a com.f1j.data.handler.DelimitedText object, as shown in the following statement:
DelimitedText dt_FFDef = (DelimitedText) f_fileSrc.getDataHandler();
Next, set the starting data row for the data in the DelimitedText object. Often the data begins in the second row because the first row contains column headings. You specify the starting row with the setStartRow( ) method, as shown in the following statement:
dt_FFDef.setStartRow(2);
You must also tell the DelimitedText object what characters separate the columns. You use the DelimitedText.setDelimiters( ) method to do this task. The following statement sets the column delimiter characters to semicolon, colon, and comma:
dt_FFDef.setDelimiters(";:,");
Some delimited text files contain delimiter characters that are not intended to separate columns. The creator of the delimited text file can mark such a character as data by preceding it with an escape character. Often this character is a backslash (\). You use the DelimitedText.setTextQualifier( ) method to set the escape character. If you use the backslash as an escape character, you must use a pair of them because the Java compiler also interprets the backslash as an escape character, as shown in the following statement:
dt_FFDef.setTextQualifier(‘\\’);
The delimiter that marks the end of a row is always either a carriage return or line feed character or a combination of one carriage return and one line feed.
By default, all of the data in a text file is retrieved as strings. To change the data type of a column, use DelimitedText.setColumnDataFormat( ), as shown in the following code:
dt_FFDef.setColumnDataFormat(0, Text.kNumber);
where
■ 0 is the index number for the column to cast.

C h a p t e r 5 , W o r k i n g w i t h d a t a s o u r c e s 81
■ Text.kNumber is a constant inherited by DelimitedText from the Text class that sets the interpretation of the column to a number. kNumber does not accept symbols, such as $, so currency values are initially retrieved as text.
Defining a fixed-width text file queryA fixed-width text file is one in which columns are a fixed number of characters or digits wide. Each column can be a different width, but a column’s width is the same for every row.
Preparing a fixed-width text file connection requires following the same process described in “Using a file data source,” earlier in this chapter. The following example illustrates the process:
DataSourceCollection dsc_DataSources = bm_book.getDataSourceCollection( );
Source s_src = dsc_DataSources.factory("salesPeople", DataSourceCollection.kFile);
com.f1j.data.source.File f_fileSrc = (com.f1j.data.source.File) s_src;
f_fileSrc.setFilePath("c:\\shared\\fixedWidthFile.txt");f_fileSrc.setDataHandler(com.f1j.data.handler.Handler
.kPositionalText);
As with all text files, you must get the Handler object and cast it appropriately:
PositionalText pt_fixedWidth = (PositionalText) f_fileSrc.getDataHandler();
You must set where each column begins in the handler by creating and passing an integer array to PositionalText.setDataPosition( ), as in the following statements:
int[ ] i_colPositions = { 6, 17, 24, 31, 38, 45, 52, 59, 66, 73,80, 87, 94 };
pt_fixedWidth.setDataPosition(i_colPositions);
The first number in the array is the position of the second column. The first column always starts in position 1. Like with delimited text files, you must tell the handler where the data begins.
Using a URL to specify a file locationThe preceding example uses a file path to specify the location of the data source. You can also use a URL in the setFilePath( ) method to specify the path to the data source. For example, you could substitute the following statement for the statement that sets the file path in the preceding example:
f_fileSrc.setFilePath("http://localhost/data/SalesPeople.xml");

82 U s i n g B I R T S p r e a d s h e e t E n g i n e a n d A P I
One advantage of using a URL is that you can also set user name and password authentication for a URL, providing you are using Java 2 version 1.3 or higher. The following example shows how to set HTTP basic authentication for a URL:
f_fileSrc.setFilePath("http://username:pwd@servername/directory/file.xml");
Using the data set cache as a data sourceBy default, BIRT Spreadsheet Engine creates a data set cache when it retrieves data from any data source. To access the data set cache, you can use DataSourceCollection.getDataSetCacheDataSource( ), which returns the data set cache directly. Alternatively, you can use the get( ) method of the DataSourceCollection object, which returns an array of Source objects, the first of which is the data cache data source. For example, if there exists a data set cache, get( )[0] returns the data set cache and get( )[1] returns the first normal data source. If there is no cache, get( ) [0] returns the first normal data source.
BIRT Spreadsheet Engine does not create the data set cache until an initial data set is queried. To test whether BIRT Spreadsheet Engine has instantiated the data set cache, use DataSourceCollection.hasDataSetCache( ), which returns true if there is a cache and false if not. All the queries on the data connections in the workbook are available to the data cache data source as tables. For example, if you have a query named query1 for a database connection, and that query retrieves customers.*, you can create a query in the data cache to retrieve query1.*.

C h a p t e r 6 , W o r k i n g w i t h d a t a r a n g e s 83
C h a p t e r
6Chapter 6Working with data ranges
This chapter contains the following topics:
■ About data ranges
■ About the data range interfaces
■ Writing a Java class that contains data range functionality

84 U s i n g B I R T S p r e a d s h e e t E n g i n e a n d A P I
About data rangesA data range is an enhanced form of pivot range that can handle multiple and complex data hierarchies, such as in a star schema or an OLAP data source. A data range always has at least one associated data set. Unlike a pivot range, a data range can have multiple associated data sets.
About the data range interfacesThere are several interfaces in the BIRT Spreadsheet API that you can use to create or modify a data range, which the following sections describe.
Understanding the DataRangeModel interfaceThe com.f1j.ss.datarange.DataRangeModel interface contains method signatures to:
■ Create a new com.f1j.ss.datarange.DataRange object.
■ Update an existing DataRange definition.
■ Create a com.f1j.ss.datarange.DataRangeDef object.
■ Get a DataRangeDef object for the selected data range.
■ Create a com.f1j.ss.datarange.Range object based on the current selection.
You create a DataRangeModel object from the BookModel object, as shown in the following statement:
DataRangeModel drm_dataModel = bm_book.getDataRangeModel();
Understanding the DataRange interfaceThe DataRange interface contains methods to get the position of the data range in the workbook and the root column and root row sections of the data range. The DataRange interface also contains methods to get and set the default data set. The following statement creates a DataRange object from a DataRangeModel object using the createDataRange( ) method of the DataRangeModel class:
DataRange dataRange = (DataRange) dataModel.createDataRange(sheet,startRow, startCol, endRow, endCol, dataQuery);
You can also create a DataRange object by passing a DataRangeDef object to the DataRangeModel.applyDataRange( ) method, as shown in the following code:

C h a p t e r 6 , W o r k i n g w i t h d a t a r a n g e s 85
DataRangeDef dataRangeDef = dataModel.getDataRangeDef();DataRange dataRange = (DataRange)
dataModel.applyDataRange(dataRangeDef);
The method of creating a data range object that the previous example shows is useful for getting an instance of an existing data range or creating a new data range that is based on the current selection. If the current selection is not inside an existing data range, applyDataRange( ) returns a definition for a new data range. To create a new data range using applyDataRange( ), the current selection must be outside the bounds of an existing data range.
Updating an existing data range definitionTo update an existing data range definition, select the data range that you want to update, complete the following tasks in this order:
■ Place the selection inside the bounds of the data range to modify.
■ Get a DataRangeDef object from the DataRangeModel object.
■ Modify the attributes of the DataRangeDef object.
■ Pass the modified DataRangeDef object to the applyDataRangeDef( ) method of the DataRangeModel object.
Creating a DataRangeDef object for a new data rangeTo create a DataRangeDef object for a new data range, complete the following tasks in this order:
■ Create a selection that is outside the bounds of any existing data ranges and at the location where you want to create a new data range.
■ Call the getDataRangeDef( ) method of the DataRangeModel object.
The DataRangeDef object that getDataRangeDef( ) returns contains the definition of a new data range at the location of the current selection. If more than one cell is selected, the size and location of the new data range is identical to the size and location of the selection. If only one cell is selected, the size of the new data range is four cells by four cells, and the upper left cell of the new data range is at the same location as the selected cell.
Getting the DataRangeDef object for an existing data rangeTo create a DataRangeDef object for an existing data range, complete the following tasks in the order shown:
■ Place the current selection inside the data range for which you want a DataRangeDef object.
■ Call the getDataRangeDef( ) method of the DataRangeModel object.

86 U s i n g B I R T S p r e a d s h e e t E n g i n e a n d A P I
The DataRangeDef object that is returned from the getDataRangeDef( ) method represents the data range that contains the current selection.
Creating a Range object that is based on the current selectionThe DataRangeModel interface contains two methods with which you can get a Range object that represents the current selection. The Range object that is returned represents a range of cells, but it is not a data range. The two methods are similar and are both named getSelectedRange( ). One of the two getSelectedRange( ) methods has a Range argument, and the other one has no arguments. If you want to create the resulting range in an existing Range object, use the method that takes a Range argument. If you pass null to the getSelectedRange( ) method, a new Range object is created. For both methods, the return value is a reference to the Range object that represents the current selection.
Formatting the data rangeOnce you associate a data range with a data query, you can set the range’s formatting. There are four options for formatting the data range. You pass a format specification constant to the DataRange.setFormattingMode( ) method to specify the formatting mode. Table 6-1 lists the four constants and what effect they have on the data range.
Understanding the DataRangeDef interfaceThe DataRangeDef interface defines the location, name, and data set that is associated with a data range. You use a DataRangeDef object to set and retrieve the name, location, and data set for a data range. You get a DataRangeDef object from the DataRangeModel object, as shown in the following statement:
DataRangeDef dataDef = dataModel.getDataRangeDef();
When you initially create a DataRangeDef object, the values for the location, name, and data set that are associated with the data range depend on the current selection at the time that you create the DataRangeDef object. If the current selection resides within an existing data range, the DataRangeDef object describes the data range that contains the active cell. If the active cell is outside all existing
Table 6-1 Options for formatting the data range
Constant Description
eCellFormatting_Clear Clears existing database formatting
eCellFormatting_Manual Uses manual formatting
eCellFormatting_Preserve Keeps existing database formatting
eCellFormatting_ReplicateFirstRow Uses formatting from first row of data range

C h a p t e r 6 , W o r k i n g w i t h d a t a r a n g e s 87
data ranges at the time that you create a DataRangeDef object, default values are assigned to the name, location, and data set attributes.
The default value for the data range location is the current selection at the time that you create the DataRangeDef object. If the selection is a single cell, a four-cell-by-four-cell data range is created. The default value for the data range data set is the default data set of the workbook. The default data set for a workbook is initially the first data set that is created for that workbook, but the user can change the default value to any available data set at any time.
You can change the location, name, and data set for a DataRangeDef object at any time before you use it to create a DataRange object. You use the setLocation( ), setName( ), and setDataSet( ) methods to change the attributes of a DataRangeDef object, as shown in the following example:
dataDef.setLocation("Sheet1!b4:d8"); dataDef.getOptions().setName("myDataRange"); DataQueryCollection dqc = dataSource.getDataQueryCollection(); DataSet ds = (DataSet) dqc.find("myQuery"); dataDef.setDataSet(ds);
Understanding the Section interfaceThe Section interface defines a single section that you can create in the row and column areas of a data range. A data range has one root row section and one root column section. Both the root row section and the root column section can have child sections, which can, in turn have other child sections. You get the root column and row sections from the DataRange object, as shown in the following example:
Section rootRowSection = dataRange1.getRowRootSection();Section rootColumnSection = dataRange1.getColumnRootSection();
You can access a child section by index, name, or position, as shown in the following example:
Section childOfRowRoot = rootRowSection.getChild(0);Section childOfColumnRoot =
rootColumnSection.getChildAt(col12);Section grandchildOfColumnRoot =
childOfColumnRoot.getChild("grandkid1");
Use Section.setCommands( ) to enter a data script command into the section. For example, the following statement sets the grouping for a section:
childOfRowRoot.setCommands("group(custid)");
The Section interface implements the AbstractSection interface. You can use the AbstractSection createParent( ) method to add a parent section. A parent section is one level higher in the section hierarchy than the section on which you call the

88 U s i n g B I R T S p r e a d s h e e t E n g i n e a n d A P I
createParent( ) method. The createParent( ) method makes a String argument that contains a name to assign to the new parent section.
The AbstractSection interface also has two methods, insertBefore( ) and insertAfter( ), that you can use to insert new rows and columns into a section. Use insertBefore( ) and insertAfter( ) to increase the height and width of existing sections. Using these methods has the effect of adding a new leaf section before or after the section on which the method is called. The following example provides examples of how to use the methods that are defined in AbstractSection:
Section parentSection1 = childOfRowRoot.createParent("parentSection1");
Section leafSection = childOfRowRoot.insertBefore( );Section leafSection2= childOfColumnRoot.insertAfter( );
Understanding data commands and report scriptData commands form the code that controls the content of a data range. The commands that drive a data range are text strings entered into data cells. A data command text string is coded in report script. The set of all report script functions and their effects on the data range is available in Designing Spreadsheets using BIRT Spreadsheet Designer.
Writing a Java class that contains data range functionality
The main features of the data range API are used in the example DataMethods class, which is included later in this section. The DataMethods class is a Java class for creating and manipulating a data range. DataMethods can be accessed through an event handler or from a stand-alone Java program that uses the BIRT Spreadsheet Engine. DataMethods can:
■ Create an empty data range in the workbook.
■ Add row sections to the data range.
■ Add cell commands to the data range.
The following code shows the DataMethods Java class:
import com.f1j.util.*;import com.f1j.data.*;import com.f1j.ss.datarange.*;import com.f1j.ss.report.functions.*;import com.f1j.data.source.*;import com.f1j.ss.*;import com.f1j.data.query.*;

C h a p t e r 6 , W o r k i n g w i t h d a t a r a n g e s 89
public class DataMethods {
public com.f1j.ss.datarange.DataRange createEmptyDataRange(BookModel bm_book) throws
F1Exception { DataRangeModel drm_model = bm_book.getDataRangeModel(); DataRangeDef drd_definition = drm_model.getDataRangeDef(); return drm_model.applyDataRangeDef(drd_definition);
}public void addRowSections(com.f1j.ss.datarange.DataRange
dr_dataRange) throws F1Exception {Section s_rowRoot = dr_dataRange.getRowRootSection();Section s_firstLeaf = s_rowRoot.getChild(0);Section s_section1 = s_firstLeaf.createParent("Parent");Section s_secondLeaf = s_rowRoot.getChild(1);Section s_section2 = s_secondLeaf.createParent("Section2");s_section1.setName("Section1");s_section2.setCommands("group(custid)");
}private void addCellCommands(BookModel bm_book) throws
com.f1j.util.F1Exception {bm_book.setEntry(0, 0, "CustID");bm_book.setEntry(1, 0, "#custid");bm_book.setEntry(0, 1, "Last");bm_book.setEntry(1, 1, "#contact_last");bm_book.setEntry(1, 2, "#contact_first");
}}

90 U s i n g B I R T S p r e a d s h e e t E n g i n e a n d A P I

C h a p t e r 7 , W o r k i n g w i t h c e l l d a t a 91
C h a p t e r
7Chapter 7Working with cell data
This chapter contains the following topics:
■ About cell data
■ Getting and setting cell content
■ Clearing, cutting, or deleting a cell or cell content
■ Copying and pasting cell data
■ Using a defined name
■ Accessing cell data
■ Sorting cell data
92 U s i n g B I R T S p r e a d s h e e t E n g i n e a n d A P I
About cell dataThis chapter describes how to manipulate data on a worksheet, including:
■ Getting and setting cell values and formulas
■ Using a defined name
■ Using an add-in function
For more information about using the BIRT Spreadsheet API to manipulate data on a worksheet, see the Javadoc.
Getting and setting cell contentThis section describes how to use the BIRT Spreadsheet API to:
■ Get and set the content of a single cell.
■ Supply the same values to all cells in a range.
■ Load data from an array.
■ Import a block of data into a range.
■ Use a validation rule to restrict the data a user can enter in a cell.
Getting the content of a cellTo get the content of a cell, use the accessor methods of the BookModel and Sheet classes.
Using BookModel.getCellText( ) and Sheet.getText( )BookModel.getCellText( ) returns the text representation of the active cell. If the active cell contains a formula, these methods return the result of the computation defined by the formula. Sheet.getText( ) returns the text representation of a cell by row and column reference. The following statements illustrate using these two methods:
// operates on the active cellString s_cellText = bm_book.getCellText(); // operates on specified cellString s_cellText = s_sheet.getText(row, col);
Using BookModel.getEntry( ) and Sheet.getEntry( )There are four signatures of BookModel.getEntry( ) and two signatures of Sheet.getEntry( ), all of which return a string that is either the text representation

C h a p t e r 7 , W o r k i n g w i t h c e l l d a t a 93
of the cell or, if the cell contains a formula, the formula in the cell. The four signatures of BookModel.getEntry( ) are summarized in Table 7-1.
The two signatures of Sheet.getEntry( ) are summarized in Table 7-2.
The following statements show the use of these methods to get cell content:
// gets contents of active cellString str = bm_book.getEntry(); // gets cell B2 on Sheet3String str = bm_book.getEntry("Sheet3!B2"); // gets cell at row and col on active sheetString str = bm_book.getEntry(row, col); // gets cell at row and col on sheetString str = bm_book.getEntry(sheet, row, col); // gets contents of active cellString str = s_sheet.getEntry(); // gets cell B1 on this Sheet objectString str = s_sheet.getEntry(0, 1);
Using getFormula( ) and getNumber( )Both BookModel and Sheet contain methods to get the formula contained in a cell. The methods that get formulas return strings that contain the formula preceded by an equal sign (=). The methods that get numbers return doubles. If the method to get a formula specifies a cell that does not contain a formula, the method throws an exception. Likewise, if the method to get a number specifies a cell that does not contain a number, that method throws an exception. BookModel
Table 7-1 Signatures of BookModel.getEntry( )
Method Target cell
getEntry( ) The active cell on the first selected worksheet
getEntry(row, col) The cell at the specified row and column on the active sheet
getEntry(sheet, row, col) The cell at the specified row and column on the specified sheet
getEntry(locationString) The specific location or defined name specified in the location string
Table 7-2 Signatures of Sheet.getEntry( )
Method Target cell
getEntry( ) The active cell
getEntry(row, col) The cell at the specified row and column

94 U s i n g B I R T S p r e a d s h e e t E n g i n e a n d A P I
has three methods for getting formulas, all called getFormula( ). BookModel also has three methods for getting numbers, all called getNumber( ). The three methods for getting formulas and the three methods for getting numbers have the same set of parameters and operate on the same target cells as the first three methods in the table of BookModel.getEntry( ) methods, appearing in “Using BookModel.getEntry( ) and Sheet.getEntry( ),” earlier in this chapter.
Sheet has one method for getting a formula and one method for getting a number, both of which specify the specific row and column on the sheet that the Sheet object represents. The following statements illustrate using the BookModel and Sheet methods to get formulas and numbers from specific cells:
// gets formula in active cellString formula = bm_book.getFormula( ); String formula = bm_book.getFormula(sheet, row, col); // row and col on active sheetString formula = bm_book.getFormula(row, col); // row and col this SheetString formula = s_sheet.getFormula(row, col); // gets formula in active cellDouble numericValue = bm_book.getNumber( ); Double numericValue = bm_book.getNumber(sheet, row, col); // on active sheetDouble numericValue = bm_book.getNumber(row, col); // row and col this SheetDouble numericValue = s_sheet.getNumber(row, col);
Setting the content of a cellThe methods to set the content of a cell closely parallel the methods to get the content of a cell. Both BookModel and Sheet have an analogous method to set cell content for every method to get cell content. The parameters to address the locations of the affected cells in the methods to set cell content are identical to the parameters in the analogous methods to get cell content.
Understanding the setEntry( ) methodsAll of the BookModel.setEntry( ) and Sheet.setEntry( ) methods take a string parameter that specifies text in the active cell just as a user would enter information by typing it. This string can represent text, a number, a date, or a formula. The setEntry( ) methods analyze the string and set the cell content and format accordingly. They differentiate between dates, times, percentages, currency, fractions, and scientific notation and apply localized number formats.
Understanding methods that set the content of the active cellSome of the methods that set content of a cell can operate on more than one cell, whereas all methods to get the content of a cell always operate on a single cell.

C h a p t e r 7 , W o r k i n g w i t h c e l l d a t a 95
When there is more than one selected sheet, methods that set the content of the active cell also set the content of the same cell in all selected sheets. For example, if cell B1 of sheet1 is the active cell, and sheet2 and sheet3 are also selected sheets, any method that sets the content of the active cell then operates on sheet1!B1, sheet2!B1, and sheet3!B1.
The following statements illustrate setting the content of the active cell in all selected sheets:
bm_book.setCellText("Expenses"); bm_book.setEntry("02/25/1944"); bm_book.setNumber(3.14159);bm_book.setFormula("sum(A2:D2)");
The following statements illustrate setting the content of a single cell:
bm_book.setFormula(sheet, row, col, "sum(a1:c23");bm_book.setNumber(sheet, row, col, 123.99);bm_book.setEntry(row, col, "4.2E05");bm_book.setCellText("Sheet1!B3");s_sheet.setText(row, col, "Payables");s_sheet.setFormula(row, col, "A1+B1");
Supplying the same value in a range of cellsTo enter one value throughout a range of cells, first create a selection that includes all the cells you want to change, as in the following statement:
bm_book.setSelection("sheet1!A1:K11");
After setting the selection, modify the upper right cell in the selection as in the following statement:
bm_book.setEntry("sheet1!A1", "0.0");
To copy the value in the top left cell of a selection into all the other cells in the selection, use the following two statements:
bm_book.editCopyDown();bm_book.editCopyRight();
The BookModel.editCopyDown( ) and BookModel.editCopyRight( ) methods are only available in the BookModel interface, and not in the Sheet interface.
Copying cell data to and from an arrayYou can copy cell data to and from an array using methods in the BookModel and Sheet interfaces. You can only copy numeric data and the array must be a two-dimensional array of doubles. The following example copies data from a range of cells in one worksheet into a two-dimensional array of doubles and then copies that array back into a different range of cells in a different worksheet:

96 U s i n g B I R T S p r e a d s h e e t E n g i n e a n d A P I
double[ ][ ] d_dataArray = new double[3][5];bm_book.copyDataToArray(sheet1, row1, col1, row2, col2,
dataArray);bm_book.copyDataFromArray(sheet2, row3, col3, row4, col4,
dataArray);
Copying cell data between ranges You can also copy a range of cells directly without using an intermediate array by using the BookModel.copyRange( ) method. The copyRange( ) method allows you to copy between sheets in separate workbooks, as in the following example:
bm_destBook.copyRange(sheet1, row1, col1, row2, col2, bm_srcBk, sheet2, row3, col3, row4, col4);
You can also use this method to copy a cell range within the same workbook by specifying the same BookModel object for the source as the object on which you call the method.
Loading cells from a tab-delimited stringYou can use the BookModel.setClip( ) and BookModel.setClipValues( ) methods to load cell data from a tab-delimited string. Both methods parse the specified string into a set of substrings separated by tab characters and return characters. A return character can be any of the following:
■ A single carriage return character
■ A single line feed character
■ A carriage return and line feed together
The active cell forms the upper left corner of the grid of columns into which these two methods place the substrings. A tab character signifies the end of a column entry, and a return characters signifies the end of a row entry. The setClip( ) method, like the setEntry( ) methods, evaluates each substring and formats the cell accordingly, The setClipValues( ) method treats every substring as a text value.
The following example shows how to use setClip( ) to parse and copy a tab-delimited string, and place the appropriate values into cell range A1:C3:
String tabDelim = "AA\tBB\tCC\n3.14159\t01/07/2005\t3E04\r20%\tHH\tII\tJJ";
// start the copy at A1bm_book.setActiveCell(0, 0); bm_book.setClip(tabDelim);

C h a p t e r 7 , W o r k i n g w i t h c e l l d a t a 97
Setting a validation rule for a cell or a rangeYou can set limitations on what values can be entered into a cell or range of cells by defining and applying a validation rule. Examples of validation rules are:
■ SUM(A6:A7)>A5
■ AND(A6>1,A6<100)
■ IF(A7>1,A7<100,A7>0)
■ OR(ISLOGICAL(A7),A7=1,A7=0)
To set a validation rule for a cell or range, you first get a com.f1j.ss.ValidationFormat object from a com.f1j.ss.CellFormat object. The following code snippet illustrates setting a validation rule for a range:
CellFormat cf_format = bm_book.getCellFormat();ValidationFormat vf_format = cf_format.validation();// the range for which we want to set the rulebm_book.setSelection("A1:D5"); vf_format.setRule("Len(A1)<5", baseRow, baseCol);bm_book.setCellFormat(cf_format);
All cell references in a validation rule are relative references, and you must specify a base cell for cell references using the Row and Column arguments in BookModel.setRule( ). For example, if you specify cell B7 as the base cell and the validation rule is:
>B6
the rule requires that the values of this cell, B7, must be greater than that of the cell one row above, B6. If you set the above rule relatively to cell C8, the rule transforms to:
>C7
This behavior is similar to how formulas change when moved from one cell to another cell in Excel. When you apply a validation rule to a range, the rule is transformed for every cell in the range.
Displaying multiline data in a cellTo display multiline data in a cell, use the new line constant, \n, to separate lines of text in the cell, or set the wordwrap property of the com.f1j.ss.AlignFormat object for the cell. The following snippet shows how to display text on separate lines using a new line constant:
String s_text = "First line" + "\n" + "Second line";bm_book.setText(1, 1, s_text);
To set the word wrap property to multiple cells, set the word wrap property in the AlignFormat for the workbook’s CellFormat object and use

98 U s i n g B I R T S p r e a d s h e e t E n g i n e a n d A P I
BookModel.setCellFormat( ) to apply the new format to multiple cells. The following example shows how to use the word wrap method:
CellFormat cf_format = bm_book.getCellFormat();AlignFormat af_format = cf_format.align();af_format.setWordWrap(true);bm_book.setCellFormat(cf_format, row1, col1, row2, col2);
Entering concatenated strings and cell referencesTo enter text that consists of strings and references from other cells, use the setFormula( ) method combined with the ampersand symbol, &. The following statement enters a concatenation of a string and data in two other cells:
bm_book.setFormula(i_sheet, row, col, "\"Whoopie \"&A1&A2");
If you do not escape the internal quotes with backslashes, the setFormula( ) method assumes that the text is a defined name. Whenever you want a formula to display text, you must bracket the text in quotation marks.
Referring to a cell in another workbookWhen you specify a formula that contains a reference to a cell in another workbook, you use the following syntax:
bm_book.setFormula(0, 0, "[secondWB]Sheet1!A1");
The string inside the brackets identifies the name of the other workbook. This statement is only legal if both workbooks are in the same group.
For more information about grouping workbooks, see “Grouping workbooks,” in Chapter 2, “Working with workbooks and worksheets.”
Creating a hyperlinkYou can add a hyperlink in a cell or range of cells. A hyperlink can link to:
■ A range in the same worksheet
■ A range in a different worksheet in the same workbook
■ An external file of a registered file type
■ A web page
■ An e-mail address
To add a hyperlink to a worksheet, use the BookModel.addHyperlink( ) method. You use the addHyperlink( ) method to specify the type of link, the URI, and a

C h a p t e r 7 , W o r k i n g w i t h c e l l d a t a 99
ToolTip string. The following statement illustrates creating a link to cell A100 in the same workbook:
bm_book.addHyperlink(i_sheet1, row1, col1, row2, col2, "a100",Hyperlink.kRange, "Link to cell a100");
The following example illustrates creating a link to a location in a workbook that is in a file on drive D:
bm_book.addHyperlink(i_sheet1, row1, col1, row2, col2, "'[D:\\example\\example.sod]Sheet1'!A1", Hyperlink.kFileAbs, null);
The following example illustrates creating a link to an absolute URL:
bm_book.addHyperlink(0, 0, 0, 0, 0, "http://www.actuate.com", Hyperlink.kURLAbs, "Actuate Website");
The following example illustrates creating a link to a relative URL:
bm_book.setHyperlinkBase("http://www.actuate.com/"); bm_book.addHyperlink(i_sheet1, row1, col1, row2, col2,
"sitemap.asp", Hyperlink.kURLRel, null);
The following example illustrates creating a link to a Microsoft Office bookmark:
bm_book.addHyperlink(i_sheet1, row1, col1, row2, col2,"D:\\excelworkbook.xls#Sheet2!A100", Hyperlink.kFileAbs,null);
The following example illustrates creating a link to a file using a relative file path:
bm_book.addHyperlink(i_sheet1, row1, col1, row2, col2,"\\test\\ExternalTestHyperlink.xls", Hyperlink.kFileRel, null);
The following example illustrates creating a link to a different file type:
bm_book.addHyperlink(i_sheet1, row1, col1, row2, col2,"C:\\temp\\Readme.pdf", Hyperlink.kFileAbs, "Readm.pdf");
The following example illustrates creating a link to send mail, including commands to set the recipient, the subject, and a cc: recipient:
bm_book.addHyperlink(i_sheet1, row1, col1, row2, col2,"mailto:[email protected]?cc= [email protected]&subject = Hyperlink Test",Hyperlink.kURLAbs, null);
For a complete list of all the hyperlink parameters and their valid values, see the Javadoc.
Clearing, cutting, or deleting a cell or cell contentThis section illustrates how to remove a cell or cell content from a worksheet and how to treat remaining cells after you remove cells.

100 U s i n g B I R T S p r e a d s h e e t E n g i n e a n d A P I
Clearing cell content in a JBookTo clear cell content, select the range to clear and call JBook.editClear( ). Use editClear( ) to clear all cells in the selected range or all selected objects on all selected worksheets. The clearType parameter specifies what to clear.
The following example shows how to clear all data and formatting:
jb_jbook.editClear(Constants.eClearAll);
The following example shows how to clear data only, leaving formatting intact:
jb_jbook.editClear(Constants.eClearContents);
The following example shows how to clear formatting only, leaving data intact:
jb_jbook.editClear(Constants.eClearFormats);
The following example shows how to open the warning message, "Are you sure you want to clear the selected cells?" with YES and NO buttons:
jb_jbook.editClear(Constants.eClearDlg);
Using the editCut( ) methodLike editClear( ), BookModel.editCut( ) clears the selected range and any objects in the range from the active worksheet. The editCut( ) method also adds the selected range or object to the Clipboard for subsequent pasting. The following example shows how to clear the selected range and add it to the clipboard:
bm_book.editCut();
Understanding locking and protectionThe locked status of a cell specifies whether the cell can be modified, but it is only relevant when its worksheet is protected. If a worksheet is unprotected, all cells can be modified regardless of their locked status. All cells are locked by default, and all worksheets are unprotected by default. For more information about cell protection, see “Setting cell protection,” in Chapter 3, “Working with worksheet elements.”
The locked state of a cell is contained in the cell’s format information. When you clear formatting for a cell, you reset the cell to its default locked status. To clear the value of a cell and leave its locked status unchanged, use the eClearValues constant when you call editClear( ).
The following example shows how to protect a worksheet, lock worksheet cells, and clear values only from the current selection:
String s_password = "pwd";bm_book.setSheetProtection(i_sheet,true,s_password,
Constants.kAllowEditObjects); bm_book.clearRange(1, 1, 7, 1, Constants.eClearContents );

C h a p t e r 7 , W o r k i n g w i t h c e l l d a t a 101
Deleting cellsThe remaining cells in a worksheet shift after a cell is deleted. The way the cells shift is based the shiftType parameter of the BookModel.deleteRange( ) method, which is used to delete cells. To specify how remaining cells shift when cells are deleted, use deleteRange( ) with a shiftType parameter. Table 7-3 describes the constants you use for the shiftType parameter of the deleteRange( ) method.
The following example shows how to delete a range including rows 1 through 7 of column 1, shifting all columns to the left of column 1:
bm_book.deleteRange(1, 1, 7, 1, Constants.eShiftColumns);
Copying and pasting cell dataThere are several ways to copy and paste data. The common methods BookModel.editCopy( ) and BookModel.editPaste( ) copy and paste selected cells using the clipboard, like in Excel. Additionally, you can control how data is copied and pasted using BookModel.copyRange( ) and JBook.editPasteSpecial( ). There are similar methods available using a Sheet object. For more information about any of the copy or paste methods, see the Javadoc.
Copying dataUsing copyRange( ), you can use a single method to copy a range from one worksheet and paste it into the same worksheet, a different worksheet in the same workbook, or a different worksheet in a separate workbook in the same workbook group. You call the copyRange( ) method from the BookModel class you are copying the data range into, as shown in the following code:
BookModel.copyRange(dstSheet, dstRow1, dstCol1, dstRow2, dstCol2, srcBookModel, srcSheet, srcRow1, srcCol1, srcRow2, srcCol2, what)
Table 7-3 Constants for the shiftType parameter for deleteRange( )
Constant Description
eShiftHorizontal Shifts cells horizontally beyond the last column, one cell to the right
eShiftVertical Shifts cells vertically beyond the last row, one cell up
eShiftColumns Shifts all cells beyond the last column, to the left
eShiftRows Shifts all cells beyond the last row, up to the first deleted row

102 U s i n g B I R T S p r e a d s h e e t E n g i n e a n d A P I
where
■ BookModel is the book you are copying the cells into.
■ dstSheet is an integer representing the sheet to which copyRange copies cells. If you omit the dstSheet argument, the active sheet receives the cells.
■ dstRows and dstCols are integers that define the data range to which copyRange copies cells.
■ srcBookModel is a BookModel object that contains the workbook you are copying cells from.
■ srcSheet is an integer representing the sheet from which copyRange copies cells. If you omit the srcSheet argument, copyRange copies cells from the current active sheet of srcBookModel.
■ srcRows and srcCols are integers that define the data range to which copyRange copies cells.
■ what specifies whether copyRange copies formulas, formats, or values from the source cells. Table 7-4 describes the valid values for the what parameter for copyRange( ).
Pasting a value onlyUsing editPasteSpecial( ), you can filter the type of data to paste, using constants, including formulas, values, formats, or a combination of types. For example, call editPasteSpecial( ) with eCopyValues to paste values in a cell or range but retain existing cell or range formatting information. You can use editPasteSpecial( ) to paste content from Java applications only. Before calling editPasteSpecial( ), call JBook.isCanEditPasteSpecial( ) to test for the presence of recognizable Clipboard data. The following example shows how to paste values only:
if (jb_jbook.canEditPasteSpecial())jb_jbook.editPasteSpecial(com.f1j.ss.Constants.eCopyValues);
Table 7-4 Constants for the what parameter for copyRange( )
Constant Label Description
1 eCopyFormulas Copies formulas only
2 eCopyValues Copies existing values and formula results
4 eCopyFormats Copies formats only
7 eCopyAll Copies formulas, values, and formats

C h a p t e r 7 , W o r k i n g w i t h c e l l d a t a 103
Using a defined nameA defined name provides a meaningful way to identify a cell, a range of cells, a value, or a formula. This section shows how to create defined names, how to determine the number of defined names in use, and how to determine whether a particular defined name is in use.
Creating a defined name When you create a defined name, the following rules apply:
■ A worksheet-level defined name begins with the worksheet name, followed by an exclamation point. For example, any defined name on the Expenses worksheet must begin with 'Expenses!'.
■ Limit the name to 255 characters.
■ Use no spaces or quotation marks.
■ Begin the name with a letter, _ , or \. Supply alphabetic, numeric, _ , \ , ., or ? characters for the remainder of the defined name.
■ Do not use a name that is the same as any possible cell reference, such as CD45 or IS100. If the name matches a possible column reference, you must enclose the name in parentheses. This matching only occurs with a defined name up to four characters long that contains only letters. For example, you do not have to distinguish SAM_1 from a column reference.
■ Do not use a name that is the same as an existing defined name. Defined names are case-insensitive.
To create or modify a defined name, use the BookModel.setDefinedName( ) method. The following example show how to assign a defined name to a cell, assign a defined name to a formula, and assign a defined name to a text value:
// Assigns the defined name MyDefinedName to cell $D$4.bm_book.setFormula(3, 3, "MyDefinedName");
// Assigns the defined name Chance to the formula RAND()*100.bm_book.setDefinedName("Chance", "RAND() * 100");bm_book.setFormula(3, 3, "Chance");bm_book.setDefinedName("Goal", "\"Total Net Gain\"");bm_book.setFormula(3, 3, "Goal");
Finding the number of defined namesTo get the number of defined names in use, use the BookModel.getDefinedNameCount( ) method, as in the following example:
int count = bm_book.getDefinedNameCount( );

104 U s i n g B I R T S p r e a d s h e e t E n g i n e a n d A P I
Deleting a defined nameTo delete a defined name, use the BookModel.deleteDefinedName( ) method, as in the following example:
bm_book.deleteDefinedName("MyDefinedName");
This method does not immediately delete the defined name. It sets the value of the defined name to an empty string. The name is only deleted the next time garbage collection runs and finds no references to the name. The count of defined names is only updated when the name is finally deleted.
Testing if a defined name existsIf a defined name does not exist, the getDefinedName( ) method throws an exception. If the defined name exists but was deleted and has not yet been removed by garbage collection, its value is null. To test for both conditions you can use code similar to the following example:
String s_definedNameValue;try{
s_definedNameValue = bm_book.getDefinedName("MyDefinedName");if (s_definedNameValue.compareTo("") != 0){
// the defined name exists !}else {// the defined name has been deleted but not collected}
} catch (F1Exception ex){// the defined name does not exist}
Getting cell coordinates of a defined name rangeWhen a defined name specifies a range, you can get the coordinates and sheets of that range by using code similar to the following lines:
RangeRef rr_rangeR = bm_book.formulaToRangeRef("DefinedName");int row1 = rr_rangeR.getRow1();int col1 = rr_rangeR.getCol1();int row2 = rr_rangeR.getRow2();int col2 = rr_rangeR.getCol2();Sheet s_sheet1 = rr_rangeR.getSheet1();Sheet s_sheet2 = rr_rangeR.getSheet2();
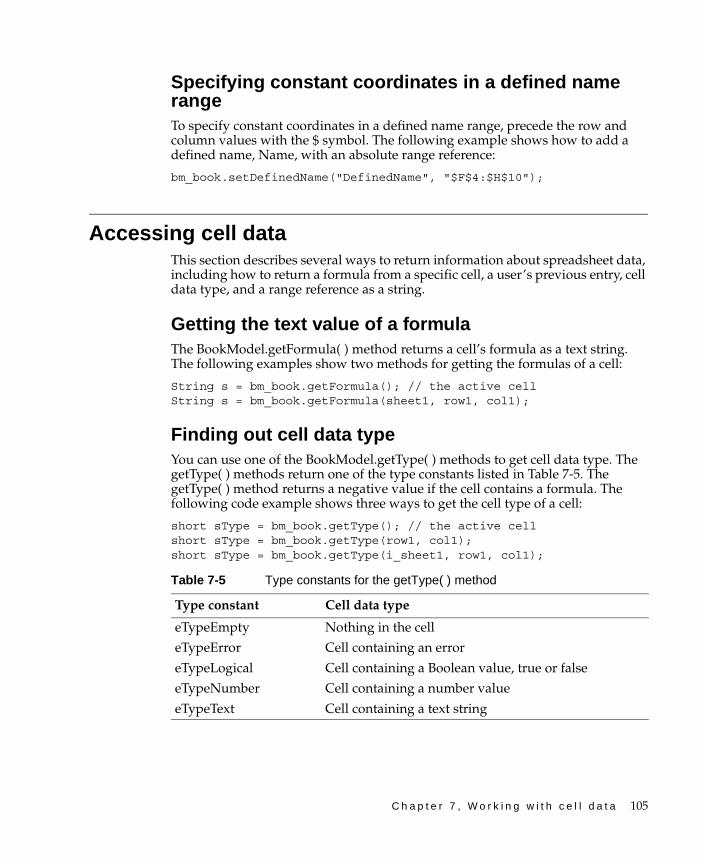
C h a p t e r 7 , W o r k i n g w i t h c e l l d a t a 105
Specifying constant coordinates in a defined name rangeTo specify constant coordinates in a defined name range, precede the row and column values with the $ symbol. The following example shows how to add a defined name, Name, with an absolute range reference:
bm_book.setDefinedName("DefinedName", "$F$4:$H$10");
Accessing cell data This section describes several ways to return information about spreadsheet data, including how to return a formula from a specific cell, a user’s previous entry, cell data type, and a range reference as a string.
Getting the text value of a formulaThe BookModel.getFormula( ) method returns a cell’s formula as a text string. The following examples show two methods for getting the formulas of a cell:
String s = bm_book.getFormula(); // the active cellString s = bm_book.getFormula(sheet1, row1, col1);
Finding out cell data typeYou can use one of the BookModel.getType( ) methods to get cell data type. The getType( ) methods return one of the type constants listed in Table 7-5. The getType( ) method returns a negative value if the cell contains a formula. The following code example shows three ways to get the cell type of a cell:
short sType = bm_book.getType(); // the active cellshort sType = bm_book.getType(row1, col1);short sType = bm_book.getType(i_sheet1, row1, col1);
Table 7-5 Type constants for the getType( ) method
Type constant Cell data type
eTypeEmpty Nothing in the cell
eTypeError Cell containing an error
eTypeLogical Cell containing a Boolean value, true or false
eTypeNumber Cell containing a number value
eTypeText Cell containing a text string

106 U s i n g B I R T S p r e a d s h e e t E n g i n e a n d A P I
Getting a formatted cell reference The BookModel.formatRCNr( ) method returns a formatted cell reference. The formatted cell reference is a string such as A5 for the cell at row A, column 5.
The following example shows how to get a formatted cell reference for cell A1:
String cellAddress= bm_book.formatRCNr(0, 0, true);
The third parameter is a Boolean that specifies whether the reference should be absolute or relative. If it is absolute, a dollar sign ($) precedes both the row and column. The preceding example returns $A$1, but if the last parameter is false, it returns A1.
Sorting cell dataThis section explains how to sort spreadsheet data. It includes examples using the sort and sort3 methods as well as examples that explain how to handle blank cells and formatting when performing a sort.
Using the sort and sort3 methodsYou can use either the BookModel.sort( ) or the BookModel.sort3( ) method to sort spreadsheet data. The only difference between the two methods is that you can specify any number of keys with sort( ) and only three keys with sort3( ). You specify the keys as an array of integers for sort( ) and as three separate integer values for sort3( ).
For both methods, you specify a range of cells to sort, whether to sort by rows or by columns, and the keys by which to sort. When you specify to sort by rows, all columns of a given row stay together. When you specify to sort by columns, all rows of a given column stay together.
When you sort by rows, the absolute values of the keys specify the relative columns on which to sort. When you specify sort by columns, the absolute values of the keys specify the relative rows on which to sort. The sign of each sort key indicates whether to sort in ascending or descending order. A negative key indicates sorting in descending order and a positive key indicates sorting in ascending order. For example, to sort on the first column in a range in ascending order, the sort key must be 1. To sort on the third column in a range in descending order, the sort key must be -3. If you don’t use one of the keys, give it a value of 0. The following example shows how to sort on the first two columns of specified the range. In this case the range is D10:G11 and the sort columns are D and E.
boolean sortByRows = true;int myarray[ ] = {1, 2};int row1 = 10, col1 = 3, row2 = 11, col2 = 6; bm_book.sort(row1, col1, row2, col2, sortByRows, myarray);

C h a p t e r 7 , W o r k i n g w i t h c e l l d a t a 107
The following example shows how to sort using three keys, using the second column of the specified range as the primary key, the first column as the secondary key, and the third column as the third key:
bm_book.sort3(0, 0, 10, 2, true, 2, 1, 3);
Sorting dates or numbers supplied as textThe sort methods understand the format of the columns and rows you use for keys. If the format is numeric, the column or row sorts numerically. If the format is date, the column or row sorts chronologically. But if a column or row has numeric or date information that does not have the proper cell format property, that column or row will not sort in the order expected. When programmatically entering numeric or date information in a cell, be sure to use the setEntry( ) or setNumber( ) method if you plan to use that cell in a sort. The following example shows how to use the setEntry( ) method to support sorting by date or number:
// To sort dates, use setEntry().bm_book.setEntry("6/9/2000");// To sort numbers use setNumber() or setEntry().bm_book.setNumber(24.0);bm_book.setEntry("24");

108 U s i n g B I R T S p r e a d s h e e t E n g i n e a n d A P I

Chapter 8, Working with formatt ing and display opt ions 109
C h a p t e r
8Chapter 8Working with formatting
and display optionsThis chapter contains the following topics:
■ Formatting a cell or range of cells
■ Using a conditional format
■ Understanding custom display options

110 U s i n g B I R T S p r e a d s h e e t E n g i n e a n d A P I
Formatting a cell or range of cellsThis section describes some common cell formatting tasks. For more information about the BIRT Spreadsheet API used in the examples, see the Javadoc. You use a com.f1j.ss.CellFormat class to set the format options for a cell or range of cells. The CellFormat class does not contain methods to set format options, but it has methods that return specialized formatting objects that do. Most of the formatting capabilities correspond to formatting options that you can set in the user interface. The CellFormat class has methods to return the specialized formatting objects listed in Table 8-1.
The most common way to use the specialized formatting objects is by combining getting the formatting object with calling one of its methods, as shown in the following example:
CellFormat cf_fmat = bm_book.getCellFormat();cf_fmat.font().setItalic(true);// apply the format to a range of cellsbm_book.setCellFormat(cf_fmat, 0, 0, 5, 5);
Setting a pattern and color of a cellYou can set patterns and colors for a cell or range of cells. To set a pattern, use the setPattern( ) method of the returned FillFormat object. Use setForeColor( ) to set the foreground color and setBackColor( ) to set the background color.
Foreground color only appears when a pattern is applied to a cell. The foreground color is the color of the lines of the pattern.
Table 8-1 Cell formatting options for CellFormat methods
CellFormat method Formatting object Functionality
fill( ) FillFormat Sets background and foreground colors and patterns
align( ) AlignFormat Sets orientation, alignment, and rotation of text
border( ) BorderFormat Sets cell border color and style
font( ) FontFormat Sets font characteristics, including type font, size, italic, bold, underline
number( ) NumberFormat Sets number formatting characteristics
protection( ) ProtectionFormat Sets visibility and protection characteristics
validation( ) ValidationFormat Sets validation characteristics

Chapter 8, Working wi th formatt ing and d isp lay opt ions 111
Background color is the color that appears behind a pattern or the fill color of a solid fill cell.
There are three categories of patterns, shading patterns, line patterns, and miscellaneous patterns. Table 8-2 lists constants to pass to FillFormat.setPattern( ) to produce the kind of pattern you want.
The following example illustrates setting a range of cells to have a trellis pattern, with light gray cross hatches on a blue background:
bm_book.setSelection(2, 2, 6, 8);FillFormat ff_fill = null;CellFormat cf_fmat = bm_book.getCellFormat();cf_fmat.fill().setPattern(ff_fill.ePatternTrellis );cf_fmat.fill().setForeColor(java.awt.Color.lightGray.getRGB());cf_fmat.fill().setBackColor(java.awt.Color.blue.getRGB());bm_book.setCellFormat(cf_fmat); //operates on current selection
To set solid, unpatterned formatting, use the FillFormat.setSolid( ) method, which takes no parameters. The following example shows how to format a single cell to a solid red color:
Table 8-2 Pattern constants for the FillFormat.setPattern( ) method
Pattern constant Effect
ePattern10Percent 10 percent shading
ePattern20Percent 20 percent shading
ePattern25Percent 25 percent shading
ePattern30Percent 30 percent shading
ePattern50Percent 50 percent shading
ePattern70Percent 70 percent shading
ePatternDarkHorizontal Horizontal line pattern
ePatternLightHorizontal Horizontal line pattern
ePatternDarkDownwardDiagonal Diagonal line pattern
ePatternDarkUpwardDiagonal Diagonal line pattern
ePatternLightDownwardDiagonal Diagonal line pattern
ePatternLightUpwardDiagonal Diagonal line pattern
ePatternDarkVertical Vertical line pattern
ePatternLightVertical Vertical line pattern
ePatternSmallCheckerboard Checkerboard pattern
ePatternSmallGrid Grid pattern
ePatternTrellis Trellis pattern

112 U s i n g B I R T S p r e a d s h e e t E n g i n e a n d A P I
bm_book.setSelection(0, 0, 0, 0);CellFormat cf_fmat = bm_book.getCellFormat();cf_fmat.fill().setSolid( );cf_fmat.fill().setForeColor(java.awt.Color.red.getRGB());bm_book.setCellFormat(cf_fmat); //operates on current selection
Setting vertical and horizontal alignment Use the setHorizontalAlignment( ) and setVerticalAlignment( ) methods of the AlignFormat object to set horizontal and vertical alignment. Table 8-3 describes the parameter values to use for setHorizontalAlignment( ) and setVerticalAlignment( ).
The following example shows how to set horizontal and vertical alignment:
CellFormat cf_fmat = bm_book.getCellFormat();cf_fmat.align().setHorizontalAlignment(af.eHorizontalRight);cf_fmat.align().setVerticalAlignment(af.eVerticalTop);bm_book.setCellFormat(cf_fmat);
Table 8-3 Alignment constants for the alignment methods
Alignment constant Effect
eHorizontalGeneral Justifies data based on data type.
eHorizontalLeft Aligns data to the left of the cell.
eHorizontalCenter Centers data in the cell, left to right.
eHorizontalRight Aligns data to the right of the cell.
eHorizontalJustify Aligns data both right and left, expanding the text as necessary by inserting spaces between words. This effect is not visible in the BIRT Spreadsheet report, but does appear when the report is opened in Excel. This value is only relevant to text that is oriented horizontally.
eVerticalTop Aligns the data at the top of the cell.
eVerticalCenter Centers the data, top to bottom.
eVerticalBottom Aligns the data at the bottom of the cell.
eVerticalJustify Aligns multiline data both top and bottom, expanding the text as necessary by inserting spaces between lines. This effect is not visible in the BIRT Spreadsheet report, but does appear when the report is opened in Excel. This constant is only relevant to text that is oriented vertically.

Chapter 8, Working with formatt ing and disp lay opt ions 113
Applying formatting to substringsYou can format a single word or phrase, or even a single character. You use the BookModel.setTextSelection( ) method to create a selection that is a substring of a text entry in a cell. The following example illustrates changing the font characteristics for the first four words appearing in a given cell:
bm_book.setActiveCell(0,0);String s_text = bm_book.getText(0,0);int i_start = 0;int i_stop = 0;for(int i=0; i < 4; i++){
// find the breaks between wordsi_stop = s_text.indexOf(" ", start);
// if stop is -1, no more breaks were found i_stop = (i_stop==-1) ? s_text.length() -1 : i_stop;bm_book.setTextSelection(i_start,i_stop);CellFormat cf_fmat = bm_book.getCellFormat();FontFormat ff_fontFormat;ff_fontFormat = cf_fmat.font();switch(i){
case 0: cf_fmat.font().setBold(true); break;case 1: cf_fmat.font().setItalic(true); break;case 2: cf_fmat.font().setUnderline(
FontFormat.eUnderlineSingle); break;case 3: cf_fmat.font().setSizePoints(14); break;default:
} // end switchbm_book.setCellFormat(cf_fmat);i_start = i_stop + 1;
} // end for
Hiding and locking a cell To hide a cell’s value, call the ProtectionFormat.setHidden( ) method with a parameter of true. The following example shows how to hide a cell’s value:
CellFormat cf_fmat = bm_book.getCellFormat();cf_fmat.protection().setHidden(true);bm_book.setCellFormat(cf_fmat);
To lock a cell so that the user can’t change the data, call the ProtectionFormat.setLocked( ) method with a parameter of true, as in the following example:
CellFormat cf_fmat = bm_book.getCellFormat();cf_fmat.protection().setLocked(true);bm_book.setCellFormat(cf_fmat);
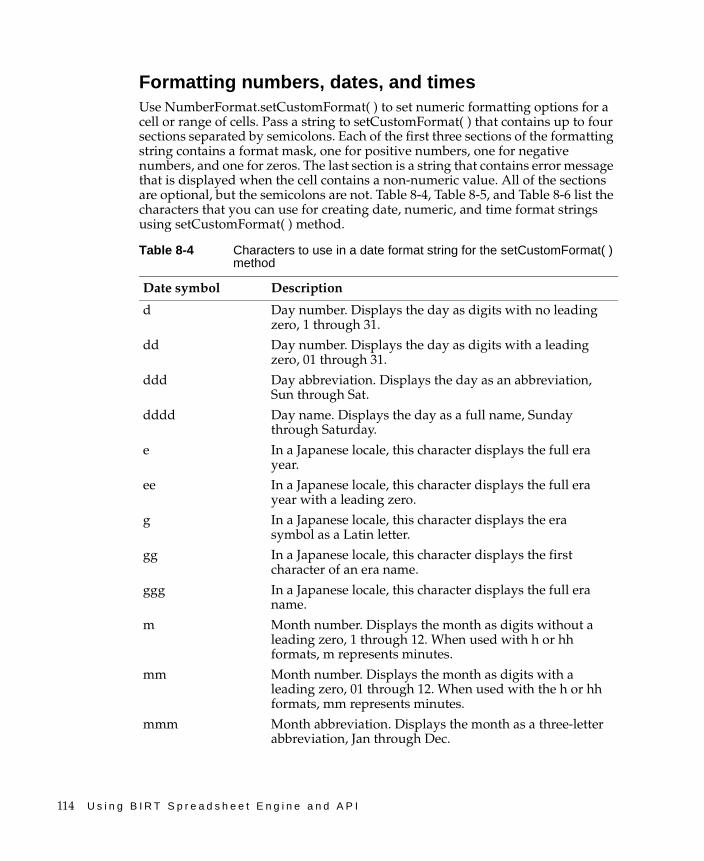
114 U s i n g B I R T S p r e a d s h e e t E n g i n e a n d A P I
Formatting numbers, dates, and timesUse NumberFormat.setCustomFormat( ) to set numeric formatting options for a cell or range of cells. Pass a string to setCustomFormat( ) that contains up to four sections separated by semicolons. Each of the first three sections of the formatting string contains a format mask, one for positive numbers, one for negative numbers, and one for zeros. The last section is a string that contains error message that is displayed when the cell contains a non-numeric value. All of the sections are optional, but the semicolons are not. Table 8-4, Table 8-5, and Table 8-6 list the characters that you can use for creating date, numeric, and time format strings using setCustomFormat( ) method.
Table 8-4 Characters to use in a date format string for the setCustomFormat( ) method
Date symbol Description
d Day number. Displays the day as digits with no leading zero, 1 through 31.
dd Day number. Displays the day as digits with a leading zero, 01 through 31.
ddd Day abbreviation. Displays the day as an abbreviation, Sun through Sat.
dddd Day name. Displays the day as a full name, Sunday through Saturday.
e In a Japanese locale, this character displays the full era year.
ee In a Japanese locale, this character displays the full era year with a leading zero.
g In a Japanese locale, this character displays the era symbol as a Latin letter.
gg In a Japanese locale, this character displays the first character of an era name.
ggg In a Japanese locale, this character displays the full era name.
m Month number. Displays the month as digits without a leading zero, 1 through 12. When used with h or hh formats, m represents minutes.
mm Month number. Displays the month as digits with a leading zero, 01 through 12. When used with the h or hh formats, mm represents minutes.
mmm Month abbreviation. Displays the month as a three-letter abbreviation, Jan through Dec.

Chapter 8, Working with formatt ing and disp lay opt ions 115
mmmm Month name. Displays the month as a full name, January through December.
mmmmm Month abbreviation. Displays the first letter of the name of the month, J through D.
yy Year number. Displays the year as a two-digit number, 00 through 99.
yyyy Year number. Displays the year as a four-digit number, 1900 through 2078.
Table 8-5 Characters to use in a numeric format string for the setCustomFormat( ) method
Numeric symbol Description
, (comma) Thousands separator. If the format contains commas separated by numbers or zeros, the number appears using commas to separate thousands.
. (period) Decimal point. Determines how many digits appear on either side of the decimal point:■ If the format contains only numbers left of the decimal
point, a number less than 1 begins with a decimal point.
■ If the format contains zeros left of the decimal point, a number less than 1 begins with a zero followed by the decimal point.
[$n] Currency format. Replace n with a currency symbol, such as £ or ¥, to create a currency format.
[conditional value] Using the conditional value brackets [ ], you can designate a different condition for each of the format sections.For example, to display positive numbers in black, negative numbers in red, and zeros in blue, use the following conditions:[>0][Black]General; [<0][Red]General;
[0][Blue]General
% Displays the number as a percentage. BIRT Spreadsheet Designer multiplies the number by 100 and appends a percent sign (%).
(continues)
Table 8-4 Characters to use in a date format string for the setCustomFormat( ) method
Date symbol Description

116 U s i n g B I R T S p r e a d s h e e t E n g i n e a n d A P I
E- E+ e- e+ Displays the number in scientific notation. If the format contains a scientific notation symbol to the left of a 0 or # placeholder, the number appears in scientific notation. The number of 0 and # placeholders to the right of the decimal determines the number of digits in the exponent.E- and e- place a minus sign (-) by a negative exponent. E+ and e+ place a minus sign by a negative exponent and a plus sign (+) by a positive exponent.
General Displays the number in the applicable predefined General format.
Table 8-6 Characters to use in a time format string for the setCustomFormat( ) method
Time symbol Description
[h] Total number of hours.
[m] Total number of minutes.
[s] Total number of seconds.
AM/PM, am/pm, A/P, a/p
Time based on a 12-hour clock. Times between midnight and noon use AM, am, A, or a. Times between midnight and noon use PM, pm, P, or p.
h Hour number. Displays the hour as a number without a leading zero, 1 through 23.If the format contains an AM or PM format, BIRT Spreadsheet Designer bases the hour number on a 12-hour clock. Otherwise, it bases the number on a 24-hour clock.
hh Hour number. Displays the hour as a number with a leading zero, 00 through 23. If the format contains an AM or PM format, BIRT Spreadsheet Designer bases the hour number on a 12-hour clock. Otherwise, it bases the number on a 24-hour clock.
m Minute number. Displays the minute as a number without a leading zero, 0 through 59, when it appears immediately after the h or hh symbol. Otherwise, BIRT Spreadsheet Designer interprets it as a month number.
Table 8-5 Characters to use in a numeric format string for the setCustomFormat( ) method (continued)
Numeric symbol Description

Chapter 8, Working with formatt ing and disp lay opt ions 117
Table 8-7 shows examples of custom number formats, using the symbols from the preceding tables.
The following example shows how to make positive numbers black with comma separators and negative numbers red with comma separators, hide zeros, and return the indicated text if a user tries to supply non-numeric data:
mm Minute number. Displays the minute as a number with a leading zero, 00 through 59, when it appears immediately after the h or hh symbol. Otherwise, BIRT Spreadsheet Designer interprets it as a month number.
s Seconds number without a leading zero, 0 through 59.
s.0, s.00, s.000 Seconds number without a leading zero.
ss Seconds number with leading zeros, 00 through 59.
ss.0, ss.00, ss.000 Seconds number with leading zeros.
Table 8-7 Examples of custom number formats
Format Typed value Displayed value
#.## 0.456 .46
#.0# 123.456 123.46
123 123.0
#,##0"CR";#,##0"DR";0 1234.567 1,235CR
0 0
-123.45 123DR
#, 10000 10
"Sales="0.0 123.45 Sales=123.5
-123.45 -Sales=123.5
000-00-0000 123456789 123-45-6789
"Cust. No." 0000 234 Cust. No. 0234
m-d-yy 2/3/94 2-3-94
mmm d, yy 2/3/94 Feb 3, 94
hh"h" mm"m" 1:32 AM 01h 32m
Table 8-6 Characters to use in a time format string for the setCustomFormat( ) method
Time symbol Description
118 U s i n g B I R T S p r e a d s h e e t E n g i n e a n d A P I
CellFormat cf_fmat = bm_book.getCellFormat();cf_fmat.number().setCustomFormat( "[Black]#,###;[Red]#,###;#;
\"Error: Entry must be numeric\"");bm_book.setCellFormat(cf_fmat);
Understanding locale-specific formattingWhen BIRT Spreadsheet displays numbers and dates, it examines the locale setting of the machine on which it is running and adjusts the display of numbers and dates accordingly. This allows a report to automatically adapt to the client locale. This feature allows you to distribute a report internationally without having to create a separate report for every possible locale. For example, in locales that use US English, the currency symbol is a dollar sign, the decimal point is a period, and commas separate triads of digits, as in the following example:
$9,765,421.35
In some other locales the decimal point is a comma and periods separate triads of digits, as in the following example:
9.765.421,35
There are many different currency symbols in use around the world. For example, in many European countries, the currency symbol is the European Euro (€), whereas in the United States it is a dollar sign ($) and in Great Britain it is the British pound (£). The position of the currency symbol also varies by locale. In some locales, the currency symbol appears before the numeric value, and in others it appears after the numeric value. Fortunately, BIRT Spreadsheet displays numbers in whatever format is appropriate for the locale of the client machine running the BIRT Spreadsheet report. For this reason, the programmer can usually ignore locale-specific formatting issues.
Understanding setCustomFormatLocal( )However, when you prompt the user for a custom number format string with which to format a cell or range of cells, it is desirable to allow them to enter the format string in their own language.
For example, a common English format string for dates is mmddyyyy, where m stands for month, d stands for day, and y stands for year. A German, however, is more likely to use TTMMJJJJ, where M stands for Monat, T stands for Tag, and J stands for Jahr.
The setCustomFormatLocal( ) method assumes that the format string you pass to it is in the language of the locale of the client machine, and does not consist of the characters in the preceding tables. The setCustomFormatLocal( ) method is not compatible across all locales, however, as illustrated in the following two statements:

Chapter 8, Working with formatt ing and disp lay opt ions 119
CellFormat cf_fmat = bm_book.getCellFormat();// does not work in Switzerlandcf_fmat.number().setCustomFormatLocal("#.##0,00"); // does not work in Germanycf_fmat.number().setCustomFormatLocal("#'##0.00");
The first of the two preceding lines works in a German locale but not in a Swiss locale, while the second works in a Swiss locale but not a German locale. Likewise, for the next two lines, the first works in an English locale but not a German locale, and the second works in a German locale but not an English locale:
// only works in English versioncf_fmat.number().setCustomFormatLocal("dd.mm.yy"); // only works in German versioncf_fmat.number().setCustomFormatLocal("TT.MM.JJ");
Displaying all digits of a large numberBy default, BIRT Spreadsheet Engine and BIRT Spreadsheet Designer use scientific notation for a number over 10 digits (>9,999,999,999). To display a large number in other than scientific notation, use a format mask such as ### or #,##0.
Formatting a dateThe information provided in this section illustrates how to deal with common date-related formatting issues, including using all four-year digits, displaying a date in a different locale, and using variations of the date format.
The simplest way to enter a date in a worksheet is to set the format of the cell using one of the date masks in the proceeding table and then supply the date as a quoted string, such as "July 4, 1776", or "07/04/1776", or "7-4-76".
Dates are stored internally as integers between 1 and 2,958,465, representing January 1st, 1900 to December 31, 9999. This is known as the 1900 format. You can enter a date as an integer in 1900 format and then set the cell’s format to a date format later. When you format a cell containing an integer, using one of the date formats, the program interprets the integer as a 1900 format date and displays it in the format you set. In most cases, however, the 1900 value for a date is not known, and it is easier to specify the date as a string.
The following statements illustrate supplying a date as an integer, followed by applying a date format:
bm_book.setNumber(27945); CellFormat cf_fmat = bm_book.getCellFormat();cf_fmat.number().setCustomFormat("mm/dd/yy");bm_book.setCellFormat(cf_fmat);

120 U s i n g B I R T S p r e a d s h e e t E n g i n e a n d A P I
BIRT Spreadsheet allows you to set a date with the same set of date formats that Excel allows. For example, in the following statement, BIRT Spreadsheet assumes that "07/04/76" is a date and sets the cell’s internal value to a 1900 format integer:
bm_book.setEntry("07/04/76");
Formatting textThis section shows examples of how to format text, including changing, formatting, and scaling a font, setting text color and orientation, and returning formatted text from a cell.
Changing a fontTo change the default font, use BookModel.setDefaultFontName( ), BookModel.setDefaultFontSize( ), or BookModel.setDefaultFont( ). When you set the font size, you can specify either twips or points. To specify the default font size in points, use the negative of the point size you desire. To specify size in twips, specify twenty times the point size you desire. For example, to specify a default font size of 8, specify either -8 or 160. The following example illustrates setting the default font name and size:
bm_book.setDefaultFontName("Helvetica");bm_book.setDefaultFontSize(20 * 12); // set size to 12 points
Changing the default font to a TrueType font makes the font scale proportionally.
To set the font for a cell or range of cells, use FontFormat.setName( ), FontFormat.setSizePoints( ), and FontFormat.setSizeTwips( ). When using setSizePoints( ), specify the size in points. When using setSizeTwips( ), specify the size in twips. For example, to specify a font size of 8, use either setSizePoints(8) or setSizeTwips(160). The following example illustrates setting the font name and size for a range of cells:
bm_book.setSelection(row1, col1, row2, col2);CellFormat cf_fmat = bm_book.getCellFormat();cf_fmat.font().setName("Arial Black");cf_fmat.font().setSizePoints(20);
Setting font attributes The FontFormat interface includes various methods to change the font characteristic for a CellFormat object, as listed in Table 8-8.
Table 8-8 Methods to use to change the font characteristics of a CellFormat object
Method Function
setBold( ) Sets the bold attribute of the font
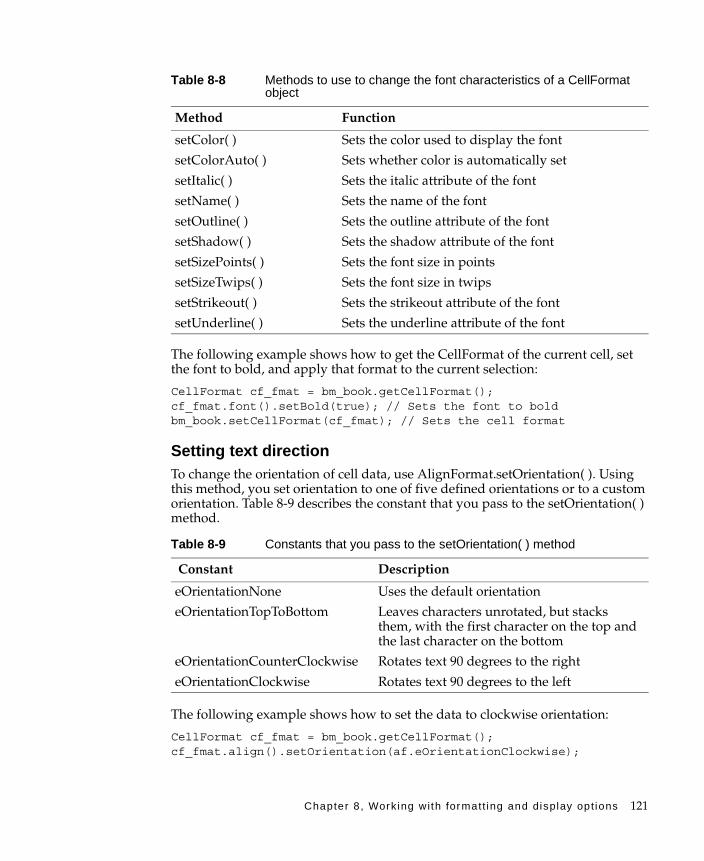
Chapter 8, Working with formatt ing and display opt ions 121
The following example shows how to get the CellFormat of the current cell, set the font to bold, and apply that format to the current selection:
CellFormat cf_fmat = bm_book.getCellFormat();cf_fmat.font().setBold(true); // Sets the font to boldbm_book.setCellFormat(cf_fmat); // Sets the cell format
Setting text directionTo change the orientation of cell data, use AlignFormat.setOrientation( ). Using this method, you set orientation to one of five defined orientations or to a custom orientation. Table 8-9 describes the constant that you pass to the setOrientation( ) method.
The following example shows how to set the data to clockwise orientation:
CellFormat cf_fmat = bm_book.getCellFormat();cf_fmat.align().setOrientation(af.eOrientationClockwise);
setColor( ) Sets the color used to display the font
setColorAuto( ) Sets whether color is automatically set
setItalic( ) Sets the italic attribute of the font
setName( ) Sets the name of the font
setOutline( ) Sets the outline attribute of the font
setShadow( ) Sets the shadow attribute of the font
setSizePoints( ) Sets the font size in points
setSizeTwips( ) Sets the font size in twips
setStrikeout( ) Sets the strikeout attribute of the font
setUnderline( ) Sets the underline attribute of the font
Table 8-9 Constants that you pass to the setOrientation( ) method
Constant Description
eOrientationNone Uses the default orientation
eOrientationTopToBottom Leaves characters unrotated, but stacks them, with the first character on the top and the last character on the bottom
eOrientationCounterClockwise Rotates text 90 degrees to the right
eOrientationClockwise Rotates text 90 degrees to the left
Table 8-8 Methods to use to change the font characteristics of a CellFormat object
Method Function

122 U s i n g B I R T S p r e a d s h e e t E n g i n e a n d A P I
To rotate text an arbitrary number of degrees, use AlignFormat.setRotation( ). The following example sets the data orientation to 45 degrees:
CellFormat cf_fmat = bm_book.getCellFormat( );cf_fmat.align().setRotation((short) 45);
Getting formatted text from a cellYou can use BookModel.getFormattedText( ) to get text from a cell in formatted form. For example, if a cell contains a date and you want a string similar to "July 4, 1776", you can format the cell using the date format, "mmmm d, yyyy" and then call getFormattedText( ).
The following example shows how to format cell A1 to hold a date, then get the day of the week for the date stored in A1:
bm_book.setActiveCell(0,0);CellFormat cf_fmat = bm_book.getCellFormat(); cf_fmat.number().setCustomFormat("ddd"); bm_book.setCellFormat(cf_fmat); // Sets the cell formatString dayOfTheWeek= bm_book.getFormattedText(0, 0);
Using a conditional formatConditional formatting provides a way to control certain display characteristics of a cell based upon the content of the cell or the result of a calculation. A typical use of conditional formatting is to highlight values that exceed a predefined limit by displaying those values in a different color than values that fall below the limit. You can control the following characteristics of a cell through conditional formatting:
■ Font colors
■ Font styles
■ Border colors
■ Fill colors
■ Fill styles
■ Fill patterns
You set conditional formatting by first creating a selection to which you apply a set of conditions. You can select the entire workbook, one or more worksheets in the workbook, a range of cells, or a single cell. You can define up to three conditions for the selection. For each condition, you specify a CellFormat object containing the formatting options that you want to apply if the condition is met. You specify a condition using a ConditionalFormat object.
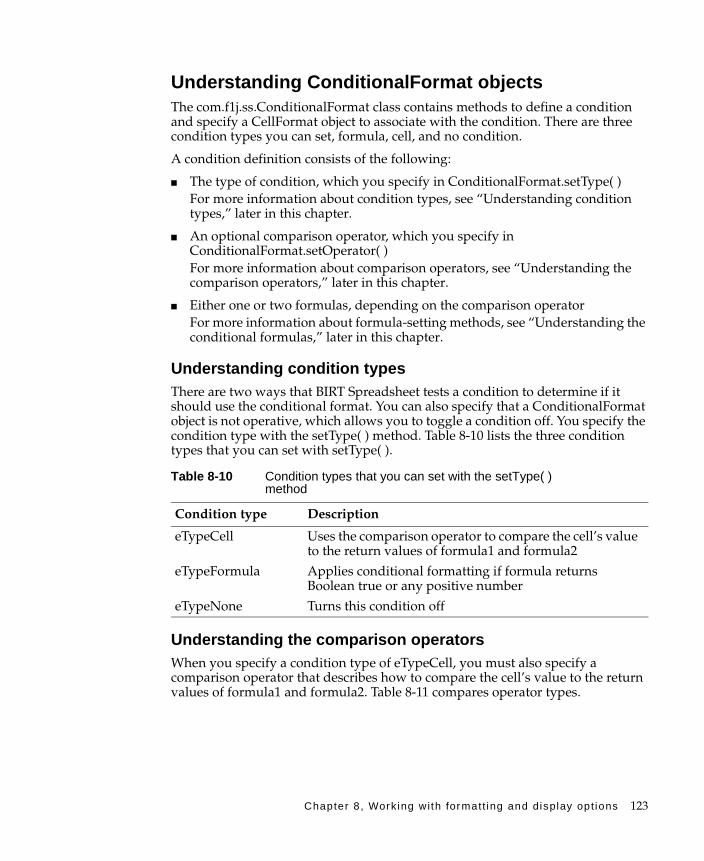
Chapter 8, Working with formatt ing and display opt ions 123
Understanding ConditionalFormat objectsThe com.f1j.ss.ConditionalFormat class contains methods to define a condition and specify a CellFormat object to associate with the condition. There are three condition types you can set, formula, cell, and no condition.
A condition definition consists of the following:
■ The type of condition, which you specify in ConditionalFormat.setType( )For more information about condition types, see “Understanding condition types,” later in this chapter.
■ An optional comparison operator, which you specify in ConditionalFormat.setOperator( )For more information about comparison operators, see “Understanding the comparison operators,” later in this chapter.
■ Either one or two formulas, depending on the comparison operatorFor more information about formula-setting methods, see “Understanding the conditional formulas,” later in this chapter.
Understanding condition typesThere are two ways that BIRT Spreadsheet tests a condition to determine if it should use the conditional format. You can also specify that a ConditionalFormat object is not operative, which allows you to toggle a condition off. You specify the condition type with the setType( ) method. Table 8-10 lists the three condition types that you can set with setType( ).
Understanding the comparison operatorsWhen you specify a condition type of eTypeCell, you must also specify a comparison operator that describes how to compare the cell’s value to the return values of formula1 and formula2. Table 8-11 compares operator types.
Table 8-10 Condition types that you can set with the setType( ) method
Condition type Description
eTypeCell Uses the comparison operator to compare the cell’s value to the return values of formula1 and formula2
eTypeFormula Applies conditional formatting if formula returns Boolean true or any positive number
eTypeNone Turns this condition off

124 U s i n g B I R T S p r e a d s h e e t E n g i n e a n d A P I
Understanding the conditional formulasThere are three pairs of formula-setting methods. One method of each pair corresponds to the first formula and the other method corresponds to the second formula. Whether you set one or two formulas depends on the comparison operator. For more information on comparison operators, see “Understanding the comparison operators,” earlier in this chapter.
The three pairs of methods for setting formulas are:
■ ConditionalFormat.setFormula1( ) and ConditionalFormat.setFormula2( )
■ ConditionalFormat.setFormula1Local( ) and ConditionalFormat.setFormula2Local( )
■ ConditionalFormat.setEntry1( ) and ConditionalFormat.setEntry2( )
All six methods take a formula string parameter, a row parameter, and a column parameter. The difference between the different pairs of methods is the format of the formula string.
Table 8-11 Comparison operators that you can pass to setOperator( )
Operator type Description
eOperatorNone No comparison
eOperatorEqual Equal to the return value of formula1
eOperatorNotEqual Not equal to the return value of formula1
eOperatorGreaterThan Greater than the return value of formula1
eOperatorLessThan Less than the return value of formula1
eOperatorGreaterThanOrEqual Greater than or equal to the return value of formula1
eOperatorLessThanOrEqual Less than or equal to the return value of formula1
eOperatorBetween Between the return value of formula1 and the return value of formula2 (cell value >= formula1 and cell value <=formula2)
eOperatorNotBetween Outside the range of the return values of formula1 and formula2(cell value < formula1 or cell value > formula2)

Chapter 8, Working with formatt ing and display opt ions 125
Understanding the formula parameterThe formula string that you pass to the formula-setting methods must be a valid formula by the same rules that apply to entering a formula in a cell in BIRT Spreadsheet. All the built-in functions and means of referencing cells and ranges and defined names are valid for the format string. You can use both relative and absolute cell addressing.
Understanding setEntry1( ), setEnty2( ), setFormula1Local( ), and setFormula2Local( ) The formula parameter for setEntry1( ), setEnty2( ), setFormula1Local( ) and setFormula2Local( ) methods is either localized to the locale of the client machine or assumed to be US English. This localization applies to function names, decimal points, and dates. Table 8-12 contains examples of equivalent formulas in three different locales.
All three of the preceding formulas produce identical results when the locale setting of the client machine is as specified. The client machine can have any locale setting and use US English formatting to get the desired result.
You use setEntry1( ) and setEntry2( ) methods when you want the formula string to be in exactly the same format that a user would enter it in using BIRT Spreadsheet Designer. You use setFormat1Local( ) and setFormat2Local( ) when you accept a conditional formatting formula from a user entry and want the code to work without further modification with any locale setting.
The formula string that you pass to setEntry1( ) and setEntry2( ) must have an equal sign (=) for the first character if the string represents a formula and not a value. The formula string you pass to setFormula1Local( ) and setFormula2Local( ) does not require an equal sign.
Understanding setFormula1( ) and setFormula2( )The formula parameter for setFormula1( ) and setFormula2( ) must always use US English formatting. These are the two methods you use when you are not dealing with a user entry.
You use either the setFormula1( ) and setFormula2( ) methods or the setFormula1Local( ) and setFormula2Local( ) methods to define the formulas.
Table 8-12 Examples of equivalent formulas in different locales
Locale Formula
English (US) AVERAGE(123.45,678.9)
German (Germany) MITTELWERT(123,45;678,9)
German (Switzerland) MITTELWERT(123.45;678.9)

126 U s i n g B I R T S p r e a d s h e e t E n g i n e a n d A P I
You use the local versions of these methods to specify the formulas in the language of the locale of the client machine.
Understanding the row and column parametersAll the formula-setting methods take a row parameter and a column parameter in addition to the formula string. The row and column parameters provide a frame of reference for relative cell addresses. Relative cell addressing works the same way it does in Excel.
Understanding the conditional formatting processThe following example illustrates the conditional formatting process:
bm_book.setSelection(row1, col1, row2, col2);ConditionalFormat cf_cFmt[ ] = bm_book.getConditionalFormats();// First condition = cell value between 500 and 1000cf_cFmt[0].setType(ConditionalFormat.eTypeCell);cf_cFmt[0].setFormula1("500", 0, 0);cf_cFmt[0].setFormula2("1000", 0, 0);cf_cFmt[0].setOperator(ConditionalFormat.eOperatorBetween);// make it redCellFormat cf_fmat = cf_cFmt[0].getCellFormat();cf_fmat.font().setColor(0xFF0000); //red colorcf_cFmt[0].setCellFormat(cf_fmat);
// Second condition = cell value > 1000cf_cFmt[1].setType(ConditionalFormat.eTypeCell);cf_cFmt[1].setFormula1("1000", 0, 0);cf_cFmt[1].setOperator(ConditionalFormat.eOperatorGreaterThan);// make it red and italiccf = cf_cFmt[1].getCellFormat(); cf_fmat.font().setColor(0xFF0000); //red colorcf_fmat.font().setItalic(true);cf_cFmt[1].setCellFormat(cf_fmat);
// Third condition = cell value < 500cf_cFmt[2].setType(ConditionalFormat.eTypeCell);cf_cFmt[2].setFormula1("500", 0, 0);cf_cFmt[2].setOperator(ConditionalFormat.eOperatorLessThan);// make it greencf_fmat = cf_cFmt[2].getCellFormat();cf.font().setColor(0x0000FF); //blue colorcf_cFmt[2].setCellFormat(cf_fmat);
// Apply the conditional format to the selectionbm_book.setConditionalFormats(cf_cFmt);

Chapter 8, Working with formatt ing and display opt ions 127
Understanding custom display optionsBIRT Spreadsheet Engine supports displaying type markers and showing either a formula or its result.
Turning type markers onA type marker is a colored frame around a cell that indicates what kind of data that cell has. You use type markers typically for debugging purposes. They do not export to Excel. You toggle type markers on and off by sending true and false to the setShowTypeMarkers( ) method of the BookModel interface. Table 8-13 shows frames that appear when markers are on.
Showing either a formula or its result You can set a cell or range of cells containing formulas to display either the formula or the result of executing that formula. Use the setShowFormulas( ) method of BookModel to toggle between formula display and value display in the current selection, as in the following example:
bm_book.setShowFormulas(true); // To show formulasbm_book.setShowFormulas(false); // To show values
Table 8-13 Frames that appear when markers are on
Type of data in cell Marker description
Empty cell None
Blank formatted cell Blue frame
Value cell (number or text) Green frame
Formula cell Red frame

128 U s i n g B I R T S p r e a d s h e e t E n g i n e a n d A P I

Chapter 9, Working wi th graphical objects and char ts 129
C h a p t e r
9Chapter 9Working with graphical
objects and chartsThis chapter contains the following topics:
■ Understanding the charting API
■ Adding a picture to a worksheet
■ Adding a graphical object to a worksheet

130 U s i n g B I R T S p r e a d s h e e t E n g i n e a n d A P I
Understanding the charting APITo programmatically add a chart to a worksheet you need to perform the following tasks:
■ Get a com.f1j.ss.DrawingModel object from the BookModel object, which contains all the graphics objects in the book.
■ Get a com.f1j.ss.ShapeAnchor object from the DrawingModel object, which identifies the position of a graphic.
■ Get a com.f1j.ss.ChartGraphic object from the DrawingModel object using the ShapeAnchor, which contains the graphic configuration information.
■ Set the chart type.
■ Associate a range of cells with the chart.
■ Give titles to the series, axes, and the chart.
The following lines of code demonstrate the first two tasks in the preceding list:
DrawingModel dm_drawingModel = bm_book.getDrawing();ShapeAnchor sa_shapeAnchor = dm_drawingModel.createShapeAnchor(0,
0, 8, 1);
The integer arguments for createShapeAnchor( ) define the range of cells to contain the graphic. Get the ChartGraphic object by passing the ShapeAnchor object to the addChart( ) method of the DrawingModel, then calling the getGraphic( ) method, as shown in the following statement:
ChartGraphic cg_chart = (ChartGraphic) dm_drawingModel.addChart(sa_shapeAnchor).getGraphic();
Setting the chart typeYou can create many different kinds of charts with the BIRT Spreadsheet API. To set the chart type, call ChartGraphic.getChartModel( ).setChartType( ). You can set the chart to any of the types in Table 9-1.
Table 9-1 Chart types
Chart constant Chart type Example
eArea Area

Chapter 9, Working wi th graphical objects and char ts 131
eBar Bar
eBopPop Bar of Pie / Pie of Pie
eBubble Bubble
eColumn Column
eCombination Combination
eDoughnut Doughnut
(continues)
Table 9-1 Chart types (continued)
Chart constant Chart type Example

132 U s i n g B I R T S p r e a d s h e e t E n g i n e a n d A P I
For example, the following statement causes a chart to be a pie chart:
cg_chart.getChartModel().setChartType(com.f1j.chart.ChartModel.ePie);
Assigning cell data to a chartA chart displays a visual representation of data contained in the cells of a spreadsheet. Adding a chart( ) report script function to the sheet properties associates a chart with a range of cells on a sheet. To use the chart( ) report script function, you must name the chart and the range of cells.
Use Shape.setName() to set the name of the chart, as shown in the following line:
dm_drawingModel.getShape(0).setName("SummaryChart");
eLine Line
ePie Pie
eScatter Scatter
eStep Step
Table 9-1 Chart types (continued)
Chart constant Chart type Example
Chapter 9, Working wi th graphical objects and char ts 133
The integer argument for getShape( ) is the index for the shape in the book to name.
Use the BookModel.setEntry( ) method to assign a name to a cell entry, as shown in the following code:
bm_book.setEntry(0, 2, 2, "#write(country) name(\"ChartData\")");
bm_book.setEntry(0, 2, 3, "#count(customerName) name(\"ChartData\")");
To maintain consistency in how data is presented in a chart, entries assigned the same name must be contiguous cells. In the example above, the column containing country and the column containing the customer count are contiguous and can therefore be safely assigned the same name, ChartData.
Finally, you set sheet properties using the Sheet.setReportFunctionsProperties() method. This method takes a com.f1j.ss.SheetProperties object as an argument, which you add the chart( ) report script function to using SheetProperties.setCommands( ), as shown in the following code:
Sheet sh_First = bm_book.getBook().getSheet(0);SheetProperties sp_pps = sh_First.getReportFunctionsProperties();sp_pps.setCommands("chart(\"SummaryChart\", \"ChartData\",
false)");sh_First.setReportFunctionsProperties(sp_pps);
The chart command will run when the spreadsheet is generated. For more information on the chart( ) report script function, see Designing Spreadsheets using BIRT Spreadsheet Designer.
Finding a chart by nameWhen there is more than one chart or other graphical object in a workbook and you want to access a particular chart, the surest way is to find the chart by name. The following code finds a particular chart and changes the range of cells to which the chart is linked:
ChartGraphic cg_chart = null;DrawingModel dm_modeli = bm_book.getDrawing();// Loop through the shapes until you find your chartfor (int i=0;i<dm_modeli.getShapeCount();i++) {if (dm_modeli.getShape(i).getName().equals("Chart 1")) {
cg_chart = (ChartGraphic)dm_modeli.getShape(i).getGraphic( );break;}
}cg_chart.setLinkRange("Sheet1!$B$4:$B$15",false);
134 U s i n g B I R T S p r e a d s h e e t E n g i n e a n d A P I
Setting series, axes, and chart titlesThe series in the two preceding illustrations have titles, such as Series for Column A and Series for Row 3. You give the series titles with ChartGraphic.setSeriesName( ). For example, in the first illustration, the series titles resulted from the following lines of code:
cg_chart.setSeriesName(0, "Series for Column A");cg_chart.setSeriesName(1, "Series for Column B");
The first parameter is the relative column or row to which the series corresponds. The first series in the chart is always series 0.
Use ChartGraphic.setAxisTitle( ) to set the titleof an axis. The setAxisTitle( ) method takes three parameters, sAxisType, iAxisIndex, and Title. The sAxisType parameter must be either Chart.eXaxis or Chart.eYaxis. The axis index parameter assigns the title to an axis. The x axis is always axis 0. The following statement assigns a title to the third axis, often called the z axis:
cg_chart.setAxisTitle(com.f1j.ss.Constants.eYaxis, 2, "Months");
Setting the name of a data series name is similar to setting an axis title. You specify the series by index, where the first series is always series 0. The following statement gives a name to the second series:
cg_chart.setSeriesName(1, "February");
Creating a chart sheetYou can either place a chart on a sheet that has other data or you can create a separate sheet just for the chart. Use the setSheetType( ) method in the Sheet class to set a worksheet to a chart sheet. You must set the worksheet type to a chart type immediately after creating a worksheet.
s_sheet.setSheetType(com.f1j.ss.Constants.eSheetTypeSheet);
Setting the series typeYou can make a single chart where each data series is displayed in different chart format types, such a line and bar formats on the same chart. This is called a combination chart. To make a combination chart, you first set the chart type to eCombination, using ChartGraphic.getChartModel( ).ChartsetChartType( ). Then set the type of each series using ChartGraphic.getChartModel( ). setSeriesType( ). The following snippet illustrates creating a combination chart where the first series is a column type and the second series is a line type:
cg_chart.getChartModel().setChartType(ChartModel.eCombination);cg_chart.getChartModel().setSeriesType(0,ChartModel.eLine);cg_chart.getChartModel().setSeriesType(1, ChartModel.eColumn);

Chapter 9, Working wi th graphical objects and char ts 135
Creating a 3D chartYou can create some of the chart types in 3D format as shown in Table 9-2. To make a chart appear in three dimensions, pass true to ChartGraphic.getChartModel( ).set3Dimensional( ).
Table 9-2 3D chart types
Chart constant Chart type Example
eArea 3D Area
eBar 3D Bar
eColumn 3D Column
eLine 3D Line
ePie 3D Pie
(continues)
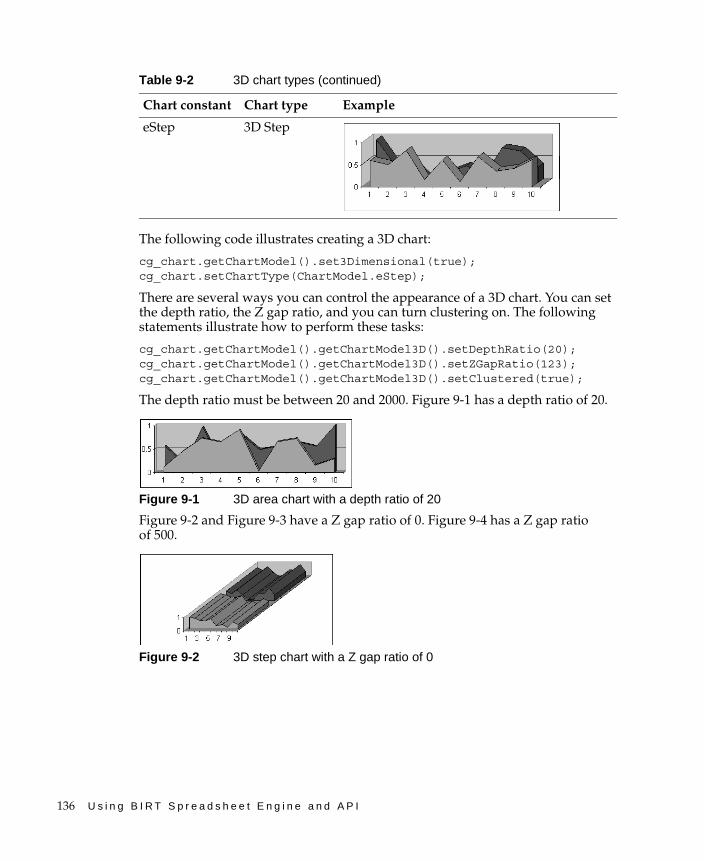
136 U s i n g B I R T S p r e a d s h e e t E n g i n e a n d A P I
The following code illustrates creating a 3D chart:
cg_chart.getChartModel().set3Dimensional(true);cg_chart.setChartType(ChartModel.eStep);
There are several ways you can control the appearance of a 3D chart. You can set the depth ratio, the Z gap ratio, and you can turn clustering on. The following statements illustrate how to perform these tasks:
cg_chart.getChartModel().getChartModel3D().setDepthRatio(20);cg_chart.getChartModel().getChartModel3D().setZGapRatio(123);cg_chart.getChartModel().getChartModel3D().setClustered(true);
The depth ratio must be between 20 and 2000. Figure 9-1 has a depth ratio of 20.
Figure 9-1 3D area chart with a depth ratio of 20
Figure 9-2 and Figure 9-3 have a Z gap ratio of 0. Figure 9-4 has a Z gap ratio of 500.
Figure 9-2 3D step chart with a Z gap ratio of 0
eStep 3D Step
Table 9-2 3D chart types (continued)
Chart constant Chart type Example

Chapter 9, Working wi th graphical objects and char ts 137
Figure 9-3 3D column chart with a Z gap ratio of 0
Figure 9-4 3D column chart with a Z gap ratio of 500
Adding a picture to a worksheetAdding a picture to a worksheet is very similar to adding a chart, except that you do not associate data with a picture. Both pictures and charts are graphical objects and you use the same methods to position them on a worksheet. As with a chart, you create a ShapeAnchor object, as in the following statement:
ShapeAnchor sa_anchor = bm_book.getDrawing().createShapeAnchor(2, 2, 10, 13);
There are two ways to put the image in the location specified by the ShapeAnchor. If you have a byte array that contains the image you want to insert into the worksheet, use a statement such as the following:
bm_book.getDrawing( ).addPicture(byteArray, sa_anchor);
If the image resides on an external resource, such as a disk file, use the same method as the previous statement, except the first parameter is an InputStream object. The following snippet illustrates this method:
FileInputStream fis_input = new FileInputStream("C:\\myImage.jpg");
bm_book.getDrawing().addPicture(fis_input, sa_anchor);

138 U s i n g B I R T S p r e a d s h e e t E n g i n e a n d A P I
Adding a graphical object to a worksheetAdding a graphical object to a worksheet is very much like adding a picture to a worksheet except that you do not have to load anything from a disk file or a byte array. For example, the following code adds a rectangle:
bm_book.getDrawing().addShape(DrawingModel.eShapeRectangle, sa_anchor);
You can also add an oval, a line, or a text box.
C h a p t e r 1 0 , W o r k i n g w i t h p r i n t o p t i o n s 139
C h a p t e r
10Chapter 10Working with print optionsThis chapter contains the following topics:
■ About print options
■ Printing a worksheet or a defined range of cells
■ Setting print orientation
■ Working with print scale
■ Working with a print area
■ Printing in greyscale
■ Working with a print header, footer, or title
■ Printing with no borders or grid lines

140 U s i n g B I R T S p r e a d s h e e t E n g i n e a n d A P I
About print optionsThis section describes some of the ways that you can use the BIRT Spreadsheet API to manipulate print options, including:
■ Showing the print window
■ Setting orientation
■ Setting print scale
■ Setting print areas
■ Setting print titles
There are numerous BookModel methods to set print options. These methods handle all of the same page setup options available in BIRT Spreadsheet Designer. Table 10-1 describes the setPrint methods.
Table 10-1 setPrint methods
Method Description
setPrintArea( ) Sets the print area. There are two signatures for this method, one that sets the area to the current selection and one that takes a formula that defines a range.
setPrintAutoPageNumbering( ) Turns page numbering on and off.
setPrintBottomMargin( ) Sets the bottom print margin.
setPrintColHeading( ) Determines whether to print column headings.
setPrintFooter( ) Sets the current page footer.
setPrintFooterMargin( ) Sets the margin for the footer from the bottom of the page.
setPrintGridLines( ) Determines whether to print grid lines on the current worksheet.
setPrintHCenter( ) Determines whether to center the worksheet horizontally during printing.
setPrintHeader( ) Sets the current page heading.
setPrintHeaderMargin( ) Sets the margin for the heading from the bottom of the page.
setPrintLandscape( ) Determines the orientation of the print job.
setPrintLeftMargin( ) Sets the left print margin.
C h a p t e r 1 0 , W o r k i n g w i t h p r i n t o p t i o n s 141
Printing a worksheet or a defined range of cellsUse the filePrint( ) method of BookModel to print the currently selected worksheet or a defined range of cells. This method prints the currently selected worksheet unless one of the following is true:
setPrintLeftToRight( ) Determines whether to print the current worksheet from left to right then top to bottom, or from top to bottom then left to right.
setPrintNoColor( ) Determines whether to print the print job in greyscale or color.
setPrintNumberOfCopies( ) Sets the number of copies to print.
setPrintPaperSize( ) There are two signatures of this method, one that sets the size of the paper in twips and one that sets the size of the paper using a constant designating a standard size.
setPrintRightMargin( ) Sets the right print margin in inches.
setPrintRowHeading( ) Determines whether to print row headings.
setPrintScale( ) Sets the scale for the print job in a range from 10 to 400 percent. There are two signatures of this method. One only has a scale parameter. The other has a flag for whether to use a scale factor to fit the report in the number of horizontal and vertical pages that you set.
setPrintScaleFitHPages( ) Sets the number of horizontal pages to which the print job is fit.
setPrintScaleFitToPage( ) Sets whether pages are scaled to fit the specified number of pages when printed.
setPrintScaleFitVPages( ) Sets the number of vertical pages to which the print job is fit.
setPrintStartPageNumber Sets the starting page to print.
setPrintTitles( ) Sets the titles to print at the top of each page.
setPrintTopMargin( ) Sets the top print margin.
setPrintVCenter( ) Determines whether to center the worksheet vertically during printing.
Table 10-1 setPrint methods
Method Description

142 U s i n g B I R T S p r e a d s h e e t E n g i n e a n d A P I
■ There is a user-defined name, Print_Area, that contains a formula for a range of cells.
■ There has been a call to setPrintArea( ) prior to calling filePrint( ).
The filePrint ( ) method has a printDialogBox parameter that determines whether to display a Print dialog box. A value of true for printDialogBox causes the Print dialog box to display. A value of false suppresses the Print dialog box.
There are two versions of filePrint( ). One version has only the printDialogBox parameter and the other has a printDialogBox parameter and a printJob parameter. The printJob parameter has the type, Java Object, and represents a java.awt.PrintJob object. You can use this parameter to attach the BIRT Spreadsheet report to an existing print job. The following statement causes the current worksheet to print after displaying a Print dialog box:
bm_book.filePrint(true);
Setting print orientationCalling the setPrintLandscape method with a parameter of true sets print orientation to landscape mode. Calling it with false sets print orientation to portrait mode. The following statement sets the print orientation to landscape:
bm_book.setPrintLandscape(true);
Working with print scaleTo adjust how large a worksheet or range appears on a printed page, adjust the print scale.
Printing to a specific scale or number of pagesThe setPrintScale( ) method supports setting the scale to a simple percentage between 10 percent and 400 percent or to scale the print job to fit a specified number of pages. The following example shows how to scale the data to print at 50 percent of its current size:
bm_book.setPrintScale(50);
The following snippet shows how to set the print scale to fit on one page, both vertically and horizontally:
int verticalPages = 1;int horizPages = 1;bm_book.setPrintScale(10, true, verticalPages, horizPages);

C h a p t e r 1 0 , W o r k i n g w i t h p r i n t o p t i o n s 143
Although the scale is set to 10 percent in the previous example, because the second parameter is true, BIRT Spreadsheet scales the report to fit in the specified number of pages.
Setting the print scalePassing true to the setPrintScaleFitToPage( ) method fits the report on one page. Use the setPrintScaleFitToPage( ) method in combination with the setPrintScaleFitVPages( ) and setPrintScaleFitHPages( ) methods to set the print scale to fit-to-page. The setPrintScaleFitVPages( ) and setPrintScaleFitHPages( ) methods have no effect unless you first call the setPrintScaleFitToPage( ) method with true. The following example shows how to fit the print job to open one page horizontally and two pages vertically:
bm_book.setPrintScaleFitToPage(true);// Fits print job to one page acrossbm_book.setPrintScaleFitHPages(1); // Fits print job to two pages downbm_book.setPrintScaleFitVPages(2);
Scaling to fit-to-page horizontally onlyTo scale a report to be one page wide and have no constraints on the number of vertical pages, call setPrintScale( ) with fitToPage set to true, horizontalPages set to 1 and verticalPages set to a sufficiently large number to accommodate the report. BIRT Spreadsheet scales as much as necessary in the horizontal direction to fill one page and prints as many vertical pages as necessary. The following example shows how to scale the print job to 100 percent, and to fit the report on up to 100 pages:
bm_book.setPrintScale(100, true, 100, 1);bm_book.filePrint(false); // false signifies no dialog box
Using fitToPage with multiple print rangesTo use the fitToPage or fit-to-print (setPrintScaleToFitPage) options with multiple print ranges, complete the following steps:
■ Set the print area.
■ Call the setPrintScale method with the following parameters:
■ fitToPage set to true
■ verticalPages set to 1
■ horizontalPages set to the number of print ranges in the print area

144 U s i n g B I R T S p r e a d s h e e t E n g i n e a n d A P I
The following example shows how to print each of two print areas on its own page:
bm_book.setPrintArea("A1:A40, B2:G25");// Sets the FitToPage argument to true, // the Vertical pages to 1 and the// horizontal pages to the number of print areas.bm_book.setPrintScale(100, true, 1, 2);bm_book.filePrint(false);
Working with a print areaThe print area is the part of the workbook that prints when you call filePrint( ) method or when the user chooses File➛Print. You can set the print area programmatically.
Setting a print areaYou set a print area by defining a name called Print_Area and setting its value to a formula that specifies the range you want to print. You can create a defined name of Print_Area in two ways:
■ Pass a formula string to setPrintArea( ).The setPrintArea( ) method creates a defined name of Print_Area if one does not already exist. The formula parameter specifies the print area you want to print.
■ Pass Print_Area and a formula to setDefinedName( ).
A print area can contain one or more ranges. For example, you can set a print area for A1:C3 and A11:C13. If Print_Area is empty, the selected portion of the active worksheet prints. Precede column and row specifiers with a $ symbol when defining a print area for an absolute range. For example, $A$1:$J$30 is an absolute print area. Setting the print area to a relative range can result in unexpected print output. A relative range is based on the active cell at the time you set the print area. If the active cell changes between the time you set the print area and the time you call filePrint( ), the print area changes as well.
Because Java sometimes incorrectly shifts print output by the dimension of the unprintable area, a loss of data can occur. The solution to this problem is to adjust the margin width downward to compensate. The following example shows how to set the print area to all cells from A1 to the last formatted row and column:
bm_book.setPrintArea("$A$1:" + bm_book.formatRCNr(bm_book.getLastRow(), bm_book.getLastCol(), true));

C h a p t e r 1 0 , W o r k i n g w i t h p r i n t o p t i o n s 145
The following example shows how to set the print area to all cells from A1 to J30:
bm_book.setPrintArea("$A$1:$J$30");
Returning print area informationUse the getPrintArea( ) method to get print area information. The return value is based on the user-defined name, Print_Area, which defines the worksheet range to print, in US English. The Print_Area definition can contain one or more ranges. For example, you can set a print area for A1:C3 and A11:C13. If Print_Area is null (""), the selected portion of the active worksheet prints. The following example shows how to get print area information:
String myPrintArea = bm_book.getPrintArea();
Clearing a print areaTo clear an existing print area, delete the Print_Area defined name. The following statement shows how to use deleteDefinedName( ):
bm_book.deleteDefinedName("Print_Area");
Printing in greyscaleCall the setPrintNoColor( ) method of BookModel with a parameter of true to print in greyscale. Printing in greyscale makes for a cleaner output and minimizes color printer driver problems. The following example illustrates using the setPrintNoColor( ) method to disable the ability to print in color:
bm_book.setPrintNoColor(true);
Working with a print header, footer, or titlePrint headers, footers, and titles are not the same as row and column headings. Print headers, footers, and titles print above or below each page of the printed part of the worksheet. This section provides examples illustrating how to print headers, footers and titles and related information. For more information about row and column headings, see Chapter 3, “Working with worksheet elements.”
Setting a print titleWhen setting print titles, make sure that the print title formulas use absolute references and that you select the entire row or column by specifying the maximum column or row. For example, $A$1:$AVLH$1 selects the first row and $A$1:$A$1076741824 selects the first column. It is not necessary to remember the

146 U s i n g B I R T S p r e a d s h e e t E n g i n e a n d A P I
largest possible column number. You can use the constant for the maximum column, as in the following example:
bm_book.setPrintTitles("$A$1:$AVLH$2, $A$1:$A$" + bm_book.kMaxRow);
The preceding example prints the first two rows and the first column on every page of the report.
Formatting a print header or a footerTo set formatting for a print header or a print footer, pass a formatting code to the setPrintHeader( ) or the setPrintFooter( ) method. You can also use a font code. Table 10-2 describes formatting codes for header or footer text. Unless you specify &L or &R, text is centered.
Font codes must appear before other codes and text. Alignment codes, such as &L, restart each section. You can specify new font codes only after an alignment code. Table 10-3 lists the font codes.
Table 10-2 Formatting codes for header and footer text
Formatting code Description
&L Left-aligns the characters that follow.
&C Centers the characters that follow.
&R Right-aligns the characters that follow.
&A Prints the worksheet name.
&D Prints the current date.
&T Prints the current time.
&F Prints the workbook name.
&P Prints the page number.
&P + number Prints the page number plus a specified number. For example, to display the first page as page 12, use: &P + 12.
&P - number Prints the page number minus a specified number. For example, to display page 11 as page 1, use: &P - 10.
&& Prints an ampersand.
&N Prints the total number of pages in the document.
\n Inserts a carriage return.

C h a p t e r 1 0 , W o r k i n g w i t h p r i n t o p t i o n s 147
The following example shows how to set the print header to print the text Customer Survey in centered, bold, Times New Roman, 16-point type:
bm_book.setPrintHeader("&C&B&\"Times New Roman\"&16 Customer Survey");
Creating a multiline print headerTo create multiline print headers, use the setPrintHeader( ) method. Use the \n format code to set carriage returns. You can use up to 256 characters in a header.
How to create a multiline print header or footer
To create a multiline print header or footer, complete the following steps:
1 Create a message string, using \n to set carriage returns.
2 Use format codes to change the font size or style. For more information about print header and footer format codes, see “Formatting a print header or a footer,” earlier in this chapter.
3 Use the setPrintFooter method and the desired format code to position the page number.
4 Pass false to the filePrint( ) method to print the worksheet without a print dialog.
String message = "&L This is to test printing a header. \n";message += "This is a test for doing subtitles. &R &D &T";bm_book.setPrintHeader(message);bm_book.setPrintFooter("&R Page &P");bm_book.filePrint(false);
Table 10-3 Font formatting codes
Font code Description
&B Use a bold font.
&I Use an italic font.
&U Underline the header.
&S Strike out the header.
&O Ignored (Mac specific).
&H Ignored (Mac specific).
&"fontname" Use the specified font.
&nn Use the nn font size, where nn is a two-digit number.

148 U s i n g B I R T S p r e a d s h e e t E n g i n e a n d A P I
Printing a four-digit year in a header or a footerTo print a four-digit year in a print header or a print footer, use the setPrintHeader( ) and setPrintFooter( ) methods. Using the &D code prints the current date, but in the m/y/dd format. To set the year to a four-digit format in headers and footers, build the print header or print footer string and concatenate the data into a string. For more examples of code you use to set number formats, see “Formatting numbers, dates, and times,” in Chapter 8, “Working with formatting and display options,” and “Formatting a print header or a footer,” earlier in this chapter. The following example shows how to create the four-digit date format and centers the date in the footer:
java.text.SimpleDateFormat dateFormat = new java.text.SimpleDateFormat("MMM dd, yyyy");
String todaysDate = dateFormat.format(new java.util.Date());bm_book.setPrintFooter("&C" + todaysDate);
Printing column and row headingsPassing true to the setPrintColHeading( ) method or the setPrintRowHeading( ) method prints column or row headings. The following example shows how to call the setPrintColHeading( ) and setPrintRowHeading methods( ):
bm_book.setPrintColHeading(true);bm_book.setPrintRowHeading(true);
Printing row or column titles on every pageUse the setPrintTitles( ) method to print row or column titles on every page. When specifying the range, make sure to specify the entire row or column. The following example shows how to print the first two rows and the first column on every page:
bm_book.setPrintTitles("A1:AVLH2, A1:A1073741824");
Printing with no borders or grid linesUse the setPrintGridLines( ) method to turn the grid lines on or off on printed output. To remove the border outline, turn off the print column headings and print row headings.
Do not confuse the setPrintGridLines( ) method with the setShowGridLines( ) method. The setShowGridlines( ) method turns off grid lines for the screen output only.

C h a p t e r 1 1 , W o r k i n g w i t h p i v o t r a n g e s 149
C h a p t e r
11Chapter 11Working with pivot ranges
This chapter contains the following topics:
■ About pivot ranges
■ Creating a pivot range
■ Understanding the pivot range class organization
150 U s i n g B I R T S p r e a d s h e e t E n g i n e a n d A P I
About pivot rangesA BIRT Spreadsheet pivot range is similar to an Excel pivot table. You use a pivot range to organize and summarize data flexibly on a spreadsheet. The user of a spreadsheet that contains a pivot range can modify the pivot range dynamically to see different organizations and summaries of the data. The user can also modify many of the characteristics of the pivot range. For more information about how to use pivot ranges in BIRT Spreadsheet Designer, see Designing Spreadsheets using BIRT Spreadsheet Designer.
Creating a pivot rangeTo create a pivot range, you must complete the following steps:
■ Get the com.f1j.ss.pivot.PivotRangeModel object from the BookModel object.
■ Create a PivotRange from the PivotRangeModel.createPivotRange( ).
You associate a data query with a location and a worksheet using a pivot range as shown in the following code:
PivotRangeModel prm_model = bm_book.getPivotRangeModel();PivotRange pr_range = prm_model.createPivotRange(sheet, row, col,
query);
When the BIRT Spreadsheet API creates a pivot range, it also creates a toolbar that the user can use to manipulate the pivot range.
Understanding the pivot range class organizationThis section is a brief overview of the classes in the com.f1j.ss.pivot package. For complete descriptions of the classes and their methods, see the Javadoc.
Understanding the PivotRangeModel objectThe PivotRangeModel object is the gateway object for building a pivot range. You get a PivotRangeModel object from a BookModel object:
PivotRangeModel prModel = bk.getPivotRangeModel();
You use a PivotRangeModel object to:
■ Create a PivotRange object.
■ Get the range containing the currently active cell.

C h a p t e r 1 1 , W o r k i n g w i t h p i v o t r a n g e s 151
■ Get the currently selected range.
■ Get the currently selected pivot range.
■ Get the currently selected field.
■ Get a PivotRangeDef definition object for the currently selected pivot range.
■ Apply the PivotRangeDef definition object to the PivotRangeModel object.
■ Update the pivot range with the latest information from the data source.
The following code illustrates some of the uses of the PivotRangeModel object:
int sheet=1, row = 1, col = 5;PivotRange pr = prModel.createPivotRange(sheet, row, col, query); Range range = (Range) prModel.getActiveCell(); Range selRange= (Range) prModel.getSelectedRange(); PivotRange pr = prModel.getActivePivotRange(); Field fld = prModel.getActiveField(); PivotRangeDef prDef = prModel.getPivotRangeDef(); prModel.refresh(pr);
Understanding the PivotRange objectThe PivotRange object is the source of other objects that define the characteristics of the pivot range, including:
■ The pivot range definition object
■ The row, column, page, and data area objects
■ Calculated and standard Field objects
■ The special data field object
■ Formulas
■ The bounds of the pivot range
■ The name of the pivot range
■ The book that contains the pivot range
You can also use the PivotRange object to do other operations, including:
■ Move and delete formulas.
■ Set the pivot range to use a specified AutoFormat style.
■ Apply a pivot range definition.
■ Add and delete calculated fields.
■ Refresh the pivot range with fresh data from the database.
152 U s i n g B I R T S p r e a d s h e e t E n g i n e a n d A P I
Understanding the PivotRangeDef objectThe com.f1j.ss.pivot.PivotRangeDef class contains the query, worksheet, and location of a pivot range. Use PivotRangeDef to change these setting for a PivotRange or a PivotRangeModel using the following steps:
■ Get the PivotRangeDef definition object from the PivotRangeModel or PivotRange object.
■ Get the DataSourceInfo object from the PivotRangeDef object.
■ Associate the pivot range with a source, using the DataSourceInfo object. The source can be a database, an Excel list, or another pivot range. The method of the DataSourceInfo object that you use depends on the type of source.
■ Use the PivotRangeDef object to set the workbook location of the pivot range.
■ Apply the definition object to the PivotRangeModel or PivotRange object.
The following code snippet sets the location of the pivot range:
PivotRangeModel prm_model = bm_book.getPivotRangeModel();PivotRangeDef prd_def = prm_model.getPivotRangeDef();prd_def.setLocation(bm_book.getBook().getSheet(0), 0, 0);prm_model.applyPivotRangeDef(prd_def);
Understanding the PivotRangeOptions objectYou use the PivotRangeOptions object to set various options of the pivot range. A list of the uses of the PivotRangeOptions object includes:
■ Setting the name of the pivot range
■ Controlling the display of row and column items
■ Controlling the display of error strings
■ Controlling print options
■ Supporting drill-down in fields
■ Preserving custom formatting
■ Including hidden items in subtotals
■ Controlling the display of grand totals for fields in the row and column areas
■ Controlling the use of AutoFormatting
The following code illustrates some uses of the PivotRangeOptions object:
po_prOpt.setName("AcctgSummary");po_prOpt.setDrillDownEnabled(true);po_prOpt.setPreserveFormatting(true);po_prOpt.setSubtotalHiddenPageItems(false);

C h a p t e r 1 1 , W o r k i n g w i t h p i v o t r a n g e s 153
po_prOpt.setUseAutoFormat( false ); //true/falsepo_prOpt.setWantRowGrandTotal(true);
Understanding the DataSourceInfo objectYou use the PivotRangeOptions object to set a data query for a pivot range, as shown in the following code:
DataSourceInfo dsi_sourceInfo = prd_def.getDataSourceInfo();dsi_sourceInfo.setDataQuery(dq_query);
dq_query is a dataquery object. For more information about data queries and data sources, see Chapter 5, “Working with data sources.”
Understanding the Area objectsThere are five kinds of Area objects, representing row, column, data, page, and hidden areas. You get Area objects from the PivotRange object. You use a parameter to the PivotRange.getArea( ) method to specify which kind of area you want, as shown in the following code:
Area a_rowArea = pr_range.getArea(PivotRange.EArea.row);Area a_columnArea = pr_range.getArea(PivotRange.EArea.column);Area a_dataArea = pr_range.getArea(PivotRange.EArea.data);Area a_pageArea = pr_range.getArea(PivotRange.EArea.page);Area a_hiddenArea = pr_range.getArea(PivotRange.EArea.none);
You can add fields to an Area object and retrieve fields from it. Its primary use is to support iteration through all fields in an area. You can add a calculated field only to the data area. You can only add a summary field to a data area. If a field has any calculated items, you cannot add it to the page area.
Understanding the Field objectsThere are several kinds of Field objects. You use each of them differently. There are column fields, row fields, data fields, summary fields, calculated fields, and a special data field. Sections later in this chapter describe all these Field objects.
Understanding the Item objectAn Item object represents a value in a field. An Item object can also be a calculated item. When you use an item as a page filter, it is a page item. For example, a field of a pivot range that represents the customer name contains as many Items as there are customers. Each Item represents the name of one customer. One way to get an Item object is by adding a calculated item to a field:
Item i_calculatedItem = f_fld.addCalculatedItem("my name", formulaString);

154 U s i n g B I R T S p r e a d s h e e t E n g i n e a n d A P I
You can also get an Item object from a Field object by index or by name:
Item i_someItem = f_fld.getItem("myItem");for(int i = 0; i < f_fld.getItemCount(); i++){
Item i_someOtherItem = f_fld.getItem(i);//... process the item in some way
}
The Item interface has methods to support the following tasks:
■ Get and set the item formula.
■ Get and set the item name.
■ Get and set the item position in the field.
■ Get the name of the source field.
■ Determine whether the item is calculated or a summary item.
■ Determine whether the item is showing detail or is visible.
■ Set the item to show or hide detail.
■ Set the item to be visible or hidden.
Understanding row, column, and data field objectsTo get a row, column, or data field object, you pass the fully qualified name of a data source field to PivotRange.getField( ). For example, you pass "Employee.phone" to indicate the phone field of the Employee table in your database. The following snippet illustrates setting various fields:
Field f_rowField = pr_range.getField("Employee.last");Field f_dataField = pr_range.getField("CurrentValue");Field f_columnField = pr_range.getField("PortfolioDate");
You add each field to the appropriate area object using the addField( ) method of the Area object, as in the following statements:
a_rowArea.addField(f_rowField);a_dataArea.addField(f_dataField);a_columnArea.addField(f_columnField);
The Field object has many methods with which you can define its characteristics. The following list includes operations you can perform with a Field object:
■ Add a calculated item to the field.
■ Set the formula for the field if it is a calculated field.
■ Set the field name.
■ Set the page item on which the field filters.
■ Set the field position within the containing area.

C h a p t e r 1 1 , W o r k i n g w i t h p i v o t r a n g e s 155
■ Create and apply summary field settings for the field.
■ Hide the field.
■ Create and apply a grouping definition for the field.
■ Get and set properties of the special data field.
■ Test the field to determine if it is any of the following types of fields:
■ Calculated field
■ Special data field
■ Summary field
■ Numeric
■ Deleted
The following code illustrates some of the uses of Field objects:
Item i_calcItem = f_myField.addCalculatedItem(s_itemName, s_formula);
f_myField.setFormula(s_newFormula);f_myField.setName("InvoiceAmt");f_myField.setPage(i_pageItem);f_myField.setPosition(1);SummaryFieldSettings sfs_settings =
f_myField.getSummaryFieldSettings();f_myField.setSummaryFieldSettings(sfs_settings);f_myField.hide();FieldGroupDef fgd_def = f_myField.createFieldGroupDef();
Understanding calculated fieldsA calculated field uses data source fields in a calculation to create new pivot range data. Unlike standard fields, a calculated field does not represent a column in a database table. It represents the result of a formula which may include values from one or more columns from a database. The user can add a calculated field to a pivot range, or the program can create one with PivotRange.addCalcuatedField( ). Every calculated field has a formula that defines how to calculate the field’s value, as illustrated in the following statement:
Field f_calculatedField = pr_range.addCalculatedField("Total Price", "=priceField * quantityField");
Understanding the special data field objectA special data field exists from the time that you create a PivotRange object. The special data field contains the summary fields for the pivot range. You get the

156 U s i n g B I R T S p r e a d s h e e t E n g i n e a n d A P I
special data field object by calling getDataField( ) on the PivotRange object, as shown in the following statement:
Field f_specialDataFld = pr_range.getDataField();
You use the special data field to gain access to the summary field objects, as shown in “Understanding the SummaryField object,” later in this chapter.
Understanding the SummaryField objectA summary field specifies a summarization method for the special data field. The special data field can contain multiple summary fields. You get a particular summary field by passing an index value to the Field.getSummary( ) method. To get all summary fields for a data field, you iterate through the list, as shown in the following code:
for(int i = 0; i < f_specialDataFld.getSummaryCount(); i++){Field f_summary = f_specialDataFld.getSummary(i);//... process the summary field
}
You set the summary method for the data field by getting a SummaryFieldSettings object from the summary field and calling its setFunction( ) method:
SummaryFieldSettings sfs_settings = f_summary.getSummaryFieldSettings();
sfs_settings.setFunction(BaseFieldSettings.EFunctionType.eAverage);
Table 11-1 lists the valid function types and the corresponding constants that you can pass to setFunction( ).
Table 11-1 Function types and constants that you can pass to set Function( )
Function typeConstant in BaseFieldSettings.EFunctionType
Average eAverage
Count eCount
Count numbers eCountNum
Maximum eMax
Minimum eMin
Product eProduct
Standard deviation eStdDev
Standard deviation population eStdDevP
Sum eSum
C h a p t e r 1 1 , W o r k i n g w i t h p i v o t r a n g e s 157
You set the name of the summary method by calling SummaryFieldSettings.setName( ). The name you choose appears in the Data field in the upper left corner of the pivot range. The following statement illustrates setting the name of a summary field:
sfs_settings.setName(f_dataField.getSourceName() + " Average");
Setting the format of a summary fieldYou set the format of a summary field by passing a NumberFormat object to the setNumberFormat( ) method of the SummaryFieldSettings object:
CellFormat cf_fmat = bm_book.getCellFormat();com.f1j.util.NumberFormat nf_fmat = cf_fmat.number();String mask = "$#,##_);[Red](#,###.00);0";nf_fmat.setCustomFormat(mask);sfs_settings.setNumberFormat(nf_fmat);
After setting the summarization method and the summary name and format, you set pass the SummaryFieldSettings object to the setSummaryFieldSettings( ) method of the SummaryField object:
f_summary.setSummaryFieldSettings(sfs_settings);
Understanding the FieldSettings objectYou can set many properties of a Field object by getting its FieldSettings object, setting properties on the FieldSettings object, then applying the FieldSettings object:
FieldSettings fs_settings = f_columnField.getFieldSettings();fs_settings.setAutoShowEnabled(true);f_columnField.setFieldSettings(fs_settings);
The following list includes some tasks that you can complete using the FieldSettings object:
■ Get the name of the summary field that is the key for AutoShow.
■ Iterate through the list of summary fields and AutoSort fields.
■ Get and set the field layout.
Variance eVar
Variance population eVarP
Table 11-1 Function types and constants that you can pass to set Function( )
Function typeConstant in BaseFieldSettings.EFunctionType

158 U s i n g B I R T S p r e a d s h e e t E n g i n e a n d A P I
■ Get and set the type of subtotal.
■ Set and test whether AutoShow is enabled and if it shows top, bottom, or all items.
Understanding the SummaryFieldSettings objectYou get a SummaryFieldSettings object by calling getSummaryFieldSettings( ) on a SummaryField object. You use a SummaryFieldSettings object to set certain properties of a SummaryField object. After you get a SummaryFieldSettings object and alter its properties, you must apply the SummaryFieldSettings to the Field object, as shown in the following code:
Field f_dataFld = pr_range.getDataField();// get the first summary fieldField f_summary = f_dataFld.getSummary(0); SummaryFieldSettings sfs_settings =
f_summary.getSummaryFieldSettings();sfs_settings.setFunction(
BaseFieldSettings.EFunctionType.eAverage);sfs_settings.setName(f_dataField.getSourceName() + " Average");
You can display a summary field value as a relative value, using another field as the basis of the comparison. This other field is called the base field. For example, when the user chooses Options in the Field Settings dialog, Show data appears, as shown in Figure 11-1.
Figure 11-1 Specifying how to display data
The choices in the selection list include such values as Difference From, % Of, and % Difference Of. Below this choice is a list of base fields and base items from which the user chooses. You can select these base fields and base items using methods in the SummaryFieldSettings interface.

C h a p t e r 1 1 , W o r k i n g w i t h p i v o t r a n g e s 159
The following list includes some tasks that you can complete using the SummaryFieldSettings object:
■ Control whether base fields and base items are allowed.
■ Get and set base fields and base items.
■ Get and set the calculation type for the field.
■ Get and set the function type for the field.
Understanding the Range objectThe Range object defines a range within a pivot range. You can use this object to act upon areas within a pivot range. You can complete the following tasks using a Range object:
■ Control whether a cell in the range can show or hide detail.
■ Test whether the range contains any of the following items:
■ Blank lines
■ Data lines
■ A field title
■ A grand total
■ A subtotal
■ Get the field that is associated with the range.
■ Get the items within the range for a specified field.
■ Group and ungroup the items within the range for a specified field.
■ Move a field within the range.
■ Set the selection type for the range.
You get a Range object from one of four methods of the PivotRangeModel object, as shown in the following code:
Range r_myRange = (Range) prm_model.getActiveCell(r_destRange);Range r_myRange = (Range) prm_model.getActiveCell();Range r_myRange = (Range) prm_model.getSelectedRange(r_destRange);Range r_myRange = (Range) prm_model.getSelectedRange();
Understanding pivot field groupingYou can group pivot fields that are in either the row area or the column area. You can group either numerically or by date. The data type of the field determines the type of grouping. You set grouping parameters using the FieldGroupDef object. To get a FieldGroupDef object, call Field.createFieldGroupDef( ) for the field on

160 U s i n g B I R T S p r e a d s h e e t E n g i n e a n d A P I
which you want to group. This method returns a null value if any row in the database contains non-numeric data for this field. For this reason, you must test the FieldGroupDef return value before using it, as shown in the following code:
FieldGroupDef fgd_def = f_myField.createFieldGroupDef();if(fgd_def != null){
//... set the properties of fgd_def} else{
//... notify user of bad data in database}
If the field is a date field, you must specify the period by which to group, such as month or quarter. You can specify multiple periods, in which case a shorter time period always groups within longer periods. You specify a grouping period by passing a constant to setDateType( ):
fgd_def.setDateTypeEnabled(FieldGroupDef.EDateType.eQuarters,true);
Table 11-2 lists the valid period constants.
To set an initial value for the groups of fields, you must first pass false to the setWantsDefaultInitialValue( ) method on the FieldGroupDef object. You must then call the setInitialValue( ) method on the FieldGroupDef object to specify the initial value. The following snippet illustrates this process:
fgd_def.setWantsDefaultInitialValue(false) ;fgd_def.setInitialValue("01/01/2002");
To set a final grouping, you call setWantsDefaultFinalValue( ) and setFinalValue( ) on the FieldGroupDef object:
fgd_def.setWantsDefaultFinalValue(false);fgd_def.setFinalValue("12/31/2002");
Table 11-2 Grouping period constants
Grouping period Constant
Seconds FieldGroupDef.EDateType.eSeconds
Minutes FieldGroupDef.EDateType.eMinutes
Hours FieldGroupDef.EDateType.eHours
Days FieldGroupDef.EDateType.eDays
Months FieldGroupDef.EDateType.eMonths
Quarters FieldGroupDef.EDateType.eQuarters
Years FieldGroupDef.EDateType.eYears

C h a p t e r 1 1 , W o r k i n g w i t h p i v o t r a n g e s 161
For numeric field grouping, you can set initial and final values the same way as you set dates. For numeric values, you can specify either a string or a double for the value:
fgd_def.setInitialValue("10000");fgd_def.setFinalValue((double)20000);
For numeric field grouping, you must set the field increment. Do this by calling setIncrement( ). You can specify either a double or a string:
fgd_def.setIncrement(10000);fgd_def.setIncrement("5000");
To apply the field group settings to the field, pass the FieldGroupDef object to the applyFieldGroupDef( ) method of the field:
f_myField.applyFieldGroupDef(fgd_def);
Formatting a pivot rangeYou can choose among several templates to format a pivot range. To set the formatting template, pass a constant to the setAutoFormat( ) method of the PivotRange object:
pr_range.setAutoFormat(PivotRange.EAutoFormat.eClassic);
Table 11-3 lists all the auto format constants with which you can format a pivot range.
Table 11-3 Auto format constants for formatting a pivot range
Auto format type Constant
Classic PivotRange.EAutoFormat.Classic
None PivotRange.EAutoFormat.eNone
Table 1 PivotRange.EAutoFormat.eTable1
Table 2 PivotRange.EAutoFormat.eTable2
Table 3 PivotRange.EAutoFormat.eTable3
Table 4 PivotRange.EAutoFormat.eTable4
Table 5 PivotRange.EAutoFormat.eTable5
Table 6 PivotRange.EAutoFormat.eTable6
Table 7 PivotRange.EAutoFormat.eTable7
Table 8 PivotRange.EAutoFormat.eTable8
Table 9 PivotRange.EAutoFormat.eTable9
Table 10 PivotRange.EAutoFormat.eTable10
(continues)

162 U s i n g B I R T S p r e a d s h e e t E n g i n e a n d A P I
For more information about the formats associated with each type of auto formatting and an example of a callback class that creates a pivot range, see Designing Spreadsheets using BIRT Spreadsheet Designer.
Report 1 PivotRange.EAutoFormat.eReport1
Report 2 PivotRange.EAutoFormat.eReport2
Report 3 PivotRange.EAutoFormat.eReport3
Report 4 PivotRange.EAutoFormat.eReport4
Report 5 PivotRange.EAutoFormat.eReport5
Report 6 PivotRange.EAutoFormat.eReport6
Report 7 PivotRange.EAutoFormat.eReport7
Report 8 PivotRange.EAutoFormat.eReport8
Report 9 PivotRange.EAutoFormat.eReport9
Table 11-3 Auto format constants for formatting a pivot range (continued)
Auto format type Constant

C h a p t e r 1 2 , W o r k i n g w i t h e v e n t s 163
C h a p t e r
12Chapter 12Working with events
This chapter contains the following topics:
■ About events
■ Working with user editing
■ Working with user key and mouse events
■ Working with user selection events
■ Restricting user access

164 U s i n g B I R T S p r e a d s h e e t E n g i n e a n d A P I
About eventsThis section describes how to use the BIRT Spreadsheet API event model. The event model allows you to identify user events and restrict user actions. For more information about the API you use with the event model, see the Javadoc. Table 12-1 describes BIRT Spreadsheet Engine event classes and listener interfaces.
Table 12-1 BIRT Spreadsheet Engine events and listeners
Events and listeners Triggers
com.f1j.swing.engine.ss.CancelEditEventcom.f1j.swing.engine.ss.CancelEditListener
The user exits in-cell editing mode by pressing the Esc key
com.f1j.chart.ChartEventcom.f1j.chart.ChartListener
Something in the chart model changes
com.f1j.swing.engine.ss.ChartViewEventcom.f1j.swing.engine.ss.ChartViewListener
Something in the chart view changes
com.f1j.swing.engine.ss.EndEditEventcom.f1j.swing.engine.ss.EndEditListener
The user exits in-cell editing mode, such as by pressing Enter or using the arrow keys or mouse to move to another cell
com.f1j.swing.engine.ss.EndRecalcEventcom.f1j.swing.engine.ss.EndRecalcListener
After the worksheet has completed its recalculation cycle
com.f1j.swing.engine.ss.HyperlinkEventcom.f1j.swing.engine.ss.HyperlinkListener
When a hyperlink is activated
com.f1j.swing.engine.ss.ModifiedEventcom.f1j.swing.engine.ss.FModifiedListener
When worksheet data or formatting changes
com.f1j.swing.engine.ss.ObjectEventcom.f1j.swing.engine.ss.ObjectListener
When the user interacts with a graphical object
com.f1j.swing.engine.ss.SelectionChangedEntcom.f1j.swing.engine.ss.SelectionChangedListener
Each time the cell selection changes
com.f1j.swing.engine.ss.StartEditEventcom.f1j.swing.engine.ss.StartEditListener
When the user enters in-cell editing mode
com.f1j.swing.engine.ss.StartRecalcEventcom.f1j.swing.engine.ss.StartRecalcListener
When the recalculation cycle is about to begin
com.f1j.swing.engine.ss.UpdateEventcom.f1j.swing.engine.ss.UpdateListener
When the component has repainted the spreadsheet
com.f1j.swing.engine.ss.ValidationFailedEventcom.f1j.swing.engine.ss.ValidationFailedListener
When a validation rule fails

C h a p t e r 1 2 , W o r k i n g w i t h e v e n t s 165
Working with user editingThis section describes how to work with common user editing events, including how to determine whether a worksheet was modified or whether the user is in edit mode. Other common user editing events include:
■ Obtaining the most recent data entry
■ Maintaining the current cell format when the user enters a value
■ Cancelling what a user types in a cell
■ Initiating in-cell editing
■ Getting a cell value before the user edits the worksheet
Determining whether a worksheet has been modifiedTo find out whether a worksheet has been modified, define a global variable and initialize it to false. Then, set the flag to true in the ModifiedEvent handler, as shown in the following code:
void modified(ModifiedEvent e) {modified = true;
}
Determining whether the user is in edit modeTo determine whether the user is in edit mode, first define a global variable, then set the variables to true in StartEditEvent, false in CancelEditEvent, and false in EndEditEvent. The following code assumes that your class implements the StartEditListener, EndEditListener, and CancelEditListener interfaces:
//...boolean isInEditMode; //global variable
jb_jbook1.addCancelEditListener((CancelEditListener) this); jb_jbook1.addEndEditListener((EndEditListener) this); jb_jbook1.addStartEditListener((StartEditListener) this); ...
com.f1j.swing.engine.ss.ViewChangedEventcom.f1j.swing.engine.ss.ViewChangedListener
When the visible part of the spreadsheet changes, such as after scrolling, tab selection, or window resize
Table 12-1 BIRT Spreadsheet Engine events and listeners
Events and listeners Triggers

166 U s i n g B I R T S p r e a d s h e e t E n g i n e a n d A P I
public void startEdit(com.f1j.swing.engine.ss.StartEditEventsee_startEditEvent) {
isInEditMode = true; }public void endEdit(com.f1j.swing.engine.ss.EndEditEvent
eee_endEditEvent) {isInEditMode = false;
}public void cancelEdit(com.f1j.swing.engine.ss.CancelEditEvent
cee_cancelEditEvent) {isInEditMode = false;
}
Getting the most recent data entryTo get the most recent data entered, create an EndEditListener, then use endEdit( ) and getEditString( ) to return the data, as shown in the following example:
//...jb_jbook1.addEndEditListener((EndEditListener) this);//...
public void endEdit(com.f1j.swing.engine.ss.EndEditEvent eee_edit){eee_edit.getEditString();
}
Maintaining cell format when the user enters a valueWhen you supply a number in a worksheet cell, BIRT Spreadsheet Engine uses the data form to derive the data type and formats the cell. For example, if you type data in the form of a date, 12/1/04, in a cell formatted numerically, #,###0.00, BIRT Spreadsheet Engine changes the cell format to a date format. To change the default behavior, use the EndEditListener interface to watch for changes to the cell, then reapply the original formatting during the EndEdit event, as shown in the following example:
public void endEdit(com.f1j.swing.engine.ss.EndEditEvent eee_edit1)
{ try {// See if the edited cell is in the formatted range.if ( jb_jbook1.getActiveCellEx().getRow1() <= 5 &&
jb_jbook1.getActiveCellEx().getCol1() <= 5 ){ // Reset the cell value format.jb_jbook1.setCellFormat( cf_specialFormat );
}}catch ( com.f1j.util.F1Exception f1e_e1 ) { }
}
C h a p t e r 1 2 , W o r k i n g w i t h e v e n t s 167
Cancelling what a user types in a cellTo leave edit mode and cancel what a user typed in a cell, use endEdit( ) with cancelEdit( ). The following example allows the user to leave edit mode and cancels what the user typed while in edit mode. Any content in the cell prior to the user’s entry is preserved:
public void endEdit(EndEditEvent eee_e) {jb_jbook1.cancelEdit();
}
To prevent the user from leaving edit mode, and preserve what was typed so far, use endEdit( ) and pass true to setCanceled( ). The following example prevents the user from leaving edit mode, but preserves what was typed:
public void endEdit(EndEditEvent eee_e) {eee_e.setCanceled(true);
}
Initiating in-cell editingUse startEdit( ) to enter edit mode for the active cell. You can start from a double-click event, a menu option, and so on. Set the first parameter to false to edit the existing data in the cell without clearing it out. The following lines show the syntax for startEdit( ):
public void startEdit(boolean clear, boolean inCellEditFocus, boolean arrowsExitEditMode)
Table 12-2 describes the parameters for startEdit.
The following code example initiates in-cell editing without clearing the cell, gives the editing focus to in-cell editing, and exits edit mode when any arrow key is pressed:
jb_jbook1.startEdit(false, true, true);
Table 12-2 startEdit parameters
Parameter Description
clear If set to true, clears edit bar when edit mode begins.
inCellEditFocus If set to true, gives editing focus to in-cell editing. If set to false, gives editing focus to the formula bar.
arrowsExitEditMode If set to true, exits edit mode when an arrow key is pressed.

168 U s i n g B I R T S p r e a d s h e e t E n g i n e a n d A P I
Getting a cell value before user editing beginsTo get the value of a cell before user editing begins, call getEntry( ) in the StartEditEvent object. This method returns the previous value because the EndEditEvent object has not yet placed the value into the cell. To get the value before editing, add the following code to the StartEditEvent object:
try {String strPrev = jb_jbook1.getEntry();
}catch (com.f1j.util.F1Exception f1e_e1) { }
Working with user key and mouse eventsThe following section describes how to use the BIRT Spreadsheet API to work with common user key and mouse events.
Determining which key the user pressedTo monitor key presses, set up a KeyListener then capture the KeyEvent using keyPressed and keyReleased. This listener does not capture text input after entering edit mode. To monitor key presses, use code similar to the following lines:
jb_jbook1.addKeyListener(this);...
public void keyPressed(KeyEvent ke_e1) {try {
jb_jbook1.setText(0, 0, ke_e1.getKeyText(ke_e1.getKeyCode()));}catch (com.f1j.util.F1Exception f1e_e2) { }
}
public void keyReleased(KeyEvent ke_e1) {try {
jb_jbook1.setText(0, 0, ke_e1.getKeyText(ke_e1.getKeyCode()));}catch (com.f1j.util.F1Exception f1e_e2) { }
}
Converting pixels to twips on mouse eventsTo convert pixels to twips, create code that converts pixels based on the current screen resolution to twips. For example, use code similar to the following lines:

C h a p t e r 1 2 , W o r k i n g w i t h e v e n t s 169
public void mouseClicked(MouseEvent me_e) {int logPixels = java.awt.Toolkit.getDefaultToolkit().
getScreenResolution();int twipsX = me_e.getX() * 1440 / logPixels;int twipsY = me_e.getY() * 1440 / logPixels;com.f1j.ss.CellRef cr_cellRef = jb_jbook1.twipsToRC(twipsX,
twipsY);}
Creating a shortcut key for copying or pastingBy creating a listener for a KeyPressed event, then calling editCopy( ) or editPaste( ), you can create a shortcut key to copy or paste. The following code creates a copy and paste shortcut key by creating a KeyListener, checking if the shortcut key is pressed, and calling editCopy( ) or editPaste( ):
public void jBook1_keyPressed(KeyEvent ke_e) {try {
if (ke_e.getKeyCode()==(ke_e.CTRL_MASK |java.awt.event.KeyEvent.VK_C)) {
jb_jbook1.editCopy();}else if (ke_e.getKeyCode()==(ke_e.CTRL_MASK |
java.awt.event.KeyEvent.VK_V)) {jb_jbook1.editPaste();
}}catch (com.f1j.util.F1Exception f1e_fje) { }
}
Locating the active cell Using twipsToRC( ) in combination with getX( ), getY( ), getRow( ), and getCol( ) returns the active cell’s position in coordinates. The following code example returns the current position of the active cell:
public void mouseClicked(java.awt.event.MouseEvent me_event) {try {
int logPixels = java.awt.Toolkit.getDefaultToolkit().getScreenResolution();
int twipsX = me_event.getX() * 1440 / logPixels;int twipsY = me_event.getY() * 1440 / logPixels;com.f1j.ss.CellRef cr_ref = jb_jbook1.twipsToRC(twipsX,
twipsY);Integer inRow = new Integer(cr_ref.getRow());Integer inCol = new Integer(cr_ref.getCol());
170 U s i n g B I R T S p r e a d s h e e t E n g i n e a n d A P I
jb_jbook1.messageBox(inRow.toString() +", " + inCol.toString(), "", jb_jbook1.OK);
} catch (Exception e_e) { }}
Working with user selection eventsThe following section describes how to use the BIRT Spreadsheet API to work with common user selection events.
Determining when a user changes cellsYou can monitor when a user changes cells by setting up a SelectionChangedListener. This listener identifies when the cell selection changes. To monitor the selection, use code similar to the following lines:
jb_jbook1.addSelectionChangedListener((SelectionChangedListener) this);
public void selectionChanged(com.f1j.swing.engine.ss.SelectionChangedEvent sce_e) {try {
jb_jbook1.setText(0, 0, jb_jbook1.getRow() + "," + jb_jbook1.getCol());
}catch (com.f1j.util.F1Exception f1e_e1) { }
}
Determining when a user changes worksheetsTo monitor whether a user has changed worksheets, establish a value for the current worksheet, then use selectionChanged( ) to compare the new worksheet to the current worksheet. To do this, use code similar to the following lines:
currentSheet = jb_jbook1.getSheet();public void selectionChanged(
com.f1j.swing.engine.ss.SelectionChangedEvent sce_e1) {int newSheet = jb_jbook1.getSheet();if (newSheet != currentSheet) {
currentSheet = newSheet;}
}

C h a p t e r 1 2 , W o r k i n g w i t h e v e n t s 171
Restricting user accessBIRT Spreadsheet Engine offers a number of ways to limit how an end user interacts with a worksheet. BIRT Spreadsheet Engine contains some restrictions, like cell protection. Other restrictions require more sophisticated programming techniques, such as setting up a listener. This section illustrates several ways to add user restrictions using code. For more information about the BIRT Spreadsheet API for setting user restrictions, see the Javadoc.
Restricting editing to a columnTo restrict editing by columns, check the column the user is in when the startEditEvent triggers, then cancel the edit if the user is attempting to put text into one of the restricted columns you set. The following code restricts users from editing worksheet cells after column E. This event allows the user to place data in the first five columns. If the user attempts to edit data outside of this range, the edit is cancelled:
public void startEdit(StartEditEvent see_e) {int m_iCol = jb_jbook1.getActiveCol(); // If the user is in the restricted column, //cancel the edit mode.if (m_iCol > 4)
e.setCanceled(true);}
Enabling users to delete values and formattingBy default, using the Delete key deletes values only. To enable users to delete both values and formatting, pass setAllowDelete( ) false, then use the KeyPressed event to trap the Delete key’s keycode and perform the clear, passing eClearAll to editClear( ).
First, pass false to setAllowDelete( ), as shown in the following code:
jb_jbook1.setAllowDelete(false);
Then, supply the following code in the KeyPressed event, as shown in the following code:
try {if (e.getKeyCode()==e.VK_DELETE)
jb_jbook1.editClear(jb_jbook1.eClearAll);}
catch (com.f1j.util.F1Exception e1) { }

172 U s i n g B I R T S p r e a d s h e e t E n g i n e a n d A P I
Allowing users to select an unprotected cell onlyIn the SelectionChangedEvent object, use isLocked( ) to determine whether a cell is locked. If the cell is locked, move the selection to a predetermined cell, the next cell, or the previous cell. The following code prevents users from selecting protected cells. When a user attempts to select a protected cell, cell B2 becomes active instead:
try {com.f1j.ss.CellFormat cf_fmat = jb_jbook1.getCellFormat();if (cf_fmat.protection().isLocked() == true)
jb_jbook1.setActiveCell(1, 1); }catch (com.f1j.util.F1Exception f1e_e1) { }
In this example, jb_jbook1.setActiveCell(1,1) moves the selection to cell B2.
Limiting the selection rangeYou can limit the selection range to a specific area by using the getRow( ) and getCol( ) methods in the CellRef class to set the selection equal to the active cell. When you do this, users can only select within the specified selection range. The following example limits the user’s selection range to a single cell. You can modify this example to set a larger selection range.
Add the following code to the SelectionChangedEvent object to limit the selection range to one cell:
try {com.f1j.ss.CellRef cf_clSelection = (CellRef) jb_jbook1.getActiveCellEx();jb_jbook1.setSelection(cf_clSelection.getRow(),
cf_clSelection.getCol(),cf_clSelection.getRow(), cf_clSelection.getCol());
}catch (com.f1j.util.F1Exception f1e_e1) { }
Preventing users from typing dataYou can enable cell protection to prevent a user from entering data. Enabling protection applies protection to all locked cells. By default, BIRT Spreadsheet Engine locks worksheet cells, but it does not protect them. To support modifying a cell or range in a protected worksheet, unlock the cell or range before you enable protection. For more information about unlocking a cell or range, see “Setting cell protection,” in Chapter 3, “Working with worksheet elements.”

C h a p t e r 1 2 , W o r k i n g w i t h e v e n t s 173
The following code registers a listener for the StartEditEvent, then defines startEdit( ) in the StartEditListener class to detect when a user enters edit mode in cell B2 of the worksheet. If the user attempts to supply data in the cell, the entry is cancelled. Implement the com.f1j.swing.engine.ss.EndEditListener interface, then use the following lines to register and unregister it.
How to prevent users from typing data
1 Register a StartEditListener:
// Add a StartEditListenerjb_jbook1.addStartEditListener((StartEditListener) this);
2 Define a startEdit( ) function in the StartEditListener class:
public void startEdit(com.f1j.swing.engine.ss.StartEditEvent see_event) {if (jb_jbook1.getActiveRow() == 1 && jb_jbook1.getActiveCol() == 1)
3 If a user tries to type in cell B2, cancel the attempt:
see_event.setCanceled(true);}
Limiting characters users type in a cellTo add a limit to the number of characters a user can type, add an EndEditListener to your code and implement the endEdit( ) method that sets a limit on character entry. The following code prevents the user from typing a string that has more than 15 characters. To do this, implement the com.f1j.swing.engine.ss.EndEditListener interface, then use the following procedure to register it.
How to limit the number of characters a user can type
1 Register an EndEditListener:
jb_jbook1.addEndEditListener((EndEditListener) this);
2 Define an endEdit( ) method in the EndEditListener class. At the end of the entry, if the number of characters exceeds 15, cancel the entry:
public void endEdit(com.f1j.swing.engine.ss.EndEditEvent eee_event) {if (eee_event.getEditString().length() > 15)
jb_jbook1.cancelEdit(); }

174 U s i n g B I R T S p r e a d s h e e t E n g i n e a n d A P I
Validating edit data from codeYou can perform validation within the endEditEvent object, as shown in the following code example. This code cancels edit mode when the user enters anything that does not begin with an equal sign:
public void endEdit(com.f1j.swing.engine.ss.EndEditEvent eee_e1) {if (! eee_e1.getEditString().startsWith("="))
jb_jbook1.cancelEdit();}
Chapter 13, Understanding BIRT Spreadsheet Engine per formance 175
C h a p t e r
13Chapter 13Understanding BIRT
Spreadsheet Engineperformance
This chapter contains the following topics:
■ Using memory efficiently
■ Understanding recalculation
■ Maintaining speed when reading in data

176 U s i n g B I R T S p r e a d s h e e t E n g i n e a n d A P I
Using memory efficientlyThis section contains information that can help you use memory efficiently with BIRT Spreadsheet Engine code. To use memory efficiently, follow these guidelines:
■ Lock a book before performing multiple related actions to improve performance and ensure consistency. For more information about locking a book, see “Getting and releasing locks,” later in this chapter.
■ Build a worksheet by rows rather than columns. For more information about building a worksheet, see “Allocating row and column references,” later in this chapter.
■ Build a range from the bottom right corner of the worksheet. For more information about row and column references, see “Allocating row and column references,” later in this chapter.
■ Avoid adding an empty row or a column for white space. Adjust the row height or column width to create white space instead of adding empty rows or columns. If you must add empty rows or columns, adding empty rows is more efficient.
■ Disable repainting when performing a series of operations. When performing a number of sequential operations on a worksheet, disable repainting with setRepaint( ) so the screen does not repaint after each operation. This increases the speed of the operation and avoids unnecessary screen flashing.
■ Use a method to copy and move data. Use the editCopyRight( ), editCopyDown( ), copyRange( ), and moveRange( ) methods to copy and move cells. These methods are much faster than using the Clipboard. In addition, these methods update cell references to maintain the integrity of your formulas.
Getting and releasing locksAny class that implements the lockable interface, including Group, BookModel, Document, and Sheet, can be made thread-safe using getLock( ).BookModel.getLock( ) locks all selections and workbooks for the current group so that no other thread is allowed to access them until BookModel.releaseLock( ) is called. Calls to getLock( ) can be nested, but releaseLock( ) must be called once for each getLock( ).
Typically, you use getLock( ) as shown in the following example:
book.getLock(); try {
...} catch(F1Exception ex){...}

Chapter 13, Understanding BIRT Spreadsheet Engine per formance 177
finally {book.releaseLock();
}
Locking a workbook before performing multiple related actions ensures consistency and improves performance. Increases in performance from using the getLock( ) and releaseLock( ) methods are highest on multiple-processor machines. Improved speeds can be up to 26 times faster than processes that do not use the getLock( ) and releaseLock( ) methods. On single processor machines, the speed is approximately 1.5 times faster.
Locking is also critical for BIRT Spreadsheet reports that you deploy to Actuate BIRT iServer. Without locking, when more than one user accesses the same report at the same time, the condition can occur where updates are lost.
Allocating row and column referencesWhere possible, fill the worksheet by rows instead of columns. An array of row references is allocated for each row with data. For each allocated row, BIRT Spreadsheet Engine allocates an array of column references. Rows without data have only a row reference, not an array of column references for that row.
Load the worksheet from bottom right to top left. Since BIRT Spreadsheet Engine allocates row and column references based on the last row or column containing data, loading the worksheet from bottom right to top left increases efficiency by allowing BIRT Spreadsheet Engine to allocate the entire array of row and column references before filling the worksheet. Once these arrays are allocated, BIRT Spreadsheet Engine only allocates space, not references, for each cell. Loading the worksheet the opposite way, from top left to bottom right, means that the arrays of row and column references must grow as the number of rows and columns grows. Each time these arrays need to grow, BIRT Spreadsheet Engine must allocate a new array. This leads to increased garbage collection, or memory reallocation, and decreased speed.
Preallocate the arrays by putting a value in the lower right corner of the expected range. This preallocates the row references. To preallocate all the arrays of column references, load a value into every cell in the column on the right of the range. This technique is especially recommended in a worksheet with a large number of columns. After loading data into the worksheet, delete the data in these preloaded cells. The worksheet then reevaluates the amount of memory and releases the remaining memory. This decreases load times considerably.
Understanding data structure and memory sizeThe three basic parts of the BIRT Spreadsheet Engine data structure are row references, cell references, and cells.
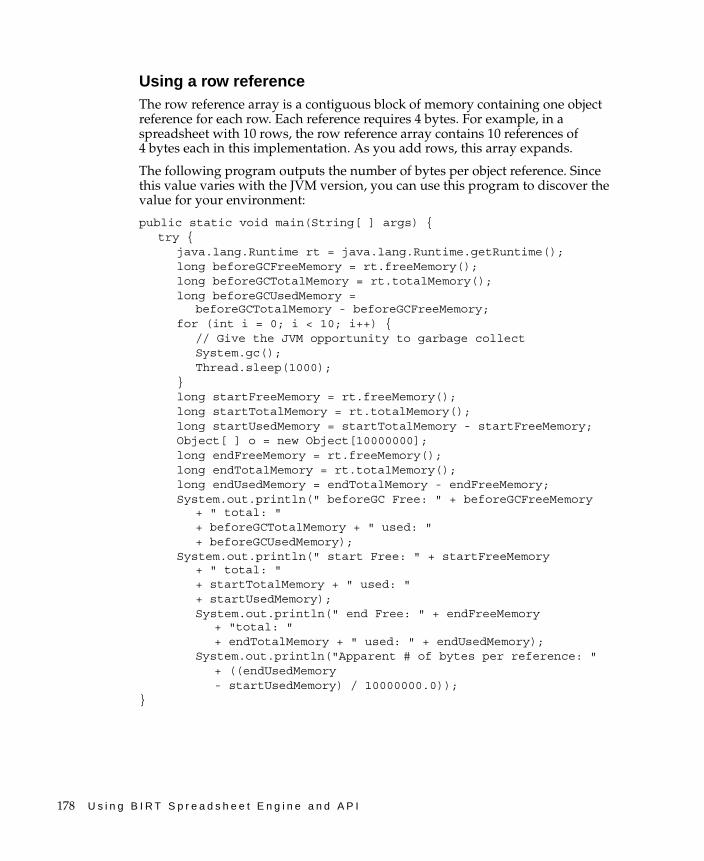
178 U s i n g B I R T S p r e a d s h e e t E n g i n e a n d A P I
Using a row referenceThe row reference array is a contiguous block of memory containing one object reference for each row. Each reference requires 4 bytes. For example, in a spreadsheet with 10 rows, the row reference array contains 10 references of 4 bytes each in this implementation. As you add rows, this array expands.
The following program outputs the number of bytes per object reference. Since this value varies with the JVM version, you can use this program to discover the value for your environment:
public static void main(String[ ] args) {try {
java.lang.Runtime rt = java.lang.Runtime.getRuntime();long beforeGCFreeMemory = rt.freeMemory();long beforeGCTotalMemory = rt.totalMemory();long beforeGCUsedMemory =
beforeGCTotalMemory - beforeGCFreeMemory;for (int i = 0; i < 10; i++) {
// Give the JVM opportunity to garbage collectSystem.gc();Thread.sleep(1000);
}long startFreeMemory = rt.freeMemory();long startTotalMemory = rt.totalMemory();long startUsedMemory = startTotalMemory - startFreeMemory;Object[ ] o = new Object[10000000];long endFreeMemory = rt.freeMemory();long endTotalMemory = rt.totalMemory();long endUsedMemory = endTotalMemory - endFreeMemory;System.out.println(" beforeGC Free: " + beforeGCFreeMemory
+ " total: " + beforeGCTotalMemory + " used: " + beforeGCUsedMemory);
System.out.println(" start Free: " + startFreeMemory + " total: " + startTotalMemory + " used: " + startUsedMemory);System.out.println(" end Free: " + endFreeMemory
+ "total: " + endTotalMemory + " used: " + endUsedMemory);
System.out.println("Apparent # of bytes per reference: " + ((endUsedMemory - startUsedMemory) / 10000000.0));
}
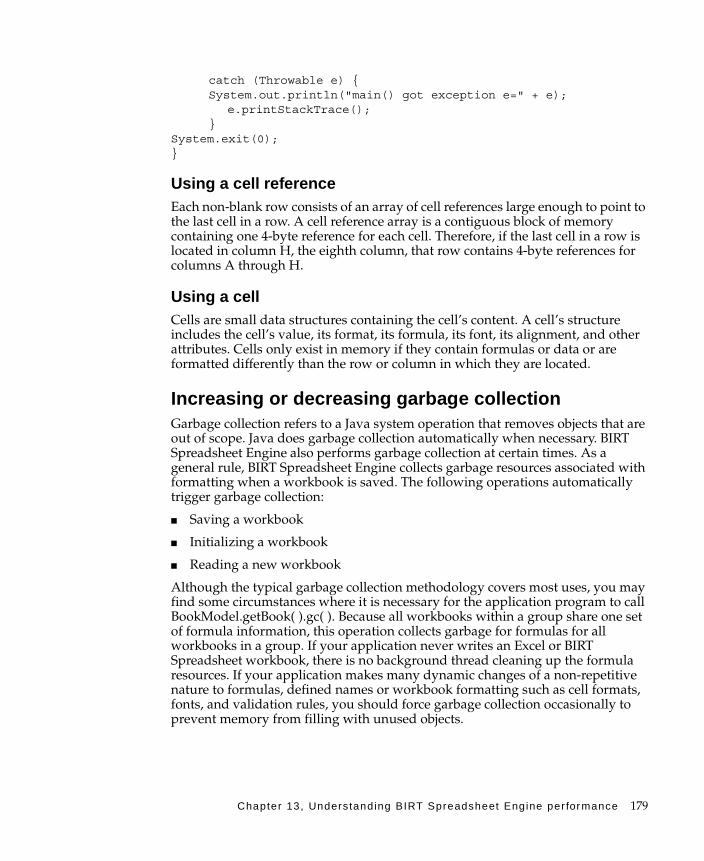
Chapter 13, Understanding BIRT Spreadsheet Engine per formance 179
catch (Throwable e) {System.out.println("main() got exception e=" + e);
e.printStackTrace();}
System.exit(0);}
Using a cell referenceEach non-blank row consists of an array of cell references large enough to point to the last cell in a row. A cell reference array is a contiguous block of memory containing one 4-byte reference for each cell. Therefore, if the last cell in a row is located in column H, the eighth column, that row contains 4-byte references for columns A through H.
Using a cellCells are small data structures containing the cell’s content. A cell’s structure includes the cell’s value, its format, its formula, its font, its alignment, and other attributes. Cells only exist in memory if they contain formulas or data or are formatted differently than the row or column in which they are located.
Increasing or decreasing garbage collectionGarbage collection refers to a Java system operation that removes objects that are out of scope. Java does garbage collection automatically when necessary. BIRT Spreadsheet Engine also performs garbage collection at certain times. As a general rule, BIRT Spreadsheet Engine collects garbage resources associated with formatting when a workbook is saved. The following operations automatically trigger garbage collection:
■ Saving a workbook
■ Initializing a workbook
■ Reading a new workbook
Although the typical garbage collection methodology covers most uses, you may find some circumstances where it is necessary for the application program to call BookModel.getBook( ).gc( ). Because all workbooks within a group share one set of formula information, this operation collects garbage for formulas for all workbooks in a group. If your application never writes an Excel or BIRT Spreadsheet workbook, there is no background thread cleaning up the formula resources. If your application makes many dynamic changes of a non-repetitive nature to formulas, defined names or workbook formatting such as cell formats, fonts, and validation rules, you should force garbage collection occasionally to prevent memory from filling with unused objects.

180 U s i n g B I R T S p r e a d s h e e t E n g i n e a n d A P I
The following statement collects formatting and formula garbage:
boolean collectFormats = true;boolean collectFormulas = true;bm_book.getBook().gc(collectFormats, collectFormulas);
Understanding recalculationTo automatically recalculate a worksheet, pass true to BookModel.setAutoRecalc( ). Use BookModel.recalc( ) to perform a one-time recalculation. Use BookModel.forceRecalc( ) to mark for recalculation all cells containing formulas. You can use iteration, or repeated calculation, to solve circular references.
How to use iteration
1 Pass true to the BookModel.setIterationEnabled( ) method.
2 Set the maximum number of iterations using BookModel.setIterationMax( ).
3 Set the maximum amount of difference between successive iterations with BookModel.setIterationMaxChange( ).
BIRT Spreadsheet Engine recalculates until it iterates the number of times specified by the setIterationMax( ) method or until all cells change by less than the amount specified in the setIterationMaxChange( ) method. The following example sets the number of iterations to 500 and the maximum difference between successive iterations to .001:
bm_book.setIterationEnabled(true);bm_book.setIterationMax(500);bm_book.setIterationMaxChange(.001);
Maintaining speed when reading in dataWhen using getEntry( ) to retrieve a value from a cell, BIRT Spreadsheet Engine analyzes the content of the cell before returning a string containing the cell content. If the cell contains a formula, for example, the returned string has a preceding equal sign (=).
The analysis of cell content takes time and if you know that a cell contains text or a number or a formula, it is more efficient to use getText( ) or getFormula( ) or getNumber( ) instead of getEntry( ).

Chapter 14, In tegrat ing BIRT Spreadsheet Engine with Java appl icat ions 181
C h a p t e r
14Chapter 14Integrating BIRT
Spreadsheet Engine withJava applications
This chapter contains the following topics:
■ About BIRT Spreadsheet Engine and J2SE
■ Writing an application class that extends JFrame
■ Accessing the BIRT Spreadsheet API using JavaScript
■ Using an add-in function

182 U s i n g B I R T S p r e a d s h e e t E n g i n e a n d A P I
About BIRT Spreadsheet Engine and J2SEThe Actuate BIRT Spreadsheet Engine class library gives you spreadsheet functionality in a Java application or applet. This chapter describes how to:
■ Write a Java Swing application that is also an applet.
■ Access the BIRT Spreadsheet API using JavaScript.
■ Deploy the license file in each deployment environment.
All of the example programs in this chapter use the BIRT Spreadsheet API. For more information about the BIRT Spreadsheet API, see the Javadoc.
Writing an application class that extends JFrameIf you do not want your Actuate BIRT Spreadsheet Engine application to double as an applet, you can write the application class to extend the Java Swing class JFrame. In the HelloWorldApp2 example that follows, the main( ) method instantiates an object of the application class and set its visible property to true. The constructor prepares itself by performing standard Java Swing tasks, including:
■ Setting the layout method of the content pane
■ Setting the frame’s size and title
■ Creating a WindowAdapter object and passing it to the addWindowListener( ) method
The HelloWorldApp2 class constructor then does a few operations specific to the BIRT Spreadsheet API, including:
■ Instantiating a JBook object
■ Adding the JBook object to the frame’s content pane
■ Creating a BookModel object from the JBook object
■ Passing the BookModel object to the doSpreadsheetTasks( ) method that does all the spreadsheet-related tasks
import com.f1j.swing.engine.ss.*;import java.awt.*;import javax.swing.*;import java.awt.event.*;import com.f1j.ss.*;
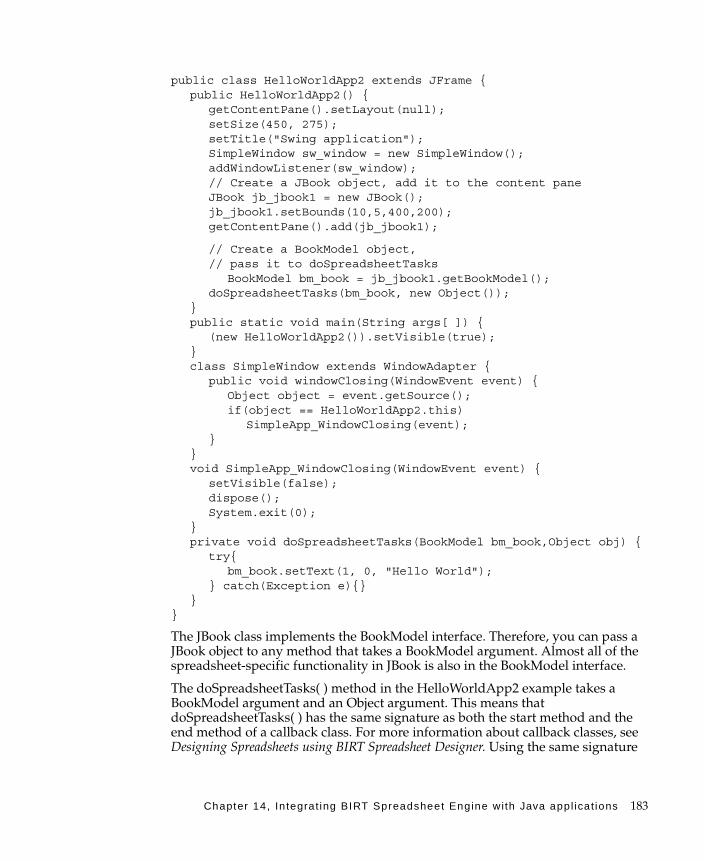
Chapter 14, In tegrat ing BIRT Spreadsheet Engine with Java appl icat ions 183
public class HelloWorldApp2 extends JFrame {public HelloWorldApp2() {
getContentPane().setLayout(null);setSize(450, 275);setTitle("Swing application");SimpleWindow sw_window = new SimpleWindow();addWindowListener(sw_window);// Create a JBook object, add it to the content paneJBook jb_jbook1 = new JBook();jb_jbook1.setBounds(10,5,400,200);getContentPane().add(jb_jbook1);
// Create a BookModel object, // pass it to doSpreadsheetTasks
BookModel bm_book = jb_jbook1.getBookModel();doSpreadsheetTasks(bm_book, new Object());
}public static void main(String args[ ]) {
(new HelloWorldApp2()).setVisible(true);}class SimpleWindow extends WindowAdapter {
public void windowClosing(WindowEvent event) {Object object = event.getSource();if(object == HelloWorldApp2.this)
SimpleApp_WindowClosing(event);}
}void SimpleApp_WindowClosing(WindowEvent event) {
setVisible(false);dispose();System.exit(0);
}private void doSpreadsheetTasks(BookModel bm_book,Object obj) {
try{bm_book.setText(1, 0, "Hello World");
} catch(Exception e){}}
}
The JBook class implements the BookModel interface. Therefore, you can pass a JBook object to any method that takes a BookModel argument. Almost all of the spreadsheet-specific functionality in JBook is also in the BookModel interface.
The doSpreadsheetTasks( ) method in the HelloWorldApp2 example takes a BookModel argument and an Object argument. This means that doSpreadsheetTasks( ) has the same signature as both the start method and the end method of a callback class. For more information about callback classes, see Designing Spreadsheets using BIRT Spreadsheet Designer. Using the same signature

184 U s i n g B I R T S p r e a d s h e e t E n g i n e a n d A P I
for doSpreadsheetTasks( ) as the signatures of the start( ) and end( ) methods of a callback class is useful for the following two reasons:
■ You can easily reuse your doSpreadsheetTasks( ) code in a callback class.
■ There are numerous examples of callback class code that apply equally well to applications and applets.
When you compile and run the HelloWorldApp2 application, a window appears, similar to the one in Figure 14-1.
Figure 14-1 HelloWorldApp2 example application
Accessing the BIRT Spreadsheet API using JavaScriptYou can access the BIRT Spreadsheet API using JavaScript. The JBookApplet class has a method, getJBookEx( ), that returns a JBook object. You can access the JBook object in a JavaScript script using code similar to the following line:
d_document.japp.getJBookEx()
In this snippet, japp is the name of the JBookApplet object, as assigned in the NAME attribute of the APPLET element. In the following example, the function startMe( ) runs every time the web page loads:
<HTML><HEAD>
<TITLE> Live Worksheet Page </TITLE><SCRIPT>
function startMe() {document.japp.getJBookEx().messageBox("Just pressOK","Testing Message Box", 1);
}</SCRIPT>
</HEAD><BODY onload="startMe()">
<APPLET CODE="com.f1j.swing.engine.ss.JBookApplet" ARCHIVE="essd11.jar, derby.jar, license/" NAME="japp" WIDTH=500 HEIGHT=500>
<PARAM name="Workbook" value="myWorkbook.xls"></APPLET>
</BODY></HTML>

Chapter 14, In tegrat ing BIRT Spreadsheet Engine with Java appl icat ions 185
The JavaScript function startMe( ) in the previous example contains the following line of code that gets a JBook object and calls its messageBox( ) method:
d_document.japp.getJBookEx().messageBox("Just press OK", "Message Box", 1);
When you open this HTML file in a browser, it displays a message box containing the message, “Just press OK”. You can access the entire BIRT Spreadsheet API in this way.
You can use this technique with any applet, including those you write yourself, as long as you include a method in your applet to return the JBook object. The following is a modification of the HelloWorld applet that includes a method to return the JBook object:
import java.awt.*;import com.f1j.swing.engine.ss.*;
public class HelloWorld2 extends javax.swing.JApplet {JBook jb_jbook1 = new JBook();public void init() {
getContentPane().setLayout(null);setSize(500, 500);jb_jbook1.setSize(500, 500);getContentPane().add(jb_jbook1);try {
jb_jbook1.setText(1, 0, "Hello World");}catch (com.f1j.util.F1Exception e) { }setVisible(true);
}public JBook getJBook() {
return jb_jbook1;}
}
The following HTML code uses the added getJBook( ) method to access the BIRT Spreadsheet API and display a message box:
<HTML><HEAD>
<TITLE> Live Worksheet Page </TITLE><SCRIPT>
function startMe() {document.MyApplet.getJBook().messageBox("Just press OK","Message Box",1);
}</SCRIPT>
</HEAD>

186 U s i n g B I R T S p r e a d s h e e t E n g i n e a n d A P I
<BODY onload="startMe()"><APPLET CODE="HelloWorld2.class" ARCHIVE="essd11.jar,
derby.jar, license/"NAME="MyApplet" WIDTH=500 HEIGHT=500>
<PARAM name="Workbook" value="401k.xls"></APPLET>
</BODY></HTML>
When you open this HTML file in a browser, a web page appears, similar to the one in Figure 14-2.
Figure 14-2 Web page containing HelloWorld2 applet
Using an add-in functionAn add-in function creates a spreadsheet function, like SUM( ), that you can reference in the spreadsheet with an equals sign followed by the function definition, like =myFunction( ). An add-in function is supported for Actuate file formats, .sod and .soi, and in BookModel instances. Add-in functions are not supported in Excel. Loading an add-in function in Excel displays #FORMULA instead of the resulting calculated value.
To implement an add-in function in BIRT Spreadsheet Engine, create a class that extends com.f1j.addin.Func. The new class must:
■ Extend the com.f1j.addin.Func class.
■ Have the same case-sensitive name as the add-in function that the application uses to call it.
■ Support only one instance of itself. To do this, the class must:
■ Have a private constructor.The constructor calls the superclass constructor and passes the name of the add-in function and the function’s minimum and maximum number of parameter, as in the following snippet:

Chapter 14, In tegrat ing BIRT Spreadsheet Engine with Java appl icat ions 187
private MyConcat() {super("MyConcat", 1, 30);
}
■ Contain a static initializer such as:
static {new MyConcat();
}
■ Override the evaluate( ) method of com.f1j.addin.Func. The evaluate( ) method provides the functionality of the add-in. Use the synchronized modifier with the evaluate( ) method to provide thread safety, as in the following snippet:
public synchronized void evaluate(com.f1j.addin.FuncContext fc_context)
■ Be in the application’s class path.
■ Have essd11.jar, derby.jar, and the license file, eselicense.xml, in the application’s class path.
Understanding the FuncContext objectThe evaluate( ) method contains a FuncContext parameter, which provides access to the parameter values that the application passes to the add-in function. The FuncContext object has the following methods that the add-in can use to get the parameters:
■ getArgumentCount( ) returns the number of parameters that the application passes to the add-in function.
■ getArgument( ) takes a parameter number argument and returns the specified parameter as a com.f1j.addin.Value object. For more information on the Value object, see “Understanding the Value object,” later in this chapter.
■ setReturnValue( ) comes in five varieties, each variety having a parameter of a a different type. The five parameter types are:
■ Boolean
■ Double
■ Short
■ String
■ StringBuffer

188 U s i n g B I R T S p r e a d s h e e t E n g i n e a n d A P I
Understanding the Value objectThe Value object contains methods to evaluate and extract the value of a parameter that the application passes to the add-in function. The Value object contains the following kinds of methods:
■ Methods to check the type of the parameter, including:
■ checkLogical( ), which checks whether the value is a Boolean
■ checkText( ), which checks whether the value is a text string
■ checkNumber( ), which checks whether the value is numeric
All the preceding methods check for their specific type and attempt to convert the value to the specified type if it is not. All the preceding methods return false if the value is not and cannot be converted to the specified type.
■ Methods to check the type of the value without attempting to convert it if it is not. These methods include:
■ isArea( ) tests if the value is a cell range.
■ isCell( ) tests if the value is a single cell reference.
■ isEmpty( ) tests if the parameter is empty.
■ isLogical( ) tests if the value is a Boolean values.
■ isNumber( ) tests if the value is a number.
■ isText( ) tests if the value is a text string.
■ isTrue( ) tests if the value is a Boolean true.
■ Methods to get the parameter value. These methods include:
■ getCol1( ) gets the column of the beginning of a range if the value is a cell range.
■ getCol2( ) gets the column of the end of a range if the value is a cell range.
■ getRow1( ) gets the row of the beginning of a range if the value is a cell range.
■ getRow2( ) gets the row of the end of a range if the value is a cell range.
■ getColCount( ) gets the number of columns in the range if the value is a cell range.
■ getSheet( ) gets the sheet for a cell range.
■ getText( ) gets the value as a text string.
■ getText(StringBuffer ) gets the value in a string buffer.

Chapter 14, In tegrat ing BIRT Spreadsheet Engine with Java appl icat ions 189
About an example of an add-in functionThe following example demonstrates an add-in function that concatenates text:
public class MyConcat extends com.f1j.addin.Func {// The following variable is sharedStringBuffer sb_accum = new StringBuffer();
static { //static initializernew MyConcat();
}
private MyConcat() { // private constructorsuper("MyConcat", 1, 30); // Specify 1-30 arguments
}
public synchronized void evaluate(com.f1j.addin.FuncContext fc) {sb_accum.setLength(0);int argCount = fc.getArgumentCount();for (int ii=0; ii < argCount; ii++) {
com.f1j.addin.Value v_val = fc.getArgument(ii);if (v_val.checkText()) {
m_accum.append(v_val.getText());}else {
fc.setReturnValue(v_val.eValueInvalidValue);return;
}}fc.setReturnValue(sb_accum.toString());
}}
Making add-in functions determinantFunctions in BIRT Spreadsheet are either determinant or non-determinant. A determinant function, such as ABS(n), consistently returns the same value for a given parameter. BIRT Spreadsheet only recalculates a determinant function if the method has a parameter value that BIRT Spreadsheet has not encountered before. A non-determinant function, such as RAND( ), returns a value that varies with every execution. BIRT Spreadsheet always recalculates the return value for a non-determinant method.
Although BIRT Spreadsheet add-in functions are non-determinant by default, you can change this default behavior by calling the setDeterminant( ) method of the com.f1j.addin.Func object. After calling this method, the add-in function becomes determinant. Calling the setDeterminant( ) method can make a significant improvement in recalculation performance.

190 U s i n g B I R T S p r e a d s h e e t E n g i n e a n d A P I

Chapter 15, In tegrat ing BIRT Spreadsheet Engine wi th serv lets and JSPs 191
C h a p t e r
15Chapter 15Integrating BIRT
Spreadsheet Engine withservlets and JSPs
This chapter contains the following topics:
■ About BIRT Spreadsheet Engine and J2EE
■ Using BIRT Spreadsheet Engine within a Java servlet
■ Using sample servlets

192 U s i n g B I R T S p r e a d s h e e t E n g i n e a n d A P I
About BIRT Spreadsheet Engine and J2EEBy integrating BIRT Spreadsheet Engine with a Java 2 Enterprise Edition (J2EE) web application, you can leverage the power of the BIRT Spreadsheet API to distribute an interactive, database-driven spreadsheet report over the web.
A large part of the popularity of J2EE is due to the separation of roles and responsibilities between the Java programmer, who writes the servlets that access the database, and the report designers, who write the JSPs. By integrating BIRT Spreadsheet Engine with J2EE, you extend the separation of roles and responsibilities to include the specialists who design and program the spreadsheets. This relieves the Java programmer of the responsibility of having to learn about the esoteric sciences and mathematical models in which your spreadsheet experts specialize. This further separation of responsibilities speeds the development of the web application and greatly increases its accuracy.
Using BIRT Spreadsheet Engine within a Java servletThis section provides common coding techniques for writing servlets that use BIRT Spreadsheet Engine. This section also provides examples of ways to display spreadsheet data and how to get data from external data sources.
Compiling and deploying a Java servlet that uses the BIRT Spreadsheet APIWhen you compile a servlet that uses the BIRT Spreadsheet API, essd11.jar, and the license file, eselicense.xml, must be in the Java classpath. When you deploy the servlet to the application server, all these files must be accessible to the servlet. How your application references the JAR files and where they must reside depends on your application server.
Setting the MIME typeAnytime a servlet sends anything but text to the browser, you must specify the type of information the servlet is sending. You specify the type of information by specifying a Multipurpose Internet Mail Extensions (MIME) type. A servlet sending a spreadsheet, for example, can send it in many different formats, including in Excel, XML, or image format. For each different format, you must set a different MIME type.
You set the MIME type by calling the setContentType( ) method of the servlet response object. For example, to send the browser an Excel file, you set the MIME type with a statement like the following:
response.setContentType("application/vnd.ms-excel");
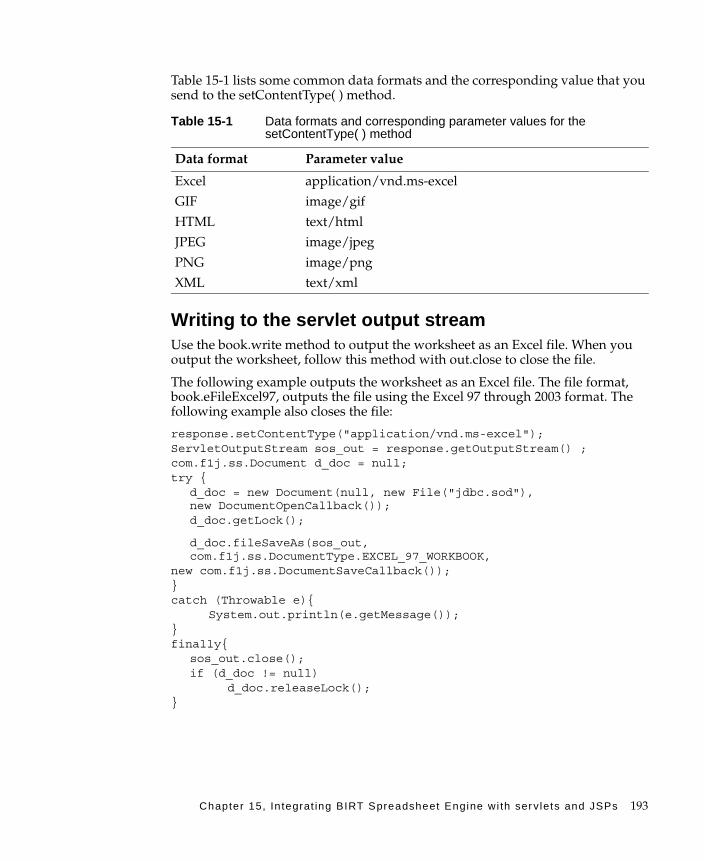
Chapter 15, In tegrat ing BIRT Spreadsheet Engine wi th serv lets and JSPs 193
Table 15-1 lists some common data formats and the corresponding value that you send to the setContentType( ) method.
Writing to the servlet output streamUse the book.write method to output the worksheet as an Excel file. When you output the worksheet, follow this method with out.close to close the file.
The following example outputs the worksheet as an Excel file. The file format, book.eFileExcel97, outputs the file using the Excel 97 through 2003 format. The following example also closes the file:
response.setContentType("application/vnd.ms-excel");ServletOutputStream sos_out = response.getOutputStream() ;com.f1j.ss.Document d_doc = null; try {
d_doc = new Document(null, new File("jdbc.sod"), new DocumentOpenCallback());d_doc.getLock();
d_doc.fileSaveAs(sos_out, com.f1j.ss.DocumentType.EXCEL_97_WORKBOOK,
new com.f1j.ss.DocumentSaveCallback()); }catch (Throwable e){
System.out.println(e.getMessage());}finally{
sos_out.close();if (d_doc != null)
d_doc.releaseLock();}
Table 15-1 Data formats and corresponding parameter values for the setContentType( ) method
Data format Parameter value
Excel application/vnd.ms-excel
GIF image/gif
HTML text/html
JPEG image/jpeg
PNG image/png
XML text/xml

194 U s i n g B I R T S p r e a d s h e e t E n g i n e a n d A P I
Getting dataYou can use the BIRT Spreadsheet API to get information from a variety of data sources. You can extract data from a database, text file, connection pool, or Java object.
The quickest way to get data from a database or external file is to create the connection to the data in BIRT Spreadsheet Designer. You can create a worksheet to establish a connection, get data in the worksheet, and then read the worksheet in your servlet.
You can base the information in the report design on a parameter so that the database information can be dynamically gathered. For more information about using parameters in a servlet, see “Passing parameters,” later in this chapter.
Using sample servletsThe following section contains sample servlets that you can modify and include in your servlets. The actions performed by these sample servlets include:
■ Sending an Excel file to the browser
■ Displaying a chart as an image
■ Creating HTML output
■ Passing parameters
Sending an Excel file to the browserThe following example, ExcelHelloWorldServlet, creates a new workbook and sends it to the browser as an Excel file. This example is written as a multi-threaded servlet. For more information about multi-threaded servlets, see “Managing multithreading issues” in Chapter 2, “Working with workbooks and worksheets.”
import java.io.File;import javax.servlet.ServletException;import javax.servlet.ServletOutputStream;import javax.servlet.http.HttpServlet;import javax.servlet.http.HttpServletResponse;import javax.servlet.http.HttpServletRequest;import com.f1j.ss.Document;import com.f1j.ss.DocumentOpenCallback;import com.f1j.ss.DocumentSaveCallback;import com.f1j.ss.DocumentType;
public class ExcelHelloWorldServlet extends HttpServlet {

Chapter 15, In tegrat ing BIRT Spreadsheet Engine wi th serv lets and JSPs 195
private static final long serialVersionUID = 1L;
public void doGet(HttpServletRequest request, HttpServletResponse response) throws ServletException, java.io.IOException {
/********************************************************** Tell the browser we are sending an Excel file*********************************************************/
response.setContentType("application/vnd.ms-excel");ServletOutputStream out = response.getOutputStream();Document doc = null;try {
/********************************************************** Populate the document from a spreadsheet report design*********************************************************/
File templateFile = new File("c:\\template.sod");doc = new Document(null, templateFile,
new DocumentOpenCallback());doc.getLock();
/********************************************************* Output the document to the output stream********************************************************/
doc.fileSaveAs(out, DocumentType.EXCEL_97_REPORT_VIEW, new DocumentSaveCallback());
}catch (Throwable e) {
System.out.println(e.getMessage());}finally {
/********************************************************* Unlock the document so other threads can access it********************************************************/
out.close();if (doc != null) doc.releaseLock();
}}
}
Displaying a chart as an imageIn a Java servlet, you can output a chart from an Excel file or BIRT Spreadsheet Designer file to the browser as a GIF, JPG, or PNG image. This type of output allows you to present a chart in the browser. The following example servlet outputs a chart from a spreadsheet as a GIF image.
The example worksheet on which this example is based, graph_11.sod, contains a chart and data from an external database. In the servlet, when you refresh the data, the chart dynamically changes on the worksheet as well as in the output.

196 U s i n g B I R T S p r e a d s h e e t E n g i n e a n d A P I
The key tasks for writing the chart as an image include:
■ Informing the browser that the MIME type is GIF
■ Getting the chart object from the worksheet
■ Instantiating the ChartImageEncoder
■ Creating the chart image
■ Writing the GIF image to the browser
The following example servlet shows how to output a chart as a GIF image in the browser. Modify the worksheet name in this servlet to a specific worksheet name to output a chart from a specific file to a GIF image in the browser.
import javax.servlet.*;import javax.servlet.http.*;import java.io.File;import com.f1j.drawing.Shape;import com.f1j.ss.Document;import com.f1j.ss.DocumentOpenCallback;import com.f1j.swing.engine.ss.ChartImageEncoder;import com.f1j.swing.engine.ss.JBook;import com.f1j.ss.FcChart;
class ChartAsGIFServlet extends HttpServlet {private static final long serialVersionUID = 1L;public void doGet(HttpServletRequest request,
HttpServletResponse response) throws ServletException,java.io.IOException {
// Inform the browser that the MIME type is GIFresponse.setContentType("image/gif");javax.servlet.ServletOutputStream out =
response.getOutputStream();Document d_doc = null;JBook jb_book = null;try {
d_doc = new Document(null, new File("graph_11.sod"), new DocumentOpenCallback());
jb_book = new JBook(doc);jb_book.getLock();jb_book.recalc();
// Assuming the chart object is the first shapeShape firstShape = jb_book.getDrawing().getShape(0);
// Instantiate the ChartImageEncoder and encode the chartChartImageEncoder cie_img = new ChartImageEncoder();cie_img.encode(jb_book, (FcChart) firstShape);

Chapter 15, In tegrat ing BIRT Spreadsheet Engine wi th serv lets and JSPs 197
// Write the chart as a GIF Image to the browsercie_img.writeImage(out, "GIF");out.close();
}catch (Exception e){
System.out.println(e);e.printStackTrace();
}finally{
if (jbook != null) {jb_book.releaseLock();jb_book.destroy();
}if (d_doc != null) d_doc.release();
}}
}
After you run this servlet, a GIF image appears, similar to the one in Figure 15-1.
Figure 15-1 Example of outputting a chart as a GIF

198 U s i n g B I R T S p r e a d s h e e t E n g i n e a n d A P I
Creating HTML outputYou can write an entire worksheet or a selected area of the worksheet as an HTML table in the browser. You can also save most of the formatting attributes of a worksheet when you write the worksheet to HTML.
The key tasks for creating output as HTML include:
■ Informing the browser that the MIME type is HTML
■ Creating an HTML writer
■ Outputting the data as HTML in the browser
The following example servlet shows how to create HTML output from a spreadsheet in the browser:
import java.io.*; import javax.servlet.*; import javax.servlet.http.*; import com.f1j.ss.*;
public class SheetAsHTMLServlet extends HttpServlet {
private static final long serialVersionUID = 1L;
public void doGet(HttpServletRequest request, HttpServletResponse response) throws
ServletException, IOException {// Inform the browser that the MIME type is HTML
response.setContentType("text/html"); OutputStreamWriter osw_out =
new OutputStreamWriter(response.getOutputStream());Document d_doc = null;
try{d_doc = new Document(null,
getServletContext().getResourceAsStream("/WEB-INF/templates/jdbc_11.sod"), new DocumentOpenCallback());
d_doc.getLock();d_doc.getBook().recalc();
// Create an HTML writer and output to browser as HTML HTMLWriter hw_Writer = new com.f1j.ss.HTMLWriter(); hw_Writer.write(d_doc.getBook(), 0, 0, 0, 0, 40, 20,
osw_out);}catch (Throwable e){
System.out.println(e.getMessage());}

Chapter 15, In tegrat ing BIRT Spreadsheet Engine wi th serv lets and JSPs 199
finally{osw_out.close();if (d_doc != null) d_doc.releaseLock();
}}
}
The resulting HTML output looks like Figure 15-2.
Figure 15-2 Example of creating HTML output from a spreadsheet
Passing parametersThe following example sends a custom Excel file to the browser. The content of the file is based on a parameter passed into the servlet. You can pass a parameter to a servlet from a JSP page, an HTML form, or as part of a URL.
The key tasks for passing a parameter include:
■ Passing the region parameter provided by the user
■ Setting the parameter value
■ Forcing a recalculation
■ Refreshing the data source
■ Outputting the new Excel file to the browser
The following example shows how to pass parameters to a servlet:
import java.io.*;import javax.servlet.*;import javax.servlet.http.*;import com.f1j.ss.*;import com.f1j.data.source.JDBC;import com.f1j.data.DataQueryCollection;
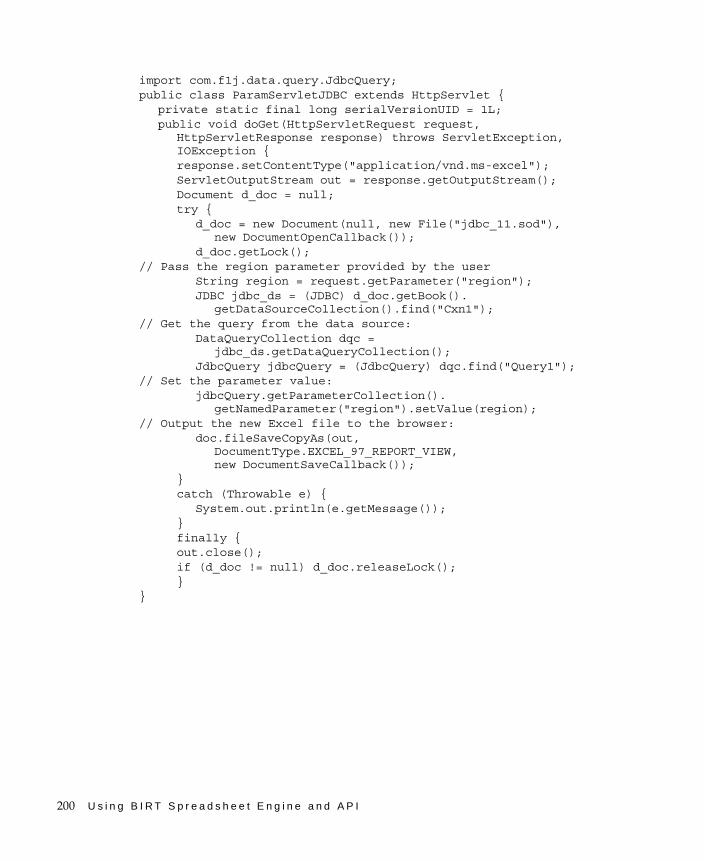
200 U s i n g B I R T S p r e a d s h e e t E n g i n e a n d A P I
import com.f1j.data.query.JdbcQuery;public class ParamServletJDBC extends HttpServlet {
private static final long serialVersionUID = 1L;public void doGet(HttpServletRequest request,
HttpServletResponse response) throws ServletException, IOException {response.setContentType("application/vnd.ms-excel");ServletOutputStream out = response.getOutputStream();Document d_doc = null;try {
d_doc = new Document(null, new File("jdbc_11.sod"), new DocumentOpenCallback());
d_doc.getLock();// Pass the region parameter provided by the user
String region = request.getParameter("region");JDBC jdbc_ds = (JDBC) d_doc.getBook().
getDataSourceCollection().find("Cxn1");// Get the query from the data source:
DataQueryCollection dqc = jdbc_ds.getDataQueryCollection();
JdbcQuery jdbcQuery = (JdbcQuery) dqc.find("Query1");// Set the parameter value:
jdbcQuery.getParameterCollection().getNamedParameter("region").setValue(region);
// Output the new Excel file to the browser:doc.fileSaveCopyAs(out,
DocumentType.EXCEL_97_REPORT_VIEW, new DocumentSaveCallback());
}catch (Throwable e) {
System.out.println(e.getMessage());}finally {out.close();if (d_doc != null) d_doc.releaseLock();}
}

I n d e x 201
IndexSymbols; (semicolon) character 114" (double quotation mark) character 98( ) (parentheses) characters 103\ (backslash) character 80, 98\n character 41, 97& (ampersand) character 98, 146= (equal sign) character 93, 125$ (dollar sign) character 105, 106, 144
Numerics3-D charts 135–137
Aabsolute print areas 144absolute references 105, 106absolute URLs 99AbstractSection interface 87access restrictions 171accessing
API constants 11BIRT Spreadsheet Engine and API 184,
185charts 133data sources 4, 72, 78external data files 194external image files 137sample code 6sample databases 6sample programs 7sample servlets 194
actions. See eventsactive cell 45, 94, 96, 169active worksheet 27, 28, 30addCalcuatedField method 155addCalculatedItem method 153addChart method 130addField method 154addHyperlink method 98add-in functions 186–189addin package 7
addingcalculated fields 153, 155cells 42–44, 179chart sheets 134charts 130, 134column or row headings 39columns to worksheets 42conditional formats 122data ranges 84defined names 103graphical objects 10, 137, 138hyperlinks 98–99multiline data 97multiline headings 39, 41multiline print headers 147pivot ranges 47, 150rows to worksheets 42, 44summary fields 153worksheet tabs 34worksheets 27, 29
addKeyListener method 168addPicture method 137addSelectionChangedListener method 170addShape method 138align method 110AlignFormat interface 112, 121AlignFormat objects 110alignment 112, 146alignment codes (print) 146alignment-horizontal tag 67alignment-vertical tag 67ampersand (&) character 98, 146APIs. See application programming interfacesappending columns and rows 44APPLET tag 18, 184applets
developing 17, 182, 185displaying worksheets in 17, 19, 184integrating BIRT Spreadsheet Engine
with 6, 7loading Excel files for 20running 18, 19

202 U s i n g B I R T S p r e a d s h e e t E n g i n e a n d A P I
application programming interfaces (APIs)documentation for 6, 7
applicationsaccessing sample code for 6accessing sample programs for 7compiling 22creating 22creating stand-alone 20, 182deploying worksheets from 9developing 176, 182exporting spreadsheet reports and 4forcing garbage collection and 179instantiating workbook objects for 16integrating BIRT Spreadsheet Engine
with 6, 7pasting data from 102selecting worksheets and 28, 30shifting print output and 144
applyDataRange method 84, 85applyFieldGroupDef method 161area charts 130, 135Area class 153Area objects 153areas (defined) 48arrays
cell references and 179column and row references and 177, 178copying data and 95fixed-width text and 81images and 137preallocating 177sort keys and 106
arrowsExitEditMode parameter 167ascending sort order 106attach method 26authentication 82autoFreezePanes method 38automatic recalculation 180
Bbackground colors 111backslash (\) character 80, 98bar charts 131, 135BIRT iServer
deploying to 177BIRT Spreadsheet components 8
BIRT Spreadsheet Designerdeveloping with 7interface components for 8language support for 5release notes for 5
BIRT Spreadsheet Engineas calculation engine 4data structures for 177deploying 6developing with 4, 182embedding in J2EE projects 4implementing add-in functions for 186integrating with J2EE 192optimizing memory usage for 176release notes for 5running with Java servlets 192sample code for 6sample databases for 6sample programs for 7specifying default locale for 9, 56, 59testing installation of 18user access restrictions for 171
BIRT Spreadsheet Engine and APIaccessing 184, 185accessing constants for 11class files for 5, 8, 9, 10creating charts with 130documentation for 2, 6, 7event model for 164JavaScript and 184–186overview 3
BIRT Spreadsheet Engine files 5BIRT Spreadsheet reports. See spreadsheet
reportsBIRT SpreadsheetEngine
components of 2blank cells 68bold attribute 120, 147book object 27Book objects 59BookImpl objects 179bookmarks 99BookModel interface
implementing 14spreadsheet-specific functionality in 22,
183workbook operations and 15, 16

I n d e x 203
worksheet operations and 15, 28, 29–30BookModel objects 15, 22, 65, 183BookModelImpl objects 16border method 110BorderFormat objects 110borders 47, 127, 148browsers. See web browsersbubble charts 131BufferedOutputStream class 65ByteArrayOutputStream class 65
Ccache 82cache data source 82calculated fields (pivot ranges) 153, 155calculated items (pivot ranges) 153calculation engine 4, 22calculations 92, 155callback classes 15, 22, 183cancelEdit method 167CancelEditEvent class 164CancelEditListener class 164cancelling data entry 167carriage return characters 39, 80, 96, 146casting operations 73, 74, 80cell blocks. See range of cellscell coordinates 48, 104, 105, 169cell data types 105cell reference arrays 179cell references
adding to formulas 98adding to validation rules 97applying conditional formats and 125, 126creating defined names and 103, 105developing functionality for 10entering 98getting 48, 106merging cells and 47multiple workbooks and 25overview 179printing and 144, 145updating 176
cell shift constants 43CellFormat class 8, 10CellFormat objects 97, 110, 122CellRef class 10
cellsSee also range of cellsaccessing data in 105adding hyperlinks to 98–99adding to worksheets 42–44, 179applying fonts to 120, 121assigning defined names to 103changing orientation of data in 121clearing 48, 100copying 48, 96determining if locked 172displaying multiline data in 97editing data in 165, 167formatting 110, 122generating formatting tags for 67getting active 169getting content 168getting content of 92–94getting coordinates of 169getting formatting information for 10getting most recent entry in 166getting text in 31, 122hiding values in 113limiting number of characters in 173locking 46, 100, 113marking for recalculation 180merging 47, 68monitoring changes for 165, 171moving 45pasting data to 102preserving data in 167preserving formats for 166protecting 172referring to in different workbooks 25restricting changes to 46, 100, 171, 172restricting data entry in 172retrieving values from 180selecting 44, 45, 170, 172setting content of 94–99setting formatting information for 10setting text in 31setting validation rules for 97skipping empty 68specifying active 45unlocking 47
centering data 112centering text 146

204 U s i n g B I R T S p r e a d s h e e t E n g i n e a n d A P I
changes, monitoring 165, 171changing
data 4, 46, 58, 100data orientation 121defined names 103fonts 113, 120worksheets 30–31, 165, 179
character attributes. See font attributescharacter sets 57, 63character strings. See stringscharacter-delimited text files. See delimited
text filescharacters
cell references and 98conditional formatting and 125defined names and 103delimited text and 80formatting masks and 114heading cells and 39limiting entry of 173multiline text and 41print headers and 147printing special 146tab-delimited strings and 96
chart package 7chart sheets 134chart type constants 130ChartEvent class 164ChartGraphic objects 130ChartImageEncoder class 9charting API 7, 130–137ChartListener class 164ChartModel class 7ChartModel interface 10charts
accessing 133adding 130, 134associating with cell ranges 132–133changing cells associated with 133defining as three-dimensional 135–137encoding as images 9, 195labeling axes values in 134labeling data series in 134locating by name 133outputting to web browsers 195setting type 130, 134
ChartViewEvent class 164
ChartViewListener class 164checkLogical method 188checkNumber method 188checkText method 188child sections (data ranges) 87circular references 180class files 5, 8, 9, 10class library 5, 182classes
accessing constants for 11BIRT Spreadsheet Engine and API
reference for 14creating add-in functions for 186getting data source types and 73overview 8
CLASSPATH variable 18classpaths 6, 17, 22, 192clear parameter 167clearing
See also deletingcells 48, 100formats 86, 100print areas 145workbooks 25
clearRange method 48clearType parameter 100Clipboard 100, 102, 176clipping 96Close command 15close method 193closing spreadsheet files 193clustering (charts) 136code pages 57, 63code samples 6colHeader parameter 40collapsing outline levels 49collapsing worksheet elements 49color printers 145color-coding number values 115, 117colored frames 127colors
applying conditional formats and 122applying to fonts 121specifying cell 110
column areas (data ranges) 87column areas (pivot ranges) 153, 159column charts 131, 135

I n d e x 205
column fields (pivot ranges) 153, 154column headings
adding 39creating 40default behavior for 39entering multiline text in 41getting content of 40getting height of 40printing 148resetting to default 41selecting 40setting height 40turning on or off 42
column parameter 126column sections (data ranges) 87column separators 54, 80, 96column width parameter 36column widths 36–37, 81, 82columns
adding to data sections 88adding to worksheets 42, 177automatically sizing 37collapsing and expanding 49deleting data and 101displaying 35freezing 37–38getting last 38hiding 35inserting empty 176limiting number of visible 35marking end of 96preserving widths for 37referencing 39resizing 36–37, 176restricting access to 171returning from text files 80, 81, 96setting first 35setting outline levels for 49sorting by 106
combination charts 131, 134comparison operators 123compiler 80compiling 17, 22concatenation 98, 189concurrency 25condition types 123conditional formats 122–126
conditional formulas 123, 124, 125, 126ConditionalFormat class 123ConditionalFormat objects 122, 123conditions
defining 123formatting data and 122, 123, 126formatting numbers and 115testing 123
connection pools 194connections
accessing data sources and 4, 72, 74creating 194creating file data source 78–79, 81external data API for 7
constants 10Constants class 7Constants interfaces 10content parameter strings 94converting pixels to twips 168coordinates (graphical objects) 10copy and paste operations 100, 101, 102, 169copyDataFromArray method 96copying
data 95, 96, 101, 176formats 102formulas 102worksheet cells 48, 96
copyRange method 48, 96, 101, 176CR characters 39createDataRange method 84createFieldGroupDef method 159createParent method 87createShapeAnchor method 130, 137creating
add-in functions 186–189applications 22calculation engine 4chart sheets 134charts 130, 134conditional formats 122connections. See connectionsdata ranges 75, 84defined names 103Excel spreadsheets 23, 63HTML files 9, 65–67, 198hyperlinks 98–99multiline headings 39, 41

206 U s i n g B I R T S p r e a d s h e e t E n g i n e a n d A P I
creating (continued)multiline print headers 147output files 60, 61, 62pivot ranges 150queries 74, 75report design files 6row or column headings 40servlets 22validation rule 97workbooks 16, 59worksheets 9, 29, 59, 176XML files 67, 69
currency formats 115currency symbols 115, 118current date 146current time 146custom data sources 72customizing
formats 10, 117functions 7
cutting cell content 100See also clearing; deleting
Ddata
See also valuesalignment options for 112changing 4, 46, 58, 100changing orientation of 121copying 95, 96, 101, 176deleting 48, 99–101, 171displaying 75, 127formatting 110, 122getting previous values for 168getting recently entered 166grouping 49hiding 113importing 37loading from arrays 95loading from tab-delimited strings 96merging 47moving 176preserving 100refreshing 26, 76, 176restricting changes to 171, 172restricting entry of 97, 113, 172, 173
retrieving 54, 194saving 4sorting 47, 106–107validating 174
data areas (pivot ranges) 153data commands 88data fields (pivot ranges) 153, 154, 155, 156data handler properties 79data handler type 74data handlers 80, 81Data interface 10data package 7data range API 88data range definitions 85, 86data range objects 75data ranges 75, 84, 88
formatting 86importing data and 37preserving column widths for 37specifying 75
data rows. See rowsdata set cache 82data sets 84, 86data source classes 73data source objects 72, 73, 78data source type constants 73data sources
accessing 4, 72overview 72reading from input files and 54retrieving data from 194setting properties for 74, 78types supported 72
data structures 177, 179data type markers 127data types 105, 159, 166database drivers 74database management systems 72database names 74database property 79databases
accessing sample 6clearing formatting in 86developing for 9preserving formatting in 86retrieving data from 194types supported 4, 72

I n d e x 207
Databases directory 6DataMethods class 88–89DataOutputStream class 65DataQuery interface 74DataQuery objects 74DataQueryCollection objects 74DataRange interface 84DataRange objects 75, 84DataRangeCollection objects 75DataRangeDef interface 86DataRangeDef objects 85, 86DataRangeModel interface 84, 86DataRangeModel objects 84DataSource objects 78DataSourceCollection class 72DataSourceCollection objects 26, 73date formats 107, 119dates
adding to cells 107, 166adding to print headers 148displaying locale-specific 118entering in worksheets 119formatting 114, 119, 122grouping on 159, 160printing current 146sorting on 107
DBMS data sources 72debugging 127decimal points 115default column widths 37default data range location 87default data set 87default fonts 120default locale 9, 56, 59default settings 25defined name ranges 104, 105defined names
applying conditional formats and 125changing 103creating 103deleting 104getting cell coordinates for 104getting number of 103inserting cells and 43overview 103specifying cell coordinates in 105testing for 104
Delete key 171deleteDefinedName method 104deleteRange method 101deleting
See also clearingdata 48, 99–101, 171defined names 104formats 171objects 179range of cells 101worksheets 31
delimited text files 72, 78, 80delimited text separators 80, 96DelimitedText objects 80deploying
BIRT Spreadsheet Engine 6servlets 192spreadsheet reports 177, 192worksheets 9
depth ratio (charts) 136derby.jar 5descending sort order 106deselecting worksheets 28design files 54, 61Designer class 8, 9designer package 8detail groups 49, 50detail information 49determinant functions 189developers 4developing applets 17, 182, 185developing applications 176, 182developing servlets 192developing spreadsheet reports 3, 4dialog boxes 8, 9, 100, 142directory paths. See pathsdisplay options 127displaying
active cell 45columns 35data 75, 127formulas 105, 127grid lines 148heading cells 42Java applets 18locale-specific formats 118rows 35

208 U s i n g B I R T S p r e a d s h e e t E n g i n e a n d A P I
displaying (continued)worksheet names 34
Document class 55, 56, 60Document Object Model. See DOMdocumentation xi, 6documentation package 7DocumentOpenCallback class 56, 58, 59DocumentOpenCallback objects 58DocumentOpenCallback parameter 56DocumentSaveCallback class 62DocumentSaveOptions class 64DocumentType class 61DocumentType parameter 61dollar sign ($) character 105, 106, 144double quotation mark (") character 98doughnut charts 131drawing graphical objects 10driver property 74, 79duplicate names 103dynamic reports 2
EeArea constant 130, 135eAverage constant 156eBar constant 131, 135eBopPop constant 131eBubble constant 131eCellFormatting_Clear constant 86eCellFormatting_Manual constant 86eCellFormatting_Preserve constant 86eCellFormatting_ReplicateFirstRow
constant 86eClearAll constant 49, 100eClearAll parameter 171eClearContents constant 49eClearDlg constant 100eClearFormats constant 49, 100eClearValues constant 100eColumn constant 131, 135eColWidthUnitsNormal constant 36eColWidthUnitsTwips constant 36eCombination constant 131, 134eCopyAll constant 102eCopyFormats constant 102eCopyFormulas constant 102eCopyValues constant 102
eCount constant 156eCountNum constant 156eDays constant 160edit mode 165, 167, 174editClear method 100, 171editCopy method 169editCopyDown method 95, 176editCopyRight method 95, 176editCut method 100editDeleteSheets method 31editing events 165–168
See also changingeditInsert method 42editPaste method 169editPasteSpecial method 102eDoughnut constant 131eFixupAppend constant 44eFixupPrepend constant 43eHorizontalAlignmentCenter constant 112eHorizontalAlignmentGeneral constant 112eHorizontalAlignmentJustify constant 112eHorizontalAlignmentLeft constant 112eHorizontalAlignmentRight constant 112eHours constant 160elements. See tagseLine constant 132, 135e-mail 99eMax constant 156embedding
BIRT Spreadsheet Engine 4eMergeRangeNone constant 68eMergeRangeRows constant 68eMin constant 156eMinutes constant 160eMonths constant 160empty cells 68empty rows or columns 176endEdit method 166, 167, 173EndEditEvent class 164EndEditListener class 164end-of-column delimiter 96end-of-row delimiter 80, 96EndRecalcEvent class 164EndRecalcListener class 164engine. See BIRT Spreadsheet EngineEnter key 45eOperatorBetween constant 124

I n d e x 209
eOperatorEqual constant 124eOperatorGreaterThan constant 124eOperatorGreaterThanOrEqual constant 124eOperatorLessThan constant 124eOperatorLessThanOrEqual constant 124eOperatorNone constant 124eOperatorNotBetween constant 124eOperatorNotEqual constant 124eOrientationClockwise constant 121eOrientationCounterClockwise constant 121eOrientationNone constant 121eOrientationTopToBottom constant 121ePattern10Percent constant 111ePattern20Percent constant 111ePattern25Percent constant 111ePattern30Percent constant 111ePattern50Percent constant 111ePattern70Percent constant 111ePatternDarkDownwardDiagonal
constant 111ePatternDarkHorizontal constant 111ePatternDarkUpwardDiagonal constant 111ePatternDarkVertical constant 111ePatternLightDownwardDiagonal
constant 111ePatternLightHorizontal constant 111ePatternLightUpwardDiagonal constant 111ePatternLightVertical constant 111ePatternSmallCheckerboard constant 111ePatternSmallGrid constant 111ePatternTrellis constant 111ePie constant 132, 135eProduct constant 156equal sign (=) character 93, 125eQuarters constant 160error messages 114escape characters 80eScatter constant 132eSeconds constant 160eselicense.xml 6, 17, 18, 19, 22, 187, 192eSheetHidden constant 32eSheetShown constant 32eSheetVeryHidden constant 32eShiftColumns constant 43, 101eShiftHorizontal constant 43, 101eShiftRows constant 43, 101eShiftVertical constant 43, 101
eShowOn constant 51essd10.jar 5eStdDev constant 156eStdDevP constant 156eStep constant 132, 136eSum constant 156eTabsBottom constant 34eTabsOff constant 34eTabsTop constant 34eTypeCell constant 123eTypeEmpty constant 105eTypeError constant 105eTypeFormula constant 123eTypeLogical constant 105eTypeNone constant 123eTypeNumber constant 105eTypeText constant 105evaluate method 187eVar constant 157eVarP constant 157event listeners 164events 16, 164eVerticalAlignmentBottom constant 112eVerticalAlignmentCenter constant 112eVerticalAlignmentTop constant 112eVerticalJustify constant 112example programs 7Examples directory 6eXaxis constant 134Excel files 54, 61, 192Excel spreadsheet interface 4Excel spreadsheets
See also spreadsheet reports; worksheetscreating 23, 63developing for 4, 182generating output for 195limitations for 70pivot tables in 150reading as input data sources 54, 59sending to web browsers 194, 199setting as MIME type 192
ExcelHelloWorldServlet sample servlet 194exception class 8, 10exceptions 10, 27expanding outline levels 49expanding worksheet elements 49exponentiation 116

210 U s i n g B I R T S p r e a d s h e e t E n g i n e a n d A P I
exportingspreadsheet reports 4
expressions. See formulasextensible markup language. See XMLextensible stylesheet language
transformation. See XSLT files; XSLT style sheets
external data connection API 7external data sources 26, 72, 76, 194external image files 137external workbooks 98eYaxis constant 134eYears constant 160
FF1Exception class 8, 10f1j11swing.jar 7factory method 72, 73, 74, 75Field class 153Field objects 153, 154, 155FieldGroupDef objects 159fields
See also columnsadding calculated items to 153adding to pivot areas 153, 154adding to pivot ranges 153calculating values in 155grouping pivot 159–161setting initial or final values for 160setting properties for 157, 158
FieldSettings class 157FieldSettings objects 157File class 73file data sources 72, 73, 78
See also specific typefile names 20File source objects 80file type constants 61file types 3, 61fileExists method 62FileInputStream objects 68FileOutputStream objects 65filePrint method 141, 142, 144files
See also specific typecontrolling access to 64
generating output 60, 61, 62importing 3installing BIRT Spreadsheet Engine and 5linking to 99opening password-protected 58reading report design 23reading workbooks from 54saving window-specific information
for 70setting code pages for 57, 63
fileSave method 60fileSaveAs method 60, 65fileSaveCopyAs method 60fill method 110fill patterns 110, 111FillFormat interface 110FillFormat objects 110FilterOutputStream class 65filters 153find and replace operations 10finding active cell 169FindReplaceInfo class 10fit-to-page print option 143fixed-width text files 72, 78, 81
See also text filesFModifiedListener class 164focus 45font attributes 120, 147font codes (print) 146font method 110font names 120, 121font-bold tag 68font-color tag 68FontFormat interface 120FontFormat objects 110font-italic tag 68fonts
applying conditional formats and 122changing 113, 120heading cells and 41setting size 120, 121
font-size-twips tag 68footers. See print headers and footersforceRecalc method 180forcing garbage collection. 179foreground colors 110foreignFileFormatLosesData method 63

I n d e x 211
format masks 114, 119format specification constants 86format strings 114, 118, 125FormatCellsDlg class 8formatRCNr method 106formats
applying conditions to 122–126clearing 49, 86, 100copying 102creating pivot ranges and 157, 161customizing 10, 117deleting 171displaying locale-specific 118Excel limitations for 70exporting spreadsheet reports and 4garbage collection and 179, 180generating HTML files and 65, 66generating XML files and 67pasting into cells 102preserving 100, 166prompting users for 118reapplying 166retrieving data and 96returning locale-specific 118setting cell content and 94sorting data and 107specifying locales for 56
formatted cell references 106formatting
data 110, 122data ranges 86dates 114, 119, 122heading cells 39, 41locale-specific reports 118numbers 114, 115, 117, 157print headers and footers 146text 113, 120–122time values 116XML data 68
formatting attributes 198formatting codes (print) 146formatting examples 110formatting information 10, 100formatting mode 86formatting options 66, 114formatting symbols 116formatting tags 67
formatting templates 161formula parameter 125formula strings 68formulas
assigning defined names to 103attaching workbooks and 26clearing 49copying 102creating calculated fields and 155defining as condition type 123, 124, 125,
126display options for 127displaying as text 105displaying literal text in 98garbage collection and 179getting cell-specific 93getting results of 92grouping workbooks and 25heading cells and 39inserting cells and 43pasting into cells 102printing and 144, 145recalculating 180referencing column and rows in 39referencing external workbooks in 98
freeing resources 25freezePanes method 37freezing columns and rows 37–38Func class 7, 186FuncContext parameter 187function types 189functions
See also methodsadding summary fields and 156applying conditional formats and 125creating add-in 186–189customizing 7
Ggarbage collection 25, 177, 179–180gc method 179General numeric format 116generating
HTML files 9, 65–67, 198output files 60, 61, 62spreadsheet files 60

212 U s i n g B I R T S p r e a d s h e e t E n g i n e a n d A P I
generating (continued)XML files 67, 69
getActiveCell method 159getArea method 48, 153getAreaCount method 48getArgument method 187getArgumentCount method 187getCacheStream method 63getCellFormat method 42getCellText method 92getCol method 169, 172getCol1 method 188getCol2 method 188getColCount method 188getColText method 40getDataField method 156getDataHandler method 80, 81getDataQueryCollection method 74getDataRangeDef method 85, 86getDataSetCAcheDataSource method 82getDefinedName method 104getDefinedNameCount method 103getEditString method 166getEntry method 92, 93, 94, 168, 180getField method 154getFieldSettings method 157getFormattedText method 122getFormula method 94, 105, 180getHeaderHeight method 40getHeaderWidth method 40getItem method 154getJBook method 185getJBookEx method 184getLastCol method 38getLastColForRow method 38getLastDataCol method 39getLastDataColForRow method 39getLastDataRow method 38getLastRow method 38getLock method 27, 176, 177getModifyPassword method 59getNumber method 94, 180getOpenPassword method 58getPivotRangeModel method 150getPrintArea method 145getRow method 169, 172
getRow1 method 188getRow2 method 188getRowText method 41getScreenResolution method 169getSelectedRange method 48, 86, 159getSelection method 48getSheet method 27, 30, 34, 63, 188getSheetName method 27getSummary method 156getSummaryFieldSettings method 158getText method 92, 180, 188getTopLeftText method 41getType method 105getViewHandle method 63getX method 169getY method 169GIF files 195, 196Globally Unique Identifiers. See GUIDsgraph_10.sod 195graphical objects 10, 133, 137, 138
See also charts; imagesgraphical user interfaces. See user interfacesgray cells 39grid lines 148GRObjectPos class 10Group argument 56Group class 9, 56Group objects 59grouping
data 49data range sections 87pivot fields 159–161workbooks 25
grouping parameters 159groups 56, 59GUIDs 56, 63GUIs. See user interfaces
HHandler objects. See data handlersheaders. See print headers and footersheading cells
changing content of 39creating new lines for 41entering null values in 41formatting 39, 41

I n d e x 213
getting content of 40selecting 40, 42setting content of 40setting size of 40turning on or off 42
headings. See column headings; row headingsHelloWorld applet 17–19, 185HelloWorld servlet 194HelloWorldApp2 application 20, 22, 182help directory 6help files 6hidden areas (pivot ranges) 153hidden tag 67hidden workbooks 26hiding
columns 35data 113heading cells 42rows 35worksheets 31zero values 117
highlighted worksheet tabs 28highlighting values 122horizontal alignment 112horizontal scroll bars 51HTML code 18HTML files 6, 9, 65, 66, 185, 198HTML output 61HTML tables 9, 65, 67, 198HTMLWriter class 9, 66HyperlinkEvent class 164HyperlinkHelper.exe 5HyperlinkListener class 164hyperlinks 5, 98–99hypertext markup language. See HTML
IiAxisIndex parameter 134image files 137, 195image formats 192image maps 9images
See also graphical objectsaccessing external 137adding 137encoding charts as 9, 195
importingdata 37files 3
in-cell editing 167inCellEditFocus parameter 167index numbers
cell ranges and 48chart series and 134columns 35, 39rows 35, 39worksheet tabs 34worksheets 27, 29
index.html 6information objects 72initWorkbook method 25input files 54–59input streams 59, 73, 137InputStream class 73InputStream parameter 59insertAfter method 88insertBefore method 88insertRange method 42insertSheets method 29integers. See numbersinteractive reports 2interfaces
See also user interfacesBIRT Spreadsheet Engine and API
reference for 14exporting spreadsheet reports and 4
Internet Explorer. See web browsersio classes 65isArea method 188isCanEditPasteSpecial method 102isCell method 188isEmpty method 188isLocked method 172isLogical method 188isNumber method 188isText method 188isTrue method 188italic attribute 121, 147Item class 153Item objects 153iteration 153, 180iText.jar 5

214 U s i n g B I R T S p r e a d s h e e t E n g i n e a n d A P I
JJ2EE environments 4, 192J2SE environments 182.jar files 5, 17Java 2 Enterprise Edition. See J2EE
environmentsJava 2 Runtime Standard Edition. See J2SE
environmentsJava applets. See appletsJava applications 22, 102, 182
See also applicationsJava archive files. See .jar filesJava Database Connectivity. See JDBCJava Development Kit. See JDK softwareJava objects 194Java Runtime Environment. See JREJava servlets. See servletsJava Virtual Machines. See JVMsjavac utility 17Javadoc 2, 6, 7Javadoc directory 6JavaScript 184–186JavaServer Pages. See JSPsJBook class 8, 9, 10, 14JBook objects 16, 17, 22, 183, 184JBookApplet class 8, 19, 184JBookApplet objects 184JDBC class 73JDBC data sources
accessing 72, 73developing for 9
JDBC standard 72JFrame class 20, 182JNIMethods.dll 5JPG files 195JSPs
building 192integrating BIRT Spreadsheet Engine
with 7justifying data 112
KkAllowDeleteColumns constant 46kAllowDeleteRows constant 46kAllowEditObjects constant 46kAllowFormatCells constant 46
kAllowFormatColumns constant 46kAllowInsertColumns constant 46kAllowInsertHyperlinks constant 46kAllowInsertRows constant 46kAllowNone constant 46kAllowSelectLocked constant 46kAllowSelectUnlocked constant 46kAllowSort constant 46kAllowUseAutoFilter constant 46kAllowUsePivotRanges constant 46key presses 167, 168, 171keyboard events 168, 169keyboard presses 45keyboard shortcuts 169keyPressed method 168keyReleased method 168keys tag 67kFile constant 73kInputStream constant 73kJDBC constant 73
Llandscape mode (print) 142language support 5leftColumn parameter 38LF characters 39license file
eselicense.xml 6, 17, 18, 19, 22, 187, 192obtaining 2
line charts 132, 135line feed characters 39, 80, 96line patterns 111linking to files 99links. See hyperlinkslisteners. See event listenersliteral characters 80literal text 98loading
workbooks 20, 25worksheets 177
local directory 5, 6locales
additional documentation for 6developing spreadsheet reports for 5displaying dates for 119displaying formats specific to 118

I n d e x 215
setting code pages for 57setting formats specific to 118, 125, 126specifying 9, 56, 59
localization files 5, 6locating active cell 169locked tag 67locking
cells 46, 100, 113views 176, 177workbooks 25, 26, 176
Mmanual formatting 86Manuals directory 6margins 144memory 176menus 9merge-horizontal tag 68merge-vertical tag 68merging cells 47, 68message dialogs 100, 185messageBox method 185methods
See also functionsBIRT Spreadsheet Engine and API
reference for 14changing font characteristics and 120copying and moving data and 176creating output files and 60, 62creating pivot ranges and 150defining conditional formulas and 124,
125, 126formatting and 110, 123getting cell content and 92setting cell content and 94setting print options and 140sorting data and 107worksheet operations and 28, 29, 30worksheet references and 27, 29
MIME types 192, 193Model class 7model-view-controller package 7ModifiedEvent class 164modifying. See changingmouse events 168, 169moveRange method 176
movingcells 45data 176
Mozilla Firefox. See web browsersmultiline column or row headings 39, 41multiline data 97, 112multiline print headers 147multipurpose internet mail extensions. See
MIME typesmulti-threaded applications 26, 56, 194mvc package 7
N\n character 41, 97names
See also defined namescreating queries and 74displaying worksheet 34external workbooks and 98printing workbook or sheet 146
namingfonts 121summary fields 157worksheets 31
naming conventions (defined names) 103negative exponents 116new line characters 41new line constant 97non-contiguous cell ranges 45, 48non-determinant functions 189notifyGUID method 63null values 41number formats 10, 56, 94, 107, 118number method 110NumberFormat class 10, 157NumberFormat objects 110numbers
adding to cells 107, 166color-coding 115, 117displaying large 119displaying locale-specific 118formatting 114, 115, 117, 157formatting dates as 119getting 93grouping on 159setting initial and final values for 161

216 U s i n g B I R T S p r e a d s h e e t E n g i n e a n d A P I
numbers (continued)sorting on 107
numeric field groupings 161
OObjectEvent class 164ObjectListener class 164objects
deleting 179ODA data sources 72OLAP data sources 84online help files 6open data access connections 72opening
spreadsheet files 58workbooks 55, 56
operators 123optimizing memory 176orientation (data) 121orientation (print) 142orientation constants 121outline attribute 121outlines 49–50output
column widths and 37Excel limitations for 70frozen panes and 38getting unexpected print 144sending to web browsers 194, 198, 199worksheet headings and 39
output files 60–64output streams 63, 65, 69OutputStream class 65
Ppackages 7page areas (pivot ranges) 153page filters (pivot ranges) 153page items (pivot ranges) 153page numbers 146PageSetupDlg class 8Panel class 14panes (worksheets) 37paper size constants 10parameters
creating add-in functions and 187, 188
defining conditional formulas and 124, 125, 126
grouping pivot fields and 159opening workbooks and 56passing to servlets 199retrieving data with 194
parentheses ( ) characters 103parsing tab-delimited strings 96Password objects 58password property 74, 79password-protected files 58passwords
accessing data sources and 74, 79authenticating 82getting 58–59prompting for 58, 59reading input files and 58setting 64
paste operations 100, 101, 102, 169paths
file data source connections and 79, 81hyperlinks and 99Java servlets and 192
pattern constants 111pattern-fg tag 68patterns 110, 111PDF documentation 6percentages 115performance tuning 175period constants (dates) 160pictures. See imagespie charts 132, 135pivot area restrictions 153pivot package 150pivot range classes 150pivot ranges
adding 47associating with queries 152calculating values in 155creating 150defining characteristics of 151defining ranges in 159formatting data in 161formatting summary fields in 157getting areas for 153getting data fields for 155getting summary fields for 156, 158

I n d e x 217
grouping fields in 159–161overview 150retrieving field objects for 154setting initial or final values for 160setting options for 152, 153setting properties for 157, 158
pivot tables 150PivotRange objects 151, 155PivotRangeDef class 152PivotRangeModel class 150PivotRangeModel objects 150PivotRangeOptions objects 152, 153pixels 168PNG files 195points (font size) 120portrait mode (print) 142positional text. See delimited files; fixed-
width textPositionalText objects 81positive exponents 116prepending columns and rows 43preserving column widths 37preserving database formatting 86print areas 144–145Print dialog boxes 142print headers and footers 145, 146, 147, 148print jobs 142, 144, 148print options 140print orientation 142print scale 142–144print titles 145, 148Print_Area defined name 142, 144, 145printDialogBox parameter 142printers 145printing
border outlines 148column and row headings 148in black and white 145page numbers 146range of cells 141, 142, 144special characters 146specified number of pages 142, 143worksheets 37, 141, 142, 145
PrintJob objects 142printJob parameter 142programmers 4programming interfaces. See interfaces
programs 7properties
creating pivot ranges and 157, 158setting data source 74, 78
protecting worksheets 46, 100, 172protection flags 46protection method 110ProtectionFormat objects 110
Qqueries
associating with pivot ranges 152connecting to file data sources and 78, 80,
81creating 74, 75recalculating workbooks and 76retrieving data with 82supported connections for 4
query objects 74query strings 74
RRange argument 86Range class 63, 159Range objects 48, 86, 159range of cells
adding hyperlinks to 98–99applying fonts to 120, 121assigning defined names to 104, 105associating charts with 132–133automatically sizing columns for 37clearing 48, 100copying 48, 96cutting content of 100deleting 101determining number of empty cells in 69duplicating values for 95formatting 110getting 86getting areas from 48getting coordinates of 48getting references to 48inserting in worksheets 42locking 47merging 47, 68pasting data to 102

218 U s i n g B I R T S p r e a d s h e e t E n g i n e a n d A P I
range of cells (continued)printing 141, 142, 144reading from output files 63referencing 10, 47selecting 45setting validation rules for 97sorting data for 106writing to HTML files 65writing to XML files 67, 68
range of columns 35, 37, 49range of rows 35, 49range of values
adding 176associating with data sets 86copying 101See also pivot ranges; data ranges
RangeRef class 10readme.txt 5readObject method 65recalc method 180recalculation 180, 189reference classes 10references
See also cell referencescolumns or rows and 39, 178defined names as 103getting size of 178memory usage and 177preallocating 177queries and 74resolving circular 180workbooks and 56worksheets and 27, 29, 34
refresh method 26refreshes 26, 76, 176regenerating 76relational databases. See databasesrelative cell addresses 126relative paths 99relative print areas 144relative references 106relative URLs 99relative values 158Release Notes 5releaseLock method 27, 176, 177removing. See deletingrepainting. See refreshes
report design files 6, 20, 23, 61report script 88report script functions 88report template files. See report design filesreports. See spreadsheet reportsresizing
columns 36–37, 176rows 176
resources 25, 179restricting cell selection 172restricting user access 171RGB values 68rotating text 122row areas (data ranges) 87row areas (pivot ranges) 153, 159row coordinates 48row fields (pivot ranges) 153, 154row headings
adding 39creating 40default behavior for 39entering multiline text in 41getting content of 40getting width of 40printing 148resetting to default 41selecting 40, 42setting fonts for 41setting width 40turning on or off 42
row parameter 126row reference arrays 178row sections (data ranges) 87row separators 54rowHeader parameter 40rows
adding to data sections 88adding to worksheets 42, 44, 177collapsing and expanding 49deleting data and 101displaying 35freezing 37–38getting last 38grouping 50hiding 35inserting empty 176limiting number of visible 35

I n d e x 219
marking end of 80, 96referencing 39, 178replicating formatting in 86resizing 176selecting 45setting first 35setting outline levels for 49setting starting 80, 81sorting by 106
rules (validation) 97running applets 18, 19
Ssample code 6sample databases 6sample programs 7sample servlets 194SAP data sources 72saveAs method 64saveViewInfo method 70saving
cell ranges 63, 65, 68data 4formatting attributes 198window-specific information 70workbooks 60, 64, 65
sAxisType parameter 134scatter charts 132scientific notation 116, 119screen resolution 168scroll bars 51scrolling 38, 50Section interface 87selection events 170selection range 172selectionChanged method 170SelectionChangedEnt class 164SelectionChangedListener class 164semicolon (;) character 114send mail links 99separators 54, 80, 96, 115servlet sample files 6servlets
accessing sample 194accessing sample programs for 7adding charts to 9
compiling 192creating 22deploying 192developing 192generating output for 198instantiating workbook objects for 16integrating BIRT Spreadsheet Engine
with 7, 192outputting charts in 195passing parameters to 199setting MIME type for 192shared workbooks and 26
Servlets directory 6set method 74set3Dimensional method 135setAdjustColWidth method 37setAllowDelete method 171setAutoFormat method 161setAutoRecalc method 180setAxisTitle method 134setBackColor method 110setBold method 120setCanceled method 167setChartType method 134setClip method 96setClipValues method 96setClustered method 136setCodePage method 57, 63setColHidden method 35setColor method 121setColorAuto method 121setColOutlineLevel method 49setColSummaryBeforeDetail method 49, 50setColText method 40setColWidth method 36setColWidthAuto method 37setColWidthTwips method 36setColWidthUnits method 36setCommands method 87setContentType method 192setCustomFormat method 114, 115setCustomFormatLocal method 118setDataHandler method 80setDataSet method 87setDateType method 160setDefaultFont method 120setDefaultFontName method 120

220 U s i n g B I R T S p r e a d s h e e t E n g i n e a n d A P I
setDefaultFontSize method 120setDefinedName method 103, 105setDelimiters method 80setDepthRatio method 136setDeterminant method 189setDocumentSaveOptions method 63setEnterMovesDown method 45setEntry method 94, 95, 107setEntry1 method 124, 125setEntry2 method 124, 125setEnty2 method 125setFieldSettings method 157setFilePath method 79, 80, 81setFinalValue method 160setFlags method 66setFontBold method 42setFontItalic method 42setFontName method 42setFontSize method 42setForeColor method 110setFormat1Local method 125setFormat2Local method 125setFormattingMode method 86setFormula method 98setFormula1 method 124setFormula1Local method 124, 125setFormula2 method 124setFormula2Local method 124, 125setFunction method 156setGroup method 25setHeaderHeight method 40setHeaderSelection method 40, 41setHeaderWidth method 40setHidden method 113setHiddenState method 31setHorizontalAlignment method 42, 112setIncrement method 161setInitialValue method 160setItalic method 121setIterationEnabled method 180setIterationMax method 180setIterationMaxChange method 180setLeftCol method 35, 45, 51setLinkRange method 132setLocation method 87setLocked method 113setMaxCol method 35
setMaxRow method 35setMergeCells method 47setMergeRangeType method 68setMinCol method 35setMinRow method 35setModifyPassword method 58, 64setName method 31, 87, 120, 121, 157setNumber method 107setNumberFormat method 157setNumSheets method 29setOpenPassword method 58, 64setOperator method 123setOrientation method 121setOutline method 121setPattern method 110setPosition method 81setPrintArea method 140, 144setPrintAutoPageNumbering method 140setPrintBottomMargin method 140setPrintColHeading method 140, 148setPrintFooter method 140, 146, 148setPrintFooterMargin method 140setPrintGridLines method 140, 148setPrintHCenter method 140setPrintHeader method 140, 146, 147, 148setPrintHeaderMargin method 140setPrintLandscape method 140, 142setPrintLeftMargin method 140setPrintLeftToRight method 141setPrintNoColor method 141, 145setPrintNumberOfCopies method 141setPrintPaperSize method 141setPrintRightMargin method 141setPrintRowHeading method 141, 148setPrintScale method 141, 142, 143setPrintScaleFitHPages method 141, 143setPrintScaleFitToPage method 141, 143setPrintScaleFitVPages method 141, 143setPrintScaleToFitPage method 143setPrintStartPageNumber method 141setPrintTitles method 141, 148setPrintTopMargin method 141setPrintVCenter method 141setQuery method 74setRepaint method 176setReturnValue method 187setRotation method 122
I n d e x 221
setRowHidden method 35setRowMode method 45setRowOutlineLevel method 49setRowSummaryBeforeDetail method 49, 50setRowText method 41setRule method 97setSelection method 45, 47, 95setSeriesName method 134setSeriesType method 134setShadow method 121setSheet method 28setSheetName method 31setSheetProtection method 46setSheetSelected method 28setSheetType method 134setShowColHeading method 42setShowFormulas method 127setShowGridlines method 148setShowHScrollBar method 51setShowRowHeading method 42setShowTabs method 34setShowTypeMarkers method 127setShowVScrollBar method 51setSizePoints method 120, 121setSizeTwips method 120, 121setSkipEmptyCells method 68setSolid method 111setStartRow method 80setStrikeout method 121setSummaryFieldSettings method 157setText method 31, 97setTextQualifier method 80setTextSelection method 113setTopLeftText method 41setTopRow method 35, 45, 51setType method 123, 130setUnderline method 121setVerticalAlignment method 112setWantsDefaultFinalValue method 160setWantsDefaultInitialValue method 160setWordWrap method 98setWriteFormatAttributes methods 67setZGapRatio method 136shading patterns 111shadow attribute 121Shape class 10ShapeAnchor objects 130, 137
sharing workbooks 26Sheet interface 27, 30Sheet objects 30sheets. See worksheetsshifted print output 144shifting data in cells 43shiftType parameter 42, 101shortcut keys 169showActiveCell method 45skip attribute 69skip tag 68.sod files. See spreadsheet object design files.soi files. See spreadsheet object instance filessort keys 106, 107sort method 106sort order 106sort3 method 106sorting data 47, 106–107source code 6source data. See data sourcesSource objects 72, 73special characters 146split views 38splitColumn parameter 38splitRow parameter 38splitView parameter 38spreadsheet components 8spreadsheet engine. See BIRT Spreadsheet
Enginespreadsheet files
as input data sources 54closing 193controlling access to 64Excel limitations for 70opening 58outputting charts from 195saving window-specific information
for 70setting code pages for 57, 63
spreadsheet object design files 54, 61spreadsheet report designer. See BIRT
Spreadsheet Designerspreadsheet report designs 61, 194spreadsheet reports
deploying 177, 192developing 3, 4exporting 4

222 U s i n g B I R T S p r e a d s h e e t E n g i n e a n d A P I
spreadsheet reports (continued)importing files for 3
spreadsheets. See Excel spreadsheets; worksheets
SQL databases 74SQL statements. See queriesss package 8star schemas 84startEdit method 167, 173StartEditEvent class 164StartEditListener class 164startMe function 185StartRecalcEvent class 164StartRecalcListener class 164step charts 132, 136strikeout attribute 121, 147strings
concatenating 98, 189creating data ranges and 88creating queries and 74displaying dates as 119, 148entering literal characters in 80formatting text in 113loading data from tab-delimited 96parsing 96referencing external workbooks and 98restricting number of characters in 173
style sheets 68substrings 96, 113summary fields (pivot ranges) 153, 155, 156,
157, 158summary rows and columns 49summary values 50, 158SummaryField class 156SummaryFieldSettings objects 156, 158, 159Swing components 14Swing designer package 8Swing engine package 8Swing ui package 8Swing-specific classes 5
Ttab characters 96tab position constants 34tab-delimited strings 96
tab-delimited text files 61, 63See also delimited text files
tables 82tabs 27, 28, 34tag libraries
See also JSP tag librarytags
generating formatting 67testing BIRT Spreadsheet Engine
installations 18text
adding multiline 39, 41, 97, 147adjusting column widths to 37assigning defined names to 103centering 146changing fonts for 120concatenating 189displaying formulas as 105displaying literal 98entering 98formatting 113, 120–122getting 122heading cells and 39, 41returning cell content as 92rotating 122wrapping 97
text attributes. See font attributestext files
as data sources 54, 72, 78connecting to 78querying 80, 81retrieving data from 96, 194saving views for 70setting code pages for 57, 63setting delimiters for 80setting starting column for 81
text strings. See stringsthousands separators 115threads 25, 26, 563-D charts 135–137throwing exceptions 10time formats 116time values 146toolbars 9ToolTips 99top left heading 39

I n d e x 223
topLeftHeader parameter 40topRow parameter 38TrueType fonts 120try-catch code block 27twips 37, 120, 168twipsToRC method 169type constants 105type markers 127
Uunderline attribute 121, 147unfreezePanes method 38Universal Resource Identifiers. See URIsunlocking
workbooks 27, 176worksheet cells 47
UpdateEvent class 164UpdateListener class 164updating
cell references 176data ranges 85
URIs 98URLs
linking to 99loading workbooks and 20setting file paths and 81
user actions. See user eventsuser events 165, 170user interface classes 8user interface components 8user interface events 16user interfaces 16, 56, 110user name property 74, 79user names 82util package 8utility classes 9
Vvalidate method 110validating data 174validation rules 97ValidationFailedEvent class 164ValidationFailedListener class 164ValidationFormat objects 97, 110Value objects 188
valuesSee also data; range of valuesattaching workbooks and 26clearing 49color-coding 115, 117comparing 123conditional formatting and 122copying 102detecting changes to 165, 171displaying summary 158filling cells with same 95getting cell 168heading cells and 39heading cells and null 41hiding 113, 117highlighting 122limiting entry of 97pasting into cells 102reading 180recalculating 180, 189returning from functions 189setting initial or final 160setting outline levels for 49
vertical alignment 112vertical scroll bars 51ViewChangedEvent class 165ViewChangedListener class 165viewing
active cell 45columns 35data 75, 127formulas 105, 127grid lines 148heading cells 42Java applets 18locale-specific formats 118rows 35worksheet names 34
viewshidden workbooks and 26locking 176, 177preserving 26repositioning active cell for 45saving information for 70splitting 38
224 U s i n g B I R T S p r e a d s h e e t E n g i n e a n d A P I
Wwarning messages 100web applications 192web browsers
displaying applets and 18outputting charts to 195sending Excel files to 194, 199sending HTML output to 198
web pagesbuilding charts for 195generating HTML files for 65–67, 198inserting worksheets in 19, 192
whatToCopy parameter 102white space 176width-twips tag 67window-specific information 70word wrapping 97wordwrap property 97workbench parameter 20workbook classes 14workbook interfaces 14workbooks
See also spreadsheet reportsaccessing 15adding tabs to 34adding worksheets to 27, 29attaching to other workbooks 26clearing 25copying and pasting in 48creating 16, 59developing for 14freeing resources for 25generating 76getting components of 15grouping 25hiding worksheets in 31loading 20, 25locking 25, 26, 176opening 55, 56printing from 144printing names for 146recalculating values in 180, 189referencing 56, 98refreshing data in 26, 76removing worksheets in 31resetting defaults for 25
returning from input files 54returning from input streams 59saving 60, 64, 65selecting worksheets in 28setting number of worksheets in 29sharing 26unlocking 27, 176writing to HTML files 65, 67writing to output streams 65writing to XML files 67–69
worksheet classes 14worksheet interfaces 14worksheet names 27, 31, 34, 146worksheet objects 30worksheet tab position constants 34worksheet tabs 27, 28, 34worksheets
See also spreadsheet reportsaccessing charts in 133adding charts to 130, 134adding columns or rows to 42, 176, 177adding graphical objects to 10, 137, 138adding headings to 39–42adding hyperlinks to 98–99adding tabs for 34adding to workbooks 27, 29aligning data in 112allocating references for 177automatically recalculating 180changing 30–31, 165, 179converting to HTML 9converting to XML 9copying and pasting in 48, 100, 101, 102,
169copying cells to multiple 96creating 9, 29, 59, 176default names for 34defining active 28defining connections in 194deleting 31deleting data and 101deploying 9deselecting 28determining if changed 165developing for 14, 34, 182embedding 19formatting data in 110, 122

I n d e x 225
getting active 27hiding 31initiating in-cell editing for 167limiting visible columns or rows in 35loading 177moving active cell in 45moving data in 176naming 31outlining in 49–50outputting as HTML 198outputting selected areas of 198overview 92printing 37, 141, 142, 145protecting 46, 100, 172referencing 27, 29, 34restricting access to 171–174scrolling 38, 50selecting 28, 170setting active 28setting cell content for multiple 95setting patterns and colors for 110, 111splitting views for 38testing for locked cells in 172validating data entry for 174viewing active cell in 45working with cells in 42–49working with columns or rows in 34–39
wrap tag 68
wrapping text 97write method 67, 68writeURL servlet 6
X.xls files. See Excel spreadsheetsXML data sources 72
See also XML filesXML documents 72XML files
adding formatting information to 67as data sources 72associating style sheets with 68connecting to 78creating 67, 69retrieving data from 194setting as MIME type 192writing to 68, 69
XML output 61XMLWriter class 9, 67, 68XSLT files 68XSLT style sheets 68
ZZ gap ratio (charts) 136zero values 117

226 U s i n g B I R T S p r e a d s h e e t E n g i n e a n d A P I