Using BIM to Streamline Your Energy Modeling...
23
Using BIM to Streamline Your Energy Modeling Workflows Jeff Olden – Glumac MP3765-P The process of building detailed energy models with results that attain the levels of accuracy required by utility incentive and green certification programs is typically tedious and convoluted. In response, Autodesk has implemented new energy analysis features for Autodesk® Revit® MEP 2013 and Autodesk® Green Building Studio® software that alleviate some of the difficult and time-consuming aspects of energy modeling for both existing buildings and new construction projects. Using an energy model created to simulate the energy performance of the Autodesk San Rafael HQ at 111 McInnis this class will walk you through the detailed energy modeling process and show you how to use these new features to save time and increase your productivity. Learning Objectives At the end of this class, you will be able to: • Use Revit 2013 to model a building's envelope and thermal zone layout and apply internal loads • Generate a DOE2 model using Green Building Studio and import it into eQuest along with the appropriate weather data • Create schedules and model HVAC and plumbing systems in eQuest • Interpret results and troubleshoot errors About the Speaker Jeff is an Energy Analyst for Glumac, a west coast based MEP consulting engineering firm. Jeff's responsibilities include creating energy models for innovative designs in both new construction and existing buildings. Jeff holds a B.S. in Mechanical Engineering from Oregon State University and is a LEED® Accredited Professional. Email: [email protected]
Transcript of Using BIM to Streamline Your Energy Modeling...
Using BIM to Streamline Your Energy Modeling
Workflows
Jeff Olden – Glumac
MP3765-P
The process of building detailed energy models with results that attain the levels of accuracy required by
utility incentive and green certification programs is typically tedious and convoluted. In response,
Autodesk has implemented new energy analysis features for Autodesk® Revit® MEP 2013 and
Autodesk® Green Building Studio® software that alleviate some of the difficult and time-consuming
aspects of energy modeling for both existing buildings and new construction projects. Using an energy
model created to simulate the energy performance of the Autodesk San Rafael HQ at 111 McInnis this
class will walk you through the detailed energy modeling process and show you how to use these new
features to save time and increase your productivity.
Learning Objectives
At the end of this class, you will be able to:
• Use Revit 2013 to model a building's envelope and thermal zone layout and apply internal loads
• Generate a DOE2 model using Green Building Studio and import it into eQuest along with the appropriate weather data
• Create schedules and model HVAC and plumbing systems in eQuest
• Interpret results and troubleshoot errors
About the Speaker
Jeff is an Energy Analyst for Glumac, a west coast based MEP consulting engineering firm. Jeff's
responsibilities include creating energy models for innovative designs in both new construction and
existing buildings. Jeff holds a B.S. in Mechanical Engineering from Oregon State University and is a
LEED® Accredited Professional.
Email: [email protected]
Using BIM to Streamline Your Energy Modeling Workflows
2
Use Revit 2013 to model a building's envelope and thermal zone layout and
apply internal loads
Selecting the Correct Level of Detail
The direction and success of an energy project is determined very early in the energy modeling process.
In order to set yourself up for success, start by taking a moment at the project kickoff to consider the key
areas of energy consumption that you will be investigating for the project. This will then dictate where to
add detail to your energy model and where broader assumptions can be made. Once the appropriate
details have been identified, Revit 2013 can help manage those details and increases the speed of
transferring them to the energy modeling software.
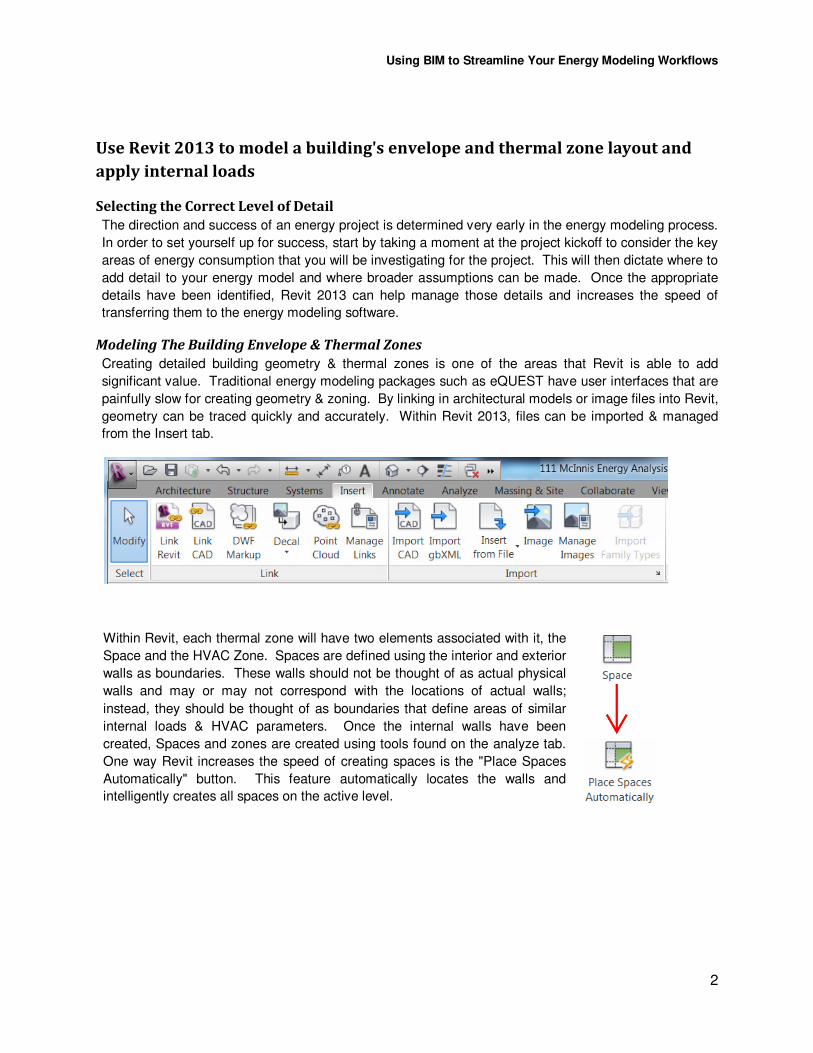
Modeling The Building Envelope & Thermal Zones
Creating detailed building geometry & thermal zones is one of the areas that Revit is able to add
significant value. Traditional energy modeling packages such as eQUEST have user interfaces that are
painfully slow for creating geometry & zoning. By linking in architectural models or image files into Revit,
geometry can be traced quickly and accurately. Within Revit 2013, files can be imported & managed
from the Insert tab.
Within Revit, each thermal zone will have two elements associated with it, the
Space and the HVAC Zone. Spaces are defined using the interior and exterior
walls as boundaries. These walls should not be thought of as actual physical
walls and may or may not correspond with the locations of actual walls;
instead, they should be thought of as boundaries that define areas of similar
internal loads & HVAC parameters. Once the internal walls have been
created, Spaces and zones are created using tools found on the analyze tab.
One way Revit increases the speed of creating spaces is the "Place Spaces
Automatically" button. This feature automatically locates the walls and
intelligently creates all spaces on the active level.

Using BIM to Streamline Your Energy Modeling Workflows
3
One important thing to always double check is
that your internal walls and spaces are associated
with the correct level, have the upper limit set as
the level directly above, and have zero offset from
those limits. All walls and spaces on a level
should have the same base constraint and upper
limit. This can be managed very quickly by
selecting everything in your view and then
applying a filter to crop the selection down to just
the spaces.
Zones are then created for each space. Within Revit be careful to create zones that are each tied to
only one space. Energy programs have a one to one correlation linking spaces and zones and cannot
support multiple spaces being grouped into zones. The zone name is also the parameter that transfers
into eQUEST as both the space and zone name. The space name transferred into the energy modeling
program follows the convention of "S~[Zone Name]."
Tip: When creating your spaces and zones there are various levels of detail that you can go into; not
every detail needs to be captured for every project. The importance of details will be dependent
on the area of interest for the project. At a minimum, all energy models should have roughly the
correct total building area, generic shape, and window to wall ratio per exposure direction. In most
cases you will also want to have zones that clearly break along the same boundaries as the air
handling equipment and separate out areas with drastically different loads or operational
schedules.
This will have implications downstream on the size, flexibility, and detail of your energy model. The
following are three examples of how an energy model could be zoned within Revit.

Using BIM to Streamline Your Energy Modeling Workflows
4
Perimeter-Core Zoning: Building Area Zoning: Room by Room Zoning:
There are many rules that must be followed when creating building geometry & thermal zones for an
energy model. This content is covered in more detail within AU 2012 presentations MP7120 Creating
BIM Models for Energy Analysis by Aryn Bergman and MP3565-P Using a Retro-BIM Workflow: Case
Studies in Energy-Driven Retrofit Projects by Brian Skripac & Aryn Bergman.
Opportunities for Improvement:
• Even when Architectural Revit files are available, they are typically not created in such a way that
can be simplified quickly for energy modeling. The geometry creation process usually still
requires tracing the linked Revit Model. The Copy / Monitor function can sometimes be used to
varying levels of success, however in order to speed up the creation of geometry an improved
process would automatically filter out un-relevant components and then interpret / modify existing
architectural features into a simplified analytical model.
• Zone creation and naming can be time consuming. A tool to automatically create one zone per
space with a corresponding name would further streamline the energy modeling process.

Using BIM to Streamline Your Energy Modeling Workflows
5
Specifying Internal Loads
In order to create an energy model key parameters must be specified for each space and zone. These
parameters have historically been input within the energy modeling software; alternatively, Revit enables
the energy model to input these parameters either individually or to groups. This process can simplify
and organize the model. Revit also provides default space type templates that can be applied in the
absence of known information.
Space Parameters - Grouped by Name:
HVAC Zone Parameters - Grouped by Level:

Using BIM to Streamline Your Energy Modeling Workflows
6
Opportunities for Improvement:
• Revit schedule filters do not currently allow for HVAC Zones to be grouped according to type. The ability to group HVAC Zones according to the associated Space Name or Space Type would improve the ability to specify zone parameters within Revit.
• Creation of custom, project specific space type templates would allow for quicker application of a group of parameters.
• Infiltration Parameters are not currently transferred to the energy model
• Space and zone parameters that are specified within Revit are imported as "hard-wired" parameters. The Revit to eQUEST workflow could be improved through the use of global parameters & conditional statements.

Using BIM to Streamline Your Energy Modeling Workflows
7
Generate a DOE2 model using Green Building Studio and import it into eQuest
along with the appropriate weather data The information provided by Green Building Studio provides a great overview of a buildings energy use,
however there are times when it is desirable to create a more detailed energy model. One of the most
commonly used tools for creating detailed energy models is eQUEST. This tool can be downloaded free
of charge at http://doe2.com/equest
Creating an eQUEST Energy Model
Green Building Studio automatically creates an .inp file for every run, this is the file type that can be used
to create an eQUEST energy model. Using 111 McInnis as an example, the following steps walk you
through how to upload your gbXML file to Green Building Studio, download an .inp file, and use that .inp
file to create an eQUEST energy model. With practice, this workflow can be accomplished in just
minutes!
• To learn how to create a Revit file and export it in gbXML format please attend or refer to the
AU 2012 class MP7120 Creating BIM Models for Energy Analysis by Aryn Bergman.
Step 1: From the Green Building Studio page "My Projects," create a new project by clicking on the link
in the upper right hand corner and following the on-screen directions.
Step 2: Enter the project and select "Upload gbXML File" from the drop-down Action menu.

Using BIM to Streamline Your Energy Modeling Workflows
8
Step 3: From the run list, click on the individual run to show additional information
Step 4: Click on "Export and Download Data Files" on the right hand side of the tab bar
Using BIM to Streamline Your Energy Modeling Workflows
9
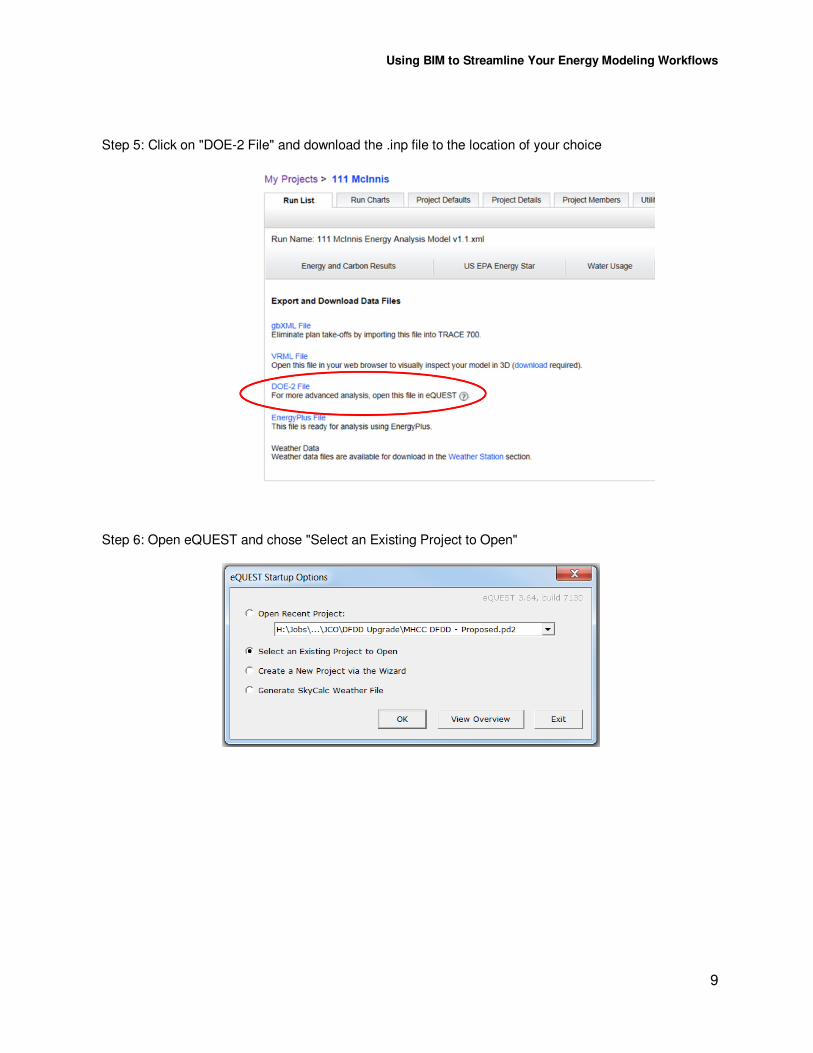
Step 5: Click on "DOE-2 File" and download the .inp file to the location of your choice
Step 6: Open eQUEST and chose "Select an Existing Project to Open"

Using BIM to Streamline Your Energy Modeling Workflows
10
Step 7: Change the file type drop down menu to "DOE-2.2 BDL Input Files (*.inp)" and select the file
that has been downloaded from Green Building Studio. You will not be able to see your .inp file
if you do not change the drop down menu.
Step 8: The following window will open, in this screen you can change the name of your project, the
project file location, and select your weather file.
Note: The "New Project File" must be saved in the default eQUEST project directory. Once the
original energy model has been created in the default location, if you prefer to save it in
another location, such as on a network, simply select "save as" and save a copy in the
location of your choice.

Using BIM to Streamline Your Energy Modeling Workflows
11
This completes the Revit to eQUEST process, below are images of the Revit and eQUEST geometry:

Using BIM to Streamline Your Energy Modeling Workflows
12
Weather Files for eQUEST
Weather files can be downloaded from many sources on the internet; two recommended sources are
discussed below. When modeling in eQUEST the weather files must be of the type .bin to be
compatible. These files also must be saved on your main hard drive in the folder path:
C:\Users\Public\Documents\eQUEST 3-64 Data\Weather\
The above folder path is for eQUEST installations configured for "all-users" (recommended). If your
eQUEST installation was configured for the individual user the weather files will be saved in the folder
path:
C:\Users\ [user name] \Documents\eQUEST 3-64 Data\Weather\
DOE-2 Weather Files
The DOE-2 website (http://doe2.com/index_wth.html) provides weather files for many of major cities
throughout the United States. The TMY2 & TMY3 weather files are some of the most commonly
accepted and used; these files are used to simulate a Typical Meteorological Year (TMY) and are based
on long-term average conditions. They typically do not contain as extreme highs or lows as one might
see in an actual year. One benefit to using the DOE-2 files is if you send your model to another user,
eQUEST will automatically download the correct weather file if it is not present on the new user's
machine. In order for this to function correctly you must save the weather files on your machine using
the same folder structure as the DOE-2 website.
Green Building Studio Weather Files
Weather files can also be downloaded from Green Building Studio on the "Weather Station" tab of each
project. These weather files are based on recent actual year conditions at local weather stations. The
weather stations used are frequently located closer to the actual site which can be beneficial in areas
where the climate varies across short distances. However, when using actual weather it can add risks
such as the possibility of the recorded year being abnormally hot or cold. The addition of more drastic
highs and lows can also lead to troubleshooting errors such as more hours being reported as outside of
throttling range.

Using BIM to Streamline Your Energy Modeling Workflows
13
Create schedules and model HVAC and plumbing systems in eQuest Depending on the level of detail input into the Revit model and what project defaults have been defined
in Green Building Studio will determine the scheduling information and HVAC selections in the resulting
eQUEST model. There are different approached that are suited to different workflows and desired level
of detail in the resulting energy model.
Defining Schedules in Revit
In Revit 2013 it is possible to assign schedules to different space end-uses by defining a common
naming systems to describe like spaces. “Name” is a default field in Revit that can be used to define
space functions in the building, other fields could be used if desired. Once a field has been selected,
creating a space schedule for inputting and viewing information is a helpful way of tracking and
managing this information.
Step 1: Defining space schedule fields
Step 2: Assigning end-uses for each space
Once each space has an end-use that can be uniquely identified it is possible to create a grouping
schedule that groups all spaces according to the “Name” and/or end-use and include the field “Space
Type”. It is the “Space Type” field that allows the user to uniquely define lighting, equipment, and
occupancy load characteristics and schedules in a template based fashion. Revit has a set list of Space
Types that must be used, however it is possible to modify the loads and schedule inputs for each Space
Type.

Using BIM to Streamline Your Energy Modeling Workflows
14
Step 3: Progression identifying space type field to editing inputs for defining unique space end-uses in
Revit.
Based on the exporting process to Green Building Studio outlined in the previous section the information
within the end-use profiles will be carried through into the DOE 2 output and listed as “schdl-
1,2,3,4,5,etc…”
Using BIM to Streamline Your Energy Modeling Workflows
15
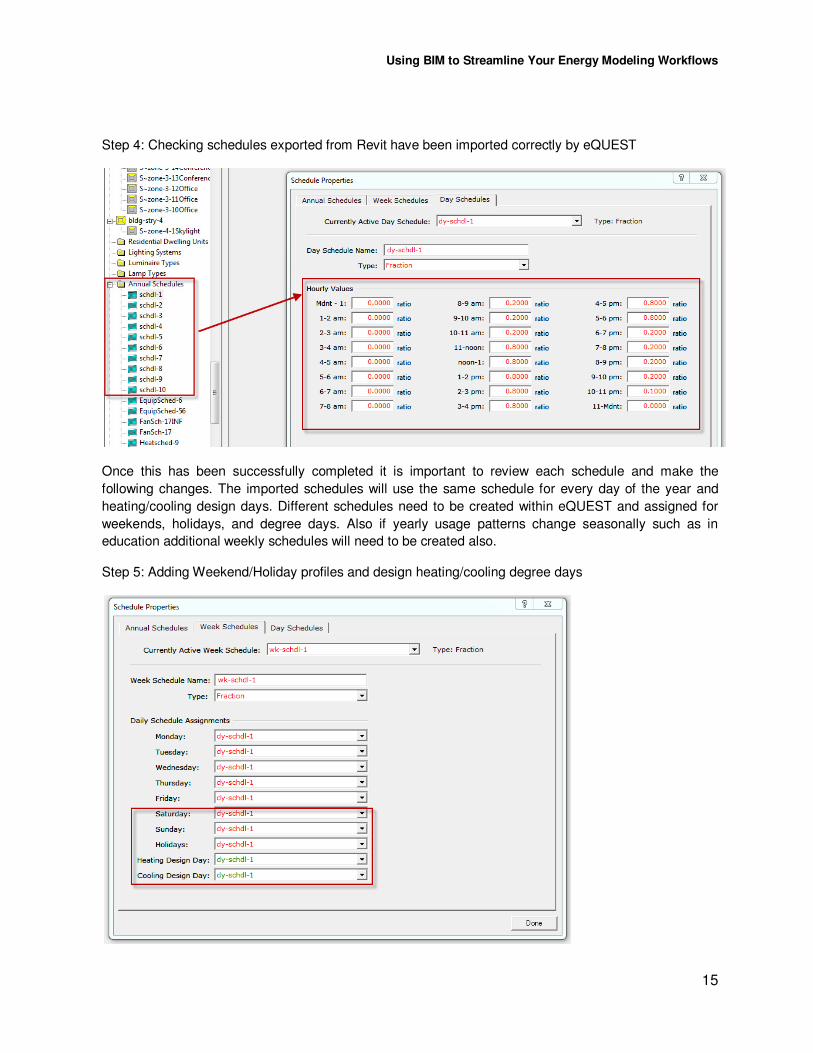
Step 4: Checking schedules exported from Revit have been imported correctly by eQUEST
Once this has been successfully completed it is important to review each schedule and make the
following changes. The imported schedules will use the same schedule for every day of the year and
heating/cooling design days. Different schedules need to be created within eQUEST and assigned for
weekends, holidays, and degree days. Also if yearly usage patterns change seasonally such as in
education additional weekly schedules will need to be created also.
Step 5: Adding Weekend/Holiday profiles and design heating/cooling degree days
Using BIM to Streamline Your Energy Modeling Workflows
16
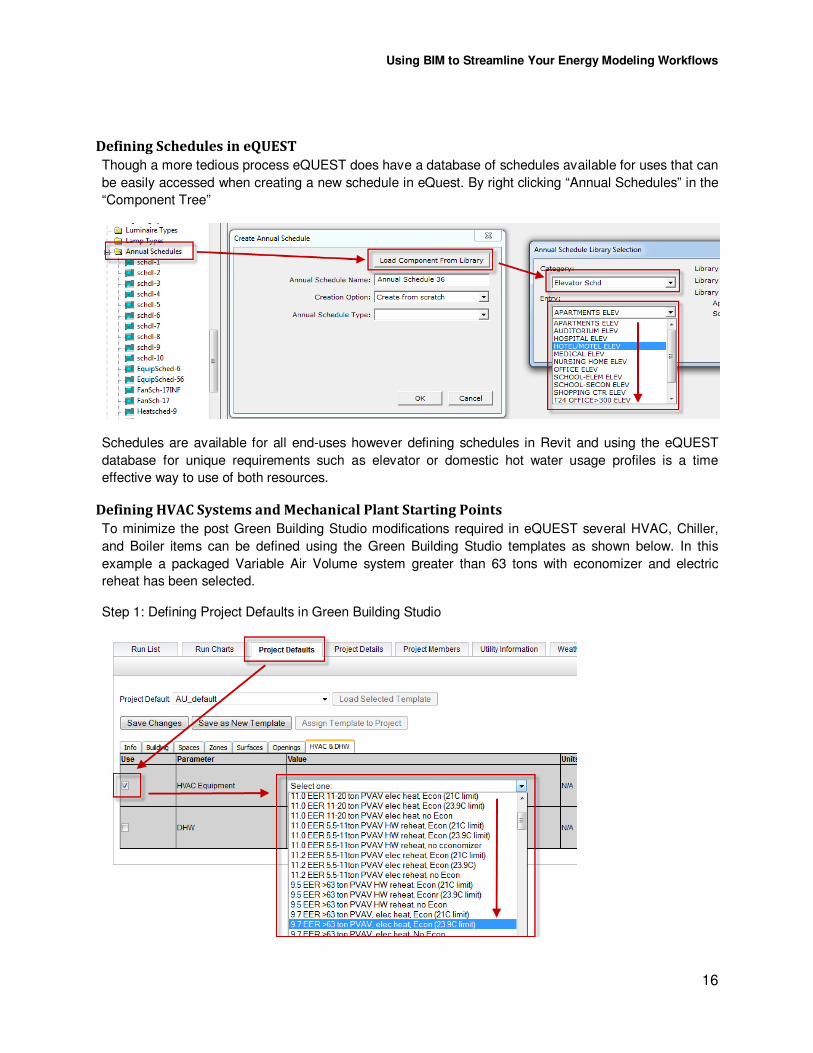
Defining Schedules in eQUEST
Though a more tedious process eQUEST does have a database of schedules available for uses that can
be easily accessed when creating a new schedule in eQuest. By right clicking “Annual Schedules” in the
“Component Tree”
Schedules are available for all end-uses however defining schedules in Revit and using the eQUEST
database for unique requirements such as elevator or domestic hot water usage profiles is a time
effective way to use of both resources.
Defining HVAC Systems and Mechanical Plant Starting Points
To minimize the post Green Building Studio modifications required in eQUEST several HVAC, Chiller,
and Boiler items can be defined using the Green Building Studio templates as shown below. In this
example a packaged Variable Air Volume system greater than 63 tons with economizer and electric
reheat has been selected.
Step 1: Defining Project Defaults in Green Building Studio
Using BIM to Streamline Your Energy Modeling Workflows
17
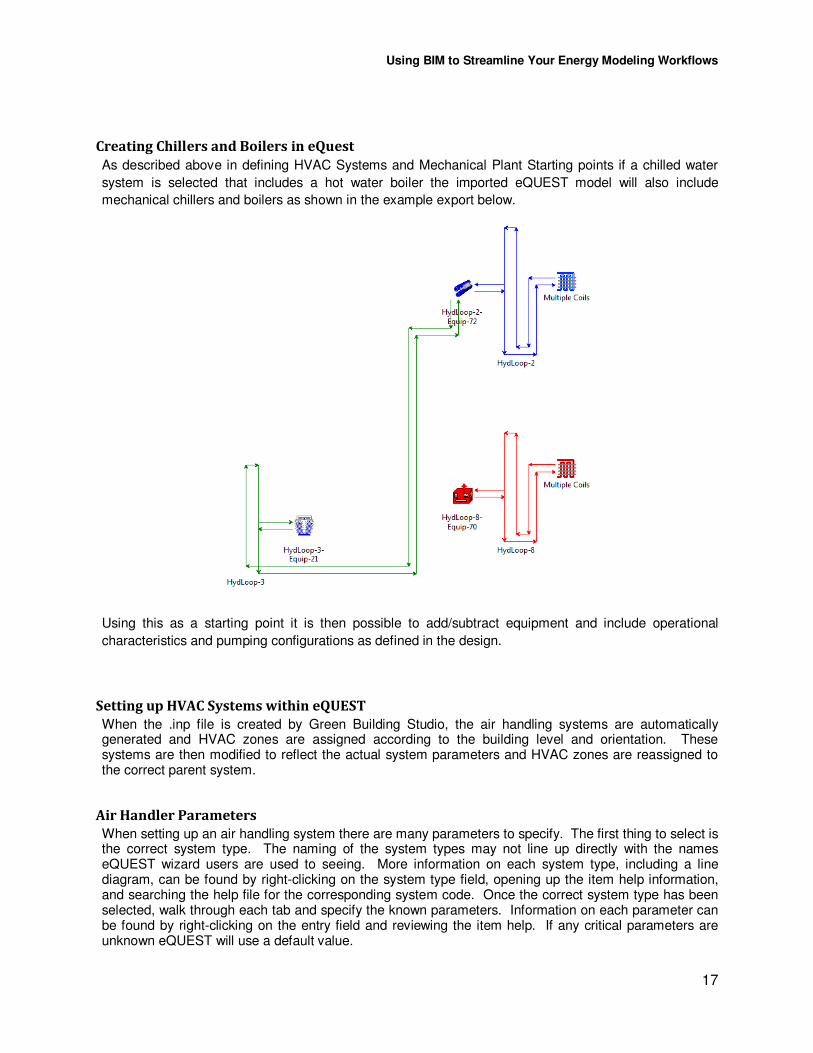
Creating Chillers and Boilers in eQuest
As described above in defining HVAC Systems and Mechanical Plant Starting points if a chilled water
system is selected that includes a hot water boiler the imported eQUEST model will also include
mechanical chillers and boilers as shown in the example export below.
Using this as a starting point it is then possible to add/subtract equipment and include operational
characteristics and pumping configurations as defined in the design.
Setting up HVAC Systems within eQUEST
When the .inp file is created by Green Building Studio, the air handling systems are automatically generated and HVAC zones are assigned according to the building level and orientation. These systems are then modified to reflect the actual system parameters and HVAC zones are reassigned to the correct parent system.
Air Handler Parameters
When setting up an air handling system there are many parameters to specify. The first thing to select is the correct system type. The naming of the system types may not line up directly with the names eQUEST wizard users are used to seeing. More information on each system type, including a line diagram, can be found by right-clicking on the system type field, opening up the item help information, and searching the help file for the corresponding system code. Once the correct system type has been selected, walk through each tab and specify the known parameters. Information on each parameter can be found by right-clicking on the entry field and reviewing the item help. If any critical parameters are unknown eQUEST will use a default value.

Using BIM to Streamline Your Energy Modeling Workflows
18

Using BIM to Streamline Your Energy Modeling Workflows
19
Assigning Zones
On the Air-Side HVAC tab, zones can be re-assigned by selecting a system and then using the Zone Assignments window.

Using BIM to Streamline Your Energy Modeling Workflows
20
Creating a DOAS System w/ VRF:
One popular system type that is being considered for a lot of west-coast retrofits is a Dedicated Outside Air System (DOAS) with Variable Refrigerant Flow (VRF) fan coil units. This system is particularly attractive for existing building retrofits because the air-ducts can be downsized, making them easier to install in tight locations. eQUEST doesn't directly support either the DOAS or VRF system; they must be created using work arounds. When creating a DOAS it must be the first system on the project tree. The simulation routine in eQUEST runs sequentially, so it will fail if it is not in the correct order. A Dummy Space and Dummy Zone are created without any loads or parameters specified. These are simply place holders required for eQUEST to function correctly. Once the DOAS has been created and the correct parameters have been specified, the next step is to create the VRF fan coil units and specify the outside air is coming from the DOAS. The Packaged Variable Volume Variable Temperature (PVVT) system is one approximation that can be used for the VRF system. This will simulate the heat pump functionality, however it will also simulate one compressor per zone and adjustments may need to be made to account for part load efficiencies and energy savings that happen in the branch controller. Advanced users can also use hourly reports to identify hours that energy sharing would happen at the branch controller. In order to specify that outside air is provided by the DOAS, specify 'Outside Air from System' on the Outside Air tab.

Using BIM to Streamline Your Energy Modeling Workflows
21
Opportunities for Improvement:
• Specifying HVAC system assignments within Revit would significantly improve the workflow by correctly organizing the HVAC Zones. This is one of the more time consuming aspects currently discouraging an energy modeler from returning to Revit once an energy model has been created.
• As Revit MEP increases it's integration with energy modeling tools, the idea workflow is likely to one day import basic HVAC system information directly from linked mechanical equipment schedules. Common parameters such as heating / cooling capacity, airflow, outside air ratio, and fan power are prime examples of information that could be imported.
Using BIM to Streamline Your Energy Modeling Workflows
22
Interpret results and troubleshoot errors As soon as you import your .inp file into eQUEST you will have a fully functioning energy model capable
of being simulated and providing results. However, how accurate will those results be?
In energy modeling, the most common "error" to troubleshoot is calibration; it is typical to run through
many iterations before arriving at a model you believe is acceptable. At times refining the energy model
can feel like a never-ending process, there's always something more that you want to add or an
assumption that you second guess. The key is knowing when to stop and say that it's far enough along
to accomplish the goals of the project.
When reviewing the results the first two questions are usually:
1. How close is my energy model to the utility bills?
2. Is the energy end-use breakdown realistic?
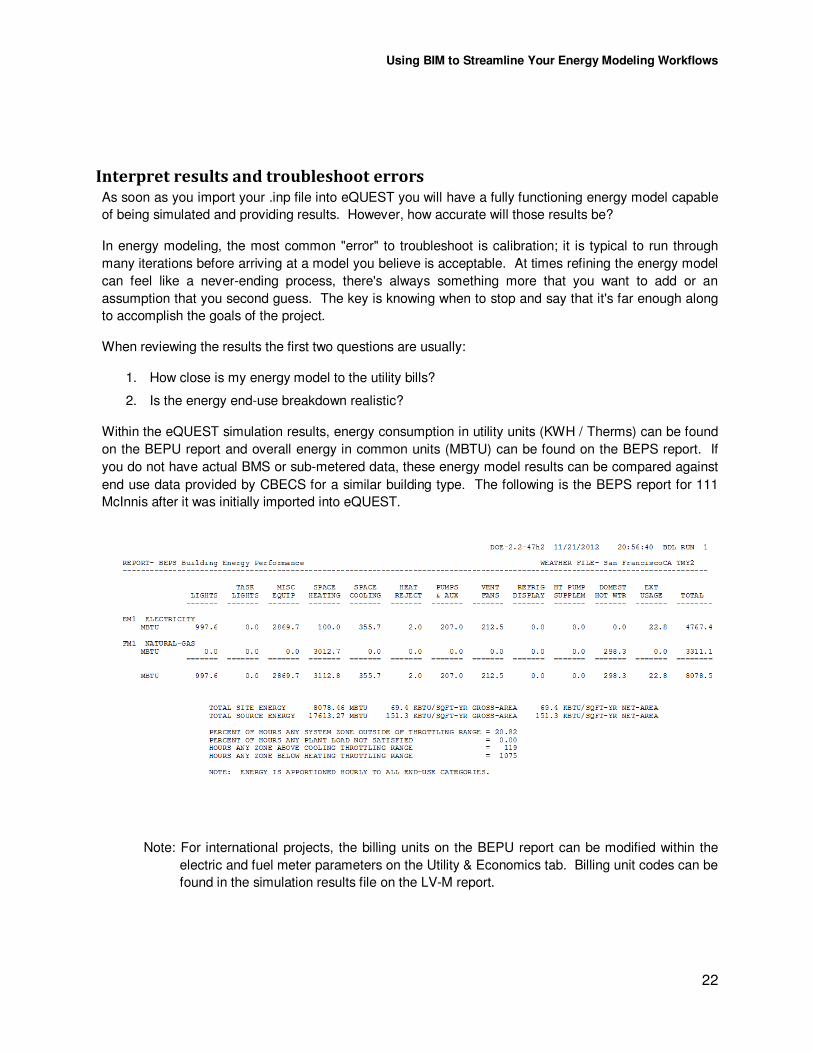
Within the eQUEST simulation results, energy consumption in utility units (KWH / Therms) can be found
on the BEPU report and overall energy in common units (MBTU) can be found on the BEPS report. If
you do not have actual BMS or sub-metered data, these energy model results can be compared against
end use data provided by CBECS for a similar building type. The following is the BEPS report for 111
McInnis after it was initially imported into eQUEST.
Note: For international projects, the billing units on the BEPU report can be modified within the
electric and fuel meter parameters on the Utility & Economics tab. Billing unit codes can be
found in the simulation results file on the LV-M report.

Using BIM to Streamline Your Energy Modeling Workflows
23
A Couple Work-Arounds to Get You Thinking...
One of the biggest challenges in energy modeling can be knowing that something isn't being simulated
realistically and having to figure out how to create a good approximation.
Broken Economizer
A broken economizer is an all too common problem in existing buildings, this can have a large impact on
the energy consumption and make it difficult to calibrate a baseline. On a recent project a conversation
with building maintenance staff revealed that a broken economizer was manually adjusted periodically
throughout the year. To simulate this we created and applied a custom schedule to define the position
of the economizer based on the season. The position of the economizer had to be guessed and then
revised for each season based on comparing the monthly simulation results against the actual utility
data. Monthly utility consumption can be found in the PS-B report of the eQUEST simulation results.
HVAC System - OA Tab
Annual Schedule - Weekly Schedule Assignments
More information on calibration is available in AU 2012 presentation MP3784-P Calibrating an Existing Building Energy Model by Lauren Kuntz and Oliver Riley
![BUILDING INFORMATION MODELING [BIM]](https://static.fdocuments.in/doc/165x107/568bd8231a28ab2034a243bd/building-information-modeling-bim-56dd5331ea499.jpg)