
User's Manual - Fisher Scientific · Inserting a Ribbon with Paper in the Printer .....7 Printer...
40
User's Manual Model 122X MiniPrinter Series
Transcript of User's Manual - Fisher Scientific · Inserting a Ribbon with Paper in the Printer .....7 Printer...

User's Manual
Model 122XMiniPrinter Series

10/01 122XUser’sManual.p65 PN 7424-14954G
Risk of electrical shock. Do not remove cover. No user serviceableparts inside. Refer servicing to qualified service personnel.
Weigh-Tronix reserves the right to changespecifications at any time.
CAUTION

TABLE OF CONTENTS
Introduction ......................................................................... 1Installation .......................................................................... 1
Installing the Paper ................................................ 1To Remove the Paper Roll ...................................... 4
Operation ............................................................................ 5Connecting and Powering up Your Printer .............. 5
Maintenance ....................................................................... 5Changing the Printer Ribbon .................................. 6
Inserting a Ribbon with Paper in the Printer .......... 7Printer Test and Setup ......................................................... 8
Printer Test ............................................................ 8Accessing the Setup Menu ................................... 9
CONFIGURE ........................................................... 9CUSTOM .............................................................. 12
SET CLOCK... ....................................................... 14RESET SEQ# ....................................................... 15
Communication ................................................................. 16Model 1220 RS-232 Serial Version ...................... 16
Model 1221 Parallel Version ................................ 18Model 1222 Serial TTL Version ............................ 20
Model 1223 20 mA Current Loop Version ............ 21Model 1224 RS-485 Serial Version ...................... 22
Control Codes ...................................................... 24Default Table ..................................................................... 33
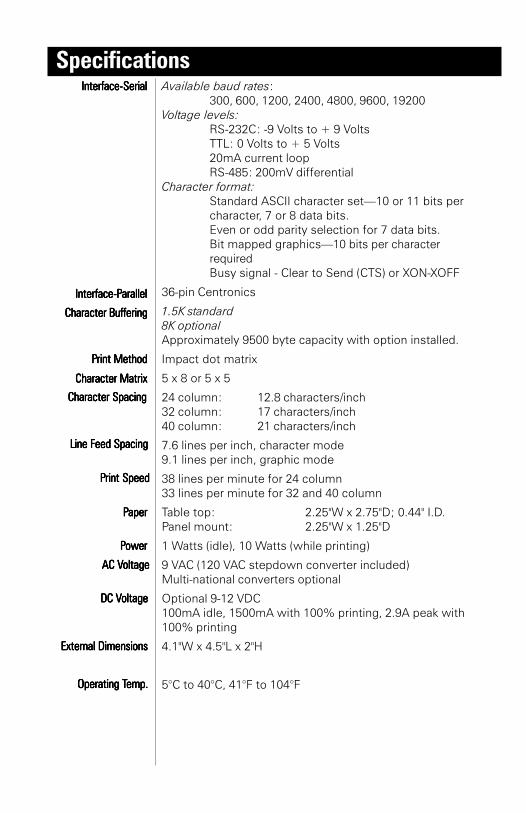
SpecificationsInterfaceInterfaceInterfaceInterfaceInterface-----SerialSerialSerialSerialSerial
Character BufferingCharacter BufferingCharacter BufferingCharacter BufferingCharacter Buffering
Character MatrixCharacter MatrixCharacter MatrixCharacter MatrixCharacter Matrix
Character SpacingCharacter SpacingCharacter SpacingCharacter SpacingCharacter Spacing
Line Feed SpacingLine Feed SpacingLine Feed SpacingLine Feed SpacingLine Feed Spacing
PPPPPrint Speedrint Speedrint Speedrint Speedrint Speed
PPPPPaperaperaperaperaper
PPPPPrint Methodrint Methodrint Methodrint Methodrint Method
PPPPPowerowerowerowerower
AC VAC VAC VAC VAC Voltageoltageoltageoltageoltage
DC VDC VDC VDC VDC Voltageoltageoltageoltageoltage
External DimensionsExternal DimensionsExternal DimensionsExternal DimensionsExternal Dimensions
Operating TOperating TOperating TOperating TOperating Temp.emp.emp.emp.emp.
Available baud rates:300, 600, 1200, 2400, 4800, 9600, 19200
Voltage levels:RS-232C: -9 Volts to + 9 VoltsTTL: 0 Volts to + 5 Volts20mA current loopRS-485: 200mV differential
Character format:Standard ASCII character set—10 or 11 bits percharacter, 7 or 8 data bits.Even or odd parity selection for 7 data bits.Bit mapped graphics—10 bits per characterrequiredBusy signal - Clear to Send (CTS) or XON-XOFF
36-pin Centronics
1.5K standard8K optionalApproximately 9500 byte capacity with option installed.
Impact dot matrix
5 x 8 or 5 x 5
24 column: 12.8 characters/inch32 column: 17 characters/inch40 column: 21 characters/inch
7.6 lines per inch, character mode9.1 lines per inch, graphic mode
38 lines per minute for 24 column33 lines per minute for 32 and 40 column
Table top: 2.25"W x 2.75"D; 0.44" I.D.Panel mount: 2.25"W x 1.25"D
1 Watts (idle), 10 Watts (while printing)
9 VAC (120 VAC stepdown converter included)Multi-national converters optional
Optional 9-12 VDC100mA idle, 1500mA with 100% printing, 2.9A peak with100% printing
4.1"W x 4.5"L x 2"H
5°C to 40°C, 41°F to 104°F
InterfaceInterfaceInterfaceInterfaceInterface-P-P-P-P-Parallelarallelarallelarallelarallel

Ribbon lifeRibbon lifeRibbon lifeRibbon lifeRibbon life
PPPPPaperaperaperaperaper
PPPPPrint Head Liferint Head Liferint Head Liferint Head Liferint Head Life 500,000 lines mean character before failure.
Black- 200,000 charactersPurple-250,000 characters
Large roll - 12,500 linesSmall roll - 3,000 lines

Introduction
11111
Installing the PInstalling the PInstalling the PInstalling the PInstalling the Paperaperaperaperaper
The Model 122X impact printer series consists of thesemodels and electronic interfaces:
Model 1220 - RS-232Model 1221 - ParallelModel 1222 - TTLModel 1223 - Current LoopModel 1224 - RS-485
This manual is split into the following main sections:• Introduction• Installation• Operation• Maintenance• Printer Test and Setup• Communication• Default Settings
InstallationFollow the precautions listed below when setting up yourprinter. They are designed to help you keep your printerworking at its best.
- Plug your power supply into an appropriate groundedoutlet.
- Place your printer on a flat hard surface, like a tabletop.- Keep your printer out of direct sunlight.
1. Remove the printer cover by pressing on thegroove patterns to pop the front edge up. Lift offthe cover.
2. Press the rocker switch to the left. The light willgo off.
3. Unroll several inches of the paper.
4. Cut a straight edge on the paper roll if it is jagged.

22222
This will facilitate the entry of the paper into theprinter.
5. Slide the paper through the slot connecting the papercompartment and the printer compartment. You canslide it in about one-quarter inch before it stops.
6. While holding the paper in place, press the rockerswitch to the Paper Feed position. The printer willactivate, and a rubber roller will pull the paper into theprinter compartment. Hold the switch in the PaperFeed position until the paper emerges from the top ofthe printer mechanism.
7. When an inch of paper has emerged from the top ofthe printer, release the Paper Feed button.
8. Now pull the paper through the printer, until severalinches are exposed.
9. Slide the paper through the slot in the printer cover.
33333
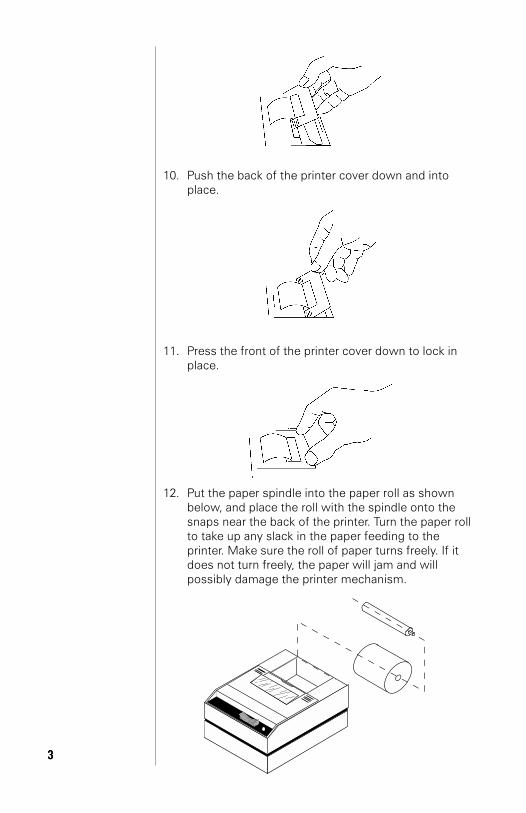
10. Push the back of the printer cover down and intoplace.
11. Press the front of the printer cover down to lock inplace.
12. Put the paper spindle into the paper roll as shownbelow, and place the roll with the spindle onto thesnaps near the back of the printer. Turn the paper rollto take up any slack in the paper feeding to theprinter. Make sure the roll of paper turns freely. If itdoes not turn freely, the paper will jam and willpossibly damage the printer mechanism.
44444
TTTTTo Remove the Po Remove the Po Remove the Po Remove the Po Remove the PaperaperaperaperaperRollRollRollRollRoll
1. Advance the paper about one inch beyond the papercutter by using the Paper Feed switch.
2. Lift the paper roll away from the printer housing andcut the paper feeding to the printer with scissors. Tryto make the cut as square as possible to help the nexttime you reload the paper.
3. Pull the remaining paper through the printer mecha-nism. Be sure to pull the paper from the topBe sure to pull the paper from the topBe sure to pull the paper from the topBe sure to pull the paper from the topBe sure to pull the paper from the top(paper cutter side).
WWWWWARNING! ARNING! ARNING! ARNING! ARNING! Pulling the paper out of the backof the printer will damage the print mechanism.
55555
OperationConnecting andConnecting andConnecting andConnecting andConnecting and
PPPPPowering Upowering Upowering Upowering Upowering UpYYYYYour Pour Pour Pour Pour Printerrinterrinterrinterrinter
For DC modifiedunits supplied with
cable, connectpositive voltage to
striped wire.
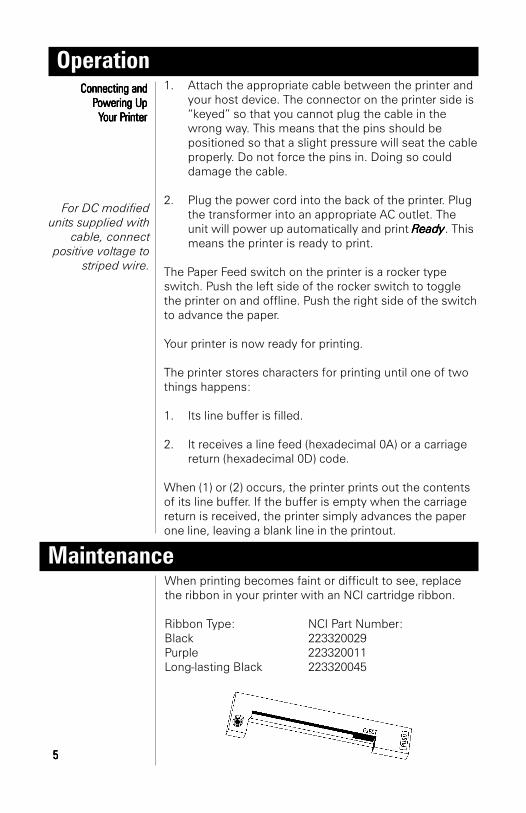
1. Attach the appropriate cable between the printer andyour host device. The connector on the printer side is“keyed” so that you cannot plug the cable in thewrong way. This means that the pins should bepositioned so that a slight pressure will seat the cableproperly. Do not force the pins in. Doing so coulddamage the cable.
2. Plug the power cord into the back of the printer. Plugthe transformer into an appropriate AC outlet. Theunit will power up automatically and print RRRRReadyeadyeadyeadyeady. Thismeans the printer is ready to print.
The Paper Feed switch on the printer is a rocker typeswitch. Push the left side of the rocker switch to togglethe printer on and offline. Push the right side of the switchto advance the paper.
Your printer is now ready for printing.
The printer stores characters for printing until one of twothings happens:
1. Its line buffer is filled.
2. It receives a line feed (hexadecimal 0A) or a carriagereturn (hexadecimal 0D) code.
When (1) or (2) occurs, the printer prints out the contentsof its line buffer. If the buffer is empty when the carriagereturn is received, the printer simply advances the paperone line, leaving a blank line in the printout.
MaintenanceWhen printing becomes faint or difficult to see, replacethe ribbon in your printer with an NCI cartridge ribbon.
Ribbon Type: NCI Part Number:Black 223320029Purple 223320011Long-lasting Black 223320045

66666
If your printer is used infrequently, the print impressionmay become weak because the ribbon has dried out. Toadvance the ribbon to a new section, hold down thePaper Feed switch for several seconds.
Below are the steps for replacing the ribbon:
1. Turn the printer offline.
2. Four small grooves are embossed on each side ofthe printer cover. Push down on one or both of theseareas until the printer cover tilts.
3. When the printer cover is tilted up, lift it completelyoff.
4. Push down on the right side of ribbon cartridgewhere it is marked “PUSH”. Remove the cartridge.
Changing the PChanging the PChanging the PChanging the PChanging the PrinterrinterrinterrinterrinterRibbonRibbonRibbonRibbonRibbon

77777
If you get ribbonink on the printercase, wipe it offimmediately.Once it dries it isdifficult toremove.
5. Install new cartridge. Be sure the ink cartridge isinserted firmly to prevent weak or irregular printing.The cartridge must be properly seated and alignedfor best printing.
6. Turn the cartridge “knob” (marked by an arrow)clockwise to stretch the ribbon.
7. Replace the cover.
8. Replace the paper.
You may insert the ribbon cartridge if there is alreadypaper in the printer.
Hold the cartridge as shown above and slide it over thepaper and into the printer compartment. Be sure thepaper goes between the ribbon cartridge and the inkribbon.
88888
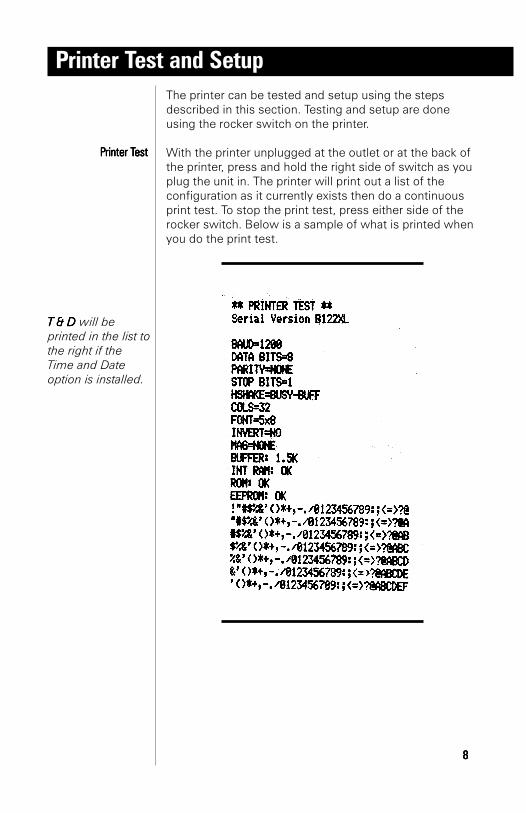
The printer can be tested and setup using the stepsdescribed in this section. Testing and setup are doneusing the rocker switch on the printer.
With the printer unplugged at the outlet or at the back ofthe printer, press and hold the right side of switch as youplug the unit in. The printer will print out a list of theconfiguration as it currently exists then do a continuousprint test. To stop the print test, press either side of therocker switch. Below is a sample of what is printed whenyou do the print test.
PPPPPrinter Trinter Trinter Trinter Trinter Testestestestest
T & DT & DT & DT & DT & D will beprinted in the list tothe right if theTime and Dateoption is installed.
Printer Test and Setup

99999
To access the setup menu follow these steps:
1. Unplug the printer either at the outlet or at the back ofthe printer.
2. Press and hold down the left side of the rocker switchand plug in the printer. The printer will advance thepaper. After the paper advance has stopped, count for3 to 5 seconds and then release the switch. Thefollowing is printed:
If you wait less than three or more than five secondsRRRRReady eady eady eady eady is printed and you will have to try steps 1 and 2again to access the setup menu.
After you access the setup menu, if you press NEXT NEXT NEXT NEXT NEXT (leftside of switch) repeatedly you will see the following listprinted. If you keep pressing NEXT NEXT NEXT NEXT NEXT (left side) the listrepeats itself.
As you can see from the above printout the setup menucontains the following items:
• CONFIGURECONFIGURECONFIGURECONFIGURECONFIGURE menu• CUSTCUSTCUSTCUSTCUSTOMOMOMOMOM menu• SET CLSET CLSET CLSET CLSET CLOCKOCKOCKOCKOCK menu• RESET SEQ#RESET SEQ#RESET SEQ#RESET SEQ#RESET SEQ#
The following pages explain these items and how tocustomize the printer to your needs.
The first setup menu item reads
CONFIGURE [NEXT/OK]CONFIGURE [NEXT/OK]CONFIGURE [NEXT/OK]CONFIGURE [NEXT/OK]CONFIGURE [NEXT/OK]
[NEXT/OK][NEXT/OK][NEXT/OK][NEXT/OK][NEXT/OK] is a visual clue so you know that pressing theleft side of the rocker switch will go to the NEXT NEXT NEXT NEXT NEXT part ofthe menu and that pressing the right side of the rockerswitch will accept (or say OKOKOKOKOK to) what this line of the setupmenu says.
Accessing the SetupAccessing the SetupAccessing the SetupAccessing the SetupAccessing the SetupMenuMenuMenuMenuMenu
CONFIGURECONFIGURECONFIGURECONFIGURECONFIGURE
This manualassumes the timeand date option isinstalled andoperating. If youdo not have thisoption you will notsee references tothe clock or datelisted in mostmenus.

1010101010
With the printer in the setup menu and withCONFIGURE [NEXT/OK] CONFIGURE [NEXT/OK] CONFIGURE [NEXT/OK] CONFIGURE [NEXT/OK] CONFIGURE [NEXT/OK] as the last item printed, pressOK OK OK OK OK (right side) to access the CONFIGURE CONFIGURE CONFIGURE CONFIGURE CONFIGURE menu. Thefollowing is printed:
LLLLLOAD DEFOAD DEFOAD DEFOAD DEFOAD DEFAULAULAULAULAULTSTSTSTSTS gives you the opportunity to reset theprinter to all default settings (shown below).
Choose OK OK OK OK OK to do this or NEXT NEXT NEXT NEXT NEXT to go to the next param-eter. The following is printed:
Baud rate is the next parameter you can set in theCONFIGURE CONFIGURE CONFIGURE CONFIGURE CONFIGURE menu. The complete list of parameters andtheir possible values is shown below.
The sample list above shows the current baud rate is1200. To accept this, press OK OK OK OK OK (right side) or view thenext baud rate value by pressing NEXT NEXT NEXT NEXT NEXT (left side). PressOK when the baud rate you want is displayed.
Choose from these baud rates;300, 600, 1200, 2400, 4800, 9600, or 19200
DDDDDAAAAATTTTTA BITSA BITSA BITSA BITSA BITS is the next parameter. Choose the data bitvalue the same way baud rate was chosen. Choices are 7or 8 data bits.
Baud RateBaud RateBaud RateBaud RateBaud Rate
Data BitsData BitsData BitsData BitsData Bits
LLLLLoad Defaultsoad Defaultsoad Defaultsoad Defaultsoad Defaults
* The parallelinterface does nothave theseselections.
The complete listof defaults isshown in theDefault Table at theend of this manual.

1111111111
Stop BitsStop BitsStop BitsStop BitsStop Bits
HandshakHandshakHandshakHandshakHandshakeeeee
Handshake isused for serialinterface only.
PPPPParityarityarityarityarity
ColumnsColumnsColumnsColumnsColumns
Invert Invert Invert Invert Invert
Parity can be selected only if 7 data bits are set. ChooseOdd or Even. If you choose 8 data bits, parity defaults toNone.
STSTSTSTSTOP BITSOP BITSOP BITSOP BITSOP BITS is the next parameter. Choose 1 or 2 stop bits.1 stop bit is used for 10 bit words, 2 stop bits are used for11 bit words.
HHHHHANDSHAKEANDSHAKEANDSHAKEANDSHAKEANDSHAKE is the next parameter. Choose from thefollowing settings:
BUSY-LINEBUSY-BUFFERXON/XOFF-LINEXON/XOFF-BUFFERNONE
COLCOLCOLCOLCOLUMNS UMNS UMNS UMNS UMNS is the next parameter. Select the number ofcharacters per line (columns) for this parameter. Thechoices you have are 24, 32, or 40. Below are samples ofeach:
INVERT INVERT INVERT INVERT INVERT is the next parameter. Choose OK if you wantinverted text (upside down) or NEXT if you want non-inverted text (right side up) in your printouts. Below is anexample of inverted text.
FONT FONT FONT FONT FONT is the next parameter. Choose from a 5 x 5 dotmatrix print pattern or a 5 x 8 dot matrix pattern. The5 x 5 dot pattern produces only upper case (capital)letters.
The last parameter is MAGNIFICAMAGNIFICAMAGNIFICAMAGNIFICAMAGNIFICATIONTIONTIONTIONTION. This refers to thesize of printed type from your printer. Your choices (withexamples) are
NONE
DOUBLE WIDE
FontFontFontFontFont
MagnificationMagnificationMagnificationMagnificationMagnification
1212121212
CUSTCUSTCUSTCUSTCUSTOMOMOMOMOM
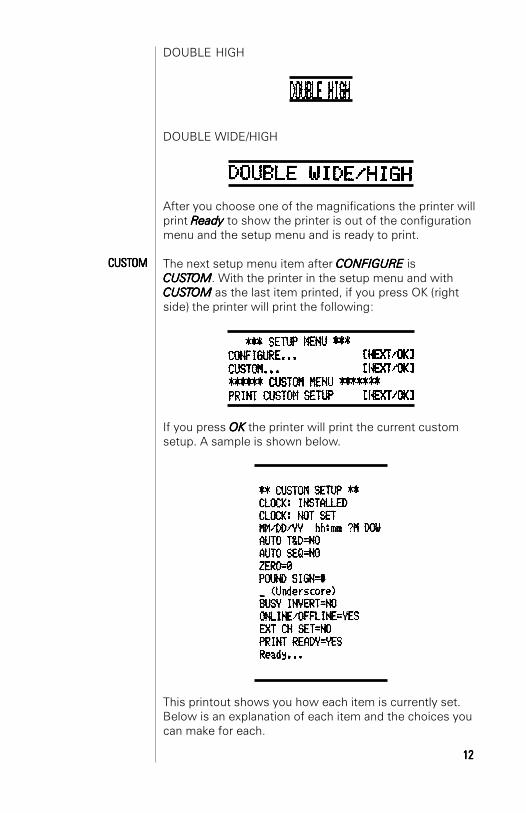
DOUBLE HIGH
DOUBLE WIDE/HIGH
After you choose one of the magnifications the printer willprint RRRRReady eady eady eady eady to show the printer is out of the configurationmenu and the setup menu and is ready to print.
The next setup menu item after CONFIGURE CONFIGURE CONFIGURE CONFIGURE CONFIGURE isCUSTCUSTCUSTCUSTCUSTOMOMOMOMOM. With the printer in the setup menu and withCUSTCUSTCUSTCUSTCUSTOM OM OM OM OM as the last item printed, if you press OK (rightside) the printer will print the following:
If you press OKOKOKOKOK the printer will print the current customsetup. A sample is shown below.
This printout shows you how each item is currently set.Below is an explanation of each item and the choices youcan make for each.
1313131313
T/D FormatT/D FormatT/D FormatT/D FormatT/D Format
This feature isavailable only onunits with thetime/date optioninstalled.Time/date optionis Y2K compatible.
TIME/DTIME/DTIME/DTIME/DTIME/DAAAAATE FORMATE FORMATE FORMATE FORMATE FORMATTTTT is the next parameter. Choose fromthe following formats.
MM/DD/YY hh:mm ?MMM/DD/YY hh:mm ?M DOW MM = monthMM/DD/YY hh:mm DD = dayMM/DD/YY hh:mm DOW YY = yearDD-MM-YY hh:mm ?M hh = hourDD-MM-YY hh:mm ?M DOW mm = minutesDD-MM-YY hh:mm ?M = AM or PMDD-MM-YY hh:mm DOW DOW=Day of weekDD-MON-YY hh:mm ?MDD-MON-YY hh:mm ?M DOWDD-MON-YY hh:mmDD-MON-YY hh:mm DOWNONE
AUTAUTAUTAUTAUTO TIME AND DO TIME AND DO TIME AND DO TIME AND DO TIME AND DAAAAATETETETETE is the next parameter.Your choices are:
YES YES YES YES YES - autoprint after CR (carriage return)NO -NO -NO -NO -NO - do not autoprint after CR
Autoprint of the time and date will not occur unless threeseconds has elapsed since the printer has stoppedprinting.
AUTAUTAUTAUTAUTO SEQUENCE NUMBERO SEQUENCE NUMBERO SEQUENCE NUMBERO SEQUENCE NUMBERO SEQUENCE NUMBER is the next parameter.Choices:
YES -YES -YES -YES -YES - autoprint sequence number after CRNO -NO -NO -NO -NO - don’t autoprint sequence number after
CRAutoprint of the sequence number will not occur unlessthree seconds has elapsed since the printer has stoppedprinting.
ZERO ZERO ZERO ZERO ZERO is the next parameter. Choose how you want thezero character to look in your printouts. Choose between00000 and ØØØØØ.....
POUND SIGNPOUND SIGNPOUND SIGNPOUND SIGNPOUND SIGN is the next parameter. Choose to showpound as ##### or as the British sterling pound symbol £££££.
_UNDERSCORE _UNDERSCORE _UNDERSCORE _UNDERSCORE _UNDERSCORE is the next parameter. Choose whichsymbol the same ASCII code will print, an underscore (_____)or a left arrow (➔ ).
BUSY INVERTBUSY INVERTBUSY INVERTBUSY INVERTBUSY INVERT is next. This controls the logic level for abusy signal for the CTS line.Choices:
Auto Seq#Auto Seq#Auto Seq#Auto Seq#Auto Seq#
Auto T&DAuto T&DAuto T&DAuto T&DAuto T&D
PPPPPound Signound Signound Signound Signound Sign
ZeroZeroZeroZeroZero
_Underscore_Underscore_Underscore_Underscore_Underscore
Busy InvertBusy InvertBusy InvertBusy InvertBusy Invert
Appears only if theclock is installed.

1414141414
YES -YES -YES -YES -YES - voltage will be in a low state until theunit is busy then voltage level goes high.
NO -NO -NO -NO -NO - voltage will be in a high state until theunit is busy then voltage level goes low.
ONLINE/OFFLINEONLINE/OFFLINEONLINE/OFFLINEONLINE/OFFLINEONLINE/OFFLINE is next.Choices:
YES -YES -YES -YES -YES - enables the rocker switch to turn theprinter offline.
NO -NO -NO -NO -NO - disables the ONLINE/OFFLINE ability.
EXT CH SETEXT CH SETEXT CH SETEXT CH SETEXT CH SET is next. This stands for Extended CharacterSet.
Choices:YES -YES -YES -YES -YES - Allows you to use hexidecimal numbers
above 80 (true only for 8 data bits.)NO -NO -NO -NO -NO - Disables the Extended Character Set
ability.
PRINT READPRINT READPRINT READPRINT READPRINT READY Y Y Y Y is next.
Choices:YES -YES -YES -YES -YES - Prints RRRRReady eady eady eady eady upon power up.NO -NO -NO -NO -NO - Disables printing RRRRReadyeadyeadyeadyeady
WWWWWARNING - ARNING - ARNING - ARNING - ARNING - If you choose NONONONONO, then you will need tohold the left side of the rocker switch down for 4 to 6seconds to access the setup menu. Begin timing whenyou plug in power to the unit and the red light comeson. The paper feed motor does not run upon power upwhen RRRRReady eady eady eady eady is disabled.
The next item in the Setup Menu is SET CLSET CLSET CLSET CLSET CLOCKOCKOCKOCKOCKWith the printer in the setup menu and with SET CLSET CLSET CLSET CLSET CLOCK OCK OCK OCK OCK asthe last item printed, if you press OK OK OK OK OK (right side) the printerwill print the following:
The printout shows the year currently in memory. The 00000 isreversed (white on black) to show the position of thecursor. This is the number which will be incremented ifNEXT NEXT NEXT NEXT NEXT (left side) is pressed. If the number is correct pressOK OK OK OK OK (right side) and the following is printed:
Ext Ch SetExt Ch SetExt Ch SetExt Ch SetExt Ch Set
The choice to usethe extendedcharacter set isavailable onlywhen 8 data bitsare chosen.
PPPPPrint Readyrint Readyrint Readyrint Readyrint Ready
SET CLSET CLSET CLSET CLSET CLOCKOCKOCKOCKOCK
Online/OfflineOnline/OfflineOnline/OfflineOnline/OfflineOnline/Offline

1515151515
The cursor now appears over the 2nd position. PressNEXT NEXT NEXT NEXT NEXT (left side) to increment this number if needed andOK OK OK OK OK if it is right. Continue this sequence of accepting orchanging the year, month, day, and DOW (Day Of Week).
When you have completed the SET DSET DSET DSET DSET DAAAAATE TE TE TE TE menu thefollowing is printed automatically:
Choose NEXT NEXT NEXT NEXT NEXT (left side) to increment the number or OK(right side) to accept the 1. Repeat this same procedurefor hours and minutes as shown below.
When everything is as you want it and you press OKOKOKOKOK,STSTSTSTSTART CLART CLART CLART CLART CLOCKOCKOCKOCKOCK is printed. Press OK OK OK OK OK (right side) to start theclock. The printer then prints RRRRReady eady eady eady eady showing you that it isout of the setup menu and ready to print.
RESET SEQ#RESET SEQ#RESET SEQ#RESET SEQ#RESET SEQ# is the last setup menu item. This menu itemlets you reset the sequence number. This number is thenumber of print transactions since the last reset.With the printer in the setup menu and with RESET SEQ#RESET SEQ#RESET SEQ#RESET SEQ#RESET SEQ#as the last item printed, if you press OK OK OK OK OK (right side) thesequence number will be reset to zero and the printer willprint RRRRReady eady eady eady eady and printer is ready to print.
To skip resetting the sequence number to zero, pressNEXT NEXT NEXT NEXT NEXT (left side). CONFIGURE CONFIGURE CONFIGURE CONFIGURE CONFIGURE is printed. Unplug and replugin the printer to return to printing mode. RRRRReady eady eady eady eady is printed.
This feature isavailable only onunits with thetime/date optioninstalled.
RESET SEQ#RESET SEQ#RESET SEQ#RESET SEQ#RESET SEQ#
DOW :0=Sunday1=Monday2=Tuesday3=Wednesday4=Thursday5=Friday6=Saturday

This section shows the cable differences in the modelsof the 1220 series printer and the control codes andcommunication protocols.
Model 1220Model 1220Model 1220Model 1220Model 1220RSRSRSRSRS-232 Serial V-232 Serial V-232 Serial V-232 Serial V-232 Serial Versionersionersionersionersion
Pin No. Pin No. Pin No. Pin No. Pin No. SignalSignalSignalSignalSignal DTE DirectionDTE DirectionDTE DirectionDTE DirectionDTE Direction DescriptionDescriptionDescriptionDescriptionDescription
1 Chassis ground - Cable shield
2 (TD) Transmitted From printer Printer data output line
data
3 (RD) Received data To printer Printer data input line
7 (SG) Signal - Signal ground
11 (CTS) Clear to send From printer Signal (equivalent to
BUSY) indicating that
printer is ready for
operation and can
receive data.
1616161616
The rest are not used.
Communication

The rest are not used.
Serial Interface VSerial Interface VSerial Interface VSerial Interface VSerial Interface Voltage Loltage Loltage Loltage Loltage Levelsevelsevelsevelsevels
Received data:Mark = OFF = Logic “1” = -25V to -3VSpace = ON = Logic “0” = +25V to +3V
Clear to send:Busy = OFF = Logic “1” = -9VNot Busy = ON = Logic “0” = +9V
Transmitted data:Mark = OFF = Logic “1” = -9VSpace = ON = Logic “0” = +9V
Model 1220 (2600)Model 1220 (2600)Model 1220 (2600)Model 1220 (2600)Model 1220 (2600)RSRSRSRSRS-232 Serial V-232 Serial V-232 Serial V-232 Serial V-232 Serial Versionersionersionersionersion
1717171717
Pin No. Pin No. Pin No. Pin No. Pin No. SignalSignalSignalSignalSignal DTE DirectionDTE DirectionDTE DirectionDTE DirectionDTE Direction DescriptionDescriptionDescriptionDescriptionDescription
1 Chassis ground _ Cable shield
2 (RD) Received data To printer Printer data input line
5 (CTS) Clear to send From printer Signal (equivalent to
BUSY) indicating that
printer is ready for
operation and can
receive data.
7 (SG) Signal _ Signal Ground
The rest are not used.
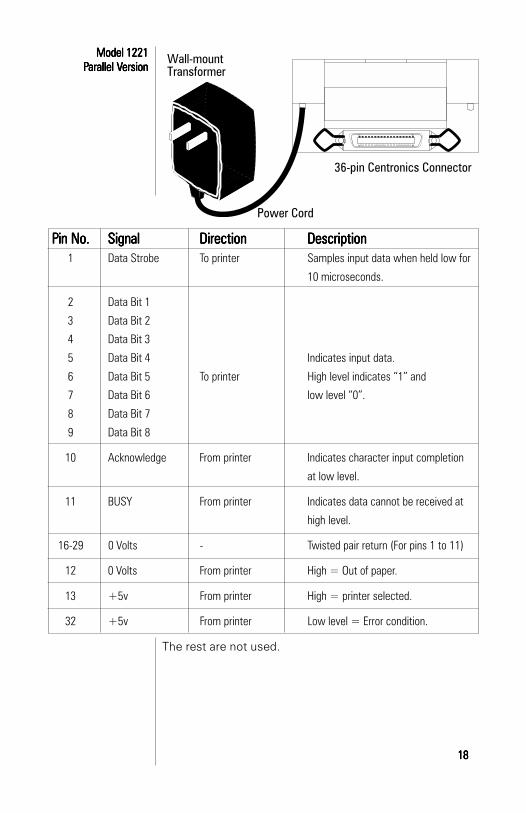
Model 1221Model 1221Model 1221Model 1221Model 1221PPPPParallel Varallel Varallel Varallel Varallel Versionersionersionersionersion
1818181818
Pin No.Pin No.Pin No.Pin No.Pin No. SignalSignalSignalSignalSignal DirectionDirectionDirectionDirectionDirection DescriptionDescriptionDescriptionDescriptionDescription1 Data Strobe To printer Samples input data when held low for
10 microseconds.
2 Data Bit 1
3 Data Bit 2
4 Data Bit 3
5 Data Bit 4 Indicates input data.
6 Data Bit 5 To printer High level indicates “1” and
7 Data Bit 6 low level “0”.
8 Data Bit 7
9 Data Bit 8
10 Acknowledge From printer Indicates character input completion
at low level.
11 BUSY From printer Indicates data cannot be received at
high level.
16-29 0 Volts - Twisted pair return (For pins 1 to 11)
12 0 Volts From printer High = Out of paper.
13 +5v From printer High = printer selected.
32 +5v From printer Low level = Error condition.

1. ConnectorsOn the printer: 36-pin receptacle, equivalent to57-40360-12-D56 AMPOn the cable: 36-pin plug, equivalent to 57-30360AMP or plug equivalent to 552274-1 AMPcover equivalent to 552073-1 AMP
2. CableUse a cable less than 10 feet long. A shielded cableusing twisted pair conductions is desirable.
3. Connector LocksAfter engaging the connectors, fasten them withlocks.
T1 = 0 minimumT2 = 0.5 microseconds minimumT3 = 1 microsecond minimumT4 = Approx. 6.8 microseconds
1919191919

Model 1222Model 1222Model 1222Model 1222Model 1222Serial TTL VSerial TTL VSerial TTL VSerial TTL VSerial TTL Versionersionersionersionersion
2020202020
Pin No.Pin No.Pin No.Pin No.Pin No. TTTTTypeypeypeypeype
1 BUSY2 GROUND3 RCV. DATA4 XMT DATA5 NOT USED

2121212121
Pin No. Pin No. Pin No. Pin No. Pin No. SignalSignalSignalSignalSignal DirectionDirectionDirectionDirectionDirection DescriptionDescriptionDescriptionDescriptionDescription
1* Chassis ground - Cable shield
23 (RD) Received data(-) From printer Printer data return line
25 (RD) Received data(+) To printer Printer data input line
*Optional
Model 1223Model 1223Model 1223Model 1223Model 122320 mA Current Loop20 mA Current Loop20 mA Current Loop20 mA Current Loop20 mA Current Loop
VVVVVersionersionersionersionersion
The rest are not used.

Pin No. Pin No. Pin No. Pin No. Pin No. SignalSignalSignalSignalSignal DTE DirectionDTE DirectionDTE DirectionDTE DirectionDTE Direction DescriptionDescriptionDescriptionDescriptionDescription
2 TXD - From printer Printer data output line
6 TXD +
3 RXD - To printer Printer data input line
8 RXD +
The rest are not used.
2222222222
Model 1224Model 1224Model 1224Model 1224Model 1224 RS RS RS RS RS-485 Serial V-485 Serial V-485 Serial V-485 Serial V-485 Serial Versionersionersionersionersion

1. ConnectorsOn the printer: 25-hole receptacle, equivalent toDB-25SOn the cable: 25-pin plug, equivalent to DB-25P
2. CableUse cable less than 2500 feet longUse cable less than 2500 feet longUse cable less than 2500 feet longUse cable less than 2500 feet longUse cable less than 2500 feet long. . . . . A shielded cableusing twisted pair conductors is desirable.
2323232323

CONTROLCONTROLCONTROLCONTROLCONTROLCODESCODESCODESCODESCODES
According to the American Standard Code of InformationInterchange (ASCII), there are 32 control codes in additionto the codes for the printable characters. (Control codesare sent as data, but the receiving device interprets themas abbreviated ‘’instructions”, communication - statusmessages, etc.)
The printer recognizes these control codes:
The printer will ignore all other control codes.
2424242424
CodeCodeCodeCodeCodeFFFFFunctionunctionunctionunctionunction AbbreviationAbbreviationAbbreviationAbbreviationAbbreviation HexHexHexHexHex DecimalDecimalDecimalDecimalDecimal
- NUL 00 0- SOH 01 1Reserved STX 02 2Reserved ETX 03 3- EOT 04 4- ENQ 05 5Reserved ACK 06 6- BEL 07 7Back Space BS 08 8- HT 09 9Line Feed LF 0A 10- VT 0B 11- FF 0C 12Carriage Return CR 0D 13Double Height SO 0E 14Double Width SI 0F 15Reset Seq. # to 0000 DLE 10 16Inhibit Line Space DC1 11 17Dot Graphics DC2 12 18User Character DC3 13 19Set Time & Date DC4 14 20Reserved NAK 15 21Get time and date SYN 16 22- ETB 17 23Stop Reverse Field CAN 18 24Reverse Field EM 19 25Escape ESC 1B 27- FS 1C 2824 Column Mode GS 1D 2932 Column Mode RS 1E 3040 Column Mode US 1F 31

Back SpaceBack SpaceBack SpaceBack SpaceBack SpaceCode 8Code 8Code 8Code 8Code 8
Line FeedLine FeedLine FeedLine FeedLine FeedCode 10Code 10Code 10Code 10Code 10
Upon receipt of this code, the printer erases from itsbuffer the previously received character. This is useful incorrecting typing errors for programs that send data bothto a video screen and the hardcopy printer. Rememberthat if you type more characters than the printer can printon a line, the printer will automatically start printing.
The printer handles this control code in exactly the samemanner as carriage return (control code 13) except when aline feed immediately follows a carriage return. The linefeed code is ignored if it is immediately preceded by acarriage return. The default setting is 7.6 lines per inch.
Whenever a carriage return code is received, the printerwill print out the current contents of its buffer, then clearthe buffer to get ready for additional data.
This control code tells the printer to switch to the doubleheight character line. The control code can be sent at anytime on a line; it need not be the first code received by theprinter after a carriage return.You cannot mix normal and double height characters onthe same line. Once you select the double height, theprinter will remain in that mode until it receives a carriagereturn or line feed. A line print caused by a buffer fullcondition will not clear the double height command. Thismeans that the “wrap around” print line will also bedouble height if the double height command was sentbefore the line buffer was filled.
This control code tells the printer to switch to doublewidth character printing. The control code should be sentas the first character on a line. If it is received after half themaximum characters per line were sent then the printerwill ignore all characters on the last half of the line.You cannot mix normal and double width characters onthe same line. Once you select the double width, theprinter will remain in that mode until it receives a carriagereturn or line feed. A line print caused by a buffer fullcondition will not clear the double width command. Thismeans that the “wrap around” print line will also bedouble width if the double width command was sentbefore the line buffer was filled.
2525252525
Carriage ReturnCarriage ReturnCarriage ReturnCarriage ReturnCarriage ReturnCode 13Code 13Code 13Code 13Code 13
Double WidthDouble WidthDouble WidthDouble WidthDouble WidthCode 15Code 15Code 15Code 15Code 15
Double HeightDouble HeightDouble HeightDouble HeightDouble HeightCode Code Code Code Code 1414141414
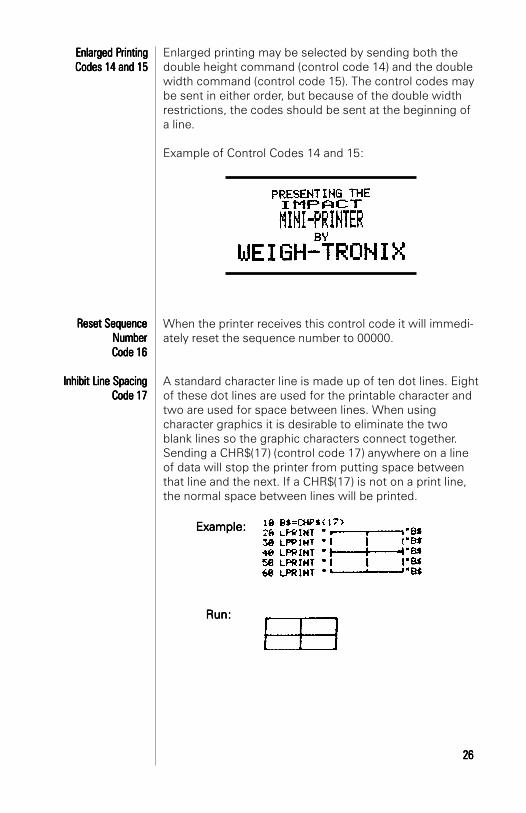
Enlarged printing may be selected by sending both thedouble height command (control code 14) and the doublewidth command (control code 15). The control codes maybe sent in either order, but because of the double widthrestrictions, the codes should be sent at the beginning ofa line.
Example of Control Codes 14 and 15:
When the printer receives this control code it will immedi-ately reset the sequence number to 00000.
A standard character line is made up of ten dot lines. Eightof these dot lines are used for the printable character andtwo are used for space between lines. When usingcharacter graphics it is desirable to eliminate the twoblank lines so the graphic characters connect together.Sending a CHR$(17) (control code 17) anywhere on a lineof data will stop the printer from putting space betweenthat line and the next. If a CHR$(17) is not on a print line,the normal space between lines will be printed.
Enlarged PEnlarged PEnlarged PEnlarged PEnlarged PrintingrintingrintingrintingrintingCodes 14 and 15Codes 14 and 15Codes 14 and 15Codes 14 and 15Codes 14 and 15
Example:Example:Example:Example:Example:
Run: Run: Run: Run: Run:
Reset SequenceReset SequenceReset SequenceReset SequenceReset SequenceNumberNumberNumberNumberNumberCCCCCodeodeodeodeode 1 1 1 1 166666
IIIIInhibit Line Spacingnhibit Line Spacingnhibit Line Spacingnhibit Line Spacingnhibit Line SpacingCCCCCodeodeodeodeode 17 17 17 17 17
2626262626

The mechanism used in the printer prints one line of dotsacross at a time. This means that when it prints one lineof characters it has actually printed ten lines of dotswhere the first eight lines make up the character and thelast two lines are blank for the space between characterlines. By using the CHR$(18) control code, you can tell theprinter which dots to print for one whole dot line. Sincethere are 144 dots per line, you must follow the CHR$(18)control code with 144 bits of information. For every placethere is a one in the 144 bit pattern you send, the printerwill print a dot. Rather than receive one bit at a time theprinter expects to receive the information eight bits at atime. This means that after receiving a CHR$(18) the nexteighteen 8 bit characters it receives will be printed asdots to form one dot line.
To figure out the dot pattern values to send after theCHR$(18), you will need some grid paper. A large sheetwith 144 grid boxes across would be convenient. If such alarge sheet of paper is not available, you could divide yourpattern in half and work with 72 grid boxes across. Divideup your grid paper by drawing a heavy line down every 8boxes across. Now fill in each box of the grid that youwant to be printed. Now do the following procedure tocompute the eighteen values which describe your desiredbit pattern.
Imagine placing the number sequence over each of thefirst eight grid boxes.
Now add together all the numbers above the boxes whichare filled in or have a dot as in the example above. In ourexample, we would have 2 + 16 + 32 which equals 50.‘50’ then would be the first entry of a data statementwhich would be followed by seventeen more numberscomputed in the exact same manner as the example.Once you have the eighteen values in a data statement,you need simply run a program which prints a CHR$(18)followed by the data value read from the data statement.Don’t forget to end all of your print statements withsemicolon. This will prevent carriage returns CHR$(13)from being sent, which would become part of theeighteen data values for which the printer is waiting.
Dot GraphicsDot GraphicsDot GraphicsDot GraphicsDot GraphicsCode 18Code 18Code 18Code 18Code 18
2727272727

Example 1:
Example 2:
By using CHR$(19) you enter the Custom Character mode.This allows you to design and print your own 6 x 8 charac-ter by inputting data. A data statement is made of num-bers that represent a row of dots which when read alltogether, will make up your character. To design yourcharacter, follow the example below. You should noticethat each number in the data statement corresponds toone row in your character. To design a character, followthese steps:
User PUser PUser PUser PUser ProgrammablerogrammablerogrammablerogrammablerogrammableCharacterCharacterCharacterCharacterCharacter
Code 19Code 19Code 19Code 19Code 19
2828282828

1. Use quad ruled paper to design your character.
2. Number 8 consecutive rows like this:1248163264128
3. Now design your character in dot form (see theexample below).
4. Add together all the numbers from the column on theleft, counting only where you have placed a dot in arow. In our example, the first column has three dotslocated in rows 4, 8, and 16. Added together theyequal 28.
5. Put your final total for each column into a datastatement in column order.
TTTTTOOOOOTTTTTALALALALAL
The data statement in your program will read:DATA 28, 34, 65, 65, 54, 34
The next step is to tell the printer your newly designedcharacter. To do this you must send a CHR$(19) followedby the six numbers you computed above. Following is anexample of how this can be done.
2929292929

After typing RUN, your custom character will be stored inthe printer’s memory. It will retain this information untilthe printer is switched off or until you write over the databy defining a different character.
To print your newly designed character, simply sendCHR$(126) which corresponds to hexidecimal value 7E.
This control code is used when setting the printer’s timeand date clock. Following is the text string to send whensetting the clock:
This control code is used to read the printer’s time anddate clock. Following is the ASCII string received:
Sending this control code will turn off the reverse fieldmode that is selected using control code 25.
Send this control code to turn on the reverse fieldprinting mode. This will print white letters on a darkbackground. Do not print more that three reverse fieldprint lines. Also, do not print more than a few emptyspaces in a reverse field. The printer may becomeoverloaded and stop printing.
Set Time and DateSet Time and DateSet Time and DateSet Time and DateSet Time and DateControl Code 20Control Code 20Control Code 20Control Code 20Control Code 20
Read Time and DateRead Time and DateRead Time and DateRead Time and DateRead Time and DateControl Code 22Control Code 22Control Code 22Control Code 22Control Code 22
Cancel Reverse FieldCancel Reverse FieldCancel Reverse FieldCancel Reverse FieldCancel Reverse FieldControl Code 24Control Code 24Control Code 24Control Code 24Control Code 24
3030303030
Reverse Field ControlReverse Field ControlReverse Field ControlReverse Field ControlReverse Field ControlCode 25Code 25Code 25Code 25Code 25

The printer powers up in the column mode last selected byconfiguration. You can change the column width bysending the appropriate control code from the list below:
Control code 29 - 24 columnsControl code 30 - 32 columnsControl code 31 - 40 columns
You can send the control code at any point on a linebefore the buffer becomes filled. You cannot changecolumn widths on the same line.
The Model 122X printer can produce all ASCII charactersfrom hex 20 through hex 7D (decimal 32 through 125).Here’s what they look like:
Note the last two codes of the usual ASCII character setare not supported. Instead, if CHR$(126), which corre-sponds to hexadecimal 7E, is received by the 122X printer,it will print the character defined in its RAM (RandomAccess Memory). The section on USER ProgrammableCharacter describes how this RAM can be loaded withany 6 x 8 pattern.
The model 122X also has a graphic character set thatresides between hexidecimal values 80 and FF (decimal128 and 255). The symbols used are compatible withRadio Shack® Model 100 portable computer.
3131313131
PPPPPrintable Charactersrintable Charactersrintable Charactersrintable Charactersrintable Characters
Selectable ColumnSelectable ColumnSelectable ColumnSelectable ColumnSelectable ColumnWidthWidthWidthWidthWidth
Codes 29, 30, 31Codes 29, 30, 31Codes 29, 30, 31Codes 29, 30, 31Codes 29, 30, 31

For special applications please contact our CustomerService Department for further assistance:
Phone 800-982-6622707-527-5555
Fax 800-847-6743707-579-0180
CommandCommandCommandCommandCommand PPPPPrint formatted datarint formatted datarint formatted datarint formatted datarint formatted data<ESC> 0 HH:MM 24 hour format<ESC> 1 HH:MM_?M 12 hour format with AM or PM
<ESC> 2 MM/DD/YY month/day/year<ESC> 3 DD-MM-YY day-month-year/numeric month<ESC> 4 DD-MON-YY day-month-year with 3 letter
abbreviation of the month<ESC> 5 DOW day of week abbreviation<ESC> 6 currently configured format<ESC> 9 XXXX current sequence number
PPPPPrinter Escaperinter Escaperinter Escaperinter Escaperinter EscapeCommand CodeCommand CodeCommand CodeCommand CodeCommand Code
DefinitionsDefinitionsDefinitionsDefinitionsDefinitions
3232323232

Default Table
3333333333
Below is a table showing the possible values for theCustom and Configuration menu parameters. The valuesshown in bold bold bold bold bold type are the default settings.
Custom MenuCustom MenuCustom MenuCustom MenuCustom Menu Configuration MenuConfiguration MenuConfiguration MenuConfiguration MenuConfiguration Menu
T/D Format 1 - None2 - MM/DD/YY_hh:mm_?M33333 ----- MM/DD/YY hh:mm ?M DOWMM/DD/YY hh:mm ?M DOWMM/DD/YY hh:mm ?M DOWMM/DD/YY hh:mm ?M DOWMM/DD/YY hh:mm ?M DOW4 - MM/DD/YY hh:mm5 - MM/DD/YY hh:mm DOW6 - DD-MM-YY hh:mm ?M7 - DD-MM-YY hh:mm ?M DOW8 - DD-MM-YY hh:mm9 - DD-MM-YY hh:mm DOW10 - DD-MON-YY hh:mm ?M11 - DD-MON-YY hh:mm ?M DOW12 - DD-MON-YY hh:mm13 - DD-MON-YY hh:mm DOW
Auto T&D 11111 ----- NO (no print after CR)NO (no print after CR)NO (no print after CR)NO (no print after CR)NO (no print after CR)2 - YES (print after CR)
Auto SEQ# 11111 ----- NO (no print after CR)NO (no print after CR)NO (no print after CR)NO (no print after CR)NO (no print after CR)2 - YES (print after CR)
Zero 11111 ----- ØØØØØ Zero with slashZero with slashZero with slashZero with slashZero with slash2 - 0 Zero without slash
Pound 11111 ----- ##### U.S. pound symbolU.S. pound symbolU.S. pound symbolU.S. pound symbolU.S. pound symbol2 - £ British pound sterling
symbol
Underscore 11111 ----- _____ UnderscoreUnderscoreUnderscoreUnderscoreUnderscore2 - ➔➔➔➔➔ Left arrow
Busy Invert 11111 ----- Non-inverted busy (CTS)Non-inverted busy (CTS)Non-inverted busy (CTS)Non-inverted busy (CTS)Non-inverted busy (CTS)2 - Inverted busy
Online/Offline 11111 ----- switch function enabledswitch function enabledswitch function enabledswitch function enabledswitch function enabled2 - switch function disabled
Ext Ch Set 11111 ----- NO (no extended char. set)NO (no extended char. set)NO (no extended char. set)NO (no extended char. set)NO (no extended char. set)2 - YES
Print Ready 11111 ----- Print “Ready” messagePrint “Ready” messagePrint “Ready” messagePrint “Ready” messagePrint “Ready” message2 - Don’t print “Ready” message
Baud 1 - 3002 - 60033333 ----- 120012001200120012004 - 24005 - 48006 - 96007 - 19200
Data Bits 1 - 722222 ----- 88888
Parity 11111 ----- ODD (none if data bits = 8)ODD (none if data bits = 8)ODD (none if data bits = 8)ODD (none if data bits = 8)ODD (none if data bits = 8)2 - EVEN (none if data bits = 8)(none if data bits = 8)(none if data bits = 8)(none if data bits = 8)(none if data bits = 8)
Stop Bits 11111 ----- 111112 - 2
Handshake 1 - None2 - BUSY-LINE (serial only)33333 ----- BUSY-BUFFBUSY-BUFFBUSY-BUFFBUSY-BUFFBUSY-BUFF (serial only)(serial only)(serial only)(serial only)(serial only)4 - XON/XOFF-LINE (serial only)5 - XON/XOFF-BUFF (serial only)
Columns 1 - 2422222 ----- 32323232323 - 40
Inver 11111 ----- No (non-inverted printing)No (non-inverted printing)No (non-inverted printing)No (non-inverted printing)No (non-inverted printing)2 - YES (inverted printing)
Font Type 11111 ----- 5x8 font5x8 font5x8 font5x8 font5x8 font2 - 5x5 font
Magnification 11111 ----- No magnificationNo magnificationNo magnificationNo magnificationNo magnification2 - Double width3 - Double height4 - Double width, double height

Notes

1000 Armstrong DriveFairmont, MN 56031 USATelephone: 507-238-4461Facsimile: 507-238-4195E-mail: service @wt-nci.comwww.wt-nci.com


