USER’S MANUAL C6 VARIABLE SPEED CONTROL Rev. 6cnc4pc.com/Tech_Docs/C6R6_2_USER_MANUAL.pdf ·...
12
USER’S MANUAL C6 – VARIABLE SPEED CONTROL Rev. 6.2 JULY, 2015
Transcript of USER’S MANUAL C6 VARIABLE SPEED CONTROL Rev. 6cnc4pc.com/Tech_Docs/C6R6_2_USER_MANUAL.pdf ·...

USER’S MANUAL
C6 – VARIABLE SPEED CONTROL Rev. 6.2
JULY, 2015
User’s Manual Page 0
USER'S MANUAL TABLE OF CONTENTS Page #
Contents
1.0 Overview ........................................................................................................................ 1
2.0 Features ......................................................................................................................... 1
3.0 Specifications ................................................................................................................ 2
4.0 Board Description ......................................................................................................... 3
5.0 Functional Block Diagrams .......................................................................................... 4
5.1 Configuring the Control Software: ............................................................................... 4
5.2 Pinout of connector RJ45: ............................................................................................ 7
6.0 Troubleshooting ............................................................................................................ 8
7.0 Dimensions .................................................................................................................. 10

User’s Manual Page 1
1.0 OVERVIEW
This card lets you control your spindle with step and direction signals, as if it was an axis motor. It convert the step signal to an analog (0-10VDC) and by using the onboard relays you can control the direction (CW/CCW) and enable the drive (On/Off). A Variable Frequency Drive or Inverter works by modifying the frequency for AC motors. You can control most of these devices with an external analog signal (0-10VDC). That is, if there is 5VDC coming into through the control signal, the motor will run at 50% of full speed, if there was 10VDC, the motor will run at 100% of full speed. If there is no signal coming out, then the motor will stop. This unit can also be used on many DC motor controllers by replacing the potentiometer that controls the speed.
2.0 FEATURES
Inputs a frequency (step) and outputs an analog 0-10VDC.
Have two relays that can be used to control the direction and enable and disable the drive.
Opto-isolated output signals. The analog and CW and CCW signals are optically isolated, so this board can be used with drives that make grounds common with the mains that drive the VFD or motor.
All TTL +5VDC or +3.3VDC Signals. Interface directly with parallel port interface products and other cnc4pc.com cards. 5VDC (TTL) signals are very common among automation devices.
Flexible design. It works with cnc4pc’s products, directly through your parallel port, or through many other parallel port control products.
RJ45 Connector. This connector is for connecting the boards directly using a
standard RJ45 cable, allowing can be used to carry input signal and power line.

User’s Manual Page 2
3.0 SPECIFICATIONS
INPUT SPECIFICATIONS
On-state voltage range 2 to 5V DC
Minimum on-state input current 16 mA
Maximum off-state voltage 0.8V
Maximum operation frequency 50KHz
Minimum on-state pulse width 3uS
Signal Type Active High
The inputs are not buffered
ELECTROMECHANICAL RELAYS SPECIFICACTIONS
Maximum Current (AC) 7A@240VAC; 10A@125VAC
Maximum Current (DC) 15A@24VDC; 10A@28VDC
GENERAL SPECIFICATIONS
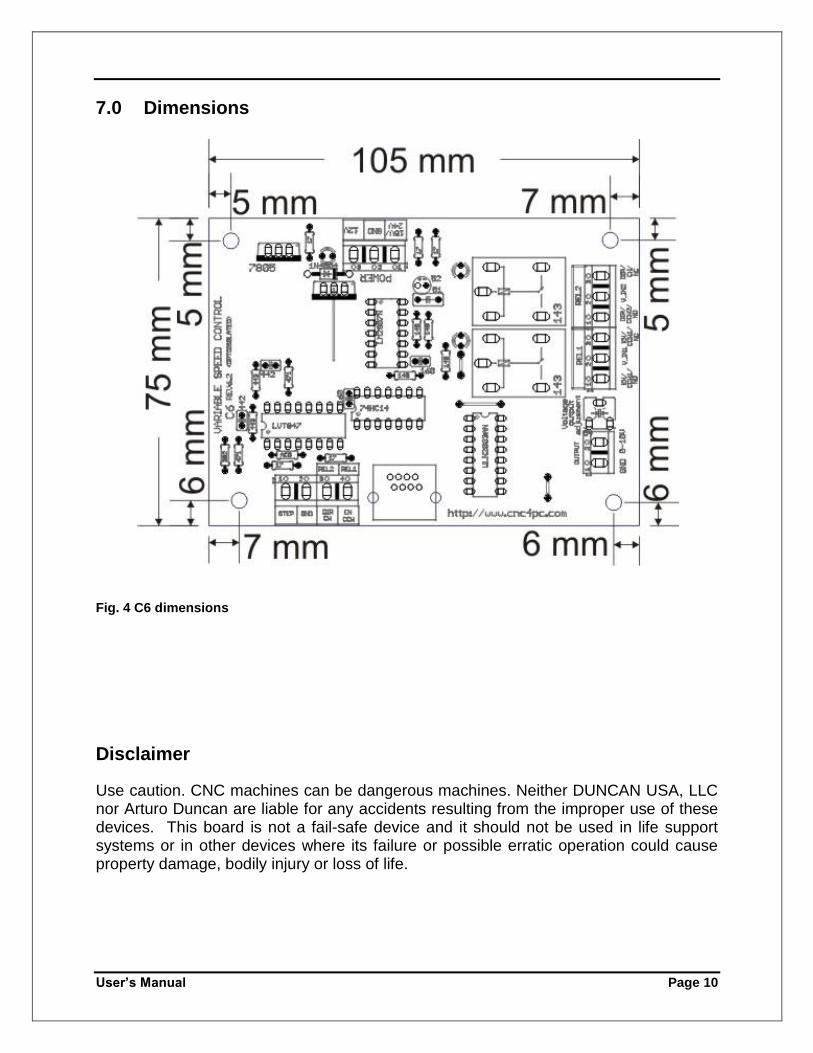
Dimensions Millimeters: 105L x 75W x22D
External power 12V DC @ 200mA
Wiring: Before connecting anything, please be sure to read your VFD’s manual and make sure you understand all the safety issues.
User’s Manual Page 3
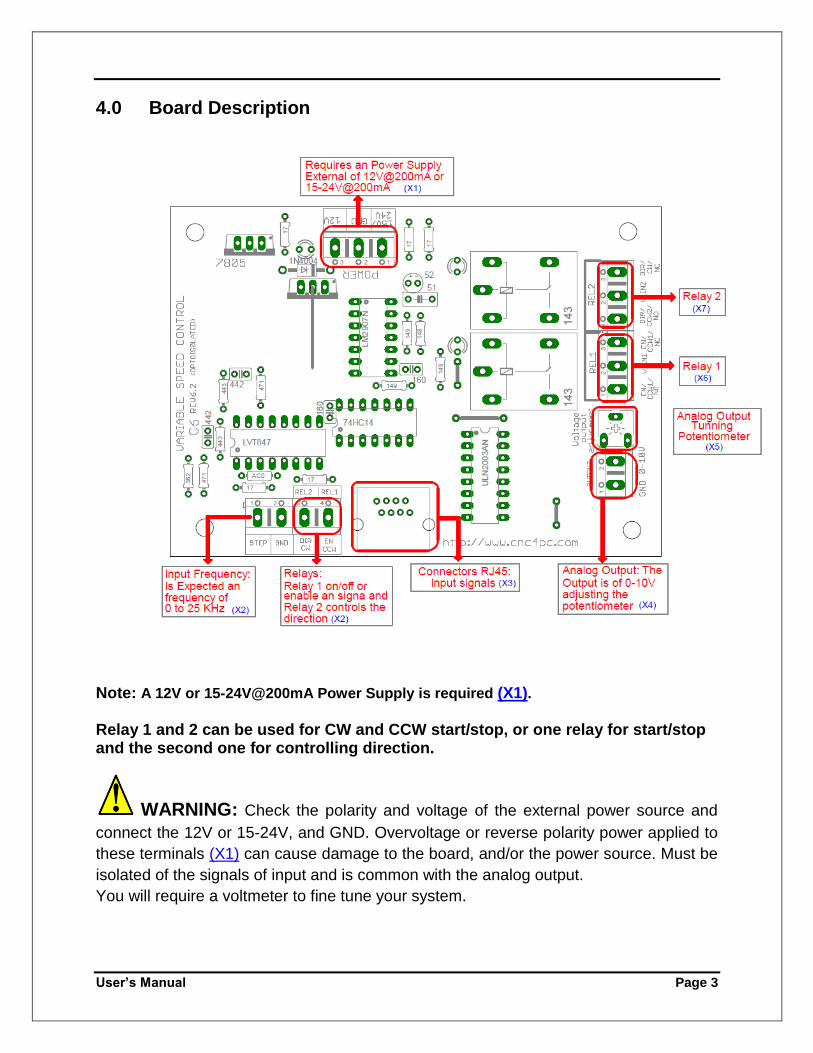
4.0 Board Description
Note: A 12V or 15-24V@200mA Power Supply is required (X1). Relay 1 and 2 can be used for CW and CCW start/stop, or one relay for start/stop and the second one for controlling direction.
WARNING: Check the polarity and voltage of the external power source and
connect the 12V or 15-24V, and GND. Overvoltage or reverse polarity power applied to
these terminals (X1) can cause damage to the board, and/or the power source. Must be
isolated of the signals of input and is common with the analog output.
You will require a voltmeter to fine tune your system.
User’s Manual Page 4
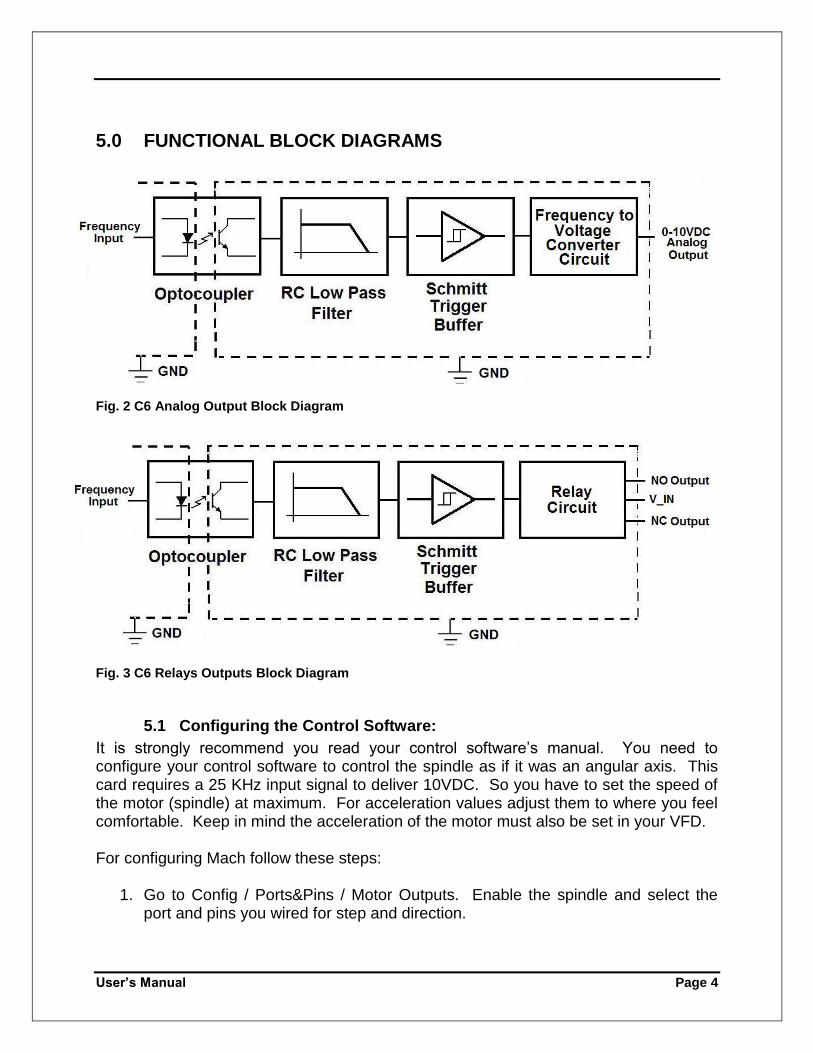
5.0 FUNCTIONAL BLOCK DIAGRAMS
Fig. 2 C6 Analog Output Block Diagram
Fig. 3 C6 Relays Outputs Block Diagram
5.1 Configuring the Control Software:
It is strongly recommend you read your control software’s manual. You need to configure your control software to control the spindle as if it was an angular axis. This card requires a 25 KHz input signal to deliver 10VDC. So you have to set the speed of the motor (spindle) at maximum. For acceleration values adjust them to where you feel comfortable. Keep in mind the acceleration of the motor must also be set in your VFD. For configuring Mach follow these steps:
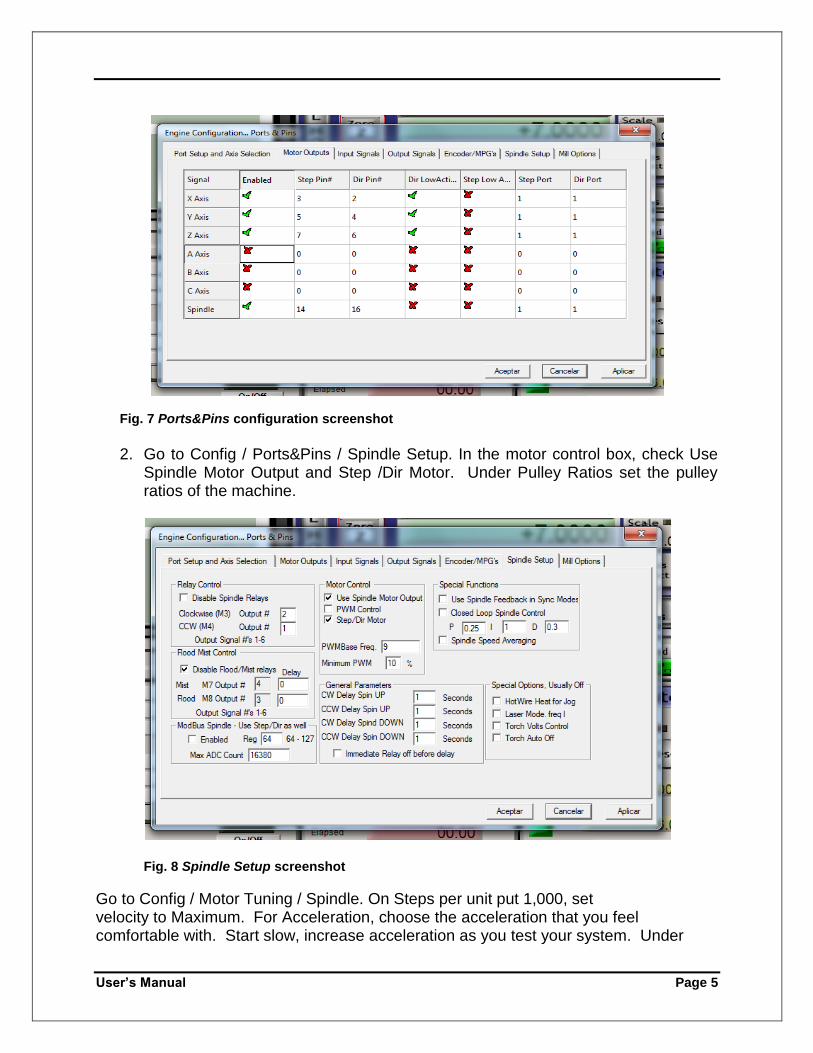
1. Go to Config / Ports&Pins / Motor Outputs. Enable the spindle and select the port and pins you wired for step and direction.
User’s Manual Page 5
Fig. 7 Ports&Pins configuration screenshot
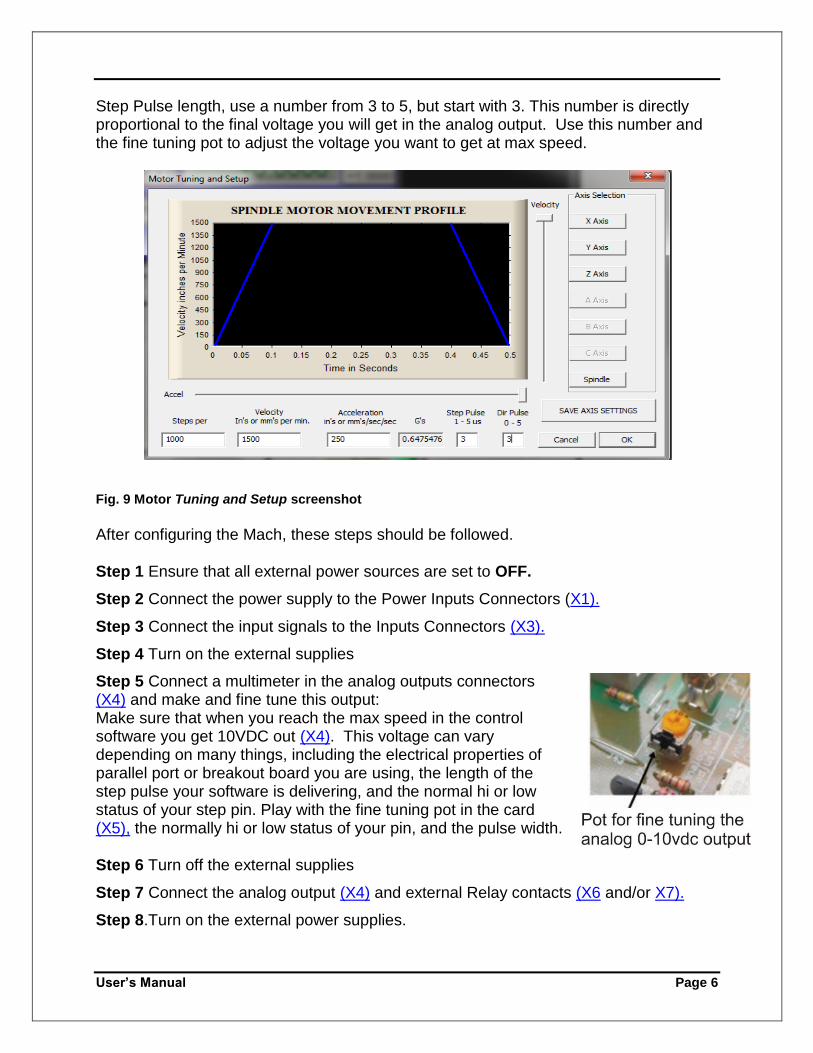
2. Go to Config / Ports&Pins / Spindle Setup. In the motor control box, check Use
Spindle Motor Output and Step /Dir Motor. Under Pulley Ratios set the pulley ratios of the machine.
Fig. 8 Spindle Setup screenshot
Go to Config / Motor Tuning / Spindle. On Steps per unit put 1,000, set velocity to Maximum. For Acceleration, choose the acceleration that you feel comfortable with. Start slow, increase acceleration as you test your system. Under
User’s Manual Page 6
Step Pulse length, use a number from 3 to 5, but start with 3. This number is directly proportional to the final voltage you will get in the analog output. Use this number and the fine tuning pot to adjust the voltage you want to get at max speed.
Fig. 9 Motor Tuning and Setup screenshot After configuring the Mach, these steps should be followed. Step 1 Ensure that all external power sources are set to OFF.
Step 2 Connect the power supply to the Power Inputs Connectors (X1).
Step 3 Connect the input signals to the Inputs Connectors (X3).
Step 4 Turn on the external supplies
Step 5 Connect a multimeter in the analog outputs connectors (X4) and make and fine tune this output: Make sure that when you reach the max speed in the control software you get 10VDC out (X4). This voltage can vary depending on many things, including the electrical properties of parallel port or breakout board you are using, the length of the step pulse your software is delivering, and the normal hi or low status of your step pin. Play with the fine tuning pot in the card (X5), the normally hi or low status of your pin, and the pulse width. Step 6 Turn off the external supplies
Step 7 Connect the analog output (X4) and external Relay contacts (X6 and/or X7).
Step 8.Turn on the external power supplies.

User’s Manual Page 7
5.2 Pinout of connector RJ45:
RJ45 PIN FUNCTION
1 GND 2 NOT USED 3 REL_1 4 REL_2 5 STEP 6 NOT USED 7 NOT USED 8 NOT USED
Replacing a Potentiometer:
This circuit can be used to replace a potentiometer of DC motor speed control circuits. This speed controller circuits are very commonly used by SIEG, KB Electronics, and many other oriental machines. Before explaining how to do it, please first keep in mind that it can be done if the voltage that goes though the pot is +12vdc or less. This circuit cannot be used for AC currents. In most cases the terminals that go to the potentiometer will carry these signals: P1 = GND P2 = WIPER P3 = REFERENCE VOLTAGE These are the steps for replacing a potentiometer: 1. Measure the voltage difference between P1 and P3. Make sure it measures
under +12vdc. 2. Fine tune the analog output to the output voltage you got from step 1. 3. Connect the ground from the analog output to the ground of the potentiometer
(P1). 4. Connect the analog output to the wiper connection of the potentiometer (P2).
If the reference voltage from pot is between +10 and 12vdc, you can use it to power the analog circuit (not for the C6, because the relays might draw too much power). In this case, connect P1 to the ground of the power terminal, and P3 to the +12vdc power connector.

User’s Manual Page 8
6.0 TROUBLESHOOTING
SYMPTOM: THE BOARD DOES NOT REACT TO THE SIGNAL.
POSSIBLE CAUSE POSSIBLE SOLUTIONS
- Pin conflict or mach3 configuration.
It is possible that the port address
used for the pin is not right, or that
there is a pin conflict with the. That is
that you are using that same pin twice.
(it could be assigned to a different
function).
- Go to the device manager in windows,
and check the memory address used for
the parallel port you are using. Usually it
will be 378 for LPT1. Check also that
the port does not have a conflict. Then
in mach3, go to Ports & Pins / Port Setup
and Axis Selection. Check the memory
address is correct.
- Check that the pin you are using is not
been used anywhere else in your setup.
Got to motor output and output signals,
and check all the entries.
- The signal or frequencies are not
getting to the board. It could be the
cable or that you are passing the
signal through the same breakout
board that you are enabling /disabling,
so the outputs could be disabled, so
they will not get to the breakout board.
- Try a different cable.
- Test the pins in the cable (before they
reach the breakout board) with a
multimeter.
- Problems with Mach3 Pulse
Generation. Mach3 could have
installation problems (you did not
restart immediately after installation),
or there could be something creating a
conflict. Some dongle devices might
cause this, other software, like
QuickTime or drivers for touch screen.
- Test this in a different PC.
- Follow Art’s suggestions for optimizing
up WinXP:
http://www.machsupport.com/downloads
/XP_Optimization.txt.
- The inputs signal does not have
enough strength. Modern PCs come
with parallel ports that have very low
amperage signals; the pulse stream
has to be able to provide at least
16mA signals.
- Use a breakout board to buffer and
boost the signals.

User’s Manual Page 9
SYMPTOM: THE ANALOG OUTPUT DOES NOT REACH THE 10VDC.
POSSIBLE CAUSE POSSIBLE SOLUTIONS
- Insufficient pulse width. It is possible
that the signal pulse width is not
enough to activate the opt couplers.
- In Mach X, go to Config / Motor Tuning /
Spindle. Under Step Pulse length
increase this value, use a number from 3
to 5, but start with 3.
- The signal is set active low or the
breakout board could be inverting
the signals.
- In Mach X, go to Config / Ports&Pins /
Motor Outputs. Change the active low
status of the pin used for step.
User’s Manual Page 10
7.0 Dimensions
Fig. 4 C6 dimensions
Disclaimer
Use caution. CNC machines can be dangerous machines. Neither DUNCAN USA, LLC nor Arturo Duncan are liable for any accidents resulting from the improper use of these devices. This board is not a fail-safe device and it should not be used in life support systems or in other devices where its failure or possible erratic operation could cause property damage, bodily injury or loss of life.