User’s Guide - The Informr - Save Money: Compare Phones ... · microwave oven. Don’t drop your...
98
TELUS i335 Mike Phone User’s Guide
Transcript of User’s Guide - The Informr - Save Money: Compare Phones ... · microwave oven. Don’t drop your...
TELUS
i335 Mike Phone
User’s Guide

DECLARATION OF CONFORMITYPer FCC CFR 47 Part 2 Section 2.1077(a)
Responsible Party Name: Motorola, Inc.Address: 8000 West Sunrise BoulevardPlantation, FL 33322 USAPhone Number: 1 (800) 453-0920Hereby declares that the product:Product Name: i335Model Number: H98XAH6JR5ANConforms to the following regulations:FCC Part 15, subpart B, section 15.107(a), 15.107(d) and section 15.109(a)Class B Digital DeviceAs a personal computer peripheral, this device complies with Part 15 of the FCC Rules. Operation is subject to the following two conditions: (1) this device may not cause
harmful interference, and (2) this device must accept any interference received, including interference that may cause undesired operation.Note: This equipment has been tested and found to comply with the limits for a Class B digital device, pursuant to part 15 of the FCC Rules. These limits are designed to provide reasonable protection against harmful interference in a residential installation. This equipment generates, uses and can radiate radio frequency energy and, if not installed and used in accordance with the instructions, may cause harmful interference to radio communications. However, there is no guarantee that interference will not occur in a particular installation.
If this equipment does cause harmful interference to radio or television reception, which can be determined by turning the equipment off and on, the user is encouraged to try to correct the interference by one or more of the following measures:
• Reorient or relocate the receiving antenna.• Increase the separation between the equipment and
receiver.• Connect the equipment into an outlet on a circuit different
from that to which the receiver is connected.• Consult the dealer or an experienced radio/TV technician
for help.

1
HELLOMOTO
Introducing your new Mike i335 phone. Here’s a quick anatomy lesson.
On/Off/Home Key
PTT Button
Audio Jack
Volume Keys
Speaker beneath keypad
USB Connector
Internal Antenna located here
Speaker Key
Microphone beneath keypad
Left Soft KeyPerform function
in lower left display.
Talk KeyMake &
answer calls.
Menu KeyFrom home screen,
open main menu.
4-Way Navigation Key
Right Soft KeyPerform function in lower right display.
Power/Home/End KeyEnd calls, exit menu system.
OK KeyIn menus & lists, press to select highlighted option.

2
check it out
up, down, left or right ( )
1
2 Customizable O key
to open theSettings screen
Press and hold the Power Key for a few seconds, or until the screen lights up, to turn on your phone.
3
4 Press the O keyto select.
Press the Navigation Key
to highlight a menu feature.
Home Screen Main Menu
that can be used More Exit
Main Menu
T uLD
q
0 glP

3
Motorola, Inc.Consumer Advocacy Office1307 East Algonquin RoadSchaumburg, IL 60196www.hellomoto.com1-800-331-6456 (United States) 1-888-390-6456 (TTY/TDD United States for hearing impaired) 1-800-461-4575 (Canada) Product Support:www.motorola.com/idenCertain mobile phone features are dependent on the capabilities and settings of TELUS’s network. Additionally, certain features may not be activated by TELUS, and/or TELUS's network settings may limit the feature’s functionality. Always contact TELUS Client Care about feature availability and functionality. All features, functionality, and other product specifications, as well as the information contained in this user's guide are based upon the latest available information and are believed to be accurate at the time of printing. Motorola reserves the right to change or modify any information or specifications without notice or obligation.This device supports Bluetooth 1.2 and HS/HF/OPP/DUN/BPP profiles. In order for Bluetooth devices to communicate with one another, they must utilize the same Bluetooth profile. To determine the profiles supported by other Motorola devices, visit www.hellomoto.com/bluetooth. For other devices, contact their respective manufacturer.
Certain Bluetooth features including those listed may not be supported by all compatible Bluetooth-enabled devices, and/or the functionality of such features may be limited in certain devices, or by certain wireless carriers. Contact your wireless carrier about feature availability and functionality.Caution: Changes or modifications made in the radio phone, not expressly approved by Motorola, will void the user's authority to operate the equipment.MOTOROLA and the Stylized M Logo are registered in the US Patent & Trademark Office. All other product or service names are the property of their respective owners. Java and all other Java-based marks are trademarks or registered trademarks of Sun Microsystems, Inc. in the U.S. and other countries.© Motorola, Inc., 2007.Manual Number: NNTN7351ASoftware Version: D7F.00.37CP Version: 6A.00.00USR Version: U7FA.32.02
4 contents
contents
check it out . . . . . . . . . . . . . . . . . 2menu map . . . . . . . . . . . . . . . . . . 6Use and Care. . . . . . . . . . . . . . . . 8essentials . . . . . . . . . . . . . . . . . . 9
about this guide . . . . . . . . . . . 9SIM card . . . . . . . . . . . . . . . . 10battery . . . . . . . . . . . . . . . . . . 10turn it on & off . . . . . . . . . . . 14make phone a call . . . . . . . . 15answer phone a call . . . . . . 15make a private call . . . . . . . 15answer a private call . . . . . 17store a phone number or private ID . . . . . . . . . . . . . . . 17call a stored phone number or private ID. . . . . . 18your phone number and Private ID . . . . . . . . . . . 19text messages . . . . . . . . . . . 19using your handset as a modem . . . . . . . . . . . . . 23
accessories . . . . . . . . . . . . . 25for more information . . . . . 25
main attractions . . . . . . . . . . . 26PTV features . . . . . . . . . . . . 26one touch PTT . . . . . . . . . . . 31PT manager . . . . . . . . . . . . . 32Mike’s wireless web services . . . . . . . . . . . . 32bluetooth® . . . . . . . . . . . . . . 35
basics . . . . . . . . . . . . . . . . . . . . 39display . . . . . . . . . . . . . . . . . 39text entry . . . . . . . . . . . . . . . 40volume . . . . . . . . . . . . . . . . . 43navigation key . . . . . . . . . . . 43handsfree speaker . . . . . . . 43transmitters . . . . . . . . . . . . . 43use GPS with map software . . . . . . . . . . . 44
calls . . . . . . . . . . . . . . . . . . . . . . 47recent calls . . . . . . . . . . . . . 47redial. . . . . . . . . . . . . . . . . . . 48
voice name . . . . . . . . . . . . . 48caller ID. . . . . . . . . . . . . . . . 49call forward . . . . . . . . . . . . 49emergency calls . . . . . . . . 50international calls . . . . . . . 50speed dial . . . . . . . . . . . . . . 51turbo dial . . . . . . . . . . . . . . . 51voice mail . . . . . . . . . . . . . . 52net alerts . . . . . . . . . . . . . . . 53Mike’s Talk AroundTM . . . . 53
customize. . . . . . . . . . . . . . . . . 60ring tones . . . . . . . . . . . . . . 60wallpaper . . . . . . . . . . . . . . 61backlight . . . . . . . . . . . . . . . 61datebook . . . . . . . . . . . . . . . 62hide or show location information . . . . . . . . . . . . . 62
other features . . . . . . . . . . . . . 64advanced calling . . . . . . . . 64contacts . . . . . . . . . . . . . . . 65datebook . . . . . . . . . . . . . . . 65

5contents
GPS . . . . . . . . . . . . . . . . . . . . 66handsfree . . . . . . . . . . . . . . . 67personalize . . . . . . . . . . . . . . 68pc applications . . . . . . . . . . 68TTY . . . . . . . . . . . . . . . . . . . . . 68security . . . . . . . . . . . . . . . . . 69
Safety and General Information . . . . . . . . . . . . . . . . 72Service & Repairs . . . . . . . . . . 77Specific Absorption Rate Data . . . . . . . . . . . . . . . . . . 78Motorola Limited Warranty for the United States and Canada . . . . . . . . . . . . . . . . . . . . 80Hearing Aid Compatibility . . . 85Information From the World Health Organization . . 87Patent and Trademark Information . . . . . . . . . . . . . . . . 89Privacy and Data Security . . . 90Smart Practices While Driving . . . . . . . . . . . . . . 91Index. . . . . . . . . . . . . . . . . . . . . . 93

6 menu map
menu mapmain menu1 Browser
L Java Apps.E Messages
• [Create Message]• Voice Mail• Inbox• Drafts• Sent Items• Net Alert
Q Shop
A Contacts• [New Contact]
p Call Alert
t Ring Tones• Vibrate All: On/Off• Ringer• Vibrate• Silent
u Settings• (see next page)
M Call Timers
B Recent Calls
o Profiles
J My Info• My Name• Line 1• Line 2• Private ID• Group ID:• Carrier IP• IP1 Address• IP2 Address• Circuit Data
D Datebook
0 VoiceRecord
P Call Forward
c GPS• Position• Privacy• Interface•
K Shortcuts• [New Entry]• 1)Shortcuts• 2)Cntcs[New Contact]• 3)Recent Calls• 4)Contacts• 5)Datebook• 6)Messages• 7)VoiceRecord• 8)Browser• 9)Call Forward
l Memo
L Talk Around
N PT Manager
• Send Picture• Send Event• Send My Info• Send Contact• Configure
O My Pictures
C Bluetooth• Hands Free• Link to Devices• Device History• Setup• Find Me
This is the standard Main Menu layout. Your phone’s menu may be a little different.

7menu map
settings menuDisplay/Info
• Wallpaper• Text Size• Theme• Home Icons• Backlight• Clock• Menu View• Large Dialing• Language
Phone Calls• Set Line• Any Key Ans• Auto Redial• Call Waiting• Auto Ans• Minute Beep• Call Duration• TTY• Notifications• DTMF Dialing• Prepend
2-Way Radio• Tkgrp Silent• Tkgrp Area• One Touch PTT• Alert Type• On/Off PTT• Store Rcvd Info
Personalize• Menu Options• Up Key• Down Key• Left Key• Right Key• Center Key• Left Sftkey• Right Sftkey• Power Up
Volume• Line 1• Line 2• Messages• Earpiece• Speaker• Keypad• Java Earpiece• Java Spkr• Data
Security• Phone Lock• Keypad Lock• SIM PIN• GPS PIN• Change Passwds
Advanced• Alert Timeout• Headset/Spkr• Connectivity• Reset Defaults• Return to Home• Transmitters• Phone Only• Baud Rate
8 Use and Care
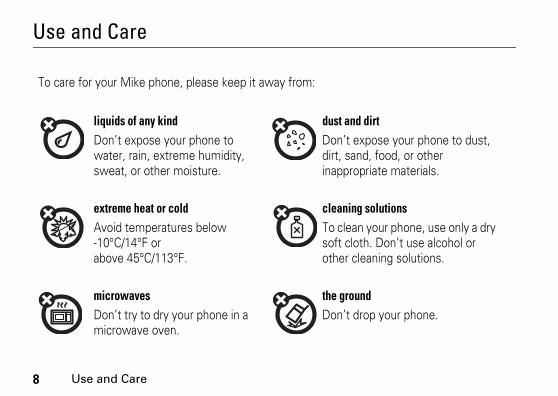
Use and Care
Use and Care
To care for your Mike phone, please keep it away from:
liquids of any kind dust and dirtDon’t expose your phone to water, rain, extreme humidity, sweat, or other moisture.
Don’t expose your phone to dust, dirt, sand, food, or other inappropriate materials.
extreme heat or cold cleaning solutionsAvoid temperatures below -10°C/14°F or above 45°C/113°F.
To clean your phone, use only a dry soft cloth. Don’t use alcohol or other cleaning solutions.
microwaves the groundDon’t try to dry your phone in a microwave oven.
Don’t drop your phone.
9essentials
essentials
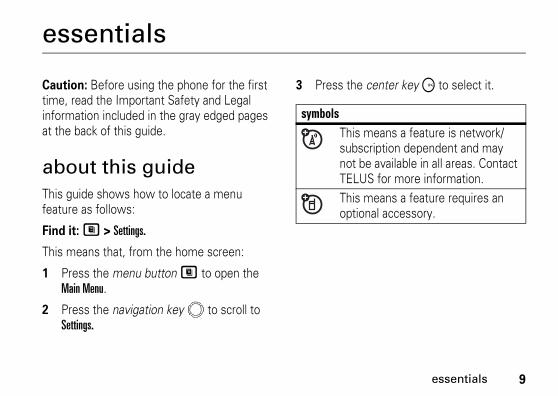
Caution: Before using the phone for the first time, read the Important Safety and Legal information included in the gray edged pages at the back of this guide.
about this guideThis guide shows how to locate a menu feature as follows:
Find it: M > Settings.
This means that, from the home screen: 1 Press the menu button M to open the
Main Menu.
2 Press the navigation key to scroll to Settings.
3 Press the center key O to select it.
symbolsThis means a feature is network/subscription dependent and may not be available in all areas. Contact TELUS for more information.This means a feature requires an optional accessory.

10 essentials
SIM card
insert the SIM cardTurn off your phone and remove your battery before you install or remove a SIM card.
Carefully slide the SIM chip into your phone, until it lies flat in the SIM chip holder.
Warning: To avoid loss or damage, do not remove your SIM chip from your phone unless absolutely necessary.
battery
Battery Use & Battery Safety• Motorola recommends you always
use Motorola-branded batteries and chargers. The warranty does not cover damage caused by non-Motorola batteries and/or chargers. Caution: Use of an unqualified battery or charger may present a risk of fire, explosion, leakage, or other hazard. Improper battery use, or use of a damaged battery, may result in a fire, explosion, or other hazard.
• Battery usage by children should be supervised.

11essentials
• Important: Motorola mobile devices are designed to work best with qualified batteries. If you see a message on your display such as Invalid Battery or Unable to Charge, take the following steps:
• Remove the battery and inspect it to confirm that it bears a Motorola “Original Equipment” hologram;
• If there is no hologram, the battery is not a qualified battery;
• If there is a hologram, replace the battery and retry charging it;
• If the message remains, contact a Motorola Authorized Service Center.
• New batteries or batteries stored for a long time may take more time to charge.
• Charging precautions: When charging your battery, keep it near
room temperature. Never expose batteries to temperatures below 0°C (32°F) or above 45°C (113°F) when charging. Always take your mobile device with you when you leave your vehicle
• When storing your battery, keep it in a cool, dry place.
• It is normal over time for battery life to decrease, and for the battery to exhibit shorter runtime between charges or require more frequent or longer charging times.
• Avoid damage to battery and mobile device. Do not disassemble, open, crush, bend, deform, puncture, shred, or submerge the battery or mobile device. Avoid dropping the battery or mobile device, especially on a hard surface. If your battery or mobile device has been subjected to such

12 essentials
damage, take it to a Motorola Authorized Service Center before using. Do not attempt to dry it with an appliance or heat source, such as a hair dryer or microwave oven.
• Use care when handling a charged battery: Particularly when placing it inside a pocket, purse, or other container with metal objects. Contact with metal objects (e.g., jewelry, keys, beaded chains) could complete an electrical circuit (short circuit), causing the battery to become very hot, which could cause damage or injury.
Promptly dispose of used batteries in accordance with local regulations. Contact your local recycling center for proper battery disposal.
Warning: Never dispose of batteries in a fire because they may explode.
battery installation
1 Slide the release button back until it releases the battery door.
2 Remove battery door.
3 Insert battery as shown below. Push the battery down until it snaps in place.
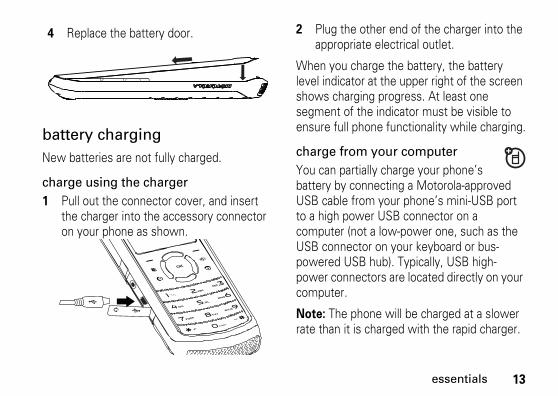
13essentials
battery chargingNew batteries are not fully charged.
charge using the charger1 Pull out the connector cover, and insert
the charger into the accessory connector on your phone as shown.
2 Plug the other end of the charger into the appropriate electrical outlet.
When you charge the battery, the battery level indicator at the upper right of the screen shows charging progress. At least one segment of the indicator must be visible to ensure full phone functionality while charging.
charge from your computerYou can partially charge your phone’s battery by connecting a Motorola-approved USB cable from your phone’s mini-USB port to a high power USB connector on a computer (not a low-power one, such as the USB connector on your keyboard or bus-powered USB hub). Typically, USB high-power connectors are located directly on your computer.
Note: The phone will be charged at a slower rate than it is charged with the rapid charger.
4 Replace the battery door.
14 essentials
Your computer must be turned on, and you must have correct software drivers installed on your computer. If the Phone is off when the USB cable is connected between the computer and the phone, the phone will power up in charging mode. This mode allows the phone to charge fastest and quickest.
Note: If the battery is very low, the phone will not turn On, but it will continue to charge at a low rate. The phone will power up in charging mode when the battery has been charged to approximately 5% of its capacity. For faster charging under a very low battery condition, it is recommended to use the rapid charger supplied with the handset.
If the phone is turned on while charging from a computer, it will not fully charge the battery. In this case, the battery charge will be maintained approximately between 80% and 95% of the battery's capacity. Cables and
software drivers are available in Motorola OriginalTM data kits, sold separately.
Tip: Motorola batteries have circuitry that protects the battery from damage from overcharging. Of course, unplugging the charger from the wall will prevent the battery from overcharging.
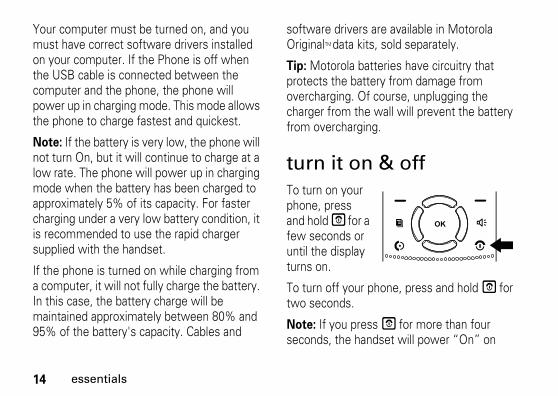
turn it on & offTo turn on your phone, press and hold E for a few seconds or until the display turns on.
To turn off your phone, press and hold E for two seconds.
Note: If you press E for more than four seconds, the handset will power “On” on

15essentials
“Transmitter Off” mode. See “transmitters” on page 43.
make phone a callEnter a phone number and press S to make a call or use a voice name. See “voice name” on page 48.
Note: For best call quality avoid covering the internal antenna with your hand.
To hang up press E.
answer phone a callWhen your phone rings and/or vibrates, you have the following options to answer:
1 If you want to answer the call on the handsfree speaker phone, press the speaker key s.
2 If you want to hear the audio through the ear speaker, press S. To hang up press E.
3 If you are using a Bluetooth headset, you can press the answer key on your Bluetooth headset. To hang up press the same key on your Bluetooth.
make a private callWith Mike’s Direct Connect service, you use your phone as a long-range, digital 2-way radio using one-to-one Private calls or one-to-many group calls.
Your Private ID is the number at which you receive one-to-one Private calls.
Talkgroup numbers are numbers through which you receive one-to-many group calls.
Your Mike sales representative creates Talkgroups for you and assigns each

16 essentials
Talkgroup to a Talkgroup number. You can choose a name for each of your Talkgroups when you create entries for them in Contacts.
to make a Private call1 Enter the Private ID you want to call.
2 Press and hold the PTT button. Begin talking after your phone emits a chirping sound.
3 Release the PTT button to listen.
To end the call press O.
A Private call ends automatically if there is no activity on the call for a few seconds.
send call alertsSending a call alert discretely lets the recipient know that you want to talk to him or her on a Private call.
When you send a call alert, the recipient’s handset displays your name and emits a series of beeps or vibrations.
The recipient has the following options:
to send a call alert1 Enter the Private ID you want to call as
you would when making a Private call.
2 Press a under Alert.
3 When the message Ready To Alert appears on the display, press the PTT button until the message Alert Successful: appears.
OptionAnswer: Begin a Private call with the sender.Queue: Store the call alert to the call alert queue.Clear: Dismiss and delete the call alert.

17essentials
answer a private call1 When your phone emits a chirping sound
or vibrates to indicate you are receiving a Private call, wait for the caller to finish speaking.
2 Press and hold the PTT button and begin talking after your phone emits a chirping sound.
3 Release the PTT button to listen. To end the call press O or press a under Exit.
receive a call alertWhen you receive a call alert, you must answer, queue, or clear it. You cannot receive phone calls or Private calls until you do.
to answer a call alert1 Press the PTT button to start a Private call
with the sender.
or
2 Queue the call allert by pressing a under Queue.
or
3 Clear the call alert by pressing a under Clear.
store a phone number or private IDYou can store a phone number or Private ID in Contacts:
1 Press M > L > [New Contact].
2 Enter a name for the new entry. Each entry’s name can contain up to 20 characters.
3 Select Ring Tones if you wish to assign a specific ring tone to that phone number.
18 essentials
4 Select a type for the entry (Mobile, Work1, Work2, Home, Fax, Pager, or Other). To store a Private ID, choose Private.
5 Enter the number for the entry and press a under Done to save the entry.
Tip: Before saving the entry, you can save more information. You can store E-mail addresses, IP addresses, or Talkgroup IDs. You can assign each number a speed dial number and voice name. You can also create Contact entries that are groups of Private IDs called Group IDs.
After you have saved the number, the new Contacts entry is displayed.
call a stored phone number or private IDShortcut: From the home screen press a under Contcs
or
Find it: M > L
1 Scroll to the Contacts entry.
Tip: By pressing the first letter of the name of the Contacts you want, you will be taken to all the contact names starting with the letter you pressed.
2 If the Contacts entry contains more than one number, scroll left or right until the type of the number you want to call is displayed (Mobile, Private, Work1, Work2, Home, etc.).
3 If you choose a phone number, press S to call the entry.
or
If you choose a Private ID, or Talkgroup ID, press and hold the PTT button to call the number.
19essentials
Tip: If the Contacts entry you scrolled to contains a Private ID, you can make an instant Private call to that Private ID by pressing and holding the PTT button, even if the Private ID is not the type of number displayed.
your phone number and Private IDFind it: M > JTip: Want to see your phone number or Private ID while you’re on a call? Press M > My Info.
text messagesText messaging allows you to send and receive short text messages to and from other Mike handsets. Messages you receive appear on your handset’s display and in the text message inbox.
set it upBefore you begin using text messaging, you may need to set up your signature, service center number, and expiration information.
Shortcut: From the home screen press a under Mesg > M
1 Scroll to Inbox, Drafts or Outbox.
2 Press M > Text Msg Setup.
The following options become available:
optionSignature: Enter your signature (up to 11 characters long).Delivery Rpt: Set this option to On if you want your phone to show you when the message has been delivered.Srvc Cntr No: Enter the phone number of your service center. If you do not know this number, contact your service provider.

20 essentials
Press a under Done to save the information you entered.
receive a text message1 To view the message press a under Read.
2 To dismiss the message notification press a under Exit.
Note: If your phone is powered off when you receive a text message, your phone notifies you the next time you power it on. If you are
Expire After: This is the amount of time messages you send are saved at the service center if they cannot be delivered. After this period, they are discarded.
Scroll to select the number of days you want your messages to be saved.Auto Clean Up: Set this option to On if you want your phone to delete sent messages.
If you set Auto Clean Up to On, select Clean Up After to set the number of days after which sent messages are deleted or the number of messages to be kept.
optionQuick Notes: Quick notes are short, pre-written text messages that you can create, edit, and send in your text messages. You can store up to 20 quick notes. A quick note may be up to 30 characters long.
You can create a [New Note] or press a under Edit to change the pre-written quick notes.
option

21essentials
out of your coverage area, your phone alerts you when you return to your coverage area.
Tip: While reading a text and numeric message that contains a phone number, you can press S to call that number.
read from the message center1 From the home screen press a under
Mesg > Inbox > Text Inbox.
2 Select the message you want to read or press the number of the message you want to read. If the message fills more than one screen, scroll to read it.
Tip: Scrolling through one message lets you view the next message.
3 To reply to the message, press a under Reply or to see all other choices, including forwarding and deleting the message, calling the sender, or storing the sender’s number in Contacts, press M.
create and send text messagesShortcut: From the home screen press a under Mesg.
1 Scroll to Inbox, Drafts or Outbox.
2 Press a under Create.
3 Select [Create Txt Msg].
4 To address the message use the keypad to enter the phone number of the person you want to send the message to and press O.
or
Press a under Browse, and select Recent Calls, Contacts or Memo to find the number you want.
5 Select Msg: and enter the text of the message or to use a quick note press a under Browse and scroll to the quick note you want.

22 essentials
6 Press M > Set Send Method and select Text, Fax, x400, Paging, Email, ERMES, or Voice.
7 If you want to send the message, press a under Send or to delete the message without sending it, press a under Cancel.
Note: If you want to request confirmation of delivery press M > Delivery Report > On.
use draftsWhen you save a message as a draft, it is saved in the drafts folder.
Shortcut: From the home screen press a under Mesg > Drafts > Text Draft.
1 Select the draft you want to edit. You also have the choice to create new text messages from this menu.
2 To edit the fields you want to change, follow step 2 through step 5 in “create and send text messages” above.
resend text messagesShortcut: From the home screen press a under Mesg > Outbox > Text Outbox.
1 Scroll to the message you want to resend or press the number of the message you want to resend.
2 Press a under Resend.
delete sent text messagesShortcut: From the home screen press a under Mesg > Outbox > Text Outbox.
1 Scroll to the message you want to delete.
2 Press a under Delete.
3 Press a under Yes to confirm.
delete all unlocked sent messagesShortcut: From the home screen press a under Mesg > Outbox > Text Outbox.
1 Press M > Delete All.

23essentials
2 Press a under Yes to confirm.
manage memoryYour text inbox, outbox, and drafts folder have a set amount of memory available for storing messages.
The text inbox holds 20 messages. If the text inbox is full, you cannot receive messages until you delete some.
The outbox and drafts folder share memory space. Togheter they can hold 30 messages. If the outbox and drafts folder memory is full, you cannot send messages or save drafts until you delete some.
To view the amount of memory available in your text inbox:
Shortcut: From the home screen press a under Mesg.
1 Scroll to Inbox, Drafts or Outbox.
2 Press M > Text Msg Setup > Mem Mtr-Inbox.
To view the amount of memory available in your outbox and drafts folder:
Shortcut: From the home screen press a under Mesg.
1 Scroll to Inbox, Drafts or Outbox.
2 Press M > Text Msg Setup > Mem Mtr-Other.
using your handset as a modemYou can use your handset as a modem (Packet Data only) with a laptop, handheld device, or desktop computer. Circuit Data is not supported. In order to use your handset as a modem, you must create a wired or wireless connection between your handset and the other device.

24 essentials
To connect your phone wirelessly, you must have a Bluetooth adapter for the other device. To create a wired connection, use a USB cable.
connect with a USB cableUse a USB cable to connect your handset to a laptop, handheld device, or desktop computer.
1 Pull out the connector cover, and insert the charger into mini USB connector on your phone as shown.
2 Insert the data plug into the data port of the other device.
connect via BluetoothUse your handset as a modem via Bluetooth. The laptop, handheld device, or desktop computer you want to connect to must have a Bluetooth adapter installed.
Check that the adapter is properly installed, and then follow the specific instructions outlined in the device’s user guide to connect the device to your handset.
When used as a modem, your handset is enabled for Packet Data transfer mode, which is used for small file transfers such as email.
Note: To use these services, you must install the iDEN Wireless Data Services software (available separately). For more information on setting up your computer and your handset for packet data calls, contact TELUS Client Care.
25essentials
accessoriesYour handset comes with a battery, and a charger.
To order additional accessories, log on to our Web site www.telusmobility.com or contact your Mike Dealer.
for more informationIf you have questions about your handset, contact your Mike Dealer or TELUS Client Care.

26 main attractions
main attractions
PTV featuresPush To View (PTV) features let you exchange the following items through Private calls with other phones that have this capability:1
• Pictures1
• Datebook events
• My Info
• Contact information
You can choose to send My Info and contact information to any Private ID.
You can choose to send pictures and events to the Private ID you are engaged in a a Private call with, Private IDs on the Recent Calls list, and Private IDs stored in Contacts.
When you make or receive a Private call, your phone automatically determines whether the phone you are engaged in a Private call with is able to receive each of these items. Your phone saves this information for as long as the Private ID is on your Recent Calls list or is saved in your Contacts. Your phone updates the saved information each time you make or receive a call to or from that Private ID.
You can turn your phone’s ability to send and receive pictures and events on and off.
Note: You cannot send PTT feature items during Talkgroup calls. 1. Additional charges may apply.

27main attractions
send picturesYou can send pictures stored in My Pictures through Private calls. The picture you send appears on the Private call recipient’s display.
If the recipient accepts the picture, their phone saves the picture.
The first time you send a stored picture after turning the phone on, Picture Fees May Apply. Continue? appears and you are prompted to respond.
Note: You cannot make or receive Private calls while transmitting or receiving a picture.
send a picture during a call1 While in a Private call, press a under
Picture or press M > Use PTT Feature > Send Picture.
A list of pictures that can be included in a Private call appears.
2 Select the picture you want to send.
3 Press the PTT button to send the picture.
4 Wait while the picture is transmitted. The Private call is temporarily interrupted while a picture is transmitted.
5 When prompted, press the PTT button to resume the Private call.
start a call by sending a picture
from My PicturesFind it: M > My Pictures
1 Select the picture you want to send.
2 Press M > Use PTT Feature > Send Picture.
A list of contacts that have Private IDs and are able to receive pictures appears.

28 main attractions
3 Select the name of the person you want to send the picture to.
4 Press the PTT button to send the picture.
5 When prompted, press the PTT button to resume the Private call.
from the PT Manager:Find it: M > PT Manager > Send Picture.
1 Select A Contact, or A Recent Call to see a list of entries that can receive pictures.
2 Select the entry containing the Private ID you want to send the message to.
3 Select the picture you want to send.
4 Press the PTT button to send the picture.
5 Once picture has been sent, when prompted press the PTT button to resume the call.
receive a picture When someone sends you a picture, your phone emits a tone or vibrates and a message appears asking if you want to accept the picture.
Pictures you receive are saved to your phone’s memory. They are accessible through My Pictures.
When you see a message asking if you want to accept the picture, press Yes to accept or No to decline.
Tip: If you want to stop the transmission before it is finished, press E.
clear a picture from the display If you want to clear a picture from your phone’s display while still on a call, press M > Clear Screen.
29main attractions
The picture will not appear on the display again the next time you receive a call from person who sent it. This does not delete the picture from My Pictures.
send eventsYou can send an event already stored in your phone’s Datebook or create a new Datebook event to send. When you create a new event to send, the event is stored to your Datebook.
1 While in a Private call, press M > Use PTT Feature > Send Event.
Note: If these options do not appear on the context-sensitive menu, the Private ID you are engaged in the Private call with is not able to receive Datebook events.
2 If you want to create a new Datebook event to send, press a under New and create the event.
or
If you want to chose an event from Datebook, select the event you want to send.
3 If the event is a recurring event: Select This Event Only to send only the event selected. Select Repeat Events to send all occurrences of the event.
4 Press the PTT button to send the event.
Note: Datebook events can also be sent from the Recent Calls list, the PT Manager or the Datebook.
send My Info1 While in a Private Call press M > Send via
PTT, and push the PTT button to send.
or
2 From the home screen press M > My Info > M > Send via PTT and push the PTT button to send.
30 main attractions
set my info sending optionYou can control what portion of the information in My Info is sent and whether it is sent automatically in every call or only when you choose to send it.
Find it: M > PT Manager > Configure > PTT My Info > Info to Send
1 Select or remove the fields you want to send.
2 Press a under Done.
The information your phone sends always includes My Name and Private. You may also send Line 1, Line 2, and Carrier IP, depending on your sending options.
automatic sending Find it: M > PT Manager > Configure > PTT My Info > Auto Send > On
When you make a call in which your information is sent automatically, the name
you entered in the My Name field of My Info appears on the display of the recipient’s phone, even if your name and Private ID are not stored in the recipient’s Contacts.
send contact information1 While in a Private Call press M > Use PTT
Feature.
2 Select Send Contact and select the contact information you want to send.
3 Push the PTT button to send.
or
1 From the home screen press M > PT Manager > Send Contact.
2 Enter the Private ID number of the person you want to send the Contact information to or press a under Browse.
3 Select from Recent Calls, Contacts, or Memo.

31main attractions
4 Select the contact information you want to send and push the PTT button.
turn PTT features on and off You can turn your phone’s ability to send and receive messages, pictures, and Datebook events on and off.
You cannot turn your phone’s ability to send and receive My Info and contact information on and off.
Find it: M > PT Manager > Configure
1 Select On/Off PTT.
2 Check or uncheck Messages, Pictures and/or Events.
one touch PTTFind it: M > PT Manager > Configure > One Touch PTT.
One Touch PTT sets your phone to do any of the following each time you press the PTT button from the home screen:
optionOff: Nothing happens when you press the PTT button from the home screen.Last Call : Call the most recent Private ID or Group on the recent calls list. Assigned No.: Call a Private ID you assign. Enter the number using your keypad, or press a under Search. Select Contacts, Recent Calls, or Memo.
Note: If you are entering a Talkgroup number, enter # before the number.PT Manager: Go to PT Manager. See “PT manager” on page 32.Send Picture: Go to the first screen to send pictures. See “send pictures” on page 27.

32 main attractions
PT manager The PT Manager lets you quickly access PTT features, and other Private call features, from the main menu. You can also set the One Touch PTT feature.
Find it: M > PT Manager
1 Select Send Message, Send Picture, Send Event, Send My Info, or Send Contact. After choosing what PTT item you are sending, select a contact and press the PTT button to send.
or
2 Select Configure to configure your PTT Quick Notes, PTT My Info, One Touch PTT, or On/Off PTT.
Mike’s wireless web servicesYour handset is equipped with a microbrowser that can be used to access Mike's Wireless Web Services and other up-to-the-minute information. You can view specially designed text versions of popular Internet sites that provide news, sports, weather, entertainment, stock quote sites, and other useful information.
access the microbrowserThe first time you use the microbrowser, you will be required to go through a security setup process that takes approximately one to three
Send Event: Go the the first screen to send a Datebook event.Send My Info: Go to the first screen to send My Info. See “send My Info” on page 29.Send Contact: Go to the first screen to send a contact. See “send contact information” on page 30.
option
33main attractions
minutes. Please follow the on-screen prompts to complete the security setup process. This setup process will only occur the first time you use the service.
Find it: M > 1
1 Once connected, the Homepage (or the last page visited) will be displayed. To access the Home menu page from any other menu in the microbrowser, press S.
2 To view additional text while visiting a site, use the navigation key to scroll to read it.
navigate the microbrowserWhen you use the microbrowser, some keys on your handset operate differently than
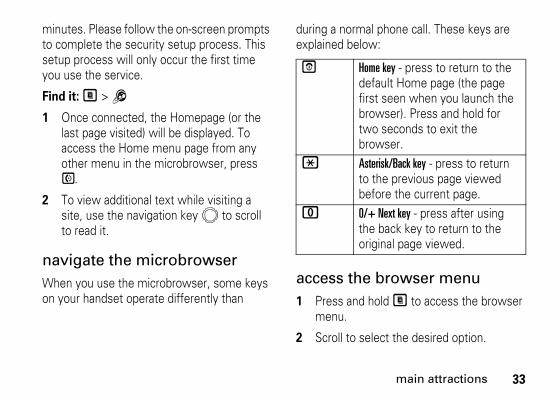
during a normal phone call. These keys are explained below:
access the browser menu1 Press and hold M to access the browser
menu.
2 Scroll to select the desired option.
E Home key - press to return to the default Home page (the page first seen when you launch the browser). Press and hold for two seconds to exit the browser.
* Asterisk/Back key - press to return to the previous page viewed before the current page.
0 0/+ Next key - press after using the back key to return to the original page viewed.
34 main attractions
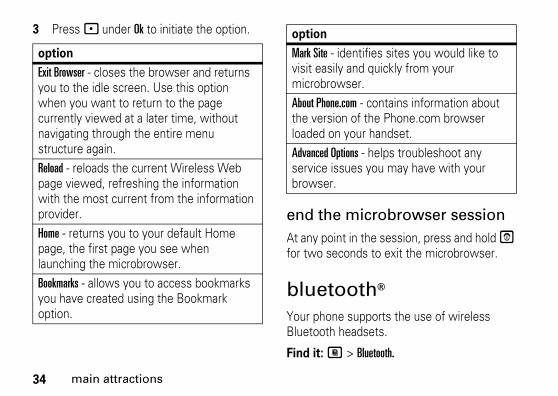
3 Press - under Ok to initiate the option.
end the microbrowser sessionAt any point in the session, press and hold E for two seconds to exit the microbrowser.
bluetooth® Your phone supports the use of wireless Bluetooth headsets.
Find it: M > Bluetooth.
optionExit Browser - closes the browser and returns you to the idle screen. Use this option when you want to return to the page currently viewed at a later time, without navigating through the entire menu structure again.Reload - reloads the current Wireless Web page viewed, refreshing the information with the most current from the information provider. Home - returns you to your default Home page, the first page you see when launching the microbrowser.Bookmarks - allows you to access bookmarks you have created using the Bookmark option.
Mark Site - identifies sites you would like to visit easily and quickly from your microbrowser.About Phone.com - contains information about the version of the Phone.com browser loaded on your handset.Advanced Options - helps troubleshoot any service issues you may have with your browser.
option

35main attractions
The Bluetooth connection menu contains an option to search for audio devices.
turn Bluetooth On or OffYou can turn your phone’s Bluetooth feature on or off. While Bluetooth power is on, your phone can communicate with other devices.
Find it: M > Bluetooth > Setup > Power > On.
1 Select Name if you wish to assign a name to your handset.
2 Select Find Me Time to determine the amount of time in which your handset can be found by other Bluetooth devices.
Tip: You can turn off Bluetooth if you want to prolong battery life or if you enter an area where Bluetooth is prohibited.
make a Bluetooth connection
connect your phone with a Bluetooth headsetFind it: M > Bluetooth > Hands Free > [Find Devices].
1 Follow the instructions on your Bluetooth headset to set it up to be found.
2 Once your Bluetooth headset is set to be found press O on your handset. Your phone will scan the Bluetooth headset until it finds it. Press O when you see the name of the Bluetooth headset on your screen.
3 Your phone requires that you create a bond in order to connect with a Bluetooth headset. Press - under Yes when you are prompted to bond with the headset.
4 Enter the Bluetooth pass key.
Some Bluetooth devices ship with Bluetooth PINs. Please refer to your
36 main attractions
Bluetooth device’s user guide to locate this information.
If a device ships without a Bluetooth PIN, then refer to its user guide to set the PIN on that device. To establish a connection to that device, enter the same PIN for both your phone and the device. For example, if you enter 1234 as the device’s PIN, then enter 1234 as your phone’s PIN.
5 Press - under Ok.
Note: This handset offers a bluetooth auto pair feature with auto pair compatible Motorola devices. When bonded via bluetooth with a certain device, the pin will not be required.
connect your phone with another deviceFind it: M > Bluetooth > Link To Devices.
1 Select the device you want from the list of found devices on your screen.
2 Create a bond if you are prompted to do so.
Tip: If you have previously connected to a device, the device will be stored on your phone so you can connect with it easily.
use Bluetooth during a callYou can connect with available Bluetooth devices during a call.
Note: If the Handsfree Devices list contains only one device, then your phone will automatically try to connect to that device.
1 While in a call, press M > Use Bluetooth.
2 Press - under Yes to power On Bluetooth.
3 Select the audio device you want to connect to from the list of Handsfree Devices.

37main attractions
send information via BluetoothYou can use your phone to send Contacts entries, Datebook events, or pictures to another Bluetooth device.
The receiving device must be within 32 feet (10 meters) of your phone in order to connect with yours.
Note: Files sent or received may be up to 200 kb.
send ContactsShortcut: From the home screen press - under Contcs.
1 Select the contact you want to send.
2 Press M > Send Via... > Bluetooth.
3 Press - under Yes to power On Bluetooth.
4 Select the device you want to transfer the contact information to.
or
Search for the device by selecting [Find Devices].
5 If prompted, bond with the device.
Your phone connects with the device and transfers the contact.
send a Datebook eventFind it: M > Datebook
1 Select the datebook event you want to send.
2 Press M > Send Via... > Bluetooth.
If the event you select repeats, then you will be prompted to choose whether to send the selected instance of the event or all instances of the event.
To send only the selected instance of the event, select This Event Only.
or
38 main attractions
To send all instances of the event, select Repeat Events.
3 Press - under Yes to power On Bluetooth.
4 Select the device you want to transfer the contact information to.
or
Search for the device by selecting [Find Devices].
5 If prompted, bond with the device.
Your phone connects with the device and sends the datebook event.
send pictures via BluetoothNote: Note: You can only send audio files, and pictures if they are not forward locked and if their DRM settings do not prevent you from sending.
Find it: M > My Pictures.
1 Select the picture you want to send.
2 Press M > Send Via... > Bluetooth.
3 Select the device you want to transfer the contact information to.
or
Search for the device by selecting [Find Devices].
4 If prompted, bond with the device.
Your phone connects with the device and sends the datebook event.
39basics
basics
See page 1 for a basic phone diagram.
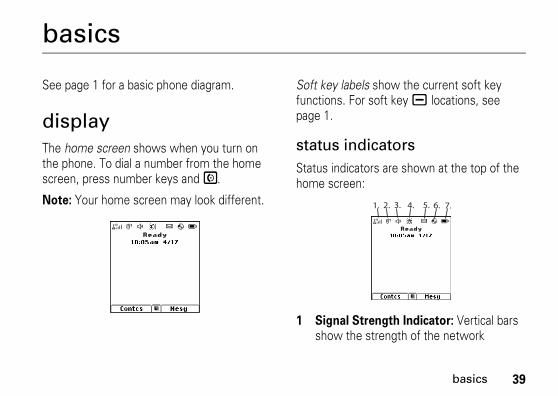
displayThe home screen shows when you turn on the phone. To dial a number from the home screen, press number keys and S.
Note: Your home screen may look different.
Soft key labels show the current soft key functions. For soft key a locations, see page 1.
status indicatorsStatus indicators are shown at the top of the home screen:
1 Signal Strength Indicator: Vertical bars show the strength of the network
1. 2. 3. 4. 5. 6. 7.

40 basics
connection. You can’t make or receive calls when 1 or 0 shows.
2 Active Phone Line: 1 indicates phone line 1 is ready to make calls.
3 Speaker Off: Sounds associated with Private calls and group calls are set to come through the earpiece rather than through the speaker.
4 Ringer Off: Your phone is set to not ring.
5 Message Indicator: Shows when you receive a text message.
6 Packet Data: Your handset is ready to transfer packet data or is transferring packet data.
7 Battery Charge Indicator: A fuller battery indicates a greater charge. Recharge the battery when your phone shows Low Battery.
text entrySome features let you enter text.
Your phone provides convenient ways to enter words, letters, punctuation, and numbers whenever you are prompted to enter text (for example, when adding a Contacts entry or when text messaging).
change the character input mode:1 When you see a screen where you can
enter text, press M to change the character input mode.
41basics
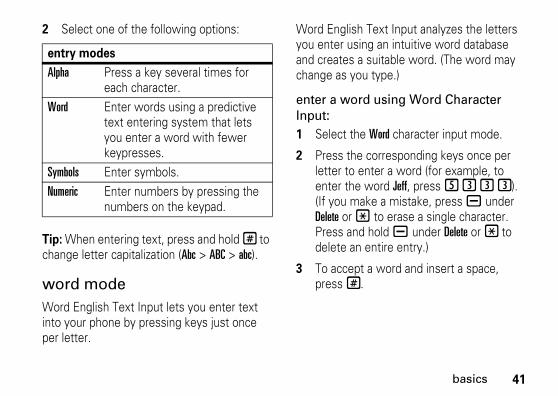
2 Select one of the following options:
Tip: When entering text, press and hold # to change letter capitalization (Abc > ABC > abc).
word modeWord English Text Input lets you enter text into your phone by pressing keys just once per letter.
Word English Text Input analyzes the letters you enter using an intuitive word database and creates a suitable word. (The word may change as you type.)
enter a word using Word Character Input:1 Select the Word character input mode.
2 Press the corresponding keys once per letter to enter a word (for example, to enter the word Jeff, press 5 3 3 3). (If you make a mistake, press a under Delete or * to erase a single character. Press and hold a under Delete or * to delete an entire entry.)
3 To accept a word and insert a space, press #.
entry modesAlpha Press a key several times for
each character.Word Enter words using a predictive
text entering system that lets you enter a word with fewer keypresses.
Symbols Enter symbols.Numeric Enter numbers by pressing the
numbers on the keypad.

42 basics
alpha mode
enter characters by tapping the keypad:1 Select the Alpha mode.
2 Press the corresponding keys repeatedly until the desired letter appears. (For example, to enter the word Jeff, press 5 once, 3 two times, 3 three times, and 3 three times again. If you make a mistake, press a under Delete to erase a single character. Press and hold a under Delete to erase an entire entry.)
By default, the first letter of an entry is capitalized and the following letters are lowercased. After a character is entered, the cursor automatically advances to the next space after two seconds or when you enter a character on a different key.
Characters scroll in the following order:
characters1 . ? ! , @ & : ; “ - ( ) ‘ ¿ ¡ % £ ¥2 A B C 2 Á Ã Â À Ç3 D E F 3 É Ê È4 G H I 4 Í Ì5 J K L 56 M N O 6 Ó Õ Ô Ò7 P Q R S 7 ß8 T U V 8 Ú Ü Û Ù9 W X Y Z 90 + - 0 * / \ [ ] = > < # §# Space* Back
43basics
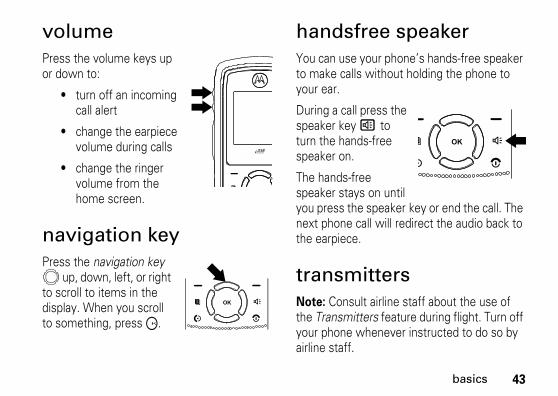
volumePress the volume keys up or down to:
• turn off an incoming call alert
• change the earpiece volume during calls
• change the ringer volume from the home screen.
navigation keyPress the navigation key
up, down, left, or right to scroll to items in the display. When you scroll to something, press O.
handsfree speakerYou can use your phone’s hands-free speaker to make calls without holding the phone to your ear.
During a call press the speaker key s to turn the hands-free speaker on.
The hands-free speaker stays on until you press the speaker key or end the call. The next phone call will redirect the audio back to the earpiece.
transmittersNote: Consult airline staff about the use of the Transmitters feature during flight. Turn off your phone whenever instructed to do so by airline staff.

44 basics
Transmitters turns off your phone’s calling features in situations where wireless phone use is prohibited, but you can use the phone’s other non-calling features when Transmitters turned Off.
Find it: M > u > Advanced > Transmitters > Off.
use GPS with map softwareYour phone is enabled with a highly-capable GPS receiver that sends location information to a USB port on a PC, laptop, or PDA.
Note: No serial port connectivity is provided by your phone. Applications on the host device which are expecting to receive the GPS location information via a serial port must instead use a Virtual Serial Comm Port.
The data sent to the host device is formatted as prescribed in the National Marine
Electronics Association 0183 V3.0 (NMEA-0183) standard. As such it supports the following sentences: GGA, GLL, GSA, GSV, RMC, and VTG.
This handset is not a full NMEA-0183 compliant device supporting electrical RS-422/RS-232 connectivity as dictated by the NMEA-0183 standard. Consequently it's unsuitable for conventional marine NMEA-0183 equipment use. Its intended use is for normal "terrestrial" mobile users who want to enable their USB hosting computing devices such as a PC, laptop or PDA with the phone's highly-capable GPS functionality.
get connected1 Slide open the
phone's bottom connector and insert a mini-

45basics
USB cable into the phone's bottom connector.
2 Insert the other end of the mini-USB cable into a vacant USB receptacle of your host device. A virtual USB Comm Port will be created on your host device upon successful enumeration of the phone as a USB Communications Device Class device.
3 Ensure no application in your host device is using the created COMM port. You may need to ensure that the created virtual COMM port settings are set as follows:
• Bits per second: 4800
• Data bits: 8
• Parity: None
• Stop bits: 1
• Flow control: None.
4 Start the GPS application on your host device. Set the GPS application to start accepting NMEA-0183 formatted data from the created Virtual COMM port.
5 Set your phone to start sending NMEA-0183 formatted location information.
Find it: M > GPS > Interface > NMEA OUT > USB.
Your phone is now actively sending location NMEA-0183 formatted GPS data to your USB host device.
To stop your phone from sending location data:
Find it: M > GPS > Interface > NMEA OUT > Off.
Note: Each time you power your phone Off, NMEA OUT is automatically set to Off and you need to manually restart it using the menu selections above.
Your USB host device will generally provide charging power (5V, up to 500mA) to your

46 basics
phone via the mini-USB cable therefore no other charging power to it will normally be required. However some laptops may require that you provide external AC/DC power to the laptop in order for it to provide full 500mA charging current capability to the phone.

47calls
calls
To make and answer calls, see page 15.
recent callsThe Recent Calls list contains information associated with calls you have made and received and call alerts you have received.
When you send or receive Private calls, the Recent Call list contains the following PTT items with those calls:
• Pictures
• Events
• My Info
• Contacts
The recent calls list displays up to 20 of the most recent calls and call alerts.
Find it: M > Recent Calls.Tip: You can also access the Recent Calls list by pressing the navigation key down.
1 Scroll through the list.
2 Highlight the item you want to view or perform some action on.
3 To view more details of the item press O.
store an item to contacts from recent callsPhone calls, Private calls, My Info received from other phones, or Contacts entries received from other phones can be stored to the Contacts list from the Recent Calls list.
Find it: M > Recent Calls.

48 calls
1 Scroll to or select the item you want to store.
2 Press a under Save to store the information as a new entry in the Contacts list.
or
3 If Save is not one or you options, press M > Update Contacts. And select the contact you want to update.
4 Press a under Done to save your changes.
redialTo redial your last outgoing phone call, press and hold N or push the PTT button if it was a private call.
voice nameYou can place calls by speaking comands to your phone if you have previously assigned a voice name to your contacts.
assign voice names to contacs:1 Press a under Contcs and select [New
Contact].
2 Assing a name, phone number and select [Options].
3 Select Voice Name and follow the propmt to record the voice name.
4 Press a under Back and a under Done to save the entry.
place a call using voice command:1 From the home screen press and hold the
speaker key s until you are prompted to say the voice name.

49calls
2 The handset will automatically place the call.
caller IDCaller ID allows people to identify a caller before answering the phone by displaying the number of the incoming call. If you do not want your number displayed when you make a call, just follow these easy steps.
To block your phone number from being displayed for a specific outgoing call:
1 Press * 6 7.
2 Enter the number you want to call.
3 Press S.
To permanently block your number, call TELUS Client Care.
call forwardCall forwarding sends calls to the phone numbers you specify. You can forward all calls to one number or forward missed calls to different numbers depending on the reason you missed the call. You can forward phone lines 1 and 2 independently.
Find it: M > Call Forward.
1 To forward all calls select All Calls and select To to enter the phone number you want all your calls forwarded to.
or
2 You can specify a forwarding number for each type of missed call by selecting Detailed and chosing the following options:
optionIf Busy: When your handset is on a call or transferring data.

50 calls
emergency callsTELUS programs one or more emergency phone numbers that you can call under any circumstances, even when your phone is locked or the SIM card is not inserted.
Note: Emergency numbers vary by country. Your phone’s preprogrammed emergency number(s) may not work in all locations, and sometimes an emergency call cannot be placed due to network, environmental, or interference issues.
Your phone supports emergency calling. Emergency phone calls can be made even
when your SIM card is blocked or not in your phone.
Dial 911 or your local emergency number to be connected to an emergency response center. If you are on an active call, you must end it before making an emergency call.
When you make an emergency call, your phone’s GPS Enabled feature can help emergency service personnel find you, if you are in a location where your phone's GPS antenna has established a clear view of the open sky and your local emergency response center has the equipment to process location information. Because of the limitations of this feature, always provide your best knowledge of your location to the emergency response center when you make an emergency call.
Note: Emergency calls cannot be placed while the keypad is locked.
If No Answer: When you do not answer on the first 4 rings.If Unreachable: When your handset is out of coverage or powered off.
option
51calls
Note: If you have not registered on the network, emergency calls cannot be placed while your SIM card is in your phone.
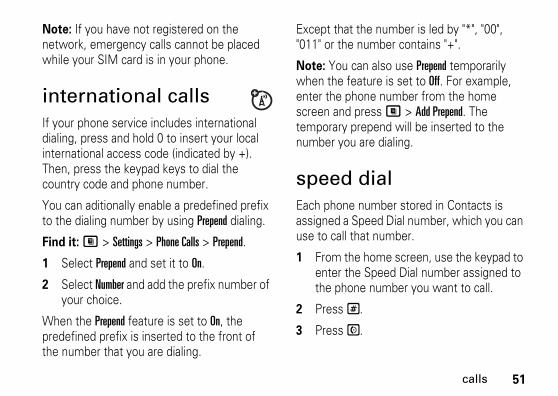
international callsIf your phone service includes international dialing, press and hold 0 to insert your local international access code (indicated by +). Then, press the keypad keys to dial the country code and phone number.
You can aditionally enable a predefined prefix to the dialing number by using Prepend dialing.
Find it: M > Settings > Phone Calls > Prepend.
1 Select Prepend and set it to On.
2 Select Number and add the prefix number of your choice.
When the Prepend feature is set to On, the predefined prefix is inserted to the front of the number that you are dialing.
Except that the number is led by "*", "00", "011" or the number contains "+".
Note: You can also use Prepend temporarily when the feature is set to Off. For example, enter the phone number from the home screen and press M > Add Prepend. The temporary prepend will be inserted to the number you are dialing.
speed dialEach phone number stored in Contacts is assigned a Speed Dial number, which you can use to call that number.
1 From the home screen, use the keypad to enter the Speed Dial number assigned to the phone number you want to call.
2 Press #.
3 Press S.
52 calls
turbo dialThe first nine entries in your contacts are set for turbo dial. They can be called by pressing and holding the speed dial number (1 through 9).
voice mailNote: To receive voice mail messages, you must first set up a voice mail account with TELUS.
receive a messageWhen you receive a voice mail message, New VoiceMail Message appears on the display.
• To call TELUS voice mail system and listen to the messages, press a under Call.
• To dismiss the message notification press O, or a under Back.
If the caller leaves a message, this icon y appears on the display, reminding you that you have a new message.
advanced voice mail with faxMike's Advanced Voice Mail with Fax allows you to receive faxes directly to your handset and store them along with your voice messages until you are ready to print. Follow the voice mail prompts to print the fax to a fax machine. It ensures privacy, convenience and eliminates the need for a separate fax line.
When you subscribe to Mike's Advanced Voice Mail with Fax, you will receive a fax number from your point of feature activation. If you have not received a fax number, please contact the nearest TELUS dealer or call TELUS client care.
Please see www.telusmobility.com for more details of TELUS Voice Messaging services.
53calls
fax mail IndicatorYour handset is equipped with a Fax Mail indicator to notify you when you have received a fax through Mike's Advanced Voice Mail with Fax.
Shortcut: From the home screen press a under Mesg > Fax Mail.
When you receive a new fax, New FaxMail Message appears on the display.
Your handset will alert you audibly until you press a under Call or a under Exit.
net alertsWhen you receive a Net Alert, a notification appears on the display.
If you dismiss the notification, this icon w appears on the display, reminding you that you have a new message.
Mike’s Talk AroundTM
Mike’s Talk Around allows direct two-way handset-to-handset communications between two or more handsets equipped for Mike’s Talk Around. You can make and receive Mike’s Talk Around calls even when network service is not available. You can talk to anyone on your code and channel within your range.
Note: Range will vary based on terrain, man-made structures and atmospheric conditions.
Mike’s Talk Around allows you to use code or private mode operation, use up to 10 channels and communicate with standalone Mike’s Talk Around radios.
Note: Mike’s Talk Around is not compatible with older Family Radio Services products.
The following features and main menu items will not be available while in Talk Around mode:

54 calls
• On-network phone calls
• On-network Private calls
• Data transmission
• Incoming message notification
• Musical ring tones
• Call forwarding
• Messages
• Call Timers
• Call alerts
• Voice records
set your phone to Mike’s Talk Around Find it: M > Talk Around > Go To TA.
After a few seconds, the Talk Around idle screen appears. The channel you are set to appears on the first line of the display, the code you
are set to appears on the second line of the display and TA Ready appears just above the softkeys.
Note: When switching from the network to Talk Around, the last channel and code that were set appear on the Talk Around idle screen.
While in Talk Around, this icon m appears on the display, indicating that there is no network signal and Talk Around is active.
Phones used in Talk Around mode should be a minimum of 6 feet apart to maximize performance and improve transmission range.
exit Talk AroundFind it: M > TA Options > Exit TA.
The following message displays: Switching to Network Please Wait. After a few seconds, the network idle screen appears.
55calls
channels and codesYour phone has 10 channels and 15 codes.
Channels are divided into sets of frequencies that allow you to make and receive Talk Around calls. Other parties may also be talking on the same channel.
Codes help minimize interference from unwanted messages and other disturbances when you are on the same channel as others.
To have a conversation, all parties must be on the same channel and code. For private Talk Around calls, the person you are calling must be in Talk Around and set to the same channel to receive your call.
Note: When making a code call, all parties that are on your code and channel can hear your conversation.
set a channel1 From the Talk Around idle screen, press
a under Edit.
2 Scroll to Channel and press a under Edit.
3 Select a channel number from 1 to 10.
4 When you are finished, press a under Back to return to the Talk Around idle screen.
set a code1 From the Talk Around idle screen, press
a under Edit.
2 Scroll to Code and press a under Edit.
56 calls
3 Select a code number from 1 to 15 or one of the following options:
4 When you are finished, press a under Back to return to the Talk Around idle screen.
optionReceive All:
Sets your phone to receive Talk Around transmissions from any phone that is set to the same channel, regardless of the code (1-15). When you receive transmissions with the code set to Receive All, the display changes from Receive All to the code on which the transmission was received.
Tip: You can reply to an incoming call within 6 seconds after hearing the short ending beep by pressing the PTT button.
Note: You cannot initiate a code call when the code is set to Receive All. If you push the PTT button with the code set to Receive All, you will receive an error message.
Pvt Only
Allows you to have a private conversation with another person using Talk Around. When on a private Talk Around call, no other parties can hear your conversation. In order to make a private Talk Around Call, you must use the valid 10-digit Personal Telephone Number (PTN) of the person you are calling. The person you are calling must be in Talk Around and set to the same channel to receive your call.
Note: An error message will occur if you don’t use a valid PTN, or the person that you are trying to reach is not in Talk Around, or is set to a different channel or out of range.
option
57calls
make and receive code calls in Talk AroundTo make a code call in Talk Around:
1 Push and hold the PTT button. TA Transmit appears on the first line of display. Begin speaking after your phone emits the Talk Around tone.
2 Release the PTT button to listen.
Note: The tone emitted from your phone when using Talk Around is 4 beeps and sounds different from the standard tone heard with on-network Private and group calls.
You could receive an error message if there are no parties on your channel or code, or if you are out of range.
When you receive a code call using Talk Around, Receive appears on the first line of the display.
Note: An incoming Talk Around call can be terminated at any time by pressing P.
make a private Talk Around call1 Enter the 10-digit PTN of the person you
want to call on your channel, or press a under Contacts and select a contact, or scroll to a number in the recent calls list.
2 Push and hold the PTT button. Begin speaking after your phone emits the Talk Around tone.
3 Release the PTT button to listen.
The number or name of the person you are calling will appear in the first line of the display.
58 calls
receive a private Talk Around call1 The number or name of the person who
initiated the call will appear in the first line of the display.
2 You can reply within 6 seconds simply by pushing the PTT button.
end a private Talk Around callA private Talk Around call will end if there is no communication for 6 seconds.
Note: A private Talk Around call may be interrupted during the 6 second idle time by another code call or private call.
make emergency calls while in Talk Around modeIf you attempt to make an Emergency 911 call while in Talk Around mode, your phone will
automatically exit Talk Around mode and attempt to find a network signal.
Note: If you are out of network coverage your phone will not be able to make an emergency 911 cellular call until you go back into the network coverage area.
You must wait until the phone reconnects to the network before attempting to make an emergency 911 cellular call.
setup optionsTalk Around setup options are available in the TA Options screen in both network and Talk Around modes.
access setup options in networkFind it: M > Talk Around > Setup.
access setup options in Talk AroundFind it: M > TA Options > Setup.
59calls
The following options become available:
optionDirect Launch
Launchs your phone directly into Talk Around when you select Talk Around from the Main Menu. If Direct Launch is set to On, you will not see TA Options when you select Talk Around from the main menu. In order to have access to your setup options, Direct Launch must be set to Off. Or you can access setup options while in Talk Around by pressing m and selecting TA Options.State Tone
Notifies you periodically with a tone that you are in Talk Around mode. You can select a time frame during which you want to be notified that you are in Talk Around mode. Select from 30 minutes, 1, 2, 3 or 4 hours.

60 customize
customize
ring tonesTo set the ring tone your phone makes when you receive phone calls, call alerts, message notifications, pictures sent using Send via PTT or Datebook reminders:
Note: Only ring tones stored in your phone’smemory are available in the ring tones list. To assign a ring tone stored on a memory card inserted in your phone’s memory card slot, you must go to the media center. Ring tones purchased or received from TELUS can be assigned as ring tones. Other audio files may not be supported as ring tones..
Find it: M > Ring Tones
1 Make sure Vibrate All is set to Off.
2 Scroll through the list of ring tones and select the one you want to assign. Vibrate sets your phone to vibrate instead of making a sound; Silent sets your phone to neither vibrate nor make a sound.
Tip: Highlighting a ring tone lets you hear it.
3 Select the features you want to assign the ring tone to.
4 When you are finished, press Done.
Note: This icon M appears on the display if you set your phone to Silent. This icon Q appears on the display if you set the phone to Vibrate All.

61customize
set your phone to vibrateYou can set your phone to vibrate instead of making a sound when you receive all phone calls, Private calls, group calls, call alerts, messages notifications, pictures sent using Send via PTT, and Datebook reminders.
Find it: M > Ring Tones > Vibrate All > On.
To set your phone to vibrate instead of making a sound for some features but not others:
Find it: M > Ring Tones
1 Make sure Vibrate All is set to Off.
2 Select Vibrate from the list of ring tones.
3 Select the features you want to set to make no sound.
4 When you are finished, press a under Done.
wallpaperSet a photo or picture as a wallpaper (background) image in your phone’s home screen or throughout all menu screens.
Find it: M > Settings > Display/Info > Wallpaper > Wallpaper.
To select a wallpaper image scroll through the list of pictures and press O to select the picture of your choice.
Note: You can set the wallpaper to change automatically after a certain period of time by turning on the Auto Cycle feature located in the Wallpaper menu.
backlightSet the amount of time that the display and java apps. backlights remain on, or turn off the backlight feature to extend battery life.

62 customize
Find it: M > Settings > Display/Info > Backlight
datebookFind it: M > Datebook > M > Setup
You can view or change these options:
hide or show location informationYour phone is equipped with a Location feature for use in connection with location-based services that may be available in the future.
The Location feature allows the network to detect your position. Turning Location off will hide your location from everyone except for your local emergency response center.
optionStart View: Sets Datebook to start in day view, week view, or month view when you access Datebook.Daily Begin: Sets the beginning of your day. This is the earliest time of day displayed in week view, if you have a 12-hour day view.Delete After: Sets the amount of time Datebook waits to delete an event after it occurs.Time Shift: Lets you shift the times of all Datebook events. This is useful if you are traveling to a different time zone.
Alert Timeout: Sets the amount of time a tone continues to sound when you receive a Datebook reminder.Clock: Controls whether the time and date appear on the home screen; sets time and date format.
option

63customize
Note: Turning Location on will allow the network to detect your position using GPS technology, making some applications and services easier to use. Turning Location off will disable the GPS location function for all purposes except 911, but will not hide your general location based on the cell site serving your call. No application or service may use your location without your request or permission. GPS-enhanced 911 is not available in all areas.
set your privacy optionsFind it: M > GPS > Privacy
Select Restricted, Unrestricted, or Ask Access.
64 other features - advanced calling
other features
advanced callingfeaturecall waiting Find it: To accept the
second call and put the active call on hold press a under Yes.
To accept the second call and end the active call press S.
Your phone rings with the second call for you to answer.
3-way call Make or receive a phone call and press M > 3 Way. Enter the second phone number, press N and a under Join.
Tip: For quick ways to enter the number, press M to see the dialing menu.
You cannot make any other calls after you have joined a 3-way call, even if one party disconnects.
feature

65other features - contacts
contacts datebookfeatureedit/delete contact entry
Press a under Contacts. Select a contact and press M > Edit. Change the desired content and press a under Done.
set ringer ID Press a under Contacts. Select a contact and press M > Edit > Ringer. Select desired ringer, press a under Back, and a under Done.
featurecreate datebook events
To create a new Datebook event press M > D > [New Event].
see datebook event
To see a calendar event press M > D > left or right to see the day and
up or down to see the events.
event reminder
When an event reminder occurs press a under View.
Press a under Back to close the reminder.

66 other features - GPS
GPSTo improve GPS performance:
• Stay in the open,
• Move away from other electrical or electronic devices
• Remain stationary.
• Avoid covering the antenna with your hands.
receive datebook events via PTT
To view the information while still in the Private call press r.
The 5 most recent events received from a Private ID are stored with the that Private ID on the recent calls list.
To store events to the Datebook press a under Save while viewing the event you want to store.
feature
featureview approximate location
To see where you currently are press M > GPS > Position.
Scroll to view the entire screen.
To recalculate position press Rfrsh. This may take several minutes.

67other features - handsfree
handsfreeNote: The use of wireless phones while driving may cause distraction. Discontinue a call if you can't concentrate on driving. Additionally, the use of wireless devices and their accessories may be prohibited or restricted in certain areas. Always obey the laws and regulations on the use of these products
set GPS privacy options
To set the level of privacy for your GPS system press M > GPS > Privacy.
If your GPS PIN security feature is enabled, enter your GPS PIN and select the privacy option you want.
change GPS PIN
Note: Your default GPS PIN is 0000.
To change your GPS PIN press M > Settings > Security > Change Passwds > GPS PIN.
Enter the current GPS PIN and enter the new 4- to 8-digit GPS PIN. Re-enter the new 4- to 8-digit GPS PIN to confirm.
feature
featurespeaker-phone
To activate the speakerphone while driving press and hold the speakerphone key s.
auto answer To automatically answer calls when connected to a car kit or headset press M > Settings > Phone Calls > Auto Ans. Select the amount of rings before answering.

68 other features - personalize
personalize pc applications
TTY
featurelanguage To set the language of your
menu press M > Settings > Display/Info > Language.
backlight time length
To select how long the display screen and keypad are backlit press M > Settings > Display/Info > Backlight.
menu style To show the Main Menu as graphic icons or a text-based list press M > Settings > Display/Info > Menu View.
clock display To display the clock on your home screen press M > Settings > Display/Info > Clock > Display > On.
featureother PC applications
For a list of complete PC applications visit www.motorola.com/iden
featureturn On TTY feature
From the home screen press M > Settings > Phone Calls > TTY > Use TTY > On.
choose TTY mode
From the home screen press M > Settings > Phone Calls > TTY > Type.
Select from TTY, VCO or HCO.
69other features - security
security
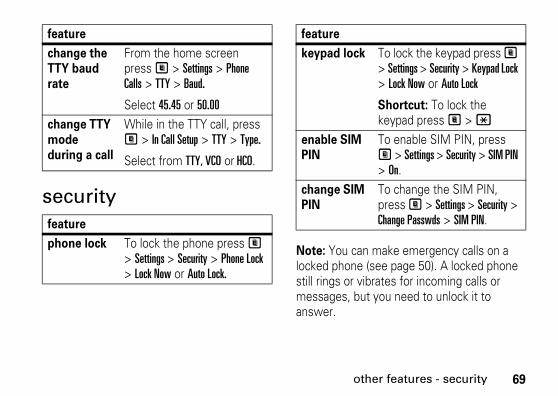
Note: You can make emergency calls on a locked phone (see page 50). A locked phone still rings or vibrates for incoming calls or messages, but you need to unlock it to answer.
change the TTY baud rate
From the home screen press M > Settings > Phone Calls > TTY > Baud.
Select 45.45 or 50.00
change TTY mode during a call
While in the TTY call, press M > In Call Setup > TTY > Type.
Select from TTY, VCO or HCO.
featurephone lock To lock the phone press M
> Settings > Security > Phone Lock > Lock Now or Auto Lock.
featurekeypad lock To lock the keypad press M
> Settings > Security > Keypad Lock > Lock Now or Auto Lock
Shortcut: To lock the keypad press M > *
enable SIM PIN
To enable SIM PIN, press M > Settings > Security > SIM PIN > On.
change SIM PIN
To change the SIM PIN, press M > Settings > Security > Change Passwds > SIM PIN.
feature

70 other features - security

71
Important Safety and Legal Information
72 Safety Information
Safety and General InformationSafety InformationThis section contains important information on the safe and efficient operation of your phone. Read this information before using your integrated multi-service portable radio.*
Exposure to Radio Frequency (RF) EnergyYour phone contains a transmitter and receiver. When it is ON, it receives and transmits RF energy. When you communicate with your phone, the system handling your call controls the power level at which your phone transmits.Your Motorola phone is designed to comply with local regulatory requirements in your country concerning exposure of human beings to RF energy.
Portable Radio Product Operation and EME ExposureYour Motorola radio product is designed to comply with the following national and international standards and guidelines regarding exposure of human beings to radio frequency electromagnetic energy (EME):
• United States Federal Communications Commission, Code of Federal Regulations; 47 CFR part 2 sub-part J.
• American National Standards Institute (ANSI) / Institute of Electrical and Electronics Engineers (IEEE). C95. 1-1992.
• Institute of Electrical and Electronics Engineers (IEEE). C95. 1-2005 Edition.*
• International Commission on Non-Ionizing Radiation Protection (ICNIRP) 1998.
• Ministry of Health (Canada). Safety Code 6. Limits of Human Exposure to Radio frequency Electromagnetic Fields in the Frequency Range from 3 kHz to 300 GHz, 1999.
• Australian Communications Authority Radio communications (Electromagnetic Radiation - Human Exposure) Standard 2003.
• ANATEL, Brazil Regulatory Authority, Resolution 303 (July 2, 2002) "Regulation of the limitation of exposure to
* The information provided in this document supersedes the general safety information in user’s guides published prior to May 1, 2006

Safety Information 73
electrical, magnetic, and electromagnetic fields in the radio frequency range between 9 kHz and 300 GHz." "Attachment to Resolution 303 from July 2, 2002."
Operational PrecautionsTo assure optimal radio product performance and to be sure that human exposure to RF does not exceed the guidelines set forth in the relevant standards, always follow these instructions and precautions:
Phone OperationWhen placing or receiving a phone call, hold your radio product as you would a wireline telephone. Speak directly into the microphone.
Two-way radio operationYour radio product has been designed and tested to comply with national and international standards and guidelines regarding human exposure to RF electromagnetic energy, when operated in the two-way mode (at the face, or at the abdomen when using an audio accessory) at usage factors of up to 50% talk/50% listen.Transmit no more than the rated duty factor of 50% of the time. To transmit (talk), push the PTT button. To receive calls, release the PTT button. Transmitting 50% of the time or less, is important because this radio generates measurable RF energy only when transmitting (in terms of measuring for standards compliance).
When using your radio product as a traditional two-way radio, hold the radio product in a vertical position with the microphone one to two inches (2.5 to 5 cm) away from the lips.If you wear a radio product on your body when transmitting, always place the radio product in a Motorola approved clip, holder, holster, case or body harness. If you do not use a body-worn accessory supplied or approved by Motorola and are not using the radio product in the intended use positions along side the head in the phone mode or in front of the face in the two-way radio mode, or if you hang your device from a lanyard around your neck, keep the device at least 2.5 centimeters (1 inch) from your body when transmitting.
Approved AccessoriesFor a list of approved Motorola accessories call 1-800-453-0920, or visit our website at www.motorola.com/iden.
RF Energy Interference/CompatibilityNearly every electronic device is subject to RF energy interference from external sources if inadequately shielded, designed or otherwise configured for RF energy compatibility. In some circumstances your handset may cause interference with other devices.
74 Safety Information
Follow Instructions to Avoid Interference ProblemsTurn OFF your radio product where posted notices instruct you to do so.In an aircraft, turn off your radio product whenever instructed to do so by airline staff. If your radio product offers an airplane mode or similar feature, consult airline staff about using it in flight.
Implantable Medical DevicesIf you have an implantable medical devices, such as a pacemaker or defibrillator, consult your physician before using this radio product.Persons with implantable medical devices should observe the following precautions:
• ALWAYS keep the phone more than 20 centimeters (8 inches) from the implantable medical device when the phone is turned ON.
• DO NOT carry the phone in a breast pocket;• Use the ear opposite the implantable medical device to
minimize the potential for interference.• Turn OFF the phone immediately if you have any reason to
suspect that the interference is taking place.Read and follow the directions from the manufacturer of your implantable medical device. If you have any questions about using
your wireless phone with your implantable medical device, consult your health care provider.
Hearing AidsSome phones may interfere with some hearing aids. In the event of such interference, you may want to consult your hearing aid manufacturer or physician to discuss alternatives.
Other Medical Devices and Health Care FacilitiesIf you use any other personal medical devices, consult your physician or the manufacturer or your device to determine if it is adequately shielded from RF energy. Turn off your radio product when instructed to do so in hospitals or health care facilities that may be using equipment that is sensitive to external RF energy.
Driving PrecautionsCheck the laws and regulations on the use of radio products in the area where you drive. Always obey them.When using your radio product while driving, please:
• Give full attention to driving and to the road. Using a phone may be distracting. Discontinue a call if you can’t concentrate on driving.
• Use hands free operation, if available.• Pull off the road and park before making or answering a
call if driving conditions so require.

Safety Information 75
• Do not place a handset in the airbag deployment area.Responsible driving practices can be found in the “Smart Practices While Driving” section at the end of this guide and/or at the Motorola Web site: www.motorola.com/callsmart.Note: The use of wireless phones while driving may cause distraction. Discontinue a call if you can’t concentrate on driving. Additionally, the use of wireless devices and their accessories may be prohibited or restricted in certain areas. Always obey the laws and regulations on the use of these products.
Operational WarningsObey all posted signs when using phones in public areas.
Potentially Explosive AtmospheresAreas with potentially explosive atmospheres are often but not always posted, and can include fueling areas such as below decks on boats, fuel or chemical transfer or storage facilities, or areas where the air contains chemicals or particles, such as grain, dust or metal powders.When you are in such area, turn off your handset, and do not remove, install, or charge batteries unless it is a radio product type especially qualified for use in such areas as “Intrinsically Safe” (for example, Factory Mutual, CSA, or UL approved). In such areas, sparks can occur and cause an explosion or fire.
Batteries and ChargersCaution: Improper treatment or use of batteries may present a danger of fire, explosion, leakage, or other hazard. For more information, see the “Battery Use and Battery Safety” section in this user’s guide.Your battery, charger, or portable radio may contain symbols, defined as follows:
Symbol Definition
Important safety information follows.
Do not dispose of your battery or phone in a fire.
Your battery or phone may require recycling in accordance with local laws. Contact your local regulatory authorities for more information.
Do not throw your battery or phone in the trash.
Your phone contains an internal lithium ion battery.
032374o032374o
032376o032376o
032375o032375o
032378oLi Ion BATT
032378oLi Ion BATT

76 Safety Information
Choking HazardsYour portable radio or its accessories may include detachable parts, which may present a choking hazard to small children. Keep your device and its accessories away from small children.
Glass PartsSome parts of your phone may be made of glass. This glass could break if the product is dropped on a hard surface or receives a substantial impact. If glass breaks, do not touch or attempt to remove. Stop using your phone until the glass is replaced by a qualified service center.
Seizures/BlackoutsSome people may be susceptible to epileptic seizures or blackouts when exposed to flashing lights, such as when playing video games. These may occur even if a person has never had a previous seizure or blackout.
If you have experienced seizures or blackouts, or if you have a family history of such occurrences, please consult with your physician before playing video games or enabling a flashing-lights feature (if available) on your phone.Discontinue use and consult a physician if any of the following symptoms occur: convulsion, eye or muscle twitching, loss of awareness, involuntary movements, or disorientation. It is always a good idea to hold the screen away from your eyes, leave the lights on in the room, take a 15-minute break every hour, and stop use if you are very tired.
Caution About High Volume UsageListening at full volume to music or voice through a headset may damage your hearing.
Repetitive MotionWhen you repetitively perform actions such as pressing keys or entering finger-written characters, you may experience occasional discomfort in your hands, arms, shoulders, neck, or other parts of your body. If you continue to have discomfort during or after such use, stop use and see a physician.
Do not let your battery, charger, or phone get wet.
Listening at full volume to music or voice through a headset may damage your hearing.
Symbol Definition
Export Law 77
Service & Repairs
If you have questions or need assistance, we’re here to help.Go to www.motorola.com/iden, where you can select from a number of customer care options. You can also contact the
Motorola Customer Support Center at 1-800-453-0920 (United States), 1-877-483-2840 (TTY/TDD United States for hearing impaired).
Export Law AssurancesExport LawThis product is controlled under the export regulations of the United States of America and Canada. The Governments of the United States of America and Canada may restrict the exportation or re-exportation of this product to certain destinations. For further information contact the U.S. Department of Commerce or the Canadian Department of Foreign Affairs and International Trade.

78 Export Law
Specific Absorption Rate Data
ALL MODELS WITH FCC ID IHDT56HG2 MEET THE GOVERNMENT’S REQUIREMENTS FOR EXPOSURE TO RADIO WAVES.Your wireless phone is a radio transmitter and receiver. It is designed and manufactured not to exceed the emission limits for exposure to radio frequency (RF) energy set by the Federal Communications Commission of the U.S. Government. These limits are part of comprehensive guidelines and establish permitted levels of RF energy for the general population. The guidelines are based on standards that were developed by independent scientific organizations through periodic and thorough evaluation of scientific studies. The standards include a substantial safety margin designed to assure the safety of all persons, regardless of age and health.The exposure standard for wireless mobile phones employs a unit of measurement known as the Specific Absorption Rate, or SAR. The SAR limit set by the FCC is 1.6W/kg.1 Tests for SAR are conducted using standard operating positions reviewed by the FCC with the phone transmitting at its highest certified power level in all tested frequency bands. Although the SAR is determined at the highest certified power level, the actual SAR level of the phone while operating can be well below the maximum value. This is because the phone is designed to operate at multiple power levels so as to use only the power required to reach the network. In
general, the closer you are to a wireless base station antenna, the lower the power output.Before a phone model is available for sale to the public, it must be tested and certified to the FCC that is does not exceed the limit established by the government-adopted requirement for safe exposure. The tests are performed in positions and locations (e.g., at the ear and worn on the body) as required by the FCC for each model. The highest SAR value for this model phone when tested for use at the ear is 1.53 W/kg and when tested on the body, as described in this user guide, is 1.55 W/kg during packet data transmission. (Body-worn measurements differ among phone models, depending upon available accessories and FCC requirements.)2 While there may be differences between the SAR levels of various phones and at various positions, they all meet the government requirement for safe exposure. Please note that improvements to this product model could cause differences in the SAR value for later products; in all cases, products are designed to be within the guidelines.Additional information on Specific Absorption Rates (SAR) can be found on the Cellular Telecommunications Industry Association (CTIA) web-site at http://www.ctia.org or the Canadian Wireless Telecommunications Association (CWTA) Web site: http://www.cwta.ca

Export Law 79
1. In the United States and Canada, the SAR limit for mobile phones used by the public is 1.6 watts/kg (W/kg) averaged over one gram of tissue. The standard incorporates a substantial margin of safety to give additional protection for the public and to account for any variations in measurements.2. The SAR information includes the Motorola testing protocol, assessment procedure, and measurement uncertainty range for this product.

80 Warranty
Motorola Limited Warranty for the United States and CanadaWarranty
What Does this Warranty Cover?Note: FOR IDEN SUBSCRIBER PRODUCTS, ACCESSORIES AND SOFTWARE PURCHASED IN THE UNITED STATES OR CANADA
What Does this Warranty Cover? Subject to the exclusions contained below, Motorola, Inc. warrants its Motorola iDEN Digital Mobile and Portable Handsets ("Products"), Motorola-branded or certified accessories sold for use with these Products ("Accessories") and Motorola software contained on CD-Roms or other tangible media and sold for use with these Products ("Software") to be free from defects in materials and workmanship under normal consumer usage for the period(s) outlined below. This limited warranty is a consumer's exclusive remedy, and applies as follows to new Products, Accessories and Software purchased by
consumers in the United States or Canada, which are accompanied by this written warranty:
Products Covered Length of Coverage
Products as defined above.
One (1) year from the date of purchase by the first consumer purchaser of the product.
Accessories as defined above.
One (1) year from the date of purchase by the first consumer purchaser of the product.
Products or Accessories that are Repaired or Replaced.
The balance of the original warranty or for ninety (90) days from the date returned to the consumer, whichever is longer.

Warranty 81
What is not covered? (Exclusions)Normal Wear and Tear. Periodic maintenance, repair and replacement of parts due to normal wear and tear are excluded from coverage.Ornamental Decorations. Ornamental decorations such as emblems, graphics, rhinestones, jewels, gemstones and their settings, and other decorative elements, are excluded from coverage.Batteries. Only batteries whose fully charged capacity falls below 80% of their rated capacity and batteries that leak are covered by this limited warranty.Abuse & Misuse. Defects or damage that result from: (a) improper operation, storage, misuse or abuse, accident or neglect, such as physical damage (cracks, scratches, etc.) to the surface of the product resulting from misuse; (b) contact with liquid, water, rain, extreme humidity or heavy perspiration, sand, dirt or the like, extreme heat, or food; (c) use of the Products or Accessories for
commercial purposes or subjecting the Product or Accessory to abnormal usage or conditions; or (d) other acts which are not the fault of Motorola, are excluded from coverage.Use of Non-Motorola Products and Accessories. Defects or damage that result from the use of Non-Motorola branded or certified Products, Accessories, Software or other peripheral equipment are excluded from coverage. Unauthorized Service or Modification. Defects or damages resulting from service, testing, adjustment, installation, maintenance, alteration, including without limitation, software changes, or modification in any way by someone other than Motorola, or its authorized service centers, are excluded from coverage. Altered Products. Products or Accessories with (a) serial numbers or date tags that have been removed, altered or obliterated; (b) broken seals or that show evidence of tampering; (c) mismatched board serial numbers; or (d) nonconforming or non-Motorola housings, antennas, or parts, are excluded from coverage.Communication Services. Defects, damages, or the failure of Products, Accessories or Software due to any communication service or signal you may subscribe to or use with the Products, Accessories or Software is excluded from coverage.Software Embodied in Physical Media. No warranty is made that the software will meet your requirements or will work in combination with any hardware or software applications provided by third parties, that the operation of the software products will be
Software as defined above. Applies only to physical defects in the media that embodies the copy of the software (e.g. CD-ROM, or floppy disk).
Ninety (90) days from the date of purchase.
Products Covered Length of Coverage
82 Warranty
uninterrupted or error free, or that all defects in the software products will be corrected. Software NOT Embodied in Physical Media. Software that is not embodied in physical media (e.g. software that is downloaded from the internet), is provided "as is" and without warranty.Who is covered? This warranty extends only to the first consumer purchaser, and is not transferable.What will Motorola Do? Motorola, at its option, will at no charge repair, replace or refund the purchase price of any Products, Accessories or Software that does not conform to this warranty. We may use functionally equivalent reconditioned/refurbished/pre-owned or new Products, Accessories or parts. No data, software or applications added to your Product, Accessory or Software, including but not limited to personal contacts, games and ringer tones, will be reinstalled. To avoid losing such data, software and applications please create a back up prior to requesting service. How to Obtain Warranty Service or Other Information? To obtain service or information, please call:Motorola iDEN Customer Services 1-800-453-0920 or 954-723-4910TTY-877-483-2840Or visit us online at http://www.motorola.com/idenYou will receive instructions on how to ship the Products, Accessories or Software, at your expense, to a Motorola Authorized Repair Center. To obtain service, you must include: (a) a
copy of your receipt, bill of sale or other comparable proof of purchase; (b) a written description of the problem; (c) the name of your service provider, if applicable; (d) the name and location of the installation facility (if applicable) and, most importantly; (e) your address and telephone number. What Other Limitations Are There? ANY IMPLIED WARRANTIES, INCLUDING WITHOUT LIMITATION THE IMPLIED WARRANTIES OF MERCHANTABILITY AND FITNESS FOR A PARTICULAR PURPOSE, SHALL BE LIMITED TO THE DURATION OF THIS LIMITED WARRANTY, OTHERWISE THE REPAIR, REPLACEMENT, OR REFUND AS PROVIDED UNDER THIS EXPRESS LIMITED WARRANTY IS THE EXCLUSIVE REMEDY OF THE CONSUMER, AND IS PROVIDED IN LIEU OF ALL OTHER WARRANTIES, EXPRESS OF IMPLIED. IN NO EVENT SHALL MOTOROLA BE LIABLE, WHETHER IN CONTRACT OR TORT (INCLUDING NEGLIGENCE) FOR DAMAGES IN EXCESS OF THE PURCHASE PRICE OF THE PRODUCT, ACCESSORY OR SOFTWARE, OR FOR ANY INDIRECT, INCIDENTAL, SPECIAL OR CONSEQUENTIAL DAMAGES OF ANY KIND, OR LOSS OF REVENUE OR PROFITS, LOSS OF BUSINESS, LOSS OF INFORMATION OR DATA, SOFTWARE OR APPLICATIONS OR OTHER FINANCIAL LOSS ARISING OUT OF OR IN CONNECTION WITH THE ABILITY OR INABILITY TO USE THE PRODUCTS, ACCESSORIES OR SOFTWARE TO THE FULL EXTENT THESE DAMAGES MAY BE DISCLAIMED BY LAW.Some states and jurisdictions do not allow the limitation or exclusion of incidental or consequential damages, or limitation on the length of an implied warranty, so the above limitations or

Warranty 83
exclusions may not apply to you. This warranty gives you specific legal rights, and you may also have other rights that vary from state to state or from one jurisdiction to another.Laws in the United States and other countries preserve for Motorola certain exclusive rights for copyrighted Motorola software such as the exclusive rights to reproduce and distribute copies of the Motorola software. Motorola software may only be copied into, used in, and redistributed with, the Products associated with such Motorola software. No other use, including without limitation disassembly of such Motorola software or exercise of the exclusive rights reserved for Motorola, is permitted.
Patent and Software ProvisionsMOTOROLA will defend, at its own expense, any suit brought against the end user purchaser to the extent that it is based on a claim that the Product or parts infringe a United States patent, and Motorola will pay those costs and damages finally awarded against the end user purchaser in any such suit which are attributable to any such claim, but such defense and payments are conditioned on the following:
a.That MOTOROLA will be notified promptly in writing by such purchaser of any notice of such claim;b.That MOTOROLA will have sole control of the defense of such suit and all negotiations for its settlement or compromise; and
c.Should the Product or parts become, or in MOTOROLA'S opinion be likely to become, the subject of a claim of infringement of a United States patent, that such purchaser will permit MOTOROLA, at its option and expense, either to procure for such purchaser the right to continue using the Product or parts or to replace or modify the same so that it becomes non-infringing or to grant such purchaser a credit for the Product or parts as depreciated and accept its return. The depreciation will be an equal amount per year over the lifetime of the Product or parts as established by MOTOROLA.MOTOROLA will have no liability with respect to any claim of patent infringement which is based upon the combination of the Product or parts furnished hereunder with software, apparatus or devices not furnished by MOTOROLA, nor will MOTOROLA have any liability for the use of ancillary equipment or software not furnished by MOTOROLA which is attached to or used in connection with the Product or any parts thereof.Laws in the United States and other countries preserve for MOTOROLA certain exclusive rights for copyrighted MOTOROLA software, such as the exclusive rights to reproduce in copies and distribute copies of such MOTOROLA software. MOTOROLA software may be used in only the Product in which the software was originally embodied and such software in such Product may not be replaced, copied, distributed, modified in any way, or used to produce any derivative thereof. No other use including, without limitation, alteration, modification, reproduction, distribution, or reverse engineering of such MOTOROLA software or exercise or rights in such MOTOROLA software is permitted. No license is
84 Warranty
granted by implication, estoppel or otherwise under MOTOROLA patent rights or copyrights.

HAC 85
Hearing Aid CompatibilityHACA number of Motorola phones have been tested for hearing aid compatibility. When some wireless phones are used with certain hearing aids, users may detect a noise which can interfere with the effectiveness of the hearing aid. Some hearing aids are more “immune” than others to this interference noise, and phones can also vary in the amount of interference noise they may generate. ANSI standard C63.19 was developed to provide a standardized means of measuring both mobile phone and hearing aids to determine usability rating categories for both. Ratings have been developed for mobile phones to assist hearing aid users find phones that may be compatible with their hearing aid. Not all phones have been rated for compatibility with hearing aids. Phones that have been rated have a label with the rating(s) located on the box, and at www.motorola.com/accessibility. These ratings are not guarantees of compatibility. Results will vary depending on the user's hearing aid and individual type and degree of hearing loss. If a hearing aid is particularly vulnerable to interference, even a phone with a higher rating may still cause unacceptable noise levels in the hearing aid Trying out the phone with your hearing aid is the best way to evaluate it for your personal needs.
“M” Rating: Phones rated M3 or M4 meet FCC requirements for hearing aid compatibility and are likely to generate less interference to hearing aids than unrated phones. (M4 is the “better” or higher of the two ratings.) On those models with an extendable antenna, this rating is determined only with the antenna extended.“T” Rating: Phones rated T3 or T4 meet FCC requirements and are likely to be more usable with a hearing aid's telecoil (“T Switch” or “Telephone Switch”) than unrated phones. (T4 is the “better” or higher of the two ratings.) On those models with a telecoil mode setting, this rating is determined only with the phone so set. For setting instructions, see “Features for the Hearing Impaired” in the section entitled “Advanced Calling Features”. Note that not all hearing aids have telecoils in them.Hearing aids may also be measured for immunity to interference from wireless phones and may have ratings similar to wireless phones. Ask your hearing health care professional for the rating of your hearing aid. Add the rating of your hearing aid and your phone to determine the estimated usability:
• Any combined rating equal to or greater than six offers excellent use.
• Any combined rating equal to five is considered normal use.

86 HAC
• Any combined rating equal to four is considered usable.Thus, if you use an M3 phone with a M3 hearing aid you will have a combined rating of six for “excellent use.” This methodology applies equally for T ratings.More information about hearing aid compatibility may be found at: www.motorola.com/accessibility, www.fcc.gov, www.fda.gov, and www.hearingloss.org/learn/cellphonetech.asp
WHO Information 87
Information From the World Health OrganizationWHO InformationPresent scientific information does not indicate the need for any special precautions for the use of mobile phones. If you are concerned, you may want to limit your own or your children’s RF
exposure by limiting the length of calls or by using hands-free devices to keep mobile phones away from your head and body.Source: WHO Fact Sheet 193Further information: http://www.who.int./peh-emf
Product RegistrationRegistrationOnline Product Registration:http://direct.motorola.com/hellomoto/ Motosupport/source/registration.aspProduct registration is an important step toward enjoying your new Motorola product. Registering helps us facilitate warranty service, and permits us to contact you should your product require an update or other service. Registration is for U.S. residents only and is not required for warranty coverage.Please retain your original dated sales receipt for your records. For warranty service of your Motorola Personal Communications Product you will need to provide a copy of your dated sales receipt to confirm warranty status.Thank you for choosing a Motorola product.
88 Recycling
Wireless: The New RecyclableRecyclingYour wireless phone can be recycled. Recycling your phone reduces the amount of waste disposed in landfills and allows recycled materials to be incorporated into new products.The Cellular Telecommunications Industry Association (CTIA) and its members encourage consumers to recycle their phones and have taken steps to promote the collection and environmentally sound recycling of end-of-life devices.
As a phone user, you have an important role in ensuring that this device is recycled properly. When it comes time to give this phone up or trade it in for a new one, please remember that the phone, the charger, and many of its accessories can be recycled. It's easy. To learn more about CTIA's Recycling Program for Used Wireless Devices, please visit us at: http://recycling.motorola.young-america.com/ index.html
California Perchlorate LabelPerchlorate LabelSome mobile phones use an internal, permanent backup battery on the printed circuit board that may contain very small amounts of perchlorate. In such cases, California law requires the following label:“Perchlorate Material - special handling may apply. See www.dtsc.ca.gov/hazardouswaste/perchlorate.”There is no special handling required by consumer.

Patent and Trademark 89
Patent and Trademark InformationPatent and TrademarkMOTOROLA, the Stylized M Logo and all other trademarks indicated as such herein are trademarks of Motorola, Inc. ® Reg. U.S. Pat. & Tm. Off. © 2007 Motorola, Inc. All rights reserved.Microsoft and Microsoft Internet Explorer are registered trademarks of Microsoft Corporation. T9 is a trademark owned by Tegic Communications. T9® Text Input Patent and Trademark Information. This product is covered by U.S. Pat. 5,818,437, U.S. Pat. 5,953,541, U.S. Pat. 6,011,554 and other patents pending. Java and all other Java-based marks are trademarks or registered trademarks of Sun Microsystems, Inc. in the U.S. and other countries. All other product names or services mentioned in this manual are the property of their respective trademark owners.
Software Copyright NoticeThe Motorola products described in this manual may include copyrighted Motorola and third party software stored in semiconductor memories or other media. Laws in the United States and other countries preserve for Motorola and third party software providers certain exclusive rights for copyrighted software, such as the exclusive rights to distribute or reproduce the copyrighted software. Accordingly, any copyrighted software contained in the Motorola products may not be modified, reverse-engineered, distributed, or reproduced in any manner to the extent allowed by law. Furthermore, the purchase of the Motorola products shall not be deemed to grant either directly or by implication, estoppel, or otherwise, any license under the copyrights, patents, or patent applications of Motorola or any third party software provider, except for the normal, non-exclusive, royalty-free license to use that arises by operation of law in the sale of a product.

90 Privacy and Data Security
Privacy and Data SecurityPrivacy and Data SecurityMotorola understands that privacy and data security are important to everyone. Because some features of your phone may affect your privacy or data security, please follow these recommendations to enhance protection of your information:
• Monitor access: Keep your phone with you and do not leave it where others may have unmonitored access. Lock your device’s keypad where this feature is available.
• Keep software up to date: If Motorola or a software/application vendor releases a patch or software fix for your phone which updates the device’s security, install it as soon as possible.
• Erase before recycling: Delete personal information or data from your phone prior to disposing of it or turning it in for recycling. For step-by-step instructions on how to delete all personal information from your device, please contact your local service provider.
• Understanding AGPS: In order to comply with emergency caller location requirements of the FCC, certain Motorola phones incorporate Assisted Global Positioning System (AGPS) technology. AGPS technology also can be used in non-emergency applications to track and monitor a user’s location, for example, to provide driving directions. Users who prefer not to permit such tracking and monitoring should avoid using such applications.
If you have further questions regarding how use of your phone may impact your privacy or data security, please contact Motorola at [email protected], or contact TELUS Client Care..

Driving Safety 91
Smart Practices While DrivingDriving Safety Drive Safe, Call Smart SM
Check the laws and regulations on the use of phones and their accessories in the areas where you drive. Always obey them. The use of these devices may be prohibited or restricted in certain areas. Go to www.motorola.com/callsmart for more information.Your phone lets you communicate by voice and data, almost anywhere, anytime, wherever wireless service is available and safe conditions allow. When driving a car, driving is your first responsibility. If you choose to use your phone while driving, remember the following tips:
• Get to know your Motorola phone and its features such as speed dial and redial. If available, these features help you to place your call without taking your attention off the road.
• When available, use a hands-free device. If possible, add an additional layer of convenience to your phone with one of the many Motorola Original hands-free accessories available today.
• Position your phone within easy reach. Be able to access your phone without removing your eyes from the
road. If you receive an incoming call at an inconvenient time, if possible, let your voice mail answer it for you.
• Let the person you are speaking with know you are driving; if necessary, suspend the call in heavy traffic or hazardous weather conditions. Rain, sleet, snow, ice, and even heavy traffic can be hazardous.
• Do not take notes or look up phone numbers while driving. Jotting down a “to do” list or going through your address book takes attention away from your primary responsibility, driving safely.
• Dial sensibly and assess the traffic; if possible, place calls when your car is not moving or before pulling into traffic. If you must make a call while moving, dial only a few numbers, check the road and your mirrors, then continue.
• Do not engage in stressful or emotional conversations that may be distracting. Make people you are talking with aware you are driving and suspend conversations that can divert your attention away from the road.
• Use your phone to call for help. Dial 911 or other local emergency number in the case of fire, traffic accident, or medical emergencies.**
92 Driving Safety
• Use your phone to help others in emergencies. If you see an auto accident, crime in progress, or other serious emergency where lives are in danger, call 911 or other local emergency number, as you would want others to do for you.**
• Call roadside assistance or a special non-emergency wireless assistance number when necessary. If you see a broken-down vehicle posing no serious hazard, a broken traffic signal, a minor traffic accident where no one appears injured, or a vehicle you know to be stolen, call roadside assistance or other special non-emergency wireless number.*
* Wherever wireless phone service is available.

93Index
Index
Aaccessories 9, 25, 67active phone line 40advanced calling 64
3-way calls 64alert
set 61turn off 43
answer a call 15
Bbacklight 61, 68battery 10, 12, 13
life, extend 10battery indicator 40Bluetooth
connect 35
send information 37setting your phone 35turning on or off 35
bluetooth 35
Ccall
answer 15end 15make 15
call forward 49caller ID 49calls 47center key 43center select key 9clock 68combined power/end/home
key 14, 15
contacts 65
Ddatebook 65
receive events via PTT 66setup 62
dial a phone number 15dialed calls 47display 39Drafts 22
Eearpiece volume 43emergency number 50end a call 15export regulations 77

94 Index
Ffrequently asked questions
service and repairs 77
GGPS 66GPS enabled
emergency calls 50GPS, see GPS enabled
Hhandsfree 67handsfree speaker 43Hearing Aid Compatibility 85home screen 39
Iincoming call message 49international calls 50, 52iTAP text entry mode 41
Llanguage 68low battery message 40
Mmake a call 15Memory
text messages 23Message center
text messages 21message indicator 40messages 68
fax mail indicator 53modem
using your handset as a 23
Nnavigation key 9, 43net alerts 53
Oone touch PTT 31optional accessory 9, 67optional feature 9
Ppacket data 40PC applications 68personalize 68phone number 19private calls
answer 17call alerts 16make 15receive a call alert 17
PT manager 32PTT 26
Qquick notes
create, edit 20, 22
95Index
Rradio frequency 72received calls 47recent calls 47recycling 88redial 48ring style indicator 40ring tones
off 60, 61setting 60vibrate 60, 61
ringer volume 43
Ssafety
radio frequency 72RF energy interference 73
safety information 72safety tips 91security 69send key 15
SIM card 10change SIM PIN 69enable SIM PIN 69
soft keys 39speaker 40, 66speed dial 51store your number 19
TTalk Around
channels 55codes 55emergency calls 58private Talk
Around calls 57setup options 58
tap text entry mode 42text entry 40text messages 19, 23
creating 21deleting 22, 23drafts 22
memory 23message center 21receiving 20resend messages 22sending 21sent messages 22setting up 19
transmitters 43TTY calls 68turn on/off 14
Vvoice mail
advance voice mail with fax 52
receiving 52setting up 52
voice names 48voicemail 52volume 43
96 Index
Wwallpaper 61WHO information 87wireless web 32
microbrowser navigation 33
Yyour phone number 19