User’s Guide - Husqvarna Vikingmanuals.husqvarnaviking.com/VSM/Husqvarna...
52
KEEPING THE WORLD SEWING User’s Guide 415, 425
Transcript of User’s Guide - Husqvarna Vikingmanuals.husqvarnaviking.com/VSM/Husqvarna...

K E E P I N G T H E W O R L D S E W I N G
User’s Guide 415, 425

Instruction book Freesia 415, 4252
This houshold sewing machine is designed to comply with IEC/EN 60335-2-28 and UL1594
IMPORTANT SAFETY INSTRUCTIONSWhen using an electrical appliance, basic safety precautions should always befollowed, including the following:Read all instructions before using this household sewing machine.
DANGER - To reduce the risk of electric shock:• A sewing machine should never be left unattended when plugged in. Always unplug
this sewing machine from the electric outlet immediately after using and beforecleaning.
• Always unplug before relamping. Replace bulb with same type rated 5 Watt.
WARNING - To reduce the risk of burns, fire, electric
shock, or injury to persons:• Do not allow to be used as a toy. Close attention is necessary when this sewing
machine is used by or near children or infirm persons.• Use this sewing machine only for its intended use as described in this manual. Use
only attachments recommended by the manufacturer as contained in this manual.• Never operate this sewing machine if it has a damaged cord or plug, if it is not
working properly, if it has been dropped or damaged, or dropped into water. Returnthe sewing machine to the nearest authorised dealer or service center forexamination, repair, electrical or mechanical adjustment.
• Never operate the sewing machine with any air openings blocked. Keep ventilationopenings of the Sewing machine and foot controller free from the accumulation oflint, dust, and loose cloth.
• Keep fingers away from all moving parts. Special care is required around the Sewingmachine needle.
• Always use the proper needle plate. The wrong plate can cause the needle to break.• Do not use bent needles.• Do not pull or push fabric while stitching. It may deflect the needle causing it to break.• Switch the sewing machine off (“0”) when making any adjustment in the needle
area, such as threading needle, changing needle, threading bobbin, or changingpresser foot, etc.
• Always unplug the sewing machine from the electrical outlet when removing covers,lubricating, or when making any other user servicing adjustments mentioned in theinstruction manual.
• Never drop or insert any object into any opening.• Do not use outdoors.• Do not operate where aerosol (spray) products are being used or where oxygen is
being administrated.• To disconnect, turn all controls to the off (“0”) position, then remove plug from outlet.• Do not unplug by pulling on cord. To unplug, grasp the plug, not the cord.• Hold plug when rewinding into cord reel. Do not allow plug to whip when
rewinding.
SAVE THESE INSTRUCTIONS

Instruction book Freesia 415, 425 3
Safety instructions 2Machine parts 4Procedures 5-22Unpacking, Packing away 5Connecting the foot control 6Connecting to the powersupply 6Accessory box, Sewing surface 7Spool pin 8Threading the upper thread 9Threading for twin needles 10Bobbin winding, Directwinding 11Threading lower thread 12Thread tension, Correct andincorrect thread tension 13Presser foot pressure,Presser foot lever, Changingthe presser foot 14Changing the needle, Loweringfeed teeth 15
Functions 16-22Infodisplay, Model 425 16-17Infodisplay, Model 415 18-19Stitch selection 20Memory, Model 425 20Programming, Model 425 21-22Mirror image 23Satin taper and darningstitches 23
List of contents
Sewing 24-43Buttonholes, Buttonholeknife 24-25Sewing buttons 26Straight stitch 27Needle positions 27Zipper 28Gathering with straightstitches 29Reinforced straight stitches 30Stretch stitch, Zigzag 30Lace edging 31Three-step zigzag 33Sewing terry cloth 33Mending and darning 33Flatlock 34Hemming 35Bridging stitch 36Seam and Overcast 36Darning stitch 37Automatic taper stitch 37Decorative stitches 38Sewing hints 39Stitch table, Model 425 40-41Stitch table, Model 415 42-43
Maintenance 44-45Changing light bulb 44
Trouble Shooting 46-47
Index 48-49

Instruction book Freesia 415, 4254
1.
2.
3.
4.
5.
8.7.
9.10.
11.
12.
13.
14.15.16.
17.18. 19.
20.21.22.23.
24.
25.
26.
27.
28.
6.
Summary
1. Lid 2. Thread take-up lever 3. Presser foot pressure dial 4. Thread guide 5. Buttonhole sensor socket (For oprional accessory Model 425) 6. Light 7. Needle bar 8. Presser foot 9. Free arm10. Bobbin cover11. Base plate12. Drop feed dial13. Needle plate14. Presser bar and Presser foot ankle15. Needle clamp screw16. Presser foot lifter17. Thread tension
18. Thread guide for bobbin winding19. Spool pin, Spool holders20. Recess for additional spool pin21. Thread cutter for bobbin winding22. Handwheel23. Bobbin spindle, Bobbin stop24. Infodisplay25. Function selector buttons26. Main power switch, Connec- tion to power supply27. Stitch panel28. Handle

Instruction book Freesia 415, 425 5
1. Place the machine on the table orcabinet, remove the packagingand lift off the carrying case(model 425).
2. Remove the side parts of thepacking material, the foot controland finally the protection cover.
3. The machine is delivered with anaccessory bag, a main cord and afoot control cord.
4. Wipe the machine, particularlyaround the needle and needleplate to remove any soil beforesewing.
Unpacking
1. Unplug the cords from the wallsocket and the machine.
2. Wind the cords around your handand place the foot control cord inthe foot control storage space andthe main cord in the pocket ofthe carrying case/the cover. Thereis also space provided for theinstruction book.
3. Check to ensure that allaccessories are in the accessorytray. Slide it onto the machinebehind the free arm.
4. Lower the presser foot.5. Place the foot control, underside
toward you, on the accessory trayat the back of the machine. Folddown the handle and replace thecarrying case/the cover.
Packing away after sewing

Instruction book Freesia 415, 4256
3 1 2
Connecting the foot controlAmong the accessories you will findthe foot control cord and the maincord.1. Place the foot control on its
narrow side. Fit the plug into thesocket inside the foot controlcompartment.
2. Push it firmly to make sure it isproperly connected. This opera-tion is only necessary the veryfirst time you are going to use themachine.
3. To correctly turn away the cord,place it into the slot, see picture.
Note: Before plugging in, check toensure that the foot control is of"type FR2/FR4".
1. Connect the foot control cord tothe first socket on the bottomright side of the machine.
2. Connect the main cord to theback socket on the bottom rightside of the machine.
3. When you press the powerswitch, both the machine and thelight are switched on.
On the underside of the machine you will find information about the powersupply (V) and the frequency (Hz). Check the power supply setting in themachine to ensure that this agrees with the main supply before you connectthe machine.
For the USA and CanadaThis Sewing Machine has a polarized plug (one blade wider than the other). Toreduce the risk of electric shock, this plug is intended to fit in a polarized outlet onlyone way. If the plug does not fit fully in the outlet, reverse the plug. If it still doesnot fit, contact a qualified electrician to install the proper outlet. Do not modify theplug in any way.
Connecting to the power supply

Instruction book Freesia 415, 425 7
Accessory box1. Open the Accessory box by
placing your finger in the spaceon the top and lift upward.
2. In the Accessory box there is aspecial tray for presser feet andbobbins plus space for otheraccessories.
3. Store the presser feet and thebobbins in the tray from thebeginning so they are alwayseasily accessible (refer to thefigure).
Extended sewing surface1. Keep the Accessory Tray on the
machine to provide a larger flatwork surface.
2. Slide the Accessory Tray to theleft when you wish to remove itand use the free arm.
3. To facilitate sewing trouser legsand sleeve hems use the free arm.
4. To replace the Accessory Tray,slide it tight onto the machine.

Instruction book Freesia 415, 4258
b c
d
c
a
d
Spool pinThe machine has spool pins suitablefor all types of thread. The mainspool pin (a) is horizontal - thethread reels off the stationary spool.Place the spool so that the threadreels counter-clockwise.There are two spool holders on thespool pin. With narrow threadspools, the small holder (b) isplaced in front of the thread. If youuse large thread spools, the largeholder (c) is placed in front of thethread.Slide the correct size spool holder inplace so the flat side is pressedfirmly against the spool. No spacebetween spool holder and spool.
There is also a separate spool pin(d) to be attached onto the machine.The fingers on the extra spool pin fitinto the two holes to the right of thefixed spool pin. Push downward tosnap in place.The large spool holder (c) is placedunder the thread. This spool pin isused when winding a bobbin from asecond spool of thread or for asecond spool when sewing with atwin needle.

Instruction book Freesia 415, 425 9
Threading the upper threadMake sure the presserfoot is raised and theneedle is in the upposition
1. Pull the spool pinout. Place the threadon the spool pin andthe spool holder onthe spool pin asdescribed. Push thespool pin back in.
2. Bring the thread inthe direction of the arrow underthe thread guide (a) and over thethread guide (b).
3. Bring the thread down betweenthe thread tension discs.
4. Continue threading by drawingthe thread from the right into theslot on the take-up lever.
5. Thread last guide just aboveneedle.
6. The needle is threaded fromfront to back. The white on thepresser foot ankle makes it easyto see the eye of the needle.
7. Place thread under the presserfoot and into the thread cutter.Pull down to cut.

Instruction book Freesia 415, 42510
Threading for twin needle1. Insert a twin needle.
2. Wind a bobbin with the threadyou are going to use as thesecond upper thread
3. Thread the machine as describedand check to ensure that thethread lies between the innerthread tension discs, inside thelowest thread guide. Thread leftneedle.
4. Attach the extra spool pin ontothe machine. Place a spool holderunder the thread.
5. Place the bobbin with the secondthread on the spool pin.
6. Thread the machine as before butthis thread should lie between theouter thread tension discs, outsidethe lowest thread guide. Threadright needle.

Instruction book Freesia 415, 425 11
1. Place an empty bobbin with the mark outwards on the bobbin spindle on thefront of the machine.
2. Place the large spool holder under the thread on the spool pin.3. Bring the thread under the thread guide (a) and over thread guide (b), then
around thread guide (c) as illustrated.4. From above wind a few turns of thread around the bobbin and into the
cutter.5. Bring the bobbin spindle down. Press the foot control. When the bobbin
winding is finished, the bobbin will stop automatically. Remove thebobbin, cut off the thread and bring the bobbin spindle up.
Bobbin winding with the machine threaded
Make sure that the presser foot is up and the needle is in the highest posi-tion.Note! Do not use a plastic presser foot when bobbin winding.1. Place your empty bobbin with the small mark outwards on the bobbin spindle
on the front of the machine.2. Pull the thread from the needle under the presser foot and to the right over the
thread guide (c).3. Start from above and wind a few turns of thread around the bobbin. Cut off the
thread on the thread cutter (d).4. Bring the bobbin spindle down. Press the foot control. When the bobbin
winding is finished, the bobbin will stop automatically. Remove the bobbin,cut off the thread and bring the bobbin spindle up.
Note! We do not recommend winding clear nylon or other stretchy threadsthrough the needle. Instead see "Bobbin winding - vertical spool pin".
Bobbin winding - vertical spool pin

Instruction book Freesia 415, 42512
b
a
c
21
3 4
Placing the bobbin in the machine
1. Open the cover by slightlypulling it towards you and take itaway.
2. Place the bobbin in the bobbincase with the mark facingupward and the thread to the leftof the bobbin. The bobbin willthen rotate counter-clockwisewhile drawing out the thread.
3. Hold the bobbin and draw thethread to the right passing (a).
4. Hold the bobbin to keep it fromturning and pull the thread to theleft so that the thread clicks intothe tension spring. Continuethreading around (b) and to theright of the thread knife (c).Replace the cover and slide it intoposition. Then pull the thread tothe left to cut it.

Instruction book Freesia 415, 425 13
1
2
3
Thread tensionUse the recommended setting givenon the Infodisplay (see pages 17,19).You can adjust the top threadtension by turning the dial which isnumbered. The higher the numberthe tighter the tension. Normalthread tension is number 4.When sewing buttonholes anddecorative stitches set thread tensionto number 3.When topstitching with a coarsethread in thick fabric, increase thetension to 7-9.
Correct and incorrect thread tensionTo understand the correct threadtension, sew a few sample stitches atdifferent settings.
1. Begin with a tension that is tooloose, i.e. set at "1". The lowerthread will lie straight and theupper thread will be drawn downon the underside.
2. If you set the tension at thehighest number, the opposite willoccur, and the seam may pucker.
3. The correct thread tension isprovided when the threadsinterlock in the middle of bothlayers of material or, in the caseof decorative stitches, on theunderside.
Make a few tests on a scrap piece ofthe material you are going to sewand check the tension.

Instruction book Freesia 415, 42514
Presser foot pressureThe presser foot pressure is adjustedwith the dial on the front of themachine. Normal setting is 4. Thehigher the number the morepressure on the fabric. Knit and Softfabrics should be sewn at a lowerpressure setting (2).
Presser foot leverThe presser foot is raised andlowered with the presser foot lever.The presser foot must be loweredwhen sewing.For thick fabrics, lift the presser footlever as far as it goes and hold itthere.The lift of the presser foot isincreased by several millimeters.
Changing the presserfoot1. Make sure that the needle is in
the highest position. Pull thepresser foot down and towardsyou.
2. Line up the cross pin on the footbetween the spring and thepresser foot ankle. Press backuntil the foot snaps into place.

Instruction book Freesia 415, 425 15
Changing the needle1. Loosen the screw in the needle
clamp.2. Remove the needle.3. Push up the new needle with the
flat side away from you until itwill go no further.
4. Tighten the screw properly.
Always use needles of system130/705H.
Lowering the feed teethThe feed teeth are lowered whenyou turn the dial to the left to .Turn the dial to the right to ifyou wish to raise the feed teeth. Thefeed teeth will not come up untilyou begin to sew.
The feed teeth are lowered whensewing buttons and for free-handwork.
By lowering the feed teeth it iseasier to get thick garments underthe presser foot. Do not forget toraise the feed teeth before starting tosew.

Instruction book Freesia 415, 42516
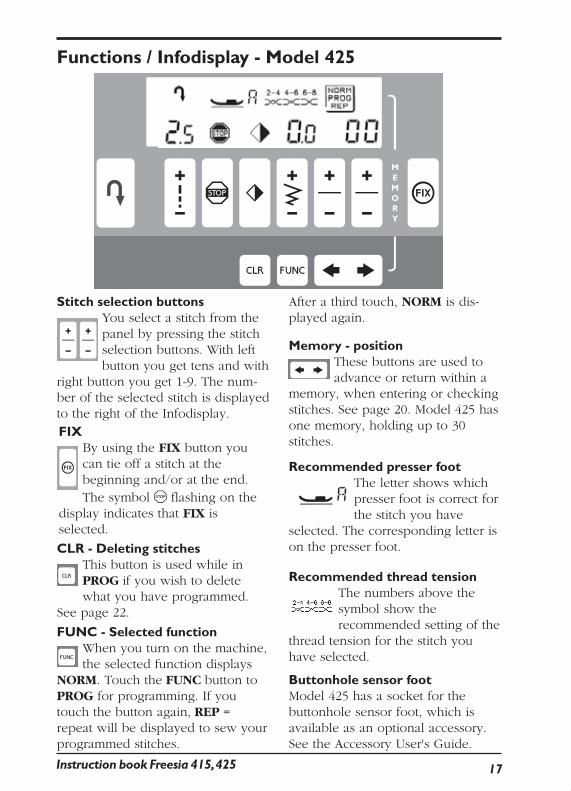
Functions / Infodisplay - Model 425
ReverseYour machine sews backwardswhen this button is pressed.The machine sews forwardwhen the button is released.
The longest stitch length whenreverse feeding is 3 mm.For permanent reverse, press thebutton twice in quick succession
before starting to sew. An arrow to the top left on the Infodisplayindicates reverse sewing. To sewforward again, press the button oncemore.
Stitch lengthWhen you select a stitch, themachine will automatically setthe best stitch length which willbe indicated by numbers on the
Infodisplay. You can change thestitch length by pressing either the(+) or (-) button. Certain stitcheshave a limited stitch length.
STOPThe STOP button is used tofinish a stitch. i.e. the machinefastens the thread and stopsautomatically when the stitch
has been completed. The symbol on the display indicates that STOP isselected. STOP is cancelled whenyou press the button again or byselecting a new stitch.
Mirror imageYou can mirror a stitch by usingthe button , mirror image sideto sideYou can also mirror the width
when you wish to to change theneedle position from left to right.The symbol will be displayed.
Stitch widthWhen you select a stitch, themachine automatically sets thebest stitch width which is dis-played with numbers on the
Infodisplay. You can change thestitch width by pressing the (+) or(-) button. The width can beadjusted between 0 and 6 mm.
Instruction book Freesia 415, 425 17
Functions / Infodisplay - Model 425
Stitch selection buttonsYou select a stitch from thepanel by pressing the stitchselection buttons. With leftbutton you get tens and with
right button you get 1-9. The num-ber of the selected stitch is displayedto the right of the Infodisplay.
FUNC - Selected functionWhen you turn on the machine,the selected function displays
NORM. Touch the FUNC button toPROG for programming. If youtouch the button again, REP =repeat will be displayed to sew yourprogrammed stitches.
Memory - positionThese buttons are used toadvance or return within a
memory, when entering or checkingstitches. See page 20. Model 425 hasone memory, holding up to 30stitches.
FIXBy using the FIX button youcan tie off a stitch at thebeginning and/or at the end.The symbol flashing on the
display indicates that FIX isselected.
CLR - Deleting stitchesThis button is used while inPROG if you wish to deletewhat you have programmed.
See page 22.
Recommended presser footThe letter shows whichpresser foot is correct forthe stitch you have
selected. The corresponding letter ison the presser foot.
Recommended thread tensionThe numbers above thesymbol show therecommended setting of the
thread tension for the stitch youhave selected.
Buttonhole sensor footModel 425 has a socket for thebuttonhole sensor foot, which isavailable as an optional accessory.See the Accessory User's Guide.
After a third touch, NORM is dis-played again.

Instruction book Freesia 415, 42518
Functions / Infodisplay - Model 415
ReverseYour machine sews backwardswhen this button is pressed.The machine sews forwardwhen the button is released.
The longest stitch length whenreverse feeding is 3 mm.For permanent reverse, press thebutton twice in quick succession
before starting to sew. An arrow to the top left on the Infodisplayindicates reverse sewing. To sewforward again, press the button oncemore.
Stitch lengthWhen you select a stitch, themachine will automatically setthe best stitch length which willbe indicated by numbers on the
Infodisplay. You can change thestitch length by pressing either the(+) or (-) button. Certain stitcheshave a limited stitch length.
STOPThe STOP button is used tofinish a stitch. i.e. the machinefastens the thread and stopsautomatically when the stitch
has been completed. The symbol on the display indicates that STOP isselected. STOP is cancelled whenyou press the button again or byselecting a new stitch.
Mirror imageYou can mirror a stitch by usingthe button , mirror image sideto sideYou can also mirror the width
when you wish to to change theneedle position from left to right.The symbol will be displayed.
Stitch widthWhen you select a stitch, themachine automatically sets thebest stitch width which is dis-played with numbers on the
Infodisplay. You can change thestitch width by pressing the (+) or(-) button. The width can beadjusted between 0 and 6 mm.

Instruction book Freesia 415, 425 19
Stitch selection buttonsYou select a stitch from thepanel by pressing the stitchselection buttons. With leftbutton you get tens and with
right button you get 1-9. Thenumber of the selected stitch isdisplayed to the right of theInfodisplay.
FIXBy using the FIX button youcan tie off a stitch at thebeginning and/or at the end.The symbol flashing on the
display indicates that FIX isselected.
Recommended presser footThe letter shows whichpresser foot is correct for
the stitch you have selected. Thecorresponding letter is on the presserfoot.
Recommended thread tensionThe numbers above thesymbol show the
recommended setting of the threadtension for the stitch you haveselected.
Functions / Infodisplay - Model 415

Instruction book Freesia 415, 42520
When you turn on the machine italways selects straight stitch and thenumber 00. You select a stitch bypressing the stitch selection buttons.With left button you get tens andwith right button you get 1-9. Thenumber of the selected stitch isdisplayed to the very right.See Stitch table, page 40-41.
Stitch selection - Model 425
When you turn on the machine italways selects straight stitch and thenumber 00. You select a stitch bypressing the stitch selection buttons.With left button you get tens andwith right button you get 1-9. Thenumber of the selected stitch isdisplayed to the very right.See Stitch table, page 42-43.
Stitch selection - Model 415
MEMORY - Model 425The machine has one stitch programmemory. The memory holds up to30 stitches. You can combine anystitches you wish with the exceptionof stitches 26-29.Use the buttons marked with arrowsto advance or return within thememory, to the right and to the left. These buttons are usedin PROG position whenprogramming and in REP if youwish to check what is programmedor if you wish to start sewing a fewstitches into the program.

Instruction book Freesia 415, 425 21
Programming - Model 425Touch FUNC so that PROG isshown on the display. If you alreadyhave a program in the memory thiswill now be shown.Touch CLR to empty the memory.See page 22.
Example
Select a stitch e.g.
The stitch is now entered in thememory. Touch the button .
Select another stitch e.g. .
Touch the button .In this way you can combine diff-erent stitches according to your owntaste and imagination. With thebutton you can go backwards tosee what you have programmed.To sew your program, touch FUNCto REP. The machine will begin atthe first programmed stitch.Also see "Quick Info" on themachine.
Programming with stitch changesIn PROG position you can changestitch length and width or mirrorstitches. Certain stitches, however,have a limited stitch length and/orwidth.1. Select desired stitch.2. Use the stitch length and the
stitch width buttons (+) or (-) orthe mirroring button to changethe setting before entering with
the button .

Instruction book Freesia 415, 42522
CorrectionsIf you wish to change a stitch inyour program:1. Touch FUNC to PROG.2. Use the buttons marked with
arrows or until the stitchnumber is displayed.
3. Select the new stitch.
CLR - Deleting stitchesIf you wish to delete a certain stitchwithin the program:1. In the PROG position, use one of
the buttons until theactual stitch number is displayed.
2. Touch CLR. Now the stitch andeverything to the right of it willbe deleted.
3. If you wish to delete the wholeprogram, touch the FUNC buttonto return to PROG. The machinewill be positioned at the firstprogrammed stitch.
4. Touch CLR. CLR deletes theprogram of stitches.
If you touch CLR by mistake, simplytouch CLR again to bring back thebalance of your program as long asyou have not used another button.When the program memory is emptythe stitch length and width is shownas 0.0/0.0 on the display.
Mirror images - Model 425Mirror image side to side .In NORM and PROG only the stitchselected is mirrored. In REP the entireprogram is mirrored. You can alsochange the straight stitch needleposition from left to right by mirrorimaging the width.When mirror image side to side isselected, the symbol will be shownon the Infodisplay.

Instruction book Freesia 415, 425 23
Model 425Stitches 28-29
Model 415Stitch 15
Mirror images - Model 415Mirror image side to side .You can change the straight stitchneedle position from left to right bymirror imaging the width.When mirror image side to side isselected the symbol will be shownon the Infodisplay.
The darning and taper satin stitcheshave their own stitch memorieswhere the number of stitches, lengthor width changes are stored.1. Sew until the stitch has reached
the desired length.
2. Touch the button. The ma-
chine now completes the stitch.3. When you have the result you
wish, touch STOP.4. The stitch will now repeat in
succession and the machine willstop automatically when the stitchis completed
If you wish to sew another stitchand then return to your stitch, youonly select this stitch and touchSTOP.The repeated stitch will not beretained if you switch off themachine.If you attempt to program thesestitches in the PROG position(Model 425), the stitch number isflashing to indicate that this is notpossible.
Darning and taper satin stitches

Instruction book Freesia 415, 42524
ButtonholesThe bartack buttonhole is used for
medium and heavy fabrics.Model 425: The keyholebuttonhole is for tailored garments
1. Select a buttonhole.2. Use the presser foot C. Loosen
the thread tension to position 2-4.3. Mark the buttonhole location on
your fabric.
When sewing stretch fabrics, use afusible stabilizer or a cord.
The buttonhole foot has guide linesto determine buttonhole length. Themiddle mark on foot C gives abuttoning edge. Place the button onthe presser foot against the needlewhich mark on the foot correspondsto the button. Sew until the firstbuttonhole column reaches thismark.
For better visibility, yourHusqvarna Viking Sewingmachine sews buttonholes awayfrom you.

Instruction book Freesia 415, 425 25
Buttonholes4. Place the material under the
presser foot and begin at thebottom of the buttonhole.
5. Sew the left column of thebuttonhole to the required length,using the markings.
6. Touch the reverse button .
7. Continue to sew the buttonholeuntil the other column is thesame length as the first, touch the
button.
8. The machine will bartack theother end, sew a few tie offstitches in the left column of thebuttonhole and then stop.Sew the next buttonhole in thesame manner.
There is a small finger at the back ofthe presser foot. For a cordedbuttonhole, loop your cord aroundthe finger as illustrated. Stitch thebuttonhole as described.
Always stitch a sample buttonholeon scraps of the garment fabric. Ifneeded, adjust the stitch setting. Usethe stitch width and length buttons.On heavy fabric, increase the stitchlength to 0.5.
Also see "Quick info" on themachine.
Buttonhole knifeThe knife is used to cut buttonholes.It is also useful for removing stitchessewn in error.

Instruction book Freesia 415, 42526
1. Mark the fabric where the button is to be located.
2. Select zigzag .
3. Lower the feed teeth, see page15.
4. Snap off the presser foot. 5. Place the material under the
presser foot ankle. 6. Place the button on marking and
lower the presser bar so that the presser foot ankle is between the holes of the button (see picture).
7. Hold the thread ends to one side. Check to be sure that the needle goes into the left hole of the button.
8. Touch the mirroring button to check that the needle also goes into the right hole.
9. Sew as many stitches as you consider necessary.
10.Touch STOP. The machine will then tie off in one of the holes and stop.
11.Touch STOP to cancel it. Move to the next pair of holes or the next button.
If you have a button with a differenthole spacing, you can adjust this bypresssing one of the stitch widthbuttons (+) or (-).
Button with a thread shankUse the hin end of the clearanceplate when sewing buttons on lightfabrics, the thick end for heavierfabrics.Place the plate between the buttonand the fabric and sew on thebutton. Pull the thread ends betweenthe button and the fabric. Wind thethreads a few times around theshank and tie the ends.
Sewing buttons

Instruction book Freesia 415, 425 27
Straight stitchStraight stitching is used to join
fabric which does not stretch and forseams which will not be subjectedto great strain.When you select straight stitch themachine will automatically set theaverage stitch length.Experiment until you arrive at theexact setting for the actual work youwill be doing.
When topstitching using straightstitch and reinforced straight stitch,the needle position can be adjustedin steps. Use the stitch width button(+), 0 is the center position, width 6is left needle position, width 6mirror imaged is right needleposition. To return to center posi-tion, use the stitch width button (-)and step back to 0. Adjust the widthbetween 0-6 for additional positions.
To edge stitch, you should takeadvantage of the possibility to setthe needle to the left or the rightposition.To sew about 2 mm from the edge,snap on presser foot A when sewinglight fabrics and presser foot D forother fabrics.Place the fabric and sew so that theedge follows the inside right edge ofthe presser foot D or the first markof the left edge of the presser footA.If you wish to sew about 5 mm fromthe edge or sew a narrow hem, usepresser foot A and set the needle tothe right position.
25 Needle Positions

Instruction book Freesia 415, 42528
4
1
2
3
Sewing zippersThe zipper foot E can be snappedon so that it is located either to theright or to the left of the needle,making it easy to sew both sides ofthe zipper. To sew the other side ofthe zipper, reposition the zipperfoot.
Lapped zipper1. Sew the seam together to the
bottom of the zipper placket.Baste the rest of the seam. Leaveabout 2 cm open at the top. Pressseam open. Set the needle tothe right position.
2. Place presser foot E to the left ofthe needle. From the wrong sidefold the fabric to one side soboth seam allowances are free.Fold and press the left allowanceunder approximately 0.5 cm fromthe basted seam.
3. Place the zipper under the foldedseam allowance with the teeth asnear to the fold as possible andstitch zipper to fabric close tofold. Begin sewing at the bottomof the zipper. Before reaching thezipper pull, lift the presser footand slide the zipper pull downpast the zipper foot. Lower thefoot and sew to the top of thezipper.
4. Snap on the zipper foot so it is tothe right of the needle. Set theneedle to the left position.Turn the garment to the rightside. It is important that the seamon the right side is sewn straight.Before you begin to sew, markthe seam line. Sew the other sideof the zipper. Begin stitchingacross the bottom and continue
upwards. Remove the basting.If you want to sew a ”gentleman’szipper”, follow the instructions butinsert in the other direction.

Instruction book Freesia 415, 425 29
Gathering with straight stitchUse a slightly longer stitch thannormal straight stitch, 3.5-5.0.Always sew two gathering threadsnext to each other.
1. Pin the gathered part to thecorresponding garment section.Make sure that the marks and theseams correspond to each other,or match notches.
2. Pull both bobbin threads from thesame direction and distribute thegathering evenly. When half thedistance is gathered, wind thethreads around a pin. Then gatherthe other half from the otherdirection. Distribute the gatheringevenly.
3. Join the pieces with straightstitch, the gathered materialfacing up. Sew between thestraight gathering rows. Hold thegathering with your fingers onboth sides of the needle to avoidfolds. Remove any gatheringthread that is visible.

Instruction book Freesia 415, 42530
Reinforced straight stitch
Stretch stitchThe stretch stitch makes a
pliable, stretchy seam that is suitablefor sewing together pieces of lightstretch fabric.The stretch stitch is ideal fortopstitching in light stretch fabrics.
The zigzag is utilized for sewing
on lace, bound edging andappliqués.When you select the zigzag themachine will automatically set stitchlength 2 and width 3.
You can change this setting bypressing either the (+) or (-) buttonon the width and/or length. Experi-ment until you reach the best settingfor your actual work.
Zigzag
The reinforced straight stitch is
stronger than ordinary straight stitch,due to the fact that it is a triple andelastic stitch.The reinforced straight stitch can beused for heavy stretch fabrics, forcrotch seams which are subject toconsiderable strain and fortopstitching in heavy fabrics.

Instruction book Freesia 415, 425 31
Lace edging1. Place wrong side of lace to right
side of fabric matching edges.Sew along inner edge of lace with
zigzag, stitch length 1.5, stitch
width 1.5.
2. Press seam allowance towards
fabric. Sew with satin stitch ,
stitch width 2.0, on the right sideover the zigzag seam.
3. Cut off the seam allowance up tothe stitching on the wrong side.

Instruction book Freesia 415, 42532
Applique1. Draw a mirror image of your
design on the paper side of thefusible web.
2. Iron the fusible web so that itsticks to the wrong side of theappliqué material.
3. Cut out the appliqué. Remove thepaper layer from the fusible web.Fuse the appliqué to the back-ground material. Place stabilizerunder background fabric.
4. Satin stitch, , stitch width 2.0,
around the edges. Sew all designlines using the same satin stitches.

Instruction book Freesia 415, 425 33
Sewing terry cloth
Three-step zigzagOvercasting
Three-step zigzag is suitable for
overcasting most fabrics. Trim theedges of the fabric before over-casting.Make sure that the needle sews overthe edge of the fabric. Place thefabric according to the presser foot(see picture).
Terry cloth is a rather loosely wovenfabric in which seams easily break.Sew the garment together withstraight stitch. Trim the seams andpress the seam allowance flat andsew the edges down against thegarment on the wrong side withthree-step zigzag. Even though thestitching goes right through to the”right” side of the garment, it isnearly invisible and even the wrongside looks neat. The stitching willalso be considerably stronger.Necklines and armholes are finishedin a similar way.
Three-step zig-zag , can be utili-
zed for mending and darning. Athread-bare spot is mended bysewing back and forth with three-step zigzag. Use the reverse button
. Guide the fabric slightly to the
side. If the fabric is very worn, apiece of fabric or lining may beattached to the reverse asreinforcement. Also see page 37 forprogrammable darning stitch.
Mending and darning

Instruction book Freesia 415, 42534
Flatlock
The flatlock , is suitable for
sewing overlapped seams anddecorative hems. Reduce the presserfoot pressure to 2 when sewingstretch fabric.
You can produce a decorative hemby folding a single hem to thewrong side and sewing the flatlockfrom the right side.
Trim excess hem to stitching fromthe wrong side.
To sew an overlapped seam, lap onepiece of fabric over the other pieceand sew flatlock stitch over thefabric edge on the right side.
Trim from the wrong side or sewanother seam from the right side.
Narrow belts and bandsFold the fabric in thirds and sew inthe center. Trim excess material fromunderneath.

Instruction book Freesia 415, 425 35
Blind hemSnap on presser foot D for blind
hem. .
Fold the material as shown. Makesure that the fold line of the fabricrides in the groove under the rightside of the presser foot.
Practice using a scrap of materialand compare with the illustrations.
1. If the stitch does not catch thefolded edge, increase the stitchwidth (+).
2. If the stitch catches too much ofthe fold, decrease the stitch width(-).
3. For an invisible hem the needlecatches a single thread of thefolded edge.

Instruction book Freesia 415, 42536
Bridging stitchThe bridging stitch is suitable for
joining two pieces of fabric withfolded edges.Also use to join lace and ribbon.Elastic shirringThe bridging stitch is also useful forgathered elastic shirring. Use thebuttonhole foot C, tighten the upperthread tension. Remember that theelastic will always be stitcheddouble, so take this into accountwhen calculating how much youwill need. Place the shirring elastic(elastic thread) around the finger ofthe presser foot C. Sew from thewrong side over both lengths of theelastic following marked lines.Gather the shirring by pulling theelastic threads.
Seam and overcastSome stitches can be used forseaming and overcasting directly onthe edge where a 5 mm (1/4") seamis allowed. Place the fabric so thatthe inside right ”toe” of the presserfoot follows the edge of the fabric.Overlock is chiefly used for sewingheavy stretch fabric. Snap on presserfoot B.Overcast stitch, may be used tosew light and medium non-stretchfabric and light stretch fabric. Snapon presser foot J.Presser foot J is also used tooverlock and overcast many diffe-rent fabrics with the exception ofheavy, firm fabrics. The pin on thepresser foot should follow the edgeof the fabric and will prevent thefabric from puckering. Stitch width5-6 mm. When using stitch width 4.5or lower, use presser foot A.
Overlock
Overcast

Instruction book Freesia 415, 425 37
Darning stitchModel 425 and Model 415
is a perfect stitch for mending anddarning. Use presser foot A.
1. Sew the first row of stitches aslong as you need to cover yourtear or worn spot.
2. Touch the reverse button and
the machine continues sewing theremaining stitches at the samelength and fastens the thread.
3. Touch STOP. Move the fabric sothat the needle is right over thelast stitch. Repeat as many timesas you need to cover the hole.
Automatic taper stitchModel 425
The tapered satin stitch , is a
tapered zigzag which makes itsuitable for sewing monograms andother embellishments. Use presserfoot B.
1. Trace the monogram on thefabric and sew over the lines.
2. Select .
3. Sew until the desired length isreached.
4. Touch the reverse button to
taper the end.5. Touch STOP to put this tapered
satin stitch in memory.

Instruction book Freesia 415, 42538
These stitches are combined to create a border. Only Model 425.
An effective edging can be produced with these scallop stitches. Sew insidethe edge with stabilizer underneath, then trim close to the stitching.Lower stitch: Only Model 425.
Decorative stitchesThese stitches are mainly used as decorative stitches.Examples:
These stitches sew entredeux and hemstitches when using a wing
needle (option).
only Model 425.

Instruction book Freesia 415, 425 39
Sewing hintsFree armTo facilitate sewing trouser legs andsleeve hems use the free arm.
The free arm also allows you todarn socks (freemotion darning footis an optional accessory). Consultthe Accessory User's Guide.
"Jeans hem"The clearance plate is used whensewing over thick seams.
One side of the plate is thicker thanthe other. Use the side that suits thethickness of the seam best to levelthe presser foot.as you sew over thefhickness.
Sewing on belt loopsUse presser foot B and lower thefeed teeth. Fold in about 1 cm onthe short ends. Place the belt loopon the garment and under thepresser foot. Set a wide zigzag stitch.
Sew a bartack from the outer edgeto the center of the loop, move thematerial and sew a new bartack.Continue to sew along the entirelength of the loop's short side.

Instruction book Freesia 415, 42540
Stitch table - Model 425
00 Straight stitch For all kind of sewing in woven fabrics,see page 27 25 different needle positions with widthPresser foot A adjustment and mirror image
01 Reinforced straight stitch For seams which are subject to considerablesee page 30 strain, i.e. to reinforce and topstitch sportswearPresser foot A and working clothes. 25 needle positions
02 Stretch stitch For seams in tricot and stretch farbricssee page 30Presser foot A
03 Zigzag For lace edging and sewing on bandssee page 30Presser foot A
04 Three-step zigzag For overcasting, mending, sewing on patchessee page 33 and elasticsPresser foot J, B
05 Overcast stitch Seam and overcast in one step along the edgesee page 36 or trim later. For light stretch and non-stretchPresser foot J fabrics
06 Overlock Seam and overcast in one step along the edgesee page 36 or trim later For medium and heavy stretchPresser foot B fabrics
07 Flatlock Decorative hems and overlapped seams,see page 34 belts and bandsPresser foot B
08 Elastic blind hem Invisible hems in stretch medium andsee page 35 heavy fabricsPresser foot D
09 Bridging stitch For joining two pieces of fabric with finishedsee page 36 edges and for elastic shirringPresser foot B, C

Instruction book Freesia 415, 425 41
Stitch table - Model 425
10-14 Decorative stitches For decorating clothes, tablecloths and curtainssee page 38Presser foot B
15-17 Hemstitches For hemstitching, use a wing needle(optional)see page 38Presser foot B, A
18 Cross stitch For sewing cross stitch borders
19 Satin stitch For appliqués, rounded edge, sewing on lacessee page 31, 33 and bandsPresser foot B
20-21 Decorative edging For decorative edges. Sew 15 mm from the edgesee page 38 and trim close to the stitchingPresser foot B
22-25 Decorative stitches For decorating clothes, tablecloths and curtainssee page 38Presser foot B
26 Bartack Buttonhole Suitable in medium and heavy fabricssee page 24-25 Use stabilizer under light fabricsPresser foot C
27 Keyhole buttonhole For tailored garments suitable in compactsee page 24-25 woollen clothPresser foot C
28 Darning stitch Darn and mend work clothes, jeans, table-see page 37 cloths and linen towelsPresser foot A
29 Tapered satin stitch Automatic tapering for sewing monogramssee page 37 and other decorationsPresser foot B

Instruction book Freesia 415, 42542
Stitch table - Model 415
00 Straight stitch For all kind of sewing in woven fabrics,see page 27 25 different needle positions with widthPresser foot A adjustment and mirror image
01 Reinforced straight stitch For seams which are subject to considerablesee page 30 strain, i.e. to reinforce and topstitch sportswearPresser foot A and working clothes. 25 needle positions
02 Stretch stitch For seams in tricot and stretch farbricssee page 30Presser foot A
03 Zigzag For lace edging and sewing on bandssee page 30Presser foot A
04 Three-step zigzag For overcasting, mending, sewing on patchessee page 33 and elasticsPresser foot J, B
05 Overcast stitch Seam and overcast in one step along the edgesee page 36 or trim later. For light stretch and non-stretchPresser foot J fabrics
06 Overlock Seam and overcast in one step along the edgesee page 36 or trim later For medium and heavy stretchPresser foot B fabrics
07 Flatlock Decorative hems and overlapped seams,see page 34 belts and bandsPresser foot B
08 Elastic blind hem Invisible hems in stretch medium andsee page 35 heavy fabricsPresser foot D

Instruction book Freesia 415, 425 43
Stitch table - Model 415
09 Bridging stitch For joining two pieces of fabric with finishedsee page 36 edges and for elastic shirringPresser foot B, C
10 Hemstitch For hemstitching, use a wing needle (optional)see page 38Presser foot B, A
11 Satin stitch For appliqués, rounded edge, sewing on lacessee page 31, 33 and bandsPresser foot B
12 Decorative edging For decorative edges. Sew 15 mm from the edgesee page 38 and trim close to the stitchingPresser foot B
13 Decorative stitch For decorative stitchingsee page 38Presser foot B
14 Bartack Buttonhole Suitable in medium and heavy fabricssee page 24-25 Use stabilizer under light fabricsPresser foot C
15 Darning stitch Darn and mend work clothes, jeans, table-see page 37 cloths and linen towelsPresser foot A

Instruction book Freesia 415, 42544
MaintenanceChanging the light bulbThe light bulb is placed to the left,above the needle. Place the rubbersheath found in the accessory boxwith its deep hole around the bulb.Do not turn the bulb, just pull itdown to remove the bulb.
When inserting, place the rubbersheath with its shallow hole aroundthe new bulb, insert the bulb bypushing it up.Use light bulb designed as indicatedon the front of the machine.
Care of the machineTo keep your sewing machineoperating satisfactorily, it requiresregular cleaning. No lubrication(oiling) is needed.

Instruction book Freesia 415, 425 45
Removing the stitch plateRemove the presser foot and the bobbin cover. Lower the feed teeth (seepage 15). Place the stitch plate opener on the brush. There is a recess at therear of the stitch plate. Insert the stitch plate opener into the recess and pullthe brush toward you to pop the stitch plate off..
CleaningWhen necessary, the feed teeth and the bottom of the bobbin area must becleaned with the brush, which you will find with the accessories.
Replacing the stitch plateReplace the stitch plate about 5 mm in front of the rear edge and push itbackward. Replace the bobbin cover. Raise the feed teeth.
Maintenance

Instruction book Freesia 415, 42546
Trouble ShootingChecking the needleAlways start with a new needle assoon as you discover that a stitch isnot what you expected. Test sew ona scrap of the fabric you are sewing.Check that you have chosen thecorrect needle and see that it iscorrectly inserted. See page 15.
Unattractive stitchesThe thread tension is not correct.See page13. Make sure that thethread is not catching. Certain threadspools are unsuitable for spoolingfrom the horizontal spool pin. Tryinstead with the vertical spool pin.The machine may be incorrectlythreaded. Be sure to place spoolholders correctly. For correctthreading, see page 9.Wrong bobbin thread. It should beof the same thickness as the upperthread.
The needle breaksThe needle can strike against stitchplate and break. Change the needle.See page 15. Do not pull fabric asyou sew, let the machine feed.
The upper thread breaksCheck the thread spool to see that ithas not caught in any way. Theneedle eye may have sharp edgeswhich cut the thread. If so, changethe needle. See page 15.The upper thread is incorrectlythreaded. See page 9. The upperthread may have too much tension.Refer to page 13.The hole in the stitch plate may bechipped and have sharp edges. Werecommend that you replace it.
The bobbin thread breaksThe bobbin thread may be incorrect-ly threaded. See page 12.The stitch plate hole is damaged.See "Upper thread breaks".
Irregular thread tensionThis may be due to poor qualitythread. When sewing with cottonthread, increase the thread tension.
The bobbin thread breaksThe bobbin thread may beincorrectly threaded. See page 12.The stitch plate hole is damaged.See "Upper thread breaks".
Irregular thread tensionThis may be due to poor qualitythread. When sewing with cottonthread, increase the thread tension.
The machine does not feed thefabricThe stitch length is too short.Increase stitch length.The feed teeth may be lowered.Raise them by turning the dial to
. See page 15.The feed teeth are full of dust anddirt. Clean with the brush. See page45.
The stitch is too loose - fabriclayers not held togetherThe thread tension is far too loose.Page 13 shows how to adjust thethread tension.

Instruction book Freesia 415, 425 47
Incorrect stitchIf the machine does not sew thestitch indicated by the display, it ispossible that the electronics havebeen disturbed in some way,perhaps by a short power cut orelectrical disturbance. Shut off themain switch, wait a few seconds andtry again. If the fault remains,contact your dealer.
Machine runs sluggishlyDirt or lint has built up under thestitch plate. Remove the plate andbrush clean between the feed teethand in the bottom area. See page 45.
Main motor does not workThe electronic overload protectormay have switched off. Shut off themain switch, wait about a minute.Then turn on the machine.
Expert assistanceHave your machine "tuned up"regularly by your dealer. If you havefollowed the preceding points andstill do not get satisfactory results,you should contact the dealer whereyou bought the machine. When themachine is being checked, it is agreat help if it can be test sewnunder conditions that are similar towhen you used it.Remember to take a sewing samplealong with you, preferably the fabricand the thread you intend to use.A sewing sample will often givemuch better information than words.
Trouble Shooting (continued)Non-original Parts andAccessoriesThe warranty does not cover anydefect or damage caused by use ofnon-original accessories or parts.

Instruction book Freesia 415, 42548
IndexAccessory box 7Applique 32
Backtacking 16, 18Baste 27Belt loops 39Blind hem 35Bobbin, placing in machine 12Bobbin winding 11Bridging stitch 36Button sewing 26Buttonholes 24-25
Care of machine 44-45Cleaning 45Connecting the machine 6
Darning 33, 37Decorative stitches 38
Elastic shirring 36Extra spool pin 8
Feed teeth, lowering 15FIX 17, 19Flatlock 34Free arm 39
Gathering 29
Hem 35Hemstitches 38
Infodisplay, Model 425 16-17Infodisplay, Model 415 18-19
Lace edging 31Lapped zipper 28Light bulb, changing 44Lowering feed teeth 15Maintenance 44-45Memory, Model 425Mending 33Mirror image 16, 18, 22-23
Needle, changing 15Needle positions 27
Overcast stitch 36Overcasting 33Overlock 36
Packing the machine 5Presser foot, changing 14Presser foot, recommended 17, 19Presser foot lever 14Presser foot pressure 14Programming, Model 425 21-22
Reinforced straight stitch 30Reverse 16, 18
Satin stitch 32Satin taper 23, 37Seam and overcast 36Setting up the machine 5-6Sewing hints 39Sewing surface 7Shirring 36Snap off & on presser foot 14Spool Holders 8Spool pin 8Stitch Length 17, 19Stitch plate 45Stitch selection 17, 19, 20Stitch table, Model 425 40-41Stitch table, Model 415 42-43Stitch Width 16, 18Stop 16, 18Straight Stitch 27Stretch stitch 30Summary 4
Tapered satin stitch 37Tension 13, 17, 19Terry cloth 33Topstitching 27Threading, bobbin 12Threading, upper 9Three-step zigzag 33Trouble Shooting 46-47Twin needle, threading 10
Unpacking the machine 5

Instruction book Freesia 415, 425 49
Vertical spool pin 8Wing needle 38
Zigzag 30-31Zippers 28

Instruction book Freesia 415, 42550
HusqvarnaViking reserves the right to change themachine equipment and the assortment ofaccessories without prior notice, or makemodifications to the performance or design.Such modifications, however, will always be to thebenefit of the user and the product.

Instruction book Freesia 415, 425 51

World Firsts From Husqvarna VikingHusqvarna Viking, the world leader in home sewing,
continues to add to its list of firsts to ensure your sewing is as fast,fun, and easy as it can be.
41
2 6
0 96
-26D
. Pr i
nt e
d i
n S
we
de
n.
Co
pyr i
ght
2003
VS
M G
roup
AB
. All
ri g
ht s
re
s er v
ed
Pr i
nted
on
envi
ronm
enta
lly-f
rien
dly
pape
r.
VSM Group AB • SE-561 84 Huskvarna, Swedenwww.husqvarnav ik ing .com
Purchase your top-of-the-line from your local authorized Husqvarna Viking Dealership:
1953 First floating jam-proof hook
1961 First color-coded stitch selection
1965 First snap-on presser foot system
1971 First to eliminate the need for oiling
1980 First programmable lettering – A writing sewing machineFirst programmable stitching
1981 First with dual lights
1982 First Sewing Advisor® – A thinking sewing machine
1983 First thinking and writing sewing machine
1989 First LCD Infodisplay® – A built-in instruction bookFirst LCD Programdisplay® – See before you sewFirst truly automatic self-adjusting tension
1994 First embroidery software for home computers
1998 First Sensor Foot LiftFirst Sensor Foot PressureFirst Selective Thread CuttersFirst Color Touch ScreenFirst Built-in Disk Drive