User’s Guide - Husqvarna...
64
KEEPING THE WORLD SEWING User’s Guide 605
Transcript of User’s Guide - Husqvarna...

K E E P I N G T H E W O R L D S E W I N G
User’s Guide 605

Instruction book Rose2
This houshold sewing machine is designed to comply with IEC/EN 60335-2-28 and UL1594
IMPORTANT SAFETY INSTRUCTIONSWhen using an electrical appliance, basic safety precautions should always befollowed, including the following:Read all instructions before using this household sewing machine.
DANGER - To reduce the risk of electric shock:• A sewing machine should never be left unattended when plugged in. Always unplug
this sewing machine from the electric outlet immediately after using and beforecleaning.
• Always unplug before relamping. Replace bulb with same type rated 5 Watt.
WARNING - To reduce the risk of burns, fire, electric
shock, or injury to persons:• Do not allow to be used as a toy. Close attention is necessary when this sewing
machine is used by or near children or infirm persons.• Use this sewing machine only for its intended use as described in this manual. Use
only attachments recommended by the manufacturer as contained in this manual.• Never operate this sewing machine if it has a damaged cord or plug, if it is not
working properly, if it has been dropped or damaged, or dropped into water. Returnthe sewing machine to the nearest authorised dealer or service center forexamination, repair, electrical or mechanical adjustment.
• Never operate the sewing machine with any air openings blocked. Keep ventilationopenings of the Sewing machine and foot controller free from the accumulation oflint, dust, and loose cloth.
• Keep fingers away from all moving parts. Special care is required around the Sewingmachine needle.
• Always use the proper needle plate. The wrong plate can cause the needle to break.• Do not use bent needles.• Do not pull or push fabric while stitching. It may deflect the needle causing it to break.• Switch the sewing machine off (“0”) when making any adjustment in the needle
area, such as threading needle, changing needle, threading bobbin, or changingpresser foot, etc.
• Always unplug the sewing machine from the electrical outlet when removing covers,lubricating, or when making any other user servicing adjustments mentioned in theinstruction manual.
• Never drop or insert any object into any opening.• Do not use outdoors.• Do not operate where aerosol (spray) products are being used or where oxygen is
being administrated.• To disconnect, turn all controls to the off (“0”) position, then remove plug from outlet.• Do not unplug by pulling on cord. To unplug, grasp the plug, not the cord.• Hold plug when rewinding into cord reel. Do not allow plug to whip when
rewinding.
SAVE THESE INSTRUCTIONS

Instruction book Rose 3
List of contents
Safety instructions 2
Machine parts 4-5
Procedures 6-16Unpacking, Packing away 6Connecting the foot control 7Connecting to the powersupply 7Accessory box, Sewing surface 8Spool pin 9Threading the upper thread 10Threading for twin needles 11Bobbin winding, Directwinding 12Threading lower thread 13Thread tension, Correct andincorrect thread tension 14Presser foot pressure,Presser foot lever, Changingthe presser foot 15Changing the needle, Loweringfeed teeth 16
Functions 17-25Infodisplay 17-19Stitch selection 20Embroidery functions 21Memory 21Programming 22-25Mirror image 24CLR - Deleting programs 25Satin taper and darningstitches 25
Embroidery template 34Color information 35
Sewing 36-54Buttonholes 36Buttonhole sensor foot 37Buttonhole knife, Sewingbuttons 38Straight stitch 39
Embroidery 26-35Storing, Connection, 26Embroidery presser foot, 27Get started 28Embroidery Hoop 29Sewing embroideries 30-31Function buttons 32-33
Needle positions 39Gathering with straightstitches 40Zipper 41Reinforced straight stitches 42Stretch stitch, Zigzag 42Lace edging 43Three-step zigzag 44Sewing terry cloth 44Mending and darning 44Flatlock 45Hemming 46Bridging stitch 47Seam and Overcast 47Darning stitch 48Automatic taper stitch 48Decorative stitches 49Quilting 50Pictogram 51Stitch table 52-53Sewing hints 54Free arm, Jeans hem,Sewing on belt loops 54
Maintenance 55Care of the machine 55Changing light bulbs 55
Fault-finding 56-57
Accessories 58-64
Index 65-66
Instruction book Rose4
Summary
17.
16.
15.
14.
13.
12.
18. 20.
21.
22.
23.
24.
25.
26.
27.
28.
29.
30.
31.
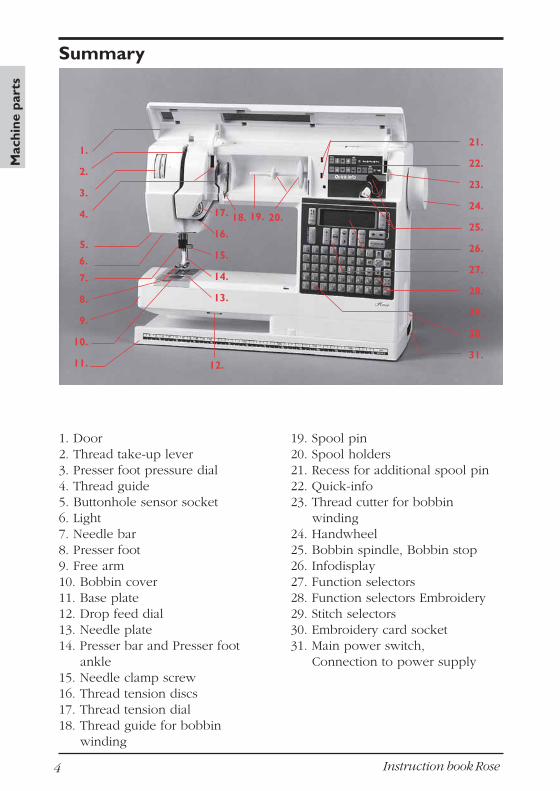
1. Door2. Thread take-up lever3. Presser foot pressure dial4. Thread guide5. Buttonhole sensor socket6. Light7. Needle bar8. Presser foot9. Free arm10. Bobbin cover11. Base plate12. Drop feed dial13. Needle plate14. Presser bar and Presser foot ankle15. Needle clamp screw16. Thread tension discs17. Thread tension dial18. Thread guide for bobbin winding
19. Spool pin20. Spool holders21. Recess for additional spool pin22. Quick-info23. Thread cutter for bobbin winding24. Handwheel25. Bobbin spindle, Bobbin stop26. Infodisplay27. Function selectors28. Function selectors Embroidery29. Stitch selectors30. Embroidery card socket31. Main power switch, Connection to power supply
Mac
hine
par
ts
1.
2.
3.
4.
7.
8.
9.
10.
11.
5.
6.
19.
Instruction book Rose 5
Summary
32.
33.
34.
35.
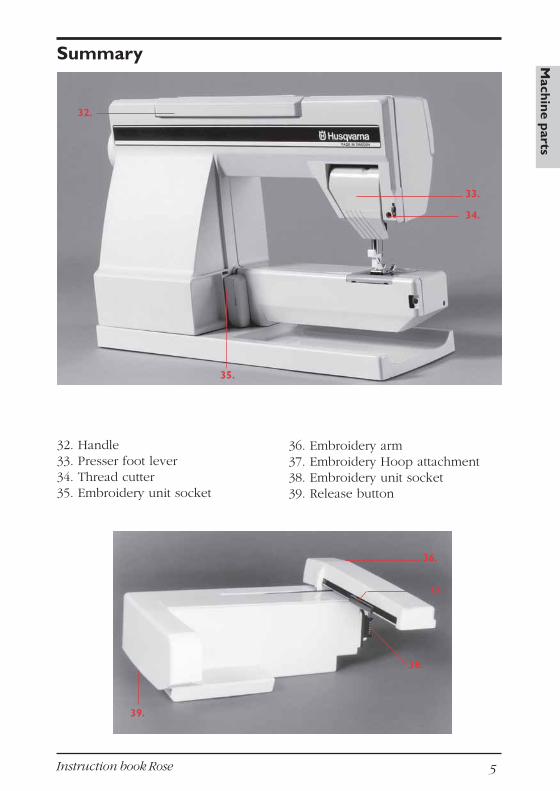
32. Handle33. Presser foot lever34. Thread cutter35. Embroidery unit socket
36. Embroidery arm37. Embroidery Hoop attachment38. Embroidery unit socket39. Release button
36.
37.
38.
39.
Machine parts
Instruction book Rose6
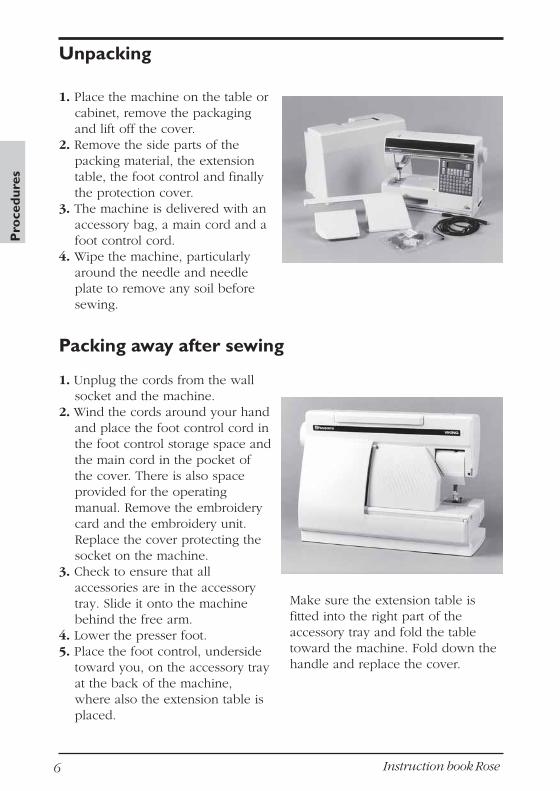
1. Place the machine on the table orcabinet, remove the packagingand lift off the cover.
2. Remove the side parts of thepacking material, the extensiontable, the foot control and finallythe protection cover.
3. The machine is delivered with anaccessory bag, a main cord and afoot control cord.
4. Wipe the machine, particularlyaround the needle and needleplate to remove any soil beforesewing.
1. Unplug the cords from the wallsocket and the machine.
2. Wind the cords around your handand place the foot control cord inthe foot control storage space andthe main cord in the pocket ofthe cover. There is also spaceprovided for the operatingmanual. Remove the embroiderycard and the embroidery unit.Replace the cover protecting thesocket on the machine.
3. Check to ensure that allaccessories are in the accessorytray. Slide it onto the machinebehind the free arm.
4. Lower the presser foot.5. Place the foot control, underside
toward you, on the accessory trayat the back of the machine,where also the extension table isplaced.
Packing away after sewing
Unpacking
Make sure the extension table isfitted into the right part of theaccessory tray and fold the tabletoward the machine. Fold down thehandle and replace the cover.
Pro
cedu
res
Instruction book Rose 7
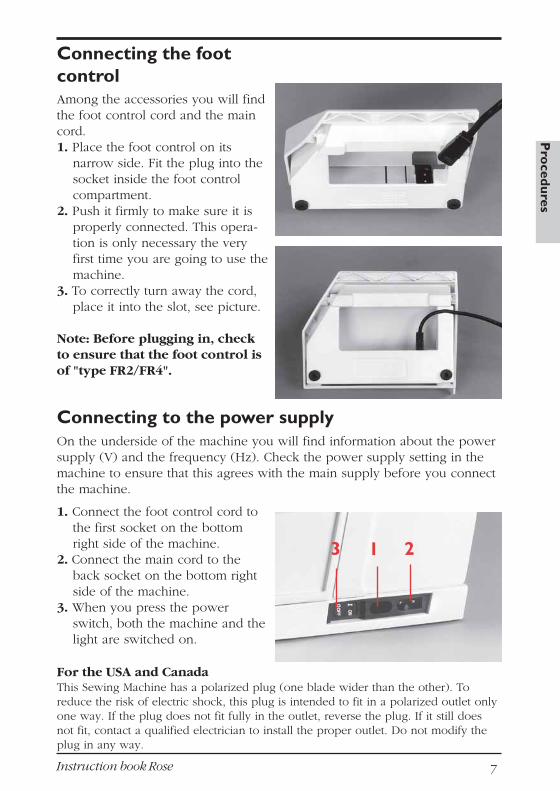
Connecting the footcontrolAmong the accessories you will findthe foot control cord and the maincord.1. Place the foot control on its
narrow side. Fit the plug into thesocket inside the foot controlcompartment.
2. Push it firmly to make sure it isproperly connected. This opera-tion is only necessary the veryfirst time you are going to use themachine.
3. To correctly turn away the cord,place it into the slot, see picture.
Note: Before plugging in, checkto ensure that the foot control isof "type FR2/FR4".
1. Connect the foot control cord tothe first socket on the bottomright side of the machine.
2. Connect the main cord to theback socket on the bottom rightside of the machine.
3. When you press the powerswitch, both the machine and thelight are switched on.
Connecting to the power supplyOn the underside of the machine you will find information about the powersupply (V) and the frequency (Hz). Check the power supply setting in themachine to ensure that this agrees with the main supply before you connectthe machine.
For the USA and CanadaThis Sewing Machine has a polarized plug (one blade wider than the other). Toreduce the risk of electric shock, this plug is intended to fit in a polarized outlet onlyone way. If the plug does not fit fully in the outlet, reverse the plug. If it still doesnot fit, contact a qualified electrician to install the proper outlet. Do not modify theplug in any way.
3 21
Pro
cedures
Instruction book Rose8
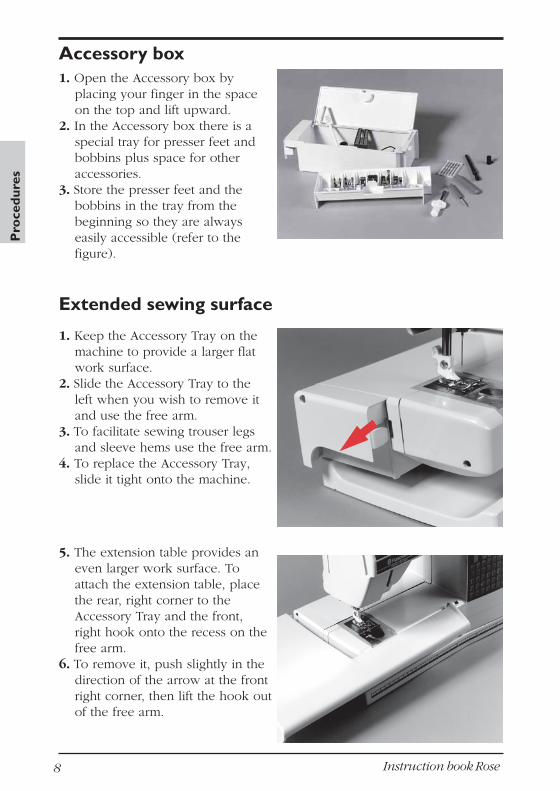
Accessory box1. Open the Accessory box by
placing your finger in the spaceon the top and lift upward.
2. In the Accessory box there is aspecial tray for presser feet andbobbins plus space for otheraccessories.
3. Store the presser feet and thebobbins in the tray from thebeginning so they are alwayseasily accessible (refer to thefigure).
5. The extension table provides aneven larger work surface. Toattach the extension table, placethe rear, right corner to theAccessory Tray and the front,right hook onto the recess on thefree arm.
6. To remove it, push slightly in thedirection of the arrow at the frontright corner, then lift the hook outof the free arm.
1. Keep the Accessory Tray on themachine to provide a larger flatwork surface.
2. Slide the Accessory Tray to theleft when you wish to remove itand use the free arm.
3. To facilitate sewing trouser legsand sleeve hems use the free arm.
4. To replace the Accessory Tray,slide it tight onto the machine.
Extended sewing surface
Pro
cedu
res

Instruction book Rose 9
Spool pin
The machine has spool pins suitablefor all types of thread. The mainspool pin (a) is horizontal - thethread reels off the stationary spool.Place the spool so that the threadreels counter-clockwise.There are two spool holders on thespool pin. With narrow threadspools, the small holder (b) isplaced in front of the thread. If youuse large thread spools, the largeholder (c) is placed in front of thethread.Slide the correct size spool holder inplace so the flat side is pressedfirmly against the spool. No spacebetween spool holder and spool.
There is also a separate spool pin(d) to be attached onto the machine.The fingers on the extra spool pin fitinto the two holes to the right of thefixed spool pin. Push downward tosnap in place.The large spool holder (c) is placedunder the thread. This spool pin isused when winding a bobbin from asecond spool of thread or for asecond spool when sewing with atwin needle.
a b d
d
c
c
Pro
cedures
Instruction book Rose10
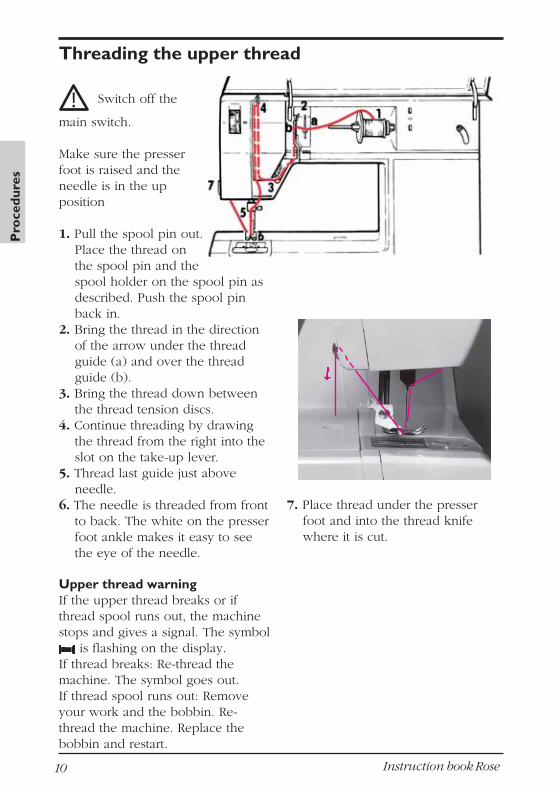
Threading the upper thread
! Switch off the
main switch.
Make sure the presserfoot is raised and theneedle is in the upposition
1. Pull the spool pin out.Place the thread onthe spool pin and thespool holder on the spool pin asdescribed. Push the spool pinback in.
2. Bring the thread in the directionof the arrow under the threadguide (a) and over the threadguide (b).
3. Bring the thread down betweenthe thread tension discs.
4. Continue threading by drawingthe thread from the right into theslot on the take-up lever.
5. Thread last guide just aboveneedle.
6. The needle is threaded from frontto back. The white on the presserfoot ankle makes it easy to seethe eye of the needle.
Upper thread warningIf the upper thread breaks or ifthread spool runs out, the machinestops and gives a signal. The symbol
is flashing on the display.If thread breaks: Re-thread themachine. The symbol goes out.If thread spool runs out: Removeyour work and the bobbin. Re-thread the machine. Replace thebobbin and restart.
7. Place thread under the presserfoot and into the thread knifewhere it is cut.
Pro
cedu
res

Instruction book Rose 11
1. Insert a twin needle.
2. Wind a bobbin with the threadyou are going to use as thesecond upper thread
3. Thread the machine as describedand check to ensure that thethread lies between the innerthread tension discs, outside thelowest thread guide. Thread leftneedle.
4. Attach the extra spool pin ontothe machine. Place a spool holderunder the thread.
Threading for twin needle
5. Place the bobbin with the secondthread on the spool pin.
6. Thread the machine as before butthis thread should lie between theouter thread tension discs, outsidethe lowest thread guide. Threadright needle.
Pro
cedures
! Switch off the main switch.
Instruction book Rose12
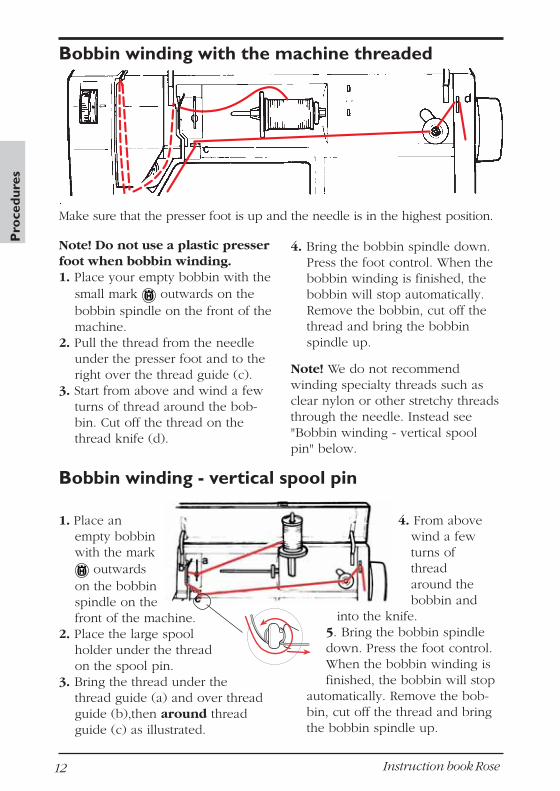
Bobbin winding with the machine threaded
.Make sure that the presser foot is up and the needle is in the highest position.
Note! Do not use a plastic presserfoot when bobbin winding.1. Place your empty bobbin with the
small mark outwards on thebobbin spindle on the front of themachine.
2. Pull the thread from the needleunder the presser foot and to theright over the thread guide (c).
3. Start from above and wind a fewturns of thread around the bob-bin. Cut off the thread on thethread knife (d).
4. Bring the bobbin spindle down.Press the foot control. When thebobbin winding is finished, thebobbin will stop automatically.Remove the bobbin, cut off thethread and bring the bobbinspindle up.
Note! We do not recommendwinding specialty threads such asclear nylon or other stretchy threadsthrough the needle. Instead see"Bobbin winding - vertical spoolpin" below.
1. Place anempty bobbinwith the mark
outwardson the bobbinspindle on thefront of the machine.
2. Place the large spoolholder under the threadon the spool pin.
3. Bring the thread under thethread guide (a) and over threadguide (b),then around threadguide (c) as illustrated.
4. From above wind a few turns of thread around the bobbin and
into the knife.5. Bring the bobbin spindledown. Press the foot control.When the bobbin winding isfinished, the bobbin will stop
automatically. Remove the bob-bin, cut off the thread and bringthe bobbin spindle up.
Bobbin winding - vertical spool pin
Pro
cedu
res

Instruction book Rose 13
2. Place the bobbin in the bobbincase with the mark facingupward and the thread to the leftof the bobbin. The bobbin willthen rotate counter clockwisewhile drawing out the thread.
! Switch off the main switch.
1. Open the cover by slightly pullingit towards you and take it away.
3. Hold the bobbin and draw thethread to the right passing (a).
4. Hold the thread tight and draw itto the left so that the thread fallscorrectly into the tension spring.Continue threading around (b)and to the right of the threadknife (c).Replace the cover and slide it intoposition. Then pull the thread tothe left to cut it.
b
Placing the bobbin in the machine
a
c
Pro
cedures
Instruction book Rose14
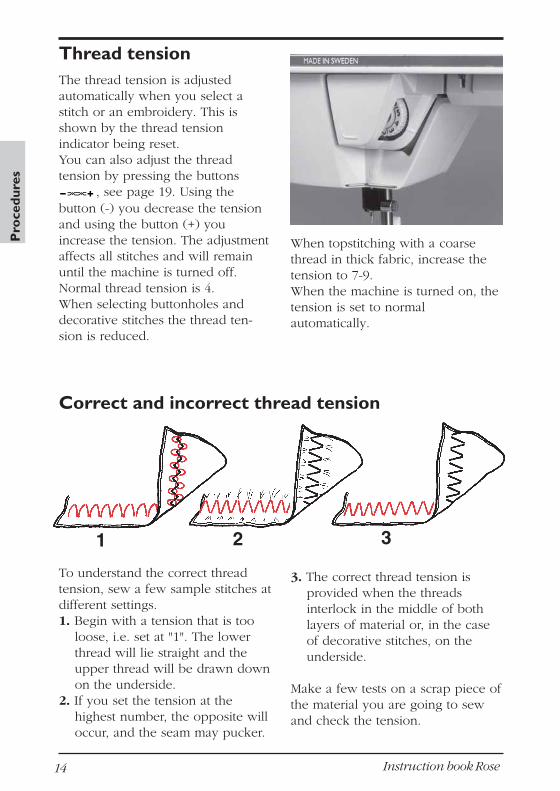
Thread tensionThe thread tension is adjustedautomatically when you select astitch or an embroidery. This isshown by the thread tensionindicator being reset.You can also adjust the threadtension by pressing the buttons
, see page 19. Using thebutton (-) you decrease the tensionand using the button (+) youincrease the tension. The adjustmentaffects all stitches and will remainuntil the machine is turned off.Normal thread tension is 4.When selecting buttonholes anddecorative stitches the thread ten-sion is reduced.
When topstitching with a coarsethread in thick fabric, increase thetension to 7-9.When the machine is turned on, thetension is set to normalautomatically.
To understand the correct threadtension, sew a few sample stitches atdifferent settings.1. Begin with a tension that is too
loose, i.e. set at "1". The lowerthread will lie straight and theupper thread will be drawn downon the underside.
2. If you set the tension at thehighest number, the opposite willoccur, and the seam may pucker.
3. The correct thread tension isprovided when the threadsinterlock in the middle of bothlayers of material or, in the caseof decorative stitches, on theunderside.
Make a few tests on a scrap piece ofthe material you are going to sewand check the tension.
321
Correct and incorrect thread tension
Pro
cedu
res

Instruction book Rose 15
The presser foot pressure is adjustedwith the dial on the front of themachine. Normal setting is 4. Thehigher the number the morepressure on the fabric. Knit and Softfabrics should be sewn at lowpressure.
Presser foot lever
The presser foot is raised andlowered with the presser foot lever.The presser foot must be loweredwhen sewing. The machine will notstart if the presser foot is in theraised position.
By raising the presser foot lever asfar as it goes and holding it there,the lift height of the presser foot canbe increased by several millimeters.
Presser foot pressure
Changing the presserfoot
! Switch off the main switch.
1. Make sure that the needle is inthe highest position. Pull thepresser foot down and towardsyou.
2. Line up the cross pin on the footbetween the spring and thepresser foot ankle. Press backuntil the foot snaps into place.
Pro
cedures

Instruction book Rose16
Changing the needle
! Switch off the main switch.
1. Loosen the screw in the needleclamp.
2. Remove the needle.3. Push up the new needle with the
flat side away from you until itwill go no further.
4. Tighten the screw properly.
Always use needles of system130/705H.
Lowering the feed teeth
The feed teeth are lowered whenyou turn the dial to the left to .Turn the dial to the right to ifyou wish to raise the feed teeth. Thefeed teeth will not come up untilyou begin to sew.
The feed teeth are lowered whensewing buttons and for free-handwork.
By lowering the feed teeth it iseasier to get thick garments underthe presser foot. Do not forget toraise the feed teeth before starting tosew.
Note: The feed teeth are loweredautomatically when the embroideryunit is put in place.When removing the embroideryunit, the feed teeth will raise as youstart to sew.
Pro
cedu
res

Instruction book Rose 17
Functions / Infodisplay
Needle stopThis button sets whether theneedle stops up or down inthe material when you lift
your foot from the foot control andstop sewing. Point the arrowupwards - the needle will stop in theup position. When you touch thebutton so that the arrow pointsdownward, the machine will stopwith the needle in the material.You can also regulate the needlestop position with the foot control.To raise or lower the needle afterstopping, lightly tap the foot control.
When sewing embroideriesonly the up position can beused.
All stitches in the machine have apre-set maximum speed at whichthey can be sewn. When you selecta stitch the machine automaticallysets the correct maximum speed.
High speed
ReverseYour machine sews backwardswhen this button is pressed.The machine sews forwardwhen the button is released.
The longest stitch length whenreverse feeding is 3 mm.For permanent reverse, press thebutton twice in quick succession
before starting to sew. An arrow to the top left on the displayindicates reverse sewing. To sewforward again, press the button oncemore.
The reverse button is also usedwhen starting and stopping theEmbroidery unit, (the footcontrol can also be used)
Sewing speedUse the SPEED button to setthe three different maximumspeeds. The machine will sew
at different maximum speeds whenthe foot control is fully depressed.For slower speeds within the rangesimply press the foot control less.
When Embroidery position isset, only the slowest speed canbe selected.
Reduced speedSlow speed
Functio
ns

Instruction book Rose18
Stitch lengthWhen you select a stitch, themachine will automatically setthe best stitch length whichwill be indicated by numberson the Infodisplay. You can
change the stitch length by pressingeither the (+) or (-) button. Certainstitches have a limited stitch length.Not active in REP position.
When sewing embroideriesthe length can be set between 2and 6 to change size of
embroidery.
Functions / Infodisplay
1. 2.
Stitch widthWhen you select a stitch, themachine automatically sets thebest stitch width which is dis-played with numbers on theInfodisplay. You can change
the stitch width by pressing the (+)or (-) button. The width can beadjusted between 0 and 6 mm. Notactive in REP position.
When sewing embroideries thewidth can be set between 2 and6, to change size of embroidery.
Mirror imageYou can mirror a stitch byusing the buttons , mirrorimage side to side and ,mirror image end to end . Thesymbols will be displayed.When sewing embroideriesonly mirror image side to sidecan be used.
(See "Satin taper...", page 25, STOP,page 24.
Embroidery sewing withoutthread color change, see page32.
STOPThe STOP button is used tofinish a stitch. i.e. the machinefastens the thread and stopsautomatically when the stitchhas been completed. The
symbol on the display indicatesthat STOP is selected. STOP iscancelled when you press the buttonagain or by selecting a new stitch.The button has the same functionboth in NORM and REP position
Fun
ctio
ns
Instruction book Rose 19
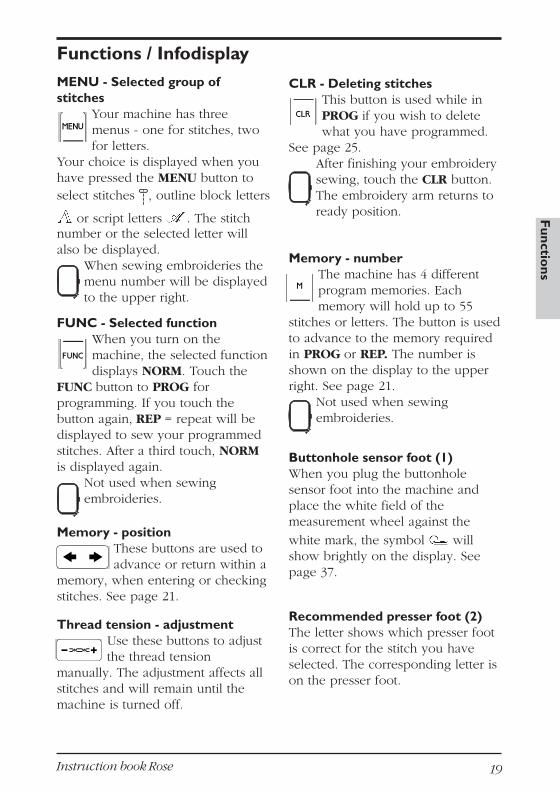
Functions / InfodisplayMENU - Selected group ofstitches
Your machine has threemenus - one for stitches, twofor letters.
Your choice is displayed when youhave pressed the MENU button toselect stitches , outline block letters
or script letters . The stitchnumber or the selected letter willalso be displayed.
When sewing embroideries themenu number will be displayedto the upper right.
FUNC - Selected functionWhen you turn on themachine, the selected functiondisplays NORM. Touch the
FUNC button to PROG forprogramming. If you touch thebutton again, REP = repeat will bedisplayed to sew your programmedstitches. After a third touch, NORMis displayed again.
Not used when sewingembroideries.
Memory - positionThese buttons are used toadvance or return within a
memory, when entering or checkingstitches. See page 21.
Thread tension - adjustmentUse these buttons to adjustthe thread tension
manually. The adjustment affects allstitches and will remain until themachine is turned off.
CLR - Deleting stitchesThis button is used while inPROG if you wish to deletewhat you have programmed.
See page 25.After finishing your embroiderysewing, touch the CLR button.The embroidery arm returns toready position.
Memory - numberThe machine has 4 differentprogram memories. Eachmemory will hold up to 55
stitches or letters. The button is usedto advance to the memory requiredin PROG or REP. The number isshown on the display to the upperright. See page 21.
Not used when sewingembroideries.
Buttonhole sensor foot (1)When you plug the buttonholesensor foot into the machine andplace the white field of themeasurement wheel against the
white mark, the symbol willshow brightly on the display. Seepage 37.
Recommended presser foot (2)The letter shows which presser footis correct for the stitch you haveselected. The corresponding letter ison the presser foot.
Functio
ns

Instruction book Rose20
Function / Stitch selection
When you turn on the machinewithout having the embroidery unitconnected, it always selects straightstitch and the number 1 as well as is displayed. The machine has onemenu of stitches shown on theselection buttons with white symbolsand two menus of letters shown inblack symbols.
With the MENU button youselect which menu you wishto sew.
The selected menu will be dis-
played, for stitches, or forletters.To the very right on the Infodisplaythe number of the selected stitch orthe selected letter is displayed.When the embroidery unit isconnected only the numbers of theselection buttons are used. In theEmbroidery booklet eachembroidery has a number.
Fun
ctio
ns
Instruction book Rose 21
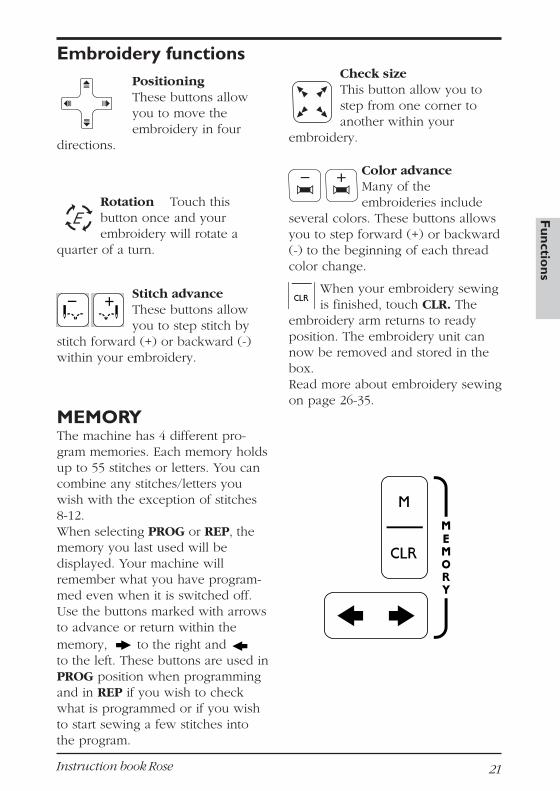
Rotation Touch thisbutton once and yourembroidery will rotate a
quarter of a turn.
Embroidery functionsPositioningThese buttons allowyou to move theembroidery in four
directions.
Check sizeThis button allow you tostep from one corner toanother within your
embroidery.
Color advanceMany of theembroideries include
several colors. These buttons allowsyou to step forward (+) or backward(-) to the beginning of each threadcolor change.
When your embroidery sewingis finished, touch CLR. The
embroidery arm returns to readyposition. The embroidery unit cannow be removed and stored in thebox.Read more about embroidery sewingon page 26-35.
MEMORY
Stitch advanceThese buttons allowyou to step stitch by
stitch forward (+) or backward (-)within your embroidery.
The machine has 4 different pro-gram memories. Each memory holdsup to 55 stitches or letters. You cancombine any stitches/letters youwish with the exception of stitches8-12.When selecting PROG or REP, thememory you last used will bedisplayed. Your machine willremember what you have program-med even when it is switched off.Use the buttons marked with arrowsto advance or return within thememory, to the right and to the left. These buttons are used inPROG position when programmingand in REP if you wish to checkwhat is programmed or if you wishto start sewing a few stitches intothe program.
Functio
ns
Instruction book Rose22
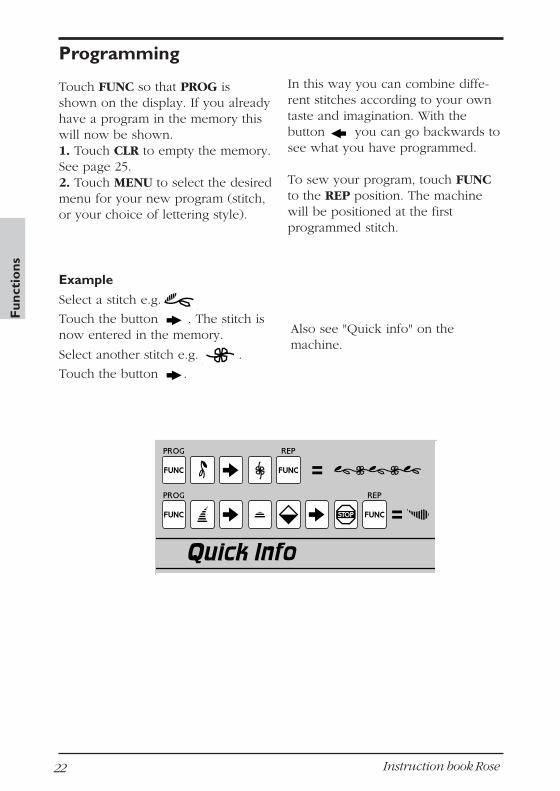
Programming
Touch FUNC so that PROG isshown on the display. If you alreadyhave a program in the memory thiswill now be shown.1. Touch CLR to empty the memory.See page 25.2. Touch MENU to select the desiredmenu for your new program (stitch,or your choice of lettering style).
Also see "Quick info" on themachine.
Example
Select a stitch e.g.
Touch the button . The stitch isnow entered in the memory.
Select another stitch e.g. .
Touch the button .
In this way you can combine diffe-rent stitches according to your owntaste and imagination. With thebutton you can go backwards tosee what you have programmed.
To sew your program, touch FUNCto the REP position. The machinewill be positioned at the firstprogrammed stitch.
Fun
ctio
ns
Instruction book Rose 23
Programming stitches from different menus
Example:Select PROG function. Select thestitch menu.
Select a stitch , touch .Change menu to block letters.
Select a letter , touch .
Select another letter , touch .
Change to stitch menu.
Select a stitch , touch .Touch STOP.Touch REP to sew.
Programming with stitch changes
If you wish to change a stitch or aletter to another one in your pro-gram:1. Touch FUNC to PROG.
Corrections
In PROG position you can changestitch length and width or mirrorstitches. Certain stitches, however,have a limited stitch length.
1. Select desired stitch.2. Use the stitch length and the
stitch width buttons (+) or (-) orthe mirroring buttons , tochange the setting before enteringwith the button.
2. Use the buttons marked witharrows or until the stitchnumber or the letter is displayed.3. Select the new stitch or letter.
Functio
ns
Instruction book Rose24
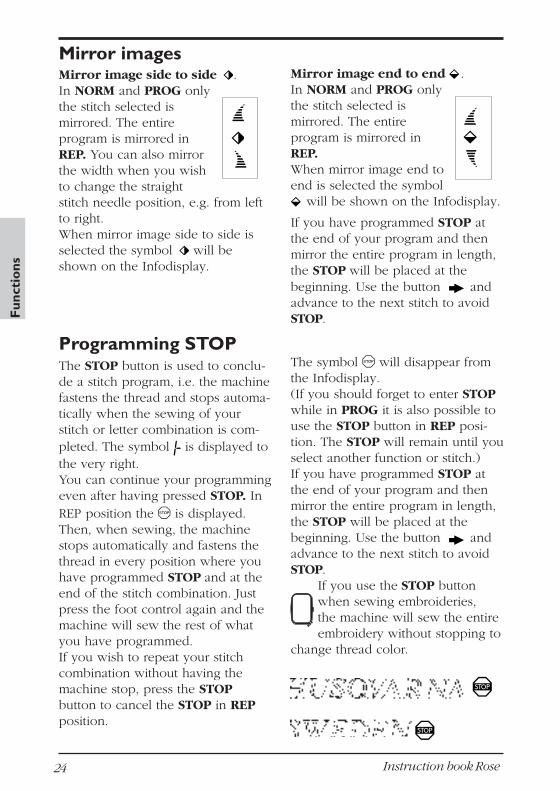
Mirror imagesMirror image side to side .In NORM and PROG onlythe stitch selected ismirrored. The entireprogram is mirrored inREP. You can also mirrorthe width when you wishto change the straightstitch needle position, e.g. from leftto right.When mirror image side to side isselected the symbol will beshown on the Infodisplay.
Mirror image end to end .In NORM and PROG onlythe stitch selected ismirrored. The entireprogram is mirrored inREP.When mirror image end toend is selected the symbol
will be shown on the Infodisplay.
If you have programmed STOP atthe end of your program and thenmirror the entire program in length,the STOP will be placed at thebeginning. Use the button andadvance to the next stitch to avoidSTOP.
Programming STOPThe STOP button is used to conclu-de a stitch program, i.e. the machinefastens the thread and stops automa-tically when the sewing of yourstitch or letter combination is com-pleted. The symbol is displayed tothe very right.You can continue your programmingeven after having pressed STOP. InREP position the is displayed.Then, when sewing, the machinestops automatically and fastens thethread in every position where youhave programmed STOP and at theend of the stitch combination. Justpress the foot control again and themachine will sew the rest of whatyou have programmed.If you wish to repeat your stitchcombination without having themachine stop, press the STOPbutton to cancel the STOP in REPposition.
The symbol will disappear fromthe Infodisplay.(If you should forget to enter STOPwhile in PROG it is also possible touse the STOP button in REP posi-tion. The STOP will remain until youselect another function or stitch.)If you have programmed STOP atthe end of your program and thenmirror the entire program in length,the STOP will be placed at thebeginning. Use the button andadvance to the next stitch to avoidSTOP.
If you use the STOP buttonwhen sewing embroideries,the machine will sew the entireembroidery without stopping to
change thread color.
Fun
ctio
ns

Instruction book Rose 25
Look through the programIf you have programmed several ofthe memories you can press FUNCfor PROG or REP. Use the M but-ton to select the following memoryand then advance with the buttons
.
The memory last used will appearon the display when you selectPROG or REP.
CLR - Deleting stitchesIf you wish to delete a certain stitchwithin the program:1. In the PROG position, use one of
the buttons until theactual stitch number is displayed.
2. Touch CLR. Now the stitch andeverything to the right of it willbe deleted.
3. If you wish to delete the wholeprogram, touch the FUNC buttonto return to PROG. The machinewill be positioned at the firstprogrammed stitch.
4. Touch CLR. CLR deletes theprogram of stitches in theselected menu.
If you by mistake touch CLR, simplytouch CLR again to bring back thebalance of your program as long asyou have not used another button.When the program memory is emptythe stitch length and width is shownas 0.0/0.0 on the display.
Letters are deleted in the same way.
Darning and taper satin stitchesThe stitches 11-12 can only beselected in NORM position. Theycan not be programmed orcombined but are set individuallyand automatically. For stitches 11and 12 there are stitch memorieswhere the number of stitches, lengthor width changes are stored.1. Sew until the stitch has reached
the desired length.
2. Touch the button. The ma-
chine now completes the stitch.3. When you have the result you
wish, touch STOP.4. The stitch will now repeat in
succession and the machine willstop automatically when the stitchis completed
If you wish to sew another stitchand then return to your stitch, youonly select this stitch and touchSTOP.The repeated stitch is retained evenif you switch off the machine.If you attempt to program thesestitches in the PROG position,PROG is flashing to indicate that thisis not possible.
11 12
Functio
ns

Instruction book Rose26
Embroidery
Em
bro
ider
y
The box contains Embroidery unit,embroidery hoop, embroiderybooklet, embroidery template,template pencil, embroidery card, apair of scissors, two thread nets anda test kit.To prevent misplacing yourembroidery accessories, store themin the box after sewing.
Connecting the Embroidery unit
! Switch off the main switch.
Make sure the machine is turned offwhile connecting the embroideryunit.
1. Slide off the accessory box.2. There is a covered socket at the
back of the machine. Theembroidery unit plugs into thissocket. To remove the cover,carefully pry it off with theaccessory screwdriver.
3. Slide the arm of the embroideryunit to the right of the needle andthe presser bar and push the unitto the right until it plugs intothe socket.
The embroidery unit is nowconnected for sewing embroi-deries. The feed teeth will belowered automatically.To remove, turn the machineoff, push in the button at thecenter of the left side on theunderside of the unit and slideoff. Remove the embroiderycard. Replace the coverprotecting the socket on themachine.

Instruction book Rose 27
A B
1. Raise the presser foot lever.2. Unscrew the presser foot ankle.3. Place the presser foot U from
behind onto the presser bar. Thearm of the presser foot should bebehind the needle clamp screw.
4. Push the presser foot upward -make sure the holes match eachother.
5. Insert the screw and tighten theembroidery presser foot.
Changing to the embroidery presser foot
Normal embroidery: The lever onthe arm of the presser foot shouldbe turned downward (A). The markU on the lever corresponds to the
symbol on the display.
Quilting or sewing terry cloth:When selecting a quilt stitch thesymbol appears on the display.Turn the lever upward (B). Alsowhen sewing terry cloth or otherthick fabrics, use setting (B).
Note: When bobbin winding you
can use the button to start and
stop. See page 12 "Bobbin winding -vertical spool pin".
Use rayon embroidery thread 40 wt.When reducing the size of theembroidery we recommend a finerthread, 60 wt. When enlarging, werecommend a thicker thread, 30 wt.
Place the net over the thread spool,especially when using rayon thread.
Use a very fine thread as bobbinthread. There is a special bobbinthread called darning cotton orbasting thread available for this kindof embroideries.
Thread
Em
broidery
! Switch off the main switch.

Instruction book Rose28
Embroidery bookletIn the Embroidery bookletyou will find all theembroideries actual size.Each embroidery is placedin a square where thecenter of each side ismarked and a cross marksthe center point.
2. Turn the machine on. If thepresser foot is in lower position
the symbol is flashing onthe display. When raising thepresser foot, the machine carriesout a self test. If the needle is inits down position it willautomatically go to up position.The embroidery unit will take itsready position.
3. When you have finished yourembroidery work, touch CLR.The arm returns to ready posi-tion. Turn off the machine. Toremove the Embroidery unit pushin the button on the left centerunderside of the unit and slide itoff. Take out the Embroiderycard. Replace the cover protectingthe socket and slide on theaccessory box.
You will also see how each embroi-dery is placed related to the centerpoint of your sewing space.The row of thread spools next to theembroideries shows the number ofthread color changes and the orderof changes.
The sewing time - excluding threadcolor changing, is also given.
1. Insert the embroidery card intothe slot on the right side of themachine. To remove the card,pull it straight out.
Get started
Em
bro
ider
y

Instruction book Rose 29
Note: Always touch CLR beforeyou turn off the machine.Otherwise the embroidery armwill not come to the correctposition to remove the unit fromthe machine.
1. Loosen the screw on the outerhoop, place the outer hoop sothat the screw is down to theright.
2. At the front edge of the hoopthere is an arrow.
3. A corresponding arrow is locatedon the inner hoop as well ascenter marks in the twodirections. You should take noticeof the back marks.
4. Place the embroidery template onyour fabric. Use the Pictogram™pen to mark within the groovesand in the center.
5. Place the inner hoop, the marksmatching the ones on the fabric.Side marks should line up withthe top marks on the sides of thehoop. We recommend using atear-away stabilizer in the hoopunder the fabric. Press hoop andfabric down, stabilize fabric asneeded, into the outer hoop andtighten the screw. The arrows ofthe outer and the inner hoopsshould both be at the bottom.
6. Slide the hoop under the presserfoot - raise up the presser footlever to take advantage of theextra lift of the presser foot.Slide hoop from the front ontothe embroidery arm.Note: Always sew a sampleEmbroidery on a scrap of thesame fabric you will embroider.
7. Raise the presser foot beforeremoving the embroidery hoopfrom the machine. Press thebutton located to the right on thehoop and pull the hoop towardsyou.
Embroidery hoop
Em
broidery

Instruction book Rose30
Sewing embroideries
1. Put on embroidery presser foot U,see page 27.
2. Place the enclosed net over thethread spool. Thread the machinewith embroidery thread as upperthread. In this case you need notplace thread under the presserfoot. Use a fine thread as bobbinthread.
3. Thread the bobbin threadaccording to "Threading" on page13 and check to be sure thethread lies under the tensionsprings. Cut the thread in thethread cutter. Hint: Slide bobbincover on, then cut thread.Always check there is enoughbobbin thread before starting anew embroidery.
4. Insert the embroidery card. The
symbol flashing on thedisplay indicates if theembroidery card is not inserted ornot inserted fully.
5. Select desired embroidery motiffrom the Embroidery booklet.Each embroidery has a number.The buttons 1-35 are used toselect embroideries.
6. Start sewing by touching the
button or by pressing the foot
control. Hold the thread tailswhen starting.
Select the number of the desiredembroidery on the stitch panel.
The machine always starts fromthe center of the embroidery area,sews a starting stitch up to thebeginning of the embroidery,sews a few stitches more, gives a”beep” and stops. A pair ofscissors flashing on thedisplay indicates that you can cutthe starting thread tail.
7. Touch the button and the
machine sews the rest of theembroidery or up to next threadcolor change.
Note: Be careful when workingwithin the needle and presser footarea to avoid touching the start/stopbutton or the foot control bymistake.
Em
bro
ider
y
Instruction book Rose 31
Sewing embroideries
8. The machine stops automaticallywhen it is time to change threadcolor. The display indicates whichthread color change you havereached by a flashing numbernext to the thread spool .
Go back a few stitches using the
button and restart. The symbol goesout.
After finishing the embroiderysewing:1. Remove the embroidery hoop by
pressing the button to the righton the hoop. Pull the hooptoward you.
2. Touch CLR and the embroideryarm returns to ready position. Inthis position you may remove theembroidery unit from themachine (by pushing the buttonon the center left underside), afterturning the machine off.
A flashing number indicates thefirst stitch of the ”new” threadcolor. The number stops flashingwhen you begin to sew.
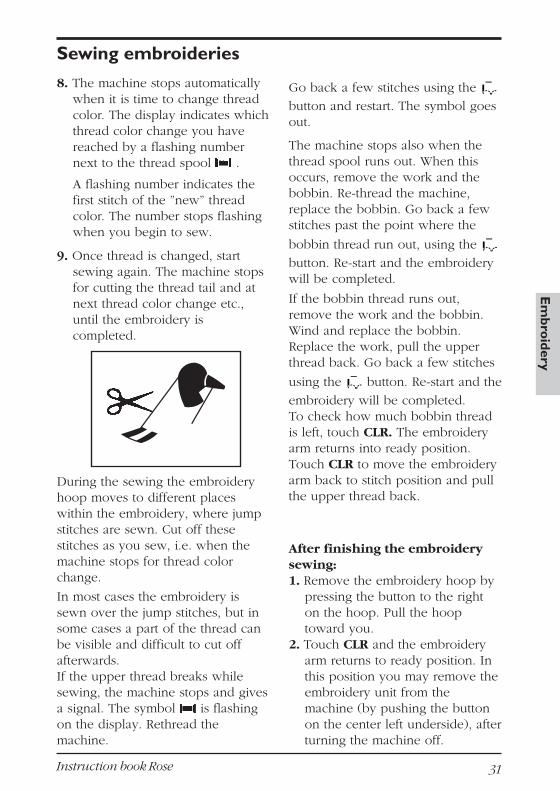
9. Once thread is changed, startsewing again. The machine stopsfor cutting the thread tail and atnext thread color change etc.,until the embroidery iscompleted.
During the sewing the embroideryhoop moves to different placeswithin the embroidery, where jumpstitches are sewn. Cut off thesestitches as you sew, i.e. when themachine stops for thread colorchange.
In most cases the embroidery issewn over the jump stitches, but insome cases a part of the thread canbe visible and difficult to cut offafterwards.If the upper thread breaks whilesewing, the machine stops and givesa signal. The symbol is flashingon the display. Rethread themachine.
The machine stops also when thethread spool runs out. When thisoccurs, remove the work and thebobbin. Re-thread the machine,replace the bobbin. Go back a fewstitches past the point where the
bobbin thread run out, using the
button. Re-start and the embroiderywill be completed.
If the bobbin thread runs out,remove the work and the bobbin.Wind and replace the bobbin.Replace the work, pull the upperthread back. Go back a few stitches
using the button. Re-start and the
embroidery will be completed.To check how much bobbin threadis left, touch CLR. The embroideryarm returns into ready position.Touch CLR to move the embroideryarm back to stitch position and pullthe upper thread back.
Em
broidery
Instruction book Rose32
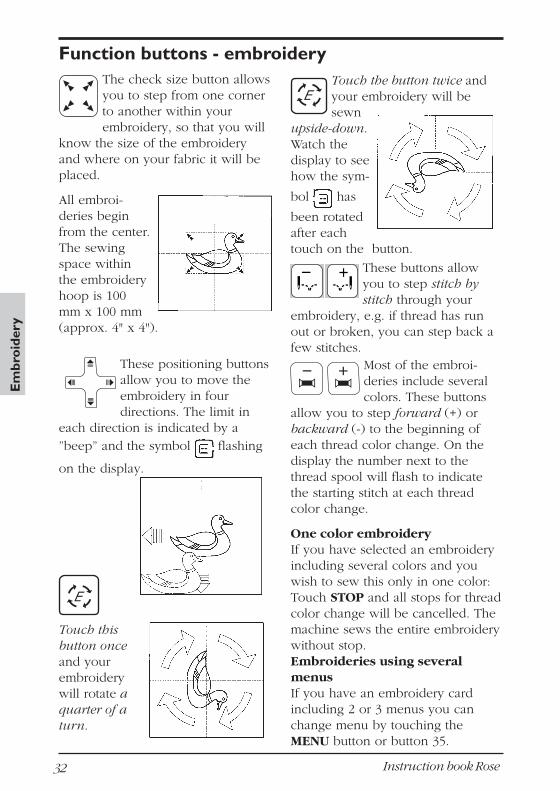
Function buttons - embroideryThe check size button allowsyou to step from one cornerto another within yourembroidery, so that you will
know the size of the embroideryand where on your fabric it will beplaced.
All embroi-deries beginfrom the center.The sewingspace withinthe embroideryhoop is 100mm x 100 mm(approx. 4" x 4").
These positioning buttonsallow you to move theembroidery in fourdirections. The limit in
each direction is indicated by a”beep” and the symbol flashing
on the display.
Touch thisbutton onceand yourembroiderywill rotate aquarter of aturn.
Touch the button twice andyour embroidery will besewn
upside-down.Watch thedisplay to seehow the sym-
bol has
been rotatedafter eachtouch on the button.
These buttons allowyou to step stitch bystitch through your
embroidery, e.g. if thread has runout or broken, you can step back afew stitches.
Most of the embroi-deries include severalcolors. These buttons
allow you to step forward (+) orbackward (-) to the beginning ofeach thread color change. On thedisplay the number next to thethread spool will flash to indicatethe starting stitch at each threadcolor change.
One color embroideryIf you have selected an embroideryincluding several colors and youwish to sew this only in one color:Touch STOP and all stops for threadcolor change will be cancelled. Themachine sews the entire embroiderywithout stop.Embroideries using severalmenusIf you have an embroidery cardincluding 2 or 3 menus you canchange menu by touching theMENU button or button 35.
Em
bro
ider
y

Instruction book Rose 33
You can mirror image the embroi-dery side to side . The symbol isshown on the display.
Read more about Mirror image onpage 24.
The thread color for each part of the embroidery can be checked by pres-sing one of the buttons . Two letters (or numbers) representing thecolor will replace the stitch number on the display for a few seconds. A - ora + above the letters indicates light or dark shade of the color. See page 35for information on how to set the language desired and a table including thecolors represented.
You can make the embroiderymotifs larger and smaller with thestitch length and stitch width buttonsbetween 2 and 6 maximum. The sizechanges are individually limited foreach embroidery motif.When enlarging or reducing theembroidery we recommendchanging the thread thickness forthe best result, see ”Thread”, page27.A ”beep” indicates when a limit isreached. You can change stitchwidth and stitch length indepen-dently.
Change the size before moving fromthe center position. If theembroidery is moved first the sizechange may be limited by the motifreaching the edge of the 100x 100mm area.
Enlarging and reducing embroideries
Color information
Mirror image embroideries
Em
broidery

Instruction book Rose34
2. Place the template on your fabricwhere you wish to sew theembroidery.
3. Draw marks on the fabric in thefour grooves and in the centerwith your Pictogram™ pen.
Make final adjustments using thepositioning buttons until theneedle will start at the center..
4. Place the embroidery hoopmatching the arrow pointingdownward to the arrow mark onthe fabric. Insert the fabric intothe hoop, see ”Embroidery hoop”,page 28.
Use the embroidery templateWhen you wish to sew the embroidery at a specific place on your fabric orgarment, you can take advantage of the embroidery template to mark wherethe embroidery is to be sewn. In the Embroidery Booklet you will find allthe embroideries pictured actual size.
1. Place the template with the arrowpointing downward and matchingthe other marks. Draw the outerlines of your selected embroideryon the template using thetemplate pencil. The markingscan later be removed with aneraser.
Em
bro
ider
y

Instruction book Rose 35
Language Code Language
0 (numerical) 1 Swedish 6 Danish11 Finnish21 Norwegian26 English31 French36 Dutch41 Italian46 Spanish51 German60 Portuguese81 Croatian82 Polish90 Czeck
Language setting
To have the thread color information for embroideries adopted to your ownlanguage press and hold the CLR button while switching on the machine. Alanguage code is now flashing on the display in place of the stitch number.Use the buttons to select the desired language, 26 for English or 0for numerical color representation, see table. When set, switch off and onthe machine again.
Color information / Language setting
Color information
The suggested thread color for each part of the embroidery can be checkedby pressing one of the buttons . Two letters representing the colorwill replace the stitch number on the display for a few seconds. A - or a +above the letters indicates light or dark shade of the color.When delivered, the machine is normally set at language code 0.
Color Numerical indication26 (Eng.) 0 (num.)
Black BK 00Blue BL 01Green GN 02Red RD 03Violet VT 04Yellow YE 05Grey GY 06Orange OR 07Pink PI 08Brown BR 09White WH 10
Em
broidery

Instruction book Rose36
For better visibility the machinesews buttonholes away from you.
Buttonholes
You can select different buttonholestyles.Buttonhole the bartackbuttonhole, used for medium andheavy fabrics.Buttonhole keyhole buttonholefor tailored garmentsButtonhole round end button-hole, for light fabrics.
1. Select a buttonhole.2. Use the presser foot C or the
buttonhole sensor foot.3. Mark the buttonhole location on
your fabric.
When sewing stretch fabrics, use afusible stabilizer or a cord.
The buttonhole feethas guide lines todeterminebuttonhole length.The middle mark onfoot C gives a 1.5cm buttoning edge.Place the button onthe presser footagainst the needleand you will be ableto see which markon the footcorresponds to thebutton. You will sewuntil the firstbuttonhole columnreaches this mark.There is a smallfinger at the back ofthe presser foot. For a cordedbuttonhole, loop your cord aroundthe finger as illustrated.
4. Place the material in the machineand begin at the bottom of thebuttonhole.
5. Sew the firstcolumn of thebuttonhole to therequired length,use the markings.
6. Touch the reverse
button .
7. Continue to sewthe buttonholeuntil the othercolumn is thesame length as the
first, touch the
button.8. The machine will
bartack the otherend, a few tie offstitches in the first column of thebuttonhole and will then stop.Sew the next buttonhole in thesame manner.
NOTE: Always stitch a samplebuttonhole on scraps of the garmentfabric to check size before sewingbuttonholes on the garment.
Sew
ing

Instruction book Rose 37
1. Snap on the buttonhole sensorfoot. Make sure that the cable isfirmly plugged into the yellow
socket (see picture). The symbol will flash until abuttonhole is selected.
2. Select a buttonhole on the stitchpanel. The buttonhole will be pre-set for a 16 mm button when themachine is turned on. Thenumber 16 is therefore shown onthe display in place of the stitchlength together with the symbol
.3. If you are using a different size
button, measure the button on thebuttonhole rule below and set thecorrect size with the stitch lengthbuttons (+) or (-). The size willchange by 2 mm at a time.
4. Turn the measurement wheel sothat the white area is lined upwith the white mark. When themeasurement wheel is correctly
set, the circle in the symbolwill stop flashing.If the circle or the whole symbol
is flashing the machine cannot be started.
Buttonhole sensor foot
The buttonhole will be sewn inone step, and when the button-hole is completed the machinewill stop automatically.
Buttonhole size5. The machine will sew the correct
size buttonhole for the buttonsize you have selected. Place the button as shown on the
circles on the picture and you caneasily see the size needed for yourbuttonhole.
Changing the density/stitchlengthTo change the stitch density of thebuttonhole columns, adjust thelength setting of the stitch. Unplugthe buttonhole sensor. The stitchlength will then be shown on theInfodisplay again and you will beable to adjust the density of thebuttonhole. When you plug in thebuttonhole sensor foot, the displaygoes back to showing the size ofthe buttonhole, but remembers thenew stitch length setting.
8 12 16 20 24 28 32 36 40 44 48
0 6 10 14 18 22 26 30 34 38 42 46 50
Sew
ing

Instruction book Rose38
Buttonhole knifeThe knife is used to cut buttonholes.It is also useful for removing stitchessewn in error.
Sewing buttons1. Mark the fabric where the button
is to be located.2. Touch FUNC to NORM and select
zigzag .
3. Lower the feed teeth with thedial. See page 16.
4. Snap off the presser foot.5. Place the material under the
presser foot ankle.6. Place the button on marking and
lower the presser bar so that thepresser foot ankle is between theholes of the button (see picture).
7. Hold the thread ends to one side.Turn the handwheel and check tobe sure that the needle goes intothe left hole of the button.
8. Touch the mirroring button tocheck that the needle also goesinto the right hole.
9. Sew as many stitches as youconsider necessary.
10. Touch STOP. The machine willthen tie off in one of the holesand stop.
11.Touch STOP to cancel it. Move tothe next pair of holes or the nextbutton.
If you have a button with a differenthole spacing, you can adjust this bypresssing one of the stitch widthbuttons (+) or (-).
Use the clearance plate for thispurpose. Use the thin end whensewing buttons on light fabrics, thethick end for heavier fabrics.Push in the plate between thebutton and the fabric. Lower thepresser bar and sew on the button.Pull the threads between the buttonand the fabric.
Button with a shank
Wind the threads a few timesaround the shank and tie the ends.
Sew
ing

Instruction book Rose 39
Straight stitch
Straight stitching is used to join
fabric which does not stretch and forseams which will not be subjectedto great strain.When you select straight stitch themachine will automatically set theaverage stitch length.Experiment until you arrive at theexact setting for the actual work youwill be doing.
Example: Increase the stitch lengthwhen basting and when topstitching.
25 Needle PositionsWhen topstitching using straightstitch and reinforced straight stitch,the needle position can be adjustedin steps. Use the stitch width button(+), 0 is the center position, width 6is left needle position, width 6mirror imaged is right needleposition. To return to center posi-tion, use the stitch width button (-)and step back to 0. Adjust the widthbetween 0-6 for additional positions.
To edge stitch, you should takeadvantage of the possibility to setthe needle to the left or the rightposition.
To sew about 2 mm from the edge,snap on presser foot A when sewinglight fabrics and presser foot D forother fabrics.Place the fabric and sew so that theedge follows the inside right edge ofthe presser foot D or the first markof the left edge of the presser footA.
Place the edge of the fabric so that itfollows the outside right edge of thepresser foot and sew the hem.
If you wish to sew about 5 mm fromthe edge or sew a narrow hem, usepresser foot A and set the needle tothe right position.
Sew
ing

Instruction book Rose40
Gathering with straight stitch
Use a slightly longer stitch thannormal straight stitch, 3.5-5.0.Always sew two gathering threadsnext to each other.
1. Pin the gathered part to thecorresponding garment section.Make sure that the marks and theseams correspond to each other,or match notches.
3. Join the pieces with straight stitch,the gathered material facing up.Sew between the straightgathering rows. Hold thegathering with your fingers onboth sides of the needle to avoidfolds. Remove any gatheringthread that is visible.
2. Pull both bobbin threads from thesame direction and distribute thegathering evenly. When half thedistance is gathered, wind thethreads around a pin. Then gatherthe other half from the otherdirection. Distribute the gatheringevenly.
Sew
ing

Instruction book Rose 41
Sewing zippers
If you want to sew a ”gentleman’szipper”, follow the instructions butinsert in the other direction.
The zipper foot E can be snappedon so that it is located either to theright or to the left of the needle,making it easy to sew both sides ofthe zipper. To sew the other side ofthe zipper, reposition the zipperfoot.
3. Place the zipper under the foldedseam allowance with the teeth asnear to the fold as possible andstitch zipper to fabric close tofold. Begin sewing at the bottomof the zipper. Before reaching thezipper pull, lift the presser footand slide the zipper pull downpast the zipper foot. Lower thefoot and sew to the top of thezipper.
2. Place presser foot E to the left ofthe needle. From the wrong sidefold the fabric to one side so bothseam allowances are free. Foldand press the left allowanceunder approximately 0.5 cm fromthe basted seam.
1. Sew the seam together to thebottom of the zipper placket.Baste the rest of the seam. Leaveabout 2 cm open at the top. Pressseam open. Set the needle tothe right position.
Lapped zipper
4. Snap on the zipper foot so it is tothe right of the needle. Set theneedle to the left position.Turn the garment to the rightside. It is important that the seamon the right side is sewn straight.Before you begin to sew, markthe seam line. Sew the other sideof the zipper.
Begin stitching across the bottomand continue upwards. Remove thebasting.
1
2
3
4
Sew
ing
Instruction book Rose42
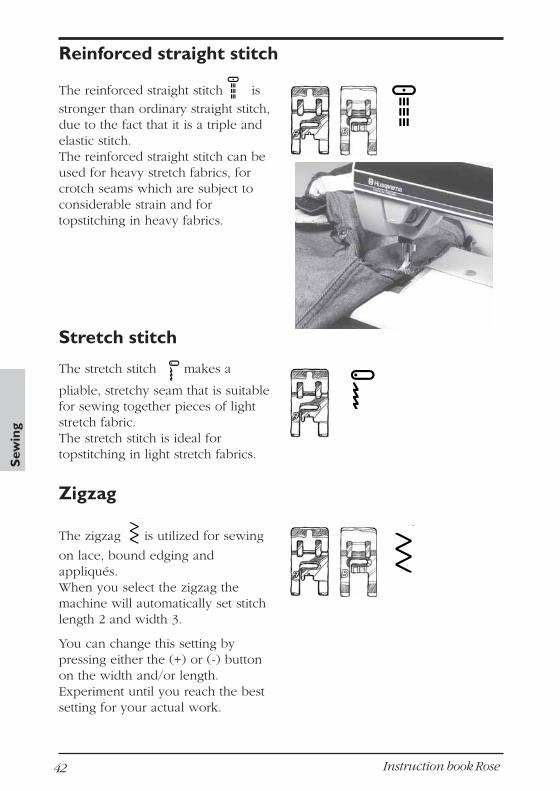
Reinforced straight stitch
The reinforced straight stitch is
stronger than ordinary straight stitch,due to the fact that it is a triple andelastic stitch.The reinforced straight stitch can beused for heavy stretch fabrics, forcrotch seams which are subject toconsiderable strain and fortopstitching in heavy fabrics.
Zigzag
The zigzag is utilized for sewing
on lace, bound edging andappliqués.When you select the zigzag themachine will automatically set stitchlength 2 and width 3.
You can change this setting bypressing either the (+) or (-) buttonon the width and/or length.Experiment until you reach the bestsetting for your actual work.
The stretch stitch makes a
pliable, stretchy seam that is suitablefor sewing together pieces of lightstretch fabric.The stretch stitch is ideal fortopstitching in light stretch fabrics.
Stretch stitch
Sew
ing

Instruction book Rose 43
Lace edging
3. Cut off the seam allowance up tothe stitching on the wrong side.
1. Place wrong side of lace to rightside of fabric matching edges.Sew along inner edge of lace with
zigzag, stitch length 1.5, stitch
width 1.5.
2. Press seam allowance towards
fabric. Sew with satin stitch ,
stitch width 2.0, on the right sideover the zigzag seam.
Sew
ing

Instruction book Rose44
Three-step zigzagOvercasting
Three-step zigzag is suitable for
overcasting most fabrics. Trim theedges of the fabric before over-casting.Make sure that the needle sews overthe edge of the fabric. Place thefabric according to the presser foot(see picture).
Sewing terry clothTerry cloth is a rather loosely wovenfabric in which seams easily break.Sew the garment together withstraight stitch. Trim the seams andpress the seam allowance flat andsew the edges down against thegarment on the wrong side withthree-step zig-zag.Even though the stitching goes rightthrough to the ”right” side of thegarment, it is nearly invisible andeven the wrong side looks neat. Thestitching will also be considerablystronger.Necklines and armholes are finishedin a similar way.
Three-step zig-zag , can be
utilized for mending and darning. Athreadbare spot is mended bysewing back and forth with three-step zig-zag.
Use the reverse feed button . For
every row of stitching, guide thefabric slightly to the side. If thefabric is very worn, a piece of fabricor lining may be attached to thereverse side of the material asreinforcement.
Mending and darning
Sew
ing
Instruction book Rose 45
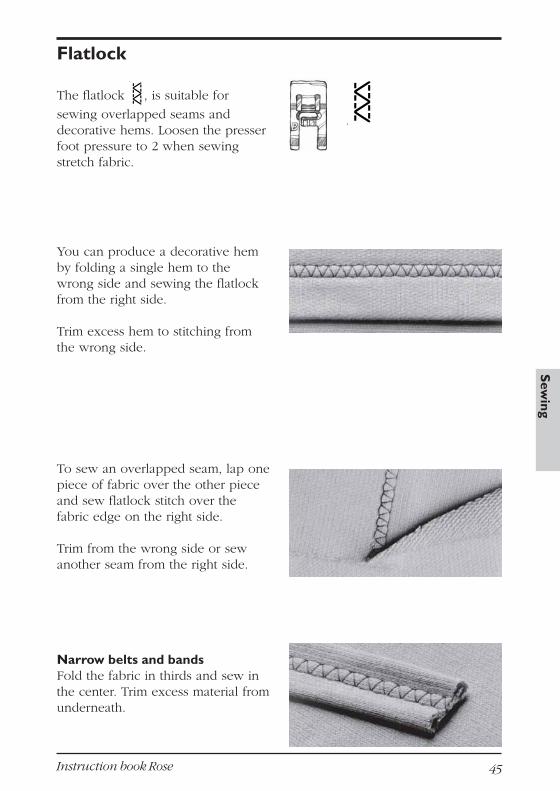
The flatlock , is suitable for
sewing overlapped seams anddecorative hems. Loosen the presserfoot pressure to 2 when sewingstretch fabric.
Narrow belts and bandsFold the fabric in thirds and sew inthe center. Trim excess material fromunderneath.
You can produce a decorative hemby folding a single hem to thewrong side and sewing the flatlockfrom the right side.
Trim excess hem to stitching fromthe wrong side.
To sew an overlapped seam, lap onepiece of fabric over the other pieceand sew flatlock stitch over thefabric edge on the right side.
Trim from the wrong side or sewanother seam from the right side.
Flatlock
Sew
ing
Instruction book Rose46
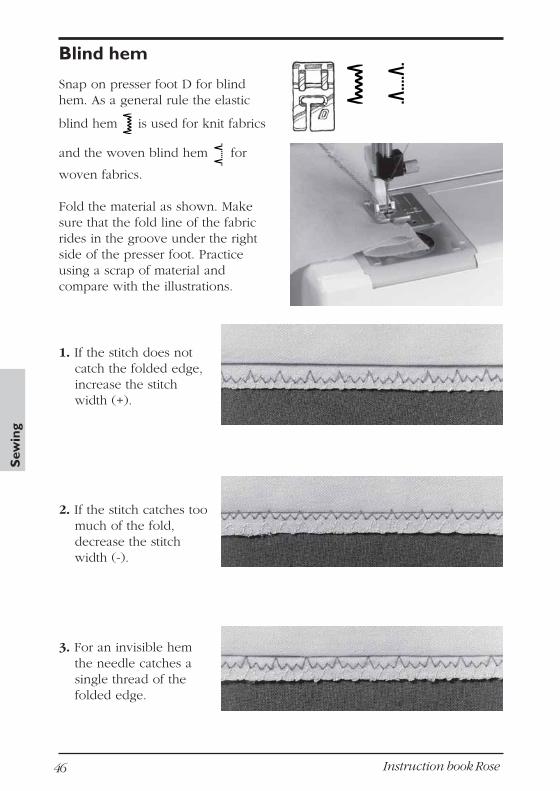
1. If the stitch does notcatch the folded edge,increase the stitchwidth (+).
2. If the stitch catches toomuch of the fold,decrease the stitchwidth (-).
3. For an invisible hemthe needle catches asingle thread of thefolded edge.
Snap on presser foot D for blindhem. As a general rule the elastic
blind hem is used for knit fabrics
and the woven blind hem for
woven fabrics.
Fold the material as shown. Makesure that the fold line of the fabricrides in the groove under the rightside of the presser foot. Practiceusing a scrap of material andcompare with the illustrations.
Blind hem
Sew
ing
Instruction book Rose 47
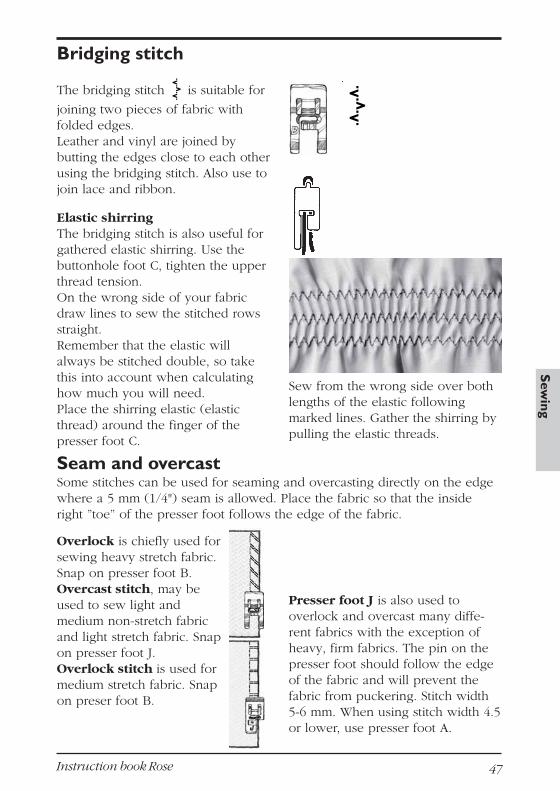
Bridging stitch
The bridging stitch is suitable for
joining two pieces of fabric withfolded edges.Leather and vinyl are joined bybutting the edges close to each otherusing the bridging stitch. Also use tojoin lace and ribbon.
Presser foot J is also used tooverlock and overcast many diffe-rent fabrics with the exception ofheavy, firm fabrics. The pin on thepresser foot should follow the edgeof the fabric and will prevent thefabric from puckering. Stitch width5-6 mm. When using stitch width 4.5or lower, use presser foot A.
Seam and overcastSome stitches can be used for seaming and overcasting directly on the edgewhere a 5 mm (1/4") seam is allowed. Place the fabric so that the insideright ”toe” of the presser foot follows the edge of the fabric.
Overlock is chiefly used forsewing heavy stretch fabric.Snap on presser foot B.Overcast stitch, may beused to sew light andmedium non-stretch fabricand light stretch fabric. Snapon presser foot J.Overlock stitch is used formedium stretch fabric. Snapon preser foot B.
Elastic shirringThe bridging stitch is also useful forgathered elastic shirring. Use thebuttonhole foot C, tighten the upperthread tension.On the wrong side of your fabricdraw lines to sew the stitched rowsstraight.Remember that the elastic willalways be stitched double, so takethis into account when calculatinghow much you will need.Place the shirring elastic (elasticthread) around the finger of thepresser foot C.
Sew from the wrong side over bothlengths of the elastic followingmarked lines. Gather the shirring bypulling the elastic threads.
Sew
ing
Instruction book Rose48
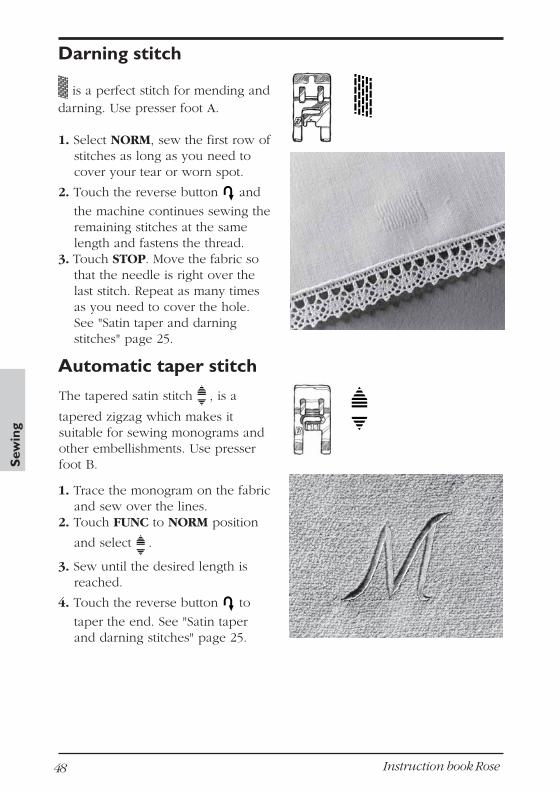
Darning stitch
is a perfect stitch for mending anddarning. Use presser foot A.
1. Select NORM, sew the first row ofstitches as long as you need tocover your tear or worn spot.
2. Touch the reverse button and
the machine continues sewing theremaining stitches at the samelength and fastens the thread.
3. Touch STOP. Move the fabric sothat the needle is right over thelast stitch. Repeat as many timesas you need to cover the hole.See "Satin taper and darningstitches" page 25.
Automatic taper stitch
The tapered satin stitch , is a
tapered zigzag which makes itsuitable for sewing monograms andother embellishments. Use presserfoot B.
1. Trace the monogram on the fabricand sew over the lines.
2. Touch FUNC to NORM position
and select .
3. Sew until the desired length isreached.
4. Touch the reverse button to
taper the end. See "Satin taperand darning stitches" page 25.
Sew
ing
Instruction book Rose 49
Decorative stitches
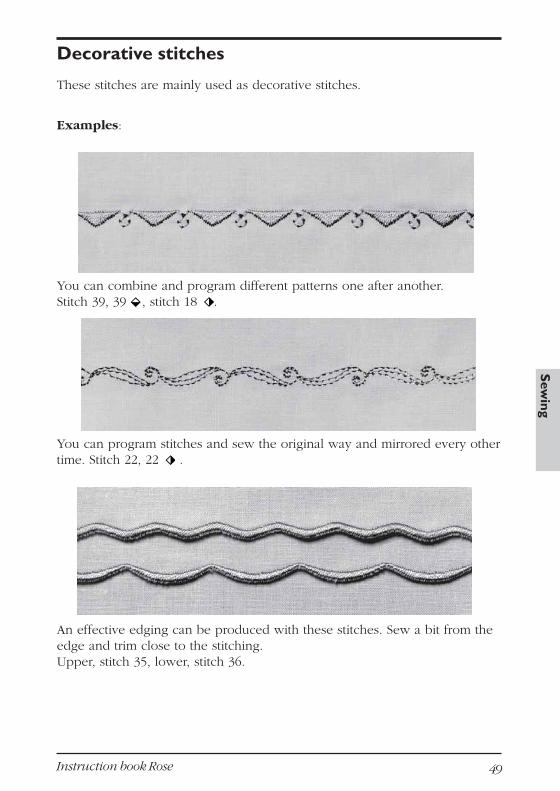
These stitches are mainly used as decorative stitches.
Examples:
You can program stitches and sew the original way and mirrored every othertime. Stitch 22, 22 .
An effective edging can be produced with these stitches. Sew a bit from theedge and trim close to the stitching.Upper, stitch 35, lower, stitch 36.
You can combine and program different patterns one after another.Stitch 39, 39 , stitch 18 .
Sew
ing

Instruction book Rose50
QuiltingThe "hand" look quilting stitch No
31 , is a perfect stitch for reliefstitching. Use presser foot P.
1. Mark the design on the top of thefabric you are going to quilt.
2. Place the fabric you are going touse as quilt backing, wrong sideup.
3. Place a layer of batting on wrongside. Finally place the top rightside up with the marking.
4. Pin all the pieces together.5. Use transparent nylon thread as
upper thread and a syntheticthread or embroidery thread asbobbin thread.
6. Test sew. On the top side of yourwork the triple stitch should befilled with the bobbin thread andthe single stitch will not be visiblethanks to the transparent upperthread.
7. Sew along the marked quiltdesign.
AppliqueUse presser foot B.
1. Sew the heirloom applique stitch
number 33 , around a binding at
the edge, or for hand lookapplique.
2. The satin stitch number 38 , set
to stitch width 2 mm sewsbeautiful appliques. Fuse or pinapplique in place and satin stitcharound the outside edges.
3. Use stitch number 32 to quilt.
Sew the stitches with a few cm inbetween.
Sew
ing

Instruction book Rose 51
Pictogram
Read about Programming on page22. Use presser foot B.
1. Program the leaf in an emptymemory.
2. Select NORM and reinforced
straight stitch .
3. Sew the stem down to the firstpair of leaves.
4. Select REP and sew a leaf fromthe stem to the top.
5. Select straight stitch, stitch length1,5. Sew from the top of the leafand back to the stem.
6. Sew the other leaf in the sameway.
7. Select reinforced straight stitchand continue sew the stem downto the flower stem.
8. Then sew the stem as far as to theflower.
9. Program the ball in an emptymemory.
10. Select REP and sew the ball.11. Return to the memory
containing the programmed leaf.12. Select REP and sew the flower
petal from ball to top. Stop withthe needle in the material.
13. Change to straight stitch, stitchlength 1,5.
14. Sew back close to the petal.15. Sew the rest of the petals in thesame way.
Also: Consult Quick info forPictogram steps.
Sew
ing
Instruction book Rose52
Stitch table
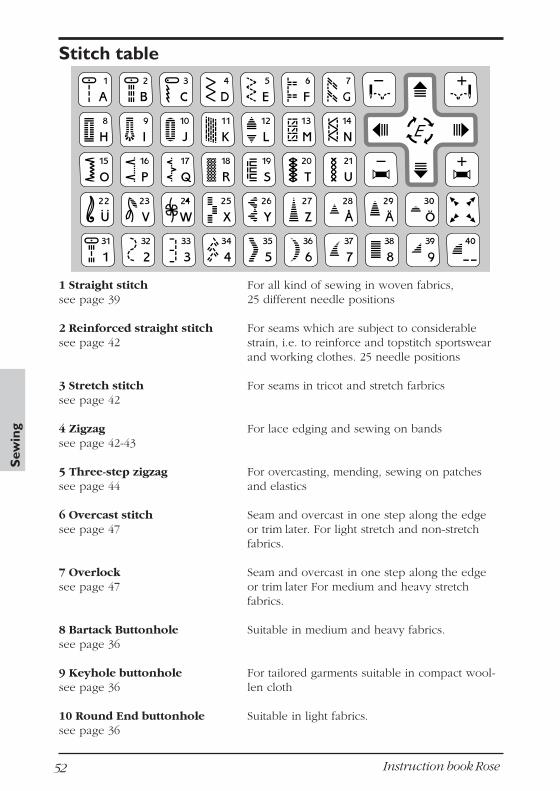
1 Straight stitch For all kind of sewing in woven fabrics,see page 39 25 different needle positions
2 Reinforced straight stitch For seams which are subject to considerablesee page 42 strain, i.e. to reinforce and topstitch sportswear
and working clothes. 25 needle positions
3 Stretch stitch For seams in tricot and stretch farbricssee page 42
4 Zigzag For lace edging and sewing on bandssee page 42-43
5 Three-step zigzag For overcasting, mending, sewing on patchessee page 44 and elastics
6 Overcast stitch Seam and overcast in one step along the edgesee page 47 or trim later. For light stretch and non-stretch
fabrics.
7 Overlock Seam and overcast in one step along the edgesee page 47 or trim later For medium and heavy stretch
fabrics.
8 Bartack Buttonhole Suitable in medium and heavy fabrics.see page 36
9 Keyhole buttonhole For tailored garments suitable in compact wool-see page 36 len cloth
10 Round End buttonhole Suitable in light fabrics.see page 36
Sew
ing

Instruction book Rose 53
Stitch table11 Darning stitch Darn and mend work clothes, jeans, table-see page 48 cloths and linen towels.
12 Tapered satin stitch Automatic tapering for sewing monogramssee page 48 and other decorations
13 Overlock stitch Seam and overcast in one step along the edgesee page 47 or trim later. For medium stretch fabrics.
14 Flatlock Decorative hems and overlapped seams,see page 45 belts and bands.
15 Elastic blind hem Invisible hems in stretch medium andsee page 46 heavy fabrics.
16 Woven blind hem Invisible hems in woven fabricssee page 46
17 Bridging stitch For joining two pieces of fabric with finishedsee page 47 edges and for elastic shirring
18-20 Hemstitches For hemstitching, use a wing needle(optional)Point de Paris 19Entredeux 20
21 Cross stitch For decorating clothes, tablecloths and curtains
22-26 Decorative stitches For decorating clothes, tablecloths and curtainssee page 49
27-30, 37-40 Pictograms Programmable satin elements which can besee page 51 mirrored and combined with each other, creating
beautiful satin embroideries
31-32 Quilting stitches Outline quilting through batting and backingsee page 50
33 Heirloom Appliqué Hand look appliqué stitching stitchsee page 50
34 Feather stitch Decorative stitching and for quilting
35-36 Decorative edging For decorative edges. Sew 15 mm from the edgesee page 49 and trim close to the stitching
38 Satin stitch For appliqués, rounded edge, sewing on lacessee page 43 and bands
Sew
ing

Instruction book Rose54
Free armTo facilitate sewing trouser legs andsleeve hems use the free arm.
The free arm also allows you todarn socks (darning foot is anoptional accessory).
Sewing on belt loopsUse presser foot B and lower thefeed teeth. Fold in about 1 cm onthe short ends. Place the belt loopon the garment and under thepresser foot. Set a wide zigzag stitch.
Sew a bartack from the outer edgeto the center of the loop, move thematerial and sew a new bartack.Continue to sew along the entirelength of the loop's short side.
"Jeans hem"The clearance plate is used whensewing over thick seams.
One side of the plate is thicker thanthe other. Use the side that suits thethickness of the seam best.
Sewing hints
Sew
ing

Instruction book Rose 55
MaintenanceChanging the light bulb
! Switch off the main switch.he
light bulb is placed to the left of theneedle. Place the rubber sheathfound in the accessory box with itsdeep hole around the bulb. Do notturn the bulb, just pull it down toremove the bulb.
When inserting, place the rubbersheath with its shallow hole aroundthe new bulb, insert the bulb bypushing it up.Use light bulb designed as indicatedon the front of the machine.
Replacing the stitch plateReplace the stitch plate about 5 mmin front of the rear edge and push itbackward. Replace the bobbincover.
Care of the machineTo keep your sewing machineoperating satisfactorily, it requires,like other precision machines,regular cleaning. No lubrication(oiling) is needed.
Removing the stitch plate
! Switch off the main switch.
Remove the presser foot and thebobbin cover. Lower the feed teeth.Place the stitch plate opener on thebrush. There is a recess at the rearof the stitch plate. Insert the stitchplate opener at the recess and turn.
Maintenance
CleaningWhen necessary, the feed teeth andthe bottom of the bobbin area mustbe cleaned with the brush, whichyou will find with the accessories
Instruction book Rose56
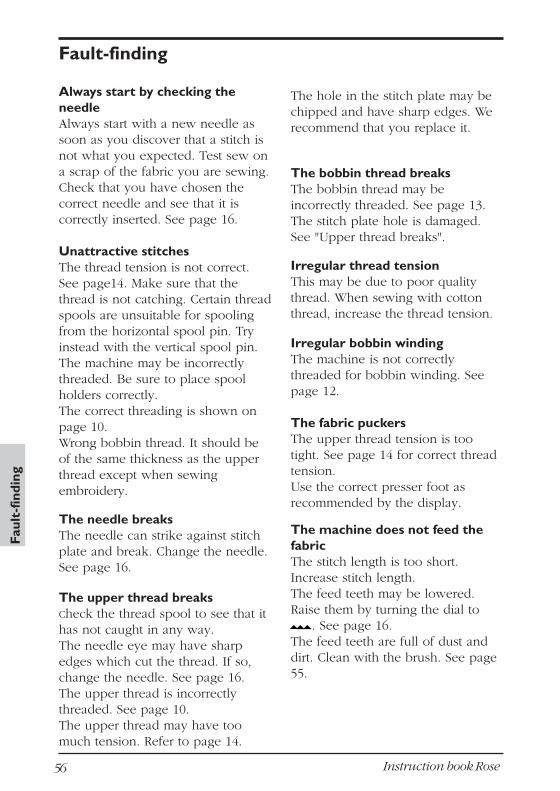
Always start by checking theneedleAlways start with a new needle assoon as you discover that a stitch isnot what you expected. Test sew ona scrap of the fabric you are sewing.Check that you have chosen thecorrect needle and see that it iscorrectly inserted. See page 16.
Unattractive stitchesThe thread tension is not correct.See page14. Make sure that thethread is not catching. Certain threadspools are unsuitable for spoolingfrom the horizontal spool pin. Tryinstead with the vertical spool pin.The machine may be incorrectlythreaded. Be sure to place spoolholders correctly.The correct threading is shown onpage 10.Wrong bobbin thread. It should beof the same thickness as the upperthread except when sewingembroidery.
The needle breaksThe needle can strike against stitchplate and break. Change the needle.See page 16.
The upper thread breaksCheck the thread spool to see that ithas not caught in any way.The needle eye may have sharpedges which cut the thread. If so,change the needle. See page 16.The upper thread is incorrectlythreaded. See page 10.The upper thread may have toomuch tension. Refer to page 14.
The hole in the stitch plate may bechipped and have sharp edges. Werecommend that you replace it.
The bobbin thread breaksThe bobbin thread may beincorrectly threaded. See page 13.The stitch plate hole is damaged.See "Upper thread breaks".
Irregular thread tensionThis may be due to poor qualitythread. When sewing with cottonthread, increase the thread tension.
Irregular bobbin windingThe machine is not correctlythreaded for bobbin winding. Seepage 12.
The fabric puckersThe upper thread tension is tootight. See page 14 for correct threadtension.Use the correct presser foot asrecommended by the display.
The machine does not feed thefabricThe stitch length is too short.Increase stitch length.The feed teeth may be lowered.Raise them by turning the dial to
. See page 16.The feed teeth are full of dust anddirt. Clean with the brush. See page55.
Fault-finding
Faul
t-fin
ding

Instruction book Rose 57
Incorrect stitchIf the machine does not sew thestitch indicated by the display, it ispossible that the electronics havebeen disturbed in some way, per-haps by a short power cut or electri-cal disturbance. Shut off the mainswitch, wait a few seconds and tryagain. If the fault remains, contactyour dealer.
The stitch is too loose - fabriclayers not held togetherThe thread tension is far too loose.Page 14 shows how to adjust thethread tension.
Fault-finding
Machine runs sluggishlyDirt or lint has built up under thestitch plate. Loosen the plate andbrush clean between the feed teethand in the bottom area. See page 55.
Balance setting for buttonholeBalance can only be set if a button-hole is selected. Press the buttons
and until the letters BALare flashing to the left on the dis-play. In place of the stitch lengthindication a balance indication isshown. When you wish to increasethe density of the right column,press stitch length button (-). Whenyou wish to decrease the density,press stitch length button (+). Thebalance can be set between -5 to +5.The balance indication on the dis-play will change in steps fo eachtouch. When you select anotherstitch, the display goes back to showthe sitch length indication. Themachine always retains the lastmade balance setting.
Main motor does not workThe electronic overload protectormay have switched off. Shut off themain switch, wait about a minute.Then switch on the machine.
The sewing and embroiderymachine screen does not respondto touchThe socket on the back of themachine where the embroidery unitis connected can be sensitive tostatic electricity when theembroidery unit is not connected. Ifthe sewing machine screen does notrespond to touch, turn the machineoff and back on again. If thispersists, contact your authorizedHusqvarna Viking retailer.
Expert assistanceHave your machine "tuned up"regularly by your dealer. If you havefollowed the preceding points andstill do not get satisfactory results,you should contact the dealer whereyou bought the machine. When themachine is being checked, it is agreat help if it can be test sewnunder as similar conditions aspossible as when you used it.Remember to take a sewing samplealong with you, preferably of thefabric and with the thread youintend to use.A sewing sample will often givemuch better information than words.
Non-original Parts andAccessoriesThe warranty does not cover anydefect or damage caused by use ofnon-original accessories or parts.
Fault-finding

Instruction book Rose58
IndexAccessory box 8Applique 50
Backtacking 17Baste 39Belt loops 54Blind hem 46Block letters 19, 20Bobbin, placing in machine 13Bobbin winding 12Bridging stitch 47Button sewing 38Buttonholes 36-37Buttonhole sensor foot 19, 37
Care of machine 55Cleaning 55Clear thread 12, 50CLR/clear 19, 25Color advance 21, 32Color information 35Correction, program 23
Darning 25, 44 ,48Decorative stitches 49Deleting stitches 19
Elastic shirring 47Embroidery 21, 26-35Embroidery booklet 28Embroidery hoop 29Embroidery presser foot 27Embroidery size 33Embroidery template 34Embroidery thread 27Embroidery unit 26Entredeux 53Extra spool pin 9
Feed teeth, lowering 16Flatlock 45Free arm 54FUNC/function 17-20
Gathering 40Get started 28
Heirloom applique 50Hems 46Hoop 29
Infodisplay 17-19
Lace edging 43Lapped zipper 41Length 18Letters 20Light bulb, changing 55Lowering feed teeth 16Maintenance 55Memory 19, 21Mending 44Menu 19, 20, 23Mirror image 18, 24
Needle, changing 16Needle positions 39Needle stop 17NORM/normal 19Nylon thread 12, 50
Overcast stitch 47Overcasting 47Overlock 47
Packing the machine 6Pictogram 51Positioning, embroidery 21Presser foot, changing 15Presser foot, recommended 19Presser foot lever 15Presser foot pressure 15Pressure 15PROG/program 19, 21Programming 22-25, 51
Quilting 50
REP/repeat 19, 21Reinforced straight stitch 42Reverse 17Rotation 21

Instruction book Rose 59
Index
Satin stitch 43, 50Satin taper 25, 48Seam and overcast 47Sensor Buttonhole 19, 37Setting up the machine 6-8Sewing hints 54Sewing speed 17Shirring 47Snap off & on presser foot 15Specialty threads 27Speed 17Spool Holders 9Spool pin 9Stitch Advance 21Stitch Length 18Stitch plate 55Stitch selection 20Stitch table 52-53Stitch Width 18Stop 18, 24Straight Stitch 39Stretch stitch 42
Tapered satin stitch 25, 48Tension 14, 19Terry cloth 44Template 34Topstitching 39Thread, tension 14, 19Thread, upper warning 10Threading, bobbin 12-13Threading twin needle 11Threading, upper 10Three-step zigzag 44Transparent thread 12, 50Twin needle, threading 11
Unpacking the machine 6-8
Vertical spool pin 9Warning, thread 10Width 18
Zigzag 42-43Zippers 41

Instruction book Rose60
We reserve the right to change the machineequipment and the assortment ofaccessories without prior notice, or makemodifications to the performance ordesign.
Such modifications, however, will alwaysbe to the benefit of the user and theproduct.

Instruction book Rose 61

Instruction book Rose62

Instruction book Rose 63

World Firsts From Husqvarna VikingHusqvarna Viking, the world leader in home sewing,
continues to add to its list of firsts to ensure your sewing is as fast,fun, and easy as it can be.
41
2 6
0 80
-26F
. P
r in
t ed
in
Sw
ed
en
. © 2
002-
2004
VS
M G
roup
AB
. All
rig
ht s
re
s er v
ed
.01.
03. P
rint
ed o
n en
viro
nmen
tal f
rien
dly
pape
r.
VSM Group AB • SE-561 84 Huskvarna, Swedenwww.husqvarnav ik ing .com
Purchase your top-of-the-line from your local authorized Husqvarna Viking Dealership:
1953 First floating jam-proof hook
1961 First color-coded stitch selection
1965 First snap-on presser foot system
1971 First to eliminate the need for oiling
1980 First programmable lettering – A writing sewing machineFirst programmable stitching
1981 First with dual lights
1982 First Sewing Advisor® – A thinking sewing machine
1983 First thinking and writing sewing machine
1989 First LCD Infodisplay® – A built-in instruction bookFirst LCD Programdisplay® – See before you sewFirst truly automatic self-adjusting tension
1994 First embroidery software for home computers
1998 First Sensor Foot LiftFirst Sensor Foot PressureFirst Selective Thread CuttersFirst Color Touch ScreenFirst Built-in Disk Drive


![(With calculator) *GMT41* - theonlinemathsteachertheonlinemathsteacher.com/sitemedia/lessondocs/ccea-june-2012-gcse... · Mathematics Unit T4 (With calculator) Higher Tier [MT41]](https://static.fdocuments.in/doc/165x107/5b93298709d3f2d9098cc34e/with-calculator-gmt41-theonlinemathsteachert-mathematics-unit-t4-with.jpg)