USER’S GUIDE GUÍA DEL USUARIO - Support | Home |...
71
CTK810/WK110ES1A ES USER’S GUIDE GUÍA DEL USUARIO
Transcript of USER’S GUIDE GUÍA DEL USUARIO - Support | Home |...

CTK810/WK110ES1A
ES
USER’S GUIDEGUÍA DEL USUARIO

CASIO Europe GmbHBornbarch 10, 22848 Norderstedt, Germany
GUIDELINES LAID DOWN BY FCC RULES FOR USE OF THE UNIT IN THE U.S.A. (not applicable to other areas).
NOTICEThis equipment has been tested and found to comply with the limits for a Class B digital device, pursuant to Part 15of the FCC Rules. These limits are designed to provide reasonable protection against harmful interference in aresidential installation. This equipment generates, uses and can radiate radio frequency energy and, if not installedand used in accordance with the instructions, may cause harmful interference to radio communications. However,there is no guarantee that interference will not occur in a particular installation. If this equipment does cause harmfulinterference to radio or television reception, which can be determined by turning the equipment off and on, the useris encouraged to try to correct the interference by one or more of the following measures:• Reorient or relocate the receiving antenna.• Increase the separation between the equipment and receiver.• Connect the equipment into an outlet on a circuit different from that to which the receiver is connected.• Consult the dealer or an experienced radio/TV technician for help.
FCC WARNINGChanges or modifications not expressly approved by the party responsible for compliance could void the user’sauthority to operate the equipment.
Important!Please note the following important information before using this product.
• Before using the optional AD-5 Adaptor to power the unit, be sure to check the AC Adaptorfor any damage first. Carefully check the power cord for breakage, cuts, exposed wire andother serious damage. Never let children use an AC adaptor that is seriously damaged.
• Never attempt to recharge batteries.• Do not use rechargeable batteries.• Never mix old batteries with new ones.• Use recommended batteries or equivalent types.• Always make sure that positive (+) and negative (–) poles are facing correctly as indicated
near the battery compartment.• Replace batteries as soon as possible after any sign they are getting weak.• Do not short-circuit the battery terminals.• The product is not intended for children under 3 years.• Use only CASIO AD-5 adaptor.• The AC adaptor is not a toy.• Be sure to disconnect the AC adaptor before cleaning the product.
This mark applies in EU countries only.
Declaration of ConformityModel Number: CTK-810/WK-110Trade Name: CASIO COMPUTER CO., LTD.Responsible party: CASIO, INC.Address: 570 MT. PLEASANT AVENUE, DOVER, NEW JERSEY 07801Telephone number: 973-361-5400This device complies with Part 15 of the FCC Rules, Operation is subject to the following two conditions:(1) This device may not cause harmful interference, and (2) this device must accept any interference received,including interference that may cause undesired operation.

E-1
Safety Precautions
Congratulations on your selection of the CASIOelectronic musical instrument.• Before using the instrument, be sure to carefully
read through the instructions contained in thismanual.
• Please keep all information for future reference.
SymbolsVarious symbols are used in this user’s guide and onthe product itself to ensure that the product is usedsafely and correctly, and to prevent injury to the userand other persons as well as damage to property.Those symbols along with their meanings are shownbelow.
DANGERThis symbol indicates information that, if ignoredor applied incorrectly, creates the danger of deathor serious personal injury.
WARNINGThis indication stipulates matters that have the riskof causing death or serious injury if the product isoperated incorrectly while ignoring this indication.
CAUTIONThis indication stipulates matters that have the riskof causing injury as well as matters for which thereis the likelihood of occurrence of physical damageonly if the product is operated incorrectly whileignoring this indication.
Symbol ExamplesThis triangle symbol ( ) means that theuser should be careful. (The example atleft indicates electrical shock caution.)
This circle with a line through it ( )means that the indicated action must notbe performed. Indications within ornearby this symbol are specificallyprohibited. (The example at left indicatesthat disassembly is prohibited.)
The black dot ( ) means that theindicated action must be performed.Indications within this symbol are actionsthat are specifically instructed to beperformed. (The example at left indicatesthat the power plug must be unpluggedfrom the electrical socket.)

E-2
DANGER
Alkaline BatteriesPerform the following steps immediately iffluid leaking from alkaline batteries evergets into your eyes.1. Do not rub your eyes! Rinse them with
water.2. Contact your physician immediately.Leaving alkaline battery fluid in your eyescan lead to loss of sight.
WARNING
Smoke, Strange Odor, OverheatingContinued use of the product while it isemitting smoke, a strange odor, or heatcreates the risk of fire and electric shock.Take the following steps immediately.1. Turn off power.2. If you are using the AC adaptor for
power, unplug it from the wall outlet.3. Contact your original retailer or an
authorized CASIO Service Provider.
AC Adaptor Misuse of the AC adaptor creates the
risk of fire and electric shock. Alwaysmake sure you observe the followingprecautions.• Be sure to use only the AC adaptor
that is specified for this product.• Use only a power source whose
voltage is within the rating marked onthe AC adaptor.
• Do not overload electrical outlets andextension cords.
Misuse of the AC adaptor’s electric cordcan damage or break it, creating the riskof fire and electric shock. Always makesure you observe the followingprecautions.• Never place heavy objects on the cord
or subject it to heat.• Never try to modify the cord or subject
it to excessive bending.• Never twist or stretch the cord.• Should the electric cord or plug
become damaged, contact youroriginal retailer or authorized CASIOService Provider.
Never touch the AC adaptor while yourhands are wet.Doing so creates the risk of electric shock.
Use the AC adaptor where it will not besplashed with water. Water creates therisk of fire and electric shock.
Do not place a vase or any other containerfilled with liquid on top of the ACadaptor. Water creates the risk of fireand electric shock.
BatteriesMisuse of batteries can cause them to leak,resulting in damage to nearby objects, or toexplode, creating the risk of fire andpersonal injury. Always make sure youobserve the following precautions.• Never try to take batteries apart or allow
them to become shorted.• Never expose batteries to heat or dispose
of them by incineration.• Never mix old batteries with new ones.• Never mix batteries of different types.• Do not charge the batteries.• Make sure the positive (+) and negative
(–) ends of the batteries are facingcorrectly.
Do not incinerate the product.Never throw the product into fire.Doing so can cause it to explode, creatingthe risk of fire and personal injury.
Water and Foreign MatterWater, other liquids, and foreign matter(such as pieces of metal) getting into theproduct create the risk of fire and electricshock. Take the following stepsimmediately.1. Turn off power.2. If you are using the AC adaptor for
power, unplug it from the wall outlet.3. Contact your original retailer or an
authorized CASIO Service Provider.
Disassembly and ModificationNever try to take this product apart ormodify it in any way. Doing so creates therisk of electric shock, burn injury, or otherpersonal injury. Leave all internalinspection, adjustment, and maintenance upto your original retailer or authorizedCASIO Service Provider.
Safety Precautions

E-3
Dropping and ImpactContinued use of this product after it hasbeen damaged by dropping or subjecting itto strong impact creates the risk of fire andelectric shock. Take the following stepsimmediately.1. Turn off power.2. If you are using the AC adaptor for
power, unplug it from the wall outlet.3. Contact your original retailer or an
authorized CASIO Service Provider.
Plastic BagsNever place the plastic bag the productcomes in over your head or in your mouth.Doing so creates the risk of suffocation.Particular care concerning this precautionis required where small children arepresent.
Keep off of the product and stand.*Climbing onto the product or stand cancause it to tip over or become damaged.Particular care concerning this precautionis required where small children arepresent.
LocationAvoid locating the product on an unstablestand, on an uneven surface, or any otherunstable location. An unstable location cancause the product to fall over, creating therisk of personal injury.
CAUTION
AC Adaptor Misuse of the AC adaptor creates the
risk of fire and electric shock. Alwaysmake sure you observe the followingprecautions.• Do not locate the electric cord near a
stove or other sources of heat.• Never pull on the cord when
unplugging from the electrical outlet.Always grasp the AC adaptor whenunplugging.
Misuse of the AC adaptor creates therisk of fire and electric shock. Alwaysmake sure you observe the followingprecautions.• Insert the AC adaptor into the wall
outlet as far as it will go.• Unplug the AC adaptor from the wall
outlet during lightening storms orbefore leaving on a trip or other long-term absence.
• To keep dust from building up in thearea between the prongs of the powerplug, unplug it from the power outletand use a dry cloth or vacuum cleanerto remove dust at least once a year.
• Never use detergent to clean the powercord, especially the plug and jack parts.
Relocating the ProductBefore relocating the product, alwaysunplug the AC adaptor from the wall outletand disconnect all other cables andconnecting cords. Leaving cords connectedcreates the risk of damage to the cords, fire,and electric shock.
CleaningBefore cleaning the product, always unplugthe AC adaptor from the wall outlet first.Leaving the AC adaptor plugged in createsthe risk of damage to the AC adaptor, fire,and electric shock.
BatteriesMisuse of batteries can cause them to leakresulting in damage to nearby objects, or toexplode, creating the risk of fire andpersonal injury. Always make sure youobserve the following precautions.• Use only batteries that are specified for
use with this product.• Remove batteries from the product if you
do not plan to use it for a long time.
Safety Precautions

E-4
ConnectorsConnect only the specified devices andequipment to the product’s connectors.Connection of a non-specified device orequipment creates the risk of fire andelectric shock.
LocationAvoid the following locations for thisproduct. Such locations create the risk offire and electric shock.• Areas subject to high humidity or large
amounts of dust.• In food preparation areas or other areas
subject to oil smoke.• Near air conditioning equipment, on a
heated carpet, in areas exposed to directsunlight, inside of a vehicle parked inthe sun, or any other area that subjectsthe product to high temperatures.
Display Screen• Never push on the display screen’s LCD
panel or subject it to strong impact. Doingso can cause the LCD panel’s glass tocrack, creating the risk of personal injury.
• Should the LCD panel ever crack orbreak, never touch the liquid inside ofthe panel. LCD panel liquid can causeskin irritation.
• Should LCD panel liquid ever get insideyour mouth, immediately wash out yourmouth with water and contact yourphysician.
• Should LCD panel liquid ever get intoyour eyes or onto your skin, rinse withclear water for at least 15 minutes, andthen contact a physician.
Sound VolumeDo not listen to music at very loud volumesfor long periods. Particular care concerningthis precaution is required when usingheadphones. High volume settings candamage your hearing.
Heavy ObjectsNever place heavy object on top of theproduct.Doing so can make the product top heavy,causing the product to tip over or the objectto fall from it, creating the risk of personalinjury.
Safety Precautions
Correct Stand* AssemblyAn incorrectly assembled stand can tip over,causing the product to fall and creating therisk of personal injury.Make sure you assemble the stand correctly,following the assembly instructions thatcome with it. Make sure you mount theproduct on the stand correctly.
* Stand is available as an option.
IMPORTANT!When using batteries, be sure to replace them or shift toone of the alternate power sources whenever you noticeany of the following symptoms.
• Dim power supply indicator• Instrument does not turn on.• Dim, difficult to read display• Abnormally low speaker/headphone volume• Distortion of sound output• Occasional interruption of sound when playing at high
volumes• Sudden power failure when playing at high volumes• Dimming of the display when playing at high volume• Continued sound output even after you release a key• A totally different tone may sound• Abnormal rhythm pattern and demo tune play
Company and product names used in thismanual may be registered trademarks ofothers.

E-5
515 tonesA wide selection of tones includes stereo piano and synthesized sounds, drum sets, and much more.Other features include digital effects that control the acoustical characteristic of tones.
PIANO SETTING buttonThe press of a button optimizes the keyboard setup for piano play.
3-Step Lesson System• 3-Step Lesson System: Now you can learn the parts that make up the keyboard’s built-in tunes and SMF data you download
over the Internet step-by-step. Guidance that appears on the monitor screen helps lead you down the path to music proficiency.• Evaluation System: The keyboard can be configured to evaluate your 3-Step Lesson progress. You can even have the keyboard
display your points, both part way through and at the end of a lesson.
100 built-in tunes
120 rhythmsA selection of rhythms cover rock, pops, jazz and just about any other musical style imaginable.
Auto AccompanimentSimply play a chord and the corresponding rhythm, bass, and chord parts play along automatically. One Touch Presets instantlyrecalls the most suitable tone and tempo settings to match the rhythm you are using.
Registration MemoryKeyboard setups can be stored in memory for later recall and instant settings whenever you need them. Up to 32 setups (4setups × 8 banks) can be stored in registration memory.
Recording and Play BackWith lesson recording you can record as you play along with built-in tunes for later playback.Performance recording lets you record your performances, including Auto Accompaniment, in real time.
Storing and Playing Back Tune Data You Transferred from Your ComputerYou can connect your keyboard to a computer, use special CASIO conversion software to convert SMF data you purchase orcreate to CASIO format, and then transfer it to the keyboard.
Main Features

E-6
Contents
Safety Precautions ................ E-1
Main Features ........................ E-5
General Guide........................ E-8
Attaching the Score Stand ..................... E-12
Quick Reference .................. E-13
To play the keyboard .............................. E-13
Power Supply ...................... E-15
Using batteries ....................................... E-15
Using the AC Adaptor ............................. E-16
Auto Power Off ....................................... E-17
Memory Contents ................................... E-17
Connections ........................ E-18
Phones/Output Terminal......................... E-18
Connecting to a Computer or Other
Equipment .............................................. E-18
Sustain/Assignable jack Terminal ........... E-19
Accessories and Options ....................... E-19
Basic Operations................. E-20
To play the keyboard .............................. E-20
Selecting a Tone..................................... E-20
Using Tone Effects ................................. E-21
PIANO SETTING Button ........................ E-21
Playing a Built-in Tune........ E-22
To play back a Song Bank tune ............. E-22
Adjusting the Tempo............................... E-23
To pause playback ................................. E-23
To fast reverse ....................................... E-23
To fast forward ....................................... E-23
Looping a Musical Phrase ...................... E-24
To change the melody tone .................... E-24
To play all tunes in succession ............... E-24
3-Step Lesson...................... E-25
Evaluation Mode .................................... E-26
Using the Lesson Functions and
Evaluation Mode .................................... E-26
Step 1 – Master the timing. .................... E-27
Step 2 – Master the notes. ..................... E-27
Step 3 – Play at normal speed. .............. E-28
Evaluating Your Keyboard Play .............. E-28
Voice Fingering Guide ............................ E-29
Using the Metronome ............................. E-29
Auto Accompaniment ......... E-30
Selecting a Rhythm ................................ E-30
Playing a Rhythm ................................... E-31
Adjusting the Tempo............................... E-31
Using Auto Accompaniment ................... E-31
Using an Intro Pattern ............................ E-35
Using a Fill-in Pattern ............................. E-35

E-7
Contents
Using a Rhythm Variation....................... E-35
Using a Fill-in Pattern with a Variation
Rhythm................................................... E-35
Synchro Starting Accompaniment with
Rhythm Play ........................................... E-35
Finishing with an Ending Pattern ........... E-36
Using One-touch Preset ......................... E-36
Registration Memory .......... E-37
Registration Memory Features ............... E-37
To Save a Setup in Registration
Memory .................................................. E-38
To Recall a Setup from Registration
Memory .................................................. E-38
Recording and Play Back ... E-39
Parts and Tracks .................................... E-39
Recording Play Along with a
Built-in Tune ........................................... E-40
Playing Back a Lesson Recording ......... E-41
Recording a Performance ...................... E-41
Playing Back a Performance
Recording ............................................... E-43
Overdubbing a Performance
Recording ............................................... E-44
Deleting a Specific Part/Track ................ E-44
Keyboard Settings .............. E-45
Using Layer ............................................ E-45
Using Split .............................................. E-45
Using Layer and Split Together .............. E-46
Transposing the Keyboard ..................... E-47
Adjusting Accompaniment and
Song Bank Volume ................................ E-47
Using Touch Response .......................... E-48
Tuning the Keyboard .............................. E-48
Connection to aComputer ............................. E-49
Connecting to a Computer ..................... E-49
Expanding the Selections in the
Song Bank Tunes ................................... E-50
Using the SMF Data on the Bundled
CD-ROM ................................................ E-51
General MIDI Tone ................................. E-51
Changing the Settings ............................ E-51
Troubleshooting .................. E-54
Specifications ...................... E-56
Operating Precautions........ E-57
Appendix ................................ A-1
Tone List ................................................... A-1
Drum Assignment List .............................. A-5
FINGERED Chord Chart .......................... A-7
Rhythm List .............................................. A-8
Song List .................................................. A-9
MIDI messages that can be sentand received using the USB port

E-8
CTK-810
P
ONMLK
TS Z ]\[
I J
Q R
V W X Y
2
D *1F
3 54 76 *2
U
1
DGE H
9 : A B
8 C
General Guide
E-9
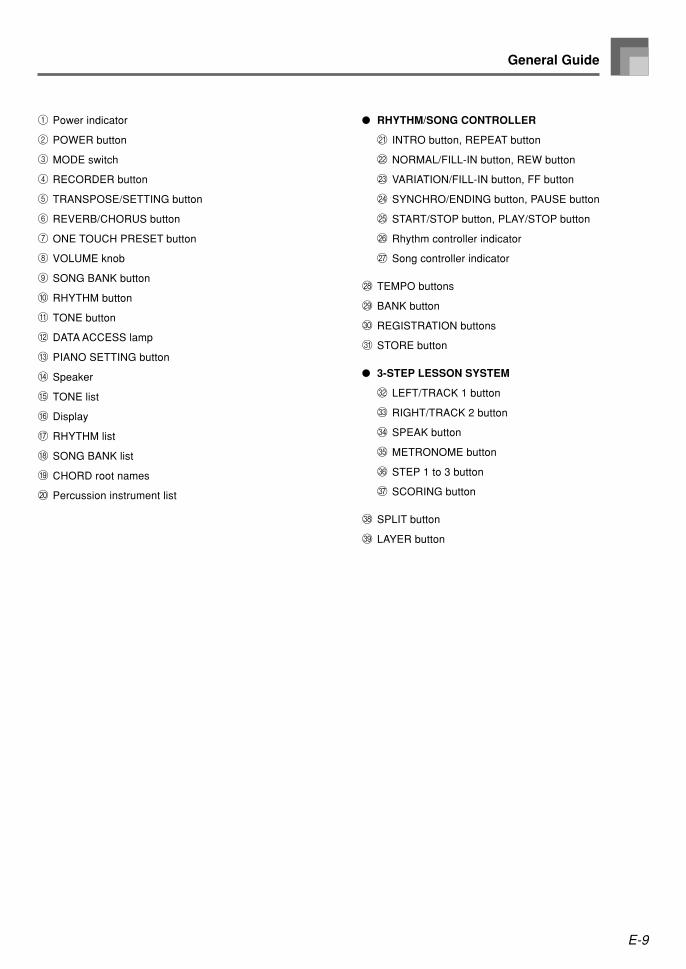
General Guide
1 Power indicator
2 POWER button
3 MODE switch
4 RECORDER button
5 TRANSPOSE/SETTING button
6 REVERB/CHORUS button
7 ONE TOUCH PRESET button
8 VOLUME knob
9 SONG BANK button
0 RHYTHM button
A TONE button
B DATA ACCESS lamp
C PIANO SETTING button
D Speaker
E TONE list
F Display
G RHYTHM list
H SONG BANK list
I CHORD root names
J Percussion instrument list
RHYTHM/SONG CONTROLLER
K INTRO button, REPEAT button
L NORMAL/FILL-IN button, REW button
M VARIATION/FILL-IN button, FF button
N SYNCHRO/ENDING button, PAUSE button
O START/STOP button, PLAY/STOP button
P Rhythm controller indicator
Q Song controller indicator
R TEMPO buttons
S BANK button
T REGISTRATION buttons
U STORE button
3-STEP LESSON SYSTEM
V LEFT/TRACK 1 button
W RIGHT/TRACK 2 button
X SPEAK button
Y METRONOME button
Z STEP 1 to 3 button
[ SCORING button
\ SPLIT button
] LAYER button

E-10
General Guide
WK-110
S TR Y ]\Z
I
G H
J K L M N P
O
Q
U V W X [
21
B BC D F*1 E
3 54 76 98 : *2A

E-11
General Guide
1 POWER button
2 Power indicator
3 MODE switch
4 RECORDER button
5 TRANSPOSE/SETTING button
6 REVERB/CHORUS button
7 ONE TOUCH PRESET button
8 SONG BANK button
9 RHYTHM button
0 TONE button
A PIANO SETTING button
B Speaker
C RHYTHM list
D SONG BANK list
E Display
F TONE list
G CHORD root names
H Percussion instrument list
I VOLUME knob
RHYTHM/SONG CONTROLLER
J INTRO button, REPEAT button
K NORMAL/FILL-IN button, REW button
L VARIATION/FILL-IN button, FF button
M SYNCHRO/ENDING button, PAUSE button
N START/STOP button, PLAY/STOP button
O Rhythm controller indicator
P Song controller indicator
Q TEMPO buttons
R BANK button
S REGISTRATION buttons
T STORE button
3-STEP LESSON SYSTEM
U LEFT/TRACK 1 button
V RIGHT/TRACK 2 button
W SPEAK button
X METRONOME button
Y STEP 1 to 3 button
Z SCORING button
[ DATA ACCESS lamp
\ SPLIT button
] LAYER button

E-12
General Guide
Rear Panel
b USB port
c SUSTAIN/ASSIGNABLE JACK terminal
d PHONES/OUTPUT terminal
e DC 9V jack
Controller Indicators
Rhythm controller indicator (CTK-810: PPPPP, WK-110: OOOOO)Pressing the RHYTHM button to enter the Rhythm Mode causes the Rhythm controller indicator to light. This indicates thatbuttons K through O (WK-110: J through N) are currently functioning as rhythm control buttons.
Song controller indicator (CTK-810: QQQQQ, WK-110: PPPPP)Pressing the SONG BANK button, or pressing the RHYTHM and TONE buttons at the same time to start demo tune play causesthe Song controller indicator to light. This indicates that buttons K through O (WK-110: J through N) are currently functioningas playback control buttons.
NOTE• Display examples shown in this User’s Guide are intended for illustrative purposes only. The actual text and values that
appear on the display may differ from the examples shown in this User’s Guide.• Viewing a liquid crystal display screen from an angle can change the appearance of display contrast. The display contrast of
this keyboard is set to allow easy viewing for a person seated on a chair in front of the keyboard. Note that display contrastis fixed, and cannot be adjusted.
*2^ Number buttons
a [+]/[–] buttons
• For input of numbers tochange a displayed numberor setting.
• Negative values cannot beinput using the numberbuttons. Use [+] (increase)and [–] (decrease) instead.
b c d e
*1 Attaching the Score Stand
Insert the score stand into the slot at the topof the keyboard as shown in the illustration.
NOTE• Illustrations in this User’s Guide shows the WK-110.
E-13
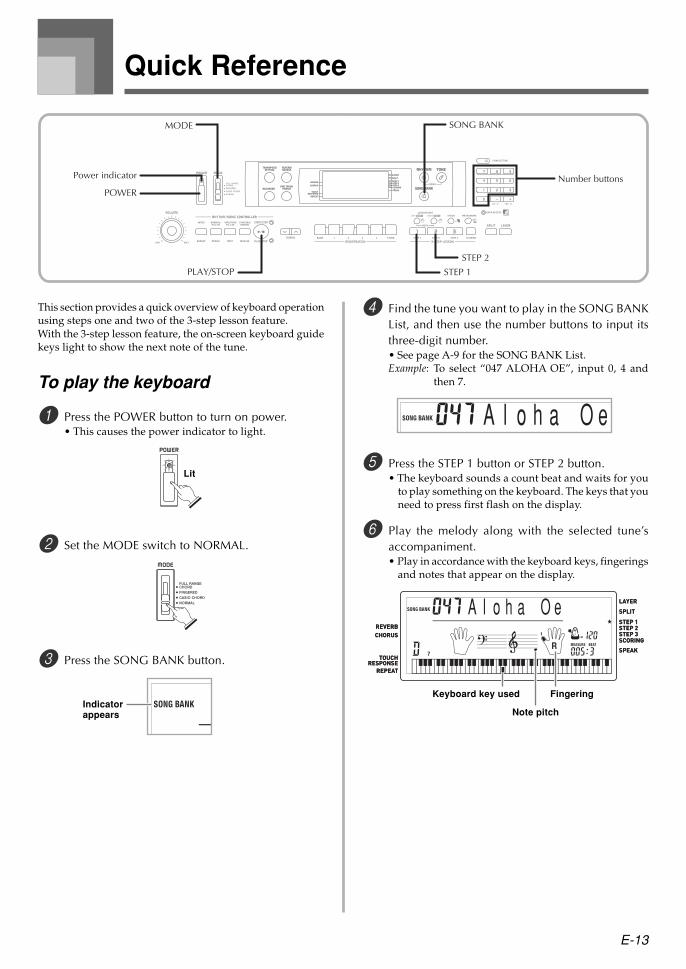
Quick Reference
This section provides a quick overview of keyboard operationusing steps one and two of the 3-step lesson feature.With the 3-step lesson feature, the on-screen keyboard guidekeys light to show the next note of the tune.
To play the keyboard
1 Press the POWER button to turn on power.• This causes the power indicator to light.
2 Set the MODE switch to NORMAL.
3 Press the SONG BANK button.
4 Find the tune you want to play in the SONG BANKList, and then use the number buttons to input itsthree-digit number.• See page A-9 for the SONG BANK List.Example: To select “047 ALOHA OE”, input 0, 4 and
then 7.
5 Press the STEP 1 button or STEP 2 button.• The keyboard sounds a count beat and waits for you
to play something on the keyboard. The keys that youneed to press first flash on the display.
6 Play the melody along with the selected tune’saccompaniment.• Play in accordance with the keyboard keys, fingerings
and notes that appear on the display.
A l o h a O e
A l o h a O e
FingeringKeyboard key used
Note pitch
SONG BANKMODE
PLAY/STOP
Number buttons
POWER
Power indicator
STEP 1
STEP 2
Indicatorappears
Lit

E-14
If you selected lesson Step 1• Play the notes on the keyboard.• Accompaniment (left-hand part) plays in time with
the notes.• With Step 1, the correct melody note is played no
matter which keyboard key you press.
If you selected lesson Step 2• Play the correct notes on the keyboard.• While an on-screen keyboard guide key is lit, press
the corresponding key on the actual keyboard. In thecase of a two-hand tune, the keyboard guideindication turns off when you press a keyboard key,and the on-screen keyboard guide key lights for thenext note to be played.
• Accompaniment (left-hand part) plays in time withthe notes, as long as you press the correct keyboardkeys.
7 To stop play at any time, press the PLAY/STOPbutton.
Quick Reference
E-15
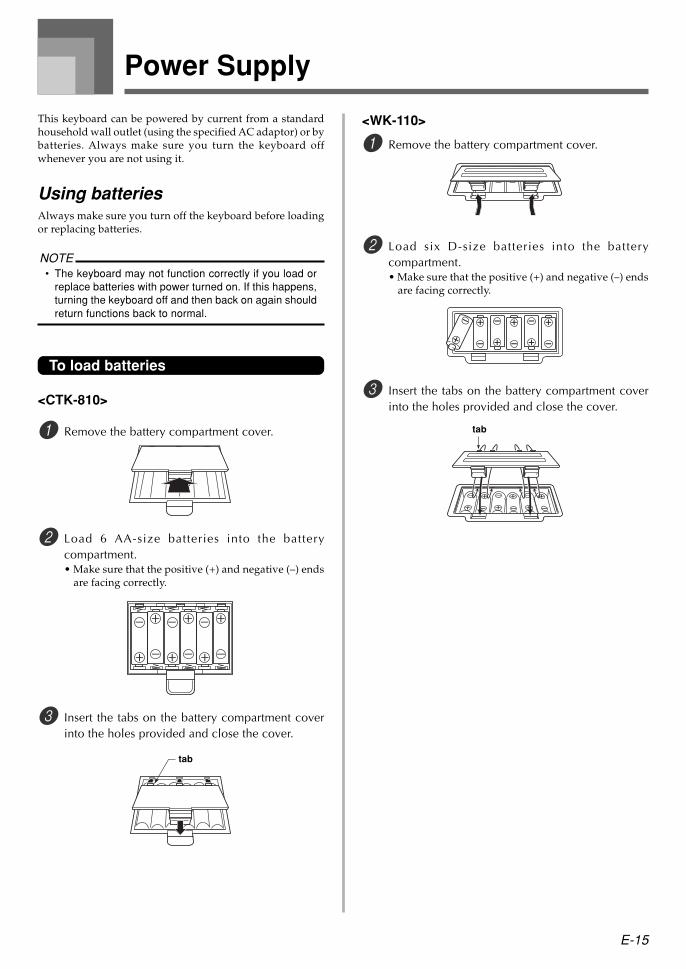
Power Supply
This keyboard can be powered by current from a standardhousehold wall outlet (using the specified AC adaptor) or bybatteries. Always make sure you turn the keyboard offwhenever you are not using it.
Using batteriesAlways make sure you turn off the keyboard before loadingor replacing batteries.
NOTE• The keyboard may not function correctly if you load or
replace batteries with power turned on. If this happens,turning the keyboard off and then back on again shouldreturn functions back to normal.
To load batteries
<CTK-810>
1 Remove the battery compartment cover.
2 Load 6 AA-size batteries into the batterycompartment.• Make sure that the positive (+) and negative (–) ends
are facing correctly.
3 Insert the tabs on the battery compartment coverinto the holes provided and close the cover.
<WK-110>
1 Remove the battery compartment cover.
2 Load six D-size batteries into the batterycompartment.• Make sure that the positive (+) and negative (–) ends
are facing correctly.
3 Insert the tabs on the battery compartment coverinto the holes provided and close the cover.
tab
tab

E-16
Power Supply
Using the AC AdaptorMake sure that you use only the AC adaptor specified forthis keyboard.
Specified AC Adaptor: AD-5
[Rear Panel]
Note the following important precautions to avoid damageto the power cord.
During Use• Never pull on the cord with excessive force.• Never repeatedly pull on the cord.• Never twist the cord at the base of the plug or connector.• The power cord should not be stretched tight while it is
in use.
During Movement• Before moving the keyboard, be sure to unplug the AC
adaptor from the power outlet.
During Storage• Loop and bundle the power cord, but never wind it
around the AC adaptor.
IMPORTANT!• Make sure that the keyboard is turned off before
connecting or disconnecting the AC adaptor.• Using the AC adaptor for a long time can cause it to
become warm to the touch. This is normal and does notindicate malfunction.
DC 9V jack AC adaptor AD-5
AC outlet
Important Battery Information The following shows the approximate battery life.
Alkaline batteries .......................... <CTK-810> 2.5 hoursManganese batteries ..................... <WK-110> 6 hoursThe above value is standard battery life at normaltemperature, with the keyboard volume at mediumsetting. Temperature extremes or playing at very loudvolume settings can shorten battery life.
WARNING
Misuse of batteries can cause them to leak, resulting indamage to nearby objects, or to explode, creating the risk offire and personal injury. Always make sure you observe thefollowing precautions.• Never try to take batteries apart or allow them to
become shorted.• Never expose batteries to heat or dispose of them by
incineration.• Never mix old batteries with new ones.• Never mix batteries of different types.• Do not charge the batteries.• Make sure the positive (+) and negative (–) ends of
the batteries are facing correctly.
CAUTION
Misuse of batteries can cause them to leak resulting indamage to nearby objects, or to explode, creating the risk offire and personal injury. Always make sure you observe thefollowing precautions.• Use only batteries that are specified for use with this
product.• Remove batteries from the product if you do not plan
to use it for a long time.
NOTE• Do not use an oxyride battery or any other type of nickel-
based primary battery with this product.Incompatibility between such batteries and productspecifications can result in shorter battery life andproduct malfunction.

E-17
Power Supply
Auto Power OffWhen you are using battery power, keyboard power turnsoff automatically whenever you leave it on withoutperforming any operation for about 6 minutes. When thishappens, press the POWER button to turn power back on.
NOTE• Auto Power Off is disabled (it does not function) when
you are using the AC adaptor to power the keyboard.
To disable Auto Power OffHold down the TONE button while turning on the keyboardto disable Auto Power Off.
NOTE• When this function is turned off, the keyboard does not
turn off automatically no matter how long it is left withno operation being performed.
• Auto Power Off is enabled again when you manuallyturn off power and then turn it back on again.
Memory ContentsRegistration memory contents, recorder memory contents,and song bank data you transfer from a computer to keyboardmemory are all retained when the keyboard is turned off,either by pressing the power button or by Auto Power Off.
Electrical PowerThe memory contents described above are retained as longas the keyboard is being supplied with electrical power.Unplugging the AC adaptor when batteries are not loadedor when loaded batteries are dead cuts off the keyboard’selectrical power supply. This clears all data stored in memory.
Power RequirementsNote the following precautions whenever you want to ensurethat current memory contents are not lost.• Make sure the keyboard is being supplied power through
the AC adaptor before replacing its batteries.• Before unplugging the AC adaptor, make sure that fresh
batteries are loaded in the keyboard.
Make sure that keyboard power is turned off before replacingbatteries or unplugging the AC adaptor.

E-18
Connections
Phones/Output TerminalPREPARATION• Before connecting headphones or other external
equipment, be sure to first turn down the volume settingsof the keyboard and the connected equipment. You canthen adjust volume to the desired level after connectionsare complete.
[Rear Panel]
1
White Red PIN plug
LEFT RIGHT
AUX IN or similar terminalof audio amplifier
2
Stereo standard plug
Audio connectionPHONES/OUTPUT terminal
Keyboard amp, guitar amp, etc.
3
Connecting Headphones (Figure 1)
Connecting headphones cuts off output from the keyboard’sbuilt-in speakers, so you can play even late at night withoutdisturbing anyone.
Audio Equipment (Figure 2)
Connect the keyboard to an audio equipment using acommercially available connecting cord with a standard plugon one end and two PIN plugs on the other end. Note thatthe standard plug you connect to the keyboard must be astereo plug, otherwise you will be able to output only one ofstereo channels. In this configuration, you normally set theinput selector of the audio equipment to the terminal (usuallymarked AUX IN or something similar) where the cord fromthe keyboard is connected. See the user documentation thatcomes with your audio equipment for full details.
Musical Instrument Amplifier (Figure 3)
Use a commercially available connecting cord to connect thekeyboard to a musical instrument amplifier.
NOTE• Be sure to use a connecting cord that has a stereo
standard plug on the end you connect to the keyboard,and a connector that provides dual channel (left andright) input to the amplifier to which you are connecting.The wrong type of connector at either end can causeone of the stereo channels to be lost.
When connected to a musical instrument amplifier, set thevolume of the keyboard to a relatively low level and makeoutput volume adjustments using the amplifier ’s controls.
Connection Example
INPUT 1
INPUT 2
PIN jackPIN plug (red)
PIN plug (white)Stereo standard plug Keyboard or
guitar amp
To keyboard’s PHONES/OUTPUT terminal
Standard plug
Connecting to a Computer orOther EquipmentYou can also connect the keyboard to a computer. See“Connecting to a Computer” on page E-49 for details.

E-19
Connections
Sustain/Assignable jack TerminalYou can connect an optional sustain pedal (SP-3 or SP-20) tothe SUSTAIN/ASSIGNABLE JACK terminal to enable thecapabilities described below.
For details on how to select the pedal function you want, see“SUSTAIN/ASSIGNABLE JACK (Default: SUS)” on pageE-53.
Sustain Pedal• With piano tones, depressing the pedal causes notes to
linger, much like a piano’s damper pedal.• With organ tones, depressing the pedal causes notes to
continue to sound until the pedal is released.
Sostenuto Pedal• As with the sustain pedal function described above,
depressing the sostenuto pedal causes notes to be sustained.• This difference between a sostenuto pedal and sustain pedal
is the timing. With a sostenuto pedal, you press the keysand then depress the pedal before you release the keys.
• Only the notes that are sounding when the pedal isdepressed are sustained.
Soft PedalDepressing the pedal softens the sound of the notes beingplayed.
Rhythm Start/Stop PedalIn this case, the pedal performs the same functions as theSTART/STOP button.
Accessories and OptionsUse only the accessories and options specified for thiskeyboard. Use of non-authorized items creates the danger offire, electrical shock, and personal injury.
SP-20
SUSTAIN/ASSIGNABLE JACK Terminal

E-20
Basic Operations
This section provides information on performing basickeyboard operations.
To play the keyboard
1 Press the POWER button to turn the keyboard on.
2 Set the MODE switch to NORMAL.
3 Use the VOLUME knob to set the volume to arelatively low level.
4 Play something on the keyboard.
Selecting a ToneThis keyboard comes with 515 built-in tones. Use thefollowing procedure to select the tone you want.
To select a tone
1 Find the tone you want to use in the TONE List andnote its tone number.• Not all of the available tones are shown on the tone
list printed on the keyboard console. For a completelist, see the “Tone List” on page A-1.
2 Press the TONE button.
3 Use the number buttons to input the three-digit tonenumber of the tone you want to select.Example: To select “111 ACOUSTIC BASS”, input 1, 1
and then 1.
NOTE• Always input all three digits for the tone number,
including leading zeros (if any). If you input one or twodigits and stop, the display will automatically clear yourinput after a few seconds.
• You can also increment the displayed tone number bypressing [+] and decrement it by pressing [–].
• When one of the drum sets is selected (tone numbers501 through 515), each keyboard key is assigned adifferent percussion sound. See page A-5 for details.
PolyphonyThe term polyphony refers to the maximum number of notesyou can play at the same time. The keyboard has 32-notepolyphony, which includes the notes you play as well as therhythms and auto-accompaniment patterns that are playedby the keyboard. This means that when a rhythm or auto-accompaniment pattern is being played by the keyboard, thenumber of notes (polyphony) available for keyboard play isreduced. Also note that some of the tones offer only 16-notepolyphony.• When rhythm or auto accompaniment is playing, the
number of sounds simultaneously played is reduced.
Indicatorappears
A c o u s . B s
POWER
TONE PIANO SETTING
Number buttons
[+] / [–]
REVERB/CHORUS
MODE
VOLUME

E-21
Using Tone EffectsReverb: Makes your notes resonateChorus: Adds more breadth to your notes
1 Press the REVERB/CHORUS button to cycle throughthe effect settings as shown below.• You can find out the current effect setting by looking
at the REVERB and CHORUS indicators.
2 After turning on the effect you want, use the numberbuttons or the [+]/[–] buttons to select the effecttype you want.• Note that you need to select an effect type with the
number buttons or the [+]/[–] buttons within a fewseconds after turning on an effect. If you don’t, thedisplay will exit the setting screen.
Effect List
Basic Operations
Reverb 1: Room 12: Room 23: Hall 14: Hall 2
Chorus 1: Chorus 12: Chorus 23: Chorus 34: Chorus 4
Reverb on
Chorus on
Both on
Both off
PIANO SETTING ButtonPressing this button changes the setup of the keyboard tooptimize it for piano play.
Settings
Tone Number: “001”Rhythm Number: “101”Layer: OffSplit: OffReverb: On (Type 3)Chorus: OffTranspose: 00Touch Response:
Off: Returns to initial defaultOn: No change
Assignable Jack: SUSLocal Control: On
To optimize keyboard settings forpiano play
1 Set the MODE switch to NORMAL.
2 Press the PIANO SETTING button.
3 Now try playing something on the keyboard.• The notes you play will sound with a piano tone.• If you want to play with rhythm accompaniment,
press the START/STOP button. This causes a rhythmthat is optimized for piano will start to play.
• To stop rhythm play, press the START/STOP buttonagain.
NOTE• Pressing the PIANO SETTING button while a rhythm is
playing stops rhythm play and then changes thekeyboard setup.
• The setup of the keyboard does not change if you pressthe PIANO SETTING button when any one of thefollowing exists.• During real-time recording of the Song Memory• During demo tune play

E-22
Playing a Built-in Tune
FF PAUSE SONG BANK
TONERHYTHMTEMPO
PLAY/STOPREW
Number buttons
[+] / [–]REPEAT
To play back a Song Bank tunePREPARATION• Adjust the main volume (page E-20).
1 Find the tune you want to play in the SONG BANKList, and note its number.• See page A-9 for the SONG BANK List.
2 Press the SONG BANK button to enter the SongBank Mode.
3 Use the number buttons to input the tune’s three-digit number.Example: To select “047 ALOHA OE”, input 0, 4 and
then 7.
Indicatorappears
NOTE• Tune Number 001 is the initial default Song Bank tune
setting whenever you turn on keyboard power.• You can also increment the displayed tune number by
pressing [+] and decrement is by pressing [–].
4 Press the PLAY/STOP button to start play of the tune.
5 Press the PLAY/STOP button to stop playback ofthe Song Bank tune.• The tune you select continues to play until you stop it.
A l o h a O eSong number Song name
A l o h a O e
Keyboard keys usedFingering
Staff display
Chord name
Your keyboard comes with a total of built-in 100 tunes. You can play back built-in tunes for your own listening pleasure, or youcan use them for practice. Built-in tunes are divided between the two groups described below.
Auto-accompanimentTunes
Two-hand tune
Tune Numbers
<CTK-810> 001, 004 through 050<WK-110> 003 through 050
<CTK-810> 002, 003, and 051 through 100<WK-110> 001, 002, and 051 through 100
Left-hand Part
Auto-accompaniment(percussion, bass, chords)
Left-hand notes
Right-hand Part
Melody
Right-hand notes
In addition to the built-in tunes, you can also play back the tunes you download over the Internet (page E-50).

E-23
Playing a Built-in Tune
Adjusting the TempoEach tune has a preset default tempo (beats per minute) thatis set automatically whenever you select a tune. While thetune is playing, you can change the tempo setting to a valuein the range of 30 to 255.
To set the tempo
1 Use the TEMPO buttons to set the tempo. : Increases the tempo value. : Decreases the tempo value.
NOTE• While the tempo value is flashing, you can also use the
number buttons or [+] and [–] to input a three-digit value.Note that you must input leading zeros, so 90 is inputas 090.
• Pressing both the and TEMPO buttons at the sametime automatically returns the currently selected rhythmto its default tempo.
To pause playback
1 Press the PAUSE button while a tune is playing topause it.
2 Pressing the PAUSE button again resumes play fromthe point where it was paused.
Flash
Tempo value
To fast reverse
1 While a tune is playing or paused, hold down theREW button to skip in a reverse direction at highspeed.• The fast reverse operation skips back one measure at
a time.• The measure and beat numbers on the display change
while the fast reverse operation is being performed.
2 Releasing the REW button starts song playback fromthe measure whose number is shown on the display.
NOTE• Fast reverse does not work while tune play is stopped.
To fast forward
1 While a tune is playing or paused, hold down theFF button to skip forward at high speed.• The fast forward operation skips forward one measure
at a time.• The measure and beat numbers on the display change
while the fast forward operation is being performed.
2 Releasing the FF button starts song playback fromthe measure whose number is shown on the display.
NOTE• Fast forward does not work while tune play is stopped.
Beat numberMeasure number
Beat numberMeasure number

E-24
Playing a Built-in Tune
Looping a Musical PhraseYou can select one or more measures and “loop” them, whichmeans that they play again and again until you stop playback.
1 While the tune is playing, press the REPEAT buttonwhile the measure you want to start from is playing.
2 When playback is within the measure you want tospecify as the end of the loop, press the REPEATbutton again.
• To cancel repeat play of a loop, press the REPEATbutton again so the repeat indicator is not displayed.
To change the melody tone
1 Press the TONE button.
2 Find the tone you want in the TONE List, and thenuse the number buttons to input its three-digitnumber.Example: To select “131 VIOLIN”, input 1, then 3, then 1.• You can select any one of the keyboard’s built-in tones.
NOTE• You can also use the [+] and [–] buttons to change the
melody tones.• Specifying the tune number for the same tune that is
currently selected returns the melody tone to the defaultsetting for that tune.
V i o l i n
Indicatorappears
To play all tunes in succession
1 Press the RHYTHM button and TONE button at thesame time.• Playback starts from Song Bank tune number 001.
2 To stop tune play, press the PLAY/STOP button.
NOTE• While a tune is playing, you can use the number buttons
or [+] and [–] to change to another tune.• You can play along with the tunes on the keyboard.
Flash
Lit

E-25
3-Step Lesson
With the 3-Step Lesson System, you can practice built-in tunesand SMF data you download over the Internet, and even plotyour progress according to the evaluation points the keyboardawards you.
* See “Expanding the Selections in the Song Bank Tunes” onpage E-50 for information about the SMF data youdownload over the Internet.
Lesson Progress
Step 1 Step 2 Step 3 Evaluation
3-Step LessonThe 3-step lesson feature takes you through the three distinctsteps described below to help you learn to play tunes on thekeyboard.
Step 1 – Master the timing.
Step 2 – Master the notes.
Step 3 – Play at normal speed.
Lesson Parts3-Step Lesson lets you practice the right-hand part, left-handpart, or the parts for both hands.
Display Contents During 3-stepLesson Play
Whenever you select an Auto Accompaniment tune for 3-step lesson play, the on-screen keyboard guide and staffnotation shows the note you should play and its length. Theon-screen keyboard guide also shows the notes you play onthe keyboard. The following describes the information thatappears on the display.
Note PitchThe key you should press lights on the on-screen keyboardguide, while the actual pitch of the note appears in thedisplay’s staff notation area. The fingers you should use toplay the notes are also shown on the display.
Note LengthThe key stays lit on the on-screen keyboard guide for as longas the note should be sustained. The staff notation andfingerings also remain on the display for the length of thenote.
Next NoteAn on-screen keyboard guide key flashes to indicate the nextnote to be played, while a number appears on the displaynear the finger you should use to play the next note.
Series of Same Pitch NotesThe on-screen keyboard guide key turns off momentarilybetween the notes, and lights again for each successive note.The staff notation and fingerings also turn off and back onagain.
Flash
Next note
Current note
Lit Flash Lit Flash
1st Note 2nd Note 3rd Note
Lit
On-screen keyboard guide
Example: When play requires pressing keys with fingers3, 2, and then 1
NOTE• Note length is not indicated when you are using two-
hand tunes with 3-step lesson Steps 1 and 2. As soonas you press a key that is lit on the on-screen keyboardguide, it goes out and the next key you need to pressstarts to flash.
• Note length is indicated by the on-screen keyboard guidewhen you use two-hand tunes with Step 3. In this case,the next key to be pressed does not flash when youpress a lit key.
• During Step 3, the next finger number does not appearon the display. Only the current finger number is shown.
3-step Lesson Tempo SettingUse the procedure under “Adjusting the Tempo” on pageE-23 to adjust the tempo for 3-step lesson play.
E-26
3-Step Lesson
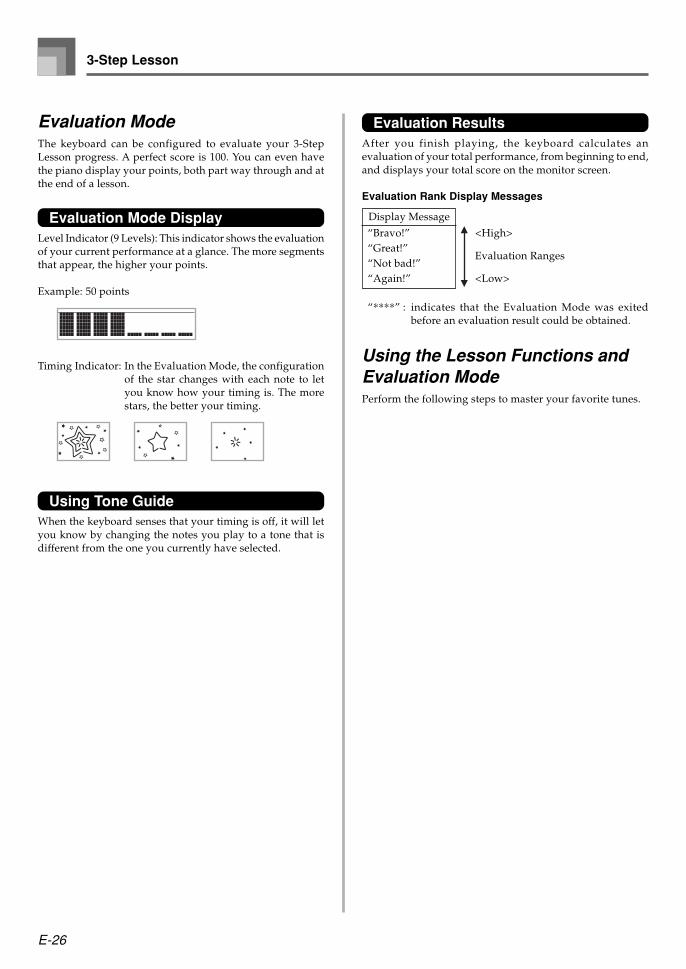
Evaluation ModeThe keyboard can be configured to evaluate your 3-StepLesson progress. A perfect score is 100. You can even havethe piano display your points, both part way through and atthe end of a lesson.
Evaluation Mode DisplayLevel Indicator (9 Levels): This indicator shows the evaluationof your current performance at a glance. The more segmentsthat appear, the higher your points.
Example: 50 points
Timing Indicator: In the Evaluation Mode, the configurationof the star changes with each note to letyou know how your timing is. The morestars, the better your timing.
Using Tone GuideWhen the keyboard senses that your timing is off, it will letyou know by changing the notes you play to a tone that isdifferent from the one you currently have selected.
“****” : indicates that the Evaluation Mode was exitedbefore an evaluation result could be obtained.
Using the Lesson Functions andEvaluation ModePerform the following steps to master your favorite tunes.
Display Message
“Bravo!” <High>“Great!”
Evaluation Ranges“Not bad!”“Again!” <Low>
Evaluation ResultsAfter you finish playing, the keyboard calculates anevaluation of your total performance, from beginning to end,and displays your total score on the monitor screen.
Evaluation Rank Display Messages

E-27
Step 1 – Master the timing.
1 Select the tune you want to use.
2 Press the RIGHT/TRACK 2 button or the LEFT/TRACK 1 button to specify the part you want topractice.• Indicator appears on the display whose part is
selected for practice.
• If you want to practice both hands, press both buttonsat the same time.
3 Press the STEP 1 button to start Step 1 play.
• After a count sounds, they keyboard stands by andwaits for you to play the first note of the tune.
• Voice fingering guide will use a simulated humanvoice to call out fingering numbers during one-handpart practice. See “Voice Fingering Guide” on pageE-29 for details.
4 Press any keyboard keys to play the notes.• The key for the next note to be played flashes on the
on-screen keyboard guide and the keyboard waits foryou to play it. When you press any key to play thenote, the on-screen key remains lit as the note plays.
• Accompaniment (left-hand part) waits until you pressany key to play a note.
• If you accidentally press more than one key insuccession, accompaniment is played for thecorresponding number of notes.
• Pressing more than one key at the same time countsas a single note. Pressing a key while another key isheld down is counted as two notes.
5 To stop play at any time, press the STEP 1 or PLAY/STOP button.
Step 2 – Master the notes.
1 Select the tune you want to use.
2 Press the RIGHT/TRACK 2 button or the LEFT/TRACK 1 button to specify the part you want topractice.• Indicator appears on the display whose part is
selected for practice.• If you want to practice both hands, press both buttons
at the same time.
Indicator appears
3-Step Lesson
RIGHT/TRACK 2
STEP 2
SPEAK
LEFT/TRACK 1
Number buttons
[+] / [–]
METRONOME
STEP 3
STEP 1 SCORING
PLAY/STOP
TEMPO
A l o h a O e
Keyboard keys used Fingering
Indicator appearsNote pitch

E-28
3-Step Lesson
3 Press the STEP 2 button to start Step 2 play.
• After a count sounds, the keyboard stands by andwaits for you to play the first note of the tune.
• Voice fingering guide will use a simulated humanvoice to call out fingering numbers during one-handpart practice. See “Voice Fingering Guide” on pageE-29 for details.
4 Play the notes as indicated by the on-screenkeyboard guide.• The key for the next note to be played flashes on the
on-screen keyboard guide and the keyboard waits foryou to play it. When you press any key to play thenote, the on-screen key remains lit as the note plays.
• If multiple keys light on the on-screen keyboard guidewhen you are using a two-hand tune, it means thatyou must press all of the keys that are lit.
5 To stop play at any time, press the STEP 2 or PLAY/STOP button.
Step 3 – Play at normal speed.
1 Select the tune you want to play.
2 Press the RIGHT/TRACK 2 button or the LEFT/TRACK 1 button to specify the part you want topractice.• Indicator appears on the display whose part is
selected for practice.• If you want to practice both hands, press both buttons
at the same time.
3 Press the STEP 3 button to start Step 3 play.
• Accompaniment (left hand part) starts to play atnormal speed.
4 Play the notes as indicated by the on-screenkeyboard guide.
5 To stop play at any time, press the STEP 3 or PLAY/STOP button.
Evaluating Your Keyboard Play
1 Press the SCORING button.• This causes the SCORING indicator to appear on the
display.
• A count beat sounds and then evaluation mode starts.
2 Play in accordance with the guidance on themonitor screen.• To stop evaluation, press the PLAY/STOP button. This
displays only the points accumulated up to that point.
3 After you finished playing, your evaluation resultappears on the display.• For information about evaluation ranks, see
“Evaluation Results” on page E-26.• Pressing the SONG BANK button returns to the tune
selection screen.
A l o h a O e
Keyboard keys used Fingering
Indicator appears
Indicator appears
B r a v o !
A l o h a O e
Keyboard keys used Fingering
Indicator appears

E-29
3-Step Lesson
Voice Fingering GuideVoice fingering guide uses a simulated human voice to callout fingering numbers during Step 1 and Step 2 one-handpart practice. If you need to press a key with your thumb, forexample, voice fingering guide says, “One!” In the case of achord to be played with your thumb, middle and little finger,voice fingering guide says, “One, three, five!”Voice Fingering Guide calls out fingerings only when you donot press the proper key when you should.
Voice Fingering Guide
One : ThumbTwo : ForefingerThree : Middle fingerFour : Ring fingerFive : Little finger
To turn voice fingering guide on or offPress the SPEAK button to toggle voice fingering guide on(voice fingering guide indicator displayed) and off (indicatornot displayed).
NOTE• Note that Voice Fingering is disabled in the Evaluation
Mode.• Exiting the Evaluation Mode automatically restores the
Voice Fingering setting that was in effect when youentered the Evaluation Mode.
Using the MetronomeThe metronome feature of this keyboard produces a bellsound for the first beat of each measure, followed by clicksounds for each successive beat of the measure. It is the perfecttool for practicing tunes without accompaniment (rhythm).
To start the metronome
1 Press the METRONOME button to start soundingthe metronome.• This causes “Beat” to appear on the display. Perform
step 2 within five seconds after “Beat” appears.
Indicatorappears
B e a t
2 Use the number buttons or [+] and [–] to changethe number of beats per measure.• You can specify 0, or a value from 2 to 6 as the number
of beats per measure.
NOTE• The bell (indicating the first beat of a measure) does not
sound while 0 beat per measure is specified. All beatsare indicated by a click sound. This setting lets youpractice with a steady beat, without worrying about howmany beats there are in each measure.
3 Use the TEMPO buttons to set the tempo.• Press to increase the tempo (make if faster) or to
decrease it (make it slower).
NOTE• While the tempo value is flashing, you can also use the
number buttons or [+] and [–] to input a three-digit value.Note that you must input leading zeros, so 90 is inputas 090.
• Pressing both the and TEMPO buttons at the sametime automatically returns the currently selected rhythmor tune to its default tempo.
4 To turn off the metronome, press the METRONOMEbutton.
NOTE• The metronome is disabled whenever you are using Step
1 or Step 2 of the 3-step lesson.
Flash
Tempo value

E-30
Auto Accompaniment
Selecting a RhythmThis keyboard provides you with 120 exciting rhythms thatyou can select using the following procedure.
To select a rhythm
1 Find the rhythm you want to use in the RHYTHMList and note its rhythm number.• Not all of the available rhythms are shown on the
rhythm list printed on the keyboard console. For acomplete list, see the “Rhythm List” on page A-8.
2 Press the RHYTHM button to enter the RhythmMode.
3 Use the number buttons to input the three digitrhythm number for the rhythm you want to select.Example: To select “095 HAWAIIAN”, input 0, 9 and
then 5.
NOTE• You can also increment the displayed rhythm number
by pressing [+] and decrement it by pressing [–].• Some rhythms (No. 110, 112 to 120) consist of chord
accompaniments only, without any drums or otherpercussion instruments. Such rhythms do not soundunless CASIO CHORD, FINGERED, or FULL RANGECHORD is selected as the accompaniment mode.
This keyboard automatically plays bass and chord parts inaccordance with the chords you finger. The bass and chordparts are played using sounds and tones that areautomatically selected to select the rhythm you are using.All of this means that you get full, realistic accompanimentsfor the melody notes you play with your right hand, creatingthe mood of an one-person ensemble.
Indicatorappears
H a w a i i a n
ONE TOUCH PRESETMODE
RHYTHM
Number buttons
[+] / [–]
TEMPO
INTRO
VARIATION/FILL-IN SYNCHRO/ENDING
START/STOPNORMAL/FILL-IN

E-31
Playing a RhythmUse the following procedure to start and stop rhythm play.
To play a rhythm
1 Set the MODE switch to NORMAL.
2 Press the START/STOP button to start play of thecurrently selected rhythm.
3 To stop rhythm play, press the START/STOP buttonagain.
NOTE• All of the keyboard keys are melody keys while the
MODE switch is set to NORMAL.
Adjusting the TempoThe tempo (beats per minute) can be set to a value in therange of 30 to 255. The tempo value you set is use for SongBank, 3-step lesson, and Auto Accompaniment chord play,as well as playback from the recorder and metronomeoperation.
To set the tempo
1 Use the TEMPO buttons to set the tempo. : Increase the tempo value. : Decreases the tempo value.
NOTE• While the tempo value is flashing, you can also use the
number buttons or [+] and [–] to input a three-digit value.Note that you must input leading zeros, so 90 is inputas 090.
• Pressing both the and TEMPO buttons at the sametime automatically returns the currently selected rhythmto its default tempo.
Auto Accompaniment
Using Auto AccompanimentThe following procedure describes how to use the keyboard’sAuto Accompaniment feature. Before starting, you shouldfirst select the rhythm you want to use and set the tempo ofthe rhythm to the value you want.
To use Auto Accompaniment
1 Set the MODE switch to CASIO CHORD,FINGERED, or FULL RANGE CHORD.
2 Press the START/STOP button to start play of thecurrently selected rhythm.
3 Play a chord.• The actual procedure you should use to play a chord
depends on the current MODE switch position. Referto the following pages for details on chord play.
CASIO CHORD .......................... Page E-32FINGERED ................................... Page E-33FULL RANGE CHORD ............. Page E-34
4 To stop Auto Accompaniment play, press the START/STOP button again.
NOTE• If you press the SYNCHRO/ENDING button and then
the INTRO button in place of the START/STOP buttonin step 2, accompaniment will start with an intro patternwhen you perform the operation in step 3. For detailsabout these buttons, see pages E-35 and E-36.
• If you press the SYNCHRO/ENDING button in place ofthe START/STOP button in step 4, an ending patternwill play before accompaniment play is ended. For detailsabout this button, see page E-36.
• You can adjust the accompaniment part volume levelindependently of the main volume. For details, see“Adjusting Accompaniment and Song Bank Volume” onpage E-47.
Beat number
MetronomeTempo value
Flash
H a w a i i a n
Chord name
(The chord form that appears here may shownotes that differ from those actually pressed onthe keyboard. With some chords, inverted chordforms may be displayed.)

E-32
CASIO CHORDThis method of chord play makes it possible for anyone toeasily play chords, regardless of previous musical knowledgeand experience. The following describes the CASIO CHORD“Accompaniment keyboard” and “Melody keyboard”, andtells you how to play CASIO CHORDs.
CASIO CHORD Accompaniment Keyboard and MelodyKeyboard
<WK-110>
<CTK-810>
Melody keyboardAccompanimentkeyboard
NOTE• The accompaniment keyboard can be used for playing
chords only. No sound will be produced if you try playingsingle melody notes on the accompaniment keyboard.
• The split point (page E-46) is the point that separatesthe Auto Accompaniment area and the melody area ofthe keyboard. You can change the location of the splitpoint, which also changes the sizes of the keyboardareas.
NOTE• It makes no difference whether you press black or white
keys to the right of a major chord key when playing minorand seventh chords.
Auto Accompaniment
Melody keyboardAccompanimentkeyboard
Example
C Major (C)
C minor (Cm)
C seventh (C7)
C minor seventh (Cm7)
Chord Types
Major chordsMajor chord names are marked abovethe keys of the accompanimentkeyboard. Note that the chordproduced when you press anaccompaniment keyboard does notchange octave, regardless of whichkey you use to play it.
Minor chords (m)To play a minor chord, keep the majorchord key depressed and press anyother accompaniment keyboard keylocated to the right of the major chordkey.
Seventh chords (7)To play a seventh chord, keep themajor chord key depressed and pressany other two accompanimentkeyboard keys located to the right ofthe major chord key.
Minor seventh chords (m7)To play a minor seventh chord, keepthe major chord key depressed andpress any other three accompanimentkeyboard keys located to the right ofthe major chord key.
CD E F GAB C DE F
CD E F GAB C DE F
CD E F GAB C DE F
CD E F GAB C DE F
Chord TypesCASIO CHORD accompaniment lets you play four types ofchords with minimal fingering.

E-33
FINGEREDFINGERED provides you with a total of 15 different chordtypes. The following describes the FINGERED“Accompaniment keyboard” and “Melody keyboard”, andtells you how to play a C-root chord using FINGERED.
FINGERED Accompaniment Keyboard and MelodyKeyboard
<WK-110>
<CTK-810>
Melody keyboardAccompanimentkeyboard
NOTE• The accompaniment keyboard can be used for playing
chords only. No sound will be produced if you try playingsingle melody notes on the accompaniment keyboard.
• The split point (page E-46) is the point that separatesthe Auto Accompaniment area and the melody area ofthe keyboard. You can change the location of the splitpoint, which also changes the sizes of the keyboardareas.
Auto Accompaniment
Melody keyboardAccompanimentkeyboard
C
Caug *1
Cm7 *2
C7 5 *1
Cmadd9
Cm
Csus4
Cmaj7 *2
C7sus4
CmM7 *2
Cdim
C7 *2
Cm7 5
Cadd9
Cdim7 *1
See the FINGERED Chord Chart on page A-7 for details onplaying chords with other roots.
*1: Inverted fingerings cannot be used. The lowest note isthe root.
*2: The same chord can be played without pressing the 5thG.
NOTE• Except for the chords specified in note*1 above, inverted
fingerings (i.e. playing E-G-C or G-C-E instead of C-E-G) will produce the same chords as the standardfingering.
• Except for the exception specified in note*2 above, allof the keys that make up a chord must be pressed.Failure to press even a single key will not play the desiredFINGERED chord.

E-34
Accompaniment keyboard/Melody keyboard
< Chords Recognized by This Keyboard >
FC
GC
A C
B C
FmC
GmC
AmC
B mC
DdimC
A 7
CF7
CFm7
CGm7
CA add9
C
C6 • Cm6 • C69
• • • • •
• • • •
• • • •
DC
C C
EC
BC
C mC
DmC
• •
• •
Chord Types
CorrespondingFINGERED Chord
Other Chords
Number of Types
15 (page E-33)
23The following are examples of chordsthat use C as the bass note.
Auto Accompaniment
Example: To play the chord C major.
Any of the fingerings shown in the illustration below willproduce C major.
<WK-110>
<CTK-810>
E
E G C
G C
2
1
1 .... Chord C
2 .... Chord CCE
44
D Bm G A
44
DC#
BmA
E7A
AG
Accompaniment keyboard/Melody keyboard
NOTE• As with the FINGERED mode (page E-33), you can play
the notes that form a chord in any combination (1).• When the composite notes of a chord are separated by
6 or more notes, the lowest sound becomes the bass(2).
< Music Example >
Tone: 001, Rhythm: 102, Tempo: 070
E
E G C
G C
2
1
1 .... Chord C
2 .... Chord CCE
FULL RANGE CHORDThis accompaniment method provides a total of 38 differentchord types: the 15 chord types available with FINGEREDplus 23 additional types. The keyboard interprets any inputof three or more keys that matches a FULL RANGE CHORDpattern to be a chord. Any other input (that is not a FULLRANGE CHORD pattern) is interpreted as melody play.Because of this, there is no need for a separate accompanimentkeyboard, so the entire keyboard, from end to end, can beused for both melody and chords.
FULL RANGE CHORD Accompaniment Keyboard andMelody Keyboard
<WK-110>
<CTK-810>

E-35
Using an Intro PatternThis keyboard lets you insert a short intro into a rhythmpattern to make startup smoother and more natural.
The following procedure describes how to use the Introfeature. Before starting, you should first select the rhythmyou want to use, and set the tempo.
To insert an intro
1 Press the INTRO button to start the selected rhythmwith an intro pattern.• With the above setup, the intro pattern is played and
the auto accompaniment with intro pattern starts assoon as you play chords on the accompanimentkeyboard.
NOTE• The standard rhythm pattern starts to play after the intro
pattern is complete.• Pressing the VARIATION/FILL-IN button while an intro
pattern is playing causes the variation pattern to soundafter the intro pattern is complete.
Using a Fill-in PatternFill-in patterns let you momentarily change the rhythmpattern to add some interesting variation to yourperformances.
The following procedure describes how to use the Fill-infeature.
To insert a fill-in
1 Press the START/STOP button to start rhythm play.
2 Press the NORMAL/FILL-IN button to insert a fill-in pattern for the rhythm you are using.
NOTE• The fill-in pattern does not play if you press the
NORMAL/FILL-IN button while an intro pattern is playing.
Auto Accompaniment
Using a Rhythm VariationIn addition to the standard rhythm pattern, you can alsoswitch to a secondary “variation” rhythm pattern for a bit ofvariety.
To insert the variation rhythm pattern
1 Press the START/STOP button to start rhythm play.
2 Press the VARIATION/FILL-IN button to switch tothe variation pattern for the rhythm you are using.
NOTE• To switch back to the standard rhythm pattern, press
the NORMAL/FILL-IN button.
Using a Fill-in Pattern with aVariation RhythmYou can also insert a fill-in pattern while a variation rhythmpattern is playing.
To insert a fill-in into a rhythm variation
1 While a variation rhythm pattern is playing, pressthe VARIATION/FILL-IN button to insert a fill-inpattern for the variation rhythm you are using.
Synchro Starting Accompanimentwith Rhythm PlayYou can set up the keyboard to start rhythm play at the sametime you play the accompaniment on the keyboard.
The following procedure describes how to use synchro start.Before starting, you should first select the rhythm you wantto use, set the tempo, and use the MODE switch to select thechord play method you want to use (NORMAL, CASIOCHORD, FINGERED, FULL RANGE CHORD).

E-36
To use synchro start
1 Press the SYNCHRO/ENDING button to put thekeyboard into synchro start standby.
2 Playing a chord and the rhythm pattern starts toplay automatically.
NOTE• If the MODE switch is set to NORMAL, only the rhythm
plays (without a chord) when you play on theaccompaniment keyboard.
• If you press the INTRO button before playing anythingon the keyboard, the rhythm starts automatically withan intro pattern when you play something on theaccompaniment keyboard.
• Pressing the VARIATION/FILL-IN button before playinganything on the keyboard causes play to start with thevariation pattern when something is played on thekeyboard.
• To cancel synchro start standby, press the SYNCHRO/ENDING button one more time.
Finishing with an Ending PatternYou can end your performances with an ending pattern thatbrings the rhythm pattern you are using to a natural-soundingconclusion.The following procedure describes how to insert an endingpattern. Note that the actual ending pattern played dependson the rhythm pattern you are using.
To finish with an ending pattern
1 While the rhythm is playing, press the SYNCHRO/ENDING button.• This causes the ending pattern to play, which brings
rhythm accompaniment to an end.
Auto Accompaniment
Using One-touch PresetOne-touch preset automatically makes the settings listedbelow in accordance with the rhythm pattern you are using.
• Keyboard tone• Layer, Split, or Layer Split on/off• Layered tone (when layer is turned on), split tone (when
split is turned on), or layered split tone (when layer andsplit are turned on)
• Tempo• Reverb and chorus settings
To use one-touch preset
1 Select the rhythm you want to use.
2 Use the MODE switch to select the accompanimentmode you want to use.
3 Press the ONE TOUCH PRESET button.• This automatically configures the one-touch preset
settings in accordance with the rhythm you selected,and enters synchro start standby.
4 Play a chord. This will cause the rhythm pattern tostart to play automatically.• Accompaniment is played using the one touch preset
settings.
Flash

E-37
Registration Memory
Registration Memory FeaturesRegistration memory lets you store up to 32 keyboard setups(4 sets × 8 banks) for instant recall whenever you need them.The following is a list of settings that are saved in registrationmemory.
Registration Memory Settings• Tone• Rhythm• Tempo• Layer on/off• Split on/off• Split point• Effect settings• Touch Response settings• Assignable jack setting• Synchro standby state
NOTE• Each bank of registration memory initially contains data
when you first use the keyboard. Simple replace theexisting data with your own data.
Setup NamesYou can assign setups into one of 32 areas, which you canselect using BANK button and the four REGISTRATIONbuttons. Area names range from 1-1 through 8-4 as shownbelow.
1 Use the BANK button to select the bank. Each press ofBANK cycles through the bank numbers from 1 to 8.
2 Pressing one of the REGISTRATION buttons (1 to 4) selectsthe corresponding area in the currently selected bank.
NOTE• Whenever you save a setup and assign it a setup name,
any setup data previously assigned to that name isreplaced with the new data.
21
1-1BANK 1 1-2 1-3 1-4
2-1BANK 2 2-2 2-3 2-4
4-1BANK 4 4-2 4-3 4-4
5-4
3-1BANK 3 3-2 3-3
6-1BANK 6 6-2 6-3 6-4
5-1BANK 5 5-2 5-3
7-1BANK 7 7-2 7-3 7-4
8-1BANK 8 8-2 8-3 8-4
3-4
1 2 3 4

E-38
Registration Memory
Number buttons
REGISTRATION STORE
BANK
To Save a Setup in RegistrationMemory
1 Select a tone and rhythm, and otherwise set up thekeyboard the way you want it.• See “Registration Memory Settings” on page E-37 for
details on what data is stored in the registrationmemory.
2 Use the BANK button or the number buttons toselect the bank you want.• If you do not perform any operation for about three
seconds after pressing the BANK button, the displayreturns to the contents in step 1, above.
• Bank 1 selected.
3 While holding down the STORE button, press aREGISTRATION button (1 to 4).• The following display appears when you press the 2
button.
4 Release the STORE and REGISTRATION buttons.
NOTE• The setup is saved as soon as you press a
REGISTRATION button in step 3, above.
B a n k
S t o r e
To Recall a Setup fromRegistration Memory
1 Use the BANK button or the number buttons toselect the bank.• If you do not perform any operation for about three
seconds after pressing the BANK button, the keyboardautomatically clears the registration memory recallscreen.
2 Press the REGISTRATION button (1 to 4) for thearea whose setup you want to recall.
• The setup name along with the message “Recall”appears on the display.
NOTE• If you press a REGISTRATION button without using the
BANK button to select a bank first, the last bank numberselected is used.
B a n k
R e c a l l

E-39
RECORDER SONG BANKMODE
RHYTHM
[+] / [–]
START/STOP LEFT/TRACK 1TEMPO
RIGHT/TRACK 2
You can record your lesson play (lesson recording) andkeyboard play along with the Auto Accompaniment you areusing (performance recording).
Parts and TracksHow data is recorded to the keyboard and the type of datathat is recorded depends on whether you are performing aperformance recording operation or a lesson recordingoperation.
Lesson RecordingWith lesson recording, you use the LEFT/TRACK 1 buttonand the RIGHT/TRACK 2 button to select recording of onlythe left-hand part, only the right-hand part, or both the left-hand and right-hand parts.
Performance RecordingWith performance recording, the keyboard operates like atape recorder or sequencer. In this case, you can use the LEFT/TRACK 1 button and the RIGHT/TRACK 2 button to selectthe track you want to record to.Performance recording records the data shown in theillustration below, using two memory tracks.
• Since each track is independent of the other, you can edit arecording by re-recording only one of the tracks.
Recording and Play Back
Track 1
Start End
Track 2
Auto Accompaniment(rhythm, bass, chords), melody
Melody
Data recorded in track
Using the RECORDER ButtonEach press of the RECORDER button cycles through therecording options in the sequence shown below.
Memory CapacityThis keyboard can hold a total of approximately 12,000 notes,which can be divided between a lesson recording and aperformance recording. Note that you can use up all 12,000notes for either the lesson recording or the performancerecording. If you do, you will not be able to record anythingfor the other type of recording.
• The recorder shares the same memory area with the songbank area used for storing song data transferred from acomputer. Because of this, you may not be able to store thefull 12,000 notes of data.
• When the number of remaining notes becomes less thanabout 100 while you are recording, the RECORDERindicator and the track/part indicator (L, R) will start toflash at high speed.
• Recording will stop automatically if memory becomes full.
If you are using Auto Accompaniment or a rhythm, they willalso stop playing at this time.
IMPORTANT!• Never turn off the keyboard while it is recording or
standing by for recording to the keyboard. Doing so willcause all of the song data currently stored in the SongBank user area to be deleted.
PlaybackStandby
RecordStandby Normal
Displayed Flashing Not displayed

E-40
Recording and Play Back
Recorded Data Storage• Anything previously stored in the keyboard is replaced
whenever you make a new recording.• Recorder contents are retained even when power is turned
off, as long as the keyboard is being supplied battery orAC adaptor power. If you remove the batteries or shouldthe batteries go dead while the keyboard is not beingsupplied power by the AC adaptor, recorder contents willbe deleted. Be sure to supply power to the keyboard withthe AC adaptor when replacing batteries.
• Turning off the keyboard while a record operation is inprogress causes the contents of the track you are currentlyrecording to be lost.
CASIO COMPUTER CO., LTD. assumes no responsibilityfor any loss or damage to you or any third party arisingout of the loss or corruption of data.
Recording Play Along with a Built-in TuneYou can use the lesson recording procedure to record notesyou play along with one of the keyboard’s built-in tunes.When you start a lesson recording, the keyboard plays thesong minus the part(s) you selected as the recording part(s).
Selecting PartsPress the part/track button that corresponds to the part(s)you want to select as the recording part(s).
To select this part:
Left-hand
Right-hand
Both hands
Press this button:
LEFT/TRACK 1
RIGHT/TRACK 2
LEFT/TRACK 1 +RIGHT/TRACK 2
The part that is currently selected is indicated by the part/track indicators (L and R) that appear on the display asdescribed below.
Part/Track Indicators in RecordingStandby
Press the part/track button of the part you want to play onthe keyboard (recording part). This causes its part/trackindicator to flash.
Example: The above indicates the left-hand part is theplayback part, and the right-hand part is therecording part.
Playback part(not displayed)
Recording part(flashing)
E-41
Recording and Play Back
To record as you play along with abuilt-in tune
1 Press the SONG BANK button to select the modethat includes the tune you want to play along with.
2 Use the RECORDER button to select record standby.• This causes the RECORDER indicator to flash on the
display.
3 Select the tune you want to play along with.• See “To play back a Song Bank tune” on page E-22 for
information about selecting Song Bank tunes.
4 Use the LEFT/TRACK 1 button or RIGHT/TRACK 2button to select the part(s) (left-hand, right-hand)you want to mute in the built-in tune playback andplay along on the keyboard.• If you want to mute and play both parts, press both
buttons at the same time.
5 Configure the following settings as required.• Tone (page E-20)• Tempo (page E-23)
6 Press the controller block START/STOP button.• This starts recording.
7 Play the notes for the part(s) you selected in step 4on the keyboard.
8 Recording stops automatically when playback ofthe built-in tune is finished.• To interrupt recording part way through, press the
controller block START/STOP button. This will playback everything you recorded up to that point.
• If you want to hear what you recorded immediately,press the controller block START/STOP button again.
Lesson Recording DataIn addition to the notes you play on the keyboard and theaccompaniment of the built-in song you selected, thefollowing data is also stored by a lesson recording operation.
• Tone setting• Tempo setting• Tune name• Recording part selection• Pedal operations• Layer and split settings, and their tone settings• Effect setting
Playing Back a Lesson Recording
1 Press the SONG BANK button to select the bank ofthe built-in tune that you originally used to recordthe lesson recording.
2 Use the RECORDER button to select playbackstandby.
3 Press the controller block START/STOP button.• This starts playback of lesson recording contents.• You can adjust the tempo at this point, if you want.
4 To stop playback, press the controller block START/STOP button again.
Recording a PerformanceUse this procedure when you want to record what you playon the keyboard in real time. Performance recording recordsboth the notes you play and any accompaniment patternsthat you use.
Selecting a TrackPress the part/track button that corresponds to the track youwant to select.
To select this track:
Track 1
Track 2
Press this button:
LEFT/TRACK 1
RIGHT/TRACK 2
The track that is currently selected is indicated by the part/track indicator (L or R) that appears on the display asdescribed below.
Indicatorappears
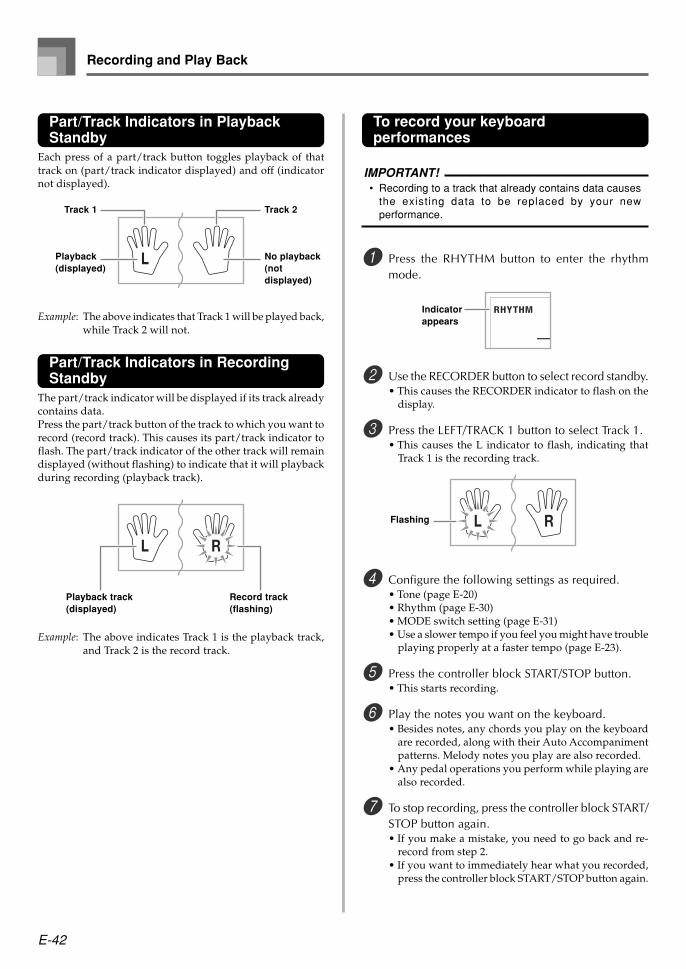
E-42
Recording and Play Back
Part/Track Indicators in PlaybackStandby
Each press of a part/track button toggles playback of thattrack on (part/track indicator displayed) and off (indicatornot displayed).
Example: The above indicates that Track 1 will be played back,while Track 2 will not.
Part/Track Indicators in RecordingStandby
The part/track indicator will be displayed if its track alreadycontains data.Press the part/track button of the track to which you want torecord (record track). This causes its part/track indicator toflash. The part/track indicator of the other track will remaindisplayed (without flashing) to indicate that it will playbackduring recording (playback track).
Example: The above indicates Track 1 is the playback track,and Track 2 is the record track.
Playback(displayed)
No playback(notdisplayed)
Track 1 Track 2
To record your keyboardperformances
IMPORTANT!• Recording to a track that already contains data causes
the existing data to be replaced by your newperformance.
1 Press the RHYTHM button to enter the rhythmmode.
2 Use the RECORDER button to select record standby.• This causes the RECORDER indicator to flash on the
display.
3 Press the LEFT/TRACK 1 button to select Track 1.• This causes the L indicator to flash, indicating that
Track 1 is the recording track.
4 Configure the following settings as required.• Tone (page E-20)• Rhythm (page E-30)• MODE switch setting (page E-31)• Use a slower tempo if you feel you might have trouble
playing properly at a faster tempo (page E-23).
5 Press the controller block START/STOP button.• This starts recording.
6 Play the notes you want on the keyboard.• Besides notes, any chords you play on the keyboard
are recorded, along with their Auto Accompanimentpatterns. Melody notes you play are also recorded.
• Any pedal operations you perform while playing arealso recorded.
7 To stop recording, press the controller block START/STOP button again.• If you make a mistake, you need to go back and re-
record from step 2.• If you want to immediately hear what you recorded,
press the controller block START/STOP button again.
Playback track(displayed)
Record track(flashing)
Flashing
Indicatorappears

E-43
Recording and Play Back
Track 1 DataIn addition to notes played on the keyboard and chordaccompaniments, the following data is also stored in Track 1during performance recording.
• Tone number• Rhythm number• INTRO button, SYNCHRO/ENDING button, NORMAL/
FILL-IN button, VARIATION/FILL-IN button operations• Pedal operations• Layer and split settings, and their tone settings• Split point• Tempo setting• Effect setting
Track 1 Recording VariationsTo record without rhythm
Skip step 5 of the above procedure.• Recording without rhythm starts as soon as you press a
keyboard key.
To start recording with synchro startIn place of step 5 of the above procedure, press theSYNCHRO/ENDING button.• Now Auto Accompaniment and recording will start when
you play a chord within the accompaniment keyboardrange.
To insert an intro, ending, or fill-in into a recordingDuring recording, press the INTRO button, SYNCHRO/ENDING button, NORMAL/FILL-IN button, orVARIATION/FILL-IN button as required.
To start recording with an intro using synchro startIn place of step 5 of the above procedure, press theSYNCHRO/ENDING button and then the INTRO button.• Now Auto Accompaniment and recording will start with
an intro pattern when you play a chord within theaccompaniment keyboard range.
To start Auto Accompaniment part way into a recordingIn place of step 5 of the above procedure, press theSYNCHRO/ENDING button, and play something withinthe melody range of the keyboard.• This records the melody without any accompaniment.
Auto Accompaniment will start when you play a chordwithin the accompaniment keyboard range.
Playing Back a PerformanceRecordingPerform the following procedure when you want to play backa tune you recorded with performance recording.
1 Press the RHYTHM button to enter the rhythmmode.
2 Use the RECORDER button to select playbackstandby.
3 Press the controller block START/STOP button.• This starts playback of performance recording
contents. During playback, you can press the LEFT/TRACK 1 or RIGHT/TRACK 2 button to mute eithertrack and listen to the contents of the other track only.
• You can adjust the tempo at this point, if you want.
4 To stop playback, press the controller block START/STOP button again.
NOTE• During performance recording playback, the entire range
of the keyboard operates as a melody keyboard,regardless of the MODE switch setting. You can playalong with performance recording playback, if you want.You could use layer and split (page E-45 through E-47)at this time to assign multiple tones to the keyboard.
• Note that pause, skip forward, and skip back operationscannot be performed during performance recordingplayback.
• You can send playback of performance recordingcontents as MIDI data.
Indicatorappears

E-44
Overdubbing a PerformanceRecordingYou can use the following procedure to record a melody inTrack 2 so it combines with a recording you previously madein Track 1.
1 Press the RHYTHM button to enter the rhythmmode.
2 Use the RECORDER button to select record standby.
3 Press the RIGHT/TRACK 2 button to select Track 2as the recording track.
4 Select the tone you want to use.
5 Press the controller block START/STOP button.• This starts playback of Track 1 and recording in
Track 2.
6 Play the melody notes you want as you listen tothe playback from Track 1.
7 To stop recording, press the controller block START/STOP button again.• If you make a mistake, you need to go back and re-
record from step 2.• If you want to immediately hear what you recorded,
press the controller block START/STOP button again.
NOTE• Track 2 is a melody-only track, which means that chord
accompaniment cannot be recorded there. Because ofthis, the entire range of the keyboard becomes a melodykeyboard when recording the Track 2, regardless of thecurrent MODE switch setting.
• If you want to record without playback from a recordedtrack, enter playback standby, deselect the playbacktrack, and then enter record standby. Note, however,that you cannot turn off rhythm and AutoAccompaniment.
Recording and Play Back
Flashing
Indicatorappears
Track 2 DataIn addition to notes played on the keyboard, the followingdata is also recorded to Track 2.
• Tone number• Pedal operations
Deleting a Specific Part/TrackYou can use the following procedure to delete a specificpart/track from a lesson recording or performance recording.
Getting ReadyWhen deleting a lesson recording part
• Press the SONG BANK button.
When deleting a performance recording track• Press the RHYTHM button.
1 Press the RECORDER button to enter recordstandby.
2 Select the part/track you want to delete by pressingthe LEFT/TRACK 1 button or RIGHT/TRACK 2button.
3 Hold down the RECORDER button.• This causes a confirmation message to appear on the
display.• To cancel the delete operation, press the [–] (NO)
button .
4 Press the [+] (YES) button to delete the part/track.• This causes the keyboard to return to playback
standby.
NOTE• Pressing the RECORDER button while the part/track
delete screen is on the display returns to record standby.

E-45
This section describes how to use layer (to play two toneswith a single key) and split (to assign different tones to eitherend of the keyboard), and how to make touch response,transpose, and tuning settings.
Using LayerLayer lets you assign two different tones (a main tone and alayered tone) to the keyboard, both of which play wheneveryou press a key. For example, you could layer the FRENCHHORN tone on the BRASS tone to produce a rich and brassysound.
To layer tones
1 First select the main tone.Example: To select “180 BRASS” as the main tone, press
the TONE button and then use the numberbuttons or [+] and [–] buttons to input 1, 8 andthen 0.
2 Press the LAYER button.
TRANSPOSE/SETTING TONE
LAYERSPLIT
Number buttons
[+] / [–]
Keyboard Settings
B r a s s
3 Select the layered tone.Example: To select “178 FRENCH HORN” as the layered
tone, use the number buttons or [+] and [–]buttons to input 1, 7 and then 8.
4 Now try playing something on the keyboard.• Both tones are played at the same time.
5 Press the LAYER button again to unlayer the tonesand return the keyboard to normal.
LAYERExample: WK-110
Using SplitWith split you can assign two different tones (a main toneand a split tone) to either end of the keyboard, which letsyou play one tone with your left hand and another tone withyour right hand. For example, you could select STRINGS asthe main (high range) tone and PIZZICATO STRINGS as thesplit (low range) tone, putting an entire string ensemble atyour fingertips.Split also lets you specify the split point, which is the locationon the keyboard where the changeover between the two tonesoccurs.
F r . H o r n
Main Tone (BRASS) + Layered Tone (FRENCH HORN)
S t r i n g s Selected layer tone Indicator appears

E-46
Keyboard Settings
To split the keyboard
1 First select the main tone.Example: To select “146 STRINGS” as the main tone,
press the TONE button and then use thenumber buttons or [+] and [–] buttons to input1, 4 and then 6.
2 Press the SPLIT button.
3 Select the split tone.Example: To select “134 PIZZICATO STRINGS” as the
split tone, use the number buttons or [+] and[–] buttons to input 1, 3 and then 4.
4 Specify the split point. While holding down theSPLIT button, press the keyboard where you wantthe leftmost key of the high end range to be.Example: To specify G3 as the split point, press the G3
key.
5 Now try playing something on the keyboard.• Every key from F3 and below is assigned the
PIZZICATO STRINGS tone, while every key from G3and above is assigned the STRINGS tone.
6 Press the SPLIT button again to unsplit the keyboardand return it to normal.
SPLITExample: WK-110
S t r i n g s
P i z z . tS r
G 3
Main Tone (STRINGS)Split Tone(PIZZICATO STRINGS)
Split point
Using Layer and Split TogetherYou can use layer and split together to created a layered splitkeyboard. It makes no difference whether you layer tonesfirst and then split the keyboard, or split the keyboard andthen layer tones. When you use layer and split in combination,the high range of the keyboard is assigned two tones (maintone + layered tone), and the low range two tones (split tone+ layered split tone).
To split the keyboard and then layertones
1 Press the TONE button and then input the tonenumber of the main tone.
2 Press the SPLIT button and then input the numberof the split tone.
• After specifying the split tone, press the SPLIT buttonto unsplit the keyboard.
3 Press the LAYER button and then input the numberof the layered tone.• Note that you can reverse steps 2 and 3, specifying
the layered tone first and then the split tone.
4 Press the SPLIT button or the LAYER button so bothof the SPLIT and LAYER indicators are displayed.
5 Input the number of the layered split tone.
6 Specify the split point.• While holding down the SPLIT button, press the
keyboard where you want the leftmost key of the lowend range to be.
B r a s s
P i z z . S t rIndicator appears
F r . H o r n Indicator appears
S t r i n g s
A c o u s . B sIndicator appears

E-47
7 Play something on the keyboard.• Press the LAYER button to unlayer the keyboard, and
the SPLIT button to unsplit it.
LAYER SPLITExample: WK-110
About TRANSPOSE/SETTING buttonEach press of the TRANSPOSE/SETTING button cyclesthrough the setting screens. If you accidentally pass the screenyou want to use, keep pressing the TRANSPOSE/SETTINGbutton until the screen appears again.
Transposing the KeyboardTranspose lets you raise and lower the overall key of thekeyboard in semitone units. If you want to play anaccompaniment for a vocalist who sings in a key that’sdifferent from the keyboard, for example, simply usetranspose to change the key of the keyboard.
To transpose the keyboard
1 Press the TRANSPOSE/SETTING button until thetranspose setting screen appears.
2 Use the number buttons or the [+]/[–] buttons tochange the key of the keyboard.Example: To transpose the keyboard five semitones
upwards.
NOTE• The keyboard can be transposed within a range of –12
(one octave downwards) to +12 (one octave upwards).• The default transpose setting is “00” when keyboard
power is turned on.
• If you leave the transpose screen on the display for aboutfive seconds without doing anything, the screen isautomatically cleared.
• The transpose setting also affects playback from memoryand Auto Accompaniment.
• To return the keyboard to its default key, perform theabove procedure and press both of the [+] and [–] buttonsat the same time in step 2.
• The effect of a transpose operation depends on the pitchof each note and on the tone you are currently using. Ifa transpose operation causes a note to be outside ofthe allowable range for a tone, the same note in thenearest octave within the range will be substituted.
Adjusting Accompaniment andSong Bank VolumeYou can adjust the volume of the accompaniment and SongBank tunes independently of the notes you play on thekeyboard. You can specify a volume level in the range of 000(minimum) to 127 (maximum).
To adjust the accompaniment volume
1 Press the TRANSPOSE/SETTING button until theaccompaniment volume adjustment screenappears.
2 Use the number buttons or the [+]/[–] buttons tochange the current volume setting value.Example: 110
NOTE• The current accompaniment volume value that appears
in Step 1 automatically clears from the display if you donot input anything within about five seconds.
To adjust built-in tune volumeEnter the Song Bank mode, and then perform the procedureunder “To adjust the accompaniment volume”.• In this case, a song volume screen will appear in place of
the accompaniment volume screen.
Keyboard Settings
T r a n s .
A c o m p V o l
A c o m p V o lCurrent accompaniment volume setting
T r a n s .
Main Tone (BRASS)+
Layered Tone (FRENCH HORN)
Split Tone(PIZZICATO STRINGS)
+Layered Split Tone (STRINGS)
Split point
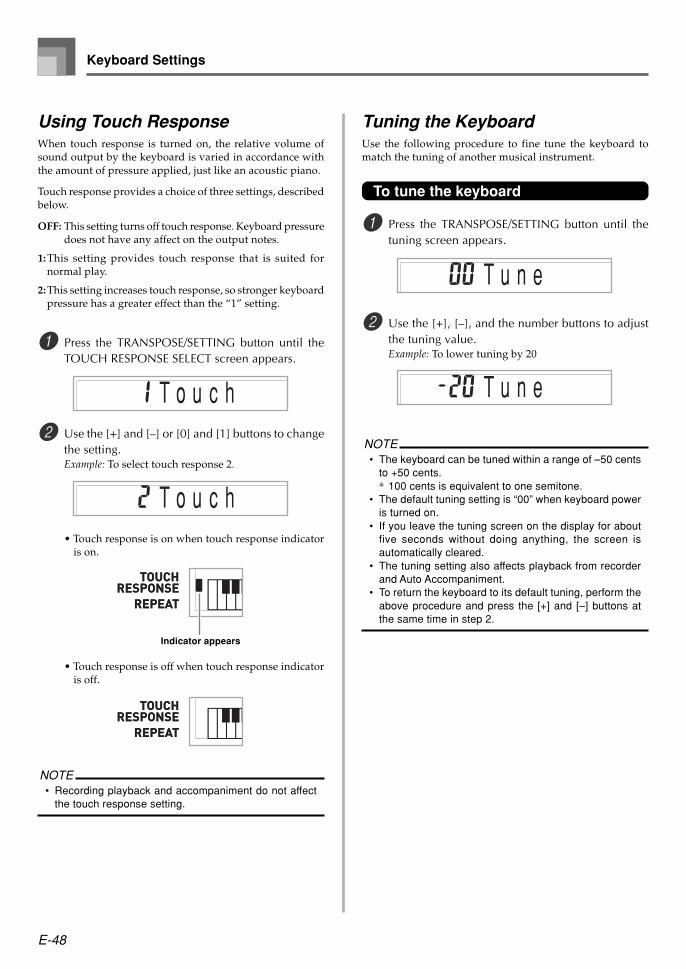
E-48
Keyboard Settings
Using Touch ResponseWhen touch response is turned on, the relative volume ofsound output by the keyboard is varied in accordance withthe amount of pressure applied, just like an acoustic piano.
Touch response provides a choice of three settings, describedbelow.
OFF: This setting turns off touch response. Keyboard pressuredoes not have any affect on the output notes.
1:This setting provides touch response that is suited fornormal play.
2:This setting increases touch response, so stronger keyboardpressure has a greater effect than the “1” setting.
1 Press the TRANSPOSE/SETTING button until theTOUCH RESPONSE SELECT screen appears.
2 Use the [+] and [–] or [0] and [1] buttons to changethe setting.Example: To select touch response 2.
• Touch response is on when touch response indicatoris on.
• Touch response is off when touch response indicatoris off.
NOTE• Recording playback and accompaniment do not affect
the touch response setting.
Indicator appears
T o u c h
T o u c h
T u n e
T u n e
Tuning the KeyboardUse the following procedure to fine tune the keyboard tomatch the tuning of another musical instrument.
To tune the keyboard
1 Press the TRANSPOSE/SETTING button until thetuning screen appears.
2 Use the [+], [–], and the number buttons to adjustthe tuning value.Example: To lower tuning by 20
NOTE• The keyboard can be tuned within a range of –50 cents
to +50 cents.* 100 cents is equivalent to one semitone.
• The default tuning setting is “00” when keyboard poweris turned on.
• If you leave the tuning screen on the display for aboutfive seconds without doing anything, the screen isautomatically cleared.
• The tuning setting also affects playback from recorderand Auto Accompaniment.
• To return the keyboard to its default tuning, perform theabove procedure and press the [+] and [–] buttons atthe same time in step 2.

E-49
Connection to a Computer
Connecting to a ComputerThe keyboard’s USB port makes it quick and simple to connectto a computer. After installing the USB MIDI driver onto yourcomputer from the CD-ROM that comes with the keyboard,you will be able to use commercially available MIDI softwareon your computer to exchange data between the keyboardand your computer.
To install the USB MIDI driver
1 On the computer to which you plan to connect,install the USB MIDI driver that comes on the CD-ROM that comes bundled with the keyboard.• For information about installing the USB MIDI driver,
see the “CASIO USB MIDI Driver User ’s Guide”(manual_e.pdf) on the “USB Manual and Driver CD-ROM”.
NOTE• Before starting actual installation of USB MIDI driver,
be sure to read the contents of the “readme.txt” file inthe “English” folder on the CD-ROM.
• Use Adobe Reader or Acrobat Reader to access the USBMIDI driver user ’s guide.*
* You need to have Adobe Reader or Acrobat Reader installed onyour computer in order to view the contents of the “CASIO USBMIDI Driver User’s Guide” (manual_e.pdf). If your computerdoes not have either Adobe Reader or Acrobat Reader installed,use the procedure below to install it.
Installing Adobe Reader (Acrobat Reader**)• Place the “USB Manual and Driver CD-ROM” into your
computer ’s CD-ROM drive.• On the CD-ROM, navigate to the folder named “Adobe”,
open the folder named “English”, and then double-click“ar601enu.exe” (“ar505enu.exe”**). Follow the instructionsthat appear on your computer screen to install AdobeReader.
** Adobe Reader cannot be installed on a computer runningWindows 98. If your computer is running under Windows 98,double-click “ar505enu.exe” to install Acrobat Reader.
TRANSPOSE/SETTING
RIGHT/TRACK 2LEFT/TRACK 1
Number buttons
[+] / [–]
Minimum Computer system RequirementsSupported Operating SystemsOperation is supported under Windows® XP Professional,Windows® XP Home Edition, Windows® 2000 Professional,Windows® Me, Windows® 98SE, and Windows® 98.
Universal• IBM AT or compatible computer• USB port that provides normal operation under Windows• CD-ROM drive (for installation)• At least 2MB of free hard disk space (not including space
required for Adobe Reader)
Windows XP• 300MHz or higher Pentium processor• At least 128MB of memory
Windows 2000• 166MHz or higher Pentium processor• At least 64MB of memory
Windows Me, Windows 98SE, Windows 98• 166MHz or higher Pentium processor• At least 32MB of memory
NOTE• Company and product names used herein are
trademarks of their respective owners.

E-50
Connection to a Computer
Using the USB portNote that you need to purchase a commercially available USBcable to connect the keyboard to a computer using the USBport.
To connect to a computer using theUSB port
1 Use a commercially available USB cable to connectthe keyboard to the computer.
DATA ACCESS Lamp• The DATA ACCESS lamp lights whenever the keyboard is
exchanging data with a connected computer over a USBcable connection. Never disconnect the USB cable while theDATA ACCESS lamp is lit.
ComputerUSB port USB cable
USB connector
Keyboard USB port
Expanding the Selections in theSong Bank TunesYou can transfer song data from your computer to thekeyboard. You can store up to 5 tunes as Song Bank tunes101 through 105. For SMF data you purchase or create, youneed to use an SMF Converter to convert it to CASIO formatbefore transferring it to the keyboard.
To install the SMF Converter
1 On the computer to which you plan to connect,install the SMF Converter that comes on the CD-ROM that comes bundled with the keyboard.• On the CD-ROM, double-click “SMFConv-e.exe”, and
then follow the instructions that appear on yourcomputer screen to install SMF Converter.
• Before installing SMF Converter, be sure to read the contents ofthe “smfreadme.txt” file in each language folder on the CD-ROM.
For information about using SMF Converter, double-click“index.html” in the [help] folder, which was created whenyou installed SMF Converter. You can also access userdocumentation from the Windows [Start] menu by clicking[Programs] - [CASIO] - [SMF Converter] - [manual].
• A browser that supports frames (like Internet Explorer 4 orNetscape Navigator 4.04 or higher) is required to view the SMFConverter manual.
Minimum Computer System Requirements Operating System:Windows 98SEWindows MeWindows XP Home Edition/XP Professional
StorageAt least 10MB free HDD space
USB interface
• You can also obtain a copy of the SMF Converter bydownloading it at the Web page shown below. Afterdownloading, install the software on your computer.
CASIO MUSIC SITE
http://music.casio.com/
• In addition to the software itself, the CASIO MUSIC SITEwill also provide you with information about its installationand use. You can also find out about the latest news aboutyour keyboard and other CASIO musical instruments, andmuch more.

E-51
Connection to a Computer
Song Data StorageSong data saved as Song Bank tunes are retained even whenpower is turned off, as long as the keyboard is being suppliedbattery or AC adaptor power. If you remove the batteries orshould the batteries go dead while the keyboard is not beingsupplied power by the AC adaptor, song data will be deleted.Be sure to supply power to the keyboard with the AC adaptorwhen replacing batteries.
NOTE• This keyboard supports SMF 0 and 1 format data.• Voice Fingering Guide, on-screen fingering indicators,
and voice announcement of evaluation points are notsupported for SMF data you purchase or create.
Using the SMF Data on theBundled CD-ROMThe CD-ROM that comes bundled with the keyboard containsdemos as well as 25 tunes (SMF data) that you can use forstep lessons. It also contains PDF format files that containthe sheet music of the included tunes.For a full list of the tunes that are included, open the “List.txt”file located inside the “MusicDataFolder” on the CD-ROM.For each tune, “List.txt” shows the tune name, SMF file name,PDF file name of the music score, and the type of lesson forwhich the tune can be used.A tune marked with an asterisk (*) can be used for a both-
hand lesson. A tune that is not marked with an asterisk canbe used for a right-hand lesson.
NOTE• You can load SMF data from the CD-ROM to the
keyboard using the SMF converter tool (page E-50).• You will need to have Adobe Reader or Acrobat Reader
installed on your computer in order to view the contentsof a music score PDF file. If neither of these applicationsis installed on your computer, see “Installing AdobeReader (Acrobat Reader)” on page E-49.
K e y b d C h
K e y b d C h
General MIDI ToneThe General MIDI standard defines the tone numberingsequence, the drum sound numbering sequence, the numberof MIDI channels that can be used, and other general factorsthat determine the sound source configuration. Because ofthis, musical data produced on a General MIDI sound sourcecan be played back using similar tones and identical nuancesas the original, even when played on another manufacturerssound source.This keyboard conforms with General MIDI standards, so itcan be connected to a computer and used to play back GeneralMIDI data that has been purchased, downloaded from theInternet, or obtained from any other source.
Changing the SettingsThis section tells you how to make the settings required whenconnecting to a computer.
KEYBOARD CHANNEL (Default: 1)The keyboard channel is the channel used to send messagesfrom this keyboard to a computer. You can specify one channelfrom 1 to 16 as the keyboard channel.
1 Press the TRANSPOSE/SETTING button until theKEYBOARD CHANNEL screen appears.
2 Use the [+], [–], and the number buttons to changethe channel number.Example: To specify channel 4
E-52
Connection to a Computer
NAVIGATE CHANNEL (Default: 4)When messages are received from a computer for play onthis keyboard, the navigate channel is the channel whose notedata appears on the display. You can select one channel from01 to 16 as the navigate channel. Since this setting lets youuse the data on any channel of commercially available SMFdata to light on the on-screen keyboard guide, you cananalyze how different parts of an arrangement are played.
1 Press the TRANSPOSE/SETTING button until theNAVIGATE CHANNEL screen appears.
2 Use the [+], [–], and the number buttons [0] through[9] to change the channel number.Example: To specify channel 2
To turn off specific sounds before playing back tune datathat is being received<<Navigate channel on/off>>
1 While playing tune data, press the RIGHT/TRACK2 button.• This cuts the sound of the navigate channel, but on-
screen keyboard guide keys continue to light inaccordance with the channel’s data as it is received.Press RIGHT/TRACK 2 button again to turn thechannel back on.
<<Next lower channel from navigate channel on/off>>
1 While playing tune data, press the LEFT/TRACK 1button.• This cuts the sound of the channel whose number is
one less than the navigate channel, but on-screenkeyboard guide keys continue to light in accordancewith the channel’s data as it is received. Press LEFT/TRACK 1 button again to turn the channel back on.
Example: If the navigate channel is channel 4, the aboveoperation turns off channel 3.
N a v i . C h
N a v i . C h
LOCAL CONTROL (Default: On)oFF: Anything played on the keyboard is output as a message
from the USB port, without being sounded by theinternal sound source.
• Note that no sound is produced by the keyboard if LOCALCONTROL is turned off and no external device isconnected.
1 Press the TRANSPOSE/SETTING button until theLOCAL CONTROL screen appears.Example: When LOCAL CONTROL is on
2 Use the [+] and [–] or [0] and [1] buttons to turnthe setting on and off.Example: To turn LOCAL CONTROL off
ACCOMP OUT (Default: Off)on: Auto Accompaniment is played by the keyboard and
the corresponding message is output from the USB port.
oFF: Auto Accompaniment messages are not output from theUSB port.
1 Press the TRANSPOSE/SETTING button until theACCOMP OUT screen appears.Example: When ACCOMP OUT is off
2 Use the [+] and [–] or [0] and [1] buttons to turnthe setting on and off.Example: To turn ACCOMP OUT on
A c o m p O u t
A c o m p O u t
L o c a l
L o c a l

E-53
Connection to a Computer
SUSTAIN/ASSIGNABLE JACK(Default: SUS)
SUS(sustain): Specifies a sustain*1 effect when the pedal isdepressed.
SoS (sostenuto): Specifies a sostenuto*2 effect when thepedal is depressed.
SFt (soft): Specifies reduction of the sound’s volume whenthe pedal is depressed.
rHy (rhythm): Specifies START/STOP button operationwhen the pedal is depressed.
1 Press the TRANSPOSE/SETTING button until theSUSTAIN/ASSIGNABLE JACK screen appears.Example: When sustain is currently set
2 Use the [+] and [–] or [0], [1], [2], and [3] buttonsto change the setting.Example: To select rhythm
*1 SustainWith piano tones and other sounds that decay, the pedal actsas a damper pedal, with sounds being sustained longer whenthe pedal is depressed. With organ tones and other continuoussounds, notes played on the keyboard continue to sound untilthe pedal is released. In either case, the sustain effect is alsoapplied to any notes that are played while the pedal isdepressed.
*2 SostenutoThis effect performs the same way as sustain, except that it isapplied only to notes that are sounding already when thepedal is depressed. It does not affect notes that are playedafter the pedal is depressed.
J a c k
J a c k

E-54
Problem Possible Cause See pageAction
No keyboard sound
Any of the following symptomswhile using battery power.
Auto Accompaniment does notsound.
Sound output does not changewhen key pressure is varied.
On-screen keyboard guide keysstay on.
When playing with anotherinstrument, keys or tunings do notmatch.
1. Power supply problem.
2. Power is not turned on.
3. Volume setting is too low.
4. The MODE switch is in theCASIO CHORD or FINGEREDposition.
5. LOCAL CONTROL is off.
Low battery power
Accompaniment volume is set to000.
Touch response is turned off.
Keyboard is waiting for play ofthe correct note during Step 1 orStep 2 play.
Transpose or tuning is set to avalue other than 00.
PagesE-15, 16
Page E-20
Page E-20
Page E-31
Page E-52
PagesE-15, 16
Page E-47
Page E-48
PagesE-27, 28PagesE-27, 28
Page E-47
Troubleshooting
1. Correctly attach the AC adaptor,make sure that batteries poles(+/–) are facing correctly, andcheck to make sure that batteriesare not dead.
2. Press the POWER button to turnon power.
3. Use the VOLUME knob toincrease volume.
4. Normal play is not possible onthe accompaniment keyboardwhile the MODE switch is set toCASIO CHORD or FINGERED.Change the MODE switchsetting to NORMAL.
5. Turn on LOCAL CONTROL.
Replace the batteries with a set ofnew ones or use the AC adaptor.
Use the TRANSPOSE/SETTINGbutton to increase the volume.
Press the TRANSPOSE/SETTINGbutton to turn it on.
1. Press the lit key to continue withStep 1 or Step 2 play.
2. Press the PLAY/STOP button toquit Step 1 or Step 2 play.
Use the TRANSPOSE/SETTINGbutton to display the applicablesetting screens and set bothtranspose and tuning to 00.
• Dim power supply indicator• Instrument does not turn on• Dim, difficult to read display• Abnormally low speaker/headphone volume• Distortion of sound output• Occasional interruption of sound when playing at high volumes• Sudden power failure when playing at high volumes• Dimming of the display when playing at high volume• Continued sound output even after you release a key• A totally different tone may sound• Abnormal rhythm pattern and demo tune play

E-55
Troubleshooting
Cannot record AutoAccompaniment or rhythm.
Cannot record chordaccompaniment data on acomputer.
After transferring song data frommy computer, playback stops partway through.
Track other than Track 1 is selectedas the recording track.
ACCOMP OUT is turned off.
Digital noise from the USB cableor power cord caused datacommunication between yourcomputer and keyboard to beinterrupted.
Page E-41
Page E-52
Page E-50
Use the track select buttons to selectTrack 1. (Track 2 is melody track.)
Turn on ACCOMP OUT.
Stop playback, disconnect the USBcable from and then reconnect it tothe keyboard’s USB port, and thentry playing back the tune again.If this does not correct the problem,exit the MIDI software you areusing, and then disconnect the USBcable from and then reconnect it tothe keyboard’s USB port. Next,restart your MIDI software and tryplayback again.
Problem Possible Cause See pageAction
This is an unavoidable result of the digital sampling process,* and does not indicatemalfunction.* Multiple digital samples are taken for the low range, middle range, and high range of
the original musical instrument. Because of this, there may be a very slight differencein tonal quality and volume between sample ranges.
A tone’s quality and volumesounds slightly differentdepending where it is played onthe keyboard.

E-56
Specifications
Models: CTK-810/WK-110
Keyboard: CTK-810: 61 standard-size keys, WK-110: 76 standard-size keys (with touchresponse on/off)
Tones: 515; with layer and split
Polyphony: 32 notes maximum (16 for certain tones)
Auto AccompanimentRhythm Patterns: 120Tempo: Variable (226 steps, = 30 to 255)Chords: 3 fingering methods (CASIO CHORD, FINGERED, FULL RANGE CHORD)Rhythm Controller: START/STOP, INTRO, NORMAL/NORMAL FILL-IN, VARIATION/
VARIATION FILL-IN, SYNCHRO/ENDINGAccomp Volume: 0 to 127 (128 steps)One Touch Presets: Recalls settings for tone, tempo, layer, split, reverb, and chorus.
3-step Lesson: 3 lessons (Step 1, 2, 3)Playback: Repeat play of a single tuneEvaluation Mode: ScoringVoice Fingering Guide: On/Off
Song BankNumber of Tunes: Song Bank: 100, download songs: Up to 5 (Capacity: Approximately 70 KB*)
* Calculated based on 1 KB = 1024 bytes.Controllers: PLAY/STOP, PAUSE, FF, REW, REPEAT, LEFT/RIGHT
Musical Information Function: Tone, Auto Accompaniment, Song Bank, numbers and names; staff notation,tempo, metronome, measure and beat number, step lesson display, chord name,fingering, pedal operation, Keyboard, Voice Fingering Guide, Evaluation Mode,Recorder indicator
Metronome: On/OffBeat Specification: 0, 2 to 6
Registration Memory:Number of Setups: 32 (4 setups × 8 banks)
RecorderNumber of Songs: Two (1 Lesson Recording, 1 Performance Recording)Recorded Data: Lesson Recording: Right-hand part, left-hand part, both-hand parts
Performance Recording: Track 1 (chord accompaniment), Track 2 (melody)Recording Method: Real-timeMemory Capacity: Approximately 12,000 notes (total for two songs)
Other FunctionsTranspose: 25 steps (–12 semitones to +12 semitones)Tuning: 101 steps (A4 = approximatery 440Hz ±50Cents)
TerminalsUSB port: TYPE BSustain/Assignable Jack: Standard jack (sustain, sostenuto, soft, rhythm start/stop)Headphone/Output Terminal: Stereo standard jack
<CTK-810> Output Impedance: 150Ω, Output Voltage: 4.5V (RMS) MAX<WK-110> Output Impedance: 200Ω, Output Voltage: 5.2V (RMS) MAX
Power Jack: 9V DC
Power Supply: 2-wayBatteries: CTK-810: 6 AA-size batteries, WK-110: 6 D-size batteriesBattery Life: CTK-810: Approximately 2.5 hours continuous operation on alkaline batteries
WK-110: Approximately 6 hours continuous operation on manganese batteriesAC Adaptor: AD-5Auto Power Off: Turns power off approximately 6 minutes after last key operation. Enabled
under batter power only, can be disabled manually.
E-57
Specifications
Speaker Output: 2.5W + 2.5W
Power Consumption: 9V 7.7W
Dimensions: CTK-810: 94.5 × 37.3 × 13.1 cm (37 1/4 × 14 11/16 × 5 1/8 inch)WK-110: 118.7 × 40.0 × 15.3 cm (46 3/4 × 15 3/4 × 6 inch)
Weight: CTK-810: Approximately 4.8 kg (10.6 lbs)(without batteries)WK-110: Approximately 7.0 kg (15.4 lbs)(without batteries)
• Design and specifications are subject to change without notice.
Be sure to read and observe the following operatingprecautions.
LocationAvoid the following locations for this product.• Areas exposed to direct sunlight and high humidity• Areas subjected to temperature extremes• Near a radio, TV, video deck, or tuner
The above devices will not cause malfunction of theproduct, but interference from the product can causeaudio or video interference of a nearby device.
User Maintenance• Never use benzene, alcohol, thinner, or other chemical
agents to clean the product.• To clean the product or its keyboard, wipe with a soft
cloth moistened in a weak solution of water and a mildneutral detergent. Wring all excess moisture from thecloth before wiping.
Included and Optional AccessoriesUse only accessories that are specified for use with thisproduct. Use of unauthorized accessories creates the riskof fire, electric shock, and personal injury.
Operating Precautions
Weld LinesLines may be visible on the exterior of the product. Theseare “weld lines” that result from the plastic moldingprocess. They are not cracks or scratches.
Musical Instrument EtiquetteAlways be aware of others around you whenever usingthis product. Be especially careful when playing late atnight to keep the volume at levels that do not disturbothers. Other steps you can take when playing late at nightare closing the window and using headphones.
• Any reproduction of the contents of this manual, eitherin part or its entirety, is prohibited. Except for yourown, personal use, any other use of the contents ofthis manual without the consent of CASIO isprohibited under copyright laws.
• IN NO EVENT SHALL CASIO BE LIABLE FOR ANYDAMAGES WHATSOEVER (INCLUDING,WITHOUT LIMITATION, DAMAGES FOR LOSS OFPROFITS, BUSINESS INTERRUPTION, LOSS OFINFORMATION) ARISING OUT OF THE USE OF ORINABILITY TO USE THIS MANUAL OR PRODUCT,EVEN IF CASIO HAS BEEN ADVISED OF THEPOSSIBILITY OF SUCH DAMAGES.
• The contents of this manual are subject to changewithout notice.

A-1
Appendix/ApéndiceTo
ne
Lis
t/Lis
ta d
e so
nid
os
1:
No
./NO
4:
Ban
k S
elec
t M
SB
/MS
B d
e se
lecc
ión
de
ban
co2
: To
ne
Nam
e/N
ombr
e de
son
ido
5:
Max
imu
m P
oly
ph
on
y/P
olifo
nía
máx
ima
3:
Pro
gra
m C
han
ge/
Cam
bio
de p
rogr
ama
6:
Ran
ge
Typ
e/Ti
po d
e ga
ma
VIB
RA
PH
ON
E &
MA
RIM
BA
TU
BU
LAR
BE
LLD
ULC
IME
RB
RIG
HT
CE
LES
TAC
HO
RU
S C
ELE
STA
CH
OR
US
GLO
CK
EN
SP
IEL
CH
OR
US
VIB
RA
PH
ON
EO
RG
AN
DR
AW
BA
R O
RG
AN
1D
RA
WB
AR
OR
GA
N 2
DR
AW
BA
R O
RG
AN
3R
OTA
RY
DR
AW
BA
RP
ER
C.O
RG
AN
1P
ER
C.O
RG
AN
2E
LEC
.OR
GA
N 1
ELE
C.O
RG
AN
2JA
ZZ
OR
GA
N 1
RO
CK
OR
GA
N 1
CH
UR
CH
OR
GA
NC
HA
PE
L O
RG
AN
RE
ED
OR
GA
NA
CC
OR
DIO
N 1
OC
TAV
E A
CC
OR
DIO
NB
AN
DO
NE
ON
HA
RM
ON
ICA
1H
AR
MO
NIC
A 2
TH
EA
TE
RO
CTA
VE
BA
ND
ON
EO
ND
RA
WB
AR
OR
GA
N 4
JAZ
Z O
RG
AN
2R
OC
K O
RG
AN
2D
RA
WB
AR
OR
GA
N 5
JAZ
Z O
RG
AN
3P
ER
C.O
RG
AN
38’
OR
GA
NR
OC
K O
RG
AN
3R
OC
K O
RG
AN
4F
ULL
DR
AW
BA
RO
RG
AN
PA
DS
EQ
UE
NC
E O
RG
AN
PIP
E O
RG
AN
1P
IPE
OR
GA
N 2
OR
GA
N &
HA
RP
SIC
HO
RD
PIP
E O
RG
AN
PA
DA
CC
OR
DIO
N 2
BA
ND
ON
EO
N S
OLO
BA
ND
ON
EO
N &
VIO
LIN
GU
ITA
RN
YLO
N S
TR
.GU
ITA
R
13 14 15 8 8 9 11 16 16 16 17 17 17 16 16 17 18 19 19 20 21 21 23 22 22 19 23 16 17 18 16 17 17 17 18 18 16 17 7 19 19 19 19 21 23 23 24
2 2 2 1 8 8 8 2 1 3 32 2 3 8 4 4 2 2 8 2 2 8 2 2 8 6 3 5 6 1 6 8 1 5 3 4 9 7 16 1 3 4 5 3 1 4 2
16 16 16 32 16 16 16 16 16 16 32 16 16 16 16 16 16 16 32 16 16 16 16 32 16 16 16 16 16 16 16 16 16 16 16 16 32 16 16 32 32 16 16 32 16 16 32
A A A A A B A A A A A A A A A A A A A A A A A A A A A A A A A A A A A A A A A A A A A A A A C
047
048
049
050
051
052
053
054
055
056
057
058
059
060
061
062
063
064
065
066
067
068
069
070
071
072
073
074
075
076
077
078
079
080
081
082
083
084
085
086
087
088
089
090
091
092
093
001
002
003
004
005
006
007
008
009
010
011
012
013
014
015
016
017
018
019
020
021
022
023
024
025
026
027
028
029
030
031
032
033
034
035
036
037
038
039
040
041
042
043
044
045
046
PIA
NO
ST
ER
EO
GR
AN
D P
IAN
OG
RA
ND
PIA
NO
BR
IGH
T P
IAN
OM
ELL
OW
PIA
NO
MO
DE
RN
PIA
NO
DA
NC
E P
IAN
OS
TR
ING
S P
IAN
OS
YN
TH
-ST
R P
IAN
OH
ON
KY-
TO
NK
1 O
CTA
VE
PIA
NO
2 O
CTA
VE
PIA
NO
ELE
C.G
RA
ND
PIA
NO
MO
DE
RN
E.G
.PIA
NO
ST
ER
EO
PIA
NO
ST
ER
EO
PIA
NO
WID
EP
IAN
O P
AD
HA
RP
SIC
HO
RD
CO
UP
LED
HA
RP
SIC
HO
RD
HA
RP
SIC
HO
RD
PA
DE
LE
CT
RIC
PIA
NO
ELE
C.P
IAN
O 1
ELE
C.P
IAN
O 2
FM
ELE
C.P
IAN
OD
YN
O E
LEC
.PIA
NO
60’S
ELE
C.P
IAN
OC
HO
RU
S E
P 1
CH
OR
US
EP
2M
OD
ER
N E
.PIA
NO
SO
FT
E.P
IAN
OE
.PIA
NO
PA
D 1
SY
NT
H-S
TR
. E.P
IAN
OE
.PIA
NO
PA
D 2
CLE
AN
E.P
IAN
OH
AR
PS
ICH
OR
D E
.PIA
NO
CLA
VI
SO
FT
CLA
VI
CLA
VI &
DR
AW
BA
RD
ET
UN
E C
LAV
IS
EQ
UE
NC
E C
LAV
IC
HR
OM
AT
IC P
ER
C.
CE
LES
TAG
LOC
KE
NS
PIE
LM
US
IC B
OX
VIB
RA
PH
ON
EM
AR
IMB
AG
LOC
KE
NS
PIE
L P
AD
SY
NT
H-V
IBR
AP
HO
NE
SY
NT
H-M
AR
IMB
A
0 0 1 0 1 1 0 1 3 3 3 2 2 0 0 0 6 6 6 4 5 5 4 4 4 4 5 4 5 4 4 4 5 7 7 7 7 7 8 9 10 11 12 9 11 12
2 1 2 3 3 1 8 5 2 9 8 2 3 4 9 5 2 8 1 2 3 5 7 5 9 6 2 8 8 3 1 4 4 2 1 3 8 9 2 2 2 2 2 3 3 3
16 32 16 16 16 16 16 16 16 16 16 16 16 16 16 16 32 16 16 32 16 16 32 32 16 16 16 16 16 16 16 32 16 32 32 16 16 16 32 32 16 32 32 16 16 16
A A A A A A A A A A A A A A A A A A A A A A A A A A A A A A A A A A A A A A A B A A A A A A
12
34
56
094
095
096
097
098
099
100
101
102
103
104
105
106
107
108
109
110
111
112
113
114
115
116
117
118
119
120
121
122
123
124
125
126
127
128
129
130
131
132
133
134
135
136
137
138
139
140
ST
EE
L S
TR
.GU
ITA
R 1
ST
EE
L S
TR
.GU
ITA
R 2
12 S
TR
.GU
ITA
RJA
ZZ
GU
ITA
RO
CT
JA
ZZ
GU
ITA
RC
LEA
N G
UIT
AR
1C
LEA
N G
UIT
AR
2M
UT
E G
UIT
AR
CR
UN
CH
ELE
C.G
UIT
AR
OV
ER
DR
IVE
GT
DIS
TO
RT
ION
GT
PO
WE
R D
IST.
GT
RH
YT
HM
DIS
T. G
TF
EE
DB
AC
K G
TC
HO
RU
S S
TE
EL
GT
DIS
T.G
T &
BA
SS
ST
EE
L G
T H
AR
MO
NIC
SB
AS
SA
CO
US
TIC
BA
SS
RID
E B
AS
SF
ING
ER
ED
BA
SS
PIC
KE
D B
AS
SF
RE
TLE
SS
BA
SS
SLA
P B
AS
SD
OU
BLE
D S
TR
ING
S B
AS
SS
AW
SY
NT
H-B
AS
SS
QR
SY
NT
H-B
AS
SV
OC
OD
ER
BA
SS
DIG
I RO
CK
BA
SS
SO
UL
SY
NT
H-B
AS
ST
RA
NC
E B
AS
SM
ELL
OW
FIN
GE
RE
D B
AS
SB
AS
S &
KIC
KC
LAV
I BA
SS
RH
YT
HM
PIC
KE
D B
AS
SR
HY
TH
M F
ING
ER
ED
BA
SS
SIN
E B
AS
SO
RG
AN
BA
SS
ST
R/O
RC
HE
ST
RA
VIO
LIN
SLO
W V
IOLI
NC
ELL
OP
IZZ
ICA
TO
ST
RIN
GS
HA
RP
1D
OU
BLE
VIO
LIN
SLO
W C
ELL
OV
IOLI
N S
EC
TIO
NS
LOW
VIO
LIN
SE
CT
ION
PIZ
ZIC
AT
O E
NS
EM
BLE
25 25 25 26 26 27 27 28 27 29 30 30 30 31 25 30 25 32 32 33 34 35 37 37 38 39 38 39 38 38 33 39 39 34 33 39 39 40 40 42 45 46 40 42 40 40 45
2 4 8 2 8 2 3 2 8 2 2 5 4 8 9 6 3 2 32 2 2 2 2 3 2 2 3 1 1 4 3 3 4 3 4 6 5 2 8 2 2 2 1 8 4 9 1
32 32 16 32 16 32 32 32 16 32 32 16 16 16 16 16 16 32 16 32 32 32 32 16 32 32 32 32 16 32 32 16 16 32 32 32 32 32 32 32 32 32 16 32 16 16 16
C C C C C C C C C C C C C C C C C C C C C C C C C C C C C C C C C C C A A A A C A A A C A A A
12
34
56
12
34
56

A-2
Appendix/Apéndice14
114
214
314
414
5
146
147
148
149
150
151
152
153
154
155
156
157
158
159
160
161
162
163
164
165
166
167
168
169
170
171
172
173
174
175
176
177
178
179
180
181
182
183
184
185
186
187
188
189
190
191
192
193
CE
LLO
SE
CT
ION
OC
TAV
E P
IZZ
ICA
TO
DO
UB
LE V
IOLA
HA
RP
2C
HO
RU
S H
AR
PE
NS
EM
BL
ES
TR
ING
SS
LOW
ST
RIN
GS
1W
IDE
ST
RIN
GS
OC
TAV
E S
TR
ING
S 1
CH
AM
BE
RS
TR
ING
S S
FZ
SY
NT
H-S
TR
ING
S 1
SY
NT
H-S
TR
ING
S 2
SY
NT
H-S
TR
ING
S 3
CH
OIR
AA
HS
CH
OIR
S 1
VO
ICE
DO
OS
YN
TH
-VO
ICE
1S
YN
TH
-VO
ICE
PA
DO
RC
HE
ST
RA
HIT
HA
RP
& S
TR
ING
SF
LUT
E &
ST
RIN
GS
OR
CH
ES
TR
A S
TR
ING
SS
LOW
ST
RIN
GS
2S
TR
ING
S V
OIC
EO
CTA
VE
ST
RIN
GS
2FA
ST
SY
NT
H S
TR
ING
SS
LOW
CH
OIR
CH
OIR
ST
RIN
GS
CH
OIR
S 2
VO
ICE
UU
HS
YN
TH
-VO
ICE
2C
HO
RU
S S
YN
TH
-VO
ICE
BR
AS
ST
RU
MP
ET
TR
OM
BO
NE
TU
BA
1M
UT
E T
RU
MP
ET
FR
EN
CH
HO
RN
HO
RN
OR
CH
ES
TR
AB
RA
SS
BR
AS
S S
EC
TIO
N 1
BR
AS
S S
FZ
BR
AS
S &
ST
RIN
GS
HA
RD
BR
AS
SB
RA
SS
SE
CT
ION
2A
NA
LOG
SY
NT
H-B
RA
SS
1S
YN
TH
-BR
AS
S 1
SY
NT
H-B
RA
SS
2T
RA
NC
E B
RA
SS
ME
LLO
W T
RU
MP
ET
VE
LO.T
RU
MP
ET
VE
LO.T
RO
MB
ON
EM
ELL
OW
TR
OM
BO
NE
42 45 41 46 46 48 49 48 48 48 48 50 51 51 52 52 53 54 54 55 50 51 48 49 49 48 50 52 52 52 53 54 54 56 57 58 59 60 60 61 61 61 61 61 61 62 62 63 62 56 56 57 57
4 3 2 1 8 2 2 16 32 3 8 2 2 3 2 8 2 2 8 2 4 4 4 3 4 1 3 9 3 4 3 1 9 2 2 2 2 2 16 2 3 8 4 5 6 8 2 2 1 8 4 4 1
16 16 16 32 16 32 32 16 16 16 32 32 32 16 32 32 32 32 16 16 16 16 16 32 16 16 32 32 16 16 32 32 16 32 32 32 32 16 16 32 16 16 16 16 16 16 32 16 16 32 32 16 32
C A A A A A A A A A A A A A A A A A A A A A A A A A A A A A A A A A C C A C C A A A A A A A A A A A A C C
12
34
56
194
195
196
197
198
199
200
201
202
203
204
205
206
207
208
209
210
211
212
213
214
215
216
217
218
219
220
221
222
223
224
225
226
227
228
229
230
231
232
233
234
235
236
237
238
239
240
241
242
243
244
245
246
TU
BA
2F
RE
NC
H H
OR
N S
OLO
ME
LLO
W B
RA
SS
AN
ALO
G S
YN
TH
-BR
AS
S 2
SY
NT
H-B
RA
SS
PA
DR
EE
D/P
IPE
SO
PR
AN
O S
AX
ALT
O S
AX
1A
LTO
SA
X 2
BR
EA
TH
Y A
.SA
XH
AR
D A
.SA
XR
ICH
A.S
AX
TE
NO
R S
AX
1T
EN
OR
SA
X 2
BR
EA
TH
Y T
.SA
XT.
SA
XY
SB
AR
ITO
NE
SA
XO
BO
EC
LAR
INE
TB
RE
AT
HY
S.S
AX
SO
FT
A.S
AX
SO
LO A
.SA
XS
AX
SE
CT
ION
SA
X S
EC
TIO
N S
FZ
DE
TU
NE
T.S
AX
SO
FT
T.S
AX
SO
LO T
.SA
XS
OLO
OB
OE
VE
LO.C
LAR
INE
TP
ICC
OLO
1F
LUT
E 1
FLU
TE
2P
UR
E F
LUT
EP
IPE
SE
CT
ION
1R
EC
OR
DE
RP
AN
FLU
TE
1B
OT
TLE
BLO
WS
HA
KU
HA
CH
IW
HIS
TLE
1O
CA
RIN
AP
ICC
OLO
2P
IPE
SE
CT
ION
2S
OF
T F
LUT
EW
HIS
TLE
2P
AN
FLU
TE
2 S
YN
TH
-LE
AD
SQ
UA
RE
LE
AD
1S
QU
AR
E P
ULS
E L
EA
DS
EQ
UE
NC
E L
EA
DS
AW
LE
AD
1M
ELL
OW
SA
W L
EA
DS
EQ
UE
NC
E S
AW
1S
INE
LE
AD
VE
LO.S
INE
LE
AD
SS
LE
AD
58 60 61 62 63 64 65 65 65 65 65 66 66 66 66 67 68 71 64 65 65 65 65 66 66 66 68 71 72 73 73 73 72 74 75 76 77 78 79 72 73 73 78 75 80 80 83 81 81 81 80 80 81
3 8 1 9 3 2 1 2 8 3 6 1 2 8 9 2 2 2 8 5 4 9 7 3 5 4 4 4 2 2 1 8 4 2 2 2 2 2 2 3 4 5 3 3 2 5 5 2 8 32 8 9 3
32 32 32 16 16 32 16 32 16 16 16 16 32 16 16 32 32 32 16 32 32 16 16 16 32 32 32 32 16 32 16 16 16 32 32 16 16 32 32 16 16 16 32 16 16 16 16 16 16 16 32 32 16
C C A A A A C C C C C C C C C C A A A C C C C C C C A A B A A A A A A A A A A B A A A A A A A A A A A A A
247
248
249
250
251
252
253
254
255
256
257
258
259
260
261
262
263
264
265
266
267
268
269
270
271
272
273
274
275
276
277
278
279
280
281
282
283
284
285
286
287
288
289
290
291
292
293
294
295
296
297
298
299
300
CA
LLIO
PE
1V
EN
T L
EA
DC
HIF
F L
EA
D 1
DR
OP
LE
AD
EP
LE
AD
VO
ICE
LE
AD
1B
AS
S+
LEA
DS
QU
AR
E L
EA
D 2
SLO
W S
QU
AR
E L
EA
DS
LOW
SQ
UA
RE
PU
LSE
SE
QU
EN
CE
SQ
UA
RE
SE
QU
EN
CE
PU
LSE
1S
QU
AR
E L
EA
D 3
SQ
UA
RE
LE
AD
4S
AW
LE
AD
2S
LOW
SA
W L
EA
DP
ULS
E S
AW
LE
AD
SLO
W S
AW
PU
LSE
FIF
TH
SE
QU
EN
CE
SE
QU
EN
CE
PU
LSE
2S
EQ
UE
NC
E S
AW
2C
ALL
IOP
E 2
VE
NT
SY
NT
HP
UR
E L
EA
DD
IST
OR
TIO
N L
EA
DO
CTA
VE
CH
AR
AN
GV
OIC
E L
EA
D 2
CH
UR
CH
LE
AD
DO
UB
LE V
OIC
E L
EA
DV
OIC
E C
HO
IR L
EA
DE
P &
VO
ICE
LE
AD
SY
NT
H-V
OIC
E L
EA
DF
IFT
H S
AW
LE
AD
FIF
TH
SQ
UA
RE
LE
AD
BA
SS
+S
AW
LE
AD
SY
NT
H-B
AS
S+
LEA
DS
YN
TH
-PA
DFA
NTA
SY
1FA
NTA
SY
2W
AR
M P
AD
WA
RM
VO
XS
INE
PA
DP
OLY
SY
NT
H 1
PO
LY S
AW
PO
LYS
YN
TH
PA
D 1
SP
AC
E S
TR
ING
S P
AD
BO
WE
D P
AD
GLA
SS
PA
DE
TH
NIC
PA
DH
ALO
PA
D 1
HA
LO P
AD
2R
AIN
DR
OP
1S
OU
ND
TR
AC
K 1
RA
VE
CR
YS
TAL
82 82 83 83 83 85 87 80 80 80 80 80 80 80 81 81 81 81 86 81 81 82 82 82 84 84 85 85 85 85 85 85 86 86 87 87 88 88 89 89 89 90 90 90 91 92 92 93 94 94 96 97 97 98
2 5 2 4 1 2 2 3 4 6 7 16 1 32 1 4 5 6 1 9 16 3 1 4 8 2 3 4 8 5 6 7 2 3 1 3 2 3 2 8 3 2 8 5 3 2 3 2 2 3 2 2 8 2
16 16 16 16 16 16 16 16 16 16 16 16 32 16 32 16 16 16 16 16 16 16 16 16 16 16 16 16 16 16 16 16 16 16 16 16 16 16 16 16 16 16 16 16 16 16 16 16 16 16 16 16 16 32
A A A A A A A A A A A A A A A A A A A A A A A A A A A A A A A A A A A A A A A A A A A A A A A A A A A A A A
12
34
56
12
34
56

A-3
Appendix/Apéndice30
130
230
330
430
530
630
730
830
931
031
131
231
331
431
531
631
731
831
932
032
132
232
332
432
532
632
732
832
933
033
133
233
333
433
533
633
733
833
934
0
341
342
343
344
345
346
347
348
349
350
351
352
353
354
SO
FT
CR
YS
TAL
AT
MO
SP
HE
RE
BR
IGH
TN
ES
S 1
GO
BLI
NE
CH
O P
AD
STA
R T
HE
ME
1S
PA
CE
PA
DN
EW
AG
E P
AD
SO
FT
PA
DH
OR
N P
AD
TH
ICK
PA
DP
OLY
SY
NT
H 2
OLD
TA
PE
PA
DP
OLY
SY
NT
H P
AD
2H
EA
VE
NU
TO
PIA
SQ
UA
RE
PA
DS
OF
T M
ETA
L P
AD
HA
RD
ME
TAL
PA
DT
INE
PA
DC
HO
RU
S P
AD
OR
GA
N C
HO
IR P
AD
SW
EE
P P
AD
SW
EE
P C
HO
IRC
LAV
I PA
DR
AIN
DR
OP
2S
OU
ND
TR
AC
K 2
SP
AC
E V
OIC
EC
HO
RA
L B
ELL
GLO
CK
EN
SP
IEL
CH
IME
CH
RIS
TM
AS
BE
LLV
IBR
AP
HO
NE
BE
LLN
YLO
N+
EP
CE
LES
TA P
AD
BR
IGH
T B
ELL
PA
DB
RIG
HT
NE
SS
2E
CH
O V
OIC
EE
CH
O D
RO
PP
OLY
DR
OP
STA
R T
HE
ME
2E
TH
NIC
/CH
INE
SE
SIT
AR
1W
AR
M S
ITA
RB
AN
JOM
UT
E B
AN
JOS
HA
MIS
EN
1T
SU
GA
RU
KO
TO
TH
UM
B P
IAN
OS
HA
NA
IS
TE
EL
DR
UM
SE
R H
U 1
ER
HU
2Y
AN
G Q
IN 1
YA
NG
QIN
2
98 99 100
101
102
103
103
88 89 89 89 90 89 90 91 91 92 93 93 93 94 94 95 95 96 96 97 97 98 98 98 98 99 99 100
100
102
102
102
103
104
104
105
105
106
106
107
108
111
114
110
110
15 15
1 2 2 2 2 2 8 1 4 5 1 1 6 4 2 1 1 3 4 1 1 4 2 1 1 3 3 1 16 5 3 8 5 1 1 3 1 3 4 1 2 1 2 1 2 1 2 2 2 2 8 9 8 9
16 16 16 16 16 16 16 16 16 16 16 16 16 16 16 16 16 16 16 16 16 16 16 16 16 16 16 16 16 16 16 16 16 16 16 16 16 16 16 16 16 16 32 32 32 32 16 32 32 16 32 32 32 16
A A A A A A A A A A A A A A A A A A A A A A A A A A A A A A A A A A A A A A A A A A A A A A A A A A A A A A
355
356
357
358
359
360
361
362
363
364
365
366
367
368
369
370
371
372
373
374
375
376
377
378
379
380
381
382
383
384
385
386
387
388
389
390
391
392
393
394
395
396
397
398
399
400
401
402
403
404
405
406
407
408
DI Z
IY
AN
G Q
IN &
ER
HU
ZH
EN
GS
UO
NA
PI P
A 1
SH
EN
GK
OT
O P
AD
SIT
AR
2TA
MB
RA
SIT
AR
PA
DR
AB
AB
PI P
A 2
SH
AM
ISE
N 2
DE
TU
NE
KO
TO
SY
NT
H-K
OT
OS
HA
MIS
EN
& T
AIK
OX
IAO
SA
NT
UR
GM
TO
NE
SG
M P
IAN
O 1
GM
PIA
NO
2G
M P
IAN
O 3
GM
HO
NK
Y-T
ON
KG
M E
.PIA
NO
1G
M E
.PIA
NO
2G
M H
AR
PS
ICH
OR
DG
M C
LAV
IG
M C
ELE
STA
GM
GLO
CK
EN
SP
IEL
GM
MU
SIC
BO
XG
M V
IBR
AP
HO
NE
GM
MA
RIM
BA
GM
XY
LOP
HO
NE
GM
TU
BU
LAR
BE
LLG
M D
ULC
IME
RG
M O
RG
AN
1G
M O
RG
AN
2G
M O
RG
AN
3G
M P
IPE
OR
GA
NG
M R
EE
D O
RG
AN
GM
AC
CO
RD
ION
GM
HA
RM
ON
ICA
GM
BA
ND
ON
EO
NG
M N
YLO
N S
TR
.GU
ITA
RG
M S
TE
EL
ST
R.G
UIT
AR
GM
JA
ZZ
GU
ITA
RG
M C
LEA
N G
UIT
AR
GM
MU
TE
GU
ITA
RG
M O
VE
RD
RIV
E G
TG
M D
IST
OR
TIO
N G
TG
M G
T H
AR
MO
NIC
SG
M A
CO
US
TIC
BA
SS
GM
FIN
GE
RE
D B
AS
SG
M P
ICK
ED
BA
SS
GM
FR
ET
LES
S B
AS
S
72 111
107
111
105
109
107
104
104
104
105
105
106
107
107
106
77 15 0 1 2 3 4 5 6 7 8 9 10 11 12 13 14 15 16 17 18 19 20 21 22 23 24 25 26 27 28 29 30 31 32 33 34 35
16 8 1 32 32 8 5 3 8 4 8 4 3 4 3 4 32 16 0 0 0 0 0 0 0 0 0 0 0 0 0 0 0 0 0 0 0 0 0 0 0 0 0 0 0 0 0 0 0 0 0 0 0 0
32 16 16 32 32 32 16 32 16 32 16 16 16 16 16 16 16 32 32 16 32 16 32 16 32 32 32 32 16 32 32 32 32 16 16 16 16 16 32 16 32 16 32 32 32 32 32 32 32 32 32 32 32 32
A A A A A A A A A A A A A A A A A A A A A A A A A A A A A A A A A A A A A A A A A A A A A A A A A A A A A A
409
410
411
412
413
414
415
416
417
418
419
420
421
422
423
424
425
426
427
428
429
430
431
432
433
434
435
436
437
438
439
440
441
442
443
444
445
446
447
448
449
450
451
452
453
454
455
456
457
458
459
460
461
462
463
GM
SLA
P B
AS
S 1
GM
SLA
P B
AS
S 2
GM
SY
NT
H-B
AS
S 1
GM
SY
NT
H-B
AS
S 2
GM
VIO
LIN
GM
VIO
LAG
M C
ELL
OG
M C
ON
TR
AB
AS
SG
M T
RE
MO
LO S
TR
ING
SG
M P
IZZ
ICA
TO
GM
HA
RP
GM
TIM
PA
NI
GM
ST
RIN
GS
1G
M S
TR
ING
S 2
GM
SY
NT
H-S
TR
ING
S 1
GM
SY
NT
H-S
TR
ING
S 2
GM
CH
OIR
AA
HS
GM
VO
ICE
DO
OG
M S
YN
TH
-VO
ICE
GM
OR
CH
ES
TR
A H
ITG
M T
RU
MP
ET
GM
TR
OM
BO
NE
GM
TU
BA
GM
MU
TE
TR
UM
PE
TG
M F
RE
NC
H H
OR
NG
M B
RA
SS
GM
SY
NT
H-B
RA
SS
1G
M S
YN
TH
-BR
AS
S 2
GM
SO
PR
AN
O S
AX
GM
ALT
O S
AX
GM
TE
NO
R S
AX
GM
BA
RIT
ON
E S
AX
GM
OB
OE
GM
EN
GLI
SH
HO
RN
GM
BA
SS
OO
NG
M C
LAR
INE
TG
M P
ICC
OLO
GM
FLU
TE
GM
RE
CO
RD
ER
GM
PA
N F
LUT
EG
M B
OT
TLE
BLO
WG
M S
HA
KU
HA
CH
IG
M W
HIS
TLE
GM
OC
AR
INA
GM
SQ
UA
RE
LE
AD
GM
SA
W L
EA
DG
M C
ALL
IOP
EG
M C
HIF
F L
EA
DG
M C
HA
RA
NG
GM
VO
ICE
LE
AD
GM
FIF
TH
LE
AD
GM
BA
SS
+LE
AD
GM
FA
NTA
SY
GM
WA
RM
PA
DG
M P
OLY
SY
NT
H
36 37 38 39 40 41 42 43 44 45 46 47 48 49 50 51 52 53 54 55 56 57 58 59 60 61 62 63 64 65 66 67 68 69 70 71 72 73 74 75 76 77 78 79 80 81 82 83 84 85 86 87 88 89 90
0 0 0 0 0 0 0 0 0 0 0 0 0 0 0 0 0 0 0 0 0 0 0 0 0 0 0 0 0 0 0 0 0 0 0 0 0 0 0 0 0 0 0 0 0 0 0 0 0 0 0 0 0 0 0
32 32 32 32 32 32 32 32 32 32 32 32 32 32 32 32 32 32 16 16 32 32 32 32 16 32 32 16 32 32 32 32 32 32 32 32 32 32 32 32 16 16 32 32 16 16 16 16 16 16 16 16 16 16 16
A A A A A A A A A A A A A A A A A A A A A A A A A A A A A A A A A A A A A A A A A A A A A A A A A A A A A A A
12
34
56
12
34
56
12
34
56

A-4
Appendix/Apéndice46
446
546
646
746
846
947
047
147
247
347
447
547
647
747
847
948
048
148
248
348
448
548
648
748
848
949
049
149
249
349
449
549
649
749
849
950
0
501
502
503
504
505
506
507
508
509
510
511
512
513
514
515
GM
SP
AC
E C
HO
IRG
M B
OW
ED
GLA
SS
GM
ME
TAL
PA
DG
M H
ALO
PA
DG
M S
WE
EP
PA
DG
M R
AIN
DR
OP
GM
SO
UN
D T
RA
CK
GM
CR
YS
TAL
GM
AT
MO
SP
HE
RE
GM
BR
IGH
TN
ES
SG
M G
OB
LIN
SG
M E
CH
OE
SG
M S
FG
M S
ITA
RG
M B
AN
JOG
M S
HA
MIS
EN
GM
KO
TO
GM
TH
UM
B P
IAN
OG
M B
AG
PIP
EG
M F
IDD
LEG
M S
HA
NA
IG
M T
INK
LE B
ELL
GM
AG
OG
OG
M S
TE
EL
DR
UM
SG
M W
OO
D B
LOC
KG
M T
AIK
OG
M M
ELO
DIC
TO
MG
M S
YN
TH
-DR
UM
GM
RE
VE
RS
E C
YM
BA
LG
M G
T F
RE
T N
OIS
EG
M B
RE
AT
H N
OIS
EG
M S
EA
SH
OR
EG
M B
IRD
GM
TE
LEP
HO
NE
GM
HE
LIC
OP
TE
RG
M A
PP
LAU
SE
GM
GU
NS
HO
TD
RU
M S
ET
STA
ND
AR
D S
ET
1S
TAN
DA
RD
SE
T 2
STA
ND
AR
D S
ET
3S
TAN
DA
RD
SE
T 4
RO
OM
SE
TP
OW
ER
SE
TR
OC
K S
ET
HIP
HO
P S
ET
ELE
CT
RO
NIC
SE
TS
YN
TH
SE
T 1
SY
NT
H S
ET
2T
RA
NC
E S
ET
JAZ
Z S
ET
BR
US
H S
ET
OR
CH
ES
TR
A S
ET
91 92 93 94 95 96 97 98 99 100
101
102
103
104
105
106
107
108
109
110
111
112
113
114
115
116
117
118
119
120
121
122
123
124
125
126
127
0 1 2 4 8 16 65 64 24 25 30 31 32 40 48
0 0 0 0 0 0 0 0 0 0 0 0 0 0 0 0 0 0 0 0 0 0 0 0 0 0 0 0 0 0 0 0 0 0 0 0 0 120
120
120
120
120
120
120
120
120
120
120
120
120
120
120
16 16 16 16 16 16 16 16 16 16 16 16 16 16 32 32 32 32 16 32 32 32 32 16 32 32 32 32 32 32 32 16 16 32 32 16 32
A A A A A A A A A A A A A A A A A A A A A A A A D D D D D A A D D D D D D D D D D D D D D D D D D D D D
12
34
56
NO
TE
•T
he m
eani
ng o
f eac
h ra
nge
type
is d
escr
ibed
bel
ow.
NO
TA•
El s
igni
ficad
o de
cad
a tip
o de
gam
a se
des
crib
e de
bajo
.
......
..Not
es in
thes
e ra
nges
are
pro
duce
d by
pla
ying
the
note
s in
ran
ge b
that
are
in th
e ne
ares
t oct
ave
as th
e re
sult
of tr
ansp
ose
and
mes
sage
rec
eive
ope
ratio
ns.
......
..Las
not
as e
n es
tas
gam
as s
e pr
oduc
en e
jecu
tand
o la
s no
tas
en la
gam
a b
que
se
encu
entr
e en
la o
ctav
a m
ás c
erca
na c
omo
resu
ltado
de
las
oper
acio
nes
de
tran
spos
ició
n y
rece
pció
n de
men
saje
s.
a...
.....K
eybo
ard
rang
e...
.....G
ama
del t
ecla
do
b...
.....A
vaila
ble
rang
e (u
sing
tran
spos
e or
mes
sage
rec
eive
)...
.....G
ama
disp
onib
le (
usan
do la
tran
spos
ició
n o
rece
pció
n de
men
saje
s)
c
C-1
C9
C8
C7
G7
C6
C5
C4
C3
C2C1
C0E0
E1E2
G6
G8
G9
A=
440H
z
No
scal
e fo
r to
nes.
Sin
esc
ala
para
los
soni
dos.
D(S
ound
Effe
ct)
(Efe
cto
de s
onid
o)
B“0
40 G
LOCK
ENSP
IEL”
/“0
52 C
HORU
S G
LOCK
ENSP
IEL ”
/“2
22 P
ICCO
LO 1
”/“2
33 P
ICCO
LO 2
”
C
Inst
rum
ento
s de
altu
ra to
nal b
aja
Low
pitc
h in
stru
men
ts
Rang
e Ty
pe/T
ipo
de g
ama
A(S
tand
ard
type
)(T
ipo
está
ndar
)
“040
GLO
CKEN
SPIE
L”/
“052
CHO
RUS
GLO
CKEN
SPIE
L ”/
“222
PIC
COLO
1”/
“233
PIC
COLO
2”
<C
TK
-810
>
<W
K-1
10> <
CT
K-8
10>
<W
K-1
10>
<C
TK
-810
>
<W
K-1
10>

A-5
Appendix/ApéndiceD
rum
Ass
ign
men
t Lis
t/Lis
ta d
e as
ign
ació
n d
e b
ater
ía
C-1
D-1
E-1
F-1
G-1
A-1
B-1
C0
D0
E0 F0 G0
A0
B0
C1
D1
E1 F1 G1
A1
B1
C2
D2
E2 F2 G2
A2
B2
C3
D3
E3 F3 G3
A3
B3
C4
D4
E4 F4 G4
A4
B4
C5
D5
E5 F5 G5
A5
B5
C6
D6
E6 F6 G6
A6
B6
C7
D7
E7
1 3 5 6 8 10 12 13 15 17 18 20 22 24 25 27 29 30 32 34 36 37 39 41 42 44 46 48 49 51 53 54 56 58 60 61 63 65 66 68 70 72 73 75 77 78 80 82 84 85 87 89 90 92 94 96 97 99 101
Key
/ N
ote
num
ber
DR
UM
S S
ET
LIS
T
2 4 7 9 11 14 16 19 21 23 26 28 31 33 35 38 40 43 45 47 50 52 55 57 59 62 64 67 69 71 74 76 79 81 83 86 88 91 93 95 98 100
C#-
1
E -
1
F#-1
A -
1
B -
1
C#0
E 0
F#0
A 0
B 0
C#1
E 1
F#1
A 1
B 1
C#2
E 2
F#2
A 2
B 2
C#3
E 3
F#3
A 3
B 3
C#4
E 4
F#4
A 4
B 4
C#5
E 5
F#5
A 5
B 5
C#6
E 6
F#6
A 6
B 6
C#7
E 7
SY
NT
H S
ET
2T
RA
NC
E S
ET
JAZ
Z S
ET
BR
US
H S
ET
OR
CH
ES
TRA
SE
T— — — — — — — — — — — — — — — — — — — — — — — — — — — S
ynth
2 K
ick
2S
ynth
2 K
ick
1 S
ynth
2 S
nare
1 S
ynth
2 S
nare
2 S
ynth
1 C
owbe
ll S
ynth
1 M
arac
as S
ynth
1 C
lave
s — — — — — — — — — —
— — — — — — — — — — — — — — — — — — — — — — — — — — Tran
ce O
pen
Hi-H
at 3
Syn
th2
Kic
k 2
Tran
ce K
ick
Sid
e S
tick
2Tr
ance
Sna
re 1
Han
d C
lap
3Tr
ance
Sna
re 2
Tran
ce C
lose
d H
i-Hat
Tran
ce O
pen
Hi-H
at 1
Tran
ce O
pen
Hi-H
at 2
Tran
ce T
ambo
urin
e — — — — — — — — — —
— — — — — — — — — — — — — — — — — — — — — — — — — — — Jazz
Kic
k 2
Jazz
Kic
k 1
Bru
sh S
nare
1B
rush
Sla
pB
rush
Sna
re 2
— — — — — — — — — —
— — — — — — — — — — — — — — — — — — — — — — — — — — — Clo
sed
Hi-H
atPe
dal H
i-Hat
Ope
n H
i-Hat
Rid
e C
ymba
l 1 Ja
zz K
ick
1C
once
rt B
D 1
Con
cert
SD
Cas
tane
tsC
once
rt S
DTi
mpa
ni F
Tim
pani
F#
Tim
pani
GTi
mpa
ni G
#Ti
mpa
ni A
Tim
pani
A#
Tim
pani
BTi
mpa
ni c
Tim
pani
c#
Tim
pani
dTi
mpa
ni d
#Ti
mpa
ni e
Tim
pani
f C
once
rt C
ymba
l 2 C
once
rt C
ymba
l 1 — — — — — — — — — —
— — — — — — — — — — — — — — — — — — — — — — — — — — — Jazz
Kic
k 2
Jazz
Kic
k 1
Jazz
Sna
re 1
Jazz
Sna
re 2
— — — — — — — — — —
STA
ND
AR
D S
ET
1S
TAN
DA
RD
SE
T 2
STA
ND
AR
D S
ET
3R
OO
M S
ET
PO
WE
R S
ET
RO
CK
SE
TH
IP-H
OP
SE
TE
LEC
TRO
NIC
SE
TS
YN
TH
SE
T 1
STA
ND
AR
D S
ET
4— — — — — — — — — — — — — — — — — — — — — — — — — — — H
igh
QS
lap
Scr
atch
Pus
hS
crat
ch P
ull
Stic
ksS
quar
e C
lick
Met
rono
me
Clic
kM
etro
nom
e B
ell
Sta
ndar
d1 K
ick
2S
tand
ard1
Kic
k 1
Sid
e S
tick
1S
tand
ard1
Sna
re 1
Han
d C
lap
1S
tand
ard1
Sna
re 2
Low
Tom
2C
lose
d H
i-Hat
Low
Tom
1Pe
dal H
i-Hat
Mid
Tom
2O
pen
Hi-H
atM
id T
om 1
Hig
h To
m 2
Cra
sh C
ymba
l 1H
igh
Tom
1R
ide
Cym
bal 1
Chi
nese
Cym
bal
Rid
e B
ell
Tam
bour
ine
Spl
ash
Cym
bal
Cow
bell
Cra
sh C
ymba
l 2V
ibra
slap
Rid
e C
ymba
l 2H
igh
Bon
goLo
w B
ongo
Mut
e H
igh
Con
gaO
pen
Hig
h C
onga
Ope
n Lo
w C
onga
Hig
h Ti
mba
leLo
w T
imba
leH
igh
Ago
goLo
w A
gogo
Cab
asa
Mar
acas
Sho
rt H
igh
Whi
stle
Long
Low
Whi
stle
Sho
rt G
uiro
Long
Gui
roC
lave
sH
igh
Woo
d B
lock
Low
Woo
d B
lock
Mut
e C
uica
Ope
n C
uica
Mut
e Tr
iang
leO
pen
Tria
ngle
Sha
ker
Jing
le B
ell
Bel
l Tre
eC
asta
nets
Mut
e S
urdo
Ope
n S
urdo
App
laus
e 1
App
laus
e 2
Fanf
are
— — — — — — — — — —
— — — — — — — — — — — — — — — — — — — — — — — — — — — Sta
ndar
d2 K
ick
2S
tand
ard2
Kic
k 1
Sta
ndar
d2 S
nare
1H
and
Cla
p 2
Sta
ndar
d2 S
nare
2 — — — — — — — — — —
— — — — — — — — — — — — — — — — — — — — — — — — — — — Sta
ndar
d3 K
ick
2S
tand
ard3
Kic
k 1
Sta
ndar
d3 S
nare
1 S
tand
ard3
Sna
re 2
Low
Tom
4S
tand
ard3
Clo
sed
Hi-H
atLo
w T
om 3
Sta
ndar
d3 P
edal
Hi-H
atM
id T
om 4
Sta
ndar
d3 O
pen
Hi-H
atM
id T
om 3
Hig
h To
m 4
Cra
sh C
ymba
l 3H
igh
Tom
3R
ide
Cym
bal 3
Cra
sh C
ymba
l 4 R
ide
Cym
bal 4
— — — — — — — — — —
Sta
ndar
d4 K
ick
1S
tand
ard4
Kic
k 2
Sta
ndar
d4 K
ick
3S
tand
ard4
Sna
re 1
Sta
ndar
d4 S
nare
2S
tand
ard4
Sna
re 3
Stan
dard
4 C
lose
d H
i-Hat
1St
anda
rd4
Clo
sed
Hi-H
at 2
Sta
ndar
d4 O
pen
Hi-H
at 1
Sta
ndar
d4 O
pen
Hi-H
at 2
— — — — — — — — — — — — — — — — — Sta
ndar
d4 K
ick
2S
tand
ard3
Kic
k 1
Sid
e S
tick
3S
tand
ard4
Sna
re 2
Sta
ndar
d4 S
nare
4 St
anda
rd4
Clo
sed
Hi-H
at 2
Roc
k Pe
dal H
i-Hat
Sta
ndar
d4 O
pen
Hi-H
at 2
Roc
k C
rash
Cym
bal
Cra
sh C
ymba
l 4 — — — — — — — — — —
— — — — — — — — — — — — — — — — — — — — — — — — — — — Pow
er K
ick
2Po
wer
Kic
k 1
Pow
er S
nare
1 Po
wer
Sna
re 2
Pow
er L
ow T
om 2
Pow
er L
ow T
om 1
Pow
er M
id T
om 2
Pow
er M
id T
om 1
Pow
er H
igh
Tom
2 Po
wer
Hig
h To
m 1
— — — — — — — — — —
— — — — — — — — — — — — — — — — — — — — — — — — — — — Roc
k K
ick
2R
ock
Kic
k 1
Roc
k S
nare
1 R
ock
Sna
re 2
Low
Tom
4R
ock
Clo
sed
Hi-H
atLo
w T
om 3
Roc
k Pe
dal H
i-Hat
Mid
Tom
4R
ock
Ope
n H
i-Hat
Mid
Tom
3H
igh
Tom
4R
ock
Cra
sh C
ymba
lH
igh
Tom
3R
ide
Cym
bal 3
Roc
k S
plas
h C
ymba
l C
rash
Cym
bal 4
Rid
e C
ymba
l 4 — — — — — — — — — —
— — — — — — — — — — — — — — — — — — — — — — — — — — — Roo
m K
ick
2R
oom
Kic
k 1
Roo
m S
nare
1 R
oom
Sna
re 2
Roo
m L
ow T
om 2
Roo
m L
ow T
om 1
Roo
m M
id T
om 2
Roo
m M
id T
om 1
Roo
m H
igh
Tom
2 R
oom
Hig
h To
m 1
— — — — — — — — — —
— — — — — — — — — — — — — — — — — — — — — — — — — — — Ele
c. K
ick
2E
lec.
Kic
k 1
Ele
c. S
nare
1 E
lec.
Sna
re 2
Ele
c. L
ow T
om 2
Ele
c. L
ow T
om 1
Ele
c. M
id T
om 2
Ele
c. M
id T
om 1
Ele
c. H
igh
Tom
2 E
lec.
Hig
h To
m 1
Rev
erse
Cym
bal
— — — — — — — — — —
— — — — — — — — — — — — — — — — — — — — — — — — — — — Syn
th1
Kic
k 2
Syn
th1
Kic
k 1
Syn
th1
Rim
Sho
tS
ynth
1 S
nare
1H
and
Cla
p 2
Syn
th1
Sna
re 2
Syn
th1
Low
Tom
2S
ynth
1 C
lose
d H
H 1
Syn
th1
Low
Tom
1S
ynth
1 C
lose
d H
H 2
Syn
th1
Mid
Tom
2S
ynth
1 O
pen
HH
Syn
th1
Mid
Tom
1S
ynth
1 H
igh
Tom
2S
ynth
1 C
rash
Cym
bal
Syn
th1
Hig
h To
m 1
Syn
th1
Rid
e C
ymba
l S
ynth
1 Ta
mbo
urin
e S
ynth
1 C
owbe
ll S
ynth
1 H
igh
Bon
goS
ynth
1 Lo
w B
ongo
Syn
th1
Mut
e H
i Con
gaS
ynth
1 O
pen
Hi C
onga
Syn
th1
Ope
n Lo
w C
onga
Syn
th1
Mar
acas
Syn
th1
Cla
ves
— — — — — — — — — —
— — — — — — — — — — — — — — — — — — — — — — — — — — — Hip
Hop
Kic
k 2
Hip
Hop
Kic
k 1
Sid
e S
tick
2H
ipH
op S
nare
1H
and
Cla
p 3
Hip
Hop
Sna
re 2
Low
Tom
4H
ipH
op C
lose
d H
i-Hat
Low
Tom
3H
ipH
op P
edal
Hi-H
atM
id T
om 4
Hip
Hop
Ope
n H
i-Hat
Mid
Tom
3H
igh
Tom
4C
rash
Cym
bal 3
Hig
h To
m 3
Rid
e C
ymba
l 3 R
ock
Spl
ash
Cym
bal
Cra
sh C
ymba
l 4 R
ide
Cym
bal 4
— — — — — — — — — —

A-6
NO
TE
•“
” In
dica
tes
the
sam
e so
und
as S
TAN
DA
RD
SE
T 1
.
NO
TA•
“
” In
dica
el m
ism
o so
nido
que
STA
ND
AR
D S
ET
1.
F7 G7
A7
B7
C8
D8
E8 F8 G8
A8
B8
C9
D9
E9 F9 G9
102
104
106
108
109
111
113
114
116
118
120
121
123
125
126
128
F#7
A 7
B 7
C#8
E 8
F#8
A 8
B 8
C#9
E 9
F#9
Key
/ N
ote
num
ber
DR
UM
S S
ET
LIS
T
103
105
107
110
112
115
117
119
122
124
127
SY
NT
H S
ET
2T
RA
NC
E S
ET
JAZ
Z S
ET
BR
US
H S
ET
OR
CH
ES
TRA
SE
T— — — — — — — — — — — — — — — — — — — — —
— — — — — — — — — — — — — — — — — — — — —
— — — — — — — — — — — — — — — — — — — — —
— — — — — — — — — — — — — — — — — — — — —
— — — — — — — — — — — — — — — — — — — — —
STA
ND
AR
D S
ET
1S
TAN
DA
RD
SE
T 2
STA
ND
AR
D S
ET
3R
OO
M S
ET
PO
WE
R S
ET
RO
CK
SE
TH
IP-H
OP
SE
TE
LEC
TRO
NIC
SE
TS
YN
TH
SE
T 1
STA
ND
AR
D S
ET
4— — — — — — — O
neTw
oTh
ree
Four
Five
— — — — — Pik
o P
iko
— — — — — — — — —
— — — — — — — — — — — — — — — — — — — — —
— — — — — — — — — — — — — — — — — — — — —
— — — — — — — — — — — — — — — — — — — — —
— — — — — — — — — — — — — — — — — — — — —
— — — — — — — — — — — — — — — — — — — — —
— — — — — — — — — — — — — — — — — — — — —
— — — — — — — — — — — — — — — — — — — — —
— — — — — — — — — — — — — — — — — — — — —
— — — — — — — — — — — — — — — — — — — — —
Appendix/Apéndice

A-7
<CTK-810 only>
* These chords can befingered if you expand theaccompaniment area of thekeyboard by changing thesplit point. For details, see“Using Split” on page E-45.
<Sólo CTK-810>
* Estos acordes se puedendigitar si expande el áreade acompañamiento delteclado cambiando el puntode división. Para másinformación, vea “Usandola división” en la páginaS-45.
Appendix/Apéndice
FINGERED Chord ChartCuadro de acordes digitados
C
D
E
F
G
A
B
C/(D)
(D)/E
F/(G)
(G)/A
(A)/B
sus4aug add97-57sus4 m add9 mM7Chord
TypeRoot
*
*
mM
C
D
E
F
G
A
B
C/(D)
(D)/E
F/(G)
(G)/A
(A)/B
dim m7-5M77 m7 dim7Chord
TypeRoot
*
*
*

A-8
JAZZ047 SLOW BIG BAND048 MIDDLE BIG BAND049 FAST BIG BAND050 SWING 1051 SWING 2052 SLOW SWING053 JAZZ WALTZ 1054 JAZZ WALTZ 2055 FOX TROT056 QUICKSTEP057 JAZZ COMBO 1
EUROPEAN058 SCHLAGER059 POLKA060 POP POLKA061 WALTZ 1062 SLOW WALTZ063 VIENNESE WALTZ064 FRENCH WALTZ065 SERENADE066 TANGO067 MARCH 1068 MARCH 2
LATIN069 BOSSA NOVA 1070 BOSSA NOVA 2071 BEGUINE072 SAMBA 1073 SAMBA 2074 MAMBO075 RHUMBA076 CHA-CHA-CHA077 MERENGUE078 BOLERO079 SALSA080 REGGAE081 POP REGGAE082 PUNTA083 SKA
VARIOUS084 COUNTRY 8 BEAT085 COUNTRY BALLAD086 COUNTRY SHUFFLE087 BLUEGRASS088 DIXIE089 TEX-MEX090 FAST GOSPEL091 SLOW GOSPEL092 PASODOBLE093 FOLKLORE
094 SIRTAKI095 HAWAIIAN096 ADANI097 BALADI098 ENKA099 SYMPHONY100 STR QUARTET
FOR PIANO101 PIANO 8 BEAT102 PIANO BALLAD 1103 PIANO BALLAD 2104 EP BALLAD 1105 EP BALLAD 2106 BLUES BALLAD107 JAZZ COMBO 2108 JAZZ COMBO 3109 RAGTIME110 PIANO ROCK & ROLL111 BOOGIE-WOOGIE112 ARPEGGIO 1113 ARPEGGIO 2114 ARPEGGIO 3115 6/8 MARCH116 MARCH 3117 STRIDE PIANO118 WALTZ 2119 WALTZ 3120 WALTZ 4
Rhythm ListLista de ritmos
Appendix/Apéndice
8 BEAT / 16 BEAT001 STRAIGHT 8 BEAT002 MELLOW 8 BEAT003 MODERN 8 BEAT004 GUITAR 8 BEAT005 8 BEAT POP006 8 BEAT007 60’S 8 BEAT008 16 BEAT 1009 16 BEAT 2010 16 BEAT SHUFFLE 1011 16 BEAT SHUFFLE 2
BALLAD012 MODERN BALLAD013 SLOW BALLAD014 16 BEAT BALLAD015 SOUL BALLAD016 POP BALLAD 1017 POP BALLAD 2018 6/8 BALLAD019 ROCK BALLAD 1020 ROCK BALLAD 2
DANCE021 HIP-HOP022 RAP POP023 DANCE POP024 DISCO POP025 TECHNO POP026 TRANCE027 MODERN R&B 1028 MODERN R&B 2029 MODERN DANCE030 DISCO SOUL
POPS031 POP 1032 POP 2033 POP ROCK034 GUITAR POP035 FAST SOUL036 SLOW SOUL037 60’S SOUL
ROCK038 SHUFFLE ROCK 1039 SHUFFLE ROCK 2040 BLUES041 SOFT ROCK042 LATIN ROCK043 MODERN ROCK044 SLOW ROCK045 NEW ORLNS R&R046 ROCK WALTZ
NOTE• Some rhythms (No. 110, 112 to 120)
consist of chord accompanimentsonly, without any drums or otherpercussion instruments. Suchrhythms do not sound unless CASIOCHORD, FINGERED, or FULLRANGE CHORD is selected as theaccompaniment mode.
NOTA• Algunos ritmos (NO 110, 112 a 120)
consisten solamente de losacompañamientos de acordes, sinninguna batería ni otros instrumentosde percusión. Tales ritmos no suenana menos que CASIO CHORD,FINGERED o FULL RANGE CHORDse seleccione como el modo deacompañamiento.

A-9
CONCERT PIECES051 FÜR ELISE052 TURKISH MARCH (MOZART)053 PIANO SONATA op.27-2 “MOONLIGHT” 1st Mov.054 ETUDE op.10-3 “CHANSON DE L’ADIEU”055 GYMNOPÉDIES no.1056 THE ENTERTAINER057 MAPLE LEAF RAG058 HUNGARIAN DANCES no.5059 TRÄUMEREI060 LA FILLE AUX CHEVEUX DE LIN061 HUMORESKE (DVO ÁK)062 PROMENADE FROM “TABLEAUX D’UNE EXPOSITION”063 MOMENTS MUSICAUX op.94-3064 LE CYGNE FROM “LE CARNAVAL DES ANIMAUX”065 VALSE op.64-1 “PETIT CHIEN”066 CHANSON DU TOREADOR FROM “CARMEN”067 LARGO (HÄNDEL)068 WEDDING MARCH FROM “MIDSUMMER NIGHT’S DREAM”069 AMERICAN PATROL070 CSIKOS POST071 DOLLY’S DREAMING AND AWAKENING072 LA CHEVALERESQUE073 PIANO SONATA K.545 1st Mov.074 LA PRIÈRE D’UNE VIERGE075 MARCIA ALLA TURCA076 NOCTURNE op.9-2 (CHOPIN)077 LIEBESTRÄUME no.3078 MARCHE MILITAIRE no.1079 BLUMENLIED080 GRANDE VALSE BRILLANTE op.18-1
ETUDES081 MINUET IN G MAJOR082 GAVOTTE (GOSSEC)083 ARABESQUE (BURGMÜLLER)084 CHOPSTICKS085 FRÖHLICHER LANDMANN086 INVENTIONEN no.1087 AVE MARIA (GOUNOD)088 JESUS BLEIBET MEINE FREUDE089 CANON (PACHELBEL)090 SONATINA op.36-1 1st Mov.091 PIANO SONATA op.13 “PATHÉTIQUE” 2nd Mov.092 PRELUDE op.28-7 (CHOPIN)093 JE TE VEUX094 RÊVERIE095 ODE TO JOY096 SERENADE FROM “EINE KLEINE NACHTMUSIK”097 MARCH FROM “THE NUTCRACKER”098 GOING HOME FROM “FROM THE NEW WORLD”099 BEAUTIFUL DREAMER100 DANNY BOY
101 - 105 User Songs/Canciones del usuario
Song List/Lista de cancionesSONG BANK List
Lista SONG BANK
DEMO TUNESCTK-810
001 GROOVEE!002 WHATEVER WILL BE WILL BE (QUE SERA SERA)003 ARIANFOR
WK-110001 ARIANFOR002 WHATEVER WILL BE WILL BE (QUE SERA SERA)003 GROOVEE!
EVENT004 WE WISH YOU A MERRY CHRISTMAS005 JINGLE BELLS006 SILENT NIGHT007 JOY TO THE WORLD008 O CHRISTMAS TREE
WORLD009 WHEN THE SAINTS GO MARCHING IN010 GREENSLEEVES011 SWING LOW, SWEET CHARIOT012 AMAZING GRACE013 AULD LANG SYNE014 TWINKLE TWINKLE LITTLE STAR015 LIGHTLY ROW016 UNDER THE SPREADING CHESTNUT TREE017 COME BIRDS018 THE MUFFIN MAN019 LONG LONG AGO020 DID YOU EVER SEE A LASSIE?021 LONDON BRIDGE022 THE FARMER IN THE DELL023 ON THE BRIDGE OF AVIGNON024 SIPPIN’ CIDER THROUGH A STRAW025 GRANDFATHER’S CLOCK026 MICHAEL ROW THE BOAT ASHORE027 ANNIE LAURIE028 MY BONNIE029 MY DARLING CLEMENTINE030 HOME SWEET HOME031 ON TOP OF OLD SMOKEY032 I’VE BEEN WORKING ON THE RAILROAD033 LITTLE BROWN JUG034 AURA LEE035 OH! SUSANNA036 HOUSE OF THE RISING SUN037 SHE WORE A YELLOW RIBBON038 CAMPTOWN RACES039 SWANEE RIVER (OLD FOLKS AT HOME)040 JEANNIE WITH THE LIGHT BROWN HAIR041 YANKEE DOODLE042 RED RIVER VALLEY043 TURKEY IN THE STRAW044 MY OLD KENTUCKY HOME045 HOME ON THE RANGE046 JAMAICA FAREWELL047 ALOHA OE048 SAKURA SAKURA049 SANTA LUCIA050 WALTZING MATILDA
Appendix/Apéndice

11-
16
Mod
e 3
X
O 9
nH v
= 1
-127
X 8
nH v
= 6
4
X X X
XX
= n
o re
latio
nX
X =
sin
rel
ació
n
1-16
1-16
Mod
e 3
X
0-12
70
- 12
7 *1
O 9
nH v
= 1
-127
X 9
nH v
= 0
, 8nH
v =
XX
X O*2
O
Mod
els
CT
K-8
10/W
K-1
10M
IDI m
essa
ges
th
at c
an b
e se
nt
and
rec
eive
d u
sin
g t
he
US
B p
ort
Los
men
saje
s M
IDI p
uede
n en
viar
se y
rec
ibir
se u
sand
o el
pue
rto
US
B
Ver
sion
: 1.0
Ban
k se
lect
Mod
ulat
ion
Dat
a en
try
Vol
ume
Pan
Exp
ress
ion
Hol
d1S
oste
nuto
O X X X X X O*4
O*4
O O*2
O*3
O O O O O
Tra
nsm
itte
dR
eco
gn
ized
Rem
arks
*1: S
ee T
one
List
on
page
A-1
.*1
: Vea
la li
sta
de s
onid
os e
n la
pági
na A
-1.
36 -
96
(CT
K-8
10)
28 -
103
(WK
-110
)
Bas
icD
efau
ltC
han
nel
Ch
ang
ed
Def
ault
Mo
de
Mes
sag
esA
lter
ed
No
teN
um
ber
:T
rue
voic
e
Vel
oci
tyN
ote
ON
No
te O
FF
Aft
erK
ey's
To
uch
Ch
's
Pit
ch B
end
er
0, 3
2 16,
38
Co
ntr
ol
7C
han
ge
10 11 64 66
Fu
nct
ion
...

O 0
-127
O*5
X X X O O X O X X
O 0
-127
O*5
*6
X X X X X X O O X
Sof
t ped
alR
ever
b se
ndC
horu
s se
ndR
PN
LS
B, M
SB
All
soun
d of
fR
eset
all
cont
rolle
r
O*4
X O X X O
O O O O*3
O O
Pro
gra
mC
han
ge:
Tru
e #
Sys
tem
Exc
lusi
ve
Sys
tem
: S
on
g P
os
Co
mm
on
: S
on
g S
el:
Tu
ne
Sys
tem
: C
lock
Rea
l Tim
e: C
omm
ands
Au
x: L
ocal
ON
/OFF
: All
note
s O
FFM
essa
ges
: Act
ive
Sens
e: R
eset
Rem
arks
Mod
e 1
: OM
NI O
N, P
OLY
Mod
e 2
: OM
NI O
N, M
ON
OO
: Y
esM
ode
3 : O
MN
I OF
F, P
OLY
Mod
e 4
: OM
NI O
FF
, MO
NO
X :
No
67 91 9310
0, 1
01 120
121
*2M
odul
atio
n an
d af
ter
touc
h fo
r ea
ch c
hann
el a
re t
he s
ame
effe
ct.
*3F
INE
TU
NE
, CO
AR
SE
TU
NE
rec
eive
, and
PIT
CH
BE
ND
SE
NS
E, R
PN
Nul
l rec
eive
*4In
acc
orda
nce
with
sus
tain
/ass
igna
ble
jack
set
ting
*5•
Rev
erb
Typ
e [F
0] [
7F]
[7F
] [0
4] [
05]
[01]
[01
] [0
1] [
01]
[01]
[00
] [v
v] [
F7]
vv=
00:
Roo
m1,
01:
Roo
m2,
04:
Hal
l1,
03:
Hal
l2•
Cho
rus
Typ
e [F
0] [
7F]
[7F
] [0
4] [
05]
[01]
[01
] [0
1] [
01]
[02]
[00
] [v
v] [
F7]
vv=
00:
Cho
rus1
, 01
: C
horu
s2,
02:
Cho
rus3
, 03
: C
horu
s4•
Mas
ter
Fin
e T
une
[F0]
[7F
] [7
F]
[04]
[03
] [ll
] [m
m]
[F7]
•M
aste
r C
oars
e T
une
[F0]
[7F
] [7
F]
[04]
[04
] [ll
] [m
m]
[F7]
•[ll
] in
dica
tes
low
-ord
er b
ytes
, [m
m]
indi
cate
s hi
gh o
rder
byt
es.
*6•
GM
on/
off
GM
ON
: [F
0] [7
E] [
7F] [
09] [
01] [
F7]
GM
OFF
: [F
0] [7
E] [
7F] [
09] [
02] [
F7]
•M
aste
r V
olum
e [F
0] [
7F]
[7F
] [0
4] [
01]
[ll]
[mm
] [F
7]Lo
w-o
rder
byt
es [
ll] a
re a
ssum
ed t
o be
00H
.
*2La
mod
ulac
ión
y de
spué
s de
l toq
ue p
ara
cada
can
al t
iene
n el
mis
mo
efec
to.
*3F
INE
TU
NE
, rec
epci
ón C
OA
RS
E T
UN
E, y
PIT
CH
BE
ND
SE
NS
E, r
ecep
ción
RP
N N
ull
*4D
e ac
uerd
o co
n el
aju
ste
de la
tom
a as
igna
ble
*5•
Tip
o de
rev
erbe
raci
ón [
F0]
[7F
] [7
F]
[04]
[05
] [0
1] [
01]
[01]
[01
] [0
1] [
00]
[vv]
[F
7]vv
=00
: R
oom
1, 0
1: R
oom
2, 0
4: H
all1
, 03
: H
all2
•T
ipo
de C
horu
s [F
0] [
7F]
[7F
] [0
4] [
05]
[01]
[01
] [0
1] [
01]
[02]
[00
] [v
v] [
F7]
vv=
00:
Cho
rus1
, 01
: C
horu
s2,
02:
Cho
rus3
, 03
: C
horu
s4•
Afin
ació
n fin
a m
aest
ro [
F0]
[7F
] [7
F]
[04]
[03
] [ll
] [m
m]
[F7]
•A
finac
ión
apro
xim
ada
mae
stro
[F
0] [
7F]
[7F
] [0
4] [
04]
[ll]
[mm
] [F
7]•
[II]
indi
ca b
ytes
de
orde
n in
feri
or,
y [m
m]
indi
ca b
ytes
de
orde
n su
peri
or.
*6•
Act
ivac
ión/
desa
ctiv
ació
n G
M
GM
AC
TIV
AD
O:
[F0]
[7E
] [7
F]
[09]
[01
] [F
7]G
M D
ES
AC
TIV
AD
O:
[F0]
[7E
] [7
F]
[09]
[02
] [F
7]•
Vol
umen
mae
stro
[F
0] [
7F]
[7F
] [0
4] [
01]
[ll]
[mm
] [F
7]Lo
s by
tes
de o
rden
infe
rior
[II
] se
sup
onen
que
son
00H
.

CTK810/WK110ES1A
This recycle mark indicates that the packaging conforms to the environmental protection legislation in Germany.
Esta marca de reciclaje indica que el empaquetado se ajusta a la legislación de protección ambiental en Alemania.
MA0702-A Printed in China
CASIO COMPUTER CO.,LTD.6-2, Hon-machi 1-chome
Shibuya-ku, Tokyo 151-8543, JapanC