UserManual - Foscamdownloads.foscam.uk.com/User_Manual/HD/C1_C2_R2_V1.4.pdfpowerful web server, to...
90
User User Manual Manual Indoor HD IP Camera Model: C1 Model: C2 Model: R2 V1.4
Transcript of UserManual - Foscamdownloads.foscam.uk.com/User_Manual/HD/C1_C2_R2_V1.4.pdfpowerful web server, to...

UserUser ManualManualIndoor HD IP Camera
Model C1 Model C2
Model R2
V14
1
Table of Contents
Security Warning21 Overview 2
11 Key Features212 Read Before Use313 Package Contents314 Physical Description 415 Micro-SD Card7
2 Access the IP Camera 721 Wired Connection722 Wireless Connection923 Access the Camera in WAN1424 Using the VLC player 1825 IP camera connection to the server20
3 Surveillance Software GUI2031 login Window2132 Setup Wizard 2233 Surveillance Window22
4 Advanced Camera Settings2941 Setup Wizard 2942 Status2943 Basic Settings3244 Network4145 Video 5146 Detector 5547 Record5948 PTZ(Only R2)6349 Firewall68410 System68
5 Playback726 Appendix 73
61 Frequently Asked Questions7362 Default Parameters8063 Specifications8164 CE amp FCC8565 Warranty 86
7 Obtaining Technical Support88
2
Security WarningFoscam cameras and NVRs require good security practices to safeguard your privacy You shouldregularly change your camera or NVR password which is 8-10 numbers letters symbols combinationYou should update your camera or NVR regularlyMake sure your camera or NVR has the latestfirmware installed for your specific model and better experience
1 OverviewFOSCAM Indoor HD IP Camera is an integrated wireless IP Camera with a color CMOS sensor whichenable to view in High Definition resolution It combines a high quality digital video camera with apowerful web server to bring clear video to your desktop and mobile devices no matter where by yourlocal network or over the Internet
These cameras support P2P function Thanks to the P2P easy access technology you donrsquot need to docomplicated Port Forwarding and DDNS settings you just need to scan the QR code on the bottom ofthe camera to connect it to smart phone or input the UID on CMS software to realize remote access
FOSCAM IP Camera provides users with more comprehensive controls over a monitored site Thecamera supports H264 video compression technology dramatically reduces file size and saves networkbandwidth
The camera is based on the TCPIP standard A built-in WEB server inside which could support InternetExplorer simplifies the management and maintenance of your device is simplified by accessing thewebsite of your camera through network
The camera is designed for indoor surveillance with wide applications such as at home in retail storeand in office Controlling the camera and managing images are simplified by using the provided webinterface across the network in either wired or wireless way
FOSCAM provides Smart Phone APP for Android and iPhone users please search and install FoscamApp named Foscam on App Store and Google Play for iOS and Android devices then you can view yourcamera anywhere anytime on your smart mobile devices
11 Key Features Standard H264 video compression algorithm to satisfy the transmission of high definition video in
narrow bandwidth network P2P feature for easy access 10 Mega-Pixel(C1) 20 Mega-Pixel (R2C2) Supports IEFirefoxGoogleSafari browser or any other standard browsers Support WEPWPA-PSK and WPA2-PSK Encryption Wireless connection is compliant with IEEE 80211bgn WI-FI up to 150Mbps
3
IR night vision Range 8m(C1R2) C2(5m) Support image snapshot Support dual-stream Support SD Card storage up to 32GB(C1) or 64GB(R2C2) When the camera has been connected the computer via the USB power cable with supplied you
can view and operate the files in SD Card by the computer (Only C2) Support IR-Cut auto switch Embedded free FOSCAM DDNS(dynamic domain name service) Service Supporting the Third Party Domain Name Service Support two-way audio Support ONVIF protocols Multi-level users management with password protection Motion detection alert via email or upload image to FTP Provide free Android and iPhone APP for viewing live video provide free Central Management
Software to manage and monitor multiple cameras Support record schedule Supports Passive Infrared Sensor(only C1C2) Supports High Dynamic Range(only R2) Supports Wide Dynamic Range(only C2) Supports 8X Magic zoom(only R2) Supports voice prompt(only R2C2)
12 Read Before UsePlease first verify that all contents received are complete according to the Package Contents listed belowBefore the IP Camera is installed please carefully read and follow the instructions in the QuickInstallation Guide to avoid damage due to faulty assembly and installation It also ensures the product isused properly as intended
13 Package Contents
C1C2 IP Camera times 1 AC Adapter times 1
Quick Installation Guide times 1 Power Line times 1
CDtimes1 Warranty Card times 1
R2 IP Camera times 1 Power Supply times 1
Quick Installation Guide times 1 Warranty Card times 1
CDtimes1 Wi-Fi Antennatimes1
Mounting brackettimes1
4
14 Physical Description
C1
Front panel Rear panel
Front panel PIRThe PIR ( Passive Infrared ) is electronic devices which are used in some security alarm
systems to detect motion of an infrared emitting source usually a human body LENS Fixed focus lens Infrared LED Infrared LEDs for night vision Microphone Built-in microphone Micro SD Card slot Supports up to 32GB SD card for storing the video
Rear panel Power Light If the power supply works fine the light will be on LAN 10100 Mbps RJ-45 port for wired connection SoftAP Press the SoftAP button for more than 2 seconds The Network light indicator begins to
twinkle every 01 seconds WPSReset
WPS Push both WPSReset button on the camera and wireless router within 1 minute thecamera will connect to the wireless router automatically in WPS process the Network light willblink every 04 seconds
Reset Push and hold the WPSReset button for more than 10 seconds to set the camera tofactory default the Power light will blink every 04 seconds
Power DC 5V1A Power supply
The flashing status of the Power light and Network light are shown in the following table
Light Flashing Status DescriptionPower light off The power dont work properly
on The power supply works fineFlashing every 04 seconds Reset to take effect
Network light off No Wireless connectionConstant Flash Wired connection
5
Slow Flash every 10 second Wi-Fi connectedFlashing every 04 seconds WPS is connectingFlashing every 02 seconds EZLink takes effectFlashing every 01 seconds SoftAP is started
R2
Front panel Rear panel
Front panel LENS Fixed focus lens Infrared LED Infrared LEDs for night vision Microphone Built-in microphone Micro SD Card slot Supports up to 64GB SD card for storing the video WPSReset
WPS Push both WPSReset button on the camera and wireless router within 1 minute thecamera will connect to the wireless router automatically in WPS process the Network light willblink every 04 seconds
Reset Push and hold the WPSReset button for more than 10 seconds to set the camera tofactory default the Power light will blink every 04 seconds
Rear panel LAN 10100 Mbps RJ-45 port for wired connection Power DC 5V2A Power supply Speaker Built-in speaker Antenna Used to connect external wireless antenna
The flashing status of the Power light and Network light are shown in the following table
Light Flashing Status DescriptionPower light off The power dont work properly
on The power supply works fineFlashing every 04 seconds Reset to take effect
Network light off No Wireless connectionConstant Flash Wired connection
6
Slow Flash every 10 second Wi-Fi connectedFlashing every 04 seconds WPS is connectingFlashing every 02 seconds EZLink takes effect
C2
Front panel Rear panel
Front panel PIRThe PIR ( Passive Infrared ) is electronic devices which are used in some security alarm
systems to detect motion of an infrared emitting source usually a human body Lens Fixed focus lens Induction IC Infrared Lamp Array Micro SD Card slot Supports up to 64GB SD card for storing the video
Rear panel LAN 10100 Mbps RJ-45 port for wired connection WPSReset
WPS Push both WPSReset button on the camera and wireless router within 1 minute thecamera will connect to the wireless router automatically in WPS process the light will be greenand blink every 04 seconds
Reset Push and hold the WPSReset button for more than 10 seconds to set the camera tofactory default the light will be red and blink every 04 seconds
Power DC 5V1A Power supply
The flashing status of the Power light and Network light are shown in the following table
Flashing Status DescriptionFlashing(red) every 04 seconds Reset to take effectConstant Flash(green) Wired connectionSlow Flash(green) every 10 second Wi-Fi connectedFlashing every(green) 04 seconds WPS is connectingFlashing every(green) 02 seconds EZLink takes effect
7
15 Micro-SD Card
This camera supports SD CardWhen you plug in the SD card during the camera work process please reboot the camera again or elsethe SD Card may be cannot work wellGo to the SettingsDevice StatusDevice Status page you can see the SD card status
2 Access the IP Camera
21 Wired Connection
1 Connect the camera to the LAN network (Router or Switch) via network cable2 Connect the power adapter to the camera3 Insert the CD into the CD drive of your computerGo to the folder ldquoEquipment Search Toolrdquo and find the folder ldquoFor Windows OSrdquo or ldquoFor Mac OSrdquo from theCD supp Copy and paste the file to your computer or drag it onto your Desktop
Shortcut icon for Windows Mac OS
Notes If your computer ( Windows OS ) supports autorun function you can find the corresponding file in
the opened control panel If your computer doesnrsquot have CD drive you can download the Equipment Search Tool from our
website for free
The camera supports HTTP and HTTPS protocols you can access the camera in two ways
(1) http LAN IP + HTTP Port NO
8
The default HTTP port NO is 88 Double click the Equipment Search Tool icon to run and it should findthe camerarsquos IP address automatically after you plug in the network cable
Double click the IP address of the camera the camera login page should be open in your defaultbrowser
(2) https LAN IP + HTTPS Port NO
The default HTTPS port NO is 443 You can use the URL to access the camera https LAN IP +HTTPS port NOGo to Settings - Network - Port panel you can see and change the HTTP and HTTPS port NO
NOTEWhen logging in for the first time you will need to download and install the add-on
9
22 Wireless ConnectionThere are some ways of wireless connection EZLink connection soft AP connection and WPSconnection EZLink connection Use the mobile phones or other mobile devices to download APP then
connect the camera and the wireless router by the APP The procedure of the EZLink connectionplease refer to the Quick Installation Guide
Soft AP connection(only C1) Use the mobile device which can search for the wireless networkThen use the web browser to visit http1921681188 by the mobile device Follow the SetupWizard to finish the settings
WPS connection WI-FI Protected Set-up Press and hold the WPS button on your wireless routerand your camera within 60 seconds So that your camera and wireless router connect successfully
221 Soft AP Connection(Only C1)
To ensure that the ethernet cable and the camera is disconnected before you begin1 Start camera power on the indicator light of camera will light on2 Press the Soft AP button for 3-5 seconds The Network light begins to twinkle at very highfrequency(every 01 seconds)3 Use a terminal which could search the WLAN (desktop or laptop This part takes laptop as anexample) to search for the AP named C1_ for connection( indicate the last six letters ofcamerarsquos MAC ID )
IP Camera The WLAN page in the terminal device
4 After finishing Soft AP connection use the web browser of the terminal to visit http1921681188
5 Log in the camera ( Default username is admin with no password ) When log in for the first time you
Soft AP Button
10
need to change the username and password
6 After logging in for the first time it will go to Setup Wizardrdquo automatically Please set the basicparameters of the camera such as camera name camera time wireless settings (The camera connectto your wireless router Wireless Network List - enter the password of your wireless router ) IPconfiguration
Input the New usernameNew password andConfirm the password
11
12
Notes We recommend you to choose to manually set the IP when you know some knowledge of the
network It needs about 1 minute to connect the camera to your router
7 After completing the setup wizard you should press the Soft AP button for 3-5 seconds to cancel theSoft AP connection mode this is located on the back of your camera The Network light begins to slowlyflash(once per second) it indicates that the wireless connection is successful
8 Please make sure that the wireless device connect your laptop to the router which your camera has
13
connected to
9 Open the CD named ldquoFOSCAMrdquo go to the folder ldquoEquipment Search Toolrdquo and find the folder ldquoForWindows OSrdquo or ldquoFor Mac OSrdquo Copy and paste the file to your wireless device or drag it onto yourdesktop
Notes You could also download the Equipment Search Tool from our website wwwfoscamcom for free If you have multiple cameras and you cannot determine which camera you are going to log in
Please match the Device MAC address on the search tool with the MAC address on the labelpasted of each camera
10 Double-click the camera list here and your default browser will open up to the login page Input theusername and password you has changed Then you will see the live video of your baby on theinterface
Main stream offers thehighest quality video whileSub stream offers lessquality but also less delaywhen viewing
14
Now you could use your camera in LAN
Note64-bit browser is not supported
222 WPS (WI-FI Protected Set-up)
Before using WPS wireless connection you need to
Make sure that your wireless router has the WPS function and has been properly connected to theInternet
WPS button on the wireless router is typically located on the front panel or rear panelTP-LINKrouters WPS button is called QSS (Quick Security Setup)
Make sure that the ethernet cable and the camera is disconnected
(1) Press and hold the WPS button for three seconds The Network light of the camera begins to twinkleat high frequency (every 04 seconds)
(2) Press and hold the WPS button for three seconds on your wireless router within 60 seconds Thenthe camera will automatically create a secure wireless connection to your router in about 60seconds
(3) The Equipment Search Tool will search the camerarsquos LAN IP Make sure the PC and the camerashare the same subnet
NOTE The security mode of router cannot be WEP or else the WPS settings may be failed
23 Access the Camera in WAN
231 Static IP Addresses
Users with static IP addresses do not need to set DDNS service settings for remote access After youhave finished connecting the camera using the LAN IP address and port forwarding you can access thecamera directly from Internet using the WAN IP address and port number
WPS Button
15
How to Obtain the WAN IP address from a public website To obtain your WAN IP address enter the following URL in your browser httpwwwwhatismyipcomYour current WAN IP will be shown on the webpage
232 Remote Access
If you want to access your camera by web browser outside of your LAN you need to configure followingconfigurations
1 Choose ldquoSettingsrdquo on the top of the camera web page then go to the ldquoNetwork gt IP Configurationrdquosection on the left side of the screen then uncheck the Obtain IP DHCP
2 Enable UPnP and DDNS in the camerarsquos settings page We recommend you to use the DDNS byfactory default
IP Address Set this in the same subnetas your computer or keep it as defaultSubnet Mask Keep it as defaultGateway and DNS Server Set it to theIP address of your router
16
3 You can see the port of your camera here If you want to set Remote Access for several cameras onthe same network you will need to change the HTTPS port for each camera
4 If the UPnP of the router has been enable you do not need to perform following steps Otherwiseyou need to select one of the following methods to configure port forwarding on your router For thesesteps we will be using the TP-LINK brand wireless router as an example
If there is a UPnP function in your routerChoose ldquoForwarding gt UPnPrdquo make sure that the Current UPnP Status is Enabled
Select Yes and click Save
Click Enable DDNS and click SaveThe content in the Manufacturersquos DDNScolumn is the domain name of your camera
17
If there is no UPnP function in your routerYou need to manually add port forwarding refer to the following steps You need go to the ldquoForwarding gtVirtual Serversrdquo panel for setup
Click Add New
Input the port and IP address ofyour camera and click Save
Here you have finished thePort Forwarding setup
18
5 Now you can access your IP camera by httpsdomain name HTTPS port via the Internet
24 Using the VLC playerThe camera supports RTSP streaming here you can view the camera by VLC player
RTSP URL rtsp [user name][password]IPPort numbervideostream
The part in the square brackets can be omitteduser name amp password The user name and password to access the camera This part can beomittedIP WAN or LAN IP addressPort NO If there is the RTSP port number on the Port page you must only use RTSP port numberotherwise you must only use http port numberVideo stream Three modes are supported video Main video Sub and audio Video Sub is a betterchoice in bad network condition If you select audio you can only hear sound without seeing picture
For exampleIP 192168111RTSP Port number 554User name adminPassword 123
Enter either one of the following four URLs in the VLC1rtspadmin123192168111554videoMain2rtsp 192168111554videoMain3rtsp123192168111554videoMain4rtspadmin192168111554videoMain
Open the VLC and go to ldquoMediardquo--rdquoOpen Network Streamrdquo option then enter the URL in VLC
19
Sometimes you may need to enter the user name and password for another time Click OK and you cansee the real-time preview
20
If you cannot play the video in the VLC player please check the port mapping You can read QuickInstallation Guide about how to configure port forwarding
NOTEIf you modify the camerarsquos username or password you had better reboot the camera to apply the newusername and password in authentication in the VLC
25 IP camera connection to the server
Device supports ONVIF 221 protocol You can easily access NVR with ONVIF or server with ONVIF
3 Surveillance Software GUIPlease refer to the section 21 if you install the camera for the first time You can start to learn aboutsoftware operation in the computer
21
31 login Window
Section1 Enter the Username and passwordThe default administrator username is ldquoadminrdquo with no password please change the password the firsttime you use and prevent unauthorized users login the camera
Section2 StreamThe camera supports two stream modes Main stream and sub stream Select Main stream if you wantto access the camera from LAN and sub stream will be better if you want to access the camera fromInternetNoteSelect sub stream to ensure a more fluent video under narrow network bandwidth
Section3 Select the languageYou click on the language dropdown list to select language
Section4 login the cameraClick ldquoLoginrdquo button
NOTEWhen setting up your camera for the first time it will request that you modify the default usernameandor password if both are still set to default Input the new username and password click Modify tocomplete the modification You will now use the new username and password to login to the camera inthe future
22
32 Setup WizardYou will go toldquoSetup Wizardrdquoautomatically after your first-login where you can set the basicparameters of camera such as camera name camera time wireless settings IP configuration
33 Surveillance Window
Section 1 FOSCAM Logo Live Video SettingsPlayback
1
2
5
3
7
4
6
23
FOSCAM LOGO
Path to surveillance window Click this button to go back to the surveillance window
Path to Administrator Control Panel Click it to go to Administrator Control Panel and do
advanced settings
Click this button to go back to the Playback panel to view the stored audio files
stored in the SD Card
Section 2 Multi-Device Window
The firmware inside the camera supports up to 9 cameras being monitored at the same time You canadd other cameras in multi-device setting
Section 3 Mode Stream HDR Mirror Flip buttons Zoom
Mode1) 50HZ ---------Indoor surveillance (Region Europe China)2) 60HZ ---------Indoor surveillance (Region USA Canada)3) Outdoor------Outdoor surveillance
StreamThe default stream supports multiple modes For example HD Mode720P23fps2M meanings Streamtype Resolution Maximum frame rate Bit rate (Different models support different specific mode )
Stream type It is used to identify the stream typeResolutionThe bigger the resolution the better of the image quality is If you are accessing the camera viainternet and want to get more fluent video streaming please select resolution VGAMaximum frame rateYou should lower frame rate when the bandwidth is limited Normally when the frame rate above 15you can achieve fluently video The maximum frame rate for each model is different please see theldquoSpecificationsrdquoBit rateGenerally speaking the larger the bit rate is the clearer video will become But the bit rateconfiguration should combine well with the network bandwidth When the bandwidth is very narrowand bit rate is large that will lead to video can not play well
You can reset the stream type on Settings-gt Video-gt Video Settings panelAfter changing please reboot the camera and you can see the modification
HDR(Only R2)HDR stands for High Dynamic Range It usually refers to the method of capturing images having
24
ldquogreater dynamic range between the lightest and darkest areas of an image than current standarddigital imaging methods or photographic methodsrdquo You can select ldquoonrdquo from the dropdown list undersunlight or with bright background
WDR(Only C2)In surveillance WDR (Wide Dynamic Range) is intended to provide clear images even underbacklighting where the intensity of illumination varies a lotmdashnamely when there are very bright andvery dark areas simultaneously in the cameras field of view
ldquoZoom inrdquo or rdquoZoom outrdquo(Only R2C2)
Device Support 8x zoom feature click or The focal length of the camera lens will be larger or
shrink you can adjust the focus distance to the target object size access to high-definition screen
(Only C2) When click the button the PanTilt Control control button will pop up You can adjust
direction of the camera when the focal length of the camera lens has been larger When the camerafocal length reduced to a minimum the PanTilt Control control button will disappear
PanTilt Control(only R2C2)
1----- Up control button 2-----Down control button3------Left control button 4------Right control button5----- Up-Left control button6----- Up-Right control button7----- Down-Left control button8----- Down-Right control button
Click this button and go to center
Section 4 Cruise Preset settings(Only R2)Cruise Settings
25
The default cruise tracks have two types Vertical and Horizontal
Vertical The camera will rotate from up to downHorizontal The camera will rotate from left to right
Start cruise Stop cruise
If you want to define or change the cruise trace please go to Settings PTZ Preset Settings panel
How to do cruiseFirstly Select one track in the track dropdown list
Secondly Click Start cruise button the camera will cruise following the predefined pathThirdly Click stop button and finish cruising
Preset settings
IPCam supports 16 preset positions which is considered enough for DIY home amp small businesssurveillance marketThe default preset position is Topmost Bottom most Left most right most you can add other presetpositions
Add Click this icon to save the position you need the camera to remember
Delete Select one preset position and click this button to delete it
GO Select one preset position in the preset drop-down list and click Go to make the camera
Select one of these
26
move the preset position
How to do preset positionFirstly move the camera and stop at a desired place where you want make preset position
Secondly click button and enter a descriptive name for the preset position The preset position
cannot contain special characters Then click OK to save it If you want to reset the preset position clickCancelAfter that you can move the camera and stop at another place and set another preset position You cando all the 16 preset positions with this methodIf you want to see one preset position you have set only select the preset position name from the preset
drop-down list and click go button the camera will go to the preset position
Section 5 IR LED Lights Color Adjustment
Click Infra led and there are three modes to adjust the infrared led Auto Manual and ScheduleAuto Select it and the camera will adjust the infra led (on or off) automaticallyManual Select it and you can turn on or turn off the infra led manuallySchedule Select it and the IR led light will be off at the schedule period If you want to define or changethe IR led lights schedule time please go to Settings---gtVideo---gt IR LED Schedule page
Color AdjustmentIn this page you can tune Hue Brightness Contrast Saturation and Sharpness to get higher quality
Section 6 OSDIf you have added time and camera name in the video you can see it in the live windowGo to Settings ---Basic settings---Camera name panel and you can change another device nameThe default device name is anonymousGo to Settings ---Basic settings---Camera time panel and adjust the device timeGo to Settings ---Video---On Screen Display panel you can add or no add OSD
27
Section 7 Play Stop Talk Audio Snap Record Full screen button
1----- Play Click it to play the video of the camera2----- Stop Click it to stop the video of the camera
3----- Talk Click the button and the icon will become to then talk to the microphone thatconnected with PC people around the camera can here your voice Click the icon again and stop talking
4----- Audio Click this icon the icon will become to you can hear the sound around the camera
by the earphone or speakers that connected with PC
5----- Adjusting the sound Click this icon the icon will become to youcan change the sound of the camera
6----- Snapshot Click it to make snapshot and it pop-up a window which picture you snapshot rightclick in the window and save the picture to anywhere you want
7----- Record Click the icon and the camera start recording you can see a green dot in the livewindow Click again and stop recording The default storage path is CIPCamRecord You can changethe storage path Go to Settings- gtRecord-gtStorage Location panel
8----- Full Screen Click it to make full-screen or you can double click the surveillance screen to makefull-screen Double click again and exit full-screen
Onscreen Mouse ControlRight click the mouse and you can adjust the screen ration full screen and Zoom up
28
Keep ration Select it and the camera will adjust the size of live window based on the the computermonitor automatically Sometimes there is a black border around the video please select Keep ration toget a better visual quality Full Screen Select it and Click it to make full-screen press ESC and exit full-screenZoom up Select it and you can see a bigger screen than beforeFirst Method Here is a convenient and fast solution to Zoom updown screen by Clicking Video Screenand adjusting Mouse pulley or by press the CTRL key and click the mouse left buttonSecond Method Click it and the live view will be digital zoomed up then click Zoom Down and the liveview back to original size
When you select the Full Screen then click right mouse there is a Screen PTZ button
29
Click the Screen PTZ button and put the mouse on the screen to indicate the camera move direction youprefer press the left mouse the camera will move to the corresponding direction Loosen the mouse andstop moving Press Esc button or double click right mouse and cancel the function
NOTE For Mac OS the plugin cannot support Onscreen Mouse Control so you cannot allow to use it
4 Advanced Camera SettingsClick the button ldquoSettingsrdquo goes to Administrator Control Panel to make advanced camera settings
41 Setup WizardPlease go to section 32 to find the way to set it
42 StatusStatus contains four columns Device Information Device Status Session Status and Log it will showyou various information about your camera
30
421 Device Information
Camera Model The camera model NO
Camera Name The Device Name is a unique name that you can give to your device to help you identifyit Click Basic Settings and go to Camera name panel where you can change your camera name Thedefault device name is anonymous
Camera ID Display the wired MAC address of your camera For example Device ID is 000C5D00008the same MAC ID sticker is found at the bottom of the camera
Camera Time The system time of the device Click Basic Settings and go to Camera time panel andadjust the timeSystem Firmware Version Display the System Firmware version of your cameraApplication Firmware Version Display the application firmware version of your cameraPlug-In Version Display the plug-in version of your camera
422 Device Status
On this page you can see device status such as Alarm status Record Status DDNS status WIFI statusand so on
31
423 Session Status
Session status will display who and which IP is visiting the camera now
424 Log
The log record shows who and which IP address accessed or logout the camera
32
Reboot the camera and clear the log records
43 Basic SettingsThis section allows you to configure your camerarsquos Name Time Mail User account and Multi-Device
431 Camera Name
You can define a name for your camera here such as apple Click Save to save your changes The aliasname cannot contain special characters
432 Camera Time
This section allows you to configure the settings of the internal system clocks for your camera
33
Time Zone Select the time zone for your region from the dropdown menuSync with NTP server Network Time Protocol will synchronize your camera with an Internet time serverChoose the one that is closest to your cameraSync with PC Select this option to synchronize the date and time of the Network Camera with yourcomputerManually The administrator can enter the date and time manually Note select the date and time formatuse DST Select the daylight saving time from the dropdown list
Click Save button and submit your settings
NOTE If the power supply of camera is disconnect you need set the camerarsquos time again
433 User Accounts
Here you can create users and set privilege visitor operator or administrator The default useraccount is admin with a blank password You can enter the users accounts of visitor operator andadministrator Manually
34
How to change the passwordFirstly select the account which you want to change the password then select ldquoChange passwordrdquoenter the old password and the new password lastly click modify to take effect
How to add account Select one blank column then enter the new user name password and privilege last click Add to takeeffect You can see the new added account on the Account list
35
Delete Select the account which you want to delete then click Delete button to take effectNOTE The default admin account cannot be deleted but you can add other administrator users
How to change the username Firstly select the account which you want to change the username then select ldquoChange usernamerdquoenter the new password lastly click modify to take effect
36
434 Multi-Camera
If you want to view multi-surveillance screens on one window you need to login one camera and set itas the main device and do Multi-Device Settings add other cameras to the first one camera Before youdo multi-cams settings you need to assign different port such as 81 82 83 84 85 86 87 88 to thecameras if there is 8 cams installedThe firmware within the camera can support a maximum of 9 devices monitoring all at the same timeThis page you can both add FOSCAM MJPEG and H264 series cameras to the first camera and viewmulti-surveillance screen on one window
Add cameras in LANIn Multi-Device Settings page you can see all devices searched in LAN The 1st Device is the defaultone You can add more cameras in the list in LAN for monitoring The camerarsquos software supports up to 9IP Cameras online simultaneously Click The 2nd Device and click the item in the Device List in LAN theAlias Host and Http Port will be filled in the boxes below automatically Enter the correct username andpassword then click Add Add more cameras in the same way
37
Camera Model Our Company produces two series cameras MJPEG and H264 Here will show youwhich series the camera belongs to
1 Click it camera model aliashost and HTTP Port will befilled in the following boxesautomatically
2 Enter the User name andpassword of the 2nd camera
3 Click Add to take effect
38
Back to Surveillance Windows and click Four Windows option you will see four cameras you added
Add cameras in WANIf you want to view all cameras via the internet(remote computer) you will need to add them using DDNSdomain name Firstly make sure all of the cameras you added can be accessed through the internet(The way to configure DDNS is in chapter 444)Login to the first camera using a DDNS domain name and port
39
Click Multi-Device Settings Choose The 2nd Device Fill in the 2nd camerarsquos name DDNS domainname port number Enter user name and password and then choose Add
1 ---- The camera model MJ or H2642 ---- The 2nd camerarsquos name3 ---- Fill in the 2nd camerarsquos DDNS host not LAN IP
NOTE The MJ series have the same HTTP Port NO and Media Port NO
4 ---- Enter the 2nd camerarsquos user name and password5 ---- Click Add button and to take effect
NOTE Here the Host must be entered as the second camerarsquos DDNS domain name not its LAN IP
Use DDNS domain
name and port to login
Make sure each camera you need add
could login with DDNS name and port
40
Return to video window You will see all of the cameras accessible through the internetWhen you are away from home you can use the first camerarsquos DDNS domain name and port to view allthe cameras via internet
435 Status Light
You can enable or disable status light
41
44 NetworkThis section will allow you to configure your camerarsquos IP PPPoE DDNS Wireless Settings UPnP andPort
441 IP Configuration
If you want to set a static IP for the camera please go to IP Configuration page Keep the camera in thesame subnet of your router or computer
Changing settings here is the same as using the Equipment Search ToolIt is recommended that you use the subnet mask gateway and DNS server from your locally attachedPC If you donrsquot know the subnet mask gateway and DNS server you can check your computerrsquos localarea connection as followsControl Panel rarrNetwork Connections rarrLocal Area Connections rarrChoose Support rarrDetails
42
If you donrsquot know the DNS server you can use the same settings as the Default Gateway
442 Wireless Settings
Step 1 Choose ldquoSettingsrdquo on the top of the camera interface and go to the ldquoNetworkrdquo panel on theleft side of the screen then click ldquoWireless Settingsrdquo
Set the same Subnet Mask andgateway of the camera with yourPC
There are two DNS servers Youcan set any of them Same withgateway is also OK
43
Click the Scan button and the camera will detect all wireless networks around the area It should alsodisplay your router in the list
Step 2 Click the SSID (name of your router) in the list the corresponding information related to yournetwork such as the name and the encryption will be filled into the relevant fields automatically
You will only need to fill in the password of your network Make sure that the SSID Encryption and thepassword you filled in are exactly the same for your router
Click the Page number to see other wirelessnetworks devices if there are more than 10
Click the Scan buttonto search for wirelessnetworks
1 Click the SSID of your router andthe relevant information will be filledin the fields automatically
2 Enter the passwordof your router
44
Step 3 Please click on the Save button after all settings have been entered and disconnect the networkcable Never shut down the power of the camera until the IP camera is able to connect to the wirelessnetwork
The LAN IP address will disappear on the window of Equipment Search Tool when the camera isconfiguring a wireless connection Wait about 1 minute the camera should obtain a wireless connectionand the LAN IP of the camera will show again on the window of the Equipment Search Tool The IPaddress may have changed after the camera receives a wireless connection we recommend setting astatic local IP address if this IP address changes by right clicking the camera in Equipment Search Toolsetting a static IP and pushing OKCongratulations You have set up the wireless connection of the camera successfully
NOTE If you fail to make a wireless connection please refer to your seller or contact us directly forassistance
443 Soft AP Password Settings(Only C1)
For the safety of your camera we recommend you change the Soft AP password
444 DDNS
FOSCAM camera has embedded a unique DDNS domain name when producing and you can directlyuse the domain name you can also use the third party domain name
FOSCAM domain nameHere take test09myfoscamorg for example Go to option of DDNS on the Settings-gtNetwork panelyou can see the domain name
45
Now you can use http Domain name + HTTP Port to access the camera via internetTake hostname test09myfoscamorg and HTTP Port no 800 for example the accessing link of thecamera via internet would be http test09myfoscamorg800
Restore DDNS to factory If you have configured Third Party DDNS successfully but you want to useManufacturerrsquos DDNS again here click this button and start Manufacturerrsquos DDNS ServiceUser can also use third part DDNS such as wwwno-ipcom www 3322com
445 UPnP
The default UPnP status is closed You can enable UPnP then the camerarsquos software will be configuredfor port forwarding Back to the ldquoDevice Statusrdquo panel you can see the UPnP status
46
The camerarsquos software will be configured for port forwarding There may be issues with your routerssecurity settings and sometimes may error We recommend you configure port forwarding manually onyour router
446 Port
This camera supports HTTP Port HTTP Port is used to access the camera remotely If you want toaccess the camera and view the video the HTTP Port must both be configured correctly
HTTP port By default the HTTP is set to 88 Also they can be assigned with another port numberbetween 1 and 65535 But make sure they can not be conflict with other existing ports like 25 21
ONVIF port By default the ONVIF port is set to 888 Also they can be assigned with another portnumber between 1 and 65535(except 0 and 65534) But make sure they can not be conflict with otherexisting ports
HTTPS port The default port is 443 You can use the url to access the camera https IP + HTTPSport
RTSP port The default port is 554 The R2 does not have RTSP port
Another way to change the HTTP port NO
Step 1 Open the Equipment Search Tool select the camera you would like to change the port of right
47
click on the IP address and click on rdquoNetwork Configurationrdquo this brings up the network configurationbox as flowing figures
Figure 41
Figure 42
Step 2 Enter the username and password of the Administrator (default username is admin with a blank
password) and click ldquoOKrdquo to apply changes
Step 3 Wait around 10 seconds yoursquoll see that the camerarsquos LAN IP address has changed In ourexample it was changed to 2000 so we see http19216811102000 in Equipment Search Tool Alsothe LAN IP address is now fixed at a static IP address of http19216811102000 This IP address willnot change even if the camera is powered off and back on the camera will remain on this LAN IPaddress This is very important that a static LAN IP address is set or you may have problems later withremote access and seeing the camera remotely if the camera loses power and reconnects on a differentLAN IP address Make sure you set a static LAN IP address
Select which camerayoursquod like to change theport for and right click
Modify the Http Port
Enter the Username andpassword click OK
48
If the camera cannot be accessed please make sure the port forwarding is succeed
447 Mail Settings
If you want the camera to send emails when motion has been detected here Mail will need to beconfigured
1---- SMTP Server Port Transport Layer Security Enter SMTP server for sender SMTP port isusually set as 25 Some SMTP servers have their own port such as 587 or 465 and Transport LayerSecurity usually is None If you use Gmail Transport Layer Security must be set to TLS or STARTTLSand SMTP Port must be set to 465 or 25 or 587 which port you choose should be decided by whichTransport Layer Security you select2---- SMTP Username password ID account and password of the sender email address3---- Sender E-mail Mailbox for sender must support SMTP4---- Receiver Mailbox for receiver need not support SMTPyou can set 4 receivers5---- Save Click Save to take effect6---- Test Click Test to see if Mail has been successfully configured
49
Click Test to see if Mail has been successfully configured
If the test success you can see the Success behind the Test at the same time the receivers will receivea test mail
If the test fails with one of the following errors after clicking Test verify that the information you enteredis correct and again select Test 1) Cannot connect to the server2) Network Error Please try later3) Server Error4) Incorrect user or password5) The sender is denied by the server Maybe the server need to authenticate the user please check itand try again6) The receiver is denied by the server Maybe because of the anti-spam privacy of the server7) The message is denied by the server Maybe because of the anti-spam privacy of the server8) The server does not support the authentication mode used by the device
448 FTP Settings
If you want to upload record files and images to your FTP serveryou can set FTP Settings
50
Figure a
Figure b
FTP server If your FTP server is located on the LAN you can set as Figure aIf you have an FTP server which you can access on the internet you can set as Figure bPort Default is port 21 If changed external FTP client program must change the server connection portaccordinglyFTP Mode Here supports two modes PORT and PASVUsernamepassword The FTP account and passwordClick Save to take effectClick Test to see if FTP has been successfully configured
449 P2P
Access the IP Camera by Smart Phone (Android or iOS operating system)First of all you must open the P2P function of the IP Camera at ldquoSettings --gt Network --gt P2Prdquo
51
Foscam App named Foscam on App Store and Google Play for iOS and Android devices
NOTEIf the QR code scanning is not successful please input the UID on the bottom of the camera manually
45 VideoThis section allows you to configure Video stream settings On screen display and Snapshot settings
451 Video Settings
There are two ways to set the stream video settings They are main stream video settings and substream video settings
Enhanced Night video Definition(Only C1) The camera will automatically drop the frame to extendthe recording time in the night
52
Stream Type There are four types to identify different streams you have set If select the HD Mode theclearer video will become and it will take up more bandwidth If select the Smooth Mode the bandwidthis very narrow and bit rate is large that will lead to video can not play well The Equilibrium Model is avalue between HD Mode and Smooth Mode
Resolution The camera supports multiple types For example 960P 720P VGA The higher theresolution is the clearer video will become But the code flux will become larger too and it will take upmore bandwidth (The maximum frame rate for each model is different please see theldquoSpecificationsrdquo )
Bit Rate Generally speaking the larger the bit rate is the clearer video will become But the bit rateconfiguration should combine well with the network bandwidth When the bandwidth is very narrow andbit rate is large that will lead to video can not play well
Frame rate You should lower frame rate when the bandwidth is limited Normally when the frame rateabove 15 you can achieve fluently video
Key Frame Interval The time between last key frame and next key frame The shorter the duration themore likely you will get a better video quality but at the cost of higher network bandwidth consumption
Variable bitrate(Only C1) Select the Bit rate type to constant or variable If select Yes the camera willchange the video bit rate according to the situation but will not more than the maximum parameter BitRate If select No the Bit Rate is unchanged
Rate Control Mode(Only R2 C2)There are three rate control modesCBR Constant Bit Rate it means that the Bit Rate is constantVBR Variable Bit Rate the camera will change the video bit rate according to the situation but will notmore than the maximum parameter Bit RateLBR Low Bit Rate If you can select the LBR then you can slide the scroll bar to choose percentage ofthe bit rate By reducing the bit rate so that the camera can obtain a better image at low bandwidth
452 On Screen Display
This page is used to add timestamp and device name on the video
Display Timestamp
53
There are two options Yes or NO Select Yes and you can see the system date on the video
Display Camera NameThere are two options Yes or NO Select Yes and you can see the device name on the video
453 Privacy Zone(Only R2 C2)
This page is used to set some mask as privacy zone on the video
Allow On Screen Display MaskThere are two options Yes or NO Select yes and draw a mask area on the video the mask area will beblack on the video
Click OK button and return to the OSD page click Save to take effectBack to the surveillance window you can see the mask area as the following picture
The mask area
54
453 Snapshot Settings
On this page you can set the snapshot picturesrsquo image quality and the storage path
Manual snap Quality Low Middle and High The higher the quality the picture will be clearerPictures Save To FTP or SD card If you have done FTP and Alarm settings when alarming thecamera will snap pictures to the FTP or SD card automaticallyIf you select the FTP you can set the file name which the picture save to (Only C1)
Enable timing to captureTo enable capture interval follow the steps below1 Select Enable Motion detection
55
2 Capture intervalThe interval time between two captures3 Select the capture time
Capture anytimeClick the black button up the MON you will see all time range turn red When something moving inthe detection area at anytime the camera will capture
Specify an capture scheduleClick the week day words the corresponding column will be selected For example click TUE theall column of TUE turns to red that means during Tuesday whole day the camera will capture
Press the left mouse and drag it on the time boxes you can select the serial area4 Click Save button to take effect
454 IR LED Schedule
On this page you can set the schedule time for switching IR LED lights When parameter Mode is set tothe Schedule on the Live Video window at these schedule time the IR LED lights will be turned off
46 Detector
461 One Key Alert(Only R2 C2)
On this page you can turn on or off the alarm function you need
462 Action Detection
IP Camera supports Action Detection Alarm when the people has been detected the IP Camera willmake a alarm
56
Step 1 Enable Action detection function
Step 2 Sensitivity---- It supports five modes Lowest Lower Low Medium and High The higher thesensitivity the camera will be more easily alarmed Select one motion sensitivity
Step 3 Trigger interval--- The interval time between two motion detection
Step 4There are some alarm indicators
A Camera Sound and PC SoundIf the camera has connected with a speaker or other audio output device if you select Camera Sound orPC Sound when the motion has been detected the people around the camera will hear beep alarmsound
B Send E-mailIf you want to receive alarm emails when motion is detected you must select Send E-mail and set MailSettings first
C Take SnapshotIf you select this checkbox when the motion has been detected the camera will snap the live viewwindow as a still picture and load it to the FTP Make sure you have set FTP and set FTP as the storagepath in Video-gtSnapshot settings panel
57
Time interval The interval time between two pictures
D RecordingIf you select this checkbox when the motion has been detected the camera will record automaticallyand store the record files to the SD Card Make sure the camera has inserted SD card and you haveset the SD card as the Alarm record files storage path please go to Recordmdashgt Storage location pageto verify this settingsThe default alarm record time is 30s and pre-alarm record time is 5s please go to Recordmdashgt AlarmRecord page and change the alarm time settings
E Push message to the phoneIf you select this checkbox when the motion has been detected the camera will push the message tothe phone which has been connected the camera
Step 7 Set detection areaClick set detect area and it pop up a window then you can draw the detection area Click Back buttonafter settings When something moving in the detection area the camera will alarm
Step 8 Alarm Schedule① Alarm anytime when motion is detectedClick the black button up the MON you will see all time range turn red When something moving in thedetection area at anytime the camera will alarm
② Specify an alarm scheduleClick the week day words the corresponding column will be selected For example click TUE the allcolumn of TUE turns to red that means during Tuesday whole day when something moving in thedetection area the camera will alarm
Click this button and select all time range
58
③ Press the left mouse and drag it on the time boxes you can select the serial area
Step 9 Click Save button to take effectWhen the motion has been detected during the detection time in the detection area the camera willalarm and adopt the corresponding alarm indicators
NOTE You must set the detection area and detection schedule or else there is no alarm anywhereand anytime
463 Sound alarm
When the ambient sound over a certain decibel the sound alarm will be triggered
59
If the Sensitivity is set to ldquoHighrdquo the camera will detect the sound whose more than 55dbIf the Sensitivity is set to ldquoMediumrdquo the camera will detect the sound whose more than 65dbIf the Sensitivity is set to ldquoLowrdquo the camera will detect the sound whose more than 75dbIf the Sensitivity is set to ldquoLowerrdquo the camera will detect the sound whose more than 85dbIf the Sensitivity is set to ldquoLowestrdquo the camera will detect the sound whose more than 95db
47 RecordThis section will allow you to change the record files storage path and the record time
471 Storage Location
On this page you can change the alarm and manually recording storage path
60
Recording Location SD card or FTP Make sure the camera has been inserted the SD card Onthis page you can see the available space of the SD card
Local Recording Location For Windows OS the manual recording path is C IPCamRecord you canchange another one For MAC OS the manual recording path is IPCamRecord
Enter the local folder Click here You can enter the local storage folder
472 Alarm Recording
473 Local Alarm Recording
This page you can enable the local alarm record and Local Alarm record time
61
474 Schedule Recording
When the video is selected as FTP the device supports scheduled recordingWhen the parameter Recording Location is set SD Card on the Storage Location page you canconfigure parameters as shown in follow figure
When the video is selected as SD card the device supports pumping frame recordingWhen the parameter Recording Location is set SD Card on the Storage Location page you canconfigure parameters as shown in follow figure
62
Record full strategy When the SD card is full you can choose to cover the previous recording or stoprecordingAudio Record You can choose yes or no
NOTES Scheduled recording only supports video saved to the SD card or FTP server The schedule recording will stop while alarm recording is beginning and it will continue
automatically after alarm recording end You can refer to alarm schedule in Alarm about editing the time of recording Schedule
475 SD Card Management
This camera supports SD Card When you plug in the SD card during the camera work process please
63
reboot the camera again or else the SD Card may be cannot work well
The default storage path of alarm record files is SD card when the available size of SD card is less than256M the old record files will be deleted automatically
SD Card Management After click the button you should enter the username and password of thecamera Then you can manage the recording files of the camera in the SD card The SD cardmanagement is only effective when access the camera in LAN
Format(except C1) Click the button you can format the SD card Note that this will delete all files on theSD card
48 PTZ(Only R2)This page will allow you to change the pantilt speed and do cruise tracks settings
481 Pan amp Tilt Speed
There are five Pt speed types very fast fast normal slow and very slowly Select the desired PTZspeed type and click save buttonThere are three zoom speed types fast normal slow
64
482 Cruise SettingsThis section explains how to add delete alter one cruise track
Setting the Cruise ModeThere are two cruise mode Cruise time and Cruise LoopsCruise time Select Cruise time from Cruise Mode drop-down then you can set the Cruise time of thecameraCruise LoopsSelect Cruise Loops from Cruise Mode drop-down you can set the Cruise Loops ofthe cameraClick Save to take effect
Manage the Cruise TrackThere are two default cruise tracks Vertical and HorizontalVertical The camera will rotate from up to down
65
Horizontal The camera will rotate form left to right
Add Add one cruise track then click save buttonDelete Select one cruise track and delete itSave After you modify the Dwell time you should click Save button to take effect
Example
How to do add cruise tracks Firstly Click Add button and enter a descriptive name to identify the cruise track
Secondly On the lower left of the page you can see all preset points you have added Select onepreset point and click Add button you can see the preset point has been added to the cruise track on thecruise track page You need to add two or more preset points to the cruise track
Thirdly Click OK button and the cruise track will take effect
You can add other cruise track as the same method
For example I have added three preset points to the ldquotrack 1rdquo that means When I select the ldquotrack 1rdquoon the surveillance window the camera moves as the following track upright then Right Most last downleftYou can add preset on the left of the surveillance window
The new added track name
1 Select one preset point 2 Click Add button
Here you can see the preset pointhas been added to one track Andyou can set the stay time
66
After add the cruise track back to the surveillance window click Cruise her you can see all cruise tracksyou have added
After add the cruise track back to the surveillance window click Cruise her you can see all cruise tracksyou have added
The cruise tracks have addedto the ldquotrack 1rdquo
Add the preset
67
There are other buttons between the Preset points and Cruise track you can use these buttons to adjustthe order of preset points or adddelete one preset points in one cruise track
Add Select one preset points and add it to the selected cruise trackDelete Select one preset points you have added to one cruise track click deleteMove up down Select one cruise track adjust the order of preset points in one cruise track
AttentionConsidering the life time and thermal issue of the motor itrsquos not recommend to do long-time cruise
483 Start-Up Options
Here section will allow you to set the stop position after the camera rebootsIt supports three modes No self test Goto home position and Goto preset pointNo self test When rebooting the camera will not pan tiltGoto home position When rebooting the camera will pa Providing Central Management Software tomanage or monitor multi-cameras n tilt and stops at centerGo to Preset point Select one preset position and save it When rebooting the camera will pan tilt andstops at the preset position you have set
68
49 FirewallThis section explains how to control the access permission by checking the client PCrsquos IP addresses Itis composed of the following columns Block access from these IP addresses and Only allow accessfrom these IP addresses
Enable firewall If you select Only allow access from these IP addresses and fill in 8 IP addresses atmost only those clients whose IP addresses listed in the Only allow access from these IP addressescan access the Network Camera If you select Block access from these IP addresses only thoseclients whose IP addresses are in the IP list cannot access the Network CameraClick Save to take effect
410 SystemIn this panel you can backuprestore your camera settings upgrade the firmware to the latest versionrestore the camera to default settings and reboot the device
4101 Back-upamp Restore
Click Backup to save all the parameters you have set These parameters will be stored in a bin file forfuture useClick Browse and select the parameters file you have stored then click Submit to restore the restore the
69
parameters
4102 System UpgradeClick ldquoDownload the latest firmwarerdquo you will see the following screen And click ldquosaverdquo to save thefirmware on your computer locally
Your current firmware version will be displayed on your screen You may go to the Status DeviceInformation page to check for the latest firmware versions availableClick Browse choose the correct bin file and then click System upgradeDonrsquot shut down the power during upgrade After upgrading you can see the upgrade result
70
Upgrade Firmware by Equipment Search Tool
Double click the Equipment Search Tool shot icon select the Camera IP that you want toupgrade the firmware Then select Upgrade Firmware and enter the username and password choosethe firmware file and upgrade
Figure 43
CAUTION If your camera works well with the current firmware we recommend not upgrading Pleasedonrsquot upgrade the firmware unnecessarily Your camera may be damaged if misconfigured during anupgrade
71
NOTES Please ensure you have download the correct firmware package for your camera before upgrading
Read the upgrade documentation (readmetxt file) in the upgrade package before you upgrade Upon downloading the firmware check the sizes of the bin files They must match the size in the
readmetxt file If not please download the firmware again until the sizes are the same Yourcamera will not function correctly if a corrupt bin file is used
Normally only Device WEB UI need to be upgrade please do not try to upgrade the Device SystemFirmware
Never shut down the power of the camera during upgrade until the IP camera restart and getconnected
After upgrade successfully please uninstall the old plugin and re-install it then reset the camera tothe default factory settings before using the camera
4103 Patch InstallationClick Browse to select the correct patch file and then click Install Patch to install the patch Do notturn off the power during it installing After installing is complete you will receive a system prompt
4104 Factory Reset
Click All reset and all parameters will return to factory settings if selected This is similar to press theReset button on the bottom of the camera
4105 RebootClick Reboot System to reboot the camera This is similar to unplugging the power to the camera
Enable Periodic Maintenance(Only R2)You can choose the reboot period of the camera
72
5 PlaybackOn this page you can view the record files stored in the SD card
Section 1 Define the Record files time and Type
The storage path of record files
Here supports three types current day current month and All records Another
way select the time on the timeampdate manually
The type of records files Here supports two typs Normal record Alarm record
and All records
Click this button to search all record files satisfy the conditions you selected
Continuous Play Select the checkbox to play continuously all the record files
73
Section 2 Search record filesOn this panel you can see all record files satisfy the conditions you set
Section 3 PlayStopAudioFull screen buttonsPlease select one record file before use these buttons
Click this button to play the record files
Click this button to stop the record files
Open or stop audio
Click this button to make full screen and double click left mouse to exit full screen
6 Appendix
61 Frequently Asked Questions
611 Install the add-on of Firefox browser Google Chrome and IE
Chrome
74
75
76
77
612 Uninstall the add-on of Firefox browser Google Chrome and IE
Chrome
78
613 I have forgotten the administrator password
To reset the administrator username and password press and hold down the RESET BUTTON for 5seconds Upon releasing the reset button wait for 20 seconds the camera will reboot and the usernameand password will return to the factory default administrator username and password Please power onthe camera before resetDefault administrator username adminDefault administrator password No password
614 Camera can not record
When you use Windows7 or Vista you may be not able to do manually record or change the record pathbecause of the security settings of computerThere are two ways to resolve this problemPlease add the camera as a trusted site to resolve this issue The steps are IE browserToolInternet PropertiesSecurityTrusted sitesSitesAdd
79
Open IE browser then right click select ldquoRun as administratorrdquo
615 Subnet doesnrsquot match
Check whether your ipcamera in the same subnet of your computer The step is ControlPanelNetwork ConnectionsDbclick Local Area Connections ChooseGeneralPropertiesCheck subnet mask IP address and gateways When you set IP address pleasemake sure they are in the same subnet Otherwise you cant access camera
616 No Pictures Problems
The video streaming is transmitted by the ActiveX controller If ActiveX controller isnrsquot installed correctlyyou will see no video image You can resolve this problem by this wayDownload ActiveX controller and set the safety property of IE in the PC when you view it first time IEbrowserToolInternet ProperSecurityCustom LevelActiveX control and Plug-ins Three optionsof front should be set to be ldquoEnablerdquo The ActiveX programs read by the computer will be stored AsfollowsEnable Download unsigned ActiveX controlsEnable Initialize and script ActiveX controls not marked as safeEnable Run ActiveX controls and plug-ins
If you allow the ActiveX running but still could not see living video Please change another port numberto try Donrsquot use port 88
80
NOTE Make sure that your firewall or anti-virus software does not block the camera or ActiveX If youcould not see video please shut down firewall or anti-virus software to try again
617 Canrsquot access IP camera in internet
There are some reasons1ActiveX controller is not installed correctly2The port which camera used is blocked by Firewall or Anti-virus software Please change another portnumber and try again3Port forwarding is not successfulCheck these settings and make sure they are correct
618 UPnP always failed
UPnP only contains port forwarding in our recent software Sometimes it may be failed to do portforwarding automatically because of firewall or anti-virus software It also has much relation with routerrsquossecurity settings So we recommend you do port forwarding manually You can view your camera ininternet successfully after you do port forwarding manually in your router
619 Camera can not connect wireless
If your camera could not connect wireless after you set wireless settings and plug out the cable Pleasecheck whether your settings are correct or notNormally camera canrsquot connect wireless mainly because of wrong settingsMake sure broadcast your SSID use the same encryption for router and camera
6110 Canrsquot see other cameras listed in multi-device when using remote
access
If you want to view all the cameras via the WAN verify that each camera added in the multi-devicesettings can be accessed by using the DDNS name and port number Use the DDNS domain name notthe camerarsquos LAN IP (For more details see How to add cameras in WAN)
62 Default ParametersDefault network ParametersIP address obtain dynamically
81
Subnet mask obtain dynamicallyGateway obtain dynamicallyDDNS Embedded FOSCAM domain nameUsername and passwordDefault admin username admin with a blank password
63 Specifications
ITEMS C1
Image SensorSensor High Definition Color CMOS Sensor
Display Resolution 1280 x 720 (1Megapixels)
Min Illumination 0 Lux (With IR Illuminator)
Lens
Lens Type Glass Lens
focal length f28mm
Aperture F24
Diagonal angle of view 115deg
Horizontal view angle 100deg
Video
Image Compression H264
Image Frame Rate 25fps(VGA) 23fps(720P) downward adjustable
Resolution720P(1280 x 720) VGA(640 x 480) VGA(640 x 360)QVGA(320 x 240) QVGA(320 x 180)
Stream dual stream
Image adjustmentThe hue brightness contrast saturation sharpness areadjustable
Flip image flip and mirror
Infrared mode Automatic or manual
manual PanTilt Angle Horizontal350deg amp Vertical 180deg
Night visibility 11pcs IR-LEDs night vision range up to 8 metres
Audio InputOutputSupports two-way audioBuilt-in Mic amp Speaker
Audio Compression PCMG726
Network
Ethernet One 10100Mbps RJ45 port
Wireless Standard IEEE80211bgn
Data RateIEEE80211b 11Mbps(Max)IEEE80211g 54Mbps(Max)IEEE80211n 150Mbps(Max)
Wireless Security WEP WPA WPA2
WPS Supports EZLink wireless setup
82
Network ProtocolIPTCPUDPHTTPHTTPSSMTPFTPDHCPDDNSUPnPRTSPWPS
Remote Access P2P DDNS
SystemRequirements
Operating SystemMicrosoft Windows XP Vista 7 8Mac OSiOSAndroid
Browser
Microsoft IE8 and above version or compatible browserMozilla FirefoxGoogle ChromeApple Safari
OtherFeatures
Motion Detection Alarm via E-Mail upload alarm snapshot to FTP
PIR Infrared human body sensor
User Accounts Three levels user role
Firewall Supports IP Filtering
Storage 32G Micro SD card local and FTP storage
Reset Reset button is available
PowerPower Supply DC 5V10A
Power Consumption 45W(Max)
Physical Dimension(LxWxH) 7070120mm
Net Weight 170g
Environment
Operating Temperature-10degC ~ 50deg(14degF ~ 122degF)
Operating Humidity 20 ~ 85 non-condensing
Storage Temperature -20degC ~ 60deg (-4degF ~ 140degF)
Storage Humidity 0 ~ 90 non-condensing
Certification CE FCC RoHS
Warranty Limited 2-year warranty
ITEMS R2
Image Sensor
Sensor Type 13 CMOS
Display Resolution 1920 x 1080 (20 Megapixels)
Frame Rate 30fps
Min Illumination 0 Lux (With IR Illuminator)
Lens
Lens Type f28mmF26
Angle of ViewHorizontal90degDiagonal 110deg
Night Vision 13pcs IR-LEDs night vision range up to 8 metres
VideoImage Compression H264
Resolution1080P(1920x1080)720P(1280 x 720) VGA(640 x 480)QVGA(320 x 240)
83
Stream dual stream
Image adjustmentThe hue brightness contrast saturation sharpness areadjustable
Flip image flip and mirror
Infrared mode Automatic or manual
manual PanTilt Angle Horizontal300deg amp Vertical 100deg
Night visibility 13pcs IR-LEDs night vision range up to 8 metres
Audio InputOutputSupports two-way audioBuilt-in Mic amp Speaker
Audio Compression PCMG726
Network
Ethernet One 10100Mbps RJ45 port
Wireless Standard IEEE80211bgn
Data RateIEEE80211b 11Mbps(Max)IEEE80211g 54Mbps(Max)IEEE80211n 150Mbps(Max)
Wireless Security WEP WPA WPA2
Wireless Setup Supports EZLink wireless setup
Network ProtocolIPTCPUDPHTTPHTTPSSMTPFTPDHCPDDNSUPnPRTSPWPSONVIF
Remote Access P2P DDNS
SystemRequirements
Operating System Microsoft Windows XP 7 8Mac OSiOSAndroid
Browser IE8 and above versionFirefoxChromeSafari
OtherFeatures
Motion Detection Alarm via E-Mail upload alarm snapshot to FTP
HDR Improve image clarity in complex scenario
Magic Zoom Picture zoom function
User Accounts Three levels user role
Firewall Supports IP Filtering
Storage 64G Micro SD card local and FTP storage
Reset Reset button is available
PowerPower Supply DC 5V20A
Power Consumption <6W
PhysicalDimension(mm) 74(L)times74(W)times119(H)
Net Weight 290g
Environment
OperatingTemperature -10degC ~ 50deg (14degF ~ 122degF)
Operating Humidity 20 ~ 85 non-condensing
Storage Temperature -20degC ~ 60deg (-4degF ~ 140degF)
Storage Humidity 0 ~ 90 non-condensing
Certification CE FCC RoHS
Warranty Limited 2-year warranty
84
ITEMS C2
Image Sensor
Sensor Type 13 CMOS
Display Resolution 1920 x 1080 (20 Megapixels)
Frame Rate 30fps
Min Illumination 0 Lux (With IR Illuminator)
LensLens Type f28mmF26
Angle of ViewHorizontal110degDiagonal 120deg
Video
Image Compression H264
Resolution1080P(1920x1080)720P(1280 x 720) VGA(640 x 480)QVGA(320 x 240)
Stream dual stream
Image adjustmentThe hue brightness contrast saturation sharpness areadjustable
Flip image flip and mirror
Infrared mode Automatic or manual
Manual PanTilt Angle Horizontal360deg amp Vertical 180deg
Night visibility High performance IR-LEDs night vision range up to 8 metres
Audio InputOutputSupports two-way audioBuilt-in Mic amp Speaker
Audio Compression PCMG726
Network
Ethernet One 10100Mbps RJ45 port
Wireless Standard IEEE80211bgn
Data RateIEEE80211b 11Mbps(Max)IEEE80211g 54Mbps(Max)IEEE80211n 150Mbps(Max)
Wireless Security WEP WPA WPA2
Wireless Setup Supports EZLink wireless setup
Network ProtocolIPTCPUDPHTTPHTTPSSMTPFTPDHCPDDNSUPnPRTSPWPSONVIF
Remote Access P2P DDNS
SystemRequirements
Operating System Microsoft Windows XP 7 8Mac OSiOSAndroid
Browser IE8 and above versionFirefoxChromeSafari
OtherFeatures
Motion Detection Alarm via E-Mail upload alarm snapshot to FTP
HDR Improve image clarity in complex scenario
Magic Zoom a Magic digital zoom rivaled Optical zoom
User Accounts Three levels user role
Firewall Supports IP Filtering
85
Storage 64G Micro SD card local and FTP storage
Reset Reset button is available
PowerPower Supply DC 5V10A
Power Consumption 48W(Max)
PhysicalDimension(mm) 7070120mm
Net Weight 160g
Environment
OperatingTemperature -10degC ~ 50deg (14degF ~ 122degF)
Operating Humidity 20 ~ 85 non-condensing
Storage Temperature -20degC ~ 60deg (-4degF ~ 140degF)
Storage Humidity 0 ~ 90 non-condensing
Certification CE FCC RoHS
Warranty Limited 2-year warranty
Attention Power adapter should be used between 0-40 and 5-90 relative humidity
64 CE amp FCCElectromagnetic Compatibility (EMC)FCC Statement
This device compiles with FCC Rules Part 15 Operation is subject to the following twoconditions This device may not cause harmful interference This device must accept any interference received including interference that may cause undesired
operation
This equipment has been tested and found to comply with the limits for a Class B digital device pursuantto Part 15 of the FCC Rules These limits are designed to provide reasonable protection against harmfulinterference when the equipment is operated in a commercial environment This equipment generatesuses and can radiate radio frequency energy and if not installed and used in accordance with theinstallation manual may cause harmful interference to radio communications Operation of thisequipment in a residential area is like to cause harmful interference in which case the user will berequired to correct the interference at his own expense
FCC CautionAny changes or modification not expressly approved by the party responsible for compliance could voidthe userrsquos authority to operate this equipmentThis equipment complies with FCC radiation exposure limits set forth for an uncontrolled environment
86
This equipment should be installed and operated with minimum distance 20cm between the radiatorampyour bodyThis transmitter must not be co-located or operating in conjunction with any other antenna or transmitter
CE Mark Warning
This is a Class B product In a domestic environment this product may cause radio interference inwhich case the user may be required to take adequate measures
65 WarrantyShenZhen FOSCAM Intelligent Technology Limited(FOSCAM) values your business and alwaysattempts to provide you the very best of serviceNo limited hardware warranty is provided by FOSCAM unless your FOSCAM product (product) waspurchased from an authorized distributor or authorized reseller Distributors may sell products toresellers who then sell products to end users No warranty service is provided unless the product isreturned to an authorized return center in the region where the product was first shipped by FOSCAM orto the point-of-purchase which may have regional specific warranty implicationsIf you purchase your FOSCAM product from online store please contact the point-of-purchaseand ask for returnreplacementrepair service
Hardware Warranty Information
FOSCAM provide 2-year limited warranty for naked product and 6-month limited warranty foraccessories
Limited Hardware Warranty
FOSCAM products are warranted to be free from manufacturing defects in materials andworkmanship starting from the shipping date of FOSCAM
This limited hardware warranty does not cover Software including the software added to the products through our factory-integration system
software that included in the CDetc Usage that is not in accordance with product instructions Failure to follow the product instructions Abuse firmware upgrade without the authorized technicianrsquos guidance Normal wear and tear
Return Procedures
Please read FOSCAM warranty policy amp policy of your reseller first before sending items back topoint-of-purchase
Customer must first contact point-of-purchase to obtain a Return Merchandise Authorization (RMA)
87
number before returning the product If the product you received is suspected to be defective andthe product warranty has not expired The RMA number will allow your reseller to track your returnmuch easier and help them expedite processing your request
After receiving your RMA case number pack the item(s) very well with the original box and all theoriginal accessories included such as power adapters brackets cables manuals and driver CDdisks
Write your RMA number and the return reason (the problem of the product) on the warranty cardalong with the complete package to send them back
Replacement Services
If customers ask for replacement service please contact point-of-purchase and follow theirpolicy
Our technicians will inspect all items returned for replacement requests If the retuned product isfound in working order we will return the same item received However customers shall beresponsible for all shipping amp handling charges incurred for getting the units back to customers
If returned products are found defective we will replace the product and assume the shipping costfor sending back the replacement unit to customers
If for any reason we are unable to provide a replacement of the original returned item(s) You willhave a choice for a ldquoSubstituterdquo item at the same equal value
We do not provide exchange and replacement due to normal hardware upgrade according themarket after 14 days after the product is delivered
Our technicians will test the product before send out the replacement any other demand for morethan two times replacement for the same product during replacement limit will be rejected
Replaced products are warranted from the balance of the former warranty period
Warranty Forfeiture
Warranty is void if purchase from unauthorized distributor or reseller Warranty is void if trade-mark serial tags product stickers have been removed altered or tampered
with Warranty is void for mishandling improper use or defacing the product Abuse firmware upgrade without the authorized technicianrsquos guidance Warranty is void for physical damage altered either internally or externally improper or inadequate
packaging when returned for RMA purposes Warranty is void if damage has resulted from accident dismantle abuse or service or modification
by someone other than the appointed vendor souse fission or the spare part has been over theperiod of warranty
Warranty is void if product is damaged due to improper working environment or operation (Forexample improper temperature humidity unusual physical or electrical stress or interferencefailure or fluctuation of electrical power static electricity using wrong power adapter etc)
Warranty is void if damaged by the use of parts not manufactured or sold by FOSCAM Damage caused by improper installation of third-party products Warranty is void if damaged for irresistible cause such as earthquake fire lightning flood etc Product beyond limited warranty
Shipping Fee
88
If products are defective or damaged under normal use or operation in the replacement limitdistributors or resellers are responsible for the shipping cost the product back to customerscustomers should assume the shipping cost send the product to the point-of-purchase
During replacement limit if customers ask for replacement due to the product does not fit forcustomerrsquos personal expectation customers should responsible for both shipping fee
Customers shall be responsible for both shipping fee if their product beyond the replacement limitbut still in warranty limit
Repair Service Out Of Warranty
FOSCAM provide extra repair service for product that out of warranty it is chargeable The total feecontains device cost and service fee Device cost (including accessories) is the standard uniformprice provide by FOSCAM
Different region may have different service fee please contact the point-of-purchase to confirm thatbefore you ask for this service
Our technicians will quote the total price after detect the product If customers refused to repair afterthe quotation customers need pay for the test fee $35hour If agree with the quotation test will befree
Repaired product out of warranty will obtains 3-month warranty from the date of the product back tocustomers
Limitation of Liability
FOSCAM is not responsible for other extra warranty or commitment promised by resellers if yourreseller promised some extra commitment or warranty please ask for written documents to protectyour rights and interests
FOSCAM does not offer refunds under any circumstances Please contact the point-of-purchaseand follow their refundreturn policy
FOSCAM shall not be liable under any circumstances for any consequential incidental special orexemplary damages arising out of or in any connection with this agreement or the productsincluding but not limited to lost profits or any claim based on indemnity or contribution or the failureof any limited or exclusive remedy to achieve its essential purpose or otherwise Purchasersexclusive remedy as against FOSCAM shall be the repair or replacement of defective parts IfFOSCAM lists a product on its website specification in error or that is no longer available for anyreason FOSCAM reserves the right to explain it without incurring any liability
All rights reserved FOSCAM and the FOSCAM logo are trademarks of ShenZhen FOSCAMIntelligent Technology Limited registered in the US and other countries
7 Obtaining Technical SupportWhile we hope your experience with the IPCAM network camera is enjoyable and easy to use you may
89
experience some issues or have questions that this Userrsquos Guide has not answeredIf you have problem with FOSCAM IP camera please first contact FOSCAM reseller for solving theproblems If our reseller cannot provide service please contact our service departmenttechfoscamcom
- Security Warning
- 1 Overview
-
- 11 Key Features
- 12 Read Before Use
- 13 Package Contents
- 14 Physical Description
- 15 Micro-SD Card
-
- 2 Access the IP Camera
-
- 21 Wired Connection
- 22 Wireless Connection
-
- 221 Soft AP Connection(Only C1)
- 222 WPS (WI-FI Protected Set-up)
-
- 23 Access the Camera in WAN
-
- 231 Static IP Addresses
- 232 Remote Access
-
- 24 Using the VLC player
- 25 IP camera connection to the server
-
- 3 Surveillance Software GUI
-
- 31 login Window
- 32 Setup Wizard
- 33 Surveillance Window
-
- 4 Advanced Camera Settings
-
- 41 Setup Wizard
- 42 Status
-
- 421 Device Information
- 422 Device Status
- 423 Session Status
- 424 Log
-
- 43 Basic Settings
-
- 431 Camera Name
- 432 Camera Time
- 433 User Accounts
- 434 Multi-Camera
- 435 Status Light
-
- 44 Network
-
- 441 IP Configuration
- 442 Wireless Settings
- 443 Soft AP Password Settings(Only C1)
- 444 DDNS
- 445 UPnP
- 446 Port
- 447 Mail Settings
- 448 FTP Settings
- 449 P2P
-
- 45 Video
-
- 451 Video Settings
- 452 On Screen Display
- 453 Privacy Zone(Only R2 C2)
- 453 Snapshot Settings
- 454 IR LED Schedule
-
- 46 Detector
-
- 461 One Key Alert(Only R2 C2)
- 462 Action Detection
- 463 Sound alarm
-
- 47 Record
-
- 471 Storage Location
- 472 Alarm Recording
- 473 Local Alarm Recording
- 474 Schedule Recording
- 475 SD Card Management
-
- 48 PTZ(Only R2)
-
- 481 Pan amp Tilt Speed
- 482 Cruise Settings
- 483 Start-Up Options
-
- 49 Firewall
- 410 System
-
- 4101 Back-upamp Restore
- 4102 System Upgrade
- 4103 Patch Installation
- 4104 Factory Reset
- 4105 Reboot
-
- 5 Playback
- 6 Appendix
-
- 61 Frequently Asked Questions
-
- 611 Install the add-on of Firefox browser Googl
- 612 Uninstall the add-on of Firefox browser Goo
- 613 I have forgotten the administrator password
- 614 Camera can not record
- 615 Subnet doesnrsquot match
- 616 No Pictures Problems
- 617 Canrsquot access IP camera in internet
- 618 UPnP always failed
- 619 Camera can not connect wireless
- 6110 Canrsquot see other cameras listed in multi-dev
-
- 62 Default Parameters
- 63 Specifications
- 64 CE amp FCC
- 65 Warranty
-
- 7 Obtaining Technical Support
-

1
Table of Contents
Security Warning21 Overview 2
11 Key Features212 Read Before Use313 Package Contents314 Physical Description 415 Micro-SD Card7
2 Access the IP Camera 721 Wired Connection722 Wireless Connection923 Access the Camera in WAN1424 Using the VLC player 1825 IP camera connection to the server20
3 Surveillance Software GUI2031 login Window2132 Setup Wizard 2233 Surveillance Window22
4 Advanced Camera Settings2941 Setup Wizard 2942 Status2943 Basic Settings3244 Network4145 Video 5146 Detector 5547 Record5948 PTZ(Only R2)6349 Firewall68410 System68
5 Playback726 Appendix 73
61 Frequently Asked Questions7362 Default Parameters8063 Specifications8164 CE amp FCC8565 Warranty 86
7 Obtaining Technical Support88
2
Security WarningFoscam cameras and NVRs require good security practices to safeguard your privacy You shouldregularly change your camera or NVR password which is 8-10 numbers letters symbols combinationYou should update your camera or NVR regularlyMake sure your camera or NVR has the latestfirmware installed for your specific model and better experience
1 OverviewFOSCAM Indoor HD IP Camera is an integrated wireless IP Camera with a color CMOS sensor whichenable to view in High Definition resolution It combines a high quality digital video camera with apowerful web server to bring clear video to your desktop and mobile devices no matter where by yourlocal network or over the Internet
These cameras support P2P function Thanks to the P2P easy access technology you donrsquot need to docomplicated Port Forwarding and DDNS settings you just need to scan the QR code on the bottom ofthe camera to connect it to smart phone or input the UID on CMS software to realize remote access
FOSCAM IP Camera provides users with more comprehensive controls over a monitored site Thecamera supports H264 video compression technology dramatically reduces file size and saves networkbandwidth
The camera is based on the TCPIP standard A built-in WEB server inside which could support InternetExplorer simplifies the management and maintenance of your device is simplified by accessing thewebsite of your camera through network
The camera is designed for indoor surveillance with wide applications such as at home in retail storeand in office Controlling the camera and managing images are simplified by using the provided webinterface across the network in either wired or wireless way
FOSCAM provides Smart Phone APP for Android and iPhone users please search and install FoscamApp named Foscam on App Store and Google Play for iOS and Android devices then you can view yourcamera anywhere anytime on your smart mobile devices
11 Key Features Standard H264 video compression algorithm to satisfy the transmission of high definition video in
narrow bandwidth network P2P feature for easy access 10 Mega-Pixel(C1) 20 Mega-Pixel (R2C2) Supports IEFirefoxGoogleSafari browser or any other standard browsers Support WEPWPA-PSK and WPA2-PSK Encryption Wireless connection is compliant with IEEE 80211bgn WI-FI up to 150Mbps
3
IR night vision Range 8m(C1R2) C2(5m) Support image snapshot Support dual-stream Support SD Card storage up to 32GB(C1) or 64GB(R2C2) When the camera has been connected the computer via the USB power cable with supplied you
can view and operate the files in SD Card by the computer (Only C2) Support IR-Cut auto switch Embedded free FOSCAM DDNS(dynamic domain name service) Service Supporting the Third Party Domain Name Service Support two-way audio Support ONVIF protocols Multi-level users management with password protection Motion detection alert via email or upload image to FTP Provide free Android and iPhone APP for viewing live video provide free Central Management
Software to manage and monitor multiple cameras Support record schedule Supports Passive Infrared Sensor(only C1C2) Supports High Dynamic Range(only R2) Supports Wide Dynamic Range(only C2) Supports 8X Magic zoom(only R2) Supports voice prompt(only R2C2)
12 Read Before UsePlease first verify that all contents received are complete according to the Package Contents listed belowBefore the IP Camera is installed please carefully read and follow the instructions in the QuickInstallation Guide to avoid damage due to faulty assembly and installation It also ensures the product isused properly as intended
13 Package Contents
C1C2 IP Camera times 1 AC Adapter times 1
Quick Installation Guide times 1 Power Line times 1
CDtimes1 Warranty Card times 1
R2 IP Camera times 1 Power Supply times 1
Quick Installation Guide times 1 Warranty Card times 1
CDtimes1 Wi-Fi Antennatimes1
Mounting brackettimes1
4
14 Physical Description
C1
Front panel Rear panel
Front panel PIRThe PIR ( Passive Infrared ) is electronic devices which are used in some security alarm
systems to detect motion of an infrared emitting source usually a human body LENS Fixed focus lens Infrared LED Infrared LEDs for night vision Microphone Built-in microphone Micro SD Card slot Supports up to 32GB SD card for storing the video
Rear panel Power Light If the power supply works fine the light will be on LAN 10100 Mbps RJ-45 port for wired connection SoftAP Press the SoftAP button for more than 2 seconds The Network light indicator begins to
twinkle every 01 seconds WPSReset
WPS Push both WPSReset button on the camera and wireless router within 1 minute thecamera will connect to the wireless router automatically in WPS process the Network light willblink every 04 seconds
Reset Push and hold the WPSReset button for more than 10 seconds to set the camera tofactory default the Power light will blink every 04 seconds
Power DC 5V1A Power supply
The flashing status of the Power light and Network light are shown in the following table
Light Flashing Status DescriptionPower light off The power dont work properly
on The power supply works fineFlashing every 04 seconds Reset to take effect
Network light off No Wireless connectionConstant Flash Wired connection
5
Slow Flash every 10 second Wi-Fi connectedFlashing every 04 seconds WPS is connectingFlashing every 02 seconds EZLink takes effectFlashing every 01 seconds SoftAP is started
R2
Front panel Rear panel
Front panel LENS Fixed focus lens Infrared LED Infrared LEDs for night vision Microphone Built-in microphone Micro SD Card slot Supports up to 64GB SD card for storing the video WPSReset
WPS Push both WPSReset button on the camera and wireless router within 1 minute thecamera will connect to the wireless router automatically in WPS process the Network light willblink every 04 seconds
Reset Push and hold the WPSReset button for more than 10 seconds to set the camera tofactory default the Power light will blink every 04 seconds
Rear panel LAN 10100 Mbps RJ-45 port for wired connection Power DC 5V2A Power supply Speaker Built-in speaker Antenna Used to connect external wireless antenna
The flashing status of the Power light and Network light are shown in the following table
Light Flashing Status DescriptionPower light off The power dont work properly
on The power supply works fineFlashing every 04 seconds Reset to take effect
Network light off No Wireless connectionConstant Flash Wired connection
6
Slow Flash every 10 second Wi-Fi connectedFlashing every 04 seconds WPS is connectingFlashing every 02 seconds EZLink takes effect
C2
Front panel Rear panel
Front panel PIRThe PIR ( Passive Infrared ) is electronic devices which are used in some security alarm
systems to detect motion of an infrared emitting source usually a human body Lens Fixed focus lens Induction IC Infrared Lamp Array Micro SD Card slot Supports up to 64GB SD card for storing the video
Rear panel LAN 10100 Mbps RJ-45 port for wired connection WPSReset
WPS Push both WPSReset button on the camera and wireless router within 1 minute thecamera will connect to the wireless router automatically in WPS process the light will be greenand blink every 04 seconds
Reset Push and hold the WPSReset button for more than 10 seconds to set the camera tofactory default the light will be red and blink every 04 seconds
Power DC 5V1A Power supply
The flashing status of the Power light and Network light are shown in the following table
Flashing Status DescriptionFlashing(red) every 04 seconds Reset to take effectConstant Flash(green) Wired connectionSlow Flash(green) every 10 second Wi-Fi connectedFlashing every(green) 04 seconds WPS is connectingFlashing every(green) 02 seconds EZLink takes effect
7
15 Micro-SD Card
This camera supports SD CardWhen you plug in the SD card during the camera work process please reboot the camera again or elsethe SD Card may be cannot work wellGo to the SettingsDevice StatusDevice Status page you can see the SD card status
2 Access the IP Camera
21 Wired Connection
1 Connect the camera to the LAN network (Router or Switch) via network cable2 Connect the power adapter to the camera3 Insert the CD into the CD drive of your computerGo to the folder ldquoEquipment Search Toolrdquo and find the folder ldquoFor Windows OSrdquo or ldquoFor Mac OSrdquo from theCD supp Copy and paste the file to your computer or drag it onto your Desktop
Shortcut icon for Windows Mac OS
Notes If your computer ( Windows OS ) supports autorun function you can find the corresponding file in
the opened control panel If your computer doesnrsquot have CD drive you can download the Equipment Search Tool from our
website for free
The camera supports HTTP and HTTPS protocols you can access the camera in two ways
(1) http LAN IP + HTTP Port NO
8
The default HTTP port NO is 88 Double click the Equipment Search Tool icon to run and it should findthe camerarsquos IP address automatically after you plug in the network cable
Double click the IP address of the camera the camera login page should be open in your defaultbrowser
(2) https LAN IP + HTTPS Port NO
The default HTTPS port NO is 443 You can use the URL to access the camera https LAN IP +HTTPS port NOGo to Settings - Network - Port panel you can see and change the HTTP and HTTPS port NO
NOTEWhen logging in for the first time you will need to download and install the add-on
9
22 Wireless ConnectionThere are some ways of wireless connection EZLink connection soft AP connection and WPSconnection EZLink connection Use the mobile phones or other mobile devices to download APP then
connect the camera and the wireless router by the APP The procedure of the EZLink connectionplease refer to the Quick Installation Guide
Soft AP connection(only C1) Use the mobile device which can search for the wireless networkThen use the web browser to visit http1921681188 by the mobile device Follow the SetupWizard to finish the settings
WPS connection WI-FI Protected Set-up Press and hold the WPS button on your wireless routerand your camera within 60 seconds So that your camera and wireless router connect successfully
221 Soft AP Connection(Only C1)
To ensure that the ethernet cable and the camera is disconnected before you begin1 Start camera power on the indicator light of camera will light on2 Press the Soft AP button for 3-5 seconds The Network light begins to twinkle at very highfrequency(every 01 seconds)3 Use a terminal which could search the WLAN (desktop or laptop This part takes laptop as anexample) to search for the AP named C1_ for connection( indicate the last six letters ofcamerarsquos MAC ID )
IP Camera The WLAN page in the terminal device
4 After finishing Soft AP connection use the web browser of the terminal to visit http1921681188
5 Log in the camera ( Default username is admin with no password ) When log in for the first time you
Soft AP Button
10
need to change the username and password
6 After logging in for the first time it will go to Setup Wizardrdquo automatically Please set the basicparameters of the camera such as camera name camera time wireless settings (The camera connectto your wireless router Wireless Network List - enter the password of your wireless router ) IPconfiguration
Input the New usernameNew password andConfirm the password
11
12
Notes We recommend you to choose to manually set the IP when you know some knowledge of the
network It needs about 1 minute to connect the camera to your router
7 After completing the setup wizard you should press the Soft AP button for 3-5 seconds to cancel theSoft AP connection mode this is located on the back of your camera The Network light begins to slowlyflash(once per second) it indicates that the wireless connection is successful
8 Please make sure that the wireless device connect your laptop to the router which your camera has
13
connected to
9 Open the CD named ldquoFOSCAMrdquo go to the folder ldquoEquipment Search Toolrdquo and find the folder ldquoForWindows OSrdquo or ldquoFor Mac OSrdquo Copy and paste the file to your wireless device or drag it onto yourdesktop
Notes You could also download the Equipment Search Tool from our website wwwfoscamcom for free If you have multiple cameras and you cannot determine which camera you are going to log in
Please match the Device MAC address on the search tool with the MAC address on the labelpasted of each camera
10 Double-click the camera list here and your default browser will open up to the login page Input theusername and password you has changed Then you will see the live video of your baby on theinterface
Main stream offers thehighest quality video whileSub stream offers lessquality but also less delaywhen viewing
14
Now you could use your camera in LAN
Note64-bit browser is not supported
222 WPS (WI-FI Protected Set-up)
Before using WPS wireless connection you need to
Make sure that your wireless router has the WPS function and has been properly connected to theInternet
WPS button on the wireless router is typically located on the front panel or rear panelTP-LINKrouters WPS button is called QSS (Quick Security Setup)
Make sure that the ethernet cable and the camera is disconnected
(1) Press and hold the WPS button for three seconds The Network light of the camera begins to twinkleat high frequency (every 04 seconds)
(2) Press and hold the WPS button for three seconds on your wireless router within 60 seconds Thenthe camera will automatically create a secure wireless connection to your router in about 60seconds
(3) The Equipment Search Tool will search the camerarsquos LAN IP Make sure the PC and the camerashare the same subnet
NOTE The security mode of router cannot be WEP or else the WPS settings may be failed
23 Access the Camera in WAN
231 Static IP Addresses
Users with static IP addresses do not need to set DDNS service settings for remote access After youhave finished connecting the camera using the LAN IP address and port forwarding you can access thecamera directly from Internet using the WAN IP address and port number
WPS Button
15
How to Obtain the WAN IP address from a public website To obtain your WAN IP address enter the following URL in your browser httpwwwwhatismyipcomYour current WAN IP will be shown on the webpage
232 Remote Access
If you want to access your camera by web browser outside of your LAN you need to configure followingconfigurations
1 Choose ldquoSettingsrdquo on the top of the camera web page then go to the ldquoNetwork gt IP Configurationrdquosection on the left side of the screen then uncheck the Obtain IP DHCP
2 Enable UPnP and DDNS in the camerarsquos settings page We recommend you to use the DDNS byfactory default
IP Address Set this in the same subnetas your computer or keep it as defaultSubnet Mask Keep it as defaultGateway and DNS Server Set it to theIP address of your router
16
3 You can see the port of your camera here If you want to set Remote Access for several cameras onthe same network you will need to change the HTTPS port for each camera
4 If the UPnP of the router has been enable you do not need to perform following steps Otherwiseyou need to select one of the following methods to configure port forwarding on your router For thesesteps we will be using the TP-LINK brand wireless router as an example
If there is a UPnP function in your routerChoose ldquoForwarding gt UPnPrdquo make sure that the Current UPnP Status is Enabled
Select Yes and click Save
Click Enable DDNS and click SaveThe content in the Manufacturersquos DDNScolumn is the domain name of your camera
17
If there is no UPnP function in your routerYou need to manually add port forwarding refer to the following steps You need go to the ldquoForwarding gtVirtual Serversrdquo panel for setup
Click Add New
Input the port and IP address ofyour camera and click Save
Here you have finished thePort Forwarding setup
18
5 Now you can access your IP camera by httpsdomain name HTTPS port via the Internet
24 Using the VLC playerThe camera supports RTSP streaming here you can view the camera by VLC player
RTSP URL rtsp [user name][password]IPPort numbervideostream
The part in the square brackets can be omitteduser name amp password The user name and password to access the camera This part can beomittedIP WAN or LAN IP addressPort NO If there is the RTSP port number on the Port page you must only use RTSP port numberotherwise you must only use http port numberVideo stream Three modes are supported video Main video Sub and audio Video Sub is a betterchoice in bad network condition If you select audio you can only hear sound without seeing picture
For exampleIP 192168111RTSP Port number 554User name adminPassword 123
Enter either one of the following four URLs in the VLC1rtspadmin123192168111554videoMain2rtsp 192168111554videoMain3rtsp123192168111554videoMain4rtspadmin192168111554videoMain
Open the VLC and go to ldquoMediardquo--rdquoOpen Network Streamrdquo option then enter the URL in VLC
19
Sometimes you may need to enter the user name and password for another time Click OK and you cansee the real-time preview
20
If you cannot play the video in the VLC player please check the port mapping You can read QuickInstallation Guide about how to configure port forwarding
NOTEIf you modify the camerarsquos username or password you had better reboot the camera to apply the newusername and password in authentication in the VLC
25 IP camera connection to the server
Device supports ONVIF 221 protocol You can easily access NVR with ONVIF or server with ONVIF
3 Surveillance Software GUIPlease refer to the section 21 if you install the camera for the first time You can start to learn aboutsoftware operation in the computer
21
31 login Window
Section1 Enter the Username and passwordThe default administrator username is ldquoadminrdquo with no password please change the password the firsttime you use and prevent unauthorized users login the camera
Section2 StreamThe camera supports two stream modes Main stream and sub stream Select Main stream if you wantto access the camera from LAN and sub stream will be better if you want to access the camera fromInternetNoteSelect sub stream to ensure a more fluent video under narrow network bandwidth
Section3 Select the languageYou click on the language dropdown list to select language
Section4 login the cameraClick ldquoLoginrdquo button
NOTEWhen setting up your camera for the first time it will request that you modify the default usernameandor password if both are still set to default Input the new username and password click Modify tocomplete the modification You will now use the new username and password to login to the camera inthe future
22
32 Setup WizardYou will go toldquoSetup Wizardrdquoautomatically after your first-login where you can set the basicparameters of camera such as camera name camera time wireless settings IP configuration
33 Surveillance Window
Section 1 FOSCAM Logo Live Video SettingsPlayback
1
2
5
3
7
4
6
23
FOSCAM LOGO
Path to surveillance window Click this button to go back to the surveillance window
Path to Administrator Control Panel Click it to go to Administrator Control Panel and do
advanced settings
Click this button to go back to the Playback panel to view the stored audio files
stored in the SD Card
Section 2 Multi-Device Window
The firmware inside the camera supports up to 9 cameras being monitored at the same time You canadd other cameras in multi-device setting
Section 3 Mode Stream HDR Mirror Flip buttons Zoom
Mode1) 50HZ ---------Indoor surveillance (Region Europe China)2) 60HZ ---------Indoor surveillance (Region USA Canada)3) Outdoor------Outdoor surveillance
StreamThe default stream supports multiple modes For example HD Mode720P23fps2M meanings Streamtype Resolution Maximum frame rate Bit rate (Different models support different specific mode )
Stream type It is used to identify the stream typeResolutionThe bigger the resolution the better of the image quality is If you are accessing the camera viainternet and want to get more fluent video streaming please select resolution VGAMaximum frame rateYou should lower frame rate when the bandwidth is limited Normally when the frame rate above 15you can achieve fluently video The maximum frame rate for each model is different please see theldquoSpecificationsrdquoBit rateGenerally speaking the larger the bit rate is the clearer video will become But the bit rateconfiguration should combine well with the network bandwidth When the bandwidth is very narrowand bit rate is large that will lead to video can not play well
You can reset the stream type on Settings-gt Video-gt Video Settings panelAfter changing please reboot the camera and you can see the modification
HDR(Only R2)HDR stands for High Dynamic Range It usually refers to the method of capturing images having
24
ldquogreater dynamic range between the lightest and darkest areas of an image than current standarddigital imaging methods or photographic methodsrdquo You can select ldquoonrdquo from the dropdown list undersunlight or with bright background
WDR(Only C2)In surveillance WDR (Wide Dynamic Range) is intended to provide clear images even underbacklighting where the intensity of illumination varies a lotmdashnamely when there are very bright andvery dark areas simultaneously in the cameras field of view
ldquoZoom inrdquo or rdquoZoom outrdquo(Only R2C2)
Device Support 8x zoom feature click or The focal length of the camera lens will be larger or
shrink you can adjust the focus distance to the target object size access to high-definition screen
(Only C2) When click the button the PanTilt Control control button will pop up You can adjust
direction of the camera when the focal length of the camera lens has been larger When the camerafocal length reduced to a minimum the PanTilt Control control button will disappear
PanTilt Control(only R2C2)
1----- Up control button 2-----Down control button3------Left control button 4------Right control button5----- Up-Left control button6----- Up-Right control button7----- Down-Left control button8----- Down-Right control button
Click this button and go to center
Section 4 Cruise Preset settings(Only R2)Cruise Settings
25
The default cruise tracks have two types Vertical and Horizontal
Vertical The camera will rotate from up to downHorizontal The camera will rotate from left to right
Start cruise Stop cruise
If you want to define or change the cruise trace please go to Settings PTZ Preset Settings panel
How to do cruiseFirstly Select one track in the track dropdown list
Secondly Click Start cruise button the camera will cruise following the predefined pathThirdly Click stop button and finish cruising
Preset settings
IPCam supports 16 preset positions which is considered enough for DIY home amp small businesssurveillance marketThe default preset position is Topmost Bottom most Left most right most you can add other presetpositions
Add Click this icon to save the position you need the camera to remember
Delete Select one preset position and click this button to delete it
GO Select one preset position in the preset drop-down list and click Go to make the camera
Select one of these
26
move the preset position
How to do preset positionFirstly move the camera and stop at a desired place where you want make preset position
Secondly click button and enter a descriptive name for the preset position The preset position
cannot contain special characters Then click OK to save it If you want to reset the preset position clickCancelAfter that you can move the camera and stop at another place and set another preset position You cando all the 16 preset positions with this methodIf you want to see one preset position you have set only select the preset position name from the preset
drop-down list and click go button the camera will go to the preset position
Section 5 IR LED Lights Color Adjustment
Click Infra led and there are three modes to adjust the infrared led Auto Manual and ScheduleAuto Select it and the camera will adjust the infra led (on or off) automaticallyManual Select it and you can turn on or turn off the infra led manuallySchedule Select it and the IR led light will be off at the schedule period If you want to define or changethe IR led lights schedule time please go to Settings---gtVideo---gt IR LED Schedule page
Color AdjustmentIn this page you can tune Hue Brightness Contrast Saturation and Sharpness to get higher quality
Section 6 OSDIf you have added time and camera name in the video you can see it in the live windowGo to Settings ---Basic settings---Camera name panel and you can change another device nameThe default device name is anonymousGo to Settings ---Basic settings---Camera time panel and adjust the device timeGo to Settings ---Video---On Screen Display panel you can add or no add OSD
27
Section 7 Play Stop Talk Audio Snap Record Full screen button
1----- Play Click it to play the video of the camera2----- Stop Click it to stop the video of the camera
3----- Talk Click the button and the icon will become to then talk to the microphone thatconnected with PC people around the camera can here your voice Click the icon again and stop talking
4----- Audio Click this icon the icon will become to you can hear the sound around the camera
by the earphone or speakers that connected with PC
5----- Adjusting the sound Click this icon the icon will become to youcan change the sound of the camera
6----- Snapshot Click it to make snapshot and it pop-up a window which picture you snapshot rightclick in the window and save the picture to anywhere you want
7----- Record Click the icon and the camera start recording you can see a green dot in the livewindow Click again and stop recording The default storage path is CIPCamRecord You can changethe storage path Go to Settings- gtRecord-gtStorage Location panel
8----- Full Screen Click it to make full-screen or you can double click the surveillance screen to makefull-screen Double click again and exit full-screen
Onscreen Mouse ControlRight click the mouse and you can adjust the screen ration full screen and Zoom up
28
Keep ration Select it and the camera will adjust the size of live window based on the the computermonitor automatically Sometimes there is a black border around the video please select Keep ration toget a better visual quality Full Screen Select it and Click it to make full-screen press ESC and exit full-screenZoom up Select it and you can see a bigger screen than beforeFirst Method Here is a convenient and fast solution to Zoom updown screen by Clicking Video Screenand adjusting Mouse pulley or by press the CTRL key and click the mouse left buttonSecond Method Click it and the live view will be digital zoomed up then click Zoom Down and the liveview back to original size
When you select the Full Screen then click right mouse there is a Screen PTZ button
29
Click the Screen PTZ button and put the mouse on the screen to indicate the camera move direction youprefer press the left mouse the camera will move to the corresponding direction Loosen the mouse andstop moving Press Esc button or double click right mouse and cancel the function
NOTE For Mac OS the plugin cannot support Onscreen Mouse Control so you cannot allow to use it
4 Advanced Camera SettingsClick the button ldquoSettingsrdquo goes to Administrator Control Panel to make advanced camera settings
41 Setup WizardPlease go to section 32 to find the way to set it
42 StatusStatus contains four columns Device Information Device Status Session Status and Log it will showyou various information about your camera
30
421 Device Information
Camera Model The camera model NO
Camera Name The Device Name is a unique name that you can give to your device to help you identifyit Click Basic Settings and go to Camera name panel where you can change your camera name Thedefault device name is anonymous
Camera ID Display the wired MAC address of your camera For example Device ID is 000C5D00008the same MAC ID sticker is found at the bottom of the camera
Camera Time The system time of the device Click Basic Settings and go to Camera time panel andadjust the timeSystem Firmware Version Display the System Firmware version of your cameraApplication Firmware Version Display the application firmware version of your cameraPlug-In Version Display the plug-in version of your camera
422 Device Status
On this page you can see device status such as Alarm status Record Status DDNS status WIFI statusand so on
31
423 Session Status
Session status will display who and which IP is visiting the camera now
424 Log
The log record shows who and which IP address accessed or logout the camera
32
Reboot the camera and clear the log records
43 Basic SettingsThis section allows you to configure your camerarsquos Name Time Mail User account and Multi-Device
431 Camera Name
You can define a name for your camera here such as apple Click Save to save your changes The aliasname cannot contain special characters
432 Camera Time
This section allows you to configure the settings of the internal system clocks for your camera
33
Time Zone Select the time zone for your region from the dropdown menuSync with NTP server Network Time Protocol will synchronize your camera with an Internet time serverChoose the one that is closest to your cameraSync with PC Select this option to synchronize the date and time of the Network Camera with yourcomputerManually The administrator can enter the date and time manually Note select the date and time formatuse DST Select the daylight saving time from the dropdown list
Click Save button and submit your settings
NOTE If the power supply of camera is disconnect you need set the camerarsquos time again
433 User Accounts
Here you can create users and set privilege visitor operator or administrator The default useraccount is admin with a blank password You can enter the users accounts of visitor operator andadministrator Manually
34
How to change the passwordFirstly select the account which you want to change the password then select ldquoChange passwordrdquoenter the old password and the new password lastly click modify to take effect
How to add account Select one blank column then enter the new user name password and privilege last click Add to takeeffect You can see the new added account on the Account list
35
Delete Select the account which you want to delete then click Delete button to take effectNOTE The default admin account cannot be deleted but you can add other administrator users
How to change the username Firstly select the account which you want to change the username then select ldquoChange usernamerdquoenter the new password lastly click modify to take effect
36
434 Multi-Camera
If you want to view multi-surveillance screens on one window you need to login one camera and set itas the main device and do Multi-Device Settings add other cameras to the first one camera Before youdo multi-cams settings you need to assign different port such as 81 82 83 84 85 86 87 88 to thecameras if there is 8 cams installedThe firmware within the camera can support a maximum of 9 devices monitoring all at the same timeThis page you can both add FOSCAM MJPEG and H264 series cameras to the first camera and viewmulti-surveillance screen on one window
Add cameras in LANIn Multi-Device Settings page you can see all devices searched in LAN The 1st Device is the defaultone You can add more cameras in the list in LAN for monitoring The camerarsquos software supports up to 9IP Cameras online simultaneously Click The 2nd Device and click the item in the Device List in LAN theAlias Host and Http Port will be filled in the boxes below automatically Enter the correct username andpassword then click Add Add more cameras in the same way
37
Camera Model Our Company produces two series cameras MJPEG and H264 Here will show youwhich series the camera belongs to
1 Click it camera model aliashost and HTTP Port will befilled in the following boxesautomatically
2 Enter the User name andpassword of the 2nd camera
3 Click Add to take effect
38
Back to Surveillance Windows and click Four Windows option you will see four cameras you added
Add cameras in WANIf you want to view all cameras via the internet(remote computer) you will need to add them using DDNSdomain name Firstly make sure all of the cameras you added can be accessed through the internet(The way to configure DDNS is in chapter 444)Login to the first camera using a DDNS domain name and port
39
Click Multi-Device Settings Choose The 2nd Device Fill in the 2nd camerarsquos name DDNS domainname port number Enter user name and password and then choose Add
1 ---- The camera model MJ or H2642 ---- The 2nd camerarsquos name3 ---- Fill in the 2nd camerarsquos DDNS host not LAN IP
NOTE The MJ series have the same HTTP Port NO and Media Port NO
4 ---- Enter the 2nd camerarsquos user name and password5 ---- Click Add button and to take effect
NOTE Here the Host must be entered as the second camerarsquos DDNS domain name not its LAN IP
Use DDNS domain
name and port to login
Make sure each camera you need add
could login with DDNS name and port
40
Return to video window You will see all of the cameras accessible through the internetWhen you are away from home you can use the first camerarsquos DDNS domain name and port to view allthe cameras via internet
435 Status Light
You can enable or disable status light
41
44 NetworkThis section will allow you to configure your camerarsquos IP PPPoE DDNS Wireless Settings UPnP andPort
441 IP Configuration
If you want to set a static IP for the camera please go to IP Configuration page Keep the camera in thesame subnet of your router or computer
Changing settings here is the same as using the Equipment Search ToolIt is recommended that you use the subnet mask gateway and DNS server from your locally attachedPC If you donrsquot know the subnet mask gateway and DNS server you can check your computerrsquos localarea connection as followsControl Panel rarrNetwork Connections rarrLocal Area Connections rarrChoose Support rarrDetails
42
If you donrsquot know the DNS server you can use the same settings as the Default Gateway
442 Wireless Settings
Step 1 Choose ldquoSettingsrdquo on the top of the camera interface and go to the ldquoNetworkrdquo panel on theleft side of the screen then click ldquoWireless Settingsrdquo
Set the same Subnet Mask andgateway of the camera with yourPC
There are two DNS servers Youcan set any of them Same withgateway is also OK
43
Click the Scan button and the camera will detect all wireless networks around the area It should alsodisplay your router in the list
Step 2 Click the SSID (name of your router) in the list the corresponding information related to yournetwork such as the name and the encryption will be filled into the relevant fields automatically
You will only need to fill in the password of your network Make sure that the SSID Encryption and thepassword you filled in are exactly the same for your router
Click the Page number to see other wirelessnetworks devices if there are more than 10
Click the Scan buttonto search for wirelessnetworks
1 Click the SSID of your router andthe relevant information will be filledin the fields automatically
2 Enter the passwordof your router
44
Step 3 Please click on the Save button after all settings have been entered and disconnect the networkcable Never shut down the power of the camera until the IP camera is able to connect to the wirelessnetwork
The LAN IP address will disappear on the window of Equipment Search Tool when the camera isconfiguring a wireless connection Wait about 1 minute the camera should obtain a wireless connectionand the LAN IP of the camera will show again on the window of the Equipment Search Tool The IPaddress may have changed after the camera receives a wireless connection we recommend setting astatic local IP address if this IP address changes by right clicking the camera in Equipment Search Toolsetting a static IP and pushing OKCongratulations You have set up the wireless connection of the camera successfully
NOTE If you fail to make a wireless connection please refer to your seller or contact us directly forassistance
443 Soft AP Password Settings(Only C1)
For the safety of your camera we recommend you change the Soft AP password
444 DDNS
FOSCAM camera has embedded a unique DDNS domain name when producing and you can directlyuse the domain name you can also use the third party domain name
FOSCAM domain nameHere take test09myfoscamorg for example Go to option of DDNS on the Settings-gtNetwork panelyou can see the domain name
45
Now you can use http Domain name + HTTP Port to access the camera via internetTake hostname test09myfoscamorg and HTTP Port no 800 for example the accessing link of thecamera via internet would be http test09myfoscamorg800
Restore DDNS to factory If you have configured Third Party DDNS successfully but you want to useManufacturerrsquos DDNS again here click this button and start Manufacturerrsquos DDNS ServiceUser can also use third part DDNS such as wwwno-ipcom www 3322com
445 UPnP
The default UPnP status is closed You can enable UPnP then the camerarsquos software will be configuredfor port forwarding Back to the ldquoDevice Statusrdquo panel you can see the UPnP status
46
The camerarsquos software will be configured for port forwarding There may be issues with your routerssecurity settings and sometimes may error We recommend you configure port forwarding manually onyour router
446 Port
This camera supports HTTP Port HTTP Port is used to access the camera remotely If you want toaccess the camera and view the video the HTTP Port must both be configured correctly
HTTP port By default the HTTP is set to 88 Also they can be assigned with another port numberbetween 1 and 65535 But make sure they can not be conflict with other existing ports like 25 21
ONVIF port By default the ONVIF port is set to 888 Also they can be assigned with another portnumber between 1 and 65535(except 0 and 65534) But make sure they can not be conflict with otherexisting ports
HTTPS port The default port is 443 You can use the url to access the camera https IP + HTTPSport
RTSP port The default port is 554 The R2 does not have RTSP port
Another way to change the HTTP port NO
Step 1 Open the Equipment Search Tool select the camera you would like to change the port of right
47
click on the IP address and click on rdquoNetwork Configurationrdquo this brings up the network configurationbox as flowing figures
Figure 41
Figure 42
Step 2 Enter the username and password of the Administrator (default username is admin with a blank
password) and click ldquoOKrdquo to apply changes
Step 3 Wait around 10 seconds yoursquoll see that the camerarsquos LAN IP address has changed In ourexample it was changed to 2000 so we see http19216811102000 in Equipment Search Tool Alsothe LAN IP address is now fixed at a static IP address of http19216811102000 This IP address willnot change even if the camera is powered off and back on the camera will remain on this LAN IPaddress This is very important that a static LAN IP address is set or you may have problems later withremote access and seeing the camera remotely if the camera loses power and reconnects on a differentLAN IP address Make sure you set a static LAN IP address
Select which camerayoursquod like to change theport for and right click
Modify the Http Port
Enter the Username andpassword click OK
48
If the camera cannot be accessed please make sure the port forwarding is succeed
447 Mail Settings
If you want the camera to send emails when motion has been detected here Mail will need to beconfigured
1---- SMTP Server Port Transport Layer Security Enter SMTP server for sender SMTP port isusually set as 25 Some SMTP servers have their own port such as 587 or 465 and Transport LayerSecurity usually is None If you use Gmail Transport Layer Security must be set to TLS or STARTTLSand SMTP Port must be set to 465 or 25 or 587 which port you choose should be decided by whichTransport Layer Security you select2---- SMTP Username password ID account and password of the sender email address3---- Sender E-mail Mailbox for sender must support SMTP4---- Receiver Mailbox for receiver need not support SMTPyou can set 4 receivers5---- Save Click Save to take effect6---- Test Click Test to see if Mail has been successfully configured
49
Click Test to see if Mail has been successfully configured
If the test success you can see the Success behind the Test at the same time the receivers will receivea test mail
If the test fails with one of the following errors after clicking Test verify that the information you enteredis correct and again select Test 1) Cannot connect to the server2) Network Error Please try later3) Server Error4) Incorrect user or password5) The sender is denied by the server Maybe the server need to authenticate the user please check itand try again6) The receiver is denied by the server Maybe because of the anti-spam privacy of the server7) The message is denied by the server Maybe because of the anti-spam privacy of the server8) The server does not support the authentication mode used by the device
448 FTP Settings
If you want to upload record files and images to your FTP serveryou can set FTP Settings
50
Figure a
Figure b
FTP server If your FTP server is located on the LAN you can set as Figure aIf you have an FTP server which you can access on the internet you can set as Figure bPort Default is port 21 If changed external FTP client program must change the server connection portaccordinglyFTP Mode Here supports two modes PORT and PASVUsernamepassword The FTP account and passwordClick Save to take effectClick Test to see if FTP has been successfully configured
449 P2P
Access the IP Camera by Smart Phone (Android or iOS operating system)First of all you must open the P2P function of the IP Camera at ldquoSettings --gt Network --gt P2Prdquo
51
Foscam App named Foscam on App Store and Google Play for iOS and Android devices
NOTEIf the QR code scanning is not successful please input the UID on the bottom of the camera manually
45 VideoThis section allows you to configure Video stream settings On screen display and Snapshot settings
451 Video Settings
There are two ways to set the stream video settings They are main stream video settings and substream video settings
Enhanced Night video Definition(Only C1) The camera will automatically drop the frame to extendthe recording time in the night
52
Stream Type There are four types to identify different streams you have set If select the HD Mode theclearer video will become and it will take up more bandwidth If select the Smooth Mode the bandwidthis very narrow and bit rate is large that will lead to video can not play well The Equilibrium Model is avalue between HD Mode and Smooth Mode
Resolution The camera supports multiple types For example 960P 720P VGA The higher theresolution is the clearer video will become But the code flux will become larger too and it will take upmore bandwidth (The maximum frame rate for each model is different please see theldquoSpecificationsrdquo )
Bit Rate Generally speaking the larger the bit rate is the clearer video will become But the bit rateconfiguration should combine well with the network bandwidth When the bandwidth is very narrow andbit rate is large that will lead to video can not play well
Frame rate You should lower frame rate when the bandwidth is limited Normally when the frame rateabove 15 you can achieve fluently video
Key Frame Interval The time between last key frame and next key frame The shorter the duration themore likely you will get a better video quality but at the cost of higher network bandwidth consumption
Variable bitrate(Only C1) Select the Bit rate type to constant or variable If select Yes the camera willchange the video bit rate according to the situation but will not more than the maximum parameter BitRate If select No the Bit Rate is unchanged
Rate Control Mode(Only R2 C2)There are three rate control modesCBR Constant Bit Rate it means that the Bit Rate is constantVBR Variable Bit Rate the camera will change the video bit rate according to the situation but will notmore than the maximum parameter Bit RateLBR Low Bit Rate If you can select the LBR then you can slide the scroll bar to choose percentage ofthe bit rate By reducing the bit rate so that the camera can obtain a better image at low bandwidth
452 On Screen Display
This page is used to add timestamp and device name on the video
Display Timestamp
53
There are two options Yes or NO Select Yes and you can see the system date on the video
Display Camera NameThere are two options Yes or NO Select Yes and you can see the device name on the video
453 Privacy Zone(Only R2 C2)
This page is used to set some mask as privacy zone on the video
Allow On Screen Display MaskThere are two options Yes or NO Select yes and draw a mask area on the video the mask area will beblack on the video
Click OK button and return to the OSD page click Save to take effectBack to the surveillance window you can see the mask area as the following picture
The mask area
54
453 Snapshot Settings
On this page you can set the snapshot picturesrsquo image quality and the storage path
Manual snap Quality Low Middle and High The higher the quality the picture will be clearerPictures Save To FTP or SD card If you have done FTP and Alarm settings when alarming thecamera will snap pictures to the FTP or SD card automaticallyIf you select the FTP you can set the file name which the picture save to (Only C1)
Enable timing to captureTo enable capture interval follow the steps below1 Select Enable Motion detection
55
2 Capture intervalThe interval time between two captures3 Select the capture time
Capture anytimeClick the black button up the MON you will see all time range turn red When something moving inthe detection area at anytime the camera will capture
Specify an capture scheduleClick the week day words the corresponding column will be selected For example click TUE theall column of TUE turns to red that means during Tuesday whole day the camera will capture
Press the left mouse and drag it on the time boxes you can select the serial area4 Click Save button to take effect
454 IR LED Schedule
On this page you can set the schedule time for switching IR LED lights When parameter Mode is set tothe Schedule on the Live Video window at these schedule time the IR LED lights will be turned off
46 Detector
461 One Key Alert(Only R2 C2)
On this page you can turn on or off the alarm function you need
462 Action Detection
IP Camera supports Action Detection Alarm when the people has been detected the IP Camera willmake a alarm
56
Step 1 Enable Action detection function
Step 2 Sensitivity---- It supports five modes Lowest Lower Low Medium and High The higher thesensitivity the camera will be more easily alarmed Select one motion sensitivity
Step 3 Trigger interval--- The interval time between two motion detection
Step 4There are some alarm indicators
A Camera Sound and PC SoundIf the camera has connected with a speaker or other audio output device if you select Camera Sound orPC Sound when the motion has been detected the people around the camera will hear beep alarmsound
B Send E-mailIf you want to receive alarm emails when motion is detected you must select Send E-mail and set MailSettings first
C Take SnapshotIf you select this checkbox when the motion has been detected the camera will snap the live viewwindow as a still picture and load it to the FTP Make sure you have set FTP and set FTP as the storagepath in Video-gtSnapshot settings panel
57
Time interval The interval time between two pictures
D RecordingIf you select this checkbox when the motion has been detected the camera will record automaticallyand store the record files to the SD Card Make sure the camera has inserted SD card and you haveset the SD card as the Alarm record files storage path please go to Recordmdashgt Storage location pageto verify this settingsThe default alarm record time is 30s and pre-alarm record time is 5s please go to Recordmdashgt AlarmRecord page and change the alarm time settings
E Push message to the phoneIf you select this checkbox when the motion has been detected the camera will push the message tothe phone which has been connected the camera
Step 7 Set detection areaClick set detect area and it pop up a window then you can draw the detection area Click Back buttonafter settings When something moving in the detection area the camera will alarm
Step 8 Alarm Schedule① Alarm anytime when motion is detectedClick the black button up the MON you will see all time range turn red When something moving in thedetection area at anytime the camera will alarm
② Specify an alarm scheduleClick the week day words the corresponding column will be selected For example click TUE the allcolumn of TUE turns to red that means during Tuesday whole day when something moving in thedetection area the camera will alarm
Click this button and select all time range
58
③ Press the left mouse and drag it on the time boxes you can select the serial area
Step 9 Click Save button to take effectWhen the motion has been detected during the detection time in the detection area the camera willalarm and adopt the corresponding alarm indicators
NOTE You must set the detection area and detection schedule or else there is no alarm anywhereand anytime
463 Sound alarm
When the ambient sound over a certain decibel the sound alarm will be triggered
59
If the Sensitivity is set to ldquoHighrdquo the camera will detect the sound whose more than 55dbIf the Sensitivity is set to ldquoMediumrdquo the camera will detect the sound whose more than 65dbIf the Sensitivity is set to ldquoLowrdquo the camera will detect the sound whose more than 75dbIf the Sensitivity is set to ldquoLowerrdquo the camera will detect the sound whose more than 85dbIf the Sensitivity is set to ldquoLowestrdquo the camera will detect the sound whose more than 95db
47 RecordThis section will allow you to change the record files storage path and the record time
471 Storage Location
On this page you can change the alarm and manually recording storage path
60
Recording Location SD card or FTP Make sure the camera has been inserted the SD card Onthis page you can see the available space of the SD card
Local Recording Location For Windows OS the manual recording path is C IPCamRecord you canchange another one For MAC OS the manual recording path is IPCamRecord
Enter the local folder Click here You can enter the local storage folder
472 Alarm Recording
473 Local Alarm Recording
This page you can enable the local alarm record and Local Alarm record time
61
474 Schedule Recording
When the video is selected as FTP the device supports scheduled recordingWhen the parameter Recording Location is set SD Card on the Storage Location page you canconfigure parameters as shown in follow figure
When the video is selected as SD card the device supports pumping frame recordingWhen the parameter Recording Location is set SD Card on the Storage Location page you canconfigure parameters as shown in follow figure
62
Record full strategy When the SD card is full you can choose to cover the previous recording or stoprecordingAudio Record You can choose yes or no
NOTES Scheduled recording only supports video saved to the SD card or FTP server The schedule recording will stop while alarm recording is beginning and it will continue
automatically after alarm recording end You can refer to alarm schedule in Alarm about editing the time of recording Schedule
475 SD Card Management
This camera supports SD Card When you plug in the SD card during the camera work process please
63
reboot the camera again or else the SD Card may be cannot work well
The default storage path of alarm record files is SD card when the available size of SD card is less than256M the old record files will be deleted automatically
SD Card Management After click the button you should enter the username and password of thecamera Then you can manage the recording files of the camera in the SD card The SD cardmanagement is only effective when access the camera in LAN
Format(except C1) Click the button you can format the SD card Note that this will delete all files on theSD card
48 PTZ(Only R2)This page will allow you to change the pantilt speed and do cruise tracks settings
481 Pan amp Tilt Speed
There are five Pt speed types very fast fast normal slow and very slowly Select the desired PTZspeed type and click save buttonThere are three zoom speed types fast normal slow
64
482 Cruise SettingsThis section explains how to add delete alter one cruise track
Setting the Cruise ModeThere are two cruise mode Cruise time and Cruise LoopsCruise time Select Cruise time from Cruise Mode drop-down then you can set the Cruise time of thecameraCruise LoopsSelect Cruise Loops from Cruise Mode drop-down you can set the Cruise Loops ofthe cameraClick Save to take effect
Manage the Cruise TrackThere are two default cruise tracks Vertical and HorizontalVertical The camera will rotate from up to down
65
Horizontal The camera will rotate form left to right
Add Add one cruise track then click save buttonDelete Select one cruise track and delete itSave After you modify the Dwell time you should click Save button to take effect
Example
How to do add cruise tracks Firstly Click Add button and enter a descriptive name to identify the cruise track
Secondly On the lower left of the page you can see all preset points you have added Select onepreset point and click Add button you can see the preset point has been added to the cruise track on thecruise track page You need to add two or more preset points to the cruise track
Thirdly Click OK button and the cruise track will take effect
You can add other cruise track as the same method
For example I have added three preset points to the ldquotrack 1rdquo that means When I select the ldquotrack 1rdquoon the surveillance window the camera moves as the following track upright then Right Most last downleftYou can add preset on the left of the surveillance window
The new added track name
1 Select one preset point 2 Click Add button
Here you can see the preset pointhas been added to one track Andyou can set the stay time
66
After add the cruise track back to the surveillance window click Cruise her you can see all cruise tracksyou have added
After add the cruise track back to the surveillance window click Cruise her you can see all cruise tracksyou have added
The cruise tracks have addedto the ldquotrack 1rdquo
Add the preset
67
There are other buttons between the Preset points and Cruise track you can use these buttons to adjustthe order of preset points or adddelete one preset points in one cruise track
Add Select one preset points and add it to the selected cruise trackDelete Select one preset points you have added to one cruise track click deleteMove up down Select one cruise track adjust the order of preset points in one cruise track
AttentionConsidering the life time and thermal issue of the motor itrsquos not recommend to do long-time cruise
483 Start-Up Options
Here section will allow you to set the stop position after the camera rebootsIt supports three modes No self test Goto home position and Goto preset pointNo self test When rebooting the camera will not pan tiltGoto home position When rebooting the camera will pa Providing Central Management Software tomanage or monitor multi-cameras n tilt and stops at centerGo to Preset point Select one preset position and save it When rebooting the camera will pan tilt andstops at the preset position you have set
68
49 FirewallThis section explains how to control the access permission by checking the client PCrsquos IP addresses Itis composed of the following columns Block access from these IP addresses and Only allow accessfrom these IP addresses
Enable firewall If you select Only allow access from these IP addresses and fill in 8 IP addresses atmost only those clients whose IP addresses listed in the Only allow access from these IP addressescan access the Network Camera If you select Block access from these IP addresses only thoseclients whose IP addresses are in the IP list cannot access the Network CameraClick Save to take effect
410 SystemIn this panel you can backuprestore your camera settings upgrade the firmware to the latest versionrestore the camera to default settings and reboot the device
4101 Back-upamp Restore
Click Backup to save all the parameters you have set These parameters will be stored in a bin file forfuture useClick Browse and select the parameters file you have stored then click Submit to restore the restore the
69
parameters
4102 System UpgradeClick ldquoDownload the latest firmwarerdquo you will see the following screen And click ldquosaverdquo to save thefirmware on your computer locally
Your current firmware version will be displayed on your screen You may go to the Status DeviceInformation page to check for the latest firmware versions availableClick Browse choose the correct bin file and then click System upgradeDonrsquot shut down the power during upgrade After upgrading you can see the upgrade result
70
Upgrade Firmware by Equipment Search Tool
Double click the Equipment Search Tool shot icon select the Camera IP that you want toupgrade the firmware Then select Upgrade Firmware and enter the username and password choosethe firmware file and upgrade
Figure 43
CAUTION If your camera works well with the current firmware we recommend not upgrading Pleasedonrsquot upgrade the firmware unnecessarily Your camera may be damaged if misconfigured during anupgrade
71
NOTES Please ensure you have download the correct firmware package for your camera before upgrading
Read the upgrade documentation (readmetxt file) in the upgrade package before you upgrade Upon downloading the firmware check the sizes of the bin files They must match the size in the
readmetxt file If not please download the firmware again until the sizes are the same Yourcamera will not function correctly if a corrupt bin file is used
Normally only Device WEB UI need to be upgrade please do not try to upgrade the Device SystemFirmware
Never shut down the power of the camera during upgrade until the IP camera restart and getconnected
After upgrade successfully please uninstall the old plugin and re-install it then reset the camera tothe default factory settings before using the camera
4103 Patch InstallationClick Browse to select the correct patch file and then click Install Patch to install the patch Do notturn off the power during it installing After installing is complete you will receive a system prompt
4104 Factory Reset
Click All reset and all parameters will return to factory settings if selected This is similar to press theReset button on the bottom of the camera
4105 RebootClick Reboot System to reboot the camera This is similar to unplugging the power to the camera
Enable Periodic Maintenance(Only R2)You can choose the reboot period of the camera
72
5 PlaybackOn this page you can view the record files stored in the SD card
Section 1 Define the Record files time and Type
The storage path of record files
Here supports three types current day current month and All records Another
way select the time on the timeampdate manually
The type of records files Here supports two typs Normal record Alarm record
and All records
Click this button to search all record files satisfy the conditions you selected
Continuous Play Select the checkbox to play continuously all the record files
73
Section 2 Search record filesOn this panel you can see all record files satisfy the conditions you set
Section 3 PlayStopAudioFull screen buttonsPlease select one record file before use these buttons
Click this button to play the record files
Click this button to stop the record files
Open or stop audio
Click this button to make full screen and double click left mouse to exit full screen
6 Appendix
61 Frequently Asked Questions
611 Install the add-on of Firefox browser Google Chrome and IE
Chrome
74
75
76
77
612 Uninstall the add-on of Firefox browser Google Chrome and IE
Chrome
78
613 I have forgotten the administrator password
To reset the administrator username and password press and hold down the RESET BUTTON for 5seconds Upon releasing the reset button wait for 20 seconds the camera will reboot and the usernameand password will return to the factory default administrator username and password Please power onthe camera before resetDefault administrator username adminDefault administrator password No password
614 Camera can not record
When you use Windows7 or Vista you may be not able to do manually record or change the record pathbecause of the security settings of computerThere are two ways to resolve this problemPlease add the camera as a trusted site to resolve this issue The steps are IE browserToolInternet PropertiesSecurityTrusted sitesSitesAdd
79
Open IE browser then right click select ldquoRun as administratorrdquo
615 Subnet doesnrsquot match
Check whether your ipcamera in the same subnet of your computer The step is ControlPanelNetwork ConnectionsDbclick Local Area Connections ChooseGeneralPropertiesCheck subnet mask IP address and gateways When you set IP address pleasemake sure they are in the same subnet Otherwise you cant access camera
616 No Pictures Problems
The video streaming is transmitted by the ActiveX controller If ActiveX controller isnrsquot installed correctlyyou will see no video image You can resolve this problem by this wayDownload ActiveX controller and set the safety property of IE in the PC when you view it first time IEbrowserToolInternet ProperSecurityCustom LevelActiveX control and Plug-ins Three optionsof front should be set to be ldquoEnablerdquo The ActiveX programs read by the computer will be stored AsfollowsEnable Download unsigned ActiveX controlsEnable Initialize and script ActiveX controls not marked as safeEnable Run ActiveX controls and plug-ins
If you allow the ActiveX running but still could not see living video Please change another port numberto try Donrsquot use port 88
80
NOTE Make sure that your firewall or anti-virus software does not block the camera or ActiveX If youcould not see video please shut down firewall or anti-virus software to try again
617 Canrsquot access IP camera in internet
There are some reasons1ActiveX controller is not installed correctly2The port which camera used is blocked by Firewall or Anti-virus software Please change another portnumber and try again3Port forwarding is not successfulCheck these settings and make sure they are correct
618 UPnP always failed
UPnP only contains port forwarding in our recent software Sometimes it may be failed to do portforwarding automatically because of firewall or anti-virus software It also has much relation with routerrsquossecurity settings So we recommend you do port forwarding manually You can view your camera ininternet successfully after you do port forwarding manually in your router
619 Camera can not connect wireless
If your camera could not connect wireless after you set wireless settings and plug out the cable Pleasecheck whether your settings are correct or notNormally camera canrsquot connect wireless mainly because of wrong settingsMake sure broadcast your SSID use the same encryption for router and camera
6110 Canrsquot see other cameras listed in multi-device when using remote
access
If you want to view all the cameras via the WAN verify that each camera added in the multi-devicesettings can be accessed by using the DDNS name and port number Use the DDNS domain name notthe camerarsquos LAN IP (For more details see How to add cameras in WAN)
62 Default ParametersDefault network ParametersIP address obtain dynamically
81
Subnet mask obtain dynamicallyGateway obtain dynamicallyDDNS Embedded FOSCAM domain nameUsername and passwordDefault admin username admin with a blank password
63 Specifications
ITEMS C1
Image SensorSensor High Definition Color CMOS Sensor
Display Resolution 1280 x 720 (1Megapixels)
Min Illumination 0 Lux (With IR Illuminator)
Lens
Lens Type Glass Lens
focal length f28mm
Aperture F24
Diagonal angle of view 115deg
Horizontal view angle 100deg
Video
Image Compression H264
Image Frame Rate 25fps(VGA) 23fps(720P) downward adjustable
Resolution720P(1280 x 720) VGA(640 x 480) VGA(640 x 360)QVGA(320 x 240) QVGA(320 x 180)
Stream dual stream
Image adjustmentThe hue brightness contrast saturation sharpness areadjustable
Flip image flip and mirror
Infrared mode Automatic or manual
manual PanTilt Angle Horizontal350deg amp Vertical 180deg
Night visibility 11pcs IR-LEDs night vision range up to 8 metres
Audio InputOutputSupports two-way audioBuilt-in Mic amp Speaker
Audio Compression PCMG726
Network
Ethernet One 10100Mbps RJ45 port
Wireless Standard IEEE80211bgn
Data RateIEEE80211b 11Mbps(Max)IEEE80211g 54Mbps(Max)IEEE80211n 150Mbps(Max)
Wireless Security WEP WPA WPA2
WPS Supports EZLink wireless setup
82
Network ProtocolIPTCPUDPHTTPHTTPSSMTPFTPDHCPDDNSUPnPRTSPWPS
Remote Access P2P DDNS
SystemRequirements
Operating SystemMicrosoft Windows XP Vista 7 8Mac OSiOSAndroid
Browser
Microsoft IE8 and above version or compatible browserMozilla FirefoxGoogle ChromeApple Safari
OtherFeatures
Motion Detection Alarm via E-Mail upload alarm snapshot to FTP
PIR Infrared human body sensor
User Accounts Three levels user role
Firewall Supports IP Filtering
Storage 32G Micro SD card local and FTP storage
Reset Reset button is available
PowerPower Supply DC 5V10A
Power Consumption 45W(Max)
Physical Dimension(LxWxH) 7070120mm
Net Weight 170g
Environment
Operating Temperature-10degC ~ 50deg(14degF ~ 122degF)
Operating Humidity 20 ~ 85 non-condensing
Storage Temperature -20degC ~ 60deg (-4degF ~ 140degF)
Storage Humidity 0 ~ 90 non-condensing
Certification CE FCC RoHS
Warranty Limited 2-year warranty
ITEMS R2
Image Sensor
Sensor Type 13 CMOS
Display Resolution 1920 x 1080 (20 Megapixels)
Frame Rate 30fps
Min Illumination 0 Lux (With IR Illuminator)
Lens
Lens Type f28mmF26
Angle of ViewHorizontal90degDiagonal 110deg
Night Vision 13pcs IR-LEDs night vision range up to 8 metres
VideoImage Compression H264
Resolution1080P(1920x1080)720P(1280 x 720) VGA(640 x 480)QVGA(320 x 240)
83
Stream dual stream
Image adjustmentThe hue brightness contrast saturation sharpness areadjustable
Flip image flip and mirror
Infrared mode Automatic or manual
manual PanTilt Angle Horizontal300deg amp Vertical 100deg
Night visibility 13pcs IR-LEDs night vision range up to 8 metres
Audio InputOutputSupports two-way audioBuilt-in Mic amp Speaker
Audio Compression PCMG726
Network
Ethernet One 10100Mbps RJ45 port
Wireless Standard IEEE80211bgn
Data RateIEEE80211b 11Mbps(Max)IEEE80211g 54Mbps(Max)IEEE80211n 150Mbps(Max)
Wireless Security WEP WPA WPA2
Wireless Setup Supports EZLink wireless setup
Network ProtocolIPTCPUDPHTTPHTTPSSMTPFTPDHCPDDNSUPnPRTSPWPSONVIF
Remote Access P2P DDNS
SystemRequirements
Operating System Microsoft Windows XP 7 8Mac OSiOSAndroid
Browser IE8 and above versionFirefoxChromeSafari
OtherFeatures
Motion Detection Alarm via E-Mail upload alarm snapshot to FTP
HDR Improve image clarity in complex scenario
Magic Zoom Picture zoom function
User Accounts Three levels user role
Firewall Supports IP Filtering
Storage 64G Micro SD card local and FTP storage
Reset Reset button is available
PowerPower Supply DC 5V20A
Power Consumption <6W
PhysicalDimension(mm) 74(L)times74(W)times119(H)
Net Weight 290g
Environment
OperatingTemperature -10degC ~ 50deg (14degF ~ 122degF)
Operating Humidity 20 ~ 85 non-condensing
Storage Temperature -20degC ~ 60deg (-4degF ~ 140degF)
Storage Humidity 0 ~ 90 non-condensing
Certification CE FCC RoHS
Warranty Limited 2-year warranty
84
ITEMS C2
Image Sensor
Sensor Type 13 CMOS
Display Resolution 1920 x 1080 (20 Megapixels)
Frame Rate 30fps
Min Illumination 0 Lux (With IR Illuminator)
LensLens Type f28mmF26
Angle of ViewHorizontal110degDiagonal 120deg
Video
Image Compression H264
Resolution1080P(1920x1080)720P(1280 x 720) VGA(640 x 480)QVGA(320 x 240)
Stream dual stream
Image adjustmentThe hue brightness contrast saturation sharpness areadjustable
Flip image flip and mirror
Infrared mode Automatic or manual
Manual PanTilt Angle Horizontal360deg amp Vertical 180deg
Night visibility High performance IR-LEDs night vision range up to 8 metres
Audio InputOutputSupports two-way audioBuilt-in Mic amp Speaker
Audio Compression PCMG726
Network
Ethernet One 10100Mbps RJ45 port
Wireless Standard IEEE80211bgn
Data RateIEEE80211b 11Mbps(Max)IEEE80211g 54Mbps(Max)IEEE80211n 150Mbps(Max)
Wireless Security WEP WPA WPA2
Wireless Setup Supports EZLink wireless setup
Network ProtocolIPTCPUDPHTTPHTTPSSMTPFTPDHCPDDNSUPnPRTSPWPSONVIF
Remote Access P2P DDNS
SystemRequirements
Operating System Microsoft Windows XP 7 8Mac OSiOSAndroid
Browser IE8 and above versionFirefoxChromeSafari
OtherFeatures
Motion Detection Alarm via E-Mail upload alarm snapshot to FTP
HDR Improve image clarity in complex scenario
Magic Zoom a Magic digital zoom rivaled Optical zoom
User Accounts Three levels user role
Firewall Supports IP Filtering
85
Storage 64G Micro SD card local and FTP storage
Reset Reset button is available
PowerPower Supply DC 5V10A
Power Consumption 48W(Max)
PhysicalDimension(mm) 7070120mm
Net Weight 160g
Environment
OperatingTemperature -10degC ~ 50deg (14degF ~ 122degF)
Operating Humidity 20 ~ 85 non-condensing
Storage Temperature -20degC ~ 60deg (-4degF ~ 140degF)
Storage Humidity 0 ~ 90 non-condensing
Certification CE FCC RoHS
Warranty Limited 2-year warranty
Attention Power adapter should be used between 0-40 and 5-90 relative humidity
64 CE amp FCCElectromagnetic Compatibility (EMC)FCC Statement
This device compiles with FCC Rules Part 15 Operation is subject to the following twoconditions This device may not cause harmful interference This device must accept any interference received including interference that may cause undesired
operation
This equipment has been tested and found to comply with the limits for a Class B digital device pursuantto Part 15 of the FCC Rules These limits are designed to provide reasonable protection against harmfulinterference when the equipment is operated in a commercial environment This equipment generatesuses and can radiate radio frequency energy and if not installed and used in accordance with theinstallation manual may cause harmful interference to radio communications Operation of thisequipment in a residential area is like to cause harmful interference in which case the user will berequired to correct the interference at his own expense
FCC CautionAny changes or modification not expressly approved by the party responsible for compliance could voidthe userrsquos authority to operate this equipmentThis equipment complies with FCC radiation exposure limits set forth for an uncontrolled environment
86
This equipment should be installed and operated with minimum distance 20cm between the radiatorampyour bodyThis transmitter must not be co-located or operating in conjunction with any other antenna or transmitter
CE Mark Warning
This is a Class B product In a domestic environment this product may cause radio interference inwhich case the user may be required to take adequate measures
65 WarrantyShenZhen FOSCAM Intelligent Technology Limited(FOSCAM) values your business and alwaysattempts to provide you the very best of serviceNo limited hardware warranty is provided by FOSCAM unless your FOSCAM product (product) waspurchased from an authorized distributor or authorized reseller Distributors may sell products toresellers who then sell products to end users No warranty service is provided unless the product isreturned to an authorized return center in the region where the product was first shipped by FOSCAM orto the point-of-purchase which may have regional specific warranty implicationsIf you purchase your FOSCAM product from online store please contact the point-of-purchaseand ask for returnreplacementrepair service
Hardware Warranty Information
FOSCAM provide 2-year limited warranty for naked product and 6-month limited warranty foraccessories
Limited Hardware Warranty
FOSCAM products are warranted to be free from manufacturing defects in materials andworkmanship starting from the shipping date of FOSCAM
This limited hardware warranty does not cover Software including the software added to the products through our factory-integration system
software that included in the CDetc Usage that is not in accordance with product instructions Failure to follow the product instructions Abuse firmware upgrade without the authorized technicianrsquos guidance Normal wear and tear
Return Procedures
Please read FOSCAM warranty policy amp policy of your reseller first before sending items back topoint-of-purchase
Customer must first contact point-of-purchase to obtain a Return Merchandise Authorization (RMA)
87
number before returning the product If the product you received is suspected to be defective andthe product warranty has not expired The RMA number will allow your reseller to track your returnmuch easier and help them expedite processing your request
After receiving your RMA case number pack the item(s) very well with the original box and all theoriginal accessories included such as power adapters brackets cables manuals and driver CDdisks
Write your RMA number and the return reason (the problem of the product) on the warranty cardalong with the complete package to send them back
Replacement Services
If customers ask for replacement service please contact point-of-purchase and follow theirpolicy
Our technicians will inspect all items returned for replacement requests If the retuned product isfound in working order we will return the same item received However customers shall beresponsible for all shipping amp handling charges incurred for getting the units back to customers
If returned products are found defective we will replace the product and assume the shipping costfor sending back the replacement unit to customers
If for any reason we are unable to provide a replacement of the original returned item(s) You willhave a choice for a ldquoSubstituterdquo item at the same equal value
We do not provide exchange and replacement due to normal hardware upgrade according themarket after 14 days after the product is delivered
Our technicians will test the product before send out the replacement any other demand for morethan two times replacement for the same product during replacement limit will be rejected
Replaced products are warranted from the balance of the former warranty period
Warranty Forfeiture
Warranty is void if purchase from unauthorized distributor or reseller Warranty is void if trade-mark serial tags product stickers have been removed altered or tampered
with Warranty is void for mishandling improper use or defacing the product Abuse firmware upgrade without the authorized technicianrsquos guidance Warranty is void for physical damage altered either internally or externally improper or inadequate
packaging when returned for RMA purposes Warranty is void if damage has resulted from accident dismantle abuse or service or modification
by someone other than the appointed vendor souse fission or the spare part has been over theperiod of warranty
Warranty is void if product is damaged due to improper working environment or operation (Forexample improper temperature humidity unusual physical or electrical stress or interferencefailure or fluctuation of electrical power static electricity using wrong power adapter etc)
Warranty is void if damaged by the use of parts not manufactured or sold by FOSCAM Damage caused by improper installation of third-party products Warranty is void if damaged for irresistible cause such as earthquake fire lightning flood etc Product beyond limited warranty
Shipping Fee
88
If products are defective or damaged under normal use or operation in the replacement limitdistributors or resellers are responsible for the shipping cost the product back to customerscustomers should assume the shipping cost send the product to the point-of-purchase
During replacement limit if customers ask for replacement due to the product does not fit forcustomerrsquos personal expectation customers should responsible for both shipping fee
Customers shall be responsible for both shipping fee if their product beyond the replacement limitbut still in warranty limit
Repair Service Out Of Warranty
FOSCAM provide extra repair service for product that out of warranty it is chargeable The total feecontains device cost and service fee Device cost (including accessories) is the standard uniformprice provide by FOSCAM
Different region may have different service fee please contact the point-of-purchase to confirm thatbefore you ask for this service
Our technicians will quote the total price after detect the product If customers refused to repair afterthe quotation customers need pay for the test fee $35hour If agree with the quotation test will befree
Repaired product out of warranty will obtains 3-month warranty from the date of the product back tocustomers
Limitation of Liability
FOSCAM is not responsible for other extra warranty or commitment promised by resellers if yourreseller promised some extra commitment or warranty please ask for written documents to protectyour rights and interests
FOSCAM does not offer refunds under any circumstances Please contact the point-of-purchaseand follow their refundreturn policy
FOSCAM shall not be liable under any circumstances for any consequential incidental special orexemplary damages arising out of or in any connection with this agreement or the productsincluding but not limited to lost profits or any claim based on indemnity or contribution or the failureof any limited or exclusive remedy to achieve its essential purpose or otherwise Purchasersexclusive remedy as against FOSCAM shall be the repair or replacement of defective parts IfFOSCAM lists a product on its website specification in error or that is no longer available for anyreason FOSCAM reserves the right to explain it without incurring any liability
All rights reserved FOSCAM and the FOSCAM logo are trademarks of ShenZhen FOSCAMIntelligent Technology Limited registered in the US and other countries
7 Obtaining Technical SupportWhile we hope your experience with the IPCAM network camera is enjoyable and easy to use you may
89
experience some issues or have questions that this Userrsquos Guide has not answeredIf you have problem with FOSCAM IP camera please first contact FOSCAM reseller for solving theproblems If our reseller cannot provide service please contact our service departmenttechfoscamcom
- Security Warning
- 1 Overview
-
- 11 Key Features
- 12 Read Before Use
- 13 Package Contents
- 14 Physical Description
- 15 Micro-SD Card
-
- 2 Access the IP Camera
-
- 21 Wired Connection
- 22 Wireless Connection
-
- 221 Soft AP Connection(Only C1)
- 222 WPS (WI-FI Protected Set-up)
-
- 23 Access the Camera in WAN
-
- 231 Static IP Addresses
- 232 Remote Access
-
- 24 Using the VLC player
- 25 IP camera connection to the server
-
- 3 Surveillance Software GUI
-
- 31 login Window
- 32 Setup Wizard
- 33 Surveillance Window
-
- 4 Advanced Camera Settings
-
- 41 Setup Wizard
- 42 Status
-
- 421 Device Information
- 422 Device Status
- 423 Session Status
- 424 Log
-
- 43 Basic Settings
-
- 431 Camera Name
- 432 Camera Time
- 433 User Accounts
- 434 Multi-Camera
- 435 Status Light
-
- 44 Network
-
- 441 IP Configuration
- 442 Wireless Settings
- 443 Soft AP Password Settings(Only C1)
- 444 DDNS
- 445 UPnP
- 446 Port
- 447 Mail Settings
- 448 FTP Settings
- 449 P2P
-
- 45 Video
-
- 451 Video Settings
- 452 On Screen Display
- 453 Privacy Zone(Only R2 C2)
- 453 Snapshot Settings
- 454 IR LED Schedule
-
- 46 Detector
-
- 461 One Key Alert(Only R2 C2)
- 462 Action Detection
- 463 Sound alarm
-
- 47 Record
-
- 471 Storage Location
- 472 Alarm Recording
- 473 Local Alarm Recording
- 474 Schedule Recording
- 475 SD Card Management
-
- 48 PTZ(Only R2)
-
- 481 Pan amp Tilt Speed
- 482 Cruise Settings
- 483 Start-Up Options
-
- 49 Firewall
- 410 System
-
- 4101 Back-upamp Restore
- 4102 System Upgrade
- 4103 Patch Installation
- 4104 Factory Reset
- 4105 Reboot
-
- 5 Playback
- 6 Appendix
-
- 61 Frequently Asked Questions
-
- 611 Install the add-on of Firefox browser Googl
- 612 Uninstall the add-on of Firefox browser Goo
- 613 I have forgotten the administrator password
- 614 Camera can not record
- 615 Subnet doesnrsquot match
- 616 No Pictures Problems
- 617 Canrsquot access IP camera in internet
- 618 UPnP always failed
- 619 Camera can not connect wireless
- 6110 Canrsquot see other cameras listed in multi-dev
-
- 62 Default Parameters
- 63 Specifications
- 64 CE amp FCC
- 65 Warranty
-
- 7 Obtaining Technical Support
-
2
Security WarningFoscam cameras and NVRs require good security practices to safeguard your privacy You shouldregularly change your camera or NVR password which is 8-10 numbers letters symbols combinationYou should update your camera or NVR regularlyMake sure your camera or NVR has the latestfirmware installed for your specific model and better experience
1 OverviewFOSCAM Indoor HD IP Camera is an integrated wireless IP Camera with a color CMOS sensor whichenable to view in High Definition resolution It combines a high quality digital video camera with apowerful web server to bring clear video to your desktop and mobile devices no matter where by yourlocal network or over the Internet
These cameras support P2P function Thanks to the P2P easy access technology you donrsquot need to docomplicated Port Forwarding and DDNS settings you just need to scan the QR code on the bottom ofthe camera to connect it to smart phone or input the UID on CMS software to realize remote access
FOSCAM IP Camera provides users with more comprehensive controls over a monitored site Thecamera supports H264 video compression technology dramatically reduces file size and saves networkbandwidth
The camera is based on the TCPIP standard A built-in WEB server inside which could support InternetExplorer simplifies the management and maintenance of your device is simplified by accessing thewebsite of your camera through network
The camera is designed for indoor surveillance with wide applications such as at home in retail storeand in office Controlling the camera and managing images are simplified by using the provided webinterface across the network in either wired or wireless way
FOSCAM provides Smart Phone APP for Android and iPhone users please search and install FoscamApp named Foscam on App Store and Google Play for iOS and Android devices then you can view yourcamera anywhere anytime on your smart mobile devices
11 Key Features Standard H264 video compression algorithm to satisfy the transmission of high definition video in
narrow bandwidth network P2P feature for easy access 10 Mega-Pixel(C1) 20 Mega-Pixel (R2C2) Supports IEFirefoxGoogleSafari browser or any other standard browsers Support WEPWPA-PSK and WPA2-PSK Encryption Wireless connection is compliant with IEEE 80211bgn WI-FI up to 150Mbps
3
IR night vision Range 8m(C1R2) C2(5m) Support image snapshot Support dual-stream Support SD Card storage up to 32GB(C1) or 64GB(R2C2) When the camera has been connected the computer via the USB power cable with supplied you
can view and operate the files in SD Card by the computer (Only C2) Support IR-Cut auto switch Embedded free FOSCAM DDNS(dynamic domain name service) Service Supporting the Third Party Domain Name Service Support two-way audio Support ONVIF protocols Multi-level users management with password protection Motion detection alert via email or upload image to FTP Provide free Android and iPhone APP for viewing live video provide free Central Management
Software to manage and monitor multiple cameras Support record schedule Supports Passive Infrared Sensor(only C1C2) Supports High Dynamic Range(only R2) Supports Wide Dynamic Range(only C2) Supports 8X Magic zoom(only R2) Supports voice prompt(only R2C2)
12 Read Before UsePlease first verify that all contents received are complete according to the Package Contents listed belowBefore the IP Camera is installed please carefully read and follow the instructions in the QuickInstallation Guide to avoid damage due to faulty assembly and installation It also ensures the product isused properly as intended
13 Package Contents
C1C2 IP Camera times 1 AC Adapter times 1
Quick Installation Guide times 1 Power Line times 1
CDtimes1 Warranty Card times 1
R2 IP Camera times 1 Power Supply times 1
Quick Installation Guide times 1 Warranty Card times 1
CDtimes1 Wi-Fi Antennatimes1
Mounting brackettimes1
4
14 Physical Description
C1
Front panel Rear panel
Front panel PIRThe PIR ( Passive Infrared ) is electronic devices which are used in some security alarm
systems to detect motion of an infrared emitting source usually a human body LENS Fixed focus lens Infrared LED Infrared LEDs for night vision Microphone Built-in microphone Micro SD Card slot Supports up to 32GB SD card for storing the video
Rear panel Power Light If the power supply works fine the light will be on LAN 10100 Mbps RJ-45 port for wired connection SoftAP Press the SoftAP button for more than 2 seconds The Network light indicator begins to
twinkle every 01 seconds WPSReset
WPS Push both WPSReset button on the camera and wireless router within 1 minute thecamera will connect to the wireless router automatically in WPS process the Network light willblink every 04 seconds
Reset Push and hold the WPSReset button for more than 10 seconds to set the camera tofactory default the Power light will blink every 04 seconds
Power DC 5V1A Power supply
The flashing status of the Power light and Network light are shown in the following table
Light Flashing Status DescriptionPower light off The power dont work properly
on The power supply works fineFlashing every 04 seconds Reset to take effect
Network light off No Wireless connectionConstant Flash Wired connection
5
Slow Flash every 10 second Wi-Fi connectedFlashing every 04 seconds WPS is connectingFlashing every 02 seconds EZLink takes effectFlashing every 01 seconds SoftAP is started
R2
Front panel Rear panel
Front panel LENS Fixed focus lens Infrared LED Infrared LEDs for night vision Microphone Built-in microphone Micro SD Card slot Supports up to 64GB SD card for storing the video WPSReset
WPS Push both WPSReset button on the camera and wireless router within 1 minute thecamera will connect to the wireless router automatically in WPS process the Network light willblink every 04 seconds
Reset Push and hold the WPSReset button for more than 10 seconds to set the camera tofactory default the Power light will blink every 04 seconds
Rear panel LAN 10100 Mbps RJ-45 port for wired connection Power DC 5V2A Power supply Speaker Built-in speaker Antenna Used to connect external wireless antenna
The flashing status of the Power light and Network light are shown in the following table
Light Flashing Status DescriptionPower light off The power dont work properly
on The power supply works fineFlashing every 04 seconds Reset to take effect
Network light off No Wireless connectionConstant Flash Wired connection
6
Slow Flash every 10 second Wi-Fi connectedFlashing every 04 seconds WPS is connectingFlashing every 02 seconds EZLink takes effect
C2
Front panel Rear panel
Front panel PIRThe PIR ( Passive Infrared ) is electronic devices which are used in some security alarm
systems to detect motion of an infrared emitting source usually a human body Lens Fixed focus lens Induction IC Infrared Lamp Array Micro SD Card slot Supports up to 64GB SD card for storing the video
Rear panel LAN 10100 Mbps RJ-45 port for wired connection WPSReset
WPS Push both WPSReset button on the camera and wireless router within 1 minute thecamera will connect to the wireless router automatically in WPS process the light will be greenand blink every 04 seconds
Reset Push and hold the WPSReset button for more than 10 seconds to set the camera tofactory default the light will be red and blink every 04 seconds
Power DC 5V1A Power supply
The flashing status of the Power light and Network light are shown in the following table
Flashing Status DescriptionFlashing(red) every 04 seconds Reset to take effectConstant Flash(green) Wired connectionSlow Flash(green) every 10 second Wi-Fi connectedFlashing every(green) 04 seconds WPS is connectingFlashing every(green) 02 seconds EZLink takes effect
7
15 Micro-SD Card
This camera supports SD CardWhen you plug in the SD card during the camera work process please reboot the camera again or elsethe SD Card may be cannot work wellGo to the SettingsDevice StatusDevice Status page you can see the SD card status
2 Access the IP Camera
21 Wired Connection
1 Connect the camera to the LAN network (Router or Switch) via network cable2 Connect the power adapter to the camera3 Insert the CD into the CD drive of your computerGo to the folder ldquoEquipment Search Toolrdquo and find the folder ldquoFor Windows OSrdquo or ldquoFor Mac OSrdquo from theCD supp Copy and paste the file to your computer or drag it onto your Desktop
Shortcut icon for Windows Mac OS
Notes If your computer ( Windows OS ) supports autorun function you can find the corresponding file in
the opened control panel If your computer doesnrsquot have CD drive you can download the Equipment Search Tool from our
website for free
The camera supports HTTP and HTTPS protocols you can access the camera in two ways
(1) http LAN IP + HTTP Port NO
8
The default HTTP port NO is 88 Double click the Equipment Search Tool icon to run and it should findthe camerarsquos IP address automatically after you plug in the network cable
Double click the IP address of the camera the camera login page should be open in your defaultbrowser
(2) https LAN IP + HTTPS Port NO
The default HTTPS port NO is 443 You can use the URL to access the camera https LAN IP +HTTPS port NOGo to Settings - Network - Port panel you can see and change the HTTP and HTTPS port NO
NOTEWhen logging in for the first time you will need to download and install the add-on
9
22 Wireless ConnectionThere are some ways of wireless connection EZLink connection soft AP connection and WPSconnection EZLink connection Use the mobile phones or other mobile devices to download APP then
connect the camera and the wireless router by the APP The procedure of the EZLink connectionplease refer to the Quick Installation Guide
Soft AP connection(only C1) Use the mobile device which can search for the wireless networkThen use the web browser to visit http1921681188 by the mobile device Follow the SetupWizard to finish the settings
WPS connection WI-FI Protected Set-up Press and hold the WPS button on your wireless routerand your camera within 60 seconds So that your camera and wireless router connect successfully
221 Soft AP Connection(Only C1)
To ensure that the ethernet cable and the camera is disconnected before you begin1 Start camera power on the indicator light of camera will light on2 Press the Soft AP button for 3-5 seconds The Network light begins to twinkle at very highfrequency(every 01 seconds)3 Use a terminal which could search the WLAN (desktop or laptop This part takes laptop as anexample) to search for the AP named C1_ for connection( indicate the last six letters ofcamerarsquos MAC ID )
IP Camera The WLAN page in the terminal device
4 After finishing Soft AP connection use the web browser of the terminal to visit http1921681188
5 Log in the camera ( Default username is admin with no password ) When log in for the first time you
Soft AP Button
10
need to change the username and password
6 After logging in for the first time it will go to Setup Wizardrdquo automatically Please set the basicparameters of the camera such as camera name camera time wireless settings (The camera connectto your wireless router Wireless Network List - enter the password of your wireless router ) IPconfiguration
Input the New usernameNew password andConfirm the password
11
12
Notes We recommend you to choose to manually set the IP when you know some knowledge of the
network It needs about 1 minute to connect the camera to your router
7 After completing the setup wizard you should press the Soft AP button for 3-5 seconds to cancel theSoft AP connection mode this is located on the back of your camera The Network light begins to slowlyflash(once per second) it indicates that the wireless connection is successful
8 Please make sure that the wireless device connect your laptop to the router which your camera has
13
connected to
9 Open the CD named ldquoFOSCAMrdquo go to the folder ldquoEquipment Search Toolrdquo and find the folder ldquoForWindows OSrdquo or ldquoFor Mac OSrdquo Copy and paste the file to your wireless device or drag it onto yourdesktop
Notes You could also download the Equipment Search Tool from our website wwwfoscamcom for free If you have multiple cameras and you cannot determine which camera you are going to log in
Please match the Device MAC address on the search tool with the MAC address on the labelpasted of each camera
10 Double-click the camera list here and your default browser will open up to the login page Input theusername and password you has changed Then you will see the live video of your baby on theinterface
Main stream offers thehighest quality video whileSub stream offers lessquality but also less delaywhen viewing
14
Now you could use your camera in LAN
Note64-bit browser is not supported
222 WPS (WI-FI Protected Set-up)
Before using WPS wireless connection you need to
Make sure that your wireless router has the WPS function and has been properly connected to theInternet
WPS button on the wireless router is typically located on the front panel or rear panelTP-LINKrouters WPS button is called QSS (Quick Security Setup)
Make sure that the ethernet cable and the camera is disconnected
(1) Press and hold the WPS button for three seconds The Network light of the camera begins to twinkleat high frequency (every 04 seconds)
(2) Press and hold the WPS button for three seconds on your wireless router within 60 seconds Thenthe camera will automatically create a secure wireless connection to your router in about 60seconds
(3) The Equipment Search Tool will search the camerarsquos LAN IP Make sure the PC and the camerashare the same subnet
NOTE The security mode of router cannot be WEP or else the WPS settings may be failed
23 Access the Camera in WAN
231 Static IP Addresses
Users with static IP addresses do not need to set DDNS service settings for remote access After youhave finished connecting the camera using the LAN IP address and port forwarding you can access thecamera directly from Internet using the WAN IP address and port number
WPS Button
15
How to Obtain the WAN IP address from a public website To obtain your WAN IP address enter the following URL in your browser httpwwwwhatismyipcomYour current WAN IP will be shown on the webpage
232 Remote Access
If you want to access your camera by web browser outside of your LAN you need to configure followingconfigurations
1 Choose ldquoSettingsrdquo on the top of the camera web page then go to the ldquoNetwork gt IP Configurationrdquosection on the left side of the screen then uncheck the Obtain IP DHCP
2 Enable UPnP and DDNS in the camerarsquos settings page We recommend you to use the DDNS byfactory default
IP Address Set this in the same subnetas your computer or keep it as defaultSubnet Mask Keep it as defaultGateway and DNS Server Set it to theIP address of your router
16
3 You can see the port of your camera here If you want to set Remote Access for several cameras onthe same network you will need to change the HTTPS port for each camera
4 If the UPnP of the router has been enable you do not need to perform following steps Otherwiseyou need to select one of the following methods to configure port forwarding on your router For thesesteps we will be using the TP-LINK brand wireless router as an example
If there is a UPnP function in your routerChoose ldquoForwarding gt UPnPrdquo make sure that the Current UPnP Status is Enabled
Select Yes and click Save
Click Enable DDNS and click SaveThe content in the Manufacturersquos DDNScolumn is the domain name of your camera
17
If there is no UPnP function in your routerYou need to manually add port forwarding refer to the following steps You need go to the ldquoForwarding gtVirtual Serversrdquo panel for setup
Click Add New
Input the port and IP address ofyour camera and click Save
Here you have finished thePort Forwarding setup
18
5 Now you can access your IP camera by httpsdomain name HTTPS port via the Internet
24 Using the VLC playerThe camera supports RTSP streaming here you can view the camera by VLC player
RTSP URL rtsp [user name][password]IPPort numbervideostream
The part in the square brackets can be omitteduser name amp password The user name and password to access the camera This part can beomittedIP WAN or LAN IP addressPort NO If there is the RTSP port number on the Port page you must only use RTSP port numberotherwise you must only use http port numberVideo stream Three modes are supported video Main video Sub and audio Video Sub is a betterchoice in bad network condition If you select audio you can only hear sound without seeing picture
For exampleIP 192168111RTSP Port number 554User name adminPassword 123
Enter either one of the following four URLs in the VLC1rtspadmin123192168111554videoMain2rtsp 192168111554videoMain3rtsp123192168111554videoMain4rtspadmin192168111554videoMain
Open the VLC and go to ldquoMediardquo--rdquoOpen Network Streamrdquo option then enter the URL in VLC
19
Sometimes you may need to enter the user name and password for another time Click OK and you cansee the real-time preview
20
If you cannot play the video in the VLC player please check the port mapping You can read QuickInstallation Guide about how to configure port forwarding
NOTEIf you modify the camerarsquos username or password you had better reboot the camera to apply the newusername and password in authentication in the VLC
25 IP camera connection to the server
Device supports ONVIF 221 protocol You can easily access NVR with ONVIF or server with ONVIF
3 Surveillance Software GUIPlease refer to the section 21 if you install the camera for the first time You can start to learn aboutsoftware operation in the computer
21
31 login Window
Section1 Enter the Username and passwordThe default administrator username is ldquoadminrdquo with no password please change the password the firsttime you use and prevent unauthorized users login the camera
Section2 StreamThe camera supports two stream modes Main stream and sub stream Select Main stream if you wantto access the camera from LAN and sub stream will be better if you want to access the camera fromInternetNoteSelect sub stream to ensure a more fluent video under narrow network bandwidth
Section3 Select the languageYou click on the language dropdown list to select language
Section4 login the cameraClick ldquoLoginrdquo button
NOTEWhen setting up your camera for the first time it will request that you modify the default usernameandor password if both are still set to default Input the new username and password click Modify tocomplete the modification You will now use the new username and password to login to the camera inthe future
22
32 Setup WizardYou will go toldquoSetup Wizardrdquoautomatically after your first-login where you can set the basicparameters of camera such as camera name camera time wireless settings IP configuration
33 Surveillance Window
Section 1 FOSCAM Logo Live Video SettingsPlayback
1
2
5
3
7
4
6
23
FOSCAM LOGO
Path to surveillance window Click this button to go back to the surveillance window
Path to Administrator Control Panel Click it to go to Administrator Control Panel and do
advanced settings
Click this button to go back to the Playback panel to view the stored audio files
stored in the SD Card
Section 2 Multi-Device Window
The firmware inside the camera supports up to 9 cameras being monitored at the same time You canadd other cameras in multi-device setting
Section 3 Mode Stream HDR Mirror Flip buttons Zoom
Mode1) 50HZ ---------Indoor surveillance (Region Europe China)2) 60HZ ---------Indoor surveillance (Region USA Canada)3) Outdoor------Outdoor surveillance
StreamThe default stream supports multiple modes For example HD Mode720P23fps2M meanings Streamtype Resolution Maximum frame rate Bit rate (Different models support different specific mode )
Stream type It is used to identify the stream typeResolutionThe bigger the resolution the better of the image quality is If you are accessing the camera viainternet and want to get more fluent video streaming please select resolution VGAMaximum frame rateYou should lower frame rate when the bandwidth is limited Normally when the frame rate above 15you can achieve fluently video The maximum frame rate for each model is different please see theldquoSpecificationsrdquoBit rateGenerally speaking the larger the bit rate is the clearer video will become But the bit rateconfiguration should combine well with the network bandwidth When the bandwidth is very narrowand bit rate is large that will lead to video can not play well
You can reset the stream type on Settings-gt Video-gt Video Settings panelAfter changing please reboot the camera and you can see the modification
HDR(Only R2)HDR stands for High Dynamic Range It usually refers to the method of capturing images having
24
ldquogreater dynamic range between the lightest and darkest areas of an image than current standarddigital imaging methods or photographic methodsrdquo You can select ldquoonrdquo from the dropdown list undersunlight or with bright background
WDR(Only C2)In surveillance WDR (Wide Dynamic Range) is intended to provide clear images even underbacklighting where the intensity of illumination varies a lotmdashnamely when there are very bright andvery dark areas simultaneously in the cameras field of view
ldquoZoom inrdquo or rdquoZoom outrdquo(Only R2C2)
Device Support 8x zoom feature click or The focal length of the camera lens will be larger or
shrink you can adjust the focus distance to the target object size access to high-definition screen
(Only C2) When click the button the PanTilt Control control button will pop up You can adjust
direction of the camera when the focal length of the camera lens has been larger When the camerafocal length reduced to a minimum the PanTilt Control control button will disappear
PanTilt Control(only R2C2)
1----- Up control button 2-----Down control button3------Left control button 4------Right control button5----- Up-Left control button6----- Up-Right control button7----- Down-Left control button8----- Down-Right control button
Click this button and go to center
Section 4 Cruise Preset settings(Only R2)Cruise Settings
25
The default cruise tracks have two types Vertical and Horizontal
Vertical The camera will rotate from up to downHorizontal The camera will rotate from left to right
Start cruise Stop cruise
If you want to define or change the cruise trace please go to Settings PTZ Preset Settings panel
How to do cruiseFirstly Select one track in the track dropdown list
Secondly Click Start cruise button the camera will cruise following the predefined pathThirdly Click stop button and finish cruising
Preset settings
IPCam supports 16 preset positions which is considered enough for DIY home amp small businesssurveillance marketThe default preset position is Topmost Bottom most Left most right most you can add other presetpositions
Add Click this icon to save the position you need the camera to remember
Delete Select one preset position and click this button to delete it
GO Select one preset position in the preset drop-down list and click Go to make the camera
Select one of these
26
move the preset position
How to do preset positionFirstly move the camera and stop at a desired place where you want make preset position
Secondly click button and enter a descriptive name for the preset position The preset position
cannot contain special characters Then click OK to save it If you want to reset the preset position clickCancelAfter that you can move the camera and stop at another place and set another preset position You cando all the 16 preset positions with this methodIf you want to see one preset position you have set only select the preset position name from the preset
drop-down list and click go button the camera will go to the preset position
Section 5 IR LED Lights Color Adjustment
Click Infra led and there are three modes to adjust the infrared led Auto Manual and ScheduleAuto Select it and the camera will adjust the infra led (on or off) automaticallyManual Select it and you can turn on or turn off the infra led manuallySchedule Select it and the IR led light will be off at the schedule period If you want to define or changethe IR led lights schedule time please go to Settings---gtVideo---gt IR LED Schedule page
Color AdjustmentIn this page you can tune Hue Brightness Contrast Saturation and Sharpness to get higher quality
Section 6 OSDIf you have added time and camera name in the video you can see it in the live windowGo to Settings ---Basic settings---Camera name panel and you can change another device nameThe default device name is anonymousGo to Settings ---Basic settings---Camera time panel and adjust the device timeGo to Settings ---Video---On Screen Display panel you can add or no add OSD
27
Section 7 Play Stop Talk Audio Snap Record Full screen button
1----- Play Click it to play the video of the camera2----- Stop Click it to stop the video of the camera
3----- Talk Click the button and the icon will become to then talk to the microphone thatconnected with PC people around the camera can here your voice Click the icon again and stop talking
4----- Audio Click this icon the icon will become to you can hear the sound around the camera
by the earphone or speakers that connected with PC
5----- Adjusting the sound Click this icon the icon will become to youcan change the sound of the camera
6----- Snapshot Click it to make snapshot and it pop-up a window which picture you snapshot rightclick in the window and save the picture to anywhere you want
7----- Record Click the icon and the camera start recording you can see a green dot in the livewindow Click again and stop recording The default storage path is CIPCamRecord You can changethe storage path Go to Settings- gtRecord-gtStorage Location panel
8----- Full Screen Click it to make full-screen or you can double click the surveillance screen to makefull-screen Double click again and exit full-screen
Onscreen Mouse ControlRight click the mouse and you can adjust the screen ration full screen and Zoom up
28
Keep ration Select it and the camera will adjust the size of live window based on the the computermonitor automatically Sometimes there is a black border around the video please select Keep ration toget a better visual quality Full Screen Select it and Click it to make full-screen press ESC and exit full-screenZoom up Select it and you can see a bigger screen than beforeFirst Method Here is a convenient and fast solution to Zoom updown screen by Clicking Video Screenand adjusting Mouse pulley or by press the CTRL key and click the mouse left buttonSecond Method Click it and the live view will be digital zoomed up then click Zoom Down and the liveview back to original size
When you select the Full Screen then click right mouse there is a Screen PTZ button
29
Click the Screen PTZ button and put the mouse on the screen to indicate the camera move direction youprefer press the left mouse the camera will move to the corresponding direction Loosen the mouse andstop moving Press Esc button or double click right mouse and cancel the function
NOTE For Mac OS the plugin cannot support Onscreen Mouse Control so you cannot allow to use it
4 Advanced Camera SettingsClick the button ldquoSettingsrdquo goes to Administrator Control Panel to make advanced camera settings
41 Setup WizardPlease go to section 32 to find the way to set it
42 StatusStatus contains four columns Device Information Device Status Session Status and Log it will showyou various information about your camera
30
421 Device Information
Camera Model The camera model NO
Camera Name The Device Name is a unique name that you can give to your device to help you identifyit Click Basic Settings and go to Camera name panel where you can change your camera name Thedefault device name is anonymous
Camera ID Display the wired MAC address of your camera For example Device ID is 000C5D00008the same MAC ID sticker is found at the bottom of the camera
Camera Time The system time of the device Click Basic Settings and go to Camera time panel andadjust the timeSystem Firmware Version Display the System Firmware version of your cameraApplication Firmware Version Display the application firmware version of your cameraPlug-In Version Display the plug-in version of your camera
422 Device Status
On this page you can see device status such as Alarm status Record Status DDNS status WIFI statusand so on
31
423 Session Status
Session status will display who and which IP is visiting the camera now
424 Log
The log record shows who and which IP address accessed or logout the camera
32
Reboot the camera and clear the log records
43 Basic SettingsThis section allows you to configure your camerarsquos Name Time Mail User account and Multi-Device
431 Camera Name
You can define a name for your camera here such as apple Click Save to save your changes The aliasname cannot contain special characters
432 Camera Time
This section allows you to configure the settings of the internal system clocks for your camera
33
Time Zone Select the time zone for your region from the dropdown menuSync with NTP server Network Time Protocol will synchronize your camera with an Internet time serverChoose the one that is closest to your cameraSync with PC Select this option to synchronize the date and time of the Network Camera with yourcomputerManually The administrator can enter the date and time manually Note select the date and time formatuse DST Select the daylight saving time from the dropdown list
Click Save button and submit your settings
NOTE If the power supply of camera is disconnect you need set the camerarsquos time again
433 User Accounts
Here you can create users and set privilege visitor operator or administrator The default useraccount is admin with a blank password You can enter the users accounts of visitor operator andadministrator Manually
34
How to change the passwordFirstly select the account which you want to change the password then select ldquoChange passwordrdquoenter the old password and the new password lastly click modify to take effect
How to add account Select one blank column then enter the new user name password and privilege last click Add to takeeffect You can see the new added account on the Account list
35
Delete Select the account which you want to delete then click Delete button to take effectNOTE The default admin account cannot be deleted but you can add other administrator users
How to change the username Firstly select the account which you want to change the username then select ldquoChange usernamerdquoenter the new password lastly click modify to take effect
36
434 Multi-Camera
If you want to view multi-surveillance screens on one window you need to login one camera and set itas the main device and do Multi-Device Settings add other cameras to the first one camera Before youdo multi-cams settings you need to assign different port such as 81 82 83 84 85 86 87 88 to thecameras if there is 8 cams installedThe firmware within the camera can support a maximum of 9 devices monitoring all at the same timeThis page you can both add FOSCAM MJPEG and H264 series cameras to the first camera and viewmulti-surveillance screen on one window
Add cameras in LANIn Multi-Device Settings page you can see all devices searched in LAN The 1st Device is the defaultone You can add more cameras in the list in LAN for monitoring The camerarsquos software supports up to 9IP Cameras online simultaneously Click The 2nd Device and click the item in the Device List in LAN theAlias Host and Http Port will be filled in the boxes below automatically Enter the correct username andpassword then click Add Add more cameras in the same way
37
Camera Model Our Company produces two series cameras MJPEG and H264 Here will show youwhich series the camera belongs to
1 Click it camera model aliashost and HTTP Port will befilled in the following boxesautomatically
2 Enter the User name andpassword of the 2nd camera
3 Click Add to take effect
38
Back to Surveillance Windows and click Four Windows option you will see four cameras you added
Add cameras in WANIf you want to view all cameras via the internet(remote computer) you will need to add them using DDNSdomain name Firstly make sure all of the cameras you added can be accessed through the internet(The way to configure DDNS is in chapter 444)Login to the first camera using a DDNS domain name and port
39
Click Multi-Device Settings Choose The 2nd Device Fill in the 2nd camerarsquos name DDNS domainname port number Enter user name and password and then choose Add
1 ---- The camera model MJ or H2642 ---- The 2nd camerarsquos name3 ---- Fill in the 2nd camerarsquos DDNS host not LAN IP
NOTE The MJ series have the same HTTP Port NO and Media Port NO
4 ---- Enter the 2nd camerarsquos user name and password5 ---- Click Add button and to take effect
NOTE Here the Host must be entered as the second camerarsquos DDNS domain name not its LAN IP
Use DDNS domain
name and port to login
Make sure each camera you need add
could login with DDNS name and port
40
Return to video window You will see all of the cameras accessible through the internetWhen you are away from home you can use the first camerarsquos DDNS domain name and port to view allthe cameras via internet
435 Status Light
You can enable or disable status light
41
44 NetworkThis section will allow you to configure your camerarsquos IP PPPoE DDNS Wireless Settings UPnP andPort
441 IP Configuration
If you want to set a static IP for the camera please go to IP Configuration page Keep the camera in thesame subnet of your router or computer
Changing settings here is the same as using the Equipment Search ToolIt is recommended that you use the subnet mask gateway and DNS server from your locally attachedPC If you donrsquot know the subnet mask gateway and DNS server you can check your computerrsquos localarea connection as followsControl Panel rarrNetwork Connections rarrLocal Area Connections rarrChoose Support rarrDetails
42
If you donrsquot know the DNS server you can use the same settings as the Default Gateway
442 Wireless Settings
Step 1 Choose ldquoSettingsrdquo on the top of the camera interface and go to the ldquoNetworkrdquo panel on theleft side of the screen then click ldquoWireless Settingsrdquo
Set the same Subnet Mask andgateway of the camera with yourPC
There are two DNS servers Youcan set any of them Same withgateway is also OK
43
Click the Scan button and the camera will detect all wireless networks around the area It should alsodisplay your router in the list
Step 2 Click the SSID (name of your router) in the list the corresponding information related to yournetwork such as the name and the encryption will be filled into the relevant fields automatically
You will only need to fill in the password of your network Make sure that the SSID Encryption and thepassword you filled in are exactly the same for your router
Click the Page number to see other wirelessnetworks devices if there are more than 10
Click the Scan buttonto search for wirelessnetworks
1 Click the SSID of your router andthe relevant information will be filledin the fields automatically
2 Enter the passwordof your router
44
Step 3 Please click on the Save button after all settings have been entered and disconnect the networkcable Never shut down the power of the camera until the IP camera is able to connect to the wirelessnetwork
The LAN IP address will disappear on the window of Equipment Search Tool when the camera isconfiguring a wireless connection Wait about 1 minute the camera should obtain a wireless connectionand the LAN IP of the camera will show again on the window of the Equipment Search Tool The IPaddress may have changed after the camera receives a wireless connection we recommend setting astatic local IP address if this IP address changes by right clicking the camera in Equipment Search Toolsetting a static IP and pushing OKCongratulations You have set up the wireless connection of the camera successfully
NOTE If you fail to make a wireless connection please refer to your seller or contact us directly forassistance
443 Soft AP Password Settings(Only C1)
For the safety of your camera we recommend you change the Soft AP password
444 DDNS
FOSCAM camera has embedded a unique DDNS domain name when producing and you can directlyuse the domain name you can also use the third party domain name
FOSCAM domain nameHere take test09myfoscamorg for example Go to option of DDNS on the Settings-gtNetwork panelyou can see the domain name
45
Now you can use http Domain name + HTTP Port to access the camera via internetTake hostname test09myfoscamorg and HTTP Port no 800 for example the accessing link of thecamera via internet would be http test09myfoscamorg800
Restore DDNS to factory If you have configured Third Party DDNS successfully but you want to useManufacturerrsquos DDNS again here click this button and start Manufacturerrsquos DDNS ServiceUser can also use third part DDNS such as wwwno-ipcom www 3322com
445 UPnP
The default UPnP status is closed You can enable UPnP then the camerarsquos software will be configuredfor port forwarding Back to the ldquoDevice Statusrdquo panel you can see the UPnP status
46
The camerarsquos software will be configured for port forwarding There may be issues with your routerssecurity settings and sometimes may error We recommend you configure port forwarding manually onyour router
446 Port
This camera supports HTTP Port HTTP Port is used to access the camera remotely If you want toaccess the camera and view the video the HTTP Port must both be configured correctly
HTTP port By default the HTTP is set to 88 Also they can be assigned with another port numberbetween 1 and 65535 But make sure they can not be conflict with other existing ports like 25 21
ONVIF port By default the ONVIF port is set to 888 Also they can be assigned with another portnumber between 1 and 65535(except 0 and 65534) But make sure they can not be conflict with otherexisting ports
HTTPS port The default port is 443 You can use the url to access the camera https IP + HTTPSport
RTSP port The default port is 554 The R2 does not have RTSP port
Another way to change the HTTP port NO
Step 1 Open the Equipment Search Tool select the camera you would like to change the port of right
47
click on the IP address and click on rdquoNetwork Configurationrdquo this brings up the network configurationbox as flowing figures
Figure 41
Figure 42
Step 2 Enter the username and password of the Administrator (default username is admin with a blank
password) and click ldquoOKrdquo to apply changes
Step 3 Wait around 10 seconds yoursquoll see that the camerarsquos LAN IP address has changed In ourexample it was changed to 2000 so we see http19216811102000 in Equipment Search Tool Alsothe LAN IP address is now fixed at a static IP address of http19216811102000 This IP address willnot change even if the camera is powered off and back on the camera will remain on this LAN IPaddress This is very important that a static LAN IP address is set or you may have problems later withremote access and seeing the camera remotely if the camera loses power and reconnects on a differentLAN IP address Make sure you set a static LAN IP address
Select which camerayoursquod like to change theport for and right click
Modify the Http Port
Enter the Username andpassword click OK
48
If the camera cannot be accessed please make sure the port forwarding is succeed
447 Mail Settings
If you want the camera to send emails when motion has been detected here Mail will need to beconfigured
1---- SMTP Server Port Transport Layer Security Enter SMTP server for sender SMTP port isusually set as 25 Some SMTP servers have their own port such as 587 or 465 and Transport LayerSecurity usually is None If you use Gmail Transport Layer Security must be set to TLS or STARTTLSand SMTP Port must be set to 465 or 25 or 587 which port you choose should be decided by whichTransport Layer Security you select2---- SMTP Username password ID account and password of the sender email address3---- Sender E-mail Mailbox for sender must support SMTP4---- Receiver Mailbox for receiver need not support SMTPyou can set 4 receivers5---- Save Click Save to take effect6---- Test Click Test to see if Mail has been successfully configured
49
Click Test to see if Mail has been successfully configured
If the test success you can see the Success behind the Test at the same time the receivers will receivea test mail
If the test fails with one of the following errors after clicking Test verify that the information you enteredis correct and again select Test 1) Cannot connect to the server2) Network Error Please try later3) Server Error4) Incorrect user or password5) The sender is denied by the server Maybe the server need to authenticate the user please check itand try again6) The receiver is denied by the server Maybe because of the anti-spam privacy of the server7) The message is denied by the server Maybe because of the anti-spam privacy of the server8) The server does not support the authentication mode used by the device
448 FTP Settings
If you want to upload record files and images to your FTP serveryou can set FTP Settings
50
Figure a
Figure b
FTP server If your FTP server is located on the LAN you can set as Figure aIf you have an FTP server which you can access on the internet you can set as Figure bPort Default is port 21 If changed external FTP client program must change the server connection portaccordinglyFTP Mode Here supports two modes PORT and PASVUsernamepassword The FTP account and passwordClick Save to take effectClick Test to see if FTP has been successfully configured
449 P2P
Access the IP Camera by Smart Phone (Android or iOS operating system)First of all you must open the P2P function of the IP Camera at ldquoSettings --gt Network --gt P2Prdquo
51
Foscam App named Foscam on App Store and Google Play for iOS and Android devices
NOTEIf the QR code scanning is not successful please input the UID on the bottom of the camera manually
45 VideoThis section allows you to configure Video stream settings On screen display and Snapshot settings
451 Video Settings
There are two ways to set the stream video settings They are main stream video settings and substream video settings
Enhanced Night video Definition(Only C1) The camera will automatically drop the frame to extendthe recording time in the night
52
Stream Type There are four types to identify different streams you have set If select the HD Mode theclearer video will become and it will take up more bandwidth If select the Smooth Mode the bandwidthis very narrow and bit rate is large that will lead to video can not play well The Equilibrium Model is avalue between HD Mode and Smooth Mode
Resolution The camera supports multiple types For example 960P 720P VGA The higher theresolution is the clearer video will become But the code flux will become larger too and it will take upmore bandwidth (The maximum frame rate for each model is different please see theldquoSpecificationsrdquo )
Bit Rate Generally speaking the larger the bit rate is the clearer video will become But the bit rateconfiguration should combine well with the network bandwidth When the bandwidth is very narrow andbit rate is large that will lead to video can not play well
Frame rate You should lower frame rate when the bandwidth is limited Normally when the frame rateabove 15 you can achieve fluently video
Key Frame Interval The time between last key frame and next key frame The shorter the duration themore likely you will get a better video quality but at the cost of higher network bandwidth consumption
Variable bitrate(Only C1) Select the Bit rate type to constant or variable If select Yes the camera willchange the video bit rate according to the situation but will not more than the maximum parameter BitRate If select No the Bit Rate is unchanged
Rate Control Mode(Only R2 C2)There are three rate control modesCBR Constant Bit Rate it means that the Bit Rate is constantVBR Variable Bit Rate the camera will change the video bit rate according to the situation but will notmore than the maximum parameter Bit RateLBR Low Bit Rate If you can select the LBR then you can slide the scroll bar to choose percentage ofthe bit rate By reducing the bit rate so that the camera can obtain a better image at low bandwidth
452 On Screen Display
This page is used to add timestamp and device name on the video
Display Timestamp
53
There are two options Yes or NO Select Yes and you can see the system date on the video
Display Camera NameThere are two options Yes or NO Select Yes and you can see the device name on the video
453 Privacy Zone(Only R2 C2)
This page is used to set some mask as privacy zone on the video
Allow On Screen Display MaskThere are two options Yes or NO Select yes and draw a mask area on the video the mask area will beblack on the video
Click OK button and return to the OSD page click Save to take effectBack to the surveillance window you can see the mask area as the following picture
The mask area
54
453 Snapshot Settings
On this page you can set the snapshot picturesrsquo image quality and the storage path
Manual snap Quality Low Middle and High The higher the quality the picture will be clearerPictures Save To FTP or SD card If you have done FTP and Alarm settings when alarming thecamera will snap pictures to the FTP or SD card automaticallyIf you select the FTP you can set the file name which the picture save to (Only C1)
Enable timing to captureTo enable capture interval follow the steps below1 Select Enable Motion detection
55
2 Capture intervalThe interval time between two captures3 Select the capture time
Capture anytimeClick the black button up the MON you will see all time range turn red When something moving inthe detection area at anytime the camera will capture
Specify an capture scheduleClick the week day words the corresponding column will be selected For example click TUE theall column of TUE turns to red that means during Tuesday whole day the camera will capture
Press the left mouse and drag it on the time boxes you can select the serial area4 Click Save button to take effect
454 IR LED Schedule
On this page you can set the schedule time for switching IR LED lights When parameter Mode is set tothe Schedule on the Live Video window at these schedule time the IR LED lights will be turned off
46 Detector
461 One Key Alert(Only R2 C2)
On this page you can turn on or off the alarm function you need
462 Action Detection
IP Camera supports Action Detection Alarm when the people has been detected the IP Camera willmake a alarm
56
Step 1 Enable Action detection function
Step 2 Sensitivity---- It supports five modes Lowest Lower Low Medium and High The higher thesensitivity the camera will be more easily alarmed Select one motion sensitivity
Step 3 Trigger interval--- The interval time between two motion detection
Step 4There are some alarm indicators
A Camera Sound and PC SoundIf the camera has connected with a speaker or other audio output device if you select Camera Sound orPC Sound when the motion has been detected the people around the camera will hear beep alarmsound
B Send E-mailIf you want to receive alarm emails when motion is detected you must select Send E-mail and set MailSettings first
C Take SnapshotIf you select this checkbox when the motion has been detected the camera will snap the live viewwindow as a still picture and load it to the FTP Make sure you have set FTP and set FTP as the storagepath in Video-gtSnapshot settings panel
57
Time interval The interval time between two pictures
D RecordingIf you select this checkbox when the motion has been detected the camera will record automaticallyand store the record files to the SD Card Make sure the camera has inserted SD card and you haveset the SD card as the Alarm record files storage path please go to Recordmdashgt Storage location pageto verify this settingsThe default alarm record time is 30s and pre-alarm record time is 5s please go to Recordmdashgt AlarmRecord page and change the alarm time settings
E Push message to the phoneIf you select this checkbox when the motion has been detected the camera will push the message tothe phone which has been connected the camera
Step 7 Set detection areaClick set detect area and it pop up a window then you can draw the detection area Click Back buttonafter settings When something moving in the detection area the camera will alarm
Step 8 Alarm Schedule① Alarm anytime when motion is detectedClick the black button up the MON you will see all time range turn red When something moving in thedetection area at anytime the camera will alarm
② Specify an alarm scheduleClick the week day words the corresponding column will be selected For example click TUE the allcolumn of TUE turns to red that means during Tuesday whole day when something moving in thedetection area the camera will alarm
Click this button and select all time range
58
③ Press the left mouse and drag it on the time boxes you can select the serial area
Step 9 Click Save button to take effectWhen the motion has been detected during the detection time in the detection area the camera willalarm and adopt the corresponding alarm indicators
NOTE You must set the detection area and detection schedule or else there is no alarm anywhereand anytime
463 Sound alarm
When the ambient sound over a certain decibel the sound alarm will be triggered
59
If the Sensitivity is set to ldquoHighrdquo the camera will detect the sound whose more than 55dbIf the Sensitivity is set to ldquoMediumrdquo the camera will detect the sound whose more than 65dbIf the Sensitivity is set to ldquoLowrdquo the camera will detect the sound whose more than 75dbIf the Sensitivity is set to ldquoLowerrdquo the camera will detect the sound whose more than 85dbIf the Sensitivity is set to ldquoLowestrdquo the camera will detect the sound whose more than 95db
47 RecordThis section will allow you to change the record files storage path and the record time
471 Storage Location
On this page you can change the alarm and manually recording storage path
60
Recording Location SD card or FTP Make sure the camera has been inserted the SD card Onthis page you can see the available space of the SD card
Local Recording Location For Windows OS the manual recording path is C IPCamRecord you canchange another one For MAC OS the manual recording path is IPCamRecord
Enter the local folder Click here You can enter the local storage folder
472 Alarm Recording
473 Local Alarm Recording
This page you can enable the local alarm record and Local Alarm record time
61
474 Schedule Recording
When the video is selected as FTP the device supports scheduled recordingWhen the parameter Recording Location is set SD Card on the Storage Location page you canconfigure parameters as shown in follow figure
When the video is selected as SD card the device supports pumping frame recordingWhen the parameter Recording Location is set SD Card on the Storage Location page you canconfigure parameters as shown in follow figure
62
Record full strategy When the SD card is full you can choose to cover the previous recording or stoprecordingAudio Record You can choose yes or no
NOTES Scheduled recording only supports video saved to the SD card or FTP server The schedule recording will stop while alarm recording is beginning and it will continue
automatically after alarm recording end You can refer to alarm schedule in Alarm about editing the time of recording Schedule
475 SD Card Management
This camera supports SD Card When you plug in the SD card during the camera work process please
63
reboot the camera again or else the SD Card may be cannot work well
The default storage path of alarm record files is SD card when the available size of SD card is less than256M the old record files will be deleted automatically
SD Card Management After click the button you should enter the username and password of thecamera Then you can manage the recording files of the camera in the SD card The SD cardmanagement is only effective when access the camera in LAN
Format(except C1) Click the button you can format the SD card Note that this will delete all files on theSD card
48 PTZ(Only R2)This page will allow you to change the pantilt speed and do cruise tracks settings
481 Pan amp Tilt Speed
There are five Pt speed types very fast fast normal slow and very slowly Select the desired PTZspeed type and click save buttonThere are three zoom speed types fast normal slow
64
482 Cruise SettingsThis section explains how to add delete alter one cruise track
Setting the Cruise ModeThere are two cruise mode Cruise time and Cruise LoopsCruise time Select Cruise time from Cruise Mode drop-down then you can set the Cruise time of thecameraCruise LoopsSelect Cruise Loops from Cruise Mode drop-down you can set the Cruise Loops ofthe cameraClick Save to take effect
Manage the Cruise TrackThere are two default cruise tracks Vertical and HorizontalVertical The camera will rotate from up to down
65
Horizontal The camera will rotate form left to right
Add Add one cruise track then click save buttonDelete Select one cruise track and delete itSave After you modify the Dwell time you should click Save button to take effect
Example
How to do add cruise tracks Firstly Click Add button and enter a descriptive name to identify the cruise track
Secondly On the lower left of the page you can see all preset points you have added Select onepreset point and click Add button you can see the preset point has been added to the cruise track on thecruise track page You need to add two or more preset points to the cruise track
Thirdly Click OK button and the cruise track will take effect
You can add other cruise track as the same method
For example I have added three preset points to the ldquotrack 1rdquo that means When I select the ldquotrack 1rdquoon the surveillance window the camera moves as the following track upright then Right Most last downleftYou can add preset on the left of the surveillance window
The new added track name
1 Select one preset point 2 Click Add button
Here you can see the preset pointhas been added to one track Andyou can set the stay time
66
After add the cruise track back to the surveillance window click Cruise her you can see all cruise tracksyou have added
After add the cruise track back to the surveillance window click Cruise her you can see all cruise tracksyou have added
The cruise tracks have addedto the ldquotrack 1rdquo
Add the preset
67
There are other buttons between the Preset points and Cruise track you can use these buttons to adjustthe order of preset points or adddelete one preset points in one cruise track
Add Select one preset points and add it to the selected cruise trackDelete Select one preset points you have added to one cruise track click deleteMove up down Select one cruise track adjust the order of preset points in one cruise track
AttentionConsidering the life time and thermal issue of the motor itrsquos not recommend to do long-time cruise
483 Start-Up Options
Here section will allow you to set the stop position after the camera rebootsIt supports three modes No self test Goto home position and Goto preset pointNo self test When rebooting the camera will not pan tiltGoto home position When rebooting the camera will pa Providing Central Management Software tomanage or monitor multi-cameras n tilt and stops at centerGo to Preset point Select one preset position and save it When rebooting the camera will pan tilt andstops at the preset position you have set
68
49 FirewallThis section explains how to control the access permission by checking the client PCrsquos IP addresses Itis composed of the following columns Block access from these IP addresses and Only allow accessfrom these IP addresses
Enable firewall If you select Only allow access from these IP addresses and fill in 8 IP addresses atmost only those clients whose IP addresses listed in the Only allow access from these IP addressescan access the Network Camera If you select Block access from these IP addresses only thoseclients whose IP addresses are in the IP list cannot access the Network CameraClick Save to take effect
410 SystemIn this panel you can backuprestore your camera settings upgrade the firmware to the latest versionrestore the camera to default settings and reboot the device
4101 Back-upamp Restore
Click Backup to save all the parameters you have set These parameters will be stored in a bin file forfuture useClick Browse and select the parameters file you have stored then click Submit to restore the restore the
69
parameters
4102 System UpgradeClick ldquoDownload the latest firmwarerdquo you will see the following screen And click ldquosaverdquo to save thefirmware on your computer locally
Your current firmware version will be displayed on your screen You may go to the Status DeviceInformation page to check for the latest firmware versions availableClick Browse choose the correct bin file and then click System upgradeDonrsquot shut down the power during upgrade After upgrading you can see the upgrade result
70
Upgrade Firmware by Equipment Search Tool
Double click the Equipment Search Tool shot icon select the Camera IP that you want toupgrade the firmware Then select Upgrade Firmware and enter the username and password choosethe firmware file and upgrade
Figure 43
CAUTION If your camera works well with the current firmware we recommend not upgrading Pleasedonrsquot upgrade the firmware unnecessarily Your camera may be damaged if misconfigured during anupgrade
71
NOTES Please ensure you have download the correct firmware package for your camera before upgrading
Read the upgrade documentation (readmetxt file) in the upgrade package before you upgrade Upon downloading the firmware check the sizes of the bin files They must match the size in the
readmetxt file If not please download the firmware again until the sizes are the same Yourcamera will not function correctly if a corrupt bin file is used
Normally only Device WEB UI need to be upgrade please do not try to upgrade the Device SystemFirmware
Never shut down the power of the camera during upgrade until the IP camera restart and getconnected
After upgrade successfully please uninstall the old plugin and re-install it then reset the camera tothe default factory settings before using the camera
4103 Patch InstallationClick Browse to select the correct patch file and then click Install Patch to install the patch Do notturn off the power during it installing After installing is complete you will receive a system prompt
4104 Factory Reset
Click All reset and all parameters will return to factory settings if selected This is similar to press theReset button on the bottom of the camera
4105 RebootClick Reboot System to reboot the camera This is similar to unplugging the power to the camera
Enable Periodic Maintenance(Only R2)You can choose the reboot period of the camera
72
5 PlaybackOn this page you can view the record files stored in the SD card
Section 1 Define the Record files time and Type
The storage path of record files
Here supports three types current day current month and All records Another
way select the time on the timeampdate manually
The type of records files Here supports two typs Normal record Alarm record
and All records
Click this button to search all record files satisfy the conditions you selected
Continuous Play Select the checkbox to play continuously all the record files
73
Section 2 Search record filesOn this panel you can see all record files satisfy the conditions you set
Section 3 PlayStopAudioFull screen buttonsPlease select one record file before use these buttons
Click this button to play the record files
Click this button to stop the record files
Open or stop audio
Click this button to make full screen and double click left mouse to exit full screen
6 Appendix
61 Frequently Asked Questions
611 Install the add-on of Firefox browser Google Chrome and IE
Chrome
74
75
76
77
612 Uninstall the add-on of Firefox browser Google Chrome and IE
Chrome
78
613 I have forgotten the administrator password
To reset the administrator username and password press and hold down the RESET BUTTON for 5seconds Upon releasing the reset button wait for 20 seconds the camera will reboot and the usernameand password will return to the factory default administrator username and password Please power onthe camera before resetDefault administrator username adminDefault administrator password No password
614 Camera can not record
When you use Windows7 or Vista you may be not able to do manually record or change the record pathbecause of the security settings of computerThere are two ways to resolve this problemPlease add the camera as a trusted site to resolve this issue The steps are IE browserToolInternet PropertiesSecurityTrusted sitesSitesAdd
79
Open IE browser then right click select ldquoRun as administratorrdquo
615 Subnet doesnrsquot match
Check whether your ipcamera in the same subnet of your computer The step is ControlPanelNetwork ConnectionsDbclick Local Area Connections ChooseGeneralPropertiesCheck subnet mask IP address and gateways When you set IP address pleasemake sure they are in the same subnet Otherwise you cant access camera
616 No Pictures Problems
The video streaming is transmitted by the ActiveX controller If ActiveX controller isnrsquot installed correctlyyou will see no video image You can resolve this problem by this wayDownload ActiveX controller and set the safety property of IE in the PC when you view it first time IEbrowserToolInternet ProperSecurityCustom LevelActiveX control and Plug-ins Three optionsof front should be set to be ldquoEnablerdquo The ActiveX programs read by the computer will be stored AsfollowsEnable Download unsigned ActiveX controlsEnable Initialize and script ActiveX controls not marked as safeEnable Run ActiveX controls and plug-ins
If you allow the ActiveX running but still could not see living video Please change another port numberto try Donrsquot use port 88
80
NOTE Make sure that your firewall or anti-virus software does not block the camera or ActiveX If youcould not see video please shut down firewall or anti-virus software to try again
617 Canrsquot access IP camera in internet
There are some reasons1ActiveX controller is not installed correctly2The port which camera used is blocked by Firewall or Anti-virus software Please change another portnumber and try again3Port forwarding is not successfulCheck these settings and make sure they are correct
618 UPnP always failed
UPnP only contains port forwarding in our recent software Sometimes it may be failed to do portforwarding automatically because of firewall or anti-virus software It also has much relation with routerrsquossecurity settings So we recommend you do port forwarding manually You can view your camera ininternet successfully after you do port forwarding manually in your router
619 Camera can not connect wireless
If your camera could not connect wireless after you set wireless settings and plug out the cable Pleasecheck whether your settings are correct or notNormally camera canrsquot connect wireless mainly because of wrong settingsMake sure broadcast your SSID use the same encryption for router and camera
6110 Canrsquot see other cameras listed in multi-device when using remote
access
If you want to view all the cameras via the WAN verify that each camera added in the multi-devicesettings can be accessed by using the DDNS name and port number Use the DDNS domain name notthe camerarsquos LAN IP (For more details see How to add cameras in WAN)
62 Default ParametersDefault network ParametersIP address obtain dynamically
81
Subnet mask obtain dynamicallyGateway obtain dynamicallyDDNS Embedded FOSCAM domain nameUsername and passwordDefault admin username admin with a blank password
63 Specifications
ITEMS C1
Image SensorSensor High Definition Color CMOS Sensor
Display Resolution 1280 x 720 (1Megapixels)
Min Illumination 0 Lux (With IR Illuminator)
Lens
Lens Type Glass Lens
focal length f28mm
Aperture F24
Diagonal angle of view 115deg
Horizontal view angle 100deg
Video
Image Compression H264
Image Frame Rate 25fps(VGA) 23fps(720P) downward adjustable
Resolution720P(1280 x 720) VGA(640 x 480) VGA(640 x 360)QVGA(320 x 240) QVGA(320 x 180)
Stream dual stream
Image adjustmentThe hue brightness contrast saturation sharpness areadjustable
Flip image flip and mirror
Infrared mode Automatic or manual
manual PanTilt Angle Horizontal350deg amp Vertical 180deg
Night visibility 11pcs IR-LEDs night vision range up to 8 metres
Audio InputOutputSupports two-way audioBuilt-in Mic amp Speaker
Audio Compression PCMG726
Network
Ethernet One 10100Mbps RJ45 port
Wireless Standard IEEE80211bgn
Data RateIEEE80211b 11Mbps(Max)IEEE80211g 54Mbps(Max)IEEE80211n 150Mbps(Max)
Wireless Security WEP WPA WPA2
WPS Supports EZLink wireless setup
82
Network ProtocolIPTCPUDPHTTPHTTPSSMTPFTPDHCPDDNSUPnPRTSPWPS
Remote Access P2P DDNS
SystemRequirements
Operating SystemMicrosoft Windows XP Vista 7 8Mac OSiOSAndroid
Browser
Microsoft IE8 and above version or compatible browserMozilla FirefoxGoogle ChromeApple Safari
OtherFeatures
Motion Detection Alarm via E-Mail upload alarm snapshot to FTP
PIR Infrared human body sensor
User Accounts Three levels user role
Firewall Supports IP Filtering
Storage 32G Micro SD card local and FTP storage
Reset Reset button is available
PowerPower Supply DC 5V10A
Power Consumption 45W(Max)
Physical Dimension(LxWxH) 7070120mm
Net Weight 170g
Environment
Operating Temperature-10degC ~ 50deg(14degF ~ 122degF)
Operating Humidity 20 ~ 85 non-condensing
Storage Temperature -20degC ~ 60deg (-4degF ~ 140degF)
Storage Humidity 0 ~ 90 non-condensing
Certification CE FCC RoHS
Warranty Limited 2-year warranty
ITEMS R2
Image Sensor
Sensor Type 13 CMOS
Display Resolution 1920 x 1080 (20 Megapixels)
Frame Rate 30fps
Min Illumination 0 Lux (With IR Illuminator)
Lens
Lens Type f28mmF26
Angle of ViewHorizontal90degDiagonal 110deg
Night Vision 13pcs IR-LEDs night vision range up to 8 metres
VideoImage Compression H264
Resolution1080P(1920x1080)720P(1280 x 720) VGA(640 x 480)QVGA(320 x 240)
83
Stream dual stream
Image adjustmentThe hue brightness contrast saturation sharpness areadjustable
Flip image flip and mirror
Infrared mode Automatic or manual
manual PanTilt Angle Horizontal300deg amp Vertical 100deg
Night visibility 13pcs IR-LEDs night vision range up to 8 metres
Audio InputOutputSupports two-way audioBuilt-in Mic amp Speaker
Audio Compression PCMG726
Network
Ethernet One 10100Mbps RJ45 port
Wireless Standard IEEE80211bgn
Data RateIEEE80211b 11Mbps(Max)IEEE80211g 54Mbps(Max)IEEE80211n 150Mbps(Max)
Wireless Security WEP WPA WPA2
Wireless Setup Supports EZLink wireless setup
Network ProtocolIPTCPUDPHTTPHTTPSSMTPFTPDHCPDDNSUPnPRTSPWPSONVIF
Remote Access P2P DDNS
SystemRequirements
Operating System Microsoft Windows XP 7 8Mac OSiOSAndroid
Browser IE8 and above versionFirefoxChromeSafari
OtherFeatures
Motion Detection Alarm via E-Mail upload alarm snapshot to FTP
HDR Improve image clarity in complex scenario
Magic Zoom Picture zoom function
User Accounts Three levels user role
Firewall Supports IP Filtering
Storage 64G Micro SD card local and FTP storage
Reset Reset button is available
PowerPower Supply DC 5V20A
Power Consumption <6W
PhysicalDimension(mm) 74(L)times74(W)times119(H)
Net Weight 290g
Environment
OperatingTemperature -10degC ~ 50deg (14degF ~ 122degF)
Operating Humidity 20 ~ 85 non-condensing
Storage Temperature -20degC ~ 60deg (-4degF ~ 140degF)
Storage Humidity 0 ~ 90 non-condensing
Certification CE FCC RoHS
Warranty Limited 2-year warranty
84
ITEMS C2
Image Sensor
Sensor Type 13 CMOS
Display Resolution 1920 x 1080 (20 Megapixels)
Frame Rate 30fps
Min Illumination 0 Lux (With IR Illuminator)
LensLens Type f28mmF26
Angle of ViewHorizontal110degDiagonal 120deg
Video
Image Compression H264
Resolution1080P(1920x1080)720P(1280 x 720) VGA(640 x 480)QVGA(320 x 240)
Stream dual stream
Image adjustmentThe hue brightness contrast saturation sharpness areadjustable
Flip image flip and mirror
Infrared mode Automatic or manual
Manual PanTilt Angle Horizontal360deg amp Vertical 180deg
Night visibility High performance IR-LEDs night vision range up to 8 metres
Audio InputOutputSupports two-way audioBuilt-in Mic amp Speaker
Audio Compression PCMG726
Network
Ethernet One 10100Mbps RJ45 port
Wireless Standard IEEE80211bgn
Data RateIEEE80211b 11Mbps(Max)IEEE80211g 54Mbps(Max)IEEE80211n 150Mbps(Max)
Wireless Security WEP WPA WPA2
Wireless Setup Supports EZLink wireless setup
Network ProtocolIPTCPUDPHTTPHTTPSSMTPFTPDHCPDDNSUPnPRTSPWPSONVIF
Remote Access P2P DDNS
SystemRequirements
Operating System Microsoft Windows XP 7 8Mac OSiOSAndroid
Browser IE8 and above versionFirefoxChromeSafari
OtherFeatures
Motion Detection Alarm via E-Mail upload alarm snapshot to FTP
HDR Improve image clarity in complex scenario
Magic Zoom a Magic digital zoom rivaled Optical zoom
User Accounts Three levels user role
Firewall Supports IP Filtering
85
Storage 64G Micro SD card local and FTP storage
Reset Reset button is available
PowerPower Supply DC 5V10A
Power Consumption 48W(Max)
PhysicalDimension(mm) 7070120mm
Net Weight 160g
Environment
OperatingTemperature -10degC ~ 50deg (14degF ~ 122degF)
Operating Humidity 20 ~ 85 non-condensing
Storage Temperature -20degC ~ 60deg (-4degF ~ 140degF)
Storage Humidity 0 ~ 90 non-condensing
Certification CE FCC RoHS
Warranty Limited 2-year warranty
Attention Power adapter should be used between 0-40 and 5-90 relative humidity
64 CE amp FCCElectromagnetic Compatibility (EMC)FCC Statement
This device compiles with FCC Rules Part 15 Operation is subject to the following twoconditions This device may not cause harmful interference This device must accept any interference received including interference that may cause undesired
operation
This equipment has been tested and found to comply with the limits for a Class B digital device pursuantto Part 15 of the FCC Rules These limits are designed to provide reasonable protection against harmfulinterference when the equipment is operated in a commercial environment This equipment generatesuses and can radiate radio frequency energy and if not installed and used in accordance with theinstallation manual may cause harmful interference to radio communications Operation of thisequipment in a residential area is like to cause harmful interference in which case the user will berequired to correct the interference at his own expense
FCC CautionAny changes or modification not expressly approved by the party responsible for compliance could voidthe userrsquos authority to operate this equipmentThis equipment complies with FCC radiation exposure limits set forth for an uncontrolled environment
86
This equipment should be installed and operated with minimum distance 20cm between the radiatorampyour bodyThis transmitter must not be co-located or operating in conjunction with any other antenna or transmitter
CE Mark Warning
This is a Class B product In a domestic environment this product may cause radio interference inwhich case the user may be required to take adequate measures
65 WarrantyShenZhen FOSCAM Intelligent Technology Limited(FOSCAM) values your business and alwaysattempts to provide you the very best of serviceNo limited hardware warranty is provided by FOSCAM unless your FOSCAM product (product) waspurchased from an authorized distributor or authorized reseller Distributors may sell products toresellers who then sell products to end users No warranty service is provided unless the product isreturned to an authorized return center in the region where the product was first shipped by FOSCAM orto the point-of-purchase which may have regional specific warranty implicationsIf you purchase your FOSCAM product from online store please contact the point-of-purchaseand ask for returnreplacementrepair service
Hardware Warranty Information
FOSCAM provide 2-year limited warranty for naked product and 6-month limited warranty foraccessories
Limited Hardware Warranty
FOSCAM products are warranted to be free from manufacturing defects in materials andworkmanship starting from the shipping date of FOSCAM
This limited hardware warranty does not cover Software including the software added to the products through our factory-integration system
software that included in the CDetc Usage that is not in accordance with product instructions Failure to follow the product instructions Abuse firmware upgrade without the authorized technicianrsquos guidance Normal wear and tear
Return Procedures
Please read FOSCAM warranty policy amp policy of your reseller first before sending items back topoint-of-purchase
Customer must first contact point-of-purchase to obtain a Return Merchandise Authorization (RMA)
87
number before returning the product If the product you received is suspected to be defective andthe product warranty has not expired The RMA number will allow your reseller to track your returnmuch easier and help them expedite processing your request
After receiving your RMA case number pack the item(s) very well with the original box and all theoriginal accessories included such as power adapters brackets cables manuals and driver CDdisks
Write your RMA number and the return reason (the problem of the product) on the warranty cardalong with the complete package to send them back
Replacement Services
If customers ask for replacement service please contact point-of-purchase and follow theirpolicy
Our technicians will inspect all items returned for replacement requests If the retuned product isfound in working order we will return the same item received However customers shall beresponsible for all shipping amp handling charges incurred for getting the units back to customers
If returned products are found defective we will replace the product and assume the shipping costfor sending back the replacement unit to customers
If for any reason we are unable to provide a replacement of the original returned item(s) You willhave a choice for a ldquoSubstituterdquo item at the same equal value
We do not provide exchange and replacement due to normal hardware upgrade according themarket after 14 days after the product is delivered
Our technicians will test the product before send out the replacement any other demand for morethan two times replacement for the same product during replacement limit will be rejected
Replaced products are warranted from the balance of the former warranty period
Warranty Forfeiture
Warranty is void if purchase from unauthorized distributor or reseller Warranty is void if trade-mark serial tags product stickers have been removed altered or tampered
with Warranty is void for mishandling improper use or defacing the product Abuse firmware upgrade without the authorized technicianrsquos guidance Warranty is void for physical damage altered either internally or externally improper or inadequate
packaging when returned for RMA purposes Warranty is void if damage has resulted from accident dismantle abuse or service or modification
by someone other than the appointed vendor souse fission or the spare part has been over theperiod of warranty
Warranty is void if product is damaged due to improper working environment or operation (Forexample improper temperature humidity unusual physical or electrical stress or interferencefailure or fluctuation of electrical power static electricity using wrong power adapter etc)
Warranty is void if damaged by the use of parts not manufactured or sold by FOSCAM Damage caused by improper installation of third-party products Warranty is void if damaged for irresistible cause such as earthquake fire lightning flood etc Product beyond limited warranty
Shipping Fee
88
If products are defective or damaged under normal use or operation in the replacement limitdistributors or resellers are responsible for the shipping cost the product back to customerscustomers should assume the shipping cost send the product to the point-of-purchase
During replacement limit if customers ask for replacement due to the product does not fit forcustomerrsquos personal expectation customers should responsible for both shipping fee
Customers shall be responsible for both shipping fee if their product beyond the replacement limitbut still in warranty limit
Repair Service Out Of Warranty
FOSCAM provide extra repair service for product that out of warranty it is chargeable The total feecontains device cost and service fee Device cost (including accessories) is the standard uniformprice provide by FOSCAM
Different region may have different service fee please contact the point-of-purchase to confirm thatbefore you ask for this service
Our technicians will quote the total price after detect the product If customers refused to repair afterthe quotation customers need pay for the test fee $35hour If agree with the quotation test will befree
Repaired product out of warranty will obtains 3-month warranty from the date of the product back tocustomers
Limitation of Liability
FOSCAM is not responsible for other extra warranty or commitment promised by resellers if yourreseller promised some extra commitment or warranty please ask for written documents to protectyour rights and interests
FOSCAM does not offer refunds under any circumstances Please contact the point-of-purchaseand follow their refundreturn policy
FOSCAM shall not be liable under any circumstances for any consequential incidental special orexemplary damages arising out of or in any connection with this agreement or the productsincluding but not limited to lost profits or any claim based on indemnity or contribution or the failureof any limited or exclusive remedy to achieve its essential purpose or otherwise Purchasersexclusive remedy as against FOSCAM shall be the repair or replacement of defective parts IfFOSCAM lists a product on its website specification in error or that is no longer available for anyreason FOSCAM reserves the right to explain it without incurring any liability
All rights reserved FOSCAM and the FOSCAM logo are trademarks of ShenZhen FOSCAMIntelligent Technology Limited registered in the US and other countries
7 Obtaining Technical SupportWhile we hope your experience with the IPCAM network camera is enjoyable and easy to use you may
89
experience some issues or have questions that this Userrsquos Guide has not answeredIf you have problem with FOSCAM IP camera please first contact FOSCAM reseller for solving theproblems If our reseller cannot provide service please contact our service departmenttechfoscamcom
- Security Warning
- 1 Overview
-
- 11 Key Features
- 12 Read Before Use
- 13 Package Contents
- 14 Physical Description
- 15 Micro-SD Card
-
- 2 Access the IP Camera
-
- 21 Wired Connection
- 22 Wireless Connection
-
- 221 Soft AP Connection(Only C1)
- 222 WPS (WI-FI Protected Set-up)
-
- 23 Access the Camera in WAN
-
- 231 Static IP Addresses
- 232 Remote Access
-
- 24 Using the VLC player
- 25 IP camera connection to the server
-
- 3 Surveillance Software GUI
-
- 31 login Window
- 32 Setup Wizard
- 33 Surveillance Window
-
- 4 Advanced Camera Settings
-
- 41 Setup Wizard
- 42 Status
-
- 421 Device Information
- 422 Device Status
- 423 Session Status
- 424 Log
-
- 43 Basic Settings
-
- 431 Camera Name
- 432 Camera Time
- 433 User Accounts
- 434 Multi-Camera
- 435 Status Light
-
- 44 Network
-
- 441 IP Configuration
- 442 Wireless Settings
- 443 Soft AP Password Settings(Only C1)
- 444 DDNS
- 445 UPnP
- 446 Port
- 447 Mail Settings
- 448 FTP Settings
- 449 P2P
-
- 45 Video
-
- 451 Video Settings
- 452 On Screen Display
- 453 Privacy Zone(Only R2 C2)
- 453 Snapshot Settings
- 454 IR LED Schedule
-
- 46 Detector
-
- 461 One Key Alert(Only R2 C2)
- 462 Action Detection
- 463 Sound alarm
-
- 47 Record
-
- 471 Storage Location
- 472 Alarm Recording
- 473 Local Alarm Recording
- 474 Schedule Recording
- 475 SD Card Management
-
- 48 PTZ(Only R2)
-
- 481 Pan amp Tilt Speed
- 482 Cruise Settings
- 483 Start-Up Options
-
- 49 Firewall
- 410 System
-
- 4101 Back-upamp Restore
- 4102 System Upgrade
- 4103 Patch Installation
- 4104 Factory Reset
- 4105 Reboot
-
- 5 Playback
- 6 Appendix
-
- 61 Frequently Asked Questions
-
- 611 Install the add-on of Firefox browser Googl
- 612 Uninstall the add-on of Firefox browser Goo
- 613 I have forgotten the administrator password
- 614 Camera can not record
- 615 Subnet doesnrsquot match
- 616 No Pictures Problems
- 617 Canrsquot access IP camera in internet
- 618 UPnP always failed
- 619 Camera can not connect wireless
- 6110 Canrsquot see other cameras listed in multi-dev
-
- 62 Default Parameters
- 63 Specifications
- 64 CE amp FCC
- 65 Warranty
-
- 7 Obtaining Technical Support
-

3
IR night vision Range 8m(C1R2) C2(5m) Support image snapshot Support dual-stream Support SD Card storage up to 32GB(C1) or 64GB(R2C2) When the camera has been connected the computer via the USB power cable with supplied you
can view and operate the files in SD Card by the computer (Only C2) Support IR-Cut auto switch Embedded free FOSCAM DDNS(dynamic domain name service) Service Supporting the Third Party Domain Name Service Support two-way audio Support ONVIF protocols Multi-level users management with password protection Motion detection alert via email or upload image to FTP Provide free Android and iPhone APP for viewing live video provide free Central Management
Software to manage and monitor multiple cameras Support record schedule Supports Passive Infrared Sensor(only C1C2) Supports High Dynamic Range(only R2) Supports Wide Dynamic Range(only C2) Supports 8X Magic zoom(only R2) Supports voice prompt(only R2C2)
12 Read Before UsePlease first verify that all contents received are complete according to the Package Contents listed belowBefore the IP Camera is installed please carefully read and follow the instructions in the QuickInstallation Guide to avoid damage due to faulty assembly and installation It also ensures the product isused properly as intended
13 Package Contents
C1C2 IP Camera times 1 AC Adapter times 1
Quick Installation Guide times 1 Power Line times 1
CDtimes1 Warranty Card times 1
R2 IP Camera times 1 Power Supply times 1
Quick Installation Guide times 1 Warranty Card times 1
CDtimes1 Wi-Fi Antennatimes1
Mounting brackettimes1
4
14 Physical Description
C1
Front panel Rear panel
Front panel PIRThe PIR ( Passive Infrared ) is electronic devices which are used in some security alarm
systems to detect motion of an infrared emitting source usually a human body LENS Fixed focus lens Infrared LED Infrared LEDs for night vision Microphone Built-in microphone Micro SD Card slot Supports up to 32GB SD card for storing the video
Rear panel Power Light If the power supply works fine the light will be on LAN 10100 Mbps RJ-45 port for wired connection SoftAP Press the SoftAP button for more than 2 seconds The Network light indicator begins to
twinkle every 01 seconds WPSReset
WPS Push both WPSReset button on the camera and wireless router within 1 minute thecamera will connect to the wireless router automatically in WPS process the Network light willblink every 04 seconds
Reset Push and hold the WPSReset button for more than 10 seconds to set the camera tofactory default the Power light will blink every 04 seconds
Power DC 5V1A Power supply
The flashing status of the Power light and Network light are shown in the following table
Light Flashing Status DescriptionPower light off The power dont work properly
on The power supply works fineFlashing every 04 seconds Reset to take effect
Network light off No Wireless connectionConstant Flash Wired connection
5
Slow Flash every 10 second Wi-Fi connectedFlashing every 04 seconds WPS is connectingFlashing every 02 seconds EZLink takes effectFlashing every 01 seconds SoftAP is started
R2
Front panel Rear panel
Front panel LENS Fixed focus lens Infrared LED Infrared LEDs for night vision Microphone Built-in microphone Micro SD Card slot Supports up to 64GB SD card for storing the video WPSReset
WPS Push both WPSReset button on the camera and wireless router within 1 minute thecamera will connect to the wireless router automatically in WPS process the Network light willblink every 04 seconds
Reset Push and hold the WPSReset button for more than 10 seconds to set the camera tofactory default the Power light will blink every 04 seconds
Rear panel LAN 10100 Mbps RJ-45 port for wired connection Power DC 5V2A Power supply Speaker Built-in speaker Antenna Used to connect external wireless antenna
The flashing status of the Power light and Network light are shown in the following table
Light Flashing Status DescriptionPower light off The power dont work properly
on The power supply works fineFlashing every 04 seconds Reset to take effect
Network light off No Wireless connectionConstant Flash Wired connection
6
Slow Flash every 10 second Wi-Fi connectedFlashing every 04 seconds WPS is connectingFlashing every 02 seconds EZLink takes effect
C2
Front panel Rear panel
Front panel PIRThe PIR ( Passive Infrared ) is electronic devices which are used in some security alarm
systems to detect motion of an infrared emitting source usually a human body Lens Fixed focus lens Induction IC Infrared Lamp Array Micro SD Card slot Supports up to 64GB SD card for storing the video
Rear panel LAN 10100 Mbps RJ-45 port for wired connection WPSReset
WPS Push both WPSReset button on the camera and wireless router within 1 minute thecamera will connect to the wireless router automatically in WPS process the light will be greenand blink every 04 seconds
Reset Push and hold the WPSReset button for more than 10 seconds to set the camera tofactory default the light will be red and blink every 04 seconds
Power DC 5V1A Power supply
The flashing status of the Power light and Network light are shown in the following table
Flashing Status DescriptionFlashing(red) every 04 seconds Reset to take effectConstant Flash(green) Wired connectionSlow Flash(green) every 10 second Wi-Fi connectedFlashing every(green) 04 seconds WPS is connectingFlashing every(green) 02 seconds EZLink takes effect
7
15 Micro-SD Card
This camera supports SD CardWhen you plug in the SD card during the camera work process please reboot the camera again or elsethe SD Card may be cannot work wellGo to the SettingsDevice StatusDevice Status page you can see the SD card status
2 Access the IP Camera
21 Wired Connection
1 Connect the camera to the LAN network (Router or Switch) via network cable2 Connect the power adapter to the camera3 Insert the CD into the CD drive of your computerGo to the folder ldquoEquipment Search Toolrdquo and find the folder ldquoFor Windows OSrdquo or ldquoFor Mac OSrdquo from theCD supp Copy and paste the file to your computer or drag it onto your Desktop
Shortcut icon for Windows Mac OS
Notes If your computer ( Windows OS ) supports autorun function you can find the corresponding file in
the opened control panel If your computer doesnrsquot have CD drive you can download the Equipment Search Tool from our
website for free
The camera supports HTTP and HTTPS protocols you can access the camera in two ways
(1) http LAN IP + HTTP Port NO
8
The default HTTP port NO is 88 Double click the Equipment Search Tool icon to run and it should findthe camerarsquos IP address automatically after you plug in the network cable
Double click the IP address of the camera the camera login page should be open in your defaultbrowser
(2) https LAN IP + HTTPS Port NO
The default HTTPS port NO is 443 You can use the URL to access the camera https LAN IP +HTTPS port NOGo to Settings - Network - Port panel you can see and change the HTTP and HTTPS port NO
NOTEWhen logging in for the first time you will need to download and install the add-on
9
22 Wireless ConnectionThere are some ways of wireless connection EZLink connection soft AP connection and WPSconnection EZLink connection Use the mobile phones or other mobile devices to download APP then
connect the camera and the wireless router by the APP The procedure of the EZLink connectionplease refer to the Quick Installation Guide
Soft AP connection(only C1) Use the mobile device which can search for the wireless networkThen use the web browser to visit http1921681188 by the mobile device Follow the SetupWizard to finish the settings
WPS connection WI-FI Protected Set-up Press and hold the WPS button on your wireless routerand your camera within 60 seconds So that your camera and wireless router connect successfully
221 Soft AP Connection(Only C1)
To ensure that the ethernet cable and the camera is disconnected before you begin1 Start camera power on the indicator light of camera will light on2 Press the Soft AP button for 3-5 seconds The Network light begins to twinkle at very highfrequency(every 01 seconds)3 Use a terminal which could search the WLAN (desktop or laptop This part takes laptop as anexample) to search for the AP named C1_ for connection( indicate the last six letters ofcamerarsquos MAC ID )
IP Camera The WLAN page in the terminal device
4 After finishing Soft AP connection use the web browser of the terminal to visit http1921681188
5 Log in the camera ( Default username is admin with no password ) When log in for the first time you
Soft AP Button
10
need to change the username and password
6 After logging in for the first time it will go to Setup Wizardrdquo automatically Please set the basicparameters of the camera such as camera name camera time wireless settings (The camera connectto your wireless router Wireless Network List - enter the password of your wireless router ) IPconfiguration
Input the New usernameNew password andConfirm the password
11
12
Notes We recommend you to choose to manually set the IP when you know some knowledge of the
network It needs about 1 minute to connect the camera to your router
7 After completing the setup wizard you should press the Soft AP button for 3-5 seconds to cancel theSoft AP connection mode this is located on the back of your camera The Network light begins to slowlyflash(once per second) it indicates that the wireless connection is successful
8 Please make sure that the wireless device connect your laptop to the router which your camera has
13
connected to
9 Open the CD named ldquoFOSCAMrdquo go to the folder ldquoEquipment Search Toolrdquo and find the folder ldquoForWindows OSrdquo or ldquoFor Mac OSrdquo Copy and paste the file to your wireless device or drag it onto yourdesktop
Notes You could also download the Equipment Search Tool from our website wwwfoscamcom for free If you have multiple cameras and you cannot determine which camera you are going to log in
Please match the Device MAC address on the search tool with the MAC address on the labelpasted of each camera
10 Double-click the camera list here and your default browser will open up to the login page Input theusername and password you has changed Then you will see the live video of your baby on theinterface
Main stream offers thehighest quality video whileSub stream offers lessquality but also less delaywhen viewing
14
Now you could use your camera in LAN
Note64-bit browser is not supported
222 WPS (WI-FI Protected Set-up)
Before using WPS wireless connection you need to
Make sure that your wireless router has the WPS function and has been properly connected to theInternet
WPS button on the wireless router is typically located on the front panel or rear panelTP-LINKrouters WPS button is called QSS (Quick Security Setup)
Make sure that the ethernet cable and the camera is disconnected
(1) Press and hold the WPS button for three seconds The Network light of the camera begins to twinkleat high frequency (every 04 seconds)
(2) Press and hold the WPS button for three seconds on your wireless router within 60 seconds Thenthe camera will automatically create a secure wireless connection to your router in about 60seconds
(3) The Equipment Search Tool will search the camerarsquos LAN IP Make sure the PC and the camerashare the same subnet
NOTE The security mode of router cannot be WEP or else the WPS settings may be failed
23 Access the Camera in WAN
231 Static IP Addresses
Users with static IP addresses do not need to set DDNS service settings for remote access After youhave finished connecting the camera using the LAN IP address and port forwarding you can access thecamera directly from Internet using the WAN IP address and port number
WPS Button
15
How to Obtain the WAN IP address from a public website To obtain your WAN IP address enter the following URL in your browser httpwwwwhatismyipcomYour current WAN IP will be shown on the webpage
232 Remote Access
If you want to access your camera by web browser outside of your LAN you need to configure followingconfigurations
1 Choose ldquoSettingsrdquo on the top of the camera web page then go to the ldquoNetwork gt IP Configurationrdquosection on the left side of the screen then uncheck the Obtain IP DHCP
2 Enable UPnP and DDNS in the camerarsquos settings page We recommend you to use the DDNS byfactory default
IP Address Set this in the same subnetas your computer or keep it as defaultSubnet Mask Keep it as defaultGateway and DNS Server Set it to theIP address of your router
16
3 You can see the port of your camera here If you want to set Remote Access for several cameras onthe same network you will need to change the HTTPS port for each camera
4 If the UPnP of the router has been enable you do not need to perform following steps Otherwiseyou need to select one of the following methods to configure port forwarding on your router For thesesteps we will be using the TP-LINK brand wireless router as an example
If there is a UPnP function in your routerChoose ldquoForwarding gt UPnPrdquo make sure that the Current UPnP Status is Enabled
Select Yes and click Save
Click Enable DDNS and click SaveThe content in the Manufacturersquos DDNScolumn is the domain name of your camera
17
If there is no UPnP function in your routerYou need to manually add port forwarding refer to the following steps You need go to the ldquoForwarding gtVirtual Serversrdquo panel for setup
Click Add New
Input the port and IP address ofyour camera and click Save
Here you have finished thePort Forwarding setup
18
5 Now you can access your IP camera by httpsdomain name HTTPS port via the Internet
24 Using the VLC playerThe camera supports RTSP streaming here you can view the camera by VLC player
RTSP URL rtsp [user name][password]IPPort numbervideostream
The part in the square brackets can be omitteduser name amp password The user name and password to access the camera This part can beomittedIP WAN or LAN IP addressPort NO If there is the RTSP port number on the Port page you must only use RTSP port numberotherwise you must only use http port numberVideo stream Three modes are supported video Main video Sub and audio Video Sub is a betterchoice in bad network condition If you select audio you can only hear sound without seeing picture
For exampleIP 192168111RTSP Port number 554User name adminPassword 123
Enter either one of the following four URLs in the VLC1rtspadmin123192168111554videoMain2rtsp 192168111554videoMain3rtsp123192168111554videoMain4rtspadmin192168111554videoMain
Open the VLC and go to ldquoMediardquo--rdquoOpen Network Streamrdquo option then enter the URL in VLC
19
Sometimes you may need to enter the user name and password for another time Click OK and you cansee the real-time preview
20
If you cannot play the video in the VLC player please check the port mapping You can read QuickInstallation Guide about how to configure port forwarding
NOTEIf you modify the camerarsquos username or password you had better reboot the camera to apply the newusername and password in authentication in the VLC
25 IP camera connection to the server
Device supports ONVIF 221 protocol You can easily access NVR with ONVIF or server with ONVIF
3 Surveillance Software GUIPlease refer to the section 21 if you install the camera for the first time You can start to learn aboutsoftware operation in the computer
21
31 login Window
Section1 Enter the Username and passwordThe default administrator username is ldquoadminrdquo with no password please change the password the firsttime you use and prevent unauthorized users login the camera
Section2 StreamThe camera supports two stream modes Main stream and sub stream Select Main stream if you wantto access the camera from LAN and sub stream will be better if you want to access the camera fromInternetNoteSelect sub stream to ensure a more fluent video under narrow network bandwidth
Section3 Select the languageYou click on the language dropdown list to select language
Section4 login the cameraClick ldquoLoginrdquo button
NOTEWhen setting up your camera for the first time it will request that you modify the default usernameandor password if both are still set to default Input the new username and password click Modify tocomplete the modification You will now use the new username and password to login to the camera inthe future
22
32 Setup WizardYou will go toldquoSetup Wizardrdquoautomatically after your first-login where you can set the basicparameters of camera such as camera name camera time wireless settings IP configuration
33 Surveillance Window
Section 1 FOSCAM Logo Live Video SettingsPlayback
1
2
5
3
7
4
6
23
FOSCAM LOGO
Path to surveillance window Click this button to go back to the surveillance window
Path to Administrator Control Panel Click it to go to Administrator Control Panel and do
advanced settings
Click this button to go back to the Playback panel to view the stored audio files
stored in the SD Card
Section 2 Multi-Device Window
The firmware inside the camera supports up to 9 cameras being monitored at the same time You canadd other cameras in multi-device setting
Section 3 Mode Stream HDR Mirror Flip buttons Zoom
Mode1) 50HZ ---------Indoor surveillance (Region Europe China)2) 60HZ ---------Indoor surveillance (Region USA Canada)3) Outdoor------Outdoor surveillance
StreamThe default stream supports multiple modes For example HD Mode720P23fps2M meanings Streamtype Resolution Maximum frame rate Bit rate (Different models support different specific mode )
Stream type It is used to identify the stream typeResolutionThe bigger the resolution the better of the image quality is If you are accessing the camera viainternet and want to get more fluent video streaming please select resolution VGAMaximum frame rateYou should lower frame rate when the bandwidth is limited Normally when the frame rate above 15you can achieve fluently video The maximum frame rate for each model is different please see theldquoSpecificationsrdquoBit rateGenerally speaking the larger the bit rate is the clearer video will become But the bit rateconfiguration should combine well with the network bandwidth When the bandwidth is very narrowand bit rate is large that will lead to video can not play well
You can reset the stream type on Settings-gt Video-gt Video Settings panelAfter changing please reboot the camera and you can see the modification
HDR(Only R2)HDR stands for High Dynamic Range It usually refers to the method of capturing images having
24
ldquogreater dynamic range between the lightest and darkest areas of an image than current standarddigital imaging methods or photographic methodsrdquo You can select ldquoonrdquo from the dropdown list undersunlight or with bright background
WDR(Only C2)In surveillance WDR (Wide Dynamic Range) is intended to provide clear images even underbacklighting where the intensity of illumination varies a lotmdashnamely when there are very bright andvery dark areas simultaneously in the cameras field of view
ldquoZoom inrdquo or rdquoZoom outrdquo(Only R2C2)
Device Support 8x zoom feature click or The focal length of the camera lens will be larger or
shrink you can adjust the focus distance to the target object size access to high-definition screen
(Only C2) When click the button the PanTilt Control control button will pop up You can adjust
direction of the camera when the focal length of the camera lens has been larger When the camerafocal length reduced to a minimum the PanTilt Control control button will disappear
PanTilt Control(only R2C2)
1----- Up control button 2-----Down control button3------Left control button 4------Right control button5----- Up-Left control button6----- Up-Right control button7----- Down-Left control button8----- Down-Right control button
Click this button and go to center
Section 4 Cruise Preset settings(Only R2)Cruise Settings
25
The default cruise tracks have two types Vertical and Horizontal
Vertical The camera will rotate from up to downHorizontal The camera will rotate from left to right
Start cruise Stop cruise
If you want to define or change the cruise trace please go to Settings PTZ Preset Settings panel
How to do cruiseFirstly Select one track in the track dropdown list
Secondly Click Start cruise button the camera will cruise following the predefined pathThirdly Click stop button and finish cruising
Preset settings
IPCam supports 16 preset positions which is considered enough for DIY home amp small businesssurveillance marketThe default preset position is Topmost Bottom most Left most right most you can add other presetpositions
Add Click this icon to save the position you need the camera to remember
Delete Select one preset position and click this button to delete it
GO Select one preset position in the preset drop-down list and click Go to make the camera
Select one of these
26
move the preset position
How to do preset positionFirstly move the camera and stop at a desired place where you want make preset position
Secondly click button and enter a descriptive name for the preset position The preset position
cannot contain special characters Then click OK to save it If you want to reset the preset position clickCancelAfter that you can move the camera and stop at another place and set another preset position You cando all the 16 preset positions with this methodIf you want to see one preset position you have set only select the preset position name from the preset
drop-down list and click go button the camera will go to the preset position
Section 5 IR LED Lights Color Adjustment
Click Infra led and there are three modes to adjust the infrared led Auto Manual and ScheduleAuto Select it and the camera will adjust the infra led (on or off) automaticallyManual Select it and you can turn on or turn off the infra led manuallySchedule Select it and the IR led light will be off at the schedule period If you want to define or changethe IR led lights schedule time please go to Settings---gtVideo---gt IR LED Schedule page
Color AdjustmentIn this page you can tune Hue Brightness Contrast Saturation and Sharpness to get higher quality
Section 6 OSDIf you have added time and camera name in the video you can see it in the live windowGo to Settings ---Basic settings---Camera name panel and you can change another device nameThe default device name is anonymousGo to Settings ---Basic settings---Camera time panel and adjust the device timeGo to Settings ---Video---On Screen Display panel you can add or no add OSD
27
Section 7 Play Stop Talk Audio Snap Record Full screen button
1----- Play Click it to play the video of the camera2----- Stop Click it to stop the video of the camera
3----- Talk Click the button and the icon will become to then talk to the microphone thatconnected with PC people around the camera can here your voice Click the icon again and stop talking
4----- Audio Click this icon the icon will become to you can hear the sound around the camera
by the earphone or speakers that connected with PC
5----- Adjusting the sound Click this icon the icon will become to youcan change the sound of the camera
6----- Snapshot Click it to make snapshot and it pop-up a window which picture you snapshot rightclick in the window and save the picture to anywhere you want
7----- Record Click the icon and the camera start recording you can see a green dot in the livewindow Click again and stop recording The default storage path is CIPCamRecord You can changethe storage path Go to Settings- gtRecord-gtStorage Location panel
8----- Full Screen Click it to make full-screen or you can double click the surveillance screen to makefull-screen Double click again and exit full-screen
Onscreen Mouse ControlRight click the mouse and you can adjust the screen ration full screen and Zoom up
28
Keep ration Select it and the camera will adjust the size of live window based on the the computermonitor automatically Sometimes there is a black border around the video please select Keep ration toget a better visual quality Full Screen Select it and Click it to make full-screen press ESC and exit full-screenZoom up Select it and you can see a bigger screen than beforeFirst Method Here is a convenient and fast solution to Zoom updown screen by Clicking Video Screenand adjusting Mouse pulley or by press the CTRL key and click the mouse left buttonSecond Method Click it and the live view will be digital zoomed up then click Zoom Down and the liveview back to original size
When you select the Full Screen then click right mouse there is a Screen PTZ button
29
Click the Screen PTZ button and put the mouse on the screen to indicate the camera move direction youprefer press the left mouse the camera will move to the corresponding direction Loosen the mouse andstop moving Press Esc button or double click right mouse and cancel the function
NOTE For Mac OS the plugin cannot support Onscreen Mouse Control so you cannot allow to use it
4 Advanced Camera SettingsClick the button ldquoSettingsrdquo goes to Administrator Control Panel to make advanced camera settings
41 Setup WizardPlease go to section 32 to find the way to set it
42 StatusStatus contains four columns Device Information Device Status Session Status and Log it will showyou various information about your camera
30
421 Device Information
Camera Model The camera model NO
Camera Name The Device Name is a unique name that you can give to your device to help you identifyit Click Basic Settings and go to Camera name panel where you can change your camera name Thedefault device name is anonymous
Camera ID Display the wired MAC address of your camera For example Device ID is 000C5D00008the same MAC ID sticker is found at the bottom of the camera
Camera Time The system time of the device Click Basic Settings and go to Camera time panel andadjust the timeSystem Firmware Version Display the System Firmware version of your cameraApplication Firmware Version Display the application firmware version of your cameraPlug-In Version Display the plug-in version of your camera
422 Device Status
On this page you can see device status such as Alarm status Record Status DDNS status WIFI statusand so on
31
423 Session Status
Session status will display who and which IP is visiting the camera now
424 Log
The log record shows who and which IP address accessed or logout the camera
32
Reboot the camera and clear the log records
43 Basic SettingsThis section allows you to configure your camerarsquos Name Time Mail User account and Multi-Device
431 Camera Name
You can define a name for your camera here such as apple Click Save to save your changes The aliasname cannot contain special characters
432 Camera Time
This section allows you to configure the settings of the internal system clocks for your camera
33
Time Zone Select the time zone for your region from the dropdown menuSync with NTP server Network Time Protocol will synchronize your camera with an Internet time serverChoose the one that is closest to your cameraSync with PC Select this option to synchronize the date and time of the Network Camera with yourcomputerManually The administrator can enter the date and time manually Note select the date and time formatuse DST Select the daylight saving time from the dropdown list
Click Save button and submit your settings
NOTE If the power supply of camera is disconnect you need set the camerarsquos time again
433 User Accounts
Here you can create users and set privilege visitor operator or administrator The default useraccount is admin with a blank password You can enter the users accounts of visitor operator andadministrator Manually
34
How to change the passwordFirstly select the account which you want to change the password then select ldquoChange passwordrdquoenter the old password and the new password lastly click modify to take effect
How to add account Select one blank column then enter the new user name password and privilege last click Add to takeeffect You can see the new added account on the Account list
35
Delete Select the account which you want to delete then click Delete button to take effectNOTE The default admin account cannot be deleted but you can add other administrator users
How to change the username Firstly select the account which you want to change the username then select ldquoChange usernamerdquoenter the new password lastly click modify to take effect
36
434 Multi-Camera
If you want to view multi-surveillance screens on one window you need to login one camera and set itas the main device and do Multi-Device Settings add other cameras to the first one camera Before youdo multi-cams settings you need to assign different port such as 81 82 83 84 85 86 87 88 to thecameras if there is 8 cams installedThe firmware within the camera can support a maximum of 9 devices monitoring all at the same timeThis page you can both add FOSCAM MJPEG and H264 series cameras to the first camera and viewmulti-surveillance screen on one window
Add cameras in LANIn Multi-Device Settings page you can see all devices searched in LAN The 1st Device is the defaultone You can add more cameras in the list in LAN for monitoring The camerarsquos software supports up to 9IP Cameras online simultaneously Click The 2nd Device and click the item in the Device List in LAN theAlias Host and Http Port will be filled in the boxes below automatically Enter the correct username andpassword then click Add Add more cameras in the same way
37
Camera Model Our Company produces two series cameras MJPEG and H264 Here will show youwhich series the camera belongs to
1 Click it camera model aliashost and HTTP Port will befilled in the following boxesautomatically
2 Enter the User name andpassword of the 2nd camera
3 Click Add to take effect
38
Back to Surveillance Windows and click Four Windows option you will see four cameras you added
Add cameras in WANIf you want to view all cameras via the internet(remote computer) you will need to add them using DDNSdomain name Firstly make sure all of the cameras you added can be accessed through the internet(The way to configure DDNS is in chapter 444)Login to the first camera using a DDNS domain name and port
39
Click Multi-Device Settings Choose The 2nd Device Fill in the 2nd camerarsquos name DDNS domainname port number Enter user name and password and then choose Add
1 ---- The camera model MJ or H2642 ---- The 2nd camerarsquos name3 ---- Fill in the 2nd camerarsquos DDNS host not LAN IP
NOTE The MJ series have the same HTTP Port NO and Media Port NO
4 ---- Enter the 2nd camerarsquos user name and password5 ---- Click Add button and to take effect
NOTE Here the Host must be entered as the second camerarsquos DDNS domain name not its LAN IP
Use DDNS domain
name and port to login
Make sure each camera you need add
could login with DDNS name and port
40
Return to video window You will see all of the cameras accessible through the internetWhen you are away from home you can use the first camerarsquos DDNS domain name and port to view allthe cameras via internet
435 Status Light
You can enable or disable status light
41
44 NetworkThis section will allow you to configure your camerarsquos IP PPPoE DDNS Wireless Settings UPnP andPort
441 IP Configuration
If you want to set a static IP for the camera please go to IP Configuration page Keep the camera in thesame subnet of your router or computer
Changing settings here is the same as using the Equipment Search ToolIt is recommended that you use the subnet mask gateway and DNS server from your locally attachedPC If you donrsquot know the subnet mask gateway and DNS server you can check your computerrsquos localarea connection as followsControl Panel rarrNetwork Connections rarrLocal Area Connections rarrChoose Support rarrDetails
42
If you donrsquot know the DNS server you can use the same settings as the Default Gateway
442 Wireless Settings
Step 1 Choose ldquoSettingsrdquo on the top of the camera interface and go to the ldquoNetworkrdquo panel on theleft side of the screen then click ldquoWireless Settingsrdquo
Set the same Subnet Mask andgateway of the camera with yourPC
There are two DNS servers Youcan set any of them Same withgateway is also OK
43
Click the Scan button and the camera will detect all wireless networks around the area It should alsodisplay your router in the list
Step 2 Click the SSID (name of your router) in the list the corresponding information related to yournetwork such as the name and the encryption will be filled into the relevant fields automatically
You will only need to fill in the password of your network Make sure that the SSID Encryption and thepassword you filled in are exactly the same for your router
Click the Page number to see other wirelessnetworks devices if there are more than 10
Click the Scan buttonto search for wirelessnetworks
1 Click the SSID of your router andthe relevant information will be filledin the fields automatically
2 Enter the passwordof your router
44
Step 3 Please click on the Save button after all settings have been entered and disconnect the networkcable Never shut down the power of the camera until the IP camera is able to connect to the wirelessnetwork
The LAN IP address will disappear on the window of Equipment Search Tool when the camera isconfiguring a wireless connection Wait about 1 minute the camera should obtain a wireless connectionand the LAN IP of the camera will show again on the window of the Equipment Search Tool The IPaddress may have changed after the camera receives a wireless connection we recommend setting astatic local IP address if this IP address changes by right clicking the camera in Equipment Search Toolsetting a static IP and pushing OKCongratulations You have set up the wireless connection of the camera successfully
NOTE If you fail to make a wireless connection please refer to your seller or contact us directly forassistance
443 Soft AP Password Settings(Only C1)
For the safety of your camera we recommend you change the Soft AP password
444 DDNS
FOSCAM camera has embedded a unique DDNS domain name when producing and you can directlyuse the domain name you can also use the third party domain name
FOSCAM domain nameHere take test09myfoscamorg for example Go to option of DDNS on the Settings-gtNetwork panelyou can see the domain name
45
Now you can use http Domain name + HTTP Port to access the camera via internetTake hostname test09myfoscamorg and HTTP Port no 800 for example the accessing link of thecamera via internet would be http test09myfoscamorg800
Restore DDNS to factory If you have configured Third Party DDNS successfully but you want to useManufacturerrsquos DDNS again here click this button and start Manufacturerrsquos DDNS ServiceUser can also use third part DDNS such as wwwno-ipcom www 3322com
445 UPnP
The default UPnP status is closed You can enable UPnP then the camerarsquos software will be configuredfor port forwarding Back to the ldquoDevice Statusrdquo panel you can see the UPnP status
46
The camerarsquos software will be configured for port forwarding There may be issues with your routerssecurity settings and sometimes may error We recommend you configure port forwarding manually onyour router
446 Port
This camera supports HTTP Port HTTP Port is used to access the camera remotely If you want toaccess the camera and view the video the HTTP Port must both be configured correctly
HTTP port By default the HTTP is set to 88 Also they can be assigned with another port numberbetween 1 and 65535 But make sure they can not be conflict with other existing ports like 25 21
ONVIF port By default the ONVIF port is set to 888 Also they can be assigned with another portnumber between 1 and 65535(except 0 and 65534) But make sure they can not be conflict with otherexisting ports
HTTPS port The default port is 443 You can use the url to access the camera https IP + HTTPSport
RTSP port The default port is 554 The R2 does not have RTSP port
Another way to change the HTTP port NO
Step 1 Open the Equipment Search Tool select the camera you would like to change the port of right
47
click on the IP address and click on rdquoNetwork Configurationrdquo this brings up the network configurationbox as flowing figures
Figure 41
Figure 42
Step 2 Enter the username and password of the Administrator (default username is admin with a blank
password) and click ldquoOKrdquo to apply changes
Step 3 Wait around 10 seconds yoursquoll see that the camerarsquos LAN IP address has changed In ourexample it was changed to 2000 so we see http19216811102000 in Equipment Search Tool Alsothe LAN IP address is now fixed at a static IP address of http19216811102000 This IP address willnot change even if the camera is powered off and back on the camera will remain on this LAN IPaddress This is very important that a static LAN IP address is set or you may have problems later withremote access and seeing the camera remotely if the camera loses power and reconnects on a differentLAN IP address Make sure you set a static LAN IP address
Select which camerayoursquod like to change theport for and right click
Modify the Http Port
Enter the Username andpassword click OK
48
If the camera cannot be accessed please make sure the port forwarding is succeed
447 Mail Settings
If you want the camera to send emails when motion has been detected here Mail will need to beconfigured
1---- SMTP Server Port Transport Layer Security Enter SMTP server for sender SMTP port isusually set as 25 Some SMTP servers have their own port such as 587 or 465 and Transport LayerSecurity usually is None If you use Gmail Transport Layer Security must be set to TLS or STARTTLSand SMTP Port must be set to 465 or 25 or 587 which port you choose should be decided by whichTransport Layer Security you select2---- SMTP Username password ID account and password of the sender email address3---- Sender E-mail Mailbox for sender must support SMTP4---- Receiver Mailbox for receiver need not support SMTPyou can set 4 receivers5---- Save Click Save to take effect6---- Test Click Test to see if Mail has been successfully configured
49
Click Test to see if Mail has been successfully configured
If the test success you can see the Success behind the Test at the same time the receivers will receivea test mail
If the test fails with one of the following errors after clicking Test verify that the information you enteredis correct and again select Test 1) Cannot connect to the server2) Network Error Please try later3) Server Error4) Incorrect user or password5) The sender is denied by the server Maybe the server need to authenticate the user please check itand try again6) The receiver is denied by the server Maybe because of the anti-spam privacy of the server7) The message is denied by the server Maybe because of the anti-spam privacy of the server8) The server does not support the authentication mode used by the device
448 FTP Settings
If you want to upload record files and images to your FTP serveryou can set FTP Settings
50
Figure a
Figure b
FTP server If your FTP server is located on the LAN you can set as Figure aIf you have an FTP server which you can access on the internet you can set as Figure bPort Default is port 21 If changed external FTP client program must change the server connection portaccordinglyFTP Mode Here supports two modes PORT and PASVUsernamepassword The FTP account and passwordClick Save to take effectClick Test to see if FTP has been successfully configured
449 P2P
Access the IP Camera by Smart Phone (Android or iOS operating system)First of all you must open the P2P function of the IP Camera at ldquoSettings --gt Network --gt P2Prdquo
51
Foscam App named Foscam on App Store and Google Play for iOS and Android devices
NOTEIf the QR code scanning is not successful please input the UID on the bottom of the camera manually
45 VideoThis section allows you to configure Video stream settings On screen display and Snapshot settings
451 Video Settings
There are two ways to set the stream video settings They are main stream video settings and substream video settings
Enhanced Night video Definition(Only C1) The camera will automatically drop the frame to extendthe recording time in the night
52
Stream Type There are four types to identify different streams you have set If select the HD Mode theclearer video will become and it will take up more bandwidth If select the Smooth Mode the bandwidthis very narrow and bit rate is large that will lead to video can not play well The Equilibrium Model is avalue between HD Mode and Smooth Mode
Resolution The camera supports multiple types For example 960P 720P VGA The higher theresolution is the clearer video will become But the code flux will become larger too and it will take upmore bandwidth (The maximum frame rate for each model is different please see theldquoSpecificationsrdquo )
Bit Rate Generally speaking the larger the bit rate is the clearer video will become But the bit rateconfiguration should combine well with the network bandwidth When the bandwidth is very narrow andbit rate is large that will lead to video can not play well
Frame rate You should lower frame rate when the bandwidth is limited Normally when the frame rateabove 15 you can achieve fluently video
Key Frame Interval The time between last key frame and next key frame The shorter the duration themore likely you will get a better video quality but at the cost of higher network bandwidth consumption
Variable bitrate(Only C1) Select the Bit rate type to constant or variable If select Yes the camera willchange the video bit rate according to the situation but will not more than the maximum parameter BitRate If select No the Bit Rate is unchanged
Rate Control Mode(Only R2 C2)There are three rate control modesCBR Constant Bit Rate it means that the Bit Rate is constantVBR Variable Bit Rate the camera will change the video bit rate according to the situation but will notmore than the maximum parameter Bit RateLBR Low Bit Rate If you can select the LBR then you can slide the scroll bar to choose percentage ofthe bit rate By reducing the bit rate so that the camera can obtain a better image at low bandwidth
452 On Screen Display
This page is used to add timestamp and device name on the video
Display Timestamp
53
There are two options Yes or NO Select Yes and you can see the system date on the video
Display Camera NameThere are two options Yes or NO Select Yes and you can see the device name on the video
453 Privacy Zone(Only R2 C2)
This page is used to set some mask as privacy zone on the video
Allow On Screen Display MaskThere are two options Yes or NO Select yes and draw a mask area on the video the mask area will beblack on the video
Click OK button and return to the OSD page click Save to take effectBack to the surveillance window you can see the mask area as the following picture
The mask area
54
453 Snapshot Settings
On this page you can set the snapshot picturesrsquo image quality and the storage path
Manual snap Quality Low Middle and High The higher the quality the picture will be clearerPictures Save To FTP or SD card If you have done FTP and Alarm settings when alarming thecamera will snap pictures to the FTP or SD card automaticallyIf you select the FTP you can set the file name which the picture save to (Only C1)
Enable timing to captureTo enable capture interval follow the steps below1 Select Enable Motion detection
55
2 Capture intervalThe interval time between two captures3 Select the capture time
Capture anytimeClick the black button up the MON you will see all time range turn red When something moving inthe detection area at anytime the camera will capture
Specify an capture scheduleClick the week day words the corresponding column will be selected For example click TUE theall column of TUE turns to red that means during Tuesday whole day the camera will capture
Press the left mouse and drag it on the time boxes you can select the serial area4 Click Save button to take effect
454 IR LED Schedule
On this page you can set the schedule time for switching IR LED lights When parameter Mode is set tothe Schedule on the Live Video window at these schedule time the IR LED lights will be turned off
46 Detector
461 One Key Alert(Only R2 C2)
On this page you can turn on or off the alarm function you need
462 Action Detection
IP Camera supports Action Detection Alarm when the people has been detected the IP Camera willmake a alarm
56
Step 1 Enable Action detection function
Step 2 Sensitivity---- It supports five modes Lowest Lower Low Medium and High The higher thesensitivity the camera will be more easily alarmed Select one motion sensitivity
Step 3 Trigger interval--- The interval time between two motion detection
Step 4There are some alarm indicators
A Camera Sound and PC SoundIf the camera has connected with a speaker or other audio output device if you select Camera Sound orPC Sound when the motion has been detected the people around the camera will hear beep alarmsound
B Send E-mailIf you want to receive alarm emails when motion is detected you must select Send E-mail and set MailSettings first
C Take SnapshotIf you select this checkbox when the motion has been detected the camera will snap the live viewwindow as a still picture and load it to the FTP Make sure you have set FTP and set FTP as the storagepath in Video-gtSnapshot settings panel
57
Time interval The interval time between two pictures
D RecordingIf you select this checkbox when the motion has been detected the camera will record automaticallyand store the record files to the SD Card Make sure the camera has inserted SD card and you haveset the SD card as the Alarm record files storage path please go to Recordmdashgt Storage location pageto verify this settingsThe default alarm record time is 30s and pre-alarm record time is 5s please go to Recordmdashgt AlarmRecord page and change the alarm time settings
E Push message to the phoneIf you select this checkbox when the motion has been detected the camera will push the message tothe phone which has been connected the camera
Step 7 Set detection areaClick set detect area and it pop up a window then you can draw the detection area Click Back buttonafter settings When something moving in the detection area the camera will alarm
Step 8 Alarm Schedule① Alarm anytime when motion is detectedClick the black button up the MON you will see all time range turn red When something moving in thedetection area at anytime the camera will alarm
② Specify an alarm scheduleClick the week day words the corresponding column will be selected For example click TUE the allcolumn of TUE turns to red that means during Tuesday whole day when something moving in thedetection area the camera will alarm
Click this button and select all time range
58
③ Press the left mouse and drag it on the time boxes you can select the serial area
Step 9 Click Save button to take effectWhen the motion has been detected during the detection time in the detection area the camera willalarm and adopt the corresponding alarm indicators
NOTE You must set the detection area and detection schedule or else there is no alarm anywhereand anytime
463 Sound alarm
When the ambient sound over a certain decibel the sound alarm will be triggered
59
If the Sensitivity is set to ldquoHighrdquo the camera will detect the sound whose more than 55dbIf the Sensitivity is set to ldquoMediumrdquo the camera will detect the sound whose more than 65dbIf the Sensitivity is set to ldquoLowrdquo the camera will detect the sound whose more than 75dbIf the Sensitivity is set to ldquoLowerrdquo the camera will detect the sound whose more than 85dbIf the Sensitivity is set to ldquoLowestrdquo the camera will detect the sound whose more than 95db
47 RecordThis section will allow you to change the record files storage path and the record time
471 Storage Location
On this page you can change the alarm and manually recording storage path
60
Recording Location SD card or FTP Make sure the camera has been inserted the SD card Onthis page you can see the available space of the SD card
Local Recording Location For Windows OS the manual recording path is C IPCamRecord you canchange another one For MAC OS the manual recording path is IPCamRecord
Enter the local folder Click here You can enter the local storage folder
472 Alarm Recording
473 Local Alarm Recording
This page you can enable the local alarm record and Local Alarm record time
61
474 Schedule Recording
When the video is selected as FTP the device supports scheduled recordingWhen the parameter Recording Location is set SD Card on the Storage Location page you canconfigure parameters as shown in follow figure
When the video is selected as SD card the device supports pumping frame recordingWhen the parameter Recording Location is set SD Card on the Storage Location page you canconfigure parameters as shown in follow figure
62
Record full strategy When the SD card is full you can choose to cover the previous recording or stoprecordingAudio Record You can choose yes or no
NOTES Scheduled recording only supports video saved to the SD card or FTP server The schedule recording will stop while alarm recording is beginning and it will continue
automatically after alarm recording end You can refer to alarm schedule in Alarm about editing the time of recording Schedule
475 SD Card Management
This camera supports SD Card When you plug in the SD card during the camera work process please
63
reboot the camera again or else the SD Card may be cannot work well
The default storage path of alarm record files is SD card when the available size of SD card is less than256M the old record files will be deleted automatically
SD Card Management After click the button you should enter the username and password of thecamera Then you can manage the recording files of the camera in the SD card The SD cardmanagement is only effective when access the camera in LAN
Format(except C1) Click the button you can format the SD card Note that this will delete all files on theSD card
48 PTZ(Only R2)This page will allow you to change the pantilt speed and do cruise tracks settings
481 Pan amp Tilt Speed
There are five Pt speed types very fast fast normal slow and very slowly Select the desired PTZspeed type and click save buttonThere are three zoom speed types fast normal slow
64
482 Cruise SettingsThis section explains how to add delete alter one cruise track
Setting the Cruise ModeThere are two cruise mode Cruise time and Cruise LoopsCruise time Select Cruise time from Cruise Mode drop-down then you can set the Cruise time of thecameraCruise LoopsSelect Cruise Loops from Cruise Mode drop-down you can set the Cruise Loops ofthe cameraClick Save to take effect
Manage the Cruise TrackThere are two default cruise tracks Vertical and HorizontalVertical The camera will rotate from up to down
65
Horizontal The camera will rotate form left to right
Add Add one cruise track then click save buttonDelete Select one cruise track and delete itSave After you modify the Dwell time you should click Save button to take effect
Example
How to do add cruise tracks Firstly Click Add button and enter a descriptive name to identify the cruise track
Secondly On the lower left of the page you can see all preset points you have added Select onepreset point and click Add button you can see the preset point has been added to the cruise track on thecruise track page You need to add two or more preset points to the cruise track
Thirdly Click OK button and the cruise track will take effect
You can add other cruise track as the same method
For example I have added three preset points to the ldquotrack 1rdquo that means When I select the ldquotrack 1rdquoon the surveillance window the camera moves as the following track upright then Right Most last downleftYou can add preset on the left of the surveillance window
The new added track name
1 Select one preset point 2 Click Add button
Here you can see the preset pointhas been added to one track Andyou can set the stay time
66
After add the cruise track back to the surveillance window click Cruise her you can see all cruise tracksyou have added
After add the cruise track back to the surveillance window click Cruise her you can see all cruise tracksyou have added
The cruise tracks have addedto the ldquotrack 1rdquo
Add the preset
67
There are other buttons between the Preset points and Cruise track you can use these buttons to adjustthe order of preset points or adddelete one preset points in one cruise track
Add Select one preset points and add it to the selected cruise trackDelete Select one preset points you have added to one cruise track click deleteMove up down Select one cruise track adjust the order of preset points in one cruise track
AttentionConsidering the life time and thermal issue of the motor itrsquos not recommend to do long-time cruise
483 Start-Up Options
Here section will allow you to set the stop position after the camera rebootsIt supports three modes No self test Goto home position and Goto preset pointNo self test When rebooting the camera will not pan tiltGoto home position When rebooting the camera will pa Providing Central Management Software tomanage or monitor multi-cameras n tilt and stops at centerGo to Preset point Select one preset position and save it When rebooting the camera will pan tilt andstops at the preset position you have set
68
49 FirewallThis section explains how to control the access permission by checking the client PCrsquos IP addresses Itis composed of the following columns Block access from these IP addresses and Only allow accessfrom these IP addresses
Enable firewall If you select Only allow access from these IP addresses and fill in 8 IP addresses atmost only those clients whose IP addresses listed in the Only allow access from these IP addressescan access the Network Camera If you select Block access from these IP addresses only thoseclients whose IP addresses are in the IP list cannot access the Network CameraClick Save to take effect
410 SystemIn this panel you can backuprestore your camera settings upgrade the firmware to the latest versionrestore the camera to default settings and reboot the device
4101 Back-upamp Restore
Click Backup to save all the parameters you have set These parameters will be stored in a bin file forfuture useClick Browse and select the parameters file you have stored then click Submit to restore the restore the
69
parameters
4102 System UpgradeClick ldquoDownload the latest firmwarerdquo you will see the following screen And click ldquosaverdquo to save thefirmware on your computer locally
Your current firmware version will be displayed on your screen You may go to the Status DeviceInformation page to check for the latest firmware versions availableClick Browse choose the correct bin file and then click System upgradeDonrsquot shut down the power during upgrade After upgrading you can see the upgrade result
70
Upgrade Firmware by Equipment Search Tool
Double click the Equipment Search Tool shot icon select the Camera IP that you want toupgrade the firmware Then select Upgrade Firmware and enter the username and password choosethe firmware file and upgrade
Figure 43
CAUTION If your camera works well with the current firmware we recommend not upgrading Pleasedonrsquot upgrade the firmware unnecessarily Your camera may be damaged if misconfigured during anupgrade
71
NOTES Please ensure you have download the correct firmware package for your camera before upgrading
Read the upgrade documentation (readmetxt file) in the upgrade package before you upgrade Upon downloading the firmware check the sizes of the bin files They must match the size in the
readmetxt file If not please download the firmware again until the sizes are the same Yourcamera will not function correctly if a corrupt bin file is used
Normally only Device WEB UI need to be upgrade please do not try to upgrade the Device SystemFirmware
Never shut down the power of the camera during upgrade until the IP camera restart and getconnected
After upgrade successfully please uninstall the old plugin and re-install it then reset the camera tothe default factory settings before using the camera
4103 Patch InstallationClick Browse to select the correct patch file and then click Install Patch to install the patch Do notturn off the power during it installing After installing is complete you will receive a system prompt
4104 Factory Reset
Click All reset and all parameters will return to factory settings if selected This is similar to press theReset button on the bottom of the camera
4105 RebootClick Reboot System to reboot the camera This is similar to unplugging the power to the camera
Enable Periodic Maintenance(Only R2)You can choose the reboot period of the camera
72
5 PlaybackOn this page you can view the record files stored in the SD card
Section 1 Define the Record files time and Type
The storage path of record files
Here supports three types current day current month and All records Another
way select the time on the timeampdate manually
The type of records files Here supports two typs Normal record Alarm record
and All records
Click this button to search all record files satisfy the conditions you selected
Continuous Play Select the checkbox to play continuously all the record files
73
Section 2 Search record filesOn this panel you can see all record files satisfy the conditions you set
Section 3 PlayStopAudioFull screen buttonsPlease select one record file before use these buttons
Click this button to play the record files
Click this button to stop the record files
Open or stop audio
Click this button to make full screen and double click left mouse to exit full screen
6 Appendix
61 Frequently Asked Questions
611 Install the add-on of Firefox browser Google Chrome and IE
Chrome
74
75
76
77
612 Uninstall the add-on of Firefox browser Google Chrome and IE
Chrome
78
613 I have forgotten the administrator password
To reset the administrator username and password press and hold down the RESET BUTTON for 5seconds Upon releasing the reset button wait for 20 seconds the camera will reboot and the usernameand password will return to the factory default administrator username and password Please power onthe camera before resetDefault administrator username adminDefault administrator password No password
614 Camera can not record
When you use Windows7 or Vista you may be not able to do manually record or change the record pathbecause of the security settings of computerThere are two ways to resolve this problemPlease add the camera as a trusted site to resolve this issue The steps are IE browserToolInternet PropertiesSecurityTrusted sitesSitesAdd
79
Open IE browser then right click select ldquoRun as administratorrdquo
615 Subnet doesnrsquot match
Check whether your ipcamera in the same subnet of your computer The step is ControlPanelNetwork ConnectionsDbclick Local Area Connections ChooseGeneralPropertiesCheck subnet mask IP address and gateways When you set IP address pleasemake sure they are in the same subnet Otherwise you cant access camera
616 No Pictures Problems
The video streaming is transmitted by the ActiveX controller If ActiveX controller isnrsquot installed correctlyyou will see no video image You can resolve this problem by this wayDownload ActiveX controller and set the safety property of IE in the PC when you view it first time IEbrowserToolInternet ProperSecurityCustom LevelActiveX control and Plug-ins Three optionsof front should be set to be ldquoEnablerdquo The ActiveX programs read by the computer will be stored AsfollowsEnable Download unsigned ActiveX controlsEnable Initialize and script ActiveX controls not marked as safeEnable Run ActiveX controls and plug-ins
If you allow the ActiveX running but still could not see living video Please change another port numberto try Donrsquot use port 88
80
NOTE Make sure that your firewall or anti-virus software does not block the camera or ActiveX If youcould not see video please shut down firewall or anti-virus software to try again
617 Canrsquot access IP camera in internet
There are some reasons1ActiveX controller is not installed correctly2The port which camera used is blocked by Firewall or Anti-virus software Please change another portnumber and try again3Port forwarding is not successfulCheck these settings and make sure they are correct
618 UPnP always failed
UPnP only contains port forwarding in our recent software Sometimes it may be failed to do portforwarding automatically because of firewall or anti-virus software It also has much relation with routerrsquossecurity settings So we recommend you do port forwarding manually You can view your camera ininternet successfully after you do port forwarding manually in your router
619 Camera can not connect wireless
If your camera could not connect wireless after you set wireless settings and plug out the cable Pleasecheck whether your settings are correct or notNormally camera canrsquot connect wireless mainly because of wrong settingsMake sure broadcast your SSID use the same encryption for router and camera
6110 Canrsquot see other cameras listed in multi-device when using remote
access
If you want to view all the cameras via the WAN verify that each camera added in the multi-devicesettings can be accessed by using the DDNS name and port number Use the DDNS domain name notthe camerarsquos LAN IP (For more details see How to add cameras in WAN)
62 Default ParametersDefault network ParametersIP address obtain dynamically
81
Subnet mask obtain dynamicallyGateway obtain dynamicallyDDNS Embedded FOSCAM domain nameUsername and passwordDefault admin username admin with a blank password
63 Specifications
ITEMS C1
Image SensorSensor High Definition Color CMOS Sensor
Display Resolution 1280 x 720 (1Megapixels)
Min Illumination 0 Lux (With IR Illuminator)
Lens
Lens Type Glass Lens
focal length f28mm
Aperture F24
Diagonal angle of view 115deg
Horizontal view angle 100deg
Video
Image Compression H264
Image Frame Rate 25fps(VGA) 23fps(720P) downward adjustable
Resolution720P(1280 x 720) VGA(640 x 480) VGA(640 x 360)QVGA(320 x 240) QVGA(320 x 180)
Stream dual stream
Image adjustmentThe hue brightness contrast saturation sharpness areadjustable
Flip image flip and mirror
Infrared mode Automatic or manual
manual PanTilt Angle Horizontal350deg amp Vertical 180deg
Night visibility 11pcs IR-LEDs night vision range up to 8 metres
Audio InputOutputSupports two-way audioBuilt-in Mic amp Speaker
Audio Compression PCMG726
Network
Ethernet One 10100Mbps RJ45 port
Wireless Standard IEEE80211bgn
Data RateIEEE80211b 11Mbps(Max)IEEE80211g 54Mbps(Max)IEEE80211n 150Mbps(Max)
Wireless Security WEP WPA WPA2
WPS Supports EZLink wireless setup
82
Network ProtocolIPTCPUDPHTTPHTTPSSMTPFTPDHCPDDNSUPnPRTSPWPS
Remote Access P2P DDNS
SystemRequirements
Operating SystemMicrosoft Windows XP Vista 7 8Mac OSiOSAndroid
Browser
Microsoft IE8 and above version or compatible browserMozilla FirefoxGoogle ChromeApple Safari
OtherFeatures
Motion Detection Alarm via E-Mail upload alarm snapshot to FTP
PIR Infrared human body sensor
User Accounts Three levels user role
Firewall Supports IP Filtering
Storage 32G Micro SD card local and FTP storage
Reset Reset button is available
PowerPower Supply DC 5V10A
Power Consumption 45W(Max)
Physical Dimension(LxWxH) 7070120mm
Net Weight 170g
Environment
Operating Temperature-10degC ~ 50deg(14degF ~ 122degF)
Operating Humidity 20 ~ 85 non-condensing
Storage Temperature -20degC ~ 60deg (-4degF ~ 140degF)
Storage Humidity 0 ~ 90 non-condensing
Certification CE FCC RoHS
Warranty Limited 2-year warranty
ITEMS R2
Image Sensor
Sensor Type 13 CMOS
Display Resolution 1920 x 1080 (20 Megapixels)
Frame Rate 30fps
Min Illumination 0 Lux (With IR Illuminator)
Lens
Lens Type f28mmF26
Angle of ViewHorizontal90degDiagonal 110deg
Night Vision 13pcs IR-LEDs night vision range up to 8 metres
VideoImage Compression H264
Resolution1080P(1920x1080)720P(1280 x 720) VGA(640 x 480)QVGA(320 x 240)
83
Stream dual stream
Image adjustmentThe hue brightness contrast saturation sharpness areadjustable
Flip image flip and mirror
Infrared mode Automatic or manual
manual PanTilt Angle Horizontal300deg amp Vertical 100deg
Night visibility 13pcs IR-LEDs night vision range up to 8 metres
Audio InputOutputSupports two-way audioBuilt-in Mic amp Speaker
Audio Compression PCMG726
Network
Ethernet One 10100Mbps RJ45 port
Wireless Standard IEEE80211bgn
Data RateIEEE80211b 11Mbps(Max)IEEE80211g 54Mbps(Max)IEEE80211n 150Mbps(Max)
Wireless Security WEP WPA WPA2
Wireless Setup Supports EZLink wireless setup
Network ProtocolIPTCPUDPHTTPHTTPSSMTPFTPDHCPDDNSUPnPRTSPWPSONVIF
Remote Access P2P DDNS
SystemRequirements
Operating System Microsoft Windows XP 7 8Mac OSiOSAndroid
Browser IE8 and above versionFirefoxChromeSafari
OtherFeatures
Motion Detection Alarm via E-Mail upload alarm snapshot to FTP
HDR Improve image clarity in complex scenario
Magic Zoom Picture zoom function
User Accounts Three levels user role
Firewall Supports IP Filtering
Storage 64G Micro SD card local and FTP storage
Reset Reset button is available
PowerPower Supply DC 5V20A
Power Consumption <6W
PhysicalDimension(mm) 74(L)times74(W)times119(H)
Net Weight 290g
Environment
OperatingTemperature -10degC ~ 50deg (14degF ~ 122degF)
Operating Humidity 20 ~ 85 non-condensing
Storage Temperature -20degC ~ 60deg (-4degF ~ 140degF)
Storage Humidity 0 ~ 90 non-condensing
Certification CE FCC RoHS
Warranty Limited 2-year warranty
84
ITEMS C2
Image Sensor
Sensor Type 13 CMOS
Display Resolution 1920 x 1080 (20 Megapixels)
Frame Rate 30fps
Min Illumination 0 Lux (With IR Illuminator)
LensLens Type f28mmF26
Angle of ViewHorizontal110degDiagonal 120deg
Video
Image Compression H264
Resolution1080P(1920x1080)720P(1280 x 720) VGA(640 x 480)QVGA(320 x 240)
Stream dual stream
Image adjustmentThe hue brightness contrast saturation sharpness areadjustable
Flip image flip and mirror
Infrared mode Automatic or manual
Manual PanTilt Angle Horizontal360deg amp Vertical 180deg
Night visibility High performance IR-LEDs night vision range up to 8 metres
Audio InputOutputSupports two-way audioBuilt-in Mic amp Speaker
Audio Compression PCMG726
Network
Ethernet One 10100Mbps RJ45 port
Wireless Standard IEEE80211bgn
Data RateIEEE80211b 11Mbps(Max)IEEE80211g 54Mbps(Max)IEEE80211n 150Mbps(Max)
Wireless Security WEP WPA WPA2
Wireless Setup Supports EZLink wireless setup
Network ProtocolIPTCPUDPHTTPHTTPSSMTPFTPDHCPDDNSUPnPRTSPWPSONVIF
Remote Access P2P DDNS
SystemRequirements
Operating System Microsoft Windows XP 7 8Mac OSiOSAndroid
Browser IE8 and above versionFirefoxChromeSafari
OtherFeatures
Motion Detection Alarm via E-Mail upload alarm snapshot to FTP
HDR Improve image clarity in complex scenario
Magic Zoom a Magic digital zoom rivaled Optical zoom
User Accounts Three levels user role
Firewall Supports IP Filtering
85
Storage 64G Micro SD card local and FTP storage
Reset Reset button is available
PowerPower Supply DC 5V10A
Power Consumption 48W(Max)
PhysicalDimension(mm) 7070120mm
Net Weight 160g
Environment
OperatingTemperature -10degC ~ 50deg (14degF ~ 122degF)
Operating Humidity 20 ~ 85 non-condensing
Storage Temperature -20degC ~ 60deg (-4degF ~ 140degF)
Storage Humidity 0 ~ 90 non-condensing
Certification CE FCC RoHS
Warranty Limited 2-year warranty
Attention Power adapter should be used between 0-40 and 5-90 relative humidity
64 CE amp FCCElectromagnetic Compatibility (EMC)FCC Statement
This device compiles with FCC Rules Part 15 Operation is subject to the following twoconditions This device may not cause harmful interference This device must accept any interference received including interference that may cause undesired
operation
This equipment has been tested and found to comply with the limits for a Class B digital device pursuantto Part 15 of the FCC Rules These limits are designed to provide reasonable protection against harmfulinterference when the equipment is operated in a commercial environment This equipment generatesuses and can radiate radio frequency energy and if not installed and used in accordance with theinstallation manual may cause harmful interference to radio communications Operation of thisequipment in a residential area is like to cause harmful interference in which case the user will berequired to correct the interference at his own expense
FCC CautionAny changes or modification not expressly approved by the party responsible for compliance could voidthe userrsquos authority to operate this equipmentThis equipment complies with FCC radiation exposure limits set forth for an uncontrolled environment
86
This equipment should be installed and operated with minimum distance 20cm between the radiatorampyour bodyThis transmitter must not be co-located or operating in conjunction with any other antenna or transmitter
CE Mark Warning
This is a Class B product In a domestic environment this product may cause radio interference inwhich case the user may be required to take adequate measures
65 WarrantyShenZhen FOSCAM Intelligent Technology Limited(FOSCAM) values your business and alwaysattempts to provide you the very best of serviceNo limited hardware warranty is provided by FOSCAM unless your FOSCAM product (product) waspurchased from an authorized distributor or authorized reseller Distributors may sell products toresellers who then sell products to end users No warranty service is provided unless the product isreturned to an authorized return center in the region where the product was first shipped by FOSCAM orto the point-of-purchase which may have regional specific warranty implicationsIf you purchase your FOSCAM product from online store please contact the point-of-purchaseand ask for returnreplacementrepair service
Hardware Warranty Information
FOSCAM provide 2-year limited warranty for naked product and 6-month limited warranty foraccessories
Limited Hardware Warranty
FOSCAM products are warranted to be free from manufacturing defects in materials andworkmanship starting from the shipping date of FOSCAM
This limited hardware warranty does not cover Software including the software added to the products through our factory-integration system
software that included in the CDetc Usage that is not in accordance with product instructions Failure to follow the product instructions Abuse firmware upgrade without the authorized technicianrsquos guidance Normal wear and tear
Return Procedures
Please read FOSCAM warranty policy amp policy of your reseller first before sending items back topoint-of-purchase
Customer must first contact point-of-purchase to obtain a Return Merchandise Authorization (RMA)
87
number before returning the product If the product you received is suspected to be defective andthe product warranty has not expired The RMA number will allow your reseller to track your returnmuch easier and help them expedite processing your request
After receiving your RMA case number pack the item(s) very well with the original box and all theoriginal accessories included such as power adapters brackets cables manuals and driver CDdisks
Write your RMA number and the return reason (the problem of the product) on the warranty cardalong with the complete package to send them back
Replacement Services
If customers ask for replacement service please contact point-of-purchase and follow theirpolicy
Our technicians will inspect all items returned for replacement requests If the retuned product isfound in working order we will return the same item received However customers shall beresponsible for all shipping amp handling charges incurred for getting the units back to customers
If returned products are found defective we will replace the product and assume the shipping costfor sending back the replacement unit to customers
If for any reason we are unable to provide a replacement of the original returned item(s) You willhave a choice for a ldquoSubstituterdquo item at the same equal value
We do not provide exchange and replacement due to normal hardware upgrade according themarket after 14 days after the product is delivered
Our technicians will test the product before send out the replacement any other demand for morethan two times replacement for the same product during replacement limit will be rejected
Replaced products are warranted from the balance of the former warranty period
Warranty Forfeiture
Warranty is void if purchase from unauthorized distributor or reseller Warranty is void if trade-mark serial tags product stickers have been removed altered or tampered
with Warranty is void for mishandling improper use or defacing the product Abuse firmware upgrade without the authorized technicianrsquos guidance Warranty is void for physical damage altered either internally or externally improper or inadequate
packaging when returned for RMA purposes Warranty is void if damage has resulted from accident dismantle abuse or service or modification
by someone other than the appointed vendor souse fission or the spare part has been over theperiod of warranty
Warranty is void if product is damaged due to improper working environment or operation (Forexample improper temperature humidity unusual physical or electrical stress or interferencefailure or fluctuation of electrical power static electricity using wrong power adapter etc)
Warranty is void if damaged by the use of parts not manufactured or sold by FOSCAM Damage caused by improper installation of third-party products Warranty is void if damaged for irresistible cause such as earthquake fire lightning flood etc Product beyond limited warranty
Shipping Fee
88
If products are defective or damaged under normal use or operation in the replacement limitdistributors or resellers are responsible for the shipping cost the product back to customerscustomers should assume the shipping cost send the product to the point-of-purchase
During replacement limit if customers ask for replacement due to the product does not fit forcustomerrsquos personal expectation customers should responsible for both shipping fee
Customers shall be responsible for both shipping fee if their product beyond the replacement limitbut still in warranty limit
Repair Service Out Of Warranty
FOSCAM provide extra repair service for product that out of warranty it is chargeable The total feecontains device cost and service fee Device cost (including accessories) is the standard uniformprice provide by FOSCAM
Different region may have different service fee please contact the point-of-purchase to confirm thatbefore you ask for this service
Our technicians will quote the total price after detect the product If customers refused to repair afterthe quotation customers need pay for the test fee $35hour If agree with the quotation test will befree
Repaired product out of warranty will obtains 3-month warranty from the date of the product back tocustomers
Limitation of Liability
FOSCAM is not responsible for other extra warranty or commitment promised by resellers if yourreseller promised some extra commitment or warranty please ask for written documents to protectyour rights and interests
FOSCAM does not offer refunds under any circumstances Please contact the point-of-purchaseand follow their refundreturn policy
FOSCAM shall not be liable under any circumstances for any consequential incidental special orexemplary damages arising out of or in any connection with this agreement or the productsincluding but not limited to lost profits or any claim based on indemnity or contribution or the failureof any limited or exclusive remedy to achieve its essential purpose or otherwise Purchasersexclusive remedy as against FOSCAM shall be the repair or replacement of defective parts IfFOSCAM lists a product on its website specification in error or that is no longer available for anyreason FOSCAM reserves the right to explain it without incurring any liability
All rights reserved FOSCAM and the FOSCAM logo are trademarks of ShenZhen FOSCAMIntelligent Technology Limited registered in the US and other countries
7 Obtaining Technical SupportWhile we hope your experience with the IPCAM network camera is enjoyable and easy to use you may
89
experience some issues or have questions that this Userrsquos Guide has not answeredIf you have problem with FOSCAM IP camera please first contact FOSCAM reseller for solving theproblems If our reseller cannot provide service please contact our service departmenttechfoscamcom
- Security Warning
- 1 Overview
-
- 11 Key Features
- 12 Read Before Use
- 13 Package Contents
- 14 Physical Description
- 15 Micro-SD Card
-
- 2 Access the IP Camera
-
- 21 Wired Connection
- 22 Wireless Connection
-
- 221 Soft AP Connection(Only C1)
- 222 WPS (WI-FI Protected Set-up)
-
- 23 Access the Camera in WAN
-
- 231 Static IP Addresses
- 232 Remote Access
-
- 24 Using the VLC player
- 25 IP camera connection to the server
-
- 3 Surveillance Software GUI
-
- 31 login Window
- 32 Setup Wizard
- 33 Surveillance Window
-
- 4 Advanced Camera Settings
-
- 41 Setup Wizard
- 42 Status
-
- 421 Device Information
- 422 Device Status
- 423 Session Status
- 424 Log
-
- 43 Basic Settings
-
- 431 Camera Name
- 432 Camera Time
- 433 User Accounts
- 434 Multi-Camera
- 435 Status Light
-
- 44 Network
-
- 441 IP Configuration
- 442 Wireless Settings
- 443 Soft AP Password Settings(Only C1)
- 444 DDNS
- 445 UPnP
- 446 Port
- 447 Mail Settings
- 448 FTP Settings
- 449 P2P
-
- 45 Video
-
- 451 Video Settings
- 452 On Screen Display
- 453 Privacy Zone(Only R2 C2)
- 453 Snapshot Settings
- 454 IR LED Schedule
-
- 46 Detector
-
- 461 One Key Alert(Only R2 C2)
- 462 Action Detection
- 463 Sound alarm
-
- 47 Record
-
- 471 Storage Location
- 472 Alarm Recording
- 473 Local Alarm Recording
- 474 Schedule Recording
- 475 SD Card Management
-
- 48 PTZ(Only R2)
-
- 481 Pan amp Tilt Speed
- 482 Cruise Settings
- 483 Start-Up Options
-
- 49 Firewall
- 410 System
-
- 4101 Back-upamp Restore
- 4102 System Upgrade
- 4103 Patch Installation
- 4104 Factory Reset
- 4105 Reboot
-
- 5 Playback
- 6 Appendix
-
- 61 Frequently Asked Questions
-
- 611 Install the add-on of Firefox browser Googl
- 612 Uninstall the add-on of Firefox browser Goo
- 613 I have forgotten the administrator password
- 614 Camera can not record
- 615 Subnet doesnrsquot match
- 616 No Pictures Problems
- 617 Canrsquot access IP camera in internet
- 618 UPnP always failed
- 619 Camera can not connect wireless
- 6110 Canrsquot see other cameras listed in multi-dev
-
- 62 Default Parameters
- 63 Specifications
- 64 CE amp FCC
- 65 Warranty
-
- 7 Obtaining Technical Support
-

4
14 Physical Description
C1
Front panel Rear panel
Front panel PIRThe PIR ( Passive Infrared ) is electronic devices which are used in some security alarm
systems to detect motion of an infrared emitting source usually a human body LENS Fixed focus lens Infrared LED Infrared LEDs for night vision Microphone Built-in microphone Micro SD Card slot Supports up to 32GB SD card for storing the video
Rear panel Power Light If the power supply works fine the light will be on LAN 10100 Mbps RJ-45 port for wired connection SoftAP Press the SoftAP button for more than 2 seconds The Network light indicator begins to
twinkle every 01 seconds WPSReset
WPS Push both WPSReset button on the camera and wireless router within 1 minute thecamera will connect to the wireless router automatically in WPS process the Network light willblink every 04 seconds
Reset Push and hold the WPSReset button for more than 10 seconds to set the camera tofactory default the Power light will blink every 04 seconds
Power DC 5V1A Power supply
The flashing status of the Power light and Network light are shown in the following table
Light Flashing Status DescriptionPower light off The power dont work properly
on The power supply works fineFlashing every 04 seconds Reset to take effect
Network light off No Wireless connectionConstant Flash Wired connection
5
Slow Flash every 10 second Wi-Fi connectedFlashing every 04 seconds WPS is connectingFlashing every 02 seconds EZLink takes effectFlashing every 01 seconds SoftAP is started
R2
Front panel Rear panel
Front panel LENS Fixed focus lens Infrared LED Infrared LEDs for night vision Microphone Built-in microphone Micro SD Card slot Supports up to 64GB SD card for storing the video WPSReset
WPS Push both WPSReset button on the camera and wireless router within 1 minute thecamera will connect to the wireless router automatically in WPS process the Network light willblink every 04 seconds
Reset Push and hold the WPSReset button for more than 10 seconds to set the camera tofactory default the Power light will blink every 04 seconds
Rear panel LAN 10100 Mbps RJ-45 port for wired connection Power DC 5V2A Power supply Speaker Built-in speaker Antenna Used to connect external wireless antenna
The flashing status of the Power light and Network light are shown in the following table
Light Flashing Status DescriptionPower light off The power dont work properly
on The power supply works fineFlashing every 04 seconds Reset to take effect
Network light off No Wireless connectionConstant Flash Wired connection
6
Slow Flash every 10 second Wi-Fi connectedFlashing every 04 seconds WPS is connectingFlashing every 02 seconds EZLink takes effect
C2
Front panel Rear panel
Front panel PIRThe PIR ( Passive Infrared ) is electronic devices which are used in some security alarm
systems to detect motion of an infrared emitting source usually a human body Lens Fixed focus lens Induction IC Infrared Lamp Array Micro SD Card slot Supports up to 64GB SD card for storing the video
Rear panel LAN 10100 Mbps RJ-45 port for wired connection WPSReset
WPS Push both WPSReset button on the camera and wireless router within 1 minute thecamera will connect to the wireless router automatically in WPS process the light will be greenand blink every 04 seconds
Reset Push and hold the WPSReset button for more than 10 seconds to set the camera tofactory default the light will be red and blink every 04 seconds
Power DC 5V1A Power supply
The flashing status of the Power light and Network light are shown in the following table
Flashing Status DescriptionFlashing(red) every 04 seconds Reset to take effectConstant Flash(green) Wired connectionSlow Flash(green) every 10 second Wi-Fi connectedFlashing every(green) 04 seconds WPS is connectingFlashing every(green) 02 seconds EZLink takes effect
7
15 Micro-SD Card
This camera supports SD CardWhen you plug in the SD card during the camera work process please reboot the camera again or elsethe SD Card may be cannot work wellGo to the SettingsDevice StatusDevice Status page you can see the SD card status
2 Access the IP Camera
21 Wired Connection
1 Connect the camera to the LAN network (Router or Switch) via network cable2 Connect the power adapter to the camera3 Insert the CD into the CD drive of your computerGo to the folder ldquoEquipment Search Toolrdquo and find the folder ldquoFor Windows OSrdquo or ldquoFor Mac OSrdquo from theCD supp Copy and paste the file to your computer or drag it onto your Desktop
Shortcut icon for Windows Mac OS
Notes If your computer ( Windows OS ) supports autorun function you can find the corresponding file in
the opened control panel If your computer doesnrsquot have CD drive you can download the Equipment Search Tool from our
website for free
The camera supports HTTP and HTTPS protocols you can access the camera in two ways
(1) http LAN IP + HTTP Port NO
8
The default HTTP port NO is 88 Double click the Equipment Search Tool icon to run and it should findthe camerarsquos IP address automatically after you plug in the network cable
Double click the IP address of the camera the camera login page should be open in your defaultbrowser
(2) https LAN IP + HTTPS Port NO
The default HTTPS port NO is 443 You can use the URL to access the camera https LAN IP +HTTPS port NOGo to Settings - Network - Port panel you can see and change the HTTP and HTTPS port NO
NOTEWhen logging in for the first time you will need to download and install the add-on
9
22 Wireless ConnectionThere are some ways of wireless connection EZLink connection soft AP connection and WPSconnection EZLink connection Use the mobile phones or other mobile devices to download APP then
connect the camera and the wireless router by the APP The procedure of the EZLink connectionplease refer to the Quick Installation Guide
Soft AP connection(only C1) Use the mobile device which can search for the wireless networkThen use the web browser to visit http1921681188 by the mobile device Follow the SetupWizard to finish the settings
WPS connection WI-FI Protected Set-up Press and hold the WPS button on your wireless routerand your camera within 60 seconds So that your camera and wireless router connect successfully
221 Soft AP Connection(Only C1)
To ensure that the ethernet cable and the camera is disconnected before you begin1 Start camera power on the indicator light of camera will light on2 Press the Soft AP button for 3-5 seconds The Network light begins to twinkle at very highfrequency(every 01 seconds)3 Use a terminal which could search the WLAN (desktop or laptop This part takes laptop as anexample) to search for the AP named C1_ for connection( indicate the last six letters ofcamerarsquos MAC ID )
IP Camera The WLAN page in the terminal device
4 After finishing Soft AP connection use the web browser of the terminal to visit http1921681188
5 Log in the camera ( Default username is admin with no password ) When log in for the first time you
Soft AP Button
10
need to change the username and password
6 After logging in for the first time it will go to Setup Wizardrdquo automatically Please set the basicparameters of the camera such as camera name camera time wireless settings (The camera connectto your wireless router Wireless Network List - enter the password of your wireless router ) IPconfiguration
Input the New usernameNew password andConfirm the password
11
12
Notes We recommend you to choose to manually set the IP when you know some knowledge of the
network It needs about 1 minute to connect the camera to your router
7 After completing the setup wizard you should press the Soft AP button for 3-5 seconds to cancel theSoft AP connection mode this is located on the back of your camera The Network light begins to slowlyflash(once per second) it indicates that the wireless connection is successful
8 Please make sure that the wireless device connect your laptop to the router which your camera has
13
connected to
9 Open the CD named ldquoFOSCAMrdquo go to the folder ldquoEquipment Search Toolrdquo and find the folder ldquoForWindows OSrdquo or ldquoFor Mac OSrdquo Copy and paste the file to your wireless device or drag it onto yourdesktop
Notes You could also download the Equipment Search Tool from our website wwwfoscamcom for free If you have multiple cameras and you cannot determine which camera you are going to log in
Please match the Device MAC address on the search tool with the MAC address on the labelpasted of each camera
10 Double-click the camera list here and your default browser will open up to the login page Input theusername and password you has changed Then you will see the live video of your baby on theinterface
Main stream offers thehighest quality video whileSub stream offers lessquality but also less delaywhen viewing
14
Now you could use your camera in LAN
Note64-bit browser is not supported
222 WPS (WI-FI Protected Set-up)
Before using WPS wireless connection you need to
Make sure that your wireless router has the WPS function and has been properly connected to theInternet
WPS button on the wireless router is typically located on the front panel or rear panelTP-LINKrouters WPS button is called QSS (Quick Security Setup)
Make sure that the ethernet cable and the camera is disconnected
(1) Press and hold the WPS button for three seconds The Network light of the camera begins to twinkleat high frequency (every 04 seconds)
(2) Press and hold the WPS button for three seconds on your wireless router within 60 seconds Thenthe camera will automatically create a secure wireless connection to your router in about 60seconds
(3) The Equipment Search Tool will search the camerarsquos LAN IP Make sure the PC and the camerashare the same subnet
NOTE The security mode of router cannot be WEP or else the WPS settings may be failed
23 Access the Camera in WAN
231 Static IP Addresses
Users with static IP addresses do not need to set DDNS service settings for remote access After youhave finished connecting the camera using the LAN IP address and port forwarding you can access thecamera directly from Internet using the WAN IP address and port number
WPS Button
15
How to Obtain the WAN IP address from a public website To obtain your WAN IP address enter the following URL in your browser httpwwwwhatismyipcomYour current WAN IP will be shown on the webpage
232 Remote Access
If you want to access your camera by web browser outside of your LAN you need to configure followingconfigurations
1 Choose ldquoSettingsrdquo on the top of the camera web page then go to the ldquoNetwork gt IP Configurationrdquosection on the left side of the screen then uncheck the Obtain IP DHCP
2 Enable UPnP and DDNS in the camerarsquos settings page We recommend you to use the DDNS byfactory default
IP Address Set this in the same subnetas your computer or keep it as defaultSubnet Mask Keep it as defaultGateway and DNS Server Set it to theIP address of your router
16
3 You can see the port of your camera here If you want to set Remote Access for several cameras onthe same network you will need to change the HTTPS port for each camera
4 If the UPnP of the router has been enable you do not need to perform following steps Otherwiseyou need to select one of the following methods to configure port forwarding on your router For thesesteps we will be using the TP-LINK brand wireless router as an example
If there is a UPnP function in your routerChoose ldquoForwarding gt UPnPrdquo make sure that the Current UPnP Status is Enabled
Select Yes and click Save
Click Enable DDNS and click SaveThe content in the Manufacturersquos DDNScolumn is the domain name of your camera
17
If there is no UPnP function in your routerYou need to manually add port forwarding refer to the following steps You need go to the ldquoForwarding gtVirtual Serversrdquo panel for setup
Click Add New
Input the port and IP address ofyour camera and click Save
Here you have finished thePort Forwarding setup
18
5 Now you can access your IP camera by httpsdomain name HTTPS port via the Internet
24 Using the VLC playerThe camera supports RTSP streaming here you can view the camera by VLC player
RTSP URL rtsp [user name][password]IPPort numbervideostream
The part in the square brackets can be omitteduser name amp password The user name and password to access the camera This part can beomittedIP WAN or LAN IP addressPort NO If there is the RTSP port number on the Port page you must only use RTSP port numberotherwise you must only use http port numberVideo stream Three modes are supported video Main video Sub and audio Video Sub is a betterchoice in bad network condition If you select audio you can only hear sound without seeing picture
For exampleIP 192168111RTSP Port number 554User name adminPassword 123
Enter either one of the following four URLs in the VLC1rtspadmin123192168111554videoMain2rtsp 192168111554videoMain3rtsp123192168111554videoMain4rtspadmin192168111554videoMain
Open the VLC and go to ldquoMediardquo--rdquoOpen Network Streamrdquo option then enter the URL in VLC
19
Sometimes you may need to enter the user name and password for another time Click OK and you cansee the real-time preview
20
If you cannot play the video in the VLC player please check the port mapping You can read QuickInstallation Guide about how to configure port forwarding
NOTEIf you modify the camerarsquos username or password you had better reboot the camera to apply the newusername and password in authentication in the VLC
25 IP camera connection to the server
Device supports ONVIF 221 protocol You can easily access NVR with ONVIF or server with ONVIF
3 Surveillance Software GUIPlease refer to the section 21 if you install the camera for the first time You can start to learn aboutsoftware operation in the computer
21
31 login Window
Section1 Enter the Username and passwordThe default administrator username is ldquoadminrdquo with no password please change the password the firsttime you use and prevent unauthorized users login the camera
Section2 StreamThe camera supports two stream modes Main stream and sub stream Select Main stream if you wantto access the camera from LAN and sub stream will be better if you want to access the camera fromInternetNoteSelect sub stream to ensure a more fluent video under narrow network bandwidth
Section3 Select the languageYou click on the language dropdown list to select language
Section4 login the cameraClick ldquoLoginrdquo button
NOTEWhen setting up your camera for the first time it will request that you modify the default usernameandor password if both are still set to default Input the new username and password click Modify tocomplete the modification You will now use the new username and password to login to the camera inthe future
22
32 Setup WizardYou will go toldquoSetup Wizardrdquoautomatically after your first-login where you can set the basicparameters of camera such as camera name camera time wireless settings IP configuration
33 Surveillance Window
Section 1 FOSCAM Logo Live Video SettingsPlayback
1
2
5
3
7
4
6
23
FOSCAM LOGO
Path to surveillance window Click this button to go back to the surveillance window
Path to Administrator Control Panel Click it to go to Administrator Control Panel and do
advanced settings
Click this button to go back to the Playback panel to view the stored audio files
stored in the SD Card
Section 2 Multi-Device Window
The firmware inside the camera supports up to 9 cameras being monitored at the same time You canadd other cameras in multi-device setting
Section 3 Mode Stream HDR Mirror Flip buttons Zoom
Mode1) 50HZ ---------Indoor surveillance (Region Europe China)2) 60HZ ---------Indoor surveillance (Region USA Canada)3) Outdoor------Outdoor surveillance
StreamThe default stream supports multiple modes For example HD Mode720P23fps2M meanings Streamtype Resolution Maximum frame rate Bit rate (Different models support different specific mode )
Stream type It is used to identify the stream typeResolutionThe bigger the resolution the better of the image quality is If you are accessing the camera viainternet and want to get more fluent video streaming please select resolution VGAMaximum frame rateYou should lower frame rate when the bandwidth is limited Normally when the frame rate above 15you can achieve fluently video The maximum frame rate for each model is different please see theldquoSpecificationsrdquoBit rateGenerally speaking the larger the bit rate is the clearer video will become But the bit rateconfiguration should combine well with the network bandwidth When the bandwidth is very narrowand bit rate is large that will lead to video can not play well
You can reset the stream type on Settings-gt Video-gt Video Settings panelAfter changing please reboot the camera and you can see the modification
HDR(Only R2)HDR stands for High Dynamic Range It usually refers to the method of capturing images having
24
ldquogreater dynamic range between the lightest and darkest areas of an image than current standarddigital imaging methods or photographic methodsrdquo You can select ldquoonrdquo from the dropdown list undersunlight or with bright background
WDR(Only C2)In surveillance WDR (Wide Dynamic Range) is intended to provide clear images even underbacklighting where the intensity of illumination varies a lotmdashnamely when there are very bright andvery dark areas simultaneously in the cameras field of view
ldquoZoom inrdquo or rdquoZoom outrdquo(Only R2C2)
Device Support 8x zoom feature click or The focal length of the camera lens will be larger or
shrink you can adjust the focus distance to the target object size access to high-definition screen
(Only C2) When click the button the PanTilt Control control button will pop up You can adjust
direction of the camera when the focal length of the camera lens has been larger When the camerafocal length reduced to a minimum the PanTilt Control control button will disappear
PanTilt Control(only R2C2)
1----- Up control button 2-----Down control button3------Left control button 4------Right control button5----- Up-Left control button6----- Up-Right control button7----- Down-Left control button8----- Down-Right control button
Click this button and go to center
Section 4 Cruise Preset settings(Only R2)Cruise Settings
25
The default cruise tracks have two types Vertical and Horizontal
Vertical The camera will rotate from up to downHorizontal The camera will rotate from left to right
Start cruise Stop cruise
If you want to define or change the cruise trace please go to Settings PTZ Preset Settings panel
How to do cruiseFirstly Select one track in the track dropdown list
Secondly Click Start cruise button the camera will cruise following the predefined pathThirdly Click stop button and finish cruising
Preset settings
IPCam supports 16 preset positions which is considered enough for DIY home amp small businesssurveillance marketThe default preset position is Topmost Bottom most Left most right most you can add other presetpositions
Add Click this icon to save the position you need the camera to remember
Delete Select one preset position and click this button to delete it
GO Select one preset position in the preset drop-down list and click Go to make the camera
Select one of these
26
move the preset position
How to do preset positionFirstly move the camera and stop at a desired place where you want make preset position
Secondly click button and enter a descriptive name for the preset position The preset position
cannot contain special characters Then click OK to save it If you want to reset the preset position clickCancelAfter that you can move the camera and stop at another place and set another preset position You cando all the 16 preset positions with this methodIf you want to see one preset position you have set only select the preset position name from the preset
drop-down list and click go button the camera will go to the preset position
Section 5 IR LED Lights Color Adjustment
Click Infra led and there are three modes to adjust the infrared led Auto Manual and ScheduleAuto Select it and the camera will adjust the infra led (on or off) automaticallyManual Select it and you can turn on or turn off the infra led manuallySchedule Select it and the IR led light will be off at the schedule period If you want to define or changethe IR led lights schedule time please go to Settings---gtVideo---gt IR LED Schedule page
Color AdjustmentIn this page you can tune Hue Brightness Contrast Saturation and Sharpness to get higher quality
Section 6 OSDIf you have added time and camera name in the video you can see it in the live windowGo to Settings ---Basic settings---Camera name panel and you can change another device nameThe default device name is anonymousGo to Settings ---Basic settings---Camera time panel and adjust the device timeGo to Settings ---Video---On Screen Display panel you can add or no add OSD
27
Section 7 Play Stop Talk Audio Snap Record Full screen button
1----- Play Click it to play the video of the camera2----- Stop Click it to stop the video of the camera
3----- Talk Click the button and the icon will become to then talk to the microphone thatconnected with PC people around the camera can here your voice Click the icon again and stop talking
4----- Audio Click this icon the icon will become to you can hear the sound around the camera
by the earphone or speakers that connected with PC
5----- Adjusting the sound Click this icon the icon will become to youcan change the sound of the camera
6----- Snapshot Click it to make snapshot and it pop-up a window which picture you snapshot rightclick in the window and save the picture to anywhere you want
7----- Record Click the icon and the camera start recording you can see a green dot in the livewindow Click again and stop recording The default storage path is CIPCamRecord You can changethe storage path Go to Settings- gtRecord-gtStorage Location panel
8----- Full Screen Click it to make full-screen or you can double click the surveillance screen to makefull-screen Double click again and exit full-screen
Onscreen Mouse ControlRight click the mouse and you can adjust the screen ration full screen and Zoom up
28
Keep ration Select it and the camera will adjust the size of live window based on the the computermonitor automatically Sometimes there is a black border around the video please select Keep ration toget a better visual quality Full Screen Select it and Click it to make full-screen press ESC and exit full-screenZoom up Select it and you can see a bigger screen than beforeFirst Method Here is a convenient and fast solution to Zoom updown screen by Clicking Video Screenand adjusting Mouse pulley or by press the CTRL key and click the mouse left buttonSecond Method Click it and the live view will be digital zoomed up then click Zoom Down and the liveview back to original size
When you select the Full Screen then click right mouse there is a Screen PTZ button
29
Click the Screen PTZ button and put the mouse on the screen to indicate the camera move direction youprefer press the left mouse the camera will move to the corresponding direction Loosen the mouse andstop moving Press Esc button or double click right mouse and cancel the function
NOTE For Mac OS the plugin cannot support Onscreen Mouse Control so you cannot allow to use it
4 Advanced Camera SettingsClick the button ldquoSettingsrdquo goes to Administrator Control Panel to make advanced camera settings
41 Setup WizardPlease go to section 32 to find the way to set it
42 StatusStatus contains four columns Device Information Device Status Session Status and Log it will showyou various information about your camera
30
421 Device Information
Camera Model The camera model NO
Camera Name The Device Name is a unique name that you can give to your device to help you identifyit Click Basic Settings and go to Camera name panel where you can change your camera name Thedefault device name is anonymous
Camera ID Display the wired MAC address of your camera For example Device ID is 000C5D00008the same MAC ID sticker is found at the bottom of the camera
Camera Time The system time of the device Click Basic Settings and go to Camera time panel andadjust the timeSystem Firmware Version Display the System Firmware version of your cameraApplication Firmware Version Display the application firmware version of your cameraPlug-In Version Display the plug-in version of your camera
422 Device Status
On this page you can see device status such as Alarm status Record Status DDNS status WIFI statusand so on
31
423 Session Status
Session status will display who and which IP is visiting the camera now
424 Log
The log record shows who and which IP address accessed or logout the camera
32
Reboot the camera and clear the log records
43 Basic SettingsThis section allows you to configure your camerarsquos Name Time Mail User account and Multi-Device
431 Camera Name
You can define a name for your camera here such as apple Click Save to save your changes The aliasname cannot contain special characters
432 Camera Time
This section allows you to configure the settings of the internal system clocks for your camera
33
Time Zone Select the time zone for your region from the dropdown menuSync with NTP server Network Time Protocol will synchronize your camera with an Internet time serverChoose the one that is closest to your cameraSync with PC Select this option to synchronize the date and time of the Network Camera with yourcomputerManually The administrator can enter the date and time manually Note select the date and time formatuse DST Select the daylight saving time from the dropdown list
Click Save button and submit your settings
NOTE If the power supply of camera is disconnect you need set the camerarsquos time again
433 User Accounts
Here you can create users and set privilege visitor operator or administrator The default useraccount is admin with a blank password You can enter the users accounts of visitor operator andadministrator Manually
34
How to change the passwordFirstly select the account which you want to change the password then select ldquoChange passwordrdquoenter the old password and the new password lastly click modify to take effect
How to add account Select one blank column then enter the new user name password and privilege last click Add to takeeffect You can see the new added account on the Account list
35
Delete Select the account which you want to delete then click Delete button to take effectNOTE The default admin account cannot be deleted but you can add other administrator users
How to change the username Firstly select the account which you want to change the username then select ldquoChange usernamerdquoenter the new password lastly click modify to take effect
36
434 Multi-Camera
If you want to view multi-surveillance screens on one window you need to login one camera and set itas the main device and do Multi-Device Settings add other cameras to the first one camera Before youdo multi-cams settings you need to assign different port such as 81 82 83 84 85 86 87 88 to thecameras if there is 8 cams installedThe firmware within the camera can support a maximum of 9 devices monitoring all at the same timeThis page you can both add FOSCAM MJPEG and H264 series cameras to the first camera and viewmulti-surveillance screen on one window
Add cameras in LANIn Multi-Device Settings page you can see all devices searched in LAN The 1st Device is the defaultone You can add more cameras in the list in LAN for monitoring The camerarsquos software supports up to 9IP Cameras online simultaneously Click The 2nd Device and click the item in the Device List in LAN theAlias Host and Http Port will be filled in the boxes below automatically Enter the correct username andpassword then click Add Add more cameras in the same way
37
Camera Model Our Company produces two series cameras MJPEG and H264 Here will show youwhich series the camera belongs to
1 Click it camera model aliashost and HTTP Port will befilled in the following boxesautomatically
2 Enter the User name andpassword of the 2nd camera
3 Click Add to take effect
38
Back to Surveillance Windows and click Four Windows option you will see four cameras you added
Add cameras in WANIf you want to view all cameras via the internet(remote computer) you will need to add them using DDNSdomain name Firstly make sure all of the cameras you added can be accessed through the internet(The way to configure DDNS is in chapter 444)Login to the first camera using a DDNS domain name and port
39
Click Multi-Device Settings Choose The 2nd Device Fill in the 2nd camerarsquos name DDNS domainname port number Enter user name and password and then choose Add
1 ---- The camera model MJ or H2642 ---- The 2nd camerarsquos name3 ---- Fill in the 2nd camerarsquos DDNS host not LAN IP
NOTE The MJ series have the same HTTP Port NO and Media Port NO
4 ---- Enter the 2nd camerarsquos user name and password5 ---- Click Add button and to take effect
NOTE Here the Host must be entered as the second camerarsquos DDNS domain name not its LAN IP
Use DDNS domain
name and port to login
Make sure each camera you need add
could login with DDNS name and port
40
Return to video window You will see all of the cameras accessible through the internetWhen you are away from home you can use the first camerarsquos DDNS domain name and port to view allthe cameras via internet
435 Status Light
You can enable or disable status light
41
44 NetworkThis section will allow you to configure your camerarsquos IP PPPoE DDNS Wireless Settings UPnP andPort
441 IP Configuration
If you want to set a static IP for the camera please go to IP Configuration page Keep the camera in thesame subnet of your router or computer
Changing settings here is the same as using the Equipment Search ToolIt is recommended that you use the subnet mask gateway and DNS server from your locally attachedPC If you donrsquot know the subnet mask gateway and DNS server you can check your computerrsquos localarea connection as followsControl Panel rarrNetwork Connections rarrLocal Area Connections rarrChoose Support rarrDetails
42
If you donrsquot know the DNS server you can use the same settings as the Default Gateway
442 Wireless Settings
Step 1 Choose ldquoSettingsrdquo on the top of the camera interface and go to the ldquoNetworkrdquo panel on theleft side of the screen then click ldquoWireless Settingsrdquo
Set the same Subnet Mask andgateway of the camera with yourPC
There are two DNS servers Youcan set any of them Same withgateway is also OK
43
Click the Scan button and the camera will detect all wireless networks around the area It should alsodisplay your router in the list
Step 2 Click the SSID (name of your router) in the list the corresponding information related to yournetwork such as the name and the encryption will be filled into the relevant fields automatically
You will only need to fill in the password of your network Make sure that the SSID Encryption and thepassword you filled in are exactly the same for your router
Click the Page number to see other wirelessnetworks devices if there are more than 10
Click the Scan buttonto search for wirelessnetworks
1 Click the SSID of your router andthe relevant information will be filledin the fields automatically
2 Enter the passwordof your router
44
Step 3 Please click on the Save button after all settings have been entered and disconnect the networkcable Never shut down the power of the camera until the IP camera is able to connect to the wirelessnetwork
The LAN IP address will disappear on the window of Equipment Search Tool when the camera isconfiguring a wireless connection Wait about 1 minute the camera should obtain a wireless connectionand the LAN IP of the camera will show again on the window of the Equipment Search Tool The IPaddress may have changed after the camera receives a wireless connection we recommend setting astatic local IP address if this IP address changes by right clicking the camera in Equipment Search Toolsetting a static IP and pushing OKCongratulations You have set up the wireless connection of the camera successfully
NOTE If you fail to make a wireless connection please refer to your seller or contact us directly forassistance
443 Soft AP Password Settings(Only C1)
For the safety of your camera we recommend you change the Soft AP password
444 DDNS
FOSCAM camera has embedded a unique DDNS domain name when producing and you can directlyuse the domain name you can also use the third party domain name
FOSCAM domain nameHere take test09myfoscamorg for example Go to option of DDNS on the Settings-gtNetwork panelyou can see the domain name
45
Now you can use http Domain name + HTTP Port to access the camera via internetTake hostname test09myfoscamorg and HTTP Port no 800 for example the accessing link of thecamera via internet would be http test09myfoscamorg800
Restore DDNS to factory If you have configured Third Party DDNS successfully but you want to useManufacturerrsquos DDNS again here click this button and start Manufacturerrsquos DDNS ServiceUser can also use third part DDNS such as wwwno-ipcom www 3322com
445 UPnP
The default UPnP status is closed You can enable UPnP then the camerarsquos software will be configuredfor port forwarding Back to the ldquoDevice Statusrdquo panel you can see the UPnP status
46
The camerarsquos software will be configured for port forwarding There may be issues with your routerssecurity settings and sometimes may error We recommend you configure port forwarding manually onyour router
446 Port
This camera supports HTTP Port HTTP Port is used to access the camera remotely If you want toaccess the camera and view the video the HTTP Port must both be configured correctly
HTTP port By default the HTTP is set to 88 Also they can be assigned with another port numberbetween 1 and 65535 But make sure they can not be conflict with other existing ports like 25 21
ONVIF port By default the ONVIF port is set to 888 Also they can be assigned with another portnumber between 1 and 65535(except 0 and 65534) But make sure they can not be conflict with otherexisting ports
HTTPS port The default port is 443 You can use the url to access the camera https IP + HTTPSport
RTSP port The default port is 554 The R2 does not have RTSP port
Another way to change the HTTP port NO
Step 1 Open the Equipment Search Tool select the camera you would like to change the port of right
47
click on the IP address and click on rdquoNetwork Configurationrdquo this brings up the network configurationbox as flowing figures
Figure 41
Figure 42
Step 2 Enter the username and password of the Administrator (default username is admin with a blank
password) and click ldquoOKrdquo to apply changes
Step 3 Wait around 10 seconds yoursquoll see that the camerarsquos LAN IP address has changed In ourexample it was changed to 2000 so we see http19216811102000 in Equipment Search Tool Alsothe LAN IP address is now fixed at a static IP address of http19216811102000 This IP address willnot change even if the camera is powered off and back on the camera will remain on this LAN IPaddress This is very important that a static LAN IP address is set or you may have problems later withremote access and seeing the camera remotely if the camera loses power and reconnects on a differentLAN IP address Make sure you set a static LAN IP address
Select which camerayoursquod like to change theport for and right click
Modify the Http Port
Enter the Username andpassword click OK
48
If the camera cannot be accessed please make sure the port forwarding is succeed
447 Mail Settings
If you want the camera to send emails when motion has been detected here Mail will need to beconfigured
1---- SMTP Server Port Transport Layer Security Enter SMTP server for sender SMTP port isusually set as 25 Some SMTP servers have their own port such as 587 or 465 and Transport LayerSecurity usually is None If you use Gmail Transport Layer Security must be set to TLS or STARTTLSand SMTP Port must be set to 465 or 25 or 587 which port you choose should be decided by whichTransport Layer Security you select2---- SMTP Username password ID account and password of the sender email address3---- Sender E-mail Mailbox for sender must support SMTP4---- Receiver Mailbox for receiver need not support SMTPyou can set 4 receivers5---- Save Click Save to take effect6---- Test Click Test to see if Mail has been successfully configured
49
Click Test to see if Mail has been successfully configured
If the test success you can see the Success behind the Test at the same time the receivers will receivea test mail
If the test fails with one of the following errors after clicking Test verify that the information you enteredis correct and again select Test 1) Cannot connect to the server2) Network Error Please try later3) Server Error4) Incorrect user or password5) The sender is denied by the server Maybe the server need to authenticate the user please check itand try again6) The receiver is denied by the server Maybe because of the anti-spam privacy of the server7) The message is denied by the server Maybe because of the anti-spam privacy of the server8) The server does not support the authentication mode used by the device
448 FTP Settings
If you want to upload record files and images to your FTP serveryou can set FTP Settings
50
Figure a
Figure b
FTP server If your FTP server is located on the LAN you can set as Figure aIf you have an FTP server which you can access on the internet you can set as Figure bPort Default is port 21 If changed external FTP client program must change the server connection portaccordinglyFTP Mode Here supports two modes PORT and PASVUsernamepassword The FTP account and passwordClick Save to take effectClick Test to see if FTP has been successfully configured
449 P2P
Access the IP Camera by Smart Phone (Android or iOS operating system)First of all you must open the P2P function of the IP Camera at ldquoSettings --gt Network --gt P2Prdquo
51
Foscam App named Foscam on App Store and Google Play for iOS and Android devices
NOTEIf the QR code scanning is not successful please input the UID on the bottom of the camera manually
45 VideoThis section allows you to configure Video stream settings On screen display and Snapshot settings
451 Video Settings
There are two ways to set the stream video settings They are main stream video settings and substream video settings
Enhanced Night video Definition(Only C1) The camera will automatically drop the frame to extendthe recording time in the night
52
Stream Type There are four types to identify different streams you have set If select the HD Mode theclearer video will become and it will take up more bandwidth If select the Smooth Mode the bandwidthis very narrow and bit rate is large that will lead to video can not play well The Equilibrium Model is avalue between HD Mode and Smooth Mode
Resolution The camera supports multiple types For example 960P 720P VGA The higher theresolution is the clearer video will become But the code flux will become larger too and it will take upmore bandwidth (The maximum frame rate for each model is different please see theldquoSpecificationsrdquo )
Bit Rate Generally speaking the larger the bit rate is the clearer video will become But the bit rateconfiguration should combine well with the network bandwidth When the bandwidth is very narrow andbit rate is large that will lead to video can not play well
Frame rate You should lower frame rate when the bandwidth is limited Normally when the frame rateabove 15 you can achieve fluently video
Key Frame Interval The time between last key frame and next key frame The shorter the duration themore likely you will get a better video quality but at the cost of higher network bandwidth consumption
Variable bitrate(Only C1) Select the Bit rate type to constant or variable If select Yes the camera willchange the video bit rate according to the situation but will not more than the maximum parameter BitRate If select No the Bit Rate is unchanged
Rate Control Mode(Only R2 C2)There are three rate control modesCBR Constant Bit Rate it means that the Bit Rate is constantVBR Variable Bit Rate the camera will change the video bit rate according to the situation but will notmore than the maximum parameter Bit RateLBR Low Bit Rate If you can select the LBR then you can slide the scroll bar to choose percentage ofthe bit rate By reducing the bit rate so that the camera can obtain a better image at low bandwidth
452 On Screen Display
This page is used to add timestamp and device name on the video
Display Timestamp
53
There are two options Yes or NO Select Yes and you can see the system date on the video
Display Camera NameThere are two options Yes or NO Select Yes and you can see the device name on the video
453 Privacy Zone(Only R2 C2)
This page is used to set some mask as privacy zone on the video
Allow On Screen Display MaskThere are two options Yes or NO Select yes and draw a mask area on the video the mask area will beblack on the video
Click OK button and return to the OSD page click Save to take effectBack to the surveillance window you can see the mask area as the following picture
The mask area
54
453 Snapshot Settings
On this page you can set the snapshot picturesrsquo image quality and the storage path
Manual snap Quality Low Middle and High The higher the quality the picture will be clearerPictures Save To FTP or SD card If you have done FTP and Alarm settings when alarming thecamera will snap pictures to the FTP or SD card automaticallyIf you select the FTP you can set the file name which the picture save to (Only C1)
Enable timing to captureTo enable capture interval follow the steps below1 Select Enable Motion detection
55
2 Capture intervalThe interval time between two captures3 Select the capture time
Capture anytimeClick the black button up the MON you will see all time range turn red When something moving inthe detection area at anytime the camera will capture
Specify an capture scheduleClick the week day words the corresponding column will be selected For example click TUE theall column of TUE turns to red that means during Tuesday whole day the camera will capture
Press the left mouse and drag it on the time boxes you can select the serial area4 Click Save button to take effect
454 IR LED Schedule
On this page you can set the schedule time for switching IR LED lights When parameter Mode is set tothe Schedule on the Live Video window at these schedule time the IR LED lights will be turned off
46 Detector
461 One Key Alert(Only R2 C2)
On this page you can turn on or off the alarm function you need
462 Action Detection
IP Camera supports Action Detection Alarm when the people has been detected the IP Camera willmake a alarm
56
Step 1 Enable Action detection function
Step 2 Sensitivity---- It supports five modes Lowest Lower Low Medium and High The higher thesensitivity the camera will be more easily alarmed Select one motion sensitivity
Step 3 Trigger interval--- The interval time between two motion detection
Step 4There are some alarm indicators
A Camera Sound and PC SoundIf the camera has connected with a speaker or other audio output device if you select Camera Sound orPC Sound when the motion has been detected the people around the camera will hear beep alarmsound
B Send E-mailIf you want to receive alarm emails when motion is detected you must select Send E-mail and set MailSettings first
C Take SnapshotIf you select this checkbox when the motion has been detected the camera will snap the live viewwindow as a still picture and load it to the FTP Make sure you have set FTP and set FTP as the storagepath in Video-gtSnapshot settings panel
57
Time interval The interval time between two pictures
D RecordingIf you select this checkbox when the motion has been detected the camera will record automaticallyand store the record files to the SD Card Make sure the camera has inserted SD card and you haveset the SD card as the Alarm record files storage path please go to Recordmdashgt Storage location pageto verify this settingsThe default alarm record time is 30s and pre-alarm record time is 5s please go to Recordmdashgt AlarmRecord page and change the alarm time settings
E Push message to the phoneIf you select this checkbox when the motion has been detected the camera will push the message tothe phone which has been connected the camera
Step 7 Set detection areaClick set detect area and it pop up a window then you can draw the detection area Click Back buttonafter settings When something moving in the detection area the camera will alarm
Step 8 Alarm Schedule① Alarm anytime when motion is detectedClick the black button up the MON you will see all time range turn red When something moving in thedetection area at anytime the camera will alarm
② Specify an alarm scheduleClick the week day words the corresponding column will be selected For example click TUE the allcolumn of TUE turns to red that means during Tuesday whole day when something moving in thedetection area the camera will alarm
Click this button and select all time range
58
③ Press the left mouse and drag it on the time boxes you can select the serial area
Step 9 Click Save button to take effectWhen the motion has been detected during the detection time in the detection area the camera willalarm and adopt the corresponding alarm indicators
NOTE You must set the detection area and detection schedule or else there is no alarm anywhereand anytime
463 Sound alarm
When the ambient sound over a certain decibel the sound alarm will be triggered
59
If the Sensitivity is set to ldquoHighrdquo the camera will detect the sound whose more than 55dbIf the Sensitivity is set to ldquoMediumrdquo the camera will detect the sound whose more than 65dbIf the Sensitivity is set to ldquoLowrdquo the camera will detect the sound whose more than 75dbIf the Sensitivity is set to ldquoLowerrdquo the camera will detect the sound whose more than 85dbIf the Sensitivity is set to ldquoLowestrdquo the camera will detect the sound whose more than 95db
47 RecordThis section will allow you to change the record files storage path and the record time
471 Storage Location
On this page you can change the alarm and manually recording storage path
60
Recording Location SD card or FTP Make sure the camera has been inserted the SD card Onthis page you can see the available space of the SD card
Local Recording Location For Windows OS the manual recording path is C IPCamRecord you canchange another one For MAC OS the manual recording path is IPCamRecord
Enter the local folder Click here You can enter the local storage folder
472 Alarm Recording
473 Local Alarm Recording
This page you can enable the local alarm record and Local Alarm record time
61
474 Schedule Recording
When the video is selected as FTP the device supports scheduled recordingWhen the parameter Recording Location is set SD Card on the Storage Location page you canconfigure parameters as shown in follow figure
When the video is selected as SD card the device supports pumping frame recordingWhen the parameter Recording Location is set SD Card on the Storage Location page you canconfigure parameters as shown in follow figure
62
Record full strategy When the SD card is full you can choose to cover the previous recording or stoprecordingAudio Record You can choose yes or no
NOTES Scheduled recording only supports video saved to the SD card or FTP server The schedule recording will stop while alarm recording is beginning and it will continue
automatically after alarm recording end You can refer to alarm schedule in Alarm about editing the time of recording Schedule
475 SD Card Management
This camera supports SD Card When you plug in the SD card during the camera work process please
63
reboot the camera again or else the SD Card may be cannot work well
The default storage path of alarm record files is SD card when the available size of SD card is less than256M the old record files will be deleted automatically
SD Card Management After click the button you should enter the username and password of thecamera Then you can manage the recording files of the camera in the SD card The SD cardmanagement is only effective when access the camera in LAN
Format(except C1) Click the button you can format the SD card Note that this will delete all files on theSD card
48 PTZ(Only R2)This page will allow you to change the pantilt speed and do cruise tracks settings
481 Pan amp Tilt Speed
There are five Pt speed types very fast fast normal slow and very slowly Select the desired PTZspeed type and click save buttonThere are three zoom speed types fast normal slow
64
482 Cruise SettingsThis section explains how to add delete alter one cruise track
Setting the Cruise ModeThere are two cruise mode Cruise time and Cruise LoopsCruise time Select Cruise time from Cruise Mode drop-down then you can set the Cruise time of thecameraCruise LoopsSelect Cruise Loops from Cruise Mode drop-down you can set the Cruise Loops ofthe cameraClick Save to take effect
Manage the Cruise TrackThere are two default cruise tracks Vertical and HorizontalVertical The camera will rotate from up to down
65
Horizontal The camera will rotate form left to right
Add Add one cruise track then click save buttonDelete Select one cruise track and delete itSave After you modify the Dwell time you should click Save button to take effect
Example
How to do add cruise tracks Firstly Click Add button and enter a descriptive name to identify the cruise track
Secondly On the lower left of the page you can see all preset points you have added Select onepreset point and click Add button you can see the preset point has been added to the cruise track on thecruise track page You need to add two or more preset points to the cruise track
Thirdly Click OK button and the cruise track will take effect
You can add other cruise track as the same method
For example I have added three preset points to the ldquotrack 1rdquo that means When I select the ldquotrack 1rdquoon the surveillance window the camera moves as the following track upright then Right Most last downleftYou can add preset on the left of the surveillance window
The new added track name
1 Select one preset point 2 Click Add button
Here you can see the preset pointhas been added to one track Andyou can set the stay time
66
After add the cruise track back to the surveillance window click Cruise her you can see all cruise tracksyou have added
After add the cruise track back to the surveillance window click Cruise her you can see all cruise tracksyou have added
The cruise tracks have addedto the ldquotrack 1rdquo
Add the preset
67
There are other buttons between the Preset points and Cruise track you can use these buttons to adjustthe order of preset points or adddelete one preset points in one cruise track
Add Select one preset points and add it to the selected cruise trackDelete Select one preset points you have added to one cruise track click deleteMove up down Select one cruise track adjust the order of preset points in one cruise track
AttentionConsidering the life time and thermal issue of the motor itrsquos not recommend to do long-time cruise
483 Start-Up Options
Here section will allow you to set the stop position after the camera rebootsIt supports three modes No self test Goto home position and Goto preset pointNo self test When rebooting the camera will not pan tiltGoto home position When rebooting the camera will pa Providing Central Management Software tomanage or monitor multi-cameras n tilt and stops at centerGo to Preset point Select one preset position and save it When rebooting the camera will pan tilt andstops at the preset position you have set
68
49 FirewallThis section explains how to control the access permission by checking the client PCrsquos IP addresses Itis composed of the following columns Block access from these IP addresses and Only allow accessfrom these IP addresses
Enable firewall If you select Only allow access from these IP addresses and fill in 8 IP addresses atmost only those clients whose IP addresses listed in the Only allow access from these IP addressescan access the Network Camera If you select Block access from these IP addresses only thoseclients whose IP addresses are in the IP list cannot access the Network CameraClick Save to take effect
410 SystemIn this panel you can backuprestore your camera settings upgrade the firmware to the latest versionrestore the camera to default settings and reboot the device
4101 Back-upamp Restore
Click Backup to save all the parameters you have set These parameters will be stored in a bin file forfuture useClick Browse and select the parameters file you have stored then click Submit to restore the restore the
69
parameters
4102 System UpgradeClick ldquoDownload the latest firmwarerdquo you will see the following screen And click ldquosaverdquo to save thefirmware on your computer locally
Your current firmware version will be displayed on your screen You may go to the Status DeviceInformation page to check for the latest firmware versions availableClick Browse choose the correct bin file and then click System upgradeDonrsquot shut down the power during upgrade After upgrading you can see the upgrade result
70
Upgrade Firmware by Equipment Search Tool
Double click the Equipment Search Tool shot icon select the Camera IP that you want toupgrade the firmware Then select Upgrade Firmware and enter the username and password choosethe firmware file and upgrade
Figure 43
CAUTION If your camera works well with the current firmware we recommend not upgrading Pleasedonrsquot upgrade the firmware unnecessarily Your camera may be damaged if misconfigured during anupgrade
71
NOTES Please ensure you have download the correct firmware package for your camera before upgrading
Read the upgrade documentation (readmetxt file) in the upgrade package before you upgrade Upon downloading the firmware check the sizes of the bin files They must match the size in the
readmetxt file If not please download the firmware again until the sizes are the same Yourcamera will not function correctly if a corrupt bin file is used
Normally only Device WEB UI need to be upgrade please do not try to upgrade the Device SystemFirmware
Never shut down the power of the camera during upgrade until the IP camera restart and getconnected
After upgrade successfully please uninstall the old plugin and re-install it then reset the camera tothe default factory settings before using the camera
4103 Patch InstallationClick Browse to select the correct patch file and then click Install Patch to install the patch Do notturn off the power during it installing After installing is complete you will receive a system prompt
4104 Factory Reset
Click All reset and all parameters will return to factory settings if selected This is similar to press theReset button on the bottom of the camera
4105 RebootClick Reboot System to reboot the camera This is similar to unplugging the power to the camera
Enable Periodic Maintenance(Only R2)You can choose the reboot period of the camera
72
5 PlaybackOn this page you can view the record files stored in the SD card
Section 1 Define the Record files time and Type
The storage path of record files
Here supports three types current day current month and All records Another
way select the time on the timeampdate manually
The type of records files Here supports two typs Normal record Alarm record
and All records
Click this button to search all record files satisfy the conditions you selected
Continuous Play Select the checkbox to play continuously all the record files
73
Section 2 Search record filesOn this panel you can see all record files satisfy the conditions you set
Section 3 PlayStopAudioFull screen buttonsPlease select one record file before use these buttons
Click this button to play the record files
Click this button to stop the record files
Open or stop audio
Click this button to make full screen and double click left mouse to exit full screen
6 Appendix
61 Frequently Asked Questions
611 Install the add-on of Firefox browser Google Chrome and IE
Chrome
74
75
76
77
612 Uninstall the add-on of Firefox browser Google Chrome and IE
Chrome
78
613 I have forgotten the administrator password
To reset the administrator username and password press and hold down the RESET BUTTON for 5seconds Upon releasing the reset button wait for 20 seconds the camera will reboot and the usernameand password will return to the factory default administrator username and password Please power onthe camera before resetDefault administrator username adminDefault administrator password No password
614 Camera can not record
When you use Windows7 or Vista you may be not able to do manually record or change the record pathbecause of the security settings of computerThere are two ways to resolve this problemPlease add the camera as a trusted site to resolve this issue The steps are IE browserToolInternet PropertiesSecurityTrusted sitesSitesAdd
79
Open IE browser then right click select ldquoRun as administratorrdquo
615 Subnet doesnrsquot match
Check whether your ipcamera in the same subnet of your computer The step is ControlPanelNetwork ConnectionsDbclick Local Area Connections ChooseGeneralPropertiesCheck subnet mask IP address and gateways When you set IP address pleasemake sure they are in the same subnet Otherwise you cant access camera
616 No Pictures Problems
The video streaming is transmitted by the ActiveX controller If ActiveX controller isnrsquot installed correctlyyou will see no video image You can resolve this problem by this wayDownload ActiveX controller and set the safety property of IE in the PC when you view it first time IEbrowserToolInternet ProperSecurityCustom LevelActiveX control and Plug-ins Three optionsof front should be set to be ldquoEnablerdquo The ActiveX programs read by the computer will be stored AsfollowsEnable Download unsigned ActiveX controlsEnable Initialize and script ActiveX controls not marked as safeEnable Run ActiveX controls and plug-ins
If you allow the ActiveX running but still could not see living video Please change another port numberto try Donrsquot use port 88
80
NOTE Make sure that your firewall or anti-virus software does not block the camera or ActiveX If youcould not see video please shut down firewall or anti-virus software to try again
617 Canrsquot access IP camera in internet
There are some reasons1ActiveX controller is not installed correctly2The port which camera used is blocked by Firewall or Anti-virus software Please change another portnumber and try again3Port forwarding is not successfulCheck these settings and make sure they are correct
618 UPnP always failed
UPnP only contains port forwarding in our recent software Sometimes it may be failed to do portforwarding automatically because of firewall or anti-virus software It also has much relation with routerrsquossecurity settings So we recommend you do port forwarding manually You can view your camera ininternet successfully after you do port forwarding manually in your router
619 Camera can not connect wireless
If your camera could not connect wireless after you set wireless settings and plug out the cable Pleasecheck whether your settings are correct or notNormally camera canrsquot connect wireless mainly because of wrong settingsMake sure broadcast your SSID use the same encryption for router and camera
6110 Canrsquot see other cameras listed in multi-device when using remote
access
If you want to view all the cameras via the WAN verify that each camera added in the multi-devicesettings can be accessed by using the DDNS name and port number Use the DDNS domain name notthe camerarsquos LAN IP (For more details see How to add cameras in WAN)
62 Default ParametersDefault network ParametersIP address obtain dynamically
81
Subnet mask obtain dynamicallyGateway obtain dynamicallyDDNS Embedded FOSCAM domain nameUsername and passwordDefault admin username admin with a blank password
63 Specifications
ITEMS C1
Image SensorSensor High Definition Color CMOS Sensor
Display Resolution 1280 x 720 (1Megapixels)
Min Illumination 0 Lux (With IR Illuminator)
Lens
Lens Type Glass Lens
focal length f28mm
Aperture F24
Diagonal angle of view 115deg
Horizontal view angle 100deg
Video
Image Compression H264
Image Frame Rate 25fps(VGA) 23fps(720P) downward adjustable
Resolution720P(1280 x 720) VGA(640 x 480) VGA(640 x 360)QVGA(320 x 240) QVGA(320 x 180)
Stream dual stream
Image adjustmentThe hue brightness contrast saturation sharpness areadjustable
Flip image flip and mirror
Infrared mode Automatic or manual
manual PanTilt Angle Horizontal350deg amp Vertical 180deg
Night visibility 11pcs IR-LEDs night vision range up to 8 metres
Audio InputOutputSupports two-way audioBuilt-in Mic amp Speaker
Audio Compression PCMG726
Network
Ethernet One 10100Mbps RJ45 port
Wireless Standard IEEE80211bgn
Data RateIEEE80211b 11Mbps(Max)IEEE80211g 54Mbps(Max)IEEE80211n 150Mbps(Max)
Wireless Security WEP WPA WPA2
WPS Supports EZLink wireless setup
82
Network ProtocolIPTCPUDPHTTPHTTPSSMTPFTPDHCPDDNSUPnPRTSPWPS
Remote Access P2P DDNS
SystemRequirements
Operating SystemMicrosoft Windows XP Vista 7 8Mac OSiOSAndroid
Browser
Microsoft IE8 and above version or compatible browserMozilla FirefoxGoogle ChromeApple Safari
OtherFeatures
Motion Detection Alarm via E-Mail upload alarm snapshot to FTP
PIR Infrared human body sensor
User Accounts Three levels user role
Firewall Supports IP Filtering
Storage 32G Micro SD card local and FTP storage
Reset Reset button is available
PowerPower Supply DC 5V10A
Power Consumption 45W(Max)
Physical Dimension(LxWxH) 7070120mm
Net Weight 170g
Environment
Operating Temperature-10degC ~ 50deg(14degF ~ 122degF)
Operating Humidity 20 ~ 85 non-condensing
Storage Temperature -20degC ~ 60deg (-4degF ~ 140degF)
Storage Humidity 0 ~ 90 non-condensing
Certification CE FCC RoHS
Warranty Limited 2-year warranty
ITEMS R2
Image Sensor
Sensor Type 13 CMOS
Display Resolution 1920 x 1080 (20 Megapixels)
Frame Rate 30fps
Min Illumination 0 Lux (With IR Illuminator)
Lens
Lens Type f28mmF26
Angle of ViewHorizontal90degDiagonal 110deg
Night Vision 13pcs IR-LEDs night vision range up to 8 metres
VideoImage Compression H264
Resolution1080P(1920x1080)720P(1280 x 720) VGA(640 x 480)QVGA(320 x 240)
83
Stream dual stream
Image adjustmentThe hue brightness contrast saturation sharpness areadjustable
Flip image flip and mirror
Infrared mode Automatic or manual
manual PanTilt Angle Horizontal300deg amp Vertical 100deg
Night visibility 13pcs IR-LEDs night vision range up to 8 metres
Audio InputOutputSupports two-way audioBuilt-in Mic amp Speaker
Audio Compression PCMG726
Network
Ethernet One 10100Mbps RJ45 port
Wireless Standard IEEE80211bgn
Data RateIEEE80211b 11Mbps(Max)IEEE80211g 54Mbps(Max)IEEE80211n 150Mbps(Max)
Wireless Security WEP WPA WPA2
Wireless Setup Supports EZLink wireless setup
Network ProtocolIPTCPUDPHTTPHTTPSSMTPFTPDHCPDDNSUPnPRTSPWPSONVIF
Remote Access P2P DDNS
SystemRequirements
Operating System Microsoft Windows XP 7 8Mac OSiOSAndroid
Browser IE8 and above versionFirefoxChromeSafari
OtherFeatures
Motion Detection Alarm via E-Mail upload alarm snapshot to FTP
HDR Improve image clarity in complex scenario
Magic Zoom Picture zoom function
User Accounts Three levels user role
Firewall Supports IP Filtering
Storage 64G Micro SD card local and FTP storage
Reset Reset button is available
PowerPower Supply DC 5V20A
Power Consumption <6W
PhysicalDimension(mm) 74(L)times74(W)times119(H)
Net Weight 290g
Environment
OperatingTemperature -10degC ~ 50deg (14degF ~ 122degF)
Operating Humidity 20 ~ 85 non-condensing
Storage Temperature -20degC ~ 60deg (-4degF ~ 140degF)
Storage Humidity 0 ~ 90 non-condensing
Certification CE FCC RoHS
Warranty Limited 2-year warranty
84
ITEMS C2
Image Sensor
Sensor Type 13 CMOS
Display Resolution 1920 x 1080 (20 Megapixels)
Frame Rate 30fps
Min Illumination 0 Lux (With IR Illuminator)
LensLens Type f28mmF26
Angle of ViewHorizontal110degDiagonal 120deg
Video
Image Compression H264
Resolution1080P(1920x1080)720P(1280 x 720) VGA(640 x 480)QVGA(320 x 240)
Stream dual stream
Image adjustmentThe hue brightness contrast saturation sharpness areadjustable
Flip image flip and mirror
Infrared mode Automatic or manual
Manual PanTilt Angle Horizontal360deg amp Vertical 180deg
Night visibility High performance IR-LEDs night vision range up to 8 metres
Audio InputOutputSupports two-way audioBuilt-in Mic amp Speaker
Audio Compression PCMG726
Network
Ethernet One 10100Mbps RJ45 port
Wireless Standard IEEE80211bgn
Data RateIEEE80211b 11Mbps(Max)IEEE80211g 54Mbps(Max)IEEE80211n 150Mbps(Max)
Wireless Security WEP WPA WPA2
Wireless Setup Supports EZLink wireless setup
Network ProtocolIPTCPUDPHTTPHTTPSSMTPFTPDHCPDDNSUPnPRTSPWPSONVIF
Remote Access P2P DDNS
SystemRequirements
Operating System Microsoft Windows XP 7 8Mac OSiOSAndroid
Browser IE8 and above versionFirefoxChromeSafari
OtherFeatures
Motion Detection Alarm via E-Mail upload alarm snapshot to FTP
HDR Improve image clarity in complex scenario
Magic Zoom a Magic digital zoom rivaled Optical zoom
User Accounts Three levels user role
Firewall Supports IP Filtering
85
Storage 64G Micro SD card local and FTP storage
Reset Reset button is available
PowerPower Supply DC 5V10A
Power Consumption 48W(Max)
PhysicalDimension(mm) 7070120mm
Net Weight 160g
Environment
OperatingTemperature -10degC ~ 50deg (14degF ~ 122degF)
Operating Humidity 20 ~ 85 non-condensing
Storage Temperature -20degC ~ 60deg (-4degF ~ 140degF)
Storage Humidity 0 ~ 90 non-condensing
Certification CE FCC RoHS
Warranty Limited 2-year warranty
Attention Power adapter should be used between 0-40 and 5-90 relative humidity
64 CE amp FCCElectromagnetic Compatibility (EMC)FCC Statement
This device compiles with FCC Rules Part 15 Operation is subject to the following twoconditions This device may not cause harmful interference This device must accept any interference received including interference that may cause undesired
operation
This equipment has been tested and found to comply with the limits for a Class B digital device pursuantto Part 15 of the FCC Rules These limits are designed to provide reasonable protection against harmfulinterference when the equipment is operated in a commercial environment This equipment generatesuses and can radiate radio frequency energy and if not installed and used in accordance with theinstallation manual may cause harmful interference to radio communications Operation of thisequipment in a residential area is like to cause harmful interference in which case the user will berequired to correct the interference at his own expense
FCC CautionAny changes or modification not expressly approved by the party responsible for compliance could voidthe userrsquos authority to operate this equipmentThis equipment complies with FCC radiation exposure limits set forth for an uncontrolled environment
86
This equipment should be installed and operated with minimum distance 20cm between the radiatorampyour bodyThis transmitter must not be co-located or operating in conjunction with any other antenna or transmitter
CE Mark Warning
This is a Class B product In a domestic environment this product may cause radio interference inwhich case the user may be required to take adequate measures
65 WarrantyShenZhen FOSCAM Intelligent Technology Limited(FOSCAM) values your business and alwaysattempts to provide you the very best of serviceNo limited hardware warranty is provided by FOSCAM unless your FOSCAM product (product) waspurchased from an authorized distributor or authorized reseller Distributors may sell products toresellers who then sell products to end users No warranty service is provided unless the product isreturned to an authorized return center in the region where the product was first shipped by FOSCAM orto the point-of-purchase which may have regional specific warranty implicationsIf you purchase your FOSCAM product from online store please contact the point-of-purchaseand ask for returnreplacementrepair service
Hardware Warranty Information
FOSCAM provide 2-year limited warranty for naked product and 6-month limited warranty foraccessories
Limited Hardware Warranty
FOSCAM products are warranted to be free from manufacturing defects in materials andworkmanship starting from the shipping date of FOSCAM
This limited hardware warranty does not cover Software including the software added to the products through our factory-integration system
software that included in the CDetc Usage that is not in accordance with product instructions Failure to follow the product instructions Abuse firmware upgrade without the authorized technicianrsquos guidance Normal wear and tear
Return Procedures
Please read FOSCAM warranty policy amp policy of your reseller first before sending items back topoint-of-purchase
Customer must first contact point-of-purchase to obtain a Return Merchandise Authorization (RMA)
87
number before returning the product If the product you received is suspected to be defective andthe product warranty has not expired The RMA number will allow your reseller to track your returnmuch easier and help them expedite processing your request
After receiving your RMA case number pack the item(s) very well with the original box and all theoriginal accessories included such as power adapters brackets cables manuals and driver CDdisks
Write your RMA number and the return reason (the problem of the product) on the warranty cardalong with the complete package to send them back
Replacement Services
If customers ask for replacement service please contact point-of-purchase and follow theirpolicy
Our technicians will inspect all items returned for replacement requests If the retuned product isfound in working order we will return the same item received However customers shall beresponsible for all shipping amp handling charges incurred for getting the units back to customers
If returned products are found defective we will replace the product and assume the shipping costfor sending back the replacement unit to customers
If for any reason we are unable to provide a replacement of the original returned item(s) You willhave a choice for a ldquoSubstituterdquo item at the same equal value
We do not provide exchange and replacement due to normal hardware upgrade according themarket after 14 days after the product is delivered
Our technicians will test the product before send out the replacement any other demand for morethan two times replacement for the same product during replacement limit will be rejected
Replaced products are warranted from the balance of the former warranty period
Warranty Forfeiture
Warranty is void if purchase from unauthorized distributor or reseller Warranty is void if trade-mark serial tags product stickers have been removed altered or tampered
with Warranty is void for mishandling improper use or defacing the product Abuse firmware upgrade without the authorized technicianrsquos guidance Warranty is void for physical damage altered either internally or externally improper or inadequate
packaging when returned for RMA purposes Warranty is void if damage has resulted from accident dismantle abuse or service or modification
by someone other than the appointed vendor souse fission or the spare part has been over theperiod of warranty
Warranty is void if product is damaged due to improper working environment or operation (Forexample improper temperature humidity unusual physical or electrical stress or interferencefailure or fluctuation of electrical power static electricity using wrong power adapter etc)
Warranty is void if damaged by the use of parts not manufactured or sold by FOSCAM Damage caused by improper installation of third-party products Warranty is void if damaged for irresistible cause such as earthquake fire lightning flood etc Product beyond limited warranty
Shipping Fee
88
If products are defective or damaged under normal use or operation in the replacement limitdistributors or resellers are responsible for the shipping cost the product back to customerscustomers should assume the shipping cost send the product to the point-of-purchase
During replacement limit if customers ask for replacement due to the product does not fit forcustomerrsquos personal expectation customers should responsible for both shipping fee
Customers shall be responsible for both shipping fee if their product beyond the replacement limitbut still in warranty limit
Repair Service Out Of Warranty
FOSCAM provide extra repair service for product that out of warranty it is chargeable The total feecontains device cost and service fee Device cost (including accessories) is the standard uniformprice provide by FOSCAM
Different region may have different service fee please contact the point-of-purchase to confirm thatbefore you ask for this service
Our technicians will quote the total price after detect the product If customers refused to repair afterthe quotation customers need pay for the test fee $35hour If agree with the quotation test will befree
Repaired product out of warranty will obtains 3-month warranty from the date of the product back tocustomers
Limitation of Liability
FOSCAM is not responsible for other extra warranty or commitment promised by resellers if yourreseller promised some extra commitment or warranty please ask for written documents to protectyour rights and interests
FOSCAM does not offer refunds under any circumstances Please contact the point-of-purchaseand follow their refundreturn policy
FOSCAM shall not be liable under any circumstances for any consequential incidental special orexemplary damages arising out of or in any connection with this agreement or the productsincluding but not limited to lost profits or any claim based on indemnity or contribution or the failureof any limited or exclusive remedy to achieve its essential purpose or otherwise Purchasersexclusive remedy as against FOSCAM shall be the repair or replacement of defective parts IfFOSCAM lists a product on its website specification in error or that is no longer available for anyreason FOSCAM reserves the right to explain it without incurring any liability
All rights reserved FOSCAM and the FOSCAM logo are trademarks of ShenZhen FOSCAMIntelligent Technology Limited registered in the US and other countries
7 Obtaining Technical SupportWhile we hope your experience with the IPCAM network camera is enjoyable and easy to use you may
89
experience some issues or have questions that this Userrsquos Guide has not answeredIf you have problem with FOSCAM IP camera please first contact FOSCAM reseller for solving theproblems If our reseller cannot provide service please contact our service departmenttechfoscamcom
- Security Warning
- 1 Overview
-
- 11 Key Features
- 12 Read Before Use
- 13 Package Contents
- 14 Physical Description
- 15 Micro-SD Card
-
- 2 Access the IP Camera
-
- 21 Wired Connection
- 22 Wireless Connection
-
- 221 Soft AP Connection(Only C1)
- 222 WPS (WI-FI Protected Set-up)
-
- 23 Access the Camera in WAN
-
- 231 Static IP Addresses
- 232 Remote Access
-
- 24 Using the VLC player
- 25 IP camera connection to the server
-
- 3 Surveillance Software GUI
-
- 31 login Window
- 32 Setup Wizard
- 33 Surveillance Window
-
- 4 Advanced Camera Settings
-
- 41 Setup Wizard
- 42 Status
-
- 421 Device Information
- 422 Device Status
- 423 Session Status
- 424 Log
-
- 43 Basic Settings
-
- 431 Camera Name
- 432 Camera Time
- 433 User Accounts
- 434 Multi-Camera
- 435 Status Light
-
- 44 Network
-
- 441 IP Configuration
- 442 Wireless Settings
- 443 Soft AP Password Settings(Only C1)
- 444 DDNS
- 445 UPnP
- 446 Port
- 447 Mail Settings
- 448 FTP Settings
- 449 P2P
-
- 45 Video
-
- 451 Video Settings
- 452 On Screen Display
- 453 Privacy Zone(Only R2 C2)
- 453 Snapshot Settings
- 454 IR LED Schedule
-
- 46 Detector
-
- 461 One Key Alert(Only R2 C2)
- 462 Action Detection
- 463 Sound alarm
-
- 47 Record
-
- 471 Storage Location
- 472 Alarm Recording
- 473 Local Alarm Recording
- 474 Schedule Recording
- 475 SD Card Management
-
- 48 PTZ(Only R2)
-
- 481 Pan amp Tilt Speed
- 482 Cruise Settings
- 483 Start-Up Options
-
- 49 Firewall
- 410 System
-
- 4101 Back-upamp Restore
- 4102 System Upgrade
- 4103 Patch Installation
- 4104 Factory Reset
- 4105 Reboot
-
- 5 Playback
- 6 Appendix
-
- 61 Frequently Asked Questions
-
- 611 Install the add-on of Firefox browser Googl
- 612 Uninstall the add-on of Firefox browser Goo
- 613 I have forgotten the administrator password
- 614 Camera can not record
- 615 Subnet doesnrsquot match
- 616 No Pictures Problems
- 617 Canrsquot access IP camera in internet
- 618 UPnP always failed
- 619 Camera can not connect wireless
- 6110 Canrsquot see other cameras listed in multi-dev
-
- 62 Default Parameters
- 63 Specifications
- 64 CE amp FCC
- 65 Warranty
-
- 7 Obtaining Technical Support
-

5
Slow Flash every 10 second Wi-Fi connectedFlashing every 04 seconds WPS is connectingFlashing every 02 seconds EZLink takes effectFlashing every 01 seconds SoftAP is started
R2
Front panel Rear panel
Front panel LENS Fixed focus lens Infrared LED Infrared LEDs for night vision Microphone Built-in microphone Micro SD Card slot Supports up to 64GB SD card for storing the video WPSReset
WPS Push both WPSReset button on the camera and wireless router within 1 minute thecamera will connect to the wireless router automatically in WPS process the Network light willblink every 04 seconds
Reset Push and hold the WPSReset button for more than 10 seconds to set the camera tofactory default the Power light will blink every 04 seconds
Rear panel LAN 10100 Mbps RJ-45 port for wired connection Power DC 5V2A Power supply Speaker Built-in speaker Antenna Used to connect external wireless antenna
The flashing status of the Power light and Network light are shown in the following table
Light Flashing Status DescriptionPower light off The power dont work properly
on The power supply works fineFlashing every 04 seconds Reset to take effect
Network light off No Wireless connectionConstant Flash Wired connection
6
Slow Flash every 10 second Wi-Fi connectedFlashing every 04 seconds WPS is connectingFlashing every 02 seconds EZLink takes effect
C2
Front panel Rear panel
Front panel PIRThe PIR ( Passive Infrared ) is electronic devices which are used in some security alarm
systems to detect motion of an infrared emitting source usually a human body Lens Fixed focus lens Induction IC Infrared Lamp Array Micro SD Card slot Supports up to 64GB SD card for storing the video
Rear panel LAN 10100 Mbps RJ-45 port for wired connection WPSReset
WPS Push both WPSReset button on the camera and wireless router within 1 minute thecamera will connect to the wireless router automatically in WPS process the light will be greenand blink every 04 seconds
Reset Push and hold the WPSReset button for more than 10 seconds to set the camera tofactory default the light will be red and blink every 04 seconds
Power DC 5V1A Power supply
The flashing status of the Power light and Network light are shown in the following table
Flashing Status DescriptionFlashing(red) every 04 seconds Reset to take effectConstant Flash(green) Wired connectionSlow Flash(green) every 10 second Wi-Fi connectedFlashing every(green) 04 seconds WPS is connectingFlashing every(green) 02 seconds EZLink takes effect
7
15 Micro-SD Card
This camera supports SD CardWhen you plug in the SD card during the camera work process please reboot the camera again or elsethe SD Card may be cannot work wellGo to the SettingsDevice StatusDevice Status page you can see the SD card status
2 Access the IP Camera
21 Wired Connection
1 Connect the camera to the LAN network (Router or Switch) via network cable2 Connect the power adapter to the camera3 Insert the CD into the CD drive of your computerGo to the folder ldquoEquipment Search Toolrdquo and find the folder ldquoFor Windows OSrdquo or ldquoFor Mac OSrdquo from theCD supp Copy and paste the file to your computer or drag it onto your Desktop
Shortcut icon for Windows Mac OS
Notes If your computer ( Windows OS ) supports autorun function you can find the corresponding file in
the opened control panel If your computer doesnrsquot have CD drive you can download the Equipment Search Tool from our
website for free
The camera supports HTTP and HTTPS protocols you can access the camera in two ways
(1) http LAN IP + HTTP Port NO
8
The default HTTP port NO is 88 Double click the Equipment Search Tool icon to run and it should findthe camerarsquos IP address automatically after you plug in the network cable
Double click the IP address of the camera the camera login page should be open in your defaultbrowser
(2) https LAN IP + HTTPS Port NO
The default HTTPS port NO is 443 You can use the URL to access the camera https LAN IP +HTTPS port NOGo to Settings - Network - Port panel you can see and change the HTTP and HTTPS port NO
NOTEWhen logging in for the first time you will need to download and install the add-on
9
22 Wireless ConnectionThere are some ways of wireless connection EZLink connection soft AP connection and WPSconnection EZLink connection Use the mobile phones or other mobile devices to download APP then
connect the camera and the wireless router by the APP The procedure of the EZLink connectionplease refer to the Quick Installation Guide
Soft AP connection(only C1) Use the mobile device which can search for the wireless networkThen use the web browser to visit http1921681188 by the mobile device Follow the SetupWizard to finish the settings
WPS connection WI-FI Protected Set-up Press and hold the WPS button on your wireless routerand your camera within 60 seconds So that your camera and wireless router connect successfully
221 Soft AP Connection(Only C1)
To ensure that the ethernet cable and the camera is disconnected before you begin1 Start camera power on the indicator light of camera will light on2 Press the Soft AP button for 3-5 seconds The Network light begins to twinkle at very highfrequency(every 01 seconds)3 Use a terminal which could search the WLAN (desktop or laptop This part takes laptop as anexample) to search for the AP named C1_ for connection( indicate the last six letters ofcamerarsquos MAC ID )
IP Camera The WLAN page in the terminal device
4 After finishing Soft AP connection use the web browser of the terminal to visit http1921681188
5 Log in the camera ( Default username is admin with no password ) When log in for the first time you
Soft AP Button
10
need to change the username and password
6 After logging in for the first time it will go to Setup Wizardrdquo automatically Please set the basicparameters of the camera such as camera name camera time wireless settings (The camera connectto your wireless router Wireless Network List - enter the password of your wireless router ) IPconfiguration
Input the New usernameNew password andConfirm the password
11
12
Notes We recommend you to choose to manually set the IP when you know some knowledge of the
network It needs about 1 minute to connect the camera to your router
7 After completing the setup wizard you should press the Soft AP button for 3-5 seconds to cancel theSoft AP connection mode this is located on the back of your camera The Network light begins to slowlyflash(once per second) it indicates that the wireless connection is successful
8 Please make sure that the wireless device connect your laptop to the router which your camera has
13
connected to
9 Open the CD named ldquoFOSCAMrdquo go to the folder ldquoEquipment Search Toolrdquo and find the folder ldquoForWindows OSrdquo or ldquoFor Mac OSrdquo Copy and paste the file to your wireless device or drag it onto yourdesktop
Notes You could also download the Equipment Search Tool from our website wwwfoscamcom for free If you have multiple cameras and you cannot determine which camera you are going to log in
Please match the Device MAC address on the search tool with the MAC address on the labelpasted of each camera
10 Double-click the camera list here and your default browser will open up to the login page Input theusername and password you has changed Then you will see the live video of your baby on theinterface
Main stream offers thehighest quality video whileSub stream offers lessquality but also less delaywhen viewing
14
Now you could use your camera in LAN
Note64-bit browser is not supported
222 WPS (WI-FI Protected Set-up)
Before using WPS wireless connection you need to
Make sure that your wireless router has the WPS function and has been properly connected to theInternet
WPS button on the wireless router is typically located on the front panel or rear panelTP-LINKrouters WPS button is called QSS (Quick Security Setup)
Make sure that the ethernet cable and the camera is disconnected
(1) Press and hold the WPS button for three seconds The Network light of the camera begins to twinkleat high frequency (every 04 seconds)
(2) Press and hold the WPS button for three seconds on your wireless router within 60 seconds Thenthe camera will automatically create a secure wireless connection to your router in about 60seconds
(3) The Equipment Search Tool will search the camerarsquos LAN IP Make sure the PC and the camerashare the same subnet
NOTE The security mode of router cannot be WEP or else the WPS settings may be failed
23 Access the Camera in WAN
231 Static IP Addresses
Users with static IP addresses do not need to set DDNS service settings for remote access After youhave finished connecting the camera using the LAN IP address and port forwarding you can access thecamera directly from Internet using the WAN IP address and port number
WPS Button
15
How to Obtain the WAN IP address from a public website To obtain your WAN IP address enter the following URL in your browser httpwwwwhatismyipcomYour current WAN IP will be shown on the webpage
232 Remote Access
If you want to access your camera by web browser outside of your LAN you need to configure followingconfigurations
1 Choose ldquoSettingsrdquo on the top of the camera web page then go to the ldquoNetwork gt IP Configurationrdquosection on the left side of the screen then uncheck the Obtain IP DHCP
2 Enable UPnP and DDNS in the camerarsquos settings page We recommend you to use the DDNS byfactory default
IP Address Set this in the same subnetas your computer or keep it as defaultSubnet Mask Keep it as defaultGateway and DNS Server Set it to theIP address of your router
16
3 You can see the port of your camera here If you want to set Remote Access for several cameras onthe same network you will need to change the HTTPS port for each camera
4 If the UPnP of the router has been enable you do not need to perform following steps Otherwiseyou need to select one of the following methods to configure port forwarding on your router For thesesteps we will be using the TP-LINK brand wireless router as an example
If there is a UPnP function in your routerChoose ldquoForwarding gt UPnPrdquo make sure that the Current UPnP Status is Enabled
Select Yes and click Save
Click Enable DDNS and click SaveThe content in the Manufacturersquos DDNScolumn is the domain name of your camera
17
If there is no UPnP function in your routerYou need to manually add port forwarding refer to the following steps You need go to the ldquoForwarding gtVirtual Serversrdquo panel for setup
Click Add New
Input the port and IP address ofyour camera and click Save
Here you have finished thePort Forwarding setup
18
5 Now you can access your IP camera by httpsdomain name HTTPS port via the Internet
24 Using the VLC playerThe camera supports RTSP streaming here you can view the camera by VLC player
RTSP URL rtsp [user name][password]IPPort numbervideostream
The part in the square brackets can be omitteduser name amp password The user name and password to access the camera This part can beomittedIP WAN or LAN IP addressPort NO If there is the RTSP port number on the Port page you must only use RTSP port numberotherwise you must only use http port numberVideo stream Three modes are supported video Main video Sub and audio Video Sub is a betterchoice in bad network condition If you select audio you can only hear sound without seeing picture
For exampleIP 192168111RTSP Port number 554User name adminPassword 123
Enter either one of the following four URLs in the VLC1rtspadmin123192168111554videoMain2rtsp 192168111554videoMain3rtsp123192168111554videoMain4rtspadmin192168111554videoMain
Open the VLC and go to ldquoMediardquo--rdquoOpen Network Streamrdquo option then enter the URL in VLC
19
Sometimes you may need to enter the user name and password for another time Click OK and you cansee the real-time preview
20
If you cannot play the video in the VLC player please check the port mapping You can read QuickInstallation Guide about how to configure port forwarding
NOTEIf you modify the camerarsquos username or password you had better reboot the camera to apply the newusername and password in authentication in the VLC
25 IP camera connection to the server
Device supports ONVIF 221 protocol You can easily access NVR with ONVIF or server with ONVIF
3 Surveillance Software GUIPlease refer to the section 21 if you install the camera for the first time You can start to learn aboutsoftware operation in the computer
21
31 login Window
Section1 Enter the Username and passwordThe default administrator username is ldquoadminrdquo with no password please change the password the firsttime you use and prevent unauthorized users login the camera
Section2 StreamThe camera supports two stream modes Main stream and sub stream Select Main stream if you wantto access the camera from LAN and sub stream will be better if you want to access the camera fromInternetNoteSelect sub stream to ensure a more fluent video under narrow network bandwidth
Section3 Select the languageYou click on the language dropdown list to select language
Section4 login the cameraClick ldquoLoginrdquo button
NOTEWhen setting up your camera for the first time it will request that you modify the default usernameandor password if both are still set to default Input the new username and password click Modify tocomplete the modification You will now use the new username and password to login to the camera inthe future
22
32 Setup WizardYou will go toldquoSetup Wizardrdquoautomatically after your first-login where you can set the basicparameters of camera such as camera name camera time wireless settings IP configuration
33 Surveillance Window
Section 1 FOSCAM Logo Live Video SettingsPlayback
1
2
5
3
7
4
6
23
FOSCAM LOGO
Path to surveillance window Click this button to go back to the surveillance window
Path to Administrator Control Panel Click it to go to Administrator Control Panel and do
advanced settings
Click this button to go back to the Playback panel to view the stored audio files
stored in the SD Card
Section 2 Multi-Device Window
The firmware inside the camera supports up to 9 cameras being monitored at the same time You canadd other cameras in multi-device setting
Section 3 Mode Stream HDR Mirror Flip buttons Zoom
Mode1) 50HZ ---------Indoor surveillance (Region Europe China)2) 60HZ ---------Indoor surveillance (Region USA Canada)3) Outdoor------Outdoor surveillance
StreamThe default stream supports multiple modes For example HD Mode720P23fps2M meanings Streamtype Resolution Maximum frame rate Bit rate (Different models support different specific mode )
Stream type It is used to identify the stream typeResolutionThe bigger the resolution the better of the image quality is If you are accessing the camera viainternet and want to get more fluent video streaming please select resolution VGAMaximum frame rateYou should lower frame rate when the bandwidth is limited Normally when the frame rate above 15you can achieve fluently video The maximum frame rate for each model is different please see theldquoSpecificationsrdquoBit rateGenerally speaking the larger the bit rate is the clearer video will become But the bit rateconfiguration should combine well with the network bandwidth When the bandwidth is very narrowand bit rate is large that will lead to video can not play well
You can reset the stream type on Settings-gt Video-gt Video Settings panelAfter changing please reboot the camera and you can see the modification
HDR(Only R2)HDR stands for High Dynamic Range It usually refers to the method of capturing images having
24
ldquogreater dynamic range between the lightest and darkest areas of an image than current standarddigital imaging methods or photographic methodsrdquo You can select ldquoonrdquo from the dropdown list undersunlight or with bright background
WDR(Only C2)In surveillance WDR (Wide Dynamic Range) is intended to provide clear images even underbacklighting where the intensity of illumination varies a lotmdashnamely when there are very bright andvery dark areas simultaneously in the cameras field of view
ldquoZoom inrdquo or rdquoZoom outrdquo(Only R2C2)
Device Support 8x zoom feature click or The focal length of the camera lens will be larger or
shrink you can adjust the focus distance to the target object size access to high-definition screen
(Only C2) When click the button the PanTilt Control control button will pop up You can adjust
direction of the camera when the focal length of the camera lens has been larger When the camerafocal length reduced to a minimum the PanTilt Control control button will disappear
PanTilt Control(only R2C2)
1----- Up control button 2-----Down control button3------Left control button 4------Right control button5----- Up-Left control button6----- Up-Right control button7----- Down-Left control button8----- Down-Right control button
Click this button and go to center
Section 4 Cruise Preset settings(Only R2)Cruise Settings
25
The default cruise tracks have two types Vertical and Horizontal
Vertical The camera will rotate from up to downHorizontal The camera will rotate from left to right
Start cruise Stop cruise
If you want to define or change the cruise trace please go to Settings PTZ Preset Settings panel
How to do cruiseFirstly Select one track in the track dropdown list
Secondly Click Start cruise button the camera will cruise following the predefined pathThirdly Click stop button and finish cruising
Preset settings
IPCam supports 16 preset positions which is considered enough for DIY home amp small businesssurveillance marketThe default preset position is Topmost Bottom most Left most right most you can add other presetpositions
Add Click this icon to save the position you need the camera to remember
Delete Select one preset position and click this button to delete it
GO Select one preset position in the preset drop-down list and click Go to make the camera
Select one of these
26
move the preset position
How to do preset positionFirstly move the camera and stop at a desired place where you want make preset position
Secondly click button and enter a descriptive name for the preset position The preset position
cannot contain special characters Then click OK to save it If you want to reset the preset position clickCancelAfter that you can move the camera and stop at another place and set another preset position You cando all the 16 preset positions with this methodIf you want to see one preset position you have set only select the preset position name from the preset
drop-down list and click go button the camera will go to the preset position
Section 5 IR LED Lights Color Adjustment
Click Infra led and there are three modes to adjust the infrared led Auto Manual and ScheduleAuto Select it and the camera will adjust the infra led (on or off) automaticallyManual Select it and you can turn on or turn off the infra led manuallySchedule Select it and the IR led light will be off at the schedule period If you want to define or changethe IR led lights schedule time please go to Settings---gtVideo---gt IR LED Schedule page
Color AdjustmentIn this page you can tune Hue Brightness Contrast Saturation and Sharpness to get higher quality
Section 6 OSDIf you have added time and camera name in the video you can see it in the live windowGo to Settings ---Basic settings---Camera name panel and you can change another device nameThe default device name is anonymousGo to Settings ---Basic settings---Camera time panel and adjust the device timeGo to Settings ---Video---On Screen Display panel you can add or no add OSD
27
Section 7 Play Stop Talk Audio Snap Record Full screen button
1----- Play Click it to play the video of the camera2----- Stop Click it to stop the video of the camera
3----- Talk Click the button and the icon will become to then talk to the microphone thatconnected with PC people around the camera can here your voice Click the icon again and stop talking
4----- Audio Click this icon the icon will become to you can hear the sound around the camera
by the earphone or speakers that connected with PC
5----- Adjusting the sound Click this icon the icon will become to youcan change the sound of the camera
6----- Snapshot Click it to make snapshot and it pop-up a window which picture you snapshot rightclick in the window and save the picture to anywhere you want
7----- Record Click the icon and the camera start recording you can see a green dot in the livewindow Click again and stop recording The default storage path is CIPCamRecord You can changethe storage path Go to Settings- gtRecord-gtStorage Location panel
8----- Full Screen Click it to make full-screen or you can double click the surveillance screen to makefull-screen Double click again and exit full-screen
Onscreen Mouse ControlRight click the mouse and you can adjust the screen ration full screen and Zoom up
28
Keep ration Select it and the camera will adjust the size of live window based on the the computermonitor automatically Sometimes there is a black border around the video please select Keep ration toget a better visual quality Full Screen Select it and Click it to make full-screen press ESC and exit full-screenZoom up Select it and you can see a bigger screen than beforeFirst Method Here is a convenient and fast solution to Zoom updown screen by Clicking Video Screenand adjusting Mouse pulley or by press the CTRL key and click the mouse left buttonSecond Method Click it and the live view will be digital zoomed up then click Zoom Down and the liveview back to original size
When you select the Full Screen then click right mouse there is a Screen PTZ button
29
Click the Screen PTZ button and put the mouse on the screen to indicate the camera move direction youprefer press the left mouse the camera will move to the corresponding direction Loosen the mouse andstop moving Press Esc button or double click right mouse and cancel the function
NOTE For Mac OS the plugin cannot support Onscreen Mouse Control so you cannot allow to use it
4 Advanced Camera SettingsClick the button ldquoSettingsrdquo goes to Administrator Control Panel to make advanced camera settings
41 Setup WizardPlease go to section 32 to find the way to set it
42 StatusStatus contains four columns Device Information Device Status Session Status and Log it will showyou various information about your camera
30
421 Device Information
Camera Model The camera model NO
Camera Name The Device Name is a unique name that you can give to your device to help you identifyit Click Basic Settings and go to Camera name panel where you can change your camera name Thedefault device name is anonymous
Camera ID Display the wired MAC address of your camera For example Device ID is 000C5D00008the same MAC ID sticker is found at the bottom of the camera
Camera Time The system time of the device Click Basic Settings and go to Camera time panel andadjust the timeSystem Firmware Version Display the System Firmware version of your cameraApplication Firmware Version Display the application firmware version of your cameraPlug-In Version Display the plug-in version of your camera
422 Device Status
On this page you can see device status such as Alarm status Record Status DDNS status WIFI statusand so on
31
423 Session Status
Session status will display who and which IP is visiting the camera now
424 Log
The log record shows who and which IP address accessed or logout the camera
32
Reboot the camera and clear the log records
43 Basic SettingsThis section allows you to configure your camerarsquos Name Time Mail User account and Multi-Device
431 Camera Name
You can define a name for your camera here such as apple Click Save to save your changes The aliasname cannot contain special characters
432 Camera Time
This section allows you to configure the settings of the internal system clocks for your camera
33
Time Zone Select the time zone for your region from the dropdown menuSync with NTP server Network Time Protocol will synchronize your camera with an Internet time serverChoose the one that is closest to your cameraSync with PC Select this option to synchronize the date and time of the Network Camera with yourcomputerManually The administrator can enter the date and time manually Note select the date and time formatuse DST Select the daylight saving time from the dropdown list
Click Save button and submit your settings
NOTE If the power supply of camera is disconnect you need set the camerarsquos time again
433 User Accounts
Here you can create users and set privilege visitor operator or administrator The default useraccount is admin with a blank password You can enter the users accounts of visitor operator andadministrator Manually
34
How to change the passwordFirstly select the account which you want to change the password then select ldquoChange passwordrdquoenter the old password and the new password lastly click modify to take effect
How to add account Select one blank column then enter the new user name password and privilege last click Add to takeeffect You can see the new added account on the Account list
35
Delete Select the account which you want to delete then click Delete button to take effectNOTE The default admin account cannot be deleted but you can add other administrator users
How to change the username Firstly select the account which you want to change the username then select ldquoChange usernamerdquoenter the new password lastly click modify to take effect
36
434 Multi-Camera
If you want to view multi-surveillance screens on one window you need to login one camera and set itas the main device and do Multi-Device Settings add other cameras to the first one camera Before youdo multi-cams settings you need to assign different port such as 81 82 83 84 85 86 87 88 to thecameras if there is 8 cams installedThe firmware within the camera can support a maximum of 9 devices monitoring all at the same timeThis page you can both add FOSCAM MJPEG and H264 series cameras to the first camera and viewmulti-surveillance screen on one window
Add cameras in LANIn Multi-Device Settings page you can see all devices searched in LAN The 1st Device is the defaultone You can add more cameras in the list in LAN for monitoring The camerarsquos software supports up to 9IP Cameras online simultaneously Click The 2nd Device and click the item in the Device List in LAN theAlias Host and Http Port will be filled in the boxes below automatically Enter the correct username andpassword then click Add Add more cameras in the same way
37
Camera Model Our Company produces two series cameras MJPEG and H264 Here will show youwhich series the camera belongs to
1 Click it camera model aliashost and HTTP Port will befilled in the following boxesautomatically
2 Enter the User name andpassword of the 2nd camera
3 Click Add to take effect
38
Back to Surveillance Windows and click Four Windows option you will see four cameras you added
Add cameras in WANIf you want to view all cameras via the internet(remote computer) you will need to add them using DDNSdomain name Firstly make sure all of the cameras you added can be accessed through the internet(The way to configure DDNS is in chapter 444)Login to the first camera using a DDNS domain name and port
39
Click Multi-Device Settings Choose The 2nd Device Fill in the 2nd camerarsquos name DDNS domainname port number Enter user name and password and then choose Add
1 ---- The camera model MJ or H2642 ---- The 2nd camerarsquos name3 ---- Fill in the 2nd camerarsquos DDNS host not LAN IP
NOTE The MJ series have the same HTTP Port NO and Media Port NO
4 ---- Enter the 2nd camerarsquos user name and password5 ---- Click Add button and to take effect
NOTE Here the Host must be entered as the second camerarsquos DDNS domain name not its LAN IP
Use DDNS domain
name and port to login
Make sure each camera you need add
could login with DDNS name and port
40
Return to video window You will see all of the cameras accessible through the internetWhen you are away from home you can use the first camerarsquos DDNS domain name and port to view allthe cameras via internet
435 Status Light
You can enable or disable status light
41
44 NetworkThis section will allow you to configure your camerarsquos IP PPPoE DDNS Wireless Settings UPnP andPort
441 IP Configuration
If you want to set a static IP for the camera please go to IP Configuration page Keep the camera in thesame subnet of your router or computer
Changing settings here is the same as using the Equipment Search ToolIt is recommended that you use the subnet mask gateway and DNS server from your locally attachedPC If you donrsquot know the subnet mask gateway and DNS server you can check your computerrsquos localarea connection as followsControl Panel rarrNetwork Connections rarrLocal Area Connections rarrChoose Support rarrDetails
42
If you donrsquot know the DNS server you can use the same settings as the Default Gateway
442 Wireless Settings
Step 1 Choose ldquoSettingsrdquo on the top of the camera interface and go to the ldquoNetworkrdquo panel on theleft side of the screen then click ldquoWireless Settingsrdquo
Set the same Subnet Mask andgateway of the camera with yourPC
There are two DNS servers Youcan set any of them Same withgateway is also OK
43
Click the Scan button and the camera will detect all wireless networks around the area It should alsodisplay your router in the list
Step 2 Click the SSID (name of your router) in the list the corresponding information related to yournetwork such as the name and the encryption will be filled into the relevant fields automatically
You will only need to fill in the password of your network Make sure that the SSID Encryption and thepassword you filled in are exactly the same for your router
Click the Page number to see other wirelessnetworks devices if there are more than 10
Click the Scan buttonto search for wirelessnetworks
1 Click the SSID of your router andthe relevant information will be filledin the fields automatically
2 Enter the passwordof your router
44
Step 3 Please click on the Save button after all settings have been entered and disconnect the networkcable Never shut down the power of the camera until the IP camera is able to connect to the wirelessnetwork
The LAN IP address will disappear on the window of Equipment Search Tool when the camera isconfiguring a wireless connection Wait about 1 minute the camera should obtain a wireless connectionand the LAN IP of the camera will show again on the window of the Equipment Search Tool The IPaddress may have changed after the camera receives a wireless connection we recommend setting astatic local IP address if this IP address changes by right clicking the camera in Equipment Search Toolsetting a static IP and pushing OKCongratulations You have set up the wireless connection of the camera successfully
NOTE If you fail to make a wireless connection please refer to your seller or contact us directly forassistance
443 Soft AP Password Settings(Only C1)
For the safety of your camera we recommend you change the Soft AP password
444 DDNS
FOSCAM camera has embedded a unique DDNS domain name when producing and you can directlyuse the domain name you can also use the third party domain name
FOSCAM domain nameHere take test09myfoscamorg for example Go to option of DDNS on the Settings-gtNetwork panelyou can see the domain name
45
Now you can use http Domain name + HTTP Port to access the camera via internetTake hostname test09myfoscamorg and HTTP Port no 800 for example the accessing link of thecamera via internet would be http test09myfoscamorg800
Restore DDNS to factory If you have configured Third Party DDNS successfully but you want to useManufacturerrsquos DDNS again here click this button and start Manufacturerrsquos DDNS ServiceUser can also use third part DDNS such as wwwno-ipcom www 3322com
445 UPnP
The default UPnP status is closed You can enable UPnP then the camerarsquos software will be configuredfor port forwarding Back to the ldquoDevice Statusrdquo panel you can see the UPnP status
46
The camerarsquos software will be configured for port forwarding There may be issues with your routerssecurity settings and sometimes may error We recommend you configure port forwarding manually onyour router
446 Port
This camera supports HTTP Port HTTP Port is used to access the camera remotely If you want toaccess the camera and view the video the HTTP Port must both be configured correctly
HTTP port By default the HTTP is set to 88 Also they can be assigned with another port numberbetween 1 and 65535 But make sure they can not be conflict with other existing ports like 25 21
ONVIF port By default the ONVIF port is set to 888 Also they can be assigned with another portnumber between 1 and 65535(except 0 and 65534) But make sure they can not be conflict with otherexisting ports
HTTPS port The default port is 443 You can use the url to access the camera https IP + HTTPSport
RTSP port The default port is 554 The R2 does not have RTSP port
Another way to change the HTTP port NO
Step 1 Open the Equipment Search Tool select the camera you would like to change the port of right
47
click on the IP address and click on rdquoNetwork Configurationrdquo this brings up the network configurationbox as flowing figures
Figure 41
Figure 42
Step 2 Enter the username and password of the Administrator (default username is admin with a blank
password) and click ldquoOKrdquo to apply changes
Step 3 Wait around 10 seconds yoursquoll see that the camerarsquos LAN IP address has changed In ourexample it was changed to 2000 so we see http19216811102000 in Equipment Search Tool Alsothe LAN IP address is now fixed at a static IP address of http19216811102000 This IP address willnot change even if the camera is powered off and back on the camera will remain on this LAN IPaddress This is very important that a static LAN IP address is set or you may have problems later withremote access and seeing the camera remotely if the camera loses power and reconnects on a differentLAN IP address Make sure you set a static LAN IP address
Select which camerayoursquod like to change theport for and right click
Modify the Http Port
Enter the Username andpassword click OK
48
If the camera cannot be accessed please make sure the port forwarding is succeed
447 Mail Settings
If you want the camera to send emails when motion has been detected here Mail will need to beconfigured
1---- SMTP Server Port Transport Layer Security Enter SMTP server for sender SMTP port isusually set as 25 Some SMTP servers have their own port such as 587 or 465 and Transport LayerSecurity usually is None If you use Gmail Transport Layer Security must be set to TLS or STARTTLSand SMTP Port must be set to 465 or 25 or 587 which port you choose should be decided by whichTransport Layer Security you select2---- SMTP Username password ID account and password of the sender email address3---- Sender E-mail Mailbox for sender must support SMTP4---- Receiver Mailbox for receiver need not support SMTPyou can set 4 receivers5---- Save Click Save to take effect6---- Test Click Test to see if Mail has been successfully configured
49
Click Test to see if Mail has been successfully configured
If the test success you can see the Success behind the Test at the same time the receivers will receivea test mail
If the test fails with one of the following errors after clicking Test verify that the information you enteredis correct and again select Test 1) Cannot connect to the server2) Network Error Please try later3) Server Error4) Incorrect user or password5) The sender is denied by the server Maybe the server need to authenticate the user please check itand try again6) The receiver is denied by the server Maybe because of the anti-spam privacy of the server7) The message is denied by the server Maybe because of the anti-spam privacy of the server8) The server does not support the authentication mode used by the device
448 FTP Settings
If you want to upload record files and images to your FTP serveryou can set FTP Settings
50
Figure a
Figure b
FTP server If your FTP server is located on the LAN you can set as Figure aIf you have an FTP server which you can access on the internet you can set as Figure bPort Default is port 21 If changed external FTP client program must change the server connection portaccordinglyFTP Mode Here supports two modes PORT and PASVUsernamepassword The FTP account and passwordClick Save to take effectClick Test to see if FTP has been successfully configured
449 P2P
Access the IP Camera by Smart Phone (Android or iOS operating system)First of all you must open the P2P function of the IP Camera at ldquoSettings --gt Network --gt P2Prdquo
51
Foscam App named Foscam on App Store and Google Play for iOS and Android devices
NOTEIf the QR code scanning is not successful please input the UID on the bottom of the camera manually
45 VideoThis section allows you to configure Video stream settings On screen display and Snapshot settings
451 Video Settings
There are two ways to set the stream video settings They are main stream video settings and substream video settings
Enhanced Night video Definition(Only C1) The camera will automatically drop the frame to extendthe recording time in the night
52
Stream Type There are four types to identify different streams you have set If select the HD Mode theclearer video will become and it will take up more bandwidth If select the Smooth Mode the bandwidthis very narrow and bit rate is large that will lead to video can not play well The Equilibrium Model is avalue between HD Mode and Smooth Mode
Resolution The camera supports multiple types For example 960P 720P VGA The higher theresolution is the clearer video will become But the code flux will become larger too and it will take upmore bandwidth (The maximum frame rate for each model is different please see theldquoSpecificationsrdquo )
Bit Rate Generally speaking the larger the bit rate is the clearer video will become But the bit rateconfiguration should combine well with the network bandwidth When the bandwidth is very narrow andbit rate is large that will lead to video can not play well
Frame rate You should lower frame rate when the bandwidth is limited Normally when the frame rateabove 15 you can achieve fluently video
Key Frame Interval The time between last key frame and next key frame The shorter the duration themore likely you will get a better video quality but at the cost of higher network bandwidth consumption
Variable bitrate(Only C1) Select the Bit rate type to constant or variable If select Yes the camera willchange the video bit rate according to the situation but will not more than the maximum parameter BitRate If select No the Bit Rate is unchanged
Rate Control Mode(Only R2 C2)There are three rate control modesCBR Constant Bit Rate it means that the Bit Rate is constantVBR Variable Bit Rate the camera will change the video bit rate according to the situation but will notmore than the maximum parameter Bit RateLBR Low Bit Rate If you can select the LBR then you can slide the scroll bar to choose percentage ofthe bit rate By reducing the bit rate so that the camera can obtain a better image at low bandwidth
452 On Screen Display
This page is used to add timestamp and device name on the video
Display Timestamp
53
There are two options Yes or NO Select Yes and you can see the system date on the video
Display Camera NameThere are two options Yes or NO Select Yes and you can see the device name on the video
453 Privacy Zone(Only R2 C2)
This page is used to set some mask as privacy zone on the video
Allow On Screen Display MaskThere are two options Yes or NO Select yes and draw a mask area on the video the mask area will beblack on the video
Click OK button and return to the OSD page click Save to take effectBack to the surveillance window you can see the mask area as the following picture
The mask area
54
453 Snapshot Settings
On this page you can set the snapshot picturesrsquo image quality and the storage path
Manual snap Quality Low Middle and High The higher the quality the picture will be clearerPictures Save To FTP or SD card If you have done FTP and Alarm settings when alarming thecamera will snap pictures to the FTP or SD card automaticallyIf you select the FTP you can set the file name which the picture save to (Only C1)
Enable timing to captureTo enable capture interval follow the steps below1 Select Enable Motion detection
55
2 Capture intervalThe interval time between two captures3 Select the capture time
Capture anytimeClick the black button up the MON you will see all time range turn red When something moving inthe detection area at anytime the camera will capture
Specify an capture scheduleClick the week day words the corresponding column will be selected For example click TUE theall column of TUE turns to red that means during Tuesday whole day the camera will capture
Press the left mouse and drag it on the time boxes you can select the serial area4 Click Save button to take effect
454 IR LED Schedule
On this page you can set the schedule time for switching IR LED lights When parameter Mode is set tothe Schedule on the Live Video window at these schedule time the IR LED lights will be turned off
46 Detector
461 One Key Alert(Only R2 C2)
On this page you can turn on or off the alarm function you need
462 Action Detection
IP Camera supports Action Detection Alarm when the people has been detected the IP Camera willmake a alarm
56
Step 1 Enable Action detection function
Step 2 Sensitivity---- It supports five modes Lowest Lower Low Medium and High The higher thesensitivity the camera will be more easily alarmed Select one motion sensitivity
Step 3 Trigger interval--- The interval time between two motion detection
Step 4There are some alarm indicators
A Camera Sound and PC SoundIf the camera has connected with a speaker or other audio output device if you select Camera Sound orPC Sound when the motion has been detected the people around the camera will hear beep alarmsound
B Send E-mailIf you want to receive alarm emails when motion is detected you must select Send E-mail and set MailSettings first
C Take SnapshotIf you select this checkbox when the motion has been detected the camera will snap the live viewwindow as a still picture and load it to the FTP Make sure you have set FTP and set FTP as the storagepath in Video-gtSnapshot settings panel
57
Time interval The interval time between two pictures
D RecordingIf you select this checkbox when the motion has been detected the camera will record automaticallyand store the record files to the SD Card Make sure the camera has inserted SD card and you haveset the SD card as the Alarm record files storage path please go to Recordmdashgt Storage location pageto verify this settingsThe default alarm record time is 30s and pre-alarm record time is 5s please go to Recordmdashgt AlarmRecord page and change the alarm time settings
E Push message to the phoneIf you select this checkbox when the motion has been detected the camera will push the message tothe phone which has been connected the camera
Step 7 Set detection areaClick set detect area and it pop up a window then you can draw the detection area Click Back buttonafter settings When something moving in the detection area the camera will alarm
Step 8 Alarm Schedule① Alarm anytime when motion is detectedClick the black button up the MON you will see all time range turn red When something moving in thedetection area at anytime the camera will alarm
② Specify an alarm scheduleClick the week day words the corresponding column will be selected For example click TUE the allcolumn of TUE turns to red that means during Tuesday whole day when something moving in thedetection area the camera will alarm
Click this button and select all time range
58
③ Press the left mouse and drag it on the time boxes you can select the serial area
Step 9 Click Save button to take effectWhen the motion has been detected during the detection time in the detection area the camera willalarm and adopt the corresponding alarm indicators
NOTE You must set the detection area and detection schedule or else there is no alarm anywhereand anytime
463 Sound alarm
When the ambient sound over a certain decibel the sound alarm will be triggered
59
If the Sensitivity is set to ldquoHighrdquo the camera will detect the sound whose more than 55dbIf the Sensitivity is set to ldquoMediumrdquo the camera will detect the sound whose more than 65dbIf the Sensitivity is set to ldquoLowrdquo the camera will detect the sound whose more than 75dbIf the Sensitivity is set to ldquoLowerrdquo the camera will detect the sound whose more than 85dbIf the Sensitivity is set to ldquoLowestrdquo the camera will detect the sound whose more than 95db
47 RecordThis section will allow you to change the record files storage path and the record time
471 Storage Location
On this page you can change the alarm and manually recording storage path
60
Recording Location SD card or FTP Make sure the camera has been inserted the SD card Onthis page you can see the available space of the SD card
Local Recording Location For Windows OS the manual recording path is C IPCamRecord you canchange another one For MAC OS the manual recording path is IPCamRecord
Enter the local folder Click here You can enter the local storage folder
472 Alarm Recording
473 Local Alarm Recording
This page you can enable the local alarm record and Local Alarm record time
61
474 Schedule Recording
When the video is selected as FTP the device supports scheduled recordingWhen the parameter Recording Location is set SD Card on the Storage Location page you canconfigure parameters as shown in follow figure
When the video is selected as SD card the device supports pumping frame recordingWhen the parameter Recording Location is set SD Card on the Storage Location page you canconfigure parameters as shown in follow figure
62
Record full strategy When the SD card is full you can choose to cover the previous recording or stoprecordingAudio Record You can choose yes or no
NOTES Scheduled recording only supports video saved to the SD card or FTP server The schedule recording will stop while alarm recording is beginning and it will continue
automatically after alarm recording end You can refer to alarm schedule in Alarm about editing the time of recording Schedule
475 SD Card Management
This camera supports SD Card When you plug in the SD card during the camera work process please
63
reboot the camera again or else the SD Card may be cannot work well
The default storage path of alarm record files is SD card when the available size of SD card is less than256M the old record files will be deleted automatically
SD Card Management After click the button you should enter the username and password of thecamera Then you can manage the recording files of the camera in the SD card The SD cardmanagement is only effective when access the camera in LAN
Format(except C1) Click the button you can format the SD card Note that this will delete all files on theSD card
48 PTZ(Only R2)This page will allow you to change the pantilt speed and do cruise tracks settings
481 Pan amp Tilt Speed
There are five Pt speed types very fast fast normal slow and very slowly Select the desired PTZspeed type and click save buttonThere are three zoom speed types fast normal slow
64
482 Cruise SettingsThis section explains how to add delete alter one cruise track
Setting the Cruise ModeThere are two cruise mode Cruise time and Cruise LoopsCruise time Select Cruise time from Cruise Mode drop-down then you can set the Cruise time of thecameraCruise LoopsSelect Cruise Loops from Cruise Mode drop-down you can set the Cruise Loops ofthe cameraClick Save to take effect
Manage the Cruise TrackThere are two default cruise tracks Vertical and HorizontalVertical The camera will rotate from up to down
65
Horizontal The camera will rotate form left to right
Add Add one cruise track then click save buttonDelete Select one cruise track and delete itSave After you modify the Dwell time you should click Save button to take effect
Example
How to do add cruise tracks Firstly Click Add button and enter a descriptive name to identify the cruise track
Secondly On the lower left of the page you can see all preset points you have added Select onepreset point and click Add button you can see the preset point has been added to the cruise track on thecruise track page You need to add two or more preset points to the cruise track
Thirdly Click OK button and the cruise track will take effect
You can add other cruise track as the same method
For example I have added three preset points to the ldquotrack 1rdquo that means When I select the ldquotrack 1rdquoon the surveillance window the camera moves as the following track upright then Right Most last downleftYou can add preset on the left of the surveillance window
The new added track name
1 Select one preset point 2 Click Add button
Here you can see the preset pointhas been added to one track Andyou can set the stay time
66
After add the cruise track back to the surveillance window click Cruise her you can see all cruise tracksyou have added
After add the cruise track back to the surveillance window click Cruise her you can see all cruise tracksyou have added
The cruise tracks have addedto the ldquotrack 1rdquo
Add the preset
67
There are other buttons between the Preset points and Cruise track you can use these buttons to adjustthe order of preset points or adddelete one preset points in one cruise track
Add Select one preset points and add it to the selected cruise trackDelete Select one preset points you have added to one cruise track click deleteMove up down Select one cruise track adjust the order of preset points in one cruise track
AttentionConsidering the life time and thermal issue of the motor itrsquos not recommend to do long-time cruise
483 Start-Up Options
Here section will allow you to set the stop position after the camera rebootsIt supports three modes No self test Goto home position and Goto preset pointNo self test When rebooting the camera will not pan tiltGoto home position When rebooting the camera will pa Providing Central Management Software tomanage or monitor multi-cameras n tilt and stops at centerGo to Preset point Select one preset position and save it When rebooting the camera will pan tilt andstops at the preset position you have set
68
49 FirewallThis section explains how to control the access permission by checking the client PCrsquos IP addresses Itis composed of the following columns Block access from these IP addresses and Only allow accessfrom these IP addresses
Enable firewall If you select Only allow access from these IP addresses and fill in 8 IP addresses atmost only those clients whose IP addresses listed in the Only allow access from these IP addressescan access the Network Camera If you select Block access from these IP addresses only thoseclients whose IP addresses are in the IP list cannot access the Network CameraClick Save to take effect
410 SystemIn this panel you can backuprestore your camera settings upgrade the firmware to the latest versionrestore the camera to default settings and reboot the device
4101 Back-upamp Restore
Click Backup to save all the parameters you have set These parameters will be stored in a bin file forfuture useClick Browse and select the parameters file you have stored then click Submit to restore the restore the
69
parameters
4102 System UpgradeClick ldquoDownload the latest firmwarerdquo you will see the following screen And click ldquosaverdquo to save thefirmware on your computer locally
Your current firmware version will be displayed on your screen You may go to the Status DeviceInformation page to check for the latest firmware versions availableClick Browse choose the correct bin file and then click System upgradeDonrsquot shut down the power during upgrade After upgrading you can see the upgrade result
70
Upgrade Firmware by Equipment Search Tool
Double click the Equipment Search Tool shot icon select the Camera IP that you want toupgrade the firmware Then select Upgrade Firmware and enter the username and password choosethe firmware file and upgrade
Figure 43
CAUTION If your camera works well with the current firmware we recommend not upgrading Pleasedonrsquot upgrade the firmware unnecessarily Your camera may be damaged if misconfigured during anupgrade
71
NOTES Please ensure you have download the correct firmware package for your camera before upgrading
Read the upgrade documentation (readmetxt file) in the upgrade package before you upgrade Upon downloading the firmware check the sizes of the bin files They must match the size in the
readmetxt file If not please download the firmware again until the sizes are the same Yourcamera will not function correctly if a corrupt bin file is used
Normally only Device WEB UI need to be upgrade please do not try to upgrade the Device SystemFirmware
Never shut down the power of the camera during upgrade until the IP camera restart and getconnected
After upgrade successfully please uninstall the old plugin and re-install it then reset the camera tothe default factory settings before using the camera
4103 Patch InstallationClick Browse to select the correct patch file and then click Install Patch to install the patch Do notturn off the power during it installing After installing is complete you will receive a system prompt
4104 Factory Reset
Click All reset and all parameters will return to factory settings if selected This is similar to press theReset button on the bottom of the camera
4105 RebootClick Reboot System to reboot the camera This is similar to unplugging the power to the camera
Enable Periodic Maintenance(Only R2)You can choose the reboot period of the camera
72
5 PlaybackOn this page you can view the record files stored in the SD card
Section 1 Define the Record files time and Type
The storage path of record files
Here supports three types current day current month and All records Another
way select the time on the timeampdate manually
The type of records files Here supports two typs Normal record Alarm record
and All records
Click this button to search all record files satisfy the conditions you selected
Continuous Play Select the checkbox to play continuously all the record files
73
Section 2 Search record filesOn this panel you can see all record files satisfy the conditions you set
Section 3 PlayStopAudioFull screen buttonsPlease select one record file before use these buttons
Click this button to play the record files
Click this button to stop the record files
Open or stop audio
Click this button to make full screen and double click left mouse to exit full screen
6 Appendix
61 Frequently Asked Questions
611 Install the add-on of Firefox browser Google Chrome and IE
Chrome
74
75
76
77
612 Uninstall the add-on of Firefox browser Google Chrome and IE
Chrome
78
613 I have forgotten the administrator password
To reset the administrator username and password press and hold down the RESET BUTTON for 5seconds Upon releasing the reset button wait for 20 seconds the camera will reboot and the usernameand password will return to the factory default administrator username and password Please power onthe camera before resetDefault administrator username adminDefault administrator password No password
614 Camera can not record
When you use Windows7 or Vista you may be not able to do manually record or change the record pathbecause of the security settings of computerThere are two ways to resolve this problemPlease add the camera as a trusted site to resolve this issue The steps are IE browserToolInternet PropertiesSecurityTrusted sitesSitesAdd
79
Open IE browser then right click select ldquoRun as administratorrdquo
615 Subnet doesnrsquot match
Check whether your ipcamera in the same subnet of your computer The step is ControlPanelNetwork ConnectionsDbclick Local Area Connections ChooseGeneralPropertiesCheck subnet mask IP address and gateways When you set IP address pleasemake sure they are in the same subnet Otherwise you cant access camera
616 No Pictures Problems
The video streaming is transmitted by the ActiveX controller If ActiveX controller isnrsquot installed correctlyyou will see no video image You can resolve this problem by this wayDownload ActiveX controller and set the safety property of IE in the PC when you view it first time IEbrowserToolInternet ProperSecurityCustom LevelActiveX control and Plug-ins Three optionsof front should be set to be ldquoEnablerdquo The ActiveX programs read by the computer will be stored AsfollowsEnable Download unsigned ActiveX controlsEnable Initialize and script ActiveX controls not marked as safeEnable Run ActiveX controls and plug-ins
If you allow the ActiveX running but still could not see living video Please change another port numberto try Donrsquot use port 88
80
NOTE Make sure that your firewall or anti-virus software does not block the camera or ActiveX If youcould not see video please shut down firewall or anti-virus software to try again
617 Canrsquot access IP camera in internet
There are some reasons1ActiveX controller is not installed correctly2The port which camera used is blocked by Firewall or Anti-virus software Please change another portnumber and try again3Port forwarding is not successfulCheck these settings and make sure they are correct
618 UPnP always failed
UPnP only contains port forwarding in our recent software Sometimes it may be failed to do portforwarding automatically because of firewall or anti-virus software It also has much relation with routerrsquossecurity settings So we recommend you do port forwarding manually You can view your camera ininternet successfully after you do port forwarding manually in your router
619 Camera can not connect wireless
If your camera could not connect wireless after you set wireless settings and plug out the cable Pleasecheck whether your settings are correct or notNormally camera canrsquot connect wireless mainly because of wrong settingsMake sure broadcast your SSID use the same encryption for router and camera
6110 Canrsquot see other cameras listed in multi-device when using remote
access
If you want to view all the cameras via the WAN verify that each camera added in the multi-devicesettings can be accessed by using the DDNS name and port number Use the DDNS domain name notthe camerarsquos LAN IP (For more details see How to add cameras in WAN)
62 Default ParametersDefault network ParametersIP address obtain dynamically
81
Subnet mask obtain dynamicallyGateway obtain dynamicallyDDNS Embedded FOSCAM domain nameUsername and passwordDefault admin username admin with a blank password
63 Specifications
ITEMS C1
Image SensorSensor High Definition Color CMOS Sensor
Display Resolution 1280 x 720 (1Megapixels)
Min Illumination 0 Lux (With IR Illuminator)
Lens
Lens Type Glass Lens
focal length f28mm
Aperture F24
Diagonal angle of view 115deg
Horizontal view angle 100deg
Video
Image Compression H264
Image Frame Rate 25fps(VGA) 23fps(720P) downward adjustable
Resolution720P(1280 x 720) VGA(640 x 480) VGA(640 x 360)QVGA(320 x 240) QVGA(320 x 180)
Stream dual stream
Image adjustmentThe hue brightness contrast saturation sharpness areadjustable
Flip image flip and mirror
Infrared mode Automatic or manual
manual PanTilt Angle Horizontal350deg amp Vertical 180deg
Night visibility 11pcs IR-LEDs night vision range up to 8 metres
Audio InputOutputSupports two-way audioBuilt-in Mic amp Speaker
Audio Compression PCMG726
Network
Ethernet One 10100Mbps RJ45 port
Wireless Standard IEEE80211bgn
Data RateIEEE80211b 11Mbps(Max)IEEE80211g 54Mbps(Max)IEEE80211n 150Mbps(Max)
Wireless Security WEP WPA WPA2
WPS Supports EZLink wireless setup
82
Network ProtocolIPTCPUDPHTTPHTTPSSMTPFTPDHCPDDNSUPnPRTSPWPS
Remote Access P2P DDNS
SystemRequirements
Operating SystemMicrosoft Windows XP Vista 7 8Mac OSiOSAndroid
Browser
Microsoft IE8 and above version or compatible browserMozilla FirefoxGoogle ChromeApple Safari
OtherFeatures
Motion Detection Alarm via E-Mail upload alarm snapshot to FTP
PIR Infrared human body sensor
User Accounts Three levels user role
Firewall Supports IP Filtering
Storage 32G Micro SD card local and FTP storage
Reset Reset button is available
PowerPower Supply DC 5V10A
Power Consumption 45W(Max)
Physical Dimension(LxWxH) 7070120mm
Net Weight 170g
Environment
Operating Temperature-10degC ~ 50deg(14degF ~ 122degF)
Operating Humidity 20 ~ 85 non-condensing
Storage Temperature -20degC ~ 60deg (-4degF ~ 140degF)
Storage Humidity 0 ~ 90 non-condensing
Certification CE FCC RoHS
Warranty Limited 2-year warranty
ITEMS R2
Image Sensor
Sensor Type 13 CMOS
Display Resolution 1920 x 1080 (20 Megapixels)
Frame Rate 30fps
Min Illumination 0 Lux (With IR Illuminator)
Lens
Lens Type f28mmF26
Angle of ViewHorizontal90degDiagonal 110deg
Night Vision 13pcs IR-LEDs night vision range up to 8 metres
VideoImage Compression H264
Resolution1080P(1920x1080)720P(1280 x 720) VGA(640 x 480)QVGA(320 x 240)
83
Stream dual stream
Image adjustmentThe hue brightness contrast saturation sharpness areadjustable
Flip image flip and mirror
Infrared mode Automatic or manual
manual PanTilt Angle Horizontal300deg amp Vertical 100deg
Night visibility 13pcs IR-LEDs night vision range up to 8 metres
Audio InputOutputSupports two-way audioBuilt-in Mic amp Speaker
Audio Compression PCMG726
Network
Ethernet One 10100Mbps RJ45 port
Wireless Standard IEEE80211bgn
Data RateIEEE80211b 11Mbps(Max)IEEE80211g 54Mbps(Max)IEEE80211n 150Mbps(Max)
Wireless Security WEP WPA WPA2
Wireless Setup Supports EZLink wireless setup
Network ProtocolIPTCPUDPHTTPHTTPSSMTPFTPDHCPDDNSUPnPRTSPWPSONVIF
Remote Access P2P DDNS
SystemRequirements
Operating System Microsoft Windows XP 7 8Mac OSiOSAndroid
Browser IE8 and above versionFirefoxChromeSafari
OtherFeatures
Motion Detection Alarm via E-Mail upload alarm snapshot to FTP
HDR Improve image clarity in complex scenario
Magic Zoom Picture zoom function
User Accounts Three levels user role
Firewall Supports IP Filtering
Storage 64G Micro SD card local and FTP storage
Reset Reset button is available
PowerPower Supply DC 5V20A
Power Consumption <6W
PhysicalDimension(mm) 74(L)times74(W)times119(H)
Net Weight 290g
Environment
OperatingTemperature -10degC ~ 50deg (14degF ~ 122degF)
Operating Humidity 20 ~ 85 non-condensing
Storage Temperature -20degC ~ 60deg (-4degF ~ 140degF)
Storage Humidity 0 ~ 90 non-condensing
Certification CE FCC RoHS
Warranty Limited 2-year warranty
84
ITEMS C2
Image Sensor
Sensor Type 13 CMOS
Display Resolution 1920 x 1080 (20 Megapixels)
Frame Rate 30fps
Min Illumination 0 Lux (With IR Illuminator)
LensLens Type f28mmF26
Angle of ViewHorizontal110degDiagonal 120deg
Video
Image Compression H264
Resolution1080P(1920x1080)720P(1280 x 720) VGA(640 x 480)QVGA(320 x 240)
Stream dual stream
Image adjustmentThe hue brightness contrast saturation sharpness areadjustable
Flip image flip and mirror
Infrared mode Automatic or manual
Manual PanTilt Angle Horizontal360deg amp Vertical 180deg
Night visibility High performance IR-LEDs night vision range up to 8 metres
Audio InputOutputSupports two-way audioBuilt-in Mic amp Speaker
Audio Compression PCMG726
Network
Ethernet One 10100Mbps RJ45 port
Wireless Standard IEEE80211bgn
Data RateIEEE80211b 11Mbps(Max)IEEE80211g 54Mbps(Max)IEEE80211n 150Mbps(Max)
Wireless Security WEP WPA WPA2
Wireless Setup Supports EZLink wireless setup
Network ProtocolIPTCPUDPHTTPHTTPSSMTPFTPDHCPDDNSUPnPRTSPWPSONVIF
Remote Access P2P DDNS
SystemRequirements
Operating System Microsoft Windows XP 7 8Mac OSiOSAndroid
Browser IE8 and above versionFirefoxChromeSafari
OtherFeatures
Motion Detection Alarm via E-Mail upload alarm snapshot to FTP
HDR Improve image clarity in complex scenario
Magic Zoom a Magic digital zoom rivaled Optical zoom
User Accounts Three levels user role
Firewall Supports IP Filtering
85
Storage 64G Micro SD card local and FTP storage
Reset Reset button is available
PowerPower Supply DC 5V10A
Power Consumption 48W(Max)
PhysicalDimension(mm) 7070120mm
Net Weight 160g
Environment
OperatingTemperature -10degC ~ 50deg (14degF ~ 122degF)
Operating Humidity 20 ~ 85 non-condensing
Storage Temperature -20degC ~ 60deg (-4degF ~ 140degF)
Storage Humidity 0 ~ 90 non-condensing
Certification CE FCC RoHS
Warranty Limited 2-year warranty
Attention Power adapter should be used between 0-40 and 5-90 relative humidity
64 CE amp FCCElectromagnetic Compatibility (EMC)FCC Statement
This device compiles with FCC Rules Part 15 Operation is subject to the following twoconditions This device may not cause harmful interference This device must accept any interference received including interference that may cause undesired
operation
This equipment has been tested and found to comply with the limits for a Class B digital device pursuantto Part 15 of the FCC Rules These limits are designed to provide reasonable protection against harmfulinterference when the equipment is operated in a commercial environment This equipment generatesuses and can radiate radio frequency energy and if not installed and used in accordance with theinstallation manual may cause harmful interference to radio communications Operation of thisequipment in a residential area is like to cause harmful interference in which case the user will berequired to correct the interference at his own expense
FCC CautionAny changes or modification not expressly approved by the party responsible for compliance could voidthe userrsquos authority to operate this equipmentThis equipment complies with FCC radiation exposure limits set forth for an uncontrolled environment
86
This equipment should be installed and operated with minimum distance 20cm between the radiatorampyour bodyThis transmitter must not be co-located or operating in conjunction with any other antenna or transmitter
CE Mark Warning
This is a Class B product In a domestic environment this product may cause radio interference inwhich case the user may be required to take adequate measures
65 WarrantyShenZhen FOSCAM Intelligent Technology Limited(FOSCAM) values your business and alwaysattempts to provide you the very best of serviceNo limited hardware warranty is provided by FOSCAM unless your FOSCAM product (product) waspurchased from an authorized distributor or authorized reseller Distributors may sell products toresellers who then sell products to end users No warranty service is provided unless the product isreturned to an authorized return center in the region where the product was first shipped by FOSCAM orto the point-of-purchase which may have regional specific warranty implicationsIf you purchase your FOSCAM product from online store please contact the point-of-purchaseand ask for returnreplacementrepair service
Hardware Warranty Information
FOSCAM provide 2-year limited warranty for naked product and 6-month limited warranty foraccessories
Limited Hardware Warranty
FOSCAM products are warranted to be free from manufacturing defects in materials andworkmanship starting from the shipping date of FOSCAM
This limited hardware warranty does not cover Software including the software added to the products through our factory-integration system
software that included in the CDetc Usage that is not in accordance with product instructions Failure to follow the product instructions Abuse firmware upgrade without the authorized technicianrsquos guidance Normal wear and tear
Return Procedures
Please read FOSCAM warranty policy amp policy of your reseller first before sending items back topoint-of-purchase
Customer must first contact point-of-purchase to obtain a Return Merchandise Authorization (RMA)
87
number before returning the product If the product you received is suspected to be defective andthe product warranty has not expired The RMA number will allow your reseller to track your returnmuch easier and help them expedite processing your request
After receiving your RMA case number pack the item(s) very well with the original box and all theoriginal accessories included such as power adapters brackets cables manuals and driver CDdisks
Write your RMA number and the return reason (the problem of the product) on the warranty cardalong with the complete package to send them back
Replacement Services
If customers ask for replacement service please contact point-of-purchase and follow theirpolicy
Our technicians will inspect all items returned for replacement requests If the retuned product isfound in working order we will return the same item received However customers shall beresponsible for all shipping amp handling charges incurred for getting the units back to customers
If returned products are found defective we will replace the product and assume the shipping costfor sending back the replacement unit to customers
If for any reason we are unable to provide a replacement of the original returned item(s) You willhave a choice for a ldquoSubstituterdquo item at the same equal value
We do not provide exchange and replacement due to normal hardware upgrade according themarket after 14 days after the product is delivered
Our technicians will test the product before send out the replacement any other demand for morethan two times replacement for the same product during replacement limit will be rejected
Replaced products are warranted from the balance of the former warranty period
Warranty Forfeiture
Warranty is void if purchase from unauthorized distributor or reseller Warranty is void if trade-mark serial tags product stickers have been removed altered or tampered
with Warranty is void for mishandling improper use or defacing the product Abuse firmware upgrade without the authorized technicianrsquos guidance Warranty is void for physical damage altered either internally or externally improper or inadequate
packaging when returned for RMA purposes Warranty is void if damage has resulted from accident dismantle abuse or service or modification
by someone other than the appointed vendor souse fission or the spare part has been over theperiod of warranty
Warranty is void if product is damaged due to improper working environment or operation (Forexample improper temperature humidity unusual physical or electrical stress or interferencefailure or fluctuation of electrical power static electricity using wrong power adapter etc)
Warranty is void if damaged by the use of parts not manufactured or sold by FOSCAM Damage caused by improper installation of third-party products Warranty is void if damaged for irresistible cause such as earthquake fire lightning flood etc Product beyond limited warranty
Shipping Fee
88
If products are defective or damaged under normal use or operation in the replacement limitdistributors or resellers are responsible for the shipping cost the product back to customerscustomers should assume the shipping cost send the product to the point-of-purchase
During replacement limit if customers ask for replacement due to the product does not fit forcustomerrsquos personal expectation customers should responsible for both shipping fee
Customers shall be responsible for both shipping fee if their product beyond the replacement limitbut still in warranty limit
Repair Service Out Of Warranty
FOSCAM provide extra repair service for product that out of warranty it is chargeable The total feecontains device cost and service fee Device cost (including accessories) is the standard uniformprice provide by FOSCAM
Different region may have different service fee please contact the point-of-purchase to confirm thatbefore you ask for this service
Our technicians will quote the total price after detect the product If customers refused to repair afterthe quotation customers need pay for the test fee $35hour If agree with the quotation test will befree
Repaired product out of warranty will obtains 3-month warranty from the date of the product back tocustomers
Limitation of Liability
FOSCAM is not responsible for other extra warranty or commitment promised by resellers if yourreseller promised some extra commitment or warranty please ask for written documents to protectyour rights and interests
FOSCAM does not offer refunds under any circumstances Please contact the point-of-purchaseand follow their refundreturn policy
FOSCAM shall not be liable under any circumstances for any consequential incidental special orexemplary damages arising out of or in any connection with this agreement or the productsincluding but not limited to lost profits or any claim based on indemnity or contribution or the failureof any limited or exclusive remedy to achieve its essential purpose or otherwise Purchasersexclusive remedy as against FOSCAM shall be the repair or replacement of defective parts IfFOSCAM lists a product on its website specification in error or that is no longer available for anyreason FOSCAM reserves the right to explain it without incurring any liability
All rights reserved FOSCAM and the FOSCAM logo are trademarks of ShenZhen FOSCAMIntelligent Technology Limited registered in the US and other countries
7 Obtaining Technical SupportWhile we hope your experience with the IPCAM network camera is enjoyable and easy to use you may
89
experience some issues or have questions that this Userrsquos Guide has not answeredIf you have problem with FOSCAM IP camera please first contact FOSCAM reseller for solving theproblems If our reseller cannot provide service please contact our service departmenttechfoscamcom
- Security Warning
- 1 Overview
-
- 11 Key Features
- 12 Read Before Use
- 13 Package Contents
- 14 Physical Description
- 15 Micro-SD Card
-
- 2 Access the IP Camera
-
- 21 Wired Connection
- 22 Wireless Connection
-
- 221 Soft AP Connection(Only C1)
- 222 WPS (WI-FI Protected Set-up)
-
- 23 Access the Camera in WAN
-
- 231 Static IP Addresses
- 232 Remote Access
-
- 24 Using the VLC player
- 25 IP camera connection to the server
-
- 3 Surveillance Software GUI
-
- 31 login Window
- 32 Setup Wizard
- 33 Surveillance Window
-
- 4 Advanced Camera Settings
-
- 41 Setup Wizard
- 42 Status
-
- 421 Device Information
- 422 Device Status
- 423 Session Status
- 424 Log
-
- 43 Basic Settings
-
- 431 Camera Name
- 432 Camera Time
- 433 User Accounts
- 434 Multi-Camera
- 435 Status Light
-
- 44 Network
-
- 441 IP Configuration
- 442 Wireless Settings
- 443 Soft AP Password Settings(Only C1)
- 444 DDNS
- 445 UPnP
- 446 Port
- 447 Mail Settings
- 448 FTP Settings
- 449 P2P
-
- 45 Video
-
- 451 Video Settings
- 452 On Screen Display
- 453 Privacy Zone(Only R2 C2)
- 453 Snapshot Settings
- 454 IR LED Schedule
-
- 46 Detector
-
- 461 One Key Alert(Only R2 C2)
- 462 Action Detection
- 463 Sound alarm
-
- 47 Record
-
- 471 Storage Location
- 472 Alarm Recording
- 473 Local Alarm Recording
- 474 Schedule Recording
- 475 SD Card Management
-
- 48 PTZ(Only R2)
-
- 481 Pan amp Tilt Speed
- 482 Cruise Settings
- 483 Start-Up Options
-
- 49 Firewall
- 410 System
-
- 4101 Back-upamp Restore
- 4102 System Upgrade
- 4103 Patch Installation
- 4104 Factory Reset
- 4105 Reboot
-
- 5 Playback
- 6 Appendix
-
- 61 Frequently Asked Questions
-
- 611 Install the add-on of Firefox browser Googl
- 612 Uninstall the add-on of Firefox browser Goo
- 613 I have forgotten the administrator password
- 614 Camera can not record
- 615 Subnet doesnrsquot match
- 616 No Pictures Problems
- 617 Canrsquot access IP camera in internet
- 618 UPnP always failed
- 619 Camera can not connect wireless
- 6110 Canrsquot see other cameras listed in multi-dev
-
- 62 Default Parameters
- 63 Specifications
- 64 CE amp FCC
- 65 Warranty
-
- 7 Obtaining Technical Support
-

6
Slow Flash every 10 second Wi-Fi connectedFlashing every 04 seconds WPS is connectingFlashing every 02 seconds EZLink takes effect
C2
Front panel Rear panel
Front panel PIRThe PIR ( Passive Infrared ) is electronic devices which are used in some security alarm
systems to detect motion of an infrared emitting source usually a human body Lens Fixed focus lens Induction IC Infrared Lamp Array Micro SD Card slot Supports up to 64GB SD card for storing the video
Rear panel LAN 10100 Mbps RJ-45 port for wired connection WPSReset
WPS Push both WPSReset button on the camera and wireless router within 1 minute thecamera will connect to the wireless router automatically in WPS process the light will be greenand blink every 04 seconds
Reset Push and hold the WPSReset button for more than 10 seconds to set the camera tofactory default the light will be red and blink every 04 seconds
Power DC 5V1A Power supply
The flashing status of the Power light and Network light are shown in the following table
Flashing Status DescriptionFlashing(red) every 04 seconds Reset to take effectConstant Flash(green) Wired connectionSlow Flash(green) every 10 second Wi-Fi connectedFlashing every(green) 04 seconds WPS is connectingFlashing every(green) 02 seconds EZLink takes effect
7
15 Micro-SD Card
This camera supports SD CardWhen you plug in the SD card during the camera work process please reboot the camera again or elsethe SD Card may be cannot work wellGo to the SettingsDevice StatusDevice Status page you can see the SD card status
2 Access the IP Camera
21 Wired Connection
1 Connect the camera to the LAN network (Router or Switch) via network cable2 Connect the power adapter to the camera3 Insert the CD into the CD drive of your computerGo to the folder ldquoEquipment Search Toolrdquo and find the folder ldquoFor Windows OSrdquo or ldquoFor Mac OSrdquo from theCD supp Copy and paste the file to your computer or drag it onto your Desktop
Shortcut icon for Windows Mac OS
Notes If your computer ( Windows OS ) supports autorun function you can find the corresponding file in
the opened control panel If your computer doesnrsquot have CD drive you can download the Equipment Search Tool from our
website for free
The camera supports HTTP and HTTPS protocols you can access the camera in two ways
(1) http LAN IP + HTTP Port NO
8
The default HTTP port NO is 88 Double click the Equipment Search Tool icon to run and it should findthe camerarsquos IP address automatically after you plug in the network cable
Double click the IP address of the camera the camera login page should be open in your defaultbrowser
(2) https LAN IP + HTTPS Port NO
The default HTTPS port NO is 443 You can use the URL to access the camera https LAN IP +HTTPS port NOGo to Settings - Network - Port panel you can see and change the HTTP and HTTPS port NO
NOTEWhen logging in for the first time you will need to download and install the add-on
9
22 Wireless ConnectionThere are some ways of wireless connection EZLink connection soft AP connection and WPSconnection EZLink connection Use the mobile phones or other mobile devices to download APP then
connect the camera and the wireless router by the APP The procedure of the EZLink connectionplease refer to the Quick Installation Guide
Soft AP connection(only C1) Use the mobile device which can search for the wireless networkThen use the web browser to visit http1921681188 by the mobile device Follow the SetupWizard to finish the settings
WPS connection WI-FI Protected Set-up Press and hold the WPS button on your wireless routerand your camera within 60 seconds So that your camera and wireless router connect successfully
221 Soft AP Connection(Only C1)
To ensure that the ethernet cable and the camera is disconnected before you begin1 Start camera power on the indicator light of camera will light on2 Press the Soft AP button for 3-5 seconds The Network light begins to twinkle at very highfrequency(every 01 seconds)3 Use a terminal which could search the WLAN (desktop or laptop This part takes laptop as anexample) to search for the AP named C1_ for connection( indicate the last six letters ofcamerarsquos MAC ID )
IP Camera The WLAN page in the terminal device
4 After finishing Soft AP connection use the web browser of the terminal to visit http1921681188
5 Log in the camera ( Default username is admin with no password ) When log in for the first time you
Soft AP Button
10
need to change the username and password
6 After logging in for the first time it will go to Setup Wizardrdquo automatically Please set the basicparameters of the camera such as camera name camera time wireless settings (The camera connectto your wireless router Wireless Network List - enter the password of your wireless router ) IPconfiguration
Input the New usernameNew password andConfirm the password
11
12
Notes We recommend you to choose to manually set the IP when you know some knowledge of the
network It needs about 1 minute to connect the camera to your router
7 After completing the setup wizard you should press the Soft AP button for 3-5 seconds to cancel theSoft AP connection mode this is located on the back of your camera The Network light begins to slowlyflash(once per second) it indicates that the wireless connection is successful
8 Please make sure that the wireless device connect your laptop to the router which your camera has
13
connected to
9 Open the CD named ldquoFOSCAMrdquo go to the folder ldquoEquipment Search Toolrdquo and find the folder ldquoForWindows OSrdquo or ldquoFor Mac OSrdquo Copy and paste the file to your wireless device or drag it onto yourdesktop
Notes You could also download the Equipment Search Tool from our website wwwfoscamcom for free If you have multiple cameras and you cannot determine which camera you are going to log in
Please match the Device MAC address on the search tool with the MAC address on the labelpasted of each camera
10 Double-click the camera list here and your default browser will open up to the login page Input theusername and password you has changed Then you will see the live video of your baby on theinterface
Main stream offers thehighest quality video whileSub stream offers lessquality but also less delaywhen viewing
14
Now you could use your camera in LAN
Note64-bit browser is not supported
222 WPS (WI-FI Protected Set-up)
Before using WPS wireless connection you need to
Make sure that your wireless router has the WPS function and has been properly connected to theInternet
WPS button on the wireless router is typically located on the front panel or rear panelTP-LINKrouters WPS button is called QSS (Quick Security Setup)
Make sure that the ethernet cable and the camera is disconnected
(1) Press and hold the WPS button for three seconds The Network light of the camera begins to twinkleat high frequency (every 04 seconds)
(2) Press and hold the WPS button for three seconds on your wireless router within 60 seconds Thenthe camera will automatically create a secure wireless connection to your router in about 60seconds
(3) The Equipment Search Tool will search the camerarsquos LAN IP Make sure the PC and the camerashare the same subnet
NOTE The security mode of router cannot be WEP or else the WPS settings may be failed
23 Access the Camera in WAN
231 Static IP Addresses
Users with static IP addresses do not need to set DDNS service settings for remote access After youhave finished connecting the camera using the LAN IP address and port forwarding you can access thecamera directly from Internet using the WAN IP address and port number
WPS Button
15
How to Obtain the WAN IP address from a public website To obtain your WAN IP address enter the following URL in your browser httpwwwwhatismyipcomYour current WAN IP will be shown on the webpage
232 Remote Access
If you want to access your camera by web browser outside of your LAN you need to configure followingconfigurations
1 Choose ldquoSettingsrdquo on the top of the camera web page then go to the ldquoNetwork gt IP Configurationrdquosection on the left side of the screen then uncheck the Obtain IP DHCP
2 Enable UPnP and DDNS in the camerarsquos settings page We recommend you to use the DDNS byfactory default
IP Address Set this in the same subnetas your computer or keep it as defaultSubnet Mask Keep it as defaultGateway and DNS Server Set it to theIP address of your router
16
3 You can see the port of your camera here If you want to set Remote Access for several cameras onthe same network you will need to change the HTTPS port for each camera
4 If the UPnP of the router has been enable you do not need to perform following steps Otherwiseyou need to select one of the following methods to configure port forwarding on your router For thesesteps we will be using the TP-LINK brand wireless router as an example
If there is a UPnP function in your routerChoose ldquoForwarding gt UPnPrdquo make sure that the Current UPnP Status is Enabled
Select Yes and click Save
Click Enable DDNS and click SaveThe content in the Manufacturersquos DDNScolumn is the domain name of your camera
17
If there is no UPnP function in your routerYou need to manually add port forwarding refer to the following steps You need go to the ldquoForwarding gtVirtual Serversrdquo panel for setup
Click Add New
Input the port and IP address ofyour camera and click Save
Here you have finished thePort Forwarding setup
18
5 Now you can access your IP camera by httpsdomain name HTTPS port via the Internet
24 Using the VLC playerThe camera supports RTSP streaming here you can view the camera by VLC player
RTSP URL rtsp [user name][password]IPPort numbervideostream
The part in the square brackets can be omitteduser name amp password The user name and password to access the camera This part can beomittedIP WAN or LAN IP addressPort NO If there is the RTSP port number on the Port page you must only use RTSP port numberotherwise you must only use http port numberVideo stream Three modes are supported video Main video Sub and audio Video Sub is a betterchoice in bad network condition If you select audio you can only hear sound without seeing picture
For exampleIP 192168111RTSP Port number 554User name adminPassword 123
Enter either one of the following four URLs in the VLC1rtspadmin123192168111554videoMain2rtsp 192168111554videoMain3rtsp123192168111554videoMain4rtspadmin192168111554videoMain
Open the VLC and go to ldquoMediardquo--rdquoOpen Network Streamrdquo option then enter the URL in VLC
19
Sometimes you may need to enter the user name and password for another time Click OK and you cansee the real-time preview
20
If you cannot play the video in the VLC player please check the port mapping You can read QuickInstallation Guide about how to configure port forwarding
NOTEIf you modify the camerarsquos username or password you had better reboot the camera to apply the newusername and password in authentication in the VLC
25 IP camera connection to the server
Device supports ONVIF 221 protocol You can easily access NVR with ONVIF or server with ONVIF
3 Surveillance Software GUIPlease refer to the section 21 if you install the camera for the first time You can start to learn aboutsoftware operation in the computer
21
31 login Window
Section1 Enter the Username and passwordThe default administrator username is ldquoadminrdquo with no password please change the password the firsttime you use and prevent unauthorized users login the camera
Section2 StreamThe camera supports two stream modes Main stream and sub stream Select Main stream if you wantto access the camera from LAN and sub stream will be better if you want to access the camera fromInternetNoteSelect sub stream to ensure a more fluent video under narrow network bandwidth
Section3 Select the languageYou click on the language dropdown list to select language
Section4 login the cameraClick ldquoLoginrdquo button
NOTEWhen setting up your camera for the first time it will request that you modify the default usernameandor password if both are still set to default Input the new username and password click Modify tocomplete the modification You will now use the new username and password to login to the camera inthe future
22
32 Setup WizardYou will go toldquoSetup Wizardrdquoautomatically after your first-login where you can set the basicparameters of camera such as camera name camera time wireless settings IP configuration
33 Surveillance Window
Section 1 FOSCAM Logo Live Video SettingsPlayback
1
2
5
3
7
4
6
23
FOSCAM LOGO
Path to surveillance window Click this button to go back to the surveillance window
Path to Administrator Control Panel Click it to go to Administrator Control Panel and do
advanced settings
Click this button to go back to the Playback panel to view the stored audio files
stored in the SD Card
Section 2 Multi-Device Window
The firmware inside the camera supports up to 9 cameras being monitored at the same time You canadd other cameras in multi-device setting
Section 3 Mode Stream HDR Mirror Flip buttons Zoom
Mode1) 50HZ ---------Indoor surveillance (Region Europe China)2) 60HZ ---------Indoor surveillance (Region USA Canada)3) Outdoor------Outdoor surveillance
StreamThe default stream supports multiple modes For example HD Mode720P23fps2M meanings Streamtype Resolution Maximum frame rate Bit rate (Different models support different specific mode )
Stream type It is used to identify the stream typeResolutionThe bigger the resolution the better of the image quality is If you are accessing the camera viainternet and want to get more fluent video streaming please select resolution VGAMaximum frame rateYou should lower frame rate when the bandwidth is limited Normally when the frame rate above 15you can achieve fluently video The maximum frame rate for each model is different please see theldquoSpecificationsrdquoBit rateGenerally speaking the larger the bit rate is the clearer video will become But the bit rateconfiguration should combine well with the network bandwidth When the bandwidth is very narrowand bit rate is large that will lead to video can not play well
You can reset the stream type on Settings-gt Video-gt Video Settings panelAfter changing please reboot the camera and you can see the modification
HDR(Only R2)HDR stands for High Dynamic Range It usually refers to the method of capturing images having
24
ldquogreater dynamic range between the lightest and darkest areas of an image than current standarddigital imaging methods or photographic methodsrdquo You can select ldquoonrdquo from the dropdown list undersunlight or with bright background
WDR(Only C2)In surveillance WDR (Wide Dynamic Range) is intended to provide clear images even underbacklighting where the intensity of illumination varies a lotmdashnamely when there are very bright andvery dark areas simultaneously in the cameras field of view
ldquoZoom inrdquo or rdquoZoom outrdquo(Only R2C2)
Device Support 8x zoom feature click or The focal length of the camera lens will be larger or
shrink you can adjust the focus distance to the target object size access to high-definition screen
(Only C2) When click the button the PanTilt Control control button will pop up You can adjust
direction of the camera when the focal length of the camera lens has been larger When the camerafocal length reduced to a minimum the PanTilt Control control button will disappear
PanTilt Control(only R2C2)
1----- Up control button 2-----Down control button3------Left control button 4------Right control button5----- Up-Left control button6----- Up-Right control button7----- Down-Left control button8----- Down-Right control button
Click this button and go to center
Section 4 Cruise Preset settings(Only R2)Cruise Settings
25
The default cruise tracks have two types Vertical and Horizontal
Vertical The camera will rotate from up to downHorizontal The camera will rotate from left to right
Start cruise Stop cruise
If you want to define or change the cruise trace please go to Settings PTZ Preset Settings panel
How to do cruiseFirstly Select one track in the track dropdown list
Secondly Click Start cruise button the camera will cruise following the predefined pathThirdly Click stop button and finish cruising
Preset settings
IPCam supports 16 preset positions which is considered enough for DIY home amp small businesssurveillance marketThe default preset position is Topmost Bottom most Left most right most you can add other presetpositions
Add Click this icon to save the position you need the camera to remember
Delete Select one preset position and click this button to delete it
GO Select one preset position in the preset drop-down list and click Go to make the camera
Select one of these
26
move the preset position
How to do preset positionFirstly move the camera and stop at a desired place where you want make preset position
Secondly click button and enter a descriptive name for the preset position The preset position
cannot contain special characters Then click OK to save it If you want to reset the preset position clickCancelAfter that you can move the camera and stop at another place and set another preset position You cando all the 16 preset positions with this methodIf you want to see one preset position you have set only select the preset position name from the preset
drop-down list and click go button the camera will go to the preset position
Section 5 IR LED Lights Color Adjustment
Click Infra led and there are three modes to adjust the infrared led Auto Manual and ScheduleAuto Select it and the camera will adjust the infra led (on or off) automaticallyManual Select it and you can turn on or turn off the infra led manuallySchedule Select it and the IR led light will be off at the schedule period If you want to define or changethe IR led lights schedule time please go to Settings---gtVideo---gt IR LED Schedule page
Color AdjustmentIn this page you can tune Hue Brightness Contrast Saturation and Sharpness to get higher quality
Section 6 OSDIf you have added time and camera name in the video you can see it in the live windowGo to Settings ---Basic settings---Camera name panel and you can change another device nameThe default device name is anonymousGo to Settings ---Basic settings---Camera time panel and adjust the device timeGo to Settings ---Video---On Screen Display panel you can add or no add OSD
27
Section 7 Play Stop Talk Audio Snap Record Full screen button
1----- Play Click it to play the video of the camera2----- Stop Click it to stop the video of the camera
3----- Talk Click the button and the icon will become to then talk to the microphone thatconnected with PC people around the camera can here your voice Click the icon again and stop talking
4----- Audio Click this icon the icon will become to you can hear the sound around the camera
by the earphone or speakers that connected with PC
5----- Adjusting the sound Click this icon the icon will become to youcan change the sound of the camera
6----- Snapshot Click it to make snapshot and it pop-up a window which picture you snapshot rightclick in the window and save the picture to anywhere you want
7----- Record Click the icon and the camera start recording you can see a green dot in the livewindow Click again and stop recording The default storage path is CIPCamRecord You can changethe storage path Go to Settings- gtRecord-gtStorage Location panel
8----- Full Screen Click it to make full-screen or you can double click the surveillance screen to makefull-screen Double click again and exit full-screen
Onscreen Mouse ControlRight click the mouse and you can adjust the screen ration full screen and Zoom up
28
Keep ration Select it and the camera will adjust the size of live window based on the the computermonitor automatically Sometimes there is a black border around the video please select Keep ration toget a better visual quality Full Screen Select it and Click it to make full-screen press ESC and exit full-screenZoom up Select it and you can see a bigger screen than beforeFirst Method Here is a convenient and fast solution to Zoom updown screen by Clicking Video Screenand adjusting Mouse pulley or by press the CTRL key and click the mouse left buttonSecond Method Click it and the live view will be digital zoomed up then click Zoom Down and the liveview back to original size
When you select the Full Screen then click right mouse there is a Screen PTZ button
29
Click the Screen PTZ button and put the mouse on the screen to indicate the camera move direction youprefer press the left mouse the camera will move to the corresponding direction Loosen the mouse andstop moving Press Esc button or double click right mouse and cancel the function
NOTE For Mac OS the plugin cannot support Onscreen Mouse Control so you cannot allow to use it
4 Advanced Camera SettingsClick the button ldquoSettingsrdquo goes to Administrator Control Panel to make advanced camera settings
41 Setup WizardPlease go to section 32 to find the way to set it
42 StatusStatus contains four columns Device Information Device Status Session Status and Log it will showyou various information about your camera
30
421 Device Information
Camera Model The camera model NO
Camera Name The Device Name is a unique name that you can give to your device to help you identifyit Click Basic Settings and go to Camera name panel where you can change your camera name Thedefault device name is anonymous
Camera ID Display the wired MAC address of your camera For example Device ID is 000C5D00008the same MAC ID sticker is found at the bottom of the camera
Camera Time The system time of the device Click Basic Settings and go to Camera time panel andadjust the timeSystem Firmware Version Display the System Firmware version of your cameraApplication Firmware Version Display the application firmware version of your cameraPlug-In Version Display the plug-in version of your camera
422 Device Status
On this page you can see device status such as Alarm status Record Status DDNS status WIFI statusand so on
31
423 Session Status
Session status will display who and which IP is visiting the camera now
424 Log
The log record shows who and which IP address accessed or logout the camera
32
Reboot the camera and clear the log records
43 Basic SettingsThis section allows you to configure your camerarsquos Name Time Mail User account and Multi-Device
431 Camera Name
You can define a name for your camera here such as apple Click Save to save your changes The aliasname cannot contain special characters
432 Camera Time
This section allows you to configure the settings of the internal system clocks for your camera
33
Time Zone Select the time zone for your region from the dropdown menuSync with NTP server Network Time Protocol will synchronize your camera with an Internet time serverChoose the one that is closest to your cameraSync with PC Select this option to synchronize the date and time of the Network Camera with yourcomputerManually The administrator can enter the date and time manually Note select the date and time formatuse DST Select the daylight saving time from the dropdown list
Click Save button and submit your settings
NOTE If the power supply of camera is disconnect you need set the camerarsquos time again
433 User Accounts
Here you can create users and set privilege visitor operator or administrator The default useraccount is admin with a blank password You can enter the users accounts of visitor operator andadministrator Manually
34
How to change the passwordFirstly select the account which you want to change the password then select ldquoChange passwordrdquoenter the old password and the new password lastly click modify to take effect
How to add account Select one blank column then enter the new user name password and privilege last click Add to takeeffect You can see the new added account on the Account list
35
Delete Select the account which you want to delete then click Delete button to take effectNOTE The default admin account cannot be deleted but you can add other administrator users
How to change the username Firstly select the account which you want to change the username then select ldquoChange usernamerdquoenter the new password lastly click modify to take effect
36
434 Multi-Camera
If you want to view multi-surveillance screens on one window you need to login one camera and set itas the main device and do Multi-Device Settings add other cameras to the first one camera Before youdo multi-cams settings you need to assign different port such as 81 82 83 84 85 86 87 88 to thecameras if there is 8 cams installedThe firmware within the camera can support a maximum of 9 devices monitoring all at the same timeThis page you can both add FOSCAM MJPEG and H264 series cameras to the first camera and viewmulti-surveillance screen on one window
Add cameras in LANIn Multi-Device Settings page you can see all devices searched in LAN The 1st Device is the defaultone You can add more cameras in the list in LAN for monitoring The camerarsquos software supports up to 9IP Cameras online simultaneously Click The 2nd Device and click the item in the Device List in LAN theAlias Host and Http Port will be filled in the boxes below automatically Enter the correct username andpassword then click Add Add more cameras in the same way
37
Camera Model Our Company produces two series cameras MJPEG and H264 Here will show youwhich series the camera belongs to
1 Click it camera model aliashost and HTTP Port will befilled in the following boxesautomatically
2 Enter the User name andpassword of the 2nd camera
3 Click Add to take effect
38
Back to Surveillance Windows and click Four Windows option you will see four cameras you added
Add cameras in WANIf you want to view all cameras via the internet(remote computer) you will need to add them using DDNSdomain name Firstly make sure all of the cameras you added can be accessed through the internet(The way to configure DDNS is in chapter 444)Login to the first camera using a DDNS domain name and port
39
Click Multi-Device Settings Choose The 2nd Device Fill in the 2nd camerarsquos name DDNS domainname port number Enter user name and password and then choose Add
1 ---- The camera model MJ or H2642 ---- The 2nd camerarsquos name3 ---- Fill in the 2nd camerarsquos DDNS host not LAN IP
NOTE The MJ series have the same HTTP Port NO and Media Port NO
4 ---- Enter the 2nd camerarsquos user name and password5 ---- Click Add button and to take effect
NOTE Here the Host must be entered as the second camerarsquos DDNS domain name not its LAN IP
Use DDNS domain
name and port to login
Make sure each camera you need add
could login with DDNS name and port
40
Return to video window You will see all of the cameras accessible through the internetWhen you are away from home you can use the first camerarsquos DDNS domain name and port to view allthe cameras via internet
435 Status Light
You can enable or disable status light
41
44 NetworkThis section will allow you to configure your camerarsquos IP PPPoE DDNS Wireless Settings UPnP andPort
441 IP Configuration
If you want to set a static IP for the camera please go to IP Configuration page Keep the camera in thesame subnet of your router or computer
Changing settings here is the same as using the Equipment Search ToolIt is recommended that you use the subnet mask gateway and DNS server from your locally attachedPC If you donrsquot know the subnet mask gateway and DNS server you can check your computerrsquos localarea connection as followsControl Panel rarrNetwork Connections rarrLocal Area Connections rarrChoose Support rarrDetails
42
If you donrsquot know the DNS server you can use the same settings as the Default Gateway
442 Wireless Settings
Step 1 Choose ldquoSettingsrdquo on the top of the camera interface and go to the ldquoNetworkrdquo panel on theleft side of the screen then click ldquoWireless Settingsrdquo
Set the same Subnet Mask andgateway of the camera with yourPC
There are two DNS servers Youcan set any of them Same withgateway is also OK
43
Click the Scan button and the camera will detect all wireless networks around the area It should alsodisplay your router in the list
Step 2 Click the SSID (name of your router) in the list the corresponding information related to yournetwork such as the name and the encryption will be filled into the relevant fields automatically
You will only need to fill in the password of your network Make sure that the SSID Encryption and thepassword you filled in are exactly the same for your router
Click the Page number to see other wirelessnetworks devices if there are more than 10
Click the Scan buttonto search for wirelessnetworks
1 Click the SSID of your router andthe relevant information will be filledin the fields automatically
2 Enter the passwordof your router
44
Step 3 Please click on the Save button after all settings have been entered and disconnect the networkcable Never shut down the power of the camera until the IP camera is able to connect to the wirelessnetwork
The LAN IP address will disappear on the window of Equipment Search Tool when the camera isconfiguring a wireless connection Wait about 1 minute the camera should obtain a wireless connectionand the LAN IP of the camera will show again on the window of the Equipment Search Tool The IPaddress may have changed after the camera receives a wireless connection we recommend setting astatic local IP address if this IP address changes by right clicking the camera in Equipment Search Toolsetting a static IP and pushing OKCongratulations You have set up the wireless connection of the camera successfully
NOTE If you fail to make a wireless connection please refer to your seller or contact us directly forassistance
443 Soft AP Password Settings(Only C1)
For the safety of your camera we recommend you change the Soft AP password
444 DDNS
FOSCAM camera has embedded a unique DDNS domain name when producing and you can directlyuse the domain name you can also use the third party domain name
FOSCAM domain nameHere take test09myfoscamorg for example Go to option of DDNS on the Settings-gtNetwork panelyou can see the domain name
45
Now you can use http Domain name + HTTP Port to access the camera via internetTake hostname test09myfoscamorg and HTTP Port no 800 for example the accessing link of thecamera via internet would be http test09myfoscamorg800
Restore DDNS to factory If you have configured Third Party DDNS successfully but you want to useManufacturerrsquos DDNS again here click this button and start Manufacturerrsquos DDNS ServiceUser can also use third part DDNS such as wwwno-ipcom www 3322com
445 UPnP
The default UPnP status is closed You can enable UPnP then the camerarsquos software will be configuredfor port forwarding Back to the ldquoDevice Statusrdquo panel you can see the UPnP status
46
The camerarsquos software will be configured for port forwarding There may be issues with your routerssecurity settings and sometimes may error We recommend you configure port forwarding manually onyour router
446 Port
This camera supports HTTP Port HTTP Port is used to access the camera remotely If you want toaccess the camera and view the video the HTTP Port must both be configured correctly
HTTP port By default the HTTP is set to 88 Also they can be assigned with another port numberbetween 1 and 65535 But make sure they can not be conflict with other existing ports like 25 21
ONVIF port By default the ONVIF port is set to 888 Also they can be assigned with another portnumber between 1 and 65535(except 0 and 65534) But make sure they can not be conflict with otherexisting ports
HTTPS port The default port is 443 You can use the url to access the camera https IP + HTTPSport
RTSP port The default port is 554 The R2 does not have RTSP port
Another way to change the HTTP port NO
Step 1 Open the Equipment Search Tool select the camera you would like to change the port of right
47
click on the IP address and click on rdquoNetwork Configurationrdquo this brings up the network configurationbox as flowing figures
Figure 41
Figure 42
Step 2 Enter the username and password of the Administrator (default username is admin with a blank
password) and click ldquoOKrdquo to apply changes
Step 3 Wait around 10 seconds yoursquoll see that the camerarsquos LAN IP address has changed In ourexample it was changed to 2000 so we see http19216811102000 in Equipment Search Tool Alsothe LAN IP address is now fixed at a static IP address of http19216811102000 This IP address willnot change even if the camera is powered off and back on the camera will remain on this LAN IPaddress This is very important that a static LAN IP address is set or you may have problems later withremote access and seeing the camera remotely if the camera loses power and reconnects on a differentLAN IP address Make sure you set a static LAN IP address
Select which camerayoursquod like to change theport for and right click
Modify the Http Port
Enter the Username andpassword click OK
48
If the camera cannot be accessed please make sure the port forwarding is succeed
447 Mail Settings
If you want the camera to send emails when motion has been detected here Mail will need to beconfigured
1---- SMTP Server Port Transport Layer Security Enter SMTP server for sender SMTP port isusually set as 25 Some SMTP servers have their own port such as 587 or 465 and Transport LayerSecurity usually is None If you use Gmail Transport Layer Security must be set to TLS or STARTTLSand SMTP Port must be set to 465 or 25 or 587 which port you choose should be decided by whichTransport Layer Security you select2---- SMTP Username password ID account and password of the sender email address3---- Sender E-mail Mailbox for sender must support SMTP4---- Receiver Mailbox for receiver need not support SMTPyou can set 4 receivers5---- Save Click Save to take effect6---- Test Click Test to see if Mail has been successfully configured
49
Click Test to see if Mail has been successfully configured
If the test success you can see the Success behind the Test at the same time the receivers will receivea test mail
If the test fails with one of the following errors after clicking Test verify that the information you enteredis correct and again select Test 1) Cannot connect to the server2) Network Error Please try later3) Server Error4) Incorrect user or password5) The sender is denied by the server Maybe the server need to authenticate the user please check itand try again6) The receiver is denied by the server Maybe because of the anti-spam privacy of the server7) The message is denied by the server Maybe because of the anti-spam privacy of the server8) The server does not support the authentication mode used by the device
448 FTP Settings
If you want to upload record files and images to your FTP serveryou can set FTP Settings
50
Figure a
Figure b
FTP server If your FTP server is located on the LAN you can set as Figure aIf you have an FTP server which you can access on the internet you can set as Figure bPort Default is port 21 If changed external FTP client program must change the server connection portaccordinglyFTP Mode Here supports two modes PORT and PASVUsernamepassword The FTP account and passwordClick Save to take effectClick Test to see if FTP has been successfully configured
449 P2P
Access the IP Camera by Smart Phone (Android or iOS operating system)First of all you must open the P2P function of the IP Camera at ldquoSettings --gt Network --gt P2Prdquo
51
Foscam App named Foscam on App Store and Google Play for iOS and Android devices
NOTEIf the QR code scanning is not successful please input the UID on the bottom of the camera manually
45 VideoThis section allows you to configure Video stream settings On screen display and Snapshot settings
451 Video Settings
There are two ways to set the stream video settings They are main stream video settings and substream video settings
Enhanced Night video Definition(Only C1) The camera will automatically drop the frame to extendthe recording time in the night
52
Stream Type There are four types to identify different streams you have set If select the HD Mode theclearer video will become and it will take up more bandwidth If select the Smooth Mode the bandwidthis very narrow and bit rate is large that will lead to video can not play well The Equilibrium Model is avalue between HD Mode and Smooth Mode
Resolution The camera supports multiple types For example 960P 720P VGA The higher theresolution is the clearer video will become But the code flux will become larger too and it will take upmore bandwidth (The maximum frame rate for each model is different please see theldquoSpecificationsrdquo )
Bit Rate Generally speaking the larger the bit rate is the clearer video will become But the bit rateconfiguration should combine well with the network bandwidth When the bandwidth is very narrow andbit rate is large that will lead to video can not play well
Frame rate You should lower frame rate when the bandwidth is limited Normally when the frame rateabove 15 you can achieve fluently video
Key Frame Interval The time between last key frame and next key frame The shorter the duration themore likely you will get a better video quality but at the cost of higher network bandwidth consumption
Variable bitrate(Only C1) Select the Bit rate type to constant or variable If select Yes the camera willchange the video bit rate according to the situation but will not more than the maximum parameter BitRate If select No the Bit Rate is unchanged
Rate Control Mode(Only R2 C2)There are three rate control modesCBR Constant Bit Rate it means that the Bit Rate is constantVBR Variable Bit Rate the camera will change the video bit rate according to the situation but will notmore than the maximum parameter Bit RateLBR Low Bit Rate If you can select the LBR then you can slide the scroll bar to choose percentage ofthe bit rate By reducing the bit rate so that the camera can obtain a better image at low bandwidth
452 On Screen Display
This page is used to add timestamp and device name on the video
Display Timestamp
53
There are two options Yes or NO Select Yes and you can see the system date on the video
Display Camera NameThere are two options Yes or NO Select Yes and you can see the device name on the video
453 Privacy Zone(Only R2 C2)
This page is used to set some mask as privacy zone on the video
Allow On Screen Display MaskThere are two options Yes or NO Select yes and draw a mask area on the video the mask area will beblack on the video
Click OK button and return to the OSD page click Save to take effectBack to the surveillance window you can see the mask area as the following picture
The mask area
54
453 Snapshot Settings
On this page you can set the snapshot picturesrsquo image quality and the storage path
Manual snap Quality Low Middle and High The higher the quality the picture will be clearerPictures Save To FTP or SD card If you have done FTP and Alarm settings when alarming thecamera will snap pictures to the FTP or SD card automaticallyIf you select the FTP you can set the file name which the picture save to (Only C1)
Enable timing to captureTo enable capture interval follow the steps below1 Select Enable Motion detection
55
2 Capture intervalThe interval time between two captures3 Select the capture time
Capture anytimeClick the black button up the MON you will see all time range turn red When something moving inthe detection area at anytime the camera will capture
Specify an capture scheduleClick the week day words the corresponding column will be selected For example click TUE theall column of TUE turns to red that means during Tuesday whole day the camera will capture
Press the left mouse and drag it on the time boxes you can select the serial area4 Click Save button to take effect
454 IR LED Schedule
On this page you can set the schedule time for switching IR LED lights When parameter Mode is set tothe Schedule on the Live Video window at these schedule time the IR LED lights will be turned off
46 Detector
461 One Key Alert(Only R2 C2)
On this page you can turn on or off the alarm function you need
462 Action Detection
IP Camera supports Action Detection Alarm when the people has been detected the IP Camera willmake a alarm
56
Step 1 Enable Action detection function
Step 2 Sensitivity---- It supports five modes Lowest Lower Low Medium and High The higher thesensitivity the camera will be more easily alarmed Select one motion sensitivity
Step 3 Trigger interval--- The interval time between two motion detection
Step 4There are some alarm indicators
A Camera Sound and PC SoundIf the camera has connected with a speaker or other audio output device if you select Camera Sound orPC Sound when the motion has been detected the people around the camera will hear beep alarmsound
B Send E-mailIf you want to receive alarm emails when motion is detected you must select Send E-mail and set MailSettings first
C Take SnapshotIf you select this checkbox when the motion has been detected the camera will snap the live viewwindow as a still picture and load it to the FTP Make sure you have set FTP and set FTP as the storagepath in Video-gtSnapshot settings panel
57
Time interval The interval time between two pictures
D RecordingIf you select this checkbox when the motion has been detected the camera will record automaticallyand store the record files to the SD Card Make sure the camera has inserted SD card and you haveset the SD card as the Alarm record files storage path please go to Recordmdashgt Storage location pageto verify this settingsThe default alarm record time is 30s and pre-alarm record time is 5s please go to Recordmdashgt AlarmRecord page and change the alarm time settings
E Push message to the phoneIf you select this checkbox when the motion has been detected the camera will push the message tothe phone which has been connected the camera
Step 7 Set detection areaClick set detect area and it pop up a window then you can draw the detection area Click Back buttonafter settings When something moving in the detection area the camera will alarm
Step 8 Alarm Schedule① Alarm anytime when motion is detectedClick the black button up the MON you will see all time range turn red When something moving in thedetection area at anytime the camera will alarm
② Specify an alarm scheduleClick the week day words the corresponding column will be selected For example click TUE the allcolumn of TUE turns to red that means during Tuesday whole day when something moving in thedetection area the camera will alarm
Click this button and select all time range
58
③ Press the left mouse and drag it on the time boxes you can select the serial area
Step 9 Click Save button to take effectWhen the motion has been detected during the detection time in the detection area the camera willalarm and adopt the corresponding alarm indicators
NOTE You must set the detection area and detection schedule or else there is no alarm anywhereand anytime
463 Sound alarm
When the ambient sound over a certain decibel the sound alarm will be triggered
59
If the Sensitivity is set to ldquoHighrdquo the camera will detect the sound whose more than 55dbIf the Sensitivity is set to ldquoMediumrdquo the camera will detect the sound whose more than 65dbIf the Sensitivity is set to ldquoLowrdquo the camera will detect the sound whose more than 75dbIf the Sensitivity is set to ldquoLowerrdquo the camera will detect the sound whose more than 85dbIf the Sensitivity is set to ldquoLowestrdquo the camera will detect the sound whose more than 95db
47 RecordThis section will allow you to change the record files storage path and the record time
471 Storage Location
On this page you can change the alarm and manually recording storage path
60
Recording Location SD card or FTP Make sure the camera has been inserted the SD card Onthis page you can see the available space of the SD card
Local Recording Location For Windows OS the manual recording path is C IPCamRecord you canchange another one For MAC OS the manual recording path is IPCamRecord
Enter the local folder Click here You can enter the local storage folder
472 Alarm Recording
473 Local Alarm Recording
This page you can enable the local alarm record and Local Alarm record time
61
474 Schedule Recording
When the video is selected as FTP the device supports scheduled recordingWhen the parameter Recording Location is set SD Card on the Storage Location page you canconfigure parameters as shown in follow figure
When the video is selected as SD card the device supports pumping frame recordingWhen the parameter Recording Location is set SD Card on the Storage Location page you canconfigure parameters as shown in follow figure
62
Record full strategy When the SD card is full you can choose to cover the previous recording or stoprecordingAudio Record You can choose yes or no
NOTES Scheduled recording only supports video saved to the SD card or FTP server The schedule recording will stop while alarm recording is beginning and it will continue
automatically after alarm recording end You can refer to alarm schedule in Alarm about editing the time of recording Schedule
475 SD Card Management
This camera supports SD Card When you plug in the SD card during the camera work process please
63
reboot the camera again or else the SD Card may be cannot work well
The default storage path of alarm record files is SD card when the available size of SD card is less than256M the old record files will be deleted automatically
SD Card Management After click the button you should enter the username and password of thecamera Then you can manage the recording files of the camera in the SD card The SD cardmanagement is only effective when access the camera in LAN
Format(except C1) Click the button you can format the SD card Note that this will delete all files on theSD card
48 PTZ(Only R2)This page will allow you to change the pantilt speed and do cruise tracks settings
481 Pan amp Tilt Speed
There are five Pt speed types very fast fast normal slow and very slowly Select the desired PTZspeed type and click save buttonThere are three zoom speed types fast normal slow
64
482 Cruise SettingsThis section explains how to add delete alter one cruise track
Setting the Cruise ModeThere are two cruise mode Cruise time and Cruise LoopsCruise time Select Cruise time from Cruise Mode drop-down then you can set the Cruise time of thecameraCruise LoopsSelect Cruise Loops from Cruise Mode drop-down you can set the Cruise Loops ofthe cameraClick Save to take effect
Manage the Cruise TrackThere are two default cruise tracks Vertical and HorizontalVertical The camera will rotate from up to down
65
Horizontal The camera will rotate form left to right
Add Add one cruise track then click save buttonDelete Select one cruise track and delete itSave After you modify the Dwell time you should click Save button to take effect
Example
How to do add cruise tracks Firstly Click Add button and enter a descriptive name to identify the cruise track
Secondly On the lower left of the page you can see all preset points you have added Select onepreset point and click Add button you can see the preset point has been added to the cruise track on thecruise track page You need to add two or more preset points to the cruise track
Thirdly Click OK button and the cruise track will take effect
You can add other cruise track as the same method
For example I have added three preset points to the ldquotrack 1rdquo that means When I select the ldquotrack 1rdquoon the surveillance window the camera moves as the following track upright then Right Most last downleftYou can add preset on the left of the surveillance window
The new added track name
1 Select one preset point 2 Click Add button
Here you can see the preset pointhas been added to one track Andyou can set the stay time
66
After add the cruise track back to the surveillance window click Cruise her you can see all cruise tracksyou have added
After add the cruise track back to the surveillance window click Cruise her you can see all cruise tracksyou have added
The cruise tracks have addedto the ldquotrack 1rdquo
Add the preset
67
There are other buttons between the Preset points and Cruise track you can use these buttons to adjustthe order of preset points or adddelete one preset points in one cruise track
Add Select one preset points and add it to the selected cruise trackDelete Select one preset points you have added to one cruise track click deleteMove up down Select one cruise track adjust the order of preset points in one cruise track
AttentionConsidering the life time and thermal issue of the motor itrsquos not recommend to do long-time cruise
483 Start-Up Options
Here section will allow you to set the stop position after the camera rebootsIt supports three modes No self test Goto home position and Goto preset pointNo self test When rebooting the camera will not pan tiltGoto home position When rebooting the camera will pa Providing Central Management Software tomanage or monitor multi-cameras n tilt and stops at centerGo to Preset point Select one preset position and save it When rebooting the camera will pan tilt andstops at the preset position you have set
68
49 FirewallThis section explains how to control the access permission by checking the client PCrsquos IP addresses Itis composed of the following columns Block access from these IP addresses and Only allow accessfrom these IP addresses
Enable firewall If you select Only allow access from these IP addresses and fill in 8 IP addresses atmost only those clients whose IP addresses listed in the Only allow access from these IP addressescan access the Network Camera If you select Block access from these IP addresses only thoseclients whose IP addresses are in the IP list cannot access the Network CameraClick Save to take effect
410 SystemIn this panel you can backuprestore your camera settings upgrade the firmware to the latest versionrestore the camera to default settings and reboot the device
4101 Back-upamp Restore
Click Backup to save all the parameters you have set These parameters will be stored in a bin file forfuture useClick Browse and select the parameters file you have stored then click Submit to restore the restore the
69
parameters
4102 System UpgradeClick ldquoDownload the latest firmwarerdquo you will see the following screen And click ldquosaverdquo to save thefirmware on your computer locally
Your current firmware version will be displayed on your screen You may go to the Status DeviceInformation page to check for the latest firmware versions availableClick Browse choose the correct bin file and then click System upgradeDonrsquot shut down the power during upgrade After upgrading you can see the upgrade result
70
Upgrade Firmware by Equipment Search Tool
Double click the Equipment Search Tool shot icon select the Camera IP that you want toupgrade the firmware Then select Upgrade Firmware and enter the username and password choosethe firmware file and upgrade
Figure 43
CAUTION If your camera works well with the current firmware we recommend not upgrading Pleasedonrsquot upgrade the firmware unnecessarily Your camera may be damaged if misconfigured during anupgrade
71
NOTES Please ensure you have download the correct firmware package for your camera before upgrading
Read the upgrade documentation (readmetxt file) in the upgrade package before you upgrade Upon downloading the firmware check the sizes of the bin files They must match the size in the
readmetxt file If not please download the firmware again until the sizes are the same Yourcamera will not function correctly if a corrupt bin file is used
Normally only Device WEB UI need to be upgrade please do not try to upgrade the Device SystemFirmware
Never shut down the power of the camera during upgrade until the IP camera restart and getconnected
After upgrade successfully please uninstall the old plugin and re-install it then reset the camera tothe default factory settings before using the camera
4103 Patch InstallationClick Browse to select the correct patch file and then click Install Patch to install the patch Do notturn off the power during it installing After installing is complete you will receive a system prompt
4104 Factory Reset
Click All reset and all parameters will return to factory settings if selected This is similar to press theReset button on the bottom of the camera
4105 RebootClick Reboot System to reboot the camera This is similar to unplugging the power to the camera
Enable Periodic Maintenance(Only R2)You can choose the reboot period of the camera
72
5 PlaybackOn this page you can view the record files stored in the SD card
Section 1 Define the Record files time and Type
The storage path of record files
Here supports three types current day current month and All records Another
way select the time on the timeampdate manually
The type of records files Here supports two typs Normal record Alarm record
and All records
Click this button to search all record files satisfy the conditions you selected
Continuous Play Select the checkbox to play continuously all the record files
73
Section 2 Search record filesOn this panel you can see all record files satisfy the conditions you set
Section 3 PlayStopAudioFull screen buttonsPlease select one record file before use these buttons
Click this button to play the record files
Click this button to stop the record files
Open or stop audio
Click this button to make full screen and double click left mouse to exit full screen
6 Appendix
61 Frequently Asked Questions
611 Install the add-on of Firefox browser Google Chrome and IE
Chrome
74
75
76
77
612 Uninstall the add-on of Firefox browser Google Chrome and IE
Chrome
78
613 I have forgotten the administrator password
To reset the administrator username and password press and hold down the RESET BUTTON for 5seconds Upon releasing the reset button wait for 20 seconds the camera will reboot and the usernameand password will return to the factory default administrator username and password Please power onthe camera before resetDefault administrator username adminDefault administrator password No password
614 Camera can not record
When you use Windows7 or Vista you may be not able to do manually record or change the record pathbecause of the security settings of computerThere are two ways to resolve this problemPlease add the camera as a trusted site to resolve this issue The steps are IE browserToolInternet PropertiesSecurityTrusted sitesSitesAdd
79
Open IE browser then right click select ldquoRun as administratorrdquo
615 Subnet doesnrsquot match
Check whether your ipcamera in the same subnet of your computer The step is ControlPanelNetwork ConnectionsDbclick Local Area Connections ChooseGeneralPropertiesCheck subnet mask IP address and gateways When you set IP address pleasemake sure they are in the same subnet Otherwise you cant access camera
616 No Pictures Problems
The video streaming is transmitted by the ActiveX controller If ActiveX controller isnrsquot installed correctlyyou will see no video image You can resolve this problem by this wayDownload ActiveX controller and set the safety property of IE in the PC when you view it first time IEbrowserToolInternet ProperSecurityCustom LevelActiveX control and Plug-ins Three optionsof front should be set to be ldquoEnablerdquo The ActiveX programs read by the computer will be stored AsfollowsEnable Download unsigned ActiveX controlsEnable Initialize and script ActiveX controls not marked as safeEnable Run ActiveX controls and plug-ins
If you allow the ActiveX running but still could not see living video Please change another port numberto try Donrsquot use port 88
80
NOTE Make sure that your firewall or anti-virus software does not block the camera or ActiveX If youcould not see video please shut down firewall or anti-virus software to try again
617 Canrsquot access IP camera in internet
There are some reasons1ActiveX controller is not installed correctly2The port which camera used is blocked by Firewall or Anti-virus software Please change another portnumber and try again3Port forwarding is not successfulCheck these settings and make sure they are correct
618 UPnP always failed
UPnP only contains port forwarding in our recent software Sometimes it may be failed to do portforwarding automatically because of firewall or anti-virus software It also has much relation with routerrsquossecurity settings So we recommend you do port forwarding manually You can view your camera ininternet successfully after you do port forwarding manually in your router
619 Camera can not connect wireless
If your camera could not connect wireless after you set wireless settings and plug out the cable Pleasecheck whether your settings are correct or notNormally camera canrsquot connect wireless mainly because of wrong settingsMake sure broadcast your SSID use the same encryption for router and camera
6110 Canrsquot see other cameras listed in multi-device when using remote
access
If you want to view all the cameras via the WAN verify that each camera added in the multi-devicesettings can be accessed by using the DDNS name and port number Use the DDNS domain name notthe camerarsquos LAN IP (For more details see How to add cameras in WAN)
62 Default ParametersDefault network ParametersIP address obtain dynamically
81
Subnet mask obtain dynamicallyGateway obtain dynamicallyDDNS Embedded FOSCAM domain nameUsername and passwordDefault admin username admin with a blank password
63 Specifications
ITEMS C1
Image SensorSensor High Definition Color CMOS Sensor
Display Resolution 1280 x 720 (1Megapixels)
Min Illumination 0 Lux (With IR Illuminator)
Lens
Lens Type Glass Lens
focal length f28mm
Aperture F24
Diagonal angle of view 115deg
Horizontal view angle 100deg
Video
Image Compression H264
Image Frame Rate 25fps(VGA) 23fps(720P) downward adjustable
Resolution720P(1280 x 720) VGA(640 x 480) VGA(640 x 360)QVGA(320 x 240) QVGA(320 x 180)
Stream dual stream
Image adjustmentThe hue brightness contrast saturation sharpness areadjustable
Flip image flip and mirror
Infrared mode Automatic or manual
manual PanTilt Angle Horizontal350deg amp Vertical 180deg
Night visibility 11pcs IR-LEDs night vision range up to 8 metres
Audio InputOutputSupports two-way audioBuilt-in Mic amp Speaker
Audio Compression PCMG726
Network
Ethernet One 10100Mbps RJ45 port
Wireless Standard IEEE80211bgn
Data RateIEEE80211b 11Mbps(Max)IEEE80211g 54Mbps(Max)IEEE80211n 150Mbps(Max)
Wireless Security WEP WPA WPA2
WPS Supports EZLink wireless setup
82
Network ProtocolIPTCPUDPHTTPHTTPSSMTPFTPDHCPDDNSUPnPRTSPWPS
Remote Access P2P DDNS
SystemRequirements
Operating SystemMicrosoft Windows XP Vista 7 8Mac OSiOSAndroid
Browser
Microsoft IE8 and above version or compatible browserMozilla FirefoxGoogle ChromeApple Safari
OtherFeatures
Motion Detection Alarm via E-Mail upload alarm snapshot to FTP
PIR Infrared human body sensor
User Accounts Three levels user role
Firewall Supports IP Filtering
Storage 32G Micro SD card local and FTP storage
Reset Reset button is available
PowerPower Supply DC 5V10A
Power Consumption 45W(Max)
Physical Dimension(LxWxH) 7070120mm
Net Weight 170g
Environment
Operating Temperature-10degC ~ 50deg(14degF ~ 122degF)
Operating Humidity 20 ~ 85 non-condensing
Storage Temperature -20degC ~ 60deg (-4degF ~ 140degF)
Storage Humidity 0 ~ 90 non-condensing
Certification CE FCC RoHS
Warranty Limited 2-year warranty
ITEMS R2
Image Sensor
Sensor Type 13 CMOS
Display Resolution 1920 x 1080 (20 Megapixels)
Frame Rate 30fps
Min Illumination 0 Lux (With IR Illuminator)
Lens
Lens Type f28mmF26
Angle of ViewHorizontal90degDiagonal 110deg
Night Vision 13pcs IR-LEDs night vision range up to 8 metres
VideoImage Compression H264
Resolution1080P(1920x1080)720P(1280 x 720) VGA(640 x 480)QVGA(320 x 240)
83
Stream dual stream
Image adjustmentThe hue brightness contrast saturation sharpness areadjustable
Flip image flip and mirror
Infrared mode Automatic or manual
manual PanTilt Angle Horizontal300deg amp Vertical 100deg
Night visibility 13pcs IR-LEDs night vision range up to 8 metres
Audio InputOutputSupports two-way audioBuilt-in Mic amp Speaker
Audio Compression PCMG726
Network
Ethernet One 10100Mbps RJ45 port
Wireless Standard IEEE80211bgn
Data RateIEEE80211b 11Mbps(Max)IEEE80211g 54Mbps(Max)IEEE80211n 150Mbps(Max)
Wireless Security WEP WPA WPA2
Wireless Setup Supports EZLink wireless setup
Network ProtocolIPTCPUDPHTTPHTTPSSMTPFTPDHCPDDNSUPnPRTSPWPSONVIF
Remote Access P2P DDNS
SystemRequirements
Operating System Microsoft Windows XP 7 8Mac OSiOSAndroid
Browser IE8 and above versionFirefoxChromeSafari
OtherFeatures
Motion Detection Alarm via E-Mail upload alarm snapshot to FTP
HDR Improve image clarity in complex scenario
Magic Zoom Picture zoom function
User Accounts Three levels user role
Firewall Supports IP Filtering
Storage 64G Micro SD card local and FTP storage
Reset Reset button is available
PowerPower Supply DC 5V20A
Power Consumption <6W
PhysicalDimension(mm) 74(L)times74(W)times119(H)
Net Weight 290g
Environment
OperatingTemperature -10degC ~ 50deg (14degF ~ 122degF)
Operating Humidity 20 ~ 85 non-condensing
Storage Temperature -20degC ~ 60deg (-4degF ~ 140degF)
Storage Humidity 0 ~ 90 non-condensing
Certification CE FCC RoHS
Warranty Limited 2-year warranty
84
ITEMS C2
Image Sensor
Sensor Type 13 CMOS
Display Resolution 1920 x 1080 (20 Megapixels)
Frame Rate 30fps
Min Illumination 0 Lux (With IR Illuminator)
LensLens Type f28mmF26
Angle of ViewHorizontal110degDiagonal 120deg
Video
Image Compression H264
Resolution1080P(1920x1080)720P(1280 x 720) VGA(640 x 480)QVGA(320 x 240)
Stream dual stream
Image adjustmentThe hue brightness contrast saturation sharpness areadjustable
Flip image flip and mirror
Infrared mode Automatic or manual
Manual PanTilt Angle Horizontal360deg amp Vertical 180deg
Night visibility High performance IR-LEDs night vision range up to 8 metres
Audio InputOutputSupports two-way audioBuilt-in Mic amp Speaker
Audio Compression PCMG726
Network
Ethernet One 10100Mbps RJ45 port
Wireless Standard IEEE80211bgn
Data RateIEEE80211b 11Mbps(Max)IEEE80211g 54Mbps(Max)IEEE80211n 150Mbps(Max)
Wireless Security WEP WPA WPA2
Wireless Setup Supports EZLink wireless setup
Network ProtocolIPTCPUDPHTTPHTTPSSMTPFTPDHCPDDNSUPnPRTSPWPSONVIF
Remote Access P2P DDNS
SystemRequirements
Operating System Microsoft Windows XP 7 8Mac OSiOSAndroid
Browser IE8 and above versionFirefoxChromeSafari
OtherFeatures
Motion Detection Alarm via E-Mail upload alarm snapshot to FTP
HDR Improve image clarity in complex scenario
Magic Zoom a Magic digital zoom rivaled Optical zoom
User Accounts Three levels user role
Firewall Supports IP Filtering
85
Storage 64G Micro SD card local and FTP storage
Reset Reset button is available
PowerPower Supply DC 5V10A
Power Consumption 48W(Max)
PhysicalDimension(mm) 7070120mm
Net Weight 160g
Environment
OperatingTemperature -10degC ~ 50deg (14degF ~ 122degF)
Operating Humidity 20 ~ 85 non-condensing
Storage Temperature -20degC ~ 60deg (-4degF ~ 140degF)
Storage Humidity 0 ~ 90 non-condensing
Certification CE FCC RoHS
Warranty Limited 2-year warranty
Attention Power adapter should be used between 0-40 and 5-90 relative humidity
64 CE amp FCCElectromagnetic Compatibility (EMC)FCC Statement
This device compiles with FCC Rules Part 15 Operation is subject to the following twoconditions This device may not cause harmful interference This device must accept any interference received including interference that may cause undesired
operation
This equipment has been tested and found to comply with the limits for a Class B digital device pursuantto Part 15 of the FCC Rules These limits are designed to provide reasonable protection against harmfulinterference when the equipment is operated in a commercial environment This equipment generatesuses and can radiate radio frequency energy and if not installed and used in accordance with theinstallation manual may cause harmful interference to radio communications Operation of thisequipment in a residential area is like to cause harmful interference in which case the user will berequired to correct the interference at his own expense
FCC CautionAny changes or modification not expressly approved by the party responsible for compliance could voidthe userrsquos authority to operate this equipmentThis equipment complies with FCC radiation exposure limits set forth for an uncontrolled environment
86
This equipment should be installed and operated with minimum distance 20cm between the radiatorampyour bodyThis transmitter must not be co-located or operating in conjunction with any other antenna or transmitter
CE Mark Warning
This is a Class B product In a domestic environment this product may cause radio interference inwhich case the user may be required to take adequate measures
65 WarrantyShenZhen FOSCAM Intelligent Technology Limited(FOSCAM) values your business and alwaysattempts to provide you the very best of serviceNo limited hardware warranty is provided by FOSCAM unless your FOSCAM product (product) waspurchased from an authorized distributor or authorized reseller Distributors may sell products toresellers who then sell products to end users No warranty service is provided unless the product isreturned to an authorized return center in the region where the product was first shipped by FOSCAM orto the point-of-purchase which may have regional specific warranty implicationsIf you purchase your FOSCAM product from online store please contact the point-of-purchaseand ask for returnreplacementrepair service
Hardware Warranty Information
FOSCAM provide 2-year limited warranty for naked product and 6-month limited warranty foraccessories
Limited Hardware Warranty
FOSCAM products are warranted to be free from manufacturing defects in materials andworkmanship starting from the shipping date of FOSCAM
This limited hardware warranty does not cover Software including the software added to the products through our factory-integration system
software that included in the CDetc Usage that is not in accordance with product instructions Failure to follow the product instructions Abuse firmware upgrade without the authorized technicianrsquos guidance Normal wear and tear
Return Procedures
Please read FOSCAM warranty policy amp policy of your reseller first before sending items back topoint-of-purchase
Customer must first contact point-of-purchase to obtain a Return Merchandise Authorization (RMA)
87
number before returning the product If the product you received is suspected to be defective andthe product warranty has not expired The RMA number will allow your reseller to track your returnmuch easier and help them expedite processing your request
After receiving your RMA case number pack the item(s) very well with the original box and all theoriginal accessories included such as power adapters brackets cables manuals and driver CDdisks
Write your RMA number and the return reason (the problem of the product) on the warranty cardalong with the complete package to send them back
Replacement Services
If customers ask for replacement service please contact point-of-purchase and follow theirpolicy
Our technicians will inspect all items returned for replacement requests If the retuned product isfound in working order we will return the same item received However customers shall beresponsible for all shipping amp handling charges incurred for getting the units back to customers
If returned products are found defective we will replace the product and assume the shipping costfor sending back the replacement unit to customers
If for any reason we are unable to provide a replacement of the original returned item(s) You willhave a choice for a ldquoSubstituterdquo item at the same equal value
We do not provide exchange and replacement due to normal hardware upgrade according themarket after 14 days after the product is delivered
Our technicians will test the product before send out the replacement any other demand for morethan two times replacement for the same product during replacement limit will be rejected
Replaced products are warranted from the balance of the former warranty period
Warranty Forfeiture
Warranty is void if purchase from unauthorized distributor or reseller Warranty is void if trade-mark serial tags product stickers have been removed altered or tampered
with Warranty is void for mishandling improper use or defacing the product Abuse firmware upgrade without the authorized technicianrsquos guidance Warranty is void for physical damage altered either internally or externally improper or inadequate
packaging when returned for RMA purposes Warranty is void if damage has resulted from accident dismantle abuse or service or modification
by someone other than the appointed vendor souse fission or the spare part has been over theperiod of warranty
Warranty is void if product is damaged due to improper working environment or operation (Forexample improper temperature humidity unusual physical or electrical stress or interferencefailure or fluctuation of electrical power static electricity using wrong power adapter etc)
Warranty is void if damaged by the use of parts not manufactured or sold by FOSCAM Damage caused by improper installation of third-party products Warranty is void if damaged for irresistible cause such as earthquake fire lightning flood etc Product beyond limited warranty
Shipping Fee
88
If products are defective or damaged under normal use or operation in the replacement limitdistributors or resellers are responsible for the shipping cost the product back to customerscustomers should assume the shipping cost send the product to the point-of-purchase
During replacement limit if customers ask for replacement due to the product does not fit forcustomerrsquos personal expectation customers should responsible for both shipping fee
Customers shall be responsible for both shipping fee if their product beyond the replacement limitbut still in warranty limit
Repair Service Out Of Warranty
FOSCAM provide extra repair service for product that out of warranty it is chargeable The total feecontains device cost and service fee Device cost (including accessories) is the standard uniformprice provide by FOSCAM
Different region may have different service fee please contact the point-of-purchase to confirm thatbefore you ask for this service
Our technicians will quote the total price after detect the product If customers refused to repair afterthe quotation customers need pay for the test fee $35hour If agree with the quotation test will befree
Repaired product out of warranty will obtains 3-month warranty from the date of the product back tocustomers
Limitation of Liability
FOSCAM is not responsible for other extra warranty or commitment promised by resellers if yourreseller promised some extra commitment or warranty please ask for written documents to protectyour rights and interests
FOSCAM does not offer refunds under any circumstances Please contact the point-of-purchaseand follow their refundreturn policy
FOSCAM shall not be liable under any circumstances for any consequential incidental special orexemplary damages arising out of or in any connection with this agreement or the productsincluding but not limited to lost profits or any claim based on indemnity or contribution or the failureof any limited or exclusive remedy to achieve its essential purpose or otherwise Purchasersexclusive remedy as against FOSCAM shall be the repair or replacement of defective parts IfFOSCAM lists a product on its website specification in error or that is no longer available for anyreason FOSCAM reserves the right to explain it without incurring any liability
All rights reserved FOSCAM and the FOSCAM logo are trademarks of ShenZhen FOSCAMIntelligent Technology Limited registered in the US and other countries
7 Obtaining Technical SupportWhile we hope your experience with the IPCAM network camera is enjoyable and easy to use you may
89
experience some issues or have questions that this Userrsquos Guide has not answeredIf you have problem with FOSCAM IP camera please first contact FOSCAM reseller for solving theproblems If our reseller cannot provide service please contact our service departmenttechfoscamcom
- Security Warning
- 1 Overview
-
- 11 Key Features
- 12 Read Before Use
- 13 Package Contents
- 14 Physical Description
- 15 Micro-SD Card
-
- 2 Access the IP Camera
-
- 21 Wired Connection
- 22 Wireless Connection
-
- 221 Soft AP Connection(Only C1)
- 222 WPS (WI-FI Protected Set-up)
-
- 23 Access the Camera in WAN
-
- 231 Static IP Addresses
- 232 Remote Access
-
- 24 Using the VLC player
- 25 IP camera connection to the server
-
- 3 Surveillance Software GUI
-
- 31 login Window
- 32 Setup Wizard
- 33 Surveillance Window
-
- 4 Advanced Camera Settings
-
- 41 Setup Wizard
- 42 Status
-
- 421 Device Information
- 422 Device Status
- 423 Session Status
- 424 Log
-
- 43 Basic Settings
-
- 431 Camera Name
- 432 Camera Time
- 433 User Accounts
- 434 Multi-Camera
- 435 Status Light
-
- 44 Network
-
- 441 IP Configuration
- 442 Wireless Settings
- 443 Soft AP Password Settings(Only C1)
- 444 DDNS
- 445 UPnP
- 446 Port
- 447 Mail Settings
- 448 FTP Settings
- 449 P2P
-
- 45 Video
-
- 451 Video Settings
- 452 On Screen Display
- 453 Privacy Zone(Only R2 C2)
- 453 Snapshot Settings
- 454 IR LED Schedule
-
- 46 Detector
-
- 461 One Key Alert(Only R2 C2)
- 462 Action Detection
- 463 Sound alarm
-
- 47 Record
-
- 471 Storage Location
- 472 Alarm Recording
- 473 Local Alarm Recording
- 474 Schedule Recording
- 475 SD Card Management
-
- 48 PTZ(Only R2)
-
- 481 Pan amp Tilt Speed
- 482 Cruise Settings
- 483 Start-Up Options
-
- 49 Firewall
- 410 System
-
- 4101 Back-upamp Restore
- 4102 System Upgrade
- 4103 Patch Installation
- 4104 Factory Reset
- 4105 Reboot
-
- 5 Playback
- 6 Appendix
-
- 61 Frequently Asked Questions
-
- 611 Install the add-on of Firefox browser Googl
- 612 Uninstall the add-on of Firefox browser Goo
- 613 I have forgotten the administrator password
- 614 Camera can not record
- 615 Subnet doesnrsquot match
- 616 No Pictures Problems
- 617 Canrsquot access IP camera in internet
- 618 UPnP always failed
- 619 Camera can not connect wireless
- 6110 Canrsquot see other cameras listed in multi-dev
-
- 62 Default Parameters
- 63 Specifications
- 64 CE amp FCC
- 65 Warranty
-
- 7 Obtaining Technical Support
-
7
15 Micro-SD Card
This camera supports SD CardWhen you plug in the SD card during the camera work process please reboot the camera again or elsethe SD Card may be cannot work wellGo to the SettingsDevice StatusDevice Status page you can see the SD card status
2 Access the IP Camera
21 Wired Connection
1 Connect the camera to the LAN network (Router or Switch) via network cable2 Connect the power adapter to the camera3 Insert the CD into the CD drive of your computerGo to the folder ldquoEquipment Search Toolrdquo and find the folder ldquoFor Windows OSrdquo or ldquoFor Mac OSrdquo from theCD supp Copy and paste the file to your computer or drag it onto your Desktop
Shortcut icon for Windows Mac OS
Notes If your computer ( Windows OS ) supports autorun function you can find the corresponding file in
the opened control panel If your computer doesnrsquot have CD drive you can download the Equipment Search Tool from our
website for free
The camera supports HTTP and HTTPS protocols you can access the camera in two ways
(1) http LAN IP + HTTP Port NO
8
The default HTTP port NO is 88 Double click the Equipment Search Tool icon to run and it should findthe camerarsquos IP address automatically after you plug in the network cable
Double click the IP address of the camera the camera login page should be open in your defaultbrowser
(2) https LAN IP + HTTPS Port NO
The default HTTPS port NO is 443 You can use the URL to access the camera https LAN IP +HTTPS port NOGo to Settings - Network - Port panel you can see and change the HTTP and HTTPS port NO
NOTEWhen logging in for the first time you will need to download and install the add-on
9
22 Wireless ConnectionThere are some ways of wireless connection EZLink connection soft AP connection and WPSconnection EZLink connection Use the mobile phones or other mobile devices to download APP then
connect the camera and the wireless router by the APP The procedure of the EZLink connectionplease refer to the Quick Installation Guide
Soft AP connection(only C1) Use the mobile device which can search for the wireless networkThen use the web browser to visit http1921681188 by the mobile device Follow the SetupWizard to finish the settings
WPS connection WI-FI Protected Set-up Press and hold the WPS button on your wireless routerand your camera within 60 seconds So that your camera and wireless router connect successfully
221 Soft AP Connection(Only C1)
To ensure that the ethernet cable and the camera is disconnected before you begin1 Start camera power on the indicator light of camera will light on2 Press the Soft AP button for 3-5 seconds The Network light begins to twinkle at very highfrequency(every 01 seconds)3 Use a terminal which could search the WLAN (desktop or laptop This part takes laptop as anexample) to search for the AP named C1_ for connection( indicate the last six letters ofcamerarsquos MAC ID )
IP Camera The WLAN page in the terminal device
4 After finishing Soft AP connection use the web browser of the terminal to visit http1921681188
5 Log in the camera ( Default username is admin with no password ) When log in for the first time you
Soft AP Button
10
need to change the username and password
6 After logging in for the first time it will go to Setup Wizardrdquo automatically Please set the basicparameters of the camera such as camera name camera time wireless settings (The camera connectto your wireless router Wireless Network List - enter the password of your wireless router ) IPconfiguration
Input the New usernameNew password andConfirm the password
11
12
Notes We recommend you to choose to manually set the IP when you know some knowledge of the
network It needs about 1 minute to connect the camera to your router
7 After completing the setup wizard you should press the Soft AP button for 3-5 seconds to cancel theSoft AP connection mode this is located on the back of your camera The Network light begins to slowlyflash(once per second) it indicates that the wireless connection is successful
8 Please make sure that the wireless device connect your laptop to the router which your camera has
13
connected to
9 Open the CD named ldquoFOSCAMrdquo go to the folder ldquoEquipment Search Toolrdquo and find the folder ldquoForWindows OSrdquo or ldquoFor Mac OSrdquo Copy and paste the file to your wireless device or drag it onto yourdesktop
Notes You could also download the Equipment Search Tool from our website wwwfoscamcom for free If you have multiple cameras and you cannot determine which camera you are going to log in
Please match the Device MAC address on the search tool with the MAC address on the labelpasted of each camera
10 Double-click the camera list here and your default browser will open up to the login page Input theusername and password you has changed Then you will see the live video of your baby on theinterface
Main stream offers thehighest quality video whileSub stream offers lessquality but also less delaywhen viewing
14
Now you could use your camera in LAN
Note64-bit browser is not supported
222 WPS (WI-FI Protected Set-up)
Before using WPS wireless connection you need to
Make sure that your wireless router has the WPS function and has been properly connected to theInternet
WPS button on the wireless router is typically located on the front panel or rear panelTP-LINKrouters WPS button is called QSS (Quick Security Setup)
Make sure that the ethernet cable and the camera is disconnected
(1) Press and hold the WPS button for three seconds The Network light of the camera begins to twinkleat high frequency (every 04 seconds)
(2) Press and hold the WPS button for three seconds on your wireless router within 60 seconds Thenthe camera will automatically create a secure wireless connection to your router in about 60seconds
(3) The Equipment Search Tool will search the camerarsquos LAN IP Make sure the PC and the camerashare the same subnet
NOTE The security mode of router cannot be WEP or else the WPS settings may be failed
23 Access the Camera in WAN
231 Static IP Addresses
Users with static IP addresses do not need to set DDNS service settings for remote access After youhave finished connecting the camera using the LAN IP address and port forwarding you can access thecamera directly from Internet using the WAN IP address and port number
WPS Button
15
How to Obtain the WAN IP address from a public website To obtain your WAN IP address enter the following URL in your browser httpwwwwhatismyipcomYour current WAN IP will be shown on the webpage
232 Remote Access
If you want to access your camera by web browser outside of your LAN you need to configure followingconfigurations
1 Choose ldquoSettingsrdquo on the top of the camera web page then go to the ldquoNetwork gt IP Configurationrdquosection on the left side of the screen then uncheck the Obtain IP DHCP
2 Enable UPnP and DDNS in the camerarsquos settings page We recommend you to use the DDNS byfactory default
IP Address Set this in the same subnetas your computer or keep it as defaultSubnet Mask Keep it as defaultGateway and DNS Server Set it to theIP address of your router
16
3 You can see the port of your camera here If you want to set Remote Access for several cameras onthe same network you will need to change the HTTPS port for each camera
4 If the UPnP of the router has been enable you do not need to perform following steps Otherwiseyou need to select one of the following methods to configure port forwarding on your router For thesesteps we will be using the TP-LINK brand wireless router as an example
If there is a UPnP function in your routerChoose ldquoForwarding gt UPnPrdquo make sure that the Current UPnP Status is Enabled
Select Yes and click Save
Click Enable DDNS and click SaveThe content in the Manufacturersquos DDNScolumn is the domain name of your camera
17
If there is no UPnP function in your routerYou need to manually add port forwarding refer to the following steps You need go to the ldquoForwarding gtVirtual Serversrdquo panel for setup
Click Add New
Input the port and IP address ofyour camera and click Save
Here you have finished thePort Forwarding setup
18
5 Now you can access your IP camera by httpsdomain name HTTPS port via the Internet
24 Using the VLC playerThe camera supports RTSP streaming here you can view the camera by VLC player
RTSP URL rtsp [user name][password]IPPort numbervideostream
The part in the square brackets can be omitteduser name amp password The user name and password to access the camera This part can beomittedIP WAN or LAN IP addressPort NO If there is the RTSP port number on the Port page you must only use RTSP port numberotherwise you must only use http port numberVideo stream Three modes are supported video Main video Sub and audio Video Sub is a betterchoice in bad network condition If you select audio you can only hear sound without seeing picture
For exampleIP 192168111RTSP Port number 554User name adminPassword 123
Enter either one of the following four URLs in the VLC1rtspadmin123192168111554videoMain2rtsp 192168111554videoMain3rtsp123192168111554videoMain4rtspadmin192168111554videoMain
Open the VLC and go to ldquoMediardquo--rdquoOpen Network Streamrdquo option then enter the URL in VLC
19
Sometimes you may need to enter the user name and password for another time Click OK and you cansee the real-time preview
20
If you cannot play the video in the VLC player please check the port mapping You can read QuickInstallation Guide about how to configure port forwarding
NOTEIf you modify the camerarsquos username or password you had better reboot the camera to apply the newusername and password in authentication in the VLC
25 IP camera connection to the server
Device supports ONVIF 221 protocol You can easily access NVR with ONVIF or server with ONVIF
3 Surveillance Software GUIPlease refer to the section 21 if you install the camera for the first time You can start to learn aboutsoftware operation in the computer
21
31 login Window
Section1 Enter the Username and passwordThe default administrator username is ldquoadminrdquo with no password please change the password the firsttime you use and prevent unauthorized users login the camera
Section2 StreamThe camera supports two stream modes Main stream and sub stream Select Main stream if you wantto access the camera from LAN and sub stream will be better if you want to access the camera fromInternetNoteSelect sub stream to ensure a more fluent video under narrow network bandwidth
Section3 Select the languageYou click on the language dropdown list to select language
Section4 login the cameraClick ldquoLoginrdquo button
NOTEWhen setting up your camera for the first time it will request that you modify the default usernameandor password if both are still set to default Input the new username and password click Modify tocomplete the modification You will now use the new username and password to login to the camera inthe future
22
32 Setup WizardYou will go toldquoSetup Wizardrdquoautomatically after your first-login where you can set the basicparameters of camera such as camera name camera time wireless settings IP configuration
33 Surveillance Window
Section 1 FOSCAM Logo Live Video SettingsPlayback
1
2
5
3
7
4
6
23
FOSCAM LOGO
Path to surveillance window Click this button to go back to the surveillance window
Path to Administrator Control Panel Click it to go to Administrator Control Panel and do
advanced settings
Click this button to go back to the Playback panel to view the stored audio files
stored in the SD Card
Section 2 Multi-Device Window
The firmware inside the camera supports up to 9 cameras being monitored at the same time You canadd other cameras in multi-device setting
Section 3 Mode Stream HDR Mirror Flip buttons Zoom
Mode1) 50HZ ---------Indoor surveillance (Region Europe China)2) 60HZ ---------Indoor surveillance (Region USA Canada)3) Outdoor------Outdoor surveillance
StreamThe default stream supports multiple modes For example HD Mode720P23fps2M meanings Streamtype Resolution Maximum frame rate Bit rate (Different models support different specific mode )
Stream type It is used to identify the stream typeResolutionThe bigger the resolution the better of the image quality is If you are accessing the camera viainternet and want to get more fluent video streaming please select resolution VGAMaximum frame rateYou should lower frame rate when the bandwidth is limited Normally when the frame rate above 15you can achieve fluently video The maximum frame rate for each model is different please see theldquoSpecificationsrdquoBit rateGenerally speaking the larger the bit rate is the clearer video will become But the bit rateconfiguration should combine well with the network bandwidth When the bandwidth is very narrowand bit rate is large that will lead to video can not play well
You can reset the stream type on Settings-gt Video-gt Video Settings panelAfter changing please reboot the camera and you can see the modification
HDR(Only R2)HDR stands for High Dynamic Range It usually refers to the method of capturing images having
24
ldquogreater dynamic range between the lightest and darkest areas of an image than current standarddigital imaging methods or photographic methodsrdquo You can select ldquoonrdquo from the dropdown list undersunlight or with bright background
WDR(Only C2)In surveillance WDR (Wide Dynamic Range) is intended to provide clear images even underbacklighting where the intensity of illumination varies a lotmdashnamely when there are very bright andvery dark areas simultaneously in the cameras field of view
ldquoZoom inrdquo or rdquoZoom outrdquo(Only R2C2)
Device Support 8x zoom feature click or The focal length of the camera lens will be larger or
shrink you can adjust the focus distance to the target object size access to high-definition screen
(Only C2) When click the button the PanTilt Control control button will pop up You can adjust
direction of the camera when the focal length of the camera lens has been larger When the camerafocal length reduced to a minimum the PanTilt Control control button will disappear
PanTilt Control(only R2C2)
1----- Up control button 2-----Down control button3------Left control button 4------Right control button5----- Up-Left control button6----- Up-Right control button7----- Down-Left control button8----- Down-Right control button
Click this button and go to center
Section 4 Cruise Preset settings(Only R2)Cruise Settings
25
The default cruise tracks have two types Vertical and Horizontal
Vertical The camera will rotate from up to downHorizontal The camera will rotate from left to right
Start cruise Stop cruise
If you want to define or change the cruise trace please go to Settings PTZ Preset Settings panel
How to do cruiseFirstly Select one track in the track dropdown list
Secondly Click Start cruise button the camera will cruise following the predefined pathThirdly Click stop button and finish cruising
Preset settings
IPCam supports 16 preset positions which is considered enough for DIY home amp small businesssurveillance marketThe default preset position is Topmost Bottom most Left most right most you can add other presetpositions
Add Click this icon to save the position you need the camera to remember
Delete Select one preset position and click this button to delete it
GO Select one preset position in the preset drop-down list and click Go to make the camera
Select one of these
26
move the preset position
How to do preset positionFirstly move the camera and stop at a desired place where you want make preset position
Secondly click button and enter a descriptive name for the preset position The preset position
cannot contain special characters Then click OK to save it If you want to reset the preset position clickCancelAfter that you can move the camera and stop at another place and set another preset position You cando all the 16 preset positions with this methodIf you want to see one preset position you have set only select the preset position name from the preset
drop-down list and click go button the camera will go to the preset position
Section 5 IR LED Lights Color Adjustment
Click Infra led and there are three modes to adjust the infrared led Auto Manual and ScheduleAuto Select it and the camera will adjust the infra led (on or off) automaticallyManual Select it and you can turn on or turn off the infra led manuallySchedule Select it and the IR led light will be off at the schedule period If you want to define or changethe IR led lights schedule time please go to Settings---gtVideo---gt IR LED Schedule page
Color AdjustmentIn this page you can tune Hue Brightness Contrast Saturation and Sharpness to get higher quality
Section 6 OSDIf you have added time and camera name in the video you can see it in the live windowGo to Settings ---Basic settings---Camera name panel and you can change another device nameThe default device name is anonymousGo to Settings ---Basic settings---Camera time panel and adjust the device timeGo to Settings ---Video---On Screen Display panel you can add or no add OSD
27
Section 7 Play Stop Talk Audio Snap Record Full screen button
1----- Play Click it to play the video of the camera2----- Stop Click it to stop the video of the camera
3----- Talk Click the button and the icon will become to then talk to the microphone thatconnected with PC people around the camera can here your voice Click the icon again and stop talking
4----- Audio Click this icon the icon will become to you can hear the sound around the camera
by the earphone or speakers that connected with PC
5----- Adjusting the sound Click this icon the icon will become to youcan change the sound of the camera
6----- Snapshot Click it to make snapshot and it pop-up a window which picture you snapshot rightclick in the window and save the picture to anywhere you want
7----- Record Click the icon and the camera start recording you can see a green dot in the livewindow Click again and stop recording The default storage path is CIPCamRecord You can changethe storage path Go to Settings- gtRecord-gtStorage Location panel
8----- Full Screen Click it to make full-screen or you can double click the surveillance screen to makefull-screen Double click again and exit full-screen
Onscreen Mouse ControlRight click the mouse and you can adjust the screen ration full screen and Zoom up
28
Keep ration Select it and the camera will adjust the size of live window based on the the computermonitor automatically Sometimes there is a black border around the video please select Keep ration toget a better visual quality Full Screen Select it and Click it to make full-screen press ESC and exit full-screenZoom up Select it and you can see a bigger screen than beforeFirst Method Here is a convenient and fast solution to Zoom updown screen by Clicking Video Screenand adjusting Mouse pulley or by press the CTRL key and click the mouse left buttonSecond Method Click it and the live view will be digital zoomed up then click Zoom Down and the liveview back to original size
When you select the Full Screen then click right mouse there is a Screen PTZ button
29
Click the Screen PTZ button and put the mouse on the screen to indicate the camera move direction youprefer press the left mouse the camera will move to the corresponding direction Loosen the mouse andstop moving Press Esc button or double click right mouse and cancel the function
NOTE For Mac OS the plugin cannot support Onscreen Mouse Control so you cannot allow to use it
4 Advanced Camera SettingsClick the button ldquoSettingsrdquo goes to Administrator Control Panel to make advanced camera settings
41 Setup WizardPlease go to section 32 to find the way to set it
42 StatusStatus contains four columns Device Information Device Status Session Status and Log it will showyou various information about your camera
30
421 Device Information
Camera Model The camera model NO
Camera Name The Device Name is a unique name that you can give to your device to help you identifyit Click Basic Settings and go to Camera name panel where you can change your camera name Thedefault device name is anonymous
Camera ID Display the wired MAC address of your camera For example Device ID is 000C5D00008the same MAC ID sticker is found at the bottom of the camera
Camera Time The system time of the device Click Basic Settings and go to Camera time panel andadjust the timeSystem Firmware Version Display the System Firmware version of your cameraApplication Firmware Version Display the application firmware version of your cameraPlug-In Version Display the plug-in version of your camera
422 Device Status
On this page you can see device status such as Alarm status Record Status DDNS status WIFI statusand so on
31
423 Session Status
Session status will display who and which IP is visiting the camera now
424 Log
The log record shows who and which IP address accessed or logout the camera
32
Reboot the camera and clear the log records
43 Basic SettingsThis section allows you to configure your camerarsquos Name Time Mail User account and Multi-Device
431 Camera Name
You can define a name for your camera here such as apple Click Save to save your changes The aliasname cannot contain special characters
432 Camera Time
This section allows you to configure the settings of the internal system clocks for your camera
33
Time Zone Select the time zone for your region from the dropdown menuSync with NTP server Network Time Protocol will synchronize your camera with an Internet time serverChoose the one that is closest to your cameraSync with PC Select this option to synchronize the date and time of the Network Camera with yourcomputerManually The administrator can enter the date and time manually Note select the date and time formatuse DST Select the daylight saving time from the dropdown list
Click Save button and submit your settings
NOTE If the power supply of camera is disconnect you need set the camerarsquos time again
433 User Accounts
Here you can create users and set privilege visitor operator or administrator The default useraccount is admin with a blank password You can enter the users accounts of visitor operator andadministrator Manually
34
How to change the passwordFirstly select the account which you want to change the password then select ldquoChange passwordrdquoenter the old password and the new password lastly click modify to take effect
How to add account Select one blank column then enter the new user name password and privilege last click Add to takeeffect You can see the new added account on the Account list
35
Delete Select the account which you want to delete then click Delete button to take effectNOTE The default admin account cannot be deleted but you can add other administrator users
How to change the username Firstly select the account which you want to change the username then select ldquoChange usernamerdquoenter the new password lastly click modify to take effect
36
434 Multi-Camera
If you want to view multi-surveillance screens on one window you need to login one camera and set itas the main device and do Multi-Device Settings add other cameras to the first one camera Before youdo multi-cams settings you need to assign different port such as 81 82 83 84 85 86 87 88 to thecameras if there is 8 cams installedThe firmware within the camera can support a maximum of 9 devices monitoring all at the same timeThis page you can both add FOSCAM MJPEG and H264 series cameras to the first camera and viewmulti-surveillance screen on one window
Add cameras in LANIn Multi-Device Settings page you can see all devices searched in LAN The 1st Device is the defaultone You can add more cameras in the list in LAN for monitoring The camerarsquos software supports up to 9IP Cameras online simultaneously Click The 2nd Device and click the item in the Device List in LAN theAlias Host and Http Port will be filled in the boxes below automatically Enter the correct username andpassword then click Add Add more cameras in the same way
37
Camera Model Our Company produces two series cameras MJPEG and H264 Here will show youwhich series the camera belongs to
1 Click it camera model aliashost and HTTP Port will befilled in the following boxesautomatically
2 Enter the User name andpassword of the 2nd camera
3 Click Add to take effect
38
Back to Surveillance Windows and click Four Windows option you will see four cameras you added
Add cameras in WANIf you want to view all cameras via the internet(remote computer) you will need to add them using DDNSdomain name Firstly make sure all of the cameras you added can be accessed through the internet(The way to configure DDNS is in chapter 444)Login to the first camera using a DDNS domain name and port
39
Click Multi-Device Settings Choose The 2nd Device Fill in the 2nd camerarsquos name DDNS domainname port number Enter user name and password and then choose Add
1 ---- The camera model MJ or H2642 ---- The 2nd camerarsquos name3 ---- Fill in the 2nd camerarsquos DDNS host not LAN IP
NOTE The MJ series have the same HTTP Port NO and Media Port NO
4 ---- Enter the 2nd camerarsquos user name and password5 ---- Click Add button and to take effect
NOTE Here the Host must be entered as the second camerarsquos DDNS domain name not its LAN IP
Use DDNS domain
name and port to login
Make sure each camera you need add
could login with DDNS name and port
40
Return to video window You will see all of the cameras accessible through the internetWhen you are away from home you can use the first camerarsquos DDNS domain name and port to view allthe cameras via internet
435 Status Light
You can enable or disable status light
41
44 NetworkThis section will allow you to configure your camerarsquos IP PPPoE DDNS Wireless Settings UPnP andPort
441 IP Configuration
If you want to set a static IP for the camera please go to IP Configuration page Keep the camera in thesame subnet of your router or computer
Changing settings here is the same as using the Equipment Search ToolIt is recommended that you use the subnet mask gateway and DNS server from your locally attachedPC If you donrsquot know the subnet mask gateway and DNS server you can check your computerrsquos localarea connection as followsControl Panel rarrNetwork Connections rarrLocal Area Connections rarrChoose Support rarrDetails
42
If you donrsquot know the DNS server you can use the same settings as the Default Gateway
442 Wireless Settings
Step 1 Choose ldquoSettingsrdquo on the top of the camera interface and go to the ldquoNetworkrdquo panel on theleft side of the screen then click ldquoWireless Settingsrdquo
Set the same Subnet Mask andgateway of the camera with yourPC
There are two DNS servers Youcan set any of them Same withgateway is also OK
43
Click the Scan button and the camera will detect all wireless networks around the area It should alsodisplay your router in the list
Step 2 Click the SSID (name of your router) in the list the corresponding information related to yournetwork such as the name and the encryption will be filled into the relevant fields automatically
You will only need to fill in the password of your network Make sure that the SSID Encryption and thepassword you filled in are exactly the same for your router
Click the Page number to see other wirelessnetworks devices if there are more than 10
Click the Scan buttonto search for wirelessnetworks
1 Click the SSID of your router andthe relevant information will be filledin the fields automatically
2 Enter the passwordof your router
44
Step 3 Please click on the Save button after all settings have been entered and disconnect the networkcable Never shut down the power of the camera until the IP camera is able to connect to the wirelessnetwork
The LAN IP address will disappear on the window of Equipment Search Tool when the camera isconfiguring a wireless connection Wait about 1 minute the camera should obtain a wireless connectionand the LAN IP of the camera will show again on the window of the Equipment Search Tool The IPaddress may have changed after the camera receives a wireless connection we recommend setting astatic local IP address if this IP address changes by right clicking the camera in Equipment Search Toolsetting a static IP and pushing OKCongratulations You have set up the wireless connection of the camera successfully
NOTE If you fail to make a wireless connection please refer to your seller or contact us directly forassistance
443 Soft AP Password Settings(Only C1)
For the safety of your camera we recommend you change the Soft AP password
444 DDNS
FOSCAM camera has embedded a unique DDNS domain name when producing and you can directlyuse the domain name you can also use the third party domain name
FOSCAM domain nameHere take test09myfoscamorg for example Go to option of DDNS on the Settings-gtNetwork panelyou can see the domain name
45
Now you can use http Domain name + HTTP Port to access the camera via internetTake hostname test09myfoscamorg and HTTP Port no 800 for example the accessing link of thecamera via internet would be http test09myfoscamorg800
Restore DDNS to factory If you have configured Third Party DDNS successfully but you want to useManufacturerrsquos DDNS again here click this button and start Manufacturerrsquos DDNS ServiceUser can also use third part DDNS such as wwwno-ipcom www 3322com
445 UPnP
The default UPnP status is closed You can enable UPnP then the camerarsquos software will be configuredfor port forwarding Back to the ldquoDevice Statusrdquo panel you can see the UPnP status
46
The camerarsquos software will be configured for port forwarding There may be issues with your routerssecurity settings and sometimes may error We recommend you configure port forwarding manually onyour router
446 Port
This camera supports HTTP Port HTTP Port is used to access the camera remotely If you want toaccess the camera and view the video the HTTP Port must both be configured correctly
HTTP port By default the HTTP is set to 88 Also they can be assigned with another port numberbetween 1 and 65535 But make sure they can not be conflict with other existing ports like 25 21
ONVIF port By default the ONVIF port is set to 888 Also they can be assigned with another portnumber between 1 and 65535(except 0 and 65534) But make sure they can not be conflict with otherexisting ports
HTTPS port The default port is 443 You can use the url to access the camera https IP + HTTPSport
RTSP port The default port is 554 The R2 does not have RTSP port
Another way to change the HTTP port NO
Step 1 Open the Equipment Search Tool select the camera you would like to change the port of right
47
click on the IP address and click on rdquoNetwork Configurationrdquo this brings up the network configurationbox as flowing figures
Figure 41
Figure 42
Step 2 Enter the username and password of the Administrator (default username is admin with a blank
password) and click ldquoOKrdquo to apply changes
Step 3 Wait around 10 seconds yoursquoll see that the camerarsquos LAN IP address has changed In ourexample it was changed to 2000 so we see http19216811102000 in Equipment Search Tool Alsothe LAN IP address is now fixed at a static IP address of http19216811102000 This IP address willnot change even if the camera is powered off and back on the camera will remain on this LAN IPaddress This is very important that a static LAN IP address is set or you may have problems later withremote access and seeing the camera remotely if the camera loses power and reconnects on a differentLAN IP address Make sure you set a static LAN IP address
Select which camerayoursquod like to change theport for and right click
Modify the Http Port
Enter the Username andpassword click OK
48
If the camera cannot be accessed please make sure the port forwarding is succeed
447 Mail Settings
If you want the camera to send emails when motion has been detected here Mail will need to beconfigured
1---- SMTP Server Port Transport Layer Security Enter SMTP server for sender SMTP port isusually set as 25 Some SMTP servers have their own port such as 587 or 465 and Transport LayerSecurity usually is None If you use Gmail Transport Layer Security must be set to TLS or STARTTLSand SMTP Port must be set to 465 or 25 or 587 which port you choose should be decided by whichTransport Layer Security you select2---- SMTP Username password ID account and password of the sender email address3---- Sender E-mail Mailbox for sender must support SMTP4---- Receiver Mailbox for receiver need not support SMTPyou can set 4 receivers5---- Save Click Save to take effect6---- Test Click Test to see if Mail has been successfully configured
49
Click Test to see if Mail has been successfully configured
If the test success you can see the Success behind the Test at the same time the receivers will receivea test mail
If the test fails with one of the following errors after clicking Test verify that the information you enteredis correct and again select Test 1) Cannot connect to the server2) Network Error Please try later3) Server Error4) Incorrect user or password5) The sender is denied by the server Maybe the server need to authenticate the user please check itand try again6) The receiver is denied by the server Maybe because of the anti-spam privacy of the server7) The message is denied by the server Maybe because of the anti-spam privacy of the server8) The server does not support the authentication mode used by the device
448 FTP Settings
If you want to upload record files and images to your FTP serveryou can set FTP Settings
50
Figure a
Figure b
FTP server If your FTP server is located on the LAN you can set as Figure aIf you have an FTP server which you can access on the internet you can set as Figure bPort Default is port 21 If changed external FTP client program must change the server connection portaccordinglyFTP Mode Here supports two modes PORT and PASVUsernamepassword The FTP account and passwordClick Save to take effectClick Test to see if FTP has been successfully configured
449 P2P
Access the IP Camera by Smart Phone (Android or iOS operating system)First of all you must open the P2P function of the IP Camera at ldquoSettings --gt Network --gt P2Prdquo
51
Foscam App named Foscam on App Store and Google Play for iOS and Android devices
NOTEIf the QR code scanning is not successful please input the UID on the bottom of the camera manually
45 VideoThis section allows you to configure Video stream settings On screen display and Snapshot settings
451 Video Settings
There are two ways to set the stream video settings They are main stream video settings and substream video settings
Enhanced Night video Definition(Only C1) The camera will automatically drop the frame to extendthe recording time in the night
52
Stream Type There are four types to identify different streams you have set If select the HD Mode theclearer video will become and it will take up more bandwidth If select the Smooth Mode the bandwidthis very narrow and bit rate is large that will lead to video can not play well The Equilibrium Model is avalue between HD Mode and Smooth Mode
Resolution The camera supports multiple types For example 960P 720P VGA The higher theresolution is the clearer video will become But the code flux will become larger too and it will take upmore bandwidth (The maximum frame rate for each model is different please see theldquoSpecificationsrdquo )
Bit Rate Generally speaking the larger the bit rate is the clearer video will become But the bit rateconfiguration should combine well with the network bandwidth When the bandwidth is very narrow andbit rate is large that will lead to video can not play well
Frame rate You should lower frame rate when the bandwidth is limited Normally when the frame rateabove 15 you can achieve fluently video
Key Frame Interval The time between last key frame and next key frame The shorter the duration themore likely you will get a better video quality but at the cost of higher network bandwidth consumption
Variable bitrate(Only C1) Select the Bit rate type to constant or variable If select Yes the camera willchange the video bit rate according to the situation but will not more than the maximum parameter BitRate If select No the Bit Rate is unchanged
Rate Control Mode(Only R2 C2)There are three rate control modesCBR Constant Bit Rate it means that the Bit Rate is constantVBR Variable Bit Rate the camera will change the video bit rate according to the situation but will notmore than the maximum parameter Bit RateLBR Low Bit Rate If you can select the LBR then you can slide the scroll bar to choose percentage ofthe bit rate By reducing the bit rate so that the camera can obtain a better image at low bandwidth
452 On Screen Display
This page is used to add timestamp and device name on the video
Display Timestamp
53
There are two options Yes or NO Select Yes and you can see the system date on the video
Display Camera NameThere are two options Yes or NO Select Yes and you can see the device name on the video
453 Privacy Zone(Only R2 C2)
This page is used to set some mask as privacy zone on the video
Allow On Screen Display MaskThere are two options Yes or NO Select yes and draw a mask area on the video the mask area will beblack on the video
Click OK button and return to the OSD page click Save to take effectBack to the surveillance window you can see the mask area as the following picture
The mask area
54
453 Snapshot Settings
On this page you can set the snapshot picturesrsquo image quality and the storage path
Manual snap Quality Low Middle and High The higher the quality the picture will be clearerPictures Save To FTP or SD card If you have done FTP and Alarm settings when alarming thecamera will snap pictures to the FTP or SD card automaticallyIf you select the FTP you can set the file name which the picture save to (Only C1)
Enable timing to captureTo enable capture interval follow the steps below1 Select Enable Motion detection
55
2 Capture intervalThe interval time between two captures3 Select the capture time
Capture anytimeClick the black button up the MON you will see all time range turn red When something moving inthe detection area at anytime the camera will capture
Specify an capture scheduleClick the week day words the corresponding column will be selected For example click TUE theall column of TUE turns to red that means during Tuesday whole day the camera will capture
Press the left mouse and drag it on the time boxes you can select the serial area4 Click Save button to take effect
454 IR LED Schedule
On this page you can set the schedule time for switching IR LED lights When parameter Mode is set tothe Schedule on the Live Video window at these schedule time the IR LED lights will be turned off
46 Detector
461 One Key Alert(Only R2 C2)
On this page you can turn on or off the alarm function you need
462 Action Detection
IP Camera supports Action Detection Alarm when the people has been detected the IP Camera willmake a alarm
56
Step 1 Enable Action detection function
Step 2 Sensitivity---- It supports five modes Lowest Lower Low Medium and High The higher thesensitivity the camera will be more easily alarmed Select one motion sensitivity
Step 3 Trigger interval--- The interval time between two motion detection
Step 4There are some alarm indicators
A Camera Sound and PC SoundIf the camera has connected with a speaker or other audio output device if you select Camera Sound orPC Sound when the motion has been detected the people around the camera will hear beep alarmsound
B Send E-mailIf you want to receive alarm emails when motion is detected you must select Send E-mail and set MailSettings first
C Take SnapshotIf you select this checkbox when the motion has been detected the camera will snap the live viewwindow as a still picture and load it to the FTP Make sure you have set FTP and set FTP as the storagepath in Video-gtSnapshot settings panel
57
Time interval The interval time between two pictures
D RecordingIf you select this checkbox when the motion has been detected the camera will record automaticallyand store the record files to the SD Card Make sure the camera has inserted SD card and you haveset the SD card as the Alarm record files storage path please go to Recordmdashgt Storage location pageto verify this settingsThe default alarm record time is 30s and pre-alarm record time is 5s please go to Recordmdashgt AlarmRecord page and change the alarm time settings
E Push message to the phoneIf you select this checkbox when the motion has been detected the camera will push the message tothe phone which has been connected the camera
Step 7 Set detection areaClick set detect area and it pop up a window then you can draw the detection area Click Back buttonafter settings When something moving in the detection area the camera will alarm
Step 8 Alarm Schedule① Alarm anytime when motion is detectedClick the black button up the MON you will see all time range turn red When something moving in thedetection area at anytime the camera will alarm
② Specify an alarm scheduleClick the week day words the corresponding column will be selected For example click TUE the allcolumn of TUE turns to red that means during Tuesday whole day when something moving in thedetection area the camera will alarm
Click this button and select all time range
58
③ Press the left mouse and drag it on the time boxes you can select the serial area
Step 9 Click Save button to take effectWhen the motion has been detected during the detection time in the detection area the camera willalarm and adopt the corresponding alarm indicators
NOTE You must set the detection area and detection schedule or else there is no alarm anywhereand anytime
463 Sound alarm
When the ambient sound over a certain decibel the sound alarm will be triggered
59
If the Sensitivity is set to ldquoHighrdquo the camera will detect the sound whose more than 55dbIf the Sensitivity is set to ldquoMediumrdquo the camera will detect the sound whose more than 65dbIf the Sensitivity is set to ldquoLowrdquo the camera will detect the sound whose more than 75dbIf the Sensitivity is set to ldquoLowerrdquo the camera will detect the sound whose more than 85dbIf the Sensitivity is set to ldquoLowestrdquo the camera will detect the sound whose more than 95db
47 RecordThis section will allow you to change the record files storage path and the record time
471 Storage Location
On this page you can change the alarm and manually recording storage path
60
Recording Location SD card or FTP Make sure the camera has been inserted the SD card Onthis page you can see the available space of the SD card
Local Recording Location For Windows OS the manual recording path is C IPCamRecord you canchange another one For MAC OS the manual recording path is IPCamRecord
Enter the local folder Click here You can enter the local storage folder
472 Alarm Recording
473 Local Alarm Recording
This page you can enable the local alarm record and Local Alarm record time
61
474 Schedule Recording
When the video is selected as FTP the device supports scheduled recordingWhen the parameter Recording Location is set SD Card on the Storage Location page you canconfigure parameters as shown in follow figure
When the video is selected as SD card the device supports pumping frame recordingWhen the parameter Recording Location is set SD Card on the Storage Location page you canconfigure parameters as shown in follow figure
62
Record full strategy When the SD card is full you can choose to cover the previous recording or stoprecordingAudio Record You can choose yes or no
NOTES Scheduled recording only supports video saved to the SD card or FTP server The schedule recording will stop while alarm recording is beginning and it will continue
automatically after alarm recording end You can refer to alarm schedule in Alarm about editing the time of recording Schedule
475 SD Card Management
This camera supports SD Card When you plug in the SD card during the camera work process please
63
reboot the camera again or else the SD Card may be cannot work well
The default storage path of alarm record files is SD card when the available size of SD card is less than256M the old record files will be deleted automatically
SD Card Management After click the button you should enter the username and password of thecamera Then you can manage the recording files of the camera in the SD card The SD cardmanagement is only effective when access the camera in LAN
Format(except C1) Click the button you can format the SD card Note that this will delete all files on theSD card
48 PTZ(Only R2)This page will allow you to change the pantilt speed and do cruise tracks settings
481 Pan amp Tilt Speed
There are five Pt speed types very fast fast normal slow and very slowly Select the desired PTZspeed type and click save buttonThere are three zoom speed types fast normal slow
64
482 Cruise SettingsThis section explains how to add delete alter one cruise track
Setting the Cruise ModeThere are two cruise mode Cruise time and Cruise LoopsCruise time Select Cruise time from Cruise Mode drop-down then you can set the Cruise time of thecameraCruise LoopsSelect Cruise Loops from Cruise Mode drop-down you can set the Cruise Loops ofthe cameraClick Save to take effect
Manage the Cruise TrackThere are two default cruise tracks Vertical and HorizontalVertical The camera will rotate from up to down
65
Horizontal The camera will rotate form left to right
Add Add one cruise track then click save buttonDelete Select one cruise track and delete itSave After you modify the Dwell time you should click Save button to take effect
Example
How to do add cruise tracks Firstly Click Add button and enter a descriptive name to identify the cruise track
Secondly On the lower left of the page you can see all preset points you have added Select onepreset point and click Add button you can see the preset point has been added to the cruise track on thecruise track page You need to add two or more preset points to the cruise track
Thirdly Click OK button and the cruise track will take effect
You can add other cruise track as the same method
For example I have added three preset points to the ldquotrack 1rdquo that means When I select the ldquotrack 1rdquoon the surveillance window the camera moves as the following track upright then Right Most last downleftYou can add preset on the left of the surveillance window
The new added track name
1 Select one preset point 2 Click Add button
Here you can see the preset pointhas been added to one track Andyou can set the stay time
66
After add the cruise track back to the surveillance window click Cruise her you can see all cruise tracksyou have added
After add the cruise track back to the surveillance window click Cruise her you can see all cruise tracksyou have added
The cruise tracks have addedto the ldquotrack 1rdquo
Add the preset
67
There are other buttons between the Preset points and Cruise track you can use these buttons to adjustthe order of preset points or adddelete one preset points in one cruise track
Add Select one preset points and add it to the selected cruise trackDelete Select one preset points you have added to one cruise track click deleteMove up down Select one cruise track adjust the order of preset points in one cruise track
AttentionConsidering the life time and thermal issue of the motor itrsquos not recommend to do long-time cruise
483 Start-Up Options
Here section will allow you to set the stop position after the camera rebootsIt supports three modes No self test Goto home position and Goto preset pointNo self test When rebooting the camera will not pan tiltGoto home position When rebooting the camera will pa Providing Central Management Software tomanage or monitor multi-cameras n tilt and stops at centerGo to Preset point Select one preset position and save it When rebooting the camera will pan tilt andstops at the preset position you have set
68
49 FirewallThis section explains how to control the access permission by checking the client PCrsquos IP addresses Itis composed of the following columns Block access from these IP addresses and Only allow accessfrom these IP addresses
Enable firewall If you select Only allow access from these IP addresses and fill in 8 IP addresses atmost only those clients whose IP addresses listed in the Only allow access from these IP addressescan access the Network Camera If you select Block access from these IP addresses only thoseclients whose IP addresses are in the IP list cannot access the Network CameraClick Save to take effect
410 SystemIn this panel you can backuprestore your camera settings upgrade the firmware to the latest versionrestore the camera to default settings and reboot the device
4101 Back-upamp Restore
Click Backup to save all the parameters you have set These parameters will be stored in a bin file forfuture useClick Browse and select the parameters file you have stored then click Submit to restore the restore the
69
parameters
4102 System UpgradeClick ldquoDownload the latest firmwarerdquo you will see the following screen And click ldquosaverdquo to save thefirmware on your computer locally
Your current firmware version will be displayed on your screen You may go to the Status DeviceInformation page to check for the latest firmware versions availableClick Browse choose the correct bin file and then click System upgradeDonrsquot shut down the power during upgrade After upgrading you can see the upgrade result
70
Upgrade Firmware by Equipment Search Tool
Double click the Equipment Search Tool shot icon select the Camera IP that you want toupgrade the firmware Then select Upgrade Firmware and enter the username and password choosethe firmware file and upgrade
Figure 43
CAUTION If your camera works well with the current firmware we recommend not upgrading Pleasedonrsquot upgrade the firmware unnecessarily Your camera may be damaged if misconfigured during anupgrade
71
NOTES Please ensure you have download the correct firmware package for your camera before upgrading
Read the upgrade documentation (readmetxt file) in the upgrade package before you upgrade Upon downloading the firmware check the sizes of the bin files They must match the size in the
readmetxt file If not please download the firmware again until the sizes are the same Yourcamera will not function correctly if a corrupt bin file is used
Normally only Device WEB UI need to be upgrade please do not try to upgrade the Device SystemFirmware
Never shut down the power of the camera during upgrade until the IP camera restart and getconnected
After upgrade successfully please uninstall the old plugin and re-install it then reset the camera tothe default factory settings before using the camera
4103 Patch InstallationClick Browse to select the correct patch file and then click Install Patch to install the patch Do notturn off the power during it installing After installing is complete you will receive a system prompt
4104 Factory Reset
Click All reset and all parameters will return to factory settings if selected This is similar to press theReset button on the bottom of the camera
4105 RebootClick Reboot System to reboot the camera This is similar to unplugging the power to the camera
Enable Periodic Maintenance(Only R2)You can choose the reboot period of the camera
72
5 PlaybackOn this page you can view the record files stored in the SD card
Section 1 Define the Record files time and Type
The storage path of record files
Here supports three types current day current month and All records Another
way select the time on the timeampdate manually
The type of records files Here supports two typs Normal record Alarm record
and All records
Click this button to search all record files satisfy the conditions you selected
Continuous Play Select the checkbox to play continuously all the record files
73
Section 2 Search record filesOn this panel you can see all record files satisfy the conditions you set
Section 3 PlayStopAudioFull screen buttonsPlease select one record file before use these buttons
Click this button to play the record files
Click this button to stop the record files
Open or stop audio
Click this button to make full screen and double click left mouse to exit full screen
6 Appendix
61 Frequently Asked Questions
611 Install the add-on of Firefox browser Google Chrome and IE
Chrome
74
75
76
77
612 Uninstall the add-on of Firefox browser Google Chrome and IE
Chrome
78
613 I have forgotten the administrator password
To reset the administrator username and password press and hold down the RESET BUTTON for 5seconds Upon releasing the reset button wait for 20 seconds the camera will reboot and the usernameand password will return to the factory default administrator username and password Please power onthe camera before resetDefault administrator username adminDefault administrator password No password
614 Camera can not record
When you use Windows7 or Vista you may be not able to do manually record or change the record pathbecause of the security settings of computerThere are two ways to resolve this problemPlease add the camera as a trusted site to resolve this issue The steps are IE browserToolInternet PropertiesSecurityTrusted sitesSitesAdd
79
Open IE browser then right click select ldquoRun as administratorrdquo
615 Subnet doesnrsquot match
Check whether your ipcamera in the same subnet of your computer The step is ControlPanelNetwork ConnectionsDbclick Local Area Connections ChooseGeneralPropertiesCheck subnet mask IP address and gateways When you set IP address pleasemake sure they are in the same subnet Otherwise you cant access camera
616 No Pictures Problems
The video streaming is transmitted by the ActiveX controller If ActiveX controller isnrsquot installed correctlyyou will see no video image You can resolve this problem by this wayDownload ActiveX controller and set the safety property of IE in the PC when you view it first time IEbrowserToolInternet ProperSecurityCustom LevelActiveX control and Plug-ins Three optionsof front should be set to be ldquoEnablerdquo The ActiveX programs read by the computer will be stored AsfollowsEnable Download unsigned ActiveX controlsEnable Initialize and script ActiveX controls not marked as safeEnable Run ActiveX controls and plug-ins
If you allow the ActiveX running but still could not see living video Please change another port numberto try Donrsquot use port 88
80
NOTE Make sure that your firewall or anti-virus software does not block the camera or ActiveX If youcould not see video please shut down firewall or anti-virus software to try again
617 Canrsquot access IP camera in internet
There are some reasons1ActiveX controller is not installed correctly2The port which camera used is blocked by Firewall or Anti-virus software Please change another portnumber and try again3Port forwarding is not successfulCheck these settings and make sure they are correct
618 UPnP always failed
UPnP only contains port forwarding in our recent software Sometimes it may be failed to do portforwarding automatically because of firewall or anti-virus software It also has much relation with routerrsquossecurity settings So we recommend you do port forwarding manually You can view your camera ininternet successfully after you do port forwarding manually in your router
619 Camera can not connect wireless
If your camera could not connect wireless after you set wireless settings and plug out the cable Pleasecheck whether your settings are correct or notNormally camera canrsquot connect wireless mainly because of wrong settingsMake sure broadcast your SSID use the same encryption for router and camera
6110 Canrsquot see other cameras listed in multi-device when using remote
access
If you want to view all the cameras via the WAN verify that each camera added in the multi-devicesettings can be accessed by using the DDNS name and port number Use the DDNS domain name notthe camerarsquos LAN IP (For more details see How to add cameras in WAN)
62 Default ParametersDefault network ParametersIP address obtain dynamically
81
Subnet mask obtain dynamicallyGateway obtain dynamicallyDDNS Embedded FOSCAM domain nameUsername and passwordDefault admin username admin with a blank password
63 Specifications
ITEMS C1
Image SensorSensor High Definition Color CMOS Sensor
Display Resolution 1280 x 720 (1Megapixels)
Min Illumination 0 Lux (With IR Illuminator)
Lens
Lens Type Glass Lens
focal length f28mm
Aperture F24
Diagonal angle of view 115deg
Horizontal view angle 100deg
Video
Image Compression H264
Image Frame Rate 25fps(VGA) 23fps(720P) downward adjustable
Resolution720P(1280 x 720) VGA(640 x 480) VGA(640 x 360)QVGA(320 x 240) QVGA(320 x 180)
Stream dual stream
Image adjustmentThe hue brightness contrast saturation sharpness areadjustable
Flip image flip and mirror
Infrared mode Automatic or manual
manual PanTilt Angle Horizontal350deg amp Vertical 180deg
Night visibility 11pcs IR-LEDs night vision range up to 8 metres
Audio InputOutputSupports two-way audioBuilt-in Mic amp Speaker
Audio Compression PCMG726
Network
Ethernet One 10100Mbps RJ45 port
Wireless Standard IEEE80211bgn
Data RateIEEE80211b 11Mbps(Max)IEEE80211g 54Mbps(Max)IEEE80211n 150Mbps(Max)
Wireless Security WEP WPA WPA2
WPS Supports EZLink wireless setup
82
Network ProtocolIPTCPUDPHTTPHTTPSSMTPFTPDHCPDDNSUPnPRTSPWPS
Remote Access P2P DDNS
SystemRequirements
Operating SystemMicrosoft Windows XP Vista 7 8Mac OSiOSAndroid
Browser
Microsoft IE8 and above version or compatible browserMozilla FirefoxGoogle ChromeApple Safari
OtherFeatures
Motion Detection Alarm via E-Mail upload alarm snapshot to FTP
PIR Infrared human body sensor
User Accounts Three levels user role
Firewall Supports IP Filtering
Storage 32G Micro SD card local and FTP storage
Reset Reset button is available
PowerPower Supply DC 5V10A
Power Consumption 45W(Max)
Physical Dimension(LxWxH) 7070120mm
Net Weight 170g
Environment
Operating Temperature-10degC ~ 50deg(14degF ~ 122degF)
Operating Humidity 20 ~ 85 non-condensing
Storage Temperature -20degC ~ 60deg (-4degF ~ 140degF)
Storage Humidity 0 ~ 90 non-condensing
Certification CE FCC RoHS
Warranty Limited 2-year warranty
ITEMS R2
Image Sensor
Sensor Type 13 CMOS
Display Resolution 1920 x 1080 (20 Megapixels)
Frame Rate 30fps
Min Illumination 0 Lux (With IR Illuminator)
Lens
Lens Type f28mmF26
Angle of ViewHorizontal90degDiagonal 110deg
Night Vision 13pcs IR-LEDs night vision range up to 8 metres
VideoImage Compression H264
Resolution1080P(1920x1080)720P(1280 x 720) VGA(640 x 480)QVGA(320 x 240)
83
Stream dual stream
Image adjustmentThe hue brightness contrast saturation sharpness areadjustable
Flip image flip and mirror
Infrared mode Automatic or manual
manual PanTilt Angle Horizontal300deg amp Vertical 100deg
Night visibility 13pcs IR-LEDs night vision range up to 8 metres
Audio InputOutputSupports two-way audioBuilt-in Mic amp Speaker
Audio Compression PCMG726
Network
Ethernet One 10100Mbps RJ45 port
Wireless Standard IEEE80211bgn
Data RateIEEE80211b 11Mbps(Max)IEEE80211g 54Mbps(Max)IEEE80211n 150Mbps(Max)
Wireless Security WEP WPA WPA2
Wireless Setup Supports EZLink wireless setup
Network ProtocolIPTCPUDPHTTPHTTPSSMTPFTPDHCPDDNSUPnPRTSPWPSONVIF
Remote Access P2P DDNS
SystemRequirements
Operating System Microsoft Windows XP 7 8Mac OSiOSAndroid
Browser IE8 and above versionFirefoxChromeSafari
OtherFeatures
Motion Detection Alarm via E-Mail upload alarm snapshot to FTP
HDR Improve image clarity in complex scenario
Magic Zoom Picture zoom function
User Accounts Three levels user role
Firewall Supports IP Filtering
Storage 64G Micro SD card local and FTP storage
Reset Reset button is available
PowerPower Supply DC 5V20A
Power Consumption <6W
PhysicalDimension(mm) 74(L)times74(W)times119(H)
Net Weight 290g
Environment
OperatingTemperature -10degC ~ 50deg (14degF ~ 122degF)
Operating Humidity 20 ~ 85 non-condensing
Storage Temperature -20degC ~ 60deg (-4degF ~ 140degF)
Storage Humidity 0 ~ 90 non-condensing
Certification CE FCC RoHS
Warranty Limited 2-year warranty
84
ITEMS C2
Image Sensor
Sensor Type 13 CMOS
Display Resolution 1920 x 1080 (20 Megapixels)
Frame Rate 30fps
Min Illumination 0 Lux (With IR Illuminator)
LensLens Type f28mmF26
Angle of ViewHorizontal110degDiagonal 120deg
Video
Image Compression H264
Resolution1080P(1920x1080)720P(1280 x 720) VGA(640 x 480)QVGA(320 x 240)
Stream dual stream
Image adjustmentThe hue brightness contrast saturation sharpness areadjustable
Flip image flip and mirror
Infrared mode Automatic or manual
Manual PanTilt Angle Horizontal360deg amp Vertical 180deg
Night visibility High performance IR-LEDs night vision range up to 8 metres
Audio InputOutputSupports two-way audioBuilt-in Mic amp Speaker
Audio Compression PCMG726
Network
Ethernet One 10100Mbps RJ45 port
Wireless Standard IEEE80211bgn
Data RateIEEE80211b 11Mbps(Max)IEEE80211g 54Mbps(Max)IEEE80211n 150Mbps(Max)
Wireless Security WEP WPA WPA2
Wireless Setup Supports EZLink wireless setup
Network ProtocolIPTCPUDPHTTPHTTPSSMTPFTPDHCPDDNSUPnPRTSPWPSONVIF
Remote Access P2P DDNS
SystemRequirements
Operating System Microsoft Windows XP 7 8Mac OSiOSAndroid
Browser IE8 and above versionFirefoxChromeSafari
OtherFeatures
Motion Detection Alarm via E-Mail upload alarm snapshot to FTP
HDR Improve image clarity in complex scenario
Magic Zoom a Magic digital zoom rivaled Optical zoom
User Accounts Three levels user role
Firewall Supports IP Filtering
85
Storage 64G Micro SD card local and FTP storage
Reset Reset button is available
PowerPower Supply DC 5V10A
Power Consumption 48W(Max)
PhysicalDimension(mm) 7070120mm
Net Weight 160g
Environment
OperatingTemperature -10degC ~ 50deg (14degF ~ 122degF)
Operating Humidity 20 ~ 85 non-condensing
Storage Temperature -20degC ~ 60deg (-4degF ~ 140degF)
Storage Humidity 0 ~ 90 non-condensing
Certification CE FCC RoHS
Warranty Limited 2-year warranty
Attention Power adapter should be used between 0-40 and 5-90 relative humidity
64 CE amp FCCElectromagnetic Compatibility (EMC)FCC Statement
This device compiles with FCC Rules Part 15 Operation is subject to the following twoconditions This device may not cause harmful interference This device must accept any interference received including interference that may cause undesired
operation
This equipment has been tested and found to comply with the limits for a Class B digital device pursuantto Part 15 of the FCC Rules These limits are designed to provide reasonable protection against harmfulinterference when the equipment is operated in a commercial environment This equipment generatesuses and can radiate radio frequency energy and if not installed and used in accordance with theinstallation manual may cause harmful interference to radio communications Operation of thisequipment in a residential area is like to cause harmful interference in which case the user will berequired to correct the interference at his own expense
FCC CautionAny changes or modification not expressly approved by the party responsible for compliance could voidthe userrsquos authority to operate this equipmentThis equipment complies with FCC radiation exposure limits set forth for an uncontrolled environment
86
This equipment should be installed and operated with minimum distance 20cm between the radiatorampyour bodyThis transmitter must not be co-located or operating in conjunction with any other antenna or transmitter
CE Mark Warning
This is a Class B product In a domestic environment this product may cause radio interference inwhich case the user may be required to take adequate measures
65 WarrantyShenZhen FOSCAM Intelligent Technology Limited(FOSCAM) values your business and alwaysattempts to provide you the very best of serviceNo limited hardware warranty is provided by FOSCAM unless your FOSCAM product (product) waspurchased from an authorized distributor or authorized reseller Distributors may sell products toresellers who then sell products to end users No warranty service is provided unless the product isreturned to an authorized return center in the region where the product was first shipped by FOSCAM orto the point-of-purchase which may have regional specific warranty implicationsIf you purchase your FOSCAM product from online store please contact the point-of-purchaseand ask for returnreplacementrepair service
Hardware Warranty Information
FOSCAM provide 2-year limited warranty for naked product and 6-month limited warranty foraccessories
Limited Hardware Warranty
FOSCAM products are warranted to be free from manufacturing defects in materials andworkmanship starting from the shipping date of FOSCAM
This limited hardware warranty does not cover Software including the software added to the products through our factory-integration system
software that included in the CDetc Usage that is not in accordance with product instructions Failure to follow the product instructions Abuse firmware upgrade without the authorized technicianrsquos guidance Normal wear and tear
Return Procedures
Please read FOSCAM warranty policy amp policy of your reseller first before sending items back topoint-of-purchase
Customer must first contact point-of-purchase to obtain a Return Merchandise Authorization (RMA)
87
number before returning the product If the product you received is suspected to be defective andthe product warranty has not expired The RMA number will allow your reseller to track your returnmuch easier and help them expedite processing your request
After receiving your RMA case number pack the item(s) very well with the original box and all theoriginal accessories included such as power adapters brackets cables manuals and driver CDdisks
Write your RMA number and the return reason (the problem of the product) on the warranty cardalong with the complete package to send them back
Replacement Services
If customers ask for replacement service please contact point-of-purchase and follow theirpolicy
Our technicians will inspect all items returned for replacement requests If the retuned product isfound in working order we will return the same item received However customers shall beresponsible for all shipping amp handling charges incurred for getting the units back to customers
If returned products are found defective we will replace the product and assume the shipping costfor sending back the replacement unit to customers
If for any reason we are unable to provide a replacement of the original returned item(s) You willhave a choice for a ldquoSubstituterdquo item at the same equal value
We do not provide exchange and replacement due to normal hardware upgrade according themarket after 14 days after the product is delivered
Our technicians will test the product before send out the replacement any other demand for morethan two times replacement for the same product during replacement limit will be rejected
Replaced products are warranted from the balance of the former warranty period
Warranty Forfeiture
Warranty is void if purchase from unauthorized distributor or reseller Warranty is void if trade-mark serial tags product stickers have been removed altered or tampered
with Warranty is void for mishandling improper use or defacing the product Abuse firmware upgrade without the authorized technicianrsquos guidance Warranty is void for physical damage altered either internally or externally improper or inadequate
packaging when returned for RMA purposes Warranty is void if damage has resulted from accident dismantle abuse or service or modification
by someone other than the appointed vendor souse fission or the spare part has been over theperiod of warranty
Warranty is void if product is damaged due to improper working environment or operation (Forexample improper temperature humidity unusual physical or electrical stress or interferencefailure or fluctuation of electrical power static electricity using wrong power adapter etc)
Warranty is void if damaged by the use of parts not manufactured or sold by FOSCAM Damage caused by improper installation of third-party products Warranty is void if damaged for irresistible cause such as earthquake fire lightning flood etc Product beyond limited warranty
Shipping Fee
88
If products are defective or damaged under normal use or operation in the replacement limitdistributors or resellers are responsible for the shipping cost the product back to customerscustomers should assume the shipping cost send the product to the point-of-purchase
During replacement limit if customers ask for replacement due to the product does not fit forcustomerrsquos personal expectation customers should responsible for both shipping fee
Customers shall be responsible for both shipping fee if their product beyond the replacement limitbut still in warranty limit
Repair Service Out Of Warranty
FOSCAM provide extra repair service for product that out of warranty it is chargeable The total feecontains device cost and service fee Device cost (including accessories) is the standard uniformprice provide by FOSCAM
Different region may have different service fee please contact the point-of-purchase to confirm thatbefore you ask for this service
Our technicians will quote the total price after detect the product If customers refused to repair afterthe quotation customers need pay for the test fee $35hour If agree with the quotation test will befree
Repaired product out of warranty will obtains 3-month warranty from the date of the product back tocustomers
Limitation of Liability
FOSCAM is not responsible for other extra warranty or commitment promised by resellers if yourreseller promised some extra commitment or warranty please ask for written documents to protectyour rights and interests
FOSCAM does not offer refunds under any circumstances Please contact the point-of-purchaseand follow their refundreturn policy
FOSCAM shall not be liable under any circumstances for any consequential incidental special orexemplary damages arising out of or in any connection with this agreement or the productsincluding but not limited to lost profits or any claim based on indemnity or contribution or the failureof any limited or exclusive remedy to achieve its essential purpose or otherwise Purchasersexclusive remedy as against FOSCAM shall be the repair or replacement of defective parts IfFOSCAM lists a product on its website specification in error or that is no longer available for anyreason FOSCAM reserves the right to explain it without incurring any liability
All rights reserved FOSCAM and the FOSCAM logo are trademarks of ShenZhen FOSCAMIntelligent Technology Limited registered in the US and other countries
7 Obtaining Technical SupportWhile we hope your experience with the IPCAM network camera is enjoyable and easy to use you may
89
experience some issues or have questions that this Userrsquos Guide has not answeredIf you have problem with FOSCAM IP camera please first contact FOSCAM reseller for solving theproblems If our reseller cannot provide service please contact our service departmenttechfoscamcom
- Security Warning
- 1 Overview
-
- 11 Key Features
- 12 Read Before Use
- 13 Package Contents
- 14 Physical Description
- 15 Micro-SD Card
-
- 2 Access the IP Camera
-
- 21 Wired Connection
- 22 Wireless Connection
-
- 221 Soft AP Connection(Only C1)
- 222 WPS (WI-FI Protected Set-up)
-
- 23 Access the Camera in WAN
-
- 231 Static IP Addresses
- 232 Remote Access
-
- 24 Using the VLC player
- 25 IP camera connection to the server
-
- 3 Surveillance Software GUI
-
- 31 login Window
- 32 Setup Wizard
- 33 Surveillance Window
-
- 4 Advanced Camera Settings
-
- 41 Setup Wizard
- 42 Status
-
- 421 Device Information
- 422 Device Status
- 423 Session Status
- 424 Log
-
- 43 Basic Settings
-
- 431 Camera Name
- 432 Camera Time
- 433 User Accounts
- 434 Multi-Camera
- 435 Status Light
-
- 44 Network
-
- 441 IP Configuration
- 442 Wireless Settings
- 443 Soft AP Password Settings(Only C1)
- 444 DDNS
- 445 UPnP
- 446 Port
- 447 Mail Settings
- 448 FTP Settings
- 449 P2P
-
- 45 Video
-
- 451 Video Settings
- 452 On Screen Display
- 453 Privacy Zone(Only R2 C2)
- 453 Snapshot Settings
- 454 IR LED Schedule
-
- 46 Detector
-
- 461 One Key Alert(Only R2 C2)
- 462 Action Detection
- 463 Sound alarm
-
- 47 Record
-
- 471 Storage Location
- 472 Alarm Recording
- 473 Local Alarm Recording
- 474 Schedule Recording
- 475 SD Card Management
-
- 48 PTZ(Only R2)
-
- 481 Pan amp Tilt Speed
- 482 Cruise Settings
- 483 Start-Up Options
-
- 49 Firewall
- 410 System
-
- 4101 Back-upamp Restore
- 4102 System Upgrade
- 4103 Patch Installation
- 4104 Factory Reset
- 4105 Reboot
-
- 5 Playback
- 6 Appendix
-
- 61 Frequently Asked Questions
-
- 611 Install the add-on of Firefox browser Googl
- 612 Uninstall the add-on of Firefox browser Goo
- 613 I have forgotten the administrator password
- 614 Camera can not record
- 615 Subnet doesnrsquot match
- 616 No Pictures Problems
- 617 Canrsquot access IP camera in internet
- 618 UPnP always failed
- 619 Camera can not connect wireless
- 6110 Canrsquot see other cameras listed in multi-dev
-
- 62 Default Parameters
- 63 Specifications
- 64 CE amp FCC
- 65 Warranty
-
- 7 Obtaining Technical Support
-
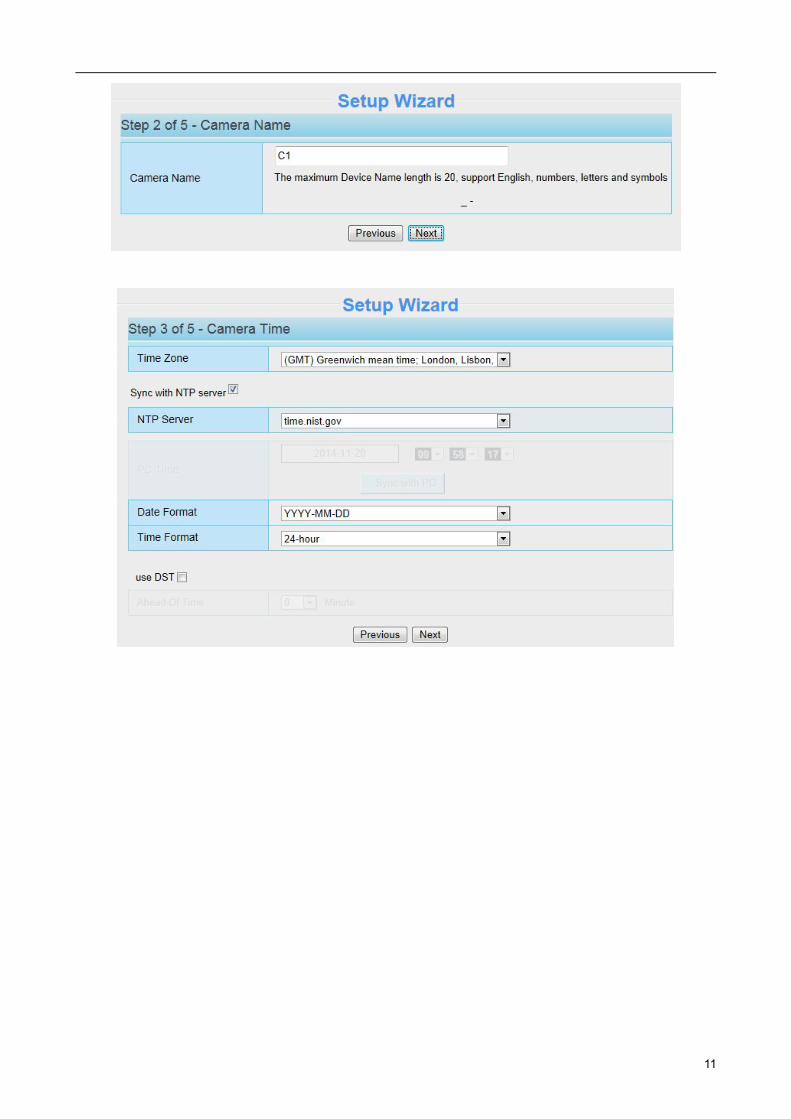
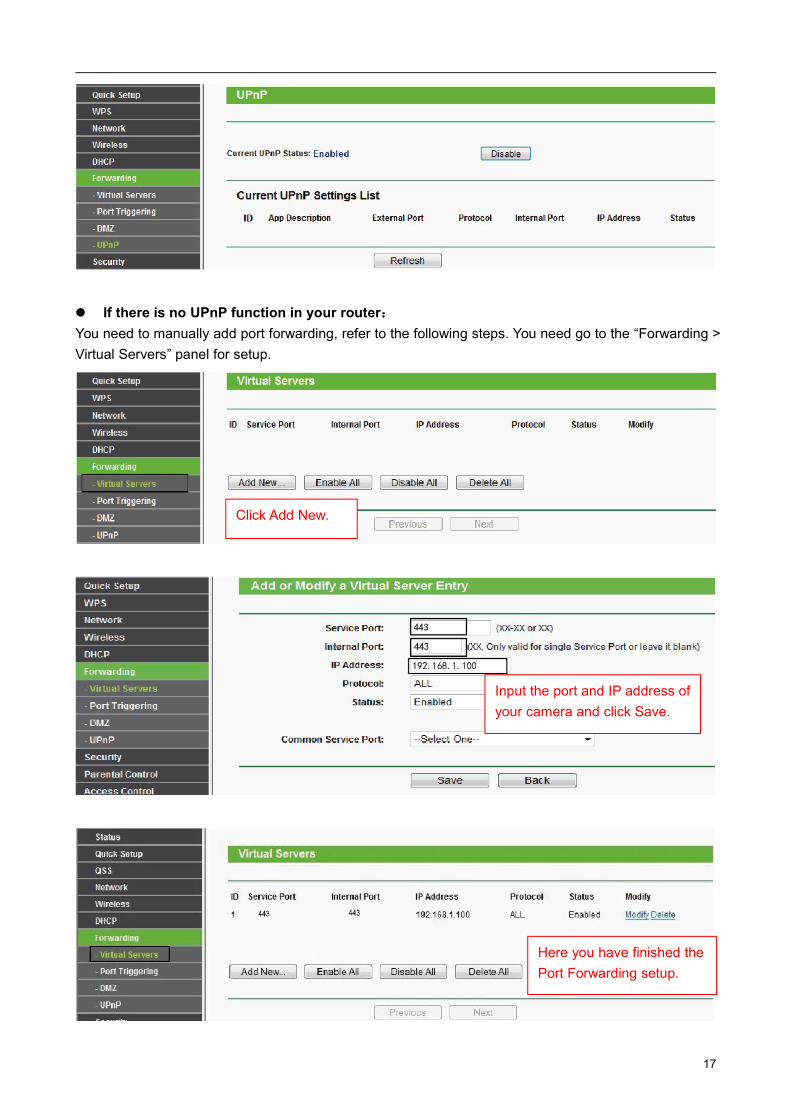
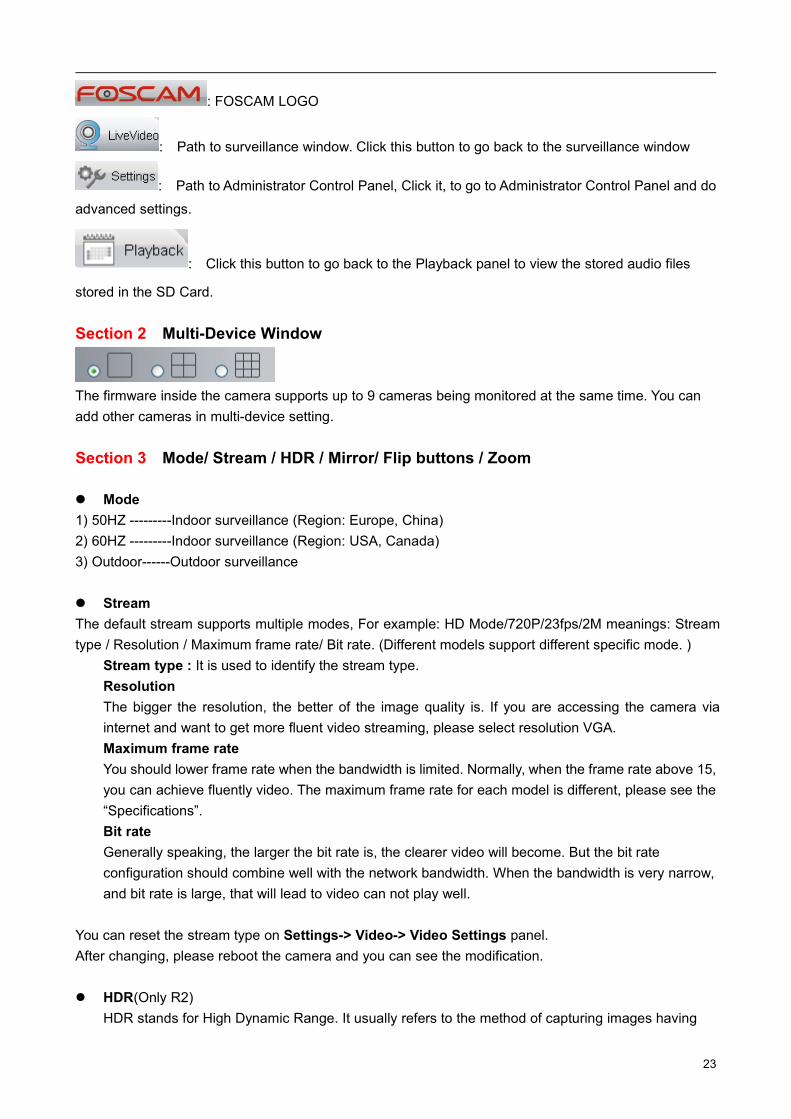
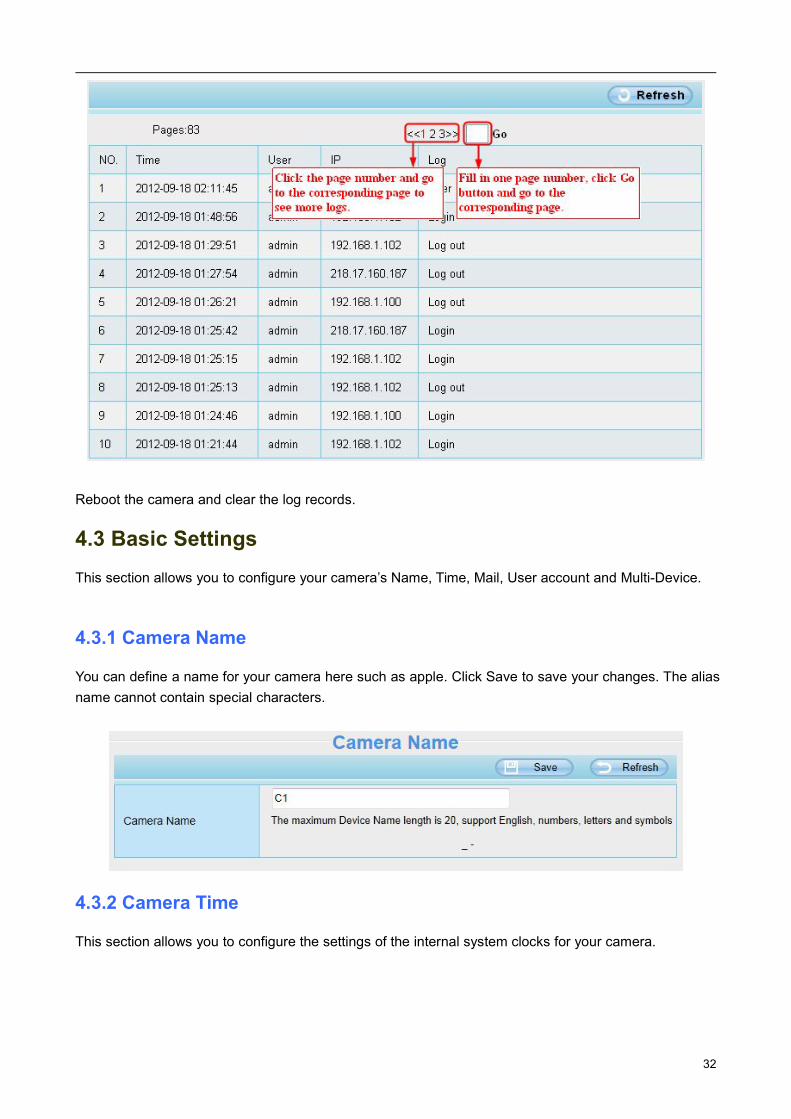
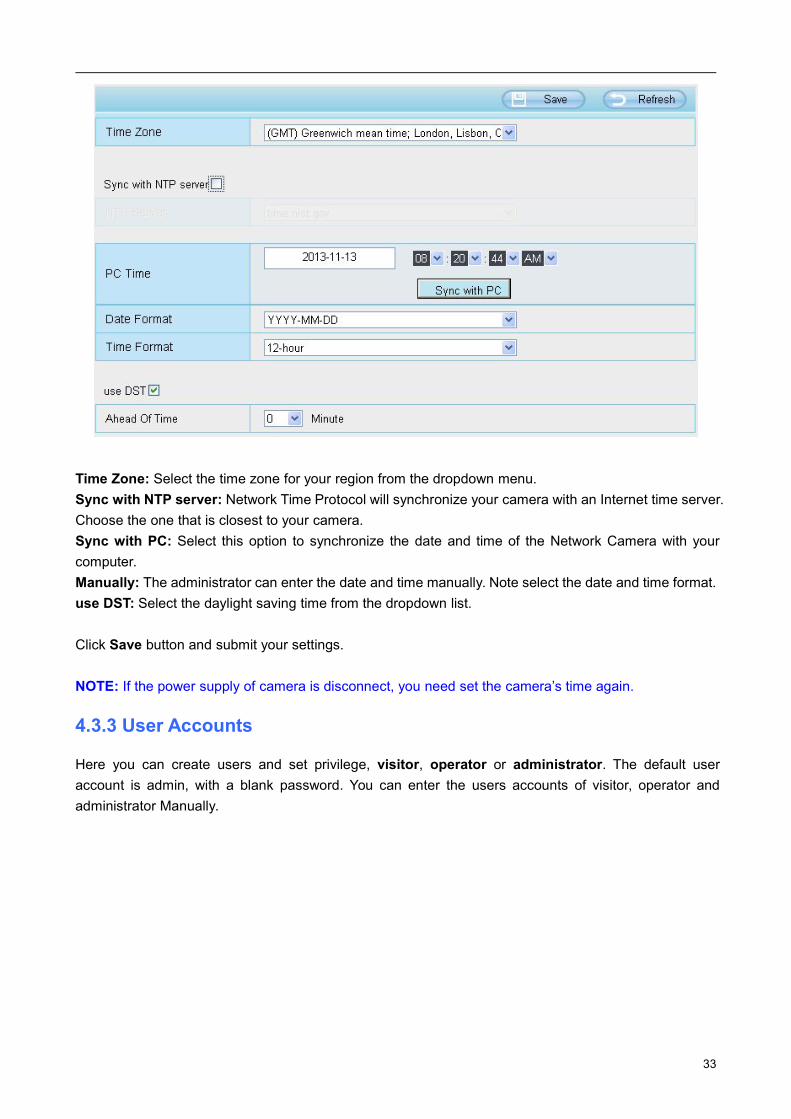
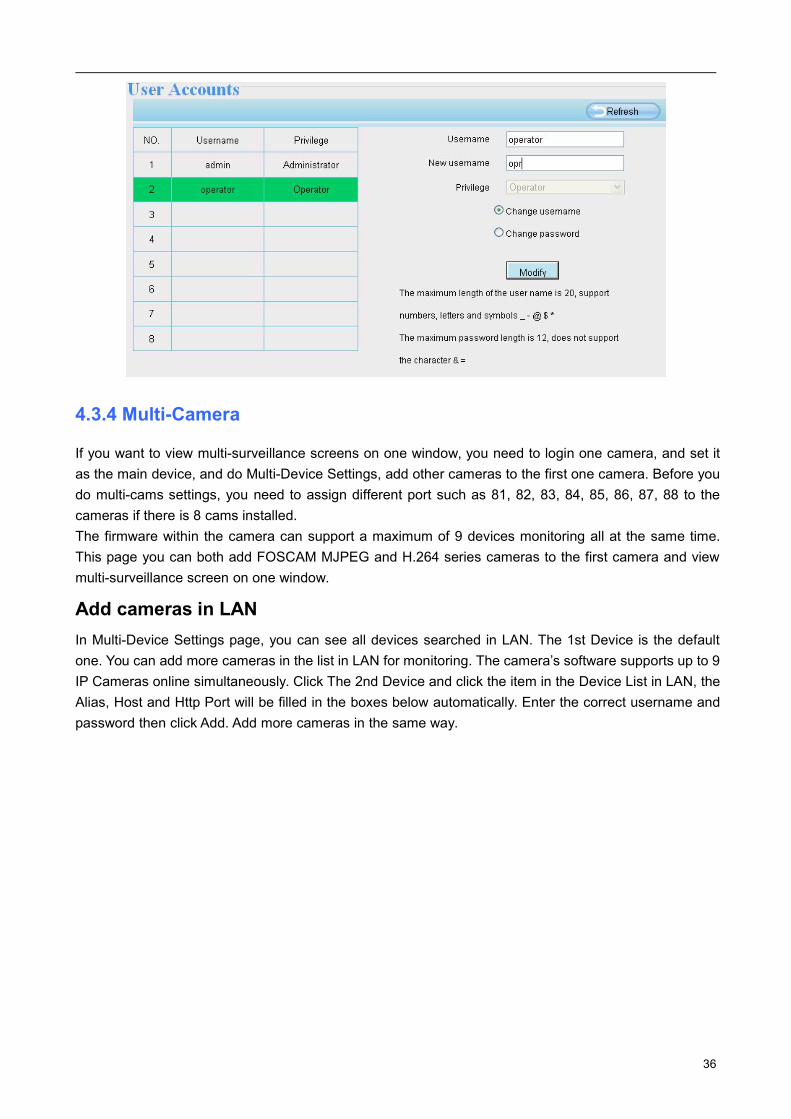
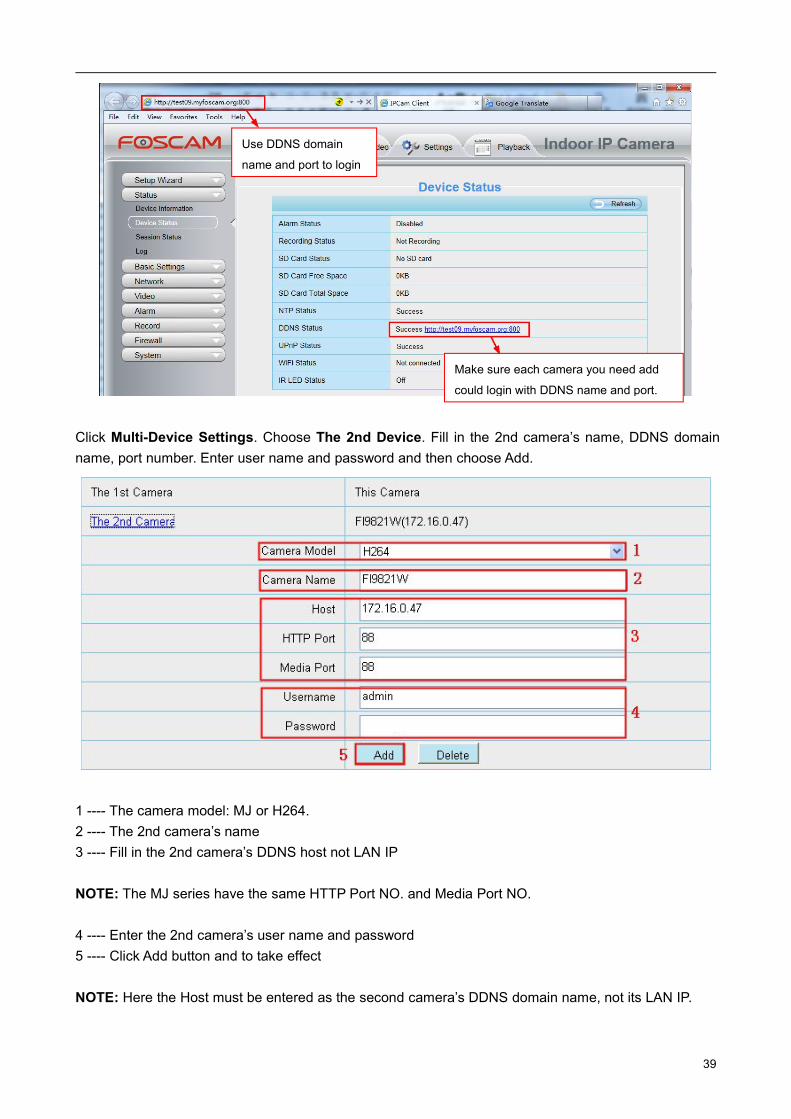
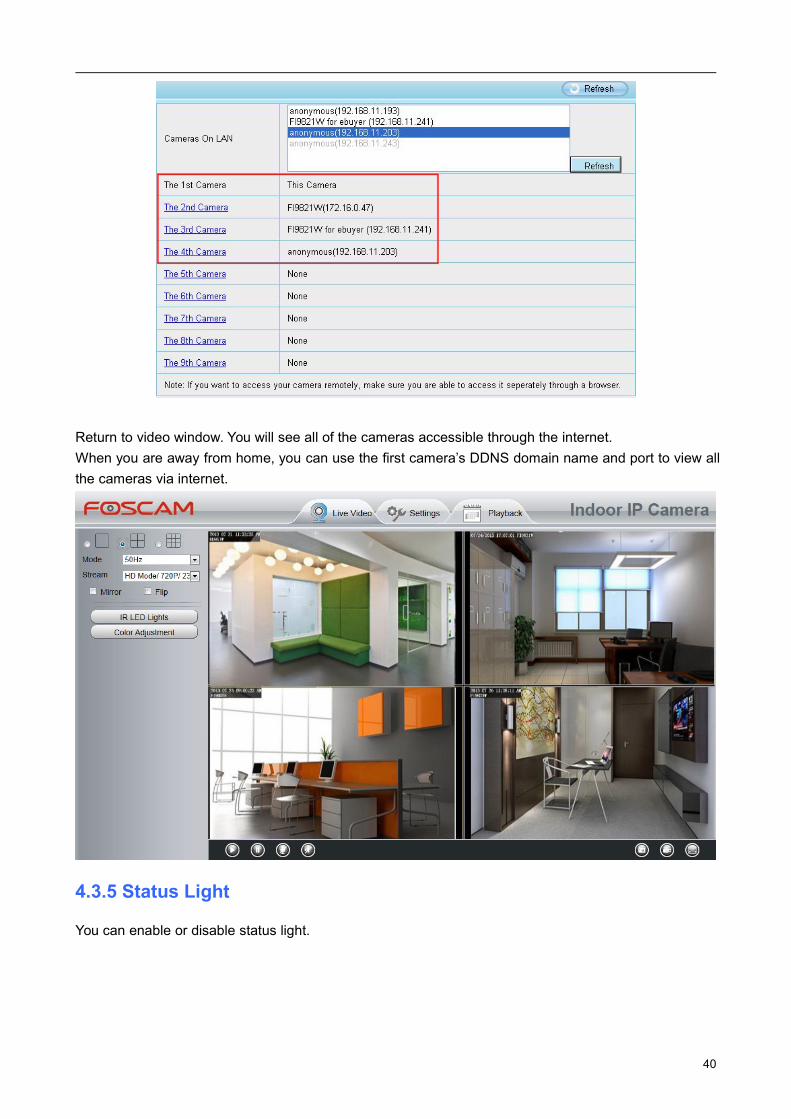
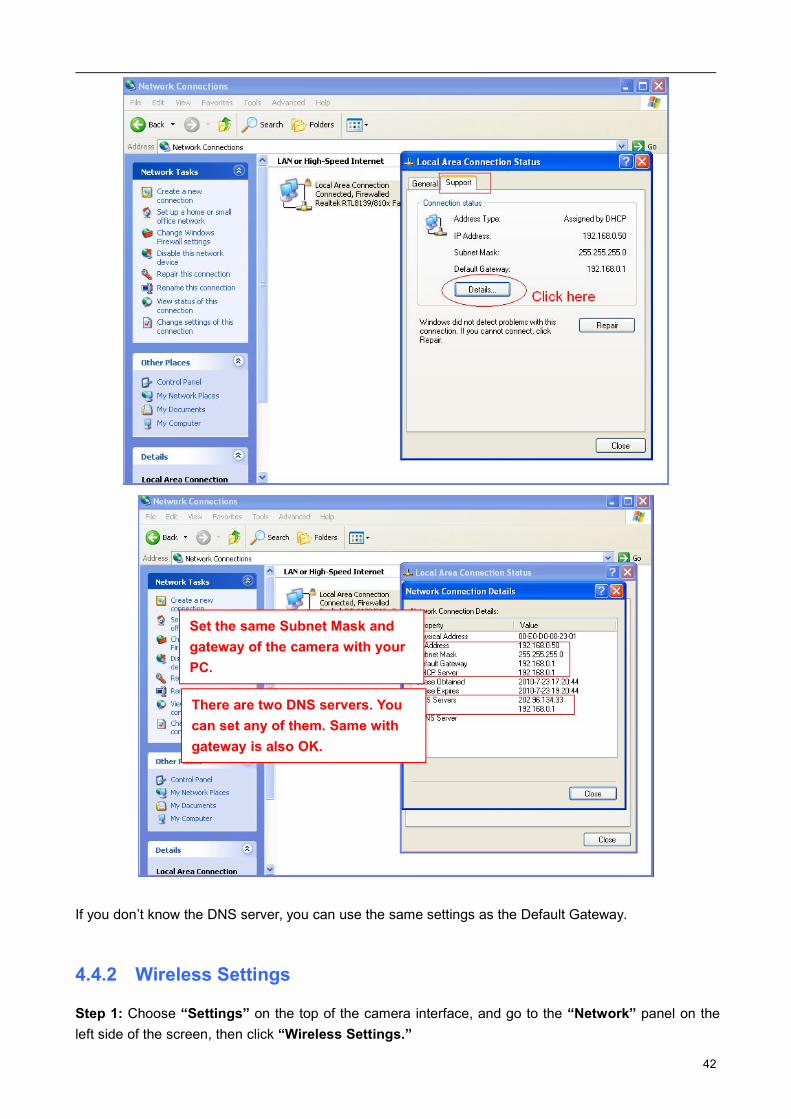
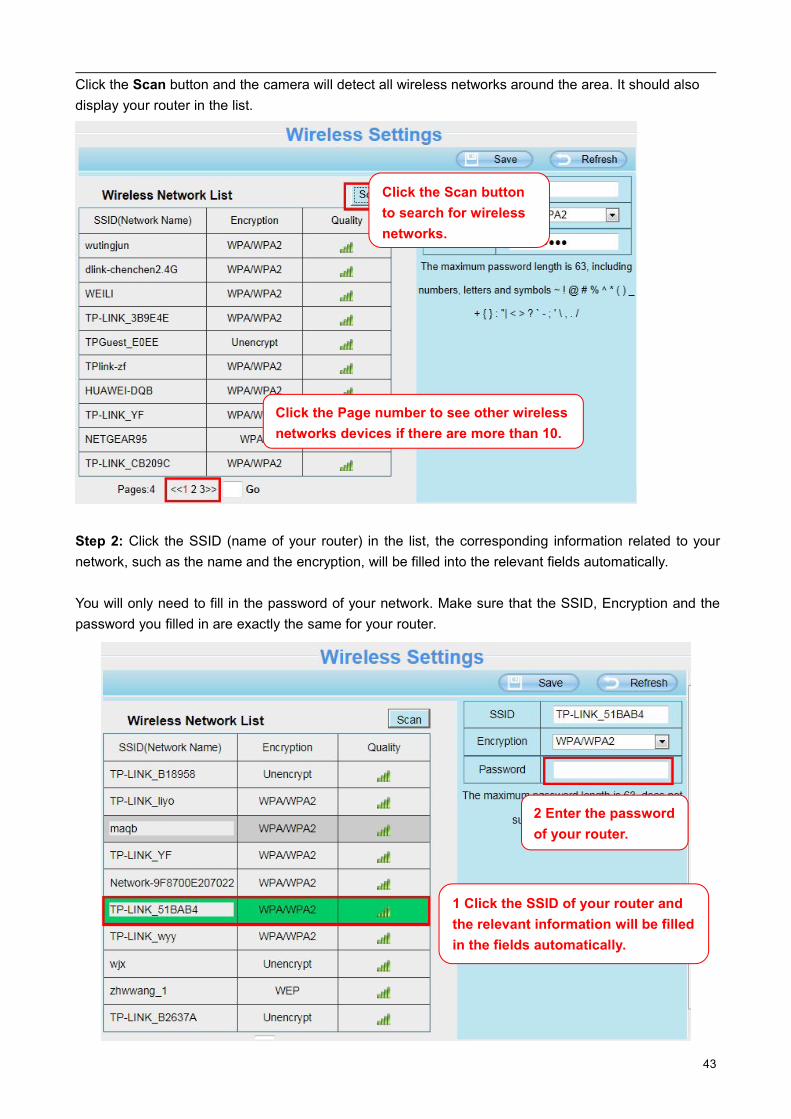
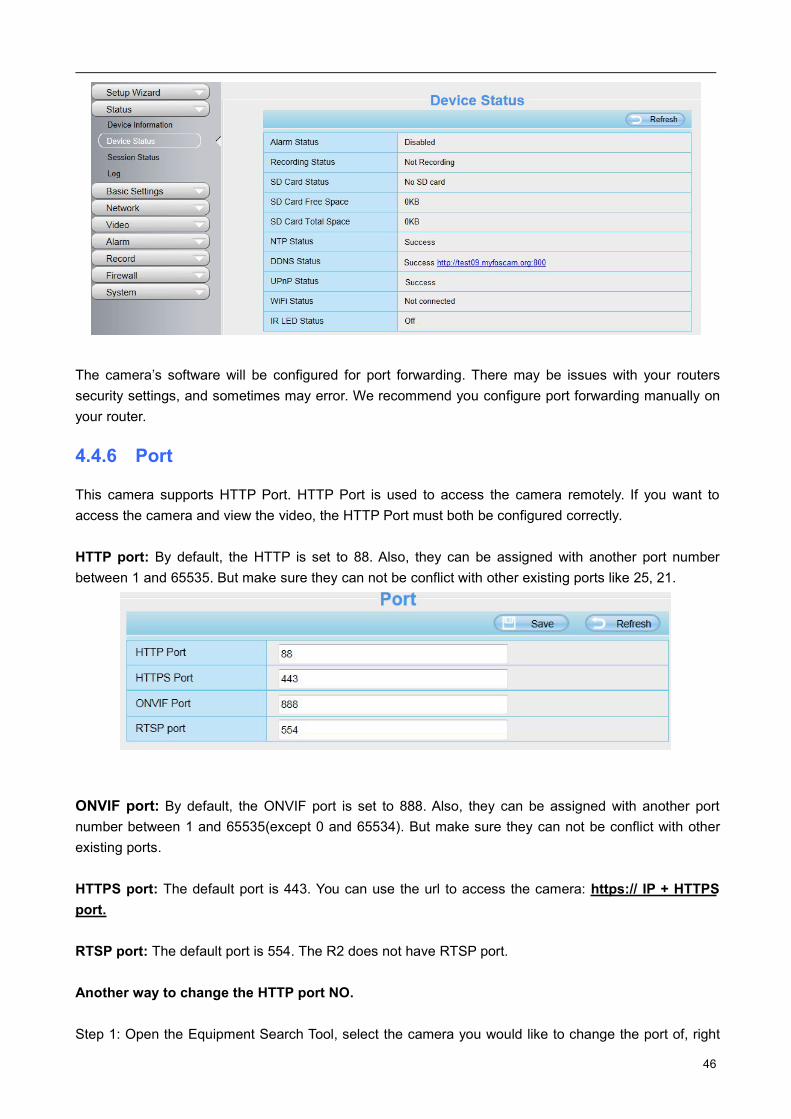
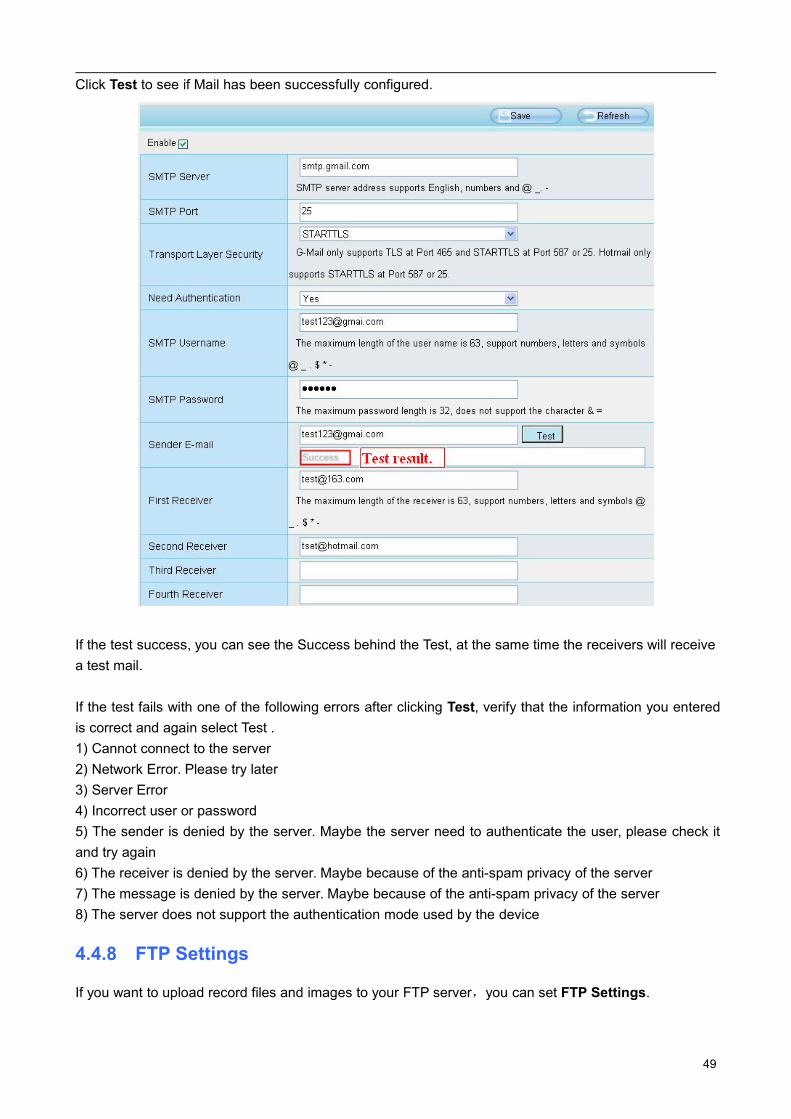
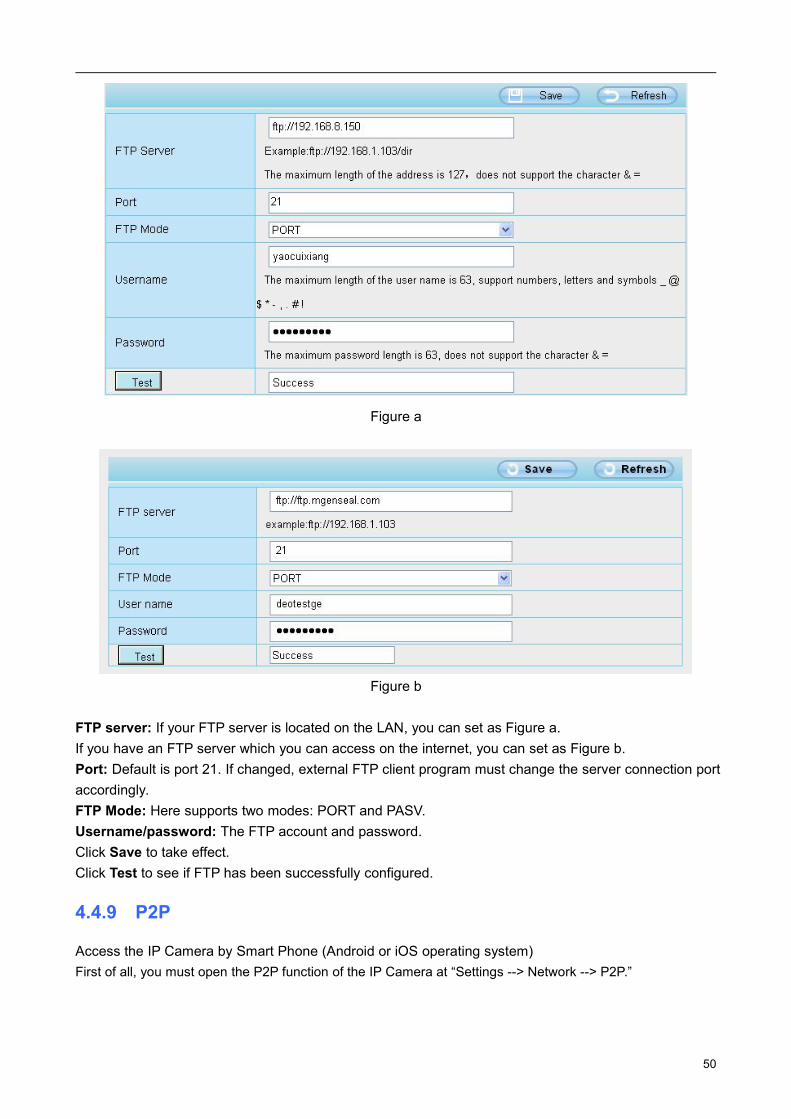
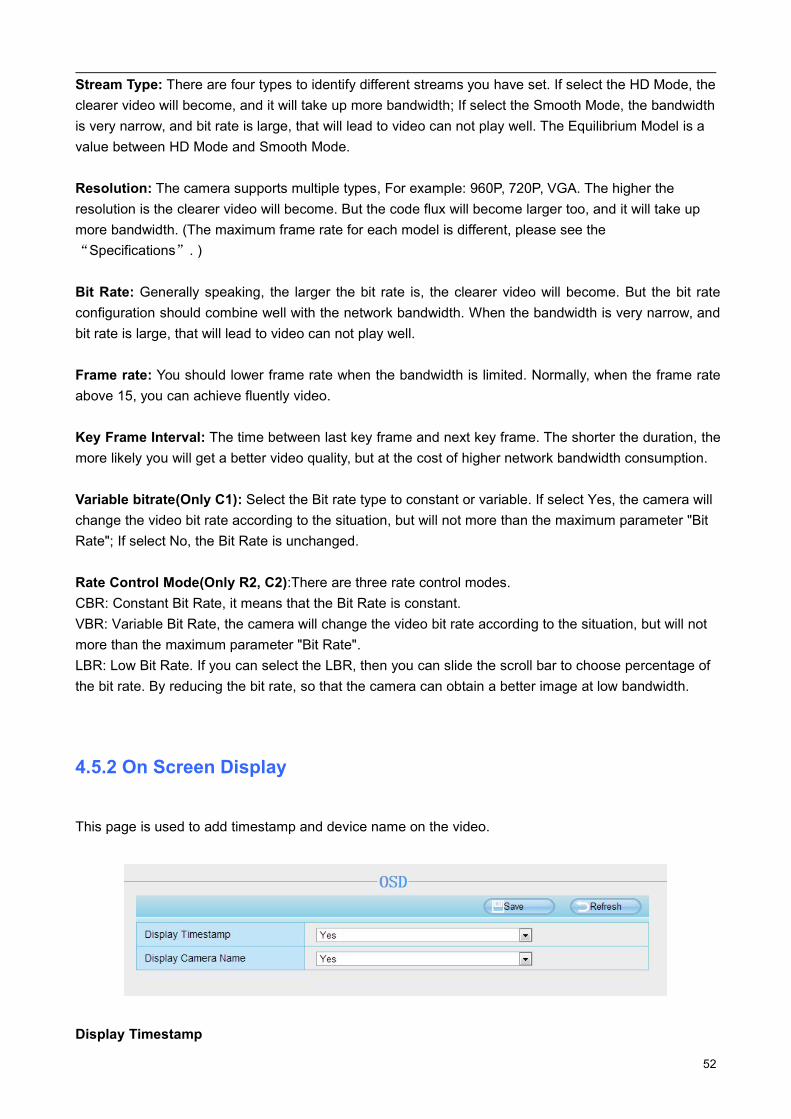
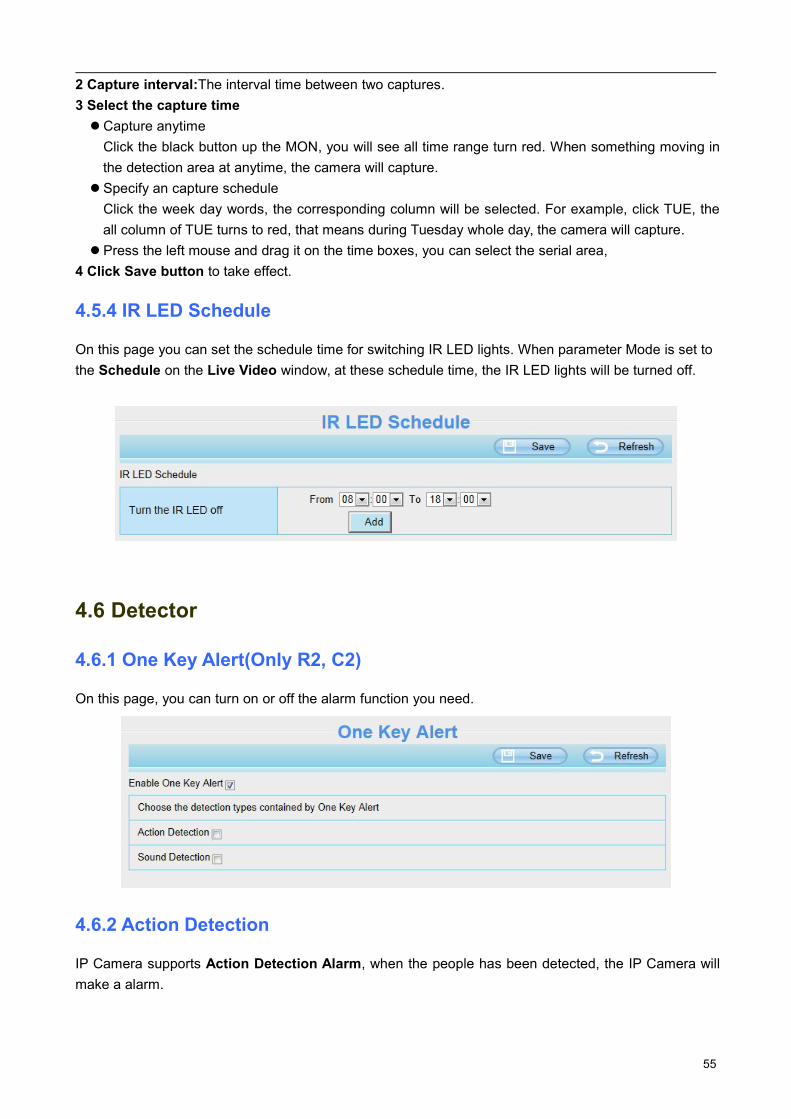
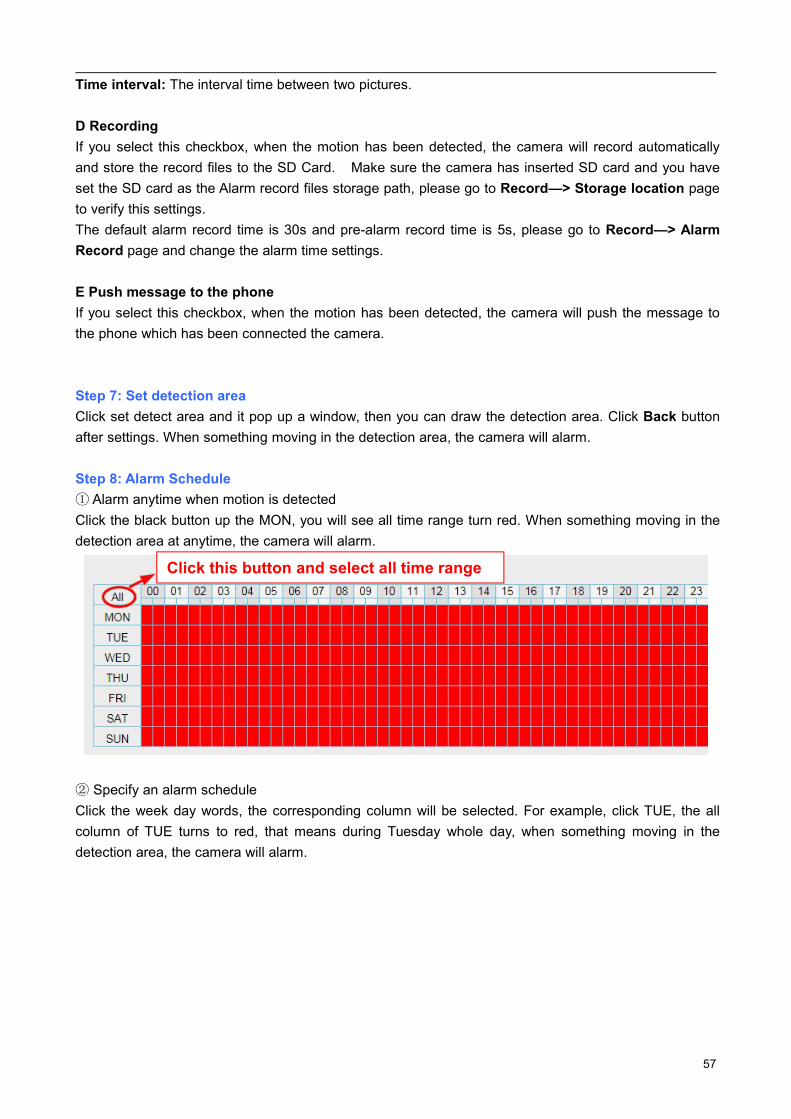
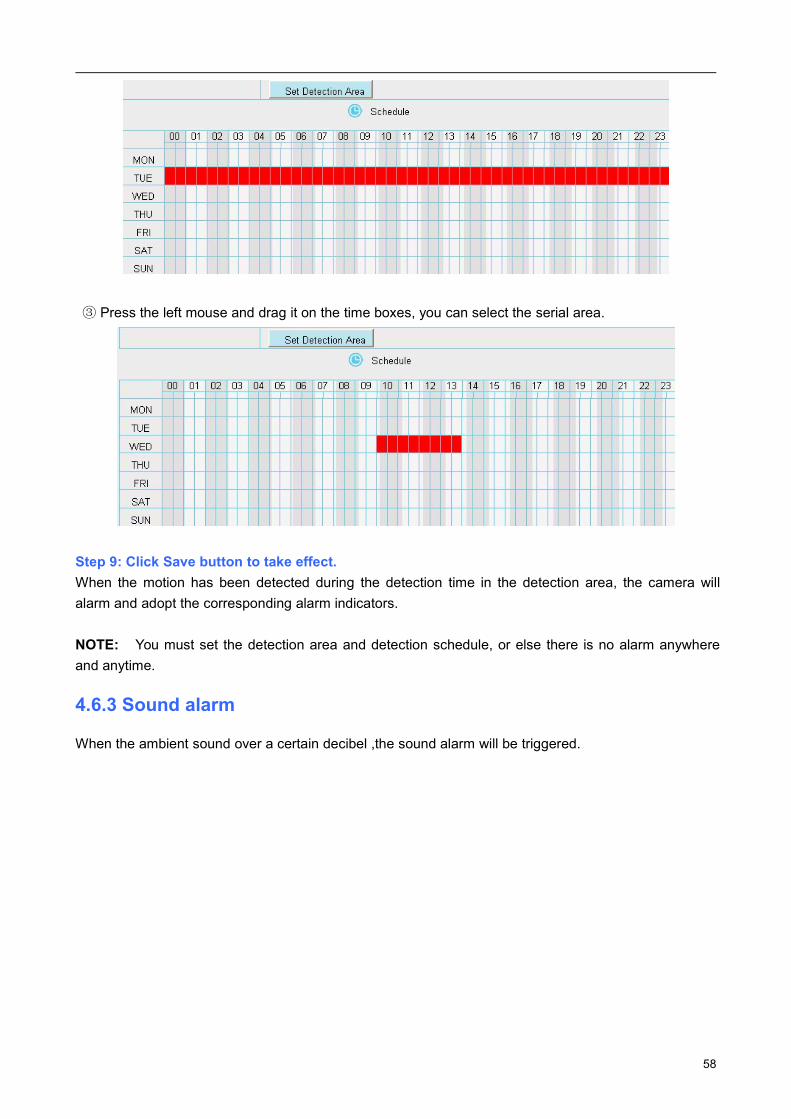
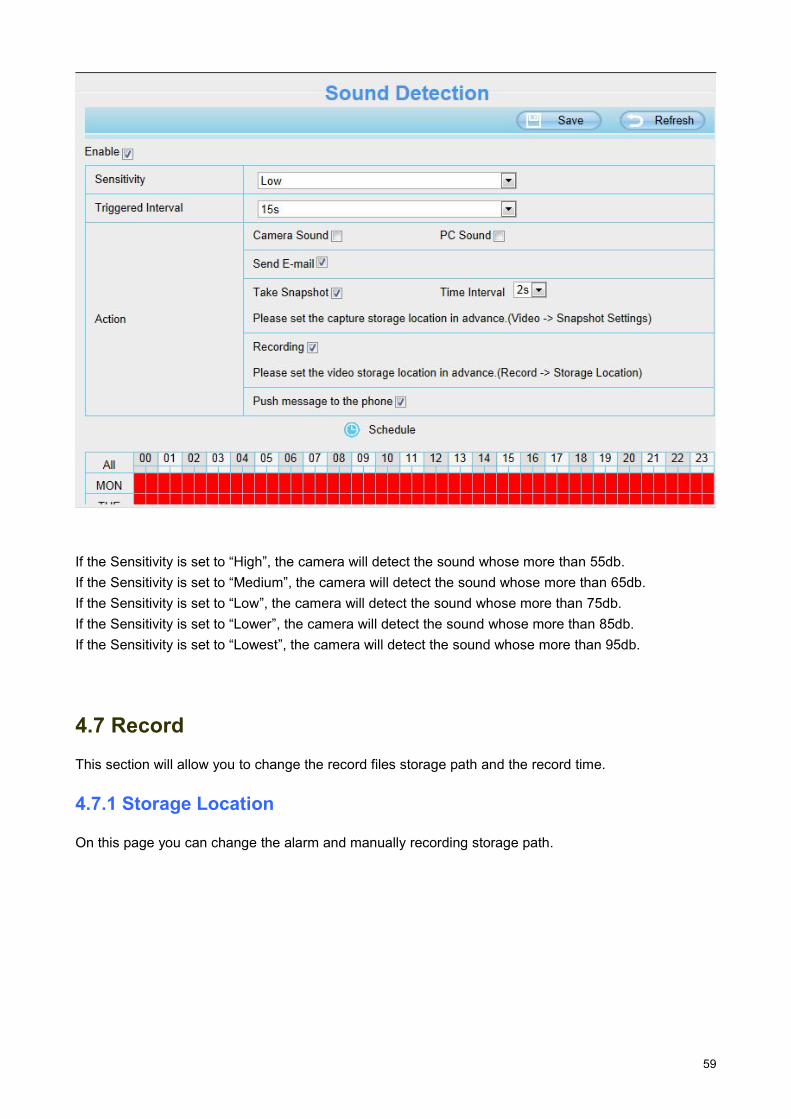
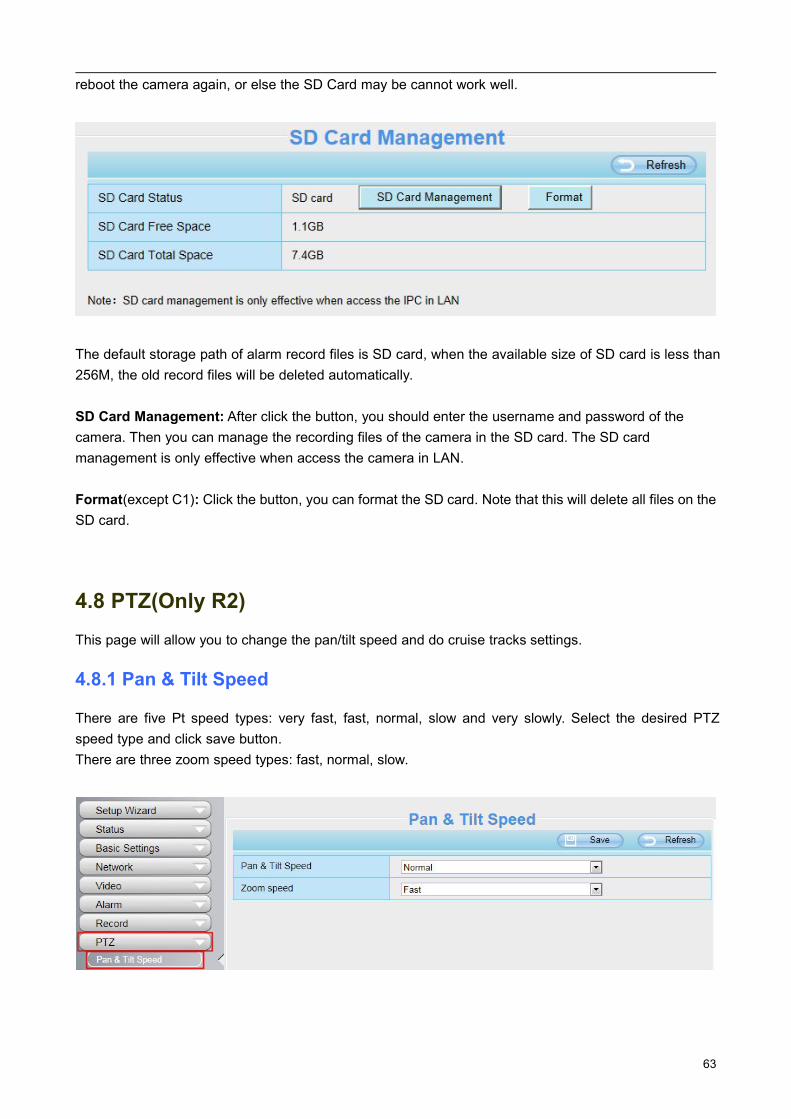
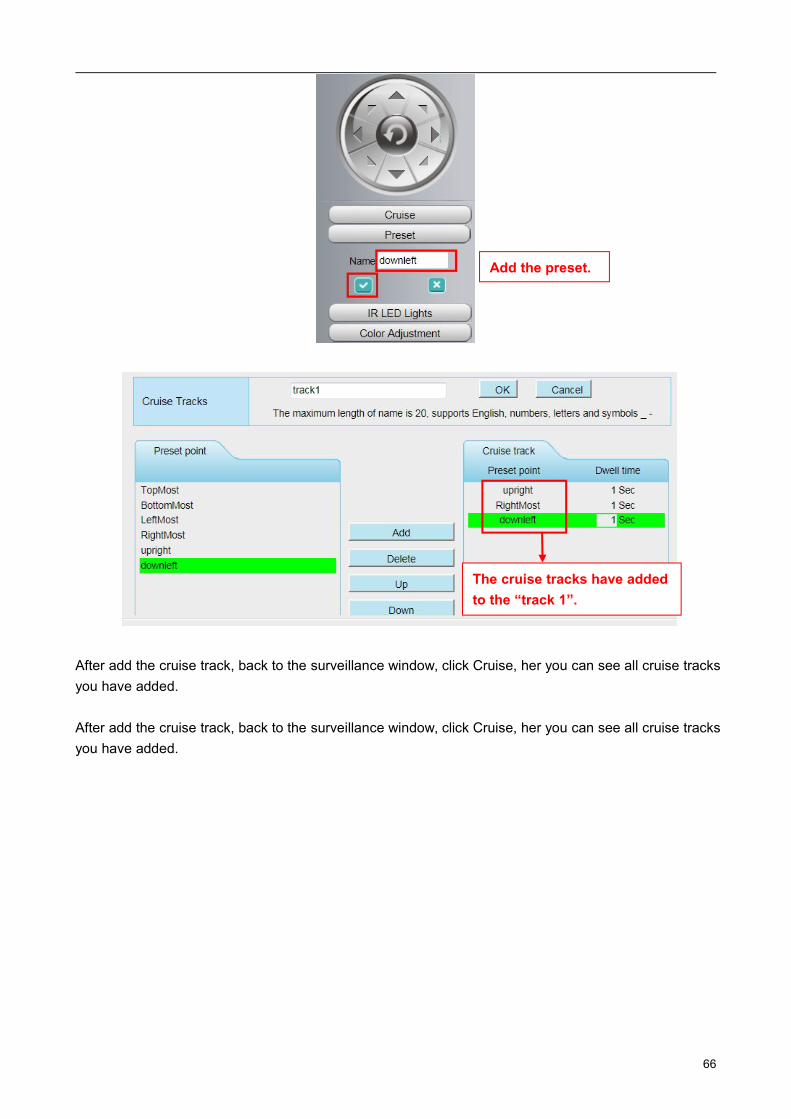
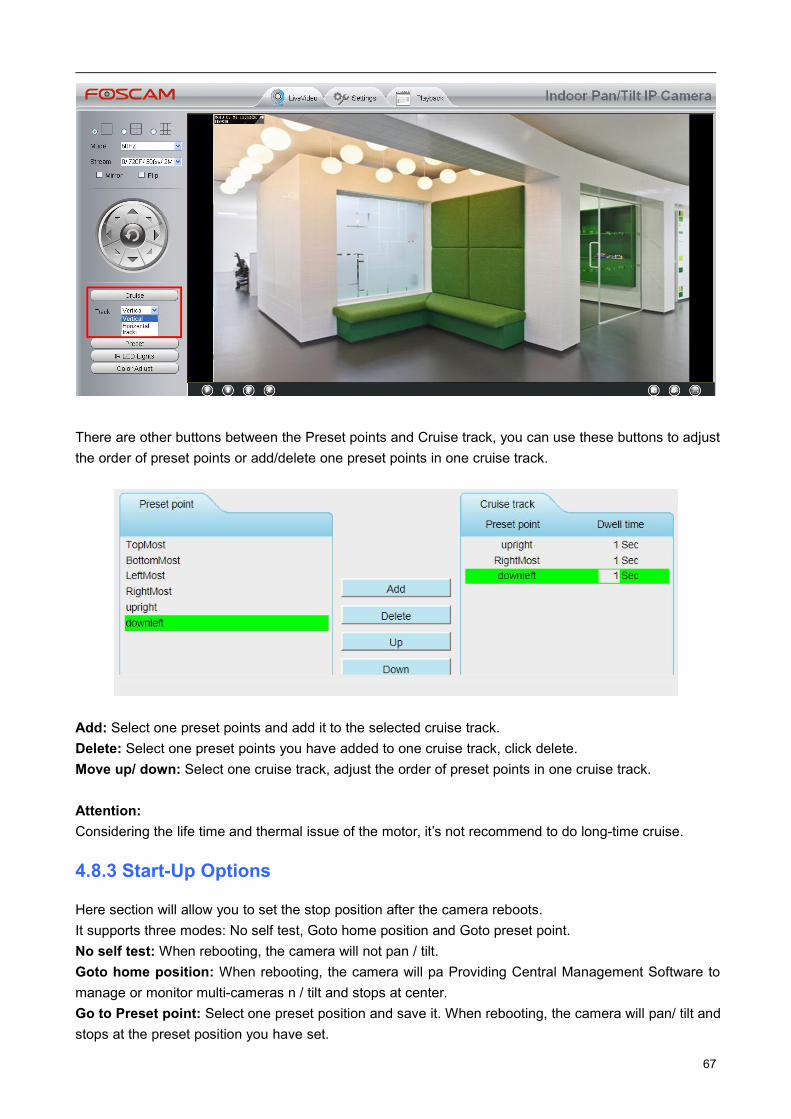
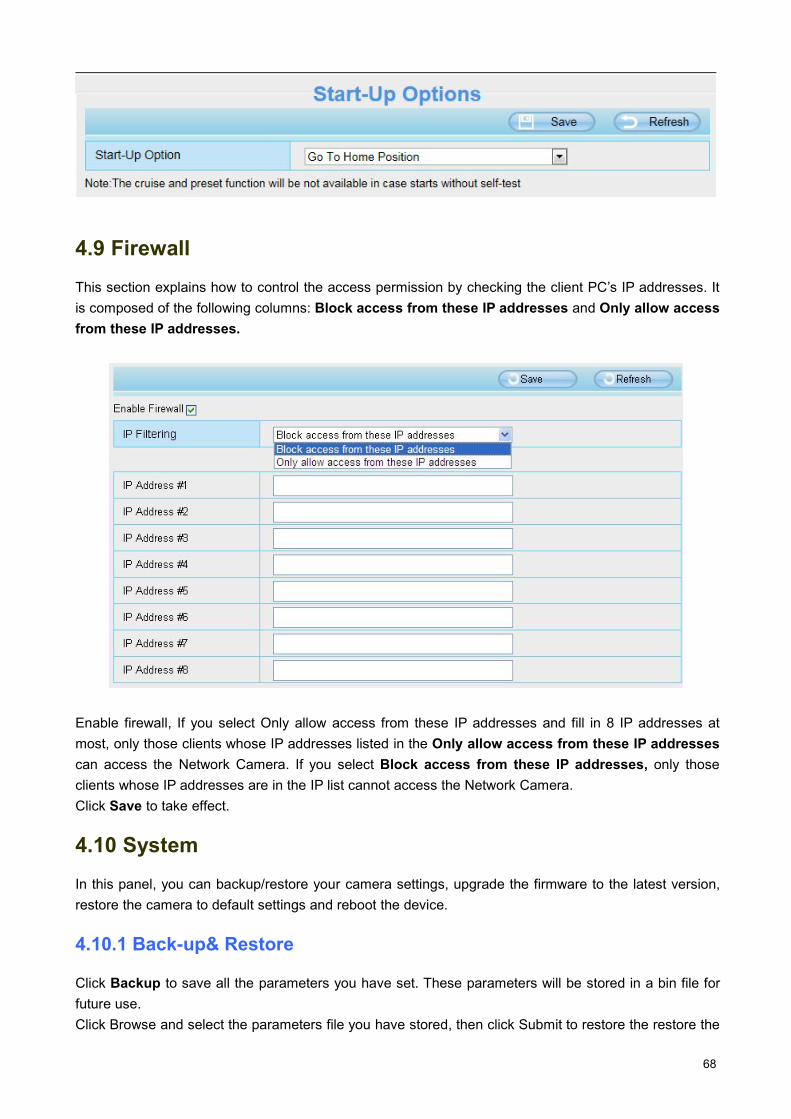
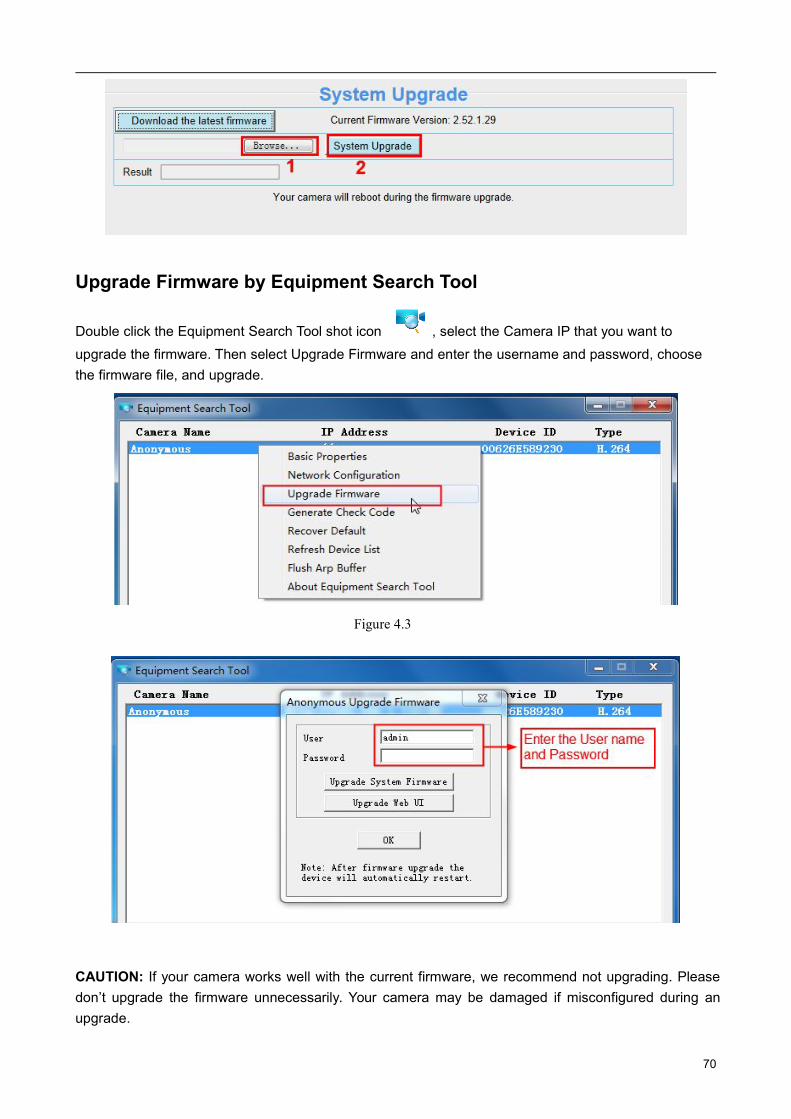
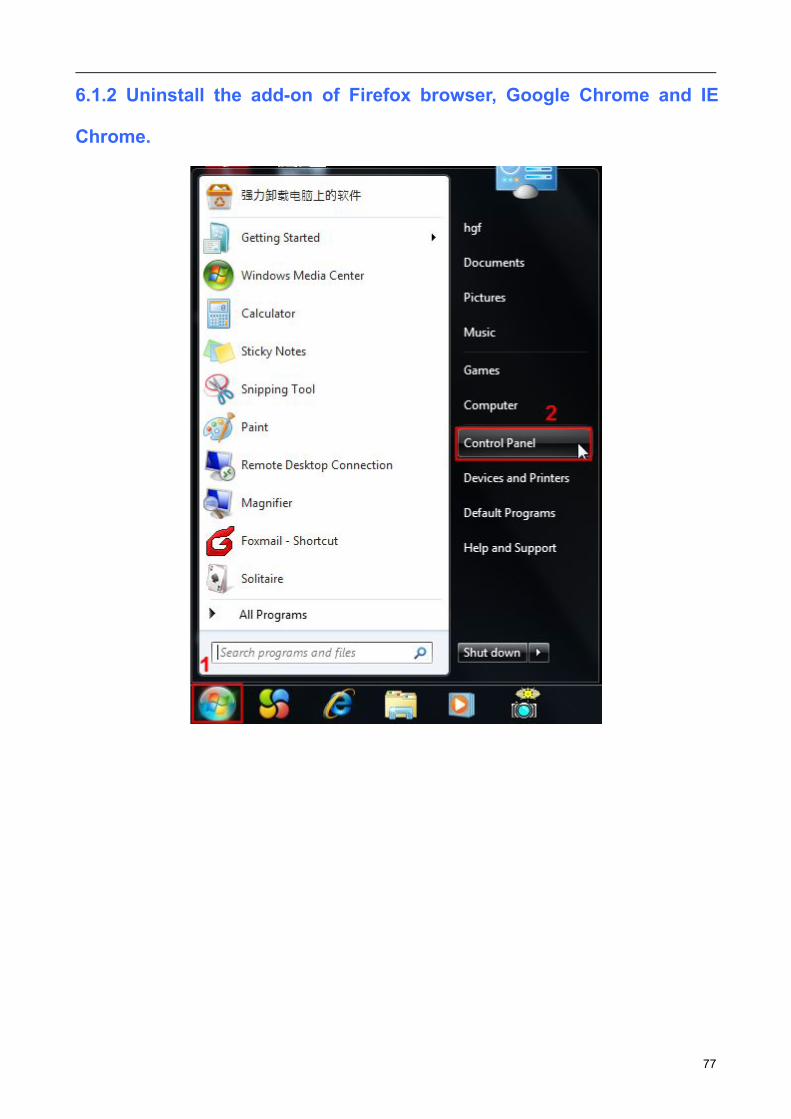
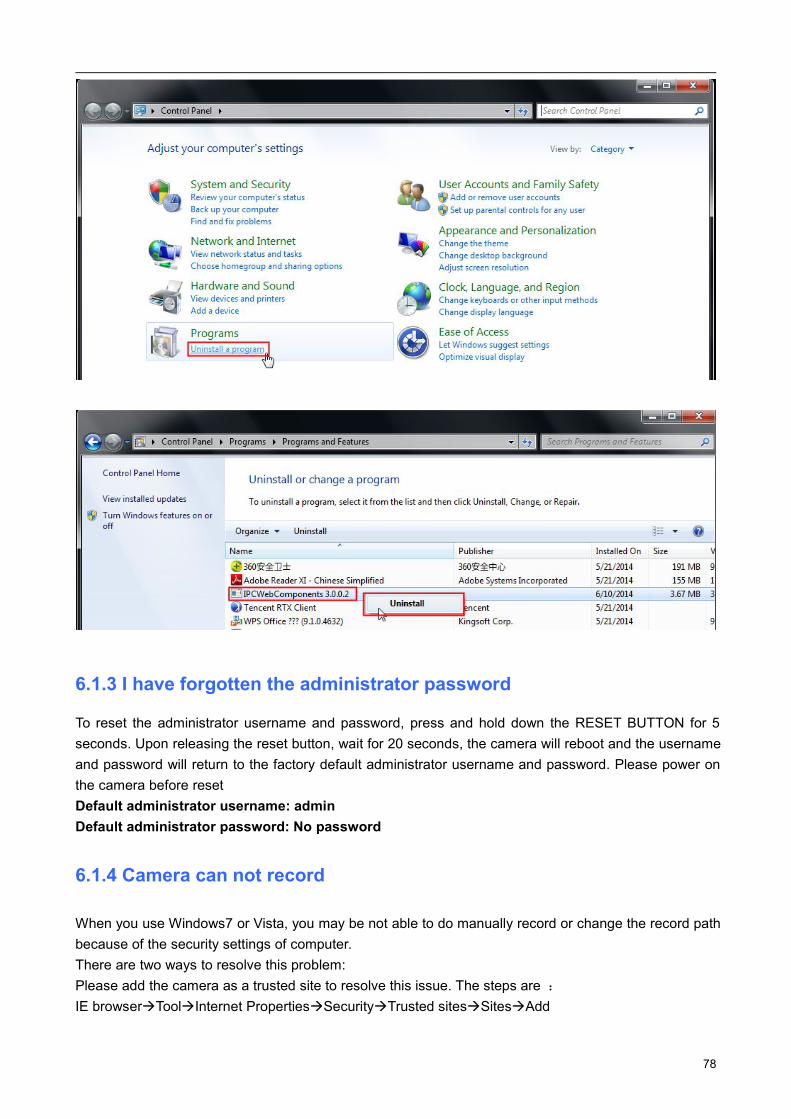
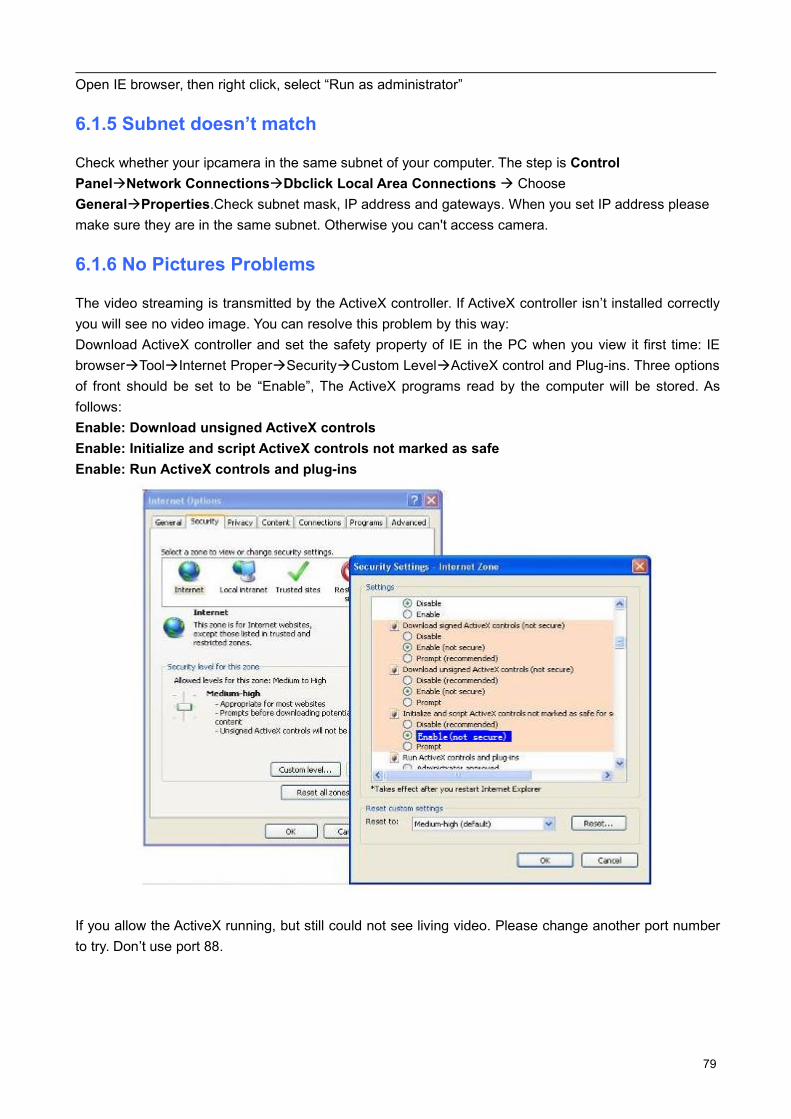
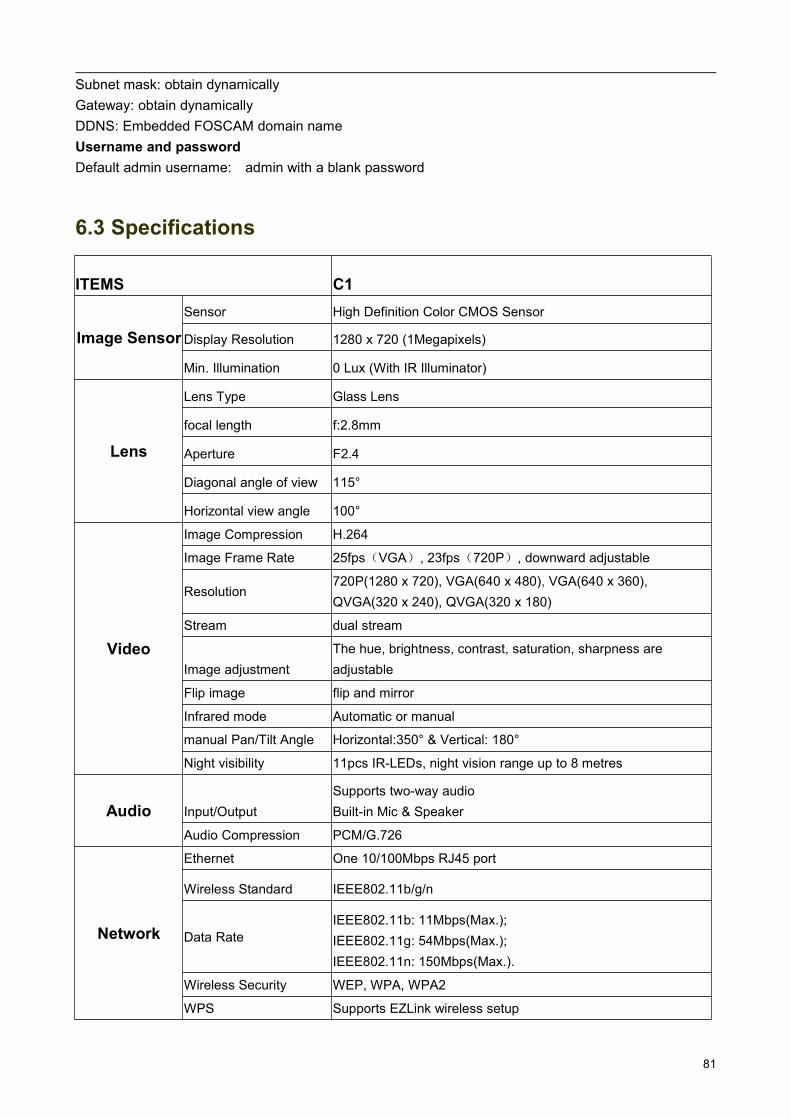
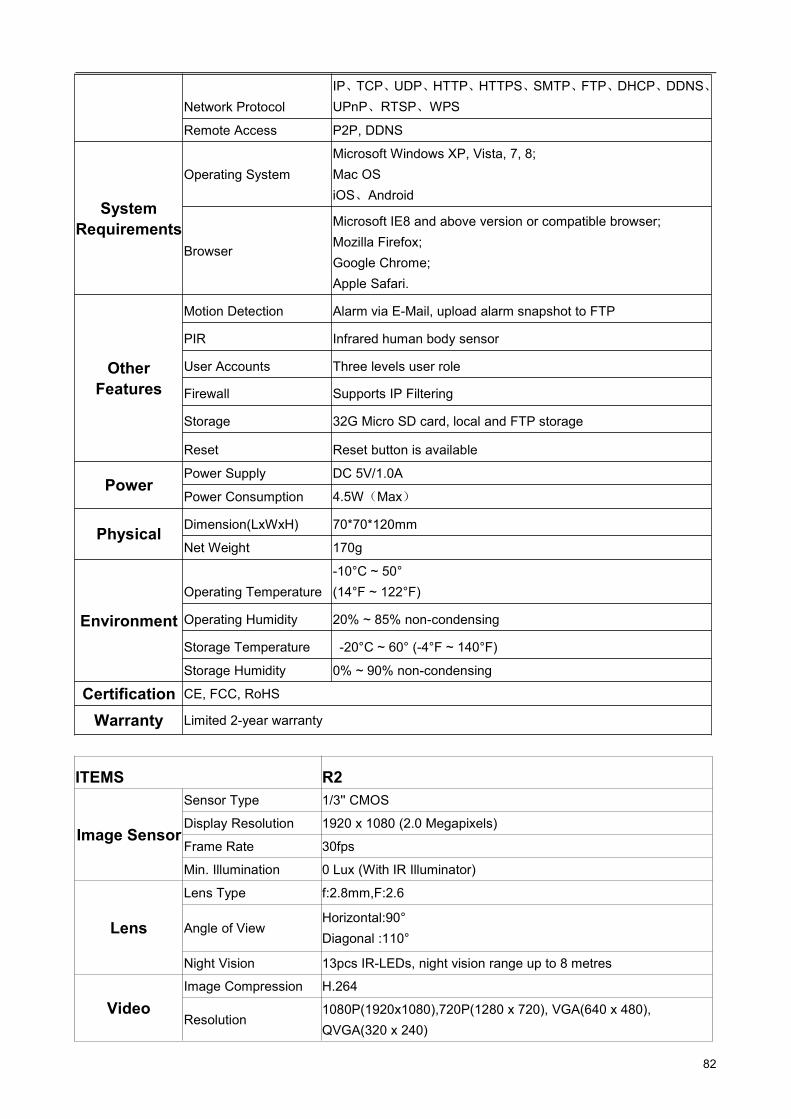
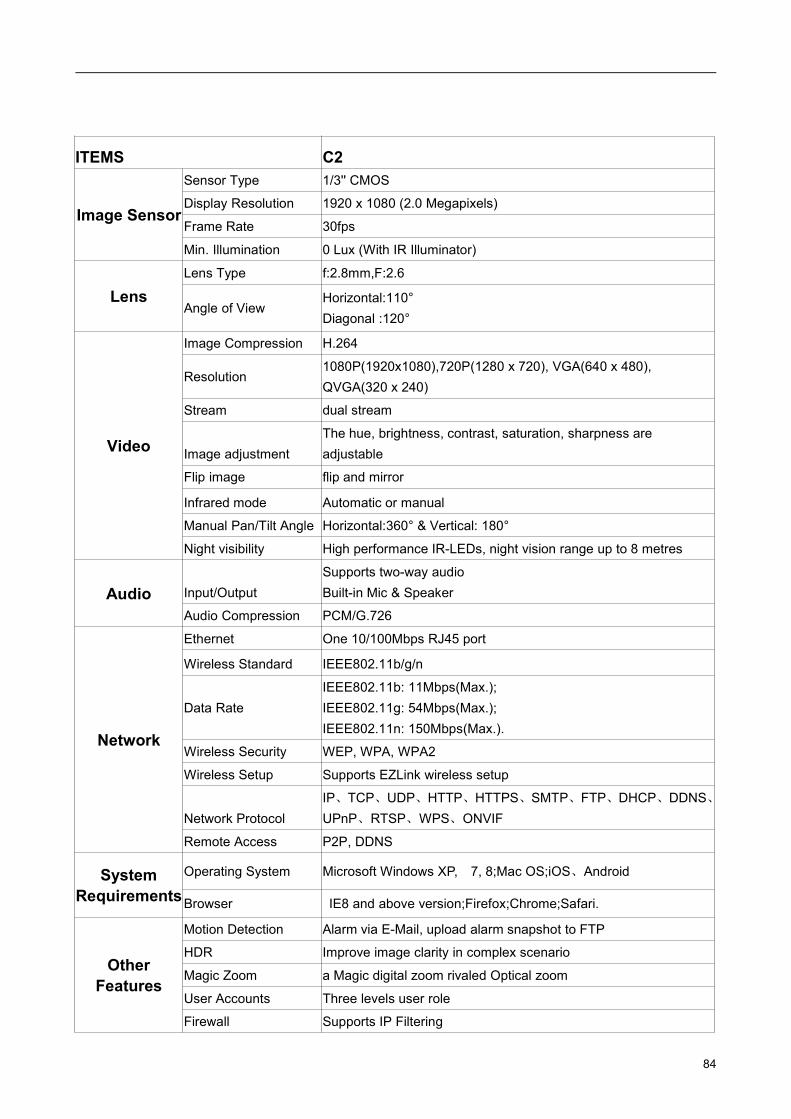
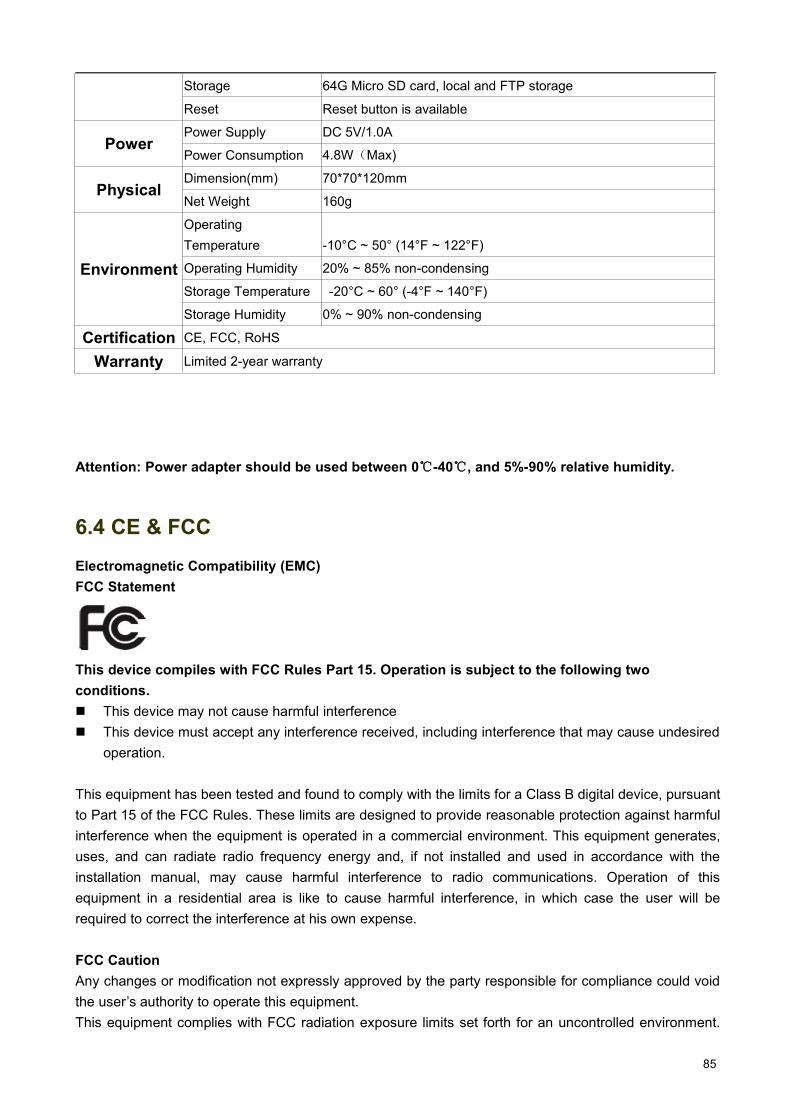