User 's Guide - CNET Content Solutions - English€¦ · Registering Destinations..... 182...
782
MF735Cx / MF734Cdw / MF732Cdw / MF635Cx / MF633Cdw / MF631Cn User's Guide USRMA-1739-00 2017-03 en Copyright CANON INC. 2017
Transcript of User 's Guide - CNET Content Solutions - English€¦ · Registering Destinations..... 182...

MF735Cx / MF734Cdw / MF732Cdw / MF635Cx / MF633Cdw /MF631Cn
User's Guide
USRMA-1739-00 2017-03 en Copyright CANON INC. 2017

Contents
Setting Up ............................................................................................................................................................ 3
Main Functions ......................................................................................................................................................... 4
Preparations Required Before Use ............................................................................................................................. 6
Preventing Unauthorized Access ................................................................................................................................ 8
Setting Up Using the Setup Guide ............................................................................................................................ 10
Setting the Date/Time ............................................................................................................................................. 12
Setting Up the Network Environment ...................................................................................................................... 14
Selecting Wired LAN or Wireless LAN ..................................................................................................................... 16
Connecting to a Wired LAN .................................................................................................................................. 17
Connecting to a Wireless LAN ............................................................................................................................... 18Setting Up Connection Using WPS Push Button Mode ....................................................................................... 20Setting Up Connection Using WPS PIN Code Mode ........................................................................................... 22Setting Up Connection by Selecting a Wireless Router ....................................................................................... 24Setting Up Connection by Specifying Detailed Settings ...................................................................................... 27Checking the SSID and Network Key ............................................................................................................... 30
Setting IP Addresses ........................................................................................................................................... 31Setting IPv4 Address ..................................................................................................................................... 32Setting IPv6 Addresses .................................................................................................................................. 35
Viewing Network Settings .................................................................................................................................... 38
Configuring Settings for Communication with a Computer ...................................................................................... 40Configuring Printing Protocols and WSD Functions ........................................................................................... 41Configuring Printer Ports ............................................................................................................................... 44Setting Up Print Server .................................................................................................................................. 48
Configuring the Machine for Your Network Environment ......................................................................................... 51Configuring Ethernet Settings ........................................................................................................................ 52Changing the Maximum Transmission Unit ...................................................................................................... 54Setting a Wait Time for Connecting to a Network .............................................................................................. 55Configuring DNS .......................................................................................................................................... 56Configuring SMB .......................................................................................................................................... 60Configuring WINS ......................................................................................................................................... 62Registering LDAP Servers .............................................................................................................................. 64Monitoring and Controlling the Machine with SNMP ......................................................................................... 69Other Network Settings ................................................................................................................................. 73
Installing Drivers .................................................................................................................................................... 78
Configuring Initial Settings for Fax Functions ........................................................................................................... 79
Deciding Which Fax Receive Mode to Use .............................................................................................................. 80
Registering the Fax Number and Unit Name .......................................................................................................... 81
Selecting the Receive Mode .................................................................................................................................. 82
Connecting the Telephone Line ............................................................................................................................ 83
Configuring Scan Settings ....................................................................................................................................... 84
Preparing to Use the Machine as a Scanner ........................................................................................................... 85
Procedure for Setting to Send E-Mail/Send and Receive I-Fax ................................................................................... 86Configuring Basic E-Mail Settings .................................................................................................................... 87
I

Configuring E-Mail/I-Fax Communication Settings ............................................................................................ 90
Procedure for Setting a Shared Folder as a Save Location ........................................................................................ 94Setting a Shared Folder as a Save Location ....................................................................................................... 95
Procedure for Setting a FTP Server as a Save Location ............................................................................................. 98
Basic Operations ........................................................................................................................................ 101
Parts and Their Functions ...................................................................................................................................... 104
Front Side ........................................................................................................................................................ 105Insert a USB Memory Device ........................................................................................................................ 107
Back Side ......................................................................................................................................................... 109
Interior ........................................................................................................................................................... 110
Feeder ............................................................................................................................................................ 111
Multi-Purpose Tray ........................................................................................................................................... 112
Paper Drawer ................................................................................................................................................... 113
Operation Panel ............................................................................................................................................... 115
Turning ON the Machine ....................................................................................................................................... 117
Turning OFF the Machine ................................................................................................................................... 118Powering OFF at a Fixed Time ...................................................................................................................... 119
Using the Operation Panel .................................................................................................................................... 121
Basic Screens ................................................................................................................................................... 122Home Screen ............................................................................................................................................. 123<Status Monitor> Screen ............................................................................................................................. 126Message Display ......................................................................................................................................... 128
Basic Operation ................................................................................................................................................ 129
Entering Text ................................................................................................................................................... 132
Logging in to the Machine ..................................................................................................................................... 134
Placing Originals ................................................................................................................................................... 136
Loading Paper ....................................................................................................................................................... 140
Loading Paper in the Paper Drawer .................................................................................................................... 142
Loading Paper in the Multi-Purpose Tray ............................................................................................................. 149
Loading Envelopes ............................................................................................................................................ 154
Loading Preprinted Paper .................................................................................................................................. 157
Specifying Paper Size and Type .......................................................................................................................... 159Specifying Paper Size and Type in the Paper Drawer ....................................................................................... 160Specifying Paper Size and Type in the Multi-Purpose Tray ................................................................................ 162Registering Default Paper Settings for the Multi-Purpose Tray ......................................................................... 164Registering a Custom Paper Size .................................................................................................................. 166Limiting the Paper Sizes Displayed ................................................................................................................ 168Automatically Selecting an Appropriate Paper Source for Each Function ............................................................ 169
Customizing the Display ........................................................................................................................................ 170
Customizing the Home Screen ........................................................................................................................... 171
Registering Frequently Used Settings .................................................................................................................. 174
Changing the Default Settings for Functions .......................................................................................................... 176
Setting Sounds ...................................................................................................................................................... 178
Entering Sleep Mode ............................................................................................................................................. 180
II
Registering Destinations ....................................................................................................................................... 182
Registering Destinations in the Address Book ...................................................................................................... 184Registering Multiple Destinations as a Group ................................................................................................. 187Editing the Registered Destinations in the Address Book ................................................................................. 189
Copying .............................................................................................................................................................. 191
Copy Basic Features Screen ................................................................................................................................... 193
Basic Copy Operations ........................................................................................................................................... 195
Canceling Copies .............................................................................................................................................. 200
Checking the Copying Status and Log ................................................................................................................. 201
Enhancing and Adjusting Copy Quality ................................................................................................................... 203
Selecting the Type of Original for Copying ........................................................................................................... 204
Adjusting Sharpness for Copying (Sharpness) ...................................................................................................... 205
Erasing Dark Borders When Copying (Erase Frame) ............................................................................................... 206
Adjusting the Color ........................................................................................................................................... 207
Useful Copy Functions ........................................................................................................................................... 208
Copying Multiple Documents onto One Sheet (N on 1) .......................................................................................... 209
Collating Copies by Page ................................................................................................................................... 210
Making ID Card Copies ...................................................................................................................................... 211
Faxing .................................................................................................................................................................. 213
Fax Basic Features Screen ...................................................................................................................................... 216
Basic Operations for Sending Faxes ....................................................................................................................... 217
Canceling Sending Faxes ................................................................................................................................... 225
Receiving Faxes .................................................................................................................................................... 226
Useful Functions When Sending ............................................................................................................................. 229
Recalling Previously Used Settings for Sending (Recall Settings) ............................................................................. 230
Sending a Fax after a Phone Call (Manual Sending) ............................................................................................... 233
Saving a Copy of a Sent Original ......................................................................................................................... 235
Various Receiving Methods .................................................................................................................................... 236
Saving Received Documents into the Machine (Memory Reception) ........................................................................ 237
Forwarding the Received Documents Automatically ............................................................................................... 239
Checking Status and Log for Sent and Received Documents .................................................................................... 241
Sending Faxes from Your Computer (PC Fax) .......................................................................................................... 243
Sending PC Faxes ............................................................................................................................................. 244
Using Internet Fax (I-Fax) ...................................................................................................................................... 246
Sending I-Faxes ................................................................................................................................................ 247
Receiving I-Faxes .............................................................................................................................................. 254
Printing .............................................................................................................................................................. 256
Printing from a Computer ..................................................................................................................................... 257
Canceling Prints ............................................................................................................................................... 260
Checking the Printing Status and Log .................................................................................................................. 262
Various Printing Methods ...................................................................................................................................... 264
III

Printing a Document Secured by a PIN (Secure Print) ............................................................................................ 265Printing via Secure Print .............................................................................................................................. 266
Printing from a USB Memory Device (Memory Media Print) .................................................................................... 269
Scanning ........................................................................................................................................................... 278
Scan Basic Features Screen .................................................................................................................................... 280
Basic Operations for Scanning Originals ................................................................................................................ 283
Scanning and Saving to a Computer .................................................................................................................... 284
Saving Data to a USB Memory Device .................................................................................................................. 286
Sending Data by E-Mail/Saving Data to a Shared Folder or FTP Server ..................................................................... 290
Canceling Sending Documents ........................................................................................................................... 299
Checking Status and Log for Scanned Originals .................................................................................................... 300
Scanning Clearly ................................................................................................................................................... 302
Adjusting Image Quality .................................................................................................................................... 303
Adjusting Density ............................................................................................................................................. 304
Adjusting Sharpness When Scanning (Sharpness) ................................................................................................. 305
Useful Scanning Functions .................................................................................................................................... 307
Enhancing the Security of Electronic Files ............................................................................................................ 308
Adjusting Balance between File Size and Image Quality ......................................................................................... 311
Recalling Previously Used Settings for Sending/Saving (Recall Settings) ................................................................... 312
Specifying E-Mail Settings .................................................................................................................................. 315
Using Your Computer to Scan (Remote Scan) .......................................................................................................... 318
Scanning Documents from an Application ........................................................................................................... 319
Using ScanGear MF ........................................................................................................................................... 321
Linking with Mobile Devices ............................................................................................................ 323
Connecting with Mobile Devices ............................................................................................................................ 324
Connecting via a Wireless LAN Router (LAN Connection) ........................................................................................ 325
Connecting Directly (Access Point Mode) ............................................................................................................. 327
Utilizing the Machine through Applications ........................................................................................................... 331
Using AirPrint ....................................................................................................................................................... 332
Printing with AirPrint ........................................................................................................................................ 337
Scanning with AirPrint ....................................................................................................................................... 340
Faxing with AirPrint .......................................................................................................................................... 342
If AirPrint Cannot Be Used ................................................................................................................................. 344
Using Google Cloud Print ....................................................................................................................................... 345
Managing the Machine by the Remote Control ....................................................................................................... 347
Managing the Machine ........................................................................................................................ 350
Setting Access Privileges ....................................................................................................................................... 352
Setting the System Manager ID and PIN .............................................................................................................. 353
Setting the Department ID Management ............................................................................................................. 355
Setting a Remote UI PIN .................................................................................................................................... 361
LDAP Server Authentication ............................................................................................................................... 363
IV

Configuring the Network Security Settings ............................................................................................................ 367
Restricting Communication by Using Firewalls ..................................................................................................... 369Specifying IP Addresses for Firewall Settings .................................................................................................. 370Specifying MAC Addresses for Firewall Settings .............................................................................................. 373
Changing Port Numbers .................................................................................................................................... 376
Setting a Proxy ................................................................................................................................................. 377
Configuring the Key and Certificate for TLS .......................................................................................................... 379Generating the Key and Certificate for Network Communication ...................................................................... 382Generating a Key and Certificate Signing Request (CSR) ................................................................................... 385Registering the Key and Certificate for Network Communication ...................................................................... 388
Configuring IPSec Settings ................................................................................................................................. 390
Configuring IEEE 802.1X Authentication Settings .................................................................................................. 397
Restricting the Machine's Functions ...................................................................................................................... 401
Restricting Access to Address Book and Sending Functions .................................................................................... 403Restricting Use of the Address Book ............................................................................................................. 404Limiting Available Destinations ..................................................................................................................... 406Restricting the Fax Sending Functions ........................................................................................................... 408
Restricting Printing from a Computer .................................................................................................................. 410
Restricting USB Functions .................................................................................................................................. 411
Disabling HTTP Communication ......................................................................................................................... 413
Disabling Remote UI ......................................................................................................................................... 414
Increasing the Security of Documents .................................................................................................................... 415
Generating a Device Signature Key ..................................................................................................................... 416
Managing the Machine from a Computer (Remote UI) ............................................................................................ 417
Starting Remote UI ........................................................................................................................................... 418
Checking the Status and Logs ............................................................................................................................ 421
Setting Up Menu Options from Remote UI ........................................................................................................... 426
Registering Destinations from Remote UI ............................................................................................................ 429
Importing/Exporting the Setting Data ................................................................................................................. 433
Updating the Firmware ......................................................................................................................................... 436
Initializing Settings ............................................................................................................................................... 438
Setting Menu List ...................................................................................................................................... 441
<Preferences> ....................................................................................................................................................... 442
<Display Settings> ............................................................................................................................................ 443
<English Keyboard Layout> ................................................................................................................................ 447
<Timer/Energy Settings> ................................................................................................................................... 448
<Network> ....................................................................................................................................................... 453
<External Interface> .......................................................................................................................................... 467
<Accessibility> .................................................................................................................................................. 468
<Adjustment/Maintenance> .................................................................................................................................. 469
<Adjust Image Quality> ..................................................................................................................................... 470
<Maintenance> ................................................................................................................................................ 484
<Function Settings> .............................................................................................................................................. 486
<Common> ...................................................................................................................................................... 487
V

<Copy> ............................................................................................................................................................ 492
<Printer> ......................................................................................................................................................... 494
<Send> ............................................................................................................................................................ 538
<Receive/Forward> ........................................................................................................................................... 549
<Store/Access Files> .......................................................................................................................................... 556
<Secure Print> .................................................................................................................................................. 564
<Set Destination> .................................................................................................................................................. 565
<Management Settings> ....................................................................................................................................... 566
<User Management> ........................................................................................................................................ 567
<Device Management> ...................................................................................................................................... 568
<License/Other>/<Remote UI Settings/Update Firmware> ..................................................................................... 572
<Data Management> ........................................................................................................................................ 574
<Security Settings> ........................................................................................................................................... 576
Maintenance ................................................................................................................................................. 579
Regular Cleaning .................................................................................................................................................. 581
Cleaning the Exterior ........................................................................................................................................ 582
Cleaning the Platen Glass .................................................................................................................................. 583
Cleaning the Feeder .......................................................................................................................................... 584
Cleaning the Fixing Assembly ............................................................................................................................. 587
Cleaning the Transfer Belt (ITB) .......................................................................................................................... 588
Replacing the Toner Cartridge ............................................................................................................................... 589
Checking the Remaining Amount of Consumables .................................................................................................. 594
Relocating the Machine ......................................................................................................................................... 595
Adjusting Print Quality .......................................................................................................................................... 597
Adjusting Gradation .......................................................................................................................................... 598
Correcting "Print Color Mismatch" ...................................................................................................................... 603
Adjusting Values for Text Color Reproducibility in Color Documents ........................................................................ 604
Adjusting Print Position ..................................................................................................................................... 606
Viewing the Counter Value .................................................................................................................................... 608
Printing Reports and Lists ..................................................................................................................................... 610
Consumables ........................................................................................................................................................ 615
Troubleshooting ......................................................................................................................................... 618
Common Problems ................................................................................................................................................ 620
Installation/Settings Problems ........................................................................................................................... 621
Copying/Printing Problems ................................................................................................................................ 625
Faxing/Telephone Problems ............................................................................................................................... 628
When You Cannot Print Properly ............................................................................................................................ 630
Printing Results Are Not Satisfactory ................................................................................................................... 632
Paper Creases or Curls ...................................................................................................................................... 643
Paper Is Fed Incorrectly ..................................................................................................................................... 646
A Message or a Number Starting with "#" (an Error Code) Is Displayed .................................................................... 647
Countermeasures for Each Message ................................................................................................................... 648
VI

Countermeasures for Each Error Code ................................................................................................................ 662
Clearing Paper Jams .............................................................................................................................................. 672
Paper Jams in the Feeder ................................................................................................................................... 674
Paper Jams in the Main Unit ............................................................................................................................... 676
Paper Jams in a Paper Source ............................................................................................................................. 679
When a Problem Cannot Be Solved ......................................................................................................................... 684
Appendix ........................................................................................................................................................... 686
Third Party Software ............................................................................................................................................. 688
Feature Highlights ................................................................................................................................................ 689
Going Green and Saving Money ......................................................................................................................... 690
Improving Efficiency ......................................................................................................................................... 692
Going Digital .................................................................................................................................................... 694
So Much More .................................................................................................................................................. 696
Specifications ....................................................................................................................................................... 698
Main Unit ........................................................................................................................................................ 699
Feeder ............................................................................................................................................................ 703
Available Paper ................................................................................................................................................ 704
Cassette Feeding Module-AF .............................................................................................................................. 708
Copy Card Reader-F .......................................................................................................................................... 709
Fax Function .................................................................................................................................................... 710
Scan Function .................................................................................................................................................. 711
Printer Functions .............................................................................................................................................. 712
Management Functions ..................................................................................................................................... 714
System Environment ......................................................................................................................................... 717
Network Environment ....................................................................................................................................... 719
Options ................................................................................................................................................................ 720
Optional Equipment .......................................................................................................................................... 721
System Options ................................................................................................................................................ 723
Manuals and Their Contents .................................................................................................................................. 725
Using User's Guide ................................................................................................................................................ 726
Screen Layout of User's Guide ............................................................................................................................ 727
Viewing User's Guide ........................................................................................................................................ 730
Basic Windows Operations .................................................................................................................................... 731
Notice .................................................................................................................................................................. 739
VII
Setting UpSetting Up ............................................................................................................................................................... 3
Main Functions ...................................................................................................................................................... 4
Preparations Required Before Use ....................................................................................................................... 6
Preventing Unauthorized Access .......................................................................................................................... 8
Setting Up Using the Setup Guide ...................................................................................................................... 10
Setting the Date/Time ......................................................................................................................................... 12
Setting Up the Network Environment ............................................................................................................... 14
Selecting Wired LAN or Wireless LAN .............................................................................................................. 16
Connecting to a Wired LAN ............................................................................................................................. 17
Connecting to a Wireless LAN ......................................................................................................................... 18Setting Up Connection Using WPS Push Button Mode ............................................................................. 20Setting Up Connection Using WPS PIN Code Mode .................................................................................. 22Setting Up Connection by Selecting a Wireless Router ............................................................................. 24Setting Up Connection by Specifying Detailed Settings ............................................................................ 27Checking the SSID and Network Key ........................................................................................................ 30
Setting IP Addresses ....................................................................................................................................... 31Setting IPv4 Address ................................................................................................................................ 32Setting IPv6 Addresses ............................................................................................................................ 35
Viewing Network Settings ............................................................................................................................... 38
Configuring Settings for Communication with a Computer ............................................................................ 40Configuring Printing Protocols and WSD Functions ................................................................................. 41Configuring Printer Ports ......................................................................................................................... 44Setting Up Print Server ............................................................................................................................ 48
Configuring the Machine for Your Network Environment ............................................................................... 51Configuring Ethernet Settings ................................................................................................................. 52Changing the Maximum Transmission Unit ............................................................................................. 54Setting a Wait Time for Connecting to a Network .................................................................................... 55Configuring DNS ...................................................................................................................................... 56Configuring SMB ...................................................................................................................................... 60Configuring WINS .................................................................................................................................... 62Registering LDAP Servers ......................................................................................................................... 64Monitoring and Controlling the Machine with SNMP ............................................................................... 69Other Network Settings ........................................................................................................................... 73
Installing Drivers ................................................................................................................................................. 78
Configuring Initial Settings for Fax Functions ................................................................................................... 79
Deciding Which Fax Receive Mode to Use ....................................................................................................... 80
Setting Up
1

Registering the Fax Number and Unit Name .................................................................................................. 81
Selecting the Receive Mode ............................................................................................................................ 82
Connecting the Telephone Line ...................................................................................................................... 83
Configuring Scan Settings ................................................................................................................................... 84
Preparing to Use the Machine as a Scanner ................................................................................................... 85
Procedure for Setting to Send E-Mail/Send and Receive I-Fax ......................................................................... 86Configuring Basic E-Mail Settings ............................................................................................................ 87Configuring E-Mail/I-Fax Communication Settings ................................................................................... 90
Procedure for Setting a Shared Folder as a Save Location .............................................................................. 94Setting a Shared Folder as a Save Location .............................................................................................. 95
Procedure for Setting a FTP Server as a Save Location ................................................................................... 98
Setting Up
2

Setting Up16SE-006
Before using the functions of the machine, the environmental conditions must be set in advance. To begin with, checkthe sequences of flow required to complete the setup, and then perform the actual settings. Preparations RequiredBefore Use(P. 6)
● The functions installed on the machine vary depending on the model you purchased. Before using themachine, see Main Functions(P. 4) and check the available functions.
Configuring Initial Settings of the Machine (Setup Guide)
● You can easily configure the initial settings required to use the machine, such as date, time, and networksettings, by following the on-screen guidance. Setting Up Using the Setup Guide(P. 10)
Setting Up
3
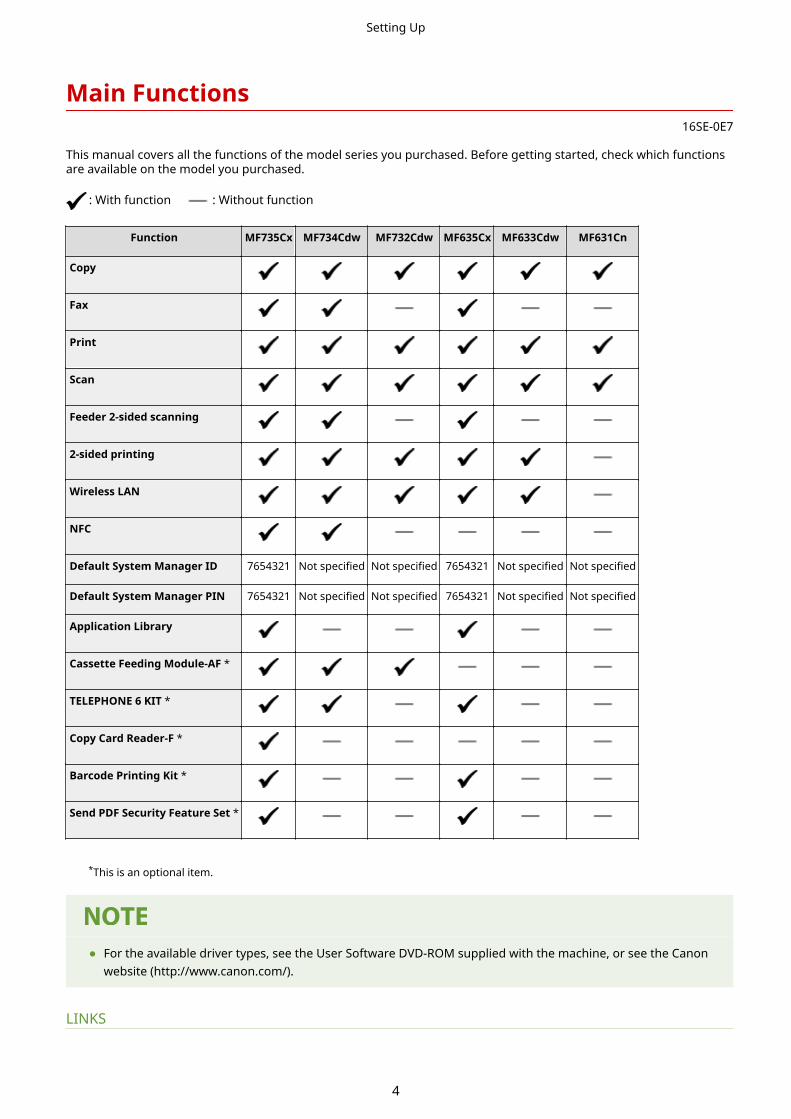
Main Functions16SE-0E7
This manual covers all the functions of the model series you purchased. Before getting started, check which functionsare available on the model you purchased.
: With function : Without function
Function MF735Cx MF734Cdw MF732Cdw MF635Cx MF633Cdw MF631Cn
Copy
Fax
Scan
Feeder 2-sided scanning
2-sided printing
Wireless LAN
NFC
Default System Manager ID 7654321 Not specified Not specified 7654321 Not specified Not specified
Default System Manager PIN 7654321 Not specified Not specified 7654321 Not specified Not specified
Application Library
Cassette Feeding Module-AF *
TELEPHONE 6 KIT *
Copy Card Reader-F *
Barcode Printing Kit *
Send PDF Security Feature Set *
*This is an optional item.
● For the available driver types, see the User Software DVD-ROM supplied with the machine, or see the Canonwebsite (http://www.canon.com/).
LINKS
Setting Up
4

Viewing User's Guide(P. 730)
Setting Up
5

Preparations Required Before Use16SE-007
Set up the machine following steps 1 to 5 in order. For more information about a particular step, click on the link to goto the corresponding section. In addition, to use the machine safely, also check Preventing UnauthorizedAccess(P. 8) .
Step 1 Setting Up Using the Setup Guide(P. 10)
Step 2 Setting Up the Network Environment(P. 14)
● Configure the network settings that are not included in the Setup Guide. If you do not needto use the Setup Guide, configure the network settings from here.
Step 3 Installing Drivers(P. 78)
Step 4 Configuring Initial Settings for Fax Functions(P. 79)
Step 5 Configuring Scan Settings(P. 84)
Setting Up
6

Setting from the Remote UI● When the network environment settings are complete, you can efficiently set the machine from a computer
using Remote UI. Starting Remote UI(P. 418)
Importing data from another machine to save time● As long as the model is the same, you can save setting data registered on another Canon printer/
multifunction machine to a computer (export) and load the setting data to this machine (import). Importing/Exporting the Setting Data(P. 433)
Setting Up
7

Preventing Unauthorized Access16SE-008
This section describes the security measures on how to prevent unauthorized access from the external network. This isa must-read for all users and administrators before using this machine, other printers, and multifunction machinesconnected to the network. In recent years, a printer/multifunction machine connected to the network can offer you avariety of useful functions, such as printing from a computer, operating from a computer using the remote function,and sending scanned documents via the Internet. On the other hand, it is essential to take security measures toreduce the security risk for information leakage, as a printer/multifunction machine has become more exposed tothreats, such as unauthorized access and theft, when it is connected to the network. This section explains necessarysettings you need to specify to prevent unauthorized access before using a printer/multifunction machine connectedto the network.
Security Measures to Prevent Unauthorized Access from the External NetworkAssigning a Private IP Address(P. 8)Using Firewall to Restrict Transmission(P. 9)Specifying the TLS Encrypted Communication (P. 9)Setting PIN to Manage Information Stored in the Multifunction Machine(P. 9)
Assigning a Private IP Address
An IP address is a numerical label assigned to each device participating in a computer network. A "global IP address" isused for the communication connecting to the Internet, and a "private IP address" is used for the communicationwithin a local area network, such as a LAN in the company. If a global IP address is assigned, your printer/multifunction machine is open to the public and can be accessed via the Internet. Thus, the risk of information leakagedue to unauthorized access from external network increases. On the other hand, if a private IP address is assigned,your printer/multifunction machine is closed to a local area network and can be accessed by only users on your localarea network, such as a LAN in the company.
Global IP AddressCan be accessed from the external network
Private IP AddressCan be accessed from the users within a local area network
Basically, assign a private IP address to your printer/multifunction machine. Make sure to confirm the IP address,assigned to the printer/multifunction machine you are using, is a private IP address or not. A private IP address isfound in one of the following ranges.
Ranges for Private IP addresses● From 10.0.0.0 to 10.255.255.255
● From 172.16.0.0 to 172.31.255.255
● From 192.168.0.0 to 192.168.255.255
For information on how to confirm the IP address, see Setting IPv4 Address(P. 32) .
● If a global IP address is assigned to a printer/multifunction machine, you can create a network environmentto reduce the risk of unauthorized access by installing security software, such as a firewall that prevents
Setting Up
8

access from the external networks. If you want to assign a global IP address to and use a printer/multifunction machine, contact your network administrator.
Using Firewall to Restrict Transmission
A firewall is a system that prevents unauthorized access from the external networks and protects against attacks/intrusions to a local area network. You can use a firewall on your network environment to block access from theexternal network that appears to be dangerous, by restricting communication from specified IP address of theexternal network. The function installed to a Canon printer/multifunction machine enables you to set up the IPaddress filter. For information on how to set up an IP address filter, see Specifying IP Addresses for FirewallSettings(P. 370) .
Specifying the TLS Encrypted Communication
For information on the TLS Encrypted Communication, see Configuring the Network Security Settings(P. 367) ,and on the procedures to specify, see Configuring the Key and Certificate for TLS(P. 379) .
Setting PIN to Manage Information Stored in the Multifunction Machine
If a malicious third party attempts to gain unauthorized access to a printer/multifunction machine, setting PIN toinformation stored in the machine will reduce the risk of information leakage. Canon printer/multifunction machineenables you to protect various type of information by setting PIN.
Setting PIN to Each Function● Setting PIN for Using Remote UI
For more information, see Setting a Remote UI PIN(P. 361) .
● Setting PIN for the System Manager SettingsFor more information, see Setting the System Manager ID and PIN(P. 353) .
● Address Book PINFor more information on setting a PIN, see Restricting Use of the Address Book(P. 404) .
Listed above are some examples of security measures for preventing unauthorized access. For more information onthe other security measures, see Managing the Machine(P. 350) and take necessary security measures forpreventing unauthorized access to suit your environment.
Setting Up
9

Setting Up Using the Setup Guide16SE-009
When the machine is turned on ( Turning ON the Machine(P. 117) ) for the first time, the Setup Guide starts up toassist you to configure the initial settings of the machine by following the on-screen guidance. In the Setup Guide, thesetting screens are displayed in the following order.
Step 1 Setting the Display Language and the Country or Region
Set the language to be displayed on the operation panel screen or in reports, as well as thecountry or region where the machine will be used.
1 Select a language.
2 Select <Yes>.
3 Select a country or region.
Step 2 Setting the Date and Time
Adjust the machine's date/time.
1 Select a time zone.
What is UTC?
● Coordinated Universal Time (UTC) is the primary time standard by which theworld regulates clocks and time. The correct UTC time zone setting is requiredfor Internet communications.
2 Enter the date and time, and select <Apply>.
Step 3 Setting the Access Security Measures
Set a PIN to access the Remote UI. Because the Remote UI can be used to change the machinesettings from a computer, setting of a PIN is recommended.
1 Select <Yes>.
● If you select <No>, PIN is not set, and the Setup Guide proceeds to step 4.
● You can also set the access security measure of the Remote UI later. Settinga Remote UI PIN(P. 361)
2 Enter the PIN, and then select <Apply>.
3 Enter the same PIN, and then select <Apply>.
Step 4 Performing the Color Adjustment
To achieve good copy quality, adjust the gradation.
1 Select <Yes>.
● If you select <No>, color adjustment is not performed, and the Setup Guideproceeds to step 5.
2 Check that the size and type of paper displayed on the screen is loaded in themachine, and select <OK>.
3 Confirm the procedure, and select <Start>.
Setting Up
10

➠An adjustment image is printed.
4 Open the feeder after the screen displayed during printing is closed.
5 Place the adjustment image on the platen glass.
● Place the adjustment image with the print side facing down while checking thatthe black stripe is placed on the back side of the machine.
6 Gently close the feeder.
7 Select <Start Scanning>.
➠Adjustment starts.
● When adjustment is complete, remove the adjustment image from the platenglass.
Step 5 Setting the Wireless LAN
Configure the settings to connect to the network using the wireless LAN.
1 Select <Yes>.
● If you select <No>, wireless LAN is not set, and the Setup Guide proceeds tostep 6.
2 Select <OK>.
3 Select the setting method.
● For more information about the wireless LAN settings, see Connecting to aWireless LAN(P. 18) .
Step 6 Viewing Application Library
The one-touch button referred to as "Application Library" is provided in the Home screen. Youcan read the description of each function.
1 To finish the Setup Guide, select <End>.
➠When the Setup Guide is complete, the Home screen appears.
Setting Up
11
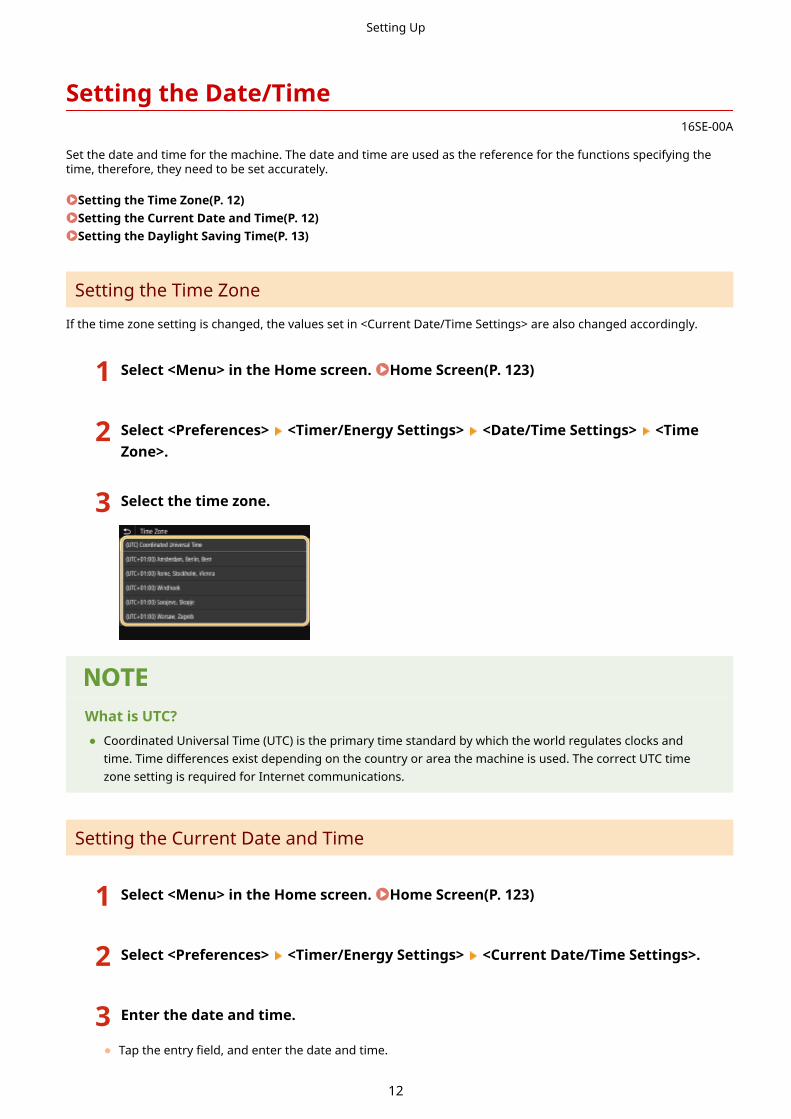
Setting the Date/Time16SE-00A
Set the date and time for the machine. The date and time are used as the reference for the functions specifying thetime, therefore, they need to be set accurately.
Setting the Time Zone(P. 12)Setting the Current Date and Time(P. 12)Setting the Daylight Saving Time(P. 13)
Setting the Time Zone
If the time zone setting is changed, the values set in <Current Date/Time Settings> are also changed accordingly.
1 Select <Menu> in the Home screen. Home Screen(P. 123)
2 Select <Preferences> <Timer/Energy Settings> <Date/Time Settings> <TimeZone>.
3 Select the time zone.
What is UTC?● Coordinated Universal Time (UTC) is the primary time standard by which the world regulates clocks and
time. Time differences exist depending on the country or area the machine is used. The correct UTC timezone setting is required for Internet communications.
Setting the Current Date and Time
1 Select <Menu> in the Home screen. Home Screen(P. 123)
2 Select <Preferences> <Timer/Energy Settings> <Current Date/Time Settings>.
3 Enter the date and time.
● Tap the entry field, and enter the date and time.
Setting Up
12

4 Select <Apply>.
● Set <Time Zone> before setting the current date and time. If the <Time Zone> setting is changed later, thecurrent date and time are also changed accordingly.
● The display format of the date and time can be changed, respectively.<Date Format>(P. 449)<Time Format>(P. 449)
Setting the Daylight Saving Time
If daylight saving time is enabled, specify the dates from which and to which daylight saving time is in effect.
1 Select <Menu> in the Home screen. Home Screen(P. 123)
2 Select <Preferences> <Timer/Energy Settings> <Date/Time Settings> <DaylightSaving Time Settings>.
3 Select <Off> or <On> in <Daylight Saving Time>.
● When you select <On>, select <Start Date> and <End Date>, and set the month and day for each item. To setthe day, specify "what day of which week."
4 Select <Apply>.
Setting Up
13
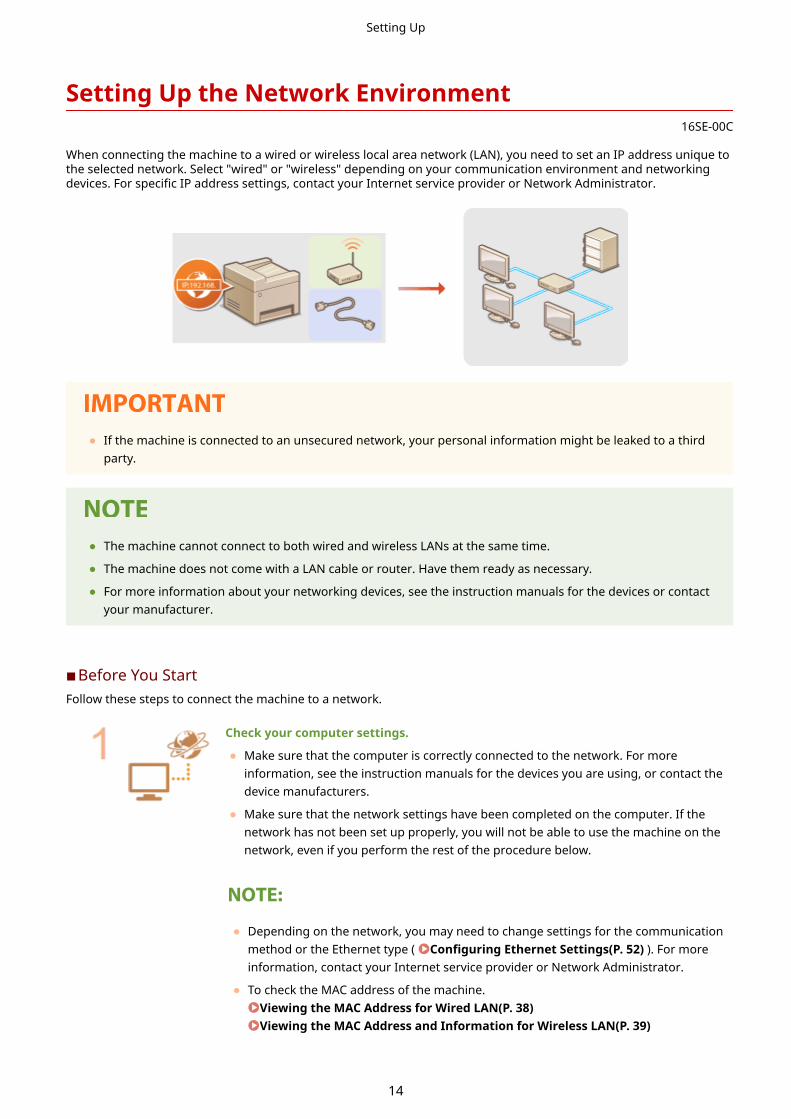
Setting Up the Network Environment16SE-00C
When connecting the machine to a wired or wireless local area network (LAN), you need to set an IP address unique tothe selected network. Select "wired" or "wireless" depending on your communication environment and networkingdevices. For specific IP address settings, contact your Internet service provider or Network Administrator.
● If the machine is connected to an unsecured network, your personal information might be leaked to a thirdparty.
● The machine cannot connect to both wired and wireless LANs at the same time.
● The machine does not come with a LAN cable or router. Have them ready as necessary.
● For more information about your networking devices, see the instruction manuals for the devices or contactyour manufacturer.
◼Before You StartFollow these steps to connect the machine to a network.
Check your computer settings.
● Make sure that the computer is correctly connected to the network. For moreinformation, see the instruction manuals for the devices you are using, or contact thedevice manufacturers.
● Make sure that the network settings have been completed on the computer. If thenetwork has not been set up properly, you will not be able to use the machine on thenetwork, even if you perform the rest of the procedure below.
● Depending on the network, you may need to change settings for the communicationmethod or the Ethernet type ( Configuring Ethernet Settings(P. 52) ). For moreinformation, contact your Internet service provider or Network Administrator.
● To check the MAC address of the machine.Viewing the MAC Address for Wired LAN(P. 38)Viewing the MAC Address and Information for Wireless LAN(P. 39)
Setting Up
14

● To connect to an IEEE 802.1X network, see Configuring IEEE 802.1XAuthentication Settings(P. 397) .
Select wired or wireless LAN.Selecting Wired LAN or Wireless LAN(P. 16)
Connect to a wired or wireless LAN.
● Proceed to the section that corresponds to the setting you selected in step 2.Connecting to a Wired LAN(P. 17)Connecting to a Wireless LAN(P. 18)
Set the IP address as necessary.
● At the time of purchase, the machine is set to automatically acquire an IP address.Change this setting if you want to use a specific IP address. Setting IPAddresses(P. 31)
LINKS
Configuring Settings for Communication with a Computer(P. 40)Configuring the Machine for Your Network Environment(P. 51)
Setting Up
15

Selecting Wired LAN or Wireless LAN16SE-00E
After you decide on wired or wireless LAN to connect the machine to the computer, select wired LAN or wireless LANusing the operation panel. Note that if you change the setting from <Wired LAN> to <Wireless LAN> or vice versa, youwill need to uninstall the drivers installed on your computer and then reinstall them. For more information, see themanuals for the relevant drivers on the online manual website.
1 Select <Menu> in the Home screen. Home Screen(P. 123)
2 Select <Preferences> <Network>.
● If the login screen appears, enter the correct ID and PIN. Logging in to the Machine(P. 134)
3 Select <Select Wired/Wireless LAN>.
4 Select <Wired LAN> or <Wireless LAN>.
LINKS
Setting Up the Network Environment(P. 14)Connecting to a Wired LAN(P. 17)Connecting to a Wireless LAN(P. 18)
Setting Up
16
Connecting to a Wired LAN16SE-00F
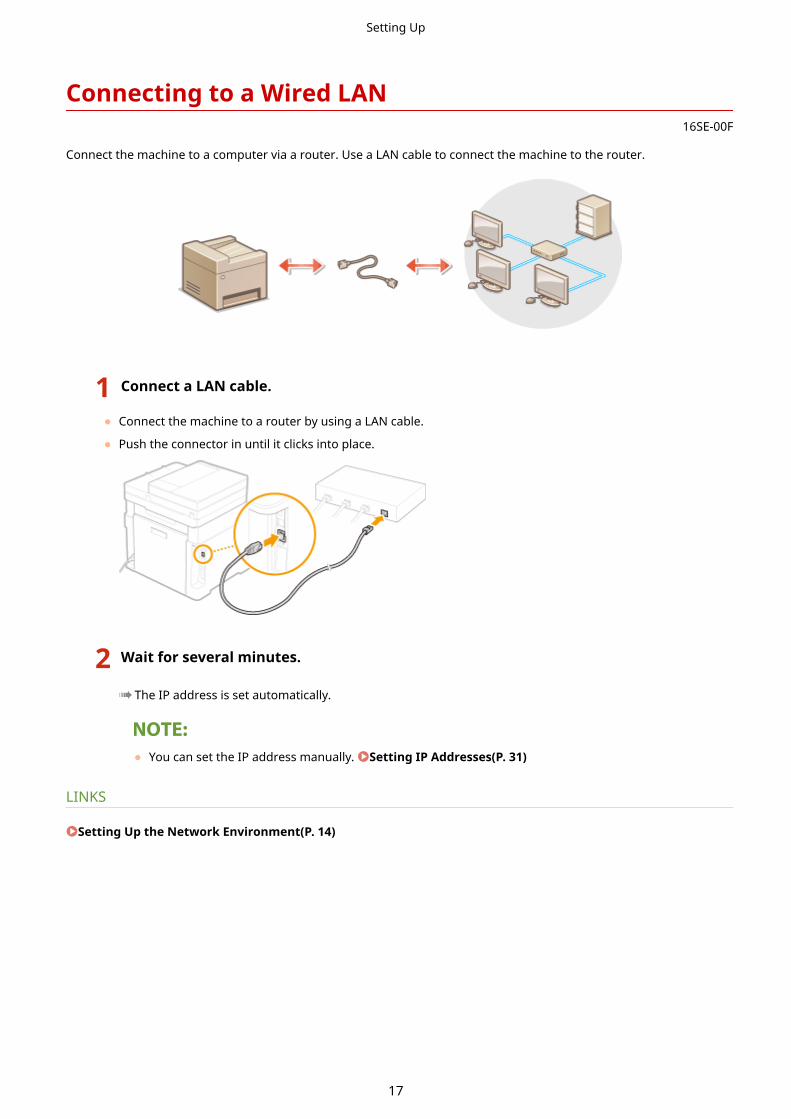
Connect the machine to a computer via a router. Use a LAN cable to connect the machine to the router.
1 Connect a LAN cable.
● Connect the machine to a router by using a LAN cable.
● Push the connector in until it clicks into place.
2 Wait for several minutes.
➠The IP address is set automatically.
● You can set the IP address manually. Setting IP Addresses(P. 31)
LINKS
Setting Up the Network Environment(P. 14)
Setting Up
17

Connecting to a Wireless LAN16SE-00H
Wireless routers (or access points) connect the machine to a computer via radio waves. If your wireless router isequipped with Wi-Fi Protected Setup (WPS), configuring your network is automatic and easy. If your networkingdevices do not support automatic configuration, or if you want to specify authentication and encryption settings indetail, you need to manually set up the connection. Make sure that your computer is correctly connected to thenetwork.
Setting Up Connection Using WPS(P. 18)Manually Setting Up Connection(P. 19)
Risk of information leak● Use wireless LAN connection at your own discretion and at your own risk. If the machine is connected to an
unsecured network, your personal information might be leaked to a third party because radio waves used inwireless communication can go anywhere nearby, even beyond walls.
Wireless LAN security● The wireless LAN function of this machine supports WEP, WPA-PSK, and WPA2-PSK. For the wireless security
compatibility of your wireless router, see the instruction manuals for your networking devices or contactyour manufacturer.
Required devices for wireless LAN connection● The machine does not come with a wireless router. Have the router ready as necessary.
Setting Up Connection Using WPS
When using WPS, two modes are available: push button mode and PIN code mode.
◼Push Button ModeFind the WPS mark shown below on the package of your wireless router. Also make sure that there is a WPS button onyour networking device. Setting Up Connection Using WPS Push Button Mode(P. 20)
Setting Up
18

◼PIN Code ModeSome WPS routers do not support the push button mode. If WPS PIN code mode is mentioned on the package or inthe instruction manuals of your networking device, set up the connection by entering the PIN code. Setting UpConnection Using WPS PIN Code Mode(P. 22)
● If the wireless router is set to use WEP authentication, you may not be able to set up connection using WPS.
Manually Setting Up Connection
When manually setting up a wireless connection, you can either select a wireless router or manually enter the requiredinformation. Regardless of the method, make sure that you have the required setup information, including the SSIDand network key. Checking the SSID and Network Key(P. 30)
◼Selecting a Wireless RouterSelect this setup option if you need to manually set up the connection but want to complete the setup as easily aspossible. Setting Up Connection by Selecting a Wireless Router(P. 24)
◼Manually Entering the Setup InformationIf you want to specify security settings in detail, such as authentication and encryption settings, manually enter theSSID and network key to set up the connection. Setting Up Connection by Specifying Detailed Settings(P. 27)
LINKS
Setting Up the Network Environment(P. 14)Selecting Wired LAN or Wireless LAN(P. 16)
Setting Up
19

Setting Up Connection Using WPS Push Button Mode16SE-00J
If your wireless router supports WPS push button mode, you can easily set up a connection with a WPS button.
● How to operate the wireless router may vary on each device. See the instruction manuals for yournetworking device for help.
1 Select <Menu> in the Home screen. Home Screen(P. 123)
2 Select <Preferences> <Network>.
● If the login screen appears, enter the correct ID and PIN. Logging in to the Machine(P. 134)
3 Select <Wireless LAN Settings>.
● If the <Do you want to enable the wireless LAN?> message is displayed, select <Yes>.
4 Read the message that is displayed, and select <OK>.
5 Select <WPS Push Button Mode>.
6 Select <Yes>.
7 Press and hold the WPS button on the wireless router.
● The button must be pressed within 2 minutes after selecting <Yes> in step 6.
● Depending on the networking device, you may need to press and hold the button for 2 seconds or longer.See the instruction manuals for your networking device for help.
If an error message is displayed during setup
● Select <Close> and return to step 5.
8 Wait until message <Connected.> is displayed.
Setting Up
20
9 Select <Close>.
➠Wait several minutes until the IP address and other items are set automatically.
Signal strength
● When more than one wireless router is available for connection, the machine connects to the devicewith the strongest signal. Signal strength is measured using RSSI (Received Signal Strength Indication).
● You can set the IP address manually. Setting IP Addresses(P. 31)
● While the machine is connected to the wireless LAN, the Wi-Fi icon is displayed in the Home screen orthe Basic Features screen of each function. Basic Screens(P. 122)
Reducing power consumption● You can set the machine to enter <Power Save Mode> based on signals emitted from the wireless router.
<Power Save Mode>(P. 454)
If the IP address of the machine has changed● In a DHCP environment, the IP address of the machine may be changed automatically. If this happens, the
connection is maintained as long as the machine and the computer belong to the same subnet.
LINKS
Connecting to a Wireless LAN(P. 18)
Setting Up
21

Setting Up Connection Using WPS PIN Code Mode16SE-00K
If your wireless router supports WPS PIN code mode, generate a PIN code with the machine and register the code tothe networking device.
● How to operate the wireless router may vary on each device. See the instruction manuals for yournetworking device for help.
From a Computer
1 Access your wireless router from a computer and display the screen for entering aWPS PIN code.
● For more information, see the instruction manuals for your networking device.
From the Operation Panel
2 Select <Menu> in the Home screen. Home Screen(P. 123)
3 Select <Preferences> <Network>.
● If the login screen appears, enter the correct ID and PIN. Logging in to the Machine(P. 134)
4 Select <Wireless LAN Settings>.
● If the <Do you want to enable the wireless LAN?> message is displayed, select <Yes>.
5 Read the message that is displayed, and select <OK>.
6 Select <WPS PIN Code Mode>.
7 Select <Yes>.
➠The PIN code is generated and shown on the display.
From a Computer
8 Register the generated PIN code to the wireless router.
● Register the PIN code on the setup screen displayed in step 1.
Setting Up
22
● The PIN code must be registered within 10 minutes after selecting <Yes> in step 7.
If an error message is displayed during setup
● Select <Close> and return to step 6.
From the Operation Panel
9 Wait until the message <Connected.> is displayed.
10 Select <Close>.
➠Wait several minutes until the IP address and other items are set automatically.
Signal strength
● When more than one wireless router is available for connection, the machine connects to the devicewith the strongest signal. Signal strength is measured using RSSI (Received Signal Strength Indication).
● You can set the IP address manually. Setting IP Addresses(P. 31)
● While the machine is connected to the wireless LAN, the Wi-Fi icon is displayed in the Home screen orthe Basic Features screen of each function. Basic Screens(P. 122)
Reducing power consumption● You can set the machine to enter <Power Save Mode> based on signals emitted from the wireless router.
<Power Save Mode>(P. 454)
If the IP address of the machine has changed● In a DHCP environment, the IP address of the machine may be changed automatically. If this happens, the
connection is maintained as long as the machine and the computer belong to the same subnet.
LINKS
Connecting to a Wireless LAN(P. 18)
Setting Up
23

Setting Up Connection by Selecting a Wireless Router16SE-00L
You can search the wireless routers (or access points) available for connection and select one from the display of themachine. For the network key, enter a WEP key or PSK. Before selecting a wireless router, check and write down therequired setup information, including the SSID and network key ( Checking the SSID and Network Key(P. 30) ).
Security settings● If the wireless connection is set up by selecting a wireless router, the WEP authentication method is set to
<Open System> or the WPA/WPA2 encryption method is set to <Auto> (AES-CCMP or TKIP). If you want toselect <Shared Key> for WEP authentication or <AES-CCMP> for WPA/WPA2 encryption, you need to set upthe connection using <Enter Manually>. Setting Up Connection by Specifying Detailed Settings(P. 27)
1 Select <Menu> in the Home screen. Home Screen(P. 123)
2 Select <Preferences> <Network>.
● If the login screen appears, enter the correct ID and PIN. Logging in to the Machine(P. 134)
3 Select <Wireless LAN Settings>.
● If the <Do you want to enable the wireless LAN?> message is displayed, select <Yes>.
4 Read the message that is displayed, and select <OK>.
5 Select <SSID Settings>.
6 Select <Select Access Point>.
➠The machine starts searching for available wireless routers.
● If a message is displayed telling that access point cannot be found, see Countermeasures for EachMessage(P. 648) .
7 Select a wireless LAN router.
● Select the router whose SSID matches the one that you have written down, and select <Next>.
Setting Up
24

To view details of security settings
● Select the wireless LAN router, and select <Details>. To return to the original screen, select .
If your wireless router is not found
● Check whether the machine is properly installed and ready to connect to the network. Installation/Settings Problems(P. 621)
8 Enter the network key that you have written down.
● Enter the network key, and select <Apply>.
● On how to enter text, see Entering Text(P. 132) .
9 Select <Yes>.
If an error message is displayed during setup
● Select <Close>, check whether the network key is correct, and return to step 5.
10 Wait until message <Connected.> is displayed.
11 Select <Close>.
➠Wait several minutes until the IP address and other items are set automatically.
Signal strength
● When more than one wireless router is available for connection, the machine connects to the devicewith the strongest signal. Signal strength is measured using RSSI (Received Signal Strength Indication).
● You can set the IP address manually. Setting IP Addresses(P. 31)
● While the machine is connected to the wireless LAN, the Wi-Fi icon is displayed in the Home screen orthe Basic Features screen of each function. Basic Screens(P. 122)
Reducing power consumption● You can set the machine to enter <Power Save Mode> based on signals emitted from the wireless router.
<Power Save Mode>(P. 454)
Setting Up
25

If the IP address of the machine has changed● In a DHCP environment, the IP address of the machine may be changed automatically. If this happens, the
connection is maintained as long as the machine and the computer belong to the same subnet.
LINKS
Connecting to a Wireless LAN(P. 18)
Setting Up
26

Setting Up Connection by Specifying Detailed Settings16SE-00R
If you want to specify the security settings in detail or cannot establish the wireless connection using the otherprocedures, manually enter all the required information for the wireless LAN connection. Before specifying detailedsettings, check and write down the required information, including the SSID, network key, and wireless securityprotocols. Checking the SSID and Network Key(P. 30)
1 Select <Menu> in the Home screen. Home Screen(P. 123)
2 Select <Preferences> <Network>.
● If the login screen appears, enter the correct ID and PIN. Logging in to the Machine(P. 134)
3 Select <Wireless LAN Settings>.
● If the <Do you want to enable the wireless LAN?> message is displayed, select <Yes>.
4 Read the message that is displayed, and select <OK>.
5 Select <SSID Settings> <Enter Manually>.
6 Enter the SSID that you have written down.
● Enter the SSID, and select <Apply>.
● On how to enter text, see Entering Text(P. 132) .
7 Specify the security settings based on the information that you have written down.
● If you do not need to specify the security settings, select <None>.
Using WEP
1 Select <WEP>.
2 Select an authentication method.
Setting Up
27

<Open System>
Sets open system authentication, which is also called "open authentication."
<Shared Key>
Uses the WEP key as a password.
When <Open System> is selected
● When connecting to a wireless LAN, the machine experiences an authentication error if the shared keyauthentication is set on the wireless router. If this happens, the machine automatically changes thesetting to <Shared Key> and retries the connection.
3 Select the WEP key you want to edit.
● Select the WEP key (1 to 4), and select <Edit>.
● Up to four WEP keys can be registered.
4 Enter the network key that you have written down.
● Enter the network key, and select <Apply>.
5 Select the desired WEP key.
● Select the WEP key you have edited, and select <Register>.
Using WPA-PSK or WPA2-PSK
1 Select <WPA/WPA2-PSK>.
2 Select an encryption method.
<Auto>
Sets the machine to automatically select AES-CCMP or TKIP to match the setting of the wireless router.
<AES-CCMP>
Sets AES-CCMP as the encryption method.
3 Enter the network key that you have written down.
● Enter the network key, and select <Apply>.
Setting Up
28

8 Select <Yes>.
If an error message is displayed during setup
● Select <Close>, check whether the specified settings are correct, and return to step 5.
9 Wait until message <Connected.> is displayed.
10 Select <Close>.
➠Wait several minutes until the IP address and other items are set automatically.
Signal strength
● When more than one wireless router is available for connection, the machine connects to the devicewith the strongest signal. Signal strength is measured using RSSI (Received Signal Strength Indication).
● You can set the IP address manually. Setting IP Addresses(P. 31)
● While the machine is connected to the wireless LAN, the Wi-Fi icon is displayed in the Home screen orthe Basic Features screen of each function. Basic Screens(P. 122)
Reducing power consumption● You can set the machine to enter <Power Save Mode> based on signals emitted from the wireless router.
<Power Save Mode>(P. 454)
If the IP address of the machine has changed● In a DHCP environment, the IP address of the machine may be changed automatically. If this happens, the
connection is maintained as long as the machine and the computer belong to the same subnet.
LINKS
Connecting to a Wireless LAN(P. 18)
Setting Up
29

Checking the SSID and Network Key16SE-00S
When manually setting up a wireless connection, you need to specify the SSID and network key of your wireless router.The SSID and network key may be indicated on these networking devices. Check your devices and write down thenecessary information before setting up the connection. For more information, see the instruction manuals for yournetworking devices or contact your manufacturer.
SSID A name given for identifying a specific wireless LAN. Some other terms used for SSID include"access point name" and "network name."
Network Key A keyword or password used for encrypting data or authenticating a network. Some otherterms used for network key include "encryption key," "WEP key," "WPA/WPA2 passphrase,"and "preshared key (PSK)."
Wireless Security Protocols(Authentication/Encryption)
When manually setting up a wireless connection by specifying detailed settings, you need tospecify security settings. Check the following information:
● Security types (WEP/WPA-PSK/WPA2-PSK)
● Authentication method (Open System/Shared Key)
● Encryption method (TKIP/AES-CCMP)
LINKS
Connecting to a Wireless LAN(P. 18)Setting Up Connection by Selecting a Wireless Router(P. 24)Setting Up Connection by Specifying Detailed Settings(P. 27)
Setting Up
30

Setting IP Addresses16SE-00U
Connecting the machine to a network requires a unique network IP address. Two versions of IP addresses areavailable: IPv4 and IPv6. Configure these settings depending on the network environment. To use IPv6 addresses, youneed to properly configure the IPv4 address settings.
Setting IPv4 Address(P. 32)Setting IPv6 Addresses(P. 35)
Setting Up
31

Setting IPv4 Address16SE-00W
The machine's IPv4 address can be either assigned automatically by a dynamic IPaddressing protocol, such as DHCP, or entered manually. When connecting themachine to a wired LAN, make sure that the connectors of the LAN cable are firmlyinserted into the ports ( Connecting to a Wired LAN(P. 17) ). You can test thenetwork connection if necessary.
Setting IPv4 Address(P. 32)Testing the Network Connection(P. 33)
Setting IPv4 Address
1 Select <Menu> in the Home screen. Home Screen(P. 123)
2 Select <Preferences> <Network>.
● If the login screen appears, enter the correct ID and PIN. Logging in to the Machine(P. 134)
3 Select <TCP/IP Settings> <IPv4 Settings> <IP Address Settings>.
4 Configure IP address settings.
<Auto Acquire>Select to automatically assign an IP address via DHCP protocol. When <On> is displayed, automaticaddressing is enabled.
<Manually Acquire>Select to configure the IP address settings by manually entering an IP address. In order to select this option,the automatic acquirement must be set to <Off>.
<Check Settings>Select when you want to view the current IP address settings.
Automatically assigning an IP address
1 Select <Auto Acquire>.
2 Select <On> in <Auto Acquire>, and select <Select Protocol>.
3 Select <DHCP>.
Setting Up
32

If you do not want to use DHCP/BOOTP/RARP to assign an IP address
● Select <Off>. If you select <DHCP> when these services are unavailable, the machine will waste timeand communications resources searching the network for these services.
4 Check that <Auto IP> is set to <On>.
● If <Off> is selected, change the setting to <On>.
5 Select <Apply>.
● IP addresses assigned via DHCP override the address obtained via Auto IP.
Manually entering an IP address
1 Select <Auto Acquire>, and select <Off> <Apply> in <Auto Acquire>.
2 Select <Manually Acquire>.
3 Enter <IP Address>, <Subnet Mask>, and <Gateway Address>, and select <Apply>.
5 Restart the machine.
● Turn OFF the machine, wait for at least 10 seconds, and turn it back ON.
Checking whether the settings are correct● Make sure that the Remote UI screen can be displayed with your computer ( Starting Remote UI(P. 418) ).
If a computer is not available, you can check the connection by using the operation panel ( Testing theNetwork Connection(P. 33) ).
When you have changed the IP address after installing the printer driver● When the MFNP port is used, the connection is maintained as long as the machine and the computer belong
to the same subnet; therefore, you do not need to add a new port. When the standard TCP/IP port is used,you need to add a new port. Configuring Printer Ports(P. 44)
*If you do not know which port is used, see Checking the Printer Port(P. 736) .
Testing the Network Connection
1 Select <Menu> in the Home screen. Home Screen(P. 123)
2 Select <Preferences> <Network>.
● If the login screen appears, enter the correct ID and PIN. Logging in to the Machine(P. 134)
3 Select <TCP/IP Settings> <IPv4 Settings> <PING Command>.
Setting Up
33

4 Enter the IPv4 address of another device on the network, and select <Apply>.
➠ If a proper connection has been established, <Received response from the host.> is displayed.
LINKS
Setting IPv6 Addresses(P. 35)Viewing Network Settings(P. 38)Configuring WINS(P. 62)
Setting Up
34

Setting IPv6 Addresses16SE-00X
The IPv6 addresses of the machine can be configured via the Remote UI. Beforesetting IPv6 addresses, check the IPv4 address settings ( Viewing IPv4Settings(P. 38) ). You need to set the correct IPv4 settings to use IPv6 addresses.Note that the scan function that uses the scanner driver or MF Scan Utility is notavailable in an IPv6 environment. The machine can use the following multiple IPv6addresses:
Type Description
Link-local address An address that is only valid within a subnet or link and cannot be used to communicate withdevices beyond a router. A link-local address is automatically set when the IPv6 function of themachine is enabled.
Manual address An address that is entered manually. When using this address, specify the prefix length and defaultrouter address.
Stateless address An address that is generated automatically using the MAC address of the machine and the networkprefix that is advertised by the router. Stateless addresses are discarded when the machine isrestarted (or turned ON).
Stateful address An address obtained from a DHCP server using DHCPv6.
● For more information about the basic operations to be performed when setting the machine from theRemote UI, see Setting Up Menu Options from Remote UI(P. 426) .
1 Start the Remote UI and log in to System Manager Mode. Starting RemoteUI(P. 418)
2 Click [Settings/Registration] on the Portal page. Remote UI Screen(P. 419)
3 Select [Network Settings] [IPv6 Settings].
4 Click [Edit].
5 Select the [Use IPv6] check box and configure the required settings.
Setting Up
35

[Use IPv6]Select the check box to enable IPv6 on the machine. When not using IPv6, clear the check box.
[Stateless Address 1]Select the check box when using a stateless address. When not using a stateless address, clear the check box.
[Use Manual Address]When you want to manually enter an IPv6 address, select the check box and enter the IP address, prefixlength, and default router address in the corresponding text boxes.
[IP Address]Enter an IPv6 address. Addresses that start with "ff" (or multicast address) cannot be entered.
[Prefix Length]Enter a number that indicates how many bits are available for the network address.
[Default Router Address]Specify the IPv6 address of the default router as necessary. Addresses that start with "ff" (or multicastaddress) cannot be entered.
[Use DHCPv6]Select the check box when using a stateful address. When not using DHCPv6, clear the check box.
6 Click [OK].
7 Restart the machine.
● Turn OFF the machine, wait for at least 10 seconds, and turn it back ON.
Checking whether the settings are correct● Make sure that the Remote UI screen can be displayed with your computer by using the IPv6 address of the
machine. Starting Remote UI(P. 418)
Setting Up
36

Selecting settings from the operation panel● IPv6 settings can also be accessed from <Menu> in the Home screen. <IPv6 Settings>(P. 457)
When you have changed the IP address after installing the printer driver● You need to add a new port. Configuring Printer Ports(P. 44)
LINKS
Setting IPv4 Address(P. 32)Viewing Network Settings(P. 38)
Setting Up
37

Viewing Network Settings16SE-00Y
Viewing IPv4 Settings(P. 38)Viewing IPv6 Settings(P. 38)Viewing the MAC Address for Wired LAN(P. 38)Viewing the MAC Address and Information for Wireless LAN(P. 39)
● The IP address is not correctly configured if it is displayed as "0.0.0.0".
● Connecting the machine to a switching hub or bridge may result in a connection failure even when the IPaddress is correctly configured. This problem can be solved by setting a certain interval before the machinestarts communicating. Setting a Wait Time for Connecting to a Network(P. 55)
● You can print a list of the current network settings. User Data List/System Manager Data List(P. 612)
Viewing IPv4 Settings
<Status Monitor> <Network Information> <IPv4> Select the setting to view Check thesettings
Viewing IPv6 Settings
<Status Monitor> <Network Information> <IPv6> Select the setting to view Check thesettings
Viewing the MAC Address for Wired LAN
1 Select <Menu> in the Home screen. Home Screen(P. 123)
2 Select <Preferences> <Network>.
● If the login screen appears, enter the correct ID and PIN. Logging in to the Machine(P. 134)
3 Select <Ethernet Driver Settings>.
➠MAC address is displayed.
Setting Up
38

Viewing the MAC Address and Information for Wireless LAN
1 Select <Menu> in the Home screen. Home Screen(P. 123)
2 Select <Preferences> <Network>.
● If the login screen appears, enter the correct ID and PIN. Logging in to the Machine(P. 134)
3 Select <Wireless LAN Settings>.
4 Read the message that is displayed, and select <OK>.
5 Select <Connection Information>.
6 Select the setting to view.
Viewing security information
● To view WEP and WPA/WPA2-PSK information, select <Security Settings>.
Viewing from the <Status Monitor> screen
● <Wireless LAN Status> and <Latest Error Information> can be viewed from <Status Monitor>.
<Status Monitor> <Network Information> <Network Connection Type> Select the setting to view
LINKS
Connecting to a Wireless LAN(P. 18)Setting IPv4 Address(P. 32)Setting IPv6 Addresses(P. 35)Configuring DNS(P. 56)
Setting Up
39

Configuring Settings for Communication with aComputer
16SE-010
Specify the protocol and port when operating the machine from a computer via the network. Before configuring themachine for printing or faxing from a computer, perform the basic setup procedures. For more information, see themanuals for the relevant drivers on the online manual website.
Configuring Printing Protocols and WSD Functions(P. 41)Configuring Printer Ports(P. 44)Setting Up Print Server(P. 48)
● Protocols explained here are rules for delivering document data between a computer and the machine, andcan be selected according to intended purposes or the network environment.
● Ports are gateways for passing data between network devices. If a communication failure occurs in thenetwork connection, the port settings may be the cause of the problem.
Setting Up
40

Configuring Printing Protocols and WSD Functions16SE-011
Configure the protocols that are used for printing documents from a networked computer.
● For more information about the basic operations to be performed when setting the machine from theRemote UI, see Setting Up Menu Options from Remote UI(P. 426) .
1 Start the Remote UI and log in to System Manager Mode. Starting RemoteUI(P. 418)
2 Click [Settings/Registration] on the Portal page. Remote UI Screen(P. 419)
3 Click [Network Settings].
4 Configure printing protocols.
Configuring LPD or RAW
1 Select [LPD Settings] or [RAW Settings] [Edit].
2 Configure the settings as necessary.
[Use LPD Printing]Select the check box to print via LPD. When not using LPD printing, clear the check box.
[Use RAW Printing]Select the check box to print via RAW. When not using RAW printing, clear the check box.
[RX Timeout]Set a value as the restart wait time for data reception. If data reception does not resume within the settime, printing is canceled.
3 Click [OK].
Setting Up
41

Configuring WSD
1 Select [WSD Settings] [Edit].
2 Configure the settings as necessary.
[Use WSD Printing]Select the check box to print via WSD. When not using WSD printing, clear the check box.
[Use WSD Browsing]Select the check box to obtain information about the machine from a computer via WSD. This check box isautomatically selected when the [Use WSD Printing] check box is selected.
[Use WSD Scanning]WSD scanning enables you to scan documents to a computer without installing the scanner driver. Selectthe check box to scan documents via WSD. When not using WSD scanning, clear the check box.
[Use Computer Scanning]Select the check box to use WSD scanning by operating the machine with the operation panel. This checkbox can only be selected when the [Use WSD Scanning] check box is selected. To perform scanning, select<Scan> in the Home screen and specify a WSD-connected computer as a scan destination ( Scanningand Saving to a Computer(P. 284) ).
[Use Multicast Discovery]Select the check box to set the machine to reply to multicast discovery messages. If the check box iscleared, the machine stays in sleep mode even when multicast discovery messages are flowing on thenetwork.
3 Click [OK].
5 Restart the machine.
● Turn OFF the machine, wait for at least 10 seconds, and turn it back ON.
Selecting settings from the operation panel● LPD, RAW, and WSD, settings can also be accessed from <Menu> in the Home screen.
<LPD Settings>(P. 459)<RAW Settings>(P. 459)<WSD Settings>(P. 460)
Setting up WSD network devices● The WSD network devices can be added from the printer folder. Open the printer folder ( Displaying the
Printer Folder(P. 731) ) click [Add a device] or [Add a printer] and follow the on-screen instructions. For
Setting Up
42

more information about how to install the driver for the WSD network, see the manuals for the relevantdrivers on the online manual website.
To change the port number● The same port number used for the machine and a computer must be used for printing protocol.
Configuring Printer Ports(P. 44)Changing Port Numbers(P. 376)
LINKS
Configuring Printer Ports(P. 44)
Setting Up
43

Configuring Printer Ports16SE-012
Printing errors can occur when the IP address of the machine has been changed, or when a printer has been added viathe Windows printer folder. These errors are typically caused by incorrect printer port settings. For example, anincorrect port number or port type may have been specified. In such situations, your attempt to print fails because thedocument data cannot reach the machine. To fix this type of problem, configure the printer port settings on thecomputer.
● To perform the following procedure, log in to your computer with an administrator account.
1 Open the printer folder. Displaying the Printer Folder(P. 731)
2 Right-click the driver icon for this machine, and click [Printer properties] or[Properties].
3 Click the [Ports] tab and configure the required settings.
Adding a portIf you have changed the IP address of the machine or you have selected an incorrect port while installing adriver from the Windows printer folder, add a new port. There are two types of port: "MFNP Port" and"Standard TCP/IP Port." Select the port type according to your environment.
MFNP Port
(only for IPv4 environment)
This is a port that allows the IP address of the machine to be detected automatically.Even if the IP address of the machine is changed, the connection is maintained,provided that the machine and the computer are in the same subnet. You do not needto add a new port every time the IP address is changed. If you are using the machinein an IPv4 environment, you should normally select this type of port.
● You can add an MFNP port only when you installed the driver from the providedDVD-ROM, or when you downloaded and installed the printer driver or the faxdriver from the Canon website.
Setting Up
44

Standard TCP/IP Port This is a standard Windows port. When you use this type of port, you need to add anew port every time that the IP address of the machine is changed. Select this type ofport when you are using the machine in an IPv6 environment and when you cannotadd an MFNP port.
Adding an MFNP port
1 Click [Add Port].
2 Select [Canon MFNP Port] in [Available port types] and click [New Port].
3 Select [Auto Detect] and select the machine when it is detected, and then click [Next].
If the machine is not detected
● Click [Refresh]. If the problem persists, select [IP address] or [MAC address], enter the IP address orMAC address of the machine ( Viewing Network Settings(P. 38) ) and then click [Next].
4 Click [Add] [Finish].
5 Click [Close].
Adding a standard TCP/IP port
1 Click [Add Port].
2 Select [Standard TCP/IP Port] in [Available port types] and click [New Port].
3 Click [Next].
4 Enter the IP address or the DNS name of the machine, and click [Next].
● The [Port Name] is entered automatically. If necessary, you can change it.
Setting Up
45

● When the next screen is displayed, follow the instructions on the screen.
*When you select the [Device Type], select [Canon Network Printing Device with P9100] under [Standard].
5 Click [Finish].
6 Click [Close].
Changing the port type or numberIf the printing protocol (LPD or RAW) has been changed on the machine side ( Configuring PrintingProtocols and WSD Functions(P. 41) ) or the port number has been changed ( Changing PortNumbers(P. 376) ), the corresponding settings on the computer must also be configured. This operation isnot needed for WSD ports.
MFNP port
1 Click [Configure Port].
2 Under [Protocol Type], select [RAW] or [LPR], and change the [Port Number].
3 Click [OK].
Standard TCP/IP port
1 Click [Configure Port].
2 Under [Protocol], select [Raw] or [LPR].
Setting Up
46

● If you selected [Raw], change the [Port Number].
● If you selected [LPR], enter "lp" in [Queue Name].
3 Click [OK].
4 Click [Close].
LINKS
Setting Up Print Server(P. 48)
Setting Up
47

Setting Up Print Server16SE-013
With a print server, you can reduce the load on the computer that you print from. The print server also enables eachcomputer to install the drivers over the network, which saves you the trouble of installing the drivers on eachcomputer by using the provided DVD-ROM. To set up a computer on the network as a print server, configure thesettings for sharing the printer.
● To perform the following procedure, log in to your computer with an administrator account.
● You may be unable to install drivers over the network depending on the operating system and the bitarchitecture (32-bit or 64-bit) of the print server and client computers.
● When implementing a print server in a domain environment, consult your Network Administrator.
To carry out Department ID Management when using a print server● "Canon Driver Information Assist Service" must be added during the printer driver installation. For more
information, see the manuals for the relevant drivers on the online manual website.
1 Open the printer folder. Displaying the Printer Folder(P. 731)
2 Right-click the printer driver icon for this machine and click [Printer properties] or[Properties].
3 Click the [Sharing] tab, select [Share this printer], and enter the share name of themachine.
● Click the [Change Sharing Options] button if displayed.
4 Install additional drivers as necessary.
● This operation is required if you want to install the drivers in other computers running a different bitarchitecture via the print server.
Setting Up
48

1 Click [Additional Drivers].
2 Select the check box for the bit architecture that other computers are running, and click [OK].
● Select additional drivers from the following, according to the operating system of the print server.
Print server Select the check box for
32-bit operating systems [x64]
64-bit operating systems [x86] under [Processor]
● If you do not know whether your Windows operating system is a 32-bit or 64-bit version, see Checking the Bit Architecture(P. 734) .
3 Insert the provided DVD-ROM into the drive on the computer, click [Browse] to specify the folder thatcontains the drivers, and then click [OK].
● If the print server runs a 32-bit operating system, select [intdrv] [UFRII] [uk_eng] [x64] [Driver] folders on the provided DVD-ROM.
● If the print server runs a 64-bit operating system, select [intdrv] [UFRII] [uk_eng] [32bit] [Driver] folders on the provided DVD-ROM.
4 Follow the on-screen instructions to install additional drivers.
5 Click [OK].
◼ Installing the Drivers on a Computer via the Print Server
1 Locate the shared printer in the print server. Displaying Shared Printers in thePrint Server(P. 732)
2 Double-click the shared printer.
Setting Up
49

3 Follow the on-screen instructions to install the drivers.
LINKS
Printing from a Computer(P. 257)
Setting Up
50

Configuring the Machine for Your NetworkEnvironment
16SE-014
The configuration of a network varies depending on the purpose of the network. The machine has been designed tobe compatible with as many network configurations as possible, and it is equipped with a variety of technologies.Consult your Network Administrator and set a configuration to suit your network environment.
Configuring Ethernet Settings(P. 52)Changing the Maximum Transmission Unit(P. 54)Setting a Wait Time for Connecting to a Network(P. 55)Configuring DNS(P. 56)Configuring SMB(P. 60)Configuring WINS(P. 62)Registering LDAP Servers(P. 64)Monitoring and Controlling the Machine with SNMP(P. 69)Other Network Settings(P. 73)
Setting Up
51

Configuring Ethernet Settings16SE-015
Ethernet is a standard for communicating data in a local area network (LAN). You canset the communication mode and the Ethernet type. In general, the machine can beused without changing the defaults ( <Ethernet Driver Settings>(P. 463) ), but youcan change these settings to suit your network environment.
1 Select <Menu> in the Home screen. Home Screen(P. 123)
2 Select <Preferences> <Network>.
● If the login screen appears, enter the correct ID and PIN. Logging in to the Machine(P. 134)
3 Select <Ethernet Driver Settings>.
4 Select whether to configure Ethernet settings automatically or manually.
● If auto-detection is enabled, the machine detects and automatically sets the Ethernet communication modeand the type that can be used.
Configuring Ethernet settings automaticallySelect <On> in <Auto Detect>.
Configuring Ethernet settings manually
1 Select <Off> in <Auto Detect>.
2 <Communication Mode> select the communication mode.
<Half Duplex>Alternately sends and receives communication data. Select when the machine is connected to anetworking device using half duplex.
Setting Up
52
<Full Duplex>Simultaneously sends and receives communication data. Use this setting for most environments.
3 <Ethernet Type> select the Ethernet type.
4 Select <Apply>.
5 Restart the machine.
● Turn OFF the machine, wait for at least 10 seconds, and turn it back ON.
LINKS
Changing the Maximum Transmission Unit(P. 54)Setting a Wait Time for Connecting to a Network(P. 55)
Setting Up
53

Changing the Maximum Transmission Unit16SE-016
In most Ethernet networks, the maximum size of a packet that can be sent is 1500 bytes. A packet refers to a chunk ofdata into which the original data is divided before being sent. The maximum transmission unit (MTU) may vary on eachnetwork. Change the settings of the machine as necessary. For more information, contact your Network Administrator.
1 Select <Menu> in the Home screen. Home Screen(P. 123)
2 Select <Preferences> <Network>.
● If the login screen appears, enter the correct ID and PIN. Logging in to the Machine(P. 134)
3 Select <TCP/IP Settings> <MTU Size>.
4 Select the MTU.
5 Restart the machine.
● Turn OFF the machine, wait for at least 10 seconds, and turn it back ON.
LINKS
Configuring Ethernet Settings(P. 52)Setting a Wait Time for Connecting to a Network(P. 55)
Setting Up
54
Setting a Wait Time for Connecting to a Network16SE-017
When a network is designed to enjoy redundant connectivity with multiple switching hubs or bridges, it must have amechanism to prevent packets from looping. One effective solution is to define the role of each switch port. However,communication may still be disrupted for several tens of seconds immediately after you change the way that networkdevices are connected, or if you add a new device. If this type of problem occurs, set a wait time for connecting to thenetwork.
1 Select <Menu> in the Home screen. Home Screen(P. 123)
2 Select <Preferences> <Network>.
● If the login screen appears, enter the correct ID and PIN. Logging in to the Machine(P. 134)
3 Select <Waiting Time for Connection at Startup>.
4 Enter the waiting time required to start a communication with the network, andselect <Apply>.
LINKS
Configuring Ethernet Settings(P. 52)Changing the Maximum Transmission Unit(P. 54)
Setting Up
55

Configuring DNS16SE-018
DNS (Domain Name System) provides a service for name resolution that associates a host (or domain) name with an IPaddress. Configure the DNS, mDNS, or DHCP option settings as necessary. Note that the procedures for configuringDNS are different for IPv4 and IPv6.
● For more information about the basic operations to be performed when setting the machine from theRemote UI, see Setting Up Menu Options from Remote UI(P. 426) .
1 Start the Remote UI and log in to System Manager Mode. Starting RemoteUI(P. 418)
2 Click [Settings/Registration] on the Portal page. Remote UI Screen(P. 419)
3 Click [Network Settings].
4 Configure DNS settings.
Configuring IPv4 DNS
1 Select [IPv4 Settings] [Edit].
2 Configure IPv4 DNS settings.
Setting Up
56

[DHCP Option Settings]
[Acquire Host Name]Select the check box to enable Option 12 to obtain the host name from the DHCP server.
[DNS Dynamic Update]Select the check box to enable Option 81 to dynamically update the DNS records through the DHCPserver.
[Acquire DNS Server Address]Select the check box to enable Option 6 to obtain a DNS server address from the DHCP server.
[Acquire Domain Name]Select the check box to enable Option 15 to obtain a domain name from the DHCP server.
[Acquire WINS Server Address]Select the check box to enable Option 44 to obtain a WINS server address from the DHCP server.
[Acquire SMTP Server Address]Select the check box to enable Option 69 to obtain an SMTP server address from the DHCP server.
[Acquire POP Server Address]Select the check box to enable Option 70 to obtain a POP3 server address from the DHCP server.
[DNS Settings]
[Primary DNS Server Address]Enter the IP address of a DNS server.
[Secondary DNS Server Address]Enter the IP address of a secondary DNS server, if any.
[Host Name]Enter alphanumeric characters for the host name of the machine that is to be registered to the DNSserver.
[Domain Name]Enter alphanumeric characters for the name of the domain the machine belongs to, such as"example.com."
[DNS Dynamic Update]Select the check box to dynamically update the DNS records whenever the machine's IP address ischanged. When specifying the interval between updates, enter the time in hours in the [DNSDynamic Update Interval] text box.
Setting Up
57

[mDNS Settings]
[Use mDNS]Adopted by Bonjour, mDNS (multicast DNS) is a protocol for associating a host name with an IPaddress without using DNS. Select the check box to enable mDNS and enter the mDNS name in the[mDNS Name] text box.
3 Click [OK].
Configuring IPv6 DNS
1 Select [IPv6 Settings] [Edit].
2 Configure IPv6 DNS settings.
● The [Use IPv6] check box must be selected to configure the settings. Setting IPv6 Addresses(P. 35)
[DHCP Option Settings]
[Acquire DNS Server Address]Select the check box to enable Option 23 to obtain a DNS server address from the DHCP server.
[Acquire Domain Name]Select the check box to enable Option 24 to obtain a domain name from the DHCP server.
[DNS Settings]
[Primary DNS Server Address]Enter the IP address of a DNS server. Addresses that start with "ff" (or multicast address) cannot beentered.
[Secondary DNS Server Address]Enter the IP address of a secondary DNS server, if any. Addresses that start with "ff" (or multicastaddress) cannot be entered.
[Use Same Host Name/Domain Name as IPv4]Select the check box to use the same host and domain names as in IPv4.
[Host Name]Enter alphanumeric characters for the host name of the machine that is to be registered to the DNSserver.
[Domain Name]
Setting Up
58

Enter alphanumeric characters for the name of the domain the machine belongs to, such as"example.com."
[DNS Dynamic Update]Select the check box to dynamically update the DNS records whenever the machine's IP address ischanged. To specify the type(s) of addresses you want to register to the DNS server, select thecheck box for [Register Manual Address], [Register Stateful Address], or [Register StatelessAddress]. To specify the interval between updates, enter the time in hours in the [DNS DynamicUpdate Interval] text box.
[mDNS Settings]
[Use mDNS]Adopted by Bonjour, mDNS (multicast DNS) is a protocol for associating a host name with an IPaddress without using DNS. Select the check box to enable mDNS.
[Use Same mDNS Name as IPv4]Select the check box to use the same mDNS name as in IPv4. To set a different name, clear thecheck box and enter the mDNS name in the [mDNS Name] text box.
3 Click [OK].
5 Restart the machine.
● Turn OFF the machine, wait for at least 10 seconds, and turn it back ON.
Selecting settings from the operation panel● DNS settings can also be accessed from <Menu> in the Home screen. <DNS Settings>(P. 458)
LINKS
Setting IPv4 Address(P. 32)Setting IPv6 Addresses(P. 35)Viewing Network Settings(P. 38)
Setting Up
59
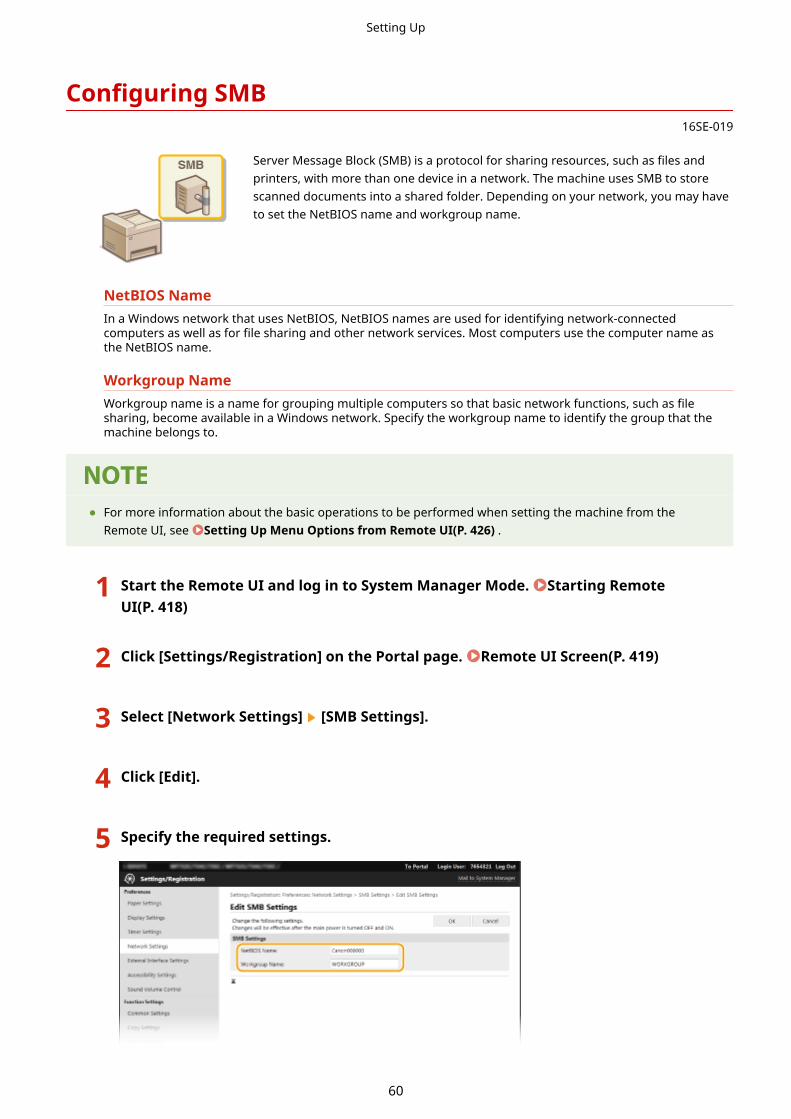
Configuring SMB16SE-019
Server Message Block (SMB) is a protocol for sharing resources, such as files andprinters, with more than one device in a network. The machine uses SMB to storescanned documents into a shared folder. Depending on your network, you may haveto set the NetBIOS name and workgroup name.
NetBIOS NameIn a Windows network that uses NetBIOS, NetBIOS names are used for identifying network-connectedcomputers as well as for file sharing and other network services. Most computers use the computer name asthe NetBIOS name.
Workgroup NameWorkgroup name is a name for grouping multiple computers so that basic network functions, such as filesharing, become available in a Windows network. Specify the workgroup name to identify the group that themachine belongs to.
● For more information about the basic operations to be performed when setting the machine from theRemote UI, see Setting Up Menu Options from Remote UI(P. 426) .
1 Start the Remote UI and log in to System Manager Mode. Starting RemoteUI(P. 418)
2 Click [Settings/Registration] on the Portal page. Remote UI Screen(P. 419)
3 Select [Network Settings] [SMB Settings].
4 Click [Edit].
5 Specify the required settings.
Setting Up
60

[NetBIOS Name]Enter alphanumeric characters for the NetBIOS name of the machine.
[Workgroup Name]Enter alphanumeric characters for the name of the workgroup that the machine belongs to.
● NetBIOS names or workgroup names that start with an asterisk (*) cannot be registered to a WINS server.
6 Click [OK].
7 Restart the machine.
● Turn OFF the machine, wait for at least 10 seconds, and turn it back ON.
LINKS
Configuring WINS(P. 62)
Setting Up
61

Configuring WINS16SE-01A
Windows Internet Name Service (WINS) is a name resolution service that associates a NetBIOS name (a computer orprinter name in an SMB network) with an IP address. To enable WINS, the WINS server must be specified.
● In order to specify WINS server settings, NetBIOS name and workgroup name are required to be set. Configuring SMB(P. 60)
● The function is not available in an IPv6 network.
● For more information about the basic operations to be performed when setting the machine from theRemote UI, see Setting Up Menu Options from Remote UI(P. 426) .
1 Start the Remote UI and log in to System Manager Mode. Starting RemoteUI(P. 418)
2 Click [Settings/Registration] on the Portal page. Remote UI Screen(P. 419)
3 Select [Network Settings] [WINS Settings].
4 Click [Edit].
5 Select the [WINS Resolution] check box, and specify the required settings.
[WINS Resolution]Select the check box to use WINS for name resolution. When not using WINS, clear the check box.
[WINS Server Address]Enter the IP address of the WINS server.
Setting Up
62

● If the IP address of the WINS server is obtained from a DHCP server, the obtained IP address overrides theIP address entered in the [WINS Server Address] text box.
6 Click [OK].
7 Restart the machine.
● Turn OFF the machine, wait for at least 10 seconds, and turn it back ON.
Selecting settings from the operation panel● WINS settings can also be accessed from <Menu> in the Home screen. <WINS Settings>(P. 459)
LINKS
Setting IPv4 Address(P. 32)
Setting Up
63
Registering LDAP Servers16SE-01C
If an LDAP server is implemented in the network, you can search the server for faxnumbers or e-mail addresses, and then specify them as destinations or registerthem in the Address Book. Note also that if send function authentication ( LDAPServer Authentication(P. 363) ) is enabled, you must register the server used forauthentication. You can register a maximum of five LDAP servers each for searchingand for authentication to the machine. Register LDAP servers via the Remote UI.
● For more information about the basic operations to be performed when setting the machine from theRemote UI, see Setting Up Menu Options from Remote UI(P. 426) .
1 Start the Remote UI and log in to System Manager Mode. Starting RemoteUI(P. 418)
2 Click [Settings/Registration] on the Portal page. Remote UI Screen(P. 419)
3 Click [LDAP Server Settings].
4 Click [Register New Server] for [LDAP Server (For Search)] or [LDAP Server (ForAuthentication)].
● LDAP server registration is separated, with registration either for searching or for authentication. To use anLDAP server for searching for fax and e-mail destinations, register if for searching, and to use it forauthenticating sending of e-mail or faxes, register it for authenticating.
To edit registered server information
● Click a text link under [Server Name] for the edit screen.
To delete registered server information
● Click [Delete] on the right of the server name you want to delete click [OK].
5 Register the LDAP server.
Register the server used for searchesRegister the server for searching for fax, e-mail destinations.
Setting Up
64

[Server Name]Enter the name to be assigned to the LDAP server.
[Server Address]Enter the IP address of the LDAP server or enter alphanumeric characters for the host name of the server(example: ldap.example.com).
[Server Address] and DNS
● To prevent errors from occurring when searching for destinations, make sure to check thefollowing:
- If the host name is entered for [Server Address], make sure that a DNS server is available in the network.
- If the IP address is entered for [Server Address], check whether the DNS server supports only forwardlookup. If the server supports only forward lookup, select [Do Not Use] or [Use] for [Login Information]. Ifyou select [Use (Security Authentication)], make sure that the DNS server supports reverse lookup.
[Position to Start Search]Specify the node in the directory information tree (DIT) that you want to start search from. Leaving the text boxblank sets the machine to start search from an arbitrary node selected automatically.
● When specifying the node, enter "DC=," followed by a host name (a dot-delimited character string in theActive Directory domain name), and separate each of the entries with a comma. If the domain name is"john.example.com," for example, enter "DC=john,DC=example,DC=com."
[Use TLS]Select the check box to encrypt communication with the LDAP server using TLS.
● This is enabled only when [Use] or [Use (Security Authentication)] is selected in [LoginInformation].
[Port Number]Enter the port number used for communicating with the LDAP server.
[Search Timeout]
Setting Up
65
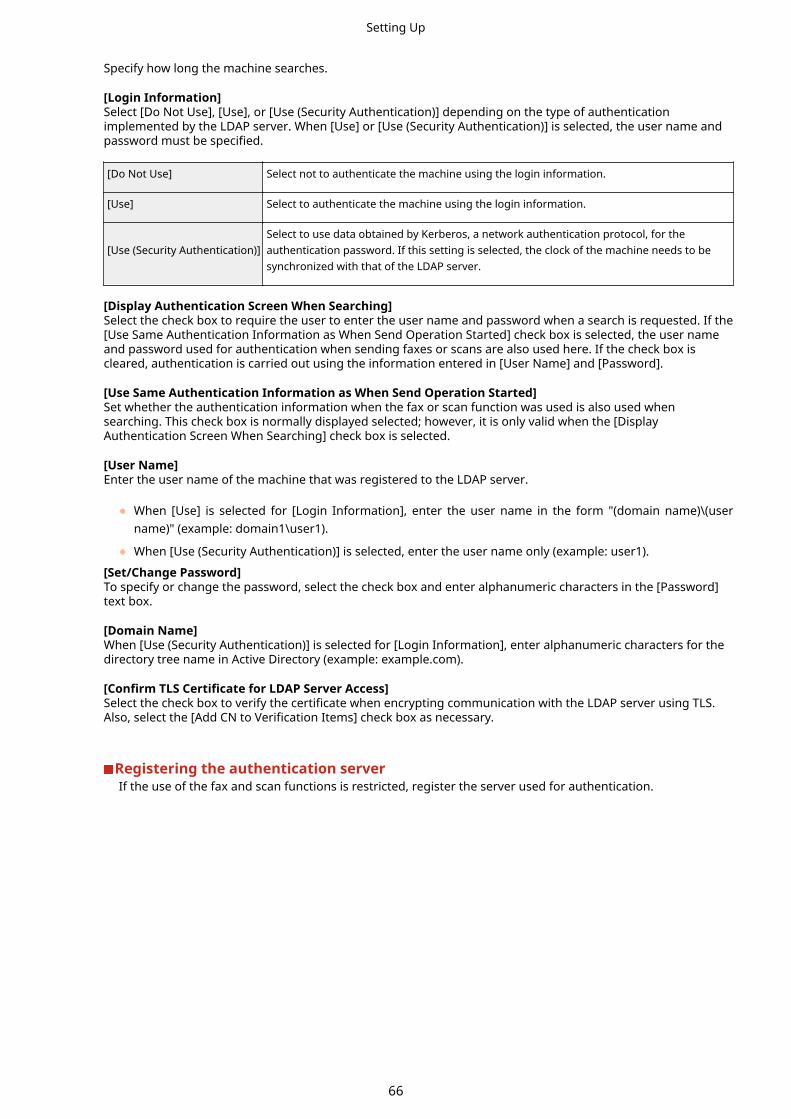
Specify how long the machine searches.
[Login Information]Select [Do Not Use], [Use], or [Use (Security Authentication)] depending on the type of authenticationimplemented by the LDAP server. When [Use] or [Use (Security Authentication)] is selected, the user name andpassword must be specified.
[Do Not Use] Select not to authenticate the machine using the login information.
[Use] Select to authenticate the machine using the login information.
[Use (Security Authentication)]Select to use data obtained by Kerberos, a network authentication protocol, for theauthentication password. If this setting is selected, the clock of the machine needs to besynchronized with that of the LDAP server.
[Display Authentication Screen When Searching]Select the check box to require the user to enter the user name and password when a search is requested. If the[Use Same Authentication Information as When Send Operation Started] check box is selected, the user nameand password used for authentication when sending faxes or scans are also used here. If the check box iscleared, authentication is carried out using the information entered in [User Name] and [Password].
[Use Same Authentication Information as When Send Operation Started]Set whether the authentication information when the fax or scan function was used is also used whensearching. This check box is normally displayed selected; however, it is only valid when the [DisplayAuthentication Screen When Searching] check box is selected.
[User Name]Enter the user name of the machine that was registered to the LDAP server.
● When [Use] is selected for [Login Information], enter the user name in the form "(domain name)\(username)" (example: domain1\user1).
● When [Use (Security Authentication)] is selected, enter the user name only (example: user1).
[Set/Change Password]To specify or change the password, select the check box and enter alphanumeric characters in the [Password]text box.
[Domain Name]When [Use (Security Authentication)] is selected for [Login Information], enter alphanumeric characters for thedirectory tree name in Active Directory (example: example.com).
[Confirm TLS Certificate for LDAP Server Access]Select the check box to verify the certificate when encrypting communication with the LDAP server using TLS.Also, select the [Add CN to Verification Items] check box as necessary.
Registering the authentication server If the use of the fax and scan functions is restricted, register the server used for authentication.
Setting Up
66

[Server Name]Enter the name to be assigned to the LDAP server.
[Server Address]Enter the IP address of the LDAP server or enter alphanumeric characters for the host name of the server(example: ldap.example.com).
[Server Address] and DNS
● To prevent errors from occurring when searching for destinations, make sure to check thefollowing:
- If the host name is entered for [Server Address], make sure that a DNS server is available in the network.
- If the IP address is entered for [Server Address], check whether the DNS server supports only forwardlookup. If the server supports only forward lookup, select [Use] for [Login Information]. If you select [Use(Security Authentication)], make sure that the DNS server supports reverse lookup.
[Position to Start Search]Specify the node in the directory information tree (DIT) that you want to start search from. Leaving the text boxblank sets the machine to start search from an arbitrary node selected automatically.
● When specifying the node, enter "DC=," followed by a host name (a dot-delimited character string in theActive Directory domain name), and separate each of the entries with a comma. If the domain name is"john.example.com," for example, enter "DC=john,DC=example,DC=com."
[Use TLS]Select the check box to encrypt communication with the LDAP server using TLS.
● This is enabled only when [Use] is selected in [Login Information].
[Port Number]Enter the port number used for communicating with the LDAP server.
[Authentication/Attribute Acquisition Timeout]Specify how long authentication and attribute acquisition can continue.
Setting Up
67
[User Name Attribute]Enter the attribute name, to be compared with a user name entered during authentication, of alphanumericcharacters (Example: "sAMAccountName").
● Not required if [Use (Security Authentication)] is selected in [Login Information].
[E-Mail Address Attribute]Enter the attribute name, to be used for obtaining an e-mail address from the authentication server, ofalphanumeric characters (Example: "mail").
[Login Information]Select [Use] or [Use (Security Authentication)] depending on the type of authentication implemented by theLDAP server.
[Use] Select to authenticate the machine using the System Manager ID.
[Use (Security Authentication)]Select to use data obtained by Kerberos, a network authentication protocol, for theauthentication password. If this setting is selected, the clock of the machine needs to besynchronized with that of the LDAP server.
[Use System Manager ID]If [Use] is selected in [Login Information], this specifies whether authentication using the system manager ID isused. To use the system manager ID, select the check box and specify the user name and password for used forauthentication. If you deselect the check box, login is anonymous (no user name).
[User Name]Enter the user name of the machine that was registered to the LDAP server in the form "(domain name)\(username)" (example: domain1\user1).
[Set/Change Password]To specify or change the password, select the check box and enter alphanumeric characters in the [Password]text box.
[Domain Name]When [Use (Security Authentication)] is selected for [Login Information], enter alphanumeric characters for thedirectory tree name in Active Directory (example: example.com).
[Confirm TLS Certificate for LDAP Server Access]Select the check box to verify the certificate when encrypting communication with the LDAP server using TLS.Also, select the [Add CN to Verification Items] check box as necessary.
6 Click [OK].
LINKS
Configuring SNTP(P. 73)Basic Operations for Sending Faxes(P. 217)Basic Operations for Scanning Originals(P. 283)LDAP Server Authentication(P. 363)
Setting Up
68

Monitoring and Controlling the Machine with SNMP16SE-01E
Simple Network Management Protocol (SNMP) is a protocol for monitoring and controlling communication devices in anetwork by using Management Information Base (MIB). The machine supports SNMPv1 and security-enhancedSNMPv3. You can check the status of the machine from a computer when you print documents or use the Remote UI.You can enable either SNMPv1 or SNMPv3, or both at the same time. Specify the settings for each version to suit yournetwork environment and the purpose of use.
SNMPv1SNMPv1 uses information called "community" to define the scope of SNMP communication. Because thisinformation is exposed to the network in plain text, your network will be vulnerable to attacks. If you want toensure network security, disable SNMPv1 and use SNMPv3.
SNMPv3With SNMPv3, you can implement network device management that is protected by robust security features.Note that TLS must be enabled for the Remote UI before configuring SNMPv3 ( Configuring the Key andCertificate for TLS(P. 379) ).
● The machine does not support the trap notification feature of SNMP.
● To change the port number of SNMP, see Changing Port Numbers(P. 376) .
● SNMP management software, when installed on a computer on the network, enables you to configure,monitor, and control the machine remotely from the computer. For more information, see the instructionmanuals for your management software.
● For more information about the basic operations to be performed when setting the machine from theRemote UI, see Setting Up Menu Options from Remote UI(P. 426) .
1 Start the Remote UI and log in to System Manager mode. Starting RemoteUI(P. 418)
2 Click [Settings/Registration] on the Portal page. Remote UI Screen(P. 419)
3 Select [Network Settings] [SNMP Settings].
4 Click [Edit].
Setting Up
69

5 Specify SNMPv1 settings.
● If you do not need to change SNMPv1 settings, proceed to the next step.
[Use SNMPv1]Select the check box to enable SNMPv1. You can specify the rest of SNMPv1 settings only when this check boxis selected.
[Use Community Name 1]/[Use Community Name 2]Select the check box to specify a community name. If you do not need to specify a community name, clearthe check box.
[Community Name]Enter alphanumeric characters for the name of the community.
[MIB Access Permission]For each community, select [Read/Write] or [Read Only] for the access privileges to MIB objects.
[Read/Write] Permits both viewing and changing the values of MIB objects.
[Read Only] Permits only viewing the values of MIB objects.
[Use Dedicated Community]Dedicated Community is a preset community, intended exclusively for Administrators using Canon software,such as iW Management Console. Select the check box to use Dedicated Community, and specify [MIB AccessPermission]. If you do not need to use Dedicated Community, clear the check box.
6 Specify SNMPv3 settings.
● If you do not need to change SNMPv3 settings, proceed to the next step.
Setting Up
70

[Use SNMPv3]Select the check box to enable SNMPv3. You can specify the rest of SNMPv3 settings only when this check boxis selected.
[Enable User]Select the check box to enable [User Settings 1]/[User Settings 2]/[User Settings 3]. To disable user settings,clear the corresponding check box.
[User Name]Enter alphanumeric characters for the user name.
[MIB Access Permission]Select [Read/Write] or [Read Only] for the access privileges to MIB objects.
[Read/Write] Permits both viewing and changing the values of MIB objects.
[Read Only] Permits only viewing the values of MIB objects.
[Security Settings]Select [Authentication On/Encryption On], [Authentication On/Encryption Off], or [Authentication Off/Encryption Off] for the desired combination of authentication and encryption settings.
[Authentication Algorithm]Click the [Authentication On/Encryption On] or [Authentication On/Encryption Off] for [Security Settings] forthe algorithm that corresponds to your environment.
[Encryption Algorithm]Click the [Authentication On/Encryption On] for [Security Settings] for the algorithm that corresponds to yourenvironment.
[Set/Change Password]To set or change the password, select the check box and enter alphanumeric characters for the password inthe [Authentication Password] or [Encryption Password] text box. For confirmation, enter the same passwordin the [Confirm] text box. Passwords can be set independently for authentication and encryption algorithms.
7 Specify Printer Management Information Acquisition Settings.
Setting Up
71

● With SNMP, the printer management information, such as printing protocols and printer ports, can bemonitored and obtained regularly from a computer on the network.
[Acquire Printer Management Information from Host]Select the check box to enable monitoring of the printer management information of the machine via SNMP.To disable monitoring of the printer management information, clear the check box.
8 Click [OK].
9 Restart the machine.
● Turn OFF the machine, wait for at least 10 seconds, and turn it back ON.
Disabling SNMPv1● If SNMPv1 is disabled, some of the functions of the machine become unavailable, such as obtaining machine
information via the printer driver.
Using the operation panel● You can enable or disable the SNMP settings from <Menu>. <SNMP Settings>(P. 461)
Enabling Both SNMPv1 and SNMPv3
● If both versions of SNMP are enabled, it is recommended that MIB access permission in SNMPv1 be set to[Read Only]. MIB access permission can be set independently in SNMPv1 and SNMPv3 (and for each user inSNMPv3). Selecting [Read/Write] (full access permission) in SNMPv1 negates the robust security featuresthat characterize SNMPv3 because most of the machine settings can then be controlled with SNMPv1.
LINKS
Configuring the Key and Certificate for TLS(P. 379)
Setting Up
72

Other Network Settings16SE-01F
Configure the following items according to your network environment.
Configuring FTP PASV Mode(P. 73)Configuring SNTP(P. 73)Monitoring the Machine from the Device Management Systems(P. 74)
Configuring FTP PASV Mode
PASV is an FTP communication mode used for file transfer. To connect to an FTP server through a firewall, you mustuse PASV mode. First check that the PASV mode is set on the FTP server.
● Whether PASV mode is used for FTP depends on your network environment and the settings on the FTPserver to which data is being sent. For more information, contact your Network Administrator.
<Menu> <Preferences> <Network> <TCP/IP Settings> <Use FTP PASV Mode> <On> Restart the machine
Configuring SNTP
Simple Network Time Protocol (SNTP) enables you to adjust the system clock by using the time server on the network.If SNTP is used, the time server is checked at the specified intervals; therefore, the correct time can always bemaintained. The time is adjusted based on Coordinated Universal Time (UTC), so specify the time zone setting beforeconfiguring SNTP ( Setting the Date/Time(P. 12) ). SNTP settings can be specified via the Remote UI.
● The SNTP of the machine supports both NTP (version 3) and SNTP (versions 3 and 4) servers.
● For more information about the basic operations to be performed when setting the machine from theRemote UI, see Setting Up Menu Options from Remote UI(P. 426) .
1 Start the Remote UI and log in to System Manager Mode. Starting RemoteUI(P. 418)
2 Click [Settings/Registration] on the Portal page. Remote UI Screen(P. 419)
3 Select [Network Settings] [SNTP Settings].
4 Click [Edit].
Setting Up
73
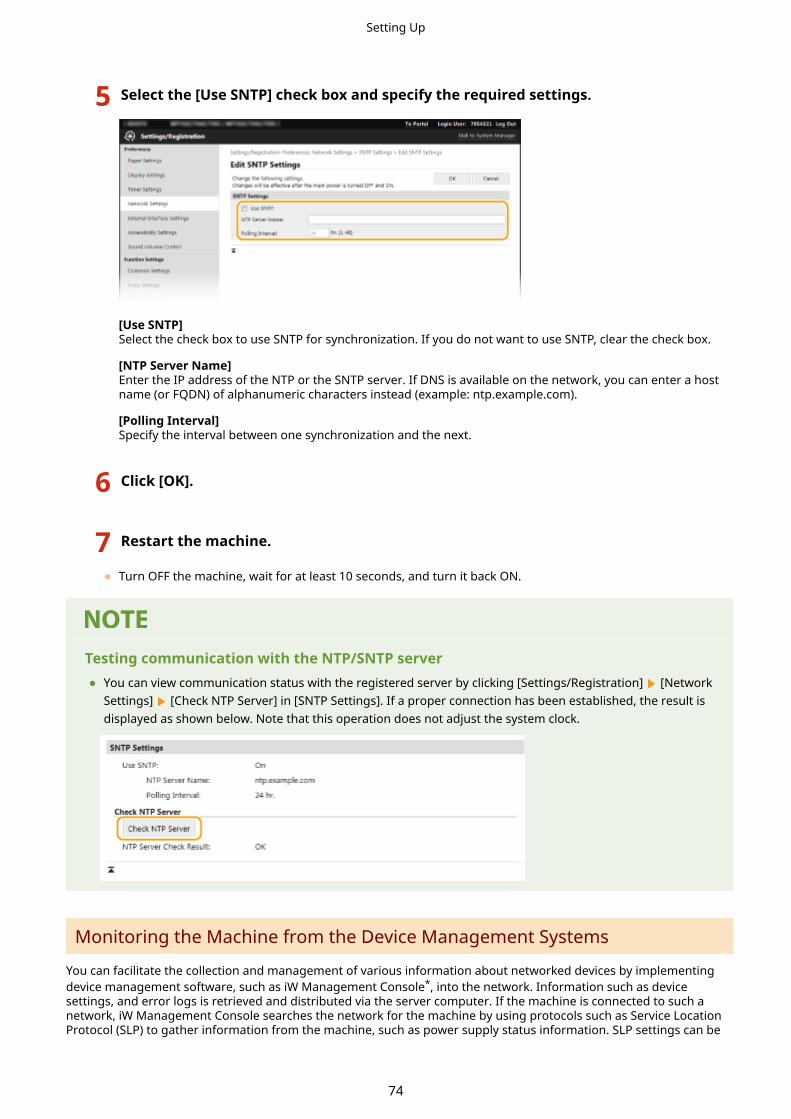
5 Select the [Use SNTP] check box and specify the required settings.
[Use SNTP]Select the check box to use SNTP for synchronization. If you do not want to use SNTP, clear the check box.
[NTP Server Name]Enter the IP address of the NTP or the SNTP server. If DNS is available on the network, you can enter a hostname (or FQDN) of alphanumeric characters instead (example: ntp.example.com).
[Polling Interval]Specify the interval between one synchronization and the next.
6 Click [OK].
7 Restart the machine.
● Turn OFF the machine, wait for at least 10 seconds, and turn it back ON.
Testing communication with the NTP/SNTP server● You can view communication status with the registered server by clicking [Settings/Registration] [Network
Settings] [Check NTP Server] in [SNTP Settings]. If a proper connection has been established, the result isdisplayed as shown below. Note that this operation does not adjust the system clock.
Monitoring the Machine from the Device Management Systems
You can facilitate the collection and management of various information about networked devices by implementingdevice management software, such as iW Management Console*, into the network. Information such as devicesettings, and error logs is retrieved and distributed via the server computer. If the machine is connected to such anetwork, iW Management Console searches the network for the machine by using protocols such as Service LocationProtocol (SLP) to gather information from the machine, such as power supply status information. SLP settings can be
Setting Up
74

specified via the Remote UI. This section also describes the procedure to configure settings for communicationbetween the machine and plug-ins for iW Management Console.
*For more information about iW Management Console, contact your local authorized Canon dealer.
To use iW Management Console plug-ins● You need to enable the settings of the dedicated port and the SNMP settings. As for the SNMP settings, set
[MIB Access Permission] to [Read/Write] for both SNMPv1 and SNMPv3.<Use Dedicated Port>(P. 462)Monitoring and Controlling the Machine with SNMP(P. 69)
Remote UI Operations● For more information about the basic operations to be performed when setting the machine from the
Remote UI, see Setting Up Menu Options from Remote UI(P. 426) .
◼Configuring SLP Communication with Device Management Software
1 Start the Remote UI and log in to System Manager Mode. Starting RemoteUI(P. 418)
2 Click [Settings/Registration] on the Portal page. Remote UI Screen(P. 419)
3 Click [Network Settings].
4 Specify SLP settings.
Specifying multicast device discovery
1 Select [Multicast Discovery Settings] [Edit].
2 Select the [Respond to Discovery] check box and specify the required settings.
[Respond to Discovery]Select the check box to set the machine to respond to device management software multicast discoverypackets and enable monitoring by device management software.
Setting Up
75

● To change the port number for multicast discovery, see Changing Port Numbers(P. 376) .
[Scope Name]To include the machine into a specific scope, enter alphanumeric characters for the scope name.
3 Click [OK].
Notifying a device management software of the power status of the machine
1 Select [Sleep Mode Notification Settings] [Edit].
2 Select the [Notify] check box and specify the required settings.
[Notify]Select the check box to notify a device management software of the power status of the machine. When[Notify] is selected, you can expect the machine to avoid unnecessary communication during sleep modeand reduce the total power consumption.
[Port Number]Change the port number for this function according to the network environment.
[Number of Routers to Traverse]Specify how many routers the notification packets can pass.
[Notification Interval]Specify how often the machine notifies a device management software of its power status.
3 Click [OK].
5 Restart the machine.
● Turn OFF the machine, wait for at least 10 seconds, and turn it back ON.
◼Configuring Settings for Communication between the Machine and Plug-insYou can specify the settings to enable communication between the machine and iW Management Console plug-ins.Use of plug-ins allows you to manage the machine's settings from iW Management Console.
Setting Up
76

<Menu> <Preferences> <Network> <Device Settings Management> <On>
Setting Up
77

Installing Drivers16SE-01H
Install the various drivers and associated software on your computer.
1 Make the necessary preparation before proceeding with the installation.
● Install the optional devices on the main unit in advance. Optional Equipment(P. 721)
● If the machine is supplied with a DVD-ROM, insert the DVD-ROM into the drive on the computer.
● You can download drivers and software you are going to use from the Canon website (http://www.canon.com/).
● When new versions of drivers and software become available, they will be uploaded to the Canon website.You can download them as necessary after checking their system requirements.
● Depending on your machine or environmental conditions, some functions may not be available.
● Some of the drivers are not supported depending on the OS. For more information about the supportedstatus of the latest OS, see the Canon website.
2 Proceed with the installation.
● For more information about the installation procedure, see the manuals for the drivers and software you aregoing to use.
● Installation of drivers is impossible if sending and receiving of the IP address are not permitted in [FirewallSettings]. For more information, see Specifying IP Addresses for Firewall Settings(P. 370) .
● If sending and receiving of the IP address of the computer on which drivers are installed become disabled by[Firewall Settings], it is no longer possible to perform printing or send faxes from that printer.
Setting Up
78

Configuring Initial Settings for Fax Functions16SE-01J
Follow steps 1 to 4 described below to configure the fax settings. First, determine which receive mode best suits yourintended use, and then follow the on-screen instructions to configure the settings. For more information about aparticular step, click on the link to go to the corresponding section.
Step 1 Deciding Which Fax Receive Mode to Use(P. 80)
Step 2 Registering the Fax Number and Unit Name(P. 81)
Step 3 Selecting the Receive Mode(P. 82)
Step 4 Connecting the Telephone Line(P. 83)
Setting Up
79
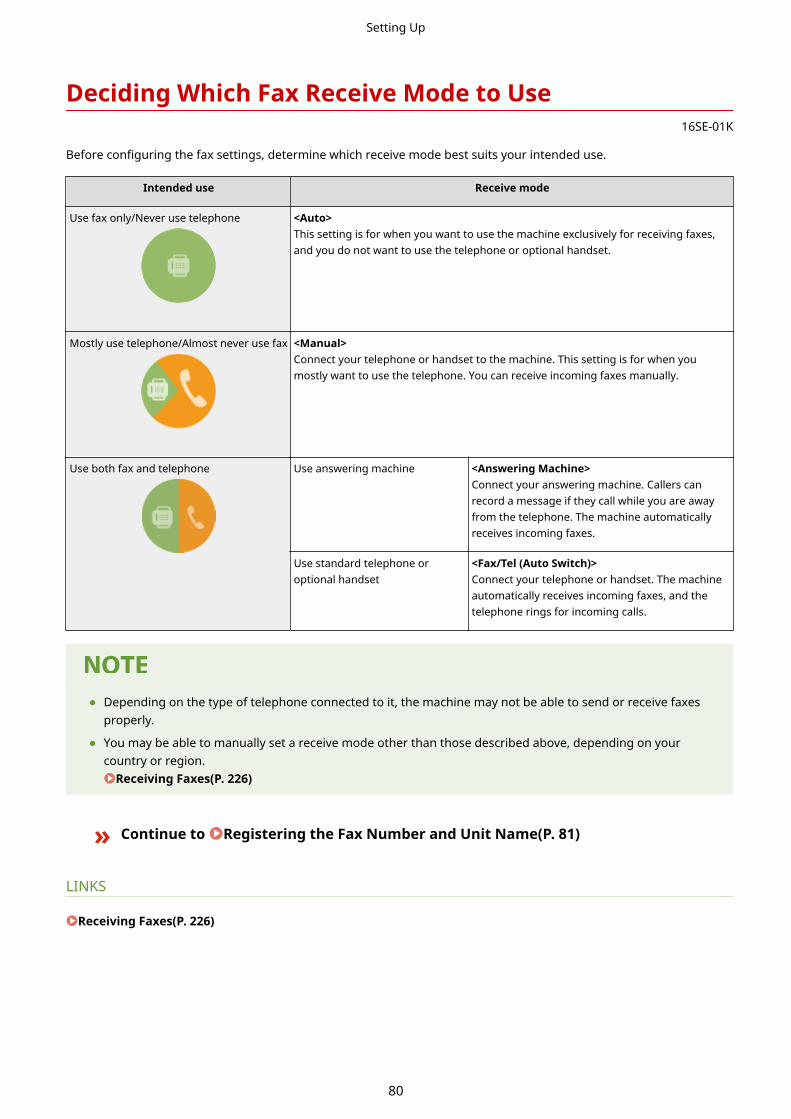
Deciding Which Fax Receive Mode to Use16SE-01K
Before configuring the fax settings, determine which receive mode best suits your intended use.
Intended use Receive mode
Use fax only/Never use telephone <Auto>This setting is for when you want to use the machine exclusively for receiving faxes,and you do not want to use the telephone or optional handset.
Mostly use telephone/Almost never use fax <Manual>Connect your telephone or handset to the machine. This setting is for when youmostly want to use the telephone. You can receive incoming faxes manually.
Use both fax and telephone Use answering machine <Answering Machine>Connect your answering machine. Callers canrecord a message if they call while you are awayfrom the telephone. The machine automaticallyreceives incoming faxes.
Use standard telephone oroptional handset
<Fax/Tel (Auto Switch)>Connect your telephone or handset. The machineautomatically receives incoming faxes, and thetelephone rings for incoming calls.
● Depending on the type of telephone connected to it, the machine may not be able to send or receive faxesproperly.
● You may be able to manually set a receive mode other than those described above, depending on yourcountry or region.
Receiving Faxes(P. 226)
» Continue to Registering the Fax Number and Unit Name(P. 81)
LINKS
Receiving Faxes(P. 226)
Setting Up
80

Registering the Fax Number and Unit Name16SE-01L
Register the fax number and unit name of your machine. This information is printed at the top of each page sent fromthe machine.
1 Select <Menu> in the Home screen. Home Screen(P. 123)
2 Select <Function Settings> <Common> <Fax Setup Guide>.
3 Select <Set Up Now>.
4 Select <Next>.
5 Enter the fax number, and select <Apply>.
6 Select <Next>.
7 Enter the unit name (such as a user name or company name), and select <Apply>.
● On how to enter text, see Entering Text(P. 132) .
➠When the unit name has been registered, the RX mode setting screen is displayed.
» Continue to Selecting the Receive Mode(P. 82)
LINKS
Receiving Faxes(P. 226)
Setting Up
81

Selecting the Receive Mode16SE-01R
Select the receive mode that suits your intended use beforehand ( Deciding Which Fax Receive Mode toUse(P. 80) ).
1 Select <Next>.
2 Select the receive mode.
● Select <Yes> or <No> to select the receive mode for the operations you intend to carry out.
● You may be able to manually set a receive mode other than those described below, depending on yourcountry or region. Receiving Faxes(P. 226)
To set the receive mode to <Auto>Select <No>.
To set the receive mode to <Answering Machine>Select <Yes> <Yes>.
To set the receive mode to <Fax/Tel (Auto Switch)>Select <Yes> <No> <Yes>.
To set the receive mode to <Manual>Select <Yes> <No> <No>.
3 Select <Apply>.
➠When the RX mode has been set, the telephone line connection method is displayed.
» Continue to Connecting the Telephone Line(P. 83)
LINKS
Receiving Faxes(P. 226)
Setting Up
82

Connecting the Telephone Line16SE-01S
Connect the telephone line to the machine.
1 Connect the telephone line to the machine.
● Connect the included telephone cable to the telephone line jack on the machine ( ) and the telephone line
jack on the wall.
● If you are using a telephone or answering machine, connect it to the external telephone jack ( ).
● If you are using an optional handset, connect it to the handset jack ( ).
● If you are connecting an external telephone with fax functions, set up the telephone to receive faxesmanually.
2 Select <End> after the telephone line has been connected.
3 Select <Yes>.
If the machine does not automatically set the type of telephone lineFollow the procedure below to set the type of telephone line. If you are not sure of the type of phone line youare using, contact your local telephone company. <Select Line Type> may not be available depending on thecountry where you are using the machine.
<Menu> <Function Settings> <Send> <Fax Settings> <Set Line> <Select Line Type> Select the type of telephone line
LINKS
Basic Operations for Sending Faxes(P. 217)Receiving Faxes(P. 226)
Setting Up
83

Configuring Scan Settings16SE-01U
To send scanned originals directly by e-mail or I-Fax or save them to shared folders or FTP server, you need toconfigure the network. The Send Function Setting Tool, an application that is included with the machine, will assist youwith the required setup. Set the necessary configuration depending on your purpose and network environment.
Saving to a Computer
Preparing to Use the Machine as a Scanner(P. 85)
Scanning to E-mail or I-Fax
Procedure for Setting to Send E-Mail/Send and Receive I-Fax(P. 86)
Scanning to Shared Folders
Procedure for Setting a Shared Folder as a Save Location(P. 94)
Saving to FTP Server
Procedure for Setting a FTP Server as a Save Location(P. 98)
LINKS
System Environment(P. 717)Scan Function(P. 711)
Setting Up
84

Preparing to Use the Machine as a Scanner16SE-01W
To use this machine as a scanner, you must complete preparations in advance, including installation of software to acomputer. For more information, see the manuals for the relevant drivers on the online manual website. In Windows,when connecting this machine to a computer via a wireless or wired LAN, you need to register this machine in "MFNetwork Scanner Selector" using the following procedure. This procedure is not required if the machine and yourcomputer are connected via USB.
● The scan function is not available if the machine and your computer are connected in an IPv6 environment.Use IPv4 or a USB connection.
1 Click in the system tray.
2 Select the check box for the machine, and click [OK].
Setting Up
85

Procedure for Setting to Send E-Mail/Send and ReceiveI-Fax
16SE-01X
Before configuring the machine for scanning to e-mail, check the setup flow shown below.
Make sure that the machine and the computer are correctly connected.Connecting to a Wireless LAN(P. 18)Connecting to a Wired LAN(P. 17)
Make sure that you have the following information:
● The IP address of the machine. Viewing Network Settings(P. 38)
● An e-mail address to be registered as a destination.
● Information about the e-mail server, including the SMTP server name, portnumbers, whether authentication is required, and the user name and passwordfor authentication.
● For more information about the e-mail server settings, contact your Internetservice provider or Network Administrator.
Make sure that the computer meets the system requirements for the SendFunction Setting Tool (sending e-mail).
● System requirements for the Send Function Setting Tool SystemEnvironment(P. 717)
● Also make sure that <Use HTTP> and <Use Remote UI> are set to <On>.Disabling HTTP Communication(P. 413)Disabling Remote UI(P. 414)
Set the machine configuration.
● Configuring Basic E-Mail Settings Configuring Basic E-Mail Settings(P. 87)
● Configuring I-Fax Receiving Settings Configuring E-Mail/I-FaxCommunication Settings(P. 90)
● Configuring Detailed E-Mail/I-Fax Communication Settings (Authentication,Encryption, etc.) Configuring E-Mail/I-Fax Communication Settings(P. 90)
Setting Up
86

Configuring Basic E-Mail Settings16SE-01Y
This section describes how to configure the e-mail settings by using the Send Function Setting Tool. With the SendFunction Setting Tool, you can also register e-mail addresses to the Address Book.
● The Send Function Setting Tool helps you configure the basic settings for sending e-mails. Instead of theSend Function Setting Tool, you can use the Remote UI to configure more detailed settings such as thesettings for POP authentication before sending or for encrypted communication. Configuring E-Mail/I-Fax Communication Settings(P. 90)
1 Start the Send Function Setting Tool.
Using a Web browserEnter "http://<the IP address of the machine>/sendsupport_login.html" in the address field of a Web browser,and press the [ENTER] key.
Using the DVD-ROM
1 Insert the provided DVD-ROM into the drive on the computer.
● Select a language and click [OK] if you are prompted to do so.
2 Click [Start Software Programs].
● If the [Software Programs/Manuals Setup] screen is not displayed, see Displaying the [SoftwarePrograms/Manuals Setup] Screen(P. 732) .
● If [AutoPlay] is displayed, click [Run MInst.exe].
3 Click [Start] for [Send Function Setting Tool].
4 Click [Next].
● If you want to view "Send Setting Guide," click [How to Set].
● If the screen that cancels the Windows firewall is displayed, click [Yes].
5 Select the machine from [Device List] and click [Next].
Setting Up
87

If the machine is not displayed in [Device List]
● Click [Search Again]. If the problem persists, click [Search by IP Address], enter the IP address of themachine, and then click [OK].
6 Confirm the settings and click [OK].
2 Click [Start].
● If the login screen is displayed, enter the appropriate ID and PIN in the corresponding text boxes, and thenclick [Logon].
3 Click [Send to E-mail Settings].
● If the screen prompting you to enter the Address Book PIN is displayed, enter the PIN for the Address Book,and click [OK]. Restricting Use of the Address Book(P. 404)
4 Specify the required settings.
[Registration]
[Favorites Number]
Setting Up
88
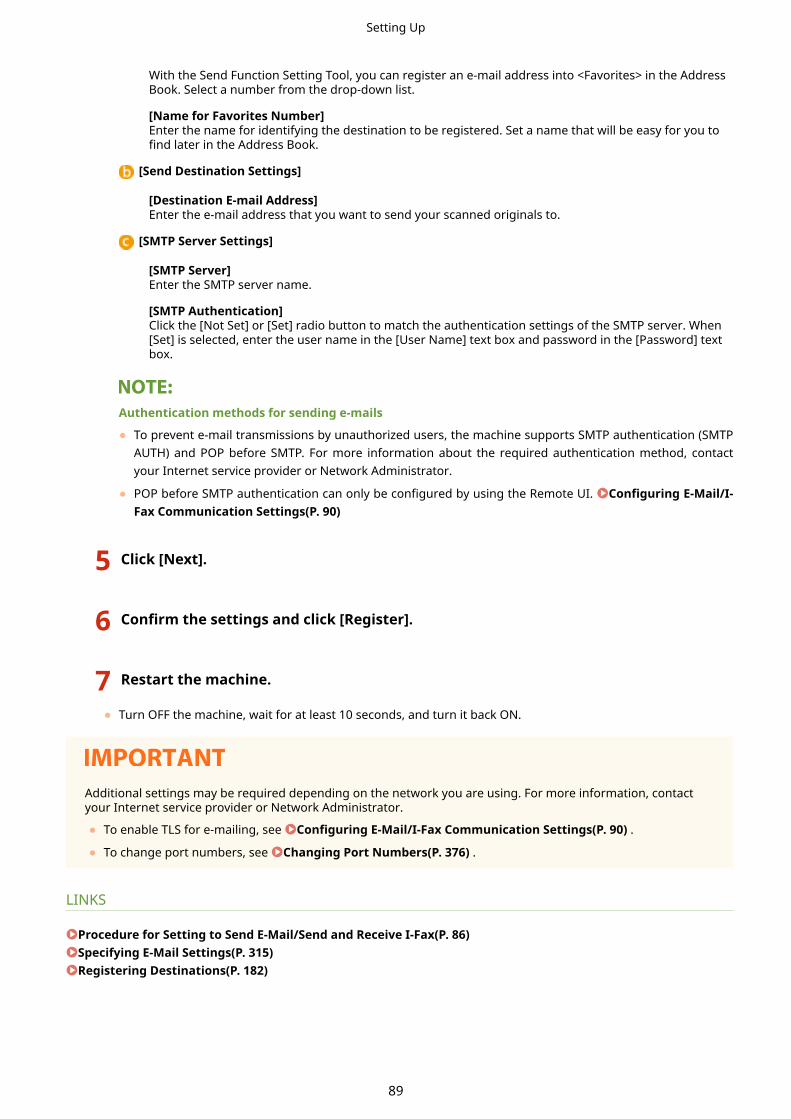
With the Send Function Setting Tool, you can register an e-mail address into <Favorites> in the AddressBook. Select a number from the drop-down list.
[Name for Favorites Number]Enter the name for identifying the destination to be registered. Set a name that will be easy for you tofind later in the Address Book.
[Send Destination Settings]
[Destination E-mail Address]Enter the e-mail address that you want to send your scanned originals to.
[SMTP Server Settings]
[SMTP Server]Enter the SMTP server name.
[SMTP Authentication]Click the [Not Set] or [Set] radio button to match the authentication settings of the SMTP server. When[Set] is selected, enter the user name in the [User Name] text box and password in the [Password] textbox.
Authentication methods for sending e-mails
● To prevent e-mail transmissions by unauthorized users, the machine supports SMTP authentication (SMTPAUTH) and POP before SMTP. For more information about the required authentication method, contactyour Internet service provider or Network Administrator.
● POP before SMTP authentication can only be configured by using the Remote UI. Configuring E-Mail/I-Fax Communication Settings(P. 90)
5 Click [Next].
6 Confirm the settings and click [Register].
7 Restart the machine.
● Turn OFF the machine, wait for at least 10 seconds, and turn it back ON.
Additional settings may be required depending on the network you are using. For more information, contactyour Internet service provider or Network Administrator.
● To enable TLS for e-mailing, see Configuring E-Mail/I-Fax Communication Settings(P. 90) .
● To change port numbers, see Changing Port Numbers(P. 376) .
LINKS
Procedure for Setting to Send E-Mail/Send and Receive I-Fax(P. 86)Specifying E-Mail Settings(P. 315)Registering Destinations(P. 182)
Setting Up
89

Configuring E-Mail/I-Fax Communication Settings16SE-020
Use the Remote UI to configure the detailed send and receive settings, such as the settings for using the machine tosend and receive I-Faxes and the settings for POP authentication and encryption of communication before you send e-mail or I-Faxes. Contact your provider or network administrator for the required settings.
● For more information about the basic operations to be performed when setting the machine from theRemote UI, see Setting Up Menu Options from Remote UI(P. 426) .
1 Start the Remote UI and log in to System Manager Mode. Starting RemoteUI(P. 418)
2 Click [Settings/Registration] on the Portal page. Remote UI Screen(P. 419)
3 Select [TX Settings] [Network Settings - E-Mail/I-Fax Settings].
4 Click [Edit].
5 Specify the required settings.
[SMTP Server]Enter alphanumeric characters as the SMTP server name (or IP address) for sending e-mail and I-Faxes.
[E-Mail Address]Enter alphanumeric characters for the e-mail address that you want to use for the machine.
[POP Server]Enter alphanumeric characters as the SMTP server name or IP address for sending e-mail and I-Faxes.
[User Name]Enter alphanumeric characters as the user name for the specified e-mail account when a POP3 server is used.
[Set/Change Password]To set or change the password when a POP3 server is used, select the check box and enter alphanumericcharacters in [Password].
Setting Up
90

Specify the settings required for I-Fax reception
[POP RX]Select the check box to receive I-Faxes.
[POP Interval]This sets the interval (in minutes) used for automatically connecting to the POP3 server. If there are any I-Faxdocuments on the server, they are automatically received and printed.
To disable automatic reception
● Set [POP Interval] to [0]. When [0] is set, you receive I-Faxes manually. Receiving I-FaxesManually(P. 254)
Configuring Pop Authentication before SendingPOP before SMTP authentication prevents unauthorized users from using e-mail and I-Faxes by performinguser authentication on the POP3 server.
[Use POP Authentication Before Sending]To use the POP3 server for authentication before you send e-mail or I-Faxes, select the check box.
[Use APOP Authentication]Select the check box to use APOP to encrypt the password during the authentication process.
Configuring SMTP authenticationIf you configure SMTP authentication (SMTP AUTH), user identification by user name and password isperformed at the time of sending e-mail or I-Fax.
Setting Up
91
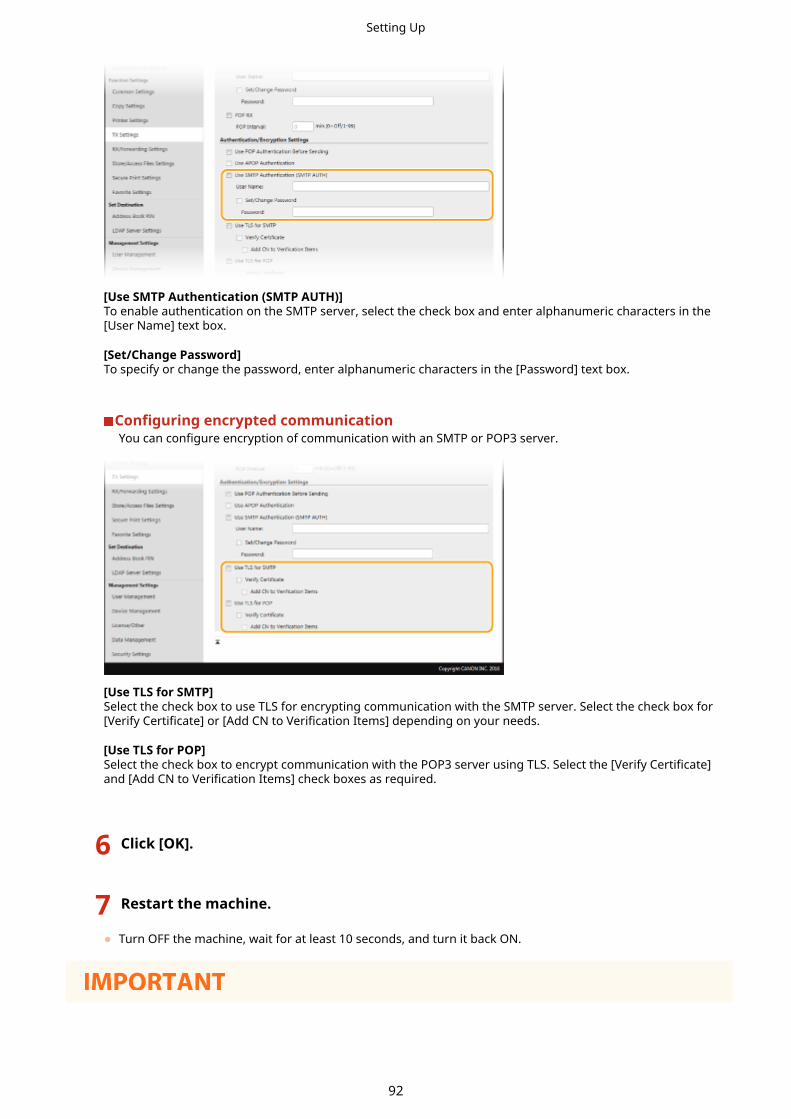
[Use SMTP Authentication (SMTP AUTH)]To enable authentication on the SMTP server, select the check box and enter alphanumeric characters in the[User Name] text box.
[Set/Change Password]To specify or change the password, enter alphanumeric characters in the [Password] text box.
Configuring encrypted communicationYou can configure encryption of communication with an SMTP or POP3 server.
[Use TLS for SMTP]Select the check box to use TLS for encrypting communication with the SMTP server. Select the check box for[Verify Certificate] or [Add CN to Verification Items] depending on your needs.
[Use TLS for POP]Select the check box to encrypt communication with the POP3 server using TLS. Select the [Verify Certificate]and [Add CN to Verification Items] check boxes as required.
6 Click [OK].
7 Restart the machine.
● Turn OFF the machine, wait for at least 10 seconds, and turn it back ON.
Setting Up
92

● Depending on the network you are using, you may need to change the SMTP or POP3 port setting ( Changing Port Numbers(P. 376) ). For more information, contact your Internet service provider or NetworkAdministrator.
LINKS
Procedure for Setting to Send E-Mail/Send and Receive I-Fax(P. 86)Configuring Basic E-Mail Settings(P. 87)Basic Operations for Scanning Originals(P. 283)Using Internet Fax (I-Fax)(P. 246)
Setting Up
93

Procedure for Setting a Shared Folder as a SaveLocation
16SE-021
Before configuring the machine for scanning to shared folders, check the setup flow shown below.
Make sure that the machine and the computer are correctly connected.Connecting to a Wireless LAN(P. 18)Connecting to a Wired LAN(P. 17)
Make sure that you have the following information:
● The IP address of the machine. Viewing Network Settings(P. 38)
● The name of the computer where the shared folder is located. Checking theComputer Name(P. 735)
● Path to and the name of the shared folder (If access restrictions are set to thefolder, the user name and password information is also needed).
● For instructions on how to create a new shared folder, see "Send Setting Guide"(included with the provided DVD-ROM).
Make sure that the computer meets the system requirements for the SendFunction Setting Tool.
● System requirements for the Send Function Setting Tool SystemEnvironment(P. 717)
● Also make sure that <Use HTTP> and <Use Remote UI> are set to <On>.Disabling HTTP Communication(P. 413)Disabling Remote UI(P. 414)
Set the machine configuration. Setting a Shared Folder as a SaveLocation(P. 95)
Setting Up
94

Setting a Shared Folder as a Save Location16SE-022
The feature of scanning to shared folders is also called "Scan to SMB" because the feature uses Server Message Block(SMB), a Windows-specific technology. SMB is a protocol for sharing resources, such as files and printers, with morethan one device in a network ( Configuring SMB(P. 60) ). To configure the machine for saving your scanneddocuments into a shared folder in the network via SMB, specify the location of the shared folder from a computer inadvance. This section describes how to specify the save location by using the Send Function Setting Tool.
● You can also use the Remote UI to specify the location of the shared folder as save destination by registeringthe folder to the Address Book. Registering Destinations in the Address Book from Remote UI. Registering Destinations from Remote UI(P. 429)
1 Start the Send Function Setting Tool.
Using a Web browserEnter "http://<the IP address of the machine>/sendsupport_login.html" in the address field of a Web browser,and press the [ENTER] key.
Using the DVD-ROM
1 Insert the provided DVD-ROM into the drive on the computer.
● Select a language and click [OK] if you are prompted to do so.
2 Click [Start Software Programs].
● If the [Software Programs/Manuals Setup] screen is not displayed, see Displaying the [SoftwarePrograms/Manuals Setup] Screen(P. 732) .
● If [AutoPlay] is displayed, click [Run MInst.exe].
3 Click [Start] for [Send Function Setting Tool].
4 Click [Next].
● If you want to view "Send Setting Guide," click [How to Set].
● If the screen that cancels the Windows firewall is displayed, click [Yes].
5 Select the machine from [Device List] and click [Next].
Setting Up
95

If the machine is not displayed in [Device List]
● Click [Search Again]. If the problem persists, click [Search by IP Address], enter the IP address of themachine, and then click [OK].
6 Confirm the settings and click [OK].
2 Click [Start].
● If the login screen is displayed, enter the appropriate ID and PIN in the corresponding text boxes, and thenclick [Logon].
3 Click [Store to Shared Folder Settings].
● If the screen prompting you to enter the Address Book PIN is displayed, enter the PIN for the Address Book,and click [OK]. Restricting Use of the Address Book(P. 404)
4 Specify the required settings.
[Registration]
Setting Up
96

[Favorites Number]With the Send Function Setting Tool, you can register a shared folder for saving scanned documentsinto <Favorites> in the Address Book. Select a number from the drop-down list.
[Name for Favorites Number]Enter the name for identifying the destination to be registered. Set a name that will be easy for you tofind later in the Address Book.
[Store Destination Settings]
[Protocol]The protocol that is used for sending scanned documents to a shared folder is displayed.
[Computer Name of Store Destination]Enter the name or the IP address of the computer where the shared folder is located.
[Shared Folder Name on Store Destination Computer]Enter the name of (or path to) the shared folder. For example, if the shared folder is a subfolder named"share" and is contained in the [Public] folder in drive C (path: C:\users\public\share), enter"users\public\share."
[Status of Settings for Shared Folder]
[Access Restriction to Shared Folder]Click the [Not Set] or [Set] radio button to match the access restrictions set to the shared folder. When[Set] is selected, enter the user name in the [Registered User Name] text box and password in the[Password to Access] text box.
5 Click [Next].
6 Confirm the settings and click [Register].
7 Restart the machine.
● Turn OFF the machine, wait for at least 10 seconds, and turn it back ON.
LINKS
Procedure for Setting a Shared Folder as a Save Location(P. 94)Basic Operations for Scanning Originals(P. 283)
Setting Up
97
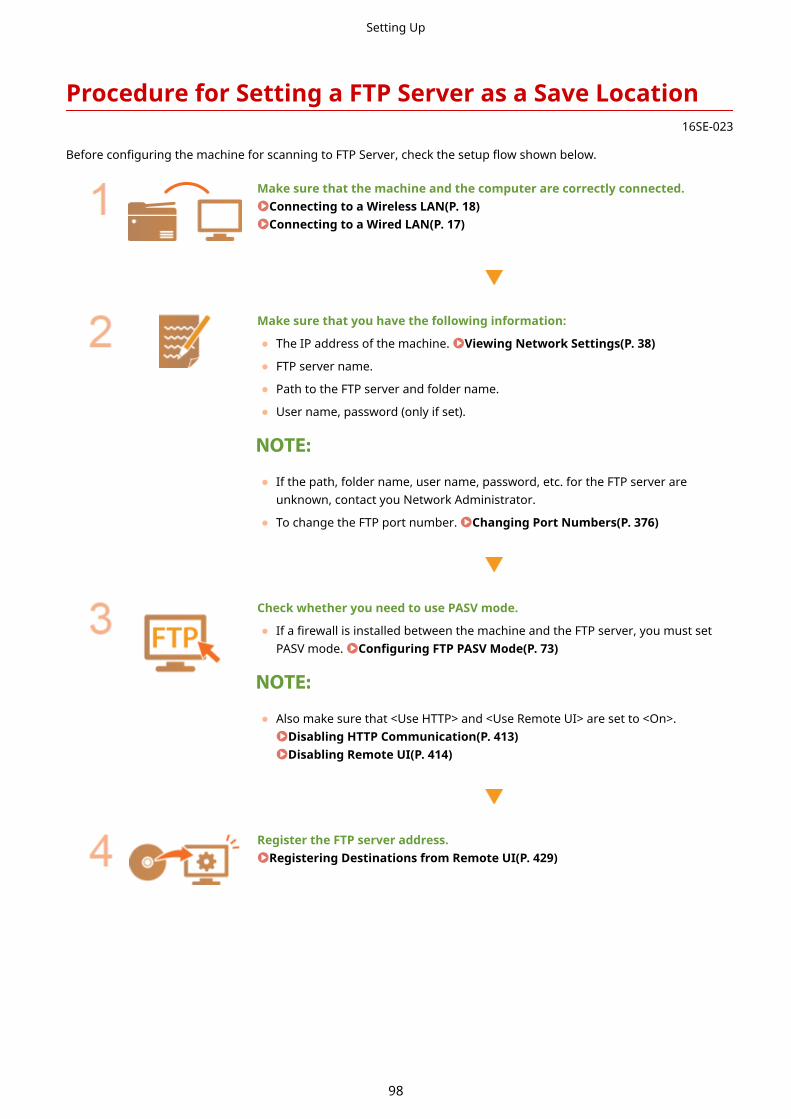
Procedure for Setting a FTP Server as a Save Location16SE-023
Before configuring the machine for scanning to FTP Server, check the setup flow shown below.
Make sure that the machine and the computer are correctly connected.Connecting to a Wireless LAN(P. 18)Connecting to a Wired LAN(P. 17)
Make sure that you have the following information:
● The IP address of the machine. Viewing Network Settings(P. 38)
● FTP server name.
● Path to the FTP server and folder name.
● User name, password (only if set).
● If the path, folder name, user name, password, etc. for the FTP server areunknown, contact you Network Administrator.
● To change the FTP port number. Changing Port Numbers(P. 376)
Check whether you need to use PASV mode.
● If a firewall is installed between the machine and the FTP server, you must setPASV mode. Configuring FTP PASV Mode(P. 73)
● Also make sure that <Use HTTP> and <Use Remote UI> are set to <On>.Disabling HTTP Communication(P. 413)Disabling Remote UI(P. 414)
Register the FTP server address.Registering Destinations from Remote UI(P. 429)
Setting Up
98

Basic OperationsBasic Operations ............................................................................................................................................ 101
Parts and Their Functions ................................................................................................................................. 104
Front Side ..................................................................................................................................................... 105Insert a USB Memory Device .................................................................................................................. 107
Back Side ...................................................................................................................................................... 109
Interior ......................................................................................................................................................... 110
Feeder .......................................................................................................................................................... 111
Multi-Purpose Tray ....................................................................................................................................... 112
Paper Drawer ............................................................................................................................................... 113
Operation Panel ........................................................................................................................................... 115
Turning ON the Machine ................................................................................................................................... 117
Turning OFF the Machine ............................................................................................................................. 118Powering OFF at a Fixed Time ................................................................................................................ 119
Using the Operation Panel ............................................................................................................................... 121
Basic Screens ................................................................................................................................................ 122Home Screen ......................................................................................................................................... 123<Status Monitor> Screen ........................................................................................................................ 126Message Display .................................................................................................................................... 128
Basic Operation ............................................................................................................................................ 129
Entering Text ................................................................................................................................................ 132
Logging in to the Machine ................................................................................................................................ 134
Placing Originals ............................................................................................................................................... 136
Loading Paper .................................................................................................................................................... 140
Loading Paper in the Paper Drawer .............................................................................................................. 142
Loading Paper in the Multi-Purpose Tray ...................................................................................................... 149
Loading Envelopes ....................................................................................................................................... 154
Loading Preprinted Paper ............................................................................................................................ 157
Specifying Paper Size and Type .................................................................................................................... 159Specifying Paper Size and Type in the Paper Drawer ............................................................................. 160Specifying Paper Size and Type in the Multi-Purpose Tray ..................................................................... 162Registering Default Paper Settings for the Multi-Purpose Tray .............................................................. 164Registering a Custom Paper Size ........................................................................................................... 166Limiting the Paper Sizes Displayed ........................................................................................................ 168Automatically Selecting an Appropriate Paper Source for Each Function ............................................... 169
Customizing the Display ................................................................................................................................... 170
Basic Operations
99

Customizing the Home Screen ..................................................................................................................... 171
Registering Frequently Used Settings ........................................................................................................... 174
Changing the Default Settings for Functions .................................................................................................. 176
Setting Sounds ................................................................................................................................................... 178
Entering Sleep Mode ......................................................................................................................................... 180
Registering Destinations .................................................................................................................................. 182
Registering Destinations in the Address Book .............................................................................................. 184Registering Multiple Destinations as a Group ........................................................................................ 187Editing the Registered Destinations in the Address Book ...................................................................... 189
Basic Operations
100
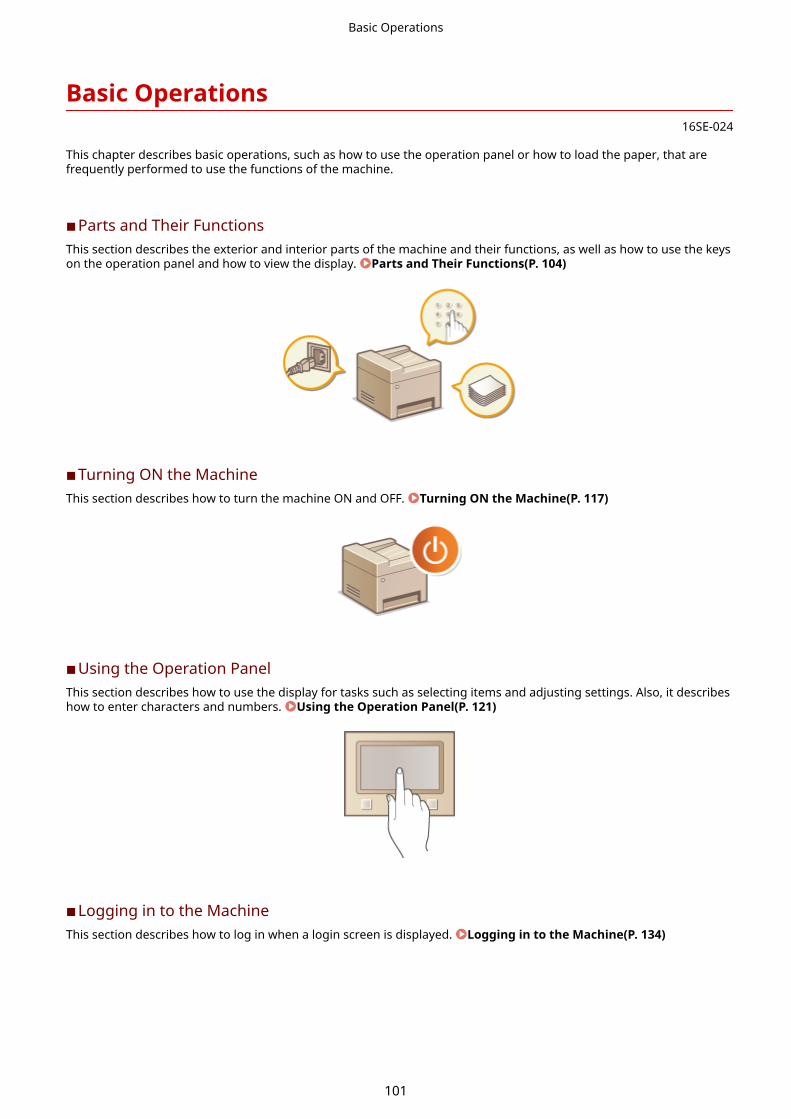
Basic Operations16SE-024
This chapter describes basic operations, such as how to use the operation panel or how to load the paper, that arefrequently performed to use the functions of the machine.
◼Parts and Their FunctionsThis section describes the exterior and interior parts of the machine and their functions, as well as how to use the keyson the operation panel and how to view the display. Parts and Their Functions(P. 104)
◼Turning ON the MachineThis section describes how to turn the machine ON and OFF. Turning ON the Machine(P. 117)
◼Using the Operation PanelThis section describes how to use the display for tasks such as selecting items and adjusting settings. Also, it describeshow to enter characters and numbers. Using the Operation Panel(P. 121)
◼Logging in to the MachineThis section describes how to log in when a login screen is displayed. Logging in to the Machine(P. 134)
Basic Operations
101

◼Placing OriginalsThis section describes how to place originals on the platen glass and in the feeder. Placing Originals(P. 136)
◼Loading PaperThis section describes how to load the paper into the paper drawer and multi-purpose tray. Loading Paper(P. 140)
◼Customizing the DisplayThis section describes how to rearrange buttons or create shortcut buttons in order to make it easier to use the screenshown in the display. Customizing the Display(P. 170)
◼Changing the Default Settings for FunctionsThis section describes how to change the setting that is displayed initially when a function is selected. Changing theDefault Settings for Functions(P. 176)
Basic Operations
102
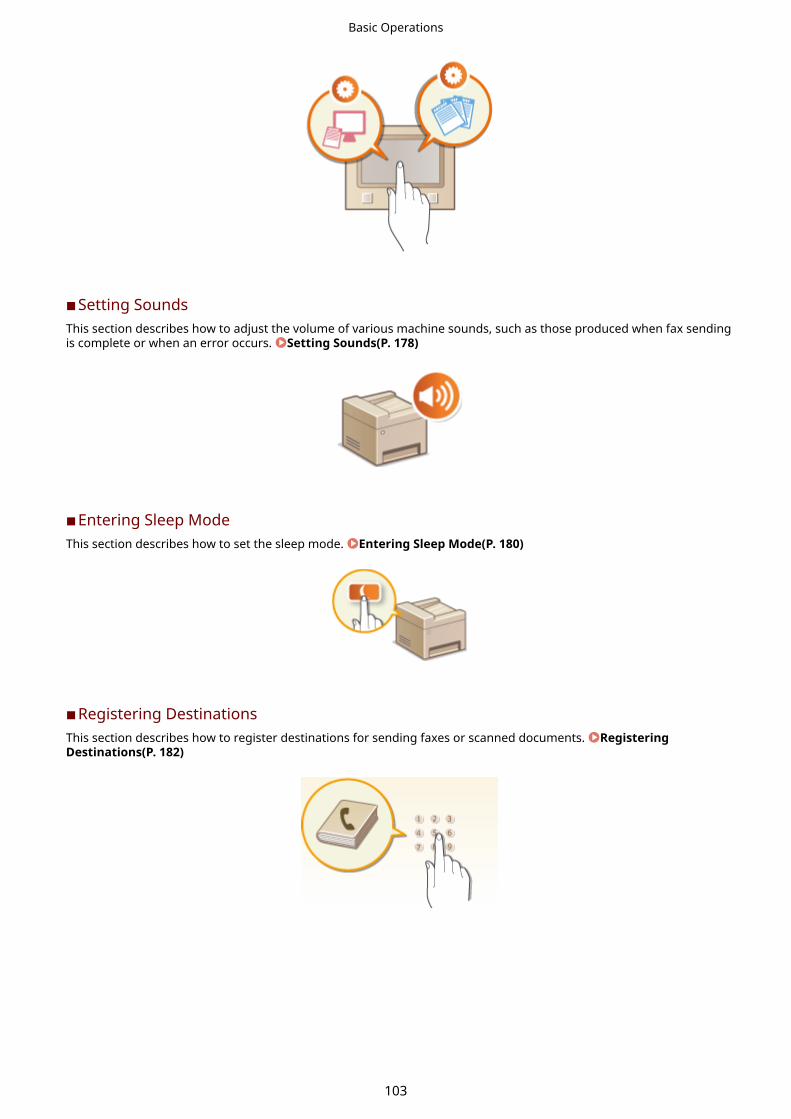
◼Setting SoundsThis section describes how to adjust the volume of various machine sounds, such as those produced when fax sendingis complete or when an error occurs. Setting Sounds(P. 178)
◼Entering Sleep ModeThis section describes how to set the sleep mode. Entering Sleep Mode(P. 180)
◼Registering DestinationsThis section describes how to register destinations for sending faxes or scanned documents. RegisteringDestinations(P. 182)
Basic Operations
103

Parts and Their Functions16SE-025
This section describes the parts of the machine (exterior, front and back side, and interior) and how they function. Inaddition to describing the parts of the machine used for such basic operations as loading paper and replacing thetoner cartridges, this section also describes the keys on the operation panel and display. Read this section for tips onhow to use the machine properly.
Front Side(P. 105)Back Side(P. 109)Interior(P. 110)Feeder(P. 111)Multi-Purpose Tray(P. 112)Paper Drawer(P. 113)Operation Panel(P. 115)
Basic Operations
104

Front Side16SE-026
Feeder / Platen glass coverThe feeder automatically feeds originals into the machine for scanning. When two or more sheets are loadedin the feeder, originals can be scanned continuously. The platen glass cover secures the originals placed onthe platen glass. Feeder(P. 111)
USB port (for USB device connection)Use this port to connect a third-party USB memory device or USB keyboard. Connecting a USB memorydevice allows you to print data from the memory device or store scanned originals on the memory device.
Insert a USB Memory Device(P. 107)Printing from a USB Memory Device (Memory Media Print)(P. 269)Sending Data by E-Mail/Saving Data to a Shared Folder or FTP Server(P. 290)
Paper stopperOpen the paper stopper when you want to prevent paper from falling out of the output tray.
SpeakerEmits sounds produced by the machine, such as fax tones and warning tones.
Basic Operations
105
Lift handlesHold the lift handles when carrying the machine. Relocating the Machine(P. 595)
Operation panelThe operation panel consists of keys such as Home key, Stop key, a display, and status indicators. You canperform all the operations and specify settings from the operation panel.
Operation Panel(P. 115)Basic Screens(P. 122)
Output trayPrinted paper is output to the output tray.
Power switchTurns the power ON or OFF. To restart the machine, turn OFF the machine, wait for at least 10 seconds, andturn it back ON.
Front coverOpen the front cover when replacing toner cartridges.
Procedure for Replacing the Toner Cartridge(P. 590)
Paper drawerLoad the type of paper you frequently use into the paper drawer. Loading Paper in the PaperDrawer(P. 142)
Multi-purpose tray/Manual feed slotLoad the paper into the multi-purpose tray when you want to temporarily use a type of paper different fromthat which is loaded in the paper drawer. Loading Paper in the Multi-Purpose Tray(P. 149)
● In the User's Guide, "manual feed slot," if it does not need to be distinguished from "multi-purpose tray," iscollectively referred to as "multi-purpose tray."
Platen GlassWhen scanning books, thick originals, thin originals, and other originals that cannot be scanned using thefeeder, place them on the platen glass. Placing Originals(P. 136)
Ventilation slotsAir from inside the machine is vented out to cool down the inside of the machine. Note that placing objects infront of the ventilation slots prevents ventilation.
Basic Operations
106

Insert a USB Memory Device16SE-027
Insert a USB memory into the USB port on the front side of the machine. You can directly print data from a USBmemory or directly save scanned originals on a USB memory.
Before using a USB memory device● The supported formats of USB memory device are FAT16 and FAT32.
● It is necessary to set <Use Scan Function> and <Use Print Function> to <On>. <Memory MediaSettings>(P. 562)
The following devices and uses are not supported:● USB memory devices that have security functions installed
● USB memory devices that do not meet the USB standards
● Memory card readers connected via a USB
● USB memory devices that are used with extension cables
● USB memory devices used via a USB hub
Handling of USB memory devices● Make sure that the USB memory device is correctly oriented before inserting it. If you attempt to insert it in
incorrect orientation, the memory device and the machine may be damaged.
● Do not remove, bump or otherwise move the USB memory device while data is being imported or exported.Also, do not turn OFF the machine while processing is in progress.
● You may not be able to save data properly on some USB memory devices.
◼Remove the USB Memory Device
● Always use the following procedure when removing USB memory devices. Using other methods to removeUSB memory devices may result in damage to the device and the machine.
1 Select <Status Monitor>.
2 Select <Rmv. Mem. Media>.
➠Wait until the <The memory media can be safely removed.> message is displayed.
3 Disconnect the USB memory device.
Basic Operations
107

LINKS
Printing from a USB Memory Device (Memory Media Print)(P. 269)Saving Data to a USB Memory Device(P. 286)
Basic Operations
108

Back Side16SE-028
Rear coverOpen the rear cover when clearing paper jams. Clearing Paper Jams(P. 672)
Rating labelThe label shows the serial number, which is needed when making inquiries about the machine. When aProblem Cannot Be Solved(P. 684)
Power socketConnect the power cord.
USB port (for USB device connection)Use this port to connect devices such as a third-party USB keyboard.
USB port (for computer connection)Connect a USB cable when connecting the machine and a computer.
LAN portConnect a LAN cable when connecting the machine to a wired LAN router, etc. Connecting to a WiredLAN(P. 17)
Handset jackConnect the optional handset.
External telephone jackConnect your telephone or answering machine. Connecting the Telephone Line(P. 83)
Telephone line jackConnect a telephone cable when connecting the machine to a telephone line. Connecting the TelephoneLine(P. 83)
Basic Operations
109

Interior16SE-029
Toner cartridge trayInstall the toner cartridges. Load the Y (yellow), M (magenta), C (cyan), and K (black) toner cartridges in theslots from the rear to the front respectively. Procedure for Replacing the Toner Cartridge(P. 590)
LINKS
Replacing the Toner Cartridge(P. 589)
Basic Operations
110

Feeder16SE-02A
Feeder coverOpen when clearing paper jams. Paper Jams in the Feeder(P. 674)
Slide guidesAdjust this guide to match the width of original.
Original supply trayAutomatically feeds originals into the machine for scanning. When two or more sheets are loaded in thefeeder, originals can be scanned continuously. Placing Originals(P. 136)
Original output trayScanned originals are output here.
Document feed scanning areaOriginals loaded in the feeder are automatically fed to the scanning area to be scanned.
● Do not place any objects in the original output area. Doing so may cause damage to the originals.
● Regularly clean the feeder and platen glass in order to obtain proper print results. RegularCleaning(P. 581)
Basic Operations
111

Multi-Purpose Tray16SE-02C
MF735Cx / MF734Cdw / MF732Cdw MF635Cx / MF633Cdw / MF631Cn
Paper guidesAdjust the paper guides to exactly the width of the loaded paper to ensure that paper is fed straight into themachine.
For MF735Cx / MF734Cdw / MF732Cdw
● Press the lock release levers that are marked with arrows in the illustrations to release the locks and slidethe paper guides.
Paper trayPull out the paper tray when loading paper.
LINKS
Loading Paper in the Multi-Purpose Tray(P. 149)
Basic Operations
112

Paper Drawer16SE-02E
MF735Cx / MF734Cdw / MF732Cdw
MF635Cx / MF633Cdw / MF631Cn
Paper guidesAdjust the paper guides to exactly the size of the loaded paper to ensure that paper is fed straight into themachine. Press the lock release levers that are marked with arrows in the illustrations to release the locksand slide the paper guides.
Lock release lever (for extending the paper drawer)When loading Legal size paper, the paper drawer needs to be extended. Press this lever to release the lockand extend the length of the paper drawer.
When Legal size paper is loaded● The front side of the paper drawer is not flush with the machine when the extended paper drawer is
inserted.
Basic Operations
113

LINKS
Loading Paper in the Paper Drawer(P. 142)
Basic Operations
114

Operation Panel16SE-02F
● The angle of the operation panel can be adjusted. Adjust it to an angle that is most comfortable forviewing the panel. Adjusting the Angle(P. 116)
DisplayYou can view the progress of the machine and error statuses. The display is also a touch panel, so you canspecify settings by touching the screen directly.
Basic Screens(P. 122)Basic Operation(P. 129)
Sound Volume keyPress to adjust volume. Setting Sounds(P. 178)
Energy Saver keyPress to put the machine into the sleep mode. The key lights up green when the machine is in the sleepmode. Press the key again to exit sleep mode. Entering Sleep Mode(P. 180)
Data indicatorBlinks while operations such as sending or printing are being performed. Lights up when there aredocuments waiting to be processed.
Error indicatorBlinks or lights up when an error such as a paper jam occurs.
Home keyPress to display the Home screen, which provides access to the setting menu and functions such as copy andscan.
Home Screen(P. 123)
Basic Operations
115

Customizing the Home Screen(P. 171)
Stop keyPress to cancel printing and other operations.
NFC (Near Field Communication) markYou can also use functions such as printing by waving a mobile device with Canon PRINT Business installedover this mark. Connecting with Mobile Devices(P. 324)
Adjusting the AngleWhen it is difficult to view the touch panel display, adjust the angle of the operation panel.
LINKS
Basic Operation(P. 129)
Basic Operations
116

Turning ON the Machine16SE-02H
This section describes how to turn ON the machine.
1 Make sure that the power plug is firmly inserted into a power outlet.
2 Press the power switch.
➠The Start screen appears. Operation Panel(P. 115)
● You can select the screen that is displayed first after the machine is turned ON. <Default Screen AfterStartup/Restoration>(P. 443)
LINKS
Turning OFF the Machine(P. 118)
Basic Operations
117

Turning OFF the Machine16SE-02J
This section describes how to turn OFF the machine.
1 Press the power switch.
● It may take some time for the machine to completely shut down. Do not unplug the power cord until thedisplay turns off.
● To restart the machine, wait for at least 10 seconds after the machine is turned OFF.
● You can specify the time for each day of the week and configure a setting to automatically turn OFF themachine. Powering OFF at a Fixed Time(P. 119)
Basic Operations
118

Powering OFF at a Fixed Time16SE-0EL
You can make a setting so that the power is automatically tuned OFF at a specified time on each day of the week. Thisallows you to avoid useless power consumption that may occur due to failure to turn OFF the power. By default, thisfunction is disabled.
● For information about the basic operation to set up the machine from Remote UI, see Setting Up MenuOptions from Remote UI(P. 426) .
1 Start the Remote UI and log in to System Manager Mode. Starting RemoteUI(P. 418)
2 Click [Settings/Registration] on the Portal page. Remote UI Screen(P. 419)
3 Select [Timer Settings] [Edit].
4 Select the check box for [Set Auto Shutdown Weekly Timer], and set the time to turnOFF the power.
[Set Auto Shutdown Weekly Timer]Selecting the check box allows you to set the time to turn OFF the power on each day of the week.
[Sunday] to [Saturday]
Basic Operations
119
Enter the desired time to turn OFF the power. For any day of the week, leaving the time field blank meansthat the auto shutdown function is disabled for that day.
5 Click [OK].
If the power is not turned OFF automatically at the specified time*
● When the Data indicator is lit up or blinking
● When the menu screen or Check Counter screen is displayed
● When settings data is being imported/exported
● When the firmware is being updated
*If the power cannot be turned OFF automatically at the specified time, a retry will be performed up to ten times at intervalsof one minute. If the power cannot be turned OFF even after ten retries, auto shutdown will be impossible for that day.
Basic Operations
120

Using the Operation Panel16SE-02K
You can use the display and keys of the operation panel to configure machine settings or operate functions. Thissection describes basic usage of the display and keys.
Basic Screens(P. 122)Basic Operation(P. 129)Entering Text(P. 132)
● If you want to invert the light and dark parts of the display: <Invert Screen Colors>(P. 468)
● If you want to adjust the brightness of the display: <Brightness>(P. 468)
LINKS
Operation Panel(P. 115)
Basic Operations
121
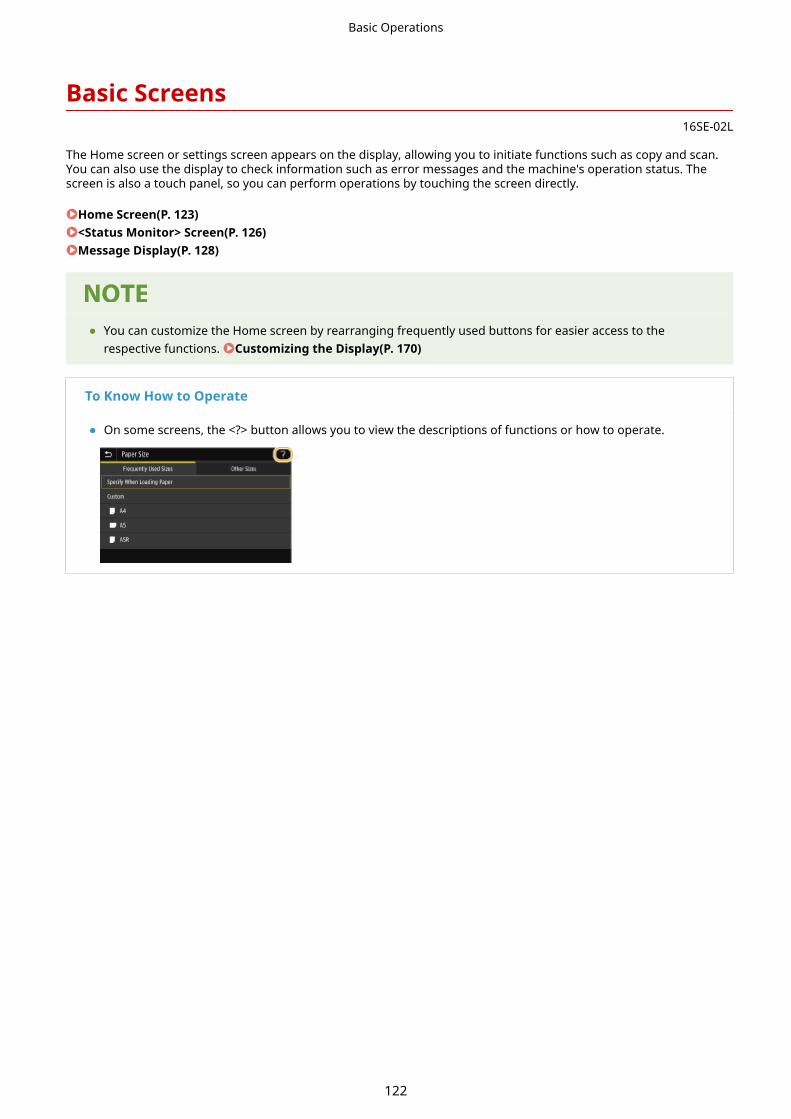
Basic Screens16SE-02L
The Home screen or settings screen appears on the display, allowing you to initiate functions such as copy and scan.You can also use the display to check information such as error messages and the machine's operation status. Thescreen is also a touch panel, so you can perform operations by touching the screen directly.
Home Screen(P. 123)<Status Monitor> Screen(P. 126)Message Display(P. 128)
● You can customize the Home screen by rearranging frequently used buttons for easier access to therespective functions. Customizing the Display(P. 170)
To Know How to Operate
● On some screens, the <?> button allows you to view the descriptions of functions or how to operate.
Basic Operations
122

Home Screen16SE-0E8
The Home screen is displayed when the power is turned ON or by pressing on the operation panel. Use this screento specify settings for and register functions.
Change page
Use this to view another page in the Home screen. You can alsoflick sideways to change pages.
<Check Counter>
Displays the totals for black and white and color printoutsseparately. Viewing the Counter Value(P. 608)
<Log Out>
Use this button to log out from the machine.
<Status Monitor>
Press to check the printing status, to view the usage history, orto view the network settings such as the IP address of themachine. You can also check the status of the machine, such asthe remaining amount of paper and the amount remaining inthe toner cartridges, or whether any errors occurred. <StatusMonitor> Screen(P. 126)
Wi-Fi icon
Displayed when the machine is connected to a wireless LAN.
<Copy>
Use this button to start copying. Copying(P. 191)
<Fax>
Use this button to send a fax from the machine. Faxing(P. 213)
<Scan>
Scans an original and converts it into an electronic file. You cansave scanned files on your computer or send them via e-mail. Scanning(P. 278)
<Memory Media Print>
Prints files stored in a USB memory device. Printing from aUSB Memory Device (Memory Media Print)(P. 269)
Basic Operations
123
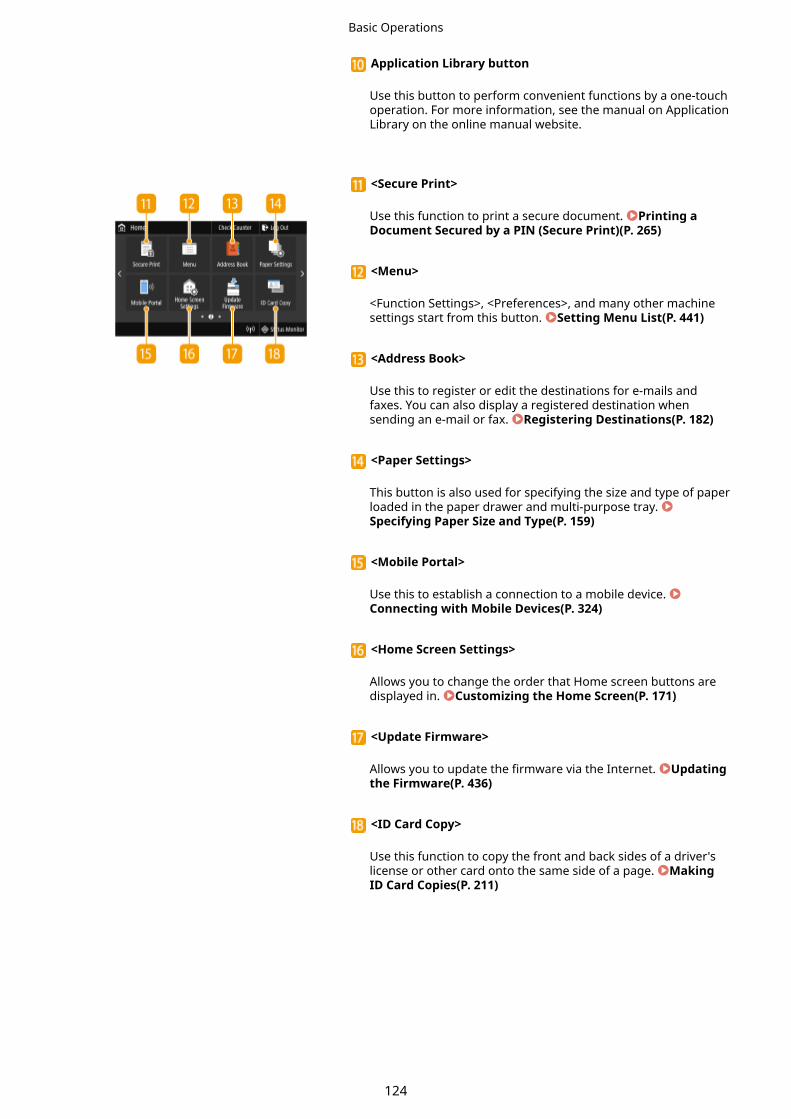
Application Library button
Use this button to perform convenient functions by a one-touchoperation. For more information, see the manual on ApplicationLibrary on the online manual website.
<Secure Print>
Use this function to print a secure document. Printing aDocument Secured by a PIN (Secure Print)(P. 265)
<Menu>
<Function Settings>, <Preferences>, and many other machinesettings start from this button. Setting Menu List(P. 441)
<Address Book>
Use this to register or edit the destinations for e-mails andfaxes. You can also display a registered destination whensending an e-mail or fax. Registering Destinations(P. 182)
<Paper Settings>
This button is also used for specifying the size and type of paperloaded in the paper drawer and multi-purpose tray. Specifying Paper Size and Type(P. 159)
<Mobile Portal>
Use this to establish a connection to a mobile device. Connecting with Mobile Devices(P. 324)
<Home Screen Settings>
Allows you to change the order that Home screen buttons aredisplayed in. Customizing the Home Screen(P. 171)
<Update Firmware>
Allows you to update the firmware via the Internet. Updatingthe Firmware(P. 436)
<ID Card Copy>
Use this function to copy the front and back sides of a driver'slicense or other card onto the same side of a page. MakingID Card Copies(P. 211)
Basic Operations
124

<Operation Guide>
Press to view operation guidance and error causes/solutions.
Shortcut buttons
Display "Favorite Settings" that are registered to Copy, Fax, andScan. Adding Buttons to the Home Screen(P. 171)
LINKS
Customizing the Home Screen(P. 171)
Basic Operations
125

<Status Monitor> Screen16SE-0E9
When you select <Status Monitor>, a screen appears in which you can check the progress of documents as well as thestatus of the machine (amount remaining in the toner cartridges, etc.) and network settings such as the machine's IPaddress.
<Error Information/Notification>Displays the details of any errors that occurred. Countermeasures for Each Message(P. 648)
<Device Information>Displays the status of the machine, such as the amount of paper or the amount remaining in the tonercartridges.
<Paper Information>Displays whether paper is loaded in each paper source.
<Cartridge Information>Displays the amount remaining in the toner cartridges. Other internal parts may reach the end of theirlifetime before the toner runs out.
<Check Counter>Displays the separate totals for black and white and color printouts. Viewing the Counter Value(P. 608)
<Secure Print Memory Usage>Displays the amount of memory currently used for storing secured document data. Printing aDocument Secured by a PIN (Secure Print)(P. 265)
<Version Information>Displays firmware version information.
<Serial Number>Displays the serial number.
Basic Operations
126

Status and logs of copied, printed, and sent/received documentsDisplays the current status of the selected item. The <Copy/Print Job> screen is shown below as an example.
<Network Information>Displays the network settings such as the IP address of the machine and status such as the condition ofwireless LAN communications. Viewing Network Settings(P. 38)
<Rmv. Mem. Media>Used to safely remove a USB memory device. This is only displayed when a USB memory device is connectedto the machine. Remove the USB Memory Device(P. 107)
Basic Operations
127

Message Display16SE-0EA
Messages are displayed on the screen in situations such as when paper runs out or when the expiration of the tonercartridge lifetime is reached. Countermeasures for Each Message(P. 648)
When an Error OccursIn some cases when an error occurs, instructions on how to respond to the error are displayed. Follow the on-screen instructions to solve the problem. The screen displayed when a paper jam occurs is shown below as anexample.
Basic Operations
128

Basic Operation16SE-02R
The display is a touch panel, allowing you to operate directly on the screen.
Avoid the following actions.● The display may misfunction or be damaged.
- Pressing forcefully
- Pressing with pointed objects (fingernails, ballpoint pen, pencil, etc.)
- Operating with wet/soiled hands
- Operating the display while an object is placed on it
● Before using the touch panel display, peel off the protective film from the display.
TapTouch the screen lightly and quickly. Use for selecting or finalizing items.
FlickFlick with the finger on the display. The effect of flicking varies depending on the screen. For instance, flicking inthe Home screen moves you one page in the direction of the flick.
◼Selecting ItemsTap an item name or button to make a selection.
Basic Operations
129

If an item is mistakenly touched● Slide your finger away then release it from the screen to cancel the selection.
To return to the previous screen● Tap to return to the previous screen.
◼Scrolling the ScreenThe scroll bar appears on the screen when there is still information that is undisplayed. If the scroll bar is displayed,flick the screen to scroll in the direction of the flick. Note that the scroll bar only appears while the screen is beingtouched.
◼Changing the Setting ValueTap <+>/<-> to adjust the setting on the scale. You can also adjust a setting by flicking the slider left or right.
Basic Operations
130

● You can change a variety of display-related settings, such as the display language: <DisplaySettings>(P. 443)
● You can change the screen that is automatically displayed when the machine remains idle for a specifiedlength of time: <Function After Auto Reset>(P. 450)
● You can change various settings about the operability such as screen brightness: <Accessibility>(P. 468)
Basic Operations
131

Entering Text16SE-02S
When entering text or a number, use the keyboard displayed on the screen. The numeric keys are displayed on thescreen to enter only numbers.
Switching the Type of TextTap <a 1/#> to switch the type of text that is entered.
● To enter upper case characters, tap .
Deleting TextOne character is deleted each time is tapped. Holding down allows you to delete successivecharacters.
Moving the Cursor (Entering a Space)Tap or to move the cursor. To enter a space, move the cursor to the end of the text, and tap .
When the Numeric Keys are DisplayedWhen only the numeric value is entered, the numeric keys are displayed on the screen. Tap numeric keys toenter the numeric value.
Value range● Values in ( ) displayed the entry box are the enterable value range.
Basic Operations
132

When buttons other than the numeric keys are displayed● When <+>/<-> or / are displayed, you can tap the buttons and increase or decrease the
numeric value or move the cursor.
Entering Characters Using a USB Keyboard
You can connect a keyboard to the USB port for USB devices on the Front Side(P. 105) or Back Side(P. 109) andenter text from the keyboard. While connecting the keyboard, you can enter text from the operation panel.
● Some keys on the USB keyboard, such as the [Backspace], [Home] and [End] keys, cannot be used. Whenkeys that cannot be used are pressed, nothing is entered or changed.
● To delete text, press the [Delete] key.
● Pressing the [RETURN/ENTER] key completes text entry in the same way as selecting <Apply>.
● You can specify the type of keyboard layout (US layout or UK layout). <English Keyboard Layout>(P. 447)
● You can disconnect the USB keyboard from the machine at any time. No special operation is required todisconnect it.
● Depending on the display language, you may not be able to enter some characters correctly.
● The USB keyboard may not operate correctly depending on the type of keyboard.
Basic Operations
133

Logging in to the Machine16SE-02U
If Department ID Management is enabled or System Manager IDs are enabled, you must log in before using themachine. You also need to log in if use of the fax and scan functions is restricted.
Department ID Management Login(P. 134)Logging in to Authorized Send(P. 134)
Department ID Management Login
When the login screen appears, use the procedure below to enter the Department ID and PIN.
● When <Insert the card.> is displayed, see Copy Card Reader-F(P. 721) .
1 Enter the ID.
1 Select <Department ID> or <System Manager ID>.
2 Enter the ID.
● If no PIN is registered, proceed to step 3.
2 Enter the PIN.
1 Select <PIN>.
2 Enter the PIN.
3 Select <Log In>.
➠The login screen will be changed to the Home screen.
● After you finish using the machine, select <Log Out> to display the login screen.
Logging in to Authorized Send
If the Send function authorization setting ( LDAP Server Authentication(P. 363) ) is enabled, the Authorized Sendlogin screen appears when the fax or scan function is used.
Basic Operations
134

1 Enter your user name.
1 Select <User Name>.
2 Enter your user name using the numeric keys.
● On how to enter text, see Entering Text(P. 132) .
2 Enter the password.
1 Select <Password>.
2 Enter the password using the numeric keys.
3 Select <Server Name>, and select the server for your authentication.
● Select the LDAP server where your user name and password are registered.
4 Select <Log In>.
➠The login screen switches to the fax or scan function Home screen.
● After you finish using the machine, select <Log Out> to display the login screen.
If the <Select Logout Type> screen appears
● If you are logged in to both Authorized Send and Department ID Management, a dialog box appears inwhich you can select the items you want to log out of. In the case where you want to log out of AuthorizedSend (fax or scan function) while remaining logged in to Department ID Management, select <Log Outfrom Authenticated Sending>. In any other cases, select <Log Out from All Authenticated Functions>.
LINKS
Setting the Department ID Management(P. 355)Setting the System Manager ID and PIN(P. 353)
Basic Operations
135

Placing Originals16SE-02W
Place originals on the platen glass or in the feeder. Use the platen glass when scanning thick or bound documentssuch as books. You can load two or more sheets of originals in the feeder so that they can be scanned continuously.For information on loadable sizes, etc., see Main Unit(P. 699) or Feeder(P. 703) .
Placing Originals on the Platen Glass(P. 137)Placing Originals in the Feeder(P. 137)
Use originals that are completely dry● When placing originals, make sure that any glue, ink, or correction fluid on the originals has completely
dried.
To avoid paper jams● Do not place the following types of originals in the feeder as this may cause paper jams:
- Wrinkled or creased paper
- Carbon paper
- Curled or rolled paper
- Coated paper
- Torn paper
- Onion skin or thin paper
- Stapled or clipped originals
- Paper printed by a thermal transfer printer
- Transparencies
To scan originals more accurately● Originals placed in the feeder are scanned while being fed into the machine. On the other hand, originals
placed on the platen glass remain in a fixed position while they are scanned. To ensure more accuratescanning results, placing originals on the platen glass is recommended.
To scan tracing paper or transparencies● To scan transparent originals (for example, tracing paper or transparencies), place them on the platen glass.
Basic Operations
136

Placing Originals on the Platen Glass
1 Open the feeder or the platen glass cover.
2 Place the original face down on the platen glass.
● Align the corner of the original with the top-left corner of the platen glass.
● To scan transparent originals (for example, tracing paper or transparencies), cover them with plain whitepaper.
3 Gently close the feeder or the platen glass cover.
➠The machine is ready to scan the document.
When scanning is complete
● Remove the original from the platen glass.
Placing Originals in the Feeder
1 Open the original supply tray.
Basic Operations
137

2 Spread the slide guides apart.
● Slide the slide guides outward until they are slightly farther apart than the actual original width.
3 Fan the original stack and align the edges.
● Fan the original stack in small batches, and align the edges by lightly tapping the stack on a flat surface a fewtimes.
4 Place the original(s) face up in the feeder.
● Make sure that the original stack does not exceed the load limit lines ( ).
● Do not load originals of various sizes at the same time.
● If originals are loaded so that they exceed the load limit line, scanning may stop or a paper jam may occur.
5 Align the slide guides against the edges of the original.
● Slide the slide guides inward until they are aligned securely against the edges of the original.
➠The machine is ready to scan the original.
Basic Operations
138

Align the slide guides securely against the edges of the original
● Slide guides that are too loose or too tight can cause misfeeds or paper jam.
While originals are being scanned
● Do not add or remove originals.
When scanning is complete
● Remove the scanned originals from beneath the feeder to prevent paper jams.
Basic Operations
139
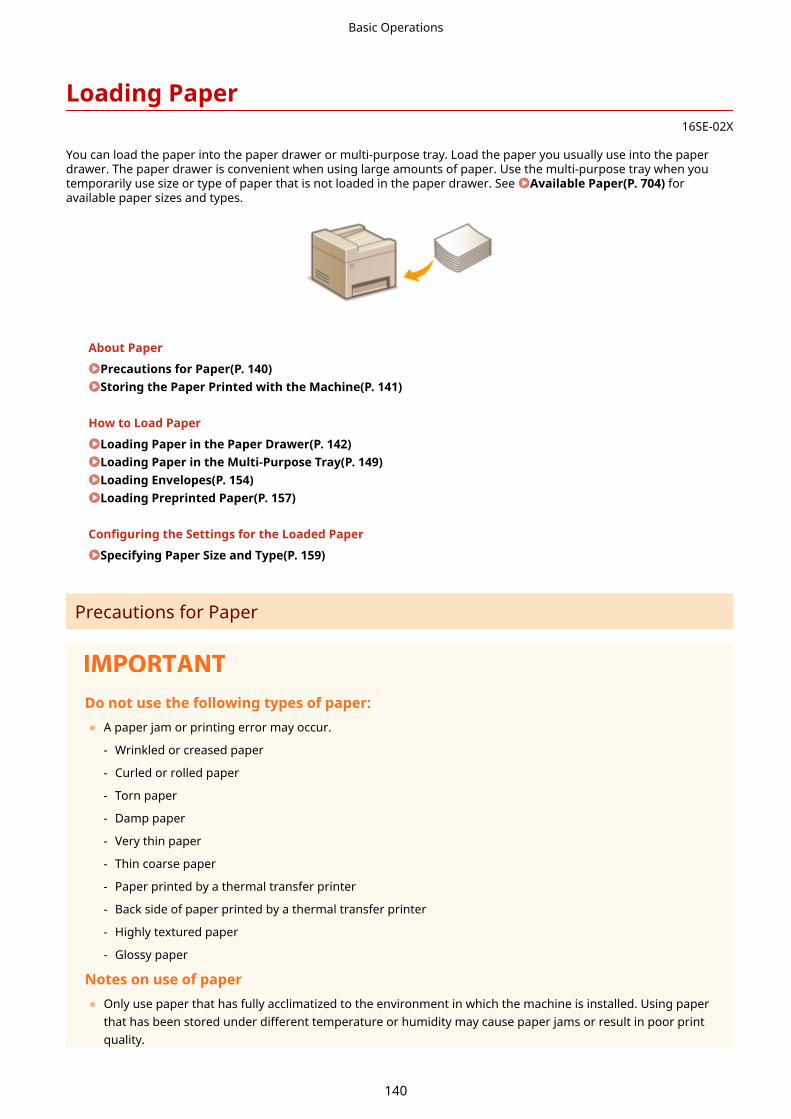
Loading Paper16SE-02X
You can load the paper into the paper drawer or multi-purpose tray. Load the paper you usually use into the paperdrawer. The paper drawer is convenient when using large amounts of paper. Use the multi-purpose tray when youtemporarily use size or type of paper that is not loaded in the paper drawer. See Available Paper(P. 704) foravailable paper sizes and types.
About Paper
Precautions for Paper(P. 140)Storing the Paper Printed with the Machine(P. 141)
How to Load Paper
Loading Paper in the Paper Drawer(P. 142)Loading Paper in the Multi-Purpose Tray(P. 149)Loading Envelopes(P. 154)Loading Preprinted Paper(P. 157)
Configuring the Settings for the Loaded Paper
Specifying Paper Size and Type(P. 159)
Precautions for Paper
Do not use the following types of paper:● A paper jam or printing error may occur.
- Wrinkled or creased paper
- Curled or rolled paper
- Torn paper
- Damp paper
- Very thin paper
- Thin coarse paper
- Paper printed by a thermal transfer printer
- Back side of paper printed by a thermal transfer printer
- Highly textured paper
- Glossy paper
Notes on use of paper● Only use paper that has fully acclimatized to the environment in which the machine is installed. Using paper
that has been stored under different temperature or humidity may cause paper jams or result in poor printquality.
Basic Operations
140
Paper handling and storage● It is recommended that you use paper as soon as possible after unwrapping. Paper remaining unused
should be covered with the original wrapping paper and stored on a flat surface.
● Keep the paper wrapped in its original package to protect the paper from moisture or dryness.
● Do not store the paper in such a way that may cause it to curl or fold.
● Do not store the paper vertically or stack too much paper.
● Do not store the paper in direct sunlight, or in a place subject to high humidity, dryness, or drastic changesin temperature or humidity.
When printing on paper that has absorbed moisture● Steam may emit from the paper output area, or water droplets may form around the paper output area.
There is nothing unusual about any of these occurrences, which occur when the heat generated from fixingtoner on the paper causes moisture in the paper to evaporate (most likely to occur at low roomtemperatures).
Storing the Paper Printed with the Machine
When handling/storing the paper printed with the machine, take the following precautions.
◼How to Store the Printed Paper● Store on a flat surface.
● Do not store together with articles made of PVC (polyvinyl chloride) such as clear folders. Toner may melt, resultingin the paper's sticking to PVC articles.
● Take care that the paper gets folded or creased. Toner may peel off.
● To store over a long period of time (two years or longer), store in binders or equivalent.
● When the paper is stored over a long period of time, it may become discolored and thus the print may seem to haveundergone a change of color.
● Do not store in a place where the temperature is high.
◼Precautions When Applying Adhesive● Always use insoluble adhesive.
● Before applying adhesive, perform a test using a printout no longer required.
● When putting adhesive-applied paper sheets one over another, make sure that the adhesive is completely dried out.
LINKS
Registering a Custom Paper Size(P. 166)
Basic Operations
141

Loading Paper in the Paper Drawer16SE-02Y
Load the paper that you usually use in the paper drawer. When you want to print on paper that is not loaded in thepaper drawer, load the paper in the multi-purpose tray. Loading Paper in the Multi-Purpose Tray(P. 149)
Loading Regular Size Paper(P. 142)Loading Custom Size Paper(P. 145)
● When using A5 size paper, see Loading Custom Size Paper(P. 145) and load it in the landscapeorientation. When loading paper in the portrait orientation, follow the steps shown in Loading RegularSize Paper(P. 142) .
Landscape orientation Portrait orientation
● Follow the procedure below when loading paper into the optional cassette feeding module.
Loading Regular Size Paper
To load paper whose size is found in the paper size markings on the paper drawer, use the following procedure. Forpaper whose size is not found in the paper size markings, see Loading Custom Size Paper(P. 145) .
1 Pull out the paper drawer.
MF735Cx / MF734Cdw / MF732Cdw MF635Cx / MF633Cdw / MF631Cn
● Make sure to hold the paper drawer with both hands, and pull it out gently. Otherwise, you may damagethe paper drawer by dropping it, if it slides out too easily.
Basic Operations
142

2 Adjust the positions of the paper guides to the paper size you want to use.
MF735Cx / MF734Cdw / MF732Cdw
● While pressing the lock release lever, move the paper guide to align the projection to the appropriatepaper size marking.
MF635Cx / MF633Cdw / MF631Cn
1 Slide the paper guide located on the side, and align the projection to the appropriate paper sizemarkings.
2 While pressing the lock release lever, move the front side paper guide to align the projection to theappropriate paper size marking..
Basic Operations
143
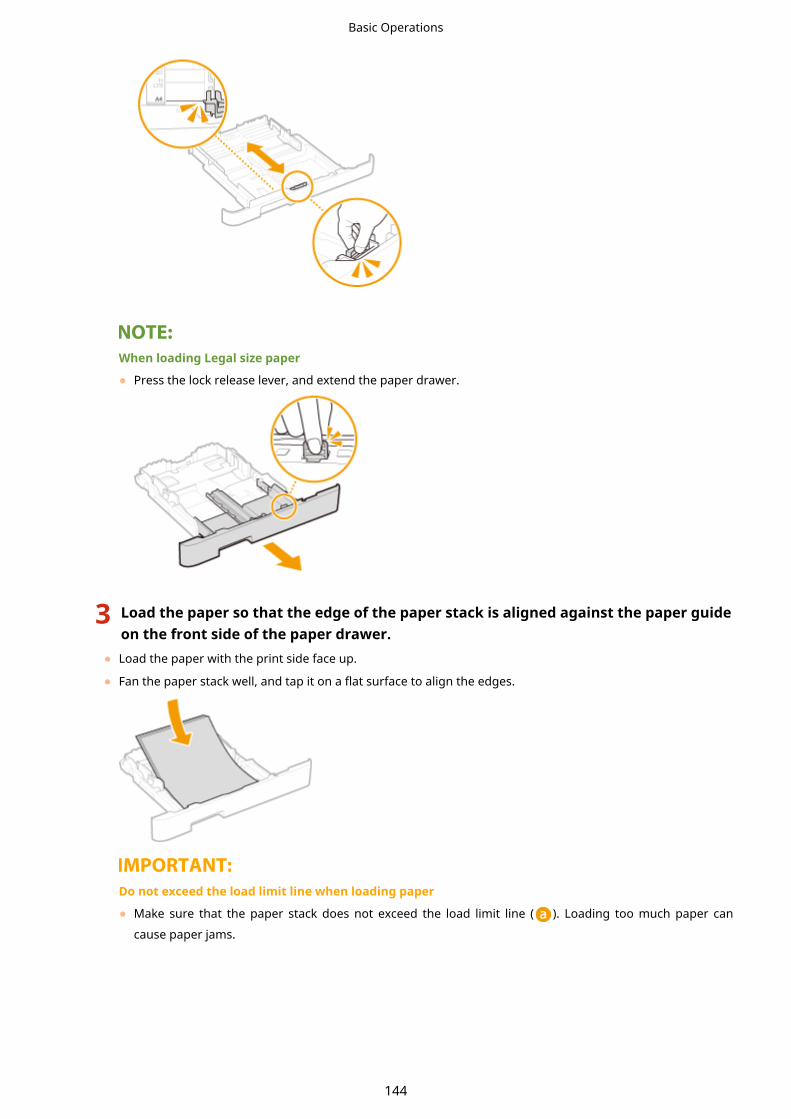
When loading Legal size paper
● Press the lock release lever, and extend the paper drawer.
3 Load the paper so that the edge of the paper stack is aligned against the paper guideon the front side of the paper drawer.
● Load the paper with the print side face up.
● Fan the paper stack well, and tap it on a flat surface to align the edges.
Do not exceed the load limit line when loading paper
● Make sure that the paper stack does not exceed the load limit line ( ). Loading too much paper can
cause paper jams.
Basic Operations
144

● When loading paper with a logo, see Loading Preprinted Paper(P. 157) .
4 Insert the paper drawer into the machine.
● When you insert the paper drawer with <Notify to Check Paper Settings> set to <On>, a confirmation screenis displayed. <Notify to Check Paper Settings>(P. 570)
When Legal size paper is loaded
● The front side of the paper drawer is not flush with the machine when the extended paper drawer isinserted.
» Continue to Specifying Paper Size and Type in the Paper Drawer(P. 160)
When changing the paper size or type
● The factory default settings for paper size and type are <A4> and <Plain 2>, respectively. If you load adifferent size or type of paper into the machine, make sure to change the settings. If you do not changethe settings, the machine cannot print properly.
Printing on the Back Side of Printed Paper (Manual 2-Sided Printing)
● You can print on the back side of printed paper. Flatten any curls on the printed paper and insert it into thepaper drawer or multi-purpose tray ( Loading Paper in the Multi-Purpose Tray(P. 149) ), with the side toprint face up (previously printed side face down).
- When using the multi-purpose tray, load one sheet of paper each time you print.
- You can use only the paper printed with this machine.
- You cannot print on the side that has previously been printed on.
- If the printouts look faded, set the target paper source to <On> in <Manual Back Side Print (2-Sided Only)>.<Manual Back Side Print (2-Sided Only)>(P. 472)
- If you are using A5 size paper, the reverse side may not be printed correctly.
Loading Custom Size Paper
To load custom size paper or other paper whose size is not found in the paper size markings on the paper drawer, usethe following procedure.
Basic Operations
145

1 Pull out the paper drawer.
MF735Cx / MF734Cdw / MF732Cdw MF635Cx / MF633Cdw / MF631Cn
● Make sure to hold the paper drawer with both hands, and pull it out gently. Otherwise, you may damagethe paper drawer by dropping it, if it slides out too easily.
2 Spread the paper guides apart.
● Press the lock release lever to slide the paper guides outward. On the MF635Cx / MF633Cdw / MF631Cn,there is no lock release lever for the side paper guides.
When loading longer paper than A4 size
● Press the lock release lever, and extend the paper drawer.
3 Load the paper so that the edge of the paper stack is aligned against the rear side ofthe paper drawer.
Basic Operations
146

● Load the paper with the print side face up.
● Fan the paper stack well, and tap it on a flat surface to align the edges.
Do not exceed the load limit line when loading paper
● Make sure that the paper stack does not exceed the load limit line ( ). Loading too much paper can
cause paper jams.
● When loading envelopes or paper with a logo, see Loading Preprinted Paper(P. 157) .
4 Align the paper guides against the edges of the paper.
● Press the lock release lever and slide the paper guides inward until they are aligned securely against theedges of the paper.
Align the paper guides securely against the edges of the paper
● Paper guides that are too loose or too tight can cause misfeeds or paper jams.
5 Insert the paper drawer into the machine.
Basic Operations
147

● When you insert the paper drawer with <Notify to Check Paper Settings> set to <On>, a confirmation screenis displayed. <Notify to Check Paper Settings>(P. 570)
When loading longer paper than A4 size
● The front side of the paper drawer is not flush with the machine when the extended paper drawer isinserted.
» Continue to Specifying Paper Size and Type in the Paper Drawer(P. 160)
When changing the paper size or type
● The factory default settings for paper size and type are <A4> and <Plain 2>, respectively. If you load adifferent size or type of paper into the machine, make sure to change the settings. If you do not changethe settings, the machine cannot print properly.
Printing on the Back Side of Printed Paper (Manual 2-Sided Printing)
● You can print on the back side of printed paper. Flatten any curls on the printed paper and insert it into thepaper drawer or multi-purpose tray ( Loading Paper in the Multi-Purpose Tray(P. 149) ), with the side toprint face up (previously printed side face down).
- When using the multi-purpose tray, load one sheet of paper each time you print.
- You can use only the paper printed with this machine.
- You cannot print on the side that has previously been printed on.
- If the printouts look faded, set the target paper source to <On> in <Manual Back Side Print (2-Sided Only)>.<Manual Back Side Print (2-Sided Only)>(P. 472)
- If you are using A5 size paper, the reverse side may not be printed correctly.
LINKS
Available Paper(P. 704)
Basic Operations
148

Loading Paper in the Multi-Purpose Tray16SE-030
When you want to print on paper that is not loaded in the paper drawer, load the paper in the multi-purpose tray.Load the paper that you usually use in the paper drawer. Loading Paper in the Paper Drawer(P. 142)
For the MF735Cx / MF734Cdw / MF732Cdw(P. 149)For the MF635Cx / MF633Cdw / MF631Cn(P. 151)
For the MF735Cx / MF734Cdw / MF732Cdw
Make sure to insert the paper drawer● The machine only prints when the paper drawer is inserted, even if paper is loaded in the multi-purpose
tray. An error message is displayed if you attempt to print without inserting the paper drawer.
When loading A5 size paper● When setting the paper size, make sure the current paper orientation. Specifying Paper Size and Type in
the Multi-Purpose Tray(P. 162)
Landscape orientation Portrait orientation
1 Open the cover.
● Hold the both sides of the cover to open it.
2 Pull out the paper tray.
Basic Operations
149

3 Spread the paper guides apart.
● Press the lock release lever to slide the paper guides outward.
4 Insert the paper into the multi-purpose tray until the paper stops.
● Load the paper with the print side face up.
● Fan the paper stack well, and tap it on a flat surface to align the edges.
Do not exceed the load limit line when loading paper
● Make sure that the paper stack does not exceed the load limit line ( ). Loading too much paper can
cause paper jams.
Basic Operations
150

● When loading envelopes or paper with a logo, see Loading Envelopes(P. 154) or Loading PreprintedPaper(P. 157) .
5 Align the paper guides against the edges of the paper.
● Slide the paper guides inward until they are aligned securely against the edges of the paper.
Align the paper guides securely against the edges of the paper
● Paper guides that are too loose or too tight can cause misfeeds or paper jams.
» Continue to Specifying Paper Size and Type in the Multi-Purpose Tray(P. 162)
Printing on the Back Side of Printed Paper (Manual 2-Sided Printing)
● You can print on the back side of printed paper. Flatten any curls on the printed paper and insert it into thepaper drawer ( Loading Paper in the Paper Drawer(P. 142) ) or multi-purpose tray, with the side to printface up (previously printed side face down).
- When using the multi-purpose tray, load one sheet of paper each time you print.
- You can use only the paper printed with this machine.
- You cannot print on the side that has previously been printed on.
- If the printouts look faded, set the target paper source to <On> in <Manual Back Side Print (2-Sided Only)>.<Manual Back Side Print (2-Sided Only)>(P. 472)
- If you are using A5 size paper, the reverse side may not be printed correctly.
For the MF635Cx / MF633Cdw / MF631Cn
Make sure to insert the paper drawer● The machine only prints when the paper drawer is inserted, even if paper is loaded in the manual feed slot.
An error message is displayed if you attempt to print without inserting the paper drawer.
Load only one sheet of paper at a time● Only one sheet of paper can be loaded each time you print.
Basic Operations
151
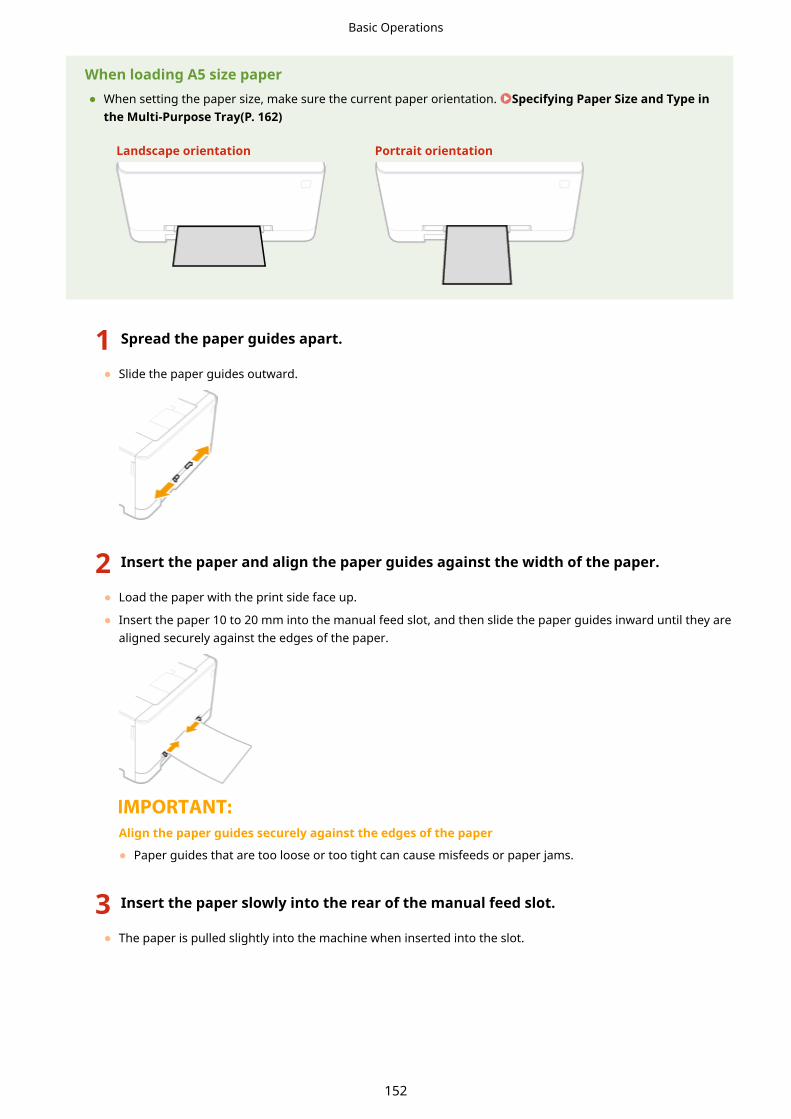
When loading A5 size paper● When setting the paper size, make sure the current paper orientation. Specifying Paper Size and Type in
the Multi-Purpose Tray(P. 162)
Landscape orientation Portrait orientation
1 Spread the paper guides apart.
● Slide the paper guides outward.
2 Insert the paper and align the paper guides against the width of the paper.
● Load the paper with the print side face up.
● Insert the paper 10 to 20 mm into the manual feed slot, and then slide the paper guides inward until they arealigned securely against the edges of the paper.
Align the paper guides securely against the edges of the paper
● Paper guides that are too loose or too tight can cause misfeeds or paper jams.
3 Insert the paper slowly into the rear of the manual feed slot.
● The paper is pulled slightly into the machine when inserted into the slot.
Basic Operations
152

● When loading envelopes or paper with a logo, see Loading Envelopes(P. 154) or Loading PreprintedPaper(P. 157) .
» Continue to Specifying Paper Size and Type in the Multi-Purpose Tray(P. 162)
Printing on the Back Side of Printed Paper (Manual 2-Sided Printing)
● You can print on the back side of printed paper. Flatten any curls on the printed paper and insert it into thepaper drawer ( Loading Paper in the Paper Drawer(P. 142) ) or manual feed slot, with the side to printface up (previously printed side face down).
- You can use only the paper printed with this machine.
- You cannot print on the side that has previously been printed on.
- If the printouts look faded, set the target paper source to <On> in <Manual Back Side Print (2-Sided Only)>.<Manual Back Side Print (2-Sided Only)>(P. 472)
- If you are using A5 size paper, the reverse side may not be printed correctly.
LINKS
Available Paper(P. 704)
Basic Operations
153
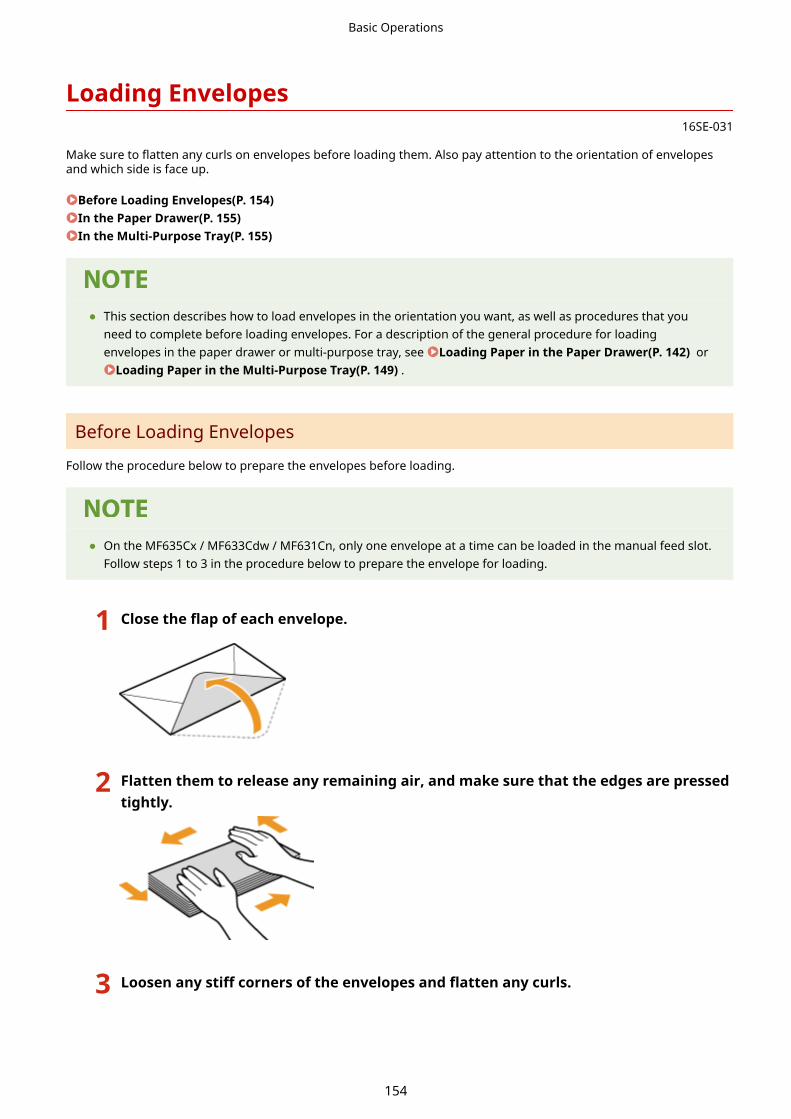
Loading Envelopes16SE-031
Make sure to flatten any curls on envelopes before loading them. Also pay attention to the orientation of envelopesand which side is face up.
Before Loading Envelopes(P. 154)In the Paper Drawer(P. 155)In the Multi-Purpose Tray(P. 155)
● This section describes how to load envelopes in the orientation you want, as well as procedures that youneed to complete before loading envelopes. For a description of the general procedure for loadingenvelopes in the paper drawer or multi-purpose tray, see Loading Paper in the Paper Drawer(P. 142) or
Loading Paper in the Multi-Purpose Tray(P. 149) .
Before Loading Envelopes
Follow the procedure below to prepare the envelopes before loading.
● On the MF635Cx / MF633Cdw / MF631Cn, only one envelope at a time can be loaded in the manual feed slot.Follow steps 1 to 3 in the procedure below to prepare the envelope for loading.
1 Close the flap of each envelope.
2 Flatten them to release any remaining air, and make sure that the edges are pressedtightly.
3 Loosen any stiff corners of the envelopes and flatten any curls.
Basic Operations
154

4 Align the edges of the envelope on a flat surface.
In the Paper Drawer
Load the envelopes Monarch, COM10, DL, or ISO-C5 in portrait orientation (with the long edges on either side), withthe non-glued side (front side) face up. You cannot print on the reverse side of envelopes.
● Load the envelopes so that the edge with the flap is toward the left side as shown in the illustration.
In the Multi-Purpose Tray
Load the envelopes Monarch, COM10, DL, or ISO-C5 in portrait orientation (with the short edge toward the machine),with the non-glued side (front side) face up. You cannot print on the reverse side of envelopes.
● Load the envelopes so that the edge with the flap is toward the left side as shown in the illustration.
MF735Cx / MF734Cdw / MF732Cdw MF635Cx / MF633Cdw / MF631Cn
Basic Operations
155

Basic Operations
156

Loading Preprinted Paper16SE-032
When you use paper that has been preprinted with a logo, pay attention to the orientation of the paper when loading.Load the paper properly so that printing is performed on the correct side of the paper with a logo.
Making 1-Sided Printouts on Paper with Logos(P. 157)Making 2-Sided Printouts on Paper with Logos(P. 157)
● This section mainly describes how to load preprinted paper with the proper facing and orientation. For adescription of the general procedure for loading paper in the paper drawer or multi-purpose tray, see Loading Paper in the Paper Drawer(P. 142) or Loading Paper in the Multi-Purpose Tray(P. 149) .
Making 1-Sided Printouts on Paper with Logos
Load the paper with the logo side (the side to print the document) face up.
Printing on Paper with Logos in Portrait Orientation
Printing on Paper with Logos in Landscape Orientation
Making 2-Sided Printouts on Paper with Logos
Load the paper with the front logo side (the side to print the first page of the document) face down.
Basic Operations
157

Printing on Paper with Logos in Portrait Orientation
Printing on Paper with Logos in Landscape Orientation
The <Switch Paper Feed Method> setting● When you print on preprinted paper, you need to change the facing of the paper to load each time you
perform 1-sided and 2-sided printing. However, if <Switch Paper Feed Method> is set to <Print Side Priority>,the facing that you use for loading preprinted paper for 2-sided printing (logo side face down) can also beused for 1-sided printing. This setting is especially useful if you frequently perform both 1-sided and 2-sidedprinting. <Switch Paper Feed Method>(P. 488)
Basic Operations
158

Specifying Paper Size and Type16SE-033
You must specify the paper size and type settings to match the paper that is loaded. Make sure to change the papersettings when you load the paper that is different from the previously loaded paper.
Specifying Paper Size and Type in the Paper Drawer(P. 160)Specifying Paper Size and Type in the Multi-Purpose Tray(P. 162)Registering Default Paper Settings for the Multi-Purpose Tray(P. 164)Registering a Custom Paper Size(P. 166)Limiting the Paper Sizes Displayed(P. 168)Automatically Selecting an Appropriate Paper Source for Each Function(P. 169)
● If the setting does not match the size and type of loaded paper, a paper jam or printing error may occur.
Basic Operations
159

Specifying Paper Size and Type in the Paper Drawer16SE-034
1 Select <Paper Settings> in the Home screen. Home Screen(P. 123)
2 Select the target paper drawer.
● is displayed only when the optional cassette feeding module is installed.
3 Select the paper size in the <Frequently Used Sizes> tab.
● If the loaded paper size is not displayed, select <Other Sizes> tab.
When loading custom size paper
1 Select <Custom>.
2 Specify the length of the <X> side and <Y> side.
● Select <X> or <Y>, and enter the length of each side using the numeric keys.
● If you register the paper size you use frequently on buttons <S1> to <S3>, you can call them up withone touch. Registering a Custom Paper Size(P. 166)
3 Select <Apply>.
When loading A5 size paper
Basic Operations
160
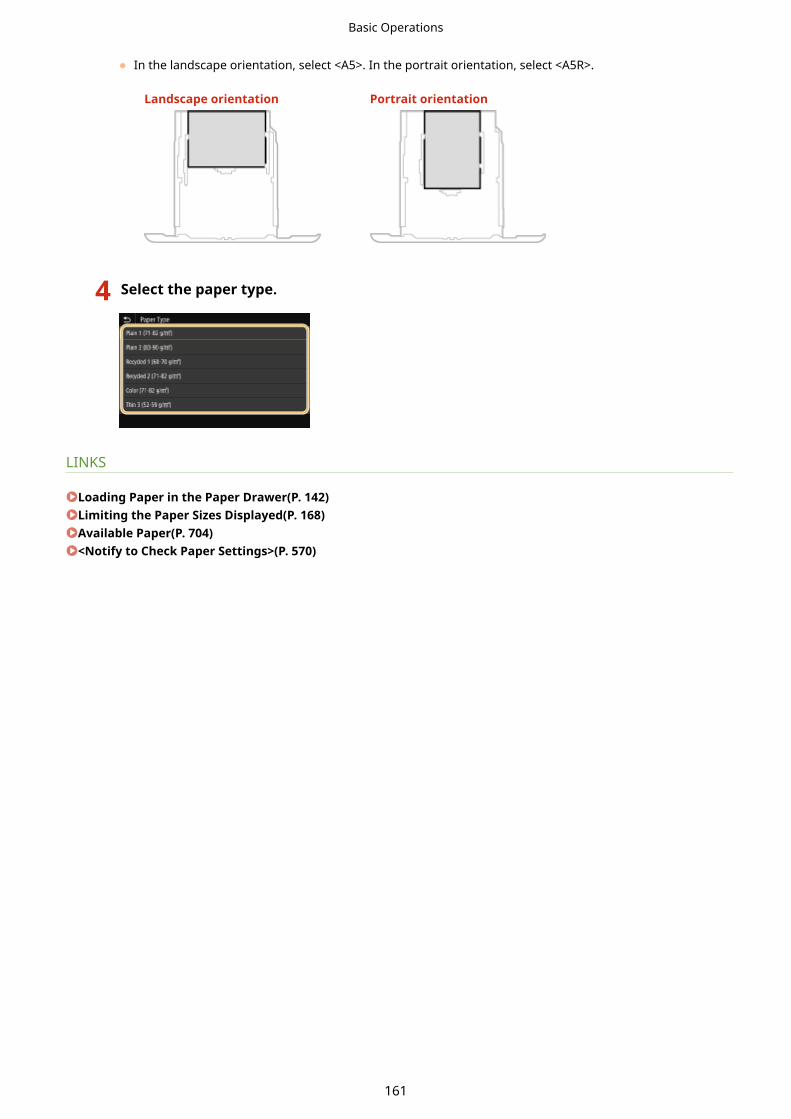
● In the landscape orientation, select <A5>. In the portrait orientation, select <A5R>.
Landscape orientation Portrait orientation
4 Select the paper type.
LINKS
Loading Paper in the Paper Drawer(P. 142)Limiting the Paper Sizes Displayed(P. 168)Available Paper(P. 704)<Notify to Check Paper Settings>(P. 570)
Basic Operations
161

Specifying Paper Size and Type in the Multi-PurposeTray
16SE-035
The screen shown here is displayed when paper is loaded in the multi-purpose tray. Follow the on-screen instructionsto specify settings that match the size and type of the loaded paper.
If the screen shown above is not displayed when paper is loaded● If you always load the same paper in the multi-purpose tray, you can skip the paper setting operations by
registering the paper size and type as the default setting. When the default setting is registered, however,the screen shown above is not displayed. To display the screen, select <Specify When Loading Paper> ( Registering Default Paper Settings for the Multi-Purpose Tray(P. 164) ).
1 Select the paper size in the <Frequently Used Sizes> tab.
● If the loaded paper size is not displayed, select <Other Sizes> tab.
When loading custom size paper
1 Select <Custom>.
2 Specify the length of the <X> side and <Y> side.
● Select <X> or <Y>, and enter the length of each side using the numeric keys.
● If you register the paper size you use frequently on buttons <S1> to <S3>, you can call them up withone touch. Registering a Custom Paper Size(P. 166)
Basic Operations
162

3 Select <Apply>.
When loading A5 size paper
● In the landscape orientation, select <A5>. In the portrait orientation, select <A5R>.
Example for MF735Cx / MF734Cdw / MF732Cdw:
Landscape orientation Portrait orientation
2 Select the paper type.
LINKS
Loading Paper in the Multi-Purpose Tray(P. 149)Limiting the Paper Sizes Displayed(P. 168)Available Paper(P. 704)
Basic Operations
163

Registering Default Paper Settings for the Multi-Purpose Tray
16SE-036
You can register default paper settings for the multi-purpose tray. Registering default settings can save yourself theeffort of having to specify the settings each time you load the same paper into the multi-purpose tray.
● After the default paper setting is registered, the paper setting screen is not displayed when paper is loaded,and the same setting is always used. If you load a different paper size or type without changing the papersettings, the machine may not print properly. To avoid this problem, select <Specify When Loading Paper> instep 3, and then load the paper.
1 Select <Paper Settings> in the Home screen. Home Screen(P. 123)
2 Select multi-purpose tray.
3 Select the paper size in the <Frequently Used Sizes> tab.
● If the loaded paper size is not displayed, select <Other Sizes> tab.
Registering a custom paper size
1 Select <Custom>.
2 Specify the length of the <X> side and <Y> side.
● Select <X> or <Y>, and enter the length of each side using the numeric keys.
Basic Operations
164

● If you register the paper size you use frequently on buttons <S1> to <S3>, you can call them up withone touch. Registering a Custom Paper Size(P. 166)
3 Select <Apply>.
When loading A5 size paper
● In the landscape orientation, select <A5>. In the portrait orientation, select <A5R>.
Example for MF735Cx / MF734Cdw / MF732Cdw:
Landscape orientation Portrait orientation
4 Select the paper type.
LINKS
Loading Paper in the Multi-Purpose Tray(P. 149)Limiting the Paper Sizes Displayed(P. 168)Available Paper(P. 704)
Basic Operations
165

Registering a Custom Paper Size16SE-037
You can register up to three frequently used custom paper sizes.
1 Select <Paper Settings> in the Home screen. Home Screen(P. 123)
2 Select <Register Custom Paper>.
3 Select the registration number.
Deleting a setting
● Select <Delete> <Yes>.
4 Specify the length of the <X> side and <Y> side.
● Select <X> or <Y>, and enter the length of each side using the numeric keys.
● If you register the paper size you use frequently on buttons <S1> to <S3>, you can call them up with onetouch.
5 Select <Apply>.
Setting to the registered custom sizeThe paper sizes that are registered in the procedure above can be called when <Custom> is selected on thepaper size selection screen for the paper drawer or multi-purpose tray.
LINKS
Basic Operations
166

Loading Paper in the Paper Drawer(P. 142)Loading Paper in the Multi-Purpose Tray(P. 149)
Basic Operations
167

Limiting the Paper Sizes Displayed16SE-038
You can ensure that only frequently used paper sizes are shown in the <Frequently Used Sizes> tab of the screen forselecting the paper size setting.
1 Select <Paper Settings> in the Home screen. Home Screen(P. 123)
2 Select <Select Frequently Used Paper Sizes>.
3 Select the paper source you want to limit the paper sizes to be displayed for.
4 Clear the check boxes for paper sizes you do not want displayed.
● Ensure that only the check boxes for frequently used paper sizes are selected.
● Paper sizes that are not selected can be viewed by selecting <Other Sizes> tab in the paper size settingselection screen.
5 Select <Apply>.
LINKS
Specifying Paper Size and Type in the Paper Drawer(P. 160)Specifying Paper Size and Type in the Multi-Purpose Tray(P. 162)Registering Default Paper Settings for the Multi-Purpose Tray(P. 164)
Basic Operations
168

Automatically Selecting an Appropriate Paper Sourcefor Each Function
16SE-0ER
Enable or disable the automatic paper source selection feature for each paper source. If this feature is set to <On>, themachine automatically selects a paper source that is loaded with paper of the appropriate size for each print job. Also,when the paper in the selected paper source runs out, this feature enables continuous printing by switching from thatpaper source to another that is loaded with the same paper size.
1 Select <Menu> in the Home screen. Home Screen(P. 123)
2 Select <Function Settings> <Common> <Paper Feed Settings>.
3 Select <Paper Source Auto Selection>.
4 Select the target function.
● When the target function is report/list printing or memory media print, select <Other>.
5 For each paper source to which you want to apply the automatic paper sourceselection feature, select <On>.
● <Drawer 2> is displayed only when the machine is equipped with the cassette feeding module (option).
● Always specify <On> for at least <Drawer 1> or <Drawer 2>. If you specify <Off> for the both, then youcannot finish the setting procedure.
6 Select <Apply>.
Basic Operations
169

Customizing the Display16SE-039
In order to make the Home screen easier to use, you can customize. In addition, you can work more efficiently byregistering your favorite settings to the Basic Features screen for each function.
Customizing the Home ScreenYou can rearrange buttons that are displayed in the Home screen. In addition, you can customize the Homescreen to make it easier to select functions by adding shortcut buttons. Customizing the HomeScreen(P. 171)
Registering "Favorite Settings"To make it possible to quickly call up the same settings for Copy, Fax, and Scan, you can register them as yourfavorite settings. You can add registered setting combinations to the Home screen as shortcut buttons. Registering Frequently Used Settings(P. 174)
Basic Operations
170

Customizing the Home Screen16SE-03A
You can add/delete shortcut buttons displayed in the Home screen according to your application or a preferredarrangement. You can also change the order that they are displayed in.
Adding Buttons to the Home Screen(P. 171)Changing the Arrangement of Buttons(P. 172)
Adding Buttons to the Home Screen
You can add shortcut buttons to the Home screen for frequently used functions such as <Copy>, <Fax>, and <Scan>.For example, you can carry out tasks more quickly and efficiently by assigning a sequence of settings (e.g. "Scan bothsides of an original, save it as a highly compressed PDF file and send it via e-mail") to a single button.
● The settings to be added as a shortcut button must be registered beforehand as Favorite Settings. Registering Frequently Used Settings(P. 174)
1 Select <Home Screen Settings> in the Home screen. Home Screen(P. 123)
● If the login screen appears, enter the correct ID and PIN. Logging in to the Machine(P. 134)
2 Select <Select Button to Display>.
3 Select the function with the Favorite Settings you want to add as a button.
4 Select the check box for all settings to be displayed in the Home screen and select<Apply>.
Removing registered buttons
Basic Operations
171
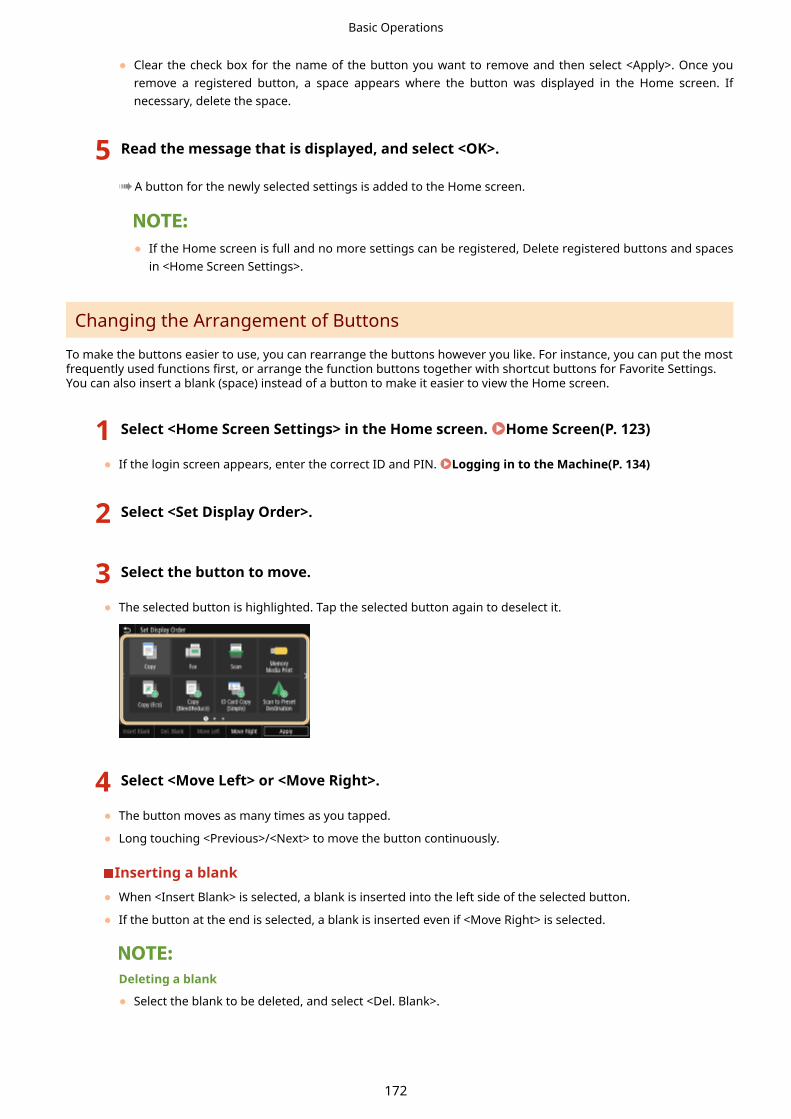
● Clear the check box for the name of the button you want to remove and then select <Apply>. Once youremove a registered button, a space appears where the button was displayed in the Home screen. Ifnecessary, delete the space.
5 Read the message that is displayed, and select <OK>.
➠A button for the newly selected settings is added to the Home screen.
● If the Home screen is full and no more settings can be registered, Delete registered buttons and spacesin <Home Screen Settings>.
Changing the Arrangement of Buttons
To make the buttons easier to use, you can rearrange the buttons however you like. For instance, you can put the mostfrequently used functions first, or arrange the function buttons together with shortcut buttons for Favorite Settings.You can also insert a blank (space) instead of a button to make it easier to view the Home screen.
1 Select <Home Screen Settings> in the Home screen. Home Screen(P. 123)
● If the login screen appears, enter the correct ID and PIN. Logging in to the Machine(P. 134)
2 Select <Set Display Order>.
3 Select the button to move.
● The selected button is highlighted. Tap the selected button again to deselect it.
4 Select <Move Left> or <Move Right>.
● The button moves as many times as you tapped.
● Long touching <Previous>/<Next> to move the button continuously.
Inserting a blank● When <Insert Blank> is selected, a blank is inserted into the left side of the selected button.
● If the button at the end is selected, a blank is inserted even if <Move Right> is selected.
Deleting a blank
● Select the blank to be deleted, and select <Del. Blank>.
Basic Operations
172

5 Select <Apply>.
LINKS
Basic Operation(P. 129)
Basic Operations
173

Registering Frequently Used Settings16SE-03C
If you register your frequently used settings as "favorite settings," you can quickly call up the same settings every timeyou make copies, send a fax, or scan. In addition, if you register complicated settings as "favorite settings," you canquickly call them up for ease of operation. You can also assign registered setting combinations to a shortcut buttondisplayed in the Home screen. This section describes how to register frequently used settings and how to call them upwhen making a copy.
Registering Settings(P. 174)Recalling Registered Settings(P. 175)
● You can also register a fax or scan destination in the frequently used settings, however, it cannot bechanged once it is registered. To change a destination, delete the settings and then register them again.
Registering Settings
1 Select <Copy> in the Home screen. Home Screen(P. 123)
2 Change the values for the settings you want to register. Basic CopyOperations(P. 195)
3 Select <Other Settings> <Favorite Settings>.
4 Select unregistered settings, and select <Register>.
● To change the content of a registered setting, select that setting and select <Edit>.
5 Check the details of the settings to be registered, and select <Register>.
● To change the value of a setting to be registered, select the setting.
● To rename the setting, select <Name>. On how to enter text, see Entering Text(P. 132) .
Basic Operations
174

6 Select whether to register the settings as a shortcut button.
● If you select <Yes>, a message appears. Check the message and then select <OK>. The registered settingcombination is added to the Home screen as a shortcut button.
● If the Home screen is full and the shortcut button cannot be added, use <Home Screen Settings> to deleteregistered buttons or blanks. Customizing the Home Screen(P. 171)
● Registered settings are retained even when the machine is turned OFF.
● If you want to delete a registered setting, select <Copy> <Other Settings> <Favorite Settings> selectthe settings, and select <Delete> <Yes>.
Recalling Registered Settings
Simply select the setting combination that suit your purpose from the favorite settings.
<Copy> <Other Settings> <Favorite Settings> Select the setting combination to be recalled,and select <Apply>
● Once you have recalled the setting combination, you can also change the copy settings as needed.
LINKS
Basic Copy Operations(P. 195)Basic Operations for Sending Faxes(P. 217)Basic Operations for Scanning Originals(P. 283)
Basic Operations
175

Changing the Default Settings for Functions16SE-03E
The default settings are the settings that are displayed whenever you turn ON the machine, or when you select<Reset>. If you change these default settings to match the operations that you perform frequently, you can eliminatethe need to specify the same settings every time you perform an action.
◼CopyFor information about changeable setting items, see <Change Default Settings (Copy)>(P. 492) .
<Menu> <Function Settings> <Copy> <Change Default Settings (Copy)> Select the setting Change the default value of the selected item <Apply>
◼FAXFor information about changeable setting items, see <Fax Settings>(P. 543) .
<Menu> <Function Settings> <Send> <Fax Settings> <Change Default Settings (Fax)> Select the setting Change the default value of the selected item <Apply>
◼Memory Media PrintFor information about changeable setting items, see <Access Stored Files Settings>(P. 557) .
<Menu> <Function Settings> <Store/Access Files> <Common Settings> <Access StoredFiles Settings> <Change Default Settings (Memory Media Print)> Select the setting Changethe default value of the selected item <Apply>
◼USB MemoryFor information about changeable setting items, see <USB Memory Settings>(P. 556) .
<Menu> <Function Settings> <Store/Access Files> <Common Settings> <Scan and StoreSettings> <USB Memory Settings> <Change Default Settings (USB Memory)> Select thesetting Change the default value of the selected item <Apply>
◼E-MailFor information about changeable setting items, see <E-Mail Settings>(P. 539) .
Basic Operations
176

<Menu> <Function Settings> <Send> <Scan and Store Settings> <E-Mail Settings> <Change Default Settings (E-Mail)> Select the setting Change the default value of the
selected item <Apply>
◼ I-FaxFor information about changeable setting items, see <I-Fax Settings>(P. 541) .
<Menu> <Function Settings> <Send> <Scan and Store Settings> <I-Fax Settings> <Change Default Settings (I-Fax)> Select the setting Change the default value of the selecteditem <Apply>
◼Shared Folder/FTP ServerFor information about changeable setting items, see <File Settings>(P. 542) .
<Menu> <Function Settings> <Send> <Scan and Send Settings> <File Settings> <ChangeDefault Settings (File)> Select the setting Change the default value of the selected item
<Apply>
● If you select <Initialize> on each setting screen, you can restore the default settings.
LINKS
Basic Copy Operations(P. 195)Basic Operations for Sending Faxes(P. 217)Printing from a USB Memory Device (Memory Media Print)(P. 269)Basic Operations for Scanning Originals(P. 283)
Basic Operations
177
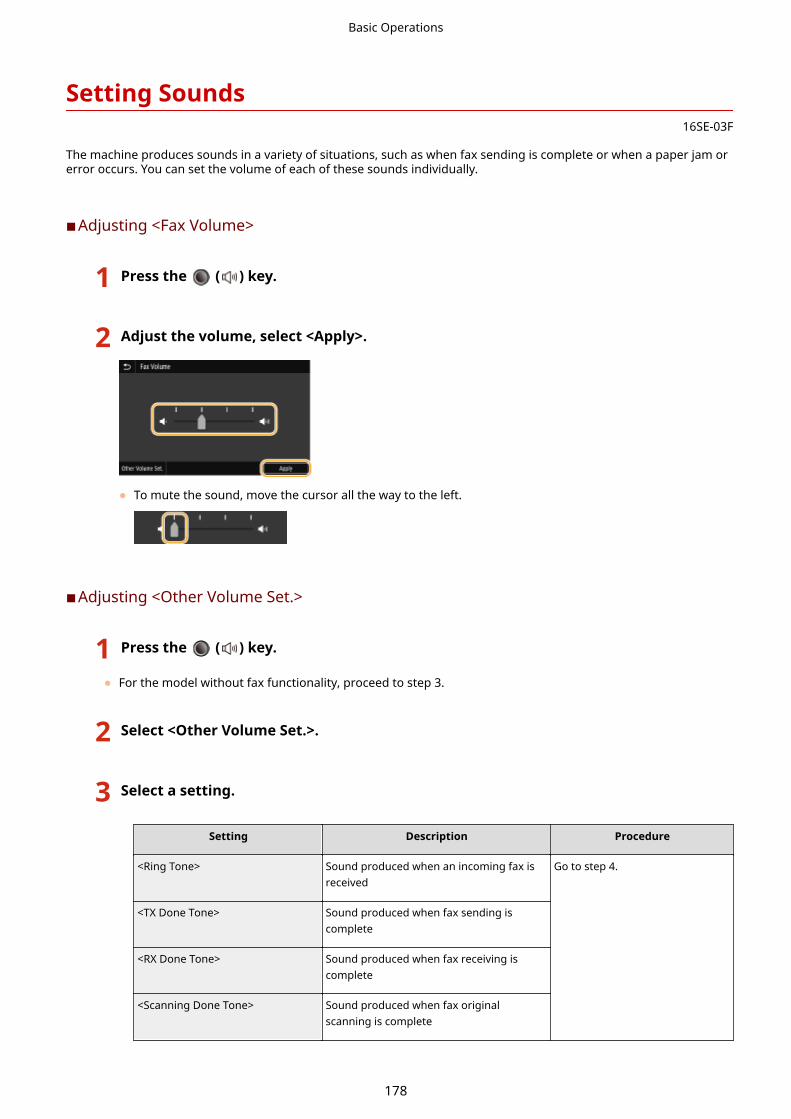
Setting Sounds16SE-03F
The machine produces sounds in a variety of situations, such as when fax sending is complete or when a paper jam orerror occurs. You can set the volume of each of these sounds individually.
◼Adjusting <Fax Volume>
1 Press the ( ) key.
2 Adjust the volume, select <Apply>.
● To mute the sound, move the cursor all the way to the left.
◼Adjusting <Other Volume Set.>
1 Press the ( ) key.
● For the model without fax functionality, proceed to step 3.
2 Select <Other Volume Set.>.
3 Select a setting.
Setting Description Procedure
<Ring Tone> Sound produced when an incoming fax isreceived
Go to step 4.
<TX Done Tone> Sound produced when fax sending iscomplete
<RX Done Tone> Sound produced when fax receiving iscomplete
<Scanning Done Tone> Sound produced when fax originalscanning is complete
Basic Operations
178

Setting Description Procedure
<Entry Tone> Confirmation sound each time a key on theoperation panel or button on the display ispressed
Select <On> (produce a tone) or<Off> (not produce a tone).
<Invalid Entry Tone> Sound produced when an invalid keyoperation is performed, such as when youenter a number outside the valid settingrange
<Restock Supplies Tone> Sound produced when a toner cartridge isalmost empty
<Warning Tone> Sound produced when a paper jam or othererror occurs
<Job Done Tone> Sound produced when an operation suchas copying or scanning is complete
<Energy Saver Alert> Sound produced when the machine entersor exits sleep mode
<Original in Feeder Detection Tone> Sound produced when an original is loadedin the feeder
4 Adjust the volume, select <Apply>.
● To mute the sound, move the cursor all the way to the left.
End sound only for errorIn <Sound Only When Error Occurs>, select <On>, and select <Apply>.
Basic Operations
179

Entering Sleep Mode16SE-03H
The sleep mode function reduces the amount of power consumed by the machine by disabling power flow to theoperation panel. If no operations will be performed on the machine for a while, such as during a lunch break, you cansave power simply by pressing on the operation panel.
When in sleep mode● When the machine enters sleep mode, lights up yellow green.
Situations in which the machine does not enter sleep mode● When the machine is in operation
● When the Data indicator is lit up or blinking
● When the machine is performing an operation such as adjustment or cleaning
● When a paper jam occurs
● When the receiver of the external telephone or the optional handset is off the hook
● When the machine is set such that the fax incoming ring will not sound
● When receiving a fax, the ring tone is set not to sound.
● When the menu screen is displayed
● When a job is waiting to be scanned to a USB memory device or to a computer
● When an error message is displayed on the screen (There are some exceptions. The machine sometimesenters sleep mode when error messages are displayed.)
● When the machine is communicating with an LDAP server, etc.
● When the SSID/network key screen for Direct Connection is displayed
● When settings are being imported or exported
Changing the Auto Sleep Time ValueAuto Sleep Time is a function that automatically puts the machine into the sleep mode if it remains idle for aspecified length of time. We recommend using the factory default settings ( <Timer/EnergySettings>(P. 448) ) to reduce power usage. If you want to change the amount of time that elapses before themachine enters the auto sleep mode, perform the procedure below.
Basic Operations
180

<Menu> <Preferences> <Timer/Energy Settings> <Auto Sleep Time> Set the amount oftime that elapses before the machine automatically enters sleep mode <Apply>
Changing the Sleep Mode Setting to the Specified TimeYou can configure a setting so that the machine is placed into the sleep mode at the specified time. You can alsoconfigure a setting so that the sleep mode is released at the specified time.
<Menu> <Preferences> <Timer/Energy Settings> Select <Auto Sleep Daily Timer> or <SleepMode Exit Time Settings> Select <On> in <Set This Function>, and enter the time <Apply>
Exiting Sleep ModeYou can press or any other key on the operation panel to exit the sleep mode.
● You can also tap the display to exit sleep mode.
● If an external telephone or the optional handset is connected, the machine exits sleep mode whenyou take the receiver off the hook.
Basic Operations
181
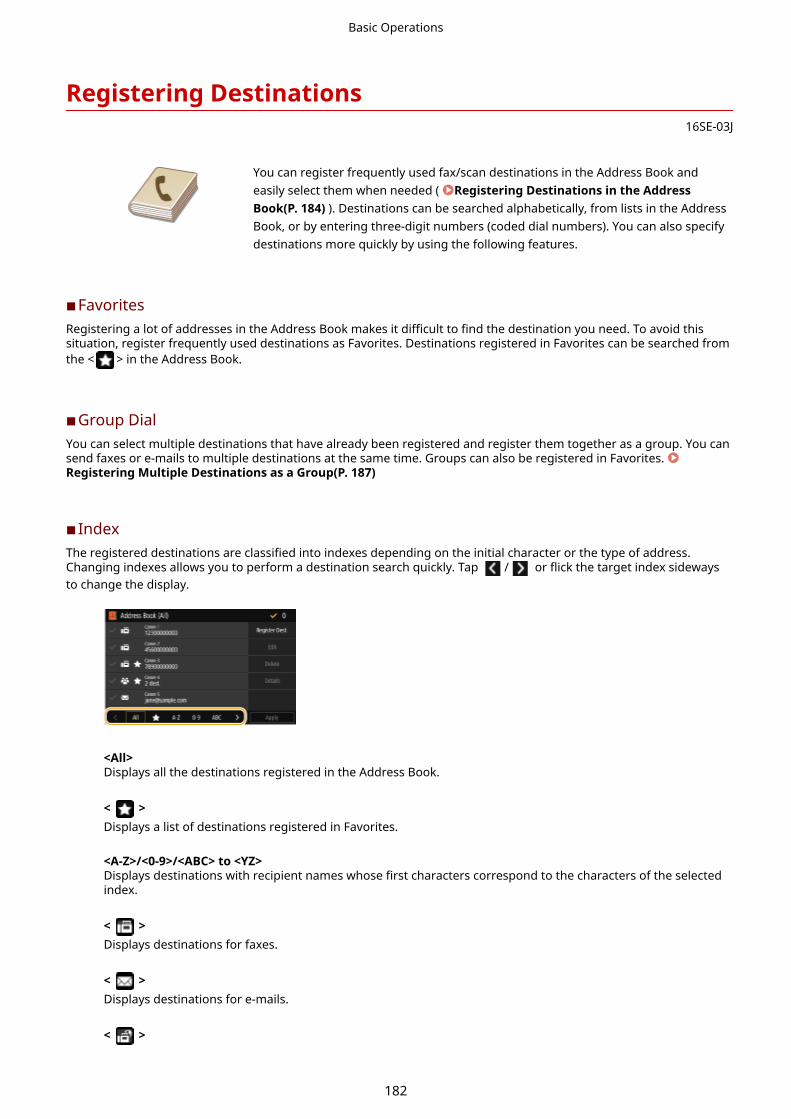
Registering Destinations16SE-03J
You can register frequently used fax/scan destinations in the Address Book andeasily select them when needed ( Registering Destinations in the AddressBook(P. 184) ). Destinations can be searched alphabetically, from lists in the AddressBook, or by entering three-digit numbers (coded dial numbers). You can also specifydestinations more quickly by using the following features.
◼FavoritesRegistering a lot of addresses in the Address Book makes it difficult to find the destination you need. To avoid thissituation, register frequently used destinations as Favorites. Destinations registered in Favorites can be searched fromthe < > in the Address Book.
◼Group DialYou can select multiple destinations that have already been registered and register them together as a group. You cansend faxes or e-mails to multiple destinations at the same time. Groups can also be registered in Favorites. Registering Multiple Destinations as a Group(P. 187)
◼ IndexThe registered destinations are classified into indexes depending on the initial character or the type of address.Changing indexes allows you to perform a destination search quickly. Tap / or flick the target index sidewaysto change the display.
<All>Displays all the destinations registered in the Address Book.
< >Displays a list of destinations registered in Favorites.
<A-Z>/<0-9>/<ABC> to <YZ>Displays destinations with recipient names whose first characters correspond to the characters of the selectedindex.
< >Displays destinations for faxes.
< >Displays destinations for e-mails.
< >
Basic Operations
182

Displays destinations for I-Faxes.
< >Displays destinations for shared folders and FTP servers. Registration of destinations is performed from thecomputer.
Setting a Shared Folder as a Save Location(P. 95)Registering Destinations from Remote UI(P. 429)
< >Displays a list of destinations registered in Group Dial.
● Use the computer to register a shared folder or FTP server as the destination for scans.Setting a Shared Folder as a Save Location(P. 95)Registering Destinations from Remote UI(P. 429)
● You can save the Address Book as a file on your computer (although you cannot use the computer to editthe Address Book). You can also import a saved Address Book from the computer to the machine. Importing/Exporting the Setting Data(P. 433)
● You can print a list of destinations registered in the Address Book. Address Book List(P. 612)
● If your office has an LDAP server installed, you can make search to find user information on the server andregister it in the Address Book. You need to specify the settings for connecting to an LDAP serverbeforehand. Registering LDAP Servers(P. 64)
Basic Operations
183

Registering Destinations in the Address Book16SE-03K
This section describes how to register destinations from the operation panel. You can also use the Remote UI toregister destinations. Registering Destinations from Remote UI(P. 429)
1 Select <Address Book> in the Home screen. Home Screen(P. 123)
2 Select <Register Dest.>
● If a screen appears prompting you to enter a PIN, enter the PIN for the Address Book and select <Apply>. Restricting Use of the Address Book(P. 404)
3 Select type of address to register.
Registering destinations with the LDAP serverIf your office has an LDAP server installed, you can make search to find user information on the server andregister it in the Address Book.
● To make registration from the LDAP server, you need to specify the settings for connecting to the LDAPserver beforehand. Registering LDAP Servers(P. 64)
1 Select <LDAP Server>.
2 Select the LDAP server you are using.
3 Select conditions for user information to be searched.
● Name, fax numbers, e-mail addresses, organization names, and organization unit are available criteriafor searching destinations.
4 Enter the search target character string, and select <Apply>.
● On how to enter text, see Entering Text(P. 132) .
● To specify multiple search criteria, repeat steps 3 and 4.
5 Select <Search Method>.
Basic Operations
184

6 Select conditions to display the search result.
<Using All Conditions Below>Searches and displays the users that meet all the search criteria specified in steps 3 and 4.
<Using Some Conditions Below>If users that meet even one of the criteria specified in steps 3 and 4 are found, displays all those users.
7 Select <Start Search>.
➠The users meeting your search criteria are displayed.
● If the authentication screen appears when you select <Start Search>, enter the user name of themachine and the password registered in the LDAP server, and select <Apply>. Registering LDAPServers(P. 64)
8 Select a user you want to register in the Address Book.
9 Select <Apply>.
➠The user name and the fax number or e-mail address registered on the LDAP server of the selecteduser are registered in the Address Book.
Registering destinations from recall settingsIf recall settings are provided, you can select <Recall Settings> and register the destinations.
4 Select <Name>.
● Registering <Name> is optional. If you register <Name>, the destination can be searched alphabetically.
5 Enter the name, and select <Apply>.
● On how to enter text, see Entering Text(P. 132) .
6 Select <Fax Number>, <E-Mail Address>, or <I-Fax Address>.
7 Enter the destination, and select <Apply>.
Making detailed settings (only when registered for fax)
After selecting <Set Details>, a screen similar to the following is displayed.
Basic Operations
185
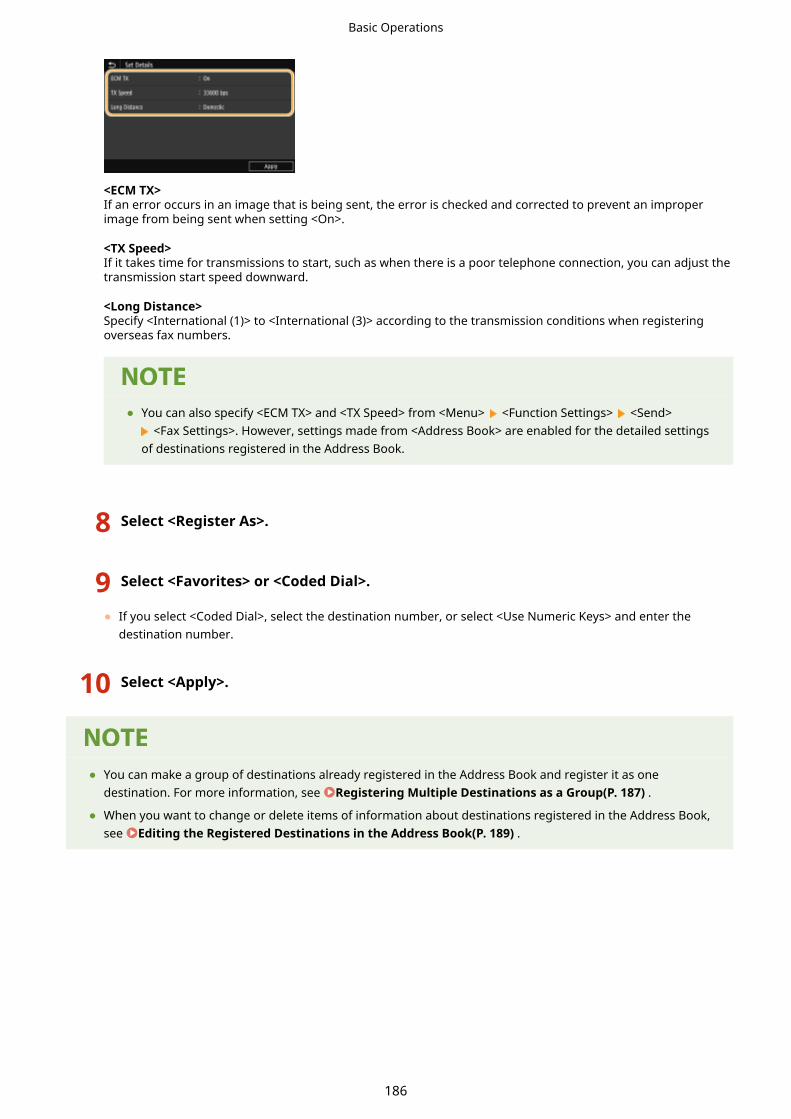
<ECM TX>If an error occurs in an image that is being sent, the error is checked and corrected to prevent an improperimage from being sent when setting <On>.
<TX Speed>If it takes time for transmissions to start, such as when there is a poor telephone connection, you can adjust thetransmission start speed downward.
<Long Distance>Specify <International (1)> to <International (3)> according to the transmission conditions when registeringoverseas fax numbers.
● You can also specify <ECM TX> and <TX Speed> from <Menu> <Function Settings> <Send> <Fax Settings>. However, settings made from <Address Book> are enabled for the detailed settings
of destinations registered in the Address Book.
8 Select <Register As>.
9 Select <Favorites> or <Coded Dial>.
● If you select <Coded Dial>, select the destination number, or select <Use Numeric Keys> and enter thedestination number.
10 Select <Apply>.
● You can make a group of destinations already registered in the Address Book and register it as onedestination. For more information, see Registering Multiple Destinations as a Group(P. 187) .
● When you want to change or delete items of information about destinations registered in the Address Book,see Editing the Registered Destinations in the Address Book(P. 189) .
Basic Operations
186

Registering Multiple Destinations as a Group16SE-03L
You can select multiple destinations that have already been registered and register them together as a group. Thissection describes how to register a group from the operation panel. You can also use the Remote UI to register agroup. Registering Destinations from Remote UI(P. 429)
● Only destinations of the same type of address can be registered in the same group.
● Shared folders or FTP servers cannot be registered in a group as destinations.
1 Select <Address Book> in the Home screen. Home Screen(P. 123)
2 Select <Register Dest.> <Group>.
● If a screen appears prompting you to enter a PIN, enter the PIN for the Address Book and select <Apply>. Restricting Use of the Address Book(P. 404)
3 Select <Name>.
● Registering <Name> is optional. If you register <Name>, the destination can be searched alphabetically.
4 Enter the name, and select <Apply>.
● On how to enter text, see Entering Text(P. 132) .
5 Select <Destination>.
6 Select <Add>.
7 Select the index containing the destination you want to register. Index(P. 182)
8 Select the destination.
Basic Operations
187

9 Repeat steps 6 to 8 until you have registered all of the destinations that you want toregister, and then select <Apply>.
To view information about the destination
● Select the target destination, and select <Details>.
To remove a destination from the group
● Select the destination that you want to remove from the group, and select <Delete> <Yes>.
10 Select <Register As>.
11 Select <Favorites> or <Coded Dial>.
● If you select <Coded Dial>, select the destination number, or select <Use Numeric Keys> and enter thedestination number.
12 Select <Apply>.
Basic Operations
188
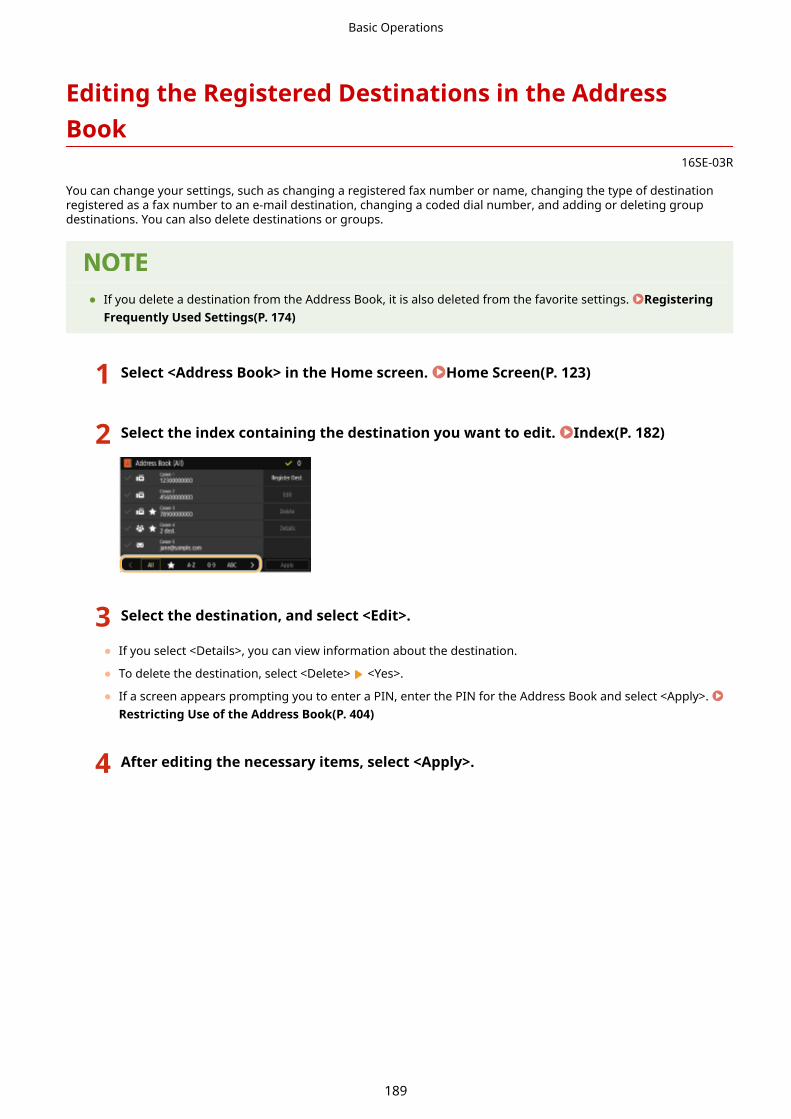
Editing the Registered Destinations in the AddressBook
16SE-03R
You can change your settings, such as changing a registered fax number or name, changing the type of destinationregistered as a fax number to an e-mail destination, changing a coded dial number, and adding or deleting groupdestinations. You can also delete destinations or groups.
● If you delete a destination from the Address Book, it is also deleted from the favorite settings. RegisteringFrequently Used Settings(P. 174)
1 Select <Address Book> in the Home screen. Home Screen(P. 123)
2 Select the index containing the destination you want to edit. Index(P. 182)
3 Select the destination, and select <Edit>.
● If you select <Details>, you can view information about the destination.
● To delete the destination, select <Delete> <Yes>.
● If a screen appears prompting you to enter a PIN, enter the PIN for the Address Book and select <Apply>. Restricting Use of the Address Book(P. 404)
4 After editing the necessary items, select <Apply>.
Basic Operations
189

CopyingCopying ................................................................................................................................................................ 191
Copy Basic Features Screen .............................................................................................................................. 193
Basic Copy Operations ...................................................................................................................................... 195
Canceling Copies .......................................................................................................................................... 200
Checking the Copying Status and Log .......................................................................................................... 201
Enhancing and Adjusting Copy Quality ............................................................................................................ 203
Selecting the Type of Original for Copying ................................................................................................... 204
Adjusting Sharpness for Copying (Sharpness) .............................................................................................. 205
Erasing Dark Borders When Copying (Erase Frame) ..................................................................................... 206
Adjusting the Color ....................................................................................................................................... 207
Useful Copy Functions ....................................................................................................................................... 208
Copying Multiple Documents onto One Sheet (N on 1) ................................................................................. 209
Collating Copies by Page .............................................................................................................................. 210
Making ID Card Copies ................................................................................................................................. 211
Copying
190

Copying16SE-03S
This chapter describes basic copy operations and various other useful functions, such as color balance adjustment andID card copy.
◼Using Basic OperationsCopy Basic Features Screen(P. 193)Basic Copy Operations(P. 195)Canceling Copies(P. 200)Checking the Copying Status and Log(P. 201)
◼Enhancing Quality Enhancing and Adjusting Copy Quality(P. 203)
Selecting the Type of Original forCopying(P. 204)
Adjusting Sharpness for Copying(Sharpness)(P. 205)
Erasing Dark Borders WhenCopying (Erase Frame)(P. 206)
Adjusting the Color(P. 207)
Copying
191

◼Using Useful Copy Functions Useful Copy Functions(P. 208)
Copying Multiple Documents ontoOne Sheet (N on 1)(P. 209)
Collating Copies by Page(P. 210) Making ID Card Copies(P. 211)
Copying
192

Copy Basic Features Screen16SE-03U
When you select <Copy> in the Home screen, the Copy Basic Features screen appears.
Current setting status and setting buttonsThe setting status, such as copy ratio, copy paper, and number of copies, are displayed. To copy correctly, besure to check the settings displayed here. When you want to change a setting, select the desired setting item.
Basic Copy Operations(P. 195)
<2-Sided>You can select a combination of 1-sided copying and 2-sided copying for the original and printout paper.Specify the detailed settings from <Other Settings>. Basic Copy Operations(P. 195)
Scans one side of an original and prints the scanned data on one side of the paper.
Scans one side of an original and prints the scanned data on both sides of the paper.
Scans both sides of an original and prints the scanned data on both sides of the paper.
Scans both sides of an original and prints the scanned data on one side of the paper.
<N on 1>You can select an "N on 1" pattern to arrange multi-page originals on the same side of one sheet. Specify thedetailed settings from <Other Settings>. Copying Multiple Documents onto One Sheet (N on 1)(P. 209)
Does not apply N on 1.
Prints data for two consecutive pages on one side of a sheet of original.
Prints data for four consecutive pages on one side of a sheet of original.
<Other Settings>You can call the detailed settings or favorite settings that are not displayed in the Copy Basic Features screen.
Copying
193

<Reset>You can collectively restore the default settings.
<Start>Use this button to start copying. Selecting <Black & White> starts black and white copying. Selecting <Color>starts color copying.
Copying
194

Basic Copy Operations16SE-03W
This section describes the basic operation procedure used to copy an original.
1 Place the original(s). Placing Originals(P. 136)
2 Select <Copy> in the Home screen. Home Screen(P. 123)
3 Select <Number of Copies> in the Copy Basic Features screen. Copy Basic FeaturesScreen(P. 193)
4 Enter the number of copies, and select <Close>.
● If you have entered an incorrect value, use to clear it.
5 Specify the copy settings as necessary.
Adjusting Density
2-Sided Copying
Enlarging or Reducing
Selecting Copy Paper
Adjusting Density
Adjust the density of the scan if the text or images in an original are excessively lightor dark. For example, you can sharpen text and lines written using a pencil. Adjusting Entire Density(P. 195)
Adjust the background density. You can make a clear copy of originals with coloredbackgrounds, or originals such as a newspaper that is printed on thin paper onwhich text or images on the other side are visible through the paper. Adjustingthe Background Density(P. 196)
◼Adjusting Entire Density
<Density> Adjust the density <Close>
Copying
195

◼Adjusting the Background Density
<Density> <Background Density> <Adjust (Manual)> Adjust the backgrounddensity <Apply> <Close>
● Depending on the original color, portions other than the background may be affected.
● If you select <Density by Color>, you can adjust the background density for each color.
2-Sided Copying
You can copy two pages of an original on both sides of the paper. You can also copya 2-sided original on both sides of the paper, or on two separate pages.
● <2-Sided> may not be available with some sizes and types of paper. Available Paper(P. 704)
<Other Settings> <2-Sided> Select the type of 2-sided copying <Apply>
Types of 2-sided copyingThe illustration below shows the types of 2-sided copying.
<1-Sided->2-Sided> <2-Sided->2-Sided> <2-Sided->1-Sided>
Copying
196

<Orig./Fin. Type>Specify the original orientation, opening type, and finishing type.
Enlarging or Reducing
You can enlarge or reduce copies by using a preset copy ratio such as <A5->A4>, orby setting a custom copy ratio in increments of 1 %.
● If you make a setting for <N on 1> after setting the copy ratio, the setting of reduction ratio in <N on1> takes priority.
<Copy Ratio> Select the copy ratio
Preset copy ratioSelect a copy ratio.
Numeric keysYou can set any copy ratio from 25 to 400% in 1% increments.
Selecting Copy Paper
Specify the paper source that contains the paper to use for printing out copies.
● You must first specify the size and type of paper that is loaded in the paper source.Specifying Paper Size and Type(P. 159)Loading Paper(P. 140)
Copying
197

<Paper> Select the paper source <Close>
Uses the paper that is loaded in the multi-purpose tray to make copies.
Uses the paper that is loaded in the paper drawer (Drawer 1) of the machine to make copies.
Uses the paper that is loaded in the optional cassette feeding module (Drawer 2) to makecopies.
● For information about other copy settings, see Enhancing and Adjusting Copy Quality(P. 203) or Useful Copy Functions(P. 208) .
6 Select <Start>.
➠Copying starts.
● If you want to cancel, select <Cancel> <Yes>. Canceling Copies(P. 200)
When placing originals in the feeder in step 1The original is automatically scanned.
When placing originals on the platen glass in step 1
For 2-sided copying or N on 1 copying, the screen prompting you to load the next original is displayed.
1 Place the next original on the platen glass, and select <Scan Next>.
● You can also specify <Density>, <Original Type>, and <Color Balance> separately for each original.
● Repeat this step until you finish scanning the entire original.
2 Select <Start Printing>.
● When the <Paper Settings and Loaded Size Mismatch> or <The memory is full. Scanning will be canceled.Do you want to print?> message is shown in the display. Countermeasures for Each Message(P. 648)
Copying
198

When copying originals with text or images that extend to the edges of the page● The edges of the original might not be copied. For more information about the scan margins, see Main
Unit(P. 699) .
● If you always want to make copies with the same settings: Changing the Default Settings forFunctions(P. 176)
● If you want to register a combination of settings to use when needed: Registering Frequently UsedSettings(P. 174)
LINKS
Checking the Copying Status and Log(P. 201)
Copying
199

Canceling Copies16SE-03X
If you want to cancel copying immediately after selecting <Start>, select <Cancel> on the screen or press on theoperation panel. You can also cancel copying after checking the copy status.
◼Select <Cancel> on the Screen That is Displayed While Copying
◼Press to Cancel
If the Screen Displays a List of Documents When is PressedOriginals have been scanned and are waiting to be printed. Select a copy document to be canceled, and select<Cancel> <Yes>.
◼Check the copy job status before canceling
<Status Monitor> <Copy/Print Job> Select the copy document in the <Copy/Print Job Status>tab <Cancel> <Yes>
LINKS
Basic Copy Operations(P. 195)
Copying
200

Checking the Copying Status and Log16SE-03Y
You can check the current copy statuses and the logs for copied documents.
● When <Display Job Log> is set to <Off>, you cannot check the copy job log. <Display Job Log>(P. 569)
Useful in the Following Cases
● When some long time has already passed after scanning of your original to be copied but printing of thedocument has not started yet, you may want to see the waiting list of the documents waiting to be printed.
● When you cannot find your printouts that you thought had been copied, you may want to see whether anerror has occurred.
1 Select <Status Monitor>.
2 Select <Copy/Print Job>.
3 Check the copy statuses and logs.
To check the copy statuses
1 Select the document whose status you want to check in the <Copy/Print Job Status> tab.
➠Displays detailed information about the document.
To check the copy logs
1 Select the document whose log you want to check in the <Copy Job Log> tab.
● <OK> is displayed when a document was copied successfully, and <Error> is displayed when adocument failed to be copied because it was canceled or there was some error.
Copying
201

➠Displays detailed information about the document.
When a three-digit number is shown in the case of <Error>
● This number represents an error code. Countermeasures for Each Error Code(P. 662)
LINKS
Basic Copy Operations(P. 195)Canceling Copies(P. 200)
Copying
202

Enhancing and Adjusting Copy Quality16SE-040
You can improve the copy quality by specifying more detailed settings, such as adjusting the brightness, erasingunnecessary shadows, etc.
Selecting the Type of Original forCopying(P. 204)
Adjusting Sharpness for Copying(Sharpness)(P. 205)
Erasing Dark Borders WhenCopying (Erase Frame)(P. 206)
Adjusting the Color(P. 207)
Copying
203

Selecting the Type of Original for Copying16SE-041
You can select the optical image quality for the copy depending on the original type,such as text-only documents, documents with charts and graphs, or magazinephotos.
<Copy> <Other Settings> <Original Type> Select the original type
<Text/Photo/Map (Speed)>Priority is given to speed over image quality. This setting is only effective when selected forcolor copying.
<Text/Photo/Map>Suitable when copying originals that contain both text and photos, or originals that includedetailed lines, such as maps.
<Text/Photo/Map (Quality)>Priority is given to image quality over speed. You can also adjust the level of priority given tothe quality of the text or photos. Adjust the setting on the scale, and select <Apply>.
<Printed Image>Suitable when making a clear copy of originals that contain printed photos (photos made ofhalftone dots), such as magazines or pamphlets.
LINKS
Basic Copy Operations(P. 195)
Copying
204

Adjusting Sharpness for Copying (Sharpness)16SE-042
You can adjust sharpness of the copied image. Increase the sharpness to sharpenblurred text and lines, or decrease the sharpness to improve the appearance ofmagazine photos.
<Copy> <Other Settings> <Sharpness> Adjust the sharpness <Apply>
Example: If you want to sharpen text and lines written in pencil
Example: If you want to improve the appearance of magazine photos
LINKS
Basic Copy Operations(P. 195)Adjusting the Color(P. 207)
Copying
205

Erasing Dark Borders When Copying (Erase Frame)16SE-043
When copying originals that are smaller than the output paper size, frame lines mayappear around the edges in the copied image. When copying facing pages fromthick book, dark borders may appear. <Erase Frame> enables you to erase theseframe lines and dark borders.
● The width of the frame to erase is increased or decreased relative to the <Copy Ratio> setting.
● <Erase Frame> is not available when using <N on 1>.
<Copy> <Other Settings> <Erase Frame> <On> Specify the width of the frame to erase <Apply> Select the original size on the <Scan Size> screen
Example: If you want to erase the dark borders and frame lines
LINKS
Basic Copy Operations(P. 195)
Copying
206

Adjusting the Color16SE-044
Adjust the levels of yellow, magenta, cyan, or black.
<Copy> <Other Settings> <Color Balance> Select the color, and adjust the color level <Apply>
Example: If you want to make a copy with colors that more closely match the original
Example: If you want to make a copy with brighter colors than the original
● If you select <Fine Adjust>, you can adjust the levels of the three density areas for each color.
LINKS
Basic Copy Operations(P. 195)Adjusting Sharpness for Copying (Sharpness)(P. 205)
Copying
207

Useful Copy Functions16SE-045
You can copy multiple sheets onto one page, or copy by grouping sheets into complete sets in sequential page order.Also, there is a function to copy both sides of a card, etc. onto one page.
Copying Multiple Documents ontoOne Sheet (N on 1)(P. 209)
Collating Copies by Page(P. 210) Making ID Card Copies(P. 211)
Copying
208

Copying Multiple Documents onto One Sheet (N on 1)16SE-046
You can reduce the size of a multiple-page original and arrange all pages on one sideof the paper. You can save the number of sheets as the document can be copied onfewer pages than those of the original.
● Using <N on 1> reduces the copy ratio automatically (the copy ratio is displayed on the screen). If thecopying process has not started, you can further reduce the image size by lowering the numeric value that isautomatically displayed. But the edges of the original might not be copied if you increase it.
● <N on 1> is not available when using <Erase Frame>.
● When you copy multiple originals onto one page, margins may be created in the copied image.
<Copy> <Other Settings> <N on 1> Select the number of pages to be combined, and select<Next> Select the original size on the <Scan Size> On the <Output Size> screen, select thepaper source that contains the paper you want to use
Number of pages to be combinedSelect the number of pages to be combined on one side of paper. For example, <4 on 1> means that "a four-page original can be combined on a single sheet."
<Layout>Specify how to arrange the originals on the page.
LINKS
Basic Copy Operations(P. 195)
Copying
209

Collating Copies by Page16SE-047
When preparing multiple copies of multi-page originals, set <Collate> to <On> tocollate copies in sequential page order. This function is useful when preparinghandouts for meetings or presentations.
<Copy> <Other Settings> <Collate> <On>
<Off>The copies are grouped by page and not collated. For example, if you are making three copies of a five-pageoriginal, the printouts will be arranged in the following page order: 1, 1, 1, 2, 2, 2, 3, 3, 3, 4, 4, 4, 5, 5, 5.
<On>The copies are grouped into complete sets in sequential page order. For example, if you are making threecopies of a five-page original, the printouts will be arranged in the following page order: 1, 2, 3, 4, 5, 1, 2, 3, 4, 5,1, 2, 3, 4, 5.
LINKS
Basic Copy Operations(P. 195)
Copying
210

Making ID Card Copies16SE-048
You can use <ID Card Copy> to copy the front and back sides of a card onto the sameside of a page. This function is useful when copying a driver's license or ID card.
● <Copy Ratio> is automatically set to <100%>.
Place the card on the platen glass <ID Card Copy> <Start> Turn the card over <Scan Next>
LINKS
Basic Copy Operations(P. 195)
Copying
211
FaxingFaxing ................................................................................................................................................................... 213
Fax Basic Features Screen ................................................................................................................................. 216
Basic Operations for Sending Faxes ................................................................................................................. 217
Canceling Sending Faxes .............................................................................................................................. 225
Receiving Faxes ................................................................................................................................................. 226
Useful Functions When Sending ....................................................................................................................... 229
Recalling Previously Used Settings for Sending (Recall Settings) .................................................................. 230
Sending a Fax after a Phone Call (Manual Sending) ...................................................................................... 233
Saving a Copy of a Sent Original ................................................................................................................... 235
Various Receiving Methods .............................................................................................................................. 236
Saving Received Documents into the Machine (Memory Reception) ............................................................. 237
Forwarding the Received Documents Automatically ...................................................................................... 239
Checking Status and Log for Sent and Received Documents ......................................................................... 241
Sending Faxes from Your Computer (PC Fax) .................................................................................................. 243
Sending PC Faxes ......................................................................................................................................... 244
Using Internet Fax (I-Fax) ................................................................................................................................. 246
Sending I-Faxes ............................................................................................................................................ 247
Receiving I-Faxes .......................................................................................................................................... 254
Faxing
212

Faxing16SE-049
This chapter describes fax settings, basic fax operations and various other useful functions to suit your needs, such asPC Fax to send documents directly from computers, Address Book to specify destinations easily, and Forwarding toreceive faxes even when you are out of the office.
● You need to complete some procedures before using fax functions. Configuring Initial Settings for FaxFunctions(P. 79)
● You need to register destinations in the Address Book before using this feature. RegisteringDestinations(P. 182)
◼Using Basic OperationsFax Basic Features Screen(P. 216)Basic Operations for Sending Faxes(P. 217)Canceling Sending Faxes(P. 225)Receiving Faxes(P. 226)Checking Status and Log for Sent and Received Documents(P. 241)
◼Using Useful Functions When Sending Useful Functions When Sending(P. 229)
Recalling Previously UsedSettings for Sending (RecallSettings)(P. 230)
Sending a Fax after a Phone Call(Manual Sending)(P. 233)
Saving a Copy of a SentOriginal(P. 235)
Faxing
213

◼Receiving According to Your Purposes Various Receiving Methods(P. 236)
Saving Received Documents into the Machine (Memory Reception)(P. 237)
◼Forwarding All the Received Documents
Forwarding the Received Documents Automatically(P. 239)
◼Sending Faxes Directly from Your Computer
Sending Faxes from Your Computer (PC Fax)(P. 243)
Faxing
214

◼Sending and Receiving Faxes via the Internet
Using Internet Fax (I-Fax)(P. 246)
Faxing
215

Fax Basic Features Screen16SE-04A
Selecting <Fax> in the Home screen displays the FAX Basic Features screen that appears when you sending faxes.
<Enter Dest.> tabSelect this tab to directly enter a destination.
<Specify Destination> tabSelect this tab to search for an LDAP server, enter a coded dial, or specify a destination using the recallsettings.
Basic Operations for Sending Faxes(P. 217)Recalling Previously Used Settings for Sending (Recall Settings)(P. 230)
<TX/RX Settings> tabSelect this tab to specify the scanning settings. You can change the RX mode ( Deciding Which FaxReceive Mode to Use(P. 80) ) of the machine.
<Confirm Destination>You can check or change the name and fax number of the specified destination as well as the number ofdestinations.
<Address Book>Specify destinations registered in the Address Book.
<Reset>You can collectively restore the default settings.
<Start>Use this button to start faxing.
Faxing
216
Basic Operations for Sending Faxes16SE-04C
This section describes the basic operation procedure used to fax an original.
● You need to complete some procedures before using fax functions. Configuring Initial Settings for FaxFunctions(P. 79)
1 Place the original(s). Placing Originals(P. 136)
2 Select <Fax> in the Home screen. Home Screen(P. 123)
● If the login screen appears, specify the user name, the password, and the authentication server. Loggingin to Authorized Send(P. 134)
3 Select <Reset> in the Fax Basic Features screen. Fax Basic Features Screen(P. 216)
● If the destinations set by the previous user are still selected, this can cause transmission errors. Always resetthe settings before sending.
4 Specify the destination.
Specifying from Address Book
Specifying from Coded Dial Numbers
Entering Destinations Directly
Specifying Destinations in an LDAP Server
Specifying from Address Book
The Address Book enables you to specify a destination by selecting from a list ofregistered destinations or by searching by name for destinations with recipientnames.
● You need to register destinations in the Address Book before using this feature. RegisteringDestinations(P. 182)
1 Select <Address Book>.
Faxing
217

2 Select an index. Index(P. 182)
3 Select the check box for the desired destination, and select <Apply>.
● If a destination is selected from <Address Book> in the Home screen, the Fax Basic Features screen can bedisplayed while the selected destination remains being specified.
Specifying from Coded Dial Numbers
Three-digit numbers (coded dial numbers) are assigned to addresses in the AddressBook. You can specify an address simply by entering its coded dial number.
● To use coded dial numbers, the destination must be registered in the Address Book beforehand. Registering Destinations(P. 182)
1 Select <Coded Dial> in the <Specify Destination> tab.
2 Enter a three-digit number.
● If you have entered an incorrect value, use to clear it.
If a confirmation screen appears
● When <Confirm When Coded Dial TX> is set to <On>, a screen is displayed that shows the destination andthe name for the number. (For Group Dial, the destination name and the number of destinations are
Faxing
218

shown.) Check the contents and if everything is correct, select <OK>. To specify a different destination,select <Cancel> and then re-enter the three-digit coded dial number. Displaying Destinations inAddress Book(P. 406)
Entering Destinations Directly
For a destination that is not registered in the Address Book, specify it by entering a fax number.
1 Enter the fax number in the <Enter Dest.> tab.
● If your machine is connected to a PBX (Private Branch Exchange), select <R> before entering the destination.If <R> is not available, you need to register the R-key settings. <R-Key Setting>(P. 547)
● If you have entered an incorrect value, use to clear it.
Adding a destination● To enter a second or subsequent destination, select <Next Dest.>.
If a confirmation screen appears● When <Confirm Entered Fax Number> is set to <On>, the input screen reappears so that you can
confirm the destination ( Confirming the Entered Fax Number(P. 408) ). Enter the destinationagain.
Sending a fax abroad● Enter the international access code, the country code, and the fax number to specify the destination.
If you are not able to successfully connect to a recipient, select <Pause> and insert a pause betweennumbers.
Specifying Destinations in an LDAP Server
If your office has an LDAP server installed, you can specify a destination using userinformation in the server. Access the LDAP server via the machine to search for theappropriate user information and specify it as destination.
● You need to specify the settings for connecting to an LDAP server beforehand. Registering LDAPServers(P. 64)
1 Select <LDAP Server> in the <Specify Destination> tab.
2 Select the LDAP server you are using.
Faxing
219

3 Select conditions for user information to be searched.
● Name, fax numbers, e-mail addresses, organization names, and organization unit are available criteria forsearching destinations.
4 Enter the search target character string, and select <Apply>.
● On how to enter text, see Entering Text(P. 132) .
● To specify multiple search criteria, repeat steps 3 and 4.
5 Select <Search Method>.
6 Select conditions to display the search result.
<Using All Conditions Below>Searches and displays the users that meet all the search criteria specified in steps 3 and 4.
<Using Some Conditions Below>If users that meet even one of the criteria specified in steps 3 and 4 are found, displays all those users.
7 Select <Start Search>.
➠The users meeting your search criteria are displayed.
● If the authentication screen appears when you select <Start Search>, enter the user name of the machineand the password registered in the LDAP server, and select <Apply>. Registering LDAP Servers(P. 64)
8 Select the check box for the user that you want to specify as destination, and select<Apply>.
Adding a destination
● To send faxes to multiple destinations at a time (sequential broadcast), repeat the appropriate steps toenter all destinations.
Faxing
220
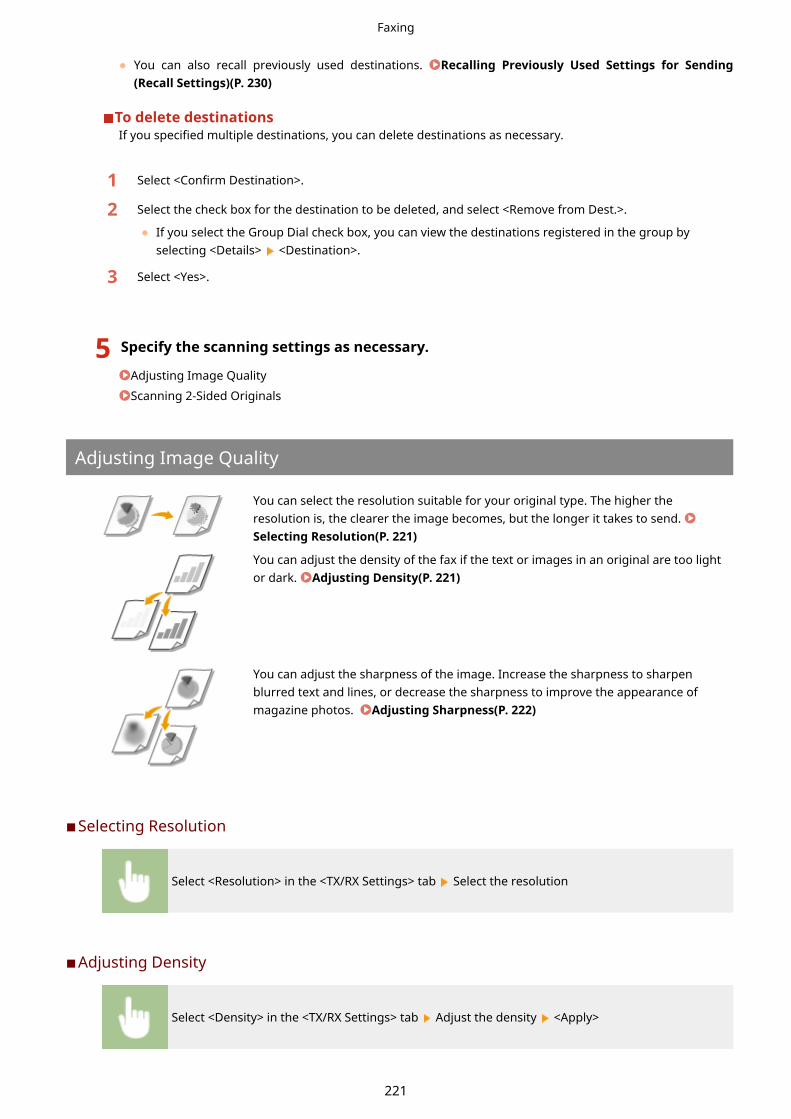
● You can also recall previously used destinations. Recalling Previously Used Settings for Sending(Recall Settings)(P. 230)
To delete destinationsIf you specified multiple destinations, you can delete destinations as necessary.
1 Select <Confirm Destination>.
2 Select the check box for the destination to be deleted, and select <Remove from Dest.>.
● If you select the Group Dial check box, you can view the destinations registered in the group byselecting <Details> <Destination>.
3 Select <Yes>.
5 Specify the scanning settings as necessary.
Adjusting Image Quality
Scanning 2-Sided Originals
Adjusting Image Quality
You can select the resolution suitable for your original type. The higher theresolution is, the clearer the image becomes, but the longer it takes to send. Selecting Resolution(P. 221)
You can adjust the density of the fax if the text or images in an original are too lightor dark. Adjusting Density(P. 221)
You can adjust the sharpness of the image. Increase the sharpness to sharpenblurred text and lines, or decrease the sharpness to improve the appearance ofmagazine photos. Adjusting Sharpness(P. 222)
◼Selecting Resolution
Select <Resolution> in the <TX/RX Settings> tab Select the resolution
◼Adjusting Density
Select <Density> in the <TX/RX Settings> tab Adjust the density <Apply>
Faxing
221

◼Adjusting Sharpness
Select <Sharpness> in the <TX/RX Settings> tab Adjust the sharpness <Apply>
Example: If you want to sharpen text and lines written in pencil
Example: If you want to improve the appearance of magazine photos
Scanning 2-Sided Originals
The machine can automatically scan the front and back sides of originals in thefeeder.
● The machine cannot scan both sides of originals automatically when the originals are placed on the platenglass or when the machine is set to Manual Sending.
Faxing
222

Select <2-Sided Original> in the <TX/RX Settings> tab Select <Book Type> or <Calendar Type>
<Book Type>Select for originals whose images on the front and back sides face the same direction.
<Calendar Type>Select for originals whose images on the front and back sides face in opposite directions.
6 Select <Start>.
● If the <Confirm Destination> screen is displayed, check whether the destination is correct, and then select<Start Scanning>.
➠Scanning of the original starts.
● If you want to cancel, select <Cancel> <Yes>. Canceling Sending Faxes(P. 225)
When placing originals in the feeder in step 1When scanning is complete, the faxes are sent.
When placing originals on the platen glass in step 1
When scanning is complete, follow the procedures below.
1 Select the original size.
● When there is only one page to be scanned, proceed to step 3.
2 Place the next original on the platen glass, and select <Scan Next>.
● Repeat this step until you finish scanning all of the pages.
3 Select <Start Sending>.
➠The faxes are sent.
● If you always want to send faxes with the same settings: Changing the Default Settings forFunctions(P. 176)
● If you want to register a combination of settings to use when needed: Registering Frequently UsedSettings(P. 174)
● If you want to sound an alarm when the handset is off the hook: <Off-Hook Alarm>(P. 544)
LINKS
Canceling Sending Faxes(P. 225)
Faxing
223

Useful Functions When Sending(P. 229)Checking Status and Log for Sent and Received Documents(P. 241)
Faxing
224
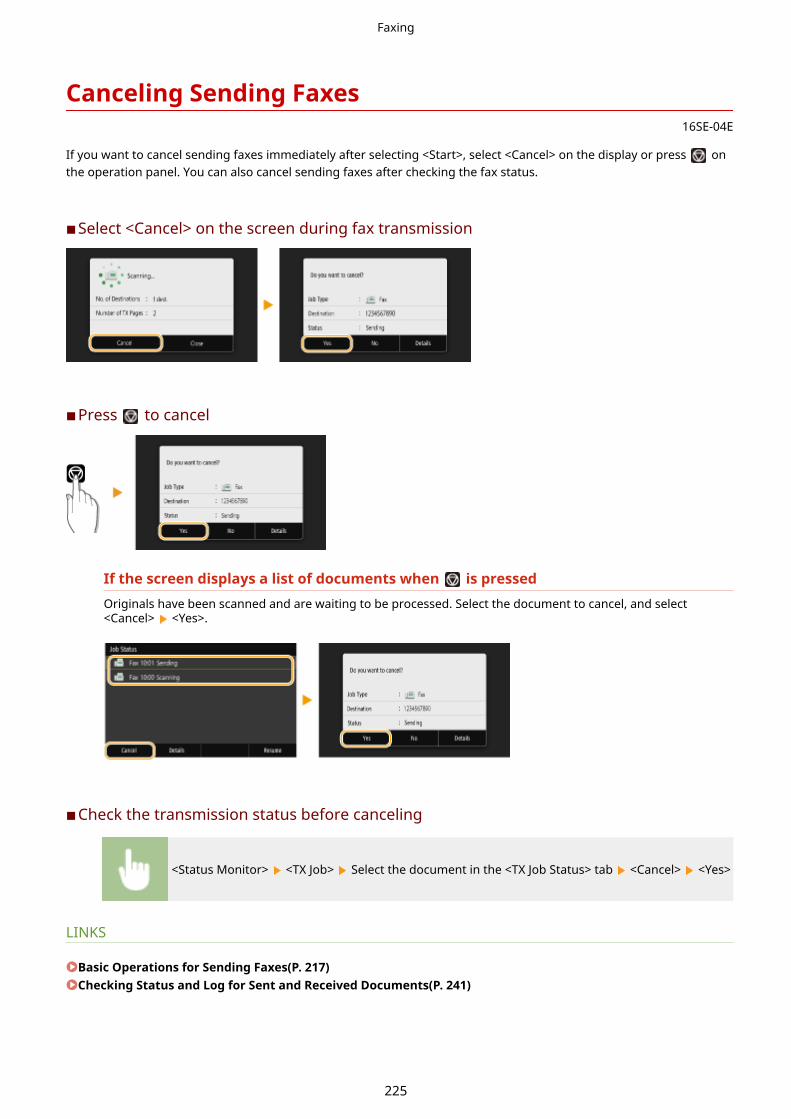
Canceling Sending Faxes16SE-04E
If you want to cancel sending faxes immediately after selecting <Start>, select <Cancel> on the display or press onthe operation panel. You can also cancel sending faxes after checking the fax status.
◼Select <Cancel> on the screen during fax transmission
◼Press to cancel
If the screen displays a list of documents when is pressedOriginals have been scanned and are waiting to be processed. Select the document to cancel, and select<Cancel> <Yes>.
◼Check the transmission status before canceling
<Status Monitor> <TX Job> Select the document in the <TX Job Status> tab <Cancel> <Yes>
LINKS
Basic Operations for Sending Faxes(P. 217)Checking Status and Log for Sent and Received Documents(P. 241)
Faxing
225

Receiving Faxes16SE-04F
This section describes the methods for receiving faxes and how to set up the machine to receive faxes. You need tocomplete some procedures for using fax functions before specifying the receiving settings. Configuring InitialSettings for Fax Functions(P. 79)
● The machine can print received fax documents on A4 or Letter size paper. If received fax documents areprinted on other paper sizes, a portion of the page may not be printed or a page may be printed on twoseparate sheets of paper.
◼Methods for Receiving FaxesThe machine provides the following receiving methods. Select the method that best suits your needs and then set it upby following the procedures in Setting Up the Machine to Receive Faxes(P. 227) .
<Auto>
Dedicated to receiving faxesThe machine receives faxes automatically. Even if someone makes a call to you, you cannottalk to the caller.
<Fax/Tel (AutoSwitch)>
When the call is a faxThe machine receives the fax automatically.
When the call is a telephone call
An incoming call rings. Pick up the handset to answer the call.
● You need to connect your telephone or the optional handset to the machine beforehand.
<Manual>
When the call is a faxAn incoming call rings. Pick up the handset. If you hear a beep, select <Fax> <Start
Receiving> to receive faxes.
When the call is a telephone call
An incoming call rings. Pick up the handset. If you do not hear a beep, start yourconversation.
● You need to connect your telephone or the optional handset to the machine beforehand.
Faxing
226
● You can set the machine to automatically receive faxes when an incoming call rings withina specified timeframe. <Switch to Auto RX>(P. 552)
<AnsweringMachine>
When the call is a faxAfter an incoming call rings, the machine receives the fax automatically.
When the call is a telephone call
The answering machine activates, enabling the caller to leave a message. If you pick up thehandset before the answering machine starts recording a message, you can talk with thecaller.
● You need to connect your answering machine to the machine beforehand.
● Set the answering machine to answer after a few rings.
● We recommend that you add approximately 4 seconds of silence at the beginning of themessage or set the maximum recording time to 20 seconds.
<Net Switch> The machine distinguishes between fax and telephone calls. This mode is only available forcertain countries and requires subscription to a network switch service.
● You need to connect your telephone or the optional handset to the machine beforehand.
● Depending on the type of telephone connected to it, the machine may not be able to send or receive faxesproperly.
● If you are connecting an external telephone with fax functions, set the telephone to not receive faxesautomatically.
● If you pick up the telephone handset and hear a beep, the call is a fax. You can receive the fax just by usingthe telephone to enter a specific ID number. Using a Telephone to Receive Faxes (Remote Reception)(P. 228)
◼Setting Up the Machine to Receive Faxes
1 Select <Fax> in the Home screen. Home Screen(P. 123)
● If the login screen appears, specify the user name, the password, and the authentication server. Loggingin to Authorized Send(P. 134)
2 Select <RX Mode> in the <TX/RX Settings> tab of the Fax Basic Features screen. FaxBasic Features Screen(P. 216)
3 Select the receiving method.
When selecting <Fax/Tel (Auto Switch)>
Specify the following three settings as necessary. When the setting is complete, select <Apply>.
Faxing
227

<Ring Start Time>Enables you to specify the duration during which the machine determines whether an incoming call is a fax or atelephone call.
<Incoming Ring Time>Enables you to specify the duration during which an incoming call rings for a telephone call.
<Action After Ring>Enables you to specify how the machine operates if you do not pick up the handset while an incoming call isringing. Select <End> to disconnect the call or <Receive> to receive an incoming fax.
● If you want to print received documents on both sides of paper: <Print on Both Sides>(P. 551)
● If you want to print information, such as reception date and time, at the bottom of received documents: <Print RX Page Footer>(P. 554)
● If you want to continue printing even when the amount remaining in the toner cartridge is low: <ContinuePrint. When Amount in Cart. Low>(P. 549)
◼Using a Telephone to Receive Faxes (Remote Reception)When you pick up the telephone and get a fax signal, you do not need to go to the machine to receive the fax. Justenter a specific ID number with the telephone, and you can start receiving the fax.
● When the telephone is not directly connected with the machine, the remote reception function is notavailable.
1 When an incoming call rings, pick up the telephone handset.
2 If you hear a beep, enter the ID number for Remote Reception with the telephone.
● For more information about setting the ID number, see <Remote RX>(P. 552) .
3 Hang up the handset.
LINKS
Checking Status and Log for Sent and Received Documents(P. 241)Various Receiving Methods(P. 236)
Faxing
228

Useful Functions When Sending16SE-04H
This section describes how to forward a fax again to a previously specified destination, how to send a fax after a phonecall, and how to save a copy of a fax document.
Recalling Previously UsedSettings for Sending (RecallSettings)(P. 230)
Sending a Fax after a Phone Call(Manual Sending)(P. 233)
Saving a Copy of a SentOriginal(P. 235)
Faxing
229

Recalling Previously Used Settings for Sending (RecallSettings)
16SE-04J
You can recall the destinations specified in the past. When you specify a previouslyused destination, the machine also sets the same fax settings such as density youused the last time you sent documents to that destination.
● When <Restrict Resending from Log> is set to <On>, you cannot use this feature. Disabling Use ofPreviously Used Destinations(P. 406)
● Turning OFF the machine or setting <Restrict New Destinations> to <On> deletes the past destinations, anddisables this feature. Restricting New Destinations that Can Be Specified(P. 406)
● The destinations in Manual Sending are not available for this feature. Sending a Fax after a Phone Call(Manual Sending)(P. 233)
● When you specify a destination using this feature, any destinations that you have already specified aredeleted.
1 Place the original(s). Placing Originals(P. 136)
2 Select <Fax> in the Home screen. Home Screen(P. 123)
● If the login screen appears, specify the user name, the password, and the authentication server. Loggingin to Authorized Send(P. 134)
3 Select <Reset> in the Fax Basic Features screen. Fax Basic Features Screen(P. 216)
● If the destinations set by the previous user are still selected, this can cause transmission errors. Always resetthe settings before sending.
4 Select <Recall Settings> in the <Specify Destination> tab.
5 Select the destination.
● When you transmit to multiple destinations, only the address specified for the first transmission is displayedin the log, but all the destinations are specified.
Faxing
230

➠The selected destination and the fax settings used at the time are specified. You can also change thesettings before sending.
To delete destinationsWhen you transmitted to multiple destinations, you can delete destinations as necessary.
1 Select <Confirm Destination>.
2 Select the check box for the destination to be deleted, and select <Remove from Dest.>.
● If you select the Group Dial check box, you can view the destinations registered in the group byselecting <Details> <Destination>.
3 Select <Yes>.
6 Specify the scanning settings as necessary. Basic Operations for SendingFaxes(P. 217)
7 Select <Start>.
● If the <Confirm Destination> screen is displayed, check whether the destination is correct, and then select<Start Scanning>.
➠Scanning of the original starts.
● If you want to cancel, select <Cancel> <Yes>. Canceling Sending Faxes(P. 225)
When placing originals in the feeder in step 1When scanning is complete, the faxes are sent.
When placing originals on the platen glass in step 1
When scanning is complete, follow the procedures below.
1 Select the original size.
● When there is only one page to be scanned, proceed to step 3.
2 Place the next original on the platen glass, and select <Scan Next>.
● Repeat this step until you finish scanning all of the pages.
Faxing
231

3 Select <Start Sending>.
➠The faxes are sent.
LINKS
Basic Operations for Sending Faxes(P. 217)
Faxing
232

Sending a Fax after a Phone Call (Manual Sending)16SE-04K
You can send faxes manually at the end of a phone conversation. When you hear abeep over the phone, it means the recipient is trying to receive your faxes. Select<Start> to send your faxes.
● You need to connect your telephone or the optional handset to the machine beforehand.
1 Place the original(s). Placing Originals(P. 136)
● The machine cannot automatically scan both sides of the originals in Manual Sending.
● When the original is placed on the platen glass, only one page can be sent.
2 Select <Fax> in the Home screen. Home Screen(P. 123)
● If the login screen appears, specify the user name, the password, and the authentication server. Loggingin to Authorized Send(P. 134)
3 Select <Reset> in the Fax Basic Features screen. Fax Basic Features Screen(P. 216)
● If the destinations set by the previous user are still selected, this can cause transmission errors. Always resetthe settings before sending.
4 Specify the scanning settings as necessary. Basic Operations for SendingFaxes(P. 217)
5 Dial the recipient's fax number.
6 Ask the recipient to set their fax machine to receive your faxes.
● If you hear a beep, proceed to step 7.
7 Select <Start>.
● If you place the original on the platen glass, select the original size.
➠Scanning of the original starts.
● If you want to cancel, select <Cancel> <Yes>. Canceling Sending Faxes(P. 225)
8 Hang up the handset.
Faxing
233

LINKS
Basic Operations for Sending Faxes(P. 217)Canceling Sending Faxes(P. 225)Checking Status and Log for Sent and Received Documents(P. 241)
Faxing
234

Saving a Copy of a Sent Original16SE-04L
In addition to the address specified when the fax is sent, you can also send faxeddocuments to a preset storage address for archiving. This is useful for keeping a logof what has been sent. You can specify a fax number, an e-mail address, a sharedfolder on the computer, an FTP server or an I-Fax as the storage address.
● Only destinations in the Address Book can be specified as a storage address. To use the Address Book, thedestination must be registered beforehand. Registering Destinations(P. 182)
<Menu> <Function Settings> <Send> <Fax Settings> <Archive TX Document> Select<On> and select <Archive Address> Select the check box for the target archive destination in theAddress Book, and select <Apply> <Apply>
Faxing
235
Various Receiving Methods16SE-04R
You can store received faxes in the machine's memory without printing them. You can reduce fax paper waste bychecking the detailed information of fax documents and only printing necessary documents.
Saving Received Documents into the Machine (Memory Reception)(P. 237)
Faxing
236

Saving Received Documents into the Machine (MemoryReception)
16SE-04S
You can store received faxes into memory of the machine, and then print them later.This feature can prevent unauthorized persons from seeing confidential documentsunintentionally.
Storing Documents into Memory(P. 237)Printing Documents in Memory(P. 237)Checking/Forwarding/Deleting Documents in Memory(P. 238)
Storing Documents into Memory
To store received documents into memory, set <Use Memory Lock> to <On>. You can also specify optional settingssuch as a security setting that makes a password necessary to unlock the feature and a time setting that specifies aperiod of time during the day in which received documents are stored in memory.
<Menu> <Function Settings> <Receive/Forward> <Common Settings> <Set Fax/I-FaxInbox> <Fax Memory Lock Settings> Select <On> in <Use Memory Lock> Specify each setting
<Apply>
<Report Print>Enables you to print RX Result reports every time documents are stored into memory. To print reports, select<On>. You also need to set <RX Result Report> to <On>. RX Result Report(P. 612)
<Memory Lock Time>Specify a period of time during the day in which received documents are stored in memory. If you do not set aperiod of time, the machine stores every document into memory when Memory Reception is turned on.
Printing Documents in Memory
To print received documents in memory, set <Use Memory Lock> to <Off>. All the documents in memory are printed.
● You cannot select a specific document for printing.
● If a time for the feature to deactivate has been specified, the documents are automatically printed at thespecified time.
Faxing
237

<Menu> <Function Settings> <Receive/Forward> <Common Settings> <Set Fax/I-FaxInbox> <Fax Memory Lock Settings> Select <Off> in <Use Memory Lock> <Apply>
Checking/Forwarding/Deleting Documents in Memory
You can check an outline of each document stored in memory, including sender fax numbers and number of pagessent. You can also select and forward a document stored in memory, and delete an unnecessary document, if any.
1 Select <Status Monitor>.
2 Select <RX Job>.
3 In the <RX Job Status> tab, select the document you want to check/forward/delete.
➠Displays detailed information about the document.
● To forward the document, select <Forward>, and specify the appropriate destination.
● To delete the document, select <Delete> <Yes>.
LINKS
Receiving Faxes(P. 226)Checking Status and Log for Sent and Received Documents(P. 241)
Faxing
238

Forwarding the Received Documents Automatically16SE-04U
The machine can forward all the received documents to specified destinations. Even if you are out of the office, youcan receive fax information anytime, anywhere.
Specifying Settings for Documents to be Forwarded Automatically(P. 239)Printing Documents to be Forwarded(P. 239)Printing/Resending/Deleting Documents that Failed to be Forwarded(P. 239)
Specifying Settings for Documents to be Forwarded Automatically
While the Forwarding feature is activated, all the documents to be received are automatically forwarded.
<Menu> <Function Settings> <Receive/Forward> <Fax Settings> <Forwarding Settings> <Forwarding Function> Select <On> in <Use Forwarding Function> <Forwarding Destination>
Select the check box for the target forwarding destination in the Address Book, and select<Apply> <Apply>
Printing Documents to be Forwarded
If you want to check the documents to be forwarded for yourself, you can set the machine to print the documentswhenever they are forwarded, or to print only the documents that failed to be forwarded.
<Menu> <Function Settings> <Receive/Forward> <Fax Settings> <ForwardingSettings> <Print Images> Select <On> or <Only When Error Occurs>
Printing/Resending/Deleting Documents that Failed to be Forwarded
You can store documents that failed to be forwarded in memory, and print, resend, or delete them later.
◼Storing Documents that Failed to be Forwarded in Memory
<Menu> <Function Settings> <Receive/Forward> <Fax Settings> <Forwarding Settings> <Store Images in Memory> <Only When Error Occurs>
◼Printing/Resending/Deleting Documents Stored in Memory
1 Select <Status Monitor>.
Faxing
239

2 Select <Fax Forwarding Errors>.
3 Select the document you want to print/resend/delete.
➠Displays detailed information about the document.
● To print the document, select <Print> <Yes>.
● To resend the document, select <Forward>, select the check box for the target destination, and thenselect <Apply>.
● To delete the document, select <Delete> <Yes>.
LINKS
Receiving Faxes(P. 226)Checking Status and Log for Sent and Received Documents(P. 241)
Faxing
240
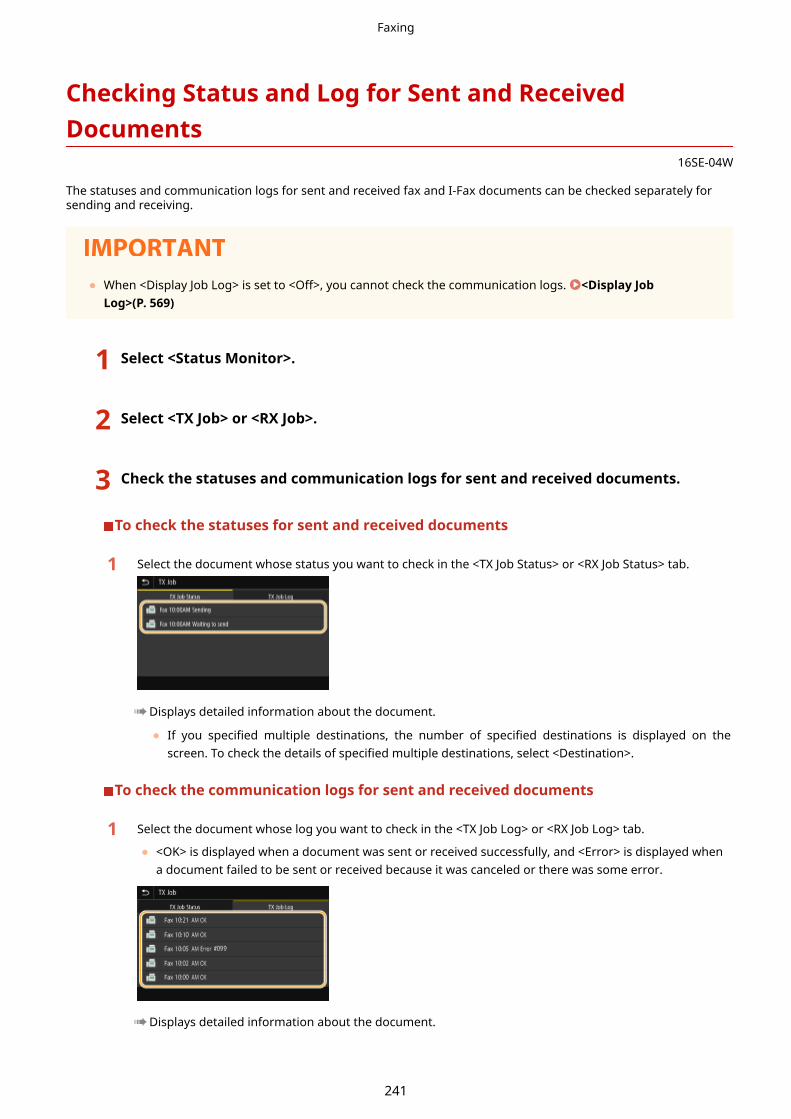
Checking Status and Log for Sent and ReceivedDocuments
16SE-04W
The statuses and communication logs for sent and received fax and I-Fax documents can be checked separately forsending and receiving.
● When <Display Job Log> is set to <Off>, you cannot check the communication logs. <Display JobLog>(P. 569)
1 Select <Status Monitor>.
2 Select <TX Job> or <RX Job>.
3 Check the statuses and communication logs for sent and received documents.
To check the statuses for sent and received documents
1 Select the document whose status you want to check in the <TX Job Status> or <RX Job Status> tab.
➠Displays detailed information about the document.
● If you specified multiple destinations, the number of specified destinations is displayed on thescreen. To check the details of specified multiple destinations, select <Destination>.
To check the communication logs for sent and received documents
1 Select the document whose log you want to check in the <TX Job Log> or <RX Job Log> tab.
● <OK> is displayed when a document was sent or received successfully, and <Error> is displayed whena document failed to be sent or received because it was canceled or there was some error.
➠Displays detailed information about the document.
Faxing
241

When a three-digit number is shown in the case of <Error>
● This number represents an error code. Countermeasures for Each Error Code(P. 662)
LINKS
Basic Operations for Sending Faxes(P. 217)Canceling Sending Faxes(P. 225)Receiving Faxes(P. 226)Sending I-Faxes(P. 247)Receiving I-Faxes(P. 254)Printing Reports and Lists(P. 610)
Faxing
242

Sending Faxes from Your Computer (PC Fax)16SE-04X
You can send fax documents created on your computer application directly from your computer. This featureeliminates the need to print documents for faxing and saves paper. You need to specify the basic fax settings ( Configuring Initial Settings for Fax Functions(P. 79) ) and install the fax driver on your computer. For moreinformation about how to install the fax driver, see the manuals for the relevant drivers on the online manual website.
Sending PC Faxes(P. 244)
● Depending on the operating system and the version of the fax driver you are using, the fax driver screens inthis manual may differ from your screens.
About the Fax Driver Help
● Clicking [Help] on the fax driver screen displays the Help screen. On this screen you can see information thatis not in the User's Guide, including information about driver features such as registering frequently usedsettings and how to set up those features.
Faxing
243
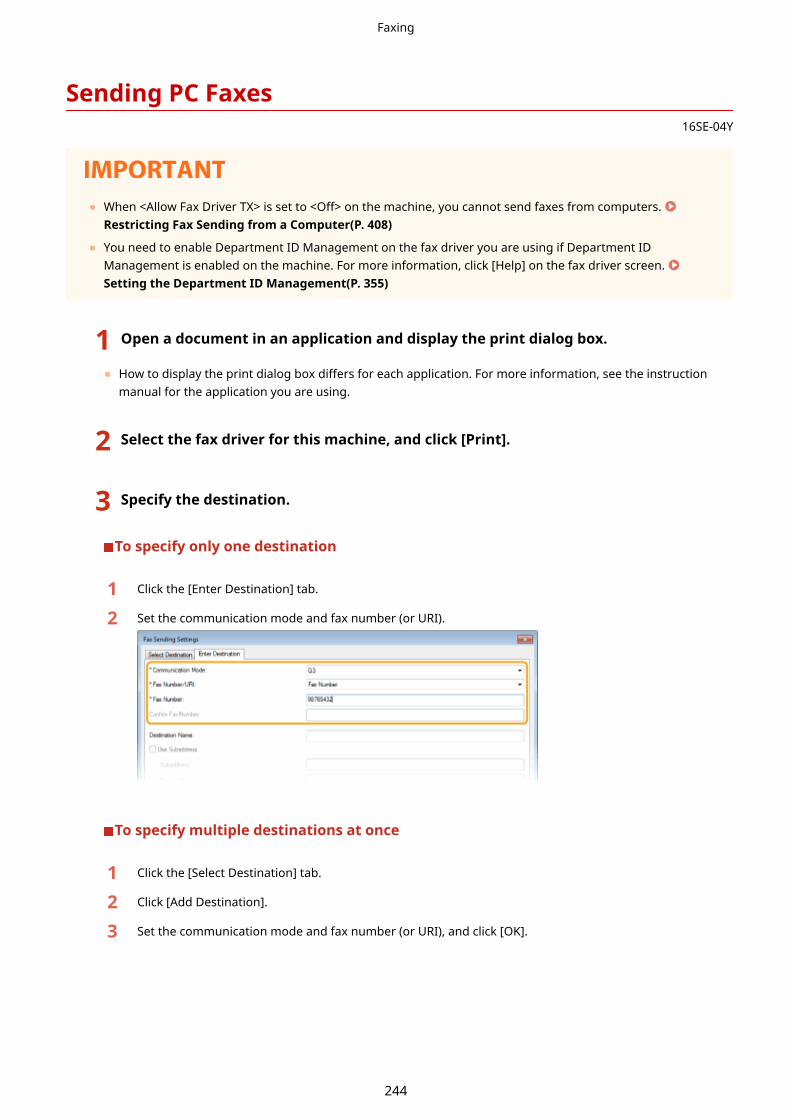
Sending PC Faxes16SE-04Y
● When <Allow Fax Driver TX> is set to <Off> on the machine, you cannot send faxes from computers. Restricting Fax Sending from a Computer(P. 408)
● You need to enable Department ID Management on the fax driver you are using if Department IDManagement is enabled on the machine. For more information, click [Help] on the fax driver screen. Setting the Department ID Management(P. 355)
1 Open a document in an application and display the print dialog box.
● How to display the print dialog box differs for each application. For more information, see the instructionmanual for the application you are using.
2 Select the fax driver for this machine, and click [Print].
3 Specify the destination.
To specify only one destination
1 Click the [Enter Destination] tab.
2 Set the communication mode and fax number (or URI).
To specify multiple destinations at once
1 Click the [Select Destination] tab.
2 Click [Add Destination].
3 Set the communication mode and fax number (or URI), and click [OK].
Faxing
244
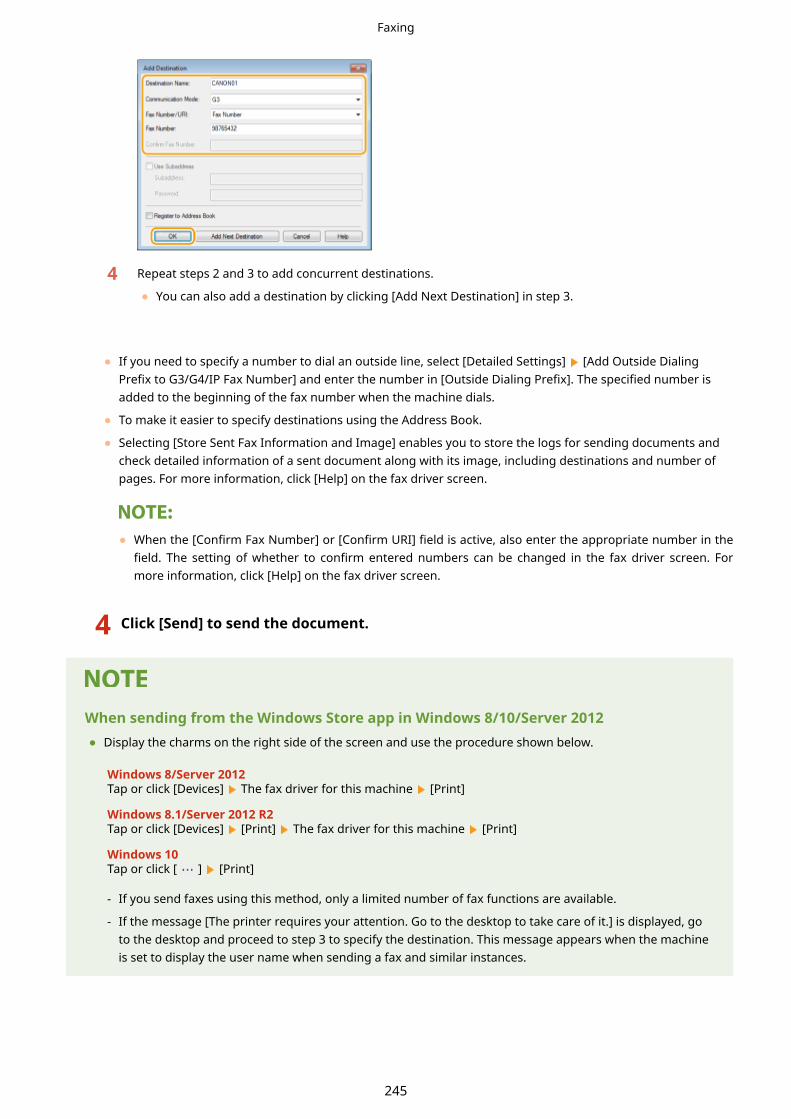
4 Repeat steps 2 and 3 to add concurrent destinations.
● You can also add a destination by clicking [Add Next Destination] in step 3.
● If you need to specify a number to dial an outside line, select [Detailed Settings] [Add Outside DialingPrefix to G3/G4/IP Fax Number] and enter the number in [Outside Dialing Prefix]. The specified number isadded to the beginning of the fax number when the machine dials.
● To make it easier to specify destinations using the Address Book.
● Selecting [Store Sent Fax Information and Image] enables you to store the logs for sending documents andcheck detailed information of a sent document along with its image, including destinations and number ofpages. For more information, click [Help] on the fax driver screen.
● When the [Confirm Fax Number] or [Confirm URI] field is active, also enter the appropriate number in thefield. The setting of whether to confirm entered numbers can be changed in the fax driver screen. Formore information, click [Help] on the fax driver screen.
4 Click [Send] to send the document.
When sending from the Windows Store app in Windows 8/10/Server 2012● Display the charms on the right side of the screen and use the procedure shown below.
Windows 8/Server 2012Tap or click [Devices] The fax driver for this machine [Print]
Windows 8.1/Server 2012 R2Tap or click [Devices] [Print] The fax driver for this machine [Print]
Windows 10Tap or click [ ] [Print]
- If you send faxes using this method, only a limited number of fax functions are available.
- If the message [The printer requires your attention. Go to the desktop to take care of it.] is displayed, goto the desktop and proceed to step 3 to specify the destination. This message appears when the machineis set to display the user name when sending a fax and similar instances.
Faxing
245
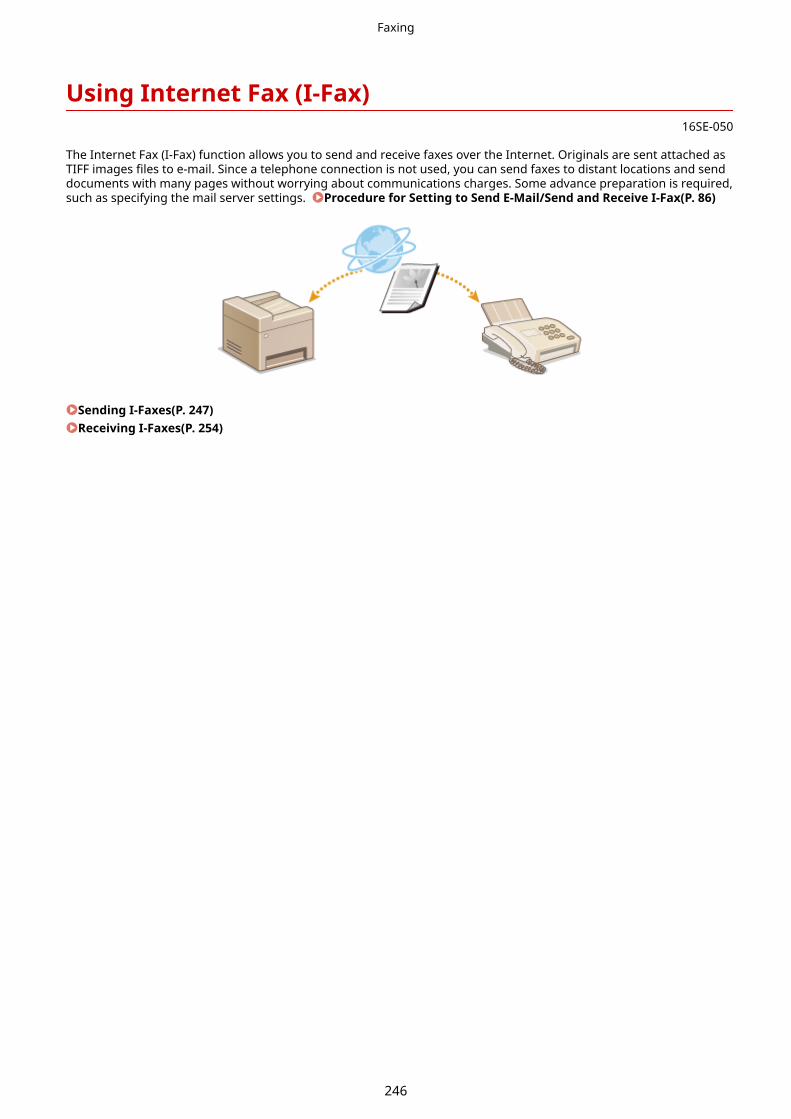
Using Internet Fax (I-Fax)16SE-050
The Internet Fax (I-Fax) function allows you to send and receive faxes over the Internet. Originals are sent attached asTIFF images files to e-mail. Since a telephone connection is not used, you can send faxes to distant locations and senddocuments with many pages without worrying about communications charges. Some advance preparation is required,such as specifying the mail server settings. Procedure for Setting to Send E-Mail/Send and Receive I-Fax(P. 86)
Sending I-Faxes(P. 247)Receiving I-Faxes(P. 254)
Faxing
246

Sending I-Faxes16SE-051
To send a fax to a computer or another I-Fax-compatible device, specify an e-mail address instead of a fax number asthe destination. If you send an I-Fax to a computer, it is sent as an e-mail attachment in TIFF format. And in the sameway as when you send e-mail to a computer, you can specify multiple destinations and specify Cc and Bcc destinations.
1 Place the original(s). Placing Originals(P. 136)
2 Select <Scan> in the Home screen. Home Screen(P. 123)
● If the login screen appears, specify the user name, the password, and the authentication server. Loggingin to Authorized Send(P. 134)
3 Select <I-Fax> in the Scan Basic Features screen. Scan Basic Features Screen(P. 280)
4 Specify the destination.
Specifying from Address Book
Specifying from Coded Dial Numbers
Entering Destinations Directly
Specifying Destinations in an LDAP Server
Specifying from Address Book
The Address Book enables you to specify a destination by selecting from a list ofregistered destinations or by searching by name for destinations with recipientnames.
● You need to register destinations in the Address Book before using this feature. RegisteringDestinations(P. 182)
1 Select <Address Book> in the <Specify Destination> tab.
2 Select <To>.
3 Select an index. Index(P. 182)
Faxing
247

4 Select the check box for the desired destination, and select <Apply>.
● If a destination is selected from <Address Book> in the Home screen, the Basic Features screen for I-Faxsending can be displayed while the selected destination remains being specified.
Specifying from Coded Dial Numbers
Three-digit numbers (coded dial numbers) are assigned to addresses in the AddressBook. You can specify an address simply by entering its coded dial number.
● To use coded dial numbers, the destination must be registered in the Address Book beforehand. Registering Destinations(P. 182)
1 Select <Coded Dial> in the <Specify Destination> tab.
2 Select <To>.
3 Enter a three-digit number.
● If you have entered an incorrect value, use to clear it.
If a confirmation screen appears
Faxing
248

● When <Confirm When Coded Dial TX> is set to <On>, a screen is displayed that shows the destination andthe name for the number. (For Group Dial, the destination name and the number of destinations areshown.) Check the contents and if everything is correct, select <OK>. To specify a different destination,select <Cancel> and then re-enter the three-digit coded dial number. Displaying Destinations inAddress Book(P. 406)
Entering Destinations Directly
For a destination that is not registered in the Address Book, specify it by entering an I-Fax address.
1 Select <Use Keyboard> in the <Specify Destination> tab.
2 Enter the I-Fax address, and select <Apply>.
● On how to enter text, see Entering Text(P. 132) .
Specifying Destinations in an LDAP Server
If your office has an LDAP server installed, you can specify a destination using userinformation in the server. Access the LDAP server via the machine to search for theappropriate user information and specify it as destination.
● You need to specify the settings for connecting to an LDAP server beforehand. Registering LDAPServers(P. 64)
1 Select <LDAP Server> in the <Specify Destination> tab.
2 Select the LDAP server you are using.
3 Select conditions for user information to be searched.
● Name, fax numbers, e-mail addresses, organization names, and organization unit are available criteria forsearching destinations.
Faxing
249

4 Enter the search target character string, and select <Apply>.
● On how to enter text, see Entering Text(P. 132) .
● To specify multiple search criteria, repeat steps 3 and 4.
5 Select <Search Method>.
6 Select conditions to display the search result.
<Using All Conditions Below>Searches and displays the users that meet all the search criteria specified in steps 3 and 4.
<Using Some Conditions Below>If users that meet even one of the criteria specified in steps 3 and 4 are found, displays all those users.
7 Select <Start Search>.
➠The users meeting your search criteria are displayed.
● If the authentication screen appears when you select <Start Search>, enter the user name of the machineand the password registered in the LDAP server, and select <Apply>. Registering LDAP Servers(P. 64)
8 Select the check box for the user that you want to specify as destination, and select<Apply>.
If a screen on which a destination is already specified appears
● You can only send to your own e-mail address. To send to other destinations, you must configure the sendfunction authentication settings so that e-mail transmission is not restricted. Contact your administratorfor details. LDAP Server Authentication(P. 363) .
Specifying destinations from the transmission records
● You can also recall previously used destinations. Recalling Previously Used Settings for Sending/Saving (Recall Settings)(P. 312)
5 Specify multiple destinations, including Cc/Bcc destinations, as necessary.
● Select the method used to specify destinations in the <Specify Destination> tab, and then specify thedestination.
Faxing
250

● If you selected <LDAP Server> or <Specify Myself as Destination>, the destination is specified in the <To>field.
● <Cc> and <Bcc> addresses can only be selected using <Address Book> or <Coded Dial>.
To delete destinationsIf you specified multiple destinations, you can delete destinations as necessary.
1 Select <Confirm Destination>.
2 Select the check box for the destination to be deleted, and select <Remove from Dest.>.
● If you select the Group check box, you can view the destinations registered in the group by selecting<Details> <Destination>.
3 Select <Yes>.
6 Specify the scanning settings as necessary.
● For more information about each setting, see Sending Data by E-Mail/Saving Data to a Shared Folder orFTP Server(P. 290) or Scanning Clearly(P. 302) .
7 Specify the subject, message, and reply-to address for the e-mail as necessary.
To specify subject/message
1 Select <Subject/Message> in the <Send Settings> tab.
2 Select <Subject>
3 Enter the subject, and select <Apply>.
4 Select <Message>.
5 Enter the message, and select <Apply>.
6 Select <Apply>.
To specify reply-to addressSpecify the reply-to address when you want to notify the recipient of an e-mail address different from that ofthe machine as the reply-to address. Select the target reply-to address from the destinations registered in the
Faxing
251

Address Book, and specify it. If the destination has not been registered in the Address Book, see Registering Destinations(P. 182) .
1 Select <Reply To> in the <Send Settings> tab.
2 Select <Specify from Address Book>.
3 Select the check box for the desired reply-to address, and select <Apply>.
● The reply-to address that can be specified is always one of the e-mail addresses registered in theAddress Book.
8 Select <Start>.
● If the <Confirm Destination> screen is displayed, check whether the destination is correct, and then select<Start Scanning>.
➠Scanning of the original starts.
● If you want to cancel, select <Cancel> <Yes>. Canceling Sending Faxes(P. 225)
When placing originals in the feeder in step 1When scanning is complete, the I-Faxes are sent.
When placing originals on the platen glass in step 1
When scanning is complete, follow the procedures below.
1 If there are additional pages of originals to be scanned, place the next original on the platen glass,and select <Scan Next>.
● Repeat this step until you finish scanning all of the pages.
● When there is only one page to be scanned, proceed to the next step.
2 Select <Start Sending>.
➠The I-Faxes are sent.
If the <SMTP Authentication> screen appears
● Enter the user name and password, and select <Apply>.
If a Send Error OccursError notifications are sometimes sent to the e-mail address set to the machine. If you leave it as-is, it mayresult in an insufficient remaining capacity of mailbox depending on your mail server. It is recommended thatyou clear the mailbox periodically.
To clear the mailbox
● When the mailbox is cleared, all e-mail in the server mailbox is deleted. When you specify the e-mailaccount that you use usually, you should first check whether any e-mail in the mailbox needs to be kept.
1 Start the Remote UI and log in to System Manager Mode. Starting Remote UI(P. 418)
Faxing
252

2 Click [Settings/Registration] on the Portal page. Remote UI Screen(P. 419)
3 Select [TX Settings] [Network Settings - E-Mail/I-Fax Settings].
4 Click [Clear] in [Clear Mail Box].
5 Read the message that is displayed, and click [OK].
➠E-mail is deleted from the mailbox.
● If you always want to send with the same settings: Changing the Default Settings for Functions(P. 176)
● If you want to register a combination of settings to use when needed: Registering Frequently UsedSettings(P. 174)
● If you want to specify the I-Fax sender name: <Register Unit Name>(P. 539)
LINKS
Checking Status and Log for Sent and Received Documents(P. 241)
Faxing
253
Receiving I-Faxes16SE-052
◼When an I-Fax ArrivesWhen an I-Fax arrives, the Data indicator on the operation panel blinks. After the I-Fax is completely received, thedocument is printed out automatically and the indicator goes out.
● To cancel reception, select <Status Monitor> <RX Job> select a document in the <RX Job Status> tab <Delete> <Yes>.
◼Receiving I-Faxes ManuallyIf you want to connect to the server before receiving I-Faxes automatically, or if you want to configure the machine sothat it does not receive I-Faxes automatically, use the method below to receive I-Faxes manually. If there is a documenton the server, printing begins.
<Status Monitor> <RX Job> <Check I-Fax RX>
◼Printout PaperRegardless of the received document size, incoming I-Faxes are printed at the size specified in <RX Print Size>. <RXPrint Size>(P. 550)
● If paper of the size specified in <RX Print Size> is not loaded in the paper drawer, the <No Paper> errormessage is displayed. Countermeasures for Each Message(P. 648)
● If you want to print received documents on both sides of paper: <Print on Both Sides>(P. 550)
● If you want to continue printing even when the amount remaining in the toner cartridge is low: <ContinuePrint. When Amount in Cart. Low>(P. 549)
LINKS
Checking Status and Log for Sent and Received Documents(P. 241)
Faxing
254

PrintingPrinting ................................................................................................................................................................ 256
Printing from a Computer ................................................................................................................................ 257
Canceling Prints ........................................................................................................................................... 260
Checking the Printing Status and Log ........................................................................................................... 262
Various Printing Methods ................................................................................................................................. 264
Printing a Document Secured by a PIN (Secure Print) ................................................................................... 265Printing via Secure Print ........................................................................................................................ 266
Printing from a USB Memory Device (Memory Media Print) ......................................................................... 269
Printing
255

Printing16SE-053
There are many ways to use the machine as a printer. You can print documents on your computer by using the printerdriver or print image files from a USB memory device. Make full use of the print functions to suit your needs.
◼Printing from a ComputerYou can print a document made on your computer by using the printer driver.
Printing from a Computer(P. 257)
◼Useful Functions When PrintingYou can assign a PIN to the print data to enhance security or directly print files stored in a USB memory device.
Various Printing Methods(P. 264)
Printing from Mobile Devices
● Linking mobile devices such as smartphones or tablets to this machine provides a quick and easy way toprint photos and web pages. The machine also supports Google Cloud Print™.
Linking with Mobile Devices(P. 323)Using Google Cloud Print(P. 345)
Printing
256

Printing from a Computer16SE-054
You can print a document made with an application on your computer by using the printer driver. There are usefulsettings on the printer driver, such as enlarging/reducing and 2-sided printing, that enable you to print yourdocuments in various ways. Before you can use this function, you need to complete some procedures, such asinstalling the printer driver on your computer. For more information, see the manuals for the relevant drivers on theonline manual website.
About the Printer Driver Help(P. 257)To Use the Optional Items(P. 257)Basic Printing Operations(P. 257)
About the Printer Driver Help
Clicking [Help] on the printer driver screen displays the Help screen. On this screen, you can see the detaileddescriptions that are not in the User's Guide.
To Use the Optional Items
If the optional cassette feeding module is attached to the machine, perform the following operation on the printerdriver.
● To perform the following procedure, log in to your computer with an administrator account.
Open the printer folder ( Displaying the Printer Folder(P. 731) ) Right-click the printer drivericon for this machine [Printer Properties] or [Properties] [Device Settings] tab Select the [550Sheet Drawer] check box [OK]
Basic Printing Operations
This section describes how to print a document on your computer by using the printer driver.
Paper settings on the machine
● Normally, it is necessary to specify the paper size and type for the paper loaded in each paper source beforeproceeding to printing.
Printing
257

● By setting <Prioritize Driver Settings When Printing> to <On>, you can print from the paper source specifiedin the printer driver, regardless of the paper settings on the machine. <Prioritize Driver Settings WhenPrinting>(P. 494)
1 Open a document in an application and display the print dialog box.
2 Select the printer driver for this machine, and click [Preferences] or [Properties].
3 Specify the print settings as necessary, and click [OK].
● Switch the tab according to the settings.
4 Click [Print] or [OK].
➠Printing starts.
● If you want to cancel printing, see Canceling Prints(P. 260) .
When printing from the Windows Store app in Windows 8/10/Server 2012● Display the charms on the right side of the screen and use the procedure shown below.
Windows 8/Server 2012Tap or click [Devices] The printer driver for this machine [Print]
Windows 8.1/Server 2012 R2Tap or click [Devices] [Print] The printer driver for this machine [Print]
Windows 10Tap or click [ ] [Print]
- f you print using this method, only a limited number of print settings are available.
Printing
258

- If the message [The printer requires your attention. Go to the desktop to take care of it.] is displayed, goto the desktop and follow the instructions in the displayed dialog box. This message appears when themachine is set to display the user name during printing and similar instances.
LINKS
Checking the Printing Status and Log(P. 262)
Printing
259

Canceling Prints16SE-055
You can cancel printing from your computer or on the operation panel of the machine.
From a Computer(P. 260)From the Operation Panel(P. 261)
From a Computer
You can cancel printing from the printer icon displayed on the system tray on the desktop.
1 Double-click the printer icon.
When the printer icon is not displayed
● Open the printer folder ( Displaying the Printer Folder(P. 731) ), right-click the printer driver icon forthis machine, and click [See what's printing] (or double-click the icon of the printer driver for this machine).
2 Select the document you want to cancel, and click [Document] [Cancel].
3 Click [Yes].
➠Printing of the selected document is canceled.
● Several pages may be output after you cancel printing.
Canceling from the Remote UI● You can cancel printing from the [Job Status] page on the Remote UI: Checking Current Status of Print
Documents(P. 421)
Canceling from an application● On some applications, a screen like shown below appears. You can cancel printing by clicking [Cancel].
Printing
260

From the Operation Panel
Cancel printing using or <Status Monitor>.
◼Press to Cancel
If the Screen Displays a List of Documents When is PressedSelect the document you want to cancel, and select <Cancel> <Yes>.
◼Check the Print Job Status Before Canceling
<Status Monitor> <Copy/Print Job> Select the document in the <Copy/Print Job Status> tab <Cancel> <Yes>
● Several pages may be output after you cancel printing.
LINKS
Basic Printing Operations(P. 257)Checking the Printing Status and Log(P. 262)
Printing
261

Checking the Printing Status and Log16SE-056
You can check the current print statuses and the logs for printed documents.
● When <Display Job Log> is set to <Off>, you cannot check the print logs. <Display Job Log>(P. 569)
Useful in the Following Cases
● When your documents are not printed for a long time, you may want to see the waiting list of thedocuments waiting to be printed.
● When you cannot find your printouts that you thought had been printed, you may want to see whether anerror has occurred.
1 Select <Status Monitor>.
2 Select <Copy/Print Job>.
3 Check the print statuses and logs.
To check the print statuses
1 Select the document whose status you want to check in the <Copy/Print Job Status> tab.
➠Displays detailed information about the document.
To check the print logs
1 Select the document whose log you want to check in the <Print Job Log> tab.
● <OK> is displayed when a document was printed successfully, and <Error> is displayed when adocument failed to be printed because it was canceled or there was some error.
Printing
262

➠Displays detailed information about the document.
● The displayed document name or user name may not reflect the actual document or user name.
When a three-digit number is shown in the case of <Error>
● This number represents an error code. Countermeasures for Each Error Code(P. 662)
LINKS
Basic Printing Operations(P. 257)Canceling Prints(P. 260)
Printing
263

Various Printing Methods16SE-057
This section describes how to print a document by adding a PIN, and how to print a file stored on a USB memorydevice without using the printer driver.
Printing a Document Secured by a PIN (SecurePrint)(P. 265)
Printing from a USB Memory Device (MemoryMedia Print)(P. 269)
Printing
264
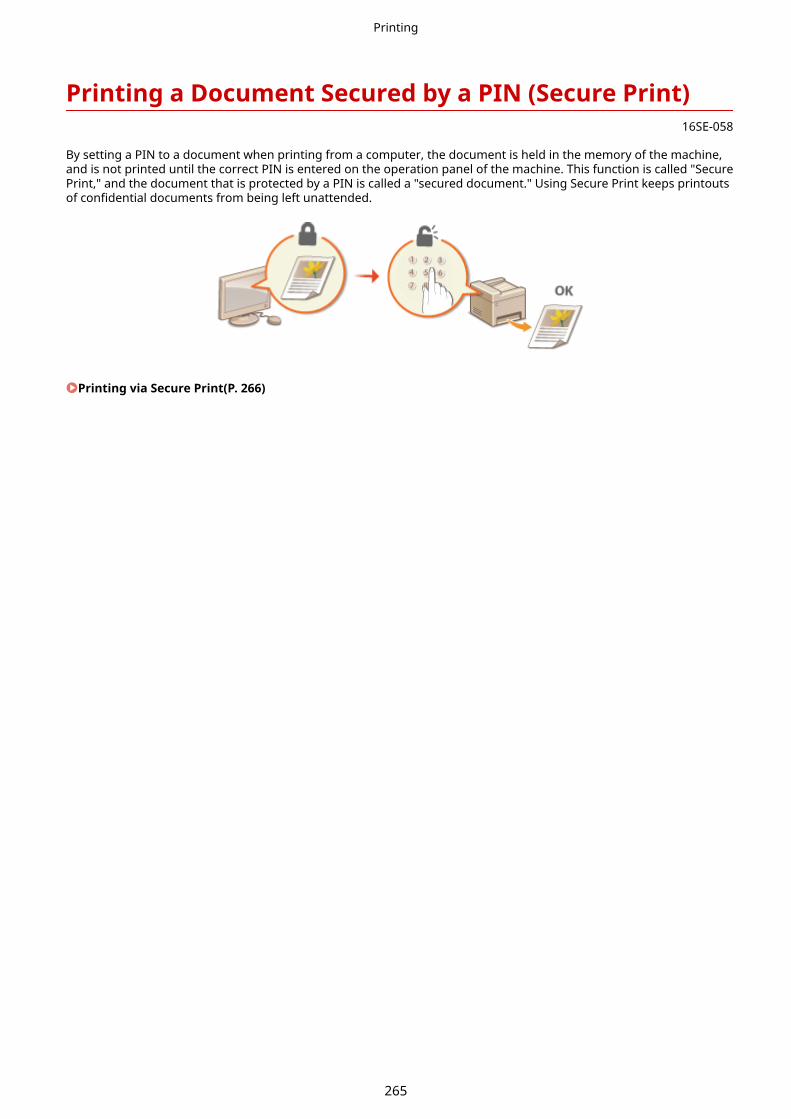
Printing a Document Secured by a PIN (Secure Print)16SE-058
By setting a PIN to a document when printing from a computer, the document is held in the memory of the machine,and is not printed until the correct PIN is entered on the operation panel of the machine. This function is called "SecurePrint," and the document that is protected by a PIN is called a "secured document." Using Secure Print keeps printoutsof confidential documents from being left unattended.
Printing via Secure Print(P. 266)
Printing
265

Printing via Secure Print16SE-05A
This section describes how to print a document from an application as a secured document. The first part of thissection describes how to send a secured document to the machine, and the second part of this section describes howto print the secured document on the machine.
Sending a Secured Document from a Computer to the Machine(P. 266)Printing Out Secured Documents(P. 267)Changing the Valid Time Period for Secured Documents(P. 268)
Sending a Secured Document from a Computer to the Machine
1 Open a document in an application and display the print dialog box.
2 Select the printer driver for this machine, and click [Preferences] or [Properties].
3 Select [Secured Print] in [Output Method].
➠The [Information] pop-up screen is displayed. Check the message, and click [Yes] or [No].
4 Specify the print settings as necessary, and click [OK].
● Switch the tab according to the settings.
5 Click [Print] or [OK].
➠After the secured document is sent to the machine, it is held in the memory of the machine waiting to beprinted.
Printing
266

Printing Out Secured Documents
Prints secured documents sent to the machine. After a valid time period ( Changing the Valid Time Period forSecured Documents(P. 268) ) has elapsed, the secured document will be deleted from the memory of the machineand can no longer be printed.
● If secured documents are left unprinted, they occupy the memory and may prevent the machine fromprinting even ordinary (not secured) documents. Make sure that you print your secured documents as soonas you can.
● You can check how much memory is being used for secured documents.<Status Monitor> <Device Information> <Secure Print Memory Usage>
1 Select <Secure Print> in the Home screen. Home Screen(P. 123)
● You cannot proceed to the next step if the <Remote Scanner> screen shown below is displayed. In thiscase, select to close the screen, and select <Secure Print>.
2 Select the check box for the secured document to print, and select <Start>.
● You can select multiple documents that have the same PIN.
If a screen for user selection is displayed
● If secured documents from two or more users are stored in memory, the screen for user selection isdisplayed prior to the screen for file selection. Select your user name.
Deleting a secured document
● You can collectively delete multiple documents. Select the check box for the secured document to delete,and select <Delete>.
3 Enter the PIN, and select <Apply>.
● When you select multiple documents with different PINs in step 2, a message is displayed. Select <Close>,and select the secured documents again in step 2.
➠Printing starts.
● If you want to cancel printing, select <Cancel> <Yes>.
Printing
267

Changing the Valid Time Period for Secured Documents
You can change the valid time period from the time secured document data is sent to the machine until the time it isdeleted within a certain period of time.
1 Select <Menu> in the Home screen. Home Screen(P. 123)
2 Select <Function Settings>.
3 Select <Secure Print>.
● If the login screen appears, enter the correct ID and PIN. Logging in to the Machine(P. 134)
4 Select <Secure Print Deletion Time>.
When <Secure Print Deletion Time> cannot be selected
● Set <Use Secure Print> to <On>.
Disabling Secure Print
● Set <Use Secure Print> to <Off>, and then restart the machine.
5 Specify how long the machine holds secured documents, and select <Apply>.
● The secured document is deleted from the memory of the machine unless it is printed before the timespecified here elapses.
6 Select <Apply>.
7 Restart the machine.
● Turn OFF the machine, wait for at least 10 seconds, and turn it back ON.
LINKS
Checking the Printing Status and Log(P. 262)Restricting Printing from a Computer(P. 410)
Printing
268

Printing from a USB Memory Device (Memory MediaPrint)
16SE-05C
You can print files directly by connecting a USB memory device to the machine. Using this function, you can printwithout using a computer. For more information about the available USB memory devices and how to insert/removethe USB memory device, see Insert a USB Memory Device(P. 107) .
1 Select <Memory Media Print> in the Home screen. Home Screen(P. 123)
2 Select the check box for the file to print.
● You can select multiple files.
● To clear a selection, select the file you have selected ( ) again.
● Selecting a folder displays its contents. To return to the folder in the upper level, select .
● Folders and files lower than the fifth directory are not displayed.
● When you move to another folder, the previous file selections will be cleared.
To select all files
1 Select <Select All>.
● To clear all selections, select <Clear Selection>.
2 If file types are mixed, select <JPEG/TIFF Files> or <PDF Files>.
To change the file display methodYou can select the file display method from "Preview"/"Details."
Preview Details
Printing
269

● You cannot view the contents of a PDF file.
● You can specify the file display method used to display the <Memory Media Print> screen. <DefaultDisplay Settings>(P. 561)
To change the file sort orderYou can change the sort order of the files in a USB memory device.
● You can specify a sort setting such as <Name (Ascending)> or <Date/Time (Ascending)> as the defaultsetting for the file sort order. <File Sort Default Settings>(P. 562)
1 Select <Sort Files>.
2 Select the criteria for file sorting.
● When you select <Date/Time (Ascending)> or <Date/Time (Descending)>, files are sorted based on themodification dates and time of the files.
3 Select <Apply>.
4 Specify the print settings as necessary.
● You can select <Reset> to restore all the default print settings.
<Paper>
Select the paper source that contains the paper to use for printing.
Printing
270
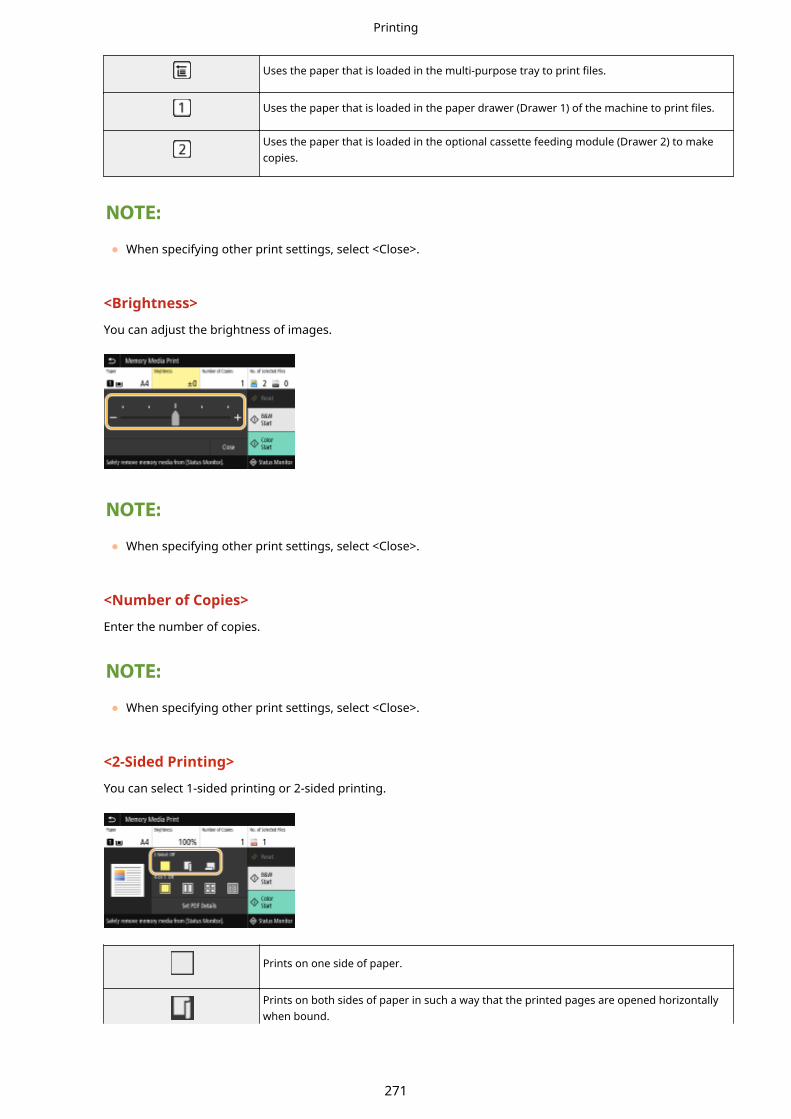
Uses the paper that is loaded in the multi-purpose tray to print files.
Uses the paper that is loaded in the paper drawer (Drawer 1) of the machine to print files.
Uses the paper that is loaded in the optional cassette feeding module (Drawer 2) to makecopies.
● When specifying other print settings, select <Close>.
<Brightness>
You can adjust the brightness of images.
● When specifying other print settings, select <Close>.
<Number of Copies>
Enter the number of copies.
● When specifying other print settings, select <Close>.
<2-Sided Printing>
You can select 1-sided printing or 2-sided printing.
Prints on one side of paper.
Prints on both sides of paper in such a way that the printed pages are opened horizontallywhen bound.
Printing
271
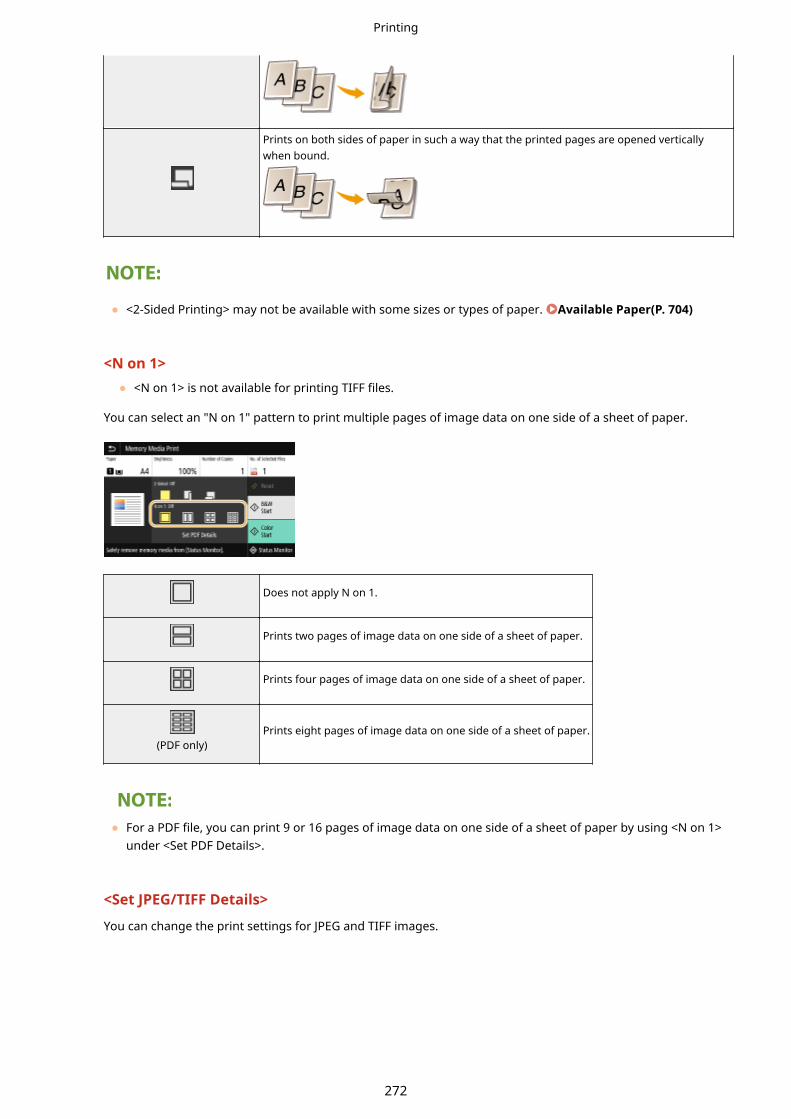
Prints on both sides of paper in such a way that the printed pages are opened verticallywhen bound.
● <2-Sided Printing> may not be available with some sizes or types of paper. Available Paper(P. 704)
<N on 1>● <N on 1> is not available for printing TIFF files.
You can select an "N on 1" pattern to print multiple pages of image data on one side of a sheet of paper.
Does not apply N on 1.
Prints two pages of image data on one side of a sheet of paper.
Prints four pages of image data on one side of a sheet of paper.
(PDF only)Prints eight pages of image data on one side of a sheet of paper.
● For a PDF file, you can print 9 or 16 pages of image data on one side of a sheet of paper by using <N on 1>under <Set PDF Details>.
<Set JPEG/TIFF Details>
You can change the print settings for JPEG and TIFF images.
Printing
272
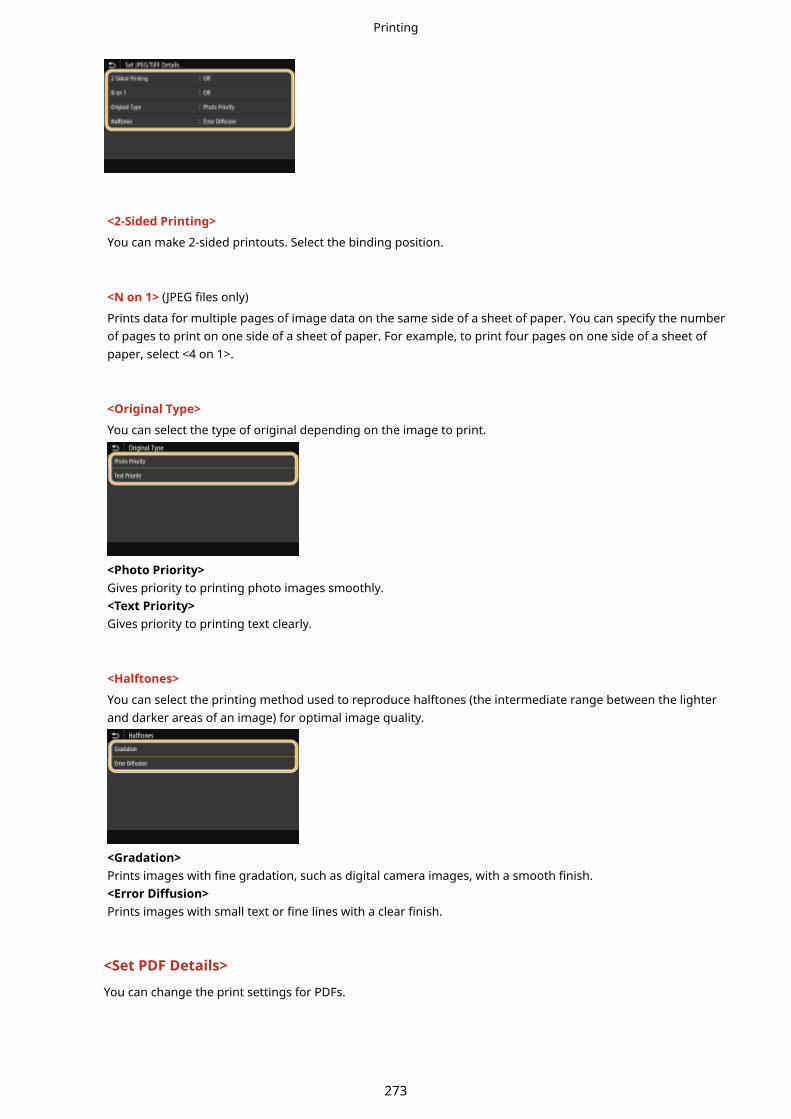
<2-Sided Printing>
You can make 2-sided printouts. Select the binding position.
<N on 1> (JPEG files only)
Prints data for multiple pages of image data on the same side of a sheet of paper. You can specify the numberof pages to print on one side of a sheet of paper. For example, to print four pages on one side of a sheet ofpaper, select <4 on 1>.
<Original Type>
You can select the type of original depending on the image to print.
<Photo Priority>Gives priority to printing photo images smoothly.<Text Priority>Gives priority to printing text clearly.
<Halftones>
You can select the printing method used to reproduce halftones (the intermediate range between the lighterand darker areas of an image) for optimal image quality.
<Gradation>Prints images with fine gradation, such as digital camera images, with a smooth finish.<Error Diffusion>Prints images with small text or fine lines with a clear finish.
<Set PDF Details>
You can change the print settings for PDFs.
Printing
273

<2-Sided Printing>
You can make 2-sided printouts. Select the binding position.
<N on 1>
Prints data for multiple pages of image data on the same side of a sheet of paper. You can specify the numberof pages to print on one side of a sheet of paper. For example, to print four pages on one side of a sheet ofpaper, select <4 on 1>.
<Print Range>
Specify pages you want to print.
<All Pages>Prints all pages.<Specified Pages>Specify the range of pages you want to print. Enter the desired value in each of <Start Page> and <End Page>,and select <Apply>.
● When the specified page range does not match any of the pages of the PDF file, printing is not performed.
<Enlarge/Reduce to Fit Paper Size>
Specify whether to enlarge or reduce the original according to the print range of paper. Note that sizeenlargement/reduction will not affect the aspect ratio of the original.
<Enlarge Print Area>
Specify whether to extend the print range to the paper size.
● If you set to <On>, part of print data may not be printed in edge areas or paper may be partly smudgeddepending on the document.
<Print Comments>
This setting specifies whether to print annotations in the PDF file.
Printing
274

<Off>Prints no annotations.<Auto>Prints only those annotations that are specified to be printed in the PDF file.
<Password to Open Document>
You can print password protected PDF files by entering the password required to open them. Enter thepassword, and select <Apply>.
<Other Settings>
<Halftones>You can select the printing method used to reproduce halftones (the intermediate range between the lighterand darker areas of an image) for optimal image quality. You can make this setting for each of the types ofimage contained in one document. See <Halftones>(P. 530) for the description of the setting.
<Pure Black Text>You can print black text of which color information is "R=G=B=0%," "C=M=Y=100%," or "C=M=Y=0%/K=100%,"using only the K (black) toner. See <Pure Black Text>(P. 526) for the description of the setting.
<Black Overprint>Specify the printing method used when black text overlaps a colored background or figure. See <BlackOverprint>(P. 526) for the description of the setting.
<RGB Source Profile>Select the source profile for color matching to print RGB data, according to the monitor you are using. See <RGB Source Profile>(P. 526) for the description of the setting.
<CMYK Simulation Profile>This setting allows you to specify the simulation target to print the CMYK (Cyan Magenta Yellow blacK) data.The machine converts CMYK data into a device dependent CMYK color model based on this simulation. See <CMYK Simulation Profile>(P. 527) for the description of the setting.
<Use Grayscale Profile>Specify whether to convert gray data to CMYK (cyan, magenta, yellow, and black) data using the grayscaleprofile of the machine. See <Use Grayscale Profile>(P. 528) for the description of the setting.
<Output Profile>Select the appropriate profile for print data. This option can be specified for each image type in onedocument. See <Output Profile>(P. 528) for the description of the setting.
<Matching Method>Select the element to be prioritized when making color adjustment in <RGB Source Profile>. See <Matching Method>(P. 529) for the description of the setting.
<Composite Overprint>Specify whether to overprint CMYK data, with overprint specified, as composite output. See <CompositeOverprint>(P. 531) for the description of the setting.
<Grayscale Conversion>Specify the way of printing color data in black and white. See <Grayscale Conversion>(P. 532) for thedescription of the setting.
<Print Quality>
<Density>Adjust the toner density to be used for printing. See <Density>(P. 496) for the description of the setting.
<Toner Save>
Printing
275

Selecting <On> prints in toner saving mode. Select <On> when you want to check the layout or otherappearance characteristics before proceeding to final printing of a large job. See <Toner Save>(P. 497)for the description of the setting.
<Gradation>Specify the processing method used to reproduce gradation. <High 2> gives finer gradation than <High1>. See <Gradation>(P. 497) for the description of the setting.
<Density Fine Adjustment>When fine lines or small text are faded, increase the density to give less faded print. See <Density FineAdjustment>(P. 497) for the description of the setting.
<Resolution>Specify the resolution to process print data. See <Resolution>(P. 498) for the description of the setting.
<Special Smoothing Mode>Specify the mode to print data with a smooth finish. If the quality of the printout is not acceptable in<Mode 1> (default), try another mode. See <Special Smoothing Mode>(P. 498) for the description ofthe setting.
<Toner Volume Correction>When the toner volume for text or lines exceeds the limit value of the machine, make a correction so thatthe toner volume does not exceed the limit value. See <Toner Volume Correction>(P. 499) for thedescription of the setting.
<Line Control>Specify the processing method used to reproduce lines. See <Line Control>(P. 499) for the descriptionof the setting.
<Width Adjustment>Configure a setting to print text or fine lines in bold. See <Width Adjustment>(P. 500) for thedescription of the setting.
<Advanced Smoothing>Configure the smoothing setting to print the outline of graphics (e.g., illustrations created usingapplications) or text with a smooth finish. <Level 2> applies a stronger smoothing effect than <Level 1>.You can apply the setting separately for text and graphics. See <Advanced Smoothing>(P. 500) for thedescription of the setting.
<Gradation Smoothing>Configure the smoothing setting to print the gradation (color density) of graphics (e.g., illustrationscreated using applications) or bit map images with a smooth finish. <Level 2> applies a strongersmoothing effect than <Level 1>. You can apply the setting separately for graphics and images. See <Gradation Smoothing>(P. 501) for the description of the setting.
5 Select <Start Printing>.
➠Printing starts.
● If you want to cancel printing, select <Cancel> <Yes>.
● If you always want to print with the same settings: Memory Media Print(P. 176)
LINKS
<Store/Access Files>(P. 556)
Printing
276

ScanningScanning .............................................................................................................................................................. 278
Scan Basic Features Screen ............................................................................................................................... 280
Basic Operations for Scanning Originals ......................................................................................................... 283
Scanning and Saving to a Computer ............................................................................................................. 284
Saving Data to a USB Memory Device ........................................................................................................... 286
Sending Data by E-Mail/Saving Data to a Shared Folder or FTP Server ......................................................... 290
Canceling Sending Documents ..................................................................................................................... 299
Checking Status and Log for Scanned Originals ........................................................................................... 300
Scanning Clearly ................................................................................................................................................ 302
Adjusting Image Quality ............................................................................................................................... 303
Adjusting Density ......................................................................................................................................... 304
Adjusting Sharpness When Scanning (Sharpness) ........................................................................................ 305
Useful Scanning Functions ............................................................................................................................... 307
Enhancing the Security of Electronic Files ..................................................................................................... 308
Adjusting Balance between File Size and Image Quality ............................................................................... 311
Recalling Previously Used Settings for Sending/Saving (Recall Settings) ....................................................... 312
Specifying E-Mail Settings ............................................................................................................................. 315
Using Your Computer to Scan (Remote Scan) .................................................................................................. 318
Scanning Documents from an Application .................................................................................................... 319
Using ScanGear MF ...................................................................................................................................... 321
Scanning
277

Scanning16SE-05E
You can scan original documents by using the operation panel of the machine or an application on a computer.Whichever way you use, the scanned originals are converted into electronic file formats such as PDFs. Use the scanfunction to convert large-volume paper documents into files so that you can organize them easily.
● To use this machine as a scanner, you must complete preparations in advance, including installation ofsoftware to a computer. For more information, see the manuals for the relevant drivers or software on theonline manual website. To connect the machine to your computer via a network, you must register themachine to the installed software. Preparing to Use the Machine as a Scanner(P. 85)
● Depending on the operating system and the version of the scanner driver or applications you are using, thescreens in this manual may differ from your screens.
◼Using Basic OperationsYou can scan and save originals to your computer by using the operation panel of the machine. You can also saveoriginals to a USB memory device or send them as e-mail attachments.
Scan Basic Features Screen(P. 280)Basic Operations for Scanning Originals(P. 283)Canceling Sending Documents(P. 299)Checking Status and Log for Scanned
Originals(P. 300)
◼Enhancing QualityYou can find instructions on how to resolve problems such as "blurry photos" or "text unreadable due to too deepcolor of the paper."
Scanning Clearly(P. 302)
◼Efficiently, ReliablyYou can find instructions on how to enhance efficiency when sending data and descriptions of useful settings.
Scanning
278
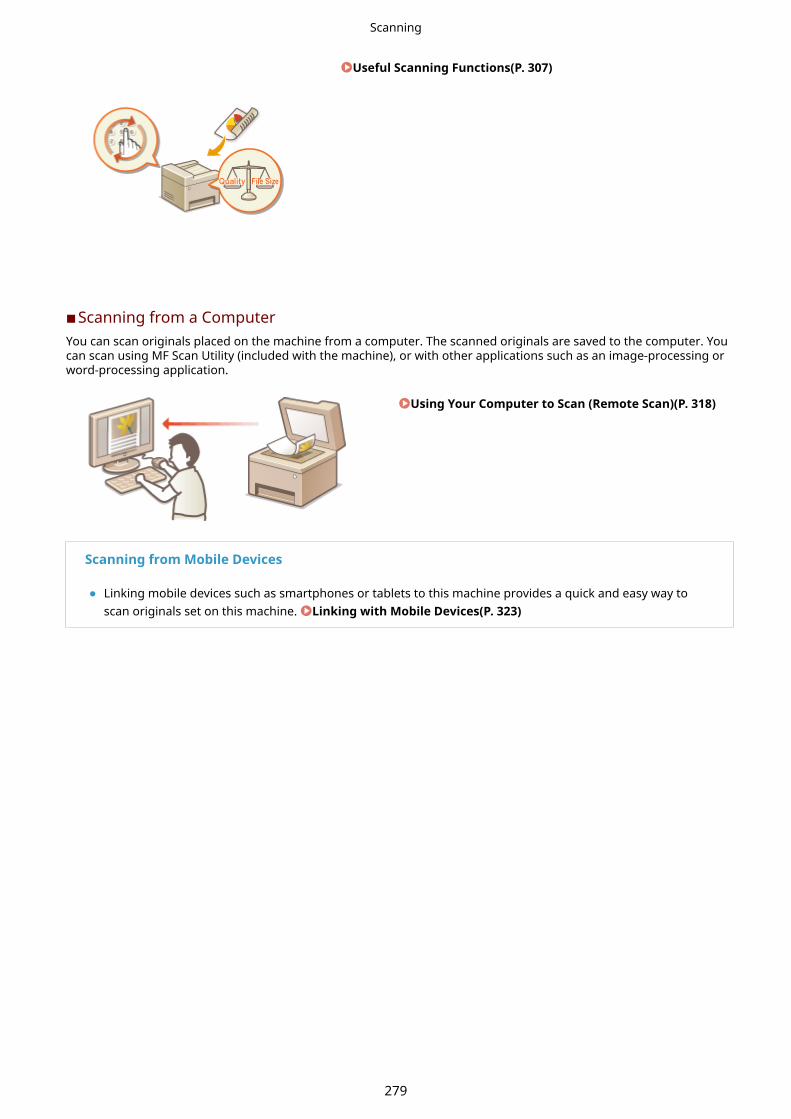
Useful Scanning Functions(P. 307)
◼Scanning from a ComputerYou can scan originals placed on the machine from a computer. The scanned originals are saved to the computer. Youcan scan using MF Scan Utility (included with the machine), or with other applications such as an image-processing orword-processing application.
Using Your Computer to Scan (Remote Scan)(P. 318)
Scanning from Mobile Devices
● Linking mobile devices such as smartphones or tablets to this machine provides a quick and easy way toscan originals set on this machine. Linking with Mobile Devices(P. 323)
Scanning
279

Scan Basic Features Screen16SE-05F
When you select <Scan> in the Home screen, the Scan Basic Features screen appears.
<Computer>Saves the scanned data to a computer. Basic Features Screen for Computer Scanning(P. 280)
<Remote Scanner>Puts the machine into the online status when originals are scanned from a computer. Using YourComputer to Scan (Remote Scan)(P. 318)
<USB Memory>Saves the scanned data to a USB memory device. Basic Features Screen for USB Scanning(P. 281)
<E-Mail>Sends the scanned data by e-mail. Basic Features Screen for E-Mail Sending/I-Fax Sending/FileSaving(P. 281)
<I-Fax>Sends the scanned data by I-Fax. Basic Features Screen for E-Mail Sending/I-Fax Sending/FileSaving(P. 281)
<File>Saves the scanned data to a shared folder or FTP server. Basic Features Screen for E-Mail Sending/I-FaxSending/File Saving(P. 281)
Basic Features Screen for Computer Scanning
Scan typeSelect the scan setting. Scanning and Saving to a Computer(P. 284)
Scanning
280

<Start>Use this button to start scanning.
Basic Features Screen for USB Scanning
Send SettingsThe original is scanned based on the settings specified here.
<Reset>You can collectively restore the default settings.
<Start>Use this button to start scanning. Selecting <B&W> starts black and white scanning. Selecting <Color> startscolor scanning.
Basic Features Screen for E-Mail Sending/I-Fax Sending/File Saving
E-Mail Sending I-Fax Sending File Saving
<Specify Destination> tabSelect this tab to search for a destination in the Address Book or an LDAP server, enter a coded dial, orspecify a destination using the recall settings.
Sending Data by E-Mail/Saving Data to a Shared Folder or FTP Server(P. 290)Recalling Previously Used Settings for Sending/Saving (Recall Settings)(P. 312)
<Send Settings> tabSelect this tab to specify the scanning settings.
Scanning
281

<Confirm Destination>You can check or change the name and address of the specified destination as well as the number ofdestinations.
<Reset>You can collectively restore the default settings.
<Start>Use this button to start scanning. Selecting <B&W> starts black and white scanning. Selecting <Color> startscolor scanning.
Scanning
282

Basic Operations for Scanning Originals16SE-05H
This section describes the basic procedures for scanning originals.
◼Scanning
Scanning and Saving to aComputer(P. 284)
Saving Data to a USB MemoryDevice(P. 286)
Sending Data by E-Mail/SavingData to a Shared Folder or FTPServer(P. 290)
◼Operating JobsCanceling Sending Documents(P. 299)Checking Status and Log for Scanned Originals(P. 300)
Scanning
283

Scanning and Saving to a Computer16SE-0EC
The sequence of "scanning an original and saving it to a computer" can only be done when scanning from themachine. Scan while specifying what computer originals will be saved to; whether to scan originals in color or blackand white; whether to save originals as PDFs or JPEGs; and other settings. Incidentally, if you want to specify acomputer connected to the network as the destination, you must register the machine with the computer in advance( Preparing to Use the Machine as a Scanner(P. 85) ).
1 Place the original(s). Placing Originals(P. 136)
2 Select <Scan> in the Home screen. Home Screen(P. 123)
● If the login screen appears, specify the user name, the password, and the authentication server. Loggingin to Authorized Send(P. 134)
3 Select <Computer> in the Scan Basic Features screen. Scan Basic FeaturesScreen(P. 280)
● If only a computer connected to the machine via USB is used, proceed to step 5.
4 Select the destination computer.
5 Select the scan type in the Computer Scan Basic Features screen. Basic FeaturesScreen for Computer Scanning(P. 280)
● The scan types and settings that are displayed can be confirmed and changed by using MF Scan Utility. Formore information, click [Instructions] on MF Scan Utility.
● If you are a macOS user, see the manuals for the relevant drivers or software on the online manualwebsite.
6 Select <Start>.
➠Scanning of the original starts.
● If you want to cancel, select <Cancel> <Yes>. Canceling Sending Documents(P. 299)
● You cannot scan while the ScanGear MF is displayed. Closethe screen before scanning.
Scanning
284

When placing originals in the feeder in step 1When scanning is complete, the save destination folder is displayed on the computer.
When placing originals on the platen glass in step 1
When scanning is complete, follow the procedures below (except if you selected JPEG as a file format).
1 If there are additional pages of originals to be scanned, place the next original on the platen glass, andselect <Scan Next>.
● Repeat this step until you finish scanning all of the pages.
● When there is only one page to be scanned, proceed to the next step.
2 Select <Finish>.
➠The save destination folder is displayed on the computer.
About the save destination folder● By default, the scanned data is saved to the My Documents folder. A subfolder named with the scanning
date is created, and the data is saved to that folder.
● You can change the save destination from the MF Scan Utility. For more information, click [Instructions] onMF Scan Utility.
Scanning
285

Saving Data to a USB Memory Device16SE-0EE
This section describes how to scan the original and save the scanned data to a USB memory device.
● Before saving data to a USB memory device, insert a USB memory device into the USB port. For informationabout the available USB memory devices and how to insert and remove a USB memory device, see Inserta USB Memory Device(P. 107) .
1 Place the original(s). Placing Originals(P. 136)
2 Select <Scan> in the Home screen. Home Screen(P. 123)
● If the login screen appears, specify the user name, the password, and the authentication server. Loggingin to Authorized Send(P. 134)
3 Select <USB Memory> in the Scan Basic Features screen. Scan Basic FeaturesScreen(P. 280)
4 Specify the scanning settings as necessary.
Specifying the Scanning Size of the Original
Selecting a File Format
Specifying Orientation of Your Original
Scanning 2-Sided Originals
Specifying the Scanning Size of the Original
You can specify the scanning size of your original.
<Scan Size> Select the original size
Scanning
286
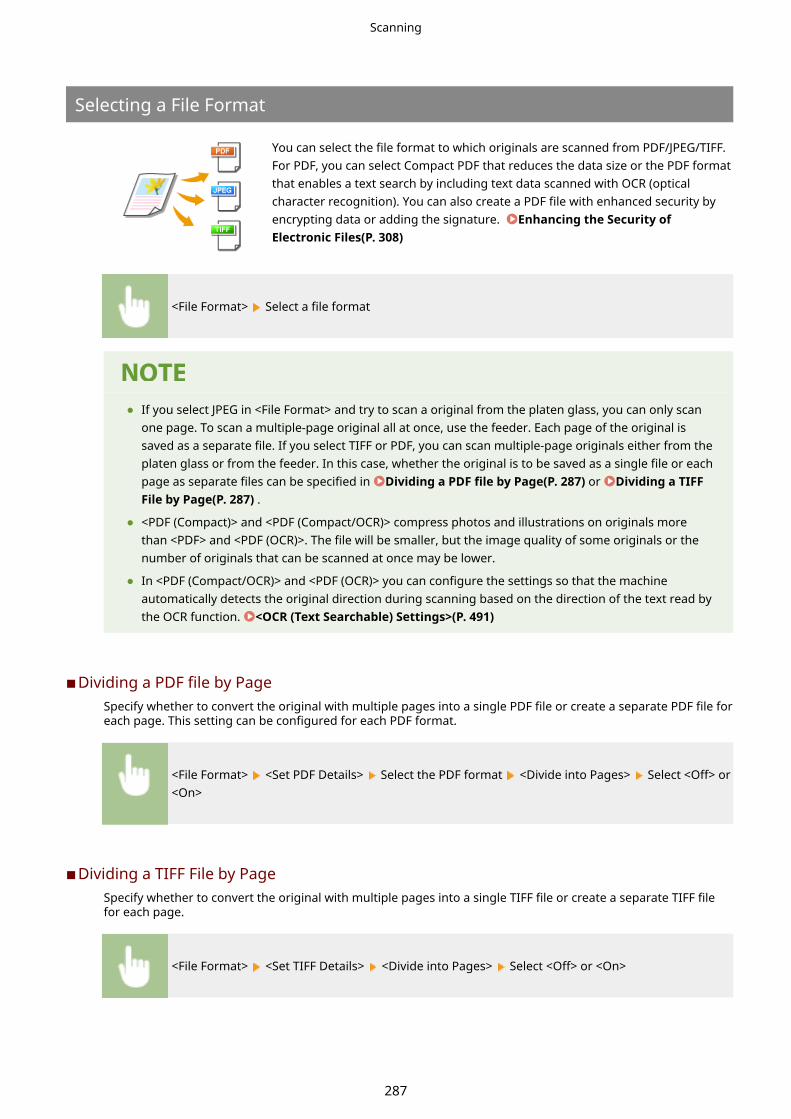
Selecting a File Format
You can select the file format to which originals are scanned from PDF/JPEG/TIFF.For PDF, you can select Compact PDF that reduces the data size or the PDF formatthat enables a text search by including text data scanned with OCR (opticalcharacter recognition). You can also create a PDF file with enhanced security byencrypting data or adding the signature. Enhancing the Security ofElectronic Files(P. 308)
<File Format> Select a file format
● If you select JPEG in <File Format> and try to scan a original from the platen glass, you can only scanone page. To scan a multiple-page original all at once, use the feeder. Each page of the original issaved as a separate file. If you select TIFF or PDF, you can scan multiple-page originals either from theplaten glass or from the feeder. In this case, whether the original is to be saved as a single file or eachpage as separate files can be specified in Dividing a PDF file by Page(P. 287) or Dividing a TIFFFile by Page(P. 287) .
● <PDF (Compact)> and <PDF (Compact/OCR)> compress photos and illustrations on originals morethan <PDF> and <PDF (OCR)>. The file will be smaller, but the image quality of some originals or thenumber of originals that can be scanned at once may be lower.
● In <PDF (Compact/OCR)> and <PDF (OCR)> you can configure the settings so that the machineautomatically detects the original direction during scanning based on the direction of the text read bythe OCR function. <OCR (Text Searchable) Settings>(P. 491)
◼Dividing a PDF file by PageSpecify whether to convert the original with multiple pages into a single PDF file or create a separate PDF file foreach page. This setting can be configured for each PDF format.
<File Format> <Set PDF Details> Select the PDF format <Divide into Pages> Select <Off> or<On>
◼Dividing a TIFF File by PageSpecify whether to convert the original with multiple pages into a single TIFF file or create a separate TIFF filefor each page.
<File Format> <Set TIFF Details> <Divide into Pages> Select <Off> or <On>
Scanning
287

Specifying Orientation of Your Original
You can specify portrait or landscape orientation.
<Original Orientation> Select the original orientation
Scanning 2-Sided Originals
The machine can automatically scan the front and back sides of originals in thefeeder.
● The machine cannot scan both sides of originals automatically when the originals are placed on the platenglass.
<2-Sided Original> Select <Book Type> or <Calendar Type>
<Book Type>Select for originals whose images on the front and back sides face the same direction.
<Calendar Type>Select for originals whose images on the front and back sides face in opposite directions.
● For information about other scan settings, see Scanning Clearly(P. 302) or Adjusting Balancebetween File Size and Image Quality(P. 311) .
5 Select <Start>.
➠Scanning of the original starts.
Scanning
288

● If you want to cancel, select <Cancel> <Yes>. Canceling Sending Documents(P. 299)
When placing originals in the feeder in step 1When scanning is complete, the saving process starts.
When placing originals on the platen glass in step 1
When scanning is complete, follow the procedures below (except if you selected JPEG as a file format).
1 If there are additional pages of originals to be scanned, place the next original on the platen glass, andselect <Scan Next>.
● Repeat this step until you finish scanning all of the pages.
● When there is only one page to be scanned, proceed to the next step.
2 Select <Finish>.
➠The saving process starts.
● A new folder is created on the USB memory device, and the scanned document is stored in that folder. Thefile name of a scanned document is automatically assigned based on the following format: the charactersSCAN followed by a four-digit number.file extension name.
● If you always want to scan with the same settings: Changing the Default Settings for Functions(P. 176)
● If you want to register a combination of settings to use when needed: Registering Frequently UsedSettings(P. 174)
Scanning
289
Sending Data by E-Mail/Saving Data to a Shared Folderor FTP Server
16SE-0EF
This section describes the procedures for scanning originals and sending the scanned data directly from the machineby attaching it to an e-mail or saving it to a shared folder or FTP server.
● Before you can send the data directly by e-mail, you need to complete certain procedures, such as specifyingthe e-mail server settings. Procedure for Setting to Send E-Mail/Send and Receive I-Fax(P. 86)
● Before you can save the data to a shared folder or FTP server, you need to complete certain procedures,such as specifying the location to save the scanned originals to.
Procedure for Setting a Shared Folder as a Save Location(P. 94)Procedure for Setting a FTP Server as a Save Location(P. 98)
1 Place the original(s). Placing Originals(P. 136)
2 Select <Scan> in the Home screen. Home Screen(P. 123)
● If the login screen appears, specify the user name, the password, and the authentication server. Loggingin to Authorized Send(P. 134)
3 Select <E-Mail> or <File> in the Scan Basic Features screen. Scan Basic FeaturesScreen(P. 280)
4 Specify the destination.
Specifying from Address Book
Specifying from Coded Dial Numbers
Entering Destinations Directly (E-Mail Sending)
Specifying Destinations in an LDAP Server
Specifying from Address Book
The Address Book enables you to specify a destination by selecting from a list ofregistered destinations or by searching by name for destinations with recipientnames.
● You need to register destinations in the Address Book before using this feature. RegisteringDestinations(P. 182)
Scanning
290

● Register the shared folder or FTP server address from a computer.Setting a Shared Folder as a Save Location(P. 95)Registering Destinations from Remote UI(P. 429)
1 Select <Address Book> in the <Specify Destination> tab.
2 Select <To>.
3 Select an index. Index(P. 182)
4 Select the check box for the desired destination, and select <Apply>.
● If a destination is selected from <Address Book> in the Home screen, the Basic Features screen for e-mailsending or file saving can be displayed while the selected destination remains being specified.
Specifying from Coded Dial Numbers
Three-digit numbers (coded dial numbers) are assigned to addresses in the AddressBook. You can specify an address simply by entering its coded dial number.
● To use coded dial numbers, the destination must be registered in the Address Book beforehand. Registering Destinations(P. 182)
● Register the shared folder or FTP server address from a computer.Setting a Shared Folder as a Save Location(P. 95)Registering Destinations from Remote UI(P. 429)
1 Select <Coded Dial> in the <Specify Destination> tab.
2 Select <To>.
Scanning
291

3 Enter a three-digit number.
● If you have entered an incorrect value, use to clear it.
If a confirmation screen appears
● When <Confirm When Coded Dial TX> is set to <On>, a screen is displayed that shows the destination andthe name for the number. (For Group Dial, the destination name and the number of destinations areshown.) Check the contents and if everything is correct, select <OK>. To specify a different destination,select <Cancel> and then re-enter the three-digit coded dial number. Displaying Destinations inAddress Book(P. 406)
Entering Destinations Directly (E-Mail Sending)
For a destination that is not registered in the Address Book, specify it by entering an e-mail address.
1 Select <Use Keyboard> in the <Specify Destination> tab.
2 Enter the e-mail address, and select <Apply>.
● On how to enter text, see Entering Text(P. 132) .
Specifying Destinations in an LDAP Server
If your office has an LDAP server installed, you can specify a destination using userinformation in the server. Access the LDAP server via the machine to search for theappropriate user information and specify it as destination.
● You need to specify the settings for connecting to an LDAP server beforehand. Registering LDAPServers(P. 64)
1 Select <LDAP Server> in the <Specify Destination> tab.
Scanning
292

2 Select the LDAP server you are using.
3 Select conditions for user information to be searched.
● Name, fax numbers, e-mail addresses, organization names, and organization unit are available criteria forsearching destinations.
4 Enter the search target character string, and select <Apply>.
● On how to enter text, see Entering Text(P. 132) .
● To specify multiple search criteria, repeat steps 3 and 4.
5 Select <Search Method>.
6 Select conditions to display the search result.
<Using All Conditions Below>Searches and displays the users that meet all the search criteria specified in steps 3 and 4.
<Using Some Conditions Below>If users that meet even one of the criteria specified in steps 3 and 4 are found, displays all those users.
7 Select <Start Search>.
➠The users meeting your search criteria are displayed.
● If the authentication screen appears when you select <Start Search>, enter the user name of the machineand the password registered in the LDAP server, and select <Apply>. Registering LDAP Servers(P. 64)
8 Select the check box for the user that you want to specify as destination, and select<Apply>.
Scanning
293

If a screen on which a destination is already specified appears
● You can only send to destinations that are not restricted. To send to other destinations, you mustconfigure the send function authentication settings in such a way that transmission is not restricted.Contact your administrator for details. LDAP Server Authentication(P. 363)
Specifying destinations from the transmission records
● You can also recall previously used destinations. Recalling Previously Used Settings for Sending/Saving (Recall Settings)(P. 312)
Saving the data to a shared folder or FTP server
● Only one destination can be specified.
5 When sending an e-mail, specify multiple destinations, including Cc/Bcc destinations,as necessary.
● Select the method used to specify destinations in the <Specify Destination> tab, and then specify thedestination.
● If you selected <LDAP Server> or <Specify Myself as Destination>, the destination is specified in the <To>field.
● <Cc> and <Bcc> addresses can only be selected using <Address Book> or <Coded Dial>.
To delete destinationsIf you specified multiple destinations, you can delete destinations as necessary.
1 Select <Confirm Destination>.
2 Select the check box for the destination to be deleted, and select <Remove from Dest.>.
● If you select Group, select <Details> <Destination>; you can view the destinations registered in thegroup.
3 Select <Yes>.
6 Specify the scanning settings as necessary.
Specifying the Scanning Size of the Original
Selecting a File Format
Specifying Orientation of Your Original
Scanning 2-Sided Originals
Scanning
294

Specifying the Scanning Size of the Original
You can specify the scanning size of your original.
Select <Scan Size> in the <Send Settings> tab Select the original size
Selecting a File Format
You can select the file format to which originals are scanned from PDF/JPEG/TIFF. ForPDF, you can select Compact PDF that reduces the data size or the PDF format thatenables a text search by including text data scanned with OCR (optical characterrecognition). You can also create a PDF file with enhanced security by encryptingdata or adding the signature. Enhancing the Security of Electronic Files(P. 308)
Select <File Format> in the <Send Settings> tab Select a file format
● If you select JPEG in <File Format> and try to scan a original from the platen glass, you can only scanone page. To scan a multiple-page original all at once, use the feeder. Each page of the original issaved as a separate file. If you select TIFF or PDF, you can scan multiple-page originals either from theplaten glass or from the feeder. In this case, whether the original is to be saved as a single file or eachpage as separate files can be specified in Dividing a PDF file by Page(P. 295) or Dividing a TIFFFile by Page(P. 296) .
● <PDF (Compact)> and <PDF (Compact/OCR)> compress photos and illustrations on originals morethan <PDF> and <PDF (OCR)>. The file will be smaller, but the image quality of some originals or thenumber of originals that can be scanned at once may be lower.
● In <PDF (Compact/OCR)> and <PDF (OCR)> you can configure the settings so that the machineautomatically detects the original direction during scanning based on the direction of the text read bythe OCR function. <OCR (Text Searchable) Settings>(P. 491)
◼Dividing a PDF file by PageSpecify whether to convert the original with multiple pages into a single PDF file or create a separate PDF file foreach page. This setting can be configured for each PDF format.
Scanning
295

Select <File Format> <Set PDF Details> Select the PDF format <Divide into Pages> Select<Off> or <On> in the <Send Settings> tab
◼Dividing a TIFF File by PageSpecify whether to convert the original with multiple pages into a single TIFF file or create a separate TIFF filefor each page.
Select <File Format> <Set TIFF Details> <Divide into Pages> Select <Off> or <On> in the<Send Settings> tab
Specifying Orientation of Your Original
You can specify portrait or landscape orientation.
Select <Orig. Orientation> in the <Send Settings> tab Select the original orientation
Scanning 2-Sided Originals
The machine can automatically scan the front and back sides of originals in thefeeder.
● The machine cannot scan both sides of originals automatically when the originals are placed on the platenglass.
Select <2-Sided Original> in the <Send Settings> tab Select <Book Type> or <Calendar Type>
Scanning
296
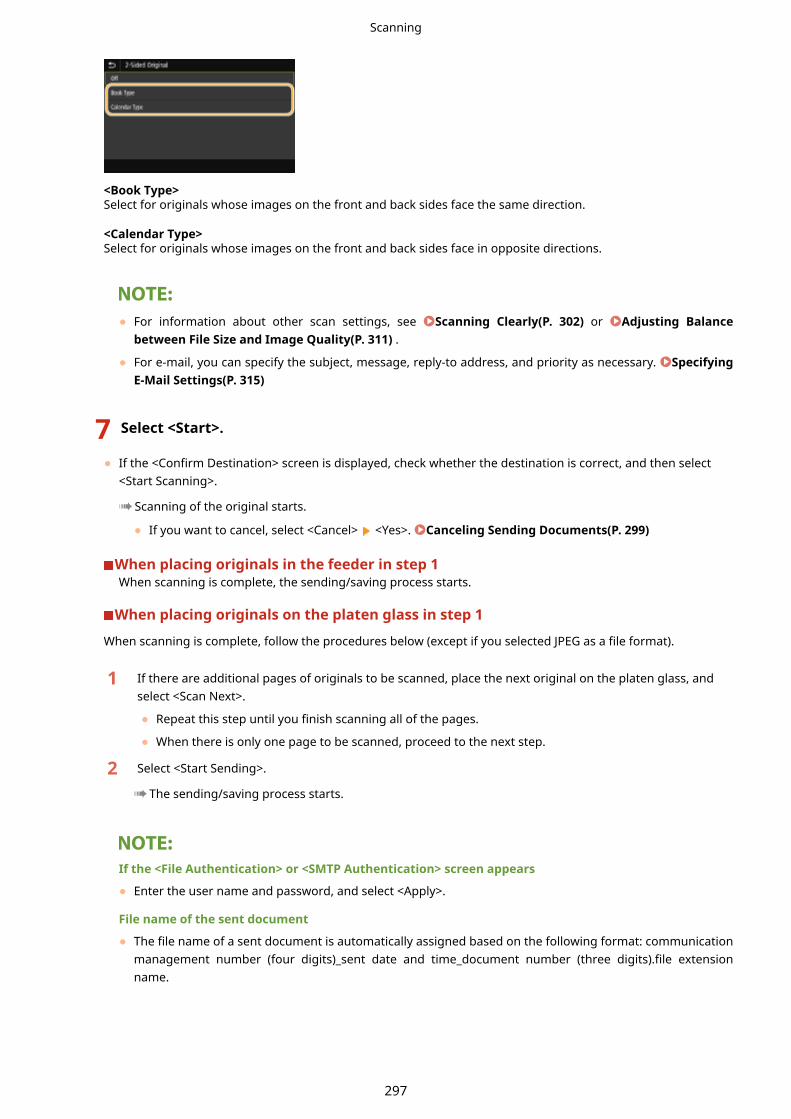
<Book Type>Select for originals whose images on the front and back sides face the same direction.
<Calendar Type>Select for originals whose images on the front and back sides face in opposite directions.
● For information about other scan settings, see Scanning Clearly(P. 302) or Adjusting Balancebetween File Size and Image Quality(P. 311) .
● For e-mail, you can specify the subject, message, reply-to address, and priority as necessary. SpecifyingE-Mail Settings(P. 315)
7 Select <Start>.
● If the <Confirm Destination> screen is displayed, check whether the destination is correct, and then select<Start Scanning>.
➠Scanning of the original starts.
● If you want to cancel, select <Cancel> <Yes>. Canceling Sending Documents(P. 299)
When placing originals in the feeder in step 1When scanning is complete, the sending/saving process starts.
When placing originals on the platen glass in step 1
When scanning is complete, follow the procedures below (except if you selected JPEG as a file format).
1 If there are additional pages of originals to be scanned, place the next original on the platen glass, andselect <Scan Next>.
● Repeat this step until you finish scanning all of the pages.
● When there is only one page to be scanned, proceed to the next step.
2 Select <Start Sending>.
➠The sending/saving process starts.
If the <File Authentication> or <SMTP Authentication> screen appears
● Enter the user name and password, and select <Apply>.
File name of the sent document
● The file name of a sent document is automatically assigned based on the following format: communicationmanagement number (four digits)_sent date and time_document number (three digits).file extensionname.
Scanning
297

If an E-Mail Send Error OccursError notifications are sometimes sent to the e-mail address set to the machine. If you leave it as-is, it mayresult in an insufficient remaining capacity of mailbox depending on your mail server. It is recommended thatyou clear the mailbox periodically.
To clear the mailbox
● When the mailbox is cleared, all e-mail in the server mailbox is deleted. When you specify the e-mailaccount that you use usually, you should first check whether any e-mail in the mailbox needs to be kept.
1 Start the Remote UI and log in to System Manager Mode. Starting Remote UI(P. 418)
2 Click [Settings/Registration] on the Portal page. Remote UI Screen(P. 419)
3 Select [TX Settings] [Network Settings - E-Mail/I-Fax Settings].
4 Click [Clear] in [Clear Mail Box].
5 Read the message that is displayed, and click [OK].
➠E-mail is deleted from the mailbox.
● If you always want to scan with the same settings: Changing the Default Settings for Functions(P. 176)
● If you want to register a combination of settings to use when needed: Registering Frequently UsedSettings(P. 174)
Scanning
298

Canceling Sending Documents16SE-05J
If you want to cancel sending documents immediately after selecting <Start>, select <Cancel> on the display or press. You can also cancel sending documents after checking the sending status.
◼Select <Cancel> to cancel
◼Press to cancel
If the screen displays a list of documents when is pressedOriginals have been scanned and are waiting to be processed. Select the document to cancel, and select<Cancel> <Yes>.
◼Check the transmission status before canceling
<Status Monitor> <TX Job> Select the document in the <TX Job Status> tab <Cancel> <Yes>
LINKS
Basic Operations for Scanning Originals(P. 283)Checking Status and Log for Scanned Originals(P. 300)
Scanning
299

Checking Status and Log for Scanned Originals16SE-05K
You can check the status and log for scanned originals sent directly from the machine.
● When <Display Job Log> is set to <Off>, you cannot check the logs for sent documents. <Display JobLog>(P. 569)
1 Select <Status Monitor>.
2 Select <TX Job>.
3 Check the statuses and logs for sent documents.
To check the statuses for sent documents
1 Select the document whose status you want to check in the <TX Job Status> tab.
➠Displays detailed information about the document.
● If you specified multiple destinations, the number of specified destinations is displayed on thescreen. To check the details of specified multiple destinations, select <Destination>.
To check the logs for sent documents
1 Select the document whose log you want to check in the <TX Job Log> tab.
● <OK> is displayed when a document was sent successfully, and <Error> is displayed when a documentfailed to be sent because it was canceled or there was some error.
➠Displays detailed information about the document.
When a three-digit number is shown in the case of <Error>
Scanning
300

● This number represents an error code. Countermeasures for Each Error Code(P. 662)
LINKS
Basic Operations for Scanning Originals(P. 283)Canceling Sending Documents(P. 299)Printing Reports and Lists(P. 610)
Scanning
301

Scanning Clearly16SE-05L
When creating files for brochures that contain many pictures or reports written in pencil, you can adjust density andbrightness to achieve clearer image quality.
Adjusting Image Quality(P. 303) Adjusting Density(P. 304) Adjusting Sharpness WhenScanning (Sharpness)(P. 305)
Scanning
302

Adjusting Image Quality16SE-05R
You can select the image quality for the scan depending on the original type, such astext-only originals, originals with charts and graphs, or magazine photos.
Saving Data to a USB Memory Device
<Scan> <USB Memory> <Original Type> Select the original type.
Sending Data by E-Mail/I-Fax or Saving Data to the Server
<Scan> Specify destinations in <E-Mail>/<I-Fax>/<File> Select <Original Type> in the <SendSettings> tab Select the original type
LINKS
Basic Operations for Scanning Originals(P. 283)Sending I-Faxes(P. 247)
Scanning
303

Adjusting Density16SE-05S
You can adjust the density of the scan if the text or images in a original are too lightor dark.
Saving Data to a USB Memory Device
<Scan> <USB Memory> <Density> Adjust the density <Apply>
Sending Data by E-Mail/I-Fax or Saving Data to the Server
<Scan> Specify destinations in <E-Mail>/<I-Fax>/<File> Select <Density> in the <Send Settings>tab Adjust the density <Apply>
LINKS
Basic Operations for Scanning Originals(P. 283)Sending I-Faxes(P. 247)Adjusting Sharpness When Scanning (Sharpness)(P. 305)
Scanning
304

Adjusting Sharpness When Scanning (Sharpness)16SE-05U
You can adjust the sharpness of the image. Increase the sharpness to sharpenblurred text and lines, or decrease the sharpness to improve the appearance ofmagazine photos.
Saving Data to a USB Memory Device
<Scan> <USB Memory> <Sharpness> Adjust the sharpness <Apply>
Sending Data by E-Mail/I-Fax or Saving Data to the Server
<Scan> Specify destinations in <E-Mail>/<I-Fax>/<File> Select <Sharpness> in the <SendSettings> tab Adjust the sharpness <Apply>
Example: If you want to sharpen text and lines written in pencil
Example: If you want to improve the appearance of magazine photos
Scanning
305

LINKS
Basic Operations for Scanning Originals(P. 283)Sending I-Faxes(P. 247)Adjusting Density(P. 304)
Scanning
306
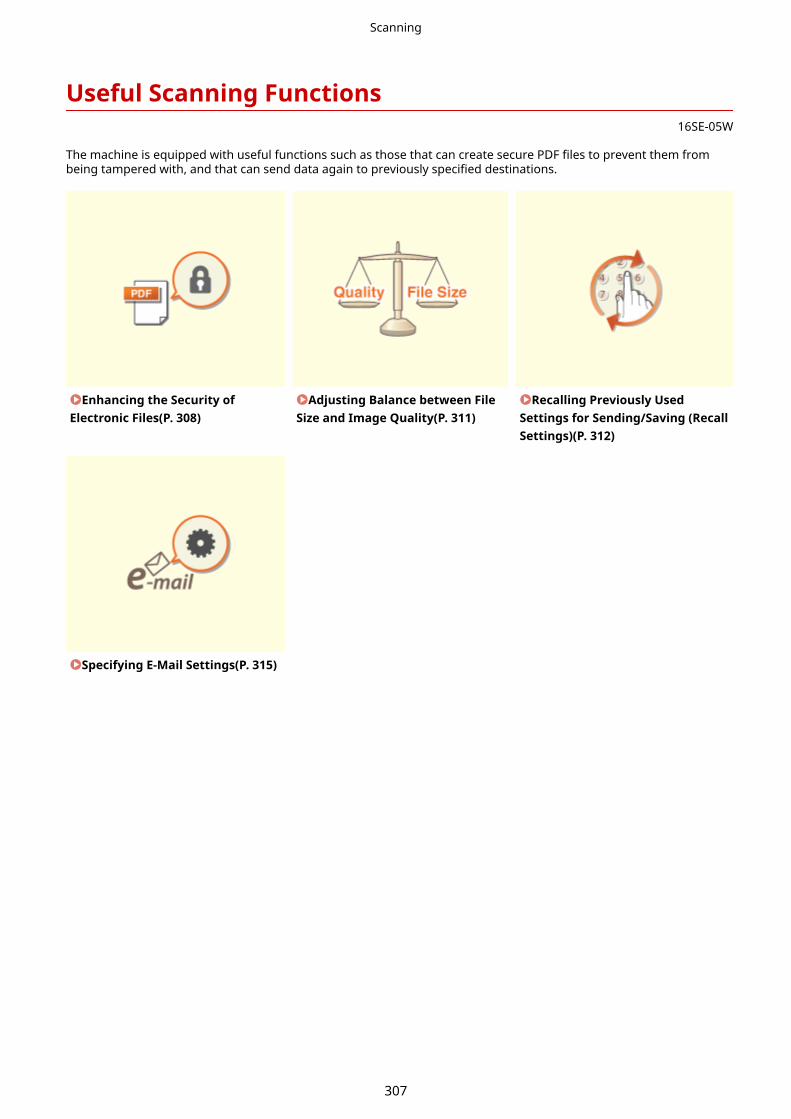
Useful Scanning Functions16SE-05W
The machine is equipped with useful functions such as those that can create secure PDF files to prevent them frombeing tampered with, and that can send data again to previously specified destinations.
Enhancing the Security ofElectronic Files(P. 308)
Adjusting Balance between FileSize and Image Quality(P. 311)
Recalling Previously UsedSettings for Sending/Saving (RecallSettings)(P. 312)
Specifying E-Mail Settings(P. 315)
Scanning
307

Enhancing the Security of Electronic Files16SE-05X
Digital files are vulnerable in terms of security because they can be easily viewed ortampered with leaving no trace. When scanning important documents, you can takeappropriate measures such as encrypting data and adding a device signature toenhance security.
Encrypting a PDF File(P. 308)Adding a Device Signature(P. 309)
● Encryption and device signature are only available for PDF files.
● Both the encryption and device signature can be used at the same time.
Encrypting a PDF File
You can encrypt and send/save a PDF file by setting a password when scanning originals. The password setting helpsreduce the risk of the PDF file being viewed or edited by others.
1 Select <Scan> in the Home screen. Home Screen(P. 123)
● If the login screen appears, specify the user name, the password, and the authentication server. Loggingin to Authorized Send(P. 134)
2 Select <USB Memory>, <E-Mail>, or <File> in the Scan Basic Features screen. ScanBasic Features Screen(P. 280)
● If you select <USB Memory>, proceed to step 4.
3 Specify the destination, and specify the scanning settings as necessary. BasicOperations for Scanning Originals(P. 283)
4 Proceed to <Set PDF Details>.
Saving data to a USB memory device● Select <File Format> <Set PDF Details>.
Sending e-mail/saving data to a shared folder or FTP server● Select <File Format> <Set PDF Details> in the <Send Settings> tab.
5 Select the type of PDF format.
● You can specify whether to enable encryption for each PDF format.
Scanning
308

6 Select <Encryption>.
7 Select the encryption level.
<Acrobat 7.0 or Later/128-bit AES>Encrypt the file in the 128-bit environment, which can be opened by Adobe Acrobat 7.0 or later.
<Acrobat 10.0 or Equivalent/256-bit AES>Encrypt the file in the 256-bit environment, which can be opened by Adobe Acrobat 10.0.
● <Acrobat 10.0 or Equivalent/256-bit AES> can be changed to <Acrobat 9.0 or Equivalent/256-bit AES> with adifferent compatible version. <256-bit AES Set. (Encrypt. PDF)>(P. 491)
8 Enter the encryption password, and select <Apply>.
● On how to enter text, see Entering Text(P. 132) .
9 Enter the password, and select <Apply>.
Adding a Device Signature
Convert the scanned original into a PDF file with a device signature. The device signature serves the same purpose assealing or signing a document; it can be used to check where the file was created and whether the document has beentampered with or falsified after the signature was appended. To assign the device signature to a PDF file, you need togenerate the key and certificate for the device signature in advance. Generating a Device Signature Key(P. 416)
1 Select <Scan> in the Home screen. Home Screen(P. 123)
● If the login screen appears, specify the user name, the password, and the authentication server. Loggingin to Authorized Send(P. 134)
2 Select <USB Memory>, <E-Mail>, or <File> in the Scan Basic Features screen. ScanBasic Features Screen(P. 280)
● If you select <USB Memory>, proceed to step 4.
3 Specify the destination, and specify the scanning settings as necessary. BasicOperations for Scanning Originals(P. 283)
Scanning
309

4 Proceed to <Set PDF Details>.
Saving data to a USB memory device● Select <File Format> <Set PDF Details>.
Sending e-mail/saving data to a shared folder or FTP server● Select <File Format> <Set PDF Details> in the <Send Settings> tab.
5 Select the type of PDF format.
● You can specify whether to enable encryption for each PDF format.
6 Select <Digital Signatures>.
7 Select <Top Left>.
Scanning
310
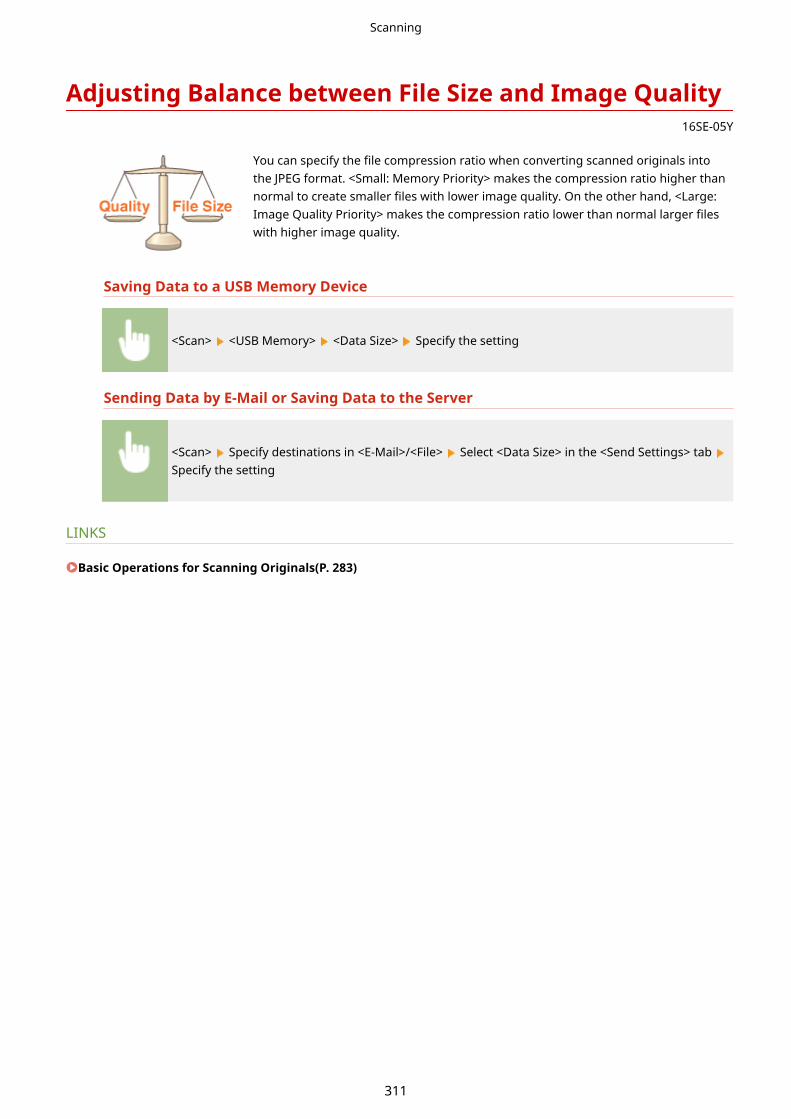
Adjusting Balance between File Size and Image Quality16SE-05Y
You can specify the file compression ratio when converting scanned originals intothe JPEG format. <Small: Memory Priority> makes the compression ratio higher thannormal to create smaller files with lower image quality. On the other hand, <Large:Image Quality Priority> makes the compression ratio lower than normal larger fileswith higher image quality.
Saving Data to a USB Memory Device
<Scan> <USB Memory> <Data Size> Specify the setting
Sending Data by E-Mail or Saving Data to the Server
<Scan> Specify destinations in <E-Mail>/<File> Select <Data Size> in the <Send Settings> tab Specify the setting
LINKS
Basic Operations for Scanning Originals(P. 283)
Scanning
311

Recalling Previously Used Settings for Sending/Saving(Recall Settings)
16SE-060
You can select a destination from among the past destinations. When you specify apreviously used destination, the machine also sets the same scan settings such asdensity you used the last time you sent documents to that destination.
● When <Restrict Resending from Log> is set to <On>, you cannot use this feature. Disabling Use ofPreviously Used Destinations(P. 406)
● Turning OFF the machine or setting <Restrict New Destinations> to <On> deletes the past destinations, anddisables this feature. Restricting New Destinations that Can Be Specified(P. 406)
● When you specify a destination using this feature, any destinations that you have already specified aredeleted.
1 Place the original(s). Placing Originals(P. 136)
2 Select <Scan> in the Home screen. Home Screen(P. 123)
● If the login screen appears, specify the user name, the password, and the authentication server. Loggingin to Authorized Send(P. 134)
3 Select <E-Mail>, <I-Fax>, or <File> in the Scan Basic Features screen. Scan BasicFeatures Screen(P. 280)
4 Select <Recall Settings> in the <Specify Destination> tab.
5 Select the destination.
● When you transmit to multiple destinations, only the address specified for the first transmission is displayedin the log, but all the destinations are specified.
Scanning
312

➠The selected destination and its scan settings are specified. You can also change the settings beforesending.
To delete destinations (e-mail/I-Fax)If you specified multiple destinations, you can delete destinations as necessary.
1 Select <Confirm Destination>.
2 Select the check box for the destination to be deleted, and select <Remove from Dest.>.
● If you select the Group check box, you can view the destinations registered in the group by selecting<Details> <Destination>.
3 Select <Yes>.
6 Select <Start>.
● If the <Confirm Destination> screen is displayed, check whether the destination is correct, and then select<Start Scanning>.
➠Scanning of the original starts.
● If you want to cancel, select <Cancel> <Yes>. Canceling Sending Documents(P. 299)
When placing originals in the feeder in step 1When scanning is complete, the sending/saving process starts.
When placing originals on the platen glass in step 1
When scanning is complete, follow the procedures below (except if you selected JPEG as a file format).
1 If there are additional pages of originals to be scanned, place the next original on the platen glass, andselect <Scan Next>.
● Repeat this step until you finish scanning all of the pages.
● When there is only one page to be scanned, proceed to the next step.
2 Select <Start Sending>.
➠The sending/saving process starts.
If the <File Authentication> or <SMTP Authentication> screen appears
● Enter the user name and password, and select <Apply>.
LINKS
Basic Operations for Scanning Originals(P. 283)
Scanning
313

Sending I-Faxes(P. 247)
Scanning
314

Specifying E-Mail Settings16SE-061
When attaching a scanned originals to an e-mail, you can specify the subject,message, reply-to address, and priority for the e-mail before sending it.
1 Place the original(s). Placing Originals(P. 136)
2 Select <Scan> in the Home screen. Home Screen(P. 123)
● If the login screen appears, specify the user name, the password, and the authentication server. Loggingin to Authorized Send(P. 134) .
3 Select <E-Mail> in the Scan Basic Features screen. Scan Basic FeaturesScreen(P. 280)
4 Specify the destination, and configure the scan settings as necessary. BasicOperations for Scanning Originals(P. 283)
5 Specify the subject, message, reply-to address, and priority for the e-mail.
To specify subject/message
1 Select <Subject/Message> in the <Send Settings> tab.
2 Select <Subject>.
3 Enter the subject, and select <Apply>.
● On how to enter text, see Entering Text(P. 132) .
4 Select <Message>.
5 Enter the message, and select <Apply>.
6 Select <Apply>.
To specify reply-to addressSpecify the reply-to address when you want to notify the recipient of an e-mail address different from that ofthe machine as the reply-to address. Select the target reply-to address from the destinations registered in the
Scanning
315

Address Book, and specify it. If the destination has not been registered in the Address Book, see Registering Destinations(P. 182) .
1 Select <Reply To> in the <Send Settings> tab.
2 Select <Specify from Address Book>.
3 Select the check box for the desired reply-to address, and select <Apply>.
To specify priority
1 Select <Priority> in the <Send Settings> tab.
2 Select a priority level.
6 Select <Start>.
● If the <Confirm Destination> screen is displayed, check whether the destination is correct, and then select<Start Scanning>.
➠Scanning of the original starts.
● If you want to cancel, select <Cancel> <Yes>. Canceling Sending Documents(P. 299)
When placing originals in the feeder in step 1When scanning is complete, the e-mails are sent.
When placing originals on the platen glass in step 1
When scanning is complete, follow the procedures below (except if you selected JPEG as a file format).
1 If there are additional pages of originals to be scanned, place the next original on the platen glass, andselect <Scan Next>.
● Repeat this step until you finish scanning all of the pages.
● When there is only one page to be scanned, proceed to the next step.
2 Select <Start Sending>.
➠The e-mails are sent.
If the <SMTP Authentication> screen appears
● Enter the user name and password, and select <Apply>.
● If you always want to scan with the same settings: Changing the Default Settings for Functions(P. 176)
● If you want to register a combination of settings to use when needed: Registering Frequently UsedSettings(P. 174)
● If you want to specify the e-mail sender name: <Register Unit Name>(P. 539)
Scanning
316

LINKS
Checking Status and Log for Scanned Originals(P. 300)
Scanning
317
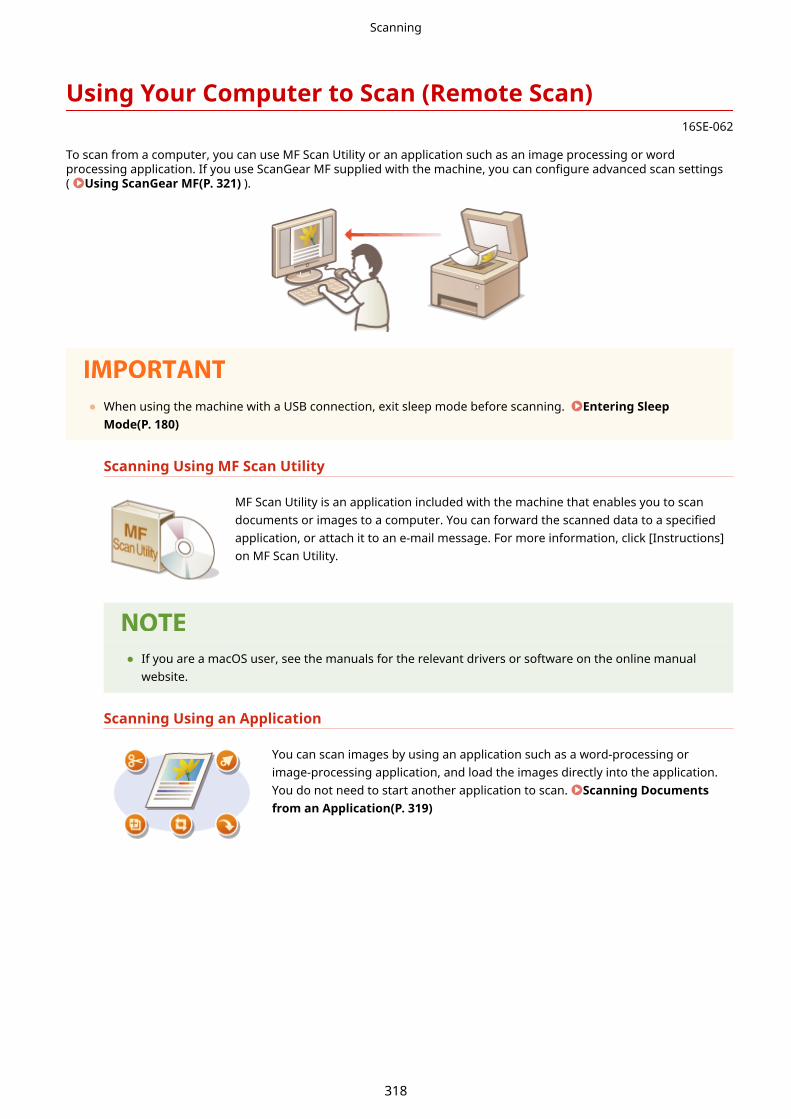
Using Your Computer to Scan (Remote Scan)16SE-062
To scan from a computer, you can use MF Scan Utility or an application such as an image processing or wordprocessing application. If you use ScanGear MF supplied with the machine, you can configure advanced scan settings( Using ScanGear MF(P. 321) ).
● When using the machine with a USB connection, exit sleep mode before scanning. Entering SleepMode(P. 180)
Scanning Using MF Scan Utility
MF Scan Utility is an application included with the machine that enables you to scandocuments or images to a computer. You can forward the scanned data to a specifiedapplication, or attach it to an e-mail message. For more information, click [Instructions]on MF Scan Utility.
● If you are a macOS user, see the manuals for the relevant drivers or software on the online manualwebsite.
Scanning Using an Application
You can scan images by using an application such as a word-processing orimage-processing application, and load the images directly into the application.You do not need to start another application to scan. Scanning Documentsfrom an Application(P. 319)
Scanning
318

Scanning Documents from an Application16SE-064
You can scan originals from applications such as image-processing or word-processing software. The scanned image is directly loaded in the application,allowing you to edit or process the image immediately. The following procedurevaries depending on the application.
● The application must be compatible with TWAIN or WIA*. For more information, see the instruction manualfor your application.
*TWAIN is a standard for connecting image input devices, such as scanners, with computers. WIA is a function that is anintegrated standard in Windows.
1 Place the original(s). Placing Originals(P. 136)
● The second or subsequent originals may not be scanned, or an error message may be displayeddepending on the application. In such a case, place and scan one original at a time.
● When <Auto Online> is set to <Off>, you must select <Scan> <Remote Scanner> in the Home screen tobring the machine online. <Auto Online>(P. 489)
2 From the application, select the start scan command.
● The procedure for selecting the start scan command varies depending on the application. For moreinformation, see the instruction manual for your application.
3 Select the scanner driver for this machine.
● Select ScanGear MF or WIA. If you select ScanGear MF, you can configure advanced scan settings.
4 Specify the scanning settings as necessary.
5 Click [Scan].
➠Scanning of the original starts.
● When scanning is complete, the scanned image is forwarded to an application.
How to use ScanGear MF
● Click on the ScanGear MF screen, and see the Help.
Scanning
319

LINKS
Using ScanGear MF(P. 321)
Scanning
320

Using ScanGear MF16SE-063
ScanGear MF is a scanner driver included with the machine. You can use ScanGearMF to configure advanced scan settings when you scan. The way ofstarting ScanGear MF differs depending of the way of scanning from the computer.
Starting from MF Scan UtilityWhen scanning from MF Scan Utility, click [ScanGear] to start ScanGear MF. For more information, click[Instructions] on MF Scan Utility.
● If you are a macOS user, see the manuals for the relevant drivers or software on the online manualwebsite.
Starting from an applicationTo scan from applications such as image-processing or word-processing software, select ScanGear MF asscanner driver. Scanning Documents from an Application(P. 319)
Functions of ScanGear MF● Previewing the image before scanning
● Specifying the scanning area
● Adjusting the detailed image quality
How to use ScanGear MF
● Click on the ScanGear MF screen, and see the Help.
Scanning
321

Linking with Mobile DevicesLinking with Mobile Devices .................................................................................................................... 323
Connecting with Mobile Devices ...................................................................................................................... 324
Connecting via a Wireless LAN Router (LAN Connection) .............................................................................. 325
Connecting Directly (Access Point Mode) ...................................................................................................... 327
Utilizing the Machine through Applications .................................................................................................... 331
Using AirPrint .................................................................................................................................................... 332
Printing with AirPrint .................................................................................................................................... 337
Scanning with AirPrint .................................................................................................................................. 340
Faxing with AirPrint ...................................................................................................................................... 342
If AirPrint Cannot Be Used ............................................................................................................................ 344
Using Google Cloud Print .................................................................................................................................. 345
Managing the Machine by the Remote Control .............................................................................................. 347
Linking with Mobile Devices
322

Linking with Mobile Devices16SE-065
Linking the machine with mobile devices such as smart phones and tablets enables you to use an appropriateapplication to perform printing, or other operation with ease. In addition, you can operate the machine from mobiledevices via remote control to confirm printing status and change the settings of the machine.
Connecting with Mobile Devices(P. 324)Connecting Directly (Access Point Mode)(P. 327)Utilizing the Machine through Applications(P. 331)Using AirPrint(P. 332)Using Google Cloud Print(P. 345)Managing the Machine by the Remote Control(P. 347)
● Depending on your mobile device, the machine may not operate correctly.
Linking with Mobile Devices
323

Connecting with Mobile Devices16SE-066
There are two methods used to connect a mobile device with the machine: connecting via a wireless LAN router, andcommunicating wirelessly and directly with the machine. Select a connection method in accordance with thecommunication environment and the device you are using. Perform communication with mobile devices from <MobilePortal> ( Home Screen(P. 123) ).
◼Connecting via a Wireless LAN RouterJust as connecting a computer to the machine, connect a mobile device to the machine via a wireless LAN router. Connecting via a Wireless LAN Router (LAN Connection)(P. 325)
◼Connecting DirectlyDirectly connect a mobile device to the machine wirelessly without using wireless LAN. It is possible to immediatelyconnect to the machine wirelessly even outside of a wireless LAN environment. Connecting Directly (Access PointMode)(P. 327)
Linking with Mobile Devices
324

Connecting via a Wireless LAN Router (LAN Connection)16SE-067
If a wireless LAN router is connected to the network connected to the machine, you can establish a communicationwith a mobile device via the wireless LAN router in the same way for a computer. For information about how toconnect a mobile device to your wireless LAN router, see the instruction manuals for your networking devices orcontact your manufacturer. Connect the machine to a router via the wired or wireless LAN. Setting Up the NetworkEnvironment(P. 14)
● To perform the procedures below, use the IPv4 address. Setting IPv4 Address(P. 32)
● Select <LAN Connection> and proceed with the procedure, if the <Direct Connection> screen is displayedafter <Mobile Portal> is selected in the procedure below.
● For information about the operating systems compatible with Canon PRINT Business, the detailed settingprocedure, and the operating procedure, please see the application's Help or the Canon website (http://www.canon.com/gomp/).
◼Connecting Manually
1 Select <Mobile Portal> in the Home screen. Home Screen(P. 123)
2 Connect from the mobile device to the IP address that appears on the screen.
◼Connecting Using a QR Code
1 Select <Mobile Portal> in the Home screen. Home Screen(P. 123)
2 Select <QR Code>.
3 Launch Canon PRINT Business on the mobile device. Utilizing the Machine throughApplications(P. 331)
4 Read the QR code displayed on the screen using the mobile device.
Linking with Mobile Devices
325

◼Connecting Using the NFC (Android)Before using the NFC, check whether <Use NFC> is set to <On>. <Use NFC>(P. 569)
1 Launch Canon PRINT Business on the mobile device. Utilizing the Machine throughApplications(P. 331)
2 Enable the NFC settings of the mobile device.
3 Move the mobile device closer to the NFC mark of the machine. OperationPanel(P. 115)
Linking with Mobile Devices
326

Connecting Directly (Access Point Mode)16SE-068
Even in an environment without a wireless LAN router, using "Access Point Mode," which can directly connect a mobiledevice to the machine wirelessly, enables you to connect the mobile device on hand to the machine without difficultsettings.
Preparing for Direct Connection (Access Point Mode)(P. 327)Connecting Directly(P. 328)
Preparing for Direct Connection (Access Point Mode)
Establish a connection by using Access Point Mode in the following order.
Check the network settings of the machine.
● Set the IPv4 address. Setting IPv4 Address(P. 32)
Preparing the mobile device
● Configure settings to connect the mobile device to Wi-Fi.
Put the machine into the connection standby status.
● <Menu> <Preferences> <Network> <Direct Connection Settings> set<Use Direct Connection> to <On>.
Specifying the value for time until auto termination● You can specify the time to automatically establish a disconnection when the direct connection is enabled.
<Direct Connection Termination>(P. 455)
Connecting multiple mobile devices at the same time● Configure the machine's SSID and network key arbitrarily. <Access Point Mode Settings>(P. 455)
Linking with Mobile Devices
327

Canon PRINT Business● For information about the operating systems compatible with Canon PRINT Business, the detailed setting
procedure, and the operating procedure, please see the application's Help or the Canon website (http://www.canon.com/gomp/).
Connecting Directly
● It may take time until connection of the machine and the mobile device is established.
◼Connecting Manually
1 Select <Mobile Portal> in the Home screen. Home Screen(P. 123)
● When any mobile device is already connected, proceed to step 3.
2 Select <Start>.
3 Configure the Wi-Fi settings from the mobile device using the SSID and network keyinformation that appears on the screen.
4 When the target operation is completed, select <Disconnect>.
◼Connecting Using a QR Code
1 Select <Mobile Portal> in the Home screen. Home Screen(P. 123)
● When any mobile device is already connected, proceed to step 3.
2 Select <Start>.
3 Select <QR Code>.
4 Launch Canon PRINT Business on the mobile device. Utilizing the Machine throughApplications(P. 331)
5 Read the QR code displayed on the screen using the mobile device.
Linking with Mobile Devices
328

6 When the target operation is completed, then select <Disconnect>.
◼Connecting Using the NFC (Android)Before using the NFC, check whether <Use NFC> is set to <On>. <Use NFC>(P. 569)
1 Select <Mobile Portal> in the Home screen. Home Screen(P. 123)
● When any mobile device is already connected, proceed to step 3.
2 Select <Start>.
3 Launch Canon PRINT Business on the mobile device. Utilizing the Machine throughApplications(P. 331)
4 Enable the NFC settings of the mobile device.
5 Move the mobile device closer to the NFC mark of the machine. OperationPanel(P. 115)
6 When the target operation is completed, then select <Disconnect>.
● Select <Connection Information> on the <Direct Connection> screen to check the connected mobile device.
● While connecting via direct connection, you may not be able to connect to the Internet depending on themobile device you are using.
● If wireless connection from the mobile device is not performed within 5 minutes while the SSID and networkkey are displayed, the connection waiting state terminates.
Linking with Mobile Devices
329

● If the status without data transmission between a mobile device and the machine continues duringcommunication by direct connection, the communication may end.
● Power saving performance of sleep mode degrades while connecting via direct connection.
● If the machine is used with a wireless LAN, you need to keep the machine connected to the wireless LANwhen using direct connection. When the machine is not connected to a wireless LAN or the connectionprocess is not complete yet, the direct connection process cannot begin. If the connection between themachine and the wireless LAN is lost during communication through direct connection, the communicationmay end.
● When you finish the desired operation, be sure to terminate the connection between the machine and themobile device. If they remain connected, power saving performance of sleep mode degrades.
● If you use the direct connection, do not set the IP address manually on the mobile device. Doing so mayprevent proper communication after using the direct connection.
Linking with Mobile Devices
330
Utilizing the Machine through Applications16SE-06A
Perform printing and other operations from the mobile device connected to the machine using applications. Variousapplications including those exclusive to Canon are supported. Use properly in accordance with your device, theapplication, and the situation.
◼Using Canon PRINT BusinessThis application is used to perform printing and other operations from mobile devices that support iOS/Android. Whenprinting, it is not necessary to perform operations on the machine. For more information on supported operatingsystems, detailed setting methods, and operations, see the application's Help or the Canon website (http://www.canon.com/gomp/).
● You can download Canon PRINT Business for free, but you will be charged the Internet connection fee.
◼Printing with Canon Print ServiceYou can easily print from the menu of applications that support the Android print subsystem. For more information onsupported operating systems and detailed settings and procedures, see the Canon website (http://www.canon.com/).
◼Printing by Mopria™The machine also supports Mopria™. Using Mopria™ enables you to print from mobile devices that support Androidusing common operations and settings, even if manufacturers and models differ. For example, if you are usingprinters supporting Mopria™ made by multiple manufacturers or a printer supporting Mopria™ that is located in aplace you are visiting, you can print without installing an application exclusive for each manufacturer or model. Formore information on supporting models or operation environments, see http://www.mopria.org.
Confirming Mopria™ Settings
Log in to the Remote UI with Administrator privileges ( Starting Remote UI(P. 418) ) [Settings/Registration] [Network Settings] [Mopria Settings] [Edit] Check that the [Use Mopria]check box is selected [OK]
◼Printing with Google Cloud PrintYou can use applications and services which support Google Cloud Print to print from a computer or mobile devicewithout using a printer driver. Using Google Cloud Print(P. 345)
Linking with Mobile Devices
331

Using AirPrint16SE-06C
This section describes the settings required to use AirPrint and the procedures to be performed using Apple devices.
AirPrint Settings
Configuring AirPrint Settings(P. 332)Displaying the Screen for AirPrint(P. 335)
Functions of the AirPrint
Printing with AirPrint(P. 337)Scanning with AirPrint(P. 340)Faxing with AirPrint(P. 342)
Troubleshooting
If AirPrint Cannot Be Used(P. 344)
Configuring AirPrint Settings
You can register information, including the name of the machine and installation location, that is used for identifyingthe machine. You can also disable the AirPrint function of the machine. Use the Remote UI to change these settings.
● For more information about the basic operations to be performed when setting the machine from theRemote UI, see Setting Up Menu Options from Remote UI(P. 426) .
1 Start the Remote UI and log in to System Manager Mode. Starting RemoteUI(P. 418)
2 Click [Settings/Registration] on the Portal page. Remote UI Screen(P. 419)
● If you are using a mobile device, such as an iPad, iPhone, or iPod touch, read "click" as "tap" in this section.
3 Select [Network Settings] [AirPrint Settings].
4 Click [Edit].
Linking with Mobile Devices
332

5 Specify the required settings.
[Use AirPrint]Select the check box to enable AirPrint. To disable AirPrint, clear the check box.
[Printer Name]Enter the name of the machine. If an mDNS name has already been registered in [mDNS Settings] ( Configuring DNS(P. 56) ), the registered name is displayed.
[Location]Enter the location of the machine. If a location has already been registered in [Device Information Settings]([Device Management] in [Management Settings] (Settings/Registration)), the registered name is displayed.
[Latitude]Enter the latitude of the location where the machine is installed.
[Longitude]Enter the longitude of the location where the machine is installed.
6 Click [OK].
If you select [Use AirPrint], the following settings in <Network> are set to <On>.● Use HTTP
● IPP Print Settings
● IPv4 Use mDNS
● IPv6 Use mDNS
● Use Network Link Scan
● If you change [Printer Name] that you have once specified, you may be unable to print any more from theMac that has been able to be used for printing so far. This phenomenon occurs because <mDNS Name> ( Configuring DNS(P. 56) ) of IPv4 is also changed automatically. In this case, add the machine to the Macagain.
● Entering the printer name makes it easier to identify multiple printers that support AirPrint.
Linking with Mobile Devices
333

◼Changing the Setting of Functions Available with AirPrintIf you want to disable functions that you are not going to use with AirPrint or encrypt communications, configure thenecessary setting using the operation panel.
Changing Print and Fax SettingsTo perform printing or fax sending with AirPrint, IPP protocol is used.
Turning the Function On/Off
You can specify whether to perform printing and fax sending with AirPrint. The factory default setting is <On>.
<Menu> <Preferences> <Network> <TCP/IP Settings> <IPP Print Settings> Set <UseIPP Printing> to <Off> or <On> <Apply>
Changing the TLS SettingYou can specify whether to encrypt communications using TLS when performing printing or sending faxes withAirPrint. The factory default setting is <Off>.
<Menu> <Preferences> <Network> <TCP/IP Settings> <IPP Print Settings> Set <UseTLS> to <Off> or <On> <Apply>
Changing the Scan SettingConfigure the scan setting using AirPrint.
Set the Function to Enable or Disable
You can turn on/off the scan function available with AirPrint. The factory default setting is <On>.
<Menu> <Preferences> <Network> <TCP/IP Settings> <Network Link Scan Settings> Set <Use Network Link Scan> to <Off> or <On> <Apply>
Change TLS SettingsYou can specify whether or not to encrypt TLS communications when scanning data using AirPrint. The factorydefault setting is <Off>.
<Menu> <Preferences> <Network> <TCP/IP Settings> <Network Link Scan Settings> Set <Use TLS> to <Off> or <On> <Apply>
Linking with Mobile Devices
334

Displaying the Screen for AirPrint
You can display the screen for AirPrint, on which you can not only access the AirPrint Settings but also viewinformation about consumables, such as paper and toner cartridge. Further, you can configure security functionsettings.
1 Select [System Preferences] [Printers & Scanners], then add the machine to the Macyou are using.
● If the machine has already been added, this operation is not required.
2 Select this machine from the list of printers in [Printers & Scanners].
3 Click [Options & Supplies].
4 Click [Show Printer Webpage].
5 Logging in to the Remote UI.
● To change the AirPrint settings, it is necessary to log in as an administrator.
◼AirPrint-Dedicated PageWhen you log in with administrator privileges, the AirPrint-dedicated page is displayed as shown below.
Linking with Mobile Devices
335

[AirPrint Settings]Enables you to check the values entered in the AirPrint settings, such as the name and location of themachine. You can click [Edit] to change the settings.
[Other Settings]
[Print Security Settings]Configure the print security settings using TLS or authentication.
[Scan Security Settings]Configure the scan security settings using TLS.
[TLS Settings]Enables you to change the key and certificate used for TLS. Configuring the Key and Certificate forTLS(P. 379)
[Key and Certificate Settings]Enables you to generate and install a key and certificate, or request a certificate to be issued. Configuring the Key and Certificate for TLS(P. 379)
[Consumables Information]Enables you to check the information of each paper source and consumables of the machine and the deviceversion.
Trademarks
Apple, Bonjour, iPad, iPhone, iPod touch, Mac, macOS, OS X and Safari are trademarks of Apple Inc., registered in theU.S. and other countries. AirPrint and the AirPrint logo are trademarks of Apple Inc.
Linking with Mobile Devices
336

Printing with AirPrint16SE-06E
You can print from an iPad, iPhone, iPod touch, or Mac without using a printer driver.
Printing from an iPad, iPhone, or iPod touch(P. 337)Printing from a Mac(P. 338)
System RequirementsOne of the following Apple devices is required to print with AirPrint.
● iPad (all models)
● iPhone (3GS or later)
● iPod touch (3rd generation or later)
● Mac (Mac OS X 10.7 or later)*
*OS X v10.9 or later when using a USB connection
Network EnvironmentOne of the following environments is required.
● An environment where an Apple device and the machine are connected to the same LAN
● An environment where an Apple device and the machine are connected directly
● An environment where a Mac is connected to the machine via USB
● For printing, it is required to set <Use IPP Printing> to <On>. Changing the Setting of FunctionsAvailable with AirPrint(P. 334)
Printing from an iPad, iPhone, or iPod touch
1 Make sure that the machine is turned ON and connected to the Apple device.
● For how to make sure of this, see Setting Up the Network Environment(P. 14) .
● For information on the Direct Connection, see Connecting Directly (Access Point Mode)(P. 327) .
2 From the application on your Apple device, tap to display the menu options.
Linking with Mobile Devices
337

3 Tap [Print].
4 Select this machine from [Printer].
● The printers connected to the network are displayed here. Select this machine in this step.
● The screen for selecting this machine in [Printer] is not displayed on applications that do not supportAirPrint. You cannot print by using those applications.
5 Specify the print settings as necessary.
● The available settings and paper sizes differ depending on the application you are using.
6 Tap [Print].
➠Printing starts.
Checking the print status
● During printing, press the Home button of the Apple device twice tap [Print].
Printing from a Mac
1 Make sure that the machine is turned ON and connected to the Mac.
● For how to make sure of this, see Setting Up the Network Environment(P. 14) .
2 Add the machine to the Mac from [System Preferences] [Printers & Scanners].
● If the machine has already been added, this operation is not required.
3 Open a document in an application and display the print dialog box.
● How to display the print dialog box differs for each application. For more information, see the instructionmanual or Help for the application you are using.
4 Select the machine in the print dialog box.
● The printers connected to the Mac are displayed. Select this machine in this step.
5 Specify the print settings as necessary.
Linking with Mobile Devices
338

● The available settings and paper sizes differ depending on the application you are using.
6 Click [Print].
➠Printing starts.
Linking with Mobile Devices
339

Scanning with AirPrint16SE-06F
You can use AirPrint to transfer the data scanned by the machine directly to a Mac.
System RequirementsTo scan with AirPrint, you need a Mac with OS X 10.9 or later installed. To scan using TLS, you need a Mac withOS X 10.11 or later installed.
Network EnvironmentOne of the following environments is required.
● An environment where an Apple device and the machine are connected to the same LAN
● An environment where a Mac is connected to the machine via USB
● For scanning, it is required to set <Use Network Link Scan> to <On>. Changing the Setting of FunctionsAvailable with AirPrint(P. 334)
● Before scanning, it is required to put the machine into online state. When the auto online function ( <AutoOnline>(P. 489) ) is set to <Off>, first put the machine into online state by selecting <Scan> <RemoteScanner>, then start the procedure for scanning.
● You cannot scan while settings for operations are being made, or while the machine is performing anyoperation whatsoever.
Scanning from a Mac
1 Make sure that the machine is turned ON and connected to the Mac.
● For how to make sure of this, see Setting Up the Network Environment(P. 14) .
2 Add the machine to the Mac from [System Preferences] [Printers & Scanners].
● If the machine has already been added, this operation is not required.
3 Select this machine from the list of printers in [Printers & Scanners].
4 Click [Scan].
Linking with Mobile Devices
340

5 Click [Open Scanner].
➠The [Scanner] screen is displayed.
6 Configure the scan settings as necessary.
7 Click [Scan].
➠The original is scanned, and the image is displayed.
Linking with Mobile Devices
341

Faxing with AirPrint16SE-06H
You can send faxes from a Mac in almost the same way as when you print from a Mac.
System RequirementsTo send faxes with AirPrint, you need a Mac with OS X 10.9 or later installed.
Network EnvironmentOne of the following environments is required.
● An environment where an Apple device and the machine are connected to the same LAN
● An environment where a Mac is connected to the machine via USB
● For faxing, it is required to set <Use IPP Printing> to <On>. Changing the Setting of FunctionsAvailable with AirPrint(P. 334)
Faxing from a Mac
1 Make sure that the machine is turned ON and connected to the Mac.
● For how to make sure of this, see Setting Up the Network Environment(P. 14) .
2 Add the machine to the Mac from [System Preferences] [Printers & Scanners].
● If the machine has already been added, this operation is not required.
3 Open a document in an application and display the print dialog box.
● How to display the print dialog box differs for each application. For more information, see the instructionmanual for the application you are using.
4 Select this machine in the print dialog box.
➠The printers connected to the Mac are displayed. Select the fax driver of this machine in this step.
5 Specify the destination.
Linking with Mobile Devices
342

6 Click [Fax].
➠ Fax sending starts.
Linking with Mobile Devices
343

If AirPrint Cannot Be Used16SE-06J
If AirPrint cannot be used, try taking the following solutions.
● Make sure that the machine is turned ON. If the machine is turned ON, first turn it OFF, then wait for at least 10seconds and then turn it back ON to check if the problem is solved.
● Make sure that no error messages are displayed on the machine.
● Make sure that Apple devices and the machine are connected to the same LAN. If the machine is turned ON, it maytake several minutes before the machine is ready for communication.
● Make sure that Bonjour on your Apple device is enabled.
● Make sure that the machine is configured to enable execution of jobs from a computer even when no departmentID and password are entered. Blocking Jobs When Department ID Is Unknown(P. 359)
● For printing, make sure that the paper is loaded in the machine and that the machine contains a sufficient amountremaining in the toner cartridges. Displaying the Screen for AirPrint(P. 335)
● For scanning, make sure that the machine's setting for Network Link Scan is <On>. Changing the Setting ofFunctions Available with AirPrint(P. 334)
Linking with Mobile Devices
344

Using Google Cloud Print16SE-06K
Google Cloud Print is a service that enables a user with a Google account to print from a smartphone, tablet, orcomputer connected to the Internet using applications compatible with Google Cloud Print. Unlike conventionalprinting from a computer, it does not require a printer driver.
Checking the Settings of the Machine(P. 345)Registering the Machine with Google Cloud Print(P. 345)
● An environment in which you can connect to the internet is required when registering the machine andwhen printing using Google Cloud Print. In addition, the customer is responsible for any fees regardinginternet connection.
● Google Cloud Print may not be available, depending on your country or region.
● Google Cloud Print does not support printing from an IPv6 address.
● A Google account is required to use Google Cloud Print. If you do not have a Google account, create one onthe Google website.
Checking the Settings of the Machine
Check the following before configuring cloud printing.
● Make sure that the IPv4 address is specified for the machine, and that the machine is able to communicate withcomputers on a network.
Connecting to a Wired LAN(P. 17)Connecting to a Wireless LAN(P. 18)
● Check whether the date and time of the machine are specified correctly. Setting the Date/Time(P. 12)
● If Department ID Management is set, make sure that you can print from a computer without entering a DepartmentID or PIN. Blocking Jobs When Department ID Is Unknown(P. 359)
Registering the Machine with Google Cloud Print
Registering the machine with Google Cloud Print enables you to print from anywhere using the service.
Linking with Mobile Devices
345

● For more information about the basic operations to be performed when setting the machine from theRemote UI, see Setting Up Menu Options from Remote UI(P. 426) .
1 Start the Remote UI and log in as an administrator. Starting Remote UI(P. 418)
2 Click [Settings/Registration] on the Portal page. Remote UI Screen(P. 419)
3 Select [Network Settings] [Google Cloud Print Settings].
4 Click [Edit] for [Basic Settings].
5 Select the [Use Google Cloud Print] check box [OK].
6 Click [Register] in [Registration Status].
Re-Registering the Machine
● To re-register the machine, delete its registration before registering it again.
7 Click the URL link displayed for [URL for Registration].
8 Follow the instructions on the screen to register the machine.
➠Printing can now be performed from applications that support Google Cloud Print, such as GoogleChrome™.
● For information on the latest applications that support Google Cloud Print, check the Google CloudPrint home page.
Configuring Settings on the Operation Panel● You can also enable or disable the Cloud Print function from <Menu> in the Home screen. <Google Cloud
Print Settings>(P. 465)
Registering from a Mobile Device or Google Chrome● You can register the machine from a mobile device or Google Chrome. The machine's display shows the
following confirmation screen before completion of the registration. Press <Yes> to complete theregistration.
● For information on registration methods, see the manual of your device or the Google Cloud Print website.
Linking with Mobile Devices
346
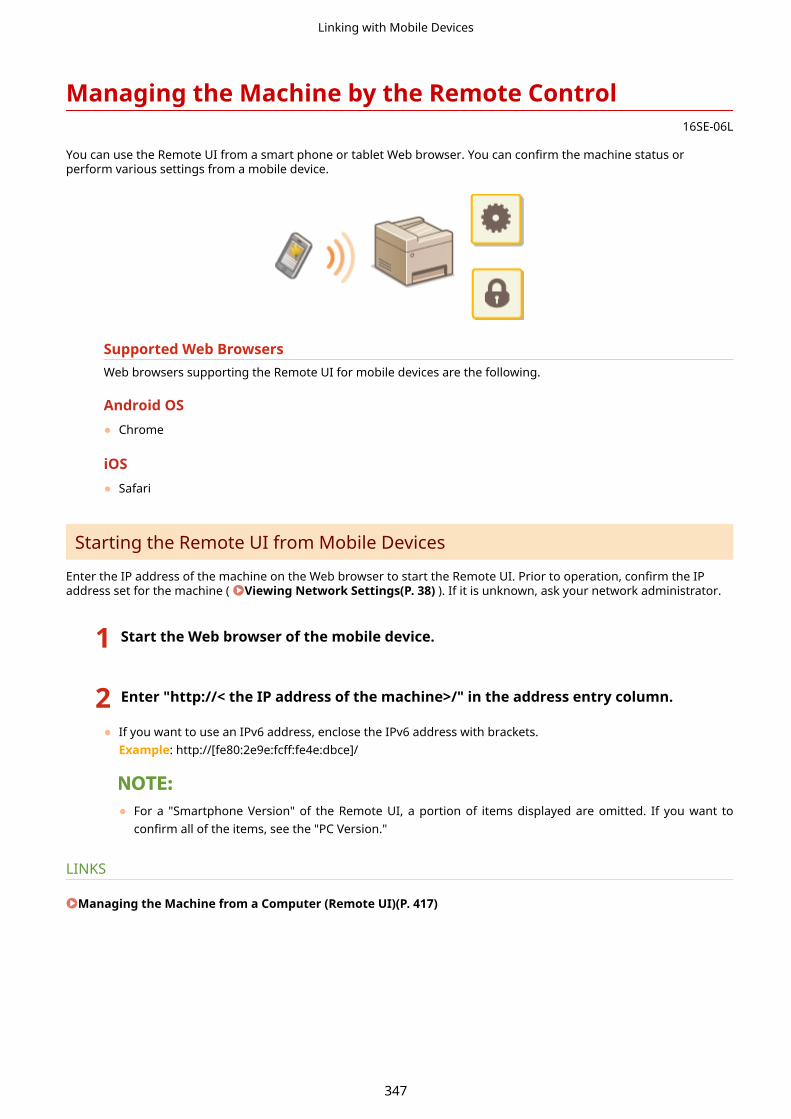
Managing the Machine by the Remote Control16SE-06L
You can use the Remote UI from a smart phone or tablet Web browser. You can confirm the machine status orperform various settings from a mobile device.
Supported Web BrowsersWeb browsers supporting the Remote UI for mobile devices are the following.
Android OS● Chrome
iOS● Safari
Starting the Remote UI from Mobile Devices
Enter the IP address of the machine on the Web browser to start the Remote UI. Prior to operation, confirm the IPaddress set for the machine ( Viewing Network Settings(P. 38) ). If it is unknown, ask your network administrator.
1 Start the Web browser of the mobile device.
2 Enter "http://< the IP address of the machine>/" in the address entry column.
● If you want to use an IPv6 address, enclose the IPv6 address with brackets.Example: http://[fe80:2e9e:fcff:fe4e:dbce]/
● For a "Smartphone Version" of the Remote UI, a portion of items displayed are omitted. If you want toconfirm all of the items, see the "PC Version."
LINKS
Managing the Machine from a Computer (Remote UI)(P. 417)
Linking with Mobile Devices
347

Managing the MachineManaging the Machine ............................................................................................................................... 350
Setting Access Privileges .................................................................................................................................. 352
Setting the System Manager ID and PIN ...................................................................................................... 353
Setting the Department ID Management ..................................................................................................... 355
Setting a Remote UI PIN ............................................................................................................................... 361
LDAP Server Authentication .......................................................................................................................... 363
Configuring the Network Security Settings .................................................................................................... 367
Restricting Communication by Using Firewalls ............................................................................................. 369Specifying IP Addresses for Firewall Settings ......................................................................................... 370Specifying MAC Addresses for Firewall Settings ..................................................................................... 373
Changing Port Numbers ............................................................................................................................... 376
Setting a Proxy ............................................................................................................................................. 377
Configuring the Key and Certificate for TLS .................................................................................................. 379Generating the Key and Certificate for Network Communication .......................................................... 382Generating a Key and Certificate Signing Request (CSR) ........................................................................ 385Registering the Key and Certificate for Network Communication .......................................................... 388
Configuring IPSec Settings ........................................................................................................................... 390
Configuring IEEE 802.1X Authentication Settings ......................................................................................... 397
Restricting the Machine's Functions ................................................................................................................ 401
Restricting Access to Address Book and Sending Functions ......................................................................... 403Restricting Use of the Address Book ...................................................................................................... 404Limiting Available Destinations .............................................................................................................. 406Restricting the Fax Sending Functions ................................................................................................... 408
Restricting Printing from a Computer ........................................................................................................... 410
Restricting USB Functions ............................................................................................................................. 411
Disabling HTTP Communication ................................................................................................................... 413
Disabling Remote UI ..................................................................................................................................... 414
Increasing the Security of Documents ............................................................................................................. 415
Generating a Device Signature Key ............................................................................................................... 416
Managing the Machine from a Computer (Remote UI) ................................................................................... 417
Starting Remote UI ....................................................................................................................................... 418
Checking the Status and Logs ....................................................................................................................... 421
Setting Up Menu Options from Remote UI ................................................................................................... 426
Registering Destinations from Remote UI .................................................................................................... 429
Importing/Exporting the Setting Data .......................................................................................................... 433
Managing the Machine
348

Updating the Firmware ..................................................................................................................................... 436
Initializing Settings ........................................................................................................................................... 438
Managing the Machine
349
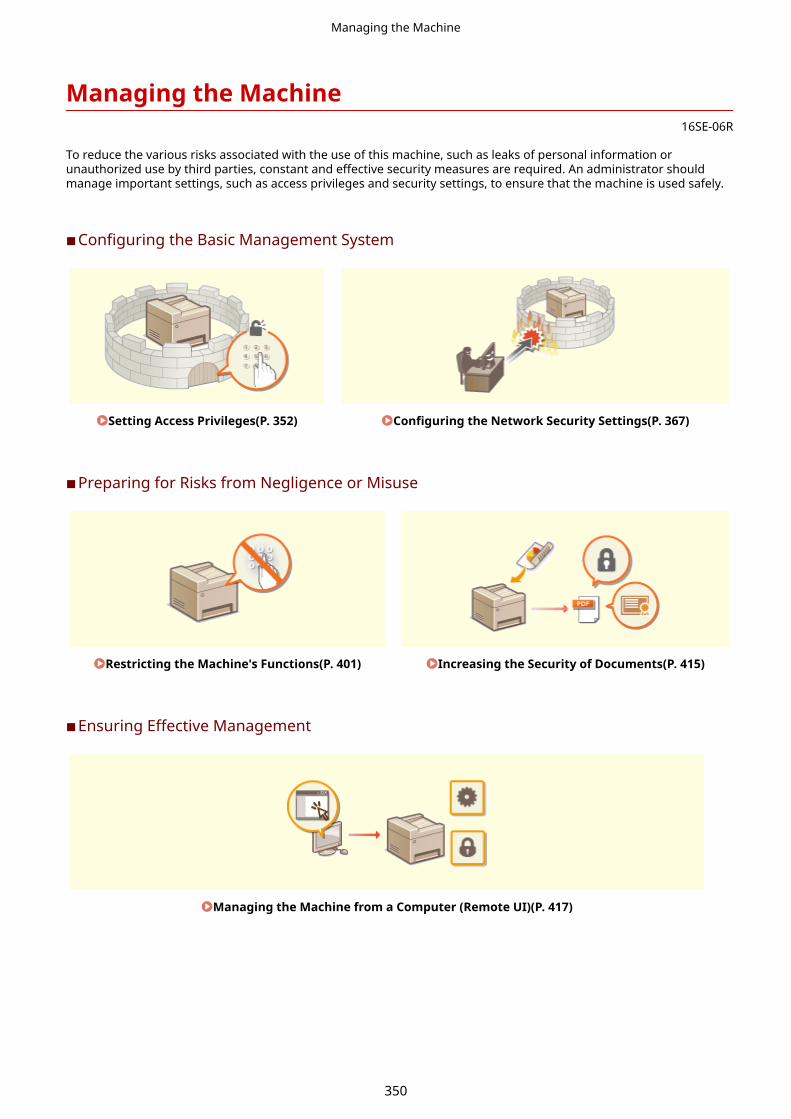
Managing the Machine16SE-06R
To reduce the various risks associated with the use of this machine, such as leaks of personal information orunauthorized use by third parties, constant and effective security measures are required. An administrator shouldmanage important settings, such as access privileges and security settings, to ensure that the machine is used safely.
◼Configuring the Basic Management System
Setting Access Privileges(P. 352) Configuring the Network Security Settings(P. 367)
◼Preparing for Risks from Negligence or Misuse
Restricting the Machine's Functions(P. 401) Increasing the Security of Documents(P. 415)
◼Ensuring Effective Management
Managing the Machine from a Computer (Remote UI)(P. 417)
Managing the Machine
350

◼Managing the System Configuration and Settings
Updating the Firmware(P. 436) Initializing Settings(P. 438)
Managing the Machine
351

Setting Access Privileges16SE-06S
Protect the machine from unauthorized access by only allowing users with access privileges to use the machine.Access privileges are set separately for system administrators, general users, and the Remote UI. When privileges areset, the user must enter an ID and PIN to print or change settings.
Set up an account with full access privileges called "System Manager ID" for a system manager. Registering an accountcalled "Department ID" allows you to manage general users. Using a Department ID, you can set a PIN for using thismachine as well as keep track of the number of pages printed for each department ID. And by setting a Remote UIAccess PIN, you can restrict use of the Remote UI.
System Manager IDSystem Manager ID is an account with full access privileges. If you specify a System Manager ID, you need tolog on to the machine using the System Manager ID information in order to access items that requiresadministrator privileges such as <Network> and <Management Settings>. We recommend that you set andregister the System Manager ID. Otherwise, anyone will be able to change the machine settings. Only oneSystem Manager ID can be registered. Setting the System Manager ID and PIN(P. 353)
Department ID (Department ID Management)You can specify access privileges for a user (or group of users) by registering a Department ID. You can registermultiple Department IDs. If a user tries to operate the machine when Department IDs are enabled, a loginscreen is displayed, and the user must enter their own Department ID and PIN to use the machine. Informationsuch as how many pages have been printed for each Department ID can be compiled. Setting theDepartment ID Management(P. 355)
Remote UI PIN (Remote UI Access PIN)This is a PIN for using the Remote UI. Only users who know the PIN can access the Remote UI. Setting aRemote UI PIN(P. 361)
Authentication Settings for Send Function (Authorized Send)If your system has an LDAP server installed, you can set LDAP server authentication to be carried out when thefax or scan function is used. LDAP Server Authentication(P. 363)
Managing the Machine
352

Setting the System Manager ID and PIN16SE-06U
Set the system manager account, "System Manager ID." You can also set a PIN for the System Manager ID. If theSystem Manager ID is specified, you can access items that require administrator privileges, for example, <Network>and <Management Settings>, only when the System Manager ID and PIN have been entered correctly. The SystemManager ID settings information is critical to the security of the machine, so make sure that only Administrators knowthe System Manager ID and PIN.
1 Select <Menu> in the Home screen. Home Screen(P. 123)
2 Select <Management Settings>.
If the System Manager ID has already been set
● If the login screen appears, enter the correct ID and PIN. Logging in to the Machine(P. 134)
3 Select <User Management> <System Manager Information Settings>.
4 Select <System Manager ID and PIN>.
5 Specify the System Manager ID and PIN.
● Specify the <System Manager ID> <System Manager PIN>.
● Enter the number in each item, and select <Apply>.
● The Confirm screen is displayed. Enter the PIN once again to confirm.
● You cannot register an ID or PIN that consists only of zeros, such as "00" or "0000000."
● To cancel the System Manager ID and PIN settings, clear the information you entered in and select
<Apply> with the fields blank.
Setting the System Manager Name
1 Select <System Manager Name>.
2 Enter the System Manager Name, and select <Apply>.
● On how to enter text, see Entering Text(P. 132) .
Managing the Machine
353

● Do not forget your PIN. If you forget your PIN, contact your local authorized Canon dealer or the Canon helpline.
Configuring settings via the Remote UI● Start the Remote UI and log in to System Manager Mode. Click [Settings/Registration] [User Management]
[System Manager Information] [Edit] and specify the necessary settings on the displayed screen.
● By using the Remote UI, you can register a variety of information, including contact information,Administrator comments, the installation location of the machine, as well as to the settings that you canregister by using the operation panel. The registered information can be viewed on the [Device Information]page of the Remote UI. Checking System Manager Information(P. 423)
Logging in to the machine● If you try to access items that require administrator privileges, for example, <Network> and <Management
Settings>, when the System Manager ID is specified, the Login screen is displayed. Logging in to theMachine(P. 134)
● You must also enter the System Manager ID and PIN to log in using the Remote UI in System ManagerMode. Starting Remote UI(P. 418)
LINKS
Setting Access Privileges(P. 352)Setting the Department ID Management(P. 355)
Managing the Machine
354
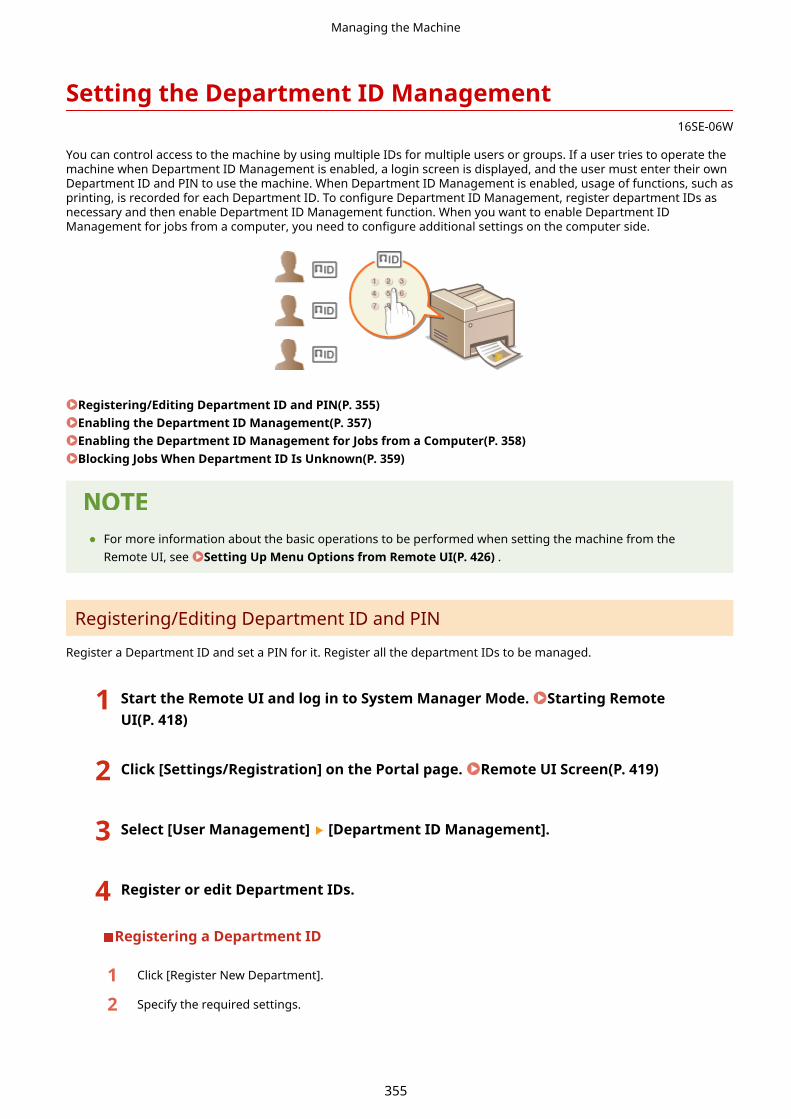
Setting the Department ID Management16SE-06W
You can control access to the machine by using multiple IDs for multiple users or groups. If a user tries to operate themachine when Department ID Management is enabled, a login screen is displayed, and the user must enter their ownDepartment ID and PIN to use the machine. When Department ID Management is enabled, usage of functions, such asprinting, is recorded for each Department ID. To configure Department ID Management, register department IDs asnecessary and then enable Department ID Management function. When you want to enable Department IDManagement for jobs from a computer, you need to configure additional settings on the computer side.
Registering/Editing Department ID and PIN(P. 355)Enabling the Department ID Management(P. 357)Enabling the Department ID Management for Jobs from a Computer(P. 358)Blocking Jobs When Department ID Is Unknown(P. 359)
● For more information about the basic operations to be performed when setting the machine from theRemote UI, see Setting Up Menu Options from Remote UI(P. 426) .
Registering/Editing Department ID and PIN
Register a Department ID and set a PIN for it. Register all the department IDs to be managed.
1 Start the Remote UI and log in to System Manager Mode. Starting RemoteUI(P. 418)
2 Click [Settings/Registration] on the Portal page. Remote UI Screen(P. 419)
3 Select [User Management] [Department ID Management].
4 Register or edit Department IDs.
Registering a Department ID
1 Click [Register New Department].
2 Specify the required settings.
Managing the Machine
355
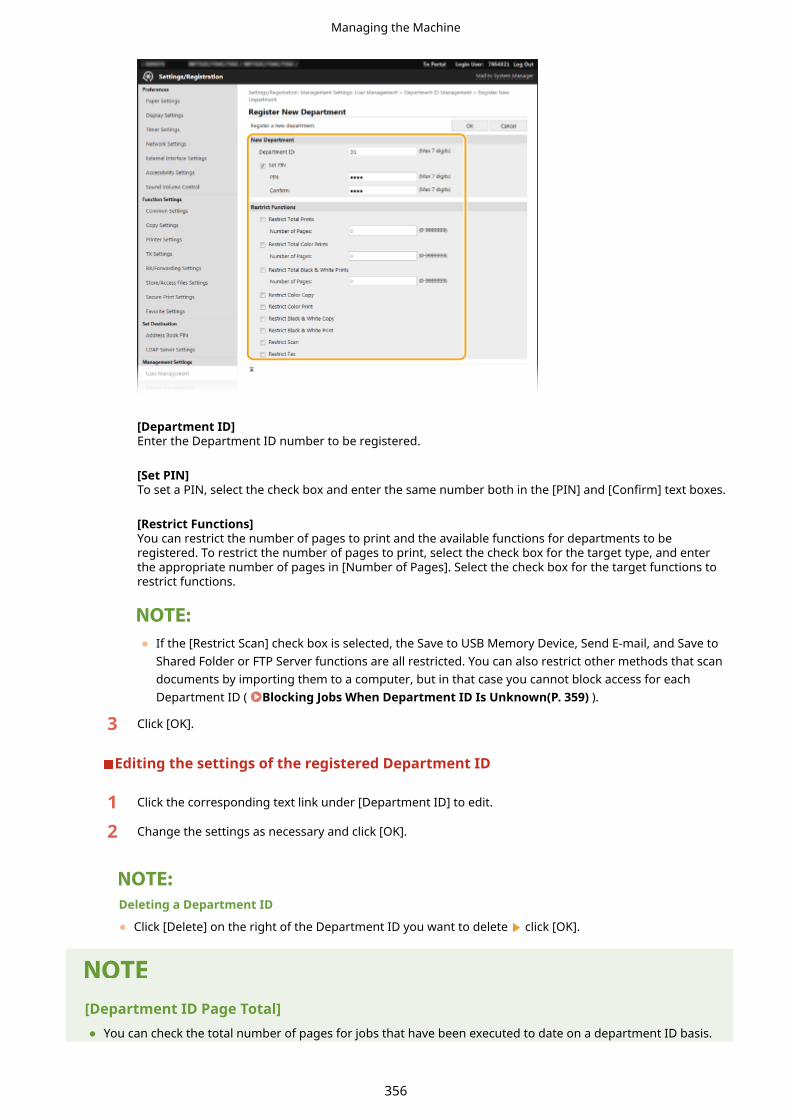
[Department ID]Enter the Department ID number to be registered.
[Set PIN]To set a PIN, select the check box and enter the same number both in the [PIN] and [Confirm] text boxes.
[Restrict Functions]You can restrict the number of pages to print and the available functions for departments to beregistered. To restrict the number of pages to print, select the check box for the target type, and enterthe appropriate number of pages in [Number of Pages]. Select the check box for the target functions torestrict functions.
● If the [Restrict Scan] check box is selected, the Save to USB Memory Device, Send E-mail, and Save toShared Folder or FTP Server functions are all restricted. You can also restrict other methods that scandocuments by importing them to a computer, but in that case you cannot block access for eachDepartment ID ( Blocking Jobs When Department ID Is Unknown(P. 359) ).
3 Click [OK].
Editing the settings of the registered Department ID
1 Click the corresponding text link under [Department ID] to edit.
2 Change the settings as necessary and click [OK].
Deleting a Department ID
● Click [Delete] on the right of the Department ID you want to delete click [OK].
[Department ID Page Total]● You can check the total number of pages for jobs that have been executed to date on a department ID basis.
Managing the Machine
356

● If you want to return the counts to zero, click the corresponding text link under [Department ID] and click[Clear Count] [OK]. If you want to return the counts of all Department IDs to zero, click [Clear All Counts]
[OK].
Using control cards● When the optional Copy Card Reader-F is attached to the machine, Department IDs will be registered
automatically.
● Do not delete the registered department IDs. The control cards that correspond to the deleted departmentIDs will become unavailable.
● You cannot use [Restrict Functions] to restrict the allowable number of pages to print.
Enabling the Department ID Management
After you register as many Department IDs as necessary, enable Department ID Management.
1 Start the Remote UI and log in to System Manager Mode. Starting RemoteUI(P. 418)
2 Click [Settings/Registration] on the Portal page. Remote UI Screen(P. 419)
3 Select [User Management] [Department ID Management].
4 Click [Edit].
5 Select the [Department ID Management] check box.
[Department ID Management]
Managing the Machine
357

Select the check box to enable Department ID Management. If you do not want to use Department IDManagement, clear the check box.
● For information about the [Allow Print Jobs with Unknown IDs]/[Allow Scan Jobs with Unknown IDs]/[AllowBlack & White Copy Jobs] check boxes, see Blocking Jobs When Department ID Is Unknown(P. 359) .
6 Click [OK].
Using the operation panel● You can also switch Department ID Management On/Off from <Menu> in the Home screen. <Department
ID Management>(P. 567)
Logging in to the machine● When you try to operate the machine when Department ID Management is enabled, the login screen is
displayed. Logging in to the Machine(P. 134)
Enabling the Department ID Management for Jobs from a Computer
When you want to enable Department ID Management for jobs from a computer, you need to specify the departmentID and PIN using the driver pre-installed on each computer.
● To perform the following procedure, log in to your computer with an administrator account.
1 Open the printer folder. Displaying the Printer Folder(P. 731)
2 Right-click the driver icon for this machine, and click [Printer properties] or[Properties].
3 Click the [Device Settings] tab.
4 Enable the Department ID Management function.
Printer driverSelect the [Use Department ID Management] check box.
Fax driverSelect [Department ID Management] under [User Management].
5 Click [Settings] found to the right.
Managing the Machine
358

6 Specify the settings as necessary and click [OK].
[Allow PIN Setting]Select the check box to enable the PIN setting.
[Department ID]Enter the Department ID number.
[PIN]Enter the PIN corresponding to the Department ID as necessary.
[Verify]Click to verify that the correct ID and PIN are entered. This function is not available if the machine and thecomputer are connected via a USB or WSD (Web Services on Devices) port.
[Confirm Department ID/PIN When Printing]/[Confirm Department ID/PIN When Sending Faxes]Select the check box to display the [Confirm Department ID/PIN] pop-up screen each time you send job froma computer.
[Do Not Use Department ID Management When B&W Printing]Select the check box to send black and white print data as an unknown ID job.
[Authenticate Department ID/PIN at Device]Select the check box if the machine and the computer are connected via a USB or WSD port.
7 Click [OK].
Logging in to the machine
● When you try to send job from a computer when Department IDManagement is enabled, the following pop-up screen is displayed(unless the [Confirm Department ID/PIN When Printing]/[ConfirmDepartment ID/PIN When Sending Faxes] check box is cleared):
Blocking Jobs When Department ID Is Unknown
If you do not change the default settings, any user can print from a computer, scan (via <Computer> and <RemoteScanner>), send a PC fax from a computer, or make black and white copies without entering an ID and PIN even whenDepartment ID Management is enabled for the machine. You can change the default settings so that the machinecannot be used for these functions without a correct ID and PIN.
1 Start the Remote UI and log in to System Manager Mode. Starting RemoteUI(P. 418)
Managing the Machine
359

2 Click [Settings/Registration] on the Portal page. Remote UI Screen(P. 419)
3 Select [User Management] [Department ID Management].
4 Click [Edit].
5 Clear the check boxes as necessary.
[Allow Print Jobs with Unknown IDs]In order to send job from a computer when Department ID Management is enabled, you need to enter thecorrect ID and PIN ( Enabling the Department ID Management for Jobs from a Computer(P. 358) ).However, if the check box is selected for this setting, jobs are executed even when the ID and PIN are notentered. When you want to configure a setting so that no jobs are executed unless the correct department IDand PIN are entered, clear the check box.
[Allow Scan Jobs with Unknown IDs]If the check box is selected, you can select <Computer> or <Remote Scanner> on the main screen and scandocuments into a computer anytime. If the check box is cleared, you cannot scan documents into a computerif Department ID Management is enabled. It is not possible to restrict scanning of documents into acomputer for individual department IDs.
[Allow Black & White Copy Jobs]If the check box is selected when Department ID Management is enabled, you can copy in black and whitewithout entering the correct ID and PIN. Clear the check box to require entering an ID and PIN.
6 Click [OK].
LINKS
Setting Access Privileges(P. 352)Setting the System Manager ID and PIN(P. 353)
Managing the Machine
360

Setting a Remote UI PIN16SE-06X
You can set a PIN for access to the Remote UI. All users use a common PIN.
● When Department ID Management is enabled, setting here is not required. Setting the Department IDManagement(P. 355)
● For more information about the basic operations to be performed when setting the machine from theRemote UI, see Setting Up Menu Options from Remote UI(P. 426) .
1 Start the Remote UI and log in to System Manager Mode. Starting RemoteUI(P. 418)
2 Click [Settings/Registration] on the Portal page. Remote UI Screen(P. 419)
3 Select [License/Other] [Remote UI Settings].
4 Click [Edit].
5 Select the [Use Remote UI Access PIN] check box and set the PIN.
[Use Remote UI Access PIN]If you select the check box, you must enter a PIN to access the Remote UI.
[Set/Change PIN]To set or change a PIN, select the check box and enter the same number both in the [PIN] and [Confirm] textboxes.
6 Click [OK].
Managing the Machine
361

Using the operation panel● Remote UI Access PIN settings can also be accessed from <Menu> in the Home screen. <Remote UI
Settings>(P. 572)
If <Management Settings> are initialized● The Remote UI Access PIN is also initialized. After an initialization, reset the PIN. <Initialize Menu>(P. 575)
LINKS
Setting Access Privileges(P. 352)Setting the System Manager ID and PIN(P. 353)
Managing the Machine
362

LDAP Server Authentication16SE-06Y
If your system has an LDAP server installed, you can ensure that LDAP server authentication is carried out when thesend function is used. This enables you to prevent unauthorized use by third parties and information disclosure. Oncethe authorization settings are enabled, the Authorized Send screen appears when the fax or scan function is used andoperation can only continue if it is correctly authorized by the LDAP server. Use the settings described here toconfigure LDAP server authentication. For more information about registering the server to be used forauthentication, see Registering LDAP Servers(P. 64) .
● For more information about the basic operations to be performed when setting the machine from theRemote UI, see Setting Up Menu Options from Remote UI(P. 426) .
1 Start the Remote UI and log in to System Manager Mode. Starting RemoteUI(P. 418)
2 Click [Settings/Registration] on the Portal page. Remote UI Screen(P. 419)
3 Select [TX Settings] [Authentication Settings for Send Function].
4 Click [Edit].
5 Select the [Display Authentication Screen When Sending Operation Starts] check boxand select whether a confirmation screen is displayed at logout.
[Display Authentication Screen When Sending Operation Starts]Select the check box to display the Authorized Send login screen when the fax or scan function is used (LDAPserver authentication).
[Display Confirmation Screen When Logging Out]Select the check box to display a screen that allows you to selectively log out when you are logged on forboth Authorized Send and Department ID Management. If you clear this check box, no selection screen isdisplayed when you log out and you are logged out from both Authorized Send and Department IDManagement.
Managing the Machine
363

6 Configure the settings for sending e-mail/I-Faxes.
[E-Mail/I-Fax Sending]Select whether to allow sending e-mail and I-Faxes.
[Do Not Allow] Blocks sending e-mail and I-Faxes. <E-Mail> and <I-Fax> in the scan function can nolonger be used.
[Allow] Permits outgoing e-mail and I-Faxes.
[Only Allow Sending to Myself] Blocks all outgoing e-mail and I-Faxes other than those to users with authorized e-mail addresses. The e-mail addresses of authorized users must be registered on theLDAP server.
[Authentication Method]When [Allow] or [Only Allow Sending to Myself] is selected in [E-Mail/I-Fax Sending], this allows you to specifywhether an authentication screen is shown on the SMTP server when e-mail is sent.
[Display the authentication screen using the sameuser name as when the sending operation started]
Displays the authentication screen showing the same username and password entered in the Authorized Send loginscreen.
[Display the authentication screen without anyauthentication information]
Displays the authentication screen with the user name andpassword fields blank.
[Use device-specific authentication information anddo not display the authentication screen]
No authentication screen is displayed when e-mail or I-Faxes aresent. Authorization on the SMTP server is carried out using theuser name and password set in [E-Mail/I-Fax Settings] Configuring E-Mail/I-Fax Communication Settings(P. 90) .
[Specify Authentication User Destination as Sender]Select the check box when the e-mail address of an authorized user will be set as the sender. The e-mailaddresses of authorized users must be registered on the LDAP server. If you clear this check box, the e-mailaddress set in the [E-Mail/I-Fax Settings] is set as the sender.
7 Configure the file transfer settings (for saving to shared folders and FTP servers).
Managing the Machine
364

[File Sending]Select whether to allow saving to shared folders and FTP servers.
[Do Not Allow] Blocks saving to shared folders and FTP servers. <File> in the scanfunction can no longer be used.
[Allow] Saving to shared folders and FTP servers is not blocked.
[Only Allow Sending to Myself orSpecified Folder]
Blocks all saving to shared folders and FTP servers other than specifiedfolders. The data is saved to folders registered on the LDAP server or tothe folder specified in [Specify Destination Folder].
When [Allow] is specified in [File Sending]
[Authentication Method]Allows you to specify whether an authentication screen is shown on the server when sending.
[Display the authentication screen using the sameauthentication information as when the sending operationstarted]
Displays the authentication screen showing the same username and password entered in the Authorized Send loginscreen.
[Display the authentication screen without anyauthentication information]
Displays the authentication screen with the user name andpassword fields blank.
[Use the authentication information from the address bookand do not display the authentication screen]
No authentication screen is displayed when sending.Authentication is carried out on the server using the username and password set in the Address Book.
When [Only Allow Sending to Myself or Specified Folder] is specified in [File Sending]
[Authentication Method]Allows you to specify whether an authentication screen is shown on the server when sending.
[Use the same authentication information aswhen the sending operation started]
Carries out authorization on the server using the user name andpassword entered in the Authorized Send login screen. Selecting the[Display Authentication Screen When Sending] check box displays theauthentication screen with this user name and password already enteredwhen you send the data.
[Display the authentication screen without anyauthentication information]
Displays the authentication screen with the user name and passwordfields blank.
Managing the Machine
365

[Specify Destination Folder]Selecting this check box allows you to specify the folder where the data is saved. If the check box is not selected,the save destination is set based on authorized user information registered on the LDAP server.
[Host Name] Enter a host name for the shared folder or FTP server.
[Folder Path]Enter a path name for the save destination folder (excluding the host name). When the [AddUser Name] check box is selected, the user name and path used for LDAP authentication areadded.
8 Configure the settings for sending faxes.
[Fax Sending]Select whether to allow sending faxes. [Do Not Allow] prevents the user from sending faxes from themachine.
9 Click [OK].
LINKS
Registering LDAP Servers(P. 64)
Managing the Machine
366

Configuring the Network Security Settings16SE-070
Authorized users may incur unanticipated losses from attacks by malicious third parties, such as sniffing, spoofing,and tampering of data as it flows over a network. To protect your important and valuable information from theseattacks, the machine supports the following features to enhance security and secrecy.
Firewall SettingsUnauthorized access by third parties, as well as network attacks and intrusions, can be blocked by limitingcommunication only to devices that have a specific IP address or MAC address. Restricting Communicationby Using Firewalls(P. 369)
Changing Port NumbersA protocol that is used to exchange information with other devices is assigned port numbers that arepredetermined according to the type of protocol. The port number must be the same for all communicationdevices; therefore, changing it to an arbitrary number is important to prevent hacking from outside. Changing Port Numbers(P. 376)
Proxy SettingsWhen the client devices are connected to an external network, communication is established through the proxyserver. When the proxy server is used, websites can be browsed more safely, therefore, security can beexpected to be enhanced. Setting a Proxy(P. 377)
TLS Encrypted CommunicationTLS is a protocol for encryption for data sent over a network and is often used for communication via a Webbrowser or an e-mail application. TLS enables secure network communication when you access the machinefrom a computer via the Remote UI. Configuring the Key and Certificate for TLS(P. 379)
Managing the Machine
367

IPSec CommunicationWhile TLS only encrypts data used on a specific application, such as a Web browser or an e-mail application,IPSec encrypts the whole (or payloads of) IP packets. This enables IPSec to offer a more versatile security systemthan TLS. Configuring IPSec Settings(P. 390)
IEEE 802.1X AuthenticationIEEE 802.1X is a standard and mechanism for blocking unauthorized access to the network by collectivelymanaging user authentication information. If a device tries to connect to the 802.1X network, the device mustgo through user authentication in order to prove that the connection is made by an authorized user.Authentication information is sent to and checked by a RADIUS server, which permits or rejects communicationto the network depending on the authentication result. If authentication fails, a LAN switch (or an access point)blocks access from the outside of the network. The machine can connect to an 802.1X network as a clientdevice. Configuring IEEE 802.1X Authentication Settings(P. 397)
Managing the Machine
368

Restricting Communication by Using Firewalls16SE-071
Without proper security, unauthorized third parties can access computers and other communication devices that areconnected to a network. To prevent this unauthorized access, specify the settings for packet filter, a feature thatrestricts communication to devices with specified IP addresses or MAC addresses.
Specifying IP Addresses for Firewall Settings(P. 370)Specifying MAC Addresses for Firewall Settings(P. 373)
Managing the Machine
369

Specifying IP Addresses for Firewall Settings16SE-072
You can either limit communication to only devices with specified IP addresses, or block devices with specified IPaddresses but permit other communications. You can specify a single IP address or a range of IP addresses.
● For more information about the basic operations to be performed when setting the machine from theRemote UI, see Setting Up Menu Options from Remote UI(P. 426) .
1 Start the Remote UI and log in to System Manager Mode. Starting RemoteUI(P. 418)
2 Click [Settings/Registration] on the Portal page. Remote UI Screen(P. 419)
3 Select [Network Settings] [Firewall Settings].
4 Click [Edit] for the target IP address filter.
● Select the filter that matches the target IP address. To restrict data sent from the machine to a computer,select [Outbound Filter]. To restrict data received from a computer, select [Inbound Filter].
5 Specify the settings for packet filtering.
● Select the default policy to allow or reject the communication of other devices with the machine, and thenspecify IP addresses for exceptions.
Managing the Machine
370
1 Select the [Use Filter] check box and click the [Reject] or [Allow] radio button for the [Default Policy].
[Use Filter]Select the check box to restrict communication. Clear the check box to disable the restriction.
[Default Policy]Select the precondition to allow or reject the communication of other devices with the machine.
[Reject]Select to pass communication packets only when they are sent to or received fromdevices whose IP addresses are entered in [Exception Addresses]. Communicationswith other devices are prohibited.
[Allow]Select to block communication packets when they are sent to or received fromdevices whose IP addresses are entered in [Exception Addresses]. Communicationswith other devices are permitted.
2 Specify address exceptions.
● Enter the IP address (or the range of IP addresses) in the [Address to Register] text box and click[Add].
Check for entry errors
● If IP addresses are incorrectly entered, you may be unable to access the machine from the Remote UI,in which case you need to set <IPv4 Address Filter> or <IPv6 Address Filter> to <Off>.
<IPv4 Address Filter>(P. 464)<IPv6 Address Filter>(P. 465)
Entry form for IP addresses
Description Example
Entering a single address
IPv4:Delimit numbers with periods.
192.168.0.10
IPv6:Delimit alphanumeric characters withcolons.
fe80::10
Specifying a range of addresses Insert a hyphen between the addresses. 192.168.0.10-192.168.0.20
Specifying a range of addresses with a prefixEnter the address, followed by a slash anda number indicating the prefix length.
192.168.0.32/27fe80::1234/64
When [Reject] is selected for an outbound filter
● Outgoing multicast and broadcast packets cannot be filtered.
Deleting an IP address from exceptions
● Select an IP address and click [Delete].
Managing the Machine
371

3 Click [OK].
6 Restart the machine.
● Turn OFF the machine, wait for at least 10 seconds, and turn it back ON.
Using the operation panel● You can also enable or disable IP address filtering from <Menu> in the Home screen.
<IPv4 Address Filter>(P. 464)<IPv6 Address Filter>(P. 465)
LINKS
Specifying MAC Addresses for Firewall Settings(P. 373)
Managing the Machine
372

Specifying MAC Addresses for Firewall Settings16SE-073
You can limit communication to only devices with specified MAC addresses, or block devices with specified MACaddresses but permit other communications.
This function is unavailable when the machine is connected to a wireless LAN.
● For more information about the basic operations to be performed when setting the machine from theRemote UI, see Setting Up Menu Options from Remote UI(P. 426) .
1 Start the Remote UI and log in to System Manager Mode. Starting RemoteUI(P. 418)
2 Click [Settings/Registration] on the Portal page. Remote UI Screen(P. 419)
3 Select [Network Settings] [Firewall Settings].
4 Click [Edit] for the target MAC address filter.
● To restrict data sent from the machine to a computer, select [Outbound Filter]. To restrict data received froma computer, select [Inbound Filter].
5 Specify the settings for packet filtering.
● Select the precondition (default policy) to allow or reject the communication of other devices with themachine, and then specify MAC addresses for exceptions.
Managing the Machine
373

1 Select the [Use Filter] check box and click the [Reject] or [Allow] radio button for the [Default Policy].
[Use Filter]Select the check box to restrict communication. Clear the check box to disable the restriction.
[Default Policy]Select the precondition to allow or reject other devices to communicate with the machine.
[Reject]Select to pass communication packets only when they are sent to or received fromdevices whose MAC addresses are entered in [Exception Addresses].Communications with other devices are prohibited.
[Allow]Select to block communication packets when they are sent to or received fromdevices whose MAC addresses are entered in [Exception Addresses].Communications with other devices are permitted.
2 Specify address exceptions.
● Enter the MAC address in the [Address to Register] text box and click [Add].
● You do not need to delimit the address with hyphens or colons.
Check for entry errors
● If MAC addresses are incorrectly entered, you may become unable to access the machine from theRemote UI, in which case you need to set <MAC Address Filter> to <Off>. <MAC AddressFilter>(P. 465)
When [Reject] is selected for an outbound filter
● Outgoing multicast and broadcast packets cannot be filtered.
Deleting a MAC address from exceptions
● Select a MAC address and click [Delete].
Managing the Machine
374

3 Click [OK].
6 Restart the machine.
● Turn OFF the machine, wait for at least 10 seconds, and turn it back ON.
Using the operation panel● You can also enable or disable MAC address filtering from <Menu> in the Home screen. <MAC Address
Filter>(P. 465)
LINKS
Specifying IP Addresses for Firewall Settings(P. 370)
Managing the Machine
375

Changing Port Numbers16SE-074
Ports serve as endpoints for communicating with other devices. Typically, conventional port numbers are used formajor protocols, but devices that use these port numbers are vulnerable to attacks because these port numbers arewell-known. To enhance security, your Network Administrator may change the port numbers. When a port number hasbeen changed, the new number must be shared with the communicating devices, such as computers and servers.Specify the port number settings depending on the network environment.
● To change the port number for proxy server, see Setting a Proxy(P. 377) .
● To change the port number for LDAP server, see Registering LDAP Servers(P. 64) .
1 Select <Menu> in the Home screen. Home Screen(P. 123)
2 Select <Preferences> <Network>.
● If the login screen appears, enter the correct ID and PIN. Logging in to the Machine(P. 134)
3 Select <TCP/IP Settings> <Port Number Settings>.
4 Selecting the protocol of which you want to change the port number.
Learning more about the protocols
● <LPD>/<RAW>/<WSD Multicast Discovery> Configuring Printing Protocols and WSD Functions(P. 41)
● <HTTP> Disabling HTTP Communication(P. 413)
● <POP3>/<SMTP> Configuring E-Mail/I-Fax Communication Settings(P. 90)
● <SNMP> Monitoring and Controlling the Machine with SNMP(P. 69)
● <Multicast Discovery> Monitoring the Machine from the Device Management Systems(P. 74)
● <FTP> Procedure for Setting a FTP Server as a Save Location(P. 98)
5 Enter the port number, and select <Apply>.
6 Restart the machine.
● Turn OFF the machine, wait for at least 10 seconds, and turn it back ON.
LINKS
Configuring Printer Ports(P. 44)
Managing the Machine
376

Setting a Proxy16SE-075
A proxy (or HTTP proxy server) refers to a computer or software that carries out HTTP communication for otherdevices, especially when communicating with resources outside the network, such as when browsing Web sites. Theclient devices connect to the outside network through the proxy server, and do not communicate directly to theresources outside. Setting a proxy not only facilitates management of traffic between in-house and outside networksbut also blocks unauthorized access and consolidates anti-virus protection for enhanced security. When you useGoogle Cloud Print to print over the Internet, you can enhance security by setting a proxy. When setting a proxy, makesure that you have the necessary proxy information, including the IP address, port number, and a user name andpassword for authentication.
● For more information about the basic operations to be performed when setting the machine from theRemote UI, see Setting Up Menu Options from Remote UI(P. 426) .
1 Start the Remote UI and log in to System Manager Mode. Starting RemoteUI(P. 418)
2 Click [Settings/Registration] on the Portal page. Remote UI Screen(P. 419)
3 Select [Network Settings] [Proxy Settings].
4 Click [Edit].
5 Select the [Use Proxy] check box and specify the required settings.
[Use Proxy]Select the check box to use the specified proxy server when communicating with an HTTP server.
[HTTP Proxy Server Address]Enter the address of the proxy server. Specify the IP address or host name depending on the environment.
[HTTP Proxy Server Port Number]
Managing the Machine
377
Change the port number as necessary.
[Use Proxy within Same Domain]Select the check box to also use the specified proxy server for communication with devices in the samedomain.
[Use Proxy Authentication]To enable authentication by the proxy server, select the check box and enter alphanumeric characters for theuser name in the [User Name] text box.
[Set/Change Password]To set or change the password for the proxy authentication, when it is enabled, select the check box andenter alphanumeric characters for the new password in the [Password] text box.
6 Click [OK].
LINKS
Using Google Cloud Print(P. 345)
Managing the Machine
378

Configuring the Key and Certificate for TLS16SE-076
You can encrypt communication between the machine and a Web browser on the computer by using Transport LayerSecurity (TLS). TLS is a mechanism for encrypting data sent or received over the network. TLS must be enabled whenthe Remote UI is used for specifying settings for IPSec (Pre-Shared Key Method), IEEE 802.1X authentication (TTLS/PEAP), or SNMPv3. To use TLS encrypted communication for the Remote UI, you need to specify a "key and certificate"(server certificate) you want to use before enabling TLS. Generate or install the key and certificate for TLS beforeenabling TLS ( Management Functions(P. 714) ).
● For more information about the basic operations to be performed when setting the machine from theRemote UI, see Setting Up Menu Options from Remote UI(P. 426) .
1 Start the Remote UI and log in to System Manager Mode. Starting RemoteUI(P. 418)
2 Click [Settings/Registration] on the Portal page. Remote UI Screen(P. 419)
3 Select [Network Settings] [TLS Settings].
4 Click [Key and Certificate].
5 Click [Register Default Key] on the right of the key and certificate you want to use.
Viewing details of a certificate
● You can check the details of the certificate or verify the certificate by clicking the corresponding text linkunder [Key Name], or the certificate icon.
6 Select [License/Other] [Remote UI Settings].
Managing the Machine
379

7 Click [Edit].
8 Select the [Use TLS] check box and click [OK].
9 Restart the machine.
● Turn OFF the machine, wait for at least 10 seconds, and turn it back ON.
Using the operation panel● You can also enable or disable TLS encrypted communication from <Menu> in the Home screen. <Remote
UI Settings>(P. 572)
Starting the Remote UI with TLS● If you try to start the Remote UI when TLS is enabled, a security alert may be displayed regarding the
security certificate. In this case, check that the correct URL is entered in the address field, and then proceedto display the Remote UI screen. Starting Remote UI(P. 418)
Using TLS to encrypt e-mail/I-Fax communication● If the SMTP server and the POP3 server support TLS, you can enable TLS for communication with these
servers ( Configuring E-Mail/I-Fax Communication Settings(P. 90) ). For more information about theSMTP server and the POP3 server, contact your Internet service provider or Network Administrator.
Limiting the TLS version● Select [Allowed Versions] on the [TLS Settings] page of Remote UI, and specify the upper limit and lower
limit.
Managing the Machine
380

LINKS
Generating the Key and Certificate for Network Communication(P. 382)Generating a Key and Certificate Signing Request (CSR)(P. 385)Registering the Key and Certificate for Network Communication(P. 388)Configuring IPSec Settings(P. 390)Configuring IEEE 802.1X Authentication Settings(P. 397)Monitoring and Controlling the Machine with SNMP(P. 69)Registering LDAP Servers(P. 64)
Managing the Machine
381

Generating the Key and Certificate for NetworkCommunication
16SE-077
A key and certificate can be generated with the machine when it is required for encrypted communication viaTransport Layer Security (TLS). You can use TLS when accessing the machine via the Remote UI. Self-signed certificatesare used with the key and certificate generated in "Network Communication."
● If you want to use a server certificate that has a CA signature, you can generate a CSR together with a keyinstead of a certificate. Generating a Key and Certificate Signing Request (CSR)(P. 385)
● For more information about the basic operations to be performed when setting the machine from theRemote UI, see Setting Up Menu Options from Remote UI(P. 426) .
1 Start the Remote UI and log in to System Manager Mode. Starting RemoteUI(P. 418)
2 Click [Settings/Registration] on the Portal page. Remote UI Screen(P. 419)
3 Select [Device Management] [Key and Certificate Settings].
4 Click [Generate Key].
Deleting a registered key and certificate
● Click [Delete] on the right of the key and certificate you want to delete click [OK].
● A key and certificate cannot be deleted if it is currently used for some purpose, such as when "[TLS]" or"[IEEE 802.1X]" is displayed under [Key Usage]. In this case, disable the function or replace the other keyand certificate before deleting it.
5 Select [Network Communication] and click [OK].
6 Specify settings for the key and certificate.
Managing the Machine
382

[Key Settings]
[Key Name]Enter alphanumeric characters for naming the key. Set a name that will be easy for you to find later in alist.
[Signature Algorithm]Select the signature algorithm from the drop-down list.
[Key Algorithm]Select the key generation algorithm from [RSA] or [ECDSA], then select the key length from the drop-down list. In either case, the larger the number for the key length is, the higher the security levelbecomes. However, the communication speed becomes slower.
● When [SHA384] or [SHA512] is selected in [Signature Algorithm], [512-bit] cannot be selected as thekey length when [RSA] is selected in [Key Algorithm].
[Certificate Settings]
[Validity Start Date (YYYY/MM/DD)]Enter the validity start date of the certificate, in the order of: year, month, day.
[Validity End Date (YYYY/MM/DD)]Enter the validity end date of the certificate, in the order of: year, month, day. A date earlier than[Validity Start Date (YYYY/MM/DD)] cannot be set.
[Country/Region]Click the [Select Country/Region] radio button and select the country/region from the drop-down list.You can also click the [Enter Internet Country Code] radio button and enter a country code, such as "US"for the United States.
[State]/[City]Enter alphanumeric characters for the location as necessary.
[Organization]/[Organization Unit]Enter alphanumeric characters for the organization name as necessary.
[Common Name]Enter alphanumeric characters for the common name of the certificate as necessary. "Common Name"is often abbreviated as "CN."
Managing the Machine
383

7 Click [OK].
● Generating a key and certificate may take some time.
● After the key and certificate is generated, it is automatically registered to the machine.
LINKS
Registering the Key and Certificate for Network Communication(P. 388)Configuring the Key and Certificate for TLS(P. 379)Configuring IPSec Settings(P. 390)
Managing the Machine
384
Generating a Key and Certificate Signing Request (CSR)16SE-079
Because certificates generated on the machine do not have a CA signature, a communication error may resultdepending on devices it communicates with. To have the certificate authority issue the certificate with the CAsignature, you need to obtain data of CSR (Certificate Signing Request), which the administrator can generate fromRemote UI. When the certificate is issued, register it in the key with the CSR generated.
Generating a Key and CSR(P. 385)Registering a Certificate to a Key(P. 387)
● For more information about the basic operations to be performed when setting the machine from theRemote UI, see Setting Up Menu Options from Remote UI(P. 426) .
Generating a Key and CSR
1 Start the Remote UI and log in to System Manager Mode. Starting RemoteUI(P. 418)
2 Click [Device Management] on the Portal page. Remote UI Screen(P. 419)
3 Select [Device Management] [Key and Certificate Settings].
4 Click [Generate Key].
Deleting a registered key and certificate
● Click [Delete] on the right of the key and certificate you want to delete click [OK].
● A key and certificate cannot be deleted if it is currently used for some purpose, such as when "[TLS]" or"[IEEE 802.1X]" is displayed under [Key Usage]. In this case, disable the function or replace the key andcertificate before deleting it.
5 Select [Key and Certificate Signing Request (CSR)] and click [OK].
6 Specify settings for the key and CSR.
Managing the Machine
385

[Key Settings]
[Key Name]Enter alphanumeric characters for naming the key. Set a name that will be easy for you to find later in alist.
[Signature Algorithm]Select the signature algorithm from the drop-down list.
[Key Algorithm]Select the key generation algorithm from [RSA] or [ECDSA], then select the key length from the drop-down list. In any case, the larger the number for the key length, the slower the communication.However, the security is tighter.
● When [SHA384] or [SHA512] is selected in [Signature Algorithm], [512-bit] cannot be selected as thekey length when [RSA] is selected in [Key Algorithm].
[Certificate Signing Request (CSR) Settings]
[Country/Region]Click the [Select Country/Region] radio button and select the country/region from the drop-down list.You can also click the [Enter Internet Country Code] radio button and enter a country code, such as "US"for the United States.
[State]/[City]Enter alphanumeric characters for the location as necessary.
[Organization]/[Organization Unit]Enter alphanumeric characters for the organization name as necessary.
[Common Name]Enter alphanumeric characters for the common name of the certificate as necessary. "Common Name"is often abbreviated as "CN."
7 Click [OK].
● Generating a key and CSR may take some time.
Managing the Machine
386

8 Click [Store in File].
● A dialog box for storing the file appears. Choose where to store the file and click [Save].
➠The CSR file is stored on the computer.
9 Attach the stored file and submit the application to the certification authority.
Registering a Certificate to a Key
The key with the CSR generated cannot be used until the certificate issued from the certificate authority based on theCSR is registered in the key. Once the certification authority has issued the certificate, register it using the procedurebelow.
1 Start the Remote UI and log in to System Manager Mode. Starting RemoteUI(P. 418)
2 Click [Settings/Registration] on the Portal page. Remote UI Screen(P. 419)
3 Select [Device Management] [Key and Certificate Settings].
4 Click [Key Name] or [Certificate] required to register the certificate.
5 Click [Register Certificate].
6 Click [Browse], specify the file for the certificate signing request, and click [Register].
LINKS
Configuring the Key and Certificate for TLS(P. 379)Generating the Key and Certificate for Network Communication(P. 382)Registering the Key and Certificate for Network Communication(P. 388)Configuring IPSec Settings(P. 390)
Managing the Machine
387

Registering the Key and Certificate for NetworkCommunication
16SE-078
You can obtain the key and certificate, and the CA certificate from a certification authority (CA) for use with themachine. Install and register the obtained key and certificate file and CA certificate file in this machine using RemoteUI. Check the key and certificate, and CA certificate conditions that are required for the machine in advance ( Management Functions(P. 714) ).
● For more information about the basic operations to be performed when setting the machine from theRemote UI, see Setting Up Menu Options from Remote UI(P. 426) .
1 Start the Remote UI and log in to System Manager Mode. Starting RemoteUI(P. 418)
2 Click [Settings/Registration] on the Portal page. Remote UI Screen(P. 419)
3 Select [Device Management] [Key and Certificate Settings] or [CA CertificateSettings].
● Click [Key and Certificate Settings] to install a key and certificate, or [CA Certificate Settings] to install a CAcertificate.
4 Click [Register Key and Certificate] or [Register CA Certificate].
Deleting a registered key and certificate or CA certificate
● Click [Delete] on the right of the key and certificate or CA certificate you want to delete click [OK]. Youcannot delete the preinstalled CA certificates.
● A key and certificate cannot be deleted if it is currently used for some purpose, such as when "[TLS]" or"[IEEE 802.1X]" is displayed under [Key Usage]. In this case, disable the function or replace the key andcertificate before deleting it.
Disabling or enabling the preinstalled CA certificates
● Click [Disable] on the right of the preinstalled CA certificate you want to disable. To enable the certificateagain, click [Enable] on the right of the certificate.
5 Click [Install].
Managing the Machine
388

Deleting the key and certificate file or CA certificate file
● Click [Delete] on the right of the file you want to delete click [OK].
6 Click [Browse], specify the file to install, and click [Start Installation].
➠The key and certificate file or the CA certificate file is installed on the machine from a computer.
7 Register the key and certificate or CA certificate.
Registering a key and certificate
1 Click [Register] on the right of the key and certificate file you want to register.
2 Enter the name of the key and password.
[Key Name]Enter alphanumeric characters for the name of the key to be registered.
[Password]Enter alphanumeric characters for the password of the private key set for the file to be registered.
3 Click [OK].
Registering a CA certificateClick [Register] on the right of the CA certificate file you want to register.
LINKS
Generating the Key and Certificate for Network Communication(P. 382)Configuring the Key and Certificate for TLS(P. 379)Configuring IPSec Settings(P. 390)Configuring IEEE 802.1X Authentication Settings(P. 397)
Managing the Machine
389

Configuring IPSec Settings16SE-07A
Internet Protocol Security (IPSec or IPsec) is a protocol suite for encrypting data transported over a network, includingInternet networks. While TLS only encrypts data used on a specific application, such as a Web browser or an e-mailapplication, IPSec encrypts either whole IP packets or the payloads of IP packets, offering a more versatile securitysystem. The IPSec of the machine works in transport mode, in which the payloads of IP packets are encrypted. Withthis feature, the machine can connect directly to a computer that is in the same virtual private network (VPN). Checkthe system requirements ( Management Functions(P. 714) ) and set the necessary configuration on the computerbefore you configure the machine.
Using IPSec with IP address filter● IP address filter settings are applied before the IPSec policies. Specifying IP Addresses for Firewall
Settings(P. 370)
Configuring IPSec Settings
Before using IPSec for encrypted communication, you need to register security policies (SP). A security policy consistsof the groups of settings described below. After registering policies, specify the order in which they are applied.
SelectorSelector defines conditions for IP packets to apply IPSec communication. Selectable conditions include IPaddresses and port numbers of the machine and the devices to communicate with.
IKEIKE configures the IKEv1 that is used for key exchange protocol. Note that instructions vary depending on theauthentication method selected.
[Pre-Shared Key Method]This authentication method uses a common key word, called Shared Key, for communication between themachine and other devices. Enable TLS for the Remote UI before specifying this authentication method ( Configuring the Key and Certificate for TLS(P. 379) ).
[Digital Signature Method]The machine and the other devices authenticate each other by mutually verifying their digital signatures.Generate or install the key and certificate beforehand ( Registering the Key and Certificate for NetworkCommunication(P. 388) ).
AH/ESPSpecify the settings for AH/ESP, which is added to packets during IPSec communication. AH and ESP can be usedat the same time. You can also select whether or not to enable PFS for tighter security.
Managing the Machine
390

● For more information about the basic operations to be performed when setting the machine from theRemote UI, see Setting Up Menu Options from Remote UI(P. 426) .
1 Start the Remote UI and log in to System Manager Mode. Starting RemoteUI(P. 418)
2 Click [Settings/Registration] on the Portal page. Remote UI Screen(P. 419)
3 Select [Network Settings] [IPSec Settings].
4 Click [Edit].
5 Select the [Use IPSec] check box and click [OK].
● If you want the machine to only receive packets that match one of the security policies that you define in thesteps below, clear the [Receive Non-Policy Packets] check box.
6 Click [Register New Policy].
7 Specify the Policy Settings.
1 In the [Policy Name] text box, enter alphanumeric characters for a name that is used for identifying thepolicy.
2 Select the [Enable Policy] check box.
8 Specify the Selector Settings.
Managing the Machine
391

[Local Address]Click the radio button for the type of IP address of the machine to apply the policy.
[All IP Addresses] Select to use IPSec for all IP packets.
[IPv4 Address] Select to use IPSec for all IP packets that are sent to or from the IPv4 address of themachine.
[IPv6 Address] Select to use IPSec for all IP packets that are sent to or from an IPv6 address of themachine.
[Remote Address]Click the radio button for the type of IP address of the other devices to apply the policy.
[All IP Addresses] Select to use IPSec for all IP packets.
[All IPv4 Addresses] Select to use IPSec for all IP packets that are sent to or from IPv4 addresses of theother devices.
[All IPv6 Addresses] Select to use IPSec for all IP packets that are sent to or from IPv6 addresses of theother devices.
[IPv4 Manual Settings] Select to specify a single IPv4 address or a range of IPv4 addresses to apply IPSec.Enter the IPv4 address (or the range) in the [Addresses to Set Manually] text box.
[IPv6 Manual Settings] Select to specify a single IPv6 address or a range of IPv6 addresses to apply IPSec.Enter the IPv6 address (or the range) in the [Addresses to Set Manually] text box.
[Addresses to Set Manually]If [IPv4 Manual Settings] or [IPv6 Manual Settings] is selected for [Remote Address], enter the IP address toapply the policy. You can also enter a range of addresses by inserting a hyphen between the addresses.
Entering IP addresses
Description Example
Entering a single address IPv4:Delimit numbers with periods.
192.168.0.10
Managing the Machine
392

Description Example
IPv6:Delimit alphanumeric characters with colons.
fe80::10
Specifying a range of addresses Insert a hyphen between the addresses. 192.168.0.10-192.168.0.20
[Subnet Settings]When manually specifying IPv4 address, you can express the range by using the subnet mask. Enter thesubnet mask using periods to delimit numbers (example:"255.255.255.240").
[Prefix Length]Specifying the range of IPv6 addresses manually also allows you to specify the range using prefixes. Enter arange between 0 and 128 as the prefix length.
[Local Port]/[Remote Port]If you want to create separate policies for each protocol, such as HTTP or WSD, enter the appropriate portnumber for the protocol to determine whether to use IPSec.
IPSec is not applied to the following packets
● Loopback, multicast, and broadcast packets
● IKE packets (using UDP on port 500)
● ICMPv6 neighbor solicitation and neighbor advertisement packets
9 Specify the IKE Settings.
[IKE Mode]The mode used for the key exchange protocol is displayed. The machine supports the main mode, not theaggressive mode.
[Authentication Method]Select [Pre-Shared Key Method] or [Digital Signature Method] for the method used when authenticating themachine. You need to enable TLS for the Remote UI before selecting [Pre-Shared Key Method]. You need togenerate or install the key and certificate before selecting [Digital Signature Method]. Configuring theKey and Certificate for TLS(P. 379)
[Valid for]Specify how long a session lasts for IKE SA (ISAKMP SA). Enter the time in minutes.
[Authentication]/[Encryption]/[DH Group]Select an algorithm from the drop-down list. Each algorithm is used in the key exchange.
Managing the Machine
393

[Authentication] Select the hash algorithm.
[Encryption] Select the encryption algorithm.
[DH Group] Select the Diffie-Hellman group, which determines the key strength.
Authenticating a machine using a pre-shared key
1 Click the [Pre-Shared Key Method] radio button for [Authentication Method] and then click [Shared KeySettings].
2 Enter alphanumeric characters for the pre-shared key and click [OK].
3 Specify the [Valid for] and [Authentication]/[Encryption]/[DH Group] settings.
Authenticating a machine using digital signature method
1 Click the [Digital Signature Method] radio button for [Authentication Method] and then click [Key andCertificate].
2 Click [Register Default Key] on the right of the key and certificate you want to use.
Viewing details of a certificate
● You can check the details of the certificate or verify the certificate by clicking the corresponding textlink under [Key Name], or the certificate icon.
3 Specify the [Valid for] and [Authentication]/[Encryption]/[DH Group] settings.
10 Specify the IPSec Network Settings.
[Use PFS]Select the check box to enable Perfect Forward Secrecy (PFS) for IPSec session keys. Enabling PFS enhancesthe security while increasing the load on the communication. Make sure that PFS is also enabled for the otherdevices.
[Specify by Time]/[Specify by Size]Set the conditions for terminating a session for IPSec SA. IPSec SA is used as a communication tunnel. Selecteither or both of the check boxes as necessary. If both check boxes are selected, the IPSec SA session isterminated when either of the conditions has been satisfied.
[Specify by Time] Enter a time in minutes to specify how long a session lasts.
[Specify by Size] Enter a size in megabytes to specify how much data can be transported in a session.
Managing the Machine
394

[Select Algorithm]Select the [ESP], [ESP (AES-GCM)], or [AH (SHA1)] check box(es) depending on the IPSec header and thealgorithm used. AES-GCM is an algorithm for both authentication and encryption. If [ESP] is selected, alsoselect algorithms for authentication and encryption from the [ESP Authentication] and [ESP Encryption] drop-down lists.
[ESP Authentication] To enable the ESP authentication, select [SHA1] for the hash algorithm. Select [Do NotUse] if you want to disable the ESP authentication.
[ESP Encryption] Select the encryption algorithm for ESP. You can select [NULL] if you do not want tospecify the algorithm, or select [Do Not Use] if you want to disable the ESP encryption.
[Connection Mode]The connection mode of IPSec is displayed. The machine supports transport mode, in which the payloads ofIP packets are encrypted. Tunnel mode, in which whole IP packets (headers and payloads) are encapsulatedis not available.
11 Click [OK].
● If you need to register an additional security policy, return to step 6.
12 Arrange the order of policies listed under [Registered IPSec Policies].
● Policies are applied from one at the highest position to the lowest. Click [Up] or [Down] to move a policy up ordown the order.
Editing a policy
● Click the corresponding text link under [Policy Name] for the edit screen.
Deleting a policy
● Click [Delete] on the right of the policy name you want to delete click [OK].
13 Restart the machine.
● Turn OFF the machine, wait for at least 10 seconds, and turn it back ON.
Managing the Machine
395

Using the operation panel● You can also enable or disable IPSec communication from <Menu> in the Home screen. <Use
IPSec>(P. 460)
LINKS
Configuring the Key and Certificate for TLS(P. 379)IPSec Policy List(P. 613)
Managing the Machine
396

Configuring IEEE 802.1X Authentication Settings16SE-07C
The machine can connect to an 802.1X network as a client device. A typical 802.1X network consists of a RADIUS server(authentication server), LAN switch (authenticator), and client devices with authentication software (supplicants). If adevice tries to connect to the 802.1X network, the device must go through user authentication in order to prove thatthe connection is made by an authorized user. Authentication information is sent to and checked by a RADIUS server,which permits or rejects communication to the network depending on the authentication result. If authentication fails,a LAN switch (or an access point) blocks access from the outside of the network.
IEEE 802.1X Authentication MethodSelect the authentication method from the options below. If necessary, install or register a key and certificate ora CA certificate before configuring IEEE 802.1X authentication ( Registering the Key and Certificate forNetwork Communication(P. 388) ).
TLSThe machine and the authentication server authenticate each other by mutually verifying their certificates. Akey and certificate issued by a certification authority (CA) is required for the client authentication (whenauthenticating the machine). For the server authentication, a CA certificate installed via the Remote UI can beused in addition to a CA certificate preinstalled in the machine.
TTLSThis authentication method uses a user name and password for the client authentication and a CA certificatefor the server authentication. MSCHAPv2 or PAP can be selected as the internal protocol. TTLS can be usedwith PEAP at the same time. Enable TLS for the Remote UI before configuring this authentication method ( Configuring the Key and Certificate for TLS(P. 379) ).
PEAPThe required settings are almost the same as those of TTLS. MSCHAPv2 is used as the internal protocol.Enable TLS for the Remote UI before configuring this authentication method ( Configuring the Key andCertificate for TLS(P. 379) ).
● For more information about the basic operations to be performed when setting the machine from theRemote UI, see Setting Up Menu Options from Remote UI(P. 426) .
1 Start the Remote UI and log in to System Manager Mode. Starting RemoteUI(P. 418)
Managing the Machine
397
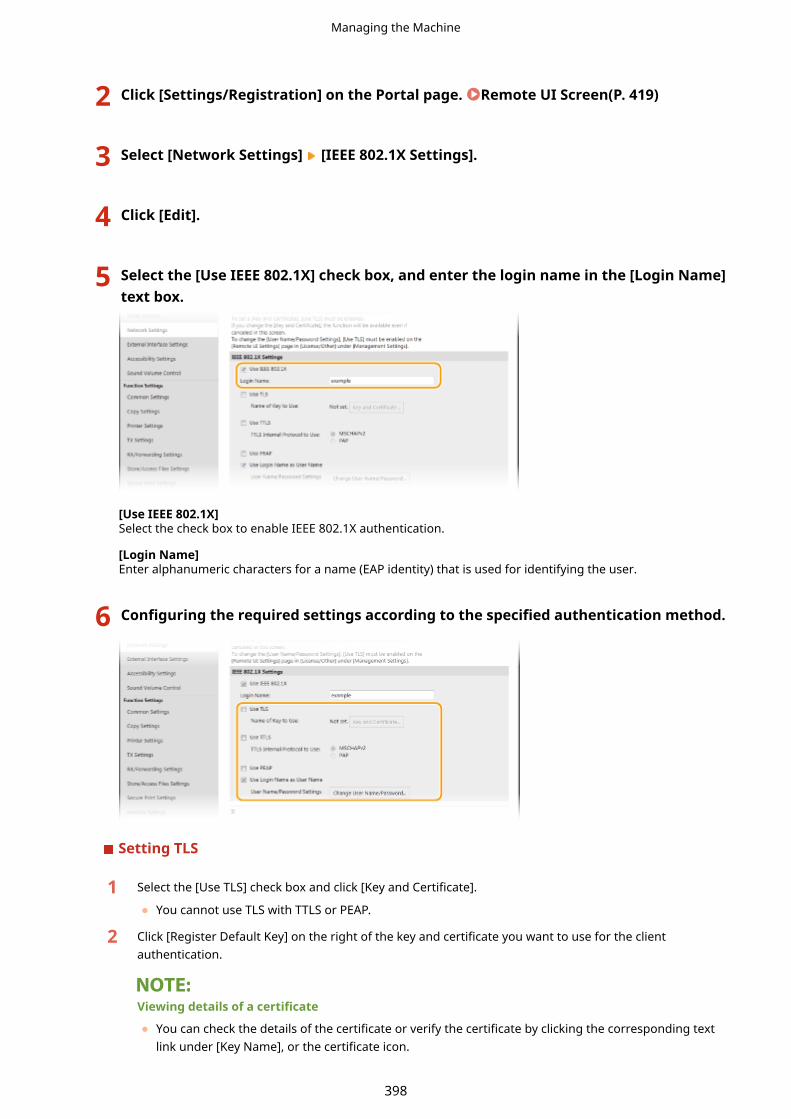
2 Click [Settings/Registration] on the Portal page. Remote UI Screen(P. 419)
3 Select [Network Settings] [IEEE 802.1X Settings].
4 Click [Edit].
5 Select the [Use IEEE 802.1X] check box, and enter the login name in the [Login Name]text box.
[Use IEEE 802.1X]Select the check box to enable IEEE 802.1X authentication.
[Login Name]Enter alphanumeric characters for a name (EAP identity) that is used for identifying the user.
6 Configuring the required settings according to the specified authentication method.
Setting TLS
1 Select the [Use TLS] check box and click [Key and Certificate].
● You cannot use TLS with TTLS or PEAP.
2 Click [Register Default Key] on the right of the key and certificate you want to use for the clientauthentication.
Viewing details of a certificate
● You can check the details of the certificate or verify the certificate by clicking the corresponding textlink under [Key Name], or the certificate icon.
Managing the Machine
398

Setting TTLS/PEAP
1 Select the [Use TTLS] or [Use PEAP] check box.
Internal protocol for TTLS
● You can select MSCHAPv2 or PAP.
2 Click [Change User Name/Password].
● To specify a user name other than the login name, clear the [Use Login Name as User Name] checkbox. Select the check box if you want to use the login name as the user name.
3 Set the user name/password.
[User Name]Enter alphanumeric characters for the user name.
[Change Password]To set or change the password, select the check box and enter alphanumeric characters for the newpassword both in the [Password] and [Confirm] text boxes.
4 Click [OK].
7 Click [OK].
8 Restart the machine.
● Turn OFF the machine, wait for at least 10 seconds, and turn it back ON.
Managing the Machine
399

Using the operation panel● You can also enable or disable IEEE 802.1X authentication from <Menu> in the Home screen. <Use IEEE
802.1X>(P. 464)
LINKS
Configuring the Key and Certificate for TLS(P. 379)
Managing the Machine
400

Restricting the Machine's Functions16SE-07E
Some of the functions of the machine may rarely be used or provide opportunities for misuse. For security purposes,the machine can be set to limit its capabilities by partially or completely disabling these functions.
Restricting Access to Address Book and Sending FunctionsYou can specify the PIN in the Address Book to disable a general user from modifying data or limit destinationsthat can be specified for fax sending. You can also disable a user from collectively sending a fax to multipledestinations (Sequential Broadcast). Restricting Access to Address Book and Sending Functions(P. 403)
Restricting Printing from a ComputerYou can limit "printing from computer" only to secure documents so that no print jobs can be executed unlessthe PIN is entered on the machine side. Restricting Printing from a Computer(P. 410)
Restricting USB FunctionsThe USB connection allows an easy connection with peripheral devices, but it may cause a security risk such asan information leakage. You can restrict a USB connection with a computer or saving to a USB memory device.
Restricting USB Functions(P. 411)
Disabling HTTP CommunicationWhen not performing operations via the network, for example, when using the machine via USB connection,you can disable HTTP communication to prevent a hacking via the HTTP port. Disabling HTTPCommunication(P. 413)
Managing the Machine
401

Disabling Remote ManagementWhen not using Remote UI, you can disable functions to prevent an unauthorized remote operation via RemoteUI. Disabling Remote UI(P. 414)
Managing the Machine
402
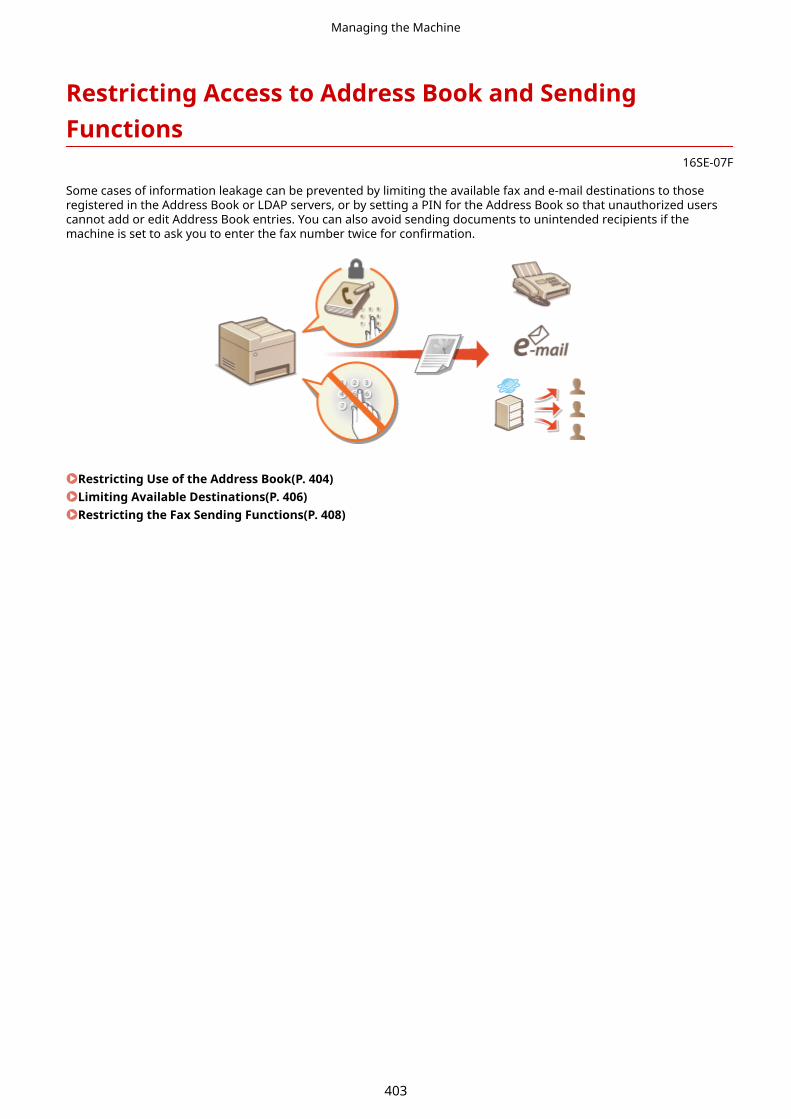
Restricting Access to Address Book and SendingFunctions
16SE-07F
Some cases of information leakage can be prevented by limiting the available fax and e-mail destinations to thoseregistered in the Address Book or LDAP servers, or by setting a PIN for the Address Book so that unauthorized userscannot add or edit Address Book entries. You can also avoid sending documents to unintended recipients if themachine is set to ask you to enter the fax number twice for confirmation.
Restricting Use of the Address Book(P. 404)Limiting Available Destinations(P. 406)Restricting the Fax Sending Functions(P. 408)
Managing the Machine
403

Restricting Use of the Address Book16SE-07H
The Address Book can be set to require users to enter a PIN in order to add newentries to the Address Book or edit existing entries. Setting a PIN to the AddressBook can reduce the risk of documents being sent to unintended recipients becausechanges to the Address Book can only be made by users who know the PIN.
1 Select <Menu> in the Home screen. Home Screen(P. 123)
2 Select <Set Destination>.
● If the login screen appears, enter the correct ID and PIN. Logging in to the Machine(P. 134)
3 Select <Address Book PIN>.
4 Specify the PIN.
● Enter the number, and select <Apply>.
● The Confirm screen is displayed. Enter the PIN once again to confirm.
● You cannot set a PIN that consists only of zeros, such as "00" or "0000000".
● To cancel the PIN setting, clear the information you entered in and select <Apply> with the field blank.
In addition to setting the Address Book PIN, you can further enhance security by performing the followingoperations:
● Restricting the addition of new destinations, see Restricting New Destinations that Can BeSpecified(P. 406) .
● Disabling the PC fax function, see Restricting Fax Sending from a Computer(P. 408) .
LINKS
Registering Destinations(P. 182)Registering Destinations from Remote UI(P. 429)
Managing the Machine
404

Configuring Basic E-Mail Settings(P. 87)Setting a Shared Folder as a Save Location(P. 95)
Managing the Machine
405

Limiting Available Destinations16SE-07J
By limiting destinations that can be specified to those registered in the Address Bookor LDAP servers, you can reduce the possibility of specifying unintended destinationsand prevent users from leaking information. You can configure the setting to displaythe confirmation screen to prevent the user from misdialing when specifying a codeddial number in the Address Book.
Restricting New Destinations that Can Be Specified(P. 406)Disabling Use of Previously Used Destinations(P. 406)Displaying Destinations in Address Book(P. 406)Checking Destinations when Sending Data(P. 407)
Restricting New Destinations that Can Be Specified
Restrict destinations that can be specified when sending faxes or scanned documents to "those already registered inthe Address Book," "those previously used," or "those searchable from the LDAP servers." When this function isenabled, the machine prohibits users from entering destinations using the numeric keys, adding new entries to theAddress Book, and editing the existing Address Book entries.
<Menu> <Function Settings> <Send> <Common Settings> <Restrict NewDestinations> <On>
● This function does not limit the available destinations for PC faxing. Restricting Fax Sending from aComputer(P. 408)
Disabling Use of Previously Used Destinations
Prohibits the specification of destinations from the transmission records. Using this restriction prevents destinationsbeing selected from the transmission records for "Send Fax," "Scan and Send as E-mail" and "Scan and Save to SharedFolder or FTP Server."
<Menu> <Function Settings> <Send> <Common Settings> <Restrict Resending fromLog> <On>
Displaying Destinations in Address Book
When using coded dial numbers to specify destinations, you need to precisely remember whose destination (or whatgroup) is registered in what coded dial number. If you do not remember all these numbers accurately, you may sendyour documents to unintended destinations. You can avoid sending data to unintended recipients by configuring the
Managing the Machine
406
machine to display the details of the coded dial number you selected/entered as a sending destination on the screenbefore you send documents to that destination.
<Menu> <Function Settings> <Send> <Common Settings> <Confirm When Coded DialTX> <On>
Checking Destinations when Sending Data
You can configure a setting so that the destination confirmation screen is displayed when fax, e-mail, or I-Fax sendingstarts. If <Only for Sequential Broadcast> is selected, the confirmation screen is displayed only when multipledestinations are specified.
<Menu> <Function Settings> <Send> <Common Settings> <Confirm Dest. BeforeSending> Select <On> or <Only for Sequential Broadcast>
LINKS
Sending I-Faxes(P. 247)Sending Data by E-Mail/Saving Data to a Shared Folder or FTP Server(P. 290)Recalling Previously Used Settings for Sending/Saving (Recall Settings)(P. 312)Restricting Use of the Address Book(P. 404)Restricting the Fax Sending Functions(P. 408)
Managing the Machine
407

Restricting the Fax Sending Functions16SE-07K
You can set various restrictions for sending faxes, which can prevent information leakage to third parties or sendingdocuments to unintended destinations.
Confirming the Entered Fax Number(P. 408)Restricting Fax Sending from a Computer(P. 408)Restricting Sequential Broadcasts(P. 408)
Confirming the Entered Fax Number
You can configure the setting to display the confirmation screen to prevent the user from misdialing when entering adestination fax number using the numeric keys.
<Menu> <Function Settings> <Send> <Fax Settings> <Confirm Entered Fax Number> <On>
Restricting Fax Sending from a Computer
You can prohibit users from PC faxing (faxing from a computer).
<Menu> <Function Settings> <Send> <Fax Settings> <Allow Fax Driver TX> <Off>
Restricting Sequential Broadcasts
You can prohibit a function that collectively sends a fax to multiple destinations (Sequential Broadcast).
<Menu> <Function Settings> <Send> <Fax Settings> <Restrict SequentialBroadcast> <Off>
LINKS
Basic Operations for Sending Faxes(P. 217)Recalling Previously Used Settings for Sending (Recall Settings)(P. 230)
Managing the Machine
408

Sending Faxes from Your Computer (PC Fax)(P. 243)Enabling the Department ID Management for Jobs from a Computer(P. 358)Restricting Use of the Address Book(P. 404)Limiting Available Destinations(P. 406)
Managing the Machine
409

Restricting Printing from a Computer16SE-07L
You can drastically reduce information leakage risks by limiting the documents printable from a computer to theSecure Print documents ( Printing a Document Secured by a PIN (Secure Print)(P. 265) ).
<Menu> <Function Settings> <Secure Print> <Restrict Printer Jobs> <On> Restart themachine
Managing the Machine
410
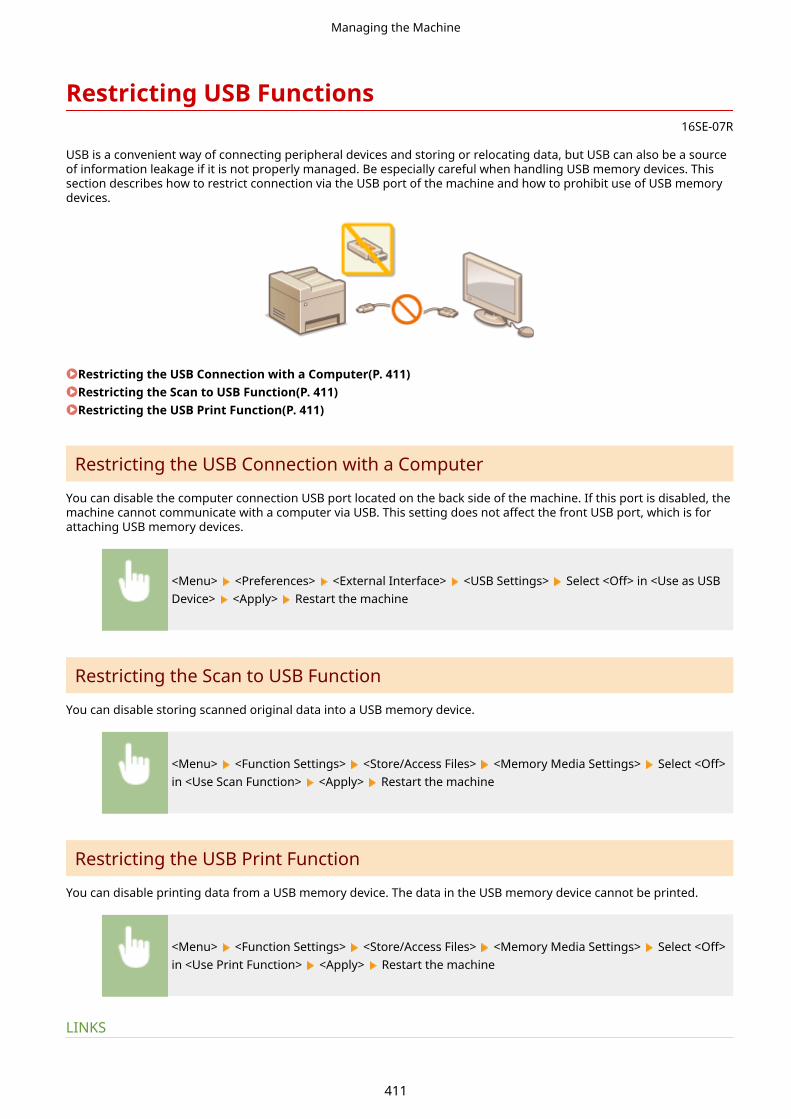
Restricting USB Functions16SE-07R
USB is a convenient way of connecting peripheral devices and storing or relocating data, but USB can also be a sourceof information leakage if it is not properly managed. Be especially careful when handling USB memory devices. Thissection describes how to restrict connection via the USB port of the machine and how to prohibit use of USB memorydevices.
Restricting the USB Connection with a Computer(P. 411)Restricting the Scan to USB Function(P. 411)Restricting the USB Print Function(P. 411)
Restricting the USB Connection with a Computer
You can disable the computer connection USB port located on the back side of the machine. If this port is disabled, themachine cannot communicate with a computer via USB. This setting does not affect the front USB port, which is forattaching USB memory devices.
<Menu> <Preferences> <External Interface> <USB Settings> Select <Off> in <Use as USBDevice> <Apply> Restart the machine
Restricting the Scan to USB Function
You can disable storing scanned original data into a USB memory device.
<Menu> <Function Settings> <Store/Access Files> <Memory Media Settings> Select <Off>in <Use Scan Function> <Apply> Restart the machine
Restricting the USB Print Function
You can disable printing data from a USB memory device. The data in the USB memory device cannot be printed.
<Menu> <Function Settings> <Store/Access Files> <Memory Media Settings> Select <Off>in <Use Print Function> <Apply> Restart the machine
LINKS
Managing the Machine
411

Basic Operations for Scanning Originals(P. 283)Printing from a USB Memory Device (Memory Media Print)(P. 269)
Managing the Machine
412

Disabling HTTP Communication16SE-07S
HTTP is used for communications over the network, such as when you access the machine via the Remote UI. If youare using a USB connection or are otherwise not using HTTP, you can disable HTTP to block malicious third-partyintrusions via the unused HTTP port.
● Disabling HTTP disables some of the network capabilities, such as the Remote UI, WSD printing, and printingwith Google Cloud Print.
<Menu> <Preferences> <Network> <TCP/IP Settings> <Use HTTP> <Off> <Yes>
LINKS
Managing the Machine from a Computer (Remote UI)(P. 417)Changing Port Numbers(P. 376)Configuring Printing Protocols and WSD Functions(P. 41)Using Google Cloud Print(P. 345)
Managing the Machine
413
Disabling Remote UI16SE-07U
The Remote UI is useful because the machine settings can be specified by using a Web browser on a computer. To usethe Remote UI, the machine must be connected to a computer over the network. If the machine is connected to acomputer via USB, or if you do not need to use the Remote UI, you might want to disable the Remote UI to reduce therisk of having your machine controlled remotely over the network by malicious third parties.
<Menu> <Management Settings> <License/Other>/<Remote UI Settings/UpdateFirmware> <Remote UI Settings> Select <Off> in <Use Remote UI> Restart the machine
LINKS
Managing the Machine from a Computer (Remote UI)(P. 417)Disabling HTTP Communication(P. 413)
Managing the Machine
414

Increasing the Security of Documents16SE-07W
The machine is equipped with security functions designed to prevent documents from being leaked or tampered with.
Device SignatureThe digital signature is added to scanned documents using a key and certificate mechanism in order to prove tothe recipient that the document has been created on the machine. The recipient can verify "the device thatcreated the document" and "whether the document has been tampered with." Before adding a devicesignature, you need to generate a key and certificate (device certificate) that is used for the device signatureusing the machine. Generating a Device Signature Key(P. 416)
Managing the Machine
415

Generating a Device Signature Key16SE-07X
You can generate a key and certificate for the device signature that show a document was scanned on the machine.The certificate is appended when an document is scanned and converted into a PDF file.
● Only one key and certificate for the device signature can be generated. It cannot be deleted.
● An optional Send PDF Security Feature Set is required. System Options(P. 723)
● Key and certificate for the device signature are valid for five years. Renew them when required.
● For more information about the basic operations to be performed when setting the machine from theRemote UI, see Setting Up Menu Options from Remote UI(P. 426) .
1 Start the Remote UI and log in to System Manager Mode. Starting RemoteUI(P. 418)
2 click [Settings/Registration] on the Portal page. Remote UI Screen(P. 419)
3 Select [Device Management] [Key and Certificate Settings].
4 Click [Generate Key].
5 Select the [Device Signature] check box, and click [OK].
➠A key and certificate for the device signature is generated.
Renewing the Device Signature Key and the Key and Certificate
1 Click [Update] at the right of the key and certificate for the device signature.
2 Click [OK].
Managing the Machine
416

Managing the Machine from a Computer (Remote UI)16SE-07Y
Using a Web browser to operate the machine remotely, you can check the documents waiting to be printed or thestatus of the machine. You can also make various settings. You can do this without leaving your desk, making systemmanagement easier. For more information about the system requirements for the Remote UI, see SystemEnvironment(P. 717) .
Functions of the Remote UI
Checking the Status and Logs(P. 421)Setting Up Menu Options from Remote UI(P. 426)Registering Destinations from Remote UI(P. 429)Importing/Exporting the Setting Data(P. 433)
Basics of the Remote UI
Starting Remote UI(P. 418)
Managing the Machine
417

Starting Remote UI16SE-080
To operate remotely, you need to input the IP address of the machine into a Web browser and start the Remote UI.Check the IP address set to the machine in advance ( Viewing Network Settings(P. 38) ). If you have any questions,ask your Network Administrator.
1 Start the Web browser.
2 Enter "http://<the IP address of the machine>/" in the address field, and press the[ENTER] key.
● If you want to use an IPv6 address, enclose the IPv6 address with brackets (example: http://[fe80::2e9e:fcff:fe4e:dbce]/).
If a security alert is displayed
● A security alert may be displayed when the Remote UI communication is encrypted ( Configuring theKey and Certificate for TLS(P. 379) ). When certificate settings or TLS settings have no errors, continuebrowsing the Web site.
3 Log in to the Remote UI.
When the Department ID Management is disabledSelect [System Manager Mode] or [General User Mode], and enter a value in [Remote UI Access PIN] asnecessary.
[System Manager Mode]You can perform all the Remote UI operations and settings. Enter the appropriate ID in [System Manager ID]and PIN in [System Manager PIN]. Setting the System Manager ID and PIN(P. 353)
[General User Mode]You can check the status of documents or the machine, and you can also change some of the settings. Whenyou want to check if a specific document of yours is in the print queue or cancel the printing of a documentof yours in the print queue, enter the user name of the document in [User Name]. The user name isautomatically set to print documents based on information such as your computer name or computer loginname.
[Remote UI Access PIN]
Managing the Machine
418

If [Remote UI Access PIN] is set, enter the PIN. Setting a Remote UI PIN(P. 361)
When the Department ID Management is enabledEnter the appropriate ID in [Department ID] and PIN in [PIN]. Setting the Department IDManagement(P. 355)
4 Click [Log In].
➠The Portal page (main page) will be displayed. Remote UI Screen(P. 419)
Remote UI Screen
When you log in to the Remote UI, the following Portal page appears. This section describes the items displayed onthe Portal page and the basic operations.
[Device Basic Information]Displays the current status of the machine and error information. If an error has occurred, the link to theError Information page will be displayed.
[Consumables Information]Displays paper information and the amount remaining in the toner cartridges.
Managing the Machine
419

[Support Link]Displays the support link specified in [Support Link] under [License/Other].
Refresh IconRefreshes the currently displayed page.
[Language]Selects the display language used for the Remote UI screens.
[Log Out]Logs off from the Remote UI. The Login page will be displayed.
[Mail to System Manager]Displays a window for creating an e-mail to the system manager specified in [System Manager Information]under [User Management].
[Status Monitor/Cancel]Displays the [Status Monitor/Cancel] page. For any of the waiting documents, you can check the status/history or cancel the processing.
[Settings/Registration]Displays [Settings/Registration] page. When you have logged in to System Manager Mode, you can changethe settings items and save/load the registered data. Setting Up Menu Options from Remote UI(P. 426)
[Address Book]Displays the coded dial numbers and the Favorites list registered in the Address Book. You can also registeror edit the Address Book when you have logged in to System Manager Mode. Registering Destinationsfrom Remote UI(P. 429)
[Application Library]Displays the Application Library setting page.
Managing the Machine
420

Checking the Status and Logs16SE-081
Checking Current Status of Print Documents(P. 421)Checking History of Documents(P. 422)Checking Error Information(P. 422)Checking Consumables(P. 422)Checking Device Specifications(P. 423)Checking System Manager Information(P. 423)Checking Print Total Counter(P. 424)Checking History of Toner Cartridges(P. 424)
● A file name of a document may not be displayed in full. The printed application name may be added to thefile name.
Checking Current Status of Print Documents
The list of the documents currently printing or waiting to be printed is displayed.
Log in to the Remote UI ( Starting Remote UI(P. 418) ) [Status Monitor/Cancel] [Job Status]
● You can delete a document job by clicking [Cancel].
● Regardless of the Department ID Management setting, all the print documents currently printing andwaiting to be printed will be listed.
● If you entered your user name when you logged on in General User Mode, your user name will onlybe displayed on the documents that you printed.
● Click [Job Number] on the paused documents and secure documents to display detailed information.You can check the user name and the page count of the printed document.
Managing the Machine
421

Checking History of Documents
The history of print, copy, sending faxes/e-mails (TX), or receiving faxes (RX) is displayed.
Log in to the Remote UI ( Starting Remote UI(P. 418) ) [Status Monitor/Cancel] [Job Log]
Checking Error Information
When an error occurs, this page will be displayed by clicking the message displayed under [Error Information] on thePortal page (main page). Remote UI Screen(P. 419)
Log in to the Remote UI ( Starting Remote UI(P. 418) ) [Status Monitor/Cancel] [ErrorInformation]
Checking Consumables
Paper size and paper type for the paper source, toner cartridge model number, etc. are displayed. You can also click[Check Consumables Details] in the Portal page (main page) to display this page ( Remote UI Screen(P. 419) ).
Log in to the Remote UI ( Starting Remote UI(P. 418) ) [Status Monitor/Cancel] [Consumables]
Managing the Machine
422

Checking Device Specifications
The maximum print speed and machine features are displayed.
Log in to the Remote UI ( Starting Remote UI(P. 418) ) [Status Monitor/Cancel] [DeviceFeatures]
Checking System Manager Information
Information about the machine and the system manager is displayed. The device name and other system managerinformation displayed here correspond to the settings in [System Manager Information] on the [User Management]page or in [Device Information Settings] on the [Device Management] page.
Log in to the Remote UI ( Starting Remote UI(P. 418) ) [Status Monitor/Cancel] [DeviceInformation]
Managing the Machine
423

Checking Print Total Counter
The total number of pages that have been printed by the copy, print, and fax functions is displayed.
Log in to the Remote UI ( Starting Remote UI(P. 418) ) [Status Monitor/Cancel] [CheckCounter]
Checking History of Toner Cartridges
You can check the usage logs of toner cartridges and other logs. The display can be changed for each color of thetoner cartridge.
Log in to the Remote UI ( Starting Remote UI(P. 418) ) [Status Monitor/Cancel] [CartridgeLog]
Managing the Machine
424
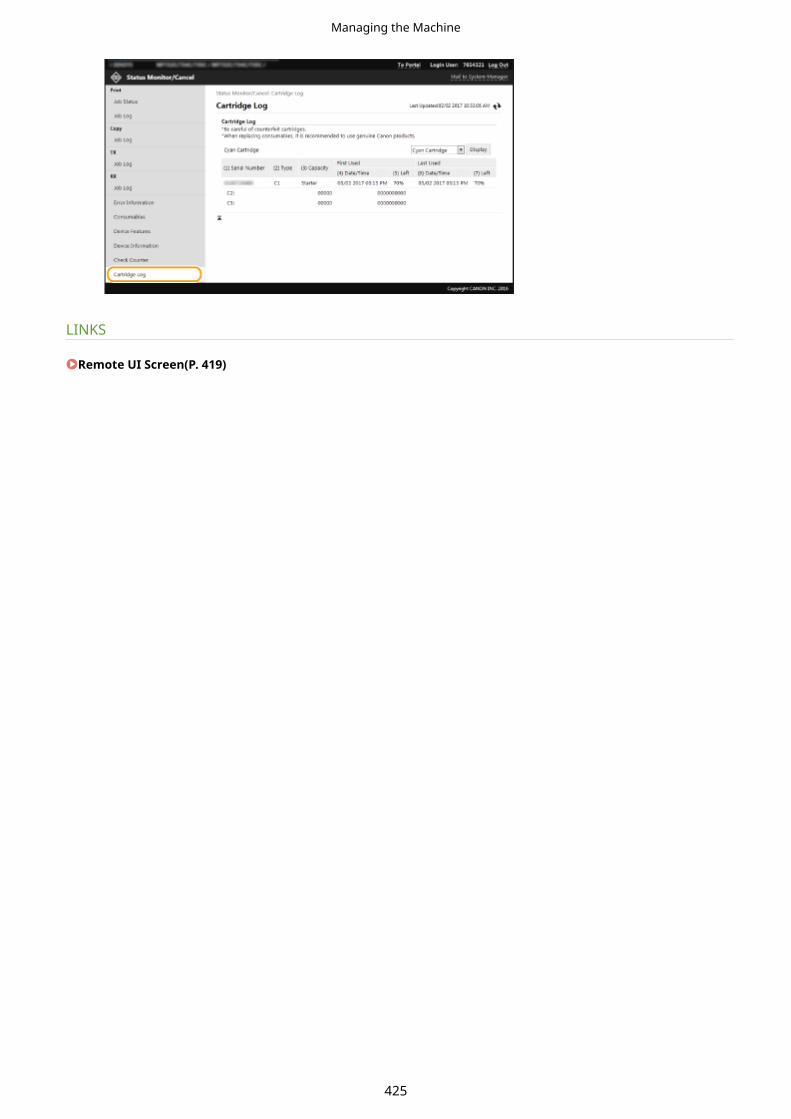
LINKS
Remote UI Screen(P. 419)
Managing the Machine
425

Setting Up Menu Options from Remote UI16SE-082
You can change the various machine settings by using the Remote UI. Most of the settings can be set also on themachine, but some settings can only be set using the Remote UI. This section describes the basic flow of changing thesettings of the machine using the Remote UI.
● Some settings can only be changed when you have logged in to System Manager Mode.
● Some settings may require operations that differ from the procedure described here.
1 Start the Remote UI. Starting Remote UI(P. 418)
2 Click [Settings/Registration] on the Portal page. Remote UI Screen(P. 419)
3 Click the setting you want to configure in the menu on the left side of the screen.
4 Click the link to display the desired page as necessary.
Managing the Machine
426
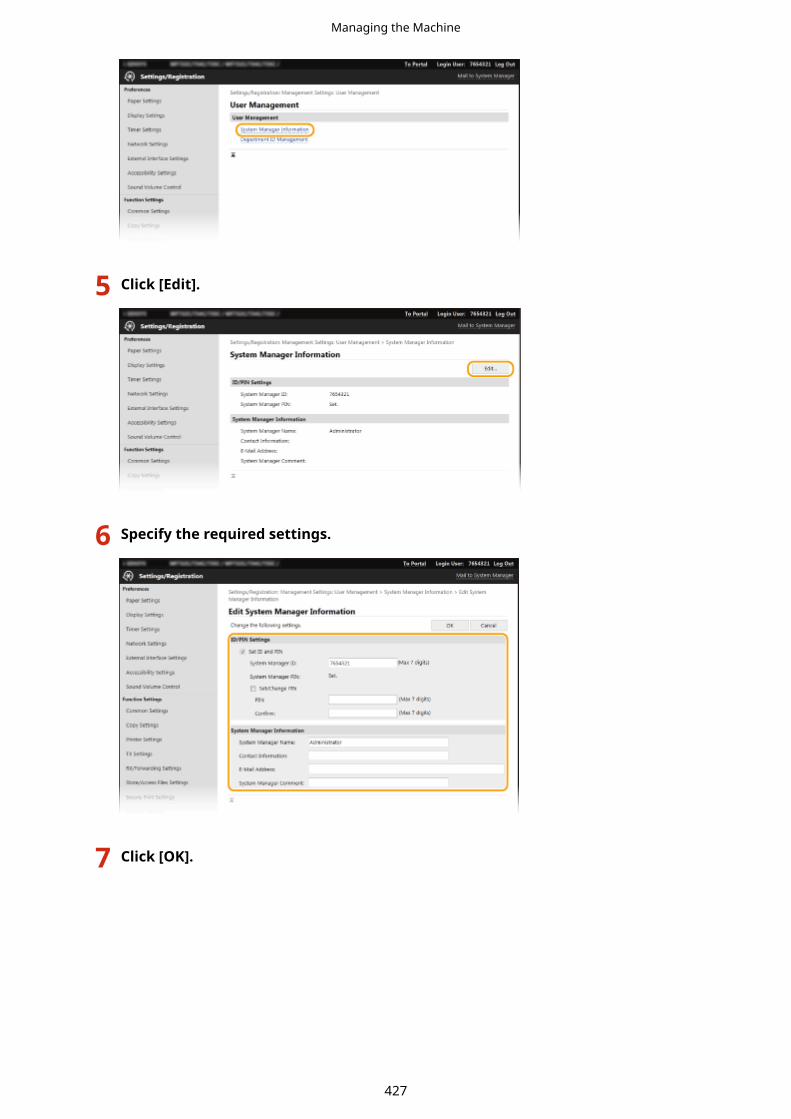
5 Click [Edit].
6 Specify the required settings.
7 Click [OK].
Managing the Machine
427

8 Restart the machine as necessary.
● Turn OFF the machine, wait for at least 10 seconds, and turn it back ON.
● For information about whether you need to restart the machine, view the message on the edit screen.
Managing the Machine
428

Registering Destinations from Remote UI16SE-083
You can use the computer to register destinations in the Address Book of the machine and edit information ofregistered destinations. Specify the shared folder or FTP server destination here.
● You can change the settings only when you have logged in to System Manager Mode.
1 Start the Remote UI. Starting Remote UI(P. 418)
2 Click [Address Book] on the Portal page. Remote UI Screen(P. 419)
If the enter PIN page is displayed
● The Address Book is protected by a PIN. Enter the [PIN] and click [OK].
3 Click [Coded Dial].
● You can also register destinations in Favorites. In this case, click [Favorites] instead of [Coded Dial]. Favorites(P. 182)
4 Click the text link under [Number], [Type], or [Name] for an item named "NotRegistered."
● You can edit a registered item by clicking the corresponding text link under [Number], [Type] or [Name].
● You can delete a registered destination by clicking the corresponding [Delete] button.
● If you delete a destination from the Address Book, it is also deleted from the favorite settings. Registering Frequently Used Settings(P. 174)
5 Select [Destination Type to Register] and click [OK].
● To register the shared folder or FTP server destination, select [File].
Managing the Machine
429

6 Specify the destination.
To register the fax destination
[Name]Enter the name of the destination.
[Fax Number]Enter the fax number of the destination.
[ECM TX]Select the check box to make the following possible: if an error occurs in an image that is being sent, the error ischecked and corrected to prevent an improper image from being sent.
[Speed]If it takes time for transmissions to start, such as when there is a poor telephone connection, you can adjust thetransmission start speed downward.
[Long Distance]Specify [International (1)] to [International (3)] according to the transmission conditions when registeringoverseas fax numbers.
● You can also specify [ECM TX] and [Speed] from <Fax Settings> ( <Send>(P. 538) ) on the operation panel.However, settings made from <Address Book> are enabled for the detailed settings of destinationsregistered in the Address Book.
Managing the Machine
430

To register the e-mail or I-Fax destination
[Name]Enter the name of the destination.
[E-Mail Address]/[I-Fax Address]Enter the e-mail address of the destination.
To register the shared folder or FTP server destination
[Name]Enter the name for the destination.
[Protocol]Select the protocol for the destination.
[Windows (SMB)] Select this when registering a shared folder as a destination.
[FTP] Select this when registering an FTP server as a destination.
[Host Name]
● For a shared folderEnter the computer name or IP address. You can include a path to the shared folder with the computername or IP address (e.g. "\\swan\share" or "\\192.168.2.100\share").
● For an FTP serverEnter the IP address of the FTP server (e.g. "192.168.2.100").
Using a DNS server
● You can also enter the host name (or FQDN) instead of the computer name or IP address (e.g. for a sharedfolder: "\\swan.organization.company.com\share").
Managing the Machine
431
[Folder Path]Enter the location of the folder to which the data will be sent.
● For a shared folderUse "\" as a separator. Specify the level that follows the path specified in [Host Name].
● For an FTP serverUse "/" as a separator. The path is an absolute path when a "/" is placed at its top, otherwise a relative pathwith respective to the current directory of the user who has logged in.
[User Name]Enter the user name set for the shared folder or FTP server.
[Set Password]To set a password for the shared folder or FTP server, select the check box and enter a [Password].
Ensure that the same display language is selected on both the computer and theRemote UI.● [Host Name] and [Folder Path] may not be displayed correctly or may not be referenceable.
7 Click [OK].
LINKS
Remote UI Screen(P. 419)Importing/Exporting the Setting Data(P. 433)Address Book List(P. 612)
Managing the Machine
432

Importing/Exporting the Setting Data16SE-084
Address Book and machine settings data can be saved in your computer (export). Data that is saved on yourcomputer can also be registered in the machine (import). You can easily copy the destinations in the Address Bookto multiple machines.* To use these features, it is required that you have logged in to System Manager Mode.
*Depending on the model, you cannot import the Address Book data that exported from the machine. If using the samemodel, you can import/export machine settings data.
Exporting the Setting Data(P. 433)Importing the Setting Data(P. 434)
Do not turn OFF the machine until the import or export process is complete● It may take a few minutes to complete the process. If the machine is turned OFF during the process, it may
result in damage to data or the machine.
Do not operate the machine during the import or export process● Before importing/exporting, check that no operation such as printing documents is currently processing.
● For the settings that cannot be imported/exported, see Setting Menu List(P. 441) .
● You can also import/export settings data via a USB memory device by using the operation panel of themachine. <Import/Export>(P. 574)
● For more information about the basic operations to be performed when setting the machine from theRemote UI, see Setting Up Menu Options from Remote UI(P. 426) .
Exporting the Setting Data
You can export Address Book and machine settings data, and save them on a computer. It is recommended that youregularly back up important settings.
1 Start the Remote UI and log in to System Manager Mode. Starting RemoteUI(P. 418)
2 Click [Settings/Registration] on the Portal page. Remote UI Screen(P. 419)
3 Select [Data Management] [Export].
4 Select the settings to export, and specify the encryption password.
Managing the Machine
433

[Address Book]Select the check box to export Address Book data.
[Address Book PIN]If the Address Book is code-protected, enter the code for the Address Book. Restricting Use of theAddress Book(P. 404)
[Settings/Registration]Select the check box to export machine settings data.
[Encryption Password]Enter a password to encrypt the export data using alphanumeric characters. Enter the same password in[Confirm]. To export the data, you must set an encryption password.
● The password is required when exported data is imported. Importing the Setting Data(P. 434)
5 Click [Start Exporting].
6 Follow the on-screen instructions to specify the location where the exported settingdata is saved.
➠The setting data will be saved.
Importing the Setting Data
Load (import) data that was exported from the machine. You can also import machine settings data from anothermachine to your machine if the models are the same.
1 Start the Remote UI and log in to System Manager Mode. Starting RemoteUI(P. 418)
2 Click [Settings/Registration] on the Portal page. Remote UI Screen(P. 419)
3 Select [Data Management] [Import].
4 Specify the file, enter the password, and select the settings to import.
Managing the Machine
434

[File Path]Click [Browse] and select the file.
[Decryption Password]Enter the password set when the settings were exported.
[Address Book]Select the check box to import Address Book data.
● Importing Address Book data will overwrite the Address Book entries currently registered on the machine.
[Address Book PIN]If the Address Book is code protected, enter the code for the Address Book. Restricting Use of theAddress Book(P. 404)
[Settings/Registration]Select the check box to import machine settings data.
5 Click [Start Importing].
6 Click [OK].
➠The selected settings data is loaded into the machine.
7 Click [OK].
➠ If the [Settings/Registration] check box is selected in step 4, the machine automatically restarts.
Managing the Machine
435

Updating the Firmware16SE-085
For the firmware, select the method of update depending on the installation condition of the machine. There are twomethods of update: the one is to access the latest firmware version on the Internet from the machine and perform theupdate if the version currently installed in the machine is not the latest, and the other is to access the latest firmwareversion on the Internet from a computer and perform the update from the computer if the version currently installedin the machine is not the latest. In an environment where connection to the Internet cannot be established via awireless LAN, establish connection via a wired LAN or USB and perform the update from the computer.
Installation Condition of the Machine How to Install the Update
Wireless LAN connection Updating via the Internet(P. 436)
Wired LAN connection Updating via the Internet(P. 436)Updating from a Computer(P. 437)
USB connection Updating from a Computer(P. 437)
● If you are in an IPv6 environment, you cannot perform firmware update. Use USB to re-establish connection,and perform the update from the computer.
Checking the firmware version● You can check the firmware version from the operation panel of the machine. After completion of the
firmware update operation, make sure that the update was performed correctly. Checking the FirmwareVersion(P. 437)
Updating via the Internet
You can access the Canon server from the machine to update the firmware to the latest version.
1 Select <Update Firmware> in the Home screen. Home Screen(P. 123)
➠A check for existence of the latest firmware is performed.
● If the <This is the latest firmware version.> message is displayed, there is no need to update thefirmware.
2 When a license screen appears, select <Accept>.
3 Select <OK>.
➠When the firmware update is complete, the machine restarts automatically.
Managing the Machine
436

● Do not turn OFF the machine while the restart is in progress.
Updating from a Computer
When you have downloaded the latest firmware version from the Canon website, use "User Support Tool" utilitysoftware to update the firmware from a computer. For how to perform firmware update from a computer, see the"User Support Tool Operation Guide" included with the firmware.
To Put the Machine into a Firmware Update Waiting State
<Menu> <Management Settings> <License/Other>/<Remote UI Settings/UpdateFirmware> <Update Firmware> <Via PC> <Yes>
Checking the Firmware Version
1 Select <Menu> in the Home screen. Home Screen(P. 123)
2 Select <Management Settings>.
● If the login screen appears, enter the correct ID and PIN. Logging in to the Machine(P. 134)
3 Select <License/Other>/<Remote UI Settings/Update Firmware> <UpdateFirmware>.
4 Select <Version Information>.
➠The current firmware version is displayed.
Managing the Machine
437

Initializing Settings16SE-086
You can restore the following settings:
Initializing Menu(P. 438)Initializing Key and Certificate(P. 438)Initializing Address Book(P. 439)Initializing All Data/Settings(P. 439)
Initializing Menu
You can restore the settings of the machine ( Setting Menu List(P. 441) ). Depending on the settings selected, youmay need to restart the machine after initialization.
<Menu> <Management Settings> <Data Management> <Initialize Menu> Select the itemyou want to initialize <Yes> Restart the machine if necessary
● You can restore the settings only for <Network> in <Preferences>.
<Menu> <Preferences> <Network> <Initialize Network Settings> <Yes> Restart the machine
Initializing Key and Certificate
You can restore the settings of the key and certificate and the CA certificate. Note that all the keys and certificates andCA certificates that you registered in the machine (except the preinstalled keys and CA certificates) will be deleted afterinitializing.
● After initializing, functions that require a key and certificate such as TLS encrypted communication and IKEof IPSec communication are not available. To use these functions, configure the settings for the key andcertificate and activate the functions again.
<Menu> <Management Settings> <Data Management> <Initialize Key andCertificate> <Yes>
Managing the Machine
438

Initializing Address Book
You can restore the settings of the Address Book. Note that all the information registered in the Address Book will bedeleted after initializing.
<Menu> <Management Settings> <Data Management> <Initialize AddressBook> <Yes>
Initializing All Data/Settings
This enables restoration of all data and machine settings, including logs, to the factory default values. This preventssensitive data from being leaked when replacing or disposing of the machine. When the initialization process finishes,the machine automatically restarts.
● Before initializing, make sure that there are no documents being processed or waiting to be processed.These documents will be deleted when initialization is performed.
● To use the machine after initializing it, you need to configure all settings from the beginning.
<Menu> <Management Settings> <Initialize All Data/Settings> <Yes> <Yes>
LINKS
Configuring the Key and Certificate for TLS(P. 379)Registering Destinations(P. 182)Registering Destinations from Remote UI(P. 429)
Managing the Machine
439

Setting Menu ListSetting Menu List ........................................................................................................................................... 441
<Preferences> .................................................................................................................................................... 442
<Display Settings> ........................................................................................................................................ 443
<English Keyboard Layout> .......................................................................................................................... 447
<Timer/Energy Settings> .............................................................................................................................. 448
<Network> .................................................................................................................................................... 453
<External Interface> ..................................................................................................................................... 467
<Accessibility> .............................................................................................................................................. 468
<Adjustment/Maintenance> ............................................................................................................................. 469
<Adjust Image Quality> ................................................................................................................................ 470
<Maintenance> ............................................................................................................................................. 484
<Function Settings> .......................................................................................................................................... 486
<Common> ................................................................................................................................................... 487
<Copy> ......................................................................................................................................................... 492
<Printer> ...................................................................................................................................................... 494
<Send> ......................................................................................................................................................... 538
<Receive/Forward> ....................................................................................................................................... 549
<Store/Access Files> ..................................................................................................................................... 556
<Secure Print> .............................................................................................................................................. 564
<Set Destination> .............................................................................................................................................. 565
<Management Settings> ................................................................................................................................... 566
<User Management> .................................................................................................................................... 567
<Device Management> ................................................................................................................................. 568
<License/Other>/<Remote UI Settings/Update Firmware> ........................................................................... 572
<Data Management> .................................................................................................................................... 574
<Security Settings> ....................................................................................................................................... 576
Setting Menu List
440

Setting Menu List16SE-0EH
You can customize the machine based on your environment and needs by configuring settings described in thischapter. To start configuration, select <Menu> on the Home screen ( Home Screen(P. 123) ). This section describeswhat each item in the setting menu can configure.
<Preferences>(P. 442) This section describes the display and network settings.
<Adjustment/Maintenance>(P. 469) This section describes how to adjust print image quality and the cleaning functions of themachine.
<Function Settings>(P. 486) This section describes the settings for the individual functions.
<Set Destination>(P. 565) This section describes the Address Book settings.
<Management Settings>(P. 566) This section describes the user and hardware information management, security settings,etc.
● You can print the setting menu in list form to check the current settings: Printing Lists of Settings(P. 612)
Setting Menu List
441

<Preferences>16SE-088
Item Description
<Display Settings>(P. 443) This section describes the settings related to viewing of the display.
<English Keyboard Layout>(P. 447) This section describes the USB keyboard settings.
<Timer/Energy Settings>(P. 448) This section describes the timer settings and energy settings.
<Network>(P. 453) This section describes the network settings.
<External Interface>(P. 467) This section describes the USB settings and other relevant settings.
<Accessibility>(P. 468) This section describes settings for improving accessibility, such as inverting the screencolors and message display time.
Setting Menu List
442

<Display Settings>16SE-089
All the settings related to viewing of the display are listed with descriptions. Default settings are marked with a dagger( ).
<Default Screen After Startup/Restoration>(P. 443)<Home Screen Button Display Settings>(P. 443)<Language>(P. 444)<Remote UI Language>(P. 444)<Notify to Clean Original Scanning Area>(P. 445)<Millimeter/Inch Entry Switch>(P. 445)<Display Timing for Cart. Prep.>(P. 446)
Asterisks (*)
● Settings marked with "*1" may not be displayed depending on the model you are using, options, or othersetting items.
● Settings marked with "*2" cannot be imported or exported.
● Settings marked with "*3" may be unavailable or vary or have different defaults depending on your countryor region.
<Default Screen After Startup/Restoration>
By default, the Home screen is displayed immediately after the machine is turned ON or when the Auto Reset functionis performed. Specify the setting to change the default screen and display the main screen of a different function.
<Home>
<Copy>
<Fax>*1
<Scan><Secure Print><Status Monitor>
<Menu> <Preferences> <Display Settings> <Default Screen After Startup/Restoration> Select a function to display the desired screen
<Home Screen Button Display Settings> *2
Configure the settings for the buttons displayed in the Home screen. You can select the settings that will be displayedas shortcut buttons, rearrange the order in which the buttons appear, and insert or remove spaces. Customizingthe Home Screen(P. 171)
<Select Button to Display><Favorite Copy Settings>
Setting Menu List
443
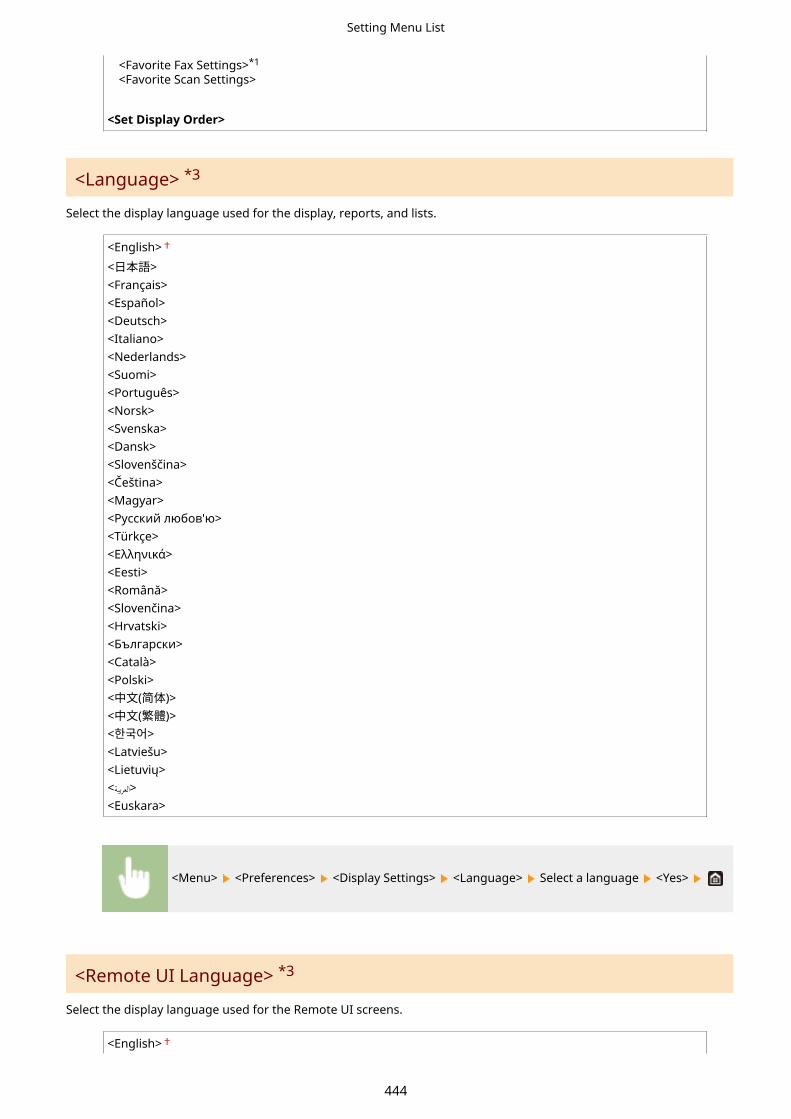
<Favorite Fax Settings>*1
<Favorite Scan Settings>
<Set Display Order>
<Language> *3
Select the display language used for the display, reports, and lists.
<English>
<日本語><Français><Español><Deutsch><Italiano><Nederlands><Suomi><Português><Norsk><Svenska><Dansk><Slovenščina><Čeština><Magyar><Русский любов'ю><Türkçe><Ελληνικά><Eesti><Română><Slovenčina><Hrvatski><Български><Català><Polski><中文(简体)><中文(繁體)><한국어><Latviešu><Lietuvių><العربية><Euskara>
<Menu> <Preferences> <Display Settings> <Language> Select a language <Yes>
<Remote UI Language> *3
Select the display language used for the Remote UI screens.
<English>
Setting Menu List
444

<Japanese><French><Spanish><German><Italian><Dutch><Finnish><Portuguese><Norwegian><Swedish><Danish><Czech><Hungarian><Russian><Turkish><Polish><Chinese (Simplified)><Chinese (Traditional)><Korean>
<Menu> <Preferences> <Display Settings> <Remote UI Language> Select alanguage
<Notify to Clean Original Scanning Area> *1
Specify whether to display a message when stains are detected in the document feed scanning area.
<Off><On>
<Menu> <Preferences> <Display Settings> <Notify to Clean Original Scanning Area> Select<Off> or <On>
<Millimeter/Inch Entry Switch>
Select the unit of measurement.
<Millimeter>
<Inch>
Setting Menu List
445

<Menu> <Preferences> <Display Settings> <Millimeter/Inch Entry Switch> Select<Millimeter> or <Inch>
<Display Timing for Cart. Prep.>
Set the display timing for the message notifying you that the amount remaining in the toner cartridges is low.
<Auto><Off>
<Custom>
<On>
<Menu> <Preferences> <Display Settings> <Display Timing for Cart. Prep.> Select <Off> in<Auto> Enter toner level in <Custom> <Apply>
Setting Menu List
446

<English Keyboard Layout>16SE-08A
Specify the layout of an USB keyboard if connected to the machine. Default settings are marked with a dagger ( ).
<USA Layout><UK Layout>
<Menu> <Preferences> <English Keyboard Layout> Select <USA Layout> or <UK Layout>
Setting Menu List
447
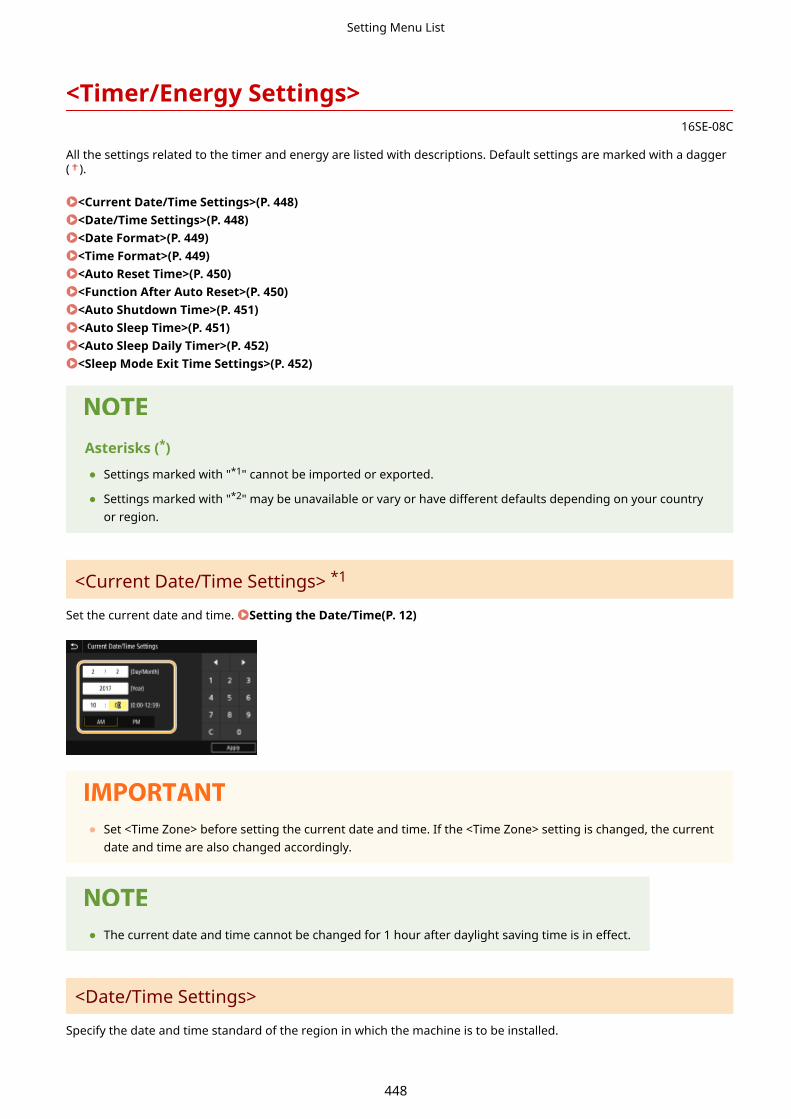
<Timer/Energy Settings>16SE-08C
All the settings related to the timer and energy are listed with descriptions. Default settings are marked with a dagger( ).
<Current Date/Time Settings>(P. 448)<Date/Time Settings>(P. 448)<Date Format>(P. 449)<Time Format>(P. 449)<Auto Reset Time>(P. 450)<Function After Auto Reset>(P. 450)<Auto Shutdown Time>(P. 451)<Auto Sleep Time>(P. 451)<Auto Sleep Daily Timer>(P. 452)<Sleep Mode Exit Time Settings>(P. 452)
Asterisks (*)
● Settings marked with "*1" cannot be imported or exported.
● Settings marked with "*2" may be unavailable or vary or have different defaults depending on your countryor region.
<Current Date/Time Settings> *1
Set the current date and time. Setting the Date/Time(P. 12)
● Set <Time Zone> before setting the current date and time. If the <Time Zone> setting is changed, the currentdate and time are also changed accordingly.
● The current date and time cannot be changed for 1 hour after daylight saving time is in effect.
<Date/Time Settings>
Specify the date and time standard of the region in which the machine is to be installed.
Setting Menu List
448

<Time Zone> Select the time zone. If the time zone setting is changed, the values set in <Current Date/Time Settings> are alsochanged accordingly. Setting the Date/Time(P. 12)
<(UTC-12:00) International Date Line West> to <(UTC) Coordinated Universal Time> to <(UTC+14:00)
Kiritimati Island>
UTC● Coordinated Universal Time (UTC) is the primary time standard by which the world regulates clocks
and time. The correct UTC time zone setting is required for Internet communications.
<Daylight Saving Time Settings> *2
Enable or disable daylight saving time. If daylight saving time is enabled, specify the dates from which and towhich daylight saving time is in effect.
<Off> <On>
Start: Month, Week, Day
End: Month, Week, Day
<Menu> <Preferences> <Timer/Energy Settings> <Date/Time Settings> <Daylight SavingTime Settings> Select <On>, and specify the dates <Apply>
<Date Format> *2
Select the date format (order of year, month, and day).
<YYYY MM/DD><MM/DD/YYYY><DD/MM YYYY>
<Menu> <Preferences> <Timer/Energy Settings> <Date Format> Select the date format
<Time Format>
Select the 12- or 24-hour clock display setting.
<12 Hour (AM/PM)>
Setting Menu List
449
<24 Hour>
<Menu> <Preferences> <Timer/Energy Settings> <Time Format> Select the displaysetting
<Auto Reset Time>
If a key is not pressed for a specified period of time, the screen and the settings are initialized to display thedefault screen (Auto Reset). Specify the interval at which the Auto Reset is performed. The Auto Reset is notperformed in the following cases:
● The setting menu is displayed.
● The machine is processing data, such as when printing documents or sending or receiving faxes.
● An error message is displayed and the Error indicator is blinking (However, Auto Reset is performed when theerror does not prevent the user from continuing to use a function.)
<Set This Function><Off>
<On>
<Set Time>
1 to 2 to 9 (min.)
<Menu> <Preferences> <Timer/Energy Settings> <Auto Reset Time> Select <On> in <SetThis Function> Enter the time in <Set Time> <Apply>
● The screen displayed after the Auto Reset is performed can be selected in <Function After Auto Reset>.
<Function After Auto Reset>
Select whether to return the display to the default screen after the Auto Reset is performed. If <Default Function> isselected, the main screen of the function selected in <Default Screen After Startup/Restoration> is displayed ( <Default Screen After Startup/Restoration>(P. 443) ). If <Selected Function> is selected, the display returns to themain screen of the function that was selected.
<Default Function>
<Selected Function>
Setting Menu List
450

<Menu> <Preferences> <Timer/Energy Settings> <Function After Auto Reset> Select<Default Function> or <Selected Function>
<Auto Shutdown Time>
Set a timer to automatically shut down the machine after the specified period of idle time has elapsed since themachine entered the sleep mode.
<Set This Function><Off>
<On>
<Set Time>
1 to 4 to 8 (hr.)
<Menu> <Preferences> <Timer/Energy Settings> <Auto Shutdown Time> Select <On>, andset the Auto Shutdown time <Apply>
Before setting <Auto Shutdown Time>
● When the <Auto Shutdown Time> setting is enabled, the machine may automatically shut down even if youare operating the machine from the Remote UI or from the Send Function Setting Tool. A malfunction mayoccur, particularly if the machine shuts down while data is being imported. When you import data using theRemote UI or use the Send Function Setting Tool, set <Auto Shutdown Time> to <Off> in advance.
● If any setting of the [Timer Settings] is changed from the Remote UI while the machine is in the sleep mode,the timer for the <Auto Shutdown Time> setting is reset to the beginning. The machine automatically shutsdown after the specified period of idle time has elapsed since the timer was reset.
<Auto Sleep Time>
If the machine has not been operated or has had no data to process for a specified period of time, the machine enterssleep mode to save energy consumption (Auto Sleep). Specify the period of time after which auto sleep is performed.Auto Sleep is not performed when the setting menu is displayed. We recommend using the factory default settings tosave the most power. Entering Sleep Mode(P. 180)
5 to 60 (min.)
Setting Menu List
451
<Auto Sleep Daily Timer>
You can specify the time when the machine is automatically set to the sleep mode. Entering Sleep Mode(P. 180)
<Set This Function><Off>
<On>
(0:00 to 23:59)
<Sleep Mode Exit Time Settings>
Specify the time when the machine is recovered from the sleep mode. Entering Sleep Mode(P. 180)
<Set This Function><Off>
<On>
(0:00 to 23:59)
Setting Menu List
452

<Network>16SE-08E
All the settings related to the network are listed with descriptions. Default settings are marked with a dagger ( ).
<Select LAN>(P. 453)<Wireless LAN Settings>(P. 453)<Direct Connection Settings>(P. 455)<TCP/IP Settings>(P. 456)<SNMP Settings>(P. 461)<Use Dedicated Port>(P. 462)<Dedicated Port Authentication Method>(P. 463)<Waiting Time for Connection at Startup>(P. 463)<Ethernet Driver Settings>(P. 463)<Use IEEE 802.1X>(P. 464)<Firewall Settings>(P. 464)<Google Cloud Print Settings>(P. 465)<Device Settings Management>(P. 466)<Monitoring Service>(P. 466)<RMT-SW>(P. 466)<Initialize Network Settings>(P. 466)
Asterisks (*)
● Settings marked with "*1" may not be displayed depending on the model you are using, options, or othersetting items.
● Settings marked with "*2" cannot be imported or exported.
<Select LAN> *1
When switching the machine from Wireless LAN to Wired LAN, you need to specify the setting. Conversely, whenswitching the machine from Wired LAN to Wireless LAN, you do not need to specify this setting (You can switch usingthe following <Wireless LAN Settings>). Selecting Wired LAN or Wireless LAN(P. 16)
<Wired LAN>
<Wireless LAN>
<Wireless LAN Settings> *1
Specify settings for connecting the machine to a wireless LAN. You can also view the current settings or specify thesetting for saving power consumption.
<SSID Settings>Select to configure a wireless connection by specifying information including an SSID or a network key byinputting manually from the operation panel.
Setting Menu List
453

<Select Access Point>Wireless LAN routers that can access the machine are automatically located, so you can select from the list.You must manually enter a network key, such as a WEP key or a PSK. Setting Up Connection by Selectinga Wireless Router(P. 24)
<Enter Manually>Select to configure a wireless connection by manually entering an SSID. By using this method, you can specifyauthentication and encryption settings in detail. Setting Up Connection by Specifying DetailedSettings(P. 27)
<Security Settings><None><WEP>
<Open System>
WEP Key 1 to 4
<Shared Key>
WEP Key 1 to 4
<WPA/WPA2-PSK>
<Auto>
<AES-CCMP>
<WPS Push Button Mode>Select to automatically configure a wireless connection by using the button on a WPS wireless router. SettingUp Connection Using WPS Push Button Mode(P. 20)
<WPS PIN Code Mode>Select to configure a wireless connection by entering a PIN code for a WPS wireless router. Setting UpConnection Using WPS PIN Code Mode(P. 22)
<Power Save Mode>Select whether or not the machine enters Power Save Mode based on signals emitted from the wireless router.
<Off><On>
<Menu> <Preferences> <Network> <Wireless LAN Settings> Read the displayedmessage <OK> <Power Save Mode> Select <Off> or <On>
<Connection Information> *2
Select to view the current wireless LAN settings. Viewing Network Settings(P. 38)
<MAC Address><Wireless LAN Status><Latest Error Information><Channel><SSID Settings><Security Settings><Power Save Mode>
Setting Menu List
454

<Direct Connection Settings> *1
Set whether to connect directly. By enabling this function, connecting directly with the machine is possible even in anenvironment without an access point or wireless LAN router. Connecting Directly (Access Point Mode)(P. 327)
<Use Direct Connection><Off>
<On>
<Direct Connection Termination>Specify the time to automatically disconnect after Direct Connection is established.
<Automatically Terminate Session><Off>
<On>
<Time Until Session Terminates>
1 to 60 (min.)
<Menu> <Preferences> <Network> <Direct Connection Settings> <Direct ConnectionTermination> Select <On> in <Automatically Terminate Session> and enter the time <Apply> <Apply>
<Access Point Mode Settings>Configure the SSID/network key arbitrarily. If you want to connect multiple mobile devices to the machine at thesame time, you need to configure both SSID and network key arbitrarily.
<Use Custom SSID><Off>
<On>
<SSID>
<Use Custom Network Key>
<Off>
<On>
<Network Key>
<Menu> <Preferences> <Network> <Direct Connection Settings> <Access Point ModeSettings> Select <On> for each item and select <SSID>/<Network Key> Enter the SSID/networkkey <Apply> <Apply> <Apply>
Setting Menu List
455

<TCP/IP Settings>
Specify settings for using the machine in a TCP/IP network, such as IP address settings.
<IPv4 Settings>Specify settings for using the machine in an IPv4 network.
<IP Address Settings>Configure the IP address, which is used for identifying devices, such as computers and printers, on a TCP/IPnetwork. Setting IPv4 Address(P. 32)
<Auto Acquire><Auto Acquire>
<Off>
<On>
<Select Protocol>
<Off>
<DHCP>
<Auto IP>
<Off>
<On>
<Manually Acquire>*1
<IP Address>: 0.0.0.0<Subnet Mask>: 0.0.0.0<Gateway Address>: 0.0.0.0
<Check Settings>
<DHCP Option Settings>If DHCP is enabled, use these settings to select whether to use the DHCP optional functions to acquire theDNS server address or the domain name. Configuring DNS(P. 56)
<Acquire Host Name><Off>
<On>
<DNS Dynamic Update>
<Off>
<On>
<Acquire DNS Server Address>
<Off>
<On>
<Acquire Domain Name>
<Off>
<On>
<Acquire WINS Server Address>
<Off>
Setting Menu List
456

<On>
<Acquire SMTP Server Address>
<Off>
<On>
<Acquire POP Server Address>
<Off>
<On>
<PING Command>Select to check that the machine is connected to a computer over a network. Testing the NetworkConnection(P. 33)
<IPv6 Settings>Specify settings for using the machine in an IPv6 network. Setting IPv6 Addresses(P. 35)
<Use IPv6><Off>
<On>
<Check IPv6 Settings>You can check the link-local address that is automatically acquired.
<Stateless Address Settings>Enable or disable stateless addresses.
<Stateless Address Settings><Off>
<On>
<Check Settings>
<Stateless Address>
<Prefix Length>
<DHCPv6 Settings>Enable or disable the stateful address that is acquired via DHCPv6.
<Use DHCPv6><Off>
<On>
<Check Settings><Stateful Address>
<Prefix Length>
<DHCP Option Settings>If DHCP is enabled, use these settings to select whether to use the DHCP optional functions to acquire theDNS server address or the domain name. Configuring DNS(P. 56)
<Acquire DNS Server Address><Off>
<On>
Setting Menu List
457

<Acquire Domain Name>
<Off>
<On>
<DNS Settings>Specify settings for Domain Name System (DNS), which provides a host name for IP address resolutions. Configuring DNS(P. 56)
<IPv4 DNS Server Address Settings>Specify the IP address of the DNS server in the IPv4 environment.
<Primary DNS Server>: 0.0.0.0<Secondary DNS Server>: 0.0.0.0
<DNS Host/Domain Name Settings>Specify the host name of the machine to be registered in the DNS server as well as the name of the domainto which the machine belongs.
<IPv4><Host Name>
<Domain Name>
<IPv6>
<Use IPv4 Host/Domain>
<Off>
<Host Name>
<Domain Name>
<On>
<DNS Dynamic Update Settings>Select whether to dynamically update the DNS records whenever the machine's IP address is changed.
<IPv4><DNS Dynamic Update>
<Off>
<On>
<DNS Dynamic Update Interval>
0 to 24 to 48 (hr.)
<IPv6>
<DNS Dynamic Update>
<Off>
<On>
<Register Manual Address>
<Off>
<On>
<Register Stateful Address>
<Off>
<On>
<Register Stateless Address>
<Off>
Setting Menu List
458

<On>
<DNS Dynamic Update Interval>
0 to 24 to 48 (hr.)
<mDNS Settings>Specify settings for using DNS functions without DNS servers.
<IPv4><Use mDNS>
<Off>
<On>
<mDNS Name>
<IPv6>
<Use mDNS>
<Off>
<On>
<Use Same mDNS Name as IPv4>
<Off>
<mDNS Name>
<On>
<WINS Settings>Specify settings for Windows Internet Name Service (WINS), which provides a NetBIOS name for IP addressresolutions in a mixed network environment of NetBIOS and TCP/IP. Configuring WINS(P. 62)
<WINS Resolution><Off>
<On>
<WINS Server Address>: 0.0.0.0
<LPD Settings>Enable or disable LPD, a printing protocol that can be used on any hardware platform or operating system. Youcan also set the reception timeout period after which printing is canceled if print data reception is interrupted. Configuring Printing Protocols and WSD Functions(P. 41)
<Use LPD Printing><Off>
<On>
<RX Timeout>
1 to 5 to 60 (min.)
<RAW Settings>Enable or disable RAW, a Windows specific printing protocol. You can also set the reception timeout period afterwhich printing is canceled if print data reception is interrupted. Configuring Printing Protocols and WSDFunctions(P. 41)
<Use RAW Printing><Off>
<On>
Setting Menu List
459

<RX Timeout> 1 to 5 to 60 (min.)
<WSD Settings>Enable or disable automatic browsing and acquiring information for the printer or scanner by using the WSDprotocol. Configuring Printing Protocols and WSD Functions(P. 41)
<Use WSD Printing><Off>
<On>
<Use WSD Browsing><Off>
<On>
<Use WSD Scanning>
<Off>
<On>
<Use Computer Scanning>
<Off>
<On>
<Use Multicast Discovery>
<Off>
<On>
<Use FTP PASV Mode>Specify whether to use PASV mode for FTP. If you are connecting to an FTP server through a firewall, you mustselect PASV mode. Configuring FTP PASV Mode(P. 73)
<Off>
<On>
<Use HTTP>Enable or disable HTTP, which is required for communications with a computer, such as when using the RemoteUI, WSD printing, or printing with Google Cloud Print. Disabling HTTP Communication(P. 413)
<Off><On>
<Use IPSec> *2
Select whether to perform encrypted communication by establishing a virtual private network (VPN) via IPSec.Configuring IPSec Settings(P. 390)
<Off>
<On>
<Menu> <Preferences> <Network> <TCP/IP Settings> <Use IPSec> Select <Off> or<On> Restart the machine
Setting Menu List
460

<Port Number Settings>Change port numbers for protocols according to the network environment. Changing Port Numbers(P. 376)
<LPD>1 to 515 to 65535
<RAW>
1 to 9100 to 65535
<WSD Multicast Discovery>
1 to 3702 to 65535
<HTTP>
1 to 80 to 65535
<Multicast Discovery>
1 to 427 to 65535
<POP3>
1 to 110 to 65535
<SMTP>
1 to 25 to 65535
<FTP>
1 to 21 to 65535
<SNMP>
1 to 161 to 65535
<MTU Size>Select the maximum size of packets the machine sends or receives. Changing the Maximum TransmissionUnit(P. 54)
<1300><1400><1500>
<SNMP Settings>
Specify the settings for monitoring and controlling the machine from a computer running SNMP-compatible software.Monitoring and Controlling the Machine with SNMP(P. 69)
<SNMPv1 Settings>Enable or disable SNMPv1. When enabling SNMPv1, specify a community name and access privileges toManagement Information Base (MIB) objects.
<Off><On>
Setting Menu List
461
<Menu> <Preferences> <Network> <SNMP Settings> Select <Off> or <On> in <SNMPv1Settings> <Apply> Restart the machine
<SNMPv3 Settings>Enable or disable SNMPv3. Use the Remote UI to specify detailed settings that are applied when SNMPv3 isenabled.
<Off>
<On>
<Menu> <Preferences> <Network> <SNMP Settings> Select <Off> or <On> in <SNMPv3Settings> <Apply> Restart the machine
<Acquire Printer Mngt. Info. from Host>Enable or disable the monitoring of printer management information from a networked computer runningSNMP-compatible software.
<Off>
<On>
<Menu> <Preferences> <Network> <SNMP Settings> Select <Off> or <On> in <AcquirePrinter Mngt. Info. from Host> <Apply> Restart the machine
<Format Host Rsrcs. MIB to RFC2790>Specify whether to conform to the advanced specifications (RFC2790) of the protocol when monitoring themachine status from the SNMP-compatible software.
<Off><On>
<Menu> <Preferences> <Network> <SNMP Settings> Select <Off> or <On> in <FormatHost Rsrcs. MIB to RFC2790> <Apply> Restart the machine
<Use Dedicated Port>
Enable or disable the dedicated port. The dedicated port is used when printing, faxing, or scanning uses MF ScanUtility and when browsing or specifying the machine settings over the network.
Setting Menu List
462

<Off><On>
<Menu> <Preferences> <Network> <Use Dedicated Port> Select <Off> or <On> Restartthe machine
<Dedicated Port Authentication Method>
Specify whether to limit the authentication method specifically to the secure one when using the dedicated port. If<Mode 2> is selected, the authentication method is limited specifically to the secure one.
<Mode 1>
<Mode 2>
<Menu> <Preferences> <Network> <Dedicated Port Auth. Method> Select <Mode 1> or<Mode 2> Restart the machine
● If <Mode 2> is selected, you cannot establish a connection from the device management software or driverin some cases.
<Waiting Time for Connection at Startup>
Specify a wait time for connecting to a network. Select the setting depending on the network environment. Setting aWait Time for Connecting to a Network(P. 55)
0 to 300 (sec.)
<Ethernet Driver Settings>
Select the Ethernet type (10BASE-T/100BASE-TX/1000BASE-T) and the communication mode of Ethernet (half-duplex/full-duplex). You can also view the MAC address for wired LAN.
<Auto Detect>Select whether to automatically detect or manually select the communication mode and the Ethernet type. Configuring Ethernet Settings(P. 52)
<Off><Communication Mode>
<Half Duplex>
<Full Duplex>
<Ethernet Type>
Setting Menu List
463

<10BASE-T>
<100BASE-TX>
<1000BASE-T>
<On>
● When <Communication Mode> is set to <Half Duplex>, you cannot select <1000BASE-T>.
<MAC Address>Check the MAC address of the machine, which is a number unique to each communication device. Viewingthe MAC Address for Wired LAN(P. 38)
<Use IEEE 802.1X> *1*2
Enable or disable IEEE 802.1X authentication. Configuring IEEE 802.1X Authentication Settings(P. 397)
<Off>
<On>
<Menu> <Preferences> <Network> <Use IEEE 802.1X> Select <Off> or <On> Restart themachine
<Firewall Settings>
Without proper security, unauthorized third parties can access computers and other communication devices that areconnected to a network. To prevent this unauthorized access, specify the settings for packet filter, a feature thatrestricts communication to devices with specified IP addresses or MAC addresses.
<IPv4 Address Filter>Enable or disable settings for filtering packets sent to or received from devices with specified IPv4 addresses. Specifying IP Addresses for Firewall Settings(P. 370)
<Outbound Filter><Off>
<On>
<Inbound Filter>
<Off>
<On>
<Menu> <Preferences> <Network> <Firewall Settings> <IPv4 Address Filter> Select<Off> or <On> in <Outbound Filter> or <Inbound Filter> <Apply> Restart the machine
Setting Menu List
464

<IPv6 Address Filter>Enable or disable settings for filtering packets sent to or received from devices with specified IPv6 addresses. Specifying IP Addresses for Firewall Settings(P. 370)
<Outbound Filter><Off>
<On>
<Inbound Filter>
<Off>
<On>
<Menu> <Preferences> <Network> <Firewall Settings> <IPv6 Address Filter> Select<Off> or <On> in <Outbound Filter> or <Inbound Filter> <Apply> Restart the machine
<MAC Address Filter>Enable or disable settings for filtering packets sent to or received from devices with specified MAC addresses. Specifying MAC Addresses for Firewall Settings(P. 373)
<Outbound Filter><Off>
<On>
<Inbound Filter>
<Off>
<On>
<Menu> <Preferences> <Network> <Firewall Settings> <MAC Address Filter> Select<Off> or <On> in <Outbound Filter> or <Inbound Filter> <Apply> Restart the machine
<Google Cloud Print Settings>
Enable or disable Google Cloud Print. Registering the Machine with Google Cloud Print(P. 345)
<Use Google Cloud Print><Off>
<On>
<Google Cloud Print Regist. Status> *2
Setting Menu List
465

<Device Settings Management>
Specify whether to use iW Management Console plug-ins to manage machine data such as settings and Address Bookdestinations. For detailed information on iW Management Console, contact your nearest Canon dealer. ConfiguringSettings for Communication between the Machine and Plug-ins(P. 76)
<Off><On>
<Monitoring Service> *1*2
Enable communication with a remote monitoring server. Execution of this item enables information about themachine to be periodically sent to the remote monitoring server connected to the machine.
<Menu> <Preferences> <Network> <Monitoring Service> <Yes>
<RMT-SW>
Leave this switch set to <Off>. When the service representative remotely performs device maintenance, you may beasked to set the switch to <On>.
<Off>
<On>
<Menu> <Preferences> <Network> <RMT-SW> Select <Off> or <On> Restart themachine
<Initialize Network Settings>
Select to return the Network Settings to the factory defaults. <Initialize Menu>(P. 575)
Setting Menu List
466

<External Interface>16SE-08F
All the settings related to the USB are listed with descriptions. Default settings are marked with a dagger ( ).
<USB Settings>
Specify whether to enable or disable use of the USB port or a USB memory device.
<Use as USB Device>Enable or disable the USB port that is used for connecting the machine to a computer. Restricting the USBConnection with a Computer(P. 411)
<Off><On>
<Use USB Storage Device>Specify whether to use a USB memory device.
<Off><On>
<Menu> <Preferences> <External Interface> <USB Settings> Select <Off> or <On> in <UseUSB Storage Device> <Apply> Restart the machine
Setting Menu List
467

<Accessibility>16SE-08H
All the settings related to accessibility, such as inverting the screen colors and message display time, are listed withdescriptions. Default settings are marked with a dagger ( ).
<Invert Screen Colors>(P. 468)<Brightness>(P. 468)<Message Display Time>(P. 468)
<Invert Screen Colors>
Select <On> to invert the display colors. Select <On> if the display is hard to view even after the brightness wasadjusted in <Brightness>.
<Off>
<On>
<Menu> <Preferences> <Accessibility> <Invert Screen Colors> Select <Off> or <On>
<Brightness>
Adjust the brightness of the display to suit the installation location of the machine.
Five Levels
<Menu> <Preferences> <Accessibility> <Brightness> Adjust the brightness <Apply>
<Message Display Time>
Specify the interval in seconds at which two different messages are alternately displayed.
1 to 2 to 5 (sec.)
<Menu> <Preferences> <Accessibility> <Message Display Time> Enter a number for theinterval <Apply>
Setting Menu List
468
<Adjustment/Maintenance>16SE-08J
Item Description
<Adjust Image Quality>(P. 470) This section describes how to adjust image quality for printing.
<Maintenance>(P. 484) This section describes how to use the cleaning functions.
Setting Menu List
469

<Adjust Image Quality>16SE-08K
All the settings related to image quality adjustment are listed with descriptions. Default settings are marked with adagger ( ).
<Auto Adjust Gradation>(P. 470)<Auto Correction Settings>(P. 470)<Correct Print Color Mismatch>(P. 471)<Black Text Processing for Color>(P. 471)<Adjust Print Position>(P. 471)<Special Processing>(P. 472)<Remove Streaks from Orig. Scanning Area>(P. 483)
Asterisks (*)
● Settings marked with an asterisk (*) may not be displayed depending on the model you are using, options, orother setting items.
<Auto Adjust Gradation>
Adjust the gradation, density, and color in copies or printouts. Adjusting Gradation(P. 598)
<Full Adjust><Quick Adjust><Adjust Copy Image>
<Auto Correction Settings>
Select whether to automatically perform a quick gradation adjustment or color shift correction after the machine isturned ON.
<Auto Adjust Image Regularly>Select when to make an automatic quick gradation adjustment. If <When Turning Main Power ON> is selected,quick adjustment is automatically made after the machine is turned ON. You can also perform this adjustmentmanually ( Quick Adjust(P. 600) ).
<Off>
<When Turning Main Power ON>
<Menu> <Adjustment/Maintenance> <Adjust Image Quality> <Auto CorrectionSettings> <Auto Adjust Image Regularly> Select <Off> or <When Turning Main PowerON>
Setting Menu List
470

<Correct Print Color Mismatch>Select the timing at which the Correct Print Color Mismatch function is to be performed automatically after themachine is turned ON. You can also perform this adjustment manually ( Correcting "Print ColorMismatch"(P. 603) ).
<After Printing First Job>
<When Turning Main Power ON>
<Menu> <Adjustment/Maintenance> <Adjust Image Quality> <Auto CorrectionSettings> <Correct Print Color Mismatch> Select <After Printing First Job> or <When TurningMain Power ON>
<Correct Print Color Mismatch>
Use this function if color shift has blurred the image. Correcting "Print Color Mismatch"(P. 603)
<Black Text Processing for Color>
Adjust the threshold value to determine whether to print black text in color originals by using only black toner or byusing a mixture of black and color toners. You can set values for the feeder and the platen glass separately. Adjusting Values for Text Color Reproducibility in Color Documents(P. 604)
<Feeder>*
Seven Levels
<Platen Glass>
Seven Levels
<Adjust Print Position>
Adjust the print position for each paper source. The print position can be adjusted in the range from -5.0 to +5.0 mm inincrements of 0.1 mm. Adjusting Print Position(P. 606)
<Multi-Purpose Tray><Adjust Vertically (Front Side)>
-5.0 to 0.0 to + 5.0 (mm)
<Adjust Horizontally (Front Side)>
-5.0 to 0.0 to + 5.0 (mm)
<Adjust Vertically (Back Side)>
-5.0 to 0.0 to + 5.0 (mm)
<Adjust Horizontally (Back Side)>
-5.0 to 0.0 to + 5.0 (mm)
<Drawer 1>
<Adjust Vertically (Front Side)>
-5.0 to 0.0 to + 5.0 (mm)
Setting Menu List
471

<Adjust Horizontally (Front Side)>
-5.0 to 0.0 to + 5.0 (mm)
<Adjust Vertically (Back Side)>
-5.0 to 0.0 to + 5.0 (mm)
<Adjust Horizontally (Back Side)>
-5.0 to 0.0 to + 5.0 (mm)
<Drawer 2> *
<Adjust Vertically (Front Side)>
-5.0 to 0.0 to + 5.0 (mm)
<Adjust Horizontally (Front Side)>
-5.0 to 0.0 to + 5.0 (mm)
<Adjust Vertically (Back Side)>
-5.0 to 0.0 to + 5.0 (mm)
<Adjust Horizontally (Back Side)>
-5.0 to 0.0 to + 5.0 (mm)
<Special Processing>
If the print results on special types of paper are not satisfactory, the following settings may improve the quality of theprintouts.
<Special Paper Processing>When printing on the back side of printed paper, rough paper, or envelopes, the print results may be improvedby adjusting the following settings.
<Manual Back Side Print (2-Sided Only)>If printouts on the back side of printed paper are too light, select <On>. You can specify this settingseparately for each paper source.
<Multi-Purpose Tray><Off>
<On>
<Drawer 1>
<Off>
<On>
<Drawer 2> *
<Off>
<On>
<Menu> <Adjustment/Maintenance> <Adjust Image Quality> <SpecialProcessing> <Special Paper Processing> <Manual Back Side Print (2-Sided Only)> Select<On> in the paper source to be set <Apply> <Yes>
Setting Menu List
472

● If you set to <On>, image quality may be affected or a paper jam may occur when a certain length of timeelapses after printing on the front side or depending on the ambient humidity.
<Rough Surface Paper Mode>When printing on rough paper, especially when color images are printed too light, select <On>. You canspecify the settings separately for each paper source.
<Multi-Purpose Tray><Off>
<On>
<Drawer 1>
<Off>
<On>
<Drawer 2> *
<Off>
<On>
<Menu> <Adjustment/Maintenance> <Adjust Image Quality> <SpecialProcessing> <Special Paper Processing> <Rough Surface Paper Mode> Select <On> in thepaper source to be set <Apply> <Yes>
● If you set to <On>, the printing speed may be slower or image quality may be affected.
<Env. Flap Closing Prevention>If envelope flaps cling to the envelope bodies when printing, select <On>.
<Off>
<On>
<Menu> <Adjustment/Maintenance> <Adjust Image Quality> <SpecialProcessing> <Special Paper Processing> <Env. Flap Closing Prevention> <On> <Yes>
● If you set to <On>, toner may not be fixed sufficiently, resulting in faded printouts.
<Paper Wrinkle Correction>Printouts may wrinkle depending on the paper to use. In this case, setting this item may solve the problem.The improvement effect is stronger with <Mode 2> than with <Mode 1>.
<Off>
<Mode 1><Mode 2>
Setting Menu List
473

<Menu> <Adjustment/Maintenance> <Adjust Image Quality> <SpecialProcessing> <Special Paper Processing> <Paper Wrinkle Correction> Select themode <Yes>
MF735Cx / MF734Cdw / MF732Cdw
● This setting is effective for plain paper and thin paper.
● Setting a greater improvement effect may result in faded printouts or slower printing speed.
MF635Cx / MF633Cdw / MF631Cn
● <Mode 1> is effective for envelopes, and <Mode 2>, for envelopes and thin paper.
● When <Mode 1> or <Mode 2> is specified, printed images may be blurry.
<Paper Curl Correction>If the printed paper curls, set this item. The improvement effect is stronger with <Mode 2> than with <Mode1>. First try with <Mode 1>.
<Off>
<Mode 1><Mode 2>
<Menu> <Adjustment/Maintenance> <Adjust Image Quality> <SpecialProcessing> <Special Paper Processing> <Paper Curl Correction> Select themode <Yes>
● Setting a greater improvement effect may result in faded printouts or slower printing speed.
<Reduce Ppr. Sticking at Output> *
When performing 2-sided printing in color, paper may stick together at the output. Setting to <On> will slowdown the printing speed of prints that may easily stick together, to reduce sticking.
MF735Cx / MF734Cdw / MF732Cdw
<Off><On>
MF635Cx / MF633Cdw
<Off>
<On>
Setting Menu List
474
<Menu> <Adjustment/Maintenance> <Adjust Image Quality> <SpecialProcessing> <Reduce Ppr. Sticking at Output> <On> <Yes>
<High Humidity Mode>Print density may be uneven when the machine is used in an environment with high humidity. In this case,setting this item to <On> may solve the problem.
<Off>
<On>
<Menu> <Adjustment/Maintenance> <Adjust Image Quality> <Special Processing> <HighHumidity Mode> <On> <Yes>
● If you set to <On> and use the machine in an environment with low humidity, printed images and textmay be blurry.
<Low Humidity Mode>When using the machine in an environment with low humidity, printed images and text may be blurry. In thiscase, setting this item to <On> may solve the problem.
<Off>
<On>
<Menu> <Adjustment/Maintenance> <Adjust Image Quality> <Special Processing> <LowHumidity Mode> <On> <Yes>
● If you set to <On>, print density may be lower or uneven when the machine is used in an environmentwith high humidity.
<Reduce Ghosting 1> *
If the printout reveals a ghost of an image in the same page, setting this item to <On> may solve the problem.
<Off>
<On>
Setting Menu List
475

<Menu> <Adjustment/Maintenance> <Adjust Image Quality> <SpecialProcessing> <Reduce Ghosting 1> <On> <Yes>
● If you set to <On>, toner may not be fixed sufficiently, resulting in faded printouts.
<Reduce Ghosting 2>If continuous printing involves generation of ghost images, setting this item to <On> may solve the problem.
<Off>
<On>
<Menu> <Adjustment/Maintenance> <Adjust Image Quality> <SpecialProcessing> <Reduce Ghosting 2> <On> <Yes>
● If you set to <On>, print density may be uneven.
<Regularly Clean Fix. Assembly> *
If the fixing assembly is dirty, edges of the paper may get smudged. In this case, changing the setting of thisitem may solve the problem. The higher level you specify, the higher frequency of regular cleaning isperformed.
<Auto>
<Level 1><Level 2><Level 3>
<Menu> <Adjustment/Maintenance> <Adjust Image Quality> <SpecialProcessing> <Regularly Clean Fix. Assembly> Select the level <Yes>
● If a higher level is specified, the printing speed may be slower.
Setting Menu List
476

<Rdc. Condens. (1-Sd->2-Sd Prt)> *
When performing 2-sided printing after 1-sided printing, the printed images may be faint due to moisturecondensation. In this case, setting to <On> may solve the problem.
<Off><On>
<Menu> <Adjustment/Maintenance> <Adjust Image Quality> <Special Processing> <Rdc.Condens. (1-Sd->2-Sd Prt)> <On> <Yes>
● If you set to <On>, the printing speed may be slower.
<Rdc Condens. (Consec 2-Sd Prt)> *
If the printed images are faint due to moisture condensation when performing 2-sided printing, setting to otherthan <Off> may solve the problem.
MF735Cx / MF734Cdw / MF732Cdw
<Off><Mode 1>
<Mode 2>
MF635Cx / MF633Cdw
<Off>
<On>
<Menu> <Adjustment/Maintenance> <Adjust Image Quality> <Special Processing> <RdcCondens. (Consec 2-Sd Prt)> Select the item <Yes>
● For MF735Cx / MF734Cdw / MF732Cdw, the improvement effect is stronger with <Mode 2> than<Mode 1>.
● If you set to other than <Off>, the print may be faded or the printing speed may be slower.
<Correct Uneven Gloss> *
When gloss unevenness occurs in the leading edge of paper, setting to <On> may solve the problem.
<Off>
<On>
Setting Menu List
477

<Menu> <Adjustment/Maintenance> <Adjust Image Quality> <SpecialProcessing> <Correct Uneven Gloss> <On> <Yes>
● If you set to <On>, toner may not be fixed sufficiently, resulting in faded printouts.
<Corr. Void on Paper Back Side> *
When performing 2-sided printing on thin paper, void may occur on the back side of paper in the leading edge.In this case, setting this item to <On> may solve the problem.
<Off>
<On>
<Menu> <Adjustment/Maintenance> <Adjust Image Quality> <Special Processing> <Corr.Void on Paper Back Side> <On> <Yes>
● If you set to <On>, print quality may be affected.
<Correct Void> *
If printing on thin paper produces void in the leading edge of the paper, setting this item to <On> may solve theproblem.
<Off>
<On>
<Menu> <Adjustment/Maintenance> <Adjust Image Quality> <Special Processing> <Correct Void> <On> <Yes>
● If you set to <On>, printouts may be faded.
<Drop Pattern Reduction Mode>If print density is uneven in a way that the print looks like a water drops pattern, setting this item to <On> maysolve the problem.
<Off>
Setting Menu List
478
<On>
<Menu> <Adjustment/Maintenance> <Adjust Image Quality> <Special Processing> <DropPattern Reduction Mode> <On> <Yes>
● If you set to <On>, print quality may be affected.
<Correct Image Corrupted by Ppr Dust> *
Using paper containing much paper dust may result in a faded or streaky printout. In this case, setting this itemto <On> may solve the problem.
<Off>
<On>
<Menu> <Adjustment/Maintenance> <Adjust Image Quality> <SpecialProcessing> <Correct Image Corrupted by Ppr Dust> <On> <Yes>
● If you set to <On>, the printing speed may be slower.
<Correct Blurry Image> *
When performing 2-sided printing, the image may be blurry on the back side of paper in the trailing edge. Inthis case, setting this item to <On> may solve the problem.
<Off>
<On>
<Menu> <Adjustment/Maintenance> <Adjust Image Quality> <SpecialProcessing> <Correct Blurry Image> <On> <Yes>
● If you set to <On>, the printing speed may be slower.
<Prevent Fogging>If white areas are lightly colored, setting this item to <On> may solve the problem.
Setting Menu List
479
<Off>
<On>
<Menu> <Adjustment/Maintenance> <Adjust Image Quality> <SpecialProcessing> <Prevent Fogging> <On> <Yes>
● If you set to <On>, print density may be lighter.
<Correct Color Mismatch> *
If color mismatch occurs, setting to <On> may solve the problem.
<Off>
<On>
<Menu> <Adjustment/Maintenance> <Adjust Image Quality> <SpecialProcessing> <Correct Color Mismatch> <On> <Yes>
● If you set to <On>, the printing speed may be slower.
<Reduce Drum Streak>If streaks appear on printouts, setting to <On> may solve the problem.
<Off>
<On>
<Menu> <Adjustment/Maintenance> <Adjust Image Quality> <SpecialProcessing> <Reduce Drum Streak> <On>
<Reduce Toner Flaking> *
Toner may peel off the printed page depending on the paper type or the environmental conditions. In this case,setting this item may solve the problem. The improvement effect is stronger with <Mode 2> than <Mode 1>.First try with <Mode 1>.
<Off>
<Mode 1><Mode 2>
Setting Menu List
480
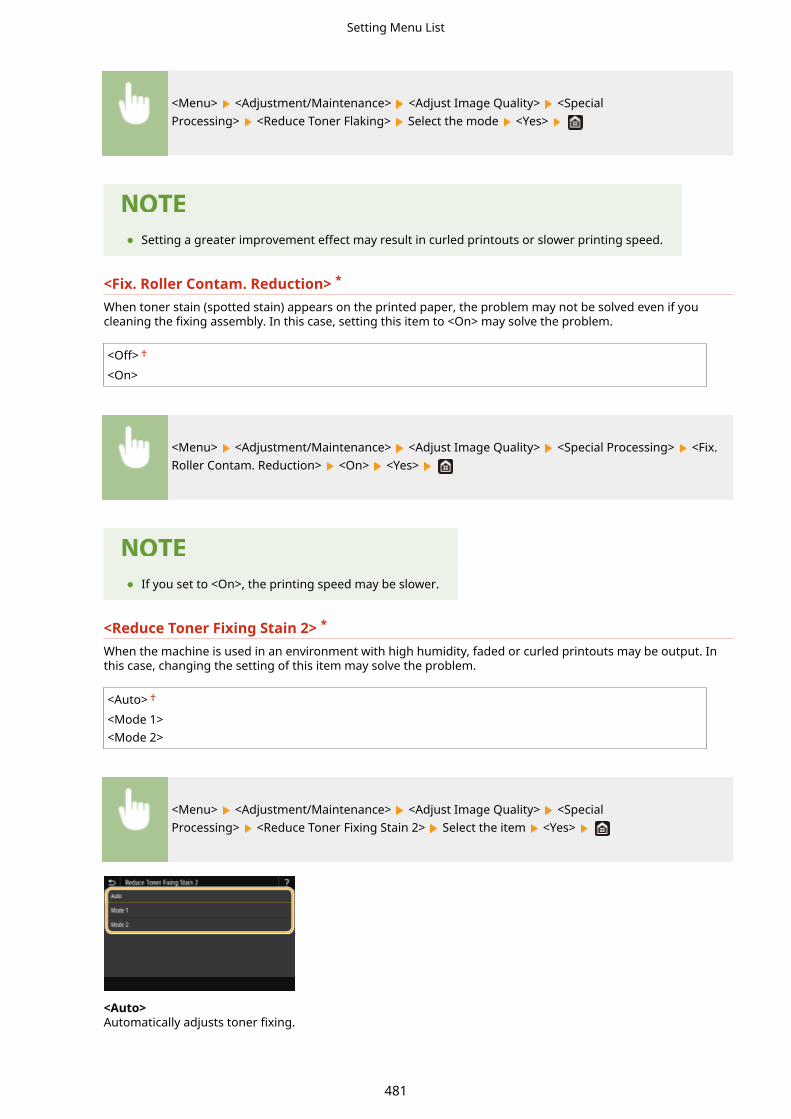
<Menu> <Adjustment/Maintenance> <Adjust Image Quality> <SpecialProcessing> <Reduce Toner Flaking> Select the mode <Yes>
● Setting a greater improvement effect may result in curled printouts or slower printing speed.
<Fix. Roller Contam. Reduction> *
When toner stain (spotted stain) appears on the printed paper, the problem may not be solved even if youcleaning the fixing assembly. In this case, setting this item to <On> may solve the problem.
<Off>
<On>
<Menu> <Adjustment/Maintenance> <Adjust Image Quality> <Special Processing> <Fix.Roller Contam. Reduction> <On> <Yes>
● If you set to <On>, the printing speed may be slower.
<Reduce Toner Fixing Stain 2> *
When the machine is used in an environment with high humidity, faded or curled printouts may be output. Inthis case, changing the setting of this item may solve the problem.
<Auto>
<Mode 1><Mode 2>
<Menu> <Adjustment/Maintenance> <Adjust Image Quality> <SpecialProcessing> <Reduce Toner Fixing Stain 2> Select the item <Yes>
<Auto>Automatically adjusts toner fixing.
Setting Menu List
481

<Mode 1>If printouts are curled, set to this option.
<Mode 2>If printouts are faded, set to this option.
● If you set to <Mode 1>, printouts may be faded.
● If you set to <Mode 2>, printouts may be curled.
<Auto Detect B&W/Color Original>When black and white print data is mixed with color data, specify whether to prioritize the print speed or toreduce the toner usage of the cyan, magenta, and yellow toner cartridges when printing data.
<Mode 1>
<Mode 2>
<Menu> <Adjustment/Maintenance> <Adjust Image Quality> <Special Processing> <AutoDetect B&W/Color Orig.> Select the mode <Yes>
<Mode 1>Prioritizes the print speed when printing.
<Mode 2>Reduces the toner usage of toner cartridges when printing.
<Rdc. Faint Print After Rplc. Cart.>Printouts may be faded immediately after replacement of toner cartridges with new ones. In this case, settingthis item to <On> may solve the problem.
<Off>
<On>
<Menu> <Adjustment/Maintenance> <Adjust Image Quality> <Special Processing> <Rdc.Faint Print After Rplc. Cart.> <On> <Yes>
Setting Menu List
482

● If you set to <On>, the setting will become effective with next replacement of toner cartridges.
● Immediately after cartridge replacement, a certain amount of time is required for toner to be evenlydistributed inside the cartridge.
<Remove Streaks from Orig. Scanning Area> *
You can configure a setting to prevent stains from being scanned when they are detected in the document feedscanning area. Selecting <On> removes streaks generated by the edge of the original.
<Off><On>
<Menu> <Adjustment/Maintenance> <Adjust Image Quality> <Remove Streaks from ScanArea> Select <Off> or <On>
● When streaks are removed, areas with stains are not scanned. Clean the original scanning area so that theoriginal is scanned satisfactorily.
Setting Menu List
483

<Maintenance>16SE-08L
The cleaning functions are listed with descriptions. Default settings are marked with a dagger ( ).
Asterisks (*)
● Settings marked with an asterisk(*) may not be displayed depending on the model you are using, options, orother setting items.
<Clean Fixing Assembly>(P. 484)<Clean ITB>(P. 484)<Clean Feeder>(P. 484)<Control Condensation>(P. 484)
<Clean Fixing Assembly>
Clean the fixing assembly after a toner cartridge is replaced or if black streaks appear on printouts. Cleaning theFixing Assembly(P. 587)
<Clean ITB>
Clean the transfer belt inside the machine to prevent the print quality from deteriorating. Cleaning the TransferBelt (ITB)(P. 588)
<Clean Feeder> *
Clean the feeder rollers if originals become dirty after being fed through the feeder. Cleaning the Feeder(P. 584)
<Control Condensation>
When the temperature changes rapidly in the environment where the machine is installed, condensation occurs, whichmay cause fading or bleeding in images and text. Select <On> to remove dew condensation in the machine. Whenselecting <On>, specify whether to restrict jobs.
<Off> <On>
<Use Fax Memory Lock> /<Allow Job Printing During Process>
<Use Fax Memory Lock + Do Not Allow Job Printing During Process>/<Do Not Allow Job Printing DuringProcess>
<Menu> <Adjustment/Maintenance> <Maintenance> <Control Condensation> <On> Check the message <OK> Select the item <Yes>
Setting Menu List
484

● While condensation removal is being performed, printing may not be performed properly and blank papermay be output.
● If you set to <On>, you need to keep the machine turned ON to maintain the effect of condensation removal.
● The setting for <Auto Shutdown Time> is unavailable when <Control Condensation> is set to <On>.
Setting Menu List
485

<Function Settings>16SE-08R
Item Description
<Common>(P. 487) This section describes settings common to each function.
<Copy>(P. 492) This section describes how to specify the copy settings.
<Printer>(P. 494) This section describes how to specify printer settings.
<Send>(P. 538) This section describes how to specify settings for sending faxes and scanned originals.
<Receive/Forward>(P. 549) This section describes how to specify settings for receiving faxes and e-mails.
<Store/Access Files>(P. 556) This section describes the settings for scanning originals and printing stored files.
<Secure Print>(P. 564) This section describes the settings for the Secure Print.
Setting Menu List
486
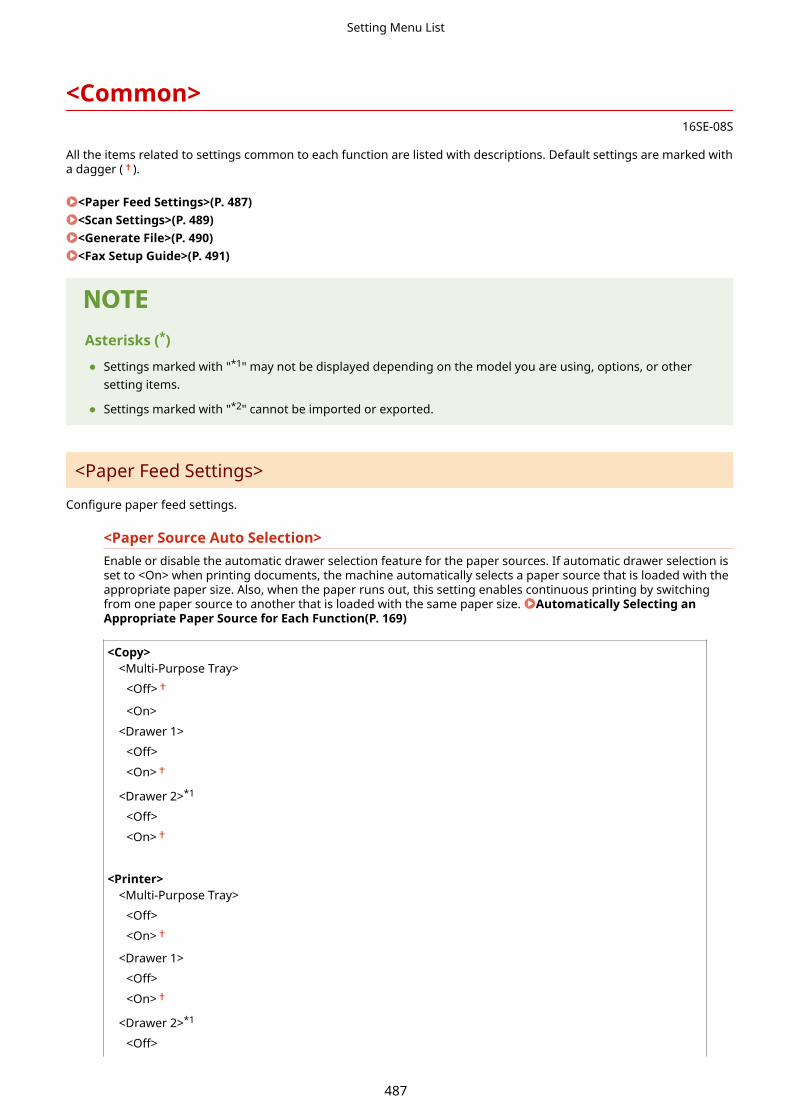
<Common>16SE-08S
All the items related to settings common to each function are listed with descriptions. Default settings are marked witha dagger ( ).
<Paper Feed Settings>(P. 487)<Scan Settings>(P. 489)<Generate File>(P. 490)<Fax Setup Guide>(P. 491)
Asterisks (*)
● Settings marked with "*1" may not be displayed depending on the model you are using, options, or othersetting items.
● Settings marked with "*2" cannot be imported or exported.
<Paper Feed Settings>
Configure paper feed settings.
<Paper Source Auto Selection>Enable or disable the automatic drawer selection feature for the paper sources. If automatic drawer selection isset to <On> when printing documents, the machine automatically selects a paper source that is loaded with theappropriate paper size. Also, when the paper runs out, this setting enables continuous printing by switchingfrom one paper source to another that is loaded with the same paper size. Automatically Selecting anAppropriate Paper Source for Each Function(P. 169)
<Copy><Multi-Purpose Tray>
<Off>
<On>
<Drawer 1>
<Off>
<On>
<Drawer 2>*1
<Off>
<On>
<Printer>
<Multi-Purpose Tray>
<Off>
<On>
<Drawer 1>
<Off>
<On>
<Drawer 2>*1
<Off>
Setting Menu List
487

<On>
<Receive/Fax >/<Receive>
<Multi-Purpose Tray>
<Off>
<On>
<Drawer 1>
<Off>
<On>
<Drawer 2>*1
<Off>
<On>
<Other>
<Multi-Purpose Tray>
<Off>
<On>
<Drawer 1>
<Off>
<On>
<Drawer 2>*1
<Off>
<On>
<Switch Paper Feed Method> *1
Specify this setting when you print a document on paper with logos. In general use, to print on paper withlogos, you need to change how the paper loaded in the paper source is facing depending on whether you areperforming 1- or 2-sided printing. However, if you change the setting to <Print Side Priority>, you can just loadthe paper with the logo side facing down for 1-sided printing in the same way as for 2-sided printing. For moreinformation, see Loading Preprinted Paper(P. 157) .
<Multi-Purpose Tray><Speed Priority>
<Print Side Priority>
<Drawer 1>
<Speed Priority>
<Print Side Priority>
<Drawer 2> *1
<Speed Priority>
<Print Side Priority>
<Menu> <Function Settings> <Common> <Paper Feed Settings> <Switch Paper FeedMethod> Select the paper source Select <Speed Priority> or <Print Side Priority>
Setting Menu List
488

Paper SourcesSelect the paper source that you want to change the setting for.
<Speed Priority>When using paper that has been preprinted with a logo, you need to change how it is facing when youperform 1-sided and 2-sided printing.
● We recommend selecting <Speed Priority> if you do not need to consider which side to print on.
<Print Side Priority>To print on a specific side of paper, you do not need to flip over paper in the paper source whether 1- or 2-sided printing is selected.
● If <Print Side Priority> is set for a paper source that is loaded with paper you cannot use for 2-sided printing( Available Paper(P. 704) ), <Speed Priority> is applied to the paper source instead. In this case, you needto load the paper in the same way as when <Speed Priority> is selected ( Loading PreprintedPaper(P. 157) ).
● 1-sided printing speed may be slower when <Print Side Priority> is selected.
<Scan Settings>
Configure scan settings.
<Auto Online>When scanning from the computer, use this to specify whether to automatically go online for remote scanning(scan standby mode) without using the operation panel.
<Off><On>
<Menu> <Function Settings> <Common> <Scan Settings> <Auto Online> Select <Off> or<On>
Setting Menu List
489

<Auto Offline>
If scan is not performed within a specified period of time after the screen below is displayed (the machine isset online for scanning), the machine automatically becomes offline. Specify the time period at which themachine becomes offline.
<Set This Function><Off>
<On>
<Set Time>
1 to 5 to 60 (min.)
<Menu> <Function Settings> <Common> <Scan Settings> <Auto Offline> Select <On> in<Set This Function> Enter the time in <Set Time> <Apply>
<Generate File>
Configure file generation settings.
<Output File Image Settings>Specify settings for the gamma value for converting scanned originals into files.
<YCbCr TX Gamma Value>Select the gamma value used when converting scanned color originals into the specified file format. You canspecify the same gamma value as that of the monitor which is to be used for viewing the converted files. Thefiles are displayed with brightness that is true to the original documents.
<Gamma 1.0><Gamma 1.4><Gamma 1.8>
<Gamma 2.2>
<Menu> <Function Settings> <Common> <Generate File> <Output File Image Settings> <YCbCr TX Gamma Value> Select the gamma value
● For the gamma value of a monitor display, see the instruction manual included with the display.
Setting Menu List
490

<OCR (Text Searchable) Settings>To run OCR (Optical Character Recognition) on a text original to create a "searchable PDF," specify whether themachine determines the original's text direction and detects the original direction.
<Smart Scan><Off>
<On>
<Menu> <Function Settings> <Common> <Generate File> <OCR (Text Searchable)Settings> Select <Off> or <On> in <Smart Scan> <Apply>
<256-bit AES Set. (Encrypt. PDF)> *1
When generating an encrypted PDF, the PDF encryption level can be set to "128-bit" or "256-bit." If "256-bit" isselected, the version compatible with Acrobat can be changed.
<Acrobat 9.0 or Equivalent><Acrobat 10.0 or Equivalent>
<Menu> <Function Settings> <Common> <Generate File> <256-bit AES Set. (Encrypt.PDF)> Select <Acrobat 9.0 or Equivalent> or <Acrobat 10.0 or Equivalent>
<Fax Setup Guide> *1*2
Select to display on-screen instructions for specifying settings, including the fax number and the RX mode. Configuring Initial Settings for Fax Functions(P. 79)
Setting Menu List
491
<Copy>16SE-08U
All the settings related to the copy are listed with descriptions. Default settings are marked with a dagger ( ).
Asterisks (*)
● Settings marked with an asterisk (*) may not be displayed depending on the model you are using, options, orother setting items.
<Change Default Settings (Copy)>
You can change the default settings about copy. The selected settings are used as the default settings of the copyfunction. Changing the Default Settings for Functions(P. 176)
<Number of Copies>1 to 999
<Paper Source>
<Multi-Purpose Tray>
<Drawer 1>
<Drawer 2>*
<Density>
Nine Levels
<Background Density>
<Auto>
<Adjust (Manual)>
Nine Levels
<Density by Color>
<Red>: Nine Levels
<Green>: Nine Levels
<Blue>: Nine Levels
<Copy Ratio>
Custom Ratio
<100% 1:1>
<400% Max>
<200%>
<141% A5->A4>
<70% A4->A5>
<50%>
<25% Min>
<2-Sided>*
<Off>
Setting Menu List
492

<1-Sided->2-Sided>
<2-Sided->2-Sided>*
<2-Sided->1-Sided>*
<Orig./Fin. Type>
<N on 1>
<Off>
<2 on 1>
<4 on 1>
<Layout>
<Original Type>
<Text/Photo/Map (Speed)>
<Text/Photo/Map>
<Text/Photo/Map (Quality)>
<Printed Image>
<Text>
<Collate>
<Off>
<On>
<Erase Frame>
<Off>
<On>
<Sharpness>
Seven Levels
<Color Balance>
Yellow/Magenta/Cyan/Black
17 Levels
<Fine Adjust>
<Yellow>/<Magenta>/<Cyan>/<Black>
<High>: 17 Levels
<Medium>: 17 Levels
<Low>: 17 Levels
Setting Menu List
493

<Printer>16SE-08W
All the settings related to the printer are listed with descriptions. Default settings are marked with a dagger ( ).
<Printer Settings>(P. 494)<PDL Selection (Plug and Play)>(P. 536)
Asterisks (*)
● Settings marked with "*1" may not be displayed depending on the model you are using, options, or othersetting items.
● Settings marked with "*2" cannot be imported or exported.
Priority of settings● If a print setting is specified both from the printer driver and the operation panel of the machine, the
specification from the printer driver overrides that from the operation panel. The specification from theoperation panel becomes effective in some specific cases, such as when performing PS/PCL printing andprinting from UNIX or other operating system that does not support printer drivers.
<Printer Settings>
Configure settings about printing and printer operations.
<Prioritize Driver Settings When Printing>Select whether printing is performed in accordance with the printer driver's settings for paper size and typetaking priority over the settings made for each paper source under <Paper Settings> in the Home screen. Byselecting <On>, you can print from the paper source specified in the printer drive, regardless of the papersettings on the machine. An error message can be set to display if the loaded paper size is largely different fromthat set in the printer driver.
<Multi-Purpose Tray><Prioritize Driver Settings>
<Off>
<On>
<Action When Size Mismatch>
<Force Output>
<Display Error>
<Drawer 1>
<Prioritize Driver Settings>
<Off>
<On>
<Action When Size Mismatch>
Setting Menu List
494

<Force Output>
<Display Error>
<Drawer 2> *1
<Prioritize Driver Settings>
<Off>
<On>
<Action When Size Mismatch>
<Force Output>
<Display Error>
<Menu> <Function Settings> <Printer> <Printer Settings> <Prioritize Driver Settings WhenPrinting> Select the paper source Select <On> in <Prioritize Driver Settings> <Action WhenSize Mismatch> Select <Force Output> or <Display Error> <Apply>
<Force Output>Continue printing even when the paper size setting in the printer driver and the loaded paper are largelydifferent.
<Display Error>When the paper size setting in the printer driver and the loaded paper are largely different, an error message isdisplayed and printing is stopped.
● If the printer driver's settings do not match the size and type of loaded paper with <On> selected, apaper jam or printing error may occur.
<Copies>Set the number of copies to print.
1 to 999
<Menu> <Function Settings> <Printer> <Printer Settings> <Copies> Set the number ofcopies to print <Apply>
<2-Sided Printing> *1
Select whether to make 2-sided printouts.
Setting Menu List
495

<Off>
<On>
<Menu> <Function Settings> <Printer> <Printer Settings> <2-Sided Printing> Select<Off> or <On>
<Default Paper>Use this item to specify the paper size and type. Available Paper(P. 704)
<Menu> <Function Settings> <Printer> <Printer Settings> <Default Paper> Select thepaper size Select the paper type
<Paper Size Override>Select whether to switch between printing on A4 and Letter size paper if one of these paper sizes is loaded butthe other is not. When you select <On>, if you specify A4 size paper to print from the computer but A4 sizepaper is not loaded in the machine, it will print your document on Letter size paper.
<Off>
<On>
<Menu> <Function Settings> <Printer> <Printer Settings> <Paper Size Override> Select<Off> or <On>
● You can specify print settings, such as the number of copies or 1-sided/2-sided printing, from anapplication or the printer driver. However, the <Paper Size Override> setting can only be specified onthe machine.
<Print Quality>You can change settings related to print quality.
<Density> *1
Adjust the toner density.
Yellow/Magenta/Cyan/Black17 Levels
<Fine Adjust>
<Yellow>/<Magenta>/<Cyan>/<Black>
<High>/<Medium>/<Low>
Setting Menu List
496

17 Levels
<Menu> <Function Settings> <Printer> <Printer Settings> <PrintQuality> <Density> Adjust the density of each color <Apply>
● You can use <Fine Adjust> to adjust the toner density of each color to three density levels: highdensity, medium density, and low density.
● When <Toner Save> is set to <On>, you cannot set this item.
<Toner Save>You can save toner consumption. Select <On> when you want to check the layout or other appearancecharacteristics before proceeding to final printing of a large job.
<Off>
<On>
<Menu> <Function Settings> <Printer> <Printer Settings> <Print Quality> <TonerSave> Select <Off> or <On>
<Gradation>Specify the processing method used to reproduce gradation. <High 2> gives finer gradation than <High 1>.
<High 1>
<High 2>
<Menu> <Function Settings> <Printer> <Printer Settings> <PrintQuality> <Gradation> Select <High 1> or <High 2>
● This setting is only available when <Resolution> is set to <600 dpi>.
<Density Fine Adjustment>When fine lines or small text are faded, increase the density to give less faded print.
Five Levels
Setting Menu List
497

<Menu> <Function Settings> <Printer> <Printer Settings> <Print Quality> <Density FineAdjustment> Adjust the adjustment value <Apply>
● A change in the density affects objects other than text or lines and the color balance.
● This setting is only available when <Resolution> is set to <1200 dpi>.
<Resolution>Specify the resolution to be used for print data processing.
<1200 dpi><600 dpi>
<Menu> <Function Settings> <Printer> <Printer Settings> <PrintQuality> <Resolution> Select <1200 dpi> or <600 dpi>
<Special Smoothing Mode>Specify the mode to print data with a smooth finish. If the quality of the printout is not acceptable in <Mode1> (default), try another mode.
<Mode 1>
<Mode 2><Mode 3><Mode 4><Mode 5><Mode 6>
<Menu> <Function Settings> <Printer> <Printer Settings> <Print Quality> <SpecialSmoothing Mode> Select the mode
<Mode 1>Prints an outline of dark text or a figure with a smooth finish. This is the optimal mode for various types ofprinting.
<Mode 2>Prints figure outline and internal halftones with a smooth finish.
<Mode 3>
Setting Menu List
498
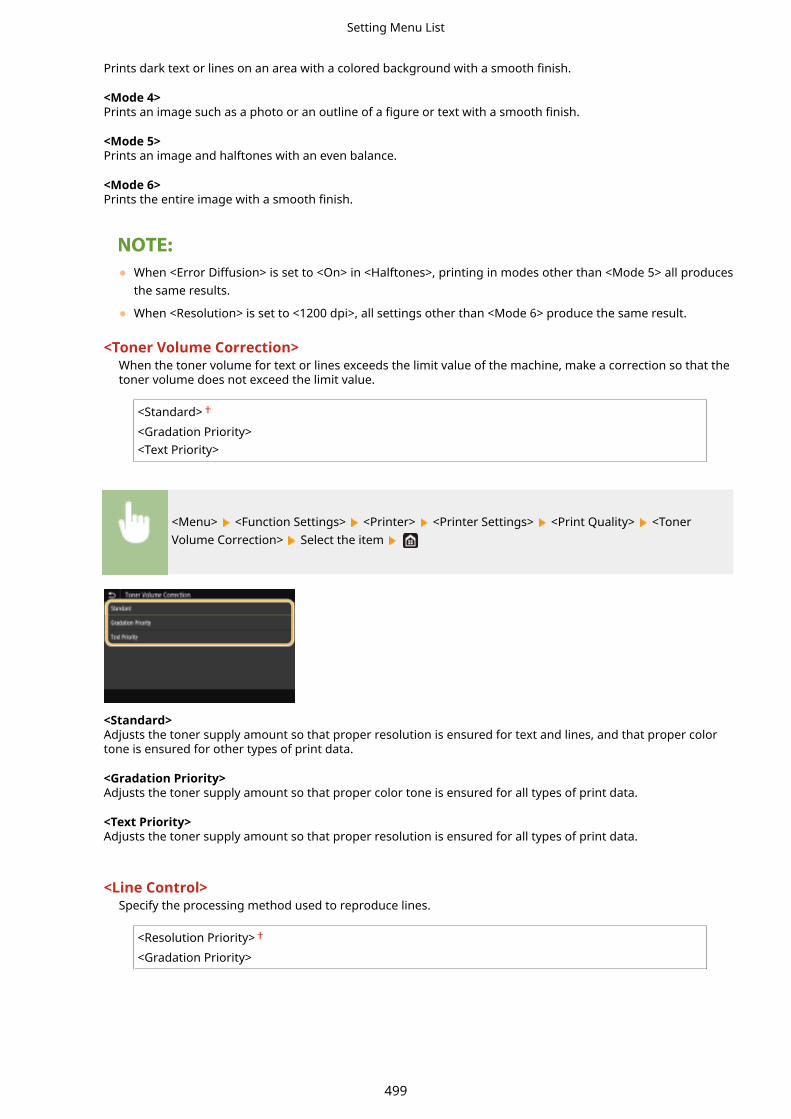
Prints dark text or lines on an area with a colored background with a smooth finish.
<Mode 4>Prints an image such as a photo or an outline of a figure or text with a smooth finish.
<Mode 5>Prints an image and halftones with an even balance.
<Mode 6>Prints the entire image with a smooth finish.
● When <Error Diffusion> is set to <On> in <Halftones>, printing in modes other than <Mode 5> all producesthe same results.
● When <Resolution> is set to <1200 dpi>, all settings other than <Mode 6> produce the same result.
<Toner Volume Correction>When the toner volume for text or lines exceeds the limit value of the machine, make a correction so that thetoner volume does not exceed the limit value.
<Standard>
<Gradation Priority><Text Priority>
<Menu> <Function Settings> <Printer> <Printer Settings> <Print Quality> <TonerVolume Correction> Select the item
<Standard>Adjusts the toner supply amount so that proper resolution is ensured for text and lines, and that proper colortone is ensured for other types of print data.
<Gradation Priority>Adjusts the toner supply amount so that proper color tone is ensured for all types of print data.
<Text Priority>Adjusts the toner supply amount so that proper resolution is ensured for all types of print data.
<Line Control>Specify the processing method used to reproduce lines.
<Resolution Priority>
<Gradation Priority>
Setting Menu List
499

<Menu> <Function Settings> <Printer> <Printer Settings> <Print Quality> <LineControl> Select <Resolution Priority> or <Gradation Priority>
<Resolution Priority>Draws lines with the same resolution as for text.
<Gradation Priority>Draws lines while maintaining color and gradation.
<Width Adjustment>Configure a setting to print text or fine lines in bold.
<Off>
<On><Text>
<Line>
<Text and Line>
<Menu> <Function Settings> <Printer> <Printer Settings> <Print Quality> <WidthAdjustment> <On> Select the target
● If you set to <On>, the printing speed may be slower or image quality may be affected.
● Even if you set to <On>, bold printing may not be possible depending on the printing application.
<Advanced Smoothing>Configure the smoothing setting to print the outline of graphics (e.g., illustrations created using applications)or text with a smooth finish.
<Advanced Smoothing>Select whether to perform smoothing processing. <Level 2> prints an outline with a smoother finish than<Level 1>. First try with <Level 1>.
<Off><Level 1>
<Level 2>
Setting Menu List
500

<Menu> <Function Settings> <Printer> <Printer Settings> <Print Quality> <AdvancedSmoothing> <Advanced Smoothing> Select the item
<Apply to Graphics> *1
Specify whether to apply smoothing processing to graphics when <Advanced Smoothing> is set to <Level1> or <Level 2>.
<Off>
<On>
<Menu> <Function Settings> <Printer> <Printer Settings> <Print Quality> <AdvancedSmoothing> <Apply to Graphics> Select <Off> or <On>
<Apply to Text> *1
Specify whether to apply smoothing processing to the text when <Advanced Smoothing> is set to <Level1> or <Level 2>.
<Off><On>
<Menu> <Function Settings> <Printer> <Printer Settings> <Print Quality> <AdvancedSmoothing> <Apply to Text> Select <Off> or <On>
● The settings of <Apply to Graphics> and <Apply to Text> are only effective when [Advanced Smoothing] isset to [Printer Default] in the printer driver.
<Gradation Smoothing>Configure the smoothing setting to print the gradation (color density) of graphics (e.g., illustrations createdusing applications) or bit map images with a smooth finish.
<Gradation Smoothing>Select whether to perform smoothing processing. <Level 2> prints an outline with a smoother finish than<Level 1>. First try with <Level 1>.
<Off>
<Level 1><Level 2>
Setting Menu List
501

<Menu> <Function Settings> <Printer> <Printer Settings> <Print Quality> <GradationSmoothing> <Gradation Smoothing> Select the item
<Apply to Graphics> *1
Specify whether to apply smoothing processing to graphics when <Gradation Smoothing> is set to <Level1> or <Level 2>.
<Off><On>
<Menu> <Function Settings> <Printer> <Printer Settings> <Print Quality> <GradationSmoothing> <Apply to Graphics> Select <Off> or <On>
<Apply to Images> *1
Specify whether to apply smoothing processing to images when <Gradation Smoothing> is set to <Level1> or <Level 2>.
<Off><On>
<Menu> <Function Settings> <Printer> <Printer Settings> <Print Quality> <GradationSmoothing> <Apply to Images> Select <Off> or <On>
● [Gradation Smoothing] in the printer driver applies only to graphics data. The setting configured hereapplies to smoothing processing for image data.
<Layout>Specify the page layout settings such as binding position and margin values.
<Binding Location>If you are binding the printouts with a binding tool such as a stapler, use this item to specify whether to bindon the long or short edge. Specify the setting of this item in combination with <Gutter>, which specifies thebinding margin to apply to the binding position.
<Long Edge>
<Short Edge>
<Menu> <Function Settings> <Printer> <Printer Settings> <Layout> <BindingLocation> Select <Long Edge> or <Short Edge>
Setting Menu List
502
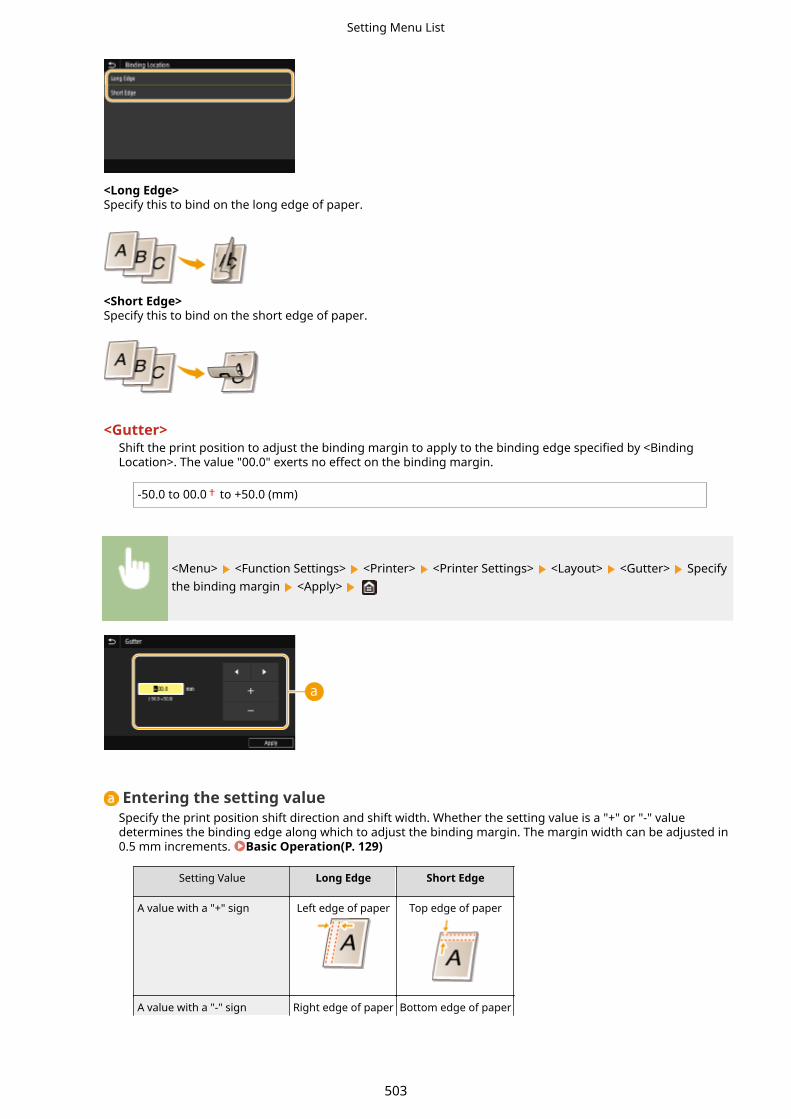
<Long Edge>Specify this to bind on the long edge of paper.
<Short Edge>Specify this to bind on the short edge of paper.
<Gutter>Shift the print position to adjust the binding margin to apply to the binding edge specified by <BindingLocation>. The value "00.0" exerts no effect on the binding margin.
-50.0 to 00.0 to +50.0 (mm)
<Menu> <Function Settings> <Printer> <Printer Settings> <Layout> <Gutter> Specifythe binding margin <Apply>
Entering the setting valueSpecify the print position shift direction and shift width. Whether the setting value is a "+" or "-" valuedetermines the binding edge along which to adjust the binding margin. The margin width can be adjusted in0.5 mm increments. Basic Operation(P. 129)
Setting Value Long Edge Short Edge
A value with a "+" sign Left edge of paper Top edge of paper
A value with a "-" sign Right edge of paper Bottom edge of paper
Setting Menu List
503

Setting Value Long Edge Short Edge
<Offset Short Edge/Offset Long Edge>Irrespective of the paper source, you can shift the print position in units of "0.5 mm" for all print jobs.
-50.0 to 00.0 to +50.0 (mm)
<Menu> <Function Settings> <Printer> <Printer Settings> <Layout> Select thecombination of adjustment direction and printing side Specify the offset value <Apply>
<Offset Short Edge (Front)>/<Offset Long Edge (Front)>Shifts the print position on the side of paper facing up.
<Offset Short Edge (Back)>/<Offset Long Edge (Back)>Shifts the print position on the side of paper facing down.
Entering the setting valueFor <Offset Short Edge (Front)>/<Offset Short Edge (Back)>, specify a value with a "+" sign to shift the printposition in the left-to-right direction. For <Offset Long Edge (Front)>/<Offset Long Edge (Back)>, specify avalue with a "+" sign to shift the print position in the up-to-down direction. To shift in the reverse direction,specify a value with a "-" sign. Basic Operation(P. 129)
<Offset Short Edge (Front)><Offset Short Edge (Back)>
<Offset Long Edge (Front)><Offset Long Edge (Back)>
Setting Menu List
504

<Auto Skip Error>Printing stops if a certain error occurs in the process. However, if you set this item to <On>, the certain error willbe skipped and printing can continue. Normally, set this item to <Off>.
<Off>
<On>
<Menu> <Function Settings> <Printer> <Printer Settings> <Auto Skip Error> Select<Off> or <On>
<Timeout>Set the time period after which the current print job is automatically canceled in the case of a print datareception interruption.
5 to 15 to 300 (sec.)
<Menu> <Function Settings> <Printer> <Printer Settings> <Timeout> Set the timeperiod <Apply>
<Personality>Specify the mode in which the machine should operate when the format of document data is unknown.
<Auto>
<PS>*1
<PCL>*1
<PDF><XPS><Imaging>
<Menu> <Function Settings> <Printer> <Printer Settings> <Personality> Select thePersonality mode
<Color Mode>Select whether to print data in color or black and white.
<Auto (Color/B&W)>
<Black & White>
Setting Menu List
505

<Menu> <Function Settings> <Printer> <Printer Settings> <Color Mode> Select <Auto(Color/B&W)> or <Black & White>
<Compressed Image Output>Specify the operation that is to be performed when the image quality has degraded due to insufficient memoryduring printing.
<Output>
<Display Error>
<Menu> <Function Settings> <Printer> <Printer Settings> <Compressed Image Output> Select <Output> or <Display Error>
<Output>Continues printing regardless of how much the image quality has degraded.
<Display Error>If the image quality has degraded significantly, an error message is displayed, and printing is stopped.
<UFR II>You can change the settings that become effective when printing from the UFR II printer driver.
<Halftones>You can select the printing method used to reproduce halftones (the intermediate range between the lighterand darker areas of an image) for optimal image quality.
<Error Diffusion>Produces finer printing results than using <Resolution/Gradation>. This option is suitable for printingsharp outlines of the text or fine-line data.
<Off>
<On>
<Menu> <Function Settings> <Printer> <Printer Settings> <UFR II> <Halftones> <Error Diffusion> Select <Off> or <On>
Setting Menu List
506

● This setting is only available when <Resolution> is set to <600 dpi>.
<Resolution/Gradation> *1
Select a method used to reproduce halftones, if <Error Diffusion> is set to <Off>. This option can bespecified for each image type in any one document.
<Text><Resolution>
<Gradation>
<Graphics>
<Resolution>
<Gradation>
<Image>
<Resolution>
<Gradation>
<Menu> <Function Settings> <Printer> <Printer Settings> <UFRII> <Halftones> <Resolution/Gradation> Select the type of image Select <Resolution> or<Gradation>
Type of imageSelect the object for which to change the setting. <Text> represents letters and characters, <Graphics>represents lines and figures, and <Image> represents photos and images.
Setting value
<Resolution>Produces a fine print with clear edges of text. It is suitable for printing characters and fine lines.
<Gradation>Produces a print with smooth gradation or smooth edges. It is suitable for printing figures or graphscontaining gradation areas.
<Matching Method>Specify the processing method used to correct the color.
<General>
<Perceptual><Colorimetric><Vivid Photo>
Setting Menu List
507

<Menu> <Function Settings> <Printer> <Printer Settings> <UFR II> <MatchingMethod> Select the item
<General>Performs processing so that the color tone is suitable for printing general papers such as photos or documents.
<Perceptual>Performs processing so that the color tone is suitable for printing bitmap images. When this item is selected, animage is printed in the colors closest to those displayed on the monitor.
<Colorimetric>Minimizes a color variance that occurs when RGB data is converted to CMYK data.
<Vivid Photo>Performs processing so that the color tone is deeper and more vivid than <General>.
<Gray Compensation>Configures a setting so that black or gray data of which color information is "R = G = B" is printed using onlythe K (black) toner. If <Off> is selected, data is printed using the toner of four colors: CMYK. This option canbe specified for each image type in any one document.
<Text><Off>
<On>
<Graphics>
<Off>
<On>
<Image>
<Off>
<On>
<Menu> <Function Settings> <Printer> <Printer Settings> <UFR II> <GrayCompensation> Select the type of image Select <Off> or <On>
<Paper Save>Specify whether to disable a blank page in print data from being output.
<Off><On>
Setting Menu List
508
<Menu> <Function Settings> <Printer> <Printer Settings> <UFR II> <PaperSave> Select <Off> or <On>
<PCL> *1
Specify the PCL printing settings such as page layout and print quality.
<Paper Save>Select whether to save paper by not outputting blank pages in documents. By selecting <On>, the machinewill not output blank pages. To output all your document data when printing, including any blank pages thatyou have inserted in your document, select <Off>.
<Off>
<On>
<Menu> <Function Settings> <Printer> <Printer Settings> <PCL> <Paper Save> Select<Off> or <On>
<Orientation>Select <Portrait> (vertical orientation) or <Landscape> (horizontal orientation) for the page orientation.
<Portrait>
<Landscape>
<Menu> <Function Settings> <Printer> <Printer Settings> <PCL> <Orientation> Select<Portrait> or <Landscape>
<Font Number>Specify the font to use by selecting a corresponding font ID number. You can print the PCL font list with fontsamples from the operation panel.
MF735Cx / MF635Cx
0 to 104
MF734Cdw / MF732Cdw / MF633Cdw
0 to 54
<Menu> <Function Settings> <Printer> <Printer Settings> <PCL> <FontNumber> Select the font number <Apply>
Setting Menu List
509

<Point Size>Set the font size in points, adjustable in 0.25 increments. You can specify this setting only when aproportionally-spaced scalable font is selected in <Font Number>.
4.00 to 12.00 to 999.75 (point)
<Menu> <Function Settings> <Printer> <Printer Settings> <PCL> <Point Size> Specifythe point size <Apply>
<Pitch>Set the font pitch, or cpi (characters per inch), adjustable in 0.01 increments. You can specify this setting onlywhen a fixed-pitch scalable font or a bitmap font is selected in <Font Number>.
0.44 to 10.00 to 99.99 (cpi)
<Menu> <Function Settings> <Printer> <Printer Settings> <PCL> <Pitch> Specify thepitch value <Apply>
<Form Lines> Set the number of lines printed on one page from 5 to 128. This setting is automatically changed accordingto the settings specified in <Default Paper Size> and <Orientation>.
5 to 64 to 128 (lines)
<Menu> <Function Settings> <Printer> <Printer Settings> <PCL> <FormLines> Specify the number of lines <Apply>
<Character Code>Select the character code that is most suited for the computer you send print data from. The specified settingis ignored when the character code is controlled by the font specified in <Font Number>.
MF735Cx / MF635Cx
<ARABIC8><DESKTOP><GREEK8><HEBREW7><HEBREW8><ISO4><ISO6><ISO11><ISO15><ISO17><ISO21>
<PC8>
<PC850><PC851><PC852><PC858><PC862><PC864><PC866><PC8DN><PC8GRK>
Setting Menu List
510

<ISO60><ISO69><ISOCYR><ISOGRK><ISOHEB><ISOL1><ISOL2><ISOL5><ISOL6><ISOL9><LEGAL><MATH8><MCTEXT><MSPUBL><PC775>
<PC8TK><PC1004><PIFONT><PSMATH><PSTEXT><ROMAN8><ROMAN9><VNINTL><VNMATH><VNUS><WIN30><WINARB><WINBALT><WINCYR><WINGRK><WINL1><WINL2><WINL5>
MF734Cdw / MF732Cdw / MF633Cdw
<DESKTOP><ISO4><ISO6><ISO11><ISO15><ISO17><ISO21><ISO60><ISO69><ISOL1><ISOL2><ISOL5><ISOL6><ISOL9><LEGAL><MATH8><MCTEXT><MSPUBL><PC775>
<PC8>
<PC850><PC852><PC858><PC8DN><PC8TK><PC1004><PIFONT><PSMATH><PSTEXT><ROMAN8><ROMAN9><VNINTL><VNMATH><VNUS><WIN30><WINBALT><WINL1><WINL2><WINL5>
<Menu> <Function Settings> <Printer> <Printer Settings> <PCL> <CharacterCode> Select the character code
<Custom Paper>Select whether to set a custom paper size. Select <On> to set the dimensions of the paper in <X dimension>and <Y dimension>.
<Off>
<On>
Setting Menu List
511

<Menu> <Function Settings> <Printer> <Printer Settings> <PCL> <CustomPaper> Select <Off> or <On>
<Unit of Measure> Select the unit of measurement to use to set a custom paper size.
<Millimeter>
<Inch>
<Menu> <Function Settings> <Printer> <Printer Settings> <PCL> <Unit ofMeasure> Select <Millimeter> or <Inch>
<X dimension>Specify the horizontal dimension (short edge) of the custom paper.
77 to 215 (mm)
<Menu> <Function Settings> <Printer> <Printer Settings> <PCL> <Xdimension> Specify the dimension <Apply>
<Y dimension>Specify the vertical dimension (long edge) of the custom paper.
127 to 355 (mm)
<Menu> <Function Settings> <Printer> <Printer Settings> <PCL> <Ydimension> Specify the dimension <Apply>
<Append CR to LF>Select whether to append a carriage return (CR) when the machine receives a line feed code (LF). If <Yes> isselected, the print position moves to the beginning of the next line when the machine receives an LF code. If<No> is selected, the print position moves to the next line, just under the received LF code.
Setting Menu List
512

<Yes><No>
<Menu> <Function Settings> <Printer> <Printer Settings> <PCL> <Append CR toLF> Select <Yes> or <No>
<Enlarge A4 Print Width>Select whether to expand the width of the printable area of A4 size paper in portrait orientation to that ofLetter size.
<Off>
<On>
<Menu> <Function Settings> <Printer> <Printer Settings> <PCL> <Enlarge A4 PrintWidth> Select <Off> or <On>
<Halftones>You can select the printing method used to reproduce halftones (the intermediate range between the lighterand darker areas of an image) for optimal image quality.
<Error Diffusion>Produces finer printing results than using <Resolution/Gradation>. This option is suitable for printingsharp outlines of the text or fine-line data.
<Off>
<On>
<Menu> <Function Settings> <Printer> <Printer Settings> <PCL> <Halftones> <ErrorDiffusion> Select <Off> or <On>
● This setting is only available when <Resolution> is set to <600 dpi>.
Setting Menu List
513

<Resolution/Gradation> *1
Select a method used to reproduce halftones, if <Error Diffusion> is set to <Off>. This option can bespecified for each image type in any one document.
<Text><Resolution>
<Gradation>
<Graphics>
<Resolution>
<Gradation>
<Image>
<Resolution>
<Gradation>
<Menu> <Function Settings> <Printer> <Printer Settings> <PCL> <Halftones> <Resolution/Gradation> Select the type of image Select <Resolution> or <Gradation>
Type of imageSelect the object for which to change the setting. <Text> represents letters and characters, <Graphics>represents lines and figures, and <Image> represents photos and images.
Setting value
<Resolution>Produces a fine print with clear edges of text. It is suitable for printing characters and fine lines.
<Gradation>Produces a print with smooth gradation or smooth edges. It is suitable for printing figures or graphscontaining gradation areas.
<Matching Method>Specify the processing method used to correct the color.
<General>
<Perceptual><Colorimetric><Vivid Photo>
Setting Menu List
514

<Menu> <Function Settings> <Printer> <Printer Settings> <PCL> <MatchingMethod> Select the item
<General>Performs processing so that the color tone is suitable for printing general papers such as photos or documents.
<Perceptual>Performs processing so that the color tone is suitable for printing bitmap images. When this item is selected, animage is printed in the colors closest to those displayed on the monitor.
<Colorimetric>Minimizes a color variance that occurs when RGB data is converted to CMYK data.
<Vivid Photo>Performs processing so that the color tone is deeper and more vivid than <General>.
<Gray Compensation>Configures a setting so that black or gray data of which color information is "R = G = B" is printed using onlythe K (black) toner. If <Off> is selected, data is printed using the toner of four colors: CMYK. This option canbe specified for each image type in any one document.
<Text><Off>
<On>
<Graphics>
<Off>
<On>
<Image>
<Off>
<On>
<Menu> <Function Settings> <Printer> <Printer Settings> <PCL> <GrayCompensation> Select the type of image Select <Off> or <On>
<BarDIMM> *1
This setting enables you to print bar codes supported by the Barcode Printing Kit. If <Enable> is selected, themachine will generate bar codes when it receives bar code commands from the host computer. If <Disable>is selected, bar codes will not be generated, even if bar code commands are sent from the host computer.
<Enable>
Setting Menu List
515

<Disable>
<Menu> <Function Settings> <Printer> <Printer Settings> <PCL> <BarDIMM> Select<Enable> or <Disable>
● To enable the BarDIMM menu, it is necessary to activate the Barcode Printing Kit. When you are notprinting bar codes, make sure to disable the BarDIMM menu. Otherwise, the processing speed ofregular print jobs may be reduced.
● The default setting is <Disable>. If you activate the Barcode Printing Kit, it changes to <Enable>.
<FreeScape>Specify the AEC (Alternate Escape Code) to be used for bar code commands when the host computer doesnot support the standard Escape Code.
<Off><~>
<"><#><$></><\><?><{><}><|>
<Menu> <Function Settings> <Printer> <Printer Settings> <PCL> <FreeScape> Selectan escape code
● This setting is available only when <BarDIMM> is enabled.
<PS> *1
Specify the PS printing settings such as page layout and print quality.
<Job Timeout>This setting enables you to specify the amount of time before a job times out. If a job has not finished withinthe set time limit, the job automatically cancels.
Setting Menu List
516

0 to 3600 (sec.)
<Menu> <Function Settings> <Printer> <Printer Settings> <PS> <Job Timeout> Specify the seconds for job timeout <Apply>
<Print PS Errors>This setting determines whether an error page is printed when an error is encountered.
<Off>
<On>
<Menu> <Function Settings> <Printer> <Printer Settings> <PS> <Print PS Errors> Select <Off> or <On>
<Pure Black Text>Configures a setting so that black text of which color information is "R = G = B = 0%," "C = M = Y = 100%," or "C= M = Y = 0%/K = 100%" is printed using only the K (black) toner. When <Off> is selected, text is printed basedon the <Output Profile> setting.
<Off><On>
<Menu> <Function Settings> <Printer> <Printer Settings> <PS> <Pure Black Text> Select <Off> or <On>
<Black Overprint> *1
Specify the printing method used when black text overlaps a colored background or figure. This option is notdisplayed when <Pure Black Text> is set to <Off>.
<Off><On>
<Menu> <Function Settings> <Printer> <Printer Settings> <PS> <Black Overprint> Select <Off> or <On>
Setting Menu List
517

<Off>Outlines black text from a colored background or figure first, then prints black text in the outlined part.Printouts may be faded much more than <On>, or text may be outlined.
<On>Prints all the colored backgrounds and figures, and overlaps black text on these backgrounds and figures usingonly the black (K) toner, then prints.
<RGB Source Profile>Select the profile for RGB data according to the monitor you are using.
<sRGB>
<Gamma 1.5><Gamma 1.8><Gamma 2.4><None>
<Menu> <Function Settings> <Printer> <Printer Settings> <PS> <RGB Source Profile> Select the profile
<sRGB>Sets the image quality to the industry standard for general Windows computer monitors. If the monitorsupports sRGB, data can be printed in the color tones closest to the displayed colors.
<Gamma 1.5> to <Gamma 2.4>Adjusts the brightness of the print result to prevent the image quality of the brightest and darkest parts frombeing degraded. The greater the gamma value is, the darker the printed text or image becomes.
<None>Carries out color separation from RGB data to CMYK data without applying an RGB source profile.
Setting Menu List
518

<CMYK Simulation Profile>Select a simulation target to print the CMYK data. The machine converts CMYK data into a device dependentCMYK color model based on the simulation.
<JapanColor(Canon)><U.S. Web Coated v1.00(Canon)><Euro Standard v1.00(Canon)><None>
<Menu> <Function Settings> <Printer> <Printer Settings> <PS> <CMYK SimulationProfile> Select the profile
<JapanColor(Canon)>Set a JapanColor profile. Data is printed in the color tones closest to those of the Japanese printing standard.
<U.S. Web Coated v1.00(Canon)>Set a U.S. Web Coated profile. Data is printed in the color tones closest to those of the U.S. printing standard.
<Euro Standard v1.00(Canon)>Set a Euro Standard profile. Data is printed in the color tones closest to those of the European printingstandard.
<None>Prints CMYK data by using a device-dependent CMYK color model without applying the CMYK simulation profile.
● When <None> is selected, the dark color gradation may become uneven depending on data.
<Use Grayscale Profile>Specify whether to convert gray data to CMYK data using the grayscale profile of the machine.
<Off>
<On>
<Menu> <Function Settings> <Printer> <Printer Settings> <PS> <Use Grayscale Profile> Select <Off> or <On>
● Even if <On> is selected, data is printed using only the K (black) toner depending on the setting of <OutputProfile> or <Pure Black Text>.
Setting Menu List
519

<Output Profile>Select the appropriate profile for the print data. This option can be specified for each image type in any onedocument.
<Text><Normal><Photo><TR Normal><TR Photo>
<Graphics>
<Normal><Photo><TR Normal><TR Photo>
<Image>
<Normal><Photo><TR Normal><TR Photo>
<Menu> <Function Settings> <Printer> <Printer Settings> <PS> <Output Profile> Select the type of image Select the profile
Type of imageSelect the object for which to change the setting. <Text> represents letters and characters, <Graphics>represents lines and figures, and <Image> represents photos and images.
Setting value
<Normal>Prints data by adjusting it to the color tones closest to those displayed on the monitor.
<Photo>Prints data by adjusting it to photo-like color tones.
<TR Normal>Prints data by adjusting it to the color tones closest to those displayed on the monitor and using only the K(black) toner to reproduce black and gray elements.
<TR Photo>Prints data by adjusting it to photo-like color tones and using only the K (black) toner to reproduce black andgray elements.
Setting Menu List
520

The setting of this item is unavailable when one of the following settings is selected.
● <RGB Source Profile> is set to <None>
● <CMYK Simulation Profile> is set to <None>
● <Use Grayscale Profile> is set to <Off>
<Matching Method>Select the element to be prioritized when carrying out color matching in <RGB Source Profile>.
<Perceptual>
<Saturation><Colorimetric>
<Menu> <Function Settings> <Printer> <Printer Settings> <PS> <Matching Method> Select the item
<Perceptual>Provides the color tone that is suitable for printing photos or bit map images.
<Saturation>Provides the color tone that is suitable for printing artworks, graphs, and other images used for presentationmaterials.
<Colorimetric>Set this option when you want to reproduce the RGB color value in the color reproduction range of the machineas accurately as possible.
● The setting of this item is unavailable when <RGB Source Profile> is set to <None>.
<Halftones>You can select the printing method used to reproduce halftones (the intermediate range between the lighterand darker areas of an image) for optimal image quality.
<Error Diffusion>Produces finer printing results than using <Resolution/Gradation>. This option is suitable for printingsharp outlines of the text or fine-line data.
<Off>
<On>
Setting Menu List
521

<Menu> <Function Settings> <Printer> <Printer Settings> <PS> <Halftones> <ErrorDiffusion> Select <Off> or <On>
● This setting is only available when <Resolution> is set to <600 dpi>.
<Resolution/Gradation> *1
Select a method used to reproduce halftones, if <Error Diffusion> is set to <Off>. This option can bespecified for each image type in any one document.
<Text><Resolution>
<Gradation>
<Graphics>
<Resolution>
<Gradation>
<Image>
<Resolution>
<Gradation>
<Menu> <Function Settings> <Printer> <PrinterSettings> <PS> <Halftones> <Resolution/Gradation> Select the type of image Select<Resolution> or <Gradation>
Type of imageSelect the object for which to change the setting. <Text> represents letters and characters, <Graphics>represents lines and figures, and <Image> represents photos and images.
Setting value
<Resolution>Produces a fine print with clear edges of text. It is suitable for printing characters and fine lines.
<Gradation>
Setting Menu List
522
Produces a print with smooth gradation or smooth edges. It is suitable for printing figures or graphscontaining gradation areas.
<Brightness> *1
Adjust the brightness of the entire image in increments of 5%. The lower the setting value is, the brighter theimage or text becomes. The greater the setting value is, the darker the image or text becomes.
85 to 100 to 115 (%)
<Menu> <Function Settings> <Printer> <Printer Settings> <PS> <Brightness> Adjustthe brightness
<Composite Overprint>Specify whether to overprint CMYK data, with overprint specified, as composite output.
<Off>
<On>
<Menu> <Function Settings> <Printer> <Printer Settings> <PS> <CompositeOverprint> Select <Off> or <On>
● Overprinting using special colors is not permitted.
<Grayscale Conversion> *1
Specify the way of printing color data in black and white.
<sRGB><NTSC>
<Uniform RGB>
<Menu> <Function Settings> <Printer> <Printer Settings> <PS> <Grayscale Conversion> Select the type of grayscale conversion
<sRGB>Prints in black and white with emphasis on color differences so that a smooth gradation is achieved.
Setting Menu List
523
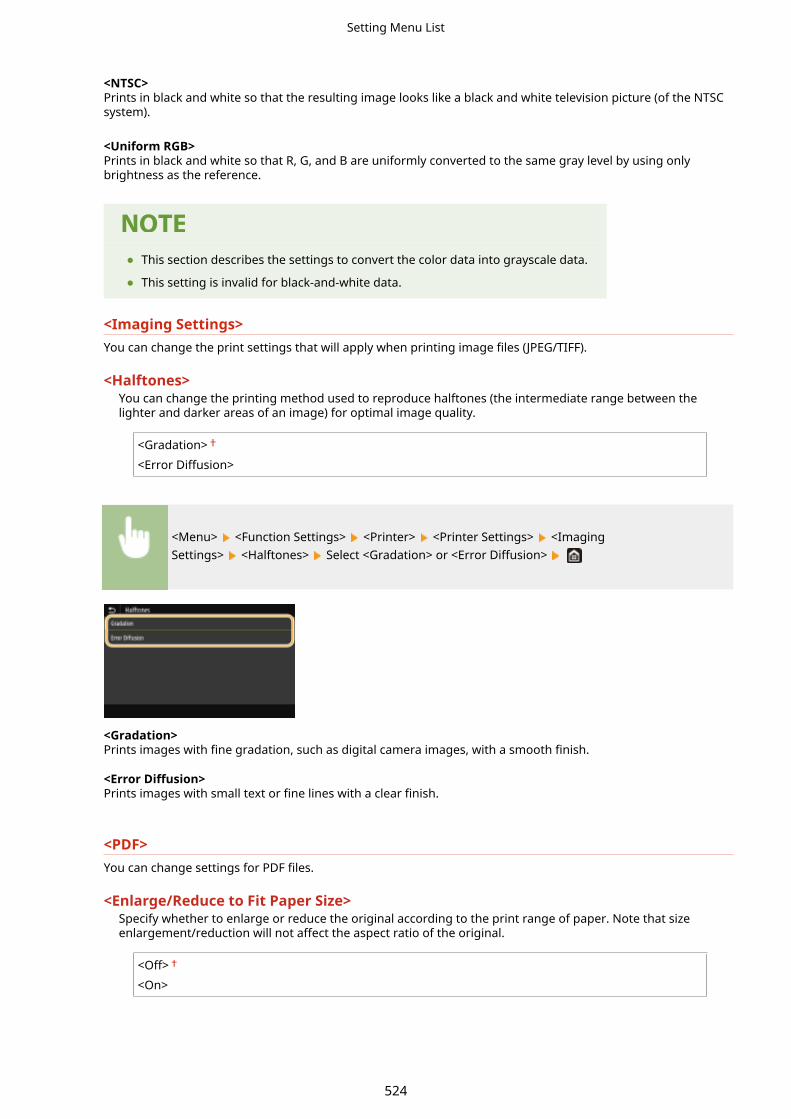
<NTSC>Prints in black and white so that the resulting image looks like a black and white television picture (of the NTSCsystem).
<Uniform RGB>Prints in black and white so that R, G, and B are uniformly converted to the same gray level by using onlybrightness as the reference.
● This section describes the settings to convert the color data into grayscale data.
● This setting is invalid for black-and-white data.
<Imaging Settings>You can change the print settings that will apply when printing image files (JPEG/TIFF).
<Halftones>You can change the printing method used to reproduce halftones (the intermediate range between thelighter and darker areas of an image) for optimal image quality.
<Gradation>
<Error Diffusion>
<Menu> <Function Settings> <Printer> <Printer Settings> <ImagingSettings> <Halftones> Select <Gradation> or <Error Diffusion>
<Gradation>Prints images with fine gradation, such as digital camera images, with a smooth finish.
<Error Diffusion>Prints images with small text or fine lines with a clear finish.
<PDF>You can change settings for PDF files.
<Enlarge/Reduce to Fit Paper Size>Specify whether to enlarge or reduce the original according to the print range of paper. Note that sizeenlargement/reduction will not affect the aspect ratio of the original.
<Off>
<On>
Setting Menu List
524

<Menu> <Function Settings> <Printer> <Printer Settings> <PDF> <Enlarge/Reduce to FitPaper Size> Select <Off> or <On>
<Enlarge Print Area>Specify whether to extend the print range to the paper size.
<Off>
<On>
<Menu> <Function Settings> <Printer> <Printer Settings> <PDF> <Enlarge Print Area> Select <Off> or <On>
● If you specify <On>, it may occur that edge-adjacent portions of page are not printed or that printoutscome out partially smudged depending on the original.
<N on 1>Specify whether to shrink multiple pages and print them on one page in such arrangement that the firstpage is positioned at top left. For example, to print 4 pages onto a single sheet, select <4 on 1>.
<Off>
<2 on 1><4 on 1><6 on 1><8 on 1><9 on 1><16 on 1>
<Menu> <Function Settings> <Printer> <Printer Settings> <PDF> <N on 1> Select thenumber of pages to be combined
<Print Comments>Specify whether to print comments. If you specify <Auto>, comments in PDF files will be printed.
<Off><Auto>
<Menu> <Function Settings> <Printer> <Printer Settings> <PDF> <Print Comments> Select <Off> or <Auto>
Setting Menu List
525
<Pure Black Text>Configures a setting so that black text of which color information is "R = G = B = 0%," "C = M = Y = 100%," or "C= M = Y = 100%" is printed using only the K (black) toner. When <Off> is selected, text is printed based on the<Output Profile> setting.
<Off><On>
<Menu> <Function Settings> <Printer> <Printer Settings> <PDF> <Pure Black Text> Select <Off> or <On>
<Black Overprint> *1
Specify the printing method used when black text overlaps a colored background or figure. This option is notdisplayed when <Pure Black Text> is set to <Off>.
<Off><On>
<Menu> <Function Settings> <Printer> <Printer Settings> <PDF> <Black Overprint> Select <Off> or <On>
<Off>Outlines black text from a colored background or figure first, then prints black text in the outlined part.Printouts may be faded much more than <On>, or text may be outlined.
<On>Prints all the colored backgrounds and figures, and overlaps black text on these backgrounds and figures usingonly the black (K) toner, then prints.
<RGB Source Profile>Select the profile for RGB data according to the monitor you are using.
Setting Menu List
526
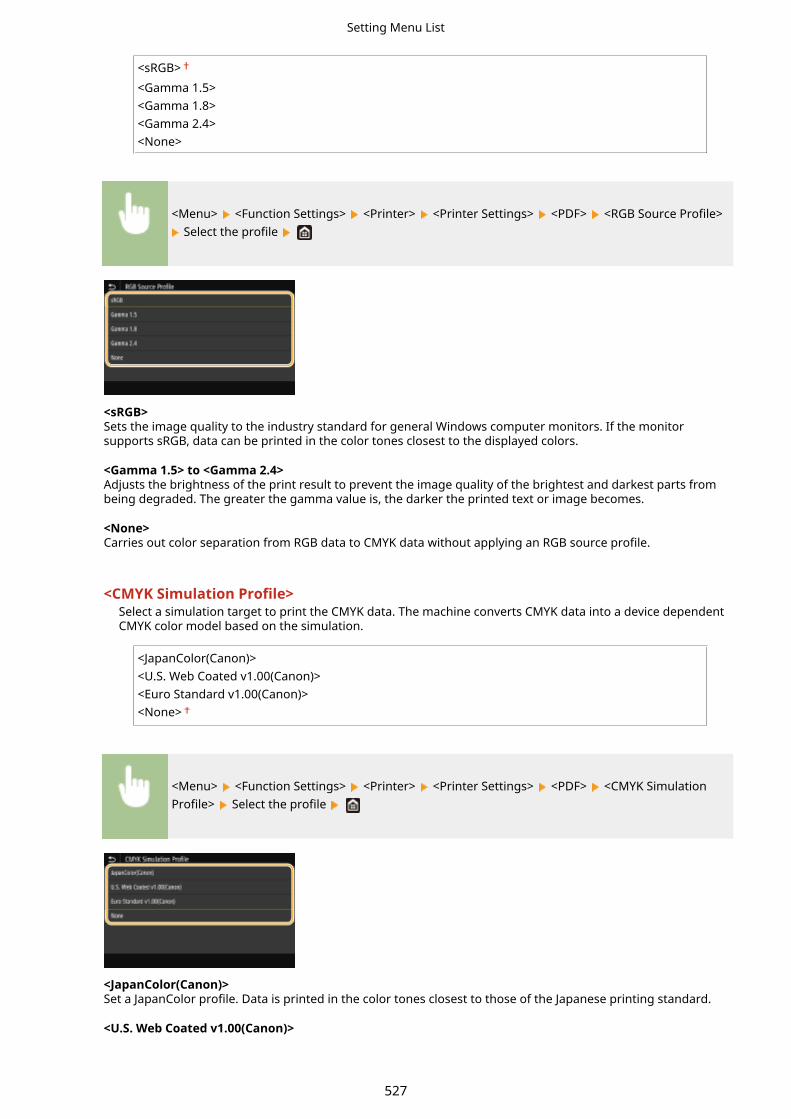
<sRGB>
<Gamma 1.5><Gamma 1.8><Gamma 2.4><None>
<Menu> <Function Settings> <Printer> <Printer Settings> <PDF> <RGB Source Profile> Select the profile
<sRGB>Sets the image quality to the industry standard for general Windows computer monitors. If the monitorsupports sRGB, data can be printed in the color tones closest to the displayed colors.
<Gamma 1.5> to <Gamma 2.4>Adjusts the brightness of the print result to prevent the image quality of the brightest and darkest parts frombeing degraded. The greater the gamma value is, the darker the printed text or image becomes.
<None>Carries out color separation from RGB data to CMYK data without applying an RGB source profile.
<CMYK Simulation Profile>Select a simulation target to print the CMYK data. The machine converts CMYK data into a device dependentCMYK color model based on the simulation.
<JapanColor(Canon)><U.S. Web Coated v1.00(Canon)><Euro Standard v1.00(Canon)><None>
<Menu> <Function Settings> <Printer> <Printer Settings> <PDF> <CMYK SimulationProfile> Select the profile
<JapanColor(Canon)>Set a JapanColor profile. Data is printed in the color tones closest to those of the Japanese printing standard.
<U.S. Web Coated v1.00(Canon)>
Setting Menu List
527
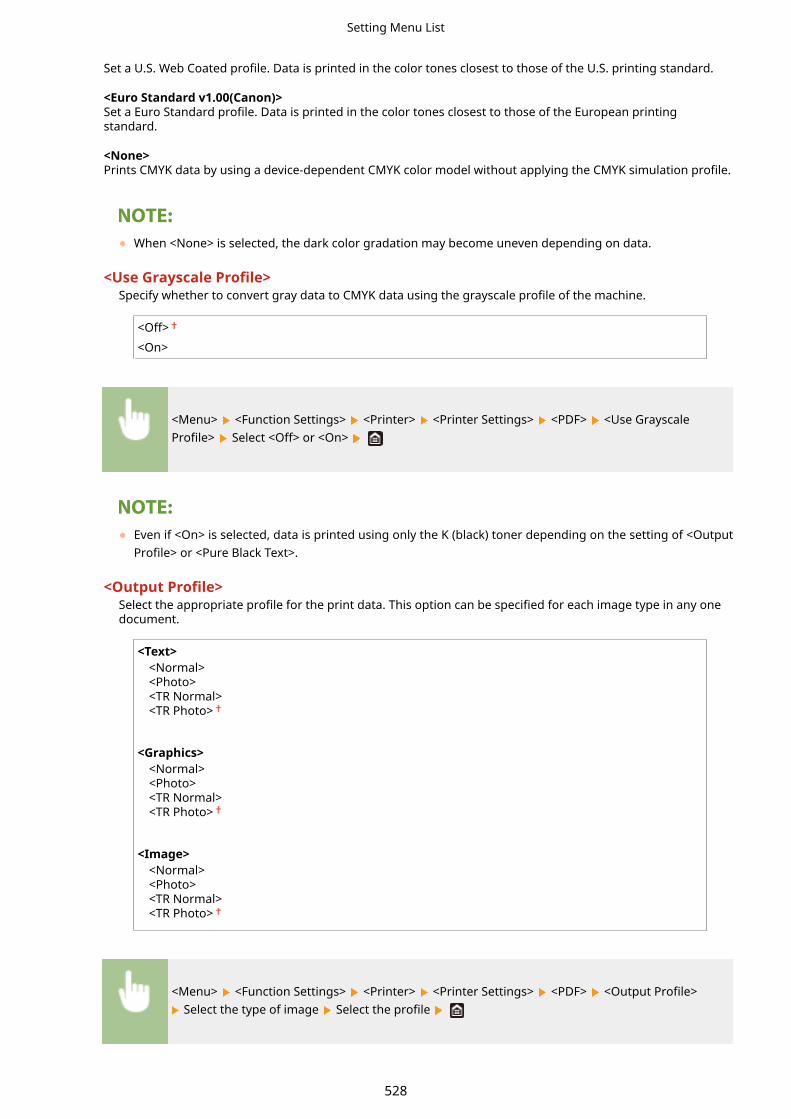
Set a U.S. Web Coated profile. Data is printed in the color tones closest to those of the U.S. printing standard.
<Euro Standard v1.00(Canon)>Set a Euro Standard profile. Data is printed in the color tones closest to those of the European printingstandard.
<None>Prints CMYK data by using a device-dependent CMYK color model without applying the CMYK simulation profile.
● When <None> is selected, the dark color gradation may become uneven depending on data.
<Use Grayscale Profile>Specify whether to convert gray data to CMYK data using the grayscale profile of the machine.
<Off>
<On>
<Menu> <Function Settings> <Printer> <Printer Settings> <PDF> <Use GrayscaleProfile> Select <Off> or <On>
● Even if <On> is selected, data is printed using only the K (black) toner depending on the setting of <OutputProfile> or <Pure Black Text>.
<Output Profile>Select the appropriate profile for the print data. This option can be specified for each image type in any onedocument.
<Text><Normal><Photo><TR Normal><TR Photo>
<Graphics>
<Normal><Photo><TR Normal><TR Photo>
<Image>
<Normal><Photo><TR Normal><TR Photo>
<Menu> <Function Settings> <Printer> <Printer Settings> <PDF> <Output Profile> Select the type of image Select the profile
Setting Menu List
528

Type of imageSelect the object for which to change the setting. <Text> represents letters and characters, <Graphics>represents lines and figures, and <Image> represents photos and images.
Profile
<Normal>Prints data by adjusting it to the color tones closest to those displayed on the monitor.
<Photo>Prints data by adjusting it to photo-like color tones.
<TR Normal>Prints data by adjusting it to the color tones closest to those displayed on the monitor and using only the K(black) toner to reproduce black and gray elements.
<TR Photo>Prints data by adjusting it to photo-like color tones and using only the K (black) toner to reproduce black andgray elements.
The setting of this item is unavailable when one of the following settings is selected.
● <RGB Source Profile> is set to <None>
● <CMYK Simulation Profile> is set to <None>
● <Use Grayscale Profile> is set to <Off>
<Matching Method>Select the element to be prioritized when carrying out color matching in <RGB Source Profile>.
<Perceptual>
<Saturation><Colorimetric>
<Menu> <Function Settings> <Printer> <Printer Settings> <PDF> <Matching Method> Select the item
Setting Menu List
529

<Perceptual>Provides the color tone that is suitable for printing photos or bit map images.
<Saturation>Provides the color tone that is suitable for printing artworks, graphs, and other images used for presentationmaterials.
<Colorimetric>Set this option when you want to reproduce the RGB color value in the color reproduction range of the machineas accurately as possible.
● The setting of this item is unavailable when <RGB Source Profile> is set to <None>.
<Halftones>You can select the printing method used to reproduce halftones (the intermediate range between the lighterand darker areas of an image) for optimal image quality.
<Error Diffusion>Produces finer printing results than using <Resolution/Gradation>. This option is suitable for printingsharp outlines of the text or fine-line data.
<Off>
<On>
<Menu> <Function Settings> <Printer> <Printer Settings> <PDF> <Halftones> <ErrorDiffusion> Select <Off> or <On>
● This setting is only available when <Resolution> is set to <600 dpi>.
<Resolution/Gradation> *1
Select a method used to reproduce halftones, if <Error Diffusion> is set to <Off>. This option can bespecified for each image type in any one document.
<Text><Resolution>
<Gradation>
<Graphics>
<Resolution>
<Gradation>
<Image>
<Resolution>
<Gradation>
Setting Menu List
530

<Menu> <Function Settings> <Printer> <PrinterSettings> <PDF> <Halftones> <Resolution/Gradation> Select the type of image Select<Resolution> or <Gradation>
Type of imageSelect the object for which to change the setting. <Text> represents letters and characters, <Graphics>represents lines and figures, and <Image> represents photos and images.
Setting value
<Resolution>Produces a fine print with clear edges of text. It is suitable for printing characters and fine lines.
<Gradation>Produces a print with smooth gradation or smooth edges. It is suitable for printing figures or graphscontaining gradation areas.
<Brightness> *1
Adjust the brightness of the entire image in increments of 5%. The lower the setting value is, the brighter theimage or text becomes. The greater the setting value is, the darker the image or text becomes.
85 to 100 to 115 (%)
<Menu> <Function Settings> <Printer> <Printer Settings> <PDF> <Brightness> Adjustthe brightness
<Composite Overprint>Specify whether to overprint CMYK data, with overprint specified, as composite output.
<Off><On>
<Menu> <Function Settings> <Printer> <Printer Settings> <PDF> <CompositeOverprint> Select <Off> or <On>
Setting Menu List
531

● Overprinting using special colors is not permitted.
<Grayscale Conversion> *1
Specify the way of printing color data in black and white.
<sRGB><NTSC>
<Uniform RGB>
<Menu> <Function Settings> <Printer> <Printer Settings> <PDF> <GrayscaleConversion> Select the type of grayscale conversion
<sRGB>Prints in black and white with emphasis on color differences so that a smooth gradation is achieved.
<NTSC>Prints in black and white so that the resulting image looks like a black and white television picture (of the NTSCsystem).
<Uniform RGB>Prints in black and white so that R, G, and B are uniformly converted to the same gray level by using onlybrightness as the reference.
<XPS>You can change settings for XPS files.
<Matching Method>Specify the processing method used to correct the color.
<General>
<Perceptual><Colorimetric><Vivid Photo>
<Menu> <Function Settings> <Printer> <Printer Settings> <XPS> <Matching Method> Select the item
Setting Menu List
532

<General>Performs processing so that the color tone is suitable for printing general papers such as photos or documents.
<Perceptual>Performs processing so that the color tone is suitable for printing bitmap images. When this item is selected, animage is printed in the colors closest to those displayed on the monitor.
<Colorimetric>Minimizes a color variance that occurs when RGB data is converted to CMYK data.
<Vivid Photo>Performs processing so that the color tone is deeper and more vivid than <General>.
<Halftones>You can select the printing method used to reproduce halftones (the intermediate range between the lighterand darker areas of an image) for optimal image quality.
<Error Diffusion>Produces finer printing results than using <Resolution/Gradation>. This option is suitable for printingsharp outlines of the text or fine-line data.
<Off>
<On>
<Menu> <Function Settings> <Printer> <Printer Settings> <XPS> <Halftones> <ErrorDiffusion> Select <Off> or <On>
● This setting is only available when <Resolution> is set to <600 dpi>.
<Resolution/Gradation> *1
Select a method used to reproduce halftones, if <Error Diffusion> is set to <Off>. This option can bespecified for each image type in any one document.
<Text><Resolution>
<Gradation>
<Graphics>
<Resolution>
<Gradation>
<Image>
<Resolution>
<Gradation>
Setting Menu List
533

<Menu> <Function Settings> <Printer> <PrinterSettings> <XPS> <Halftones> <Resolution/Gradation> Select the type of image Select<Resolution> or <Gradation>
Type of imageSelect the object for which to change the setting. <Text> represents letters and characters, <Graphics>represents lines and figures, and <Image> represents photos and images.
Setting value
<Resolution>Produces a fine print with clear edges of text. It is suitable for printing characters and fine lines.
<Gradation>Produces a print with smooth gradation or smooth edges. It is suitable for printing figures or graphscontaining gradation areas.
<Gray Compensation>Configures a setting so that black or gray data of which color information is "R = G = B" is printed using onlythe K (black) toner. If <Off> is selected, data is printed using the toner of four colors: CMYK. This option canbe specified for each image type in any one document.
<Text><Off>
<On>
<Graphics>
<Off>
<On>
<Image>
<Off>
<On>
<Menu> <Function Settings> <Printer> <Printer Settings> <XPS> <GrayCompensation> Select the type of image Select <Off> or <On>
Setting Menu List
534

<Grayscale Conversion> *1
Specify the way of printing color data in black and white.
<Text><sRGB>
<NTSC>
<Uniform RGB>
<Graphics>
<sRGB>
<NTSC>
<Uniform RGB>
<Image>
<sRGB>
<NTSC>
<Uniform RGB>
<Menu> <Function Settings> <Printer> <Printer Settings> <XPS> <GrayscaleConversion> Select the type of image Select the type of grayscale conversion
Type of imageSelect the object for which to change the setting. <Text> represents letters and characters, <Graphics>represents lines and figures, and <Image> represents photos and images.
Type of grayscale conversion
<sRGB>Prints in black and white with emphasis on color differences so that a smooth gradation is achieved.
<NTSC>Prints in black and white so that the resulting image looks like a black and white television picture (of theNTSC system).
<Uniform RGB>Prints in black and white so that R, G, and B are uniformly converted to the same gray level by using onlybrightness as the reference.
<Paper Save>Specify whether to disable a blank page in print data from being output.
Setting Menu List
535

<Off>
<On>
<Menu> <Function Settings> <Printer> <Printer Settings> <XPS> <Paper Save> Select<Off> or <On>
<PDL Selection (Plug and Play)>
Select a page description language so that the machine is detected as a printer that is compatible with that languagewhen it is connected to a computer by using Plug and Play.
<Network> *2
Select a page description language so that the machine is detected as a printer that is compatible with thatlanguage when it is detected over the network.
<FAX>*1
<UFR II>
<UFR II (V4)>
<PCL6>*1
<PS>*1
<USB>Select a page description language so that the machine is detected as a printer that is compatible with thatlanguage when it is connected to a computer via USB.
<UFR II>
<UFR II (V4)>
<PCL6>*1
<PS>*1
<Menu> <Function Settings> <Printer> <PDL Selection (Plug and Play)> Select <Network>or <USB> Select a page description language Restart the machine
<FAX>Detects and connects the machine as a fax device.
<UFR II>Detects and connects the machine as a UFR II printer.
<UFR II (V4)>
Setting Menu List
536

Detects and connects the machine as a UFR II printer that is compatible with XML Paper Specification (XPS).
<PCL6>Detects and connects the machine as a PCL6 printer.
<PS>Detects and connects the machine as a PS printer.
Setting Menu List
537

<Send>16SE-08X
All the settings related to sending faxes and scanned originals are listed with descriptions. Default settings are markedwith a dagger ( ).
<Common Settings>(P. 538)<Scan and Send Settings>(P. 539)<Fax Settings>(P. 543)
Asterisks (*)
● Settings marked with "*1" may not be displayed depending on the model you are using, options, or othersetting items.
● Settings marked with "*2" may be unavailable or vary or have different defaults depending on your countryor region.
● Settings marked with "*3" cannot be imported or exported.
<Common Settings>
Configure the settings to restrict destinations at the time of sending faxes, e-mails, or I-Faxes, and specify theconfirmation method to prevent transmission to wrong destinations.
<Restrict New Destinations>Select whether to limit the fax numbers and e-mail/I-Fax addresses that can be specified as destinations tothose already registered in the Address Book. Restricting New Destinations that Can Be Specified(P. 406)
<Off>
<On>
<Restrict Resending from Log>Select whether to prevent a destination from being selected from the sent job logs. Disabling Use ofPreviously Used Destinations(P. 406)
<Off>
<On>
<Confirm When Coded Dial TX>Select whether to display the details of an entered coded dial number when it is selected as a destination. Displaying Destinations in Address Book(P. 406)
<Off>
<On>
<Confirm Dest. Before Sending>Specify whether to display the destination confirmation screen when sending faxes, e-mails, or I-Faxes. If <Onlyfor Sequential Broadcast> is selected, the confirmation screen is displayed only when multiple destinations arespecified. Checking Destinations when Sending Data(P. 407)
<Off>
Setting Menu List
538
<On><Only for Sequential Broadcast>
<Scan and Send Settings>
You can change and register the settings for sending faxes or scanned documents.
<Register Unit Name>Register the sender name for e-mails and I-Faxes. The registered name is displayed in e-mails, along with the e-mail address. If the sender name is not registered, only the e-mail address is displayed.
<Menu> <Function Settings> <Send> <Scan and Send Settings> <Register UnitName> Enter the sender name <Apply>
<E-Mail Settings>Change the default settings used for scanning originals to send as e-mails.
<Change Default Settings (E-Mail)>You can change the default settings used for scanning originals to send as e-mails. The selected settings areused as the default settings when scanning originals. Changing the Default Settings forFunctions(P. 176)
<Scan Size><A4>
<A5R>
<B5>
<LGL>
<LTR>
<STMT>
<EXEC>
<FOOLSCAP/FOLIO>
<OFICIO>
<LETTER (Government)>
<LEGAL (Government)>
<LEGAL (India)>
<FOOLSCAP (Australia)>
<OFICIO (Brazil)>
<OFICIO (Mexico)>
<File Format>
<PDF>
<PDF (Compact)>
<PDF (Compact/OCR)>
<PDF (OCR)>
<Set PDF Details>
<PDF>/<PDF (Compact)>/<PDF (Compact/OCR)>/<PDF (OCR)>
<Encryption>
<None>
Setting Menu List
539

<Acrobat 7.0 or Later/128-bit AES>
<Acrobat 9.0 or Equivalent/256-bit AES>*1
<Acrobat 10.0 or Equivalent/256-bit AES>*1
<Digital Signatures>
<None>
<Top Left><Divide into Pages>
<Off>
<On>
<JPEG>
<TIFF>
<Set TIFF Details>
<Divide into Pages>
<Off>
<On>
<Density>
Nine Levels
<Original Orientation>
<Portrait>
<Landscape>
<Original Type>
<Text>
<Text/Photo>
<Photo>
<2-Sided Original > *1
<Off>
<Book Type>
<Calendar Type>
<Sharpness>
Seven Levels
<Data Size>
<Small: Memory Priority>
<Standard>
<Large: Image Quality Priority>
<Subject/Message>
<Subject>
<Message>
<Reply To>
<None>
<Specify from Address Book>
<Priority>
<Low>
Setting Menu List
540

<Standard>
<High>
<I-Fax Settings>Specify the basic settings for using the machine as an I-Fax device.
<Change Default Settings (I-Fax)>You can change the default settings used for sending I-Fax. The selected settings are used as the defaultsettings when scanning originals. Changing the Default Settings for Functions(P. 176)
<Scan Size><A4>
<A5R>
<B5>
<LGL>
<LTR>
<STMT>
<EXEC>
<FOOLSCAP/FOLIO>
<OFICIO>
<LETTER (Government)>
<LEGAL (Government)>
<LEGAL (India)>
<FOOLSCAP (Australia)>
<OFICIO (Brazil)>
<OFICIO (Mexico)>
<Density>
Nine Levels
<Original Type>
<Text>
<Text/Photo>
<Photo>
<2-Sided Original > *1
<Off>
<Book Type>
<Calendar Type>
<Sharpness>
Seven Levels
<Subject/Message>
<Subject>
<Message>
<Reply To>
<None>
<Specify from Address Book>
Setting Menu List
541
<TX Terminal ID> Information such as the date and time of transmission and the e-mail address of the machine (senderinformation) can be added as a header in transmitted documents. This information tells the recipient whenthe I-Fax was sent and who sent it.
<Add TX Terminal ID><Off>
<On>
<Print Position>
<Inside Image Area>
<Outside Image Area>
<Menu> <Function Settings> <Send> <Scan and Send Settings> <I-Fax Settings> <TXTerminal ID> Select <On> in <Add TX Terminal ID> <Print Position> Select <Inside ImageArea> or <Outside Image Area> <Apply>
<File Settings>Change the default settings used when originals are saved to a shared folder or FTP server.
<Change Default Settings (File)>You can change the default settings used when originals are saved to a shared folder or FTP server. Theselected settings are used as the default settings when scanning. Changing the Default Settings forFunctions(P. 176)
<Scan Size><A4>
<A5R>
<B5>
<LGL>
<LTR>
<STMT>
<EXEC>
<FOOLSCAP/FOLIO>
<OFICIO>
<LETTER (Government)>
<LEGAL (Government)>
<LEGAL (India)>
<FOOLSCAP (Australia)>
<OFICIO (Brazil)>
<OFICIO (Mexico)>
<File Format>
<PDF>
<PDF (Compact)>
<PDF (Compact/OCR)>
<PDF (OCR)>
<Set PDF Details>
Setting Menu List
542

<PDF>/<PDF (Compact)>/<PDF (Compact/OCR)>/<PDF (OCR)>
<Encryption>
<None>
<Acrobat 7.0 or Later/128-bit AES>
<Acrobat 9.0 or Equivalent/256-bit AES>*1
<Acrobat 10.0 or Equivalent/256-bit AES>*1
<Digital Signatures>
<None>
<Top Left><Divide into Pages>
<Off>
<On>
<JPEG>
<TIFF>
<Set TIFF Details>
<Divide into Pages>
<Off>
<On>
<Density>
Nine Levels
<Original Orientation>
<Portrait>
<Landscape>
<Original Type>
<Text>
<Text/Photo>
<Photo>
<2-Sided Original>*1
<Off>
<Book Type>
<Calendar Type>
<Sharpness>
Seven Levels
<Data Size>
<Small: Memory Priority>
<Standard>
<Large: Image Quality Priority>
<Fax Settings> *1
Specify the basic settings for using the machine as a fax device.
Setting Menu List
543

<Change Default Settings (Fax)>You can change the default settings used for sending faxes. The selected settings are used as the defaultsettings when scanning originals. Changing the Default Settings for Functions(P. 176)
<Resolution><200 x 100 dpi (Normal)>
<200 x 200 dpi (Fine)>
<200 x 200 dpi (Photo)>
<200 x 400 dpi (Superfine)>
<400 x 400 dpi (Ultrafine)>
<Density>
Nine Levels
<2-Sided Original >
<Off>
<Book Type><Calendar Type>
<Sharpness>
Seven Levels
<Off-Hook Alarm>Select whether the machine makes an alert sound when the handset of a telephone or the optional handsetconnected to the machine is not properly set on the cradle. You can also adjust the volume of the alert sound.
0 to 3
<Menu> <Function Settings> <Send> <Fax Settings> <Off-Hook Alarm> Select thevolume of the alert sound <Apply>
<ECM TX>Enable or disable error correction mode (ECM). ECM checks for fax data errors and corrects them. To reduceerrors on received faxes, see <ECM RX>(P. 551) .
<Off><On>
<Menu> <Function Settings> <Send> <Fax Settings> <ECM TX> <On>
● ECM must be enabled on both the machine and the other fax device because error checks areperformed on both the sending and receiving devices.
Setting Menu List
544
● Even when ECM is enabled, errors may occur due to telephone line conditions.
● It may take a longer time than usual to process data when ECM is enabled because the error checksand corrections are performed while the data is transmitted.
<Set Pause Time> *2
For example, when you make calls by dialing "0 - (pause) - (telephone number)," 0 is dialed first and then a fewseconds later, the telephone number. When sending faxes overseas, you need to specify destinations by dialing"(international access code) - (country code) - (area code) - (fax number)" but consecutive numbers that areinput without pauses may not be recognized correctly. In this case, try adding a pause after the internationalaccess code or the fax number. If the code or the number is still not recognized correctly, change the durationof the pause. For instructions on how to enter a pause, see step 4 on Basic Operations for SendingFaxes(P. 217) .
1 to 4 to 15 (sec.)
<Menu> <Function Settings> <Send> <Fax Settings> <Set Pause Time> Specify theduration of pause <Apply>
<Auto Redial> *2
Specify settings for Auto Redial, a function that automatically redials the fax number after several minutes if thefirst attempt fails because the line is busy. You can specify how many times the machine redials and the intervalbetween redials.
<Use Auto Redial><Off>
<On>
<Number of Times to Redial>
1 to 2 to 10 (time(s))
<Redial Interval>
2 to 99 (min.)
<Redial When Error Occurs>
<Off>
<On>
<Menu> <Function Settings> <Send> <Fax Settings> <Auto Redial> Select <On> in <UseAuto Redial> Specify the settings <Apply>
<Number of Times to Redial>Specifies how many times the machine redials. Enter a number, and select <Apply>.
Setting Menu List
545

<Redial Interval>Specifies the interval between redials. Enter a number for the interval, and select <Apply>.
<Redial When Error Occurs>When set to <On>, specifies to redial when a transmission error occurs.
<Check Dial Tone Before Sending> *2
Select whether to check the dial tone before a fax number is dialed.
<Off>
<On>
<Menu> <Function Settings> <Send> <Fax Settings> <Check Dial Tone BeforeSending> <On>
<Set Line>Specify a fax number, unit name, and line type.
<Register Unit Telephone Number>Register the fax number for the machine. Registering the Fax Number and Unit Name(P. 81)
<Register Unit Name>Register the name of a company or person ( Registering the Fax Number and Unit Name(P. 81) ). Theregistered name is sent as sender information to the destination ( <TX Terminal ID>(P. 548) ).
<Select Line Type> *2
Select the telephone line type used for fax transmission. Connecting the Telephone Line(P. 83)
<Pulse><Tone>
<TX Start Speed>If it takes a long time to start sending a fax, such as when there is a poor connection, you can adjust thecommunication start speed downward incrementally.
<33600 bps>
<14400 bps><9600 bps><7200 bps><4800 bps><2400 bps>
<Menu> <Function Settings> <Send> <Fax Settings> <TX Start Speed> Select thecommunication start speed
Setting Menu List
546
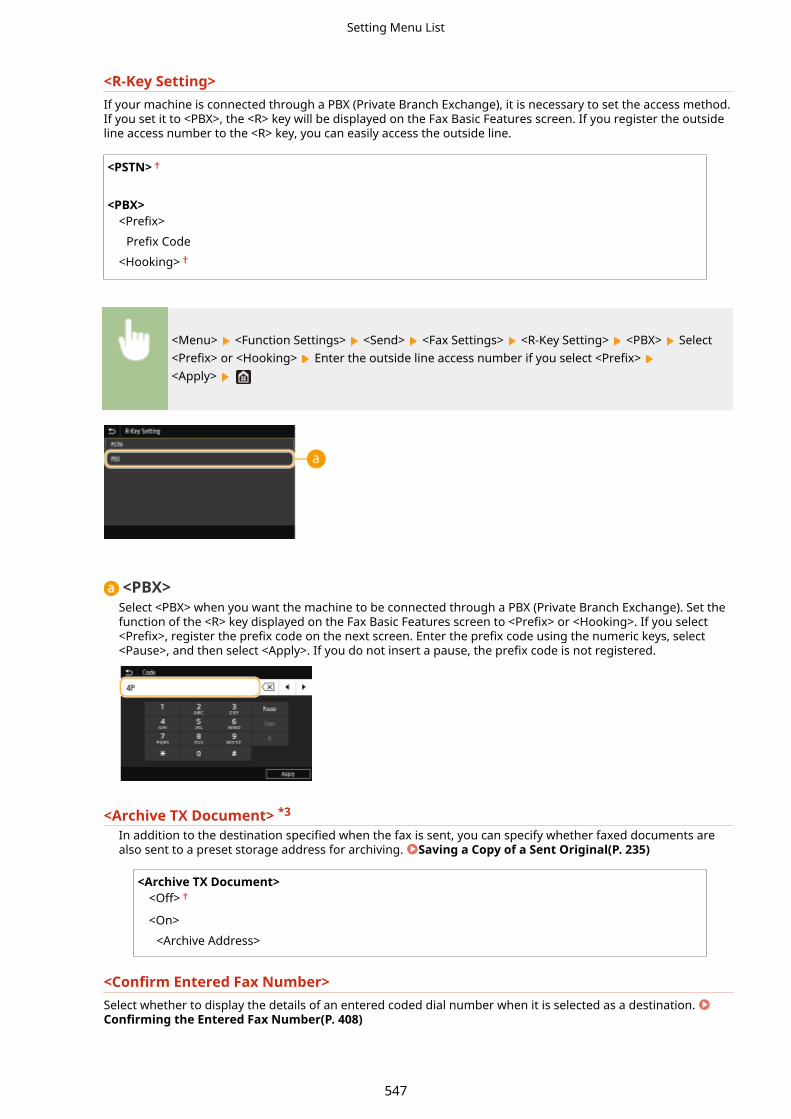
<R-Key Setting>If your machine is connected through a PBX (Private Branch Exchange), it is necessary to set the access method.If you set it to <PBX>, the <R> key will be displayed on the Fax Basic Features screen. If you register the outsideline access number to the <R> key, you can easily access the outside line.
<PSTN> <PBX><Prefix>
Prefix Code
<Hooking>
<Menu> <Function Settings> <Send> <Fax Settings> <R-Key Setting> <PBX> Select<Prefix> or <Hooking> Enter the outside line access number if you select <Prefix> <Apply>
<PBX>Select <PBX> when you want the machine to be connected through a PBX (Private Branch Exchange). Set thefunction of the <R> key displayed on the Fax Basic Features screen to <Prefix> or <Hooking>. If you select<Prefix>, register the prefix code on the next screen. Enter the prefix code using the numeric keys, select<Pause>, and then select <Apply>. If you do not insert a pause, the prefix code is not registered.
<Archive TX Document> *3
In addition to the destination specified when the fax is sent, you can specify whether faxed documents arealso sent to a preset storage address for archiving. Saving a Copy of a Sent Original(P. 235)
<Archive TX Document><Off>
<On>
<Archive Address>
<Confirm Entered Fax Number>Select whether to display the details of an entered coded dial number when it is selected as a destination. Confirming the Entered Fax Number(P. 408)
Setting Menu List
547

<Off>
<On>
<Allow Fax Driver TX>Enable or disable PC faxing (sending faxes from a computer). Restricting Fax Sending from aComputer(P. 408)
<Off><On>
<Restrict Sequential Broadcast>Select whether to prohibit sequential broadcasting, a feature that sends faxes to multiple destinations insuccession. Restricting Sequential Broadcasts(P. 408)
<Off>
<On>
<TX Terminal ID>Specify settings for adding the sender information, including the fax number and the name of the machine, tothe fax header. The recipient can check who sent the fax by looking at the added information.
<Add TX Terminal ID><Off>
<On>
<Print Position>
<Inside Image Area><Outside Image Area>
<Mark Number As>
<Fax><Tel>
<Menu> <Function Settings> <Send> <Fax Settings> <TX Terminal ID> Select <On> in<Add TX Terminal ID> Specify the settings <Apply>
<Print Position>Specifies the position to print the terminal ID information in the sent fax. Select <Inside Image Area> to printthe information inside the image area, or <Outside Image Area> to print the information outside the imagearea.
<Mark Number As>Adds the "Fax" or "Tel" mark in front of the fax number registered for the machine ( Registering the FaxNumber and Unit Name(P. 81) ). Select <Tel> to indicate that the notified number is a telephone number.
Setting Menu List
548
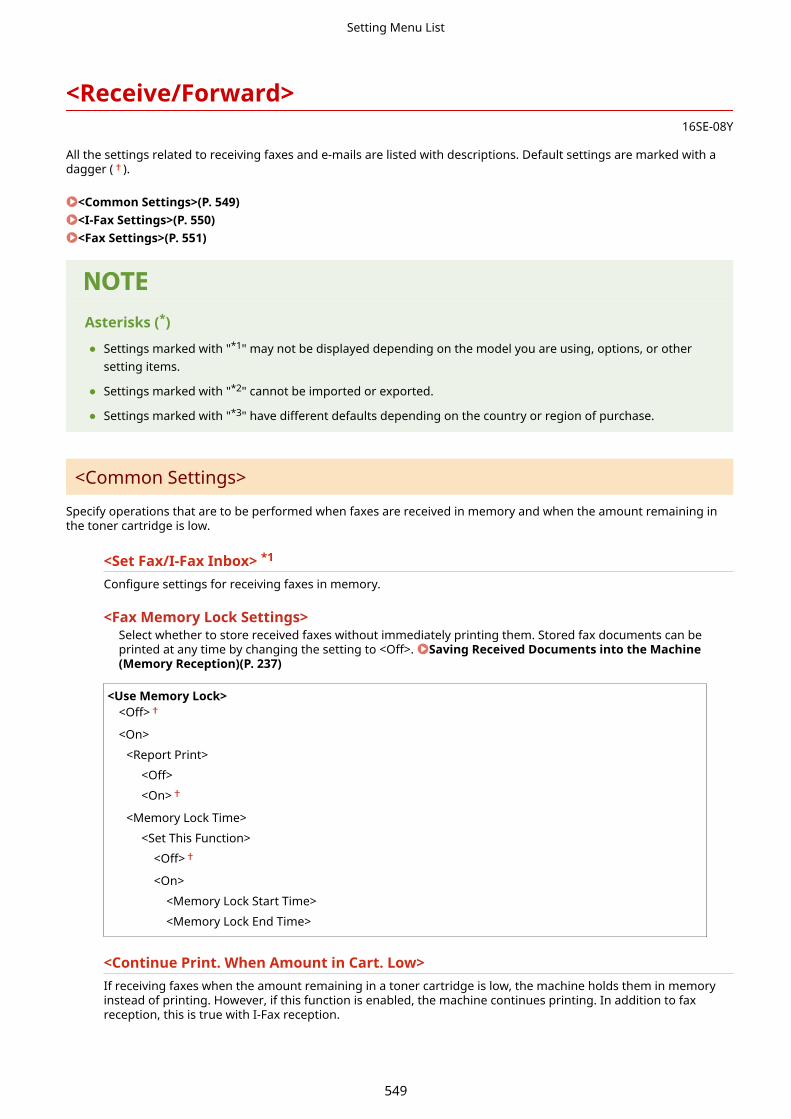
<Receive/Forward>16SE-08Y
All the settings related to receiving faxes and e-mails are listed with descriptions. Default settings are marked with adagger ( ).
<Common Settings>(P. 549)<I-Fax Settings>(P. 550)<Fax Settings>(P. 551)
Asterisks (*)
● Settings marked with "*1" may not be displayed depending on the model you are using, options, or othersetting items.
● Settings marked with "*2" cannot be imported or exported.
● Settings marked with "*3" have different defaults depending on the country or region of purchase.
<Common Settings>
Specify operations that are to be performed when faxes are received in memory and when the amount remaining inthe toner cartridge is low.
<Set Fax/I-Fax Inbox> *1
Configure settings for receiving faxes in memory.
<Fax Memory Lock Settings>Select whether to store received faxes without immediately printing them. Stored fax documents can beprinted at any time by changing the setting to <Off>. Saving Received Documents into the Machine(Memory Reception)(P. 237)
<Use Memory Lock><Off>
<On>
<Report Print>
<Off>
<On>
<Memory Lock Time>
<Set This Function>
<Off>
<On>
<Memory Lock Start Time>
<Memory Lock End Time>
<Continue Print. When Amount in Cart. Low>If receiving faxes when the amount remaining in a toner cartridge is low, the machine holds them in memoryinstead of printing. However, if this function is enabled, the machine continues printing. In addition to faxreception, this is true with I-Fax reception.
Setting Menu List
549

<Off>
<On>
<Menu> <Function Settings> <Receive/Forward> <Common> <Continue Print. WhenAmount in Cart. Low> <On>
● When this function is enabled, faxes may fade or blur. Because received documents are not stored,you need to ask the sender to resend the document.
<I-Fax Settings>
Configure settings to print received I-Fax documents.
<Print on Both Sides> *1
Specify settings for printing received documents on both sides of paper.
<Off>
<On>
<Menu> <Function Settings> <Receive/Forward> <I-Fax Settings> <Print on Both Sides> <On>
<RX Print Size>Specify the paper size to be used for printing.
<A4>
<LTR><LGL><FOOLSCAP/FOLIO><OFICIO><LETTER (Government)><LEGAL (Government)><LEGAL (India)><FOOLSCAP (Australia)><OFICIO (Brazil)><OFICIO (Mexico)>
Setting Menu List
550
<Menu> <Function Settings> <Receive/Forward> <I-Fax Settings> <RX Print Size> Selectthe paper size
<Fax Settings> *1
Configure settings for receiving and forwarding faxes.
<Print on Both Sides>Specify settings for printing received documents on both sides of paper.
<Off>
<On>
<Menu> <Function Settings> <Receive/Forward> <Fax Settings> <Print on BothSides> <On>
<ECM RX>Enable or disable error correction mode (ECM). ECM checks for fax data errors and corrects them. To reduceerrors on sent faxes, see <ECM TX>(P. 544) .
<Off><On>
<Menu> <Function Settings> <Receive/Forward> <Fax Settings> <ECM RX> <On>
● ECM must be enabled on both the machine and the other fax device because error check isperformed on both the sending and receiving devices.
● Even when ECM is enabled, errors may occur due to telephone line conditions.
● It may take a longer time than usual to process data when ECM is enabled because the error checkand corrections are performed while the data is transmitted.
<Incoming Ring> *3
Specify settings for sounding a ring to notify you of incoming faxes. This feature is only available when <Auto>or <Fax/Tel (Auto Switch)> is selected for the receive mode. Specify how many times the incoming call ringswhen the machine receives a fax call. You can also disable the settings to prevent the incoming call fromringing.
<Use Incoming Ring>
Setting Menu List
551

<Off>
<On>
<Number of Rings>
1 to 2 to 99 (time(s))
<Menu> <Function Settings> <Receive/Forward> <Fax Settings> <Incoming Ring> Select<On> in <Use Incoming Ring> Enter the desired number in <Number of Rings> <Apply>
● When <On> is specified, you need to connect your telephone or the optional handset to the machinebeforehand.
● When <Off> is specified, the machine does not enter sleep mode.
<Remote RX> *3
Specify settings for receiving a fax by operating a telephone that is connected to the machine (RemoteReception). When a fax is sent to the machine, you can receive it just by picking up the handset of the telephoneand entering a specific ID number by using the telephone. This feature can save you the trouble of going all theway to the machine. For instructions on how to use Remote Reception, see Using a Telephone to ReceiveFaxes (Remote Reception)(P. 228) .
<Use Remote RX><Off>
<On>
<Remote RX ID>
00 to 25 to 99
<Menu> <Function Settings> <Receive/Forward> <Fax Settings> <Remote RX> Select<On> in <Use Remote RX> Enter the ID number in <Remote RX ID> <Apply>
<Switch to Auto RX>Specify settings for automatically receiving a fax after the machine has rung for a specified time period. Thisfeature is only available when <Manual> is selected for the receive mode. By using this feature, faxes can bereceived even when no one is available to pick up the handset.
<Use Switch to Auto RX><Off>
<On>
<Ring Time Until Auto RX>
1 to 15 to 99 (sec.)
Setting Menu List
552

<Menu> <Function Settings> <Receive/Forward> <Fax Settings> <Switch to AutoRX> Select <On> in <Use Switch to Auto RX> Enter the desired number of seconds in <RingTime Until Auto RX> <Apply>
<RX Start Speed>If it takes a long time to start receiving a fax, such as when there is a poor connection, you can adjust thecommunication start speed downward incrementally.
<33600 bps>
<14400 bps><9600 bps><7200 bps><4800 bps><2400 bps>
<Menu> <Function Settings> <Receive/Forward> <Fax Settings> <RX Start Speed> Selectthe communication start speed
<Use Reduce RX Size>Specify settings for reducing the image size of a received document. You can select an automatic reduction ratiothat reduces the received document to size of the loaded paper. You can also select a ratio from a list.
<Use Reduce RX Size><Off>
<On>
<Reduction Ratio>
<Auto><97%><95%><90%><75%>
<Reduction Direction>
<Vertical/Horizontal><Vertical Only>
<Menu> <Function Settings> <Receive/Forward> <Fax Settings> <Use Reduce RXSize> Select <On> in <Use Reduce RX Size> Specify each setting item <Apply>
Setting Menu List
553

<Reduction Ratio><Auto> reduces the image by a ratio that is based on the size of the loaded paper. <97%>, <95%>, <90%>, or<75%> reduce the image by the corresponding ratio.
<Reduction Direction>Select <Vertical/Horizontal> to reduce the image both vertically and horizontally. Select <Vertical Only> toreduce only vertically.
<Print RX Page Footer>Select whether to print information, including date and time of reception and page numbers, on the bottom ofreceived faxes.
<Off>
<On>
<Menu> <Function Settings> <Receive/Forward> <Fax Settings> <Print RX PageFooter> <On>
<Forwarding Settings>Specify settings for forwarding faxes.
<Forwarding Function> *2
Select whether to forward all the received fax documents to a specified destination. In addition to a faxnumber, you can also specify an e-mail address or a shared folder in a computer, etc. as the forwardingdestination. Forwarding the Received Documents Automatically(P. 239)
<Use Forwarding Function><Off>
<On>
<Forwarding Destination>
<Print Images>Select whether to print forwarded fax documents. You can set the machine to print forwarded documentsonly when an error occurs. Printing Documents to be Forwarded(P. 239)
<Off><On>
<Only When Error Occurs>
<Store Images in Memory>Select whether to store fax documents in memory when they are not successfully forwarded. You can resendor print the documents later as necessary. Printing/Resending/Deleting Documents that Failed to beForwarded(P. 239)
<Off>
Setting Menu List
554

<Only When Error Occurs>
Setting Menu List
555
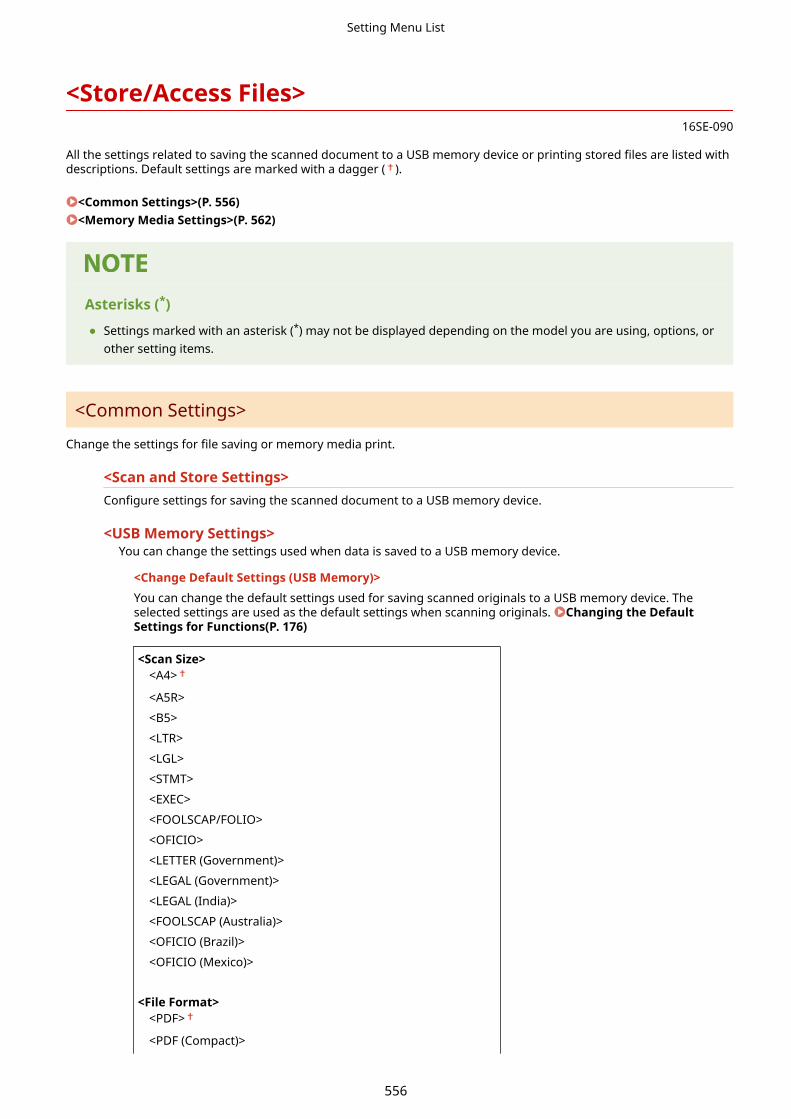
<Store/Access Files>16SE-090
All the settings related to saving the scanned document to a USB memory device or printing stored files are listed withdescriptions. Default settings are marked with a dagger ( ).
<Common Settings>(P. 556)<Memory Media Settings>(P. 562)
Asterisks (*)
● Settings marked with an asterisk (*) may not be displayed depending on the model you are using, options, orother setting items.
<Common Settings>
Change the settings for file saving or memory media print.
<Scan and Store Settings>Configure settings for saving the scanned document to a USB memory device.
<USB Memory Settings>You can change the settings used when data is saved to a USB memory device.
<Change Default Settings (USB Memory)>You can change the default settings used for saving scanned originals to a USB memory device. Theselected settings are used as the default settings when scanning originals. Changing the DefaultSettings for Functions(P. 176)
<Scan Size><A4>
<A5R>
<B5>
<LTR>
<LGL>
<STMT>
<EXEC>
<FOOLSCAP/FOLIO>
<OFICIO>
<LETTER (Government)>
<LEGAL (Government)>
<LEGAL (India)>
<FOOLSCAP (Australia)>
<OFICIO (Brazil)>
<OFICIO (Mexico)>
<File Format>
<PDF>
<PDF (Compact)>
Setting Menu List
556

<PDF (Compact/OCR)>
<PDF (OCR)>
<Set PDF Details>
<PDF>/<PDF (Compact)>/<PDF (Compact/OCR)>/<PDF (OCR)>
<Encryption>
<None>
<Acrobat 7.0 or Later/128-bit AES>
<Acrobat 9.0 or Equivalent/256-bit AES>*
<Acrobat 10.0 or Equivalent/256-bit AES>*
<Digital Signatures>
<None>
<Top Left><Divide into Pages>
<Off>
<On>
<JPEG>
<TIFF>
<Set TIFF Details>
<Divide into Pages>
<Off>
<On>
<Density>
Nine Levels
<Original Orientation>
<Portrait>
<Landscape>
<Original Type>
<Text>
<Text/Photo>
<Photo>
<2-Sided Original>*
<Off>
<Book Type>
<Calendar Type>
<Sharpness>
Seven Levels
<Data Size>
<Small: Memory Priority>
<Standard>
<Large: Image Quality Priority>
<Access Stored Files Settings>You can change the settings to print files in a USB memory device and the method for displaying them.
Setting Menu List
557

<Change Default Settings (Memory Media Print)>You can change the default settings associated with memory media print. The settings configured here areused as the default settings of the memory media print function. Changing the Default Settings forFunctions(P. 176)
<Paper><Multi-Purpose Tray>
<Drawer 1>
<Drawer 2>*
<Number of Copies>
1 to 999
<2-Sided>*
<Off>
<Book Type>
<Calendar Type>
<Set JPEG/TIFF Details>
<Brightness>
Five Levels
<N on 1>
<Off>
<2 on 1>
<4 on 1>
<Original Type>
<Photo Priority><Text Priority>
<Halftones>
<Gradation>
<Error Diffusion>
< Set PDF Details>
<Brightness>
Seven Levels
<N on 1>
<Off>
<2 on 1>
<4 on 1>
<6 on 1>
<8 on 1>
<9 on 1>
<16 on 1>
<Print Range>
<All Pages>
<Specified Pages>
<Enlarge/Reduce to Fit Paper Size>
<Off>
<On>
<Enlarge Print Area>
Setting Menu List
558

<Off>
<On>
<Print Comments>
<Off>
<Auto>
<Other Settings>
<Halftones>
<Error Diffusion>
<Off>
<On>
<Resolution/Gradation>*
<Text>
<Resolution>
<Gradation>
<Graphics>
<Resolution>
<Gradation>
<Image>
<Resolution>
<Gradation>
<Pure Black Text>
<Off>
<On>
<Black Overprint>*
<Off>
<On>
<RGB Source Profile>
<sRGB>
<Gamma 1.5>
<Gamma 1.8>
<Gamma 2.4>
<None>
<CMYK Simulation Profile>
<JapanColor(Canon)>
<U.S. Web Coated v1.00(Canon)>
<Euro Standard v1.00(Canon)>
<None>
<Use Grayscale Profile>
<Off>
<On>
<Output Profile>
<Text>
<Normal>
<Photo>
<TR Normal>
<TR Photo>
<Graphics>
<Normal>
Setting Menu List
559

<Photo>
<TR Normal>
<TR Photo>
<Image>
<Normal>
<Photo>
<TR Normal>
<TR Photo>
<Matching Method>
<Perceptual>
<Saturation>
<Colorimetric>
<Composite Overprint>
<Off>
<On>
<Grayscale Conversion>
<sRGB>
<NTSC>
<Uniform RGB>
<Print Quality>
<Density>*
Yellow/Magenta/Cyan/Black 17 Levels
<Fine Adjust>
<Yellow>/<Magenta>/<Cyan>/<Black>
<High>/<Medium>/<Low>
17 levels
<Toner Save>
<Off>
<On>
<Gradation>
<High 1>
<High 2>
<Density Fine Adjustment>
Five Levels
<Resolution>
<1200 dpi>
<600 dpi>
<Special Smoothing Mode>
<Mode 1>
<Mode 2>
<Mode 3>
<Mode 4>
<Mode 5>
<Mode 6>
<Toner Volume Correction>
<Standard>
<Gradation Priority>
Setting Menu List
560
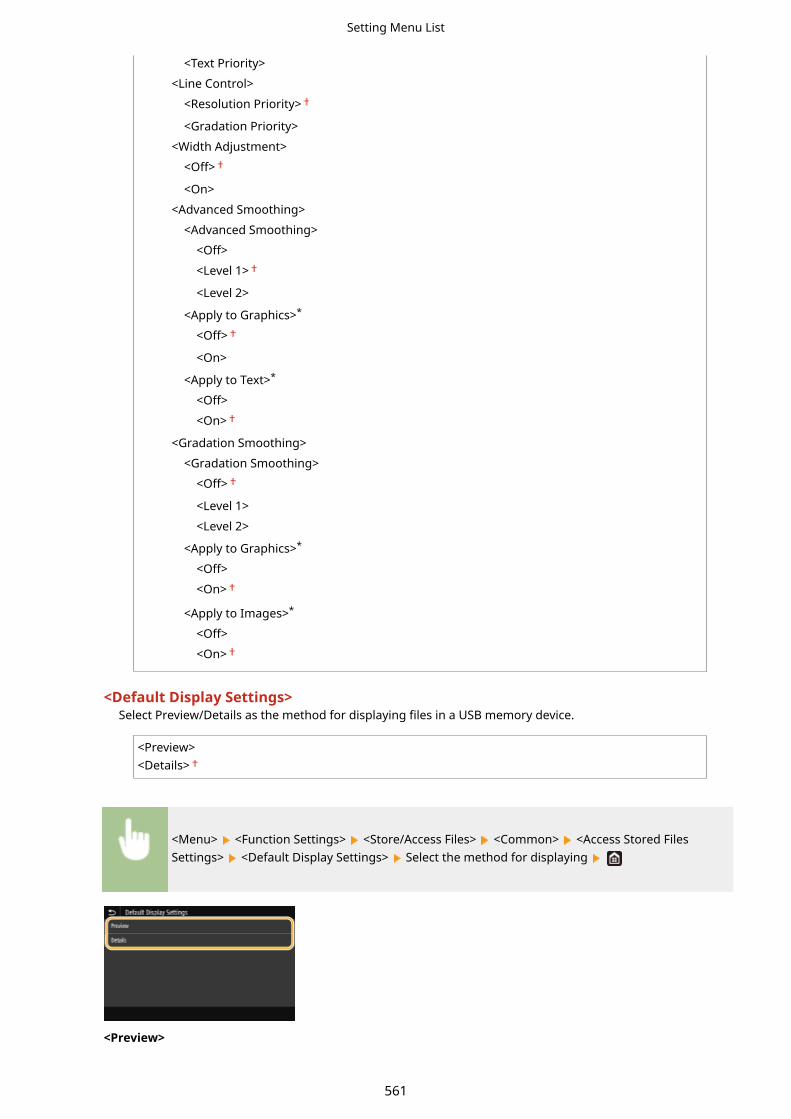
<Text Priority>
<Line Control>
<Resolution Priority>
<Gradation Priority>
<Width Adjustment>
<Off>
<On>
<Advanced Smoothing>
<Advanced Smoothing>
<Off>
<Level 1>
<Level 2>
<Apply to Graphics>*
<Off>
<On>
<Apply to Text>*
<Off>
<On>
<Gradation Smoothing>
<Gradation Smoothing>
<Off>
<Level 1>
<Level 2>
<Apply to Graphics>*
<Off>
<On>
<Apply to Images>*
<Off>
<On>
<Default Display Settings>Select Preview/Details as the method for displaying files in a USB memory device.
<Preview><Details>
<Menu> <Function Settings> <Store/Access Files> <Common> <Access Stored FilesSettings> <Default Display Settings> Select the method for displaying
<Preview>
Setting Menu List
561
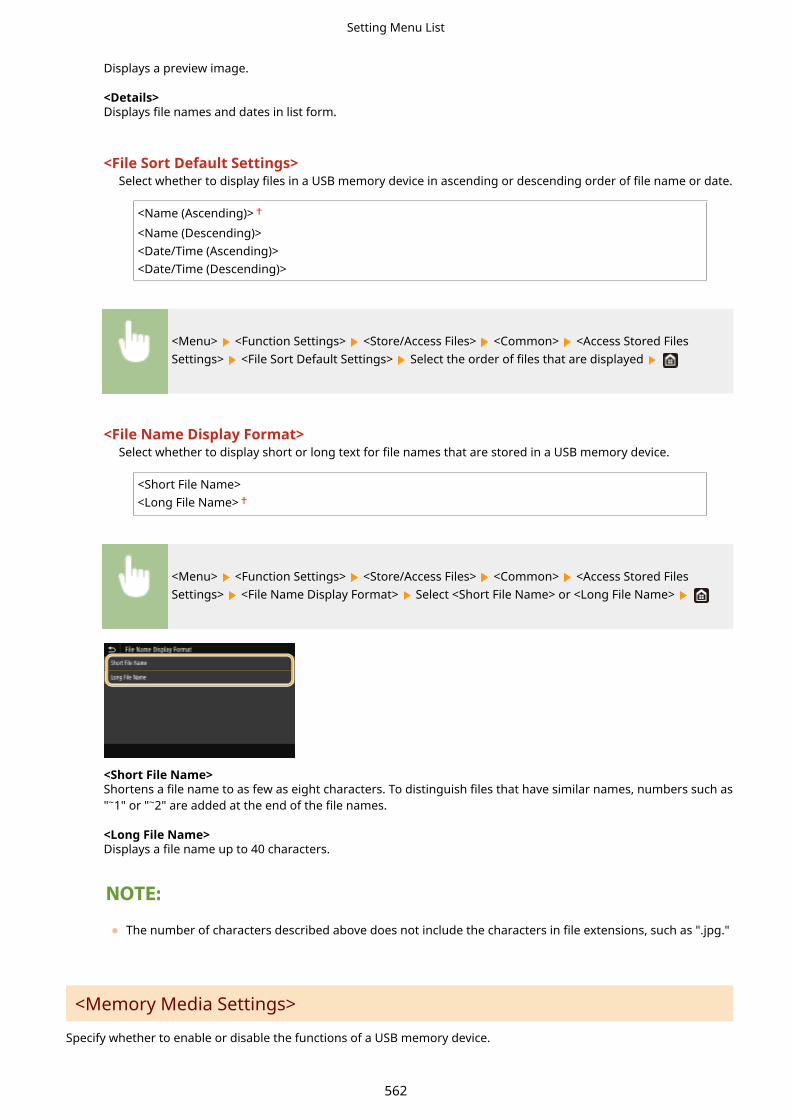
Displays a preview image.
<Details>Displays file names and dates in list form.
<File Sort Default Settings>Select whether to display files in a USB memory device in ascending or descending order of file name or date.
<Name (Ascending)>
<Name (Descending)><Date/Time (Ascending)><Date/Time (Descending)>
<Menu> <Function Settings> <Store/Access Files> <Common> <Access Stored FilesSettings> <File Sort Default Settings> Select the order of files that are displayed
<File Name Display Format>Select whether to display short or long text for file names that are stored in a USB memory device.
<Short File Name><Long File Name>
<Menu> <Function Settings> <Store/Access Files> <Common> <Access Stored FilesSettings> <File Name Display Format> Select <Short File Name> or <Long File Name>
<Short File Name>Shortens a file name to as few as eight characters. To distinguish files that have similar names, numbers such as"~1" or "~2" are added at the end of the file names.
<Long File Name>Displays a file name up to 40 characters.
● The number of characters described above does not include the characters in file extensions, such as ".jpg."
<Memory Media Settings>
Specify whether to enable or disable the functions of a USB memory device.
Setting Menu List
562

<Use Scan Function>Select whether to permit storing scanned originals into a USB memory device. Restricting the Scan to USBFunction(P. 411)
MF735Cx / MF635Cx
<Off>
<On>
MF734Cdw / MF732Cdw / MF633Cdw / MF631Cn
<Off><On>
<Use Print Function>Select whether to permit printing data from a USB memory device when it is attached to the machine. Restricting the USB Print Function(P. 411)
MF735Cx / MF635Cx
<Off>
<On>
MF734Cdw / MF732Cdw / MF633Cdw / MF631Cn
<Off><On>
Setting Menu List
563

<Secure Print>16SE-091
Specify whether to enable or disable Secure Print ( Printing via Secure Print(P. 266) ). Default settings are markedwith a dagger ( ).
<Use Secure Print><Off>
<On>
<Restrict Printer Jobs>
<Off>
<On>
<Secure Print Deletion Time>
10 to 30 to 240 (min.)
Setting Menu List
564

<Set Destination>16SE-092
All the settings related to the address book are listed with descriptions.
<Address Book PIN>
Specify a PIN and require entering it to add new entries to or edit existing entries in the Address Book. RestrictingUse of the Address Book(P. 404)
Setting Menu List
565
<Management Settings>16SE-093
Item Description
<User Management>(P. 567) You can configure the settings for managing users of the machine.
<Device Management>(P. 568) You can manage information about the hardware and operations, as well asvarious data required when using the machine functions.
<License/Other>/<Remote UI Settings/UpdateFirmware>(P. 572)
You can configure the settings related to the Remote UI and softwareavailable for the machine.
<Data Management>(P. 574) You can configure settings to utilize data such as machine settings data orperform data initialization.
<Security Settings>(P. 576) You can configure the settings related to the user authentication function,password, and encryption.
<Initialize All Data/Settings> Restores all data including logs and setting values to their default settings. Initializing All Data/Settings(P. 439)
Setting Menu List
566
<User Management>16SE-094
All the settings related to user management of the machine are listed with descriptions. Default settings are markedwith a dagger ( ).
<System Manager Information Settings>(P. 567)<Department ID Management>(P. 567)
<System Manager Information Settings>
Specify the ID or PIN exclusively for Administrators who have access privileges to <Network> and <ManagementSettings>. ID is <System Manager ID> and PIN is <System Manager PIN>. You can also register the name of anAdministrator. Setting the System Manager ID and PIN(P. 353)
<System Manager ID and PIN>Enter a number for the System Manager ID and PIN.
<System Manager ID><System Manager PIN>
<System Manager Name>Enter alphanumeric characters for the name of an Administrator.
<Department ID Management>
Select whether to use the Department ID Management, a feature that uses IDs as user accounts to specify accessprivileges and maintain information on how the machine is used. Setting the Department ID Management(P. 355)
<Off>
<On>
<Menu> <Management Settings> <User Management> <Department IDManagement> Select <Off> or <On>
Setting Menu List
567

<Device Management>16SE-095
All the settings related to management of information for the hardware and operations, as well as about managementof data required when using the machine functions are listed with descriptions. Default settings are marked with adagger ( ).
<Device Information Settings>(P. 568)<Select Country/Region>(P. 568)<Display Job Log>(P. 569)<Use NFC>(P. 569)<Display Consumables Information (RUI/Toner Status)>(P. 569)<Scan with Canon PRINT Business>(P. 570)<Notify to Check Paper Settings>(P. 570)
Asterisks (*)
● Settings marked with "*1" cannot be imported or exported.
● Settings marked with "*2" may be unavailable or vary or have different defaults depending on your countryor region.
● Settings marked with "*3" may not be displayed depending on the model you are using, options, or othersetting items
<Device Information Settings>
Enter alphanumeric characters for the name and the installation location to identify the machine.
<Device Name><Location>
<Menu> <Management Settings> <Device Management> <Device InformationSettings> Select <Device Name> or <Location> Enter the device name or location ( EnteringText(P. 132) ) <Apply>
<Select Country/Region> *1 *2
Specify the country or region where the machine is used. The default setting may vary depending on the settingselected at initial power-on.
<Austria (AT)><Belarus (BY)><Belgium (BE)><Czech Republic (CZ)><Denmark (DK)><Egypt (EG)>
<Netherlands (NL)><Norway (NO)><Poland (PL)><Portugal (PT)><Russia (RU)><Saudi Arabia (SA)>
Setting Menu List
568

<Finland (FI)><France (FR)><Germany (DE)><Greece (GR)><Hungary (HU)><Ireland (IE)><Italy (IT)><Jordan (JO)><Luxembourg (LU)>
<Slovenia (SI)><South Africa (ZA)><Spain (ES)><Sweden (SE)><Switzerland (CH)><Ukraine (UA)><Great Britain (GB)>
<Other>
<Menu> <Management Settings> <Device Management> <Select Country/Region> Selecta country or region
<Display Job Log>
Select whether to display the copying, printing, faxing, and scanning logs on the display of the machine and in theCommunication Management Report.
<Off><On>
<Menu> <Management Settings> <Device Management> <Display Job Log> Select <Off>or <On> Restart the machine
<Use NFC> *3
Select whether to allow printing by touching an NFC-capable mobile device to the NFC mark on the machine'soperation panel.
<Off><On>
<Menu> <Management Settings> <Device Management> <Use NFC> Select <Off> or <On> Restart the machine
<Display Consumables Information (RUI/Toner Status)>
Set whether to display a button in the Remote UI or Toner Status for accessing the Web site for purchasing tonercartridges. Also set whether to use Toner Status.
<Displ. Cnsmbls. Purch. Btn.(RUI)>
Setting Menu List
569

<Off>
<On>
<Toner Status Settings>
<Off>
<On>
<Displ. Consmbls. Purchase Btn.>
<Off>
<On>
<Menu> <Management Settings> <Device Management> <Display ConsumablesInformation (RUI/Toner Status)> Specify the settings
<Displ. Cnsmbls. Purch. Btn.(RUI)>Select <Off> to prevent a button that accesses sites for purchasing toner cartridges from being displayed in theRemote UI.
<Toner Status Settings>If you do not want to use Toner Status, select <Off>. To prevent a button that accesses sites for purchasingtoner cartridges from being displayed in Toner Status, select <On> and then <Off>.
<Scan with Canon PRINT Business>
Select whether to allow scanning from a mobile device using the Canon PRINT Business application.
<Off><On>
<Menu> <Management Settings> <Device Management> <Scan w/ Canon PRINT Business> Select <Off> or <On> Restart the machine
<Notify to Check Paper Settings>
Specify whether to display a message prompting you to check paper settings when loading the paper drawer into themachine.
<Off><On>
Setting Menu List
570

<Menu> <Management Settings> <Device Management> <Notify to Check Paper Settings> Select <Off> or <On> Restart the machine
Setting Menu List
571

<License/Other>/<Remote UI Settings/UpdateFirmware>
16SE-096
All the settings related to the software and system options available for the machine as well as about Register Licenseare listed with descriptions. Default settings are marked with a dagger ( ).
<Register License>(P. 572)<Remote UI Settings>(P. 572)<Update Firmware>(P. 573)
Asterisks (*)
● Settings marked with "*1" cannot be imported or exported.
● Settings marked with "*2" may not be displayed depending on the model you are using, options, or othersetting items.
<Register License> *1*2
Enter the license key for a system option that can be used on the machine. License Registration(P. 723)
<Remote UI Settings> *1
Configure settings for using the Remote UI. Using the Remote UI allows you to configure machine settings from a Webbrowser.
<Remote UI Settings>Select whether to use the Remote UI ( Disabling Remote UI(P. 414) ). When using Remote UI, you can alsospecify whether to use the TLS encrypted communication ( Configuring the Key and Certificate forTLS(P. 379) ).
<Use Remote UI><Off>
<On>
<Use TLS>
<Off>
<On>
<Menu> <Management Settings> <License/Other>/<Remote UI Settings/UpdateFirmware> <Remote UI Settings> <Remote UI Settings> Select <On> in <Use Remote UI> Select <Off> or <On> in <Use TLS> <Apply> Restart the machine
Setting Menu List
572
<Restrict Access>Specify so that entry of a PIN is required for access to the Remote UI. Set a PIN of up to 7 digits. All users use acommon PIN. Setting a Remote UI PIN(P. 361)
<Off >
<On>
<Remote UI Access PIN>
<Menu> <Management Settings> <License/Other>/<Remote UI Settings/UpdateFirmware> <Remote UI Settings> <Restrict Access> <On> Enter the PIN <Apply>
Enter the PIN (Confirm) <Apply>
<Update Firmware> *1
Select how to install the firmware update according to the environment of the machine. Updating theFirmware(P. 436)
<Via PC><Via Internet><Version Information>
Setting Menu List
573

<Data Management>16SE-097
The settings for utilizing the machine settings and for initializing data are listed with descriptions. Default settings aremarked with a dagger ( ).
<Import/Export>(P. 574)<Enable Prod. Ext'd Survey Prog.>(P. 575)<Initialize Key and Certificate>(P. 575)<Initialize Address Book>(P. 575)<Initialize Menu>(P. 575)
Asterisks (*)
● Settings marked with "*" cannot be imported or exported.
<Import/Export> *
You can use a USB memory device to import and export data in the Address Book and various settings of the machine.
<Import><Export>
Import
<Menu> <Management Settings> <Data Management> <Import/Export> <Import> <Yes> Enter the password <Apply>
Export
<Menu> <Management Settings> <Data Management> <Import/Export> <Export> Enter the password <Apply> Enter the password (Confirm) <Apply>
If the <Address Book PIN> screen appears● If a PIN has been set for the Address Book, the <Address Book PIN> screen appears during importing/
exporting. Enter the Address Book PIN and select <Apply>. Select <Skip> to cancel Address Book dataimporting/exporting.
When import is executed● The machine automatically restarts after the import process has finished.
Setting Menu List
574
<Enable Prod. Ext'd Survey Prog.>
Enable or disable the Product Extended Survey Program (a program for the machine usage survey).
<Off><On>
<Menu> <Management Settings> <Data Management> <Enable Prod. Ext'd SurveyProg.> Select <Off> or <On> Restart the machine
<Initialize Key and Certificate> *
Select to restore [Key and Certificate Settings] and [CA Certificate Settings] to the factory defaults. Initializing Keyand Certificate(P. 438)
<Initialize Address Book> *
Select to restore the Address Book settings to the factory defaults. Initializing Address Book(P. 439)
<Initialize Menu> *
Select to restore the settings listed below to the factory defaults. You can restore all the settings listed below at once,or you can restore individual settings separately. Initializing Menu(P. 438)
<Preferences><Adjustment/Maintenance><Function Settings><Set Destination><Management Settings><Initialize All>
Setting Menu List
575

<Security Settings>16SE-098
All the settings related to the authentication function and encryption are listed with descriptions. Default Settings aremarked with a dagger .
<Authentication/Password Settings>(P. 576)<Encryption Settings>(P. 576)
<Authentication/Password Settings>
You can reinforce the security of the authentication function.
<Authentication Function Settings>Configure the security functions for user authentication.
<Lockout>When a user has failed user authentication, specify whether to disable the user from temporarily logging into the machine (lockout). When <On> is selected, specify how many consecutive times failures are permittedbefore lockout is activated and also the time required before a user can log in again after lockout.
<Enable Lockout><Off>
<On>
<Lockout Threshold>
1 to 10 (time(s))
<Lockout Period>
1 to 60 (min.)
<Menu> <Management Settings> <Security Settings> <Authentication/Password Settings> <Authentication Function Settings> <Lockout> Select <On> in <Enable Lockout> Specify
each setting item <Apply> Restart the machine
● This option is not applied to login using the department ID.
<Encryption Settings>
Configure a setting for disabling a weak encryption or the key and certification using a weak encryption.
<Prohibit Use of Weak Encrypt.><Off>
<On>
<Prohibit Weak Encryp. Key/Cert.>
<Off>
<On>
Setting Menu List
576

<Menu> <Management Settings> <Security Settings> <Encryption Settings> Select <On>in <Prohibit Use of Weak Encrypt.> Select <Off> or <On> in <Prohibit Weak Encryp. Key/Cert.>
<Apply> Restart the machine
Setting Menu List
577

MaintenanceMaintenance ..................................................................................................................................................... 579
Regular Cleaning ............................................................................................................................................... 581
Cleaning the Exterior .................................................................................................................................... 582
Cleaning the Platen Glass ............................................................................................................................. 583
Cleaning the Feeder ..................................................................................................................................... 584
Cleaning the Fixing Assembly ....................................................................................................................... 587
Cleaning the Transfer Belt (ITB) .................................................................................................................... 588
Replacing the Toner Cartridge ......................................................................................................................... 589
Checking the Remaining Amount of Consumables ......................................................................................... 594
Relocating the Machine .................................................................................................................................... 595
Adjusting Print Quality ..................................................................................................................................... 597
Adjusting Gradation ..................................................................................................................................... 598
Correcting "Print Color Mismatch" ................................................................................................................ 603
Adjusting Values for Text Color Reproducibility in Color Documents ............................................................ 604
Adjusting Print Position ................................................................................................................................ 606
Viewing the Counter Value ............................................................................................................................... 608
Printing Reports and Lists ................................................................................................................................ 610
Consumables ..................................................................................................................................................... 615
Maintenance
578

Maintenance16SE-099
This chapter describes upkeep of the machine, including how to clean the machine and adjustment of print quality.
◼Basic Cleaning
Regular Cleaning(P. 581)
◼Replacing Consumables
Replacing the Toner Cartridge(P. 589) Checking the Remaining Amount of Consumables(P. 594)
Consumables(P. 615)
◼Adjusting and Managing the Machine
Maintenance
579

Relocating the Machine(P. 595) Adjusting Print Quality(P. 597)
Viewing the Counter Value(P. 608) Printing Reports and Lists(P. 610)
Maintenance
580
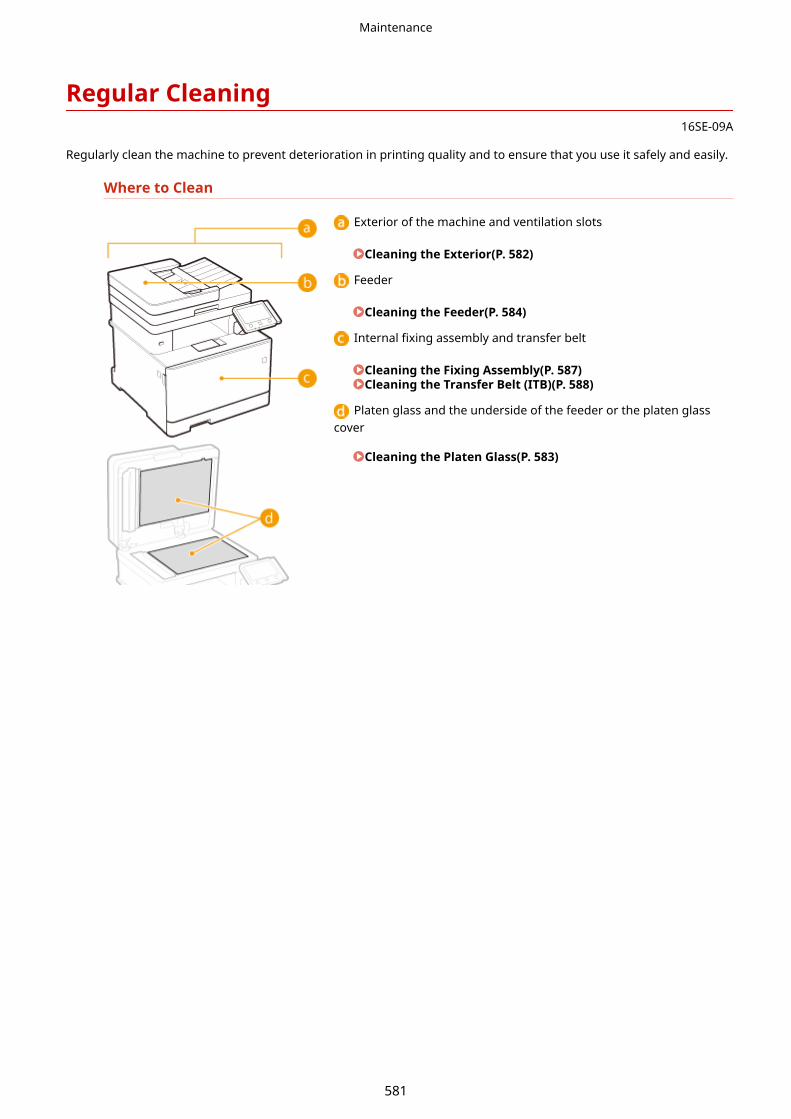
Regular Cleaning16SE-09A
Regularly clean the machine to prevent deterioration in printing quality and to ensure that you use it safely and easily.
Where to Clean
Exterior of the machine and ventilation slots
Cleaning the Exterior(P. 582)
Feeder
Cleaning the Feeder(P. 584)
Internal fixing assembly and transfer belt
Cleaning the Fixing Assembly(P. 587)Cleaning the Transfer Belt (ITB)(P. 588)
Platen glass and the underside of the feeder or the platen glasscover
Cleaning the Platen Glass(P. 583)
Maintenance
581

Cleaning the Exterior16SE-09C
Regularly wipe the exterior of the machine, especially around the ventilation slots, to keep the machine in goodcondition.
1 Turn OFF the machine, and unplug the power cord from the AC power outlet.
● When you turn OFF the machine, data that is waiting to be printed is deleted. Fax documents that werereceived by using the Memory Reception function, faxes that are waiting to be sent, and reports that areautomatically printed after sending and receiving faxes are not deleted.
2 Clean the exterior of the machine and the ventilation slots.
● Use a soft, well-wrung-out cloth dampened with water or a mild detergent diluted with water.
● To locate the ventilation slots, see Front Side(P. 105) .
3 Wait for the exterior of machine to dry completely.
4 Reconnect the power cord and turn ON the machine.
Maintenance
582

Cleaning the Platen Glass16SE-09E
Regularly wipe off the dust from the platen glass and the underside of the feeder or the platen glass cover to preventsmudges to be printed on originals or printouts.
1 Turn OFF the machine, and unplug the power cord from the AC power outlet.
● Turning the printer off erases any queued print data. Data such as documents received and held in memory,documents waiting to be sent, and reports that are automatically printed after sending or receiving faxes arenot deleted.
2 Open the feeder or the platen glass cover.
3 Clean the platen glass and the underside of the feeder or the platen glass cover.
● Clean the areas with a cloth dampened with water. Then, wipe the area with a soft, dry cloth.
4 Wait for the cleaned area to dry completely.
5 Gently close the feeder or the platen glass cover.
6 Reconnect the power cord and turn ON the machine.
Maintenance
583

Cleaning the Feeder16SE-09F
Graphite powder or dust on the rollers inside the feeder or on the document feed scanning area may cause smudgesto appear on printouts. If this occurs or if a paper jam occurs frequently, clean the feeder. If the problem persists aftercleaning the feeder, perform automatic feeder cleaning.
Cleaning the Feeder(P. 584)Automatic Feeder Cleaning(P. 586)
Cleaning the Feeder
1 Turn off the machine and unplug it from the power outlet.
● Turning the printer off erases any queued print data. Data such as documents received and held in memory,documents waiting to be sent, and reports that are automatically printed after sending or receiving faxes arenot deleted.
2 Open the original supply tray.
3 Open the feeder cover.
4 Wipe the rollers in the feeder.
● Wipe the rollers with a cloth that has been moistened with water and wrung out. Then wipe with a dry cloth.
Maintenance
584

● If the rollers and surrounding areas are very dirty, clean them out. To do this, wet a cloth with water andwring it out well, then wipe the dirty areas. Afterwards, wipe the areas with a soft and dry cloth.
5 Close the feeder cover and original supply tray.
6 Open the feeder.
7 Wipe the document feed scanning area.
● Wipe with a cloth that has been moistened with water and wrung out, and then wipe with a dry cloth.
8 Wait for the cleaned area to dry completely.
Maintenance
585

9 Gently close the feeder.
10 Plug the machine back into the power outlet and switch it on.
Automatic Feeder Cleaning
Automatic feeder cleaning uses paper loaded in the feeder. Set 10 sheets of plain A4 or US Letter size paper in thefeeder before starting automatic cleaning. Placing Originals(P. 136)
1 Select <Menu> in the Home screen. Home Screen(P. 123)
2 Select <Adjustment/Maintenance> <Maintenance>.
3 Select <Clean Feeder>.
4 Select <Start>.
➠Cleaning starts. When a message appears notifying that cleaning is complete, press to return to the
Home screen.
Maintenance
586

Cleaning the Fixing Assembly16SE-09H
Dirt may adhere to the fixing assembly inside the machine and cause black streaks to appear on printouts. To cleanthe fixing assembly, perform the following procedure. Note that you cannot clean the fixing assembly when themachine has documents waiting to be printed. To clean the fixing assembly, you need plain A4 or Letter size paper. Setthe paper in the paper drawer or multi-purpose tray before performing the following procedure. LoadingPaper(P. 140)
● Cleaning consumes the toner cartridge. Make sure that there is sufficient toner cartridge remainingbeforehand. Checking the Remaining Amount of Consumables(P. 594)
1 Select <Menu> in the Home screen. Home Screen(P. 123)
2 Select <Adjustment/Maintenance> <Maintenance>.
3 Select <Clean Fixing Assembly>.
4 Check that the size and type of paper displayed on the screen is loaded in themachine, and select <OK>
5 Select <Start>.
➠Cleaning starts. When a message appears notifying that cleaning is complete, press to return to the
Home screen.
Maintenance
587
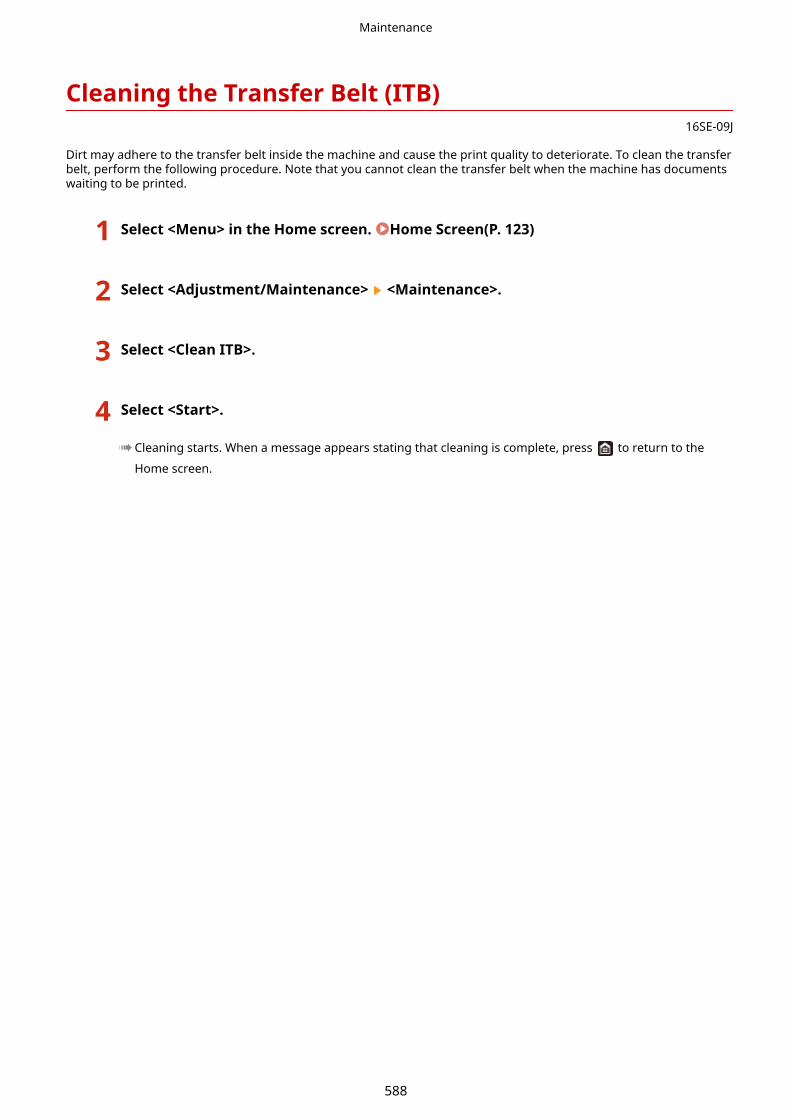
Cleaning the Transfer Belt (ITB)16SE-09J
Dirt may adhere to the transfer belt inside the machine and cause the print quality to deteriorate. To clean the transferbelt, perform the following procedure. Note that you cannot clean the transfer belt when the machine has documentswaiting to be printed.
1 Select <Menu> in the Home screen. Home Screen(P. 123)
2 Select <Adjustment/Maintenance> <Maintenance>.
3 Select <Clean ITB>.
4 Select <Start>.
➠Cleaning starts. When a message appears stating that cleaning is complete, press to return to the
Home screen.
Maintenance
588

Replacing the Toner Cartridge16SE-09L
The machine displays a message when the amount remaining in the toner cartridge is low. Note that the print qualitymay suffer if you continue printing without resolving this issue. You can check the amount remaining in the tonercartridges on the display ( Checking the Remaining Amount of Consumables(P. 594) ).
When a Message Appear(P. 589)When Printouts are Poor in Quality(P. 590)Procedure for Replacing the Toner Cartridge(P. 590)
When a Message Appear
The message that is displayed depends on the amount remaining in the toner cartridges. Depending on whichmessage is displayed, prepare a new toner cartridge ( Consumables(P. 615) ) or replace the current toner cartridgewith a new one ( Procedure for Replacing the Toner Cartridge(P. 590) ).
<Prepare cartridge.>
This message notifies you that a toner cartridge needs to be replaced soon. Make sure that you have areplacement toner cartridge ready. Replace the toner cartridge if you see this message before you start to printa large job.
When this message is displayed
● When copying or printing, you can continue printing the original.
● If a message is displayed for the black toner cartridge when the machine is receiving a fax orautomatic report output is set, received faxes and reports will be stored in memory so that they donot appear faded after they are printed. To continue printing even if the amount remaining in tonercartridge is running low, set <Continue Print. When Amount in Cart. Low> to <On>. <ContinuePrint. When Amount in Cart. Low>(P. 549)
Specify when this message is displayed
● You can set any value as the percentage of the amount remaining in the toner cartridge that triggersthis message. <Display Timing for Cart. Prep.>(P. 446)
<End of Cartridge Lifetime>
This message, which appears with the toner cartridge color(s), notifies you that a toner cartridge has reachedthe end of its lifetime. It is recommended that you replace the cartridge with a new one. You can continueprinting, but the print quality cannot be guaranteed.
Maintenance
589
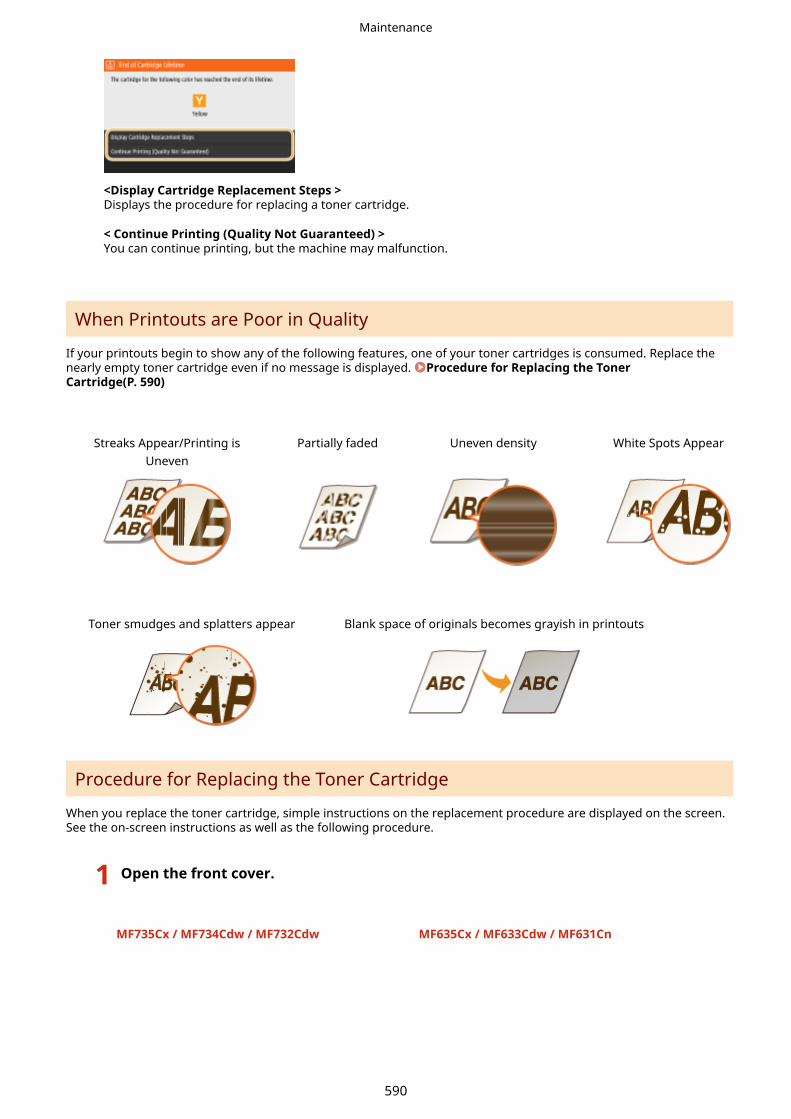
<Display Cartridge Replacement Steps >Displays the procedure for replacing a toner cartridge.
< Continue Printing (Quality Not Guaranteed) >You can continue printing, but the machine may malfunction.
When Printouts are Poor in Quality
If your printouts begin to show any of the following features, one of your toner cartridges is consumed. Replace thenearly empty toner cartridge even if no message is displayed. Procedure for Replacing the TonerCartridge(P. 590)
Streaks Appear/Printing isUneven
Partially faded Uneven density White Spots Appear
Toner smudges and splatters appear Blank space of originals becomes grayish in printouts
Procedure for Replacing the Toner Cartridge
When you replace the toner cartridge, simple instructions on the replacement procedure are displayed on the screen.See the on-screen instructions as well as the following procedure.
1 Open the front cover.
MF735Cx / MF734Cdw / MF732Cdw MF635Cx / MF633Cdw / MF631Cn
Maintenance
590

2 Pull out the cartridge tray.
3 Pull the target toner cartridge straight up and out of the machine.
4 Remove the replacement toner cartridge from the packing material.
1 Pull the tab of the packing material on a flat place.
2 Pull out the toner cartridge.
Maintenance
591
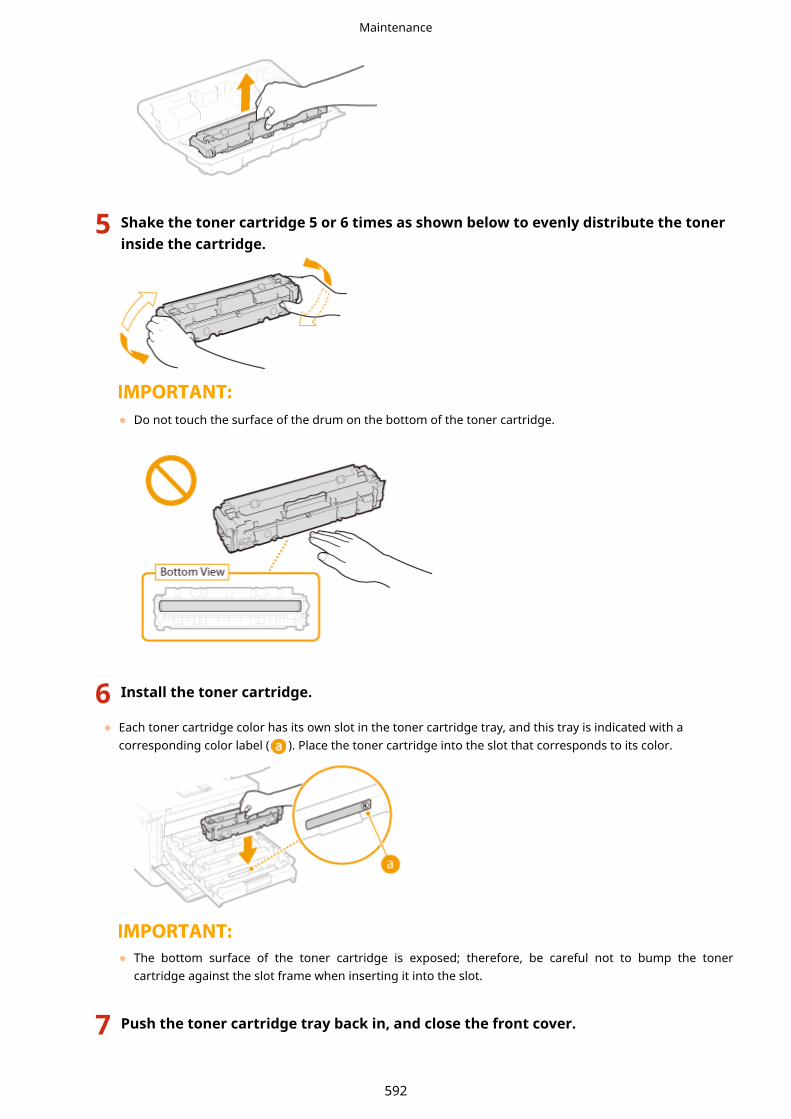
5 Shake the toner cartridge 5 or 6 times as shown below to evenly distribute the tonerinside the cartridge.
● Do not touch the surface of the drum on the bottom of the toner cartridge.
6 Install the toner cartridge.
● Each toner cartridge color has its own slot in the toner cartridge tray, and this tray is indicated with acorresponding color label ( ). Place the toner cartridge into the slot that corresponds to its color.
● The bottom surface of the toner cartridge is exposed; therefore, be careful not to bump the tonercartridge against the slot frame when inserting it into the slot.
7 Push the toner cartridge tray back in, and close the front cover.
Maintenance
592

● Immediately after the front cover is closed, the quick adjustment ( Quick Adjust(P. 600) ) starts. Toperform adjustment for higher quality, perform full adjustment ( Full Adjust(P. 598) ).
LINKS
Consumables(P. 615)
Maintenance
593

Checking the Remaining Amount of Consumables16SE-09R
Use the procedure below to check the amount remaining in the toner cartridges. It is particularly important to checkwhether you need to have a new toner cartridge ready before starting a large print job.
<Status Monitor> <Device Information> <Cartridge Information> Checking the amountremaining in the toner cartridges
Amount Remaining in CartridgeDisplays the amount remaining in the toner cartridges. Other internal parts may reach the end of theirlifetime before the toner runs out.
● The displayed amount remaining in a toner cartridge can be used only as a guide and may differ from theactual amount.
LINKS
Replacing the Toner Cartridge(P. 589)Consumables(P. 615)
Maintenance
594

Relocating the Machine16SE-09S
The machine is heavy. Make sure to follow the procedures below when moving the machine to avoid injury.
1 Turn OFF the machine and computer.
● When you turn OFF the machine, data that is waiting to be printed is deleted. Fax documents that werereceived by using the Memory Reception function, faxes that are waiting to be sent, and reports that areautomatically printed after sending and receiving faxes are not deleted.
2 Disconnect the cables and cord from the machine in numerical order as in theillustration below.
● Whether the cables with "*" are connected depends on your environment.
● If an optional handset is mounted on the machine, remove the handset from its mounting.
Power plug
Power cord
USB keyboard*
USB cable*
LAN cable*
Handset*
External telephone*
Telephone cable*
3 When transporting the machine across a long distance, remove the toner cartridges.Procedure for Replacing the Toner Cartridge(P. 590)
4 Pull out the paper drawer.
MF735Cx / MF734Cdw / MF732Cdw MF635Cx / MF633Cdw / MF631Cn
● Make sure to hold the paper drawer with both hands, and pull it out gently. Otherwise, you may damagethe paper drawer by dropping it, if it slides out too easily.
Maintenance
595

5 Close all the open covers and multi-purpose tray, and move the machine to a newlocation.
● The machine is heavy ( Main Unit(P. 699) ). If you are using MF735Cx / MF734Cdw / MF732Cdw, makesure to move the machine with two or more people.
● Hold the lift handles, and lift up the machine. If you have attached the optional cassette feeding module,leave the optional paper feeder on the floor and move it after moving the main unit of the machine.
MF735Cx / MF734Cdw / MF732Cdw
MF635Cx / MF633Cdw / MF631Cn
6 Carefully place the machine at the new installation site.
● For information about how to install the machine after relocating it, see "Getting Started." Manuals andTheir Contents(P. 725)
Maintenance
596

Adjusting Print Quality16SE-09U
If the printing results are not satisfactory such as low image quality, poor reproducibility, or print color mismatch, trythe adjustments below.
◼Auto Adjust GradationIf the density or brightness of colors in printouts and originals are different, perform <Auto Adjust Gradation> toimprove color reproducibility. There are three types of adjustments: <Full Adjust>, <Quick Adjust>, and <Adjust CopyImage>. Adjusting Gradation(P. 598)
◼Correct Print Color MismatchIf the colors in printouts become blurry, perform <Correct Print Color Mismatch>. This problem may be caused by acolor mismatch. Correcting "Print Color Mismatch"(P. 603)
◼Black Text Processing for ColorYou can specify which cartridges to use to print black text in color printouts. Adjusting Values for Text ColorReproducibility in Color Documents(P. 604)
◼Adjust Print PositionYou can adjust the print position when the printed image is skewed or part of the image is outside the print range. Adjusting Print Position(P. 606)
Maintenance
597

Adjusting Gradation16SE-09W
Gradation refers to the dark to light continuum of shades of a color. The more shades in the gradations of colors thatare printed, the more natural printouts seem. If color reproducibility becomes poor and the density and brightness ofprintouts differs markedly from the originals, perform the appropriate auto adjustment. There are three types ofadjustments: "Full Adjust" for accurate adjustment, "Quick Adjust" for simple adjustment, and "Adjust Copy Image" forgradation adjustment, especially for copying.
Full Adjust(P. 598)Quick Adjust(P. 600)Adjust Copy Image(P. 600)
● Adjustments may not be performed effectively if there is not sufficient toner cartridge remaining. Check theamount remaining in the toner cartridges. If the amount remaining in the toner cartridge is low, it isrecommended that you replace the toner cartridge. Checking the Remaining Amount ofConsumables(P. 594)
Full Adjust
This adjustment optimizes reproducibility for color printing. When the machine performs full adjustment, it obtainsinformation to optimize color reproducibility. The machine maintains this information until the next time you performfull adjustment. To make a full adjustment, repeat the operation, "print out the adjustment image and scan it,"multiple times. Note that you cannot perform this adjustment while performing some functions, including, scanning,and printing.
1 Select <Menu> in the Home screen. Home Screen(P. 123)
2 Select <Adjustment/Maintenance> <Adjust Image Quality> <Auto AdjustGradation>.
3 Select <Full Adjust>.
4 Check that the size and type of paper displayed on the screen is loaded in themachine, and select <OK>.
5 Confirm the procedure, and select <Start>.
➠An adjustment image is printed.
Maintenance
598

6 Open the feeder or the platen glass cover after the screen displayed during printingdisappears.
7 Place the adjustment image on the platen glass.
● Place the adjustment image with the print side facing down while checking that the black stripe is placed onthe back side of the machine.
8 Gently close the feeder or the platen glass cover.
9 Select <Start Scanning>.
➠The placed adjustment image is scanned, and then the second adjustment image is printed.
10 Open the feeder or the platen glass cover, remove the first adjustment image, andthen place the second adjustment image on the platen glass with the print side facedown.
● In the same way as for the first adjustment image, place the adjustment image with the print side facingdown while checking that the black stripe is placed on the back side of the machine.
11 Gently close the feeder or the platen glass cover.
12 Select <Start Scanning>.
➠The adjustment image is scanned and adjustment starts.
13 When a message appears notifying that adjustment is complete, open the feeder orthe platen glass cover, and remove the adjustment image.
14 Gently close the feeder or the platen glass cover.
If the <Could not perform correction.> message is displayed● Did you load the paper displayed in step 4 into the paper source?
Maintenance
599

● Did you place the adjustment image with the print side face down, with the black stripe toward the back sideof the machine?
● Has a paper jam occurred? Clearing Paper Jams(P. 672)
● Is the amount remaining in toner cartridge sufficient? If the amount remaining in the toner cartridge is low,it is recommended that you replace the toner cartridge. Checking the Remaining Amount ofConsumables(P. 594)
● Is the transfer belt inside the machine dirty? Cleaning the Transfer Belt (ITB)(P. 588)
Quick Adjust
This adjustment maintains the optimized status that was acquired by <Full Adjust>. If the result of this adjustment isnot satisfactory, perform <Full Adjust>. This adjustment may be automatically performed after you replace a tonercartridge.
● Quick adjustment is not available while scanning or printing is performed.
● You can set the machine to perform this adjustment automatically after the power is turned ON. <AutoCorrection Settings>(P. 470)
1 Select <Menu> in the Home screen. Home Screen(P. 123)
2 Select <Adjustment/Maintenance> <Adjust Image Quality> <Auto AdjustGradation>.
3 Select <Quick Adjust>.
4 Select <Start>.
➠The adjustment starts.
Adjust Copy Image
Use this adjustment when the appearance of copy is extremely different from that of the original. The adjustmentoperation is to "print out the adjustment image and scan it." Note that you cannot perform this adjustment whileperforming some functions such as scanning and printing.
1 Select <Menu> in the Home screen. Home Screen(P. 123)
2 Select <Adjustment/Maintenance> <Adjust Image Quality> <Auto AdjustGradation>.
3 Select <Adjust Copy Image>.
Maintenance
600

4 Check that the size and type of paper displayed on the screen is loaded in themachine, and select <OK>.
5 Confirm the procedure, and select <Start>.
➠An adjustment image is printed.
6 Open the feeder or the platen glass cover after the screen displayed during printingdisappears.
7 Place the adjustment image on the platen glass.
● Place the adjustment image with the print side facing down while checking that the black stripe is placed onthe back side of the machine.
8 Gently close the feeder or the platen glass cover.
9 Select <Start Scanning>.
➠The adjustment image is scanned and adjustment starts.
10 When a message appears notifying that adjustment is complete, open the feeder orthe platen glass cover, and remove the adjustment image.
11 Gently close the feeder or the platen glass cover.
If the <Could not perform correction.> message is displayed● Did you load the paper displayed in step 4 into the paper source?
● Did you place the adjustment image with the print side face down, with the black stripe toward the back sideof the machine?
● Has a paper jam occurred? Clearing Paper Jams(P. 672)
● Is the amount remaining in toner cartridge sufficient? If the amount remaining in the toner cartridge is low,it is recommended that you replace the toner cartridge. Checking the Remaining Amount ofConsumables(P. 594)
Maintenance
601

● Is the transfer belt inside the machine dirty? Cleaning the Transfer Belt (ITB)(P. 588)
Maintenance
602

Correcting "Print Color Mismatch"16SE-09Y
Print color mismatch refers to a shift in the positions of colors that may occur when printing one image with multipletoner cartridges. Print color mismatch can cause printouts to appear blurry. If print color mismatch occurs, performthe following procedure. This adjustment is sometimes performed automatically, such as when toner cartridges arereplaced.
● You can set the machine to perform this adjustment automatically after the power is turned ON. <AutoCorrection Settings>(P. 470)
1 Select <Menu> in the Home screen. Home Screen(P. 123)
2 Select <Adjustment/Maintenance> <Adjust Image Quality>.
3 Select <Correct Print Color Mismatch>.
4 Select <Start>.
➠The adjustment starts.
Maintenance
603

Adjusting Values for Text Color Reproducibility in ColorDocuments
16SE-0A0
If copy results of black or blackish text are not satisfactory, you can improve the color reproducibility with thisadjustment.
● The settings are applied to color copies when <Original Type> is set to <Text/Photo/Map> or <Text> ( Selecting the Type of Original for Copying(P. 204) ).
1 Select <Menu> in the Home screen. Home Screen(P. 123)
2 Select <Adjustment/Maintenance> <Adjust Image Quality>.
3 Select <Black Text Processing for Color>.
4 Adjust the value.
● This adjustment value can be set independently in the feeder and platen glass.
<Color Text Priority>Makes black or blackish text in a copy match more closely with the original.
<Black Text Priority>Enhances the clarity of black text.
Maintenance
604

5 Select <Apply>.
Maintenance
605

Adjusting Print Position16SE-09X
If a document is printed off-center or out of the printable range, adjust the print position. You can adjust the printposition for each paper source. You can adjust the print position in the range -5.0 to +5.0 mm in increments of 0.1 mm.
Checking the Direction and Distance to AdjustWhen you adjust the print position, specify the direction using "+" and "-" and the distance using "mm." For<Adjust Vertically (Front Side)>/<Adjust Vertically (Back Side)>, specify a value with a "+" sign to shift the printposition in the up-to-down direction. For <Adjust Horizontally (Front Side)>/<Adjust Horizontally (Back Side)>,specify a value with a "+" sign to shift the print position in the left-to-right direction. To shift in the reversedirection, specify a value with a "-" sign.
<Adjust Vertically (Front Side)>/<Adjust Vertically(Back Side)>
<Adjust Horizontally (Front Side)>/<AdjustHorizontally (Back Side)>
1 Select <Menu> in the Home screen. Home Screen(P. 123)
2 Select <Adjustment/Maintenance> <Adjust Image Quality>.
3 Select <Adjust Print Position>.
4 Select the paper source.
5 Select the combination of adjustment direction and printing side.
Maintenance
606

6 Set an adjustment value.
7 Select <Apply>.
Adjusting the Print Position for All Print Jobs
● You can use <Function Settings> in the setting menu of the operation panel to adjust the print position forall print jobs, irrespective of the paper source. The print position can be adjusted in 0.5 mm incrementsbetween -50.0 mm and +50.0 mm. <Offset Short Edge/Offset Long Edge>(P. 504)
Maintenance
607
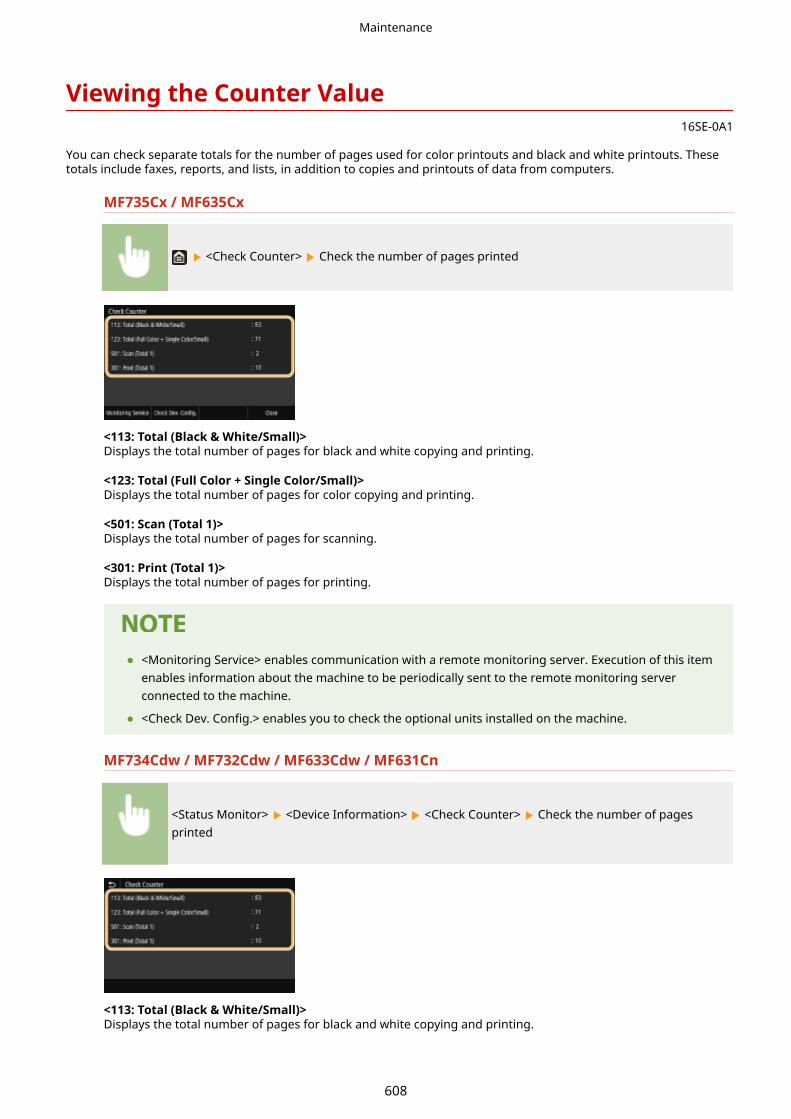
Viewing the Counter Value16SE-0A1
You can check separate totals for the number of pages used for color printouts and black and white printouts. Thesetotals include faxes, reports, and lists, in addition to copies and printouts of data from computers.
MF735Cx / MF635Cx
<Check Counter> Check the number of pages printed
<113: Total (Black & White/Small)>Displays the total number of pages for black and white copying and printing.
<123: Total (Full Color + Single Color/Small)>Displays the total number of pages for color copying and printing.
<501: Scan (Total 1)>Displays the total number of pages for scanning.
<301: Print (Total 1)>Displays the total number of pages for printing.
● <Monitoring Service> enables communication with a remote monitoring server. Execution of this itemenables information about the machine to be periodically sent to the remote monitoring serverconnected to the machine.
● <Check Dev. Config.> enables you to check the optional units installed on the machine.
MF734Cdw / MF732Cdw / MF633Cdw / MF631Cn
<Status Monitor> <Device Information> <Check Counter> Check the number of pagesprinted
<113: Total (Black & White/Small)>Displays the total number of pages for black and white copying and printing.
Maintenance
608

<123: Total (Full Color + Single Color/Small)>Displays the total number of pages for color copying and printing.
<501: Scan (Total 1)>Displays the total number of pages for scanning.
<301: Print (Total 1)>Displays the total number of pages for printing.
Maintenance
609

Printing Reports and Lists16SE-0A2
You can print reports and lists to check information such as the total volume of printouts for each <Department ID>and machine settings.
Printing a Report on the Total Volume of Printouts by Department ID(P. 610)Setting Reports on the Communication Results(P. 610)Printing Lists of Settings(P. 612)Printing Reports and Lists on the Usage Status of the Machine(P. 613)
Printing a Report on the Total Volume of Printouts by Department ID
Department ID Management ReportWhen Department ID Management is enabled, you can check the total volume of printouts for each<Department ID> by printing a Department ID Management Report. By checking the printout totals, you canbetter manage your paper and toner cartridge supplies.
<Menu> <Output Report> <Print List> <Department ID Management Report> Check thatthe size and type of paper displayed on the screen is loaded in the machine, and select<Start>
Setting Reports on the Communication Results
You can print reports on the results of sending/receiving by e-mail, fax, and I-Fax, as well as results of saving to ashared folder or FTP server. Some reports can be printed automatically while others are only printed when an erroroccurs.
● If "Result" in a printed list contains "NG," you can check details of the error from a three-digit numberprefixed with "#" displayed in the next to the result. Countermeasures for Each Error Code(P. 662)
● Reports printed for e-mail/I-Fax indicate the transmission result between the machine and the mail server,not between the machine and the destination address.
Communication Management ReportYou can check the fax and e-mail logs of sent and received documents by printing a CommunicationManagement Report. The report can be printed automatically after every 40 transmissions, or you can print itmanually.
<Menu> <Output Report> <Report Settings> <Communication ManagementReport> Configure report settings <Apply>
Maintenance
610

<Auto Print (40 Transmissions)>Select <On> to print the report automatically after every 40 transmissions, or <Off> if you do not want to printthe report automatically.
<Separate TX/RX>Select <On> to print sent and received reports separately, or <Off> to print both reports on one sheet.
Print the report manually
<Menu> <Output Report> <Print List> <Communication Management Report> Check thatthe size and type of paper displayed on the screen is loaded in the machine, and select<Start>
Fax TX Result ReportYou can check the fax logs of sent documents by printing a Fax TX Result Report. The report can be printedeither every time a transmission is completed or only when a sending error occurs.
<Menu> <Output Report> <Report Settings> <Fax TX Result Report> Select <On> or <OnlyWhen Error Occurs> Select <Off> or <On> <Apply>
<Include TX Image>When you select <On>, a part of a sent document can be included in the TX Result Report.
E-Mail/I-Fax/File TX Result ReportYou can check the e-mail and I-Fax logs of sent documents as well as documents saved to a shared folder or FTPserver by printing an E-Mail/I-Fax/File TX Result Report. The report can be printed either every time atransmission is completed or only when a sending error occurs.
<Menu> <Output Report> <Report Settings> <E-Mail/I-Fax/File TX Result Report> Select<On> or <Only When Error Occurs>
Maintenance
611
Communication result● If an error occurs during transmission by e-mail/I-Fax or saving to a shared folder/FTP server, the
report does not show the error code. To check the error code, print a Communication ManagementReport ( Communication Management Report(P. 610) ).
RX Result ReportYou can check the logs of received fax and I-Fax documents by printing an RX Result Report. The report can beprinted either every time a transmission is completed or only when a receiving error occurs.
<Menu> <Output Report> <Report Settings> <RX Result Report> Select <On> or <OnlyWhen Error Occurs>
Printing Lists of Settings
You can print information and settings registered in the machine as a list.
Address Book ListYou can check the list of destinations registered in the Address Book as <Coded Dial>, <Favorites>, and <Group>by printing an Address Book List.
<Menu> <Output Report> <Print List> <Address Book List> Select the setting you want toprint out Check that the size and type of paper displayed on the screen is loaded in themachine, and select <Start>
User Data List/System Manager Data ListYou can check the list of the settings ( Setting Menu List(P. 441) ) as well as the content that has beenregistered in the machine by printing a User Data List or a System Manager Data List. Both lists include thefirmware version, the paper size and type registered in the machine, and the print settings of CommunicationManagement Report, TX Result Report, and RX Result Report.
<Menu> <Output Report> <Print List> Select <User Data List> or <System Manager DataList> Check that the size and type of paper displayed on the screen is loaded in the machine, andselect <Start>
● The User Data List does not include certain settings such as Network Settings and ManagementSettings. To check all the settings items, print the System Manager Data List.
Maintenance
612

IPSec Policy ListYou can check the list of policy names and the IPSec settings registered in the machine by printing an IPSecPolicy List.
<Menu> <Output Report> <Print List> <IPSec Policy List> Check that the size and type ofpaper displayed on the screen is loaded in the machine, and select <Start>
Printing Reports and Lists on the Usage Status of the Machine
You can print the machine status report, the usage log of toner cartridges, and the list of fonts available in PCL or PSmode.
Eco ReportYou can check the monthly total volume of printouts and the power consumption with a report. This reportincludes tips that are useful for saving paper and power consumption based on the usage status.
<Menu> <Output Report> <Print List> <Eco Report> Check that the size and type of paperdisplayed on the screen is loaded in the machine, and select <Start>
Consumables Status ReportYou can check the consumables status installed in the machine with a report.
<Menu> <Output Report> <Print List> <Consumables Status Report> Check that the sizeand type of paper displayed on the screen is loaded in the machine, and select <Start>
PCL Font ListYou can check the list of fonts available in PCL mode with a report.
<Menu> <Output Report> <Print List> <PCL Font List> Check that the size and type ofpaper displayed on the screen is loaded in the machine, and select <Start>
PS Font ListYou can check the list of fonts available in PS mode with a report.
Maintenance
613
<Menu> <Output Report> <Print List> <PS Font List> Check that the size and type of paperdisplayed on the screen is loaded in the machine, and select <Start>
Cartridge Log ReportYou can check the usage logs of toner cartridges with a report.
<Menu> <Output Report> <Print List> <Cartridge Log Report> Check that the size andtype of paper displayed on the screen is loaded in the machine, and select <Start>
Maintenance
614

Consumables16SE-0A7
The following is a guide to the estimated replacement time for the consumables used inthis machine. Purchase consumables at your local authorized Canon dealer. Observesafety and health precautions when storing and handling consumables. For optimumprint quality, using Canon genuine Toner, Cartridge and Parts is recommended.
● To handle and store consumables, observe precautions in "Getting Started" provided for this product.
● Depending on the installation environment, printing paper size, or original type, you may need to replaceconsumables before the end of the estimated lifetime.
● Specifying an auto shutdown time shorter than the default setting (4 hours) may shorten the life of the tonercartridges.
◼Toner Cartridges
Supplied Toner CartridgesThe average yields* of the toner cartridges that come with the machine are shown in the table below.
*The average yield is based on "ISO/IEC 19798" (the global standard related to "Method for the determination of tonercartridge yield for monochromatic electrophotographic printers and multi-function devices that contain printercomponents" issued by ISO [International Organization for Standardization]) when printing A4 size paper with the defaultprint density setting.
MF735Cx / MF734Cdw / MF732Cdw
● Black: 2,200 sheets
● Y (Yellow), M (Magenta), and C (Cyan): 1,200 sheets
MF635Cx / MF633Cdw / MF631Cn
● Black: 1,400 sheets
● Y (Yellow), M (Magenta), and C (Cyan): 690 sheets
Replacement Toner CartridgesFor optimum print quality, using Canon genuine toner cartridges is recommended.
MF735Cx / MF734Cdw / MF732Cdw
Canon Genuine Toner Cartridge Average yield of toner cartridge*
Canon Cartridge 046 Black 2,200 sheets
Maintenance
615

Canon Cartridge 046 YellowCanon Cartridge 046 MagentaCanon Cartridge 046 Cyan
2,300 sheets
Canon Cartridge 046 H Black 6,300 sheets
Canon Cartridge 046 H Yellow
Canon Cartridge 046 H Magenta
Canon Cartridge 046 H Cyan
5,000 sheets
MF635Cx / MF633Cdw / MF631Cn
Canon Genuine Toner Cartridge Average yield of toner cartridge*
Canon Cartridge 045 Black 1,400 sheets
Canon Cartridge 045 YellowCanon Cartridge 045 MagentaCanon Cartridge 045 Cyan
1,300 sheets
Canon Cartridge 045 H Black 2,800 sheets
Canon Cartridge 045 H Yellow
Canon Cartridge 045 H Magenta
Canon Cartridge 045 H Cyan
2,200 sheets
Be careful of counterfeit toner cartridges● Please be aware that there are counterfeit Canon toner cartridges in the marketplace. Use of
counterfeit toner cartridge may result in poor print quality or machine performance. Canon is notresponsible for any malfunction, accident or damage caused by the use of counterfeit toner cartridge.For more information, see canon.com/counterfeit.
● When replacing toner cartridges, see Replacing the Toner Cartridge(P. 589) .
Maintenance
616

TroubleshootingTroubleshooting ............................................................................................................................................. 618
Common Problems ............................................................................................................................................ 620
Installation/Settings Problems ..................................................................................................................... 621
Copying/Printing Problems .......................................................................................................................... 625
Faxing/Telephone Problems ......................................................................................................................... 628
When You Cannot Print Properly ...................................................................................................................... 630
Printing Results Are Not Satisfactory ............................................................................................................ 632
Paper Creases or Curls ................................................................................................................................. 643
Paper Is Fed Incorrectly ................................................................................................................................ 646
A Message or a Number Starting with "#" (an Error Code) Is Displayed ........................................................ 647
Countermeasures for Each Message ............................................................................................................ 648
Countermeasures for Each Error Code ......................................................................................................... 662
Clearing Paper Jams .......................................................................................................................................... 672
Paper Jams in the Feeder .............................................................................................................................. 674
Paper Jams in the Main Unit ......................................................................................................................... 676
Paper Jams in a Paper Source ....................................................................................................................... 679
When a Problem Cannot Be Solved .................................................................................................................. 684
Troubleshooting
617

Troubleshooting16SE-0A8
When a problem occurs, check this chapter to find out solutions before contacting Canon.
◼Common ProblemsThis section describes how to take action when you suspect that the machine is malfunctioning. CommonProblems(P. 620)
◼When You Cannot Print ProperlyThis section describes how to take action when printing results are not satisfactory or the paper creases or curls. When You Cannot Print Properly(P. 630)
◼A Message or a Number Starting with "#" (an Error Code) is DisplayedThis section describes how to take action when a message or error code (three digits) appears on the display. AMessage or a Number Starting with "#" (an Error Code) Is Displayed(P. 647)
◼Clearing Paper JamsThis section describes how to take action when a paper is jammed. Clearing Paper Jams(P. 672)
◼When a Problem Cannot Be SolvedIf a problem persists, see When a Problem Cannot Be Solved(P. 684) to find out where to contact.
Troubleshooting
618

Troubleshooting
619

Common Problems16SE-0A9
If you encounter problems when using the machine, check the items in this section before contacting us. If theproblems persist, contact your local authorized Canon dealer or the Canon help line.
Check the Following
Is the machine turned ON? Is the power cord connected?
● If the machine is turned ON but does not respond, turn it OFF, check whether the power cord is connectedcorrectly, and turn it back ON. For information on connecting the power cord, see Getting Started. Manuals and Their Contents(P. 725)
Are the phone cord, LAN cable and USB cable connected correctly?
● Check whether these cables are connected correctly. Use care not to mistake the phone cord's port for theother cables' ports.
Connecting the Telephone Line(P. 83)Parts and Their Functions(P. 104)
Is sleep mode activated?
● If you leave the machine unattended for a specific period of time, it enters sleep mode for powerconservation, not allowing you to operate it.To cancel sleep mode, press .
Is any message displayed on the screen?
● If a problem occurs, a message is displayed. Countermeasures for Each Message(P. 648)
If a problem persists even after checkingClick the link that corresponds to the problem.
Installation/Settings Problems(P. 621)Copying/Printing Problems(P. 625)Faxing/Telephone Problems(P. 628)
Troubleshooting
620

Installation/Settings Problems16SE-0AA
See Common Problems(P. 620) also.
Problems with the Wireless/Wired LAN Connection(P. 621)Problem with the USB Connection(P. 624)Problem with the Print Server(P. 624)
Problems with the Wireless/Wired LAN Connection
The wireless LAN and wired LAN cannot be connected at the same time.
● The wireless LAN and wired LAN cannot be connected at the same time. The following can be used at thesame time: a USB cable and a wireless LAN, or a USB cable and a wired LAN.
Remote UI is not displayed.
● Are <Use HTTP> and <Use Remote UI> set to <On>?Disabling HTTP Communication(P. 413)Disabling Remote UI(P. 414)
● If the machine is connected to a wireless LAN, check that the Wi-Fi icon is displayed in the Home screen andthat the IP address is set correctly, and then start the Remote UI again.
Home Screen(P. 123)Viewing Network Settings(P. 38)
● If the machine is connected to a wired LAN, check that the cable is connected firmly and the IP address is setcorrectly, and then start the Remote UI again.
Connecting to a Wired LAN(P. 17)Viewing Network Settings(P. 38)
● Are you using a proxy server? If so, add the machine's IP address to the [Exceptions] list (addresses that donot use the proxy server) in the Web browser's proxy settings dialog.
● Is communication not limited by the firewall on your computer? If IP addresses are or an MAC address isincorrectly entered, the Remote UI cannot be displayed. In that case, you need to use the operation panel toset <IPv4 Address Filter>, <IPv6 Address Filter>, or <MAC Address Filter> to <Off>.
Restricting Communication by Using Firewalls(P. 369)<IPv4 Address Filter> (P. 464)<IPv6 Address Filter> (P. 465)<MAC Address Filter> (P. 465)
A connection to a network cannot be established.
● The IP address may not be set correctly. Set the IP address again.Setting IP Addresses(P. 31)
● When you connect the machine to a computer via wireless LAN, check whether the machine is properlyinstalled and ready to connect to the network.
When the Machine Cannot Connect to the Wireless LAN(P. 622)
Troubleshooting
621
You are unsure of the set IP address. Viewing Network Settings(P. 38)
The connection method cannot be switched between a wired LAN and a
wireless LAN.● Did you select a wired LAN or a wireless LAN on the operation panel on the machine as well? This selection is
required to have the machine switch to your selection.Selecting Wired LAN or Wireless LAN(P. 16)
The SSID of the wireless router to be connected is not displayed in the access
point list.● Check whether the SSID is correct.
Checking the SSID and Network Key(P. 30)
● If the SSID of the wireless router is hidden (using a stealth mode*), set the SSID to be visible on the wirelessrouter.
* A mode that disables the SSID auto-detection of other devices.
● Check whether the machine is properly installed and ready to connect to the network.When the Machine Cannot Connect to the Wireless LAN(P. 622)
The machine dials up to an unintended connection destination (if a dialup
router is connected to a network).● If a dialup router does not need to pass broadcast packets, set the dialup router so that the broadcast
packets will not pass. If the dialup router needs to pass broadcast packets, check whether the settings arecorrect.
● If a DNS server is located in an external network, set the IP address to be connected, not the host name, evenif connecting to the devices that are on the network that is connected to the machine.
● If a DNS server is located on a network that is connected to the machine and the information about thedevices that are connected to an external network is registered to the DNS server, check whether the settingsare correct.
When the Machine Cannot Connect to the Wireless LAN
Check the status of your computer.
● Have the settings of the computer and the wireless router been completed?
● Are the cables of the wireless router (including the power cord and LAN cable)correctly plugged in?
● Is the wireless router turned on?
If the problem persists even after checking the above:
● Turn off the devices, and then turn them on again.
● Wait for a while, and try again to connect to the network.
Troubleshooting
622

Check whether the machine is turned ON.
● If the machine is turned ON, turn it OFF, and then turn it back ON.
Check the installation site of the machine and the wireless router.
● Is the machine too far from the wireless router?
● Are there any obstacles such as walls between the machine and the wireless router?
● Are there any appliances such as microwave ovens or digital cordless phones thatemit radio waves near the machine?
Perform one of the following settings again.Setting Up Connection Using WPS Push Button Mode(P. 20)Setting Up Connection Using WPS PIN Code Mode(P. 22)Setting Up Connection by Selecting a Wireless Router(P. 24)Setting Up Connection by Specifying Detailed Settings(P. 27)
When you need to manually set up the connectionIf the wireless router is set as described below, manually enter all the required information for the wireless LANconnection ( Setting Up Connection by Specifying Detailed Settings(P. 27) ).
● ANY connection refusal* is activated.
● The WEP key that was automatically generated (hexadecimal) is selected.
● The stealth mode is activated.
* A function in which the wireless router refuses the connection if the SSID on the device to be connected is set to "ANY"or is blank.
When you need to change the settings of the wireless routerIf the wireless router is set as described below, change the settings of the router.
● The MAC address packet filtering is set.
● When only IEEE 802.11n is used for the wireless communication, WEP is selected or the WPA/WPA2encryption method is set to TKIP.
Troubleshooting
623

Problem with the USB Connection
Cannot communicate.
● Change the USB cable. If you are using a long USB cable, replace it with a short one.
● If you are using a USB hub, connect the machine directly to your computer using a USB cable.
Problem with the Print Server
You cannot find the print server to connect to.
● Are the print server and computer connected correctly?
● Is the print server running?
● Do you have user rights to connect to the print server? If you are not sure, contact the server administrator.
● Is [Network discovery] enabled?Enabling [Network discovery](P. 731)
You cannot connect to a shared printer.
● On the network, does the machine appear among the printers of the print server? If it is not displayed,contact the network or server administrator.
Displaying Shared Printers in the Print Server(P. 732)
Troubleshooting
624

Copying/Printing Problems16SE-0AE
See Common Problems(P. 620) also.
Printing/copy results are not satisfactory. Paper creases or curls. When You
Cannot Print Properly(P. 630)
You cannot print.
● Can you print a Windows test page? If you can print a Windows test page, there is no problem with themachine or the printer driver. Check the print settings of your application.
Printing a Test Page in Windows(P. 733)
If you cannot print a test page, check the following according to your environment.
Wireless LAN connection
● Check the connection status (signal strength) of the wireless LAN.Viewing Network Settings(P. 38)
● If the connection is poor, try the following.
- Change the channel of your wireless LAN router. If you have more than one router, set the channels tobe at least five channels apart.
- If you can change the radio output power of your wireless LAN router, raise the output power.
● If your computer is connected to a wireless LAN, are the computer and this machine using the samewireless LAN router SSID? If they are different, reset the wireless LAN connection settings of this machine.
Viewing Network Settings(P. 38)Checking the SSID to Which Your Computer is Connected(P. 738)Connecting to a Wireless LAN(P. 18)
When you reset wireless LAN connection settings
● As the wireless LAN router, select the one with the SSID to which the computer is connected.
● Have you selected the correct port? If there is no port to use, create a port.Checking the Printer Port(P. 736)Configuring Printer Ports(P. 44)
● Is communication not limited by the firewall on your computer? If IP addresses are incorrectly entered,you will be not able to access the machine. In that case, you need to use the operation panel to set <IPv4Address Filter> or <IPv6 Address Filter> to <Off>.
Restricting Communication by Using Firewalls(P. 369)<IPv4 Address Filter> (P. 464)<IPv6 Address Filter> (P. 465)
● Disable security software and other resident software.
● Reinstall the printer driver.Installing Drivers(P. 78)
Troubleshooting
625

● Can you print from other computers on the network? If you also cannot print from other computers,contact your local authorized Canon dealer or the Canon help line.
Wired LAN connection
● Have you selected the correct port? If there is no port to use, create a port.Checking the Printer Port(P. 736)Configuring Printer Ports(P. 44)
● Is communication not limited by the firewall on your computer? If IP addresses are or an MAC address isincorrectly entered, you will be not able to access the machine. In that case, you need to use the operationpanel to set <IPv4 Address Filter>, <IPv6 Address Filter>, or <MAC Address Filter> to <Off>.
Restricting Communication by Using Firewalls(P. 369)<IPv4 Address Filter> (P. 464)<IPv6 Address Filter> (P. 465)<MAC Address Filter> (P. 465)
● Disable security software and other resident software.
● Reinstall the printer driver.Installing Drivers(P. 78)
● Can you print from other computers on the network? If you also cannot print from other computers,contact your local authorized Canon dealer or the Canon help line.
USB connection
● Have you selected the correct port? If there is no port to use or you are not sure, reinstall the printerdriver. When you reinstall the printer driver, the correct port is created automatically.
Checking the Printer Port(P. 736)Installing Drivers(P. 78)
● Is bidirectional communication enabled? Enable bidirectional communication, and restart the computer.Checking Bidirectional Communication(P. 737)
● Disable security software and other resident software.
● Connect to another USB port on the computer.
● Can you print from a USB connection to another computer? If you also cannot print from other computers,contact your local authorized Canon dealer or the Canon help line.
Via print server
● Can you print from the print server? If you can print from the print server, check the connection betweenthe print server and your computer.
Problem with the Print Server(P. 624)
● Disable security software and other resident software.
● Reinstall the printer driver.Installing Drivers(P. 78)
● Can you print from other computers via the print server? If you also cannot print from other computers,contact your local authorized Canon dealer or the Canon help line.
● Has an error occurred? Check the job log.Checking the Copying Status and Log(P. 201)Checking the Printing Status and Log(P. 262)
Printing seems to be slow. *
● Disabling Secure Print is recommended if you are not using it.Changing the Valid Time Period for Secured Documents(P. 268)
Troubleshooting
626

* When the free space in memory is running low, the processing speed of the machine becomes slow, just as a computerdoes. There is nothing abnormal.
You cannot print with Google Cloud Print. Using Google Cloud Print(P. 345)
It takes a long time before printing starts.
● Did you print to narrow width paper? After you print to narrow width paper, the machine may cool itself tomaintain the print quality. As a result, it may take some time before the next job is printed. Wait until themachine is ready to print. Printing will resume when the temperature inside the machine has fallen.
Troubleshooting
627

Faxing/Telephone Problems16SE-0AF
See Common Problems(P. 620) also.
Sending Problems(P. 628)Receiving Problems(P. 629)
Sending Problems
A fax cannot be sent.
● Is an external phone line busy? Wait until the line becomes free.
● Has an error occurred? Print and check a Communication Management Report.Communication Management Report(P. 610)
● Is a telephone line set correctly?Connecting the Telephone Line(P. 83)
● When sending the fax overseas, insert pauses in the fax number.Basic Operations for Sending Faxes(P. 217)
A fax cannot be sent with a destination in the history specified.
● Did you turn OFF the machine? If so, the stored history was deleted.
● Did you set <Restrict New Destinations> to <On>? If so, the history before you set was deleted.
● Did you set <Restrict Resending from Log> to <On>? If so, the destinations in the history cannot be specified.
A fax cannot be sent on an optical fiber line.
● The machine is compliant with use on analog lines. When using an optical fiber line or IP phone line, themachine may not work correctly depending on the connection environment or connected devices. In such acase, contact the provider of the optical fiber line or IP phone.
The results of a sent fax are not satisfactory.
● Clean the platen glass or feeder. If cleaning does not improve the results, the recipient's fax machine may bea cause.
Cleaning the Platen Glass(P. 583)Cleaning the Feeder(P. 584)
Troubleshooting
628
Receiving Problems
The results of received fax are not satisfactory. Paper creases or curls. When
You Cannot Print Properly(P. 630)
Telephone and fax cannot be switched automatically.
● Check that the receive mode is set to <Fax/Tel (Auto Switch)>, <Answering Machine>, or <Net Switch>.Selecting the Receive Mode(P. 82)
● Free space in memory may be running low. Print or delete data in memory.Checking/Forwarding/Deleting Documents in Memory(P. 238)Printing Documents in Memory(P. 237)
A fax cannot be received automatically.
● Check that the receive mode is set to <Fax/Tel (Auto Switch)>, <Auto>, <Answering Machine>, or <NetSwitch>.
Selecting the Receive Mode(P. 82)
● Free space in memory may be running low. Print or delete data in memory.Checking/Forwarding/Deleting Documents in Memory(P. 238)Printing Documents in Memory(P. 237)
A fax cannot be received on an optical fiber line.
● The machine is compliant with use on analog lines. When using an optical fiber line or IP phone line, themachine may not work correctly depending on the connection environment or connected devices. In such acase, contact the provider of the optical fiber line or IP phone.
Troubleshooting
629

When You Cannot Print Properly16SE-0AH
If printing results are not satisfactory, or paper creases or curls, try the following solutions. If the problems persist,contact your local authorized Canon dealer or the Canon help line.
◼Problems with Image Quality Printing Results Are Not Satisfactory(P. 632)
Smudge Marks Appear on theEdge of Printouts(P. 632)
Smudges Appear onPrintouts(P. 632)
Afterimages Appear in BlankAreas(P. 633)
Toner Smudges and SplattersAppear(P. 634)
Printouts Are Faded(P. 635) A Portion of the Page Is NotPrinted(P. 636)
Streaks Appear/Printing isUneven(P. 637)
Printouts Become LightlyColored(P. 639)
White Spots Appear(P. 640)
Troubleshooting
630

Spots Appear(P. 641) Reverse Side of Paper isSmudged(P. 642)
◼Problems with Printout Paper Paper Creases or Curls(P. 643)
Paper Creases(P. 643) Paper Curls(P. 644)
◼Problems with Paper Feed Paper Is Fed Incorrectly(P. 646)
Printouts Are Skewed(P. 646) Paper Is Not Fed/Two or More Sheets Are Fed Together(P. 646)
Troubleshooting
631
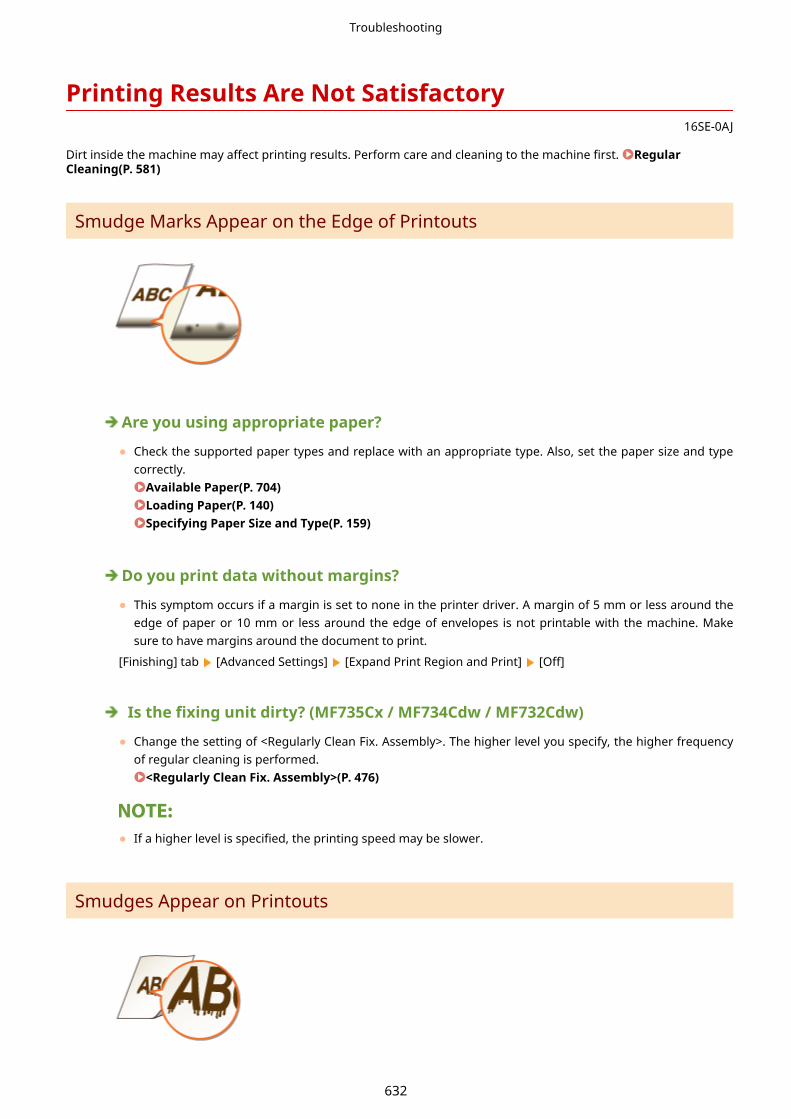
Printing Results Are Not Satisfactory16SE-0AJ
Dirt inside the machine may affect printing results. Perform care and cleaning to the machine first. RegularCleaning(P. 581)
Smudge Marks Appear on the Edge of Printouts
Are you using appropriate paper?
● Check the supported paper types and replace with an appropriate type. Also, set the paper size and typecorrectly.
Available Paper(P. 704)Loading Paper(P. 140)Specifying Paper Size and Type(P. 159)
Do you print data without margins?
● This symptom occurs if a margin is set to none in the printer driver. A margin of 5 mm or less around theedge of paper or 10 mm or less around the edge of envelopes is not printable with the machine. Makesure to have margins around the document to print.
[Finishing] tab [Advanced Settings] [Expand Print Region and Print] [Off]
Is the fixing unit dirty? (MF735Cx / MF734Cdw / MF732Cdw)
● Change the setting of <Regularly Clean Fix. Assembly>. The higher level you specify, the higher frequencyof regular cleaning is performed.
<Regularly Clean Fix. Assembly>(P. 476)
● If a higher level is specified, the printing speed may be slower.
Smudges Appear on Printouts
Troubleshooting
632
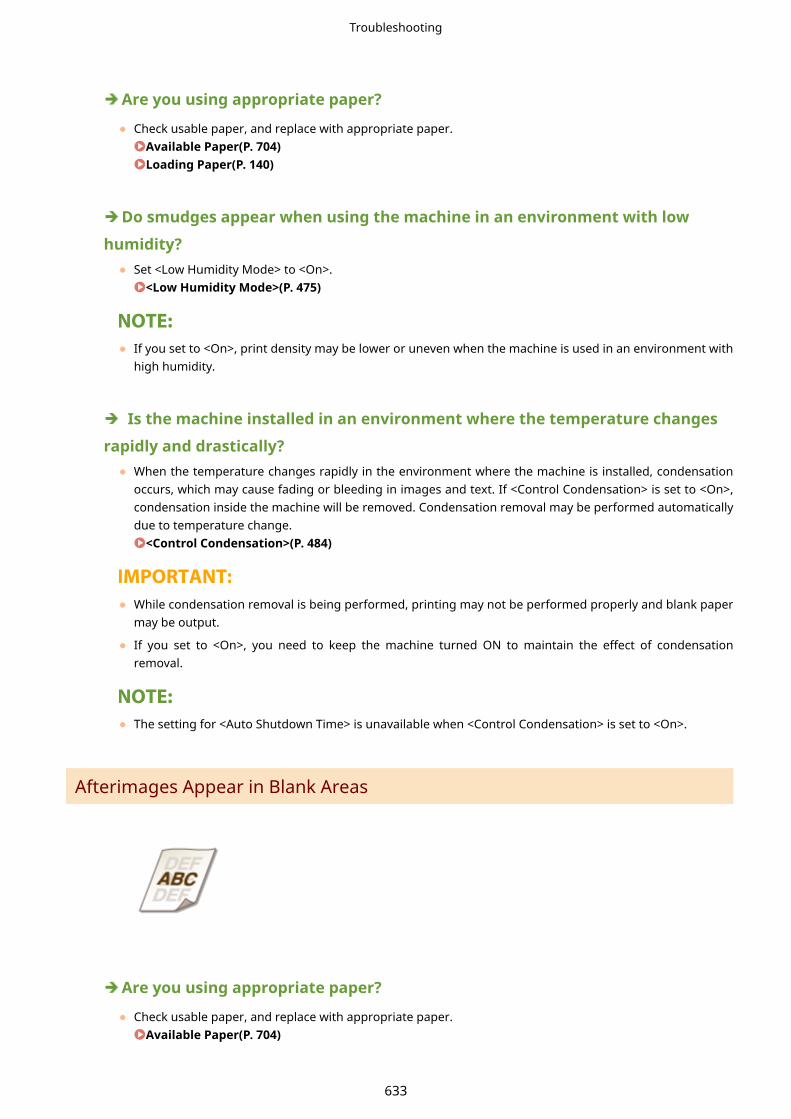
Are you using appropriate paper?
● Check usable paper, and replace with appropriate paper.Available Paper(P. 704)Loading Paper(P. 140)
Do smudges appear when using the machine in an environment with low
humidity?● Set <Low Humidity Mode> to <On>.
<Low Humidity Mode>(P. 475)
● If you set to <On>, print density may be lower or uneven when the machine is used in an environment withhigh humidity.
Is the machine installed in an environment where the temperature changes
rapidly and drastically?● When the temperature changes rapidly in the environment where the machine is installed, condensation
occurs, which may cause fading or bleeding in images and text. If <Control Condensation> is set to <On>,condensation inside the machine will be removed. Condensation removal may be performed automaticallydue to temperature change.
<Control Condensation>(P. 484)
● While condensation removal is being performed, printing may not be performed properly and blank papermay be output.
● If you set to <On>, you need to keep the machine turned ON to maintain the effect of condensationremoval.
● The setting for <Auto Shutdown Time> is unavailable when <Control Condensation> is set to <On>.
Afterimages Appear in Blank Areas
Are you using appropriate paper?
● Check usable paper, and replace with appropriate paper.Available Paper(P. 704)
Troubleshooting
633

Loading Paper(P. 140)
Is it time to replace the toner cartridge?
● Materials inside the toner cartridge may have deteriorated. Replace the toner cartridge.Replacing the Toner Cartridge(P. 589)
Do ghost images appear in the same page? (MF735Cx / MF734Cdw /
MF732Cdw)● Change the setting for <Reduce Ghosting 1>. Setting to <On> may solve the problem.
<Reduce Ghosting 1>(P. 475)
● If you set to <On>, toner may not be fixed sufficiently, resulting in faded printouts.
Do ghost images appear when you perform continuous printing?
● Change the setting of <Reduce Ghosting 2>. Setting to <On> may solve the problem.<Reduce Ghosting 2>(P. 476)
● If you set to <On>, print density may be uneven.
Toner Smudges and Splatters Appear
Are you using appropriate paper?
● Check usable paper, and replace with appropriate paper.Available Paper(P. 704)Loading Paper(P. 140)
Is the toner cartridges consumed?
● Check how much the amount remaining in toner cartridges is left, and replace the toner cartridges asnecessary.
Replacing the Toner Cartridge(P. 589)
Troubleshooting
634
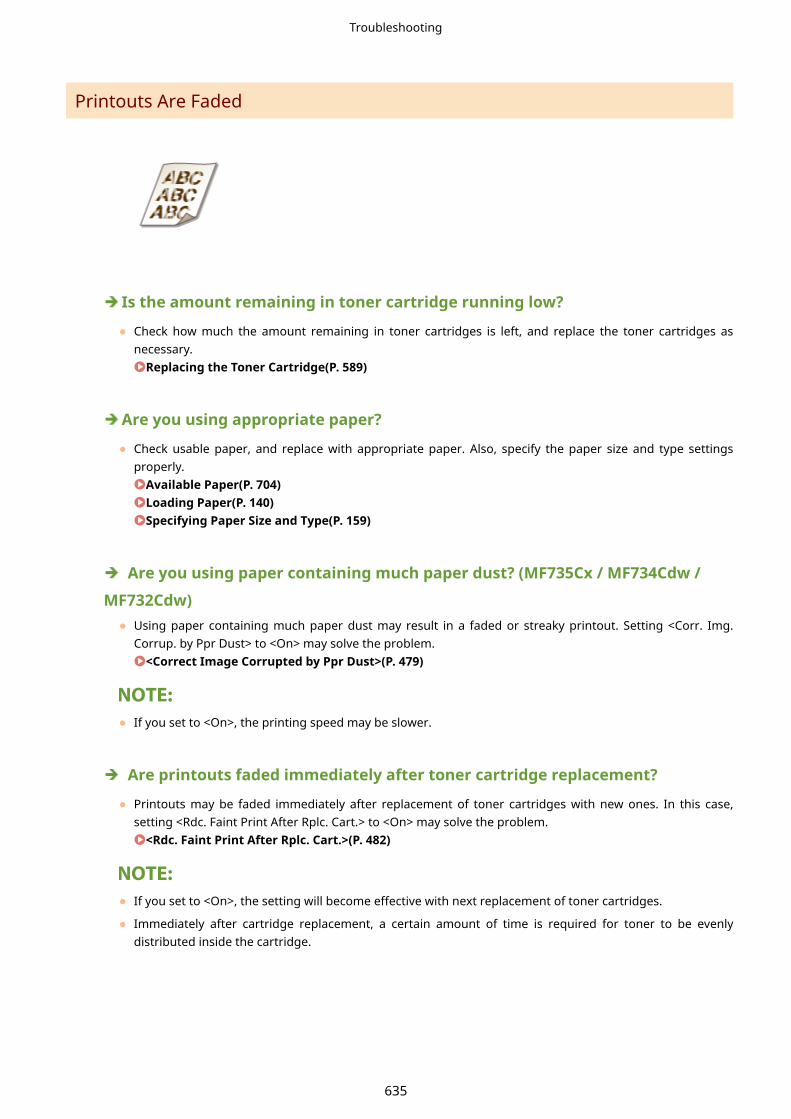
Printouts Are Faded
Is the amount remaining in toner cartridge running low?
● Check how much the amount remaining in toner cartridges is left, and replace the toner cartridges asnecessary.
Replacing the Toner Cartridge(P. 589)
Are you using appropriate paper?
● Check usable paper, and replace with appropriate paper. Also, specify the paper size and type settingsproperly.
Available Paper(P. 704)Loading Paper(P. 140)Specifying Paper Size and Type(P. 159)
Are you using paper containing much paper dust? (MF735Cx / MF734Cdw /
MF732Cdw)● Using paper containing much paper dust may result in a faded or streaky printout. Setting <Corr. Img.
Corrup. by Ppr Dust> to <On> may solve the problem.<Correct Image Corrupted by Ppr Dust>(P. 479)
● If you set to <On>, the printing speed may be slower.
Are printouts faded immediately after toner cartridge replacement?
● Printouts may be faded immediately after replacement of toner cartridges with new ones. In this case,setting <Rdc. Faint Print After Rplc. Cart.> to <On> may solve the problem.
<Rdc. Faint Print After Rplc. Cart.>(P. 482)
● If you set to <On>, the setting will become effective with next replacement of toner cartridges.
● Immediately after cartridge replacement, a certain amount of time is required for toner to be evenlydistributed inside the cartridge.
Troubleshooting
635
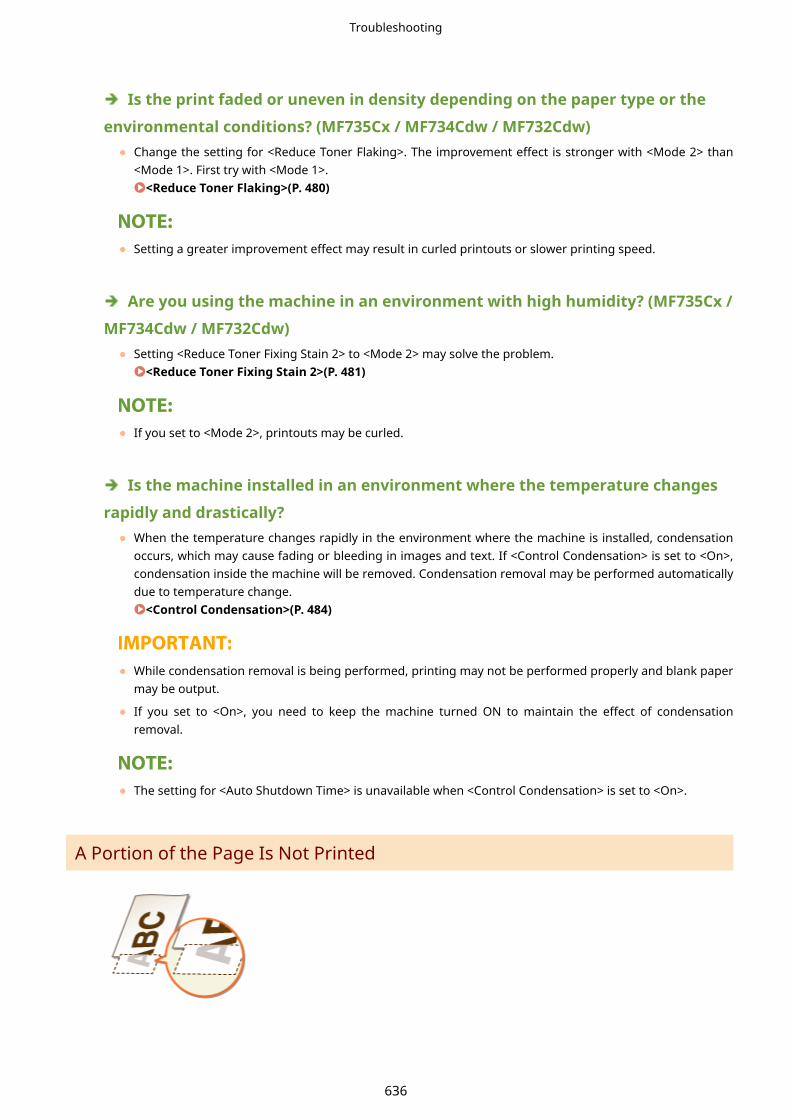
Is the print faded or uneven in density depending on the paper type or the
environmental conditions? (MF735Cx / MF734Cdw / MF732Cdw)● Change the setting for <Reduce Toner Flaking>. The improvement effect is stronger with <Mode 2> than
<Mode 1>. First try with <Mode 1>.<Reduce Toner Flaking>(P. 480)
● Setting a greater improvement effect may result in curled printouts or slower printing speed.
Are you using the machine in an environment with high humidity? (MF735Cx /
MF734Cdw / MF732Cdw)● Setting <Reduce Toner Fixing Stain 2> to <Mode 2> may solve the problem.
<Reduce Toner Fixing Stain 2>(P. 481)
● If you set to <Mode 2>, printouts may be curled.
Is the machine installed in an environment where the temperature changes
rapidly and drastically?● When the temperature changes rapidly in the environment where the machine is installed, condensation
occurs, which may cause fading or bleeding in images and text. If <Control Condensation> is set to <On>,condensation inside the machine will be removed. Condensation removal may be performed automaticallydue to temperature change.
<Control Condensation>(P. 484)
● While condensation removal is being performed, printing may not be performed properly and blank papermay be output.
● If you set to <On>, you need to keep the machine turned ON to maintain the effect of condensationremoval.
● The setting for <Auto Shutdown Time> is unavailable when <Control Condensation> is set to <On>.
A Portion of the Page Is Not Printed
Troubleshooting
636

Do you print data without margins?
● This symptom occurs if a margin is set to none in the printer driver. A margin of 5 mm or less around theedge of paper or 10 mm or less around the edge of envelopes is not printable with the machine. Makesure to have margins around the document to print.
[Finishing] tab [Advanced Settings] [Expand Print Region and Print] [Off]
Do the paper guides align with the edges of the paper?
● If the paper guides are too loose or too tight, part of a document may not be printed.Loading Paper(P. 140)
Is the machine installed in an environment where the temperature changes
rapidly and drastically?● When the temperature changes rapidly in the environment where the machine is installed, condensation
occurs, which may cause fading or bleeding in images and text. If <Control Condensation> is set to <On>,condensation inside the machine will be removed. Condensation removal may be performed automaticallydue to temperature change.
<Control Condensation>(P. 484)
● While condensation removal is being performed, printing may not be performed properly and blank papermay be output.
● If you set to <On>, you need to keep the machine turned ON to maintain the effect of condensationremoval.
● The setting for <Auto Shutdown Time> is unavailable when <Control Condensation> is set to <On>.
Streaks Appear/Printing is Uneven
Are you using appropriate paper?
● Check usable paper, and replace with appropriate paper.Available Paper(P. 704)Loading Paper(P. 140)
Is the platen glass dirty?
● Clean the platen glass and the underside of the feeder.
Troubleshooting
637

Cleaning the Platen Glass(P. 583)
Have you cleaned the fixing unit?
● Clean the fixing unit.Cleaning the Fixing Assembly(P. 587)
Is the amount remaining in toner cartridge running low?
● Check how much the amount remaining in toner cartridges is left, and replace the toner cartridges asnecessary.
Replacing the Toner Cartridge(P. 589)
Is it time to replace the toner cartridge?
● Materials inside the toner cartridge may have deteriorated. Replace the toner cartridge.Replacing the Toner Cartridge(P. 589)
Is the print faded or uneven in density depending on the paper type or the
environmental conditions? (MF735Cx / MF734Cdw / MF732Cdw)● Change the setting for <Reduce Toner Flaking>. The improvement effect is stronger with <Mode 2> than
<Mode 1>. First try with <Mode 1>.<Reduce Toner Flaking>(P. 480)
● Setting a greater improvement effect may result in curled printouts or slower printing speed.
Are you using the machine in an environment with high humidity?
● Change the setting for <High Humidity Mode>. Setting this item to <On> may solve the problem.<High Humidity Mode>(P. 475)
● If you set to <On> and use the machine in an environment with low humidity, printed images and text maybe blurry.
Are you using paper containing much paper dust? (MF735Cx / MF734Cdw /
MF732Cdw)● Using paper containing much paper dust may result in a faded or streaky printout. Setting <Corr. Img.
Corrup. by Ppr Dust> to <On> may solve the problem.<Correct Image Corrupted by Ppr Dust>(P. 479)
● If you set to <On>, the printing speed may be slower.
Troubleshooting
638

Is the machine installed in an environment where the temperature changes
rapidly and drastically?● When the temperature changes rapidly in the environment where the machine is installed, condensation
occurs, which may cause fading or bleeding in images and text. If <Control Condensation> is set to <On>,condensation inside the machine will be removed. Condensation removal may be performed automaticallydue to temperature change.
<Control Condensation>(P. 484)
● While condensation removal is being performed, printing may not be performed properly and blank papermay be output.
● If you set to <On>, you need to keep the machine turned ON to maintain the effect of condensationremoval.
● The setting for <Auto Shutdown Time> is unavailable when <Control Condensation> is set to <On>.
Printouts Become Lightly Colored
Does the original have background color, is it stained, or are you copying an
original such as a newspaper that is printed on thin paper so that text or imageson the other side are visible through the paper?● Check the original and then adjust the density to the correct settings.
Basic Copy Operations(P. 195)
Is the toner cartridges consumed?
● Check how much the amount remaining in toner cartridges is left, and replace the toner cartridges asnecessary.
Replacing the Toner Cartridge(P. 589)
Are white areas lightly colored?
● Change the setting of <Prevent Fogging>. Setting to <On> may solve the problem.<Prevent Fogging>(P. 479)
● If you set to <On>, print density may be lighter.
Troubleshooting
639

White Spots Appear
Are you using paper that has absorbed moisture?
● Replace with appropriate paper.Loading Paper(P. 140)
Are you using appropriate paper?
● Check usable paper, and replace with appropriate paper.Available Paper(P. 704)Loading Paper(P. 140)
Is the amount remaining in toner cartridge running low?
● Check how much the amount remaining in toner cartridges is left, and replace the toner cartridges asnecessary.
Replacing the Toner Cartridge(P. 589)
Is it time to replace the toner cartridge?
● Materials inside the toner cartridge may have deteriorated. Replace the toner cartridge.Replacing the Toner Cartridge(P. 589)
When performing 2-sided printing, does void occur in the leading edge of
paper? (MF735Cx / MF734Cdw / MF732Cdw)● When performing 2-sided printing on thin paper, void may occur on the back side of paper in the leading
edge. Setting <Corr. Void on Paper Back Side> to <On> may solve the problem.<Corr. Void on Paper Back Side>(P. 478)
● If you set to <On>, print quality may be affected.
Does void occur in the leading edge of paper? (MF635Cx / MF633Cdw /
MF631Cn)● When printing on thin paper, void may occur in the leading edge of paper. Setting <Correct Void> to <On>
may solve the problem.<Correct Void>(P. 478)
Troubleshooting
640

● If you set to <On>, printouts may be faded.
Does uneven print density occur in a way that the print looks like a water
drops pattern?● Setting <Drop Pattern Reduction Mode> to <On> may solve the problem.
<Drop Pattern Reduction Mode>(P. 478)
● If you set to <On>, print quality may be affected.
Is the machine installed in an environment where the temperature changes
rapidly and drastically?● When the temperature changes rapidly in the environment where the machine is installed, condensation
occurs, which may cause fading or bleeding in images and text. If <Control Condensation> is set to <On>,condensation inside the machine will be removed. Condensation removal may be performed automaticallydue to temperature change.
<Control Condensation>(P. 484)
● While condensation removal is being performed, printing may not be performed properly and blank papermay be output.
● If you set to <On>, you need to keep the machine turned ON to maintain the effect of condensationremoval.
● The setting for <Auto Shutdown Time> is unavailable when <Control Condensation> is set to <On>.
Spots Appear
Have you cleaned the fixing unit?
● Clean the fixing unit.Cleaning the Fixing Assembly(P. 587)
● If cleaning the fixing assembly does not solve the problem, setting <Fix. Roller Contam. Reduction> to<On> may solve the problem.
<Fix. Roller Contam. Reduction>(P. 481)
Troubleshooting
641

● If you set to <On>, the printing speed may be slower.
Reverse Side of Paper is Smudged
Have you loaded paper that is smaller than the size of the print data?
● Check to make sure that the paper size matches the size of the print data.
Have you cleaned the fixing unit?
● Clean the fixing unit.Cleaning the Fixing Assembly(P. 587)
Do smudges appear on 2-sided printed paper? (MF635Cx / MF633Cdw /
MF631Cn)● When performing 2-sided printing, the image may be blurry on the back side of paper in the trailing edge.
Setting <Correct Blurry Image> to <On> may solve the problem.<Correct Blurry Image>(P. 479)
● If you set to <On>, the printing speed may be slower.
Troubleshooting
642

Paper Creases or Curls16SE-0AK
Paper Creases
Is paper loaded correctly?
● If paper is not loaded below the load limit line or is loaded obliquely, it may crease.Loading Paper(P. 140)
Are you using paper that has absorbed moisture?
● Replace with appropriate paper.Loading Paper(P. 140)
Are you using appropriate paper?
● Check usable paper, and replace with appropriate paper.Available Paper(P. 704)Loading Paper(P. 140)
Does this problem occur when printing on plain paper or thin paper?
(MF735Cx / MF734Cdw / MF732Cdw)● Change the setting of <Paper Wrinkle Correction>. The improvement effect is stronger with <Mode 2> than
<Mode 1>. First try with <Mode 1>.<Paper Wrinkle Correction>(P. 473)
● Setting a greater improvement effect may result in faded printouts or slower printing speed.
Does this problem occur when printing on envelopes or thin paper?
(MF635Cx / MF633Cdw / MF631Cn)● Change the setting of <Paper Wrinkle Correction>. <Mode 1> is effective for envelopes. <Mode 2> provides
stronger improvement, and is effective for envelopes and thin paper. First try with <Mode 1>.<Paper Wrinkle Correction>(P. 473)
Troubleshooting
643
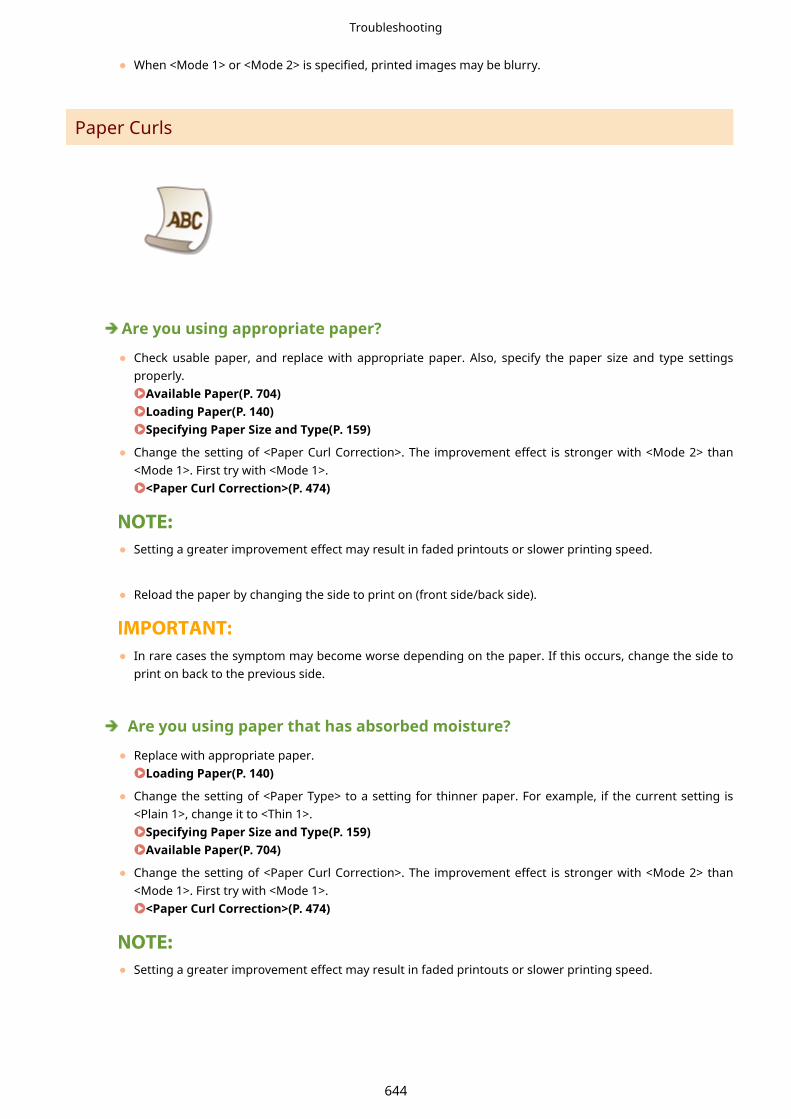
● When <Mode 1> or <Mode 2> is specified, printed images may be blurry.
Paper Curls
Are you using appropriate paper?
● Check usable paper, and replace with appropriate paper. Also, specify the paper size and type settingsproperly.
Available Paper(P. 704)Loading Paper(P. 140)Specifying Paper Size and Type(P. 159)
● Change the setting of <Paper Curl Correction>. The improvement effect is stronger with <Mode 2> than<Mode 1>. First try with <Mode 1>.
<Paper Curl Correction>(P. 474)
● Setting a greater improvement effect may result in faded printouts or slower printing speed.
● Reload the paper by changing the side to print on (front side/back side).
● In rare cases the symptom may become worse depending on the paper. If this occurs, change the side toprint on back to the previous side.
Are you using paper that has absorbed moisture?
● Replace with appropriate paper.Loading Paper(P. 140)
● Change the setting of <Paper Type> to a setting for thinner paper. For example, if the current setting is<Plain 1>, change it to <Thin 1>.
Specifying Paper Size and Type(P. 159)Available Paper(P. 704)
● Change the setting of <Paper Curl Correction>. The improvement effect is stronger with <Mode 2> than<Mode 1>. First try with <Mode 1>.
<Paper Curl Correction>(P. 474)
● Setting a greater improvement effect may result in faded printouts or slower printing speed.
Troubleshooting
644

Are you using the machine in an environment with high humidity? (MF735Cx /
MF734Cdw / MF732Cdw)● Setting <Reduce Toner Fixing Stain 2> to <Mode 1> may solve the problem.
<Reduce Toner Fixing Stain 2>(P. 481)
● If you set to <Mode 1>, printouts may be faded.
Troubleshooting
645

Paper Is Fed Incorrectly16SE-0AL
Printouts Are Skewed
Do the paper guides align with the edges of the paper?
● If the paper guides are too loose or too tight, the printouts are skewed.Loading Paper(P. 140)
Paper Is Not Fed/Two or More Sheets Are Fed Together
Is paper loaded correctly?
● Fan the paper stack thoroughly so that paper is not stuck together.
● Check whether paper is loaded correctly.Loading Paper(P. 140)
● Check whether the number of sheets of paper loaded is appropriate and whether the appropriate paper isused.
Available Paper(P. 704)Loading Paper(P. 140)
● Check whether mixed sizes and types of paper are loaded together.
Troubleshooting
646

A Message or a Number Starting with "#" (an ErrorCode) Is Displayed
16SE-0AR
When a message appears on the machine's display, or a number (error code) prefixed with "#" appears, see thefollowing sections to check the solution.
Countermeasures for Each Message(P. 648)Countermeasures for Each Error Code(P. 662)
Troubleshooting
647

Countermeasures for Each Message16SE-0AS
If you cannot send a fax or the memory is full, or you encounter operation problems, a message appears on thedisplay. Find out more information about messages in the following list.
A counterfeit or non-Canon cartridge may be in use. The amount in thecartridge cannot be displayed correctly.
The toner cartridge used may not be a genuine Canon product.
● Only genuine Canon toner cartridges should be used as replacement toner cartridges.Consumables(P. 615)
An error occurred during certificate verification.
The certificate has expired, or contains incorrect information.
● Install the correct CA certificate.Registering the Key and Certificate for Network Communication(P. 388)
● Check the certificate for validity period and domain name in the DNS settings.
Black & White copying is restricted. Only Color copying is available.
Black and white copying is disabled in the Department ID Management.
● To copy in black and white, log in using a Department ID for which black and white copying is notrestricted. For the Department ID and PIN, contact your Administrator.
Setting the Department ID Management(P. 355)
Black & White printing is restricted. Only Color printing is available.
Black and white printing is disabled in the Department ID Management.
● To print in black and white, log in using a Department ID for which black and white printing is notrestricted. Contact your Administrator for the Department ID and PIN.
Setting the Department ID Management(P. 355)
Cannot analyze the authentication server certificate.
The authentication server certificate may be invalid, or the certificate may be in a format that theprinter does not support.
● Check the authentication server certificate.Configuring IEEE 802.1X Authentication Settings(P. 397)
Troubleshooting
648

Cannot change the destination type of destinations registered to a group.
A selected destination could not be edited because it was registered to Group Dial.
● To change the type of destination that is registered to Group Dial, first delete the registered destinationfrom Group Dial. Next, change the destination type, and then register the destination to Group Dial again.
Cannot find the access point.
When automatic setting with WPS was attempted, a wireless router could not be detected within aspecific period of time.
● Connect again paying attention to the time limit.Setting Up Connection Using WPS Push Button Mode(P. 20)Setting Up Connection Using WPS PIN Code Mode(P. 22)
An SSID or network key of a wireless router was entered manually, but the entry was incorrect.
● Check the SSID and network key, and enter the correct ones again.Checking the SSID and Network Key(P. 30)Setting Up Connection by Specifying Detailed Settings(P. 27)
A wireless router could not be detected due to setting problems of the network to be connected.
● Check whether the machine is properly installed and ready to connect to the network.Installation/Settings Problems(P. 621)
● If the problem persists, check the security settings of the wireless router.
Cannot print RX data.
Received documents cannot be printed due to some specific situation.
● Check if there has occurred one of the following situations. If messages including causes and solutionsappear on the display, check the contents.
A cover is open.
There is no paper loaded.
The paper is jammed.
The toner cartridge is consumed.
An error has occurred.
Cannot receive the fax. Make sure the fax was sent correctly by the sender.
The recipient's machine did not respond within 35 seconds.
● Ask the sender to send the fax again. If you hear a beep, select <Start Receiving> to receive the fax.Receiving Faxes(P. 226)
Troubleshooting
649

Cannot send because more than one destination is specified.
Sending a fax to multiple destinations is disabled.
● To specify multiple destinations, you need to set <Restrict Sequential Broadcast> to <Off>. For moreinformation, contact your Administrator.
Restricting Sequential Broadcasts(P. 408)
Cannot specify group destinations, or multiple destinations at the sametime.
You specified multiple destinations or Group Dial after selecting <Hook>.
● After you select <Hook>, you cannot specify multiple destinations or Group Dial. Specify destinationswithout selecting <Hook>, and send fax documents.
Cannot specify group destinations when on-hook.
Group Dial was specified as a destination after selecting <Hook>.
● Once you select <Hook>, you cannot specify destinations in Group Dial. Specify destinations to send faxdocuments without selecting <Hook>.
Cannot use these settings. Sending to the specified destination is restricted.
The machine is set up so that the user currently logged in cannot send to the addresses registered in theselected <Favorite Settings>.
● Change the send restrictions for the logged in user.Setting the Department ID Management(P. 355)
Cartridge Communication Error A counterfeit or non-Canon cartridge may bein use.
A toner cartridge may not be installed correctly or may be faulty.
● Re-install the toner cartridge. If re-installing the toner cartridge fails to clear the error message, the tonercartridge may be faulty. Contact the store where you purchased the toner cartridge or consult the CanonCustomer Help Center.
Procedure for Replacing the Toner Cartridge(P. 590)
The toner cartridge used may not be a genuine Canon product.
● Only genuine Canon toner cartridges should be used as replacement toner cartridges.Consumables(P. 615)
Troubleshooting
650

Change the authentication password.
The password has expired.
● Set a new password.
Check the authentication settings.
The authentication method set on the machine does not match the authentication method set on theRADIUS server.
● Check that the same authentication method is set on this machine and the RADIUS server, and set thecorrect authentication method.Configuring IEEE 802.1X Authentication Settings(P. 397)
Color copying is restricted. Only Black & White copying is available.
Color copying is disabled in the Department ID Management.
● To copy in color, log in using a Department ID for which color copying is not restricted. Contact yourAdministrator for the Department ID and PIN.
Setting the Department ID Management(P. 355)
Color printing is restricted. Only Black & White printing is available.
Color printing is disabled in the Department ID Management.
● To print in color, log in using a Department ID for which color printing is not restricted. Contact yourAdministrator for the Department ID and PIN.
Setting the Department ID Management(P. 355)
Copying is restricted.
Copying is disabled in the Department ID Management.
● Log in with a Department ID for which copying is not disabled. For the Department ID and PIN, contactyour Administrator.
Setting the Department ID Management(P. 355)
Could not connect.
Connection in Access Point Mode failed due to an error.
● Wait a few moments and try again. If you still cannot connect, try switching the machine off briefly.Connecting Directly (Access Point Mode)(P. 327)
Troubleshooting
651

Could not connect. Check the PSK settings.
The network key (PSK) of a wireless router to be connected is not set to the machine correctly.
● Check the network key (PSK) of the wireless router, and set it to the machine again.Checking the SSID and Network Key(P. 30)Setting Up Connection by Selecting a Wireless Router(P. 24)Setting Up Connection by Specifying Detailed Settings(P. 27)
● If the problem persists even after checking the network key, check whether the machine is properlyinstalled and ready to connect to the network.
Installation/Settings Problems(P. 621)
Could not connect. The maximum number of devices that can connect to theaccess point has been reached.
The machine attempted to connect to a wireless LAN router to which the maximum number of deviceswere already connected.
● Decrease the number of devices (clients) that are connected to the wireless LAN router. For information onthe maximum number of devices that can connect, see the instruction manual for the wireless LAN routeror contact the manufacturer.
Could not connect using the wireless LAN. Turn the main power OFF and ON,then configure the settings again.
A connection failed due to an error while setting wireless LAN connection.
● Restart the machine and set again.
● If the problem persists even after restarting the machine, check whether the machine is properly installedand ready to connect to the network.
Installation/Settings Problems(P. 621)
● If the problem persists even after checking the wireless LAN connection, check the security settings of thewireless router.
Could not connect using WPS. Wait a moment, then configure the settingsagain.
When automatic setting with WPS was attempted, the connection failed due to an error.
● Wait for a while, and set again. If the problem persists, check whether the wireless router supports WPS.
If WPS is supported:Check whether the machine is properly installed and ready to connect to the network.
Installation/Settings Problems(P. 621)If WPS is not supported:Set using another connecting method.
Connecting to a Wireless LAN(P. 18)
Troubleshooting
652

Could not detect any connections from wireless devices.
Mobile device detection was not possible within the predetermined length of time.
● Connect again paying attention to the time limit.Connecting Directly (Access Point Mode)(P. 327)
Could not perform cleaning.
Paper jammed during cleaning.
● Remove the jammed paper, set paper correctly, and perform cleaning again.Clearing Paper Jams(P. 672)Cleaning the Feeder(P. 584)Cleaning the Fixing Assembly(P. 587)
The amount remaining in toner cartridges required for cleaning the fixing assembly is insufficient.
● Cleaning requires sufficient toner cartridge remaining. Replace the toner cartridge, and perform thecleaning again.
Procedure for Replacing the Toner Cartridge(P. 590)
Could not perform correction.
Appropriate paper that is required for correction is not loaded in a paper drawer.
● Load the paper matching the paper specification displayed on the screen into the paper drawer.Full Adjust(P. 598)Adjust Copy Image(P. 600)
An adjustment image that is required for correction is not placed on the platen glass correctly.
● Place the adjustment image on the platen glass with the print side face down and the black stripe towardthe back side of the machine.
Full Adjust(P. 598)Adjust Copy Image(P. 600)
Paper jammed during correction.
● Remove the jammed paper, and perform correction again.Clearing Paper Jams(P. 672)
The amount remaining in toner cartridges required for correction is insufficient.
● Corrections require sufficient toner cartridge remaining. Replace the toner cartridge, and performcorrection again.
Procedure for Replacing the Toner Cartridge(P. 590)
The transfer belt inside the machine is dirty.
● Perform automatic cleaning of the transfer belt.Cleaning the Transfer Belt (ITB)(P. 588)
Troubleshooting
653

Could not perform Open System authentication. Check the WEP settings.
The authentication method of the machine is set to <Open System>, but that of a wireless router is set to"Shared Key."
● Connect again by manually changing the WEP authentication method to <Shared Key>.Setting Up Connection by Specifying Detailed Settings(P. 27)
The MAC address of the machine is rejected because the MAC address filter is set at a wireless router.
● Set the wireless router to permit the MAC address of the machine and your computer. For moreinformation about how to set, see the instruction manuals for your networking devices or contact yourmanufacturer. To check the MAC address of the machine, select <Menu> <Preferences>
<Network> <Wireless LAN Settings> <Connection Information>.Viewing the MAC Address for Wired LAN(P. 38)
Could not perform Shared Key authentication. Check the WEP settings.
The network key (the WEP key) of a wireless router to be connected is not set to the machine correctly.
● Check the network key (the WEP key) of the wireless router, and set it to the machine again.Checking the SSID and Network Key(P. 30)Setting Up Connection by Specifying Detailed Settings(P. 27)
● Connect again by selecting a wireless router or by manually changing the WEP authentication method to<Open System>.
Setting Up Connection by Selecting a Wireless Router(P. 24)Setting Up Connection by Specifying Detailed Settings(P. 27)
The authentication method of the machine is set to <Shared Key>, but that of the wireless router is set to"Open System."
● Change the WEP authentication method to "Shared Key" at the wireless router, and connect again. Formore information about how to change, see the instruction manuals for your networking devices orcontact your manufacturer.
Direct Connection terminated.
Connection with the mobile device was interrupted.
● Establish Direct Connection again.Connecting Directly (Access Point Mode)(P. 327)
End of Cartridge Lifetime
The toner cartridge has reached the end of its lifetime.
● Select one of the settings on the display.
Troubleshooting
654
● To display the replacement method, select <Display Cartridge Replacement Steps> on the screen.
● If you select <Continue Printing (Quality Not Guaranteed)>, you can continue printing, but themachine may malfunction.
Faxing is restricted.
Faxing is disabled in the Department ID Management.
● Log in with a Department ID for which faxing is not disabled. For the Department ID and PIN, contact yourAdministrator.
Setting the Department ID Management(P. 355)
Google Cloud Print Authentication Error
Cloud Print could not perform server authentication, or could not acquire information for registration.
● Check whether the date and time settings are correctly specified.<Date/Time Settings>(P. 448)
Google Cloud Print Communication Error
Cloud Print is unavailable due to an error.
● Check whether the machine is correctly connected to a wireless LAN or wired LAN.Connecting to a Wireless LAN(P. 18)Connecting to a Wired LAN(P. 17)
● A port that is used for Cloud Print may be blocked by a firewall or other protection. Check whether the5222 port is available with your computer.
● If a proxy server is used on the network, check whether the proxy settings on the machine and the serverare correct. For details, contact your Network Administrator.
Setting a Proxy(P. 377)
Load paper.
Paper is not loaded in the paper drawer or the manual feed slot.
● Load the paper.Loading Paper(P. 140)
Paper on which reports or lists can be printed is not loaded.
● Reports or lists can be printed on plain/recycled/color/thin paper of A4 or Letter size. Load appropriatepaper, and make settings for paper size and paper type.
Loading Paper(P. 140)Specifying Paper Size and Type(P. 159)
Paper on which received documents can be printed is not loaded.
Troubleshooting
655

● Load appropriate paper for printing the received document, and make settings for paper size and papertype.
Loading Paper(P. 140)Specifying Paper Size and Type(P. 159)Available Paper(P. 704)
● If you print received documents on paper other than A4 or Letter size, some portions of the image may bemissing or the image may be divided and printed onto several sheets.
Memory Full (Secure Print)
Memory became full of secured documents that were not printed.
● Print the secured documents that are stored in memory.Printing via Secure Print(P. 266)
Memory Full (Skip Error)
The memory became full of print data that could not be printed due to errors.
● Cancel printing of documents to which an error has occurred, or print the documents by selecting <SkipError> on the screen for checking the printing status.
Canceling Prints(P. 260)
Memory Media Print is restricted.
The function that prints files in a USB memory device is disabled.
● Set <Use Print Function> in <Memory Media Settings> to <On>.Restricting the USB Print Function(P. 411)
No reply from the destination.
A network cable may be disconnected, or there may be a problem in a switch.
● Check the status of the network cables and switches.
No response from the host.
The machine is not connected to a network correctly.
● Check the machine and network settings, and connect again.Setting Up the Network Environment(P. 14)
Troubleshooting
656

Paper jammed.
Paper jams.
● Remove the jammed paper, and print again (Printing may resume automatically).Clearing Paper Jams(P. 672)
Paper Settings and Loaded Size Mismatch
The paper size setting on the operation panel does not match the loaded paper size.
● Match the paper size setting specified in <Paper Settings> and the size of the paper that is actually loaded.
To use the loaded paperChange the setting of <Paper Settings> to match the loaded paper size.
Specifying Paper Size and Type(P. 159)
● If printing from a computer, check whether the paper size setting in the printer driver matches the loadedpaper size.
To load paper without changing the settingsLoad the paper with the size that is set to <Paper Settings>.
Loading Paper(P. 140)
● Check that the paper guides in the paper drawer are set in the correct position.Loading Paper(P. 140)
Prepare cartridge.
Toner cartridge replacement time is near.
● Make sure that you have a replacement toner cartridge ready. Replace the toner cartridge if you see thismessage before you start to print a large job.
Consumables(P. 615)
Printing is restricted.
Printing is disabled in the Department ID Management.
● Log in with a Department ID for which printing is not disabled. For the Department ID and PIN, contactyour Administrator.
Setting the Department ID Management(P. 355)
Remote scanning is restricted.
Scanning that is operated by using a computer is disabled in the Department ID Management.
Troubleshooting
657
● Log in to the Remote UI in System Manager Mode, display the edit screen of Department ID Management,and select the [Allow Scan Jobs with Unknown IDs] check box.
Setting the Department ID Management(P. 355)
Scanning is restricted.
Scanning is disabled in the Department ID Management.
● Log in with a Department ID for which scanning is not disabled. For the Department ID and PIN, contactyour Administrator.
Setting the Department ID Management(P. 355)
Set the correct authentication information.
The client authentication information (key and certificate, user name and password, or CA certificate) isnot set correctly.
● Check the specified authentication method and authentication information (key and certificate, user nameand password, and CA certificate).Configuring IEEE 802.1X Authentication Settings(P. 397)
Set the information necessary for authentication.
The IEEE 802.1X authentication has not been configured correctly.
● Configure the IEEE 802.1X correctly from the Remote UI.Configuring IEEE 802.1X Authentication Settings(P. 397)
Specifying and registering new destinations is restricted.
Only destinations that are registered in the Address Book can be specified to send a fax or e-mail.
● To enter a new destination with the operation panel, or add or edit it in the Address Book, you need to set<Restrict New Destinations> to <Off>. For more information, contact your Administrator.
Restricting New Destinations that Can Be Specified(P. 406)
The authentication server certificate has expired.
The server certificate sent from the RADIUS server has expired.
● Check the valid period of the server certificate on the RADIUS server.Configuring IEEE 802.1X Authentication Settings(P. 397)
Troubleshooting
658

The authentication server certificate is incorrect.
There is no CA certificate registered in the printer that is compatible with the authentication servercertificate.
● Check that there is a CA certificate registered in the printer that is compatible with the authenticationserver certificate.Configuring IEEE 802.1X Authentication Settings(P. 397)
The computer is restricted.
Scanning that is operated on the operation panel is disabled in the Department ID Management.
● Log in to the Remote UI in System Manager Mode, display the edit screen of the correspondingDepartment ID, and select the [Allow Scan Jobs with Unknown IDs] check box.
Setting the Department ID Management(P. 355)
The memory is full.
A fax could not be sent or received, or an original could not be scanned due to insufficient memoryspace.
● If a sending or printing job is queued, wait until the job is completed.
● If a received document is stored to memory, print or delete it.Saving Received Documents into the Machine (Memory Reception)(P. 237)
● If sending an original with many pages, divide it into multiple sections.
● If sending a fax, reduce the resolution to scan the original.Basic Operations for Sending Faxes(P. 217)
● If scanning, change the file format to reduce its file size.Basic Operations for Scanning Originals(P. 283)
A scanned original could not be stored to a USB memory device due to insufficient memory space.
● Delete unnecessary data to free space in the USB memory device, or connect a different USB memorydevice.
Insert a USB Memory Device(P. 107)
The memory is full. Enter the original type settings again.
An original could not be scanned because memory became full during copying.
● Set <Original Type> to <Text/Photo/Map (Speed)>, and copy.Selecting the Type of Original for Copying(P. 204)
Troubleshooting
659
The memory is full. Scanning will be canceled. Do you want to print?
An original could not be scanned due to insufficient memory space.
● Select whether to print the pages that were scanned or cancel the job.
● Copy the original in two or more parts.
Not all of the pages could be scanned during sorting and copying.
● Select whether to print the pages that were scanned or cancel the job.
● If this is a copy job, either copy the original in two or more parts or change the <Original Type> setting to<Text/Photo/Map> and then copy the original.
Selecting the Type of Original for Copying(P. 204)
The number of entered characters is incorrect or invalid characters are used.
The network key (the WPA/WPA2-PSK or WEP key) of a wireless router is not entered correctly.
● Check the network key (the WPA/WPA2-PSK or WEP key) of the wireless router, and set it to the machineagain. For more information about how to check the network key, see the instruction manuals for yournetworking devices or contact your manufacturer.
Checking the SSID and Network Key(P. 30)Setting Up Connection by Selecting a Wireless Router(P. 24)Setting Up Connection by Specifying Detailed Settings(P. 27)
The USB memory is restricted.
The function that stores a scanned original to a USB memory device is disabled.
● Set <Use Scan Function> to <On>.Restricting the Scan to USB Function(P. 411)
The WEP key is not set correctly. Check the WEP settings.
The network key (the WEP key) of a wireless router to be connected is not set to the machine correctly.
● Check the network key (the WEP key) of the wireless router, and set it to the machine again.Checking the SSID and Network Key(P. 30)Setting Up Connection by Selecting a Wireless Router(P. 24)Setting Up Connection by Specifying Detailed Settings(P. 27)
The authentication method of the machine is set to <Shared Key>, but that of the wireless router is set to"Open System."
● Connect again by selecting a wireless router or by manually changing the WEP authentication method to<Open System>.
Setting Up Connection by Selecting a Wireless Router(P. 24)Setting Up Connection by Specifying Detailed Settings(P. 27)
Troubleshooting
660

● Change the WEP authentication method to "Shared Key" at the wireless router, and connect again. Formore information about how to change, see the instruction manuals for your networking devices orcontact your manufacturer.
Use Remote UI to set the information necessary for authentication.
The IEEE 802.1X settings are incorrect.
● Check whether [Login Name] is set correctly.
● Check whether the [Use TLS], [Use TTLS], or [Use PEAP] check box is selected.
● If using TLS, check whether a "key and certificate" is registered.
● If using TTLS or PEAP, check whether a user name and password are set correctly.Configuring IEEE 802.1X Authentication Settings(P. 397)
Troubleshooting
661

Countermeasures for Each Error Code16SE-0AU
If an error occurs such as when printing is not successful or when you cannot send or receive a fax or scannedoriginal, the corresponding error code is displayed in a report or in the job log screen as a three-digit number. Checkthe following to find out causes and solutions for each error code. For how to print an error report and information inthe report, see Printing Reports and Lists(P. 610) . For details of the job log screen, see <Status Monitor>Screen(P. 126) .
#001
An original jams in the feeder.
● Remove the jammed original.Paper Jams in the Feeder(P. 674)
#003
A fax could not be sent or received due to its large data size.
● When sending a fax: Reduce the resolution, and scan the original.Basic Operations for Sending Faxes(P. 217)
● When receiving a fax: Ask the sender to divide the original into multiple sections or reduce the resolutionbefore sending.
#005
A fax could not be sent because the recipient's machine did not respond within 35 seconds.
● When the recipient's machine is turned OFF or the line is busy, a fax may not be sent. Ask the recipient tocheck the machine status. When sending the fax overseas, insert pauses in the fax number.
Basic Operations for Sending Faxes(P. 217)
#012
A fax could not be sent because the recipient's machine ran out of paper.
Troubleshooting
662
● Ask the recipient to reload the paper.
#018
A fax could not be sent since the recipient's machine did not respond because the line was busy or forother reasons.
● When the recipient's machine is turned OFF or the line is busy, a fax may not be sent. Ask the recipient tocheck the machine status. When sending the fax overseas, insert pauses in the fax number.
Basic Operations for Sending Faxes(P. 217)
#022
Sending of a fax from a computer is disabled.
● To send a fax from a computer, you need to set <Allow Fax Driver TX> to <On>. For more information,contact your Administrator.
Restricting Fax Sending from a Computer(P. 408)
A fax could not be forwarded because the specified destination was deleted from the Address Book.
● Register the forwarding destination again. If the documents that failed to be forwarded remain inmemory, you can forward it again.
Registering Destinations(P. 182)Printing/Resending/Deleting Documents that Failed to be Forwarded(P. 239)
#037
A fax could not be sent because the memory is full.
● If a job queued, wait until the job is completed.
● If a received document is stored to memory, print or delete it.Saving Received Documents into the Machine (Memory Reception)(P. 237)
● If sending an original with many pages, divide it into multiple sections.
● If sending a fax, reduce the resolution to scan the original.Basic Operations for Sending Faxes(P. 217)
The file is too large to print.
● Optimize the file to reduce the size or divide the file into sections, and then proceed to printing again.
● Try printing from the printer driver. This may work well.
#099
An operation that caused a job to be canceled has been performed.
● When you cancel a job, this error code is displayed, but this is not abnormal. Print, send, or receivedocuments again as necessary.
Troubleshooting
663

#401
A scanned original could not be stored to a USB memory device due to insufficient memory space.
● Delete unnecessary data to free space in the USB memory device, or connect a different USB memorydevice.
Insert a USB Memory Device(P. 107)
#406
A scanned document could not be stored to a USB memory device due to an error.
● Remove the USB memory device, and connect it again.Insert a USB Memory Device(P. 107)
● Reduce the number of originals to scan.
#408
Read failed because the USB memory device was removed while data was being read from it.
● Check that the USB memory device has not been removed and then read the data again.Insert a USB Memory Device(P. 107)Printing from a USB Memory Device (Memory Media Print)(P. 269)
The connected USB memory device is using an unsupported format.
● Check that the USB memory device is using a format supported by this machine.Insert a USB Memory Device(P. 107)
#701
Authentication failed because an incorrect Department ID or PIN was entered when the Department IDManagement was activated.
● Enter the correct Department ID and PIN.
Continuing operating without entering a Department ID was attempted even though unknown-ID jobs(functions that permit operations without a Department ID and PIN) were disabled in the Department IDManagement.
● Enable unknown-ID jobs in System Manager Mode in Remote UI.Blocking Jobs When Department ID Is Unknown(P. 359)
#703
Data could not be written because the memory space that was allocated for images was full whensending an e-mail/I-Fax or storing to a shared folder/FTP server.
● If another sending document is queued, wait for a while until it is completed, and send again.
Troubleshooting
664

● Divide the document into multiple sections before sending.
● Delete the documents that are stored in memory.
● Turn OFF the machine, wait for at least 10 seconds, and turn it back ON.
#751
The FTP server has not been started up or a network connection has been cut.(Failure to connect to the destination is sometimes caused by a disconnection en route.)
● Check the destination.
● Check the network status.Viewing Network Settings(P. 38)
The IP address was not set correctly.
● Check <TCP/IP Settings>.Setting IP Addresses(P. 31)
#752
E-mail sending or I-Fax sending/receiving was impossible because an incorrect SMTP/POP3 server namewas set.
● Check the SMTP/POP3 server name, and correct the setting.Configuring Basic E-Mail Settings(P. 87)Configuring E-Mail/I-Fax Communication Settings(P. 90)
E-mail sending or I-Fax sending/receiving was impossible because an incorrect domain name was set.
● Check the domain name, and correct the setting.Configuring DNS(P. 56)
E-mail sending or I-Fax sending/receiving was impossible because the machine was not connected to anetwork correctly.
● Check whether the machine is properly installed and correctly connected to the network.Installation/Settings Problems(P. 621)
#753
Scanned data could not be sent as e-mail, not sent/received as I-Fax, or not stored in the sharedfolder/FTP server because the LAN cable is disconnected.
● Check whether the LAN cable is connected correctly.Connecting to a Wired LAN(P. 17)
#755
Scanned data could not be sent as e-mail or I-Fax nor stored in the shared folder or FTP server becauseTCP/IP was not working correctly.
● Check <TCP/IP Settings>, and set correctly.
Troubleshooting
665

<Network>(P. 453)
An IP address is not set.
● Set the IP address correctly.Setting IP Addresses(P. 31)
The machine cannot communicate with devices on a network immediately after the machine starts upbecause the waiting time for the start of the communication is set.
● The machine cannot start communicating immediately after it is turned ON. Wait until the set time for<Waiting Time for Connection at Startup> passes after turning ON the machine, and send again.
Setting a Wait Time for Connecting to a Network(P. 55)
#766
The certificate has expired.
● Update the certificate or use a certificate that has not expired.
● Check that the <Current Date/Time Settings> are correct.Setting the Date/Time(P. 12)
#801
When communicating with an SMTP server to send an e-mail/I-Fax, a timeout error occurred from theserver.
● Check whether SMTP is running on the network correctly.
● Check whether the machine is properly installed and correctly connected to the network.Installation/Settings Problems(P. 621)
When communicating with the SMTP server, an error returned from the server.
● Check whether the SMTP server is set correctly.
A destination is not set correctly.
● Check whether the destination is set correctly.
When storing a scanned original into the shared folder, an error occurred from the folder.
● Check whether the shared folder and the computer that has the shared folder are running correctly.
The incorrect folder name or password was specified when storing to the shared folder.
● Check the destination settings.
#802
The SMTP/POP3/FTP server name is not set correctly.
● Set the SMTP/POP3/FTP server name correctly.Configuring Basic E-Mail Settings(P. 87)Configuring E-Mail/I-Fax Communication Settings(P. 90)Registering Destinations from Remote UI(P. 429)
Troubleshooting
666

#804
No access privileges to access the shared folder/FTP server are granted.
● Assign the privilege for writing data to the storage folder to the sender (user name registered in thedestination). For details, contact your Network Administrator.
The incorrect folder name was specified when storing to the shared folder/FTP server.
● Check the destination settings.
#806
When storing data to a shared folder/FTP server, an incorrect user name or password was specified.
● The same user name and password as those registered in a shared folder/FTP server must be registered inthe Address Book.
Setting a Shared Folder as a Save Location(P. 95)Registering Destinations from Remote UI(P. 429)
When sending an e-mail/I-Fax, an incorrect destination was specified.
● Enter the correct e-mail address, and send the message again. If the destination that was registered in theAddress Book was used, check whether the e-mail address is correct.
Registering Destinations(P. 182)
#808
An error or timeout occurred on the FTP server.
● Check the FTP server settings.Registering Destinations from Remote UI(P. 429)
#810
An error has been returned from the POP3 server when sending an e-mail or sending/receiving I-Fax.
● Check whether the POP3 server is set correctly.
● Check whether your mail server and network are running correctly. For more information, contact yourNetwork Administrator.
#813
The login name or the password that is used on the POP3 server is not set correctly.
● Correctly enter the login name or the password that is used on the POP3 server.
Troubleshooting
667
#816
The number of print pages has reached the upper limit specified for the department.
● To reset the print page count, click [Clear Count] on the [Department ID Management] page of Remote UI.Registering/Editing Department ID and PIN(P. 355)
#818
The received data is in a file format that the machine cannot print.
● Contact the other party and ask them to resend the data in a different file format.
#819
The received data is not supported (incorrect MIME information).
● Contact the other party and ask them to check the settings and then resend the data.
#820
The received data is not supported (incorrect BASE64 or uuencode information).
● Contact the other party and ask them to check the settings and then resend the data.
#821
The received data is not supported (a TIFF analysis error occurred).
● Contact the other party and ask them to check the settings and then resend the data.
#822
An file in a USB memory device could not be printed because the format of the file is not supported.
● Check the supported file formats and save the file again.Printer Functions(P. 712)
#827
The received data is not supported (includes unsupported MIME information).
● Contact the other party and ask them to check the settings and then resend the data.
Troubleshooting
668
#829
The received data exceeds the maximum receivable size.
● In fax reception, the machine deletes the data for page 1,000 onwards and either prints the first 999 pagesor holds them in memory. Get the sender to resend page 1,000 onwards.
● In I-Fax reception, the machine cannot receive the e-mail if its size exceeds 24 MB. Ask the sender toreduce the size of the e-mail down to under 24 MB and try resending.
#839
A user name and password that are used for SMTP authentication are not set correctly.
● Set the user name and password correctly.Configuring Basic E-Mail Settings(P. 87)Configuring E-Mail/I-Fax Communication Settings(P. 90)
#841
When sending an e-mail/I-Fax, an encryption algorithm that is common to the mail server is not present.
● Clear the [Use TLS for SMTP]/[Use TLS for POP] check box.Configuring E-Mail/I-Fax Communication Settings(P. 90)
● Add the common encryption algorithm to the mail server settings.
A TLS server certificate verification error has occurred during communication with the SMTP server.
● Check that the CA certificate that signed the TLS server certificate on the SMTP server side is registered tothe machine by using the Remote UI.
● Check that the TLS server certificate on the SMTP server side is valid.
● Check that the TLS server certificate is not a self-signed one.
#844
TLS encrypted communication to a POP3 server failed when sending an e-mail with POP before SMTP.
● Check the TLS encrypted communication settings in the POP3 server.
● Clear the [Use TLS for POP] check box. If the problem persists, clear the [Use POP Authentication BeforeSending] check box, and set the communication setting to a setting other than POP before SMTP.Configuring E-Mail/I-Fax Communication Settings(P. 90)
When verifying an TLS server certificate to communicate to the POP3 server, a verification erroroccurred.
● Check that the CA certificate that signed the TLS server certificate on the POP3 server side is registered tothe machine by using the Remote UI.
● Check that the TLS server certificate on the POP3 server side is valid.
● Check that the TLS server certificate is not a self-signed certificate.
Troubleshooting
669
#846
An e-mail or I-Fax could not be sent due to a POP authentication failure.
● Check the setting, and try again.Configuring E-Mail/I-Fax Communication Settings(P. 90)
#852
The machine turns OFF for some reason.
● Check whether the power plug is inserted into an outlet firmly.
#853
A document could not be printed because its data size exceeded the machine's upper processingcapability.
● The machine may not be able to print documents with many pages. Reduce the number of pages perprinting, or print when no print job is queued or no document is being printed. If you are still unable toprint, check the document data for any defects.
Printing was canceled from the computer.
● If you cancel an operation when the print data is being sent to the machine from a computer, this errorcode is displayed, but this is not abnormal. Print again as necessary.
A secured document that was left unprinted was deleted.
● If the secured document is not printed within a specific period of time (30 minutes by default), it is deletedfrom memory. Send the secured document again, and print it within the period.
Printing via Secure Print(P. 266)
Printing using Secure Print was attempted when Secure Print was restricted.
● When <Secure Print> is set to <Off>, you cannot use Secure Print. Set the setting to <On> and print again.Printing via Secure Print(P. 266)
● Print without using Secure Print.Basic Printing Operations(P. 257)
You tried to print a file that is either corrupted or not supported.
● Check the file and try again.Basic Printing Operations(P. 257)
Password protected PDF files could not be printed.
● Enter the correct password for the PDF file.Printing from a USB Memory Device (Memory Media Print)(P. 269)
Troubleshooting
670

#861
A document could not be printed because a printer driver that was not intended for this machine wasused.
● Print again by using the printer driver for this machine.Basic Printing Operations(P. 257)
A document could not be printed due to a defect in its data.
● Check the document data for any defects.
#863
An error occurred when printing from a computer.
● Turn OFF the machine, wait for at least 10 seconds, and turn it back ON. After the restart is complete, tryprinting again.
#995
A document waiting to be sent or received was canceled.
● Sent or received the document again as necessary.
Troubleshooting
671

Clearing Paper Jams16SE-0AW
If a paper jams, <Paper jammed.> is displayed on the screen. Select <Next> to display simple solutions. If it is difficultto understand the procedures on the display, see the following sections to clear jams.
MF735Cx / MF734Cdw / MF732Cdw
Feeder
Paper Jams in theFeeder(P. 674)
Output tray
Paper Jams in theMain Unit(P. 676)
Multi-purpose tray/
Paper drawer
Paper Jams in aPaper Source(P. 679)
Back side
Paper Jams in theMain Unit(P. 676)
MF635Cx / MF633Cdw / MF631Cn
Feeder
Paper Jams in theFeeder(P. 674)
Output tray
Paper Jams in theMain Unit(P. 676)
Manual feed slot/
Paper drawer
Paper Jams in aPaper Source(P. 679)
Back side
Troubleshooting
672

Paper Jams in theMain Unit(P. 676)
When removing the jammed paper, do not turn OFF the machine● Turning OFF the machine deletes the data that is being printed. Be especially careful when receiving fax
documents.
If paper tears● Remove all the paper fragments to prevent them from becoming jammed.
If paper jams repeatedly● Tap the paper stack on a flat surface to even the edges of the paper before loading it into the machine.
● Check that the paper is appropriate for the machine. Available Paper(P. 704)
● Check that no jammed paper fragments remain in the machine.
Do not forcibly remove the jammed paper from the machine● Forcibly removing the paper may damage parts. If you are not able to remove the paper, contact your local
authorized Canon dealer or the Canon help line. When a Problem Cannot Be Solved(P. 684)
Troubleshooting
673

Paper Jams in the Feeder16SE-0AX
If there are originals placed in the feeder, remove them first. Then, follow the procedure below. Do not forcibly removejammed paper from the machine. If the jammed paper cannot be removed easily, proceed to the next step.
1 Remove the jammed original from the feeder cover.
1 Open the feeder cover.
2 Gently pull out the original.
3 Lift the original tray, and gently pull out the original.
4 Close the feeder cover.
2 Remove the jammed original from the underside of the feeder.
1 Open the feeder.
Troubleshooting
674

2 Gently pull out the original.
3 Gently close the feeder.
3 Place the original again.
Troubleshooting
675
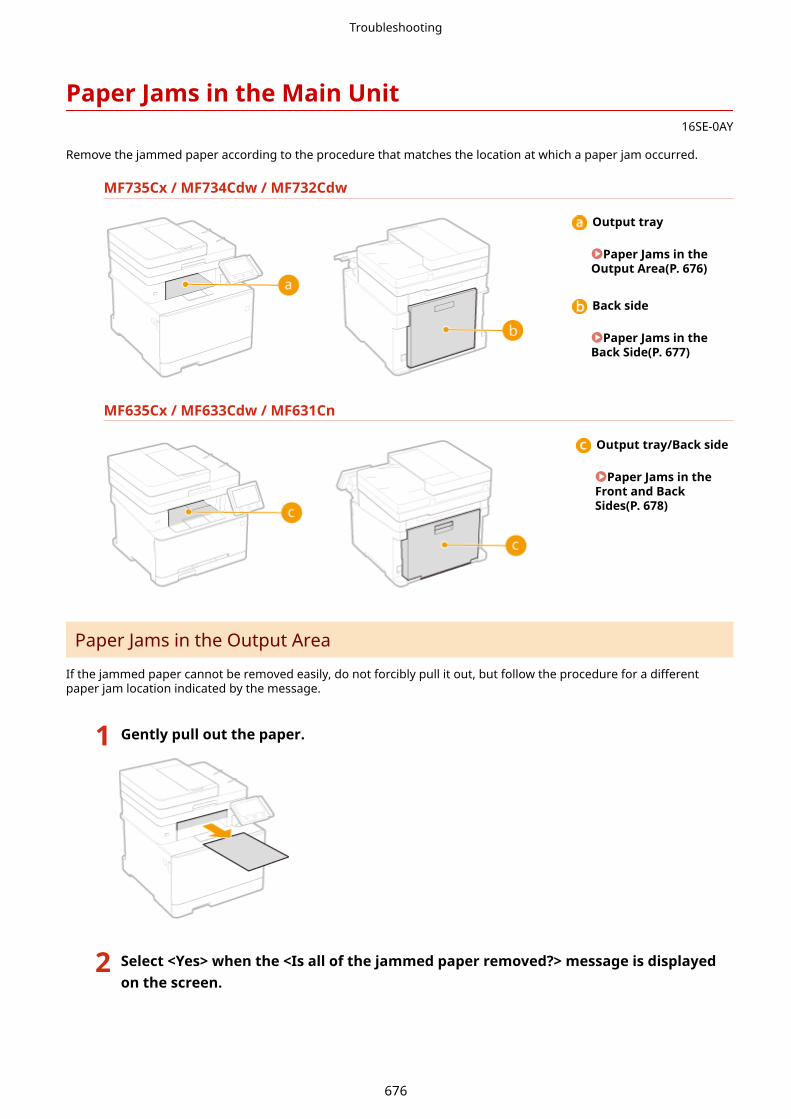
Paper Jams in the Main Unit16SE-0AY
Remove the jammed paper according to the procedure that matches the location at which a paper jam occurred.
MF735Cx / MF734Cdw / MF732Cdw
Output tray
Paper Jams in theOutput Area(P. 676)
Back side
Paper Jams in theBack Side(P. 677)
MF635Cx / MF633Cdw / MF631Cn
Output tray/Back side
Paper Jams in theFront and BackSides(P. 678)
Paper Jams in the Output Area
If the jammed paper cannot be removed easily, do not forcibly pull it out, but follow the procedure for a differentpaper jam location indicated by the message.
1 Gently pull out the paper.
2 Select <Yes> when the <Is all of the jammed paper removed?> message is displayedon the screen.
Troubleshooting
676

Paper Jams in the Back Side
Do not forcibly remove jammed paper from the machine. If the jammed paper cannot be removed easily, proceed tothe next step.
1 Open the rear cover.
2 Gently pull out the paper.
3 Lift the duplex unit.
4 Gently pull out the paper.
Troubleshooting
677

5 Close the rear cover.
Paper Jams in the Front and Back Sides
Do not forcibly remove jammed paper from the machine. If the jammed paper cannot be removed easily, proceed tothe next step.
1 Gently pull out the paper.
2 Open the rear cover.
3 Gently pull out the paper.
4 Close the rear cover.
Troubleshooting
678

Paper Jams in a Paper Source16SE-0C0
Remove the jammed paper according to the procedure that matches the location at which a paper jam occurred.
MF735Cx / MF734Cdw / MF732Cdw
Multi-purpose tray
Paper Jams in the Multi-Purpose Tray(P. 679)
Paper drawer
Paper Jams in the Paper Drawer(P. 682)
MF635Cx / MF633Cdw / MF631Cn
Manual feed slot
Paper Jams in the Manual Feed Slot(P. 681)
Paper drawer
Paper Jams in the Paper Drawer(P. 682)
Paper Jams in the Multi-Purpose Tray
If there is paper loaded in the multi-purpose tray, remove it first. Do not forcibly remove jammed paper from themachine. If the jammed paper cannot be removed easily, proceed to the next step.
1 Remove the jammed paper in the multi-purpose tray.
1 Gently pull out the paper.
2 Close the tray.
Troubleshooting
679
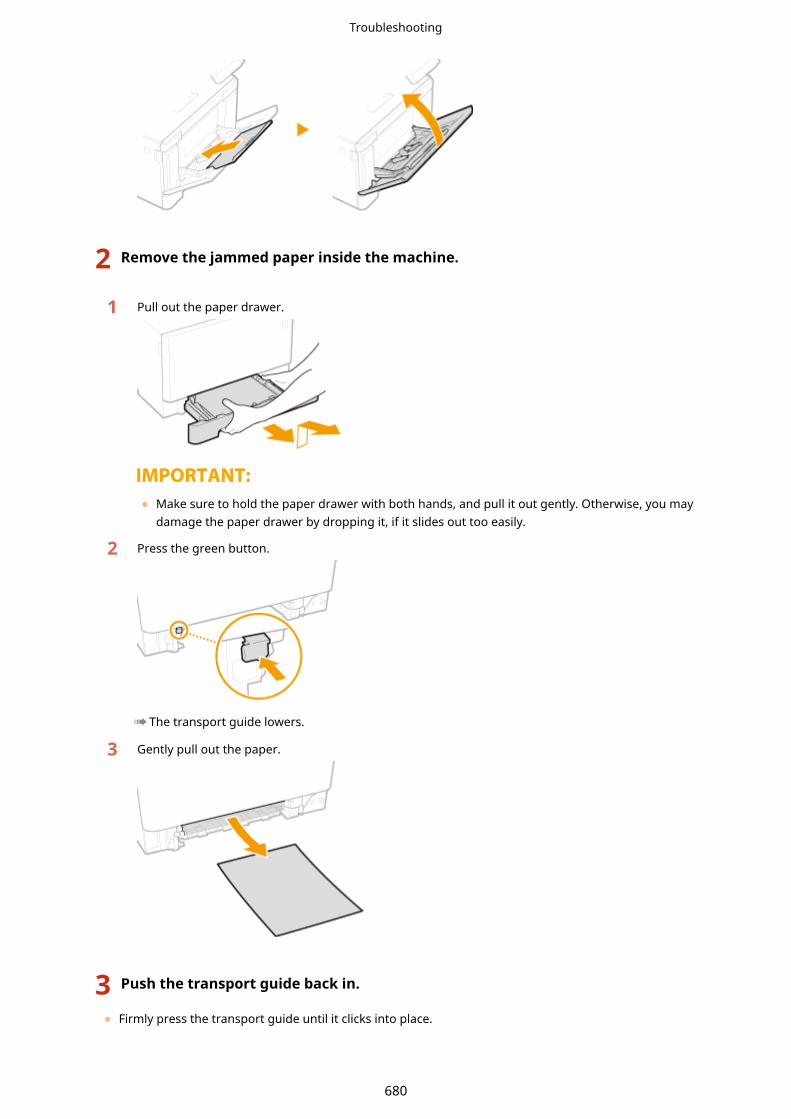
2 Remove the jammed paper inside the machine.
1 Pull out the paper drawer.
● Make sure to hold the paper drawer with both hands, and pull it out gently. Otherwise, you maydamage the paper drawer by dropping it, if it slides out too easily.
2 Press the green button.
➠The transport guide lowers.
3 Gently pull out the paper.
3 Push the transport guide back in.
● Firmly press the transport guide until it clicks into place.
Troubleshooting
680

4 Set the paper drawer.
● When you insert the paper drawer with <Notify to Check Paper Settings> set to <On>, a confirmation screenis displayed. <Notify to Check Paper Settings>(P. 570)
5 Select <Yes> when the <Is all of the jammed paper removed?> message is displayedon the screen.
Paper Jams in the Manual Feed Slot
If the jammed paper cannot be removed easily, do not forcibly pull it out, but follow the procedure for a differentpaper jam location indicated by the message.
1 Pull out the paper drawer.
● Make sure to hold the paper drawer with both hands, and pull it out gently. Otherwise, you may damagethe paper drawer by dropping it, if it slides out too easily.
2 Remove the transport guide.
● Hold the bottom of the manual feed slot, and pull out the transport guide.
Troubleshooting
681

3 Gently pull out the paper.
4 Carefully insert the transport guide straight in.
● Firmly push the transport guide back in until it clicks into place.
5 Set the paper drawer.
● When you insert the paper drawer with <Notify to Check Paper Settings> set to <On>, a confirmation screenis displayed. <Notify to Check Paper Settings>(P. 570)
6 Select <Yes> when the <Is all of the jammed paper removed?> message is displayedon the screen.
Paper Jams in the Paper Drawer
If the jammed paper cannot be removed easily, do not forcibly pull it out, but follow the procedure for a differentpaper jam location indicated by the message.
1 Pull out the paper drawer.
MF735Cx / MF734Cdw / MF732Cdw MF635Cx / MF633Cdw / MF631Cn
Troubleshooting
682
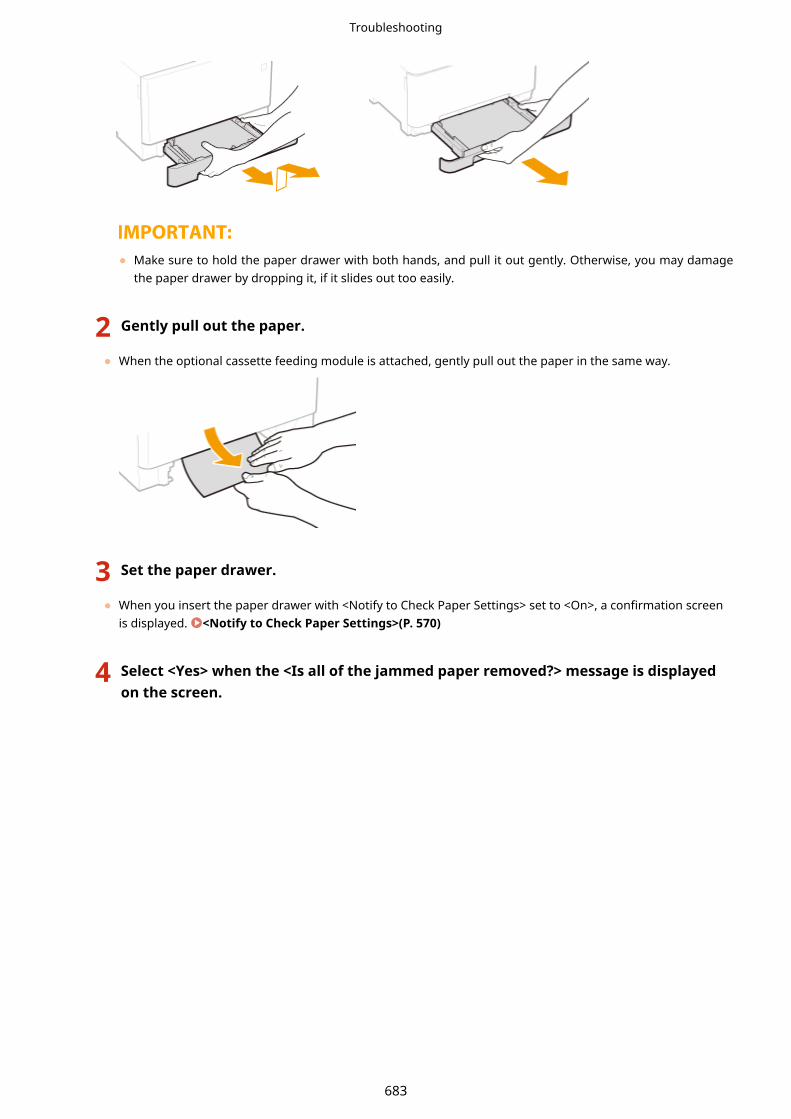
● Make sure to hold the paper drawer with both hands, and pull it out gently. Otherwise, you may damagethe paper drawer by dropping it, if it slides out too easily.
2 Gently pull out the paper.
● When the optional cassette feeding module is attached, gently pull out the paper in the same way.
3 Set the paper drawer.
● When you insert the paper drawer with <Notify to Check Paper Settings> set to <On>, a confirmation screenis displayed. <Notify to Check Paper Settings>(P. 570)
4 Select <Yes> when the <Is all of the jammed paper removed?> message is displayedon the screen.
Troubleshooting
683

When a Problem Cannot Be Solved16SE-0C1
If you cannot solve a problem by referring to the information in this chapter, contact your local authorized Canondealer or the Canon help line.
Do not disassemble or repair the machine yourself● If you disassemble or repair the machine yourself, it may not be covered by warranty.
◼When Contacting CanonWhen contacting us, have the following information ready:
● Product name (MF735Cx / MF734Cdw / MF732Cdw / MF635Cx / MF633Cdw / MF631Cn)
● Dealer where you purchased the machine
● Details about your problem (such as what you did and what happened as a result)
● Serial number (found on the label on the back side of the machine)
MF735Cx / MF734Cdw / MF732Cdw MF635Cx / MF633Cdw / MF631Cn
Checking the serial number from the operation panel● Select <Status Monitor> <Device Information> <Serial Number>.
Troubleshooting
684

AppendixAppendix ............................................................................................................................................................. 686
Third Party Software ......................................................................................................................................... 688
Feature Highlights ............................................................................................................................................ 689
Going Green and Saving Money ................................................................................................................... 690
Improving Efficiency ..................................................................................................................................... 692
Going Digital ................................................................................................................................................ 694
So Much More .............................................................................................................................................. 696
Specifications .................................................................................................................................................... 698
Main Unit ...................................................................................................................................................... 699
Feeder .......................................................................................................................................................... 703
Available Paper ............................................................................................................................................. 704
Cassette Feeding Module-AF ........................................................................................................................ 708
Copy Card Reader-F ...................................................................................................................................... 709
Fax Function ................................................................................................................................................. 710
Scan Function ............................................................................................................................................... 711
Printer Functions .......................................................................................................................................... 712
Management Functions ................................................................................................................................ 714
System Environment .................................................................................................................................... 717
Network Environment .................................................................................................................................. 719
Options .............................................................................................................................................................. 720
Optional Equipment ..................................................................................................................................... 721
System Options ............................................................................................................................................ 723
Manuals and Their Contents ............................................................................................................................. 725
Using User's Guide ............................................................................................................................................ 726
Screen Layout of User's Guide ...................................................................................................................... 727
Viewing User's Guide .................................................................................................................................... 730
Basic Windows Operations ............................................................................................................................... 731
Notice ................................................................................................................................................................. 739
Appendix
685
Appendix16SE-0ES
This chapter contains technical specifications of this machine, instructions on how to use the User's Guide, disclaimers,copyright information, and other important information for customers.
◼Machine SpecificationsSee the following section(s) when you want to check the specifications of the main unit and optional equipment,network environment, print function, and so on.
Specifications(P. 698)
◼Using Optional EquipmentSee the following section(s) when you want to check what options are available to use this machine more convenientlyand more effectively.
Options(P. 720)
◼Referencing the Manual of This MachineSee the first of the following sections when you want to be sure of the kinds of the manuals describing the functions ofthe machine and how to operate the machine. When you want to know how to read and use the User's Guide (thismanual), see the second section.
Manuals and Their Contents(P. 725)Using User's Guide(P. 726)
◼OthersSee the following section(s) when you want to get useful information, and check the disclaimers and copyrightinformation.
Appendix
686

Third Party Software(P. 688)Feature Highlights(P. 689)Basic Windows Operations(P. 731)Notice(P. 739)
Appendix
687

Third Party Software16SE-0C3
For information related to third-party software, click the following icon(s).
Appendix
688

Feature Highlights16SE-0C4
This section describes tips for leveraging the features of the machine by category. You can make use of the featuresaccording to your intended purposes and operating environment.
Going Green and Saving Money(P. 690)Improving Efficiency(P. 692)Going Digital(P. 694)So Much More(P. 696)
Appendix
689
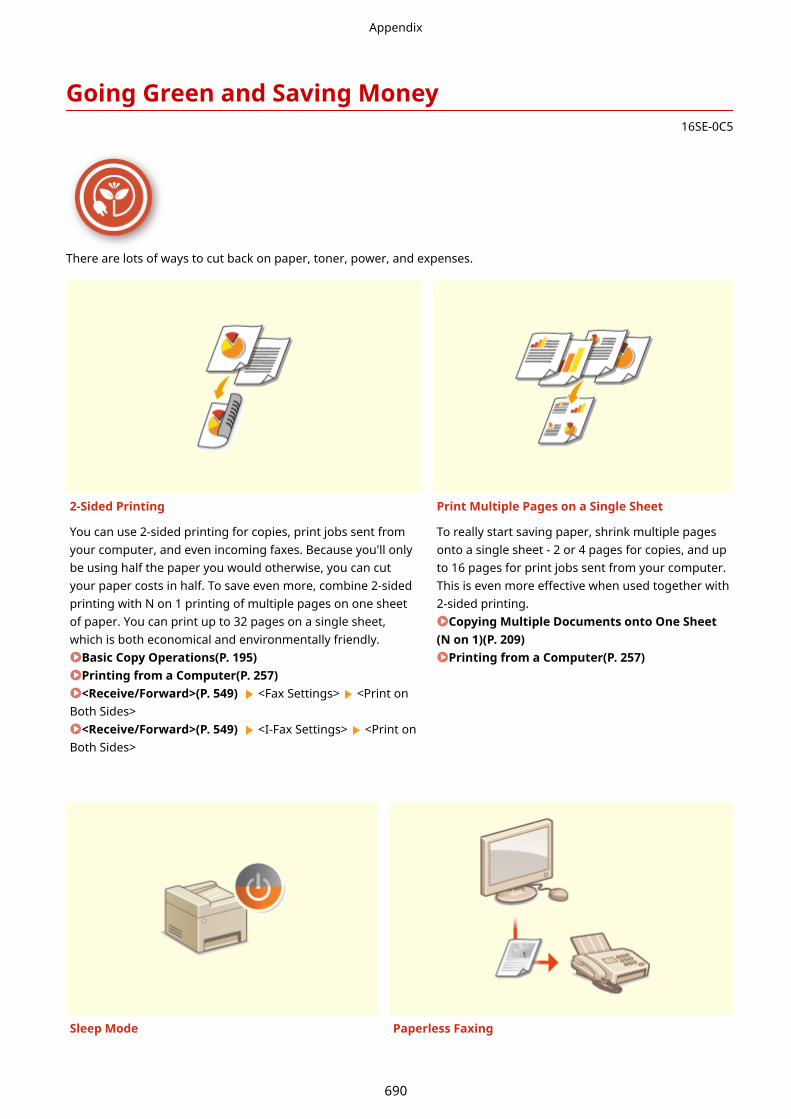
Going Green and Saving Money16SE-0C5
There are lots of ways to cut back on paper, toner, power, and expenses.
2-Sided Printing Print Multiple Pages on a Single Sheet
You can use 2-sided printing for copies, print jobs sent fromyour computer, and even incoming faxes. Because you'll onlybe using half the paper you would otherwise, you can cutyour paper costs in half. To save even more, combine 2-sidedprinting with N on 1 printing of multiple pages on one sheetof paper. You can print up to 32 pages on a single sheet,which is both economical and environmentally friendly.
Basic Copy Operations(P. 195)Printing from a Computer(P. 257)<Receive/Forward>(P. 549) <Fax Settings> <Print on
Both Sides><Receive/Forward>(P. 549) <I-Fax Settings> <Print on
Both Sides>
To really start saving paper, shrink multiple pagesonto a single sheet - 2 or 4 pages for copies, and upto 16 pages for print jobs sent from your computer.This is even more effective when used together with2-sided printing.
Copying Multiple Documents onto One Sheet(N on 1)(P. 209)
Printing from a Computer(P. 257)
Sleep Mode Paperless Faxing
Appendix
690

For saving energy and money, a sleep mode thatpowers down a machine when nobody is using it hasbecome an essential feature. This machine will entersleep mode automatically, and can also be put tosleep whenever you want. Press once to put the
machine to sleep. Press it again to instantly wake themachine back into action.
Entering Sleep Mode(P. 180)
Assume you need paper to fax? Those old paper printoutsyou always make are a thing of the past. Send documentsby fax just as they are, created on your computer. It'spaperless, so it's fast. And, received documents are firststored in memory, allowing you to print out only thoseneeded and eliminating worry about paper getting used ondirect mailings, etc.
Sending Faxes from Your Computer (PC Fax)(P. 243)Saving Received Documents into the Machine
(Memory Reception)(P. 237)
Appendix
691

Improving Efficiency16SE-0C6
Here are some simple operations that can make complicated tasks more efficient.
Address Book Frequently used Settings in One Touch
Entering fax and e-mail addresses in the Address Book savesyou the inconvenience of entering them number-by-number,letter-by-letter every time you have something to send. Displaythe addresses you use most frequently with the <Favorites>feature to quickly and easily send what you need to the peoplewho need it. You can save your Address Book data on yourcomputer and feel secure knowing that your important contactinformation is backed up.
Registering Destinations(P. 182)Registering Destinations from Remote UI(P. 429)Basic Operations for Sending Faxes(P. 217)Basic Operations for Scanning Originals(P. 283)Importing/Exporting the Setting Data(P. 433)
Always making 2-sided copies. Always scanning inthe same format and to the same savedestination. Frequently used settings like thesecan be registered to a single shortcut button. Thisis convenient by allowing you to specify involvedoperations all in a single touch.
Registering Frequently Used Settings(P. 174)
Print Images Right Off Your USB Memory Device Remote Management with Remote UI
Appendix
692

Plug a USB memory device into the machine and you canprint images and documents directly, without using acomputer. You can even preview JPEG and other imagesbefore you print, so there is no wasted paper. You can alsoscan handwritten memos, etc. and save them directly to aUSB memory device. Convenient for carrying about.
Printing from a USB Memory Device (Memory MediaPrint)(P. 269)
Basic Operations for Scanning Originals(P. 283)
Remote UI lets you manage a lot from your computer,all without having to go over to the machine. Configuresettings and keep an eye on the machine's status withan intuitive, easy-to-understand Web browser interfacethat you'll master immediately. Save your time andenergy for things other than taking care of themachine.
Managing the Machine from a Computer (RemoteUI)(P. 417)
Make Print Settings Quickly with Intuitive Operation
You can easily specify the page layout as well as binding position, switchingbetween 1-sided and 2-sided printing, etc. intuitively on the preview image inthe printer driver. The simple click-operation allows you to conveniently makesettings while viewing how settings are applied.
Printing from a Computer(P. 257)
Appendix
693

Going Digital16SE-0C7
Digitalizing a document enables editing using a computer as well as reducing cost and time by using e-mail.
Scan and E-Mail Scan and Share
E-mail scanned originals without even turning onyour computer. Just convert your scanned originalinto an e-mail attachment right from the machine. Ifyou're one of those people who'd rather send a faxthan mess around with a computer, this feature is foryou.
Basic Operations for Scanning Originals(P. 283)
Say you've got a paper copy of a report for a company-widemeeting. Scan it, convert it, and now everyone can see it.It's saved directly in a shared folder on your network, sothere's no need to print out copies and pass them out. Onceyou start talking about hundreds of pages of documentsthat everyone needs, there's just no other way to go.
Basic Operations for Scanning Originals(P. 283)
Scan Only What You Need Searchable PDFs
Appendix
694

What if you're scanning a whole page of a newspaper butall you're really interested in is a headline and a photo?Use ScanGear MF. You can select what you want from apreview, and then have the scanner disregard the rest.Otherwise you'll have to use an editing program to cropout everything you don't need.
Using ScanGear MF(P. 321)
● Using your product to scan, print or otherwisereproduce certain documents, and the use ofsuch images as scanned, printed or otherwisereproduced by your product, may beprohibited by law and may result in criminaland/or civil liability. If you are uncertain aboutthe legality of using your product to scan,print or otherwise reproduce any particulardocument, and/or of the use of the imagesscanned, printed or otherwise reproduced,you should consult in advance with your legaladvisor for guidance.
Searching of text in a PDF can be done with a"searchable PDF." By scanning an original with bothtext and images, text portions are converted by OCRinto text data. In addition to being able to search fortext information, you can also copy required portionsinto an Excel spreadsheet or Word document inMicrosoft Office. Eliminate the need to type incustomer data, addresses, etc. from scratch.
Basic Operations for Scanning Originals(P. 283)Using Your Computer to Scan (Remote Scan)
(P. 318)
Add Images to a Work in Progress
Some applications work with the machine to let you easily import scannedimages directly into documents you're working on. This way you can skip thesteps of opening a separate application just for receiving the scanned imagesand then exporting them to the application you're really using.
Scanning Documents from an Application(P. 319)
Appendix
695

So Much More16SE-0C8
There are a variety of features for whatever you need to do - at home, in the office, or even on the road.
Using a smartphone/tablet Easy Printing with Google Cloud Print
At times such as when you want to quickly print out a proposalyou completed on a tablet while travelling to a businessdestination, or scan materials handed out at a meeting using asmartphone, Canon PRINT Business comes in handy. Even inenvironments without a wireless LAN router, you can connectto the machine with a mobile device wirelessly and directly.PCless, quick, and easy! An even broader range of possibilitiesfor work/play with functionality made for this age of speed.
Linking with Mobile Devices(P. 323)
Hook up to Google Cloud Print with your laptop orcell phone, send your data, and out come yourprinted documents. With this machine, GoogleCloud Print, and your mobile device, printwhenever you want from wherever you want.
Using Google Cloud Print(P. 345)
Keep Your Printouts Private Go Wireless
Appendix
696

Normally, when you print something from yourcomputer, it comes out of the printer right away.However, if you have sensitive documents, this may notbe what you want. Just use secure printing and no onewill be able to print your documents without enteringyour password on the machine's operation panel. Don'tlet your confidential documents lie exposed on the trayfor everyone to see.
Printing a Document Secured by a PIN (SecurePrint)(P. 265)
No cables, easy installation, simple maintenance. Ifyou've got a WPS wireless LAN router, bypass thesettings process altogether and be ready to go beforeyou know it. Enjoy the kind of clutter-free and easy touse document system that you can only get fromwireless. Compatible with IEEE 802.11b/g/n for stress-free wireless, and also supports WEP and WPA/WPA2-PSK (TKIP/AES-CCMP) for tighter security.
Connecting to a Wireless LAN(P. 18)
Get Faxes Wherever You Go
Never worry about missing a fax when you're out of the office. Set a forwardingdestination and any fax that comes in on the machine will go right to you. Betteryet, make the forwarding destination the e-mail address for your tablet ormobile.
Forwarding the Received Documents Automatically(P. 239)
Appendix
697

Specifications16SE-0C9
Specifications are subject to change without notice for product improvement or future release.
◼Machine SpecificationsMain Unit(P. 699)Feeder(P. 703)Available Paper(P. 704)
◼Specifications of Optional EquipmentCassette Feeding Module-AF(P. 708)Copy Card Reader-F(P. 709)
◼Functional SpecificationsFax Function(P. 710)Scan Function(P. 711)Printer Functions(P. 712)Management Functions(P. 714)
◼Environment To Use the MachineSystem Environment(P. 717)Network Environment(P. 719)
Appendix
698
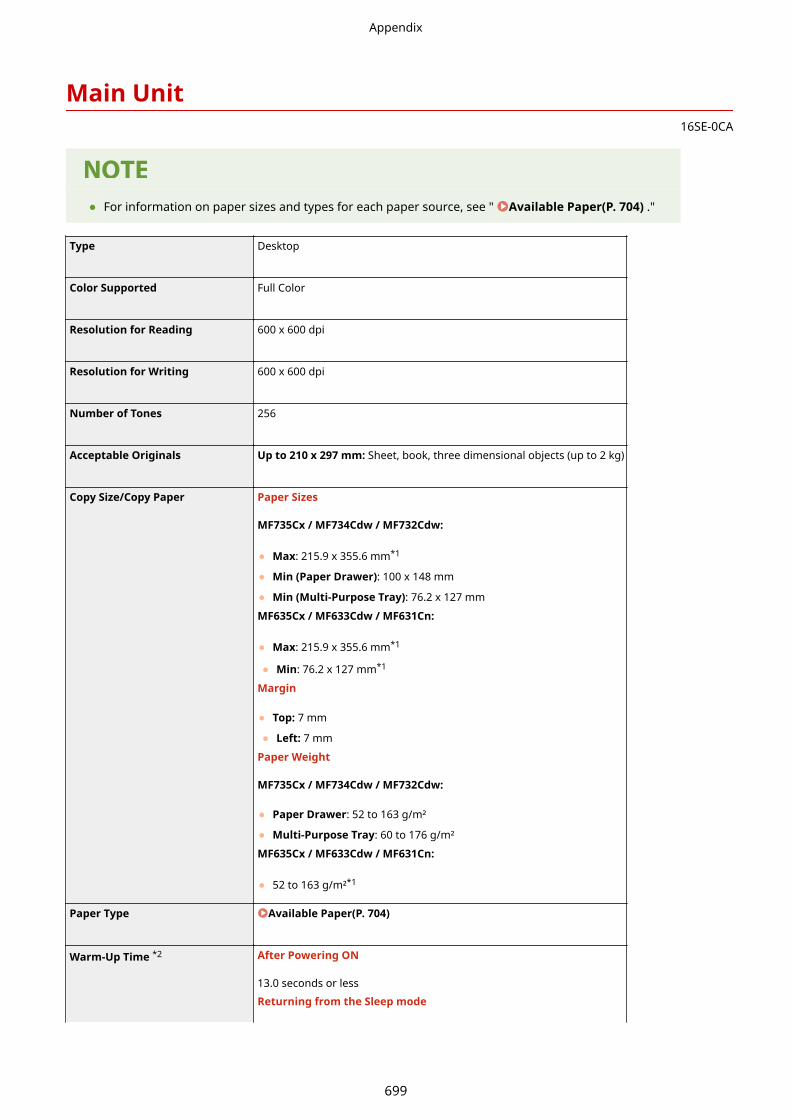
Main Unit16SE-0CA
● For information on paper sizes and types for each paper source, see " Available Paper(P. 704) ."
Type Desktop
Color Supported Full Color
Resolution for Reading 600 x 600 dpi
Resolution for Writing 600 x 600 dpi
Number of Tones 256
Acceptable Originals Up to 210 x 297 mm: Sheet, book, three dimensional objects (up to 2 kg)
Copy Size/Copy Paper Paper Sizes
MF735Cx / MF734Cdw / MF732Cdw:
● Max: 215.9 x 355.6 mm*1
● Min (Paper Drawer): 100 x 148 mm
● Min (Multi-Purpose Tray): 76.2 x 127 mm
MF635Cx / MF633Cdw / MF631Cn:
● Max: 215.9 x 355.6 mm*1
● Min: 76.2 x 127 mm*1
Margin
● Top: 7 mm
● Left: 7 mm
Paper Weight
MF735Cx / MF734Cdw / MF732Cdw:
● Paper Drawer: 52 to 163 g/m²
● Multi-Purpose Tray: 60 to 176 g/m²
MF635Cx / MF633Cdw / MF631Cn:
● 52 to 163 g/m²*1
Paper Type Available Paper(P. 704)
Warm-Up Time *2 After Powering ON
13.0 seconds or less
Returning from the Sleep mode
Appendix
699

6.1 seconds or less
First Copy Time
(A4)
MF735Cx / MF734Cdw / MF732Cdw:
● Full Color: 11.3 seconds
● Black-and-White: 9.8 seconds
MF635Cx / MF633Cdw / MF631Cn:
● Full Color: 14.0 seconds
● Black-and-White: 12.0 seconds
Copy Speed *3
(Plain A4, 100%)MF735Cx / MF734Cdw / MF732Cdw:
● Full Color: 27 sheets/minute
● Black-and-White: 27 sheets/minute
MF635Cx / MF633Cdw / MF631Cn:
● Full Color: 18 sheets/minute
● Black-and-White: 18 sheets/minute
Magnification Regular Paper Size
● Same Ratio
● Enlargement: 115%, 122%, 141%, 200%, 400%
● Reduction: 86%, 81%, 70%, 50%, 25%
Zoom
25 to 400 % (in 1 % increments)
Paper Feeding System/Capacity *4 MF735Cx / MF734Cdw / MF732Cdw:
Paper Drawer
250 sheets (80 g/m²)/250 sheets (64 g/m²) x 1
Multi-Purpose Tray50 sheets (80 g/m²)/50 sheets (64 g/m²) x 1
MF635Cx / MF633Cdw / MF631Cn:
Paper Drawer
150 sheets (80 g/m²)/150 sheets (64 g/m²) x 1
Multi-Purpose Tray
1 sheet
Paper Output System/Capacity *4 MF735Cx / MF734Cdw / MF732Cdw:
Output Tray
150 sheets (75 g/m²)
MF635Cx / MF633Cdw / MF631Cn:
Output Tray
100 sheets (75 g/m²)
Multiple Copies 999 sheets
Power Source 220 to 240 V AC, 50/60 Hz
Appendix
700
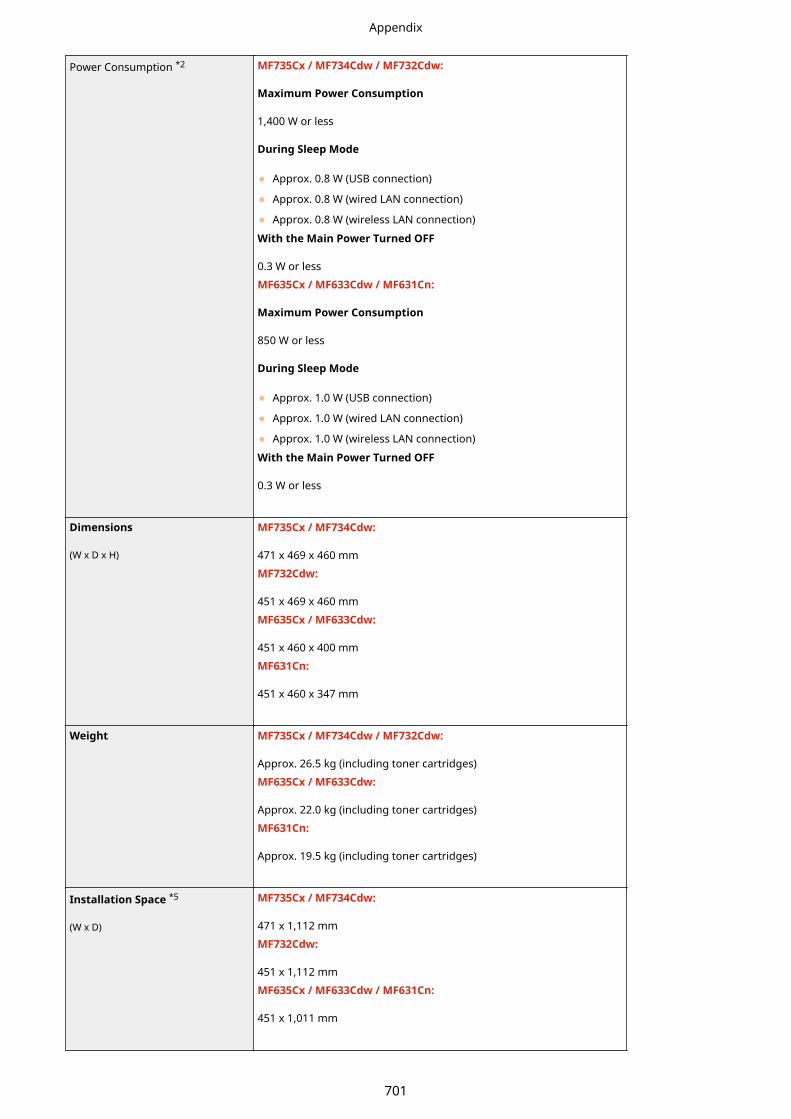
Power Consumption *2 MF735Cx / MF734Cdw / MF732Cdw:
Maximum Power Consumption
1,400 W or less
During Sleep Mode
● Approx. 0.8 W (USB connection)
● Approx. 0.8 W (wired LAN connection)
● Approx. 0.8 W (wireless LAN connection)
With the Main Power Turned OFF
0.3 W or less
MF635Cx / MF633Cdw / MF631Cn:
Maximum Power Consumption
850 W or less
During Sleep Mode
● Approx. 1.0 W (USB connection)
● Approx. 1.0 W (wired LAN connection)
● Approx. 1.0 W (wireless LAN connection)
With the Main Power Turned OFF
0.3 W or less
Dimensions
(W x D x H)
MF735Cx / MF734Cdw:
471 x 469 x 460 mm
MF732Cdw:
451 x 469 x 460 mm
MF635Cx / MF633Cdw:
451 x 460 x 400 mm
MF631Cn:
451 x 460 x 347 mm
Weight MF735Cx / MF734Cdw / MF732Cdw:
Approx. 26.5 kg (including toner cartridges)
MF635Cx / MF633Cdw:
Approx. 22.0 kg (including toner cartridges)
MF631Cn:
Approx. 19.5 kg (including toner cartridges)
Installation Space *5
(W x D)
MF735Cx / MF734Cdw:
471 x 1,112 mm
MF732Cdw:
451 x 1,112 mm
MF635Cx / MF633Cdw / MF631Cn:
451 x 1,011 mm
Appendix
701
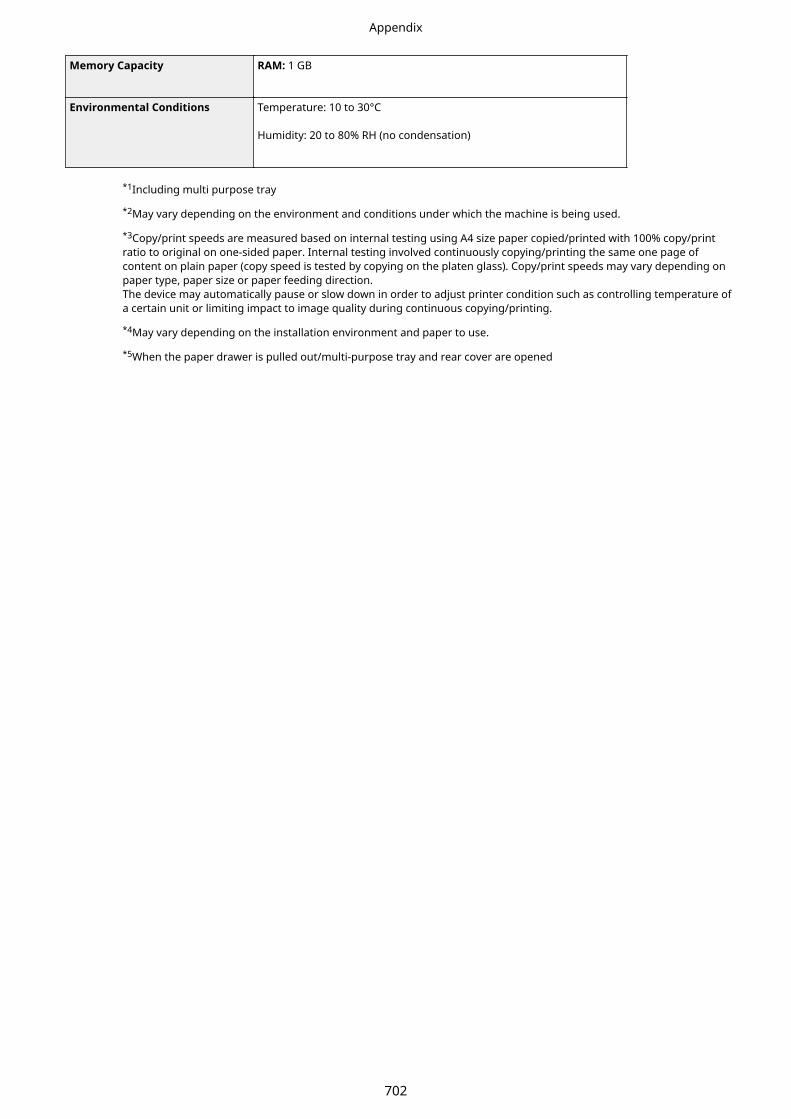
Memory Capacity RAM: 1 GB
Environmental Conditions Temperature: 10 to 30°C
Humidity: 20 to 80% RH (no condensation)
*1Including multi purpose tray
*2May vary depending on the environment and conditions under which the machine is being used.
*3Copy/print speeds are measured based on internal testing using A4 size paper copied/printed with 100% copy/printratio to original on one-sided paper. Internal testing involved continuously copying/printing the same one page ofcontent on plain paper (copy speed is tested by copying on the platen glass). Copy/print speeds may vary depending onpaper type, paper size or paper feeding direction.The device may automatically pause or slow down in order to adjust printer condition such as controlling temperature ofa certain unit or limiting impact to image quality during continuous copying/printing.
*4May vary depending on the installation environment and paper to use.
*5When the paper drawer is pulled out/multi-purpose tray and rear cover are opened
Appendix
702
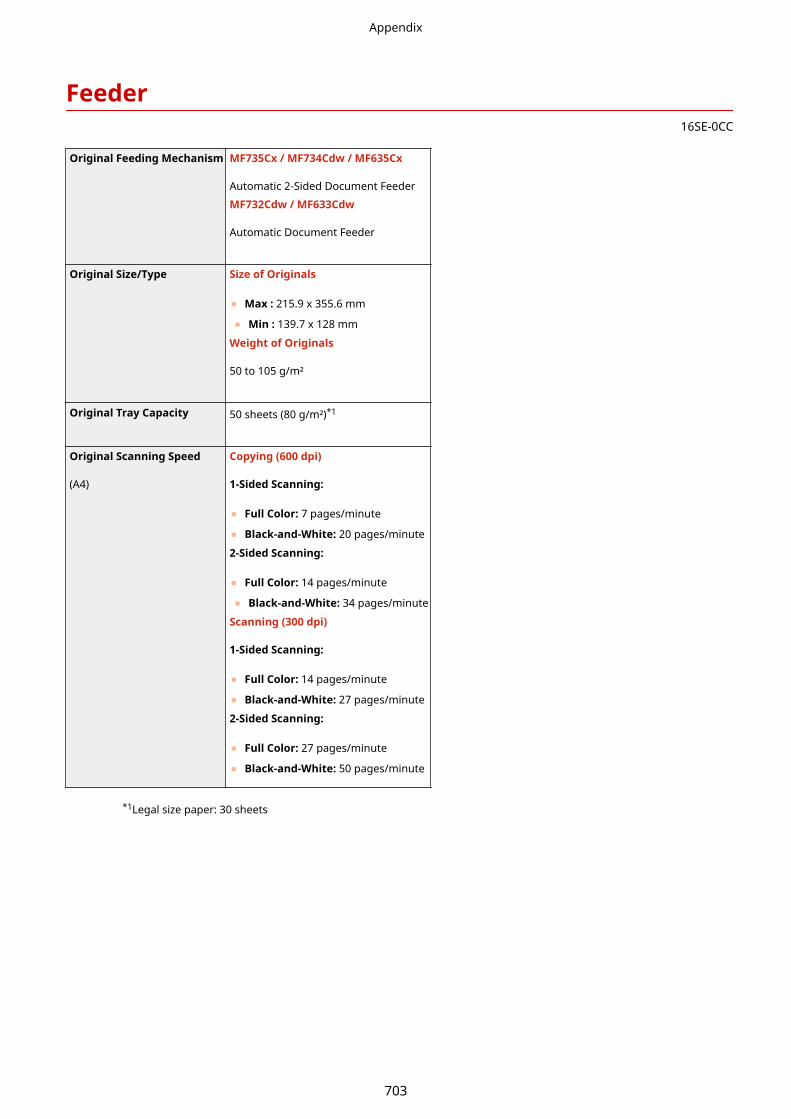
Feeder16SE-0CC
Original Feeding Mechanism MF735Cx / MF734Cdw / MF635Cx
Automatic 2-Sided Document Feeder
MF732Cdw / MF633Cdw
Automatic Document Feeder
Original Size/Type Size of Originals
● Max : 215.9 x 355.6 mm
● Min : 139.7 x 128 mm
Weight of Originals
50 to 105 g/m²
Original Tray Capacity 50 sheets (80 g/m²)*1
Original Scanning Speed
(A4)
Copying (600 dpi)
1-Sided Scanning:
● Full Color: 7 pages/minute
● Black-and-White: 20 pages/minute
2-Sided Scanning:
● Full Color: 14 pages/minute
● Black-and-White: 34 pages/minute
Scanning (300 dpi)
1-Sided Scanning:
● Full Color: 14 pages/minute
● Black-and-White: 27 pages/minute
2-Sided Scanning:
● Full Color: 27 pages/minute
● Black-and-White: 50 pages/minute
*1Legal size paper: 30 sheets
Appendix
703

Available Paper16SE-0CL
The paper types that can be used with this machine are shown in the following table.
◼Supported Paper Sizes: Available : Unavailable
Paper Sizes Paper Drawer *1 Multi-Purpose Tray Automatic 2-Sided Printing *2
A4 *3*4
B5 *3
A5 *3
Legal (LGL) *3*4
Letter (LTR) *3*4
Statement (STMT) *3
Executive (EXEC)
Oficio *3*4
Oficio (Brazil) *3*4
Oficio (Mexico) *3*4
Letter (Government) *3*4
Legal (Government) *3*4
Foolscap/Folio *3*4
Foolscap (Australia) *3*4
Legal (India) *4
3x5inch *5
Envelope No.10 (COM10) *6
Appendix
704

Paper Sizes Paper Drawer *1 Multi-Purpose Tray Automatic 2-Sided Printing *2
Envelope Monarch *5 *6
Envelope C5 *6
Envelope DL *6
Custom Paper Size *7 *8 *9
*1Includes the optional Cassette Feeding Module-AF.
*2Automatic 2-sided printing is available without replacing paper.
*3Allows you to print received fax documents.
*4Allows you to print received I-Fax documents.
*5For MF635Cx / MF633Cdw / MF631Cn only.
*6For MF635Cx / MF633Cdw / MF631Cn, it is recommended that you print from the paper drawer to obtain optimumprint quality. Printing from the manual feed slot may produce skewed printouts.
*7The following custom sizes are available.
● MF735Cx / MF734Cdw / MF732Cdw: 100 x 148 mm to 215.9 x 355.6 mm
● MF635Cx / MF633Cdw / MF631Cn: 76.2 x 127 mm to 215.9 x 355.6 mm
*8The custom size ranging from 76.2 x 127 mm to 215.9 x 355.6 mm is available.
*9The following custom sizes are available.
● MF735Cx / MF734Cdw / MF732Cdw: 176 x 250 mm to 215.9 x 355.6 mm
● MF635Cx / MF633Cdw / MF631Cn: 182 x 257 mm to 215.9 x 355.6 mm
◼Supported Paper TypesChlorine-free paper can be used with this machine.
: Available : Unavailable
MF735Cx / MF734Cdw / MF732Cdw
Paper Type Paper Drawer *1 Multi-Purpose Tray Automatic 2-Sided Printing *2
Thin 1 *3 60 to 70 g/m²
Thin 2 *3*4 60 g/m²
Thin 3 52 to 59 g/m²
Plain 1 *3 71 to 82 g/m²
Plain 2 *3 83 to 90 g/m²
Heavy 1 91 to 119 g/m²
Appendix
705

Paper Type Paper Drawer *1 Multi-Purpose Tray Automatic 2-Sided Printing *2
Heavy 2 120 to 128 g/m²
Heavy 3 129 to 163 g/m²
Recycled 1 *3 60 to 70 g/m²
Recycled 2 *3 71 to 82 g/m²
Color *3 71 to 82 g/m²
Coated 1 100 to 120 g/m²
Coated 2 121 to 150 g/m²
Coated 3 151 to 200 g/m²
Labels
Envelope
*1Includes the optional Cassette Feeding Module-AF.
*2Automatic 2-sided printing is available without replacing paper.
*3Allows you to print received fax/I-Fax documents.
*4Select this if paper curl occurs when the paper type setting <Thin 1> is specified for paper of 60 g/m².
MF635Cx / MF633Cdw / MF631Cn
Paper Type Paper Drawer Manual feed slot Automatic 2-sided printing *1
Thin 1 *2 60 to 70 g/m²
Thin 2 *2*3 60 g/m²
Thin 3 *2 52 to 59 g/m²
Plain 1 *2 71 to 82 g/m²
Plain 2 *2 83 to 90 g/m²
Heavy 1 91 to 120 g/m²
Heavy 2 121 to 163 g/m²
Appendix
706

Paper Type Paper Drawer Manual feed slot Automatic 2-sided printing *1
Recycled 1 *2 60 to 70 g/m²
Recycled 2 *2 71 to 82 g/m²
Color *2 71 to 82 g/m²
Coated 1 100 to 120 g/m²
Coated 2 121 to 150 g/m²
Coated 3 151 to 200 g/m² *4
Labels
Envelope *4
*1Automatic 2-sided printing is available without replacing paper.
*2Allows you to print received fax/I-Fax documents.
*3Select this if paper curl occurs when the paper type setting <Thin 1> is specified for paper of 60 g/m².
*4It is recommended that you print from the paper drawer to obtain optimum print quality. Printing from the manualfeed slot may produce skewed printouts.
Appendix
707

Cassette Feeding Module-AF16SE-0EJ
Paper Sizes ● Max: 215.9 x 355.6 mm
● Min: 100 x 148 mm
Paper Weight 52 to 163 g/m²
Paper Drawers Capacity *1 550 sheets (80 g/m²)/640 sheets (64 g/m²) x 1
Dimensions
(W x D x H)
437 x 469 x 136 mm
Weight Approx. 8.5 kg
*1May vary depending on the installation environment and paper to use.
Appendix
708

Copy Card Reader-F16SE-0EK
Available Cards Magnetic
Card Readout Method Magnetic readout
Magnetic Card Reading Direction Face up
Store/Replay Replay
Dimensions
(W x D x H)
88 x 96 x 40 mm (excluding the attachment kit and cable)
Weight Approx. 200 g (including the attachment kit and cable)
Appendix
709
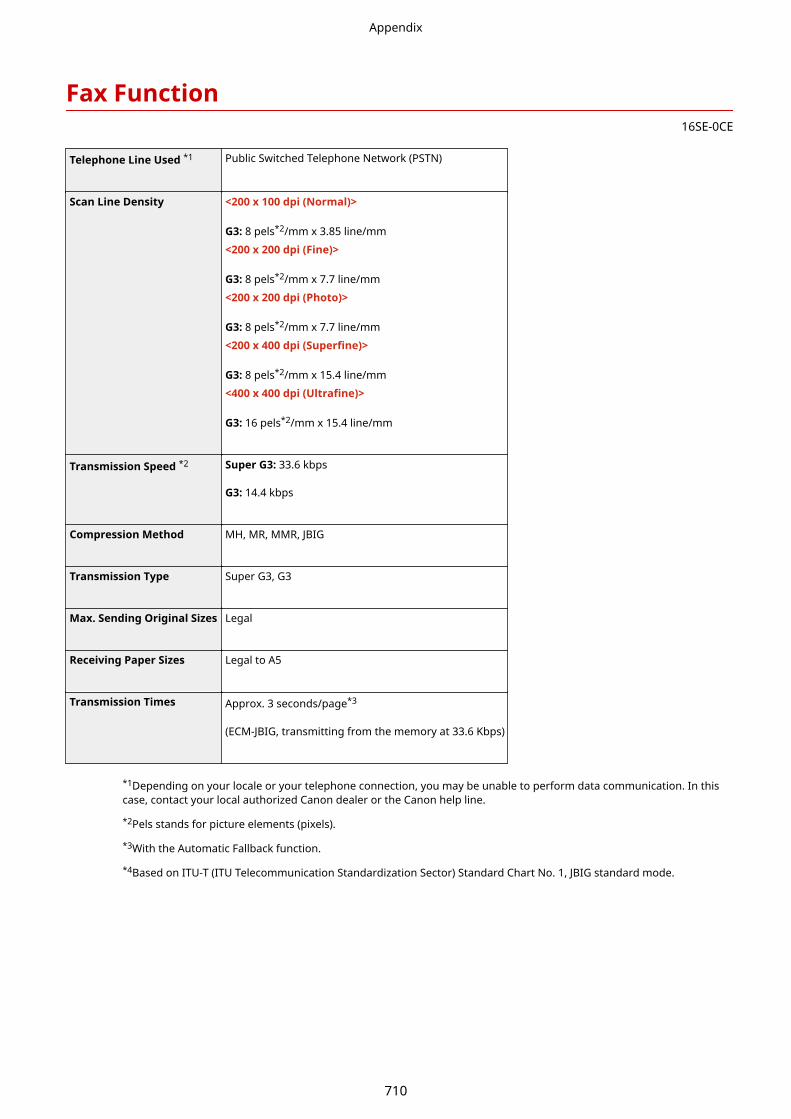
Fax Function16SE-0CE
Telephone Line Used *1 Public Switched Telephone Network (PSTN)
Scan Line Density <200 x 100 dpi (Normal)>
G3: 8 pels*2/mm x 3.85 line/mm
<200 x 200 dpi (Fine)>
G3: 8 pels*2/mm x 7.7 line/mm
<200 x 200 dpi (Photo)>
G3: 8 pels*2/mm x 7.7 line/mm
<200 x 400 dpi (Superfine)>
G3: 8 pels*2/mm x 15.4 line/mm
<400 x 400 dpi (Ultrafine)>
G3: 16 pels*2/mm x 15.4 line/mm
Transmission Speed *2 Super G3: 33.6 kbps
G3: 14.4 kbps
Compression Method MH, MR, MMR, JBIG
Transmission Type Super G3, G3
Max. Sending Original Sizes Legal
Receiving Paper Sizes Legal to A5
Transmission Times Approx. 3 seconds/page*3
(ECM-JBIG, transmitting from the memory at 33.6 Kbps)
*1Depending on your locale or your telephone connection, you may be unable to perform data communication. In thiscase, contact your local authorized Canon dealer or the Canon help line.
*2Pels stands for picture elements (pixels).
*3With the Automatic Fallback function.
*4Based on ITU-T (ITU Telecommunication Standardization Sector) Standard Chart No. 1, JBIG standard mode.
Appendix
710

Scan Function16SE-0CH
Type Color Scanner
Original Scanning Size (Max) 215.9 x 355.6 mm
Resolution (Max) 600 x 600 dpi
Scanning Speed Feeder(P. 703)
Interface USB
USB 2.0 Hi-Speed
Wired LAN
10Base-T, 100Base-TX, 1000Base-T
Wireless LAN
IEEE 802.11b, IEEE 802.11g, IEEE 802.11n
Protocol Supported *1 SMB, FTP, SMTP, MultiPass, MFNP
Output Format *1 TIFF, JPEG (Single-Page), PDF
*1Some formats are not supported depending on the function.
Appendix
711

Printer Functions16SE-0CK
◼UFR II Printer Function
Type Internal
Print Size Available Paper(P. 704)
Print Speed Same as "Copy Speed" on Main Unit(P. 699)
Resolution Data Processing
1200 dpi x 1200 dpi, 600 dpi x 600 dpi
Page Description Language (PDL) UFR II
Protocol Supported Network Environment(P. 719)
Resident Fonts None
Interface USB
USB 2.0 Hi-Speed
Wired LAN
10Base-T, 100Base-TX, 1000Base-T
Wireless LANIEEE 802.11b, IEEE 802.11g, IEEE 802.11n
◼PCL/PS Printer Function
Type Internal
Print Size Available Paper(P. 704)
Print Speed Same as "Copy Speed" on Main Unit(P. 699)
Resolution Data Processing
1200 dpi x 1200 dpi, 600 dpi x 600 dpi
Page Description Language (PDL) PCL6, Adobe PS 3
Protocol Supported Network Environment(P. 719)
Appendix
712

Resident Fonts PCL fontsMF735Cx / MF635Cx
93 Roman, 10 Bitmap fonts, 2 OCR fonts
MF734Cdw / MF732Cdw / MF633Cdw
45 Roman, 10 Bitmap fonts
PS fonts136 Roman
Interface USB
USB 2.0 Hi-Speed
Wired LAN
10Base-T, 100Base-TX, 1000Base-T
Wireless LAN
IEEE 802.11b, IEEE 802.11g, IEEE 802.11n
◼Memory Media Print Function
Printable File Formats ● JPEG (DCF/Exif 2.21 or earlier/JFIF)
● TIFF (JPEG/MH/MR/MMR compression)
● PDF (Version 1.7)
Appendix
713

Management Functions16SE-0CR
◼Authentication Functions● LDAP servers that are supported by the machine are Windows Server 2008/Server 2012 Active Directory.
● The machine communicates with LDAP servers using LDAPv3.
● UTF-8 is the supported character encoding used when the text data is transmitted between the machine and anLDAP server.
◼Firewall Settings● Up to 16 IP addresses (or ranges of IP addresses) can be specified for both IPv4 and IPv6.
● The packet filters described in this section control communications over TCP, UDP, and ICMP.
● Up to 32 MAC addresses can be specified.
◼ IPSec● IPSec that is supported by the machine conforms to RFC2401, RFC2402, RFC2406, and RFC4305.
Operating system Windows Vista/7/8/Server 2008/Server 2012
Connection mode Transport mode
Key exchange protocol
IKEv1 (main mode)
Authentication method● Pre-shared key
● Digital signature
Hash algorithm(and key length)
● HMAC-SHA1-96
● HMAC-SHA2 (256 bits or 384 bits)
Encryption algorithm(and key length)
● 3DES-CBC
● AES-CBC (128 bits, 192 bits, or 256 bits)
Key exchange algorithm/group (and key length)
Diffie-Hellman (DH)
● Group 1 (768 bits)
● Group 2 (1024 bits)
● Group 14 (2048 bits)
ESP
Hash algorithm HMAC-SHA1-96
Encryption algorithm(and key length)
● 3DES-CBC
● AES-CBC (128 bits, 192 bits, or 256 bits)
Hash algorithm/encryption algorithm (and keylength)
AES-GCM (128 bits, 192 bits, or 256 bits)
AH Hash algorithm HMAC-SHA1-96
Appendix
714

● IPSec supports communication to a unicast address (or a single device).
● The machine cannot use both IPSec and DHCPv6 at the same time.
● IPSec is unavailable in networks in which NAT or IP masquerade is implemented.
◼Registration of Keys and Certificates● A certificate and key that can be generated by the machine conform to X.509v3. If you install a key or CA certificate
from a computer, make sure that they meet the following requirements:
Format● Key: PKCS#12*1
● CA certificate: X.509v1 or X.509v3, DER (encoded binary), PEM
File extension● Key: ".p12" or ".pfx"
● CA certificate: ".cer" or ".pem"
Public key algorithm(and key length)
RSA (512 bits, 1024 bits, 2048 bits, or 4096 bits), ECDSA (P256, P384, P521)
Certificate signature algorithmSHA1-RSA, SHA256-RSA, SHA384-RSA*2, SHA512-RSA*2, MD5-RSA, MD2-RSA, SHA1-ECDSA,SHA256-ECDSA, SHA384-ECDSA, or SHA512-ECDSA
Certificate thumbprint algorithm SHA1
*1Requirements for the certificate contained in a key are pursuant to CA certificates.
*2SHA384-RSA and SHA512-RSA are available only when the RSA key length is 1024 bits or more.
● The machine does not support use of a certificate revocation list (CRL).
◼Definition of "Weak Encryption"When <Prohibit Use of Weak Encrypt.> is set to <On>, the use of the following algorithms are prohibited.
Hash: MD4, MD5, SHA-1
HMAC: HMAC-MD5
Common key cryptosystem: RC2, RC4, DES
Public key cryptosystem:RSA encryption (512 bits/1024 bits), RSA signature (512 bits/1024 bits), DSA (512 bits/1024bits), DH (512 bits/1024 bits)
● Even when <Prohibit Weak Encryp. Key/Cert.> is set to <On>, the hash algorithm SHA-1, which is used forsigning a root certificate, can be used.
Appendix
715

◼ Import/Export of the Setting DataSee Setting Menu List(P. 441) .
Appendix
716

System Environment16SE-0CF
System Environment for WSD ● Windows Vista/7/8/10
System Requirements for the Remote UI *1 Windows
● Windows Vista/7/8/10
● Microsoft Internet Explorer 9.0 and later
macOS
● Mac OS X 10.5.8 and later (except for Classic environment)
● Safari 5.0.6 and later
E-mail/I-Fax Forwarding Server Software ● Microsoft Exchange Server 2007
● Microsoft Exchange Server 2010
● Microsoft Exchange Server 2013
● Lotus Domino R6.0 and later
● Sendmail 8.12.5 and later
E-mail/I-Fax Receiving Server Software ● Microsoft Exchange Server 2007
● Microsoft Exchange Server 2010
● Microsoft Exchange Server 2013
● Lotus Domino R6.0 and later
● Qpopper 2.53 and later
File Servers Available as Destinations forFile Transmission
● Windows Vista/7/8/Server 2003/Server 2008/Server 2012
● Solaris Version 2.6 or later (with Samba 2.2 or later)
● macOS
● Red Hat Linux 7.2 or later (with Samba 2.2 or later)
System Requirements for the SendFunction Setting Tool
OS
● Windows Vista/7/8/10/Server 2008/Server 2012
Web Browser
● Microsoft Internet Explorer 7.0 and later
Display
● SVGA monitor (with at least 800 x 600 pixel screen resolution) that supports atleast 256 colors
System Requirements for the User's Guide Windows
● Internet Explorer 9 and later
● Microsoft Edge
● Firefox 38 and later
● Firefox ESR 38 and later
● Chrome 45 and later*2
macOS
● Safari 8 and later
● Firefox 38 and later
● Chrome 45 and later*2
Appendix
717

Linux
● Firefox 38 and later
iOS
● Safari (iOS 6.0 and later)*2
Android
● Chrome 45 and later*2
System Requirements for NFC Function ● Android 4.0 or later
*1Before changing the settings of the machine, set your Web browser to enable all cookies and use JavaScript.
*2Only when viewing manuals on the Internet
Appendix
718

Network Environment16SE-0CJ
◼Common Specifications
Protocol Supported Communication Protocol
TCP/IP (Frame type: Ethernet II)
Printing Protocol
● LPD
● RAW
● WSD
◼Wired LAN Specifications
Interface 10Base-T, 100Base-TX, 1000Base-T
◼Wireless LAN Specifications
Standard IEEE 802.11b, IEEE 802.11g, IEEE 802.11n
Transmission Scheme IEEE 802.11b (Modulation system: DS-SS)IEEE 802.11g (Modulation system: OFDM method)IEEE 802.11n (Modulation system: OFDM method)
Frequency Range 2.412 to 2.472 GHz
Maximum Radio-Frequency Power Transmitte 15.98 dBm
Communication Mode ● Infrastructure Mode
● Access Point Mode
Security (encryption method) Infrastructure Mode
● 128 (104)/64 (40) bit WEP
● WPA-PSK (TKIP/AES-CCMP)
● WPA2-PSK (TKIP/AES-CCMP)
Access Point Mode
WPA2-PSK (AES-CCMP)
Connection Method WPS (Wi-Fi Protected Setup), Manual setup
Appendix
719
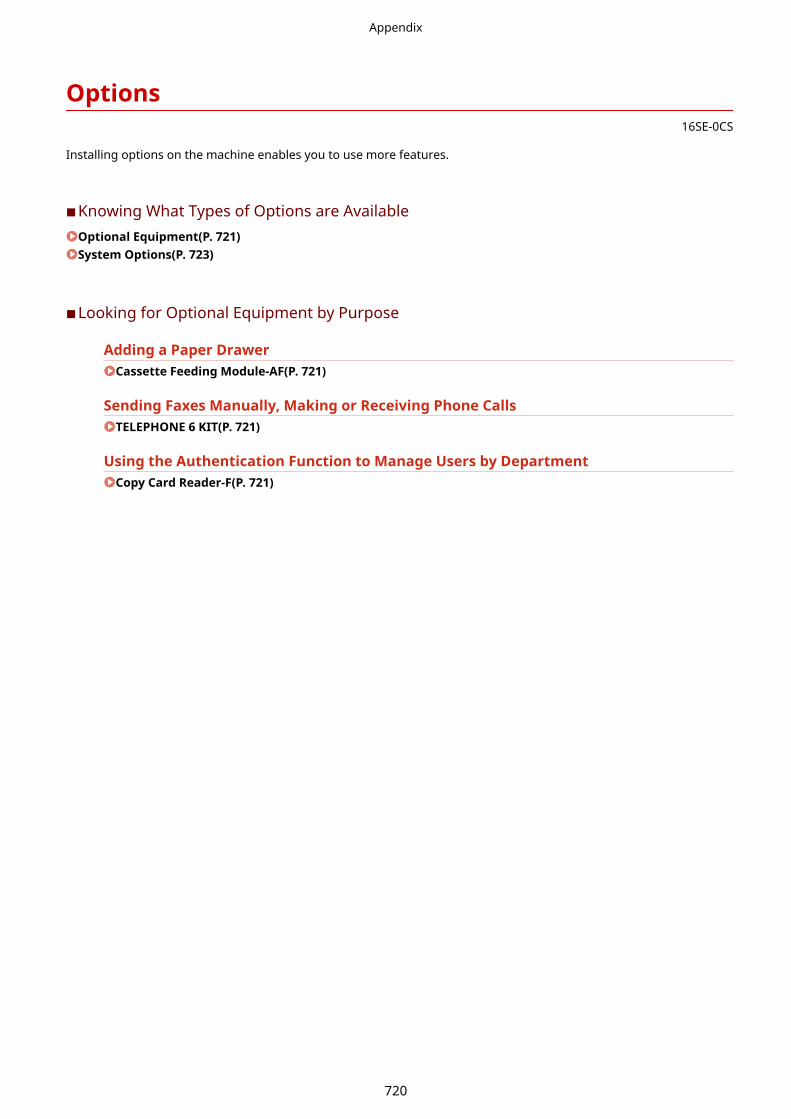
Options16SE-0CS
Installing options on the machine enables you to use more features.
◼Knowing What Types of Options are AvailableOptional Equipment(P. 721)System Options(P. 723)
◼Looking for Optional Equipment by Purpose
Adding a Paper DrawerCassette Feeding Module-AF(P. 721)
Sending Faxes Manually, Making or Receiving Phone CallsTELEPHONE 6 KIT(P. 721)
Using the Authentication Function to Manage Users by DepartmentCopy Card Reader-F(P. 721)
Appendix
720

Optional Equipment16SE-0CU
The functionality of the machine can be fully utilized by using the optional equipment described below. Optionalequipment can be purchased from the retail outlet where you purchased the machine or from your local Canon dealer.
Cassette Feeding Module-AF(P. 721)TELEPHONE 6 KIT(P. 721)Copy Card Reader-F(P. 721)
Cassette Feeding Module-AF
Installing this cassette feeding module enables you to load paper of a differentsize than that of paper loaded in the standard paper drawer. This surely reducesthe time and labor for paper replacement.
TELEPHONE 6 KIT
This is a handset that can be connected to the machine. Use the handset whenyou use the machine as a telephone. Also, use the handset when you send orreceive faxes manually.
Copy Card Reader-F
This is a card authentication system that enables you to perform the login process of Department ID Management byusing a control card instead of entering a department ID. You can log in to the machine by inserting a control card andlog off by removing it.
Card slotInsert the control card into the card slot when the login screen is displayed. Remove the control card fromthe card slot after using the machine.
Appendix
721

Control cardYou can use the control card shown below. Hold the card the front side up and insert in the directionindicated on the card.
Appendix
722

System Options16SE-0CW
The machine performance can be enhanced even more by installing system options.
Barcode Printing Kit(P. 723)Send PDF Security Feature Set(P. 723)License Registration(P. 723)
Barcode Printing Kit
This option enables you to generate barcodes in various formats. Note that if you want to print barcodes, PCL must beenabled. For information on using the Barcode Printing Kit, see the Barcode Printing Guide (PDF manual).
Send PDF Security Feature Set
You can enhance the security of PDF files with the Send PDF Security Feature Set. This option enables you to add adigital signature to PDF files or to create encrypted PDF files when scanning originals.
License Registration
To activate certain system options, you need to obtain a license key and register the key to the machine.
◼Obtaining a License KeyYou can obtain a license key by using a web browser. Access the License Management System (http://www.canon.com/lms/license) and follow the procedure. As a part of the procedure, you are required to enter thefollowing numbers.
License Access NumberCheck the license access number provided on the License Access Number Certificate that is included in thepackage of the option.
Serial Number of the MachineCheck the serial number of the machine from the operation panel.
<Status Monitor> <Device Information> <Serial Number>
◼Registering a License Key
1 Select <Menu> in the Home screen. Home Screen(P. 123)
2 Select <Management Settings>.
● If the login screen appears, enter the correct ID and PIN. Logging in to the Machine(P. 134)
Appendix
723

3 Select <License/Other> <Register License>.
4 Confirm the message on the screen, and select <OK>.
5 Enter the license key using the numeric keys, and select <Apply>.
➠Registration starts. Wait until the <Installation is complete. Changes will be effective after the main poweris turned OFF and ON.> message is displayed.
● If the <The feature required for installation is not present.> message is displayed, enable the functionsthat are required to activate the option and register the license key again.
6 Select <Close>.
Appendix
724
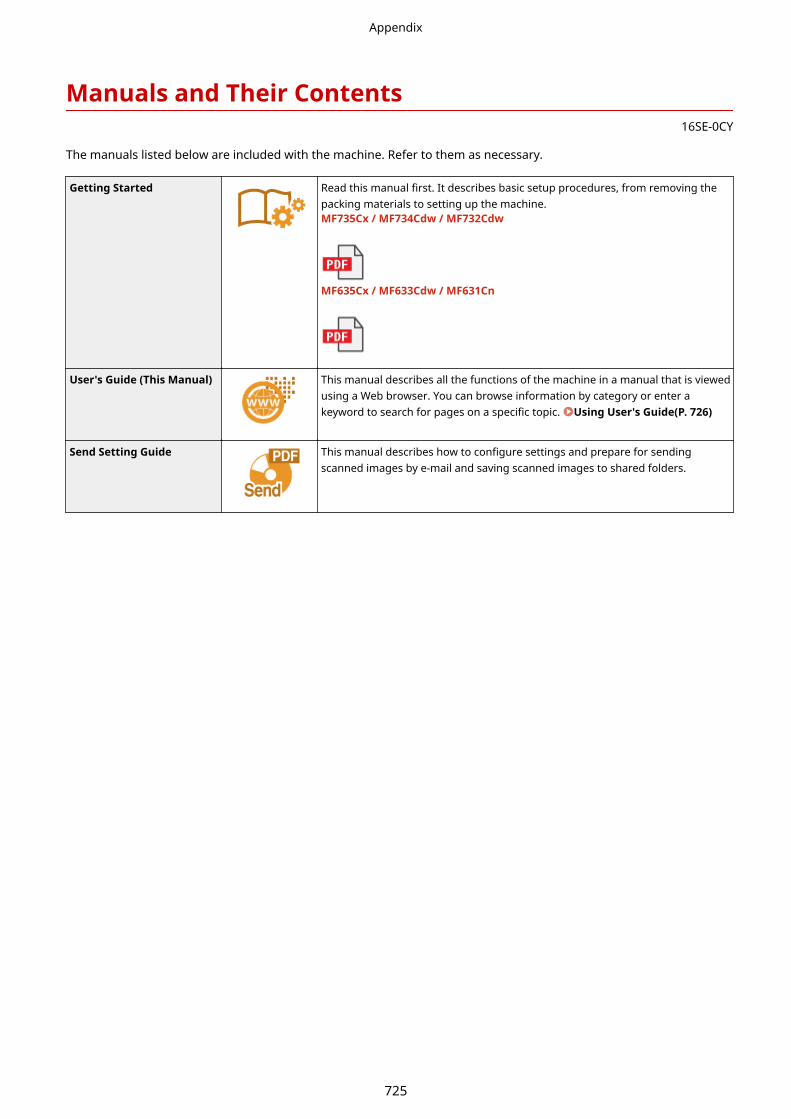
Manuals and Their Contents16SE-0CY
The manuals listed below are included with the machine. Refer to them as necessary.
Getting Started Read this manual first. It describes basic setup procedures, from removing thepacking materials to setting up the machine.MF735Cx / MF734Cdw / MF732Cdw
MF635Cx / MF633Cdw / MF631Cn
User's Guide (This Manual) This manual describes all the functions of the machine in a manual that is viewedusing a Web browser. You can browse information by category or enter akeyword to search for pages on a specific topic. Using User's Guide(P. 726)
Send Setting Guide This manual describes how to configure settings and prepare for sendingscanned images by e-mail and saving scanned images to shared folders.
Appendix
725

Using User's Guide16SE-0E0
The User's Guide is a manual that can be viewed on your computer or mobile device and it describes all of thefunctions of the machine. You can search from your intended use or enter a keyword to quickly find the page you arelooking for. The section describes the screen layout of the User's Guide and how to read the Guide. You can specifyhow the appearance of the User's Guide looks.
◼Screen Layout of User's GuideThis section describes the screens configuring the User's Guide and how to use the on-screen buttons. ScreenLayout of User's Guide(P. 727)
◼Viewing User's GuideThis section describes the meaning of the marks used in the User's Guide, how the keys on the operation panel andthe buttons on the computer display are represented, and other matters that help you understand the informationcontained in the User's Guide. Viewing User's Guide(P. 730)
◼Specifying How the Appearance of the User's Guide LooksYou can change the character size used in the User's Guide, and switch the screen layout to fit to the device you use toview the User's Guide.
● If you do not have access to Adobe Reader to view the manuals in PDF format, try other programs such asPDF Preview developed by Vivid Document Imaging Technologies.
How to Find the Topic You Are Looking for
Search the contents● You can find the page you are looking for by selecting the topic from the "Contents" on the left side of the
screen.
Search by keyword● Perform a search by entering a keyword, such as "envelope" or "toner cartridge," and the pages containing
the keyword are displayed. You can find the page you are looking for from those results. You can also enterphrases such as "connecting to a network." The keyword search also supports the AND Boolean to search formultiple keywords. For the organization of the search screen and how to operate the search screen, see Search(P. 729) .
Appendix
726
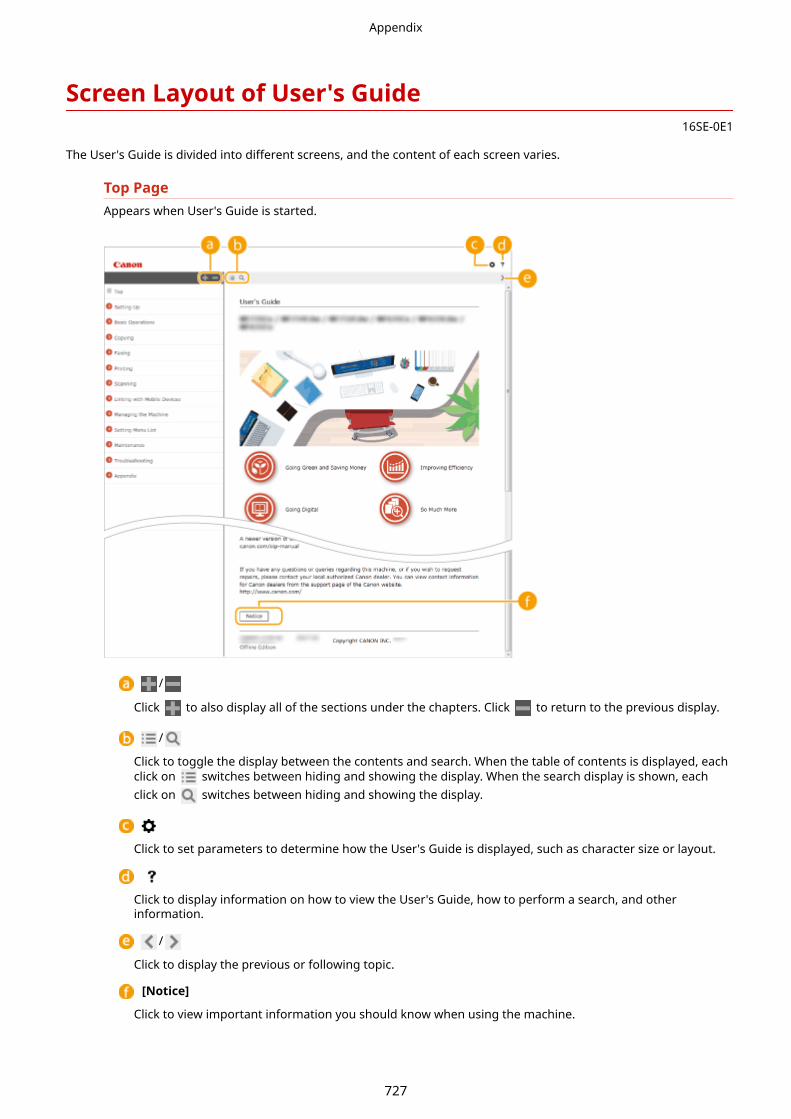
Screen Layout of User's Guide16SE-0E1
The User's Guide is divided into different screens, and the content of each screen varies.
Top PageAppears when User's Guide is started.
/
Click to also display all of the sections under the chapters. Click to return to the previous display.
/
Click to toggle the display between the contents and search. When the table of contents is displayed, eachclick on switches between hiding and showing the display. When the search display is shown, eachclick on switches between hiding and showing the display.
Click to set parameters to determine how the User's Guide is displayed, such as character size or layout.
Click to display information on how to view the User's Guide, how to perform a search, and otherinformation.
/
Click to display the previous or following topic.
[Notice]
Click to view important information you should know when using the machine.
Appendix
727

Topic PageContains information about how to configure and use the machine.
Navigation
See what chapter topic you are currently viewing.
Click to jump to the corresponding page. To return to the previous page, click "Back" on your Webbrowser.
● When you click the icon, the current page may go dark and a pop-up window may appear. To return tothe page, click [Close] in the pop-up window.
Appendix
728

/
Click to display the hidden detailed descriptions. Click to close the detailed descriptions.
Click to return to the page top.
SearchClick to display the search window. Contains a text box to perform a search by keyword and find the pageyou are looking for.
[Enter keyword(s) here]
Enter a keyword or keywords and click to display the search results. You can search for pagescontaining all the keywords by separating the keywords by a space (blank). Also you can only search forpages containing an exact phrase by enclosing the keywords in double quotation marks.
Search result
Displays the search results of the pages that contain the specified keywords. From the results, locate thepage you are looking for and click the topic title of the page.
● The specified keyword(s) are shown in bold in the search results.
Appendix
729

Viewing User's Guide16SE-0E2
This section describes the marks, buttons, screens, and other items used in the User's Guide. The warnings andcautions are also given in the "Important Safety Instructions" in the "Getting Started" included with the machine. Seealso these instructions.
MarksCautions regarding safety, restrictions and cautions regarding the handling of the machine, useful tips, andother information are indicated using the marks below.
Indicates an operation that must not be performed. Read these items carefully,and make sure not to perform the described operations.
Indicates operational requirements and restrictions. Be sure to read these itemscarefully to operate the machine correctly, and avoid damage to the machine orproperty.
Indicates a clarification of an operation, or contains additional explanations for aprocedure.
Indicates useful functions or tips for using the machine.
Keys and Buttons Used in this ManualKeys on the operation panel and buttons on the computer display appear in the following notation:
Type Example
Keys on the operation panel
Settings displayed on the operation panel<Timer/Energy Settings><Paper jammed.>
Buttons and other text interfaces displayed on the computer display [Preferences]
Computer Screens Used in This ManualUnless otherwise noted, displays used in the User's Guide are those for the MF735Cx. Depending on the modelor operating system you are using, the appearance of the displays used in this manual may slightly differ fromthe actual displays. Also, the appearance of drivers and software may differ depending on their version.
Illustrations Used in This ManualUnless otherwise noted, illustrations used in the User's Guide are those for the MF735Cx. When differences aresignificant, multiple illustrations are used with the model names, such as "MFXXX / MFXXX." The illustrations ofthe toner cartridge are those for the Canon Cartridge 046.
Appendix
730

Basic Windows Operations16SE-0E4
Displaying the Printer Folder(P. 731)Enabling [Network discovery](P. 731)Displaying Shared Printers in the Print Server(P. 732)Displaying the [Software Programs/Manuals Setup] Screen(P. 732)Printing a Test Page in Windows(P. 733)Checking the Bit Architecture(P. 734)Checking the Computer Name(P. 735)Checking the Printer Port(P. 736)Checking Bidirectional Communication(P. 737)Checking the SSID to Which Your Computer is Connected(P. 738)
◼Displaying the Printer FolderWindows Vista[Start] select [Control Panel] [Printer].
Windows 7/Server 2008 R2[Start] select [Devices and Printers].
Windows 8/Server 2012Right-click the lower-left corner of the screen select [Control Panel] [View devices and printers].
Windows 8.1/Server 2012 R2Right-click [Start] select [Control Panel] [View devices and printers].
Windows 10Right-click [ ] select [Control Panel] [Hardware and Sound] [Devices and Printers].
Windows Server 2008[Start] select [Control Panel] double-click [Printers].
◼Enabling [Network discovery]Enable [Network discovery] to view the computers on your network.
Windows Vista[Start] select [Control Panel] [View network status and tasks] select [Turn on network discovery] under[Network discovery].
Windows 7/Server 2008 R2[Start] select [Control Panel] [View network status and tasks] [Change advanced sharing settings]
select [Turn on network discovery] under [Network discovery].
Windows 8/Server 2012Right-click the lower-left corner of the screen select [Control Panel] [View network status and tasks]
[Change advanced sharing settings] select [Turn on network discovery] under [Network discovery].
Windows 8.1/Server 2012 R2Right-click [Start] select [Control Panel] [View network status and tasks] [Change advanced sharingsettings] select [Turn on network discovery] under [Network discovery].
Windows 10Right-click [ ] select [Control Panel] [View network status and tasks] [Change advanced sharingsettings] select [Turn on network discovery] under [Network discovery].
Windows Server 2008
Appendix
731

[Start] select [Control Panel] double-click [Network and Sharing Center] select [Turn on networkdiscovery] under [Network discovery].
◼Displaying Shared Printers in the Print Server
1 Open Windows Explorer.
Windows Vista/7/Server 2008[Start] select [All Programs] or [Programs] [Accessories] [Windows Explorer].
Windows 8/Server 2012Right-click the lower-left corner of the screen select [File Explorer].
Windows 8.1/Server 2012 R2Right-click [Start] select [File Explorer].
Windows 10[ ] select [File Explorer].
2 Select the printer server in [Network] or [My Network Places].
● To view computers on the network, you may need to turn on network discovery or search the network forcomputers.
➠Shared printers are displayed.
1
◼Displaying the [Software Programs/Manuals Setup] ScreenIf your computer does not display the [Software Programs/Manuals Setup] screen after inserting the provided DVD-ROM, follow the procedure below. The DVD-ROM drive name is indicated as "D:" in this manual. The DVD-ROM drivename may differ depending on the computer you are using.
Windows Vista/7/Server 2008[Start] enter "D:\MInst.exe" in [Search programs and files] or [Start Search] press the [ENTER] key.
Appendix
732
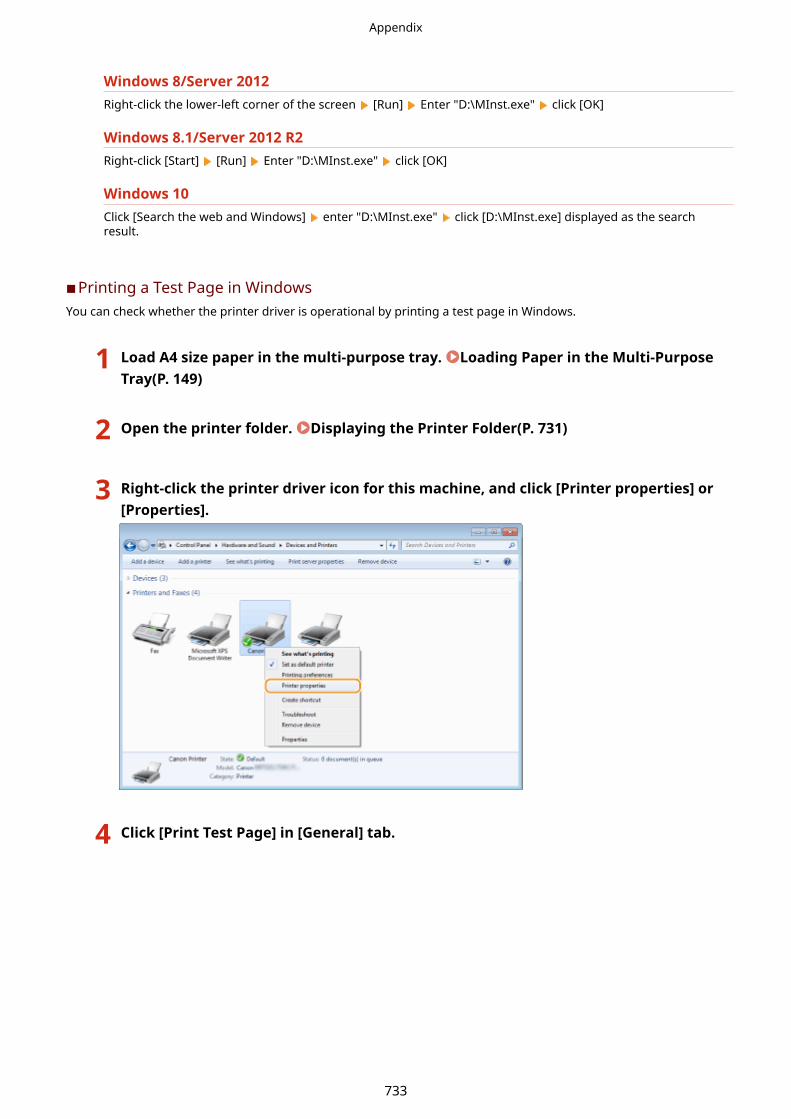
Windows 8/Server 2012Right-click the lower-left corner of the screen [Run] Enter "D:\MInst.exe" click [OK]
Windows 8.1/Server 2012 R2Right-click [Start] [Run] Enter "D:\MInst.exe" click [OK]
Windows 10Click [Search the web and Windows] enter "D:\MInst.exe" click [D:\MInst.exe] displayed as the searchresult.
◼Printing a Test Page in WindowsYou can check whether the printer driver is operational by printing a test page in Windows.
1 Load A4 size paper in the multi-purpose tray. Loading Paper in the Multi-PurposeTray(P. 149)
2 Open the printer folder. Displaying the Printer Folder(P. 731)
3 Right-click the printer driver icon for this machine, and click [Printer properties] or[Properties].
4 Click [Print Test Page] in [General] tab.
Appendix
733

➠The test page is printed.
◼Checking the Bit ArchitectureIf you are not sure whether your computer is running 32-bit or 64-bit Windows follow the procedure below.
1 Display [Control Panel].
Windows Vista/7/Server 2008[Start] select [Control Panel].
Windows 8/Server 2012Right-click the lower-left corner of the screen select [Control Panel].
Windows 8.1/Server 2012 R2Right-click [Start] select [Control Panel].
Windows 10Proceed to step 2.
2 Display [System].
Windows Vista/7/8/Server 2008 R2/Server 2012Click [System and Maintenance] or [System and Security] [System].
Windows 10Click [ ] [Settings] [System] select [About].
Windows Server 2008Double-click [System].
3 Check the bit architecture.
For 32-bit versions[32-bit Operating System] is displayed.
For 64-bit versions[64-bit Operating System] is displayed.
Appendix
734

◼Checking the Computer Name
1 Display [Control Panel].
Windows Vista/7/Server 2008[Start] select [Control Panel].
Windows 8/Server 2012Right-click the lower-left corner of the screen select [Control Panel].
Windows 8.1/Server 2012 R2Right-click [Start] select [Control Panel].
Windows 10Right-click [ ] select [Control Panel].
2 Display [System].
Windows Vista/7/8/10/Server 2008 R2/Server 2012Click [System and Maintenance] or [System and Security] [System].
Windows Server 2008Double-click [System].
3 Check the computer name.
Appendix
735

◼Checking the Printer Port
1 Open the printer folder. Displaying the Printer Folder(P. 731)
2 Right-click the printer driver icon for this machine, and click [Printer properties] or[Properties].
3 In the [Ports] tab, check that the port is selected correctly.
Appendix
736

If you are using a network connection and have changed the machine's IP address● If [Description] for the selected port is [Canon MFNP Port], and the machine and the computer are on the
same subnet, then the connection will be maintained. You do not need to add a new port. If it is [StandardTCP/IP Port], you need to add a new port. Configuring Printer Ports(P. 44)
◼Checking Bidirectional Communication
1 Open the printer folder. Displaying the Printer Folder(P. 731)
2 Right-click the printer driver icon for this machine, and click [Printer properties] or[Properties].
3 In the [Ports] tab, make sure that the [Enable bidirectional support] check box isselected.
Appendix
737

◼Checking the SSID to Which Your Computer is ConnectedIf your computer is connected to a wireless LAN network, click , , or in the system tray to display the SSID ofthe connected wireless LAN router.
Appendix
738
Notice16SE-0E5
◼ International ENERGY STAR Program
As an ENERGY STAR® Partner, Canon has determined that this product meets the ENERGYSTAR Program for energy efficiency.The ENERGY STAR Program is an international program that promotes energy savingthrough the use of computers and other office equipment.The program backs the development and dissemination of products with functions thateffectively reduce energy consumption. It is an open system in which business proprietorscan participate voluntarily.The targeted products are office equipment, such as computers, displays, printers,facsimiles, and copiers. The standards and logos are uniform among participating nations.
◼ IPv6 Ready Logo
The protocol stack included in this machine has obtained the IPv6 Ready Logo Phase-2established by the IPv6 Forum.
◼Product Information required by COMMISSION REGULATION (EU) No 801/2013 amendingRegulation (EC) No 1275/2008
Power consumption of the product in networked standby if wired network ports are connected and all wirelessnetwork ports are activated (if they are available at the same time).
Model Name Power consumption of the product in networked standby
MF735Cx / MF734Cdw / MF732Cdw 1.3 w
MF635Cx / MF633Cdw 1.6 w
● The above value(s) are the actual values for single machine, chosen arbitrarily, and may therefore vary fromthe value of the machine in use. Optional network ports are not connected and/or activated in themeasurement.
◼WEEE and Battery Directives
Appendix
739
Only for European Union and EEA (Norway, Iceland and Liechtenstein)
These symbols indicate that this product is not to be disposed of with your household waste, according to the WEEEDirective (2012/19/EU), the Battery Directive (2006/66/EC) and/or national legislation implementing those Directives.If a chemical symbol is printed beneath the symbol shown above, in accordance with the Battery Directive, thisindicates that a heavy metal (Hg = Mercury, Cd = Cadmium, Pb = Lead) is present in this battery or accumulator at aconcentration above an applicable threshold specified in the Battery Directive.This product should be handed over to a designated collection point, e.g., on an authorized one-for-one basis whenyou buy a new similar product or to an authorized collection site for recycling waste electrical and electronicequipment (EEE) and batteries and accumulators. Improper handling of this type of waste could have a possibleimpact on the environment and human health due to potentially hazardous substances that are generally associatedwith EEE. Your cooperation in the correct disposal of this product will contribute to the effective usage of naturalresources.For more information about the recycling of this product, please contact your local city office, waste authority,approved scheme or your household waste disposal service or visit www.canon-europe.com/weee, or www.canon-europe.com/battery.
◼Environmental InformationReducing your environmental impact while saving money
Power Consumption and Activation TimeThe amount of electricity a device consumes depends on the way the device is used. This product is designed and setin a way to allow you to reduce your electricity costs. After the last print it switches to Ready Mode. In this mode it canprint again immediately if required. If the product is not used for a time, the device switches to its Power Save Mode.The devices consume less power (Watt) in these modes.If you wish to set a longer Activation Time or would like to completely deactivate the Power Save Mode, pleaseconsider that this device may then only switch to a lower energy level after a longer period of time or not at all.Canon does not recommend extending the Activation Times from the optimum ones set as default.
Energy Star ®The Energy Star® programme is a voluntary scheme to promote the development and purchase of energy efficientmodels, which help to minimise environmental impact.Products which meet the stringent requirements of the Energy Star® programme for both environmental benefits andthe amount of energy consumption will carry the Energy Star® logo accordingly.
Paper typesThis product can be used to print on both recycled and virgin paper (certified to an environmental stewardshipscheme), which complies with EN12281 or a similar quality standard. In addition it can support printing on mediadown to a weight of 64g/m2.Lighter paper means less resources used and a lower environmental footprint for your printing needs.
Duplex printing (Standard duplex printing products only)Duplex printing capability enables you to print on both sides automatically, and therefore helps to reduce the use ofvaluable resources by reducing your paper consumption.The duplex function has been auto enabled during the set up and driver installation and Canon strongly recommendsthat you do not disable this function. You should continue to use the duplex function to reduce the environmentalimpact of your work with this product at all times.
◼Disclaimers● The information in this document is subject to change without notice.
● CANON INC. MAKES NO WARRANTY OF ANY KIND WITH REGARD TO THIS MATERIAL, EITHER EXPRESS OR IMPLIED,EXCEPT AS PROVIDED HEREIN, INCLUDING WITHOUT LIMITATION, THEREOF, WARRANTIES AS TO MARKETABILITY,MERCHANTABILITY, FITNESS FOR A PARTICULAR PURPOSE OF USE, OR NON-INFRINGEMENT. CANON INC. SHALLNOT BE LIABLE FOR ANY DIRECT, INCIDENTAL, OR CONSEQUENTIAL DAMAGES OF ANY NATURE, OR LOSSES OREXPENSES RESULTING FROM THE USE OF THIS MATERIAL.
Appendix
740
◼TrademarksAdobe, Acrobat, and Reader are registered trademarks of Adobe Systems Incorporated in the United States and/orother countries.Apple, Bonjour, iPad, iPhone, iPod touch, Mac, macOS, OS X and Safari are trademarks of Apple Inc.Microsoft, Windows, Windows Vista, Windows Server, Internet Explorer, Word and Excel are either registeredtrademarks or trademarks of Microsoft Corporation in the United States and/or other countries.iOS is a trademark or registered trademark of Cisco in the U.S. and other countries and is used under license.Google Cloud Print, Google Chrome and Android are either registered trademarks or trademarks of Google Inc.This product contains the Universal Font Scaling Technology or UFST® under license from Monotype Imaging, Inc.UFST® is a trademark of Monotype Imaging, Inc. registered in the United States Patent and Trademark Office and maybe registered in certain jurisdictions.UFST: Copyright © 1989 - 1996, 1997, 2003, 2004, 2008, all rights reserved, by Monotype Imaging Inc.
Adobe, PostScript, and the PostScript logo are either registered trademarks or trademarks of Adobe SystemsIncorporated in the United States and/or other countries.
Copyright © 2007 -08 Adobe Systems Incorporated. All rights reserved.
Protected by U.S. Patents 5,737,599; 5,781,785; 5,819,301; 5,929,866; 5,943,063; 6,073,148; 6,515,763; 6,639,593;6,754,382; 7,046,403; 7,213,269; 7,242,415; Patents pending in the U.S. and other countries.
All instances of the name PostScript in the text are references to the PostScript language as defined by Adobe SystemsIncorporated unless otherwise stated. The name PostScript also is used as a product trademark for Adobe Systems'implementation of the PostScript language interpreter.
Except as otherwise stated, any reference to a "PostScript printing device," "PostScript display device," or similar itemrefers to a printing device, display device or item (respectively) that contains PostScript technology created or licensedby Adobe Systems Incorporated and not to devices or items that purport to be merely compatible with the PostScriptlanguage.
Adobe, the Adobe logo, PostScript, the PostScript logo, and PostScript 3 are either registered trademarks ortrademarks of Adobe Systems Incorporated in the United States and/or other countries.
Linux is a registered trademark of Linus Torvalds. Microsoft and Windows are either registered trademarks ortrademarks of Microsoft Corporation in the United States and/or other countries.
All other trademarks are the property of their respective owners.
Appendix
741

The PDF logo is a trademark or registered trademark of Adobe Systems Incorporated in the United States and othercountries.
Copyright © 2008 Adobe Systems Incorporated. All rights reserved.
Protected by U.S. Patents 6,185,684; 6,205,549; 7,213,269; 7,272,628; 7,278,168; Patents pending in the U.S. and othercountries.
All instances of the name PostScript in the text are references to the PostScript language as defined by Adobe SystemsIncorporated unless otherwise stated. The name PostScript also is used as a product trademark for Adobe Systems'implementation of the PostScript language interpreter.
Except as otherwise stated, any reference to a "PostScript printing device," "PostScript display device," or similar itemrefers to a printing device, display device or item (respectively) that contains PostScript technology created or licensedby Adobe Systems Incorporated and not to devices or items that purport to be merely compatible with the PostScriptlanguage.
Adobe, the Adobe logo, Adobe LiveCycle® Policy Server, PostScript, the PostScript Logo, and PostScript 3 are eitherregistered trademarks or trademarks of Adobe Systems Incorporated in the United States and/or other countries.
All other trademarks are the property of their respective owners.
All other product and brand names are registered trademarks, trademarks or service marks of their respective owners.
◼CopyrightReproduction of the contents of this document in whole or in part without prior permission is prohibited.
V_160913
Appendix
742
This Font Software is licensed under the SIL Open Font License,Version 1.1.
This license is copied below, and is also available with a FAQ at:http://scripts.sil.org/OFL
-----------------------------------------------------------SIL OPEN FONT LICENSE Version 1.1 - 26 February 2007-----------------------------------------------------------
PREAMBLEThe goals of the Open Font License (OFL) are to stimulate worldwidedevelopment of collaborative font projects, to support the fontcreation efforts of academic and linguistic communities, and toprovide a free and open framework in which fonts may be shared andimproved in partnership with others.
The OFL allows the licensed fonts to be used, studied, modified andredistributed freely as long as they are not sold by themselves. Thefonts, including any derivative works, can be bundled, embedded,redistributed and/or sold with any software provided that any reservednames are not used by derivative works. The fonts and derivatives,however, cannot be released under any other type of license. Therequirement for fonts to remain under this license does not apply toany document created using the fonts or their derivatives.
DEFINITIONS"Font Software" refers to the set of files released by the CopyrightHolder(s) under this license and clearly marked as such. This mayinclude source files, build scripts and documentation.
"Reserved Font Name" refers to any names specified as such after thecopyright statement(s).
"Original Version" refers to the collection of Font Softwarecomponents as distributed by the Copyright Holder(s).
"Modified Version" refers to any derivative made by adding to,deleting, or substituting -- in part or in whole -- any of thecomponents of the Original Version, by changing formats or by portingthe Font Software to a new environment.
"Author" refers to any designer, engineer, programmer, technicalwriter or other person who contributed to the Font Software.
PERMISSION & CONDITIONSPermission is hereby granted, free of charge, to any person obtaininga copy of the Font Software, to use, study, copy, merge, embed,modify, redistribute, and sell modified and unmodified copies of theFont Software, subject to the following conditions:
SIL OPEN FONT LICENSE
743
1) Neither the Font Software nor any of its individual components, inOriginal or Modified Versions, may be sold by itself.
2) Original or Modified Versions of the Font Software may be bundled,redistributed and/or sold with any software, provided that each copycontains the above copyright notice and this license. These can beincluded either as stand-alone text files, human-readable headers orin the appropriate machine-readable metadata fields within text orbinary files as long as those fields can be easily viewed by the user.
3) No Modified Version of the Font Software may use the Reserved FontName(s) unless explicit written permission is granted by thecorresponding Copyright Holder. This restriction only applies to theprimary font name as presented to the users.
4) The name(s) of the Copyright Holder(s) or the Author(s) of the FontSoftware shall not be used to promote, endorse or advertise anyModified Version, except to acknowledge the contribution(s) of theCopyright Holder(s) and the Author(s) or with their explicit writtenpermission.
5) The Font Software, modified or unmodified, in part or in whole,must be distributed entirely under this license, and must not bedistributed under any other license. The requirement for fonts toremain under this license does not apply to any document created usingthe Font Software.
TERMINATIONThis license becomes null and void if any of the above conditions arenot met.
DISCLAIMERTHE FONT SOFTWARE IS PROVIDED "AS IS", WITHOUT WARRANTY OF ANY KIND,EXPRESS OR IMPLIED, INCLUDING BUT NOT LIMITED TO ANY WARRANTIES OFMERCHANTABILITY, FITNESS FOR A PARTICULAR PURPOSE AND NONINFRINGEMENTOF COPYRIGHT, PATENT, TRADEMARK, OR OTHER RIGHT. IN NO EVENT SHALL THECOPYRIGHT HOLDER BE LIABLE FOR ANY CLAIM, DAMAGES OR OTHER LIABILITY,INCLUDING ANY GENERAL, SPECIAL, INDIRECT, INCIDENTAL, OR CONSEQUENTIALDAMAGES, WHETHER IN AN ACTION OF CONTRACT, TORT OR OTHERWISE, ARISINGFROM, OUT OF THE USE OR INABILITY TO USE THE FONT SOFTWARE OR FROMOTHER DEALINGS IN THE FONT SOFTWARE.
SIL OPEN FONT LICENSE
744

- 1 -
Third-Party Services
If you use third-party services through the PRODUCT, use of the services are subjected the conditions below.
When you access and/or obtain some third party content (such as text, images, videos, audios, or software)
through the SOFTWARE, except as expressly permitted by the content owner or by applicable law, you may
not (a) scrape, build databases or otherwise create permanent copies of such content, or keep cached copies
longer than permitted by the cache header; (b) copy, translate, modify, create a derivative work of, sell, lease,
lend, convey, distribute, publicly display or sublicense to any third party; (c) misrepresent the source or
ownership; and (d) remove, obscure, or alter any copyright, trademark or other proprietary rights notices, falsify
or delete any author attributions, legal notices or other labels of the origin or source of material.

- 2 -
The Software Subjected to the Other License Conditions
Please refer to Table of Software and respective License terms below, for more detail and corresponding
license conditions.
Table of Software
Names of Software Terms and Conditions of the
License:
See Page
Adobe PDF Scan Library 3
Adobe PostScript 3 6
expat 13
HarfBuzz 2012-07-30 14
libjingle 15
Lua 16
LuaSocket 17
MD4 18
Net-SNMP 19
OpenSSL 27

- 3 -
Adobe PDF Scan Library
Portions use software under the following terms:
______________________________________________________________________________________
This product contains either BSAFE and/or TIPEM software by RSA Security Inc.
______________________________________________________________________________________
This product includes software developed by the Apache Software Foundation (http://www.apache.org/).
Copyright (c) 1998-2000 The Apache Software Foundation. All rights reserved.
Redistribution and use in source and binary forms, with or without modification, are permitted provided that the
following conditions are met:
1. Redistributions of source code must retain the above copyright notice, this list of conditions and the
following disclaimer.
2. Redistributions in binary form must reproduce the above copyright notice, this list of conditions and the
following disclaimer in the documentation and/or other materials provided with the distribution.
3. The end-user documentation included with the redistribution, if any, must include the following
acknowledgment:
"This product includes software developed by the Apache Software Foundation (http://www.apache.org/)."
Alternately, this acknowledgment may appear in the software itself, if and wherever such third-party
acknowledgments normally appear.
4. The names "Xerces" and "Apache Software Foundation" must not be used to endorse or promote products
derived from this software without prior written permission. For written permission, please contact
5. Products derived from this software may not be called "Apache", nor may "Apache" appear in their name,
without prior written permission of the Apache Software Foundation.
THIS SOFTWARE IS PROVIDED ``AS IS'' AND ANY EXPRESSED OR IMPLIED WARRANTIES, INCLUDING,
BUT NOT LIMITED TO, THE IMPLIED WARRANTIES OF MERCHANTABILITY AND FITNESS FOR A
PARTICULAR PURPOSE ARE DISCLAIMED. IN NO EVENT SHALL THE APACHE SOFTWARE
FOUNDATION OR ITS CONTRIBUTORS BE LIABLE FOR ANY DIRECT, INDIRECT, INCIDENTAL,
SPECIAL, EXEMPLARY, OR CONSEQUENTIAL DAMAGES (INCLUDING, BUT NOT LIMITED TO,
PROCUREMENT OF SUBSTITUTE GOODS OR SERVICES; LOSS OF USE, DATA, OR PROFITS; OR
BUSINESS INTERRUPTION) HOWEVER CAUSED AND ON ANY THEORY OF LIABILITY, WHETHER IN
CONTRACT, STRICT LIABILITY, OR TORT (INCLUDING NEGLIGENCE OR OTHERWISE) ARISING IN ANY
WAY OUT OF THE USE OF THIS SOFTWARE, EVEN IF ADVISED OF THE POSSIBILITY OF SUCH
DAMAGE.

- 4 -
This software consists of voluntary contributions made by many individuals on behalf of the Apache Software
Foundation and was originally based on software copyright (c) 1999, International Business Machines, Inc.,
http://www.ibm.com. For more information on the Apache Software Foundation, please see
<http://www.apache.org/>.
______________________________________________________________________________________
March 27, 2003
Portions of this product are based on Modifications created from the Original Code known as the "Sablotron
XSLT Processor". The Sablotron XSLT Processor is subject to the Mozilla Public License Version 1.1 (the
"License"). You may obtain a copy of
the License at http://www.mozilla.org/MPL/
Software distributed under the License is distributed on an "AS IS" basis, WITHOUT WARRANTY OF ANY
KIND, either express or implied. See the License for the specific language governing rights and limitations
under the License.
The Original Code is the Sablotron XSLT Processor.
The Initial Developer of the Original Code is Ginger Alliance Ltd. Portions created by Ginger Alliance are
Copyright (C) 2000 Ginger Alliance Ltd. All Rights Reserved.
Pursuant to sections 3.2 and 3.6 of the License, the Modifications created by Adobe Systems Incorporated are
available as Source Code. The Modifications may be downloaded via the Internet from:
http://partners.adobe.com/asn/tech/xml/sablotron/index.jsp
The Original Code may be downloaded via the Internet from:
https://sourceforge.net/projects/sablotron/
______________________________________________________________________________________
Portions Copyright (c) 1997-1999 Silicon Graphics Computer Systems, Inc.
Permission to use, copy, modify, distribute and sell this software and its documentation for any purpose is
hereby granted without fee, provided that the above copyright notice appear in all copies and that both that
copyright notice and this permission notice appear in supporting documentation. Silicon Graphics makes no
representations about the suitability of this software for any purpose. It is provided "as is" without express or
implied warranty.
______________________________________________________________________________________

- 5 -
The Loki Library
Portions Copyright (c) 2001 by Andrei Alexandrescu . This code accompanies the book: Alexandrescu,
Andrei. "Modern C++ Design: Generic Programming and Design Patterns Applied".
Portions Copyright (c) 2001. Addison-Wesley. Permission to use, copy, modify, distribute and sell this software
for any purpose is hereby granted without fee, provided that the above copyright notice appear in all copies and
that both that copyright notice and this permission notice appear in supporting documentation. The author or
Addison-Wesley Longman make no representations about the suitability of this software for any purpose. It is
provided "as is" without express or implied warranty.
______________________________________________________________________________________
Updated Information/Additional Third Party Code Information available at http://www.adobe.com/go/thirdparty .
______________________________________________________________________________________
- 6 -
Adobe PostScript 3
Copyright 2007-2008 Adobe Systems Incorporated and its licensors. All rights reserved.
Portions include software under the following terms:
______________________________________________________________________________________
This product contains either BSAFE and/or TIPEM software by RSA Security Inc.
______________________________________________________________________________________
Portions of Pool.c_Copyright 1987 - NeXT, Inc., and portions of Graphics.c_Copyright 1988 NeXT, Inc. as an
unpublished work. All Rights Reserved.
______________________________________________________________________________________
The Apache Software License, Version 1.1
This product includes software developed by the Apache Software Foundation (http://www.apache.org/).
Portions Copyright (c) 1998-2000 The Apache Software Foundation. All rights reserved.
Redistribution and use in source and binary forms, with or without modification, are permitted provided that the
following conditions are met:
1. Redistributions of source code must retain the above copyright notice, this list of conditions and the following
disclaimer.
2. Redistributions in binary form must reproduce the above copyright notice, this list of conditions and the
following disclaimer in the documentation and/or other materials provided with the distribution.
3. The end-user documentation included with the redistribution, if any, must include the following
acknowledgment:
"This product includes software developed by the Apache Software Foundation (http://www.apache.org/)."
Alternately, this acknowledgment may appear in the software itself, if and wherever such third-party
acknowledgments normally appear.
4. The names "Xerces" and "Apache Software Foundation" must not be used to endorse or promote products
derived from this software without prior written permission. For written permission, please contact
5. Products derived from this software may not be called "Apache", nor may "Apache" appear in their name,
without prior written permission of the Apache Software Foundation.
THIS SOFTWARE IS PROVIDED ``AS IS'' AND ANY EXPRESSED OR IMPLIED WARRANTIES, INCLUDING,
BUT NOT LIMITED TO, THE IMPLIED WARRANTIES OF MERCHANTABILITY AND FITNESS FOR A
PARTICULAR PURPOSE ARE DISCLAIMED. IN NO EVENT SHALL THE APACHE SOFTWARE
FOUNDATION OR ITS CONTRIBUTORS BE LIABLE FOR ANY DIRECT, INDIRECT, INCIDENTAL,
SPECIAL, EXEMPLARY, OR CONSEQUENTIAL DAMAGES (INCLUDING, BUT NOT LIMITED TO,
- 7 -
PROCUREMENT OF SUBSTITUTE GOODS OR SERVICES; LOSS OF USE, DATA, OR PROFITS; OR
BUSINESS INTERRUPTION) HOWEVER CAUSED AND ON ANY THEORY OF LIABILITY, WHETHER IN
CONTRACT, STRICT LIABILITY, OR TORT (INCLUDING NEGLIGENCE OR OTHERWISE) ARISING IN ANY
WAY OUT OF THE USE OF THIS SOFTWARE, EVEN IF ADVISED OF THE POSSIBILITY OF SUCH
DAMAGE.
This software consists of voluntary contributions made by many individuals on behalf of the Apache Software
Foundation and was originally based on software copyright (c) 1999, International Business Machines, Inc.,
http://www.ibm.com. For more information on the Apache Software Foundation, please see
<http://www.apache.org/>.
______________________________________________________________________________________
This product includes software developed by the University of California, Berkeley and its contributors.
Portions Copyright (c) 1990 The Regents of the University of California. All rights reserved.
Redistribution and use in source and binary forms, with or without modification, are permitted provided that the
following conditions are met:
1. Redistributions of source code must retain the above copyright notice, this list of conditions and the following
disclaimer.
2. Redistributions in binary form must reproduce the above copyright notice, this list of conditions and the
following disclaimer in the documentation and/or other materials provided with the distribution.
3. All advertising materials mentioning features or use of this software must display the following
acknowledgement:
This product includes software developed by the University of California, Berkeley and its contributors.
4. Neither the name of the University nor the names of its contributors may be used to endorse or promote
products derived from this software without specific prior written permission.
THIS SOFTWARE IS PROVIDED BY THE REGENTS AND CONTRIBUTORS "AS IS" AND ANY EXPRESS
OR IMPLIED WARRANTIES, INCLUDING, BUT NOT LIMITED TO, THE IMPLIED WARRANTIES OF
MERCHANTABILITY AND FITNESS FOR A PARTICULAR PURPOSE ARE DISCLAIMED. IN NO EVENT
SHALL THE REGENTS OR CONTRIBUTORS BE LIABLE FOR ANY DIRECT, INDIRECT, INCIDENTAL,
SPECIAL, EXEMPLARY, OR CONSEQUENTIAL DAMAGES (INCLUDING, BUT NOT LIMITED TO,
PROCUREMENT OF SUBSTITUTE GOODS OR SERVICES; LOSS OF USE, DATA, OR PROFITS; OR
BUSINESS INTERRUPTION) HOWEVER CAUSED AND ON ANY THEORY OF LIABILITY, WHETHER IN
CONTRACT, STRICT LIABILITY, OR TORT (INCLUDING NEGLIGENCE OR OTHERWISE) ARISING IN ANY
WAY OUT OF THE USE OF THIS SOFTWARE, EVEN IF ADVISED OF THE POSSIBILITY OF SUCH
DAMAGE.
______________________________________________________________________________________
Portions Copyright (c) 1985, 1986 The Regents of the University of California. All rights reserved.

- 8 -
This code is derived from software contributed to Berkeley by James A. Woods, derived from original work by
Spencer Thomas and Joseph Orost.
Redistribution and use in source and binary forms are permitted provided that the above copyright notice and
this paragraph are duplicated in all such forms and that any documentation, advertising materials, and other
materials related to such distribution and use acknowledge that the software was developed by the University
of California, Berkeley. The name of the University may not be used to endorse or promote products derived
from this software without specific prior written permission.
THIS SOFTWARE IS PROVIDED ``AS IS'' AND WITHOUT ANY EXPRESS OR IMPLIED WARRANTIES,
INCLUDING, WITHOUT LIMITATION, THE IMPLIED WARRANTIES OF MERCHANTIBILITY AND FITNESS
FOR A PARTICULAR PURPOSE.
Portions Copyright (c) 1993 X Consortium
Permission is hereby granted, free of charge, to any person obtaining a copy of this software and associated
documentation files (the "Software"), to deal in the Software without restriction, including without limitation the
rights to use, copy, modify, merge, publish, distribute, sublicense, and/or sell copies of the Software, and to
permit persons to whom the Software is furnished to do so, subject to the following conditions:
The above copyright notice and this permission notice shall be included in all copies or substantial portions of
the Software.
THE SOFTWARE IS PROVIDED "AS IS", WITHOUT WARRANTY OF ANY KIND, EXPRESS ORIMPLIED,
INCLUDING BUT NOT LIMITED TO THE WARRANTIES OF MERCHANTABILITY,FITNESS FOR A
PARTICULAR PURPOSE AND NONINFRINGEMENT. IN NO EVENT SHALL THEX CONSORTIUM BE
LIABLE FOR ANY CLAIM, DAMAGES OR OTHER LIABILITY, WHETHER INAN ACTION OF CONTRACT,
TORT OR OTHERWISE, ARISING FROM, OUT OF OR INCONNECTION WITH THE SOFTWARE OR THE
USE OR OTHER DEALINGS IN THE SOFTWARE.
Except as contained in this notice, the name of the X Consortium shall not be used in advertising or otherwise
to promote the sale, use or other dealings in this Software without prior written authorization from the X
Consortium.
______________________________________________________________________________________
NOTICE REGARDING SABLOTRON
March 27, 2003

- 9 -
Portions of this product are based on Modifications created from the Original Code known as the "Sablotron
XSLT Processor". The Sablotron XSLT Processor is subject to the Mozilla Public License Version 1.1 (the
"License"). You may obtain a copy of
the License at http://www.mozilla.org/MPL/
Software distributed under the License is distributed on an "AS IS" basis, WITHOUT WARRANTY OF ANY
KIND, either express or implied. See the License for the specific language governing rights and limitations
under the License.
The Original Code is the Sablotron XSLT Processor.
The Initial Developer of the Original Code is Ginger Alliance Ltd. Portions created by Ginger Alliance are
Copyright (C) 2000 Ginger Alliance Ltd. All Rights Reserved.
Pursuant to sections 3.2 and 3.6 of the License, the Modifications created by Adobe Systems Incorporated are
available as Source Code. The Modifications may be downloaded via the Internet from:
http://partners.adobe.com/asn/tech/xml/sablotron/index.jsp
The Original Code may be downloaded via the Internet from:
https://sourceforge.net/projects/sablotron/
______________________________________________________________________________________
This product includes software developed by the University of California, Berkeley and its contributors.
Portions Copyright (c) 1982, 1986, 1987, 1988, 1989, 1990, 1991, 1992, 1993, 1994 The Regents of the
University of California. All rights reserved.
Redistribution and use in source and binary forms, with or without modification, are permitted provided that the
following conditions are met:
1. Redistributions of source code must retain the above copyright notice, this list of conditions and the following
disclaimer.
2. Redistributions in binary form must reproduce the above copyright notice, this list of conditions and the
following disclaimer in the documentation and/or other materials provided with the distribution.
3. All advertising materials mentioning features or use of this software must display the following
acknowledgement: This product includes software developed by the University of California, Berkeley and its
contributors.
4. Neither the name of the University nor the names of its contributors may be used to endorse or promote
- 10 -
products derived from this software without specific prior written permission.
THIS SOFTWARE IS PROVIDED BY THE REGENTS AND CONTRIBUTORS "AS IS" AND ANY EXPRESS
OR IMPLIED WARRANTIES, INCLUDING, BUT NOT LIMITED TO, THE IMPLIED WARRANTIES OF
MERCHANTABILITY AND FITNESS FOR A PARTICULAR PURPOSE ARE DISCLAIMED. IN NO EVENT
SHALL THE REGENTS OR CONTRIBUTORS BE LIABLE FOR ANY DIRECT, INDIRECT, INCIDENTAL,
SPECIAL, EXEMPLARY, OR CONSEQUENTIAL DAMAGES (INCLUDING, BUT NOT LIMITED TO,
PROCUREMENT OF SUBSTITUTE GOODS OR SERVICES; LOSS OF USE, DATA, OR PROFITS; OR
BUSINESS INTERRUPTION) HOWEVER CAUSED AND ON ANY THEORY OF LIABILITY, WHETHER IN
CONTRACT, STRICT LIABILITY, OR TORT (INCLUDING NEGLIGENCE OR OTHERWISE) ARISING IN ANY
WAY OUT OF THE USE OF THIS SOFTWARE, EVEN IF ADVISED OF THE POSSIBILITY OF SUCH
DAMAGE.
______________________________________________________________________________________
Portions Copyright (c) 2001 by Andrei Alexandrescu. This code accompanies the book:
Alexandrescu, Andrei. "Modern C++ Design: Generic Programming and Design Patterns Applied". Copyright
(c) 2001. Addison-Wesley.
Permission to use, copy, modify, distribute and sell this software for any purpose is hereby granted without fee,
provided that the above copyright notice appear in all copies and that both that copyright notice and this
permission notice appear in supporting documentation. The author or Addison-Welsey Longman make no
representations about the suitability of this software for any purpose. It is provided "as is" without express or
implied warranty.
______________________________________________________________________________________
Portions developed by the University of California, Berkeley.
______________________________________________________________________________________
Portions Copyright © 1991-2005 Unicode, Inc. All rights reserved. Distributed under the Terms of Use in
http://www.unicode.org/copyright.html.
Permission is hereby granted, free of charge, to any person obtaining a copy of the Unicode data files and
associated documentation (the "Data Files") or Unicode software and associated documentation (the
"Software") to deal in the Data Files or Software without restriction, including without limitation the rights to use,
copy, modify, merge, publish, distribute, and/or sell copies of the Data Files or Software, and to permit persons
to whom the Data Files or Software are furnished to do so, provided that (a) the above copyright notice(s) and
this permission notice appear in all copies of the Data Files or Software, (b) both the above copyright notice(s)
and this permission notice appear in associated documentation, and (c) there is clear notice in each modified
Data File or in the Software as well as in the documentation associated with the Data File(s) or Software that
the data or software has been modified.
THE DATA FILES AND SOFTWARE ARE PROVIDED "AS IS", WITHOUT WARRANTY OF ANY KIND,
- 11 -
EXPRESS OR IMPLIED, INCLUDING BUT NOT LIMITED TO THE WARRANTIES OF MERCHANTABILITY,
FITNESS FOR A PARTICULAR PURPOSE AND NONINFRINGEMENT OF THIRD PARTY RIGHTS. IN NO
EVENT SHALL THE COPYRIGHT HOLDER OR HOLDERS INCLUDED IN THIS NOTICE BE LIABLE FOR
ANY CLAIM, OR ANY SPECIAL INDIRECT OR CONSEQUENTIAL DAMAGES, OR ANY DAMAGES
WHATSOEVER RESULTING FROM LOSS OF USE, DATA OR PROFITS, WHETHER IN AN ACTION OF
CONTRACT, NEGLIGENCE OR OTHER TORTIOUS ACTION, ARISING OUT OF OR IN CONNECTION
WITH THE USE OR PERFORMANCE OF THE DATA FILES OR SOFTWARE.
Except as contained in this notice, the name of a copyright holder shall not be used in advertising or otherwise
to promote the sale, use or other dealings in these Data Files or Software without prior written authorization of
the copyright holder.
Unicode and the Unicode logo are trademarks of Unicode, Inc., and may be registered in some jurisdictions. All
other trademarks and registered trademarks mentioned herein are the property of their respective owners.
______________________________________________________________________________________
Adobe shall retain and reproduce, and require its Sublicensees to retain and reproduce JIM's following
copyright notice within each copy of the licensed programs in any form, in whole or in part: "© 1981, 1990 JMI
Consultants, Inc. All rights reserved."
______________________________________________________________________________________
This product includes software developed by the University of California, Berkeley and its contributors.
Portions Copyright (c) 1990, 1993 The Regents of the University of California. All rights reserved.
This code is derived from software contributed to Berkeley by Chris Torek.
Redistribution and use in source and binary forms, with or without modification, are permitted provided that the
following conditions are met:
1. Redistributions of source code must retain the above copyright notice, this list of conditions and the following
disclaimer.
2. Redistributions in binary form must reproduce the above copyright notice, this list of conditions and the
following disclaimer in the documentation and/or other materials provided with the distribution.
3. All advertising materials mentioning features or use of this software must display the following
acknowledgement:
This product includes software developed by the University of California, Berkeley and its contributors.
4. Neither the name of the University nor the names of its contributors may be used to endorse or promote
products derived from this software without specific prior written permission.
THIS SOFTWARE IS PROVIDED BY THE REGENTS AND CONTRIBUTORS "AS IS" AND ANY EXPRESS

- 12 -
OR IMPLIED WARRANTIES, INCLUDING, BUT NOT LIMITED TO, THE IMPLIED WARRANTIES OF
MERCHANTABILITY AND FITNESS FOR A PARTICULAR PURPOSE ARE DISCLAIMED. IN NO EVENT
SHALL THE REGENTS OR CONTRIBUTORS BE LIABLE FOR ANY DIRECT, INDIRECT, INCIDENTAL,
SPECIAL, EXEMPLARY, OR CONSEQUENTIAL DAMAGES (INCLUDING, BUT NOT LIMITED TO,
PROCUREMENT OF SUBSTITUTE GOODS OR SERVICES; LOSS OF USE, DATA, OR PROFITS; OR
BUSINESS INTERRUPTION) HOWEVER CAUSED AND ON ANY THEORY OF LIABILITY, WHETHER IN
CONTRACT, STRICT LIABILITY, OR TORT (INCLUDING NEGLIGENCE OR OTHERWISE) ARISING IN ANY
WAY OUT OF THE USE OF THIS SOFTWARE, EVEN IF ADVISED OF THE POSSIBILITY OF SUCH
DAMAGE.
______________________________________________________________________________________
The Loki Library
Portions Copyright (c) 2001 by Andrei Alexandrescu // This code accompanies the book: Alexandrescu,
Andrei. "Modern C++ Design: Generic Programming and Design Patterns Applied". Copyright (c) 2001.
Addison-Wesley.
Permission to use, copy, modify, distribute and sell this software for any purpose is hereby granted without fee,
provided that the above copyright notice appear in all copies and that both that copyright notice and this
permission notice appear in supporting documentation. The author or Addison-Wesley Longman make no
representations about the suitability of this software for any purpose. It is provided "as is" without express or
implied warranty.
______________________________________________________________________________________
Updated Information/Additional Third Party Code Information available at http://www.adobe.com/go/thirdparty .
______________________________________________________________________________________

- 13 -
expat
Copyright (c) 1998, 1999, 2000 Thai Open Source Software Center Ltd
and Clark Cooper
Copyright (c) 2001, 2002, 2003, 2004, 2005, 2006 Expat maintainers.
Permission is hereby granted, free of charge, to any person obtaining a copy of this software and associated
documentation files (the "Software"), to deal in the Software without restriction, including without limitation the
rights to use, copy, modify, merge, publish, distribute, sublicense, and/or sell copies of the Software, and to
permit persons to whom the Software is furnished to do so, subject to the following conditions:
The above copyright notice and this permission notice shall be included in all copies or substantial portions of
the Software.
THE SOFTWARE IS PROVIDED "AS IS", WITHOUT WARRANTY OF ANY KIND, EXPRESS OR IMPLIED,
INCLUDING BUT NOT LIMITED TO THE WARRANTIES OF MERCHANTABILITY, FITNESS FOR A
PARTICULAR PURPOSE AND NONINFRINGEMENT. IN NO EVENT SHALL THE AUTHORS OR
COPYRIGHT HOLDERS BE LIABLE FOR ANY CLAIM, DAMAGES OR OTHER LIABILITY, WHETHER IN AN
ACTION OF CONTRACT, TORT OR OTHERWISE, ARISING FROM, OUT OF OR IN CONNECTION WITH
THE SOFTWARE OR THE USE OR OTHER DEALINGS IN THE SOFTWARE.

- 14 -
HarfBuzz 2012-07-30
Copyright (C) 2006 Behdad Esfahbod
Copyright (C) 1998-2004 David Turner and Werner Lemberg
Copyright (C) 2008 Nokia Corporation and/or its subsidiary(-ies)
Copyright (C) 2004,2007 Red Hat, Inc.
Permission is hereby granted, without written agreement and without license or royalty fees, to use, copy,
modify, and distribute this software and its documentation for any purpose, provided that the above copyright
notice and the following two paragraphs appear in all copies of this software.
IN NO EVENT SHALL THE COPYRIGHT HOLDER BE LIABLE TO ANY PARTY FOR DIRECT, INDIRECT,
SPECIAL, INCIDENTAL, OR CONSEQUENTIAL DAMAGES ARISING OUT OF THE USE OF THIS
SOFTWARE AND ITS DOCUMENTATION, EVEN IF THE COPYRIGHT HOLDER HAS BEEN ADVISED OF
THE POSSIBILITY OF SUCH DAMAGE.
THE COPYRIGHT HOLDER SPECIFICALLY DISCLAIMS ANY WARRANTIES, INCLUDING, BUT NOT
LIMITED TO, THE IMPLIED WARRANTIES OF MERCHANTABILITY AND FITNESS FOR A PARTICULAR
PURPOSE. THE SOFTWARE PROVIDED HEREUNDER IS ON AN "AS IS" BASIS, AND THE COPYRIGHT
HOLDER HAS NO OBLIGATION TO PROVIDE MAINTENANCE, SUPPORT, UPDATES, ENHANCEMENTS,
OR MODIFICATIONS.

- 15 -
libjingle
Copyright 2004--2007, Google Inc.
Redistribution and use in source and binary forms, with or without modification, are permitted provided that the
following conditions are met:
1. Redistributions of source code must retain the above copyright notice, this list of conditions and the following
disclaimer.
2. Redistributions in binary form must reproduce the above copyright notice, this list of conditions and the
following disclaimer in the documentation and/or other materials provided with the distribution.
3. The name of the author may not be used to endorse or promote products derived from this software without
specific prior written permission.
THIS SOFTWARE IS PROVIDED BY THE AUTHOR ``AS IS'' AND ANY EXPRESS OR IMPLIED
WARRANTIES, INCLUDING, BUT NOT LIMITED TO, THE IMPLIED WARRANTIES OF MERCHANTABILITY
AND FITNESS FOR A PARTICULAR PURPOSE ARE DISCLAIMED. IN NO EVENT SHALL THE AUTHOR
BE LIABLE FOR ANY DIRECT, INDIRECT, INCIDENTAL, SPECIAL, EXEMPLARY, OR CONSEQUENTIAL
DAMAGES (INCLUDING, BUT NOT LIMITED TO, PROCUREMENT OF SUBSTITUTE GOODS OR
SERVICES; LOSS OF USE, DATA, OR PROFITS; OR BUSINESS INTERRUPTION) HOWEVER CAUSED
AND ON ANY THEORY OF LIABILITY, WHETHER IN CONTRACT, STRICT LIABILITY, OR TORT
(INCLUDING NEGLIGENCE OR OTHERWISE) ARISING IN ANY WAY OUT OF THE USE OF THIS
SOFTWARE, EVEN IF ADVISED OF THE POSSIBILITY OF SUCH DAMAGE.

- 16 -
Lua
Copyright © 1994–2014 Lua.org, PUC-Rio.
Permission is hereby granted, free of charge, to any person obtaining a copy of this software and associated
documentation files (the "Software"), to deal in the Software without restriction, including without limitation the
rights to use, copy, modify, merge, publish, distribute, sublicense, and/or sell copies of the Software, and to
permit persons to whom the Software is furnished to do so, subject to the following conditions:
The above copyright notice and this permission notice shall be included in all copies or substantial portions of
the Software.
THE SOFTWARE IS PROVIDED "AS IS", WITHOUT WARRANTY OF ANY KIND, EXPRESS OR IMPLIED,
INCLUDING BUT NOT LIMITED TO THE WARRANTIES OF MERCHANTABILITY, FITNESS FOR A
PARTICULAR PURPOSE AND NONINFRINGEMENT. IN NO EVENT SHALL THE AUTHORS OR
COPYRIGHT HOLDERS BE LIABLE FOR ANY CLAIM, DAMAGES OR OTHER LIABILITY, WHETHER IN AN
ACTION OF CONTRACT, TORT OR OTHERWISE, ARISING FROM, OUT OF OR IN CONNECTION WITH
THE SOFTWARE OR THE USE OR OTHER DEALINGS IN THE SOFTWARE.

- 17 -
LuaSocket
LuaSocket 2.0.2 license
Copyright © 2004-2007 Diego Nehab
Permission is hereby granted, free of charge, to any person obtaining a
copy of this software and associated documentation files (the "Software"),
to deal in the Software without restriction, including without limitation
the rights to use, copy, modify, merge, publish, distribute, sublicense,
and/or sell copies of the Software, and to permit persons to whom the
Software is furnished to do so, subject to the following conditions:
The above copyright notice and this permission notice shall be included in
all copies or substantial portions of the Software.
THE SOFTWARE IS PROVIDED "AS IS", WITHOUT WARRANTY OF ANY KIND, EXPRESS OR
IMPLIED, INCLUDING BUT NOT LIMITED TO THE WARRANTIES OF MERCHANTABILITY,
FITNESS FOR A PARTICULAR PURPOSE AND NONINFRINGEMENT. IN NO EVENT SHALL THE
AUTHORS OR COPYRIGHT HOLDERS BE LIABLE FOR ANY CLAIM, DAMAGES OR OTHER
LIABILITY, WHETHER IN AN ACTION OF CONTRACT, TORT OR OTHERWISE, ARISING
FROM, OUT OF OR IN CONNECTION WITH THE SOFTWARE OR THE USE OR OTHER
DEALINGS IN THE SOFTWARE.

- 18 -
MD4
"RSA Data Security, Inc. MD4 Message-Digest Algorithm"

- 19 -
Net-SNMP
Various copyrights apply to this package, listed in various separate
parts below. Please make sure that you read all the parts.
---- Part 1: CMU/UCD copyright notice: (BSD like) -----
Copyright 1989, 1991, 1992 by Carnegie Mellon University
Derivative Work - 1996, 1998-2000
Copyright 1996, 1998-2000 The Regents of the University of California
All Rights Reserved
Permission to use, copy, modify and distribute this software and its
documentation for any purpose and without fee is hereby granted,
provided that the above copyright notice appears in all copies and
that both that copyright notice and this permission notice appear in
supporting documentation, and that the name of CMU and The Regents of
the University of California not be used in advertising or publicity
pertaining to distribution of the software without specific written
permission.
CMU AND THE REGENTS OF THE UNIVERSITY OF CALIFORNIA DISCLAIM ALL
WARRANTIES WITH REGARD TO THIS SOFTWARE, INCLUDING ALL IMPLIED
WARRANTIES OF MERCHANTABILITY AND FITNESS. IN NO EVENT SHALL CMU OR
THE REGENTS OF THE UNIVERSITY OF CALIFORNIA BE LIABLE FOR ANY SPECIAL,
INDIRECT OR CONSEQUENTIAL DAMAGES OR ANY DAMAGES WHATSOEVER RESULTING
FROM THE LOSS OF USE, DATA OR PROFITS, WHETHER IN AN ACTION OF
CONTRACT, NEGLIGENCE OR OTHER TORTIOUS ACTION, ARISING OUT OF OR IN
CONNECTION WITH THE USE OR PERFORMANCE OF THIS SOFTWARE.
---- Part 2: Networks Associates Technology, Inc copyright notice (BSD) -----
Copyright (c) 2001-2003, Networks Associates Technology, Inc
All rights reserved.

- 20 -
Redistribution and use in source and binary forms, with or without
modification, are permitted provided that the following conditions are met:
* Redistributions of source code must retain the above copyright notice,
this list of conditions and the following disclaimer.
* Redistributions in binary form must reproduce the above copyright
notice, this list of conditions and the following disclaimer in the
documentation and/or other materials provided with the distribution.
* Neither the name of the Networks Associates Technology, Inc nor the
names of its contributors may be used to endorse or promote
products derived from this software without specific prior written
permission.
THIS SOFTWARE IS PROVIDED BY THE COPYRIGHT HOLDERS AND CONTRIBUTORS ``AS
IS'' AND ANY EXPRESS OR IMPLIED WARRANTIES, INCLUDING, BUT NOT LIMITED TO,
THE IMPLIED WARRANTIES OF MERCHANTABILITY AND FITNESS FOR A PARTICULAR
PURPOSE ARE DISCLAIMED. IN NO EVENT SHALL THE COPYRIGHT HOLDERS OR
CONTRIBUTORS BE LIABLE FOR ANY DIRECT, INDIRECT, INCIDENTAL, SPECIAL,
EXEMPLARY, OR CONSEQUENTIAL DAMAGES (INCLUDING, BUT NOT LIMITED TO,
PROCUREMENT OF SUBSTITUTE GOODS OR SERVICES; LOSS OF USE, DATA, OR PROFITS;
OR BUSINESS INTERRUPTION) HOWEVER CAUSED AND ON ANY THEORY OF LIABILITY,
WHETHER IN CONTRACT, STRICT LIABILITY, OR TORT (INCLUDING NEGLIGENCE OR
OTHERWISE) ARISING IN ANY WAY OUT OF THE USE OF THIS SOFTWARE, EVEN IF
ADVISED OF THE POSSIBILITY OF SUCH DAMAGE.
---- Part 3: Cambridge Broadband Ltd. copyright notice (BSD) -----
Portions of this code are copyright (c) 2001-2003, Cambridge Broadband Ltd.
All rights reserved.
Redistribution and use in source and binary forms, with or without
modification, are permitted provided that the following conditions are met:
* Redistributions of source code must retain the above copyright notice,
this list of conditions and the following disclaimer.

- 21 -
* Redistributions in binary form must reproduce the above copyright
notice, this list of conditions and the following disclaimer in the
documentation and/or other materials provided with the distribution.
* The name of Cambridge Broadband Ltd. may not be used to endorse or
promote products derived from this software without specific prior
written permission.
THIS SOFTWARE IS PROVIDED BY THE COPYRIGHT HOLDER ``AS IS'' AND ANY
EXPRESS OR IMPLIED WARRANTIES, INCLUDING, BUT NOT LIMITED TO, THE
IMPLIED WARRANTIES OF MERCHANTABILITY AND FITNESS FOR A PARTICULAR
PURPOSE ARE DISCLAIMED. IN NO EVENT SHALL THE COPYRIGHT HOLDER BE
LIABLE FOR ANY DIRECT, INDIRECT, INCIDENTAL, SPECIAL, EXEMPLARY, OR
CONSEQUENTIAL DAMAGES (INCLUDING, BUT NOT LIMITED TO, PROCUREMENT OF
SUBSTITUTE GOODS OR SERVICES; LOSS OF USE, DATA, OR PROFITS; OR
BUSINESS INTERRUPTION) HOWEVER CAUSED AND ON ANY THEORY OF LIABILITY,
WHETHER IN CONTRACT, STRICT LIABILITY, OR TORT (INCLUDING NEGLIGENCE
OR OTHERWISE) ARISING IN ANY WAY OUT OF THE USE OF THIS SOFTWARE, EVEN
IF ADVISED OF THE POSSIBILITY OF SUCH DAMAGE.
---- Part 4: Sun Microsystems, Inc. copyright notice (BSD) -----
Copyright © 2003 Sun Microsystems, Inc., 4150 Network Circle, Santa Clara,
California 95054, U.S.A. All rights reserved.
Use is subject to license terms below.
This distribution may include materials developed by third parties.
Sun, Sun Microsystems, the Sun logo and Solaris are trademarks or registered
trademarks of Sun Microsystems, Inc. in the U.S. and other countries.
Redistribution and use in source and binary forms, with or without
modification, are permitted provided that the following conditions are met:
* Redistributions of source code must retain the above copyright notice,

- 22 -
this list of conditions and the following disclaimer.
* Redistributions in binary form must reproduce the above copyright
notice, this list of conditions and the following disclaimer in the
documentation and/or other materials provided with the distribution.
* Neither the name of the Sun Microsystems, Inc. nor the
names of its contributors may be used to endorse or promote
products derived from this software without specific prior written
permission.
THIS SOFTWARE IS PROVIDED BY THE COPYRIGHT HOLDERS AND CONTRIBUTORS ``AS
IS'' AND ANY EXPRESS OR IMPLIED WARRANTIES, INCLUDING, BUT NOT LIMITED TO,
THE IMPLIED WARRANTIES OF MERCHANTABILITY AND FITNESS FOR A PARTICULAR
PURPOSE ARE DISCLAIMED. IN NO EVENT SHALL THE COPYRIGHT HOLDERS OR
CONTRIBUTORS BE LIABLE FOR ANY DIRECT, INDIRECT, INCIDENTAL, SPECIAL,
EXEMPLARY, OR CONSEQUENTIAL DAMAGES (INCLUDING, BUT NOT LIMITED TO,
PROCUREMENT OF SUBSTITUTE GOODS OR SERVICES; LOSS OF USE, DATA, OR PROFITS;
OR BUSINESS INTERRUPTION) HOWEVER CAUSED AND ON ANY THEORY OF LIABILITY,
WHETHER IN CONTRACT, STRICT LIABILITY, OR TORT (INCLUDING NEGLIGENCE OR
OTHERWISE) ARISING IN ANY WAY OUT OF THE USE OF THIS SOFTWARE, EVEN IF
ADVISED OF THE POSSIBILITY OF SUCH DAMAGE.
---- Part 5: Sparta, Inc copyright notice (BSD) -----
Copyright (c) 2003-2012, Sparta, Inc
All rights reserved.
Redistribution and use in source and binary forms, with or without
modification, are permitted provided that the following conditions are met:
* Redistributions of source code must retain the above copyright notice,
this list of conditions and the following disclaimer.
* Redistributions in binary form must reproduce the above copyright
notice, this list of conditions and the following disclaimer in the
documentation and/or other materials provided with the distribution.

- 23 -
* Neither the name of Sparta, Inc nor the names of its contributors may
be used to endorse or promote products derived from this software
without specific prior written permission.
THIS SOFTWARE IS PROVIDED BY THE COPYRIGHT HOLDERS AND CONTRIBUTORS ``AS
IS'' AND ANY EXPRESS OR IMPLIED WARRANTIES, INCLUDING, BUT NOT LIMITED TO,
THE IMPLIED WARRANTIES OF MERCHANTABILITY AND FITNESS FOR A PARTICULAR
PURPOSE ARE DISCLAIMED. IN NO EVENT SHALL THE COPYRIGHT HOLDERS OR
CONTRIBUTORS BE LIABLE FOR ANY DIRECT, INDIRECT, INCIDENTAL, SPECIAL,
EXEMPLARY, OR CONSEQUENTIAL DAMAGES (INCLUDING, BUT NOT LIMITED TO,
PROCUREMENT OF SUBSTITUTE GOODS OR SERVICES; LOSS OF USE, DATA, OR PROFITS;
OR BUSINESS INTERRUPTION) HOWEVER CAUSED AND ON ANY THEORY OF LIABILITY,
WHETHER IN CONTRACT, STRICT LIABILITY, OR TORT (INCLUDING NEGLIGENCE OR
OTHERWISE) ARISING IN ANY WAY OUT OF THE USE OF THIS SOFTWARE, EVEN IF
ADVISED OF THE POSSIBILITY OF SUCH DAMAGE.
---- Part 6: Cisco/BUPTNIC copyright notice (BSD) -----
Copyright (c) 2004, Cisco, Inc and Information Network
Center of Beijing University of Posts and Telecommunications.
All rights reserved.
Redistribution and use in source and binary forms, with or without
modification, are permitted provided that the following conditions are met:
* Redistributions of source code must retain the above copyright notice,
this list of conditions and the following disclaimer.
* Redistributions in binary form must reproduce the above copyright
notice, this list of conditions and the following disclaimer in the
documentation and/or other materials provided with the distribution.
* Neither the name of Cisco, Inc, Beijing University of Posts and
Telecommunications, nor the names of their contributors may
be used to endorse or promote products derived from this software
without specific prior written permission.
THIS SOFTWARE IS PROVIDED BY THE COPYRIGHT HOLDERS AND CONTRIBUTORS ``AS

- 24 -
IS'' AND ANY EXPRESS OR IMPLIED WARRANTIES, INCLUDING, BUT NOT LIMITED TO,
THE IMPLIED WARRANTIES OF MERCHANTABILITY AND FITNESS FOR A PARTICULAR
PURPOSE ARE DISCLAIMED. IN NO EVENT SHALL THE COPYRIGHT HOLDERS OR
CONTRIBUTORS BE LIABLE FOR ANY DIRECT, INDIRECT, INCIDENTAL, SPECIAL,
EXEMPLARY, OR CONSEQUENTIAL DAMAGES (INCLUDING, BUT NOT LIMITED TO,
PROCUREMENT OF SUBSTITUTE GOODS OR SERVICES; LOSS OF USE, DATA, OR PROFITS;
OR BUSINESS INTERRUPTION) HOWEVER CAUSED AND ON ANY THEORY OF LIABILITY,
WHETHER IN CONTRACT, STRICT LIABILITY, OR TORT (INCLUDING NEGLIGENCE OR
OTHERWISE) ARISING IN ANY WAY OUT OF THE USE OF THIS SOFTWARE, EVEN IF
ADVISED OF THE POSSIBILITY OF SUCH DAMAGE.
---- Part 7: Fabasoft R&D Software GmbH & Co KG copyright notice (BSD) -----
Copyright (c) Fabasoft R&D Software GmbH & Co KG, 2003
Author: Bernhard Penz <[email protected]>
Redistribution and use in source and binary forms, with or without
modification, are permitted provided that the following conditions are met:
* Redistributions of source code must retain the above copyright notice,
this list of conditions and the following disclaimer.
* Redistributions in binary form must reproduce the above copyright
notice, this list of conditions and the following disclaimer in the
documentation and/or other materials provided with the distribution.
* The name of Fabasoft R&D Software GmbH & Co KG or any of its subsidiaries,
brand or product names may not be used to endorse or promote products
derived from this software without specific prior written permission.
THIS SOFTWARE IS PROVIDED BY THE COPYRIGHT HOLDER ``AS IS'' AND ANY
EXPRESS OR IMPLIED WARRANTIES, INCLUDING, BUT NOT LIMITED TO, THE
IMPLIED WARRANTIES OF MERCHANTABILITY AND FITNESS FOR A PARTICULAR
PURPOSE ARE DISCLAIMED. IN NO EVENT SHALL THE COPYRIGHT HOLDER BE
LIABLE FOR ANY DIRECT, INDIRECT, INCIDENTAL, SPECIAL, EXEMPLARY, OR
CONSEQUENTIAL DAMAGES (INCLUDING, BUT NOT LIMITED TO, PROCUREMENT OF
SUBSTITUTE GOODS OR SERVICES; LOSS OF USE, DATA, OR PROFITS; OR

- 25 -
BUSINESS INTERRUPTION) HOWEVER CAUSED AND ON ANY THEORY OF LIABILITY,
WHETHER IN CONTRACT, STRICT LIABILITY, OR TORT (INCLUDING NEGLIGENCE
OR OTHERWISE) ARISING IN ANY WAY OUT OF THE USE OF THIS SOFTWARE, EVEN
IF ADVISED OF THE POSSIBILITY OF SUCH DAMAGE.
---- Part 8: Apple Inc. copyright notice (BSD) -----
Copyright (c) 2007 Apple Inc. All rights reserved.
Redistribution and use in source and binary forms, with or without
modification, are permitted provided that the following conditions
are met:
1. Redistributions of source code must retain the above copyright
notice, this list of conditions and the following disclaimer.
2. Redistributions in binary form must reproduce the above
copyright notice, this list of conditions and the following
disclaimer in the documentation and/or other materials provided
with the distribution.
3. Neither the name of Apple Inc. ("Apple") nor the names of its
contributors may be used to endorse or promote products derived
from this software without specific prior written permission.
THIS SOFTWARE IS PROVIDED BY APPLE AND ITS CONTRIBUTORS "AS IS" AND
ANY EXPRESS OR IMPLIED WARRANTIES, INCLUDING, BUT NOT LIMITED TO,
THE IMPLIED WARRANTIES OF MERCHANTABILITY AND FITNESS FOR A
PARTICULAR PURPOSE ARE DISCLAIMED. IN NO EVENT SHALL APPLE OR ITS
CONTRIBUTORS BE LIABLE FOR ANY DIRECT, INDIRECT, INCIDENTAL,
SPECIAL, EXEMPLARY, OR CONSEQUENTIAL DAMAGES (INCLUDING, BUT NOT
LIMITED TO, PROCUREMENT OF SUBSTITUTE GOODS OR SERVICES; LOSS OF
USE, DATA, OR PROFITS; OR BUSINESS INTERRUPTION) HOWEVER CAUSED AND
ON ANY THEORY OF LIABILITY, WHETHER IN CONTRACT, STRICT LIABILITY,
OR TORT (INCLUDING NEGLIGENCE OR OTHERWISE) ARISING IN ANY WAY OUT
OF THE USE OF THIS SOFTWARE, EVEN IF ADVISED OF THE POSSIBILITY OF
SUCH DAMAGE.
---- Part 9: ScienceLogic, LLC copyright notice (BSD) -----

- 26 -
Copyright (c) 2009, ScienceLogic, LLC
All rights reserved.
Redistribution and use in source and binary forms, with or without
modification, are permitted provided that the following conditions are
met:
* Redistributions of source code must retain the above copyright notice,
this list of conditions and the following disclaimer.
* Redistributions in binary form must reproduce the above copyright
notice, this list of conditions and the following disclaimer in the
documentation and/or other materials provided with the distribution.
* Neither the name of ScienceLogic, LLC nor the names of its
contributors may be used to endorse or promote products derived
from this software without specific prior written permission.
THIS SOFTWARE IS PROVIDED BY THE COPYRIGHT HOLDERS AND CONTRIBUTORS
``AS IS'' AND ANY EXPRESS OR IMPLIED WARRANTIES, INCLUDING, BUT NOT
LIMITED TO, THE IMPLIED WARRANTIES OF MERCHANTABILITY AND FITNESS FOR
A PARTICULAR PURPOSE ARE DISCLAIMED. IN NO EVENT SHALL THE COPYRIGHT
HOLDERS OR CONTRIBUTORS BE LIABLE FOR ANY DIRECT, INDIRECT,
INCIDENTAL, SPECIAL, EXEMPLARY, OR CONSEQUENTIAL DAMAGES (INCLUDING,
BUT NOT LIMITED TO, PROCUREMENT OF SUBSTITUTE GOODS OR SERVICES; LOSS
OF USE, DATA, OR PROFITS; OR BUSINESS INTERRUPTION) HOWEVER CAUSED AND
ON ANY THEORY OF LIABILITY, WHETHER IN CONTRACT, STRICT LIABILITY, OR
TORT (INCLUDING NEGLIGENCE OR OTHERWISE) ARISING IN ANY WAY OUT OF THE
USE OF THIS SOFTWARE, EVEN IF ADVISED OF THE POSSIBILITY OF SUCH
DAMAGE.

- 27 -
OpenSSL
OpenSSL License
---------------
/* ====================================================================
* Copyright (c) 1998-2011 The OpenSSL Project. All rights reserved.
*
* Redistribution and use in source and binary forms, with or without
* modification, are permitted provided that the following conditions
* are met:
*
* 1. Redistributions of source code must retain the above copyright
* notice, this list of conditions and the following disclaimer.
*
* 2. Redistributions in binary form must reproduce the above copyright
* notice, this list of conditions and the following disclaimer in
* the documentation and/or other materials provided with the
* distribution.
*
* 3. All advertising materials mentioning features or use of this
* software must display the following acknowledgment:
* "This product includes software developed by the OpenSSL Project
* for use in the OpenSSL Toolkit. (http://www.openssl.org/)"
*
* 4. The names "OpenSSL Toolkit" and "OpenSSL Project" must not be used to
* endorse or promote products derived from this software without
* prior written permission. For written permission, please contact
*
* 5. Products derived from this software may not be called "OpenSSL"
* nor may "OpenSSL" appear in their names without prior written
* permission of the OpenSSL Project.
*
* 6. Redistributions of any form whatsoever must retain the following
* acknowledgment:
* "This product includes software developed by the OpenSSL Project
* for use in the OpenSSL Toolkit (http://www.openssl.org/)"

- 28 -
*
* THIS SOFTWARE IS PROVIDED BY THE OpenSSL PROJECT ``AS IS'' AND ANY
* EXPRESSED OR IMPLIED WARRANTIES, INCLUDING, BUT NOT LIMITED TO, THE
* IMPLIED WARRANTIES OF MERCHANTABILITY AND FITNESS FOR A PARTICULAR
* PURPOSE ARE DISCLAIMED. IN NO EVENT SHALL THE OpenSSL PROJECT OR
* ITS CONTRIBUTORS BE LIABLE FOR ANY DIRECT, INDIRECT, INCIDENTAL,
* SPECIAL, EXEMPLARY, OR CONSEQUENTIAL DAMAGES (INCLUDING, BUT
* NOT LIMITED TO, PROCUREMENT OF SUBSTITUTE GOODS OR SERVICES;
* LOSS OF USE, DATA, OR PROFITS; OR BUSINESS INTERRUPTION)
* HOWEVER CAUSED AND ON ANY THEORY OF LIABILITY, WHETHER IN CONTRACT,
* STRICT LIABILITY, OR TORT (INCLUDING NEGLIGENCE OR OTHERWISE)
* ARISING IN ANY WAY OUT OF THE USE OF THIS SOFTWARE, EVEN IF ADVISED
* OF THE POSSIBILITY OF SUCH DAMAGE.
* ====================================================================
*
* This product includes cryptographic software written by Eric Young
* ([email protected]). This product includes software written by Tim
* Hudson ([email protected]).
*
*/
Original SSLeay License
-----------------------
/* Copyright (C) 1995-1998 Eric Young ([email protected])
* All rights reserved.
*
* This package is an SSL implementation written
* by Eric Young ([email protected]).
* The implementation was written so as to conform with Netscapes SSL.
*
* This library is free for commercial and non-commercial use as long as
* the following conditions are aheared to. The following conditions
* apply to all code found in this distribution, be it the RC4, RSA,
* lhash, DES, etc., code; not just the SSL code. The SSL documentation
* included with this distribution is covered by the same copyright terms
* except that the holder is Tim Hudson ([email protected]).
*

- 29 -
* Copyright remains Eric Young's, and as such any Copyright notices in
* the code are not to be removed.
* If this package is used in a product, Eric Young should be given attribution
* as the author of the parts of the library used.
* This can be in the form of a textual message at program startup or
* in documentation (online or textual) provided with the package.
*
* Redistribution and use in source and binary forms, with or without
* modification, are permitted provided that the following conditions
* are met:
* 1. Redistributions of source code must retain the copyright
* notice, this list of conditions and the following disclaimer.
* 2. Redistributions in binary form must reproduce the above copyright
* notice, this list of conditions and the following disclaimer in the
* documentation and/or other materials provided with the distribution.
* 3. All advertising materials mentioning features or use of this software
* must display the following acknowledgement:
* "This product includes cryptographic software written by
* Eric Young ([email protected])"
* The word 'cryptographic' can be left out if the rouines from the library
* being used are not cryptographic related :-).
* 4. If you include any Windows specific code (or a derivative thereof) from
* the apps directory (application code) you must include an acknowledgement:
* "This product includes software written by Tim Hudson ([email protected])"
*
* THIS SOFTWARE IS PROVIDED BY ERIC YOUNG ``AS IS'' AND
* ANY EXPRESS OR IMPLIED WARRANTIES, INCLUDING, BUT NOT LIMITED TO, THE
* IMPLIED WARRANTIES OF MERCHANTABILITY AND FITNESS FOR A PARTICULAR PURPOSE
* ARE DISCLAIMED. IN NO EVENT SHALL THE AUTHOR OR CONTRIBUTORS BE LIABLE
* FOR ANY DIRECT, INDIRECT, INCIDENTAL, SPECIAL, EXEMPLARY, OR CONSEQUENTIAL
* DAMAGES (INCLUDING, BUT NOT LIMITED TO, PROCUREMENT OF SUBSTITUTE GOODS
* OR SERVICES; LOSS OF USE, DATA, OR PROFITS; OR BUSINESS INTERRUPTION)
* HOWEVER CAUSED AND ON ANY THEORY OF LIABILITY, WHETHER IN CONTRACT, STRICT
* LIABILITY, OR TORT (INCLUDING NEGLIGENCE OR OTHERWISE) ARISING IN ANY WAY
* OUT OF THE USE OF THIS SOFTWARE, EVEN IF ADVISED OF THE POSSIBILITY OF
* SUCH DAMAGE.
*
* The licence and distribution terms for any publically available version or

- 30 -
* derivative of this code cannot be changed. i.e. this code cannot simply be
* copied and put under another distribution licence
* [including the GNU Public Licence.]
*/