User Maual
76
VIRAJ SAP PS User Guide TABLE OF CONTENTS 1
-
Upload
indresh-chandra -
Category
Documents
-
view
289 -
download
5
Transcript of User Maual
VIRAJ SAP PS User Guide
TABLE OF CONTENTS
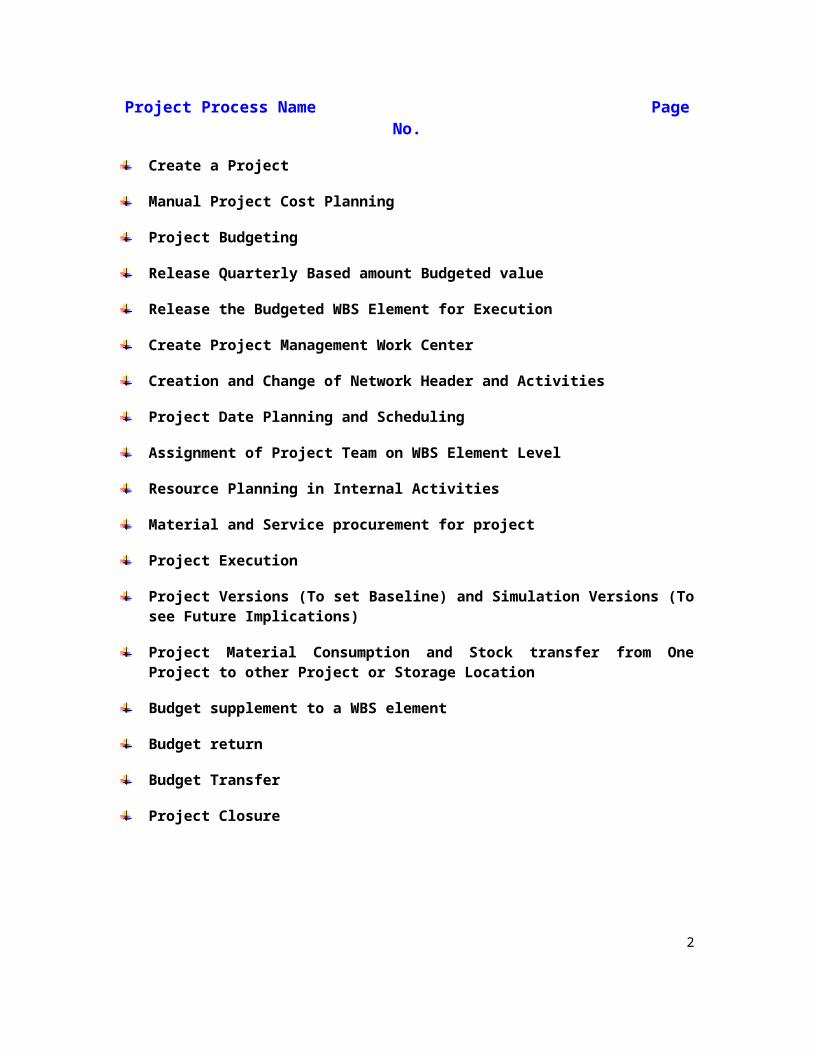
Project Process Name Page No.
Create a Project
Manual Project Cost Planning
Project Budgeting
Release Quarterly Based amount Budgeted value
Release the Budgeted WBS Element for Execution
Create Project Management Work Center
Creation and Change of Network Header and Activities
Project Date Planning and Scheduling
Assignment of Project Team on WBS Element Level
Resource Planning in Internal Activities
Material and Service procurement for project
Project Execution
Project Versions (To set Baseline) and Simulation Versions (To see Future Implications)
Project Material Consumption and Stock transfer from One Project to other Project or Storage Location
Budget supplement to a WBS element
Budget return
Budget Transfer
Project Closure
1
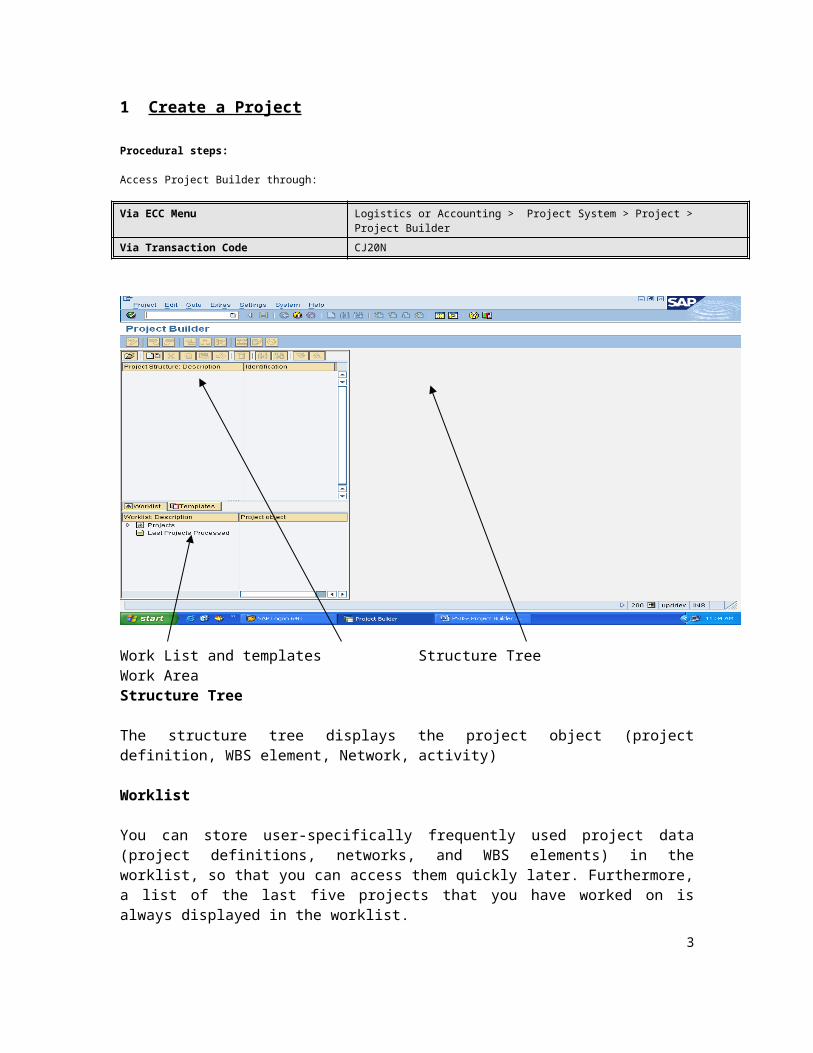
1 Create a Project
Procedural steps:
Access Project Builder through:
Via ECC Menu Logistics or Accounting > Project System > Project > Project Builder
Via Transaction Code CJ20N
Work List and templates Structure Tree Work AreaStructure Tree
The structure tree displays the project object (project definition, WBS element, Network, activity)
Worklist
You can store user-specifically frequently used project data (project definitions, networks, and WBS elements) in the worklist, so that you can access them quickly later. Furthermore, a list of the last five projects that you have worked on is always displayed in the worklist.
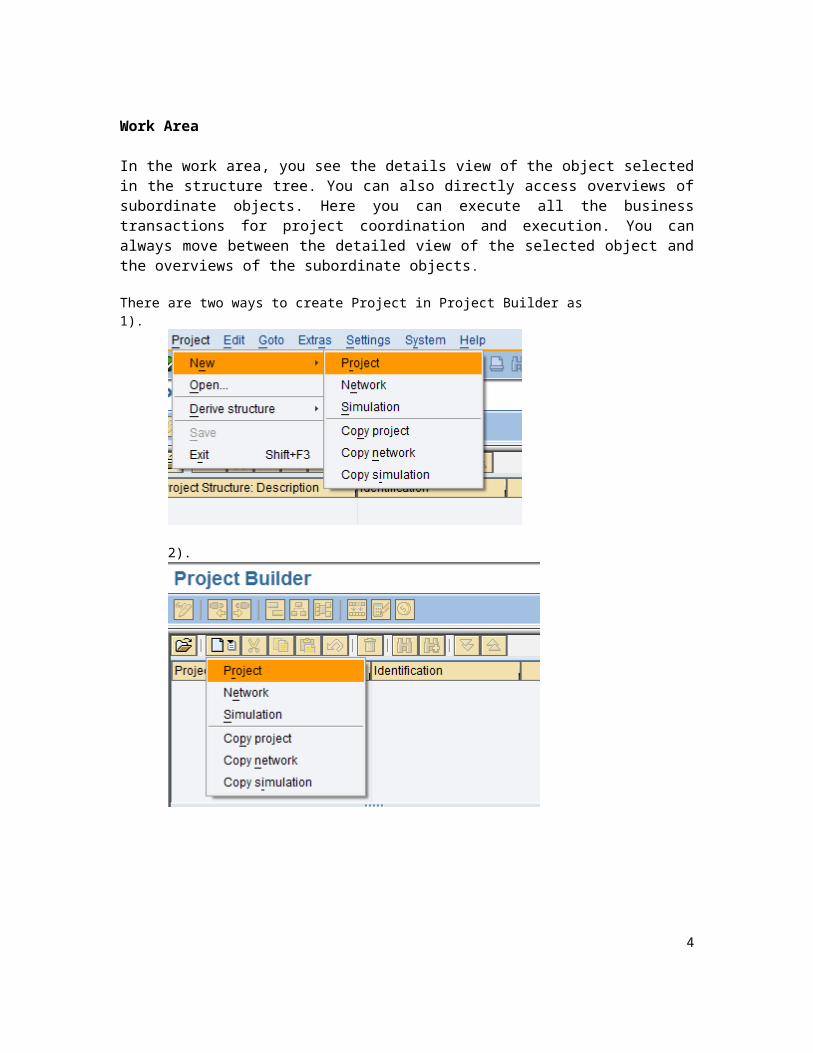
Work Area
In the work area, you see the details view of the object selected in the structure tree. You can also directly access overviews of subordinate objects. Here you can execute all the business transactions for project coordination and execution. You can always move
2
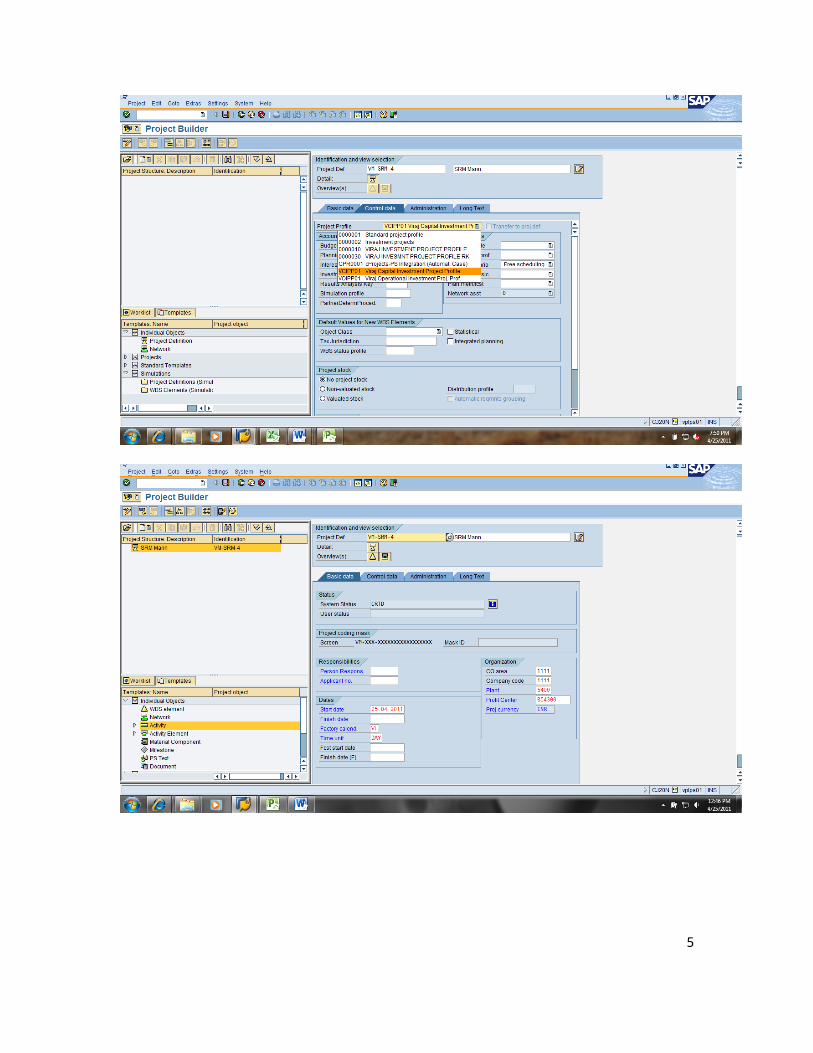
between the detailed view of the selected object and the overviews of the subordinate objects. There are two ways to create Project in Project Builder as 1).
2).
3
4
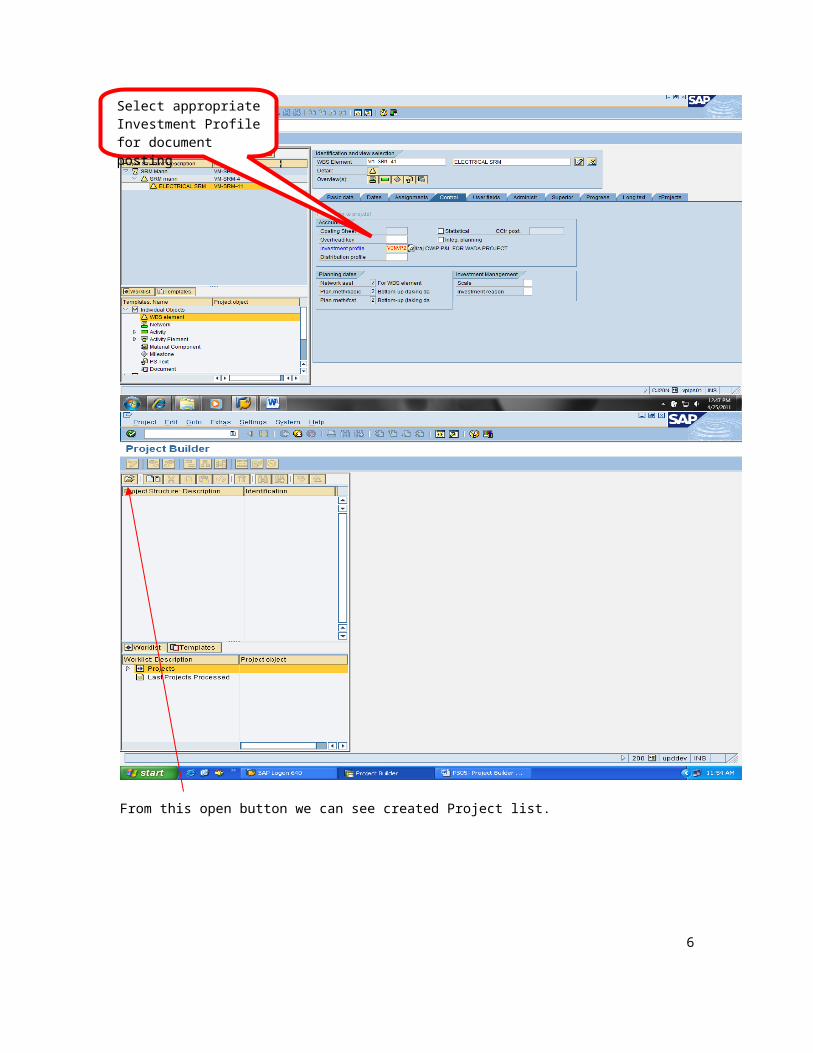
From this open button we can see created Project list.
5
Select appropriate Investment Profile for document posting.
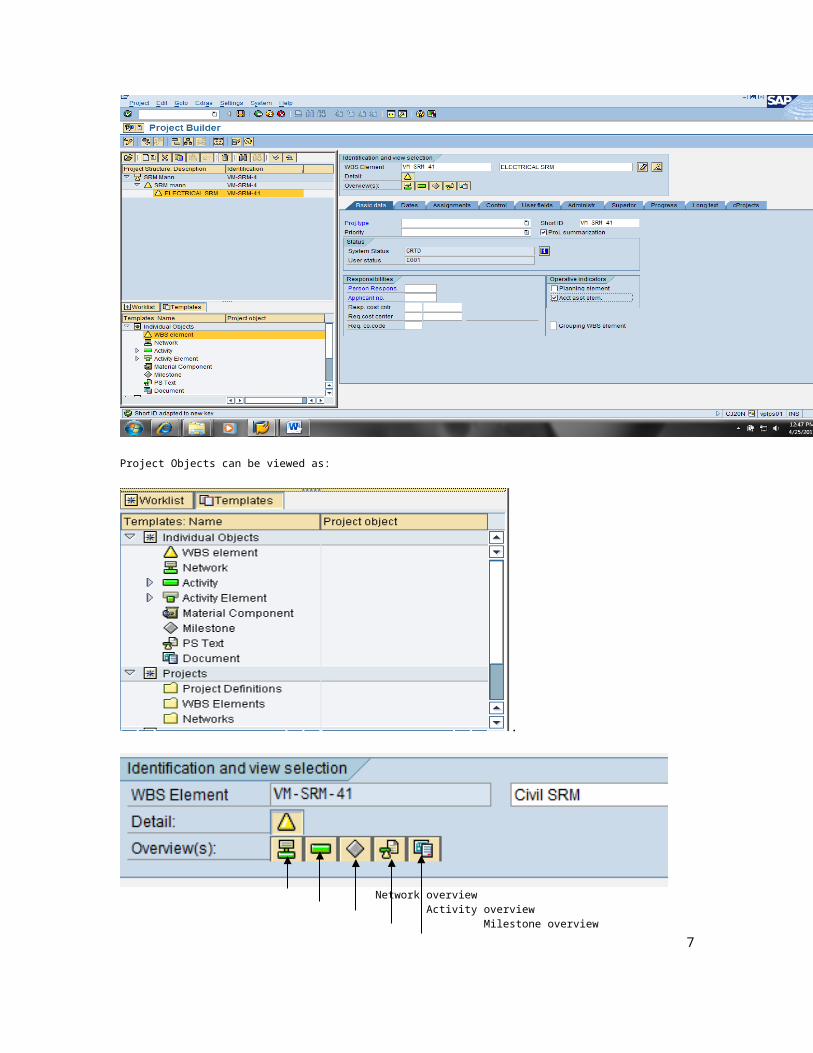
Project Objects can be viewed as:
.
Network overview Activity overview Milestone overview PS Text overview Document overview
6
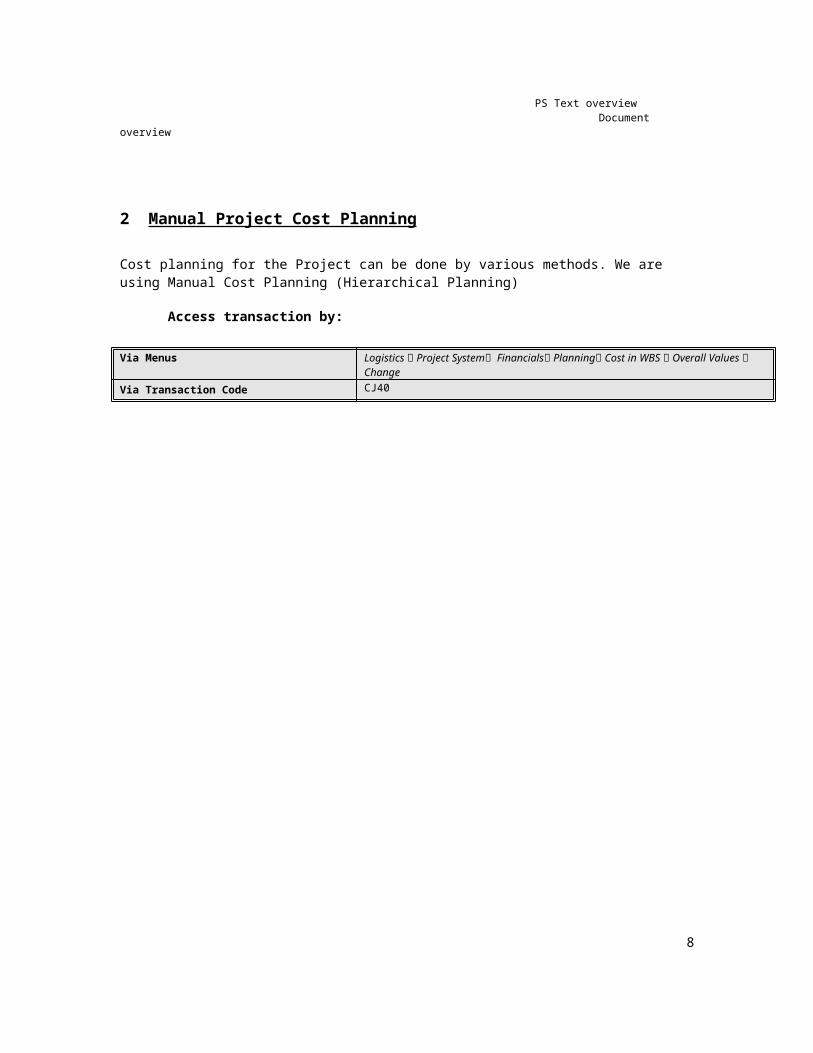
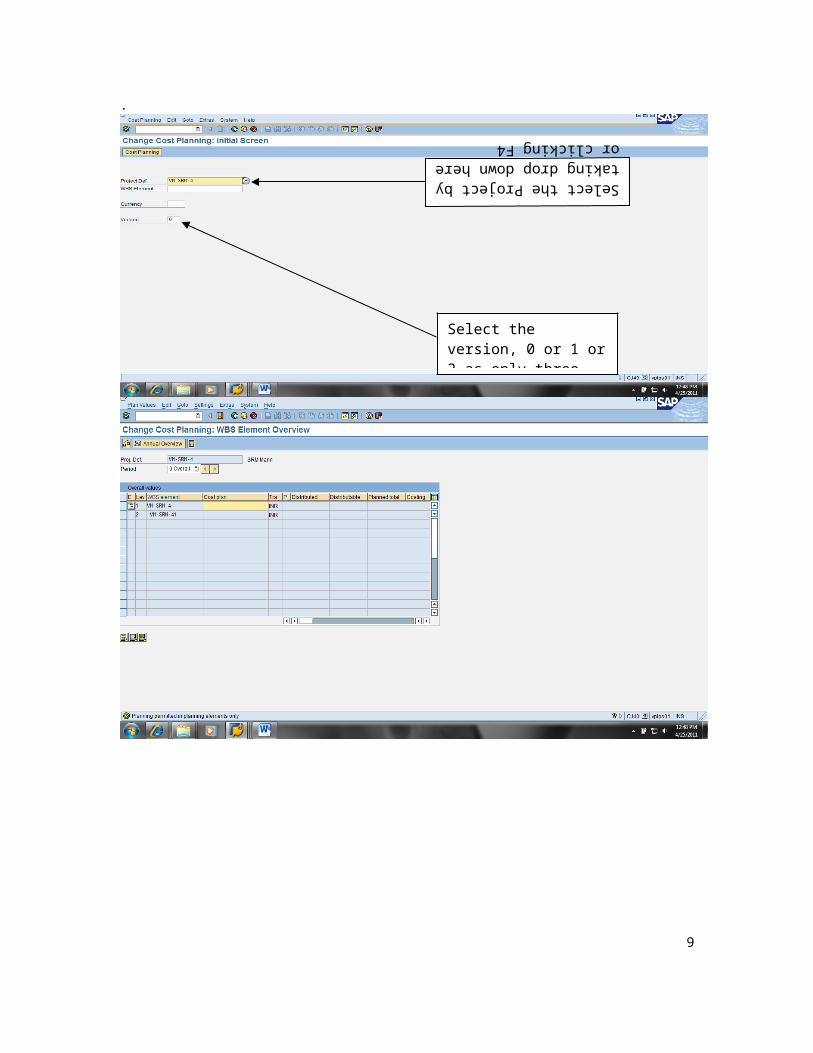
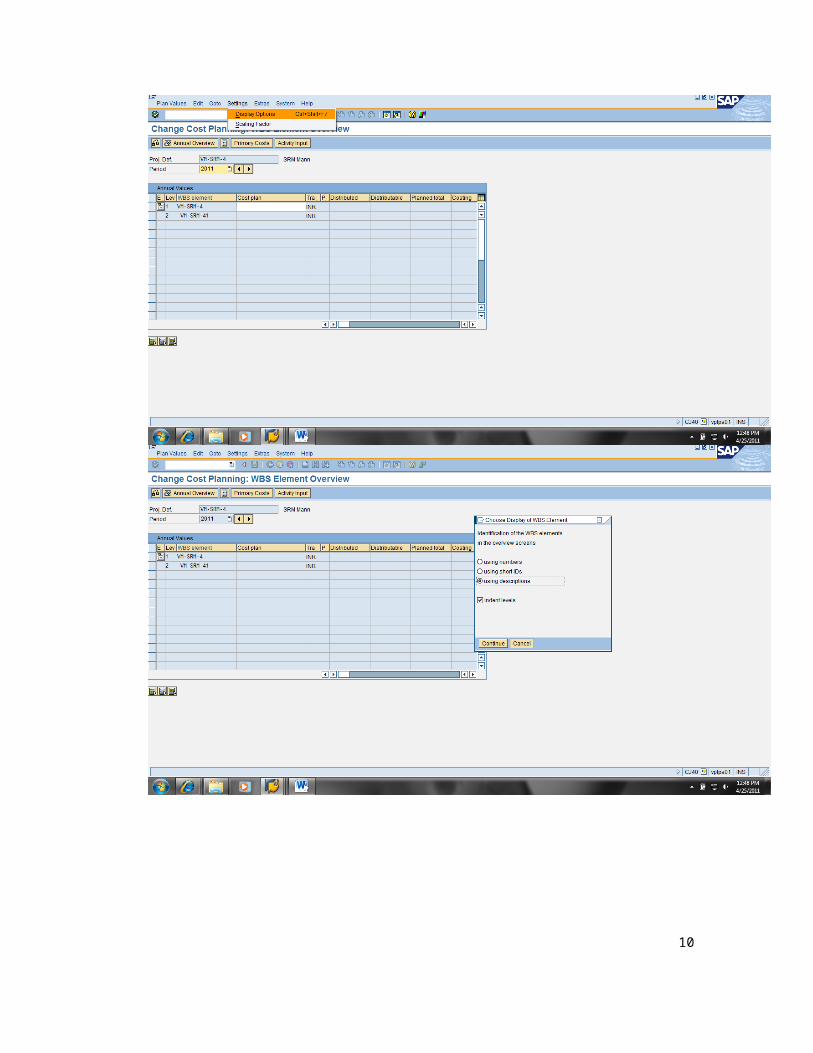
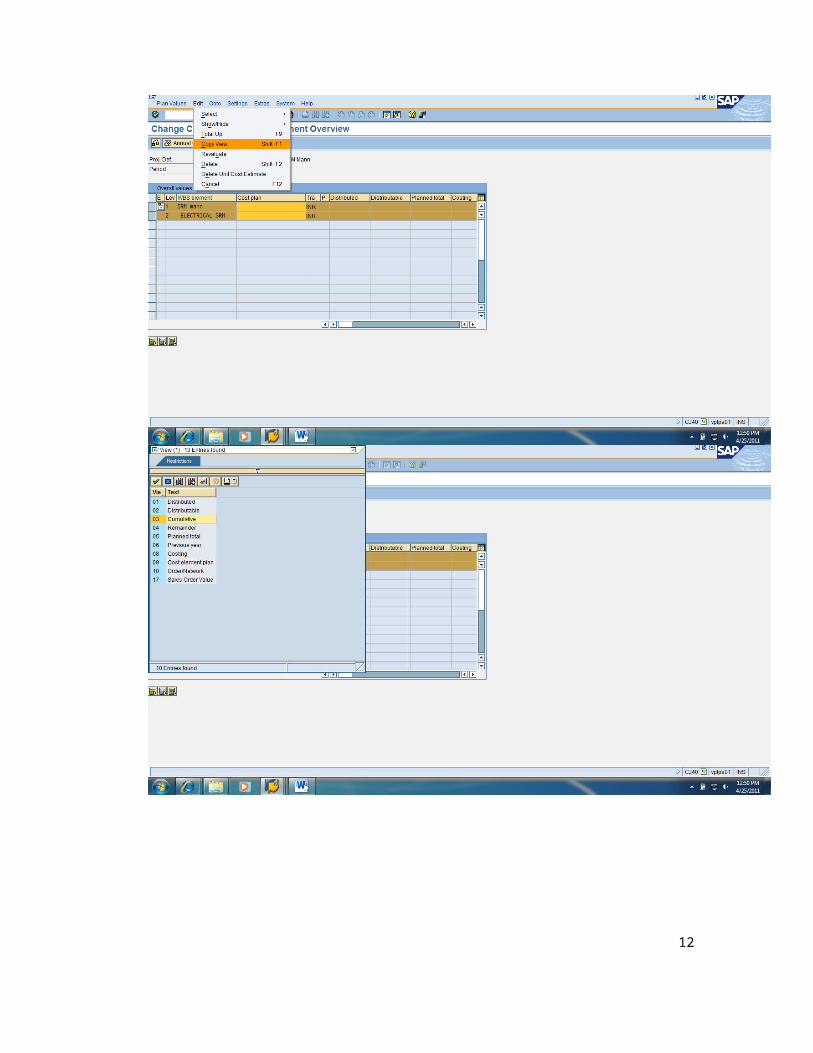
2 Manual Project Cost Planning
Cost planning for the Project can be done by various methods. We are using Manual Cost Planning (Hierarchical Planning)
Access transaction by:
Via Menus Logistics Project System Financials Planning Cost in WBS Overall Values Change
Via Transaction Code CJ40
7
.
8
Select the Project by taking drop down here or clicking F4
Select the version, 0 or 1 or 2 as only three versions are available in
9
10

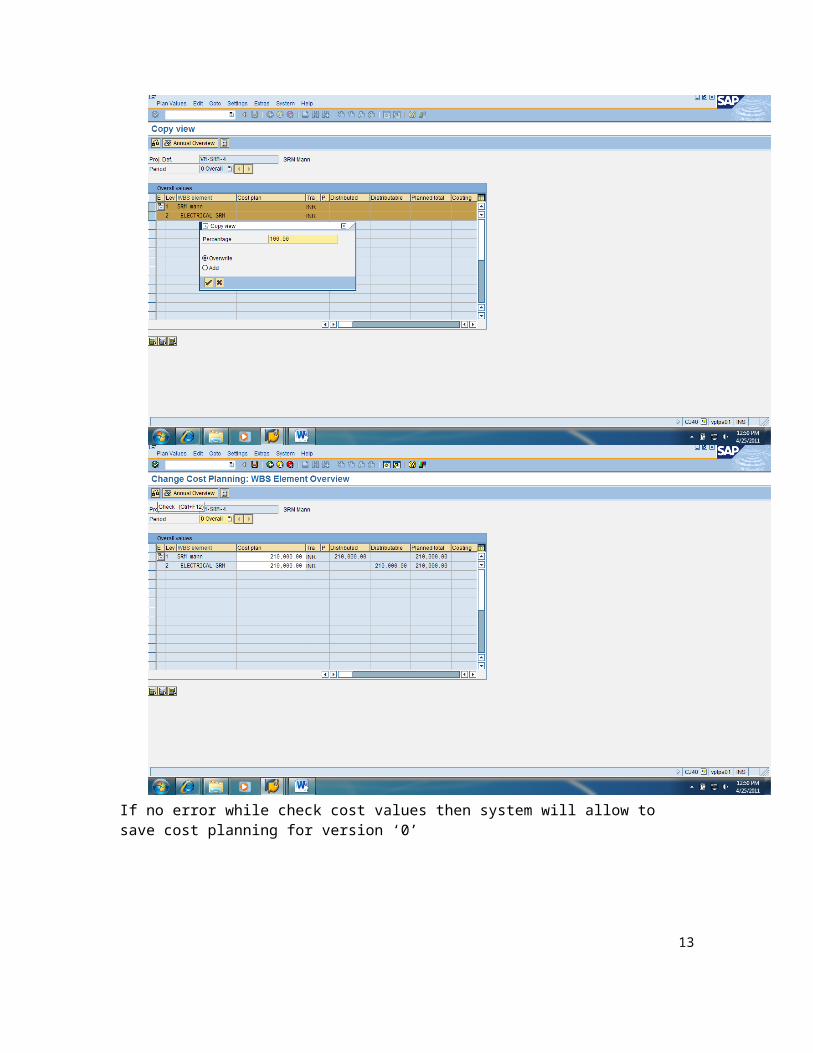
11
If no error while check cost values then system will allow to save cost planning for version ‘0’
12
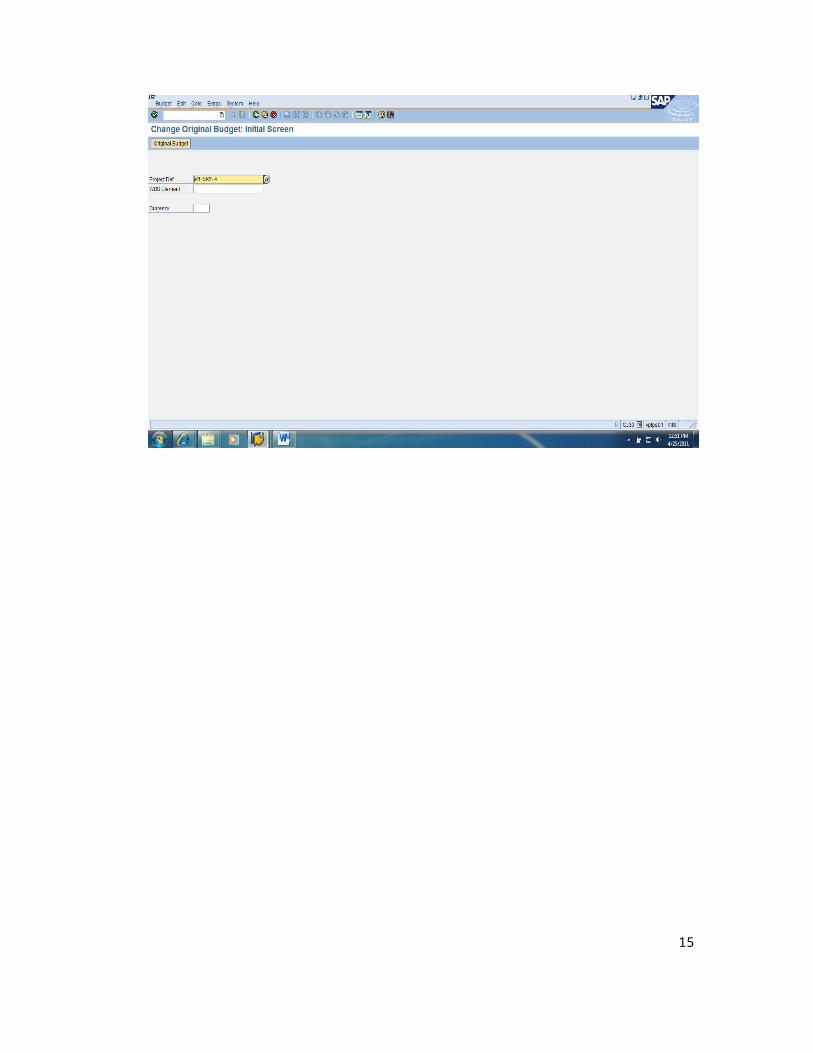
3 Project Budgeting:-
The Project Budgeting will be copying from the Project cost planned with suitable approved version, before scheduling the original project for actual executions. Default cost planning for budgeting is ‘0’.
Access transaction by:
Menu path Logistics Project System Financials Budgeting Original Budget Change
Transaction code CJ30
13

14
15

16

17

18
19
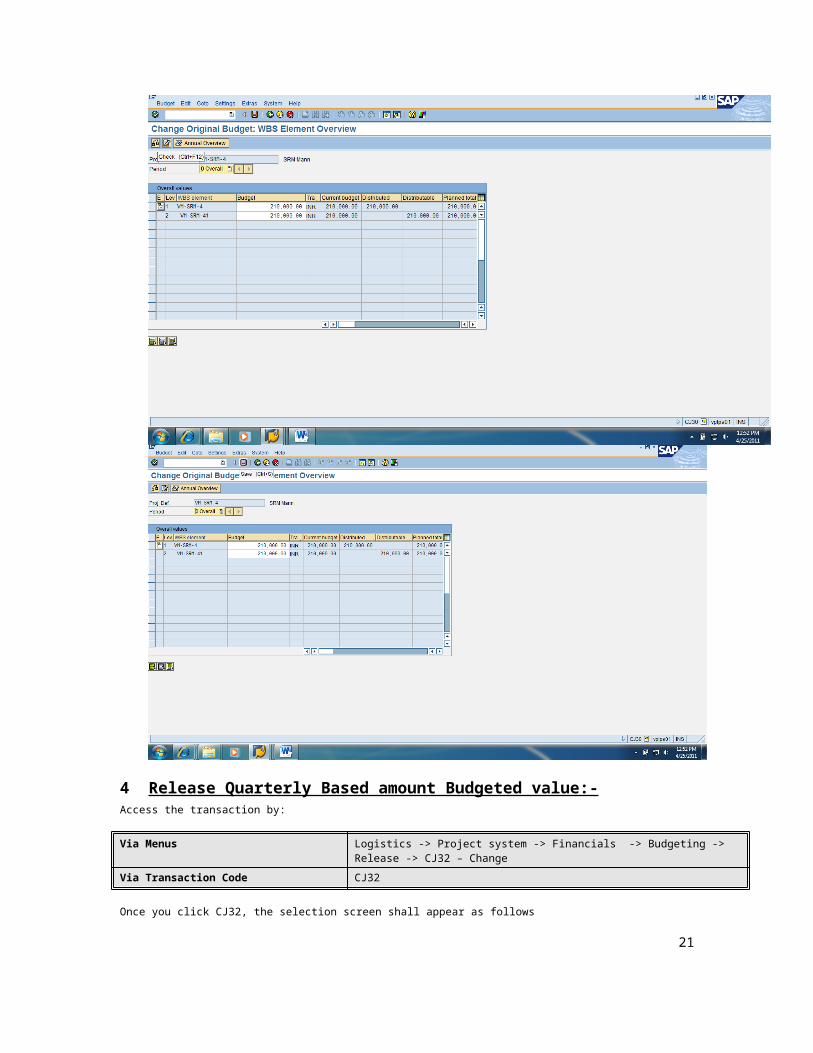
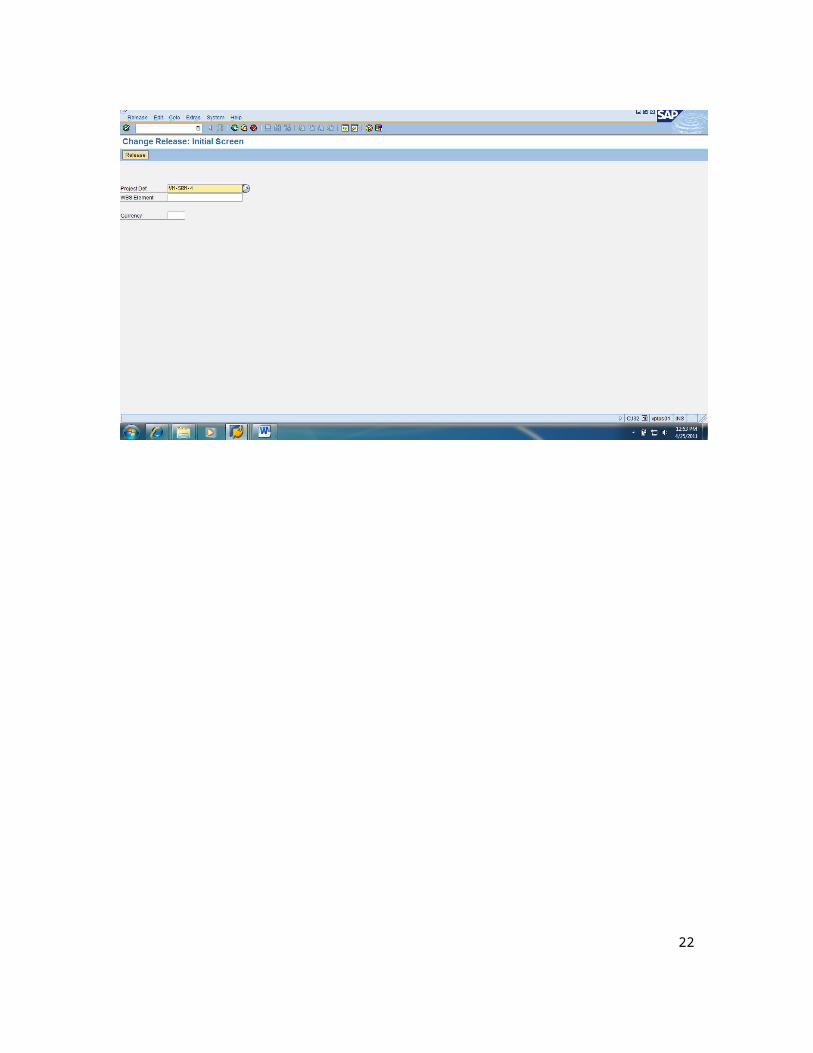
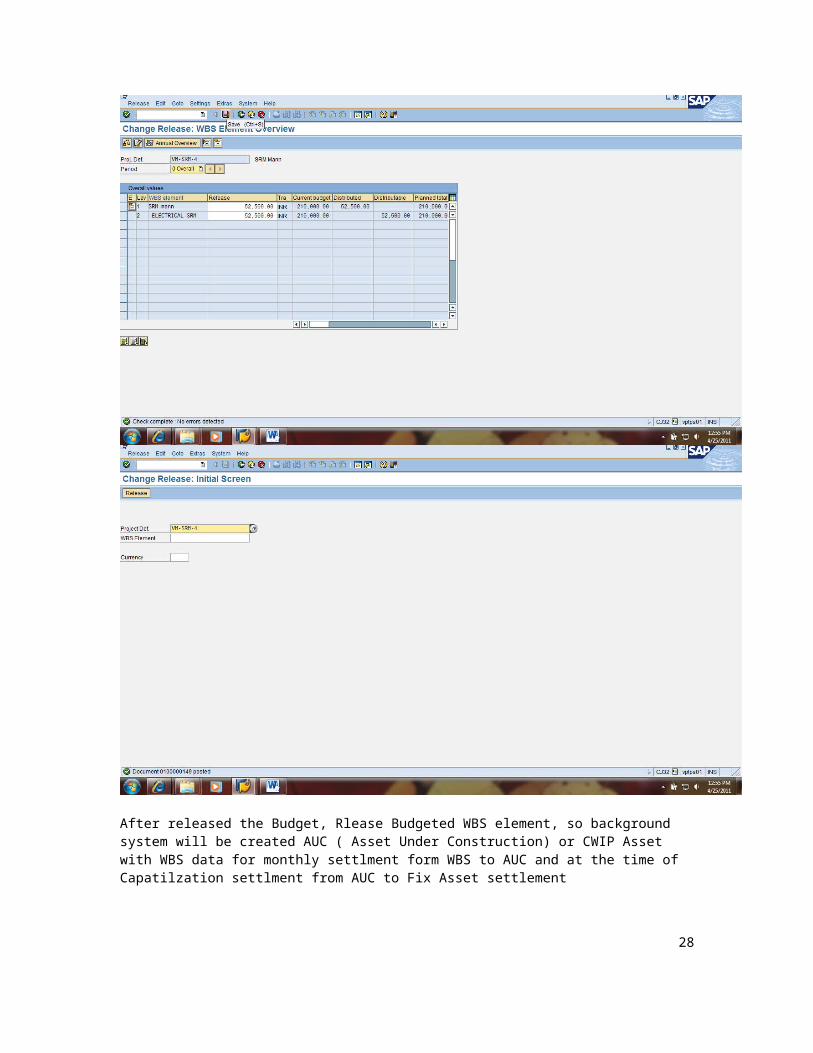
4 Release Quarterly Based amount Budgeted value:- Access the transaction by:
Via Menus Logistics -> Project system -> Financials -> Budgeting -> Release -> CJ32 – Change
Via Transaction Code CJ32
Once you click CJ32, the selection screen shall appear as follows
20
21
22
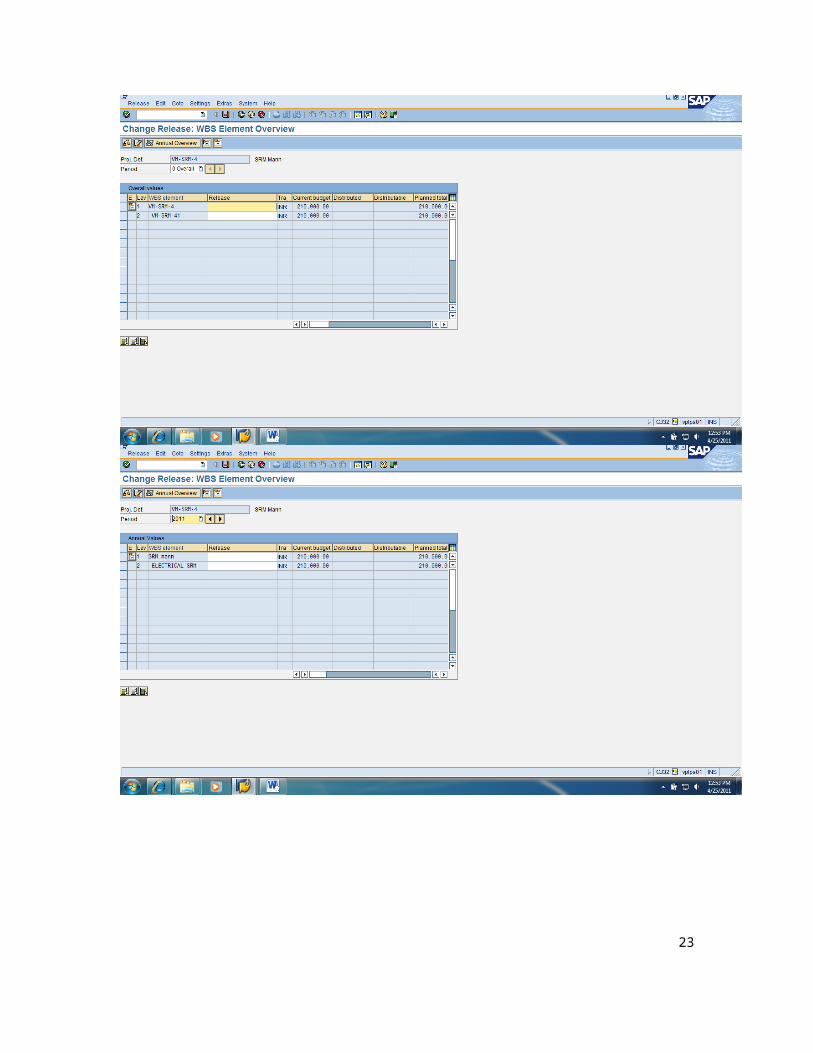
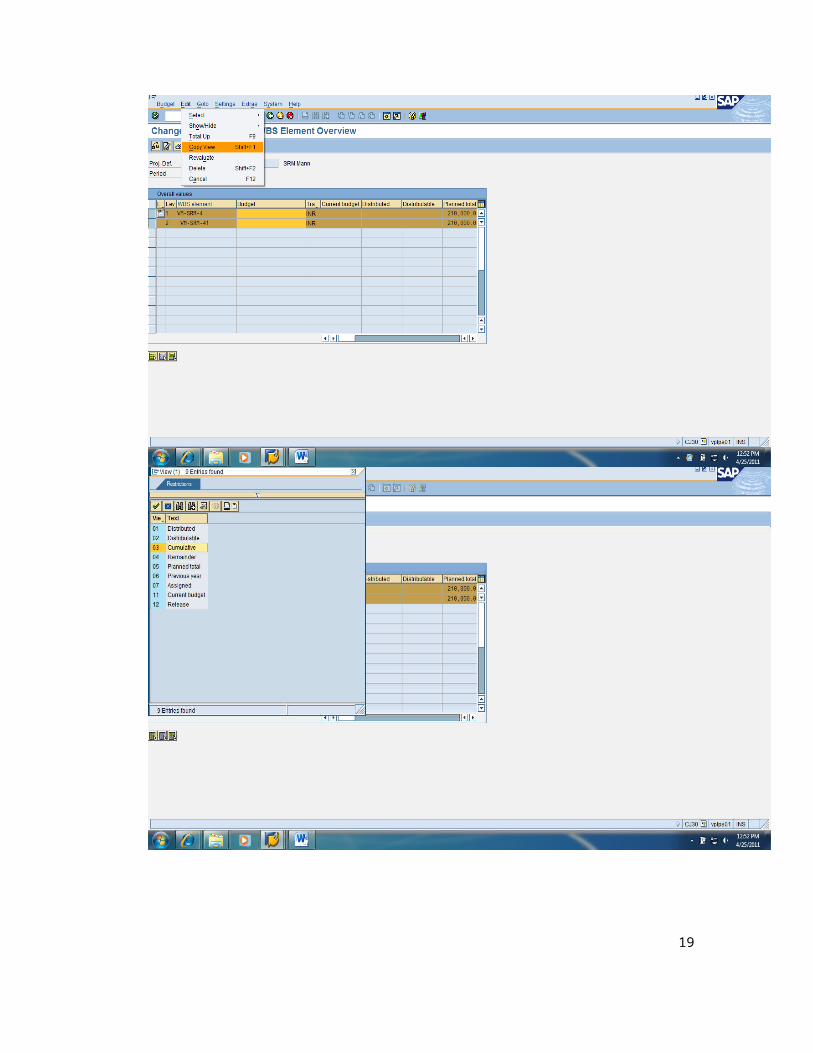
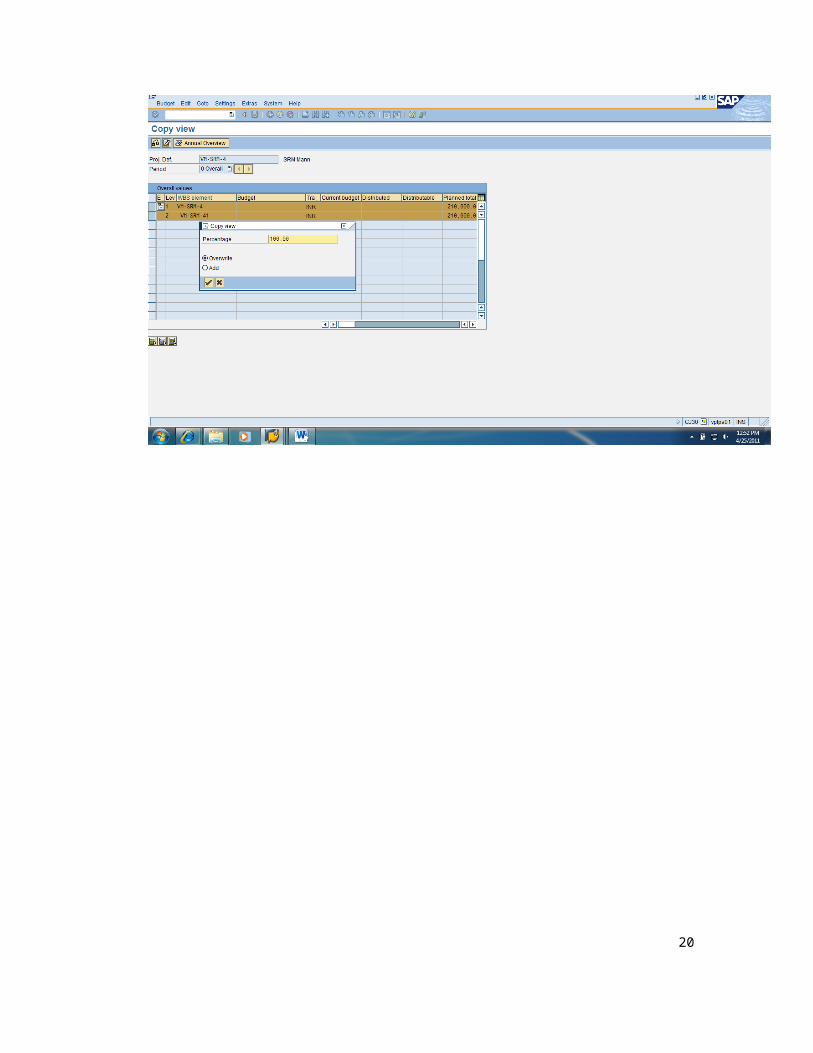
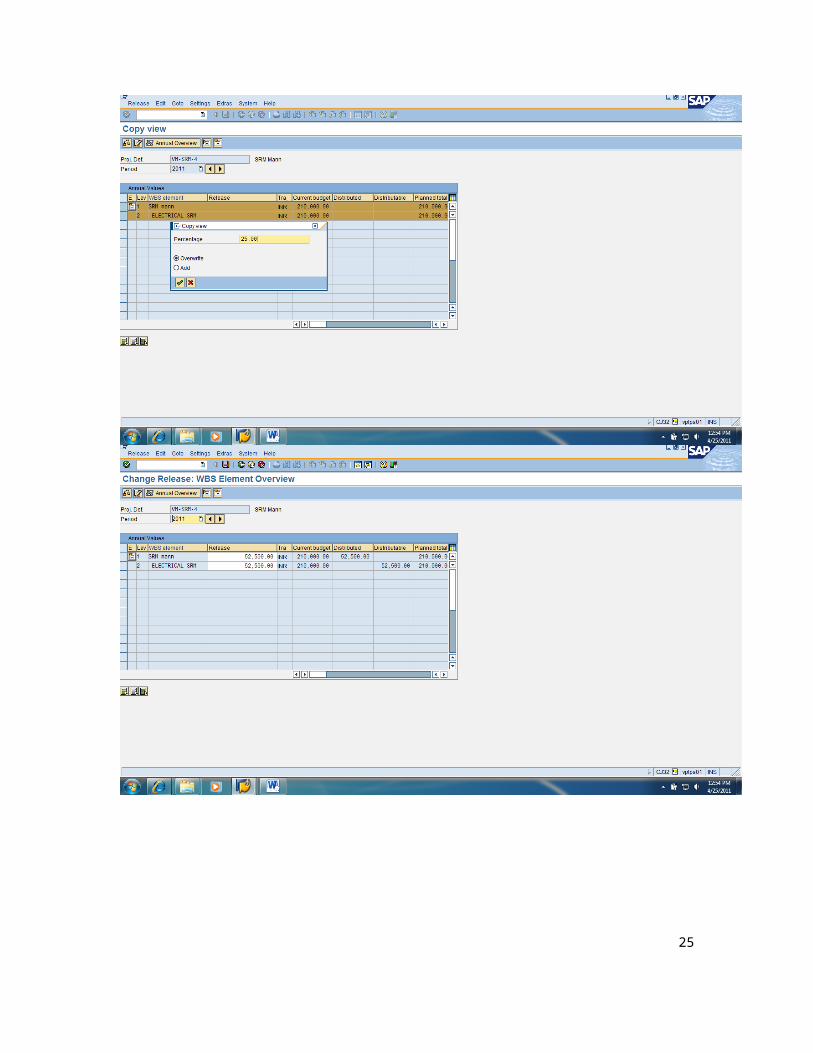
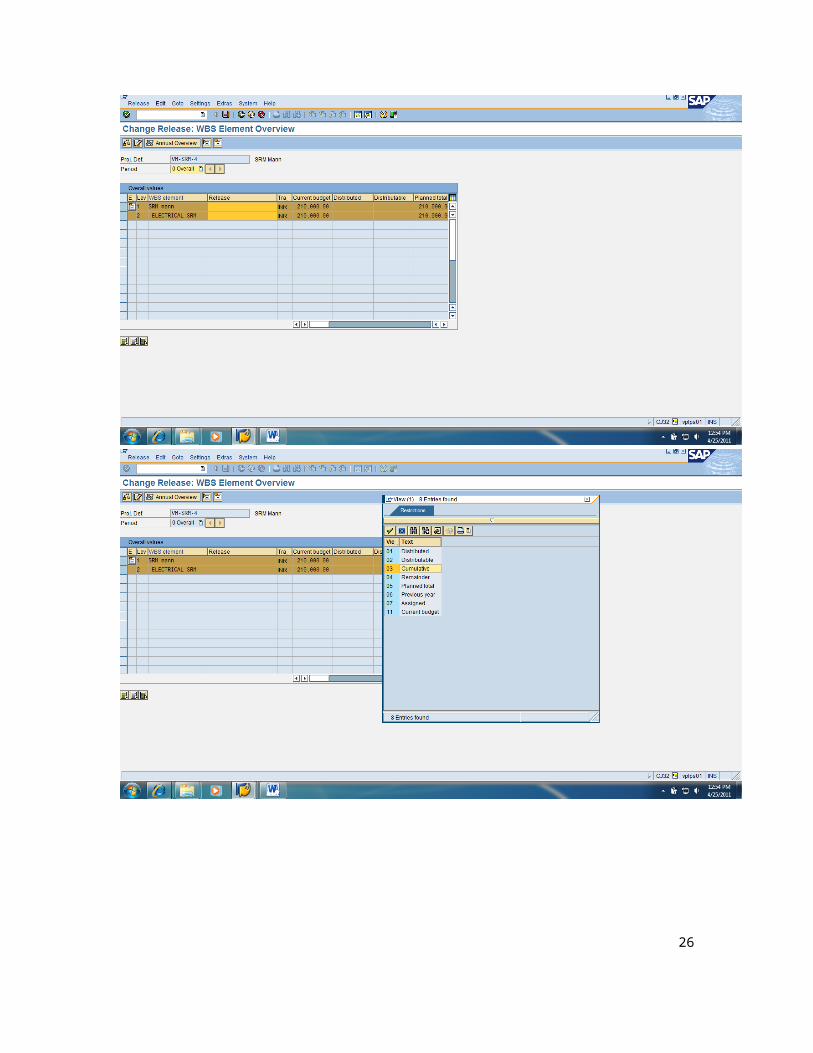
The Current Budget and Planned Totals at the right may be used as a reference to decide upon the budgets released amount. You can select the WBS Elements which have budgeted and have the system calculate the budget amounts as a fixed percentage of the Current Budget. In our case, we select all the WBS elements listed above. Then, using the menu path Edit Copy View (Shift + F1), choose 5th option “Current Budget” and giving the percentage as 25.
23

24
25
26

After released the Budget, Rlease Budgeted WBS element, so background system will be created AUC ( Asset Under Construction) or CWIP Asset with WBS data for monthly settlment form WBS to AUC and at the time of Capatilzation settlment from AUC to Fix Asset settlement
27
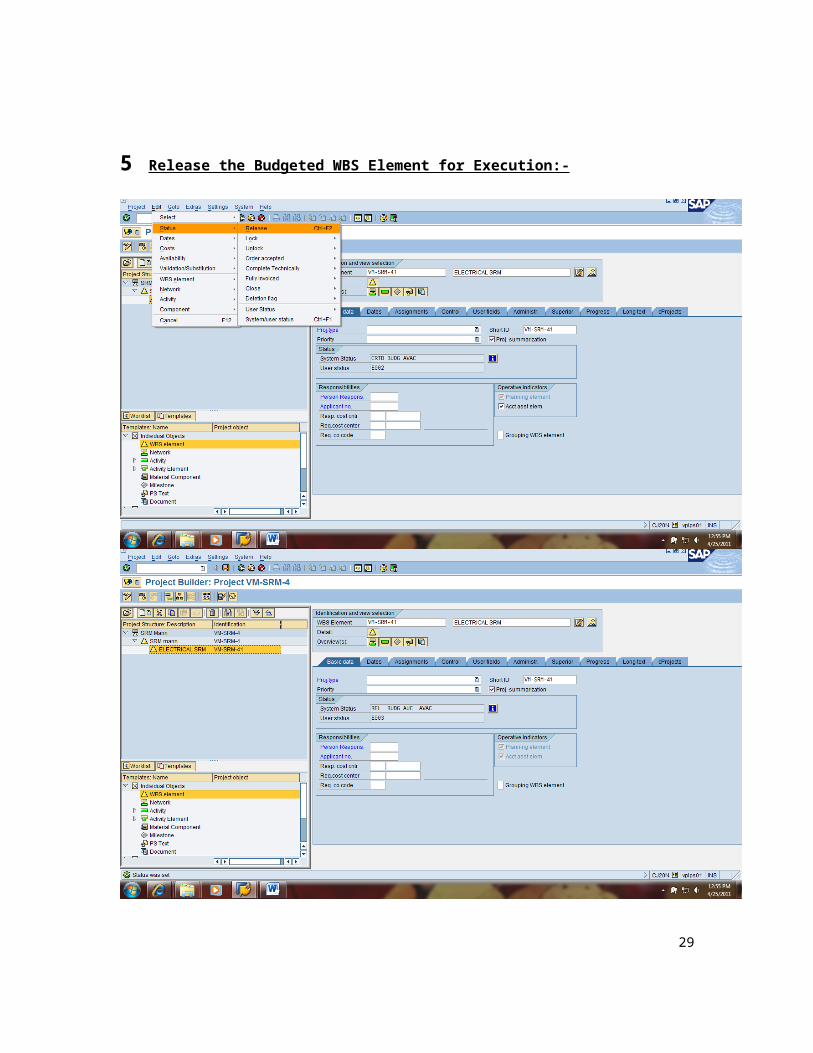
5 Release the Budgeted WBS Element for Execution:-
28
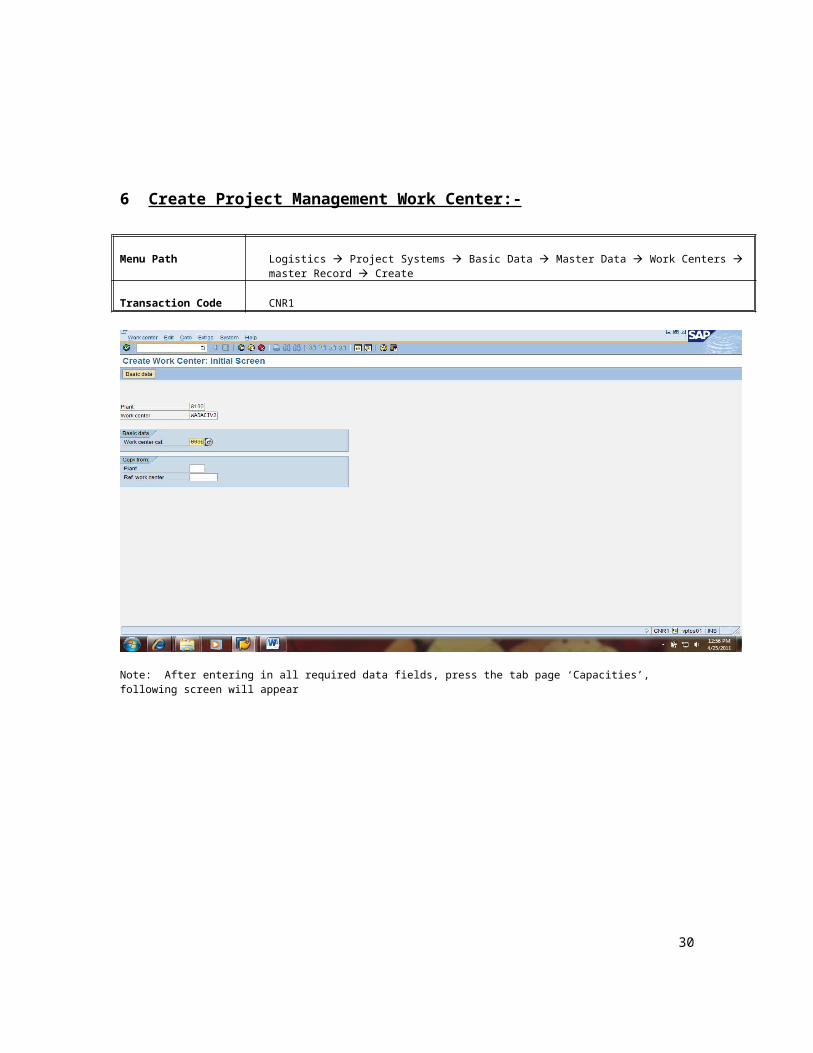
6 Create Project Management Work Center:-
Menu Path Logistics Project Systems Basic Data Master Data Work Centers master Record Create
Transaction Code CNR1
Note: After entering in all required data fields, press the tab page ‘Capacities’, following screen will appear
29
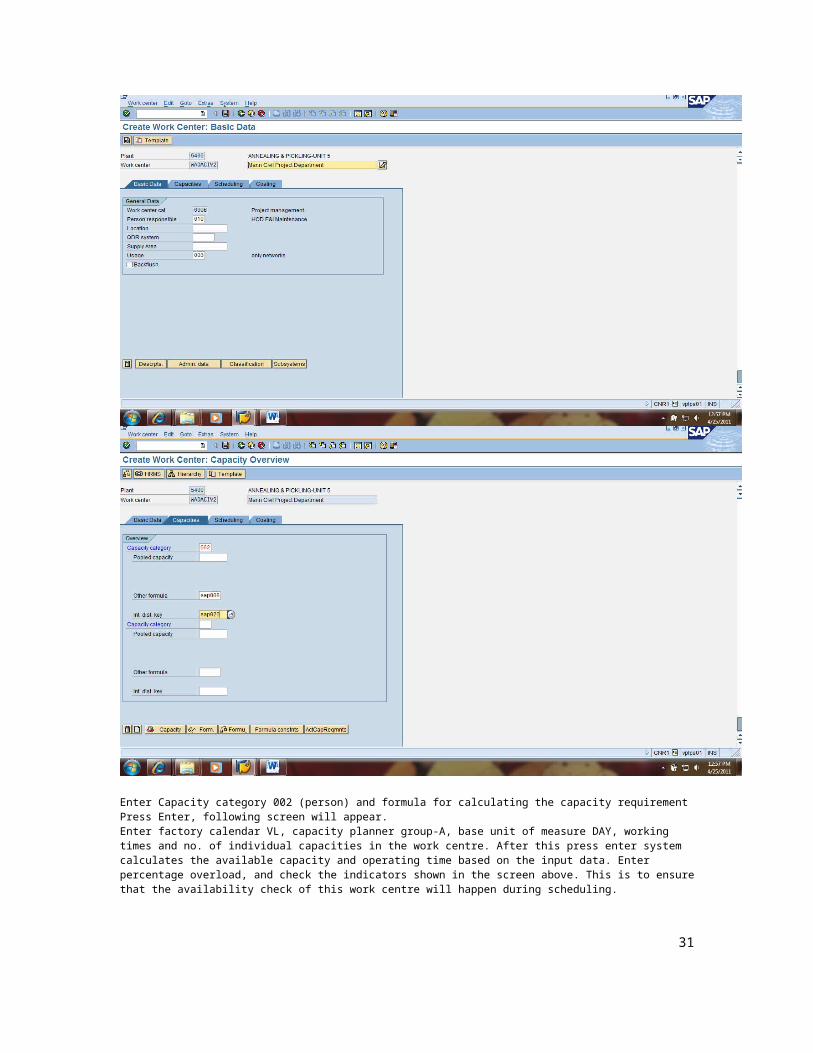
Enter Capacity category 002 (person) and formula for calculating the capacity requirementPress Enter, following screen will appear.Enter factory calendar VL, capacity planner group-A, base unit of measure DAY, working times and no. of individual capacities in the work centre. After this press enter system calculates the available capacity and operating time based on the input data. Enter percentage overload, and check the indicators shown in the screen above. This is to ensure that the availability check of this work centre will happen during scheduling.
30
Note: After entering in all required data fields, press the green arrow , to go back to Capacity overview page, than press the ‘Scheduling’ tab page, following screen will appear
Enter capacity category
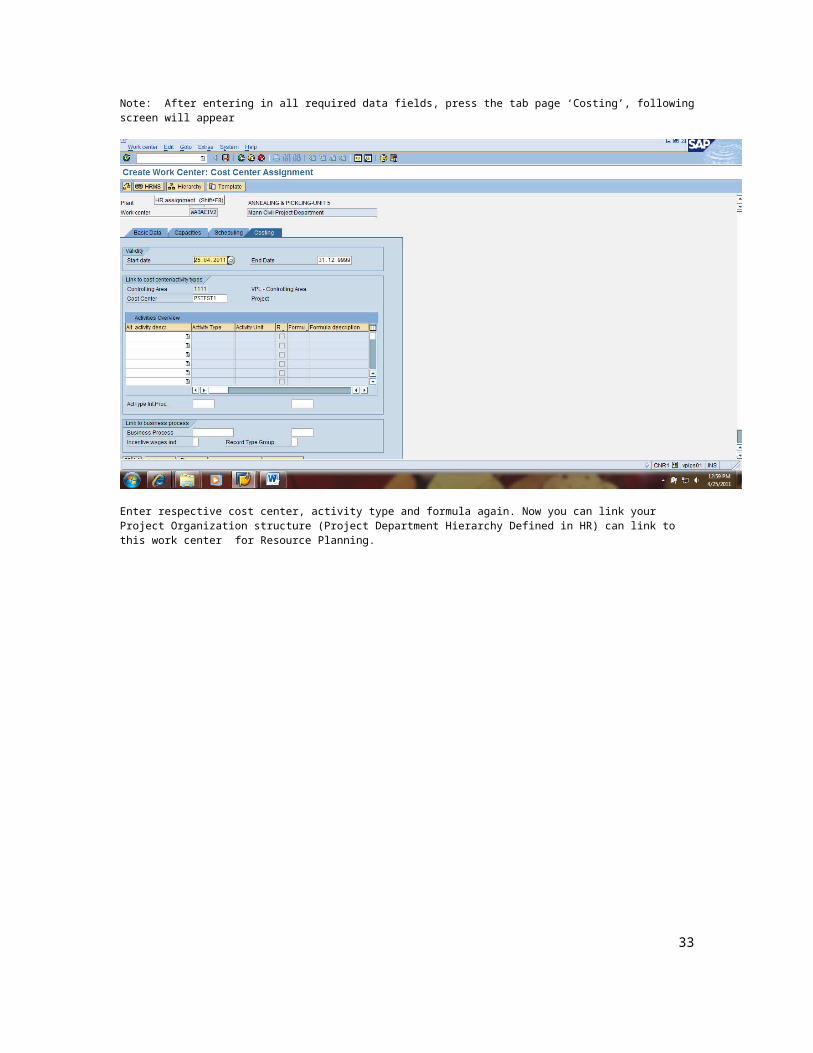
Note: After entering in all required data fields, press the tab page ‘Costing’, following screen will appear
31

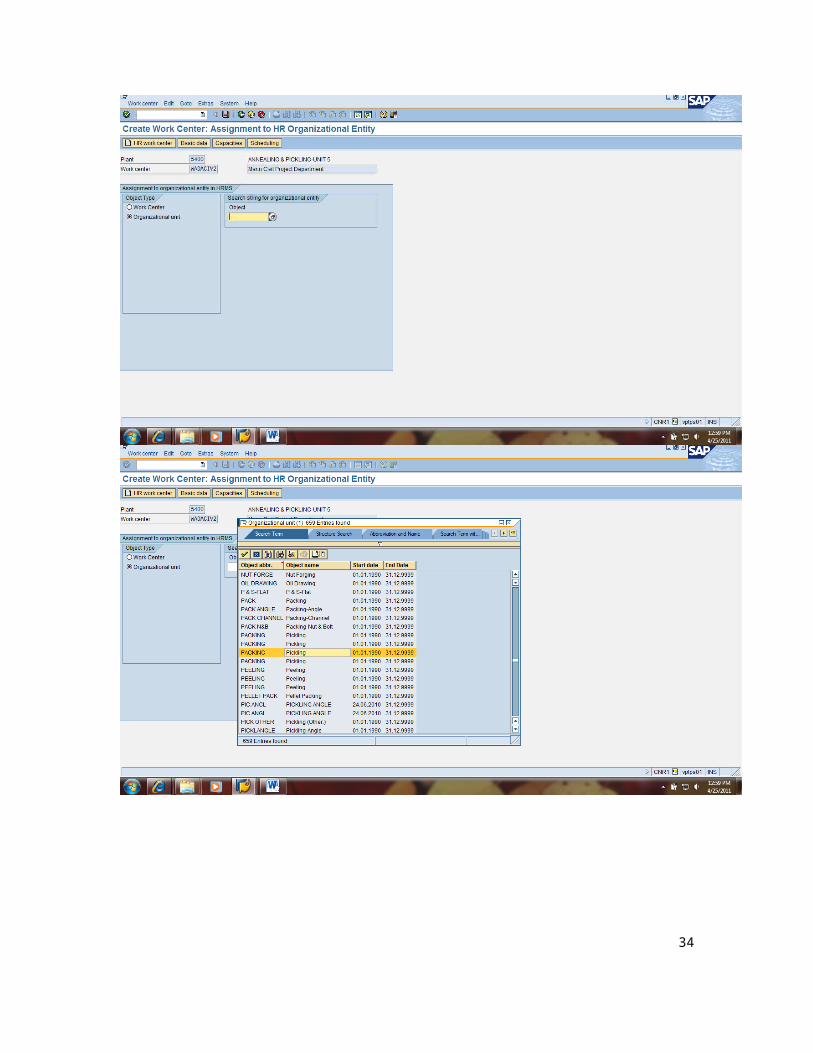
Enter respective cost center, activity type and formula again. Now you can link your Project Organization structure (Project Department Hierarchy Defined in HR) can link to this work center for Resource Planning.
32
33
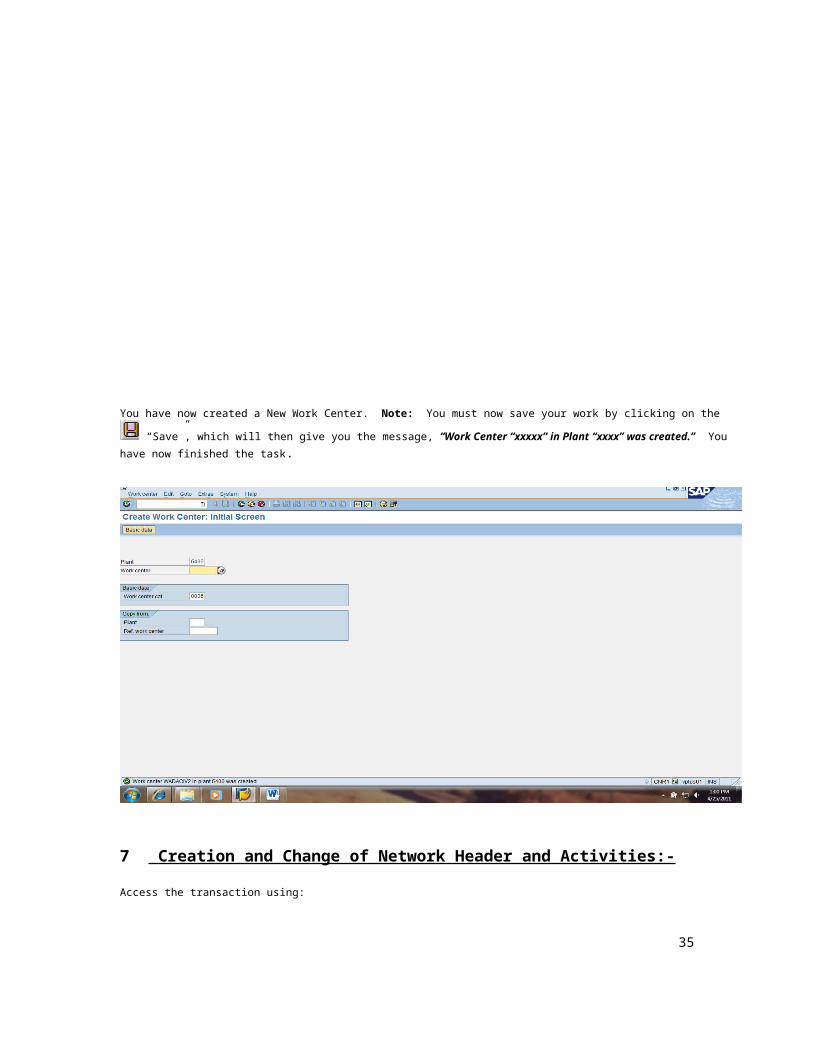
You have now created a New Work Center. Note: You must now save your work by clicking on the “Save”, which will then give you the message, “Work Center “xxxxx” in Plant “xxxx” was created.” You have now finished the task.
7 Creation and Change of Network Header and Activities:-
Access the transaction using:
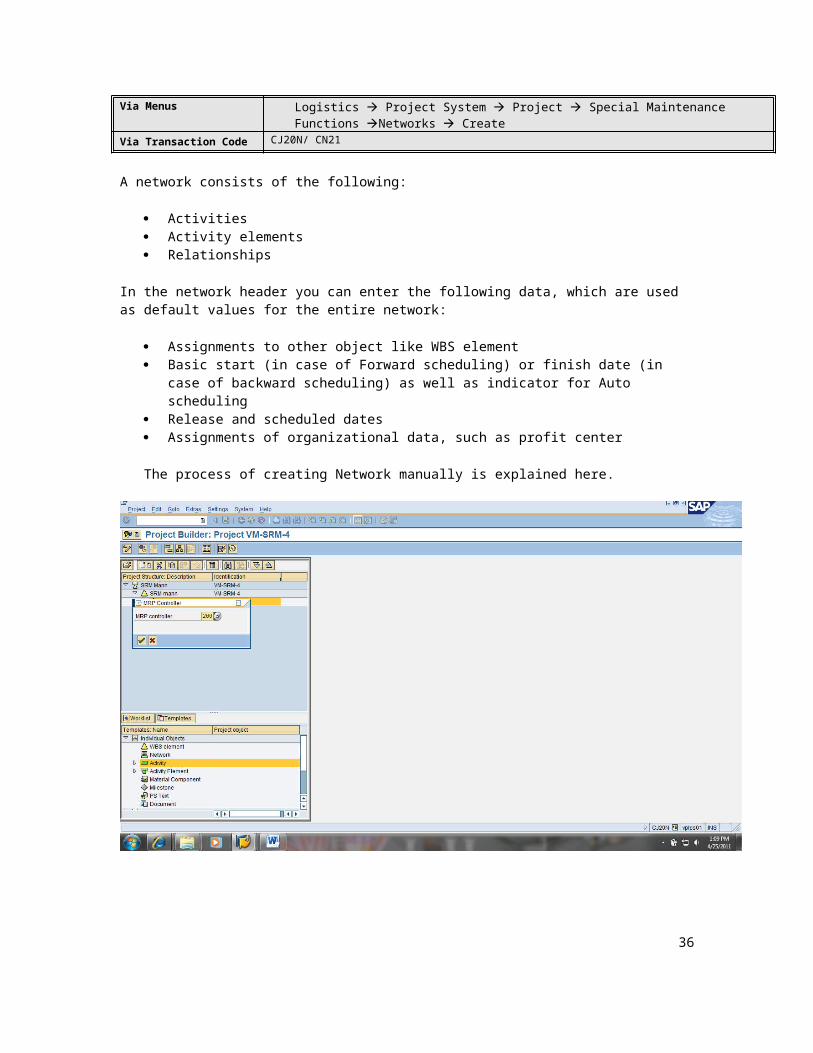
Via Menus Logistics Project System Project Special Maintenance Functions Networks Create
Via Transaction Code CJ20N/ CN21
34
A network consists of the following:
Activities Activity elements Relationships
In the network header you can enter the following data, which are used as default values for the entire network:
Assignments to other object like WBS element Basic start (in case of Forward scheduling) or finish date (in case of backward
scheduling) as well as indicator for Auto scheduling Release and scheduled dates Assignments of organizational data, such as profit center
The process of creating Network manually is explained here.
35
36

37
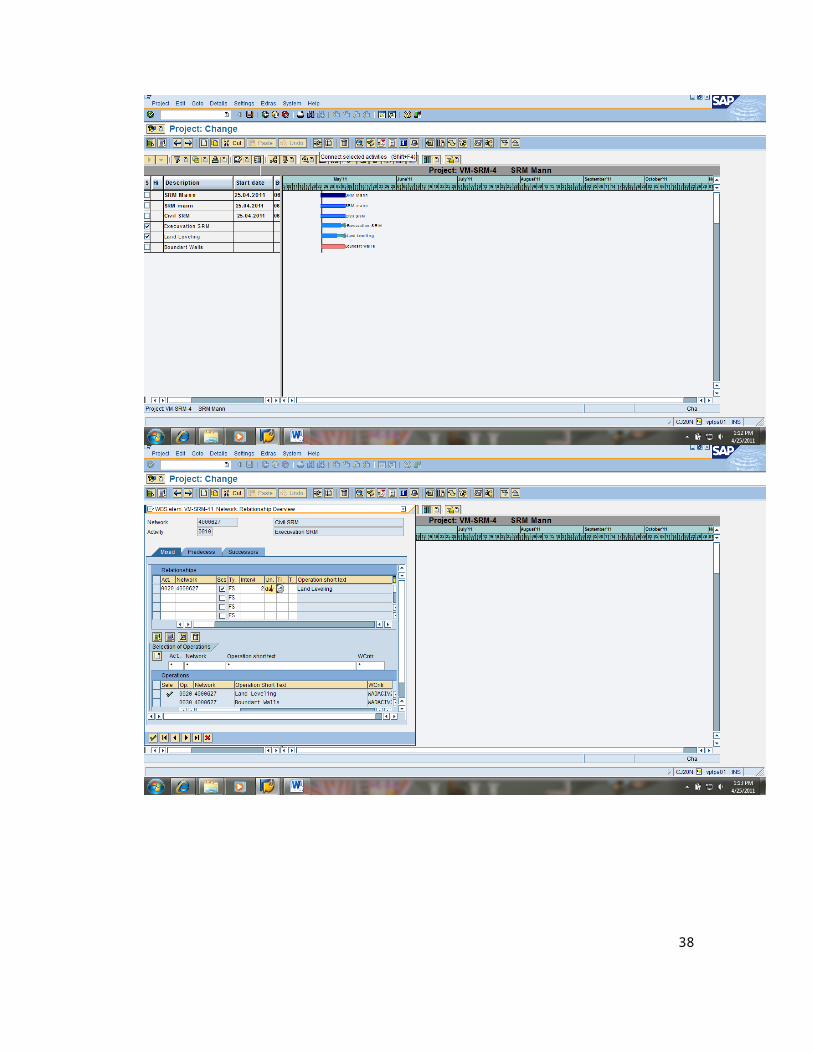
8 Project Date Planning and Scheduling:-
8.1 Project Planning Board / Date Planning
1. Durations are maintained in each activity.2. Relationships are maintained among activities
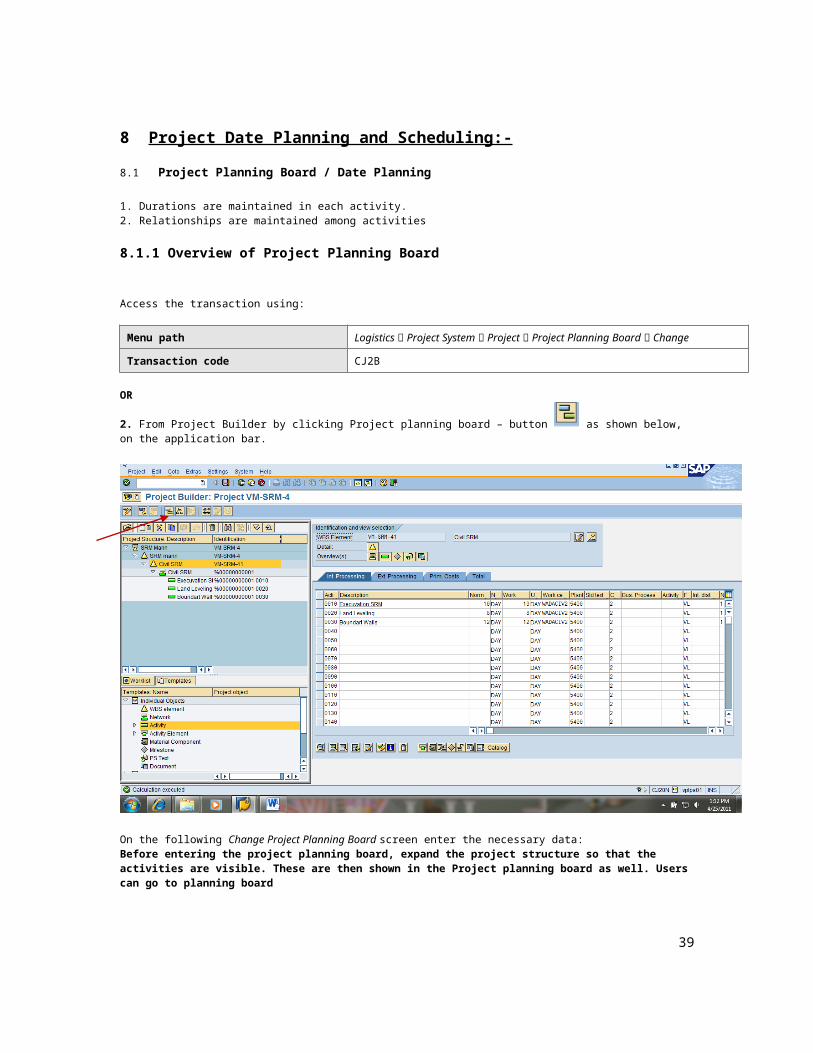
8.1.1 Overview of Project Planning Board
Access the transaction using:
Menu path Logistics Project System Project Project Planning Board Change
Transaction code CJ2B
OR
2. From Project Builder by clicking Project planning board – button as shown below, on the application bar.
On the following Change Project Planning Board screen enter the necessary data:Before entering the project planning board, expand the project structure so that the activities are visible. These are then shown in the Project planning board as well. Users can go to planning board
38
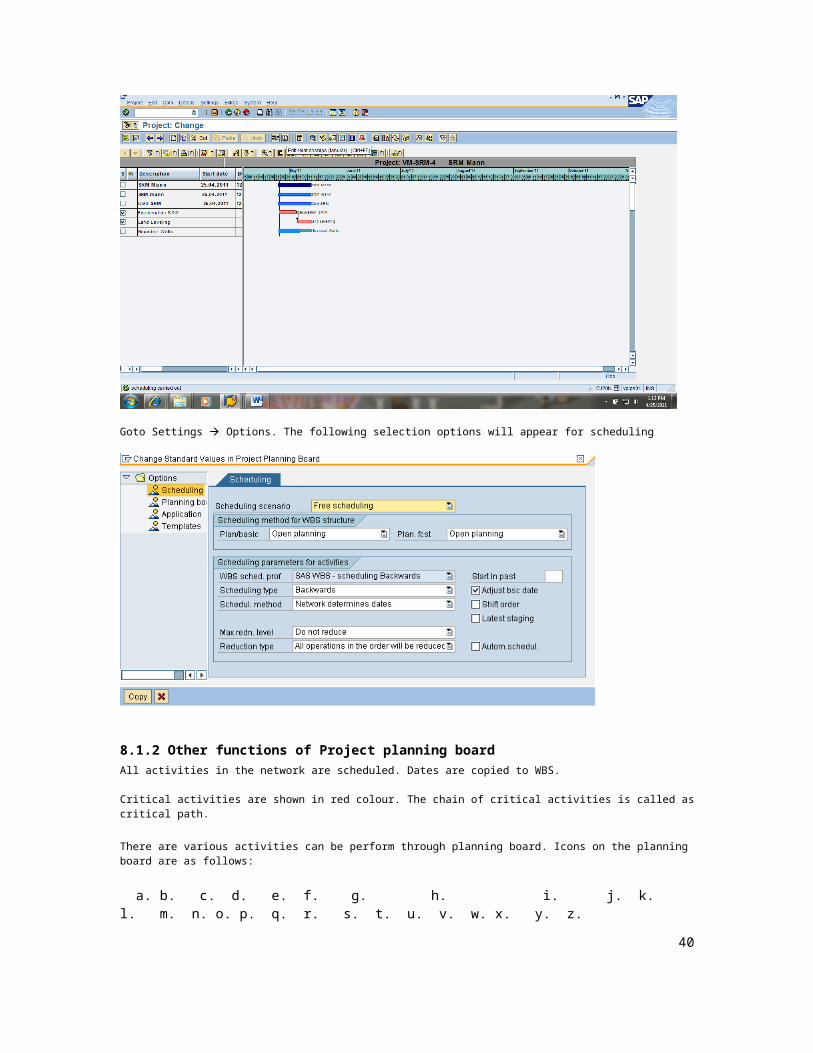
Goto Settings Options. The following selection options will appear for scheduling
8.1.2 Other functions of Project planning boardAll activities in the network are scheduled. Dates are copied to WBS.
Critical activities are shown in red colour. The chain of critical activities is called as critical path.
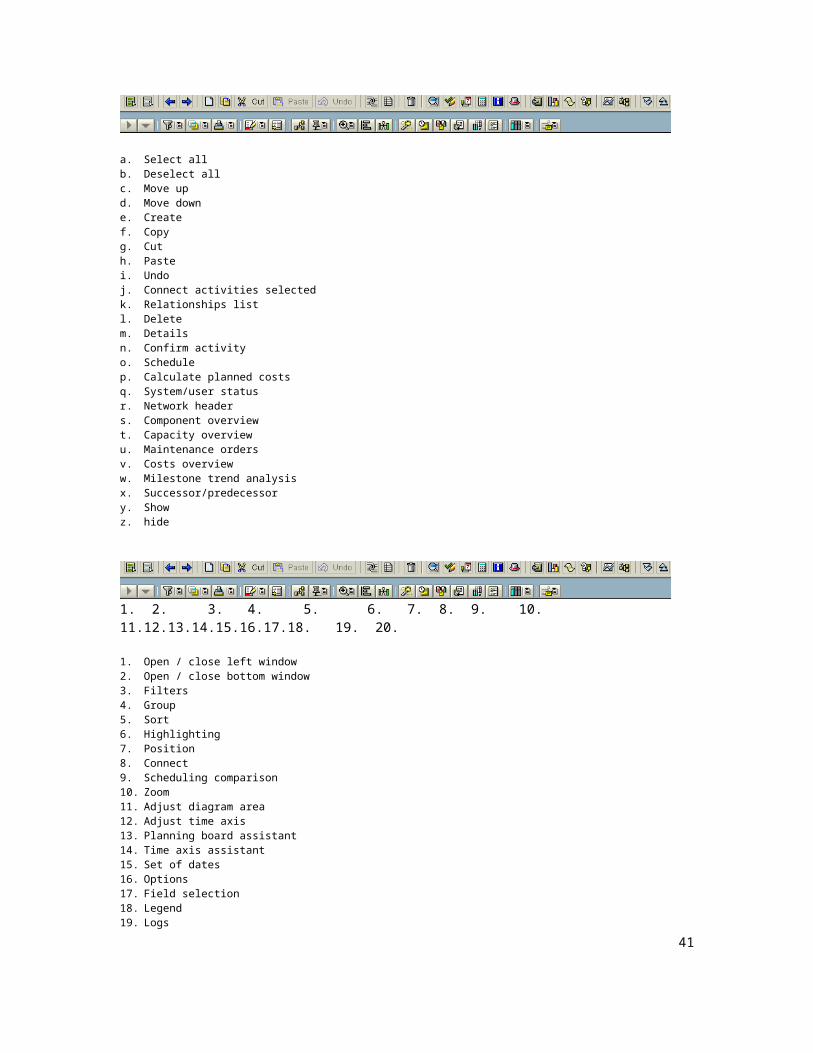
There are various activities can be perform through planning board. Icons on the planning board are as follows:
a. b. c. d. e. f. g. h. i. j. k. l. m. n. o. p. q. r. s. t. u. v. w. x. y. z.
a. Select allb. Deselect allc. Move up
39
d. Move downe. Createf. Copyg. Cuth. Pastei. Undoj. Connect activities selectedk. Relationships listl. Deletem. Detailsn. Confirm activityo. Schedulep. Calculate planned costsq. System/user statusr. Network headers. Component overviewt. Capacity overviewu. Maintenance ordersv. Costs overvieww. Milestone trend analysisx. Successor/predecessory. Showz. hide
1. 2. 3. 4. 5. 6. 7. 8. 9. 10. 11.12.13.14.15.16.17.18. 19. 20.
1. Open / close left window2. Open / close bottom window3. Filters4. Group5. Sort6. Highlighting7. Position8. Connect9. Scheduling comparison10. Zoom11. Adjust diagram area12. Adjust time axis13. Planning board assistant14. Time axis assistant15. Set of dates16. Options17. Field selection18. Legend19. Logs20. User settings.
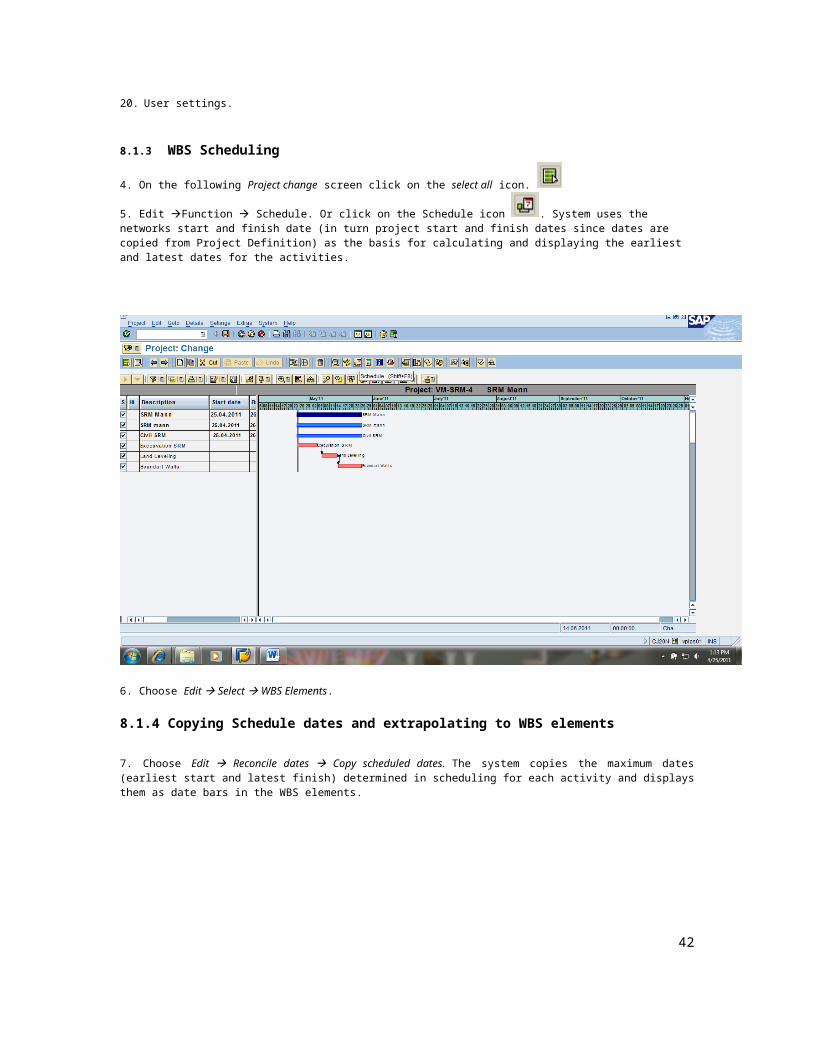
8.1.3 WBS Scheduling
4. On the following Project change screen click on the select all icon.
5. Edit Function Schedule. Or click on the Schedule icon . System uses the networks start and finish date (in turn project start and finish dates since dates are copied from Project Definition) as the basis for calculating and displaying the earliest and latest dates for the activities.
40
6. Choose Edit Select WBS Elements.
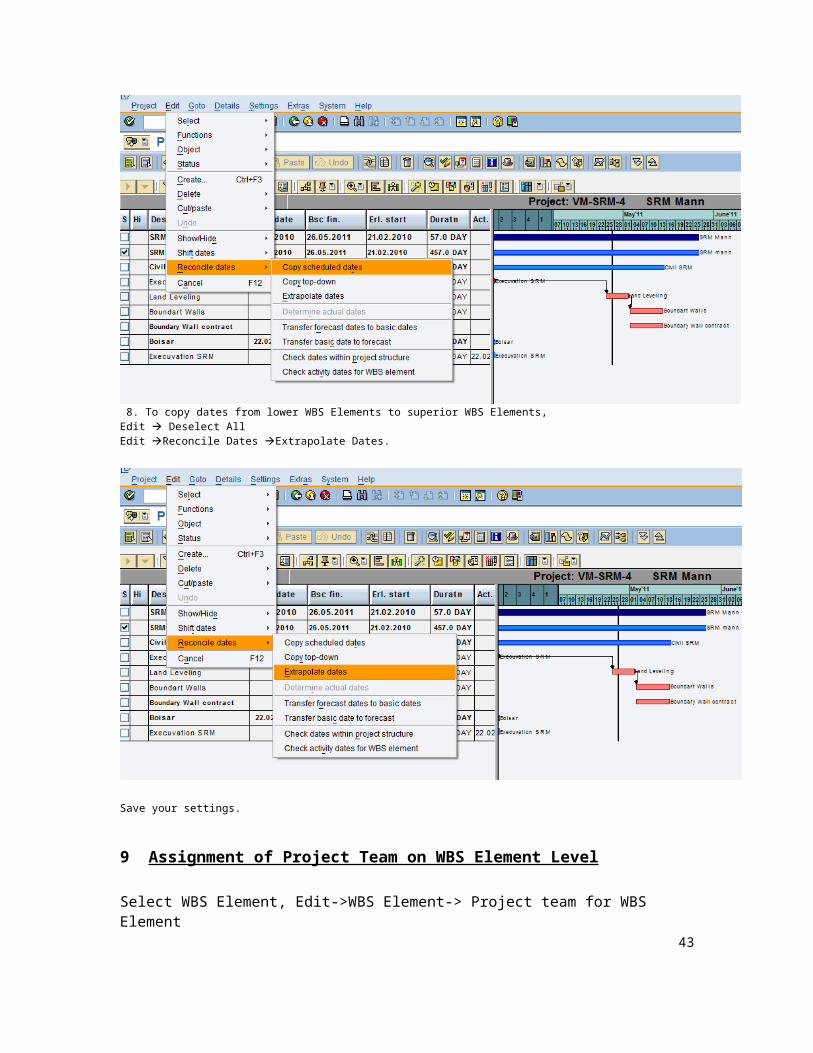
8.1.4 Copying Schedule dates and extrapolating to WBS elements
7. Choose Edit Reconcile dates Copy scheduled dates. The system copies the maximum dates (earliest start and latest finish) determined in scheduling for each activity and displays them as date bars in the WBS elements.
8. To copy dates from lower WBS Elements to superior WBS Elements,Edit Deselect AllEdit Reconcile Dates Extrapolate Dates.
41
Save your settings.
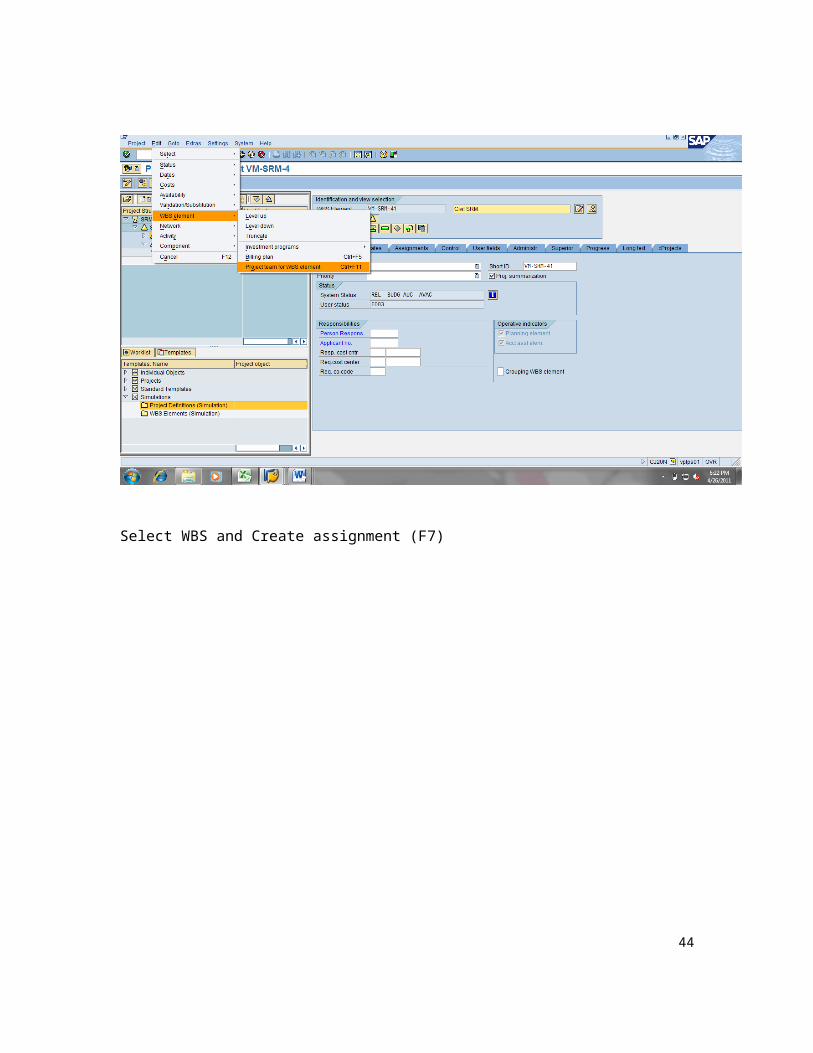
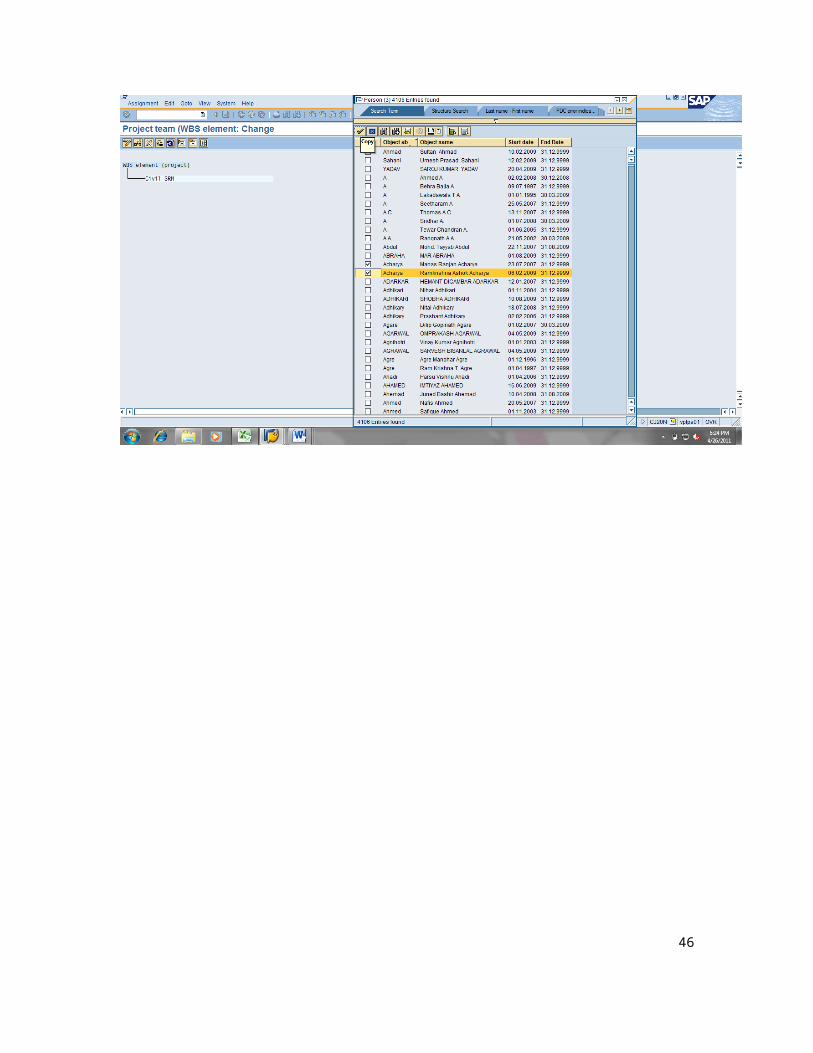
9 Assignment of Project Team on WBS Element Level
Select WBS Element, Edit->WBS Element-> Project team for WBS Element
42
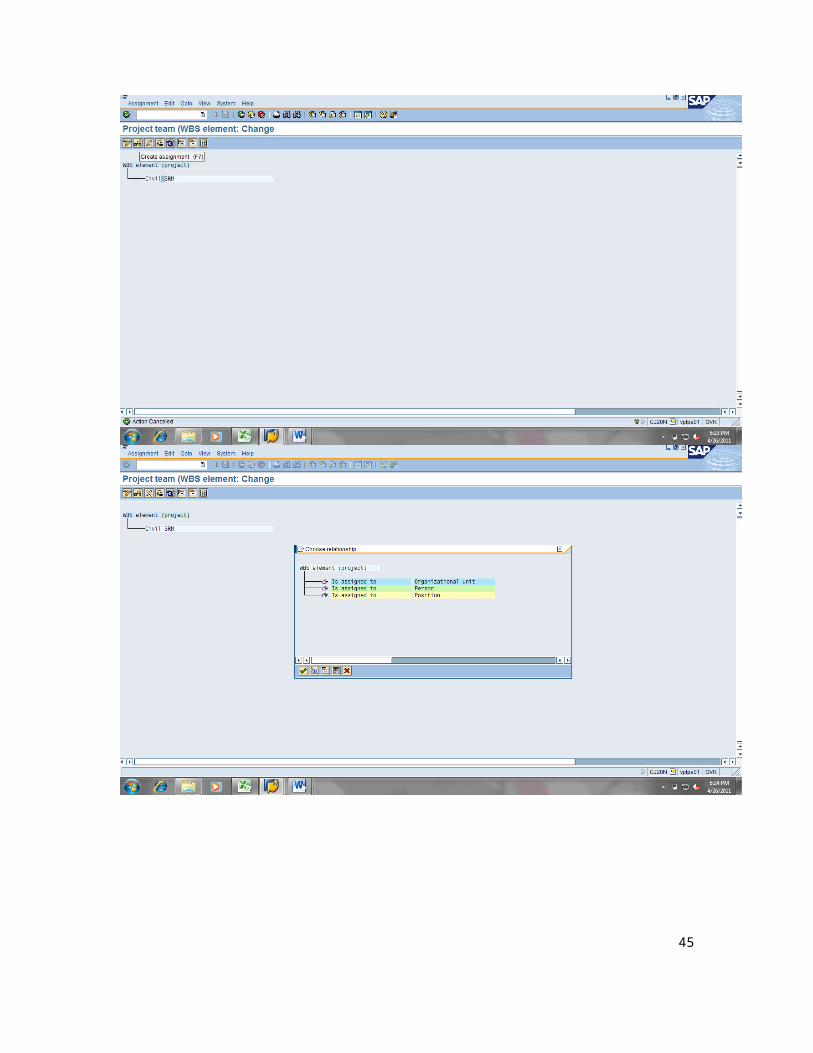
Select WBS and Create assignment (F7)
43
44
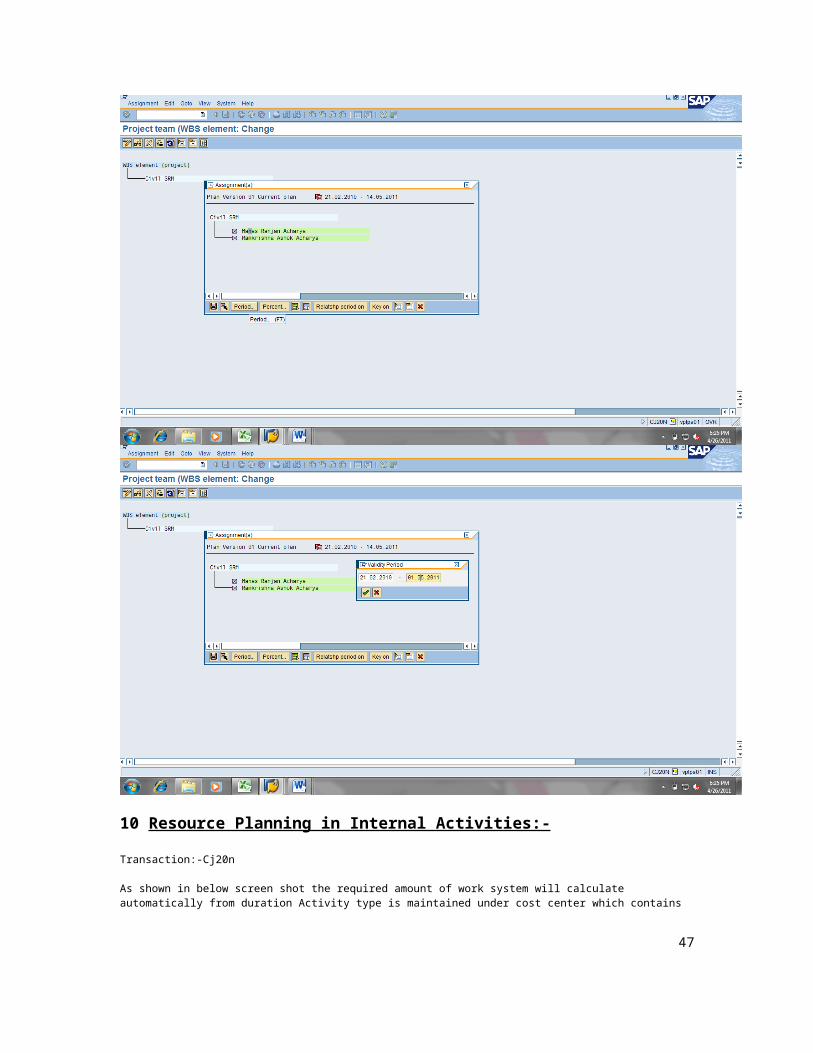
10 Resource Planning in Internal Activities:-
Transaction:-Cj20n
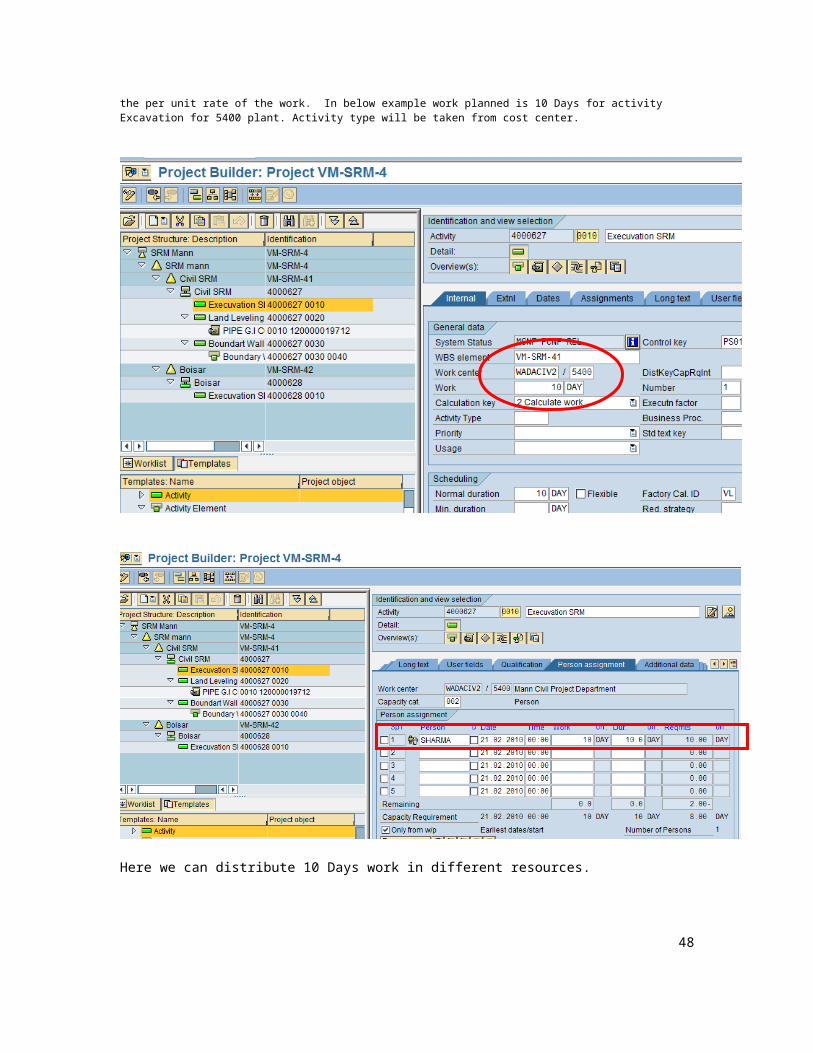
As shown in below screen shot the required amount of work system will calculate automatically from duration Activity type is maintained under cost center which contains the per unit rate of the work. In below example work planned is 10 Days for activity Excavation for 5400 plant. Activity type will be taken from cost center.
45
Here we can distribute 10 Days work in different resources.
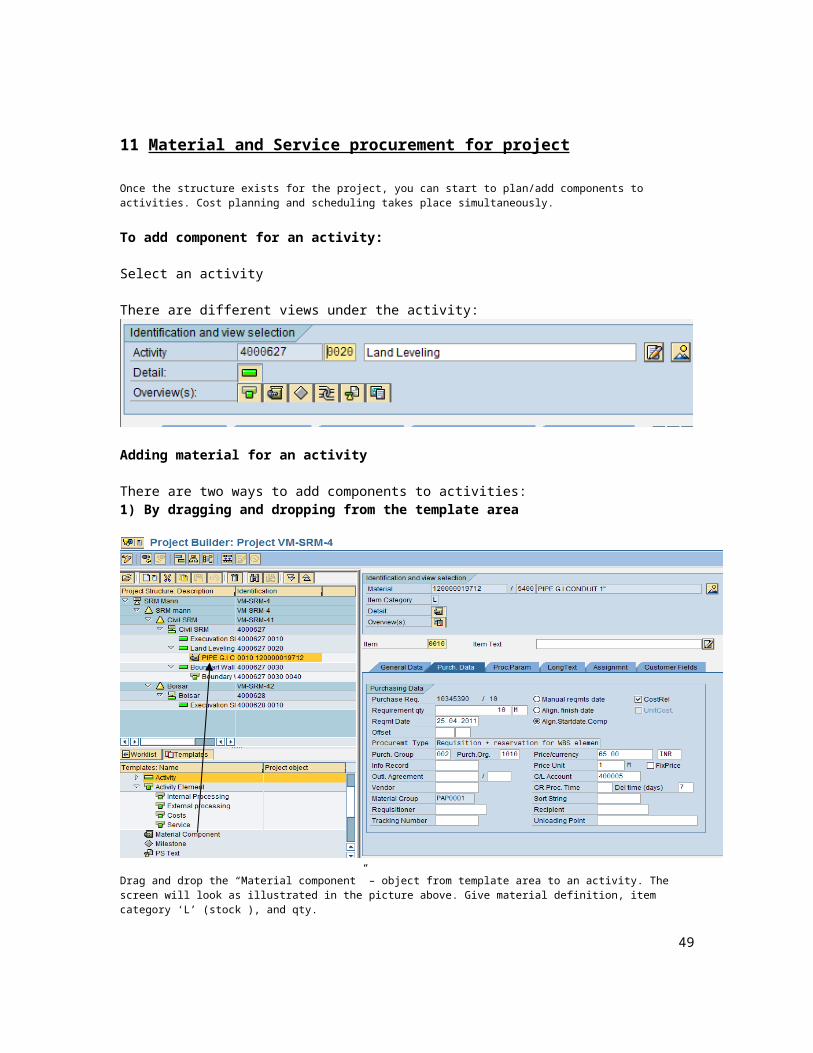
11 Material and Service procurement for project
Once the structure exists for the project, you can start to plan/add components to activities. Cost planning and scheduling takes place simultaneously.
46
To add component for an activity:
Select an activity
There are different views under the activity:
Adding material for an activity
There are two ways to add components to activities:1) By dragging and dropping from the template area
Drag and drop the “Material component” – object from template area to an activity. The screen will look as illustrated in the picture above. Give material definition, item category ‘L’ (stock ), and qty.
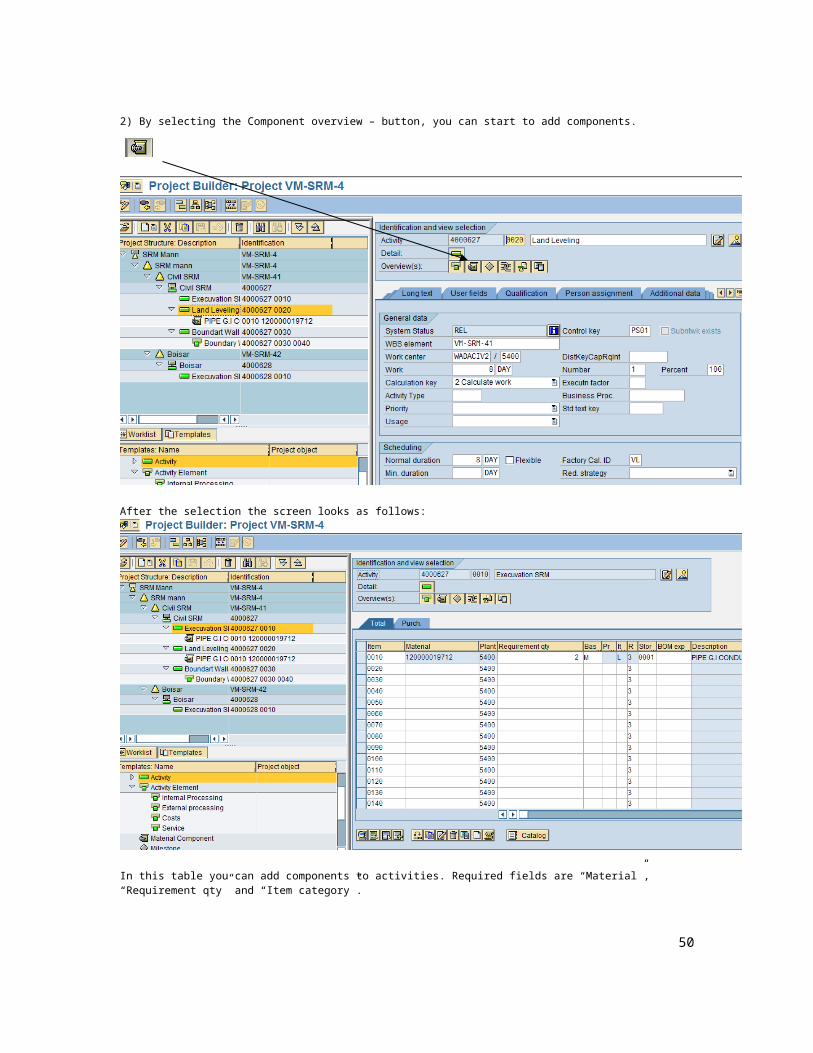
2) By selecting the Component overview – button, you can start to add components.
47
After the selection the screen looks as follows:
In this table you can add components to activities. Required fields are “Material”, “Requirement qty” and “Item category”.
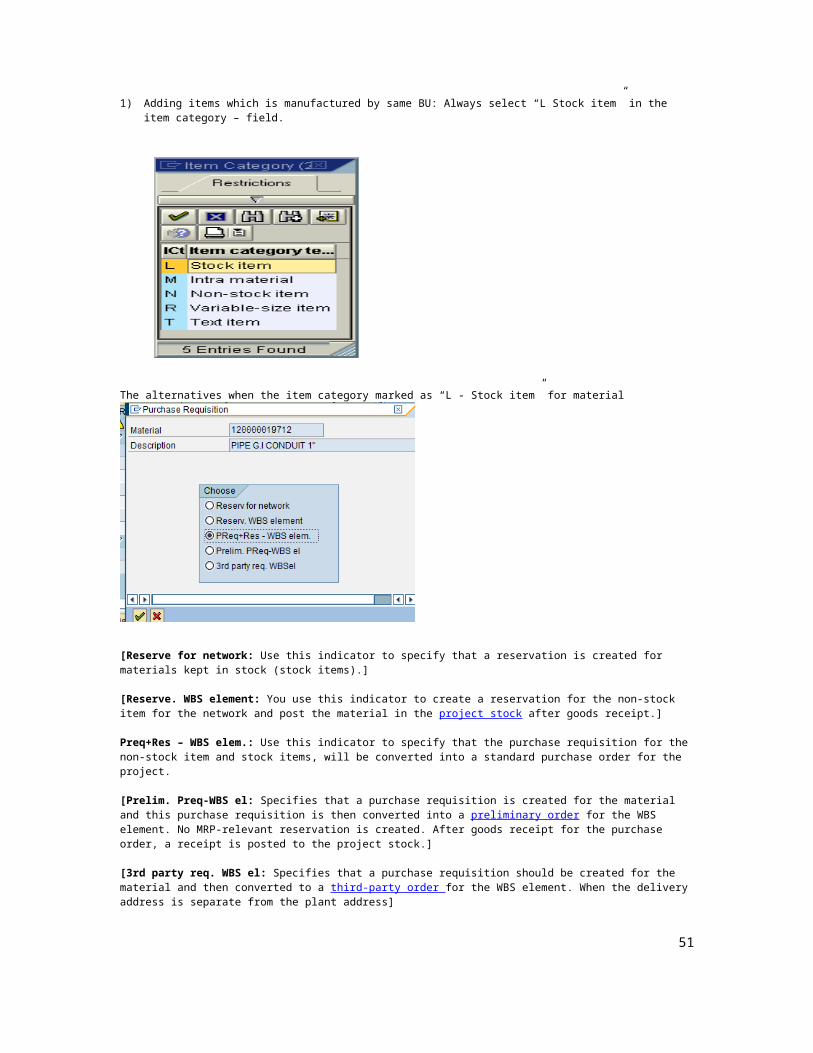
1) Adding items which is manufactured by same BU: Always select “L Stock item” in the item category – field.
48
The alternatives when the item category marked as “L - Stock item” for material
[Reserve for network: Use this indicator to specify that a reservation is created for materials kept in stock (stock items).]
[Reserve. WBS element: You use this indicator to create a reservation for the non-stock item for the network and post the material in the project stock after goods receipt.]
Preq+Res – WBS elem.: Use this indicator to specify that the purchase requisition for the non-stock item and stock items, will be converted into a standard purchase order for the project.
[Prelim. Preq-WBS el: Specifies that a purchase requisition is created for the material and this purchase requisition is then converted into a preliminary order for the WBS element. No MRP-relevant reservation is created. After goods receipt for the purchase order, a receipt is posted to the project stock.]
[3rd party req. WBS el: Specifies that a purchase requisition should be created for the material and then converted to a third-party order for the WBS element. When the delivery address is separate from the plant address]
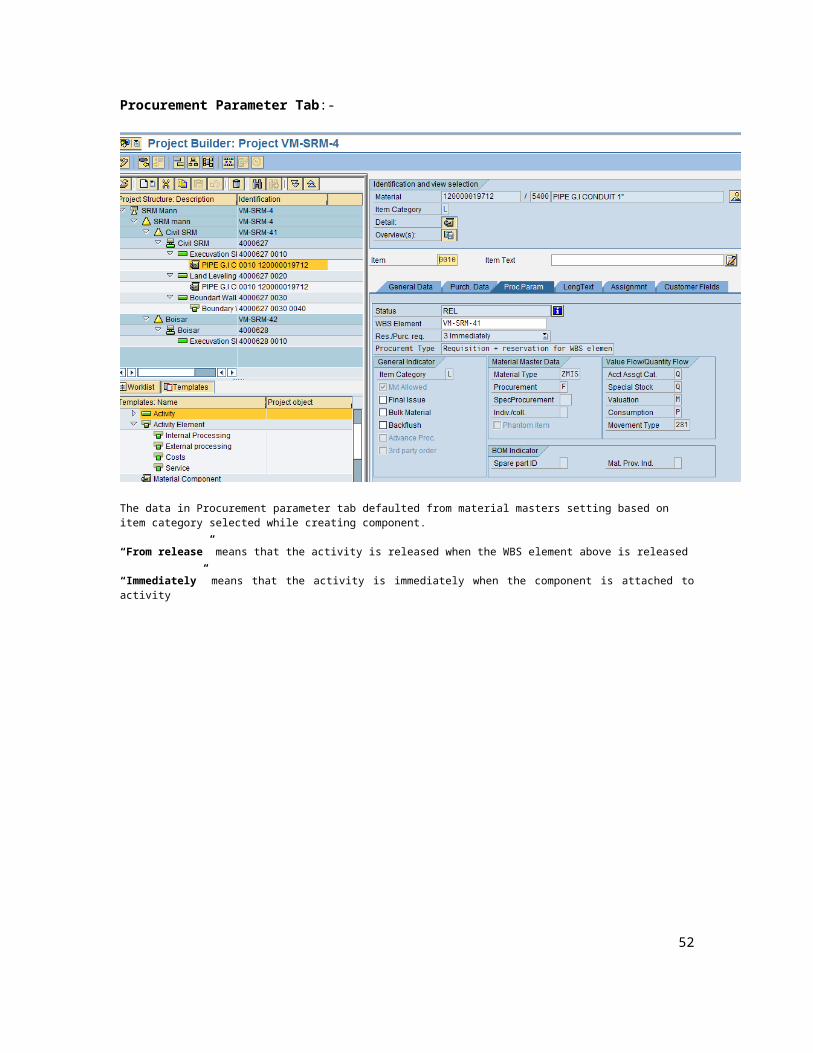
Procurement Parameter Tab:-
49
The data in Procurement parameter tab defaulted from material masters setting based on item category selected while creating component.
“From release” means that the activity is released when the WBS element above is released
“Immediately” means that the activity is immediately when the component is attached to activity
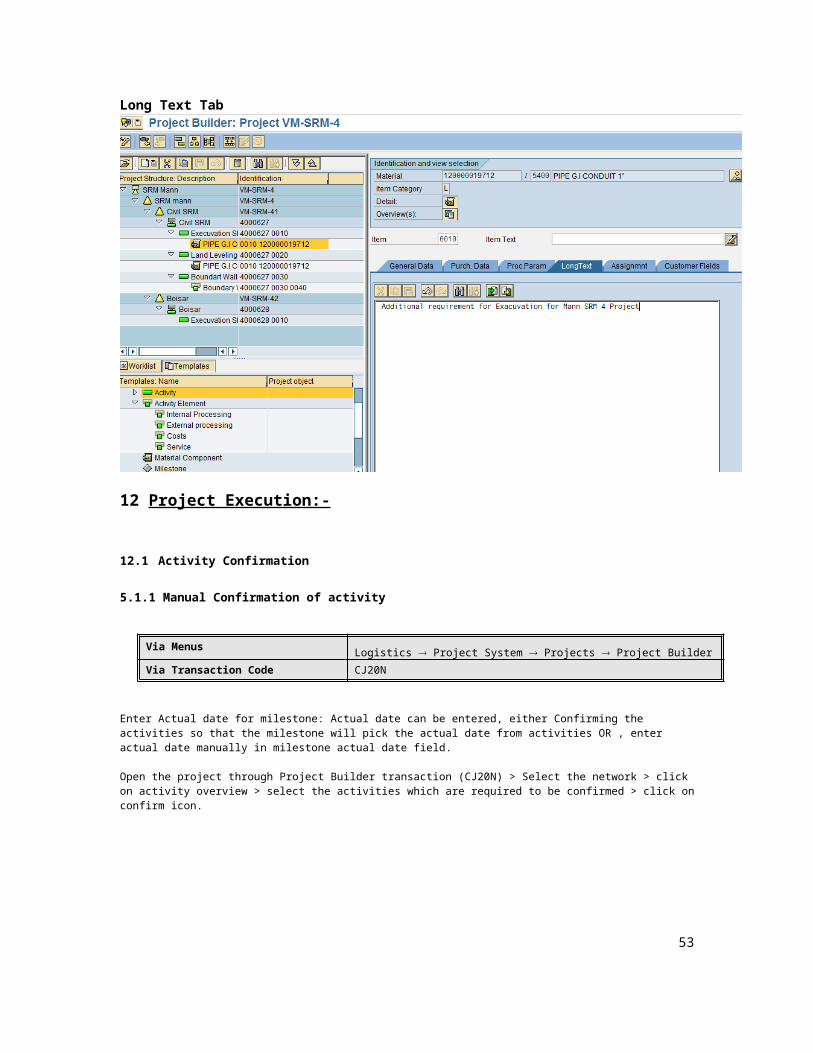
Long Text Tab
12 Project Execution:-
12.1 Activity Confirmation
5.1.1 Manual Confirmation of activity
Via MenusLogistics Project System Projects Project Builder
Via Transaction Code CJ20N
Enter Actual date for milestone: Actual date can be entered, either Confirming the activities so that the milestone will pick the actual date from activities OR , enter actual date manually in milestone actual date field.
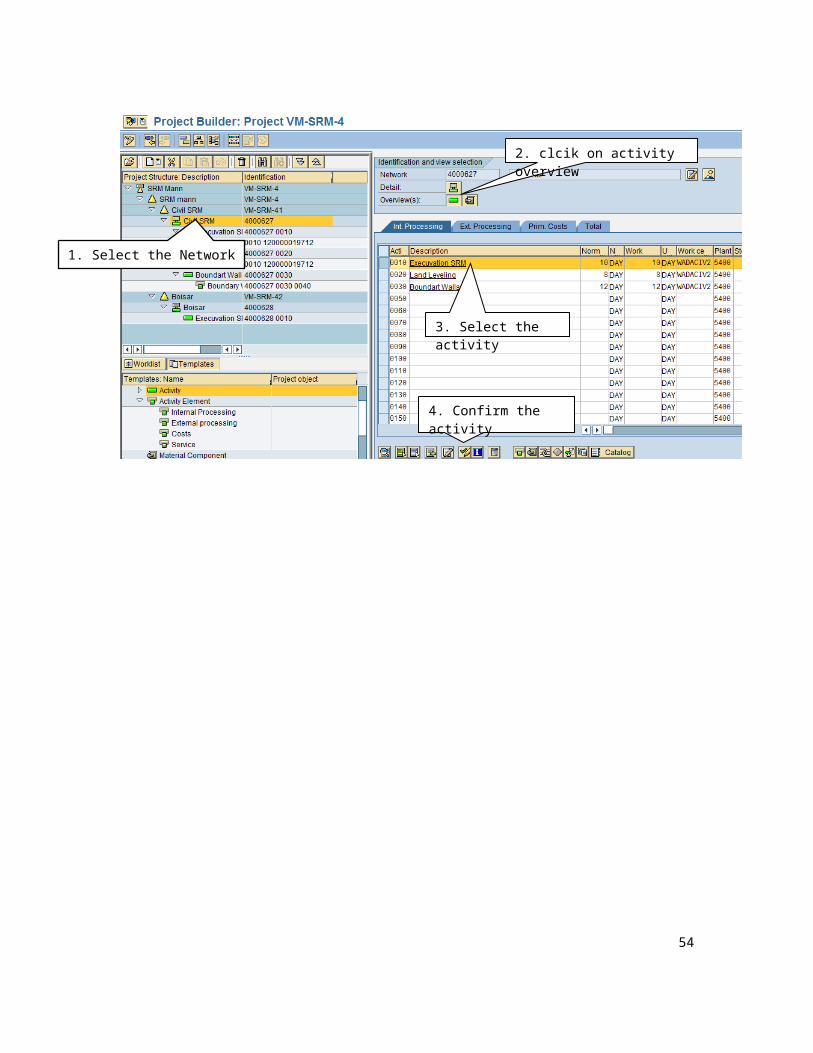
Open the project through Project Builder transaction (CJ20N) > Select the network > click on activity overview > select the activities which are required to be confirmed > click on confirm icon.
50
51
1. Select the Network
2. clcik on activity overview
3. Select the activity
4. Confirm the activity
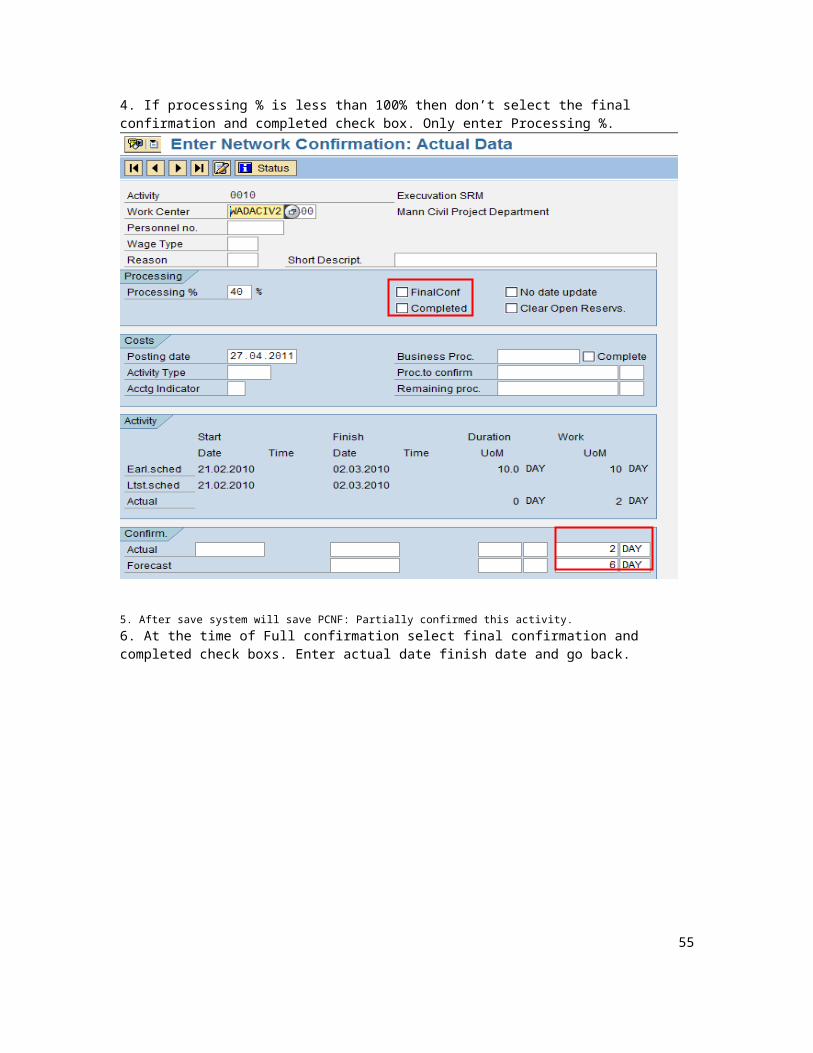
4. If processing % is less than 100% then don’t select the final confirmation and completed check box. Only enter Processing %.
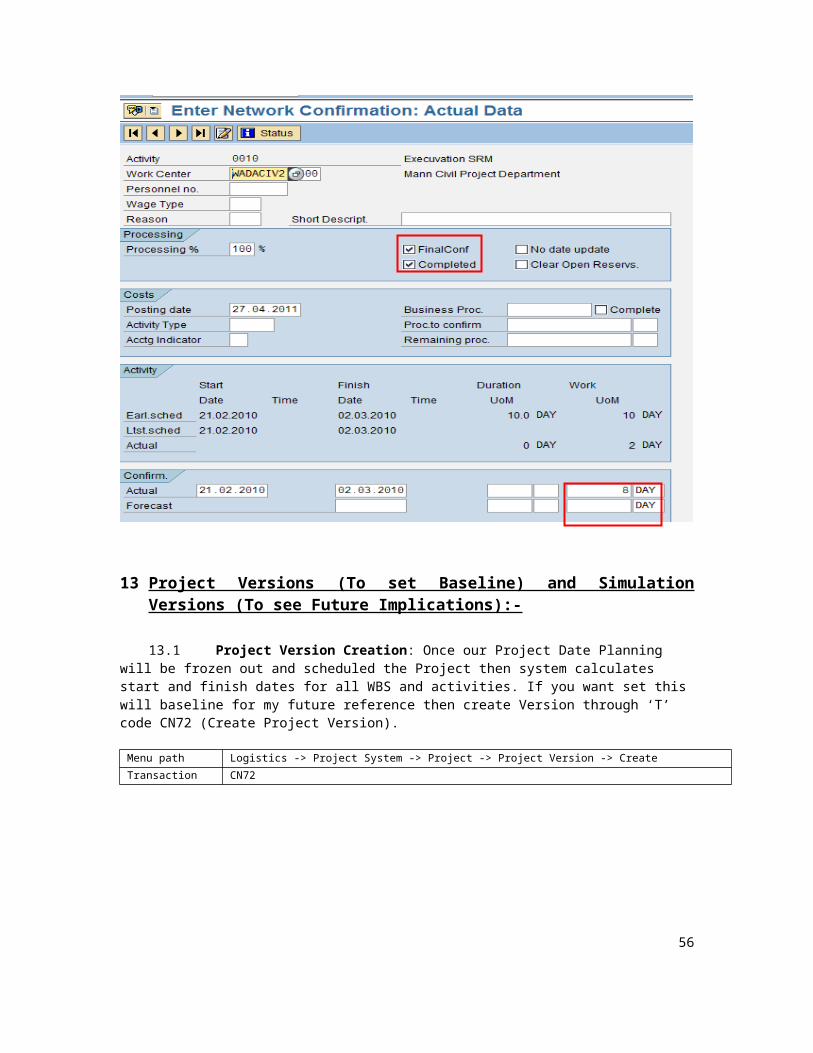
5. After save system will save PCNF: Partially confirmed this activity. 6. At the time of Full confirmation select final confirmation and completed check boxs. Enter actual date finish date and go back.
52
13 Project Versions (To set Baseline) and Simulation Versions (To see Future Implications):-
13.1 Project Version Creation: Once our Project Date Planning will be frozen out and scheduled the Project then system calculates start and finish dates for all WBS and activities. If you want set this will baseline for my future reference then create Version through ‘T’ code CN72 (Create Project Version).
Menu path Logistics -> Project System -> Project -> Project Version -> Create
Transaction CN72
53
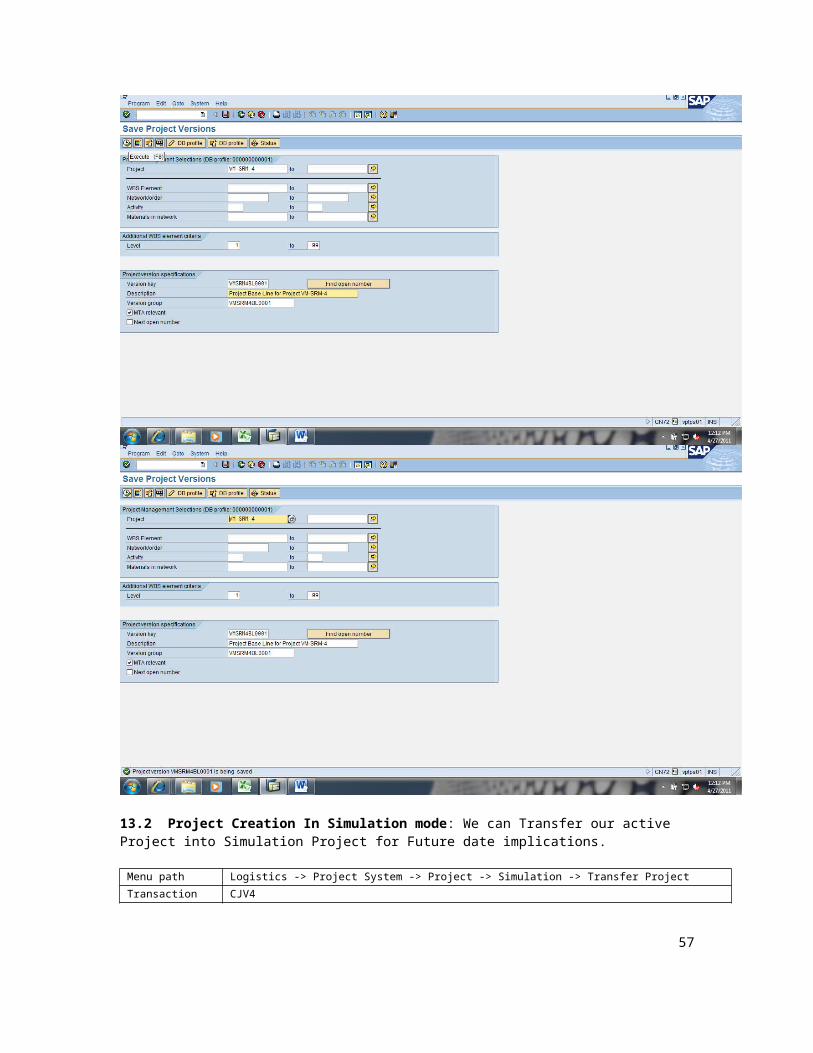
13.2 Project Creation In Simulation mode: We can Transfer our active Project into Simulation Project for Future date implications.
Menu path Logistics -> Project System -> Project -> Simulation -> Transfer Project
Transaction CJV4
54
55
14 Project Material Consumption and Stock transfer from One Project to other Project or Storage Location:
14.1 Project Material Consumption:-
The Purchase Department will convert your Project Material Purchase requisition into Purchase Order. Then that material received in Project Stock for consumption.
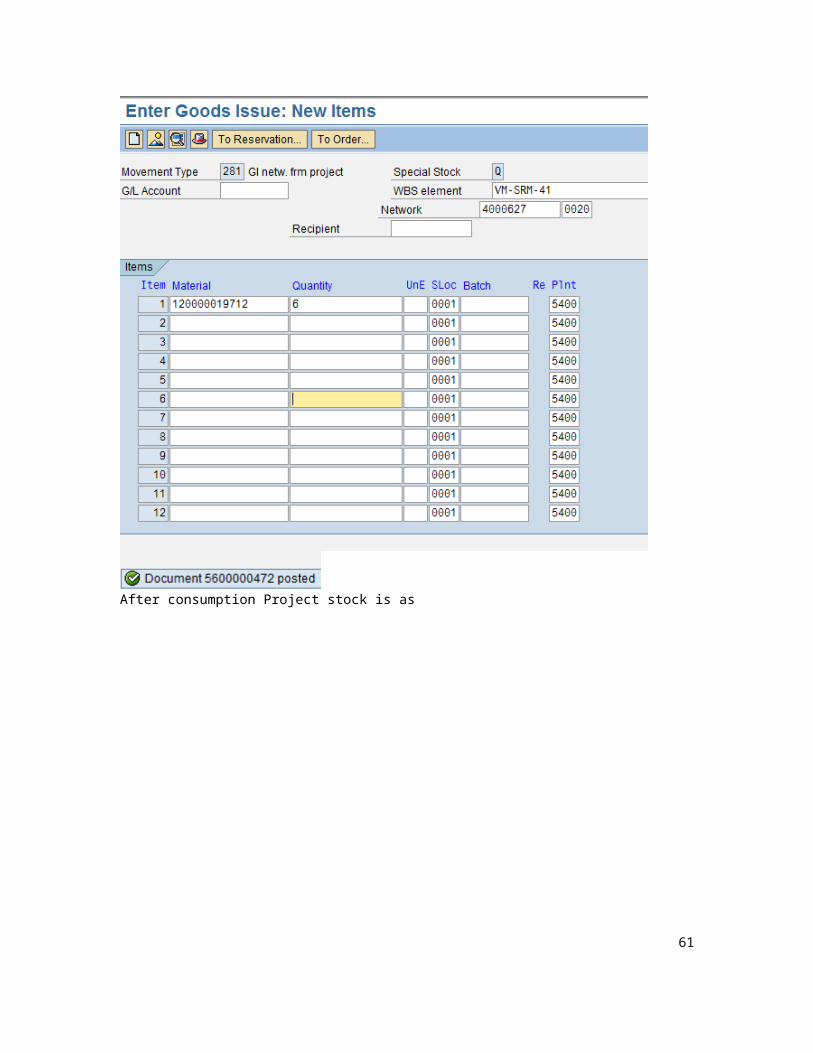
Menu path Logistics Logistics Execution Outbound Process Goods Issue for Other Transactions Enter Goods Issue (Mvt type is 281)
Transaction MB1A
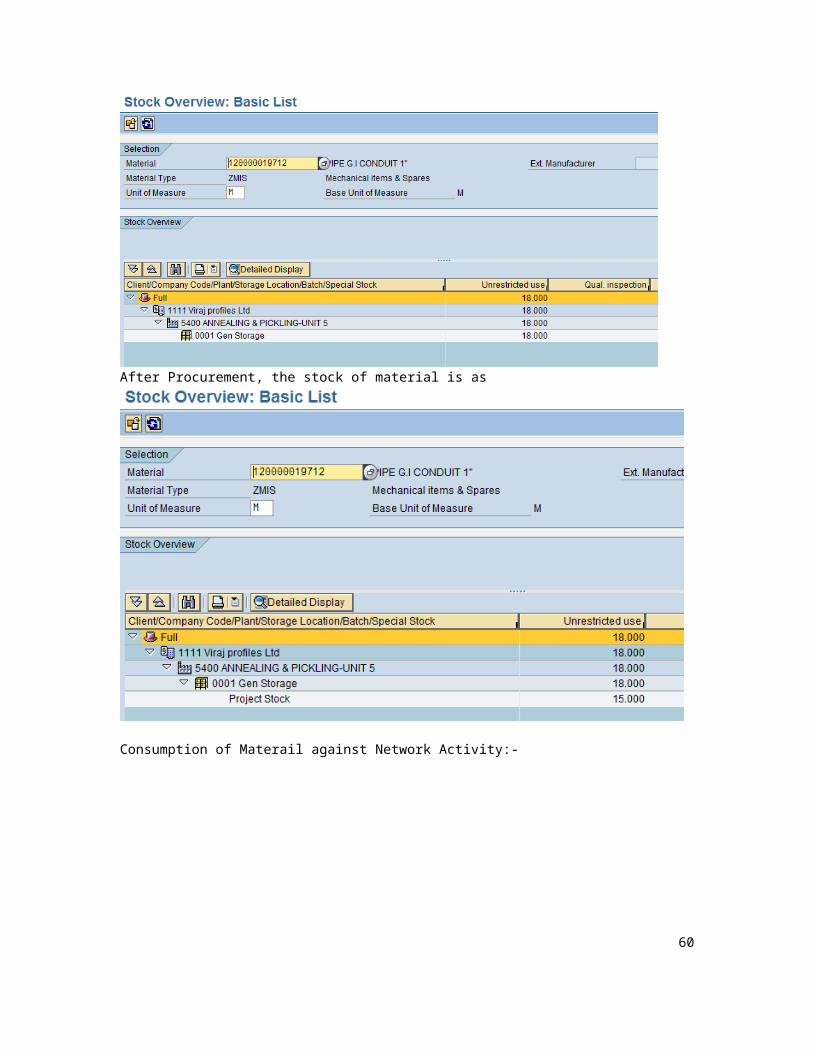
Before Procurement, the stock of material is as
After Procurement, the stock of material is as
56
Consumption of Materail against Network Activity:-
57

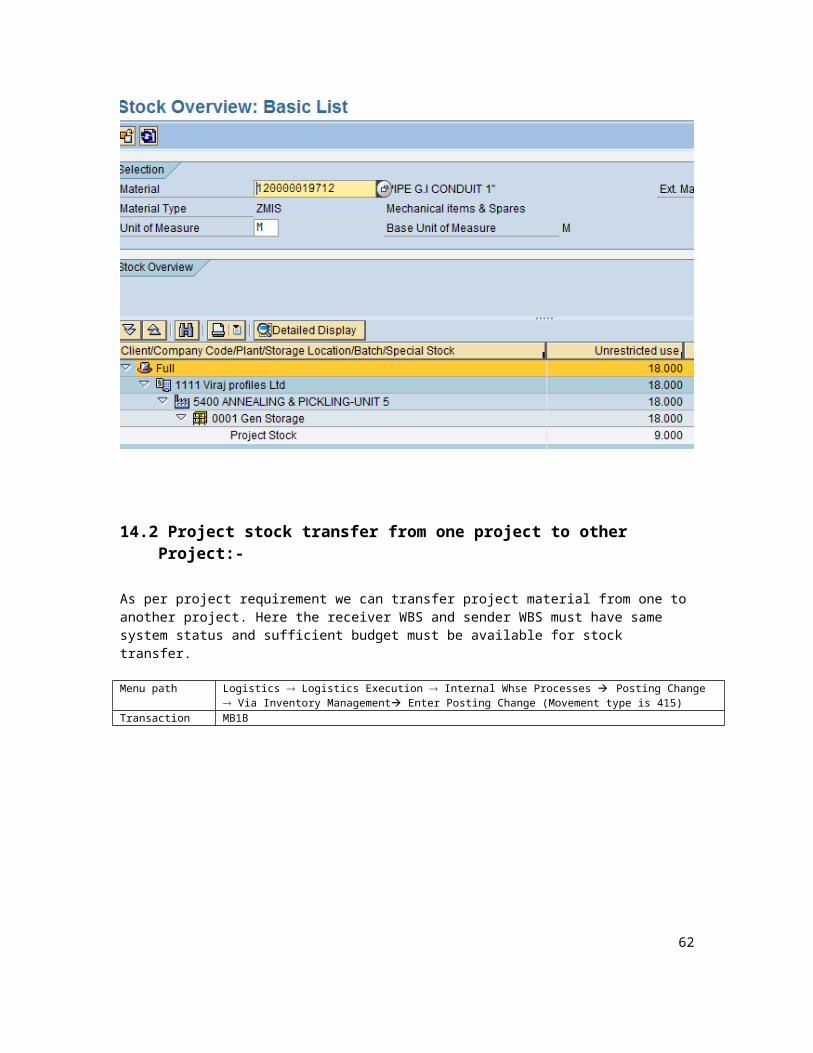
After consumption Project stock is as
58

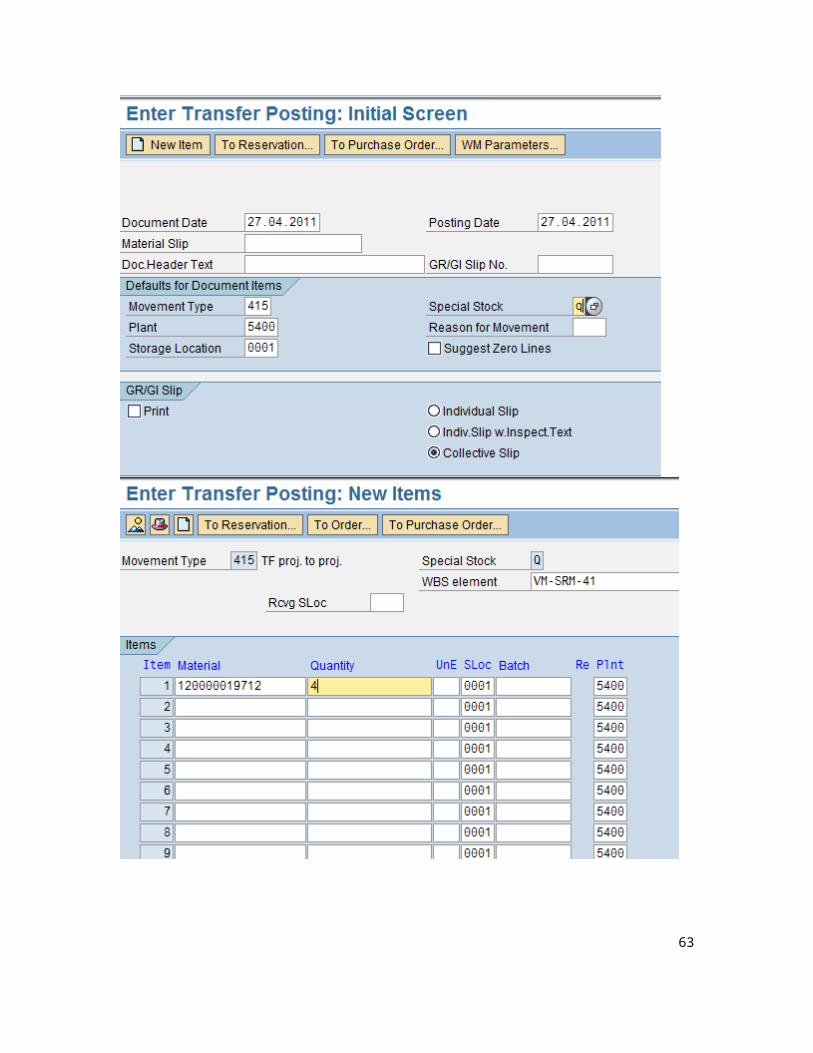
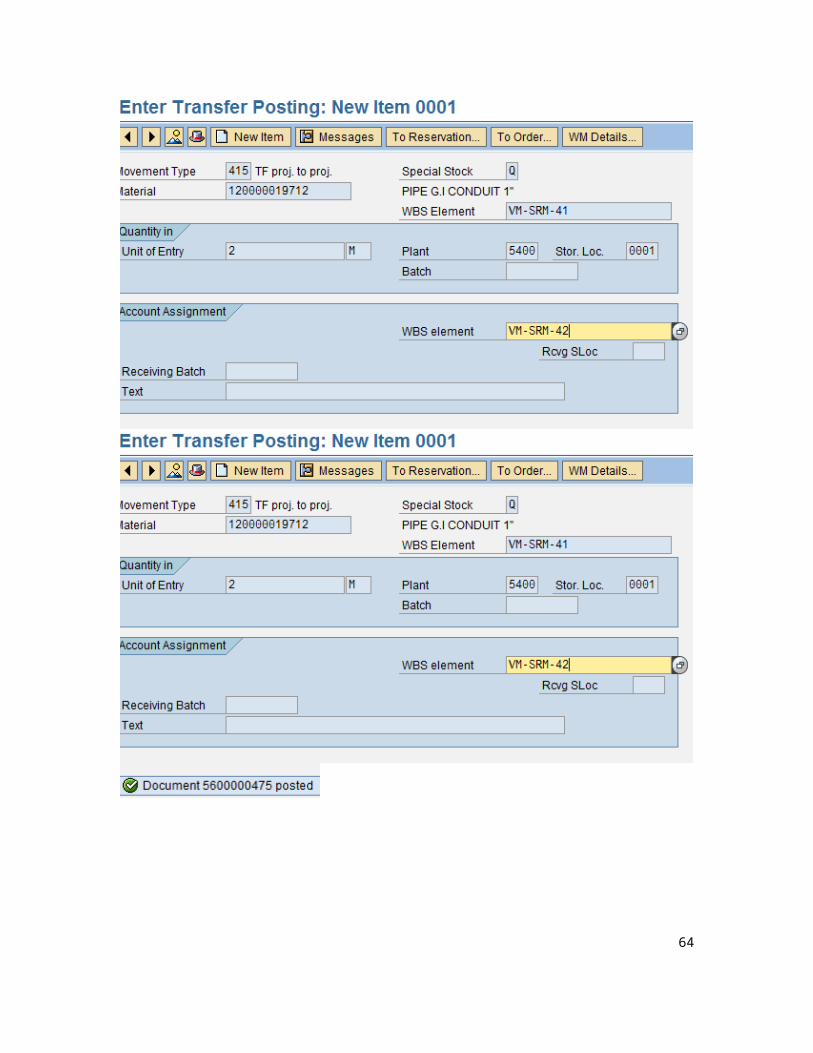
14.2 Project stock transfer from one project to other Project:-
As per project requirement we can transfer project material from one to another project. Here the receiver WBS and sender WBS must have same system status and sufficient budget must be available for stock transfer.
Menu path Logistics Logistics Execution Internal Whse Processes Posting Change Via Inventory Management Enter Posting Change (Movement type is 415)
Transaction MB1B
59
60
61
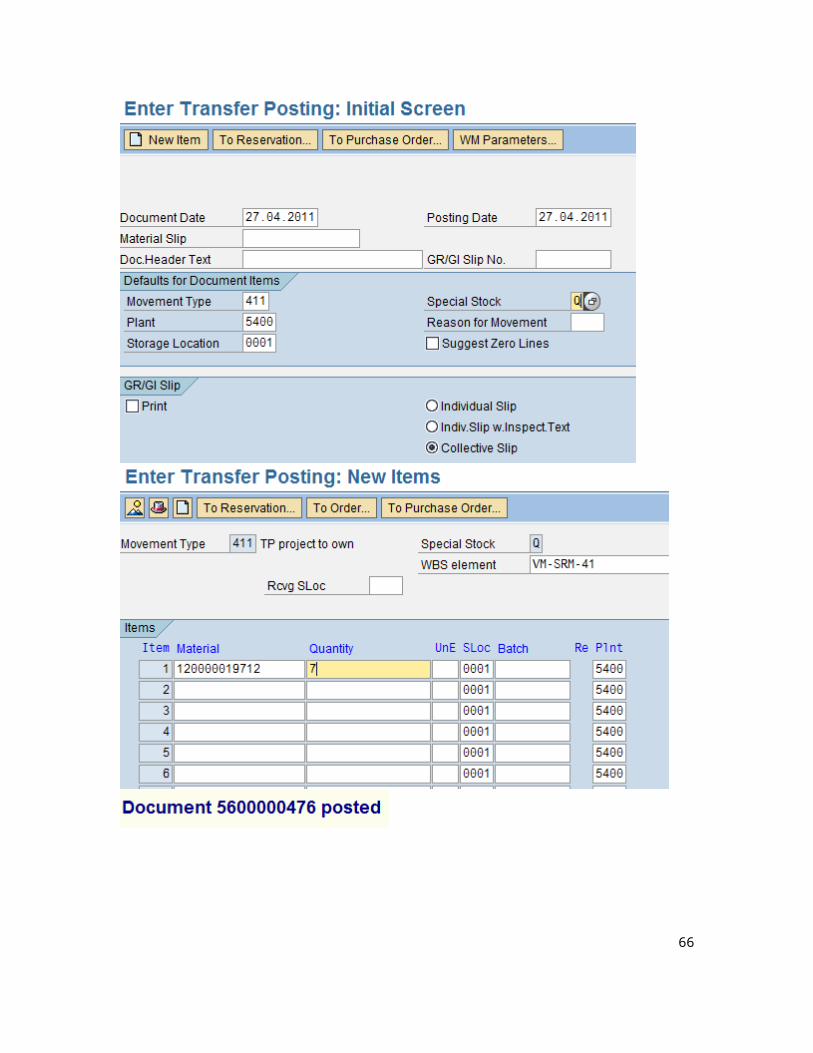
14.3 Project stock transfer from Project stock to storage Location:-
At the time of Project closer all project stock should consumed or transferred to another project or we can transfer this project stock into storage location stock.
Menu path Logistics Logistics Execution Internal Whse Processes Posting Change Via Inventory Management Enter Posting Change (Movement Type :411)
Transaction MB1B
62
63
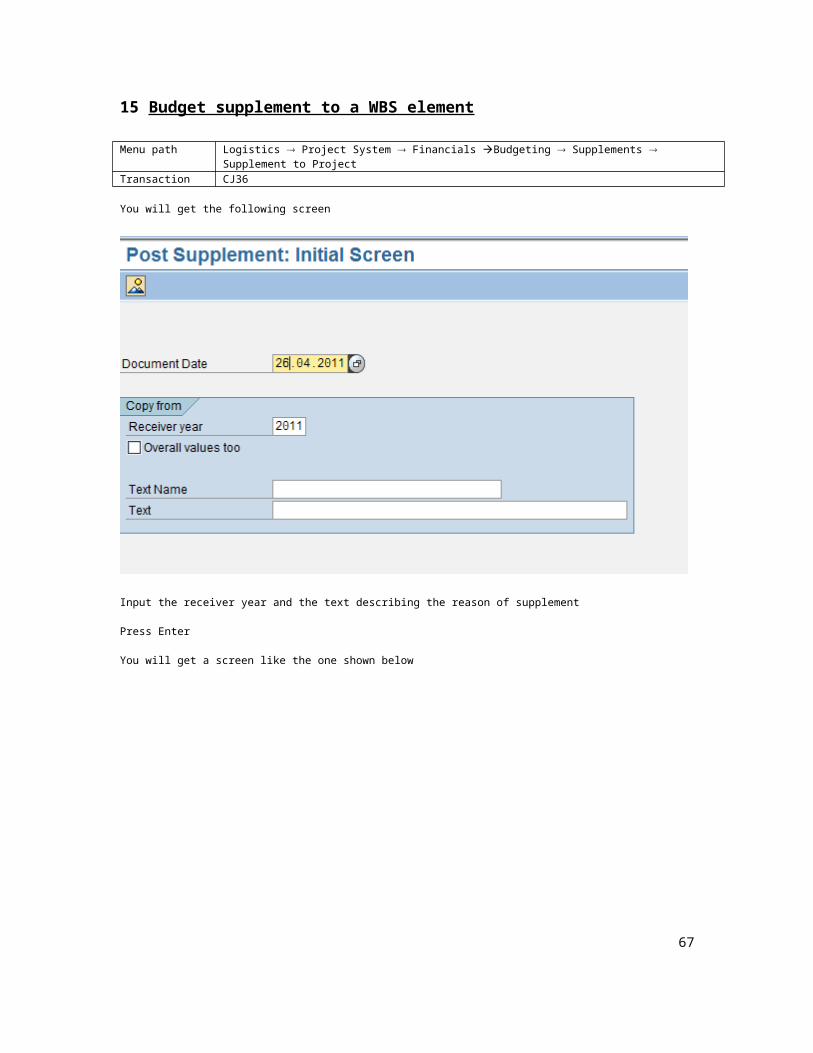
15 Budget supplement to a WBS element
Menu path Logistics Project System Financials Budgeting Supplements Supplement to ProjectTransaction CJ36
You will get the following screen
Input the receiver year and the text describing the reason of supplement
Press Enter
You will get a screen like the one shown below
64

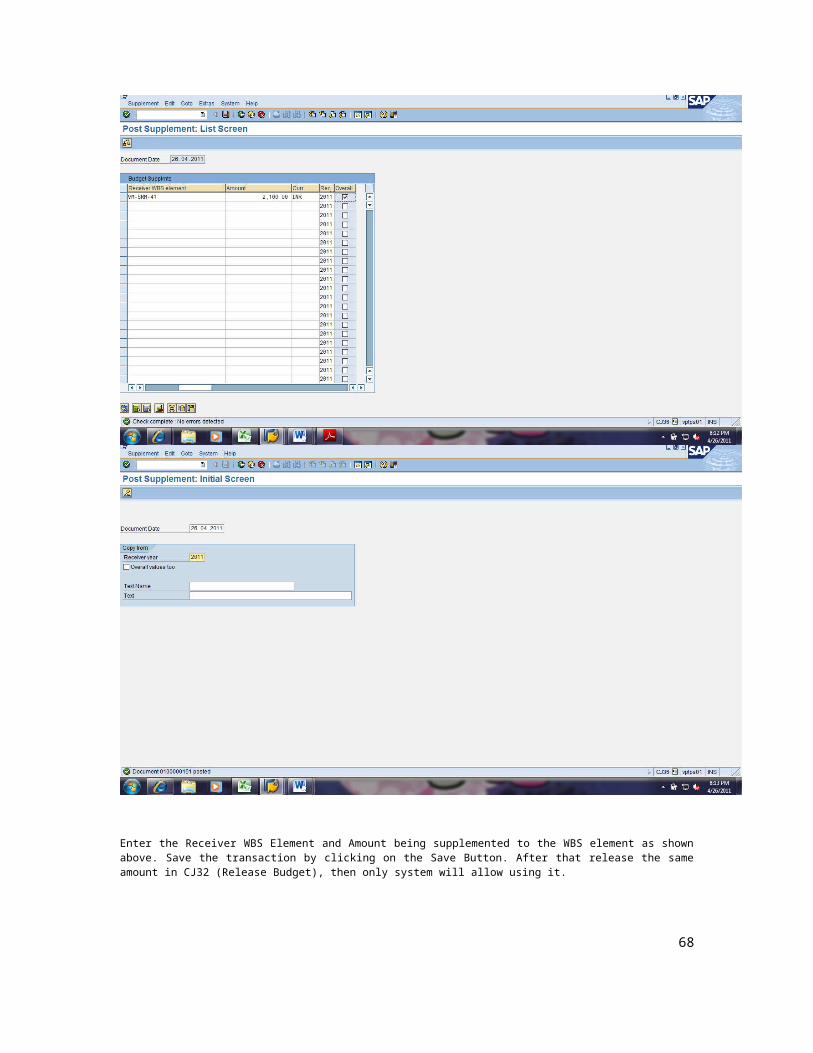
Enter the Receiver WBS Element and Amount being supplemented to the WBS element as shown above. Save the transaction by clicking on the Save Button. After that release the same amount in CJ32 (Release Budget), then only system will allow using it.
65
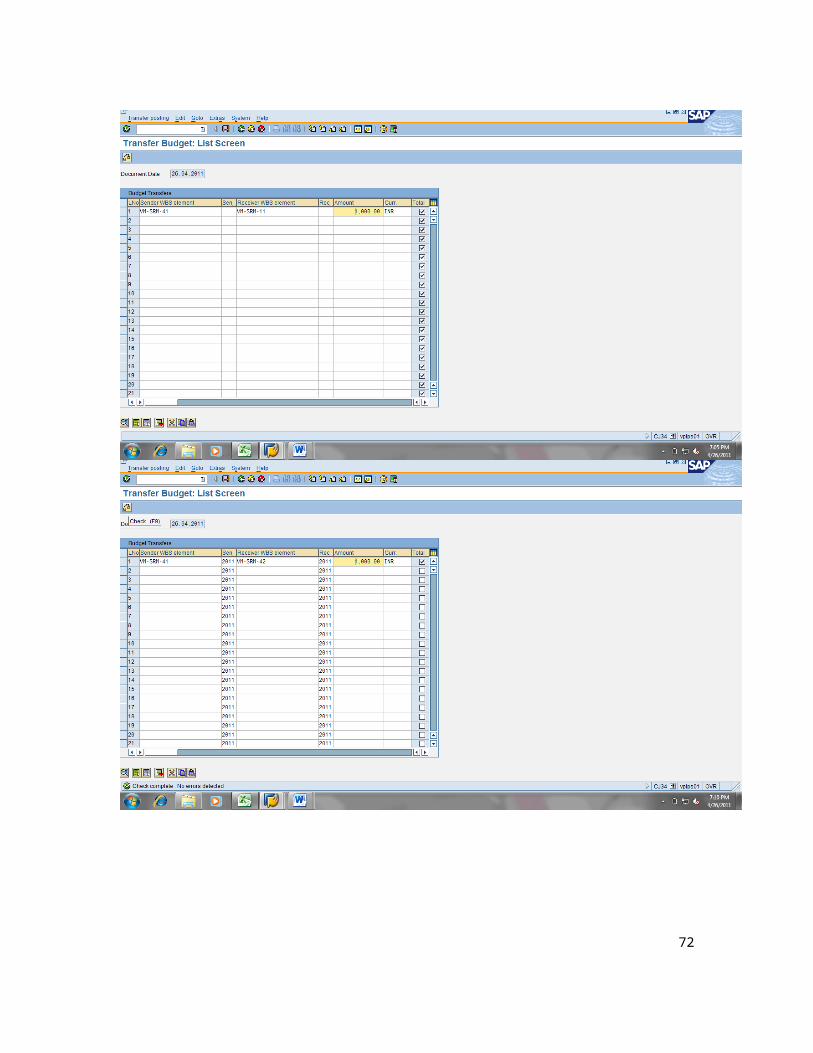
16 Budget return
Menu path Logistics Project System FinancialsBudgeting Return from Project Transaction CJ35
Following screen appears,
66
67
17 Budget Transfer
Menu path Logistics --> Project system-->Financials --> Budgeting --> Transfer
Transaction code CJ34
Input sender/receiver years, the text and Press Enter
68
69

Enter the Sender WBS Element, Receiving WBS Element and Amount being transferred between the WBS elements as shown above. Save the transaction by clicking on the Save Button.
Budget Line Item Report
Menu path Logistics --> Project system--> Information system --> Financials --> Line Items --> Budget
Transaction code CJI8
The initial screen follows as below,
70

Budget Type – KBUD – Original BudgetBudget Type – KBNO – SupplementBudget Type – KBRO – ReturnBudget Type – KBUS – Transfer
You can view the changes made in the report S_Alr_87013560Enter the Project Definition and execute
71
The report shall be displayed as follows
18 Project Closure:-
Prerequisites for project closures are as1. All Budget amount should be either consumed against WBS or transfer to another project
or returned to controlling area.2. All expenditures must be settled to AUC or Fix asset or Cost center.3. All Project stock against that WBS should be nil
72
4. All activities or child components belong to this WBS must be zero.
Access Project Builder through:
Via ECC Menu Logistics or Accounting > Project System > Project > Project Builder
Via Transaction Code CJ20N
73