User Manual & Setup Guide v1 -...
44
User Manual & Setup Guide v1.0
Transcript of User Manual & Setup Guide v1 -...

UserManual&SetupGuidev1.0

P a g e |1 KOPIS2
Contents
Overview...........................................................................................................................................1Features
Specifications
WarrantyandReturnPolicy
SpareParts........................................................................................................................................4InstallBetaflight.............................................................................................................................5InstalltheReceiver.......................................................................................................................8BindtheReceiver...........................................................................................................................9VerifyChannelMapping...........................................................................................................12VerifyChannelDirections.......................................................................................................13AdjustChannelCenters............................................................................................................16AdjustChannelEndpoints.......................................................................................................20SetUpArmingSwitch...............................................................................................................24MounttheAntenna(s)...............................................................................................................28CustomizeTheOSD....................................................................................................................29InstalltheProps..........................................................................................................................31AtlatlFunctions...........................................................................................................................34Channel-Change
Pit-Mode
SavingYourConfiguration......................................................................................................35Pre-FlightCheck..........................................................................................................................36BestPracticesForFPV..............................................................................................................37QuadcopterSafety......................................................................................................................38AdjustPIDs/Rates/vTXfromTaranis...........................................................................41

P a g e |2 KOPIS2

P a g e |1 KOPIS2
OverviewKOPISisahigh-performanceready-to-flyFPVracingdronefromHolybro,Low-deckdesignmeanscentralizedmassandexcellenthandling.Stretched-Xmotorlayoutisthechoiceoftopracersbecausetherearpropsarefurtherfromthe"dirtyair"comingfromthefrontprops.Theresultissmoothercorneringandhighertopspeed.TheFPVantennaisinauniquelocationbehindthequad,toprotectagainstdamage.KakuteF7flightcontrollerandAtlatlHVV2videotransmittergiveperfectlyintegratedcontrolofallquadcoptersystems.TMOTORF40Pro-II2400kvmotorsgiveawesomepowerandspeed,justliketopracers.RunCamSwiftMicrocameraislightandsmall,withgreatimagequality.KOPISgivesalltheperformance,looks,anddurabilityofahand-builtmachine,withouteverhavingtopickupasolderingiron!
Features• 5mmfull3kcarbonfibertwill• Counter-sunkscrewsonbaseforgreatappearanceandprotectionofbatteryagainstdamage.• KakuteF7flightcontrollerwithsoft-mountedgyroformechanicalfilteringofvibration.Means
youcandisablemoresoftwarefiltersforbestflighthandling.• Improvedsoft-mountingfoamforKakuteF7givesoptimalbalanceofstiffnessanddampingfor
evenbettergyroperformancethanbefore!• BetaflightOSDincluded.MonitorvoltageandbatterycapacityinyourFPVgoggles.ChangePIDs
andRatesusingyourtransmittersticks.• AtlatlHVV2videotransmitter:
o 5.8GHzo Standard40-channelset.However5645MHzand5925MHz5945MHzareillegalin
manyareas,sotheyarenotsupported.Ifyouselectoneofthesechannels,itwillsimplyfailtowork.
o OutputPower:0.5mW(pitmode),25mW,200mW,500mW,800mWo MMCXantennaconnectorforeasy,secureconnection.Won’tbreakorcomelooselike
theIPEXconnectorusedonothervTX.o ControlthevTXchannelandtransmitpowerfromtheOSDusingyourtransmittersticks
orfromyourTransmitter.NomorepickingupthequadtochangevTXsettings!• Buzzerincluded.• RunCamSwiftMicroFPVcamera• Adjustablecamerauptiltfrom0degreesto90degrees.• Serialreceiversupported(SBUS,iBUS,Spektrum).LegacyPPMandPWMreceiversnot
supported.

P a g e |2 KOPIS2
Specifications• MCU:STM32F745VGT632-bitprocessor• IMU:ICM20689(SPI)32kHzcapable• Barometer:BMP280• TFcardforBlackboxlogging• Tekko32BLHeli_324-in-1ESC(Dshot1200compatible)• Supports4S-6Sbattery(motorsareoptimizedfor4S)• Weight299gramswithoutbatteryorprops

P a g e |3 KOPIS2
WarrantyandReturnPolicyIfyoubelievethatyourKOPISisdefective,pleasecontactus.Ifwedeterminethattheboardisdefective,itwillberepairedorreplacedatnochargetoyou.WemayaskyoutosendyourKOPIStoourservicecenterforexaminationorrepair.Shippingcostsareyourresponsibility.Returneditemsshouldincludetheoriginalpackagingandallaccessories.
Ifproductisdamagedordefective,wewillrepairorreplaceit.Refundsareonlygivenwhenproductislostbytheshippingcompany.Therefundamountislimitedtothepriceoftheproduct.Shippingcostsareneverrefundable.
Contactusat:
• Email:[email protected]• FacebookPage:Holybro• FacebookGroup:HolybroShurikenOwnerGroup

P a g e |4 KOPIS2
SpareParts

P a g e |5 KOPIS2
InstallBetaflightAlthoughyourKOPIScomesfromthefactorynearlycompletelyreadytofly,youstillneedtoinstalltheBetaflightconfiguratoronyourcomputersothatyoucanmakesureyourtransmitterisconfiguredcorrectly.IfyoupurchasedthePlug-N-FlyversionoftheKOPIS,youalsomayneedtousetheconfiguratortobindyourreceiver.
InstallingDriversInordertoconnecttoyourKOPIS,youmustgettheBetaflightdriversinstalledonyourcomputer.IfyouareonMacOSorLinux,YourO/Scomeswiththedriversyouneedpre-installed.Youdonotneedtoperformthisstep.Youmayskipdirectlyto“InstallingBetaflightConfigurator”.
IfyouareonWindows,youmustinstallthedriversmanually.Thisisaplacewherebeginnersoftenstruggle.We’regoingtopresentthestepshere,andifyoucanfollowthem,thengreat,butmanypeoplewon’tbeabletofollowthem.Ifyouneedamorepersonalapproach,hereisalinktoavideothatwalksyouthroughtheprocessinmoredetail.
AllAboutBetaflightDrivers,IncludingHowtoInstallThem
https://www.youtube.com/watch?v=m4ygG6Y5zXI
ThevideolinkedaboveshowsaprocessofusingZadigtoreplacetheVCPdriver.TheImpluseRCDriverFixerisaneasierwayofdoingthesamething.TheinstructionsbelowwillshowhowtousetheImpulseRCDriverFixer.
Herearethestepsyouwillperform:
1. DownloadtheVirtualCOMPort(VCP)driverinstallerfromhere.Unfortunately,youmusteithercreatealoginorgivethemyouremailaddress,thenwaitforthemtoemailyoualink,todownloadtheactualinstaller.Werecommendthatyoucreateauserloginbecausethe“sendyoualinkinanemail”methodsometimestakesalongtimetogothrough.
a. TocreatealoginattheSTMsite,firstgotothisURL.b. Click“CreateanAccount”c. Enteryourinformationinthenextpageandclick“Register”d. Youwillreceiveaconfirmationemail.Completetheconfirmationprocess.e. LogintotheSTMsiteusingtheloginyoujustcreatedanddownloadtheVCPdriver
installerfromthelinkinstep3.2. RuntheVCPinstallerandletitfinish.3. DownloadtheImpulseRCDriverFixerfromhere.4. RuntheImpulseRCDriverFixer.Itwillinstructyoutopluginyourflightcontroller.

P a g e |6 KOPIS2
5. WhileholdingdownthebootloaderbuttonontheKakuteF7,plugitintoyourPCviaUSB.TheImpulseRCDriverFixershouldcompletesuccessfully.Thebootloaderbuttonisquitesmall.Useaplastictooltopressit.Ifyouuseametaltoollikeascrewdrivertip,becarefulnottodamageit.Usetheflatofthetoolandnotthetip.
IsItOverYet?THATWASSUPERANNOYINGWASN’TIT.Yes…weknow.
Thegoodnewsis,youdonotneedtorepeatthisprocessagain.Sortof.Youneverneedtoinstallthedriversagainonthiscomputer,unlessyoureinstalltheoperatingsystemforsomereason.Ifyouuseanothercomputerforthefirsttime,youwillneedtoinstallthosedriversonit.Also,youmayneedtore-runtheImpulseRCDriverFixersometimeswhenyougotoflashtheboard.Ifyoutrytoflashtheboardanditfails,repeatsteps4and5above.
TheBootloaderButton

P a g e |7 KOPIS2
InstallingBetaflightConfiguratorBetaflightismanagedusingtheBetaflightConfiguratorapplication,alsoknownforshortastheBetaflightGUI,orjust,“TheGUI”.(GUIispronounced“gooey”incaseyouwondered.Onlyweirdossay,“GeeYouEye”.)DownloadtheBetaflightConfiguratorapplicationhere:
https://github.com/betaflight/betaflight-configurator/releases
ThisisastandardapplicationpackageforWindows,MacOS,orLinux.Afteryoudownloadit,installandrunitthesameasanyotherapplication.
OnMacOSyoumustgivetheapplicationpermissiontorunandaccessthenetwork.Thesimplestwaytodothisistoright-clicktheinstallerandchooseOpen.Asecuritypromptwillappearasking,“Areyousureyouwanttoopenit?”ClickOpenonthispromptandtherelevantconfigurationchangeswillbemadeautomatically.

P a g e |8 KOPIS2
InstalltheReceiverYourKOPIScomesfullybuilt.Buttherearestillsomebasicstepsthatyouneedtodo,tomakesurethatyourtransmitterisgoingtoworkcorrectlywithKOPIS.We’regoingtowalkthroughthosestepsnow.
KOPIScomeseitherasaPlug-n-Fly(PnF)modeloraBind-n-Fly(BnF)model.TheBnFmodelhasaFrSkyR-XSRreceiveralreadyinstalled.IfyoupurchasedtheBnFmodel,youcanskiptheinstallationinstructionsbelow.Godirectlytothebindinginstructions.
IfyoupurchasedthePnFmodeloftheKOPIS,youneedtoinstallyourownreceiver.Westronglyrecommendthatyouusealow-profile-receiverliketheFrSkyXM+orR-XSR.TheKOPISisdesignedtobesmallandlight,forbestflightperformance.Butthisalsomeansitwillbehardtofitalargereceiverontoit.
First,usea2mmhexdrivertoremovethefourscrewsatthecorneroftheKOPIStopplate.Removethetopplate.Thiswillexposetheflightcontrolstack.Awirehasbeenpre-installedfromthefactoryforyourreceivertoconnectto.
Thepre-installedwirehasaconnectorforaFrSkyXSRreceiver.IfyouhaveaFrSkyradio,simplyplugthatreceiverintothepre-installedwire.Ifyouhaveanyotherreceiver,cuttheconnectoroffthewireandsolderitdirectlytoyourreceiver,orinstallanewconnectorifyouprefer.(DONOTCUTTHEWIRESWHENTHEBATTERYISPLUGGEDIN!)TheXSRReceiverusesthesameplugastheFrSkyR-XSRreceiver,howeverthepinoutisnotcompatiblebetweenthetworeceivers.YoucannotsimplypluganR-XSRreceiverintotheKopisandhaveitwork.
Thepre-installedwirehasthreecolors:red,black,andyellow.Theredwireisforpower;theblackwireisforground;theyellowwireisforsignal.Besuretoreferencethepinoutdiagramforyourreceiver,toensurethatyouareconnectingthecorrectpadstogether.
YoumustuseareceiverthatsupportsaserialprotocolsuchasSBUS,iBus,andSpektrumSatellite.YoucannotuseaPPMorPWMreceiverwiththeKakuteflightcontrollerontheKOPIS.
Ifyourreceiverrequires5vpower(mostreceiversexceptforSpektrumSatellite),noadditionalactionisrequired.Ifyourreceiverrequires3.3vpower(mostSpektrumSatellitereceivers),youmustmovetheredwirefromthe5vpadontheKakutetothe3v3padrightnexttoit.ThiswillrequireyoutotaketheAtlatlvideotransmitteroffthetopoftheflightcontrolstacktogetatthesolderpadsontheKOPIS.Donotconnectareceiverthattakes3.3vpowertothe5vwirethatisinstalledfromthefactoryoryouwilldestroythereceiver.
Werecommendsecuringthereceivertothequadusingapieceofservomountingtapeordouble-sidedfoamtape.Ifitwillfit,stickthereceivertothetopoftheTekkoESC,betweentheESCandtheflightcontroller.Ifitwillnotfitthere…well,let’sjustsayyou’llneedtogetcreative.
P a g e |9 KOPIS2
BindtheReceiverNowthatyourreceiverisinstalledinyourKOPIS,thenextthingyouneedtodoisbindthereceivertoyourTaranis.BindingistheprocessoflettingtheTaranisandtheR-XSRknowthattheyshouldtalktoeachother.It’showyourquadcopterknowstolistentoyourtransmitterandnotanybodyelse’s.
Theexactinstructionsforbindingyourreceiverwillbedifferentdependingonwhatreceiverandtransmitteryouhave.Hereareinstructionsforsomecommonreceivers.
BindingAFlySkyReceiverFortheFlySkyA8Sreceiver,thebindinginstructionsareasfollows.
1. Un-plugtheA8Sreceiverfromthewireheaderthatcamepre-installedonyourKOPIS.2. REMOVETHEPROPSfromyourKOPISforsafety.DONOTSKIPTHISSTEP.3. PluginyourLiPototheKOPISmainbatterylead.4. HolddowntheBINDbuttononthebackoftheA8Sreceiver.WhileholdingdowntheBIND
button,plugtheA8Sreceiverintothewireheaderthatcamepre-installedonyourKOPIS.TheLEDonthereceiverwillblinkquickly.
5. WiththeFS-i6transmitterpoweredoff,holddowntheBindKey,thenpowerontheradiowhilecontinuingtoholddowntheBindKey.TheBindKeyisonthefrontoftheradio,tothelower-leftofthescreen.Theradiowillpoweronandthescreenwillsay“RXBinding.”
6. TheLEDonthereceiverwillswitchfromquicklyblinkingtoslowlyblinking.Thisindicatesthatbindinghasoccurred.
7. PowerdowntheFS-i6transmitter.8. PowertheFS-i6transmitterbackup,thistimewithoutholdingdowntheBINDKEY.TheLEDon
thereceiverwillgosolidred(noblinking).Thisindicatesthatthereceiveriscommunicatingwiththetransmitter.

P a g e |10 KOPIS2
BindingAFrSkyReceiverFortheFrSkyR-XSR,XSR,X4R-SB,andXM+receiver,thebindinginstructionsareasfollows.
1. REMOVETHEPROPSfromyourKOPISforsafety.DONOTSKIPTHISSTEP.2. IntheTaranis,navigatetotheModelSetupscreenbypressingMENU,PAGE.3. AtthebottomoftheModelSetupscreen,scrolldowntofindthe“InternalRF”sub-section.4. ConfirmthatModeissettoD165. Highlight[BIND]andpresstheENTbutton.BINDwillbeginflashingandtheTaraniswillmakea
high-pitchedbeeping(assumingitsvolumeisturnedup).
6. Ifthequadcopterbatteryispluggedin,un-plugitsothatthereceiverispowereddown.7. HolddowntheBIND/FSbuttononthereceiver.OntheXM+especially,thebuttonisverysmall
anditcanbedifficulttodepresswithyourfinger.Ifyouuseatooltopressthebutton,beverygentlesoasnottodamagethebutton.
8. WhilecontinuingtoholddowntheBIND/FSbuttononthereceiver,plugintheLiPotothequadcoptersothatthereceiverpowersup.Itcanbehelpfultohaveafrienddothiswhileyouholddownthebindbutton.
9. BindingwillbeindicatedbythegreenLEDlightingupsolidandtheredLEDblinking.
Ifbindingisnotsuccessful,mostlikelyyoudidn’tfullydepressthebindbutton.Inthiscase,un-plugtheLiPoandrepeatsteps6-8.

P a g e |11 KOPIS2
BindingASpektrumSatelliteReceiverBindingaSpektrumSatellitereceiverislittledifferentthanbindingnormalreceivers.SpektrumSatellitereceiverswereoriginallydesignedtoworkonlywhenpluggedintoafull-sizedreceiver.Satellitereceiversdon’thavetheabilitytobindwithouthelpfromafull-sizedreceiver.
TherearetwowaystobindaSpektrumSatellitereceiver.Onewayinvolvesusingsomecommand-lineinstructionsinBetaflighttocauseyourflightcontrollertopretendtobeafull-sizedreceiver.TheFCcommandstheSatellitetogointobindingmode.MostF4flightcontrollers,includingtheKakuteflightcontrollerinyourKOPIS,don’tsupportthistypeofbinding.
HereishowyoucanbindyourSpektrumSatellitereceivertoyourSpektrumradiowithoutusingtheflightcontrollerinyourKOPIS.Youwillneedafull-sizedSpektrum-compatiblereceiver.WerecommendtheLemonLM0027sinceitischeap(lessthan$12U.S.)andwidelyavailable.
1. PlugtheBindPlugthatcomeswiththeLM0027ontotheBindingPins.2. PlugtheSpektrumSatellitereceiverintotheSatellitePortontheLM0027withaSpektrum
SatelliteExtensionCable.3. Pluga5vpowersourceintoanyoftheservopinsontheLM0027.TheredLEDsontheLM0027
andtheSatellitereceiverwillflashquicklyindicatingtheyareinbindingmode.AspareESCwithaBECisonepossiblesourceof5vpower.Youcouldalsowireaservoplugtothe5vandGNDpadsonyourFCorasparePDB.DONOTAPPLY5VtotheSatelliteReceiverdirectly.Itwillbedestroyed.
4. TheBindButtonisontheupper-leftshoulderofmostSpektrumradios.WhileholdingdowntheBindbuttonontheSpektrumradio,switchtheradio’spoweron.
5. TheredLEDsontheLM0027andtheSatellitereceivershouldstopflashing.ThescreenontheSpektrumradioshouldindicatethatbindinghasoccurred.
Atthispoint,theSatellitereceiverisboundtothetransmitter.Youcannowun-plugtheSatellitereceiverfromtheLM0027andinstalltheSatellitereceiverinyourKOPIS.WesuggestkeepingtheLM0027aroundforbindingoffuturesatellitereceivers.YoucouldevenbuyacheapPDBandsoldertheLM0027toits5voutputpadsandusethatasyour“bindingadapter”.

P a g e |12 KOPIS2
VerifyChannelMappingNext,youmustverifythatyourtransmitterisconfiguredcorrectlyforthedefaultconfigurationthatwasshippedwithyourKOPIS.
1. REMOVETHEPROPSfromyourKOPISforsafety.DONOTSKIPTHISSTEP.2. ConnectyourKOPIStoyourcomputer’sUSBport.3. StarttheBetaflightConfigurator.Clickthe“Connect”buttonintheupper-righttoconnectto
yourKOPIS.4. GototheReceiverTab.Moveyourtransmittersticks.Verifythatthecorrectchannelmoves
whenyoumoveeachstick.a. MovingtheleftstickupshouldmoveThrottleup(highernumber).b. MovingtheleftstickleftshouldmoveYawdown(lowernumber).c. MovingtherightstickupshouldmovePitchup(highernumber).d. MovingtherightstickleftshouldmoveRolldown(lowernumber).
5. Ifanyofyourcontrolsmovethewrongchannel,youmustre-ordertheChannelMapparameterinthetop-centeroftheReceiverTabscreentocorrectthem.Thechannelmapparametersare:
a. (A)ileron=RollChannelb. (E)levator=PitchChannelc. (T)hrottle=ThrottleChanneld. (R)udder=YawChannel
Forexample,ifyourYawandRollwereswappedwitheachother,youwouldchangetheChannelMapfromAETR1234toRETA1234.The1234attheendofthemapwillalwaysbethesame.RearrangetheA,E,T,andRinthechannelmapuntilthecontrolsareasdescribedinstep4.
ThestepsdescribedaboveassumeaMode2transmitter.WeassumethatmostpilotswillbeflyingMode2.WewanttoacknowledgeallyouMode1flyerstoo.Pleaseunderstandthatwe’rejusttryingnottoconfusebeginnerswithtoomuchinformation.Ifyou’reabeginnerandthisparagraphdidn’tmakesense,don’tworryaboutit.

P a g e |13 KOPIS2
VerifyChannelDirectionsIfthechannelsaremappedcorrectly,butmovethewrongdirection,youmustreversethechannelinyourtransmitter.ThisiscommonlythecasefortheRollandYawchannelsonSpektrumradios.
ReversingChannelsonaFlySkyRadioHereareinstructionsforreversingchannelsonaFlySkyFS-i6radio.
1. Powerontheradio.2. TheHolddownthe“OK”buttontoentertheSystemSetupscreen.3. PresstheDownbuttontohighlighttheFunctionsSetupoption.
4. PressOktoentertheFUNCTIONSmenu.5. Theselectionarrowwillbepointingat“Reverse”.PressOktoentertheReversemenu.
6. PressOktocyclethroughthechannels.PressUporDowntochoosewhetherthechanneldirectionisNormalorReversed.ReversetherequiredchannelssothatthechannelsmoveasdescribedaboveintheBetaflightReceiverTab.
7. Whenyouarefinishedmakingtherequiredchanges,HOLDDOWNthe“Cancel”buttontosaveandexitthemenu.SimplypressingCancelexitswithoutsaving.

P a g e |14 KOPIS2
ReversingChannelsonaSpektrumRadioHereareinstructionsforreversingchannelsonaSpektrumDX6e.OtherSpektrumradiosmaybesimilar.
1. Inthemainmenu,highlightServoSetupandclickthejog-wheeltoopentheServoSetupscreen.
2. IntheServoSetupscreen,movethejog-wheeltohighlight“Travel”.With“Travel”highlighted,clickthejog-wheel,thenscrollthejog-wheeltofindthe“Reverse”screen.
3. Clickthejog-wheeltode-select“Reverse”.Scrollthejog-wheeltohighlightthechannelthatyouwanttoreverse.Clickthejog-wheeltoreversethechannel.ThefinalconfigurationformostSpektrumradiosisshownbelow.YoustillneedtoverifyforyourselfthatthechannelsmovethecorrectdirectionbycheckingthebehaviorintheBetaflightReceiverTab.

P a g e |15 KOPIS2
ReversingChannelsonaTaranisHerearetheinstructionsforreversingchannelsonaTaranis.
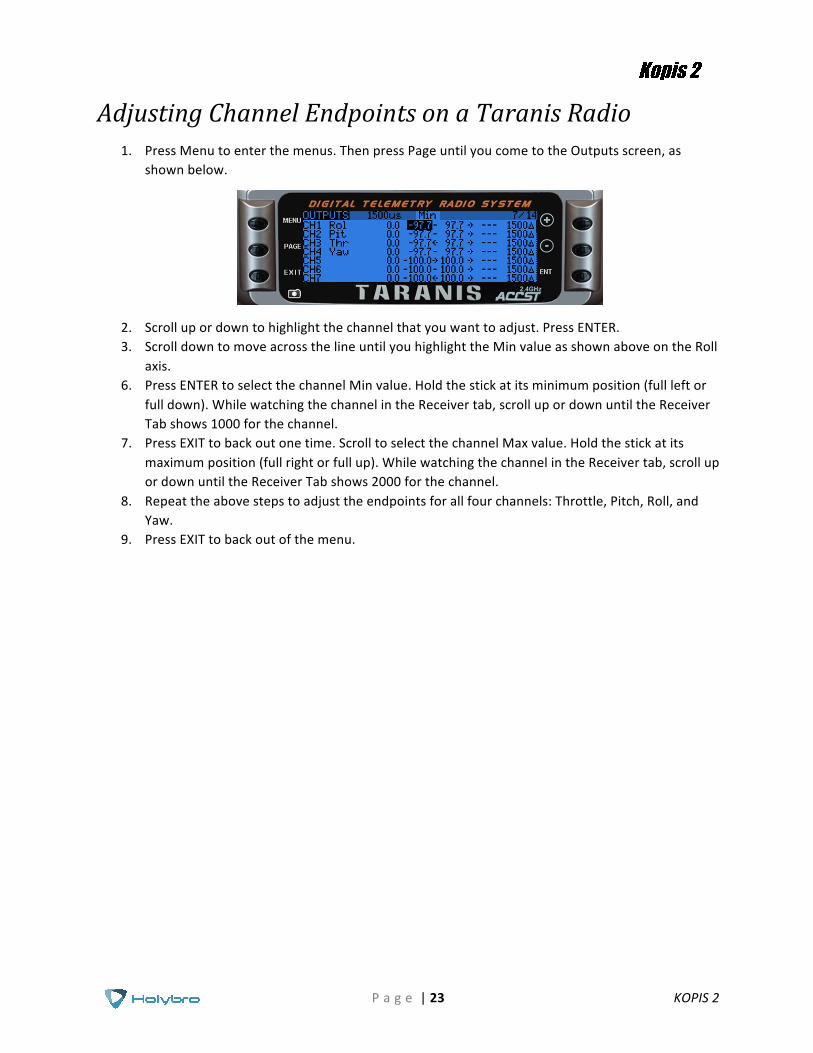
1. PressMenutoenterthemenus.ThenpressPageuntilyoucometotheOutputsscreen,asshownbelow.
2. Scrolltohighlightthechannelthatyouwanttoreverse.PressENTER.3. ScrolltomoveacrossthelineuntilyouhighlighttheDirectionarrowasshownaboveontheRoll
axis.4. PressENTERtoinvertthechanneldirection.5. PressEXITtobackoutofthemenu.
P a g e |16 KOPIS2
AdjustChannelCentersIfyourchannelsdon’tcenterproperly,yourKOPISwilldriftwhenyoucenterthesticks.Tocheckwhetheryourchannelsareadjustedcorrectly,firstcenteryourtransmittersticks.
REMOVETHEPROPSfromyourKOPIS.DONOTSKIPTHISSTEP.PluginaLiPototheKOPISandplugtheKOPISintoyourcomputer’sUSBport.
IntheBetaflightConfiguratorReceiverTab,lookattheRoll,Pitch,Yaw,andThrottlechannels.Thesechannelsshouldbeatexactly1500.Iftheyarewithintherangeofabout1498to1502,thenyoucanskipthisstep.Iftheyaremuchdifferentthan1500,youmustadjustyourchannelcenter-points.
Beforeyouadjustchannelcenter-points,ensurethattheTrimswitchesonyourradioarecentered.Theradiowilltypicallyindicateonthescreenandwithanaudiotonewhenthetrimswitchesarecentered.Presseachofthefourtrimswitchesandlistenforthetonethattheradiomakes.Usuallythetonewillbehigherasthetrimapproachescenter,andtherewillbealongsinglebeepwhenthetrimiscentered.Taraniswillspeak,“TrimCentered”.
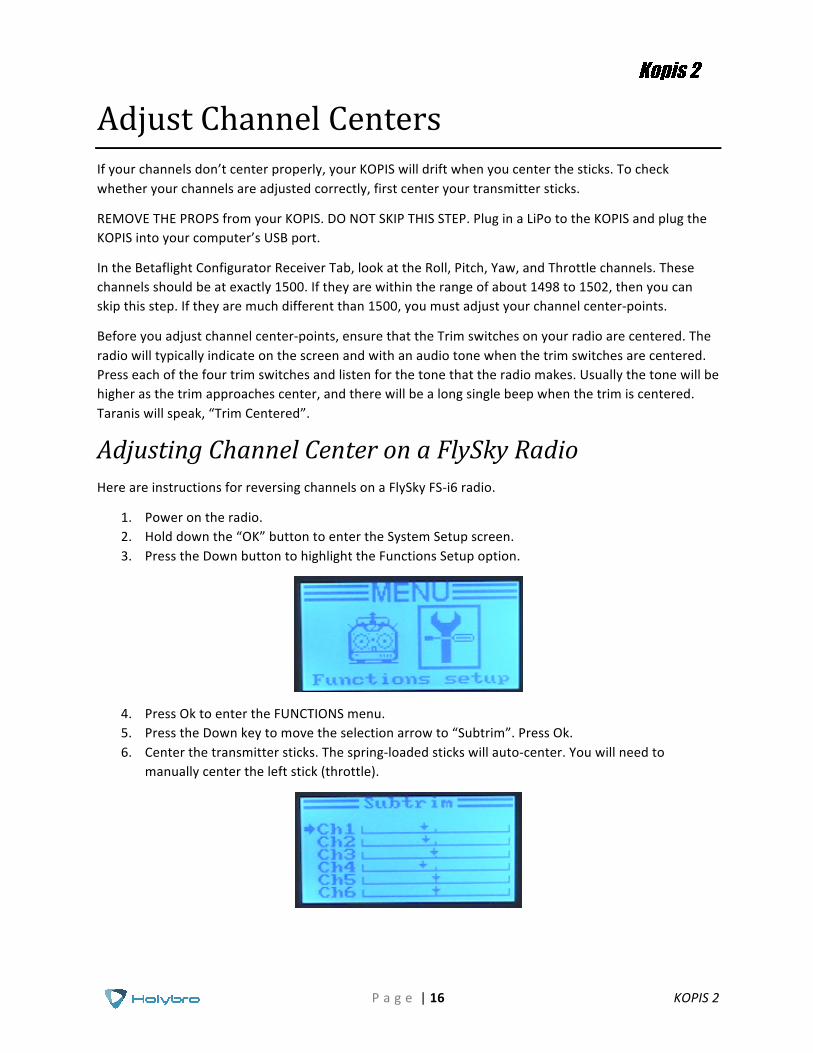
AdjustingChannelCenteronaFlySkyRadioHereareinstructionsforreversingchannelsonaFlySkyFS-i6radio.
1. Powerontheradio.2. Holddownthe“OK”buttontoentertheSystemSetupscreen.3. PresstheDownbuttontohighlighttheFunctionsSetupoption.
4. PressOktoentertheFUNCTIONSmenu.5. PresstheDownkeytomovetheselectionarrowto“Subtrim”.PressOk.6. Centerthetransmittersticks.Thespring-loadedstickswillauto-center.Youwillneedto
manuallycentertheleftstick(throttle).

P a g e |17 KOPIS2
7. IntheSubtrimscreen,Okcyclesthroughthechannels.Up/Downraisesorlowersthechannelcenter.Withthetransmitterstickscentered,adjustthesubtrimforchannels1,2,3,and4sothatthechannelreadsascloseto1500asyoucangetitintheBetaflightReceiverTab.
8. Whenyouarefinishedmakingtherequiredchanges,HOLDDOWNthe“Cancel”buttontosaveandexitthemenu.SimplypressingCancelexitswithoutsaving.

P a g e |18 KOPIS2
AdjustingChannelCenteronaSpektrumRadioHereareinstructionsforadjustingchannelcenteronaSpektrumDX6e.OtherSpektrumradiosmaybesimilar.
1. Inthemainmenu,highlightServoSetupandclickthejog-wheeltoopentheServoSetupscreen.
2. IntheServoSetupscreen,movethejog-wheeltohighlight“Travel”.With“Travel”highlighted,clickthejog-wheel,thenscrollthejog-wheeltofindthe“Subtrim”screen.
3. Clickthejog-wheeltode-select“Subtrim”.Scrollthejog-wheeltohighlightthechannelthatyouwanttoadjust.Clickthejog-wheeltoselectthevalue.
4. Leavethestickscentered.WhilewatchingthechannelintheReceivertab,scrollthejog-wheeluntiltheReceiverTabshows1500forthechannel.

P a g e |19 KOPIS2
AdjustingChannelCenteronaTaranisRadio1. PressMenutoenterthemenus.ThenpressPageuntilyoucometotheOutputsscreen,as
shownbelow.
2. Scrolltohighlightthechannelthatyouwanttoadjust.PressENTER.3. ScrolltomoveacrossthelineuntilyouhighlighttheSubtrimvalueasshownaboveontheRoll
axis.5. PressENTERtoselectthechannelsubtrimvalue.Leavethestickscentered.Whilewatchingthe
channelintheReceivertab,scrollupordownuntiltheReceiverTabshows1500forthechannel.
4. PressEXITtobackoutofthemenu.

P a g e |20 KOPIS2
AdjustChannelEndpointsIfyourchannelendpointsarenotadjustedcorrectly,thequadcoptermayrotatefasterinonedirectionthantheother.Inextremecases,youmaynotevenbeabletoarm!Tocheckwhetheryourchannelendpointsareadjustedcorrectly,firstREMOVETHEPROPSfromyourKOPIS.DONOTSKIPTHISSTEP.PluginaLiPototheKOPISandplugtheKOPISintoyourcomputer’sUSBport.
GototheBetaflightConfiguratorReceiverTab.Loweryourthrottleallthewaydown.TheThrottlechannelshouldhaveavalueof1000.Raiseyourthrottleallthewayup.Thethrottlechannelshouldhaveavalueof2000.Pushyouryawstickallthewaytotheleft.TheYawchannelshouldhaveavalueof1000.Pushyouryawstickallthewaytotheright.TheYawchannelshouldhaveavalueof2000.ThesameshouldbetrueforPitchandRoll:downorleftshouldbeequalto1000;uporrightshouldbeequalto2000.
Ifyourchannelsarenotequalto1000and2000whenyoufullydeflectthesticks,youneedtoadjustyourchannelendpoints.
AdjustingChannelEndpointsonaFlySkyRadioHereareinstructionsforadjustingchannelendpointsonaFlySkyFS-i6radio.
1. Powerontheradio.2. TheHolddownthe“OK”buttontoentertheSystemSetupscreen.3. PresstheDownbuttontohighlighttheFunctionsSetupoption.
4. PressOktoentertheFUNCTIONSmenu.5. PresstheDownkeytomovetheselectionarrowto“EndPoints”.PressOk.

P a g e |21 KOPIS2
6. IntheEndpointsscreen,Okscrollsbetweenchannels.Up/Downadjuststheendpoint.Youcontrolwhetheryouareadjustingthetoporbottomendpointbyraisingorloweringthestickforthechannelyouareadjusting.Thiscanbealittleconfusingbecauseit’sprobablynotobvioustomostpeoplewhichchannelgoeswithwhichstick.ThedefaultchannelorderfortheFlySkyradioandforBetaflightis:
• Channel1=Aileron=Roll=Rightstickleft/rightaxis• Channel2=Elevator=Pitch=Rightstickup/downaxis• Channel3=Throttle=Leftstickup/downaxis• Channel4=Rudder=Yaw=Leftstickleft/rightaxis
7. Foreachofchannels1,2,3,and4,adjustthetopandbottomendpoint.Dothisbyholdingthecorrectstickfullleftordowntoadjustthebottomendpointandfullrightoruptoadjustthetopendpoint.Thenusetheup/downbuttonsontheFlySkyFS-i6toadjusttheendpoint%untiltheBetaflightConfiguratorReceiverTabshows1000(forthebottomendpoint)or2000(forthetopendpoint).
8. Whenyouarefinishedmakingtherequiredchanges,HOLDDOWNthe“Cancel”buttontosaveandexitthemenu.SimplypressingCancelexitswithoutsaving.

P a g e |22 KOPIS2
AdjustingChannelEndpointsonaSpektrumRadioHereareinstructionsforadjustingchannelcenteronaSpektrumDX6e.OtherSpektrumradiosmaybesimilar.
1. Inthemainmenu,highlightServoSetupandclickthejog-wheeltoopentheServoSetupscreen.TheTravelscreenshouldappear.
2. IntheTravelscreen,movethejog-wheeltohighlighttheTHRchannel.Lowerthethrottlestickallthewaydown.Clickthejog-wheeltoselecttheTHRchannel.
3. Scrollthejog-wheeltoadjusttheThrottlechannellowerendpointuntiltheBetaflightReceiverTabshows1000asthevaluefortheThrottlechannel.
4. Raisethethrottletothetop.RepeattheprevioussteptoadjustthetopendpointuntiltheBetaflightReceiverTabshows2000asthevaluefortheThrottlechannel.
5. Repeatthestepsaboveforeachoftheremainingchannels:Yaw,Pitch,andRoll.Holdthesticktothelowerextremeofitsmovement(leftordown)andadjustthechannelendpointtocausetheReceiverTabtoshow1000asitsvalue.Holdthesticktotheupperextremeofitsmovement(uporright)andadjustthechannelendpointtocausetheReceiverTabtoshow2000asitsvalue.
P a g e |23 KOPIS2
AdjustingChannelEndpointsonaTaranisRadio1. PressMenutoenterthemenus.ThenpressPageuntilyoucometotheOutputsscreen,as
shownbelow.
2. Scrollupordowntohighlightthechannelthatyouwanttoadjust.PressENTER.3. ScrolldowntomoveacrossthelineuntilyouhighlighttheMinvalueasshownaboveontheRoll
axis.6. PressENTERtoselectthechannelMinvalue.Holdthestickatitsminimumposition(fullleftor
fulldown).WhilewatchingthechannelintheReceivertab,scrollupordownuntiltheReceiverTabshows1000forthechannel.
7. PressEXITtobackoutonetime.ScrolltoselectthechannelMaxvalue.Holdthestickatitsmaximumposition(fullrightorfullup).WhilewatchingthechannelintheReceivertab,scrollupordownuntiltheReceiverTabshows2000forthechannel.
8. Repeattheabovestepstoadjusttheendpointsforallfourchannels:Throttle,Pitch,Roll,andYaw.
9. PressEXITtobackoutofthemenu.

P a g e |24 KOPIS2
SetUpArmingSwitchForsafety,yourKOPISwillnotallowthemotorstospinunlessthequadcopterisarmed.Thepreferredwaytoarmaquadcopterisusingaswitchonyourtransmitter.Todothis,youwillneedatleastfivechannelsonyourtransmitter.Fortunately,mosttransmitterstodayhavesixormorechannels.
Therearetwostepstosettingupyourarmingswitch.First,youmustsetupyourtransmitter.Second,youmustsetupBetaflight.
SetupAuxSwitchonTaranis1. PressMENU,thenpressPAGEfourtimesuntilyouseetheMIXERscreen.2. ScrolldowntoCH5.
3. PressENTERtocreateanewmix.4. Inthenewmixscreen,scrolldowntohighlighttheSourceline.
5. PressENTERonetime.TheSourceparameterwillflash.6. Flicktheswitchthatyouwanttouseforarmingonetime.TheSourceparameterwillchangeto
readthatswitchlabel.WesuggestusingswitchSF,thelargetwo-positionswitchontheupper-leftshoulderoftheTaranis.
7. PressEXITtobackouttothemainmenu.SwitchSFisnowmappedtochannel5,Aux1.

P a g e |25 KOPIS2
SetupAuxSwitchonSpektrumGoodnews!OurDX6ecamepre-configuredwiththechannel5,Aux-1,pre-assignedtotheupper-leftshoulderswitch.Thisisexactlyhowwewantthingsconfiguredforswitcharming,sotheSpektrumisreadytogo!
SetupAuxSwitchonFlySkyGoodnews!OurFS-i6radiocamepre-configuredwiththechannel5,Aux-1,pre-assignedtotheupper-leftswitch,switchSWA.Thisisexactlyhowwewantthingsconfiguredforswitcharming,sotheFlySkyisreadytogo!

P a g e |26 KOPIS2
SetupAuxModeinBetaflight1. REMOVETHEPROPSFROMYOURKOPIS.Seriously.DONOTSKIPTHISSTEP.2. InBetaflightConfigurator,gototheModesTab.Click“AddRange”nexttotheArmtab.The
screenwillchangetolookasshownbelow.Changethepull-downmenufrom“AUTO”to“AUX1”asshownbelow.
3. Turnonyourtransmitter.PluginaLiPo.ThesmallyellowindicatorwillmovetoindicatethecurrentpositionoftheAux1channel.

P a g e |27 KOPIS2
4. Putyourarmswitchinthepositionyouintendtouseas“armed”.Youshouldseetheyellowindicatormoveasyoumovetheswitch.(Thiswon’tworkifyouhaven’tboundyourtransmitter,ofcourse.)Thecommonstandardistouse“switchpushedawayfromyou”astheneutralpositiononatransmitter.Bythislogic,“switchpulledtowardsyou”shouldbearmed.Mypersonalpreferenceistouse“switchpulledtowardsyou”asdisarmed,becauseit’seasiertoslaptheswitchthatdirectionifyouaretryingtodisarminahurry.
5. Withtheswitchinthe“armed”position,dragtheyellowrangemarkertotheendofthechannelwheretheyellowindicatoris.
6. Click“Save”inthelower-rightofthewindow.YOURMOTORSMAYNOWSTARTSPINNINGISUREHOPEYOUREMOVEDYOURPROPS!

P a g e |28 KOPIS2
MounttheAntenna(s)Themethodpicturedbelowiswhatwebelievetobethebestwaytomountthereceiverantenna(s)onamini-quad.Todothis,installasmallzip-tieonthearmofyourKOPIS,pointingtowardsthefrontofthequad.Passthezip-tieunderneaththeESCwires.Placealengthofheatshrinktubingoverthezip-tie,thenthreadtheendoftheantennaintotheheat-shrinksothatitlaysflatagainstthezip-tie.
Beforeshrinkingtheheat-shrink,tuckortwistanyexcesslengthofantennawireintothebodyofyourKOPISsothatitdoesn’tgetcutbythepropsorsnaggedbyabranchwhileflying.Donotkinktheantennawire.Donotcuttheantennawiretoshortenit.
Onceeverythingisroutedhowyoulike,shrinktheheatshrinktosecuretheantennainplace.Finally,cutofftheexcessendofthezip-tie,butbecarefulnottocuttheactualantennawire.

P a g e |29 KOPIS2
CustomizeTheOSDIntheOSDtab,youcanchoosewhichvaluesyouwanttoseeonscreenwhileyouareflying.EnableanddisableindividualelementsusingtheElementstogglesontheleft.
TheVideoFormatsectionletsyouchoosewhetheryourcameraisNTSCorPAL.BetaflightdefaultsthisvaluetoAuto,butAutosometimespickswrong.Ifthishappens,youmightnotseeanyOSDtext,orthebottomoftheOSDtextmightbeoffthebottomofthescreen.Insomecases,youwon’tseeanyvideoatall—justtheOSD.Becauseofthis,werecommendmanuallysettingtheVideoFormattoNTSCorPALdependingonwhichtypeofFPVcamerayouhave.
YoucanrearrangetheindividualOSDelementsonscreenbydraggingthemwithyourmouseinthe“Preview”sectionofthewindow.
SomeindividualOSDElementsofnoteare:
MainBattVoltage:Thisisprobablythesinglemostimportantelementtouse.Yourbatterymustnevergobelow3.3voltspercellunderanycircumstances,oritwillsufferdamage.Fora3Sbattery,thiswouldbe3times3.3=9.9volts.Fora4Sbattery,itwouldbe13.2volts.Anytimethebatterygoesbelowthislevel,itislikelybeingdamaged,atleastalittle.Moreimportantly,youwillhaveverylittlepowerandmaycrashifyouaredoingaggressivemaneuvers.
Although3.3voltsistherecommendedabsoluteminimum,youwillgetthebestlifeoutofyourbatteriesifyoukeepthevoltageaboveabout3.5voltspercell—10.5voltsfor3Sand14.0voltsfor4S.Ifyouareflyingandyounoticethebatterygoingbelowthislevel,itmightbetimetoland,oratleastgoeasieronthethrottle.Ifyourbatteriesconsistentlydroptothislevelwhenyoutrytofly,itmightbetimetogetnewbatteries.
Whenyouareusingthebattery,itsvoltagewilldrop.Thisisreferredtoas“sag”.Afteryouland,thebatterywillrecoverasmallamountanditsvoltagewillrise.Ourrecommendationisthat,thebattery

P a g e |30 KOPIS2
shouldbeatnolessthan3.75voltspercell—11.25voltsfora3Sand15.0voltsfora4S—afterithasbeenallowedtorestattheendofaflight.Ifyourbatteriesareconsistentlyrestingatbelowthislevelattheendofadayofflying,thenyoumightbeshorteningtheirlifespanatleastalittle.
mAhDrawn:Althoughvoltageiswhatultimatelydetermineswhetherabatteryisbeingdamaged,mAhmaybeabetterwayofdecidingwhentoland.Becausevoltagesagswhenyouraisethethrottleandrecoverswhenyoulowerthethrottle,itcanbehardtotellexactlyhowused-upthebatteryis.mAhislikea“gasgauge”foryourbattery.Itshowshowmuchcapacityyouhaveconsumed,independentofotherfactors.
Agoodpracticeistodrawfromabatterynomorethanabout80%ofitsratedmAh.So,a1300mAhbatterywouldbeabletodeliverabout1000to1100mAh.Withahealthybatteryandanhonestbatteryrating,thiswillresultinthebatteryrestingatabout15.0voltsafterflying.Ifyoudraw80%ofabattery’sratedcapacityanditisrestingathigherthan15.0volts,themanufacturermighthaveunder-rateditscapacity.Ifthebatteryisrestingatlowerthan15.0volts,themanufacturermighthaveover-rateditscapacity.Also,rememberthatbatterieslosecapacityastheyage.Abatterythatconsistentlyfailstodeliver80%ofitsratedcapacitywithoutsaggingbelow14.0voltsmightneedretirement.
CurrentSensorCalibrationThecurrentsensorinyourKOPIShasbeensetwithanominalcalibrationvalue.However,youmaybeabletoimprovetheaccuracybyperformingamoreprecisecalibration.WerecommendthatyourecordthemAhusedattheendofyourfirstfewflights,thencompareittothemAhthatyourbatterychargerputsbackintothebatteries.ThenadjusttheCurrentScaleinthePowerAndBatterytabtocompensateforanydifference.
Hereisanexample:
• OSDshows1100mAhDrawnattheendoftheflight.• Chargershows1000mAhputbackintothebattery.• 1100/1000=1.10.TheOSDisreading10%high.• CurrentScaleworksbackwardsfromhowyoumight
think.TomaketheOSDreadlower,youmakeCurrentScalelarger.SincetheOSDisreading10%high,weneedtoINCREASECurrentScaleby10%.ThiswillcausetheOSDtoread10%lower.
• IftheCurrentScalewasat400,wewillmultiplyitby1.10toadd10%,meaningthenewvalueshouldbe440.
ThemAhputbackinbythebatterywillseldomperfectlymatchthemAhreportedbytheOSD,butbytakingseveralmeasurementsandaveragingtheresults,youcanusuallygetitreasonablyclose.
P a g e |31 KOPIS2
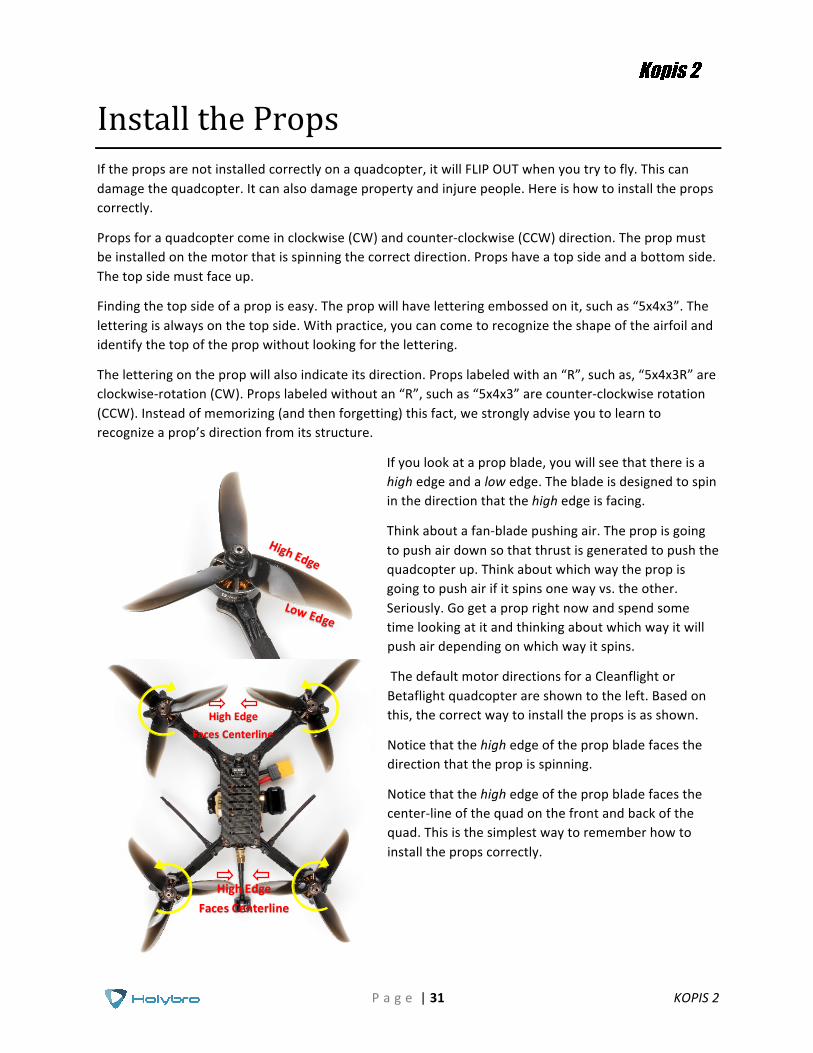
InstallthePropsIfthepropsarenotinstalledcorrectlyonaquadcopter,itwillFLIPOUTwhenyoutrytofly.Thiscandamagethequadcopter.Itcanalsodamagepropertyandinjurepeople.Hereishowtoinstallthepropscorrectly.
Propsforaquadcoptercomeinclockwise(CW)andcounter-clockwise(CCW)direction.Thepropmustbeinstalledonthemotorthatisspinningthecorrectdirection.Propshaveatopsideandabottomside.Thetopsidemustfaceup.
Findingthetopsideofapropiseasy.Thepropwillhaveletteringembossedonit,suchas“5x4x3”.Theletteringisalwaysonthetopside.Withpractice,youcancometorecognizetheshapeoftheairfoilandidentifythetopofthepropwithoutlookingforthelettering.
Theletteringonthepropwillalsoindicateitsdirection.Propslabeledwithan“R”,suchas,“5x4x3R”areclockwise-rotation(CW).Propslabeledwithoutan“R”,suchas“5x4x3”arecounter-clockwiserotation(CCW).Insteadofmemorizing(andthenforgetting)thisfact,westronglyadviseyoutolearntorecognizeaprop’sdirectionfromitsstructure.
Ifyoulookatapropblade,youwillseethatthereisahighedgeandalowedge.Thebladeisdesignedtospininthedirectionthatthehighedgeisfacing.
Thinkaboutafan-bladepushingair.Thepropisgoingtopushairdownsothatthrustisgeneratedtopushthequadcopterup.Thinkaboutwhichwaythepropisgoingtopushairifitspinsonewayvs.theother.Seriously.Gogetaproprightnowandspendsometimelookingatitandthinkingaboutwhichwayitwillpushairdependingonwhichwayitspins.
ThedefaultmotordirectionsforaCleanflightorBetaflightquadcopterareshowntotheleft.Basedonthis,thecorrectwaytoinstallthepropsisasshown.
Noticethatthehighedgeofthepropbladefacesthedirectionthatthepropisspinning.
Noticethatthehighedgeofthepropbladefacesthecenter-lineofthequadonthefrontandbackofthequad.Thisisthesimplestwaytorememberhowtoinstallthepropscorrectly.
HighEdgeFacesCenterline
HighEdgeFacesCenterline

P a g e |32 KOPIS2
UsingTheOSDIfyouareusingaBetaflightFlightControllerwithBetaflightOSD,youcanmanagetheAtlatl’stransmitpowerandchannelfromwithintheOSD.
ThegraphicsaboveshowthestickcommandtobringuptheOSDmenu.Thestickcommandis:throttlecentered,yawleft,pitchforward.Theexactstickcommandthereforedependsonwhichmodeyourtransmittersticksarein.
IntheOSDmenu,usepitchup/downtomovethecursorbetweenmenuitems.Whenamenuoptionhasa>symboltotherightofit,thisindicatesthatitcontainsasub-menu.Roll-rightwillenterthesub-menu.Forexample,inthescreentotheright,movingthecursorto“Features”andthenmovingtherollsticktotherightwillenterthe“Features”sub-menu.
TomanagetheAtlatl,enterthe“Features”menu.Fromthere,enter“VTXSA”
Mode2 Mode1
P a g e |33 KOPIS2
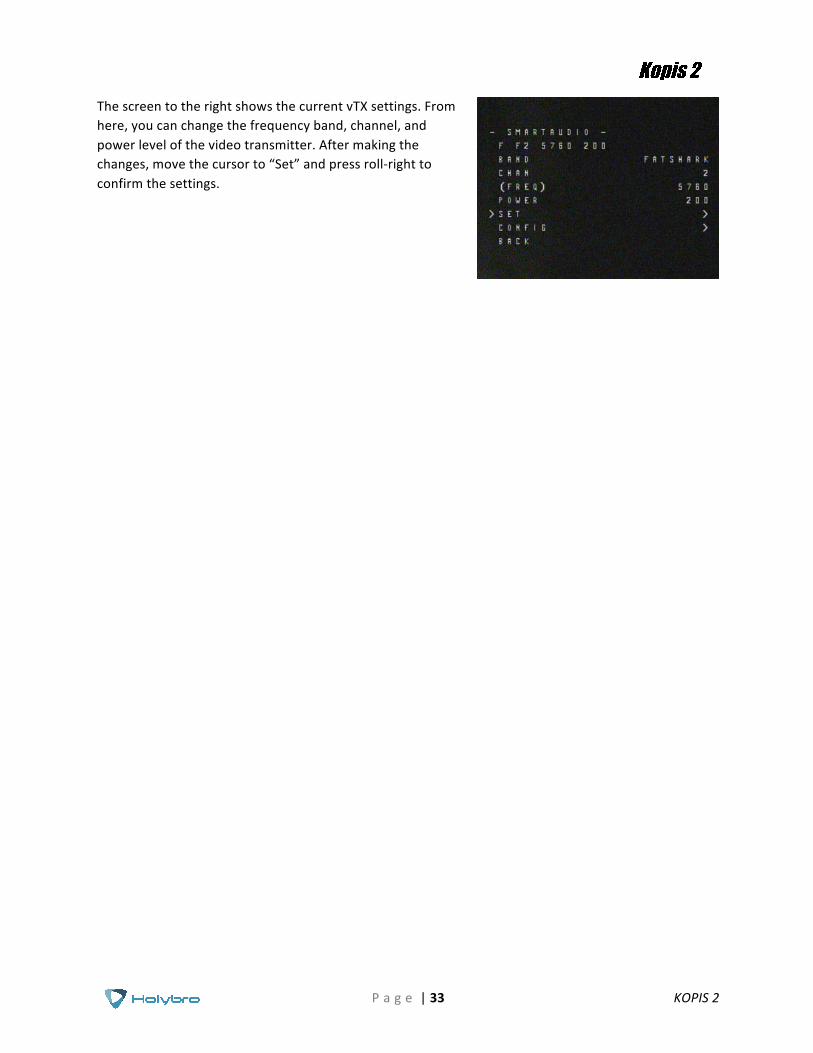
ThescreentotherightshowsthecurrentvTXsettings.Fromhere,youcanchangethefrequencyband,channel,andpowerlevelofthevideotransmitter.Aftermakingthechanges,movethecursorto“Set”andpressroll-righttoconfirmthesettings.

P a g e |34 KOPIS2
AtlatlFunctionsChannel-ChangeButtonTheAtlatlcanbeconfiguredviaeitherSmartAudioorthechannelchangebutton.IfyouhaveSmartAudioenabledinBetaflight,thenthebuttoncannotbeused.Ifyouprefertousethebutton,youmustdisableSmartAudioinBetaflight.
Hereishowtousethebutton:
• Tochangechannel,holddownthebuttonfor2secondsuntiltheChannelLEDblinks.Youarenowinchannelselectmode.Pressthebuttononetimetoadvancethechannel.
• Tochangeband,firstgointochannelselectmode.Fromchannelselectmode,holddownthebuttonfor2secondsuntiltheBandLEDblinks.Youarenowinbandselectmode.Pressthebuttononetimetoadvancethroughthebands.
• Tochangepower,firstgointobandselectmode.Frombandselectmode,holddownthebuttonfor2secondsuntilthePowerLEDblinks.Youarenowinpowerselectmode.Pressthebuttononetimetoadvancethroughthepoweroptions.
• Frompowerselectmode,holddownthebuttonfor2secondstoexitconfigurationandreturntonormaloperation.
PitModeHaveyoueverpoweredupyourcopter,onlytohaveoneofyourfriendsstartshoutingandcrash?Yourvideotransmitterwasonthesamechannelhewason,orevenanearbychannel,andyoursignalwassoloudthatitoverpoweredhisown.Thisiscommonlyreferredtoasbeing“stompedon”,andit’sabigproblemanytimemorethanonepersonisflyingtogether.Evenifyouarenotonthesamechannelassomebodyelse,youcanstomponthemifyouaretooclosetothem
PitModehelpstopreventyoufromstompingonotherpilots.WhenthetransmitterisinPitMode,itwillonlytransmitataverylowpower.Withinashortdistance,youwillbeabletoseeyourowncopter’stransmission,butotherpilotswhoarefurtheraway,won’tbeaffected.
ToputtheAtlatlintoPitMode,holddownthebuttonwhileyoupluginyourbattery.ThiswillcausetheAtlatltopowerupinPitMode.Ifyou’reflyingwithfriends,it’sagoodideatomakeahabitofthis,toensurethatyoudon’tstomponanyofthemwhenyoupowerup.
WhentheAtlatlisinPitMode,youcanchangethechannel,band,andpowersettings.Thesewilltakeeffectwhenyoupowercycletheboard.ThisallowsyoutoconfiguretheAtlatlwithoutstompingonotherpilotswhoarealreadyintheair.
Alwaysfollowbestpracticesforfrequencyassignmentwhenflyingwithotherpilots.Neverpowerupnearotherpilots,evenifyouthinkthechannelisclear.Neverlandyourcopterneartootherpilotseither.Alwayspowerup,takeoff,andland,atleast20-30feetawayfrompilotswhoareflying.

P a g e |35 KOPIS2
SavingYourConfigurationOnceyouhavefinishedbuilding,configuring,andtuningyourmultirotor,it’sagoodideatobackupyourconfigurationsothatyoucanrestoreitlater.Thisisusefulifyouloseyourquad,orifyoudamageyourflightcontroller,orifyouaccidentallylockyourselfoutofyourflightcontrollerandmustresetittogetbackin.
Beforeweshowyoutherightwaytosaveandrestoreyourconfiguration,letuswarnyouaboutthewrongway.BetaflightandCleanflighthavea“saveconfiguration”and“restoreconfiguration”button.Withoutgoingintotoomuchdetail,theyhavesomesignificantdrawbacksthatmeanwedon’trecommendthatyouusethem.
Thecorrectwaytosaveyourconfigurationisasfollows.
1. ConnectyourKakutetoyourPCbyplugginginUSB.2. StarttheBetaflightGUIapp.3. GototheCLItab.4. InthetextboxatthebottomoftheCLI,type“diffall”andhitenter.Thiswillcausetheflight
controllertodisplayallconfigurationoptionsthatyouhavechangedfromthedefaultvalues.5. Inthelower-rightcorneroftheconfigurator,clickthe“SavetoFile”button.6. Savethefilesomewhereyouwon’tloseit.
Torestoreyourconfiguration,dothis:
1. Openthetextfileinyourtexteditor.2. Highlighttheentirecontentsofthefile.3. Right-clickinthetexteditorwindowandchoose“Copy”.4. ConnectyourKakutetoyourPCbyplugginginUSB.5. StarttheBetaflightGUIapp.6. GototheCLItab.7. ClickthemouseonceinthetextboxatthebottomoftheCLItabtoplacethecursorthere.8. Insteadoftypinganycommands,right-clickinthetextboxandchoose“Paste”.9. PresstheEnterkeyonyourkeyboard.Thepasted-intextwillrapidlyscrollpast.10. Type“save”inthetextboxatthebottomofthescreen.11. PressEnter.Theflightcontrollerwillrebootandtheconfigurationwillberestored.

P a g e |36 KOPIS2
Pre-FlightCheckForsafety,herearestepsthatyoushouldperformbeforeEVERYpackyoufly.Yes,therearealotofthem.Therearealotofstepsbeforeafighterpilottakesoffinhisjet,oranF1driverstartsuphiscar.Thisisnodifferent.
1. Turnonyourcontroller.2. Ifthecontrollerhasmultiplemodelmemories,confirmthatthecorrectmodelisselected.3. Ifyouuseswitcharming,confirmthatthearmingswitchonthetransmitterisinthe“disarmed”
positionandthrottleisallthewaydown.4. Ifyoucrashedlasttimeyouflew,performaphysicalinspectionofthequadfordamage.5. Ifyoujustinstalledanyprops,confirmthatpropsareinstalledcorrectly.Yes,Iknowyou’resure
youputthemoncorrectly.CHECKITAGAIN.Trustme.6. Confirmthatpropnutsaretightenoughthatapropcannotspinwithoutsomeeffort.Theydon’t
needtobegorilla-tight.Justtightenoughthatthepropdoesn’tslipinflight.7. CheckLiPobatteryvoltage.Afully-chargedLiPoshouldbeabout4.2voltspercell,orabout12.6
voltsfora3S,or16.8voltsfora4S.8. InstalltheLiPoonthebottomofyourKOPISusingthebatterystrap.9. Securethebalanceleadsothatitcan’tbestruckbytheprops.Forexample,twistthebalance
leadaroundthedischargeleadandtuckthebalanceplugbetweentheredandblackwiresofthedischargelead.
10. RoutethemainLiPodischargeleadsothatitcannotbestruckbytheprops.Thismightinvolvetwistingittotakeupslackorwrappingitinthebatterystrap.Theexactwayofdoingthiswillvarydependingonthelengthofyourbatterylead.
11. LookinyourFPVgogglesorscreentoseeifanybodyistransmittingonyourchannel.Iftheyare,stop.Donotpowerup.
12. Scantheflightareaforanysafetyissuesthatmightbepresent,suchaspeopleordogs.Aspottershouldalwaysbewatchingtheflightareawhileyoufly.
13. PlugintheLiPo.Imaginethat,theinstantyoupluggedinthebattery,themotorswenttofullpower.Howwouldyouwanttobeholdingthequadwhenthathappened?Oneapproachistoturnthequadupsidedownwhileplugginginthebattery.Thisworksespeciallywellforbottom-mountedbatteriesliketheKOPIS.
14. AfterpluggingintheLiPo,setyourKOPISdownanddonotmoveitforafewsecondsuntilyouhearthethreebeepsthatindicatethegyrohascalibrated.
15. Verifythatyouhaveclean,strongvideoinyourFPVgogglesorscreen.Ifyouseeinterferenceoryouseeanotherpilot’sfeed,resolvethisissuebeforeflying.
16. Armthequad.Listenforthepropshittinganythinglikeanantennaorthebatterywire.Checkyourvideoforanysignsofissuelikeincreasednoiseordegradedvideoquality.
17. Takeoffandfly.Ifyouhavejustperformedarepaironthequad,orifthisisanewbuild,flyconservativelyuntilyouhaveverifiedthateverythingisworkingasintended.Flylowtothegroundandclose-in.Bepreparedtodisarmimmediatelyifyoulosevideoorlosecontrolofthequadforanyreason.

P a g e |37 KOPIS2
BestPracticesForFPVTheanalogvideotransmittersthatweusecaninterferewitheachotherifnotusedproperly.Thereisnothingmoreannoyingthancrashingorlosingyourquadbecauseanotherpilotinterferedwithyoursignal!Ifyouaregoingtoflywithotherpeople,herearebestpracticesforyoutofollow.
DONOTEVERPOWERUPNEARANOTHERPILOTWHOISFLYING.
Nomatterwhatchannelyouareon.Nomatterwhatyourpoweroutputis.Nomatterifyouareinpitmodeornot.Nomatterifyoudiditfivetimestodayandeverythingwasfine.Nomatterwhat.Ifyoupowerupnearanotherpilot,youcaninterferewiththemandknockthemoutoftheair.
DONOTEVERLANDORFLYNEARANOTHERPILOTWHOISFLYING.
Wheneveryourvideotransmitterispoweredupanditisnearbytoanotherpilotwhoisflying,youcancauseinterference.So,cominginforalandingrightatyourownfeetwhenyourbuddyisflyingnexttoyouisjustasbadasplugginginyourbatterynexttohim.
Bestpracticeistodesignateatakeoffandlandingareathatisatleast50feetawayfromthepilotstation.Nobodycanpowerupexceptinthetakeoffandlandingarea,andafterverifyingthattheyareonasafechannelthatisnotgoingtointerferewithanybodyelsewhoisintheair.Everybodylandsinthelandingareaandthenwalksoverandpowersdowntheirquadbeforereturningtothepilotarea.
ALWAYSENSUREATLEAST40MHZSPACINGBETWEENPILOTS.60MHZISBETTER.
Whenmultiplepilotsareflyingtogether,frequencycoordinationisamust,toensurethatnobodyinterfereswithanybodyelse.Theshortestruleofthumbisthat40-60MHzofspacingistheminimum.So,ifonepilotison5740MHz,theclosestanotherpilotcouldbewouldbe5780Mhz,and5800MHzwouldbebetter.
Ifyouneedtogetmorethanthreepilotsintheairatthesametime,wesuggestyoulookuptheIMD5andIMD6channelsets,orthe“MultiGPbestsixchannels”set.Theseareproventoworkwell.
USETHELEASTTRANSMITPOWERPOSSIBLE.25MWISBEST.200MWATMOST.
Transmittingathigheroutputpowersincreasesthelikelihoodofinterference.25mWismorethanenoughpowerforgoodrangemostofthetime.Above200mW,thelikelihoodofinterferencesignificantlyincreases.Ofcourse,ifyou’reflyingalone,useasmuchpowerasyoulike!

P a g e |38 KOPIS2
QuadcopterSafetyQuadcoptersareincrediblypowerfulmachines.Theirpropscanseriouslyinjureyou.Operatingyourquadcoptersafelyisuptoyou!Thisisn’tintendedasacompletesafetymanual,buthereareafewguidelineswethinkareworthmentioning.
ArmingSwitchWefirmlybelievethataswitchisthesafestwaytoarmanddisarmyourquadcopter,becauseitallowsyoutoquicklyandconfidentlydisarmthequadwhenyouneedto.However,armingswitcheshavearisk:youcanveryeasilybumptheswitchandarmthequadwhenyoudidn’tintendto.Themostcommonwaythishappensisifyouhaveyourtransmitterdanglingaroundyourneckasyoupickupyourquadafteraflight.
TaranisSaferSwitchArming
https://www.youtube.com/watch?v=bv3VJ1jznw8
Thebestwaytoavoidthisistosetupatwo-stagearmingswitch.AvideoshowinghowtodothisonTaranisislinkedabove.Therearevariousotherwaystoaccomplishthesamethingonothertransmitters.
Ifyoudon’twanttosetupatwo-stagearmingswitch,thenext-bestthingistoraiseyourthrottleimmediatelyafteryoudisarm.Betaflightwillnotletthequadarmifthethrottleisraised.Soraisingthethrottleislikeyoursafetyswitch.Makeahabitof,“Fliptheswitch,thenraisethethrottle,”everytimeyoudisarm.
Thereisonecatchwiththistechnique.Ifyouraisethethrottle,thenflipthearmswitch,thequadwon’tarm.However,ifyouthenlowerthethrottle,thequadwillarmimmediately,assoonasthethrottletouchesbottom.Theworkaroundforyoushouldbethatyour“armingprocedure”isalways:verifyswitchdisarmed,lowerthrottle,flipswitchtoarm.Ifyouwatchold-timerswhohavebeendoingthisforever,youmayevenseethemcarrytheirtransmitterswiththeirfingerrestingonthearmswitch,holdingitinthedisarmedposition.Thisisagreathabittodevelop.

P a g e |39 KOPIS2
SafeHandlingIt’seasytobecomecomplacentwhenhandlingquads.Theyusuallydon’tdoanythingunexpected.Buttheyareincrediblypowerfulanddangerous,andcancauseseriousinjuries.EVERYSECONDTHATYOURBATTERYISPLUGGEDIN,youshouldtreatyourquadlikethedangerousmachinethatitis.Keepyourfingersoutoftheprops.Thinkaboutwhatwaythequadwouldflyifthepropssuddenlyspunup.Carrythequadbythebottomplateorbattery,facingawayfromyourself.Alwaysun-plugthebatterybeforepickingupthequad,orimmediatelyafterwards.Alwaysplugthebatteryinjustbeforesettingthequaddown.Andforgoodnesssake,ifyourquadisdoingsomethingweird,don’t“test-fly”itinyourlivingroom.Yourceilingwillthankyou.

P a g e |40 KOPIS2
FailsafeFailsafeiswhathappenswhenyouflytoofarawayoryourreceivergetsdisconnectedfromyourflightcontroller.Ifyoudon’tconfigurefailsafe,thequadcouldflyaway,oritcouldcrashintosomething…orsomeone.
Failsafe
https://www.youtube.com/watch?v=dikr9oDzQqc
DON’TEVERFLYWITHOUTVERIFYINGTHATFAILSAFEWORKSCORRECTLY.
Toverifyfailsafe,removeyourprops,thenpluginyourbatteryandarmyourcopter.Thenturnoffyourtransmitter.Yourmotorsshouldstopwithin1to3secondsatmost.
Ifyourmotorsdon’tstopwhenyouturnoffyourtransmitter,DONOTFLYYOURMULTIROTORUNDERANYCIRCUMSTANCES.
IfyouhaveaTaraniswithanX-seriesreceiver(boundinD16mode),youcanensurefailsafeissetcorrectlybychoosing“NoPulses”asyourfailsafemodeintheModelSetupscreen.IfyouhaveaTaraniswithaD-seriesreceiver(D8mode)thissettinghasnoeffect!

P a g e |41 KOPIS2
AdjustPIDs/Rates/vTXfromTaranisIfyouhaveaFrSkyTaranisradioandifyouareusingSmartPorttelemetry,youcanuseyourTaranistochangeyourPIDsandrates.
ThisisdonebyinstallingapieceofprogrammingcodecalledaLuascriptonyourTaranis.IfyouarealsousingSmartAudio,youcanuseaLuascripttochangeyourvTXsettings.ThisisthesameasifyouwereusingtheBetaflightOSD,butitworkswithoutyouhavingtoputyourgoggleson.
Detailedinstructionsforhowtodothisarebeyondthescopeofthisdocument.Here’savideoshowinghowtodoit.
HowtoAdjustPIDs,Rates,andvTXSettingsviaLuaScript
http://bit.ly/2GUmY96