User Manual - Philips€¦ · 2 Press PROG to activate the storing mode. 3 Press PRESET + or PRESET...
16
www.philips.com/welcome OST690 Always there to help you User Manual Question? Contact Philips Register your product and get support at
Transcript of User Manual - Philips€¦ · 2 Press PROG to activate the storing mode. 3 Press PRESET + or PRESET...

www.philips.com/welcome
OST690
Always there to help you
User Manual
Question?Contact Philips
Register your product and get support at

2EN
Contents1 Important 3
2 Your Speaker System 4Introduction 4What's in the box 4Overview of the system 5
3 Get started 6Connect power 6Turn on 7Turn off 7Switch to standby mode 7
4 Play 8Play from a USB device 8Play from Bluetooth-enabled device 9Play from an external audio device 9
5 Listen to FM radio 10Tune to FM radio stations 10Store radio stations automatically 10Store radio stations manually 10Select a preset radio station 10
6 Other features 11Charge your mobile phone 11Adjust display brightness 11Adjust volume 11Enhance bass 11
7 Product information 12Specifications 12Supported MP3 disc formats 12USB playability information 12
8 Troubleshooting 13About Bluetooth device 14
9 Notice 14

3 EN
1 Important• Read these instructions.• Follow all instructions.• Do not block any ventilation openings.
Install in accordance with the manufacturer's instructions.
• Do not install near any heat sources such as radiators, heat registers, stoves, or otherapparatus(includingamplifiers)thatproduce heat.
• Protect the power cord from being walked on or pinched, particularly at plugs, convenience receptacles, and the point where they exit from the unit.
• Only use attachments or accessories specifiedbythemanufacturer.
• Unplug this unit during lightning storms or when unused for long periods of time.
• Referallservicingtoqualifiedservicepersonnel. Servicing is required when the unit has been damaged in any way.
• Battery usage CAUTION – To prevent battery leakage which may result in bodily injury, property damage, or damage to the unit: • Install all batteries correctly, + and - as
marked on the unit. • Do not mix batteries (old and new or
carbonandalkaline,etc.).• Remove batteries when the unit is not
used for a long time.• Batteries (battery pack or batteries
installed)shallnotbeexposedtoexcessiveheatsuchassunshine,fireorthelike.
• Tropical condition has been considered and complied.
• The unit shall not be exposed to dripping or splashing.
• Do not place any sources of danger on theunit(e.g.liquidfilledobjects,lightedcandles).
• Where the MAINS plug or an appliance coupler is used as the disconnect device,
the disconnect device shall remain readily operable.
Warning
• Never remove the casing of this unit. • Never place this unit on other electrical equipment.

4EN
2 Your Speaker System
IntroductionWith this speaker system, you can:• listen to FM radio; • enjoy audio from Bluetooth-enabled
devices, USB device, and other external audio devices; and
• charge your mobile phone with the supplied USB cable.
The system offers you Dynamic Bass Boost (DBB)toenrichsound.
What's in the boxCheck and identify the contents of the package: • Main unit• AC power cord• USB cable for charging• Short user manual• Safety¬iceleaflet

5 EN
Overview of the system
a Source selector
• Select a source: BLUETOOTH, FM, or USB.
b LED indicator
c ON/OFF• Turn the system on or off.
d • Connect a USB storage device. • Charge a mobile phone with the
supplied USB cable.
e AUDIO IN• Connect an external audio device.
f Slider• Stabilize the mobile phone while
charging.
g VOLUME• Adjust volume.
h - TUNING +• Tune to FM radio stations manually.
ab
cd
e
l
m
n
k
hij
g
f
rq
po
MODE PROG
SEARCH -PRESET - PROGPRESET +SEARCH +
ALB ALB
i DBB• Turn dynamic bass enhancement on
or off.
j Display panel
k FM antenna• Improve FM radio reception.
l ALB/PRESET -/+• Select a preset radio station.• Skip to the previous or next album.• Adjust display brightness.
m MODE• Selectarepeatorshufflemode.• Activate brightness adjustment.
n / SEARCH+/-• Skip to the previous or next track.• Tune to FM radio stations automatically.• Search within a track.
o PROG• Program the play sequence of tracks. • Program FM radio stations.

6EN
p • Open or close the compartment.
q • Start or pause play.
r • Stop play.• Erase a program.
3 Get startedAlways follow the instructions in this chapter in sequence.
Connect powerThe system can be powered by either AC power or batteries.
Option 1: Battery power
Caution
• Batteries contain chemical substances, so they should be disposed of properly.
Note
• Batteries are not supplied with the accessories.
1 Open the battery compartment. 2 Insert6batteries(type:R14/UM2/CCELL)
withcorrectpolarity(+/-)asindicated.3 Close the battery compartment.

7 EN
Option 2: AC power
Warning
• Risk of product damage! Make sure that the power supply voltage corresponds to the voltage printed on the back or the underside of the system.
• Risk of electric shock! When you disconnect the AC power, always pull the plug from the socket. Never pull the cord.
Connect the AC power cord to:• the AC~ MAINS socket on the back of the
system. • the wall outlet.
Tip
• To save energy, turn off the system after use.
Turn onSwitch the power slide to the ON position. » The system switches to the last selected
source. » The LED indicator lights up.
Turn offSwitch the power slide to the OFF position. » The LED indicator turns off.
Switch to standby mode• In AC power supply mode, if there is no
operation for 3 hours, this product will switch to standby mode automatically for energy-saving.Afterthefirst30-minuteinactivity, the display will start to show the remaining time before entering standby mode(from149:59to0:00).
• In DC power supply mode, if there is no operation for 15 minutes, this product will switch to standby mode automatically forenergy-saving.Afterthefirst5-minuteinactivity, the display will start to show the remaining time before entering standby mode(from9:59to0:00).
» You may press to cancel the countdown and resume normal operation, or continue charging.

8EN
4 Play
Play from a USB deviceNote
• Make sure that your USB device contains playable audio content.
1 Rotate the source selector to the USB position.
2 Press to open the compartment.3 Insert the USB device into the socket
inside the compartment. » Play starts automatically. If not, press
.
Note
• The USB socket is not compatible with music playback from your smartphone.
Control playIn USB mode, you can control play through the following operations.
/ Selectanaudiofile;Press and hold to fast-forward or fast-reverse the track during playback, then release to resume play.
ALB-/ALB+
Skip to the previous or next MP3/WMA album.Start or pause play.Stop play.
MODE [ ]: Play the current track repeatedly.[ ]: Play the current album repeatedly.[ ]: Play all tracks repeatedly.[ ]: Play tracks randomly.To return to normal play, press MODE repeatedly until the repeat orshuffleiconsdisappear.
Program tracksIn USB mode, you can program the play sequence of tracks. A maximum of 20 tracks can be programmed.1 Press to stop playback.2 Press PROG to activate the programming
mode. » [PROG] is displayed and [P01] begins
to blink.
3 For MP3/WMA tracks, press ALB -/ALB + to select an album.
4 Press / to select a track number, then press PROGtoconfirm.
5 Repeat steps 3-4 to program more tracks.6 Press to play the programmed tracks.
» During play, [PROG] (program)isdisplayed.
• To erase the program, press twice.

9 EN
Play from Bluetooth-enabled device
Note
• The effective operating range between the system and thepaireddeviceisapproximately10meters(30feet).
• Any obstacle between the system and the device can reduce the operational range.
• Compatibility with all Bluetooth devices is not guaranteed.
1 Rotate the source selector to the BLUETOOTH position.
2 On your Bluetooth device, enable Bluetooth and search for Bluetooth devices that can be paired (refer to the user manualofthedevice).
3 When [OST690] is displayed on your device, select it to start pairing and connection. » After successful pairing and connection,
the system beeps twice.
4 Play audio on your device. » Audio streams from your device to this
system.
To disconnect the Bluetooth-enabled device:• Deactivate Bluetooth on your device; or• Move the device beyond the
communication range.
To clear Bluetooth pairing history:Press and PROG together for 3 seconds. » The current Bluetooth connection is
disconnected. » After successful clearing, [CLR](clear)
blinks for 5 seconds, then [-] scrolls on the display.
Play from an external audio deviceYou can also listen to an external audio device such as an MP3 player through this system.1 Press to open the compartment.2 Connect an audio cable (3.5mm, not
supplied)to:• the AUDIO IN socket inside the
compartment.• the headphone socket on an external
device. » The system switches to Audio-in mode
automatically.
3 Play audio on the external device (see the
usermanualofthedevice).

10EN
5 Listen to FM radio
Tune to FM radio stationsNote
• For better reception, fully extend and adjust the position of the FM antenna.
1 Rotate the source selector to the FM position.
2 Press SEARCH +/-. » The system tunes to a station with
strong reception automatically.
3 Repeat step 2 to tune to more stations.
To tune to a radio station manually:Rotate the tuning knob slowly.
Store radio stations automaticallyIn tuner mode, press and hold PROG for 2 seconds. » The system stores all the available FM radio
stations. » Thefirststoredradiostationisbroadcast
automatically.
Store radio stations manuallyNote
• You can store a maximum of 20 FM radio stations.
1 Tune to an FM radio station.2 Press PROG to activate the storing mode.
3 Press PRESET + or PRESET - to allocate a number(1to20)tothisradiostation,thenpress PROGtoconfirm. » The preset number and the frequency
of the preset station are displayed.
4 Repeat the above steps to store other stations.
Note
• To remove a pre-stored FM radio station, store another station in its place.
Select a preset radio stationIn FM tuner mode, press PRESET + or PRESET - to select a preset radio station.

11 EN
6 Other features
Charge your mobile phoneNote
• Make sure that you have switched on the system.
1 Rotate the source selector to BLUETOOTH/CHR or FM/CHR
2 Press to open the compartment.3 Connect the supplied USB cable to:
• the socket inside the compartment.• the USB socket on your mobile phone. » The charging icon is displayed on your
phone.
4 Adjust the slider inside the compartment
to stabilize your phone.
BLUETOOTH/CHR
USB
FM/CHR
BLUETOOTH/CHR
USB
FM/CHR
5 Close the compartment.
Note
• You cannot charge your mobile phone when the system is powered by the batteries.
Adjust display brightness
1 Press and hold MODE for 3 seconds.2 Press ALB/PRESET -/+ repeatedly to adjust
the display brightness.
Adjust volumeRotate the VOLUME knob to adjust volume.
Enhance bassTo turn dynamic bass boost on or off, switch the DBB slide to the ON or OFF position.
12EN
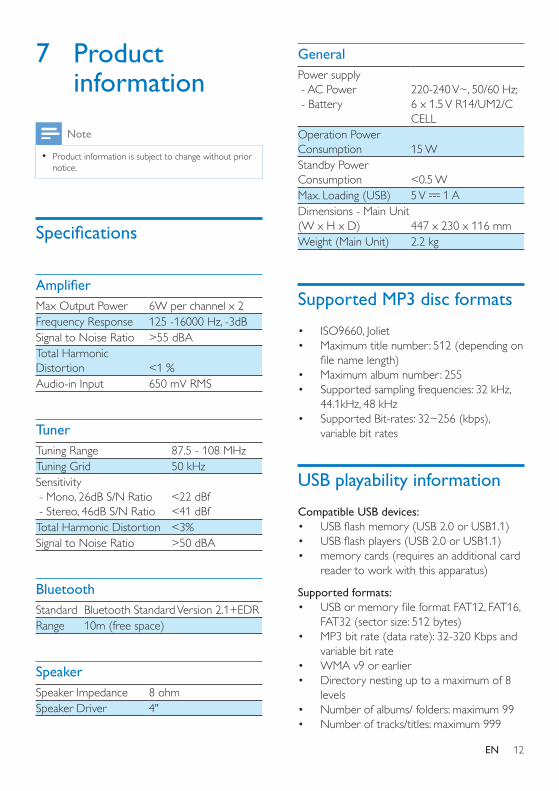
7 Product information
Note
• Product information is subject to change without prior notice.
Specifications
AmplifierMax Output Power 6W per channel x 2Frequency Response 125 -16000 Hz, -3dBSignal to Noise Ratio >55 dBATotal Harmonic Distortion
<1 %
Audio-in Input 650 mV RMS
TunerTuning Range 87.5 - 108 MHzTuning Grid 50 kHzSensitivity - Mono, 26dB S/N Ratio - Stereo, 46dB S/N Ratio
<22 dBf<41 dBf
Total Harmonic Distortion <3%Signal to Noise Ratio >50 dBA
BluetoothStandard Bluetooth Standard Version 2.1+EDRRange 10m(freespace)
SpeakerSpeaker Impedance 8 ohmSpeaker Driver 4"
GeneralPower supply - AC Power - Battery
220-240 V~, 50/60 Hz; 6 x 1.5 V R14/UM2/C CELL
Operation Power Consumption
15 W
Standby Power Consumption
<0.5 W
Max.Loading(USB) 5 V 1 ADimensions - Main Unit (WxHxD)
447 x 230 x 116 mm
Weight(MainUnit) 2.2 kg
Supported MP3 disc formats• ISO9660, Joliet• Maximum title number: 512 (depending on
filenamelength)• Maximum album number: 255• Supported sampling frequencies: 32 kHz,
44.1kHz, 48 kHz• SupportedBit-rates:32~256(kbps),
variable bit rates
USB playability informationCompatible USB devices:• USBflashmemory(USB2.0orUSB1.1)• USBflashplayers(USB2.0orUSB1.1)• memory cards (requires an additional card
readertoworkwiththisapparatus)
Supported formats:• USBormemoryfileformatFAT12,FAT16,
FAT32(sectorsize:512bytes)• MP3bitrate(datarate):32-320Kbpsand
variable bit rate• WMA v9 or earlier• Directory nesting up to a maximum of 8
levels• Number of albums/ folders: maximum 99• Number of tracks/titles: maximum 999

13 EN
• ID3 tag v2.0 or later• File name in Unicode UTF8 (maximum
length:128bytes)
Unsupported formats:• Empty albums: an empty album is an album
thatdoesnotcontainMP3/WMAfiles,andis not be shown in the display.
• Unsupportedfileformatsareskipped.Forexample,Worddocuments(.doc)orMP3fileswithextension.dlfareignoredandnot played.
• AAC,WAV,PCMaudiofiles• DRMprotectedWMAfiles(.wav,.m4a,
.m4p,.mp4,.aac)• WMAfilesinLosslessformat
8 TroubleshootingWarning
• Never remove the casing of this device.
To keep the warranty valid, never try to repair the system yourself. If you encounter problems when using this device, check the following points before requesting service. If the problem remains unsolved, go to the Philips Web page (www.philips.com/support).WhenyoucontactPhilips, make sure that the device is nearby and the model number and serial number are available.
No power • Ensure that the AC power plug of the unit
is connected properly. • Ensure that there is power at the AC
outlet. • Insert the batteries with their polarities
(+/–signs)alignedasindicated. • Replace the battery.
No sound or poor sound • Adjust the volume.
No response from the unit • Disconnect and reconnect the AC power
plug, then turn on the system again.
USB device not supported • The USB device is incompatible with the
apparatus. Try another one.
Poor radio reception • Increase the distance between the unit and
your TV or VCR. • Fully extend the FM antenna.

14EN
About Bluetooth device
Music playback is unavailable on the system even after successful Bluetooth connection. • The device cannot be used with the
system to play music.
The audio quality is poor after connection with a Bluetooth-enabled device. • The Bluetooth reception is poor. Move
the device closer to the system or remove any obstacle between the device and the system.
Cannot connect with the system. • Thedevicedoesnotsupporttheprofiles
required for the system. • The Bluetooth function of the device is not
enabled. Refer to the user manual of the device for how to enable the function.
• The system is not in the pairing mode. • The system is already connected with
another Bluetooth-enabled device. Disconnect that device or all other connected devices and then try again.
The paired device connects and disconnects constantly. • The Bluetooth reception is poor. Move
the device closer to the system or remove any obstacle between the device and the system.
• For some devices, the Bluetooth connection may be deactivated automatically as a power-saving feature. This does not indicate any malfunction of the system.
9 NoticeAnychangesormodificationsmadetothisdevice that are not expressly approved by WOOX Innovations may void the user’s authority to operate the equipment.
This product complies with the radio interference requirements of the European Community.
Your product is designed and manufactured with high quality materials and components, which can be recycled and reused.
When this crossed-out wheeled bin symbol is attached to a product it means that the product is covered by the European Directive 2002/96/EC.Please inform yourself about the local separate collection system for electrical and electronic products.Please act according to your local rules and do not dispose of your old products with your normal household waste. Correct disposal of your old product helps to prevent potential negative consequences for the environment and human health.
Your product contains batteries covered by the European Directive 2006/66/EC, which cannot be disposed with normal household waste.Please inform yourself about the local

15 EN
rules on separate collection of batteries because correct disposal helps to prevent negative consequences for the environmental and human health. Environmental informationAll unnecessary packaging has been omitted. We have tried to make the packaging easy to separateintothreematerials:cardboard(box),paperpulp(buffer)andpolyethylene(bags,protectivefoamsheet.)Your system consists of materials which can be recycled and reused if disassembled by a specialized company. Please observe the local regulations regarding the disposal of packaging materials, exhausted batteries and old equipment.Class II equipment symbol
This symbol indicates that the unit has a double insulation system.
Note
• The type plate is located on the bottom of the apparatus.

Specifications are subject to change without notice2013 © WOOX Innovations Limited. All rights reserved.This product was brought to the market by WOOX Innovations Limited or one of its affiliates, further referred to in this document as WOOX Innovations, and is the manufacturer of the product. WOOX Innovations is the warrantor in relation to the product with which this booklet was packaged. Philips and the Philips Shield Emblem are registered trademarks of Koninklijke Philips N.V.
OST690_10_UM_V2.0