User Manual - Outspot · User Manual Model: VV-SV-TT-xx English PACKAGE CONTENT • Turntable...
20
User Manual Model: VV-SV-TT-xx
Transcript of User Manual - Outspot · User Manual Model: VV-SV-TT-xx English PACKAGE CONTENT • Turntable...

User ManualModel: VV-SV-TT-xx


EN 03
User ManualModel: VV-SV-TT-xx
English
PACKAGE CONTENT• Turntable (including 45 rpm adapter holder)• Power Adapter• User’s Manual
BEFORE USE• Choose a safe location and avoid placing the turntable in direct sunlight or near any heat source. • Avoid locations subject to vibrations, excessive dust, cold or humidity. • Do not open the cabinet as this may result in electrical shock. • Do not attempt to clean the unit with chemical solvents as this might damage the finishing. A clean, dry cloth is recommended for cleaning. • Keep this manual for future reference.
• 45 RPM adapter holder – Holds the included 45 RPM adapter. When not using the adapter, please place it in this holder.
• Tone arm – The turntable comes with a ready to use pre-balanced tone arm and cartridge. The tone arm can be raised and lowered by hand, or by using the raise / lower lever . Please note that the tone arm needs to be moved away from resting position (on the arm clip) for the turntable motor to activate if AUTO STOP is ON.
• Lift lever• 33 / 45/78 RPM switch – This switch controls the RPM of the turntable platter.• AUTO STOP ON/OFF switch• Ceramic cartridge• Platter – Place your record here. Please use the 45 RPM adapter, if the spindle is the
incorrect size.• Spindle.• Power ON/OFF and volume control.
TURNTABLE PARTS & FEATURES
1
2
3
3
4567
89
123
45
6
8
7

EN 04
LISTENING TO A RECORD• Lift the buckle on the front of the turntable and open the lid.• Turn the power & volume control knob clockwise. • Place a record on the turntable platter and select the desired speed (33/45/78) o according to the record. NOTE: when playing a 45 rpm record, use the included 45 rpm adapter .• Open the tone arm clip to release the tone arm . Push the lift lever backward to raise the tone arm and gently move the tone arm to the desired position over the record. The turntable will begin to spin when the arm is moved toward the record. Push the lift lever forward lower the tone arm slowly onto the desired position on the record to begin playing the record. Please note: The record will begin to spin only when the tone arm is moved over to the record if the AUTO STOP is turned ON. • If the AUTO STOP ON/OFF Switch is turned ON, the record will stop automatically when finished (For some vinyl records, it will stop when it the record did not come to the end, or it will not stop when it comes to the end). This due to the position of the tone arm. If Auto Stop Control is turned OFF, the record will NOT stop automatically when finished.
LINE IN FUNCTION• Turn off the power & volume control knob • Connect your your Smartphone, Tablet, MP3 or other Digital Audio Player to the LINE IN o port with a 3.5mm-3.5mm audio stereo jack cable (not included).• You can enjoy the music of the connected device at the turntable player.
LINE OUT FUNCTION• Turn off the power & volume control knob • Connect the RCA connectors to your external amplifier or speakers (RCA cable not included).• You can enjoy the music of the vinyl records at your own (speaker) audio system.
HEADPHONE FUNCTION• Connect your headphone, with 3.5 mm stereo jack to the headphone port .• You can enjoy the music of the vinyl records at your headphone.
• Headphone port• Power Adaptor connection port• Line out port (RCA) – Use to connect to external amplifier or speakers• Line in port (3.5 mm) – For connecting your Smartphone, Tablet, MP3 or other Digital Audio Player
10
97 4
12
5
913
9
10
3
111213
9 10 11 12 13

EN 05
HOW TO REPLACE THE TURNTABLE STYLUS (NEEDLE)Removing the Stylus from the Cartridge • Place a screwdriver at the tip of the stylus and push downward as shown in direction .• Remove the stylus by pulling the stylus forward and pushing downward. Installing the Stylus• Hold the tip of the stylus and insert the stylus by pressing as shown in direction .• Push the stylus upward as in direction until the stylus locks into the tip position.
All contents and specification mentioned in this manual are subject to change without prior noticeAll brand / company names, logos and trademarks referenced in this manual are the property of their respective owners
Our products including the packaging are not toys and they might contain small parts and sharp objects. Please keep away from children
TIPS TO BETTER TURNTABLE PERFORMANCE• When opening or closing the turntable cover, handle it gently, gripping it either at the
center or at each sides.• Do not touch the needle tip with your fingers; avoid bumping the needle against the
turntable platter or record edge.• Frequently clean the needle tip-use a soft brush in a “back-to-front’ motion only.• If you must use a needle cleaning fluid, use very sparingly.• Gently wipe the dust cover and turntable housing with a soft cloth. Use only a small
amount of mild detergent to clean the turntable and dust cover.• Never apply harsh chemicals or solvents to any part of the turntable system.
A
BC

NL 06
GebruikshandleidingModel: VV-SV-TT-xx
Dutch
INHOUD VERPAKKING• Platenspeler (inclusief 45 toerenadapter)• Stroomadapter• Gebruikshandleiding
VÓÓR GEBRUIK• Kies een veilige locatie voor de platenspeler en plaats hem niet in direct zonlicht of in de buurt van een warmtebron. • Vermijd locaties die blootstaan aan trillingen, vrieskou, een te hoge luchtvochtigheid of een buitensporige hoeveelheid stof. • Bij het openen van de behuizing bestaat de kans op een elektrische schok.• Reinig de platenspeler niet met chemische oplosmiddelen, aangezien die schadelijk zijn voor de lak. Voor reinigen wordt een schone, droge doek aanbevolen. • Bewaar deze handleiding voor toekomstig gebruik.
• Houder voor het opbergen van de 45 toerenadapter. Als u de adapter niet gebruikt, leg hem dan in deze houder.
• Toonarm – De platenspeler wordt geleverd met een direct te gebruiken, uitgebalanceerde toonarm, inclusief element. U kunt de toonarm met de hand op en neer bewegen of daarvoor de speciale lifthendel gebruiken . Als AUTO STOP is ingeschakeld, moet de toonarm van de rustpositie (in de toonarmclip) af worden bewogen om de motor van de platenspeler te activeren.
• Lifthendel• 33/45/78 toerenschakelaar – Deze schakelaar bepaalt de draaisnelheid van het
draaiplateau.• AUTO STOP aan-uitschakelaar• Keramisch element• Draaiplateau – Leg hier uw plaat op. Gebruik de 45 toerenadapter als de as de
verkeerde maat heeft.
ONDERDELEN EN FUNCTIES
1
2
34
567
123
45
6
8
7
3

NL 07
EEN PLAAT AFSPELEN• Open het lipje aan de voorzijde van de platenspeler en til het deksel op.• Draai de aan-uitknop met de klok mee. • Leg de plaat op het draaiplateau en kies de juiste snelheid (33/45/78) voor de plaat in kwestie. LET OP: Als u een 45 toerenplaat afspeelt, gebruik dan de meegeleverde 45 toerenadapter .• Open de toonarmclip om de toonarm te ontgrendelen. Duw de lifthendel naar achteren om de toonarm op te tillen en beweeg de toonarm rustig naar de gewenste positie boven de plaat. Het draaiplateau begint te draaien wanneer de toonarm boven de plaat wordt bewogen. Trek de lifthendel naar voren om de toonarm langzaam op de gewenste positie te laten zakken en het afspelen te starten. LET OP: Het draaiplateau begint alleen te draaien als de toonarm boven de plaat wordt bewogen en AUTO STOP is ingeschakeld.• Als AUTO STOP is ingeschakeld, stopt het draaiplateau automatisch met draaien wanneer de plaat is afgelopen. (Bij sommige vinylplaten stopt het draaiplateau al als de plaat nog niet is afgelopen; bij andere stopt het helemaal niet.) Dit wordt aangestuurd door de positie van de toonarm. Als AUTO STOP is uitgeschakeld, stopt de plaat NIET wanneer hij is afgelopen.
DE LINE-IN-FUNCTIE• Schakel de aan-uit- en volumeknop uit.• Verbind uw smartphone, tablet, MP3-speler of andere digitale audiodevice met een 3,5mm-3,5mm-stereo-jack (niet meegeleverd) aan de LINE-IN-ingang .• U kunt nu via de platenspeler genieten van de muziek op de verbonden device.
DE LINE-OUT-FUNCTIE• Schakel de aan-uit- en volumeknop uit.• Verbind de tulpstekkertjes aan de externe versterker of speakers (tulpsnoer niet meegeleverd).• U kunt nu uw platen afluisteren via uw eigen speakersysteem.
DE KOPTELEFOON• Verbind de koptelefoon door middel van een 3,5mm-stereo-jack aan de koptelefooningang .• U kunt nu uw platen afluisteren door uw eigen koptelefoon.
1. Koptelefooningang2. Stroomadapteringang3. Line-out (tulp) – Voor het aansluiten van een externe versterker of speakers4. Line-in (3,5 mm) – Voor het aansluiten van een smartphone, tablet, MP3-speler of
andere digitale audiodevice
• As• Aan-uitknop en volumeregeling10111213
9 10 11 12 13
89
97 4
12
5
9
13
9
10
3

NL 08
DE STYLUS (NAALD) VERVANGENDe stylus uit het element verwijderen• Zet een schroevendraaier op het puntje van de stylus en druk hem naar beneden in richting .• Verwijder de stylus door hem naar voren te trekken en naar beneden te duwen. De nieuwe stylus plaatsen• Houd de stylus bij het uiteinde vast en steek hem in het element door te drukken in richting .• Druk de stylus omhoog in richting totdat hij in de juiste positie vastklikt.
Alle in deze handleiding vermelde inhoud en specificaties zijn onderhevig aan wijzigingen, zonder voorafgaande kennisgeving.Alle in deze handlelding vermelde merk-/bedrijfsnamen, logo’s en handelsmerken zijn het eigendom van de desbetreffende eigenaren.
TIPS VOOR BETERE PRESTATIES• Als u het deksel opent of sluit, wees dan voorzichtig en pak het deksel in het midden of
aan beide zijkanten vast.• Raak de punt van de naald niet aan met uw vingers; laat de naald niet tegen het
draaiplateau of de rand van de plaat botsen.• Maak de naald geregeld schoon. Gebruik hiervoor een zachte borstel die u van achteren
naar voren beweegt.• Als u speciale reinigingsvloeistof voor de naald wilt gebruiken, doe dat dan spaarzaam.• Gebruik een zachte doek om stof van het deksel en de behuizing te verwijderen. Als u
de behuizing en het deksel wilt reinigen, gebruik dan een kleine hoeveelheid van een mild schoonmaakmiddel.
• Gebruik nooit bijtende stoffen of oplosmiddelen om de platenspeler te reinigen.
A
BC

FR 09
Manuel d’utilisateurModel: VV-SV-TT-xx
French
CONTENU DU PACK• Tourne-disque (avec support pour adaptateur 45 tours)• Adaptateur secteur• Manuel d’utilisateur
AVANT L’UTILISATION• Choisir un endroit sûr et éviter de placer le tourne-disque en plein soleil ou près d’une source de chaleur. • Éviter les endroits soumis à des vibrations, la poussière excessive, le froid ou l’humidité. • Ne pas ouvrir le boîtier car cela pourrait provoquer un choc électrique. • Ne pas essayer de nettoyer l’unité avec un produit chimique car cela pourrait endommager le boîtier. Un chiffon sec et propre est recommandé pour le nettoyage. • Conserver ce manuel pour consultation ultérieure.
• Support pour adaptateur 45 RPM – avec adaptateur 45 RPM. Si l’adaptateur n’est pas utilisé, le placer dans ce support.
• Bras – Le tourne-disque est livré avec un bras équilibré et une cartouche prêts à l’emploi. Le bras peut être relevé et baissé manuellement, ou à l’aide d’un levier . Attention : le bras de lecture doit être relevé du support pour que le moteur du tourne-disque soit mis en marche si AUTO STOP est en position ON.
• Levier de levage• Commutateur 33 / 45/78 RPM – Ce commutateur contrôle la vitesse du plateau du tourne-disque.• Commutateur AUTO STOP ON/OFF• Cartouche céramique• Plateau – Placer votre disque à cet endroit. Utiliser l’adaptateur 45 RPM, si l’axe n’a pas
la taille correcte.• Axe.• Bouton ON/OFF et contrôle de volume.
PARTIES DÉTACHÉES & ACCESSOIRES DU TOURNE-DISQUE
123
45
6
8
7
3
1
2
34567
89

FR 10
ÉCOUTER UN DISQUE• Relever le clip à l’avant du tourne-disque et ouvrir le couvercle.• Tourner le bouton ON/OFF & volume dans le sens des aiguilles d’une montre. • Placer un disque sur le plateau du tourne-disque et sélectionner la vitesse voulue (33/45/78) en fonction du disque. ATTENTION : pour tourner un disque 45 tours, utiliser l’adaptateur 45 tours inclus .• Ouvrir le clip du bras de lecture pour libérer le bras de lecture . Pousser le levier de levage vers l’arrière pour relever le bras de lecture et déplacer délicatement le bras de lecture jusqu’à la position désirée au-dessus du disque. Le plateau commencera à tourner dès que le bras est déplacé en direction du disque. Pousser le levier de levage en avant pour abaisser lentement le bras de lecture sur le disque à l’endroit désiré, et le disque commencera à jouer. Veuillez noter : Le disque ne commencera à tourner que si le bras de lecture est déplacé au-dessus du disque si AUTO STOP est en position ON. • Si le commutateur AUTO STOP ON/OFF est en position ON, le tourne-disque s’arrêtera automatiquement à la fin du disque (Pour certaines disques en vinyle, il s’arrêtera avant que le disque ne soit terminé, ou bien il ne s’arrêtera pas à la fin du disque). Cela est causé par la position du bras de lecture. Si le commutateur AUTO STOP est en position OFF, le tourne-disque ne s’arrêtera PAS automatiquement à la fin du disque.
FONCTION LINE IN• Éteindre le bouton ON/OFF & volume. • Brancher votre Smartphone, Tablette, MP3 ou autre lecteur audio numérique au port LINE IN avec un câble audio stéréo jack 3,5mm-3,5mm (non inclus).• Vous pourrez écouter la musique de l’appareil connecté au tourne-disque.
FONCTION LINE OUT• Éteindre le bouton ON/OFF & volume • Brancher les connecteurs RCA à votre amplificateur ou haut-parleurs externes (câble RCA non inclus).• Vous pourrez écouter la musique des disques en vinyle sur votre propre système audio.
FONCTION ÉCOUTEURS• Connecter vos écouteurs avec fiche jack stéréo 3,5mm au port pour écouteurs .• Vous pourrez écouter la musique des disques en vinyle sur vos écouteurs.
• Port pour écouteurs• Port de connexion adaptateur secteur• Port de sortie Line out (RCA) – Utiliser pour connecter un amplificateur ou des haut-
parleurs externes• Port d’entrée Line in (3,5mm) – Pour la connexion de votre Smartphone, Tablette, MP3
ou autre lecteur audio numérique
10
97
41
2
5
9
13
9
10
3
1112
13
9 10 11 12 13

FR 11
COMMENT REMPLACER L’AIGUILLE DU TOURNE-DISQUERetirer l’aiguille de la cartouche • Placer un tournevis à la pointe de l’aiguille et la pousser vers le bas comme indiqué en .• Retirer l’aiguille en tirant sur l’aiguille et la baissant. Mettre en place l’aiguille• Tenir la pointe de l’aiguille et insérer l’aiguille en poussant comme indiqué en .• Pousser l’aiguille vers le haut comme indiqué en jusqu’à ce qu’elle se bloque dans la bonne position.
Tous contenus et spécifications mentionnés dans ce manuel peuvent être modifiés sans préavisTous noms de marques / sociétés, logos et marques déposées mentionnés dans ce manuel sont la propriété de leurs détenteurs respectifsNos produits, y compris l’emballage, ne sont pas des jouets et ils peuvent contenir de petites pièces et des objets tranchants. Tenir à l’écart
des enfants
CONSEILS POUR UNE MEILLEURE PERFORMANCE DU TOURNE-DISQUE• Pour ouvrir ou fermer le couvercle du tourne-disque, le manipuler avec précaution, en le
tenant soit par le centre, soit par les deux côtés en même temps.• Ne pas toucher la pointe de l’aiguille des doigts, éviter de heurter l’aiguille contre le
plateau ou le bord du disque.• Nettoyer fréquemment la pointe de l’aiguille à l’aide d’un pinceau, dans un mouvement
arrière-avant uniquement.• Si vous devez utiliser un fluide pour nettoyer l’aiguille, n’en user que très peu.• Essuyer délicatement le couvercle anti-poussière et le boîtier avec un chiffon doux.
N’utiliser que très peu de détergent doux pour nettoyer le tourne-disque et le couvercle anti-poussière.
• Ne jamais utiliser de produits chimiques ou de dissolvants agressifs sur aucune partie du tourne-disque.
A
BC
DE 12
BedienungsanleitungModel: VV-SV-TT-xx
Deutsch
VERPACKUNGSINHALT• Plattenspieler (mit Halter für 45-U/min-Adapter)• Netzadapter• Bedienungsanleitung
VOR GEBRAUCH• Wählen Sie einen sicheren Aufstellungsort. Stellen Sie den Plattenspieler nicht im direkten Sonnenlicht und nicht in Nähe einer Wärmequelle auf. • Vermeiden Sie Orte mit Vibrationen, Staub, Kälte oder Feuchtigkeit. • Das Gehäuse nicht öffnen, da es einen Stromschlag zur Folge haben kann. • Das Gerät nicht mit chemischen Lösungsmitteln reinigen: Diese Mittel können die Oberfläche beschädigen. Zur Reinigung wird ein sauberes, trockenes Tuch empfohlen. • Bewahren Sie diese Anleitung zum späteren Nachschlagen auf.
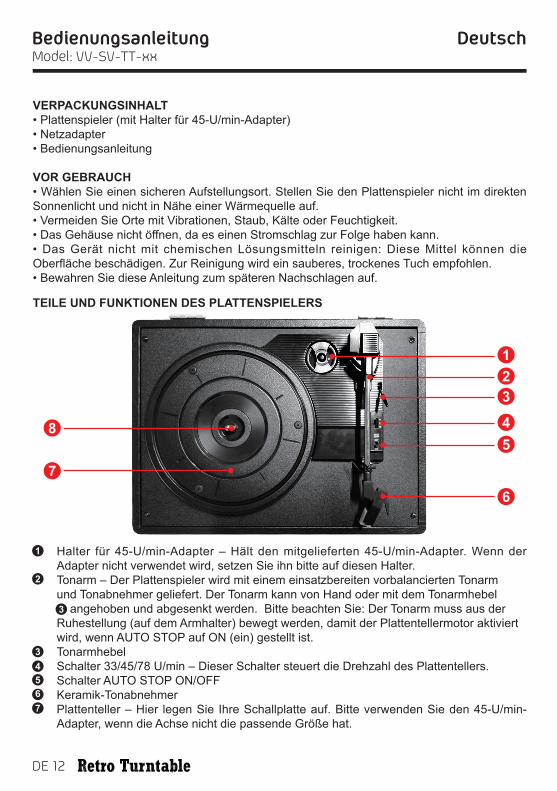
• Halter für 45-U/min-Adapter – Hält den mitgelieferten 45-U/min-Adapter. Wenn der Adapter nicht verwendet wird, setzen Sie ihn bitte auf diesen Halter.
• Tonarm – Der Plattenspieler wird mit einem einsatzbereiten vorbalancierten Tonarm und Tonabnehmer geliefert. Der Tonarm kann von Hand oder mit dem Tonarmhebel .. angehoben und abgesenkt werden. Bitte beachten Sie: Der Tonarm muss aus der Ruhestellung (auf dem Armhalter) bewegt werden, damit der Plattentellermotor aktiviert wird, wenn AUTO STOP auf ON (ein) gestellt ist.
• Tonarmhebel• Schalter 33/45/78 U/min – Dieser Schalter steuert die Drehzahl des Plattentellers.• Schalter AUTO STOP ON/OFF• Keramik-Tonabnehmer• Plattenteller – Hier legen Sie Ihre Schallplatte auf. Bitte verwenden Sie den 45-U/min-
Adapter, wenn die Achse nicht die passende Größe hat.
TEILE UND FUNKTIONEN DES PLATTENSPIELERS
1
2
34567
123
45
6
8
7
3

DE 13
WIEDERGABE EINER SCHALLPLATTE• Heben Sie die Verriegelung vorn am Plattenspieler an und öffnen Sie die Haube.• Drehen Sie den kombinierten Ein/Aus-Schalter und Lautstärkeregler im Uhrzeigersinn. • Legen Sie eine Schallplatte auf den Plattenteller und wählen Sie die gewünschte Drehzahl (33/45/78) für die Schallplatte. HINWEIS: Verwenden Sie zur Wiedergabe einer 45-U/min-Schallplatte den mitgelieferten 45-U/min-Adapter .• Öffnen Sie zum Freigeben des Tonarms den Tonarm-Clip. Drücken Sie den Tonarmhebel ... nach hinten, um den Tonarm anzuheben, und bewegen Sie den Tonarm vorsichtig in die gewünschte Position über der Schallplatte. Der Plattenteller beginnt sich zu drehen, wenn der Tonarm in Richtung Schallplatte bewegt wird. Drücken Sie den Tonarmhebel nach vorn und senken Sie den Tonarm langsam an der gewünschten Position auf die Schallplatte ab, um die Wiedergabe zu beginnen. Bitte beachten Sie: Nur wenn AUTO STOP auf ON (ein) eingestellt ist, beginnt sich der Plattenteller zu drehen, wenn der Tonarm in Richtung Schallplatte bewegt wird. • Wenn der Schalter AUTO STOP ON/OFF auf ON (ein) steht, hält die Schallplatte am Ende automatisch an (bei bestimmten Schallplatten hält der Plattenspieler an, obwohl die Schallplatte noch nicht zu Ende ist, oder er hält nicht an, obwohl die Schallplatte zu Ende ist). Das ist auf die Position des Tonarms zurückzuführen. Ist die Auto-Stop-Steuerung auf OFF (aus) geschaltet, hält die Schallplatte am Ende NICHT automatisch an.
LINE-EINGANGSFUNKTION• Schalten Sie das Gerät am kombinierten Ein-Aus-Schalter und Lautstärkeregler aus.• Schließen Sie Ihr Smartphone, Tablet, Ihren MP3- oder anderen digitalen Audioplayer mit einem Audiokabel mit 3,5-mm–3,5-mm-Stereosteckern (nicht mitgeliefert) an den Anschluss LINE IN an.• Jetzt können Sie die Musik auf dem angeschlossenen Gerät über den Plattenspieler wiedergeben.
LINE-AUSGANGSFUNKTION• Schalten Sie das Gerät am kombinierten Ein-Aus-Schalter und Lautstärkeregler aus.• Verbinden Sie die Cinch-Buchsen mit Ihrem externen Verstärker oder Ihren externen Lautsprechern (Cinch-Kabel nicht mitgeliefert).• Jetzt können Sie die Musik auf Schallplatten über Ihr eigenes Audio-System (bzw. die Lautsprecher) wiedergeben.
• Achse.• EIN/AUS-Schalter und Lautstärkeregler.• Kopfhörer-Anschluss• Netzadapter-Anschluss• Line-Ausgangsanschluss (Cinch) – zum Anschluss an einen externen Verstärker oder
externe Lautsprecher• Line-Eingangsbuchse (3,5 mm) – zum Anschluss Ihres Smartphone, Tablets, MP3- oder
anderen digitalen Audioplayers
101112
13
9 10 11 12 13
89
97
41
2
5
9
13
9
3

DE 14
KOPFHÖRER-FUNKTION• Schließen Sie den Kopfhörer mit einem 3,5-mm-Stereostecker an die Kopfhörerbuchse an.• Jetzt können Sie die Musik der Schallplatten mit dem Kopfhörer hören.
AUSTAUSCH DER NADEL AM PLATTENSPIELERAusbauen der Nadel aus dem Tonabnehmer • Setzen Sie einen Schraubendreher an der Spitze der Nadel an und drücken Sie wie
abgebildet in Richtung nach unten.• Zum Ausbauen ziehen Sie die Nadel nach vorn und drücken gleichzeitig nach unten. Einsetzen der Nadel• Halten Sie Nadel an der Spitze fest und setzen Sie die Nadel ein, indem Sie wie
abgebildet in Richtung drücken.• Drücken Sie die Nadel in Richtung nach oben, bis die Nadel in der Spitzenposition
einrastet.
Änderung aller Inhalte und der technischen Daten in dieser Anleitung ohne vorherige Ankündigung vorbehalten.Alle in dieser Anleitung genannten Marken- und Firmennamen, Logos und Handelsmarken sind Eigentum der entsprechenden Unternehmen.Unsere Produkte (einschließlich Verpackung) sind kein Spielzeug, und sie können Kleinteile und scharfkantige Gegenstände enthalten. Bitte
außerhalb der Reichweite von Kindern aufbewahren
TIPPS FÜR EINE BESSERE LEISTUNG DES PLATTENSPIELERS• Behandeln Sie die Haube des Plattenspielers beim Öffnen oder Schließen vorsichtig,
fassen Sie in der Mitte oder an beiden Seiten an.• Berühren Sie die Nadelspitze nicht mit den Fingern und stoßen Sie nicht mit der Nadel
gegen den Plattenteller oder den Plattenrand.• Reinigen Sie die Nadelspitze häufig. Verwenden Sie dazu nur einen weichen Pinsel, den
Sie von hinten nach vorn bewegen.• Wenn Sie einen flüssigen Nadelreiniger verwenden müssen, sollten Sie ihn sehr
sparsam verwenden.• Wischen Sie die Staubschutzhaube und das Plattentellergehäuse mit einem weichen
Tuch ab. Verwenden Sie zum Reinigen des Plattentellers und der Staubschutzhaube nur eine geringe Menge eines schonenden Reinigungsmittels.
• Verwenden Sie niemals aggressive Chemikalien oder Lösungsmittel an Teilen des Plattenspielersystems.
A
BC
10

CZ 15
Uživatelská příručkaModel: VV-SV-TT-xx
čeština
OBSAH BALENÍ• Gramofon (včetně držáku adaptéru 45 ot./min.)• Adaptér napájení• Uživatelská příručka
PŘED POUŽITÍM• Vyberte bezpečné umístění. Gramofon nesmí být umístěn v dosahu přímého slunečního světla ani v blízkosti zdroje tepla. • Zařízení nesmí být vystaveno působení vibrací, nadměrnému prachu, chladu nebo vlhkosti. • Skříň gramofonu neotvírejte, protože by mohlo dojít k úrazu elektrickým proudem. • K čištění nepoužívejte chemická rozpouštědla, protože by mohla poškodit povrch. Doporučuje se čištění provádět čistým a suchým hadříkem. • Tuto příručku uložte tak, aby byla v případě potřeby k dispozici.
• Držák adaptéru 45 ot./min. – Je určen pro umístění adaptéru 45 ot./min., který je součástí dodávky. Pokud se adaptér právě nepoužívá, měl by být uložen v tomto držáku.
• Ramínko – Gramofon se dodává s předem vyváženým ramínkem a přenoskou, připravený k použití. Ramínko je možné zvednout nebo položit ručně, anebo páčkou .... Ramínkem je potřeba pohnout směrem pryč od klidové polohy (na sponě), aby se aktivoval motor gramofonu v případě, že přepínač AUTO STOP je v poloze ON.
• Zdvihací páčka• Přepínač otáček 33 / 45/78 – Tento přepínač se používá k nastavení otáček talíře gramofonu.• Přepínač AUTO STOP ON/OFF• Keramická přenoska• Talíř – Zde položte desku. V případě vřetena nesprávné velikosti použijte adaptér 45 ot./
min.• Vřeteno.• Zapnutí/vypnutí (ON/OFF) a regulace hlasitosti.
DÍLY A FUNKCE
1
2
3
3
4567
89
123
45
6
8
7

CZ 16
POSLECH NAHRÁVKY• Nadzdvihněte sponu na přední straně gramofonu a otevřete víko.• Otočte knoflíkem pro zapnutí a ovládání hlasitosti směrem zleva doprava. • Na talíř gramofonu položte desku a podle typu desky vyberte odpovídající rychlost (33/45/78) . POZNÁMKA: pro přehrávání desek typu 45 ot./min. používejte adaptér, který je součástí dodávky .• Otevřete sponu ramínka, abyste ramínko uvolnili . Jemně zatlačte zdvihací páčku .. dozadu, abyste zdvihli ramínko, a potom ramínko mírným pohybem přesuňte do požadované polohy nad deskou. Když se ramínko přesune směrem k desce, talíř se začne otáčet. Zatlačením zdvihací páčky směrem dopředu se ramínko pomalu snižuje do požadované polohy a deska začne hrát. Upozornění: Deska se začne otáčet jen tehdy, když je ramínko přesunuto nad desku a přepínač AUTO STOP je v poloze ON. • Pokud je přepínač AUTO STOP ON/OFF v poloze ON, deska se na konci automaticky zastaví (U některých vinylových desek dochází k tomu, že se zastaví i dříve, než skladba skončí, anebo se naopak na konci nahrávky nezastaví). Záleží na poloze ramínka. Pokud je přepínač AUTO STOP v poloze OFF, deska na konci přehrávání automaticky nezastaví.
PŘIPOJENÍ VSTUPNÍCH ZAŘÍZENÍ• Otočte knoflíkem pro zapnutí a ovládání hlasitosti .• Připojte chytrý telefon, tablet, MP3 nebo jiný digitální audio přehrávač do portu LINE IN .. pomocí příslušného připojovacího kabelu šířky 3,5mm (není součástí dodávky).• Můžete si potom hudbu z tohoto připojeného zařízení přehrát na gramofonu.
PŘIPOJENÍ VÝSTUPNÍCH ZAŘÍZENÍ• Otočte knoflíkem pro zapnutí a ovládání hlasitosti .• Do konektorů RCA připojte externí zesilovač nebo reproduktory (kabel RCA není součástí dodávky).• Můžete potom poslouchat hudbu z vinylových desek prostřednictvím svého vlastního audio systému (reproduktorů).
POSLECH ZE SLUCHÁTEK• Připojte sadu sluchátek příslušným kabelem s konektorem šířky 3,5 mm do portu pro sluchátka .• Můžete si potom pouštět hudbu z vinylových desek do sluchátek.
• Port pro sluchátka • Port pro připojení adaptéru napájení• Výstupní port (RCA) – Použijte pro připojení externího zesilovače nebo reproduktorů• Vstupní port (3,5 mm) – Pro připojení vašeho chytrého telefonu, tabletu, MP3 nebo
jiného digitálního audio přehrávače
10
97
41
2
5
913
9
10
3
111213
9 10 11 12 13

CZ 17
VÝMĚNA SNÍMACÍHO HROTUDemontáž snímacího hrotu z přenosky • Umístěte hrot šroubováku na koncovou část snímacího hrotu a zatlačte směrem dolů,
viz směr na obrázku.• Snímací hrot odeberete tak, že za něj zatáhnete směrem dopředu a zatlačíte směrem
dolů. Montáž snímacího hrotu• Snímací hrot uchopte za jeho koncovou část, vložte na jeho určené místo a mírně
zatlačte, viz směr na obrázku.• Hrot mírně tlačte směrem nahoru, viz směr na obrázku, až nadoraz.
Obsah a specifikace uvedené v této příručce mohou být změněny bez předchozího oznámeníVeškeré obchodní značky / názvy společností, loga a ochranné známky, které jsou zmíněny v této příručce, jsou majetkem příslušných vlastníků
Naše výrobky, včetně obalů, nejsou hračky, a mohou obsahovat díly menší velikosti a díly s ostrými hranami. Tyto výrobky nepatří do rukou dětem
TIPY PRO LEPŠÍ VÝKON A DELŠÍ ŽIVOTNOST GRAMOFONU• Když otvíráte nebo zavíráte víko gramofonu, zacházejte s ním jemně - uchopte jej buď
uprostřed nebo po obou stranách.• Nesahejte na snímací hrot rukama; dávejte pozor, aby snímací hrot nenarazil na otočný
talíř ani na okraj desky.• Hrot udržujte v čistotě, k čištění používejte měkký kartáček, kterým pohybujte pouze ve
směru „zezadu dopředu“.• Pokud musíte použít k čištění hrotu čisticí prostředek, použijte jen velmi malé množství.• Prach na víku a na talíři setřete jemným pohybem měkkého hadříku. K čištění víka a
skříně gramofonu použijte jen velmi malé množství šetrného čisticího prostředku.• Na žádnou část systému gramofonu nikdy nenanášejte agresivní chemické látky ani
silná rozpouštědla.
A
BC

EC Declaration Of Conformity
We,Mascot Online BVBellstraat 73861 NP NijkerkThe Netherlands
Declare under our sole responsibility that the product:• Product Brand: Vintage Vinyl• Product Model No: VV-SV-TT-xx• Product Description: Retro Turntable• Product Rating: DC Input: 9V, 600 Mah • Power Adapter Rating: Input: 100~240 VAC, 50/60Hz, Output: 9VDC, Class 2, IPX0, 600 Mah
Following the provisions of the Directives:• Electromagnetic Compatibility (EMC) Directive PA: 2014/30/EC• Electromagnetic Compatibility (EMC) Directive Turntable: 2004/108/EC• Low Voltage Directive (LVD) PA: 2014/35/EU• RoHS Directive: 2011/65/EU
And standards to which Conformity is declared:LVD PA:• EN 60065:2014
EMC PA:• EN 55013:2013• EN 55020:2007+A1+A11:2011• EN 61000-3-2:2014• EN 61000-3-3:2013
EMC Turntable:• EN 55015:2013:2001+A2:2006• EN55020:2007• EN 61000-3-2:2006+A2:2009• EN 61000-3-3:2008
Date & place of issue: Nijkerk, 01-05-2016
Signature & Company stamp:
Authorized Signature name: B. van DijkTitle: Managing Director
This declaration is an EC Type Declaration Of Conformity as referred in EN45014


Version 2016.04.28