User Manual of ScopeImage 9.0- 1.3MG CMOS(MDE-130 Software)
34
= ScopeImage 9.0 Professional imaging software Operation Manual
-
Upload
aaron-aguinaga -
Category
Documents
-
view
1.213 -
download
12
Transcript of User Manual of ScopeImage 9.0- 1.3MG CMOS(MDE-130 Software)

=
ScopeImage 9.0 Professional imaging software
Operation Manual

=
Contents
1 Introduction .................................................................................................................. 1
1.1 Specification........................................................................................................................1 1.2 About ScopeImage 9.0 ........................................................................................................1 1.3 Features ............................................................................................................................. 2 1.4 Assemble .............................................................................................................................3
2. Installation Instruction................................................................................................ 4 2.1 Minimum System Requirements.........................................................................................4 2.2 Common sense about hardware and software .....................................................................5 2.3 Install Introduction ..............................................................................................................5 2.4 Check whether the device is rightly installed......................................................................8
3 Workspace.................................................................................................................... 9 3.1 Menu .................................................................................................................9 3.2 Tools Bar .............................................................................................................................9 3.3 Camera Pane .......................................................................................................................9
4 Operation .................................................................................................................... 12 4.1 Video Mode.......................................................................................................................12
4.1.1 Video Preview ........................................................................................................12 4.1.2 Video Control .........................................................................................................13 4.1.3 Color Adjust ...........................................................................................................14 4.1.4 Capture ...................................................................................................................16
4.2 Image Mode ......................................................................................................................18 4.2.1 Image Process.........................................................................................................18 4.2.2 Image Flip ..............................................................................................................19 4.2.3 Image Measurement ...............................................................................................20 4.2.4 Image Calibration...................................................................................................22
4.3 Full Screen Mode ..............................................................................................................29 5 Trouble Shooting ....................................................................................................... 29
5.1 Attention............................................................................................................................29 5.2 Cannot preview successfully.............................................................................................31

ScopeImage 9.0 image processing software
Thank you for purchasing our microscope product. To avoid any misuse and damage, please read the operation instruction carefully before operation. This is a color USB2.0 digital image system that captures microscope images and displays real-time live video on your PC screen. It comes with a high-resolution digital camera, built-in reduction lens, user-friendly software, and adapters for all sizes of microscopes.
1 Introduction 1.1 Specification
Image Sensor 1/3.2″CMOS Valid Pixel 1280×1024(1.3M Pixel)
Digital Output 24–bit (color) 1280×1024 7.5f/s
800×600 30f/s Image Format
frame rate 600×480 30f/s
Sensitivity 1.8v@550um/lux/s
Exposure Manual/Auto Exposure Process, Exposure Time Adjustable
(1~500ms) SNR 42.3dB
Dynamic Range 71dB
Connecting Mode Insert it into Eyepiece Tube of Microscope Directly or
Using Standard C Mount Image Output USB2.0, Directshow and Twain
Working Temperature -30°C ~ 70°C System Windows 2000/XP/Vista
·With High Resolution chip(1.3M),Providing High Quality Image and Widely Used in Academic and Medical Field for High Precision and Resolution Image Capturing and Processing;
·Very convenient to Use, just insert it into Eyepiece Tube or Top Tube of Trinocular Head; ·By USB2.0, getting Real-time and Non-compressing Video Data and Capturing Image Directly;
1.2 About ScopeImage 9.0
High resolution image processing software is especially designed for digital microscope; it has friendly operation interface, stable performance and powerful function, very easy to operate. And can be widely used in various optical micro fields, such as teaching, researching, electronic checking and so on.
1
ScopeImage 9.0 image processing software
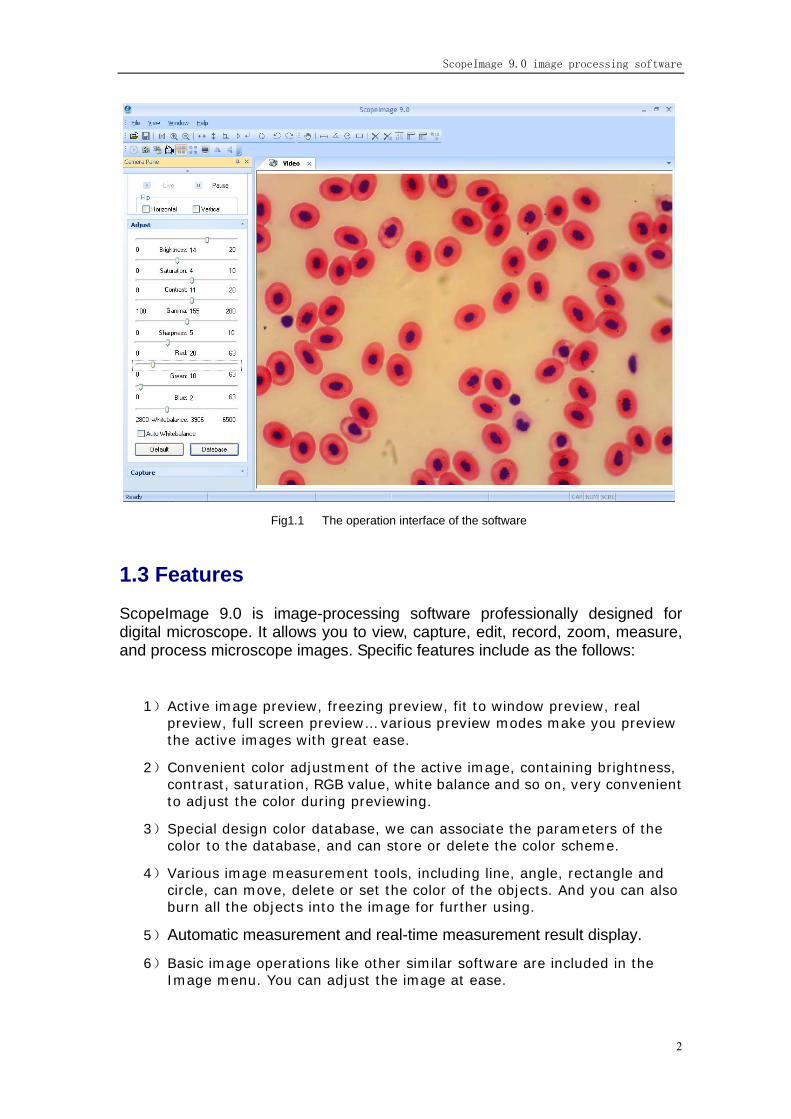
Fig1.1 The operation interface of the software
1.3 Features
ScopeImage 9.0 is image-processing software professionally designed for digital microscope. It allows you to view, capture, edit, record, zoom, measure, and process microscope images. Specific features include as the follows:
1) Active image preview, freezing preview, fit to window preview, real preview, full screen preview… various preview modes make you preview the active images with great ease.
2) Convenient color adjustment of the active image, containing brightness, contrast, saturation, RGB value, white balance and so on, very convenient to adjust the color during previewing.
3) Special design color database, we can associate the parameters of the color to the database, and can store or delete the color scheme.
4) Various image measurement tools, including line, angle, rectangle and circle, can move, delete or set the color of the objects. And you can also burn all the objects into the image for further using.
5) Automatic measurement and real-time measurement result display.
6) Basic image operations like other similar software are included in the Image menu. You can adjust the image at ease.
2

ScopeImage 9.0 image processing software
7) Image flip function, include horizontal flip and vertical flip of the active image, and rotate 90 degree, 180 degree, 270 degree or any angle degree of the captured image.
8) Image Zoom: Contain image zoom in, zoom out, 1:1.
The follow is the image captured by the camera as example.
1.4 Assemble
The HDCE-10C camera packaging box includes: 1. The HDCE-10C Camera device with a High-Quality IR Cutoff Filter inside. 2. High Quality USB2.0 Cable 2. 30mm adaptor (Optional: 30.5mm adaptor) 3. NDPL-10: 0.45X medium adapter 4. CD: Software includes the ‘ScopeImage 9.0’. Additional information and manuals can be
found on the CD.
Optional (choose to buy): 0.01mm or 0.1mm Calibration Slide.
Please assemble the accessories as follows:
3

ScopeImage 9.0 image processing software
2. Installation Instruction 2.1 Minimum System Requirements
System Requirements - Operating System Windows 2000, XP or Windows Vista 32bit or 64bit. - Windows 2000 need to install the DirectX9.0 to obtain better picture quality. - Video adapter supports 24bit color or more and 1280*1024 or 1024*768 resolution - CPU with 2.0GHz or more - System Memory 256MB or more, Display Memory 128MB or more - USB2.0 interface - Hard Disk Space 1GB for installation plus additional space for captured images Since video processing is hardware intensive, a faster computer with a
4
ScopeImage 9.0 image processing software
fast hard disk drive and extra memory will yield better results.
2.2 Common sense about hardware and software
Here introduce the basic sense of digital camera. Generally speaking, it includes two sections: one is the hardware driver; the other is the software application.
The driver is combining with the hardware (the chip of the digital camera) closely. The computer can operate the hardware, only when it has installed the right driver. Say in brief, it’s the question of can and can not.
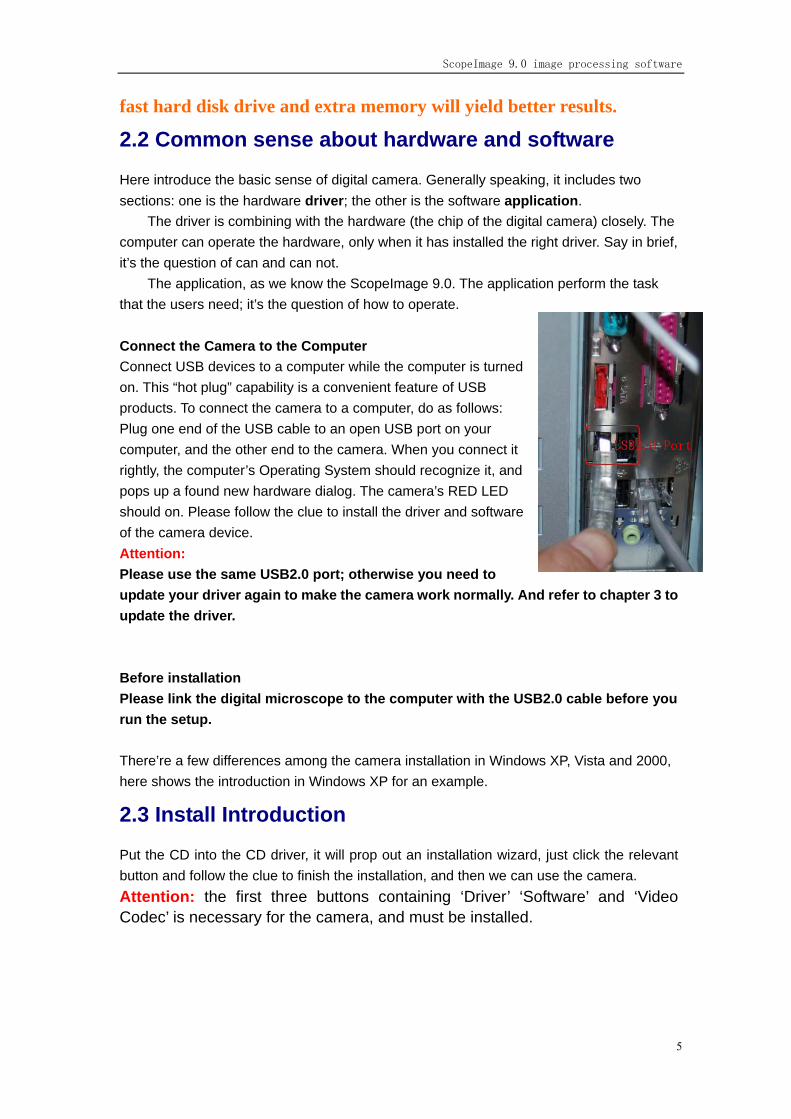
The application, as we know the ScopeImage 9.0. The application perform the task that the users need; it’s the question of how to operate. Connect the Camera to the Computer Connect USB devices to a computer while the computer is turned on. This “hot plug” capability is a convenient feature of USB products. To connect the camera to a computer, do as follows: Plug one end of the USB cable to an open USB port on your computer, and the other end to the camera. When you connect it rightly, the computer’s Operating System should recognize it, and pops up a found new hardware dialog. The camera’s RED LED should on. Please follow the clue to install the driver and software of the camera device. Attention: Please use the same USB2.0 port; otherwise you need to update your driver again to make the camera work normally. And refer to chapter 3 to update the driver. Before installation Please link the digital microscope to the computer with the USB2.0 cable before you run the setup. There’re a few differences among the camera installation in Windows XP, Vista and 2000, here shows the introduction in Windows XP for an example.
2.3 Install Introduction
Put the CD into the CD driver, it will prop out an installation wizard, just click the relevant button and follow the clue to finish the installation, and then we can use the camera. Attention: the first three buttons containing ‘Driver’ ‘Software’ and ‘Video Codec’ is necessary for the camera, and must be installed.
5

ScopeImage 9.0 image processing software
Driver: Please link the camera with the PC before running the driver setup, if the
system has not detected the camera, there will come out a dialog reminding you to insert camera to the PC first, as the picture shows below.
In Windows XP system, there will be two warning dialogs when installing the driver, as the pictures below, just click ‘Continue Anyway’.
6

ScopeImage 9.0 image processing software
Software: Click the software button to install the microscope image processing
software – ScopeImage 9.0. Follow the clue to finish the installation.
Video Codec: Click the video codec button to install video encoding and decoding
software, this is necessary for recording videos. Otherwise you will find you can not record or record error.
Adobe Reader: If you can not read the user manual, please installe the Adobe
reader first, for the user manual is pdf format, and pdf files can only be read after you have installed the Adobe Reader. After installation, you can open the ‘User Manual. pdf’.
User Manual: Operation manual about how to operate the software.
Browse CD: Click this button to browse the CD.
Exit: After the installation, click this button to exit and close the installation wizard.
Attention in Windows 2000 and XP System In the Windows 2000 System, you need to install DirectX9.0 to obtain better picture quality. Please click Browse CD button to open the CD, and then double click the dxsetup.exe under the folder “DirectX9.0” to run the DirectX installation
7

ScopeImage 9.0 image processing software
2.4 Check whether the device is rightly installed (1). After the installation, there will be a quick launch icon on the desktop, as follows:
(2). Check the Start Menu as follows, Camera-H1C is the driver of the camera, and the
ScopeImage 9.0.1 is the software:
8

ScopeImage 9.0 image processing software
3 Workspace Besides image windows, many other windows or user interface elements reside within
the main window of ScopeImage 9.0. These include menu, toolbars, status bar and control windows providing additional information about the images or control of the camera.
3.1 Menu
The menu can be either docked or floating. Double-click its grip or caption bar to toggle between the two states. When the menu is docked, it can be docked to any of the four sides of the main window. Drag the grip or caption of the menu to adjust its position or to dock it to a particular side of the main window. The grip of the menu is the dot matrix at the left or top of the menu in docked state.
Video model menus
Image model menus
3.2 Tools Bar
ScopeImage DynamicPro has four toolbars. Each toolbar can be either shown or hidden. When a toolbar is shown, it can be either docked or floating. Double-click its grip or caption to toggle between the two states. When a toolbar is docked, it can be docked to any of the four sides of the main window. Drag the grip or caption of a toolbar to adjust its position or to dock it to a particular side of the main window. The grip of a toolbar is the dot matrix at the left or top of the toolbar in docked state.
Floating state:
3.3 Camera Pane
Camera pane is where camera control commands are issued. It is further divided into three
9

ScopeImage 9.0 image processing software
sub-panes (Video, Adjust and Capture) for specific aspects of the imaging process.
Sub-panes are shrinkable. To shrink a sub-pane, click the arrows at its top right corner. To expand a shrunk sub-pane, click again the arrows at this to right corner. The arrows at the top left corner of a sub-pane point upward in expanded state and downward in shrunk state. Camera pane also maintains a history of the panes shown.
If all the three sub-panel have been opened, the panel will be too long to display all
the contents, so there will be two arrows at the top and the bottom of panel, put the mouse on it, the panel will expend upward or downward to display the other part contents.
Use the idler wheel of the mouse to extend the contents of the camera pane: click to
select the camera pane, when it displays as yellow, roll the idler wheel to upward or downward display the contents of the camera pane.
Double click the title bar of the ‘Camera Pane’ (the yellow part of the image above), can turn to floating state, drag the grip or caption of the menu to adjust its position or to
10

ScopeImage 9.0 image processing software
dock it to any of the four sides of the main window. Double click to return back, as the pictures shows below.
Camera pane can close, hide and display.
Locking state
Hiding or Hanging state
When it is in hiding or hanging state, click the ‘Camera Pane’ or just put your mouse on it, the camera pane will display.
11

ScopeImage 9.0 image processing software
4 Operation ScopeImage 9.0 mainly divides into two parts operation, one is for the video
operation, and the other one is for the image operation;
The Video mode menu: File, View, Window, Help;
The Image mode menu: File, Edit, View, Image, Variant, Measure, Window, Help;
“Alt + the first letter of the menu” can open the relevant menu. Here we introduce you both the operation of the video and the image mode.
4.1 Video Mode
4.1.1 Video Preview
Video preview mode, the new preview button is gray ;
When the preview window is closed, the video preview button is activated ; Push
the button can create a new preview window.
New Preview Push to new a new preview window; the equivalent command is the “File->New Preview” menu;
Capture Push to acquire an image based on the current camera settings and store into the disk;
Capture to
field Capture a frame to the field;
Record Push to record ,the equivalent command is the record button on the camera pane;
Suitable preview
Suitable preview mode is fit to the window preview. This mode is best for finding the right field of view to capture. In this mode, the full field of view is visible, albeit possibly in a reduced resolution.
Real
Preview
Real Preview mode is best for finding the right focus position. In real preview mode, maximal details are shown, although the field of view may be partially visible.
Full screen Full screen display the active image.
Horizontal
flip Flip the active image by the Vertical axis, click to set or reset a flip state.
Vertical flip Flip the active image by the horizontal axis, press to set or reset a flip state.
12

ScopeImage 9.0 image processing software
4.1.2 Video Control
The ‘Live’ and ‘Pause’ button can switch between active and static image
Live (Video preview
mode)
In video preview mode, the image is activating, we usually call it active image, it is fit for observing specimen or slice.
Pause (Freeze
preview mode)
In freeze preview mode, the image has been frozen; it is fit for observing the detail information of the specimen.
Image flip The image flip contains horizontal flip and vertical flip 。
Horizontal Flip: Flip the active image by the Vertical axis.
Original Image After click the Horizontal Flip button
Vertical Flip: Flip the active image by the Horizontal axis.
Original Image After click the Vertical Flip button
13

ScopeImage 9.0 image processing software
Horizontal and Vertical Flip: Flip the active image by both of the
Vertical and Horizontal axis.
Original Image After click both the Horizontal and Vertical button
4.1.3 Color Adjust
The color adjust function contains the adjustment of the brightness, saturation, contrast, Gamma, sharpness, Red, Green, Blue, and also contain the auto white balance, recovery to the default setting and the color database.
Brightness Adjust the brightness of the camera.
Saturation Adjust the saturation of the camera. Saturation is a measure of a color's pureness and brilliance.
Contrast Adjust the contrast of the camera.
Gamma
Adjust the gamma of the camera. Gamma is an image quality enhancement function that offers a richer image by brightening the darker portions of the image without altering the brightness of the brighter portions.
Sharpness Adjust the sharpness of the camera.
Red Increase the Red value of the active image.
Green Increase the Green value of the active image.
Blue Increase the Blue value of the active image.
Click ‘Auto Whitebalance’ button, the system will do auto white balance. Click again to manual white balance. Attention: If you set it to auto white balance, you can not adjust the other values.
14

ScopeImage 9.0 image processing software
Recovery to the default setting.
The management of the built-in database can allow you to store the current image parameters, which brings you great ease for adjusting the color.
The database of the color parameters
Apply Apply the select item to the active image.
Add Add a new item to the active image.
Del Delete the select item.
Cancel Exit the ‘ColorParm’ dialog window.
15

ScopeImage 9.0 image processing software
4.1.4 Capture
2,Capture Push to acquire an image based on the current camera settings and store into the disk as jpg or bmp file format; 3,Record Video
Click the button
16

ScopeImage 9.0 image processing software
Set the route and the file name.
Click the ‘Start’ button to begin to record.
Click the ‘Stop’ button to stop recording
4,MultiCapture
ScopeImage 9.0 is able to acquire a sequence of images automatically, an operation referred to as multi-capture. Before acquire, we can set the wait time, interval time, amount, prefix, type, path and so on. After setting, a sequence of the image will be acquired according to the camera settings at the time when the acquisition action occurs.
The time to wait before beginning capture, in seconds
Time interval, it means take image every 2 seconds, and can be referred as frequency.
The amount to acquire.
Set the prefix of the file name.
17

ScopeImage 9.0 image processing software
The suffix of the file name. Attention: The prefix can be modified, but the suffix can not, it increases automatically while acquiring. If you have changed the storage folder, the suffix will change into 0 again, and increase from 0.
Set the image type of the images to be acquired.
Set the path of the image to be acquired
Attention: In Windows Vista System, you’d better not set the capture as C:/, or you may can not save the images which is limited by user’s authority.
Begin to multicapture.
Stop capture.
4.2 Image Mode
4.2.1 Image Process
After we capture images, we can do image process, flip, measurement to the image
Invert
Color reversal, can turn a positive image to a negative image, or turn a negative image back to a positive image. A negative image performing higher contrast and higher color saturation.
Average Do average filter to the image, to clear the image noise;
Median Do mediate filter to the image, the median filter is much better at preserving sharp edges than the average filter.
Sharpen
All digital photographs lose a certain amount of sharpness. That means that most photographs will look a bit blurred and their details won’t be as prominent. Basically, sharpening makes the edges of a photographed object appear more distinct.
18

ScopeImage 9.0 image processing software
Emboss The Emboss filter makes a selection appear raised or stamped by suppressing the color within the selection and tracing its edges with black
Brightness Change the brightness of the image;
Contrast Change the brightness of the image;
Saturation Change the brightness of the image;
Original Average Median
Invert Sharpen Emboss
Brightness Contrast Saturation
4.2.2 Image Flip
The image flip operation is as the commands of the image flip menu.
19

ScopeImage 9.0 image processing software
Icon Function
Open an image, support bmp and jpg format;
Save the image, or the changes to the image;
100%display the image;
Magnify display the image;
Reduce display the image;
Image flip by the vertical axis;
Image flip by the horizontal axis;
Retort 90 degree of the image;
Retort 180 degree of the image;
Retort 270 degree of the image;
Retort any angle of degree of the image;
Use the Undo command to reverse the most recent action that has modified the image. The equivalent command is the undo function under the Edit menu.
Use the Redo command to undo an Undo operation. The equivalent command is the redo function under the Edit menu.
4.2.3 Image Measurement
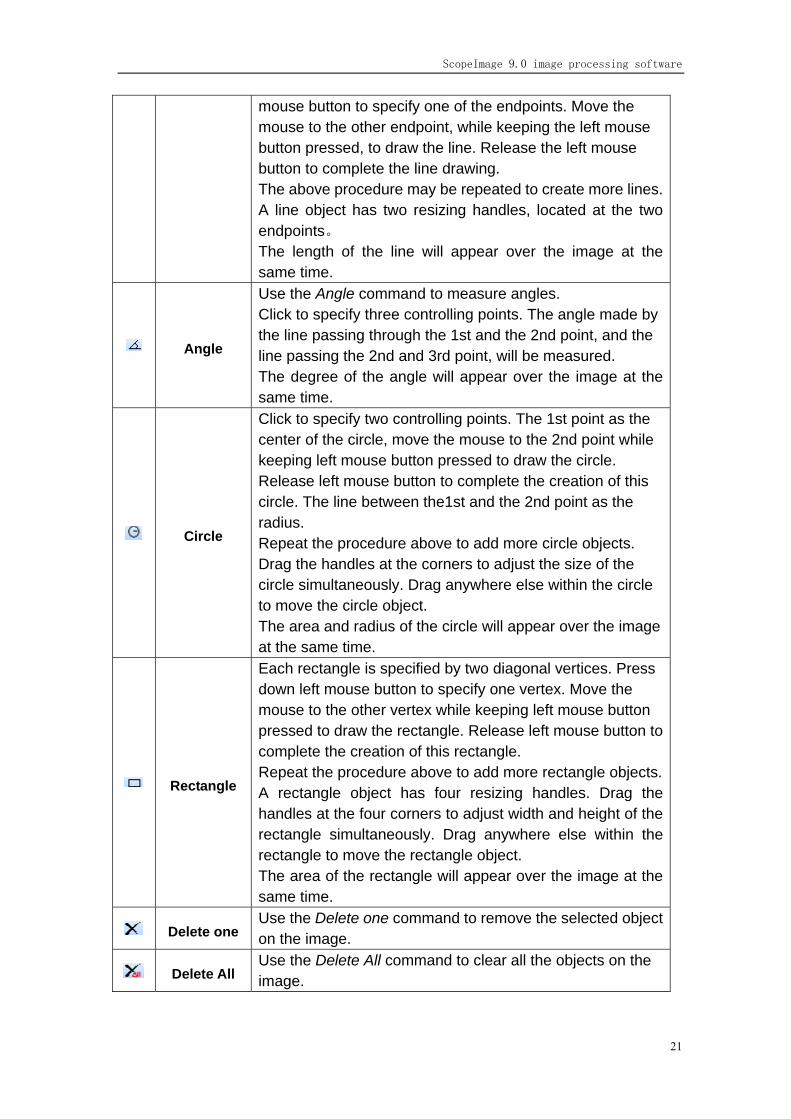
The system support several measure tools, as the line, circle, rectangle, angle and so on. The measure result can real time display on the image and can be merged into the image and save for further using. The function is equivalent to the commands under the Measure menu. Icon Function Function Introduction
Move Move or adjust the objects, containing line, angle, circle, and rectangle.
Line Add line objects. Each line object is defined by two endpoints. Press left
20
ScopeImage 9.0 image processing software
mouse button to specify one of the endpoints. Move the mouse to the other endpoint, while keeping the left mouse button pressed, to draw the line. Release the left mouse button to complete the line drawing. The above procedure may be repeated to create more lines. A line object has two resizing handles, located at the two endpoints。 The length of the line will appear over the image at the same time.
Angle
Use the Angle command to measure angles. Click to specify three controlling points. The angle made by the line passing through the 1st and the 2nd point, and the line passing the 2nd and 3rd point, will be measured. The degree of the angle will appear over the image at the same time.
Circle
Click to specify two controlling points. The 1st point as the center of the circle, move the mouse to the 2nd point while keeping left mouse button pressed to draw the circle. Release left mouse button to complete the creation of this circle. The line between the1st and the 2nd point as the radius. Repeat the procedure above to add more circle objects. Drag the handles at the corners to adjust the size of the circle simultaneously. Drag anywhere else within the circle to move the circle object. The area and radius of the circle will appear over the image at the same time.
Rectangle
Each rectangle is specified by two diagonal vertices. Press down left mouse button to specify one vertex. Move the mouse to the other vertex while keeping left mouse button pressed to draw the rectangle. Release left mouse button to complete the creation of this rectangle. Repeat the procedure above to add more rectangle objects. A rectangle object has four resizing handles. Drag the handles at the four corners to adjust width and height of the rectangle simultaneously. Drag anywhere else within the rectangle to move the rectangle object. The area of the rectangle will appear over the image at the same time.
Delete one Use the Delete one command to remove the selected object on the image.
Delete All Use the Delete All command to clear all the objects on the image.
21

ScopeImage 9.0 image processing software
Generate measureme
nt data
This command will clear background image, and generate an image that just will the measurement marker.
Calibration
The system micrometer consists of the sampling intervals in horizontal and vertical directions. In the calibration process both of the two sampling intervals should be calculated. Details please see chapter 3.2.4 Image Calibration. IMPORTANT!!! Calibration should be done on an image before measuring.
Show/hide calibration
ruler Click this button to show the calibration ruler, click again to hide it.
Measure setting
Set the color of the coordinate, line, adjuster and text,
4.2.4 Image Calibration
The system micrometer consists of the sampling intervals in horizontal and vertical directions. In the calibration process both of the two sampling intervals should be calculated as there’s tolerance error between the two directions. Here shows the calibration under 10× object lens for an example. 1. For the calibration can only do to the static image, we should take a picture first.
22

ScopeImage 9.0 image processing software
First, put the 0.1mm micro-ruler in the video window, adjust to display clear, then turn around the camera, make the active images parallel to the horizontal line, and
click the button on the tools bar to capture a frame to the field, as the picture
shows below.
2. In the image field, click the button to move the scale, you can also click the
or button to magnify or reduce the current image in order to convenient the
calibration. Here shows the calibration result when it is reduced to 50%.
23

ScopeImage 9.0 image processing software
3. Click the icon to display the calibration scale, click the icon to move the scale to the right position, confirm the begin point and the end point, as the picture shows below.
4, Click the calibration icon to set the ‘X-Ruler Unit’, Input the actual length 100um, and click the button ‘Save As’ to save the calibration for X axis.
24

ScopeImage 9.0 image processing software
5, Click input a calibration file name on the box, and click ‘Save’ to save it, then click ‘OK’ to exit, now we have finished the calibration for the X axis.
The calibration for the Y axis is as follows. 6. The calibration for the Y axis is similar to the X axis. First, we turn around the
camera to make the micro ruler vertical to the horizontal line, click the button on
the tools bar to capture a frame to the field, as the picture shows below.
25

ScopeImage 9.0 image processing software
7. Click the calibration icon on the tools bar, then click ‘Lode’ button, and select the file of calibration for X axis we have just done, click ‘Open’.
26

ScopeImage 9.0 image processing software
8. Now we keep the X axis don’t move, and do calibration to the Y axis, move the scale to the right position, confirm the begin and the end point;
9. Click the icon , input the actual length in the “Y-Ruler Unit”, and click “save” to save the calibration result for further using. Click “OK” to exit, now we have finished the calibration for both X axis and Y axis, and we can find that there is a little difference between them.
27

ScopeImage 9.0 image processing software
Check the calibration result: The calibration has been finished, now we check it. Use the micro ruler, and capture a frame to the field, lode the calibrations we have just done, and do line measure, as the picture below:
We can find the measurement is close to the actual length, take the tolerance error for account, the measurement result is right.
28

ScopeImage 9.0 image processing software
4.3 Full Screen Mode
As we know, it is very convenient to preview the live image in the full screen mode.
Double click the live image or click the button on the tools bar can enter into
the full screen mode, double click or click the button “Close Full Screen” to exit full screen mode.
5 Trouble Shooting 5.1 Attention
1. please link the camera with PC before running the driver installation; and when there comes out warning dialog, just click ‘Continue Anyway’, as the pictures show below:
29

ScopeImage 9.0 image processing software
2. Error hint: Cannot preview successfully. Please check whether the camera has linked with the PC, and whether the driver has been installed rightly. If not, please refer to the next chapters 5.2.
3. Can not record or record error. Please check whether you have
installed the ‘Video Codec’ in the CD. .
4. When launching the software, there will be several seconds displays as black preview, please don’t worry, it is normal, because the camera needs time to do some pretreatment to ensure the stable working of the camera. The same reason for the recording, when you begin to record, it will displays as black preview for several seconds, and when the images display normal, the recording begins
5. USB2.0 is a mandatory, not optional. This camera cannot work on the computers with USB1.1 ports. In order to ensure the stability of the connection with the USB2.0 interfaces, please insert the plug into those interfaces in the back panel the mainframe.
6. Please use the same USB2.0 port every time. Using on a different USB2.0 port may need to reinstall the driver again to make the camera work. Refer to the next chapter to reinstall the driver.
7. This camera supports operation system: Windows 2000/XP/Vista 32bit and 64bit.
8. Please unplug the USB cable from the computer immediately after using. It will shorten the lifetime of the camera, sometimes may cause repair service if the camera is plugged in the computer all the time and you do not shut down the computer for a long time.
30

ScopeImage 9.0 image processing software
5.2 Cannot preview successfully
Attention: Please use the same USB2.0 port every time. Using on a different USB2.0 port may cause the camera can not work, and comes out a hint dialog as follows when you try to open the ScopeImage 9.0 software, especially in Windows XP and 2000 system.
When there’s a hint dialog as the picture shows above, the most problem is the driver is not right, you’d better reinstall the driver again, after installation please remember to use the same USB2.0 port every time.
Please do as follows”
(1) Run the driver in the CD, and select the second choice ‘Repair’, then click next button.
(2) Hardware Installation warning dialog, please click ‘Continue Anyway’ button.
31

ScopeImage 9.0 image processing software
(3) Click finish to finish the installation.
32