User Manual - Neutrik
24
User Manual
Transcript of User Manual - Neutrik

User Manual

2
2014/06 | BDA 364
� Contents
A About this document 3
Terms .................................................................... 3
Symbols on the equipment/packaging ................... 3
Symbols in the documentation .............................. 3
Safety information ................................................ 3
B System components 5
Scope of delivery and accessories .......................... 5
Controls ............................................................... 6TRX Base station .............................................. 6TX/RX Portable unit ......................................... 7TX-T/RX-T Touring Portable unit ...................... 7
C Functions 8
Connection of peripheral devices .......................... 8
Configuration of the audio channel ...................... 8
Broadcasting ........................................................ 8
Muting of Audio signals ....................................... 8
D Installation and Assembly 9
Rack-mounted TRX Base station ........................... 9
TRX Base station installation ................................. 9
Attach brackets for Portable units ......................... 9
Attach antennas to TRX Base station .................... 9
E Commissioning and configuration 10
Set up the TRX Base station ................................. 10Connect the TX-channel and RX-channel to the TRX Basestation .............................................. 10Switch on the TRX Base station ....................... 10
Set up the TX Portable unit .................................. 11Adjust inputs to the TX Portable unit .............. 11Connect the audio source to the TX Portable unit 11TX Portable units with power supply ............... 12
Connect the TRX Base station and TX Portable units 13Connect the TX Portable unit .......................... 13Plug the audio source/output device directly to the TRX Base station ....................................... 14
Connect the TRX Base station and RX Portable units 14RX Portable units with power supply ............... 14Connect the RX Portable unit .......................... 14
Connect additional Portable units ......................... 15Connect additional TX Portable units ............... 15Connect additional RX Portable units .............. 15Identify connected Portable units .................... 15
Connect output device to RX Portable unit ........... 16
Connect additional TRX Base station .................... 16
F Operation 17
Turn on the System ............................................. 17
Use the System .................................................... 17Adjust signal strength and volume .................. 17Change a Peripheral on a Portable unit ........... 18Muting ........................................................... 18
Turn off the System .............................................. 18Turn off the TRX Base station .......................... 18Turn off the Portable unit 18
G HMI Events 19
H After Use 20
Decommissioning and dismantling ....................... 20
Transport ............................................................ 20
Storage ............................................................... 20
Care and Cleaning .............................................. 20
Maintenance, Repair and Overhaul ..................... 20
Disposal .............................................................. 20
I Service 21
Contact ............................................................... 21
Troubleshooting .................................................. 21
Reset Device ........................................................ 21
Declaration of Conformity ................................... 21
J Technical Data 22
32014/06 | BDA 364
About this document
A About this document
This document describes the safe use of the multi-channel radio system XIRIUM (hereinafter referred to as „XIRIUM network“), consisting of the TRX base station and the TX and RX Portable units (hereinafter referred to as the „XIRIUM devices“) and other accessories, such as antennas, mounts, power supply units and cables.
� TermsName Description
XIRIUM network
All components: TRX base station, TX Portable unit, RX Portable unit, cables, connectors, antennas, mounts, power supplies
XIRIUM devices TRX base station, TX Portable unit, RX Portable unit
Audio source All the equipment that transmits audio signals to the XIRIUM network, e.g. instruments, microphones, tablets, MP3 players (guitars, etc.)
Output devices All devices that receive audio signals from the XIRIUM network, such as speakers, MP3 players, audio system (amplifier, etc.)
Control devices All devices that process audio signals from XIRIUM network, such as mixers.
Peripheral devices
All devices that can be connected to the XIRIUM network, e.g. audio equipment (transmitters), output devices (receivers) , ECUs, etc.
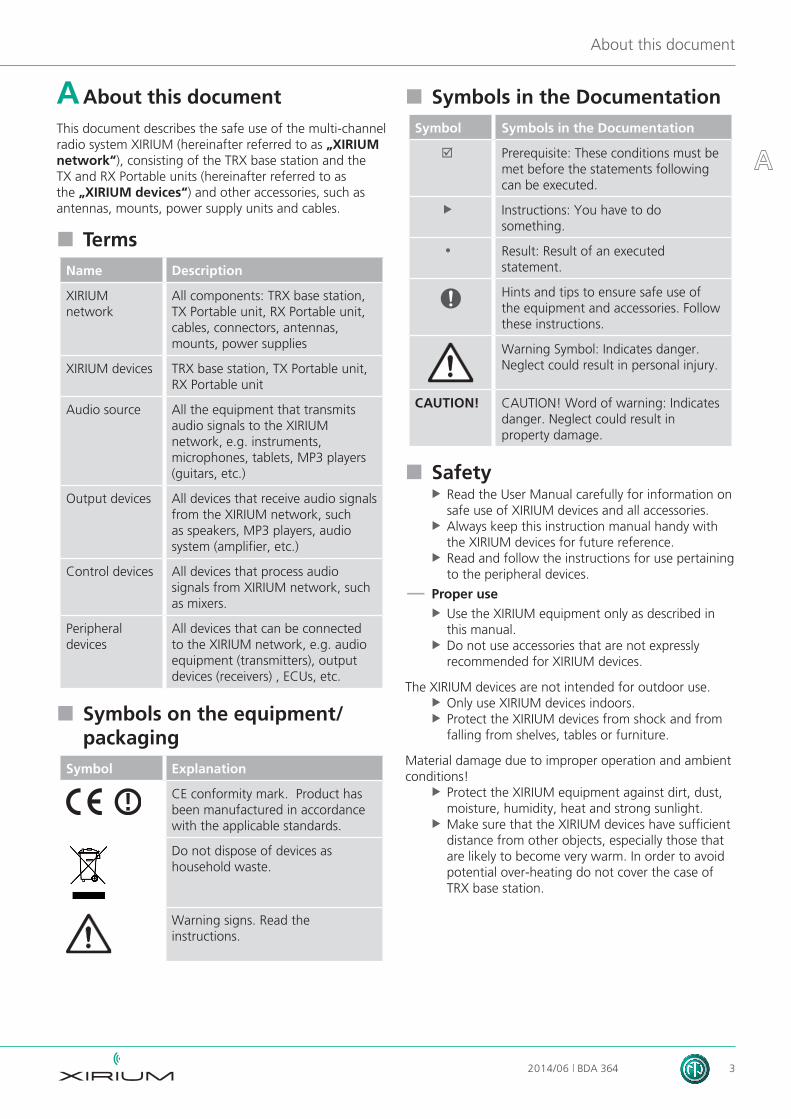
� Symbols on the equipment/ packaging
Symbol Explanation
CE conformity mark. Product has been manufactured in accordance with the applicable standards.
Do not dispose of devices as household waste.
Warning signs. Read the instructions.
� Symbols in the DocumentationSymbol Symbols in the Documentation
; Prerequisite: These conditions must be met before the statements following can be executed.
X Instructions: You have to do something.
y Result: Result of an executed statement.
Hints and tips to ensure safe use of the equipment and accessories. Follow these instructions.
Warning Symbol: Indicates danger. Neglect could result in personal injury.
CAUTION! CAUTION! Word of warning: Indicates danger. Neglect could result in property damage.
� Safety X Read the User Manual carefully for information on safe use of XIRIUM devices and all accessories.
X Always keep this instruction manual handy with the XIRIUM devices for future reference.
X Read and follow the instructions for use pertaining to the peripheral devices.
— Proper use X Use the XIRIUM equipment only as described in this manual.
X Do not use accessories that are not expressly recommended for XIRIUM devices.
The XIRIUM devices are not intended for outdoor use. X Only use XIRIUM devices indoors. X Protect the XIRIUM devices from shock and from falling from shelves, tables or furniture.
Material damage due to improper operation and ambient conditions!
X Protect the XIRIUM equipment against dirt, dust, moisture, humidity, heat and strong sunlight.
X Make sure that the XIRIUM devices have sufficient distance from other objects, especially those that are likely to become very warm. In order to avoid potential over-heating do not cover the case of TRX base station.

4
About this document
2014/06 | BDA 364
Risk of injury and material damage due to improper repair! The XIRIUM devices do not contain any parts that can be repaired.
X Do not open the housing of the XIRIUM devices, or attempt to replace any parts yourself. Unauthorized opening or repair can cause severe damage to equipment and/or injury to the operator.
X Allow the repair of the XIRIUM devices only by an authorized dealer.
— Batteries/Rechargeable Batteries X Use only batteries/rechargeable batteries to operate the TX/RX Portable units with the same technical values.
X Do not mix standard alkaline batteries with rechargeable batteries in the same unit.
X Do not use batteries/rechargeable batteries having different charge states.
— Electrical connection
Risk of electric shock! X Connect the XIRIUM devices to only properly installed electrical outlets.
X Do not touch the XIRIUM devices and connections with wet or damp hands.
X Make sure that the label on the XIRIUM devices and power supplies mains voltage and frequency match the values of the mains supply-indices.
X Use only the power devices supplied with the XIRIUM devices for connection to an electrical outlet. Do not make any modifications to the power supply.
X Before switching on the XIRIUM devices ensure that the power adapters or the battery/ batteries have no external damage, fractures or cracks. Use only an undamaged power supply unit for connection to the power grid.
X If you do not operate the XIRIUM equipment for a long time, turn off the power and unplug the power cord from the outlet.
X During thunderstorms or risk of voltage fluctuations in the power grid: Turn off the XIRIUM devices and disconnect the power plug from the outlet.
X Make sure that the power cables are not kinked in operation, overhang any sharp edges and do not touch any warm or hot surfaces.
X Do not use any of the XIRIUM devices if interference or damage to the power supply occurs to the individual devices, displays, controls or accessory parts.
— Instructions to follow during operation X Make sure that the defined technical environmental conditions for the XIRIUM devices are observed in operation at all times.
X Do not use the XIRIUM equipment if it does not work properly, has been dropped, damaged or has become wet or parts of it has been submerged in water.
X Turn off the XIRIUM devices immediately and disconnect from the power supply when faults occur during operation.
X XIRIUM devices must not be operated in areas where combustible or explosive materials, gases or vapors occur.

52014/06 | BDA 364
System components and accessories
B System components and accessories
1
23
4
5
DIGITAL WIRELESS AUDIO NETWORK
NEUTRIK AG | Im alten Riet 143 | 9494 Schaan | LiechtensteinT +423 237 24 24 | F +423 232 53 93 | [email protected] | www.neutrik.com
2013-04-30
DIGITAL WIRELESS AUDIO NETWORK
NEUTRIK AG | Im alten Riet 143 | 9494 Schaan | LiechtensteinT +423 237 24 24 | F +423 232 53 93 | [email protected] | www.neutrik.com
2013-04-30
6 7
8 9
10 11
12 13
14 15
16 17
1918
20
Pos. XIRIUM device / accessories - (Type.No.)
1 Base Station 4 CH (NX4TRX)
2 Remote Transmitter TX (NX1TX)
3 Remote Receiver RX (NX1RX)
4 Touring Transmitter TX (NX1TX-T)
5 Touring Receiver RX (NX1RX-T)
Accessories
6 5 GHz Antenna 3dBi omnidirectional (NXA-3-360)
7 5 GHz directional antennas (NXA*)
8 5 GHz Antenna 10dBi omnidirectional (NXA-10-360-10)
9 SMA Adapter for direct antenna mount(NXA-SMA-MM)
10 Antenna cable (NKXA*)
11 Data Cable USB to Tiny XLR (NKX-DATA)
12 12-V Power supply with XLR connector (to use with the base station) (NPS-24W)
13 5-V power supply with Micro-USBconnector (to use with the remote units TX, RX) (NPS-10W)
14 5-V power supply with Tiny XLR connector (to use with the touring units TX-T, RX-T)
(NPS-10W-T)
15 Battery Pack (NXBP-T-6)
16 Master/Slave link cable (NKX-MS)
17 Stand holder for remote units (NXM-*)
18 Manfrotto™ Universal Mounting Clamp (NXUC-M-15)
19 Aluminum Case (CAS-NX-ALU)
20 Quick Start Guide21 Software Xirium Configurator

6
About this document
2014/06 | BDA 364
1
2
3
4 5
6 8
7
10
119
1413
12
15 16 1817 19
20
� Controls � TRX base station
— front view
— back view
No. Description Note
1 On/Off button TRX base station on/off button
2 Power LED Indicator is illuminated when the TRX base station is switched on
3 MUTE button In - Output silent switch
4 MUTE LED Indicator illuminated when MUTE button is in use and flashes red when switching on the TRX base station
5 GAIN LED Display of signal amplification to increase
6 GAIN-up button Amplification increase (in 8-dB steps)
7 GAIN-down button Amplification reduction (in 8-dB steps)
8 TX-link LED Indicator lights up when connected toTX Portable unit
9 RX-link LED Indicator lights up when connected to RX Portable unit
10 LINK button Start connection processShort press: Displays connected Portable units
11 BAT-LED Displays charge status of the battery/batteries in the connected Portable unit
12 Label field Data field
13 Link button Connects adjacent audio channels(switch is on : connected with adjacent audio channel)
14 XLR-OUT XLR output for peripheral equipment
15 XLR IN Combo input (XLR and TRS) from the peripheral device
16 Reset button ResetsTRX base station to factory settings
17 RJ45 connection Connection for computer to operate with user software
18 M/S terminal connection
Connection for master/slave operation (2 TRX base stations)
19 Power supply connection
Connection for 12V power supply
20 Antenna connection SMA connector for antennas (with mounted rod antenna)

72014/06 | BDA 364
About this document
252423222126 27
29 30 333231
28 — TX/RX, above
— TX/RX, rear
� Touring TX-T/RX-T Portable units
— TX-T, front — RX-T, front — TX-T/ RX-T, rear
28
2934 34
24 2224 22
35 35
33 31
35
� TX/RX Portable units
— TX below
— RX below
No. Description Note
21 On/Off button Portable unit on/off button: short press starts connection process: Connected Portable units are displayed
22 Mute LED Indicator illuminated when MUTE button is in use
23 MUTE button In - Output silent switch
24 Link LED Displays connection status
25 Battery-LED Displays charge status of the batter/batteries
26 XLR IN XLR input from the peripheral device (COMBO TX-T)
27 Mini-USB connection Connection for 5V power supply via mini USB
28 XLR IN Combo input (XLR and TRS)
29 XLR-OUT XLR output to the peripheral device
30 Mini-USB port connector Connection for 5V power supply via mini-USB
31 Input signal switch Between phantom/HI-Z and line-in switch
32 Battery compartment Compartment for 4 batteries, Type AA
33 XLR release Releases XLR connector
34 Mini-XLR connector Connection for 5V power supply via mini XLR
35 Antenna connection SMA connector for antenna (with mounted rod antenna)

8
Functions
2014/06 | BDA 364
C FunctionsThe XIRIUM network allows for the replacement of conventional cable connections between all types of audio devices and control and output devices (hereinafter called the „peripherals“) by a convenient wireless connection. The XIRIUM network transmits the audio signals without any loss on multiple audio channels on the 5 GHz band between the components:
y Audio sources: Input devices, e.g. musical instruments (guitars, keyboards) and microphones Audio devices, e.g. hi-fi and stereo systems, tablet PCs, MP3 players
y Output devices: Receivers, e.g. speakers, headphones, audio amplifiers y Control devices, e.g. mixers
� Conventionally with cables � With XIRIUM network
TX
TX
TX
RX
TX
TX
TX
RX
� Connect PeripheralsConnect the peripheral devices via the Portable units with the TRX base station to transmit or receive audio signals.
y The TX Portable unit sends audio signals from a connected audio source (sender) to the TRX base station. y The RX Portable unit receives audio signals from the base station TRX and passes them on to a connected output device (receiver).
You can also connect the TRX peripherals directly to the base station with an XLR cable, without the use of the TX/RX Portable units.
� Configuration of the audio channelsYou can use each audio channel at the base station TRX as either an input channel (connected with TX Portable unit) or an output channel (connected with RX Portable unit).
The combination of input channels with output channels specifies the path of the audio signal from the audio source to the output device.To send a combined audio signal from multiple audio sources (e.g. a microphone and an electric guitar) to a single out-put device (e.g. a speaker), you need a mixer that is connected to the TRX base station with cables or via Portable units.
� BroadcastingIn addition, you can associate up to 3 RX Remote units to one TRX output channel. This means that you can send the same audio signal to, for example, 3 loudspeakers or 2 loudspeakers and 1 mixer.
� Signal split for broadcast modeIt’s possible to split a signal source which is connected to one input of the TRX and assign it to the three other channels. This way it is possible to increase the number of channels in the broadcast mode from so far 3 to 12 channels with only one audio source.
This is done either by the Xirium configurator (see XIRIUM Configurator Manual) or by a HMI event (Human Machine Interface) (see page 17).

92014/06 | BDA 364
Installation and assembly
� Muting of audio signalsEach channel of the TRX base station and each TX/RX Portable unit can be set individually on MUTE so that the audio signal is muted.
D Installation and assembly X Unpack all parts of the XIRIUM devices. Keep the original packaging for shipping or storage. X Check the contents of the package for visible transport damage. X Check whether the items delivered match the details on the delivery note. X In case of damage to the packaging or to the delivered parts, do not power up or operate the XIRIUM devices. Consult your dealer or contact Neutrik-service.
� Rack-mounted TRX base station set up X If you use the TRX base station in a rack, please do not mount the supplied rubber feet. X Make sure that the rack is suitable for mounting the base station TRX. Please observe the instructions of the rack manufacturer.
X Attach the rack mounts to the TRX base station. X Push the TRX base station into the rack. X Assemble the rack mounts in a suitable mounting position in the rack.
� TRX base station set up Location, clearances, surface
X Install the supplied rubber feet to the bottom of the TRX base station. ( Assembly Instruction BDA 376).
BOTTOM SIDE
X Place the TRX base station on a stable, flat, non-slip surface. X Make sure that the TRX base station has sufficient clearance to other objects, and that adequate ventilation is provided.
� Attaching the brackets for Portable units X Make sure that the tube diameter of the stand provides a non-slip, secure attachment (Inner diameter of the mounts: 20 or 35 mm).
X Insert the Portable units in the brackets. X Attach the brackets for the Portable units on the microphone or speaker stand.
� Installation of the TRX base station antennas X Screw the two whip antennas into the antenna connection.
y Alternatively, you can also connect an antenna cable to a remote antenna.
X Align the antennas at a 45 ° angle.
— The use of TX-T/RX-T Touring Portable units X Screw the two whip antennas into the antenna connection.
y Alternatively, you can also connect an antenna cable to a remote antenna.
1
OUT OUT OUTINOUT IN IN IN
CH1
CH1 CH2 CH3 CH4
CH2CH3CH445°

10
Commissioning and configuration
2014/06 | BDA 364
E Commissioning and configuration
� TRX base station set up � Connect the TX channel and the RX channel to the TRX base station
This combination of audio channels is made with either the Link Button or an XLR cable to the XLR connectors. y Using the Link Button, you can only connect directly adjacent audio channels (for example, channel 1 with channel 2). The lower channel is the TX channel, the higher channel is the RX channel.
y With an XLR cable, you can also connect audio channels that are not directly adjacent to each other (e.g. channel 1 with channel 3, or channel 4 with channel 1).
Connection by Link Button X Push the link button between two adjacent channels (e.g. channel 1 and channel 2) over to the left . y Both channels are connected.
Connection by XLR Cable X Connect XLR-OUT and XLR-IN to two channels (e.g. channel 1 and channel 3) with an XLR cable. y Both channels are connected.
2OUT OUT OUTINOUT IN IN IN
OUTIN
TRXRX
CH2
� Switch on the TRX base station
X Make sure that the power outlet is within range of the base station TRX and is easily accessible at all times.
CAUTION! Damage to the equipment, accessories and components if connected to incorrect connection values!
X Make sure that the power rating of the socket (i.e. voltage, current, frequency) is suitable for the TRX base station (see „Technical data“).
X Insert the appliance plug into the 12-V power supply.
X Insert the power plug of the power adapter into a power outlet.
Once the TRX base station is powered, it will turn on automatically. If you have turned off the TRX base station since the last use of the On/Off button, you will need to turn it on again manually.
3OUT OUT OUTINOUT IN IN IN
CH1CH2CH3CH4
TRX
To turn on the TRX base station manually X Press the On/Off button for 3 seconds.
y The Power LED light is green. All MUTE LEDs flash red.
X If all MUTE LEDs light up: Release the On/Off button. y All MUTE LEDs go out. The unit is ready for
operation.
33 sec.TRX

112014/06 | BDA 364
Commissioning and configuration
Overwrite the existing configuration
When you turn on the TRX base station, the last used configuration of audio channels and associated TX/RX Portable units is automatically active.The last used configuration is overwritten automatically when you configure the audio channels.If necessary, you can delete the last used configuration with a reset („Device Reset“ on page 26) before you set up a new configuration.
� Set up the TX Portable units
Using TX-T Touring Portable units
If the following procedures differ when using the TX-T Touring Portable units, these are listed separately.
� Adjust the inputs of the TX Portable unitBy default both inputs of the Portable units are interpreted as Line-In.If required for the selected audio source (for example, electric guitar or condenser microphone), you can put the inputs on phantom power/Hi-Z:
y Input XLR IN: 48 V phantom power y Input jack: HI-Z
X Remove the cover of the battery compartment. X Slide the input switch to the off position.
y The inputs can be connected with Line-In. – or –
X Slide the input switch to on. y The inputs can be connected with phantom
power and Hi-Z. y The Mute LED on the top of the TX Portable
unit is lit green.
4
Line
Phantom
TX
— When using a TX-T Touring mobile unit: X Slide the input switch on the rear of the mobile unit to off (for Line) or on (for Phantom Power/Hi-Z) respectively.
� Connect the audio source to TX Portable unit
CAUTION! Damage to the equipment, accessories and connected audio source due to incorrect connection values!
X Make sure that the inputs are set correctly on the TX Portable unit (Line-In or Phantom Power/Hi-Z).
X Connect the audio cable to the audio source. X Insert the plug of the audio cable to the TX Portable unit XLR-IN or jack.
4TX
on o�
on o�
Line Line
Phantom HI-Z

12
Commissioning and configuration
2014/06 | BDA 364
� TX Portable units with power supply
— Portable units using batteries/rechargeable batteries
Recommendation: X Use rechargeable batteries.
X Use only fully charged batteries. X Do not combine alkaline batteries and rechargeable batteries. X If you are using batteries ensure that all batteries are fully charged.
Batteries/Battery insertion or replacement X Remove the cover of the battery compartment. X Remove the depleted batteries/rechargeable batteries.
X Insert the batteries/rechargeable batteries type AA (LR6, AA). When inserting ensure correct polarity.
X Close the cover of the battery compartment.
5TX
— Connect Portable units to mains power supply
You can also connect the Portable units with the power supply unit to the mains. When operating with AC adapter you can leave the batteries/rechargeable batteries in the battery compartment. When connecting the power supply unit, the Portable unit is switched on automatically.
X Insert the mini-USB plug and mini XLR plug into the headphone connector of the Portable unit.
X Insert the mains plug into a mains socket.
5TX
— Check the charge state of the TX Portable units
LEDs indicate the charging status of the batteries/rechargeable batteries in the Portable units: y BAT LED on the TRX base station y Battery-LED on the Portable unit
X Note the following: y If there are several RX Portable units associated with an RX channel (Broadcasting), the BAT LED indicates the charge status of the weakest Portable unit.
y In the XIRIUM Configurator software the charge states of all Portable units are displayed.
Display Explanation
Green State of charge OK
Orange Batteries should soon be changed, rechargeable batteries should be charged soon.
Red Battery/Battery discharged X Change batteries, charge the batteries.

132014/06 | BDA 364
Commissioning and configuration
� Connect the TRX base station to TX Portable unitsConnect the Portable units one after another to the TRX base station. For each Portable unit, you determine which audio channel at the TRX base station is used for the connection. You specify the signal paths by connecting the audio channels with each other at the TRX base station. The following LEDs indicate the connection status when connecting to:
y TX/RX-Link-LEDs on the TRX base station y Link-LED on the Portable unit
Display Explanation
Red No connection
Orange Connecting
Green Connection established
� Connecting the TX Portable unit
— Start connection to base station TRX
X Press the LINK button on the TRX base station in a free channel panel (example shown right = Channel 1) for about 3 seconds. y TX/RX-Link-LED and BAT-LED flash on the
TRX base station.
X Recommendation: Switch off the Port-able unit after successfully connecting to conserve the battery/batteries.
6TX
CH1
— Connect the TX Portable unit
Connection Error to the Portable unit - too close! X Do not hold the Portable unit too close to the antenna: keep a distance of at least 30 cm.
If using the AC adapter for power supply
When using the AC adapter power supply unit, the Portable unit is already turned on.
y The Portable unit will connect to the TRX base station. y Link-LED (on the Portable unit) and TX-
Link-LED (on the TRX base) light in the sequence: Red, Orange, Green.
y Green = Connection is established.
7TX
If powered with batteries X Press the On/Off button on the Portable unit for about 3 seconds.
y The Portable unit will connect to the base station TRX. y TX/RX-Link-LED and BAT-LED flash on the
TRX base station. y Link-LED (on the Portable unit) and TX-
Link-LED (on the TRX base station) light in the sequence: Red, Orange, Green.
y Green = connection is established.
7TX
— Identify the connected Portable units X Press briefly the LINK button on an audio channel on the TRX base station.
y The Link-LEDs associated with this audio channel connection flash on the Portable unit.
LINKTX
RX
BAT
3 sec.
CH1
LINTX
RX
BAT
TX
3 sec.
MUTE
TX

14
Commissioning and configuration
2014/06 | BDA 364
� Connect an audio source/output device directly to the TRX base stationIf desired, you can add audio sources and output devices, and especially control devices (such as a mixer) and connect them directly to the TRX base station.
Link failure due to incorrect connection of audio channels!
X When setting up the direct connection of audio sources, ensure that the Link button on the back of the TRX base station is slid to the right � as shown.
OUT OUT OUTINOUT IN IN IN
OUTIN
— Audio source connected directly to the TRX base station X Connect a suitable audio cable to the audio source. X Insert the plug of the audio cable into the TRX base station in the XLR-IN of the RX channel.
— Control unit/output device connected directly to the TRX base station X Connect a suitable audio cable to the control or output device. X Insert the plug of the audio cable into the TRX base station in the XLR-OUT of the TX channel.
� Connect the TRX base station and RX Portable units � Supply the RX Portable units with power
X Repeat the same procedure as for the power supply to the TX Portable units („TX Portable units with power supply“ on page 12).
8 8RX RX
— Check the charge status of the RX Portable units
The charge status is displayed in the same manner as for TX Portable units.
� Connect an RX Portable unit
— To start connection to the TRX base station
In this example, Channel 1 is already connected to the TX Portable unit. Therefore, in order to connect the RX Portable unit, the next free channel, i.e. Channel 2, is used.
X Make sure that the Link button on the back of the TRX base station between the two adjacent channels (here: Channel 1 and Channel 2) is in the connecting position . y Both channels are connected.
X Press the the LINK button on a free channel panel on the TRX base station (here: Channel 2), for about 3 seconds. y The TX/RX Link-LED and BAT-LED flash on
the TRX base station.
9RX
CH2LINK
TX
RX
BAT
3 sec.
CH2
LINTX
RX
BAT

152014/06 | BDA 364
Commissioning and configuration
— Connect an RX Portable unit
Connection Error to the Portable unit - too close! X Portable unit held too close to the antenna: keep a distance of at least 30 cm
X Repeat the process of connecting TX Portable units. ( „To connect the TX Portable unit“ page 13)
If powered with power supplies If powered with batteries/rechargeable batteries
10
RX
10
3 sec.
MUTE
RX
RX RX
— Identify the connected Portable units X Press the LINK button on an audio channel on the TRX base station.
y The Link-LEDs associated with this audio channel connection flash on the Portable unit.
� Connect more Portable unitsFor each additional Portable unit, repeat the process for connecting Portable units.With a TX channel on the TRX base station, you can connect only one TX Portable unit.
y For each additional TX Portable unit you want to connect with the TRX base station, you must provide an additional TX channel on the TRX base station.
y An existing connection can be simply replaced by a new one, allowing you to perform the process of connecting again on the audio channel that is already occupied with another Portable unit.
— Broadcasting
With an RX channel on the TRX base station, you can connect up to 3 RX Portable units.
If you want to connect a 4th RX Portable unit to a TRX base station already fully occupied with 3 RX Portable unit channels, all existing links will be deleted.
� Connect more TX Portable units X Repeat the procedure for joining TRX base station and TX Portable units ( Connecting „TRX base station and TX Portable units“, page 13).
X Use an available input channel at the TRX base station which is not yet connected to a TX Portable unit.
� Connect more RX Portable units X Repeat the procedure for joining TRX base station and RX Portable units ( Connecting „TRX base station and RX Portable units“, page 14).
X Use an available output channel at the TRX base station which is not yet connected to a RX Portable unit. – or –
X If Broadcasting: Use an already occupied output channel.
� Identifying the connected Portable units X Press the LINK button on an audio channel of the TRX base station.
y The Link-LEDs associated with this Portable unit’s audio channel flash.
16
Commissioning and configuration
2014/06 | BDA 364
� Connect the output device to RX Portable unit
To avoid signal peaks, we recommend to activate the muting function on the XIRIUM devices before connect-ing the peripherals.
Caution! Hearing damage! Damage to the output device due to high volume setting!
X Adjust the volume control of the audio source to zero before connecting to the Portable unit. X Press the MUTE button on the TRX base station or the Mute button on the Portable unit.
X Connecting the audio cable to the receiver. X Insert the plug of the audio cable to the RX Portable unit in XLR-OUT.
� Connecting an additional TRX base station — Connecting TRX base stations in a master/slave operation
X Follow the installation and assembly instructions for TRX base station ( „Setup and Installation“, page 9). X Insert the M/S-Link cable to both TRX base stations in the M/S connection.
y The TRX base stations are synchronized. X Perform the usual configuration and connection of audio channels on both TRX base stations. X Make sure that the audio channels with the same number on both devices have the same function (TX or RX channel).

172014/06 | BDA 364
HMI Events
F HMI EventsBy the use of HMI Events it is possible to control the most important XIRIUM Configurator functions without running the software.
The following list provides an overview of the HMI events:
X Press the Event button(s) first and then the power button for two seconds until the battery LED on all channels light up. Release both buttons and the event is activated.
Event Taste Activation
Mute slot 1: WLAN Channel switching
Changes the WLAN channel. Each event increments the WLAN channel. Cycles through the 4 channels upon each execution of this event.
The channels are: Ch 36 – 5180 GHzCh 40 – 5200 GHzCh 44 – 5220 GHzCh 48 – 5240 GHz
Disabled in master slave mode!
Mute slot 2: Default IP address
Sets the IP Address to default 192.168.1.2 and reset immediately
Mute slot 3: Illuminating the current WLAN channel
Flashes the current WLAN channel at the Tx and Rx LEDs on slot 4.
Flashes Channel-----------------------------1 time 362 times 403 times 444 times 48
Mute + Gain Up slot 1: Factory Reset
Resets to factory settings
Mute + Gain Up slot 2: Reset
Resets without factory settings
Gain Up slot x: Signal split for broadcast mode
If this slot is associated to an Rx, this event splits up the input signal of this channel and routes it to all other channels.
Gain Down slot x: Disconnect “Signal split for broadcast mode”
If the audio signal of this slot was splitted up using the previous event, this command stops the multiplexing.
Note! In a Master Slave, the power button is still the power button of the master TRX and not of the slave TRX (since the slave TRX power button is inactive).

18
Operation
2014/06 | BDA 364
G OperationIf you have configured the operating system and have connected the peripherals, the TRX base station stores this cur-rent configuration.
� Switch the system on
; Placed and secured the TRX base station ; TRX base station is receiving power ; Audio channels configured ; Portable devices connected ; Peripherals connected
X Insert the plug of the AC adapter into a power outlet. X Insert the device plug into the 12-V power supply.
Once the TRX base station is powered, it automatically turns on. If you have turned the TRX base station off since the last use of the on/off button, you need to turn it on manually
– or – X Press the On/Off button for 3 seconds.
y The Power-LED is green. All MUTE-LEDs flash red. X If all MUTE-LEDs light up: Release the On/Off button.
y All MUTE-LEDs go out. The unit is ready for operation.
� Use the System � Adjusting the signal strength and volume
The GAIN-LED on the TRX base station indicates the signal strength of a Portable unit.
Display Explanation
LEDs display green continuously Optimal sensitivity
LED yellow Shortly before clipping
LED red Clipping Clipping
;Muting disabled
X If necessary, press the MUTE button on the audio channel of the TRX base station and the Mute button on the Portable unit to enable the sending/receiving of audio signals.
X Playback an audio signal on the audio source. X Look to see that the base station TRX-GAIN-LED channel is connected to the audio source of the Portable unit X Press the GAIN-up or GAIN-down button until the GAIN green LED lights up evenly. X Adjust the high volume at the output device which is connected to the RX Portable unit.
y Listen to the audio signal with increasing volume.
Is any audio signal audible? X Check the connection of the audio source, the TX Portable unit and TRX base station. X Check the connection of the output device, the RX Portable unit and TRX base station. X Check the charging state of the batteries/rechargeable batteries in the Portable units. X Make sure that channel TX and RX channels are properly connected to the TRX base station safely.

192014/06 | BDA 364
Operation
� Change a Peripheral on a Portable unit X Turn the TX/RX Portable unit or the associated audio channel at the TRX base station to silent ( See: „muting“, page 18).
X Adjust the volume of the peripheral device to zero and turn off the peripheral device. X Unplug the XLR cable. X Connect the replacement peripheral device and turn it on ( „Connecting peripherals“ on page 8).
� Muting During operation, you can mute depending on the application, individual peripherals or audio channels.
— Audio channel mute X Press the MUTE-button on the desired audio channel of the TRX base station.
y The MUTE-LED is lit. The audio channel is muted. y The audio signals from all connected to the audio channel peripherals are not transferred.
— Individually muting a peripheral device X Press the Mute button on the Portable unit.
y The Mute-LED lights. The TX/RX Portable unit with the connected peripheral device is muted. y The audio signals of the peripheral device are not transmitted.
— Peripheral(s) active switch X Press the MUTE-button (on the TRX base station) or Mute-button (on the Portable unit) again.
y The MUTE LED and Mute LED goes out. y The peripheral device or the audio channel are activated again. y The audio signals are transmitted.
� Turn off the system � Turning off theTRX base station
; Peripherals are switched off
X Press the On/Off button for 3 seconds. y The MUTE-LED flashes. The unit turns off. y The MUTE-LED goes out. The Power LED turns off. The power is off.
� Switch off the Portable unit
— when using battery/rechargeable batteries X Press the On/Off button on the TX/RX Portable unit.
y The Link-LED and TX-Link-LED will go out. The power is off.
— For operation with AC power supply adapter X Unplug the mini USB plug of the AC adapter from the TX/RX Portable unit.
y The Link-LED and TX-Link-LED will go out. The power is off.

20
After using the XIRIUM equipment
2014/06 | BDA 364
H After using the XIRIUM equipment
� Decommissioning and dismantling X Switch off all XIRIUM devices and unplug the power cord from the outlet. X Disconnect any peripherals connected by cable to the XIRIUM devices. X Remove the batteries/rechargeable batteries in the TX/RX Portable units. X For the rack mounted the TRX base station:
y Remove the antennas. y Loosen the mounting screws and pull the TRX base station from the rack.
� Transport X Transport the equipment and all accessories in the original packaging.
� Storage X Switch off the XIRIUM equipment and unplug the power cord from the power outlet when you are not using the XIRIUM devices.
X Remove the batteries/rechargeable batteries in the TX and RX Portable units when not in use for extended periods of time.
X Keep the XIRIUM equipment and all accessories in the original packaging. X Keep the XIRIUM devices in a clean, dry place. Protect the XIRIUM devices from dirt, dust, heat, humidity and moisture.
� Care and Cleaning
CAUTION! Damage to the device and its accessories due to improper cleaning!
X Do not allow the equipment or the accessories to be immersed in water. X Turn off the XIRIUM devices. X Remove the batteries/rechargeable batteries from the Portable units. X Disconnect the X-XIRIUM equipment from the power supply. X Clean the surfaces of the XIRIUM devices, and accessories with a soft damp cloth. Use a little detergent if necessary.
X Make sure that no moisture or liquids enter the interior of the XIRIUM devices. X Do not use chemical cleaning agents. X Do not use materials (e.g. wipes with a rough coating) that can scratch the surface.
� Maintenance, Repair and Overhaul
The XIRIUM devices contain no parts that you can service or repair yourself. X Check the XIRIUM devices for visible signs of damage to housings, controls, cables and connectors. X In the case of visible damage, do not use the XIRIUM devices. Turn off the XIRIUM devices and disconnect from the power supply.
X Replace defective cables and accessories immediately.
� Disposal X Dispose of the XIRIUM devices and accessories according to local regulations. X Do not dispose of electrical appliances and electrical accessories, such as cables, connectors, batteries/rechargeable batteries and components in household garbage.
X Dispose of the packaging and packaging components according to local regulations. X Dispose of the components in the device made of plastic, metal and other recyclable materials in accordance with the locally applicable regulations for recycling.

212014/06 | BDA 364
Service
I Service
� Contact X If you have any questions about the unit contact your Dealer or Neutrik Service.
y Addresses and contact details can be found at the back of this manual.
� Troubleshooting X If you have any questions about the unit contact your Dealer or Neutrik Service.
y Addresses and contact details can be found at the back of this manual.
� Device reset X Press with a pointed object (e.g. pen) the RESET button on the TRX base station.
y The device is reset to factory settings. The last configuration is deleted.
� Declaration of Conformity
The Declaration of Conformity can be downloaded from the Neutrik website.
22
Technical Data Sheet
2014/06 | BDA 364
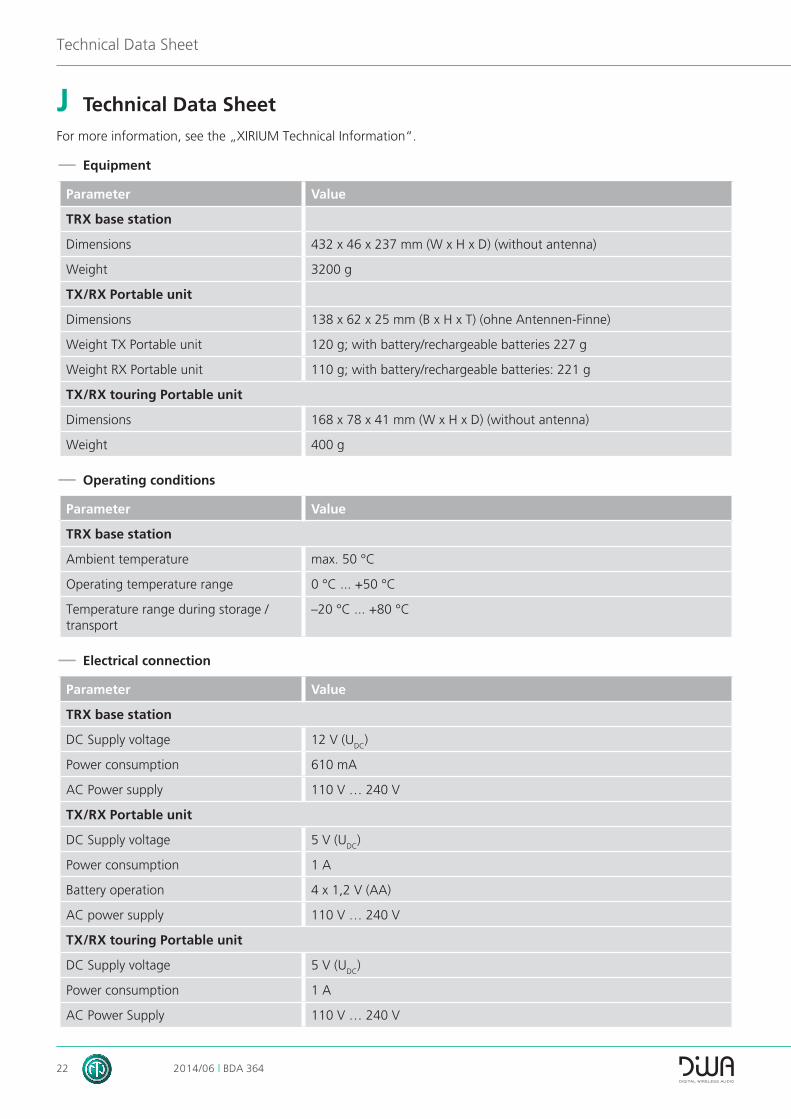
J Technical Data Sheet
For more information, see the „XIRIUM Technical Information“.
— Equipment
Parameter Value
TRX base station
Dimensions 432 x 46 x 237 mm (W x H x D) (without antenna)
Weight 3200 g
TX/RX Portable unit
Dimensions 138 x 62 x 25 mm (B x H x T) (ohne Antennen-Finne)
Weight TX Portable unit 120 g; with battery/rechargeable batteries 227 g
Weight RX Portable unit 110 g; with battery/rechargeable batteries: 221 g
TX/RX touring Portable unit
Dimensions 168 x 78 x 41 mm (W x H x D) (without antenna)
Weight 400 g
— Operating conditions
Parameter Value
TRX base station
Ambient temperature max. 50 °C
Operating temperature range 0 °C ... +50 °C
Temperature range during storage / transport
–20 °C ... +80 °C
— Electrical connection
Parameter Value
TRX base station
DC Supply voltage 12 V (UDC
)
Power consumption 610 mA
AC Power supply 110 V … 240 V
TX/RX Portable unit
DC Supply voltage 5 V (UDC
)
Power consumption 1 A
Battery operation 4 x 1,2 V (AA)
AC power supply 110 V … 240 V
TX/RX touring Portable unit
DC Supply voltage 5 V (UDC
)
Power consumption 1 A
AC Power Supply 110 V … 240 V

232014/06 | BDA 364
Technical Data Sheet

XIR
IUM
Use
r M
an
ua
l 2
01
4/0
6 B
DA
36
4 –
Dat
a su
bjec
t to
cha
nge
with
out
prio
r no
tice.
© 2
014
NEU
TRIK
® .
N
EUTR
IK®
, X
IRIU
M®
, D
IWA
® a
re r
egis
tere
d tr
adem
arks
of
NEU
TRIK
AG
. A
LL R
IGH
TS R
ESER
VED
.
www.neutrik.com www.experience-neutrik. com
DIG
ITA
L W
IRE
LES
S A
UD
IO N
ETW
OR
K
Liechtenstein (Headquarters)NEUTRIK AG, Im alten Riet 143, 9494 SchaanT +423 237 24 24, F +423 232 53 93, [email protected]
Germany / Netherlands / Denmark / AustriaNeutrik Vertriebs GmbH, Felix-Wankel-Strasse 1, 85221 Dachau, GermanyT +49 8131 28 08 90, [email protected]
Great BritainNeutrik (UK) Ltd., Westridge Business Park, Cothey WayRyde, Isle of Wight PO33 1 QTT +44 1983 811 441, [email protected]
FranceNeutrik France SARL, Rue du Parchamp 13, 92100 Boulogne-BillancourtT +33 1 41 31 67 50, [email protected]
USANeutrik USA Inc., 4115 Taggart Creek Road, Charlotte, North Carolina, 28208T +1 704 972 30 50, [email protected]
JapanNeutrik Limited, Yusen-Higashinihonbashi-Ekimae Bldg., 3-7-19Higashinihonbashi, Chuo-ku, Tokyo 103T +81 3 3663 47 33, [email protected]
Hong KongNeutrik Hong Kong LTD., Suite 18, 7th Floor Shatin Galleria Fotan, Shatin T +852 2687 6055, [email protected]
ChinaNingbo Neutrik Trading Co., Ltd., Shiqi Street, Yinxian Road WestFengjia Villiage, Yinzhou Area, Ningbo, Zhejiang; 315153T +86 574 88250488 800, [email protected]
IndiaNeutrik India Pvt. Ltd., Level 3, Neo Vikram, New Link Road, Above Audi Show Room, Andheri West, Mumbai, 400058T +91 982 05 43 424, [email protected]
Associated companies
Contrik AG Steinackerstrasse 35, 8902 Urdorf, Switzerland T +41 44 736 50 10, [email protected]
H. Adam GmbHFelix-Wankel-Straße 1, 85221 Dachau, Germany T +49 08131 28 08-0, [email protected]