USER MANUAL - Game Ready · 2020. 10. 26. · The Med4 Elite User Manual may be updated from time...
84
Model Number 650550 United States Federal Law restricts this device to sale by, or on the order of, a licensed health care practitioner. USER MANUAL
Transcript of USER MANUAL - Game Ready · 2020. 10. 26. · The Med4 Elite User Manual may be updated from time...

Model Number 650550
United States Federal Law restricts this device to sale by,
or on the order of, a licensed health care practitioner.
USER MANUAL

The Med4 Elite User Manual may be updated from time to time. The most current version of the User Manual can be found online in various languages at www.gameready.com.
If you require a paper copy of this manual, contact Game Ready Customer Service
at 1.888.426.3732. International customers contact your local distributor.
دليل المستخدم هذا متوفر بلغات عدة على الموقع الإلكترونيwww.gameready.com
Dieses Betriebshandbuch ist in verschiedenen Sprachen online unter www.gameready.com verfügbar
Este Manual del usuario está disponible en www.gameready.com en distintos idiomas
可前往在线获得本用户手册的多种语言版本www.gameready.com
Denne brugervejledning kan findes online på forskellige sprog på www.gameready.com
Deze Gebruikershandleiding is online beschikbaar in verschillende talen op www.gameready.com
Tämä käyttöopas löytyy netistä eri kielillä: www.gameready.com
On peut trouver ce manuel de l’utilisateur dans plusieurs langues en ligne à www.gameready.com
Μπορείτε να βρείτε αυτό το Εγχειρίδιο Χρήσης σε ηλεκτρονική μορφή σε διάφορες γλώσσεςστη διεύθυνση: www.gameready.com
www.gameready.com ניתן למצוא את המדריך הזה למשתמש בשפות שונות באתר
Questo Manuale per l’utente è disponibile online in varie lingue su www.gameready.com
本ユーザー・マニュアルは、www.gameready.com へ行けば様々な言語でオンライン閲覧できます。
www.gameready.com 에 가시면 이 사용자 설명서를 온라인에서 다양한 언어로 찾아보실 수 있습니다.
Niniejszą Instrukcję obsługi można znaleźć w internecie w różnych językach na stroniewww.gameready.com
Este Manual do Usuário pode ser encontrado online em vários idiomas em www.gameready.com
Данную инструкцию по применению, а также ее переводы на различные языки,можно найти на веб-сайте www.gameready.com
Denna användarhandbok finns tillgänglig på olika språk på nätet via www.gameready.com
Bu Kullanıcı Kılavuzu, değişik dillerde çevrimiçi olarak www.gameready.comadresinde bulunmaktadır

WELCOME TOMED4 ELITE

EN-iv TablE of CoNTENTs
C o N T E N T s
Introduction to the Med4 Elite™
Indications for Use �����������������������������������������������������������������2
Features ��������������������������������������������������������������������������������3
Compression Levels ��������������������������������������������������������������3
Illustrations ����������������������������������������������������������������������������4
Included Hardware and Documentation ��������������������������������5
Definitions ����������������������������������������������������������������������������� 6
safety
Med4 Elite Contraindications �������������������������������������������������7
General Warnings and Cautions ������������������������������������������� 8
System Warnings and Cautions �������������������������������������������� 9
Getting started
Setting Up ����������������������������������������������������������������������������10
Filling the Reservoirs �����������������������������������������������������������10
Powering Up ������������������������������������������������������������������������10
Setting the Language ���������������������������������������������������������� 11
Changing Factory Settings���������������������������������������������������12
Personal Identification Number (PIN) ����������������������������������12
Med4 Elite at a Glance
User Interface Elements ������������������������������������������������������13
Therapy Icons �����������������������������������������������������������������������14
System Settings Icons ���������������������������������������������������������15
Using the Med4 Elite
Setting the Temperature ������������������������������������������������������16
Setting the Temperature Scale (°F / °C) �������������������������������16
Setting Up Therapy Sessions ����������������������������������������������16
Single Patient Therapy with One Wrap ����������������������������17
Single Patient Therapy with Two Wraps ��������������������������18
Two Patient Therapy ���������������������������������������������������������18
Heat Therapy ���������������������������������������������������������������������� 20
Cold Therapy ������������������������������������������������������������������������22
Rapid Contrast Therapy �������������������������������������������������������24
Compression-Only Therapy ������������������������������������������������ 28
Pausing, Changing, and Stopping a Therapy ���������������������� 30
Powering Down �������������������������������������������������������������������31
Configuring Med4 Elite system settings
Personal Identification Number (PIN) ����������������������������������32
Changing the PIN �������������������������������������������������������������32
Setting Defaults ������������������������������������������������������������������ 33
Accessing System Settings ��������������������������������������������� 36
Heat Settings �������������������������������������������������������������������37
Cold Settings ������������������������������������������������������������������� 40
Snooze Function �������������������������������������������������������������� 43
Rapid Contrast Settings �������������������������������������������������� 44
Compression-Only Settings �������������������������������������������� 50
Resetting the Med4 Elite to Factory Settings ���������������������52
Changing the Language ������������������������������������������������������ 53
Working With Med4 Elite
System Software and Information ������������������������������������� 54
Viewing System Information ������������������������������������������� 54
Downloading Data ����������������������������������������������������������� 55
Updating the System Software �������������������������������������� 56
storing, Cleaning and Maintaining the Med4 Elite
Storing ��������������������������������������������������������������������������������� 58
Cleaning and Maintaining ���������������������������������������������������� 59
Control Unit and Connector Hoses ��������������������������������� 59
Control Unit Reservoirs ��������������������������������������������������� 59
Control Unit Filter ������������������������������������������������������������ 60
Wraps ������������������������������������������������������������������������������ 60
Adding Distilled Water ��������������������������������������������������������61
Water Reservoir Levels ����������������������������������������������������61
Transporting the Med4 Elite ������������������������������������������������62
Moving Within the Facility �����������������������������������������������62
Transporting In A Vehicle ��������������������������������������������������62
Disposing ����������������������������������������������������������������������������62

EN-vTablE of CoNTENTs
Troubleshooting the Med4 Elite
Important Messages ���������������������������������������������������������� 63
Alarms ��������������������������������������������������������������������������������� 64
Error Codes ������������������������������������������������������������������������� 68
Repairing the Med4 Elite �������������������������������������������� 68
Med4 Elite Product specifications ���������������������������� 69
supplied Power Cord specifications ������������������������� 70
Ul Classification ���������������������������������������������������������� 72
Essential Performance ������������������������������������������������ 73
Electromagnetic Compatibility ���������������������������������� 73
accessories and Replacement Parts
Accessories ������������������������������������������������������������������������� 76
Replacement Parts ������������������������������������������������������������� 76
Warranty
Manufacturer's Limited Warranty ��������������������������������������� 76
How to Obtain Warranty Service ������������������������������������ 76
Warranty Registration ����������������������������������������������������������77
Warranty of Med4 Elite Accessories �����������������������������������77
Intellectual Property
Trademarks, Trade Names, Copyrights and Patents �����������77
Software License �����������������������������������������������������������������77
symbol Descriptions ��������������������������������������������������� 78
Contact Game Ready ��������������������������������������������������� 79

EN-2 INtroductIoN
I N t r o d u c t I o N t o t H E M E d 4 E L I t E ™
Based in Concord, California, and founded in 1997, Game Ready®
(CoolSystems®, Inc.) is a best-in-class medical technology company that
helps patients and athletes recover from injury or orthopedic surgery.
The first Game Ready System was launched in 2002 providing health-
care practitioners with a state-of-the-art medical device that combines
cold with active compression.
Building upon the breakthrough Game Ready technology, the Med4 Elite
is a multi-modality recovery device for professional users. The system
delivers iceless cold therapy, heat therapy, rapid contrast (alternating
heat and cold) therapy, and intermittent pneumatic compression therapy
providing healthcare practitioners with flexible treatment options for
different patients, procedures, injuries and stages of rehabilitation.
Time-tested principles like RICE (Rest, Ice, Compression, Elevation)
and heat therapy are taken to a new level with the use of the state-of-
the-art Med4 Elite System. Cumbersome contrast therapy workflows
are improved with the more compact and convenient footprint. Rapid
contrast therapy techniques are improved with targeted, body-part
specific, dual-action Game Ready Wraps. Heat therapy treatments can
be set, monitored and controlled with better accuracy and consistency
than traditional methods.
The advanced technology used in the Med4 Elite allows for treatment
of two users simultaneously and utilizes the same anatomically
designed Wraps as the Game Ready GRPro® 2.1 System. The device
is controlled by an intuitive touch screen computer interface, allowing
the user to manage the therapy modalities as well as easily adjust and
monitor treatment times, temperature and compression settings.
A list of current patent(s) covering Game Ready technology can be
found at: www.gameready.com/patents.
INdIcAtIoNS For uSE
The Med4 Elite™ combines cold, heat, contrast, and compression
therapies. It is intended to treat postsurgical and acute injuries to
reduce edema, swelling and pain for which cold and compression
are indicated. It is intended to treat post traumatic and post surgical
medical and/or surgical conditions for which localized thermal therapy
(hot or cold or contrast) are indicated. It is intended to be used by, or on
the order of, licensed healthcare professionals in rehabilitation facilities,
outpatient clinics, and athletic training settings.

EN-3INtroductIoN
FEAturES
The Med4 Elite offers four therapy options: Heat, Cold, Rapid Contrast and Compression-Only for one or two patients simultaneously. The features
and available options that can be customized for each therapy session are shown in the table below.
Four therapy options
(up to 2 Patients)temperature Levels treatment time
compression Level*
(Intermittent Pneumatic)other Features
HeatSet Minimum and
Maximum, in °F or °CSet total therapy time Low & None —
coldSet Minimum and
Maximum, in °F or °CSet total therapy time
Low, Medium-Low,
Medium, High & None
Snooze function, up to 6
cycles
rapid contrast
Set Heat and Cold
Minimum and Maximum,
in °F or °C
Set Heat and Cold Cycle
time and total therapy time
Heat: Low & None
Cold: Low, Medium-Low,
Medium, High & None
Start Rapid Contrast
Therapy with either Heat
or Cold Therapy
compression-only — Set total therapy timeLow, Medium-Low,
Medium, High—
coMPrESSIoN LEVELS
The Med4 Elite offers four compression levels for Compression-Only and Cold Therapy: Low, Medium-Low, Medium, and High, and one
compression level for Heat Therapy: Low. Cold Therapy and Heat Therapy may also be administered with No compression.
No compression
(None)
Low
(5–15 mmHg)
Medium-Low
(5–30 mmHg)
Medium
(5–50 mmHg)
High
(5–75 mmHg)

EN-4 INtroductIoN
ILLuStrAtIoNS
on/off Button
reservoir Fill cover
Front cover
Four (4) Locking casters
touch display
Air Vents
Hose Holster
connector Hose
Handles
FroNt VIEW
WrAP (Sold Separately)
A Wrap (comprised of an inner ATX® Series Heat Exchanger and an out-
er Sleeve) must be attached to the Med4 Elite to begin treatment. Each
Wrap is sold separately and is not included with the Med4 Elite. Use
only Game Ready Wraps with the Med4 Elite. Using products other
than those manufactured or provided by Game Ready with the Med4
Elite may void the warranty.
Hose Hanger

EN-5INtroductIoN
INcLudEd HArdWArE ANd docuMENtAtIoN
The following items are included with your system:
1 Med4 Elite Control Unit
1 Power Cord (~8 ft / 2.4 m)
2 Connector Hoses (attached to Control Unit)
2 Drain Hoses
1 User Manual
1 Quick Start
1 Quick Reference
1 Game Ready USB flash drive
BAcK VIEW
AtX® Series Heat Exchanger
Sleeve
Fan
on/off Power Switch
Air Vents
uSB Port
drain Ports
Power cord Inlet
Four (4) Locking casters
EN-6 INtroductIoN
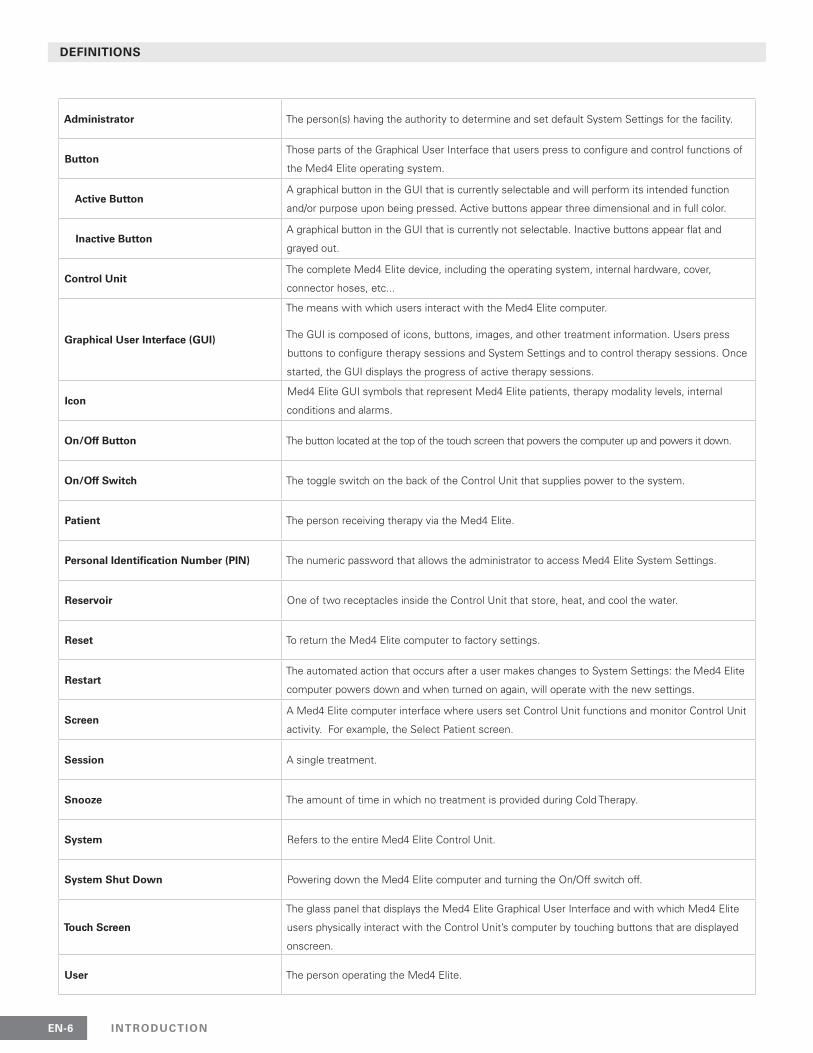
dEFINItIoNS
Administrator The person(s) having the authority to determine and set default System Settings for the facility.
ButtonThose parts of the Graphical User Interface that users press to configure and control functions of
the Med4 Elite operating system.
Active ButtonA graphical button in the GUI that is currently selectable and will perform its intended function
and/or purpose upon being pressed. Active buttons appear three dimensional and in full color.
Inactive ButtonA graphical button in the GUI that is currently not selectable. Inactive buttons appear flat and
grayed out.
control unitThe complete Med4 Elite device, including the operating system, internal hardware, cover,
connector hoses, etc...
Graphical user Interface (GuI)
The means with which users interact with the Med4 Elite computer.
The GUI is composed of icons, buttons, images, and other treatment information. Users press
buttons to configure therapy sessions and System Settings and to control therapy sessions. Once
started, the GUI displays the progress of active therapy sessions.
IconMed4 Elite GUI symbols that represent Med4 Elite patients, therapy modality levels, internal
conditions and alarms.
on/off Button The button located at the top of the touch screen that powers the computer up and powers it down.
on/off Switch The toggle switch on the back of the Control Unit that supplies power to the system.
Patient The person receiving therapy via the Med4 Elite.
Personal Identification Number (PIN) The numeric password that allows the administrator to access Med4 Elite System Settings.
reservoir One of two receptacles inside the Control Unit that store, heat, and cool the water.
reset To return the Med4 Elite computer to factory settings.
restartThe automated action that occurs after a user makes changes to System Settings: the Med4 Elite
computer powers down and when turned on again, will operate with the new settings.
ScreenA Med4 Elite computer interface where users set Control Unit functions and monitor Control Unit
activity. For example, the Select Patient screen.
Session A single treatment.
Snooze The amount of time in which no treatment is provided during Cold Therapy.
System Refers to the entire Med4 Elite Control Unit.
System Shut down Powering down the Med4 Elite computer and turning the On/Off switch off.
touch Screen
The glass panel that displays the Med4 Elite Graphical User Interface and with which Med4 Elite
users physically interact with the Control Unit’s computer by touching buttons that are displayed
onscreen.
user The person operating the Med4 Elite.

EN-7SafEt y aNd CoNtr aiNdiCatioNS
WARNING: It is mandatory to fully read and
understand the User Manual before using the
device. Failure to follow operating instructions
could result in serious injury.
ATTENTION: Consult User Manual.
S A F E T Y
iMPortaNt: rEad CoMPLEtE iNdiCatioNS, CoNtra-
iNdiCatioNS, CaUtioNS aNd WarNiNGS BEforE
USiNG tHiS ProdUCt
Caution: United States Federal Law restricts this device to
sale by, or on the order of, a licensed health care practitioner.
Follow the treatment recommendations of your health
care practitioner for duration and frequency of use for this
device. A licensed health care professional should set up and
supervise the use of this device for the patient.
X = Absolute Contraindication – Therapy in these situations should not be used in patients who have:
r = Relative Contraindication – Therapy for these conditions should be used only under the supervision of a licensed healthcare practitioner in patients who have:
tHEraPy ModE
Thermotherapy
Cryotherapy
Compression
Rapid Contrast
Current clinical signs in the affected region of significant peripheral edema (e.g., deep vein thrombosis, chronic venous insufficiency, acute compartment syndrome, systemic venous hypertension, congestive heart failure, cirrhosis/liver failure, renal failure).
X X X X
Significant vascular impairment in the affected region (e.g., from prior frostbite, arteriosclerosis, arterial insufficiency, diabetes, vascular dysregulation, or other vascular ischemic disease). X X X X
Known hematological dyscrasias that predispose to thrombosis (e.g., paroxysmal cold hemoglobinuria, cryoglobulinemia, sickle-cell disease, serum cold agglutinins). X r X
Tissues inflamed as result of recent injury or exacerbation of chronic inflammatory condition. X r X
Extremities with diffuse or focal impaired sensitivity to pain or temperature that prevent the patient from giving accurate and timely feedback. X r X
Compromised local circulation or neurologic impairment (including paralysis or localized compromise due to multiple surgical procedures) in the affected region. r r r r
Cognition or communication impairments that prevent them from giving accurate and timely feedback. X r X
An acute, unstable (untreated) fracture in the affected region. X r X
Local malignancy. X r X
Areas of skin breakdown or damage (damaged or at-risk skin) producing uneven heat conduction across the skin (e.g., open wound, scar tissue, burn or skin graft). Any open wound must be dressed prior to use of the Med4 Elite. X r r X
Actively bleeding tissue or hemorrhagic conditions. X X
Recently radiated tissues or areas affected by heat-sensitive skin diseases (e.g., eczema, psoriasis, vasculitis, dermatitis). X X
Localized unstable skin condition (e.g., dermatitis, vein ligation, gangrene, or recent skin graft) in the affected region. r r r r
Any active local or systemic infection. X X X
Current clinical signs of inflammatory phlebitis, venous ulcers, or cellulitis. r X X X
MED4 ELITE CONTRAINDICATIONS

EN-8 SafEt y aNd CoNtr aiNdiCatioNS
iMPortaNt: Refer to the most up-to-date Wrap Use Guide
for Wrap specific contraindications and warnings, which can
be found at www.gameready.com
GENERAL WARNINGS AND CAUTIONS
• (General) Follow the treatment recommendations of your health care practitioner for duration and frequency of use for this device.
• (General) Improper placement or prolonged use of the Med4 Elite could result in tissue damage.
• (General) The Med4 Elite is not for use in a sterile environment.
• (General) Game Ready Wraps are not sterile; do not place directly against open wounds, sores, rashes, infections, or stitches. The Wrap may be applied over clothing or dressing.
• (General) A layer of clothing between Wrap and skin is recommended for all patients.
• (General) Game Ready Wraps are available in multiple configurations but are not intended for all possible physiologic uses. For example, the Ankle Wrap is not designed for use on the toes and the Back Wrap is not designed for use in the abdominal region.
• (General) Use extra caution during the immediate postoperative period, especially when sedated or on any medication that could alter normal pain sensation. Check the skin of the treated region
frequently and use mid-to-higher (warmer) temperature range settings or leave more time between treatments, if necessary.
• (General) During the course of therapy, patients should monitor the skin of the treated region, the surrounding area and the digits of the extremities of the treated limb (if applicable) for any excessive redness, blistering, signs of burning, light-headedness, generalized sweating (increased core temperature), itching, increased swelling, or pain. If any of these signs are present, or any changes in skin appearance occur (such as blisters, increased redness, discoloration, or other noticeable skin changes), patients are advised to discontinue use and consult a physician.
• Monitor the level of heat throughout treatment session. Caution should be used with the Med4 Elite System or any thermotherapy (Heat Therapy) device generating high intensity heat at 113°F or above. Check the skin of the treated region frequently and use mid-to-lower (cooler) temperature range settings or leave more time between treatments, if necessary.
• Device not intended for use with numbing agents.
• Heating of the gonads and developing fetus should be avoided.
• When using heat and rapid contrast therapy, skin should be protected in heat- sensitive or high-risk patients, especially over regions with sensory deficits.
• All Cryotherapy and Thermotherapy warnings and cautions also apply to Rapid Contrast Therapy.
• Compression Therapy in combination with Heat Therapy should only be used at a level that provides better (or firm) contact with the skin, but does not compress the tissues.
X = Absolute Contraindication – Therapy in these situations should not be used in patients who have:
r = Relative Contraindication – Therapy for these conditions should be used only under the supervision of a licensed healthcare practitioner in patients who have:
tHEraPy ModE
Thermotherapy
Cryotherapy
Compression
Rapid Contrast
A pregnancy. X X
Any significant risk factors or current clinical signs of embolism (e.g. pulmonary embolus, pulmonary edema, cerebral infraction, atrial fibrillation, endocarditis, myocardial infarction, or artheromatous embolic plaque). X X X
A condition in which increased venous or lymphatic return is not desired in the affected extremity (e.g., lymphedema after breast cancer or other local carcinoma and/or carcinoma metastasis in the affected extremity). X X X
Raynaud’s disease or cold hypersensitivity (cold urticaria). X X
Hypertension, Cardiac failure, extreme low blood pressure, or decompensated cardiac insufficiency. r r X r
Children under 18 years old r r r r
Had recent toe surgery in the affected region. r r r
Obtunded or with diabetes mellitus, multiple sclerosis, poor circulation, spinal cord injuries, and rheumatoid arthritis. r r X r
Decompensated hypertonia in the affected region. X X

EN-9SafEt y aNd CoNtr aiNdiCatioNS
• Device contains R-134a refrigerant, to be serviced by qualified technicians only.
• The cooling system in your Med4 Elite contains R-134a, a refrigerant covered by the United States Environmental Protection Agency’s (EPA) disposal regulations and potentially other international environmental agencies. To avoid confusion and potential environmental damage, contact your local waste facility and inquire about disposal procedures for the Med4 Elite.
• WARNING: To safely interact with the Med4 Elite touch screen, you must be standing within 1 foot (30 cm) directly in front of the device.
• Use only Game Ready supplied Power Cord. See Supplied Power Cord Specifications for details.
• Use of this equipment adjacent to or stacked with other equipment
should be avoided because it could result in improper operation. If
such use is necessary, this equipment and the other equipment
should be observed to verify that they are operating normally.
• This symbol on the Control Unit or its packaging means that this product must not be disposed of with household/consumer waste. To learn where to drop off your electrical and electronic waste, please contact your local city/municipal waste disposal service office or contact Game Ready for assistance.
• In order to prevent trip hazards, the connector hose(s) must be properly placed in the holster(s) when not in use. Wrap the Hose once around the Hose hanger and place the end into the holster as shown. Ensure the numbered Hose Connector corresponds with the number on the Hose hanger.
WarNiNG: To comply with California Proposition 65, the
following warning has been included. This product contains
chemicals known to the State of California to cause cancer,
birth defects or other reproductive harm.
• WARNING: Use Carefully. May cause serious burns. Do not use over sensitive skin areas or in the presence of poor circulation. The unattended use of the Med4 Elite by children or incapacitated persons may be dangerous.
Measured Skin temperatures
Maximum TemperatureSkin temperature measured as high as 111 °F (44 °C) when set to maximum Heat Reservoir set point
Minimum TemperatureSkin temperature measured as low as 44 °F (7 °C) when set to minimum Cold Reservoir set point
SYSTEM WARNINGS AND CAUTIONS
• To avoid the risk of electrical shock, do not remove any panels from the Control Unit. Opening the Control Unit will void the Med4 Elite warranty. For all servicing and repair, in the U.S. call Game Ready Technical Support at 1.888.426.3732 (+1.510.868.2100); from outside of the U.S. please contact your local distributor.
• To avoid electrical shock, product malfunction or damage, never operate the system with damaged power cords or Connector Hoses, or other mechanical damage, or if the unit is otherwise not fully operational.
• WARNING: To avoid the risk of electric shock, this equipment must only be connected to a supply mains with protective earth.
• WARNING: No modification of this equipment is allowed. Any modification, or attempt at modification, could be hazardous and will void the Med4 Elite warranty.
• Do not tip the Med4 Elite on its side.
• To avoid potential damage to the Med4 Elite, do not use other manufacturers’ wraps with the Control Unit.
• To avoid injury, be careful not to trip over the Control Unit’s power cords and Connector Hoses.
• Keep the Med4 Elite, including hoses and cords, away from children and pets.
• Use caution when handling small parts to reduce any possibility of swallowing or inhalation.
• The Med4 Elite Control Unit is a medical device. To avoid damage to your product, handle it with the same care as you would a laptop computer. Do not drop it, kick it or otherwise abuse it. Such abuse will void the Med4 Elite warranty.
• Use only distilled water to fill device.
• Perform routine cleaning and water disinfection per instructions.
• Fill reservoirs with distilled water per instructions before supplying power to the device.

EN-10 GEt tiNG StartEd
G E t t i N G S t a r t E d
SEttiNG UP
The Med4 Elite arrives with a Quick Start located in the Accessory Kit
box. Please read the instructions carefully before powering up and
operating the device.
Use the handles to move the Control Unit into place. The Control Unit
should be set up:
• within six feet of a power outlet with a dedicated electrical circuit or enough power to supply 1200 watts
• with adequate access to the On/Off Switch on the back of the unit and with the power cord unobstructed
• on level ground within the facility
• indoors only
• in a dry location
• so that vents on all sides are unobstructed
• free of trip hazards
iMPOrtaNt: The Med4 Elite should never be tipped on its
side. Tipping of the control unit may cause damage to the
compressor and may void the warranty.
Once the device is located in a suitable location, lock the casters in place by pressing down on all four caster locks until they click into the down and locked position.
FiLLiNG tHE rESErVOirS
The Med4 Elite ships with the reservoirs empty. You will need to fill the
reservoirs prior to use. Two gallons (eight liters) of distilled water are
needed to completely fill the reservoirs.
iMPOrtaNt: Use distilled water only. DO NOT use deionized
water or tap water. Failure to use distilled water may void the
warranty of the device.
1. The reservoir opening is located below the touchscreen on
the Control Unit. Open by pressing on the cover to release the
latch and lift.
2. Carefully pour distilled water into the reservoir opening.
3. When finished filling the reservoirs, close the cover. Press
firmly to engage the latch.
POWEriNG UP
Connections and Powering Up
1. Attach the supplied power cord to the back of the Control Unit.
2. Plug the power cord into the appropriate power outlet.
iMPOrtaNt: Place the power cord in a safe location to
prevent tripping hazards or inadvertent disconnection.
3. Turn on the power switch located on the back of the Control Unit.

EN-11GEt tiNG StartEd
After you switch the power on, the On/Off button at the top of the
touch screen illuminates in amber.
4. Press the On/Off button to turn on the Med4 Elite. The On/Off
button at the top of the touch screen will turn green.
The Med4 Elite operating system takes up to 60 seconds to load.
SEttiNG tHE LaNGUaGE
The first task you will be asked to complete with your Med4 Elite is to
select and confirm a Language for the user interface.
On the initial boot, the Select Language screen appears.
1. Press the up or down arrows to scroll through the available
languages.
2. To select the default language setting, press the
Confirm button.
The Confirm Language screen appears.
3. To confirm the default language setting, press the
Confirm button.
4. Restart to Apply Settings by pressing the Confirm
button a second time.
The Control Unit's computer powers down.
5. Press the On/Off button located at the top of the touch screen
to restart the computer.

EN-12 GEt tiNG StartEd
Upon powering the Control Unit back on, the Select Patient screen will
appear. The Med4 Elite is now ready for use. Select a patient to begin
setting up a therapy. See Using the Med4 Elite for further instruction.
iMPOrtaNt: If the Control Unit detects an insufficient
amount of water in the reservoirs, you will not be allowed to
continue until adding an adequate amount of water.
it is important that you fill the reservoirs prior to turning on the
Med4 Elite. If it is turned on without water, or with an insufficient
amount of water, you will be prompted to add water before continuing.
See Filling the Reservoirs for instruction. Once both reservoir levels
reach at least 75%, the Select Patient screen will automatically appear,
and the Med4 Elite is now ready for use.
CHaNGiNG FaCtOrY SEttiNGS
The Med4 Elite ships with factory settings that define the default set-
tings for therapy sessions. Settings include minimum, maximum and
default heat and cold temperatures; minimum, maximum and default
compression, minimum, maximum and default therapy session times,
reservoir temperatures, interface language, and temperature scale.
These settings determine the allowable temperature and compression
ranges for therapy sessions, as well as the default settings you see
when you start up the Control Unit.
You can use the Med4 Elite with factory settings, or you can change
these settings to meet the requirements of your facility at any time.
To view the factory settings and the procedures to change the settings,
refer to Configuring Med4 Elite System Settings.
PErSONaL idENtiFiCatiON NUMBEr (PiN)
The Med4 Elite is delivered with a factory default PIN. the factory
default PiN is 1111. The PIN is necessary to access System Settings
and to change default settings. You may change the PIN number in
System Settings, refer to Configuring Med4 Elite System Settings.
Please remember to keep your PIN secure and accessible.
iMPOrtaNt: If you lose or forget your PIN, call Game
Ready Technical Support and request a Master PIN. This
will allow you to access the System Settings to configure
a new PIN. You can contact Game Ready Technical Support
at 1.888.426.3732 (1.888.GameReady) and +1.510.868.2100.
From outside the U.S., contact your local distributor.

EN-13Gr aphical UsEr iNtErfacE
UsEr iNtErfacE ElEMENts
A. Screen Title
B. Access System Settings
C. Toggle Temperature Scale between °F and °C
D. Selected Patient
E. Available Therapies
F. Switch Patient
G. Target Reservoir Temperature
H. Decrease or Increase Target Temperature
I. Actual Reservoir Temperature
D
J
K
G
E
c
a
h
N
p
Q
i
B
f
l
O
M
M E D 4 E l i t E at a G l a N c E
J. Type of Therapy in Progress
K. Total Time Remaining
L. Stop Therapy
M. Pause Therapy
N. Compression Level
O. Add Patient
P. Actual Heat Reservoir Temperature
Q. Actual Cold Reservoir Temperature
PATIENT OPTIONS TITLES / SETTINGS RESERVOIR OPTIONS

EN-14 Gr aphical UsEr iNtErfacE
thErapY icONs
The User Interface uses icons to control the Med4 Elite.
icon Name
Access System Settings
Toggle between Fahrenheit (°F)
and Celsius (°C)
Heat Reservoir Level and
Current Reservoir Temperature
Cold Reservoir Level and
Current Reservoir Temperature
Increase setting
Decrease setting
Start Therapy
Cancel
Pause Therapy
Stop Therapy
Patient 1 Add
Patient 1 Select
Patient 1 Switch
Patient 2 Add
Patient 2 Select
Patient 2 Switch
Cold Therapy
Adjust Cold Therapy Settings
Toggle Snooze On
Toggle Snooze Off
icon Name
Snooze Total Number of Cycles
Snooze Cycle Status
Heat Therapy
Adjust Heat Therapy Settings
Rapid Contrast Therapy
Adjust Rapid Contrast Therapy Settings
Set Beginning Therapy
Rapid Contrast Therapy Heat Time
Rapid Contrast Therapy Cold Time
Rapid Contrast Therapy Total Time
Compression-Only Therapy
Adjust Compression-Only Therapy Settings
No compression (None)
Low compression (5–15 mmHg)
Medium-Low compression (5–30 mmHg)
Medium compression (5–50 mmHg)
High compression (5–75 mmHg)
General Alarm
Attention: Consult User Manual

EN-15Gr aphical UsEr iNtErfacE
sYstEM sEttiNGs icONs
The System Settings User Interface uses icons to control the default settings of the Med4 Elite.
icon Name
Access System Settings
Change Personal Identification Number (PIN)
Factory Reset
Language Settings
System Information
Data Download
Software Update
Cold Therapy Settings
Cold Therapy Time Settings
Cold Therapy Compression Settings
Cold Reservoir Temperature Settings
Snooze Settings
Enable Snooze
Disable Snooze
Heat Therapy Settings
Heat Therapy Time Settings
Heat Therapy Compression Settings
Heat Reservoir Temperature Settings
Rapid Contrast Therapy Settings
Rapid Contrast Time Settings
icon Name
Compression-Only Therapy Settings
Compression-Only Therapy Time Settings
Cancel
Confirm
Return
Start
Exit to Save Settings (Restart Required)
No compression (None)
Low compression (5–15 mmHg)
Medium-Low compression (5–30 mmHg)
Medium compression (5–50 mmHg)
High compression (5–75 mmHg)

EN-16 UsiNg thE MEd4 ElitE
3. Resume therapy for the first patient by pressing the Start button.
4. Set up the second patient and press the Start button.
sEttiNg thE tEMPERAtURE sCAlE (°F / °C)
The Med4 Elite enables you to view temperatures in either Fahrenheit (°F)
or Celsius (°C). From any screen you can quickly switch between the two.
For example, to set the temperature scale from the Select Patient screen:
1. Press the temperature scale icon in the lower right corner of
the screen.
The temperature scale switches. In this example, the scale switches
from Fahrenheit to Celsius.
sEttiNg UP thERAPY sEssiONs
The Med4 Elite allows you to set up individual therapy sessions for up
to two patients at a time. Therapy modalities include:
• Heat Therapy (Thermotherapy) with or without compression
• Cold Therapy (Cryotherapy) with or without compression
• Rapid Contrast Therapy (rapidly alternates between Heat and Cold therapies) with or without compression
• Compression-Only Therapy (no water flow)
You can pause, stop or change therapies at any time during treatment.
U s i N g t h E M E d 4 E l i t E
sEttiNg thE tEMPERAtURE
• The Med4 Elite has two water reservoirs that are used to achieve the desired therapy temperature. One is used for Heat Therapy and one is used for Cold Therapy. Reservoir temperatures can be set from the Select Patient screen shown above.
• It is recommended that reservoir temperatures are set for the most common therapy temperatures at the start of the work day.
• Or the reservoir temperatures can be set in the Administrative Settings to default temperatures when the Med4 Elite is turned on.
• If a therapy requires a change from the set reservoir temperature, the new reservoir temperature can be selected from the Select Patient screen prior to setting up the patient therapy. This allows the reservoirs time to reach desired temperatures prior to treatment.
NOtE: See Safety > General Warnings and Cautions for
expected maximum and minimum skin temperatures.
AdJUstiNg REsERVOiR tEMPERAtURE
WhEN shAREd BEtWEEN tWO PAtiENts
The Med4 Elite reservoirs are shared between patients. When two
patients are being treated with therapies that use the same reservoir,
the therapy temperature will be the same for both patients.
When setting up a therapy for the second patient that uses the same
reservoir as the first patient, the therapy temperature selection (+ or -)
buttons will be inactive. The reservoir temperature will remain at the
temperature set for the first patient. If a different temperature is desired,
all therapies must first be paused in order to adjust the reservoir
temperature. Attempting to change the temperature while a therapy is
in progress will display the Heat/Cold Reservoir in Use message.
To change the reservoir temperature:
1. Pause treatment on the first patient, and adjust the temperature.
2. This adjusted temperature will be the same for both patients.

EN-17UsiNg thE MEd4 ElitE
iMPORtANt: The default settings determine the minimum,
maximum and default temperatures, compression levels and
therapy times for individual treatment sessions.
These settings are set at the factory or by your facility
administrator. Refer to Configuring Med4 Elite's System
Settings in this manual for more information.
The Med4 Elite allows for a single patient therapy or up to two
patients to receive therapy simultaneously. When two patients receive
treatment, you can individualize the treatment sessions for each patient.
siNglE PAtiENt thERAPY With ONE WRAP
To set up a therapy session for a single patient:
1. Apply the desired Wrap to the patient and attach the Wrap to
the Hose. When you hear a click, you have connected the
Wrap correctly.
2. Select the desired patient by pressing the Patient Icon: Patient
1 is on the left side of the screen or Patient 2 is on the right
side of the screen. This selection allows you to adjust settings
for the desired patient.
Click hose connector into place
disconnect Button
NOtE: You can set up the patient as either Patient 1 or Patient
2. If you set up a patient on the Hose marked with the number
1, configure that patient as Patient 1 in the user interface. If
you set up a patient on the Hose marked with the number 2,
configure that patient as Patient 2 in the user interface.
The Select Therapy screen appears with four active therapy icons. (In
the following example, Patient 1 is selected. However, if you need to
switch to Patient 2 instead, press the Patient 2 Switch button.)
3. Select the desired therapy.
Hose for Patient 1
Hose for Patient 2
Front Front

EN-18 UsiNg thE MEd4 ElitE
For setting up these therapies, refer to the procedures in the
appropriate section in Using the Med4 Elite:
• Heat Therapy
• Cold Therapy
• Rapid Contrast Therapy
• Compression-Only Therapy
In the following example, Cold Therapy is selected.
4. Once you have selected the patient’s therapy settings and
the treatment temperature reaches the set point, press the
Start button to begin the therapy session.
5. Press the Cancel button to go back to the main screen
without starting the session. By returning to the main screen,
settings will not be saved.
When the session starts, the Therapy Status screen displays the session
time as a countdown for the total treatment time. The screen also shows
the type of therapy, treatment temperatures, the compression levels,
and the reservoir temperatures and water levels. From this screen, you
can stop or pause treatment.
In this example, Patient 1’s session is in progress with:
• Cold Therapy
• Medium compression
• 14:50 minutes of Cold Therapy remaining
• Cold Therapy temperature set to 40 °F (4 °C)
• Actual reservoir temperature is 43 °F (6 °C)
siNglE PAtiENt thERAPY With tWO WRAPs
OR
tWO PAtiENt thERAPY
iMPORtANt: For Two Patient Therapy sessions, the heat
and cold reservoirs are shared between patients. Therefore,
the temperatures will be the same for both patients. When
setting up a therapy for the second patient that uses
the same reservoir as the first patient, the therapy
temperature selection (+ or -) will be inactive. The
reservoir temperature will remain at the temperature set
for the first patient. If a different temperature is desired, all
therapies must first be paused in order to adjust the reservoir
temperature. Attempting to change the temperature while a
therapy is in progress will display the Heat/Cold Reservoir in
Use message.
If you want to change the reservoir temperature before adding
a second patient, you will first need to pause treatment on the
first patient and adjust the temperature. This new temperature
will affect both patient therapies. See Pausing, Stopping and
Changing Therapy Sessions.
To add a second patient after first setting up a single patient (see previ-
ous section Single Patient Therapy):
1. Select the appropriate Wrap and attach it to the Hose. When
you hear it click, you have connected the Wrap correctly.

EN-19UsiNg thE MEd4 ElitE
NOtE: If the unused Hose is marked with the number 1,
configure the second patient as Patient 1 in the user interface.
If the unused Hose is marked with the number 2, configure
the second patient as Patient 2 in the user interface.
2. Select either Patient 1 Add or Patient 2 Add (based on
whichever Hose is available) by pressing the Patient Add icon
on the Therapy Status screen. This allows you to adjust settings
for the second patient or a second wrap for a single patient.
disconnect Button
Click hose connector into place
Hose for Patient 1
Hose for Patient 2
Front Front
Once you select the Patient, the four therapy icons become active. (In
this example, Patient 2 is selected for a new therapy to be set up, and
Patient 1 is receiving Cold Therapy.)
3. Select the desired therapy.
For setting up these therapies, refer to the procedures in the
appropriate section in Using the Med4 Elite:
• Heat Therapy
• Cold Therapy
• Rapid Contrast Therapy
• Compression-Only Therapy
In the following example, Heat Therapy is selected for Patient 2 while
Cold Therapy continues for Patient 1.
4. Once you have selected the the second patient’s therapy
settings and the treatment temperature reaches the set point,
press the Start button to begin the therapy
session.
5. Press the Cancel button to go back without starting the
session. By returning to the previous screen, settings will not
be saved.

EN-20 UsiNg thE MEd4 ElitE
When the session starts, the Therapy Status screen displays the session
time as a countdown for the total treatment time. The screen also shows
the type of therapy, treatment temperatures, the compression levels,
and the reservoir temperatures and water levels. From this screen, you
can stop or pause treatment.
In this example:
Patient 1’s session is in progress
with:
• Cold Therapy
• Medium compression
• 13:00 minutes of Cold
Therapy remaining
• Cold Therapy tempera-
ture is set to 40 °F
(4 °C)
• Actual reservoir tem-
perature is 43 °F (6 °C)
Patient 2’s session is in progress
with:
• Heat Therapy
• Low compression
• 14:46 minutes of Heat
Therapy remaining
• Heat Therapy tem-
perature set to 105 °F
(41 °C)
• Actual reservoir
temperature is 98 °F
(37 °C)
hEAt thERAPY
The Med4 Elite allows you to set up a Heat Therapy session for each
patient. Individual settings for each patient’s session include treatment
temperature, time and compression level.
To set up a Heat Therapy session from the Select Patient screen:
1. Select the desired patient by pressing the appropriate Patient
Icon: Patient 1 is on the left side of the screen or Patient 2 is
on the right side of the screen.
The Select Therapy screen appears with four active therapy icons. (In
this example, Patient 1 is selected.)
2. Press the Heat Therapy icon.
The Heat Therapy screen appears for the selected patient. This screen
allows you to adjust individual settings. These include heat tempera-
ture, treatment time (in minutes) and compression level (Low or No
compression) for Heat Therapy as indicated for use.

EN-21UsiNg thE MEd4 ElitE
3. Press the plus (+) arrow to increase or the minus (-) arrow to
decrease the treatment time for the Heat Therapy session.
4. Press the plus (+) arrow to increase or the minus (-) arrow to
decrease the compression level for the Heat Therapy session.
Available compression levels:
No compression Low compression
5 - 15 mmHg
5. Press the plus (+) arrow to increase or the minus (-) arrow to
decrease the treatment temperature for the Heat Therapy
session.
NOtE: The water for Heat Therapy comes from a shared
reservoir. Therefore, if two patients receive Heat Therapy at
the same time, the temperature will be the same for both
patients. Any modification to the heat setting will affect both
patients.
6. Once you have selected the patient’s therapy settings and
the treatment temperature reaches the set point, press the
Start button to begin the therapy session.
7. Press the Cancel button to go back to the main screen
without starting the session. By returning to the main screen,
settings will not be saved.
When the session starts, the Therapy Status screen displays the session
time as a countdown for the total treatment time. The screen also shows
the type of therapy, treatment temperatures, the compression levels,
and the reservoir temperatures and water levels. From this screen, you
can stop or pause treatment.
In this example, Patient 1’s session is in progress with:
• Heat Therapy
• Low compression
• 14:50 minutes of Heat Therapy remaining
• Heat Therapy temperature set to 105 °F (41 °C)
• Actual reservoir temperature is 98 °F (37 °C)

EN-22 UsiNg thE MEd4 ElitE
COld thERAPY
A Cold Therapy session can be set up for each patient. Individual
settings for each patient’s session include treatment temperature, time
and compression level. Cold Therapy also includes an optional Snooze
function. The Snooze function allows up to six (on/off) cycles of Cold
Therapy and the ability to set the time between cycles. If a patient’s
therapy requires Snooze, enable this function in the System Settings.
See Configuring Med4 Elite System Settings > Setting up Defaults >
Cold Settings > Snooze Function.
To set up a Cold Therapy session from the Select Patient screen:
1. Select the desired patient by pressing the appropriate Patient
Icon: Patient 1 is on the left side of the screen or Patient 2 is
on the right side of the screen.
The Select Therapy screen appears with four active therapy icons. (In
this example, Patient 1 is selected.)
2. Press the Cold Therapy icon.
The Cold Therapy screen appears for the selected patient. This screen
allows you to adjust individual settings. These include cold temperature,
treatment time (in minutes), compression level (Low, Medium-low,
Medium, High or No compression) and the Snooze function (if enabled).
NOtE: The following screens are shown with the Snooze
function enabled. the system's master snooze function
is disabled by default. Before using it in Cold Therapy,
remember to enable it in System Settings. See Configuring
Med4 Elite System Settings > Setting Defaults > Snooze
Function.
If the Snooze function is enabled, but is not desired for the patient
therapy session, press the red Toggle Snooze button to disable the
Snooze function for the session.
3. Press the plus (+) arrow to increase or the minus (-) arrow to
decrease the treatment time (in minutes) for the Cold Therapy
session.
4. Press the plus (+) arrow to increase or the minus (-) arrow to
decrease the compression level for the Cold Therapy session.
Available compression levels:
No compression
Low
(5–15 mmHg)
Medium-Low
(5–30 mmHg)
Medium
(5–50 mmHg)
High
(5–75 mmHg)

EN-23UsiNg thE MEd4 ElitE
5. Press the plus (+) arrow to increase or minus arrow (-) to
decrease the cold temperature for the Cold Therapy session.
NOtE: The water for Cold Therapy comes from a shared
reservoir. Therefore, if two patients receive Cold Therapy at
the same time, the temperature will be the same for both
patients. Any modification to the cold setting will affect both
patients.
6. Set up the Snooze function.
a. To determine the amount of time between Cold Therapy
sessions (snooze time), press the plus (+) arrow to increase
or the minus (-) arrow to decrease the time.
b. Press the plus (+) arrow to increase or the minus (-) arrow
to decrease the number of Cold Therapy cycles.
NOtE: The Med4 Elite allows you to set up a maximum of
six (6) Cold Therapy cycles when Snooze is enabled. Set the
maximum number of cycles to allow for individual therapy
sessions in the default settings.
7. Once you have selected the patient’s therapy settings and
the treatment temperature reaches the set point, press the
Start button to begin the therapy session.
8. Press the Cancel button to go back to the main screen
without starting the session. By returning to the main screen,
settings will not be saved.
When the session starts, the Therapy Status screen displays the session
time as a countdown for the total treatment time. The screen also shows
the type of therapy, treatment temperatures, the compression levels,
and the reservoir temperatures and water levels. From this screen, you
can stop or pause treatment.
EN-24 UsiNg thE MEd4 ElitE
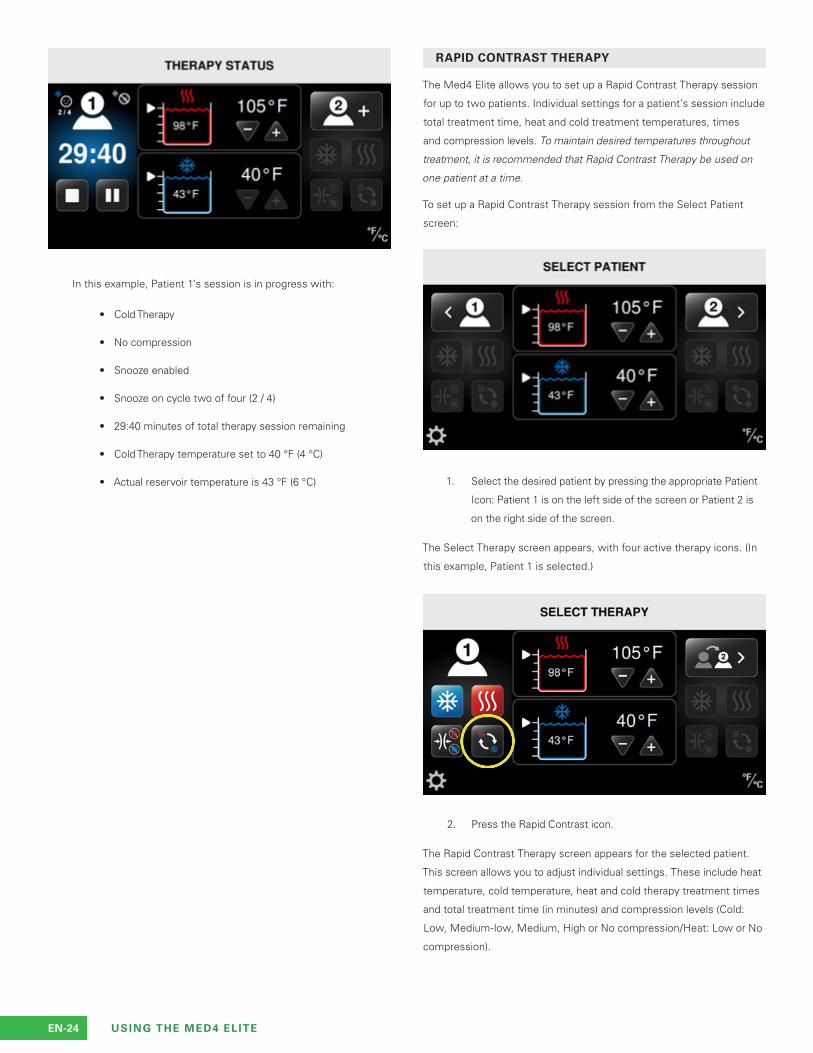
RAPid CONtRAst thERAPY
The Med4 Elite allows you to set up a Rapid Contrast Therapy session
for up to two patients. Individual settings for a patient’s session include
total treatment time, heat and cold treatment temperatures, times
and compression levels. To maintain desired temperatures throughout
treatment, it is recommended that Rapid Contrast Therapy be used on
one patient at a time.
To set up a Rapid Contrast Therapy session from the Select Patient
screen:
1. Select the desired patient by pressing the appropriate Patient
Icon: Patient 1 is on the left side of the screen or Patient 2 is
on the right side of the screen.
The Select Therapy screen appears, with four active therapy icons. (In
this example, Patient 1 is selected.)
2. Press the Rapid Contrast icon.
The Rapid Contrast Therapy screen appears for the selected patient.
This screen allows you to adjust individual settings. These include heat
temperature, cold temperature, heat and cold therapy treatment times
and total treatment time (in minutes) and compression levels (Cold:
Low, Medium-low, Medium, High or No compression/Heat: Low or No
compression).
In this example, Patient 1’s session is in progress with:
• Cold Therapy
• No compression
• Snooze enabled
• Snooze on cycle two of four (2 / 4)
• 29:40 minutes of total therapy session remaining
• Cold Therapy temperature set to 40 °F (4 °C)
• Actual reservoir temperature is 43 °F (6 °C)

EN-25UsiNg thE MEd4 ElitE
3. Press the plus (+) arrow to increase or the minus (-) arrow to
decrease the total treatment time (in minutes) for the Rapid
Contrast Therapy session.
hEAt tREAtMENt iN RAPid CONtRAst thERAPY
To set up the Heat Therapy treatment in Rapid Contrast Therapy:
To set up the Heat Therapy treatment in Rapid Contrast Therapy:
4. Press the plus (+) arrow to increase or the minus (-) arrow to
decrease the treatment time (in minutes) for the Heat Therapy
portion of the Rapid Contrast Therapy session.
5. Press the plus (+) arrow to increase or the minus (-) arrow to
decrease the compression level for the Heat Therapy portion
of the Rapid Contrast Therapy session.
Available compression levels:
No compressionLow compression
5 - 15 mmHg
6. Press the plus (+) arrow to increase or the minus (-) arrow to
decrease the heat temperature for the Rapid Contrast Therapy
session.
NOtE: The water for Heat Therapy comes from a shared
reservoir. Therefore, if two patients receive Heat Therapy at the
same time, the temperature will be the same for both patients.
Any modification to the heat setting will affect both patients.

EN-26 UsiNg thE MEd4 ElitE
COld tREAtMENt iN RAPid CONtRAst thERAPY
To set up the Cold Therapy treatment in Rapid Contrast Therapy:
7. Press the plus (+) arrow to increase or the minus (-) arrow to
decrease the treatment time (in minutes) for the Cold Therapy
portion of the Rapid Contrast Therapy session.
8. Press the plus (+) arrow to increase or the minus (-) arrow to
decrease the compression level for the cold therapy portion of
the Rapid Contrast Therapy session.
Available compression levels:
No compression
Low
(5–15 mmHg)
Medium-Low
(5–30 mmHg)
Medium
(5–50 mmHg)
High
(5–75 mmHg)
9. Press the plus (+) arrow to increase or the minus (-) arrow to
decrease the cold temperature for the Rapid Contrast Therapy
session.
NOtE: The water for Cold Therapy comes from a shared
reservoir. Therefore, if two patients receive Cold Therapy at
the same time, the temperature will be the same for both
patients. Any modification to the cold setting will affect both
patients.

EN-27UsiNg thE MEd4 ElitE
sEttiNg thE stARtiNg ANd ENdiNg thERAPY iN RAPid CONtRAst thERAPY
10. Use the Set Beginning Therapy button to start Rapid
Contrast Therapy with Cold or Heat treatment. The therapy
icon shown within the circle indicates the treatment that will
begin your Rapid Contrast Therapy session. The therapy icon
shown within the octagon indicates the treatment that will
end your session.
11. To control which therapy treatment the session ends on, you
may increase or decrease total treatment time, or Heat or
Cold Therapy times. The ending icon will adjust accordingly.
12. Once you have selected the patient’s therapy settings and
the treatment temperature reaches the set point, press the
Start button to begin the therapy session.
13. Press the Cancel button to go back to the main screen
without starting the session. By returning to the main screen,
settings will not be saved.
Rapid Contrast Therapy
Begin on Cold / End on Heat
Rapid Contrast Therapy
Begin on Heat / End on Cold
Rapid Contrast Therapy
Begin on Cold / End on Cold
Rapid Contrast Therapy
Begin on Heat / End on Heat
When the session starts, the Therapy Status screen displays the session
time as a countdown for the total treatment time. The screen also shows
the type of therapy, treatment temperatures, the compression levels,
and the reservoir temperatures and water levels. From this screen, you
can stop or pause treatment.
In this example, Patient 1’s session is in progress with:
• Rapid Contrast Therapy
• 44:40 minutes remaining in the Rapid Contrast Therapy session
• Cold Therapy is in progress
• 2:40 minutes remaining in the current portion of Cold Therapy
• Medium compression for Cold Therapy
• Heat temperature set to 105 °F (41 °C)
• Actual reservoir temperature is 98 °F (37 °C)
• Cold temperature set to 40 °F (4 °C)
• Actual reservoir temperature is 43 °F (6 °C)

EN-28 UsiNg thE MEd4 ElitE
COMPREssiON-ONlY thERAPY
The Med4 Elite allows you to set up a Compression-Only Therapy ses-
sion for each patient. Compression-Only Therapy sessions only provide
compression, no Heat or Cold therapy.
To set up a Compression-Only Therapy session from the Select Patient
screen:
1. Select the desired patient by pressing the appropriate Patient
Icon: Patient 1 is on the left side of the screen or Patient 2 is
on the right side of the screen.
The Select Therapy screen appears with four active therapy icons. (In
the following example, Patient 1 is selected.)
2. Press the Compression Therapy icon.
The Compression-Only Therapy screen appears for the selected pa-
tient. This screen allows you to adjust individual settings. These include
treatment time (in minutes) and the compression level.
3. Press the plus (+) arrow to increase or the minus (-) arrow to
decrease the treatment time (in minutes) for the Compression
Therapy session.
4. Press the plus (+) arrow to increase or the minus (-) arrow to
decrease the compression level for the Compression Therapy
session.
Available compression levels:
Low
(5–15 mmHg)
Medium-Low
(5–30 mmHg)
Medium
(5–50 mmHg)
High
(5–75 mmHg)

EN-29UsiNg thE MEd4 ElitE
5. Once you have selected the patient’s therapy settings and
the treatment temperature reaches the set point, press the
Start button to begin the therapy session.
6. Press the Cancel button to go back to the main screen
without starting the session. By returning to the main screen,
settings will not be saved.
When the session starts, the Therapy Status screen displays the
session time as a countdown for the total treatment time. The screen
also shows the compression level. From this screen, you can stop or
pause treatment.
In this example, Patient 1’s session is in progress with:
• Compression-Only Therapy
• Medium compression
• 14:50 minutes remaining of Compression-Only Therapy

EN-30 UsiNg thE MEd4 ElitE
PAUsiNg, ChANgiNg, ANd stOPPiNg A thERAPY
PAUsiNg
The Med4 Elite allows you to pause a therapy session at any time.
NOtE: Heat Therapy is used in the following illustrations to
show how to pause a therapy in progress. These procedures
can be used to pause in Cold, Rapid Contrast and Compression-
Only Therapies.
1. From the Therapy Status screen, press the Pause button.
The therapy session pauses.
2. To resume the paused therapy without any adjustments, press
the Start button.
ChANgiNg
You may change therapy session settings only while treatment is
paused. To make changes, first pause the therapy, as described in the
previous section, Pausing.
1. Once the therapy is paused, press the Adjust Therapy
Settings icon.
The Heat Therapy settings screen appears after pressing the Adjust
Therapy Settings icon.
In the following example, Patient 1’s Heat Therapy session was modi-
fied with a reduced time setting.
2. Press the plus (+) arrow to increase or the minus (-) arrow
to decrease the time, compression level, or temperature
setting(s) for the current session.
3. When you are ready to resume the session, press the
Start button.
The Therapy Status screen displays the new therapy settings and the
therapy session will continue.

EN-31UsiNg thE MEd4 ElitE
stOPPiNg
The Med4 Elite allows you to stop a therapy session at any time. By
pressing the Stop button, all therapy settings will reset to the default
settings and new therapy settings must be selected.
To stop a therapy session:
1. Press the Stop button in the Therapy Status screen.
The therapy session stops and the Select Patient screen appears. The
previous therapy settings cannot be adjusted. A new therapy session
can then be started with new settings.
For setting up new therapies, refer to the procedures in the appropriate
section in Using the Med4 Elite:
• Heat Therapy
• Cold Therapy
• Rapid Contrast Therapy
• Compression-Only Therapy
POWERiNg dOWN
To power down the Med4 Elite, use any of the following methods:
1. By pressing and holding the green On/Off button located above the
touch screen.
NOtE: If powering down the Control Unit while a therapy is
still in progress, all therapy will be stopped automatically.
2. By switching the On/Off switch on the back of the Control Unit to
the Off position.
3. If the On/Off button and the On/Off switch are not working properly,
you may power down the Control Unit by carefully detaching the power
cord from the back.
To power the Med4 Elite up after it has been powered down, ensure
the power cord is properly attached to the back of the Control Unit and
into an appropriate wall outlet, that the power switch is switched to on,
and then press the amber On/Off button.
NOtE: The Med4 Elite will automatically power down after six
(6) hours of inactivity.

EN-32 CoNfiguriNg MEd4 ElitE SyStEM SEt tiNgS
C o N f i g u r i N g M E d 4 E l i t E
S y S t E M S E t t i N g S
The Med4 Elite allows you to change the factory settings and to
customize the default settings through System Settings.
PErSoNAl idENtifiCAtioN NuMBEr (PiN)
For security, the Med4 Elite requires users to enter a PIN before
accessing System Settings. the factory default PiN is 1111, however,
you can change the PIN at any time.
iMPortANt: If you lose or forget your PIN, call Game
Ready Technical Support and request a Master PIN. This
will allow you to access the System Settings to configure
a new PIN. You can contact Game Ready Technical Support
at 1.888.426.3732 (1.888.GameReady) and +1.510.868.2100.
From outside the U.S., contact your local distributor.
CHANgiNg tHE PiN
To change the PIN:
1. Press the System Settings icon located in the bottom left
corner of the Select Patient screen.
The Enter Pin screen appears.
2. Press 1111 (the factory default PIN), or the current PIN.
The System Settings screen appears.
3. Press the security icon.
The Enter Current PIN screen appears.
4. Press 1111 (the factory default PIN), or the current PIN.
The Enter New PIN screen appears.
5. Press the desired numbers to enter the new four-digit PIN.
NotE: To return to System Settings without changing the PIN,
press the Return button.

EN-33CoNfiguriNg MEd4 ElitE SyStEM SEt tiNgS
The Re-enter New PIN screen appears.
6. Re-enter the new PIN to confirm.
The Confirm PIN Change screen appears.
7. To confirm PIN change, press the Confirm button.
8. To cancel the PIN change, press the Cancel button.
Upon confirmation, the System Settings screen returns, allowing you
to change other settings.
9. If no other changes are required, press the Exit icon to
save the new settings. Please remember to keep your PIN
secure and accessible. The PIN is necessary to access System
Settings and to change default settings.
SEttiNg dEfAultS
Default settings define the minimum, maximum and default therapy
temperatures, therapy compression levels, and treatment time. You
can use the Med4 Elite with factory settings, or change these settings
at any time.
The Heat Reservoir Temperature Settings screen is shown below as an
example of how to set defaults.
1. To set Minimum Defaults: Press the plus (+) arrow to increase
and the minus (-) arrow to decrease the temperature to select
the minimum allowable therapy setting. In the example above,
the minimum allowable temperature when a Heat Therapy
session is set-up will be 95 °F. Users will not be able to set a
heat therapy temperature lower than 95 °F.
2. To set Maximum Defaults: Press the plus (+) arrow to increase
and the minus (-) arrow to decrease the temperature to select
the maximum allowable therapy setting. In the example above,
the maximum allowable temperature when a Heat Therapy
session is set-up will be 113 °F. Users will not be able to set a
heat therapy temperature higher than 113 °F.
3. To set Defaults: Press the plus (+) arrow to increase and the
minus (-) arrow to decrease the temperature to select the
default therapy setting. In the example above, the default
temperature when a Heat Therapy session is set-up will be
105 °F. This is the temperature setting that first appears in
the Heat Therapy screen when a Heat Therapy session is
being configured. Users can customize this temperature for
specific therapy sessions, but not outside the range set in the
minimum and maximum settings above.
A complete listing of all factory settings is shown on the following pages.

EN-34 CoNfiguriNg MEd4 ElitE SyStEM SEt tiNgS
fACtory dEfAult SEttiNgS
Minimum Setting Maximum Setting default Setting
reservoir temperature
Heat 95 °F / 35 °C 113 °F / 45 °C 105 °F / 41 °C
Cold 38 °F / 3 °C 60 °F / 16 °C 45 °F / 7 °C
Heat therapy
Compression Level None Low None
Treatment Time 5 minutes 30 minutes 15 minutes
Cold therapy
Compression Level None High None
Treatment Time 5 minutes 60 minutes 15 minutes
Snooze Disabled Enabled Disabled
When Snooze is Enabled:
Snooze Duration 30 minutes 60 minutes 30 minutes
Number of Snooze Cycles 2 6 4
Compression therapy
Level Low High Low
Treatment Time 5 minutes 60 minutes 15 minutes

EN-35CoNfiguriNg MEd4 ElitE SyStEM SEt tiNgS
fACtory dEfAult SEttiNgS
Minimum Setting Maximum Setting default Setting
Rapid Contrast Therapy
Heat Treatment Time 1 minute 10 minutes 3 minutes
Cold Treatment Time 1 minute 10 minutes 3 minutes
Total Treatment Time 15 minutes 90 minutes 30 minutes
Hot Compression None Low None
Cold Compression None High None
Set Beginning Therapy — — Cold
Temperature
Degree Scale — — °F
Language — — English

EN-36 CoNfiguriNg MEd4 ElitE SyStEM SEt tiNgS
ACCESSiNg SyStEM SEttiNgS
To change default settings, enter System Settings from the Select
Patient screen:
1. Press the System Settings icon located in the bottom left
corner of the Select Patient screen.
The Enter Pin screen appears.
2. Use the keypad to enter your PIN.
You can now use the System Settings interface to change the system
settings of your Med4 Elite.

EN-37CoNfiguriNg MEd4 ElitE SyStEM SEt tiNgS
HEAt SEttiNgS
The Med4 Elite enables you to define the following Heat Therapy
default settings:
• Minimum and maximum default temperatures
• Minimum, maximum and default therapy session times
• Compression settings: Low and No compression
These settings determine the limits the Med4 Elite can be set for
individual therapy sessions.
HEAt tEMPErAturE SEttiNgS
To set up the default temperature settings for Heat Therapy:
1. From the System Settings screen, press the Heat
Temperature icon
The Heat Reservoir Temperature Settings screen appears.
This screen allows you to control minimum, maximum and default heat
temperature settings.
NotE: The Control Unit has factory settings set at minimum
heat 95 °F / 35 °C and maximum heat 113 °F / 45 °C. The
default heat setting is set at 105 °F / 41 °C.
2. Press the plus (+) arrows to increase or minus arrows (-)
to decrease the minimum, maximum, and default heat
temperatures for therapy treatments.
When Heat Therapy mode is selected for a therapy, the Control Unit
will default to the temperature set.
3. To confirm the default heat reservoir settings, press the
Confirm button.
4. To cancel these settings, press the Cancel button.
Upon confirmation, the System Settings screen returns, allowing you
to change other default settings.
5. When you have made all desired changes, press the Exit
icon to save the system settings.
The Control Unit's computer powers down.
6. Press the On/Off button located at the top of the touch screen
to restart the computer.
EN-38 CoNfiguriNg MEd4 ElitE SyStEM SEt tiNgS
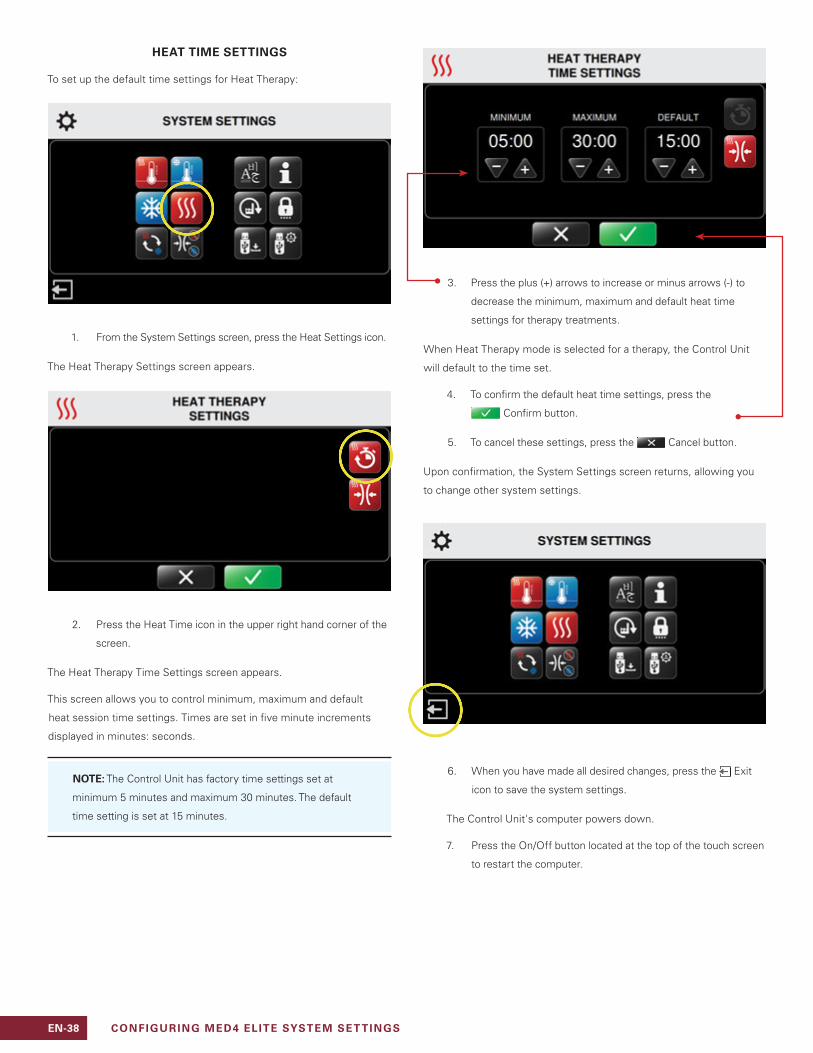
HEAt tiME SEttiNgS
To set up the default time settings for Heat Therapy:
1. From the System Settings screen, press the Heat Settings icon.
The Heat Therapy Settings screen appears.
2. Press the Heat Time icon in the upper right hand corner of the
screen.
The Heat Therapy Time Settings screen appears.
This screen allows you to control minimum, maximum and default
heat session time settings. Times are set in five minute increments
displayed in minutes: seconds.
NotE: The Control Unit has factory time settings set at
minimum 5 minutes and maximum 30 minutes. The default
time setting is set at 15 minutes.
3. Press the plus (+) arrows to increase or minus arrows (-) to
decrease the minimum, maximum and default heat time
settings for therapy treatments.
When Heat Therapy mode is selected for a therapy, the Control Unit
will default to the time set.
4. To confirm the default heat time settings, press the
Confirm button.
5. To cancel these settings, press the Cancel button.
Upon confirmation, the System Settings screen returns, allowing you
to change other system settings.
6. When you have made all desired changes, press the Exit
icon to save the system settings.
The Control Unit's computer powers down.
7. Press the On/Off button located at the top of the touch screen
to restart the computer.

EN-39CoNfiguriNg MEd4 ElitE SyStEM SEt tiNgS
HEAt CoMPrESSioN SEttiNgS
To set up the default compression settings for Heat Therapy:
1. From the System Settings screen, press the Heat Settings icon.
The Heat Therapy Settings screen appears.
2. Press the Heat Compression icon on the right hand side of the
screen.
The Heat Therapy Compression Settings screen appears.
This screen allows you to control the maximum heat compression
setting. The minimum and default settings are set to No compression
and cannot be changed. This ensures that No compression is always
an option for individual sessions.
NotE: The Med4 Elite has a maximum setting of Low
compression, as indicated for use with Heat Therapy. This
setting cannot be exceeded.
3. Under the maximum setting, press the minus (-) arrow to
disabled or plus arrow (+) to set to Low compression for
therapy treatments.
Available compression levels:
No compression Low compression
5 - 15 mmHg
4. To confirm the default heat compression settings, press the
Confirm button .
5. To cancel these settings, press the Cancel button.
Upon confirmation, the System Settings screen returns, allowing you
to change other system settings.
6. When you have made all desired changes, press the Exit
icon to save the system settings.
The Control Unit's computer powers down.
7. Press the On/Off button located at the top of the touch screen
to restart the computer.

EN-40 CoNfiguriNg MEd4 ElitE SyStEM SEt tiNgS
Cold SEttiNgS
The Med4 Elite enables you to define the following Cold Therapy
default settings:
• Minimum and maximum default temperatures
• Minimum, maximum and default therapy session times
• Compression settings: Low, Medium-low, Medium, High and
No compression
• Enable/disable snooze
• Minimum, maximum and default snooze cycle times
These settings determine the limits the Med4 Elite can be set for
individual therapy sessions.
Cold tEMPErAturE SEttiNgS
To set up the default temperature settings for Cold Therapy:
1. From the System Settings screen, press the Cold
Temperature icon
The Cold Reservoir Temperature Settings screen appears.
This screen allows you to control minimum, maximum and default cold
temperature settings.
NotE: The Control Unit factory settings are set to a minimum
cold of 38 °F / 3 °C and maximum cold of 60 °F / 16 °C. The
default cold setting is set at 45 °F / 7 °C.
2. Press the plus (+) arrows to increase or minus arrows (-)
to decrease the minimum, maximum and default cold
temperatures for therapy treatments.
When Cold Therapy mode is selected for a therapy, the Control Unit
will default to the temperature set.
3. To confirm the default cold reservoir settings, press the
Confirm button .
4. To cancel these settings, press the Cancel button.
Upon confirmation, the System Settings screen returns, allowing you
to change other system settings.
5. When you have made all desired changes, press the Exit
icon to save the system settings.
The Control Unit's computer powers down.
6. Press the On/Off button located at the top of the touch screen
to restart the computer.

EN-41CoNfiguriNg MEd4 ElitE SyStEM SEt tiNgS
Cold tiME SEttiNgS
To set up the default time and compression settings for Cold Therapy:
1. From the System Settings screen, press the Cold Settings
icon
The Cold Therapy Settings screen appears.
2. Press the Cold Time icon in the upper left hand corner of the
screen.
The Cold Therapy Time Settings screen appears.
This screen allows you to control minimum, maximum and default
cold session time settings. Times are set in five minute increments
displayed in minutes: seconds.
NotE: The Control Unit has factory time settings set at
minimum 5 minutes and maximum 60 minutes. The default
time setting is set at 15 minutes.
3. Press the plus (+) arrows to increase or minus arrows (-) to
decrease the minimum, maximum and default cold times for
therapy treatments.
When Cold Therapy mode is selected for a therapy, the Control Unit
will default to the time set.
4. To confirm default cold time settings, press the
Confirm button.
5. To cancel these settings, press the Cancel button.
Upon confirmation, the System Settings screen returns, allowing you
to change other system settings.
6. When you have made all desired changes, press the Exit
icon to save the system settings.
The Control Unit's computer powers down.
7. Press the On/Off button located at the top of the touch screen
to restart the computer.

EN-42 CoNfiguriNg MEd4 ElitE SyStEM SEt tiNgS
Cold CoMPrESSioN SEttiNgS
To set up the default compression settings for Cold Therapy:
1. From the System Settings screen, press the Cold Settings icon.
The Cold Therapy Settings screen appears.
2. Press the Cold Compression icon on the left hand side of the
screen.
The Cold Therapy Compression Settings screen appears.
This screen allows you to control the maximum cold compression
setting. The minimum and default settings are set to No compression
and cannot be changed. This ensures that No compression is always
an option for individual sessions.
3. Press the plus (+) arrows to increase or the minus (-) arrows to
decrease the maximum and default cold compression settings.
Available compression levels:
No compression
Low
(5–15 mmHg)
Medium-Low
(5–30 mmHg)
Medium
(5–50 mmHg)
High
(5–75 mmHg)
4. To confirm default cold compression settings, press the
Confirm button.
5. To cancel these settings, press the Cancel button.
Upon confirmation, the System Settings screen returns, allowing you
to change other system settings.
6. When you have made all desired changes, press the Exit
icon to save the system settings.
The Control Unit's computer powers down.
7. Press the On/Off button located at the top of the touch screen
to restart the computer.

EN-43CoNfiguriNg MEd4 ElitE SyStEM SEt tiNgS
SNooZE fuNCtioN
The Snooze function is available for Cold Therapy treatments only. This
function allows you to set up to six snooze cycles. One cycle consists
of Cold Therapy on and Cold Therapy off (Snooze). The length of time
for both Cold Therapy on and Cold Therapy off (Snooze) can be set by
the user.
To set up the default Snooze settings for Cold Therapy:
1. From the System Settings screen, press the Cold Settings icon.
The Cold Therapy Settings screen appears.
2. Press the Snooze Settings icon on the left hand side of the
screen.
The Cold Therapy Snooze Settings screen appears.
NotE: The Snooze function is disabled by default. Pressing
the green snooze icon enables snooze. When snooze is
enabled, pressing the red snooze icon will disable snooze.
Cold Therapy Snooze disabled
Press the green Snooze icon to enable the Snooze function.
Cold Therapy Snooze Enabled
Press the red Snooze icon to disable the Snooze function.
3. To enable Snooze, press the Enable Snooze icon.
The Cold Therapy Snooze Settings screen refreshes.
This screen allows you to control the minimum, maximum and default
amount of time the Control Unit sleeps (pauses) between therapy
cycles. Times are set in five-minute increments displayed in minutes:
seconds.
4. Press the plus (+) arrows to increase or minus arrows (-) to
decrease the minimum, maximum and default Snooze times
for therapy treatments.
NotE: To disable Snooze, press the Disable Snooze icon.
5. To confirm default Snooze settings, press the
Confirm button.
6. To cancel these settings, press the Cancel button.
Upon confirmation, the System Settings screen returns, allowing you
to change other settings.

EN-44 CoNfiguriNg MEd4 ElitE SyStEM SEt tiNgS
7. When you have made all desired changes, press the Exit
icon to save the system settings.
The Control Unit's computer powers down.
8. Press the On/Off button located at the top of the touch screen
to restart the computer.
rAPid CoNtrASt SEttiNgS
The Med4 Elite enables you to define the following Rapid Contrast
default settings:
for the Cold therapy portions of rapid Contrast therapy:
• Minimum, maximum and default session times
• Compression settings: Low, Medium-low, Medium, High and
No compression
for the Heat therapy portions of rapid Contrast therapy:
• Minimum, maximum and default session times
• Compression settings: Low and No compression
for rapid Contrast therapy sessions in general:
• Minimum, maximum and default total session times
These settings determine the limits the Med4 Elite can be set for
individual therapy sessions.

EN-45CoNfiguriNg MEd4 ElitE SyStEM SEt tiNgS
Cold tiME SEttiNgS iN rAPid CoNtrASt tHErAPy
To set up the default times for the Cold Therapy portions of Rapid
Contrast therapy:
1. From the System Settings screen, press the Rapid Contrast
icon.
The Rapid Contrast Therapy Settings screen appears.
2. To set the cold contrast time defaults, press the Cold Contrast
Time icon.
The Rapid Contrast Therapy Cold Time Settings screen appears
This screen allows you to control minimum, maximum and default ses-
sion time settings. Times are set in one minute increments displayed in
minutes: seconds.
3. Press the plus (+) arrow to increase or the minus (-) arrow to
decrease the minimum, maximum and default cold times.
This will be the default cold session time for Rapid Contrast Therapy
when the Control Unit is turned on and Rapid Contrast Therapy mode
is selected.
4. To confirm default cold time settings for Rapid Contrast
Therapy, press the Confirm button.
5. To cancel these settings, press the Cancel button.
Upon confirmation, the System Settings screen returns, allowing you
to change other settings.
6. When you have made all desired changes, press the Exit
icon to save the system settings.
The Control Unit's computer powers down.
7. Press the On/Off button located at the top of the touch screen
to restart the computer.

EN-46 CoNfiguriNg MEd4 ElitE SyStEM SEt tiNgS
Cold CoMPrESSioN SEttiNgS iN rAPid CoNtrASt tHErAPy
To set up the default compression settings for the Cold Therapy por-
tions of Rapid Contrast therapy:
1. From the System Settings screen, press the Rapid Contrast
icon
The Rapid Contrast Therapy Settings screen appears.
2. To set up the Cold Compression default, press the Cold
Compression Contrast icon.
The Rapid Contrast Therapy Cold Compression Settings screen appears.
This screen allows you to control the maximum contrast compression
setting. The minimum and default settings are set to No compression
and cannot be changed. This ensures that No compression is always
an option for individual sessions.
3. Press the plus (+) arrow to increase or the minus (-) arrow to
decrease the maximum and default compression settings.
Available compression levels:
No compression
Low
(5–15 mmHg)
Medium-Low
(5–30 mmHg)
Medium
(5–50 mmHg)
High
(5–75 mmHg)
4. To confirm default cold compression settings in Rapid Contrast
Therapy, press the Confirm button.
5. To cancel these settings, press the Cancel button.
Upon confirmation, the System Settings screen returns, allowing you
to change other settings.
6. When you have made all desired changes, press the Exit
icon to save the system settings.
The Control Unit's computer powers down.
7. Press the On/Off button located at the top of the touch screen
to restart the computer.

EN-47CoNfiguriNg MEd4 ElitE SyStEM SEt tiNgS
HEAt tiME SEttiNgS iN rAPid CoNtrASt tHErAPy
To set up the default times for the Heat Therapy portions of Rapid
Contrast therapy:
1. From the System Settings screen, press the Rapid Contrast
icon.
The Rapid Contrast Therapy Settings screen appears.
2. To set the heat contrast time defaults, press the Heat Contrast
Time icon.
The Rapid Contrast Therapy Heat Time Settings screen appears.
This screen allows you to control minimum, maximum and default ses-
sion time settings. Times are set in one minute increments displayed in
minutes: seconds.
3. Press the plus (+) arrows to increase or minus arrows (-) to
decrease the minimum, maximum and default heat times
This will be the default heat session time in Rapid Contrast Therapy
when the Control Unit is turned on and Rapid Contrast Therapy mode
is selected.
4. To confirm default heat time settings for Rapid Contrast
Therapy, press the Confirm button.
5. To cancel these settings, press the Cancel button.
Upon confirmation, the System Settings screen returns, allowing you
to change other settings.
6. When you have made all desired changes, press the Exit
icon to save the system settings.
The Control Unit's computer powers down.
7. Press the On/Off button located at the top of the touch screen
to restart the computer.

EN-48 CoNfiguriNg MEd4 ElitE SyStEM SEt tiNgS
HEAt CoMPrESSioN SEttiNgS iN rAPid CoNtrASt tHErAPy
To set up the default compression settings for the Heat Therapy
portions of Rapid Contrast therapy:
1. From the System Settings screen, press the Rapid Contrast
icon.
The Rapid Contrast Therapy Settings screen appears.
2. To set up the Heat Compression default, press the Heat
Compression Contrast icon.
The Rapid Contrast Therapy Heat Compression Settings screen appears.
This screen allows you to control the maximum contrast compression
setting. The minimum and default settings are set to No compression
and cannot be changed. This ensures that No compression is always
an option for individual sessions.
NotE: The Med4 Elite has a maximum setting of Low
compression, as indicated for use with Heat Therapy. This
setting cannot be exceeded.
3. Under the maximum setting, press the minus (-) arrow to
disabled or plus arrow (+) to set to Low compression for Rapid
Contrast therapy treatments.
Available compression levels:
No compression Low compression
5 - 15 mmHg
4. To confirm default heat compression settings, press the
Confirm button.
5. To cancel these settings, press the Cancel button.
Upon confirmation, the System Settings screen returns, allowing you
to change other settings.
6. When you have made all desired changes, press the Exit
icon to save the system settings.
The Control Unit's computer powers down.
7. Press the On/Off button located at the top of the touch screen
to restart the computer.

EN-49CoNfiguriNg MEd4 ElitE SyStEM SEt tiNgS
totAl tiME SEttiNgS iN rAPid CoNtrASt tHErAPy
The Total Time setting for Rapid Contrast Therapy defines the duration
of an entire Rapid Contract Therapy session. When Total Time is set,
the Cold and Heat Therapies will repeat one after the other within that
total time.
To set up the default total times for Rapid Contrast therapy:
1. From the System Settings screen, press the Rapid Contrast
icon.
The Rapid Contrast Therapy Settings screen appears.
2. To set up the Total Time default, press the Total Time icon.
The Rapid Contrast Therapy Total Time Settings screen appears.
This screen allows you to control minimum, maximum and default
session time settings. Total times are set in five minute increments
displayed in minutes: seconds.
3. Press the plus (+) arrows to increase or minus arrows (-) to
decrease the minimum, maximum and default time for therapy
treatments.
This will be the default total time in Rapid Contrast Therapy when the
Control Unit is turned on and Rapid Contrast Therapy mode is selected.
4. To confirm default total rapid contrast session time settings,
press the Confirm button .
5. To cancel these settings, press the Cancel button.
Upon confirmation, the System Settings screen returns, allowing you
to change other settings.
6. When you have made all desired changes, press the Exit
icon to save the system settings.
The Control Unit's computer powers down.
7. Press the On/Off button located at the top of the touch screen
to restart the computer.

EN-50 CoNfiguriNg MEd4 ElitE SyStEM SEt tiNgS
CoMPrESSioN-oNly SEttiNgS
The Med4 Elite enables you to define the following Compression-Only
default settings:
• Minimum, maximum and default therapy session times
• Compression settings: Low, Medium-low, Medium and High
These settings determine the limits the Med4 Elite can be set for
individual therapy sessions.
CoMPrESSioN tiME SEttiNgS
To set up the default times for Compression-Only therapy:
1. From the System Settings screen, press the Compression
Settings icon.
The Compression-Only Therapy Settings screen appears.
2. Press the Compression-Only Time Setting icon.
The Compression-Only Therapy Time Settings screen appears.
This screen allows you to control minimum and maximum time
settings and the default session time settings. Time is set in five
minute increments with times displayed in minutes: seconds.
3. Press the plus (+) arrows to increase or minus arrows (-)
to decrease the minimum, maximum and default times for
therapy treatments.
This will be the default time settings time when the Control Unit is
turned on and Compression-Only Therapy mode is selected.
4. To confirm default compression time settings, press the
Confirm button.
5. To cancel these settings, press the Cancel button.
Upon confirmation, the System Settings screen returns, allowing you
to change other settings.
6. When you have made all desired changes, press the Exit
icon to save the system settings.
The Control Unit's computer powers down.
7. Press the On/Off button located at the top of the touch screen
to restart the computer.
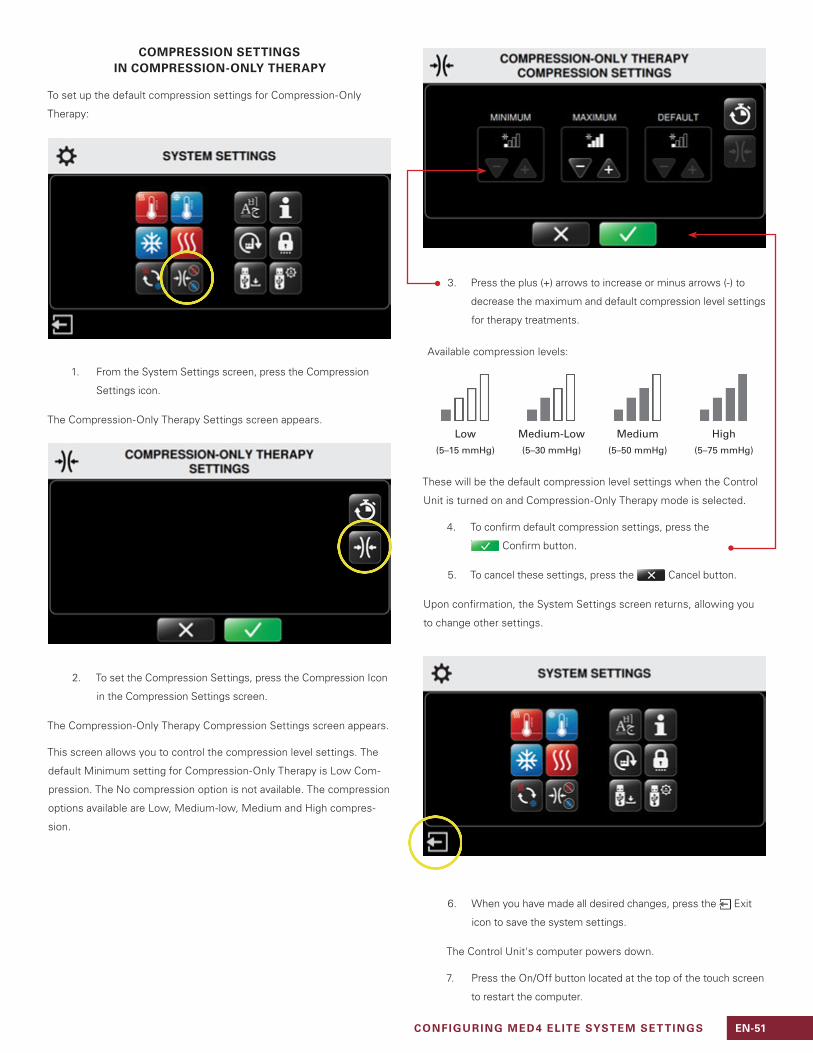
EN-51CoNfiguriNg MEd4 ElitE SyStEM SEt tiNgS
CoMPrESSioN SEttiNgS iN CoMPrESSioN-oNly tHErAPy
To set up the default compression settings for Compression-Only
Therapy:
1. From the System Settings screen, press the Compression
Settings icon.
The Compression-Only Therapy Settings screen appears.
2. To set the Compression Settings, press the Compression Icon
in the Compression Settings screen.
The Compression-Only Therapy Compression Settings screen appears.
This screen allows you to control the compression level settings. The
default Minimum setting for Compression-Only Therapy is Low Com-
pression. The No compression option is not available. The compression
options available are Low, Medium-low, Medium and High compres-
sion.
3. Press the plus (+) arrows to increase or minus arrows (-) to
decrease the maximum and default compression level settings
for therapy treatments.
Available compression levels:
Low
(5–15 mmHg)
Medium-Low
(5–30 mmHg)
Medium
(5–50 mmHg)
High
(5–75 mmHg)
These will be the default compression level settings when the Control
Unit is turned on and Compression-Only Therapy mode is selected.
4. To confirm default compression settings, press the
Confirm button.
5. To cancel these settings, press the Cancel button.
Upon confirmation, the System Settings screen returns, allowing you
to change other settings.
6. When you have made all desired changes, press the Exit
icon to save the system settings.
The Control Unit's computer powers down.
7. Press the On/Off button located at the top of the touch screen
to restart the computer.

EN-52 CoNfiguriNg MEd4 ElitE SyStEM SEt tiNgS
rESEttiNg tHE MEd4 ElitE to fACtory SEttiNgS
You may reset the Med4 Elite control unit back to factory defaults. The
PIN will not reset.
To reset all settings to factory settings:
1. From the System Settings screen, press the Apply
Factory Reset Icon.
The Enter PIN screen appears.
NotE: Press the Exit icon to return to the System Settings
screen without Applying Factory Reset.
2. To reset settings, press the appropriate numbers to enter
the PIN.
The Apply Factory Reset screen appears.
3. To apply Factory Reset, press the Confirm button.
4. To cancel these settings, press the Cancel button.
The Confirm Factory Reset screen appears.
5. To confirm Factory Reset, press the Confirm button.
Upon confirmation, the Restart to Apply Settings screen appears.
6. Press the Confirm button to restart the Control Unit.
The Control Unit's computer powers down.
7. Press the On/Off button located at the top of the touch screen
to restart the computer.

EN-53CoNfiguriNg MEd4 ElitE SyStEM SEt tiNgS
CHANgiNg tHE lANguAgE
The Med4 Elite enables you to view the user interface in one of 19
different languages. Use the System Settings to choose your desired
language:
Arabic
Chinese (Simplified)
Danish
Dutch
English
Finnish
French
German
Greek
Hebrew
Italian
Japanese
Korean
Polish
Portuguese (Brasil)
Russian
Spanish (Latin America)
Swedish
Turkish
To set the User Interface language on the Control Unit:
1. From the System Settings screen, press the Language Icon on
the settings screen.
The Select Language screen appears.
2. Press the up or down arrows to scroll through the available
languages.
3. To select the default language setting, press the
Confirm button.
4. To cancel these settings, press the Cancel button.
The Confirm Language screen appears.
5. To confirm the default language setting, press the
Confirm button.
6. To cancel these settings, press the Cancel button.

EN-54 CoNfiguriNg MEd4 ElitE SyStEM SEt tiNgS
7. Restart to Apply Settings by pressing the Confirm
button a second time.
The Control Unit's computer powers down.
8. Press the On/Off button located at the top of the touch screen
to restart the computer.
WorKiNg WitH MEd4 ElitE
SyStEM SoftWArE ANd iNforMAtioN
ViEWiNg SyStEM iNforMAtioN
The Med4 Elite enables the quick viewing of important Control Unit
information, which can help with support and troubleshooting.
To view Control Unit information:
1. From the System Settings screen, press the System Info icon.
The System Information screen appears.
The screen displays the GUI Operating System (OS), GUI Application
(App) Version, and Real Time Control Board (RTCB) Version of the
Control Unit.
2. To exit System Info, press the Return button to return
to the System Settings screen.

EN-55CoNfiguriNg MEd4 ElitE SyStEM SEt tiNgS
doWNloAdiNg dAtA
Download usage data from the Med4 Elite onto the Game Ready USB
flash drive that was provided with your Control Unit. If you are unable
to locate your Game Ready USB flash drive, or you have completed
downloading, contact Game Ready Customer Service to provide this
data for troubleshooting and diagnostics. In the U.S. contact Game
Ready Technical Support at 1.888.GameReady (1.888.426.3732) or
1.510.868.2100. From outside the U.S., contact your local distributor.
To download data from the Control Unit:
1. From the System Settings screen, press the Data Download icon.
The Data Download screen appears. To cancel this function and return
to the System Settings main menu, press the Cancel button.
2. Using a Phillips screw driver, remove the USB port cover at
back of Control Unit.
uSB Port
3. Insert the Game Ready provided USB flash drive into the USB
port on the Control Unit. The Data Download screen refreshes.
NotE: Only Game Ready USB flash drives will work with the
Med4 Elite. Do not use other USB drives.
4. To start the data download, press the Start button .
5. To cancel this function, press the Cancel button.
The Data Download screen refreshes.

EN-56 CoNfiguriNg MEd4 ElitE SyStEM SEt tiNgS
If data download is successful, the Download Successful screen
appears.
6. Remove the USB flash drive from the Control Unit’s USB port
to return to the System Settings main menu. Replace the USB
port cover on back of Control Unit.
If there is a problem during the download, the screen displays the
message, Download Failed.
7. Remove the USB flash drive from the Control Unit’s USB port.
Return to Step 3 to try the download again.
NotE: Replace the cover on the USB port to prevent
unapproved use.
NotE: The USB port is designed for Data Downloads and
Software Updates only. Use USB drives loaded only with
software for the Med4 Elite.
uPdAtiNg tHE SyStEM SoftWArE
To install software updates:
1. From the System Settings screen, press the Software
Update icon.
The Software Update screen appears. To cancel this function and re-
turn to the System Settings main menu, press the Cancel button.
2. Using a Phillips screw driver, remove the USB port cover at
back of Control Unit
uSB Port
3. Insert the Game Ready provided USB flash drive into the
USB port. The Software Update screen refreshes, displaying
the version of software installed on the Control Unit.

EN-57CoNfiguriNg MEd4 ElitE SyStEM SEt tiNgS
NotE: To learn whether you have the most current version,
go to www.gameready.com. If you don’t have the most recent
version, call Game Ready Customer Service. If your operating
system needs to be updated, Game Ready will send you a
USB flash drive with the software preloaded.
4. If an update is not necessary, press the Cancel button.
5. If an update is necassary, press the Start button to start
the update.
The Med4 Elite installs the new software. The Software Update screen
refreshes.
When the update is complete, the Control Unit indicates the Software
Update was successful.
6. Remove the USB flash drive.
7. Replace USB port cover on back of Control Unit.
8. Press the Confirm Button to apply the update. The
Control Unit's computer powers down.
9. Press the On/Off button located at the top of the touch screen
to restart the computer.
NotE: Replace the cover on the USB port to prevent
unapproved use.
NotE: The USB port is designed for Data Downloads and
Software Updates only. Use USB drives loaded only with
software for the Med4 Elite.
If there is a problem during the update, the Control Unit indicates the
Software Update failed.
10. Remove the USB drive from the Control Unit. The Software
Update screen appears. Insert USB flash drive again to retry.
If the Software Update fails after several attempts, contact Technical
Support. In the U.S. contact Game Ready Technical Support at 1.888.
GameReady (1.888.426.3732) or 1.510.868.2100. From outside the U.S.,
contact your local distributor.

EN-58 StoriNg, ClEaNiNg, aNd MaiNtaiNiNg thE MEd4 ElitE
S t o r i N g , C l E a N i N g a N d M a i N t a i N i N g
t h E M E d 4 E l i t E
StoriNg
To store the Control Unit at the end of a therapy session:
1. Wrap the Hose once around the Hose hanger and place the end
into the holster as shown above. Ensure the numbered Hose
Connector corresponds with the number on the Hose hanger.
2. Press and hold the On/Off button located at the top of the
touch screen for three seconds to power down the computer.
To store the Control Unit at the end of each day:
1. Power off the Control Unit by moving the power switch on
the back of the Control Unit to the off position.
2. Unplug the Control Unit power cord from the wall outlet.
3. Wrap the Hose once around the Hose hanger and place the end
into the holster as shown above. Ensure the numbered Hose
Connector corresponds with the number on the Hose hanger.
4. If moving, unplug the power cord from the back of the Control Unit.
5. Unlock the wheel casters, and using the handles, move the
Control Unit to its storage location.
6. Once the Control Unit is located in the appropriate location,
make sure to lock the four casters in place.
To store the Control Unit if it will not be in use for more than two
weeks:
1. Power off the Control Unit by moving the power switch on
the back of the Control Unit to the off position.
2. Unplug the Control Unit from the outlet.
3. Unplug the power cord from the back of the Control Unit.
4. Wrap the Hose once around the Hose hanger and place the end
into the holster as shown below. Ensure the numbered Hose
Connector corresponds with the number on the Hose hanger.
5. Drain the reservoirs as described in Cleaning and Maintaining
> Control Unit Reservoirs.
6. Unlock the wheel casters, and using the handles, move the
Control Unit to its storage location.
iMPortaNt: The Med4 Elite should never be tipped on its
side. Tipping of the control unit may cause damage to the
compressor and may void the warranty.
7. Once Control Unit is located in the appropriate location, make
sure to lock the four casters in place.
8. Clean and store Wraps as described in Cleaning and
Maintaining > Wraps.

EN-59StoriNg, ClEaNiNg, aNd MaiNtaiNiNg thE MEd4 ElitE
ClEaNiNg aNd MaiNtaiNiNg
The Expected Service Life of the Med4 Elite Control Unit is five (5) years.
Regular cleaning and maintenance will help to keep the Med4 Elite
operating at peak performance.
CoNtrol UNit aNd CoNNECtor hoSES (CLEAN AND MAINTAIN DAILY)
1. It is important to keep the Control Unit and Connector Hoses
clean and as dust-free as possible. To ensure that your Med4
Elite remains in the best condition possible, we recommend
that you clean the exterior surfaces, including the touch
screen, and Connector Hoses with a soft cloth and one of the
following:
• Mild detergent
• CaviCide™ or CaviWipes™
• Antifect® FF
• Mikrozid® Sensitive Wipes
• Clorox Healthcare® Bleach Germicidal Wipes
• 70% isopropyl alcohol
NotE: Do not apply liquid cleaner directly to the surface of
the Control Unit. Always apply liquid cleaner to the cloth first.
Using some products to clean and maintain your Med4 Elite will
void its warranty. therefore, never use:
• Phenolic-based disinfectants (such as Amphyl®).
• Abrasive materials, which will damage the plastics.
• Any cleaning materials or solutions not specified in this User
Manual.
CaUtioN: The Med4 Elite is not waterproof. Do not apply a
direct stream of any liquid onto the Control Unit, submerge
the Control Unit or allow any liquid to pool onto the surface of
the Control Unit.
2. Keep Hoses in place in their holsters on the Control Unit when
not in use.
3. Keep Wraps clean by wiping off any spills or dirt immediately.
CoNtrol UNit rESErVoirS (EVERY TWO WEEKS)
Drain and replace distilled water in reservoirs every two (2) weeks. To
clean the Med4 Elite reservoirs, drain the reservoirs as described in the
following section.
To drain the Med4 Elite reservoirs:
1. Turn off the Control Unit.
2. Using the drain hoses included with the Control Unit, put
the end of each Hose without the connector into a container
to catch water drainage. Once hoses are inserted, water will
immediately drain from Control Unit. Make sure the container
is set to capture water prior to Hose insertion.
3. Put the remaining end of each Hose with the connector into
the reservoir drain outlets until you hear an audible click.
4. Drain the water into the container and dispose of liquid.
To refill the reservoirs:
1. Power off the Med4 Elite by pressing the green On/Off
button on the Control Unit screen and the Power off switch
on the back of the unit.
2. Locate the reservoir opening. It is located below the
touchscreen on the Control Unit. Open by pressing on the
cover to release the latch and lift.
3 gal / 12 liter minimum

EN-60 StoriNg, ClEaNiNg, aNd MaiNtaiNiNg thE MEd4 ElitE
3. Clear any debris from the fill ports.
4. Carefully pour distilled water into the reservoir opening.
iMPortaNt: Use distilled water only. DO NOT use deionized
water or tap water. Failure to use distilled water may void the
warranty of the device.
5. When finished filling the reservoirs, close the cover. Press
firmly to engage the latch.
6. To turn the Control Unit on, move the power switch on the
back of the Control Unit to the on position.
The On/Off button will illuminate in amber color.
7. Press the On/Off button to boot the computer operating
system. The button turns green.
Once reservoirs are full and the Med4 Elite has powered on, the
Control Unit heats and cools the water in the reservoirs to the default
temperatures. This process takes approximately 15 minutes.
CoNtrol UNit FiltEr (EVERY THREE MONTHS)
1. Open the cover on the front of the Control Unit by loosening
the screws located at the top corners of the cover. To loosen,
push screws in and turn.
2. Remove the filter.
3. Rinse the filter off with water, shake off excess moisture, hang
to dry and place it back into the Control Unit.
4. Replace the filter by inserting back into place.
5. Close the cover. Tighten screws by pushing screws in and
turning.
Replace filter as needed. Replacement filters may be ordered by con-
tacting Game Ready Customer Service.
WraPS
To ensure long-term use of the Wraps and to keep them free from dust
and contamination, we recommend regular wiping down and gentle
cleaning.
To clean the Wraps:
1. Gently remove the Heat Exchanger from the Sleeve.

EN-61StoriNg, ClEaNiNg, aNd MaiNtaiNiNg thE MEd4 ElitE
2. Hand wash the Sleeve in cold water, using a mild detergent or
antibacterial soap.
iMPortaNt: Do not use fabric softener.
3. Hang Sleeve to dry.
4. If needed, you can hand wash the external surface of the Heat
Exchanger, using a very small amount of mild detergent or
antibacterial soap.
5. Hang Heat Exchanger to dry.
iMPortaNt: For Heat Exchangers: Do not machine wash,
and do not place in dryer.
Refer to the Use Guide included with each Wrap for additional details.
addiNg diStillEd WatEr
To add distilled water to the Med4 Elite reservoirs between mainte-
nance (every two weeks), or for a Low Water Alarm, follow these
procedures:
1. Locate the reservoir opening. It is located below the
touchscreen on the Control Unit. Open by pressing on the
cover to release the latch and lift.
2. Clear any debris from the Fill Port screens.
3. Carefully pour distilled water into the reservoir opening until
the GUI registers the water level at 75% for both reservoirs.
See example below.
4. When finished filling the reservoirs, close the cover. Press
firmly to engage the latch.
iMPortaNt: Do not overfill the reservoirs. Pour slowly, and
monitor the level indicated on the GUI.
WatEr rESErVoir lEVElS
The Med4 Elite has two water reservoirs that are used to achieve the
desired therapy temperature. The GUI indicates the current water level
of each reservoir with the following graphics.
Cold Reservoir 100% Heat Reservoir 100%
Cold Reservoir 75% Heat Reservoir 75%
Cold Reservoir 50% Heat Reservoir 50%
Cold Reservoir 25%
add Water Soon (See Alarms)
Heat Reservoir 25%
add Water Soon (See Alarms)
! !Cold Reservoir Empty
add Water to Continue (See Alarms)
Heat Reservoir Emtpy
add Water to Continue (See Alarms)

EN-62 StoriNg, ClEaNiNg, aNd MaiNtaiNiNg thE MEd4 ElitE
traNSPortiNg thE MEd4 ElitE
MoViNg WithiN thE FaCilitY
1. Power off the Control Unit by moving the power switch on the
back of the Control unit to the off position.
2. Unplug the Control Unit power cord from the wall outlet.
3. Wrap the Hose once around the Hose hanger and place the
end into the holster. Ensure the numbered Hose Connector
corresponds with the number on the Hose hanger.
4. Unplug the power cord from the back of the Control Unit.
5. Unlock the wheel casters, and using the handles, move the
Control unit to its new location.
6. Once the Control Unit is located in the new location, make
sure to lock the four casters in place.
traNSPortiNg iN a VEhiClE
1. Follow instructions in the Storing section: To Store the Control
Unit if it will not be in use for more than two weeks.
2. The Med4 Elite should always be transported upright and
never on its side.
3. Use Proper care and shipping materials to protect and secure
the Control Unit during transport.
4. The Med4 Elite Travel Case or its original shipping container is
recommended for transportation of the Control Unit to prevent
damage.
If the Control Unit is damaged during transport and proper care and ap-
propriate shipping materials are not used, the warranty may be voided.
diSPoSiNg
The cooling system in your Med4 Elite contains R-134a, a refrigerant
covered by the United States Environmental Protection Agency’s (EPA)
disposal regulations and potentially other international environmental
agencies. To avoid confusion and potential environmental damage,
contact your local waste facility and inquire about disposal procedures
for the Med4 Elite.
There are no special disposal requirements for the Wraps.
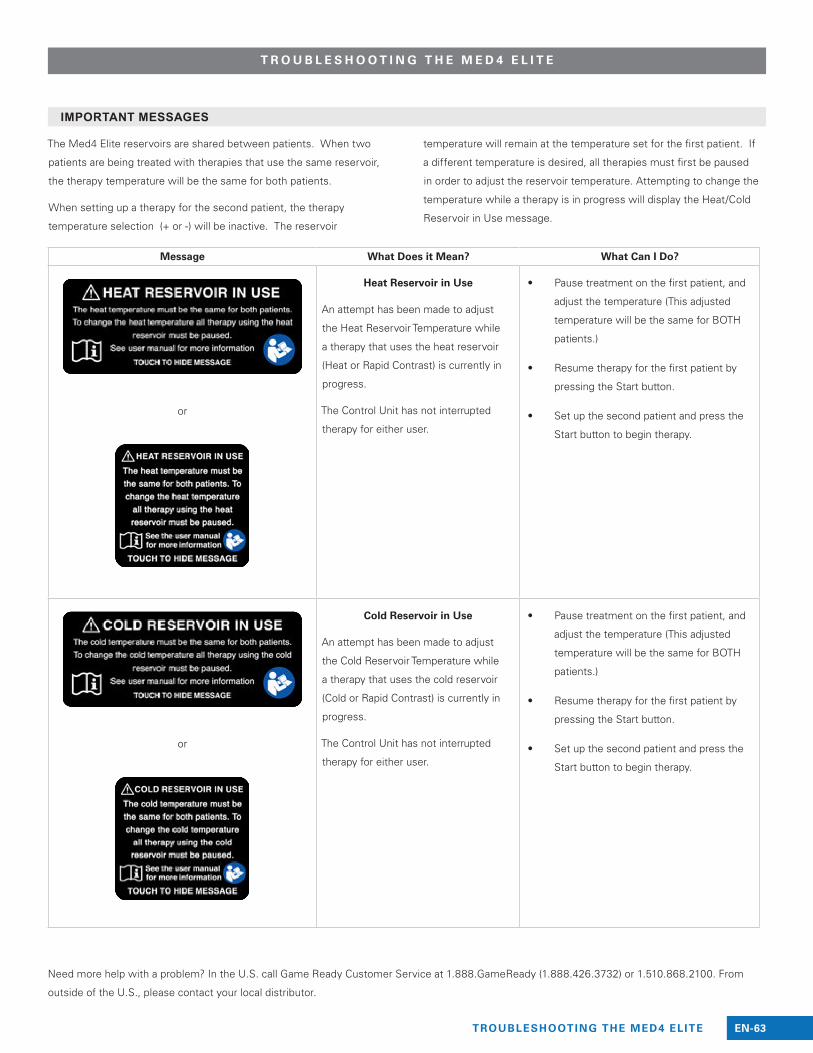
EN-63TroublEshooTiNg ThE MEd4 EliTE
IMPORTANT MESSAGES
T r o u b l E s h o o T i N g T h E M E d 4 E l i T E
The Med4 Elite reservoirs are shared between patients. When two
patients are being treated with therapies that use the same reservoir,
the therapy temperature will be the same for both patients.
When setting up a therapy for the second patient, the therapy
temperature selection (+ or -) will be inactive. The reservoir
temperature will remain at the temperature set for the first patient. If
a different temperature is desired, all therapies must first be paused
in order to adjust the reservoir temperature. Attempting to change the
temperature while a therapy is in progress will display the Heat/Cold
Reservoir in Use message.
Message What does it Mean? What Can i do?
or
heat reservoir in use
An attempt has been made to adjust
the Heat Reservoir Temperature while
a therapy that uses the heat reservoir
(Heat or Rapid Contrast) is currently in
progress.
The Control Unit has not interrupted
therapy for either user.
• Pause treatment on the first patient, and
adjust the temperature (This adjusted
temperature will be the same for BOTH
patients.)
• Resume therapy for the first patient by
pressing the Start button.
• Set up the second patient and press the
Start button to begin therapy.
or
Cold reservoir in use
An attempt has been made to adjust
the Cold Reservoir Temperature while
a therapy that uses the cold reservoir
(Cold or Rapid Contrast) is currently in
progress.
The Control Unit has not interrupted
therapy for either user.
• Pause treatment on the first patient, and
adjust the temperature (This adjusted
temperature will be the same for BOTH
patients.)
• Resume therapy for the first patient by
pressing the Start button.
• Set up the second patient and press the
Start button to begin therapy.
Need more help with a problem? In the U.S. call Game Ready Customer Service at 1.888.GameReady (1.888.426.3732) or 1.510.868.2100. From
outside of the U.S., please contact your local distributor.

EN-64 TroublEshooTiNg ThE MEd4 EliTE
ALARMS
The Med4 Elite self-monitors for events that impede its proper
operation. If an event occurs, the Control Unit triggers an alarm. These
alarms are easy to reset, using the simple instructions listed below.
Alarm What does it Mean? What Can i do?
Add Water soon
The Control Unit has detected that the
water level of either reservoir has been
below 50% for 20 seconds.
The Control Unit has not interrupted
therapy for either user.
• Add distilled water into either reservoir
inlet, located just below the touch
screen on the Control Unit. Water may
be added while the Control Unit is
turned on.
• Alarm turns off when the reservoir levels
reach 75% for 10 seconds.
• The therapy session continues.
Add Water to Continue
The Control Unit has detected that the
water level of either reservoir has been
below 25% for 10 seconds.
The Control Unit has paused therapy for
both users until the reservoirs are filled.
Therapy session(s) can be restarted or
stopped.
• Add distilled water into either reservoir
inlet, located just below the touch
screen on the Control Unit. Water may
be added while the Control Unit is
turned on.
• Alarm turns off when the reservoir levels
reach 75%.
• Therapy sessions remain paused.
• Continue therapy after filling the
reservoirs by pressing the Start button
for Patient(s).
• Pressing the Stop button will end the
therapy session.

EN-65TroublEshooTiNg ThE MEd4 EliTE
Alarm What does it Mean? What Can i do?
low Water Flow Patient 1
The Control Unit has detected low water
flow for Patient 1.
The Control Unit has not interrupted
therapy for either user.
• Check Wrap for kinks, other obstructions
or leaks.
• If alarm persists, check the Hose to
Patient 1 for kinks, other obstructions
or leaks.
• Ensure wrap is applied with a snug fit.
• If alarm persists, make sure it is
securely snapped into the Hose, or
try a different Wrap to isolate which
component may be producing the error.
• Reduce compression level.
• Alarm will turn off once obstruction is
cleared.
• Therapy session(s) continue(s).
Persistent low Water Flow
Patient 1
The Control Unit has detected low water
flow for Patient 1 for at least 90 seconds.
The Control Unit has paused Patient 1’s
therapy.
If Patient 2’s therapy session is in
progress, the Control Unit has not
interrupted Patient 2’s therapy.
• Check Wrap for kinks, other obstructions
or leaks.
• If alarm persists, check the Hose to
Patient 1 for kinks, other obstructions
or leaks.
• Reduce compression level.
• Therapy session for blocked user will
remain paused.
• Push Alarm Reset button.
• If alarm persists, make sure the Wrap
is securely snapped into the Hose, or
try a different Wrap to isolate which
component may be producing the error.
• Press the Start button for Patient 1 to
start therapy, or press the Stop button to
stop therapy.
Need more help with a problem? In the U.S. call Game Ready Customer Service at 1.888.GameReady (1.888.426.3732) or 1.510.868.2100. From
outside of the U.S., please contact your local distributor.

EN-66 TroublEshooTiNg ThE MEd4 EliTE
Alarm What does it Mean? What Can i do?
low Water Flow Patient 2
The Control Unit has detected low water
flow for Patient 2.
The Control Unit has not interrupted
therapy for either user.
• Check Wrap for kinks, other obstructions
or leaks.
• If alarm persists, check the Hose to
Patient 2 for kinks, other obstructions
or leaks.
• Ensure wrap is applied with a snug fit.
• If alarm persists, make sure the Wrap
is securely snapped into the Hose, or
try a different Wrap to isolate which
component may be producing the error.
• Reduce compression level.
• Alarm will turn off once obstruction is
cleared.
• Therapy session(s) continue(s).
Persistent low Water Flow Patient 2
The Control Unit has detected low water
flow for Patient 2 for at least 90 seconds.
The Control Unit has paused Patient 2’s
therapy.
If Patient 1’s therapy session is in
progress, the Control Unit does not
pause Patient 1’s therapy.
• Check Wrap for kinks, other obstructions
or leaks.
• If alarm persists, check the Hose to
Patient 2 for kinks, other obstructions
or leaks.
• Reduce compression level
• Therapy session for blocked user will
remain Paused.
• Push Alarm Reset button.
• If alarm persists, make sure the Wrap
is securely snapped into the Hose, or
try a different Wrap to isolate which
component may be producing the error.
• Press the Start button for Patient 2 to
start therapy, or press the Stop button to
stop therapy.

EN-67TroublEshooTiNg ThE MEd4 EliTE
Alarm What does it Mean? What Can i do?
low Air Pressure
Patient 1
The Control Unit has detected that
Patient 1 has had low air pressure for at
least 30 seconds beyond expected time
to reach peak pressure.
The Control Unit has paused Patient 1’s
therapy.
If Patient 2’s therapy session is in
progress, The Control Unit has not
paused Patient 2’s.
• Check that Wrap has been applied
correctly (hook and loop should be
attached).
• Remove Wrap from connector and
deflate by pressing it flat to expel air.
• Try again.
• Push Alarm Reset button.
• If this does not correct the problem,
check for air leaks in the Hose or Wrap.
• To help isolate the problem, try a
different wrap.
If you find air leaks, contact Game Ready
support or your local distributor for further
assistance.
• After pressing Alarm Reset, press
Patient 1’s Start button to restart therapy,
or the Stop button to stop therapy.
low Air Pressure
Patient 2
The Control Unit has detected that
Patient 2 has had low air pressure for at
least 30 seconds beyond expected time
to reach peak pressure.
The Control Unit has paused Patient 2’s
therapy.
If Patient 1’s therapy session is in
progress, The Control Unit has not
paused Patient 1’s.
• Check that Wrap has been applied
correctly (hook and loop should be
attached).
• Remove Wrap from connector and
deflate by pressing it flat to expel air.
• Try again.
• Push Alarm Reset button.
• If this does not correct the problem,
check for air leaks in the Hose or Wrap.
• To help isolate the problem, try a
different wrap.
If you find air leaks, contact Game Ready
support or your local distributor for further
assistance.
• After pressing Alarm Reset, press
Patient 2’s Start button to restart therapy,
or the Stop button to stop therapy.
Need more help with a problem? In the U.S. call Game Ready Customer Service at 1.888.GameReady (1.888.426.3732) or 1.510.868.2100. From
outside of the U.S., please contact your local distributor.

EN-68 TroublEshooTiNg ThE MEd4 EliTE
ERROR CODES
If the Med4 Elite displays an error message during a therapy session,
the Control Unit will turn off the power supply. Make note of the error
code, and in the U.S. contact Game Ready Technical Support at
1.888.GameReady (1.888.426.3732) or 1.510.868.2100. From outside
the U.S., contact your local distributor.
r E P A i r i N g T h E M E d 4 E l i T E
In the event that the Med4 Elite requires repair, such work must be
performed by a Game Ready authorized agent. Do not attempt to
repair the Control Unit. Unauthorized repairs will void the warranty.
Device contains R-134a refrigerant, to be serviced by qualified
technicians only. Contact Game Ready Technical Support. In the U.S.
call 1.888. GameReady (1.888.426.3732) or 1.510.868.2100. Outside
the U.S., contact your local distributor.
NoTE: The error code will be shown in the title bar.

EN-69Product SPEcif icatioNS
Dimensions 32.5” L x 24.75” W x 43” H (83 cm L x 63 cm W x 109 cm H)
Weight when Reservoirs are empty 172 lb (78 kg)
Weight when Reservoirs are full 188 lb (85 kg)
Input Voltage 100–240 V~, 50–60 Hz
Input Power 1200 VA
Heat Reservoir Temperature Range 95–113 °F (35–45 °C)
Cold Reservoir Temperature Range 38–60 °F (3.33–15.56 °C)
Ambient Operating Environment50–90 °F (10–32 °C)
30–90% non-condensing
Storage Temperature and Humidity33–122 °F (1–50 °C)
10–95% non-condensing
Operating Altitude Range 0–9,842 ft (0–3,000 m)
Reservoir CapacitiesHeat Reservoir: 1 gallon (3.8 liters)
Cold Reservoir: 1 gallon (3.8 liters)
Reservoir Temperature:
Maximum Heat Reservoir Temperature: 113 °F (45 °C)
Minimum Cold Reservoir Temperature: 38 °F (3 °C)
Water Temperature Accuracy: ±4 °F (±2 °C)
Intermittent Pneumatic Compression
No compression: Wrap shall be vented to atmosphere
Low: 5–15 mmHg
Medium-Low: 5–30 mmHg
Medium: 5–50 mmHg
High: 5–75 mmHg
Air Pressure Accuracy: ±10 mmHg
Bottom of pressure ramp: 5 mmHg
The ranges above represent the cyclical compression that the Med4 Elite delivers. For example, Low compression starts at a low
end level of 5 mmHg and reaches its peak compression at 15 mmHg. The Control Unit cycles from bottom to top of pressure ramp
repeatedly until the therapy session time runs out.
M E d 4 E L i t E P r o d u c t S P E c i f i c a t i o N S
Pressure vs time
Pre
ssur
e (m
mH
g)
Time (Minutes)
High
Medium
Medium-Low
Low

EN-70 Product SPEcif icatioNS
S u P P L i E d P o W E r c o r d S P E c i f i c a t i o N S
Medical Grade Power cord Game Ready PN 303835
Canada Mexico United States
Cordage14 AWG / 3C, SJTW, Temp Rating 105 °C
Rating 125V, 15A
Plug NEMA 5-15P
Connector IEC 60320 C19
Approvals UL, C-UL
RoHS Compliant
Power cord Game Ready PN 303836
Finland France Germany Greece Netherlands Poland Russia Spain Sweden Turkey
CordageK60227 IEC53 3G 1.5 mm2 + H05VV-F 3G 1.5 mm2
Rating 250V, 16A
Plug CEE 7/7 European Schuko
Connector IEC 60320 C19
Approvals European.CE+KC, VDE+KC, EAC
RoHS Compliant
Power cord Game Ready PN 303837
Hong Kong Kuwait Saudi Arabia United Arab Emirates United Kingdom
Cordage H05VV-F 3G 1.5 mm2
Rating 250V, 13A
Plug BS1363 UK13
Connector IEC 60320 C19
Approvals European.CE, BSI+PSB
RoHS Compliant
Power cord Game Ready PN 303838
Chile Italy
Cordage H05VV-F 3G 1.5 mm2
Rating 250V, 16A
Plug CEI 23-16 Italian
Connector IEC 60320 C19
Approvals EUROPEAN, VDE
RoHS Compliant
Power cord Game Ready PN 303839
India
Cordage H05VV-F 3G 0.75 mm2
Rating 250V, 16A
Plug IS 6538 India
Connector IEC 60320 C19
Approvals BIS
RoHS Compliant
Power cord Game Ready PN 303840
Switzerland
Cordage H05VV-F 3G 1.5 mm2
Rating 250V, 10A
Plug SEV 1011 Swiss
Connector IEC 60320 C19
Approvals European, CE, SEV
RoHS Compliant
Power cord Game Ready PN 303841
Brazil
CordageIEC 60227-5 60227 IEC 53 3G 1.5 mm2
Rating 250V, 10A
Plug NBR 14136 Brazil
Connector IEC 60320 C19
Approvals INMETRO
RoHS Compliant
Power cord Game Ready PN 303842
Argentina
Cordage H05VV-F 3G 1.5 mm2
Rating 250V, 10A
Plug IRAM 2073:2009 Argentina
Connector IEC 60320 C19
Approvals European, VDE, CE
RoHS Compliant

EN-71Product SPEcif icatioNS
Power cord Game Ready PN 303843
Australia
Cordage H05VV-F 3G 1.5 mm2
Rating 250V, 15A
Plug AS/NZS 4417 Australia 15A
Connector IEC 60320 C19
Approvals European, SAA
RoHS Compliant
Power cord Game Ready PN 303844
Denmark
Cordage H05VV-F 3G 1.5 mm2
Rating 250V, 10A
Plug SRAF 1962/DB 16/87 Danish
Connector IEC 60320 C19
Approvals European, VDE
RoHS Compliant
Power cord Game Ready PN 303845
Israel
Cordage H05W-F 3G 1.5 mm2
Rating 250V, 16A
Plug SI 32 Israel
Connector IEC 60320 C19
Approvals VDE, CE
RoHS Compliant
Power cord Game Ready PN 303846
Japan
Cordage VCTF 3C 2.0 mm2
Rating 125V, 15A
Plug JIS 8303 Japan
Connector IEC 60320 C19
Approvals PSE
RoHS Compliant
Power cord Game Ready PN 303847
Korea
Cordage K60227 IEC53 3C 1.5 mm2
Rating 250V, 16A
Plug KSC 8305 Korean
Connector IEC 60320 C19
Approvals KC
RoHS Compliant
iMPortaNt: Use only Game Ready supplied Power Cord.
Only the Power Cord suitable for your country will be included
with Med4 Elite.
Replacement power cords can be purchased through your local autho-
rized Game Ready Representative or by contacting Game Ready Cus-
tomer Service. In the U.S. call 1.888. Game Ready (1.888.426.3732)
or +1.510.868.2100. Outside the U.S., contact your local distributor. for
additional parts. See Accessories and Replacement Parts for additional
parts and accessories.

EN-72 UL CL assifiCatioN
U L C L A S S I F I C AT I O N
Classification: CLASS I ME EQUIPMENT
applied Part type: TYPE B APPLIED PART
Protection against
electric shock:
THE MED4 ELITE SYSTEM IS CONSIDERED TO BE
CLASS I (PROTECTIVELY EARTHED)
MED4 ELITE SYSTEM: GENERAL MEDICAL
EQUIPMENT AS TO ELECTRICAL SHOCK, FIRE
AND MECHANICAL HAZARDS ONLY IN
ACCORDANCE WITH ANSI/AAMI ES60601-1:2005/(R)2012 and
CAN/CSA- C22.2 No. 60601-1:2014
Protection against harmful
ingress of water: This product is categorized as IPX0.
Pollution Degree
Classification:This product is classified as Pollution degree 2.
Degree of safety in the
presence of flammable
anesthetics or oxygen:
Not suitable for use in an oxygen enriched environment or in the
presence of flammable anesthetics.

EN-73ElEctromagNEtic compatibil it y
E S S E N T I A L P E R F O R M A N C E
The Essential Performance of the Med4 Elite System is:
INTERMITTENT PNEUMATIC COMPRESSION CYCLES
No compression
Low
(5–15 mmHg)
Medium-Low
(5–30 mmHg)
Medium
(5–50 mmHg)
High
(5–75 mmHg)
Air Pressure Accuracy: ±10 mmHg
pressure vs time
Pre
ssur
e (m
mH
g)
Time (Minutes)
High
Medium
Medium-Low
Low
TEMPERATURE CONTROL
• Cold Therapy: The Cold Reservoir temperature will be
adjustable between 38–60 °F (3.33–15.56 °C)
• Heat Therapy: The Heat Reservoir temperature will be adjustable between 95–113 °F (35–45 °C)
• Rapid Contrast Therapy: Alternates between Cold Therapy and Heat Therapy. See above for ranges.
• Compression-Only Therapy: Temperature control does not
apply.
Water Temperature Accuracy: ±4 °F (±2 °C)
If Essential Performance is lost, the device may display an Alarm
screen or Error message, may stop therapy, and/or may shut down.
E L E C T R O M A G N E T I C C O M P AT I B I L I T Y
The Med4 Elite complies with the appropriate IEC 60601-1-2 specifica-
tions regarding electromagnetic compatibility. Ensure that the Med4
Elite is installed and used according to the electromagnetic compatibili-
ty information provided.
• WARNING: Use of accessories or cables other than those
specified or provided by the manufacturer of this equipment
could result in increased electromagnetic emissions or
decreased electromagnetic immunity of this equipment and
result in improper operation.
• WARNING: Use of this equipment adjacent to or stacked with
other equipment should be avoided because it could result in
improper operation. If such use is necessary, this equipment
and the other equipment should be observed to verify that
they are operating normally.
• WARNING: Portable RF communications equipment (including
peripherals such as antenna cables and external antennas)
should be used no closer than 30 cm (12 inches) to any part of
the Med4 Elite. Otherwise, degradation of the performance
of this equipment could result.
• NOTE: The emissions characteristics of this equipment make
it suitable for use in industrial areas and hospitals (CISPR
11 class A). If it is used in a residential environment (for
which CISPR 11 class B is normally required) this equipment
might not offer adequate protection to radio-frequency
communication services. The user might need to take
mitigation measures, such as relocating or re-orienting the
equipment.
guidance and manufacturer’s Declaration
for Electromagnetic Emissions:
Emissions Test Compliance
Conducted and radiated RF
emissions
CISPR 11 Group 1 Class A
Harmonic distortion CISPR 11 Group 1 Class A. See
IEC 61000-3-2.
Voltage fluctuations and flicker CISPR 11 Group 1 Class A. See
IEC 61000-3-3.

EN-74 ElEctromagNEtic compatibil it y
E L E C T R O M A G N E T I C C O M P AT I B I L I T Y
guidance and manufacturer’s Declaration for Electromagnetic immunity:
Immunity Test Basic EMC standard or test
method
Immunity Test Levels Compliance Levels
Electrostatic Discharge IEC 61000-4-2 ± 8kV contact ± 8kV contact
± 2kV, ± 4kV, ± 8kV, ± 15kv air ± 2kV, ± 4kV, ± 8kV, ± 15kv air
Radiated RF EM Fields IEC 61000-4-3 3 V/m
80 MHz – 2.7 GHz
80% AM at 1 kHz
3 V/m
80 MHz – 2.7 GHz
80% AM at 1 kHz
Proximity Fields From RF
Wireless Communications
Equipment
IEC 61000-4-3 See table See table
Rated Power Frequency
Magnetic Fields
IEC 61000-4-8 30 A/m
50 Hz or 60 Hz
30 A/m
50 Hz or 60 Hz
Electrical Fast Transients /
Bursts
IEC 61000-4-4 ± 2kV
100 kHz repetition frequency
± 2kV
100 kHz repetition frequency
Surges Line-to-Line IEC 61000-4-5 ± 0.5kV, ± 1kV ± 0.5kV, ± 1kV
Surges Line-to-Ground IEC 61000-4-5 ± 0.5kV, ± 1kV, ± 2kV ± 0.5kV, ± 1kV, ± 2kV
Conducted Disturbances
induced by RF Fields
IEC 61000-4-6 3 V
0.15 MHz – 80 MHz
6V in ISM bands between 0.15
MHz and 80 MHz
80% AM at 1 kHz
3 V
0.15 MHz – 80 MHz
6V in ISM bands between 0.15
MHz and 80 MHz
80% AM at 1 kHz
Voltage Dips IEC 61000-4-11 0% UT; 0.5 cycle
At 0°, 45°, 90°, 135°, 180°,
225°, 270°, and 315°
0% UT; 1 cycle
and
70% UT ; 25/30 cycles
Single phase: at 0°
0% UT; 0.5 cycle
At 0°, 45°, 90°, 135°, 180°,
225°, 270°, and 315°
0% UT; 1 cycle
and
70% UT ; 25/30 cycles
Single phase: at 0°
Voltage Interruptions IEC 61000-4-11 0% UT; 250/300 cycle Device will power down and/or
reboot if power is interrupted
for five seconds.
Note: UT is the AC mains voltage prior to the application of the test level

EN-75ElEctromagNEtic compatibil it y
proximity Fields From rF Wireless communications Equipment
test Frequency
(mHz)
band Service modulation maximum
power (W)
Distance (m) immunity test
level (V/m)
385 380-390 TETRA 400 Pulse
modulation 18
Hz
1.8 0.3 27
450 430-470 GMRS 460, FRS
460
FM ± 5kHz
deviation
1 kHz sine
2 0.3 28
710 704-787 LTE Band 13, 17 Pulse
modulation
217 Hz
0.2 0.3 9
745
780
810 800-960 GSM 800/900,
TETRA 800,
iDEN 820,
CDMA 850, LTE
Band 5
Pulse
modulation 18
Hz
2 0.3 28
870
930
1720 1700-1990 GSM 1800,
CDMA 1900,
GSM 1900,
DECT, LTE
Band 1, 3, 4, 25,
UMTS
Pulse
modulation 217
Hz
2 0.3 28
1845
1970
2450 2400-2570 Bluetooth,
WLAN, 802.11
b/g/n, RFID
2450, LTE Band
7
Pulse
modulation 217
Hz
2 0.3 28
5240 5100-5800 WLAN 802.11
a/n
Pulse
modulation 217
Hz
0.2 0.3 9
5500
5785

EN-76 Warr aNt y
A C C E S S O R I E S A N D R E P L A C E M E N T P A R T S
Accessories and Replacement Parts can be purchased through
your local authorized Game Ready Representative or by contacting
Game Ready Customer Service. In the U.S. call 1.888. Game Ready
(1.888.426.3732) or +1.510.868.2100. Outside the U.S., contact your
local distributor.
ACCESSORIES
• Game Ready ATX® Series Wraps are available in various sizes
for various parts of the body including: shoulder, elbow, hand/
wrist, back, hip/groin, knee, leg, and ankle.
• Custom Med4 Elite Travel Case for transporting Control Unit
To view a complete list of products visit www.gameready.com.
REPLACEMENT PARTS
• Connector Hose
• Filter
• Reservoir Fill Port Screens
• Drain Hose
• Power Cord
NOtE: Only Game Ready accessories and replacement parts
should be used with the Med4 Elite. Using products with the
Med4 Elite other than Game Ready products may void the
Med4 Elite Warranty.
W A R R A N T Y
MANUFACTURER'S LIMITED WARRANTY
CoolSystems warrants that the Med4 Elite (including the Connector
Hoses and Power Cord), if properly used, will be free from defects in
material and workmanship for a period of two (2) years after the date
the Med4 Elite was purchased. If the Med4 Elite, which is the subject
of this Limited Warranty, malfunctions during the warranty period for
reasons covered by this Limited Warranty, CoolSystems, at its sole
option, will:
• REPAIR the Med4 Elite
OR
REPLACE the Med4 Elite with another Med4 Elite.
EXTENT OF LIMITED WARRANTY
CoolSystems may elect to replace or repair the Med4 Elite with either
a new or reconditioned product. The returned product shall become
CoolSystems’ property upon receipt. The replacement Med4 Elite
is warranted under this written warranty and is subject to the same
limitations and exclusions for the remainder of the original warranty
period. THIS LIMITED WARRANTY APPLIES ONLY TO THE ORIGINAL
PURCHASER OF THE Med4 Elite AND IS NOT TRANSFERABLE.
LIMITED WARRANTY EXCLUSIONS
This limited warranty does not cover damages due to external caus-
es, including, without limitation, storage, usage or handling not in
accordance with product instructions, accident, misuse, neglect, or
alteration, or an unauthorized repair.
HOW TO OBTAIN WARRANTY SERVICE
To obtain warranty service, in the U.S. call Game Ready Customer
Service at 1.888.426.3732 (+1.510.868.2100); from outside of
the U.S. please contact your local distributor. If you are not sure
who the local distributor is, call Game Ready Customer Service
at +1.510.868.2100 and we will refer you to one. You must have
registered the product online with CoolSystems within thirty (30)
days from the date of purchase to qualify for warranty service. If you
qualify for warranty service from CoolSystems, CoolSystems, or its
distributor, will schedule an authorized service technician to provide
on-site repair. If CoolSystems authorizes the return of the Med4 Elite,
you will be issued a Return Material Authorization (RMA) number. You
should keep this RMA number for your records. CoolSystems, or its
distributor, will make arrangements for the shipment of the Med4 Elite
to CoolSystems (at CoolSystems expense). Customer is not to return
the Med4 Elite without prior written authorization from CoolSystems.
CoolSystems may require you to verify in writing that you are the
original purchaser of the Med4 Elite.

EN-77Warr aNt y
WARRANTY DISCLAIMERS
THESE WARRANTIES ARE IN LIEU OF ANY AND ALL OTHER WAR-
RANTIES, EXPRESS OR IMPLIED INCLUDING, BUT NOT LIMITED
TO, THE IMPLIED WARRANTIES OF MERCHANTABILITY AND
FITNESS FOR A PARTICULAR PURPOSE. COOLSYSTEMS MAKES
NO EXPRESS WARRANTIES BEYOND THOSE STATED HERE. COOL-
SYSTEMS DISCLAIMS ALL OTHER WARRANTIES, EXPRESS OR IM-
PLIED INCLUDING, WITHOUT LIMITATION, IMPLIED WARRANTIES
OF MERCHANTABILITY AND FITNESS FOR A PARTICULAR PUR-
POSE. SOME JURISDICTIONS DO NOT ALLOW THE EXCLUSION OF
IMPLIED WARRANTIES SO THIS LIMITATION MAY NOT APPLY TO
YOU. ALL EXPRESS AND IMPLIED WARRANTIES ARE LIMITED IN
DURATION TO THE LIMITED WARRANTY PERIOD. NO WARRAN-
TIES APPLY AFTER THAT PERIOD. SOME JURISDICTIONS DO NOT
ALLOW LIMITATIONS ON HOW LONG AN IMPLIED WARRANTY
LASTS, SO THIS LIMITATION MAY NOT APPLY TO YOU.
LIMITATIONS OF LIABILITY
COOLSYSTEMS’ RESPONSIBILITY UNDER THIS, OR ANY OTHER
WARRANTY, IMPLIED OR EXPRESS, IS LIMITED TO REPAIR OR
REPLACEMENT, AS SET FORTH ABOVE. THESE REMEDIES ARE
THE SOLE AND EXCLUSIVE REMEDIES FOR ANY BREACH OF WAR-
RANTY. IN NO EVENT SHALL COOLSYSTEMS BE LIABLE TO ANY
PERSON FOR ANY INCIDENTAL, SPECIAL, PUNITIVE OR CONSE-
QUENTIAL DAMAGES, INCLUDING LOST PROFITS, COST OF PRO-
CUREMENT OF SUBSTITUTE GOODS, DOWNTIME, GOODWILL,
DAMAGE TO OR REPLACEMENT OF EQUIPMENT OR PROPERTY
OR ANY INDIRECT DAMAGES EVEN IF COOLSYSTEMS HAS BEEN
INFORMED OF THE POSSIBILITY THEREOF AND NOTWITHSTAND-
ING THE FAILURE OF ESSENTIAL PURPOSE OF ANY LIMITED
REMEDY STATED HEREIN. SOME JURISDICTIONS DO NOT ALLOW
THE EXCLUSION OR LIMITATION OF INCIDENTAL OR CONSEQUEN-
TIAL DAMAGES, SO THE ABOVE LIMITATIONS OR EXCLUSIONS
MAY NOT APPLY TO YOU. THIS LIMITED WARRANTY GIVES YOU
SPECIFIC RIGHTS, AND YOU MAY ALSO HAVE OTHER RIGHTS THAT
VARY FROM JURISDICTION TO JURISDICTION.
WARRANTY REGISTRATION
Please complete the Warranty Registration within 30 days for the
Med4 Elite online at www.gameready.com. Visit the Product Registra-
tion page, fill out the form, and submit your information. You will need
the following information to complete your Warranty Registration: The
Control Unit’s model number (REF) and its serial number (SN). These
numbers are located on the label on the backside of the Control Unit
and may also be found on the Information screen in System Settings.
WARRANTY OF MED4 ELITE ACCESSORIES
Warranty information for Game Ready’s Heat Exchangers, Wraps and
Sleeves is available at www.gameready.com.
I N T E L L E C T U A L P R O P E R T Y
TRADEMARKS, TRADE NAMES, COPYRIGHTS AND
PATENTS
The Med4 Elite and all accessories are covered by intellectual property
rights including, but not limited to, trademarks, trade names, copy-
rights and patents, owned or licensed by CoolSystems. No license
under such intellectual property rights are granted to users, and all
such rights are hereby expressly reserved by CoolSystems. User shall
not (i) modify any Med4 Elite product or documentation CoolSystems
provides to user or (ii) reverse engineer, decompile, or disassemble any
Med4 Elite product, or encourage or assist any third party in doing so.
Certain of CoolSystems trademarks, trade names and copyrights are
listed herein.
SOFTWARE LICENSE
Med4 Elite products contain software that is installed in the products
by CoolSystems. CoolSystems owns or licenses this software from
third parties. Each sale of a Med4 Elite product is not a sale of the soft-
ware contained therein but rather is only a license to use the software
in the Med4 Elite product in which the software was initially installed.
Any license granted by CoolSystems to use the software contained
in its Med4 Elite products does not give the user/licensee the right to
copy, alter, disassemble, reverse engineer, create derivative works of
such software or to use such software in either original or modified
form in any product other than the Med4 Elite product in which the
software was initially installed by CoolSystems.

EN-78 Symbol DEScriptioNS
S Y M B O L D E S C R I P T I O N S
MED4 ELITE SYSTEM: GENERAL MEDICAL
EQUIPMENT AS TO ELECTRICAL SHOCK,
FIRE AND MECHANICAL HAZARDS ONLY IN
ACCORDANCE WITH ANSI/AAMI ES60601-
1:2005/(R)2012 and CAN/CSA- C22.2 No.
60601-1:2014
100-240 VAC 1200 VA50-60Hz
Powered by AC Current
Type B Applied Parts
Caution: Dangerous voltage
(IEC 60417-5036)
Caution: Fan Finger Hazard. Keep fingers away
from blades of fan.
Qualified Service Technician
Refrigerant Type
Refrigerant Amount in grams
Warning: It is mandatory to fully read and under-
stand the User Manual before using the device.
Failure to follow operating instructions could
result in serious injury.
Attention: Consult User Manual
Stand-by (On/Off button)
This symbol on the Control Unit or its packaging
means that this product must not be disposed
of with household/consumer waste. To learn
where to drop off your electrical and electronic
waste, please contact your local city/municipal
waste disposal service office or contact Game
Ready for assistance.
Manufacturer
Symbol for “Made in” a specific country (USA)
Symbol for “Assembled in” a specific country
(USA)
REFIndicates the manufacturer's catalogue number
so that the medical device can be identified
SN Serial Number
UDI
Unique Device Identifier
A UDI is a unique numeric or alphanumeric
code that consists of two parts: a fixed device
identifier and a variable production identifier (i.e.
serial number or lot/batch number)

EN-79CoNtaCt GamE REady
C O N TA C T G A M E R E A D Y
CoRPoRatE oFFICES
CoolSystems®, Inc.
DBA Game Ready®
1800 Sutter Street, Suite 500
Concord, California 94520
USA
PRodUCt and tECHNICaL SUPPoRt
Inside the U.S.
Call toll-Free1.888.426.3732, Option 3
Representatives are available 24/7 to answer questions about the
products and provide troubleshooting assistance.
International customers contact your local distributor.
Game Ready has Authorized Distributors across the globe. Find
the closest one to you. Visit www.gameready.com for a list of our
International Distributors.
PHoNE, EmaIL, & FaX
Inside the U.S.
Call toll-Free
1.888.GameReady
1.888.426.3732
Phone 1.510.868.2100
Fax 1.510.559.9402
Email [email protected]
Hours: Monday–Friday
9:00 a.m. to 5:00 p.m. PST
EMERGO EUROPE
Prinsessegracht 20
2514 AP The Hague
The Netherlands
EMERGO AUSTRALIA
201 Sussex Street
Darling Park, Tower II, Level 20
Sydney NSW 2000
Australia

www.gameready.com www.gameready.com/patents
COOLSYSTEMS®, INC.DBA GAME READY® 1800 SUTTER STREET, SUITE 500CONCORD, CA 94520 USA
1.888.GAMEREADY +1.510.868.2100
© 2017 CoolSystems, Inc. All rights reserved.Med4 Elite Control Unit User Manual PN 704444 Rev F