User manual - FPV3DCAMfpv3dcam.com/files/blackbird2/documents/fpv3dcam-3d-fpv-camera... · 3D FPV...
16
User manual
Transcript of User manual - FPV3DCAMfpv3dcam.com/files/blackbird2/documents/fpv3dcam-3d-fpv-camera... · 3D FPV...
User manual
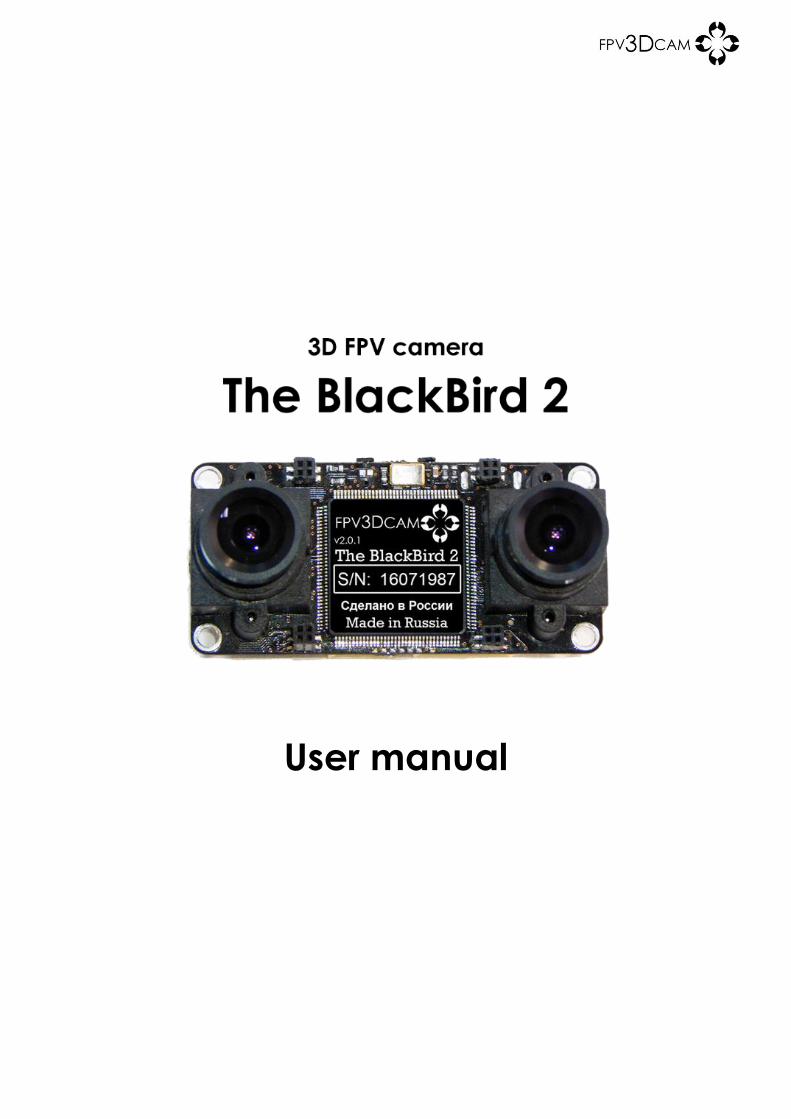
3D FPV camera The BlackBird 2
User manual
1
2016 fpv3dcam.com
Tables of contents
1. Description and operation .......................................................................................... 2
1.1. Product description .................................................................................................. 2
1.2. Specifications ............................................................................................................ 3
1.3. Equipment .................................................................................................................. 4
1.4. Construction .............................................................................................................. 5
1.5. Desing and operation .............................................................................................. 7
1.6. Adjustment instrument, tools and accessories ..................................................... 7
2. Intended use ................................................................................................................ 7
2.1. Operating limitations ................................................................................................ 7
2.2. Preparing for use ....................................................................................................... 8
2.3. Use of the menue ...................................................................................................... 9
3. Connect to PC and update software ...................................................................... 10
4. Maintenance and calibration .................................................................................. 11
4.1. Lens focus adjustment ............................................................................................ 11
4.2. Adjusting the vertical image shift ......................................................................... 12
4.3. Selecting the video format .................................................................................... 13
4.4. Switch the left and right image from side to side .............................................. 13
4.5. Selection the exposure mode ............................................................................... 14
4.6. Factory settings ....................................................................................................... 14
4.7. Possible errors and methods of their elimination................................................ 14

3D FPV camera The BlackBird 2
User manual
2
2016 fpv3dcam.com
1. Description and operation
1.1. Product description
The video camera BlackBird 2 is designed to generate a video signal a various of
formats:
3D SIDE BY SIDE – video format of the stereo pair
INTERLACED 3D – interlaced stereo image
3D dual channel video – dual channel mode stereo image
2D video – single video image (right or left video sensor)
Through the use of high-quality image sensors and a FPGA chip for video processing,
the BlackBird 2 generates a stereoscopic analog video signal in real time. The small
size, support for input supply voltage in the range of 5V to 15V and a large choice of
video outputs makes the camera versatile and easy to use.
For the wireless transmission of stereo image from the camera to your 3D monitor or
3D video goggles, you can use an analog video transmitter1, to transmit via Wi-Fi
network, use a Converter AV to Wi-Fi. Recording is done via the capture card or DVR.
Areas of use of the BlackBird 2:
FPV (first person view) - as a steering camera to a radio controlled
quadrocopter, model airplane, car or robotic platform
Video surveillance - as a stereo security video camera
A system of computer vision - for stereo image capture and its subsequent
processing (i.e. VR)
Only the BlackBird 2 can be used in one of the many applications with a need for a
true stereo video signal.
1 The BlackBird 2 can transmit stereo images using one or two analog video transmitters, depending
on the size of the stereo image. Recommended frequencies for an analog video transmission are:
5.8GHz, 2.4 GHz, 1.2GHz or 900MHz.

3D FPV camera The BlackBird 2
User manual
3
2016 fpv3dcam.com
1.2. Specifications Тable 1
Video sensor
Model Aptina MT9V136
Size and type of the matrix 1/4'' CMOS
Size of the array of pixels 680 x 512
Sensitivity 11.9V / Lux- sec @ 550nm
Signal / noise ratio 45 dB
Optics
Focal length of the lens 2.5 mm
Angle of view (full frame) 90°
Thread type М12 х 1
IR filter on the lens 680 nm (day lens for color cameras)
Focus operation by hand
Video output
Video format NTSC 525/60
Horizontal resolution 550 TVL
Video output 75 ohm, scope 1V
Stereo
Stereo base 42 mm
3D formats
side by side 16:9 cropped
side by side 4:3 cropped
side by side 4:3
side by side horizontally scaleable
Interlaced (Field Sequential 3D 4:3)
Frame rate for each eye 60 Hz
Adjusting the convergence by hand, shifting the lens holder
digitally, in the clipped SBS modes
Electrical specifications
Supply voltage 5V - 15V
Current consumption at 12V 150 mА
Power consumption at 5V 2.2 W
Power consumption at 12V 1.8 W
Type of connectors
Interface connector DF13-10P-1.25H
Modular connector HsuanMao C4828-04BDGDN0R
USB 10 pin mini USB
Mechanical and performance
Camera weight 23 g.
Dimensions (LxWxH) 59 x 28 x 27 mm
Operating temperature from -30º C to + 50º C

3D FPV camera The BlackBird 2
User manual
4
2016 fpv3dcam.com
1.3. Equipment
picture name and description number
3D FPV camera BlackBird 2 1 part
Lens cap - used to protect the lens
from dirt and damage during
storage or carrying the BlackBird 2
2 part
Interface cable - connects the
BlackBird 2 output to a playback
device or to a video transmitter,
connection to a power source
1 part
Full cable - allows you to use all the
contacts of the connector of the
BlackBird 2
1 part
Power splitter cable - is a branching
JST connector to the Li-Po battery. It
allows you to connect the BlackBird
2 and a video transmitter to the
same power source
1 part

3D FPV camera The BlackBird 2
User manual
5
2016 fpv3dcam.com
1.4. Construction
Desing description:
front view
Picture1
back view
Picture 2
№ name number
1 Printed circuit board 1 part
2 Lens mount 2 parts
3 Lens 2 parts
4
Lens fixing screw
(in some models the
locking ring)
2 parts.
5 Modular connector 4 parts
6 Mounting hole 4 parts
7 «BACK» button 1 part
8 «MENU» button 1 part
9 «NEXT» button 1 part
10 mini USB connector 1 part
11 Interface connector 1 part
12 Screw fixing the lens
holder 4 parts
13 Green LED «MENU» 1 part
14 Red LED «MEMORY» 1 part
15 Green LED «FPGA» 1 part
3D FPV camera The BlackBird 2
User manual
6
2016 fpv3dcam.com
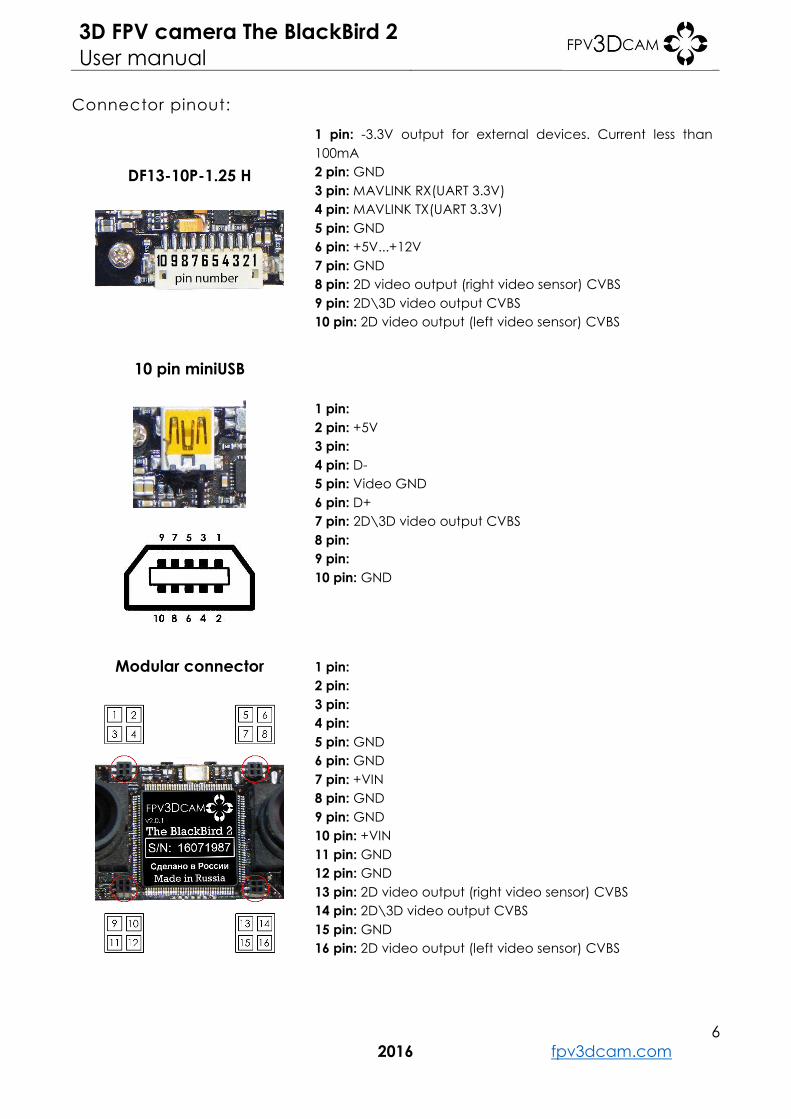
Connector pinout:
DF13-10P-1.25 H
1 pin: -3.3V output for external devices. Current less than
100mA
2 pin: GND
3 pin: MAVLINK RX(UART 3.3V)
4 pin: MAVLINK TX(UART 3.3V)
5 pin: GND
6 pin: +5V...+12V
7 pin: GND
8 pin: 2D video output (right video sensor) CVBS
9 pin: 2D\3D video output CVBS
10 pin: 2D video output (left video sensor) CVBS
10 pin miniUSB
1 pin:
2 pin: +5V
3 pin:
4 pin: D-
5 pin: Video GND
6 pin: D+
7 pin: 2D\3D video output CVBS
8 pin:
9 pin:
10 pin: GND
Modular connector
1 pin:
2 pin:
3 pin:
4 pin:
5 pin: GND
6 pin: GND
7 pin: +VIN
8 pin: GND
9 pin: GND
10 pin: +VIN
11 pin: GND
12 pin: GND
13 pin: 2D video output (right video sensor) CVBS
14 pin: 2D\3D video output CVBS
15 pin: GND
16 pin: 2D video output (left video sensor) CVBS

3D FPV camera The BlackBird 2
User manual
7
2016 fpv3dcam.com
1.5. Desing and operation
The basis of the BlackBird 2 are two video sensor and optical system. The signal from
the video sensor is processed in the FPGA chip, where the signal is generated in the
required 3D format. Further there is a digital-to-analog conversion and the signal is
transmitted to the interface, the modular connector and a mini USB port of your
camera.
1.6. Adjustment instrument, tools and accessories
The main tool that is required for camera maintenance - phillips screwdriver. It is used
when setting the vertical displacement and focusing the lenses. You can use it to
loosen the screws that hold the lenses and their holders.
Optional accessories:
Pencil for cleaning lenses. It is used to clean the lenses from contamination (see
Figure 3). The flat side of the stick used for cleaning the lens from dirt. A brush is
used to clean the dust from the lenses
A special table is used for measuring the resolution of the instrument. For
example, EIA1956 or others authorized for at least 600 TVL (see Picture 4) Picture 3
Picture 4
2. Intended use
2.1. Operating limitations The camera operating temperature ranges from - 30 to +50 degrees Celsius. If
the use at different temperatures is planned, it is necessary to arrange extra
cooling or heating to provide the allowed temperature;
The BlackBird 2 comes in a frameless design and is not protected against
moisture. Protection class IP50 sensors, protection class IP00 for the other
components. For use in a moist environment it must be protected from
moisture;
The BlackBird 2 is not protected against static electricity. When working with
the BlackBird 2 it is necessary to take measures to protect your camera from
static electricity;
When operating the BlackBird 2 it is possible that the camera heats up to a
temperature of about 50 degrees Celsius;
3D FPV camera The BlackBird 2
User manual
8
2016 fpv3dcam.com
2.2. Preparing for use
Connect video and power
Before you begin, you need to connect the BlackBird 2 output to a video playback
device or a video transmitter2, and also to a power source. To do this, connect the
interface cable or a preconfigured full cable to the interface connector of the
BlackBird 2. The yellow RCA connector of the interface cable is connected to the
playback device or a video transmitter. The red JST connector of the interface cable
is to be connected to the 2S or 3S Li-Po battery or another power source. If everything
is connected correctly, the camera should light up the LEDs and the video monitor /
3D video goggles connected to the camera should display the live video of the
BlackBird 2.
Do not connect the video output jack to the audio input. Usually this RCA red or
white jacks. It does not cause damage, but the image on the monitor / 3D video
goggles will not show..
As power for the camera it is permissible to use an external DC power source with a
voltage of 5 to 15V. The sources to be used can be:
From 4 to 9 batteries with a voltage ( 1.5V ) connected in series;
From 5 to 9 batteries NiMH, NiCd ( 1.2V ) connected in series;
From 2 to 3 batteries Li-Ion, Li-Po ( 3.6V ) connected in series;
1 lead battery with a voltage of 6 to 12V;
A stabilized DC power supply with a voltage of 5 to 15 V and a current of 150
mA.
Additionally, the power supply is connected to the red wire of the interface cable
and to the negative black wire of the interface cable.
Attention! Observe that the polarity to the power supply connections are correct.
Connection of the power supply to the video output, or failure to comply with the
polarity will damage the camera!
Before starting
Before using the BlackBird 2 it is recommended:
check the lens focus settings ..................................................................... (item 4.1)
ensure there is no vertical image shift...................................................... (item 4.2)
select the outgoing video format ............................................................. (item 4.3)
check the orientation of the image of each eye ................................... (item 4.4)
set the desired metering mode ................................................................. (item 4.5)
2 Under playback device or a video transmitter are understood: video eyepieces, monitors, video
transmitters, video capture devices, etc.

3D FPV camera The BlackBird 2
User manual
9
2016 fpv3dcam.com
2.3. Use of the menu
Adjusted and correctly connected the camera starts to operate immediately after
power-up. A lit up green LED 13 (see Picture 2) indicates the power supply is on.
Table 2: Menu
count of fast flashing green LED «MENU» name and description of the menu item
Selecting video mode – allows you to select
an outgoing video format
1. Side by side 3D crop 16x9
2. Side by side 3D crop 4x3
3. Side by side 3D full frame
4. Side by side 3D manual cropping
5. Interlaced 3D
6. 2D
change of right for left – for swapping the right
and left images (switch images)
image shift – this menu item lets you adjust the
convergence in SBS crop modes
stretch / zoom images horizontally – serves to
adjust the cropping of SBS in manual mode
selecting the exposure – allows you to select one
of four modes of light metering
1. Across the frame
2. At the center of the frame
3. In the bottom half of the frame
4. In the upper half of the frame
To change a menu item, use the «МЕNU» button, to change the settings of the menu
item use the «NEXT» and «ВACK» buttons.

3D FPV camera The BlackBird 2
User manual
10
2016 fpv3dcam.com
3. Connect to PC and update software
To connect BlackBird 2 to a personal computer or laptop will need a cable Mini USB
- USB.
Before connecting the USB cable, disconnect camera from all power sources.
The BlackBird 2 is connected to a power source (e.g. Li-Po battery) can damage your
PC
Picture 5: The scheme of connection of PC
Software update on the camera BlackBird 2:
launch the app BlackBird 2 Assistant
connect the camera to PC via Mini USB cable – USB port, first disable the
camera from all power sources. When properly connected in the right part of
the main window to show the serial number of the camera (see Picture 6)
Picture 6: Main window BlackBird 2 Assistant
click "UPDATE" and select the firmware file. Wait until the update is
completed
If successful, the program updates the microcontroller, to receive a message, for
example - Write ATmega 38s, 744Byte/s
If successful, the program updates the FPGA chip, the message, for example –
Write FPGA 223s, 2415Byte/s
3D FPV camera The BlackBird 2
User manual
11
2016 fpv3dcam.com
4. Maintenance and calibration
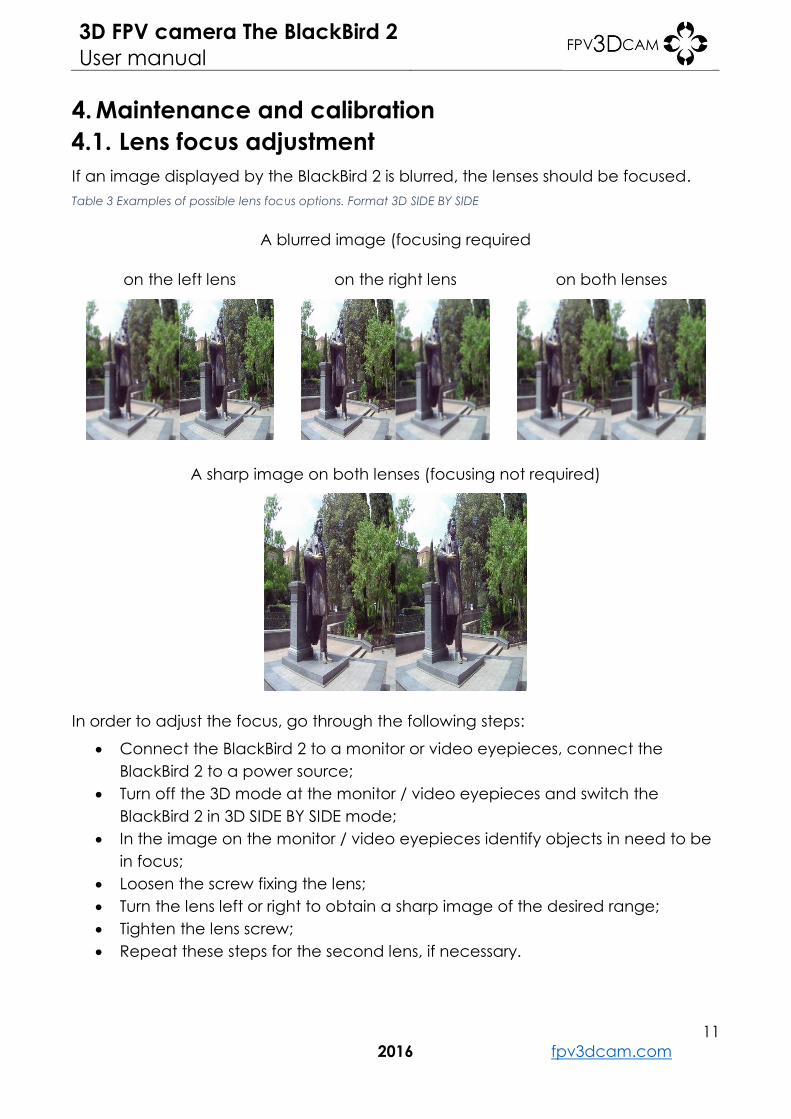
4.1. Lens focus adjustment
If an image displayed by the BlackBird 2 is blurred, the lenses should be focused.
Table 3 Examples of possible lens focus options. Format 3D SIDE BY SIDE
A blurred image (focusing required
on the left lens on the right lens on both lenses
A sharp image on both lenses (focusing not required)
In order to adjust the focus, go through the following steps:
Connect the BlackBird 2 to a monitor or video eyepieces, connect the
BlackBird 2 to a power source;
Turn off the 3D mode at the monitor / video eyepieces and switch the
BlackBird 2 in 3D SIDE BY SIDE mode;
In the image on the monitor / video eyepieces identify objects in need to be
in focus;
Loosen the screw fixing the lens;
Turn the lens left or right to obtain a sharp image of the desired range;
Tighten the lens screw;
Repeat these steps for the second lens, if necessary.

3D FPV camera The BlackBird 2
User manual
12
2016 fpv3dcam.com
4.2. Adjusting the vertical image shift
A vertical shift of the images will be perceived by the viewer as disconcerting. The
presence of vertical displacement can quickly tire the eyes, lead to an incorrect
perception of distance and possibly headache.
Table 4: Examples of possible vertical image shift. Format 3D SIDE BY SIDE
There is vertical shift (requires adjustment)
on the left lens on the right lens on both lenses
The vertical shift is absent (no adjustment required)
To eliminate the vertical shift, go through the following steps:
Connect the BlackBird 2 to a monitor or video eyepieces, connect the
BlackBird 2 to a power source;
Turn off the 3D mode at the monitor / video eyepieces and switch the
BlackBird 2 in 3D SIDE BY SIDE mode;
In the image on the monitor / video eyepieces identify objects
where adjustment of the vertical shift is necessary;
Loosen the screws fixing the lens holder;
Move the lens holder up or down until the vertical shift is
eliminated;
Secure the lens mount screws;
After fixing the screws, make sure that there is no more vertical image
shift. If necessary, repeat the steps above to resolve the vertical shift

3D FPV camera The BlackBird 2
User manual
13
2016 fpv3dcam.com
4.3. Selecting the video format
To change the stereo image format, choose the menu item «Selecting the video
mode»3 and «NEXT» button or «BACK» to select the desired stereo image format. After
selecting wait until the red LED goes out - it will mean that the camera has stored
your settings and is ready for use.
4.4. Switch the left and right image from side to side
In order to understand the need to switch the images from side to side or not conduct
a little test:
Close the right lens cap of the BlackBird 2. Connect the camera to the
monitor / video eyepieces, connect the power supply;
Change the video format of the BlackBird 2 to 3D SIDE BY SIDE. Switch the
monitor / video eyepieces to 2D mode;
Look at the monitor or video eyepieces - one of the pictures should be dark. If
the dark image is on the right side of the screen, indoor lens meets the eye
- everything is fine, there is no need to switch images. If the dark picture is on
the left side of the screen, it is necessary to switch the images from side to
side;
Right lens cover (front view)
we need to switch the images
from side to side
do not need to switch the images
from side to side
In order to switch the left and right image from side to side press the «MENU» button,
go to the menu item «Exchange of right-left»4. Click on the button once «NEXT» or
3 Green led makes a single blink 4 Green led makes a quick blink

3D FPV camera The BlackBird 2
User manual
14
2016 fpv3dcam.com
«BACK». After a wait until the red LED goes out - this means that the camera
remembers the settings you made - they are stored in memory for use and after
Power Off or a power failure, you will not have to adjust them again.
4.5. Selection the exposure mode
The BlackBird 2 allows you to do ‹in picture› light metering in one of four options:
The entire frame
Frame center
The bottom half of the frame
The top half of the frame
In order to set the desired setting of light metering with the button «MENU» you need
to navigate to the menu «Selecting the exposure». Use the «NEXT» and «BACK»
buttons to set the desired metering parameter.
Note: when using the BlackBird 2 in a FPV system, the light metering must be set to
«The bottom half of the frame» in order to eliminate the ‹black land› phenomenon.
4.6. Factory settings
To reset the camera to factory settings, you must:
Connect to the camera the power source and the monitor/video glasses
Wait until the image on the monitor screen/video glasses
Press the «MENU» button and hold (about 3-4 seconds), should light up red(14)
and green(13) LEDs.
To release the «MENU» button and wait for when goes out the red(14) led
4.7. Possible errors and methods of their elimination
When you operate the camera BlackBird 2 you may experience the following
problems. Most of them happening by negligence of the user or application to FPV
systems.
errors reason elimination
Green screen, whole or half Touch the data bus of one of the
sensors
Reconnect power
LEDs don't burn when you turn
on
Failed software the FPGA or
memory. A failed software
upgrade use Mini USB – USB
cable is of poor quality
Repeat the process of
updating the firmware of the
FPGA with a PC (see item 2.4)
The camera is connected to
PC, but BlackBird 2 Assistant
displays the message
«DISCONNECT»
The fouling of the Mini USB
connector or its damage.
Using a brush and isopropyl
alcohol clean the Mini USB
connector of the camera.

3D FPV camera The BlackBird 2
User manual
15
2016 fpv3dcam.com
errors reason elimination
The use of the defective cable
Mini USB-USB
Change the cable.
After turning on of the camera
three LEDs are lit, there is no
picture on any of the outputs
The fault of crystal oscillator. Contact support service of
FPV3DCAM company.