User Manual for Orbweb Virtual Desktop (OVD) -...
50
User Manual for Orbweb Virtual Desktop (OVD) Information in this document is subject to change without notice. Companies, names, and data used in examples herein are fictitious unless otherwise noted. No part of this document may be reproduced or transmitted in any form or by any means, electronic or mechanical, for any purpose, without the express written permission of Kloudian Systems Inc. Orbweb is copyright of Kloudian Systems Inc. All rights reserved. Version 2.1.2.2 – Last updated 2011/08/27 Kloudian Systems Inc. All rights reserved.
Transcript of User Manual for Orbweb Virtual Desktop (OVD) -...

User Manual for Orbweb Virtual Desktop (OVD)
Information in this document is subject to change without notice. Companies, names, and data used in examples herein are fictitious unless otherwise noted. No part of this document may be reproduced or transmitted in any form or by any means, electronic or mechanical, for any purpose, without the express written permission of Kloudian Systems Inc. Orbweb is copyright of Kloudian Systems Inc. All rights reserved. Version 2.1.2.2 – Last updated 2011/08/27
Kloudian Systems Inc. All rights reserved.

Table of Contents
System Requirements Chapter 1. General Setup Chapter 2. Activation Chapter 3. Changing Administrator Password Chapter 4. Creating Orbweb Users Chapter 5. Installing Applications
Chapter 6 Using PC Browser as Client 6.1 Browser Login 6.2 Browser Logout 6.3 Password Change
Chapter 7. Using Tablet Client Application 7.1 Enter Orbweb login page from Dashboard 7.2 Enter Orbweb login page from Native Client 7.3 Tablet Login 7.4 Tablet Settings 7.5 Tablet Quick link Creation 7.6 Tablet Virtual Keyboard 7.7 Tablet language input methods
Chapter 8. Setting Up Internet Access to Home Server 8.1 Setup 8.2 Identify Home Server DHCP IP 8.3 Forward Port (on network router/access point) 8.4 Setup Domain Name 8.5 Associate Home Server to Orbweb Virtual Desktop 8.6 Access Orbweb Virtual Desktop using Domain Name
Chapter 9. Administrator Orbweb Management Tool 9.1 Terminating Sessions 9.2 User Account Settings 9.3 Managing Users Group(s) 9.4 Managing Applications Group(s) 9.5 Linking Users Group(s) and Applications Group(s) 9.6 Uninstalling Applications

System Requirements
Supported PC Browser Clients (JRE 1.6.x Dependent):
Internet Explorer v9.x
Firefox v13.x
Chrome v20.x
Safari v5.x
Windows √ √ √ √
Mac √ √ √
Supported Android Tablet Client:
Android v2.x or above
Supported iPad Tablet Client:
iOS v5.x or above
Chapter 1. General Setup
Make sure unit powers up normally
Make sure unit is connected to your local network
Identify Home Server IP
*If you want to access Windows Home Server 2011 or Orbweb Virtual Desktop through
internet, please refer to the Users Manual on Recovery CD
Chapter 2.Activation
Enter Home Server IP
For SSL warning message, Click on “Continue to this website”

Enter default account name and password and click on “Right arrow” User Name: “homeadmin”, Password: “123456”
Click “Orbweb Management Console” icon
Enter “Activation Code”(please refer to User’s Manual)
Click “active” button

Activation passed, when you see this page
If you see “active fail” error message, Please double-check the entered activation code or internet connection
Enter default login name and password Login: admin, Password: admin
Click on “Log in” button

Click “Accept” button
Chapter 3. Changing Administrator Password
Go to Orbweb Management Console Home Page
Click “ Users” button on main menu
Select “ Users” on side button

Select “Change Administrator Password” on side menu
Enter “Current Password”
Type “New Password”
Retype “New Password”
Click “Change” button
Confirmation page for Reset Password

Chapter 4. Creating Orbweb Users
Enter Home Server IP For SSL warning message, Click on “Continue to this website”
Enter default account name and password and click on “Right arrow” User Name: “homeadmin”, Password: “123456”
Click on “For PC Client” link

For JAVA security warning message
Click "Yes" button
If prompted, JRE has not been installed or updated in the system,
Click on “JRE” link to start downloading JAVA
Select “Yes” or “No” for optional full screen settings
Click on “Language” drop-down menu for optional language settings
Click on “Connect" button

Double-click on “Dashboard” icon
Select "Users"
Click on “Add a user account”

First name: Enter first name
User account name: Enter desired account name
Password: Enter desired password
Confirm password: Retype password
Click “Next” button
Select “Read/Write” Access level for all shared folders
Click “Next” button
Select Remote Web Access options
Click “Create account” button

Waiting for the process to complete
Click “Close” button
Under dashboard Check current users list to see if new user has been created

Chapter 5. Installing Applications
Go to Orbweb Virtual Desktop log in page
Select “Yes” or “No” for optional full screen settings
Click on “Language” drop-down menu for optional language settings
Click on “Connect" button
Click on “Start”
Click on “homeadmin”

Locate the Installation file
Double-click In this example, installing MS office
Click on “Yes” button in Alert Warning Window
Waiting for installation preparation

Check “I accept the terms of agreement”
Click “Continue” button
Click “Install Now” button
Waiting for the process to complete

Click “Close” button to complete the installation
Chapter 6. Publishing Application Go to Orbweb Management Console Home Page
Click on “Servers” button on main menu
Click “ Manage” button

Click “Stop_service” button
Click “Start_service” button
Click on “Applications” button on main menu

Scroll down to find the application just being installed, and click on “Manage”
In this example, “Microsoft Excel 2011”
Click on “Add to this group”
Checking Application has been successfully published Go to Orbweb Virtual Desktop log in page
Select “Yes”or “No” for optional full screen settings
Click on “Language” drop-down menu for optional language settings
Click on “Connect" button

In this example, “Microsoft Excel 2010 shortcut icon” has been created on Orbweb desktop
Chapter 6. Using PC Browser as Client
6.1 Browser Login
Enter Home Server IP
For SSL warning message Click on “Continue to this website”

Enter account name and password and click on “Right arrow”
Click on “For PC Client” link
For JAVA security warning message, Click "Yes" button

If prompted, JRE has not been installed or updated in the system,
Click on “JRE” link to start downloading JAVA
Select “Yes” or “No” for optional full screen settings
Click on “Language” drop-down menu for optional language settings
Click on “Connect" button
Double-click on “Dashboard” icon

6.2 Browser Logout
6.3 Password Change Go to Windows Home Server 2011 Dashboard Home page
Mouse-over the account name in the upper right corner of the window
Click on “Change password” button

Enter “old password”
Enter “new password”
Confirm “new password”
Click on “right arrow”
Change password confirmation page

Chapter 7. Using Tablet Client Application
7.1 Enter Orbweb login page from Dashboard Go to Windows Home Server 2011 Dashboard Home page
Android iPad
7.2 Enter Orbweb login page from Native Client
Android iPad
7.3 Tablet Login
Android iPad
Enter “Username”, “Password” and “Home Server DDNS or IP”
Touch on “Start” button

Enter Orbweb Virtual Desktop
7.4 Tablet Settings
Optional setting for “Display Orientation”
Optional setting for “Display Resolution”

Android iPad
Optional setting for “Display Language”
7.5 Tablet Quick link Creation Touch on “Setting” icon to bring up “Quick Link” preset window
Quick Link preset menu: 1. Check “Enable Quick Link” 2. Quick Link Name: Enter desired name 3. Quick Link URL: Enter Home Server DDNS or IP 4. Click on “OK”on Android pad or “Back” on iPad
7.6 Tablet Virtual Keyboard Two finger tap on the screen to show or hide virtual keyboard
Touch “Normal” button to bring up “Function Key” menu

“Function Key 1”menu
Function Key 2”menu
7.7 Tablet language input methods
English language input

Other languages input, in the example of Chinese
1. Change input language 2. Touch “Text”button 3. Type 4. Touch “Send”button
Chapter 8. Setting Up Internet Access to Home Server
8.1 Setup Method: Forward Port + DDNS
Make sure unit powers up normally
Make sure unit is connected to your local network and DHCP service is available

8.2 Identify Home Server DHCP IP
8.3 Forward Port (on network router/access point)
Port Range
Local IP Local Port
Protocol
80 NAS Server’s
IP
80 TCP
443 NAS Server’s
IP
443 TCP
3389 NAS Server’s
IP
3389 TCP
Note:
Some routers don't allow using customer ports for system services forwarding, see the documentation that came with your router for more information.
Please always keep the unit power on when you are away from home for awhile, this is to make DHCP (which most home networks use) IP addresses consistent and stay the same whenever possible.
In the event of lighting strikes or power shortages that causes the Home Server to shutdown, please repeat “General Setup” process and Home Server ‘Router setup” wizard.
NAS Server IP
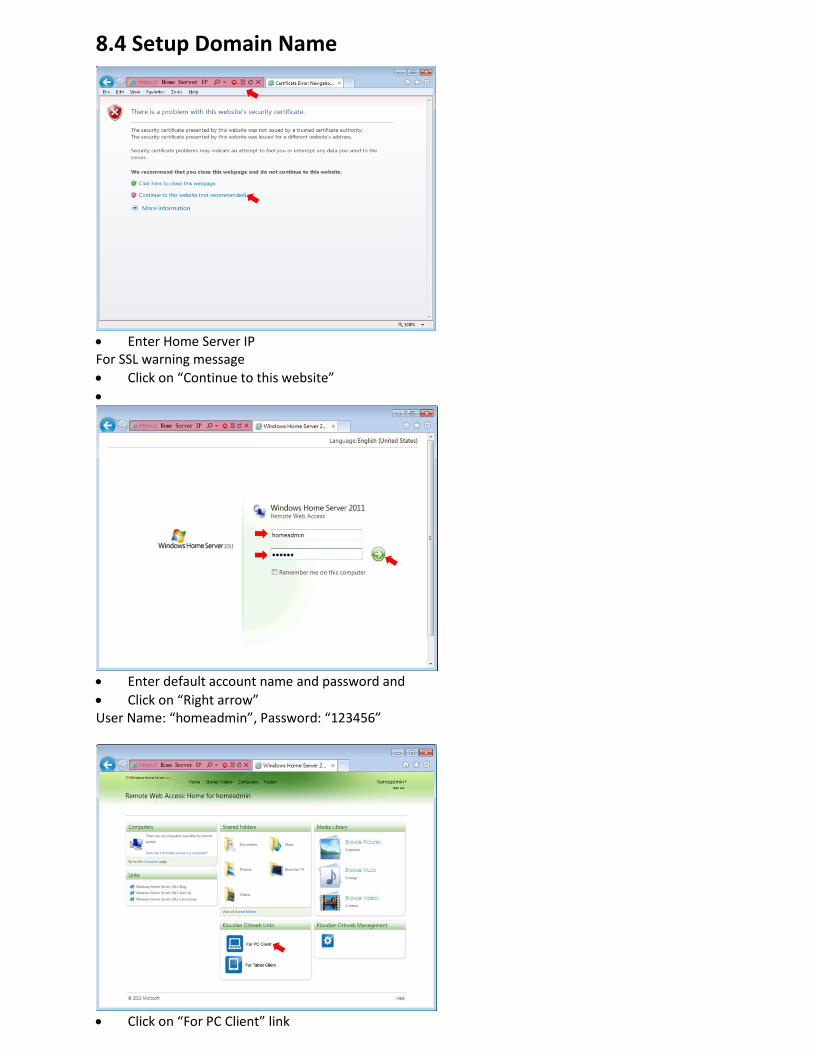
8.4 Setup Domain Name
Enter Home Server IP For SSL warning message
Click on “Continue to this website”
Enter default account name and password and
Click on “Right arrow” User Name: “homeadmin”, Password: “123456”
Click on “For PC Client” link

For JAVA security warning message
Click "Yes" button
If prompted , JRE has not been installed or updated in the system,
Click on “JRE” link to start downloading JAVA
Select “Yes”or “No” for optional full screen settings
Click on “Language” drop-down menu for optional language settings
Click on “Connect" button

Double-click on “Dashboard” icon
Select “Server settings"
Select “Remote Web Access”

Under Domain name
Click “Set up” button
Click “Next” button
Check “I want to set up a new domain name”
Click “Next” button

Select “Get a personalized domain name from Microsoft”
Click “Next” button

Enter the valid Microsoft Live “User name” and “Password”
Click“Next”button
Wait for process to complete and click “Next” button
Click “Accept” button on Agreement Page

Domain: Enter desired domain name
Click “Check availability” button for registration
Click “Set up” button
Wait for the process to complete
Click “Next”
On Security alert page
Click “Yes” button

Check assigned Home Server domain name
Click “Close” button
8.5 Associate Home Server to Orbweb Virtual Desktop
Enter Home Server IP
For SSL warning message, Click on “Continue to this website”
Enter default account name and password
Click on “Right arrow” User Name: “homeadmin”, Password: “123456”

Click “Orbweb Management Console” icon
Enter default login name: “admin” and password
Click on “Servers” button on main menu

Enter assigned “home server domain name”
Click “change” button
8.6 Access Orbweb Virtual Desktop using Domain Name
Enter Home Server “DDNS”
Click on “Continue to this website”
Enter default account name and password and click on “Right arrow” User Name: “homeadmin” Password: “123456”

Click on “For PC Client” link
For JAVA security warning message
Click "Yes" button
If prompted, JRE has not been installed or updated in the system,
Click on “JRE” link to start downloading JAVA

Chapter 9. Administrator Orbweb Management Tool
9.1 Terminating Sessions Go to Orbweb Management Console Home Page
Click on “Servers” button on main menu
Select “Sessions” on side menu

To terminate the session(s)
Click “Kill” button
9.2 User Account Settings Go to Orbweb Virtual Desktop log in page
Select “Yes” or “No” for optional full screen settings
Click on “Language” drop-down menu for optional language settings
Click on “Connect" button

Double-click on “Dashboard” icon
Select "Users"
Access User Settings in the red box
9.3 Managing Users Group(s) Orbweb Management Console Home Page
Click “ Users” button on main menu

Select“ Users Groups” on side menu
Name: Type a desired Name
Description: Type a desired Description
Click on “Add”
Select the user from drop-down list
Click on “ Add to this group”

Confirmation page for user being successfully added
9.4 Managing Applications Group(s) Orbweb Management Console Home Page
Click “Applications” button on main menu
Select “Applications Groups” on side menu

Name: Type a desired Name
Description: Type a desired Description
Click on “Add”
Scroll down to find and select the application to add in this example “Microsoft OneNote 2011”
Click on “Add to this group”
Confirmation page for application being successfully added

9.5 Linking Users Group(s) and Applications Group(s) Orbweb Management Console Home Page
Click “ Users” button on main menu
Select“ Users Groups” on side menu
Select ‘Users Group” you want to link
Click “Manage” button

Select the “Application Group” you want to link
Click on “Add this publication”
Confirmation page for linking “Users Group” and “Applications Group”
9.6 Uninstalling Applications Prepare already uninstalled application
Go to Orbweb Management Console Home Page
Click on “Servers” button on main menu

Click “ Manage” button
Click “Stop_service” button
Click “Start_service” button
Remove orphan applications (To ensure uninstalled applications are complete removed)

Click “Applications” button on main menu
Scroll down to the bottom of the page
Click “Remove orphan applications” button