User Manual - Reson8 · ©Unique Computer Systems 1 Reson8 Online User Manual Reson8 V2 Document...
47
©Unique Computer Systems 1 Reson8 Online User Manual Reson8 V2 Document Version 2.0
Transcript of User Manual - Reson8 · ©Unique Computer Systems 1 Reson8 Online User Manual Reson8 V2 Document...

©Unique Computer Systems 1 Reson8 Online
User Manual
Reson8 V2
Document Version 2.0

©Unique Computer Systems 2 Reson8 Online
General Notice
The information contained in this document is subject to change without notice.
Unique Computer Systems makes no warranty of any kind with regard to this material,
including, but not limited to, the implied warranties of merchantability and fitness for a
particular purpose. Unique Computer Systems shall not be liable for any errors contained
herein, or for incidental or consequential damages in connection with the furnishing,
performance or use of this material.
This document contains proprietary information, which is protected by copyright. All rights reserved. No part of this document may be photocopied, reproduced, or translated to another language without the prior written consent of Unique Computer Systems.
© Copyright Unique Computer Systems 2015. All rights reserved.
History
Version 2.0 of Reson8 Online User Manual, 7/4/2013
Updated 9/9/2014
Updated 4/20/2015
Updated 12/22/2015

©Unique Computer Systems 3 Reson8 Online
Table of Contents
1 Overview ..................................................................................................... 5
1.1 Introduction ............................................................................................................................... 5
1.2 Intended Purpose ...................................................................................................................... 5
1.3 Review ......................................................................................................................................... 5
2 Getting Started ........................................................................................... 6
2.1 Registration and Login ............................................................................................................. 7
2.2 Reson8 Online Login ................................................................................................................. 7
2.2.1 Forgotten Password .............................................................................................................. 8
2.3 Reson8 Online Dashboard ..................................................................................................... 10
2.3.1 Account Details .................................................................................................................... 11
2.3.2 Recent Transactions ........................................................................................................... 12
2.3.3 Recent Campaigns ............................................................................................................... 12
2.4 SMS Credits ............................................................................................................................... 13
2.4.1 SMS Credit Charges ............................................................................................................. 13
2.4.2 English SMS credit charges ................................................................................................ 13
2.4.3 Arabic SMS credit charges ................................................................................................. 14
2.4.4 Request Credits .................................................................................................................... 14
2.4.5 Transfer Credits .................................................................................................................. 15
2.5 Groups and Users .................................................................................................................... 16
2.5.1 Creating Groups/Users ...................................................................................................... 17
2.5.2 Change Password ................................................................................................................ 19
2.6 Address Book ........................................................................................................................... 19
2.6.1 Managing Individual Contacts .......................................................................................... 20
Adding Contacts ............................................................................................................................... 20
Modifying/Deleting Contacts ........................................................................................................ 21
2.6.2 Managing Distribution Lists .............................................................................................. 21
2.6.3 Importing contacts from a CSV file .................................................................................. 22
............................................................................................................... Error! Bookmark not defined.
2.6.4 Importing contacts from an existing distribution list ................................................. 24
3 Implementing your SMS solution ........................................................... 26

©Unique Computer Systems 4 Reson8 Online
Go to SMS Messaging > Send SMS. .......................................................................................... 27
3.1 SMS Recipients ......................................................................................................................... 29
3.1.1 Send SMS to existing Distribution List ............................................................................ 29
3.1.2 Send SMS to Existing Contacts........................................................................................... 30
3.1.3 Send SMS to manually entered contacts ......................................................................... 31
3.1.4 Send Bulk SMS using a CSV file ......................................................................................... 31
3.2 Scheduling your SMS message .............................................................................................. 32
3.2.1 Modify/Delete your scheduled SMS message ................................................................ 33
3.3 SMS Templates: Static vs. Dynamic ...................................................................................... 36
4 Tracking your SMS campaigns................................................................ 40
4.1 Broadcast Report .................................................................................................................... 40
4.2 Credit Transactions Report ................................................................................................... 45
4.3 User Accounts Report ............................................................................................................. 46
5 Troubleshooting ...................................................................................... 47

©Unique Computer Systems 5 Reson8 Online
1 Overview
1.1 Introduction
Reson8 Online is a web-based SMS solution that enables organizations to
“resonate” their messages with their intended audience (customers/personnel)
through mobile alerts, notifications, and relevant marketing material. This is
facilitated through the use of our web based portal or by enhancing existing
infrastructure and line of business applications using the Reson8 API. Reson8
Online represents an easy and cost-effective SMS solution that enables you to
enhance the reach and visibility of your mobile communications with your
customers and employees.
1.2 Intended Purpose
This user manual intends to provide you with a comprehensive overview of the
features in Reson8 Online. A detailed description of each feature and its utilization
has been outlined enabling you to immediately take advantage of the benefits that
Reson8 Online has to offer you.
1.3 Review
If you have any suggestions that you feel will help us improve this user manual,
please email us on [email protected]

©Unique Computer Systems 6 Reson8 Online
2 Getting Started
This section will lay down the groundwork necessary to get you started with pushing out
SMS messages to your desired audience.
If you’re new to Reson8, this user guide will help you familiarize yourself with the user
interface and basic functions to access Reson8 Online.
This page will show you how to log in to our web application at http://www.reson8.ae
Note
Access to the Reson8 Web Application is limited to paying customers and those utilizing
a Reson8 trial account. You will receive an email notification if you choose to register for
a trial account.
For information on how to sign up for a paid or trial account, please contact our Sales
department at [email protected]

©Unique Computer Systems 7 Reson8 Online
2.1 Registration and Login
In order to start using Reson8 Online, you will first need to log-in into your account on
the following URL, http://www.reson8.ae.
Bookmark this URL so that you can access Reson8 instantly.
If you do not yet have a login to the Reson8 Dashboard, you will need to create an
account or have one created for you. You can do so by registering for a free trial at
http://www.reson8.ae/sms/TrialRequestForm.jsp or by contacting our Sales department at
Once registered, you will receive an email confirming your new account with details on
your user name and how to access Reson8 Online.
2.2 Reson8 Online Login

©Unique Computer Systems 8 Reson8 Online
Your login details are emailed to you on the successful creation of your account.
The login details for your Reson8 Online account will consist of a username and
password. You will be prompted to enter these login details every time you wish to
access your account.
If your account remains inactive for 30 minutes, you will automatically be logged out
from your account for security purposes.
To login into your Reson8 Online account you need to enter your User Name, password,
the values shown in the security image and click Login.
2.2.1 Forgotten Password
In the event that you forget your password, it can be reset as follows
Click on the Forgot Password? link which appears below the log-in screen.
You will then be prompted to enter your existing user name. You can find this in your
email when your account was initially registered and created.

©Unique Computer Systems 9 Reson8 Online
On clicking Submit, you will receive an email with an URL through which you can reset
your password.
Note
The email will be sent to the primary email address that is registered on your account.
The email will look as below.

©Unique Computer Systems 10 Reson8 Online
On following the password update link in the email, you will be prompted to change your
password and save it. You will be able to resume using your Reson8 Online account once
the new password has been confirmed.
2.3 Reson8 Online Dashboard
On successfully logging in into your account, the following dashboard summarizing your
account details will appear. The dashboard describes your account information, most
recent credit transactions and campaign transactions.

©Unique Computer Systems 11 Reson8 Online
The Send SMS button is your quick access to preparing and sending a new SMS campaign.
Each SMS message (bundle) that you send out will be referred to as a
campaign on your account. Your campaign details will be summarized in the Recent
Campaigns section on the dashboard while the credit usage associated with each
campaign will be summarized in the Recent Transactions section.
The Reson8 Dashboard menu allows you to navigate the features of Reson8 Online
available to your account.
2.3.1 Account Details
You can view your account details by clicking on the icon visible on the top left corner
of the dashboard. You can add and/or edit your company name, primary contact email,
mobile number, fax and address.
The primary contact email will receive all communications pertaining to your account,
such as password reset mailers, credit transaction mailers, and low credit alerts.

©Unique Computer Systems 12 Reson8 Online
The header is the sender name that will appear on the recipient’s mobile device. It is the name under which your recipient(s) will receive your SMS messages. Please contact the UCS Support Team if you require additional headers on your account.
2.3.2 Recent Transactions
On the main Reson8 dashboard, under the Recent Transactions section, you will be able
to review the credits being used on the account. If the account being used is a customer
account or group, then all transactions and campaigns below the account will be shown
as well.
The information provides details of credits used in your SMS campaigns, credits refunded
to you, credits transferred to your sub-accounts and any credit purchases you carry out.
Clicking View All will display the Credit Transactions Report where a filtered report for
all transactions done may be retrieved.
To refresh the data shown, click the Refresh option.
2.3.3 Recent Campaigns
When you have scheduled or sent a SMS campaign, you will be able to preview the
campaign details on your dashboard under Recent Campaigns. You will be able to see
whether the SMS messages were successfully sent and the statistics of the SMS that failed

©Unique Computer Systems 13 Reson8 Online
under the Sent/Failed columns respectively. For a detailed view of the campaigns, click
on View All.
2.4 SMS Credits
To start sending your SMS messages, you will need to purchase credits. Please contact the
UCS Support Team for credit purchases or go to My Account > Request Credits.
2.4.1 SMS Credit Charges
The charges for sending SMS messages differs depending on the language (English, Arabic,
etc.) in which your message is configured to be sent.
2.4.2 English SMS credit charges
A single SMS message created in English, constitutes 160 characters for which 1 SMS credit
is deducted. However, if the message length exceeds 160 characters in English, then 1 credit
will be taken as 134 characters per message.
If you send a message of length 160 characters, you will be charged 1 SMS credit.
If you send a message of length in the range of 161 - 268 characters, you will be charged
2 SMS credits.
©Unique Computer Systems 14 Reson8 Online
If you send a message of length in the range of 269 - 402 characters, you will be charged
3 SMS credits.
If you send a message of length in the range of 403 - 536 characters, you will be charged
4 SMS credits.
2.4.3 Arabic SMS credit charges
A single SMS message created in a non-English character set comprises 70 characters and 1
SMS credit will be deducted for a message of 70 characters or less. However, if the message
length exceeds 70 characters, then the message count will be calculated as 67 characters per
message.
If you send a message of length 70 characters, you will be charged 1 SMS credit.
If you send a message of length in the range of 71 - 134 characters, you will be charged 2
SMS credits.
If you send a message of length in the range of 135 - 201 characters, you will be charged
3 SMS credits.
If you send a message of length in the range of 202 - 268 characters, you will be charged
4 SMS credits.
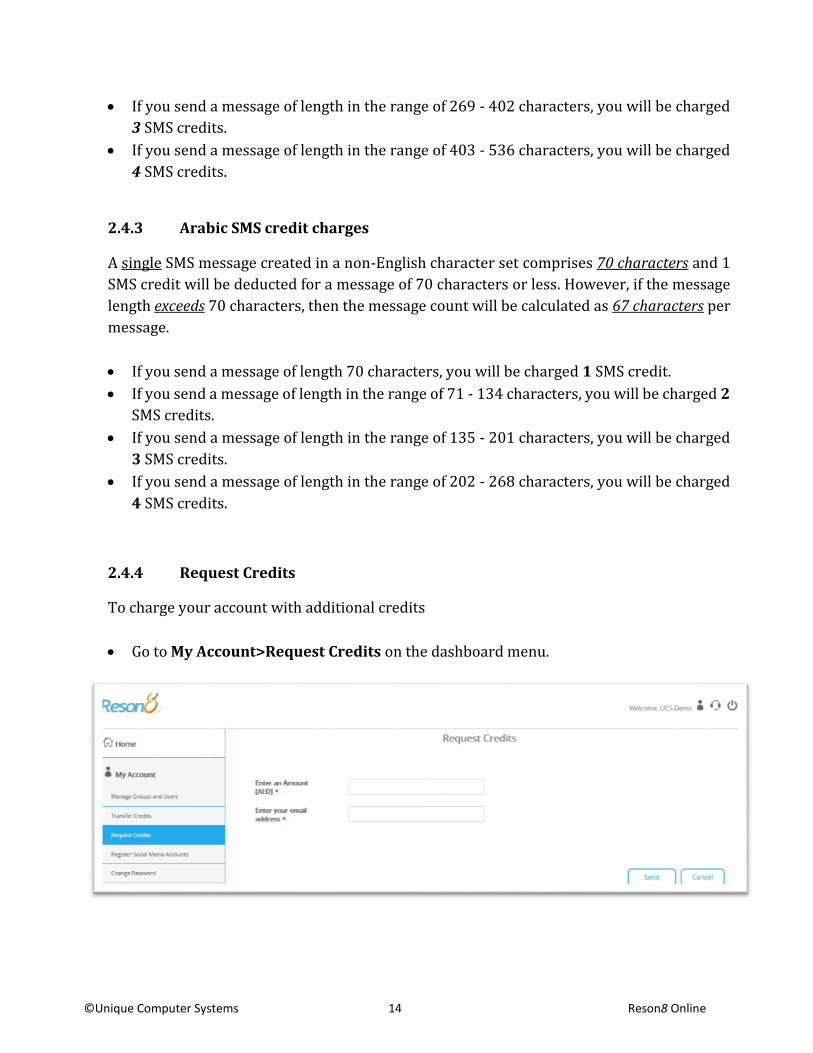
2.4.4 Request Credits
To charge your account with additional credits
Go to My Account>Request Credits on the dashboard menu.

©Unique Computer Systems 15 Reson8 Online
Once you have entered the value of credits required for your email address, review the
details and click Send Request.
Your request for credits will then be processed and you should receive an email
confirming the addition of new credits.
2.4.5 Transfer Credits
Reson8 Online allows a number of cost-centers and sub-accounts to be affiliated to your parent account. Cost-centers and sub-accounts can request credits in the same way as the parent account. However, credits can also be transferred between the parent account and cost-centers, and its associated sub-accounts. Credits cannot be transferred between sub-accounts of different cost-centers.
To transfer credits,
Go to My Account > Transfer Credits on the dashboard menu.
Once you have filled in all the fields, and submit Transfer, the credits should be
transferred immediately. This can be confirmed from Recent Transactions on the
dashboard and you will also receive an email notification.

©Unique Computer Systems 16 Reson8 Online
2.5 Groups and Users
Groups and Users, under My Account, enables
you to reflect your organizational structure in
your account, by giving you the freedom to create
groups/cost-centers under which you can affix
multiple sub-accounts/users. These cost-centers
may represent the various departments in your
organization or even the various
brands/subsidiaries that you may have.
As an example, corporation XXYYZZ (customer account) has two departments HR and
Admin, for which they have created two separate groups to distinguish between the two
communication channels. Charlie B., who works in Administration, and Calvin H., who works
in HR, have been added as respective users of the aforementioned groups.
In this way, XXYYZZ can effectively organize communications being sent out by its various
departments as each group and each authorized user in a department may be provided with
an individual access to a separate Reson8 Online account to send messages from.
Admin HR
XXYYZZ
Charlie B. Calvin H.

©Unique Computer Systems 17 Reson8 Online
To start organizing your Reson8 Online account, go to My Account > Groups and Users on
the Dashboard menu. You will then be able to view and edit the details of all your existing
groups and users.
2.5.1 Creating Groups/Users
To create a new group/user
Go to My Account > Groups and Users on the dashboard menu
Click on Add New User to start organizing your Reson8 Online account. You will be
prompted to enter the details of your required user/group account in the following dialog
box
Using the Type field you can indicate if the new account will be a group or a user account
The Parent Account of a group will always be your customer account whereas the parent
account of a user will be its respective cost-center/group to which it belongs. Note: The
maximum number of group or user accounts that can be created are defined at the time
of creating a parent account. If additional accounts are needed, please contact Reson8
Support.

©Unique Computer Systems 18 Reson8 Online
The Header refers to the sender name that the recipient will see on receipt of SMS
messages from the respective group/user.
The User Name will serve as the identity of the group/user as well as being the login ID
of the user.
The Status of the new group/user can be either one of Active, Blacklisted, Cancel,
Suspended, Trial. If the need arises, the status of the group/user accounts can be edited
to bar a group/user from sending out any SMS messages temporarily.
The Minimum Credit Limit indicates the minimum threshold limit at which a low credit
reminder will be sent to the parent account on the primary contact email address.
Has Fixed Header indicates that the user account can only use the header assigned to the
account
Send Daily Report indicates if a daily report should be sent to the user for all the
campaigns done on the previous day. The assigned email addresses to which the report
will be sent can be added with comma separation in Send reports to (email IDs).
Primary Contact Email and Mobile No needs to be filled with the primary contact email
address for the user account being created
Once you have completed all the required fields, click on Save.
An account opening activation email will be sent to the user on the primary contact email
address entered. Through this email, the user will be able to create a new password for
the new group/user created and start using it to log into the Reson8 dashboard.

©Unique Computer Systems 19 Reson8 Online
You can now create several group/user accounts wherein each account will be able to run
SMS campaigns relevant to its nature. In this way, you will be able to streamline your SMS
campaigns and their target audiences.
2.5.2 Change Password
The Change Password option under My Account can be used by the active user to change
the access password for the account.
The user needs to enter the current password and then the new password and confirm it to
update to the new password.
2.6 Address Book

©Unique Computer Systems 20 Reson8 Online
Reson8 Online provides an address book to create and recipient contacts and groups. The
Address Book saves you the time and effort of having to manually input the contact details
of your audience when you are running your SMS campaigns.
The address book follows a bottom-up hierarchical structure. This means that all the
contacts saved within the user accounts will automatically appear in the address book of the
group that it is associated with. These in turn will automatically appear within your customer
account.
Note
Contacts added in a parent account will not appear in the group or sub user accounts.
2.6.1 Managing Individual Contacts
Adding Contacts
To start adding contacts into your address book,
Go to Address Book > Manage Contacts on the dashboard menu.
Click on the button to add a new contact to your address book.
The mobile number must be entered in the following format, country code + area code +
mobile number. e.g. 971509999999 (UAE), 966509999999 (KSA), 968999999999
(Oman)
On saving the details, your contact will now appear in your address book.

©Unique Computer Systems 21 Reson8 Online
Modifying/Deleting Contacts
In order to view and/or edit your contact list
Go to Address Book > Manage Contacts on the dashboard menu. You will then be able
to delete/modify existing contact details by clicking on the delete/ edit icons, seen
next to the record of the contact, respectively.
You can also search for your contacts by name/mobile using the search bar above your
contact list. This saves you the time of going through the contact list page by page.
In order to delete multiple contacts,
Click on the check box next to each contact that you want to delete.
Then click on the button.
You will be prompted to confirm the deletion of the selected contacts.
2.6.2 Managing Distribution Lists

©Unique Computer Systems 22 Reson8 Online
A distribution list consists of the contact details of a particular section of your audience that
you communicate with on a regular basis. Distribution lists, offers the convenience of
grouping your audience based on a profile.
There are two ways of creating a distribution list in Reson8 Online.
A distribution list can be imported from a CSV file or create a list using existing contacts in
the address book.
In order to view existing distribution lists, go to Address Book >Manage Distribution Lists
on the dashboard menu. Distribution lists can be edited by clicking on the edit icon. To
delete a distribution list, click on the delete icon.
Note
Deleting a distribution list only deletes the distribution list and does not delete the contacts
within a distribution list.
To edit individual contact details within the distribution list:
Go to Address Book > Manage Contacts
Search for the contact by name or mobile number
Click on the edit icon and make the necessary changes
Save the changes
2.6.3 Importing contacts from a CSV file
You can start creating your distribution list from an existing list of your contacts’ details
provided that they are available in a CSV file format. In case you don’t have this at hand, the
steps to building your distribution list will be as follows.

©Unique Computer Systems 23 Reson8 Online
Before you can import an existing address book into Reson8 Online as a distribution
list, you will need to prepare a CSV file of your contact list. To prepare this, create an
Excel spreadsheet with all the details of your contacts listed in the following format.
Your contacts’ names must appear in the first column, and the adjacent column must
contain the contact numbers in the following format, country code + area code +
number (formatted as number with no decimal places). Once you have your Excel
spreadsheet ready, click on File > Save As, and select CSV (Comma delimited) under the
Save As type.
To create the new distribution list, go to Address Book > Manage Distribution Lists.
Click on the button.
Name the distribution list under description. Choose Import from a CSV file.
Browse and locate the CSV file that contains the address book to be imported. Click on
OK and you will be prompted to confirm the file.
Verify that the correct file has been selected and click OK again.

©Unique Computer Systems 24 Reson8 Online
Save the distribution list and you will be able to verify the number of contacts that you
are importing into your Reson8 Online address book. On confirming that the number of
contacts is correct, click Save again. Your distribution list will now appear in the Manage
Distribution Lists dashboard.
You can now start creating multiple distribution lists to successfully organize and classify
your communications with your target audiences. These distribution lists can be edited at a
later date to incorporate more contacts or even delete any contacts that may have become
extraneous. You can even merge two existing distribution lists as outlined in the next section.
2.6.4 Importing contacts from an existing distribution list
You can create new distribution lists from existing distribution lists.
Select Address Book > Manage Distribution Lists and follow the subsequent steps.
Click on the button.
The description of your list indicates the name by which you will identify your new
distribution list.

©Unique Computer Systems 25 Reson8 Online
Choose Import existing distribution lists from the drop down menu.
On selection of the option, the following dialog box appears. You can choose the Group
Name which indicates the distribution list you would like to import contacts from. Click
on Search.
Check the contacts from the distribution list that you want to import.

©Unique Computer Systems 26 Reson8 Online
Click on the button. Once you have done this, you can use another
distribution list to import contacts into your new distribution list by repeating the same
steps listed above.
Once you have added all required contacts into your new distribution list, click on save.
Your distribution list will appear under Address Book > Manage Distribution Lists.
You can now create a distribution list by importing contacts from a CSV file and an existing
distribution list. All you need to do is change the method under Choose an option instead of
saving immediately. You can do this multiple times to import contacts from various
distribution lists and CSV files before saving the newly created distribution list. Rest assured
that you can always edit your distribution lists to delete/add contacts. To do so follow the
steps listed above with the exception of the first step instead of which you click on the
edit icon of the distribution list that you want to add more contacts into.
3 Implementing your SMS solution
This section will explore how you can start composing your SMS communication for your
audience. In order to start sending out SMS messages, go to SMS Messaging > Send SMS on
the dashboard menu.

©Unique Computer Systems 27 Reson8 Online
The following screen allows you to compose your SMS message.
The basic steps involved in sending out an SMS message are as follows.
Go to SMS Messaging > Send SMS.
Select a Campaign Type – Marketing or Operational – this explains purpose of sending
SMS.
Select a Campaign Name to describe your SMS operation. The campaign name will be
recorded in the reports and transactions sections.
Select the Sender on whose behalf the campaign is being run. The sender can be any
group/user affiliated to your customer account.
Select the relevant header, to be used for the campaign, associated with the sender
account.
Select the Language in which you want the message to be sent. You can either send SMS
messages in English or in Arabic.

©Unique Computer Systems 28 Reson8 Online
The templates section allows you to manage any pre-defined messages that you
frequently use.
If you are not using a template, type your Message in the message box. The character
count and the message count are located above and below the message box respectively.
You can, therefore, keep track of your character count dynamically and alter the message
length to your preference.
Under the drop-down menu for Recipients, select one of the available options for the
recipients of the campaign. The available options are Use Existing Distribution List, Use
Existing Contacts, Upload a File, Manual. You can always review your selection by clicking
on View Selection (next to Recipients) which appears only once you have selected one of
the four options. These options will be detailed in the following sections. (See Section 3.1)
Campaign Description and Brand Name fields can be used to record details on the
campaign
Schedule the message to be sent instantly by selecting Send Now or at a later date and
time by selecting Schedule this message (See Section 3.2).
Click Send SMS. You will be prompted to verify and confirm the details of the SMS
message that you are trying to send out. Once you have confirmed this, click Send.
Your SMS message(s) will be sent out and you will receive confirmation on the screen
notifying you that the SMS message(s) have successfully been sent.
Please contact [email protected] for more details on sending multi-
channel messaging for twitter and face book.

©Unique Computer Systems 29 Reson8 Online
You can view the related credit transaction on your dashboard or under Reports (Section 4)
and your campaign will appear under your campaign history as well. The steps listed above
remain the same for any message that you wish to send except the settings will change based
on the options you select. The following sections will walk you through the different settings
you can make use of when sending out your SMS messages.
3.1 SMS Recipients
This section will detail the steps involved in configuring the recipient settings when sending
out your SMS messages. There are four ways by which you can add recipients to your SMS
message.
3.1.1 Send SMS to existing Distribution List
Under the drop-down menu for Recipients, select Use Existing Distribution List.
Select the appropriate distribution lists by clicking on Add in the right-hand column.
All selected distribution lists will appear in the left-hand column. If you wish to remove
the distribution list, click on Delete in the left-hand column. You can even use the Add
All/Remove All options appearing on the top of each column to use all your existing
distribution lists or remove them from the broadcast respectively. The search field can
be used to search for the desired distribution list. Once the required distribution lists
are chosen, click OK to confirm them.

©Unique Computer Systems 30 Reson8 Online
The contacts within the selected distribution lists will receive the SMS message you will send
out.
3.1.2 Send SMS to Existing Contacts
Select Use Existing Contacts under Recipients.
Search for contacts by Name or Mobile Number. Based on your search criteria, type the
name/mobile number in the search bar, and click Search.
The contacts with the same names/contact number will appear in the right-hand column.
Add the relevant contact into the recipient list by clicking on next to the correct contact.
Once you have added all the respective contacts into the recipient list, click Ok.
You can now send SMS messages to any number of contacts already existing in your address
book.

©Unique Computer Systems 31 Reson8 Online
3.1.3 Send SMS to manually entered contacts
To send messages to new contacts or those that do not exist in your address book, you can
use the Manual (Comma Separated) option.
Under Recipients, select Manual (Comma separated).
Enter the mobile numbers of your contacts in the format, country code + area code +
mobile number. You can enter multiple contact numbers by separating them with
commas. Once you have entered the contact numbers, click OK.
In case you want to review the mobile numbers that you sent the SMS message(s) to, you can
do so by going to Reports > Broadcast Reports. A list of all the recipients for each SMS
campaign is maintained for your verification purposes.
3.1.4 Send Bulk SMS using a CSV file
Reson8 Online also allows you to send bulk SMS using contacts contained within a CSV file.
To import the contacts from a CSV file into your recipient list, follow the steps.
Select Upload a File under Recipients.
Keep your CSV file ready with the mobile numbers in the following format.
Make sure that the mobile number contains the
country code and area code, and is formatted as a number
in your CSV file. To learn more about how to save CSV files
from Excel, refer to this article.

©Unique Computer Systems 32 Reson8 Online
Click on Browse and upload the CSV file containing the mobile numbers you want to use
as recipients of your SMS campaign. Once the file has been uploaded click OK. Any invalid
numbers will be discarded during the import.
Once the import process is complete, all valid mobile numbers in the selected CSV file will
be added onto the recipient list for the SMS campaign.
3.2 Scheduling your SMS message
Reson8 Online allows you to organize your SMS campaigns in advance by enabling you to
schedule your messages at a specific date and time. In this way you can arrange multiple
campaigns which may need to be implemented at/around the same time.
Select Schedule this message under Schedule Message

©Unique Computer Systems 33 Reson8 Online
On doing so, additional fields will appear prompting you to fill in the date, time and time
zone for the SMS campaign.
Once you have scheduled your message, you will be able to view its status in Reports section
under Broadcast Reports. Once the message has been sent, the status of your campaign will
change from scheduled to complete. You will also be able to see your scheduled
campaign on your dashboard under recent campaigns.
3.2.1 Modify/Delete your scheduled SMS message
You can delete or edit the details of your scheduled message prior to its scheduled broadcast
time. This feature allows you to accommodate any changes that you may need to implement
in the SMS campaign. To modify or delete your scheduled SMS, follow the steps below set the
required preferences to schedule the message
Go to Reports > Broadcast Statistics Reports.
Search for your campaign either by name or date. Click on Search.

©Unique Computer Systems 34 Reson8 Online
Once your campaign appears in the list, click on the View Status icon to view the
details of your scheduled campaign.

©Unique Computer Systems 35 Reson8 Online
To delete the scheduled message, click on the delete icon. You will be prompted to confirm the deletion of your scheduled message. Click Ok to confirm. The scheduled campaign will be removed from your campaign history and a credit refund transaction will be applied to your account by adding these credits back to your account. You will also receive an email notifying you of the refund.
To modify the details of your scheduled message instead, click on the edit icon. You will be able to change the text of your message, and/or the scheduled date and time of the campaign. Once you have made all the necessary changes, click on Modify SMS. A notification will be shown confirming the successful update to the campaign.

©Unique Computer Systems 36 Reson8 Online
3.3 SMS Templates: Static vs. Dynamic
Often you may need to send out standard SMS messages on a regular basis. Reson8 Online
makes this easy for you by allowing you to save standard messages as templates. These
templates can simply be reused by choosing the appropriate template in the Template drop-
down menu of your Send SMS dashboard.
Go to SMS Messaging > Manage Templates on the dashboard menu.

©Unique Computer Systems 37 Reson8 Online
Click on the button. Give the template a name so that you can use it as a reference.
Select the language in which you will be composing your template. A template can be
either static or dynamic.
A static template does not contain placeholders for custom fields and cannot be
personalized for each recipient. Each recipient will receive exactly the same message.

©Unique Computer Systems 38 Reson8 Online
A dynamic template may contain one or more placeholders for customization. Dynamic
templates allow for the personalization of the campaign for each of the recipient. All
placeholders must be placed between % symbols. To define a dynamic template, select
No under the drop-down menu of Is Static Message. Click Save.
Note
When using a dynamic template for an SMS campaign, a CSV file with a record for all the
custom fields needs to be defined and used. The first column must contain the Mobile
number, and the remaining columns must be labeled exactly as the placeholders used in the
template. The name of the columns need to be as the parameters between the % signs and
are case-sensitive.

©Unique Computer Systems 39 Reson8 Online
When sending an SMS campaign composed of your dynamic template, you will need to
select the appropriate Template you wish to use. Choose Upload a File under Recipients
in the Send SMS dashboard. Click on Browse to upload the correct file and click OK when
the file has successfully been uploaded.
You can then Send SMS.
This is how your message will appear to its respective recipients.

©Unique Computer Systems 40 Reson8 Online
Templates can be managed from the Manage Templates dashboard option.
4 Tracking your SMS campaigns
Reson8 Online allows you to keep track of all the activity on your account through built-in
reports. These reports highlight the usage of all your group and user accounts enabling you
to comprehensively keep a tab on all your sub-campaigns.
4.1 Broadcast Statistics Report
In order to view all the SMS campaigns you have run from the parent account (including
those run from your group/user accounts), go to Reports > Broadcast Statistics Report.
Note the user accounts will only display broadcast reports of their own campaigns. On the
Broadcast Report dashboard, you will be able to see an overview of each campaign. For a
detailed report of each recipient, you can click on the View Status icon which will also
include the message text and the mobile number status of all recipients.

©Unique Computer Systems 41 Reson8 Online
You can search for specific campaign details either by Period and/or the Campaign Name,
Header, Recipient Number, Message text. The following legend will help you use the icons
to your advantage.
Your SMS campaign is currently being processing for delivery.
Your SMS campaign broadcast is complete.
You SMS campaign has successfully been scheduled.
Click to view detailed delivery report on the recipients/to modify or delete a scheduled message.
/
Click to export report in CSV/Excel file format.
In addition to an up-to-date record of all your activity available on your account, you will also
receive daily email notifications of all successful campaigns run the previous day. This will
highlight the credit usage and will provide you with an attachment containing the details of
each campaign.

©Unique Computer Systems 42 Reson8 Online
Additionally you will receive a monthly digest outlining all the campaigns carried out in that
month, together with the credit usage on each campaign. The email will contain an
attachment with this detailed report.

©Unique Computer Systems 43 Reson8 Online
4.2 Campaign Dispatch Summary
In order to view all the SMS campaigns you have run against a brandname or CampaignID,
go to Reports > Campaign Dispatch Summary Report. Note the user accounts will only
display broadcast reports of their own campaigns.
You can search for specific campaign details either by Period and/or the Campaign Name,
Header, Brand Name.
You can then export the report as an excel or pdf using the icons at the bottom of the screen.
4.3 Incoming Messages Report
To check your incoming messages for any 2 Way SMS short codes registered with UCS, go
to Reports > Incoming Messages Report. You can then search for the messages either by
Date Range, All, Mobile Number or Status.

©Unique Computer Systems 44 Reson8 Online
The report summarizes the message IDs, date, the mobile number of the person who sent the
message and the message itself.
To reply to the message, click on the icon on the right, select the language (either
English/Arabic), type your message in the box then click Reply. The character and message
count will appear above and below the message box respectively.

©Unique Computer Systems 45 Reson8 Online
4.4 Credit Transactions Report
To track and tally your available credits, go to Reports >Credit Transactions Report. This
report, lists all the credit transactions that have taken place on your account and records the
purchase of new credits, any credits spent on campaigns, credits refunded due to the deletion
of a scheduled message and the transfer of credits to your group and user accounts.
The list can be sorted by Transaction Type or the period. For your financial purposes, you
may also export the list to an Excel file to be saved.
At the end of each month, you will receive an email notification with your account’s credit
balance.
The notification for the monthly credit report will be sent on the first day of the following
month.

©Unique Computer Systems 46 Reson8 Online
4.5 Broadcast Campaign Report
To keep track of all your campaigns, in addition to the credits available on them, go to
Reports >Broadcast Campaign Report. The detailed report of each campaign can be
obtained by clicking on View Status where you will be able to see the details with which
each campaign was registered.

©Unique Computer Systems 47 Reson8 Online
5 Troubleshooting
In the writing of this manual, it was attempted to clarify every feature you can use on your
Reson8 Online. If you are unable to work any feature or if you experience any technical
problems, you can find below a list of useful contacts for your reference.
In case of queries you may contact us on +971 6 5254491. You can also get in touch with us
via email on [email protected].
We hope you enjoy using your Reson8 Online account to your advantage.