user manual - akai.com.ro · manualul utilizatorului APRC-106 MP3 Player portabil cu USB/SD Este...
14
user manual APRC-106 Portable MP3 Player with USB/SD It is important to read this user manual prior to using your new product for the first time.
Transcript of user manual - akai.com.ro · manualul utilizatorului APRC-106 MP3 Player portabil cu USB/SD Este...

user manual
APRC-106
Portable MP3 Player with USB/SD
It is important to read this user manual prior to using your new product for the first time.
Welcome
Thank you for purchasing the Micro system Player APRC-106.In order to fully benefit from this product,
please follow the instructions in this user manual very carefully. Store this user manual in a safe place for
future reference. We are sure your new Micro system will satisfy your needs.
PREPARATION FOR USE
Unpacking and Setup
* Carefully remove the unit from the display carton and remove all packing material from the unit itself.
* Remove any descriptive labels that may be found on either the front or top cabinet of the unit. Do not
remove any labels located on either the back or button cabinet of the unit.
* Press the CD door OPEN Button to open the CD compartment door. There is a white card in the CD
compartment which is intended to prevent the CD pickup from moving during shipment of the product,
Remove this card from the CD compartment before use.
POWER SURRLY
Using AC Power
1. Check if the power voltage, as shown on the type plate located on the bottom of the set, corresponds to your local AC power supply. If it does not, consult your dealer or service center.
2. Connect the power cord to the AC socket inlet and the wall outlet, the power supply is now connected and ready for use.
3. To switch off completely, unplug the power cord from the wall outlet. 4. Unplug the power cord from the wall outlet to protect your set during heavy thunderstorms. Batteries (not included)
Open the battery compartment and insert six batteries, type LR14, UM-2 or C-cells,
(Preferably Alkaline) with the correct polarity as indicated by the“ +”and“-” symbols inside the compartment
Batteries contain chemical substances, so they should be disposed of properly.
Incorrect use of batteries can cause electronic leakage and will corrode the compartment or cause the
batteries to burst. Therefore:
EN-1

EN-2
1. STEREO HEADPHONE JACK
2. VOLUME BUTTON
3.POWER/ALARM OFF BUTTON
4.SD CARD JACK
5. FUNCTION BUTTON
6. SNOOZE/REPEAT/MEMORY
BUTTON
7.PLAY/PAUSE/TIME BUTTON
8. USB JACK
9.STOP/SLEEP BUTTON
10. CLOCK-(BACK)/CLOCK+(NEXT)
BUTTON
11. AUX JACK
12. LCD DISPLAY
13. POWER INDICATOR
14.LEFT&RIGHT SPEAKER
15.FM ANTENNA
16. AC SOCKET
17. BATTERY DOOR

BASIC FUNCTION
1.STEREO HEADPHONE JACK
-To insert a 3.5mm stereo headphone.
2.VOLUME BUTTON
-Adjust volume level.
3.POWER/ALARM OFF BUTTON
-Press POWER button to turn on/off power.
-Shut down the alarm.
-To delete the alarm setup.
4.SD CARD JACK
-To listen to your SD card with Mp3 music files.
5.FUNCTION SELECTOR
-To select mode by ALARM/USB/SD/
AUX/RADIO.
-Setup the time format by 12h or 24h.
6.SNOOZE/REPEAT/MEMORY BUTTON
-Press to stop alarm, after Nine
minutes alarm will ring again.
-To repeat a track of the USB/SD.
-FM 30 preset memories.
7.PLAY/PAUSE/TIME BUTTON
-To start or pause USB/SD play.
-In the radio mode, long press the play/pause/time
button enter the automatic channel scan mode.
-To setup the time of the unit.
-To setup the alarm time.
8.USB JACK
-To listen to your USB with Mp3 music files.
9.STOP/SLEEP BUTTON
-To stop USB/SD play.
-To setup the power off time.
-To setup the sleep time.
10.CLOCK-(BACK)/CLOCK+(NEXT) BUTTON
CLOCK-(BACK)BUTTON
-To setup the time of unit.
-To select back track of USB/SD.
-Press this button 1.5 sec backward search intra track.
- In the radio mode, press this button will enter
the low end of the manual channel scan mode.
EN-3
CLOCK+(NEXT) BUTTON
-To setup the time of unit.
-To select next track of USB/SD.
-Press this button 1.5 sec forward search intra
track.
-In the radio mode, press this button will enter
the high-end manual channel scan mode.
11.AUX JACK
-Select AUX mode, inset aux jack to play
MP3, Discman, Walkman.
12.LCD DISPLAY
-To show the time and tracks number of the
USB and the frequency of the radio.
13. POWER INDICATOR
14.LEFT & RIGHT SPEAKER
15.FM ANTENNA
16. AC SOCKET
17.BATTERY DOOR
-To open battery compartment.

USE RADIO Radio reception
1.Press FUNCTION button select RADIO mode.
2.Tune to required station by pressing BACK, NEXT or PLAY/PAUSE/TIME.
Manual Tuning: Press and hold the BACK or NEXT button.
Auto Tuning: Press and hold the PLAY/PAUSE/TIME button to start automatic channel Scan mode.
Preset Channel:(FM 30 preset memories)
(1) Press BACK or NEXT select desired station.
(2) Press MEMORY button once, the memory number indicator will be displayed.
(3) Press BACK or NEXT buttons to select the desired number.
(4) Press MEMORY button to save the station.
(5) Repeat steps (1) to (4) to saved other stations in the memory.
3.After the end of a program. Press the PLAY / PAUSE / TIME button on the unit,
press number keys to select the frequency you want to play.
4.Press [VOL-]or [VOL +] to adjust the volume.
5.Extend TELESCOPIC ANTENNA to its full length if you are listening to FM broadcast.
6.Turn off the radio by pressing the FUNCTION button to select another mode or press the power button
to turn off the unit.
7.The frequency will be stored in memory once the unit has been switched on again. USE USB/SD To listen to your USB/SD with MP3 music files.
-Press the FUNCTION button to select to USB/SD mode.
-Insert one USB/SD card, the unit will read the USB/SD and will begin playback automatically.
-Press PLAY/PAUSE button to play or pause playback;
-Press STOP button to stop playback;
-Press [VOL-]or [VOL +] to adjust the volume.
-Press BACK or NEXT to select tracks of the USB/SD;
-Press and hold on BACK or NEXT button to rewind of fast forward within a track;
NOTE: Press and hold the BACK button to return to the beginning of the current track.
Press the BACK or NEXT buttons to select the track.
Press PLAY button to start playback. USE AUX
This model includes an Aux in jack which enables connection to any external audio device such as MP3,
Discman or Walkman.
1. Connect your external audio device to the AUX in of the micro system.
2. Select the function to AUX. Play the music from your audio device to hear it through the speakers.
Adjust the volume level to your desire.
Note: The Micro system buttons cannot control the external device. All functions must be operated from the
external audio device.
EN-4
USE CLOCK To setup the time of the unit
1.Connect the ac on(The following operation must be in standby mode).
2.Short according to the TIME button, the time will flash on the lcd display.
3.Press clk-、clk+ to select the number of the time. You can long press function button setup the time format
by 12h or 24h.
4.Press time button to confirm.
5.Then you can set the hour and the minute with the same method of steps 3-4.
Note: if you power the unit after set up the alarm time, then the alarm time will be closed. USE OTHER IMPORTANT BUTTON POWER/ALARM OFF BUTTON
-Push this key to power on/off the system.
-Under power off mode, all control keys have no function except
Time, Alarm, Sleep and Snooze.
STOP/SLEEP BUTTON
-In normal working condition, hold on the SLEEP button more than 1.5 sec adjustable sleep time.
*Press this button to set the sleep countdown time. Press once is 00 minutes, press twice 90 minutes, and
press more time will reduce 10 minutes until press 10 times to close sleep function. USE THE ALARM To setup the alarm of the unit
1.Connect the AC on.
2.Hold on the TIME button more than 1.5 sec to into alarm setup whenever the unit power on or off.
The time number will flash on the LCD display.
3.Press CLK-、CLK+ to select the hour of the time.
4.Press TIME button to confirm.
5.Then you can set the minute with the same method of steps 3-4.
6.While the alarm time is up, how the alarm ring please look for the form of following:
7.How to shut down the alarm ring when the alarm time is up:
-Press ALARM OFF button to shut down the ring.
-Press SNOOZE button to shut down the ring, then the alarm will ring out after 9 minutes.
8. If want to cancel the alarm, you long press ALARM OFF button, also want to restore alarm,
Long press ALARM OFF button again. Note:
*In standby state set alarm time.
*Press function button set alarm to choose model (AUX/USB/RADIO/ALARM).
Power Off Erp2 function: When the unit idle on AUX/USB/SD mode over 10 min. Then the unit will switch into standby mode
automatically. EN-5

WARNING
To prevent fire or shock hazard, do not expose the unit to rain or moisture. To avoid electrical shock, do not open the cabinet, refer to service agent or qualified engineer only. If at any time in the future, you should need to dispose of this product please note that Waste electrical products should not be disposed of with household waste. Please recycle where facilities exist. Check with your Local Authority or retailer for recycling advice. (Waste Electrical and Electronic Equipment Directive). TECHNICAL SPECIFICATIONS GENERAL Power Requirement .............................................................................................AC/DC: 230V ~ 50Hz Power consumption ...........................................................................................................AC 13 Watts Battery power supply..........................................................................9V (6XUM2/LR-14 batteries 1.5v) Dimensions...................................................................Approx.236 mm(L)x175 mm(W) x109.5 mm(H) Operation temperature...................................................................................................+5 ℃ - +35℃ RECEIVER SECTION Receiving Bands................................................................................................................................FM Tuning Range............................................................................................................ FM 87.5-108MHz AUDIO SECTION Power output ......................................................................................................Maximum 1.5 Watt x 2 Headphone Impedance ....................................................................................................4 ~ 32 Ohms ACCESSORIES Instruction Booklet................................................................................................................................1 Ac line cord...........................................................................................................................................1 DISPOSAL OF WASTE ELECTRICAL AND ELECTRONIC EQUIPMENT This symbol on the product or packaging means that the product should not be treated as household
waste. Do not throw garbage at the end of its life, but take it to a collection center for recycling. In this way you will help to protect the environment and be able to prevent any negative consequences that it would have on the environment and human health. To find your nearest collection center:
Contact local authorities; Access the website: www.mmediu.ro; Request additional information from the store where you purchased the
product.
EN-6
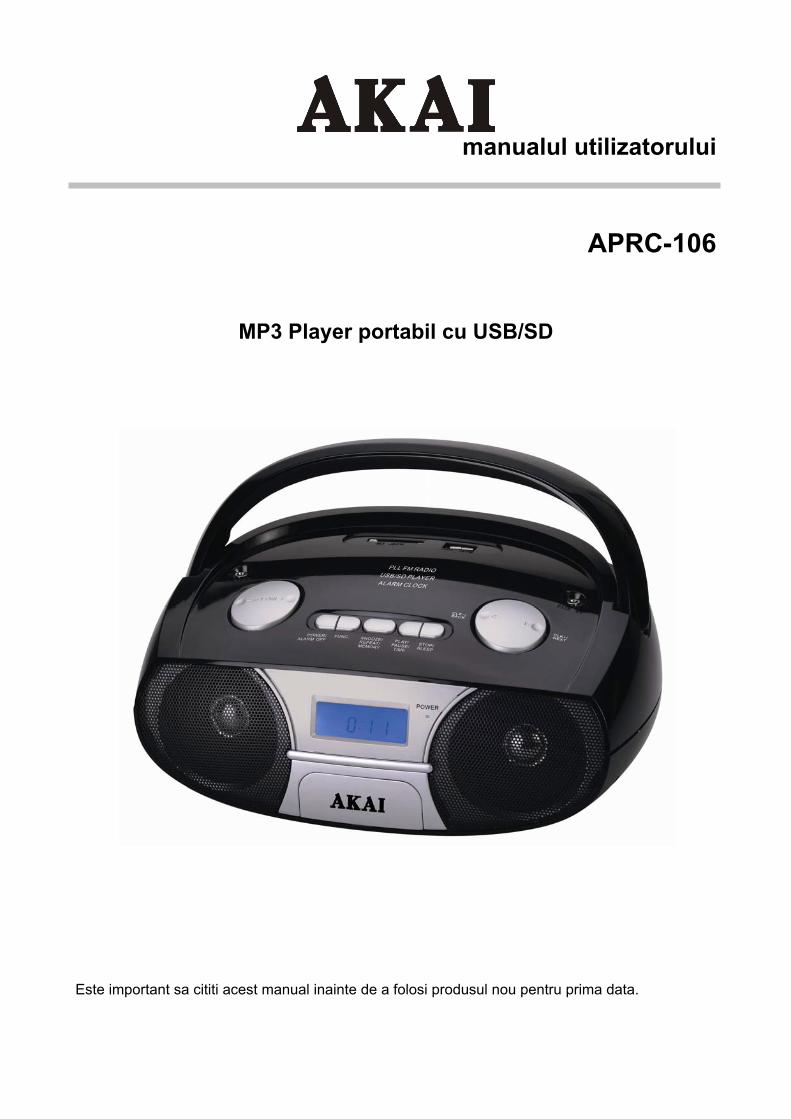
manualul utilizatorului
APRC-106
MP3 Player portabil cu USB/SD
Este important sa cititi acest manual inainte de a folosi produsul nou pentru prima data.
Bine ati venit! Va multumim pentru achizitionarea Micro sistemului PlayerAPRC-106.Pentru a beneficia complet de acest produs, va rugam sa urmati cu atentie instructiunile din acest manual al utilizatorului. Pastrati acest manual intr-un loc sigur pentru viitoare referinte. Suntem convinsi ca noul nostru Micro sistem va va satisface nevoile.
PREGATIRE PENTRU UTILIZARE
Despachetare i montareș
* Indepartati cu grija unitatea din cutie si indepartati tot ambalajul de pe unitate.
* Scoateti orice etichete care pot fi aplicate fie pe fata sau pe partea de sus a unitatii. Nu scoateti
nicio eticheta situata fie pe spatele sau pe butoanele cutiei unitatii.
* Apasati butonul de DESCHIDERE pentru CD, pentru a deschide compartimentul CD-ului. In interiorul compartimentului pentru CD exista un carton alb, care are rolul de a impiedica miscarea pickup-ului CD-ului de a se misca in timpul transportului produsului. Scoateti acest carton din compartimentul CD-ului inainte de utilizare.
ALIMENTARE
Utilizarea curentului alternativ 1. Verificati daca tensiunea corespunde furnizorului dumneavoastra local de curent, dupa cum se
arata pe placuta situata in partea de jos a setului. Daca nu, consultati un dealer sau centrul de
service.
2. Conectati cablul de curent la priza; alimentarea este conectata si gata pentru utilizare.
3. Pentru a deconecta complet aparatul, scoateti cablul din priza.
4. Scoateti cablul din priza de perete pentru a va proteja setul in timpul furtunilor puternice.
Baterii (nu sunt incluse)
Deschideti compartimentul bateriilor si introduceti opt baterii, de tip LR14, UM-2 sau R14, (de
preferat alcaline), cu polaritatea corect pozitionata, dupa cum indica simbolurile “+” si “-”, din
interiorul compartimentului.
Bateriile contin substante chimice, asadar trebuie sa fie aruncate corespunzator.
Utilizarea incorecta a bateriilor poate cauza scurgere electronica si va oxida compartimentul sau va
cauza explozia bateriilor. De aceea:
RO-1
RO-2
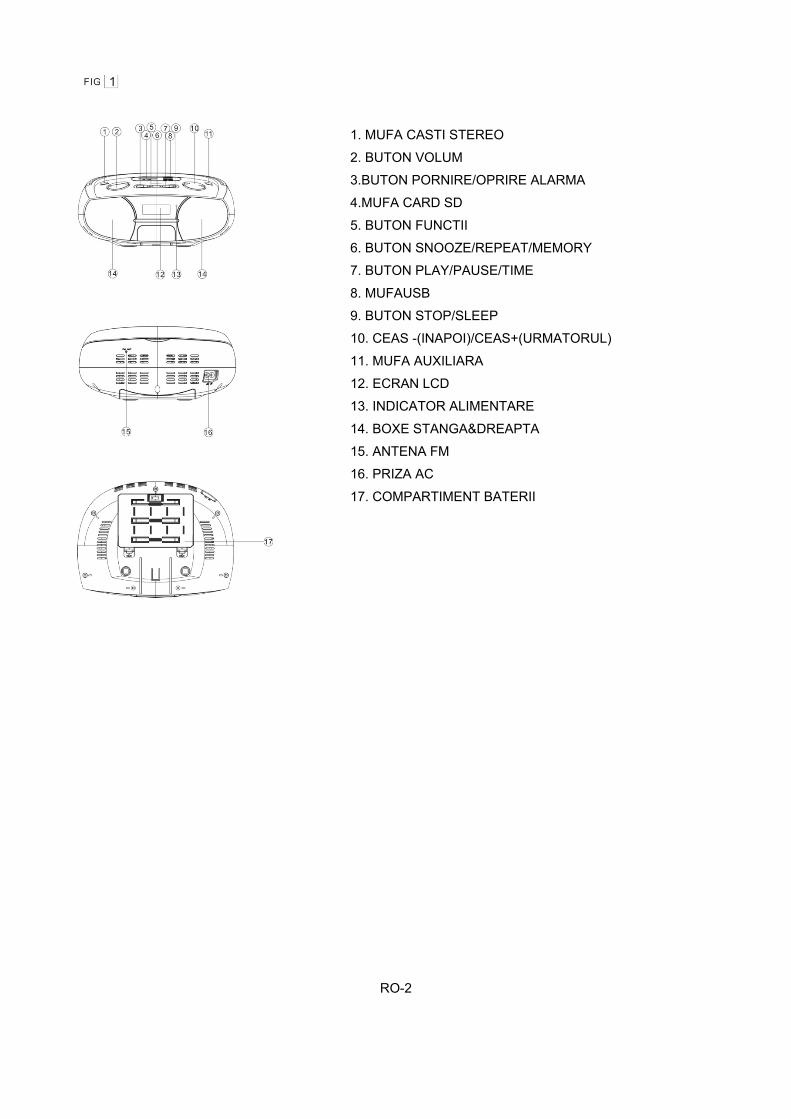
1. MUFA CASTI STEREO
2. BUTON VOLUM
3.BUTON PORNIRE/OPRIRE ALARMA
4.MUFA CARD SD
5. BUTON FUNCTII
6. BUTON SNOOZE/REPEAT/MEMORY
7. BUTON PLAY/PAUSE/TIME
8. MUFAUSB
9. BUTON STOP/SLEEP
10. CEAS -(INAPOI)/CEAS+(URMATORUL)
11. MUFA AUXILIARA
12. ECRAN LCD
13. INDICATOR ALIMENTARE
14. BOXE STANGA&DREAPTA
15. ANTENA FM
16. PRIZA AC
17. COMPARTIMENT BATERII

FUNCTII DE BAZA
1.MUFA CASTI STEREO
-Pentru a introduce casti stereo de 3.5mm.
2. BUTON VOLUM
-Ajustati nivelul volumului.
3.BUTON ALIMENTARE/OPRIRE ALARMA
-Apasati butonul POWER pentru a porni/opri alimentarea.
-Opriti alarma.
-Pentru a sterge setarile alarmei.
4.MUFA CARD SD
-Pentru a asculta muzica MP3 de pe cardul SD.
5.SELECTOR FUNCTII
-Pentru a selecta modul ALARM/USB/SD/AUX/RADIO.
-Setati formatul orei de 12h sau 24h.
6.BUTONUL SNOOZE/REPEAT/MEMORY
-Apasati pentru a opri alarma; dupa noua minute alarma
va suna din nou.
-Pentru a repeta melodia de pe USB/SD.
- 30 memorii FM presetate.
7.BUTONUL PLAY/PAUSE/TIME
-Pentru a porni sau a pune pe pauza redarea de pe USB/SD.
-In modul radio, apasati lung butonul play/pause/time pentru
a porni modul de scanare automat al posturilor.
-Pentru a seta ceasul.
-Pentru a seta alarma.
8. MUFAUSB
-Pentru a asculta muzica de pe fisierele MP3 prin USB.
9.BUTONUL STOP/SLEEP
-Pentru a opri redarea de pe USB/SD.
-Pentru a seta oprirea ceasului.
-Pentru a seta perioada de inactivitate.
10.BUTON CEAS-(ANTERIOR)/CEAS+(URMATOR)
BUTON CEAS-(ANTERIOR)
-Pentru a seta ora.
-Pentru a selecta derularea inapoi de pe USB/SD.
-Apasati acest buton timp de 1.5 sec pentru a initia derularea inapoi a piesei.
- In modul radio, apasati acest buton pentru a initia modul de scanare manual a posturilor.
RO-3
BUTONUL CEAS+(URMATORUL)
-Pentru a seta ceasul.
-Pentru a selecta urmatoarea piesa de pe
USB/SD.
-Apasati acest buton timp de 1.5 sec pentru a
derula inainte cautarea pieselor.
-In modul radio, apasati acest buton pentru a
intra in modul de scanare automata a posturilor.
11.MUFA AUXILIARA
-Selectati modul AUX; introduceti mufa pentru
redareMP3, Discman, Walkman.
12.ECRAN LCD
-Pentru a arata ora si numarul pieselor de pe
USB, precum si frecventa de radio.
13. INDICATOR ALIMENTARE
14. BOXE STANGA&DREAPTA
15. ANTENAFM
16. PRIZAAC
17. COMPARIMENT BATERII
-Pentru a deschide compartimentul pentru
baterii.
UTILIZAREA RADIOULUI Receptia radio
1.Apasati butonul FUNCTION pentru a selecta modul RADIO.
2.Reglati postul dorit prin apasarea butonului BACK,NEXTsau PLAY/PAUSE/TIME.
Reglare manuala: Apasati si tineti apasat butonul BACK sau NEXT.
Reglare auto: Apasati si tineti apasat butonul PLAY/PAUSE/TIME pentru a porni modul de scanare automata
a posturilor.
Posturi presetate: (30 de posturi FM presetate)
(1) ApasatiBACK sau NEXT pentru a selecta postul de radio dorit.
(2) Apasatibutonul MEMORY o data; pe ecran va aparea numarul de memorie.
(3) Apasatibutoanele BACK sau NEXT pentru a selecta numarul dorit.
(4) Apasatibutonul MEMORY pentru a memora postul de radio.
(5) Repetati pasii (1) la (4) pentru a memora alte posturi de radio.
3.La terminarea programului. Apasati butonul PLAY / PAUSE / TIME, apasati tastele cu numere pentru a
selecta frecventa pe care doriti sa ascultati.
4.Apasati[VOL-]sau [VOL +] pentru a ajusta volumul.
5.Intindeti ANTENA TELESCOPICA la lungime maxima pentru a asculta transmisiunea FM.
6.Opri�i radio-ul prin apasarea butonului FUNCTION, pentru a selecta alt mod sau apasa�i butonul de
alimentare pentru a opri unitatea.
7.Frecventa va fi memorată o data ce unitatea va fi din nou pornita. UTILIZAREA USB/SD Pentru a asculta fisiere de muzica de pe USB/SD.
-Apasati butonul FUNCTION pentru a selecta modul USB/SD.
-Introduceti cardul USB/SD; unitatea va citi USB/SD si va reda muzica automat.
-Apasatibutonul PLAY/PAUSE pentru a reda muzica sau a pune redarea pe pauza.
-Apasatibutonul STOP pentru a opri redarea.
-Apasati[VOL-]sau [VOL +] pentru a ajusta volumul.
-Apasatibutoanele BACK sau NEXT pentru a selecta piesele de pe cardul USB/SD;
-Apasatisi tineti apasat butoanele BACK sau NEXT pentru a derula o piesainapoi sau inainte.
NOTĂ: Apasati si tineti apasat butonul BACK pentru a va reintoarce la inceputul piesei curente.
Apasati butoanele BACK sau NEXT pentru a selecta piesa.
Apasatibutonul PLAY pentru a incepe redarea. UTILIZAREA SURSEI AUXILIARE Acest model include mufa auxiliara de intrare, care permite conectarea la orice sursa externa pentru
dispozitive audio, cum ar fi MP3, Discman sau Walkman.
1.Conectati sursa auxiliara a dispozitivului audio la mufa AUX a micro sistemului.
2. Selectati functia AUX. Redati muzica de pe dispozitivul audio pentru a o asculta in boxe. Ajustati nivelul
volumului după preferinte.
NOTĂ: Butoanele micro sistemului nu pot controla dispozitivul extern. Toate functiile trebuie operate de pe
dispozitivul audio extern.
RO-4

UTILIZAREA CEASULUI Pentru a seta ceasul
1.Porniti unitatea (Următoarea operatie trebuie facuta in modul standby).
2.Apasati scurt butonul TIME; pe ecran va aparea ceasul intermitent.
3.Apasati clk-, clk+ pentru a selecta numarul orei. Puteti apasa lung butonul pentru functii pentru a seta
formatul de 12h sau 24h.
4.Apasati butonul TIME pentru a confirma.
5.Apoi puteti seta ora si minutele prin aceeasi metodă ca cea de la pasii 3-4.
Nota: dacaalimentati unitatea după setarea alarmei, alarma va fi inchisa. FOLOSIREA ALTOR BUTOANE IMPORTANTE BUTONUL DE ALIMENTARE/OPRIREA ALARMEI
-Apasatiacest buton pentru a porni/opri sistemul.
-In modul oprit, toate butoanele vor fi nefunctionale, cu exceptia butoanelor Time,Alarm,Sleep si Snooze.
BUTONUL STOP/SLEEP
-In conditii normale de functionare, tineti apasat butonul SLEEP mai mult de 1.5 sec pentru a ajusta timpul
de repaus.
*Apasatiacest buton pentru a seta numaratoarea inversa pentru repaus. Apasatio dată pentru 00 minute,
apasatide doua ori pentru 90 minute si apasati de mai multe ori pentru a reduce timpul cu cate 10 minute;
apasatide 10 ori pentru a inchide functia de repaus. FOLOSIREA ALARMEI Pentru a seta alarma
1.Porniti unitatea.
2.Tineti apasat butonul TIME mai mult de 1.5 secundela setarea alarmei, indiferent daca unitatea este
pornita sau oprita.
Ora va aparea intermitent pe ecran.
3.Apasati CLK-, CLK+ pentru a selecta ora.
4.Apasati butonul TIME pentru a confirma.
5.Apoi puteti seta minutele, folosind aceeasi metoda ca la pasii 3-4.
6.In timp ce alarma este pornitasi suna, urmati acesti pasi pentru a seta urmatoarele:
7.Cum sa opriti alarma in timp ce aceasta func�ioneaza:
-Apasati butonul ALARM OFF pentru a opri sunetul.
-Apasatibutonul SNOOZE pentru a inchide sunetul, dupa care alarmava suna din nou dupa 9 minute.
8. Daca doriti sa anulati alarma, apasati lung butonul ALARM OFF, sau daca doriti sa resetati alarma,
apasati din nou lung butonul ALARM OFF. Nota:
*Setati alarma in modul ”standby”.
*Apasatibutonul ”function” pentru a seta alarma si a alege modelul (AUX/USB/RADIO/ALARM).
Functia de oprire Erp2: Cand unitatea se afla in repaus in modul CD/AUX/USB mai mult de 10 min, atunci aceasta va intra automat in asteptare/standby.
RO-5
AVERTISMENT
Pentru a preveni riscurile de incendiu sau soc, nu expuneti unitatea la ploaie sau umiditate. Pentru a evita socurile electrice, nu deschideti carcasa. Adresati-va doar unui agent de service sau unui inginer calificat. Dacain orice perioada din viitor doriti sava debarasati de acest produs, va rugam sa retineti ca deseurile de produse electrice nu trebuie sa fie aruncate cu deseurile casnice. Va rugam sa reciclati la centrele de reciclare existente. Cereti sfaturi pentru reciclare la Autoritatea Locala sau la distribuitor. (Directiva referitoare la deseurile electrice si electronice). SPECIFICA�II TEHNICE GENERAL Cerinte alimentare .....................................................................................................AC/DC: 230V ~ 50Hz Consum energie ......................................................................................................................AC 13 Watts Alimentare cu baterii................................................................................9V (6XUM2/LR-14 baterii de1.5v) Dimensiuni............................................................................Aprox.236 mm(L)x175 mm(W) x109.5 mm(H) Temperatura de operare.......................................................................................................+5 - +35 SECTIUNEA RECEPTOR Benzi receptie.........................................................................................................................................FM Frecvente ........................................................................................................................ FM 87.5-108MHz SECTIUNEA AUDIO Putere de iesire..............................................................................................................Maxim 1.5 Watt x 2 Impedanta casti........................................................................................................................4 ~ 32 Ohms ACESORII Manual instructiuni......................................................................................................................................1 Cablu alimentare.........................................................................................................................................1 DEZAFECTAREA echipamentelor electrice si electronice uzate
Acest simbol prezent pe produs sau pe ambalaj semnifică faptul că produsul respectiv nu trebuie tratat ca un deşeu menajer obişnuit. Nu aruncaţi aparatul la gunoiul menajer la sfârşitul duratei de funcţionare, ci duceţi-l la un centru de colectare autorizat pentru reciclare. În acest fel veţi ajuta la protejarea mediului înconjurător şi veţi putea împiedica eventualele consecinţe negative pe care le-ar avea asupra mediului înconjurător şi veţi putea împiedica eventualele consecinţe negative pe care le-ar avea asupra mediului şi sănătăţii umane. Pentru a afla adresa celui mai apropiat centru de colectare:
Contactaţi autorităţile locale; Accesaţi pagina de internet: www.mmediu.ro; Solicitaţi informaţii suplimentare de la magazinul de unde aţi achiziţionat produsul.
RO-6