User GuideAxioCam ERc 5sMicroscope Camera
35
User Guide AxioCam ERc 5s Microscope Camera
Transcript of User GuideAxioCam ERc 5sMicroscope Camera

User Guide
AxioCam ERc 5s
Microscope Camera
2
Carl Zeiss Microscopy GmbH
Carl-Zeiss-Promenade 10
07745 Jena, Germany
www.zeiss.com/microscopy
Carl Zeiss Microscopy GmbH
Königsallee 9-21
37081 Göttingen
Germany
Effective from: 12 / 2015
© Jena 2015 by Carl Zeiss Microscopy GmbH - all rights reserved
This document or any part of it must not be translated, reproduced, or transmitted in any form or by any means, electronic or mechanical, including
photocopying, recording, or by any information or retrieval system. Violations will be prosecuted.
The use of general descriptive names, registered names, trademarks, etc. in this document does not imply, even in the absence of a specific
statement, that such names are exempt from the relevant protective laws and regulations and therefore free for general use. Software programs will
fully remain the property of ZEISS. No program, documentation, or subsequent upgrade thereof may be disclosed to any third party, unless prior
written consent of ZEISS has been procured to do so, nor may be copied or otherwise duplicated, even for the customer's internal needs, apart from
a single back-up copy for safety purposes.
ZEISS reserves the right to make modifications to this document without notice.

1 About this guide | 1.1 Introduction
User Guide AxioCam ERc 5s | V 2.0 en 3
1 About this guide
1.1 Introduction | 1.1Introduction
Welcome to the AxioCam ERc 5s user guide.
The camera is a high-resolution digital camera with a color CMOS sensor for light-microscopy applications. To make it easier for you to set up the camera, pleasefollow the instructions in these chapters step by step.
Content Chapter Content
About this guide Introduction and overview of this manual.
Safety Important information on the safe handling of thecamera. Read this chapter before unpacking andoperating the camera.
Shipment The contents of delivery and optional attachmentswill be described here.
Technical data Here you will find the camera's technical data.
Connecting the camera In this chapter, you will find detailed instructionson connecting and using the camera.
Remote Control and OSDmenu
This chapter lists the functions of the IR remotecontrol and the functions in the On Screen Display(OSD) menu.
Installing software anddrivers
Here you will learn how to install the software andcamera drivers.
Acquiring images This chapter provides the basics of imageacquisition.
Troubleshooting In this chapter, we have listed some solutions tovarious problems. If you are still unable to solveyour problem, contact ZEISS support.
Maintenance This chapter describes some measures for themaintenance and care of your camera. In case ofgreater damage, always contact ZEISS support.
Disposal and Recycling Important instructions for disposal and recycling.

1 About this guide | 1.2 Safety notes conventions
4 User Guide AxioCam ERc 5s | V 2.0 en
1.2 Safety notes conventions | 1.2Safety notes conventions
The safety notes in this document follow a system of risk levels, defined in thefollowing manner:
CAUTION
Risk of personal injury
CAUTION indicates a potentially hazardous situation which, if not avoided, mayresult in minor or moderate personal injury.
NOTICE
Risk of property damage
NOTICE indicates a property damage message. In addition, NOTICE is used fordata loss or corrupt data.
Note
Indicates useful additional information. It helps you to make your daily workeasier, but it is optional. There is no risk for personal injury or property damageinvolved.

1 About this guide | 1.3 Text formats and conventions
User Guide AxioCam ERc 5s | V 2.0 en 5
1.3 Text formats and conventions | 1.3Text formats and conventions
Bold texts
Bold is used for texts within the software like names of GUI elements (e.g. buttons,sections, tools, menus), buttons on a device, and product names (e.g. MTB 2011).
Font type "Courier"
Used for programming code, e.g. macro code as well asfor anything that you would type literally whenprogramming, including keywords, data types, constants,method names, variables, class names, and interfacenames.
Shortcuts and key commands
Shortcuts are written like Crtl+C, meaning you should press Crtl-Key and C-Keysimultaneously.
Procedures
The following formats are used for procedures (instructive sequences):
Prerequisites ¢ stands for a condition which must be fulfilled before starting with the action.
Procedure 1 stands for a single step the user is asked to perform.
Web-Links
Web links appear in blue text. To open the linked website, simply click on the link.Please make sure you have an internet connection established before opening theweb link.

2 Safety | 2.1 Safety Notes
6 User Guide AxioCam ERc 5s | V 2.0 en
2 Safety
2.1 Safety Notes | 2.1Safety Notes
The AxioCam ERc 5s has been manufactured and tested by ZEISS according to theregulations specified in CE and has left the manufacturer’s premises in perfectworking order. In order to ensure that this condition is maintained and to avoid anyrisks when operating the system, the user must comply with any notes andwarnings contained in this manual. The manufacturer shall be exempt fromstatutory liability for accidents should the operator fail to observe the safetyregulations.
CAUTION
Personal Injury
To avoid personal injury, read and adhere to the safety notes below.
u To avoid the risk of fire or explosion, do not use the camera nearinflammable liquids or gases.
u Setup, expansions, re-adjustments, alterations, and repairs must be carriedout only by persons who have been authorized by ZEISS.
u Do not allow any cables, particularly power cords, to trail across the floor,where they can be snagged by people walking past.
u Protect the cables from excessive heat (e.g. halogen lamps, microscopefluorescence illumination).

2 Safety | 2.2 Limitation of liability
User Guide AxioCam ERc 5s | V 2.0 en 7
NOTICE
To avoid equipment damage, data loss, or corrupted data, read and adhere tothe safety notes below.
u Protect the camera against mechanical impact. External damage may affectthe operation of inner components.
u Keep chemicals and fluids away from the camera.
u Make sure there is sufficient ventilation of the camera head. Avoid directexposure to sunlight and locations near heat sources (radiators, stoves).Overheating can cause noisy images.
u Use the camera in a clean and dry location.
u Attach all connectors firmly and securely.
u Use only the accessories supplied by ZEISS, when applicable.
u Use only normal microscope cleaning material to clean the camera housing.
u Contact your local ZEISS service organization if a repair is necessary.
u Save all your data, such as images, measurement data, archives, reports,forms and documents, at regular intervals on an external storage medium.Otherwise it cannot be avoided that access to this data may be lost as aresult of operational errors or hardware defects. ZEISS accepts no liability forconsequential damage resulting from insufficient data protection.
2.2 Limitation of liability | 2.2Limitation of liability
No warranty shall be assumed by ZEISS during the warranty period if the equipmentis operated without observing the safety regulations. In any such case, ZEISS shallbe exempt from statutory liability for accidents resulting from such operation.
2.3 Warranty | 2.3Warranty
ZEISS shall be exempt from any warranty obligations should the user fail to observethe safety regulations. ZEISS only guarantees the safety, reliability, and performanceof the system if the safety notes are closely observed.

2 Safety | 2.4 Intended Use
8 User Guide AxioCam ERc 5s | V 2.0 en
2.4 Intended Use | 2.4Intended Use
NOTICE
The camera should only be used for training and research. The images / videosfrom this camera must not be used for the direct generation of diagnosticresults.

3 Technical data | 3.1 AxioCam ERc 5s Rev.2
User Guide AxioCam ERc 5s | V 2.0 en 9
3 Technical data
3.1 AxioCam ERc 5s Rev.2 | 3.1AxioCam ERc 5s Rev.2
Feature Value
Sensor type Micron CMOS color sensor
Number of pixels 2560 (H) x 1920 (V) = 5 megapixels
Pixel size 2.2 µm x 2.2 µm
Chip size 5.70 x 4.28 mm, corresponds to1/2.5"
Live image frame rates on PC(maximal values when using optimalhardware)
H x V: Frame rate @1ms:
800 x 600 20 fps
Sensor subarea readout (ROI) Adjustable
Digitization 8 Bit / pixel
Exposure times 10 us up to 2 s
Interface (camera) USB 2.0 mini, SD card slot, RJ 45(LAN), HDMI (DVI-D)
Interface (PC) 2x USB 2.0 Standard-A
Optical interface C-Mount adapter
Dimensions in mm (H x W x D) 66 x 68 x 68
Operating systems Microsoft® Windows 7 x64 UltimateSP1, Microsoft® Windows 7 x32Ultimate SP1
Certificate CE, RoHS
Power supply Via USB 2.0 interface
Environment conditions 5° ... + 45° Celsius, max. 80% relativeair humidity, no condensation, free aircirculation required
Order number 426540-9901-000

3 Technical data | 3.1 AxioCam ERc 5s Rev.2
10 User Guide AxioCam ERc 5s | V 2.0 en
Note
Computer hardware, operating system, and software may decrease the framerates. Selecting a part of the sensor area or applying binning can increase theframe rate. All specifications are subject to change without notice.
3.1.1 Spectral Sensitivity
Fig. 3.1: Spectral Sensitivity AxioCam ERc 5s

4 Shipment
User Guide AxioCam ERc 5s | V 2.0 en 11
4 Shipment
Content Order No.
1 x AxioCam ERc 5s Rev.2 camera 426540-9901-000
1 x USB 2.0 data Y-cable
1 x DVD with ZEISS software and device driver
Accessory Package
The accessory package is optional. For any use without a PC, the accessory packageis required.
Content Order No.
1 x Power supply with country specific plug adapters 426540-0003-000
1 x SD (SDHC) memory card, 4GB, with protective case
1 x SD card reader
1 x HDMI to DVI cable
1 x IR Remote Control

5 Connecting the camera | 5.1 Camera layout and cables
12 User Guide AxioCam ERc 5s | V 2.0 en
5 Connecting the camera
5.1 Camera layout and cables | 5.1Camera layout and cables
Camera Connections
Fig. 5.1: Camera Connections
1 Fast Ethernet port for communication and image data transfer.2 HDMI port for image data transfer to a monitor, TV, or projector.3 (Mini) USB 2.0 port for communication and image data transfer, as well as
power supply.
5 Connecting the camera | 5.1 Camera layout and cables
User Guide AxioCam ERc 5s | V 2.0 en 13
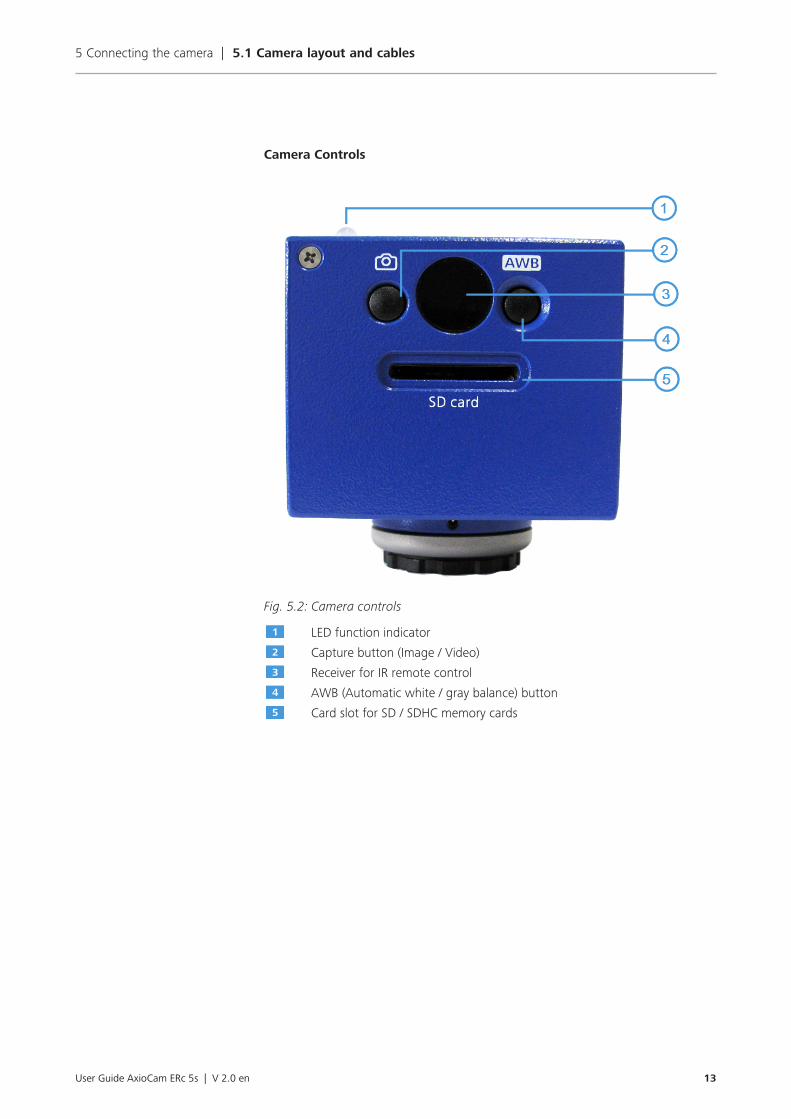
Camera Controls
Fig. 5.2: Camera controls
1 LED function indicator2 Capture button (Image / Video)3 Receiver for IR remote control4 AWB (Automatic white / gray balance) button5 Card slot for SD / SDHC memory cards

5 Connecting the camera | 5.1 Camera layout and cables
14 User Guide AxioCam ERc 5s | V 2.0 en
Connecting Cables
The following connecting cables are required for voltage supply and use of theports:
Name Figure Remarks
USB 2.0 Y cable Connection between camera and PC /plug-in power supply
USB 2.0 cable (not supplied)
Connection between camera and plug-in power supply
Plug-in power supplyOutput 5 V DC, 1.0 A(optional)
Power cord 100-240 V50 / 60 Hz
HDMI cable(not supplied)
Connection between camera andmonitor, TV, or projector
HDMI / DVI adapter cable(optional)
Connection between camera andmonitor / projector
Ethernet cable(not supplied)
Connection between camera andnetwork or WLAN router
Note
If the ZEISS Labscope / Matscope app is used, a commercially available WLANrouter is required.

5 Connecting the camera | 5.2 Connecting the camera to the mains supply
User Guide AxioCam ERc 5s | V 2.0 en 15
5.2 Connecting the camera to the mains supply | 5.2Connecting the camera to the mains supply
Prerequisites ¢ The power supply has been adapted with the appropriate country-specificadapter.
Procedure 1 Insert the mini USB plug of the USB 2.0 cable into the mini USB port of thecamera.
2 Insert the USB plug of the USB 2.0 cable into the power supply and connect toa power outlet.
Note
If the USB 2.0 Y cable is used for connection to the mains supply, leave thesecond USB plug unused. Using both USB plugs is only required if the device isto be operated on the PC. In the case of using the camera with a PC, both USBplugs should be plugged into the PC.
5.3 Connecting the camera to a display (without PC) | 5.3Connecting the camera to a display (without PC)
The camera can be connected to a monitor, TV, or projector for visualization of thelive image data. The data at the HDMI output is in DVI format. Further HDMIfunctions (e.g. audio, communication between monitor and camera) are notsupported. To enable the display of HD quality, it is recommended that only HD-capable devices be connected.
Fig. 5.3: Connecting the camera to a display / projector

5 Connecting the camera | 5.4 Connecting the camera to a network
16 User Guide AxioCam ERc 5s | V 2.0 en
Prerequisites ¢ The monitor / projector has been set to 720p60.
Procedure 1 Insert the HDMI cable into the HDMI port of the camera (1 and 2).
2 Insert the other end of the HDMI cable into the monitor / projector. Secure theHDMI plug on the jack on the monitor / projector (3).
Note
If the monitor / projector has a DVI port and no HDMI port, an HDMI / DVIadapter cable or HDMI / DVI adapter will be required for the visualization ofimage data (4).
3 Set the monitor / projector’s aspect ratio to 1:1 or Aspect. Refer to thedocumentation provided by the monitor / projector’s manufacturer.
4 For further camera settings using the on-screen display menu (OSD), theremote control is required, see chapter Remote Control [} 18].
5 Connect the camera to the mains supply, see chapter Connecting the camerato the mains supply [} 15].
6 The camera’s output has a default resolution of 720p60. To set the camera’sresolution to 1080p30, press the Input button on the remote control, orchange the resolution in the Resolution Menu [} 22]. In this case, make surethe monitor is set to accept a 1080p30 output (refer to monitor / projector’sdocumentation from the manufacturer).
5.4 Connecting the camera to a network | 5.4Connecting the camera to a network
Prerequisites ¢ The camera is powered via the mains power supply, see chapter Connectingthe camera to the mains supply [} 15].
Procedure 1 Insert the Ethernet cable into the camera’s Ethernet port.
2 Insert the other end of the Ethernet cable into a WLAN router.
If you want to use the camera together with the ZEISS Labscope/Matscope app, aWLAN router will be required. We recommend a high-performance 802.11n WLANwith sufficient free bandwidth. In the event of an overloaded or slow WLAN, thelive image of the camera may be delayed or incorrectly displayed on the iPad.
Existing WLAN infrastructure may be used or a separate microscope WLAN may beset up. The camera will identify itself automatically to the network (DHCP) and willbe automatically recognized by Labscope/Matscope, provided the iPad is on thesame network.
For an overview of all ZEISS Microscopy apps and further information on Labscope/Matscope, visit: http://www.zeiss.com/micro-apps

5 Connecting the camera | 5.5 Connecting the camera to a PC
User Guide AxioCam ERc 5s | V 2.0 en 17
5.5 Connecting the camera to a PC | 5.5Connecting the camera to a PC
The USB port is for supplying power to the camera and can also be used for datatransfer to the PC. Due to the camera's power requirements, a Y-cable is requiredfor transferring data to the PC.
Procedure 1 Insert the mini USB plug of the Y-cable into the mini USB port on the back ofthe camera.
2 Insert the two USB 2.0 plugs on the other end of the Y-cable into the PC.
No plug-in power supply is required for operation on the PC.
Note
One USB 2.0 port is not enough to supply power to the camera. If only one plugis inserted, the camera will not receive sufficient power.
5.6 Function indicator | 5.6Function indicator
For the definitions of the LED color signals, refer to the list below:
Signal Description
Green Power supplied
Green flash Cameras start sequence finished; Write to SD card
Red Camera not ready
Red flash Camera error
Off No power supplied
6 Remote Control and OSD menu | 6.1 Remote Control
18 User Guide AxioCam ERc 5s | V 2.0 en
6 Remote Control and OSD menu
6.1 Remote Control | 6.1Remote Control
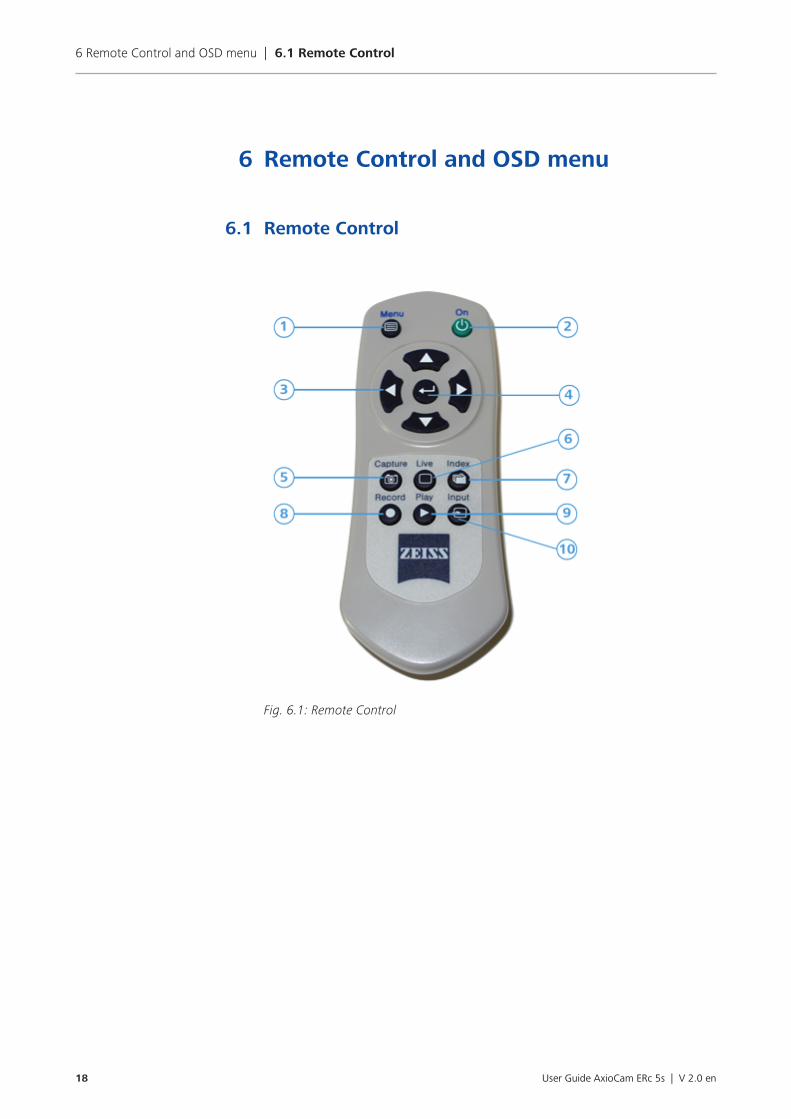
Fig. 6.1: Remote Control

6 Remote Control and OSD menu | 6.1 Remote Control
User Guide AxioCam ERc 5s | V 2.0 en 19
No. Button Standard function Function in OSD menu
1 Menu Activate menu Exit menu
2 On Turn On / Off HDMIoutput
Turn On / Off HDMIoutput
3 Arrow Up Increase contrast Up / increase value
ArrowDown
Reduce contrast Down / reduce value
Arrow Left Reduce brightness Left
Arrow Right Increase brightness Right
4 Enter Trigger automatic whitebalance
OK (apply value)
5 Capture Capture an image to SDcard
Capture an image to SDcard
6 Live Clear screen of windows Exit menu
7 Index None Go to top tier of menu
8 Record Start / Stop recordingvideo
Start / Stop recordingvideo
9 Play Clear screen of windows Exit menu
10 Input Toggle between 720p60and 1080p30 outputs
Toggle between 720p60and 1080p30 outputs

6 Remote Control and OSD menu | 6.2 On Screen Display Menu
20 User Guide AxioCam ERc 5s | V 2.0 en
6.2 On Screen Display Menu | 6.2On Screen Display Menu
To open the On Screen Display (OSD) menu, press the Menu button on the RemoteControl. The OSD menu for adjusting the settings will appear. The following menusare available for configuring the camera:
6.2.1 Color menu
Fig. 6.2: Color menu
Menu entry Description
AWB The purpose of white balance is to calibrate the camera to the color temperatureof the light source used. The AWB function of the camera supports theContinuous / Push button modes.
In Continuous mode, the white balance is carried out continuously. In certainsamples this may result in incorrect colors.
To ensure that the white balance applies to the light source and not the maincolor of the sample, the Push button mode can be set. Here the white balance iscarried out only once if the AWB / Enter button is pressed outside the OSDmenu.
Color Temp. This creates a white balance bias towards yellow (left) or blue (right). If AWB (seeabove) is set to Push button, the effect of this regulator is only visible after awhite balance has been carried out with the AWB button (outside the OSDmenu).
Saturation The camera's images are in sRGB color space with an 8 bit color depth perchannel. The color saturation per RGB value can be adjusted.
¢ Extreme left: Gray scales
¢ Extreme right: Maximum color saturation
Gamma The gamma correction of the camera can be adjusted. Gamma 1 and 0.45 areavailable.

6 Remote Control and OSD menu | 6.2 On Screen Display Menu
User Guide AxioCam ERc 5s | V 2.0 en 21
6.2.2 Exposure Menu
Fig. 6.3: Exposure menu
Menu entry Description
AET / AGC AET (automatic exposure time) and AGC (auto gain control) automatically ensurethe correct brightness of the image when the setting is at Continuous. Thesettings are Once / Continuous / Off.
In some situations (e.g. strong contrast within the specimen), the automaticsetting may cause the image to be under- or overexposed. In this case, theautomatic setting can be deactivated by switching to Off.
A shorter exposure time with higher amplification (= more noise, but smootherlive image) or a longer exposure with lower amplification (= less noise, lesssmooth live image) can be selected in Off mode.
In Once mode, a one-time automatic adjustment will be carried out whenconfirmed with Enter, before being deactivated again.
Auto level Influences the AET / AGC control when Continuous mode is set.
¢ Extreme left: very dark image
¢ Extreme right: very bright image
Exposure The exposure time can be set within the range 20 µs to ~2s. The exposure timemay be set automatically or manually. Manual setting is possible by selecting theAET / AGC control in Off mode.
¢ Extreme left: 20 µs
¢ Extreme right: 2000 ms (2 s)
Gain The sensor amplification function can be set within the range 1x to 8x. Sensorgain may be set automatically or manually. Manual setting is possible by selectingthe AET / AGC control in Off mode.
¢ Extreme left: no increased amplification (less image noise, less light sensitivity of sensor)
¢ Extreme right: maximum amplification (strong image noise, high light sensitivity of sensor)

6 Remote Control and OSD menu | 6.2 On Screen Display Menu
22 User Guide AxioCam ERc 5s | V 2.0 en
6.2.3 Resolution Menu
Fig. 6.4: Resolution menu
Menu entry Description
Preset The following options are available:
¢ 720p60: HD resolution, 1280x720, 60 Hz
¢ 1080p30: Full HD resolution, 1920x1080, 30 Hz
A default resolution of 720p60 has been set.
Prior to conversion to the full HD resolution (1080p30), check that the monitorsupports this option. If 1080p30 has already been activated and the monitordisplays no image, follow the instructions as described in this chapter Camera[} 29].
Video Encoder The live image and video recordings are influenced by this setting. The followingsettings are possible:
¢ FPS:HALF BR:HIGH: Half frame rate, high data rate (8 Mbit / s)
¢ FPS:HALF BR:MID: Half frame rate, medium data rate (4 Mbit / s)
¢ FPS:HALF BR: LOW: Half frame rate, low data rate (2 Mbit / s)
¢ FPS:FULL BR:HIGH: Full frame rate, high data rate (8 Mbit / s)
¢ FPS:FULL BR:MID: Full frame rate, high data rate (4 Mbit / s)
¢ FPS:FULL BR:LOW: Full frame rate, low data rate (2 Mbit / s)
Half frame rate results in improved image quality with the same data rate.
Sharpening Value range: 0 to 3. Edge flickering may occur in some HDMI monitors with a default value of 3, butthis will disappear with lower values.
6 Remote Control and OSD menu | 6.2 On Screen Display Menu
User Guide AxioCam ERc 5s | V 2.0 en 23
Menu entry Description
Snapshot Res(Res = resolution)
The resolution for snapshots captured to the SD card can be defined here. Thefollowing modes can be set:
¢ as monitor on the HDMI port– 1920x1080 (16:9 aspect ratio), when the camera is in 1080p mode (see
default settings)
– 1280x720 (16:9 aspect ratio), when the camera is in 720p mode (seedefault settings)
Advantages: Acquisition lasts < 1 second, small file sizes due to comparativelylow resolution.
¢ 5 MP– 2560x1920 (4:3 aspect ratio) – full sensor resolution, 5 megapixels
Advantages: full resolution, wider vertical image field.
¢ 2560x1440– 2560x1440 (16:9 aspect ratio)
Advantages: high resolution (3.7 megapixels), same image field as in liveimage.
Snapshot Delay This setting is useful when images are to be captured using the Capture buttonon the camera. Because pressing the button causes the microscope to shake,motion blur would be visible in the image with immediate exposure. This effect isavoided with a snapshot delay. The snapshot delay can be set between 0 and 10 seconds.

6 Remote Control and OSD menu | 6.2 On Screen Display Menu
24 User Guide AxioCam ERc 5s | V 2.0 en
6.2.4 Setup User Menu
Fig. 6.5: Setup User menu
Menu entry Description
Date / Time Date and time in year-month-day / hour-minute-second format.Each element can be adjusted using the Arrow Up/Arrow Down buttons. Thenew time can be set by pressing the Enter button. Date and time are integratedinto the folder and file names on the SD card.
Flip image The following modes are available for image mirroring:
¢ FLIP H+V: horizontal and vertical mirroring
¢ FLIP V: only vertical mirroring
¢ FLIP H: only horizontal mirroring
¢ OFF: no mirroring
Load Settings The previously saved user settings (USER 1-4) can be loaded in this menu. Selecting FACTORY DEFAULT reinstates the default camera settings. Afterconfirmation with Enter, the camera will be restarted. This may take severalseconds. If the OSD menu is not available, the factory settings can be reinstated by pressingthe Capture + AWB buttons on the camera (keep pressed for two seconds).
Save Settings The current settings can be saved in a user storage location (USER 1-4).They can be automatically loaded in the Load Settings or Startup Set menus at alater point in time or each time the camera is switched on.Notice that if the settings are saved, Startup Set is automatically set to this newuser storage location.
Startup Set This setting determines which user storage location (USER 1-4) is to be loadedeach time the camera is switched on.
6 Remote Control and OSD menu | 6.2 On Screen Display Menu
User Guide AxioCam ERc 5s | V 2.0 en 25
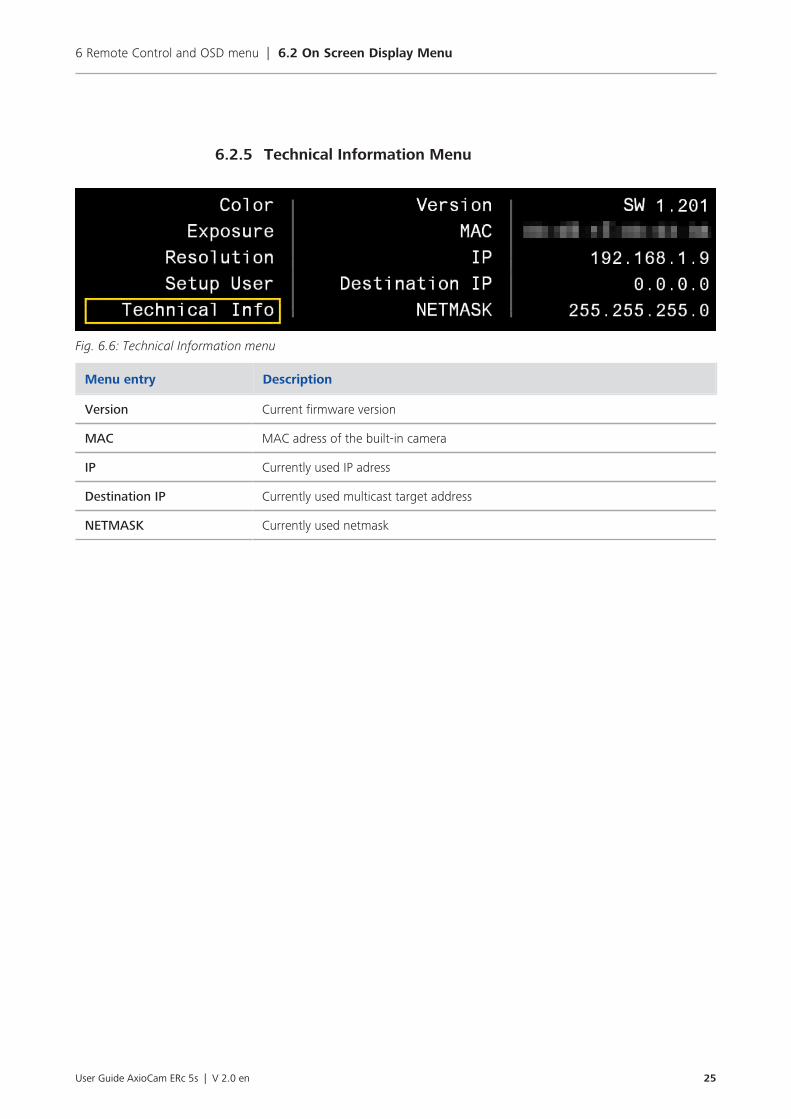
6.2.5 Technical Information Menu
Fig. 6.6: Technical Information menu
Menu entry Description
Version Current firmware version
MAC MAC adress of the built-in camera
IP Currently used IP adress
Destination IP Currently used multicast target address
NETMASK Currently used netmask

7 Installing software and drivers | 7.1 Installing Labscope / Matscope App
26 User Guide AxioCam ERc 5s | V 2.0 en
7 Installing software and drivers
Prerequisites ¢ To acquire images with the AxioCam ERc 5s on a PC, you must install ZEISSsoftware (e.g. ZEN or AxioVision). You will find the software installation on theDVD delivered. The camera drivers will be installed automatically during theinstallation of the software.
¢ Before starting the installation of the software and drivers, the camera must beconnected to the PC, see chapter Connecting the camera to a PC [} 17].
Procedure 1 Install the software according to the installation guide delivered with thesoftware.
2 During the installation you will be asked to install the camera drivers. Followthe procedure by confirming the upcoming messages.
3 Restart your PC after the installation.
4 You can check in the device manager if the driver installation was successful.
You have installed the software and the camera drivers. You can now startacquiring images with your camera using ZEISS software. For more information,please read the software documentation.
7.1 Installing Labscope / Matscope App | 7.1Installing Labscope / Matscope App
From your iPad, go to the App Store and search for “Labscope” or "Matscope" byCarl Zeiss AG. Install the app as described.

8 Acquiring images | 8.1 Introduction
User Guide AxioCam ERc 5s | V 2.0 en 27
8 Acquiring images
8.1 Introduction | 8.1Introduction
The AxioCam ERc 5s is a high-resolution digital camera for color images. It issuitable for use as an accessory for educational and routine microscopy inlaboratory environments and for use by trained laboratory personnel. It has beendesigned to be used in the field of light microscopy for general observation, routinework, and simple applications in which a sufficient amount of light is available.
Due to the fact that image acquisition is already covered in the ZEISS softwaremanuals, image acquisition in ZEISS software is not a part of this guide. For moreinformation on image acquisition with these software products, please refer to thecorresponding software manuals and online help.
NOTICE
The camera should only be used for training and research. The images / videosfrom this camera must not be used for the direct generation of diagnosticresults.
8.2 Acquiring the first image / video to the SD card | 8.2Acquiring the first image / video to the SD card
Note
An SD card has a max. capacity of 4 GB, while an SDHC (HC = high capacity) hasup to 32 GB. Prior to use on the PC, the SDHC card must be formatted in formatFAT32.
Prerequisites ¢ A SD / SDHC card has been inserted into the card slot of camera.
Procedure 1 Position your specimen on the microscope and adjust the microscope to see afocused image through the eyepieces.
2 Set the microscope light path to divert the image to the camera(e.g. Adjust the tube slider of the microscope to 50% camera and 50%eyepieces).
3 To acquire an image:1 Briefly press the Capture button on the camera to trigger an exposure.
The images are saved on the SD / SDHC card in JPG format.
4 To record a video:

8 Acquiring images | 8.3 Image acquisition with Labscope/Matscope
28 User Guide AxioCam ERc 5s | V 2.0 en
1 Press the Capture button for a longer moment to start a video recording.
2 Briefly press the Capture button once again to stop the video recording.
Note
When recording a video directly to the SD card, the video is saved as a *.h264file. The videos can be played back using standard software that includes aH.264/AVC decoder.
In the case that an existing solution is not already available on the PC, VLCmedia player is an optional solution. VLC media player is a free and open sourcemedia player and is available online at www.videolan.org. Please make sure toinstall the appropriate version for your operating system.
Only VLC for Windows has been tested. For Windows, please use Version 2.1.3or newer.
8.3 Image acquisition with Labscope/Matscope | 8.3Image acquisition with Labscope/Matscope
Upon first starting Labscope or Matscope, each screen starts with an overlayinginformation screen explaining the functions. Refer to these information screens forusing the software. Disable or re-enable the information screens in the software`sSettings menu on your iPad.
For further support in using Labscope / Matscope, see www.zeiss.com/microscopy/community. Please check both Labscope and Matscope threads for problem-solvingnotes.

9 Troubleshooting | 9.1 Camera
User Guide AxioCam ERc 5s | V 2.0 en 29
9 Troubleshooting
9.1 Camera | 9.1Camera
Problem Cause Solution
LED is off. The camera is not drawing power viathe USB cable.
Connect the camera to a running PC(using both Y-cable plugs) or with aplugged-in power supply to an outlet.
USB cable is not connected to acertified PSU.
Requirements: 5 V DC with at least950 mA at output.
USB cable is not suitable. Use the originally supplied USB cable.
LED flashes red. The camera indicates an error. SD card is full: Insert a new card or delete imagesfrom the current card.
SD card is write-protected: Push the locking slide on the card to"unlocked".
SD card is defective or not formatted: Format SD card; replace SD card iferror message does not disappear.
Buttons do not react, LEDflashes red when a button ispressed.
The buttons are temporarily locked, asthe camera is being accessedexclusively from the PC or network.
Control the camera via PC software orZeiss app, or close the PC software orZeiss app.
Firmware update notfunctioning.
For an update, an SD card must beinserted and the firmware update mustbe saved to a specified subfolder onthe SD card.
Insert a formatted, unsecured SD cardwith at least 10 MB free memoryspace. Be sure to carefully follow theinstructions enclosed with thefirmware update.
Newly captured images arenot visible in MicrosoftWindows Explorer on thememory card.
Microsoft Windows Explorer has notupdated the contents of the card.
Remove the memory card from thecamera, wait for three seconds and re-insert it. Microsoft Windows Explorerwill read the contents of the cardagain.
The camera "forgets" thedate / time.
The buffer battery is empty. Contact service to replace the bufferbattery. Replacement requires specialtools and therefore cannot be carriedout by the customer.
The image has severe noise. The amplification (gain) is set too high. Reduce the gain and increase theexposure time instead.
9 Troubleshooting | 9.1 Camera
30 User Guide AxioCam ERc 5s | V 2.0 en
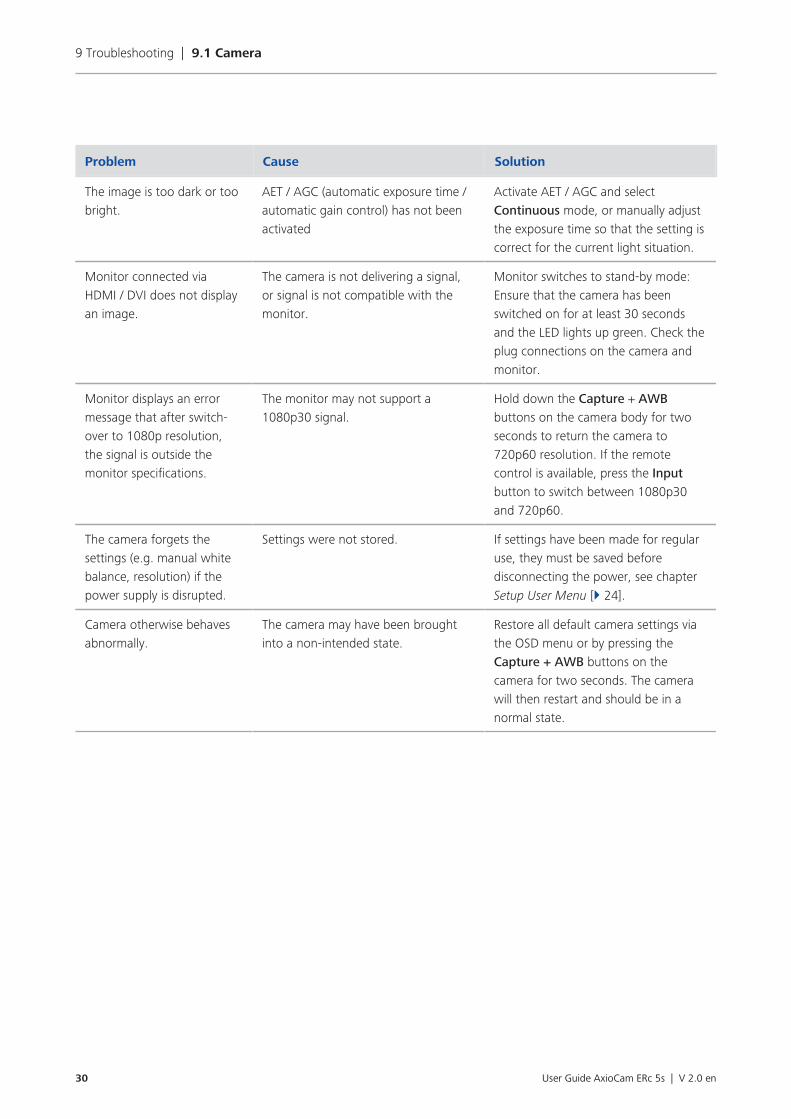
Problem Cause Solution
The image is too dark or toobright.
AET / AGC (automatic exposure time /automatic gain control) has not beenactivated
Activate AET / AGC and selectContinuous mode, or manually adjustthe exposure time so that the setting iscorrect for the current light situation.
Monitor connected viaHDMI / DVI does not displayan image.
The camera is not delivering a signal,or signal is not compatible with themonitor.
Monitor switches to stand-by mode:Ensure that the camera has beenswitched on for at least 30 secondsand the LED lights up green. Check theplug connections on the camera andmonitor.
Monitor displays an errormessage that after switch-over to 1080p resolution,the signal is outside themonitor specifications.
The monitor may not support a1080p30 signal.
Hold down the Capture + AWBbuttons on the camera body for twoseconds to return the camera to720p60 resolution. If the remotecontrol is available, press the Inputbutton to switch between 1080p30and 720p60.
The camera forgets thesettings (e.g. manual whitebalance, resolution) if thepower supply is disrupted.
Settings were not stored. If settings have been made for regularuse, they must be saved beforedisconnecting the power, see chapterSetup User Menu [} 24].
Camera otherwise behavesabnormally.
The camera may have been broughtinto a non-intended state.
Restore all default camera settings viathe OSD menu or by pressing theCapture + AWB buttons on thecamera for two seconds. The camerawill then restart and should be in anormal state.

9 Troubleshooting | 9.2 Labscope / Matscope
User Guide AxioCam ERc 5s | V 2.0 en 31
9.2 Labscope / Matscope | 9.2Labscope / Matscope
Problem-solving notes for the use of the camera in conjunction with the network /WLAN and Labscope/Matscope app are to be found separately at the ZEISS websitewww.zeiss.com/microscope/community. Please check both Labscope andMatscope threads for problem-solving notes.
9.3 ZEN Software | 9.3ZEN Software
9.3.1 The camera does not appear in the menu of selectablecameras
¢ Make sure that you have connected the camera and installed the software anddrivers in accordance to the instructions in this manual.
¢ Make sure that you installed the software and drivers with administrativerights. Install the driver with administrative rights again if necessary.
9.3.2 You don't see a camera image on your screen
¢ Check the light path setting of the microscope.
¢ Is the status LED on the camera on? If not, check the cable connectionsbetween camera and computer.
¢ Execute a reset of the camera.
¢ Execute an automatic exposure measurement.
¢ Check the display adjustments for the live image.
¢ Check the aperture diaphragm of the microscope.
¢ Check the position of the beam splitter between the ocular and the TV port.

9 Troubleshooting | 9.4 Other
32 User Guide AxioCam ERc 5s | V 2.0 en
9.3.3 The color of my image does not correspond to theimpression through the ocular
In case of color cameras:
¢ Check white balance and, if necessary, repeat white balance.
¢ Check the monitor’s color temperature setting. If necessary, reduce this to thelowest value that can be set (usually 5200 K).
In case of monochrome cameras:
¢ Images of monochrome cameras are displayed by using overlay colors torepresent the colors of fluorescence dyes on the monitor. If the color isdifferent to the visual impression in the eyepiece, select a different overlaycolor.
9.4 Other | 9.4Other
The color of the image on the monitor / projector does not correspond tothe image in the software
¢ Simultaneous usage of the camera through both a monitor / projector (HDMIport) and through a PC (mini USB port) is not supported.

10 Maintenance | 10.1 Optical System
User Guide AxioCam ERc 5s | V 2.0 en 33
10 Maintenance
10.1 Optical System | 10.1Optical System
The internal optical components of the camera should always be protected. If nolens, or TV adapter with optics, is screwed into the camera's C-Mount thread, thecamera's sensor and protective glass must be protected by screwing the protectivecap onto the camera's C-Mount thread.
10.2 Cleaning the infrared filter or protective glass | 10.2Cleaning the infrared filter or protective glass
Contamination of the IR filter (for color cameras only) or the protective glass has anadverse effect on the quality of the resulting image (dark points, cloudy structuresin the image). If there is dry dust on the front side of the infrared filter or protectiveglass, you can remove it with a soft brush or with cotton (wool). Use cleaning fluidfor optics/lenses only to clean the IR filter. Do not use tap water to clean the IRfilter.

11 Disposal and Recycling
34 User Guide AxioCam ERc 5s | V 2.0 en
11 Disposal and Recycling
This product has been developed, tested and manufactured in accordance with theapplicable environmental provisions and directives of the European Union:
¢ The product and its accessories comply with EU directives 2002/95/EC (RoHS)and 2002/96/EC (WEEE), insofar as these apply to this product.
¢ ZEISS has implemented a take-back and recycling process that ensures thatproper recycling is carried out in accordance with the aforementioned EUdirectives.
¢ Please contact your ZEISS sales/service organization for details relating todisposal and recycling.
¢ This product must not be disposed of with domestic waste or using municipalwaste disposal services. In the event of resale, the seller must inform the buyerof the need to dispose of the product appropriately.

Carl Zeiss Microscopy GmbH
Carl-Zeiss-Promenade 10
07745 Jena, Germany
www.zeiss.com/microscopy
Carl Zeiss Microscopy GmbH
Königsallee 9-21
37081 Göttingen
Germany
ZEISS reserves the right to make modifications to this document without notice.
© Jena 2015 by Carl Zeiss Microscopy GmbH - all rights reserved