User guide to the Andrew's Vectors Plugins set 26 Line Tool
70
Andrew's (Vector) Plug-ins Volume 26 - Line Tool
-
Upload
andrew-buckle -
Category
Documents
-
view
222 -
download
0
description
User guide / documentation to the Andrew's Vector Plugins set 26 - Line Tool - Plugin for Illustrator (R) CS4 PC and MAC OS X. The plugin includes many sub-plugin tools such as a grid tool, zoom tool, circular design tool, paint tool and more - design with lines, curved line designs, random line designs (for many millions of different shapes / paths). Plugin guide gives details about the tools, settings, how to use, modify settings, fill and stroke settings, pattern settings and more. Screenshots are shown with kind permission of Adobe Systems Incorporated. Adobe and Illustrator are registered trademarks of Adobe Systems Incorporated
Transcript of User guide to the Andrew's Vectors Plugins set 26 Line Tool

Andrew's (Vector) Plug-ins Volume 26 - Line Tool

Introduction
Thanks for the interest in the line tool plug-in. The plug-in is a combination tool and includes plug-ins for grid, zoom effects,line drag effects, circular effects, random line effects, a basic paint tool and much more. The plug-in set is similar to thevolume 4 set but instead of selecting a symbol or image etc, the plug-in generates lines only, straight or curved lines, and ingreat numbers.
The plug-in appears in the toolbox of Illustrator and not the filters or the object menu. The plug-in set is for CS4 only, PC andMAC OS X.
Andrew
Install the line tool plug-in
Please install the GX26_LineTool.aip file into the plug-ins folder of the host application. To remove, simply remove the plug-in.
PC CS4 C:\program files\adobe\adobe illustrator CS4\plug-ins\graphicxtras
OS X CS4 HD:applications:adobe illustrator CS4:plug-ins:graphicxtras
NOTE: If the 'graphicxtras' folder does not exist, simply create it in the plug-ins folder or use another folder name. You canalso just place the file in the top level plug-ins folder if you wish but by putting it in a sub folder makes it easier to find theplugins tools at a later date for updates / removal / moving to another machine).
NOTE: the graphicxtras folder is not necessary for this to work, it is purely for convenience, you can place the pluginanywhere in the plugin path of Illustrator.
NOTE for DEMO: If you are using the demo, please note the plug-in toolkit will only display while you are dragging the mouse/ pen and will vanish on release, the full version doesn't do this and keeps the generated lines

Alternate plug-in installation location
Because of recent improvements in security, you may wish to install the plug-in sets in an alternate location such as an useraccount and not the default plug-in folder. If you are using a basic level account and one without admin features, you might

not be able to save the AIP plug-in files to the usual folder. Set up an alternate or secondary plug-in folder in your useraccount and then copy the files there. 1) Go to the edit > preferences > plug-ins 2) Check the additional plug-ins folderoption 3) Specify / browse for your required file in your user account (such as 'third party plug-ins' etc)

Trademarks
Illustrator is registered trademark of Adobe. Photoshop is registered trademark of Adobe Systems Incorporated. We have noconnection whatsoever with Adobe Systems Incorporated. Adobe product screen shot(s) reprinted with permission fromAdobe Systems Incorporated.
Copyright
The plugins are copyright (c) 2010, Abneil Software Ltd (Andrew Buckle). This product was released by Abneil Software ltd(UK based company)
Future updates
Please use the link you were sent (or if not, please store the serial number or purchase details associated with this order) toget future updates
Plug-in page on graphicxtras.com
For more up to date information about the plugin set, http://www.graphicxtras.com/products/aiplugin26.htm Any questions,please e-mail support on [email protected] The latest copy of the manuals can all be found via the following page,http://www.graphicxtras.com/manuals.htm
Brush strokes
The plug-in generates lines, the lines are basic Illustrator paths. On competition of the plug-in, you can apply brush strokessuch as the grunge brushes to the lines. Please note, the plug-in does not apply the brush stroke, it has no brushfunctionality. Simply select the lines and then apply the brushes (many brushes are available with Illustrator, there are alsomany brushes sets available from graphicxtras.com)

Symbols
Once you have created the lines you can also simply select all the lines and drag them to the symbol palette and save thedesign as a symbol. The lines can then be applied using the symbol sprayer tool, or used in Flash videos etc

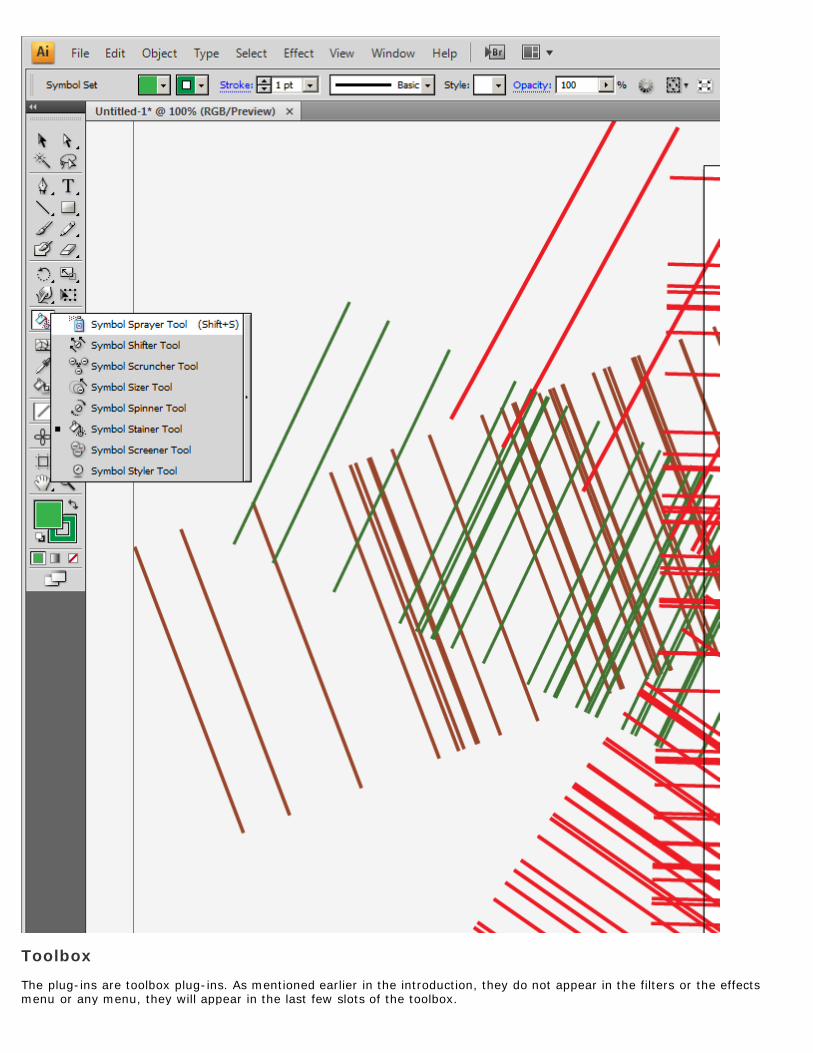
Toolbox
The plug-ins are toolbox plug-ins. As mentioned earlier in the introduction, they do not appear in the filters or the effectsmenu or any menu, they will appear in the last few slots of the toolbox.

Options / settings
You can use the plugin without modifying the various plugin options but then most of the functionality of the plugin will be
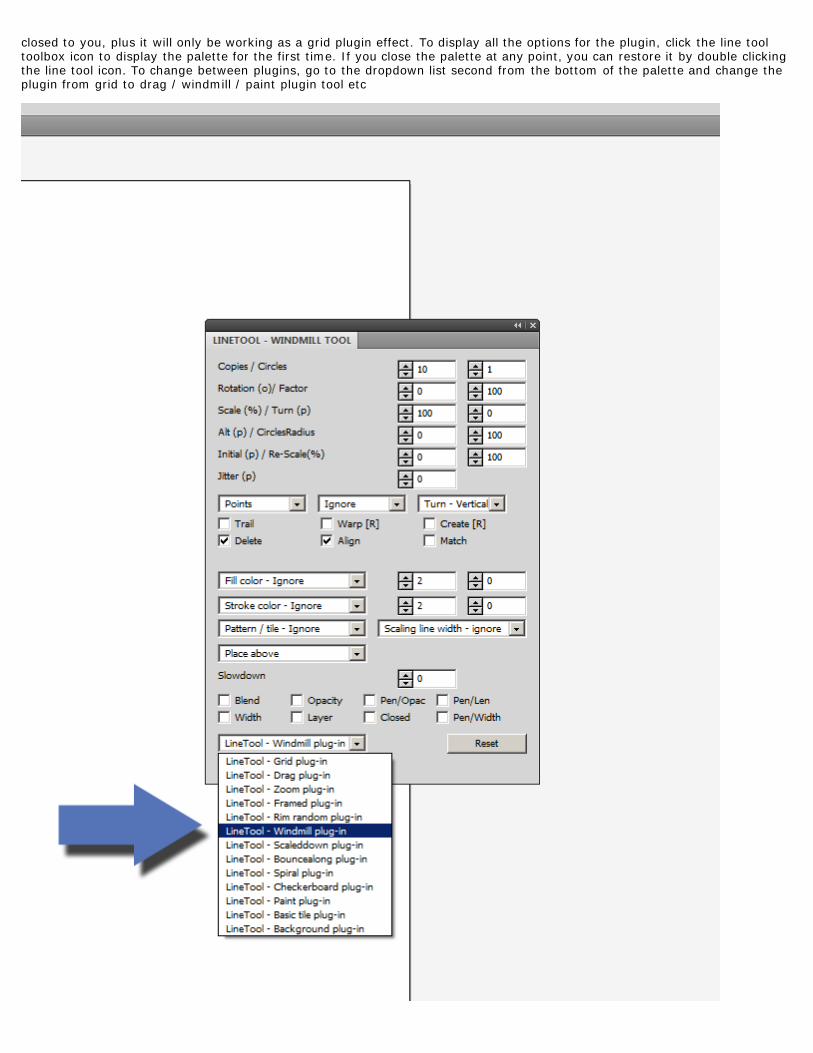
closed to you, plus it will only be working as a grid plugin effect. To display all the options for the plugin, click the line tooltoolbox icon to display the palette for the first time. If you close the palette at any point, you can restore it by double clickingthe line tool icon. To change between plugins, go to the dropdown list second from the bottom of the palette and change theplugin from grid to drag / windmill / paint plugin tool etc

Modifiers (Shift Space Command Ctrl space etc) for the line tool
You can modify the plugin settings / options via the palette but you can also modify them during use of the plugin. Hold downthe shift / space etc keys to modify various settings. Each plugin tool uses the modifiers in different ways. The list belowshows the settings and the modifiers for each plugin. The plug-in comes with a number of modifiers. Use the modifiers (to thevalues) during the cursor drag
Used only with the 'Points - keys' options for the line type dropdown at the bottom of the palette, use the spacekey to define the position of the points
Stop trail process only, allowing the cursor to be re-positioned
Grid tool - Copies setting updatedDrag tool - Copies updatedZoom tool - Copies updatedFramed tool - Copies updatedRim Random tool - Copies updatedWindmill tool - Copies updatedScaledown tool - Copies updatedBouncealong tool - Copies updatedSpiral tool - Copies updatedCheckboard tool - Copies updatedPaint tool - Scale updatedTile tool - n/aBackground tool - Copies updated
+
Grid tool - Rotate value updatedDrag tool - Start point re-positionedZoom tool - Curve valueFramed tool - Jitter value updatedRim Random tool - Start point re-positionedWindmill tool - Rotate value updatedScaledown tool - Twist value updatedBouncealong tool - Bounce value updatedSpiral tool - Spirals value updatedCheckboard tool - Rotate updatedPaint tool - Jitter value updatedTile tool - n/aBackground tool - Start point re-positioned
General use / issues
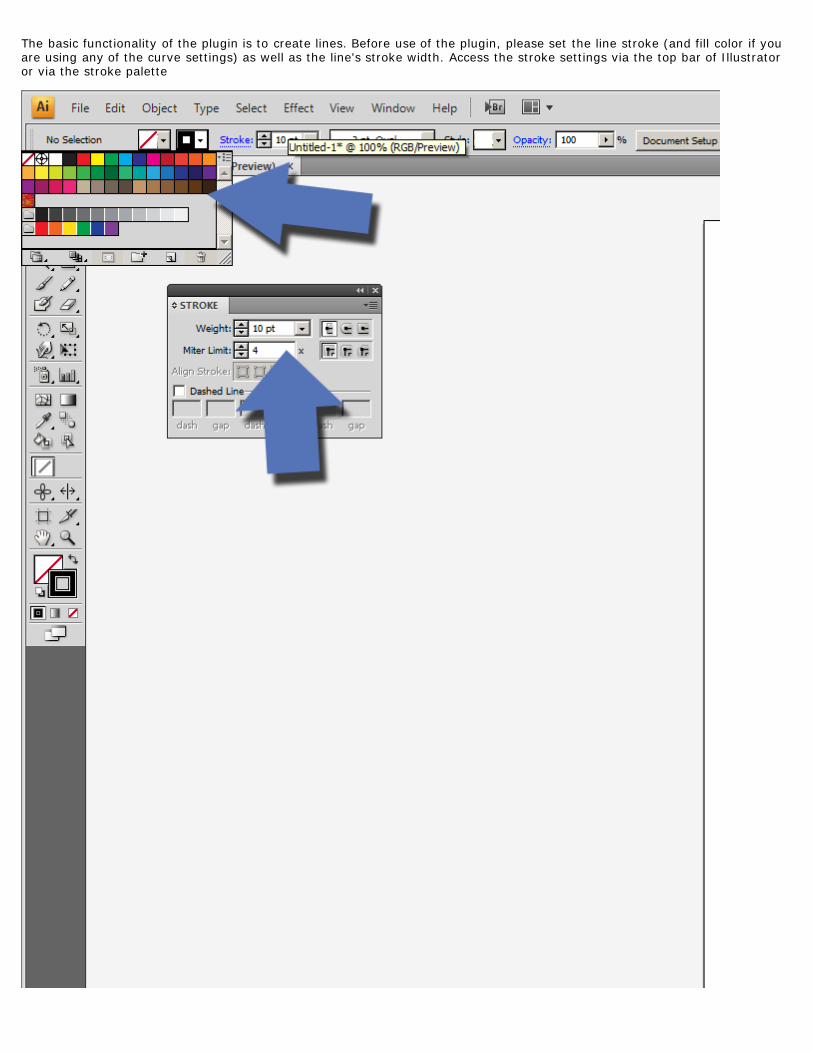
The basic functionality of the plugin is to create lines. Before use of the plugin, please set the line stroke (and fill color if youare using any of the curve settings) as well as the line's stroke width. Access the stroke settings via the top bar of Illustratoror via the stroke palette

Select the starting point by clicking the artboard and then holding the mouse key down. The dragging of the mouse (with themouse key down) defines the rough range of the start (where you click the document) and end point (cursor position) of theplugin. As you drag the mouse, you will see the outline of the plugin effect displayed such as lines or circles etc (unless youhave set the trail settings to ON and then you will see the actual lines being generated), you will not see any color or strokesettings though. On releasing the mouse down button, the actual lines will be generated in the area defined by the start andend point of the dragged mouse (or pen). Please note, the area of the start point and end point is only a rough approximationso you might see some lag between these settings and your actual dragged area, also the functionality of the plugin such assetting a pattern might generate lines outside of the start / end defined region.

Buttons
The only button on the dialog is a RESET button. The reset button resets all the values back to the factory default values.

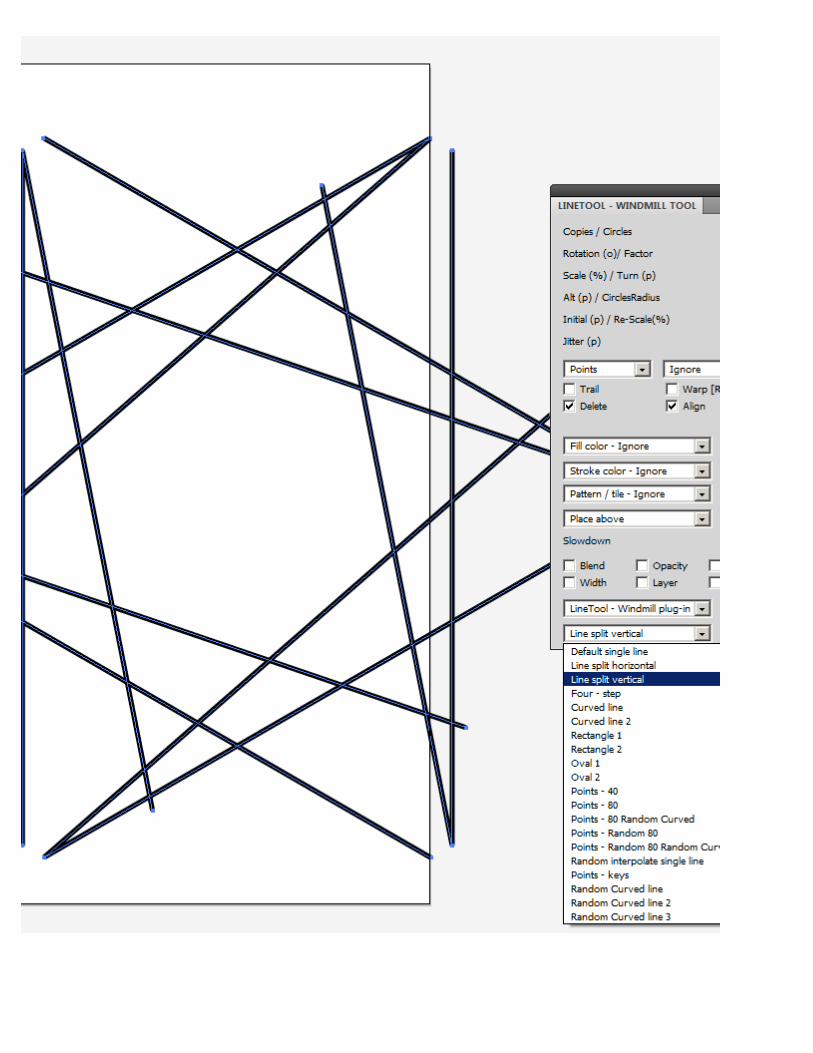
Line types
All the plug-ins except the zoom tool use the line type dropdown at the bottom of the palette. The default line is a singlestraight line. There are many variant line types such as curved lines, lines that use randomized interpolation between the

start and end points of the drag.
Other line options include a basic drawing approach where the line is generated as you drag the mouse, the actual pointsgenerated are based on a certain distance (such as 40pts or 80pts or randomized pts) from the last point generated. You canuse this to create many truly weird and wonderful (but probably not reproducible) designs. The point generation only allowsthe generation of 20 points in the line
There is also an option that generates the line based on drawing but generates the points by the action of holding down theSHIFT and CTRL (CMD) key. To draw a point, hold the SHIFT and CTRL key and then release and then continue to draw andthen re-hold down the SHIFT and CTRL to set another point. As with the above, the point generation only allows thegeneration of 20 points in the line and any further SHIFT and CTRL key combinations are ignored.

Global settings
The dialogs all have their settings split between local and global. The global settings can be updated from any dialog andupdate all the dialogs. The end result of the setting depends on the functionality of the plug-in.
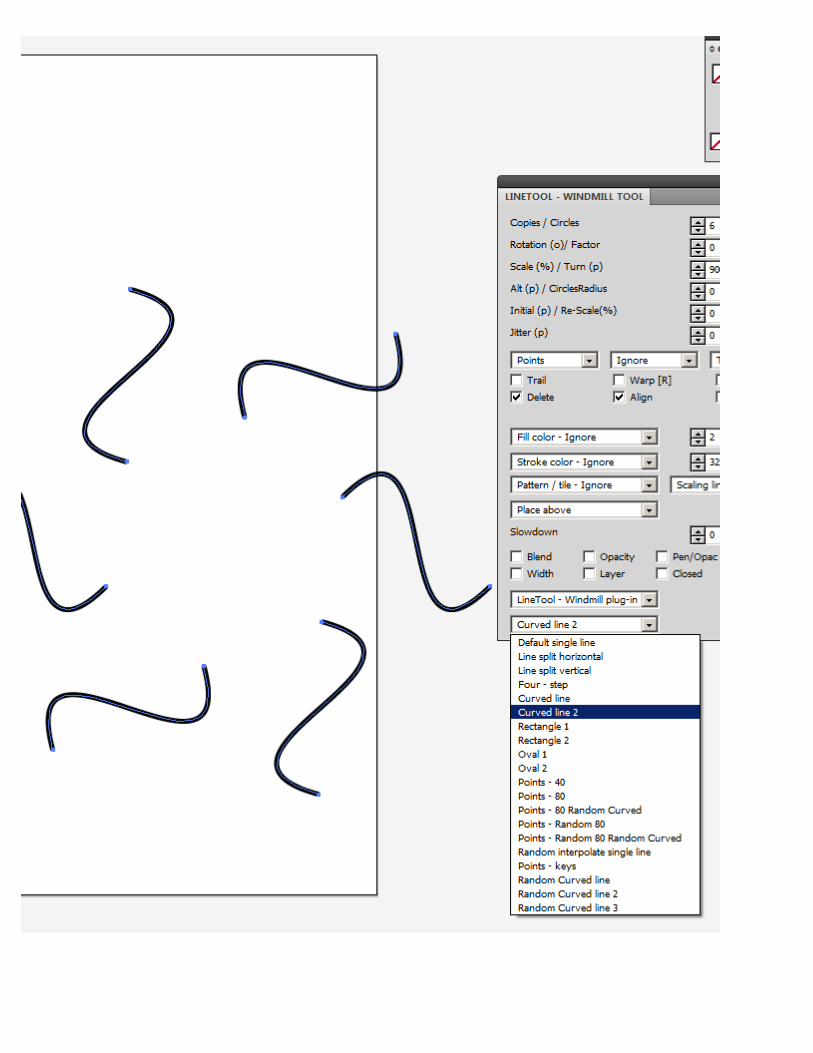
Fill color dropdown
The fill color settings are only useful if you use either the close or curved settings, the main functionality of the plugin is thegeneration of lines and as such stroke settings are of more importance.
The fill option requires there to be a fill in the first place as well as a fill the same as the document color model (i.e. nomixing CMYK with RGB etc). The fill dropdown will apply the color to the generated lines in order of creation. If the option isset to fill color ignore, the color of the line is not changed. If set to a [To white ] or [ to black ] etc then the color is appliedas a fraction of the difference between the current color and the end color such as white or black, the last generated colorbeing the color listed. The 'to swatch' option colors the lines to the current selected swatch color. By default this is 2 (white ifthe swatch palette has not been changed). It is not a visual swatch display so it is a little bit of trial and error to match thecolor and depends on the setup of your swatch palette. The first swatch is [none] (0) and the second swatch is registration(1). Say you want to use Mars Red, you will have to enter 12 (if this is the default RGB swatch palette). Some of the filloptions are random options and these generate the lines with random colors or random colors based on the swatches andthese can include gradients as well as patterns (which co-exist with the colors in the swatch palette). Some of the fill optionsare listed as [ Alternate white ] etc and they alternate the generated lines color white color white etc.
Fill color swatch
If you select the [ to swatch ] or [ alternate swatch ] the swatch setting will be activated and you can enter a swatch numbersuch as 12 (mars red in the default or 2 which is white etc). A little trial and error. You can at any time change the order ofthe swatches and the numbers as well as altering the swatches included in the swatches palette (such as making the entirepalette blues or reds). All the other color options will have the swatches field de-activated and ignored.
Fill color process
Instead of even distribution of the [to white ] or [ to black ] etc the fill end result can be set to beyond the actual number oflines or set to end before the end of generated lines. If the the initial color is blue and 10 lines are to be generated and thesetting is 5 and the [ to ] option is white then only the first half of the items will have a blue color before turning white, theremaining will be all generated white. Alternatively, if the setting is 40 then all the generated lines will be blue and the [ towhite] will never reach a white fill.
Stroke color dropdown
As above but for the stroke. If there is no stroke, this is ignored.

Stroke color swatch
As above but for stroke.
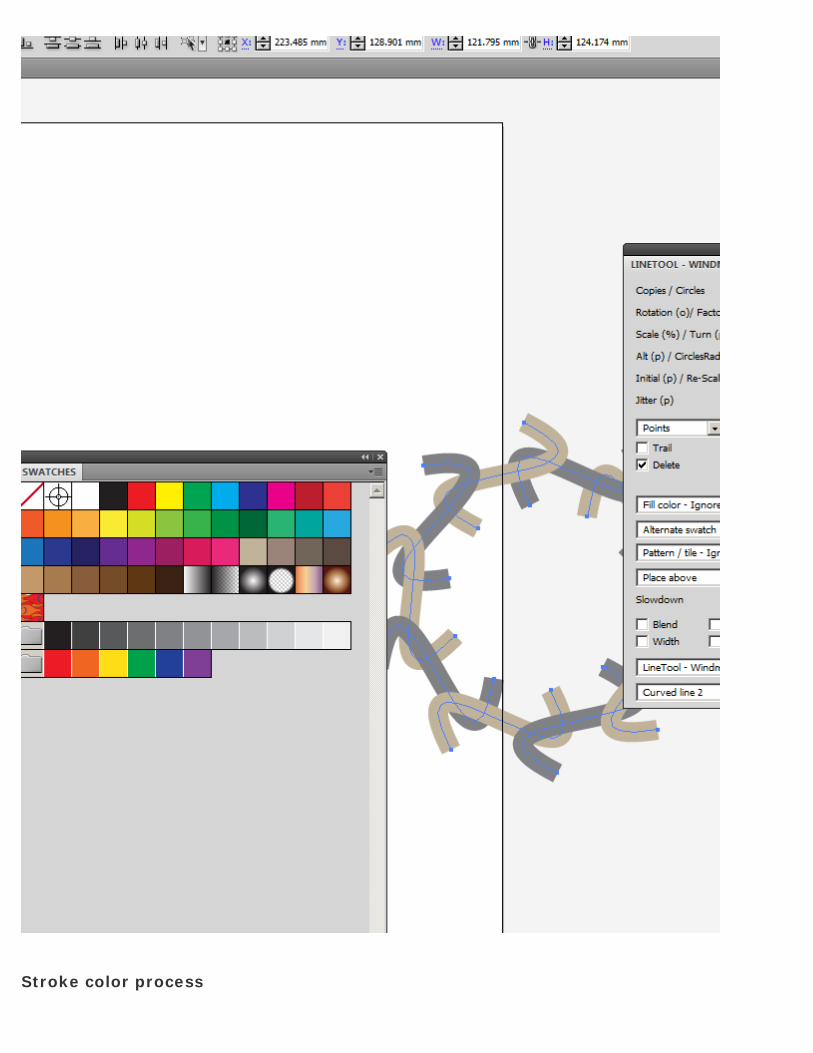
Stroke color process

As above but for stroke.
Pattern tile dropdown
By default, the plug-in generates only the number of copies selected and between the ranges limited by the start and end ofthe cursor drag (pattern / tile ignore). If the pattern option is set to [ document center ] , the lines are generated as beforebut also repeated (color opacity etc) as a reflection based around the document center, creating a tile (this can be then usedby the define pattern to save the pattern for future use). Other options include the pattern based around the [ end of thecursor ] (the current mouse position) as well as the [ start cursor position ] (where you first click) and many other variantpattern designs such as pattern based on a mirror and not a tile. The tile options can be used as a close equivalent to theFreehand's Mirror Xtra tool. With the latest version of the plugin, there are no many more than the earlier 4 patterns. Each ofthe pattern options can be used in different ways with different tools as well as repeating the application of the pattern /apply to create very complex patterns (or snowflakes). The pattern feature can also be used in combination with differenttools as well as different settings (such as opacity or color options or scaling or jitter) as well as used with the trail cursor andalso the modifiers to modify the start and end position during operation. The pattern feature can be used to create trulystunning designs. It also can generate a lot of additional lines, please take note.
The patterns list is the same for each plugin tool, some of the plugin patterns will appear to do the same thing but the resultoften also depends on the start and end position and this may just result in a similar design as others (even though theunderlying algorithm is different). The pattern feature also works well with the trace / trail option and the windmill tool /rotate factor. Combine these to create truly unique and weird and wonderful designs. Use to create basic designs as well asextreme distressed and grunged designs and more.

Scaling line width dropdown
Modifies the scaling of the stroke depending on the scaling setting, this is not relevant to all the plugins

Slowdown
Not really a visual feature it is not possible to show an example of the slowdown. The slowdown setting by default is set to 0,this means that the plugin generates the lines as quickly as it can depending on the processing by Illustrator / plugin / yourmachine - this might generate 100s and 100s of lines in a short period which might overwhelm your machine or slow downfuture responses from Illustrator. You might like to set the slowdown setting to something like 5 or 6 and this will generatelines only each 5 or 6 times the plugin routine is called by the movement of your tool drag. If you set the value to a verylarge figure, you might end up with no response from the tool. The slowdown is really only of use with the trace / trail featureas 1000s of lines might be generated (as well as in the paint tool). If you suddenly find a situation where no lines are beingcreated by the plugin then the slowdown setting might be the reason. As with all the tools in Illustrator, you can modify theslowdown value directly by entering a value into the field or you can click the up and down control (though the values canonly be 0 upwards)
Blend
The plug-in generates the lines in normal blend mode. If set to randomized then each line generated will be set to a newblending mode so the line might be applied using lighten or difference etc, the next one might be set to multiply and so on.This might result in an interesting result or a mishmash of color effects. The lines can always be re-selected on completion ofthe plugin tool and then the blending modes can be re-set to normal or perhaps difference or another single blending mode.
If you select the paths and then use the pathfinder tool to the paths, the paths will end up with the same blending mode.

Opacity
The plug-in applies a random opacity between 0 and 100 to the lines. Subsequent generated lines maybe set to 10% 50%then 12% and so on. This can result in a more painted effect of generated lines. The opacity feature is also useful combined
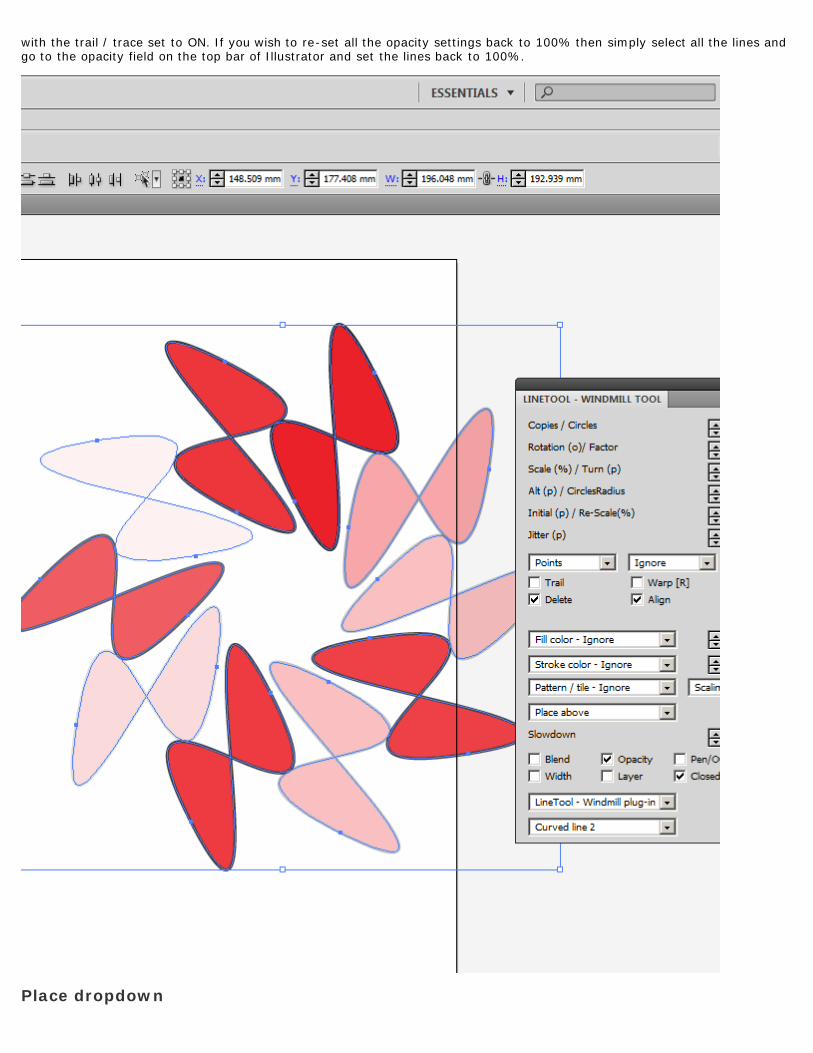
with the trail / trace set to ON. If you wish to re-set all the opacity settings back to 100% then simply select all the lines andgo to the opacity field on the top bar of Illustrator and set the lines back to 100%.
Place dropdown

Changes how the generated lines are stacked. The plugin includes options to place the generated lines beneath the previousline. Other options include alternating the layering of lines beneath / above in a variety of steps. Example being layer lineabove, then below and then below and then above and then below and then below and then above and so on. The placedropdown can be useful to create weaving in and out line designs. Also useful combined with blurring effects using opacity.NOTE: If the layers is set to ON, the placement settings are ignored as the layers override the place beneath. NOTE: Youmight not visually see any difference in the layering of the paths, but a quick visit to the layers palette will show the differentlayering of the lines and this might be of significance if you export the lines as a Flash movie.

Layer
Generates the lines for an entire action onto a single layer. More useful perhaps in combination with the trail cursor feature(as that generates repeated paths and repeated new layers and is useful for animations etc). It is also useful if you re-apply

the line tool as the next set of lines will be on a new layer. You can see the different line groupings via the layers palette.Great for creating designs for export as a Flash movie.
Pen / Opac

This modifies the opacity based on pen pressure. Works with a mouse as well but it is much much more effective with a penand pad.
NOTE: If set to ON and you are using a mouse then the lines will be set to a default opacity of 50%
Pen / Len
This modifies the length of the line based on pen pressure. Pen pressure does require a little trial and error, a rapid release ofthe pen pressure is best; a slow release might result in a very small line. Each line type is modified slightly different by penpressure, some of the line types ignore the pressure setting (to be honest, hard to work out what the end result should be forthose line types if the pressure is 50% etc so ignoring the pressure was easier)
Pen / Width
This modifies the width of the line based on pen pressure. Pen pressure does require a little trial and error, a rapid release ofthe pen pressure is best; a slow release might end up resulting in very light line widths
Closed
If OFF, the path is left as an open path. If ON, then the path is closed and the start and end point are joined. Usefuldepending on the purpose for the designs i.e. embroidery

Width
If no stroke applied or width available, this is ignored. If you set the stroke width setting to 10pt and then set the width torandomization, the lines will be generated with stroke width settings between 0pt and 10pt i.e. 3.45pt 4.56pt 8.23pt etc This

can create many subtle line effects.
Grid tool

Creates a grid / checkerboard grid of lines.
Rotation: Requires the rotation to be set to greater than 0. The rotation is based around the document zero position. Set therotation to ON will randomize the rotation between 0 and the current setting.
Checkerboard options: Offers a selection of loose checkerboard styles for the duplication. Some of the options error with thebottom left initial item and you may wish to remove item manually. The checkerboard feature removes alternate lines, thoughthis depends on the checkerboard option set. Great combined with the apply and turn options.
Apply options: The first dropdown is for the horizontal direction, the second dropdown for the vertical. The dropdown modifiesthe scaling of lines and their adjacent items. Use to create unusual patterns and designs with the grid.
Turn options: Turn options dropdown applies a uniform rotation to alternate lines (such as first line is set at 0 degrees angle,second line at 90 degrees and the third line is set at 0 degrees). A number of turn options are available. They work well incombination with the apply and the checkerboard settings. Use the turn options to create many interesting grid designs.

Drag tool
Create a zoom or row of lines. The drag tool also is useful combined with the various key modifiers (especially when usedwith the trail / trace checkbox ON)

There are no additional tool settings for the drag tool so if you wish to learn about the jitter and rotation etc settings, pleasecheck the local settings section and the global settings section.

Zoom tool
This plug-in is different from all the others in that it does not use the line types found at the bottom of the palette. It onlycreates a basic line. The line might be stretching from the edge of the document or it might be stretched from the start pointto the end point. The lines can be re-applied and re-applied using the trail feature. Works very well combined with the livepaint tool in Illustrator.
Interpolate: Modifies the line length by the set percentage. If the line normally stretches from left to right across the entirewidth of the document, and the setting for the interpolate is set to 50% then the line will stop halfway across the document.
Curve: Curves the line, useful combined with fill settings.
Zoom type dropdown: Different types of line applied. The default creates a set of lines from the edge of the document to thecurrent end point (cursor position). Other settings include grids, lines from left to right, lines from the top, cris cros lines andother types.
Length [R]: Randomizes the length of line. If the line was supposed to be 100pts across then the randomized line length willbe something between 0pt and 100pt i.e. 93.2pt, 56.2pt etc Great for focus line effects / manga illustrations
Document View: Instead of using the document as the defining region for the line effects (and sometimes there are issueswith the document definition especially with artboards as an added complication), you can use the current document viewinstead. The document view is the region you see. If you zoom in and in, the document view changes again to just include theentire viewport / region you see on the screen. You can change the document view via the navigator or the scrollbars. Thedefault is to use the document. The patterns, however, still use the document even if the document view has been set, so thegenerated lines of the pattern might not be visible until you change the document view on completion of the line effect
The zoom tool includes many different types: basic zoom below

grid zoom type below. The grid depends on the start position and end position of your cursor. To create the full grid as below,select the bottom left of the document / artboard and then drag to the far corner (top right - though this depends on theartboard / document)

Left right zoom type below

Abstract zoom type. Note the filled areas, this has been done post line plugin using the live paint tool

Framed tool
The plug-in to create a basic frame of lines (the frame is only a square frame, if you wish to create a circular frame then Iwould suggest you check out the features of the windmill tool). The type of edge can be controlled by the edge dropdown.

The stroke as well as fill can be manipulated in this plug-in. The scale option is useful for additional frames created using thetool. The number of elements on each side are controlled by the copies field, this is split into width (across) and height (up).
Edge options: Changes the direction of the lines from edge to edge (there are four edges to the frame - top left right andbottom)

Rim Random tool
Plug-in for creating random jittered lines; also useful for creating brush designs for use in Illustrator as well as export toPhotoshop.

The scale settings control the size of generated lines between a minimum and maximum size, the scaling can be linkedhorizontal and vertically as with the other plugins. The plugin also works well with opacity setting to create softer randomizeddesigns confetti. The size of the area generated is based on the original source position stretching out to approximately half ofthe distance to the end point of the rim random tool
Scale (minimum): The minimum scaling applied horizontally and vertically. If you want smaller fragments of lines, set thevalue to 5%. If you want the lines to be the same size, set the minimum and maximum to the same value.
Scale (maximum): The maximum size / scaling of the lines.
Rotation [R]: By default, on. Rotates the lines randomly about the line's center. If off, no rotation is applied and all the linesare generated at the same angle as the source design.
Linked: Links the scaling

Windmill tool
Generates circular or elliptical sets of lines
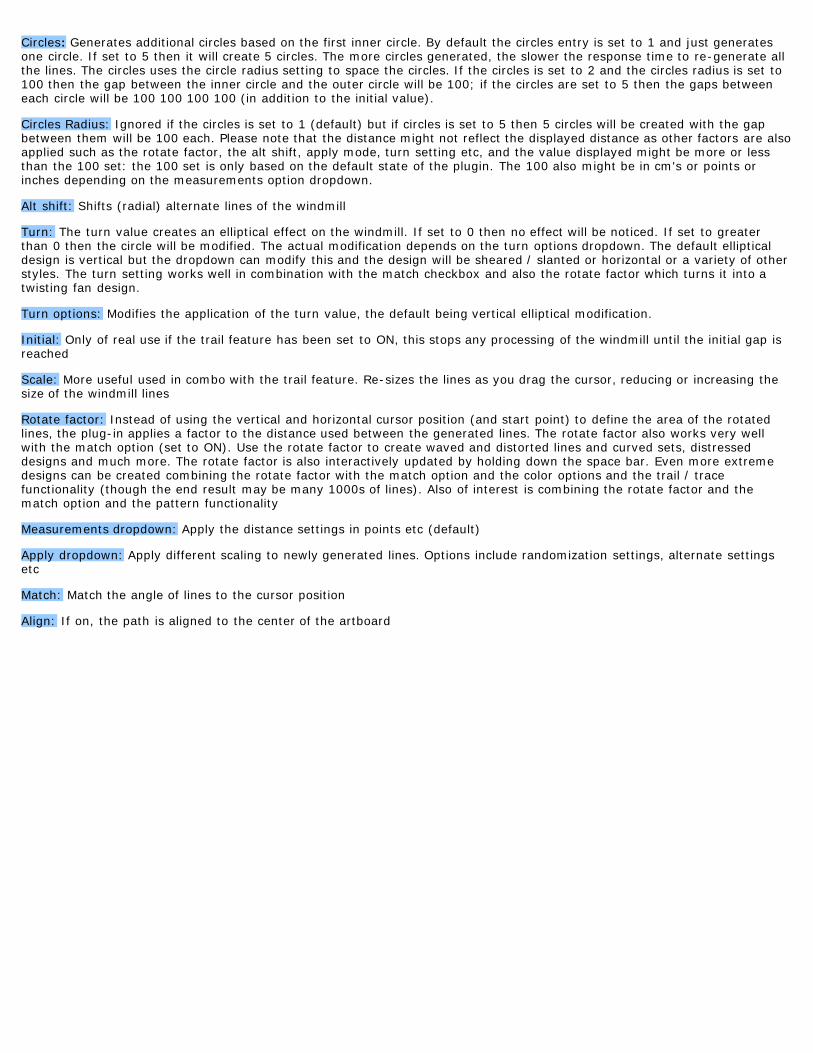
Circles: Generates additional circles based on the first inner circle. By default the circles entry is set to 1 and just generatesone circle. If set to 5 then it will create 5 circles. The more circles generated, the slower the response time to re-generate allthe lines. The circles uses the circle radius setting to space the circles. If the circles is set to 2 and the circles radius is set to100 then the gap between the inner circle and the outer circle will be 100; if the circles are set to 5 then the gaps betweeneach circle will be 100 100 100 100 (in addition to the initial value).
Circles Radius: Ignored if the circles is set to 1 (default) but if circles is set to 5 then 5 circles will be created with the gapbetween them will be 100 each. Please note that the distance might not reflect the displayed distance as other factors are alsoapplied such as the rotate factor, the alt shift, apply mode, turn setting etc, and the value displayed might be more or lessthan the 100 set: the 100 set is only based on the default state of the plugin. The 100 also might be in cm's or points orinches depending on the measurements option dropdown.
Alt shift: Shifts (radial) alternate lines of the windmill
Turn: The turn value creates an elliptical effect on the windmill. If set to 0 then no effect will be noticed. If set to greaterthan 0 then the circle will be modified. The actual modification depends on the turn options dropdown. The default ellipticaldesign is vertical but the dropdown can modify this and the design will be sheared / slanted or horizontal or a variety of otherstyles. The turn setting works well in combination with the match checkbox and also the rotate factor which turns it into atwisting fan design.
Turn options: Modifies the application of the turn value, the default being vertical elliptical modification.
Initial: Only of real use if the trail feature has been set to ON, this stops any processing of the windmill until the initial gap isreached
Scale: More useful used in combo with the trail feature. Re-sizes the lines as you drag the cursor, reducing or increasing thesize of the windmill lines
Rotate factor: Instead of using the vertical and horizontal cursor position (and start point) to define the area of the rotatedlines, the plug-in applies a factor to the distance used between the generated lines. The rotate factor also works very wellwith the match option (set to ON). Use the rotate factor to create waved and distorted lines and curved sets, distresseddesigns and much more. The rotate factor is also interactively updated by holding down the space bar. Even more extremedesigns can be created combining the rotate factor with the match option and the color options and the trail / tracefunctionality (though the end result may be many 1000s of lines). Also of interest is combining the rotate factor and thematch option and the pattern functionality
Measurements dropdown: Apply the distance settings in points etc (default)
Apply dropdown: Apply different scaling to newly generated lines. Options include randomization settings, alternate settingsetc
Match: Match the angle of lines to the cursor position
Align: If on, the path is aligned to the center of the artboard
Scaledown tool
This plugin create a set of lines that reduce or increase in size depending on the scale (horizontal and vertical settings); thelines can also be twisted and turned

Twists: Turns the lines through a number of cycles
Opacity fade: Fades the lines
Apply dropdown: Apply different scaling to newly generated lines.
Turn: Rotate each line in turn. Use to create unusual turning designs. So if set to 1 then all subsequent lines will be 2, 3, 4, 5,6 etc degrees from the original line.
Rotate: Adds an additional rotation to the lines. If set to 0, you will see all the lines in a single overlapping line. The defaultvalue is set to 45 to generate lines at 45 in the basic state, this means you will see the individual lines (and not just see a rowof points)

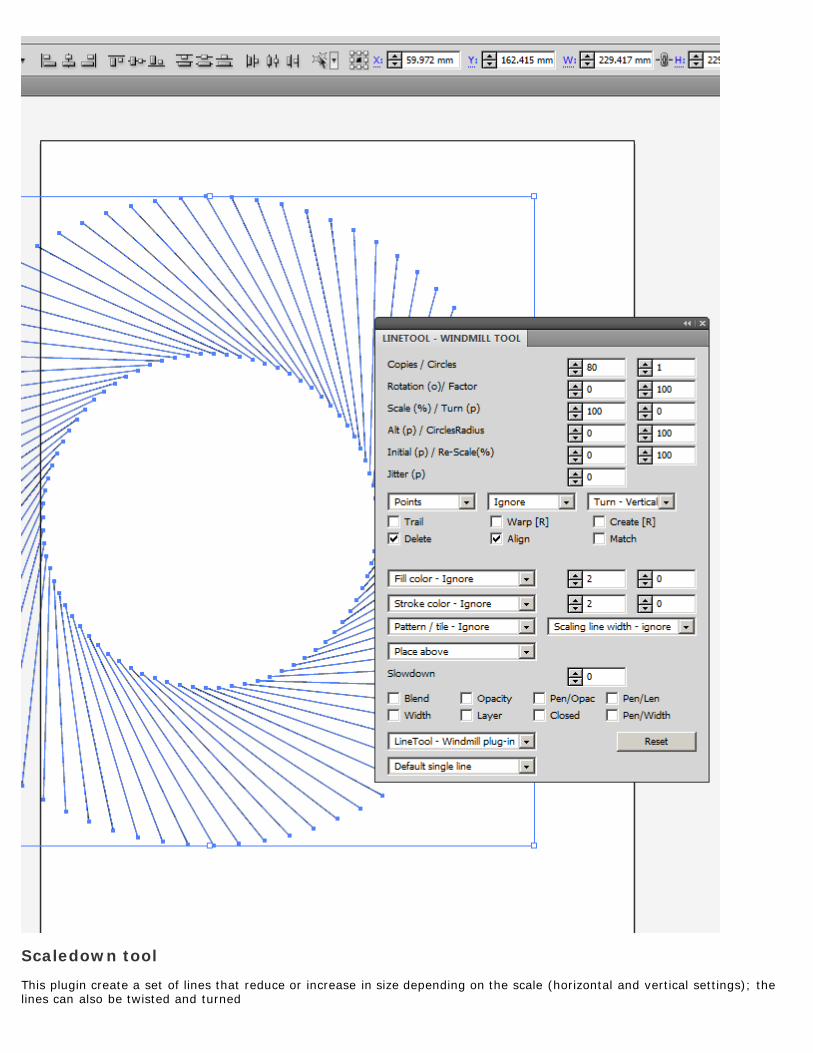
Bouncealong tool
A variant of the scaledown tool but with a bounce option as well as line crunch feature.
Bounce: Bounce steps for the lines
Crunch: Reduce then return to the original size and so on (instead of a bounce)

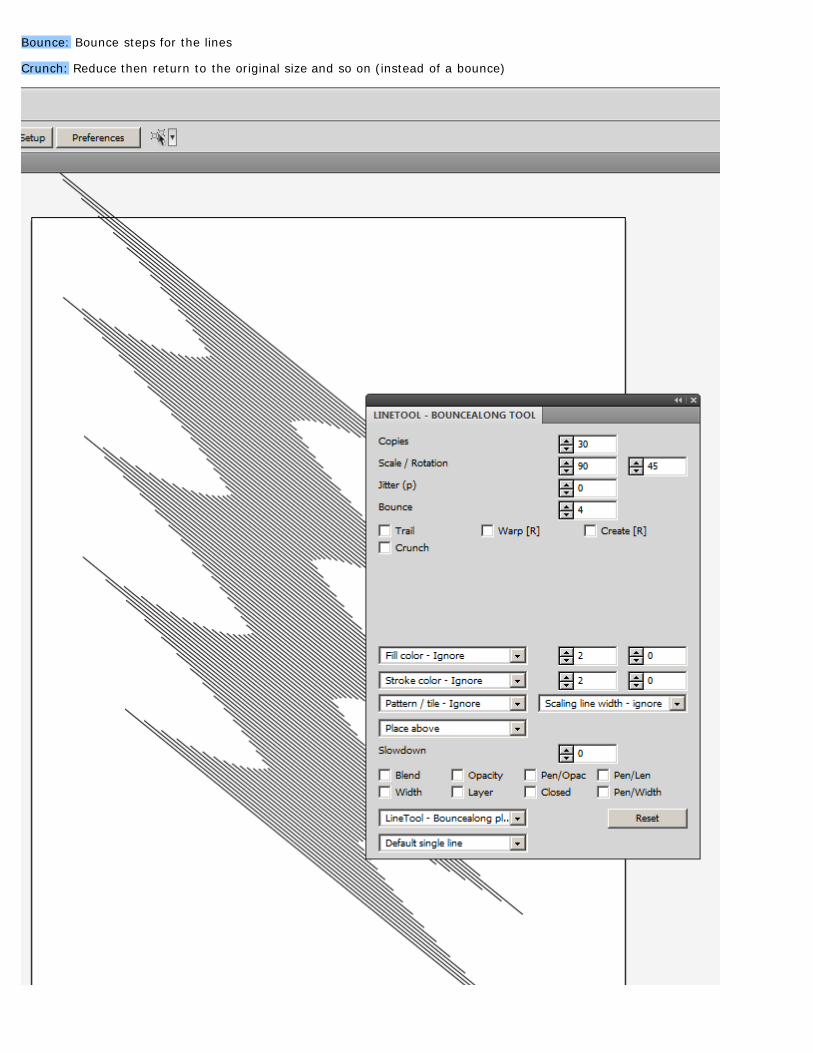
Spiral tool
Create a spirals designs using lines, though the actual result depends on the number of copies to be generated and the armsof the spirals and the decay of the spiral.
Arms: Number of arms to generate of the spiral
Decay: Decay of the spiral Align: Align the lines to the document center
Match: Match the lines to the position of the cursor
Reverse: Reverse the spiral direction
Checkerboard tool
A variant of the grid / row column tool and creates a checkerboard grid of lines. There is now a checkerboard feature in thegrid tool but this plugin does include a few additional settings that the grid tool cannot reproduce.

Touch: Set the size to touch other lines (using the bounding box of the lines)
Paint tool

Paints with lines. The painted lines can be made to fade away rapidly as well as scaled (reduced or increase). This tool isslightly different from nearly all the other tools in that its functionality includes the trail / trace feature by default (if it didn't,it wouldn't work at all!). The plugin generates a lines as you move from the start point and instead of deleting the lines andthen re-building the design, the generated lines are left as a paint trail. The slowdown setting is particularly useful with thistool as the lines can be generated at a pace (depending on your machine) so setting the slowdown to 5 or 6 will slow downthe paint to a more controllable level (and won't generate 1000s and 1000s of unnecessary and resource eating lines).
Opacity fade: Fade the opacity of the painted lines
Intensity color: Increase or decrease the intensity of the painted lines
Follow: Rotate the line to follow the paint direction

Tile tool
Create a tile (for possible use as a pattern) This tile tool is very basic, creates a basic pattern / tile of lines

Background tool
A variant of the rim random tool. The plugin creates a background based on the cursor position and start position but insteadof creating a circular area for the generated lines, the range is set to the rectangular area of the start and cursor position.

This tool is perhaps useful if you wish to create the designs spread over an entire artboard. The lines are positionedrandomized in this area.
Frame: Value between 0 and 50. 50% is the default and the frame feature is ignored, less than 50% and the middle of thebackground is not used. Close to 0% and the background will only be a single rim of lines.
Rotation [R]: Randomizes the rotation of lines
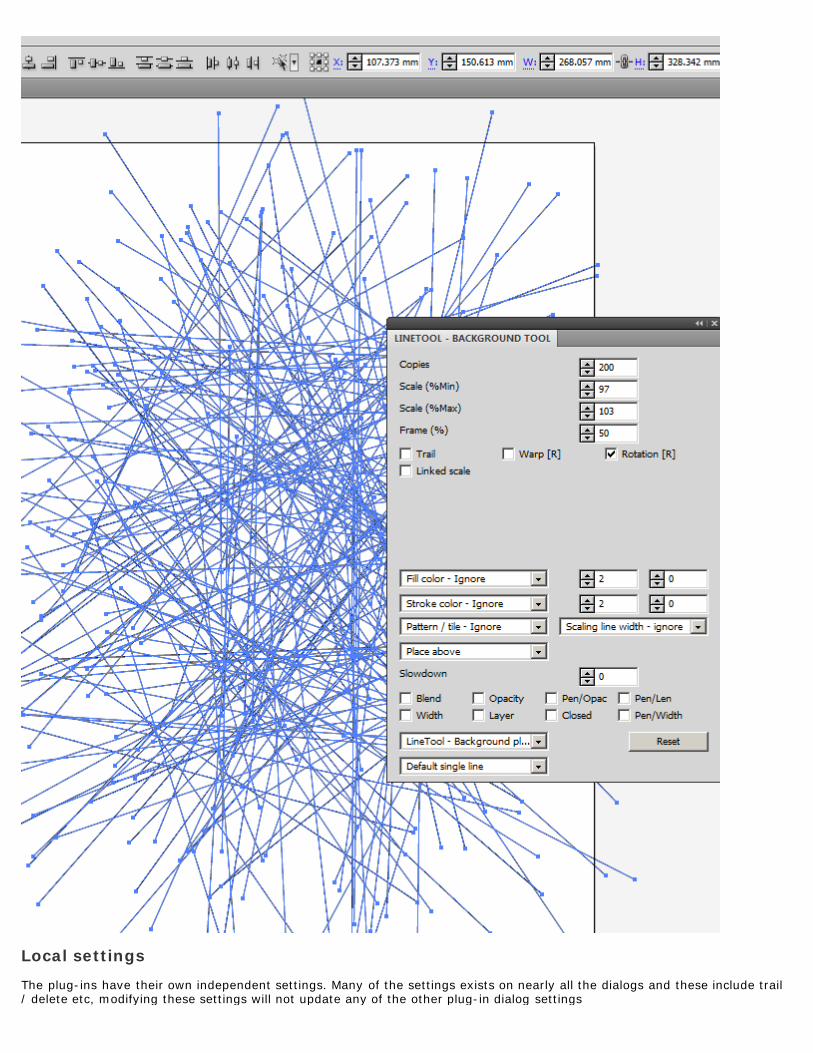
Local settings
The plug-ins have their own independent settings. Many of the settings exists on nearly all the dialogs and these include trail/ delete etc, modifying these settings will not update any of the other plug-in dialog settings

Trail
This option generates a lot of lines. It simply ignores the undo option and generates the lines such as a drag or scale downand doesn't remove them at the end of the drag, leaving a trail of lines based on the current cursor movement. You can usethe modifiers to stop this action and / or move to a new position and continue with the trail action. This feature is very usefulcombined with opacity and color and fade, creates painted designs. The actual result depends on the mouse movement andthe tool, literally millions and millions of possible designs can be created using the trail feature

Warp
The warp option can be slow. This applies a warp to each generated line such as a random warp such as an arc or bend oftwirl. This generates a wide range of unusual designs. While you are dragging the tool you will see the envelopes being

randomly applied to the lines, this can happen fairly rapidly so the end result of the warping is hard to predict so some trialand error might be required for a particular result. All the factors of the warp / envelope are applied such as horizontal /vertical, distortion, vertical bend etc.
On exit of the tool you might like to continue to edit the envelope of the lines, so select the lines with the envelope and clickthe edit envelope: you can then change the envelope type, bend, distortion manually, If you wish to expand the envelope,select all the lines and then use the object > envelope distort menu to expand. Once expanded, you cannot furthermanipulate the envelope but it does make the movement and use of the lines a whole lot easier, especially if you havegenerated many lines. NOTE: There is a weird quirk with the warp and the plugin, not sure of the exact reason but the settingof the warp will result in the fill being set to a light gray. This can be easily fixed by resetting the color to red / green etc asrequired.

Delete
Some of the plugins use an initial line to generate all the subsequent lines, this line is deleted if the delete is set to ON. IfOFF, you might end up with an additional set of lines which may or may not obscure or ruin the design.

Create
Randomizes the creation of the lines, so gaps are generated between the generated lines. If you set the create [R] to OFFthen all the possible lines are generated. If the you set the create [R] to ON then the line might or might not be created,there is a 50% chance that the line might be created.
In the case of the grid tool, you will see wholes in the grid (such as in the case of the old computer cards). In the drag tool,you will see gaps instead of the same intervals between the lines. Likewise in the windmill tool. Depending on therandomization, no gaps will be created or another possibility, no lines are generated. As the plugin tools generates and re-generates the lines as you move the tool from one position to another, you will see the gaps change from pass to pass, sothe actual end result might vary at the last second, the result depends on some trial and error.

Rotation
This rotates the lines. The plug-in works on the generation of a line to create additional lines. The initial line is defined by thestart and end point of the dragged tool, so the initial line might be say angled at 0 degrees and this might result in a single

line (overlapping) for all the lines, use the rotation setting to modify this and generate lines perpendicular or slanted to thedrag of the tool.
The actual rotation still depends on other factors such as the align setting and the match and other tool settings so the endresult might be 45 or it might 78.3 etc.

Jitter
This jitters the line's position etc (can be also set as jitter vertical and that only applies the jitter / random shift to thevertical)

Copies
The plug-in generates the number of required lines. If you have set the create checkbox to ON then the number of generated

lines will be randomized and may be less than the copies setting. Some of the tools also have additional 'copies' fields such asthe number of circles to create in the windmill tool as well as splitting the copies setting into a vertical and horizontal copiessetting. Also, the number of lines actually generated might be modified by additional factors such as 'no of circles' etc

Scale
The scale setting varies from tool to tool. In some of the tools it just applies a single scaling of the generated line, in some itaccumulates the scaling applied. The scaling can increase the size of the line as well as reduce the size of the lines generated.Note: the actual size of the line at any particular point depends on the starting and end point of the mouse drag as well asother factors, this is all combined with the scaling setting: it might mean that the actual size might increase even though thescaling setting is attempting to reduce the size of the line.