USER GUIDE - Oregon
49
Oregon Department of Forestry SMOKE DATA SYSTEM USER GUIDE Version 1.0 Last Updated 01/05/2017
Transcript of USER GUIDE - Oregon

Oregon Department of Forestry
SMOKE DATA SYSTEM
USER GUIDE
Version 1.0
Last Updated 01/05/2017

Page 1 of 48
TABLE OF CONTENTS 1. INTRODUCTION .............................................................................................................. 3
1.1 DATA ENTRY PROCESS FLOW ........................................................................................... 4
2. THE SMOKE DATA SYSTEM APPLICATION OVERVIEW ....................................................... 6
2.1 NAVIGATION PANE ............................................................................................................ 6 2.2 REPORTS PAGE ............................................................................................................... 6 2.3 VENDORS PAGE ............................................................................................................... 6 2.4 ADMIN PAGE .................................................................................................................... 7 2.5 HOME PAGE ..................................................................................................................... 7 2.6 REGISTRATION DATA PAGE ............................................................................................... 8
2.6.1 BILLING SECTION ...................................................................................................................... 8 2.6.2 REGISTRATION SECTION ........................................................................................................... 8 2.6.3 PLANS SECTION ....................................................................................................................... 9
3. THE VENDORS PAGE ................................................................................................... 11 3.1.1 ADD A NEW VENDOR RECORD ................................................................................................. 11 3.1.2 MODIFY EXISTING VENDOR RECORDS ..................................................................................... 12
4. HOME PAGE / SEARCH ................................................................................................. 15
4.1 REGISTRATION NUMBER ..................................................................................................15 4.2 DISTRICT SEARCH ...........................................................................................................16 4.3 COUNTY SEARCH ............................................................................................................16 4.4 SALE NAME SEARCH .......................................................................................................16 4.5 VENDOR ID SEARCH ........................................................................................................17 4.6 VENDOR NAME SEARCH ..................................................................................................17 4.7 BUSINESS NAME SEARCH ................................................................................................18 4.8 SEARCH RESULTS ...........................................................................................................18
5. REGISTRATION DATA PAGE .......................................................................................... 20
5.1 BILLING SECTION ............................................................................................................20 5.1.1 SEARCHING FOR AN VENDOR .................................................................................................. 21 5.1.2 SEARCH OPTIONS ................................................................................................................... 21 5.1.3 UNDERSTANDING THE FEES SECTION ...................................................................................... 22 5.1.4 UNDERSTANDING THE INVOICES SECTION ................................................................................ 22
5.2 REGISTRATION SECTION ..................................................................................................22 5.2.1 CREATE A NEW REGISTRATION ............................................................................................... 23
5.3 PLANS SECTION ..............................................................................................................30 5.3.1 ENTERING PLANNED BURNS .................................................................................................... 30 5.3.2 ENTERING ACCOMPLISHED BURNS .......................................................................................... 31
5.4 MODIFY A REGISTRATION RECORD ...................................................................................33 5.5 TROUBLESHOOTING ERRORS ...........................................................................................33
5.5.1 UNABLE TO SAVE REGISTRATION............................................................................................. 33 5.5.2 “RED BOX” ERRORS ............................................................................................................... 34
6. REPORTS .................................................................................................................... 36
6.1 OLD VS NEW REPORT NAMES ..........................................................................................36 6.2 REPORTS MENU ..............................................................................................................36 6.3 REPORT CRITERIA ...........................................................................................................37 6.4 VIEWING REPORTS ..........................................................................................................38
6.4.1 ACTION TOOLBAR ................................................................................................................... 38 6.4.2 MULTIPLE SUMMARIES IN ONE REPORT .................................................................................... 39
6.5 SUMMARY BY GROUP REPORT .........................................................................................40 6.6 PRINTING REPORTS ........................................................................................................40 6.7 EXPORTING REPORTS .....................................................................................................41
7. ADMIN USERS ............................................................................................................. 44
7.1 DELETING REGISTRATIONS ..............................................................................................44 7.2 MODIFYING DROP DOWN OPTIONS ...................................................................................44
8. APPENDIX A – DATA ENTRY QUICK REFERENCE GUIDE ................................................. 46

Page 2 of 48
Chapter 1 INTRODUCTION
Page 3 of 48
1. INTRODUCTION The intended design of the Smoke Data System (SDS) application is to:
Make data entry of billing information, registered units, planned burns, and accomplished burns easier to enter
Eliminate past connectivity and delayed response issues
Make future enhancements easier to implement
Print reports easier with additional filters
Include additional security grouping
Include additional validation of data fields
Update the data fields by removing unnecessary fields and adding fields for future enhancements
This User Guide is a tool to assist the users in navigating through the application. Included in the User Guide are detailed instructions and information for using the entire application.
This User Guide is for use and guidance of the Smoke Data System Web Application ONLY. For questions regarding laws, rules, and procedures of the Smoke Management Plan see the Smoke Management web page.

Page 4 of 48
1.1 DATA ENTRY PROCESS FLOW
The design of the Smoke Data System follows the below data entry flow chart:
Page 5 of 48
Chapter 2 THE SMOKE DATA SYSTEM APPLICATION OVERVIEW

Page 6 of 48
2. THE SMOKE DATA SYSTEM APPLICATION OVERVIEW Designed as a user-friendly system, the SDS application allows for:
Entering registrations when a landowner reports a request to burn
Records when the landowner plans to burn
Records when the burn is accomplished
Creates invoices for the fees
Creates multiple reports
While all of the data entry fields for Billing, Registration, Plans, and Accomplishments are on one page, there are additional areas such as a Reports section and a place to update or add Vendors, to name a couple.
This chapter provides a quick look into each of the areas of the application in order for the user to become familiar with the layout. Later chapters review each area in more detail.
2.1 NAVIGATION PANE
Located along the left side of the application, the Navigation Pane allows for fast connections to the different areas of the application. This is visible from all areas of the application.
2.2 REPORTS PAGE
All reports now show on one page. The report names in the Report menu are slightly different from the previous program but are the same reports. Other reports are combined and new reports added. In addition, there are modified filters/parameters. For more information, see Chapter 6.
2.3 VENDORS PAGE
A new option is a section where the Vendor information is updated or new records added. See Chapter 3 for more information.
Home – Shortcut to the Home page to perform searches
Reports – Shortcut to the Reports page to view and print multiple types of reports
Vendors – Shortcut to the Vendors page to maintain information
Admin – Shortcut to the Admin page to maintain certain areas of the application

Page 7 of 48
2.4 ADMIN PAGE
The Admin page, which has limited access, is for modifying the drop down options seen throughout the application, and other functionality as well. Below is a sample of some of the areas available for modifications. See Chapter 7 for more details.
2.5 HOME PAGE
The Home page is the initial screen the user sees once logged into SDS. The default view shows the last 14 days of registrations registered. This is also the place to search for a Registration with multiple options for searching. For detailed instructions regarding the different search options, see Chapter 4.

Page 8 of 48
2.6 REGISTRATION DATA PAGE
The Billing, Registration, Plans, and Accomplishments are on one page, in three separate sections. This chapter shows these sections individually.
2.6.1 BILLING SECTION
This section shows the name and address of the vendor and all fees associated to the registration and burn. In addition, below the fees will show the invoice number, fee type, fee amount, Burn Type, and invoice date of all invoices sent to the Landowner for the registration and burn fees.
The Billing section is the first stop when entering a new registration for an existing vendor. For more information on the Vendors Page, see Chapter 3 and for the Billing section, see Chapter 5.1.
2.6.2 REGISTRATION SECTION
The Registration section has a new layout to make entering data easier and faster. The first screenshot below is what currently shows when first entering a new registration. The extra space on the screen shows more fields when there are Broadcast Acres entered (see second screenshot). For more information, see Chapter 5.2.

Page 9 of 48
2.6.3 PLANS SECTION
Similar to the previous application, the Plans and Accomplishments are together for easier processing. A summary area below the Billing and Registration sections is visible for a quick review of any plans and/or accomplishments entered. For more information, see Chapter 5.3.

Page 10 of 48
Chapter 3 THE VENDORS PAGE

Page 11 of 48
3. THE VENDORS PAGE The new application now contains a separate area to add and maintain Vendors. The below sections review how to create a new vendor record and how to search for and modify existing vendor.
NOTE: This does not allow a user to delete a record, only to add or modify. Users are unable to delete VID records due to the invoicing impact this could have.
3.1.1 ADD A NEW VENDOR RECORD
Once submitted, a registration that includes a Vendor not currently in the Smoke application goes through a process to obtain a new Vendor ID number (VID).
The Smoke user contacts the Finance Department by sending an email to ODF_DL_Revenue Unit. The email should contain:
First and Last Name or, if the vendor is a Business, enter the First/Last Name of the Business Contact
Business Name, if applicable
Complete address (with City State and Zip Code)
Phone number The Revenue unit creates a new VID and Mail Code The Revenue unit replies to the user with the new VID number Once received, the user accesses the Vendor page to create the new Vendor record
Below are the steps to add a new Vendor in the SDS Application:
1. In the Navigation Pane, click on the link to open the Vendors section of the application:
2. Click on the Create New Vendor button:
3. This opens the Vendor window with two sections: Identity and Contact
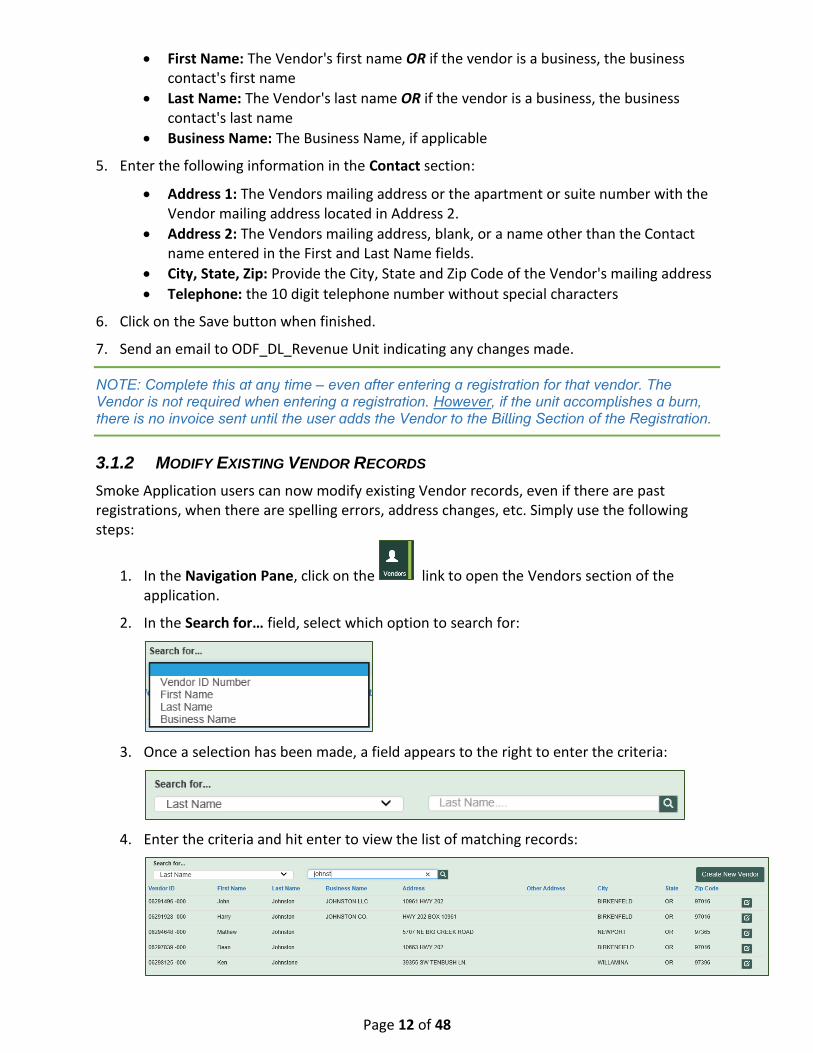
4. Enter the following information in the Identify section:
Vendor ID: The Vendor ID provided by the Finance Department
Mailing Code: The 3-digit number representing the mail code, also provided by the Finance Department
Page 12 of 48
First Name: The Vendor's first name OR if the vendor is a business, the business contact's first name
Last Name: The Vendor's last name OR if the vendor is a business, the business contact's last name
Business Name: The Business Name, if applicable
5. Enter the following information in the Contact section:
Address 1: The Vendors mailing address or the apartment or suite number with the Vendor mailing address located in Address 2.
Address 2: The Vendors mailing address, blank, or a name other than the Contact name entered in the First and Last Name fields.
City, State, Zip: Provide the City, State and Zip Code of the Vendor's mailing address
Telephone: the 10 digit telephone number without special characters
6. Click on the Save button when finished.
7. Send an email to ODF_DL_Revenue Unit indicating any changes made.
NOTE: Complete this at any time – even after entering a registration for that vendor. The Vendor is not required when entering a registration. However, if the unit accomplishes a burn, there is no invoice sent until the user adds the Vendor to the Billing Section of the Registration.
3.1.2 MODIFY EXISTING VENDOR RECORDS
Smoke Application users can now modify existing Vendor records, even if there are past registrations, when there are spelling errors, address changes, etc. Simply use the following steps:
1. In the Navigation Pane, click on the link to open the Vendors section of the application.
2. In the Search for… field, select which option to search for:
3. Once a selection has been made, a field appears to the right to enter the criteria:
4. Enter the criteria and hit enter to view the list of matching records:

Page 13 of 48
5. Click on the 'Edit' button, on the right to view the Vendor record:
6. Modify the necessary information and select the Save button when finished or select Cancel to return to the Vendors search page, discarding any changes.
NOTE: an existing name should never be deleted or replaced! A new name or address requires a new vendor number or mail code from the Revenue Unit. The changes above are only completed when a type in the SDS application was made that does not match the information in the SFMA program.

Page 14 of 48
Chapter 4 HOME PAGE / SEARCH

Page 15 of 48
4. HOME PAGE / SEARCH The Home page’s main function is searching for existing registrations. When a user first opens the SDS application, the system automatically populates the window with all registrations entered within the last 14 days. If the registration is more than 14 days old, or if the window shows too many records, then use the different search options to locate the necessary registration.
The Search For drop down has many ways to search for a registration. These options include:
Registration Number
District
County
Sale Name
Vendor ID
Vendor Name
Business Name
This chapter discusses each of these search options as well as understanding and using the search results.
4.1 REGISTRATION NUMBER
Previously known as the FACTS ID (or FACTS No.), the Registration number is the most common search. When the user selects to search for Registration Number, another field appears to the right for the user to enter the number:
To find the desired record, the user can enter the first five numbers (or more), and hit enter to get a list of registrations for the specified year and District. For example, if a user wants to see registrations from the year 2015 for District number 532 (Forest Grove-Columbia City), enter 15532 and hit enter.
Directly below the search boxes, the system displays matching registrations. If there are more than the screen can show, the user is able to scroll through the results using the wheel on a mouse, the up and down arrow keys, the Page Up/Page Down keys on the keyboard, or clicking on the scroll bar on the right of the screen.
Keep in mind, the criteria numbers entered will search the entire registration number:
As shown above, there are times when you are looking for the first five numbers but the results show Registration Numbers with the 15532 elsewhere in the number.
If there are too many records in the search results, simply type the next section of the registration number and hit enter to narrow down the search results: (see next page)
Page 16 of 48
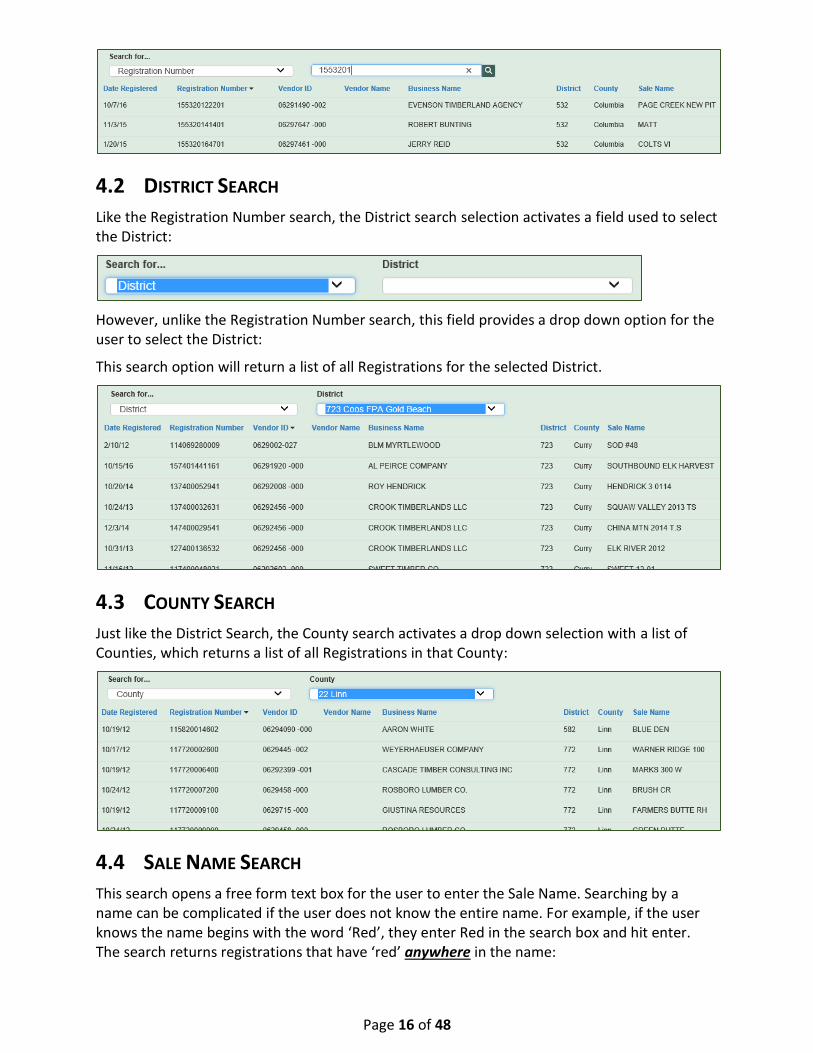
4.2 DISTRICT SEARCH
Like the Registration Number search, the District search selection activates a field used to select the District:
However, unlike the Registration Number search, this field provides a drop down option for the user to select the District:
This search option will return a list of all Registrations for the selected District.
4.3 COUNTY SEARCH
Just like the District Search, the County search activates a drop down selection with a list of Counties, which returns a list of all Registrations in that County:
4.4 SALE NAME SEARCH
This search opens a free form text box for the user to enter the Sale Name. Searching by a name can be complicated if the user does not know the entire name. For example, if the user knows the name begins with the word ‘Red’, they enter Red in the search box and hit enter. The search returns registrations that have ‘red’ anywhere in the name:

Page 17 of 48
However, since any of the column headers are available to sort by, clicking on the Sale Name column header will sort the results alphabetically in ascending order. The user can then scroll down until they locate the Sale Names that begin with the word Red (see next page).
4.5 VENDOR ID SEARCH
As with the Name searches, numeric searches will look for a match anywhere in the Vendor ID. For example, searching for 612 could return the following:
NOTE: because all Vendor IDs begin with '0629', searching with just those numbers will return every record in the database.
4.6 VENDOR NAME SEARCH
The Vendor Name is a combination of the First and Last Names entered in the Vendors page window. As with the other searches, the system looks for a match in either name. For example, searching for the name 'John' may return the following information:

Page 18 of 48
4.7 BUSINESS NAME SEARCH
The final search option allows the user to find all registrations associated with a specific Business Name. Just like the above searches, the system uses the criteria to match on any part of the Business Name. Searching for 'The' will return all businesses that begin with 'The', but also business names that have the letters 'the' entered anywhere in the name:
4.8 SEARCH RESULTS
Once the user initiates a search, the search might take a bit longer depending on the criteria entered. When this occurs, the word ‘Searching…’ appears next to the Search input box:
In addition, if there are no results found in the search, a message appears letting the user know.
All column headers in the search results are sortable to help locate the correct registration. However, at this time, the sort is only in ascending order.
Access the Registration Data Page by clicking on the edit button of the necessary record. For more information on modifying a registration record, see Chapter 5.4.

Page 19 of 48
Chapter 5 REGISTRATION DATA PAGE
Page 20 of 48
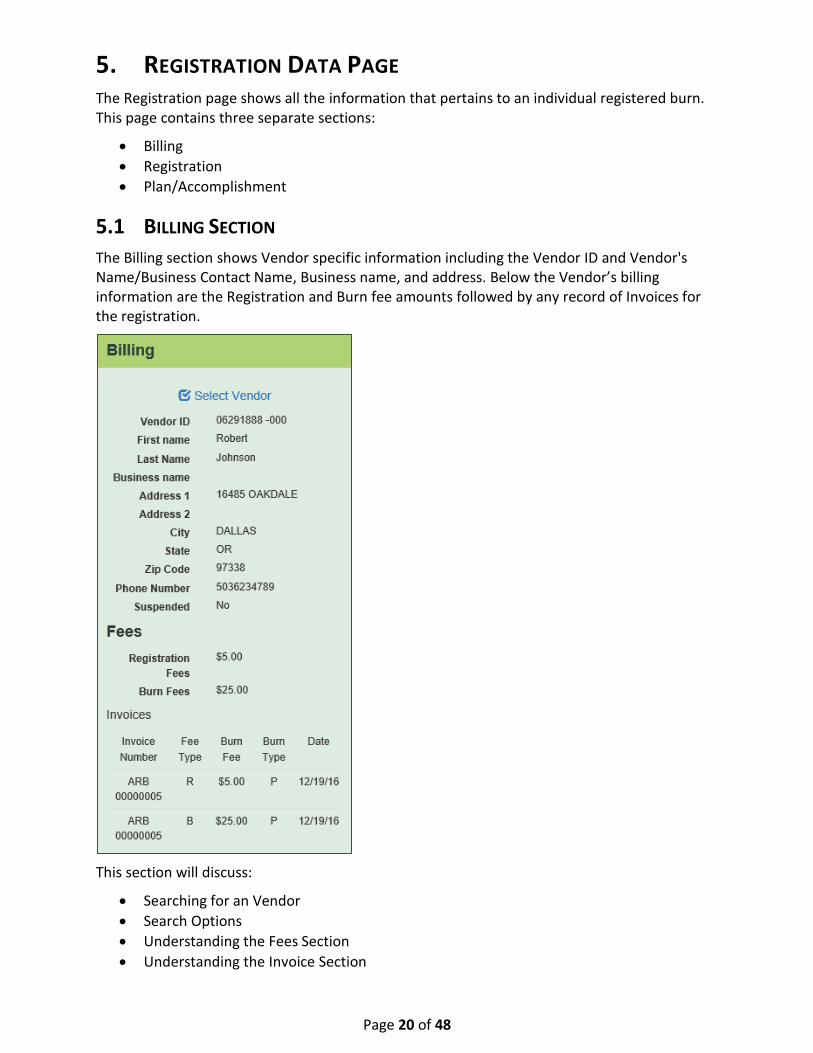
5. REGISTRATION DATA PAGE The Registration page shows all the information that pertains to an individual registered burn. This page contains three separate sections:
Billing
Registration
Plan/Accomplishment
5.1 BILLING SECTION
The Billing section shows Vendor specific information including the Vendor ID and Vendor's Name/Business Contact Name, Business name, and address. Below the Vendor’s billing information are the Registration and Burn fee amounts followed by any record of Invoices for the registration.
This section will discuss:
Searching for an Vendor
Search Options
Understanding the Fees Section
Understanding the Invoice Section

Page 21 of 48
5.1.1 SEARCHING FOR AN VENDOR
When entering a new registration, the first step is to locate an existing billing record for the vendor. To do this, follow these steps:
1. In the Billing section, click on the Select Vendor link
2. In the Select Vendor window, click on the Search for… drop down and select the appropriate search criteria option
3. Once selected, a field will appear to the right of the option for the user to enter the criteria
4. To begin searching, either click on the magnifying glass icon, or simply hit enter after entering the criteria
5. The window will refresh with the search results
6. Click on the check mark ( ) on the right to select the correct vendor for the registration
5.1.2 SEARCH OPTIONS
VENDOR ID SEARCH
1. In the Select Vendor window, click on the Search for drop down and select the Vendor ID Number search option.
2. In the field to the right, enter the appropriate Vendor ID criteria. See Chapter 4.6 for information on searching by the Vendor ID.
3. Once the correct Vendor has been located, click on the check mark on the right to select the Vendor and begin the registration process.
VENDOR NAME SEARCH
The new application has the Vendor name split into three separate fields:
First Name
Last Name
Business Name
1. Select one of these fields to use in the search. See Chapter 4.5 for tips on searching using names.
2. In the field to the right, enter the appropriate name criteria.
3. Once the correct Vendor has been located, click on the check mark on the right to select the Vendor and begin the registration process.
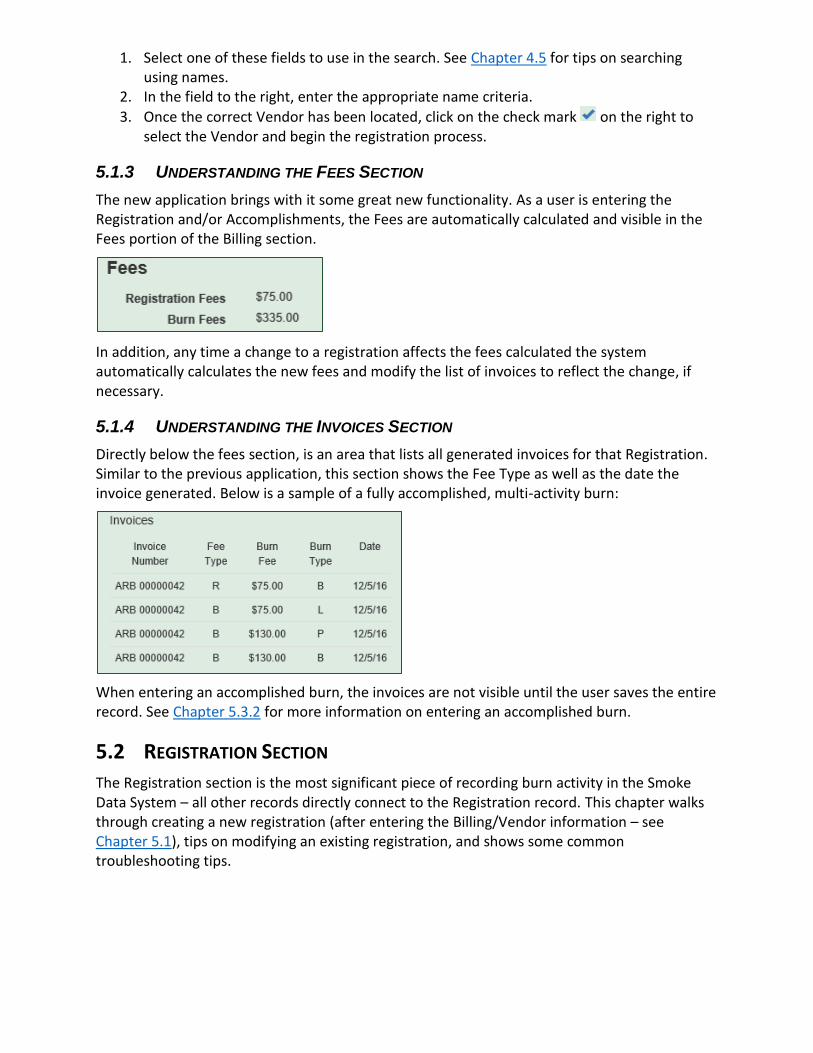
5.1.3 UNDERSTANDING THE FEES SECTION
The new application brings with it some great new functionality. As a user is entering the Registration and/or Accomplishments, the Fees are automatically calculated and visible in the Fees portion of the Billing section.
In addition, any time a change to a registration affects the fees calculated the system automatically calculates the new fees and modify the list of invoices to reflect the change, if necessary.
5.1.4 UNDERSTANDING THE INVOICES SECTION
Directly below the fees section, is an area that lists all generated invoices for that Registration. Similar to the previous application, this section shows the Fee Type as well as the date the invoice generated. Below is a sample of a fully accomplished, multi-activity burn:
When entering an accomplished burn, the invoices are not visible until the user saves the entire record. See Chapter 5.3.2 for more information on entering an accomplished burn.
5.2 REGISTRATION SECTION
The Registration section is the most significant piece of recording burn activity in the Smoke Data System – all other records directly connect to the Registration record. This chapter walks through creating a new registration (after entering the Billing/Vendor information – see Chapter 5.1), tips on modifying an existing registration, and shows some common troubleshooting tips.
Page 23 of 48
5.2.1 CREATE A NEW REGISTRATION
First, select the Create New Registration button in the upper right portion of the Home screen. The main Registration screen appears where the user then adds the detailed registration information.
Once in the Registration window, the user first searches for (see Chapter 5.1.1) or creates (see Chapter 3.1.1) the Vendor record. After searching for or creating the Vendor record, the user enters the specific registration information.
The following pages of this chapter review each data field, grouped into the different sections:
Unit Identification
Unit Information
Treatment Summary
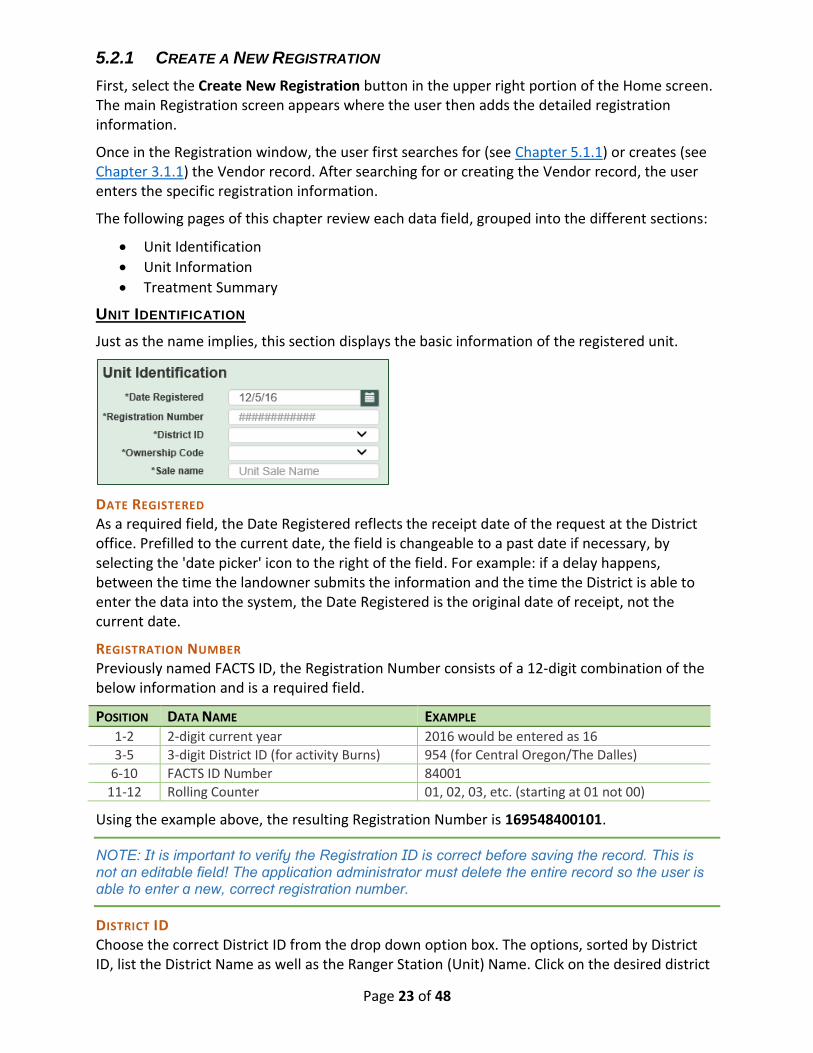
UNIT IDENTIFICATION
Just as the name implies, this section displays the basic information of the registered unit.
DATE REGISTERED As a required field, the Date Registered reflects the receipt date of the request at the District office. Prefilled to the current date, the field is changeable to a past date if necessary, by selecting the 'date picker' icon to the right of the field. For example: if a delay happens, between the time the landowner submits the information and the time the District is able to enter the data into the system, the Date Registered is the original date of receipt, not the current date.
REGISTRATION NUMBER Previously named FACTS ID, the Registration Number consists of a 12-digit combination of the below information and is a required field.
POSITION DATA NAME EXAMPLE 1-2 2-digit current year 2016 would be entered as 16
3-5 3-digit District ID (for activity Burns) 954 (for Central Oregon/The Dalles)
6-10 FACTS ID Number 84001
11-12 Rolling Counter 01, 02, 03, etc. (starting at 01 not 00)
Using the example above, the resulting Registration Number is 169548400101.
NOTE: It is important to verify the Registration ID is correct before saving the record. This is not an editable field! The application administrator must delete the entire record so the user is able to enter a new, correct registration number.
DISTRICT ID Choose the correct District ID from the drop down option box. The options, sorted by District ID, list the District Name as well as the Ranger Station (Unit) Name. Click on the desired district

Page 24 of 48
and the District ID field populates with the selection. The user may also tab to the District ID field and enter the 3-digit District ID code. This is a required field.
OWNERSHIP CODE The Ownership Code indicates the entity of the landowner and is a required field. The user has two ways to enter the Ownership Codes: use the mouse and select an option from the drop down, or simply hit the character code for the Code desired. Available options are:
The new application cannot accept a ‘blank’ option in a drop down selection when the field is a required field. Therefore, the new code for USFS is ‘U’. In addition, a new option is available for Other Federal. This option, only used with the Federal file import, represents Federal landowners that are not in Region 6 and are not USFS.
SALE NAME The Sale Name field is a free form text field that is a required field. The user enters the Unit Sale Name into this box.
UNIT INFORMATION
The Unit Information section describes the location information of the registered unit and identifies the burn type and reason.
TOWNSHIP This field represents the North/South location of the unit. It is a required field that does not accept leading zeros. Additional validation also checks to see if the value entered is within the State of Oregon’s boundaries. To enter a half value, simply enter it as XX.5N/S (i.e.: 31.5S). However, only valid half values are accepted. For example, 2S is a valid Township, but 2.5S is not.
RANGE Similar to Township, Range is a required field but represents the East/West location of the unit. The Range also does not allow leading zeros and the value must be within the Oregon boundaries. In addition, enter half values here as well, as long as the value is a valid Range.
SECTION The Section is a required, 2-digit field that represents a point within the Township and Range selection. The number must be greater than or equal to 1 and less than or equal to 36.

Page 25 of 48
LATITUDE AND LONGITUDE The Latitude and Longitude are new, required, fields. This requirement is due to the new mapping representation of Plans, and Burns and in the future, Registrations.
The data must be in Decimal Degrees format ONLY: Latitude format: II.DDDD Longitude format: -III.DDDD (the user must enter the minus sign)
COUNTY Using the drop down options, select the County the unit is located in, or type in the 1 – 2 digit County Code – with no leading zeros.
DISTANCE TO SSRA Enter the number of miles to the nearest SSRA within the range of 0 – 60 miles. If the nearest SSRA is more than 60 miles, enter 60.
UNIT ACRES Enter the total number of acres in the unit into the Unit Acres field. This required field must be greater than 0 and less than 99999. Once entered, and the record saved, the system uses the Unit Acres, along with other factors to determine if there are any Registration and Burn Fees associated with the record.
CUTTING DATE Enter the date, in YYYY-MM format, which represents when 70% of the cutting is complete. This is a required field and the user must enter the dash (-). For natural fuels or no cutting, leave the field blank – DO NOT enter values of ‘0000’ or ‘9999’. These are not acceptable values.
ELEVATION Rounding to the nearest 100 feet, enter the Elevation of the unit in numbers 0 – 9999.
SLOPE This required field is the percent of the slope of the Unit. Valid entries are 0 – 200.
BURN TYPE The type of burn is required for all registrations. The user can choose to use the drop down to locate the correct Burn Type, or tab to the field and enter the single character code for the needed type. The options are:
BURN REASON The last field in the Unit Information section is the Burn Reason. As in other drop down selections, the user may choose to click anywhere in the data field to initiate the drop down list or tab to the field and enter the single character code for the applicable Burn Reason.
Valid options are: (see next page)

Page 26 of 48
TREATMENT SUMMARY
The Treatment Summary area focuses on the acres and tons of fuel on the unit as well as the types of fuels and treatments. This section has multiple subsections that focus on the different areas of treatment and fuels. The user enters data into the first section of the Treatment Summary (first seven fields, as necessary) for all registrations. However, the remaining subsections are only necessary when the Burn Type is Broadcast or Underburn.
GENERAL INFORMATION
OPERATOR NAME Because the company or persons conducting the burn may or may not be the landowner, the Operator Name is an optional, free form field where the user can enter this information.
FUEL SPECIES This required field specifies they type of fuel in the unit for burning. Click anywhere in the data field to initiate the drop down menu, or tab to the data field and enter the single character code for the species type. Valid options are: (see next page)

Page 27 of 48
LANDING R/W ACRES An optional field to identify how many acres of the Unit created the Landing. This must be equal to or less than the Unit Acres. If not used, leave the field blank. If used, the value must be greater than 1. This becomes a required field if any amount greater than 0 is in the Landing R/W Tons field.
LANDING R/W TONS The weight, in tons, of the unit brought to the Landing.
PILE ACRES An optional field to identify how many acres of the unit is in Piles. If not used, leave the field blank. If used, the value must be greater than 1. This becomes a required field if any amount greater than 0 is in the Pile Tons field.
PILE TONS The weight, in tons, of the unit included in the Piles
BROADCAST ACRES Another optional field used to identify the number of acres to broadcast burn from the unit. If not used, leave the field blank. If used, the value must be greater than 1.
Enter the following data fields only if the Burn Type is Broadcast Activity, Broadcast Natural, Underburn Activity, or Underburn Natural.
DUFF DEPTH The required Duff Depth field is a part of the Forest Floor Fuel but for visibility purposes is located just below Broadcast Acres. The field represents the debris on the forest floor, to the nearest tenth of an inch. If the depth is a decimal amount, enter the number without the decimal. For example, if the depth is 1.6, enter 16 as the Duff Depth.
FUEL TONS PER ACRE This section is measured groupings of live fuel included in the broadcast burn that represents the tonnage per acre, per size class. Enter values of 0-999 into the applicable groups (more than one group may have values).

FOREST FLOOR FUEL
This section defines the type of litter fuel covering the broadcast burn area, the depth of the litter, and the percentage of coverage for that litter type. Create multiple entries for each Litter Type on the unit.
To add the Forest Floor Fuel litter information, click on the plus sign and a separate window appears:
LITTER TYPE This field identifies the type of litter that makes up the Forest Floor Fuel. The Litter Type options are:
Using the keyboard, simply type the first letter of the option desired to select it. Alternatively, click on the drop down and select the correct option using the computer mouse.
LITTER DEPTH Enter a value of zero through 999 that represents the depth of the litter, in inches.
LITTER COVERAGE PERCENT Enter the percent of coverage on the unit for that litter type. The ‘% Covered’ total must equal 100%.
Once the user closes the data entry window, the Forest Floor Fuel section becomes populated.
If an entry is incorrect, click on the ‘trash can’ icon to delete the line.
When creating a new Broadcast or Underburn registration, the below message automatically appears. If using the Forest Floor Fuel data fields, all entries are required to total 100% Covered.
Once the user enters appropriate Litter Types and the combined percentages equal 100, this message disappears.

Page 29 of 48
ROTTEN FUEL TONS PER ACRE
This section tracks the dead fuel on the unit to broadcast burn. Similar to Fuel Tons per Acre, the Rotten Fuel Tons per Acre has separate groupings for the tonnage per acre, per size class.
ROTTEN STUMPS
This section reflects the rotten stumps in the Unit to broadcast burn.
DIAMETER Enter the average diameter, in inches, of the stumps on the Unit to burn. Valid values are 0 – 999.
HEIGHT This reflects the average height of the stumps, in feet. Valid values are 0 – 999.
DENSITY Enter a value of 0 – 999 to reflect the average number of stumps per acre.
LIVE FUELS
This section reflects times when a Broadcast burn includes live shrubs.
SHRUB TYPE Use the drop down menu to select the type of shrub:
SHRUB % COVERED Enter the percentage of the Unit the Shrub type covers. Valid values are 0 – 100.
SHRUB HEIGHT Enter the average height of the shrub in tenths of feet. Valid values are 0 – 999.
TONS PER ACRE Enter the total tonnage per acre of the selected Shrub Type. Valid values are 0 – 999.
COMMENTS A new comment section to the SDS Application allows the users to enter registration specific information that is not already accounted for elsewhere on the screen.
Page 30 of 48
SAVING THE NEW REGISTRATION
Once the user enters all necessary data, the Save button at the top of the screen is available. After clicking on the Save button, a temporary message will appear at the top of the window notifying the user the registration saved successfully:
If the Save button is not available, see Chapter 5.5 for help on troubleshooting errors.
5.3 PLANS SECTION
Once a landowner has decided a day and time to burn the registered unit, they submit the Part 2 form or contacts their District ODF office with the necessary information, which the data entry user enters into the Smoke Data System. The Plan section includes data entry for not only the Plans, but Accomplishments as well for the Part 3 form. This section discusses just the Plans.
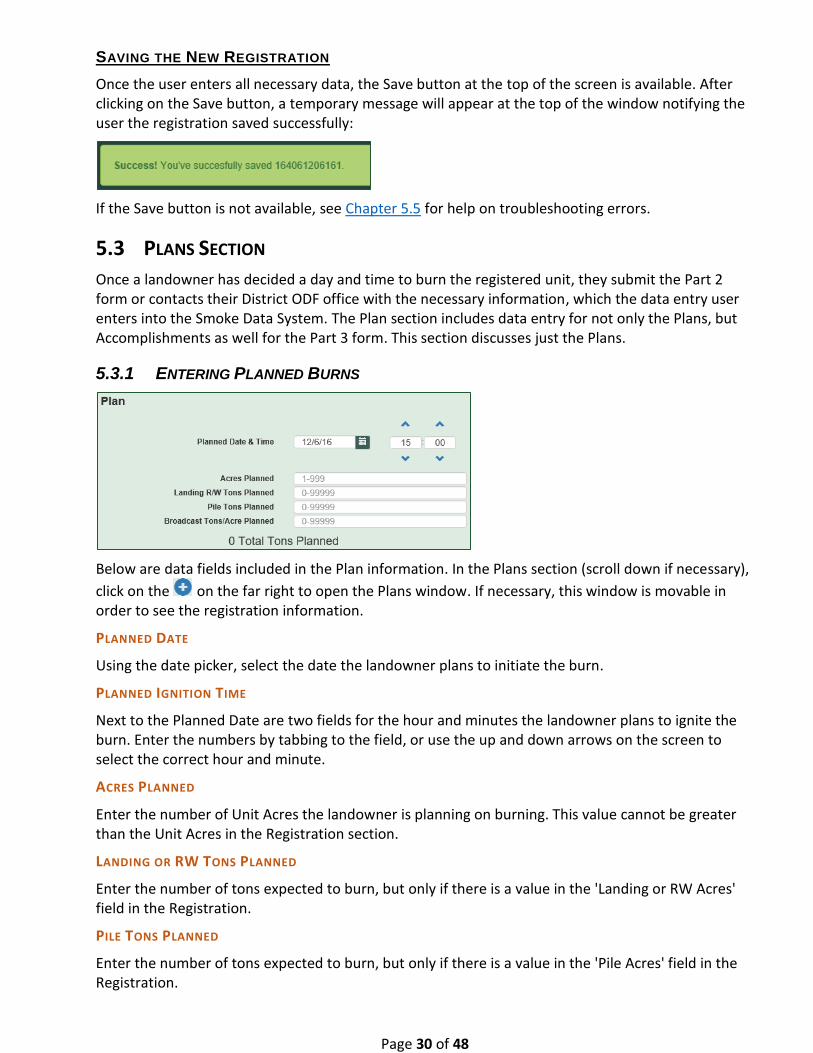
5.3.1 ENTERING PLANNED BURNS
Below are data fields included in the Plan information. In the Plans section (scroll down if necessary),
click on the on the far right to open the Plans window. If necessary, this window is movable in order to see the registration information.
PLANNED DATE
Using the date picker, select the date the landowner plans to initiate the burn.
PLANNED IGNITION TIME
Next to the Planned Date are two fields for the hour and minutes the landowner plans to ignite the burn. Enter the numbers by tabbing to the field, or use the up and down arrows on the screen to select the correct hour and minute.
ACRES PLANNED
Enter the number of Unit Acres the landowner is planning on burning. This value cannot be greater than the Unit Acres in the Registration section.
LANDING OR RW TONS PLANNED
Enter the number of tons expected to burn, but only if there is a value in the 'Landing or RW Acres' field in the Registration.
PILE TONS PLANNED
Enter the number of tons expected to burn, but only if there is a value in the 'Pile Acres' field in the Registration.

Page 31 of 48
BROADCAST TONS PER ACRE PLANNED
Enter the number of tons per acre for any Broadcast burns planned.
After entering all the necessary data, click on the Add button at the bottom of the window to add the
Plan to the Registration. If necessary, add another Plan to the same registration by clicking on the . The main data entry window updates to show a summary of the Plan entered:
In order to save the entered Plans to the registration, click on the Save button at the top of the Registration section to save all changes and additions.
5.3.2 ENTERING ACCOMPLISHED BURNS
Similar to entering a Planned Burn, once the users receive the Part 3 form or information from the Landowner, the user enters the information into the Results section under Plans.
Below are data fields included in the Results (Accomplishments) information. In the Plans section
(scroll down if necessary), click on the on the far right to open the Plans window. If necessary, this window is movable in order to see the registration information.
In the Plans section (scroll down if necessary), locate the previously entered Plan. Click on the edit
icon. The Plans window opens, allowing the user to enter the Accomplishment for that specific plan. The user then enters the following data as necessary:
ACTUAL BURN DATE
Using the date picker, select the date the landowner accomplished the burn.
ACTUAL IGNITION TIME
Next to the Actual Burn Date are two fields for the hour and minutes the landowner ignited the burn. Enter the numbers by tabbing to the field and entering the proper values, or use the up and down arrows on the screen to select the correct hour and minute.

Page 32 of 48
ACRES BURNED
Enter the number of Unit Acres the landowner burned. This value cannot be greater than the Unit Acres in the Registration section.
Enter the following data fields only if the Accomplishment is Broadcast Activity, Broadcast Natural, Underburn Activity, or Underburn Natural.
IGNITION DURATION
Enter the duration of the ignition in minutes.
ACHIEVED RAPID IGNITION
Check the box if the burn achieved rapid ignition.
SHRUB CONSUMPTION
Enter the percentage of shrubs consumed, without the ‘%’; valid values are 0-100
DUFF FUEL MOISTURE
Select from the drop down one of the following options:
FUEL MOISTURE 10 HR %
Enter a value between 0 and 100 to represent the percentage of fuel moisture over a 10-hour period.
FUEL MOISTURE 1000 HR %
Enter a value between 0 and 100 to represent the percentage of fuel moisture over a 1000-hour period.
FUEL MOISTURE 1000 HR CODE
Using the drop down, select the method used to determine the 1000 Hr Fuel Moisture percentage.
DAYS SINCE SIGNIFICANT RAIN West of the Cascades: Enter the number of days since 0.5 inches of rain have fallen within a 48-hour period. East of the Cascades: Enter the number of days since 0.25 inches of rain have fallen within a 48-hour period.
WIND SPEED
Enter the approximate wind speed in MPH
After entering all the necessary fields, click on the Close button to close the plan and result.
The Plans section updates to show a summary of the Accomplishment entered:
Page 33 of 48
Click on the Save button in the upper right of the data entry window to save all changes and/or additions to the Registration.
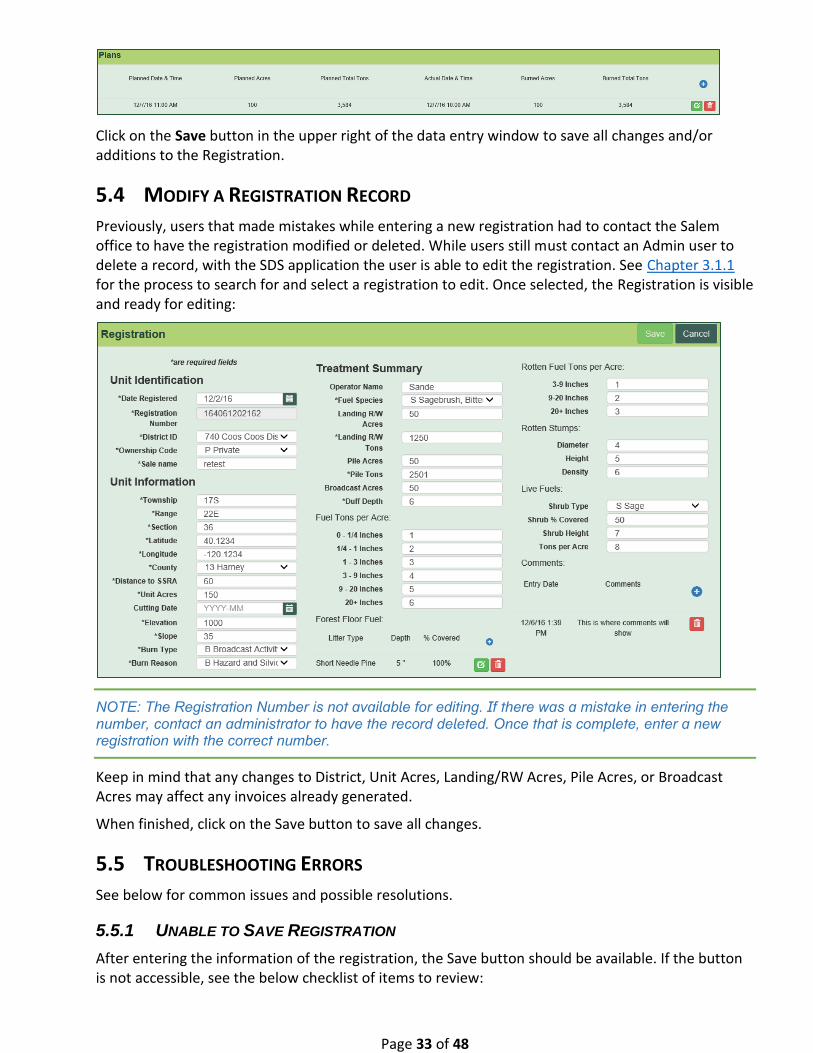
5.4 MODIFY A REGISTRATION RECORD
Previously, users that made mistakes while entering a new registration had to contact the Salem office to have the registration modified or deleted. While users still must contact an Admin user to delete a record, with the SDS application the user is able to edit the registration. See Chapter 3.1.1 for the process to search for and select a registration to edit. Once selected, the Registration is visible and ready for editing:
NOTE: The Registration Number is not available for editing. If there was a mistake in entering the number, contact an administrator to have the record deleted. Once that is complete, enter a new registration with the correct number.
Keep in mind that any changes to District, Unit Acres, Landing/RW Acres, Pile Acres, or Broadcast Acres may affect any invoices already generated.
When finished, click on the Save button to save all changes.
5.5 TROUBLESHOOTING ERRORS
See below for common issues and possible resolutions.
5.5.1 UNABLE TO SAVE REGISTRATION
After entering the information of the registration, the Save button should be available. If the button is not accessible, see the below checklist of items to review:

Page 34 of 48
Check all fields that have an asterisk (*) next to the field name to verify data is entered
Verify all data fields contain properly formatted values (e.g. dates, lat/long, etc.)
Make sure the data is within the validation range for that field (e.g., value must be between 0-999)
This should resolve any issues and allow the Save button to be used. If the button is still not available, please take a screenshot (Alt + PrtScn) of the entire Registration window and paste the screenshot into a Word document (Ctrl + V) or save as a .jpg file. Then, open a Help Desk ticket with Tech Support. Once opened, the ticket routes to the correct person to assist in correcting the situation.
5.5.2 “RED BOX” ERRORS
There are times while saving a record a red box appears at the top of the window with an error
message. If this happens:
□ Take a screenshot of the message using Alt + PrtScn – The message is only temporary. If you are unable to take the screenshot when the message first appears, then click on the Save button again - the message will reappear.
□ Paste it into a Microsoft Word document (Ctrl + V)
□ Take a screenshot of all the data entry fields of the Registration window (Alt + PrtScn)
□ Paste the screenshot (Ctrl + V) into the same Word document with the error text
□ Save the Word document
□ Open a new Help Desk Ticket with Tech Support and add the saved error document as an attachment to the ticket. This will help the Support staff to determine the cause of the error.

Page 35 of 48
Chapter 6 REPORTS

Page 36 of 48
6. REPORTS The Reports section of SDS is a 'one stop shop' for all reports. This chapter reviews all areas of reports, including invoice printing.
6.1 OLD VS NEW REPORT NAMES
The names of the reports have changed slightly. Below is a chart of the previous report name with the name of the new report name.
Previous Report Name New Report Name
Unit Reports: Registered Units By District Registered Units
Planned Units By District Planned Units
Planned Units by District (Lat/Long) Planned Units (Lat/Long)
Accomplished Units By District Accomplished Units
Accomplished Units By Date Accomplished Units by Date
Accomplishment Summary Reports: Accomplished Summary By County Summary by County
Accomplished Summary By District By Month Summary by Month
Accomplished Summary By County By District Summary by County
Accomplished Summary By Burn Type By District Summary by Burn Type
Accomplished Summary By Burn Type By County Summary by Burn Type
Accomplished Summary By Owner By District Summary by Ownership by District
Accomplished Summary By District Summary by District
Accomplished Summary By District By County Summary by County
6.2 REPORTS MENU
The main report window will list all available reports, based on the user's permissions. The reports, grouped by Unit Reports, Summary Reports (of Accomplishments), and Invoice Reports, are available for viewing, printing, or exporting (Excel, PDF, etc.). The invoices and invoice reports are only available to users with the proper permissions.
Below is an example of what a regular Smoke User would see:

Page 37 of 48
6.3 REPORT CRITERIA
Each report has specific criteria the user enters to generate the desired information. The criteria (called parameters in the SDS application) available for selection in SDS is similar to the previous options. A new feature with the SDS application is the Display Type option. Defaulting to View Only mode, the report has background colors and formatting specific for viewing on the screen. The other option, Print Friendly, removes the coloring and formats the report to print in a 'black and white' option to save printer ink/toner.
Below is a view of the parameters for the Registered Units report. Most reports have the same parameters.
Some reports have parameters that are specific to that report. For example, the Summary by Group report has an option for the user to select how to group the output. See Chapter 6.4 for more information on the Summary by Group report.
The following are the basic steps to selecting the printing criteria. Some parameters differ depending on the report:
1. Select the desired report by clicking on the report title on the Reports screen (see Chapter 6.1)
2. Select the appropriate District value using the drop down option. There is also an 'All Districts' option. In order to enter the remaining parameters, the District is required.
3. Next, select the desired Units (Ranger Stations) for the report. All Units in the District are selected by default.
4. The Start and End Dates default to the current date, but are modifiable. Type over the date or use the Date Picker to select a new date.

Page 38 of 48
5. The Display Type defaults to View Only. As mentioned previously, change to Print Friendly to remove the coloring and format the report to print in a 'black and white' option to save printer ink/toner.
6. Click on the View Report button located on the far right portion of the parameters section:
6.4 VIEWING REPORTS
After entering the desired parameters from Chapter 6.2, the report opens in a display mode. In order to see more of the report on the screen without scrolling, click on the ‘up arrow’ button to hide the parameter section:
6.4.1 ACTION TOOLBAR
Some reports generate multiple pages or require a different zoom rate. To modify these features and use others the Action Toolbar, located at the top of the report, will assist the user.
Features of the toolbar are:
Page navigation
Refresh
Return to Parent Report
Increase/Decrease Zoom
Save file as (Export)
Search for Text in the report

Page 39 of 48
6.4.2 MULTIPLE SUMMARIES IN ONE REPORT
Using the Accomplished Units Summary as an example, the following pages show how to see multiple summaries in one screen (keep in mind, not all reports have this option).
NOTE: We are aware of the difficulty reading the header due to the dark font and dark header color. We are working to resolve the issue.
The initial view is SUMMARY BY COUNTY BY MONTH:
Notice the next to the month.
Click on the + to see the DAILY SUMMARY for each County:

Page 40 of 48
6.5 SUMMARY BY GROUP REPORT
The Summary by Group Report is new to the SDS application and provides the users a way to create a more customizable report. After entering the same parameters as most other reports, the final parameter is to select which option to group the data by in the report.
As an example, the below report is the Summary by Group – Ownership report for all districts:
Below is a sample of the Summary by Group – Burn Reason report:
6.6 PRINTING REPORTS
Using the report from Chapter 6.3, once the desired view of data appears, change the Display Type drop down to Print Friendly and click on View Report.
The same report shows, but now is 'black and white' to reduce the toner/ink a printer uses when printing.

Page 41 of 48
To print the report, click on the printer icon in the action toolbar above the report:
6.7 EXPORTING REPORTS
Similar to printing reports, the user can export reports as well. Complete this by clicking on the ‘diskette’ (save) icon in the action toolbar.
Simply click on the type of file to export the data. Using the previous report as an example, an Excel format of the same report would appear as:

Page 42 of 48
Notice the + on the left. This allows you to expand the data to see daily totals once the report is in Excel.

Page 43 of 48
Chapter 7 ADMIN USERS

Page 44 of 48
7. ADMIN USERS
7.1 DELETING REGISTRATIONS
There are times when a user enters an incorrect Registration number. Since this field is not editable, the solution is to have an Admin User delete the entire incorrect record. The Admin’s home page search results include a delete button next to each record:
The user contacts the Admin user providing the incorrect registration number, Date of Registration, District ID, and any other useful information to insure the Admin finds the correct record to delete.
Once selected, a message appears warning the user that this action is irreversible:
Once deleted, the user may enter the correct Registration information.
7.2 MODIFYING DROP DOWN OPTIONS
Another feature for Admin users is the 'wrench' icon on the navigation bar. This option takes the user to a page where modifications to certain areas of the application happen. Most of these are options that appear in drop down selections:
(See next page)

Page 45 of 48
An important area to note is the Burn Fees section.
Changing information in this section will modify ALL records currently stored in the application!!
It is critical that only top Smoke Management personnel make changes in this section.
When editing this section, a message appears at the top informing the user:

Page 46 of 48
8. APPENDIX A – DATA ENTRY QUICK REFERENCE GUIDE The following two pages show a quick reference guide that users can print and hang near their computer for a fast reference to the data fields while entering Smoke data.
(The rest of this page intentionally left blank)

Page 47 of 48
SMOKE QUICK REFERENCE GUIDE BILLING SECTION
Click on the Select Vendor link Click on the Search For… drop down and select the type of search to perform In the box that appears to the right, enter the search criteria
In results section, click on the check mark on the right to select the vendor
REGISTRATION SECTION * = REQUIRED FIELD
UNIT IDENTIFICATION Date Registered* Verify the date is correct, change if necessary using date picker or type in
Registration Number* Previously the FACTS ID; 12 digit Unit Number (NOAP #)
District ID* District the Registration is in
Ownership Code* Select type of ownership
Sale Name* Enter the name of the unit or sale
UNIT INFORMATION Township* Format: ##X [X=(N)orth or (S)outh] e.g. 9N, 31.5S, 26S
Range* Format: ##X [X=(E)ast or (W)est] e.g. 10W, 11.5E, 8W
Section* Format: ## (1-36)
Latitude* Format: II.DDDD Decimal Degrees Only
Longitude* Format: -III.DDDD Decimal Degrees Only; must type the -
County* County where the unit is located
Distance to SSRA Distance to Smoke Restriction Area; 0-60 but if >60, enter 60
Unit Acres* Total Acres of the Unit; 1 – 999
Cutting Date When 70% of cutting completed; enter as YYYY-MM; leave blank if not applicable
Elevation* Round to the nearest 100 ft
Slope* Enter 0 to 200%
Burn Type* Select the type of burn conducted
Burn Reason* Select reason for the burn
TREATMENT SUMMARY Operator Name Individual or business conducting the burn
Fuel Species* Select the species of the fuel
Landing-R/W Acres Number of Unit Acres from which the Landing was created
Landing-R/W Tons* Tons brought to the Landing from the unit
Pile Acres Number of Unit Acres that were piled
Pile Tons* Tons brought to the Pile from the unit
Broadcast Acres Number of Unit Acres that will be Broadcast burned
Duff Depth Depth of duff for all forest floor fuels, in tenths of inches
Fuel Tons per Acre Fuel loading in tons, by size group; see photo series
Forest Floor Fuel Depth and coverage percent per type of litter
Litter Type Type of fuel litter on forest floor
Litter Depth Depth of the litter in tenths of inches
Litter Coverage Percent Percent of coverage for litter type
Rotten Fuel Tons per Acre Tons of rotten fuel per acre in the Unit, by size group; see photo series
Rotten Stumps Rotten stumps in the Unit
Diameter Average diameter of stumps, in inches
Height Average height of stumps, in feet
Density Number of stumps per acre
Live Fuels Live fuels included in the Unit
Shrub Type Type of live shrub
Shrub % Covered Percent of Unit the shrub type covers
Shrub Height Height of shrug in feet to nearest 10th
Tons per Acre Number of shrub tons per acre
Comments Type in comments regarding the Registration

Page 48 of 48
PLAN SECTION Click on the plus sign to the far right of the Plan area to enter a new Plan (or Accomplishment)
* = Required Field
Planned Date* Enter date burn is scheduled; Defaults to current date
Planned Ignition Time* Time the ignition is planned; type in or use arrows
Acres Planned* Total acres planned to burn; cannot exceed Unit Acres
Landing-R/W Tons Planned Landing or R/W tons of planned burn
Pile Tons Planned Pile tons of planned burn
Broadcast Tons/Acre Planned Broadcast tons per acre planned to burn
ACCOMPLISHMENT SECTION
Actual Burn Date Enter actual date of burn or use date picker
Actual Ignition Time Enter time of ignition or use arrows
Acres Burned Total acres burned
Landing-R/W Tons Burned Landing or R/W tons burned
Pile Tons Burned Piled tons burned
Broadcast Tons/Acre Burned Tons per acre of Broadcast burned
Total Broadcast Tons Burned System calculated field
Total Tons Burned System calculated field
Ignition Duration If Broadcast/Underburn, enter duration in minutes Achieved Rapid Ignition Check if burn achieved rapid ignition
Shrub Consumption Percentage of burn that consumed Shrubs
Duff Fuel Moisture Select appropriate percentage
Fuel Moisture 10 Hr % Percentage of fuel moisture 10hr
Fuel Moisture 1000 Hr % Percentage of fuel moisture 1000hr
Fuel Moisture 1000 Hr Code Code of the measurement taken for 1000hr %
Days Since Significant Rain Number of days since measurable precipitation occurred
Wind Speed Speed of wind at time of ignition