User Guide - Nektar€¦ · Nektar Impact GX49 & GX61 DAW Integration User Guide 5 The Impact GX...
25
User Guide www.nektartech.com DAW Integration for Nektar Impact iX49 & iX61 Nektar DAW Integration User Guide for Impact GX49/61
Transcript of User Guide - Nektar€¦ · Nektar Impact GX49 & GX61 DAW Integration User Guide 5 The Impact GX...

User Guidewww.nektartech.com
DAW Integration for
Nektar Impact iX49 & iX61
Nektar DAW Integration User Guide for Impact GX49/61

2 Nektar Impact GX49 & GX61 DAW Integration User Guide www.nektartech.com
Page
Bitwig Studio Setup and Configuration 3
Bitwig Studio and Impact GX49 Working Together 4
Cubase/Nuendo Installation and Setup 5
Cubase/Nuendo and Impact GX49 Working Together 6
Digital Performer Setup and Configuration 7
Digital Performer and Impact GX49 Working Together 8
FL Studio Setup 9
FL Studio and Impact GX49 Working Together 10
GarageBand Setup and Configuration 11
GarageBand and Impact GX49 Working Together 12
Logic Setup and Configuration 13
Logic and Impact GX49 Working Together 14
Mixcraft 7 and Impact GX49 Setup and Working Together 15
Reaper Installation and Setup 16
Reaper and Impact GX49 Working Together 17
Reason Setup and Configuration 18
Reason and Impact GX49 Working Together 19
Sonar Setup and Configuration 20
Sonar and Impact GX49 Working Together 21
Studio One Setup and Configuration 22
Studio One and Impact GX49 Working Togher 23
Transport Control without Nektar DAW Integration 24
Setting up Impact GX to Work with Pro Tools 25
Index

www.nektartech.com Nektar Impact GX49 & GX61 DAW Integration User Guide 3
The Impact GX Bitwig Integration works with Bitwig Studio and Bitwig 8-Track and is compatible with Windows Vista, 7, 8 and 10 or higher as well as OS X 10.6 or higher. The Impact GX Bitwig integration is also compatible with Linux as long as a USB class MIDI driver has been installed. FInally, Impact GX can be used as a generic USB MIDI controller with Windows XP.
Setup
Here are the steps you need to go through to get Bitwig Studio or Bitwig 8-Track up and running with your Impact GX:
• Make sure Bitwig is already installed on your computer. If not, please install Bitwig first, then open Bitwig at least once, before running the installer included with this package.
• Locate the Impact_GX_Bitwig_support installer included with this package and run it. See note for OS X.
• Plug-in your Impact GX and make sure it’s switched on (if you didn’t do so already)
• Launch Bitwig Studio and go to Options/Preferences/Controllers
• Click “Detect available controllers”. Your Impact GX should now appear in the list (see below image).
• Click “OK” and exit Device Setup.
That’s it, setup is now complete.
Bitwig Setup and Configuration

4 Nektar Impact GX49 & GX61 DAW Integration User Guide www.nektartech.com
With installation complete, it’s time to take a look at how the Impact GX49 integrates with Bitwig Studio or Bitwig 8-Track.
The below chart shows you what each of the buttons are assigned to do. Press the [Play] button to make sure everything is working correc-tly. Next move on to check the other features by pressing the buttons and button combinations.
* Note that a device has to be present on the currently selected track for the browser to open when pressing [S2].
CONTROLLING VOLUME
The pot control is assigned to control volume of the currently selected track
Move the pot all the way up and down. The Bitwig mixer volume for the currently selected track is now controlled by the pot on your Im-pact GX. Every time you select or create a track, your Impact GX will automatically control the volume of that track.
CONTROLLING MASTER VOLUME
You can also use the pot to control Bitwig‘s master volume. Press and hold the [Shift] button and move the pot.
SOFT TAKE-OVER
When changing tracks and adjusting Bitwig Studio’s mixer volume with a control, you would normally experience parameter jumping. This happens when a control’s physical position is not the same as the position of the parameter you are controlling. When you move the cont-rol, the parameter therefore jumps to the value the control is sending out.
To avoid parameter jumping when using the pot, your Impact GX is equipped with Soft Take-Over. This means that if the pot is not in sync with the current channel volume, moving the pot will not cause a change, until it’s position matches the value of the parameter.
Even better, two LED‘s below the pot indicate which direction the pot should be turned to change volume. If for example the right LED is red, move the pot to the right. Once the pot‘s position matches the current tracks volume setting, the two LED‘s will both illuminate in green.
When you change track, the LED‘s update to indicate the current status of the selected track.
SUPPORT
If you are not getting the results described, please check your installation one more time as well as the Nektar support tab on our website www.nektartech.com. You can also contact our support staff here
Bitwig 8-Track/Studio and Impact GX49 Working Together
BLUE LED BUTTON OFF BLUE LED BUTTON ON [SHIFT] FUNCTIONS
BUTTON PARAMETER BUTTON PARAMETER BUTTON COMB. PARAMETER
Click on/off Open/close Mixer lane
+ Undo
Rewind,1 bar Open/close Device chain
+ Goto Left locator
Forward, 1 bar Open/close brow-ser*
+ Goto Right locator
Cycle on/off Select previous track + Set Left locator
Stop. Press again to go to zero
Select next track + Set Right locator
Play. Press again to pause
Previous patch for selected device
+ Launcher Overdub
Record Next patch for selected device
+ Arranger Overdub
www.nektartech.com Nektar Impact GX49 & GX61 DAW Integration User Guide 5
The Impact GX Cubase Integration is compatible with all versions of Cubase from v5 and higher.
These instructions assumes you have a compatible Cubase or Nuendo program installed running on either Windows (Vista, 7, 8, 10 or higher) or Mac OS X 10.6 or higher. Throughout we talk about Cubase but the same instructions apply to Nuendo.
Installation
• Locate the Impact_GX_Steinberg_support installer included with this package and run it.
• Plug-in your Impact GX and make sure it’s switched on (if you didn’t do so already)
• Launch Cubase and go to Devices/Device Setup/MIDI Port Setup
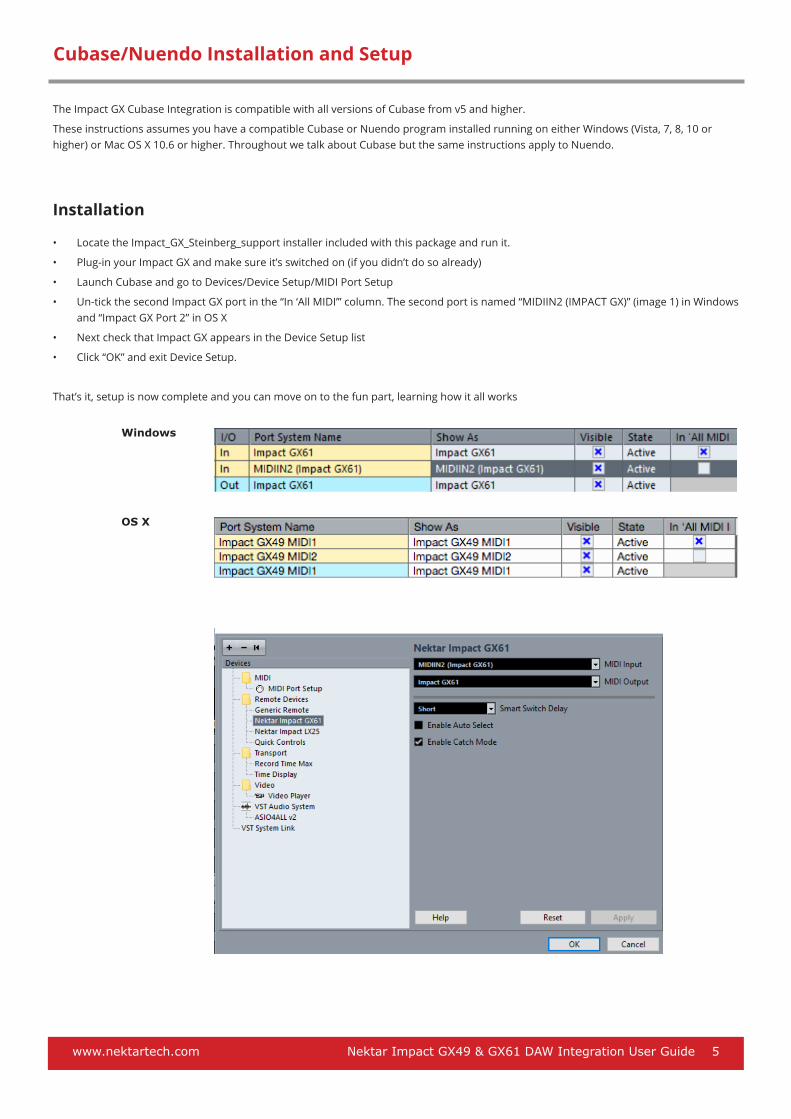
• Un-tick the second Impact GX port in the “In ‘All MIDI’” column. The second port is named “MIDIIN2 (IMPACT GX)” (image 1) in Windows and “Impact GX Port 2” in OS X
• Next check that Impact GX appears in the Device Setup list
• Click “OK” and exit Device Setup.
That’s it, setup is now complete and you can move on to the fun part, learning how it all works
Cubase/Nuendo Installation and Setup
Windows
OS X

6 Nektar Impact GX49 & GX61 DAW Integration User Guide www.nektartech.com
With installation complete, it’s time to take a look at how the Impact GX49 integrates with Cubase or Nuendo.
The below chart shows you what each of the buttons are assigned to do. Press the [Play] button to make sure everything is working correctly. Next move on to check the other features by pressing the buttons and button combinations.
* Not all VST instruments allow you to change the patch using the patch change function. Most of the Steinberg plugins follow the stan-dard though so first check this feature with some of the default plugins.
CONTROLLING VOLUME
Next check the functionality of the pot control.
Move the pot all the way up and down. The Cubase mixer volume for the currently selected track is now controlled by the pot on your Impact GX. Every time you select or create a track, your Impact GX will automatically control the volume of that track.
CONTROLLING MASTER VOLUME
You can also use the pot to control the Cubase mixer‘s master volume. Press and hold the [Shift] button and move the pot.
SOFT TAKE-OVER
When changing tracks and adjusting mixer volume in Cubase with a control, you would normally experience parameter jumping. This happens when a control’s physical position is not the same as the position of the parameter you are controlling. When you move the control, the parameter therefore jumps to the value the control is sending out.
To avoid parameter jumping when using the pot, your Impact GX is equipped with Soft Take-Over. This means that if the pot is not in sync with the current channel volume, moving the pot will not cause a change, until it’s position matches the value of the parameter.
Even better, two LED‘s below the pot indicate which direction the pot should be turned to change volume. If for example the right LED is red, move the pot to the right. Once the pot‘s position matches the current tracks volume setting, the two LED‘s will both illuminate in green.
When you change track, the LED‘s update to indicate the current status of the selected track.
SUPPORT
If you are not getting the results described, please check your installation one more time as well as the Nektar support tab on our website www.nektartech.com. You can also contact our support staff here
Cubase/Nuendo and Impact GX49 Working Together
BLUE LED BUTTON OFF BLUE LED BUTTON ON [SHIFT] FUNCTIONS
BUTTON PARAMETER BUTTON PARAMETER BUTTON COMB. PARAMETER
Click on/off Open/close Mixer + Undo
Rewind,1 bar. Press to scroll
Open/close Instru-ment
+ Goto Left locator
Forward, 1 bar. Press to scroll
Open/close Channel Strip
+ Goto Right locator
Cycle on/off Select previous track + Set Left locator
Stop. Press again to go to starting point
Select next track + Set Right locator
Play. Press again to pause
Previous instrument patch*
+ -
Record Next instrument patch*
+ Arranger Overdub

www.nektartech.com Nektar Impact GX49 & GX61 DAW Integration User Guide 7
The Impact GX integration for MOTU‘s Digital Performer is compatible with Digital Performer 8 and higher. These instructions assume Digital Performer is installed running on either Windows (Vista, 7, 8 or higher) or Mac OS X 10.6 or higher.
Setup
Here are the steps you need to go through to get your Impact GX up and running with Digital Performer:
• Locate the Impact_GX_MOTU_support installer included with this package and run it.
• Plug-in your Impact GX and make sure it’s switched on (if you didn’t do so already)
• Launch Digital Performer and create a Project or open an existing one
• Go to Setup/Control Surface Setup...
• Click the “+“
• For “Driver“ select Nektar Impact GX
• For “Unit“ select Multi MIDI
• For “MIDI Input“, select MIDIIN2 (Impact GX) in Windows or Impact GX Port 2-16 in OS X
• For “MIDI Output“, select Impact GX49 in Windows or Impact GX49 Port 1 in OS X
• Click “OK“ to close the Control Surface Setup window.
That’s it, Digital Performer is now configured to work with your Impact GX.
Digital Performer Setup and Configuration
Windows
OS X

8 Nektar Impact GX49 & GX61 DAW Integration User Guide www.nektartech.com
With installation complete, it’s time to take a look at how the Impact GX49 integrates with Digital Performer.
The below chart shows you what each of the buttons are assigned to do. Press the [Play] button to make sure everything is working correctly. Next move on to check the other features by pressing the buttons and button combinations.
.
CONTROLLING VOLUME
The Impact GX pot is assigned to control volume for the currently selected/record armed track.
Move the pot all the way up and down. The Digital Performer mixer volume for the currently selected track is now controlled by the pot on your Impact GX. Every time you select or create a track, your Impact GX will automatically control the volume of that track.
Note: Digital Performer doesn‘t allow control of the instrument volume parameter but instead sends MIDI cc 7 which controls the volume MIDI parameter instead. In practical use the outcome is the same but it means that you will be recording MIDI data instead of automation data when moving the Impact GX pot on an instrument track.
SOFT TAKE-OVER
When changing tracks and adjusting mixer volume in Digital Performer with a control, you would normally experience parameter jumping. This happens when a control’s physical position is not the same as the position of the parameter you are controlling. When you move the control, the parameter therefore jumps to the value the control is sending out.
To avoid parameter jumping when using the pot, your Impact GX is equipped with Soft Take-Over. This means that if the pot is not in sync with the current channel volume, moving the pot will not cause a change, until it’s position matches the value of the parameter.
Even better, two LED‘s below the pot indicate which direction the pot should be turned to change volume. If for example the right LED is red, move the pot to the right. Once the pot‘s position matches the current tracks volume setting, the two LED‘s will both illuminate in green. When you change track, the LED‘s update to indicate the current status of the selected track.
SUPPORT
If you are not getting the results described, please check your installation one more time as well as the Nektar support tab on our website www.nektartech.com. You can also contact our support staff here
Digital Performer and Impact GX49 Working Together
BLUE LED BUTTON OFF BLUE LED BUTTON ON [SHIFT] FUNCTIONS
BUTTON PARAMETER BUTTON PARAMETER BUTTON COMB. PARAMETER
Click on/off Open/close Mixer + Undo/Redo
Rewind. Press again to stop
Open/closeInstru-ment
+ Goto Left locator
Forward. Press again to stop
- + Goto Right locator
Cycle on/off Select previous track + Set Left locator
Stop Select next track + Set Right locator
Play. Press again to pause
Previous instrument patch
+ -
Record Next instrument patch
+ Overdub

www.nektartech.com Nektar Impact GX49 & GX61 DAW Integration User Guide 9
The Impact GX FL Studio Integration is compatible with Fl Studio 11.2 or later. If „Nektar Impact Series“ does not appear in the Controller Type list, upgrade to the latest version of FL Studio.
Installation
• Plug-in your Impact GX and make sure to switch it on (if you didn’t do so already)
• Launch FL Studio and go to Options/MIDI Settings (image 1)
• The Impact GX ports should now appear in the FL Studio window as per Image 1. If you don’t see them, click “Rescan devices” at the bottom of the window
• The Output port IMPACT GX49 should be set to port 155
• Enable input port IMPACT GX49 and set Controller Type to “(generic controller)”
• Enable input port MIDIIN2 (IMPACT GX49) and set Controller Type to “Nektar Impact series”*
• Set MIDIIN2 (IMPACT GX49) to port 155
• If you setup now matches the image below, exit MIDI settings
That’s it, setup is now complete and you can move on to the fun part, learning how it all works.
* If “Nektar Impact series” is not available in the controller type list, you’ll need to upgrade your version of FL Studio.
FL Studio Setup

10 Nektar Impact GX49 & GX61 DAW Integration User Guide www.nektartech.com
With installation complete, it’s time to take a look at how the Impact GX49 integrates with Fl Studio.
The below chart shows you what each of the buttons are assigned to do. Press the [Play] button to make sure everything is working correctly. Next move on to check the other features by pressing the buttons and button combinations.
.
CONTROLLING VOLUME
The Impact GX pot is assigned to control volume for the currently selected track. This means that every time you select or create a track, your Impact GX will automatically control the volume of that track.
SUPPORT
If you are not getting the results described, please check your installation one more time as well as the Nektar support tab on our website www.nektartech.com. You can also contact our support staff here
FL Studio and Impact GX49 Working Together
BLUE LED BUTTON OFF BLUE LED BUTTON ON [SHIFT] FUNCTIONS
BUTTON PARAMETER BUTTON PARAMETER BUTTON COMB. PARAMETER
- Open/close Mixer + -
Rewind. Press and hold
Open/closeInstru-ment
+ Playback slow
Forward. Press and hold
- + Playback fast
Cycle on/off Select previous mixer track
+ -
Stop Select next mixer track
+ Undo last change
Play. Press again to pause
Previous channel + Metronome on/off
Record Next channel + Close all unforcu-sed Windows
www.nektartech.com Nektar Impact GX49 & GX61 DAW Integration User Guide 11
The Impact GX GarageBand Integration is compatible with version 6 and higher.
Setup
Here are the steps you need to go through to get GarageBand up and running with your Impact GX:
• Locate the Impact_GX_Apple_support installer included with this package and run it.
• Plug-in your Impact GX and make sure it’s switched on (if you didn’t do so already)
• Launch GarageBand
• Create a new Project
• Create an Audio or Instrument track
That’s it, setup is now complete.
GarageBand Setup and Configuration

12 Nektar Impact GX49 & GX61 DAW Integration User Guide www.nektartech.com
The Impact GX GarageBand Integration is compatible with version 6 and higher.
Setup
Here are the steps you need to go through to get GarageBand up and running with your Impact GX:
• Locate the Impact_GX_Apple_support installer included with this package and run it.
• Plug-in your Impact GX and make sure it’s switched on (if you didn’t do so already)
• Launch GarageBand
• Create a new Project
• Create an Audio or Instrument track
That’s it, setup is now complete.
OPERATING GARAGEBAND FROM IMPACT GX
With installation complete, it’s time to take a look at how the Impact GX49 integrates with GarageBand.
The below chart shows you what each of the buttons are assigned to do. Press the [Play] button to make sure everything is working correctly. Next move on to check the other features by pressing the buttons and button combinations.
*Function only active if a loop/cycle area already exists.
CONTROLLING VOLUME
Next check the functionality of the pot control.
Move the pot all the way up and down. The GarageBand mixer volume for the currently selected track is now controlled by the pot on your Impact GX. Every time you select or create a track, your Impact GX will automatically control the volume of that track.
CONTROLLING MASTER VOLUME
You can also use the pot to control the GarageBand mixer‘s master volume. Press and hold the [Shift] button and move the pot.
SUPPORT
If you are not getting the results described, please check your installation one more time as well as the Nektar support tab on our website www.nektartech.com. You can also contact our support staff here
GarageBand and Impact GX49 Setup/Working Together
BLUE LED BUTTON OFF BLUE LED BUTTON ON [SHIFT] FUNCTIONS
BUTTON PARAMETER BUTTON PARAMETER BUTTON COMB. PARAMETER
Click on/off Open/close Library + Undo
Rewind,1 bar. Press to scroll
Open/closeApple Loops
+ Move cycle loop back
Forward, 1 bar. Press to scroll
Open/close Smart Controls
+ Move cycle loop forward
Cycle on/off Move selected track up
+ Set Left cycle point*
Stop Move selected track down
+ Set Right cycle point*
Play. Press again to pause
Previous instrument patch
+ Arpeggiator enable
Record Next instrument patch
+ -
www.nektartech.com Nektar Impact GX49 & GX61 DAW Integration User Guide 13
The Impact GX Logic Integration has been verified with Logic 8, 9 and X. The following instructions assumes you have one of these pro-grams installed running OS X 10.6 or higher.
Setup
Here are the steps you need to go through to get Logic up and running with your Impact GX:
• Locate the Impact_GX_Apple_support installer included with this package and run it.
• Plug-in your Impact GX and make sure it’s switched on (if you didn’t do so already)
• Launch Logic
• Create a new Project and at least one track
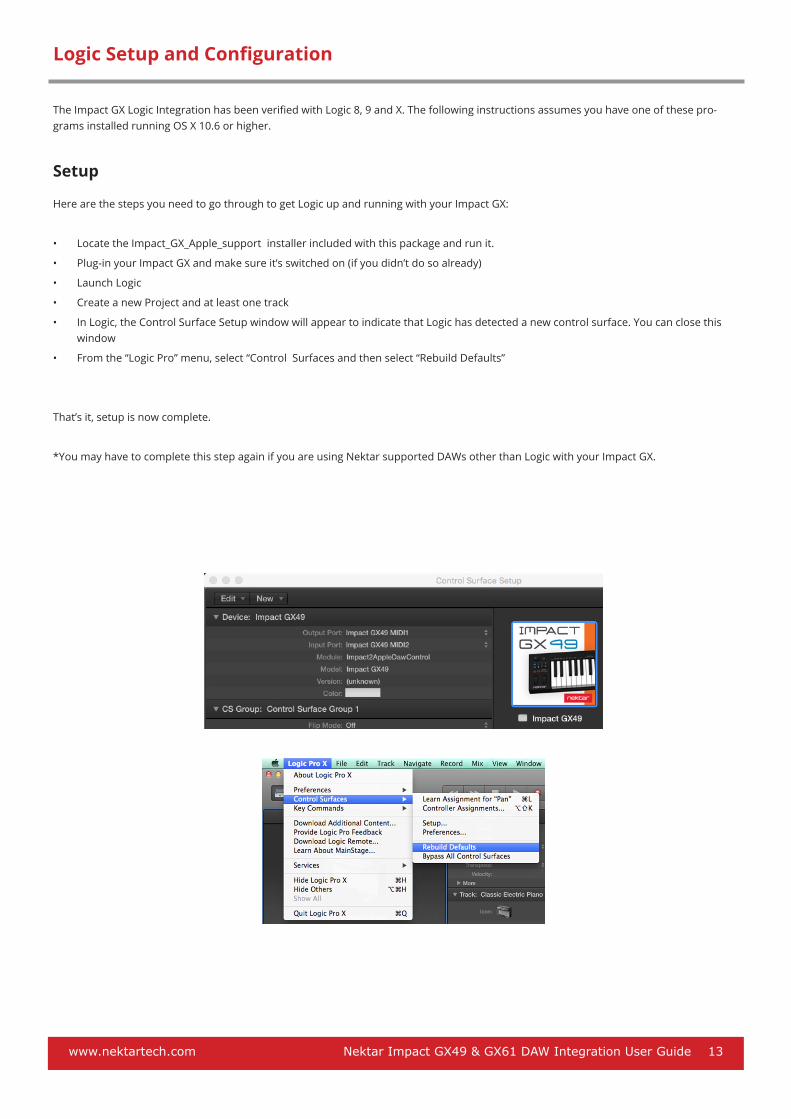
• In Logic, the Control Surface Setup window will appear to indicate that Logic has detected a new control surface. You can close this window
• From the “Logic Pro” menu, select “Control Surfaces and then select “Rebuild Defaults”
That’s it, setup is now complete.
*You may have to complete this step again if you are using Nektar supported DAWs other than Logic with your Impact GX.
Logic Setup and Configuration
14 Nektar Impact GX49 & GX61 DAW Integration User Guide www.nektartech.com
With installation complete, it’s time to take a look at how the Impact GX49 integrates with Logic.
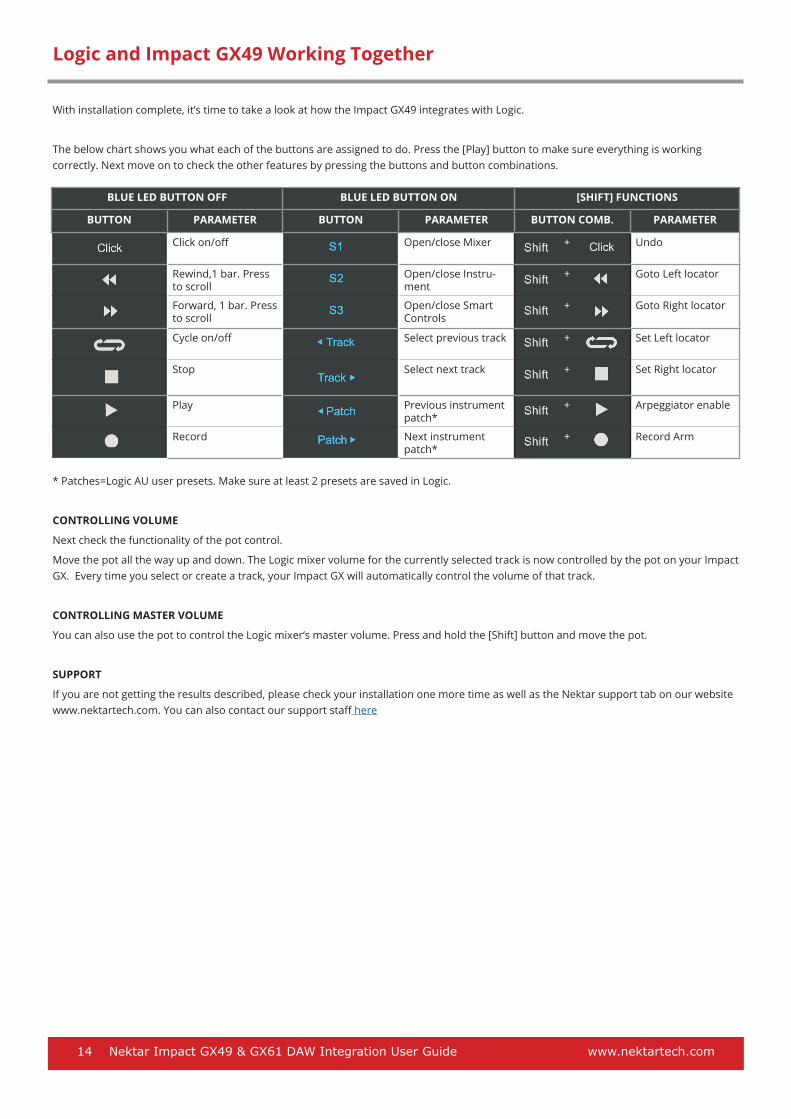
The below chart shows you what each of the buttons are assigned to do. Press the [Play] button to make sure everything is working correctly. Next move on to check the other features by pressing the buttons and button combinations.
* Patches=Logic AU user presets. Make sure at least 2 presets are saved in Logic.
CONTROLLING VOLUME
Next check the functionality of the pot control.
Move the pot all the way up and down. The Logic mixer volume for the currently selected track is now controlled by the pot on your Impact GX. Every time you select or create a track, your Impact GX will automatically control the volume of that track.
CONTROLLING MASTER VOLUME
You can also use the pot to control the Logic mixer‘s master volume. Press and hold the [Shift] button and move the pot.
SUPPORT
If you are not getting the results described, please check your installation one more time as well as the Nektar support tab on our website www.nektartech.com. You can also contact our support staff here
Logic and Impact GX49 Working Together
BLUE LED BUTTON OFF BLUE LED BUTTON ON [SHIFT] FUNCTIONS
BUTTON PARAMETER BUTTON PARAMETER BUTTON COMB. PARAMETER
Click on/off Open/close Mixer + Undo
Rewind,1 bar. Press to scroll
Open/close Instru-ment
+ Goto Left locator
Forward, 1 bar. Press to scroll
Open/close Smart Controls
+ Goto Right locator
Cycle on/off Select previous track + Set Left locator
Stop Select next track + Set Right locator
Play Previous instrument patch*
+ Arpeggiator enable
Record Next instrument patch*
+ Record Arm

www.nektartech.com Nektar Impact GX49 & GX61 DAW Integration User Guide 15
BLUE LED BUTTON OFF BLUE LED BUTTON ON [SHIFT] FUNCTIONS
BUTTON PARAMETER BUTTON PARAMETER BUTTON COMB. PARAMETER
Metronome on/off Undo + -
Rewind,a bit Play from previous marker
+ -
Forward a bit Play from next marker
+ -
Loop on/off Select previous track + -
Stop Select next track + -
Play Zoom out + -
Record Zoom in + -
Mixcraft 7 and Impact GX49 Setup and Working Together
To get up and running with Acoustica Mixcraft 7, follow these steps:
• Locate the Nektar Impact GX file included with this package
• Place the file in this location on your Windows PC (note you can copy the path in to File Explore): c:\ProgramData\Acoustica\Mixcraft\control-surfaces
• Make sure your Impact GX is connected and powered on
• Launch Mixcraft and check that the Impact GX control surface appears the following Mixcraft Menu: Mix/MIDI Control Surface
That‘s it. Setup is now complete.
OPERATING MIXCRAFT FROM IMPACT GX
The below chart shows you what each of the buttons are assigned to do. Press the [Play] button to make sure everything is working correctly. Next move on to check the other features by pressing the buttons and button combinations.
CONTROLLING MASTER VOLUME
You can also use the pot to control the Mixcraft‘s master volume. Simply move the pot.
SUPPORT
If you are not getting the results described, please check your installation one more time as well as the Nektar support tab on our website www.nektartech.com. You can also contact our support staff here

16 Nektar Impact GX49 & GX61 DAW Integration User Guide www.nektartech.com
The Impact GX Reaper Integration is compatible with Reaper 4.59 or later. We recommend that you upgrade to the latest version if you have not already done so.
These instructions assumes you have a compatible Reaper program installed running on either Windows (Vista, 7, 8, 10 or higher) or Mac OS X 10.6 or higher.
Installation
• If you have just completed a fresh install of Reaper, make sure to first open Reaper once and quit again, before installing the Impact Reaper support files.
• Locate the Impact_GX_Reaper_support installer included with this package and run it.
• Plug-in your Impact GX and make sure it’s switched on (if you didn’t do so already)
• Launch Reaper and go to Options/Preferences/Control Surfaces
• Click “Add”, then in the pop-up window, select your Impact GX model in the “Control surface mode” list. As long as your Impact GX is connected and switched on, Reaper should automatically detect the correct ports. (See Image 1 for Windows setup and Image 2 for OS X). Click “OK”
• Go to Preferences/Audio/MIDI Devices next and enable Port 1 for your Impact GX. The mode should be “Enable+Control”. The other 2 Impact GX ports should remain disabled.
• Click “Apply” and OK
That’s it, setup is now complete and you can move on to the fun part, learning how it all works.
Windows OS X
Reaper Installation and Setup
www.nektartech.com Nektar Impact GX49 & GX61 DAW Integration User Guide 17
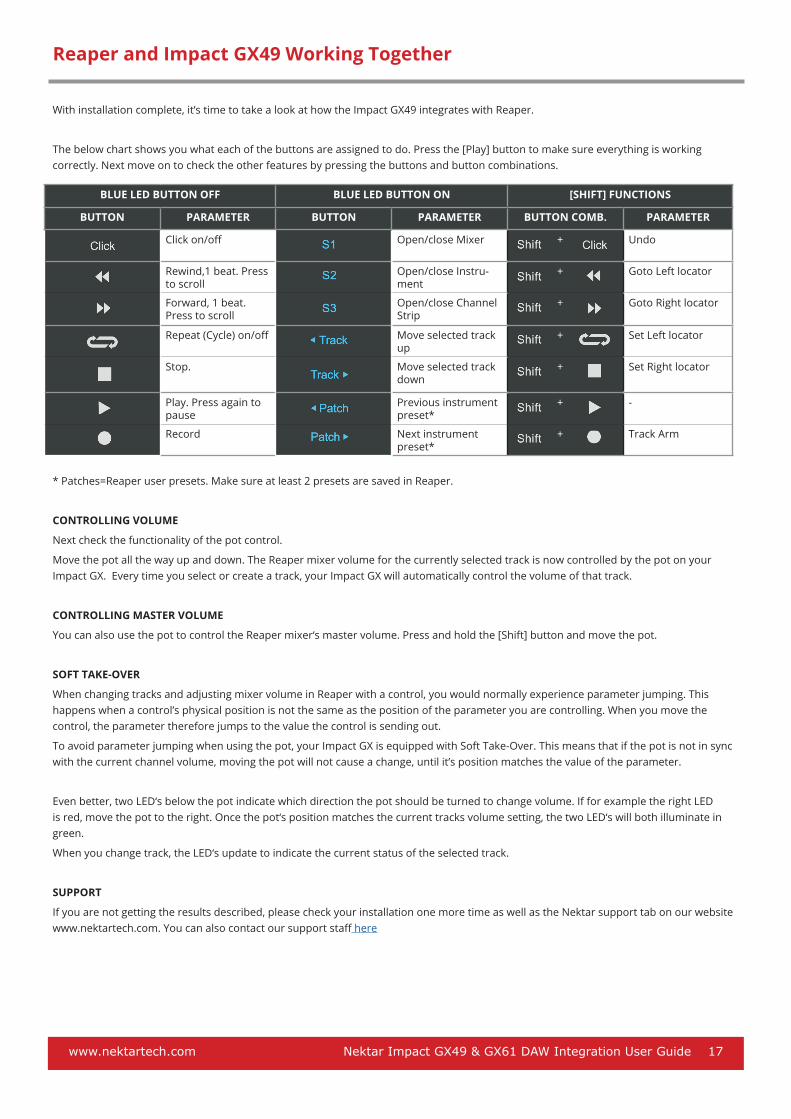
With installation complete, it’s time to take a look at how the Impact GX49 integrates with Reaper.
The below chart shows you what each of the buttons are assigned to do. Press the [Play] button to make sure everything is working correctly. Next move on to check the other features by pressing the buttons and button combinations.
* Patches=Reaper user presets. Make sure at least 2 presets are saved in Reaper.
CONTROLLING VOLUME
Next check the functionality of the pot control.
Move the pot all the way up and down. The Reaper mixer volume for the currently selected track is now controlled by the pot on your Impact GX. Every time you select or create a track, your Impact GX will automatically control the volume of that track.
CONTROLLING MASTER VOLUME
You can also use the pot to control the Reaper mixer‘s master volume. Press and hold the [Shift] button and move the pot.
SOFT TAKE-OVER
When changing tracks and adjusting mixer volume in Reaper with a control, you would normally experience parameter jumping. This happens when a control’s physical position is not the same as the position of the parameter you are controlling. When you move the control, the parameter therefore jumps to the value the control is sending out.
To avoid parameter jumping when using the pot, your Impact GX is equipped with Soft Take-Over. This means that if the pot is not in sync with the current channel volume, moving the pot will not cause a change, until it’s position matches the value of the parameter.
Even better, two LED‘s below the pot indicate which direction the pot should be turned to change volume. If for example the right LED is red, move the pot to the right. Once the pot‘s position matches the current tracks volume setting, the two LED‘s will both illuminate in green.
When you change track, the LED‘s update to indicate the current status of the selected track.
SUPPORT
If you are not getting the results described, please check your installation one more time as well as the Nektar support tab on our website www.nektartech.com. You can also contact our support staff here
Reaper and Impact GX49 Working Together
BLUE LED BUTTON OFF BLUE LED BUTTON ON [SHIFT] FUNCTIONS
BUTTON PARAMETER BUTTON PARAMETER BUTTON COMB. PARAMETER
Click on/off Open/close Mixer + Undo
Rewind,1 beat. Press to scroll
Open/close Instru-ment
+ Goto Left locator
Forward, 1 beat. Press to scroll
Open/close Channel Strip
+ Goto Right locator
Repeat (Cycle) on/off Move selected track up
+ Set Left locator
Stop. Move selected track down
+ Set Right locator
Play. Press again to pause
Previous instrument preset*
+ -
Record Next instrument preset*
+ Track Arm

18 Nektar Impact GX49 & GX61 DAW Integration User Guide www.nektartech.com
The Impact GX Reason Integration is compatible with all version of Reason from 5.0 and up. These instructions assume you have one of these programs installed running on either Windows (Vista, 7, 8 or higher) or Mac OS X 10.6 or higher.
Installation
Here are the steps you need to go through to get Reason up and running with your Impact GX:
• Locate the Impact_GX_Reason_support installer included with this package and run it.
• Plug-in your Impact GX and make sure it’s switched on (if you didn’t do so already)
• Launch Reason and go to Edit/Preferences/Control Surfaces
• Click “Auto-detect surfaces”
• You should now see Impact GX appear as a control surface In Reason.
• Close the Reason Preferences window
That’s it, setup is now complete.
Adding the Impact GX ports manually
If the Impact GX control surfaces did not appear in Reason after auto-detection, you can add it manually.
• Click the “Add“ button
• Set up each of the two ports as per the below images and click ok when done
Windows OS X
Reason Setup and Configuration
www.nektartech.com Nektar Impact GX49 & GX61 DAW Integration User Guide 19
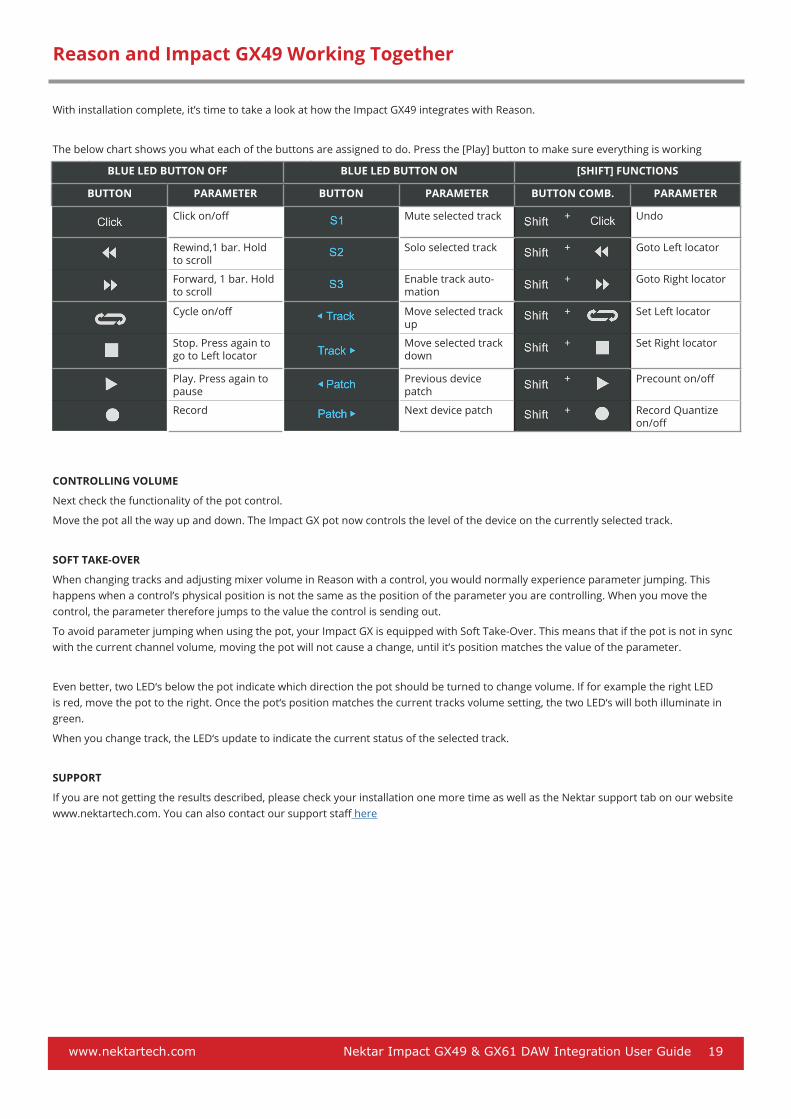
With installation complete, it’s time to take a look at how the Impact GX49 integrates with Reason.
The below chart shows you what each of the buttons are assigned to do. Press the [Play] button to make sure everything is working correctly. Next move on to check the other features by pressing the buttons and button combinations.
CONTROLLING VOLUME
Next check the functionality of the pot control.
Move the pot all the way up and down. The Impact GX pot now controls the level of the device on the currently selected track.
SOFT TAKE-OVER
When changing tracks and adjusting mixer volume in Reason with a control, you would normally experience parameter jumping. This happens when a control’s physical position is not the same as the position of the parameter you are controlling. When you move the control, the parameter therefore jumps to the value the control is sending out.
To avoid parameter jumping when using the pot, your Impact GX is equipped with Soft Take-Over. This means that if the pot is not in sync with the current channel volume, moving the pot will not cause a change, until it’s position matches the value of the parameter.
Even better, two LED‘s below the pot indicate which direction the pot should be turned to change volume. If for example the right LED is red, move the pot to the right. Once the pot‘s position matches the current tracks volume setting, the two LED‘s will both illuminate in green.
When you change track, the LED‘s update to indicate the current status of the selected track.
SUPPORT
If you are not getting the results described, please check your installation one more time as well as the Nektar support tab on our website www.nektartech.com. You can also contact our support staff here
Reason and Impact GX49 Working Together
BLUE LED BUTTON OFF BLUE LED BUTTON ON [SHIFT] FUNCTIONS
BUTTON PARAMETER BUTTON PARAMETER BUTTON COMB. PARAMETER
Click on/off Mute selected track + Undo
Rewind,1 bar. Hold to scroll
Solo selected track + Goto Left locator
Forward, 1 bar. Hold to scroll
Enable track auto-mation
+ Goto Right locator
Cycle on/off Move selected track up
+ Set Left locator
Stop. Press again to go to Left locator
Move selected track down
+ Set Right locator
Play. Press again to pause
Previous device patch
+ Precount on/off
Record Next device patch + Record Quantize on/off
20 Nektar Impact GX49 & GX61 DAW Integration User Guide www.nektartech.com
The Impact GX Sonar Integration is compatible with all versions of Sonar from v8.5 and higher.
These instructions assumes you have a compatible Sonar program installed, running on Windows (Vista, 7, 8, 10 or higher)
Setup
Here are the steps you need to go through to get Cakewalk Sonar up and running with your Impact GX:
• Locate the Impact_GX_Cakewalk_support installer included with this package and run it.
• Plug-in your Impact GX and make sure it’s switched on (if you didn’t do so already)
• Launch Sonar and go to Edit/Preferences/MIDI/Devices
• Make sure both Impact GX and MIDIIN2 (IMPACT GX) are ticked.
• In Sonar Preferences, now go to MIDI/Control Surfaces
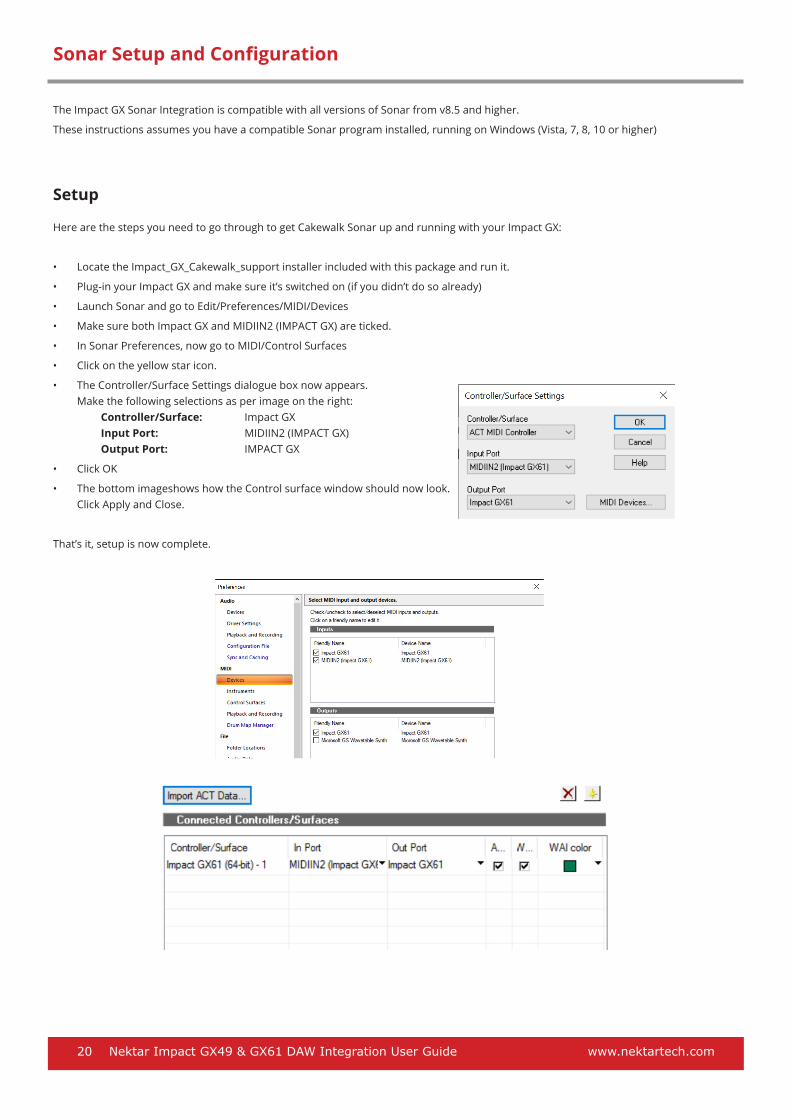
• Click on the yellow star icon.
• The Controller/Surface Settings dialogue box now appears. Make the following selections as per image on the right: Controller/Surface: Impact GX Input Port: MIDIIN2 (IMPACT GX) Output Port: IMPACT GX
• Click OK
• The bottom imageshows how the Control surface window should now look. Click Apply and Close.
That’s it, setup is now complete.
Sonar Setup and Configuration

www.nektartech.com Nektar Impact GX49 & GX61 DAW Integration User Guide 21
With installation complete, it’s time to take a look at how the Impact GX49 integrates with Cakewalk Sonar.
The below chart shows you what each of the buttons are assigned to do. Press the [Play] button to make sure everything is working correctly. Next move on to check the other features by pressing the buttons and button combinations.
* To open and close the correct instrument window, you‘ll need to use the Patch buttons to navigate the instrument rack.
CONTROLLING VOLUME
Next check the functionality of the pot control.
Move the pot all the way up and down. The Sonar mixer volume for the currently selected track is now controlled by the pot on your Im-pact GX. Every time you select or create a track, your Impact GX will automatically control the volume of that track.
CONTROLLING MASTER VOLUME
You can also use the pot to control the Sonar mixer‘s master volume. Press and hold the [Shift] button and move the pot.
SOFT TAKE-OVER
When changing tracks and adjusting mixer volume in Sonar with a control, you would normally experience parameter jumping. This happens when a control’s physical position is not the same as the position of the parameter you are controlling. When you move the control, the parameter therefore jumps to the value the control is sending out.
To avoid parameter jumping when using the pot, your Impact GX is equipped with Soft Take-Over. This means that if the pot is not in sync with the current channel volume, moving the pot will not cause a change, until it’s position matches the value of the parameter.
Even better, two LED‘s below the pot indicate which direction the pot should be turned to change volume. If for example the right LED is red, move the pot to the right. Once the pot‘s position matches the current tracks volume setting, the two LED‘s will both illuminate in green.
When you change track, the LED‘s update to indicate the current status of the selected track.
SUPPORT
If you are not getting the results described, please check your installation one more time as well as the Nektar support tab on our website www.nektartech.com. You can also contact our support staff here
Sonar and Impact GX49 Working Together
BLUE LED BUTTON OFF BLUE LED BUTTON ON [SHIFT] FUNCTIONS
BUTTON PARAMETER BUTTON PARAMETER BUTTON COMB. PARAMETER
Click on/off Open Mixer . Two press to close
+ Undo
Rewind,1 bar Open Instrument. Two presses to close
+ Goto Left locator
Forward, 1 bar - + Goto Right locator
Cycle on/off Select previous Track + Set Left locator
Stop Select next Track + Set Right locator
Play Previous Instrument in rack*
+ -
Record Next instrument in rack *
+ Record Arm

22 Nektar Impact GX49 & GX61 DAW Integration User Guide www.nektartech.com
The Impact GX Studio One Integration is compatible with Studio One 3.0 or later. We recommend that you upgrade to the latest version if you have not already done so.
Installation
• Locate the Impact_GX_Presonus_support installer included with this package and run it.
• Plug-in your Impact GX and make sure it’s switched on (if you didn’t do so already)
• Launch Studio One and in the initial screen, click on “Configure External Devices“
• In the „Options“ menu that appears, click on “External Devices“
• The window should now show 2 Impact GX devices. Click ok and close the window.
• Create a new project or open an existing one.
• Press the play button on the Impact keyboard to confirm that Impact GX is communicating with Studio One 3.
That’s it, setup is now complete and you can move on to the fun part, learning how it all works.
Troubleshooting: If only one or no Impact GX appears in the Options menu, you may have to set it up manually.check steps 6, 7 and 8 on this page, for information about how to do that. Check also the troubleshooting steps at the bottom of that page, if you continue to strugg-le with the Studio One setup.
Studio One Setup and Configuration

www.nektartech.com Nektar Impact GX49 & GX61 DAW Integration User Guide 23
With installation complete, it’s time to take a look at how the Impact GX49 integrates with Studio One.
The below chart shows you what each of the buttons are assigned to do. Press the [Play] button to make sure everything is working correctly. Next move on to check the other features by pressing the buttons and button combinations.
CONTROLLING VOLUME
The Impact GX pot is automatically assigned to control volume on the currently selected track. Every time you select or create a track, your Impact GX will automatically control the volume of that track.
CONTROLLING MASTER VOLUME
You can also use the pot to control the Studio One mixer‘s master volume. Press and hold the [Shift] button and move the pot.
SUPPORT
If you are not getting the results described, please check your installation one more time as well as the Nektar support tab on our website www.nektartech.com. You can also contact our support staff here
Studio One and Impact GX49 Working Together
BLUE LED BUTTON OFF BLUE LED BUTTON ON [SHIFT] FUNCTIONS
BUTTON PARAMETER BUTTON PARAMETER BUTTON COMB. PARAMETER
Click on/off Open/close Mixer + Undo
Rewind,1 bar Open/close Instru-ment
+ Goto Left locator
Forward, 1 bar Open/close browser + Goto Right locator
Cycle on/off Select previous track + Set Left locator
Stop. Press again to play start
Select next track + Set Right locator
Play. Press again to pause
Previous instrument patch
+ Precount
Record Next instrument patch
+ Quantize Mode
24 Nektar Impact GX49 & GX61 DAW Integration User Guide www.nektartech.com
The Nektar DAW Integration files automatically map the Octave and Transpose buttons so they can be used to control transport. If your DAW is not supported directly , you may still be able to control your DAWs transport controls using MIDI Machine Control.
Here is how you set up the Impact GX keyboard to send MIDI Machine Control messages
• Press the [Setup] button. The LED above the button will blink and the color is orange to indicate setup is active.
• Press the A2 key on your GX keyboard.
• Press the numeric key to enter 3
• Press Enter (C5). This will accept the change and exit Setup.
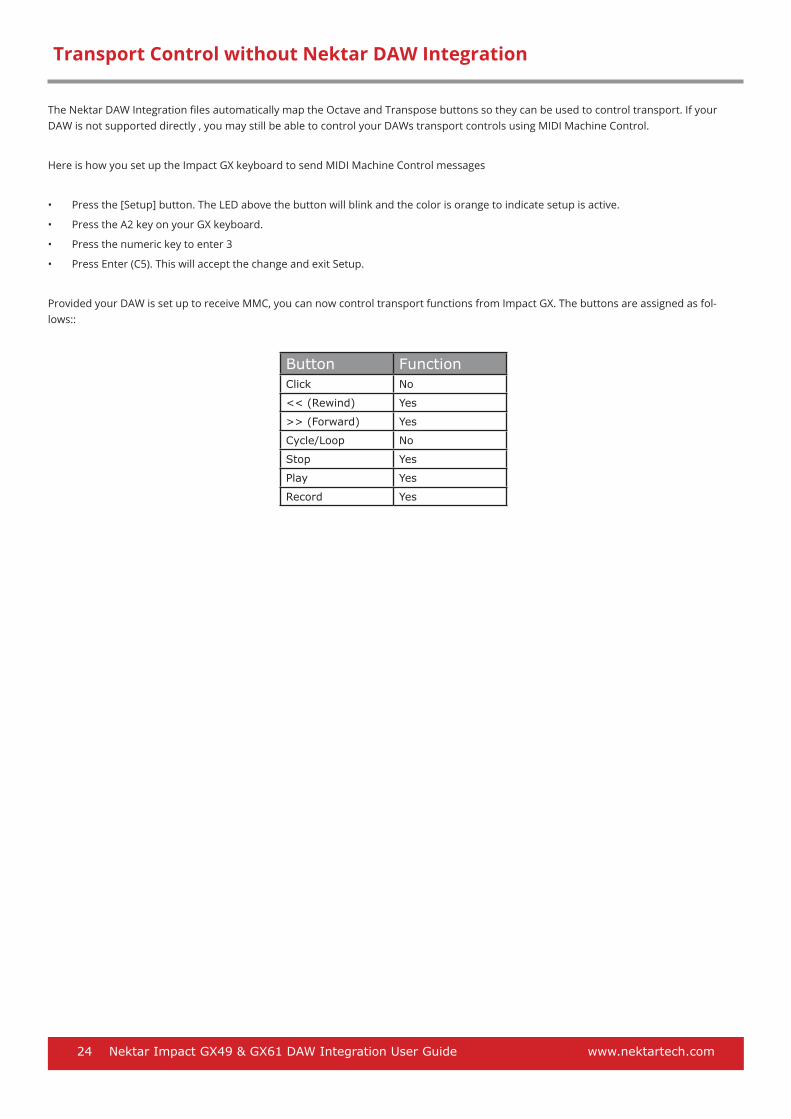
Provided your DAW is set up to receive MMC, you can now control transport functions from Impact GX. The buttons are assigned as fol-lows::
Button FunctionClick No
<< (Rewind) Yes
>> (Forward) Yes
Cycle/Loop No
Stop Yes
Play Yes
Record Yes
Transport Control without Nektar DAW Integration
www.nektartech.com Nektar Impact GX49 & GX61 DAW Integration User Guide 25
Avid Pro Tools is a closed environment that doesn‘t offer the same external control as other DAWs. However there are a few options to set up your Impact GX for use with Pro Tools.
You can for example use MMC as described on the previous page to control Pro Tools transport.
There is also an option to use a standard setup that provides a bit more functionality. Check this page for setup details.
Setting up Impact GX to Work with Pro Tools