User Guide -...
575
User Guide Delphi Connect 4G LTE
Transcript of User Guide -...

User Guide
Delphi Connect 4G LTE

2
Welcome .................................................................................................................................................................11Is My Vehicle Compatible? ...............................................................................................................................12Package Contents ..............................................................................................................................................13Equipment Overview ..........................................................................................................................................13System Requirements .......................................................................................................................................14Installation Requirements ...............................................................................................................................14First-Time Setup Using Smartphone App ..................................................................................................15Find Your Vehicle’s OBD Connector Port ....................................................................................................20Need help finding your vehicle’s OBD Connector Port? ........................................................................20Install Your Module .............................................................................................................................................22Initiate Module Setup ........................................................................................................................................23Verify Module Setup ..........................................................................................................................................24Verify Wi-fi Hotspot ...........................................................................................................................................26First-Time Setup Using Delphi Connect Website ....................................................................................27Launch Your Internet Browser ........................................................................................................................27Sign In to Your Delphi Account .......................................................................................................................27Find Your Vehicle’s OBD Connector Port ....................................................................................................30Need help finding your vehicle’s OBD Connector port? ........................................................................31Install Your Module .............................................................................................................................................34Verify Module Setup ..........................................................................................................................................37Reconnect Your Module ....................................................................................................................................38Install Your Module .............................................................................................................................................38Initiate Module Setup ........................................................................................................................................39Verify Module Setup ..........................................................................................................................................40Application & Service Features .....................................................................................................................41Using the Android App ......................................................................................................................................41 Forgot Username or Password .............................................................................................................41 Navigating Around .....................................................................................................................................45 Refreshing Your Vehicle Data ................................................................................................................47 Selecting Your Vehicle ..............................................................................................................................48 Dashboard ....................................................................................................................................................49
Table Of Contents
3
Location .........................................................................................................................................................52 Hide/Show Vehicles on the Location Map ........................................................................................55 Map View .......................................................................................................................................................57 View Geo-Fences ......................................................................................................................................58 Find My Car ..................................................................................................................................................59 Find All My Cars ..........................................................................................................................................60 Navigate to Vehicle ...................................................................................................................................61 Programmable Odometer .......................................................................................................................62 Managing Geo-Fences ..............................................................................................................................64 Create a Geo-Fence Using the Map .....................................................................................................64 Create a Geo-Fence by Searching for an Address or Business Name ....................................70 Edit an Existing Geo-Fence ....................................................................................................................78 Delete an Existing Geo-Fence ...............................................................................................................83 Enable or Disable a Geo-Fence .............................................................................................................86 Live Tracking ................................................................................................................................................90 Alerts ..............................................................................................................................................................94 Clearing Alerts ............................................................................................................................................96 Health .............................................................................................................................................................98 Performing a Diagnostic Code Scan on Your Vehicle ....................................................................99 Clearing Diagnostic Codes .....................................................................................................................100 Recent Trips .................................................................................................................................................103 Key Fob Pairing ...........................................................................................................................................106 Key Fob Pairing Without VIN..................................................................................................................110 Pair Smartphone Bluetooth® to Module ............................................................................................113 Remove the Bluetooth Connection to Your Module .....................................................................119 Settings .........................................................................................................................................................125 Account Settings........................................................................................................................................126 User Settings ...............................................................................................................................................127 Account Email Address ...........................................................................................................................127 Add Account Email Address ...................................................................................................................127 Edit or Delete Account Email Address ...............................................................................................128

4
Change Username ......................................................................................................................................130 Change Password .......................................................................................................................................132 Vehicle Nicknames and Descriptions ..................................................................................................134 Modify Vehicle Nickname ........................................................................................................................135 Modify Vehicle Description ....................................................................................................................138 Select Notification Language ................................................................................................................141 Select Unit of Measure ............................................................................................................................143 Module Management ................................................................................................................................145 View Modules Associated with Your Account .................................................................................145 Add a Module to Your Account ..............................................................................................................146 Remove a Module from Your Account ................................................................................................150 Vehicle Settings ..........................................................................................................................................153 Review Your Vehicle Information .........................................................................................................153 Edit Your Vehicle Information ...............................................................................................................155 Configuring Alerts .....................................................................................................................................159 Configuring the Geo-Fence Alerts .......................................................................................................159 Configuring the Speed Alert ..................................................................................................................166 Configuring the Motion Alert ................................................................................................................172 Configuring the Engine RPM Alert .......................................................................................................178 Configuring Notifications .......................................................................................................................184 Add a Notification......................................................................................................................................185 Modify or Delete a Notification ............................................................................................................193 Wi-Fi Hotspot ..............................................................................................................................................199 Configure the Network Name (SSID) and Broadcasting ..............................................................199 Configure the Network Password ........................................................................................................201 Configure the Hotspot Timeouts .........................................................................................................203 View Connected Devices .........................................................................................................................205 Wi-Fi Administrator Portal Access .....................................................................................................206 View Hotspot Data Usage .......................................................................................................................208 View, Block and Unblock Connected Devices ..................................................................................209 Modify Administrator Password ..........................................................................................................210
5
Modify Hotspot Timeout .........................................................................................................................211 Backup and Restore Hotspot Settings ..............................................................................................212 Settings .........................................................................................................................................................212 Modify Basic Hotspot Settings ............................................................................................................213 Modify Advanced Hotspot Settings ...................................................................................................214 View Hotspot Support Information ....................................................................................................217 About Section ..............................................................................................................................................228 Locating Your OBD Connector ..............................................................................................................228 Reviewing the Terms of Use and Privacy Policy .............................................................................230 Logout ............................................................................................................................................................232Using the iPhone App .........................................................................................................................................233 Forgot Username or Password .............................................................................................................233 Navigating Around .....................................................................................................................................237 Refreshing Your Vehicle Data ................................................................................................................239 Selecting Your Vehicle ..............................................................................................................................240 Dashboard ....................................................................................................................................................241 Location .........................................................................................................................................................244 Hide/Show Vehicles on the Location Map ........................................................................................247 Map View .......................................................................................................................................................249 View Geo-Fences .......................................................................................................................................250 Find My Car ..................................................................................................................................................251 Find All My Cars .........................................................................................................................................252 Navigate To Vehicle ...................................................................................................................................253 Programmable Odometer .......................................................................................................................254 Managing Geo-Fences ..............................................................................................................................256 Create a Geo-Fence Using the Map .....................................................................................................256 Create a Geo-Fence by Searching for an Address or Business Name ....................................262 Edit an Existing Geo-Fence ....................................................................................................................270 Delete an Existing Geo-Fence ...............................................................................................................275 Enable or Disable a Geo-Fence .............................................................................................................278 Live Tracking ................................................................................................................................................280
6
Alerts ..............................................................................................................................................................282 Health .............................................................................................................................................................286 Performing a Diagnostic Code Scan on Your Vehicle ....................................................................287 Clearing Diagnostic Codes .....................................................................................................................288 Recent Trips .................................................................................................................................................290 Key Fob Pairing ...........................................................................................................................................293 Key Fob Pairing Without VIN..................................................................................................................300 Pair Smartphone Bluetooth® to Module ............................................................................................304 Remove the Bluetooth Connection to Your Module .....................................................................313 Settings .........................................................................................................................................................319 Account Settings........................................................................................................................................320 User Settings ...............................................................................................................................................320 Account Email Address ............................................................................................................................320 Add Account Email Address ...................................................................................................................321 Edit or Delete Account Email Address ...............................................................................................322 Change Username ......................................................................................................................................324 Change Password .......................................................................................................................................326 Vehicle Nicknames and Descriptions ..................................................................................................328 Modify Vehicle Nickname ........................................................................................................................329 Modify Vehicle Description ....................................................................................................................332 Select Notification Language ................................................................................................................335 Select Unit of Measure ............................................................................................................................337 Module Management ................................................................................................................................339 View Modules Associated with Your Account .................................................................................339 Add a Module to Your Account ..............................................................................................................340 Remove a Module from Your Account ................................................................................................344 Vehicle Settings ..........................................................................................................................................347 Review Your Vehicle Information .........................................................................................................347 Edit Your Vehicle Information ...............................................................................................................349 Configuring Alerts .....................................................................................................................................353 Configuring the Geo-Fence Alerts .......................................................................................................353

7
Configuring the Speed Alert ..................................................................................................................360 Configuring the Motion Alert ................................................................................................................366 Configuring the Engine RPM Alert .......................................................................................................372 Configuring Notifications .......................................................................................................................378 Add a Notification......................................................................................................................................379 Delete a Notification ................................................................................................................................386 Wi-Fi Hotspot ..............................................................................................................................................392 Configure the Network Name (SSID) and Broadcasting ..............................................................392 View Connected Devices .........................................................................................................................394 Configure the Network Password ........................................................................................................395 Configure the Hotspot Timeouts .........................................................................................................397 Wi-Fi Administrator Portal Access .....................................................................................................399 View Hotspot Data Usage .......................................................................................................................401 View, Block and Unblock Connected Devices ..................................................................................402 Modify Administrator Password ..........................................................................................................403 Modify Hotspot Timeout .........................................................................................................................404 Backup and Restore Hotspot Settings ..............................................................................................405 Settings .........................................................................................................................................................405 Modify Basic Hotspot Settings ............................................................................................................406 Modify Advanced Hotspot Settings ...................................................................................................407 View Hotspot Support Information ....................................................................................................410 Enable Personal PIN-Code......................................................................................................................415 Disable Personal PIN-Code ....................................................................................................................418 About Section ..............................................................................................................................................421 Locating Your OBD Connector ..............................................................................................................421 Reviewing the Terms of Use and Privacy Policy .............................................................................423 Logout ............................................................................................................................................................425Using the Delphi Connect Website ...............................................................................................................426 Accessing the Website .............................................................................................................................426 Forgot Username or Password .............................................................................................................426 Navigating Around .....................................................................................................................................430
8
Selecting Your Vehicle ..............................................................................................................................431 Vehicle Settings ..........................................................................................................................................434 Edit Your Vehicle Information ...............................................................................................................434 Vehicle Nicknames and Descriptions ..................................................................................................437 Modify Vehicle Nickname ........................................................................................................................438 Username Menu ..........................................................................................................................................441 Refreshing Your Vehicle Data ................................................................................................................442 Dashboard ....................................................................................................................................................443 Location .........................................................................................................................................................446 Hide/Show Vehicles on the Location Map ........................................................................................450 Find My Car ..................................................................................................................................................452 Find All My Cars ..........................................................................................................................................453 Map View .......................................................................................................................................................454 Programmable Odometer .......................................................................................................................455 Managing Geo-Fences ..............................................................................................................................457 Create a Geo-Fence Using the Map .....................................................................................................457 Create a Geo-Fence by Searching for an Address or Business Name ....................................461 Edit an existing Geo-Fence ....................................................................................................................466 Delete an Existing Geo-Fence ...............................................................................................................467 Enable or Disable a Geo-Fence .............................................................................................................469 Live Tracking ................................................................................................................................................472 Alerts ..............................................................................................................................................................474 Clearing Alerts ............................................................................................................................................475 Health .............................................................................................................................................................476 Performing a Diagnostic Code Scan on Your Vehicle ....................................................................477 Clearing Diagnostic Codes .....................................................................................................................478 Recent Trips .................................................................................................................................................480 Key Fob Pairing ...........................................................................................................................................481 Key Fob Setup without VIN ....................................................................................................................485 Username Menu ..........................................................................................................................................488 User Settings, Notification Language and Units of Measure ...................................................489
9
Settings .........................................................................................................................................................491 Module Management ................................................................................................................................491 View Modules Associated with Your Account .................................................................................492 Add a Module to Your Account ..............................................................................................................493 Remove a Module from Your Account ................................................................................................496 Configuring Alerts .....................................................................................................................................498 Configuring the Geo-Fence Alerts .......................................................................................................498 Configuring the Speed Alert ..................................................................................................................502 Configuring the Motion Alert ................................................................................................................505 Configuring the Engine RPM Alert .......................................................................................................507 Configuring Notifications .......................................................................................................................509 Add a Notification Email Address ........................................................................................................509 Delete a Notification Email Address ..................................................................................................512 Add a Notification Text Number ...........................................................................................................514 Delete a Notification Text Number ......................................................................................................517 Wi-Fi Hotspot ..............................................................................................................................................519 Configure the Wi-Fi Hotspot .................................................................................................................519 View Wi-Fi Connected Devices .............................................................................................................524 Log Out Mobile Device .............................................................................................................................525 Wi-Fi Administrator Portal Access .....................................................................................................526 View Hotspot Data Usage .......................................................................................................................528 View, Block and Unblock Connected Devices ..................................................................................529 Modify Administrator Password ..........................................................................................................530 Modify Hotspot Timeout .........................................................................................................................531 Backup and Restore Hotspot Settings ..............................................................................................532 Settings .........................................................................................................................................................532 Modify Basic Hotspot Settings ............................................................................................................533 Modify Advanced Hotspot Settings ...................................................................................................534 View Hotspot Support Information ....................................................................................................537Frequently Asked Questions ..........................................................................................................................542Status LED and Troubleshooting ...................................................................................................................558

10
Understanding the Status LED Indicators .................................................................................................558Troubleshooting ...................................................................................................................................................560Customer Information .......................................................................................................................................567Product Safety and Warranty .........................................................................................................................568
11
Welcome
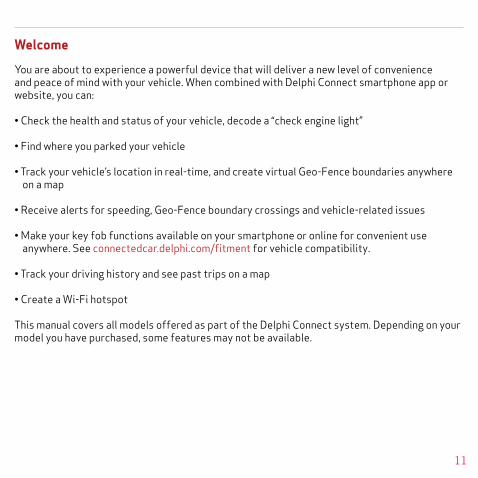
You are about to experience a powerful device that will deliver a new level of convenience and peace of mind with your vehicle. When combined with Delphi Connect smartphone app or website, you can:
• Check the health and status of your vehicle, decode a “check engine light”
• Find where you parked your vehicle
• Track your vehicle’s location in real-time, and create virtual Geo-Fence boundaries anywhere on a map
• Receive alerts for speeding, Geo-Fence boundary crossings and vehicle-related issues
• Make your key fob functions available on your smartphone or online for convenient use anywhere. See connectedcar.delphi.com/fitment for vehicle compatibility.
• Track your driving history and see past trips on a map
• Create a Wi-Fi hotspot
This manual covers all models offered as part of the Delphi Connect system. Depending on your model you have purchased, some features may not be available.

12
Is My Vehicle Compatible?
The Delphi Connect module works with most 1996 and newer vehicles (cars, light trucks, SUVs and minivans) sold in the United States including domestic, Asian and European imports. Before you start installation, please visit connectedcar.delphi.com/fitment to make sure your vehicle is compatible with the Delphi Connect system. The fitment guide will also tell you if a Relocation Kit* is recommended for your vehicle. These can be purchased at verizonwireless.com/accessories.
NOTE: Screen images and icons shown are for reference only. Changes may occur in the future.
* Sold Separately

13
• Delphi Connect Module• Get to Know Your Device Guide• Product Safety and Warranty Guide
If anything is missing, please contact Verizon Wireless Customer Service at (800) 922-0204 or by dialing *611 from your Verizon mobile phone.
Note: The figures are only for your reference. The actual shape and color of the product may differ slightly.
Equipment Overview
Package Contents
The package you purchased should contain the following items. Please contact Verizon Wireless if any of the items are missing or damaged.
1. OBD connector (plugs into vehicle ’s OBD-II port)
2. Function button
3. Status LED4. Service connector (manufacturer use only)5. Labels, showing product information
1
2
3
5
(bottom)
4
Product Safety & Warranty Information
PSW
233V
W
Delphi Connect SystemA
Get to KnowYour Device
Delphi Connect System
14
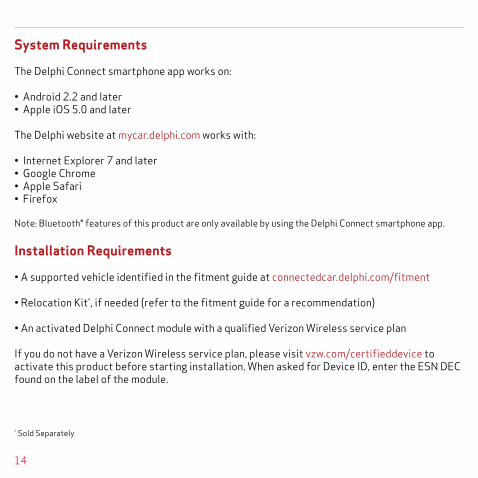
System Requirements
The Delphi Connect smartphone app works on:
• Android 2.2 and later• Apple iOS 5.0 and later
The Delphi website at mycar.delphi.com works with:
• Internet Explorer 7 and later• Google Chrome• Apple Safari• Firefox
Note: Bluetooth® features of this product are only available by using the Delphi Connect smartphone app.
Installation Requirements
• A supported vehicle identified in the fitment guide at connectedcar.delphi.com/fitment
• Relocation Kit*, if needed (refer to the fitment guide for a recommendation)
• An activated Delphi Connect module with a qualified Verizon Wireless service plan
If you do not have a Verizon Wireless service plan, please visit vzw.com/certifieddevice to activate this product before starting installation. When asked for Device ID, enter the ESN DEC found on the label of the module.
* Sold Separately

15
First-Time Setup Using Smartphone App
Download Delphi Connect Smartphone App1. Launch your smartphone’s app store—either Google Play Store for Android or Apple’s
App Store for iPhone.2. Search for the Delphi Connect app and download it to your smartphone.
Sign In to Your Delphi Account1. Launch the Delphi Connect app.
2. In the Username, enter the Registration Key exactly as it is printed on the module label - including the dash. If you purchased model ACT233L with the WiFi hotspot, in the Password field, enter the IMEI exactly as it is printed on the label. For all other models, in the Password field, enter the ESN DEC exactly as it is printed on the label.
Model ACT233L

16
3. If you purchased model ACT233L with the WiFi hotspot, the WiFi hotspot SSID and Password are located on the product label. The SSID is the network name that your device will broadcast for the hotspot. It will look like Verizon-ACT233L-12AB where 12AB will be four characters specific to your module. Enter the SSID and Password here. You will need them later to verify that the hotspot is working.
SSID (Network Name):
Password:
4. Review and accept the privacy and terms of use.
On Android:

17
On iPhone:

18
5. When prompted, change your Username and Password, to something easy to remember but difficult for other people to guess. Passwords must be at least six characters long and include at least one number. Usernames must be at least one character long and do not have to include a number.

19
6. You will see the following screen after successfully changing your username and password.
7. Now you’re ready to install the module in your vehicle.
Note: The Delphi Connect smartphone app will remain logged in to your vehicle indefinitely, unless you log out using the Log Out feature.
Note: The Delphi Connect smartphone app will be updated periodically and you will receive notification of updates via standard Android and iOS app update notifications.
Note: You can review Delphi’s complete Terms of Use and Privacy Policy at connectedcar.delphi.com/terms

20
Find Your Vehicle’s OBD Connector PortThe OBD connector is usually located on or under the dash, on the driver’s side. Other possible locations are the center console area or inside the glove compartment.
Need help finding your vehicle’s OBD Connector Port?1. After logging in for the first time, tap OBD LOCATOR.
2. Select your vehicle make from the provided drop-down selector and tap Submit. If you are unable to select your vehicle, you can use the “Click here” link to submit an email for the unlisted vehicle.
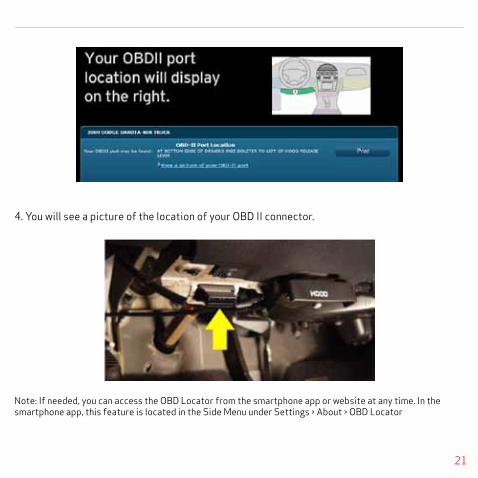
3. A description of the location of your OBD II port will be given. Click “View a picture of your OBD-II port” to view an actual photograph of the location of your OBD II port.
21
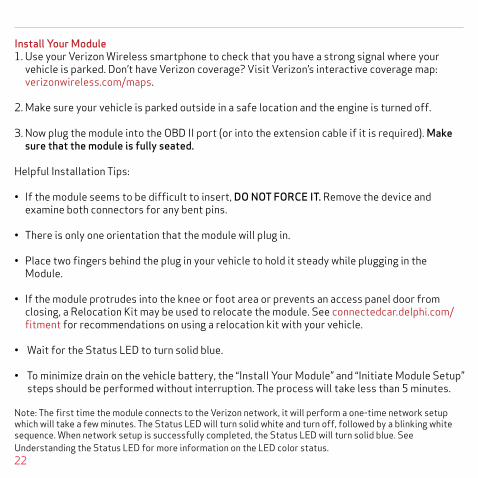
4. You will see a picture of the location of your OBD II connector.
Note: If needed, you can access the OBD Locator from the smartphone app or website at any time. In the smartphone app, this feature is located in the Side Menu under Settings > About > OBD Locator
22
Install Your Module1. Use your Verizon Wireless smartphone to check that you have a strong signal where your
vehicle is parked. Don’t have Verizon coverage? Visit Verizon’s interactive coverage map: verizonwireless.com/maps.
2. Make sure your vehicle is parked outside in a safe location and the engine is turned off.
3. Now plug the module into the OBD II port (or into the extension cable if it is required). Make sure that the module is fully seated.
Helpful Installation Tips:
• If the module seems to be difficult to insert, DO NOT FORCE IT. Remove the device and examine both connectors for any bent pins.
• There is only one orientation that the module will plug in.
• Place two fingers behind the plug in your vehicle to hold it steady while plugging in the Module.
• If the module protrudes into the knee or foot area or prevents an access panel door from closing, a Relocation Kit may be used to relocate the module. See connectedcar.delphi.com/fitment for recommendations on using a relocation kit with your vehicle.
• Wait for the Status LED to turn solid blue.
• To minimize drain on the vehicle battery, the “Install Your Module” and “Initiate Module Setup” steps should be performed without interruption. The process will take less than 5 minutes.
Note: The first time the module connects to the Verizon network, it will perform a one-time network setup which will take a few minutes. The Status LED will turn solid white and turn off, followed by a blinking white sequence. When network setup is successfully completed, the Status LED will turn solid blue. See Understanding the Status LED for more information on the LED color status.
23
Note: To avoid any unnecessary drain on the vehicle battery, it is recommended to not leave the module in the solid blue state for more than 24 hours.
Initiate Module SetupStop! Do not proceed until the Status LED is solid blue, indicating activation on the Verizon network is complete.
1. Insert your vehicle’s ignition key and turn it to the On position (not ACC/Accessory). Do not start the engine!
Note: Typically, all of the warning lamps on the dashboard will illuminate briefly in this position.
Note: For pushbutton-start vehicles, the procedure is typically to push the Start button without your foot on the brake (check your vehicle owner’s manual to determine how many presses are required to turn the ignition on).
2. Press and hold the Function Button on the side of the module until the Status LED blinks red one time. This will occur after approximately 5 seconds. Then release the Function Button. The LED will blink red several times while vehicle setup occurs.
3. Wait up to 30 seconds for the LED to display a mix of solid and blinking green.
4. Wait until the LED stops flashing green and goes out.
5. When the LED begins to flash blue every 10 seconds, setup is complete.
Stop! Do not proceed if the Status LED never turned green and returned to solid blue. Your vehicle may not be compatible with the Delphi Connect system (check fitment guide connectedcar.delphi.com/fitment) or you did not place the ignition in the On position.

24
Verify Module Setup1. Start the engine and let it run for at least 30 seconds.
2. Stop the engine and wait at least 20 seconds.
3. You are now ready to access your vehicle information using the Delphi Connect app or website. • Open the Delphi Connect app and, if needed, sign in using the username and password
you created in Sign In to Your Delphi Account.
• You should see the Dashboard screen.

25
• If not, tap the Retry button.
• If you still do not see the Dashboard screen, go to the Troubleshooting section of this guide.

26
Verify Wi-fi HotspotStop! Do not proceed until you have successfully completed Step 6: Verify Module Setup and verified proper functioning of the module.
• Start your vehicle’s engine• Press your phone’s Home button• Follow the procedure for turning on your smartphone’s Wi-Fi feature• Tap Scan for Devices if your phone doesn’t begin scanning automatically• When the SSID (Network Name) you wrote down earlier appears, select it.• When asked for the Wi-Fi password, enter the password you wrote down earlier.• The device Verizon-ACT233L should now show as connected• Using your smartphone, verify that you can access remote services such as the internet
Congratulations, you have completed verification of your Wi-Fi hotspot.
Note: You can change the Wi-Fi hotspot settings such as the network name (SSID) and password using the Wi-Fi Hotspot Settings available in the smartphone app and on the mycar.delphi.com website.
Note: If the module has a cellular connection and the Wi-Fi hotspot is on and connected to at least one device, the ability to send key FOB commands over Bluetooth will be disabled. All key FOB commands will be sent over the cellular network.

27
First-Time Setup Using Delphi Connect Website
Launch Your Internet BrowserUse your website browser and go to mycar.delphi.com.
Sign In to Your Delphi Account1. In the Username, enter the Registration Key exactly as it is printed on the module
label - including the dash. In the Password field, enter the IMEI exactly as it is printed on the label.
2. If you purchased model ACT233L with the WiFi hotspot, in the Password field, enter the IMEI exactly as it is printed on the label. For all other models, in the Password field, enter the ESN DEC exactly as it is printed on the label.
Model ACT233L
28
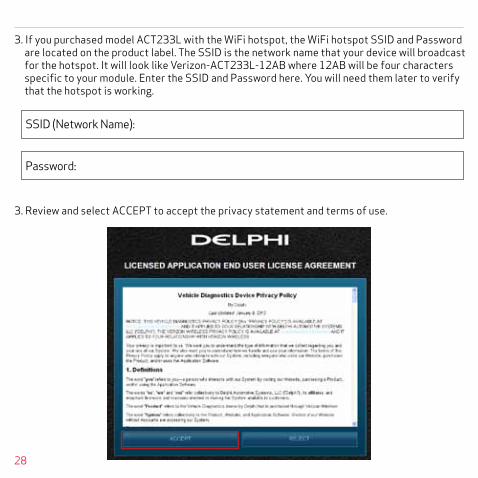
3. Review and select ACCEPT to accept the privacy statement and terms of use.
3. If you purchased model ACT233L with the WiFi hotspot, the WiFi hotspot SSID and Password are located on the product label. The SSID is the network name that your device will broadcast for the hotspot. It will look like Verizon-ACT233L-12AB where 12AB will be four characters specific to your module. Enter the SSID and Password here. You will need them later to verify that the hotspot is working.
SSID (Network Name):
Password:

29
4. When prompted, change your Username and Password to something easy to remember but difficult for other people to guess. Passwords must be at least six characters long and include at least one number. Usernames must be at least one character long and do not have to include a number.

30
6. Now you’re ready to install the module in your vehicle.
Note: The website will automatically log you out after 20 minutes of inactivity, unless you log out using the Log Out feature.
Note: You can review Delphi’s complete Terms of Use and Privacy Policy at connectedcar.delphi.com/terms
Find Your Vehicle’s OBD Connector PortThe OBD connector is usually located on or under the dash, on the driver’s side. Other possible locations are the center console area or inside the glove compartment.
5. You will see the following screen after successfully changing your username and password.

31
Need help finding your vehicle’s OBD Connector port?1. After logging in for the first time, click the button labeled OBD LOCATOR. You will be presented with the OBD II Port Location Guide.
2. Select you vehicle make from the provided drop-down selections.

32
3. Complete your vehicle selections using the drop-downs for Make, Model, Year, Body Type and Trim as requested and then select Submit.
If you are unable to select your vehicle, you can use the “Click here” link to submit an email for the unlisted vehicle.

33
4. A description of the location of your OBD II port will be given. Click “View a picture of your OBD II port” to view an actual photograph of the location of your OBD II port.
You can also use the Print button to print this page to have with you in your vehicle.

34
Note: If needed, you can access the OBD Locator from the website or the smartphone app. On the website, click on your username in the upper right-hand corner. From the drop-down menu, click the button labeled OBD LOCATOR.
Install Your Module1. Check that you have a strong signal where your vehicle is parked. Visit Verizon’s interactive
coverage map: verizonwireless.com/maps.
2. Make sure your vehicle is parked outside in a safe location and the engine is turned off.
3. Now plug the module into the OBD II port (or into the extension cable if it is required). Make sure that the module is fully seated.
5. You will see a picture of the location of your OBD-II connector.
35
Helpful Installation Tips:• If the module seems to be difficult to insert, DO NOT FORCE IT. Remove the module and
examine both connectors for any bent pins.
• There is only one orientation that the module will plug in.
• Place two fingers behind the plug in your vehicle to prevent it from moving while plugging in the module.
• If the module protrudes into the knee or foot area or prevents an access panel door from closing, a Relocation Kit may be used to relocate the module. See connectedcar.delphi.com/fitment for recommendations on using a relocation kit with your vehicle.
• Wait for the Status LED to turn solid blue.
• To minimize drain on the vehicle battery, the “Install Your Module” and “Initiate Module Setup” steps should be performed without interruption. The process will take less than 5 minutes.
Note: The first time the module connects to the Verizon network, it will perform a one-time network setup which will take a few minutes. The Status LED will turn solid white then turn off, followed by a blinking white sequence. When network setup is successfully completed, the Status LED will turn solid blue. See Understanding the Status LED for more information on the LED color status.
Note: To avoid any unnecessary drain on the vehicle battery, it is recommended to not leave the module in the solid blue state for more than 24 hours.

36
Initiate Module SetupDo not proceed until the Status LED is solid blue, indicating activation on the Verizon network is complete.
1. Insert your vehicle’s ignition key and turn it to the On position (not ACC/Accessory). Do not start the engine!
Note: Typically, all of the warning lamps on the dashboard will illuminate briefly in this position.
Note: For pushbutton-start vehicles, the procedure is typically to push the Start button without your foot on the brake (check your vehicle owner’s manual to determine how many presses are required to turn the ignition on).
2. Press and hold the Function Button on the side of the module until the Status LED blinks red one time. This will occur after approximately 5 seconds. Then release the Function Button. The LED will blink red several times while vehicle setup occurs.
3. Wait up to 30 seconds for the LED to display a mix of solid and blinking green.
4. Wait until the LED stops flashing green and goes out.
5. When the LED begins to flash blue every 10 seconds, setup is complete.
Stop! Do not proceed if the Status LED never turned green and returned to solid blue. Your vehicle may not be compatible with the Delphi Connect system (check fitment guide connectedcar.delphi.com/fitment) or you did not place the ignition in the On position.
37
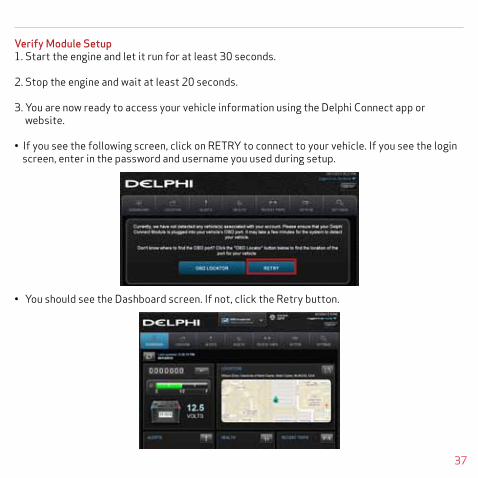
Verify Module Setup1. Start the engine and let it run for at least 30 seconds.
2. Stop the engine and wait at least 20 seconds.
3. You are now ready to access your vehicle information using the Delphi Connect app or website.
• If you see the following screen, click on RETRY to connect to your vehicle. If you see the login screen, enter in the password and username you used during setup.
• You should see the Dashboard screen. If not, click the Retry button.

38
• If you still do not see the Dashboard screen, see the Troubleshooting section of this guide.
Reconnect Your Module
If you are installing the module for the first time, please refer to the instructions for First-Time Setup.
If your device becomes disconnected from your vehicle or the battery is disconnected from your vehicle, you will need to re-initialize the module with your vehicle. In this case, please complete the following steps.
Note: If you are re-initializing the module to a vehicle that you have previously used with the module:
• The vehicle history will be available for all times the Module was connected
• If you paired the keyfob previously to this vehicle, it will remain paired once reconnected
Install Your Module1. If you are currently using the app on your Verizon Wireless smartphone, use your smartphone
to check that you have a strong signal where your vehicle is parked. Don’t have Verizon coverage? Visit Verizon’s interactive coverage map: verizonwireless.com/maps.
2. Make sure your vehicle is parked outside in a safe location and the engine is turned off.
3. Now plug the module into the OBD port (or into the extension cable if it is required). Make sure that the module is fully seated.
Helpful Installation Tips:• If the module seems to be difficult to insert, DO NOT FORCE IT, remove the device and
examine both connectors for any bent pins.

39
• There is only one orientation that the module will plug in.
• Place two fingers behind the plug in your vehicle to prevent it from moving while plugging in the module.
• If the module protrudes into the knee or foot area or prevents an access panel door from closing, a Relocation Kit may be used to relocate the module. See connectedcar.delphi.com/fitment for recommendations on using a relocation kit with your vehicle.
• Wait for the Status LED to turn solid blue.
• To minimize drain on the vehicle battery, the “Install Your Module” and “Initiate Module Setup” steps should be performed without interruption. The process will take less than 5 minutes.
Note: The Status LED will remain dark for approximately 30 seconds. When vehicle setup is successfully completed, the Status LED will turn solid blue.
Note: To avoid any unnecessary drain on the vehicle battery, it is recommended to not leave the module in the solid blue state for more than 24 hours.
Initiate Module SetupStop! Do not proceed until the Status LED is solid blue, indicating activation on the Verizonnetwork is complete.
1. Insert your vehicle’s ignition key and turn it to the On position (not ACC/Accessory). Do not start the engine!
Note: Typically, all of the warning lamps on the dashboard will illuminate briefly in this position.
Note: For pushbutton-start vehicles, the procedure is typically to push the start button without your foot on the brake (check your vehicle owner’s manual to determine how many presses are required to turn the ignition on).

40
2. Press and hold the Function Button on the side of the module until the Status LED blinks red one time. This will occur after approximately 5 seconds. Then release the Function Button. The LED will blink red several times while vehicle setup occurs.
3. Wait up to 30 seconds for the LED to display a mix of solid and blinking green.
4. Wait an additional 10 seconds for the LED to go out.
5. When the LED begins to flash blue every 10 seconds, setup is complete.
Stop! Do not proceed if the Status LED never turned green and returned to solid blue. Your vehicle may not be compatible with the Delphi Connect system (check fitment guide connectedcar.delphi.com/fitment) or you did not place the ignition in the On position.
Verify Module Setup
1. Start the engine and let it run for at least 30 seconds.
2. Stop the engine and wait at least 20 seconds.
You are now ready to access your vehicle information using the Delphi Connect app or web site.

41
Application & Service Features
Using the Android App
Forgot Username or PasswordShould you forget your account login credentials, you can request your username or a password reset from the login screen.
To request your Username, tap Forgot Username or Password?
42
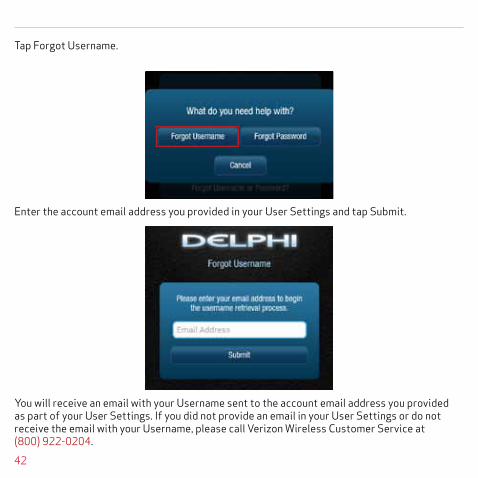
Tap Forgot Username.
Enter the account email address you provided in your User Settings and tap Submit.
You will receive an email with your Username sent to the account email address you provided as part of your User Settings. If you did not provide an email in your User Settings or do not receive the email with your Username, please call Verizon Wireless Customer Service at (800) 922-0204.

43
To request a Password reset, tap Forgot Username or Password?
Tap Forgot Password.

44
You will receive an email providing you a temporary password sent to the account email address you provided as part of your User Settings. Use this temporary password to login to your account. You will be required to change your password once you login. If you did not provide an email in your User Settings or do not receive the email with your temporary password, please call Verizon Wireless Customer Service at (800) 922-0204.
Enter your Username and tap Submit.

45
Navigating AroundTo navigate to a specific category, tap the item you want to view, such as Alerts, Recent Trips, Health and Location (as shown in the red boxes). You can also tap the Side Menu icon, located in the top left corner to navigate to the various features of the app.
Note: The Wi-Fi hotspot icon (indicated by the blue box) is only available on modules purchased with that feature.
Side Menu

46
• From the Side Menu, you can navigate to any of the Delphi Connect features.
• Open the Settings feature to modify account information, manage your modules, configure Alerts and Notifications, and set up Bluetooth® pairing for compatible devices.
• Tap Key Fob to access the key fob feature for compatible vehicles.
• Tap Logout to log out from your vehicle. You can also tap the Back button to return to the previous screen.
Side Menu Options

47
Refreshing Your Vehicle DataThe Delphi Connect system will update your vehicle information as it becomes available. This may cause the display to change while you are viewing it. If you wish to request the most recent data from the module, tap the Refresh button from anywhere within the app. A refresh may take up to two minutes. You can continue to use the app during this time. The newest information will be displayed when it becomes available.
Note: Trips are not complete until after the engine has been turned off for a short period of time. Therefore, the Recent Trip list will not show a trip that is currently underway.
Refresh Button
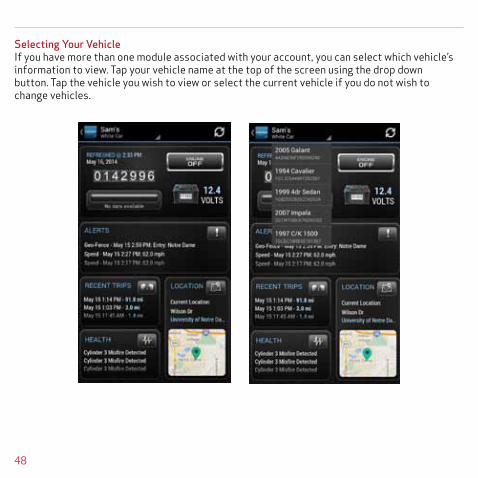
48
Selecting Your VehicleIf you have more than one module associated with your account, you can select which vehicle’s information to view. Tap your vehicle name at the top of the screen using the drop down button. Tap the vehicle you wish to view or select the current vehicle if you do not wish to change vehicles.

49
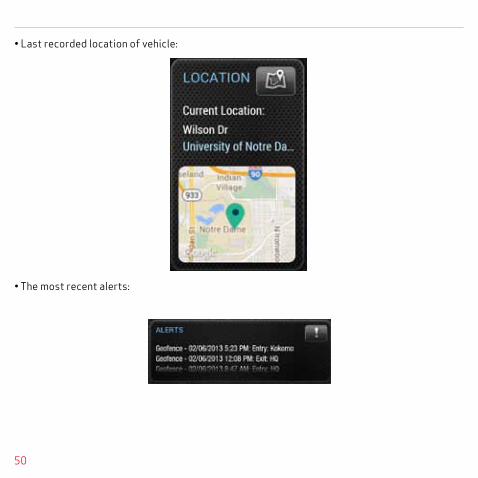
DashboardThe Dashboard provides a summary of your vehicle status.
It includes the following information.
• Basic vehicle information including the engine run status, current programmable odometer, battery voltage and the fuel level, if your vehicle supports this feature. If you have a Wi-Fi equipped model, the Wi-Fi icon will be colored blue with the hotspot is on and grey when it is off.
Note: Fuel level readings will work on compatible vehicles.
50
• Last recorded location of vehicle:
• The most recent alerts:

51
• The most recent health information reported by your vehicle:
• The most recent trips:
Note: You will only see Health information if your vehicle has reported trouble codes using the diagnostic code scanning feaure. See Performing a Diagnostic Scan on Your Vehicle.

52
LocationUse the Location feature to locate your vehicles at any time. The location screen indicates the last recorded vehicle locations. The current vehicle, the one identified at the top of the screen, is indicated by a green vehicle marker with a black dot in the center. Other vehicles are indicated by a blue marker with a black dot in the center surrounded by a transparent circle. If you have your GPS services turned on, the location of your phone will be shown as a blue dot.
Note: Vehicle location is subject to GPS accuracy. Depending on local conditions, it can take a few minutes to locate your vehicle using GPS services. This may delay your ability to see your vehicle location when installing the module. In addition, when your vehicle is located in an enclosed structure, such as a garage, determining your vehicle’s location may not be possible

53
Tap on a vehicle marker to select it and display additional information such as the location ad-dress and the latitude and longitude. The marker of the selected vehicle will darken slightly and a pop-up will show additional vehicle information. If you tap on a vehicle that is not the current vehicle, you will be able to Hide it, which will remove it from the location view. The vehicle is still in your account and you can view it again by using the Hide/Show location menu. Or, you can also Select it, which will make it the current vehicle and the marker will turn green. To close the vehicle information box, tap anywhere on the map or use the dismiss button, the small x in the corner of the box.
54
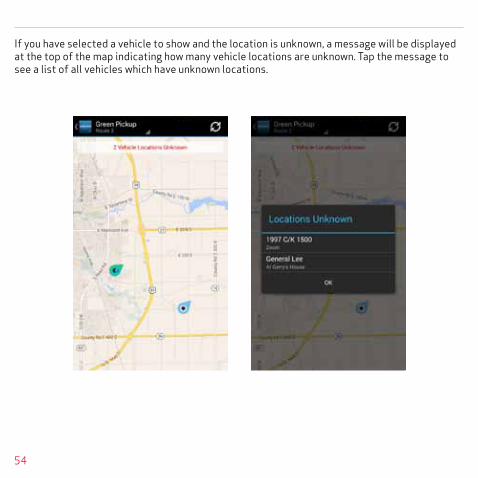
If you have selected a vehicle to show and the location is unknown, a message will be displayed at the top of the map indicating how many vehicle locations are unknown. Tap the message to see a list of all vehicles which have unknown locations.
55
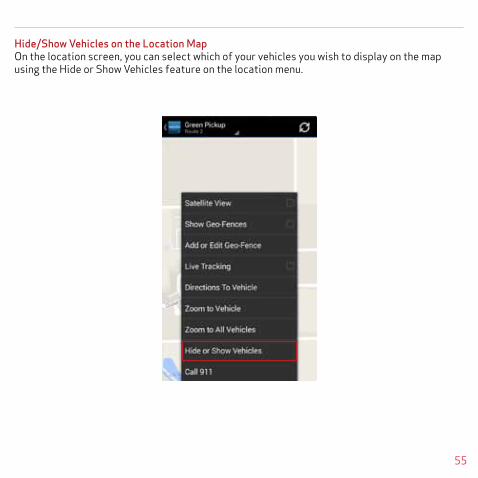
Hide/Show Vehicles on the Location MapOn the location screen, you can select which of your vehicles you wish to display on the map using the Hide or Show Vehicles feature on the location menu.

56
Check the vehicles you wish to show in the location map. You cannot uncheck the current vehicle. Tap Select Current Vehicle Only to display only the current vehicle on the map. Tap Save to save your changes and return to the location map or Cancel to return to the map without saving your changes.
57
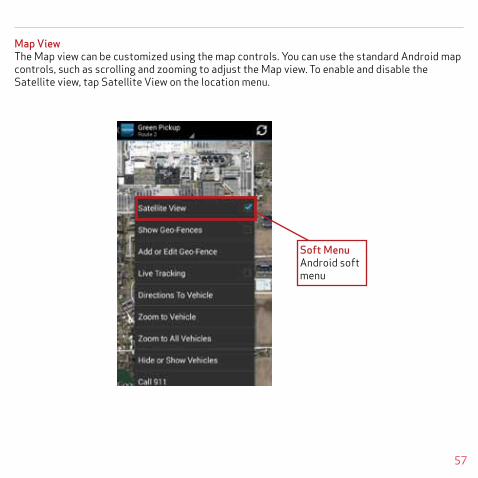
Map ViewThe Map view can be customized using the map controls. You can use the standard Android map controls, such as scrolling and zooming to adjust the Map view. To enable and disable the Satellite view, tap Satellite View on the location menu.
Soft MenuAndroid soft menu

58
View Geo-Fences To enable and disable the display of Geo-Fences, select Geo-Fences on the location menu. You will see the geo-fences associated with the current vehicle. See Managing Geo-Fences for more information.
59
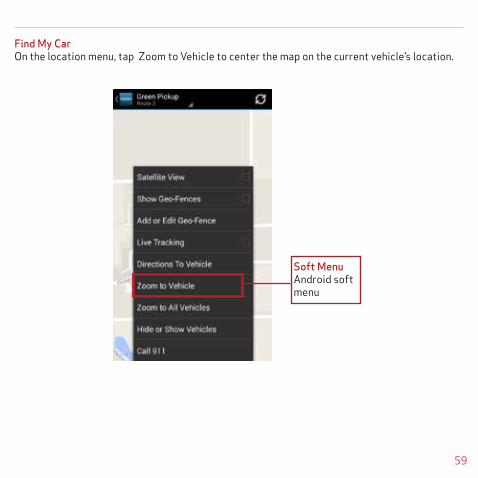
Find My CarOn the location menu, tap Zoom to Vehicle to center the map on the current vehicle’s location.
Soft MenuAndroid soft menu

60
Find All My CarsOn the location menu, tap Zoom to All Vehicles to resize the map to show all vehicles selected for display.
61
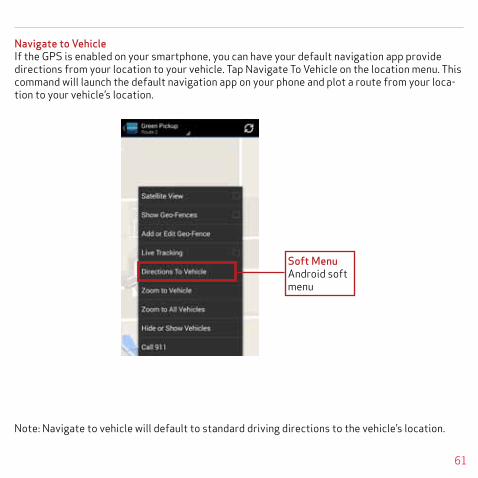
Navigate to VehicleIf the GPS is enabled on your smartphone, you can have your default navigation app provide directions from your location to your vehicle. Tap Navigate To Vehicle on the location menu. This command will launch the default navigation app on your phone and plot a route from your loca-tion to your vehicle’s location.
Note: Navigate to vehicle will default to standard driving directions to the vehicle’s location.
Soft MenuAndroid soft menu

62
Programmable OdometerA programmable odometer is provided for your vehicle. You can set it to your vehicle’s odometer to track total mileage or you can set the odometer to 0 prior to a trip to use it as a trip odometer.
To set the odometer value, tap the odometer on the dashboard.

63
Enter the desired value in miles. Tap Save to save the value or tap back to exit without saving.
64
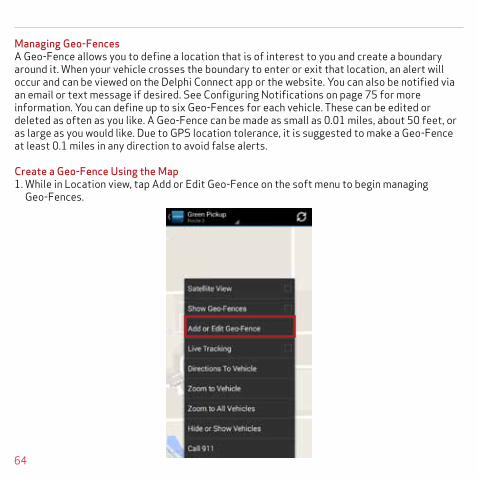
Managing Geo-FencesA Geo-Fence allows you to define a location that is of interest to you and create a boundary around it. When your vehicle crosses the boundary to enter or exit that location, an alert will occur and can be viewed on the Delphi Connect app or the website. You can also be notified via an email or text message if desired. See Configuring Notifications on page 75 for more information. You can define up to six Geo-Fences for each vehicle. These can be edited or deleted as often as you like. A Geo-Fence can be made as small as 0.01 miles, about 50 feet, or as large as you would like. Due to GPS location tolerance, it is suggested to make a Geo-Fence at least 0.1 miles in any direction to avoid false alerts.
Create a Geo-Fence Using the Map1. While in Location view, tap Add or Edit Geo-Fence on the soft menu to begin managing Geo-Fences.

65
2. In the Geo-Fences settings panel, tap CREATE NEW FENCE.
66
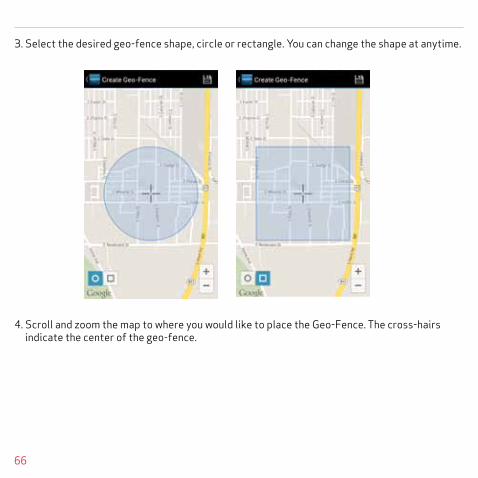
3. Select the desired geo-fence shape, circle or rectangle. You can change the shape at anytime.
4. Scroll and zoom the map to where you would like to place the Geo-Fence. The cross-hairs indicate the center of the geo-fence.

67
5. To resize the geo-fence, tap Resize Shape on the soft menu and use the handles to change the shape of the geo-fence boundaries. Tap the checkmark when done or tap Discard to return to the previous boundaries.

68
6. Tap the Save icon (upper right hand corner) to save your geo-fence.
7. Enter the name of the new geo-fence and tap OK, or tap Cancel to exit without saving.

69
8. Create additional Geo-Fences as desired.
9. Tap the Back button or Side Menu button when you are finished to return to Location view.

70
Create a Geo-Fence by Searching for an Address or Business Name
1. While in Location view, tap Add or Edit Geo-Fence on the soft menu to begin managing Geo-Fences.
71
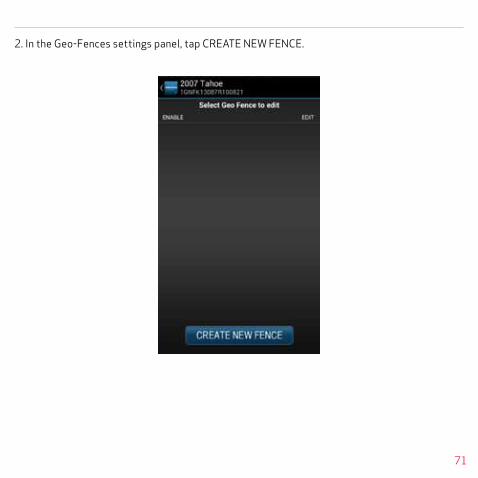
2. In the Geo-Fences settings panel, tap CREATE NEW FENCE.

72
3. Tap Search on the soft menu.

73
4. Enter the address or business name you want to find and tap the search icon (magnifying glass)
74
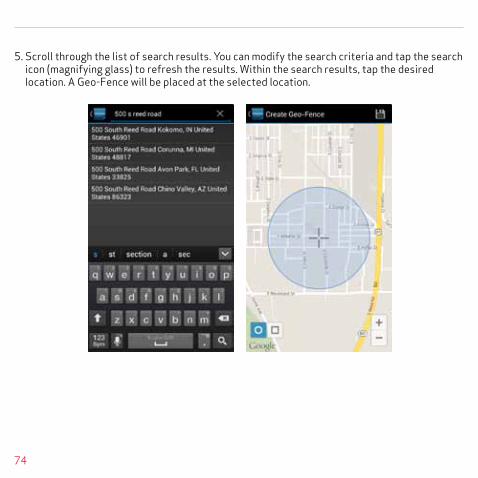
5. Scroll through the list of search results. You can modify the search criteria and tap the search icon (magnifying glass) to refresh the results. Within the search results, tap the desired location. A Geo-Fence will be placed at the selected location.
75
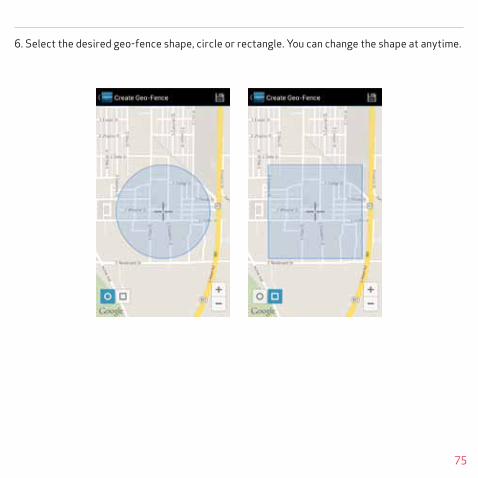
6. Select the desired geo-fence shape, circle or rectangle. You can change the shape at anytime.

76
7. To resize the geo-fence, tap Resize Shape on the soft menu and use the handles to change the shape of the geo-fence boundaries. Tap the checkmark when done or tap Discard to return to the previous boundaries.

77
8. Tap the Save icon (upper right hand corner) to save your geo-fence.
9. The search text you used will be automatically entered as the geo-fence name. If desired, edit the geo-fence name and tap OK, or tap Cancel to exit without saving.
78
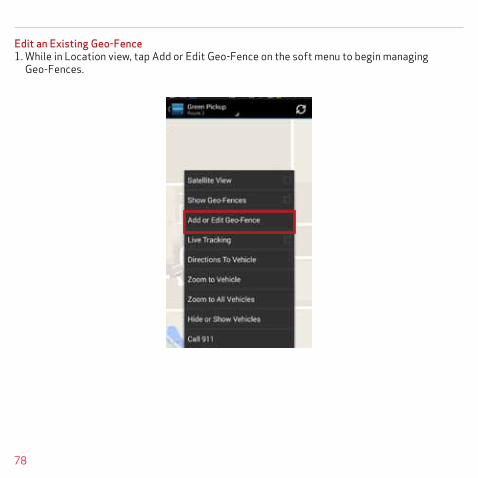
Edit an Existing Geo-Fence1. While in Location view, tap Add or Edit Geo-Fence on the soft menu to begin managing Geo-Fences.
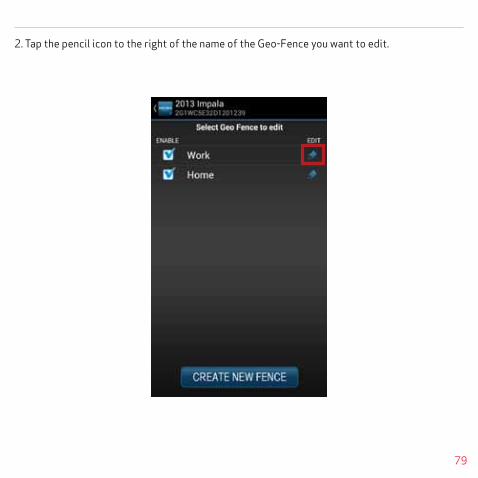
79
2. Tap the pencil icon to the right of the name of the Geo-Fence you want to edit.
80
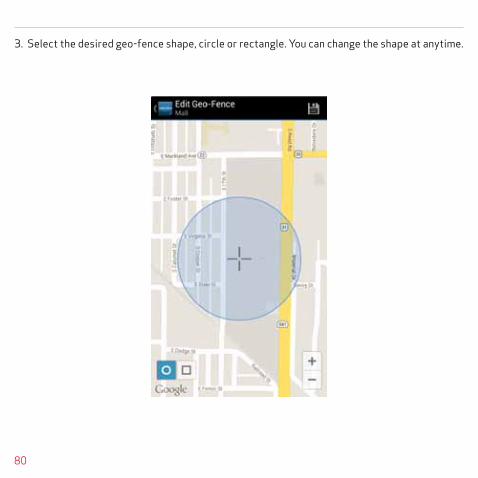
3. Select the desired geo-fence shape, circle or rectangle. You can change the shape at anytime.
81
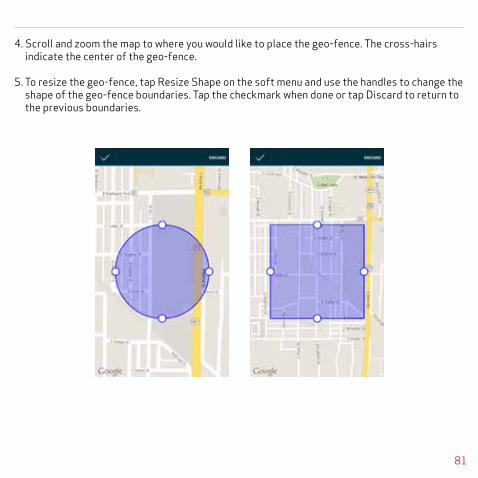
4. Scroll and zoom the map to where you would like to place the geo-fence. The cross-hairs indicate the center of the geo-fence.
5. To resize the geo-fence, tap Resize Shape on the soft menu and use the handles to change the shape of the geo-fence boundaries. Tap the checkmark when done or tap Discard to return to the previous boundaries.
82
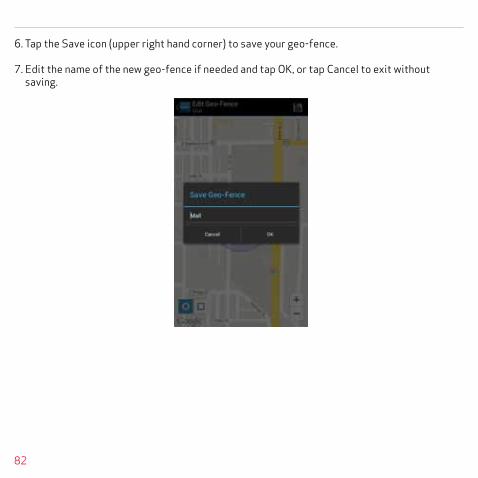
6. Tap the Save icon (upper right hand corner) to save your geo-fence.
7. Edit the name of the new geo-fence if needed and tap OK, or tap Cancel to exit without saving.

83
Delete an Existing Geo-Fence1. While in Location view, tap Add or Edit Geo-Fence on the soft menu to begin managing Geo-Fences.

84
2. Tap the pencil icon to the right of the name of the Geo-Fence you want to delete.

85
3. On the soft menu tap Delete, then tap OK to delete or Cancel to exit without deleting.
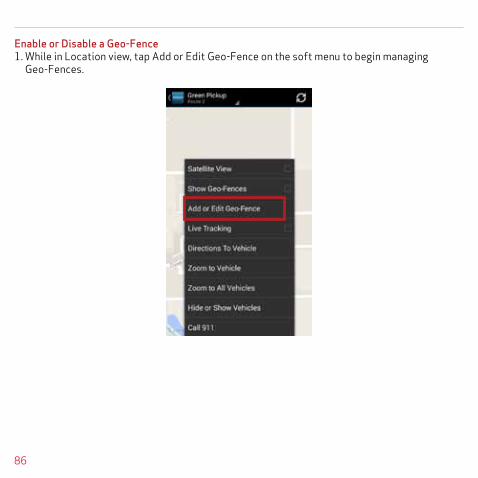
86
Enable or Disable a Geo-Fence1. While in Location view, tap Add or Edit Geo-Fence on the soft menu to begin managing Geo-Fences.

87
2. In the Geo-Fence settings panel, tap the checkbox to the left of the Geo-Fence you wish to disable.

88
3. The checkmark will be cleared and the Geo-Fence will no longer be visible on the map. This will not delete the Geo-Fence, but alerts will no longer be generated by this Geo-Fence.

89
4. To enable a Geo-Fence, tap the box to the left of the Geo-Fence name. The Geo-Fence will be shown on the map again.
90
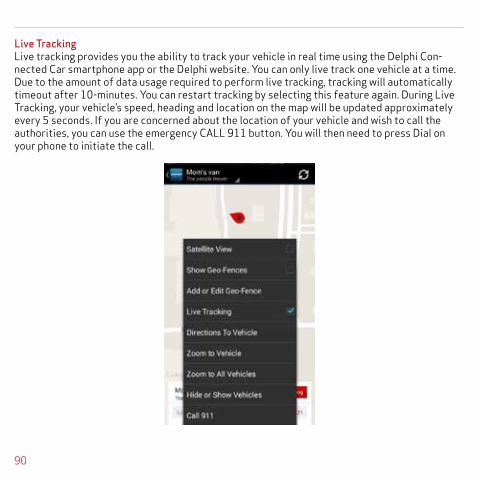
Live TrackingLive tracking provides you the ability to track your vehicle in real time using the Delphi Con-nected Car smartphone app or the Delphi website. You can only live track one vehicle at a time. Due to the amount of data usage required to perform live tracking, tracking will automatically timeout after 10-minutes. You can restart tracking by selecting this feature again. During Live Tracking, your vehicle’s speed, heading and location on the map will be updated approximately every 5 seconds. If you are concerned about the location of your vehicle and wish to call the authorities, you can use the emergency CALL 911 button. You will then need to press Dial on your phone to initiate the call.

91
1. While in Location view, tap Live Tracking on the location menu to start the live tracking feature.
Note: While in Location view, depending on your Android version, either tap the Live Trackingicon or tap Live Tracking from the soft menu to start the live tracking feature. If the GPS is enabled on your phone, the location of your phone will be indicated with a blue dot on the map.
92
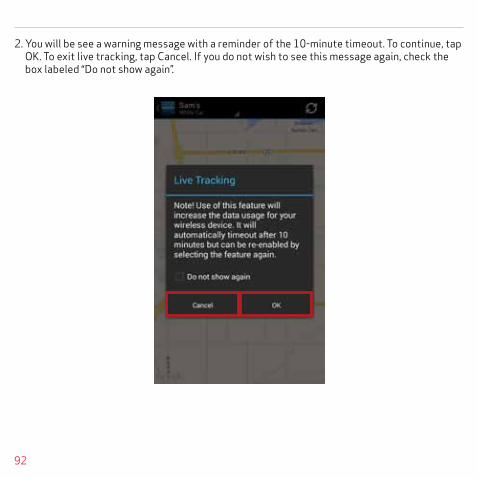
2. You will be see a warning message with a reminder of the 10-minute timeout. To continue, tap OK. To exit live tracking, tap Cancel. If you do not wish to see this message again, check the box labeled “Do not show again”.
93
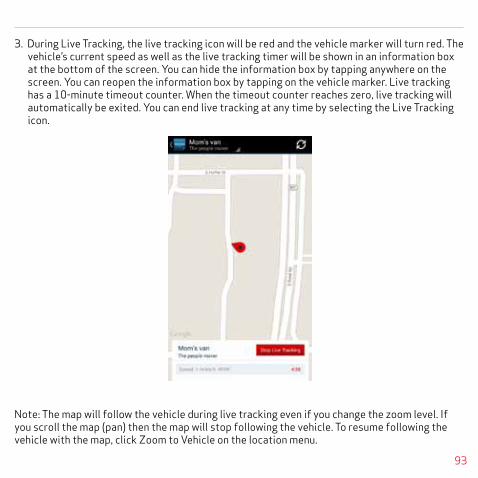
3. During Live Tracking, the live tracking icon will be red and the vehicle marker will turn red. The vehicle’s current speed as well as the live tracking timer will be shown in an information box at the bottom of the screen. You can hide the information box by tapping anywhere on the screen. You can reopen the information box by tapping on the vehicle marker. Live tracking has a 10-minute timeout counter. When the timeout counter reaches zero, live tracking will automatically be exited. You can end live tracking at any time by selecting the Live Tracking icon.
Note: The map will follow the vehicle during live tracking even if you change the zoom level. If you scroll the map (pan) then the map will stop following the vehicle. To resume following the vehicle with the map, click Zoom to Vehicle on the location menu.

94
AlertsThe Delphi Connect application will notify you with alerts of specific vehicle behaviors. Current alerts include the following:
• Vehicle speed exceeding a limit that you choose
• Vehicle RPM exceeding a limit that you choose
• Vehicle has entered or exited a Geo-Fence location
• The Check Engine Light (CEL) has illuminated, this is sometimes referred to as the Malfunction Indicator Lamp (MIL)
• The battery voltage falls below 11.5 volts
• While the engine is not running and the vehicle experiences a motion that exceeds a threshold that you choose. • 5 failed attempts logging into your account
You can also configure email and text message notifications for each alert. For more information on configuring your alerts and the associated notifications, see sections Configuring Alerts and Configuring Notifications.
Note: The motion alert is enabled 10 minutes after the vehicle is turned off and disabled when the vehicle is started.

95
Within the smartphone app, you can scroll to view all of your Alerts. The most recent Alert appears first.

96
Clearing AlertsTo clear alerts, tap the box next to the alerts you wish to clear and tap Clear. The smartphone app only displays the most recent alerts, you may not be able to clear all recorded alerts. In order to clear all alerts at one time, login to your account using the mycar.delphi.com website and select the Alerts tab.

97
You will need to confirm that you wish to clear the selected alerts. Tap OK to confirm, or tap Cancel to exit.

98
HealthThe Health feature displays a history of vehicle diagnostic codes, often called trouble codes, which you have read from your vehicle. If the Check Engine Light comes on, you can perform a diagnostic scan of your vehicle which will display the codes reported by your vehicle. The Delphi Connect app will show you both the numeric diagnostic code and the meaning of the code. In some cases, the definition of a manufacturer specific code may not be available.
Each time you perform a diagnostic scan, any newly reported codes will be added to the list being displayed. Every code displayed will show the time and date when the code was read from your vehicle. Therefore, you may read the same code from the vehicle multiple times and see it in the list multiple times.
For more information on reading your vehicle codes, see section Performing a Diagnostic Scan on Your Vehicle on page 80.
You can scroll to view all of the reported diagnostic codes. The most recent codes are listed first.
Note: A diagnostic scan will be performed automatically during the initial installation process.

99
Performing a Diagnostic Code Scan on Your VehicleTo begin a diagnostic scan, tap the soft menu at the bottom of the screen. Then tap Perform trouble code scan.
You will see a warning to make sure the engine is turned off and the key is in the On position before continuing. Once you begin the scan, please wait at least 2 minutes before starting your vehicle. Select Cancel to cancel the scan.

100
Clearing Diagnostic CodesYou can choose to clear the codes from either your display or from from your vehicle. If you clear the codes from your display, you will no longer see them in your vehicle’s data but they may still be active in your vehicle. Performing a diagnostic scan will allow to see if they are still being reported by your vehicle.
If you clear the codes from your vehicle, the module will command your vehicle to clear the current diagnostic codes. If a fault condition exists in your vehicle, a diagnostic code may return until the problem is fixed. Clearing the codes in the vehicle will not clear the codes you see displayed in the app in the Health section. You can leave this list if you want to maintain a history of your vehicle’s health.
Note: Simply clearing the diagnostic codes in your vehicle will not repair any problems it may have. Driving a vehicle that has diagnostic problems without first repairing them may cause damage to your vehicle. You should always correct any problems before clearing the diagnostic codes in your vehicle.

101
To begin clearing codes, tap the soft menu at the bottom of the screen. Then tap Clear trouble codes
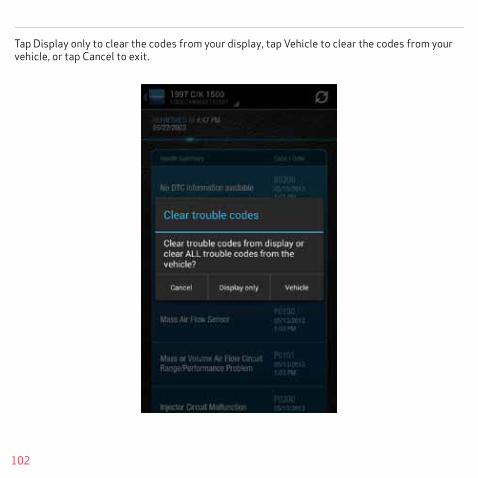
102
Tap Display only to clear the codes from your display, tap Vehicle to clear the codes from your vehicle, or tap Cancel to exit.

103
Recent TripsThe Recent Trips feature records all the trips the vehicle has taken since you installed the module. Within the smartphone app, you can view the ten most recent vehicle trips. The most recent trip is listed first. Select any trip to view the trip details. To view all the recorded trips, use the website.
Tap any trip to view its details.

104
The trip details include total distance, start date and time, start location, end date and time, end location, and the amount of time the engine was idle time during the trip. Tap View Trip Map to view the trip on a map.
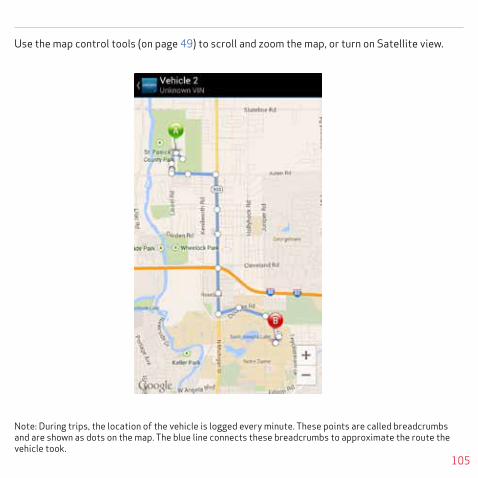
105
Use the map control tools (on page 49) to scroll and zoom the map, or turn on Satellite view.
Note: During trips, the location of the vehicle is logged every minute. These points are called breadcrumbs and are shown as dots on the map. The blue line connects these breadcrumbs to approximate the route the vehicle took.

106
Key Fob PairingThe key fob setup process has two main steps, configuring your module for your vehicle and pairing your module with your vehicle. You can perform the configuration step at any time from either the smartphone app or the website. To complete the pairing step you will need to be in your vehicle. It is necessary to perform this step in your vehicle because you may be prompted at times to turn your ignition key and press specific vehicle buttons. Following the successful set up of your key fob, you will be able to use the smartphone app to send key fob commands to your vehicle in the same manner as you would with your original key fob. In addition, you can use the Delphi Connect website to send key fob commands as well.
Note: While the Delphi Connect system currently supports most remote start systems that came from the manufacturer, you can check if your remote start feature is supported. Refer to the fitment guide at connectedcar.delphi.com/fitment. For vehicles that require a sequence of buttons to be pressed to perform a remote start, you only need to press the Remote Start button once. The module will automatically provide any button sequence required to start the vehicle.
Note: You will only need to pair the key fob using the Delphi Connect app or website one time. After the initial pairing, the key fob capability will be available from either location.
Note: The key fob setup should be only performed when all key fobs are present. If you do this with only one present it may de-program your secondary key fobs.
Before attempting the key fob setup process, look on your dashboard view to see if your vehicle’s VIN has been identified. If the module was able to read your vehicle’s VIN, you will see it displayed at the top of the screen below your vehicle name. If the module was unable to read your vehicle’s VIN, your vehicle will be identified by the word Vehicle followed by a number. If your VIN is not available, see section Key Fob Setup without VIN. You can also edit your vehicle information and provide either the VIN or the Make, Model, and Model Year of your vehicle prior to fob setup. See section Edit Your Vehicle Information.
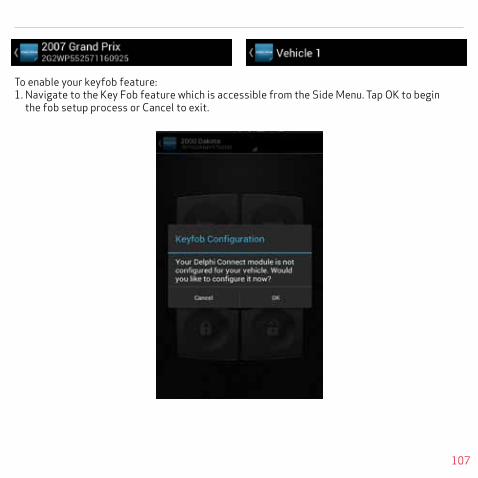
107
To enable your keyfob feature: 1. Navigate to the Key Fob feature which is accessible from the Side Menu. Tap OK to begin the fob setup process or Cancel to exit.

108
2. Using the Prev and Next buttons, look for the key fob picture that matches yours. Once you have found your key fob, tap Continue. If you do not find a picture of your key fob, tap “I don’t see my key fob. In this case, your key fob is not currently supported.
3. Once you have tapped Continue, you will see the following message while your key fob is being initialized. The configuration step can take up to 5 minutes. Do not close the app during this process.

109
4. When complete, the following screen will be displayed and you will need to be in the vehicle to perform the final key fob setup steps. If you wish to complete the process later, you can tap “Perform this step later”.
5. Once in the vehicle, tap Continue. Carefully follow the on screen instructions. You may be required to push buttons in your vehicle such as the door lock/unlock switch or you may need to turn the ignition key a certain number of times.
Following the successful pairing of your Key Fob, you will be able to use your Delphi Connect app to send key fob commands over the Verizon Network to your vehicle in the same manner as you would with your manufacturer key fob. In addition, you can also use the Delphi Connect website to send key fob commands to your vehicle.
Note: You will only need to pair the key fob using the Delphi Connect app or the website once. After the initial pairing, it will be available from the smartphone app or website.

110
Key Fob Pairing Without VIN1. To enable your keyfob feature without a vehicle VIN, navigate to the Key Fob feature which is accessible from the Side Menu. If your key fob is not already set up, you will see the following message. Tap OK to begin the fob set up process or Cancel to exit.

111
2. Use the on screen prompts to select your vehicle and tap Submit. If are not able to select your vehicle, tap “My vehicle is not listed” and see section My Vehicle is Not Supported.
3. After you have selected your vehicle, tap Submit. The configuration process can take up to 5 minutes. Do not close your browser window during this process.
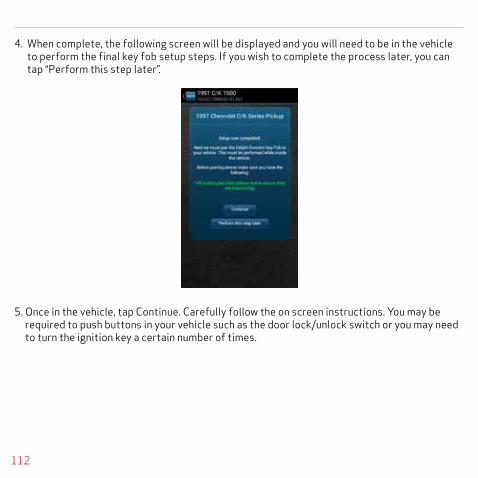
112
4. When complete, the following screen will be displayed and you will need to be in the vehicle to perform the final key fob setup steps. If you wish to complete the process later, you can tap “Perform this step later”.
5. Once in the vehicle, tap Continue. Carefully follow the on screen instructions. You may be required to push buttons in your vehicle such as the door lock/unlock switch or you may need to turn the ignition key a certain number of times.
113
Following the successful pairing of your Key Fob, you should be able to use your Delphi Connected Car app to send key fob commands over the Verizon Network to your vehicle in the same manner as you would with your manufacturer key fob. In addition, you can also use the Delphi Connect website to send key fob commands to your vehicle.
Note: You will only need to pair the key fob using the Delphi Connect app or the website once. After the initial pairing, it will be available from the smartphone app or website.
Pair Smartphone Bluetooth® to ModuleThis feature lets you access the key fob functions on your Delphi Connect smartphone app within Bluetooth® range of the module (range is dependent on your cell phone).
This feature requires:• Successful key fob pairing to your vehicle
• A compatible smartphone with Bluetooth®
Note: If the module has a cellular connection and the Wi-Fi hotspot is on and connected to at least one device, the ability to send key FOB commands over Bluetooth will be disabled. All key FOB commands will be sent over the cellular network.

114
To pair your Smartphone with the module Bluetooth Direct Connect follow the steps below:
1. Access the Delphi Connect Car app side menu by tapping the menu icon in the upper-left corner. Tap Settings.
2. Tap Vehicle Settings.
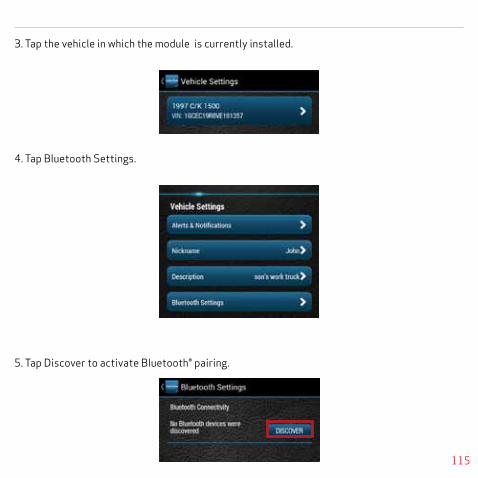
115
3. Tap the vehicle in which the module is currently installed.
4. Tap Bluetooth Settings.
5. Tap Discover to activate Bluetooth® pairing.

116
6. The Status LED on your module should begin flashing blue.
7. Press your phone’s Home button and follow the procedures for turning on your smartphone’s Bluetooth® feature.
8. Tap Search for Devices or Scan Now if your phone doesn’t begin scanning automatically.
9. When a device named ACT###, where ### are three numbers, appears as an available device, tap it.
10. The device ACT### should now show as paired.
Authorize your smartphone’s Bluetooth® key fob functionality.
1. Return to the Delphi Connect Car app. If your phone doesn’t appear on the list of Bluetooth® phones, tap the Back button and then re-enter Bluetooth Settings.
2. Your phone will be listed as Unauthorized.
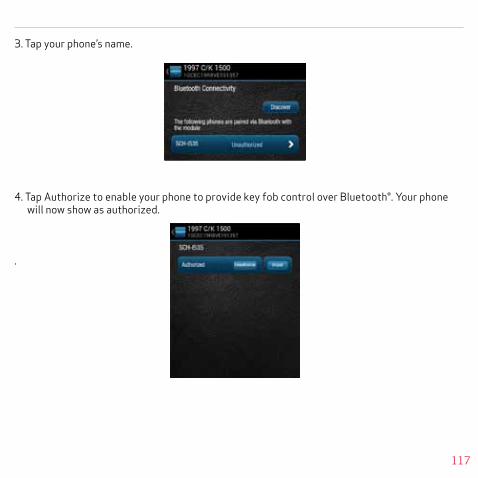
117
3. Tap your phone’s name.
4. Tap Authorize to enable your phone to provide key fob control over Bluetooth®. Your phone will now show as authorized.
.

118
5. Tap Delphi menu icon until you return to the Delphi Connect side menu.
6. Observe the LED on the module and wait until it returns to flashing blue every 10 seconds.
7. Tap the Key Fob menu item and test the buttons.
Bluetooth® setup is complete.
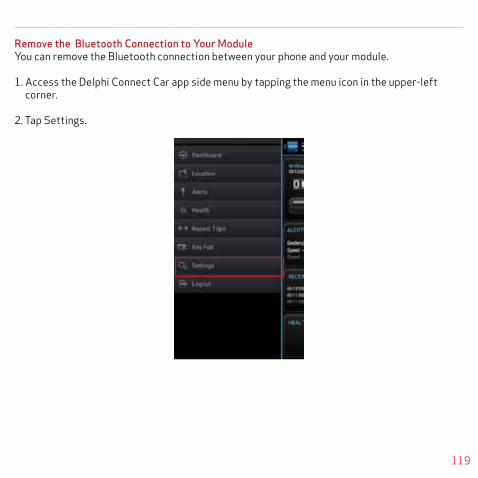
119
Remove the Bluetooth Connection to Your ModuleYou can remove the Bluetooth connection between your phone and your module.
1. Access the Delphi Connect Car app side menu by tapping the menu icon in the upper-left corner.
2. Tap Settings.

120
3. Tap Vehicle Settings.

121
4. Tap the vehicle in which the module is currently installed.

122
5. Tap Bluetooth Settings.

123
6. Tap the name of the device you wish to remove.

124
7. Tap Unauthorize and then tap Unpair to remove the pairing for this device. The device will be removed from the list.
Note: Remember to unpair the module from your smartphone, sometimes this is called “forget.”

125
SettingsThe Settings menu provides access to your Account Settings, Vehicle Settings, your personal PIN-code, and additional information in the About section.
126
Account Settings
The Account Settings allow you to:
• Modify your User Settings, including login credentials, account email address, language for notifications and unit of measure.
• Manage the modules associated with your account
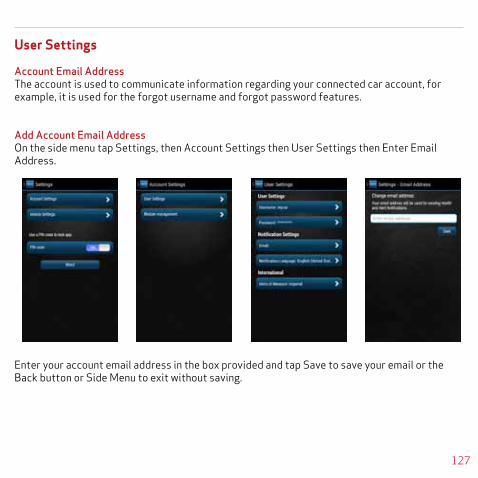
127
User Settings
Account Email Address The account is used to communicate information regarding your connected car account, for example, it is used for the forgot username and forgot password features.
Add Account Email AddressOn the side menu tap Settings, then Account Settings then User Settings then Enter Email Address.
Enter your account email address in the box provided and tap Save to save your email or the Back button or Side Menu to exit without saving.
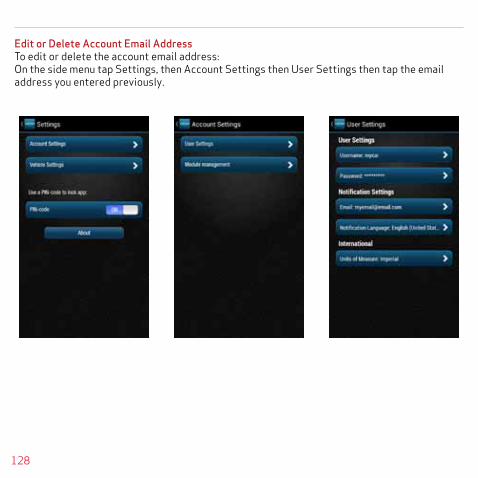
128
Edit or Delete Account Email AddressTo edit or delete the account email address:On the side menu tap Settings, then Account Settings then User Settings then tap the email address you entered previously.

129
Enter your new account email address or delete the current one by clearing the field. Tap Save Settings to save the email address or tap the Back button or Side Menu to exit without saving.
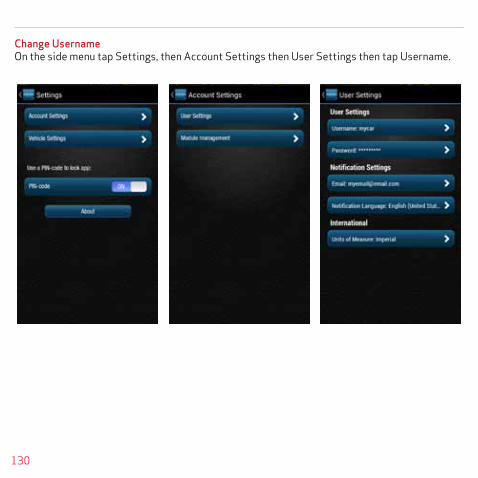
130
Change UsernameOn the side menu tap Settings, then Account Settings then User Settings then tap Username.

131
Usernames must be at least one character long, can include letters, numbers and special characters. The username may be composed only of letters, if desired. Tap Save when done or tap the Back button or the Side Menu to exit without saving. Usernames are not case sensitive.

132
Change PasswordOn the side menu tap Settings, then Account Settings then User Settings then tap Password.

133
You must enter the same password twice in order to change it. Passwords must be at least six characters long and include at least one number. Passwords are case sensitive. Tap Save to save your new password or tap back to cancel changing your password.

134
Vehicle Nicknames and DescriptionsYou can assign a nickname and a description to each vehicle. If defined, the nickname will be displayed instead of the vehicle year and vehicle make, or instead of Vehicle 1 if the VIN is unknown. If defined, the description will be displayed instead of the VIN or VIN Unknown for vehicles that didn’t report a VIN. For example, in the dashboard images below, one shows the default vehicle year and model and the VIN and the other shows the use of a nickname and description.

135
Modify Vehicle NicknameOn the side menu tap Settings, then vehicle settings, then tap the vehicle you wish to modify.

136
Tap on Nickname to edit the vehicle nickname.

137
Enter the desired nickname and press Save to save the nickname.
Note: If you delete the nickname, the vehicle year and model will again be displayed.

138
Modify Vehicle DescriptionOn the side menu tap Settings, then vehicle settings, then tap the vehicle you wish to modify.

139
Tap on Description to edit the vehicle description.

140
Enter the desired description and press Save to save the description.
Note: If you delete the description, the vehicle VIN will again be displayed.

141
Select Notification LanguageThe notification language setting allows you to receive your alert notifications, both email and txt messages, in any of the languages we support.
On the side menu tap Settings, then Account Settings, then tap User Settings.
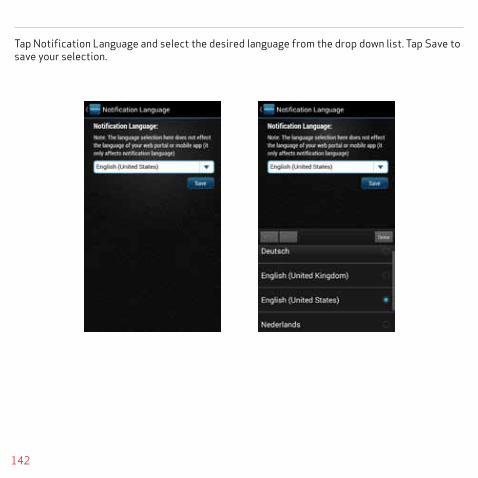
142
Tap Notification Language and select the desired language from the drop down list. Tap Save to save your selection.
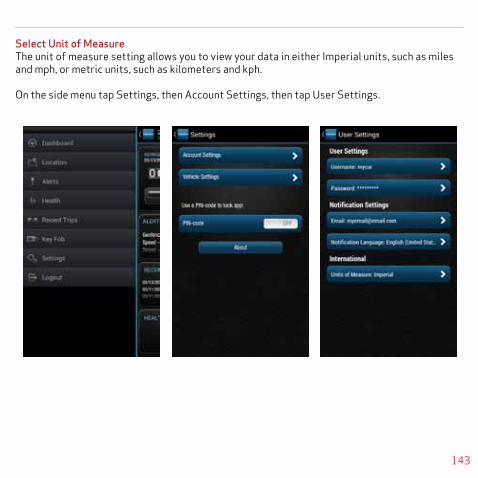
143
Select Unit of MeasureThe unit of measure setting allows you to view your data in either Imperial units, such as miles and mph, or metric units, such as kilometers and kph.
On the side menu tap Settings, then Account Settings, then tap User Settings.

144
Tap Units of Measure and select desired system of measurement from the drop down list. Tap Save to save your selection.
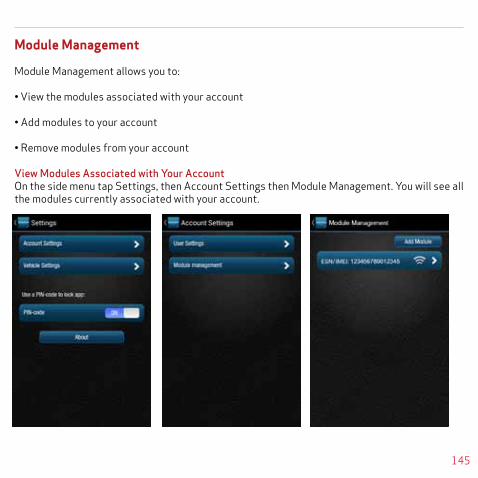
145
Module Management
Module Management allows you to:
• View the modules associated with your account
• Add modules to your account
• Remove modules from your account
View Modules Associated with Your AccountOn the side menu tap Settings, then Account Settings then Module Management. You will see all the modules currently associated with your account.

146
Add a Module to Your Account1. On the side menu tap Settings, then Account Settings then Module Management.
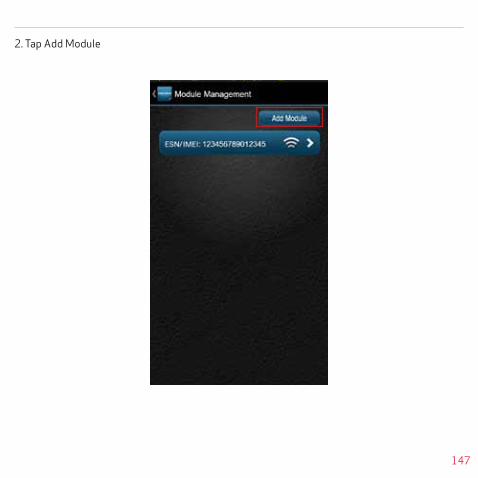
147
2. Tap Add Module
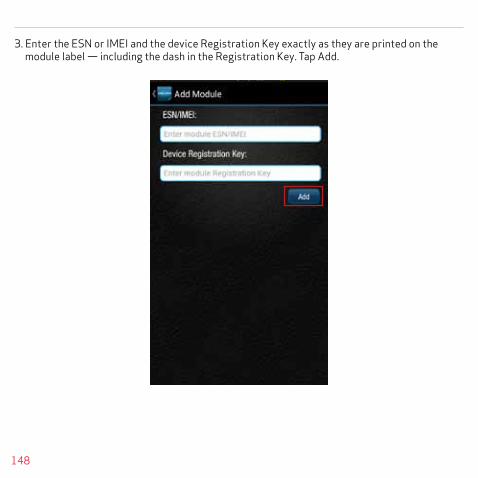
148
3. Enter the ESN or IMEI and the device Registration Key exactly as they are printed on the module label — including the dash in the Registration Key. Tap Add.
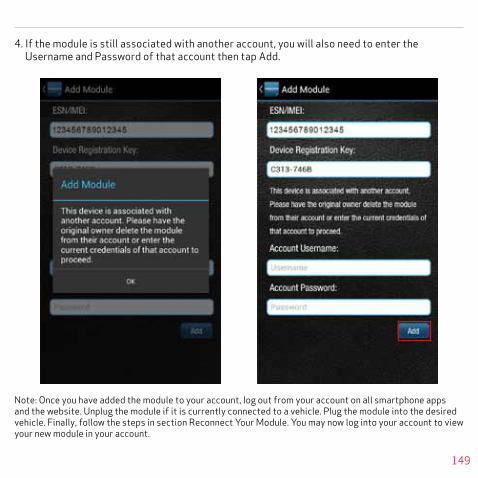
149
4. If the module is still associated with another account, you will also need to enter the Username and Password of that account then tap Add.
Note: Once you have added the module to your account, log out from your account on all smartphone apps and the website. Unplug the module if it is currently connected to a vehicle. Plug the module into the desired vehicle. Finally, follow the steps in section Reconnect Your Module. You may now log into your account to view your new module in your account.
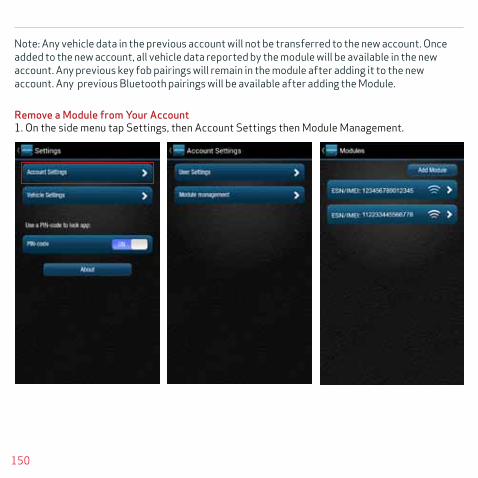
150
Note: Any vehicle data in the previous account will not be transferred to the new account. Once added to the new account, all vehicle data reported by the module will be available in the new account. Any previous key fob pairings will remain in the module after adding it to the new account. Any previous Bluetooth pairings will be available after adding the Module.
Remove a Module from Your Account1. On the side menu tap Settings, then Account Settings then Module Management.

151
2. Tap the ESN or IMEI number of the module you want to remove.
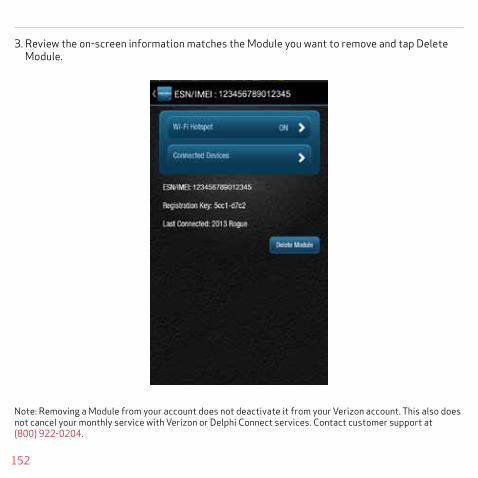
152
3. Review the on-screen information matches the Module you want to remove and tap Delete Module.
Note: Removing a Module from your account does not deactivate it from your Verizon account. This also does not cancel your monthly service with Verizon or Delphi Connect services. Contact customer support at (800) 922-0204.

153
Vehicle Settings
The Vehicle Settings allow you to:
• Review and edit your vehicle information, such as providing your vehicle VIN when the VIN is not available
• Configure alerts and notifications
• Setup Bluetooth Direct Connect
Review Your Vehicle Information1. To review your vehicle information, tap Settings from the side menu then tap Vehicle Settings.

154
2. Tap the vehicle you wish to review.

155
Edit Your Vehicle InformationIf your vehicle did not report a VIN, you can enter the VIN or information about your vehicle yourself.
1. To edit your vehicle information, tap Settings from the side menu then tap Vehicle Settings.
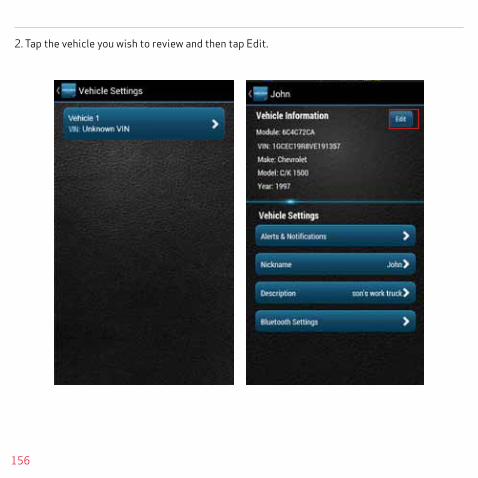
156
2. Tap the vehicle you wish to review and then tap Edit.

157
3. You can enter either the VIN from your vehicle or you can enter the vehicle make, model and model year. Tap the circle next to the information you want to provide.
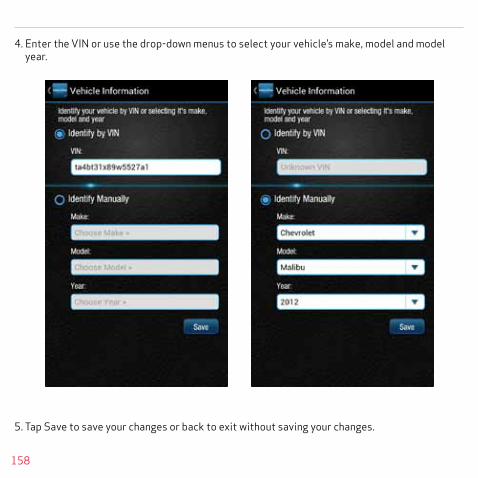
158
4. Enter the VIN or use the drop-down menus to select your vehicle’s make, model and model year.
5. Tap Save to save your changes or back to exit without saving your changes.

159
Configuring Alerts
The Alerts & Notifications settings allow you to customize some of the alerts available to you. All alerts will be stored in your vehicle’s cloud data and can be viewed using your smartphone app. See section Alerts. You can also configure the notifications associated with each alert. See section Configuring Notifications.
Note: The following alerts cannot be customized. You can only enable and disable the alert from occurring: Battery Level, Check Engine Light and Failed Login.
Configuring the Geo-Fence Alerts1. Tap Settings from the side menu then tap Vehicle Settings.
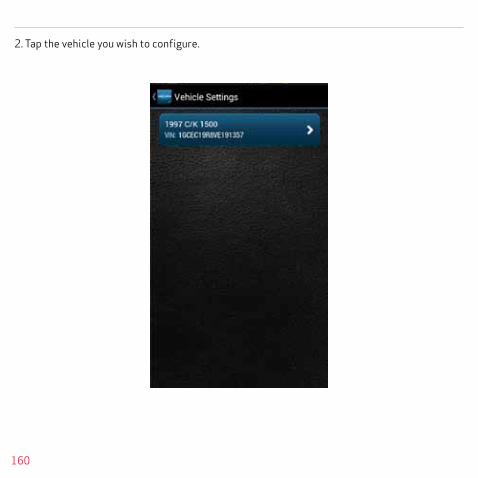
160
2. Tap the vehicle you wish to configure.
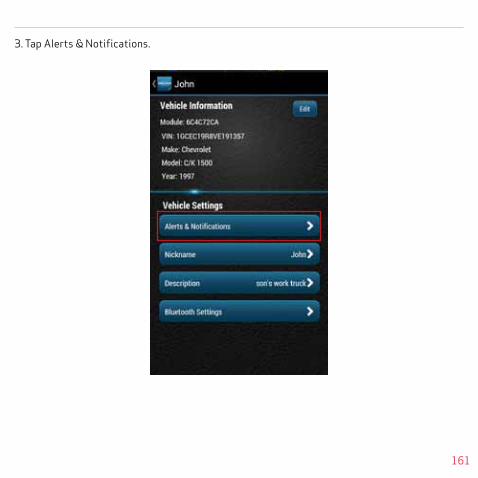
161
3. Tap Alerts & Notifications.

162
4. Tap Geofence.
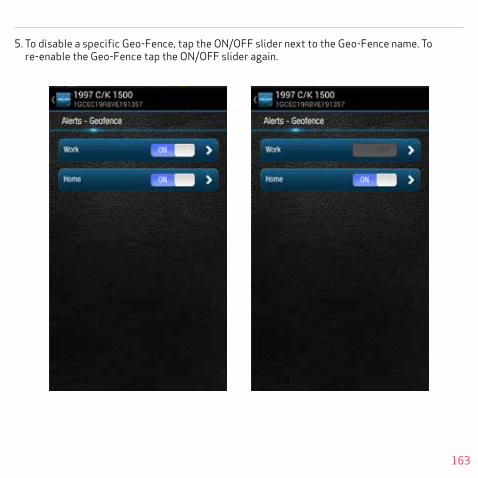
163
5. To disable a specific Geo-Fence, tap the ON/OFF slider next to the Geo-Fence name. To re-enable the Geo-Fence tap the ON/OFF slider again.

164
6. Tap the Geo-Fence name to configure the entry and exit alerts individually.
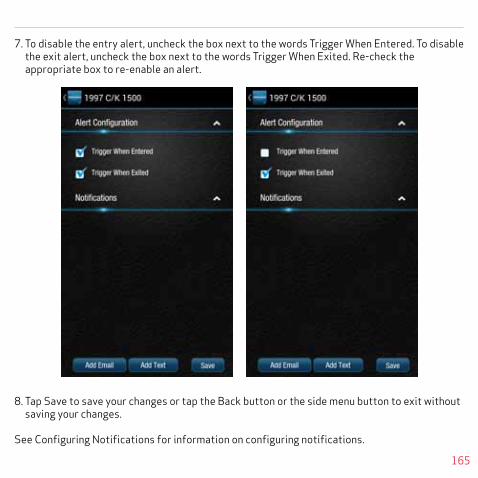
165
7. To disable the entry alert, uncheck the box next to the words Trigger When Entered. To disable the exit alert, uncheck the box next to the words Trigger When Exited. Re-check the appropriate box to re-enable an alert.
8. Tap Save to save your changes or tap the Back button or the side menu button to exit without saving your changes.
See Configuring Notifications for information on configuring notifications.

166
Configuring the Speed Alert1. Tap Settings from the side menu then tap Vehicle Settings.

167
2. Tap the vehicle you wish to configure.
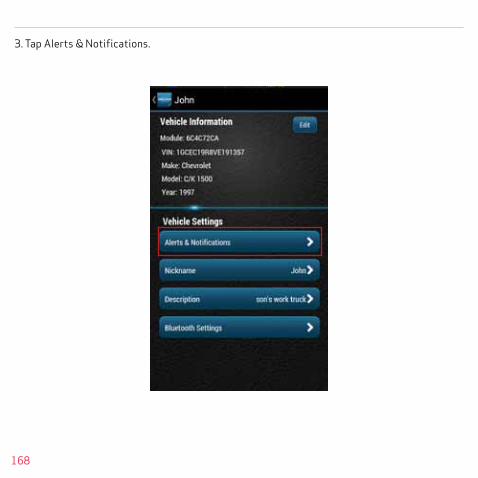
168
3. Tap Alerts & Notifications.
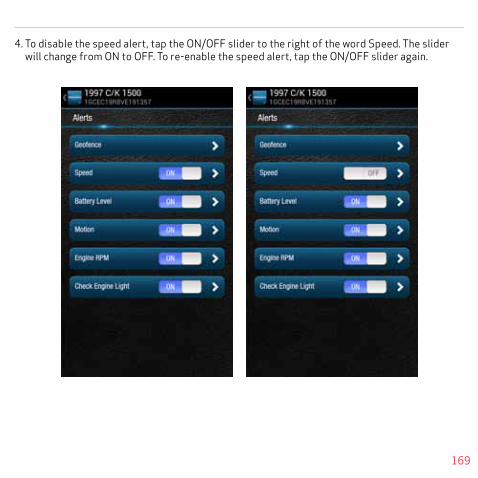
169
4. To disable the speed alert, tap the ON/OFF slider to the right of the word Speed. The slider will change from ON to OFF. To re-enable the speed alert, tap the ON/OFF slider again.

170
5. Tap the word Speed to configure the speed threshold.

171
6. Enter the speed in miles per hour that you want to trigger the speed alert. That is, when the vehicle is driven at this speed or higher for 5 seconds or more, the speed alert will be recorded.
7. Tap Save to save your changes or tap the Back button or the side menu button to exit without saving your changes.
See Configuring Notifications for information on configuring notifications.

172
Configuring the Motion Alert1. Tap Settings from the side menu then tap Vehicle Settings.
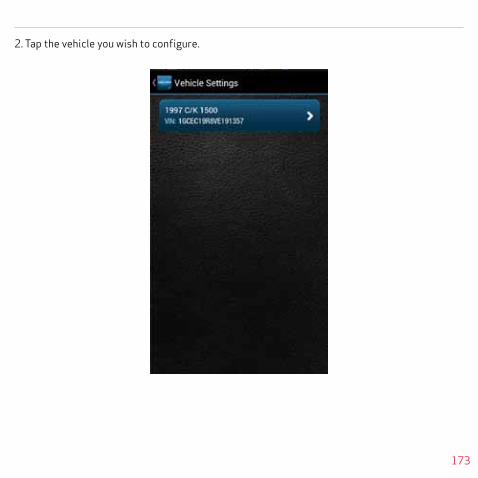
173
2. Tap the vehicle you wish to configure.

174
3. Tap Alerts & Notifications.

175
4. To disable the motion alert, tap the ON/OFF slider to the right of the word Speed. The slider will change from ON to OFF. To re-enable the motion alert, tap the ON/OFF slider again.

176
5. Tap the word Motion to configure the motion threshold.

177
6. Enter the threshold in G-forces that you want to trigger the motion alert. That is, once the ignition of off for 10 minutes and the vehicle experiences a motion of this force or more , the motion alert will be recorded. A setting of 2 G’s can typically be set off by slamming a vehicle door or rocking the vehicle.
7. Tap Save to save your changes or tap the Back button or the side menu button to exit without saving your changes.
Note: You may need to adjust the motion threshold more than once to achieve the desired level of sensitivity for you vehicle. A smaller value is more sensitive, a larger value is less sensitive.
See Configuring Notifications for information on configuring notifications.

178
Configuring the Engine RPM Alert1. Tap Settings from the side menu then tap Vehicle Settings.
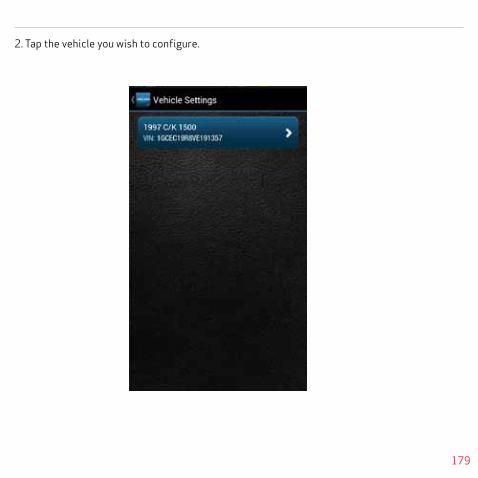
179
2. Tap the vehicle you wish to configure.
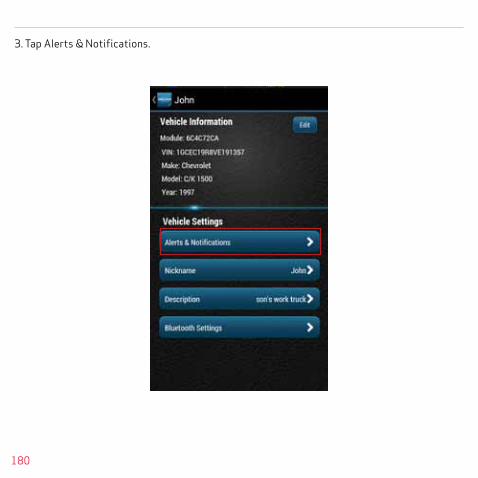
180
3. Tap Alerts & Notifications.
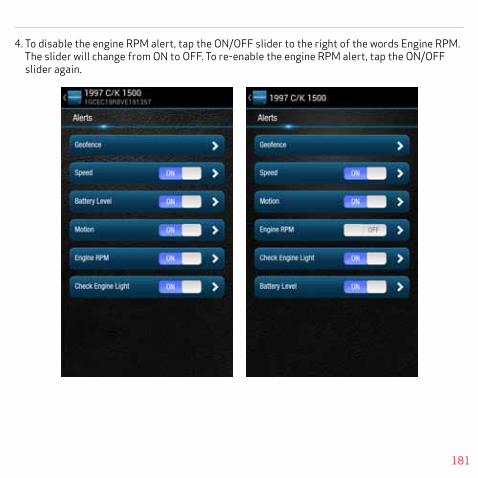
181
4. To disable the engine RPM alert, tap the ON/OFF slider to the right of the words Engine RPM. The slider will change from ON to OFF. To re-enable the engine RPM alert, tap the ON/OFF slider again.
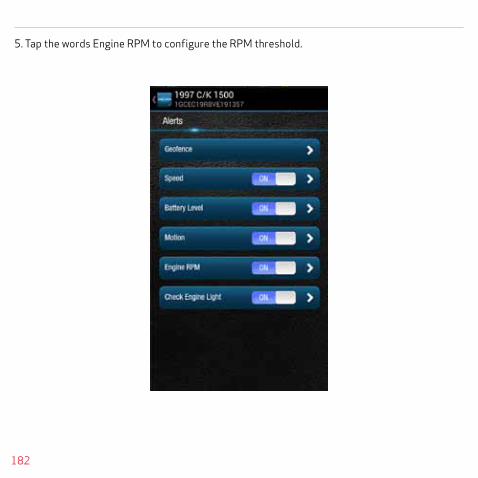
182
5. Tap the words Engine RPM to configure the RPM threshold.
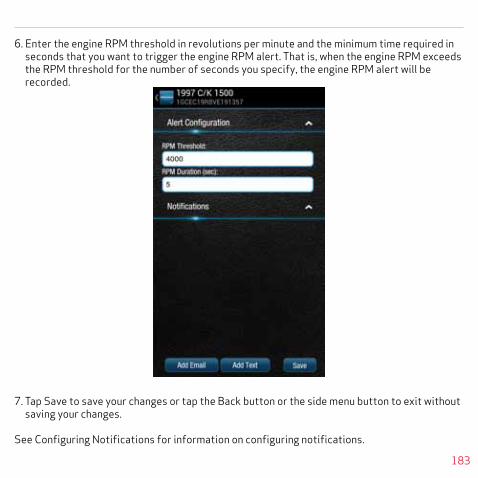
183
6. Enter the engine RPM threshold in revolutions per minute and the minimum time required in seconds that you want to trigger the engine RPM alert. That is, when the engine RPM exceeds the RPM threshold for the number of seconds you specify, the engine RPM alert will be recorded.
7. Tap Save to save your changes or tap the Back button or the side menu button to exit without saving your changes.
See Configuring Notifications for information on configuring notifications.

184
Configuring Notifications
For each alert, you can configure email and text notifications that will be sent when the alert occurs. This includes the ability to send a notification email to any number of email addresses you choose for each alert and to send a text message to any number of mobile phones you choose for each alert.
Note: When you add a new mobile number for notifications, you will recieve a confirmation txt message with opt-in instructions. In order to receive notifications at that number, follow the opt-in instructions in the txt message. If you do not opt-in, you will not recieve notifications on that mobile number.
Note: To discontinue recieving alerts on a mobile phone, you can remove the mobile number from the notification settings. You can also reply STOP to any notification txt message. This will remove the mobile number from every place it occurs in the notification settings.

185
Add a NotificationYou can add an email and text (SMS) notification to any alert. The process is similar for all alerts, here is how to add notifications to the speed alert. For Geo-Fence notifications, you will need to tap the name of the Geo-Fence you wish to configure.
1. Tap Settings from the side menu then tap Vehicle Settings.

186
2. Tap the vehicle you wish to configure.

187
3. Tap Alerts & Notifications.
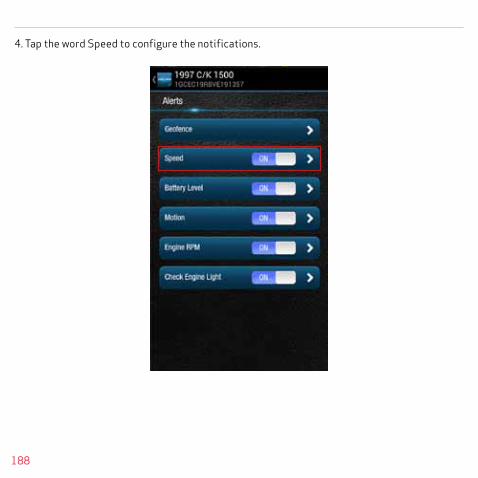
188
4. Tap the word Speed to configure the notifications.

189
5. Tap Add Email at the bottom of the screen. If you do not see the button Add Email, tap the small down arrow to right of the word Notifications to expand the notification section.
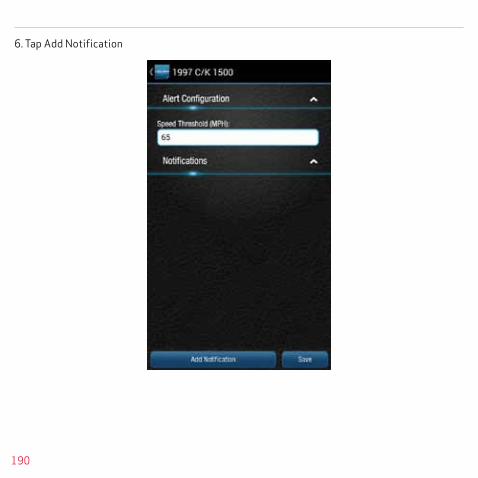
190
6. Tap Add Notification

191
7. To send a notifcation to an email address, select the email address icon and enter a valid email address in the format [email protected]. To enter additional email addresses, tap Add Notification. You can enter as many email addresses as you wish.
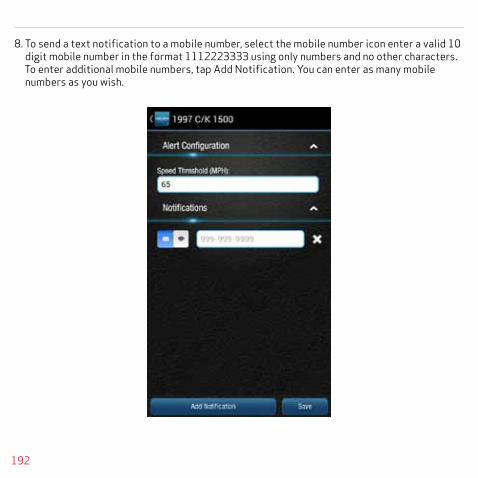
192
8. To send a text notification to a mobile number, select the mobile number icon enter a valid 10 digit mobile number in the format 1112223333 using only numbers and no other characters. To enter additional mobile numbers, tap Add Notification. You can enter as many mobile numbers as you wish.
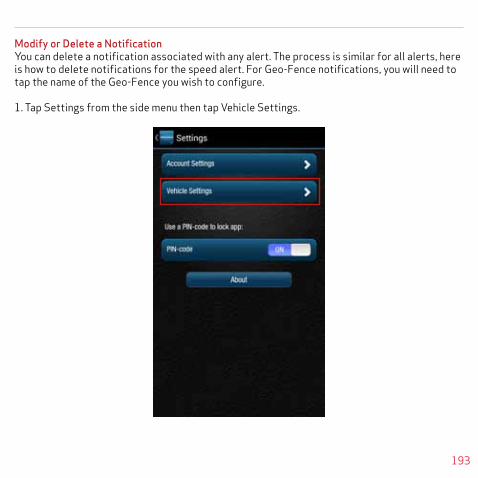
193
Modify or Delete a NotificationYou can delete a notification associated with any alert. The process is similar for all alerts, here is how to delete notifications for the speed alert. For Geo-Fence notifications, you will need to tap the name of the Geo-Fence you wish to configure.
1. Tap Settings from the side menu then tap Vehicle Settings.
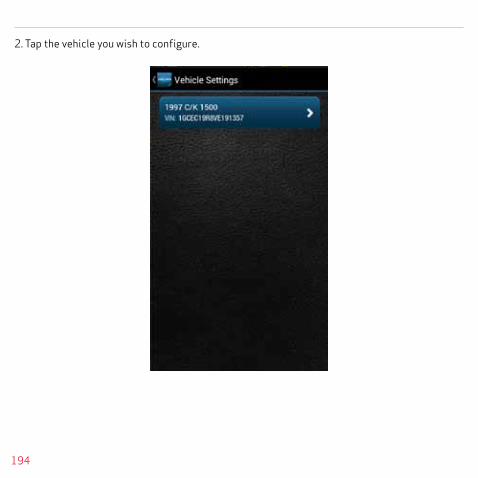
194
2. Tap the vehicle you wish to configure.

195
3. Tap Alerts & Notifications.

196
4. Tap the word Speed to configure the notifications.

197
5. If you do not see the notification email addresses or mobile numbers displayed on the screen, tap the small down arrow to right of the word Notifications to expand the notification section.
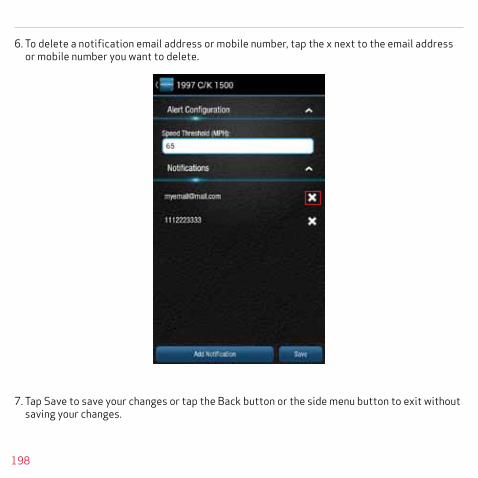
198
6. To delete a notification email address or mobile number, tap the x next to the email address or mobile number you want to delete.
7. Tap Save to save your changes or tap the Back button or the side menu button to exit without saving your changes.

199
Wi-Fi HotspotModel ACT233L of the Delphi Connect system offers you a mobile hotspot in your vehicle. The hotspot is enabled whenever the engine is running and can be programmed to be enabled for a period of time after the engine is turned off. You can have a maximum of five devices connected to the hotspot at one time.
Configure the Network Name (SSID) and BroadcastingFrom the Settings menu, tap Account Settings, Module Management, then tap the module you wish to configure. Tap on Wi-Fi hotspot.
Note: If the Delphi Connect system has a cellular connection and the Wi-Fi hotspot is on and connected to at least one device, the ability to send key FOB commands over Bluetooth will be disabled. All key FOB commands will be sent over the cellular network.
Note: After modifying the Wi-Fi hotspot settings, the hotspot will turn off for a few moments and then turn back on.
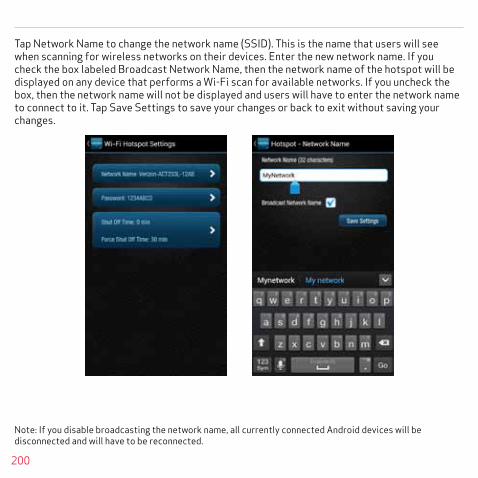
200
Tap Network Name to change the network name (SSID). This is the name that users will see when scanning for wireless networks on their devices. Enter the new network name. If you check the box labeled Broadcast Network Name, then the network name of the hotspot will be displayed on any device that performs a Wi-Fi scan for available networks. If you uncheck the box, then the network name will not be displayed and users will have to enter the network name to connect to it. Tap Save Settings to save your changes or back to exit without saving your changes.
Note: If you disable broadcasting the network name, all currently connected Android devices will be disconnected and will have to be reconnected.
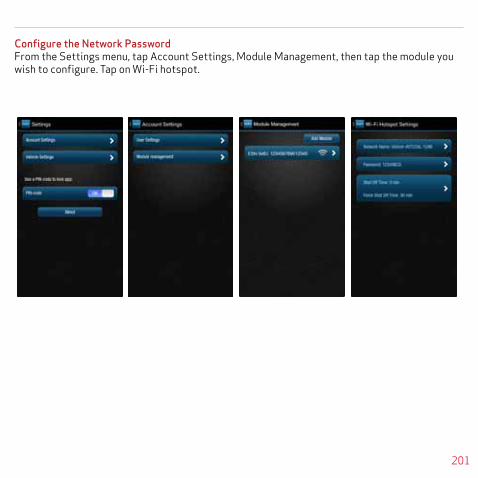
201
Configure the Network PasswordFrom the Settings menu, tap Account Settings, Module Management, then tap the module you wish to configure. Tap on Wi-Fi hotspot.

202
Tap Password to change the network password. Enter the new password in both boxes. The Wi-Fi password must be between 8 and 63 characters. Tap Save Settings to save your changes or back to exit without saving your changes.

203
Configure the Hotspot TimeoutsThe hotspot can be configured to remain on after the engine has been turned off. When the engine is turned off, the hotspot will remain on for a programmable amount of time called Shut Off Time. This time ranges from 0 to 30 minutes. If, at the end of Shut Off Time and anytime thereafter, there are no devices connected to the hotspot, the hotspot will turn off and remain off until the engine is started. If Shut Off Time is set to 0, then when the engine is turned off, if no devices are connected to the hotspot, it will shut off immediately. If there is at least once device connected, the hotspot will remain on. In order to limit the amount of time the hotspot is enabled after the engine is turned off, an additional time called Force Shut Off Time begins when the engine is turned off. This time ranges from 0 to 120 minutes. Once the Force Shut Off Time runs out, the hotspot will turn off regardless if any devices are connected. If Force Shut Off time is set to 0, then the hotspot will turn off as soon as the engine is turned off, even if devices are currently connected.
From the Settings menu, tap Account Settings, Module Management, then tap the module you wish to configure. Tap on Wi-Fi hotspot.

204
Tap the box indicating the Shut Off Time and Force Shut Off Time. Using the drop down menus, tap the desired time settings. Tap Save Settings to save your changes or back to exit without saving your changes.
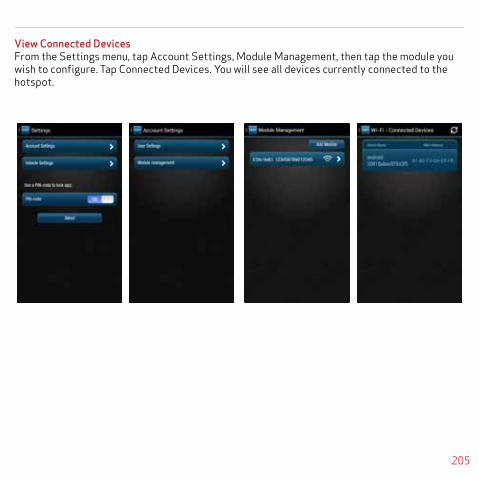
205
View Connected DevicesFrom the Settings menu, tap Account Settings, Module Management, then tap the module you wish to configure. Tap Connected Devices. You will see all devices currently connected to the hotspot.

206
Wi-Fi Administrator Portal AccessYou can log in to the Wi-Fi hotspot using an administrator account while connected to the hotspot. The administrator account is best viewed on a laptop or similar device with a large screen. All screenshots in this section are taken from a laptop screen for clarity. Open the web browser on your laptop or mobile phone. In the address bar enter my.dphconnect and press Enter. If you have difficulty reaching the administrator website, clear your browser’s cache and try again.
The home page provides you links to hotspot settings, account information and help.

207
In order to view or modify any of the hotspot settings, you will need to sign in as the administra-tor. You can click the Sign In link in the upper right hand corner or you will be prompted to sign in when you try to access the hotspot settings. The default administrator password is printed on the product label and called Password.
Note: The administrator login will timeout after 10 minutes of inactivity.
WARNING: This section contains instructions on how to modify the hotspot settings. Modifying the hotspot settings incorrectly can cause serious problems that may result in loss of hotspot functionality. Modifying the hotspot settings should only be performed by knowledgeable individuals. For added protection, back up the hotspot settings before you modify them. You can restore the settings if needed. For more information about how to back up and restore the settings, see section Backup and Restore Hotspot Settings.
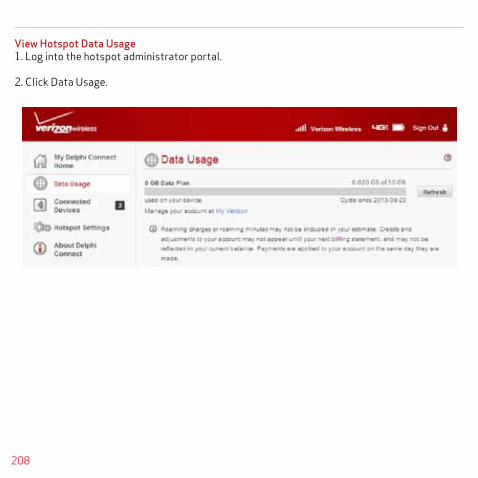
208
View Hotspot Data Usage1. Log into the hotspot administrator portal.
2. Click Data Usage.
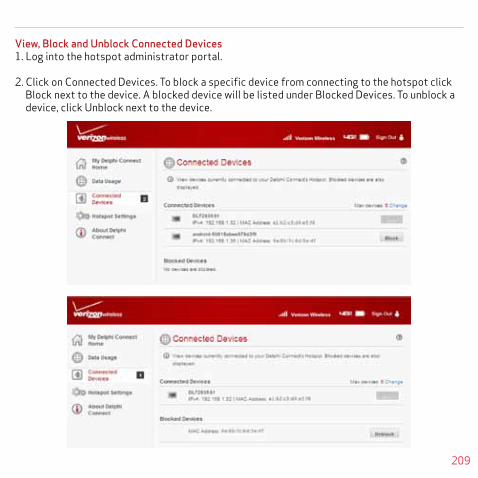
209
View, Block and Unblock Connected Devices1. Log into the hotspot administrator portal.
2. Click on Connected Devices. To block a specific device from connecting to the hotspot click Block next to the device. A blocked device will be listed under Blocked Devices. To unblock a device, click Unblock next to the device.

210
Modify Administrator Password1. Log into the hotspot administrator portal.
2. Click Hostpot Settings. Click the Hotspot tab. Click the Admin Password subtab.
3. Enter the current password.
4. Enter the new password twice.
5. Click Save Changes.

211
Modify Hotspot TimeoutThe hotspot can be configured to remain on after the engine has been turned off. When the engine is turned off, the hotspot will remain on for a programmable amount of time called Shut Off Time. This time ranges from 0 to 30 minutes. If, at the end of Shut Off Time and anytime thereafter, there are no devices connected to the hotspot, the hotspot will turn off and remain off until the engine is started. If Shut Off Time is set to 0, then when the engine is turned off, if no devices are connected to the hotspot, it will shut off immediately. If there is at least once device connected, the hotspot will remain on. In order to limit the amount of time the hotspot is enabled after the engine is turned off, an additional time called Force Shut Off Time begins when the engine is turned off. This time ranges from 0 to 120 minutes. Once the Force Shut Off Time expires, the hotspot will turn off regardless if any devices are connected. If Force Shut Off time is set to 0, then the hotspot will turn off as soon as the engine is turned off, even if devices are currently connected.
1. Log into the hotspot administrator portal.
2. Click on Hostpot Settings. Click the Hotspot tab. Click the Preferences subtab.
3. Select the desired timeout values.
4. Click Save Changes.
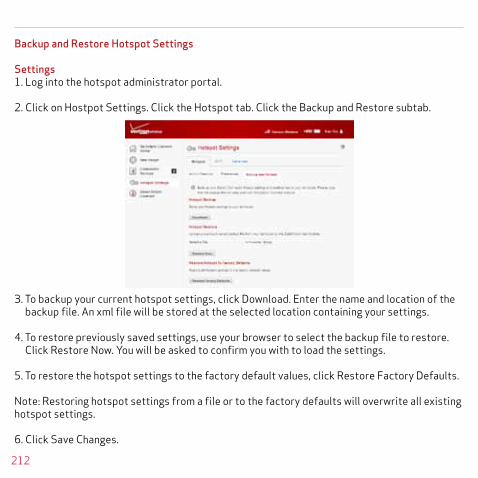
212
Backup and Restore Hotspot Settings
Settings1. Log into the hotspot administrator portal.
2. Click on Hostpot Settings. Click the Hotspot tab. Click the Backup and Restore subtab.
3. To backup your current hotspot settings, click Download. Enter the name and location of the backup file. An xml file will be stored at the selected location containing your settings.
4. To restore previously saved settings, use your browser to select the backup file to restore. Click Restore Now. You will be asked to confirm you with to load the settings.
5. To restore the hotspot settings to the factory default values, click Restore Factory Defaults.
Note: Restoring hotspot settings from a file or to the factory defaults will overwrite all existing hotspot settings.
6. Click Save Changes.

213
Modify Basic Hotspot SettingsThe Wi-Fi hotspot settings allow you to configure the following settings:
- Wi-Fi network name (SSID), name used by devices wishing to connect to the hotspot
- Network password, required password to connect to the hotspot
- 802.11 mode, wireless protocol to use
- Security mode, WPA2 Personal/PSK is currently the only security mode supported
- Maximum number of connected devices, 1 through 5
- Enable and disable broadcasting of the SSID, allows devices to scan for and see the hotspot network name
- Channel to use, select auto to allow the module to choose the best channel
1. Log into the hotspot administrator portal.
2. Click on Hostpot Settings. Click the Wi-Fi tab.

214
3. Edit the hotspot settings.
4. Click Save Changes.
Modify Advanced Hotspot SettingsThe advanced hotspot settings allow you to configure the following settings:
- Firewall, this includes VPN Passthrough and Wi-Fi Privacy separation
- LAN settings, for IPv4 and IPv6 settings
- Port filtering
1. Log into the hotspot administrator portal.
2. Click on Hostpot Settings. Click the Advanced tab.

215
3. A warning message will be displayed. Click Go Back to exit Advanced Settings or click Continue.
4. Click on Firewall to modify the firewall settings. Enable or disable VPN Passthrough using the provided ON/OFF switch. When ON, connected devices are allowed to create a VPN tunnel using the hotspot. Enable or disable Wi-Fi privacy separation using the provided ON/OFF switch. When ON, connected devices cannot connect directly to each other using the hotspot.

216
5. Click on LAN to modify the LAN settings. Enter the desired IPv4 and IPv6 settings. Click Save Changes.
6. Click on Port Filtering to modify the port filtering settings. Enable or disable port filtering using the provided ON/OFF switch. If ON, create, edit or delete the port filtering rules.
7. Click Save Changes.

217
View Hotspot Support InformationThe hotspot provides status and diagnostic information as well as links to support services.
1. Log into the hotspot administrator portal.
2. To view current internet status, click on About Delphi Connect. Click the Internet Status tab.
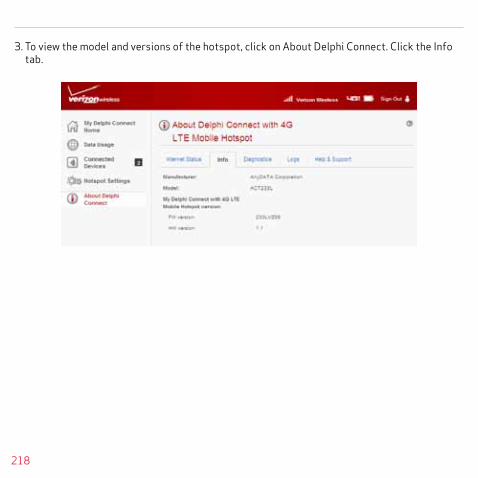
218
3. To view the model and versions of the hotspot, click on About Delphi Connect. Click the Info tab.

219
4. To view diagnostic information about the hotspot, click About Delphi Connect. Click on the Diagnostics tab.

220
5. To manage hotspot log files, click About Delphi Connect. Click on the Logs tab. To enable recording hotspot logs, check Enable Logs. Select how long to store each hotspot log before it is automatically deleted.

221
6. To view available support links, click About Delphi Connect. Click on the Help & Support tab.

222
Personal PIN-CodeFor added security, you can create a personal PIN-code. Once created, the PIN must be entered each time you access the app except when logging in to the app. That is, you will be required to enter the PIN whenever you return to the app from using a different feature of your phone.If someone enters an incorrect PIN 5 times in a row, the app will be logged out and you will need to log in the next time you access the app.
Enable Personal PIN-Code
On the side menu tap Settings, then PIN-code.

223
Enter a 4 digit PIN. You will be asked to re-enter the 4 digit PIN for confirmation.
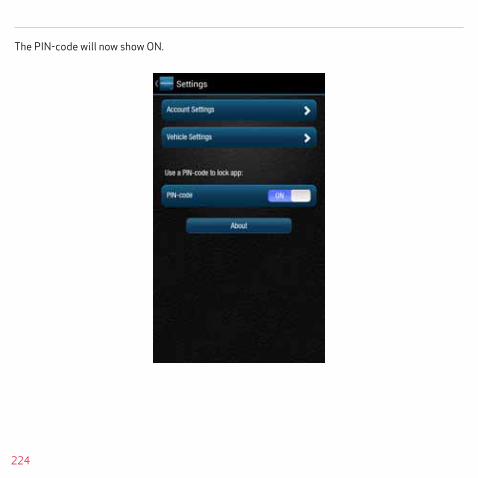
224
The PIN-code will now show ON.

225
Disable Personal PIN-Code
On the side menu tap Settings, then PIN-code.

226
Enter your 4 digit PIN.

227
The PIN-code will now show OFF.
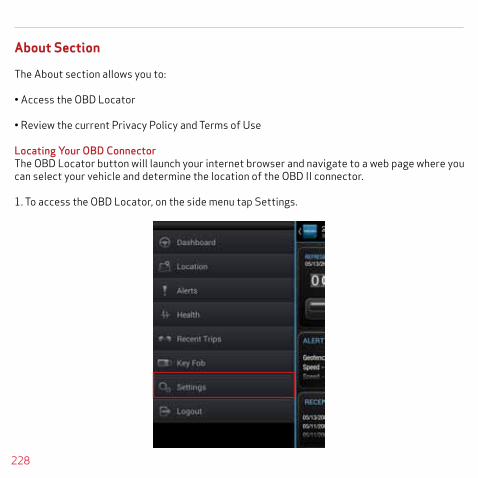
228
About Section
The About section allows you to:
• Access the OBD Locator
• Review the current Privacy Policy and Terms of Use
Locating Your OBD ConnectorThe OBD Locator button will launch your internet browser and navigate to a web page where you can select your vehicle and determine the location of the OBD II connector.
1. To access the OBD Locator, on the side menu tap Settings.

229
2. Tap About and then tap OBD Locator.
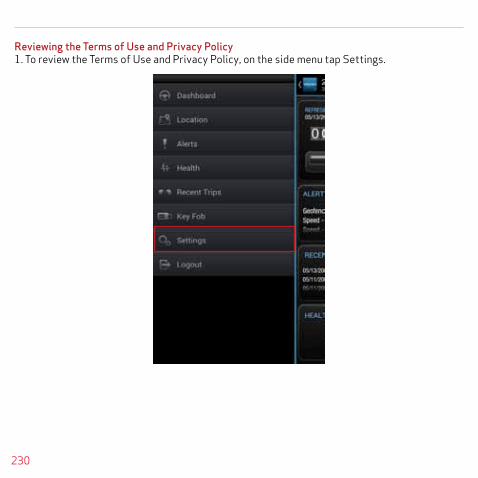
230
Reviewing the Terms of Use and Privacy Policy1. To review the Terms of Use and Privacy Policy, on the side menu tap Settings.

231
2. Tap About and then tap the document you wish to review.

232
LogoutOn the Side Menu of the app, tap Logout to logout from your vehicle. This will return you to the login screen.
Note: The Delphi Connect smartphone app will remain logged in indefinitely, unless the user logs out using the MENU and Logout selection.

233
Using the iPhone App
Forgot Username or PasswordShould you forget your account login credentials, you can request your username or a password reset from the login screen.
To request your Username, tap Forgot Username or Password?
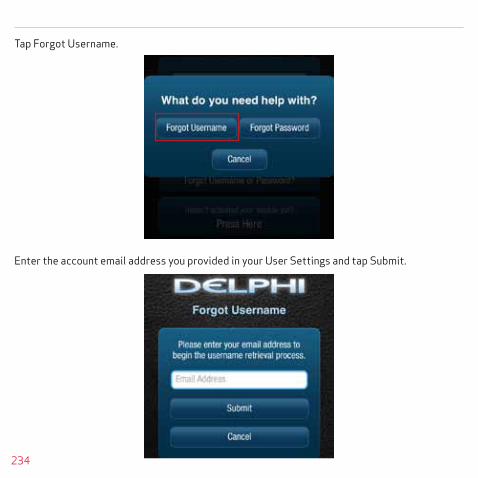
234
Tap Forgot Username.
Enter the account email address you provided in your User Settings and tap Submit.

235
You will receive an email with your Username sent to the account email address you provided as part of your User Settings. If you did not provide an account email address in your User Settings or do not receive the email with your Username, please call Verizon Wireless Customer Service at (800) 922-0204.
To request a Password reset, tap Forgot Username or Password?
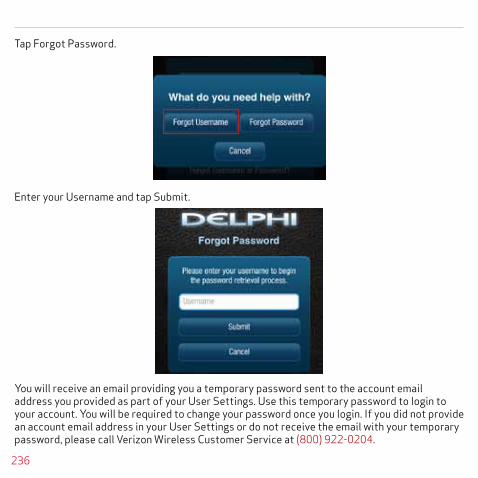
236
Tap Forgot Password.
Enter your Username and tap Submit.
You will receive an email providing you a temporary password sent to the account email address you provided as part of your User Settings. Use this temporary password to login to your account. You will be required to change your password once you login. If you did not provide an account email address in your User Settings or do not receive the email with your temporary password, please call Verizon Wireless Customer Service at (800) 922-0204.

237
Navigating AroundTo navigate to a specific category, tap the item you want to view, such as Alerts, Recent Trips, Health and Location (as shown in the red boxes). You can also tap the Side Menu icon, located in the top left corner to navigate to the various features of the app.
NOTE: The Wi-Fi hotspot icon (indicated by the blue box) is only available on modules purchased with that feature.
Side Menu

238
• From the Side Menu, you can navigate to any of the Delphi Connect features.
• Open the Settings feature to modify account information, manage your modules, configure Alerts and Notifications, and set up Bluetooth® pairing for compatible devices.
• Tap Key Fob to access the key fob feature.
• Tap Logout to log out from your vehicle.
Side Menu Options
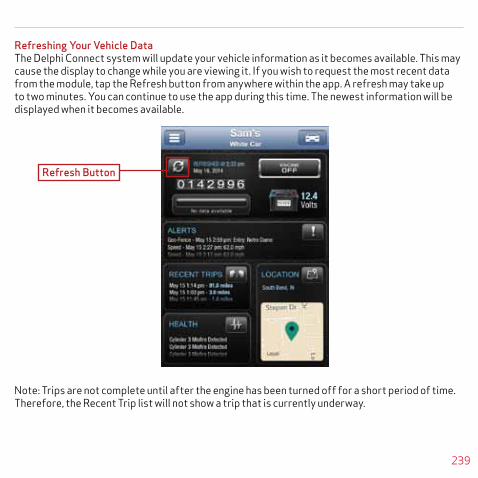
239
Refreshing Your Vehicle DataThe Delphi Connect system will update your vehicle information as it becomes available. This may cause the display to change while you are viewing it. If you wish to request the most recent data from the module, tap the Refresh button from anywhere within the app. A refresh may take up to two minutes. You can continue to use the app during this time. The newest information will be displayed when it becomes available.
Note: Trips are not complete until after the engine has been turned off for a short period of time. Therefore, the Recent Trip list will not show a trip that is currently underway.
Refresh Button

240
Selecting Your VehicleIf you have more than one module associated with your account, you can select which vehicle’s information to view. Tap the vehicle icon at the top of the screen to display all available vehicles. Tap the vehicle you wish to view or select current vehicle if you do not wish to change vehicles. The last vehicle that recorded data is indicated with the module icon, see yellow box.

241
DashboardThe Dashboard provides a summary of your vehicle status.
It includes the following information:
• Basic vehicle information including the engine run status, current programmable odometer, battery voltage and the fuel level, if your vehicle supports this feature. If you have a Wi-Fi equipped model, the Wi-Fi icon will be colored blue with the hotspot is on and grey when it is off.
Note: Fuel level readings will work on compatible vehicles.
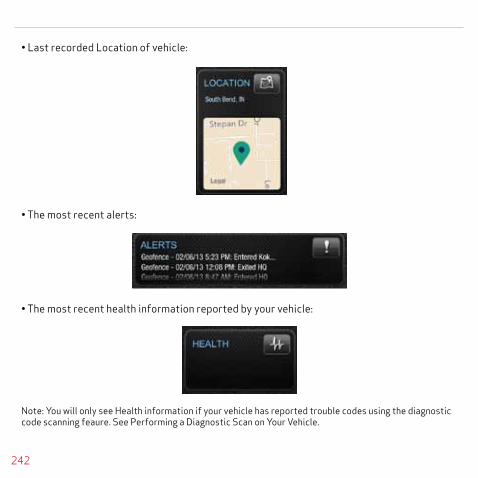
242
• Last recorded Location of vehicle:
• The most recent alerts:
• The most recent health information reported by your vehicle:
Note: You will only see Health information if your vehicle has reported trouble codes using the diagnostic code scanning feaure. See Performing a Diagnostic Scan on Your Vehicle.
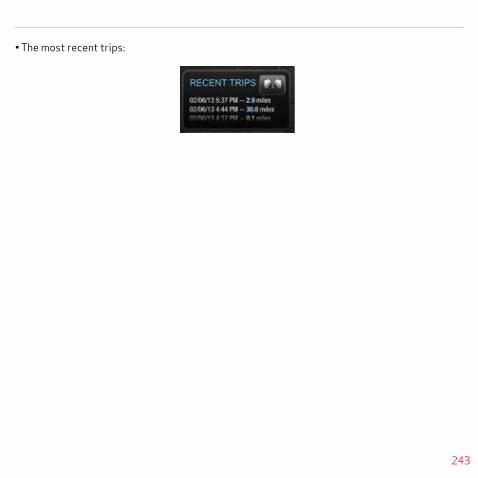
243
• The most recent trips:

244
LocationUse the Location feature to locate your vehicles at any time. The location screen indicates the last recorded vehicle locations. The current vehicle, the one identified at the top of the screen, is indicated by a green vehicle marker with a black dot in the center. Other vehicles are indicated by a blue marker with a black dot in the center surrounded by a transparent circle. If you have your GPS services turned on, the location of your phone will be shown as a blue dot.
Note: Vehicle location is subject to GPS accuracy. Depending on local conditions, it can take a few minutes to locate your vehicle using GPS services. This may delay your ability to see your vehicle location when installing the module. In addition, when your vehicle is located in an enclosed structure, such as a garage, determining your vehicle’s location may not be possible.

245
Tap on a vehicle marker to select it and display additional information such as the address and the latitude and longitude. The marker of the selected vehicle will darken slightly and a pop-up will show additional vehicle information. If you tap on a vehicle that is not the current vehicle, you will be able to Hide it, which will remove it from the location view. The vehicle is still in your account and you can view it again by using the Hide/Show location menu. Or, you can Select it, which will make it the current vehicle and the marker will turn green. To close the vehicle information box, tap anywhere on the map or use the dismiss button, the small x in the corner of the box.

246
If you have selected a vehicle to show on the map and the location is unknown, a message will be displayed at the top of the map indicating how many vehicle locations are unknown. Tap the message to see a list of all vehicles which have unknown locations.
Missingios_loc_unknown3

247
Hide/Show Vehicles on the Location MapOn the location screen, you can select which of your vehicles you wish to display on the map using the Hide or Show Vehicles feature on the location menu.

248
Check the vehicles you wish to show in the location map. You cannot uncheck the current vehicle. Tap Select Current Vehicle Only to display only the current vehicle on the map. Tap the back arrow at the top of the screen to return to the location menu. Tap the back arrow again to close the location menu.

249
Map ViewThe Map view can be customized using the map controls. You can use the standard Apple map controls, such as scrolling and zooming to adjust the Map view. To enable and disable the satellite view, tap Satellite on the location menu.

250
View Geo-FencesTo enable and disable the display of Geo-Fences, tap the Show Geo-Fences switch on the location menu. You will see the geo-fences associated with the current vehicle. See Managing Geo-Fences for more information.

251
Find My Car Tap the Zoom to Vehicle button to center the map on the current vehicle’s location.
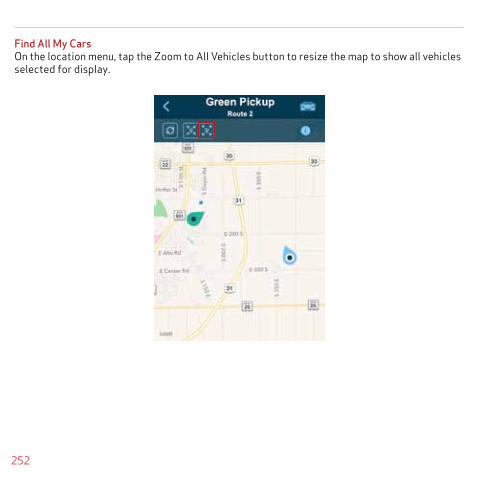
252
Find All My Cars On the location menu, tap the Zoom to All Vehicles button to resize the map to show all vehicles selected for display.

253
Navigate To VehicleIf the GPS is enabled on your smartphone, you can have your default navigation app provide directions from your location to your vehicle. Tap Directions To Vehicle on the location menu. This command will launch the default navigation app on your phone and plot a route from your location to your vehicle’s location.
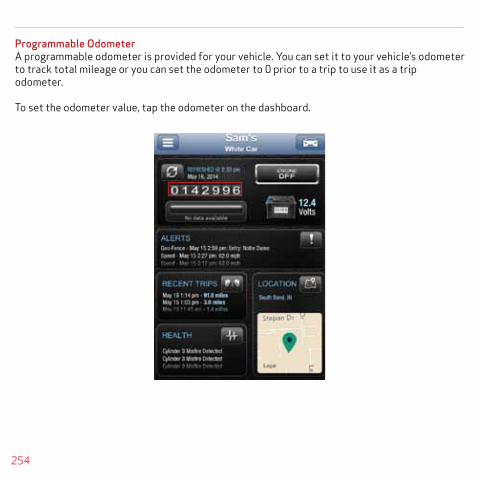
254
Programmable OdometerA programmable odometer is provided for your vehicle. You can set it to your vehicle’s odometer to track total mileage or you can set the odometer to 0 prior to a trip to use it as a trip odometer.
To set the odometer value, tap the odometer on the dashboard.

255
Enter the desired value in miles. Tap Save to save the value or tap back to exit without saving.

256
Managing Geo-FencesA geo-fence allows you to define a location that is of interest to you and create a boundary around it. When your vehicle crosses the boundary to enter or exit that location, an alert will oc-cur and can be viewed on the Delphi Connect app or the website. You can also be notified via an email or text message if desired. See Configuring Notifications on page 75 for more informa-tion. You can define up to six geo-fences for each vehicle. These can be edited or deleted as often as you like. A geo-fence can be made as small as 0.01 miles, about 50 feet, or as large as you would like. Due to GPS location tolerance, it is suggested to make a geo-fence at least 0.1 miles in any direction to avoid false alerts.
Create a Geo-Fence Using the Map1. Open the location menu by tapping the information icon. Tap Add or Edit Geo-fence in the location menu.
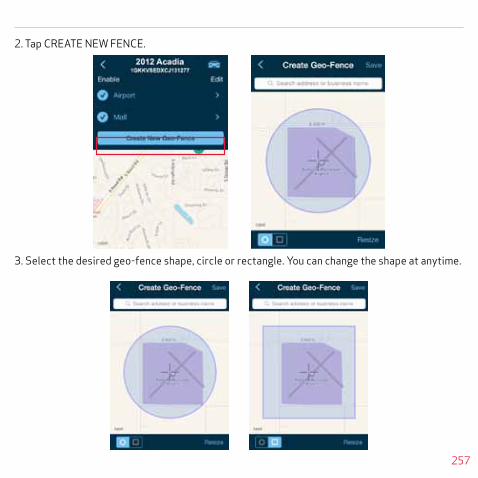
257
2. Tap CREATE NEW FENCE.
3. Select the desired geo-fence shape, circle or rectangle. You can change the shape at anytime.
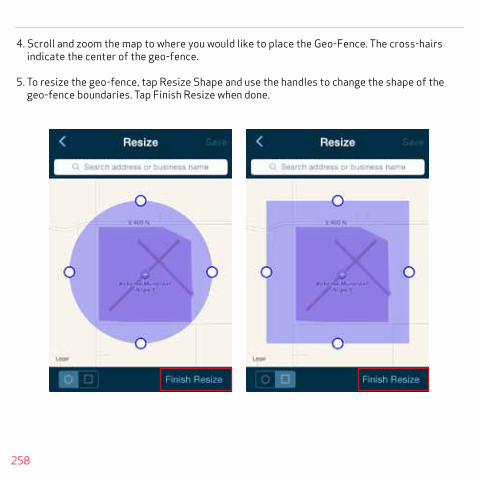
258
4. Scroll and zoom the map to where you would like to place the Geo-Fence. The cross-hairs indicate the center of the geo-fence.
5. To resize the geo-fence, tap Resize Shape and use the handles to change the shape of the geo-fence boundaries. Tap Finish Resize when done.
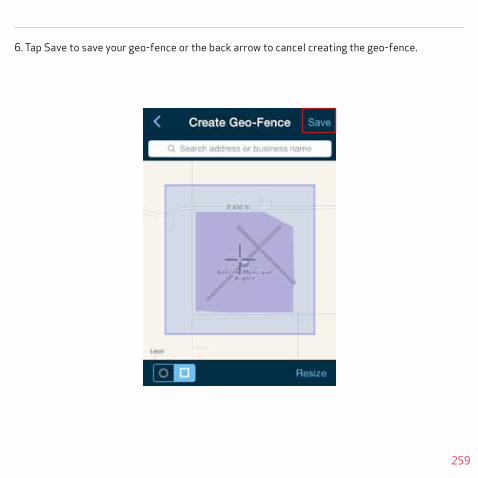
259
6. Tap Save to save your geo-fence or the back arrow to cancel creating the geo-fence.

260
7. Enter the name of the new geo-fence and tap Save, or tap the back arrow to exit without saving.
8. Create additional Geo-Fences if desired.

261
9. Tap the back arrow when you are done.

262
Create a Geo-Fence by Searching for an Address or Business Name1. Open the location menu by tapping the information icon. Tap Add or Edit Geo-fence in the location menu.
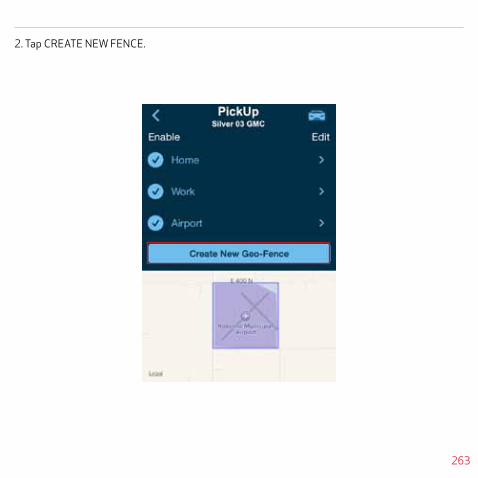
263
2. Tap CREATE NEW FENCE.

264
3. In the search bar (located at the top of the map), enter the address or business name you want to find and tap Search.

265
4. Select the desired location from the list of results. You can modify your search criteria and search again.
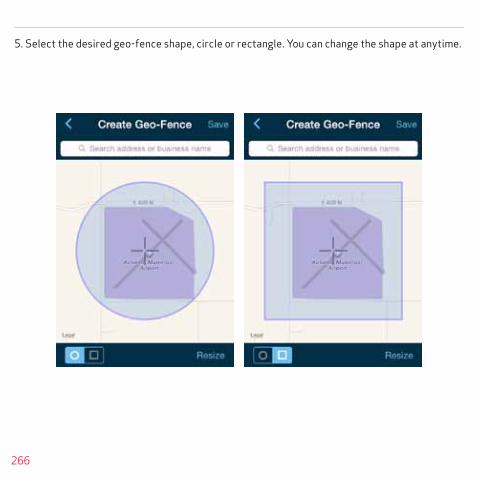
266
5. Select the desired geo-fence shape, circle or rectangle. You can change the shape at anytime.

267
6. Scroll and zoom the map to where you would like to place the Geo-Fence. The cross-hairs indicate the center of the geo-fence.
7. To resize the geo-fence, tap Resize Shape and use the handles to change the shape of the geo-fence boundaries. Tap Finish Resize when done.

268
8. Tap Save to save your geo-fence.

269
9. The search text you used will be automatically entered as the geo-fence name. If desired, edit the geo-fence name and tap Save, or tap the back arrow to exit without saving.
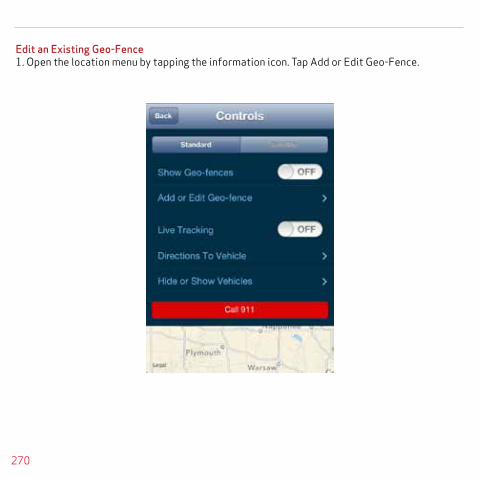
270
Edit an Existing Geo-Fence1. Open the location menu by tapping the information icon. Tap Add or Edit Geo-Fence.
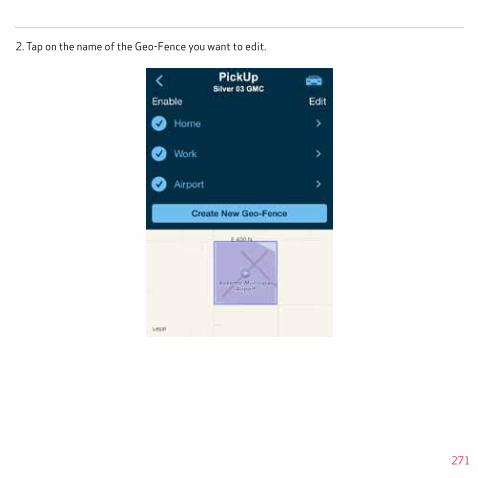
271
2. Tap on the name of the Geo-Fence you want to edit.

272
3. Select the desired geo-fence shape, circle or rectangle. You can change the shape at anytime.
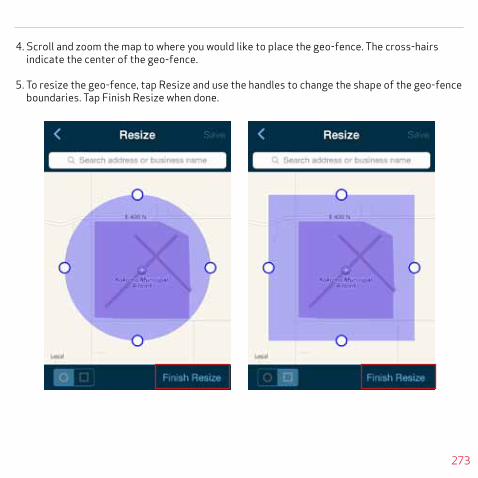
273
4. Scroll and zoom the map to where you would like to place the geo-fence. The cross-hairs indicate the center of the geo-fence.
5. To resize the geo-fence, tap Resize and use the handles to change the shape of the geo-fence boundaries. Tap Finish Resize when done.

274
6. Tap the Save icon (upper right hand corner) to save your geo-fence.
7. Edit the name of the new geo-fence if needed and tap OK, or tap the back arrow to exit without saving.

275
Delete an Existing Geo-Fence1. Open the location menu by tapping the information icon. Tap Add or Edit Geo-Fence.
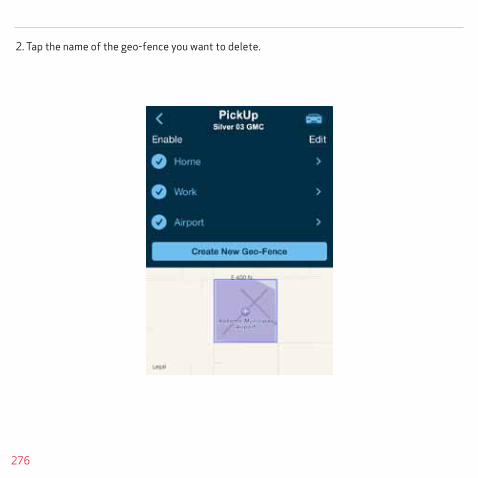
276
2. Tap the name of the geo-fence you want to delete.

277
3. Tap Delete, then tap Yes to delete or No to exit without deleting.
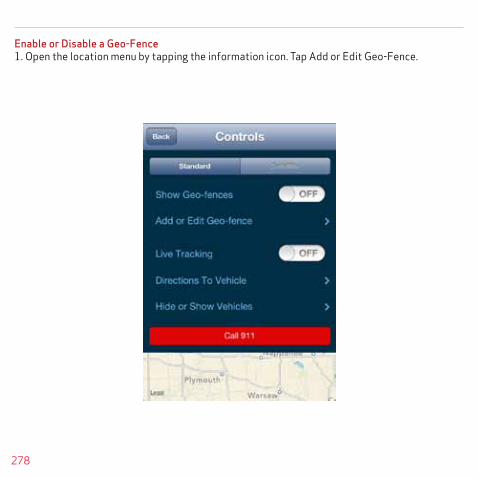
278
Enable or Disable a Geo-Fence1. Open the location menu by tapping the information icon. Tap Add or Edit Geo-Fence.
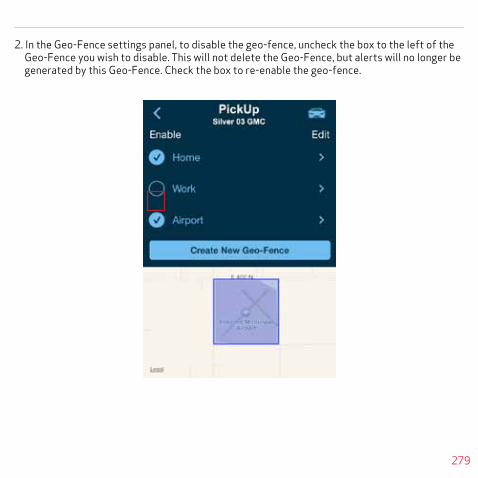
279
2. In the Geo-Fence settings panel, to disable the geo-fence, uncheck the box to the left of the Geo-Fence you wish to disable. This will not delete the Geo-Fence, but alerts will no longer be generated by this Geo-Fence. Check the box to re-enable the geo-fence.
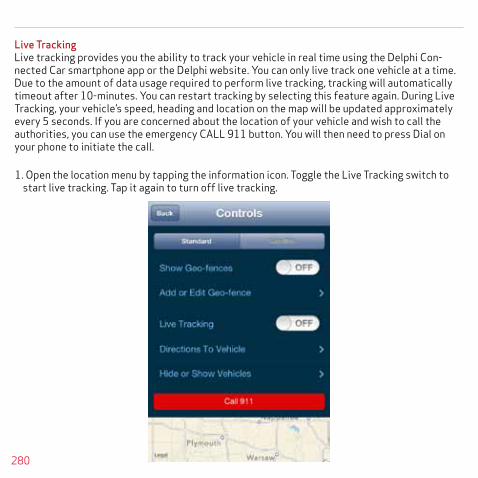
280
1. Open the location menu by tapping the information icon. Toggle the Live Tracking switch to start live tracking. Tap it again to turn off live tracking.
Live TrackingLive tracking provides you the ability to track your vehicle in real time using the Delphi Con-nected Car smartphone app or the Delphi website. You can only live track one vehicle at a time. Due to the amount of data usage required to perform live tracking, tracking will automatically timeout after 10-minutes. You can restart tracking by selecting this feature again. During Live Tracking, your vehicle’s speed, heading and location on the map will be updated approximately every 5 seconds. If you are concerned about the location of your vehicle and wish to call the authorities, you can use the emergency CALL 911 button. You will then need to press Dial on your phone to initiate the call.
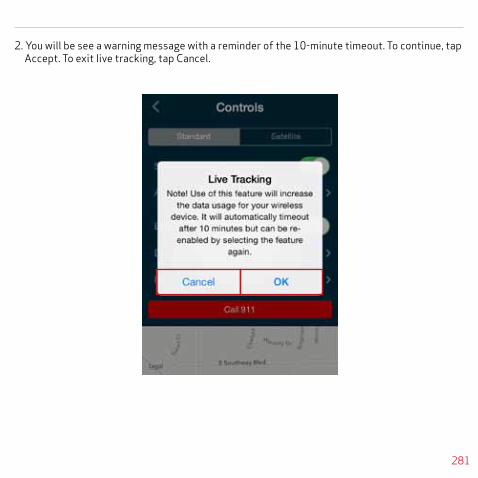
281
2. You will be see a warning message with a reminder of the 10-minute timeout. To continue, tap Accept. To exit live tracking, tap Cancel.
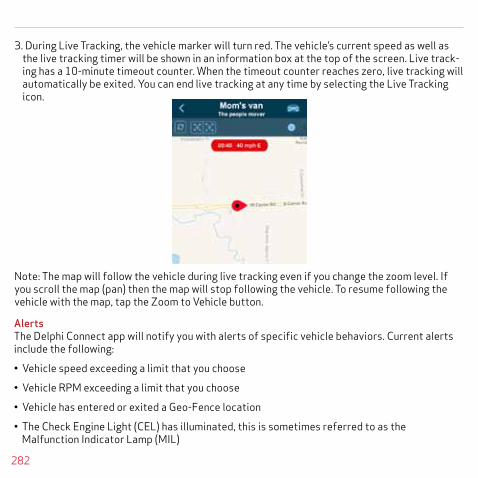
282
3. During Live Tracking, the vehicle marker will turn red. The vehicle’s current speed as well as the live tracking timer will be shown in an information box at the top of the screen. Live track-ing has a 10-minute timeout counter. When the timeout counter reaches zero, live tracking will automatically be exited. You can end live tracking at any time by selecting the Live Tracking icon.
Note: The map will follow the vehicle during live tracking even if you change the zoom level. If you scroll the map (pan) then the map will stop following the vehicle. To resume following the vehicle with the map, tap the Zoom to Vehicle button.
AlertsThe Delphi Connect app will notify you with alerts of specific vehicle behaviors. Current alerts include the following:
• Vehicle speed exceeding a limit that you choose
• Vehicle RPM exceeding a limit that you choose
• Vehicle has entered or exited a Geo-Fence location
• The Check Engine Light (CEL) has illuminated, this is sometimes referred to as the Malfunction Indicator Lamp (MIL)
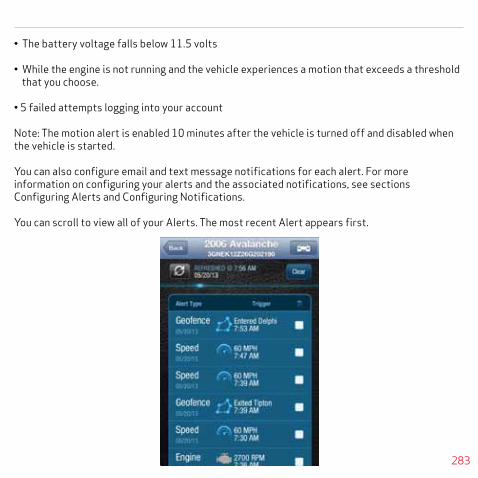
283
• The battery voltage falls below 11.5 volts
• While the engine is not running and the vehicle experiences a motion that exceeds a threshold that you choose.
• 5 failed attempts logging into your account
Note: The motion alert is enabled 10 minutes after the vehicle is turned off and disabled when the vehicle is started.
You can also configure email and text message notifications for each alert. For more information on configuring your alerts and the associated notifications, see sections Configuring Alerts and Configuring Notifications.
You can scroll to view all of your Alerts. The most recent Alert appears first.
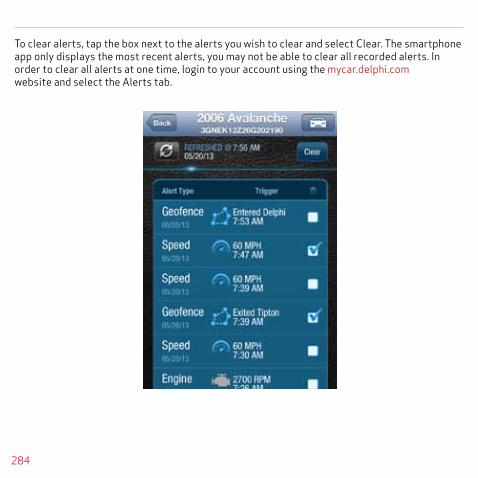
284
To clear alerts, tap the box next to the alerts you wish to clear and select Clear. The smartphoneapp only displays the most recent alerts, you may not be able to clear all recorded alerts. Inorder to clear all alerts at one time, login to your account using the mycar.delphi.comwebsite and select the Alerts tab.

285
You will need to confirm that you wish to clear the selected alerts. Tap OK to confirm, or tap Cancel to exit.
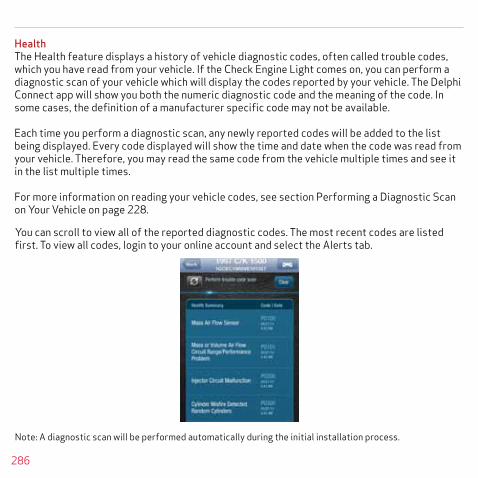
286
You can scroll to view all of the reported diagnostic codes. The most recent codes are listed first. To view all codes, login to your online account and select the Alerts tab.
Note: A diagnostic scan will be performed automatically during the initial installation process.
HealthThe Health feature displays a history of vehicle diagnostic codes, often called trouble codes, which you have read from your vehicle. If the Check Engine Light comes on, you can perform a diagnostic scan of your vehicle which will display the codes reported by your vehicle. The Delphi Connect app will show you both the numeric diagnostic code and the meaning of the code. In some cases, the definition of a manufacturer specific code may not be available.
Each time you perform a diagnostic scan, any newly reported codes will be added to the list being displayed. Every code displayed will show the time and date when the code was read from your vehicle. Therefore, you may read the same code from the vehicle multiple times and see it in the list multiple times.
For more information on reading your vehicle codes, see section Performing a Diagnostic Scanon Your Vehicle on page 228.

287
Performing a Diagnostic Code Scan on Your VehicleTo begin a diagnostic scan, tap the Refresh button labeled Perform trouble code scan
You will see a warning to make sure the engine is turned off and the key is in the On position before continuing. Once you begin the scan, please wait at least 2 minutes before starting your vehicle. Select Cancel to cancel the scan.

288
Clearing Diagnostic CodesYou can choose to clear the codes from either your display or from from your vehicle. If you clear the codes from your display, you will no longer see them in your vehicle’s data but they may still be active in your vehicle. Performing a diagnostic scan will allow to see if they are still being reported by your vehicle.
If you clear the codes from your vehicle, the module will command your vehicle to clear the current diagnostic codes. If a fault condition exists in your vehicle, a diagnostic code may return until the problem is fixed. Clearing the codes in the vehicle will not clear the codes you see displayed in the app in the Health section. You can leave this list if you want to maintain a history of your vehicle’s health.
Note: Simply clearing the diagnostic codes in your vehicle will not repair any problems it may have. Driving a vehicle that has diagnostic problems without first repairing them may cause damage to your vehicle. You should always correct any problems before clearing the diagnostic codes in your vehicle.
To begin clearing codes, tap Clear.
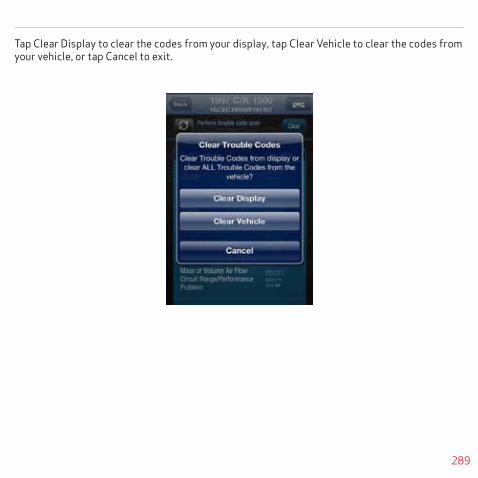
289
Tap Clear Display to clear the codes from your display, tap Clear Vehicle to clear the codes from your vehicle, or tap Cancel to exit.

290
Recent TripsThe Recent Trips feature records all the trips the vehicle has taken since you installed the module. Within the smartphone app, you can view the ten most recent vehicle trips. The most recent trip is listed first. Select any trip to view the trip details. To view all the recorded trips, use the website.
Tap any trip to view its details.

291
The trip details include total distance, start date and time, start location, end date and time, end location, and the amount of time the engine was idle time during the trip. Tap View Trip Map to view the trip on a map.

292
Use the map control tools to scroll and zoom the map, or turn on Satellite view.
Note: During trips, the location of the vehicle is logged every minute. These points are called breadcrumbs and are shown as dots on the map. The blue line connects these breadcrumbs to approximate the route the vehicle took.

293
Key Fob PairingThe key fob setup process has two main steps, configuring your module for your vehicle and pairing your module with your vehicle. You can perform the configuration step at any time from either the smartphone app or the website. To complete the pairing step you will need to be in your vehicle. It is necessary to perform this step in your vehicle because you may be prompted at times to turn your ignition key and press specific vehicle buttons. Following the successful set up of your Key Fob, you will be able to use the smartphone app to send key fob commands to your vehicle in the same manner as you would with your original key fob. In addition, you can use the Delphi Connect web site to send key fob commands as well.
Note: While the Delphi Connect system currently supports most remote start systems that came from the manufacturer, you can check if your remote start feature is supported. Refer to the fitment guide at connectedcar.delphi.com/fitment. For vehicles that require a sequence of buttons to be pressed to perform a remote start, you only need to press the Remote Start button once. The module will automatically provide any button sequence required to start the vehicle.
Note: You will only need to pair the key fob using the Delphi Connect app or website one time. After the initial pairing, the key fob capability will be available from either location.
Note: For vehicles that require a sequence of buttons to be pressed to perform a remote start, you only need to press the Remote Start button once. The module will automatically provide any button sequence required to start the vehicle.
Note: It is necessary to perform this step in your vehicle because you may be prompted at times to turn your ignition key and press specific vehicle buttons.
Note: The key fob setup should be only performed when all key fobs are present. If you do thiswith only one present it may de-program your secondary key fobs.

294
Before attempting the key fob setup process, look on your dashboard view to see if your vehicle’s VIN has been identified. If the module was able to read your vehicle’s VIN, you will see it displayed at the top of the screen below your vehicle name. If the module was unable to read your vehicle’s VIN, your vehicle will be identified by the word Vehicle followed by a number. If your VIN is not available, see section Key Fob Setup without VIN.
You can also edit your vehicle information and provide either the VIN or the Make, Model, and Model Year of your vehicle prior to fob setup. See section Edit Your Vehicle Information.

295
To enable your keyfob feature:1. Navigate to the Key Fob feature which is accessible from the Side Menu. Tap OK to begin the
fob setup process or Cancel to exit.

296
2. Using the Prev and Next buttons, look for the key fob picture that matches your key fob. Once you have found your key fob, tap Continue. If you do not find a picture of your key fob, tap “I don’t see my fob”. In this case, your key fob is not currently supported.
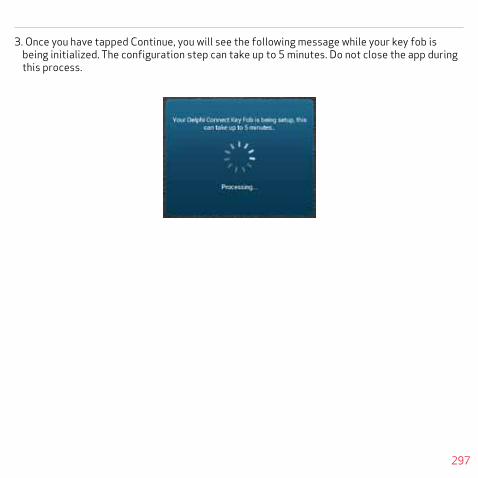
297
3. Once you have tapped Continue, you will see the following message while your key fob is being initialized. The configuration step can take up to 5 minutes. Do not close the app during this process.
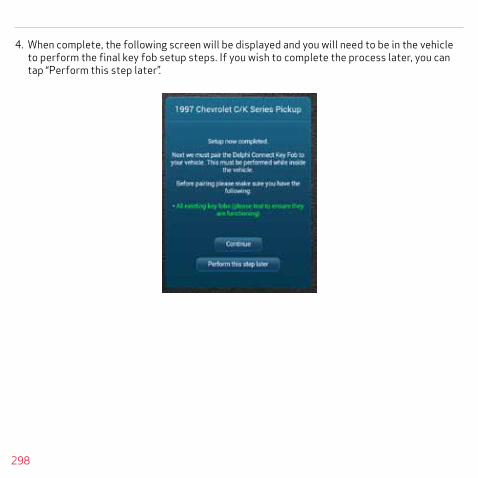
298
4. When complete, the following screen will be displayed and you will need to be in the vehicle to perform the final key fob setup steps. If you wish to complete the process later, you can tap “Perform this step later”.

299
5. Once in the vehicle, tap Continue. Carefully follow the on screen instructions. You may be required to push buttons in your vehicle such as the door lock/unlock switch or you may need to turn the ignition key a certain number of times.
Following the successful pairing of your Key Fob, you should be able to use your Delphi Connected Car app to send key fob commands over the Verizon Network to your vehicle in the same manner as you would with your manufacturer key fob. In addition, you can also use the Delphi Connect website to send key fob commands to your vehicle.
Note: You will only need to pair the key fob using the Delphi Connect app or website once.After the initial pairing, it will be available from the smartphone app or website.
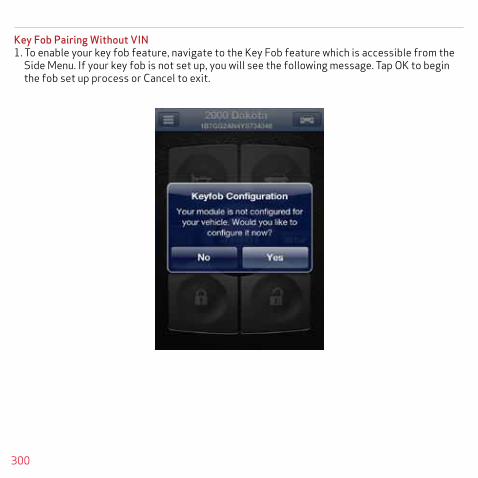
300
Key Fob Pairing Without VIN1. To enable your key fob feature, navigate to the Key Fob feature which is accessible from the
Side Menu. If your key fob is not set up, you will see the following message. Tap OK to begin the fob set up process or Cancel to exit.
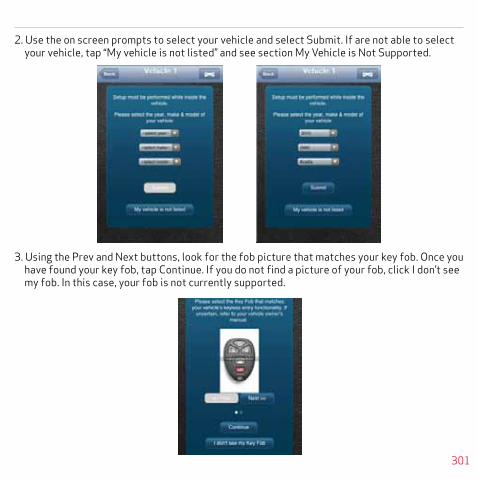
301
2. Use the on screen prompts to select your vehicle and select Submit. If are not able to select your vehicle, tap “My vehicle is not listed” and see section My Vehicle is Not Supported.
3. Using the Prev and Next buttons, look for the fob picture that matches your key fob. Once you have found your key fob, tap Continue. If you do not find a picture of your fob, click I don’t see my fob. In this case, your fob is not currently supported.
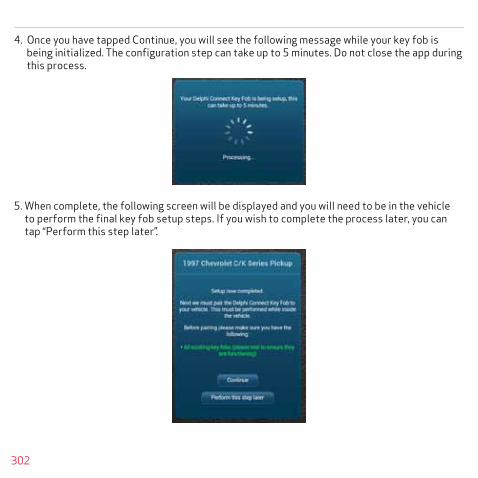
302
4. Once you have tapped Continue, you will see the following message while your key fob is being initialized. The configuration step can take up to 5 minutes. Do not close the app during this process.
5. When complete, the following screen will be displayed and you will need to be in the vehicle to perform the final key fob setup steps. If you wish to complete the process later, you can tap “Perform this step later”.

303
6. Once in the vehicle, tap Continue. Carefully follow the on screen instructions. You may be required to push buttons in your vehicle such as the door lock/unlock switch or you may need to turn the ignition key a certain number of times.
Following the successful pairing of your Key Fob, you will be able to use your Delphi Connected Car app to send key fob commands over the Verizon Network to your vehicle in the same manner as you would with your manufacturer key fob. In addition, you can also use the Delphi Connected Car website to send key fob commands to your vehicle.
Note: You will only need to pair the key fob using the Delphi Connect app or the website once. After the initial pairing, it will be available from the smartphone app or website.

304
Pair Smartphone Bluetooth® to ModuleThis feature lets you access the key fob functions on your Delphi Conncted Car smartphone app when within Bluetooth® range of the module (range is dependent on your cell phone).
This feature requires:• Successful key fob pairing to your vehicle.
• A compatible smartphone with Bluetooth®
Note: If the module has a cellular connection and the Wi-Fi hotspot is on and connected to at least one device, the ability to send key FOB commands over Bluetooth will be disabled. All key FOB commands will be sent over the cellular network.
To pair your Smartphone with the module Bluetooth® Direct Connect, follow the steps below:
1. Access the Delphi Connect Car app side menu. Tap Settings.

305
2. Tap Vehicle Settings.
3. Tap the vehicle in which the module is currently installed.

306
4. Tap Bluetooth Settings.

307
5. Tap Discover to activate Bluetooth® pairing.
6. The Status LED on your module should begin flashing blue.
7. Press your phone’s Home button and follow the procedures for turning on your smartphone’s Bluetooth® feature.
8. Tap Search for Devices or Scan Now if your phone doesn’t begin scanning automatically.
9. When a device named ACT###, where ### are three numbers, appears as an available device, tap it.
10. The device ACT### should now show as paired.
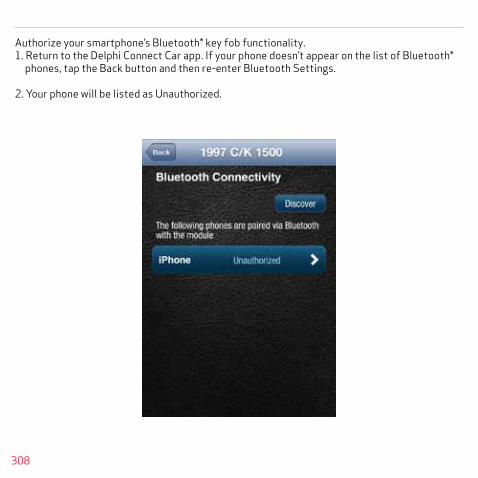
308
Authorize your smartphone’s Bluetooth® key fob functionality.1. Return to the Delphi Connect Car app. If your phone doesn’t appear on the list of Bluetooth®
phones, tap the Back button and then re-enter Bluetooth Settings.
2. Your phone will be listed as Unauthorized.
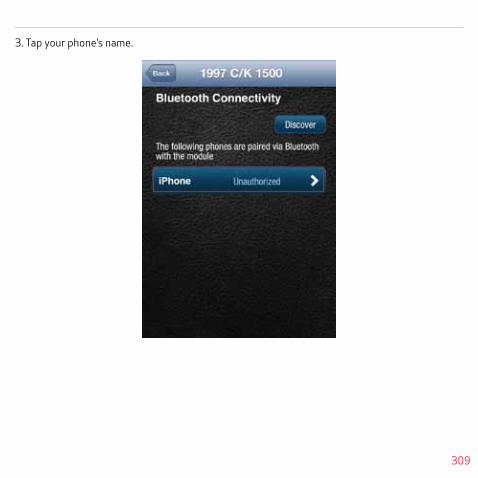
309
3. Tap your phone’s name.

310
4. Tap Authorize to enable your phone to provide key fob control over Bluetooth®. Your phone will now show as authorized.

311
5. Return to the Delphi Connect side menu.
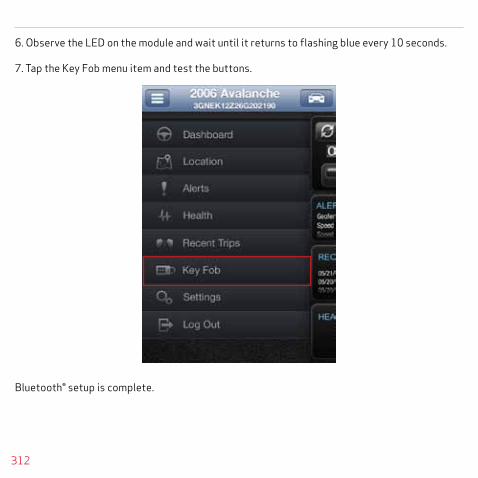
312
6. Observe the LED on the module and wait until it returns to flashing blue every 10 seconds.
7. Tap the Key Fob menu item and test the buttons.
Bluetooth® setup is complete.

313
Remove the Bluetooth Connection to Your ModuleYou can remove the Bluetooth connection between your phone and your module.
1. Access the Delphi Connect Car app side menu.
2. Tap Settings.

314
3. Tap Vehicle Settings.
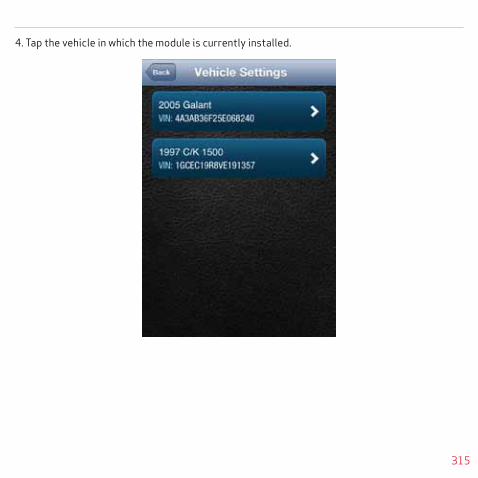
315
4. Tap the vehicle in which the module is currently installed.
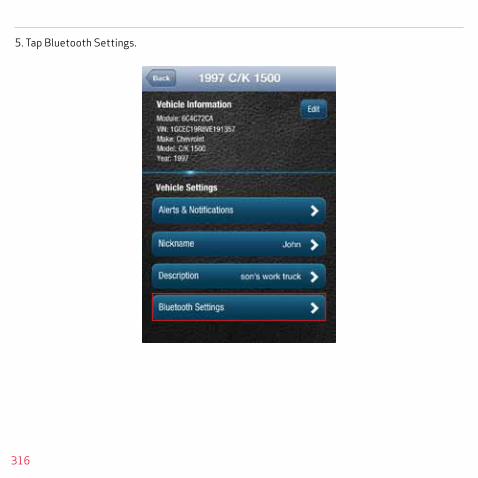
316
5. Tap Bluetooth Settings.

317
6. Tap the name of the device you wish to remove.
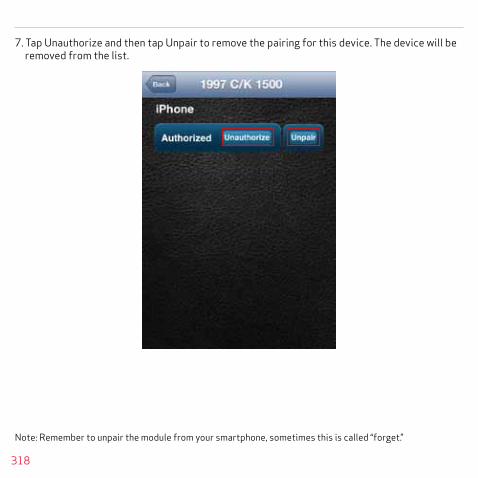
318
7. Tap Unauthorize and then tap Unpair to remove the pairing for this device. The device will be removed from the list.
Note: Remember to unpair the module from your smartphone, sometimes this is called “forget.”

319
SettingsThe Settings menu provides access to your Account Settings, Vehicle Settings, your personal PIN-code, and additional information in the About section.
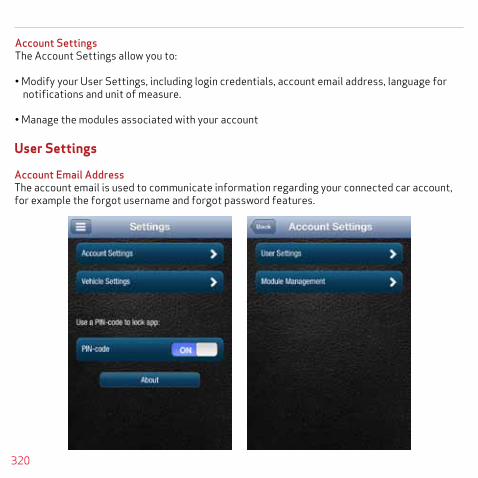
320
User Settings
Account Email AddressThe account email is used to communicate information regarding your connected car account, for example the forgot username and forgot password features.
Account SettingsThe Account Settings allow you to:
• Modify your User Settings, including login credentials, account email address, language for notifications and unit of measure.
• Manage the modules associated with your account

321
Add Account Email AddressOn the side menu tap Settings, then Account Settings then User Settings then Enter Email Address.

322
Edit or Delete Account Email AddressTo edit or delete the account email address:
On the side menu tap Settings, then Account Settings then User Settings then tap the email address you entered previously.
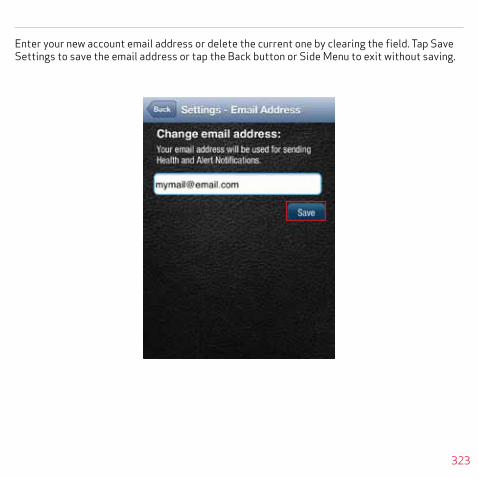
323
Enter your new account email address or delete the current one by clearing the field. Tap Save Settings to save the email address or tap the Back button or Side Menu to exit without saving.

324
Change UsernameOn the side menu tap Settings, then Account Settings then User Settings then tap Username.
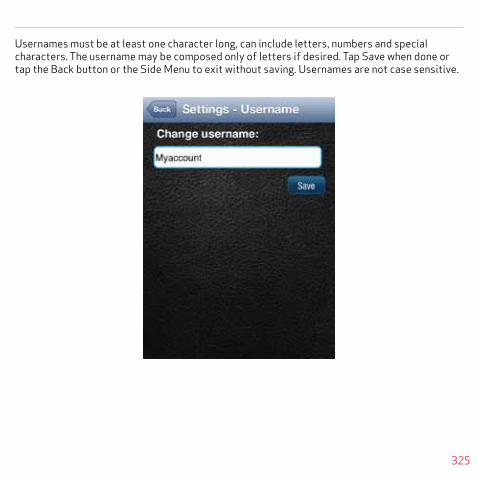
325
Usernames must be at least one character long, can include letters, numbers and special characters. The username may be composed only of letters if desired. Tap Save when done or tap the Back button or the Side Menu to exit without saving. Usernames are not case sensitive.

326
Change PasswordOn the side menu tap Settings, then Account Settings then User Settings then tap Password.
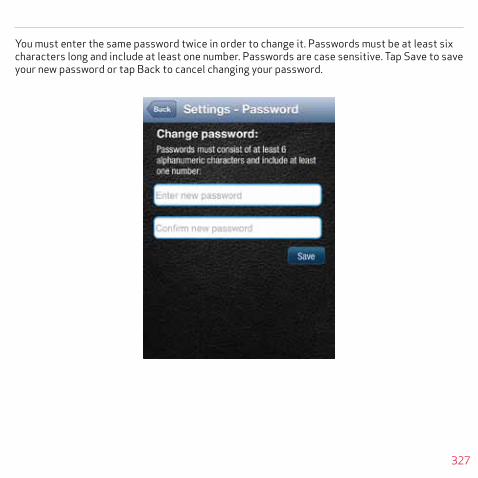
327
You must enter the same password twice in order to change it. Passwords must be at least six characters long and include at least one number. Passwords are case sensitive. Tap Save to save your new password or tap Back to cancel changing your password.

328
Vehicle Nicknames and DescriptionsYou can assign a nickname and a description to each vehicle. If defined, the nickname will be displayed instead of the vehicle year and vehicle make, or instead of Vehicle 1 if the VIN is unknown. If defined, the description will be displayed instead of the VIN or VIN Unknown for vehicles that didn’t report a VIN. For example, in the dashboard images below, one shows the default vehicle year and model and the VIN and the other shows the use of a nickname and description.
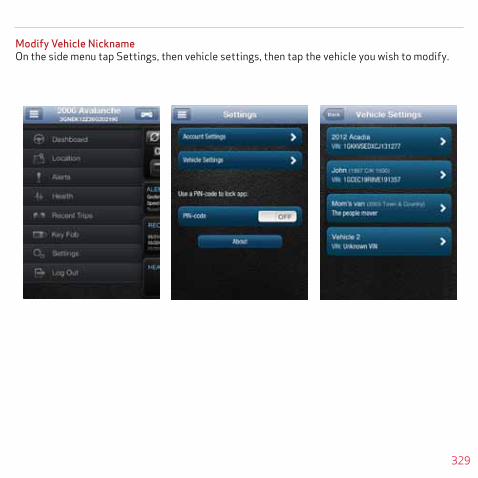
329
Modify Vehicle NicknameOn the side menu tap Settings, then vehicle settings, then tap the vehicle you wish to modify.
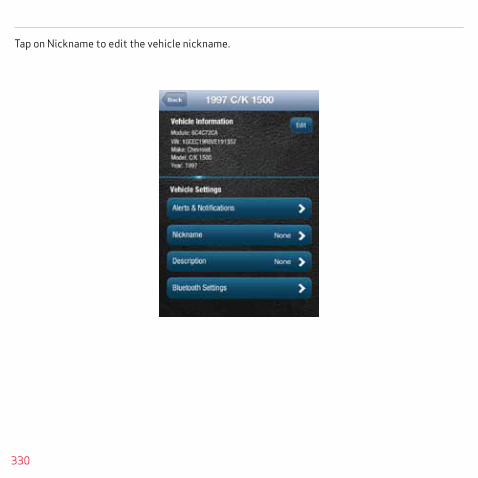
330
Tap on Nickname to edit the vehicle nickname.

331
Enter the desired nickname and press Save to save the nickname.
Note: If you delete the nickname, the vehicle year and model will again be displayed.
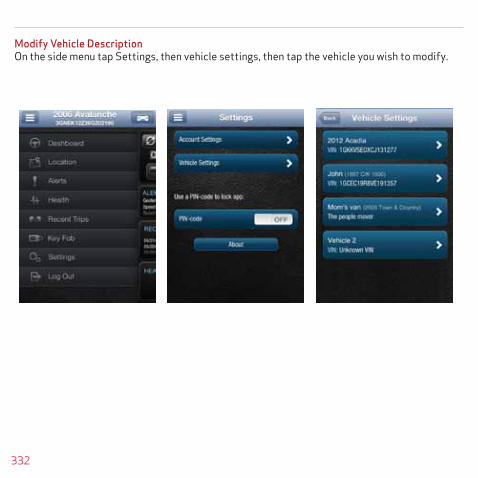
332
Modify Vehicle DescriptionOn the side menu tap Settings, then vehicle settings, then tap the vehicle you wish to modify.

333
Tap on Description to edit the vehicle description.

334
Enter the desired description and press Save to save the description.
Note: If you delete the description, the vehicle VIN will again be displayed.

335
Select Notification LanguageThe notification language setting allows you to receive your alert notifications, both email and txt messages, in any of the languages we support.
On the side menu tap Settings, then Account Settings, then tap User Settings.
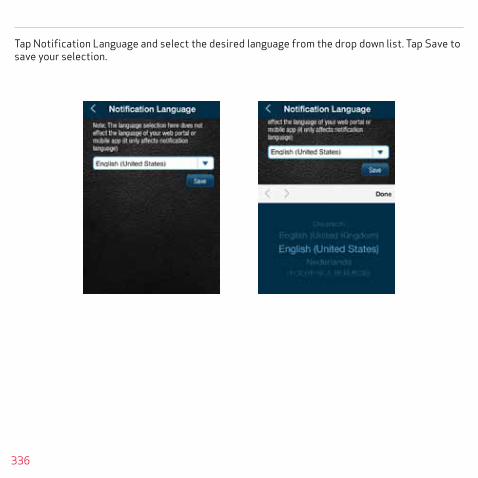
336
Tap Notification Language and select the desired language from the drop down list. Tap Save to save your selection.
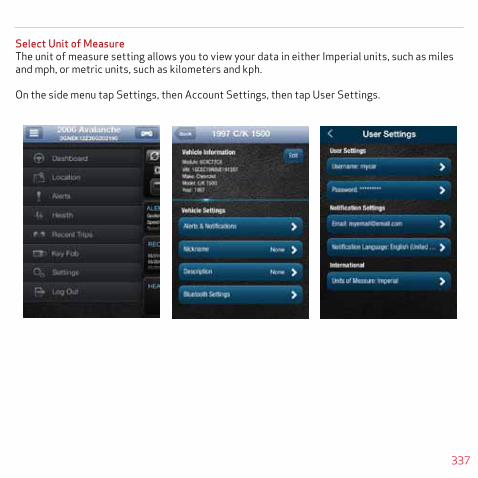
337
Select Unit of MeasureThe unit of measure setting allows you to view your data in either Imperial units, such as miles and mph, or metric units, such as kilometers and kph.
On the side menu tap Settings, then Account Settings, then tap User Settings.
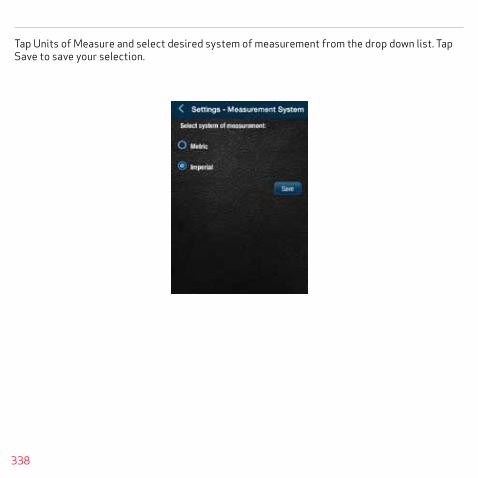
338
Tap Units of Measure and select desired system of measurement from the drop down list. Tap Save to save your selection.

339
Module Management
Module Management allows you to:
• View the modules associated with your account
• Add modules to your account
• Remove modules from your account
View Modules Associated with Your AccountOn the side menu tap Settings, then Account Settings then Module Management. You will see all the modules currently associated with your account.
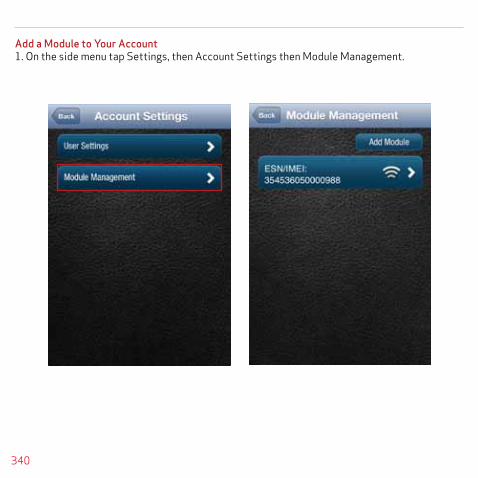
340
Add a Module to Your Account1. On the side menu tap Settings, then Account Settings then Module Management.

341
2. Tap Add Module.
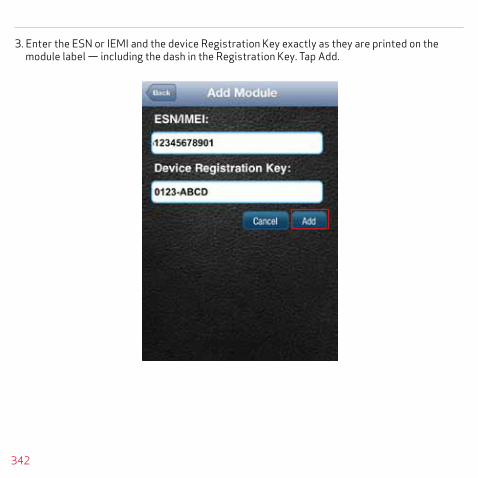
342
3. Enter the ESN or IEMI and the device Registration Key exactly as they are printed on the module label — including the dash in the Registration Key. Tap Add.

343
4. If the module is still associated with another account, you will also need to enter the Username and Password of that account then click Add.
Note: Once you have added the module to your account, log out from your account on all smartphone apps and the website. Unplug the module if it currently on a vehicle. Plug the module into the desired vehicle. Finally, follow the steps in section Reconnect Your Module. You may now log into your account to view your new module in your account.
Note: Any vehicle data in the previous account will not be transferred to the new account. Once added to the new account, all vehicle data reported by the module will be available in the new account. Any previous key fob pairings will remain in the module after adding the module to the new account. Any previous Bluetooth pairings will be available after adding the module.

344
Remove a Module from Your Account1. On the side menu tap Settings, then Account Settings then Module Management.

345
2. Tap the ESN or IEMI number of the module you want to remove.
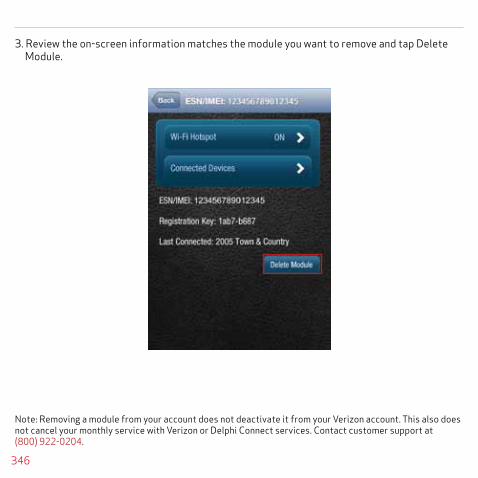
346
3. Review the on-screen information matches the module you want to remove and tap Delete Module.
Note: Removing a module from your account does not deactivate it from your Verizon account. This also does not cancel your monthly service with Verizon or Delphi Connect services. Contact customer support at (800) 922-0204.

347
Review Your Vehicle InformationTo review your vehicle information, tap Settings from the side menu then tap Vehicle Settings.
Vehicle Settings
The Vehicle Settings allow you to:
• Review and edit your vehicle information, such as providing your vehicle VIN when the VIN is not available
• Configure alerts and notifications
• Setup Bluetooth Direct Connect
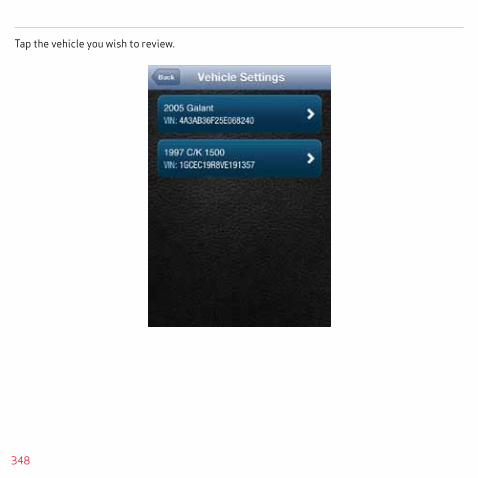
348
Tap the vehicle you wish to review.

349
Edit Your Vehicle InformationIf your vehicle did not report a VIN, you can enter the VIN or information about your vehicle yourself.
1. To edit your vehicle information, tap Settings from the side menu then tap Vehicle Settings.

350
2. Tap the vehicle you wish to review and then tap Edit.

351
3. You can enter either the VIN from your vehicle or you can enter the vehicle make, model and model year. Tap the circle next to the information you want to provide.

352
4. Enter the VIN or use the drop-down menus to select your vehicle’s make, model and model year.
5. Tap Save to save your changes or back to exit without saving your changes.
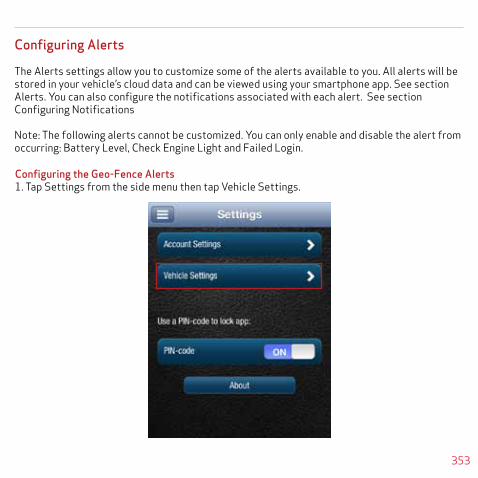
353
Configuring Alerts
The Alerts settings allow you to customize some of the alerts available to you. All alerts will be stored in your vehicle’s cloud data and can be viewed using your smartphone app. See section Alerts. You can also configure the notifications associated with each alert. See section Configuring Notifications
Note: The following alerts cannot be customized. You can only enable and disable the alert from occurring: Battery Level, Check Engine Light and Failed Login.
Configuring the Geo-Fence Alerts1. Tap Settings from the side menu then tap Vehicle Settings.

354
2. Tap the vehicle you wish to configure.

355
3. Tap Alerts & Notifications.

356
4. Tap Geofence.

357
5. To disable a specific Geo-Fence, tap the ON/OFF slider next to the Geo-Fence name. To re- enable the Geo-Fence tap the ON/OFF slider again.
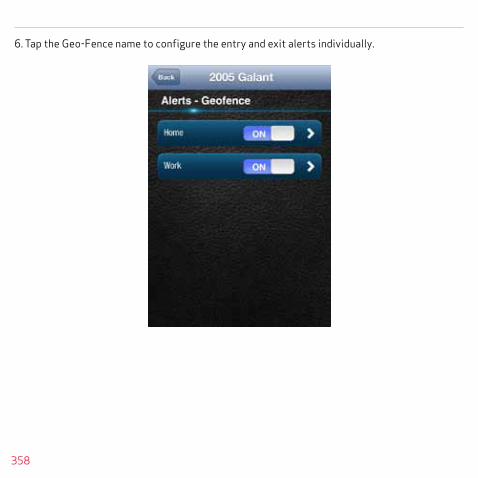
358
6. Tap the Geo-Fence name to configure the entry and exit alerts individually.

359
7. To disable the entry alert, uncheck the box next to the words Trigger When Entered. To disable the exit alert, uncheck the box next to the words Trigger When Exited. Re-check the appropriate box to re-enable an alert.
8. Tap Save to save your changes or tap the Back button or the side menu button to exit without saving your changes.
See Configuring Notifications for information on configuring notifications.

360
Configuring the Speed Alert1. Tap Settings from the side menu then tap Vehicle Settings.
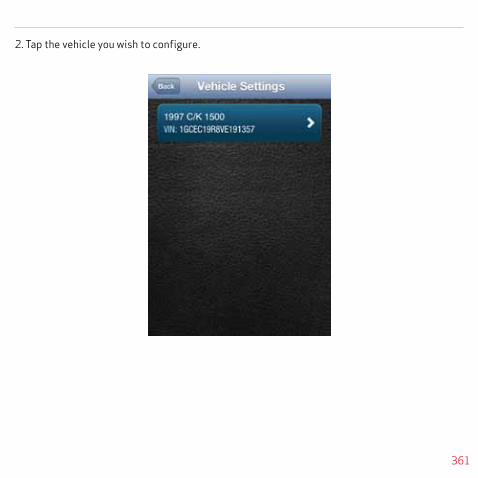
361
2. Tap the vehicle you wish to configure.

362
3. Tap Alerts & Notifications.

363
4. To disable the speed alert, tap the ON/OFF slider to the right of the word Speed. The slider will change from ON to OFF. To re-enable the speed alert, tap the ON/OFF slider again.

364
5. Tap the word Speed to configure the speed threshold.

365
6. Enter the speed in miles per hour that you want to trigger the speed alert. That is, when the vehicle is driven at this speed or higher for 5 seconds or more, the speed alert will be recorded.
7. Tap Save to save your changes or tap the Back button or the side menu button to exit without saving your changes.
See Configuring Notifications for information on configuring notifications.
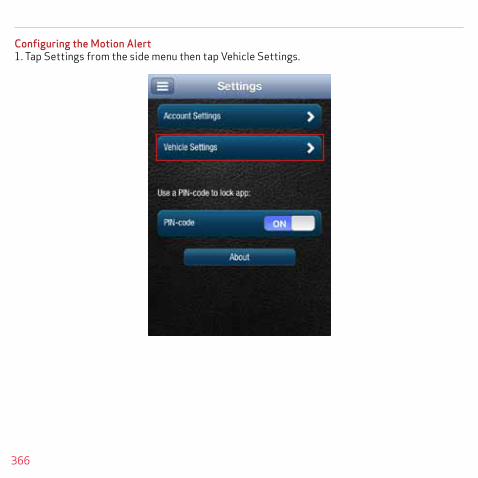
366
Configuring the Motion Alert1. Tap Settings from the side menu then tap Vehicle Settings.

367
2. Tap the vehicle you wish to configure.

368
3. Tap Alerts & Notifications.

369
4. To disable the motion alert, tap the ON/OFF slider to the right of the word Speed. The slider will change from ON to OFF. To re-enable the motion alert, tap the ON/OFF slider again.

370
5. Tap the word Motion to configure the motion threshold.

371
6. Enter the threshold in G-forces that you want to trigger the motion alert. That is, once the ignition of off for 10 minutes and the vehicle experiences a motion of this force or more , the motion alert will be recorded. A setting of 2 G’s can typically be set off by slamming a vehicle door or rocking the vehicle.
7. Tap Save to save your changes or tap the Back button or the side menu button to exit without saving your changes.
See Configuring Notifications for information on configuring notifications.
Note: You may need to adjust the motion threshold more than once to achieve the desired level of sensitivity for you vehicle. A smaller value is more sensitive, a larger value is less sensitive.

372
Configuring the Engine RPM Alert1. Tap Settings from the side menu then tap Vehicle Settings.
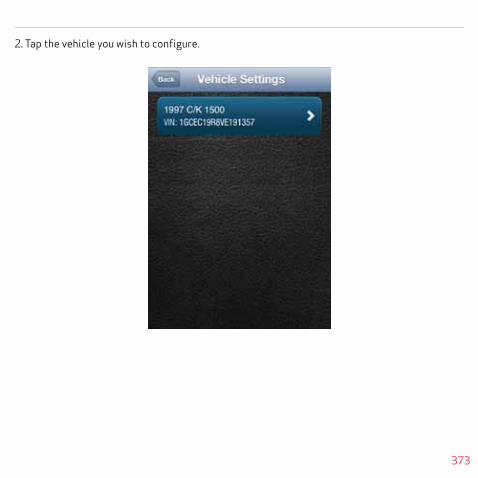
373
2. Tap the vehicle you wish to configure.

374
3. Tap Alerts & Notifications.
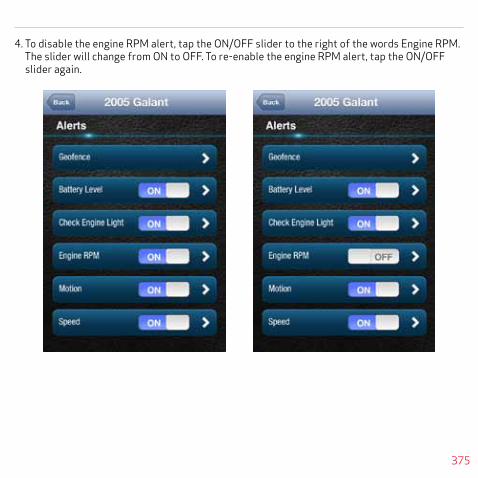
375
4. To disable the engine RPM alert, tap the ON/OFF slider to the right of the words Engine RPM. The slider will change from ON to OFF. To re-enable the engine RPM alert, tap the ON/OFF slider again.

376
5. Tap the words Engine RPM to configure the RPM threshold.

377
6. Enter the engine RPM threshold in revolutions per minute and the minimum time required in seconds that you want to trigger the engine RPM alert. That is, when the engine RPM exceeds the RPM threshold for the number of seconds you specify, the engine RPM alert will be recorded.
7. Tap Save to save your changes or tap the Back button or the side menu button to exit without saving your changes.
See Configuring Notifications for information on configuring notifications.

378
Configuring NotificationsFor each alert, you can configure email and text notifications that will be sent when the alert occurs. This includes the ability to send a notification email to any number of email addresses you choose for each alert and to send a text message to any number of mobile phones you choose for each alert.
Note: When you add a new mobile number for notifications, you will receive a confirmation txt message with opt-in instructions. In order to receive notifications at that number, follow the opt-in instructions in the txt message. If you do not opt-in, you will not receive notifications on that mobile number.
Note: To discontinue receiving alerts on a mobile phone, you can remove the mobile number from the notification settings. You can also reply STOP to any notification txt message. This will remove the mobile number from every place it occurs in the notification settings.

379
Add a NotificationYou can add an email and text (SMS) notification to any alert. The process is similar for all alerts, here is how to add notifications to the speed alert. For Geo-Fence notifications, you will need to tap the name of the Geo-Fence you wish to configure.
1. Tap Settings from the side menu then tap Vehicle Settings.
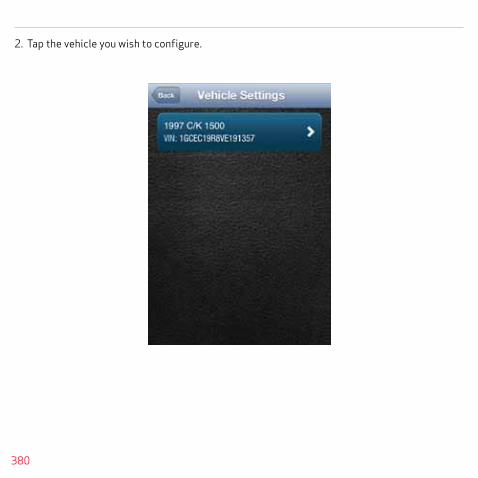
380
2. Tap the vehicle you wish to configure.

381
3. Tap Alerts & Notifications.

382
4. Tap the word Speed to configure the notifications.

383
5. Tap Add Email at the bottom of the screen. If you do not see the button Add Email, tap the small down arrow to right of the word Notifications to expand the Notifications section.

384
6. Tap Add Notification
7. To send a notifcation to an email address, select the email address icon and enter a valid email address in the format [email protected]. To enter additional email addresses, tap Add Notification. You can enter as many email addresses as you wish.

385
8. To send a text notification to a mobile number, select the mobile number icon enter a valid 10 digit mobile number in the format 1112223333 using only numbers and no other characters. To enter additional mobile numbers, tap Add Notification. You can enter as many mobile numbers as you wish.
9. Tap Save to save your changes or tap the Back button or the side menu button to exit without saving your changes

386
Delete a NotificationYou can delete a notification associated with any alert. The process is similar for all alerts, here is how to delete notifications for the speed alert. For Geo-Fence notifications, you will need to tap the name of the Geo-Fence you wish to configure.
1. Tap Settings from the side menu then tap Vehicle Settings.

387
2. Tap the vehicle you wish to configure.

388
3. Tap Alerts & Notifications.

389
4. Tap the word Speed to configure the notifications.

390
5. If you do not see the notification email addresses or mobile numbers displayed on the screen, tap the small down arrow to right of the word Notifications to expand the notification section.

391
6. To delete a notification email address or mobile number, tap the x next to the email address or mobile number you want to delete.
7. Tap Save to save your changes or tap the Back button or the side menu button to exit without saving your changes.

392
Wi-Fi HotspotModel ACT233L of the Delphi Connected Car System offers you a mobile hotspot in your vehicle. The hotspot is enabled whenever the engine is running and can be programmed to be enabled for a period of time after the engine is turned off. You can have a maximum of five devices connected to the hotspot at one time.
Configure the Network Name (SSID) and BroadcastingFrom the Settings menu, tap Account Settings, Module Management, then tap the module you wish to configure. Tap on Wi-Fi hotspot.
Note: If the module has a cellular connection and the Wi-Fi hotspot is on and connected to at least one device, the ability to send FOB commands over Bluetooth will be disabled. All FOB commands will be sent over the cellular network.
Note: After modifying the Wi-Fi hotspot settings, the hotspot will turn off for a few moments and then turn back on.

393
Tap Network Name to change the network name (SSID). This is the name that users will see when scanning for wireless networks on their devices. Enter the new network name. If you check the box labeled Broadcast Network Name, then the network name of the hotspot will be displayed on any device that performs a Wi-Fi scan for available networks. If you uncheck the box, then the network name will not be displayed and users will have to enter the network name to connect to it. Tap Save Settings to save your changes or back to exit without saving your changes.

394
View Connected DevicesFrom the Settings menu, tap Account Settings, Module Management, then tap the module you wish to configure. Tap on Connected Devices. You will see all devices currently connected to the hotspot.

395
Configure the Network PasswordFrom the Settings menu, tap Account Settings, Module Management, then tap the module you wish to configure. Tap on Wi-Fi hotspot.
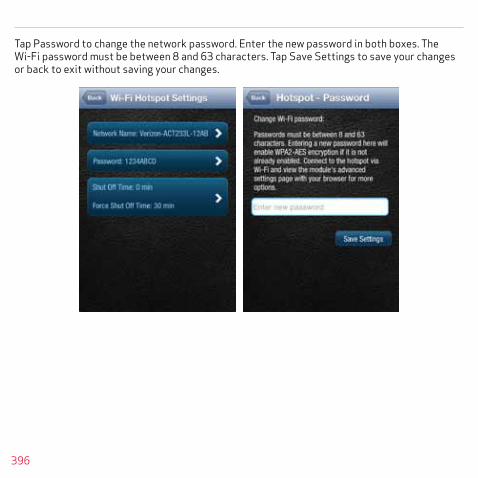
396
Tap Password to change the network password. Enter the new password in both boxes. The Wi-Fi password must be between 8 and 63 characters. Tap Save Settings to save your changes or back to exit without saving your changes.

397
Configure the Hotspot TimeoutsThe hotspot can be configured to remain on after the engine has been turned off. When the engine is turned off, the hotspot will remain on for a programmable amount of time called Shut Off Time. This time ranges from 0 to 30 minutes. If, at the end of Shut Off Time and anytime thereafter, there are no devices connected to the hotspot, the hotspot will turn off and remain off until the engine is started. If Shut Off Time is set to 0, then when the engine is turned off, if no devices are connected to the hotspot, it will shut off immediately. If there is at least once device connected, the hotspot will remain on. In order to limit the amount of time the hotspot is enabled after the engine is turned off, an additional time called Force Shut Off Time begins when the engine is turned off. This time ranges from 0 to 120 minutes. Once the Force Shut Off Time runs out, the hotspot will turn off regardless if any devices are connected. If Force Shut Off time is set to 0, then the hotspot will turn off as soon as the engine is turned off, even if devices are currently connected.
From the Settings menu, tap Account Settings, Module Management, then tap the module you wish to configure. Tap on Wi-Fi hotspot.
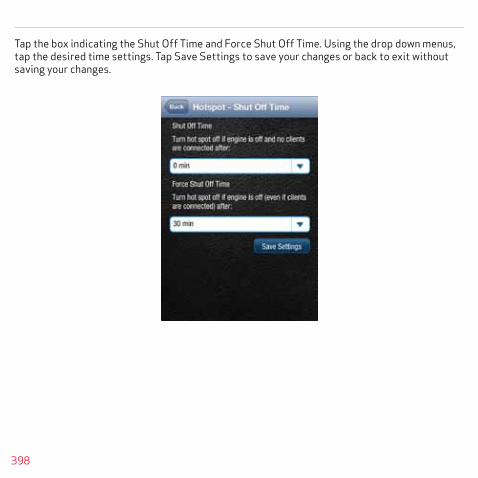
398
Tap the box indicating the Shut Off Time and Force Shut Off Time. Using the drop down menus, tap the desired time settings. Tap Save Settings to save your changes or back to exit without saving your changes.

399
Wi-Fi Administrator Portal AccessYou can log in to the Wi-Fi hotspot using an administrator account while connected to the hotspot. The administrator account is best viewed on a laptop or similar device with a large screen. All screenshots in this section are taken from a laptop screen for clarity. Open the web browser on your laptop or mobile phone. In the address bar enter my.dphconnect and press Enter. If you have difficulty reaching the administrator website, clear your browser’s cache and try again.
The home page provides you links to hotspot settings, account information and help.
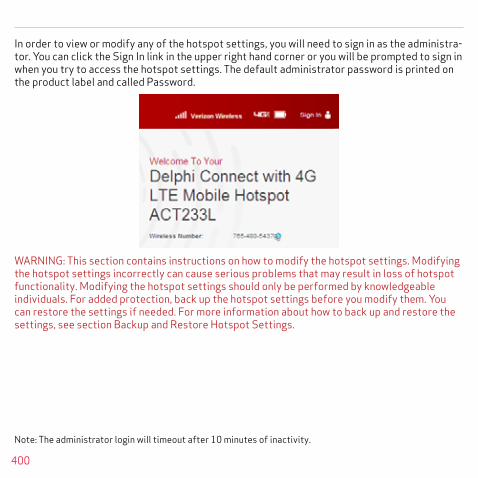
400
In order to view or modify any of the hotspot settings, you will need to sign in as the administra-tor. You can click the Sign In link in the upper right hand corner or you will be prompted to sign in when you try to access the hotspot settings. The default administrator password is printed on the product label and called Password.
WARNING: This section contains instructions on how to modify the hotspot settings. Modifying the hotspot settings incorrectly can cause serious problems that may result in loss of hotspot functionality. Modifying the hotspot settings should only be performed by knowledgeable individuals. For added protection, back up the hotspot settings before you modify them. You can restore the settings if needed. For more information about how to back up and restore the settings, see section Backup and Restore Hotspot Settings.
Note: The administrator login will timeout after 10 minutes of inactivity.

401
View Hotspot Data Usage1. Log into the hotspot administrator portal.
2. Click Data Usage.

402
View, Block and Unblock Connected Devices1. Log into the hotspot administrator portal.
2. Click on Connected Devices. To block a specific device from connecting to the hotspot click Block next to the device. A blocked device will be listed under Blocked Devices. To unblock a device, click Unblock next to the device.

403
Modify Administrator Password1. Log into the hotspot administrator portal.
2. Click Hostpot Settings. Click the Hotspot tab. Click the Admin Password subtab.
3. Enter the current password.
4. Enter the new password twice.
5. Click Save Changes.
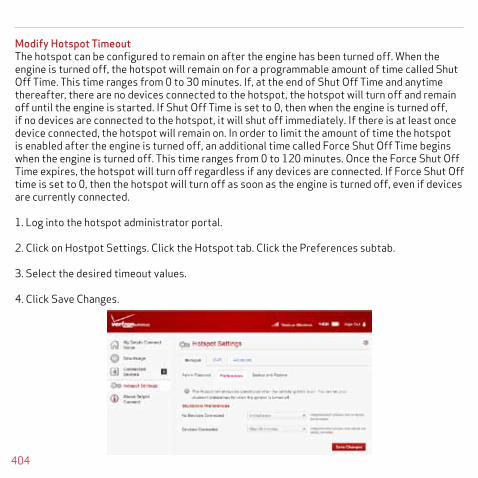
404
Modify Hotspot TimeoutThe hotspot can be configured to remain on after the engine has been turned off. When the engine is turned off, the hotspot will remain on for a programmable amount of time called Shut Off Time. This time ranges from 0 to 30 minutes. If, at the end of Shut Off Time and anytime thereafter, there are no devices connected to the hotspot, the hotspot will turn off and remain off until the engine is started. If Shut Off Time is set to 0, then when the engine is turned off, if no devices are connected to the hotspot, it will shut off immediately. If there is at least once device connected, the hotspot will remain on. In order to limit the amount of time the hotspot is enabled after the engine is turned off, an additional time called Force Shut Off Time begins when the engine is turned off. This time ranges from 0 to 120 minutes. Once the Force Shut Off Time expires, the hotspot will turn off regardless if any devices are connected. If Force Shut Off time is set to 0, then the hotspot will turn off as soon as the engine is turned off, even if devices are currently connected.
1. Log into the hotspot administrator portal.
2. Click on Hostpot Settings. Click the Hotspot tab. Click the Preferences subtab.
3. Select the desired timeout values.
4. Click Save Changes.
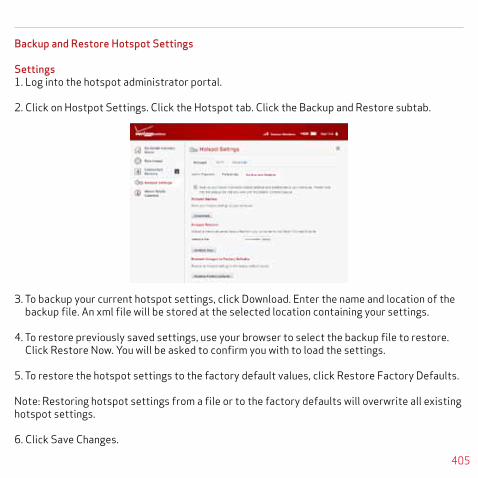
405
Backup and Restore Hotspot Settings
Settings1. Log into the hotspot administrator portal.
2. Click on Hostpot Settings. Click the Hotspot tab. Click the Backup and Restore subtab.
3. To backup your current hotspot settings, click Download. Enter the name and location of the backup file. An xml file will be stored at the selected location containing your settings.
4. To restore previously saved settings, use your browser to select the backup file to restore. Click Restore Now. You will be asked to confirm you with to load the settings.
5. To restore the hotspot settings to the factory default values, click Restore Factory Defaults.
Note: Restoring hotspot settings from a file or to the factory defaults will overwrite all existing hotspot settings.
6. Click Save Changes.

406
Modify Basic Hotspot SettingsThe Wi-Fi hotspot settings allow you to configure the following settings:
- Wi-Fi network name (SSID), name used by devices wishing to connect to the hotspot
- Network password, required password to connect to the hotspot
- 802.11 mode, wireless protocol to use
- Security mode, WPA2 Personal/PSK is currently the only security mode supported
- Maximum number of connected devices, 1 through 5
- Enable and disable broadcasting of the SSID, allows devices to scan for and see the hotspot network name
- Channel to use, select auto to allow the module to choose the best channel
1. Log into the hotspot administrator portal.
2. Click on Hostpot Settings. Click the Wi-Fi tab.

407
3. Edit the hotspot settings.
4. Click Save Changes.
Modify Advanced Hotspot SettingsThe advanced hotspot settings allow you to configure the following settings:
- Firewall, this includes VPN Passthrough and Wi-Fi Privacy separation
- LAN settings, for IPv4 and IPv6 settings
- Port filtering
1. Log into the hotspot administrator portal.
2. Click on Hostpot Settings. Click the Advanced tab.

408
3. A warning message will be displayed. Click Go Back to exit Advanced Settings or click Continue.
4. Click on Firewall to modify the firewall settings. Enable or disable VPN Passthrough using the provided ON/OFF switch. When ON, connected devices are allowed to create a VPN tunnel using the hotspot. Enable or disable Wi-Fi privacy separation using the provided ON/OFF switch. When ON, connected devices cannot connect directly to each other using the hotspot.

409
5. Click on LAN to modify the LAN settings. Enter the desired IPv4 and IPv6 settings. Click Save Changes.
6. Click on Port Filtering to modify the port filtering settings. Enable or disable port filtering using the provided ON/OFF switch. If ON, create, edit or delete the port filtering rules.
7. Click Save Changes.
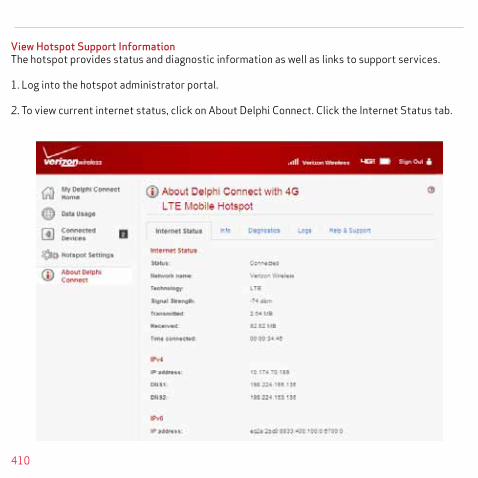
410
View Hotspot Support InformationThe hotspot provides status and diagnostic information as well as links to support services.
1. Log into the hotspot administrator portal.
2. To view current internet status, click on About Delphi Connect. Click the Internet Status tab.
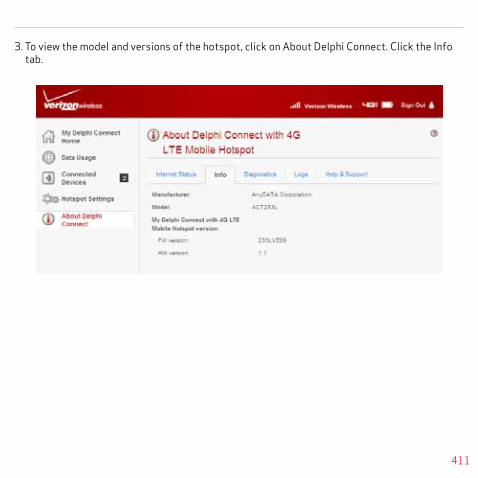
411
3. To view the model and versions of the hotspot, click on About Delphi Connect. Click the Info tab.

412
4. To view diagnostic information about the hotspot, click About Delphi Connect. Click on the Diagnostics tab.
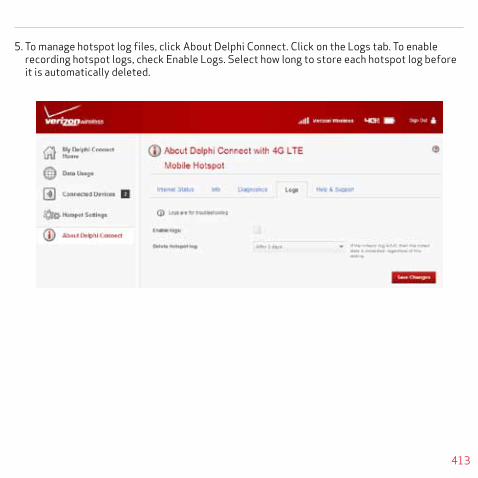
413
5. To manage hotspot log files, click About Delphi Connect. Click on the Logs tab. To enable recording hotspot logs, check Enable Logs. Select how long to store each hotspot log before it is automatically deleted.
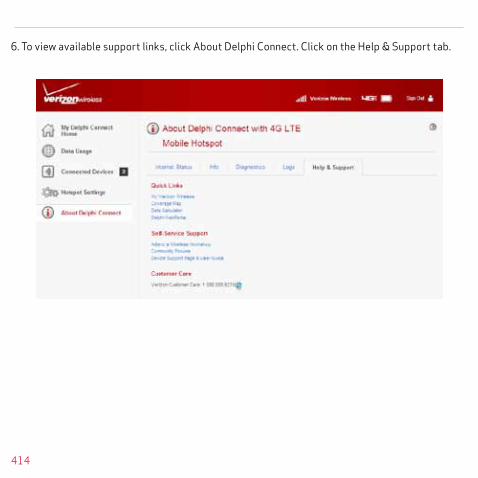
414
6. To view available support links, click About Delphi Connect. Click on the Help & Support tab.

415
Personal PIN-CodeFor added security, you can create a personal PIN-code. Once created, the PIN must be entered each time you access the app except when logging in to the app. That is, you will be required to enter the PIN whenever you return to the app from using a different feature of your phone.If someone enters an incorrect PIN 5 times in a row, the app will be logged out and you will need to log in the next time you access the app.
Enable Personal PIN-Code
On the side menu tap Settings, then PIN-code.

416
Enter a 4 digit PIN. You will be asked to re-enter the 4 digit PIN for confirmation.

417
The PIN-code will now show ON.

418
Disable Personal PIN-Code
On the side menu tap Settings, then PIN-code.

419
Enter your 4 digit PIN.

420
The PIN-code will now show OFF.

421
About Section
The About section allows you to:
• Access the OBD Locator
• Review the current Privacy Policy and Terms of Use
Locating Your OBD ConnectorThe OBD Locator button will launch your internet browser and navigate to a web page where you can select your vehicle and determine the location of the OBD II connector.
To access the OBD Locator, on the side menu tap Settings.

422
Tap About and then tap OBD Locator.

423
Reviewing the Terms of Use and Privacy PolicyTo review the Terms of Use and Privacy Policy, on the side menu tap Settings.

424
Tap About and then tap the document you with to review.

425
LogoutOn the Side Menu of the app, tap Log Out to logout from your vehicle. This will return you to the login screen.
Note: The Delphi Connect smartphone app will remain logged in, unless the user logs out using the MENU and Log Out selection.

426
Using the Delphi Connect Website
Accessing the WebsiteYou can log in to your vehicle at mycar.delphi.com.
Forgot Username or PasswordShould you forget your account login credentials, you can request your username or a password reset from the login screen.To request your Username, click Forgot Username?
Note: The website will automatically log you out after 20 minutes of inactivity if you do not log out using the Logout feature.

427
Enter the account email address you provided in your User Settings and click Send Email.
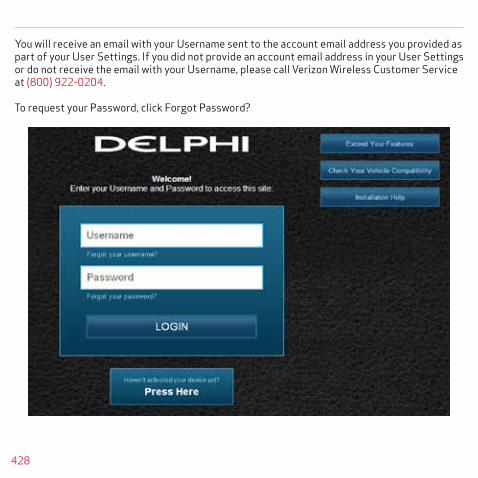
428
You will receive an email with your Username sent to the account email address you provided as part of your User Settings. If you did not provide an account email address in your User Settings or do not receive the email with your Username, please call Verizon Wireless Customer Service at (800) 922-0204.
To request your Password, click Forgot Password?

429
Enter your Username and click SEND EMAIL.
You will receive an email providing you a temporary password sent to the account email address you provided as part of your User Settings. Use this temporary password to login to your account. You will be required to change your password once you login. If you did not provide an account email address in your User Settings or do not receive the email with your temporary password, please call Verizon Wireless Customer Service at (800) 922-0204.
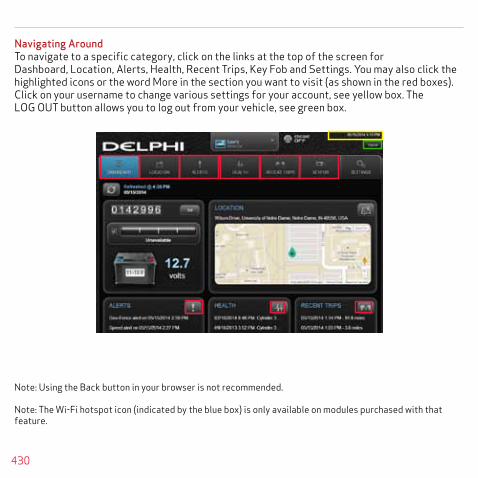
430
Navigating AroundTo navigate to a specific category, click on the links at the top of the screen for Dashboard, Location, Alerts, Health, Recent Trips, Key Fob and Settings. You may also click the highlighted icons or the word More in the section you want to visit (as shown in the red boxes). Click on your username to change various settings for your account, see yellow box. The LOG OUT button allows you to log out from your vehicle, see green box.
Note: Using the Back button in your browser is not recommended.
Note: The Wi-Fi hotspot icon (indicated by the blue box) is only available on modules purchased with that feature.
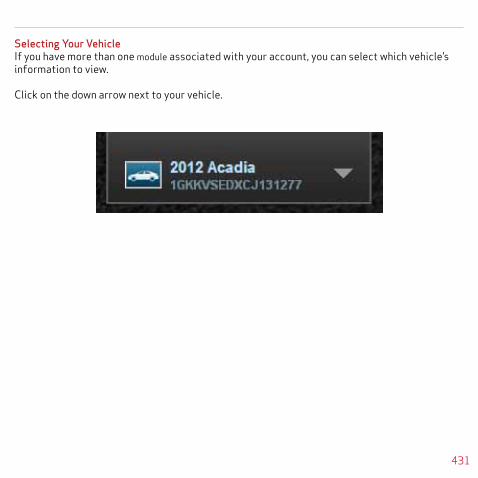
431
Selecting Your VehicleIf you have more than one module associated with your account, you can select which vehicle’s information to view.
Click on the down arrow next to your vehicle.

432
Click on the vehicle you wish to view or click on the up arrow to keep viewing the current vehicle.
Note: The last vehicle that recorded data is indicated with the module icon, see yellow box.

433
If there are more than 6 vehicles to choose from you can page through the list of all vehicles using the right arrow.
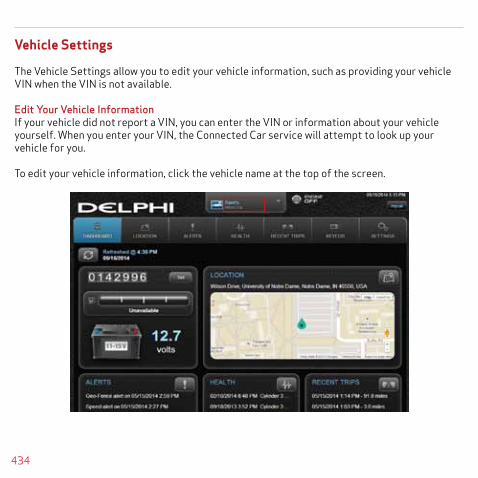
434
Vehicle Settings
The Vehicle Settings allow you to edit your vehicle information, such as providing your vehicle VIN when the VIN is not available.
Edit Your Vehicle InformationIf your vehicle did not report a VIN, you can enter the VIN or information about your vehicle yourself. When you enter your VIN, the Connected Car service will attempt to look up your vehicle for you.
To edit your vehicle information, click the vehicle name at the top of the screen.

435
Click the circle next to the information you want to provide.

436
Enter the VIN or use the drop-down menus to select your vehicle’s make, model and model year.
Click Save to save your changes or Cancel to exit without saving your changes.

437
Vehicle Nicknames and DescriptionsYou can assign a nickname and a description to each vehicle. If defined, the nickname will be displayed instead of the vehicle year and vehicle make, or instead of Vehicle 1 if the VIN is unknown. If defined, the description will be displayed instead of the VIN or VIN Unknown for vehicles that didn’t report a VIN. For example, in the dashboard images below, one shows the default vehicle year and model and the VIN and the other shows the use of a nickname and description.

438
Modify Vehicle NicknameSelect the vehicle you want to modify from the dropdown at the top of the screen. Click on the vehicle name at the top of the screen.

439
If your vehicle has reported the VIN, you will see the following pop-up window and it will already contain vehicle information. Click Edit. If your vehicle has not reported the VIN, you will not see this pop-up.

440
Edit the nickname and description. If your vehicle has not reported the VIN, you can also enter your vehicle information at this time or leave it blank. Click Save to save your changes.
Note: If you delete the nickname, the vehicle year and model will again be displayed. If you delete the description, the vehicle VIN will again be displayed.

441
Username MenuTo access your username menu, click on your username in the upper right-hand corner. From this drop-down, you can access your user settings and the OBD locator feature. You can also logoff from your Delphi Connect account by clicking Log Out.
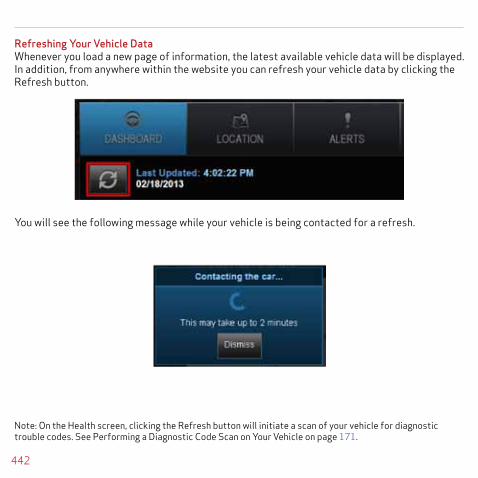
442
Refreshing Your Vehicle DataWhenever you load a new page of information, the latest available vehicle data will be displayed. In addition, from anywhere within the website you can refresh your vehicle data by clicking the Refresh button.
You will see the following message while your vehicle is being contacted for a refresh.
Note: On the Health screen, clicking the Refresh button will initiate a scan of your vehicle for diagnostic trouble codes. See Performing a Diagnostic Code Scan on Your Vehicle on page 171.

443
Once the vehicle is contacted, you will see the following message.
Select Dismiss to return to the website. The refresh process will continue in the background but the screen will not display the new vehicle information until you click on one of the tabs.
Should the refresh fail, you will receive an error message indicating why the refresh was unsuccessful. Select OK to return to the website.
DashboardThe Dashboard provides a summary of your vehicle status. It includes the following areas:
• Basic vehicle information including the engine run status, current programmable odometer, battery voltage and the fuel level, if your vehicle supports this feature:
Note: Fuel level readings will work on compatible vehicles. Battery Voltage
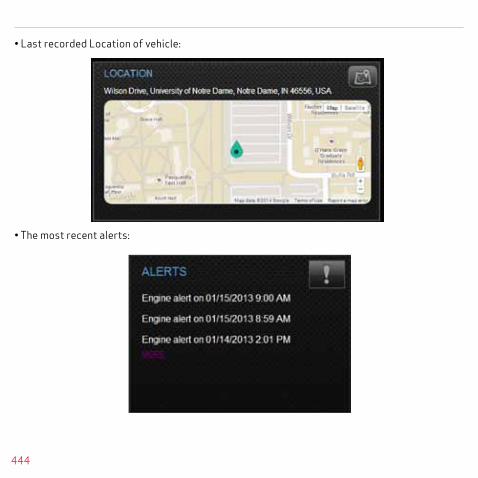
444
• Last recorded Location of vehicle:
• The most recent alerts:
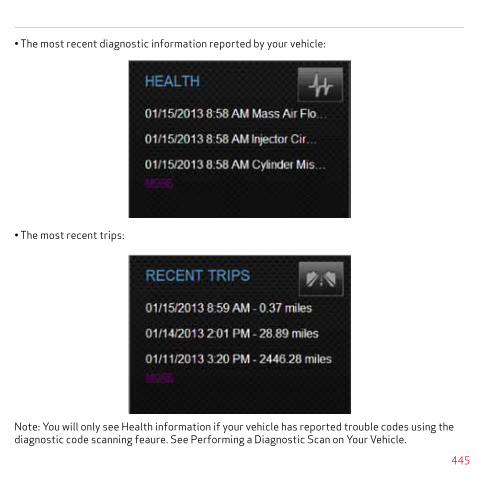
445
• The most recent diagnostic information reported by your vehicle:
• The most recent trips:
Note: You will only see Health information if your vehicle has reported trouble codes using the diagnostic code scanning feaure. See Performing a Diagnostic Scan on Your Vehicle.
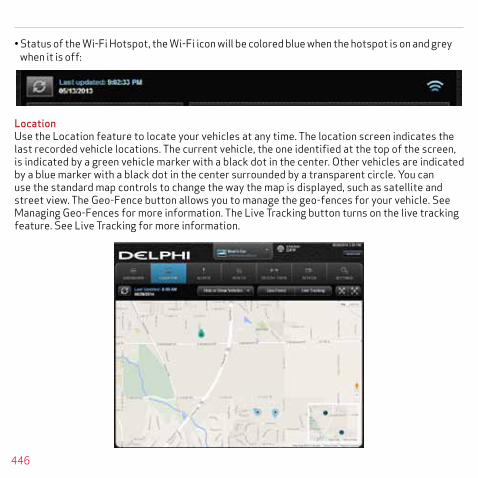
446
• Status of the Wi-Fi Hotspot, the Wi-Fi icon will be colored blue when the hotspot is on and grey when it is off:
LocationUse the Location feature to locate your vehicles at any time. The location screen indicates the last recorded vehicle locations. The current vehicle, the one identified at the top of the screen, is indicated by a green vehicle marker with a black dot in the center. Other vehicles are indicated by a blue marker with a black dot in the center surrounded by a transparent circle. You can use the standard map controls to change the way the map is displayed, such as satellite and street view. The Geo-Fence button allows you to manage the geo-fences for your vehicle. See Managing Geo-Fences for more information. The Live Tracking button turns on the live tracking feature. See Live Tracking for more information.

447
Depending on zoom level, all vehicles may not be visible on the main map. The mini map shows the locations of all vehicles selected for display. Vehicles that are close together are grouped and the number in the cirle indicates how many vehicles are in the group. Click on a group in the mini map to zoom the main map to that group of vehicles.
Note: Vehicle location is subject to GPS accuracy. Depending on local conditions, it can take a few minutes to locate your vehicle using GPS services. This may delay your ability to see your vehicle location when installing the module. In addition, when your vehicle is located in an enclosed structure, such as a garage, determining your vehicle’s location may not be possible.

448
Click on a vehicle marker to select it and display additional information such as the address. The marker of the selected vehicle will darken slightly and a pop-up will show additional vehicle information. If you click on a vehicle that is not the current vehicle, you will be able to Hide it, which will remove it from the location view. The vehicle is still in your account and you can view it again by using the Hide/Show location menu. Or, you can Select it, which will make it the current vehicle and the marker will turn green. To close the vehicle information box, click the small x in the corner of the box.

449
If you have selected a vehicle to show on the map and the location is unknown, a message will be displayed at the top of the map indicating how many vehicle locations are unknown. Click View more to see a list of all vehicles which have unknown locations.
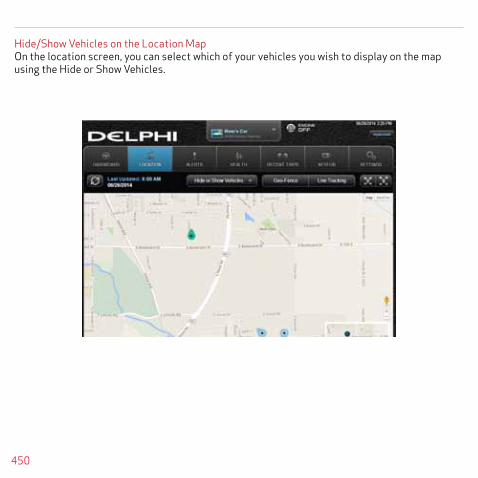
450
Hide/Show Vehicles on the Location MapOn the location screen, you can select which of your vehicles you wish to display on the map using the Hide or Show Vehicles.

451
Check the vehicles you wish to show in the location map. You cannot uncheck the current vehicle. Click Select Current Vehicle Only to display only the current vehicle on the map. Click Apply to save your changes and return to the map or Cancel to exit without saving.

452
Find My CarClick the Zoom to Vehicle button to center the map on the current vehicle’s location.

453
Find All My CarsClick the Zoom to All Vehicles button to resize the map to show all vehicles selected for display.

454
Map ViewThe map view can be customized using the the standard map controls, such as scrolling and zooming to adjust the Map view.

455
Programmable OdometerA programmable odometer is provided for your vehicle. You can set it to your vehicle’s odometer to track total mileage or you can set the odometer to 0 prior to a trip to use it as a trip odometer.
To set the odometer value, click Set next to the odometer on the dashboard.

456
Enter the desired value in miles. Tap Submit to save the value or Cancel to exit without saving.

457
Managing Geo-FencesA geo-fence allows you to define a location that is of interest to you and create a boundary around it. When your vehicle crosses the boundary to enter or exit that location, an alert will occur and can be viewed on the Delphi Connect app or the website. You can also be notified via an email or text message if desired. See Configuring Notifications on page 75 for more information. You can define up to six geo-fences for each vehicle. These can be edited or deleted as often as you like. A geo-fence can be made as small as 0.01 miles, about 50 feet, or as large as you would like. Due to GPS location tolerance, it is suggested to make a geo-fence at least 0.1 miles in any direction to avoid false alerts.
Create a Geo-Fence Using the Map1. Click the Geo Fence button in the Location view to begin managing Geo-Fences
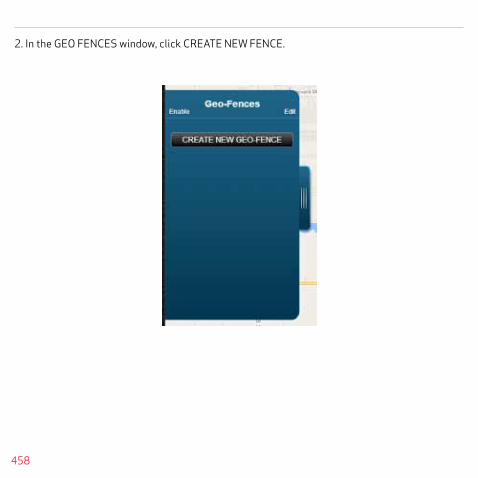
458
2. In the GEO FENCES window, click CREATE NEW FENCE.

459
3. Scroll and zoom the map to where you would like to place the Geo-Fence and tap DROP PIN HERE.

460
4. Follow the on-screen instructions to locate, resize and name your Geo-Fence. Use the icons in the upper right corner of the map to change the shape of the geo-fence between a circle and a rectangle. You can hide the Geo-Fence panel to see more of the map by clicking on the panel tab (see yellow box). Simply click the tab again to show the Geo-Fence panel. When you are finished, select SAVE to save it or CANCEL to cancel creation.
5. Create additional Geo-Fences as desired.
6. Select Close Geo-Fence when you are done.
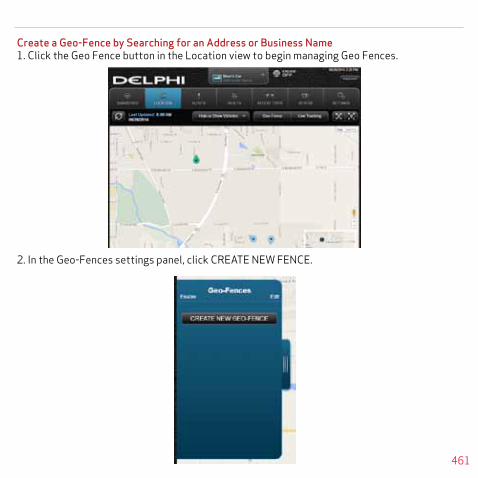
461
Create a Geo-Fence by Searching for an Address or Business Name1. Click the Geo Fence button in the Location view to begin managing Geo Fences.
2. In the Geo-Fences settings panel, click CREATE NEW FENCE.

462
3. Click ENTER ADDRESS.

463
4. Enter the address or business name you want to find and click VIEW RESULTS

464
5. Scroll through the list of search results. You can modify the search criteria and click VIEW RESULTS to refresh the results. Within the search results, click the desired location. A Geo-Fence will be created at the selected location.

465
6. Follow the on-screen instructions to locate and size the Geo-Fence. Use the icons in the upper right corner of the map to change the shape of the geo-fence between a circle and a rectangle. The name of the Geo-Fence will default to your search text but you can change it to a different name. When you are finished, click Save to save the Geo-Fence. Click Back to return to the search results and choose a different result or change the search criteria.
To exit without saving your changes, click CANCEL or click Close Geo Fence.

466
Edit an existing Geo-Fence1. Click the Geo Fence button in the Location view to begin managing Geo-Fences.
2. Click on the name of the Geo-Fence you want to edit. The map will center on that Geo-Fence. Click on the arrow next to the Geo-Fence you want to edit.

467
3. Follow the on-screen instructions to locate, resize and rename your Geo-Fence. You can hide the Geo-Fence panel to see more of the map by clicking on the panel (see yellow box). Simply click the tab again to show the Geo-Fence panel. When you are finished, select SAVE CHANGES to save it or CANCEL to exit without saving your changes.
Delete an Existing Geo-Fence1. Click the Geo Fence button in the Location view to begin managing Geo-Fences.

468
2. Click on the name of the Geo-Fence you want to edit. The map will center on that Geo-Fence. Click on the arrow next to the Geo-Fence you want to edit.
3. Click Delete.

469
Enable or Disable a Geo-Fence1. Click the Geo-Fence button in the Location view to begin managing Geo-Fences

470
2. In the GEO FENCES window, click the checkbox to the left of the Geo-Fence you wish to disable.
The checkmark will be cleared and the Geo-Fence will no longer be visible on the map. This will not delete the Geo-Fence, but alerts will no longer be generated by this Geo-Fence.

471
3. To enable a Geo-Fence, check the box to the left of the Geo-Fence name.
The Geo-Fence will be shown on the map again and alerts will again be generated by this Geo-Fence.

472
Live TrackingLive tracking provides you the ability to track your vehicle in real time using the website. Click on the Live Tracking icon to start live tracking. Due to the amount of data usage required to perform live tracking, tracking will automatically timeout after 10-minutes. You can restart tracking by selecting this feature again. During Live Tracking, your vehicle’s speed, heading and location on the map will be updated approximately every 5 seconds.
1. Click Live Tracking in the Location view to start the live tracking feature.
2. You will see the following message as the vehicle is being contacted. Select Cancel to return to the Location view.

473
3. You will see the following message once the vehicle is connected. Select Cancel to return to the Location view.
4. If the vehicle cannot be reached or located using the GPS feature, the service will retry to contact your vehicle. Select Cancel to return to the Location view. If your vehicle cannot be connected, the feature will timeout. Select OK to return to Location view.

474
5. During live tracking, the vehicle marker will be red. To view the vehicle speed and the live tracking timer, click on the vehicle marker. To close the vehicle information pop-up, click the small x in the corner of the box. You can end live tracking at any time by clicking Stop Tracking.
AlertsThe Delphi Connect app will notify you with alerts of specific vehicle behaviors. Current alerts include the following:
• Vehicle speed exceeding a limit that you choose
• Vehicle RPM exceeding a limit that you choose
• Vehicle has entered or exited a Geo-Fence location
• The Check Engine Light (CEL) has illuminated, this is sometimes referred to as the Malfunction Indicator Lamp (MIL)
• The battery voltage falls below 11.5 volts
• While the engine is not running and the vehicles experiences a motion that exceeds a threshold that you choose.• 5 failed attempts logging into your account
Note: The motion alert is enabled 10 minutes after the vehicle is turned off and disabled when the vehicle is started.
Note: The map will follow the vehicle during live tracking even if you change the zoom level. If you scroll the map (pan) then the map will stop following the vehicle. To resume following the vehicle with the map, click the Zoom to Vehicle button.

475
You can also configure email and text message notifications for each alert. For more information on configuring your alerts and the associated notifications, see sections Configuring Alerts and Configuring Notifications.
Use the navigation buttons to scroll through the alerts.
Clearing AlertsTo clear specific alerts, select the check box to the right of the alerts you wish to clear, then select CLEAR SELECTED. You will be asked to confirm your desire to clear the selected alerts.
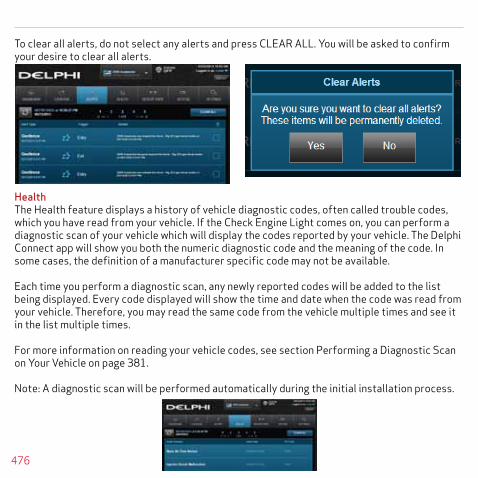
476
To clear all alerts, do not select any alerts and press CLEAR ALL. You will be asked to confirm your desire to clear all alerts.
HealthThe Health feature displays a history of vehicle diagnostic codes, often called trouble codes, which you have read from your vehicle. If the Check Engine Light comes on, you can perform a diagnostic scan of your vehicle which will display the codes reported by your vehicle. The Delphi Connect app will show you both the numeric diagnostic code and the meaning of the code. In some cases, the definition of a manufacturer specific code may not be available.
Each time you perform a diagnostic scan, any newly reported codes will be added to the list being displayed. Every code displayed will show the time and date when the code was read from your vehicle. Therefore, you may read the same code from the vehicle multiple times and see it in the list multiple times.
For more information on reading your vehicle codes, see section Performing a Diagnostic Scan on Your Vehicle on page 381.
Note: A diagnostic scan will be performed automatically during the initial installation process.

477
Performing a Diagnostic Code Scan on Your VehicleTo perform a diagnostic scan of your vehicle, navigate to the Health screen and click the Refresh button.
You will see a warning to make sure the engine is turned off and the key is in the On position before continuing. Once you begin the scan, please wait at least 2 minutes before starting your vehicle. Select Cancel to cancel the scan.

478
Once the scan is complete, the diagnostic codes reported by your vehicle will be displayed on the screen. Use the navigation buttons to scroll through your codes.
Clearing Diagnostic CodesYou can choose to clear the codes from either your display or from from your vehicle. If you clear the codes from your display, you will no longer see them in your vehicle’s data but they may still be active in your vehicle. Performing a diagnostic scan will allow to see if they are still being reported by your vehicle.
If you clear the codes from your vehicle, the module will command your vehicle to clear the current diagnostic codes. If a fault condition exists in your vehicle, a diagnostic code may return until the problem is fixed. Clearing the codes in the vehicle will not clear the codes you see displayed in the app in the Health section. You can leave this list if you want to maintain a history of your vehicle’s health.
Note: Simply clearing the diagnostic codes in your vehicle will not repair any problems it may have. Driving a vehicle that has diagnostic problems without first repairing them may cause damage to your vehicle. You should always correct any problems before clearing the diagnostic codes in your vehicle.
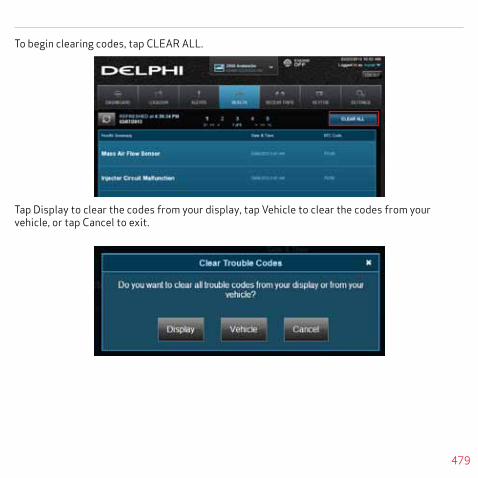
479
To begin clearing codes, tap CLEAR ALL.
Tap Display to clear the codes from your display, tap Vehicle to clear the codes from your vehicle, or tap Cancel to exit.

480
Recent TripsThe Recent Trips feature displays all the trips the vehicle has taken since you installed the module. The most recent trip is listed first.
Use the navigation buttons to scroll through your trips. Click in any row (see the yellow box) to view the details of a specific trip. Select CLEAR ALL to clear all the trips from this vehicle’s history.
Use the map control tools to change the rotation, zoom and view type, Bird’s Eye or Road view. See Modify the Map Display for more information on customizing the Map view.
Note: During trips, the location of the vehicle is logged every minute. These points are called breadcrumbs and are shown as dots on the map. The blue line connects these breadcrumbs to approximate the route the vehicle took.
481
Key Fob PairingThe key fob setup process has two main steps, configuring your module for your vehicle and pairing your module with your vehicle. You can perform the configuration step at any time from either the smartphone app or the website. To complete the pairing step you will need to be in your vehicle. It is necessary to perform this step in your vehicle because you may be prompted at times to turn your ignition key and press specific vehicle buttons. Following the successful set up of your Key Fob, you will be able to use the smartphone app to send key fob commands to your vehicle in the same manner as you would with your original key fob. In addition, you can use the Delphi Connect website to send key fob commands as well.
Note: While the module currently supports most remote start systems that came from the manufacturer, you can check if your remote start feature is supported. Refer to the fitment guide at connectedcar.delphi.com/fitment. For vehicles that require a sequence of buttons to be pressed to perform a remote start, you only need to press the Remote Start button once. The module will automatically provide any button sequence required to start the vehicle.
Note: You will only need to pair the key fob using the Delphi Connect app or website onetime. After the initial pairing, the key fob capability will be available from either location.
Note: The key fob setup should be only performed when all key fobs are present. If you do this with only one present it may de-program your secondary key fobs.
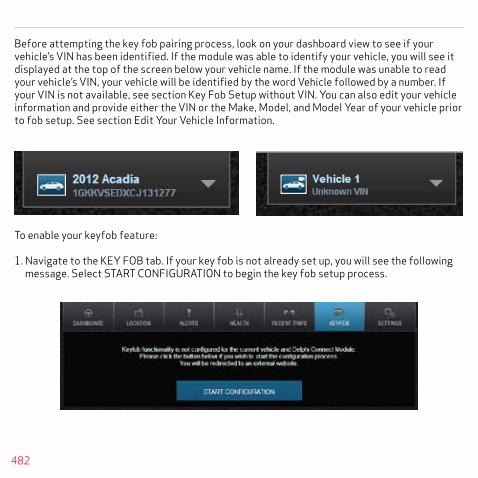
482
Before attempting the key fob pairing process, look on your dashboard view to see if your vehicle’s VIN has been identified. If the module was able to identify your vehicle, you will see it displayed at the top of the screen below your vehicle name. If the module was unable to read your vehicle’s VIN, your vehicle will be identified by the word Vehicle followed by a number. If your VIN is not available, see section Key Fob Setup without VIN. You can also edit your vehicle information and provide either the VIN or the Make, Model, and Model Year of your vehicle prior to fob setup. See section Edit Your Vehicle Information.
To enable your keyfob feature:
1. Navigate to the KEY FOB tab. If your key fob is not already set up, you will see the following message. Select START CONFIGURATION to begin the key fob setup process.

483
2. Using the Prev and Next buttons, look for the fob picture that matches your key fob. Once you have found your key fob, click Continue. If you do not find a picture of your fob, click I don’t see my fob. In this case, your fob is not currently supported.
3. Once you have tapped Continue, you will see the following message while your key fob is being initialized. The configuration step can take up to 5 minutes.

484
4. When complete, the following screen will be displayed and you will need to be in the vehicle to perform the final key fob set up step. If you wish to complete the process later, you can tap “Perform this step later”.
5. Once in the vehicle, tap Continue. Carefully follow the on screen instructions. You may be required to push buttons in your vehicle such as the door lock/unlock switch or you may need to turn the ignition key a certain number of times.
Following successful pairing of your Key Fob, you should be able to use your Delphi Connect app to send key fob commands over the Verizon Network to your vehicle in the same manner as you would with your manufacturer key fob. In addition, you can also use the website to send key fob commands to your vehicle with your Internet connection.
Note: You will only need to pair the key fob using the Delphi Connect app or website once. After the initial pairing, it will be available from the smartphone app or website.

485
Key Fob Setup without VIN1.To enable your keyfob feature without a vehicle VIN, navigate to the KEY FOB tab. If your key fob is not already set up, you will see the following message. Click on START CONFIGURATION to begin the fob set up process.
2. Use the on screen prompts to select your vehicle and click Submit. If are not able to select your vehicle, tap “My vehicle is not listed” and see section My Vehicle is Not Supported.

486
3. Using the Prev and Next buttons, look for the fob picture that matches your key fob. Once you have found your key fob, click Continue. If you do not find a picture of your fob, click I don’t see my fob. In this case, your fob is not currently supported
3. After you have selected your vehicle, press Submit. The configuration process can take up to 5-minutes. Do not close your browser window during this process.

487
4. When complete, the following screen will be displayed and you will need to be in the vehicle to perform the final key fob set up step. If you wish to complete the process later, you can tap “Perform this step later”.
5. Once in the vehicle, click Continue. Carefully follow the on screen instructions. You may be required to push buttons in your vehicle such as the door lock/unlock switch or you may need to turn the ignition key a certain number of times.
Following the successful pairing of your Key Fob, you will be able to use your Delphi Connect app to send key fob commands over the Verizon Network to your vehicle in the same manner as you would with your manufacturer key fob. In addition, you can also use the Delphi Connect website to send key fob commands to your vehicle.
Note: You will only need to pair the key fob using the Delphi Connect app or the website once. After the initial pairing, it will be available from the smartphone app or website.

488
Username MenuTo access your username menu, click on your username in the upper right-hand corner. From this drop-down, you can access your user settings and the OBD locator feature. You can also logoff from your Delphi Connect account by clicking Log Out.

489
User Settings, Notification Language and Units of Measure To access your user settings, click on your username in the upper right-hand corner. From the drown-click menu, click User Settings.
From this screen you can modify your Username and your account email address. The account email is used to communicate information regarding your Delphi Connect account, for example, it is used for both the forgot username and forgot password features. You can delete the account email by clearing the box and clicking Save Changes.
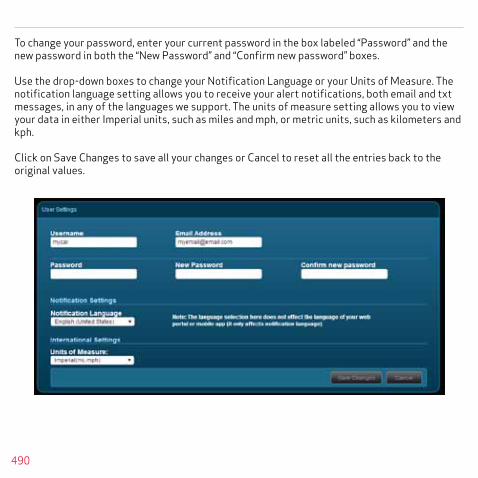
490
To change your password, enter your current password in the box labeled “Password” and the new password in both the “New Password” and “Confirm new password” boxes.
Use the drop-down boxes to change your Notification Language or your Units of Measure. The notification language setting allows you to receive your alert notifications, both email and txt messages, in any of the languages we support. The units of measure setting allows you to view your data in either Imperial units, such as miles and mph, or metric units, such as kilometers and kph.
Click on Save Changes to save all your changes or Cancel to reset all the entries back to the original values.

491
Settings
The Settings menu allows you to manage your modules and Alerts and Notifications Settings.
Module Management
Module Management allows you to:
• View the modules associated with your account
• Add modules to your account
• Remove modules from your account

492
View Modules Associated with Your AccountOn the Settings menu select MANAGE MODULES. You will see all the modules currently associated with your account.
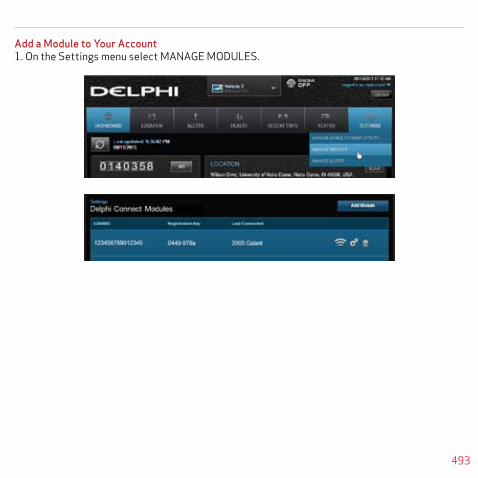
493
Add a Module to Your Account1. On the Settings menu select MANAGE MODULES.
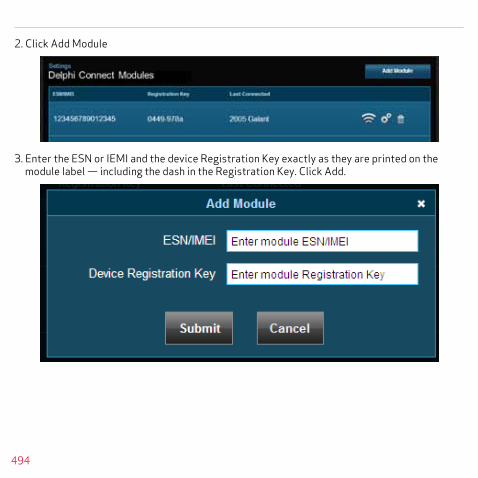
494
2. Click Add Module
3. Enter the ESN or IEMI and the device Registration Key exactly as they are printed on the module label — including the dash in the Registration Key. Click Add.
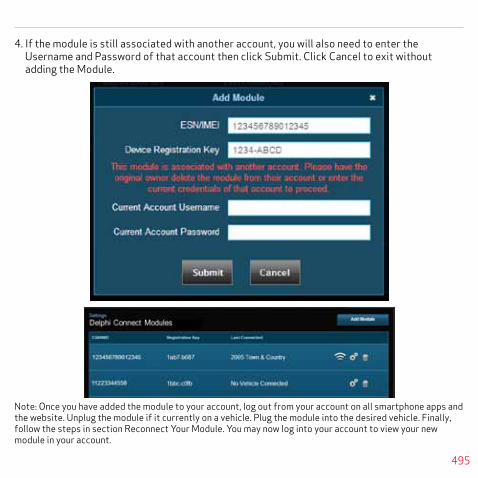
495
4. If the module is still associated with another account, you will also need to enter the Username and Password of that account then click Submit. Click Cancel to exit without adding the Module.
Note: Once you have added the module to your account, log out from your account on all smartphone apps and the website. Unplug the module if it currently on a vehicle. Plug the module into the desired vehicle. Finally, follow the steps in section Reconnect Your Module. You may now log into your account to view your new module in your account.

496
Note: Any vehicle data in the previous account will not be transferred to the new account. Once added to the new account, all vehicle data reported by the module will be available in the new account. Any previous key fob pairings will remain in the module after adding the module to the new account. Any previous Bluetooth pairings will be available after adding the module.
Remove a Module from Your Account1. On the Settings menu select MANAGE MODULES.
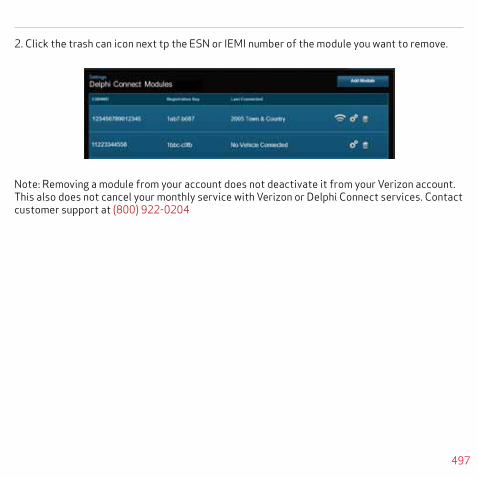
497
2. Click the trash can icon next tp the ESN or IEMI number of the module you want to remove.
Note: Removing a module from your account does not deactivate it from your Verizon account. This also does not cancel your monthly service with Verizon or Delphi Connect services. Contact customer support at (800) 922-0204
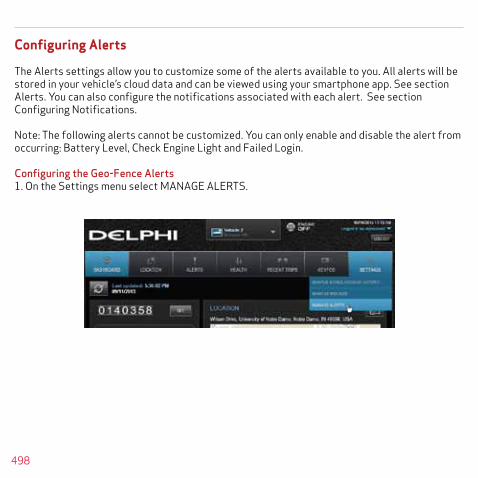
498
Configuring Alerts
The Alerts settings allow you to customize some of the alerts available to you. All alerts will be stored in your vehicle’s cloud data and can be viewed using your smartphone app. See section Alerts. You can also configure the notifications associated with each alert. See section Configuring Notifications.
Note: The following alerts cannot be customized. You can only enable and disable the alert from occurring: Battery Level, Check Engine Light and Failed Login.
Configuring the Geo-Fence Alerts1. On the Settings menu select MANAGE ALERTS.

499
2. Click GeoFences.
3. To disable a specific Geo-Fence, click the checkbox next to the Geo-Fence you wish to dis-able. The checkmark will be cleared. This will not delete the Geo-Fence, but alerts will no longer be generated by this Geo-Fence. To enable the Geo-Fence click the box next to the Geo-Fence name.
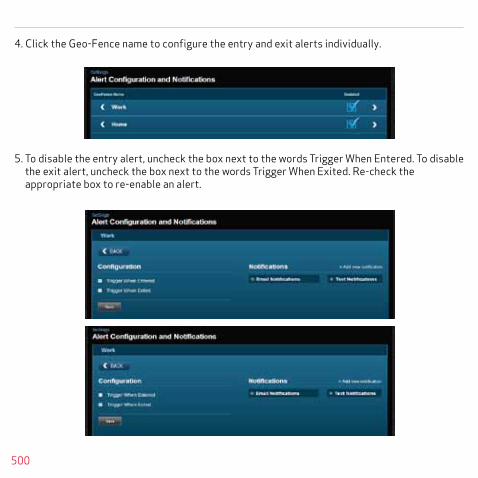
500
4. Click the Geo-Fence name to configure the entry and exit alerts individually.
5. To disable the entry alert, uncheck the box next to the words Trigger When Entered. To disable the exit alert, uncheck the box next to the words Trigger When Exited. Re-check the appropriate box to re-enable an alert.

501
6. Click Save to save your changes or click the Back button or the side menu button to exit without saving your changes.
See Configuring Notifications for information on configuring notifications.

502
Configuring the Speed Alert1. On the Settings menu select MANAGE ALERTS.
2. To disable the speed alert, click the checkbox next to the word Speed. The checkmark will be cleared.
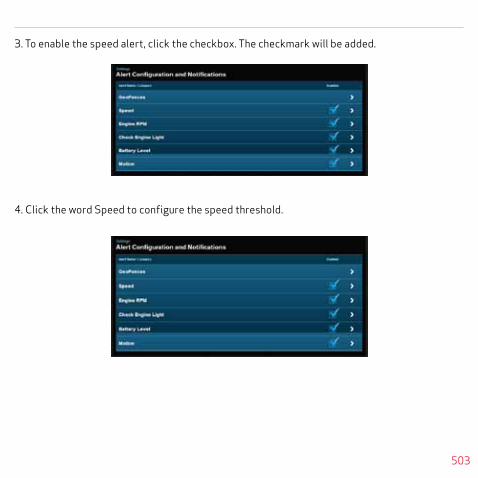
503
3. To enable the speed alert, click the checkbox. The checkmark will be added.
4. Click the word Speed to configure the speed threshold.
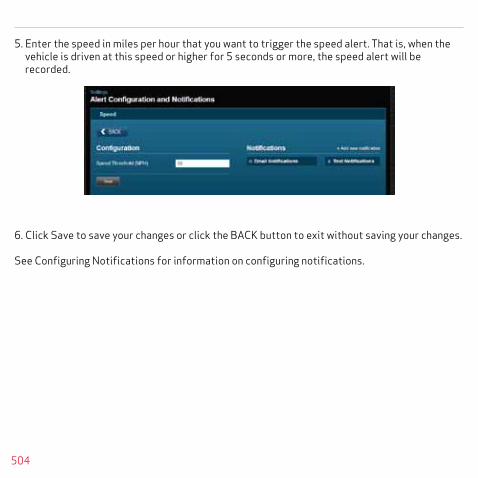
504
5. Enter the speed in miles per hour that you want to trigger the speed alert. That is, when the vehicle is driven at this speed or higher for 5 seconds or more, the speed alert will be recorded.
6. Click Save to save your changes or click the BACK button to exit without saving your changes.
See Configuring Notifications for information on configuring notifications.

505
Configuring the Motion Alert1. On the Settings menu select MANAGE ALERTS.
2. To disable the motion alert, click the checkbox next to the word Motion. The checkmark will be cleared. To enable the motion alert, click the checkbox. The checkmark will be added. Click the word Motion to configure the motion threshold.

506
3. Enter the threshold in G-forces that you want to trigger the motion alert. That is, once the ignition of off for 10 minutes and the vehicle experiences a motion of this force or more , the motion alert will be recorded. A setting of 2 G’s can typically be set off by slamming a vehicle door or rocking the vehicle.
4. Click Save to save your changes or click the BACK button to exit without saving your changes. See Configuring Notifications for information on configuring notifications.
Note: You may need to adjust the motion threshold more than once to achieve the desired level of sensitivity for you vehicle. A smaller value is more sensitive, a larger value is less sensitive.

507
Configuring the Engine RPM Alert1. On the Settings menu select MANAGE ALERTS.
2. To disable the engine RPM alert, click the checkbox next to the words Engine RPM. The checkmark will be cleared. To enable the engine RPM alert, click the checkbox. The checkmark will be added.

508
3. Click the words Engine RPM to configure the RPM threshold.
4. Enter the engine RPM threshold in revolutions per minute and the minimum time required in seconds that you want to trigger the engine RPM alert. That is, when the engine RPM exceeds the RPM threshold for the number of seconds you specify, the engine RPM alert will be recorded.
5. Click Save to save your changes or click the Back button or the side menu button to exit without saving your changes. See Configuring Notifications for information on configuring notifications.

509
Configuring NotificationsFor each alert, you can configure email and text notifications that will be sent when the alert occurs. This includes the ability to send a notification email to any number of email addresses you choose for each alert and to send a text message to any number of mobile phones you choose for each alert.
Note: When you add a new mobile number for notifications, you will recieve a confirmation txt message with opt-in instructions. In order to receive notifications at that number, follow the opt-in instructions in the txt message. If you do not opt-in, you will not recieve notifications on that mobile number.
Note: To discontinue recieving alerts on a mobile phone, you can remove the mobile number from the notifica-tion settings. You can also reply STOP any notification txt message. This will not remove the mobile number from the notification settings, you will need to perform this step separately.
Add a Notification Email AddressYou can add an email notification to any alert. The process is similar for all alerts, here is how to add one to the speed alert. For Geo-Fence notifications, you will need to click the name of the Geo-Fence you wish to configure.
1. On the Settings menu select MANAGE ALERTS.

510
2. Click the word Speed to configure the notifications.
3. Click Add new notification.

511
4. Select Email for the notification type.
5. Enter a valid email address in the format [email protected] and click Save. Click Cancel to exit without saving. To enter additional email addresses, click Add new notification again. You can enter as many email addresses as you wish.
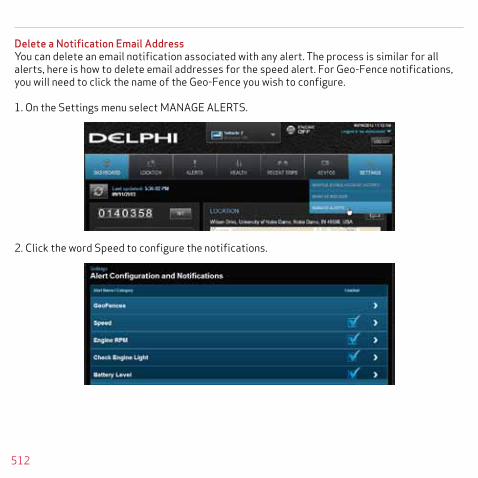
512
Delete a Notification Email AddressYou can delete an email notification associated with any alert. The process is similar for all alerts, here is how to delete email addresses for the speed alert. For Geo-Fence notifications, you will need to click the name of the Geo-Fence you wish to configure.
1. On the Settings menu select MANAGE ALERTS.
2. Click the word Speed to configure the notifications.

513
3. To delete a notification email address, click the x next to the email address.
4. You will be asked to confirm you want to delete the email. Click Delete to delete it, click Cancel to exit without deleting.

514
Add a Notification Text NumberYou can add a text notification to any alert. The process is similar for all alerts, here is how to add one to the speed alert. For Geo-Fence notifications, you will need to click the name of the Geo-Fence you wish to configure.
1. On the Settings menu select MANAGE ALERTS.
2. Click the word Speed to configure the notifications.

515
3. Click Add new notification.
4. Select Text for the notification type.
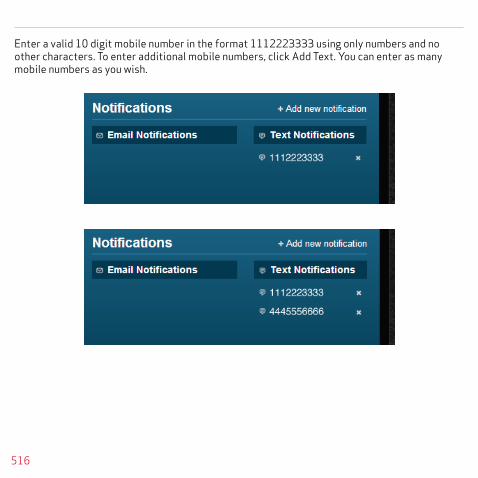
516
Enter a valid 10 digit mobile number in the format 1112223333 using only numbers and no other characters. To enter additional mobile numbers, click Add Text. You can enter as many mobile numbers as you wish.
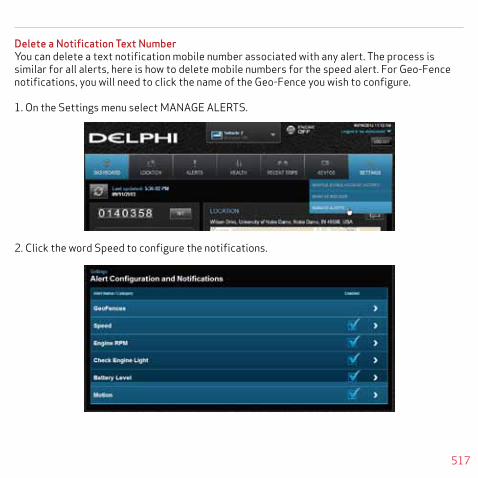
517
Delete a Notification Text NumberYou can delete a text notification mobile number associated with any alert. The process is similar for all alerts, here is how to delete mobile numbers for the speed alert. For Geo-Fence notifications, you will need to click the name of the Geo-Fence you wish to configure.
1. On the Settings menu select MANAGE ALERTS.
2. Click the word Speed to configure the notifications.
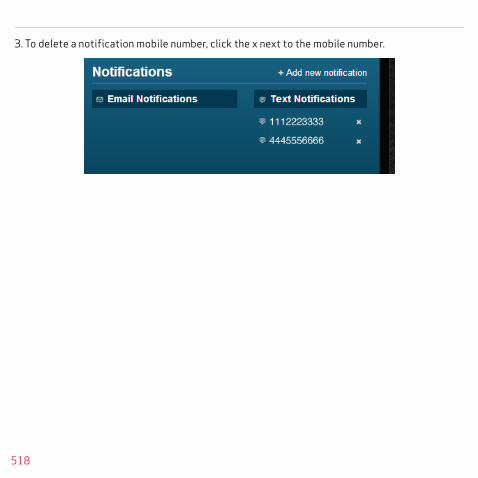
518
3. To delete a notification mobile number, click the x next to the mobile number.

519
Wi-Fi HotspotModel ACT233L of the Delphi Connect system offers you a mobile hotspot in your vehicle. The hotspot is enabled whenever the engine is running and can be programmed to be enabled for a period of time after the engine is turned off. You can have a maximum of five devices connected to the hotspot at one time.
Configure the Wi-Fi HotspotOn the Settings menu select MANAGE MODULES. Click the Wi-Fi icon next to the module you wish to configure.
Note: If the module has a cellular connection and the Wi-Fi hotspot is on and connected to at least one device, the ability to send FOB commands over Bluetooth will be disabled. All FOB commands will be sent over the cellular network.
Note: After modifying the Wi-Fi hotspot settings, the hotspot will turn off for a few moments and then turn back on.

520
Enter a new Network Name to change the network name (SSID). This is the name that users will see when scanning for wireless networks on their devices. If you set SSID Broadcast Enabled to Yes, then the network name of the hotspot will be displayed on any device that performs a Wi-Fi scan for available networks. If you set it to No, then the network name will not be displayed and users will have to enter the network name to connect to it. Click Update to save our changes or click the X to the right to exit without saving.

521
Enter the new password twice. The Wi-Fi password must be between 8 and 63 characters. Click Update to save your changes or click the X to the right to exit without saving.
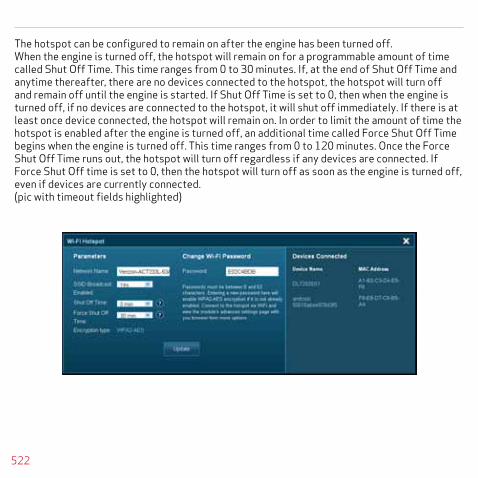
522
The hotspot can be configured to remain on after the engine has been turned off. When the engine is turned off, the hotspot will remain on for a programmable amount of time called Shut Off Time. This time ranges from 0 to 30 minutes. If, at the end of Shut Off Time and anytime thereafter, there are no devices connected to the hotspot, the hotspot will turn off and remain off until the engine is started. If Shut Off Time is set to 0, then when the engine is turned off, if no devices are connected to the hotspot, it will shut off immediately. If there is at least once device connected, the hotspot will remain on. In order to limit the amount of time the hotspot is enabled after the engine is turned off, an additional time called Force Shut Off Time begins when the engine is turned off. This time ranges from 0 to 120 minutes. Once the Force Shut Off Time runs out, the hotspot will turn off regardless if any devices are connected. If Force Shut Off time is set to 0, then the hotspot will turn off as soon as the engine is turned off, even if devices are currently connected.(pic with timeout fields highlighted)

523
Click Update to save your changes or click the X to the right to exit without saving.

524
View Wi-Fi Connected DevicesOn the Settings menu select MANAGE MODULES. Click the Wi-Fi icon next to the module you wish to configure.
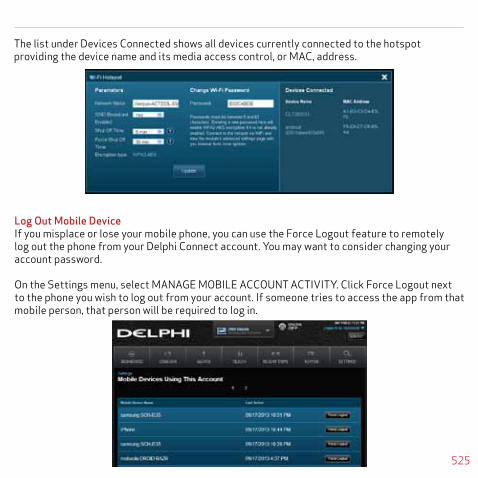
525
Log Out Mobile DeviceIf you misplace or lose your mobile phone, you can use the Force Logout feature to remotely log out the phone from your Delphi Connect account. You may want to consider changing your account password.
On the Settings menu, select MANAGE MOBILE ACCOUNT ACTIVITY. Click Force Logout next to the phone you wish to log out from your account. If someone tries to access the app from that mobile person, that person will be required to log in.
The list under Devices Connected shows all devices currently connected to the hotspot providing the device name and its media access control, or MAC, address.

526
Wi-Fi Administrator Portal AccessYou can log in to the Wi-Fi hotspot using an administrator account while connected to the hotspot. The administrator account is best viewed on a laptop or similar device with a large screen. All screenshots in this section are taken from a laptop screen for clarity. Open the web browser on your laptop or mobile phone. In the address bar enter my.dphconnect and press Enter. If you have difficulty reaching the administrator website, clear your browser’s cache and try again.
The home page provides you links to hotspot settings, account information and help.

527
In order to view or modify any of the hotspot settings, you will need to sign in as the administra-tor. You can click the Sign In link in the upper right hand corner or you will be prompted to sign in when you try to access the hotspot settings. The default administrator password is printed on the product label and called Password.
Note: The administrator login will timeout after 10 minutes of inactivity.
WARNING: This section contains instructions on how to modify the hotspot settings. Modifying the hotspot settings incorrectly can cause serious problems that may result in loss of hotspot functionality. Modifying the hotspot settings should only be performed by knowledgeable individuals. For added protection, back up the hotspot settings before you modify them. You can restore the settings if needed. For more information about how to back up and restore the settings, see section Backup and Restore Hotspot Settings.

528
View Hotspot Data Usage1. Log into the hotspot administrator portal.
2. Click Data Usage.

529
View, Block and Unblock Connected Devices1. Log into the hotspot administrator portal.
2. Click on Connected Devices. To block a specific device from connecting to the hotspot click Block next to the device. A blocked device will be listed under Blocked Devices. To unblock a device, click Unblock next to the device.

530
Modify Administrator Password1. Log into the hotspot administrator portal.
2. Click Hostpot Settings. Click the Hotspot tab. Click the Admin Password subtab.
3. Enter the current password.
4. Enter the new password twice.
5. Click Save Changes.

531
Modify Hotspot TimeoutThe hotspot can be configured to remain on after the engine has been turned off. When the engine is turned off, the hotspot will remain on for a programmable amount of time called Shut Off Time. This time ranges from 0 to 30 minutes. If, at the end of Shut Off Time and anytime thereafter, there are no devices connected to the hotspot, the hotspot will turn off and remain off until the engine is started. If Shut Off Time is set to 0, then when the engine is turned off, if no devices are connected to the hotspot, it will shut off immediately. If there is at least once device connected, the hotspot will remain on. In order to limit the amount of time the hotspot is enabled after the engine is turned off, an additional time called Force Shut Off Time begins when the engine is turned off. This time ranges from 0 to 120 minutes. Once the Force Shut Off Time expires, the hotspot will turn off regardless if any devices are connected. If Force Shut Off time is set to 0, then the hotspot will turn off as soon as the engine is turned off, even if devices are currently connected.
1. Log into the hotspot administrator portal.
2. Click on Hostpot Settings. Click the Hotspot tab. Click the Preferences subtab.
3. Select the desired timeout values.
4. Click Save Changes.

532
Backup and Restore Hotspot Settings
Settings1. Log into the hotspot administrator portal.
2. Click on Hostpot Settings. Click the Hotspot tab. Click the Backup and Restore subtab.
3. To backup your current hotspot settings, click Download. Enter the name and location of the backup file. An xml file will be stored at the selected location containing your settings.
4. To restore previously saved settings, use your browser to select the backup file to restore. Click Restore Now. You will be asked to confirm you with to load the settings.
5. To restore the hotspot settings to the factory default values, click Restore Factory Defaults.
Note: Restoring hotspot settings from a file or to the factory defaults will overwrite all existing hotspot settings.
6. Click Save Changes.

533
Modify Basic Hotspot SettingsThe Wi-Fi hotspot settings allow you to configure the following settings:
- Wi-Fi network name (SSID), name used by devices wishing to connect to the hotspot
- Network password, required password to connect to the hotspot
- 802.11 mode, wireless protocol to use
- Security mode, WPA2 Personal/PSK is currently the only security mode supported
- Maximum number of connected devices, 1 through 5
- Enable and disable broadcasting of the SSID, allows devices to scan for and see the hotspot network name
- Channel to use, select auto to allow the module to choose the best channel
1. Log into the hotspot administrator portal.
2. Click on Hostpot Settings. Click the Wi-Fi tab.
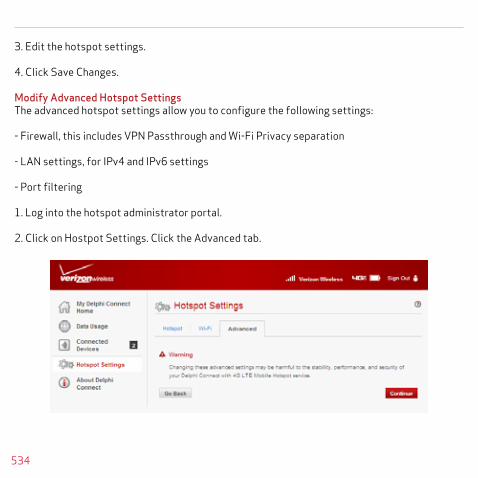
534
3. Edit the hotspot settings.
4. Click Save Changes.
Modify Advanced Hotspot SettingsThe advanced hotspot settings allow you to configure the following settings:
- Firewall, this includes VPN Passthrough and Wi-Fi Privacy separation
- LAN settings, for IPv4 and IPv6 settings
- Port filtering
1. Log into the hotspot administrator portal.
2. Click on Hostpot Settings. Click the Advanced tab.
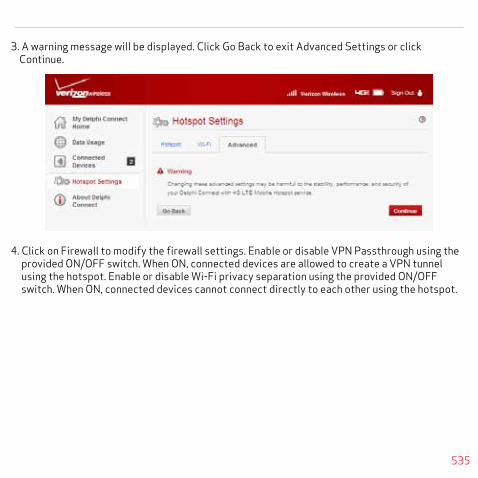
535
3. A warning message will be displayed. Click Go Back to exit Advanced Settings or click Continue.
4. Click on Firewall to modify the firewall settings. Enable or disable VPN Passthrough using the provided ON/OFF switch. When ON, connected devices are allowed to create a VPN tunnel using the hotspot. Enable or disable Wi-Fi privacy separation using the provided ON/OFF switch. When ON, connected devices cannot connect directly to each other using the hotspot.

536
5. Click on LAN to modify the LAN settings. Enter the desired IPv4 and IPv6 settings. Click Save Changes.
6. Click on Port Filtering to modify the port filtering settings. Enable or disable port filtering using the provided ON/OFF switch. If ON, create, edit or delete the port filtering rules.
7. Click Save Changes.

537
View Hotspot Support InformationThe hotspot provides status and diagnostic information as well as links to support services.
1. Log into the hotspot administrator portal.
2. To view current internet status, click on About Delphi Connect. Click the Internet Status tab.

538
3. To view the model and versions of the hotspot, click on About Delphi Connect. Click the Info tab.
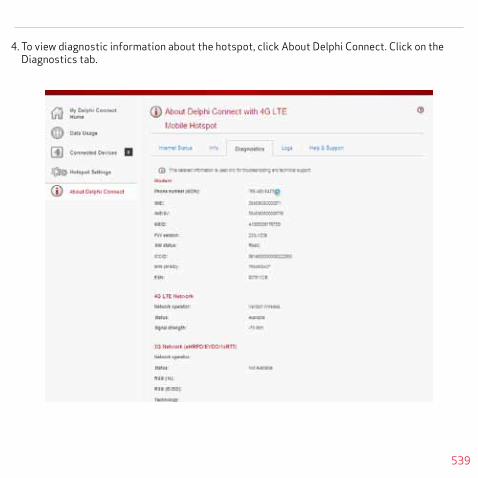
539
4. To view diagnostic information about the hotspot, click About Delphi Connect. Click on the Diagnostics tab.
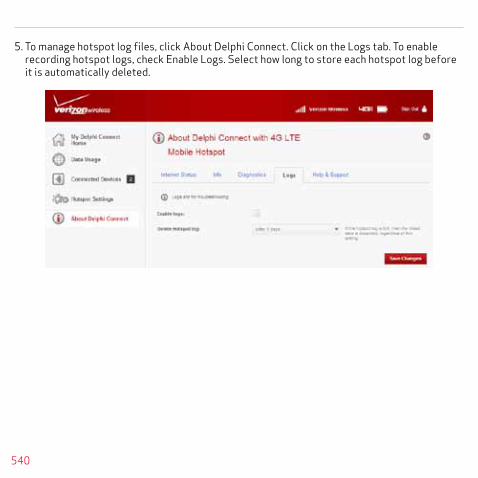
540
5. To manage hotspot log files, click About Delphi Connect. Click on the Logs tab. To enable recording hotspot logs, check Enable Logs. Select how long to store each hotspot log before it is automatically deleted.

541
6. To view available support links, click About Delphi Connect. Click on the Help & Support tab.

542
Frequently Asked Questions
1. What are the extension cable and cradle mount for?The relocation kit, which includes the extension cable and cradle, will allow you to install the module in a location other than the OBDII connector. This may be desired because the module interferes with driver or passenger movement or for aesthetic reasons. The extension cable will also permit relocating the module for better GPS reception in the event of position accuracy problems.
2. Can I receive alerts via text message?Yes, you can instantly receive alerts via a text message sent to your mobile phone, without having to login to your account. On the smartphone app, from the Settings menu tap Vehicle Settings, then tap the vehicle you want to configure then tap Alerts & Notifications. On the website, on the Settings menu, click Manage Alerts.
3. Can I have alert notifications sent to multiple email addresses and multiple mobile phones?Yes, for each alert, you can define any number of email addresses to receive alert notifications. In addition, you can specify any number of mobile phone numbers to receive a text message for each alert. On the smartphone app, from the Settings menu tap Vehicle Settings, then tap the vehicle you want to configure, then tap Alerts & Notifications. On the website, on the Settings menu click Manage Alerts.
4. Can I create customized alerts?Yes, you can customize the following alerts:- Speed alert threshold- RPM threshold value and minimum time required to set a high RPM alert- Individually enable or disable the entry and exit alerts for each geo-fence- Amount of G-forces required to trigger a motion alert”
5. I drove over the programmed speed threshold, why didn’t I receive a speed alert?The speed alert is only set once the vehicle goes over the threshold for at least 5 seconds. In addition, some vehicles have speedometers that are calibrated slightly high, so the vehicle
543
may actually be going just under the speed the speedometer indicates. To see the alert in the mobile apps or website, you may need to refresh the data using the refresh data. To receive an notification via email, ensure your email address is entered correctly in the settings area for notifications.
6. How do I turn on e-mail notifications for alerts?Email notifications can be configured for any alert. To receive a notification you need to have the correct alert conditions occur, and you need to ensure there is a valid email address entered under the Notifications settings. To edit your email notifications on the mobile app, on the Settings menu, select Vehicle Settings then select the vehicle you want to configure and then select Alerts and Notifications for the vehicle. On the website, make sure you are viewing the vehicle you want to configure; on the Settings menu select Manage Alerts and then select the alert you want to configure.
7. How do I stop receiving alert notifications in my e-mail?You can remove individual email addresses to stop sending notifications to that email address. To edit your email notifications on the mobile app, on the Settings menu, select Vehicle Settings then select the vehicle you want to configure and then select Alerts and Notifications for the vehicle. On the website, make sure you are viewing the vehicle you want to configure; on the Settings menu select Manage Alerts and then select the alert you want to configure. In addition, for geo-fences, you can deactivate the entire geo-fence in which case, no alerts or notifications will be generated for that geo-fence. Further, you can deactivate the entry and exit from that geo-fence independently if you wish. A deactivated alert will not generate notifications.
8. Why don’t I receive any e-mail alert notifications?To receive alerts you need to have the correct driving conditions occur and you need to ensure there is a valid email address entered under the settings area for Alerts and Notifications.
9. I crossed a geo-fence, why didn’t I receive an alert?Geo-fence detection depends on a number of factors, including the tolerance of the GPS system, the size of the geo-fence and how close the vehicle is to the edge of the geo-fence. Because of this, in some cases, a geo-fence crossing may not be detected. To get an alert via

544
email, you need to ensure your email address is entered correctly in the settings area for email.
10. Why do I see multiple geo-fence alerts at about the same time when I crossed the geo-fence only once?Geo-fence detection depends on a number of factors, including the tolerance of the GPS system, the size of the geo-fence and how close the vehicle is to the edge of the geo-fence. As a result, you may see multiple alerts for one crossing.
11. Why did I receive a geo-fence alert even though I didn’t move my vehicle?Geo-fence detection depends on a number of factors, including the tolerance of the GPS system, the size of the geo-fence and how close the vehicle is to the edge of the geo-fence. To minimize false alerts, you can increase the size of the geo-fence, a minimum radius of 0.1 mile is recommended, and you can center the geo-fence on where you normally park your vehicle.
12. Is there a limit on how many email addresses or mobile phone number I can enter to receive notifications?No, you can enter as many email addresses and mobile phone numbers as you wish.What is the approximate time to receive an alert notification through email or a text message? The email or text messages are sent as soon as they are communicated from your module to the cloud server. Cellular coverage at the vehicle location can affect how quickly an alert is communicated to the server. In addition, the time for the notification to reach your inbox or phone can vary due to network delays. In general, most notifications are received within minutes after the alert.
13. Can I select my own username?Yes, as long as it is not already in use. Your username must be a minimum of 1 character, a maximum 75 characters. It must not contain any of the following characters: $ & + ( ) / : ; = ? @ (space character) “ < > # % { } | \ ^ ~ [ ] `
14. What are the rules for a valid password?Your password must be a minimum of 6 characters, must contain at least 1 number, and is

545
limited to the following list of characters: ABCDEFGHIJKLMNOPQRSTUVWXYZabcdefghijklm-nopqrstuvwxyz0123456789 -_!?()@#$*&.,
15. What if I forget my username or password?You can use our automated system if you forgot your login information. Simply use the provided buttons on the login screen in both the apps and the website. If you enter an email address in your User Settings, you will be able to retrieve your login information without contacting customer support.
16. What if I forget my username or password?You can use our automated system if you forgot your login information. Simply use the provided buttons on the login screen in both the apps and the website. If you enter an email address in your User Settings, you will be able to retrieve your login information without contacting customer support.
17. How many modules can I add to one account?You can add as many modules as you wish.
18. How do I remove a module from my account?You can delete a specific module from your account, should you no longer need access to it. In the smartphone app, from the Settings menu, tap Account Settings, then tap Manage Modules. Tap the module you wish to remove then tap Delete Module. On the website, under the Settings menu click Manage Modules. Click on the trash can icon next to the module you want to remove.
19. My phone is frozen and I can’t do anything with the app. How do I close the app?You can use the application manager on your phone to stop the app from running. Or you can turn your phone off and then back on again.
20. What happens if I load the app on my non-Verizon phone?The smartphone apps are designed to run on the following smartphones regardless of your service provider: Android version 2.2 and later, Apple iPhone running iOS version 5.0 and later.

546
21. How many mobile devices or PCs can be logged on to the same account?There is no limit on how many phones and/or PCs can be logged into the same account.
22. If I have multiple modules on one account, how can I see the data from my other vehicles?On an iPhone, you can select a different vehicle by tapping on the vehicle icon in the upper right hand corner. On an Android, you can select a different vehicle by tapping on the vehicle name at the top of the screen. On the website, you can select a different vehicle by clicking on the drop down arrow located to the right of your vehicle name at the top of the screen.
23. How can I see all my vehicles at the same time on the map?On the menu within the Location screen, use the Hide/Show Vehicles features to select which vehicles you want to display on the map.
24. When I added a new module, the application displayed an error message, but once I logged out and logged back in it appeared on the module list. Why?The proper procedure when adding a new module is to add the module to your account, log out of your account on all phones and the website, then log back in. This will ensure you see all modules associated with your account.
25. Does the programmable odometer show me total vehicle mileage or just the recent trip mileage?You can use either method. If you clear the programmable odometer prior to a trip, it will perform as a trip odometer displaying the mileage for that trip. If you set the odometer to your vehicle odometer, it will track the total mileage of your vehicle.
26. Why is the programmable odometer not updating while I am driving?The programmable odometer will not update until your turn off the ignition and the trip is recorded in your Delphi Connect account.
27. How do I get a copy of the User Manual?You can download the User Manual from http://delphiconnect.com/connect-your-car.php.

547
28. Why doesn’t my VIN or my make, model and year of my vehicle show up on my Dashboard page?Not all vehicles report VIN to the module. For those which do not, you will see the word “Vehicle” followed by a number, such as “Vehicle 1.” You can update your vehicle information by entering the VIN or the make, model and year of your vehicle yourself. In the mobile app, navigate to the Settings menu, select Vehicle Settings, select the vehicle you wish to edit, and then select Edit. On the website, click the name of the vehicle at the top of the screen.
29. Why doesn’t fuel data show on my Dashboard page?Not all vehicle manufacturers report fuel level to the module. Refer to the fitment guide at delphiconnect.com/fitment.
30. Why isn’t the data on my Dashboard page right?To view the latest vehicle data, use the Refresh feature. The time and date of the last refresh is displayed.
31. Do I need a Smartphone to use the Delphi Connect system?No, once you set up your Delphi Connect account, you can sign in to it through the Internet by visiting mycar.delphi.com.
32. How many geo-fences can I set?You can set a maximum of 6 geo-fences per vehicle.
33. How do I create geo-fences in different states?You can create geo-fences in any location you wish using the geo-fence feature on the website or the smartphone app.
34. Can I create a geo-fence by using an address or business name?Yes, when creating a new geo-fence, you can enter an address or business name to locate where you wish to create a new geo-fence.

548
35. Does the module impact my gas mileage? The module has no impact on your vehicle’s gas mileage.
36. Why don’t I see the right vehicle at the top of my Dashboard page?If you have connected your module to more than one vehicle or have more than one module in your account, you can choose which vehicle’s data you want to view. On the website, click the down arrow next to the vehicle name at the top of the page and select the desired vehicle. In the Android app, tap the name of the vehicle name at the top of the screen and tap the desired vehicle. In the iPhone app, tap the vehicle icon at the top of the screen and then tap the desired vehicle.
37. How do I know if I am out of my wireless carrier’s coverage area?With the engine running, you can determine this by looking at the Status LED. If it is solid Red, there is no cellular coverage. If it is solid or blinking Yellow, you are connected on a roaming network and off your wireless carrier’s network.
38. I plugged my module into my OBD II port but I don’t see my vehicle when I log into the app or portal. Why?Verify your vehicle’s compatibility using the Fitment Guide before proceeding. If it is listed as compatible, follow the steps in the installation pamphlet included with your purchase and ensure that each step is completed successfully. Check the Troubleshooting section for further guidance. Make sure you are looking at the correct vehicle by using the vehicle selector in the app. If the blue LED returns to solid after the initial installation, your vehicle is currently incompatible with Delphi Connect system.
39. Will my module work with the telematics system that came with my car, examples include Mercedes mBrace, Lexus Enform, Hyundai BlueLink, BMW ConnectedDrive, Volvo On Call?The Delphi Connect modules are designed to work regardless of a car’s existing telematics system. However, some features provided by the car maker may be impacted. Please contact your car manufacturer for further information.

549
40. I setup the key fob feature with my vehicle and now my factory Key Fob doesn’t work. Why?During key fob setup, the step where your factory key fobs needed to be re-paired may not have completed successfully. You can repeat the key fob setup by initiating the setup process in the website (not the app) and trying the setup again. If it fails again, please call KeylessRide technical support at (888) 861-2651 for assistance.
41. I have an aftermarket keyless entry system. Will this affect the key fob function on my phone?The Delphi Connect system is currently only designed to operate factory (OEM) remote keyless entry systems. You will not be able to activate the Key fob function with your aftermarket remote keyless entry system.
42. Why doesn’t the key fob feature work on my car? Will it ever?While Delphi Connect supports most vehicle key fobs, unfortunately, there are some we currently do not support. We continue to add key fob support for additional vehicles. You will need to check the Fitment Guide for compatibility to determine when support is added.
43. What happens if you hit the call 911 button while live tracking?You will be presented with the phone’s dialer screen with the “911” entry preloaded. You must select Yes or Call to initiate the call. If it was unintentional, you can select No or Back or the Home button.
44. How do I start live tracking?To start live tracking, ensure the module is properly installed and working. In the website, select the Location feature, then select “Live Tracking.” In the Android app, tap the Location feature then tap the live tracking icon which looks like a small radar. On the iPhone, tap the Location feature. On the Location menu, tap the Live Tracking slider. Note, to avoid excessive data usage, live tracking will automatically exit after 10 minutes, but you can restart live tracking as many times as you wish.
45. Why is live tracking limited to 10 minutes?This is a precaution to prevent excessive wireless data use and charges in the event you forget

550
to cancel the Live Tracking mode. You can continue to Live Track an unlimited number of times after a timeout.
46. I was tracking a vehicle and it stopped giving me a location and then started up again. Why?If the module or you cell phone lose their cellular connection during live tracking, updates will stop. Once the cellular connection is re-established, the live tracking will resume automatically.
47. After live tracking for 10 minutes, how long do I have to wait to restart live tracking?You can start live tracking again at any time. There is no requirement to wait to start it again.
48. Why does the car on live tracking jump when it moves?During live tracking, the information on your vehicle is updated about every 5 seconds. When this update occurs, the display will automatically center the map on the current location of your vehicle. Note, when using the website, if you move the map away from the vehicle while live track is running, the map will no longer center on the vehicle every 5 seconds.
49. Why does the vehicle icon show red (ON) in live tracking and the engine icon is OFF on the dashboard?The live tracking feature uses a red vehicle icon to show the location of the vehicle whether it is running or not. The data on the dashboard represents the last time you requested an update of information using the refresh feature which may not be the same as the live tracking data. The engine indicator will be updated to show the correct state, running or not.
50. What is the blue dot on my location screen?Within the smartphone apps, the blue dot represents the current location of the phone running the app (where your phone is, not your vehicle)
51. I installed my module and it won’t pick up my current location. Why?Your module relies upon GPS to determine vehicle location. Location accuracy is subject to GPS accuracy which means that it could take minutes for a first-time position to be available and it may not work inside of garages or in other structures. It may even be possible that the location in the vehicle where the module is installed may create a weak GPS signal and use of an
551
extension cable may be necessary to relocate the module to a better location for GPS reception.
52. I don’t see all my vehicles on the map?On the dashboard, only the current vehicle will be displayed on the small location map. On the Location screen, all vehicles that are selected to be displayed will be shown. Use the Hide/Show Vehicles feature available on the Location menu select vehicles for display.
53. It’s really cold where I live. Will this affect the module?Being a cellular device, the module will generally work in the same conditions as your cell phone, although there are no batteries in the module to be concerned about as you would have with a cell phone.
54. It’s really hot where I live. Will this affect the module?Being a cellular device, the module will generally work in the same conditions as your cell phone, although there are no batteries in the module to be concerned about as you would have with a cell phone.
55. How do you use the data collected on my vehicle?Delphi will never forward your specific, individual vehicle data to your wireless carrier or any third-parties without your express permission. Your vehicle data may be aggregated with other vehicle data anonymously for other purposes per the Terms of Service which you, the consumer, accepted after your first login.
56. Does Delphi or my wireless carrier track me or my cars without my knowledge?The Delphi Connect service is intended solely for the consumer to use for their own purposes and no one else can track your vehicle unless you give them your username and password. Protect your username and password to prevent any unauthorized person from accessing your information.
57. How can I program the module to track my mileage?You can use the programmable odometer on the dashboard to track your mileage. You can set
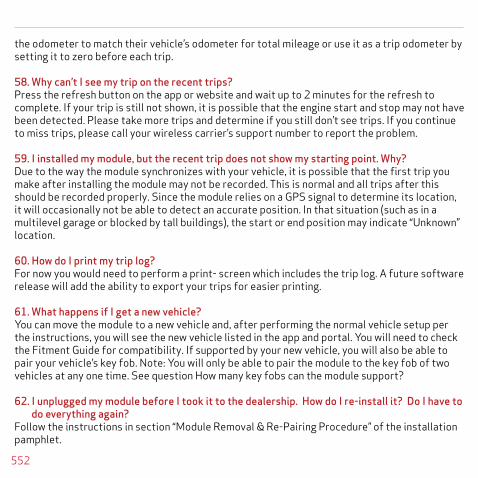
552
the odometer to match their vehicle’s odometer for total mileage or use it as a trip odometer by setting it to zero before each trip.
58. Why can’t I see my trip on the recent trips?Press the refresh button on the app or website and wait up to 2 minutes for the refresh to complete. If your trip is still not shown, it is possible that the engine start and stop may not have been detected. Please take more trips and determine if you still don’t see trips. If you continue to miss trips, please call your wireless carrier’s support number to report the problem.
59. I installed my module, but the recent trip does not show my starting point. Why?Due to the way the module synchronizes with your vehicle, it is possible that the first trip you make after installing the module may not be recorded. This is normal and all trips after this should be recorded properly. Since the module relies on a GPS signal to determine its location, it will occasionally not be able to detect an accurate position. In that situation (such as in a multilevel garage or blocked by tall buildings), the start or end position may indicate “Unknown” location.
60. How do I print my trip log?For now you would need to perform a print- screen which includes the trip log. A future software release will add the ability to export your trips for easier printing.
61. What happens if I get a new vehicle?You can move the module to a new vehicle and, after performing the normal vehicle setup per the instructions, you will see the new vehicle listed in the app and portal. You will need to check the Fitment Guide for compatibility. If supported by your new vehicle, you will also be able to pair your vehicle’s key fob. Note: You will only be able to pair the module to the key fob of two vehicles at any one time. See question How many key fobs can the module support?
62. I unplugged my module before I took it to the dealership. How do I re-install it? Do I have to do everything again?Follow the instructions in section “Module Removal & Re-Pairing Procedure” of the installation pamphlet.
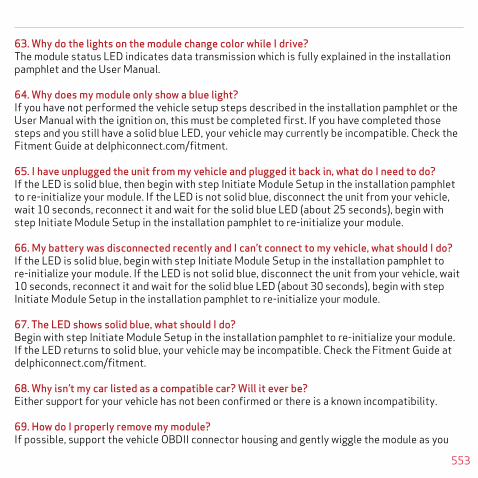
553
63. Why do the lights on the module change color while I drive?The module status LED indicates data transmission which is fully explained in the installation pamphlet and the User Manual.
64. Why does my module only show a blue light?If you have not performed the vehicle setup steps described in the installation pamphlet or the User Manual with the ignition on, this must be completed first. If you have completed those steps and you still have a solid blue LED, your vehicle may currently be incompatible. Check the Fitment Guide at delphiconnect.com/fitment.
65. I have unplugged the unit from my vehicle and plugged it back in, what do I need to do?If the LED is solid blue, then begin with step Initiate Module Setup in the installation pamphlet to re-initialize your module. If the LED is not solid blue, disconnect the unit from your vehicle, wait 10 seconds, reconnect it and wait for the solid blue LED (about 25 seconds), begin with step Initiate Module Setup in the installation pamphlet to re-initialize your module.
66. My battery was disconnected recently and I can’t connect to my vehicle, what should I do?If the LED is solid blue, begin with step Initiate Module Setup in the installation pamphlet to re-initialize your module. If the LED is not solid blue, disconnect the unit from your vehicle, wait 10 seconds, reconnect it and wait for the solid blue LED (about 30 seconds), begin with step Initiate Module Setup in the installation pamphlet to re-initialize your module.
67. The LED shows solid blue, what should I do?Begin with step Initiate Module Setup in the installation pamphlet to re-initialize your module. If the LED returns to solid blue, your vehicle may be incompatible. Check the Fitment Guide at delphiconnect.com/fitment.
68. Why isn’t my car listed as a compatible car? Will it ever be?Either support for your vehicle has not been confirmed or there is a known incompatibility.
69. How do I properly remove my module?If possible, support the vehicle OBDII connector housing and gently wiggle the module as you

554
pull uniformly outward away from the vehicle OBDII connector. Note that the module is designed for a snug fit and may require a strong pull to fully remove it.
70. Why is it hard to disconnect the module from the OBDII port?The module was designed to maintain a secure and snug fit on all vehicles so that it would never come loose or fall off the connector. Vehicles which are driven on bumpy roads create excessive vibration which could loosen the module if it weren’t designed for a snug fit.
71. Should I disconnect the module before having my vehicle jump started?Delphi recommends disconnecting your module when jump starting your vehicle.
72. I have a Check Engine Light on but I don’t see anything on the Health page. Why?Diagnostic codes will automatically be scanned when the module is installed. Anytime following installation, to retrieve current codes, you need to press the refresh button on the health page in the website (not the smartphone app) and follow the instructions. If your error codes still do not show up, your vehicle manufacturer may have manufacturer specific codes they have not shared with other tool providers, which prevents the module from properly reading these codes.
73. What codes are pulled during a vehicle health scan (pending, active, historical)?The vehicle scan will display the diagnostic codes reported by the vehicle. The codes returned varies by vehicle manufacturer but in general these are codes that have been set since the last time the codes were cleared in the vehicle.
74. Can I clear Diagnostic Codes in my car?Yes, you can send a command to your vehicle to clear the diagnostic codes. Navigate to the Health page. On an Android, open the soft menu and tap Clear trouble codes and then tap Vehicle. On an iPhone, tap Clear on the Health page then tap Clear Vehicle. Note: Simply clearing the diagnostic codes in your vehicle will not repair any problems it may have. Driving a vehicle that has diagnostic problems without first repairing them may cause damage to your vehicle. You should always correct any problems before clearing the diagnostic codes in your vehicle.

555
75. Will using this product void my new car warranty?Delphi stands behind the Delphi Connect product and maintains that it does not void your new car warranty.
76. How much of data does the module use?Average monthly data usage is typically less than 10MB (Mega-Bytes) per month per module. This may vary depending on how you use your vehicle and how often you enable the live tracking feature.
77. I have more than one module on my account, why don’t I see all of my vehicles?Make sure each unit is properly installed and functioning. First, under the Settings page, tap Account Settings, then Module Management, then confirm that all the modules are listed. Second, start each vehicle and confirm that the LED on the module is blinking green while the engine is running. If all modules are on the account and functioning, it may be that one or more vehicles is not reporting the VIN. In this case, it is possible that such a vehicle cannot be uniquely identified from another vehicle on the account. This can occur when you have two vehicles with similar make and model and one or both do not report the VIN. If all modules are properly installed, use the Hide/Show Vehicle feature located on the Location screen menu to make sure the vehicles will be displayed on the map.
78. How do I add an additional module to my account?If the additional or “second” module is on an account that you have logged in to, first remove the second module from that account using the Remove feature. Then log into the account, called the “master” account, you want to add it to and use the Add Module feature. You will need to enter the ESN or IMEI or MEID and the Registration Key of the second module. These are printed on the module label. You may also need to enter in the username and password of the second module account. Once successfully added, you will need to i) log out of your master account and log back in and ii) if currently installed in a vehicle, remove the second module from the vehicle and reinstall it in the vehicle. These two steps will ensure you will be able to see the new module in your account. In the apps, from the Settings menu, tap Account Settings, then tap Module Management. On the website, under the Settings menu, select Manage Modules.

556
79. I don’t see all my vehicles on the map?On the dashboard, only the current vehicle will be displayed on the small location map. On the Location screen, all vehicles that are selected to be displayed will be shown. Use the Hide/Show Vehicles feature available on the Location menu select vehicles for display.
80. How do I change my Wi-Fi settings?In the apps, under the Settings page, tap Account Settings, Module management, then tap the name of the Wi-Fi capable module you want modify. Tap Wi-Fi Hotspot to access the Wi-Fi settings. On the web, select Manage Modules on the Settings drop-down menu, then click on the Wi-Fi icon next to the module you wish to modify. For access to all available settings, including advanced features, use the administrator portal available in the module. Connect to the module over Wi-Fi. Open your browser and in the address bar, enter http://my.dphconnect and press Enter.
81. What is the difference between the shut off time and the force shut off time? When the engine is turned off, the Wi-Fi hotspot will remain on waiting for a device to connect until the shut off time expires. At the end of shut off time, if no devices are connected, the hotspot will turn off. When the engine is turned off, once force shutoff time has expired, the hotspot will always turn off, regardless if any devices are connected or not. Therefore, if force shutoff time is set to zero, then the hotspot will always turn off when the engine is turned off.
82. Can I disconnect or disallow a device from using the Wi-Fi hotspot?Yes, using the administrator portal, you can view the connected devices. Next to each device there is button to Block that device from accessing the hotspot. See the User Manual for more detailed information.
83. How many devices can I connect to my Delphi Connect Wi-Fi Hotspot?You can connect up to 5 devices at one time.
84. How will using the Wi-Fi hotspot affect my data usage?All usage of the Wi-Fi hotspot will be added to your normal data usage for your wireless account.

557
85. How do I activate my Hotspot?The Wi-Fi hotspot is enabled prior to purchase.
86. How do I change my login information for my hotspot connection?In the apps, under the Settings page, tap Account Settings, Module management, then tap the name of the Wi-Fi capable module you want modify. Tap Wi-Fi Hotspot to access the Wi-Fi settings. On the web, select Manage Modules on the Settings drop-down menu, then click on the Wi-Fi icon next to the module you wish to modify. For full access to all settings, use the administrator portal available in the module. Connect to the module over Wi-Fi. Open your browser and in the address bar, enter http://my.dphconnect and press Enter.
87. Will using my hotspot drain my battery?While the engine is running, there is no impact to your battery. If you use the hotspot while the engine if off, you will use some power from the battery. You can control the time the hotspot remains on after turning the engine off by using the shutoff timers.
88. Can I access my mobile hotspot from outside the vehicle?The hotspot is designed to provide good signal strength inside your vehicle. You may be able to connect to the hotspot while outside the vehicle but the signal will be significantly reduced.
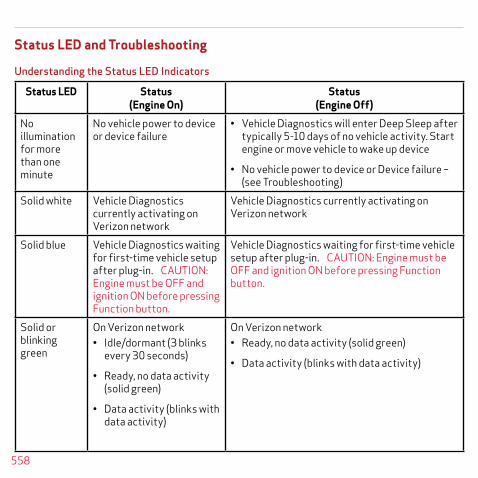
558
Status LED and Troubleshooting
Understanding the Status LED Indicators
Status LED Status (Engine On)
Status (Engine Off)
No illumination for more than one minute
No vehicle power to device or device failure
• Vehicle Diagnostics will enter Deep Sleep after typically 5-10 days of no vehicle activity. Start engine or move vehicle to wake up device
• No vehicle power to device or Device failure – (see Troubleshooting)
Solid white Vehicle Diagnostics currently activating on Verizon network
Vehicle Diagnostics currently activating on Verizon network
Solid blue Vehicle Diagnostics waiting for first-time vehicle setup after plug-in. CAUTION: Engine must be OFF and ignition ON before pressing Function button.
Vehicle Diagnostics waiting for first-time vehicle setup after plug-in. CAUTION: Engine must be OFF and ignition ON before pressing Function button.
Solid or blinking green
On Verizon network• Idle/dormant (3 blinks
every 30 seconds)
• Ready, no data activity (solid green)
• Data activity (blinks with data activity)
On Verizon network• Ready, no data activity (solid green)
• Data activity (blinks with data activity)

559
Solid or blinking yellow
On Roaming network• Idle/dormant (3 blinks
every 30 seconds)
• Ready, no data activity (solid yellow)
• Data activity (blinks with data transfer)
On Roaming network• Ready, no data activity (solid yellow)
• Data activity (blinks with data transfer)
Solid red No wireless service No wireless serviceBlinking red • Transmitting key fob
command to vehicle (2 blinks)
• User-initiated vehicle setup in process (1 blink per second) - CAUTION: Not recommended with engine running.
• Transmitting key fob command to vehicle (2 blinks)
• User-initiated vehicle setup in process (1 blink per second) - CAUTION: Do not start engine.
Blinking blue Bluetooth® Pairing in Progress CAUTION: Do not unplug (blinking once per second for one minute)
• Engine Off –Light sleep (blinking once every 10 seconds)
• Bluetooth pairing in progress. CAUTION: Do not unplug (blinking once per second for one minute)
Blinking white
Activation or firmware update in progress. CAUTION: Do not unplug
Activation or firmware update in progress. CAUTION: Do not unplug

560
Troubleshooting
Issue Likely Cause(s) Corrective Action(s)Can’t login to my account
Incorrect username or password entry
First-time: Enter Registration Key from this guide or Vehicle Diagnostics label exactly as shown (e.g. 1a2b-3c4d) in Username field. (lowercase or UPPERCASE)Enter ESN DEC from this guide or Vehicle Diagnostics label exactly as shown.After first-time: Enter the username and password you created during first-time login. If you forgot your Username or Password, select the appropriate button on the login page to request help.
No Network connection to smartphone or internet connection to computer
Verify your connection to smartphone or computer is active.
Can’t find OBD port on vehicle
Vehicle older than 1996
The Delphi Connect system is not compatible with older vehicles
Incorrect OBD photo in app
Call Verizon support (800)922-0204
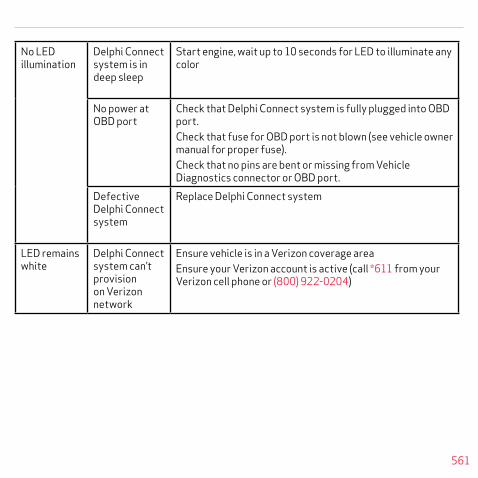
561
No LED illumination
Delphi Connect system is in deep sleep
Start engine, wait up to 10 seconds for LED to illuminate any color
No power at OBD port
Check that Delphi Connect system is fully plugged into OBD port.Check that fuse for OBD port is not blown (see vehicle owner manual for proper fuse).Check that no pins are bent or missing from Vehicle Diagnostics connector or OBD port.
Defective Delphi Connect system
Replace Delphi Connect system
LED remains white
Delphi Connect system can’t provision on Verizon network
Ensure vehicle is in a Verizon coverage areaEnsure your Verizon account is active (call *611 from your Verizon cell phone or (800) 922-0204)

562
LED remains solid blue
Device can’t complete vehicle setup
Check all OBD port connectors on Delphi Connect system and on vehicle for dirty/corroded pinsVehicle may be incompatible. Check fitment guide (connectedcar.delphi.com/fitment)
Device isremoved fromthe OBD port and reinstalled
Device needs to bepaired again with yourvehicle. Please go to page11 and perform steps 5and 6.
Low voltage orloss of batterypower
Device needs to bepaired again with yourvehicle. Please go to page11 and perform steps 5and 6.
Can’t get to Dashboard page for first time login (remains on OBD Locator page)
Delphi Connect system is not reaching the Delphi cloud server after cellular network activation.
Check that Delphi Connect system LED turns green when engine is started. If it does, (call *611 from your Verizon cell phone or (800) 922-0204). If not, follow Troubleshooting according to Status LED table
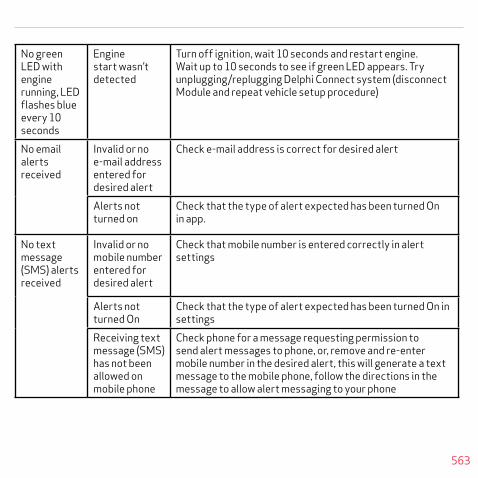
563
No green LED with engine running, LED flashes blue every 10 seconds
Engine start wasn’t detected
Turn off ignition, wait 10 seconds and restart engine. Wait up to 10 seconds to see if green LED appears. Try unplugging/replugging Delphi Connect system (disconnect Module and repeat vehicle setup procedure)
No email alerts received
Invalid or no e-mail address entered for desired alert
Check e-mail address is correct for desired alert
Alerts not turned on
Check that the type of alert expected has been turned On in app.
No text message (SMS) alerts received
Invalid or no mobile number entered for desired alert
Check that mobile number is entered correctly in alert settings
Alerts not turned On
Check that the type of alert expected has been turned On in settings
Receiving text message (SMS) has not been allowed on mobile phone
Check phone for a message requesting permission to send alert messages to phone, or, remove and re-enter mobile number in the desired alert, this will generate a text message to the mobile phone, follow the directions in the message to allow alert messaging to your phone
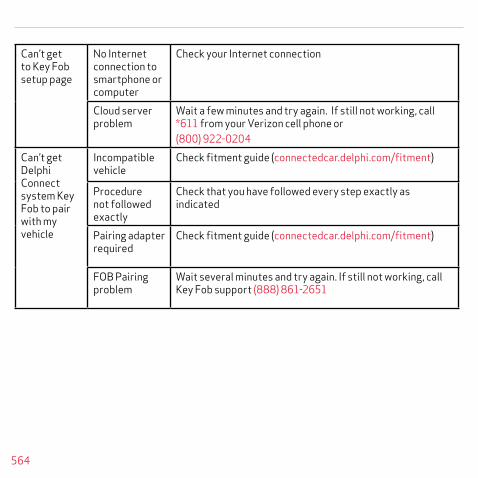
564
Can’t get to Key Fob setup page
No Internet connection to smartphone or computer
Check your Internet connection
Cloud server problem
Wait a few minutes and try again. If still not working, call *611 from your Verizon cell phone or(800) 922-0204
Can’t get Delphi Connect system Key Fob to pair with my vehicle
Incompatible vehicle
Check fitment guide (connectedcar.delphi.com/fitment)
Procedure not followed exactly
Check that you have followed every step exactly as indicated
Pairing adapter required
Check fitment guide (connectedcar.delphi.com/fitment)
FOB Pairing problem
Wait several minutes and try again. If still not working, call Key Fob support (888) 861-2651

565
Can’t get Delphi Connect system Key Fob to control vehicle keyless entry system
Not paired See “Can’t get Delphi Connect system key fob to pair with my vehicle”
No Internet connection to smartphone, computer or Delphi Connect system
Check internet connection to smartphone or computer. Start engine and watch for green or yellow LED activity. If LED remains red, Delphi Connect system has no cellular connection
Function restricted by vehicle manufacturer
Check if the manufacturer supplied key fob can perform the same feature. If not, it is a vehicle restriction. Read the vehicle owner’s manual about your remote keyless entry system.Check if smartphone Bluetooth is ON. VerifyDelphi Connect system (ACT231) is listedin smartphone paired Bluetooth devices.Verify smartphone is listed in Delphi smartphoneapp in Settings page as Authorized
No Bluetoothconnection(if paired andauthorized)and within 30feet of VehicleDiagnosticsModule

566
Can’t pair my smartphone to Delphi Connect system with Bluetooth®
Incompatible smartphone
Must be iPhone with iOS 5.0 or later or Android 2.2 or later and with Bluetooth® 2.1 or higher.
Delphi Connect system wasn’t in Bluetooth® pairing mode
On the Settings menu in the app, tap Vehicle Settings, then tap your vehicle from the list, then tap Bluetooth Settings, then tap the Discover button and ensure LED begins flashing blue every second.
Too far away from Delphi Connect system
Must be within 30 feet of Delphi Connect system for Bluetooth® functions.

567
Customer Information
Your Wireless Device and Third Party Services Verizon Wireless is the mobile carrier associated with this wireless product. However, many services and features offered through the product are provided by Delphi alone or in conjunction with third parties. Verizon Wireless is not responsible for your use of your wireless device, including any damage resulting from installation of the device and is not responsible for any non-Verizon Wireless applications, services, or any personal information you submit to Delphi or that is associated with your Delphi account or that you share with others. You will incur Verizon Wireless data usage by using this wireless product. Your relationship with Verizon Wireless is governed by your Customer Agreement, available on the Verizon Wireless website at www.verizonwireless.com. Please review carefully all applicable terms and conditions and policies prior to using this wireless product and any associated component, application, or service.
568
Product Safety and Warranty
Health and Safety
This section outlines the safety precautions associated with using Vehicle Diagnostics. The term “mobile device” will be used to refer to the Vehicle Diagnostics in this section. Before operating your vehicle with your mobile device plugged in, please be aware of all the safety details.
DRIVING SAFETY
Remember that safety comes first when driving. If having the mobile device plugged in your vehicle interferes with your ability to access your vehicle’s pedals, or in any way prohibits you from properly operating your vehicle, do not drive with your mobile device plugged in. You can purchase an extension cable to move your mobile device to a more fitting location. The extension cable can be purchased from Delphi at http://mycar.delphi.com/accessories. If you discover while driving that you are not able to properly operate the vehicle with the mobile device plugged in, wait until you have safely pulled off the road and parked before attempting to remove the mobile device.
PRECAUTIONS
Your mobile device is a high quality piece of equipment. Before operating, read all instructions and cautionary markings.Failure to follow the directions below could result in serious bodily injury and/or property damage:
• DO NOT use this equipment in an extreme environment where high temperature or high humidity exists.
• DO NOT abuse the equipment. Avoid striking, shaking or shocking.

569
• DO NOT expose this equipment to rain or spilled beverages.
• DO NOT use unauthorized accessories.
GPS & AGPS
You mobile device uses a Global Positioning System (GPS) signal for location-based applications. A GPS uses satellites controlled by the U.S. Government that are subject to changes implemented in accordance with the Department of Defense policy and the 2008 Federal Radio navigation Plan (FRP). Changes may affect the performance of the location-based services on your Delphi Connect system.Your mobile device can also use an As-sisted Global Positioning System (AGPS), which obtains information from the cellular network to improve GPS performance. AGPS uses your wireless service provider’s network and there-fore airtime, data charges, and/or additional charges may apply in accordance with your service plan. Please contact your wireless service provider for details.
Location Information
Location-based information includes information that can be used to determine the approximate location of a mobile device. Mobile devices which are connected to a wireless network transmit location-based information. Additionally, if you use applications that require location-based information, such applications transmit location-based information. The location-based information may be shared with third-parties, including you wireless service provider, applications providers, and other third-parties providing services.
FCC COMPLIANCE INFORMATION
This device complies with Part 15 of FCC Rules. Operation is subject to the following two conditions:
(1) This device may not cause harmful interference, and
570
(2) This device must accept any interference received.
Including interference that may cause undesired operation.
INFORMATION TO THE USER
This equipment has been tested and found to comply with the limits for a Class B digital device pursuant to Part 15 of the FCC Rules.These limits are designed to provide reasonable protection against harmful Interference in a residential installation This equipment generates, uses, and can radiate radio frequency energy and, if not installed and used in accordance with the instructions, may cause harmful Interfer-ence to radio communications. However, there is no guarantee that interference will not occur in a particular installation.
Warranty
12 MONTH LIMITED WARRANTY
Personal Communications Devices, LLC (the “Company”) warrants to the original retail purchaser of this wireless device (Product), that should this Product or any part thereof during normal consumer usage and conditions, be proven defective in material or workmanship that results in the Product’s failure within the first twelve (12) month period from the date of purchase (proof of purchase required), such defect(s) will be repaired or replaced (with new or rebuilt parts) at the Company’s option, without charge for parts or labor directly related to the defect(s). The antenna, keypad, display, rechargeable battery and battery charger, if included with the Product, are similarly warranted for twelve (12) months from the date of purchase.This Warranty extends only to consumers who purchase the product in the United States or Canada and it is not transferable or assignable.

571
This Warranty does not apply to:
(a) Product subjected to abnormal use or conditions, accident, mishandling, neglect, unauthorized alteration, misuse, improper installation or repair or improper storage;
(b) Product whose mechanical serial number or electronic serial number has been removed, altered or defaced;
(c) Damage from exposure to moisture, humidity, excessive temperatures or extreme environmental conditions;
(d) Damage resulting from connection to, or use of any accessory or other product not approved or authorized by the Company;
(e) Defects in appearance, cosmetic, decorative or structural items such as framing and non-operative parts;
(f) Product damaged from external causes such as fire, flooding, dirt, sand, weather conditions, battery leakage, blown fuse, theft or improper usage of any electrical source;
g) Product subjected to unauthorized modifications to the software of the Product or to the Product itself;
(h) Product subjected to the unauthorized opening or repair of the Product;
(i) Product subjected to hacking, password-mining, jail breaking, the unlocking of the boot loader using the fast boot program or the tampering with or short-circuiting of the battery; or
(j) Product that has been modified to alter functionality or capability of the Product without the written permission of the Company.
The Company disclaims liability for removal or reinstallation of the Product, for geographic coverage, for inadequate signal reception by the antenna or for communications range or opera-tion of the cellular system as a whole.
When sending your wireless device to the Company for repair or service, please note that any personal data or software stored on the Product may be inadvertently erased or altered.

572
Therefore, we strongly recommend you make a back up copy of all data and software contained on your Product before submitting it for repair or service. This includes all contact lists, downloads (i.e. third-party software applications, ringtones, games and graphics) and any other data added to your Product. In addition, if your Product utilizes a SIM or Multimedia card, please remove the card before submitting the Product and store for later use when your Product is returned.
The Company is not responsible for and does not guarantee restoration of any third-party software, personal information or memory data contained in, stored on, or integrated with any other wireless device, whether under warranty or not, returned to the Company for repair or service.
To obtain repairs or replacement within the terms of this Warranty, the Product should be delivered with proof of Warranty coverage (e.g. dated bill of sale), the consumer’s return address, daytime phone number and/or fax number and complete description of the problem, transportation prepaid, to the Company at the address shown below or to the place of purchase for repair or replacement processing. In addition, for reference to an authorized Warranty station in your area, you may telephone in the United States (800) 229-1235, and in Canada (800) 465-9672 (in Ontario call 416-695-3060).
THE EXTENT OF THE COMPANY’S LIABILITY UNDER THIS WARRANTY IS LIMITED TO THE REPAIR OR REPLACEMENT PROVIDED ABOVE AND, IN NO EVENT, SHALL THE COMPANY’S LIABILITY EXCEED THE PURCHASE PRICE PAID BY PURCHASER FOR THE PRODUCT.ANY IMPLIED WARRANTIES, INCLUDING ANY IMPLIED WARRANTY OF MERCHANTABILITY OR FITNESS FOR A PARTICULAR PURPOSE, SHALL BE LIMITED TO THE DURATION OF THIS WRITTEN WARRANTY. ANY ACTION FOR BREACH OF ANY WARRANTY MUST BE BROUGHT WITHIN A PERIOD OF 18 MONTHS FROM DATE OF ORIGINAL PURCHASE. IN NO CASE SHALL THE COMPANY BE LIABLE FOR AN SPECIAL CONSEQUENTIAL OR INCIDENTAL DAMAGES FOR BREACH OF THIS OR ANY OTHER WARRANTY, EXPRESS OR IMPLIED, WHATSOEVER.

573
THE COMPANY SHALL NOT BE LIABLE FOR THE DELAY IN RENDERING SERVICE UNDER THIS WARRANTY OR LOSS OF USE DURING THE TIME THE PRODUCT IS BEING REPAIRED OR REPLACED.
No person or representative is authorized to assume for the Company any liability other than expressed herein in connection with the sale of this product.Some states or provinces do not allow limitations on how long an implied warranty lasts or the exclusion or limitation of incidental or consequential damage so the above limitation or exclusions may not apply to you. This Warranty gives you specific legal rights, and you may also have other rights, which vary from state to state or province to province.
IN USA: Personal Communications Devices, LLC.1516 Motor ParkwayHauppauge, NY 11749www.pcdphones.com
IN CANADA: PCD Communications Canada Ltd.5535 Eglington Avenue West Suite #210Toronto, ON M9C 5K5www.pcdphones.com

574

OM231VW v.00