User Guide DSF Guide 2 Digital StoreFront Training Manual The Print Shop | Algonquin College Table...
36
DSF User Guide
Transcript of User Guide DSF Guide 2 Digital StoreFront Training Manual The Print Shop | Algonquin College Table...

DSF
User Guide

2
Digital StoreFront Training Manual
The Print Shop | Algonquin College
Table of Contents
About the Digital StoreFront
What is the Digital StoreFront (DSF) ................................................................................................ 3How to log-in to the DSF (username and password) ......................................................................... 3
Getting Started
Update your profile information......................................................................................................... 4Change your default password .......................................................................................................... 4Change your default security question ............................................................................................... 4
EFI PrintMessenger Driver (download & install)
What is the EFI PrintMessenger Driver? ........................................................................................... 5Installation instructions for PC / Windows ........................................................................................ 7Installation instructions for Mac OS .................................................................................................10
Submitting Print Jobs to the DSF
Printing with the EFI PrintMessenger Driver (Highly Recommended)........................................... 13Uploading your Press Quality PDF file to the DSF ........................................................................ 17
Printing Details
Printing options ................................................................................................................................ 21Review & Approve your order ......................................................................................................... 25Due date & Delivery method ........................................................................................................... 26Budget code payment ....................................................................................................................... 27Final review & Order confirmation .................................................................................................. 28Order status ...................................................................................................................................... 28
Submitting Offline Content................................................................................................... 29Algonquin Business Cards .................................................................................................... 32Featured Categories ................................................................................................................. 33
Contact Us
FAQ (Frequently Asked Questions) .......................................................................................................34 Contact information .............................................................................................................................. 35

3
Digital StoreFront Training Manual
The Print Shop | Algonquin College
About the Digital StoreFrontWhat is the Digital StoreFront?The Digital StoreFront (DSF) is a website offered by The Print Shop that allows customers to order printing and other goods and services online 24/7 from within the college or outside the college using VPN. The Print Shop DSF offers a quick and easy print ordering experience similar to other online retail stores that you may be familiar with.
1 DSF Website Address (URL) http://printshop.algonquincollege.com/dsf/login.aspx
2 Default UsernameYour default username is the same as your Algonquin College username.
3 Default Password Your default password is your first name all in lowercase letters.
Default Security Question and Answer Default question: What high school did you graduate from? Default answer: algonquin college
Who do I call for help with the DSF?See contact information at the end of this user guide.
Log-in using the information above. Your account should already be registered with the DSF and ready to use! If your account could not be retrieved please register by clicking the “Register” link.
3
!
1
2
!

4
Digital StoreFront Training Manual
The Print Shop | Algonquin College
Getting StartedWe suggest completing your profile so that your orders will be delivered to the correct location. Your profile information will also be used to automatically fill in certain DSF forms improving your ordering expeience.
1 Changing your Security Question Click on “My Account”. Next to Security Question, click “Change”. Type in your current password, select a new security question from the drop down list and type in the new security answer. Click “Save”.
2 Changing your PasswordClick on “My Account”. Next to Password, click “Change” . Type in your current password, a new password, confirm new password and click “Save Changes”.
3 Updating your Profile InformationLog-in to the DSF and click on “My Account”. The Profile box will appear. Click “Edit” at the bottom of the page. Make your changes then click “Save”.
Default Password
The default password is your first name in lowercase.
New Password RulesMin. eight (8) characters• Max ten (10) characters • Two (2) uppercase letters• One (1) numeric character• Cannot contain your name •
or your DSF user name
Your new password must satisfy all above requirements.
Take Note
3
1
2

Installing the EFI PrintMessenger Driver
Content Overview
Download and install the EFI Print Messenger driver in order to print
directly to the DSF using Word or your favorite software package.
• PC/Windows users continue page 7
• Mac users continue on page 10


7
Digital StoreFront Training Manual
The Print Shop | Algonquin College
Installing EFI PrintMessenger on PC Computers Windows Vista & Windows XP
In order to print directly to DSF you will need to install EFI PrintMessenger driver on your computer. Follow these steps below to get started.
1 Log-in to the DSF. Click “Login” button to continue. See page 3 for URL & login information.
2 Under the EFI PrintMessenger section, click on the “Windows” link.
!

8
Digital StoreFront Training Manual
The Print Shop | Algonquin College
3 When prompted with the “Do you want to run or save this file?” dialogue box, click on “Run”.
4 You will be prompted with another security warning. Click “Run”.
5 PrintMessenger Setup Wizard. Click “Next”.
6 License Agreement. Choose “I accept the terms in the license agreement”, then click “Next” to continue.

9
Digital StoreFront Training Manual
The Print Shop | Algonquin College
7 Destination Folder. DO NOT change the default location. Click “Next”.
8 Ready to Install the Program. Click “Install”.
9 Hardware Installation warning. Click “Continue Anyway”.
10 PrintMessenger Setup Wizard Completed. Click “Finish”.
Congratulations! You are now able to submit jobs from any application using the print command. The DSF printer driver will be listed under your available printers as “Digital StoreFront”. See page 13 for instructions on how to use the PrintMessenger driver.
Restart Needed?
You may need to restart your computer in order to complete installation or for your new printer driver to be active
Don’t forget to save any open documents before you restart.
Take Note

10
Digital StoreFront Training Manual
The Print Shop | Algonquin College
Installing EFI PrintMessenger on Apple MacMac OS 10.5 Leopard, 10.4 Tiger, 10.3 Panther
In order to print directly to DSF you will need to install EFI PrintMessenger driver on your computer. Follow these steps below to get started.
1 Log-in to the DSF. Click “Login” button to continue. See page 3 for URL & login information.
2 Under the EFI PrintMessenger section, click on the “Mac” link
!
3 PrintMessenger.dmg file will download to your computer. Double-click on the icon to open it.

11
Digital StoreFront Training Manual
The Print Shop | Algonquin College
4 The PrintMessenger drive will appear on your desktop. Double-click the PrintMessenger drive icon.
5 A new PrintMessenger window will open. Double-click on the PrintMessenger icon to launch the install.
6 If you get a warning regarding the application being downloaded from the internet, click “Open”.
7 Authenticate the installation. Type in your computer user name and password and click “OK”.
8 License. Click “Accept”.

12
Digital StoreFront Training Manual
The Print Shop | Algonquin College
8 Install Location. DO NOT change the location of the folder. Click “Install”.
9 Installation successful. Click the Quit button to quit the install process.
Congratulations! You are now able to submit jobs from any application using the print command. The DSF printer driver will be listed under your available printers as “Printshop_DSF”. See page 13 for instructions on how to use the PrintMessenger driver.

Printing with the EFI PrintMessenger
Content Overview
This is the recommended method for submitting your fi les. This method will
automatically create a proper PDF and upload it to your DSF account using
the print command from your favorite software. (PC & Mac compatible)
Method #1 (recommended)

14
Digital StoreFront Training Manual
The Print Shop | Algonquin College
Printing with the EFI PrintMessenger Driver Overview of instructions for PC and Mac users
Before you start, make sure you have installed the Print-Messenger driver on your computer. You only need to install it once for each computer you use. See page 5. Detailed instructions are provided on the following pages.
1 Open the document you wish to print.
2 Click “File”, “Print”, select the printer called “Digital StoreFront” or
“Printshop_DSF”. Click “OK” or “Print”.
Note: This will create a PDF and add it to the PrintMessenger upload queue.
3 After you have finished adding all your documents, click “upload”.
4 Enter your DSF log-in information. Click “Login”. Click “Save Password” if desired.
5 The DSF website will open. Click “Get Started”.
6 Select a category and click “Begin” beside colour or black & white.
7 Your PDF has been added to the job. Enter a job name and quantity. Click “Next”.
!

15
Digital StoreFront Training Manual
The Print Shop | Algonquin College
Printing with the EFI PrintMessenger Driver Detailed instructions for PC and Mac users
1 Open the document you wish to print. Remember, you can print from any application on your computer as long as you can access the print command and select the PrintMessenger driver.
2 With your document open, click “File”, “Print”, select the printer called “Digital StoreFront” on a PC or “Printshop_DSF” if your on a Mac. Click “OK” (PC) or “Print” (Mac). See figure #1.
3 After you have finished printing your documents to the upload queue, click “upload”. See figure #2
4 Enter your DSF username and password, then click “Login” to continue. See figure #3
figure #3
figure #2figure #1
figure #4
5 The DSF website will launch in your internet browser, click “Get Started” to continue. See figure #4

16
Digital StoreFront Training Manual
The Print Shop | Algonquin College
6 Select a category which best represents your printing requirements. After you have selected a category, click “Begin” beside colour or black & white depending on your needs.
7 As you can see, your file has already been uploaded and added to the job. Enter a “Job Name” and “Quantity” then click “Next”.
PDF Preview
With just one click you are able to preview your PDF(s). Great for double checking to see if they were created and uploaded properly.
Take Note
Congratulations! You have successfully created and uploaded your PDF file(s). Please continue on page 21 for instructions on how to select your printing details.

Uploading PDF’sto the DSF
Method #2
Content Overview
Use this method if you would like to upload your own PDFs to the DSF. This
method requires you to know how to manually create a proper press quality
PDF with fonts embedded.

18
Digital StoreFront Training Manual
The Print Shop | Algonquin College
Before you start, make sure you have already produced a press quality PDF with fonts embedded and have ready for upload. Detailed instructions are provided on the following pages.
1 Go to the Digital StoreFront website and log-in.
2 Select a category and click “Begin” beside colour or black & white.
3 Fill out job information and upload PDF document. Click “Next” to continue.
Uploading PDF’s to the DSFOverview of instructions for PC and Mac users
!

19
Digital StoreFront Training Manual
The Print Shop | Algonquin College
Uploading PDF’s to the DSFDetailed instructions for PC and Mac users
1 Go to the DSF website and log-in. Type in your username and password. Click “Login”.Website: http://printshop.algonquincollege.com/DSF/Login.aspxIf you are unsure of your username and password see page 3.
2 Select a category which best represents your printing requirements. After you have selected a category, click “Begin” beside colour or black & white depending on your needs.
19

20
Digital StoreFront Training Manual
The Print Shop | Algonquin College
3 Selecting your PDF document to upload is easy, just follow these simple steps below.
Make sure the PDF file you’re going to upload has been created properly for print (fonts are embedded and press quality)
A Give your job a name and indicate the quantity.
B Click on the “Browse” button to locate the PDF document on your computer. Once you have
found the file, click “OK”.
C Click “Upload File”. Check off “Add to My Saved Files” to store the file online for next time.
D Once your file has been uploaded, you will see a PDF icon and the name of your document in
the preview window. Click “Next” to continue.
!
B
C
D
A
Congratulations! You have successfully uploaded your PDF file(s). Please continue on page 21 for instructions on how to select your printing details.
My Saved Files
Currently, the files will be saved for one year.
PDF Preview
With just one click you are able to preview your PDF(s). Great for double checking to see if they were created and uploaded properly.
Wrong PDF File?
If you have accidently uploaded the wrong PDF file just click on the to remove it and upload another file.
Take Note

Printing Details

22
Digital StoreFront Training Manual
The Print Shop | Algonquin College
1 Select your Print Options.
2 Select your Additional Services if required.
3 Add Special Pages to your print job if required.
4 Indicate any Special Instructions and click “Next” to continue.
5 Review & Preview your print job. Check “I Approve” then Click “Add to Cart”.
6 Click the Calendar Icon to select your desired ship date and time. Click “Save”.
7 Select a delivery method from the drop down list and Click “Checkout”.
8 Enter your budget code in this format: “44002 00 XXXX”. Click “Next”.
9 Review your order and click “Place My Order” to finalize and submit the order.
10 The Order Confirmation page appears. Take note of the Order Number, in the event you need to contact the Print Shop regarding your order.
11 To check the status of your order click “Order Status” from the main navigation.
Printing DetailsOverview of instructions for PC and Mac users
Detailed instructions are provided on the following pages.!

23
Digital StoreFront Training Manual
The Print Shop | Algonquin College
Printing DetailsDetailed instructions for PC and Mac users
1 Select your print options. The ticket template (which is the same as a paper print requisition you may be familiar with) is where you choose your print options such as the type of paper, single or double sided printing, and orientation.
!
2 Select Additional Services if required.
3 Add Special Pages. If you have one or more pages that will be treated differently than the rest of your job, click “Special Pages”.
Double Sided Printing
The default setting for single or double sided printing is set to double sided. If you would like to print a document single sided please remember to change the settings to single.This is in place to support the Algonquin College Green Initiative. We’re doing our part.
Not enough options?
Something to remember is that each category (copies, brochures...) has its own set of available options to select from. If you don’t see the options your looking for you might have selected the wrong category. Please feel free to contact us if you suspect that something is in fact missing.
Take Note

24
Digital StoreFront Training Manual
The Print Shop | Algonquin College
3 Add Special Pages (continued)
For example, you may wish to have your entire job printed in Black and White except for page 1, which should be printed in colour.
A Select “By Page(s)”, enter the page number. B Select “Color” from the Color or B&W drop down list, click “Save”.
A
B
This will bring you back to the main print options page. You will now see the page(s) that will be printed differently from the rest of the print job. You are able to add as many special pages as you like, notice we have page 1 printed in colour and page 7 printed on Blue stock.
If you decide you want to make further changes to one of the special pages or if you decide you would like to remove a special page, click on the edit or delete buttons indicated above.
Special Pages Colour or B&W
Colour or B&W refers to the toner on your page, not the paper or stock colour. To choose a different colour of paper, select it from the Paper/Media drop down menu.
Take Note

25
Digital StoreFront Training Manual
The Print Shop | Algonquin College
4 Special Instructions. Please use this area to indicate any special instructions or requests you may have for our Print Shop staff that may not be covered in the standard Print Options area. Click “Next“.
5 Review & Preview your print job. The “Review” screen gives you a thumbnail preview of what your job will look like, with the options you’ve chosen, once it is printed. You are also given a review of all the options you have selected. If you have missed an option, or picked one in error, click the “Previous” button to go back a screen to correct it.
Pricing Summary. To view the pricing summary, click on “View Pricing Summary”. Another window pops up with the price breakdown for your job. When you are done, click the “Done” button to close the window.
Check “I Approve” then Click “Add to Cart”.

26
Digital StoreFront Training Manual
The Print Shop | Algonquin College
6 Click the Calendar Icon to select your desired ship date and time. After you have made your selection Click “Save”.
Regular turn around time is three (3) business days. You may request an earlier date, however, a rush fee may be applied. The dates highlighted in yellow indicate rush dates. Rush orders must be picked up at the Print Shop and will not be delivered by mail services.
7 Delivery methods available are Customer Pick-up or Mail Services. If you choose Mail Services, please fill in the address information, especially your room number, then click “Save”.
Entering your Room Number Quickly
To avoid entering your room number every time you submit an order, update the address field in your profile. See page 4 for instructions on how to update your profile.
Take Note
Rush Orders
The ability to select a faster turnaround time (rush date) may not be available. Please contact our customer service clerk directly should you require to place a rush order.
Take Note
27
Digital StoreFront Training Manual
The Print Shop | Algonquin College
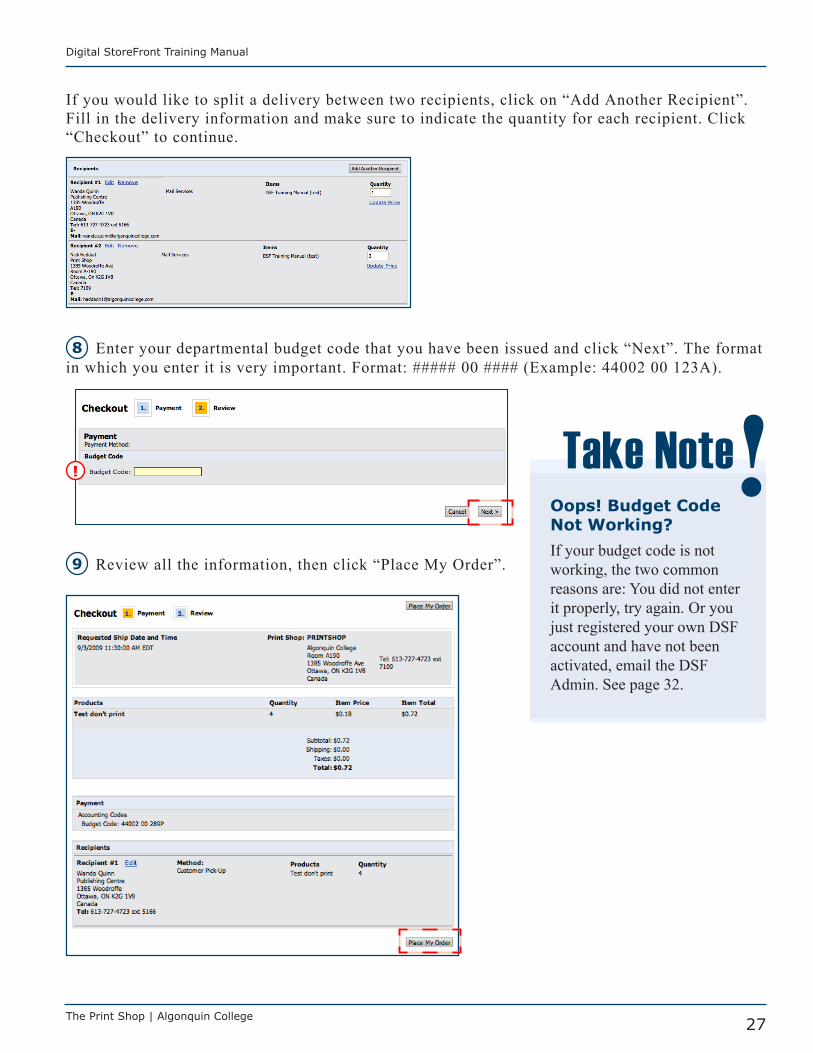
If you would like to split a delivery between two recipients, click on “Add Another Recipient”. Fill in the delivery information and make sure to indicate the quantity for each recipient. Click “Checkout” to continue.
8 Enter your departmental budget code that you have been issued and click “Next”. The format in which you enter it is very important. Format: ##### 00 #### (Example: 44002 00 123A).
!
9 Review all the information, then click “Place My Order”.
Oops! Budget Code Not Working?
If your budget code is not working, the two common reasons are: You did not enter it properly, try again. Or you just registered your own DSF account and have not been activated, email the DSF Admin. See page 32.
Take Note

28
Digital StoreFront Training Manual
The Print Shop | Algonquin College
10 Take note of your order number. You will need this number if you call the Print Shop with questions about your order.
!
11 To view the status of your order you must first be logged in to the DSF. Click on “Order Status”.
A View your entire order history. Select a filter to find a specific order. B View complete order details and PDF file.C View order confirmation and re-order option
A
B C

Submitting Off-Line Content

30
Digital StoreFront Training Manual
The Print Shop | Algonquin College
1 Log-in to the Print Shop DSF. See page 3 for login details.
2 To begin, choose a category which best represents your printing needs.
3 Fill out the Job Ticket information. See screen shot below for instructions.
A Give your job a name and indicate the quantity.
B Click on the “Offline Material” tab. Choose the type of offline material you are submitting.
C Enter a file name and number of pages in your document
D In the Delivery Instructions area, type in detailed instructions regarding how you will get your file to The Print Shop (Eg: Please see graphic design team for original file.) Click “Add”.
E Click Next to continue.
4 Please continue on page 21, “Printing Details”.
A
B
C
D
E
Submitting Offline ContentOverview of instructions for PC and Mac users

Algonquin Business Cards

32
Digital StoreFront Training Manual
The Print Shop | Algonquin College
Algonquin Business CardsHow to order your Algonquin business cards
1 Log-in to the DSF. See page 3 for login details.
2 Select the category named “Business Cards”.
3 Click “Begin” and fill out the required information.
A Give your job a name and select a quantity.
B Select your campus and complete the form.
C Click “Update Preview” near the top of the page.
4 Click “Next”. Continue on page 25 for further instructions.
Update Your Account
We make ordering business cards quick and easy. The business card form will automatically be filled out for you based on your profile. Be sure to keep your account profile up to date. See page 4 to update your DSF profile.
Take Note
A
B
C

33
Digital StoreFront Training Manual
The Print Shop | Algonquin College
Copies: Generic printing in colour or black and white. Print options include: Binding, Cutting, Drill, Fold, Shrink Wrap, Slip sheets, Orientation and Staple.
Manuals: Print options include: Binding, Covers (Front and Back), Drill, Tabs, Shrink Wrap, Call to Discuss and Request Proof.
Brochure: 3-panel brochure that prints on two sides of the paper in landscape mode and has two folds. Prints in black and white or colour. Print options include: Fold, and Call to Discuss.
Booklet: Booklets that fold in half, have two staples down the middle of the spine. With a self cover or hard cover. Black and white or colour. Hard cover print options include: Call to Discuss, Cover, Print in colour or BW, Request Proof, Saddle stitch. Soft cover print options include: Call to Discuss, Print in colour or BW, Request Proof, Saddle stitch
NCR: No Carbon Required paper. Choose between 2-part or 3-part.
Business Cards: Standard Algonquin College business cards can be ordered directly through the DSF using our new variable data form. If you require a more customized business card, please contact our customer service clerk to get started.
Most of your basic printing needs will be met with the “Copies” category. If you require more advanced options we have a variety of other categories to choose from. Please read the descriptions below when deciding which category is right for your printing requirements.
Featured CategoriesWhich category is right for me?
More products and categories are available, visit the DSF for more information.

34
Digital StoreFront Training Manual
The Print Shop | Algonquin College
FAQFrequently Asked Questions
1 What is a job ticket?
A job ticket is an electronic version of a print requisition form. It provides you with all the print options available to you based on the type of printing category you select.
2 Do I need to embed my fonts in MS Word or PowerPoint before I use the PrintMessenger driver?
When submitting Microsoft Word and PowerPoint documents via PrintMessenger, the following steps may be necessary if you are using the Monotype Corsiva font in the original document. From MS Word or PowerPoint click “File”, “Print”, Select “Options” and then click the “Save” tab. Check “Embed TrueType Fonts”. Uncheck “Do not embed common system fonts.” Click “OK”.
3 I don’t have administrator rights to install the PrintMessenger driver on my computer. Now what?
Call the ITS help desk (x.5555) to request assistance.
4 What is a press-ready PDF?
It’s a PDF created using Adobe Acrobat Pro software and enables you to choose the settings you wish to save your PDF as, such as the quality of the PDF (i.e. High quality, Standard, Press quality) and allows you to embed the fonts.
5 I don’t have Adobe Acrobat installed on my computer. Can I use the “save as PDF” command from MS Word or PowerPoint?
No. MS Word does not give the option of changing the settings (such as choosing the quality of PDF (press quality) or embedding the fonts) therefore it does not create a proper PDF. Please use the EFI PrintMessenger driver.
6 Which VPN do I use?
Use the VPN Client only. Do not use the WebVPN. For more informaiton, call the ITS help desk (x.5555) to request assistance.
7 I have registered myself to the DSF and it does not accept my budget code and I am sure I have entered it correctly. Help!
Your DSF account has not been activated. Contact the DSF Admin.

35
Digital StoreFront Training Manual
The Print Shop | Algonquin College
Contact Us
Orders & Job Status:Production Clerk613-727-4723 ext. 5419 [email protected]
Technical Support & Training:DSF Administrator613-727-4723 ext. 2573 [email protected]
The Print Shop DSF Inquiries:Paul Capuano, Manager613-727-4723 ext. 5012 [email protected]
For more help & information, please visit www.algonquincollege.com/printshop/html/DSFInfoPage.htm?

DSF User Guide V2.0 Digital StoreFront Version 4.5
The Print Shop, Algonquin College