User Guide - CompanyMileage · PDF fileUser Guide Revised June 2014 CompanyMileage.com, LLC
30
User Guide Revised June 2014 CompanyMileage.com, LLC https://login.companymileage.com
Transcript of User Guide - CompanyMileage · PDF fileUser Guide Revised June 2014 CompanyMileage.com, LLC

User
Guide
Revised June 2014
CompanyMileage.com, LLC
https://login.companymileage.com

TABLE OF CONTENTS First Time Access 3
Logging In 3
Validating Addresses 4
Changing Email and Password 5
Password Recovery 6
Control Panel 7
Personal Dashboard 7
My Profile Settings 8
Editing Profile 8
Updating Addresses 9
Approval Group Listing 10
Additional Address Book Access 10
Address Book 11
Searching and Filtering 11
Adding an Address 12
Importing Addresses 14
New Trip
New Trip Entry 16
Input Grid 19
Input Edit Grid 20
Routes 21
Expense List
Trips 22
Awaiting Approval 22
Awaiting Payment 23
Rejected 23
Reports
Mileage Reports 24
User Manual and Logging Out
User Manual 25
Logging Out 25
Mobile Application
Using SureMobile 26
Accessing SureMobile 27
Home Screen and Settings 28
Trips 29
Addresses 30

First Time AccessFirst Time AccessFirst Time Access
CompanyMileage will be providing the tools to help you manage your trips and/or expenses for reimbursement by your company. This
manual will help cover all aspects of using the system. Depending on your company’s setup and policies, certain sections or features may
not apply or be available to you. If that’s the case, feel free to ignore and skip these sections.
https://login.companymileage.com/
Some companies may have a unique domain, such as https://mycompany.companymileage.com. In these cases, simply visiting your company’s unique URL will get
you to the login page. You will be notified by your supervisors if this applies to you, otherwise use the link in the box above. You can login in to the program by en-
tering the username and password provided to you by your company and clicking Sign In.
Logging In
You can access CompanyMileage by visiting:

Validating Addresses
* This section only applies to companies using home and work addresses, and which allow their employees to change these addresses.
In many cases, your employer will have your work and home addresses imported into the system before you login. If you are allowed to
change these addresses, the system will ask you to validate their accuracy the first time you login, beginning with your Home Address. If the
address is correct and the map shows the correct location, simply click Validate then Save. If the address is incorrect, type your correct home
address in the appropriate fields and click Validate then Save. If the system cannot validate your address, you will receive the message
“Cannot determine the geographical coordinates of this address. You can pinpoint home address on the map.” You can then click on the map
marker, drag it to the approximate location of your home, and click Save. The process for validating your work address is the same as your
home address, so follow the same steps to complete the address validation process.

Changing Email and Password
* This section only applies to companies which use an email associated with users, and allow users to change their email and password.
Just as your employer will often import your work and home addresses before you login, your employer will also provide an email and setup
password which you used to initially login. Depending on your company’s settings, you may be prompted to confirm your email and set a new
password. Password reset requests are often sent to a user’s email, so confirming your email correct is important. Password must be a mini-
mum of 6 characters with at least one number or symbol . You can leave your password unchanged if the default password meets require-
ments, but this is not recommended. Once you have confirmed your email and password in the appropriate fields, click the Save & Continue
Login button. This will take you to the Personal Dashboard page, covered in the next section.

Password Recovery
If at any time you forget your password, you will need to go through the password recovery process to log back in to the system. You can ac-
cess this page by clicking on the Forgot Password link on the Login page.
This will take you to the Password Recovery page. If you have an email associated with
your username, and your company allows you to change your password, you will need
to enter your user name and click Reset Password. After doing so, you will receive an
email with a temporary password. After you login with this new password, you will be
prompted to change your password before accessing the system. Otherwise, your su-
pervisor will receive a request to reset your password after you enter your user name
and click Reset Password. Your password will not be changed until your supervisor up-
dates it in the system, so you will need to coordinate with them.

Control PanelControl PanelControl Panel
Located on the navigation bar at the top of the page, Control Panel contains your Personal Dashboard, My Profile Settings, and Address
Book, all of which are covered in this section.
Personal Dashboard
The Personal Dashboard page appears after clicking the
Control Panel button on the navigation bar. If your compa-
ny is using the system to log trips, the number of trips
awaiting approval, payment, and rejected will appear here.
Companies which also use the system to log expenses will
have the number of trips awaiting posting, approval, pay-
ment, and rejected will appear here. Clicking on the links
will take you to the appropriate Expense Items page. These
details will be covered in a later section, so ignore them for
now. The Personal Dashboard also contains a link to any
available training videos, and a suggestion box for any ideas
or concerns you’d like to share with CompanyMileage.

My Profile Settings Control Panel > My Profile Settings
Located under the Control Panel, the My Profile Settings page displays all the information associated with your user. Depending on your
company’s settings, you may not be able to update certain fields, like your name, email, password, and home/work addresses. If your
home and work addresses are in the system, this page will show your Miles to Work. Depending on how your company handles your
home commute, this number may be subtracted against your daily mileage total. Check with your supervisor to confirm. After changing
any information in your My Profile Settings page, you will need to click the Save Changes button.

My Profile Settings Control Panel > My Profile Settings
If you have permission to change your home and work address, you will need to validate any address you enter. The validation process is
similar to the first-time login address confirmation. You must first enter an address, then click Validate Home Address or Validate Work
Address, depending on which address you are updating. If the addresses is properly validated, then a green checkmark will appear below
the button. If the address cannot be validated after using Mapquest and Yahoo, then a red “X” will appear below the button, and you will
need to use the appropriate Work or Home map and marker to approximate the location of the address. After doing so, there will be a yel-
low “!” below the validate button, signifying that you have provided a manual override for the location of the address.

My Profile Settings Control Panel > My Profile Settings
If your company is using the Approval Groups hierarchy, a listing of Approval Groups to which you belong will be listed on your My Profile
Settings page. This is simply for your reference, and does not affect your use of the program. Each group is separated by a comma.
If you are allowed to manage your own Address Book access, which will be discussed in the next section, you can also add Address Books
belonging to other divisions or department in your company to your account. Select the desired Division and/or Department you want ac-
cess to from the drop-down menus, then click Assign. These addresses will now be available in the Address Book page under Company. If
you wish to remove access to the Address Book of a Division and/or Department you have selected in the past, click the Unassign button
next to the respective entry.
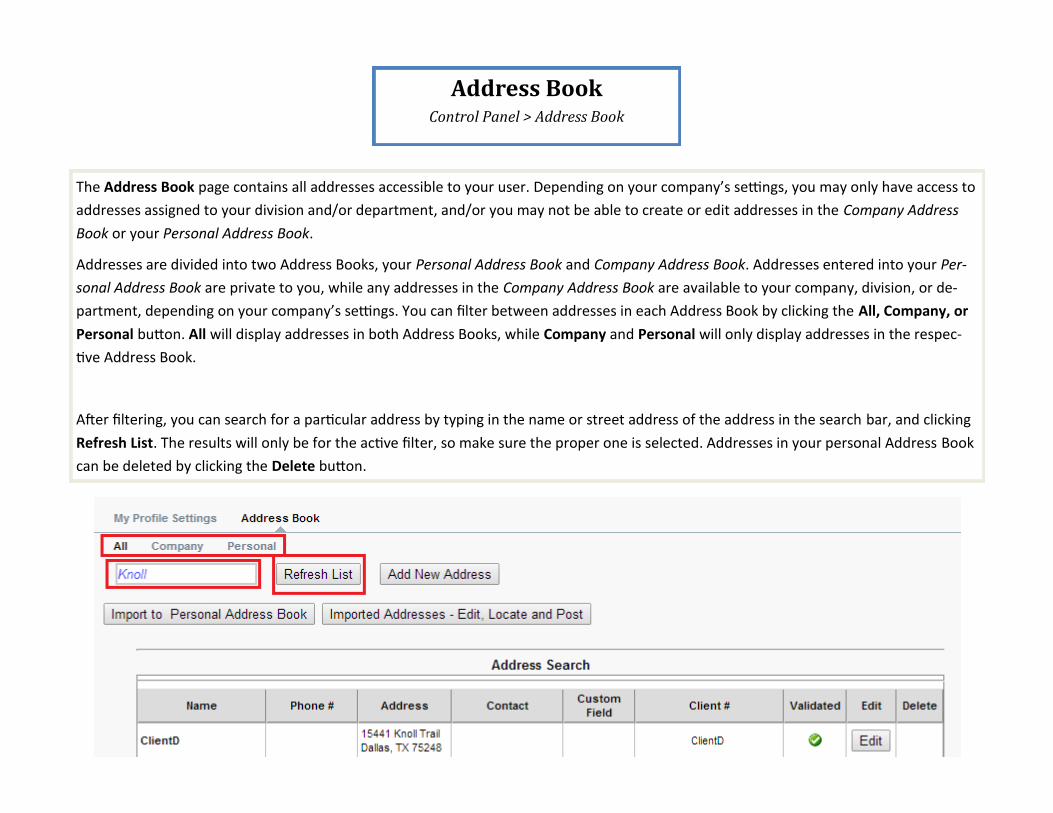
Address Book Control Panel > Address Book
The Address Book page contains all addresses accessible to your user. Depending on your company’s settings, you may only have access to
addresses assigned to your division and/or department, and/or you may not be able to create or edit addresses in the Company Address
Book or your Personal Address Book.
Addresses are divided into two Address Books, your Personal Address Book and Company Address Book. Addresses entered into your Per-
sonal Address Book are private to you, while any addresses in the Company Address Book are available to your company, division, or de-
partment, depending on your company’s settings. You can filter between addresses in each Address Book by clicking the All, Company, or
Personal button. All will display addresses in both Address Books, while Company and Personal will only display addresses in the respec-
tive Address Book.
After filtering, you can search for a particular address by typing in the name or street address of the address in the search bar, and clicking
Refresh List. The results will only be for the active filter, so make sure the proper one is selected. Addresses in your personal Address Book
can be deleted by clicking the Delete button.

Add / Edit Address Control Panel > Address Book > Add New Address / Edit
Adding and editing addresses is also done on Address Book page. Click the Add New Address button or the Edit button next to the Address
you wish to edit.. The following fields can be defined on address—
Company/Personal—Sets the address to your Company or Personal Address Book.
Company/Client Name—Name associated with address. Mandatory field.
Phone Number / Contact First, Last Name—Contact information associated with address. Non-mandatory.
Address 1 / City / State / ZIP—Physical location of address. Will be validated after entering Address 1 and ZIP. Mandatory fields.
Project Code / Reference / Job Cost Code—Drop down to select appropriate code associated with address. May or may not be mandatory.
Client # - Client number associated with address. May or may not be mandatory.
Custom Fields—Your company may use custom fields not defined in these manual. They may or may not be mandatory. Check with your supervisor regarding
questions about these fields.
After entering an address in the Address 1 and ZIP fields, you will need to click the Validate Address button.

Add / Edit Address, cont. Control Panel > Address Book > Add New Address / Edit
After clicking the Validate Address button, the system will either succeed or fail in validating the address. If the validation succeeds, the
system will locate the address on the map and display a green checkmark. If the address fails to validate through two sources, the system
will show a red “X”. If the address cannot be validated, you can drag the map marker to the approximate location of the address, and a yel-
low “!” will appear. This is a manual override, and its geo-coordinates will be used when issuing reimbursements.
When finished, click the Save button.

Importing Addresses Control Panel > Address Book > Import to Personal Address Book
* Only applies to companies which use Personal Address Books and allow user imports.
From the Address Book page, you can click on the Import to Personal Address Book button to begin the import process. Click the Choose
File button, select the appropriate data file from your computer, then click the Import button. Note that files must be in .csv format and
start on row 1. The following columns map to the following fields by default, but be sure to follow the listed order when creating your im-
port file.

Importing Addresses, cont. Control Panel > Address Book > Import to Personal Address Book
After importing, click the Imported Addresses—Edit, Locate and Post button to finish the importing process. On this page, you can filter
imports via the Status drop-down, or searching and clicking Refresh. Once you find the import batch, click the checkbox next to the batch
or the column to select it. The Import Status field will tell you if the address is ready for posting, or errors need to be corrected. To correct
errors, look at the Errors column and change the respective fields in the address after clicking the Edit button. This will take you to the Edit
Address page, and after correcting any errors you can click the Update Address button.
After correcting any errors, click the Post to Personal Address Book button to post the address to your Personal Address Book. You can
also delete the address by clicking the Delete button.

New TripNew TripNew Trip
New Trip
New Trip > New Trip
The following fields apply to a New Trip. Note that your employer may require some of these fields, or they may not be in use.
Date—select the date on which the trip took place
Start Time—select the start time for the trip.
End Time—select when the trip ended
Reference— Click the icon or type in the field to select an associated client/reference with the trip
Project Code—Click the icon or type in the field to select a project code for the trip
Job Code—Click the icon or type in the field to select a job code for the trip

New Trip
New Trip > New Trip
Starting Location —This can be completed manually, or by clicking one of the icons to the right of the Start Name field. The Home Icon, the
farthest to the left, automatically populates your home address if it’s entered into the system. The Office icon in the center automatically
populates your work address, if it is available. The last icon to the right, the Address Book icon, opens up the Address Book, allowing you to
select an address from the list.
The preferred method for selecting an address is to type part of the address name or number into the name field. This will provide a list
below the Start Name field from which you can click to select an address.
Checking the Add to Address Book box will add the address to the Address Book. Please ensure this is checked only when entering new
addresses, as it will create duplicates if checked for a previously entered address.
Entering a Destination Location follows the same steps and rules as the Starting Location.

New Trip
New Trip > New Trip
Avoid Highways—If enabled for your company, check this box if you want to calculate mileage without using highways.
Round Trip—If enabled for your company, this will create a round-trip returning to the starting address from the destination. Effective-
ly doubles the mileage amount.
Manual Mileage Override—If the amount of miles you traveled differs from the reported amount, e.g. you had to take a detour from
the correct route, then check this box. A field will appear where you can enter the amount of miles traveled. This will replace the calcu-
lated mileage amount, but will generate a flag for approvers.
Avoid Tolls—If enabled for your company, checking this box will create a route which does not include tolls.
Memo—Enter a memo regarding the trip.
Custom Fields—Your company may use custom fields. Please fill them out if applicable.
After completing the required fields, click the Get Mileage button to calculate mileage. Clicking Save will save the trip and return you to a
blank new trip page. Clicking Continue Trip will use the destination address of the current trip as the starting address of a new trip. Print
will send the page to an attached printer. Clear form clears all details from the New Trip page. Clicking the Map & Directions button will
show the map and direction used to generate the trip’s mileage.

Input Grid
New Trip > Input Grid
The Input Grid page allows you to enter a series of trips at once. The same fields apply to each trip as in the New Trip page, but there are
additional buttons on this page to allow multiple entries. After completing the necessary information for a trip on a row, click the checkbox
under the Add/remove rows column to add a trip to the grid. To remove a trip, click the red X button for the appropriate row. When fin-
ished entering trips, click the Get Mileage button to calculate. The Save & Post Later button will save the information on this page, but not
submit the trips. You can submit the trips by returning to the Input Grid page. Save & Post will post the trips for reimbursement.
If Templates are enabled for your company, you can enter a name into the Templates field and click the Save button. This will save the or-
der of the trips as template you can use at any time. You can click Load button to apply the template to the Input Grid page, or the Delete
button to delete the template.

Input Edit Grid
New Trip > Input Edit Grid
The Input Edit Grid page allows you to edit previously entered trips. First, click the Calendar icon and select the date for the trips you want
to edit. Then, click the Refresh button. You will be able to change all fields except for the Destination Name and Address. If necessary, you
can enter mileage override for these trips. Last, you can add trips by clicking the + button, remove trips by clicking the X button, or change
the order of the trips by clicking the up and down arrows. When finished editing, click the Get Mileage button, then the Save/Update
button to commit the changes to the system.

Routes
New Trip > Routes
The Routes page allows you to create a series of destinations, calculate
the mileage, and receive directions from each destination to the next. To
use the Routes page, first select the date by clicking on the ^ button.
Then, select an address from the Address Book, or manually enter an
address, then click Add to Route. You can change the order of the ad-
dresses in the route by clicking the Up and Down arrows, or remove an
address by clicking the X button.
After entering all addresses, click the Create Route button to create a
route with the shortest time between destinations, or click the Shortest
Route button to generate a route with the shortest distance. Below
these buttons are other trip-associated fields, like custom fields and
memo, so you may need to complete these as well.
After all fields have been entered, you can Print the route, or click Save
& Post to save the trips into the system for reimbursement.

Expense ListExpense ListExpense List
Trips Awaiting Approval
Expense List > Trips > Awaiting Approval
The Expense List pages allow you to access all Trips and Expenses that are Awaiting Approval, Awaiting Payment, or trips and expenses that
have been Rejected and require resubmission.
The Trips Awaiting Approval page shows all trips waiting to be approved for reimbursement. You can also View or Edit trips by clicking on
the respective button next to the desired trip. You can also delete any selected by trips by clicking the Delete Trips button, or de-select any
selected trips by clicking the Reset button.

Trips Awaiting Payment
Expense List > Trips > Trips Awaiting Payment
The Trips Awaiting Payment page shows all trips already approved and waiting for reimbursement. You can also View trips by clicking on
the View button next to the desired trip.
Rejected Trips
Expense List > Trips > Rejected
The Rejected Trips page shows any trips rejected by your supervisor. You can resubmit the trips with any necessary corrections, but you
will need to add a memo in the Response field. Trips can also be deleted from this page by clicking the Delete button. Select the trips using
the checkboxes for individual trips, or select all trips by clicking on the column’s checkbox, then click the Repost Trips button. You can de-
select any selected trips with the Reset button. Trips can also be viewed and edited from this page by clicking the View and Edit buttons.

ReportsReportsReports
The Reports section allows you to run reports against your mileage and/or expenses, depending on which modules your company is using.
Mileage Reports
Reports > Mileage
The available Mileage Reports include:
Summary Report by Date Range—This report generates a count of all trips pending, posted, approved, rejected, paid, and their totals,
for a time period. In addition, mileage, override miles, and reimbursement totals are included.
Detail Report by Date Range—Same as Summary Report, but provides additional information about the trips, including starting and
destination addresses, notes, custom fields, round trip, and manual override status.
Job Cost Detail Report by Date Range—Same as above, except trips can be filtered by status and job cost billing unit. Can add a page
separator for each unique job code.
Job Cost Detail Report by Date Range—Paid—Same as above, yet only with regards to paid trips
Project Code Detail Report by Date Range—Same as Job Cost Detail Report by Date Range, except uses Project Codes.
Route Report—After selecting a date, this report will list all trips made on that date.
Daily Mileage Totals Report– For a given date range, this report will provide the daily mileage totals for each day.
Detail Report by Date Range (Archived Years) - This provides a detail report for all trips older than two years.

User ManualUser ManualUser Manual
You can access the User Manual at any time by clicking the User Manual button on the navigation bar.
Logging OutLogging OutLogging Out
You can logout of the system by clicking the Logout button on the navigation bar.

SureMobile SureMobile SureMobile
Using SureMobile
SureMobile allows you to access your company’s SureMileage and SureExpense instance in a mobile-friendly format for iOS, Android, and
any HTML5 compatible browser.
With SureMobile, you can:
Record trips and expenses for processing and reimbursement
View, edit, submit, delete, and resubmit your trips and expenses
Create, view, edit, and delete addresses in available Address Books
Change the email and password associated with your user
Some companies have different levels of approval and review, as well as unique EHR, Accounting and Payroll system integrations. These
integrations allow for a simple, scheduled reimbursement of your expenses, paid directly to you.
Please note that some features require specific user permissions and company settings, so check with your Supervisor or Administrator in
case of any difficulty or confusion regarding a setting or feature.

Accessing SureMobile
You can download the SureMobile iOS or Android app, SureMobile is always available in your browser by visiting https://mobile.companymileage.com and logging in. iOS users who do not wish to install the app can add a shortcut Sure-Mobile on their Home screen by following these instructions.
Logging into SureMobile requires your username and password. If your compa-
ny has a unique domain, please enter this in the domain field – otherwise leave
it blank.
After logging in with your username and password, you can immediately access
Trips or Expenses by clicking on the matching button on the Home page.

Home Screen and Settings
You can navigate back to Home, Trips, Expenses, or Addresses at any time by
clicking on the matching tab in the navigation bar at the bottom of the screen
You can navigate to your Settings by tapping the Settings button.

Trips
Tapping Trips allows you to access personal records in the SureMileage system.
The fields next to the buttons indicate the number of records in the category –
tap the button to access these records.
Create new trips by tapping New Trip. Directions, map, and calculated mileage
will be available after entering a Start and Destination address. Be sure to fill out
all mandatory fields before submitting your trip!

Addresses
Addresses can be accessed through the tapping Addresses tab, and entering a
value into the search field. If your company allows access to Company and Per-
sonal Address Books, you can filter between the two.
After tapping an address record, you can tap Use Address, then From or To, to
make a new trip using the address as either the start or destination address. If
permissions are available, you can also edit an address while viewing it.


![User Guide - Virgin Mobile USA · PDF fileUser Guide [Sprint UG template version 14a] VMU_SPH-L710T_Eng_UG_NE5_TE_061714_F3](https://static.fdocuments.in/doc/165x107/5aab005a7f8b9a8d678b4b1e/user-guide-virgin-mobile-usa-guide-sprint-ug-template-version-14a-vmusph-l710tengugne5te061714f3.jpg)