User Guide - Artsyl Technologies Partner Portal · Export to Domino (Lotus) 24 1.26. Export to...
36
User Guide Administration Station. Export Connectors www.artsyltech.com docAlpha 5.0
Transcript of User Guide - Artsyl Technologies Partner Portal · Export to Domino (Lotus) 24 1.26. Export to...

User Guide
Administration Station. Export Connectors
www.artsyltech.com
docAlpha 5.0
2www.artsyltech.com
docAlpha Administration. Export Connectors
Contents1. Setting up Connections for the Export Destinations 4
1.1. File Export 5
1.2. FTP/SFTP Export 5
1.3. Database Export 6
1.4. MS SharePoint Export 8
1.5. Export to DocuWare 9
1.6. Export to Westbrook Fortis 10
1.7. Export to FileBound 11
1.8. Export to MasterControl 12
1.9. Export to Digitech 12
1.10. Laserfiche Export 12
1.11. Palette Export 13
1.12. NSi AutoStore Export 13
1.13. Export to Ademero 14
1.14. Export to SentryFile 14
1.15. Export to SysPro 15
1.16. Export to MaxxVault 16
1.17. Export to EMC AX 16
1.18. E-Mail Export 17
1.19. Export to DocStar Eclipse 18
1.20. Export to WebDocs 19
1.21. Export to QuickBooks Accounting System 21
1.22. Custom Export 23
1.23. Export to KwikTag 24
1.24. Export to Mitchel 25
1.25. Export to Domino (Lotus) 25

3 www.artsyltech.com
docAlpha Administration. Export Connectors
1.26. Export to Doc-Link (Altec) 26
1.27. EDI Exports 27
1.27.1. Export to EDI 810 (Invoices) 27
1.27.2. Export to EDI 840 (Request for Quotation) 28
1.27.3. Export to EDI 850 (Purchase Orders) 28
1.28. Export to Questis 28
1.29. Export to NetSuite 29
1.30. Export to CMIS (Alfesco) 31
1.31. Export to Acumatica 32
1.32. Export to OnBase 35

4www.artsyltech.com
docAlpha Administration. Export Connectors
1. Setting up Connections for the Export DestinationsThese are the export type connectivity options in docAlpha 5.0:
• Physical File Export Profiles:
File Folder Export
FTP/SFTP Folder Export
• Database Export Profiles:
MS Access Export
MS SQL Export
ODBC/OLE DB Export
• EDMS (Electronic Document Management Systems) Export Profiles:
Ademero
AutoStore
Docuware
File bound
Fortis
Master Control
Palette
SentryFile
SharePoint
EMC AX
SharePoint 2013
SysPro
MaxxVault
KwikTag
Doc-Link
WebDocs
DocStar Eclipse
Hyland OnBase DIP
Domino
Acumatica
Questis
NetSuit
CMIS
Digitech File
Laserfiche
Mitchell
• EDI Export Profiles
810
837 HCFA
837 UB
840
850
• E-mail Export Profiles
• Accounting Export Profiles:
QuickBooks
• Custom Export Profiles
• Printer Export Profiles
The type of parameters required on the “Connection” node of export options depends on the selected export destination. Refer to “Export Connectors Setting. Admin guide” to learn how to set different types of Export Connectors.

5 www.artsyltech.com
docAlpha Administration. Export Connectors
1.1. File Export
The File Export allows storing extracted data as data files, and one or more copy of the original document in one of the supported image formats. This option allows also creating a full-page searchable PDF copy of a document.
The connection for the file export is a network path to the location where to place the generated files. You can create multiple Export Profiles for each of the Verification Profiles and can use this ability to create copies at different destinations since each Export Profile has its own Connection settings node and other configuration settings.
The connection for file export allows setting the following parameters:
• Connection user and password (optional): if required, allow setting the proper access credentials. If the Auto-Filing option is used, which creates an automatic sub-directory structure, make sure the user has the right not only to write to the folder but also to create sub-folders. Click “Test Connection” to verify that the destination is accessible.
• Path To Folder: type in the address or browse using the button for the destination local or network
file folder where the files should be stored. If Auto-Filing option is used, this destination path becomes the root folder of the automatic sub-folder structure.
Note:
if you select File Export but do not select any file formats on the “Data Files” and “Document Files” nodes of the settings, no export will be performed. Don’t forget to go to the “Data Files” and “Document Files” nodes of the Export Profile and check any desired formats and detailed settings there.
1.2. FTP/SFTP Export
Export to FTP allows you to store processed data to a remote server over FTP or SFTP protocol. Specify the destination FTP server address, username, password and the FTP root folder to set up this type of export:
The connection for FTP/SFTP export allows setting the following parameters:
• Connection user and password: the proper access user credentials. If the Auto-Filing option is used,
which creates an automatic sub-directory structure, make sure the user has the right not only to write to the folder but also to create sub-folders. Click “Test Connection” to verify that the destination is accessible.
• FTP Address: type in the address for the destination FTP/SFTP folder where the files will be stored. If Auto-Filing option is used, this destination path becomes the root folder of the automatic sub-folder structure.
• FTP Folder: (optional) parameter that allows selecting the FTP folder to be used. If not listed, the FTP root folder is used.
Note: if you select FTP/SFTP Export but do not select any file formats on the “Data Files” and “Document Files” nodes of the settings, no export will be performed. Don’t forget to go to the “Data Files” and “Document Files” nodes of the Export Profile and check any desired formats and detailed settings there.
6www.artsyltech.com
docAlpha Administration. Export Connectors
1.3. Database Export
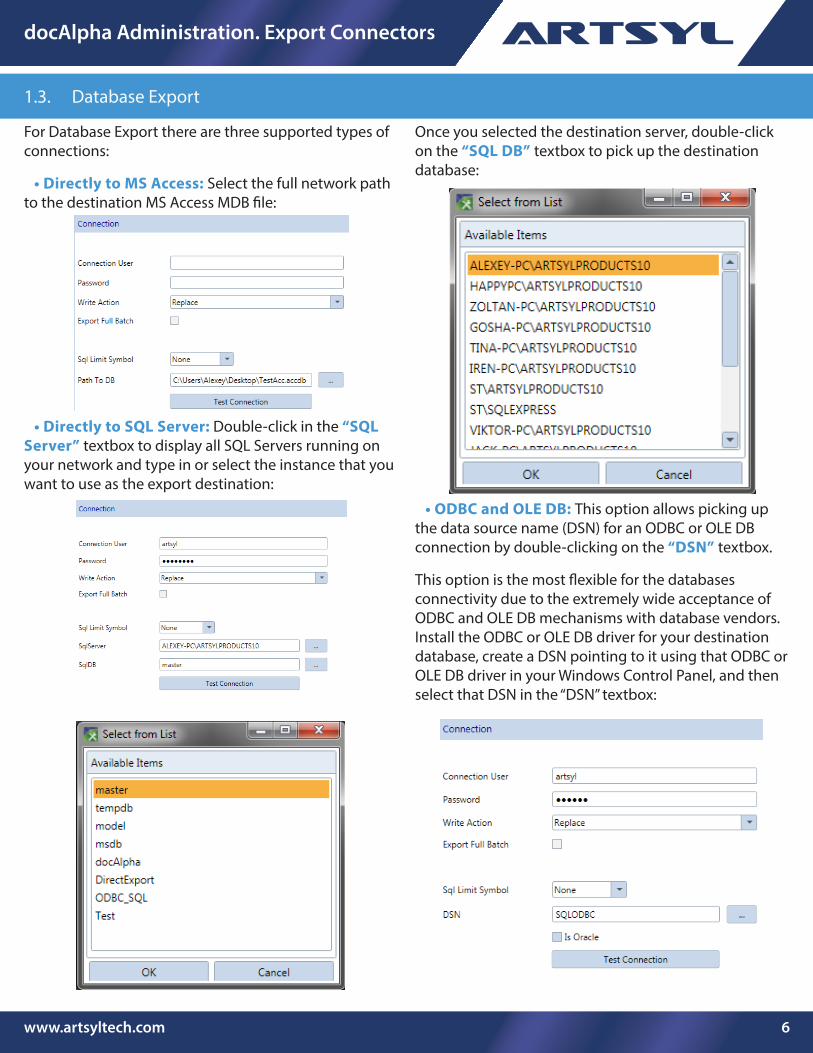
For Database Export there are three supported types of connections:
• Directly to MS Access: Select the full network path to the destination MS Access MDB file:
• Directly to SQL Server: Double-click in the “SQL Server” textbox to display all SQL Servers running on your network and type in or select the instance that you want to use as the export destination:
Once you selected the destination server, double-click on the “SQL DB” textbox to pick up the destination database:
• ODBC and OLE DB: This option allows picking up the data source name (DSN) for an ODBC or OLE DB connection by double-clicking on the “DSN” textbox.
This option is the most flexible for the databases connectivity due to the extremely wide acceptance of ODBC and OLE DB mechanisms with database vendors. Install the ODBC or OLE DB driver for your destination database, create a DSN pointing to it using that ODBC or OLE DB driver in your Windows Control Panel, and then select that DSN in the “DSN” textbox:

7 www.artsyltech.com
docAlpha Administration. Export Connectors
Note: for Oracle back-end, select “Is Oracle” checkmark so that the syntax of all export operations becomes automatically optimized for Oracle databases.
In the Authentication block, you can specify your User Name and Password to access the destination’s database. Note that export will be updating existing records, creating new records, and even creating tables. Because of that, your user account here needs to have the rights to:
• Select records
• Update records
• Insert records
• Create tables
in the destination database that you are using for the export.
In case table or column names in the database use a space character, or non-Latin characters, then select the appropriate SQL Query Enclosure Character in the drop-down list provided for that purpose.
Click “Test Connection” to make sure you selected the right parameters and spelled your user name and password correctly. You should see the confirmation if they are correct:
Note: The “Test Connection” does a check that the user has rights, to select records from that database. However it doesn’t verify the ability to update records, insert records, and create tables. You need to make sure that the account used here has those rights listed above.
During the database export the data will be stored to the tables allocated at the document class level.
At the time of export docAlpha will also automatically generate two or three (depending on selected settings) additional tables in the destination database. One is used for linking multiple records together (if you map different fields to different tables in the database). The second is used to store audit trail meta-data about your processed documents.
The table with audit trail meta-data is created under the name “DocumentInfo”. It contains the following columns of meta-data about processed documents:
• FileName – original name of the file being exported.
• FileLength – length of the file.
• FileDateTime – creation date of the file.
• PagesCount – number of pages in the file.
• ProfileName – the name of the verification profile used to process the document.
• Machine – the name of the computer on which the document was verified, if any.
• UserName – the name of the operator who verified or changed the document, if any.
• DocID – unique ID (primary key) for processed document in the DB. Allows linking together the records stored from the same source document to multiple destination tables.
8www.artsyltech.com
docAlpha Administration. Export Connectors
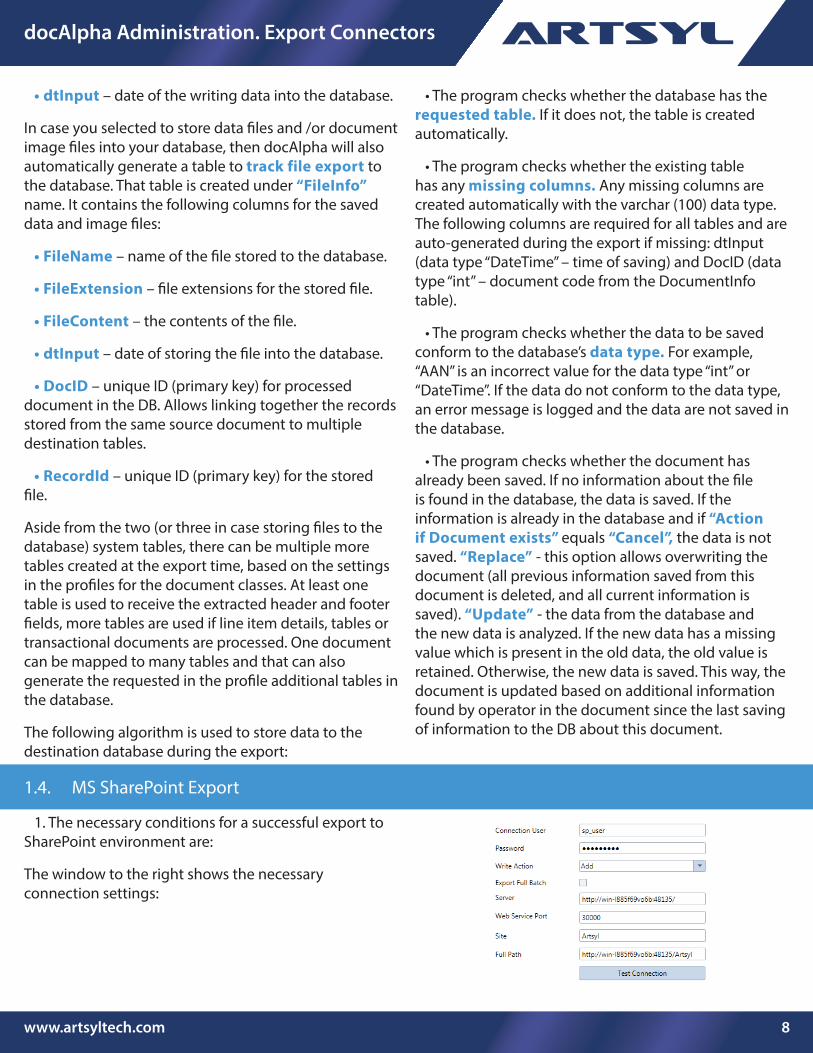
• dtInput – date of the writing data into the database.
In case you selected to store data files and /or document image files into your database, then docAlpha will also automatically generate a table to track file export to the database. That table is created under “FileInfo” name. It contains the following columns for the saved data and image files:
• FileName – name of the file stored to the database.
• FileExtension – file extensions for the stored file.
• FileContent – the contents of the file.
• dtInput – date of storing the file into the database.
• DocID – unique ID (primary key) for processed document in the DB. Allows linking together the records stored from the same source document to multiple destination tables.
• RecordId – unique ID (primary key) for the stored file.
Aside from the two (or three in case storing files to the database) system tables, there can be multiple more tables created at the export time, based on the settings in the profiles for the document classes. At least one table is used to receive the extracted header and footer fields, more tables are used if line item details, tables or transactional documents are processed. One document can be mapped to many tables and that can also generate the requested in the profile additional tables in the database.
The following algorithm is used to store data to the destination database during the export:
• The program checks whether the database has the requested table. If it does not, the table is created automatically.
• The program checks whether the existing table has any missing columns. Any missing columns are created automatically with the varchar (100) data type. The following columns are required for all tables and are auto-generated during the export if missing: dtInput (data type “DateTime” – time of saving) and DocID (data type “int” – document code from the DocumentInfo table).
• The program checks whether the data to be saved conform to the database’s data type. For example, “AAN” is an incorrect value for the data type “int” or “DateTime”. If the data do not conform to the data type, an error message is logged and the data are not saved in the database.
• The program checks whether the document has already been saved. If no information about the file is found in the database, the data is saved. If the information is already in the database and if “Action if Document exists” equals “Cancel”, the data is not saved. “Replace” - this option allows overwriting the document (all previous information saved from this document is deleted, and all current information is saved). “Update” - the data from the database and the new data is analyzed. If the new data has a missing value which is present in the old data, the old value is retained. Otherwise, the new data is saved. This way, the document is updated based on additional information found by operator in the document since the last saving of information to the DB about this document.
1.4. MS SharePoint Export
1. The necessary conditions for a successful export to SharePoint environment are:
The window to the right shows the necessary connection settings:

9 www.artsyltech.com
docAlpha Administration. Export Connectors
You should provide the link to your SharePoint server, your user name and password, the port number on which you deployed the web services on your SharePoint Server machine, and then you can key in the name of the site.
Server – link to your SharePoint server;
Port – the port number on which you deployed the web services of SharePoint;
Site – value of this field can be empty, or must be name of site;
Full Path – this field shows the full path.
After all the fields are filled, click the “Test Connection” button. And if the “Connection test is Successful”, you need to specify a library name on the Document Level Naming node of the Export Profile properties. Inside that node, select the name of the Verification Profile for which you want to select the destination SharePoint library first:
And then in the Document Level Parameters window below click on the “Connect to Server” button to retrieve the list of SharePoint libraries available on the destination site of the selected SharePoint Server. Select from the list the library that needs to be the export destination for documents processed under that Verification Profile.
Alternatively, you can also key in the name of the library. This method allows you also to auto-generate a SharePoint library based on the docAlpha Export Profile settings during the first batch exporting.
To appoint the SharePoint library as the destination for this Verification Profile, click the “Apply” button. To unselect the destination library, click the “Clear” button.
2. Choose any formats for “Data Files”, and/or “Document Files” nodes.
3. After all settings have been selected publish the Workflow using “Publish Workflow/Version” button.
4. The export result example to SharePoint could be seen below:
If E-Profile has a table, in SharePoint it will look like a field with reference to the XML file.
Connection Type SharePoint13 is used for SharePoint 2010/2013.
1.5. Export to DocuWare
Export to DocuWare option allows you to store processed data to a DocuWare document management system. To setup this type of export, you must specify Server name, port, Organization, login and password to
a DocuWare system. To test a connection, press Get File Cabinet List. Test is passed, if File Cabinet List is formed without error messages.

10www.artsyltech.com
docAlpha Administration. Export Connectors
1. The necessary conditions for a successful export to DocuWare environment are:
The following connection settings for Export profile should be provided:
Export to DocuWare option allows you to store processed data to a DocuWare document management system. To setup this type of export, you must specify Server name, DWPort, Organization, login and password to a DocuWare system.
After all the fields are filled, click the “Test Connection” button. And then in the Document Level Parameters window below click on the “Connect to Server” button. After “Connect to Server” button was used it is possible to select the existing file cabinet, from the drop-down list of “Docuware Cabinet” setting string or to select the Basket if necessary.
To appoint DocuWare as the destination for this Export Profile, click the “Apply” button. To unselect the destination cabinet, click the “Clear” button.
Note: If you have DocuWare version 6.6 or higher select checkbox “API 6.6 And Above”
2. Choose any formats for “Data Files”, and/or “Document Files” nodes.
3. After all settings have been selected publish the Workflow using “Publish Workflow/Version” button.
4. An export example to DocuWare can be seen below:
Note:
- The field names in Export profile should be the same as in DocuWare.
1.6. Export to Westbrook Fortis
Export to Fortis option allows you to store processed data to the Westbrook Fortis document management system. Specify the user name, password, write action, server name, port and the database name to be used in the Connection configuration parameters:
Note:
That the Connection Name is a required parameter to be able to use this connection. Make sure you save the changes by clicking on the “Save” button on the top toolbar of Export window prior to publishing the workflow version.

11 www.artsyltech.com
docAlpha Administration. Export Connectors
1.7. Export to FileBound
FileBound Export Connector allows storing data, meta-data, original and processed images to the FileBound document management system:
The connectivity can be established using a Web Connection, SQL Server connection or Data Archive connection.
To setup this type of export, select a connection type. Then, depending on the connection type selected, choose a node, database connect or data archive, and enter a login name and password.
For FileBound Web Export choose server directory:
- http://demo.filebounddm.com/v5 (for v5)
- https://demo6.filebound.com (for version 6)
- https://demo7.filebound.com (for version 7)
You can also test the connection by clicking the “Test Connection” button.
After that, you should set connection for “Document Level Naming”:
In “Document Level Parameters” window click the “Connect to server” button, after that you will be able to choose the name of the project where you want to make an export (“Project Name” field)
Note:
- This export type may require additional profile-level export settings.
- The field names in Export profile should be the same as in FileBound project.

12www.artsyltech.com
docAlpha Administration. Export Connectors
1.8. Export to MasterControl
Export to MasterControl option allows you to store processed data to the MasterControl document management system. Provide the user name and password, server name and path to MyFiles to connect to the MasterControl back-end:
1.9. Export to Digitech
Digitech Export Connector allows storing data, meta-data, original and processed images to Digitech document management systems, including both Digitech PaperVision Server and Digitech ImageSilo. To setup this type of export, specify an export folder for generated data files and processed documents (which can be multi-page). This can be a local or network folder or a remote (such as FTP) folder. For a local or network folder, select a path to the folder. For a remote folder, specify a web address, subfolder (required), login name and password.
Note: this export type may require additional profile-level export settings.
1.10. Laserfiche Export
1. The necessary conditions for a successful export to Laserfiche environment are:
The connection settings for Export profile need to be provided:
You must provide the server name, your user name and password, repository, Patch To Folder, Template, Laserfiche Path, Volume.
Server Name – the server name or IP address of the server you wish to connect to;
Repository – the name of the repository you wish to send the files to;
Path To Folder – the Laserfiche client repository folder where the documents will export;
Template – this template of Laserfiche, the Laserfiche template consists of a collection of fields;
Laserfiche Path – Folder path in Laserfiche;

13 www.artsyltech.com
docAlpha Administration. Export Connectors
Volume – this seeting allows to set the Volume existing in Laserfiche. Volume is the internal option which is used to define the proper path for incomming files.
After all the fields are filled in, click the “Test Connection” button. Click to verify that the information entered in this tab is correct and the server accepts it.
2. Choose one image file in “Document Files” nodes.
3. After all settings have been selected publish the Workflow using “Publish Workflow/Version” button.
4. The export example to Laserfiche can be seen below:Note: - The field names in Export profile should be the same as in Laserfiche.
1.11. Palette Export
The Palette Export option allows storing images, data and meta-data to the Palette document management system.
This export option creates the special-format XML files with all extracted data and meta-data, and supplements it with image documents for the Palette Document Importer to be able to automatically pick up the documents, extracted data and meta-data. Select the destination path to folder where those XML files will be stored for the Palette Document Importer: After this, workflow could be published.
1.12. NSi AutoStore Export
The NSi AutoStore Export option allows using the Device License of AutoStore to perform unlimited export to many dozen back-end systems supported by AutoStore. This covers popular destinations such as Documentum, FileNet, and dozens more.
1. The necessary conditions for success export to AutoStore environment are:
1) Next connection settings for Export profile should be provided:

14www.artsyltech.com
docAlpha Administration. Export Connectors
Select the destination path to folder where those XML files with embedded images will be stored for the AutoStore Knowledge Package auto-importer.
The NSi AutoStore Export option allows using the Device License of AutoStore to perform unlimited export to many dozen back-end systems supported by AutoStore. That covers such popular destinations as Documentum, FileNet, and dozens more.
This export option creates the special-format XML files with all data, meta-data and image documents
embedded in the XML for the AutoStore Knowledge Package to be able to automatically pick up the documents, extracted data and meta-data and store to the destination back-end system.
2. The image file(s) that you can setup on the “Document Formats” tab will be embedded into the XML file and provided to the AutoStore to be released into the destination back-end system.
3. After the all settings have been selected publish Workflow using “Publish Workflow/Version” button.
1.13. Export to Ademero
1. The necessary conditions for a successful export to Ademero environment are:
The connection settings for Export profile should be provided:
This export option creates the special-format XML files with all data that can be then auto-imported by Ademero DMS back-end. Select the destination path to folder where those XML files will be stored for the Ademero auto-importer
You also need to specify am Ademero Catalog and Ademero Document Type on the Document Level
To appoint the Ademero Catalog and Document Type as the destination for this Export Profile, click the “Apply” button. To disconnect them, click the “Clear” button.
2. Don’t choose any formats for “Data Files”, and/or “Document Files” nodes, export in Ademero auto generate XML and TIFF.
3. After all settings have been selected publish the Workflow using “Publish Workflow/Version” button.
1.14. Export to SentryFile
1. The necessary conditions for a successful export to SentryFile environment are:
The connection settings for Export profile should be provided:

15 www.artsyltech.com
docAlpha Administration. Export Connectors
This export prepares special-format text files for each exported document that the SentryFile back-end DMS can auto-import along with the processed document images. Select the destination path to folder where those files will be stored for the SentryFile auto-importer
You also need to specify a SentryFile Title on the Document Level
To appoint the Ademero Catalog and Document Type as the destination for this Export Profile, click the “Apply” button. To disconnect them, click the “Clear” button.
2. Choose TIFF format in the “Document Files” node.
3. After all settings have been selected publish the Workflow using “Publish Workflow/Version” button.
1.15. Export to SysPro
The option to export to SysPro allows you to store processed data to the SysPro 6.0. document management system.
This export pushes info directly to a specified database of SysPro from each separate document from a batch. To set up the export enter connection info and authentication credentials to required blocks (see image):
Connection user and Password are required to give docAlpha access to SysPro. Important: the selected user must have access privileges to the database selected at Company Name and Server.
Path to Folder specifies an address on a local workstation or within local network where log files will be stored.

16www.artsyltech.com
docAlpha Administration. Export Connectors
1.16. Export to MaxxVault
Export to MaxxVault option allows you to store processed data to the MaxxVault document management system.
This export pushes info directly to a specified database of MaxxVault from each separate document from a batch. MaxxVault must be installed on the same workstation as docApha. After connection is tested and confirmed, select MaxxVault Workflow from a dropdown list. Then specify Path To Folder where MaxxVault would record export files.
Export file type must be .xml and .pdf.
After the export is completed data is stored in MaxxVault please refresh the database.
Click WorkTemp Refresh
1.17. Export to EMC AX
Export to EMC AX option allows you to store processed data to ApplicationXtender Desktop 6.5 document management system.
This export pushes info directly to a specified database of ApplicationXtender Desktop 6.5 from each separate document from a batch. ApplicationXtender Desktop 6.5 must be installed on the same workstation as docApha.
Connection user and Password are required to give docAlpha access to EMC AX. Important: selected user must have access privileges to the database selected at Data Base Source and Application Name in the AX.
Export into AX Application and Create Index File give you the option to export directly to AX or to a file. By default the system exports a .txt file and an original image. These parameters are adjustable at File Options Data Files and File Options Document Files.

17 www.artsyltech.com
docAlpha Administration. Export Connectors
1.18. E-Mail Export
E-Mail Export uses the SMTP protocol to send the processed image documents and extracted indexes information via E-Mail. To use it you need to specify the required parameters – user name, password, SMTP server, port and the “Send To” e-mail address:
Connection User: e-mail address of sender, will show up at the receivers mailbox;
Password: password of the sender e-mail box;
Server: they differ for different e-mail services;
Port: the default port for SMTP export is 25;
Message To: e-mail address of the receiver;
The “Use SSL” option allows using the SSL encryption.
“Use non-default subject and body” this option allows to set default text value for email`s Subject and email`s body.
The value provided to “Subject” string would be displayed as the subject of the e-mail at receivers mailbox.
The value provided for “The Message Body” string will be stored to the exported email`s body.
Also it is possible to set custom expression for the body text including exported fields data and columns data using specific order and accompanying text.
Here are some tips and examples how it could be done:
1) To include any field value as the usual block use next format: @BlockName@.
2) To include line items use following expression: @@%PrintTable(@%InvoiceDetails%@ This Item# @%[Itemid]%@ is @%[Name]%@)%@@
Where PrintTable is an internal command to display the line items in message body.
InvoiceDetails - line items name.
This Item# - regular text or description. No need to use any specific characters to define.
Itemid, Name - columns names.
Note! As it could be seen from the example the table should be declared with @@% at the beginning and at the end to close the expression. The expression after PrintTable command should be concluded into brackets. The columns should be declared using next format: @%[Itemid]%@
Here is the example of export results according to the settings provided at the example above:
1) At Verification Station:

18www.artsyltech.com
docAlpha Administration. Export Connectors
2) At Export Station:
Check message body: allows to check the provided expression for Body Text to avoid any format mistakes, unsupported characters etc.
To verify that the settings are valid, click on the “Test Mail” button. docAlpha will try to generate an outgoing e-mail with the provided settings, sent to the “Message To” addressee.
The header and body of the e-mail contains:
- Names of fields in V-profile;
- Content of fields;
- Table parts of documents with names of columns from the V-profile;
Body view example:
Header view example:
Finally, the e-mail will contain as attachments all file type(s) of data and document image files that you select on the “Data Files” and “Document Files” nodes of the “File Option” node
1.19. Export to DocStar Eclipse
Use the following conditions to conduct the export to Eclipse:
1. All fields names should be the same for docAlpha and Eclipse as well.
2. The following connection settings should be provided:
• Conncetion User - the user name that is used to log in to Eclipse
• Password - the password that is used to log in to Eclipse
• Server – default value used for this field
is https://corpcloud.docstar.com ;

19 www.artsyltech.com
docAlpha Administration. Export Connectors
• “Path (Optional)” – Eclipse`s folder, where the document will be placed after the export
3. Only one document or data format should be selected for the current export, if more than one format is selected, then an error will appear during the publishing.
Note!
- The Eclipse connector works with any data and document formats.
- Eclipse`s web service will automatically log out during the export session or after the use of the “test connection” button.
To view the export result, please do as described below:
- log in into DocStar`s Eclipse web service
- open the folder that was set on “Path (Optional)” setting block:
- Choose the desired document from the appeared list:
- Double click on the document to get access to the fields information:
1.20. Export to WebDocs
1. The necessary conditions for a successful export to WebDocs environment are:
1) The names of docAlpha`s fields and fields created in WebDocs should be identical.

20www.artsyltech.com
docAlpha Administration. Export Connectors
2) At least 1 format should be selected for Export Profile`s Document type (export also works with all available document types).
3) The field type selected for docAlpha`s V-profile is not important because the field in the WebDocs environment always has the “text” type.
4) The following settings for the connection node should be provided:
Connection User – user name that is used to enter to WebDocs
Password – password that is used to get access to WebDocs
Write action - this setting defines the policy what happens if the file with the exactly same name at exactly the same location already exists.
Service address – IP address of the machine, where is the server machine for WebDocs is placed at.
4.1) after the first 4 fields have been filed in with data. Click on the “Test Connection” button to connect to WebDocs database. If connection settings were provided correctly, the drop down lists for “FolderKey” and “DocType” become available:
FolderKey – path to the necessary folder, which was created in WebDocs;
DocType – analogue of docAlpha`s verification profile created with WebDocs, consist in information about fields names and their types (names of DocType`s fields and names of docAlpha`s V-profile`s caption fields should be identical).
2. An example of the export result to the WebDocs environment:
- Accordingly to example above it could be seen that every next string complies to different exported format selected for Data/Document Files Export settings (txt, pdf, jpg, excel etc.)
- The columns Key 1, Key 2, Key 3 etc. matches the exported data from docAlpha fields. At the example above, we are exporting only three fields, so we have three columns (Key 1, Key 2, Key 3) as the result in Eclipse EDMS.
- Date Added, Title, Actions are the internal service columns of WebDocs.

21 www.artsyltech.com
docAlpha Administration. Export Connectors
1.21. Export to QuickBooks Accounting System
Export to QuickBooks allows you to store processed data to the QuickBooks Accounting system using the QuickBooks API. This export requires a careful configuration since QuickBooks data fields and parameters may dictate strict data type, size, and other limitations. Many parameters in QuickBooks allow only a selected list of possible values and so have to be configured in docAlpha to allow only a selection from drop-down lists. Other parameters in QuickBooks can never be blank so they require setting up the correct default values on docAlpha’s side.
1. The necessary conditions for a successful export to a QuickBooks environment are:
The following connection settings for Export profile should be provided: When setting up the export profile for QuickBooks export, you can use the Company File parameter or you can skip it, for example “C:\Users\Public\Documents\Intuit\QuickBooks\Sample Company Files\QuickBooks 2013\sample_company_file.qbw” in the sample screenshot below:
If the company file name is not specified, the company currently opened in QuickBooks will be used for the export.
2. Don’t choose any formats for “Data Files” and/or “Document Files” nodes, export in QuickBooks auto generate XML and TIF.
3. After all settings have been selected publish the Workflow using “Publish Workflow/Version” button.
On top of those limitations, QuickBooks limits the type of connectivity (the type of user) that can connect and insert records into QuickBooks. It requires that the account used is a fully authenticated user. Therefore, the QuickBooks export connector is working in docAlpha totally different from all other connectors – instead of being executed on the Export Station, it is being
executed on the Verification Station, at the moment when the batch is being sent back to docAlpha Server.
This enforces a limitation, that the verification station that is used to verify the accounting documents is run on the same machine where QuickBooks is installed and running. QuickBooks needs to be launched and running when the Verification Station operator clicks on “Send Batch” button after finishing processing a batch in Verification Station.
docAlpha export to QuickBooks supports four types of documents:
• Invoice (in QuickBooks, this document is called “Bill”). The invoices can be exported both with line item details and without them.
• Check (in QuickBooks, this document is called “Payments”).
• Purchase Order (in QuickBooks, this document is called “Sales Order”).
• Deposit (General Ledger entry, called “Deposit” in QuickBooks as well).
Make sure the QuickBooks application is launched before clicking on the “Send” button on the Verification Station. If the QuickBooks application is not launched, the export will not be performed and the following message will be displayed to the operator, regardless of whether the Company File was specified or not in the Export Profile settings:

22www.artsyltech.com
docAlpha Administration. Export Connectors
Specifics of QuickBooks Export Fields:
QuickBooks maintains two separate lists, “Customers” and “Vendors”. Even if the same company is a customer and a vendor for you in different situations, that company will have two different IDs as a customer and as a vendor. But QuickBooks requires a unique list of names, so the same name cannot be used in both lists. For setting up the invoices, the “Vendors” list is used.
The “Vendor Name” field is required to be able to store records to QuickBooks. If the “Vendor Name” field is blank, the following error message will be shown to the operator:
For the documents “Check” and “Purchase Order”, the “Customers” list is used. In the Verification Profile for the Check, the field is called “Check Issuer” with its correspondent “Check Issuer ID”.
During Rules Validation stage, a special custom rule connects to QuickBooks to validate if the Customer or Vendor (depending on the document type) exists in QuickBooks. If the Customer (or Vendor, for Invoices) exists, then the Customer ID field (or Vendor ID field, for Invoices) is automatically filled in based on that Customer (Vendor) name:
If the Customer (Vendor) is not found in QuickBooks, then upon pressing on the “Info” (“…”) button, the message displays that offers adding such a Vendor (Customer) to the appropriate QuickBooks list:
When the verification operator clicks on “Yes”, such vendor is then added to QuickBooks:
A new, unique ID is generated by QuickBooks, which then becomes available for the rule and is populated automatically in the Vendor ID field (Vendor ID field name provided only as example, it is also could be called: Customer ID, Check Issuer ID etc.)
If the vendor with such name does not exist, but there is a customer with such name, docAlpha will offer a shortcut, adding a vendor with the same name and suffix “Vendor”:

23 www.artsyltech.com
docAlpha Administration. Export Connectors
And add it to the QuickBooks Vendors list once the user confirms:
After that, the rule will also automatically change the Vendor Name field with the updated value:
Both Invoices and Purchase Orders can be processed with line item details. If the line item details table contains an Item or a Service that are not found in QuickBooks, docAlpha will display a prompt to an operator to add them:
And will offer to fill in their parameters – Account and Class:
After the Verification Station operator presses “Ok”, those items will be added with the selected details to the QuickBooks accounting system.
1.22. Custom Export
The Custom Export option allows 3rd party developers to create custom export connectors for docAlpha as DLL libraries. A DLL library must contain a class in which one of the custom export interfaces is implemented. The examples of custom export library projects, written in C#, are placed in the Samples subfolder of docAlpha Server Installation.
To deploy a ready-to-use custom export connector, select your .DLL library and .INI configuration file (optional) in the corresponding dialog box, and set the Write Action for duplicate file exporting (Replace, Update, Add, or Cancel the Export):
Refer to the “Artsyl docAlpha Custom Export API Guide” printable manual for the details on creating, deploying and running custom export scripts with docAlpha 5.0

24www.artsyltech.com
docAlpha Administration. Export Connectors
1.23. Export to KwikTag
1. The necessary conditions for a successful export to KwikTag environment are:
1.1. Connection settings described below for Export profile should be as follows:
1.2. IP Adress – IP address of the KwikTag`s server machine;
1.3. Path – “Hot folder” which is used by KwikTag to get the files that are formed by docAlpha as the export result;
1.4. Local Copy – copy of all files that were formed for KwikTag in folder that is set in the “Path” setting;
1.5. Empty Field – value that is set for described field will replace the content of fields that are empty (have no value);
1.6. Local Path – the path we are mentioning in “Local Copy” has the same files as in the backup files of path folder.
1.7. ApiUrl - this string allows to change the URL path to KwikTag`s API. For most of the cases the value is http://ktrsrv1 where ktrsv1 is the domain name.
2.1 After the fields above are set, “Test Connection” button will be set, use “Get Drawer” button.
Note
- Drawer is the list of all existing fields in KwikTag Environment which are used to store the data exported from docAlpha.
If all the settings were correctly provided (before the box of “Test Connection”) click on “Get Drawer” to get the drop down list located below the “Test Connection” box.
The example of all settings can be seen at the screen below:
2.2 Don’t choose any formats for the “Data files” node.
2.3 For the “Document files” node choose “Export PDF Full Text File” format.
2.4 Use “Save Fields” button to save the list of all fields provided by the chosen drawer to the *txt file (this setting eases the creation of fields for V-profile of docAlpha)
2.5 The names of fields for docAlpha V-profile should match the fields of KwikTag`s Drawer.
3. An example of the export result to KwikTag is shown below:

25 www.artsyltech.com
docAlpha Administration. Export Connectors
Note! Don’t forget to choose the exact drawer and site to view export results.
Note! It is highly recommended to send to export all fields filled with data. The reasons why it should be performed:
- all fields coming after an unfilled field will come empty to KwikTag environment
- if you have an unfilled column at verification, all columns placed to the right of it would come empty to KwikTag environment
To avoid this provide some value to the “Empty field”. In this case all unfilled fields would be automatically filled with data provided for the “Empty field” after sending to Export.
1.24. Export to Mitchel
Before the setting on the export to Mitchell make sure, that Mitchel and docAlpa`s server are placed on the same local machine.
The appointment of Mitchel export connector is next:
If the data in “Part Number” field is the same both for docAlpha and Mitchel, the date provided for “Expected By” field in Mitchel environment would be changed to docAlpha`s exported date field value.
There is no need to select any formats for “Document File” and “Data File” export settings.
Connection settings are as follows:
1.25. Export to Domino (Lotus)
1. The necessary conditions for a successful export to Lotus environment are:
1) docAlpha should be located on the same machine as the Lotus Server.
2) During the export, IBM Notes should be closed. The reason why it should be done is that Lotus and docAlpha are using the same Windows services.
3) After the export has been done, to see the export result in the IBM Notes all docAlpha services should be stopped, otherwise the IBM Notes wouldn’t run for the reason which is described in the point 2.
4) Any formats for Document and Data files could be chosen.
5) The following settings for the connection node should be provided:

26www.artsyltech.com
docAlpha Administration. Export Connectors
Connection User – is empty by default for this connector
Password – password that is used to get access to IBM Notes
Write action - this setting defines the policy for files with the exact same name at exactly the same location.
Service address – the address of the Lotus Server`s machine
Database path – the internal path of Lotus which is defined by the DB which it uses
Email Address – the recipient address.
Click on the “Test Connection” button to check if all connection options were provided correctly.
2. An example of the export result to the Domino environment:
Note! The formed e-mail letter will be replaced at “Drafts” node. You can make any changes (attach additional documents, change the recipient address, change the email`s subject etc.) to it before sending it to the recipient`s email box.
All exported data and document files will be located at the e-mails attachment.
1.26. Export to Doc-Link (Altec)
1. The necessary conditions for a successful export to Doc-Link environment are:
1) The names of docAlpha`s fields and fields created in Altec`s DocType should be identical. At least 1 format should be selected for Export Profile`s Document type (export also works with all available document types).
2) If there are spaces in the names of the fields in Altec`s DocType, for docAlpha`s E-profile they should be replaced with “_”.
3) Only one format should be selected for Document File or Data File export settings.
4) The following settings for the connection node should be provided:

27 www.artsyltech.com
docAlpha Administration. Export Connectors
Connection User – user name that is used to enter to Altec (both Smart client and Administration)
Password – password that is used to get access to Altec
Write action - this setting defines the policy for files with the exactly same name at exact the same location.
Database Name – the name of Altec`s DB (could be found in Altec`s Data Sources node)
Database Server – the name of Altec`s DB server
DocType Name – the internal type created in Doc-Link. The type consist the list of all the fields created in Doc-Link and should match the list of fields created in docAlpha Export Profile.
RemotingEndPoint – IP address of Altec`s server machine in the proper format (example can be seen from the screenshot above).
2. An example of the export result to the Doc-Link environment:
The allocated fields are the table export example. The types that were selected: Compliance Number – “group
identifier” type; test1, test2 – “member of group” type.
If you are using Doc-Link version 3.1 or higher additional settings should be provided:
1. Stop all the docAlpha services
2. On each machine with docAlpha installed, copy the following files from the Doc-Link installation into
Program Files(x86)\Artsyl Technologies\DocAlpha\DocAlphaStations\Admin
3. On each machine with docAlpha Export installed, copy the following files from the Doc-Link installation into
Program Files(x86)\Artsyl Technologies\DocAlpha\DocAlphaStations\Export
1.27. EDI Exports
1.27.1. Export to EDI 810 (Invoices)
The export generates a standard EDI-810 Invoice Transaction format file. The file can be saved in TXT or XML format. The export saves the mandatory EDI-810 fields (BIG (M)) and optional EDI-810 fields (BIG, NTE
(O), CUR(O), REF(O), N1(O), N2(O), N3(O), N4(O), PER(O), ITD(O), DTM(O), PID(O), TDS(O), TXI(O), SAC(O)) and optionally the table of line item details (ItemData)

28www.artsyltech.com
docAlpha Administration. Export Connectors
1.27.2. Export to EDI 840 (Request for Quotation)
The export generates a standard EDI-840 Request for Quotation Transaction format file. The file can be saved in TXT or XML format. The export saves the EDI-840 fields (BQT (M), CUR(O), PER(O), TAX(O), FOB(O), SAC(O), ITD(O), DTM(O), LDT(O), PKG(O), TD1(O), TD5(O), TD3(O), TD4(O),
N9(O), MSG(O)) and/or tables (RefIdentifyingInformation REF(O); NameInformation N1(O), N2(O), N3(O), N4(O) ; BaseLineItemData PO1(O); ProductDescription PID(O); Measurements MEA(O))
1.27.3. Export to EDI 850 (Purchase Orders)
The export generates a standard EDI-850 Purchase Order Transaction format file. The file can be saved in TXT or XML format. The export saves the EDI-850 fields (BEG, CSH (O), CUR(O), SAC(O), CUR(O), TXI(O), N9(O), DTM(O), MSG(O), SAC(O); CUR(O); SAC(O); CUR(O); AMT(O)) and/or tables (RefIdentifyingInformation REF(O); CommunicationsContact; ReferenceIdentification; BillTo N1(O), N2(O), N3(O), N4(O);
BillToCommunicationsContact PER(O); ShipTo N1(O), N2(O), N3(O), N4(O); ShipToCommunicationsContact PER(O); Detailinformation N1(O), N2(O), N3(O), N4(O); DetailCommunicationsContact PER(O); BaseLineItemData PO1(O); UnitPrice CUR(O); ProductDescription PID(O); AdminCommunicationsContact PER (O); RefRequisition REF(O); RefSupplier REF(O))
1.28. Export to Questis
The necessary conditions for a successful export to Questys environment are:
1) The names of docAlpha`s fields and fields created in Questys should be identical.
2) Only 1 format should be selected for Export Profile`s Document or Data type (export works with any of available formats).
3) The following settings for the connection node should be provided:
Connection User – user name that is used to enter to Questys
Password – password that is used to get access to Questys
URI - used to identify the name of the Questys resource
Repository – the Questys repository that is used for the current export (could be seen when entering the Questys web interface).
Record type – the internal Questys record types.

29 www.artsyltech.com
docAlpha Administration. Export Connectors
Note! The recommended record type is “record”, this type allow to export all fields data from docAlpha to Questys.
Record category – all internal categories of Questys. Every category has its own fields’ list that could be checked in Questys (these fields should be created for docAlpha`s V-profile and E-profile)
Parent ID – the ID of the folder where the export would be provided, its automatically set after the folder has been chosen from the Parent`s ID drop-down list:
4) The setting order is:
- Enter the Connector User, Password and URI and click on the “Refresh” button
- Select from the drop-down list the necessary Repository and Record type
- Select the Record category and the Parent ID according to the chosen Questys folder
1.29. Export to NetSuite
1. The necessary conditions for a successful export to NetSuite environment are:
1) The names of docAlpha`s fields and fields created in NetSuite should be identical.
2) There are four different set of fields (profiles) that should be provided in docAlpha according to the type of document (Check, PO, Invoice (Expenses), Invoice (Item))
3) The following settings for the connection node should be provided:
Connection User – user name that is used to enter to NetSuite
Password – password that is used to get access to NetSuite
Account ID – internal NetSuite ID which is unique for every user (to find it inside of NetSuite Environment: Go to Setup Integration Web Services Preferences)
Record type – the internal NetSuite record types.
2. The example of the export result to NetSuite environment according to the type of the documents:
2.1. Invoice (Item)
- List of fields in docAlpha`s V-Profile. The field naming for docAlpha`s Export Profile should be the same as the naming for Verification Profile:

30www.artsyltech.com
docAlpha Administration. Export Connectors
- Export example in NetSuite:
Note!
To reach this node inside of NetSuite: Transaction Payables Enter Bills List
2.2. Invoice (Expenses)
- List of fields in docAlpha`s V-Profile The field naming for docAlpha`s Export Profile should be the same as the naming for Verification Profile:
- Export example in NetSuite:
2.3. Purchase Order
- List of fields in docAlpha`s V-Profile. The field naming for docAlpha`s Export Profile should be the same as the naming for Verification Profile:
Export example in NetSuite:
Note! To get to this node in NetSuite:
Transactions Sales Enter Sales Order List

31 www.artsyltech.com
docAlpha Administration. Export Connectors
2.4. Check
- List of fields of docAlpha`s V-Profile. The field naming for docAlpha`s Export Profile should be the same as the naming for Verification Profile:
- Export example of Check form in NetSuite:
Note!
To get to Checks node in NetSuite:
Transactions Bank Write Checks List.
1.30. Export to CMIS (Alfesco)
1. The necessary conditions for a successful export to CMIS environment are:
The following settings for the connection node should be provided:
Connection User – user name that is used to enter to CMIS
Password – password that is used to get access to CMIS
Url – the protocol identifier that indicates the name of the protocol to be used to fetch the resource
Folder – allows to select the existing Folder in CMIS. This folder would be used to store the export results
2. Export results
- You can export any type of documents available for connection settings: PDF, TIFF, XML, TXT, PNG, CSV etc. both as 1 format or multi export of different formats.
- Alfesco allows only to store the document without extracted data so there are no any requirements for the export field`s names.
Example of export results in Alfesco:

32www.artsyltech.com
docAlpha Administration. Export Connectors
1.31. Export to Acumatica
1. The Export Profile`s settings depend on the document type:
1.1 Settings for Checks:
Connection User – user name that is used to enter to Acumatica
Password – password that is used to get access to Acumatica
Url – the protocol identifier that indicates the name of the protocol to be used to fetch the resource
Type – “Check” type should be selected from the drop down list
1.2. Settings for Invoices:
Connection User – user name that is used to enter to Acumatica
Password – password that is used to get access to Acumatica
Url – the protocol identifier that indicates the name of the protocol to be used to fetch the resource
Type – “Bill” type should be selected from the drop down list
1.3 Setting for Purchase Orders (PO):
Connection User – user name that is used to enter to Acumatica
Password – password that is used to get access to Acumatica
Url – the protocol identifier that indicates the name of the protocol to be used to fetch the resource
Type – “SalesOrders” type should be selected from the drop down list
Note! There is no need to select any document or data type for any of the 3 scenarios
2. Field`s list accordingly to exported document type
2.1. Check`s Fields List
№ Field Name1 OrderNumber2 IsHold3 Date

33 www.artsyltech.com
docAlpha Administration. Export Connectors
4 PostPeriod5 ExternalRef6 DescriptionSummary7 Branch8 TransactionDetails (Table)
8.1 Branch8.2 InventoryID8.3 Warehouse8.4 Location8.5 Quantity8.6 UOM8.7 UnitCost8.8 ExtCost8.9 ReasonCode8.10 Project8.11 Description
2.2. Invoice`s Fields List
№ Field Name1 Vendor2 IsHold3 Date4 PostPeriod5 VendorRef6 Location7 Currency8 Terms9 DueDate10 CashDiscountDate11 DescriptionSummary12 DocumentDetails (Table)12.1 Branch12.2 InventoryID12.3 TransactionDescription12.4 Quantity12.5 UOM12.6 UnitCost12.7 ExtCost12.8 DiscountPercent
12.9 DiscountAmount12.10 IsManualDiscount12.11 Account12.12 Description12.13 Subaccount12.14 Project12.15 IsNonBillable12.16 DeferralCode12.17 TaxCategory13 Branch14 APAccount15 APSubaccount16 ReclassificationAccount17 ReclassificationSubaccount18 IsPaySeparately19 IsApprovedForPayment20 PayDate21 PaymentLocation22 PaymentMethod23 CashAccount24 VendorTaxZone25 TaxDetails (Table)25.1 TaxId25.2 TaxRate25.3 TaxableAmount25.4 TaxAmount25.5 DeductibleTaxRate25.6 ExpenseAmount
2.3. PO`s Fields List
№ Field Name1 Customer2 Description3 Project4 RequestedOn5 Date6 Location7 Currency8 DocumentDetails (Table)

34www.artsyltech.com
docAlpha Administration. Export Connectors
8.1 Branch8.2 InventoryID8.3 IsFreeItem8.4 Warehouse8.5 LineDescription8.6 UOM8.7 Quantity8.8 DiscountPercent8.9 IsManualDiscount8.10 ExtPrice8.11 RequestedOnLine8.12 ShipOn8.13 UndershipThreshold8.14 OvershipThreshold8.15 IsCompleted8.16 IsMarkForPO8.17 POSource8.18 ReasonCode8.19 DocSalespersonID8.20 TaxCategory8.21 IsCommissionable8.22 AlternateId9 TaxDetails (Table)9.1 TaxId9.2 TaxRate9.3 TaxableAmount9.4 TaxAmount10 Comissions10.1 Comission10.2 SalespersonID11 Payments11.1 DocType11.2 ReferenceNbr11.3 AppliedToOrder11.4 TransferredToInvoice11.5 Balance11.6 PaymentStatus11.7 PaymentRef11.8 PaymentMethod
11.9 CashAccount11.10 PaymentAmount11.11 Currency12 Branch13 CustomerTaxZone14 IsBillSeparately15 Terms16 PostPeriod17 Owner18 IsBillToOverrideContact19 IsBillToOverrideAdress20 BillToAddressLine121 BillToAddressLine222 BillToCity23 BillToCountry24 BillToState25 BillToPostalCode26 PaymentMethod27 CardAccountNo28 CashAccount29 PaymentRef30 CCNumber31 ProcessingStatus32 PCResponseReason33 PreAuthNbr34 AuthExpiresOn35 PreAuthorizedAmountSettings36 PaymentsTotalSettings37 UnpaidBalanceSettings38 CaptureTranNbr39 OrigPCRefNbr40 IsNewCard41 Identifier42 ProcCenterID43 CardInfoDescription44 IsOverrideAddress45 ShipToAddressLine146 ShipToAddressLine247 ShipToCity

35 www.artsyltech.com
docAlpha Administration. Export Connectors
48 ShipToCountry49 ShipToState50 ShipToPostalCode51 IsShipToOverrideContact52 ShipToBusinessName53 ShipToAttention54 ShipToPhone155 ShipToEmail56 SchedShipment57 IsShipSeparately58 ShippingRule59 CancelBy60 PreferredWarehouseID61 ShipVia62 FOBPoint63 Priority64 ShippingTerms65 ShippingZone66 IsResidentialDelivery67 IsSaturdayDelivery
68 IsInsurance69 IsUseCustomerSAccount70 PackageWeight71 PremiumFreight72 FreightTaxCategory
3. Acumatica directories to check export results dependently of document`s type
3.1. Checks
Distribution Inventory
ENTER Receipts
3.2. PO
Distribution SalesOrders
ENTER SalesOrders
3.3. Invoices
Distribution SalesOrders
ENTER SalesOrders
1.32. Export to OnBase
1. Connection Settings
Connection User – user name (can be left empty)
Password – user`s password (can be empty)
DIP Type – could be set to Tagged DIP or to Ordered DIP using drop-down list
Document Name – accordingly to necessary document type could be set to Invoice, PO, Delivery Slip, Check using drop-down list:
Separator – allows user to select the necessary separator type for the exported field`s data in the resulting file. In case if “Custom” separator was selected, the additional field would be provided to allow the user to enter their own type of separator:
Path to Folder – endpoint directory (physical folder) where the export results would be stored.

36www.artsyltech.com
docAlpha Administration. Export Connectors
Note! There is no need to select either Data or Document types.
2. Export result formed with OnBase export connector: