User Guidance Note IN-01
25
Page 1 of 25 December 2012 User Guidance Note IN-01 Introduction: SASPAC Version 9.75 is the first version of the application to provide access to 2011 Census datasets. These datasets were released by the Office for National Statistics in December 2012 and represent the first Census tables to be made available for England & Wales. This release provides users with all the functionality to search, query and export the 2011 Key Statistics and Quick Statistics tables. SASPAC for Windows includes three important third-party software components, namely, Pebbleshore, Mapshore, GeoWise Publisher and GeoWise InstantAtlas TM for SASPAC. The developers of SASPAC have worked closely with those from Pebbleshore and GeoWise to ensure that all the software components work together seamlessly during day-to-day use. Detailed attention has also been given to making the process of getting SASPAC up and running as straightforward as possible both for standalone, networked or thin-client use. A new wizard has been coupled with a complete overhaul of the SASPAC configuration and ‘About’ information dialogs in order to provide both end users and software professionals with information and assistance in carrying out their respective jobs. Introduction: It is recommended that the software is installed on a PC with the following specification: Operating System: Windows 2000 (SP4), Windows XP, Windows Vista, Windows 7 Java Virtual Machine: 1.6 or later Memory: 256MB system memory (RAM) Hard disk space: 100MB plus data space of up to 10GB (data is provided on DVD) Processor: Pentium 3 1GHz processor or equivalent Video resolution: 1024x768 Microsoft .NET Framework: Version 1.1 or later Installation and Configuration of SASPAC Version 9.75 or later. This note covers the installation of SASPAC in various environments and its configuration, along with that of allied software (Mapshore and GeoWise Publisher/InstantAtlas TM ) to meet differing user needs. See UGN GE-04 for more information on the Web Services Wizard. Guidance on minimum PC requirements
Transcript of User Guidance Note IN-01
Page 1 of 25 December 2012
User Guidance Note IN-01
Introduction: SASPAC Version 9.75 is the first version of the application to provide access to 2011 Census datasets. These datasets were released by the Office for National Statistics in December 2012 and represent the first Census tables to be made available for England & Wales. This release provides users with all the functionality to search, query and export the 2011 Key Statistics and Quick Statistics tables. SASPAC for Windows includes three important third-party software components, namely, Pebbleshore, Mapshore, GeoWise Publisher and GeoWise InstantAtlasTM for SASPAC. The developers of SASPAC have worked closely with those from Pebbleshore and GeoWise to ensure that all the software components work together seamlessly during day-to-day use. Detailed attention has also been given to making the process of getting SASPAC up and running as straightforward as possible both for standalone, networked or thin-client use. A new wizard has been coupled with a complete overhaul of the SASPAC configuration and ‘About’ information dialogs in order to provide both end users and software professionals with information and assistance in carrying out their respective jobs.
Introduction:
It is recommended that the software is installed on a PC with the following specification: Operating System: Windows 2000 (SP4), Windows XP, Windows Vista,
Windows 7 Java Virtual Machine: 1.6 or later Memory: 256MB system memory (RAM) Hard disk space: 100MB plus data space of up to 10GB (data is provided on DVD) Processor: Pentium 3 1GHz processor or equivalent Video resolution: 1024x768 Microsoft .NET Framework: Version 1.1 or later
Installation and Configuration of SASPAC Version 9.75 or later.
This note covers the installation of SASPAC in various environments and its configuration, along with that of allied software (Mapshore and GeoWise Publisher/InstantAtlasTM) to meet differing user needs.
See UGN GE-04 for more information on the Web Services Wizard.
Guidance on minimum PC requirements
User Guidance Note IN-01 Installation and Configuration Version 9.75
December 2012 Page 2 of 25
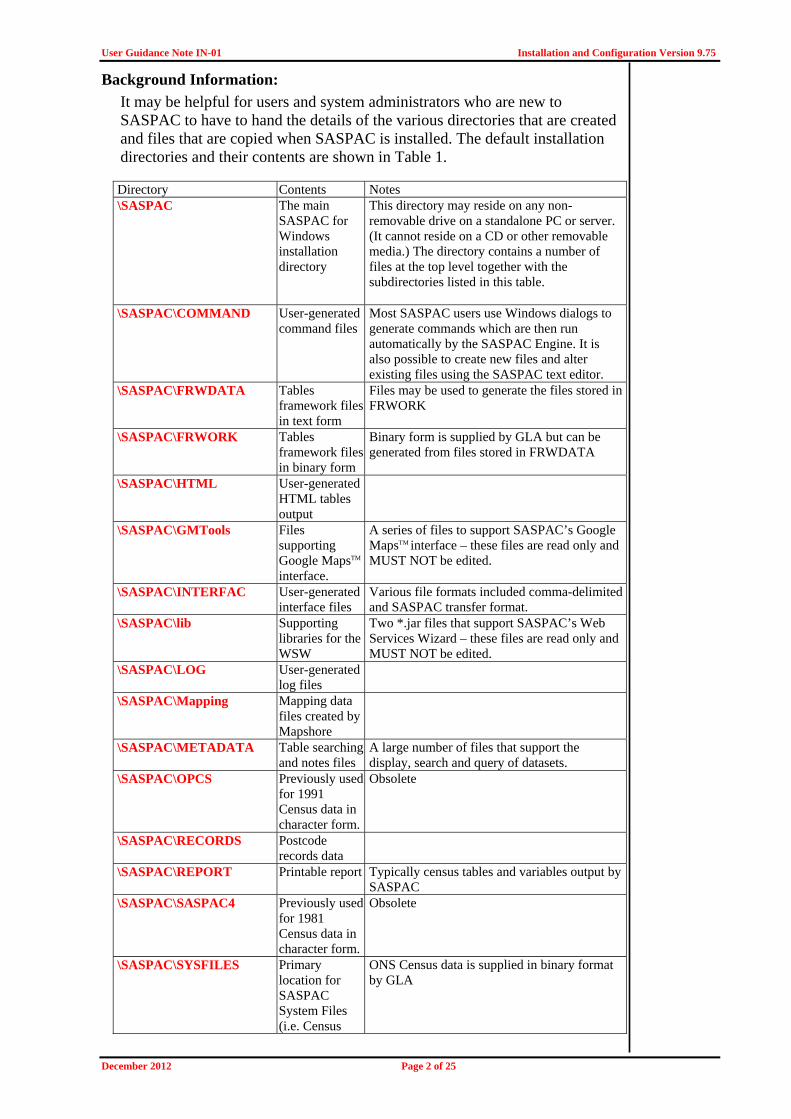
Background Information: It may be helpful for users and system administrators who are new to SASPAC to have to hand the details of the various directories that are created and files that are copied when SASPAC is installed. The default installation directories and their contents are shown in Table 1. Directory Contents Notes \SASPAC
The main SASPAC for Windows installation directory
This directory may reside on any non-removable drive on a standalone PC or server. (It cannot reside on a CD or other removable media.) The directory contains a number of files at the top level together with the subdirectories listed in this table.
\SASPAC\COMMAND User-generated command files
Most SASPAC users use Windows dialogs to generate commands which are then run automatically by the SASPAC Engine. It is also possible to create new files and alter existing files using the SASPAC text editor.
\SASPAC\FRWDATA Tables framework files in text form
Files may be used to generate the files stored in FRWORK
\SASPAC\FRWORK Tables framework files in binary form
Binary form is supplied by GLA but can be generated from files stored in FRWDATA
\SASPAC\HTML User-generated HTML tables output
\SASPAC\GMTools Files supporting Google MapsTM
interface.
A series of files to support SASPAC’s Google MapsTM interface – these files are read only and MUST NOT be edited.
\SASPAC\INTERFAC User-generated interface files
Various file formats included comma-delimited and SASPAC transfer format.
\SASPAC\lib Supporting libraries for the WSW
Two *.jar files that support SASPAC’s Web Services Wizard – these files are read only and MUST NOT be edited.
\SASPAC\LOG User-generated log files
\SASPAC\Mapping Mapping data files created by Mapshore
\SASPAC\METADATA Table searching and notes files
A large number of files that support the display, search and query of datasets.
\SASPAC\OPCS Previously used for 1991 Census data in character form.
Obsolete
\SASPAC\RECORDS Postcode records data
\SASPAC\REPORT Printable report Typically census tables and variables output by SASPAC
\SASPAC\SASPAC4 Previously used for 1981 Census data in character form.
Obsolete
\SASPAC\SYSFILES Primary location for SASPAC System Files (i.e. Census
ONS Census data is supplied in binary format by GLA

Installation and Configuration Version 9.75 User Guidance Note IN-01
Page 3 of 25 December 2012
data in binary format)
\SASPAC\SYS2 Secondary location for SASPAC System Files
\SASPAC\SYS3 Tertiary location for SASPAC System Files
\SASPAC\GeoWise The program directory for GeoWise Publisher
This directory contains the GeoWise Publisher program and the following subdirectories:
\SASPAC\GeoWise\ Templates
A series of publication templates used by the Publisher program.
\SASPAC\GeoWise\XML Read-only data used by the Publisher
\SASPAC\GeoWise\ PUBLISHED
For user-created output files
\SASPAC\GeoWise\ PUBLICATIONS
For user-created output files
C:\Program Files\GeoWise\InstantAtlas
The program directory for InstantAtlasTM for SASPAC
This directory contains the GeoWise InstantAtlasTM for SASPAC publisher program and the following subdirectories:
C:\Program Files\GeoWise\InstantAtlas\bin
Read-only data used by the Publisher
C:\Program Files\GeoWise\InstantAtlas\documentation
Various PDF documents.
Contains guidance notes on the use of InstantAtlasTM for SASPAC.
C:\Program Files\GeoWise\InstantAtlas\help
InstantAtlasTM help file 'Help.chm'
Contains the default help file for the InstantAtlasTM application. NB. Although still a very useful resource, this does not relate specifically to InstantAtlasTM for SASPAC. For further guidance on InstantAtlasTM for SASPAC see SASPAC’s own help file located in SASPAC\ directory.
C:\Program Files\GeoWise\InstantAtlas\images
Various sample data files
Contains sample mapping data files referenced in the ‘Getting Started’ PDF guide.
C:\Program Files\GeoWise\InstantAtlas\jre
Read-only files relating to InstantAtlasTM for SASPAC
C:\Program Files\GeoWise\InstantAtlas\languages
Read-only files relating to InstantAtlasTM for SASPAC
C:\Program Files\GeoWise\InstantAtlas\lib
Read-only files relating to InstantAtlasTM for SASPAC
C:\Program Various sample Contains sample mapping data files referenced

User Guidance Note IN-01 Installation and Configuration Version 9.75
December 2012 Page 4 of 25
Files\GeoWise\InstantAtlas\maps
data files in the ‘Getting Started’ PDF guide.
\Program Files\Mapshore The program directory for Mapshore
SASPAC and the ancillary programs are installed using a Windows Installer XML (WiX) installer package. As with most installation packages, the supplied defaults will be suitable for the vast majority of users of stand-alone PCs. The installation package is also suitable for network installation. SASPAC may be installed on to a server either directly or from a network workstation (see below). Any number of other networked PCs can then be initially configured using a wizard built into SASPAC itself.
Mandatory third party software components. Table 2 lists the mandatory ancillary software components that are required by SASPAC, Mapshore, GeoWise Publisher and GeoWise InstantAtlasTM for SASPAC.
Application Component Notes SASPAC salflibc.dll Supplied and installed automatically as part of the
SASPAC installation. The DLL is only ever updated if necessary when a new version of SASPAC is released.
SASPAC GIQ60.dll & GIQ60.dat
Supplied and installed automatically as part of the SASPAC installation.
SASPAC TransCoords.dll Supplied and installed automatically as part of the SASPAC installation.
Web Services Wizard
commons-io-2.0.1.jar
Supplied and installed automatically as part of the SASPAC installation.
Web Services Wizard
commons-lang-2.6.jar
Supplied and installed automatically as part of the SASPAC installation.
Web Services Wizard
Java Virtual Machine (necessary to run the Web Services Wizard)
May be downloaded from: http://www.java.com/en/download/
GeoWise Publisher
Microsoft .NET Framework Version 1.1
Supplied on the SASPAC installation CD but not installed automatically. May also be downloaded from http://www.microsoft.com/downloads/search.aspx?displaylang=en
GeoWise Publisher
Adobe SVG Viewer (necessary only to view published web pages)
May be downloaded from: http://www.adobe.com/svg/viewer/install
GeoWise InstantAtlasT
M for SASPAC
Adobe Flash Viewer (necessary only to view published web pages)
May be downloaded from: http://www.adobe.com/shockwave/download/download.cgi?P1_Prod_Version=ShockwaveFlash
Mapshore vic32.dll Supplied and installed automatically as part of the SASPAC installation. The DLL is only ever updated if necessary when a new version of Mapshore is released.
Table 2: Mandatory Software Components
Table 1: SASPAC Directories

Installation and Configuration Version 9.75 User Guidance Note IN-01
Page 5 of 25 December 2012
Of the four programs that comprise the SASPAC application, currently Mapshore, InstantAtlasTM for SASPAC and GIQ60.dll make use of the Registry. Mapshore and InstantAtlasTM create and update entries in both HKEY_LOCAL_MACHINE and HKEY_CURRENT_USER. GIQ60.dll is registered on the local PC during the installation process. SASPAC and GeoWise Publisher use settings files stored in the Applications subfolder of each user’s own Documents and Settings folder. The precise path of these settings files varies with the version of the Windows operating system that is installed and can also depend on whether Windows has been upgraded on a particular PC (say from Windows NT to Windows 2000). Please note that the location and contents of any file and the specific Registry keys used by any of the four applications are subject to change in future versions. In particular, settings files may be superseded by Registry entries in future in which case the transition will be made automatically and invisibly to the program user. Table 3 summarises the current use of Registry and settings files. Application Settings type Location SASPAC File e.g. …\Documents & Settings\
<user>\Application Data\SASPAC\ SASPAC.INI
GeoWise Publisher File e.g. …\Documents & Settings\ <user>\Application Data\SASPAC\ GeoPubSettings.xml
GeoWise InstantAtlasTM for SASPAC
Registry HKLM\Software\ HKCU\ Software\
Mapshore Registry HKLM\Software\Intervations\Mapshore HKCU\ Software\Intervations\Mapshore
Note: All program settings may be made via the SASPAC “Tools|Configuration” menu (see page 17 of this note). Making direct changes either to settings files or to Registry data is strongly discouraged as there is a risk that you will make one or more of the applications unstable or unusable.
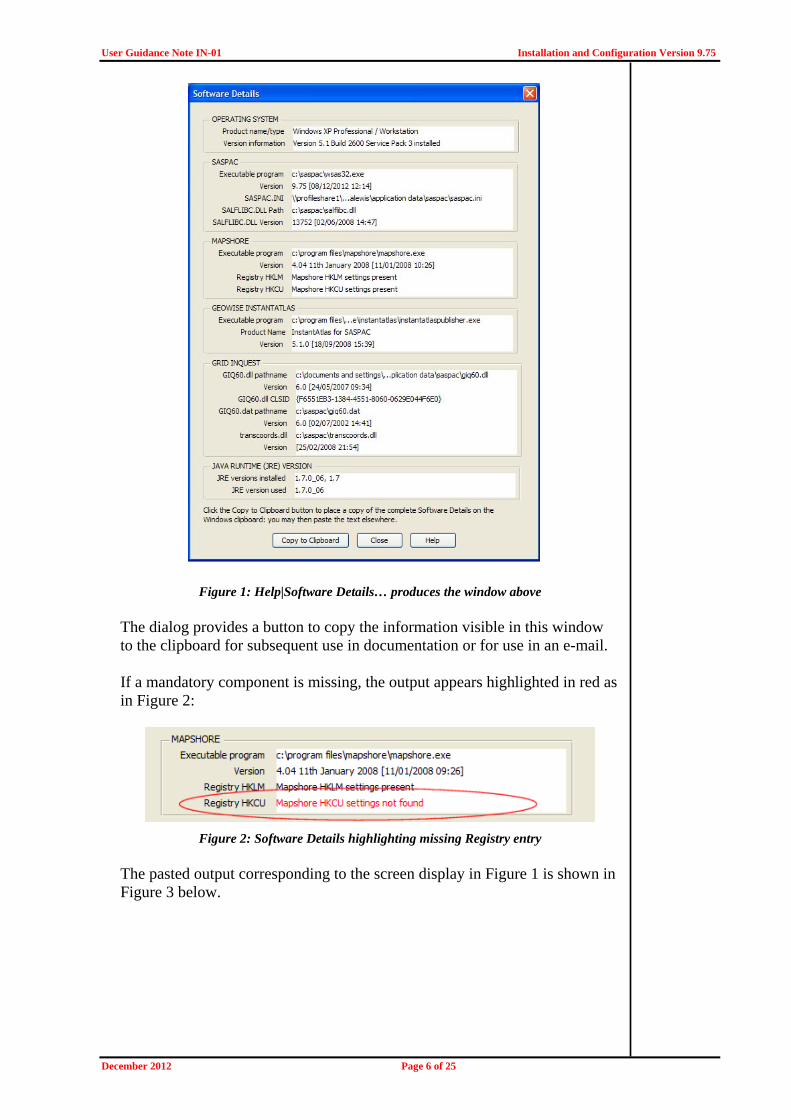
Table 3: Registry and Settings Files Summary SASPAC Version 9.75 provides a facility to ascertain which versions of SASPAC and the other software components are installed, and where they are located. Within SASPAC, the ‘Help’ menu item has a ‘Software Details’ entry. Use of this option will lead to a window as shown here in Figure 1.
User Guidance Note IN-01 Installation and Configuration Version 9.75
December 2012 Page 6 of 25
Figure 1: Help|Software Details… produces the window above The dialog provides a button to copy the information visible in this window to the clipboard for subsequent use in documentation or for use in an e-mail. If a mandatory component is missing, the output appears highlighted in red as in Figure 2:
Figure 2: Software Details highlighting missing Registry entry
The pasted output corresponding to the screen display in Figure 1 is shown in Figure 3 below.

Installation and Configuration Version 9.75 User Guidance Note IN-01
Page 7 of 25 December 2012
Installation on a standalone PC
This procedure may be used whether or not there is an earlier version of SASPAC present on the user’s system. If SASPAC Version 9.75 is being installed to upgrade a previously installed older version of SASPAC, please note that the installation process will automatically add or substitute new program files and other ‘read-only’ files to the existing system. However, users’ own data files are left untouched by the process and any existing settings (i.e. for SASPAC and Mapshore) are not affected. To start the installation, the supplied package – distributed via a CD, pen drive or the web - should be inserted into the appropriate drive or USB port, or ‘unzipped’ if downloaded from the SASPAC website. If the installation program does not now start automatically, then the Windows Start button should be pressed, after which the user should select the “Run…” option. In the dialog box that then appears, the user should type: <Drive letter designation>:\SaspacLauncher.exe
Figure 3: Software Details from Clipboard
User Guidance Note IN-01 Installation and Configuration Version 9.75
December 2012 Page 8 of 25
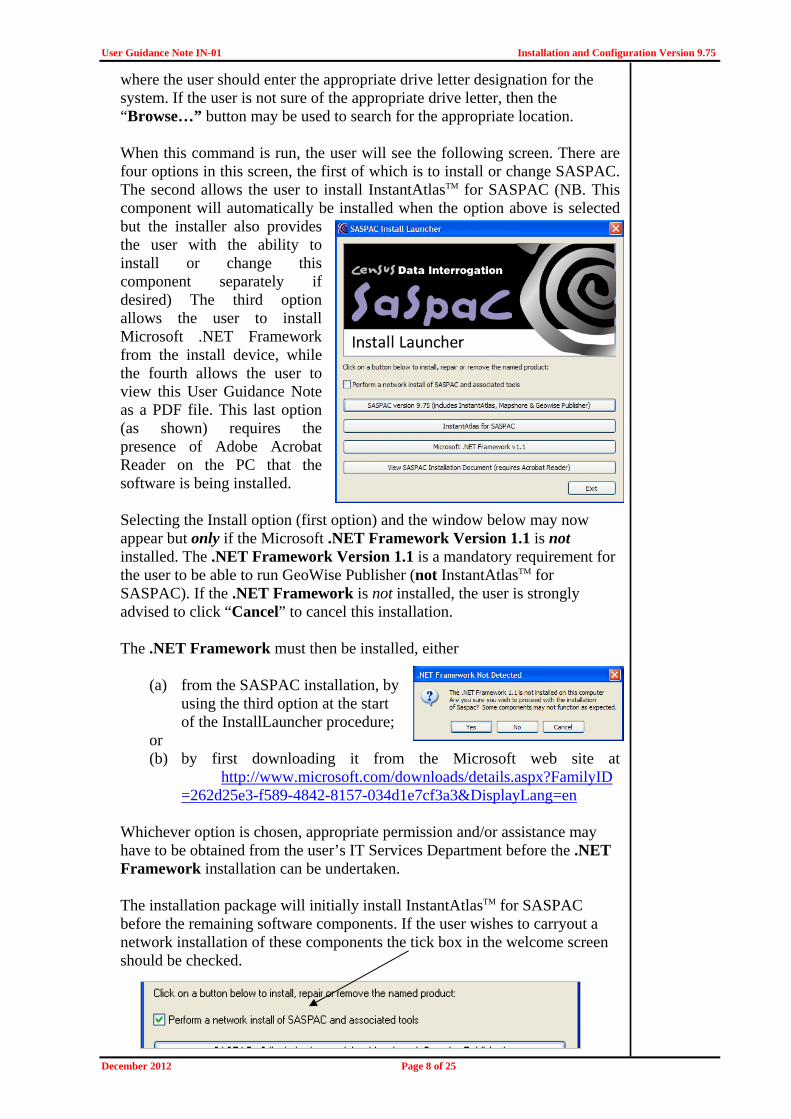
where the user should enter the appropriate drive letter designation for the system. If the user is not sure of the appropriate drive letter, then the “Browse…” button may be used to search for the appropriate location. When this command is run, the user will see the following screen. There are four options in this screen, the first of which is to install or change SASPAC. The second allows the user to install InstantAtlasTM for SASPAC (NB. This component will automatically be installed when the option above is selected but the installer also provides the user with the ability to install or change this component separately if desired) The third option allows the user to install Microsoft .NET Framework from the install device, while the fourth allows the user to view this User Guidance Note as a PDF file. This last option (as shown) requires the presence of Adobe Acrobat Reader on the PC that the software is being installed.
Selecting the Install option (first option) and the window below may now appear but only if the Microsoft .NET Framework Version 1.1 is not installed. The .NET Framework Version 1.1 is a mandatory requirement for the user to be able to run GeoWise Publisher (not InstantAtlasTM for SASPAC). If the .NET Framework is not installed, the user is strongly advised to click “Cancel” to cancel this installation. The .NET Framework must then be installed, either
(a) from the SASPAC installation, by using the third option at the start of the InstallLauncher procedure;
or (b) by first downloading it from the Microsoft web site at
http://www.microsoft.com/downloads/details.aspx?FamilyID=262d25e3-f589-4842-8157-034d1e7cf3a3&DisplayLang=en
Whichever option is chosen, appropriate permission and/or assistance may have to be obtained from the user’s IT Services Department before the .NET Framework installation can be undertaken. The installation package will initially install InstantAtlasTM for SASPAC before the remaining software components. If the user wishes to carryout a network installation of these components the tick box in the welcome screen should be checked.
Installation and Configuration Version 9.75 User Guidance Note IN-01
Page 9 of 25 December 2012
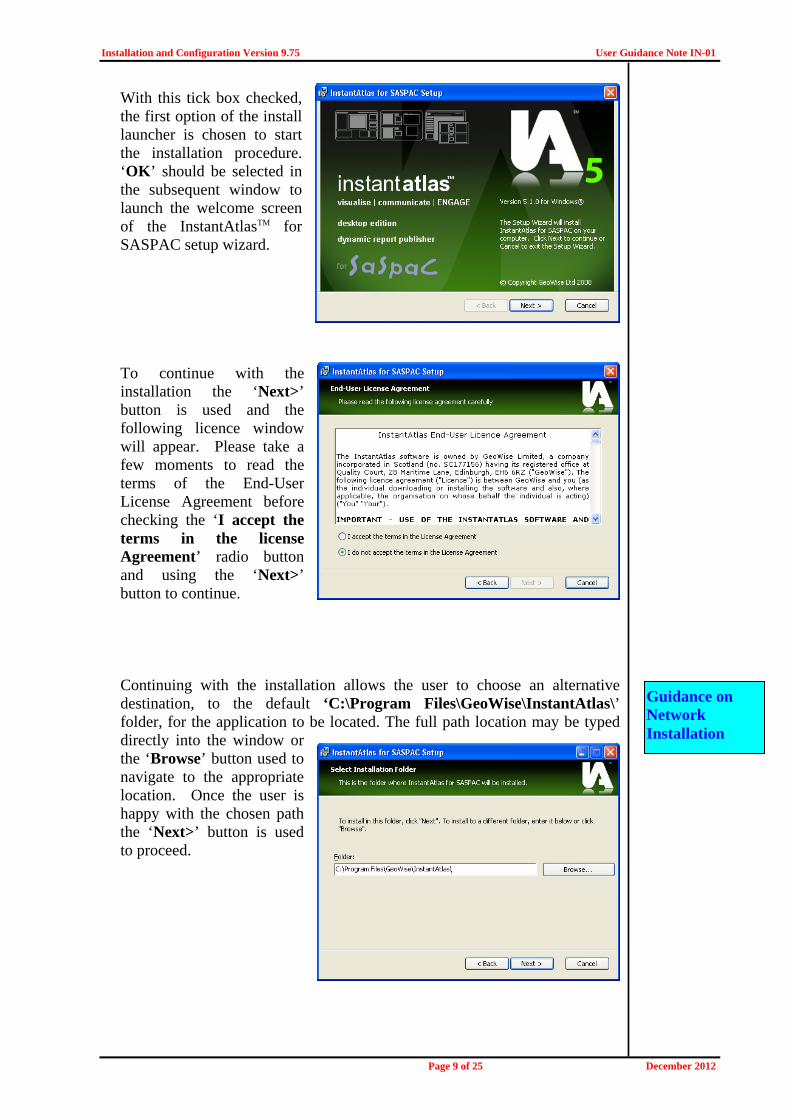
With this tick box checked, the first option of the install launcher is chosen to start the installation procedure. ‘OK’ should be selected in the subsequent window to launch the welcome screen of the InstantAtlasTM for SASPAC setup wizard. To continue with the installation the ‘Next>’ button is used and the following licence window will appear. Please take a few moments to read the terms of the End-User License Agreement before checking the ‘I accept the terms in the license Agreement’ radio button and using the ‘Next>’ button to continue. Continuing with the installation allows the user to choose an alternative destination, to the default ‘C:\Program Files\GeoWise\InstantAtlas\’ folder, for the application to be located. The full path location may be typed directly into the window or the ‘Browse’ button used to navigate to the appropriate location. Once the user is happy with the chosen path the ‘Next>’ button is used to proceed.
Guidance on Network Installation

User Guidance Note IN-01 Installation and Configuration Version 9.75
December 2012 Page 10 of 25
Finally InstantAtlasTM for SASPAC is ready to be installed and this is shown by the following window. Selecting ‘Install’ will run this procedure.
After a few moments a completed window will appear with two tick boxes that control if the ‘Getting Started’ Guide is opened and InstantAtlasTM for SASPAC is launched automatically. Once the user is happy with these selections the ‘Finish’ button is used to continue with the SASPAC installation.
If a network installation was not chosen and a standard installation (option one) was selected, after a few moments, and selecting the initial 'OK' button, the following window will appear:
This signifies the completion of the installation of InstantAtlasTM for SASPAC in the default locations as defined in Table 1. Selecting ‘OK’ allows the installer to continue with the SASPAC installation.
Installation and Configuration Version 9.75 User Guidance Note IN-01
Page 11 of 25 December 2012
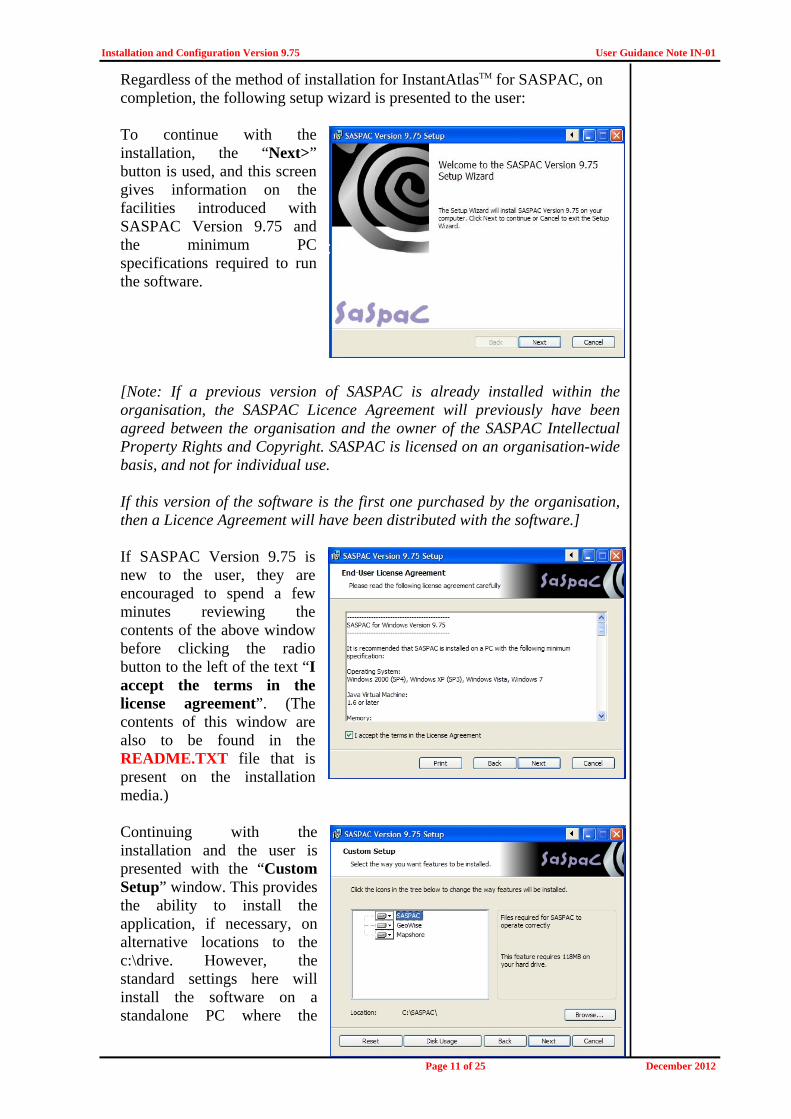
Regardless of the method of installation for InstantAtlasTM for SASPAC, on completion, the following setup wizard is presented to the user: To continue with the installation, the “Next>” button is used, and this screen gives information on the facilities introduced with SASPAC Version 9.75 and the minimum PC specifications required to run the software. [Note: If a previous version of SASPAC is already installed within the organisation, the SASPAC Licence Agreement will previously have been agreed between the organisation and the owner of the SASPAC Intellectual Property Rights and Copyright. SASPAC is licensed on an organisation-wide basis, and not for individual use. If this version of the software is the first one purchased by the organisation, then a Licence Agreement will have been distributed with the software.] If SASPAC Version 9.75 is new to the user, they are encouraged to spend a few minutes reviewing the contents of the above window before clicking the radio button to the left of the text “I accept the terms in the license agreement”. (The contents of this window are also to be found in the README.TXT file that is present on the installation media.) Continuing with the installation and the user is presented with the “Custom Setup” window. This provides the ability to install the application, if necessary, on alternative locations to the c:\drive. However, the standard settings here will install the software on a standalone PC where the

User Guidance Note IN-01 Installation and Configuration Version 9.75
December 2012 Page 12 of 25
installation directories are those supplied by default as follows:
SASPAC c:\saspac Mapshore c:\program files\mapshore GeoWise Publisher c:\saspac\geowise
If the user wishes to choose alternative directories or if SASPAC is being installed for use from a network drive then the installation may be customised as follows. The dropdown menus associated with each component of the installation (i.e. SASPAC, GeoWise Publisher, or Mapshore) may now be used to specify whether the user wishes that component to be installed. If the drop-down menu alongside any of the software components is activated, the user is presented with a window as shown here. The text relates to features and sub-features, but in all cases here, there are no sub-features, and so the user should disregard this distinction. In addition, the embedded text used by the installer refers to “local hard drive”. This is inaccurate, as the software may be installed on any appropriate device linked to the PC being used for the installation. The “Browse…” button allows the user to select a location other than on the local hard drive for the installation of the software. It is by these means that the software can be networked. Once the user is satisfied with the selections, the “Next>” button is clicked to start the copying of files from the install media to their chosen location(s). The windows now encountered are those that are also seen in a “Complete” installation.
Guidance on Network Installation

Installation and Configuration Version 9.75 User Guidance Note IN-01
Page 13 of 25 December 2012
The Installer Wizard will now automatically install all the necessary files to the default or user-selected locations. There are three windows which are self-explanatory, and the user need only follow the on-screen instructions to successfully complete the installation. Once SASPAC and the ancillary software have been installed, they may require initial configuration to allow the user full access. If a previous version of SASPAC was present, then the configuration will already have been created, and the user should be able to access SASPAC immediately. However, if this is a new installation, or if the software has been installed for network access, then, before SASPAC can be used, the user will be presented with a series of windows that will carry out this configuration process.
Starting SASPAC on a PC for the first time In order for SASPAC to run, a configuration file (SASPAC.INI) must be present on the user’s system as mentioned in pages 5 and 6 of this note. If an earlier version of SASPAC has previously been used on the system, then this configuration file will already exist, and will be used by SASPAC Version 9.75. It is imperative that where an earlier system is being updated, SASPAC is started, for the first time, from the SASPAC directory. This restriction does not apply after updating has been carried out. However, if SASPAC Version 9.75 is the first ever version of the application to be installed for use on a particular PC (whether SASPAC is installed locally or on a network drive), this window will appear on the first occasion that SASPAC is started:

User Guidance Note IN-01 Installation and Configuration Version 9.75
December 2012 Page 14 of 25
Use of the “Next>” button will then lead to a series of windows which allow each of the component parts of the software to be separately configured. The first such window offers the user the ability to configure the SASPAC component, as shown here. As shown above, the software location will default to C:\SASPAC\. If this is not the desired location, either the “Browse” or “Search” buttons may be used to locate the actual program file (WSAS32.EXE). Use of the “Browse” button will initiate a standard Windows file opening dialog, while use of the “Search” button will open a “File Search” window in which use of the “Start Search” button will initiate a search for WSAS32.EXE. The user has the option to change the location of the search through the drop down menu that appears alongside the text “Look in”. In this case the search has found several instances of the application in various locations, but additional information in the form of the date/time stamp associated with the executable is shown to assist the user in identifying the correct location. Once the correct location has been identified, the “OK” button will return the user to the SASPAC component configuration window where use of the “Next>”button will lead to the Geowise Publisher component configuration, as shown here. As with the SASPAC component, the “Browse” or “Search” buttons may be used to locate the actual program file (GWPUBLISHER.EXE).
Guidance on Network Installation and Configuration

Installation and Configuration Version 9.75 User Guidance Note IN-01
Page 15 of 25 December 2012
It has previously been noted that the Geowise Publisher requires the presence of third party software for operation, and should either of these not be present on the system, then one or both of these windows will be seen. If either appears, then the user will need to take the appropriate action to ensure correct operation. It should be noted that whereas the .NET Framework Version 1.1 must be present for the Geowise Publisher to operate, the Adobe SVG Viewer Browser is only necessary for viewing the output. In addition, the Adobe Flash Viewer is only necessary for viewing the output produced by InstantAtlasTM for SASPAC. On each of the main windows relating to the component configurations for GeoWise Publisher and Mapshore, there is “Skip” button. Use of this will mean that the user will move on to the next window without effecting any changes, so that a default configuration is created. If this is done, then the user will see this window. In the main window relating to the GeoWise component configuration, use of the “Next>”button will lead to the Mapshore component configuration, as shown here. Again, as with the SASPAC component, the ‘Browse’ or ‘Search’ buttons may be used to locate the actual program file (MAPSHORE.EXE).

User Guidance Note IN-01 Installation and Configuration Version 9.75
December 2012 Page 16 of 25
Once all the component configurations have been set, the user may proceed to using SASPAC. However, if any of the necessary ancillary files are missing or configurations have not been fully set (for example, after use of the “Skip” button) then it is possible the user will see this window. As the heading indicates, this is for information, and will not stop the operation of SASPAC. When configuration is complete, this window will appear. As the text states, the user may configure the GeoWise Publisher and/or Mapshore from within SASPAC’s Tools|SASPAC Configuration… menu option. That menu option may also be used to change the configuration of any of the components.
Installation on a network When installing SASPAC for network use, the initial installation will normally be done from one of the workstations from which SASPAC will be used. The procedures described above may then be used for ensuring that each workstation can be set up to run the network installed software. In particular, each user will require that the configuration file (SASPAC.INI) is correctly set up in the appropriate location. The following table shows “typical” locations for this file under various operating systems.
Operating System SASPAC.INI location Windows NT C:\WINNT\Profiles\<user area>\
Application Data\SASPAC Windows 2000 (updated installation)
C:\Windows\Profiles\<user area>\ Application Data\SASPAC
Windows 2000 (clean install)
C:\Documents and settings\<user area>\ Application Data\SASPAC
Windows XP C:\Documents and settings\<user area>\ Application Data\SASPAC
Windows Vista C:\Users\<user area>\AppData\Roaming\SASPAC\saspac.ini
Windows 7 C:\Users\<user area>\AppData\Roaming\SASPAC\saspac.ini
Typical locations of SASPAC.INI It must be emphasised that these are typical locations and that there may be subtle differences for particular installations at certain organisations depending on exactly how that organisation’s System Administrator will have defined that particular system.
Installation and Configuration Version 9.75 User Guidance Note IN-01
Page 17 of 25 December 2012
If there are local difficulties in identifying the location, users should first look at the Frequently Asked Questions (FAQs) at the end of this User Guidance Note.
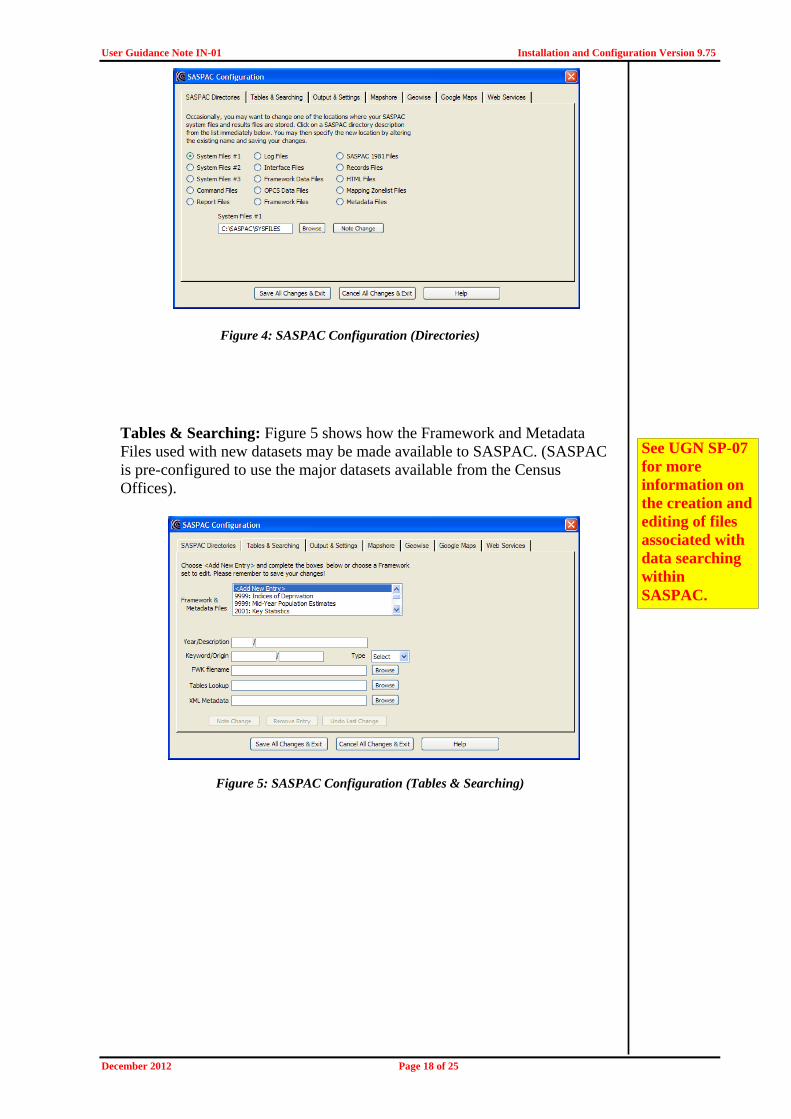
Configuration All user-controllable settings for SASPAC itself, GeoWise Publisher and Mapshore may be configured using the SASPAC Tools|SASPAC Configuration dialogs. The dialogs appear on seven separate panels, four of which apply to SASPAC itself and one each to Mapshore, GeoWise Publisher and InstantAtlas™ and the Google™ Maps configuration. SASPAC Directories: As described earlier, SASPAC uses and creates files in a number of directories. There is normally no need to change these directory settings once SASPAC is installed and operational. However, initial configuration may be necessary, especially when SASPAC is installed for network operation. Figure 4 shows the SASPAC directory configuration dialog. The name and location of any SASPAC directory may be changed by selecting it, by first clicking the radio button adjacent to its description in the list followed either by typing a pathname or by using the Browse button to establish a new directory. Clicking ‘Note Change’ causes the chosen directory name to be validated. If the directory does not exist, the user is offered the opportunity to create that directory. Changes are committed to the settings file by clicking ‘Save all Changes & Exit’. Note: The contents of the Framework and Metadata directories are fundamental to the user interfaces of many functions available within SASPAC. If the user attempts to change either of these directories, SASPAC responds with a reminder of the importance of the directory. Furthermore, if the user has actually created a new directory, SASPAC offers the chance to copy the existing data files in the original directory to the newly created directory. Users are warned that SASPAC will not function completely unless the relevant files are present in the nominated directory.
User Guidance Note IN-01 Installation and Configuration Version 9.75
December 2012 Page 18 of 25
Tables & Searching: Figure 5 shows how the Framework and Metadata Files used with new datasets may be made available to SASPAC. (SASPAC is pre-configured to use the major datasets available from the Census Offices).
Figure 5: SASPAC Configuration (Tables & Searching)
See UGN SP-07 for more information on the creation and editing of files associated with data searching within SASPAC.
Figure 4: SASPAC Configuration (Directories)

Installation and Configuration Version 9.75 User Guidance Note IN-01
Page 19 of 25 December 2012
Output & Settings: In addition to a number of options related to the processing of census data itself, SASPAC also provides several options to control preferences such as screen readability, number of recent files etc. (see Figure 6).
Figure 6: SASPAC Configuration (Output & Settings) Within this properties sheet, many of the parameters associated with output from SASPAC may be set by the user. Additionally, the presentation of the Graphical User Interface (GUI) can be amended from this window. Mapshore: As with SASPAC, the mapping software associated with it, Mapshore, uses a series of default directories or folders in which the different types of file it accesses are stored, or written to. Again, these defaults may be changed by the user through the “Tools|SASPAC Configuration…” menu option. Use of the Mapshore tab will then reveal the property sheet shown in Figure 7.
See UGN SP-03 for more information on the effect of changing parameter values within this settings properties sheet.
See UGN MS-02 for more information on the effect of changing parameter values within the Mapshore properties sheet.
Figure 7: Mapshore Configuration

User Guidance Note IN-01 Installation and Configuration Version 9.75
December 2012 Page 20 of 25
GeoWise: Figure 8a demonstrates the GeoWise configuration settings following a standard installation of SASPAC v9.75 – notice that the InstantAtlas application is automatically selected. This element of SASPAC's configuration presents the user with the opportunity to amend settings relating to both GeoWise Web Publishers. To alter the Publisher in use the user simply uses the radio buttons at the top of the window. Once set in this window, SASPAC defaults to the specified application during any Web Publishing related task.
Choosing to select the Web Publisher results in the following settings becoming available (Figure 8b). This allows the user to alter default directories for the files used by the Publisher, and the directory to which the final results are published. It also allows the user to add default text which will appear on the final published pages. If required, this default text may be amended for specific instances within the Publisher, as described in UGN GP02 to UGN GP07.
See UGN GP-02 for more information on the effect of changing parameter values within the GeoWise properties sheet.
Figure 8b: GeoWise Publisher Configuration
Figure 8a: GeoWise InstantAtlasTM for SAPSAC Configuration

Installation and Configuration Version 9.75 User Guidance Note IN-01
Page 21 of 25 December 2012
Google Maps: As displayed in Figure 9, this element of the SASPAC Configuration option presents the user with the opportunity to change the default Web Browser (although it is strongly recommended that Internet Explorer version 6.0 or later is used).
Figure 9: Google Maps Configuration In addition the default Geodetic transformation system can be altered from Ordnance Survey's Grid Inquest (recommended) to SASPAC's own, if the appropriate library files are not available. The size of the Google map window visualised through SASPAC's radial search tool can be changed if desired. Web Services: Figure 10 demonstrates the configuration options relating to the Web Services Wizard. Some user’s security systems may require the provision of additional web proxy host and port settings to allow SASPAC to communicate directly with an external web service – these may be stored and saved here. Finally, the user may edit the frequency (daily, weekly or monthly) for which SASPAC checks for new datasets available from the NeSS website or choose to delete the existing data file (cache) if necessary.
Figure 9: Web Services Configuration
See UGN GE-04 for more information on web proxy server settings.

User Guidance Note IN-01 Installation and Configuration Version 9.75
December 2012 Page 22 of 25
Frequently Asked Questions.
1. Why does my code get a security exception when I run it from a
network shared drive? GeoWise Publisher was created using software development techniques made available within the Microsoft .NET Framework Development Environment. The executable program that results from this method of development is known as a .NET Assembly. A .NET Assembly may be installed on a user’s local hard drive and used in exactly the same way as any other program that is available on that user’s PC. However, if the same .NET Assembly is installed on a network hard drive then, before it can be used on a particular user’s PC, that user must grant permission for the Assembly to execute on his or her PC. If this is not done, a security exception will occur when the Assembly attempts to perform actions (e.g. opening a file on the local machine) for which it has not been granted permission. This exception takes the form of a message, which appears when GeoWise is started from a network drive before appropriate permissions have been granted. As with every topic associated with the security of PCs which are connected to the internet or to an intranet (i.e. a local network), much has been written and made available from textbooks and via the internet. As the vast majority of GeoWise Publisher users will simply want a solution rather than a detailed explanation, this UGN simply sets out the method by which a single user may grant the appropriate permission so that GeoWise Publisher will execute on his or her own PC.
If further information is required, the following URLs may be useful: http://msdn.microsoft.com/library/default.asp?url=/library/en-us/dv_wrcore/html/wrtskGrantingPermissionsToFoldersAssemblies.asp http://blogs.msdn.com/shawnfa/archive/2003/06/20/57023.aspx http://www.code-magazine.com/Article.aspx?quickid=0211111
Granting permission is done using one of the .NET Framework Configuration Tools as follows: The user should click on the Start button in the bottom left hand corner of the desktop. Select Control Panel and then click on Administrative Tools. The Microsoft .NET Framework Wizards shortcut will be displayed within Administrative Tools.
If Administrative Tools are not visible, you will have to contact your IT Department for advice on how to proceed
Installation and Configuration Version 9.75 User Guidance Note IN-01
Page 23 of 25 December 2012
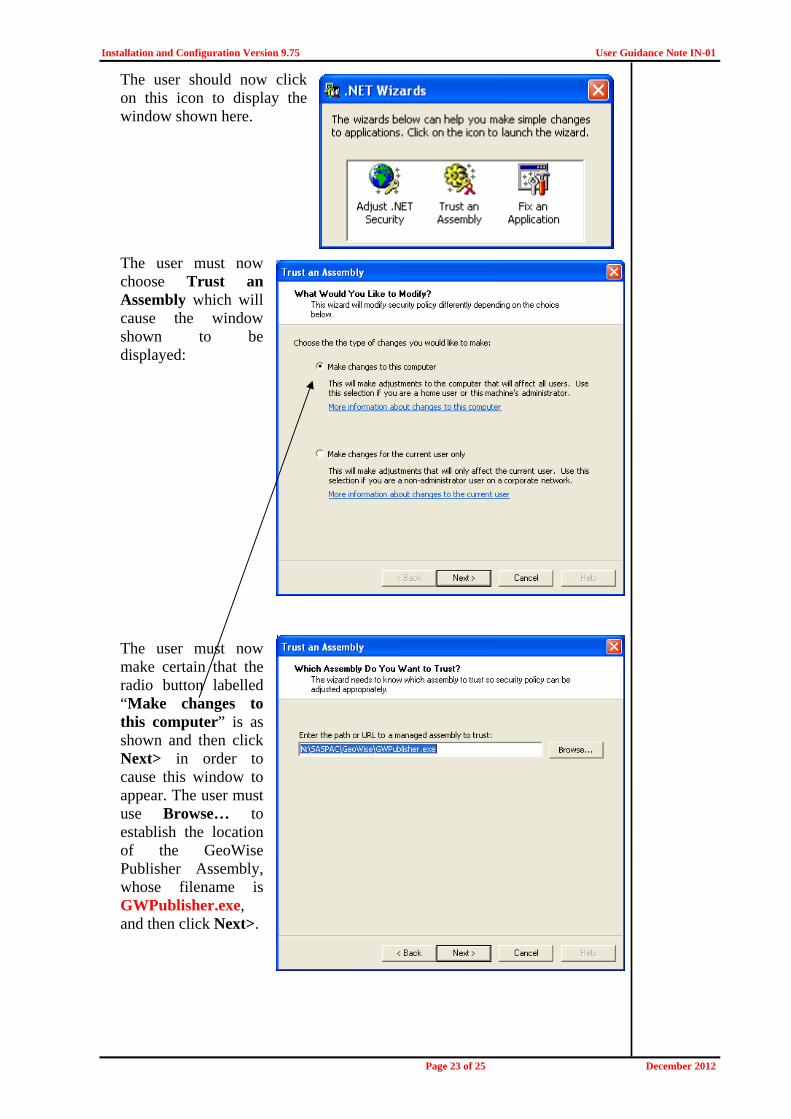
The user should now click on this icon to display the window shown here. The user must now choose Trust an Assembly which will cause the window shown to be displayed: The user must now make certain that the radio button labelled “Make changes to this computer” is as shown and then click Next> in order to cause this window to appear. The user must use Browse… to establish the location of the GeoWise Publisher Assembly, whose filename is GWPublisher.exe, and then click Next>.
User Guidance Note IN-01 Installation and Configuration Version 9.75
December 2012 Page 24 of 25
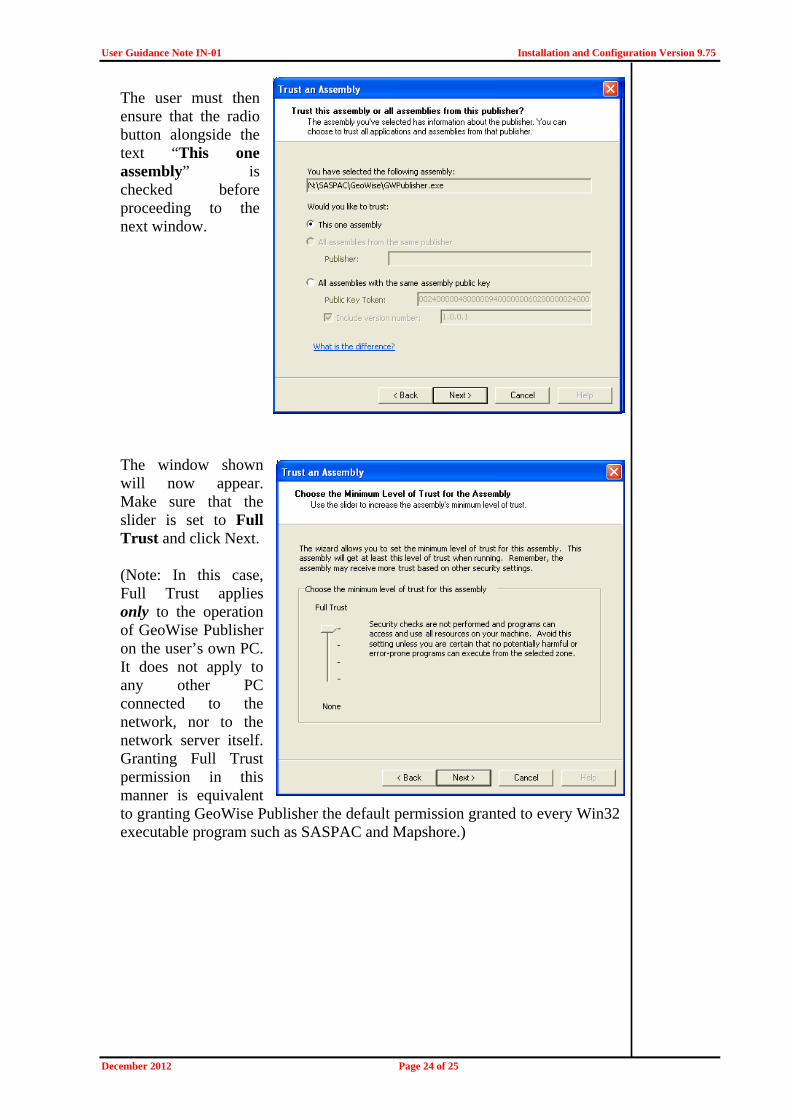
The user must then ensure that the radio button alongside the text “This one assembly” is checked before proceeding to the next window. The window shown will now appear. Make sure that the slider is set to Full Trust and click Next. (Note: In this case, Full Trust applies only to the operation of GeoWise Publisher on the user’s own PC. It does not apply to any other PC connected to the network, nor to the network server itself. Granting Full Trust permission in this manner is equivalent to granting GeoWise Publisher the default permission granted to every Win32 executable program such as SASPAC and Mapshore.)

Installation and Configuration Version 9.75 User Guidance Note IN-01
Page 25 of 25 December 2012
The final window of the Wizard will now be displayed. At this point, the user must click Finish to complete the permission granting process. GeoWise Publisher may now be used in conjunction with SASPAC according to UGN GP-01. 2. How do I configure SASPAC for use over a network? SASPAC can be installed to operate from a network location, with users accessing it from a local workstation. To facilitate this, there will be a configuration file (SASPAC.INI) located on the hard drive of the local machine. When SASPAC is first accessed from a local machine, SASPAC will automatically create this file in the appropriate location as discussed on page 10 of this document, and as shown in the table on page 13. However, since there may be local variations in the way the different operating systems are implemented, the “typical” installations previously referred to may not apply in all cases. If problems are experienced in running SASPAC through the configuration file having been created in an unexpected location, the user may identify that location through use of the “Help|INI file location…” menu item within SASPAC. This will return a window similar to the one shown here. In exceptional cases under Windows NT, where the System Administrator has set up a Documents and Settings folder in the C: drive, the configuration file will be in that folder. If SASPAC is being set up to run on a workstation that is operating under such a Windows NT set-up then, to ensure Windows XP behaviour, with the configuration file being located in the Documents and Settings folder, as shown for Windows XP in the table on page 13, the option /FORCEXP should be added to the command line as shown in this screen.