Use QNAP NAS for Backupfiles.qnap.com/news/pressresource/product/Backup_Exec_12.5_with... · Using...
33
©Copyright 2010. QNAP Systems, Inc. All Rights Reserved. V1.0 Use QNAP NAS for Backup BACKUP EXEC 12.5 WITH QNAP NAS
Transcript of Use QNAP NAS for Backupfiles.qnap.com/news/pressresource/product/Backup_Exec_12.5_with... · Using...
©Copyright 2010. QNAP Systems, Inc. All Rights Reserved. V1.0
Use QNAP NAS for Backup
BACKUP EXEC 12.5 WITH QNAP NAS
©Copyright 2010. QNAP Systems, Inc. All Rights Reserved. 2
Document revision history:
Date Version Changes
Apr 2010 1.0 Initial release
Note:
Information presented is subject to change without notice.
Trademarks
QNAP and the QNAP logo are trademarks of QNAP Systems, Inc.
All brands and product names referred to are trademarks of their respective holders. Further, the
® or ™ symbols are not used in the text.
Disclaimer
In no event shall the liability of QNAP Systems, Inc. (QNAP) exceed the price paid for the product from
direct, indirect, special, incidental, or consequential software, or its documentation. QNAP makes no
warranty or representation, expressed, implied, or statutory, with respect to its products or the
contents or use of this documentation and all accompanying software, and specifically disclaims its
quality, performance, merchantability, or fitness for any particular purpose. QNAP reserves the right
to revise or update its products, software, or documentation without obligation to notify any individual
or entity.
©Copyright 2010. QNAP Systems, Inc. All Rights Reserved. 3
Intended Audience
The guide is intended for system administrators and backup administrators who are familiar with
storage and backup technologies.
This document assumes that the reader is familiar with the following topics:
- Backup Exec
- Active Directory
- Windows Server administration
- iSCSI
©Copyright 2010. QNAP Systems, Inc. All Rights Reserved. 4
Contents
Intended Audience ...................................................................................................................................................................... 3
Before starting ........................................................................................................................................................................... 5
Backup Topology ........................................................................................................................................................................ 6
Back up to an iSCSI drive on QNAP NAS ...................................................................................................................................... 7
Create an iSCSI target on the NAS ..................................................................................................................... 7
Connect BE to the iSCSI drive (NAS) as a media repository ................................................................................. 7
Select the NAS as destination ........................................................................................................................... 9
Back up to a shared folder on QNAP NAS ................................................................................................................................. 10
Shared folder and permission ......................................................................................................................... 10
Connect BE to the NAS shared folder as a media repository............................................................................. 16
Select the shared folder as the backup destination.......................................................................................... 22
Restore with Intelligent Disaster Recovery (IDR) from the NAS ................................................................................................. 23
Back up the contents of an iSCSI drive ...................................................................................................................................... 26
Back up the data from the NAS shared folders ......................................................................................................................... 27
Enable user shares selection ........................................................................................................................... 27
Select the shared folder on the NAS................................................................................................................ 28
Back up the data from the NAS shared folders: Important Notice .................................................................... 29
Restore files to the NAS ............................................................................................................................................................ 30
Error in restoring data to the NAS ................................................................................................................... 30
Appendix .................................................................................................................................................................................. 32
©Copyright 2010. QNAP Systems, Inc. All Rights Reserved. 5
Before starting
If you are using Windows Server 2008 R2, make sure you have an up-to-date version of Backup Exec
to avoid the following error:
336357: Remote Windows Server 2008 R2 backup fails with error - 0xe000fec9 - A failure occurred
accessing the Writer metadata
http://support.veritas.com/docs/336357
Definition:
- BE stands for Backup Exec
- IDR stands for Intelligent Disaster Recovery
Notes:
- This application note has been written and tested with Symantec BE SP3 with Windows Server
2008 R2 and with Windows Server 2003 SP2 (for IDS), in Active Directory environment for
accessing the shared folders.
- This application note describes the connection between BE 12.5 and a QNAP NAS, and specific
points you have to pay attention. It will not describe full usage of the backup software.
- You must use a domain user account to connect to the shared folders on QNAP NAS with BE
12.5 if the NAS has been joined to an Active Directory.
- In this application note we use a domain called ‘adtest.local’. This is an example and needs to
be changed to match your domain information.
- Please read Symantec BE documentation for more information about the backup software.
- To use file archive bit, the NAS firmware must be updated to version 3.3.0 or later (for more
details, please refer to page 29).
Minimal configuration:
- You need a shared folder on the QNAP NAS, with Read/Write access granted to a domain user.
- BE services on the Windows server must run with the same domain user account used for the
shared folder on the NAS (to be described later), with administrative privileges on that server.
- For Active Directory integration, make sure:
o You have the DNS entry of your NAS on the DNS server
o The Windows server with BE is the client of the correct DNS server: your domain DNS
server.
o The DNS suffix has been correctly set up in the Windows server with BE.
- If necessary, you can use an iSCSI drive to store the backups from Backup Exec.
©Copyright 2010. QNAP Systems, Inc. All Rights Reserved. 6
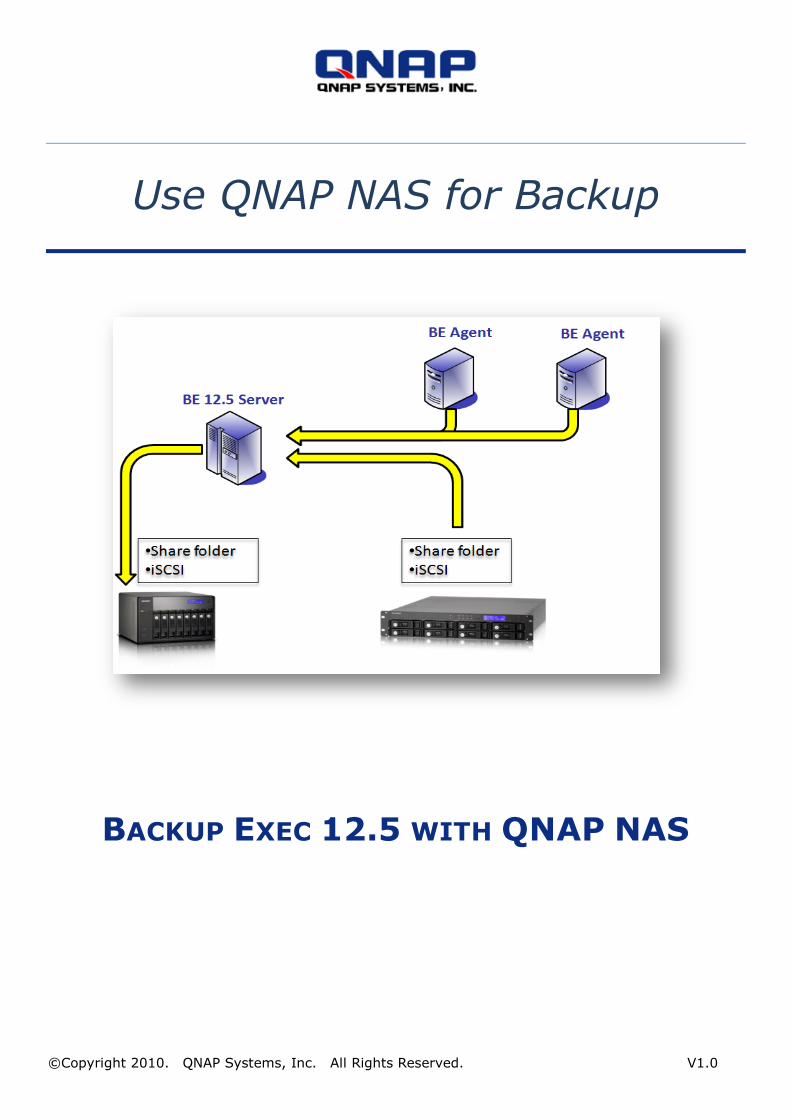
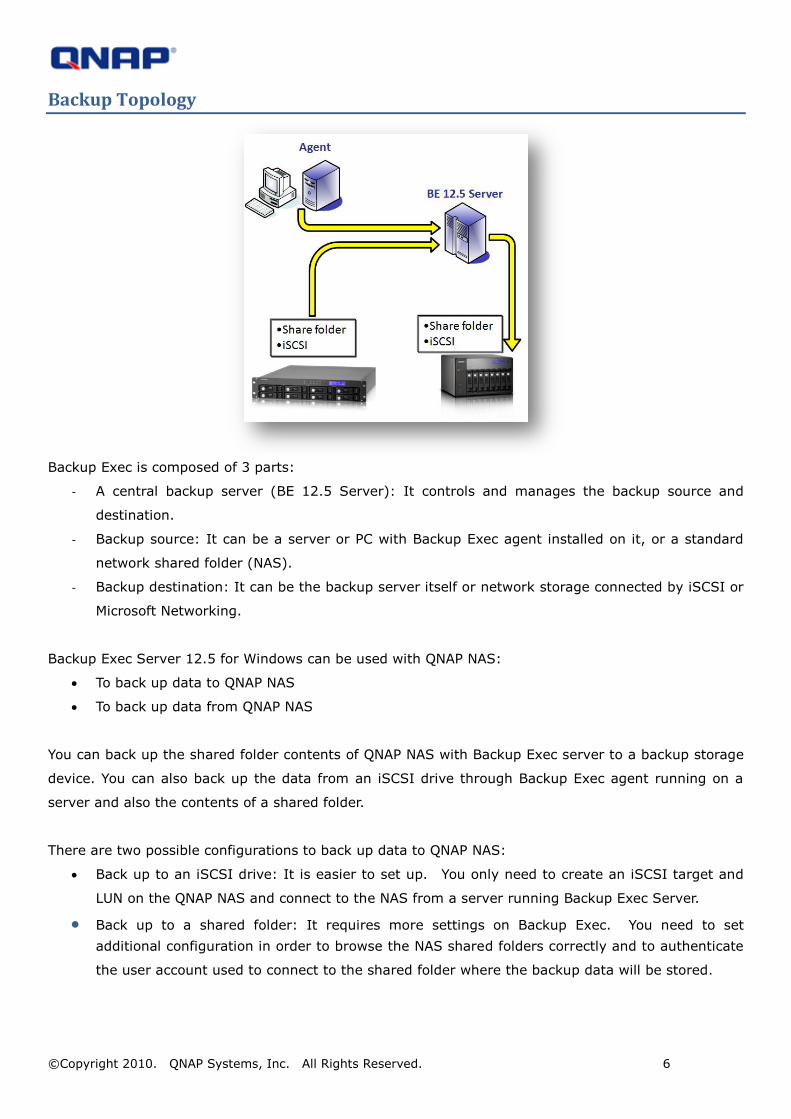
Backup Topology
Backup Exec is composed of 3 parts:
- A central backup server (BE 12.5 Server): It controls and manages the backup source and
destination.
- Backup source: It can be a server or PC with Backup Exec agent installed on it, or a standard
network shared folder (NAS).
- Backup destination: It can be the backup server itself or network storage connected by iSCSI or
Microsoft Networking.
Backup Exec Server 12.5 for Windows can be used with QNAP NAS:
To back up data to QNAP NAS
To back up data from QNAP NAS
You can back up the shared folder contents of QNAP NAS with Backup Exec server to a backup storage
device. You can also back up the data from an iSCSI drive through Backup Exec agent running on a
server and also the contents of a shared folder.
There are two possible configurations to back up data to QNAP NAS:
Back up to an iSCSI drive: It is easier to set up. You only need to create an iSCSI target and
LUN on the QNAP NAS and connect to the NAS from a server running Backup Exec Server.
Back up to a shared folder: It requires more settings on Backup Exec. You need to set
additional configuration in order to browse the NAS shared folders correctly and to authenticate
the user account used to connect to the shared folder where the backup data will be stored.
©Copyright 2010. QNAP Systems, Inc. All Rights Reserved. 7
Back up to an iSCSI drive on QNAP NAS
Create an iSCSI target on the NAS
Create an iSCSI target on the NAS and connect the iSCSI drive to your Windows server. For the
instructions, see this application note: http://qnap.com/pro_application.asp?ap_id=135
For example, if you have connected your iSCSI drive as M:\ on your server, you can use the new iSCSI
drive as the media repository and specify the Backup-to-Disk Folder to M:\
Connect BE to the iSCSI drive (NAS) as a media repository
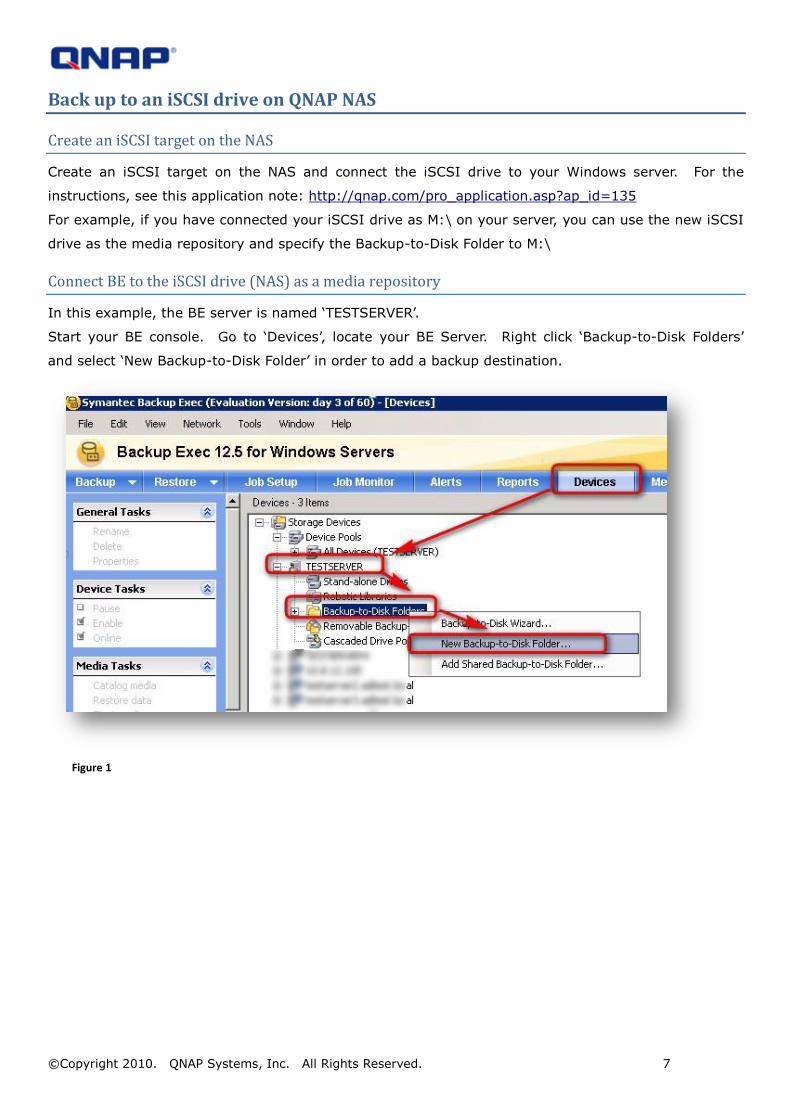
In this example, the BE server is named ‘TESTSERVER’.
Start your BE console. Go to ‘Devices’, locate your BE Server. Right click ‘Backup-to-Disk Folders’
and select ‘New Backup-to-Disk Folder’ in order to add a backup destination.
Figure 1
©Copyright 2010. QNAP Systems, Inc. All Rights Reserved. 8
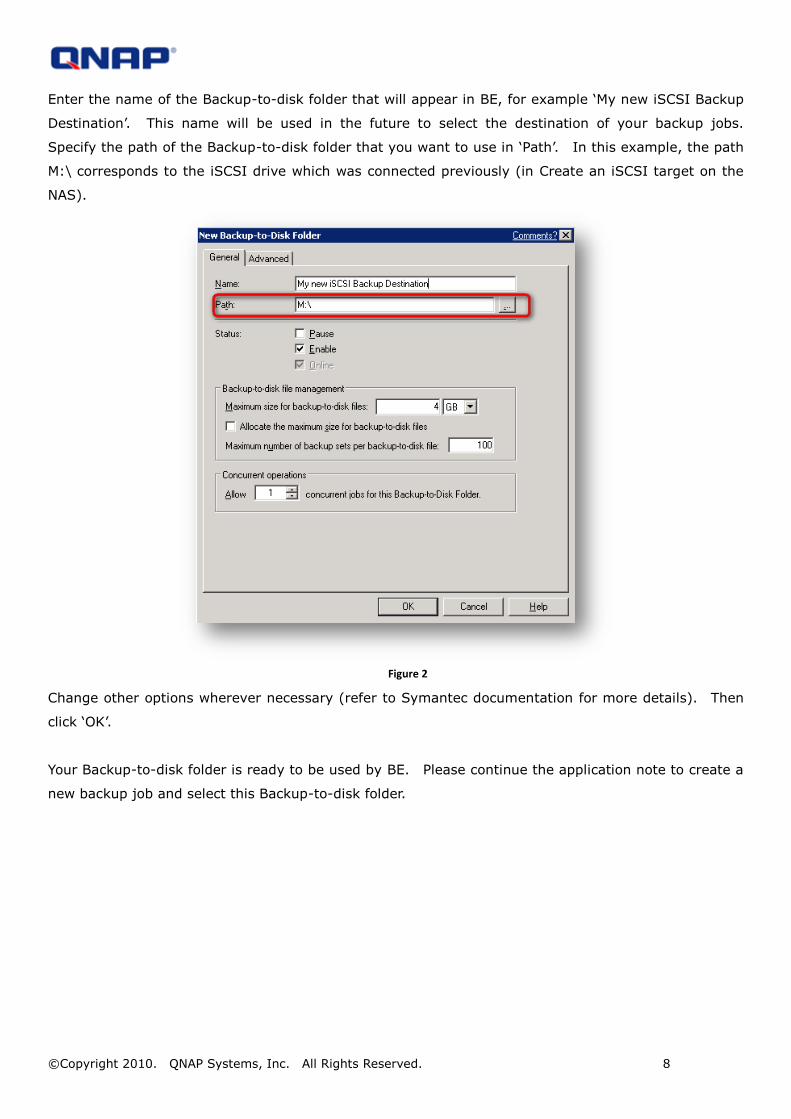
Enter the name of the Backup-to-disk folder that will appear in BE, for example ‘My new iSCSI Backup
Destination’. This name will be used in the future to select the destination of your backup jobs.
Specify the path of the Backup-to-disk folder that you want to use in ‘Path’. In this example, the path
M:\ corresponds to the iSCSI drive which was connected previously (in Create an iSCSI target on the
NAS).
Figure 2
Change other options wherever necessary (refer to Symantec documentation for more details). Then
click ‘OK’.
Your Backup-to-disk folder is ready to be used by BE. Please continue the application note to create a
new backup job and select this Backup-to-disk folder.
©Copyright 2010. QNAP Systems, Inc. All Rights Reserved. 9
Select the NAS as destination
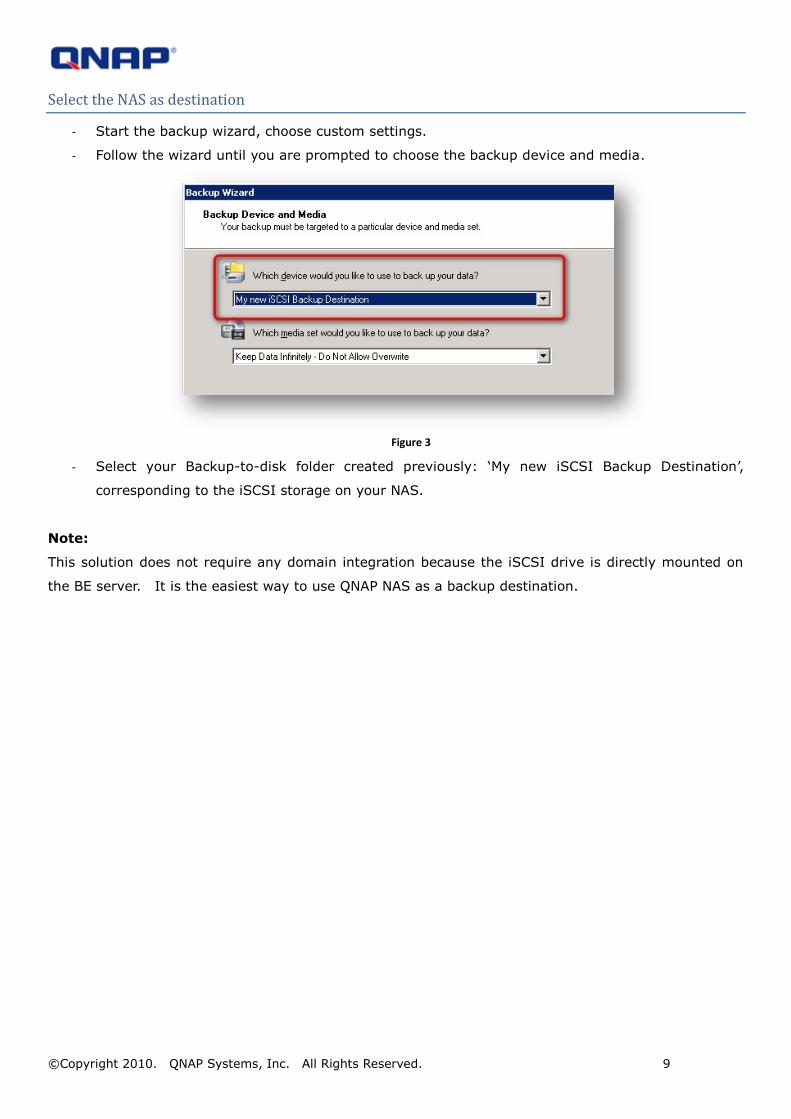
- Start the backup wizard, choose custom settings.
- Follow the wizard until you are prompted to choose the backup device and media.
Figure 3
- Select your Backup-to-disk folder created previously: ‘My new iSCSI Backup Destination’,
corresponding to the iSCSI storage on your NAS.
Note:
This solution does not require any domain integration because the iSCSI drive is directly mounted on
the BE server. It is the easiest way to use QNAP NAS as a backup destination.
©Copyright 2010. QNAP Systems, Inc. All Rights Reserved. 10
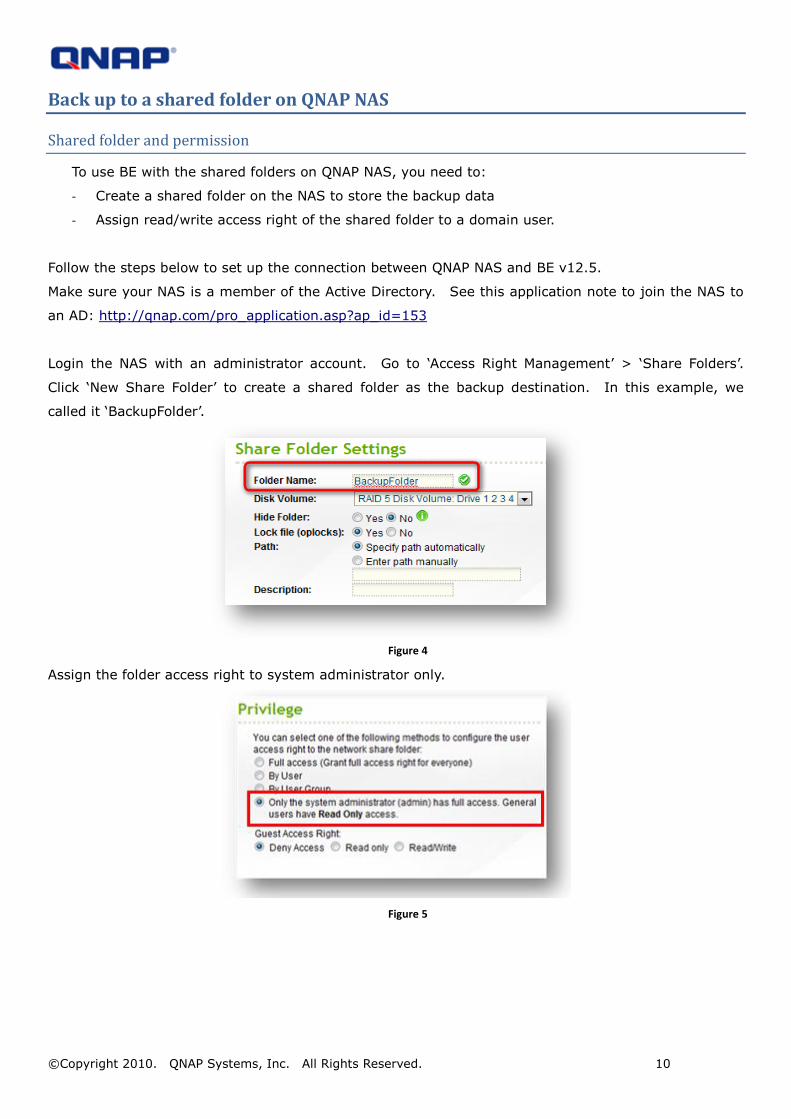
Back up to a shared folder on QNAP NAS
Shared folder and permission
To use BE with the shared folders on QNAP NAS, you need to:
- Create a shared folder on the NAS to store the backup data
- Assign read/write access right of the shared folder to a domain user.
Follow the steps below to set up the connection between QNAP NAS and BE v12.5.
Make sure your NAS is a member of the Active Directory. See this application note to join the NAS to
an AD: http://qnap.com/pro_application.asp?ap_id=153
Login the NAS with an administrator account. Go to ‘Access Right Management’ > ‘Share Folders’.
Click ‘New Share Folder’ to create a shared folder as the backup destination. In this example, we
called it ‘BackupFolder’.
Figure 4
Assign the folder access right to system administrator only.
Figure 5
©Copyright 2010. QNAP Systems, Inc. All Rights Reserved. 11
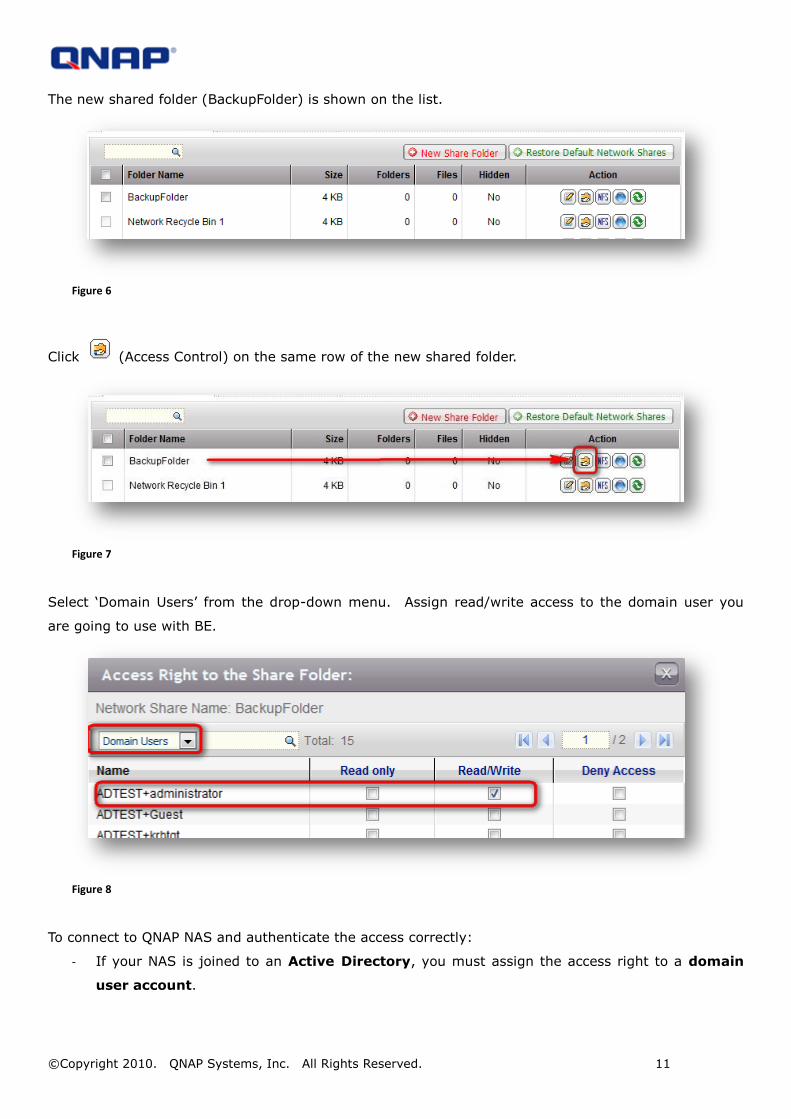
The new shared folder (BackupFolder) is shown on the list.
Figure 6
Click (Access Control) on the same row of the new shared folder.
Figure 7
Select ‘Domain Users’ from the drop-down menu. Assign read/write access to the domain user you
are going to use with BE.
Figure 8
To connect to QNAP NAS and authenticate the access correctly:
- If your NAS is joined to an Active Directory, you must assign the access right to a domain
user account.

©Copyright 2010. QNAP Systems, Inc. All Rights Reserved. 12
- If your NAS is in standalone mode (not joined to an Active Directory), you may use a local
user account to login the NAS. The user name and password on the NAS must be the
same as the user name and password used by BE services (to be explained later).
- It is highly recommended to use Active Directory.
- In this example the domain user we use is ‘adtest\administrator’. You can use other domain
user account.
The domain user must have administration privileges on the local BE server (see Symantec
documentation for more details).
This domain user is chosen during BE installation.
Figure 9
©Copyright 2010. QNAP Systems, Inc. All Rights Reserved. 13
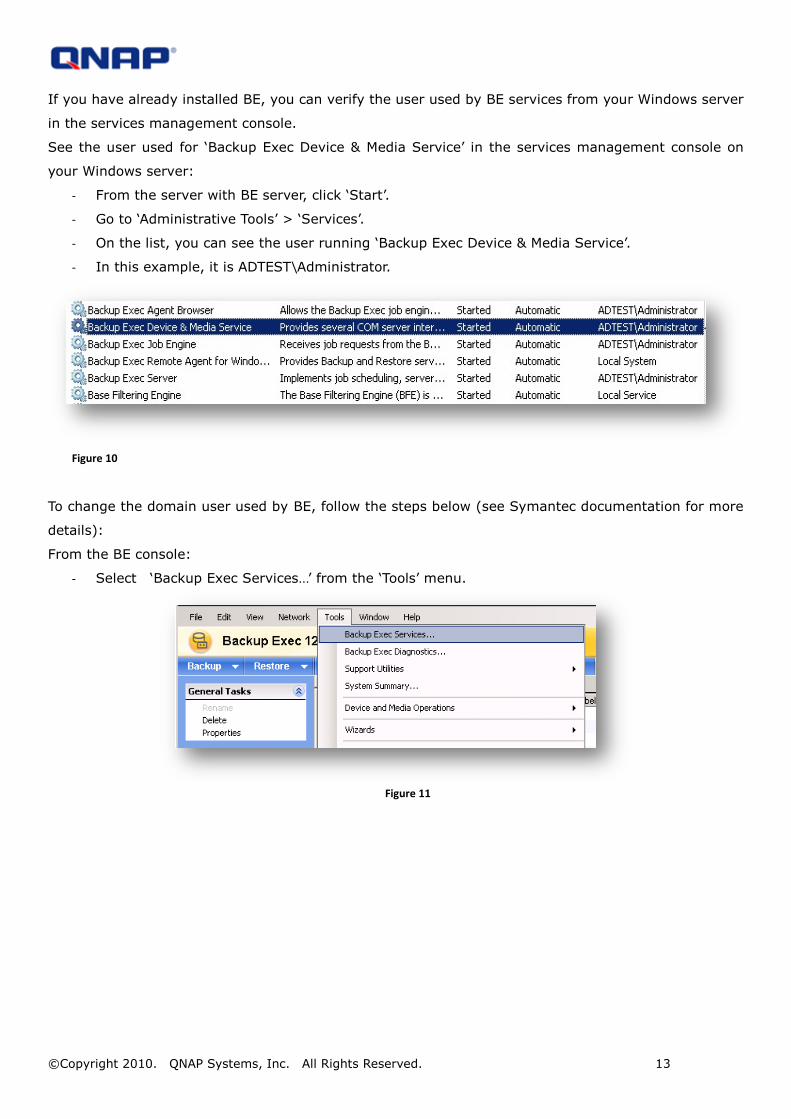
If you have already installed BE, you can verify the user used by BE services from your Windows server
in the services management console.
See the user used for ‘Backup Exec Device & Media Service’ in the services management console on
your Windows server:
- From the server with BE server, click ‘Start’.
- Go to ‘Administrative Tools’ > ‘Services’.
- On the list, you can see the user running ‘Backup Exec Device & Media Service’.
- In this example, it is ADTEST\Administrator.
Figure 10
To change the domain user used by BE, follow the steps below (see Symantec documentation for more
details):
From the BE console:
- Select ‘Backup Exec Services…’ from the ‘Tools’ menu.
Figure 11
©Copyright 2010. QNAP Systems, Inc. All Rights Reserved. 14
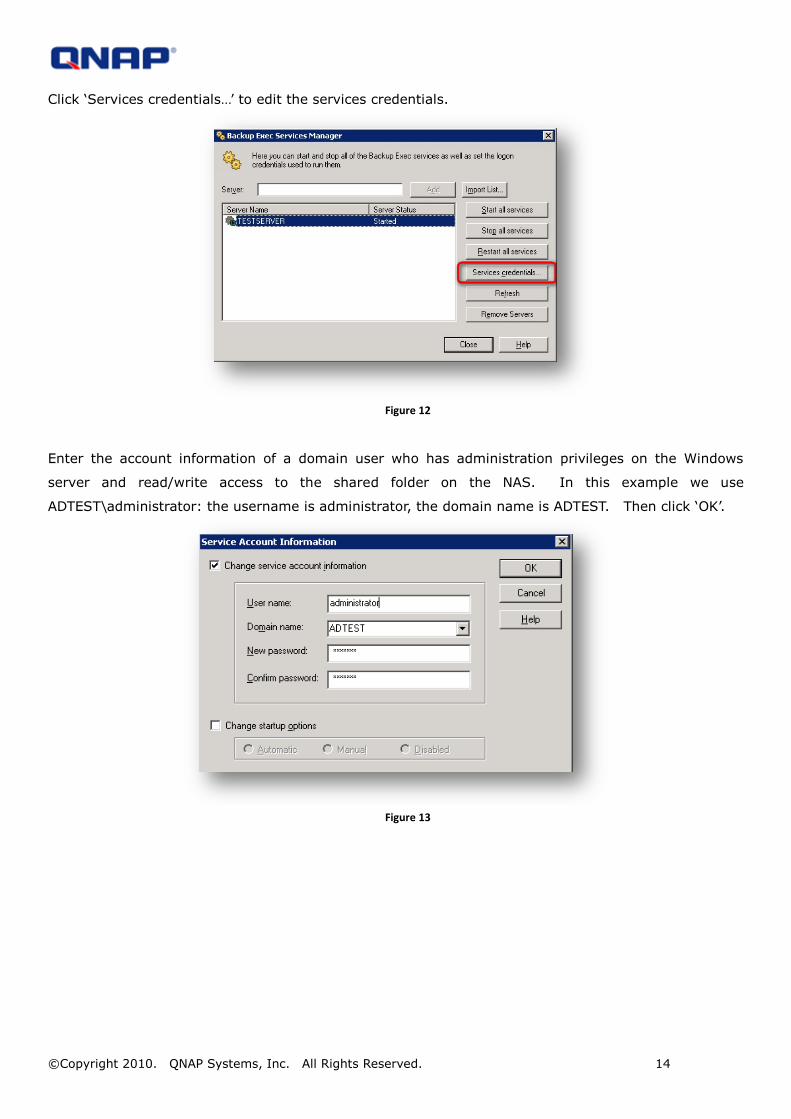
Click ‘Services credentials…’ to edit the services credentials.
Figure 12
Enter the account information of a domain user who has administration privileges on the Windows
server and read/write access to the shared folder on the NAS. In this example we use
ADTEST\administrator: the username is administrator, the domain name is ADTEST. Then click ‘OK’.
Figure 13
©Copyright 2010. QNAP Systems, Inc. All Rights Reserved. 15
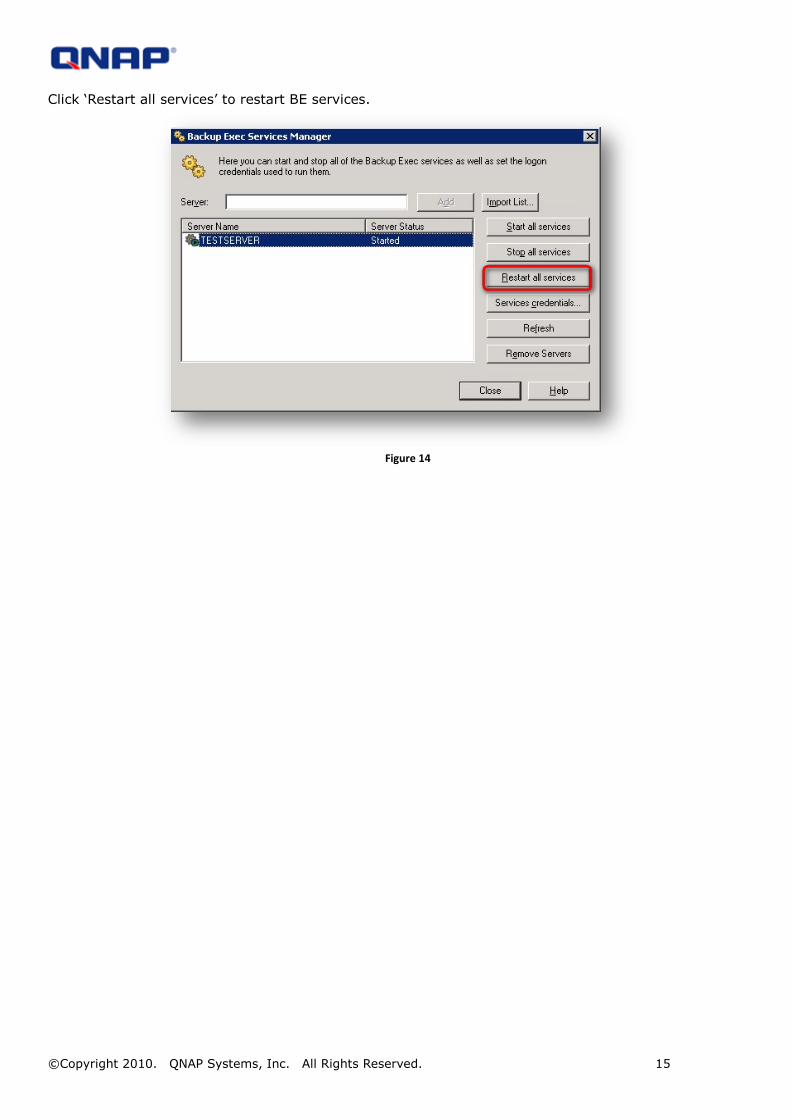
Click ‘Restart all services’ to restart BE services.
Figure 14
©Copyright 2010. QNAP Systems, Inc. All Rights Reserved. 16
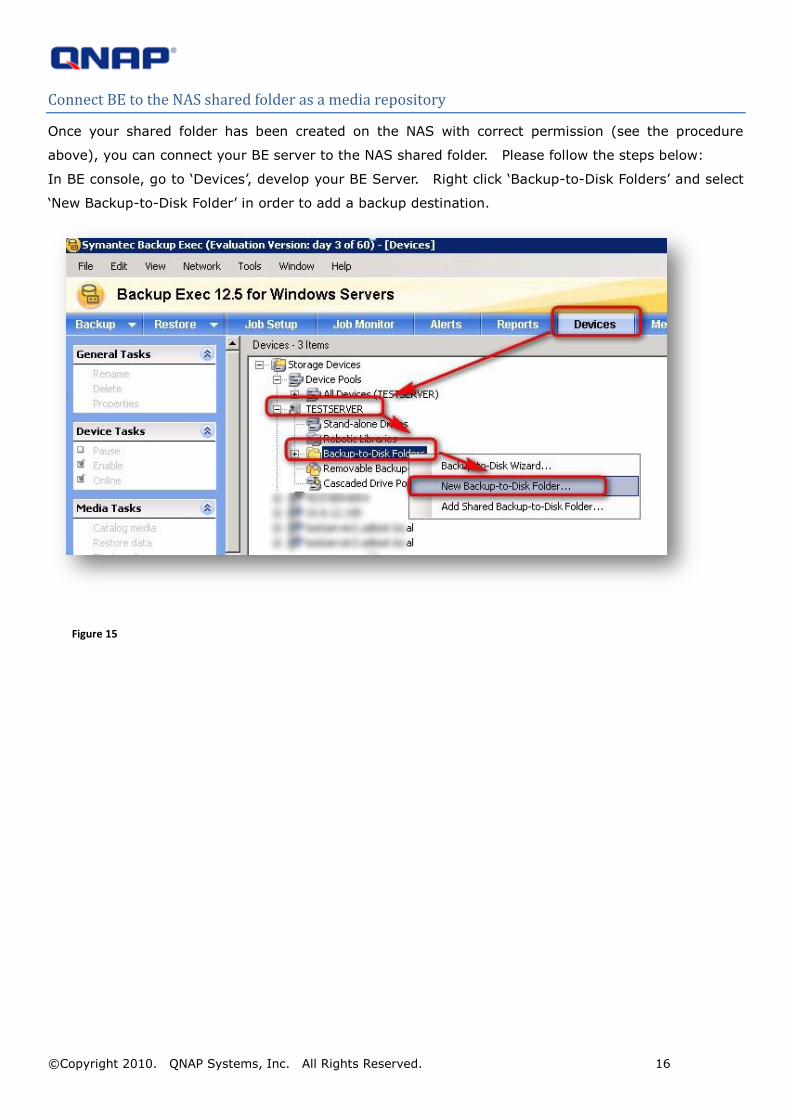
Connect BE to the NAS shared folder as a media repository
Once your shared folder has been created on the NAS with correct permission (see the procedure
above), you can connect your BE server to the NAS shared folder. Please follow the steps below:
In BE console, go to ‘Devices’, develop your BE Server. Right click ‘Backup-to-Disk Folders’ and select
‘New Backup-to-Disk Folder’ in order to add a backup destination.
Figure 15
©Copyright 2010. QNAP Systems, Inc. All Rights Reserved. 17
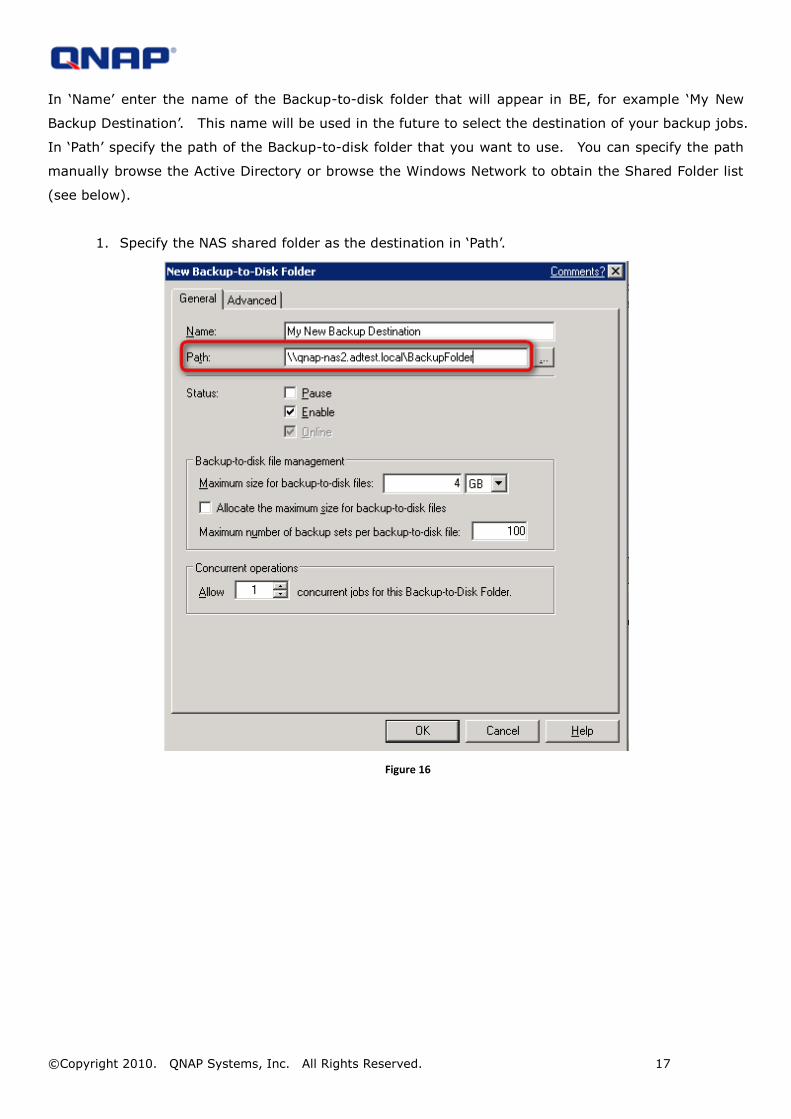
In ‘Name’ enter the name of the Backup-to-disk folder that will appear in BE, for example ‘My New
Backup Destination’. This name will be used in the future to select the destination of your backup jobs.
In ‘Path’ specify the path of the Backup-to-disk folder that you want to use. You can specify the path
manually browse the Active Directory or browse the Windows Network to obtain the Shared Folder list
(see below).
1. Specify the NAS shared folder as the destination in ‘Path’.
Figure 16
©Copyright 2010. QNAP Systems, Inc. All Rights Reserved. 18
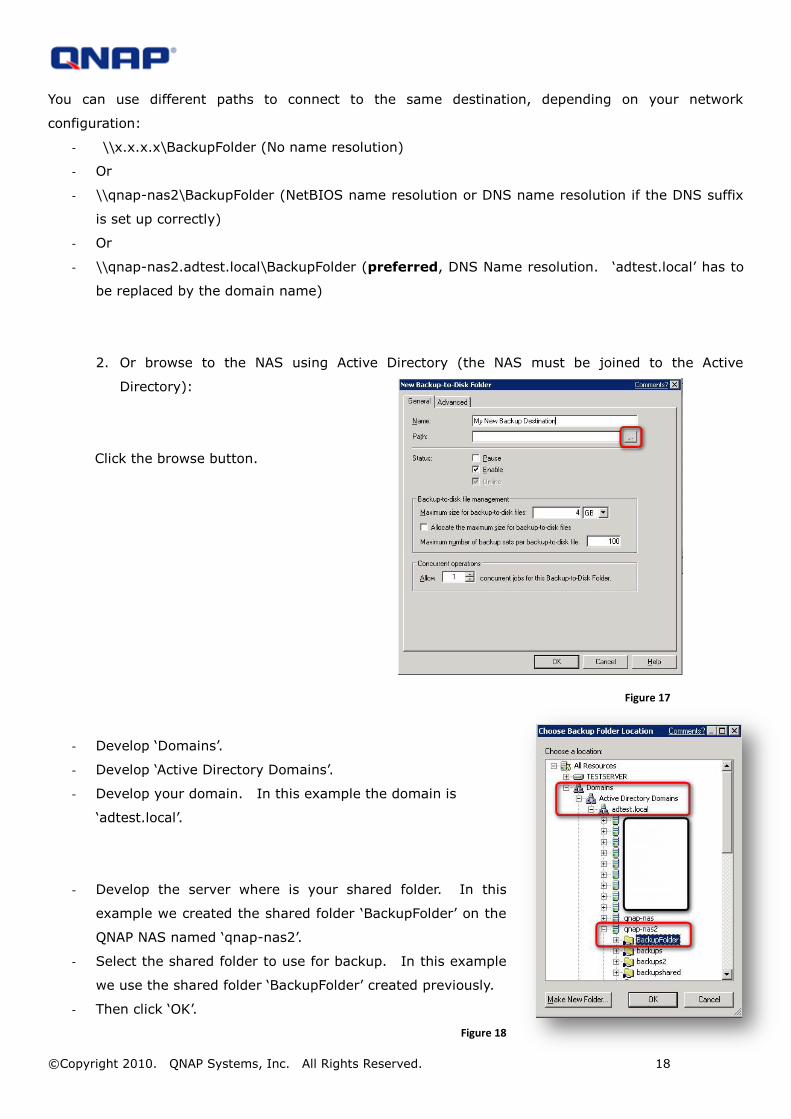
You can use different paths to connect to the same destination, depending on your network
configuration:
- \\x.x.x.x\BackupFolder (No name resolution)
- Or
- \\qnap-nas2\BackupFolder (NetBIOS name resolution or DNS name resolution if the DNS suffix
is set up correctly)
- Or
- \\qnap-nas2.adtest.local\BackupFolder (preferred, DNS Name resolution. ‘adtest.local’ has to
be replaced by the domain name)
2. Or browse to the NAS using Active Directory (the NAS must be joined to the Active
Directory):
Click the browse button.
Figure 17
- Develop ‘Domains’.
- Develop ‘Active Directory Domains’.
- Develop your domain. In this example the domain is
‘adtest.local’.
- Develop the server where is your shared folder. In this
example we created the shared folder ‘BackupFolder’ on the
QNAP NAS named ‘qnap-nas2’.
- Select the shared folder to use for backup. In this example
we use the shared folder ‘BackupFolder’ created previously.
- Then click ‘OK’.
Figure 18
©Copyright 2010. QNAP Systems, Inc. All Rights Reserved. 19
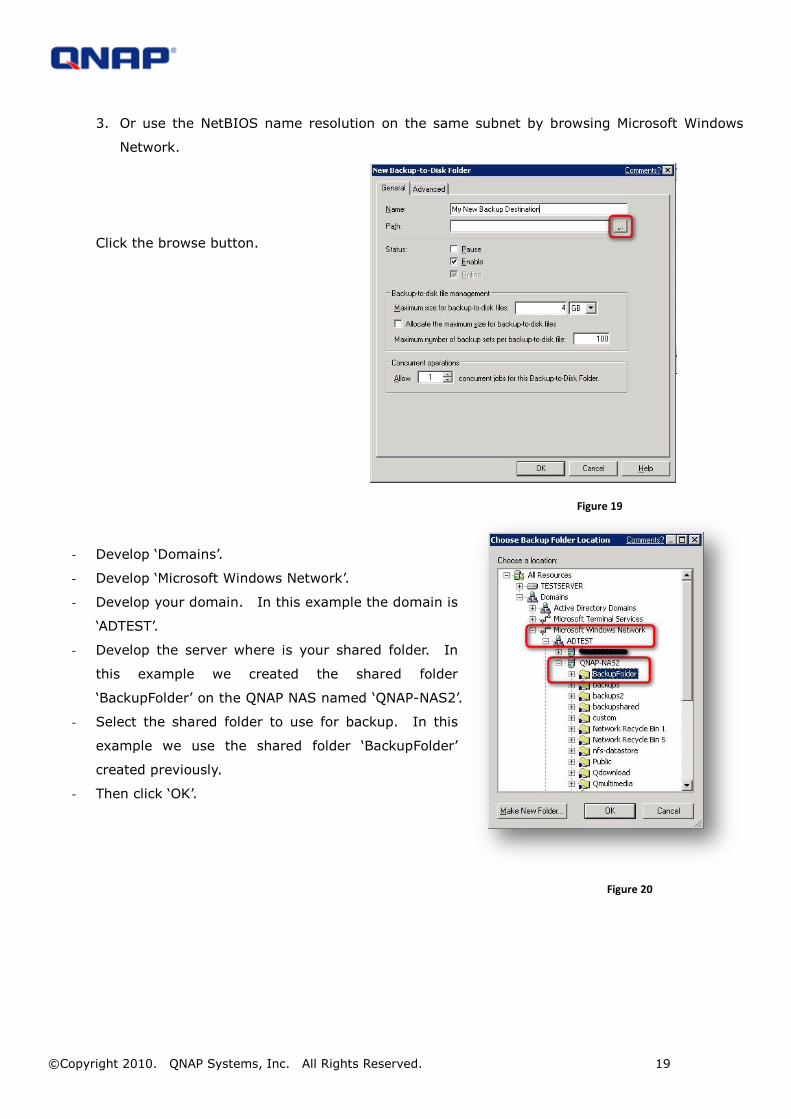
3. Or use the NetBIOS name resolution on the same subnet by browsing Microsoft Windows
Network.
Click the browse button.
Figure 19
- Develop ‘Domains’.
- Develop ‘Microsoft Windows Network’.
- Develop your domain. In this example the domain is
‘ADTEST’.
- Develop the server where is your shared folder. In
this example we created the shared folder
‘BackupFolder’ on the QNAP NAS named ‘QNAP-NAS2’.
- Select the shared folder to use for backup. In this
example we use the shared folder ‘BackupFolder’
created previously.
- Then click ‘OK’.
Figure 20
©Copyright 2010. QNAP Systems, Inc. All Rights Reserved. 20
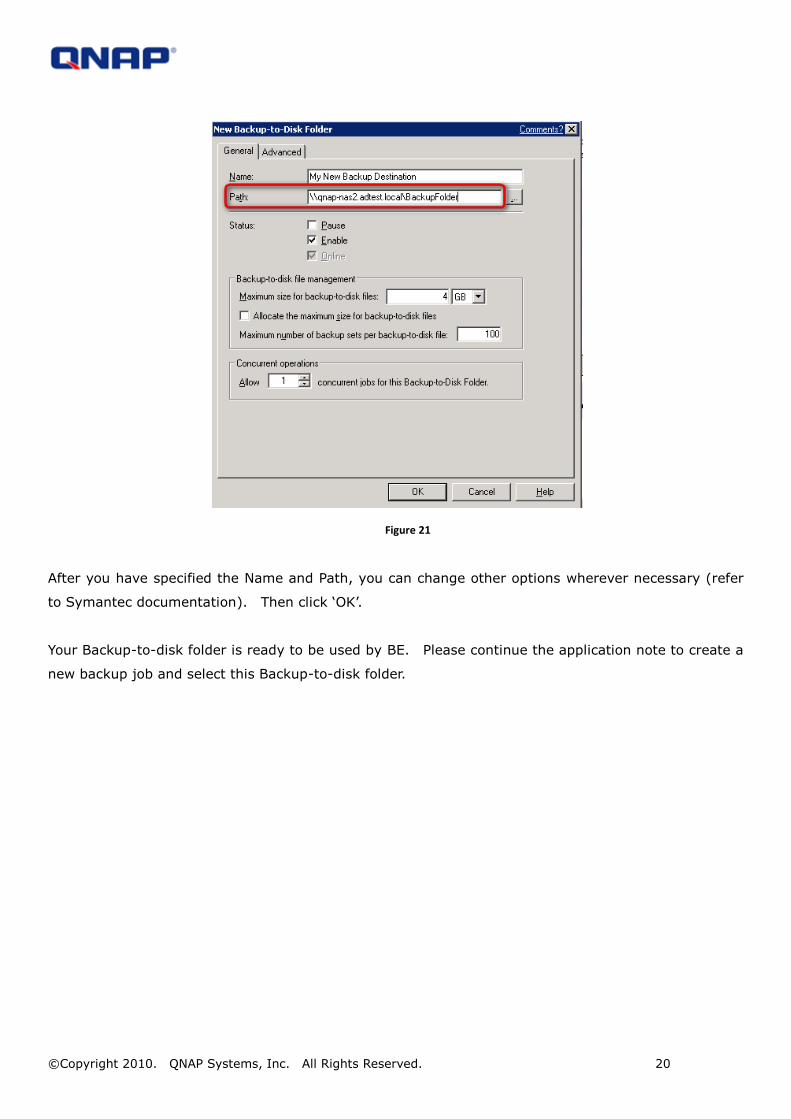
Figure 21
After you have specified the Name and Path, you can change other options wherever necessary (refer
to Symantec documentation). Then click ‘OK’.
Your Backup-to-disk folder is ready to be used by BE. Please continue the application note to create a
new backup job and select this Backup-to-disk folder.
©Copyright 2010. QNAP Systems, Inc. All Rights Reserved. 21
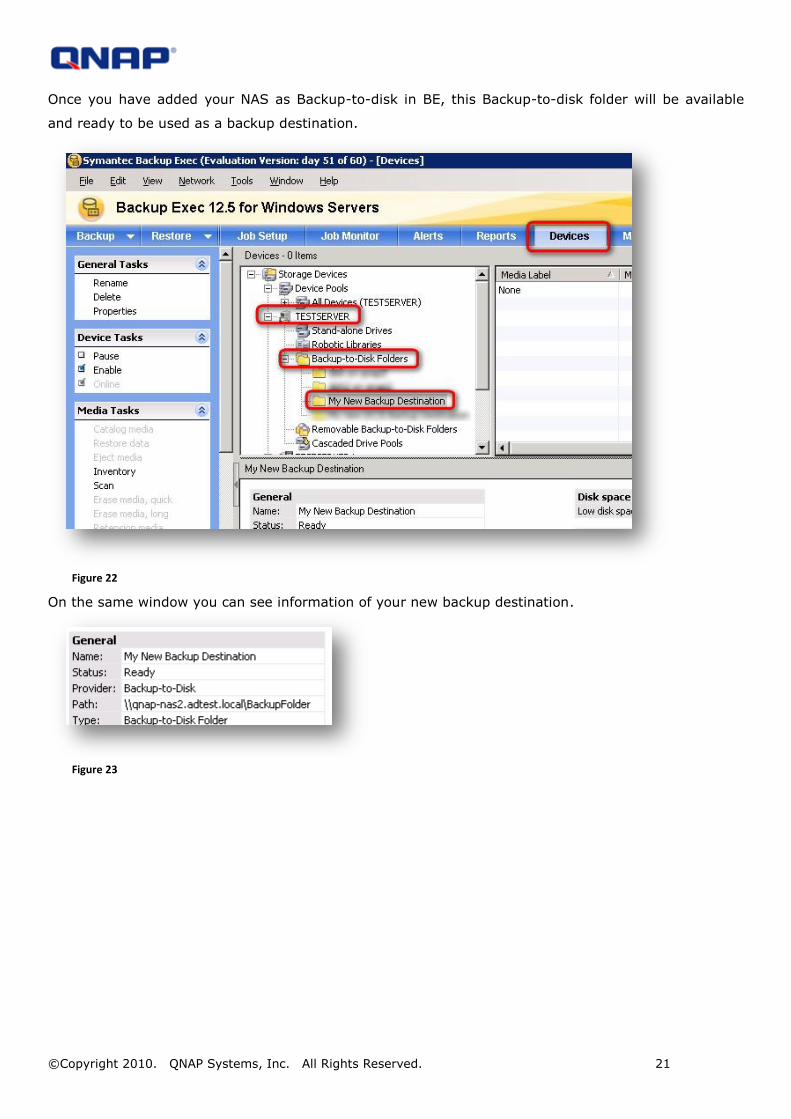
Once you have added your NAS as Backup-to-disk in BE, this Backup-to-disk folder will be available
and ready to be used as a backup destination.
Figure 22
On the same window you can see information of your new backup destination.
Figure 23

©Copyright 2010. QNAP Systems, Inc. All Rights Reserved. 22
Select the shared folder as the backup destination
- Start the backup wizard, choose custom settings.
- Follow the wizard until you are prompted to choose the backup device and media.
Figure 24
- Select your Backup-to-disk folder created previously (My New Backup Destination)
corresponding to the shared folder on your NAS.
- Complete the wizard until the end.
When you run the backup job, the backup data will be stored in ‘My New Backup Destination’
corresponding to the shared folder on the NAS.
For the other options regarding backup with Backup Exec, please refer to Symantec documentation.
©Copyright 2010. QNAP Systems, Inc. All Rights Reserved. 23
Restore with Intelligent Disaster Recovery (IDR) from the NAS
Symantec IDR allows you to restore a complete server after a disaster, for example in case of hardware
failure, even if the system cannot start anymore, by booting the server on a recovery CD. You can
back up your servers with IDR backups, store your backups on QNAP NAS, and restore the complete
server.
This solution has been tested with a Windows Server 2003 R1 SP2 backup. You have to create an IDR
backup first to be able to restore the data using IDR. Please refer to Symantec documentation to
learn how to use IDR and create the recovery CD.
- Boot the server you want to restore using the IDR CD.
- Select Automated Recovery.
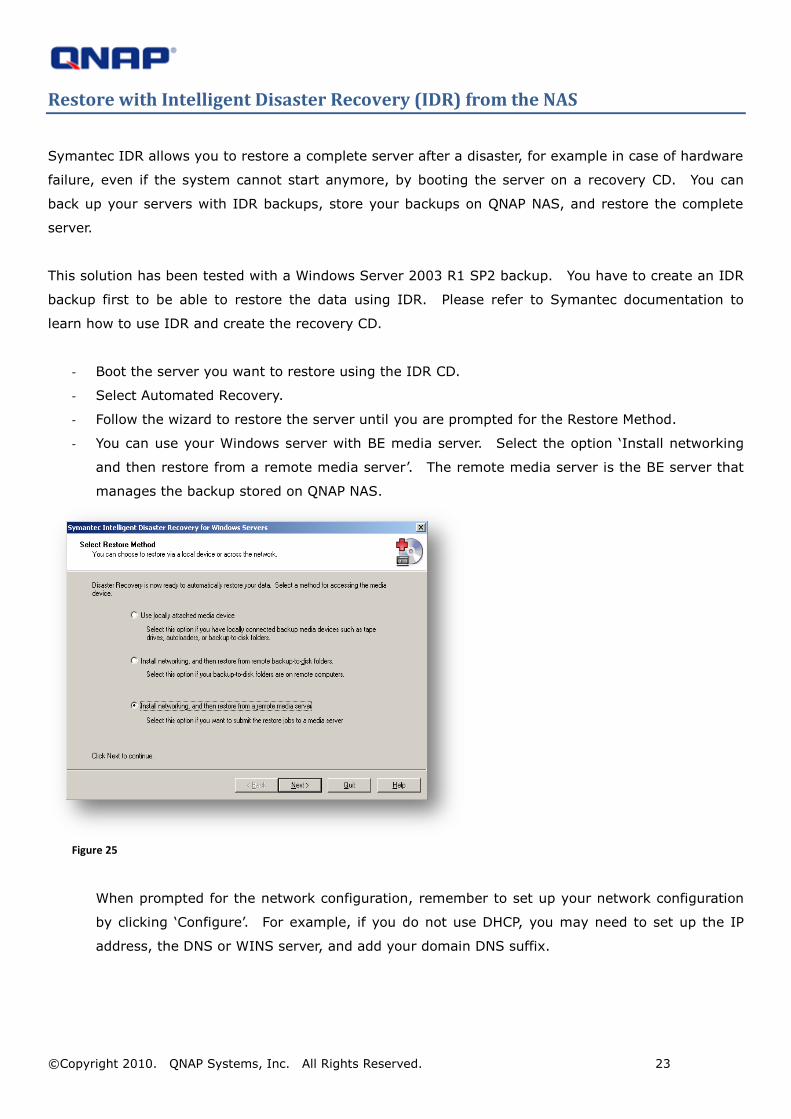
- Follow the wizard to restore the server until you are prompted for the Restore Method.
- You can use your Windows server with BE media server. Select the option ‘Install networking
and then restore from a remote media server’. The remote media server is the BE server that
manages the backup stored on QNAP NAS.
Figure 25
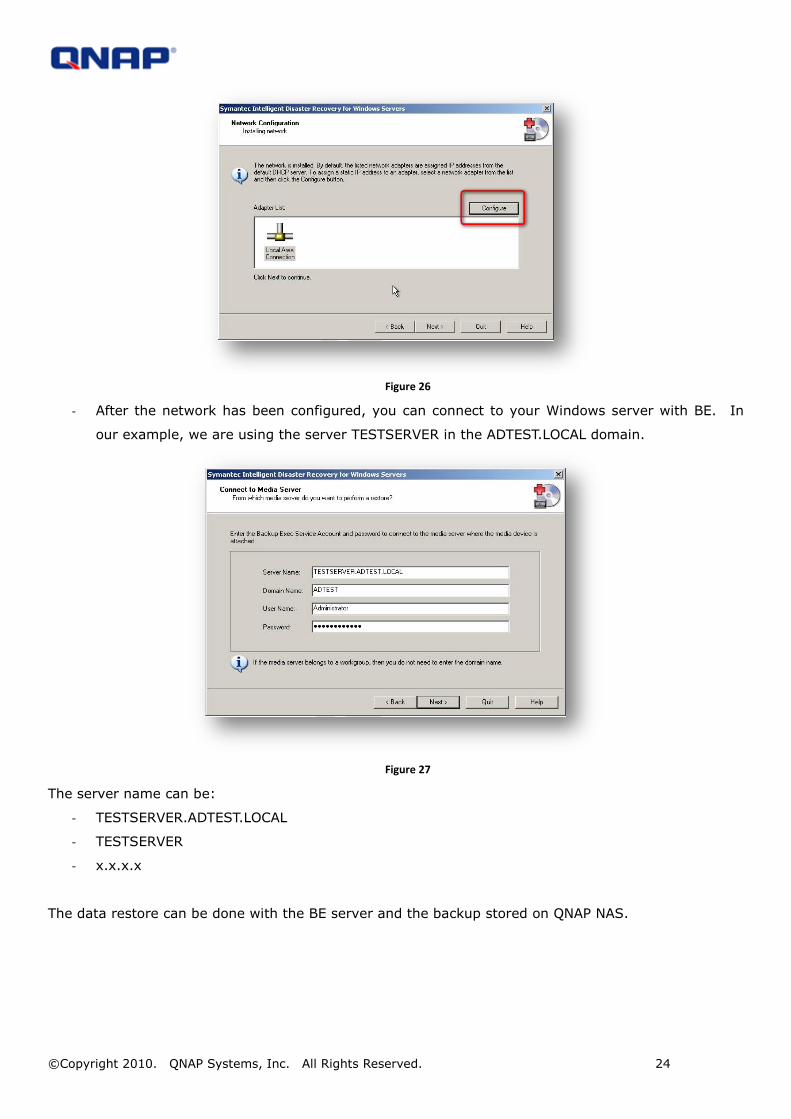
When prompted for the network configuration, remember to set up your network configuration
by clicking ‘Configure’. For example, if you do not use DHCP, you may need to set up the IP
address, the DNS or WINS server, and add your domain DNS suffix.
©Copyright 2010. QNAP Systems, Inc. All Rights Reserved. 24
Figure 26
- After the network has been configured, you can connect to your Windows server with BE. In
our example, we are using the server TESTSERVER in the ADTEST.LOCAL domain.
Figure 27
The server name can be:
- TESTSERVER.ADTEST.LOCAL
- TESTSERVER
- x.x.x.x
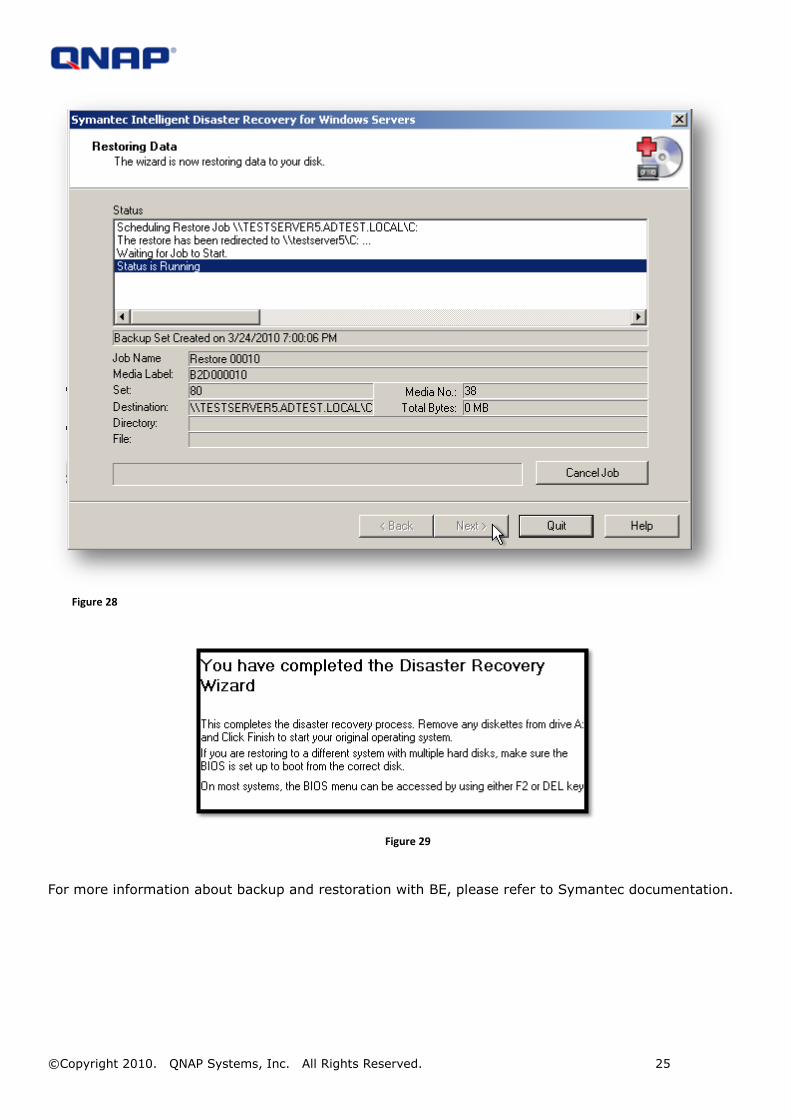
The data restore can be done with the BE server and the backup stored on QNAP NAS.
©Copyright 2010. QNAP Systems, Inc. All Rights Reserved. 25
Figure 28
Figure 29
For more information about backup and restoration with BE, please refer to Symantec documentation.
©Copyright 2010. QNAP Systems, Inc. All Rights Reserved. 26
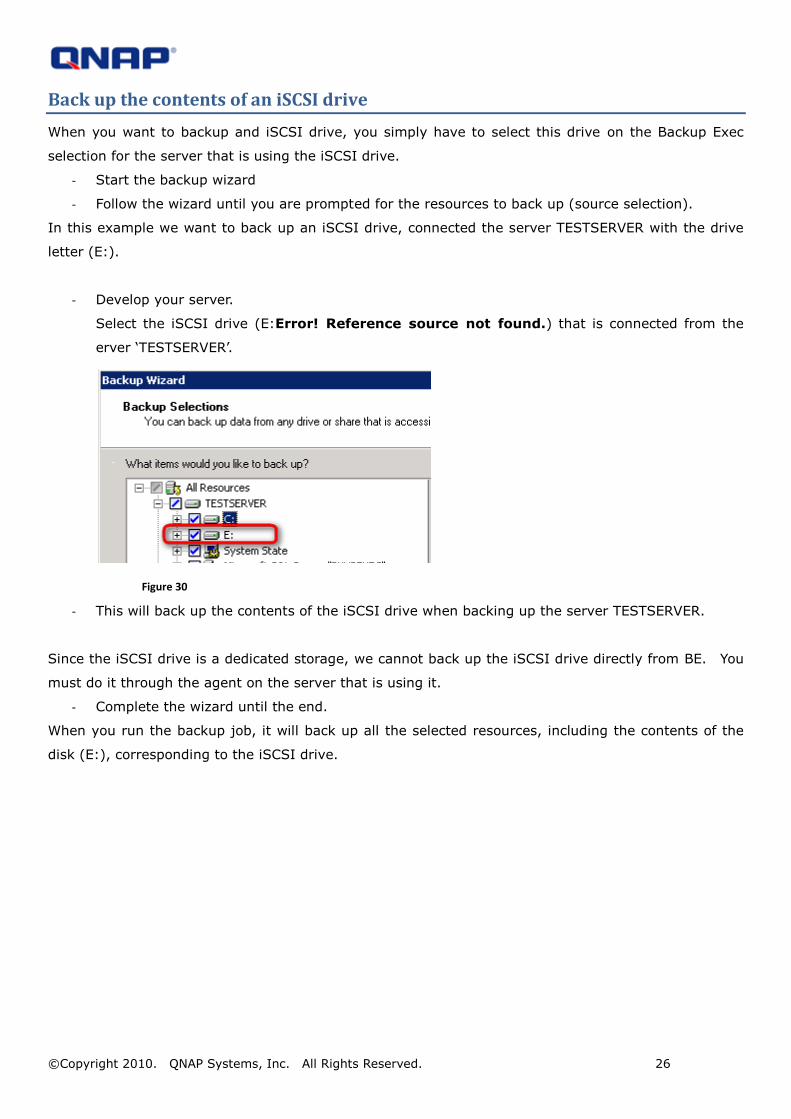
Back up the contents of an iSCSI drive
When you want to backup and iSCSI drive, you simply have to select this drive on the Backup Exec
selection for the server that is using the iSCSI drive.
- Start the backup wizard
- Follow the wizard until you are prompted for the resources to back up (source selection).
In this example we want to back up an iSCSI drive, connected the server TESTSERVER with the drive
letter (E:).
- Develop your server.
Select the iSCSI drive (E:Error! Reference source not found.) that is connected from the
erver ‘TESTSERVER’.
Figure 30
- This will back up the contents of the iSCSI drive when backing up the server TESTSERVER.
Since the iSCSI drive is a dedicated storage, we cannot back up the iSCSI drive directly from BE. You
must do it through the agent on the server that is using it.
- Complete the wizard until the end.
When you run the backup job, it will back up all the selected resources, including the contents of the
disk (E:), corresponding to the iSCSI drive.
©Copyright 2010. QNAP Systems, Inc. All Rights Reserved. 27
Back up the data from the NAS shared folders
You can back up your shared folders using BE 12.5.
To do so, you need to grant the read/write access to the shared folder to the user used by BE Services
(see Shared folder and permission page 10 ).
Note:
Firmware version 3.3 and above supports the file archive bit.
Firmware version 3.2 and below do not support the file archive bit.
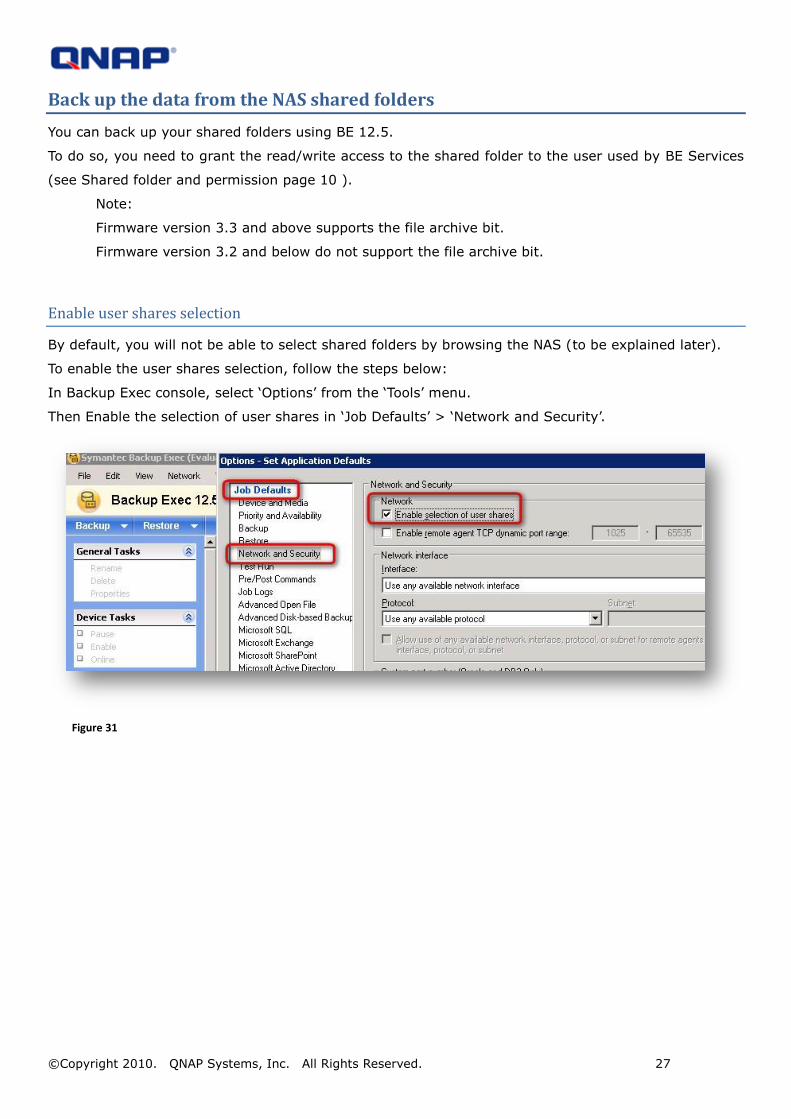
Enable user shares selection
By default, you will not be able to select shared folders by browsing the NAS (to be explained later).
To enable the user shares selection, follow the steps below:
In Backup Exec console, select ‘Options’ from the ‘Tools’ menu.
Then Enable the selection of user shares in ‘Job Defaults’ > ‘Network and Security’.
Figure 31
©Copyright 2010. QNAP Systems, Inc. All Rights Reserved. 28
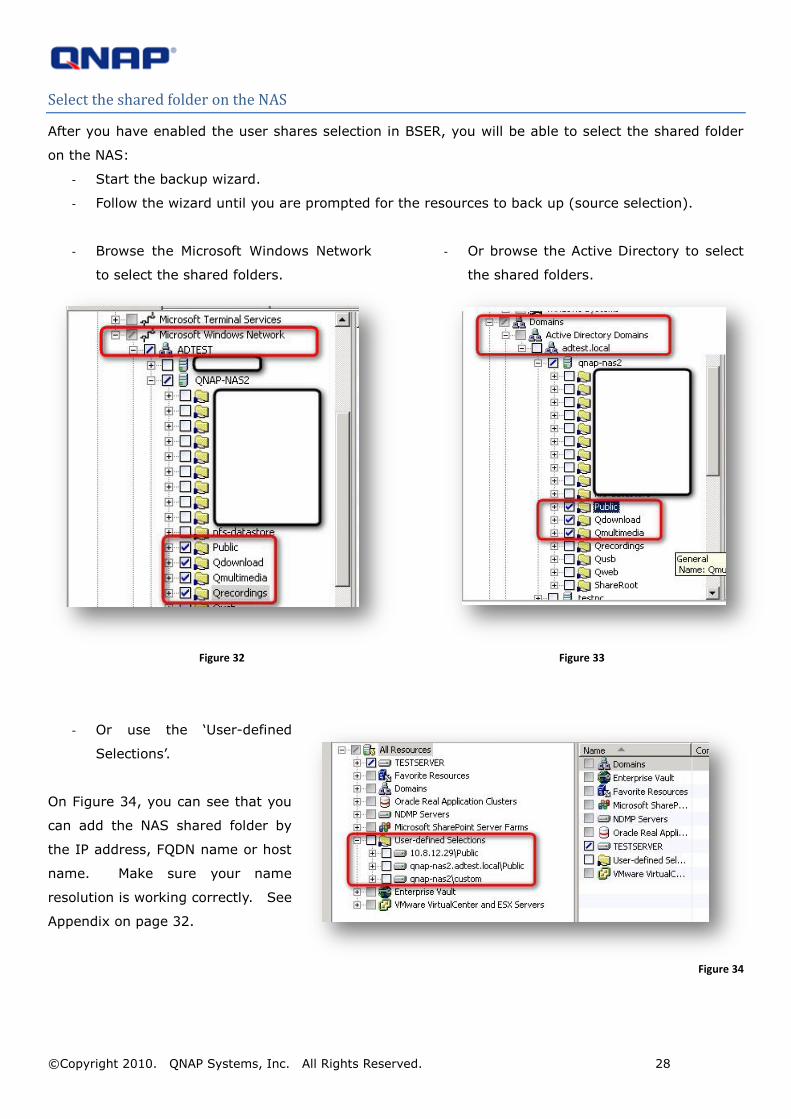
Select the shared folder on the NAS
After you have enabled the user shares selection in BSER, you will be able to select the shared folder
on the NAS:
- Start the backup wizard.
- Follow the wizard until you are prompted for the resources to back up (source selection).
- Browse the Microsoft Windows Network
to select the shared folders.
Figure 32
- Or browse the Active Directory to select
the shared folders.
Figure 33
- Or use the ‘User-defined
Selections’.
On Figure 34, you can see that you
can add the NAS shared folder by
the IP address, FQDN name or host
name. Make sure your name
resolution is working correctly. See
Appendix on page 32.
Figure 34
©Copyright 2010. QNAP Systems, Inc. All Rights Reserved. 29
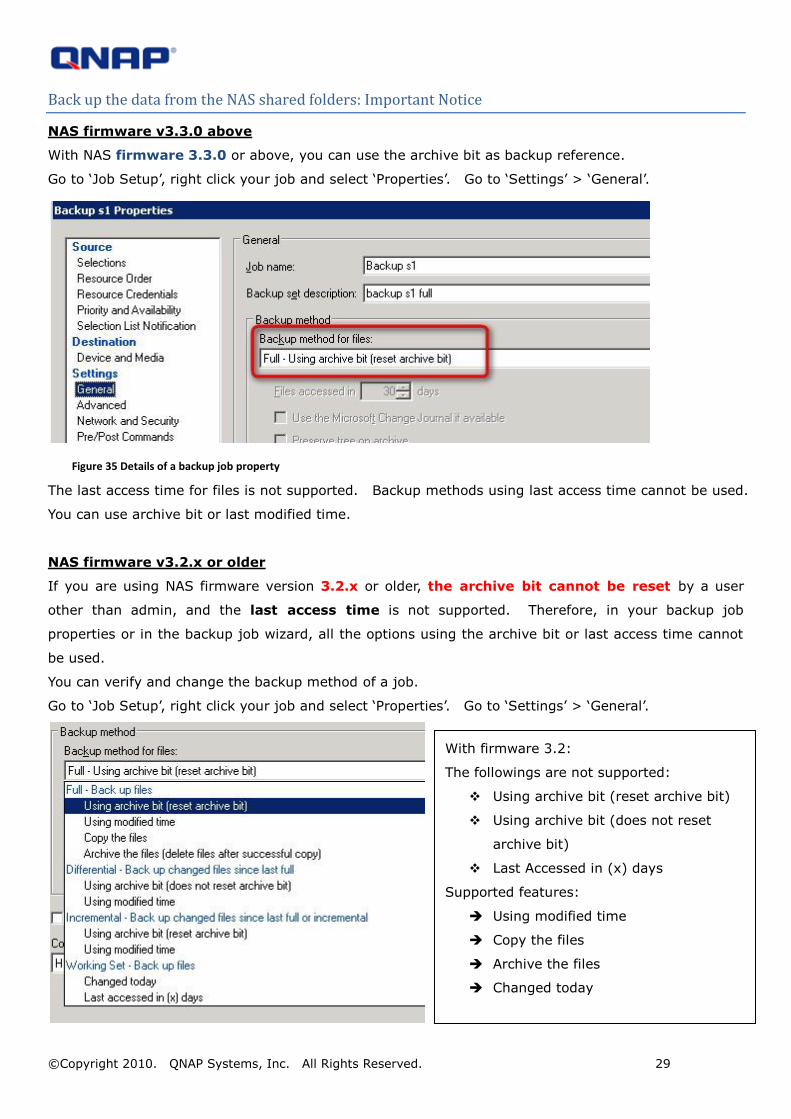
Back up the data from the NAS shared folders: Important Notice
NAS firmware v3.3.0 above
With NAS firmware 3.3.0 or above, you can use the archive bit as backup reference.
Go to ‘Job Setup’, right click your job and select ‘Properties’. Go to ‘Settings’ > ‘General’.
Figure 35 Details of a backup job property
The last access time for files is not supported. Backup methods using last access time cannot be used.
You can use archive bit or last modified time.
NAS firmware v3.2.x or older
If you are using NAS firmware version 3.2.x or older, the archive bit cannot be reset by a user
other than admin, and the last access time is not supported. Therefore, in your backup job
properties or in the backup job wizard, all the options using the archive bit or last access time cannot
be used.
You can verify and change the backup method of a job.
Go to ‘Job Setup’, right click your job and select ‘Properties’. Go to ‘Settings’ > ‘General’.
With firmware 3.2:
The followings are not supported:
Using archive bit (reset archive bit)
Using archive bit (does not reset
archive bit)
Last Accessed in (x) days
Supported features:
Using modified time
Copy the files
Archive the files
Changed today
©Copyright 2010. QNAP Systems, Inc. All Rights Reserved. 30
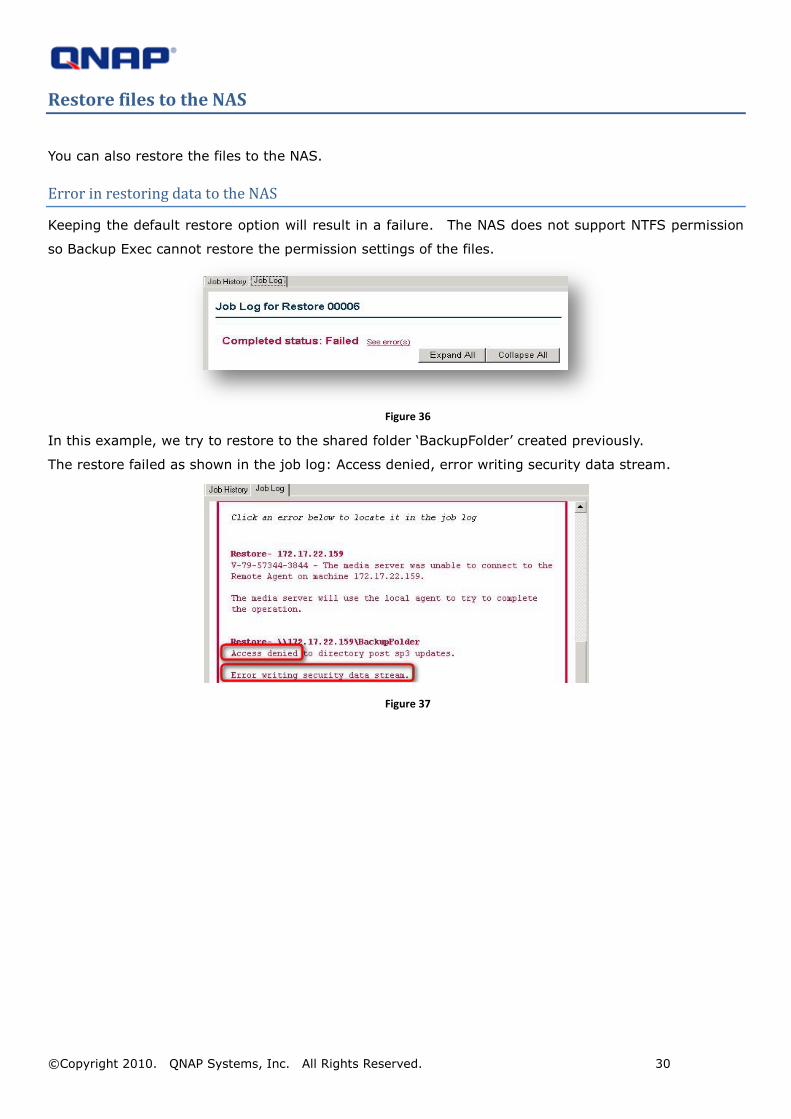
Restore files to the NAS
You can also restore the files to the NAS.
Error in restoring data to the NAS
Keeping the default restore option will result in a failure. The NAS does not support NTFS permission
so Backup Exec cannot restore the permission settings of the files.
Figure 36
In this example, we try to restore to the shared folder ‘BackupFolder’ created previously.
The restore failed as shown in the job log: Access denied, error writing security data stream.
Figure 37
©Copyright 2010. QNAP Systems, Inc. All Rights Reserved. 31
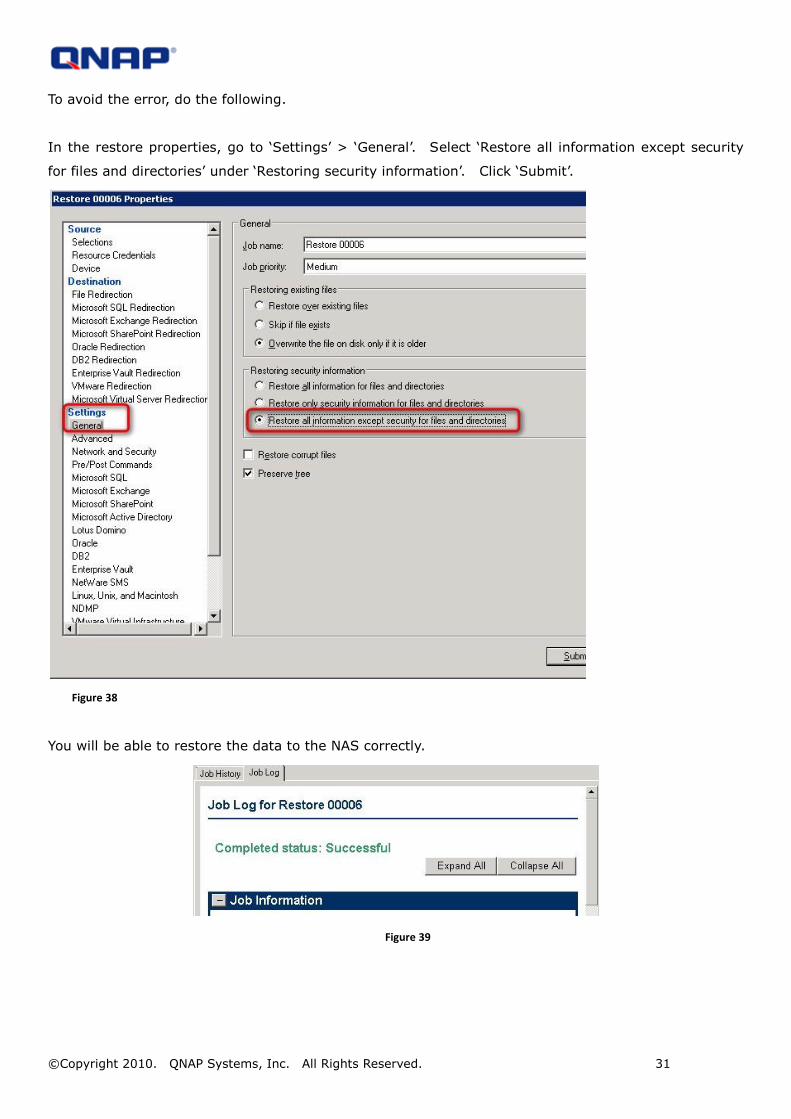
To avoid the error, do the following.
In the restore properties, go to ‘Settings’ > ‘General’. Select ‘Restore all information except security
for files and directories’ under ‘Restoring security information’. Click ‘Submit’.
Figure 38
You will be able to restore the data to the NAS correctly.
Figure 39
©Copyright 2010. QNAP Systems, Inc. All Rights Reserved. 32
Appendix
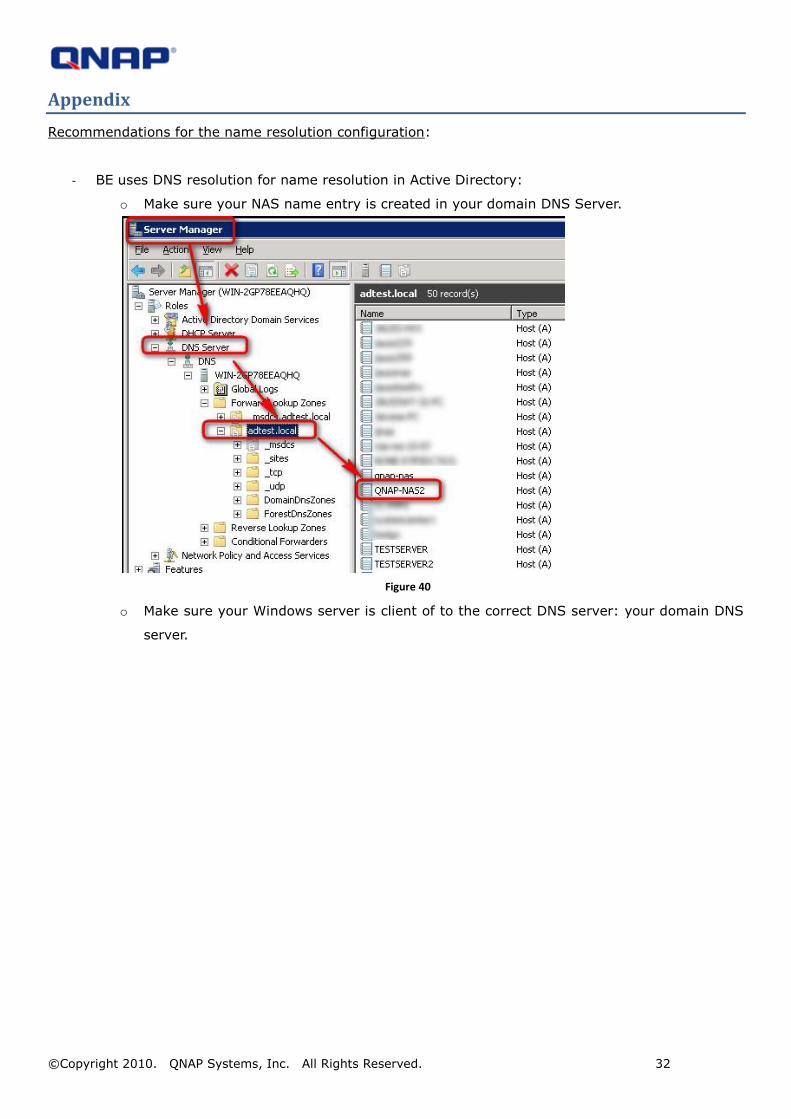
Recommendations for the name resolution configuration:
- BE uses DNS resolution for name resolution in Active Directory:
o Make sure your NAS name entry is created in your domain DNS Server.
Figure 40
o Make sure your Windows server is client of to the correct DNS server: your domain DNS
server.
©Copyright 2010. QNAP Systems, Inc. All Rights Reserved. 33
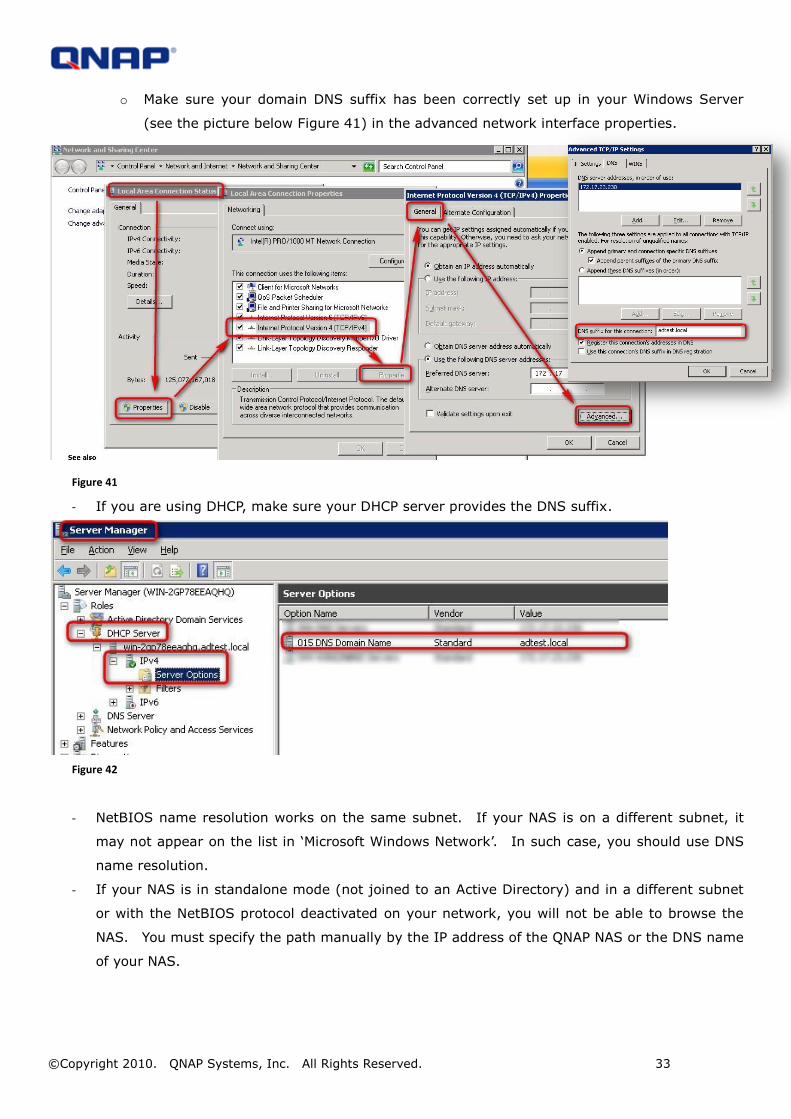
o Make sure your domain DNS suffix has been correctly set up in your Windows Server
(see the picture below Figure 41) in the advanced network interface properties.
Figure 41
- If you are using DHCP, make sure your DHCP server provides the DNS suffix.
Figure 42
- NetBIOS name resolution works on the same subnet. If your NAS is on a different subnet, it
may not appear on the list in ‘Microsoft Windows Network’. In such case, you should use DNS
name resolution.
- If your NAS is in standalone mode (not joined to an Active Directory) and in a different subnet
or with the NetBIOS protocol deactivated on your network, you will not be able to browse the
NAS. You must specify the path manually by the IP address of the QNAP NAS or the DNS name
of your NAS.