Use and Care Manual - EuroCave
17
Use and Care Manual Cigar storage unit XS 200 7082 643-01
Transcript of Use and Care Manual - EuroCave

Use and Care Manual
Cigar storage unit
XS 2007082 643-01
2
Optimum humidity and temperature are key.The very best humidors keep cigars at an even and constant relative humidity. Experts put the ideal level at 68-75% at an interior temperature of between 61 and 68°F. These climatic conditions allow the characteristic flavours of the cigar to unfold, the cigar will burn evenly and your enjoyment of the cigar and its taste will be enhanced. With the Liebherr cigar storage unit you can ensure constant humidity and a constant temperature - and control each one individually.
Naturally Spanish cedarwood.The interior fittings of the Liebherr cigar storage unit are made of Spanish cedarwood. This top quality wood is used for the shelves and presentation boxes. Spanish cedarwood is used because it ensures an even climate inside the appliance, it helps the cigars to mature and its aroma enhances the unique flavour of exclusive cigars.
Additional benefits• CFC-free• Energy-optimizedrefrigerantcircuit• Energy-efficientinsulation• Lowenergyconsumption• User-friendlyelectroniccontrols• Displayoffunctionsswitchedon• Temperaturecanbecontrolledwithinclimateratingrange,
regardless of room temperature• Audibledooropenalarm• Easytoclean
Thank you for your trustCongratulationsonyourpurchaseofthiscigarstorageunit.Inbuyingthisproduct,whichis distinguished by its perfect user-friendliness, impeccable reliability and high quality, you have chosen a top class appliance. We hope that you enjoy your new cigar storage unit - and that you get a lot of pleasure from your exclusive cigars.
The features on your appliance have been designed to ensure maximum convenience - day in, day out.
This appliance has been manufactured with recyclable materials using an environmentally friendly process, so together we’re making an active contribution to the preservation of our environment.
Please read the information in the operating instructions carefully to become familiar with all the benefits of your new appliance.
We know you will be pleased with your new appliance.
2

3
IMPORTANTAll types and models are subject to continuous improvement. The manufacturer reserves the right to make modifications in the shape, equip-ment and technology.
Table of ConTenTs
IMPORTANT INFORMATIONAfter starting the appliance for the first time, allow it to reach the set temperature and humidity points before adding any cigars. It may take up to 24 hours to reach the set points.
Contents PagePleaseReadandFollowtheseInstructions.................. 3
CaliforniaProposition65 ............................................... 3
DisposalofOldAppliance ............................................. 4
Electrical Safety ............................................................. 4
ImportantSafetyInformation ......................................... 5
Safety Regulations ......................................................... 5
SafetyInstructionsandWarnings ................................. 6
DisposalofCarton ......................................................... 6
Wall mounting ................................................................ 6
Dimensions .................................................................... 7
Descriptionofapplianceandequipment ...................... 7
Leveling the appliance ................................................... 7
OperatingandControlElements ................................... 8
Switching on for the first time ........................................ 8
Setting the Temperature ................................................ 9
Adjustingthehumidity ................................................... 9
Lighting ........................................................................... 9
AudibleWarningSignal ................................................. 9
Setup Mode ...................................................................10
Equipment .....................................................................12
Alternativeinteriorlayouts ............................................13
Cleaning ........................................................................14
Troubleshooting ............................................................15
Liebherr Warranty Plan .................................................16
ApplianceInformation ...................................................16
Please Read and Follow these InstructionsTheseinstructionscontainDanger,WarningandCautionnotes.
This information is important for safe and efficient installation and operation.
AlwaysreadandcomplywithallDanger,WarningandCautionnotes!
DANGER! Danger indicates a hazard which will cause serious injury or death if precautions are not followed.
WARNING! Warning indicates a potentially hazardous situation which, if not avoided, could result in death or serious injury.
CAUTION! Caution indicates a potentially hazardous situation which, if not avoided, may result in minor or moderate injury.
IMPORTANTThis indicates information that is especially relevant to a problem-free installation and operation.
California Proposition 65- This product contains chemicals known to the state of Californiatocausecancerorreproductiveharm.
- This product can expose you to chemicals including DiisononylPhthalate(DINP)whichisknowntotheStateofCaliforniatocausecancer.Formoreinformation go to www.P65Warnings.ca.gov.
- This product can expose you to chemicals including Di-isodecylPhthalate(DIDP)whichisknowntotheStateofCaliforniatocausebirthdefectsorotherreproductive harm. For more information go to
www.P65Warnings.ca.gov.
3

4
safeTy
Disposal of Old Appliance
DANGER! Risk of child entrapment.
Childentrapmentandsuffocationarenotproblemsofthe past.
Junked or abandoned refrigerators are still dangerous – even if they will sit for “just a few days.”
Ifyouaregettingridofyouroldrefrigerator,pleasefollow these instructions to help prevent accidents.
Before you discard old appliances:
• Takeoffthedoors.
• Leavetheshelvesinplacesothatchildren may not easily climb inside.
• Cutoffthepowercablefromthediscarded appliance. Discard separately from the appliance.
• Besuretofollowyourlocalrequirementsfor disposal of appliances.
Contact the trash collection agency in your area for additional information.
Electrical SafetyConnectthisappliancetoa15ampor20amp,110-120VAC,circuitwhichisgroundedandprotectedbyacircuit breaker or fuse.
We recommend using a dedicated circuit for this appliance to prevent circuit overload and the chance of interruption to the appliance.
This appliance is equipped with a three-prong (grounding)polarizedplugforyourprotectionagainstpossibleshockhazards.
Where a two-prong wall receptacle is encountered, contact a qualified electrician and have it replaced with a properly grounded three-prong receptacle in accordance with all local codes and ordinances.
WARNING!
Electrocution hazard.
Electricalgroundingrequired.
• Do not remove the round grounding prong from the plug.
• Do not use extension cords or ungrounded (two-prong) adapters.
• Donotuseapowercordthatisfrayedordamaged.
• Do not use a power strip.
Failure to follow these instructions may result in fire, electrical shock or death.
4

5
safeTy
Important Safety Information• Topreventinjurytoyouordamagetotheunit,
the appliance should be unpacked and set up by two people.
• Iftheapplianceisdamagedondelivery,contactthe supplier immediately before connecting to the power source.
• Toguaranteesafeoperation,ensurethatappli-ance is set up and connected as described in these operating instructions.
• Disconnecttheappliancefromthepowersource if a fault occurs. Pull out the plug, turn off or disable the power source.
• Whendisconnectingtheappliance,usetheplug.Donotpullonthecord.
• Anyrepairsandworkontheapplianceshouldonly be performed by the customer service department.Unauthorizedworkmaybedan-geroustotheuser.Changingthepowersourcecable should only be done by the customer ser-vice department.
• Donotstoreexplosivesorspraysusingcom-bustible propellants such as butane, propane, pentane, etc. in the appliance. Electrical com-ponents might cause leaking gas to ignite. You may identify such sprays by the printed contents or a flame symbol.
• Donotuseelectricalappliancesinsidetheappliance.
• Donotallowchildrentoplaywiththeappliance.Childrenmustnotclimb,sitorstandontheracks or door.
• Topreventpossibleinjuryduetoanelectricalshock, be sure to disconnect the power cord or turn off the circuit breaker before cleaning the appliance.
• Toavoidinjuryordamagetotheappliance,donot use steam cleaning equipment to clean the appliance.
• Donotoperatetheapplianceinthepresenceofexplosive fumes.
• Intheeventofapoweroutage,minimizeopen-ing the door.
• Toprotecttheappliancefrompossibledam-age, allow the appliance to stand 1/2 to 1 hour in place before turning the electricity on. This allows the refrigerant and system lubrication to reach equilibrium.
Safety RegulationsTheapplianceisdesignedforstoringcigarsonly.Itisdesigned as a household appliance.
The appliance is set to operate within specific ambient temperature limits according to its climate rating. These temperature limits should not be exceeded. The cor-rect climate rating for your appliance is indicated on the model plate.
This is explained as follows:
Climate Rating Set for Ambient Temperatures of
SN 50°Fto90°F(10°Cto32°C) N 61°Fto90°F(16°Cto32°C) ST 61°Fto100°F(16°Cto38°C) SN-ST 50°Fto100°F(10°Cto38°C) SN-T 50°Fto109°F(10°Cto43°C) T 61°Fto109°F(16°Cto43°C)
- The refrigerant circuit has been tested for leaks.- The appliance complies with current safety regula-tionsUL250andCSAC22.2#63.
We recommend cleaning the appliance before turning it on for the first time. See Cleaning.
WARNING!
Do not allow children to play with the appliance. Children must not climb, sit or stand on the racks or door.Failure to follow these instructions may result in death or serious injury.
5

6
UnpaCking
Safety Instructions and WarningsAvoidplacingtheapplianceindirectsunlightornearthestove,rangetop,radiatorsandsimilarheatsources.Donot place microwave ovens, toaster ovens or other heat-emitting appliances on top of this unit.
Keep the appliance out of the weather. The ventilation grillesshouldnotbeobstructed.Alwaysensurethereisgood ventilation all around the appliance.
Assoonasyouuncratetheunit:
• Examinetheunitandpackagingforshippingdamage.Contactthecarrierimmediatelyifyoususpect there is any damage.
• Notethetype(modelnumber),servicenumber,serial number, date of purchase and where purchased on the spaces provided in the back of this manual.
Disposal of CartonThe packaging is designed to protect the appliance and individual components during moving and is made of recyclable materials.
• Corrugatedboard/cardboard• Moldedpolystyrene(foamed,CFC-freepolystyrene)• Polythenebagsandsheets• Polypropylenestraps
WARNING!
Keep packaging materials away from children. Polythene sheets and bags can cause suffocation!
• Pleasetakethepackagingmaterialtoyourlocalrecy-cling facility.
Wall mountingThe appliance can be wall-mounted. There are two mounting holes 1 at the back of the appliance.
WARNING! Make sure the wall and fastenings can with-stand the weight of the appliance when fully loaded. The empty appliance weighs 68.4 lbs.
IMPORTANTTo ensure sufficient ventilation through the ventilation slots, the four wall spacers 2 must always be inserted, regardless of whether the appliance is wall-mounted or standing on the floor against a wall.
Simply insert the spacers in the openings provided.
1
2
113 - 3
/8"
2
2
2
6
7
feaTUres
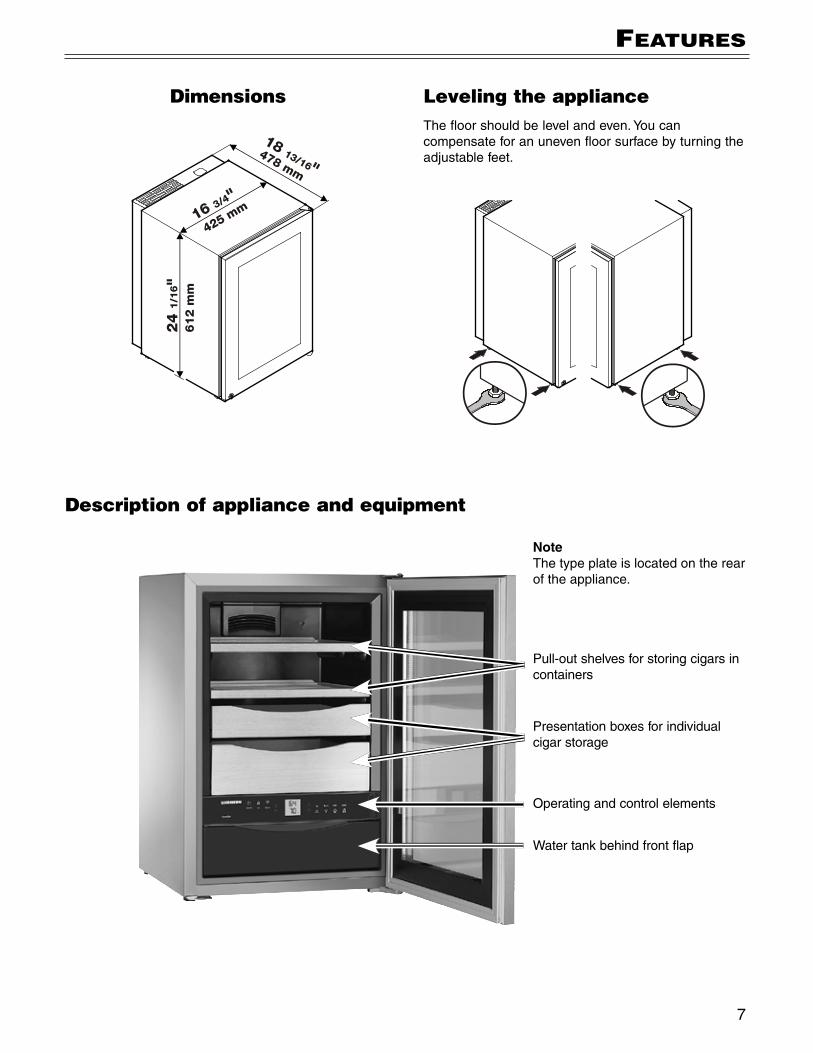
Description of appliance and equipment
Dimensions
Operatingandcontrolelements
Pull-out shelves for storing cigars in containers
Water tank behind front flap
Leveling the applianceThe floor should be level and even. You can compensate for an uneven floor surface by turning the adjustable feet.
Presentation boxes for individual cigar storage
NoteThe type plate is located on the rear of the appliance.
7

8
Switching on for the first timeBefore switching on the appliance, fill the watertankwith32ozofdistilled water.
Use distilled water only!
Fold down the front flap completely and if necessary slide it into the appliance as far as it will go.
Lift the water tank slightly, remove and fill with water.
Replace the water tank, sliding it in as far as it will go. Pull out the front flap completely and fold upwards at a 90° angle.
To switch on: Press the On/Off button. The display will flash.
The appliance will take 24 hours to reach the correct levelforstoringcigars(temperature,humidity).
The factory setting is 64°F and 70% humidity.
To switch off: Press the On/Off button for 3 seconds until the display goes dark.
operaTion
Operating and Control ElementsThe electronic control panel has the “Touch capaci-tance technology”.Anyfunctioncanbeactivatedbyafingertip on the symbol of the operating icons.
The exact contact point is between the Symbol and its label.
�ApplianceON/OFFTemperaturesettingbuttons(forsettingtheinteriortemperature)
Humiditysettingbuttons(forsettingtheinteriorhumidity)
InteriorlightON/OFF Mute alarm
InteriorlightOnLED Temperature display
AlarmLED(flashestoindicateamalfunction)ChildlockLED Humidity display
bm Top up water tank
421 7 8 5 6 3
9 bl bm
LEDlightsupwhenthelightingisswitchedon.
LEDlightsupwhenthechildlockisactive.
LEDflasheswhenthetemperatureorhumidityinside the appliance is too high or too low.
LEDlightsupwhenthewatertankneedstoppingup.
Important!This alarm will activate when the water level drops to 13oz(sufficienttoallowtheappliancetorunproperlyforanother6weeks).Whentoppingupthewater,alwaysremoveanyimpuritiessuchascigarleaves.Ifthe water tank is very dirty, clean it and refill.
8

9
operaTion
Setting the TemperatureTo reduce the temperature: Press the Down button.
To increase the temperature: Press the Up button.
- While you are entering the temperature, the set temperature will flash on the display.
- The electronic controls will switch over automatically about 5 seconds after the last time you pressed the button, and the actual temperature will be displayed.
The temperature can be set at between 61°F and 68°F.
Audible Warning SignalThe audible warning signal sounds in the event of a malfunction.
Itsoundswhenthedoorhasbeenleftopenforlongerthan 60 seconds.
Itwillalsosoundiftheinteriorbecomestoocoldortoo warm or if the humidity is too high or too low. The corresponding display will also flash.
The symbol lights up.
The audible warning device is switched off by pressing the Alarm button.
LightingThe light is integrated into the door frame and can be switched on and off by pressing the Light button.
The symbol lights up when the light is switched on.
Furthermore, the brightness of the lighting can be adjusted.
Press and hold the Light button and at the same time press the humidity setting buttons to increase or decrease the brightness.
Down = darker , Up = brighterAdjusting the humidityTo reduce the humidity: Press the Down button.
To increase the humidity: Press the Up button.
- While you are setting the humidity, the display will flash.-About5secondsafterthebuttonwaslastpressed,the
actual interior humidity will be displayed.
The humidity can be adjusted between 68% and 75%.
9

10
operaTion
Setup ModeInthesetupmodeyoucanactivatethefollowingfunc-tions:
= Sabbath mode
=Displaybrightness
= Temperature display mode
=Childlock
How to activate the setup mode• PresstheLight button for approximately five seconds
- after 5 seconds will flash in the display.
You can select the setup mode functions by pressing the Up/Down buttons.
Exit setup mode• PresstheOn/Off button. The appliance will change
back to normal operation.
= Sabbath ModeThis feature considers the Religious requirements on Sabbath or Holidays. When the Sabbath Mode is active some functions of the electronic controls are switched off.
The door can be opened and closed at any time.• Thelightingremainsoff.• Thecoolingfanremainsinitsactualstate:Ifitisonit
remains on, if it is off it remains off.• Thereisnodooralarm.• Thereisnotemperaturealarm.• TheunitwillreturnintoSabbathModeafterapower
failure.
How to activate the Sabbath Mode• ActivatethesetupmodebypressingtheLight button
for 5 seconds.
- the display shows
• PresstheLight button
- the display shows
• PresstheLight button again
- the display shows
- the Sabbath mode is activated.
• ExitsetupmodebypressingtheOn/Off button.
How to deactivate the Sabbath Mode• ActivatethesetupmodebypressingtheLight button
for 5 seconds.
- the display shows
• PresstheLight button
- the display shows
• PresstheLight button again
- the S symbol intheDisplaydisappears, the Sabbath mode is deactivated.
• ExitsetupmodebypressingtheOn/Off button.
10

11
operaTion
= Display brightness
How to adjust the display brightness• ActivatethesetupmodebypressingtheLight button
for 5 seconds.
• Press the Down button until appears in the display.
• PresstheLight button
- the display shows
• PressUp/Down buttons to select 0 = minimum to 5 = maximum brightness
• PresstheLight button at the desired value.
• ExitsetupmodebypressingtheOn/Off button.
• Closethedoor.Thenewsettingwillactivateafterabout 1 minute.
= Temperature display modeYou can choose the unit of temperature for the display indegreesFahrenheitordegreesCelsius.
NoteThe factory setting is degrees Fahrenheit.
How to change the temperature display to degrees Celsius• ActivatethesetupmodebypressingtheLight button
for 5 seconds.
• PresstheDown button until appears in the display.
• PresstheLight button
- the display shows
• PresstheLight button again
- the temperature reading is now displayed in degree Celsius.
• ExitsetupmodebypressingtheOn/Off button.
NoteTo change the temperature display back to degrees
Fahrenheit, follow the steps above.
= Child lock
The child lock is designed to protect the appliance frombeingturnedOFFaccidentally.
How to activate the child lock• ActivatethesetupmodebypressingtheLight button
for 5 seconds
• Press the Down button until appears in the display.
• PresstheLight button
- the display shows
• PresstheLight button again
-theLED is lit and the child lock is activated.
• ExitsetupmodebypressingtheOn/Off button.
How to deactivate the child lock• ActivatethesetupmodebypressingtheLight button
for 5 seconds.
• Press the Down button until appears in the display.
• PresstheLight button
- the display shows
• PresstheLight button again
-theLED goes out. The child lock is deactivated.
• ExitsetupmodebypressingtheOn/Off button.
11
12
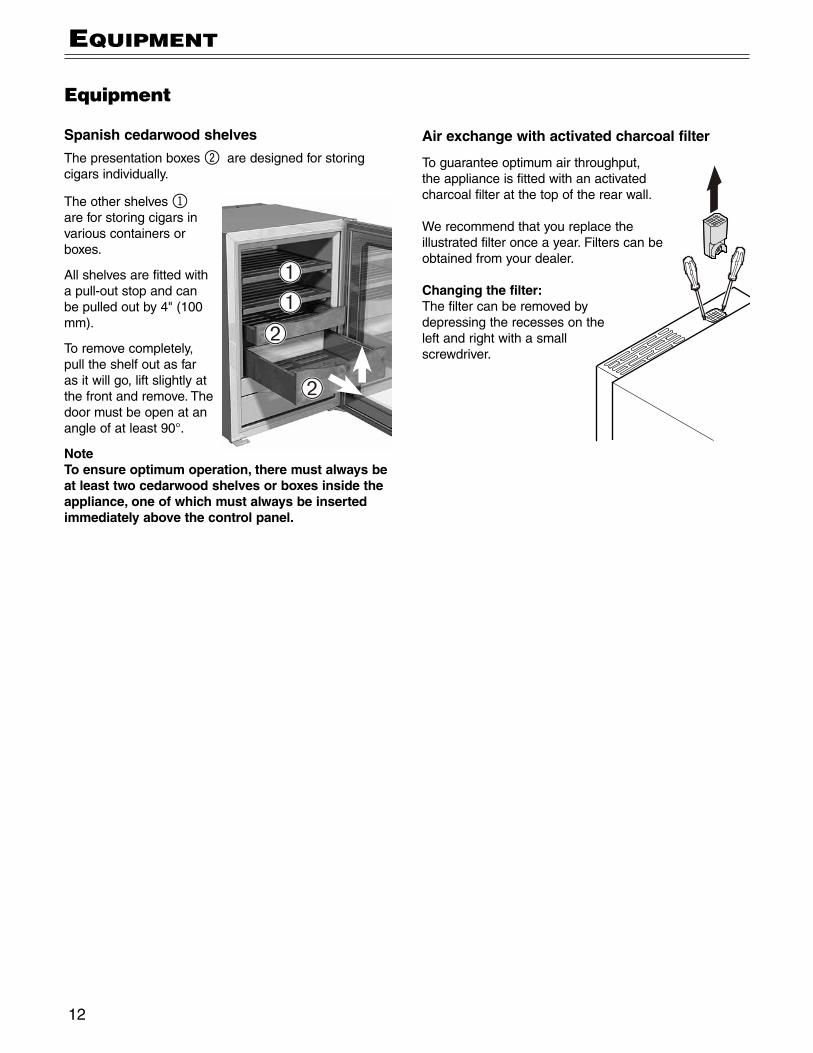
Air exchange with activated charcoal filter
To guarantee optimum air throughput, the appliance is fitted with an activated charcoal filter at the top of the rear wall.
We recommend that you replace the illustrated filter once a year. Filters can be obtained from your dealer.
Changing the filter:The filter can be removed by depressing the recesses on the left and right with a small screwdriver.
Equipment
Spanish cedarwood shelves
The presentation boxes 2 are designed for storing cigars individually.
The other shelves 1 are for storing cigars in various containers or boxes.
Allshelvesarefittedwitha pull-out stop and can bepulledoutby4"(100mm).
To remove completely, pull the shelf out as far as it will go, lift slightly at the front and remove. The door must be open at an angle of at least 90°.
Note To ensure optimum operation, there must always be at least two cedarwood shelves or boxes inside the appliance, one of which must always be inserted immediately above the control panel.
eqUipmenT
12
13
eqUipmenT
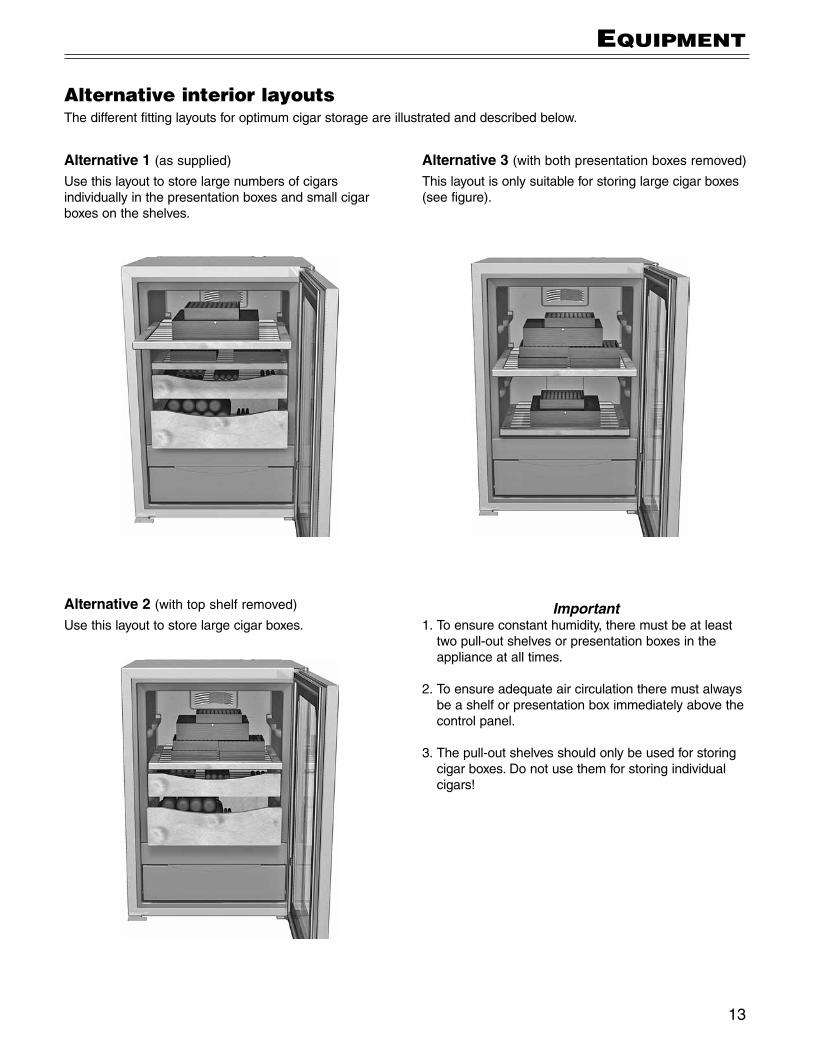
Alternative interior layoutsThe different fitting layouts for optimum cigar storage are illustrated and described below.
Alternative 1 (assupplied)Usethislayouttostorelargenumbersofcigarsindividually in the presentation boxes and small cigar boxes on the shelves.
Alternative 2 (withtopshelfremoved)Usethislayouttostorelargecigarboxes.
Alternative 3 (withbothpresentationboxesremoved)This layout is only suitable for storing large cigar boxes (seefigure).
Important1. To ensure constant humidity, there must be at least
two pull-out shelves or presentation boxes in the appliance at all times.
2. To ensure adequate air circulation there must always be a shelf or presentation box immediately above the control panel.
3. The pull-out shelves should only be used for storing cigarboxes.Donotusethemforstoringindividualcigars!
13
14
• Drytheinteriorandthewatertankthoroughlywithaclean cloth and replace the water tank.
• Switchtheappliancebackonandreplacethecigars.
• Donotdamagethetypeplateonthebackoftheappliance.Itisveryimportantforservicingpurposes.
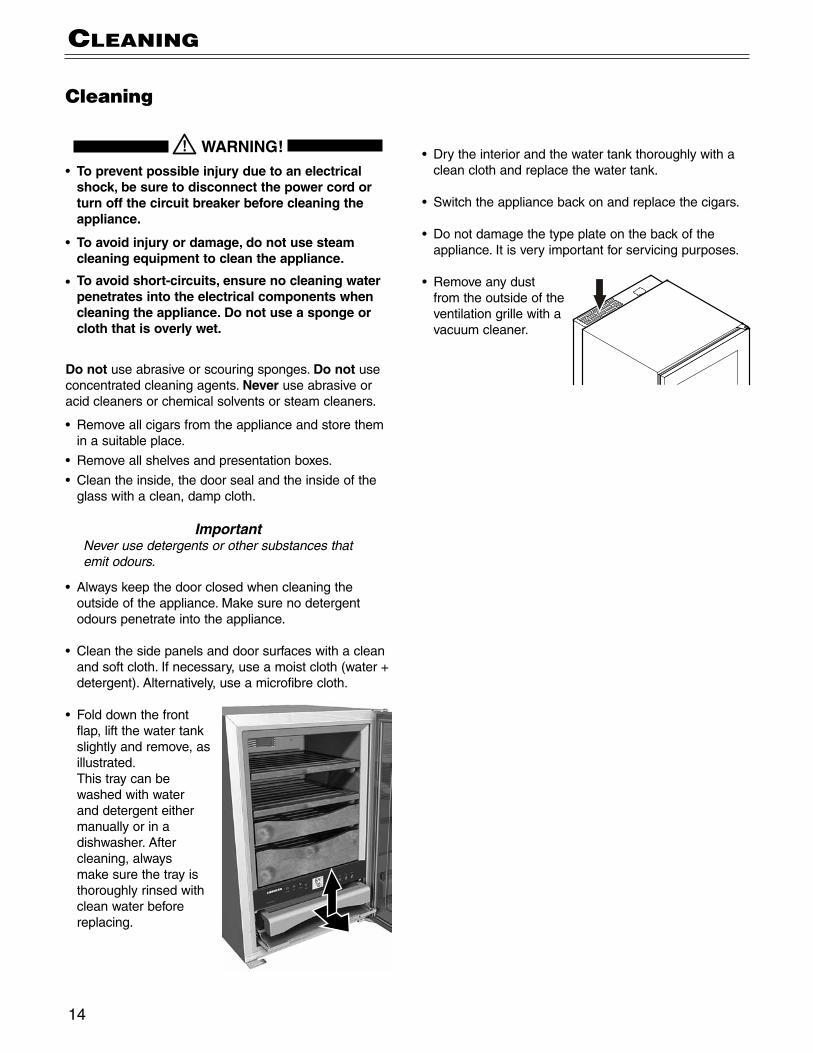
• Removeanydustfrom the outside of the ventilation grille with a vacuum cleaner.
Cleaning
Cleaning
WARNING! • To prevent possible injury due to an electrical
shock, be sure to disconnect the power cord or turn off the circuit breaker before cleaning the appliance.
• To avoid injury or damage, do not use steam cleaningequipmenttocleantheappliance.
• To avoid short-circuits, ensure no cleaning water penetrates into the electrical components when cleaning the appliance. Do not use a sponge or cloth that is overly wet.
Do not use abrasive or scouring sponges. Do not use concentrated cleaning agents. Never use abrasive or acid cleaners or chemical solvents or steam cleaners.
• Removeallcigarsfromtheapplianceandstorethemin a suitable place.
• Removeallshelvesandpresentationboxes.
• Cleantheinside,thedoorsealandtheinsideoftheglass with a clean, damp cloth.
ImportantNever use detergents or other substances that emit odours.
• Alwayskeepthedoorclosedwhencleaningtheoutside of the appliance. Make sure no detergent odours penetrate into the appliance.
• Cleanthesidepanelsanddoorsurfaceswithacleanandsoftcloth.Ifnecessary,useamoistcloth(water+detergent).Alternatively,useamicrofibrecloth.
• Folddownthefrontflap, lift the water tank slightly and remove, as illustrated.
This tray can be washed with water and detergent either manually or in a dishwasher.Aftercleaning, always make sure the tray is thoroughly rinsed with clean water before replacing.
14
15
TroUbleshooTing
Customer ServiceIfnoneoftheabovepossiblecausesapply,andyoucan not rectify the fault yourself, contact your nearest customerservicerepresentative.Indicatethetype(1) of appliance, service number (2) and the appliance / serial number (3) as indicated on the model plate. The model plate is located on the left-hand inside wall.
Problem Possible Cause and Remedy
Your appliance is designed and manufactured for a long life and reliable operation.
Ifaproblemoccursduringoperation,checkwhetheritisduetoanoperatingerror.Pleasenotethatevenduringthewarranty period, some repair costs may be your responsibility.
You may be able to correct the following faults by checking the possible causes yourself:
The temperature inside the appliance is too high
F8 appears in the display
Appliancedoesnotwork, display is off
Loud running noise
Theappliancehasafault.Contactyournearestcustomerservicerepresentative,indi-cate the type of appliance, service number and appliance / serial number.
- Istheapplianceturnedonproperly? - Isthepowercordproperlyinsertedintheoutlet? - Isthecircuitbreakerorfuseinoperatingcondition?
- Isthetemperaturesettingcorrect?SeeSetting The Temperature.- Istheventilationsystemworkingproperly?- Istheappliancesetuptooclosetoaheatsource?
- Istheapplianceplacedfirmlyonthefloor.Please note that noises caused by the refrigerant circuit and fan noise cannot be avoided. The interior fan runs constantly.
The humidity inside the appliance is too low
- Istheresufficientwaterinthewatertank?
The humidity inside the appliance is too high
- Isthewatertankinsertedasfarasitwillgo?- Isthesealseatedproperlyagainstthewatertray?Youcancheckthisvisuallyfromthefrontoftheappliance.Ifthesealisnotseatedproperly,removethewatertankand slide it back into the appliance.
- Ifthehumidityistoohigh,thiscouldindicateatechnicalfault.Contactthecustomerservice department and, as an interim measure, leave the door of the appliance open until the display returns to a normal value.
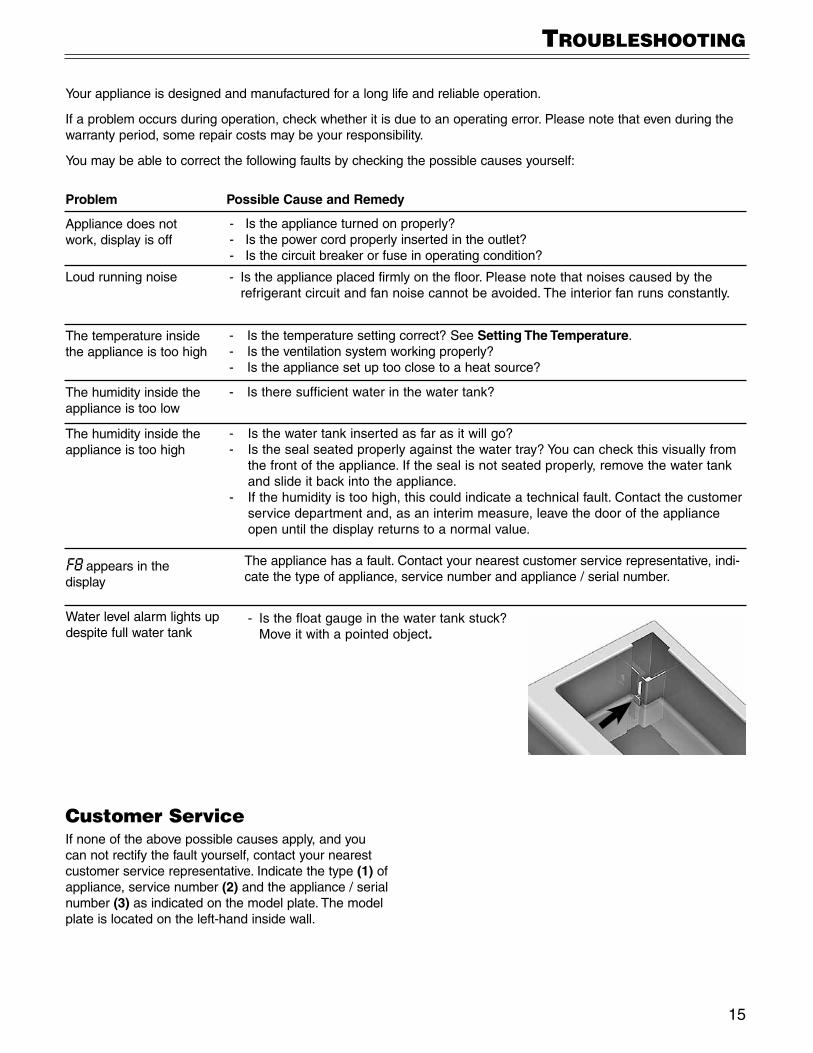
Water level alarm lights up despite full water tank
- Isthefloatgaugeinthewatertankstuck?Move it with a pointed object.
15
16
WarranTy
Appliance InformationRecord this information when the appliance is installed.
TypeDesignation: ______________________________
ServiceNumber: _______________________________
Appliance/serialnumber: ________________________
DateofPurchase: ______________________________
Where Purchased: ______________________________
LIEBHERR WARRANTY PLAN
FULLTWOYEARWARRANTYFor two years from the date of original purchase, your Liebherr warranty covers all parts and labor to repair or replace any part of the product which proves to be defective in materials or workmanship.
FULLFIVEYEARWARRANTY For five years from the date of original purchase, your Liebherr warranty covers all parts and labor to repair or replace any components that prove to be defective in materials or workmanship in the sealed system. The “Sealed System” means only the compressor, condenser, evaporator, drier and all connecting tubing.
LIMITED6THTHROUGH12THYEARWARRANTY From the 6th through 12th year from the date of original purchase, your Liebherr warranty covers all parts that prove tobedefectiveinmaterialsorworkmanshipintheSealedSystem(partsonly).
TERMSAPPLICABLETOEACHWARRANTYAllserviceprovidedbyLiebherrunderthewarrantymustbeperformedbyauthorizedLiebherrservicerepresentatives, unless otherwise specified by Liebherr. Service will be provided in the home during normal business hours.Thiswarrantyappliesonlytoproductsinstalledfornormalresidentialuse.Detailsregardinganon-residentialwarranty are available on request.
ThewarrantyappliesonlytoproductsinstalledinCanadaandanyoneofthefiftystatesoftheUnitedStatesortheDistrictofColumbia.Thiswarrantydoesnotcoveranypartsorlabortocorrectanydefectcausedbynegligence,accident or improper use, maintenance, installation, service or repair, including but not limited to improper removal and reinstallation of the condensing unit.
THEWARRANTIESDESCRIBEDABOVEAREMADEEXPRESSLYINLIEUOFANYOTHERWARRANTIES,EXPRESSEDORIMPLIED,INCLUDINGANYIMPLIEDWARRANTYOFMERCHANTABILITYORFITNESSFORAPARTICULARPURPOSE,ANDOFANYOTHEROBLIGATIONORLIABILITYONTHEPARTOFLIEBHERR.INNOEVENTSHALLLIEBHERRBELIABLEFORSPECIAL,INCIDENTALORCONSEQUENTIALDAMAGESARISINGFROMTHEBREACHOFTHESEWARRANTIESORANYOTHERWARRANTIES,WHETHEREXPRESS,IMPLIEDORSTATUTORY.
Some States do not allow the exclusion or limitation of incidental or consequential damages so the above limitation or exclusion may not apply to you. This warranty gives you specific legal rights and you may also have other rights which vary from State to State.
Toreceivepartsand/orserviceandthenameoftheLiebherrauthorizedservicerepresentativenearestyou,contactyour Liebherr dealer or distributor or contact the Liebherr designated national service provider:
intheUS:[email protected],orcall1-866-LIEBHERor1-866-543-2437inCanada:www.euro-parts.ca,orcall1-888-LIEBHER,1-888-543-2437.
16
For Service in the U.S.
LiebherrServiceCenter
Toll Free: 1-866-LIEBHERor1-866-543-2437
Email: [email protected]
PlusOne Solutions, Inc. 3501 Quadrangle Blvd, Suite 120Orlando,FL32817
For Service in Canada
LiebherrServiceCenter
Toll Free: 1-888-LIEBHERor1-888-543-2437
www.euro-parts.ca
EURO-PARTS CANADA39822 Belgrave RoadBelgrave,Ontario,N0G1E0Phone:(519)357-3320Fax:(519)357-1326
www. l iebher r-app l iances .com