Urban Worm Castings Harvesterurbanwormcompany.com/.../2015/01/UW-Casting-Harvester.pdfThe frame,...
14
Urban Worm Castings Harvester Thank you for your interest in the Urban Worm Castings Harvester, a simple and inexpensive way to separate fine worm castings from your worms and coarser vermicompost. The goal is simple: design a device with parts found at any major hardware store that can be assembled and disassembled quickly without any special tools.
Transcript of Urban Worm Castings Harvesterurbanwormcompany.com/.../2015/01/UW-Casting-Harvester.pdfThe frame,...

Urban Worm Castings Harvester
Thank you for your interest in the Urban Worm Castings Harvester, a simple and inexpensive way to separate fine worm castings from your worms and coarser vermicompost. The goal is simple: design a device with parts found at any major hardware store that can be assembled and disassembled quickly without any special tools.

The frame, constructed with 1-in PVC with zero glued joints, supports a rotating trommel built using a metal mesh office waste basket, threaded rod and simple hardware. The frame is sized to accommodate a small concrete mixing bin. The trommel can be rotated manually or with the use of a handheld power drill, bit driver and socket. Gearheads, you probably already have ideas about how to automate this further Parts List: 1-in PVC Parts Part # Qty Description Cost per/Total
A 4 25 ½ inch lengths .59/2.36 B 2 21 inch lengths .48/.96 C 1 15 inch length handle .35 D 1 10 7/8 inch length .25 E 2 10 ½ inch lengths .25/.50 F 2 9 3/8
inch lengths .22/.44 G 2 5-in lengths (optional) .12/.24 H 2 Elbow 1.26/2.52 I 4 Side Outlet Elbow 2.05/8.20
J 4 Cap (Optional) .66/2.64
K 1 1 x ½ inch Tee .86 L 2 1 x ½ inch Tee (Snap and Thread) 1.63/3.26
1/2-in PVC Parts Part # Qty Description Cost Per/Total
M 1 18 3/4 inch length .39 N 2 Adapter (Slip and Thread) .37/.74

Hardware Part # Qty Description Cost Per
O 5 5/16-in Hex Nuts .32/1.60 P 1 5/16-in x 36-in Threaded Rod 9.18 Q 4 5/16-in Flat Washers .22/.88 R 2 5/16 inch Fender Washers .45/.90 S 1 Metal Mesh Waste Basket* 9.98 T 1 5/16-in Acorn Nut .54
* These waste baskets may vary by store and region. Tools Needed 5/16-in wrench 1/2-in wrench Power Drill 5/16-in drill bit Hand saw (mitre saw preferred) Bit Driver (optional) 5/16-in socket (Optional) Overall Cost All parts and materials were purchased at a Philadelphia-area Lowe’s for $46.79 USD, not including tax. If you forego the optional items, all materials can be purchased for $43.91. Materials Preparation
1. Using the 5/16-in drill bit, drill a hole through: a. The 1/2-in opening of the 1-in x 1/2-in Tee (Part K),
completely through its interior wall. b. The 10 7/8 -in PVC length (Part D) at exactly the
midway point.* c. The 15-in PVC length (Part C) at exactly the
midway point.* *You may find that drilling through PVC produces a jagged exit hole. You can use a carpenters knife to easily remove any material still hanging on.

d. The center of the bottom of the waste basket (Part S).
2) Thread 2 hex nuts onto the threaded rod. Thread one nut 15 inches from the end. Thread another one 3 inches from the same end.
✔ Don't guess the middle of the circle! Most of these metal mesh waste baskets have 3 small bumps on the bottom that form a triangle. Draw a straight line between the centers of the bumps. Then mark the exact midpoint of each line and draw a line from that mark to the opposite bump. Once all 3 lines are drawn, the intersection of the lines is the exact center of your waste
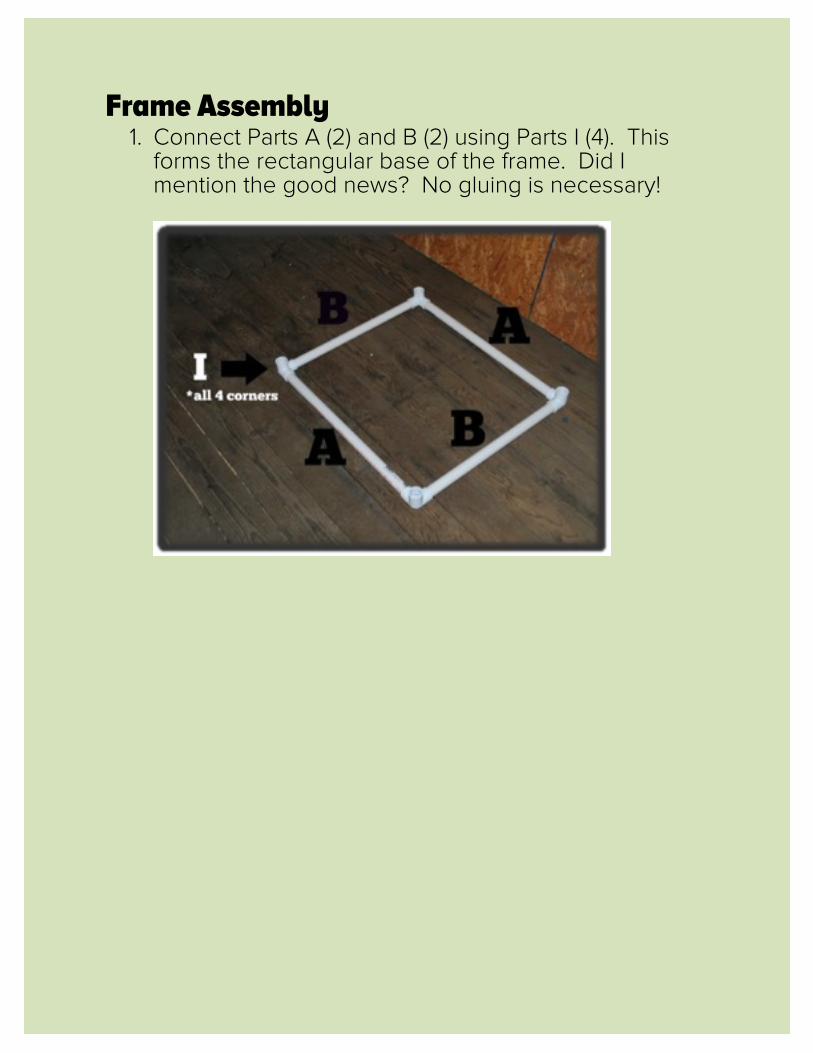
Frame Assembly
1. Connect Parts A (2) and B (2) using Parts I (4). This forms the rectangular base of the frame. Did I mention the good news? No gluing is necessary!

2. Connect Parts E to Parts I. This is now the axis end of the harvester where the trommel will rest. Attach Parts H to Parts E.
3. Connect Parts F with Part K. Now connect this assembly to Parts H. This now completes the axis end.
K

4. Screw Parts N into Parts L. Then connect the ½-in PVC (Part M) to the slip connectors on Parts N. This forms the trommel support assembly.

5. Connect Parts A to Parts I and attach optional Parts J. The trommel support assembly will easily snap into place between these two vertical supports.
Trommel
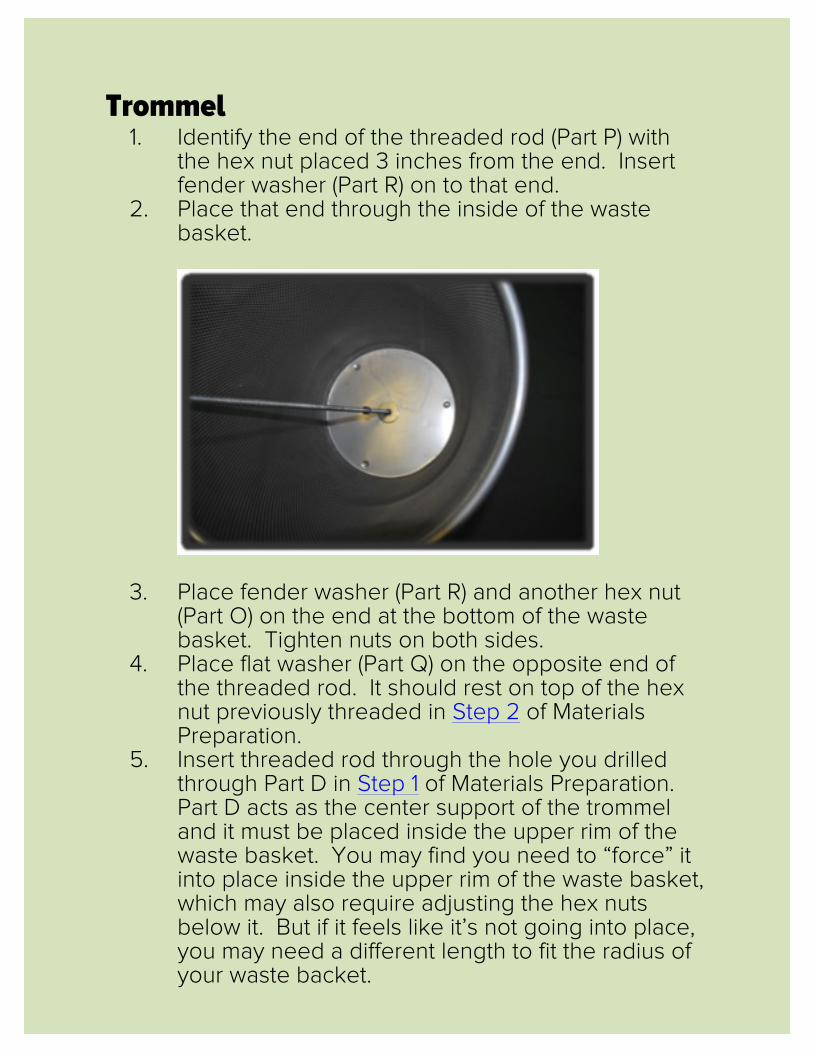
1. Identify the end of the threaded rod (Part P) with the hex nut placed 3 inches from the end. Insert fender washer (Part R) on to that end.
2. Place that end through the inside of the waste basket.
3. Place fender washer (Part R) and another hex nut (Part O) on the end at the bottom of the waste basket. Tighten nuts on both sides.
4. Place flat washer (Part Q) on the opposite end of the threaded rod. It should rest on top of the hex nut previously threaded in Step 2 of Materials Preparation.
5. Insert threaded rod through the hole you drilled through Part D in Step 1 of Materials Preparation. Part D acts as the center support of the trommel and it must be placed inside the upper rim of the waste basket. You may find you need to “force” it into place inside the upper rim of the waste basket, which may also require adjusting the hex nuts below it. But if it feels like it’s not going into place, you may need a different length to fit the radius of your waste backet.

6. Once the Part D is in place, secure it with a flat
washer and hex nut. Tighten hex nuts on either side of Part D.
7. Thread another hex nut and flat washer on threaded rod approximately 2 ½ inches from the end of the threaded rod. Place Part C and optional Parts G and H on threaded rod to form manual handle for trommel rotation.
8. Fix Part C in place with flat washer and acorn nut (Part T). You may find you need to adjust the hex nut below Part C to get a proper fit.

Attaching the Trommel to the Frame 1. This is simple. Remember the hole you drilled into
the 1 ½-in tee (Part K) in Materials Preparation? Simply insert the threaded rod protruding through the bottom of the waste basket into the open end of Part K. You should see less than a half inch exposed through the bottom of Part K.
2. Notice I don’t direct you to affix the trommel to the frame. This is for easy removal. Everything will stay in place just fine
Wanna See It In Action? Click Me!

This Is It! (Pretty Much)
The Urban Worm Castings Harvester accommodates a small concrete/mortar mixing tub to catch the castings, though a shallow Sterilite or Rubbermaid bin would work fine too. Though the trommel can be rotated manually, it can also be rotated using a power drill on low speed by affixing a 5/16-in socket attachment (check size) to a bit driver. This is my preferred option.
On one version I had inserted the threaded rod through a hole drilled in the horizontal ½-in PVC (Part M). I did this to keep the trommel from moving laterally on its horizontal support. But I found this to be of little benefit as I enjoyed

having more range of motion and flexibility. You may find that you like that option though. While both assembly (less than 4 minutes to reassemble) and operation are delightfully simple, making it easy for non-mechanically inclined worm composters, this isn’t a perfect solution for everyone. The fineness of the metal mesh of the waste basket ensures you will have very fine screening, but it also ensures you won’t be able to harvest massive amounts of castings quickly, especially if your vermicompost is wet. This is not an effective worm harvester as there is no outlet for the worms You will also find that the concrete mixing bin won’t catch all the castings as some will be expelled laterally beyond your bin. You may want to craft a better method of catching these stray castings, possibly with a tarp. This can be mitigated somewhat by ensuring slow rotation speed. But this is a cheap option for those on a budget and also a good solution for smale scale vermicomposters in urban or suburban homes who don’t have much space to store larger equipment.

Send Me Your Feeback! If you have any feedback (good or bad) or design improvement suggestions please let me know at [email protected] , on Twitter at @UrbanWormCo or on the Urban Worm Facebook page.