
Effects of Time on Dyeing of Different Cotton Fabrics With Reactive Dye. 47

A Free Project SheetNOT FOR RESALE
Finished Tool Belt Size: 10 ½” x 5”Finished Pillow Case Size” 20” x 30”
49 West 37th Street, 14th floor, New York, NY 10018Toll Free: 800-294-9495
fax: 212-679-4578www.blankquilting.net
Tool TimeTool Time Tool Belt & Pillow Case
By Art by Bernie
Skill Level: Advanced Beginner
Des
ign
by H
eidi
Prid
emor
e
UPDATED ON NOVEMBER 28, 2017
Tool Time
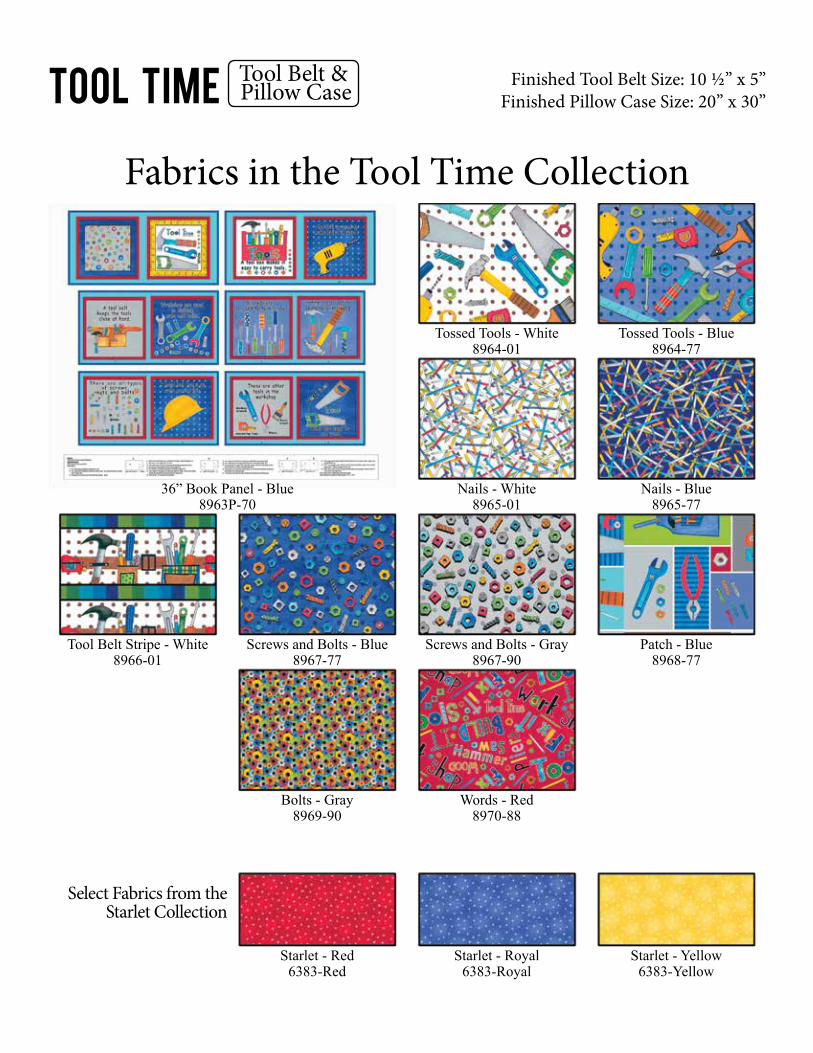
Fabrics in the Tool Time Collection
Select Fabrics from the Starlet Collection
Finished Tool Belt Size: 10 ½” x 5”Finished Pillow Case Size: 20” x 30”
Tool Belt & Pillow Case
36” Book Panel - Blue8963P-70
Tossed Tools - White8964-01
Nails - White8965-01
Nails - Blue8965-77
Tool Belt Stripe - White8966-01
Screws and Bolts - Blue8967-77
Screws and Bolts - Gray8967-90
Patch - Blue8968-77
Bolts - Gray8969-90
Words - Red8970-88
Starlet - Red6383-Red
Starlet - Royal6383-Royal
Starlet - Yellow6383-Yellow
Tossed Tools - Blue8964-77

Tool Time Page 1Tool Belt & Pillow Case
Tool Belt Cutting Instructions Please Note: All strips are cut across the width of fabric (WOF) from selvage to selvage edge unless otherwise noted.
Fig. 2
Fig. 1
Fig. 3
Tool Belt Materials¼ yard Tossed Tools - Blue (A) 8964-77¼ yard Words - Red (B) 8971-88¼ yard Screws and Blots - Gray (C) 8967-90⅓ yard Starlet - Red (D) 6383-Red
From the Tossed Tools - Blue (A), cut:• (1) 4 ½” x WOF strip. Sub-cut into (2) 4 ½” x 5” rectangles.
From the Words - Red (B), cut:• (1) 4 ½” square
From the Screws and Blots - Gray (C), cut:• (1) 5 ½” x WOF strip. Sub-cut into (2) 5 ½” x 10 ½” strips and (1) 4 ½” x 13” strip.
From the Starlet - Red (D), cut:• (1) 4” x 3” rectangle• (1) 4” x WOF strip
You will also need:• (1) 5 ½” x 10 ½” piece of fusible fleece• (1) Wash away marking pencil
A AB
½” ½” ½”½”½”½”
Unit 1make 1
C
Tool Belt Assembly1. Sew (1) 4 ½” x 5” Fabric A rectangle to each side of the 4 ½” Fabric B square. Using a wash away pencil. Mark a line ½” from each sewn seam as shown in Figure 1.
2. Place (1) 4 ½” x 13” Fabric C strip on top of sewn unit from Step 1, right sides together. Stitch across the top and bottom of the layered pieces to make Unit 1 (Fig. 2). Turn the Unit 1 strip right side out and press.
3. To form the pleats for the pockets, fold the Unit 1 strip on each drawn line from Step 1, wrong sides together and press.
4. Press (1) 5 ½” x 10 ½” Fabric C strip to the Fusible Fleece. Quilt as desired to make the Tool Belt Body.
5. Position Unit 1 on top of (1) Tool Belt Body, with the right side facing up in the Fabric C strip and the pockets facing out. Pin the two pieces together along the short sides, aligning the raw edges of the Unit 1 with the short sides and bottom of the Tool Belt Body. Stitch down each short side to attach the two pieces together. Center the Fabric B pocket onto the Tool Belt Body and pin in place. Pin the pleats press from Step 3 in place along the bottom to form the other two pockets.
6. To create the three pocket, Stitch-in-the-Ditch through Unit 1 and the Tool Belt Body through the seams formed in Step 1 (Fig. 3).
7. Position and pin the bottoms of the pocket aligning them with the bottom of the Tool Belt Body.
Tool Time Page 2Tool Belt & Pillow Case
Fig. 8
Fig. 7
A
B
Right Side Out
Right Side Out
Fig. 6Fig. 4 Fig. 5
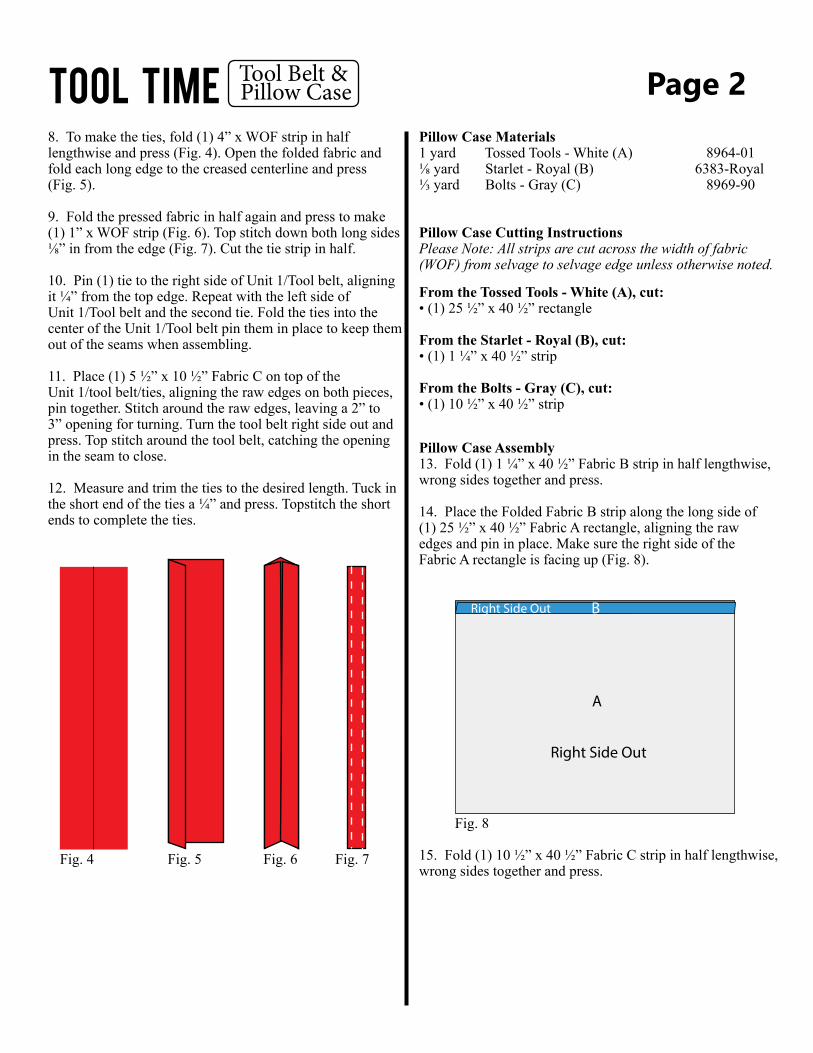
8. To make the ties, fold (1) 4” x WOF strip in half lengthwise and press (Fig. 4). Open the folded fabric and fold each long edge to the creased centerline and press (Fig. 5).
9. Fold the pressed fabric in half again and press to make (1) 1” x WOF strip (Fig. 6). Top stitch down both long sides ⅛” in from the edge (Fig. 7). Cut the tie strip in half.
10. Pin (1) tie to the right side of Unit 1/Tool belt, aligning it ¼” from the top edge. Repeat with the left side of Unit 1/Tool belt and the second tie. Fold the ties into the center of the Unit 1/Tool belt pin them in place to keep them out of the seams when assembling.
11. Place (1) 5 ½” x 10 ½” Fabric C on top of the Unit 1/tool belt/ties, aligning the raw edges on both pieces, pin together. Stitch around the raw edges, leaving a 2” to 3” opening for turning. Turn the tool belt right side out and press. Top stitch around the tool belt, catching the opening in the seam to close.
12. Measure and trim the ties to the desired length. Tuck in the short end of the ties a ¼” and press. Topstitch the short ends to complete the ties.
Pillow Case Materials1 yard Tossed Tools - White (A) 8964-01⅛ yard Starlet - Royal (B) 6383-Royal⅓ yard Bolts - Gray (C) 8969-90
From the Tossed Tools - White (A), cut:• (1) 25 ½” x 40 ½” rectangle
From the Starlet - Royal (B), cut:• (1) 1 ¼” x 40 ½” strip
From the Bolts - Gray (C), cut:• (1) 10 ½” x 40 ½” strip
Pillow Case Cutting Instructions Please Note: All strips are cut across the width of fabric (WOF) from selvage to selvage edge unless otherwise noted.
Pillow Case Assembly13. Fold (1) 1 ¼” x 40 ½” Fabric B strip in half lengthwise, wrong sides together and press.
14. Place the Folded Fabric B strip along the long side of (1) 25 ½” x 40 ½” Fabric A rectangle, aligning the raw edges and pin in place. Make sure the right side of the Fabric A rectangle is facing up (Fig. 8).
15. Fold (1) 10 ½” x 40 ½” Fabric C strip in half lengthwise, wrong sides together and press.

©2017 Blank Quilting Corp.
Tool Time
Every effort has been made to ensure that all projects are error free. All the information is presented in good faith, however no warranty can be given nor results guaranteed as we have no control over the execution of instructions. Therefore, we assume no responsibility for the use of this information or damages that may occur as a result. When errors are brought to our attention, we make every effort to correct and post a revision as soon as possible. Please make sure to check www.blankquilting.net for pattern updates prior to starting the project. We also recommend that you test the project prior to cutting for kits. Finally, all free projects are intended to remain free to you and are not for resale.
Page 3Tool Belt & Pillow Case
Fig. 10
Fig. 11
Fig. 12
Fig. 9
A
CRight Side Out
19. Turn the pillow case right side out and press (Fig. 12).
FOLD
C AB
16. Place the Folded Fabric C strip on top of the Fabric B/ Fabric A pieces, aligning the raw edges and pin in place (Fig. 9).
17. Stitch across the top of the layered fabrics using a ¼” seam allowance to make the pillow case (Fig. 10).
18. Fold the pillowcase in half width wise, aligning the raw edges of the Fabric A, Fabric B and Fabric C pieces. Pin in place. Stitch Down the long side and across the bottom of the folded pillowcase to complete (Fig. 11).