
Untitled presentation (1)
6
Evaluation part 4: How did you use new media technologi es in the construction and research, planning and evalu ation stages ?
-
Upload
sheenyyrose -
Category
Art & Photos
-
view
19 -
download
0
Transcript of Untitled presentation (1)

Evaluation part 4: How did you use new media technologies in the construction and research, planning and evaluation stages
?

Technological Convergence
The idea of technological convergence means that students like me, who are on a small budget are able to create an ‘amateur’ music video using high quality mobile phones and video cameras along with the very accessible use of the internet for research and planning plus cheap software progammes like movie maker and the not so cheap like Sony Vegas which thankfully the school can provide us with! As we learnt in the AS units, technology has become increasingly accessible for independent and amateur film makers.

Youtube Lots of my research into music videos has been by simply scouring youtube. Here you can search for any genre type music video to contrast and compare of how each genre successfully creates a music video fit for it’s target audience. youtube has also allowed to upload my music video (for free) so it is easier to display on my blog through a simple link
as well as receive any feedback from viewers on youtube!
Here, there is a ‘music’ tab that allows users to search for new videos and of different genres
So simply and easy to upload a video by clicking this button, as long as you have a youtube log in
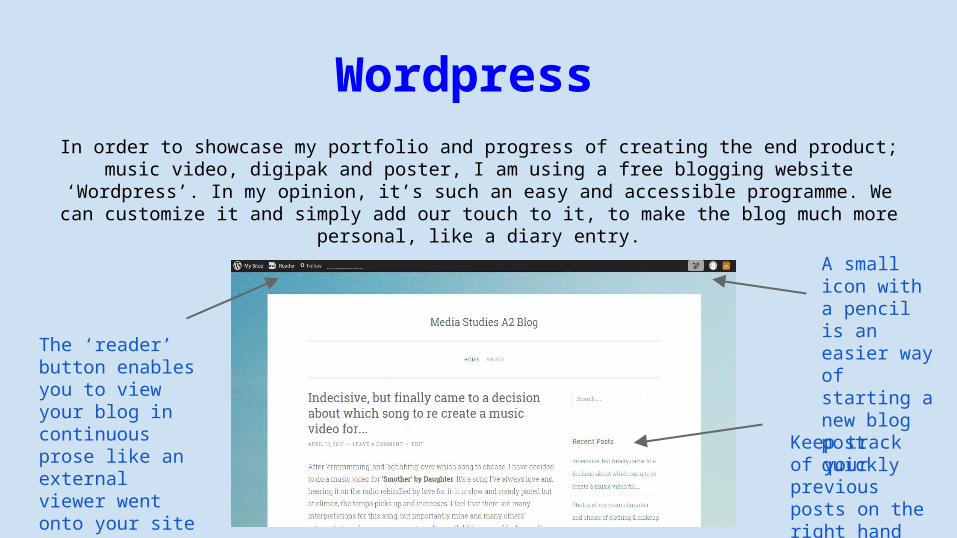
Wordpress In order to showcase my portfolio and progress of creating the end product; music video, digipak and
poster, I am using a free blogging website ‘Wordpress’. In my opinion, it’s such an easy and accessible programme. We can customize it and simply add our touch to it, to make the blog much
more personal, like a diary entry.
The ‘reader’ button enables you to view your blog in continuous prose like an external viewer went onto your site
A small icon with a pencil is an easier way of starting a new blog post quickly
Keep track of your previous posts on the right hand side

Sony Vegas Through my school they have provided us with a good quality editing software, that at first was very hard to use but
after you can soon get the hang of it - even if you’re not that good with techonology (like myself). Here, you can split, cut, duplicate parts of your video as well as adding effects like overlapping, fades and colour changes to add a litte
something more to your video, in the hope it will make it look slightly more professional.
‘Edit’ and ‘Tools’ is a quicker way of finding the editing tools
This is where your video will be inserted and edited
This is where sound will be inserted and edited

Recording equipment In order to record my footage I used a few devices to do so. The JVC video camera provided by my school was the main type of recording device as it is compatible with the tripod. It enabled me to take establishing shots as well as
filming stable shots without any shaking of the camera if I were to hold it, to once again increase the idea of a professional film. Next I used an iphone to record some parts. This device has great camera quality and with shots such as close ups, it was in high definition to capture the detail of e.g. my sister’s eye and the beauty of it. For the
times when I couldn’t have access to the school’s camera, I used my home Sony video camera to capture shots. Once again it was brilliant and footage was in high definition however, without the tripod it seems more difficult to film without
any shaking of the camera.


![Untitled presentation[1]](https://static.fdocuments.in/doc/165x107/589f310b1a28ab4d568b6359/untitled-presentation1-589f3182f08bc.jpg)