University of Napoli “Federico II”
16
DIS Deliverable TR-DIS-NP-2-2007 How to set up and configure StarEast in Access Point mode with Intel 2200 wireless network interfaces Pag. 1 of 16 University of Napoli “Federico II” Faculty of Engineering Computer and Systems Engineering Department How to set up and configure StarEast in Access Point mode with Intel 2200 wireless network interfaces TR-DIS-NP-2-2007 Authors: Alessio Botta – a.botta AT unina.it Antonio Pescapè – pescape AT unina.it Student contributors: Giuseppe Bruno Francesco Rendine
Transcript of University of Napoli “Federico II”

DIS Deliverable TR-DIS-NP-2-2007
How to set up and configure StarEast in Access Point mode with Intel 2200 wireless network interfaces Pag. 1 of 16
University of Napoli “Federico II”
Faculty of Engineering
Computer and Systems Engineering Department
How to set up and configure StarEast in Access Point mode with Intel 2200 wireless network interfaces
TR-DIS-NP-2-2007
Authors:
Alessio Botta – a.botta AT unina.it
Antonio Pescapè – pescape AT unina.it
Student contributors:
Giuseppe Bruno
Francesco Rendine
DIS Deliverable TR-DIS-NP-2-2007
How to set up and configure StarEast in Access Point mode with Intel 2200 wireless network interfaces Pag. 2 of 16
Index 1 Introduction...........................................................................................................................3
1.1 Hardware Setup................................................................................................................3
1.2 Overview of the software provided with the board....................................................4
2 Installing and setting up SnapGear on StarEast using precompiled images [1]............5
3 Load Linux images onto StarEast [1][2].............................................................................5
3.1 Load Linux images via Ethernet ....................................................................................5
3.2 Load Linux images via serial port ..................................................................................7
4 Wireless network configuration...........................................................................................8
4.1 Configuring the wireless network with automatic script.............................................8
4.2 HostAP configuration [3] ...............................................................................................8
5 Compiling SnapGear kernel 2.6 for the StarEast [4][5][6] .............................................10
6 Add drivers and tools to ram disk [4] ...............................................................................13
7 Sources and firmware for the IPw2200 driver in AP mode [4][7] ................................13
8 References ............................................................................................................................16

DIS Deliverable TR-DIS-NP-2-2007
How to set up and configure StarEast in Access Point mode with Intel 2200 wireless network interfaces Pag. 3 of 16
1 Introduction
This report is meant to explain how to set up and configure the StarEast platform with SnapGear Linux and Intel Pro Wireless 2200BG in order to obtain a configurable Access Point. As reported in [8] “StarEast is a stackable system with three kinds of modified PCI Mezzanine Cards. One is a baseboard, and the other two are adapter daughter cards to provide miniPCI and CardBus interfaces. The baseboard is based on an Intel IXP425 network processor. It provides two fast Ethernet ports, one UART, and two mirror PMC PCI interfaces to connect the two daughter cards for miniPCI, CardBus or other customizing functions. To support large applications, the baseboard includes 133MHz, 256Mbytes of on-board SDRAM, and 32Mbytes of on-board Intel StrataFlash memory. With two PMC2miniPCI daughter cards, StarEast supports four wireless Type IIIA miniPCI cards.” As for the SnapGear Operating System, in [7] it is reported that “SnapGear's embedded Linux distribution represents state-of-the-art embedded Linux technology for deeply embedded microprocessors with or without MMU (memory management unit), an important advantage in allowing developers more choice in selection of processors for producing vertical ranges of products. SnapGear embedded Linux is unique in providing commercial quality tool chains and processor support in a freely downloadable open source format.” This report is structured as follows. In the remainder of this section we report the hardware and software configuration we used. In Section 2 we report the easiest way to reach our objective which is not correctly reported in [1] and which uses a precompiled SnapGear version provided with the StarEast board. Section 3 provides insights related to loading the Operating System and ram disk images onto the board. In Section 4 we illustrate how to configure the wireless network settings. Section 5 provides information useful for compiling a new SnapGear kernel. In Section 6 we illustrate how to add custom files to the ram disk previously created. Finally Section 7 describes how to recompile the wireless network drivers.
1.1 Hardware Setup
Below it is reported the configuration we used in our laboratory. All the following explanations are related to such configuration.
• Development host: 3 GHz Intel Pentium 4 with 2GB of RAM, 250 GB of Hard Disk, a serial port and a 100 Mbps Ethernet port, and running Kubuntu Dapper Linux operating system with 2.6.15.26 kernel.
• StarEast board: 533 MHz Intel IXP425, 16 MB of Strata Flash memory and 256 of RAM, 2 100 Mbps Ethernet ports, 1 Serial port, 1 daughter board with 2 Mini PCI slots.

DIS Deliverable TR-DIS-NP-2-2007
How to set up and configure StarEast in Access Point mode with Intel 2200 wireless network interfaces Pag. 4 of 16
• Mini PCI Intel IPW2200BG wireless network interface.
• Ethernet cable.
• RJ45 Serial-to-Ethernet cable (normally provided with StarEast).
The connections between the development host and the StarEast board are explained in the following Sections 3.1 and 3.2.
1.2 Overview of the software provided with the board
Below we report the directory structure of the compact disk provided with the StarEast board.
stareast |-- drivers | |-- cardbus | | |-- ixdp425-pci.c | | |-- madwifi.tar.gz | | `-- pcmcia-cs-3.2.7.tar.gz | `-- minipci | |-- gemtek-minipci | | `-- gemtek-config-readme | `-- calexico2 | |-- clx2_st.tar.gz | `-- hostap_st.tar.gz |-- redboot | |-- i686-pc-linux-gnulibc2.2-x-xscale-elf.tar.Z | |-- npe-1.1.epk | |-- patch.128-16 | |-- patch.128-32 | |-- patch.256-32 | |-- redboot-intel-xscale-031212.tar |-- snapgear | |-- pci-auto.c | |-- arm-linux-tools-20030927.tar.gz | |-- ixp400AccessLibrary-1_4.zip | |-- snapgear-3.1.1.tar.gz | `-- snapgear-3.1.x-ixp400-v1.4.2-support.tar.gz `-- tools |-- pci-utility.tar.gz `-- we26.tar.gz

DIS Deliverable TR-DIS-NP-2-2007
How to set up and configure StarEast in Access Point mode with Intel 2200 wireless network interfaces Pag. 5 of 16
2 Installing and setting up SnapGear on StarEast using precompiled images [1]
The fastest way to go is using precompiled kernel (referred to as 2.4.x kernel) and ram disk image found on the StarEast CD, as suggested in the NOTES file at point II:
“Ready-to-load "ramdisk.4cards.gz" and "zImage", are in folder /drivers/minipci/calexico2.”
These two files include the wireless interface drivers; we only need to load them onto the platform as explained in Section 3. Otherwise, if you want to recompile the kernel, go to Section 5. In this case you may need also to recompile the drivers of the wireless interface as explained in Section 7.
3 Loading Linux images onto StarEast [1][2] There are two different ways to load images onto StarEast:
1. via Ethernet using tftp (fastest) as explained in Section 3.1 2. via serial port using ymodem (simplest) as explained in Section 3.2
3.1 Loading Linux images via Ethernet
To load Linux images via Ethernet we must enable tftp (Trivial File Transfer Protocol). To install tftpd and related packages, use the following command:
sudo apt-get install xinetd tftpd tftp
Create file /etc/xinetd.d/tftp and put this entry:
service tftp { protocol = udp port = 69 socket_type = dgram wait = yes user = nobody server = /usr/sbin/in.tftpd server_args = /tftpboot
DIS Deliverable TR-DIS-NP-2-2007
How to set up and configure StarEast in Access Point mode with Intel 2200 wireless network interfaces Pag. 6 of 16
disable = no }
Create /tftpboot directory
sudo mkdir /tftpboot sudo chmod -R 777 /tftpboot sudo chown -R nobody /tftpboot
Copy the image files, Ramdisk.4cards e zImage from /drivers/minipci/calexico2 directory on CD, into it. The file named zImage is the Linux kernel while ramdisk.gz is a compressed ram disk containing all the binaries and other files that are used by Linux. Start tftpd through xinetd
sudo /etc/init.d/xinetd start
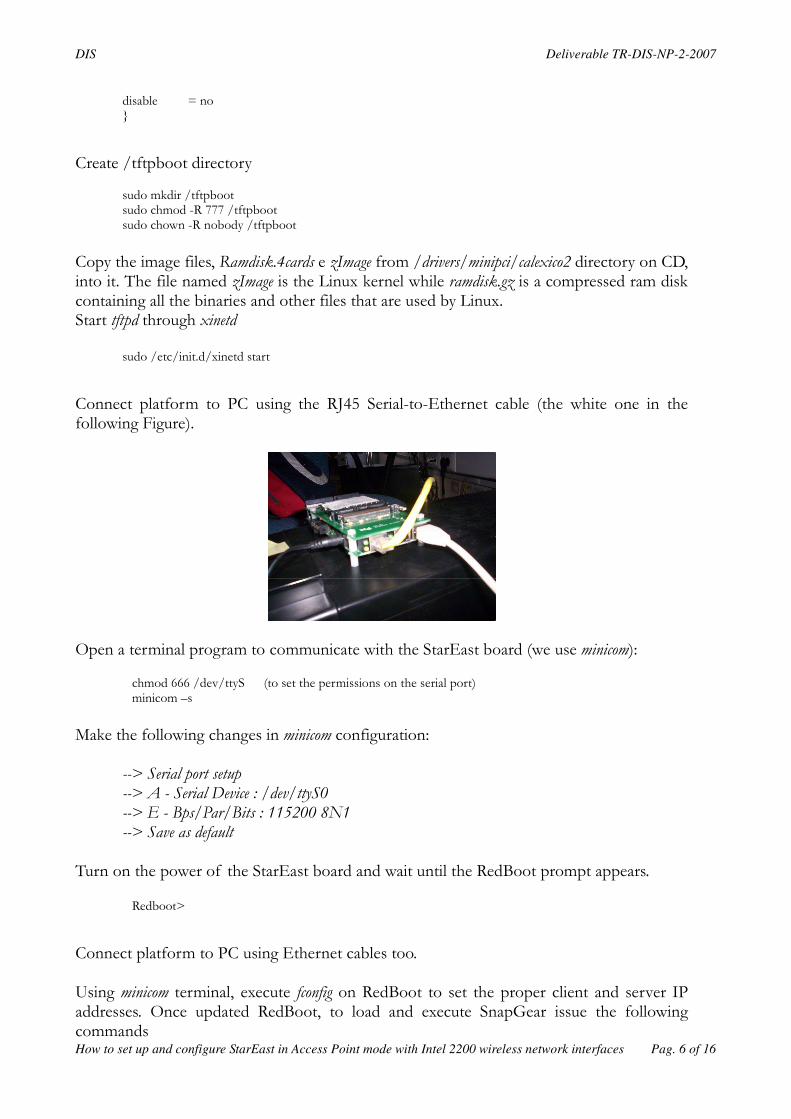
Connect platform to PC using the RJ45 Serial-to-Ethernet cable (the white one in the following Figure).
Open a terminal program to communicate with the StarEast board (we use minicom):
chmod 666 /dev/ttyS (to set the permissions on the serial port) minicom –s
Make the following changes in minicom configuration:
--> Serial port setup --> A - Serial Device : /dev/ttyS0 --> E - Bps/Par/Bits : 115200 8N1 --> Save as default
Turn on the power of the StarEast board and wait until the RedBoot prompt appears.
Redboot>
Connect platform to PC using Ethernet cables too. Using minicom terminal, execute fconfig on RedBoot to set the proper client and server IP addresses. Once updated RedBoot, to load and execute SnapGear issue the following commands

DIS Deliverable TR-DIS-NP-2-2007
How to set up and configure StarEast in Access Point mode with Intel 2200 wireless network interfaces Pag. 7 of 16
load -r -v -b 0x01600000 zImage load -r -v -b 0x00800000 ramdisk.gz exec 0x01600000
3.2 Loading Linux images via serial port
To load Linux images via serial port we must install X/Y/Z Modem (Lrsz package). Than connect platform to PC using the RJ45 Serial-to-Ethernet cable.
Open a terminal program to communicate with the StarEast board (we use minicom):
chmod 666 /dev/ttyS (to set the permissions on the serial port) minicom –s
Make the following changes:
--> Serial port setup --> A - Serial Device : /dev/ttyS0 --> E - Bps/Par/Bits : 115200 8N1 --> Save ad default
Turn on the power of the StarEast board and wait until the RedBoot prompt appears. Redboot>
Execute the following command: load –r –v –m ymodem –b 0x01600000
Then press CTRL+A and then S, to send zImage file. Once finished, execute: load –r –v –m ymodem –b 0x00800000 And press CTRL+A and S, to send ramdisk.gz. Now you have a kernel and a ram disk loaded on the processor. To load up Linux there is a quick command: exec 0x01600000
DIS Deliverable TR-DIS-NP-2-2007
How to set up and configure StarEast in Access Point mode with Intel 2200 wireless network interfaces Pag. 8 of 16
These will load SnapGear and you will get a prompt that is a hash (#). There is a directory structure and a small amount of standard Linux commands available to you.
4 Wireless network configuration In this section we explain how to configure the wireless network of the StarEast in AP mode. There are 2 possibilities:
1. using the script contained in the precompiled ram disk as explained in Section 4.1 2. manually configuring the parameters provided by HostAP driver as explained in
Section 4.2
4.1 Configuring the wireless network with automatic script
If you have followed the instructions of Section 2 and 3, you have loaded two files (called zImage and ramdisk.4cards.gz respectively) onto the board. The file named ramdisk.4cards.gz contains four scripts. They are called clx_first.sh, clx_second.sh, clx_third.sh, clx_fourth.sh and are meant to configure up to four wireless network cards in AP mode. They execute some iwconfig and ifconfig commands in order to set up the right configuration. Once your SnapGear Linux is up and running, you will find those scripts in the /bin folder. All you have to do is launch the correct one (depending on which slot your wireless card is connected). Afterwards, your StarEast board will start to behave as an access point with ESSID ctl_bj11, ctl_bj12, ctl_bj13, or ctl_bj14 respectively. Now, other stations can associate with the AP. Since there is no DHCP configured on the board, you have to set up an IP address on the client station to be able to ping the StarEast.
4.2 HostAP configuration [3]
To configure the StarEast board in AP mode the most important tool is iwconfig (it is similar to ifconfig used to set up Ethernet interface). You will use iwconfig to set the operating mode of your card (Master, Managed, and Ad-Hoc), the wireless channel, and ESSID. Anyway, you will still need to set an IP address for you card using the traditional ifconfig. To configure the wireless part issue the following commands (wlan0 is the name of your wireless network inteface): # ifconfig wlan0 192.168.11.1 # iwconfig wlan0 essid ctl_bj11 # iwconfig wlan0 channel 6 # iwconfig wlan0 mode master
Then look at your new software based access point: # iwconfig wlan0 wlan0 IEEE 802.11b ESSID: "ctl_bj11" Mode:Master Frequency:2.412GHz Access Point: 00:11:11:11:11:00

DIS Deliverable TR-DIS-NP-2-2007
How to set up and configure StarEast in Access Point mode with Intel 2200 wireless network interfaces Pag. 9 of 16
Bit Rate:11Mb/s Sensitivity=1/242700000 Retry min limit:8 RTS thr:off Fragment thr:off Encryption key:off Power Management:off Link Quality:0 Signal level:0 Noise level:0 Rx invalid nwid:0 Rx invalid crypt:0 Rx invalid frag:0 Tx excessive retries:0 Invalid misc:0 Missed beacon:0
Most of the items are self explanatory. Link quality, signal, and noise won't show up when in Master mode. In any event, with the above configuration, client stations can now associate with your new access point. Simply tell each station your ESSID ("ctl_bj11" in this case). They should associate without incidents. Since DHCP is not setup, you will need to manually assign an IP address. Once that's done, your client station should be able to ping your access point. On another machine, put the wireless interface into managed mode by using the following commands: # iwconfig wlan0 mode managed # iwconfig wlan0 essid ctl_bj11 # ifconfig wlan0 192.168.11.2
The station will associate with the AP. In order to verify the correct operation issue the command: # ping 192.168.11.1 PING 192.168.11.2 (192.168.1.1): 56 data bytes 64 bytes from 192.168.11.1: icmp_seq=0 ttl=64 time=81.6 ms 64 bytes from 192.168.11.1: icmp_seq=1 ttl=64 time=2.6 ms 64 bytes from 192.168.11.1: icmp_seq=2 ttl=64 time=2.5 ms --- 192.168.11.1 ping statistics --- 3 packets transmitted, 3 packets received, 0% packet loss round-trip min/avg/max = 2.5/28.9/81.6 ms
And the command: # iwconfig wlan wlan0 IEEE 802.11b ESSID:"ctl_bj11" Mode:Managed Frequency:2.412GHz Access Point: 00:11:11:11:11:00 Bit Rate:11Mb/s Sensitivity=1/242700000 Retry min limit:8 RTS thr:off Fragment thr:off Encryption key:off Power Management:off Link Quality:92/1 Signal level:-40 dBm Noise level:-99 dBm Rx invalid nwid:0 Rx invalid crypt:0 Rx invalid frag:0 Tx excessive retries:4 Invalid misc:4 Missed beacon:0

DIS Deliverable TR-DIS-NP-2-2007
How to set up and configure StarEast in Access Point mode with Intel 2200 wireless network interfaces Pag. 10 of 16
5 Compiling SnapGear kernel 2.6 for the StarEast [4][5][6] Download the snapgear-3.3.0.tar.gz and snapgear-modules-20051115.sh files from http://ftp.snapgear.org:9981/pub/snapgear/src. Decompress the SnapGear source code: tar xvzf snapgear-3.3.0.tar.gz
This will create a snapgear directory that contains the source code. Now change to the SnapGear directory that was just created:
cd snapgear
If the sharutils are installed on your machine, to extract patch files to a folder run:
sh snapgear-modules-20051115.sh
There should be a file “README” to tell you how to install SnapGear and how to patch the IAL patch into SnapGear:
patch -p1 < snapgear-20051115.patch mkdir -p modules/ixp425/ixp400-2.0 cd modules/ixp425/ixp400-2.0
Download from the address “http://www.intel.com/design/network/products/npfamily/ixp400_archives.htm” the IPL_ixp400AccessLibrary-2_0.zip and IPL_ixp400NpeLibrary-2_0_5.zip libraries and unzip them into the new folder:
unzip IPL_ixp400AccessLibrary-2_0.zip unzip IPL_ixp400NpeLibrary-2_0_5.zip
Copy the file modules-csr2.0-20051115.patch in the current directory and patch it:
cp/(your snapgear directory)/modules-csr2.0-20051115.patch ./ patch -p1 < modules-csr2.0-20051115.patch
To fix a bug on serial port 1, edit the file linux-2.6.x/arch/arm/mach-ixp4xx/ixdp425-setup.c and replace
irq = IRQ_IXP4XX_UART1 � irq = IRQ_IXP4XX_UART2
Now we need the tools for compiling the images. We can download the package arm-linux-tools-20061213.tar.gz from “http://www.snapgear.org/snapgear/downloads.html” that contains needed compiler and libraries. Decompress the file in SnapGear directory and it will create a new directory called usr. tar xvzf arm-linux-tools-20061213.tar.gz

DIS Deliverable TR-DIS-NP-2-2007
How to set up and configure StarEast in Access Point mode with Intel 2200 wireless network interfaces Pag. 11 of 16
Move this directory to your home directory and add it to your path:
export PATH=(your home directory)/usr/local/bin:${PATH}
Now we need to configure the kernel. From the decompressed SnapGear directory, issue the command:
make menuconfig
Make the following changes in the displayed menu (changes are in bold):
Vendor/Product Selection � Select the Vendor you wish to target Intel Select the Product you wish to target IXDP425 EXIT Kernel/Library/Defaults Selection � (linux-2.6.x) Kernel Version (uclibc) Libc Version [*]Customize Kernel Settings [*]Customize Module Settings [*]Customize Vendor/User Settings EXIT
Exiting and saving, a new window will appear, make the following changes in that window:
System Type � ARM system type� IXP4xx-based [*]Build big-endian kernel EXIT Boot Options � Default kernel command string "console=ttyS1,115200 root=/dev/ram0 initrd=0x00800000,16M mem=256M@0x00000000"
The commands below are what is changed from the original string in the string above.
"ttyS0 -> ttyS1" "8M -> 16M" "64M -> 256M"
These particular modifications are done because my IXP425 network processor has 256MB SDRAM (generally it ranges between 8 and 256 MB) and 16MB of flash memory (generally it ranges from 8 to 16 MB). If you’ve a different configuration, replace values on purpose. Then:
EXIT Devices Drivers� Generic Driver Options � <*> Hotplug firmware loading support EXIT Block devices � <*> Loopback device support (16384) Default RAM disk size (Kbytes)

DIS Deliverable TR-DIS-NP-2-2007
How to set up and configure StarEast in Access Point mode with Intel 2200 wireless network interfaces Pag. 12 of 16
EXIT Networking support � Networking options � <*> 802.1d Ethernet Bridging EXIT Wireless LAN (non-hamradio)� [*] Wireless LAN drivers (non-hamradio) & Wireless Extensions EXIT EXIT Input device support � Unselect all input device to reduce size of kernel EXIT EXIT File systems � Network File Systems� [*] Provide NFSv3 client support [*] Provide NFSv4 client support EXIT EXIT Kernel hacking � “Options in this folder can be used to print more debugging information of kernel!” EXIT
Exit and save setting. Then go to modules setup GUI.
XSCALE/IXP400 Modules � (2.0) Intel Access Library version [] Names network interfaces as eth, not ixp (Unselect for convenience) EXIT
Exit and save setting. Then go to User apps setup GUI.
Network Applications � [*] bridge utils - Net-tools [*] arp - Wireless-tools [*] wireless_tools support [*] iwconfig [*] iwgetid [*] iwlist [*] iwpriv [*] iwspy EXIT
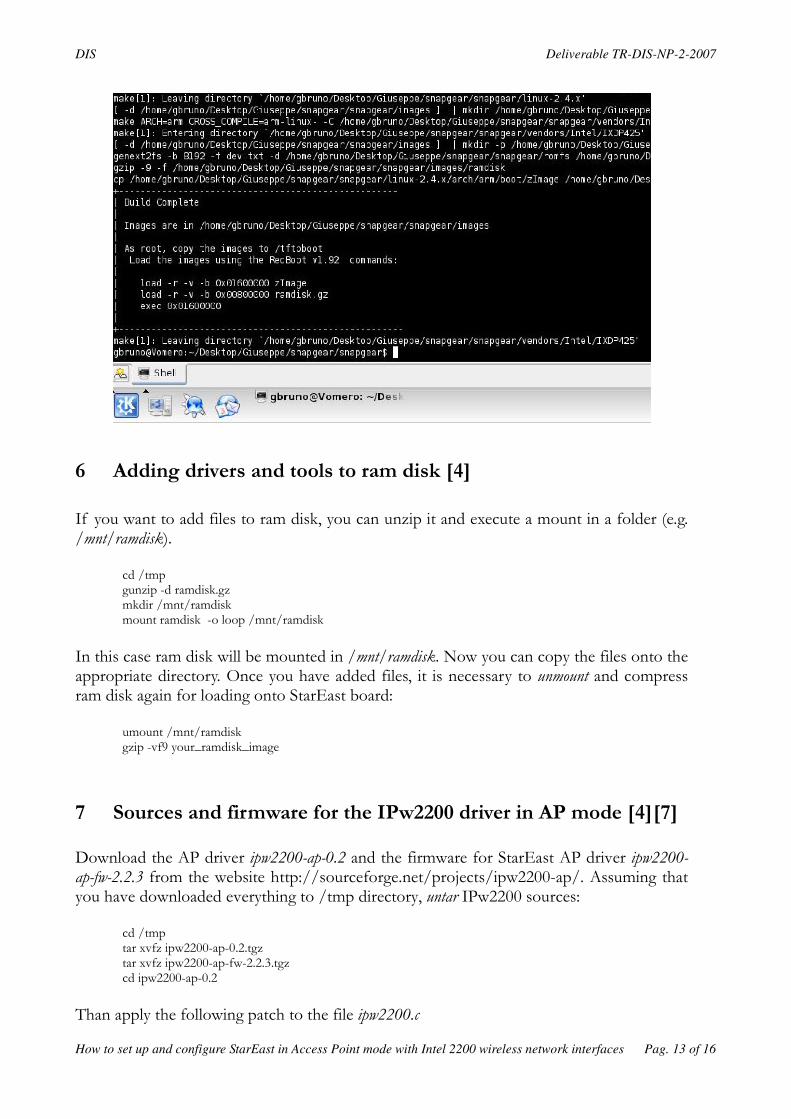
Exit and save. The kernel configuration is done. Now change back to the SnapGear directory and build the images:
make dep make
At the end of make process we have the images in (your snapgear directory)/images (i.e. on my PC images were in /home/gbruno/Desktop/snapgear/snapgear/images).
DIS Deliverable TR-DIS-NP-2-2007
How to set up and configure StarEast in Access Point mode with Intel 2200 wireless network interfaces Pag. 13 of 16
6 Adding drivers and tools to ram disk [4]
If you want to add files to ram disk, you can unzip it and execute a mount in a folder (e.g. /mnt/ramdisk).
cd /tmp gunzip -d ramdisk.gz mkdir /mnt/ramdisk mount ramdisk -o loop /mnt/ramdisk
In this case ram disk will be mounted in /mnt/ramdisk. Now you can copy the files onto the appropriate directory. Once you have added files, it is necessary to unmount and compress ram disk again for loading onto StarEast board:
umount /mnt/ramdisk gzip -vf9 your_ramdisk_image
7 Sources and firmware for the IPw2200 driver in AP mode [4][7] Download the AP driver ipw2200-ap-0.2 and the firmware for StarEast AP driver ipw2200-ap-fw-2.2.3 from the website http://sourceforge.net/projects/ipw2200-ap/. Assuming that you have downloaded everything to /tmp directory, untar IPw2200 sources:
cd /tmp tar xvfz ipw2200-ap-0.2.tgz tar xvfz ipw2200-ap-fw-2.2.3.tgz cd ipw2200-ap-0.2
Than apply the following patch to the file ipw2200.c

DIS Deliverable TR-DIS-NP-2-2007
How to set up and configure StarEast in Access Point mode with Intel 2200 wireless network interfaces Pag. 14 of 16
--- ipw2200_before_IRQ_change.c 2006-10-20 11:35:21.000000000 +0200 +++ ipw2200.c 2006-10-20 11:42:46.000000000 +0200 @@ -73,6 +73,7 @@ static int associate = 1; static int auto_create = 1; static int led = 0; static int disable = 0; +static int irq = 0; static const char ipw_modes[] = { 'a', 'b', 'g', '?' }; @@ -10293,6 +10294,12 @@ static int ipw_pci_probe(struct pci_dev priv->power_mode = IPW_POWER_AC; priv->tx_power = IPW_DEFAULT_TX_POWER; + if (irq) { + printk(KERN_INFO "Override default irq from %d to %d.\n", + pdev->irq, irq); + pdev->irq = irq; + } + err = request_irq(pdev->irq, ipw_isr, SA_SHIRQ, DRV_NAME, priv); if (err) { @@ -10962,5 +10969,8 @@ module_param(mode, int, 0444); MODULE_PARM_DESC(mode, "network mode (0=BSS,1=IBSS)"); #endif +module_param(irq, int, 0444); +MODULE_PARM_DESC(irq, "override defualt irq assigned by the system"); + module_exit(ipw_exit); module_init(ipw_init);
It is necessary in order to avoid the following error:
ipw2200: Detected Intel PRO/Wireless 2200BG Network Connection ipw2200: failed to send MAC_MODE command
Now we can compile IPw2200 sources:
export PATH=/home/gbruno/Desktop/usr/local/bin:${PATH} make KSRC=(snapgear directory)
At the end of this process we can add the object files (*.ko for 2.6.x kernel version) to update ram disk as explained in Section 6. Than, once mounted ram disk in /mnt/ramdisk execute the following commands:
mkdir /mnt/ramdisk/lib/modules/2.6.12- uc0/kernel/drivers/net/wireless/ipw2200 cp -Rvf *.ko /mnt/ramdisk/lib/modules/2.6.12 uc0/kernel/drivers/net/wireless/ipw2200 cd /tmp cp -R hotplug/etc /mnt/ramdisk cp -R hotplug/sbin /mnt/ramdisk tar -xovf hotplug-scripts.tar cp -Rvf hotplug_scripts/* /mnt/ramdisk/etc/

DIS Deliverable TR-DIS-NP-2-2007
How to set up and configure StarEast in Access Point mode with Intel 2200 wireless network interfaces Pag. 15 of 16
mkdir -p /mnt/ramdisk/usr/lib/hotplug/firmware/ cp -Rvf *.fw /mnt/ramdisk/usr/lib/hotplug/firmware/
Finally, to enable the Ethernet and the wireless at the start of Stareast with SnapGear 3.3.0, we must update the /etc/rc file so that it appears:
hostname IXDP425 mount -t proc proc /proc mount -o remount,rw /dev/root / mkdir /sys mount -t sysfs /sys /sys ifconfig lo 127.0.0.1 modprobe ixp400 cat /etc/IxNpeMicrocode.dat > /dev/ixNpe modprobe ixp400_eth ifconfig ixp0 192.168.0.1 broadcast 192.168.0.255 netmask 255.255.255.0 route add -net 127.0.0.0 netmask 255.255.255.0 lo insmod /lib/modules/2.6.12-uc0/kernel/drivers/net/wireless/ipw2200/ieee80211_crypt.ko insmod /lib/modules/2.6.12-uc0/kernel/drivers/net/wireless/ipw2200/ieee80211.ko insmod /lib/modules/2.6.12-uc0/kernel/drivers/net/wireless/ipw2200/ipw2200.ko irq=28 #dhcpcd & cat /etc/motd
Unmount ram disk and recompress it as described at the end of Section 6.

DIS Deliverable TR-DIS-NP-2-2007
How to set up and configure StarEast in Access Point mode with Intel 2200 wireless network interfaces Pag. 16 of 16
8 References [1] "StarEast Multi-Radio Wireless Platform Reference Manual" [2]http://www.idav.ucdavis.edu/~atm/tutorial/StareastTutorial.htm [3]http://www.trekweb.com/~jasonb/articles/hostap_20030727.shtml [4] http://commnet.ee.washington.edu/funlab/ [5] http://www.snapgear.org/ [6] http://www.intel.com/ [7] http://sourceforge.net/ [8] http://www.flexcomm.com.cn/products_details.asp?RecordID=91&CategoryName