Unit Two: What Lives In The Ocean? - USC Dana and David ...
49
Island Explorers: Unit 2 © 2014, USC Sea Grant Unit Two: What Lives In The Ocean? Now we are ready to learn about the many different kinds of plants and animals that live in the ocean. The ocean has one of the highest levels of diversity of any environment on earth. Marine organisms range in size from the mighty blue whale (nearly 100 feet in length!) to the microscopic bacteria. The seas are inhabited from the very shallowest to the very deepest parts by creatures sometimes quite strange yet perfectly adapted to their environment. Students will first learn the conditions necessary for life to exist and how life on earth actually began in the seas many millions of years ago. They will understand the term evolution and will begin to investigate the evolution of living organisms from the most simple organisms to the wide diversity of both simple and complex organisms that we see today. Plants as part of life in the sea and on land will be part of this unit, as well as learning about plankton--a significant foundation to all life in the sea. In addition, students will learn how scientists classify the myriad of life on Earth using the Linnaean system. They will be introduced to tools that biologists use to identify plants and animals, like the dichotomous key. Finally, the students will progress through a study of all five kingdoms of life in the sea, beginning with the intrepid bacteria and ending with a study of the vertebrates, especially the marine mammals.
Transcript of Unit Two: What Lives In The Ocean? - USC Dana and David ...
Island Explorers: Unit 2 © 2014, USC Sea Grant
Unit Two: What Lives In The Ocean?
Now we are ready to learn about the many different kinds of plants and animals that live in the ocean. The ocean has one of the highest levels of diversity of any environment on earth. Marine organisms range in size from the mighty blue whale (nearly 100 feet in length!) to the microscopic bacteria. The seas are inhabited from the very shallowest to the very deepest parts by creatures sometimes quite strange yet perfectly adapted to their environment.
Students will first learn the conditions necessary for life to exist and how life on earth actually began in the seas many millions of years ago. They will understand the term evolution and will begin to investigate the evolution of living organisms from the most simple organisms to the wide diversity of both simple and complex organisms that we see today. Plants as part of life in the sea and on land will be part of this unit, as well as learning about plankton--a significant foundation to all life in the sea.
In addition, students will learn how scientists classify the myriad of life on Earth using the Linnaean system. They will be introduced to tools that biologists use to identify plants and animals, like the dichotomous key. Finally, the students will progress through a study of all five kingdoms of life in the sea, beginning with the intrepid bacteria and ending with a study of the vertebrates, especially the marine mammals.

Island Explorers: Unit 2, Lesson 1 © 2014, USC Sea Grant
Concepts & Objectives
VOCABULARY
• Adaptation-Characteristics or traits that allow a species to better survive in its environment.
• Evolution- Process in all plants and animals that transmits traits from one generation to the next; these traits are generally beneficial to the plant or animal’s survival.
• Natural selection- Process through which evolution occurs; those plants/animal’s with traits that are less likely to help that plant/animal survive and reproduce die; process of nature selecting traits that will help a plant/animal to reproduce with healthy offspring
Vocabulary & Background
Lesson 1: Evolutionary Alphabet Soup45 minutes
QUESTION
• What is “natural selection” and how does it work?
UNDERLYING CONCEPT
Organisms that have the best means to deal with their environment are those that will most successfully reproduce.
SKILLS
• Observation• Deductive reasoning
OBJECTIVES
• Students will be able to define natural selection
MATERIALS NEEDED
• paper lunch bags, one per pair of students• dried alphabet noodles (or type letters on a computer and cut up)

Island Explorers: Unit 2, Lesson 1 © 2014, USC Sea Grant2
Activity
INTRODUCTION
• What does the word extinct mean? That a plant/animal is no longer alive and that it can-not reproduce.
• Can you name some animals that have become extinct? Dinosaurs…• Was there anything that these animals could have done to stay alive? No because their
deaths were due to environmental changes. • Let’s play an activity that will demonstrate how favorable characteristics/traits might help
an animal adapt to their environment. Before class: In each bag, put a small handful of alphabet noodles. Make sure that each has at least several of the following letters:
E L W H A.
ACTIVITY STEPS1. Pair the students up into teams.2. Give each team a bag with the alphabet noodles.
- The noodles represent all the characteristics in a population of whales. The stu-dents play the part of nature, selecting and eliminating certain characteristics because of environmental pressures.
3. Have the students pick five letters at a time out of the bag.4. The students may throw back into the bag all the letters E, L, W, H and A.
- Those letters stand for characteristics that help the whale to survive (for exam-ple, thicker blubber).
5. All other letters should be set aside; they represent a whale that died off because they had characteristics that were not useful or were harmful to them (for example, thin or no blubber).
Little by little, the students will eliminate the useless or harmful traits and will
BACKGROUND INFORMATION
Evolution is the gradual change in a species over geologic time, many thousands ormillions of years. All organisms go about the business of survival in many different ways. Overtime, those that have the best ways of dealing with the environment are those that have the best chance of surviving. For example, a whale with a thicker blubber layer will survive cold northern waters better than another with less blubber. The whale with the thicker blubber layer will survive to pass on this trait to its offspring, which will in turn pass the same trait on to theiroffspring. Over time, slowly but surely all whales of that species will end up with thickerblubber. Thus, the entire species will end up with thicker blubber. This is called naturalselection and was first described by Charles Darwin, an English naturalist who lived in thenineteenth century.
Changes like these can take many thousands or millions of years. These changes arecalled adaptations.

Island Explorers: Unit 2, Lesson 1 © 2014, USC Sea Grant3
Have students investigate other animals that have either successfully or not successfullycoped with changes in the environment.
Extensions
concentrate on the good ones in the bag (our “population”). Sooner or later they will draw fiveletters that happen to spell whale. The students didn’t plan it that way; neither did nature. Butthis is how whales evolved to have a thick, insulating layer of blubber.
*Note: The game can be continued by using letters typed on the computer/printed out and cutup.
DISCUSSION
Here are some thought questions to ask your students:• What are some types of environmental pressures that may have caused some species
of whales to evolve with thicker blubber than others? Cold water! For example, Northern Right Whales, which live in cold northern waters, can have blubber that is more than 1 foot thick.
• What do we know about whales that tell us that they are related to bears, dogs, cats and humans? They are mammals and so have hair (whales, dolphins and porpoises all have at least a few “whiskers” around the snout area), nurse their young which are born live, breathe air and are warm blooded.
• If whales are mammals, how can they survive living in the ocean? We know that they have thick blubber to keep them warm. What are other ways that they have evolved for a marine lifestyle?- Their bodies have become very streamlined and torpedo-like.- Their forelimbs have become paddle-like.- They can hold their breath for long periods of time while swimming.- Their nostrils have migrated over time to the tops of their heads for easy
breathing while swimming.- They have lost their hind limbs and now have a stiff pair of flat “flukes” which
make up their powerful tail used for swimming.- They have lost nearly all their hair to become sleek and slippery in the water.- They have lost their external ears and other body parts that stick out, again, so
that they are more streamlined in the water.

Island Explorers: Unit 2, Lesson 2 © 2014, USC Sea Grant
Lesson 2: Convergent Concentration55 minutes
QUESTION
Why do some animals which are very different from each other in most ways, share similarcharacteristics?
UNDERLYING CONCEPT
Ancestrally unrelated animals (species) have independently developed similar characteristics to deal with similar environmental pressures. Examples are wings for flight (such as birds andbutterflies) and fins for swimming (such as whales and fish).
SKILLS
• Identification• Analysis and interpertation
OBJECTIVES
Students will be able to:• Select examples of convergent evolution• Explain shared characteristics and how these characteristics helped the animal survive.
MATERIALS NEEDED
• Copies of “Convergent Concentration Game Cards” (enclosed) depicting examples of convergent evolution.
• 2 pages (per group) of 81/2 X 11” medium weight construction paper• Glue, adhesive• Scissors
Concepts & Objectives

Island Explorers: Unit 2, Lesson 2 © 2014, USC Sea Grant2
VOCABULARY
• Evolution - a gradual process in which something changes into a different form; life forms • • changing over time.• Convergence - to meet; to approach the same point from different directions.• Adaptation - a feature that allows an animal to survive in its environment.
BACKGROUND
Evolution is the gradual change in a species over geologic time, many thousands ormillions of years. Natural selection refers to the fact that an organism which has the mosteffective way of dealing with the environment is most likely to survive. An example is sea otters; those with warmer thicker fur will survive cold northern waters better than another with less thick fur. The sea otters with thicker fur will survive to pass this trait on to their offspring, so that over time all sea otters end up with thicker fur.
An adaptation is a feature that an animal has that allows it to survive in its environment.Sometimes these adaptations are very similar among different animals. In fact, entirely differentspecies can have the same type of adaptation to survive in similar environments. As metionedabove, wings (to fly and escape) and fins (to swim) are good examples. Other examples include:
- armor (for protection)- elongated Snouts (for sucking up food)- horns (for combat and protection)- large Ears (for both predator and prey to hear better in an environment
wherehearing is more important than sight)- large Eyes (for seeing well at night)- long Necks (for reaching food sources)- spines (for protection)- stripes (for predator/prey camouflage)- tusks (for rooting and digging, protecting or fighting)
To help in you discussion here are some criteria to determine valid examples of convergent evolution. In order to be considered an example of convergent evolution the animals must:
- be ancestrally unrelated- have structurally similar characteristics- are using these characteristics for the same function.
In essence they must have similar structures with similar functions. For instance “tails” would
Vocabulary & Background
Island Explorers: Unit 2, Lesson 2 © 2014, USC Sea Grant3
Activity INTRODUCTION
• To initiate the discussion Teacher shows two examples of two sets of animals usin overlays (made up from examples on the cards included in this activity) and a pointer can be very helpful. Example:A.) flying insect / small bird, and B.) antelope/steer- Ask students what they have in common.- Then give brief description of what convergent evolution is.
• Have students brainstorm other categories/examples of adaptations resulting from convergent evolution.
• Ultimately list on the board the 11 categories described in the background. Ask what these adaptations are for (example: “wings to fly and escape”). You may leave the title of the categories (without explanations) on the board to aid students with the activity, if needed.
ACTIVITY STEPS
Before You Start:
1. Divide students into groups of four (three or five will also work, but with four you can have the option of working in pairs [against another pair].)
2. Give each group a copy of the two pages of “Convergent Evolution” Animals, two pieces of construction paper, scissors, and glue stick, and one copy of “Convergent Concentration” Score sheet (or groups can make their own).
3. Ask students to paste the sheet of animals to the construction paper and then cut out thesquares to make “cards.” In addition each group writes the players name on the score sheet (or creates their own). Choose one player to also be scorekeeper.
not be a good example of convergent evolution because they are something shared by almost all vertebrates in their life cycle and also because they are not necessarily used for the same function. For example, horses use tails to swish flies and monkeys use tails for balance and certain monkeys use them to hang from trees.
Convergent Evolution is what occurs when two different species evolve similar structures fromsimilar lifestyles.

Island Explorers: Unit 2, Lesson 2 © 2014, USC Sea Grant4
• Create a variation of the convergent evolution worksheet using different animals (example; birds and butterflies or fish and whales), and then draw lines connecting animals that share similar characteristics.
• Students (individually or in groups) can research and find other examples of convergent evolution and share their findings with the class.
• Also students can draw and create an example of convergent evolution, as long as the explanation of the shared characteristic and how it helped the animals survive in the similar environment (all can be created) is valid. An environment can be specified for this activity such as “wetlands,” cold Arctic,” “hot desert,” etc. [These animals can be versions of their favorite pair (if appropriate for “their environment”) or entirely new creatures.]
Extensions
How to Play:
• Shuffle the animal “cards” and place face down.• Students play “Concentration” by taking turns (clockwise around the table). Each student
can turn any 2 cards over so the animal is visible. If the cards “match” and the student can say what the shared characteristic is, she/he wins 10 points. If the student can also say how it helped the animal to survive she/he gets another 10 points. The cards are removed from the game and placed face up by the student. Scorekeeper awards 10 (or 20) points by the students name.
• If the cards do not match, they are put back into the original position, face down to be used again. Each time a player is able to match and describe the reason why for a pair, she/he gets another turn; until she/he “misses”.
• The idea is for the students to both remember the position of the cards and more importantly to identify why they are a “match”.
Island Explorers: Unit 2, Lesson 3 © 2014, USC Sea Grant
Lesson 3: Sinking Slowly2 hours, allow time to experiment with the materials they will be using to design plankton
QUESTION
How do planktonic organisms, which are not strong enough to swim against the current in thewater, keep from sinking to the bottom of the ocean?
UNDERLYING CONCEPT
Plankton have a variety of strategies (adaptations) for staying above the bottom of the ocean inthe water column.
SKILLS
• Observation• Prediction• Inference• Measurement• Experimentation
OBJECTIVES
Students will be able to describe strategies used by plankton to keep from sinking and testtheir predictions about certain strategies in a model building exercise.
MATERIALS NEEDED
• Pictures of different types of plankton• Movie or video on plankton if available
- Plankton and the Open Sea, 18 minutes, Encyclopedia Britannica- Plankton of the Sea, 12 minutes, Fleetwood Films- Plankton: Pastures of the Ocean, 10 minutes. Encyclopedia Britannica- Plankton: the Endless Harvest, 18 minutes, Universal Education
• Various art supplies (sticks, string, beads, plastic, clay, styrofoam, wire, aluminum foil, nuts, glue, pipe cleaners, etc.)
• Buckets of water• Large glass aquarium or trash can full of water• Stopwatches• Small prizes
Concepts & Objectives

Island Explorers: Unit 2, Lesson 3 © 2014, USC Sea Grant2
VOCABULARY
• Plankton- Organisms that drift; they cannot swim against a current stronger than 1 knot (1 nautical mile/hour)
• Phytoplankton- plant plankton• Zooplankton- animal plankton• Photosynthesis- process through which plants obtain their energy from the sun• Adaptation- a feature that allows an animal to survive in its environment.
BACKGROUND
Plankton are organisms that drift; they cannot swim against a current any stronger than 1knot (1 nautical mile/hour). Usually, plankton are very small, microscopic organisms but somelarger animals, like certain jellyfish, are also considered plankton. Plankton are divided into twogroups, plants (phytoplankton) or they can be animals (called zooplankton). Phytoplanktonmake their own food through photosynthesis (using sunlight to combine carbon dioxide andwater into sugar), but zooplankton must ingest or eat food from the ocean.
Plankton are usually heavier than water. This is important because if a planktonic organismjust floated on the surface of the water, it might not be able to get to food sources below it or itmight get too warm or too much light from the sun (even phytoplankton can be “bleached” by the sun!). So plankton will tend to sink in the water column. But phytoplankton do need to staywhere sunlight penetrates. Zooplankton feed on phytoplakton so the zooplankton want to staywhere the phytoplankton are in the water column. One important note is that zooplankton areusually able to swim upward in the water column very slowly to maintain their position. But ifthey sink too quickly or are too heavy, they will go straight to the bottom of the ocean and notbe able to get back up! Therefore, planktonic organisms will have adaptations that prevent them from sinking too quickly. These adaptations include the following:
• small size (small things sink slower than large things)• long spines or projections that increase drag• long, thin or flattened shape - also increases drag• contain small amounts of oil (which is lighter than water)
Vocabulary & Background
Activity
ACTIVITY STEPS
Before Class:
This is a great, messy activity. It is particularly good for a warm day when the class may be
Island Explorers: Unit 2, Lesson 3 © 2014, USC Sea Grant3
naturally restless and ready for some excitement. The best way to finish this class is with acontest so you may want to think about some possible prizes (coupons for lost homework, small toys) during class.
During Class:
1. Start with observations of zooplankton and phytoplankton. Observe their shapes, projections and behaviors. Most plankton are heavier than water and tend to sink. Ask how they might stay up in the water. Make a list of the students’ observations.
2. Some of the students should notice that many plankton have long projections or antennae or hairs. Have them speculate on how these would affect movement through water. Could the students run through water faster with their own arms spread out or folded up?
3. Now the students are going to see if they can make a model phytoplankton or zooplankton which will sink slowly. Since “thrashing” or swimming is not possible in a non-mechanical model, they must concentrate on designing a plant or animal that is just barely heavier than water and that slows its rate of sinking by increasing its resistance to movement through water with long projections or hairs or that sinks slowly because it swings back and forth as it goes down. Have selections of materials and buckets of water available around he room for design and testing. Use stopwatches to time the speed of sinking. Set a time limit for experimentation and announce a contest for the slowest sinking animal or plant at the end of that time.
4. The best way to have the contest is to gather around a large glass aquarium where everyone can see. A big trash can of water or a large bucket will work, but you cannot give everyone a good view. In that case have several students help you as judges. You can time each separately, but it will be more exciting if pairs of phytoplankton or zooplankton are released to “reverse race” their way down. Put both on a sheet of cardboard so they can be tipped in at the same time for a fair start. The SLOWEST from each pair goes into a second heat and so on until you get down to two.
5. Have the students analyze what they think made each of the last two models winners. Then have them vote on which they think will win the grand prize for slowest overall based on their analysis. Do the final test and distribute prizes. Note: The plankton must SINK not float. They may not sink because they get wet slowly, but rather, because they are heavier than water from the start.
RESULTS
Something just barely heavier than water with lots of projections should win unless a student can produce a flat, pie pan shaped object that makes big swings from side to side as itdescends.

Island Explorers: Unit 2, Lesson 3 © 2014, USC Sea Grant4
Extensions
Have the students write a poem or paragraph about what it might feel like to be a phytoplankter or zooplanker, tending to sink. Remember that zooplankton can “swim” their wayup.
DISCUSSION
Have students discuss why certain models floated and others sank.
Adapted from Living in Water. To order, contact Kendall-Hint Publishing 1-800-228-0810

Island Explorers: Unit 2, Lesson 4 © 2014, USC Sea Grant
Lesson 4: Sea Water Surprise40 minutes, depending on age group and depth of investigation
QUESTION
What life forms can you find in a drop of seawater?
UNDERLYING CONCEPT
Plankton are diverse organisms that cannot swim against a current. Most plankton are microscopic and cannot be seen with the naked eye. In addition, special equipment must be used to collect them because they are so small.
SKILLS
• Observation• Prediction• Classification• Using appropriate scientific tools for investigations
OBJECTIVES
Students will be able to:
• Use a microscope• Recognize microscopic organisms found in seawater• Draw one of the planktonic organisms observed• Identify one or more plankton by comparing with guides
MATERIALS NEEDED
• Microscope Picture and Rules• Blue butcher paper (cut into shape of large drop of water)• Markers• Sea water samples (do not use artificial sea water like, “Instant Ocean”)• Plankton guides and photographs for students• Dissecting microscopes and light source• Petri dishes (or slides or watch glasses to hold samples)• Paper• Pens
Concepts & Objectives

Island Explorers: Unit 2, Lesson 4 © 2014, USC Sea Grant2
VOCABULARY
• Plankton – Organisms that drift; they cannot swim against a current stronger than 1 knot (1 nautical mile/hour)
• Microscopic- Living or nonliving particles that are unable to be seen with the naked eye• Microscope- Scientific instrument used to observe detailed view of living and nonliving
objects• Sampling- The process of taking a small portion of (sample of) a material to study it
METHOD
Students will observe plankton under a microscope, record their observations, classify theplankton using guides, photographs and other resources.
BACKGROUND
Marine life can be divided into three categories based on lifestyles. Organisms that live in or on the bottom, such as seaweed or crabs, are called benthic. Strongswimming animals that live in the open water, such as squid, whales, and adult fish, are called the nekton. Plankton are small floating or feebly-swimming plants and animals in the water. Plankton may be primitive unicellular organisms or complex multicellular plants and animals. All types of plankton are at the mercy or the waves, tides, and currents for transportation. Most of the organic matter in the sea is plankton, and directly or indirectly, nearly all other marine creatures depend on it as a source of food. Plant plankton (phytoplankton) need to be near the surface, where light is available for photosynthesis. Most animal plankton (zooplankton) need to be near the surface to feed upon the phytoplankton. In order to stay afloat near the surface, plankton have evolved many ways to control their position in the sea. Spikes and other projections on a plankton help to distribute the organisms weight over a large surface area, slowing its sinking. Examples are zoea larva (pre-adult stage of crabs) and brachiolaria larva (preadult stage of sea cucumber). Oil is lighter than water. Many organisms, such as copepods and diatoms, produce oil to help them float. Air-filled floats help many types of marine zooplankton, such as the Portuguese man-o-war, stay afloat. For additional resources and plankton photos, please see Related Sites below.
Vocabulary & Background
Activity
INTRODUCTION
• What can you find in the ocean? Seawater, fish, whales, rocks, etc.• Which of these things are living and which are not? Fish, whales, squid are alive; • seawater and rocks are not.

Island Explorers: Unit 2, Lesson 4 © 2014, USC Sea Grant3
Extensions
Science: Phytoplankton are the primary food source and producers of oxygen in the ocean. This connects to the study of photosynthesis, food chain and life cycles, water, ocean water with fresh water, polluted water with non-polluted water). Compare zooplankton with phytoplankton.Math: Sort and count organisms in a quadrat of the sample. Journal observations and record on a graph.Language Arts: Students create a haiku describing one of their favorite microscopic organisms. Students generate fictional stories about the life of a plankton.Social Studies: Who needs plankton? How do humans use plankton? How do humans adversely affect the plankton population? Can plankton adversely affect humans or other populations?Art: Students paste tissue paper representations of plankton on a circle of white paper representative of the petri dish. The tissue paper is layered to simulate how the plankton overlaps in an actual sample. Students make pipe cleaner mobiles of various microscopic organisms they observed.
• What can you find in a drop of seawater? Salt...and plankton!
ACTIVITY STEPS
1. Class discusses function of a microscope.2. Teacher introduces students to the parts of the microscope and explains the basic
operation of the microscope.3. In small groups, students examine samples of ocean water under a microscope.4. Students try to identify the organisms by comparing them to the plankton pictures/photos
from books and websites.RELATED WEBSITES- Phytoplankton Image Library- www.paulsmiths.edu/aai/phyto.html- Article on “Scientists Map Evolution of Phytoplakton”: http://www.enn.com/arch.
html?id=198355. Students draw as accurately as possible an organism they have identified.6. The labeled rendering will be placed on the butcher paper water drop.7. Students also record their observations in their science journals and identify any
characteristics.
Authored by: A.Zeithen, S. Wilson, S. Rossbach, J. Trochez, L. Braggs, B. Beach, J. Wrigh; at the University of SouthernCalifornia Sea Grant Teacher Workshop
Island Explorers: Unit 2, Lesson 4 © 2014, USC Sea Grant4
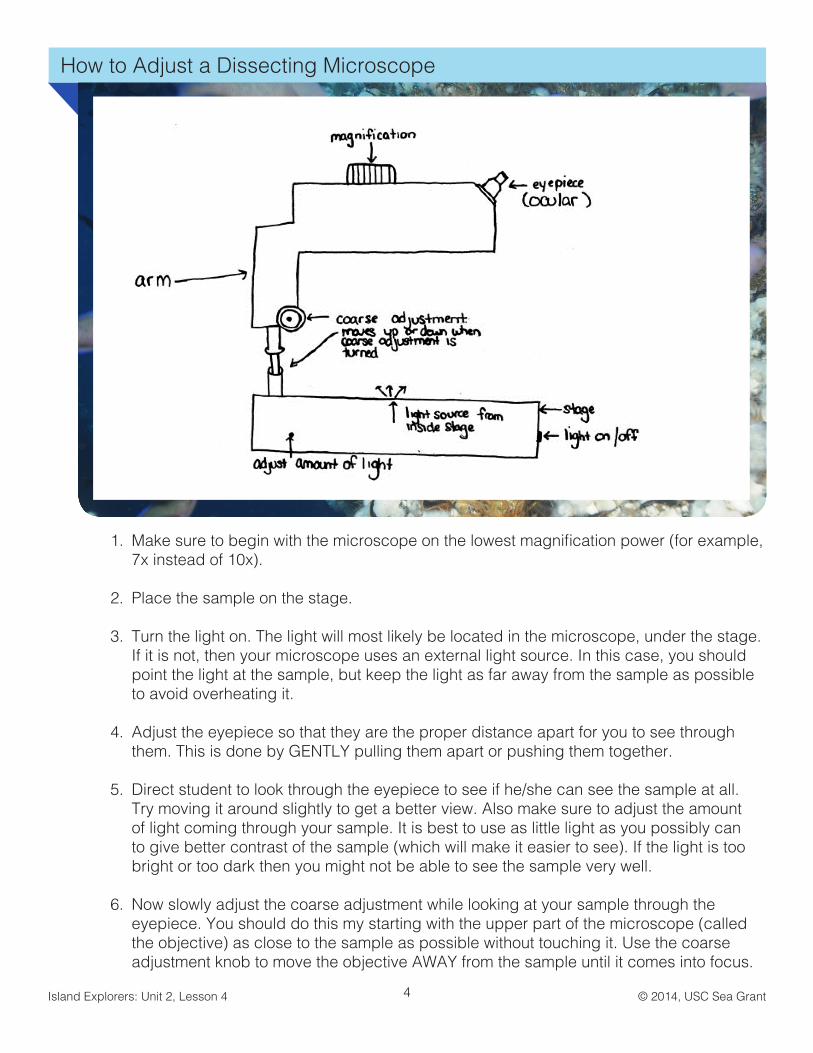
1. Make sure to begin with the microscope on the lowest magnification power (for example, 7x instead of 10x).
2. Place the sample on the stage.
3. Turn the light on. The light will most likely be located in the microscope, under the stage. If it is not, then your microscope uses an external light source. In this case, you should point the light at the sample, but keep the light as far away from the sample as possible to avoid overheating it.
4. Adjust the eyepiece so that they are the proper distance apart for you to see through them. This is done by GENTLY pulling them apart or pushing them together.
5. Direct student to look through the eyepiece to see if he/she can see the sample at all. Try moving it around slightly to get a better view. Also make sure to adjust the amount of light coming through your sample. It is best to use as little light as you possibly can to give better contrast of the sample (which will make it easier to see). If the light is too bright or too dark then you might not be able to see the sample very well.
6. Now slowly adjust the coarse adjustment while looking at your sample through the eyepiece. You should do this my starting with the upper part of the microscope (called the objective) as close to the sample as possible without touching it. Use the coarse adjustment knob to move the objective AWAY from the sample until it comes into focus.
How to Adjust a Dissecting Microscope

Island Explorers: Unit 2, Lesson 4 © 2014, USC Sea Grant5
How to Adjust a Dissecting Microscope Continued
As you slowly turn the adjustment knob you will notice the image will get clearer and clearer. Stop adjusting when the sample is the clearest.
7. After the sample has been completely focused with the coarse adjustment the microscope can be turned up to a higher magnification power by turning the magnification control knob. Make sure to only go turn the knob up by one magnification at a time and then stop to look through the eyepiece.
SOME RULES TO FOLLOW WHEN USING A MICROSCOPE
Direct students to:
• Be careful and gentle every time they use a microscope. Microscopes are delicate and expensive.
• If any kind of material from your sample (such as water) gets onto any part of the micro-scope make sure to wipe it off immediately and carefully.
• When carrying a microscope, always hold it underneath the stage with one hand and hold the arm of it with the other hand. Never carry it by the cord or without supporting the stage area.
• Always adjust the coarse adjustment with the microscope on lowest power. This way it will make it easier to focus on the sample and not damage any parts of the microscope.
Island Explorers: Unit 2, Lesson 5 © 2014, USC Sea Grant
Lesson 5: What’s on the Outside2 hours
Concepts & Objectives
QUESTION
How does body shape relate to function (how it swims, where it lives, etc)?
UNDERLYING CONCEPT
How body design relates to function.
SKILLS
• Identification• Creating Imprints
OBJECTIVES
Students will be able to:
• Create fish prints with paints• Label the various fish parts• Identify parts of the organism• Relate form to function• Compare the body of a fish to other types of bodies, humans for example
MATERIALS NEEDED
“What’s on the Outside?” activity
• Whole fresh fish (various kinds)• “Fish: What’s on the Outside?” and
“Fish Shapes” activity sheets• Compound microscope (optional) or
magnifying lens• Newspaper on which to lay fish• Tweezers• Fish books for reference• FISH INFO SHEETS• FISH PICTURE FOR REFERENCE
“Gyotaku” (fish rubbing/printing)
• Fish• Paper for fish printing• Ink for fish printing• Paper towels for clean up• 1/2-1 inch brushes (roller) and narrow
one• Push pins• Tissues• Plasticene modeling clay
Island Explorers: Unit 2, Lesson 5 © 2014, USC Sea Grant2
VOCABULARY
• Vertebrates- animals with backbones• Lateral line- horizontal “line” on fish that detects physical vibrations in the water
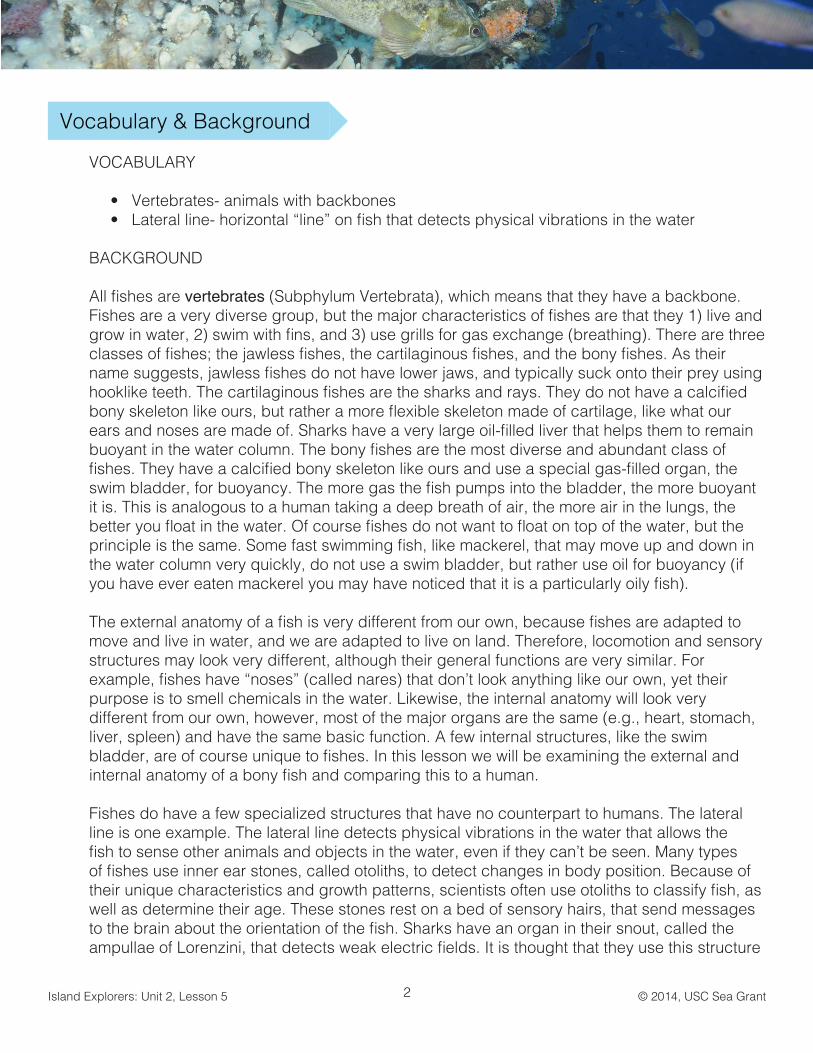
BACKGROUND
All fishes are vertebrates (Subphylum Vertebrata), which means that they have a backbone.Fishes are a very diverse group, but the major characteristics of fishes are that they 1) live andgrow in water, 2) swim with fins, and 3) use grills for gas exchange (breathing). There are threeclasses of fishes; the jawless fishes, the cartilaginous fishes, and the bony fishes. As their name suggests, jawless fishes do not have lower jaws, and typically suck onto their prey using hooklike teeth. The cartilaginous fishes are the sharks and rays. They do not have a calcifiedbony skeleton like ours, but rather a more flexible skeleton made of cartilage, like what our ears and noses are made of. Sharks have a very large oil-filled liver that helps them to remain buoyant in the water column. The bony fishes are the most diverse and abundant class of fishes. They have a calcified bony skeleton like ours and use a special gas-filled organ, the swim bladder, for buoyancy. The more gas the fish pumps into the bladder, the more buoyant it is. This is analogous to a human taking a deep breath of air, the more air in the lungs, the better you float in the water. Of course fishes do not want to float on top of the water, but the principle is the same. Some fast swimming fish, like mackerel, that may move up and down in the water column very quickly, do not use a swim bladder, but rather use oil for buoyancy (if you have ever eaten mackerel you may have noticed that it is a particularly oily fish).
The external anatomy of a fish is very different from our own, because fishes are adapted tomove and live in water, and we are adapted to live on land. Therefore, locomotion and sensorystructures may look very different, although their general functions are very similar. Forexample, fishes have “noses” (called nares) that don’t look anything like our own, yet theirpurpose is to smell chemicals in the water. Likewise, the internal anatomy will look verydifferent from our own, however, most of the major organs are the same (e.g., heart, stomach,liver, spleen) and have the same basic function. A few internal structures, like the swim bladder, are of course unique to fishes. In this lesson we will be examining the external and internal anatomy of a bony fish and comparing this to a human.
Fishes do have a few specialized structures that have no counterpart to humans. The lateralline is one example. The lateral line detects physical vibrations in the water that allows the fish to sense other animals and objects in the water, even if they can’t be seen. Many types of fishes use inner ear stones, called otoliths, to detect changes in body position. Because of their unique characteristics and growth patterns, scientists often use otoliths to classify fish, as well as determine their age. These stones rest on a bed of sensory hairs, that send messages to the brain about the orientation of the fish. Sharks have an organ in their snout, called the ampullae of Lorenzini, that detects weak electric fields. It is thought that they use this structure
Vocabulary & Background

Island Explorers: Unit 2, Lesson 5 © 2014, USC Sea Grant3
Activity
INTRODUCTION
• What can you find in the ocean? Seawater, fish, whales, rocks, etc.• Which of these things are living and which are not? Fish, whales, squid are alive; • seawater and rocks are not.• What can you find in a drop of seawater? Salt...and plankton!
ACTIVITY STEPS
1. Class discusses function of a microscope.2. Teacher introduces students to the parts of the microscope and explains the basic
operation of the microscope.3. In small groups, students examine samples of ocean water under a microscope.4. Students try to identify the organisms by comparing them to the plankton pictures/photos
from books and websites.RELATED WEBSITES- Phytoplankton Image Library- www.paulsmiths.edu/aai/phyto.html- Article on “Scientists Map Evolution of Phytoplakton”: http://www.enn.com/arch.
html?id=198355. Students draw as accurately as possible an organism they have identified.6. The labeled rendering will be placed on the butcher paper water drop.7. Students also record their observations in their science journals and identify any
characteristics.
to detect prey, perhaps being able to distinguish the weak electrical signals given off by injured animals.
ExtensionsScience: Phytoplankton are the primary food source and producers of oxygen in the ocean. This connects to the study of photosynthesis, food chain and life cycles, water, ocean water with fresh water, polluted water with non-polluted water). Compare zooplankton with phytoplankton.Math: Sort and count organisms in a quadrat of the sample. Journal observations and record on a graph.Language Arts: Students create a haiku describing one of their favorite microscopic organisms. Students generate fictional stories about the life of a plankton.Social Studies: Who needs plankton? How do humans use plankton? How do humans adversely affect the plankton population? Can plankton adversely affect humans or other populations?Art: Students paste tissue paper representations of plankton on a circle of white paper

Island Explorers: Unit 2, Lesson 5 © 2014, USC Sea Grant4
representative of the petri dish. The tissue paper is layered to simulate how the plankton overlaps in an actual sample. Students make pipe cleaner mobiles of various microscopic organisms they observed.
© University of Hawaii. Information also provided by Chris DeWees

Island Explorers: Unit 2, Lesson 5 © 2014, USC Sea Grant5
You can tell a lot about a fish’s lifestyle by examining its body shape and fins. Does your fish live near the bottom? Is it a fast swimmer? What does the lens from its eye look like? After you have observed your fish, look at another fish that is different from yours.
1. Look carefully at your fish. Draw it on the back of this sheet. Leave room for a written description of your fish under the drawing (Question #6).
2. Look inside your fish’s mouth. Does your fish have:a tongue? ____________teeth? __________ Draw the teeth here:
3. Lift the operculum (gill cover). Describe the gills:. As you slowly turn the adjustment knob you will notice the image will get clearer and clearer. Stop adjusting when the sample is the clearest.
Fish: What’s on the Outside?

Island Explorers: Unit 2, Lesson 5 © 2014, USC Sea Grant6
Fish: What’s on the Outside Continued
4. How many fins on your fish? Put the number of each kind in the blank.
_______ dorsal (on the back) _______ caudal (tail) _______ pectoral (“arms”)
_______ pelvic (“legs”) _______ Any other fins?
Which fins are spiny? ___________________________________________
5. Scales: Put a scale on a microscope slide in a drop of water. You can do this byusing tweezers to remove the scale. Grasp a scale and pull toward the tail. Look atthe scale with a compound microscope or magnifying lens. With a microscope, startat the lowest power (shortest lens). Make a drawing of the scale here:
6. Using the “Fish Shapes” sheet:Describe the lifestyle of your fish. Support your statements with information about its body-shape, fins and tail, mouth and eye position. Write your description on the back of this paper under your fish drawing.
Island Explorers: Unit 2, Lesson 5 © 2014, USC Sea Grant7
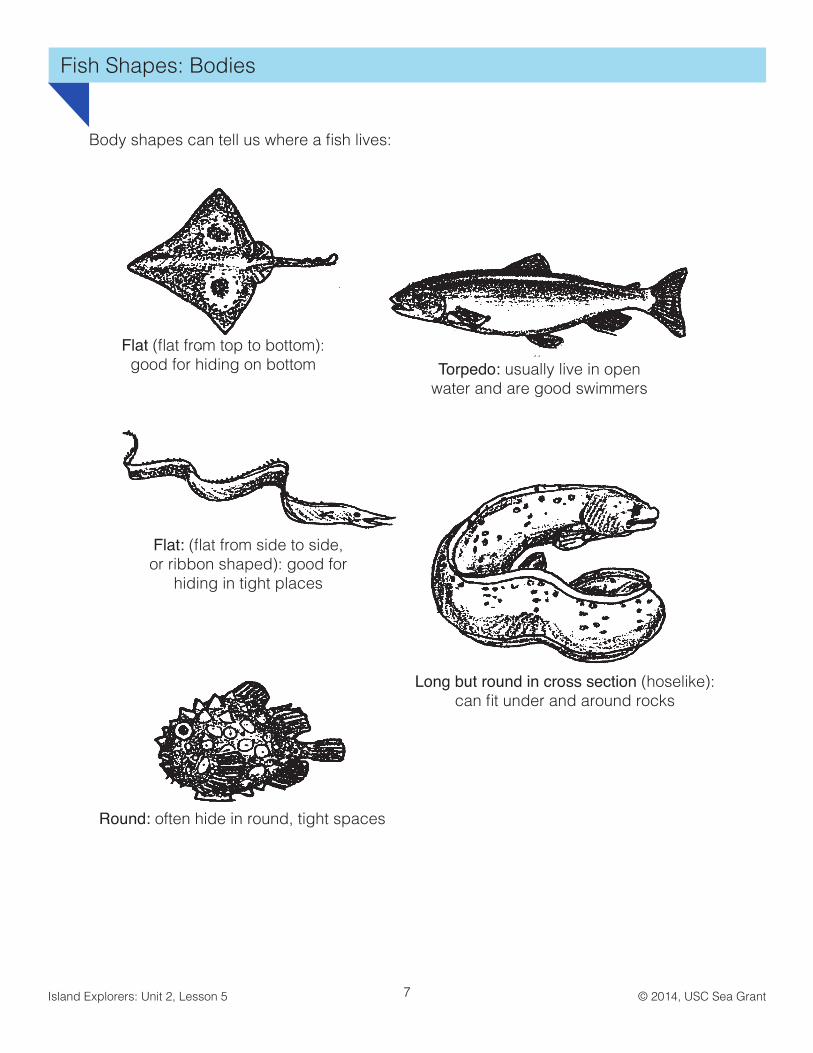
Fish Shapes: Bodies
Body shapes can tell us where a fish lives:
Flat (flat from top to bottom):good for hiding on bottom Torpedo: usually live in open
water and are good swimmers
Flat: (flat from side to side, or ribbon shaped): good for
hiding in tight places
Long but round in cross section (hoselike): can fit under and around rocks
Round: often hide in round, tight spaces
Island Explorers: Unit 2, Lesson 5 © 2014, USC Sea Grant8
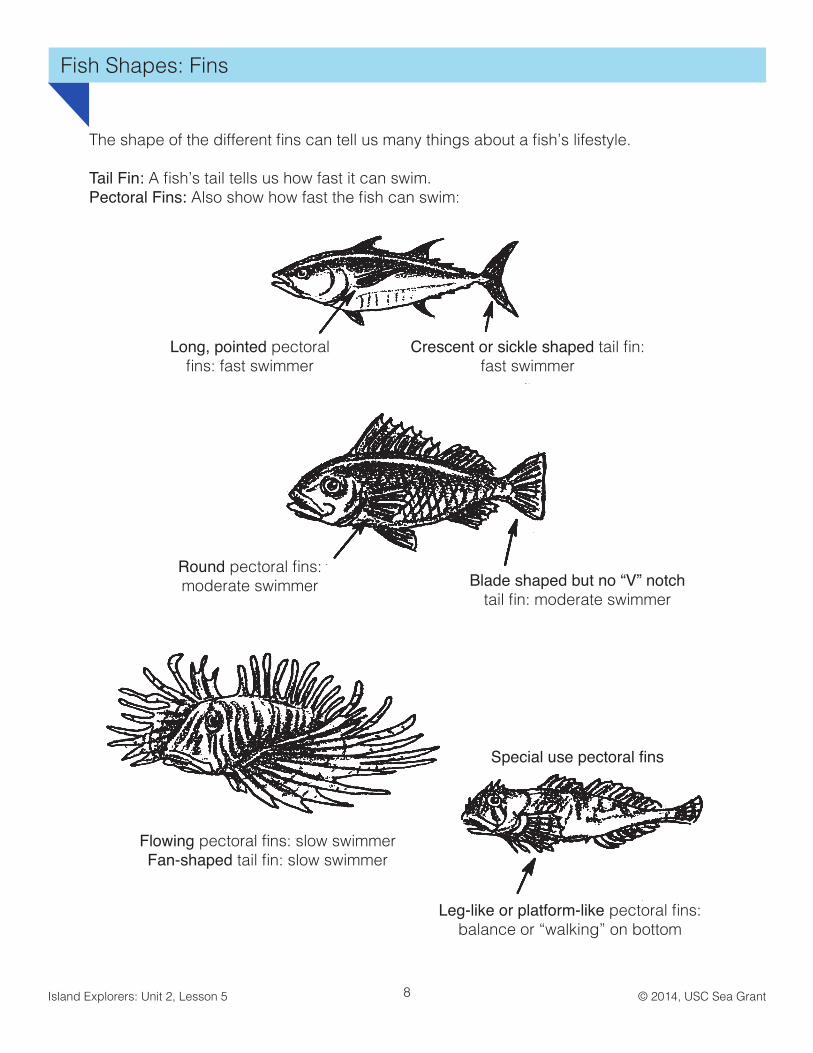
Fish Shapes: Fins
The shape of the different fins can tell us many things about a fish’s lifestyle.
Tail Fin: A fish’s tail tells us how fast it can swim.Pectoral Fins: Also show how fast the fish can swim:
Long, pointed pectoralfins: fast swimmer
Crescent or sickle shaped tail fin: fast swimmer
Round pectoral fins:moderate swimmer Blade shaped but no “V” notch
tail fin: moderate swimmer
Flowing pectoral fins: slow swimmerFan-shaped tail fin: slow swimmer
Leg-like or platform-like pectoral fins: balance or “walking” on bottom
Special use pectoral fins

Island Explorers: Unit 2, Lesson 5 © 2014, USC Sea Grant9
Fish Shapes: Mouths
The position of a fish’s mouth tells us how it feeds:
Wide, upturned mouth: gulperswhich often wait quietly for foodto come within gulping distance
Mouth slanted toward top offish: surface feeder
Long, skinny nose with mouth atthe end: prober which searches forfood in crevices, cracks, and holes
Mouth on underside: bottomfeeder

Island Explorers: Unit 2, Lesson 5 © 2014, USC Sea Grant10
Fish Shapes: Eyes
The position of a fish’s eyes tells us where it spends most of its time:
One eye on each side: usuallyswims above the bottom
Both eyes on top of head: stayon or near the bottom
Both eyes on one side of thehead: stay on or near the bottom
Used with permission from OCEAN STUDIES, OCEAN ISSUES FOR SEA: GRADE 8 - Oceanography and Marine Biology, © 1997, James A. Kolb. The FOR
SEA series includes 14 guides for grades 1 - 12 available from FOR SEA, Institute of Marine Science, Indianola, WA 98342, www.forsea.org

Island Explorers: Unit 2, Lesson 6 © 2014, USC Sea Grant
QUESTION
What is the basic internal structure of a fish? How is it similar to a human?
UNDERLYING CONCEPT
There are both similarities and differences between the internal structures of humans and fish.Dissecting a fish will allow the student to see the insides and compare the organs to a human body.
SKILLS
• Dissection• Identification
OBJECTIVES
Students will be able to:• Demonstrate dissecting techniques• Identify parts of the organism and compare the organs to the human body appearance
and function
MATERIALS NEEDED
• Fish• Paper towels for clean up• Dissecting tools:
- Scapel or sharp knife- Small sharp scissors- Tweezers
• Blunt probes• Cardboard or thick newspapers (to place fish on)• Apron• Soap and water• INTERNAL FISH ANATOMY DIAGRAM• CLEANING FISH: INTERNAL ANATOMY
Lesson 6: What’s on the Inside2 hours
Concepts & Objectives

Island Explorers: Unit 2, Lesson 6 © 2014, USC Sea Grant2
VOCABULARY
Some of the more obvious and important internal structures:• Gills - for breathing/exchange of oxygen• Heart - circulation of blood• Liver - filters and cleans the blood of impurities• Pyloric caeca - produces digestive juices• Gonad (ovaries or testes) - produces eggs (orange or yellow) or sperm (white)• Stomach - digestion of food• Intestine - digestion of food/movement of wastes• Anus - exit for solid wastes• Kidneys - produce urine• Urogenital opening - exit for urine, eggs and sperm
BACKGROUND
All fishes are vertebrates (Subphylum Vertebrata), which means that they have abackbone. Fishes are a very diverse group, but the major characteristics of fishes are that they 1) live and grow in water, 2) swim with fins, and 3) use grills for gas exchange (breathing).There are three classes of fishes; the jawless fishes, the cartilaginous fishes, and the bony fishes. As their name suggests, jawless fishes do not have lower jaws, and typically suck onto their prey using hooklike teeth. The cartilaginous fishes are the sharks and rays. They do not have a calcified bony skeleton like ours, but rather a more flexible skeleton made of cartilage, like what our ears and noses are made of. Sharks have a very large oil-filled liver that helps them to remain buoyant in the water column. The bony fishes are the most diverse and abundant class of fishes. They have a calcified bony skeleton like ours and use a special gas-filled organ, the swim bladder, for buoyancy. The more gas the fish pumps into the bladder, the more buoyant it is. This is analogous to a human taking a deep breath of air, the more air in the lungs, the better you float in the water. Of course fishes do not want to float on top of the water, but the idea of having greater buoyancy after more air is the same. Some fast swimming fish, like mackerel, that may move up and down in the water column very quickly, do not use a swim bladder, but rather use oil for buoyancy (if you have ever eaten mackerel you may have noticed that it is a particularly oily fish).
The external anatomy of a fish is very different from our own, because fishes are adaptedto move and live in water, and we are adapted to live on land. Therefore, locomotion and sensory structures may look very different, although their general functions are very similar. Forexample, fishes have “noses” (called nares) that don’t look anything like our own, yet theirpurpose is to smell chemicals in the water. Likewise, the internal anatomy will look verydifferent from our own, however, most of the major organs are the same (e.g., heart, stomach,liver, spleen) and have the same basic function. A few internal structures, like the swim bladder, are of course unique to fishes. In this lesson we will be examining the external and
Vocabulary & Background

Island Explorers: Unit 2, Lesson 6 © 2014, USC Sea Grant3
INTRODUCTION
Explain that you are going to dissect a fish. Have the students discuss the anatomic parts they would expect to find in a fish. Have them:
• List the parts they expect to find.• Explain why they think each part will be present.• Tell what they think may be the function of these different parts.
List questions they would like answered when observing fish entrails.
ACTIVITY STEPS
Information for teachers before beginning:
You will probably want to do the opening of the fish for the students, once this is done turnthe fish over to the students. Insert a sharp knife in the anus and make a shallow cut alongthe belly to the area right below the gill opening. Open the body to identify as many organsas possible without removing them. Have them carefully tease the organs away from thebody with their fingers.
Where to find parts of the body:
• Heart and Liver- The heart and liver are found right below the gills and cutting should be done carefully so they are not injured.
• Brain- The brain is on the front part of the head. You will need to cut through bone of the head to get at it.
• Eye- The eye can be removed and opened to reveal a round lens.
Activity
internal anatomy of a bony fish and comparing this to a human.
Fishes do have a few specialized structures that have no counterpart to humans. Thelateral line is one example. The lateral line detects physical vibrations in the water that allowsthe fish to sense other animals and objects in the water, even if they can’t be seen. Many typesof fishes use inner ear stones, called otoliths, to detect changes in body position. Because oftheir unique characteristics and growth patterns, scientists often use otoliths to classify fish, aswell as determine their age. These stones rest on a bed of sensory hairs, that send messages to the brain about the orientation of the fish. Sharks have an organ in their snout, called theampullae of Lorenzini, that detects weak electric fields. It is thought that they use this structure to detect prey, perhaps being able to distinguish the weak electrical signals given off by injured animals.
Island Explorers: Unit 2, Lesson 6 © 2014, USC Sea Grant4
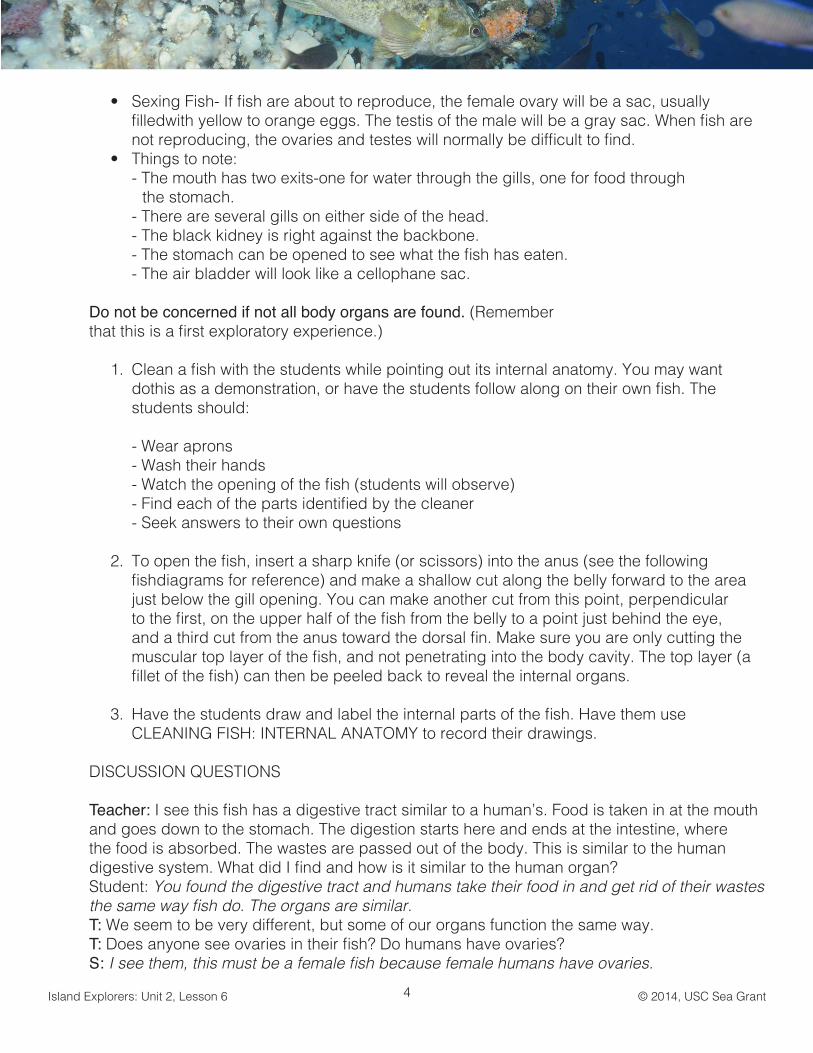
• Sexing Fish- If fish are about to reproduce, the female ovary will be a sac, usually filledwith yellow to orange eggs. The testis of the male will be a gray sac. When fish are not reproducing, the ovaries and testes will normally be difficult to find.
• Things to note:- The mouth has two exits-one for water through the gills, one for food through
the stomach.- There are several gills on either side of the head.- The black kidney is right against the backbone.- The stomach can be opened to see what the fish has eaten.- The air bladder will look like a cellophane sac.
Do not be concerned if not all body organs are found. (Rememberthat this is a first exploratory experience.)
1. Clean a fish with the students while pointing out its internal anatomy. You may want dothis as a demonstration, or have the students follow along on their own fish. The students should:
- Wear aprons- Wash their hands- Watch the opening of the fish (students will observe)- Find each of the parts identified by the cleaner- Seek answers to their own questions
2. To open the fish, insert a sharp knife (or scissors) into the anus (see the following fishdiagrams for reference) and make a shallow cut along the belly forward to the area just below the gill opening. You can make another cut from this point, perpendicular to the first, on the upper half of the fish from the belly to a point just behind the eye, and a third cut from the anus toward the dorsal fin. Make sure you are only cutting the muscular top layer of the fish, and not penetrating into the body cavity. The top layer (a fillet of the fish) can then be peeled back to reveal the internal organs.
3. Have the students draw and label the internal parts of the fish. Have them use CLEANING FISH: INTERNAL ANATOMY to record their drawings.
DISCUSSION QUESTIONS
Teacher: I see this fish has a digestive tract similar to a human’s. Food is taken in at the mouth and goes down to the stomach. The digestion starts here and ends at the intestine, where the food is absorbed. The wastes are passed out of the body. This is similar to the human digestive system. What did I find and how is it similar to the human organ?Student: You found the digestive tract and humans take their food in and get rid of their wastes the same way fish do. The organs are similar.T: We seem to be very different, but some of our organs function the same way.T: Does anyone see ovaries in their fish? Do humans have ovaries?S: I see them, this must be a female fish because female humans have ovaries.

Island Explorers: Unit 2, Lesson 6 © 2014, USC Sea Grant5
Extensions
Continue looking for organs and labeling them. If they are similar to human organ write howtheir function is the same or different. If the fish has an organ a human does not have, labelthe part in your drawing and write its function on your chart.
EVALUATION
• Review the detail and accuracy if the students worksheet on internal anatomy.• Have the students make a wall chart of the external anatomy of a fish.
T: What is the function of the ovaries in the human?S: They carry the eggs that can become babies.T: Ovaries have the same function in the fish. (Draw and list function on chart)T: With a partner, decide which organs are similar to human organs (find them in the fish). Afterten minutes, I will call on volunteers to share what they have found. Tell me the organ, whereit is found, and how the function is similar to the human organ.S: We found a kidney and humans have kidneys. Kidneys are used to remove wastes from thebody. It is near the intestine.
ADDITIONAL DISCUSSION QUESTIONS
• What parts of the fish’s anatomy seem to be involved in processing food? Agree on the mouth, tongue, teeth, stomach, intestine, anus.
• How were these parts arranged in the fish?• Where were the sex organs of the fish?• How do eggs or milt (sperm) leave the body of the fish? Locate a second opening
behind the anus. This is the urogenital opening.• Where was the heart of the fish?• How was the heart connected to the rest of the body? Only large blood vessels will be
observable.• Where were the kidneys of the fish?• Where were the gills of the fish?• How were they connected to the rest of the body? The blood vessels leading to the heart
may be found.• What questions of your own did you investigate? What answers did you find?
Provided Courtesy of the DASH Project © University of Hawaii

Island Explorers: Unit 2, Lesson 6 © 2014, USC Sea Grant6
Cleaning Fish: Internal Anatomy
Draw the internal anatomy of a fish and label the organs listed in the table #2

Island Explorers: Unit 2, Lesson 6 © 2014, USC Sea Grant7
Cleaning Fish: Internal Anatomy
Organ Function
Tongue
Gills
Stomach
Intestine
Pyloric Caeca
Anus
Kidneys
Gonads(testes, ovaries)
Air Bladder
Heart
Liver
Brain
Urogenital Opening
Suggest what the following organs might do:

Island Explorers: Unit 2, Lesson 7 © 2014, USC Sea Grant
Lesson 7: Critters ClassifiedAbout 1 hour
QUESTION
What are the major groups of invertebrates and what do they look like?
UNDERLYING CONCEPT
Scientists divide organisms into different groups (phyla) according to their shared characteristics. Most marine invertebrates fall into one of the six major phyla.
SKILLS
• Observation• Comparison• Critical analysis
OBJECTIVES
Students will be able to:
• Recognize the major phylogenetic groups of invertebrate animals.• Work through a dichotomous key to identify the phylum of specific invertebrates.
MATERIALS NEEDED
• Several pictures of various invertebrates within each phylum.• Dichotomous key.
Concepts & Objectives
Vocabulary & Background
VOCABULARY
• Body plan: the overall organization of an animal’s body.• Invertebrate: an animal that does not have a backbone.• Phylum: animals grouped together by their similar body plans.• Segmented: animal whose body is divided into distinct sections so that it looks jointed,• such as a centipede.
Island Explorers: Unit 2, Lesson 7 © 2014, USC Sea Grant2
Activity
1. Before discussing the major phyla: Have 3 pictures of different invertebrates from each of the major phyla. Tell students that you would like them to group the animals into 6 (and only 6) groups and that there should be 3 animals in each group. Have the students work in small teams to decide on their groups.
2. As a class, discuss the groups that the student teams have come up with. Ask them to describe why they put certain animals together. Next, show the students the “correct” groupings of the animals (a key with the proper groups will be provided). These are the groups that scientists have come up with. Ask the students to describe the main “traits” or similarities within each group (i.e., those things that all the animals in a group have in common). The students will not be able to come up with all of the characteristic traits of
• Tentacle: slender, finger-like extension usually found near an animal’s mouth or head• used to catch and handle food.
BACKGROUND
Invertebrates are animals that do not have backbones. Over 90% of all the animals on theearth are invertebrates! There are thousands of types of invertebrates to be seen along the shores and in the ocean off Southern California.
Scientists group all animals according to the similarities in their body plan. A body plan isthe overall organization of an animal’s body: what it looks like; what kind of internal and external parts it has and where they are located; how it moves and feeds. A group of animals with a similar body plan is called a phylum. Organisms within a phylum have a shared evolutionary history as well, meaning they are “related” to one another through a distant common ancestor. Invertebrates are so diverse that they include dozens of phyla (plural). In contrast, vertebrates, animals with backbones, are only a small subgroup within one phylum.
Most commonly seen invertebrates belong to one of these six phyla. If an animal belongsto one phylum, it does not belong to any other phyla.
6 Major Invertebrate Phyla:
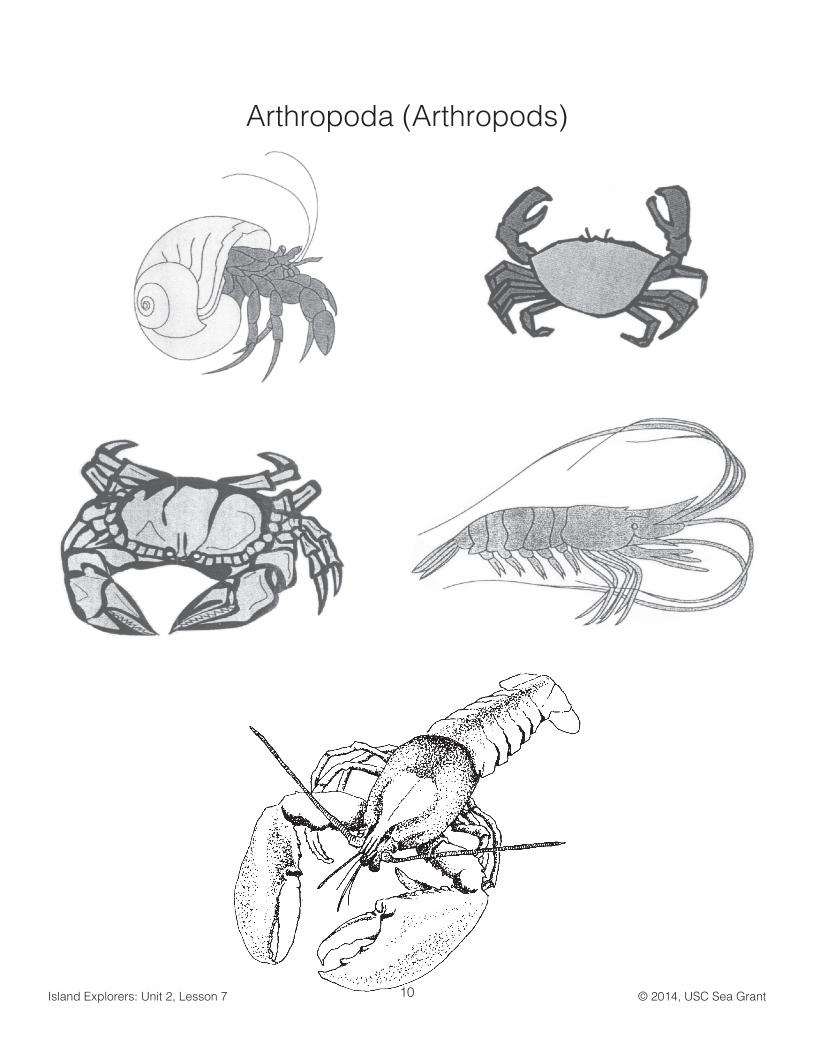
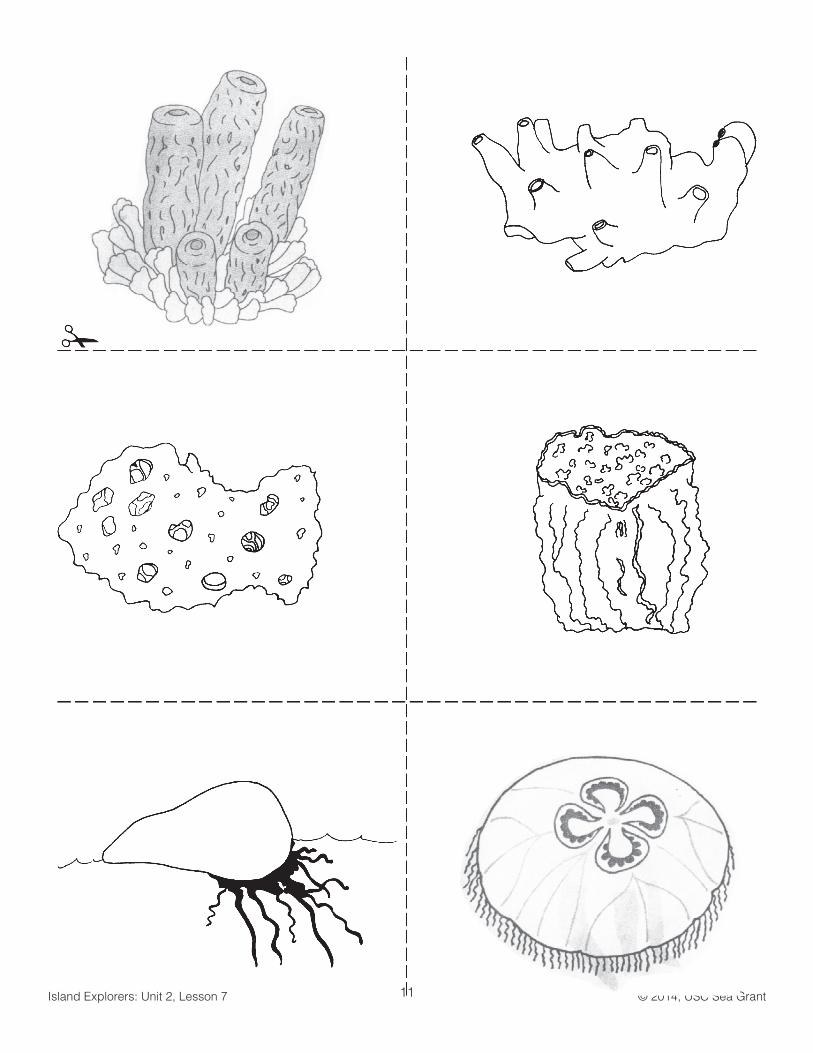
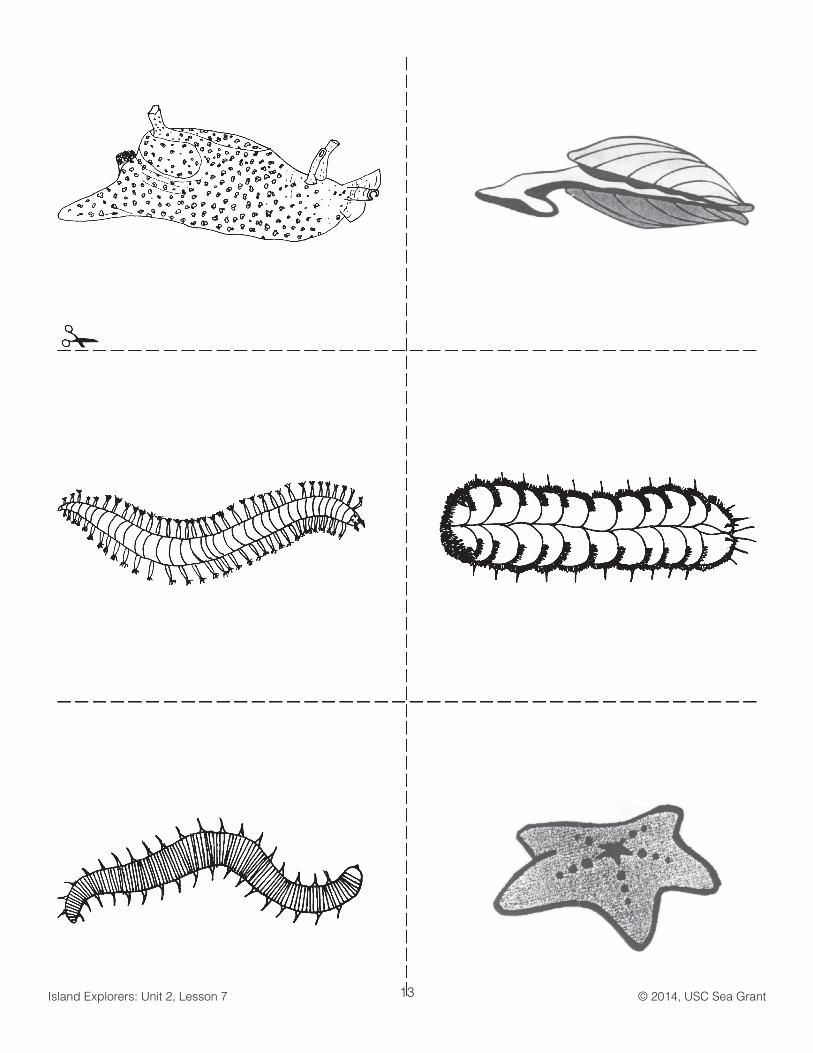
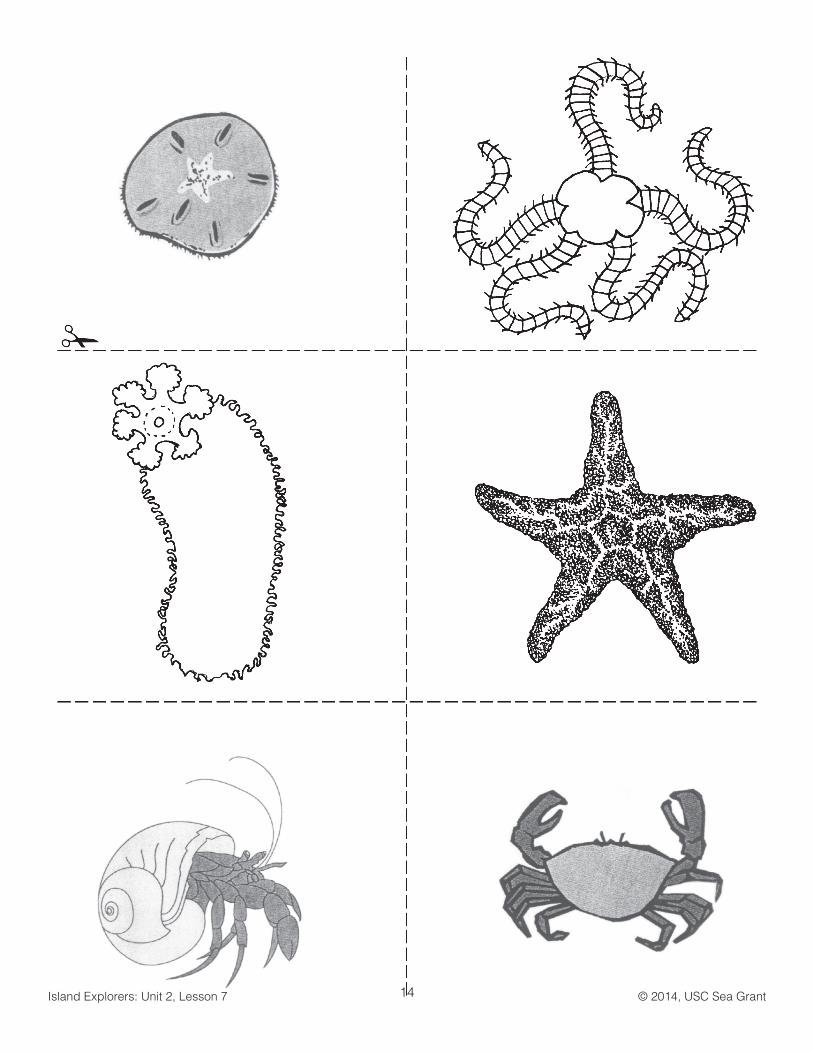
Porifera - sponges (por IF er ah)Cnidaria - sea anemones and jellyfish (ny DARE ee ah)Mollusca - snails, slugs, squids and octopuses (mall US kah)Annelida - segmented worms (repeated body segments) (a NELL i dah)Arthropoda - insects, shrimps, lobsters and crabs (are thro POE dah)Echinodermata - sea stars, urchins, brittle stars (ee ky no der MAH tah)
We can learn to recognize all these different groups by the similarities in their body plans.

Island Explorers: Unit 2, Lesson 7 © 2014, USC Sea Grant3
each phylum just by looking at photographs. But it is important to stress to them that they will be able to experience the same process that scientists go through when they group organisms.
3. Dichotomous Key (also contained in PDF file CrittersClassified.pdf) Hand out pictures of 3 different animals, from 3 different phyla, to the teams again. The students will work through the dichotomous key to discover the name of the phylum that each animal be-longs to.
Adapted from “Marine Life of Southern California (2nd Ed.) by Donald J. Reish (1995)
Island Explorers: Unit 2, Lesson 7 © 2014, USC Sea Grant4
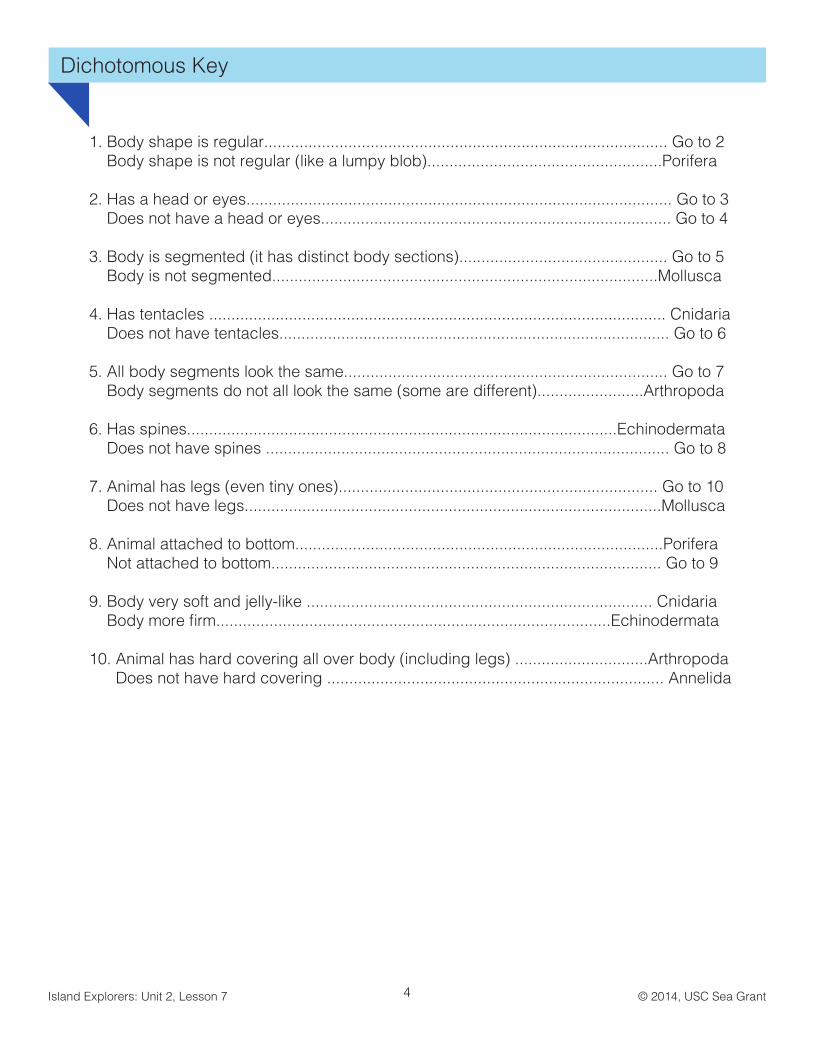
Dichotomous Key
1. Body shape is regular........................................................................................... Go to 2 Body shape is not regular (like a lumpy blob).....................................................Porifera
2. Has a head or eyes................................................................................................ Go to 3 Does not have a head or eyes............................................................................... Go to 4
3. Body is segmented (it has distinct body sections)............................................... Go to 5 Body is not segmented.......................................................................................Mollusca
4. Has tentacles ....................................................................................................... Cnidaria Does not have tentacles........................................................................................ Go to 6
5. All body segments look the same......................................................................... Go to 7 Body segments do not all look the same (some are different)........................Arthropoda
6. Has spines.................................................................................................Echinodermata Does not have spines ........................................................................................... Go to 8
7. Animal has legs (even tiny ones)........................................................................ Go to 10 Does not have legs..............................................................................................Mollusca
8. Animal attached to bottom...................................................................................Porifera Not attached to bottom........................................................................................ Go to 9
9. Body very soft and jelly-like .............................................................................. Cnidaria Body more firm.........................................................................................Echinodermata
10. Animal has hard covering all over body (including legs) ..............................Arthropoda Does not have hard covering ............................................................................ Annelida

Island Explorers: Unit 2, Lesson 7 © 2014, USC Sea Grant5
Porifera

Island Explorers: Unit 2, Lesson 7 © 2014, USC Sea Grant6
Cnidaria (Cndarians)

Island Explorers: Unit 2, Lesson 7 © 2014, USC Sea Grant7
Mollusca (Mollusks)

Island Explorers: Unit 2, Lesson 7 © 2014, USC Sea Grant8
Annelida (Annelids)

Island Explorers: Unit 2, Lesson 7 © 2014, USC Sea Grant9
Echinodermata (Echinoderms)
Island Explorers: Unit 2, Lesson 7 © 2014, USC Sea Grant10
Arthropoda (Arthropods)
Island Explorers: Unit 2, Lesson 7 © 2014, USC Sea Grant11

Island Explorers: Unit 2, Lesson 7 © 2014, USC Sea Grant12
Island Explorers: Unit 2, Lesson 7 © 2014, USC Sea Grant13
Island Explorers: Unit 2, Lesson 7 © 2014, USC Sea Grant14

Island Explorers: Unit 2, Lesson 7 © 2014, USC Sea Grant15