Unit Testsjxs/courses/cs410/note05.pdfTest Classes and Test Methods •Test class –A public class...
9
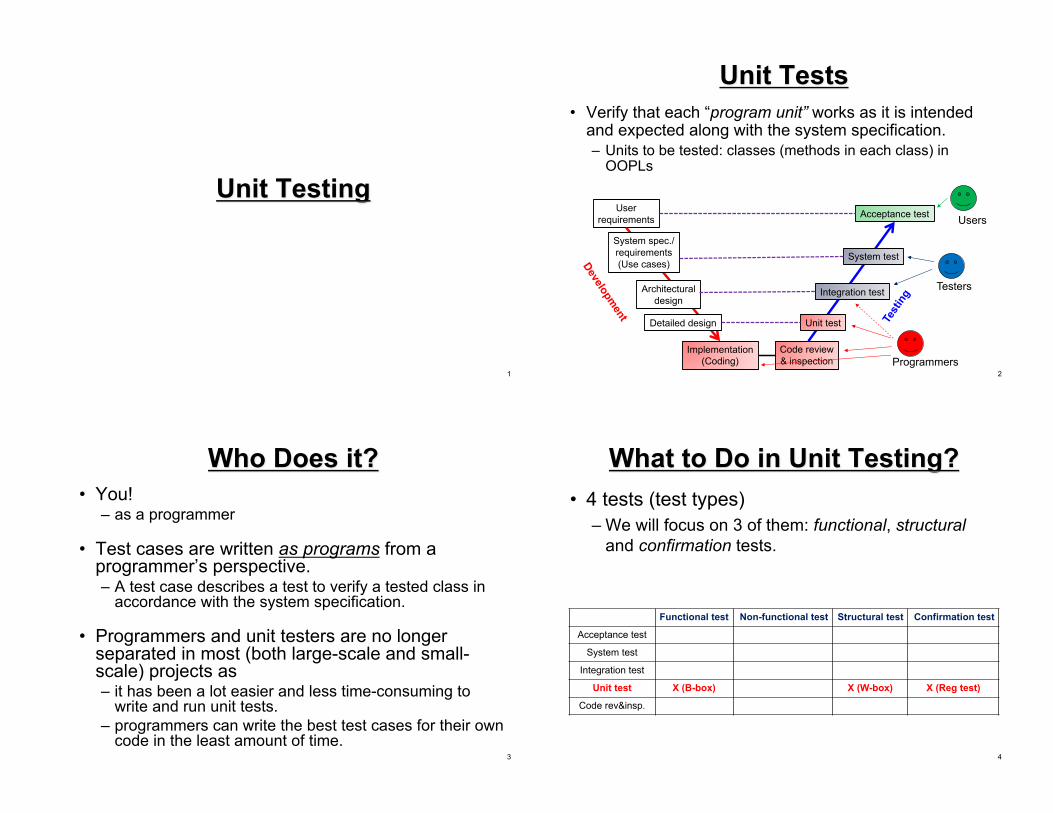
Unit Testing 1 Unit Tests • Verify that each “program unit” works as it is intended and expected along with the system specification. – Units to be tested: classes (methods in each class) in OOPLs 2 User requirements Implementation (Coding) Code review & inspection Acceptance test System spec./ requirements (Use cases) Architectural design Detailed design Unit test Integration test System test Programmers Testers Users Who Does it? • You! – as a programmer • Test cases are written as programs from a programmer’s perspective. – A test case describes a test to verify a tested class in accordance with the system specification. • Programmers and unit testers are no longer separated in most (both large-scale and small- scale) projects as – it has been a lot easier and less time-consuming to write and run unit tests. – programmers can write the best test cases for their own code in the least amount of time. 3 What to Do in Unit Testing? • 4 tests (test types) – We will focus on 3 of them: functional, structural and confirmation tests. 4 Functional test Non-functional test Structural test Confirmation test Acceptance test System test Integration test Unit test X (B-box) X (W-box) X (Reg test) Code rev&insp.
Transcript of Unit Testsjxs/courses/cs410/note05.pdfTest Classes and Test Methods •Test class –A public class...
Unit Testing
1
Unit Tests
• Verify that each “program unit” works as it is intended and expected along with the system specification. – Units to be tested: classes (methods in each class) in
OOPLs
2
Userrequirements
Implementation(Coding)
Code review& inspection
Acceptance test
System spec./requirements(Use cases)
Architecturaldesign
Detailed design Unit test
Integration test
System test
Programmers
Testers
Users
Who Does it?
• You!– as a programmer
• Test cases are written as programs from a programmer’s perspective.– A test case describes a test to verify a tested class in
accordance with the system specification.
• Programmers and unit testers are no longer separated in most (both large-scale and small-scale) projects as– it has been a lot easier and less time-consuming to
write and run unit tests. – programmers can write the best test cases for their own
code in the least amount of time. 3
What to Do in Unit Testing?
• 4 tests (test types)– We will focus on 3 of them: functional, structural
and confirmation tests.
4
Functional test Non-functional test Structural test Confirmation test
Acceptance test
System test
Integration test
Unit test X (B-box) X (W-box) X (Reg test)
Code rev&insp.
Functional Test in Unit Testing
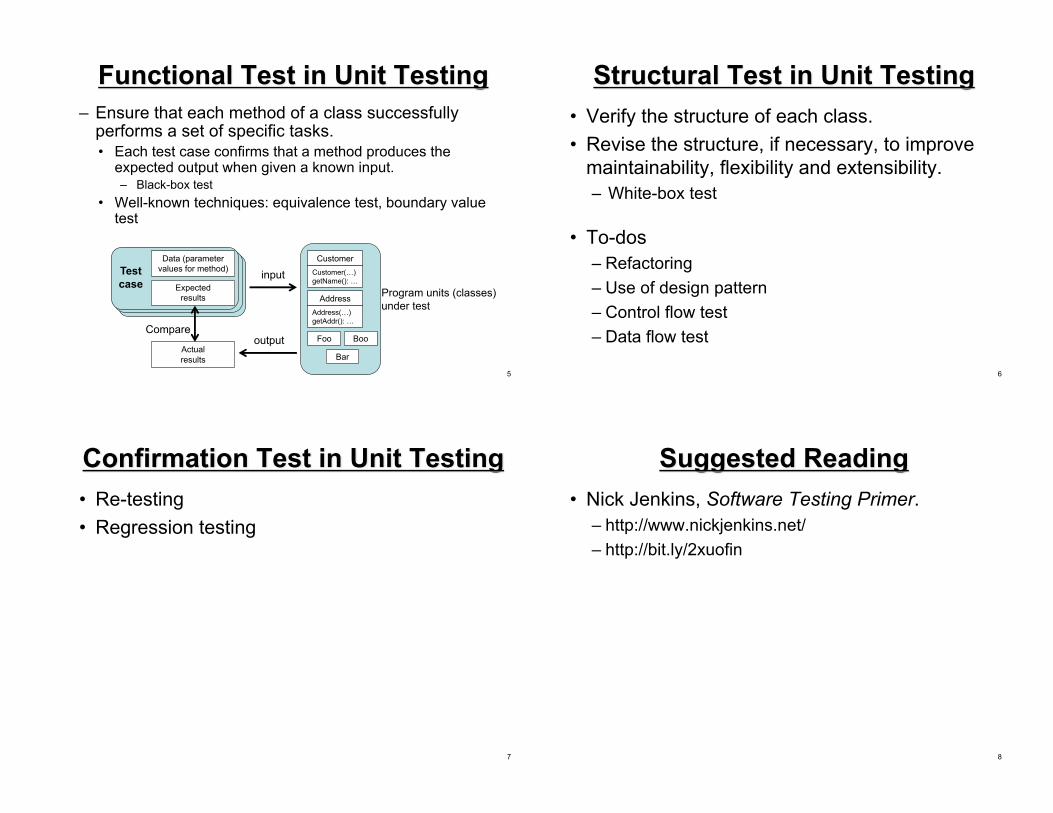
– Ensure that each method of a class successfully performs a set of specific tasks.• Each test case confirms that a method produces the
expected output when given a known input.– Black-box test
• Well-known techniques: equivalence test, boundary value test
5
CustomerCustomer(…)getName(): …
AddressAddress(…)getAddr(): …
Foo Boo
Bar
Program units (classes)under test
Data (parameter values for method)
Expectedresults
Test
case
Actualresults
input
outputCompare
Structural Test in Unit Testing
• Verify the structure of each class.• Revise the structure, if necessary, to improve
maintainability, flexibility and extensibility. – White-box test
• To-dos– Refactoring– Use of design pattern– Control flow test– Data flow test
6
Confirmation Test in Unit Testing
• Re-testing• Regression testing
7
Suggested Reading
• Nick Jenkins, Software Testing Primer. – http://www.nickjenkins.net/– http://bit.ly/2xuofin
8

Unit Testing with JUnit
9
JUnit
• A unit testing framework for Java– Defines the format of a test case
• Test case– a program to verify a method(s) of a given class with a set
of inputs/conditions and expected results.– Provides APIs to write and run test cases– Reports test results
• Making unit testing as easy and automatic as possible.
• Version 4.x, http://junit.org/junit4/
• Integration with Ant and Eclipse (and other IDEs)– <junit> and <junitreport> for Ant
10
Test Classes and Test Methods
• Test class– A public class that has a set of “test methods”– Common naming convention: XYZTest
• XYZ is a class under test.– One test class for one class under test
• Test method – A public method in a test class.
• No parameters• No values returned (“void” return type)• Can have a “throws” clause
– Annotated with @Test• org.junit.Test
– One test method implements one test case. 11
Assertions
• Each test method verifies one or more assertions.– An assertion is a statement that a predicate
(boolean function/expression) is expected to always be true at a particular point in code. • String line = reader.readLine();
Assertion: line != null
• String str = foo.getPassword(); Assertion: str.length() > 6
• In JUnit, running unit tests means verifying assertions described in test methods.
12

An Example
• Class under testpublic class Calculator{public float multiply(float x,
float y){return x * y;
}public float divide(float x,
float y){if(y==0){ thrownew IllegalArgumentException(“division by zero”);}
return x/y;}]
• Test class• import static org.junit.Assert.*;
import static org.hamcrest.CoreMatchers.*;import org.junit.Test;
public class CalculatorTest{@Testpublic void multiply3By4(){Calculator cut = new Calculator();float expected = 12;float actual = cut.multiply(3,4);assertThat(actual, is(expected); }
@Testpublic void divide3By2(){Calculator cut = new Calculator();float expected = 1.5f;float actual = cut.divide(3,2);assertThat(actual, is(expected)); }
@Test(expected=illegalArgumentException.class)public void divide5By0(){Calculator cut = new Calculator();cut.divide(5,0); }
} 13
Key APIs
• org.junit.Assert
– Used to define an assentation and verify if it holds
• org.hamcrest.CoreMatchers
– Provides a series of matchers, each of which performs a particular matching logic.
14
Key Annotations
• @Test– org.junit.Test– JUnit runs test methods that are annotated with
@Test.
• @Ignore– org.junit.Ignore– JUnit ignores test methods that are annotated with
@Ignore• No need to comment out the entire test method.
15
Static Imports
• Assert and CoreMatchers are typically referenced through static import.– import static org.junit.Assert.*;
import static org.hamcrest.CoreMatchers.*;
– With static import» assertThat(actual, is(expected);
» “assert that actual is expected”» assertThat() is a static method of Assert. » is() is a static method of CoreMatcher.
– With normal import» Assert.assertThat(actual, CoreMatchers.is(expected));
16

JUnit and Hamcrest
• Hamcrest provides many useful matchers for JUnit– http://hamcrest.org/JavaHamcrest/
– junit.jar and hamcrest-core.jar available from http://junit.org
• Both are available in Eclipse (and other IDEs) by default.
17
Principles in Unit Testing
• Define one or more fine-grained specific test cases (test methods) for each method in a class under test.
• Give a concrete/specific and intuitive name to each test method.– e.g. “divide5by4”
• Use specific values and conditions, and detect design and coding errors.– Be detail-oriented. The devil resides in the details!
• No need to worry about redundancy in/among test methods.
18
• Write simple, short, easy to understand test cases– Try to write many simple test cases, rather than a
fewer number of complicated test cases. • Avoid a test case that perform multiple tasks. • You won’t feel bothered/overwhelmed by the number of
test cases as far as they have intuitive names. – e.g. “divide5by4”
19
Test Suite with JUnit
• A set of test classes– ~/code/projectX/ [project directory]
• build.xml• src [source code directory]
– edu/umb/cs/cs410/hw01/Foo.java– edu/umb/cs/cs410/hw02/Boo.java
• bin [byte code directory]– edu/umb/cs/cs410/hw01/Foo.class– edu/umb/cs/cs410/hw02/Boo.class
• test [a test suite; a set of test classes] – src
» edu/umb/cs/cs410/hw01/FooTest.java» edu/umb/cs/cs410/hw02/BooTest.java
– bin» edu/umb/cs/cs410/hw01/FooTest.class» edu/umb/cs/cs410/hw02/BooTest.class
20
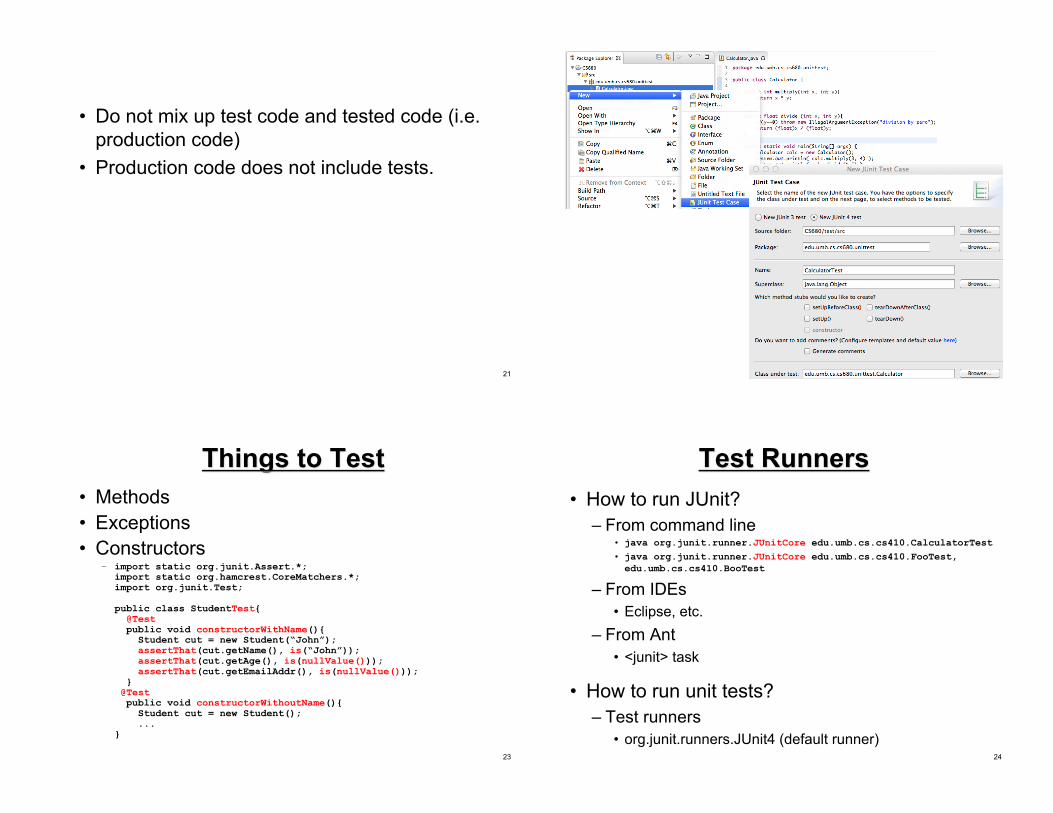
• Do not mix up test code and tested code (i.e. production code)
• Production code does not include tests.
21 22
Things to Test
• Methods• Exceptions• Constructors
– import static org.junit.Assert.*;import static org.hamcrest.CoreMatchers.*;import org.junit.Test;
public class StudentTest{@Testpublic void constructorWithName(){
Student cut = new Student(“John”);assertThat(cut.getName(), is(“John”));assertThat(cut.getAge(), is(nullValue()));assertThat(cut.getEmailAddr(), is(nullValue()));
}@Testpublic void constructorWithoutName(){
Student cut = new Student();...
}
23
Test Runners
• How to run JUnit?– From command line
• java org.junit.runner.JUnitCore edu.umb.cs.cs410.CalculatorTest• java org.junit.runner.JUnitCore edu.umb.cs.cs410.FooTest, edu.umb.cs.cs410.BooTest
– From IDEs• Eclipse, etc.
– From Ant• <junit> task
• How to run unit tests? – Test runners
• org.junit.runners.JUnit4 (default runner)24

25
HW 1 – Step 1
26
• Implement Calculator– Package: edu.umb.cs.cs410.hw01
• Follow the directory structure shown in Slide 20.– <proj dir>/src/edu/umb/cs/cs410/hw01/Calculator.java– <proj dir>/bin/edu/umb/cs/cs410/hw01/Calculator.class
• Use Ant to build and run Calculator– Set up all directories used by Calculator.java
• <proj dir>/src/edu/umb/cs/cs410/hw01• <proj dir>/bin/edu/umb/cs/cs410/hw01
– Set up CLASSPATH• <proj dir>/bin
– Compile Calculator.java and generate Calculator.class to <proj dir>/bin/edu/.../hw01
– Run Calculator.class
27
Automatic Build
• Use Ant (http://ant.apache.org/) to build all of your Java programs in every coding HW.– Learn how to use it, if you don’t know that. – Turn in *.java and a build script (e.g. build.xml).
• Turn in a single build script (build.xml) that– configures all settings (e.g., class paths, a directory of source code, a
directory to generate binary code),– compiles all source code from scratch,– generates binary code (*.class files), and – runs compiled code
• DO NOT include absolute paths in a build script.– You can assume my OS configures a right Java API (JDK/JRE) Jar file (in its env
setting).
• DO NOT turn in byte code (class files).
• DO NOT use any other ways for configurations and compilation. – Setting paths manually with a GUI (e.g., Eclipse)– Setting an output directory manually with a GUI– Clicking the “compile” button manually
– I will simply type “ant” (on my shell) in the directory where your build.xml is located and see how your code works.
• You can name your build script as you like.– No need to name it build.xml.– I will type: ant -f abc.xml
• If the “ant” command fails, I will NOT grade your HW code.
– Fully automate configuration and compilation process to
• speed up your configuration/compilation process. • remove potential human-made errors in your
configuration/compilation process.• Make it easier for other people (e.g., code reviewers,
team mates) to understand your code/project. 28
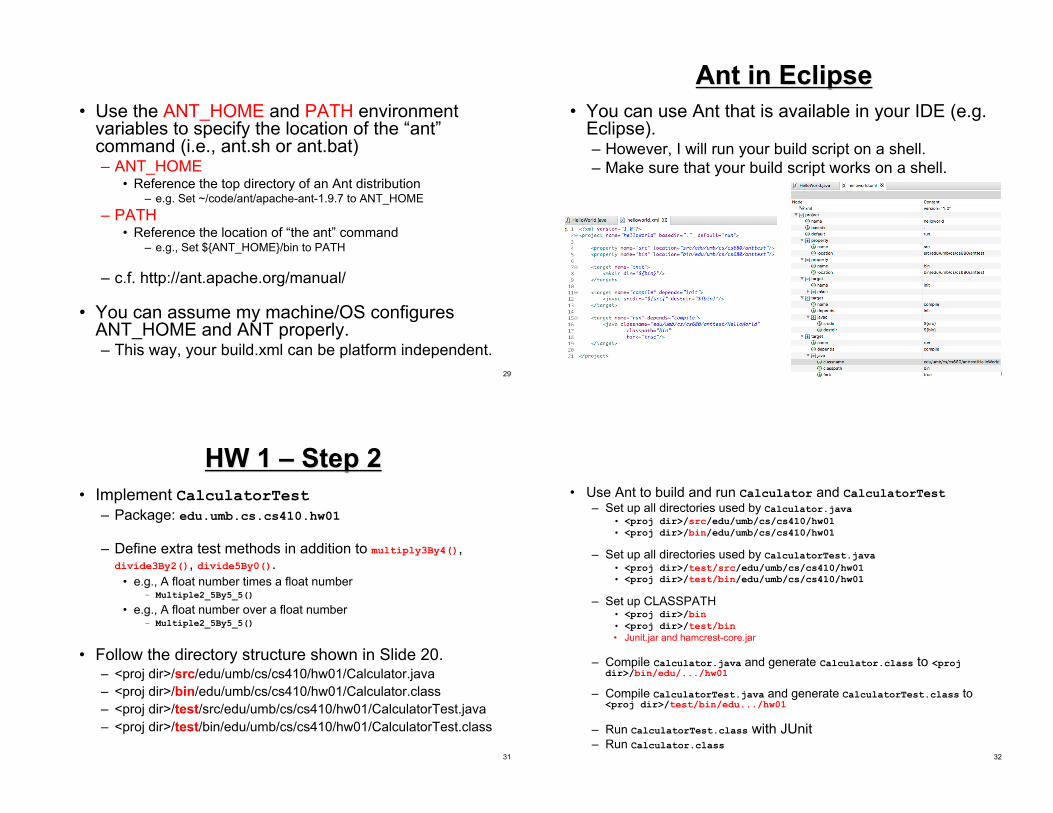
• Use the ANT_HOME and PATH environment variables to specify the location of the “ant” command (i.e., ant.sh or ant.bat)– ANT_HOME
• Reference the top directory of an Ant distribution– e.g. Set ~/code/ant/apache-ant-1.9.7 to ANT_HOME
– PATH• Reference the location of “the ant” command
– e.g., Set ${ANT_HOME}/bin to PATH
– c.f. http://ant.apache.org/manual/
• You can assume my machine/OS configures ANT_HOME and ANT properly. – This way, your build.xml can be platform independent.
29
Ant in Eclipse
• You can use Ant that is available in your IDE (e.g. Eclipse).– However, I will run your build script on a shell.– Make sure that your build script works on a shell.
30
HW 1 – Step 2
31
• Implement CalculatorTest– Package: edu.umb.cs.cs410.hw01
– Define extra test methods in addition to multiply3By4(), divide3By2(), divide5By0().
• e.g., A float number times a float number– Multiple2_5By5_5()
• e.g., A float number over a float number– Multiple2_5By5_5()
• Follow the directory structure shown in Slide 20.– <proj dir>/src/edu/umb/cs/cs410/hw01/Calculator.java– <proj dir>/bin/edu/umb/cs/cs410/hw01/Calculator.class– <proj dir>/test/src/edu/umb/cs/cs410/hw01/CalculatorTest.java– <proj dir>/test/bin/edu/umb/cs/cs410/hw01/CalculatorTest.class
32
• Use Ant to build and run Calculator and CalculatorTest– Set up all directories used by Calculator.java
• <proj dir>/src/edu/umb/cs/cs410/hw01• <proj dir>/bin/edu/umb/cs/cs410/hw01
– Set up all directories used by CalculatorTest.java• <proj dir>/test/src/edu/umb/cs/cs410/hw01• <proj dir>/test/bin/edu/umb/cs/cs410/hw01
– Set up CLASSPATH• <proj dir>/bin• <proj dir>/test/bin• Junit.jar and hamcrest-core.jar
– Compile Calculator.java and generate Calculator.class to <projdir>/bin/edu/.../hw01
– Compile CalculatorTest.java and generate CalculatorTest.class to <proj dir>/test/bin/edu.../hw01
– Run CalculatorTest.class with JUnit– Run Calculator.class

33
– Run JUnit from Ant. Use <junit> task in Ant. • c.f. JUnit documentations (API docs, user manual, etc.)
– No need to save test results in files. Just print them out on a shell• <formatter type="plain" usefile="false" /> in <junit>
– Keep your build.xml platform independent. • Set the location of junit.jar to the environment variable JUNIT
– e.g., JUNIT à ~/.p2/pool/plugins/org.junit_4.xxx/junit.jar
• Set the location of hamcrest-core.jar to the environment variable HAMCREST_CORE– e.g., HAMCREST_CORE à
~/.p2/pool/plugins/org.hamcrest.core_1.xxxx.jar
34
– Reference the two environment variables to configure CLASSPATH in your build script.– <property environment="env"/>
<path id="test.classpath"><pathelement path=“${env.JUNIT}” /><pathelement path=“${env.HAMCREST_CORE}” />
</path>
<javac …>...<classpath refid="test.classpath"/>…
</javac>
<junit …>... <classpath refid="test.classpath"/>…
</junit>
HW Submission
35
• Submit me an archive file (.rar, .rar, .tar.gz, .7z, etc.) that contains
• build.xml• “src” sub-directory• “test/src” sub-directory
• DO NOT send me binary files (.class and .jar files)• Avoid a .zip file
– Send the archive file to [email protected]
– Or, place it somewhere online (e.g. at G Drive) and email me a link to it.
• FIRM Deadline: October 10 (midnight)
Suggestions
36
• Start as early as possible.
• Go step by step– If you are not familiar with Ant…
• compile and run your code for Step 1 without using Ant first and then use Ant to build the code
– Step 1 and then Step 2
• Expect “Death by XML” – You may need to spend a few hours, a half day or
even a full day to make your build.xml run correctly. – That’s a part of your learning curve.