Unit Lessons on Transformations
29
10 th grade Geometry Unit on Transformations One class period (40-45-minutes) Goal: These two lessons are designed to introduce students to reflections, and rotations. In this section we will investigate transformations, which describe how geometric figures of some shape are related to one another in a plane. The goal for student is to learn three ways to describe motion of geometric figures in the plane and learn how to use transformations in real- life situations. In this lesson students will learn about the mathematical properties of rotations, reflections, and have an opportunity to make their own designs. Key vocabulary: Image, transformation, reflection, rotation, translation, one-to-one correspondence, line of reflection, line of symmetry, fixed point, point of rotation, axis of symmetry, composition (of transformations), glide reflection, reflections over parallel lines theorem, reflection over intersecting lines theorem Objectives Upon completion of these two lessons, students will: Have been introduced to the concepts of rotation and reflection Have practiced reflecting and rotating two-dimensional objects on the coordinate plane. Use visualization, spatial reasoning, and geometric modeling to solve problems Apply transformations and use symmetry to analyze mathematical situations Lesson 1 Outline 1. Focus and Review Remind students what has been learned in previous lessons that will be pertinent to this lesson and/or have them begin to think about the words and ideas of this lesson. I will ask students few questions: Can someone tell me where you might see a reflection in everyday life? Can anyone tell me what it means to reflect an object? Can anyone guess what it might mean to translate an object? Students may not have an answer to this question, in which case I may let them know that they will learn what it means to translate an object in today's lesson. 2. Objectives Learn and understand what reflection is. Practice reflection in a coordinate plane. Solve problems
description
one week of lessons and a test
Transcript of Unit Lessons on Transformations

10th grade Geometry
Unit on Transformations
One class period (40-45-minutes)
Goal:
These two lessons are designed to introduce students to reflections, and rotations. In this
section we will investigate transformations, which describe how geometric figures of some
shape are related to one another in a plane. The goal for student is to learn three ways to
describe motion of geometric figures in the plane and learn how to use transformations in real-
life situations. In this lesson students will learn about the mathematical properties of rotations,
reflections, and have an opportunity to make their own designs.
Key vocabulary:
Image, transformation, reflection, rotation, translation, one-to-one correspondence, line of
reflection, line of symmetry, fixed point, point of rotation, axis of symmetry, composition (of
transformations), glide reflection, reflections over parallel lines theorem, reflection over
intersecting lines theorem
Objectives
Upon completion of these two lessons, students will:
Have been introduced to the concepts of rotation and reflection
Have practiced reflecting and rotating two-dimensional objects on the coordinate
plane.
Use visualization, spatial reasoning, and geometric modeling to solve problems
Apply transformations and use symmetry to analyze mathematical situations
Lesson 1 Outline
1. Focus and Review
Remind students what has been learned in previous lessons that will be pertinent to this
lesson and/or have them begin to think about the words and ideas of this lesson.
I will ask students few questions:
Can someone tell me where you might see a reflection in everyday life?
Can anyone tell me what it means to reflect an object?
Can anyone guess what it might mean to translate an object?
Students may not have an answer to this question, in which case I may let them know
that they will learn what it means to translate an object in today's lesson.
2. Objectives
Learn and understand what reflection is.
Practice reflection in a coordinate plane.
Solve problems
3. Teacher Input
1) First, I entertain a discussion about translations and reflections with the class
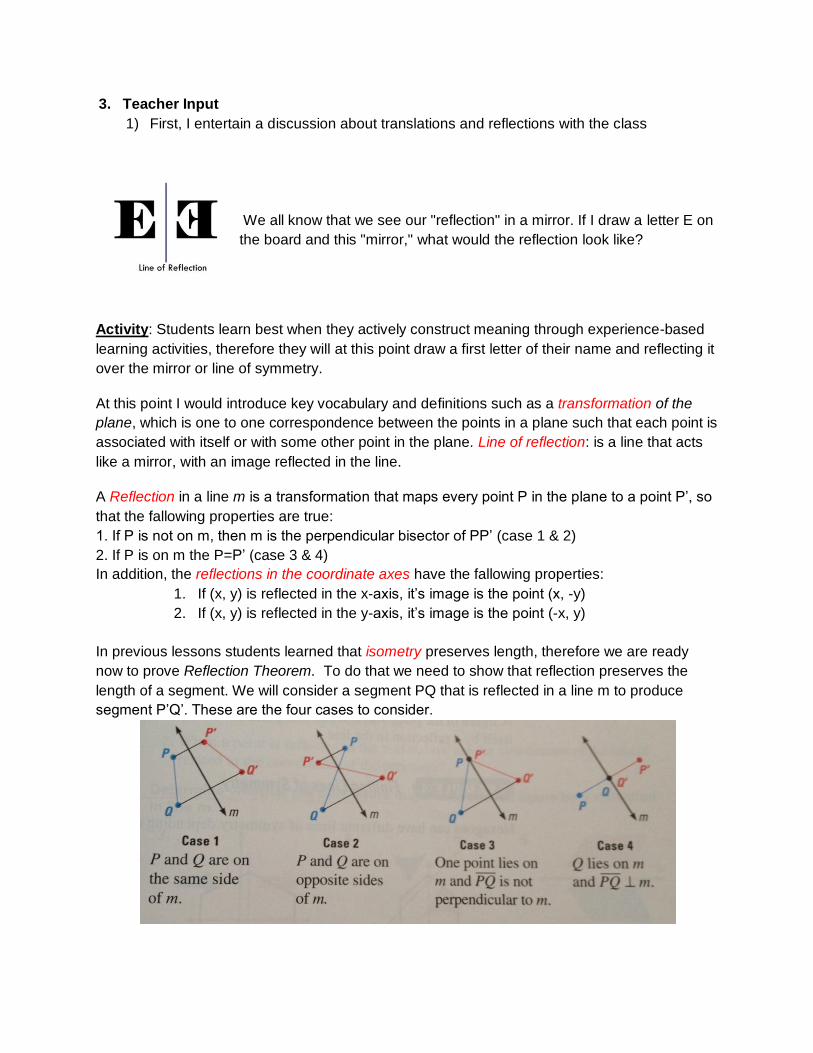
We all know that we see our "reflection" in a mirror. If I draw a letter E on
the board and this "mirror," what would the reflection look like?
Activity: Students learn best when they actively construct meaning through experience-based
learning activities, therefore they will at this point draw a first letter of their name and reflecting it
over the mirror or line of symmetry.
At this point I would introduce key vocabulary and definitions such as a transformation of the
plane, which is one to one correspondence between the points in a plane such that each point is
associated with itself or with some other point in the plane. Line of reflection: is a line that acts
like a mirror, with an image reflected in the line.
A Reflection in a line m is a transformation that maps every point P in the plane to a point P’, so
that the fallowing properties are true:
1. If P is not on m, then m is the perpendicular bisector of PP’ (case 1 & 2)
2. If P is on m the P=P’ (case 3 & 4)
In addition, the reflections in the coordinate axes have the fallowing properties:
1. If (x, y) is reflected in the x-axis, it’s image is the point (x, -y)
2. If (x, y) is reflected in the y-axis, it’s image is the point (-x, y)
In previous lessons students learned that isometry preserves length, therefore we are ready
now to prove Reflection Theorem. To do that we need to show that reflection preserves the
length of a segment. We will consider a segment PQ that is reflected in a line m to produce
segment P’Q’. These are the four cases to consider.
As a class we will prove case 1 where the reflection in m maps P onto P’ and Q onto Q’. We will
prove PQ=P’Q’. For this case P and Q are on the same side of line m. I will draw a segment PP’
and QQ’ intersecting line m at R and S, then draw RQ and RQ’. By the definition of a reflection
m is perpendicular to QQ’, and QS = Q’S. It fallows that triangle RSQ=RSQ’ using the SAS
congruence postulate. This implies line RQ similar to RQ’ and angle QRS =angle Q’RS.
Because line RS is a perpendicular bisector of segment PP’, we have enough information to
apply SAS to conclude that triangle RQP is similar to triangle RQ’P’, because corresponding
parts of congruent triangles are congruent, PQ=P’Q’.
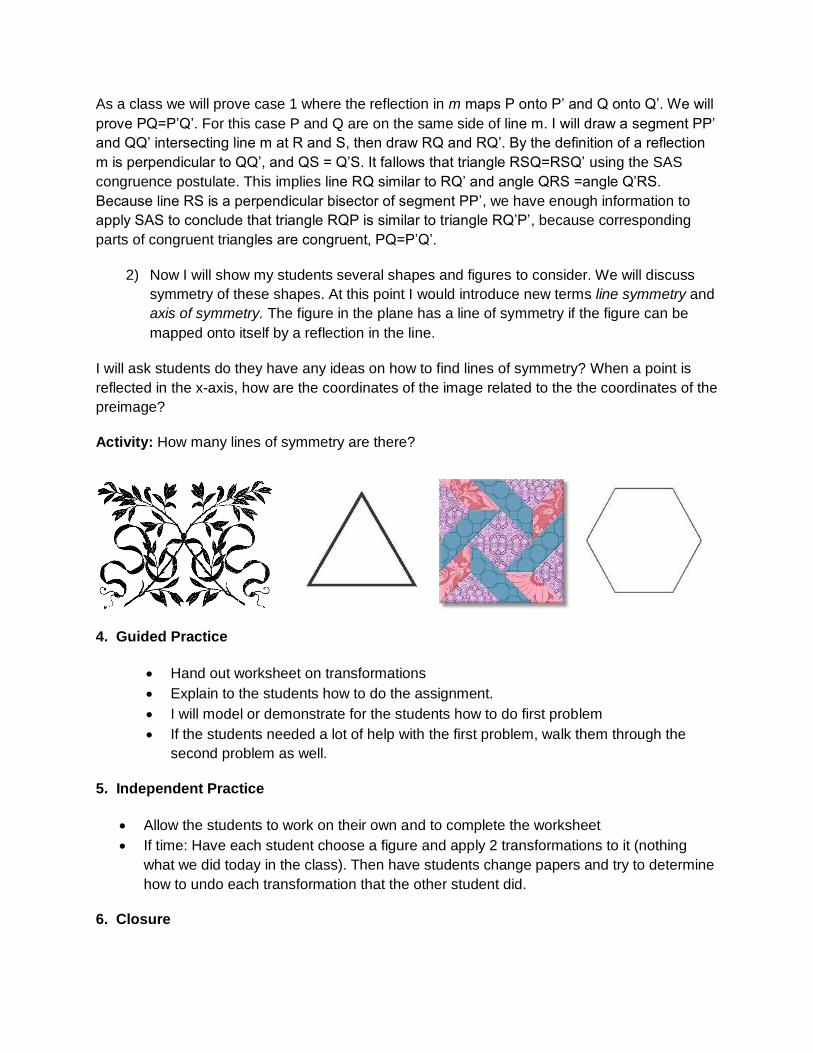
2) Now I will show my students several shapes and figures to consider. We will discuss
symmetry of these shapes. At this point I would introduce new terms line symmetry and
axis of symmetry. The figure in the plane has a line of symmetry if the figure can be
mapped onto itself by a reflection in the line.
I will ask students do they have any ideas on how to find lines of symmetry? When a point is
reflected in the x-axis, how are the coordinates of the image related to the the coordinates of the
preimage?
Activity: How many lines of symmetry are there?
4. Guided Practice
Hand out worksheet on transformations
Explain to the students how to do the assignment.
I will model or demonstrate for the students how to do first problem
If the students needed a lot of help with the first problem, walk them through the
second problem as well.
5. Independent Practice
Allow the students to work on their own and to complete the worksheet
If time: Have each student choose a figure and apply 2 transformations to it (nothing
what we did today in the class). Then have students change papers and try to determine
how to undo each transformation that the other student did.
6. Closure
I will allow students to explain the concepts of translation and reflection.. The students should
share about the places where the activity was difficult. I will ensure that all students understand
the two concepts before moving on to another lesson.
Worksheet on Transformations
Reflections and Rotations
.
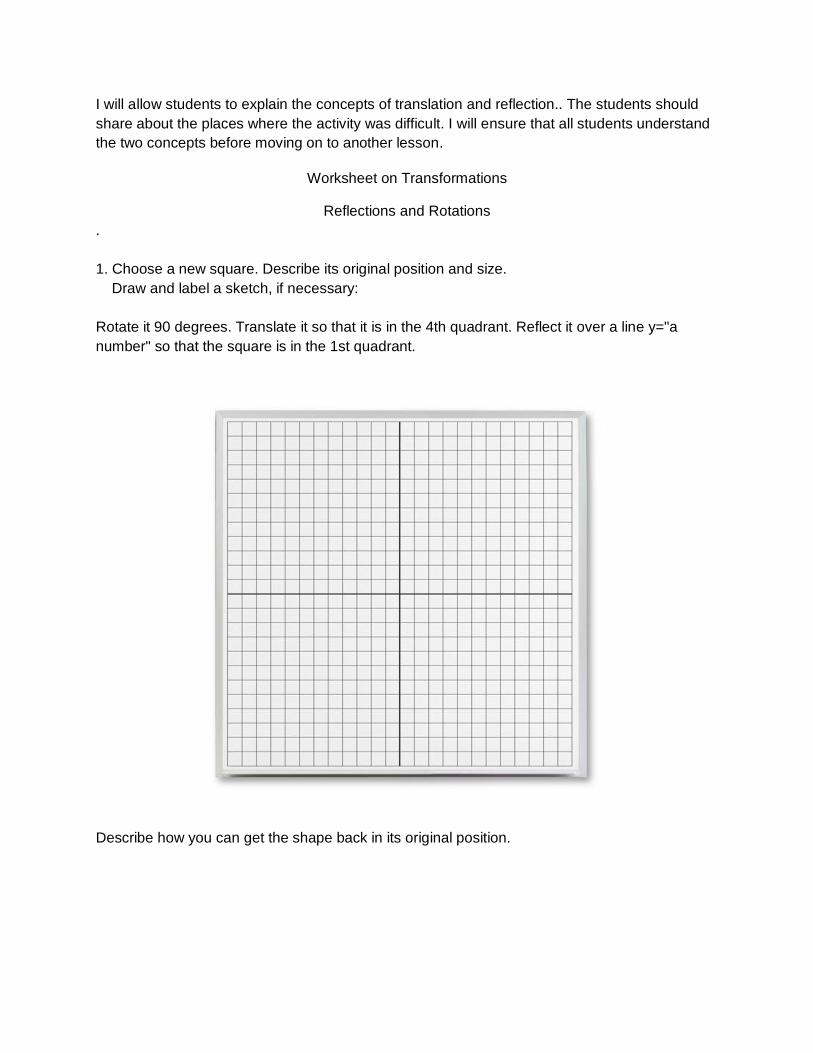
1. Choose a new square. Describe its original position and size.
Draw and label a sketch, if necessary:
Rotate it 90 degrees. Translate it so that it is in the 4th quadrant. Reflect it over a line y="a
number" so that the square is in the 1st quadrant.
Describe how you can get the shape back in its original position.
2. Choose a new triangle. Describe its original position and size. Draw and label a sketch, if
necessary:
Rotate, Translate, and Reflect the triangle so that the sides are touching the pre-image in such
a way to form a parallelogram with both triangles. List your steps here:
3. Choose a new parallelogram. Describe its original position and size. Draw and label a sketch,
if necessary:
Rotate, Translate, and Reflect the parallelogram several time, listing your steps here:
Now, challenge a friend to get the parallelogram back into its original position! Are the steps that
your friend used the reverse of your steps, or are they different
Lesson 2 Outline
1. Focus and Review
Briefly remind students what has been learned in previous lesson about reflection of an
object in coordinate plane and/or have them begin to think about the words and ideas of
this lesson.
I will ask students few questions:
Can someone tell me where you might see a rotation in everyday life?
Can anyone tell me what it means to rotate an object?
Students may not have an answer to this question, in which case I may let them know
that they will learn what it means to rotate an object in today's lesson.
2. Objectives
Learn what rotation of an object is.
Rotating figures about the origin.
Rotating figures about a point.
Students will be able to graph rotations of 90, 180 and 270 degrees in the
coordinate planes given the coordinates of a pre-image
3. Key terminology
Rotation, center of rotation, angle of rotation, Rotation Theorem, reflection, translation,
mapping, pre image, image
4. Materials
Graph paper
Straight edge
Copies of the attached worksheet
5. Teacher Input
1). At the beginning of the class I will hand out a warm up activity sheet that will check
student’s knowledge from previous class. At the time when students will be busy doing their
work I will check attendance.
Look Warm-up sheet
2). When students finish their work we will talk about the worksheet and I will answer all the
questions students might have. This activity will make students ready for today’s class that is
the continuation of the last class.
After hand out discussion I will talk about rotation with the class. The lesson begins with
Brainstorming. I will have the students think about what a rotation is and what it looks like. I will
remind them of vocabulary such as pre-image and image. Looking at the several examples of

rotation on my smart board I will introduce new terminology such as center of rotation, angle of
rotation and rotation.
A rotation about a point P through an angle of xo maps every point Q in the plane to a point Q’
so that one of the following properties is true:
• If Q is not the center of rotation P,
then QP = Q’P and m<QPQ’= xo,
or
• If Q is the center of rotation P,
then the image of Q is Q.
Activity for independent practice:
At this point I will hand out a sheet and ask students to sit in groups of two or three. When
working on the worksheet students will come up with their own rules for rotations in the
coordinate plane. By doing it so, they will learn a key concept for rotations such as: Coordinate
Rules for Rotations about the Origin unconsciously without memorization. MOTIVATOR: I will
tell students that the first group to correctly finishes all of the rules will get free no homework
pass.
Look at Graph triangle worksheet

Once the students will finish working on the sheet I will ask the group to write it down on the
board so that all students can see correct answers to the questions. When we finish talking
about all the rules I will introduce formal rules all students should know.
Coordinate Rules for Rotations about the Origin
When a point (a, b) is rotated counterclockwise about the origin, the following are true:
1. For a rotation of 90o, (a, b) → (-b, a).
2. For a rotation of 180o, (a, b) → (-a, -b).
3. For a rotation of 270o, (a, b) → (b, -a)
4. To make sure students really grasped the concept we will do one exercise together on
the board to show a rotation of 270o, (a, b) → (b, -a)
Graph quadrilateral RSTU with vertices R(3, 1), S(5, 1), T(5, 23), and U(2, 21). Then rotate the
quadrilateral 2708 about the origin.
Solution: We will plot the point as shown in blue. Use a protractor, a compass, and a
straightedge to find the rotated vertices. The coordinates of the preimage and image are:
R (3, 1) →R’ (1, 23)
S (5, 1) →S’ (1, 25)
T (5, 23) → T ‘(23, 25)
U( 2, 21) → U’ (21, 22)
6. Closure
As students are finishing up with the excerse I will introduce the idea of having a skype chat
with middle school students. My students will superimpose real-world images on to a coordinate
plane, then transform them (translation, rotation, dilation, and reflection). The students will
create an activity to share with middle school students. Middle school students will plot given
points, determine the type of transformation that took place, and then discuss results with the
high school creators via a Skype video conference.

Warm-up Hand out
In the diagram k || m, triangle ABC is reflected in line k, and triangle A’B’C’ is reflected in line m.
1. A translation maps Δ ABC onto which triangle
2. Which line is perpendicular to AA”
3. Name two segments parallel to BB”
4. If the distance from B’ to m is 1.4 inches, what is the length of CC”
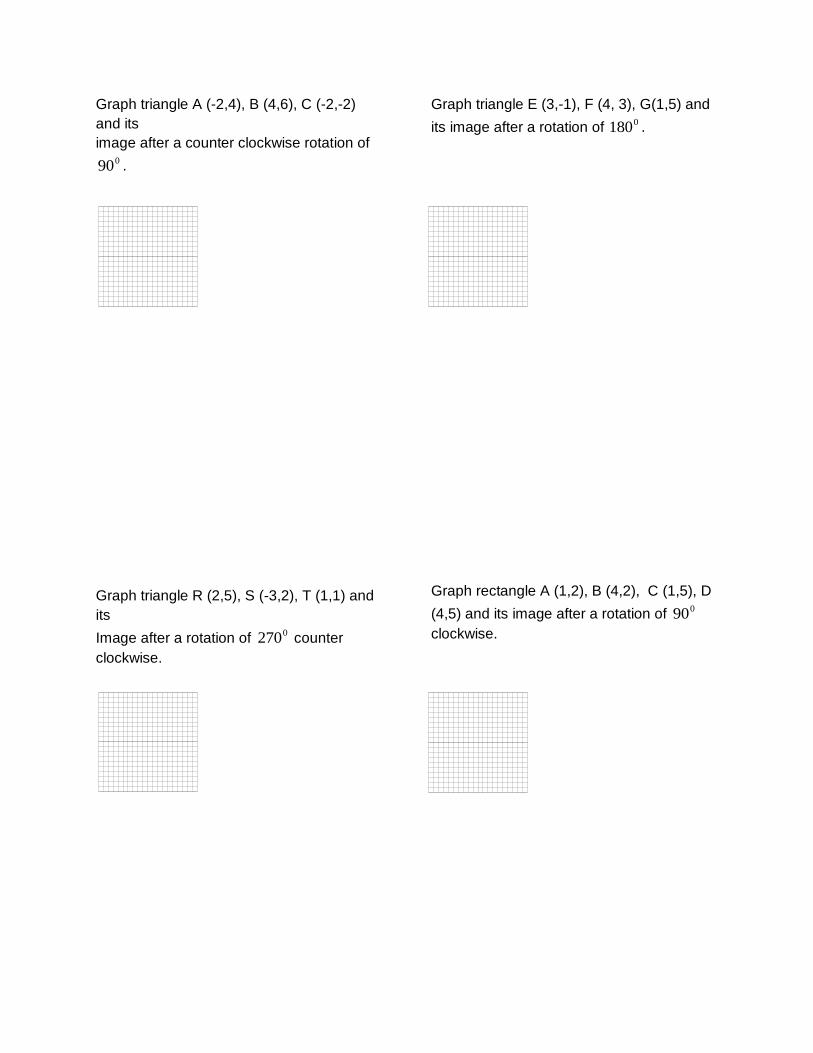
Graph triangle A (-2,4), B (4,6), C (-2,-2)
and its
image after a counter clockwise rotation of 090 .
Graph triangle R (2,5), S (-3,2), T (1,1) and
its
Image after a rotation of 0270 counter
clockwise.
Graph triangle E (3,-1), F (4, 3), G(1,5) and
its image after a rotation of 0180 .
Graph rectangle A (1,2), B (4,2), C (1,5), D
(4,5) and its image after a rotation of 090
clockwise.

Rubric assessing rotation
Points Description
4
Pre-image and image both drawn accurately
and the new coordinates are labeled and
stated correctly
3
One error made, such as misplotting a point
but new coordinates are labeled
and stated correctly
OR
3
Figures are drawn and labeled accurately but
the new coordinates are not stated
OR
3
New coordinates are labeled and stated
correctly but the figure is not drawn
2
Two errors made but new coordinates are
labeled and stated appropriately based on
that figure
OR
2
Appropriate work shown but one conceptual
error is made, such as rotating the figure the
correct number of degrees but in the incorrect
direction and the new coordinates are labeled
and stated correctly
1
Appropriate work shown but one conceptual
error is made, such as rotating the figure the
correct number of degrees but in the incorrect
direction and the new are not labeled and
stated.
0
Appropriate work is shown but is rotated the
incorrect number of degrees and the
coordinates are not labeled ore stated
OR
0
Completely incorrect, irrelevant or incoherent
or correct response that is obtained by an
obviously incorrect procedure

Lesson 3 Outline
1. Focus and Review
High school geometry students will superimpose real-world images on to a coordinate
plane, then transform them (translation, rotation, dilation, and reflection). The students
will create an activity to share with middle school students. Middle school students will
plot given points, determine the type of transformation that took place, and then discuss
results with the high school creators via a Skype video conference.
2. Objectives
Create Skype account
Manipulating images using technology
reasearch the types of transformations, locate, capture, and manipulate an image to
transform on a coordinate plane.
Create an activity for middle school students
Collect all notes send to parent with premition to use skype
3. Focus and review
At the beginning of the class I will hand out to all of the students a rotations on the
coordinate plane sheet. This warm up will allow me to see did all of the students understand
topics we were talking about in a previous lesson. This exercise will remind them about
definitions and help them to create an assignment we will work on in today’s class.
Look rotations on the coordinate plane sheet
4. Project
Middle school students will plot points on a coordinate plane given to them by high school
students. Based on the information provided by the high school students, the middle school
students will determine the type of transformation that the high school students modeled
and guess the name of the image that was transformed. Students will discuss their results
with each other through a video conference using Skype.
5. Engage
At this point, with the use of computer or smart board I will show students several real world
images that have been transformed: translated, rotated, dilated, and reflected. I will ask
students to describe what they think happened to each image. We will proceed to discuss
ideas. I will show the same images again, with a coordinate plane superimposed over each
image. I then will ask students to describe again, what they think happened to each figure
using the coordinate plane as a point of reference. When talking we will review main ideas and
vocabulary such us translation, rotation, reflection, and dialetion.
When finished I will Distribute copies of the assignment via a collaborative web space such as
Sharepoint, or use hard copies if an online workspace is unavailable. Review the guidelines
and expectations with the students. I will tell students that they will be researching the various
types of transformations, creating their own transformations with real-world images, and then
generating an activity that they will share with middle school students.
6. Explain
Students should develop a translation rule
Students should develop a rotation rule Ex: rotate 90 degrees clockwise about the origin
Students should develop a reflection rule Ex: reflect about the x-axis
Students should develop a dilation rule Ex: (2x, 3y)
7. Elaborate
After high school students have researched and generated original transformations of real
world figures they should:
I. Create a set of instructions for plotting the coordinates of the pre-image and post-
image.
II. Offer a list of hints for determining the name of the original figure that was
transformed.
III. These will be shared with middle school students.
8. Closure
I will explain to all students that upon the completion of the project they should be able to
accurately discuss whether or not the middle school students correctly plotted and
transformed the images. When finished discussing I will then reveal the true solution to
check student work. Students should discuss any questions or misconceptions that
occurred when completing the assignment.

Evaluation for the project
Students will be graded based upon criteria defined in a rubric. The following criteria will be
used to evaluate and assess students:
1. Mathematical Understanding:
1) Student displays a clear, in-depth understanding of all types of transformations.
2) Images are accurately transformed on the coordinate plane with no mistakes.
3) A unique and creative approach to choosing images to transform.
4) Information is presented in a unique and viewer-friendly manner.
5) Extra & informative details are included
6) All students hold a confident & professional discussion appropriate to the assignment.
7) Students guide thinking rather than reveal answers in a straightforward manner.
8) The discussion does not stray from the topic of transformations.
9) Misconceptions are recognized & addressed with a clear explanation
10) Students have a strong understanding of accurately locating points on the coordinate
plane.
2. Discussion:
1) Students hold a confident & professional discussion appropriate to the assignment.
2) Students accurately express their knowledge verbally and convey their ideas clearly.
3) Misconceptions are recognized & addressed with a clear explanation.
4) All group members participate in the discussion.
I will provide students with a copy of the rubric when this project is introduced so that they are
familiar with the expectations for succeeding in this assignment. Before submitting their final
products, I will have students reflect on the rubric and circle the scores that they feel best
describe their final work products.

Lesson 4 Outline
1. Focus and review
At the beginning of the class we will talk about previous classes’ materials that will remind
students about important definitions and how to use them when performing transformations of
various figures and objects. When finish discussing problems and questions students might
have about past three classes I will introduce the idea of glide reflection. I will explain that
through last few classes we were studied transformations like: point reflection, line reflection,
translation, rotation and today we will talk about glide reflection. Each of these transformations
is called isometry because it preserves distance. I will underline to my students that under a
glide reflection, distance, collinearity, and midpoint are preserved.
2. Learning Objectives
Understand the meaning of composition.
Perform a glide reflection.
Perform a reflection over parallel lines and the axes.
Perform a double rotation with the same center of rotation.
Determine a single transformation that is equivalent to a composite of two
transformations.
You will perform combinations of two or more transformations.
So you can describe the transformations that represent a rowing crew,
3. Key Vocabulary
glide reflection, composition of transformations, isometry, reflection in parallel lines, reflection in
intersecting lines
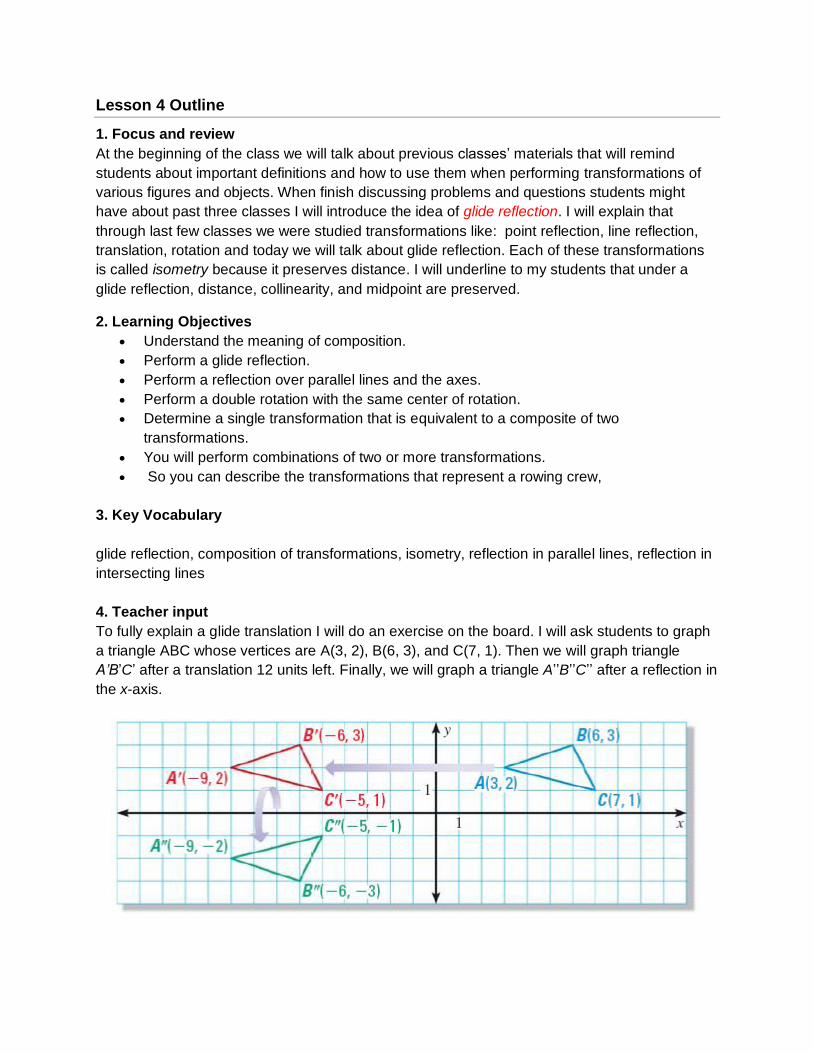
4. Teacher input
To fully explain a glide translation I will do an exercise on the board. I will ask students to graph
a triangle ABC whose vertices are A(3, 2), B(6, 3), and C(7, 1). Then we will graph triangle
A’B’C’ after a translation 12 units left. Finally, we will graph a triangle A’’B’’C’’ after a reflection in
the x-axis.
At this point I will ask my students can they describe what we have just done in their own words.
This will lead to discovery that this is an example of a glide reflection where we did
translation: (x, y) (x-12, y), then reflection: in the x-axis. We will discover that for this
transformation to be a glide reflection the line of reflection must be parallel to the direction of the
translation. Therfore our conclusion will be that the glide reflection is a composition of a
reflection and a translation. I will explain to students that the order in which you reflect or
translate does not matter. It is important to note that the translation for any glide reflection will
always be in one direction. So, if you reflect over a vertical line, the translation can be up or
down, and if you reflect over a horizontal line, the translation will be to the left or right. One of
the interesting things about compositions is that they can always be written as one rule. What
this means is, you don’t necessarily have to perform one transformation followed by the next.
You can write a rule and perform them at the same time. Therefore, our example can be
express as: A(3, 2) (-9, -2), B(6, 3) (-6, -3), and C(7, 1) (-5, -1). It is important for
students to notice that above example involved two separate transformations one following the
other. This kind of transformation is called a composition of transformations.
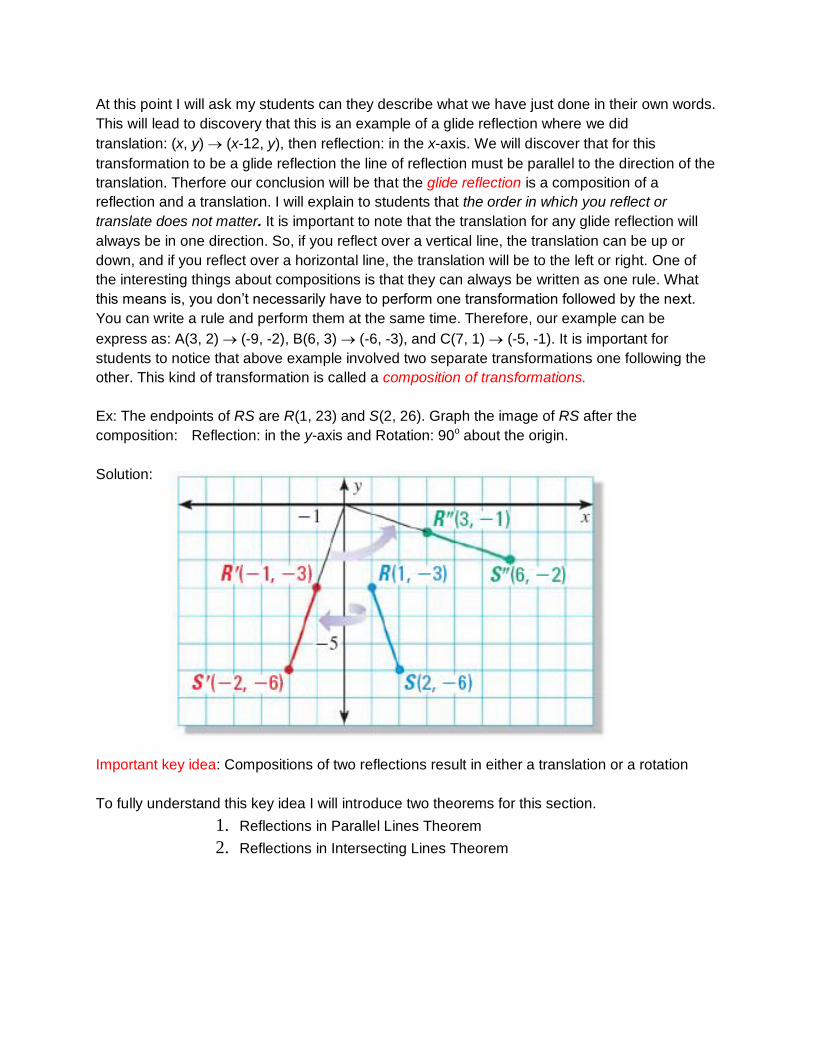
Ex: The endpoints of RS are R(1, 23) and S(2, 26). Graph the image of RS after the
composition: Reflection: in the y-axis and Rotation: 90o about the origin.
Solution:
Important key idea: Compositions of two reflections result in either a translation or a rotation
To fully understand this key idea I will introduce two theorems for this section.
1. Reflections in Parallel Lines Theorem
2. Reflections in Intersecting Lines Theorem
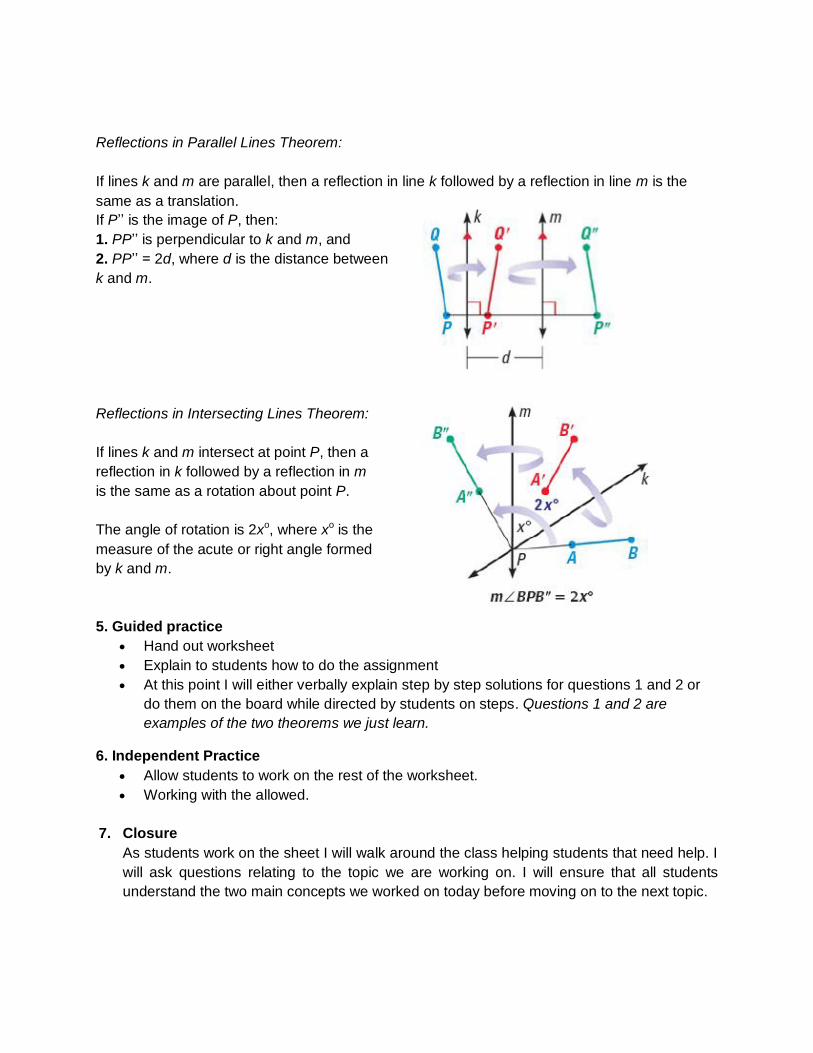
Reflections in Parallel Lines Theorem:
If lines k and m are parallel, then a reflection in line k followed by a reflection in line m is the
same as a translation.
If P’’ is the image of P, then:
1. PP’’ is perpendicular to k and m, and
2. PP’’ = 2d, where d is the distance between
k and m.
Reflections in Intersecting Lines Theorem:
If lines k and m intersect at point P, then a
reflection in k followed by a reflection in m
is the same as a rotation about point P.
The angle of rotation is 2xo, where xo is the
measure of the acute or right angle formed
by k and m.
5. Guided practice
Hand out worksheet
Explain to students how to do the assignment
At this point I will either verbally explain step by step solutions for questions 1 and 2 or
do them on the board while directed by students on steps. Questions 1 and 2 are
examples of the two theorems we just learn.
6. Independent Practice
Allow students to work on the rest of the worksheet.
Working with the allowed.
7. Closure
As students work on the sheet I will walk around the class helping students that need help. I
will ask questions relating to the topic we are working on. I will ensure that all students
understand the two main concepts we worked on today before moving on to the next topic.
Hand-out on glide reflections
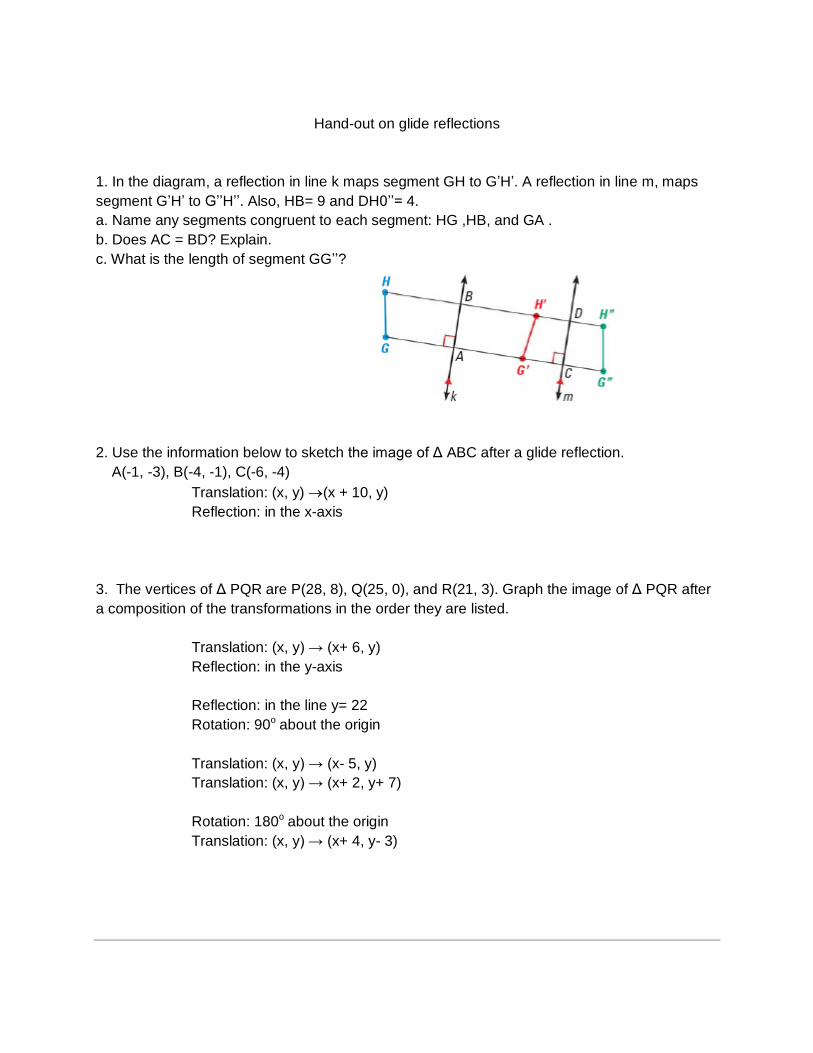
1. In the diagram, a reflection in line k maps segment GH to G’H’. A reflection in line m, maps
segment G’H’ to G’’H’’. Also, HB= 9 and DH0’’= 4.
a. Name any segments congruent to each segment: HG ,HB, and GA .
b. Does AC = BD? Explain.
c. What is the length of segment GG’’?
2. Use the information below to sketch the image of Δ ABC after a glide reflection.
A(-1, -3), B(-4, -1), C(-6, -4)
Translation: (x, y) (x + 10, y)
Reflection: in the x-axis
3. The vertices of Δ PQR are P(28, 8), Q(25, 0), and R(21, 3). Graph the image of Δ PQR after
a composition of the transformations in the order they are listed.
Translation: (x, y) → (x+ 6, y)
Reflection: in the y-axis
Reflection: in the line y= 22
Rotation: 90o about the origin
Translation: (x, y) → (x- 5, y)
Translation: (x, y) → (x+ 2, y+ 7)
Rotation: 180o about the origin
Translation: (x, y) → (x+ 4, y- 3)

Lesson 5 Outline
1. Focus and review
I will remind students what we had learned about dilation few weeks back that will be
pertinent to this lesson I will remind students about few dilation key ideas:
A dilation is a transformation in which the original figure and its image are similar.
We use a compass and straightedge to construct a dilation
Dilation is a type of similarity transformation.
In dilation, a figure is enlarged or reduced with respect to a fixed point called the center
of dilation.
The scale factor of dilation is the ratio of a side length of the image to the corresponding
side length of the original figure.
If students won’t have answers to my questions or will no remember previous material I might
do quick review of previous chapter. This will allow me to remind them about Coordinate
Notation for a Dilation:
You can describe dilation with respect to the origin with the notation
(x, y) → (kx, ky), where k is the scale factor.
If 0 < k < 1, the dilation is a reduction. If k > 1, the dilation is an enlargement.
To make sure students remember how to draw a dilation with a scale factor greater than 1 we
will do a quick review problem. To fully MOTIVATE students I will offer extra 3 points on the
next test for those who correctly find solution to the fallowing problem
Draw a dilation of quadrilateral ABCD with vertices A(2, 1), B(4, 1),
C(4, 21), and D(1, 21). Use a scale factor of 2.
Solution:
First draw ABCD. Find the dilation of each vertex
by multiplying its coordinates by 2. Then draw
the dilation.
(x, y) → (2x, 2y)
A (2, 1)→ L(4, 2)
B (4, 1)→ M(8, 2)
C (4, 21) → N(8, 22)
D (1, 21) → P(2, 22)
2. Objectives
Construct an enlargement dilation
Use observations to complete exercises
use drawing tools and matrices to draw dilations.
Understand that dilation is an another transformation that preserves angle measure but
not distance
Calculate and apply scalar products.

Use scalar products to represent dilations
3. key vocabulary
Matrix, element, entry, dimension, scalar multiplication, dilation,
4. Teacher input
Above problem will be a great introduction to dilations in the coordinate plane. At this time I will
tell students that today’s lesson will be about another type of transformation in the plane that is
an isometry as well. This transformation like other preserves angle measure but not distance.
For example, in the coordinate plane of 2 with center at the origin will stretch each ray by a
factor of 2. If the image of A is A’ then A’ is a point on ray OA and OA’=2OA.
A dilation of k is a transformation of the plane such that:
1. The image of point O, the center of dilation, is O
2. When k is positive and the image of P is P’, then ray OP and ray OP’ are
the same ray and OP’=kOP
3. When k is negative and the image of P is P’, then ray OP and ray OP’ are
opposite rays and OP’=-kOP
This definition is best understood thorough examples which will show students what each point
of the definition means. Especially a concept that when k is negative, -k is positive.
In the coordinate plane, the center od dilation is usually the origin. If the center of dilation is not
the origin, the coordinates of the center will always be given. In the coordinate plane, under a
dilation of k with the center at the origin:
P(x, y) P’(kx, ky) or Dk(x, y)=(kx, ky)
The following problem will explain and show students that the distance is not preserve.
Ex: the coordinates of the parallelogram EFGH are E(0, 0), F(3, 0), G(4, 2), H(1, 2). Under D3,
the image of EFGH is E’F’G’H’.
a. Find the coordinates of the vertices of E’F’G’H’.
b. Let M be the midpoint of EF. Find the coordinates of M and of M’, the image ofM. Verify
that the midpoint is preserved.
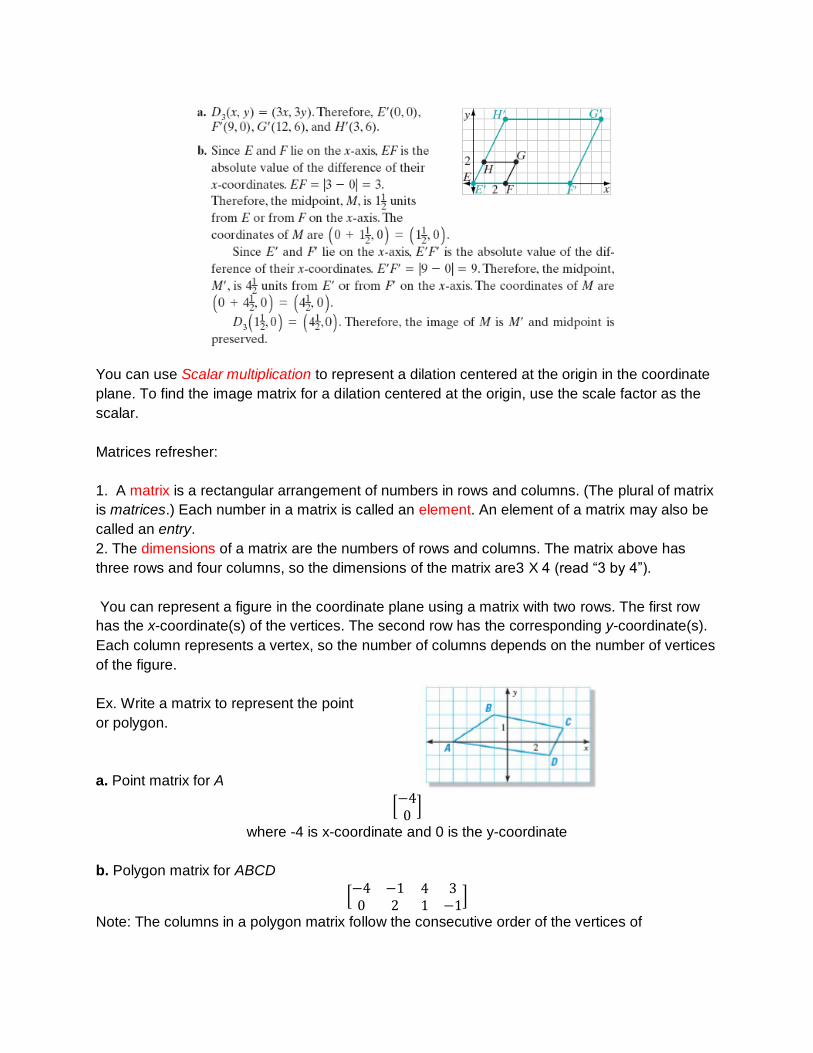
You can use Scalar multiplication to represent a dilation centered at the origin in the coordinate
plane. To find the image matrix for a dilation centered at the origin, use the scale factor as the
scalar.
Matrices refresher:
1. A matrix is a rectangular arrangement of numbers in rows and columns. (The plural of matrix
is matrices.) Each number in a matrix is called an element. An element of a matrix may also be
called an entry.
2. The dimensions of a matrix are the numbers of rows and columns. The matrix above has
three rows and four columns, so the dimensions of the matrix are3 X 4 (read “3 by 4”).
You can represent a figure in the coordinate plane using a matrix with two rows. The first row
has the x-coordinate(s) of the vertices. The second row has the corresponding y-coordinate(s).
Each column represents a vertex, so the number of columns depends on the number of vertices
of the figure.
Ex. Write a matrix to represent the point
or polygon.
a. Point matrix for A
where -4 is x-coordinate and 0 is the y-coordinate
b. Polygon matrix for ABCD
Note: The columns in a polygon matrix follow the consecutive order of the vertices of
After the quick reminder about the basics of the matrices we will talk about the translations
using the matrix. I will introduce the translations using matrix. I will explain that we can use
matrix addition to represent a translation in the coordinate plane. The image matrix for a
translation is the sum of the translation matrix and the matrix that represents the pre-image.
To AVOID ERRORS it is important to remember that in order to add two matrices, they must
have the same dimensions, so the translation matrix here must have three columns like the
polygon matrix. A an example we will do the problem.
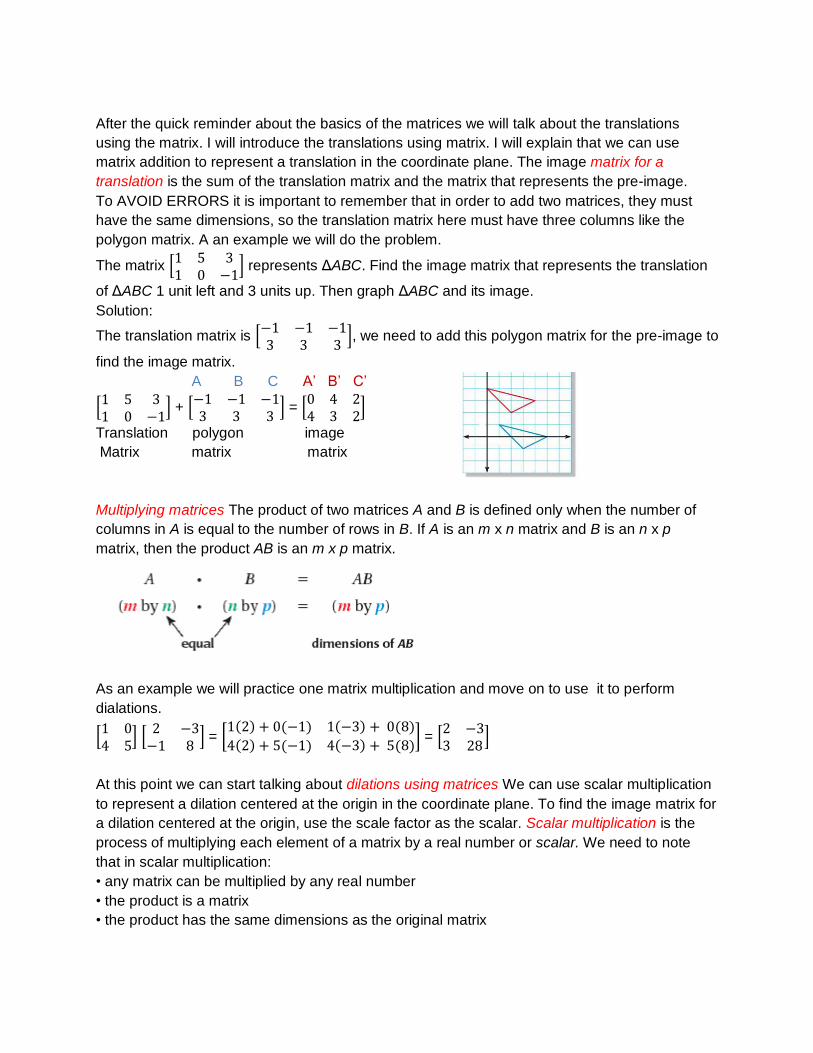
The matrix
represents ΔABC. Find the image matrix that represents the translation
of ΔABC 1 unit left and 3 units up. Then graph ΔABC and its image.
Solution:
The translation matrix is
, we need to add this polygon matrix for the pre-image to
find the image matrix.
A B C A’ B’ C’
+
=
Translation polygon image
Matrix matrix matrix
Multiplying matrices The product of two matrices A and B is defined only when the number of
columns in A is equal to the number of rows in B. If A is an m x n matrix and B is an n x p
matrix, then the product AB is an m x p matrix.
As an example we will practice one matrix multiplication and move on to use it to perform
dialations.
=
=
At this point we can start talking about dilations using matrices We can use scalar multiplication
to represent a dilation centered at the origin in the coordinate plane. To find the image matrix for
a dilation centered at the origin, use the scale factor as the scalar. Scalar multiplication is the
process of multiplying each element of a matrix by a real number or scalar. We need to note
that in scalar multiplication:
• any matrix can be multiplied by any real number
• the product is a matrix
• the product has the same dimensions as the original matrix

As an quick example we will simplify the product: 4 *
, to do that we will have to
multiply each element in the matrix by 4.
4 *
=
=
Once student remind themselves about matrix multiplication and addition we can talk about
using scalar multiplication in a dilation.
Recall from the refresher above:
The image of point (h; k) in a dilation centered at the origin, with a scale factor r, is the point
(rh, rk).This is exactly the tool we need in order to use matrices for dilations.
The following rectangle is dilated with a scale factor of
a) What is the polygon matrix for the rectangle?
b) Write a scalar product for the dilation.
=
c) What are the coordinates of the vertices of the image rectangle?
(−2; −2); (−2; 2); (6; 2); (6; −2)
d) What is the perimeter of the image?
Perimeter of the original rectangle is 6 + 12 + 6 + 12 = 36.
Perimeter of the image is
× 36 = 24 .

e) What is the area of the image?
Area of the original rectangle is 6 × 12 = 72.
Area of the image is
(
× 72 = 32
5. Guided practice
Dilations can be one of the transformations in a composition, just as translations, reflections,
and rotations can. For example:
We will use two transformations to move the circle below.
First we will dilate the circle with scale factor 4. Then, we will translate the new image 3 units
right and 5 units up. We can call this a translation-dilation.
a) What are the coordinates of the center of the final image circle?
(3, 5)
b) What is the radius of the final image?
4
c) What is the circumference of the final image?
8Π
d) What is the area of the original circle?
Π
e) What is the area of the final image circle?
16 Π

If P is a polygon matrix for a set of points in a coordinate plane, we could use matrix arithmetic
to find P′, the matrix of the image of the polygon after the translation-dilation of this example.
Let’s use this translation-dilation to move the rectangle from previous example.
. The dilation scalar is 4. Translation matrix is
The final image is the rectangle with vertices at (−9, −7),(−9, 17),(39, 17) and (39, −7)
6. Closure
After today’s lesson there are few points to consider
All of our work with the matrices that represent polygons and translations in two-
dimensional space (a coordinate plane) has rather obvious parallels in three dimensions.
A matrix that represents n points would have n rows and 3 columns rather than 2.
A dilation is still a scalar product.
A translation matrix for n points would have n rows and 3 columns in which the rows are
all the same.
And, of course, there seem to be many more than three dimensions!

Summative assessment:
1. Write a rule for the translation of ΔABC to ΔA’B’C’. Then verify that the translation is
an isometry.
2. Graph the image of the polygon after the reflection in the given line. x-axis y = 3 y= - x
3. Determine whether the flag has line symmetry and/or rotational symmetry. Identify all lines of symmetry and/or angles of rotation that map the figure onto itself.
4. The vertices of ΔPQR are P(25, 1), Q(24, 6), and R(22, 3). Graph ΔP’Q’R’ after a composition of the transformations in the order they are listed.
a) Translation: (x, y) → (x 2 8, y) b) Reflection: in the y-axis
Dilation: centered at the origin, k=2 Rotation: 90o about the origin
Describe your steps. Include a graph with your answer.
5. Extend It: Not all figures moved with a translation and a reflection are glide
reflections.
6. In rectangle PQRS, one side is twice as long as the other side. Rectangle P’Q’R’S’ is
the image of PQRS after a dilation centered at P with a scale factor of 0.5. The area of P’Q’R’S' is 32 square inches.
a. Find the lengths of the sides of PQRS. Explain. b. Find the ratio of the area of PQRS to the area of P’Q’R’S’.
7. The vertices of ΔEFG are E(4, 2), F(22, 1), and G(0, 23). a. Find the coordinates of the vertices of ΔE’F’G’, the image of ΔEFG after a dilation
centered at the origin with a scale factor of 2. Graph ΔEFG and ΔE’F’G’ in the same coordinate plane.
b. Find the coordinates of the vertices of ΔE’F’G’, the image of ΔE’F’G’ after a dilation
centered at the origin with a scale factor of 2.5. Graph ΔE’F’G’ in the same coordinate plane you used in part (a).
c. What is the dilation that maps ΔEFG to ΔE’F’G’? d. What is the scale factor of a dilation that is equivalent to the composition of two
dilations described below? Explain.
Dilation: centered at (0, 0) with a scale factor of a
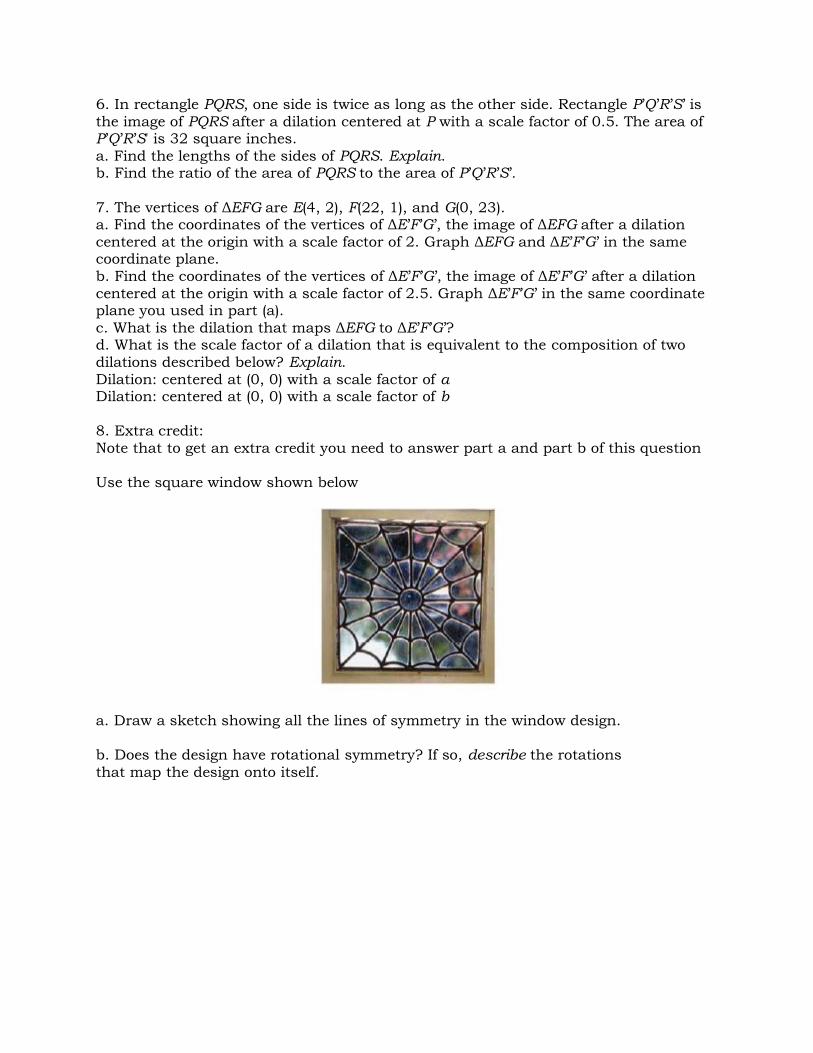
Dilation: centered at (0, 0) with a scale factor of b 8. Extra credit:
Note that to get an extra credit you need to answer part a and part b of this question
Use the square window shown below
a. Draw a sketch showing all the lines of symmetry in the window design.
b. Does the design have rotational symmetry? If so, describe the rotations
that map the design onto itself.