Unigui Guide Eng
24
uniGUI guide 1 uniGUI guide About uniGUI Developing a stateful Rich Internet Application (RIA) is one of the challenging fields in software development. Tasks such as creating and handling user sessions, tracking view state, updating web controls, handling AJAX calls and etc. can be very challenging if your development tool doesn't automatically handle all these for you. uniGUI Web application framework makes developing stateful Web applications easier than ever. uniGUI extends Web Application development experience to a new dimension. Each uniGUI application can be considered both as a desktop and a Web application at the same time. This new technology unique to uniGUI enables developers to create, design and debug their Delphi applications as if they are regular desktop applications and then choose one of the available options for Web deployment. Of course, with uniGUI it is possible to create, design and debug applications which target only the Web. One of the unique features of uniGUI is its ability to use a single code base/resource base for creating a VCL desktop application or a Web application. Developer's Guide Web Deployment Currently there are four options available for deploying your uniGUI project to the Web . VCL Application Standalone Server ISAPI Module Windows Service (not implemented in this version) Ext JS License Considerations Any uniGUI server requires deploying a full copy of Ext JS along with your Delphi generated modules. FMSoft Inc. in no way grants any form of license regarding Ext JS library and its files. All files (except where stated) distributed by uniGUI installer under "ext" folder are property of Sencha Inc . Regardless of licensing model that uniGUI may adopt in its future beta/non-beta releases, you are bound by Ext JS license terms imposed by Sencha Inc . Ext JS files are distributed under <InstallFolder>\FMSoft\Framework\UniGUI\ext folder. Ext JS license requires developers who want to develop a proprietary product to purchase a proper number of Ext JS commercial licenses. Ext JS license are sold in a per-developer and royalty free manner. Please visit the following link for more information: http://www.sencha.com/products/license.php Ext JS Commercial License This is the appropriate option if you are creating proprietary applications and you are not prepared to distribute and share the source code of your application under the GPL. • Based on the "Quid Pro Quo" principle , if you wish to derive a commercial advantage by not releasing your application under an open source license, you must purchase an appropriate number of commercial licenses from Ext. By purchasing commercial licenses, you are no longer obligated to publish your source code. Commercial licenses: • Are on a per developer basis. Each person who directly or indirectly creates an application or user interface containing Ext components is considered a developer. • Are perpetual and include upgrades to all minor revisions. For example: a 3.0 license includes all publicly 3.x releases including 3.0, 3.1, 3.3, etc. • Do not include access to patch releases until they are rolled up into the next minor release. For example: the 3.0.3 patch release will be available to commercial licensees when 3.1 is released. • Are royalty-free. • Remove any obligations to release any source code under GPL.
-
Upload
neimar-hahmeier -
Category
Documents
-
view
190 -
download
5
Transcript of Unigui Guide Eng
uniGUI guide
1
uniGUI guide
About uniGUI
Developing a stateful Rich Internet Application (RIA) is one of the challenging fields in software development. Tasks such as creating and handling user sessions, tracking view state, updating web controls, handling AJAX calls and etc. can be very challenging if your development tool doesn't automatically handle all these for you. uniGUI Web application framework makes developing stateful Web applications easier than ever. uniGUI extends Web Application development experience to a new dimension. Each uniGUI application can be considered both as a desktop and a Web application at the same time. This new technology unique to uniGUI enables developers to create, design and debug their Delphi applications as if they are regular desktop applications and then choose one of the available options for Web deployment. Of course, with uniGUI it is possible to create, design and debug applications which target only the Web. One of the unique features of uniGUI is its ability to use a single code base/resource base for creating a VCL desktop application or a Web application.
Developer's Guide Web Deployment Currently there are four options available for deploying your uniGUI project to the Web . VCL Application Standalone Server ISAPI Module Windows Service (not implemented in this version)
Ext JS License Considerations Any uniGUI server requires deploying a full copy of Ext JS along with your Delphi generated modules. FMSoft Inc. in no way grants any form of license regarding Ext JS library and its files. All files (except where stated) distributed by uniGUI installer under "ext" folder are property of Sencha Inc. Regardless of licensing model that uniGUI may adopt in its future beta/non-beta releases, you are bound by Ext JS license terms imposed by Sencha Inc. Ext JS files are distributed under <InstallFolder>\FMSoft\Framework\UniGUI\ext folder. Ext JS license requires developers who want to develop a proprietary product to purchase a proper number of Ext JS commercial licenses. Ext JS license are sold in a per-developer and royalty free manner. Please visit the following link for more information: http://www.sencha.com/products/license.php Ext JS Commercial License This is the appropriate option if you are creating proprietary applications and you are not prepared to distribute and share the
source code of your application under the GPL.
•
Based on the "Quid Pro Quo" principle, if you wish to derive a commercial advantage by not releasing your application under
an open source license, you must purchase an appropriate number of commercial licenses from Ext. By purchasing
commercial licenses, you are no longer obligated to publish your source code. Commercial licenses:
• Are on a per developer basis. Each person who directly or indirectly creates an application or user interface containing Ext
components is considered a developer.
• Are perpetual and include upgrades to all minor revisions. For example: a 3.0 license includes all publicly 3.x releases
including 3.0, 3.1, 3.3, etc.
• Do not include access to patch releases until they are rolled up into the next minor release. For example: the 3.0.3 patch
release will be available to commercial licensees when 3.1 is released.
• Are royalty-free.
• Remove any obligations to release any source code under GPL.
uniGUI guide
2
• View the license terms
• Purchase a commercial Ext JS license
(Current price for a single Ext JS Developer license is $329 )
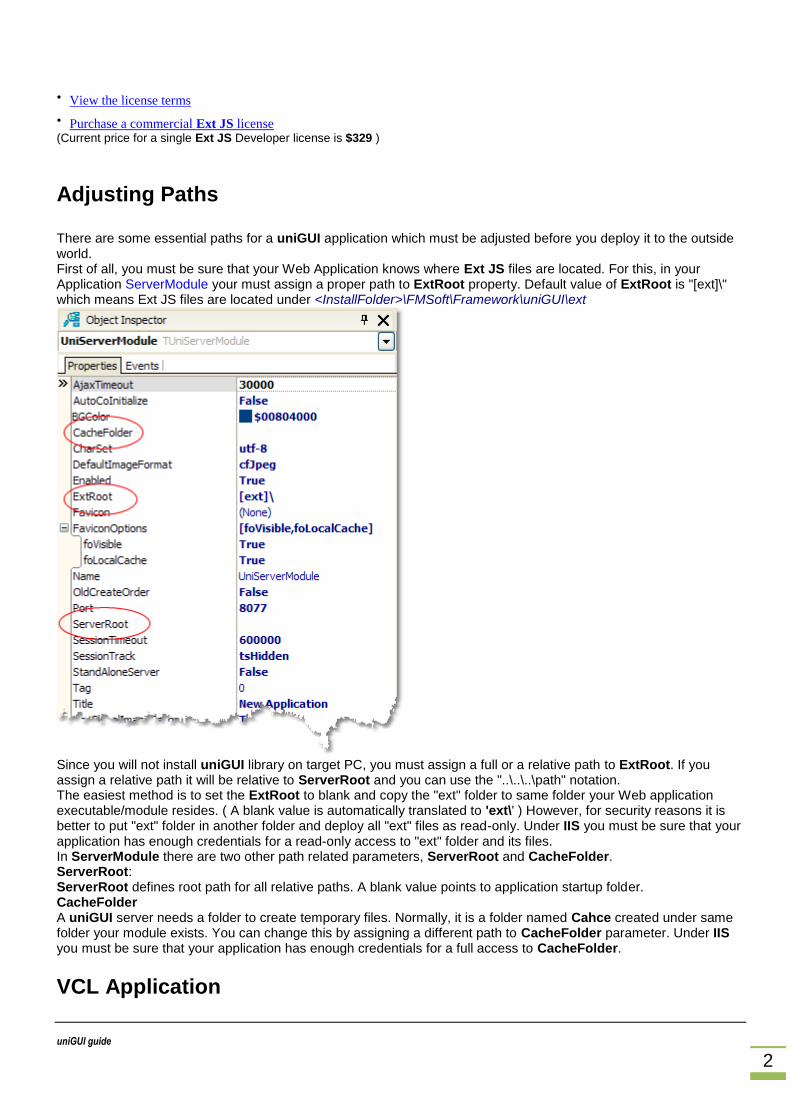
Adjusting Paths There are some essential paths for a uniGUI application which must be adjusted before you deploy it to the outside world. First of all, you must be sure that your Web Application knows where Ext JS files are located. For this, in your Application ServerModule your must assign a proper path to ExtRoot property. Default value of ExtRoot is "[ext]\" which means Ext JS files are located under <InstallFolder>\FMSoft\Framework\uniGUI\ext
Since you will not install uniGUI library on target PC, you must assign a full or a relative path to ExtRoot. If you assign a relative path it will be relative to ServerRoot and you can use the "..\..\..\path" notation. The easiest method is to set the ExtRoot to blank and copy the "ext" folder to same folder your Web application executable/module resides. ( A blank value is automatically translated to 'ext\' ) However, for security reasons it is better to put "ext" folder in another folder and deploy all "ext" files as read-only. Under IIS you must be sure that your application has enough credentials for a read-only access to "ext" folder and its files. In ServerModule there are two other path related parameters, ServerRoot and CacheFolder. ServerRoot: ServerRoot defines root path for all relative paths. A blank value points to application startup folder. CacheFolder A uniGUI server needs a folder to create temporary files. Normally, it is a folder named Cahce created under same folder your module exists. You can change this by assigning a different path to CacheFolder parameter. Under IIS you must be sure that your application has enough credentials for a full access to CacheFolder.
VCL Application
uniGUI guide
3
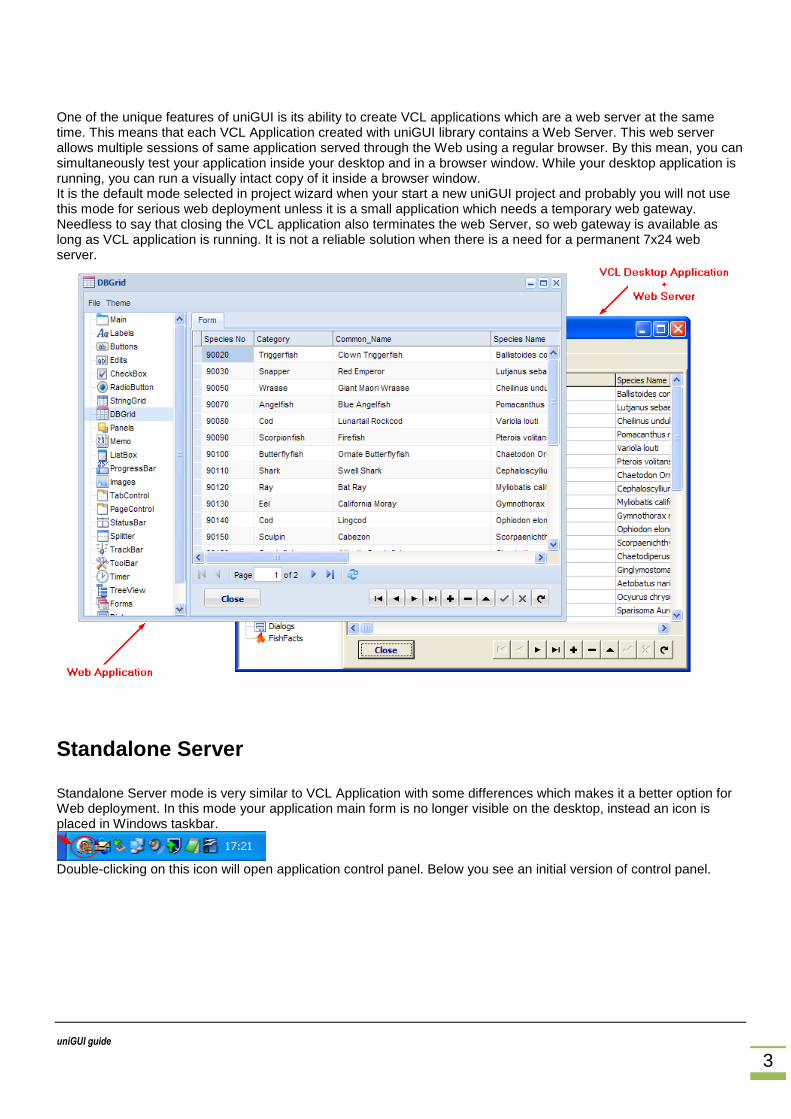
One of the unique features of uniGUI is its ability to create VCL applications which are a web server at the same time. This means that each VCL Application created with uniGUI library contains a Web Server. This web server allows multiple sessions of same application served through the Web using a regular browser. By this mean, you can simultaneously test your application inside your desktop and in a browser window. While your desktop application is running, you can run a visually intact copy of it inside a browser window. It is the default mode selected in project wizard when your start a new uniGUI project and probably you will not use this mode for serious web deployment unless it is a small application which needs a temporary web gateway. Needless to say that closing the VCL application also terminates the web Server, so web gateway is available as long as VCL application is running. It is not a reliable solution when there is a need for a permanent 7x24 web server.
Standalone Server Standalone Server mode is very similar to VCL Application with some differences which makes it a better option for Web deployment. In this mode your application main form is no longer visible on the desktop, instead an icon is placed in Windows taskbar.
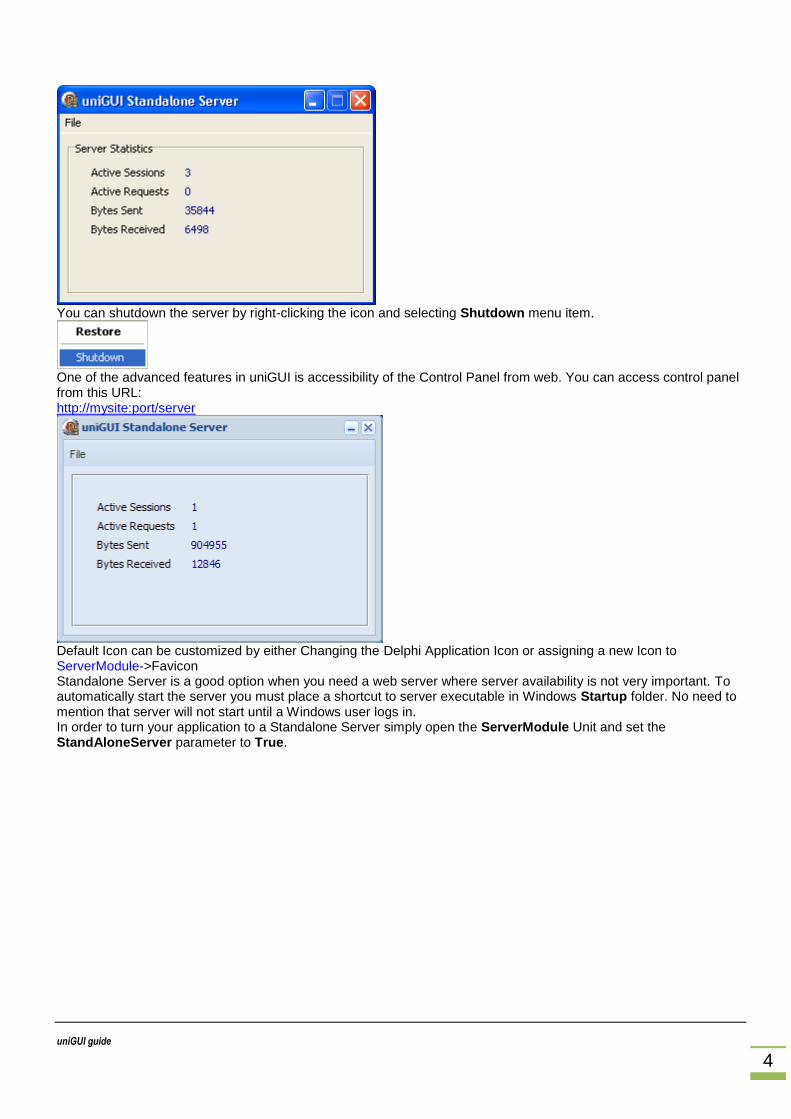
Double-clicking on this icon will open application control panel. Below you see an initial version of control panel.
uniGUI guide
4
You can shutdown the server by right-clicking the icon and selecting Shutdown menu item.
One of the advanced features in uniGUI is accessibility of the Control Panel from web. You can access control panel from this URL: http://mysite:port/server
Default Icon can be customized by either Changing the Delphi Application Icon or assigning a new Icon to ServerModule->Favicon Standalone Server is a good option when you need a web server where server availability is not very important. To automatically start the server you must place a shortcut to server executable in Windows Startup folder. No need to mention that server will not start until a Windows user logs in. In order to turn your application to a Standalone Server simply open the ServerModule Unit and set the StandAloneServer parameter to True.

uniGUI guide
5
ISAPI Module Deploying your Internnet application as ISAPI module probably is best method of deployment. You can run several modules together without a need to dedicate a TCP port to each application. You can use all Web Servers which support ISAPI extentions. uniGUI generated modules are tested with IIS 5.1, IIS 6.0, IIS 7.0 and Apache 2.2. Installing instructions are different for each Web server. Please refer to below sections for instructions: IIS 5.1 IIS 6.0 IIS 7.0 Apache 2.2
IIS 5 First step is to create a new Virtual Directory.

uniGUI guide
6
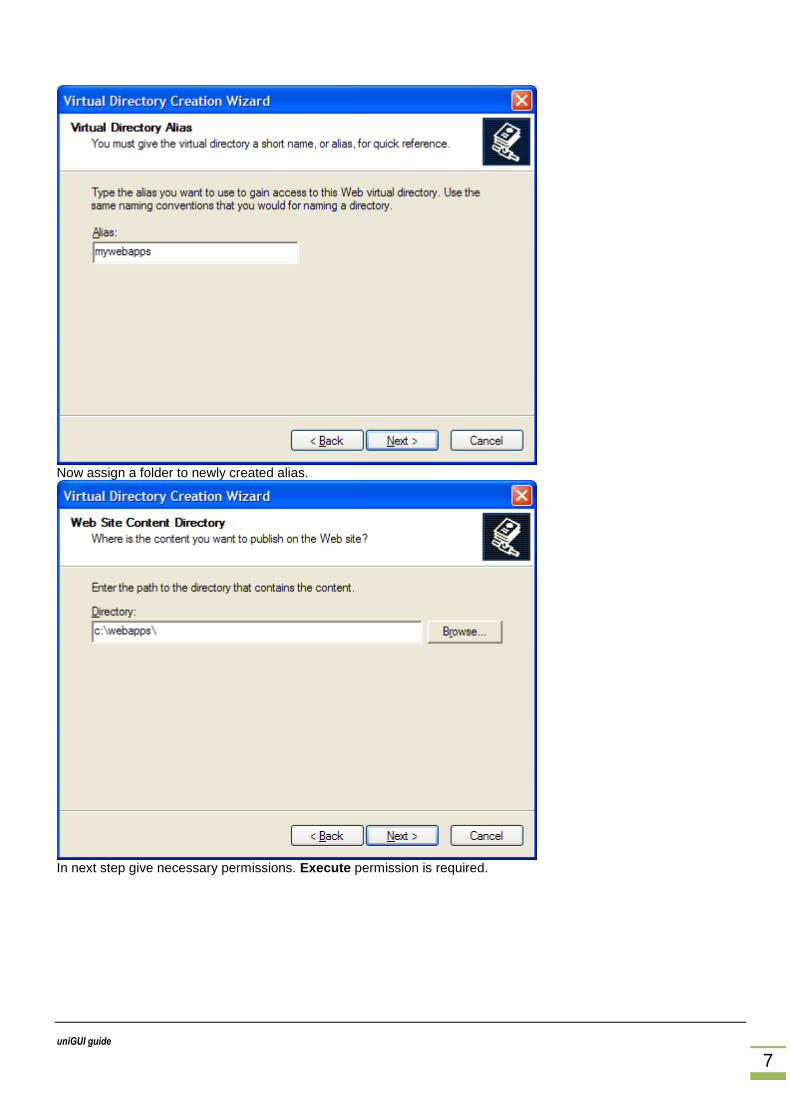
Select an alias for new virtual Directory.
uniGUI guide
7
Now assign a folder to newly created alias.
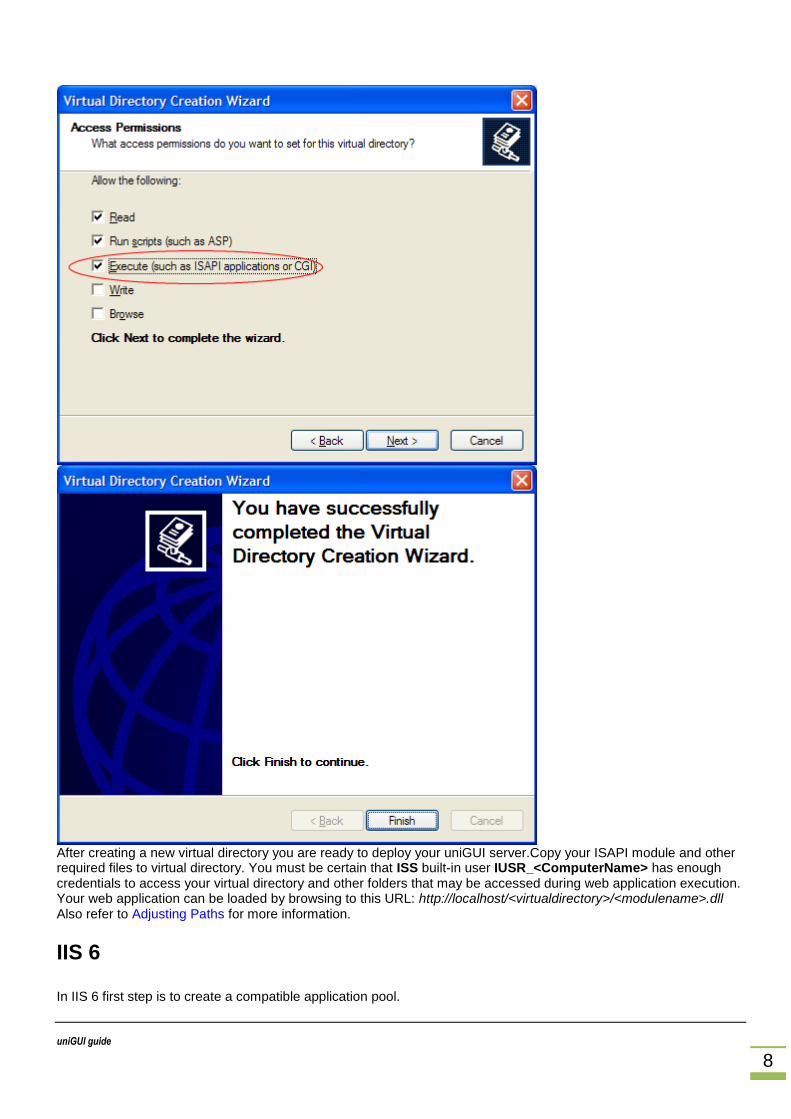
In next step give necessary permissions. Execute permission is required.
uniGUI guide
8
After creating a new virtual directory you are ready to deploy your uniGUI server.Copy your ISAPI module and other required files to virtual directory. You must be certain that ISS built-in user IUSR_<ComputerName> has enough credentials to access your virtual directory and other folders that may be accessed during web application execution. Your web application can be loaded by browsing to this URL: http://localhost/<virtualdirectory>/<modulename>.dll Also refer to Adjusting Paths for more information.
IIS 6 In IIS 6 first step is to create a compatible application pool.

uniGUI guide
9
Give a proper name to the new pool.
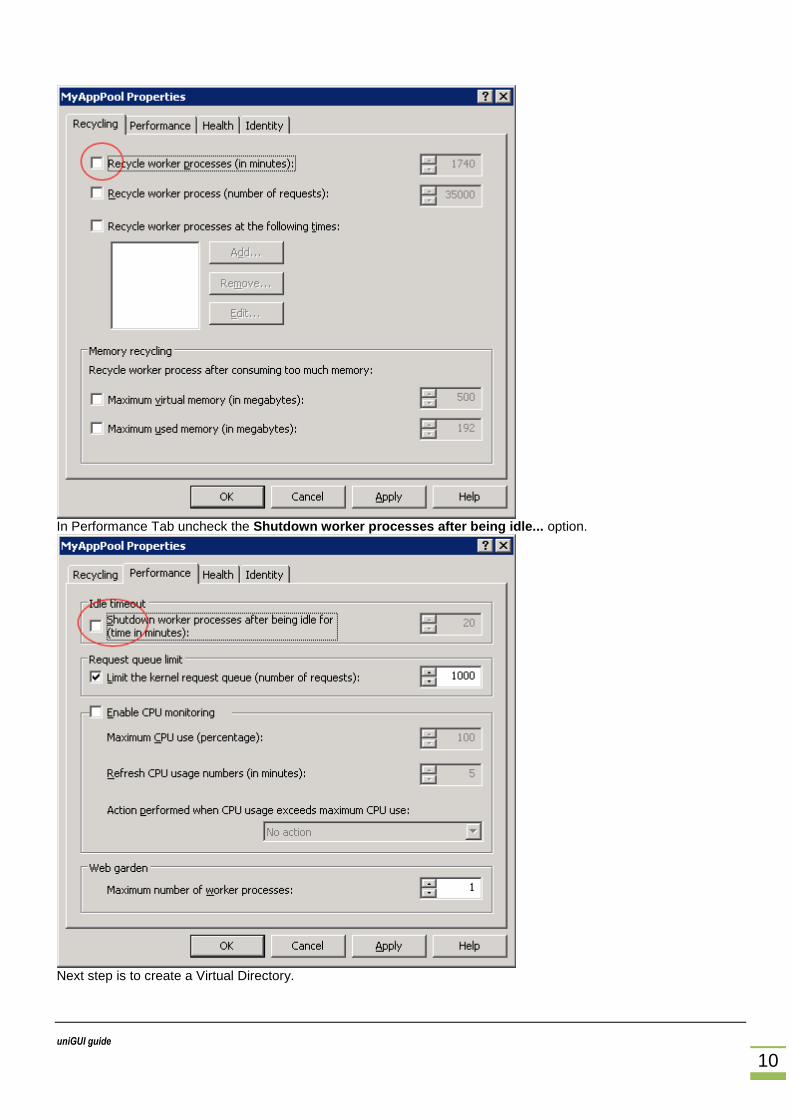
In Application Pool properties, Recycling Tab uncheck the Recycle worker processes option.
uniGUI guide
10
In Performance Tab uncheck the Shutdown worker processes after being idle... option.
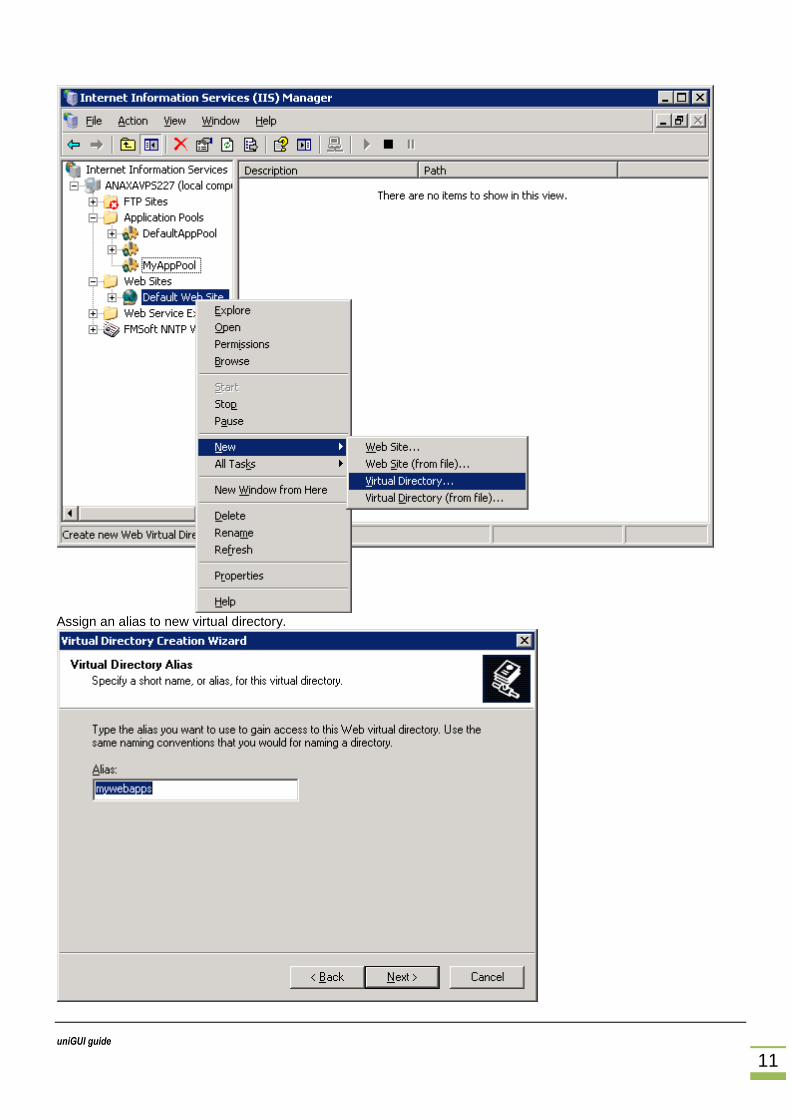
Next step is to create a Virtual Directory.
uniGUI guide
11
Assign an alias to new virtual directory.
uniGUI guide
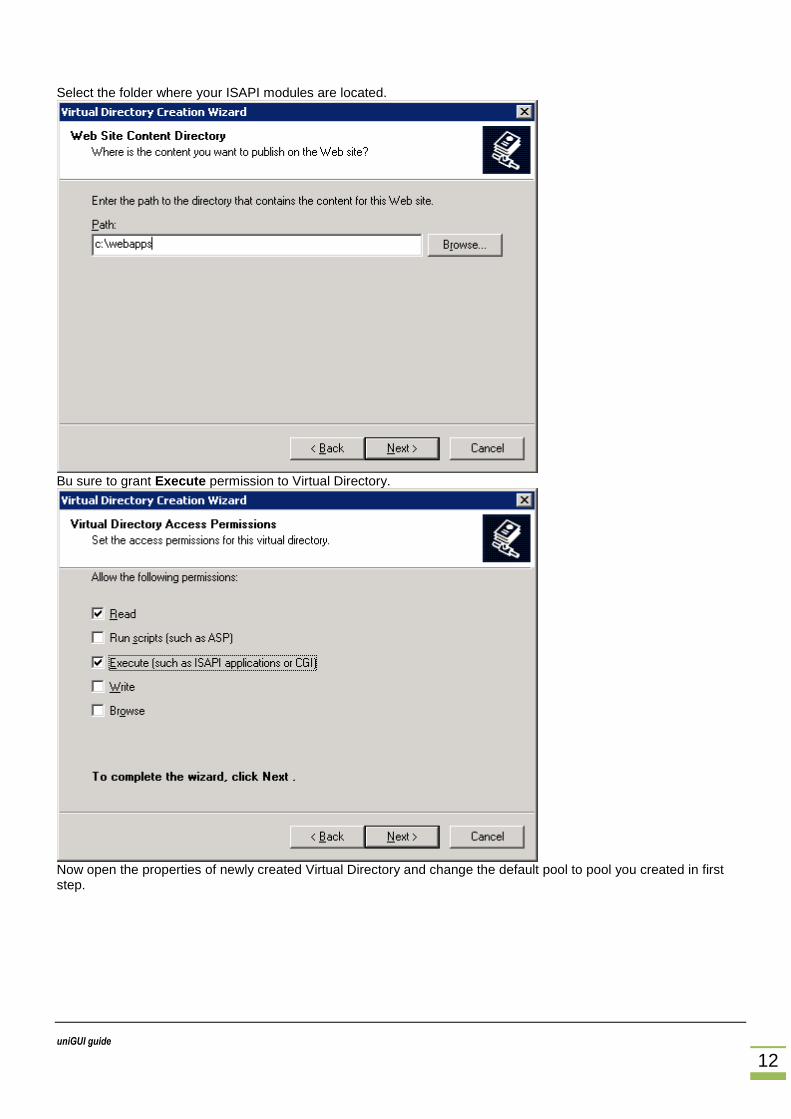
12
Select the folder where your ISAPI modules are located.
Bu sure to grant Execute permission to Virtual Directory.
Now open the properties of newly created Virtual Directory and change the default pool to pool you created in first step.

uniGUI guide
13
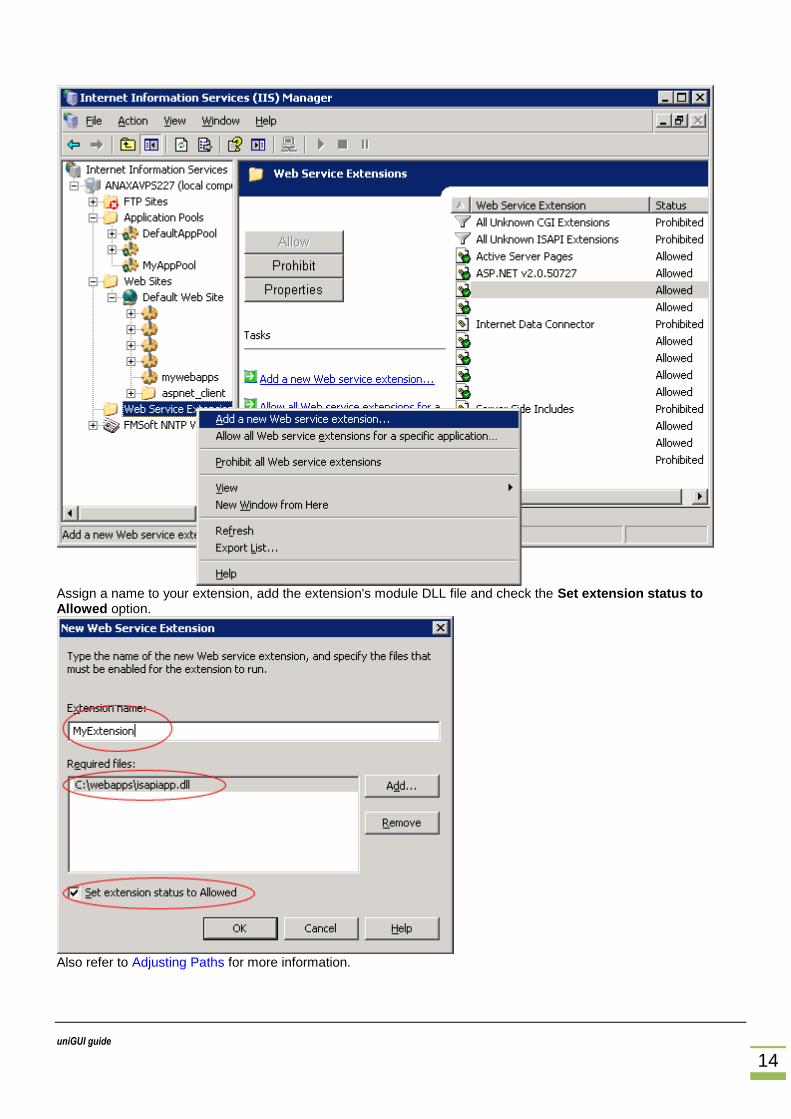
There is one further step in IIS 6. Your ISAPI extenstion must added to list of allowed extensions.
uniGUI guide
14
Assign a name to your extension, add the extension's module DLL file and check the Set extension status to Allowed option.
Also refer to Adjusting Paths for more information.
uniGUI guide
15
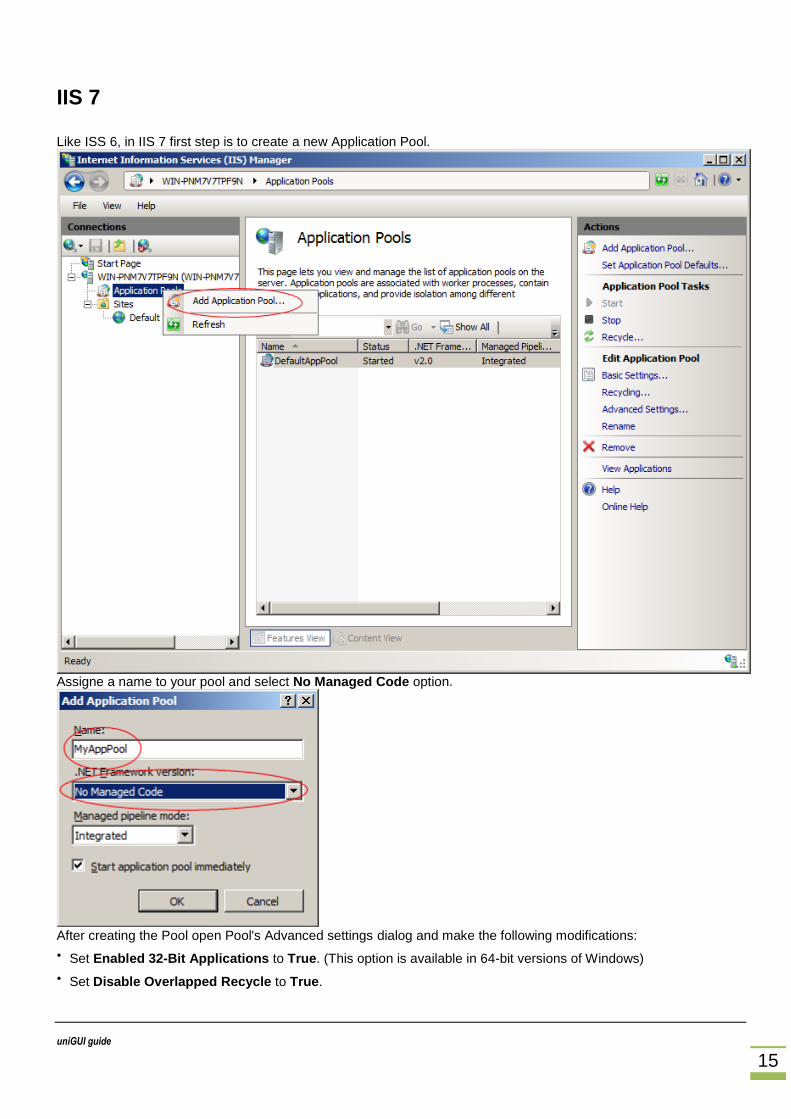
IIS 7 Like ISS 6, in IIS 7 first step is to create a new Application Pool.
Assigne a name to your pool and select No Managed Code option.
After creating the Pool open Pool's Advanced settings dialog and make the following modifications:
• Set Enabled 32-Bit Applications to True. (This option is available in 64-bit versions of Windows)
• Set Disable Overlapped Recycle to True.

uniGUI guide
16
• Set Regular Time Interval to 0
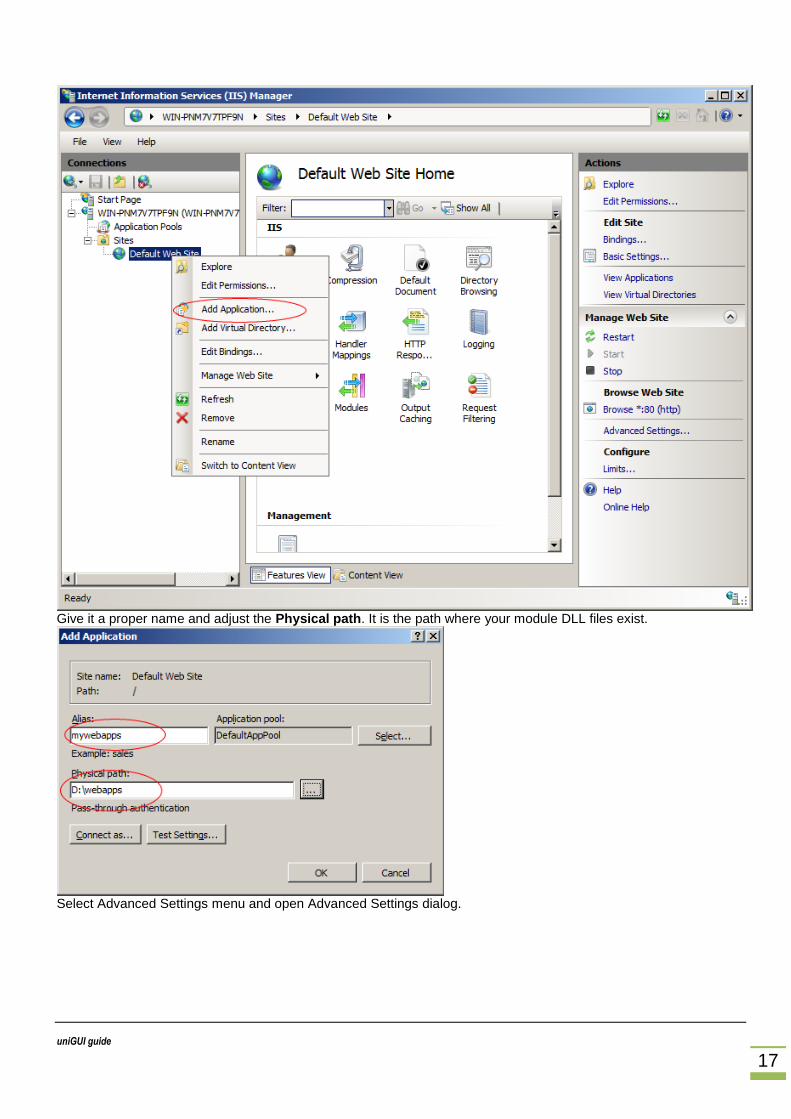
Now add a new Application.
uniGUI guide
17
Give it a proper name and adjust the Physical path. It is the path where your module DLL files exist.
Select Advanced Settings menu and open Advanced Settings dialog.

uniGUI guide
18
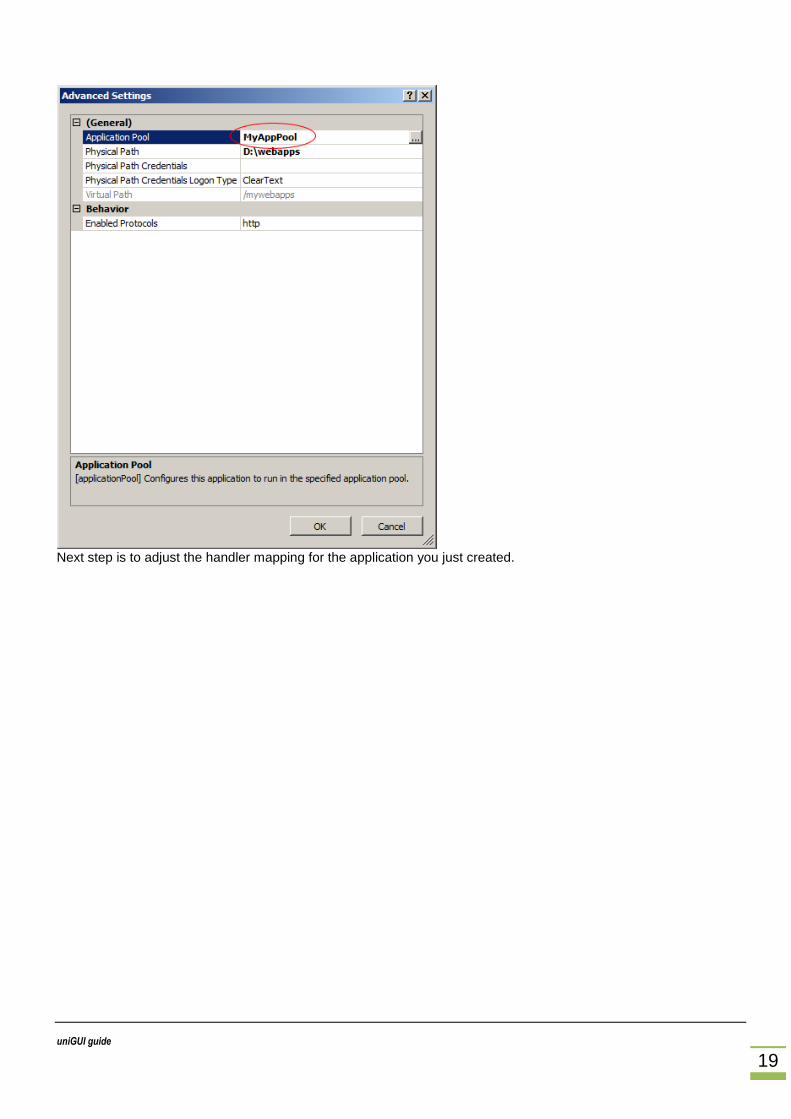
In Advance Settings screen set the Application Pool to one you created in first step.
uniGUI guide
19
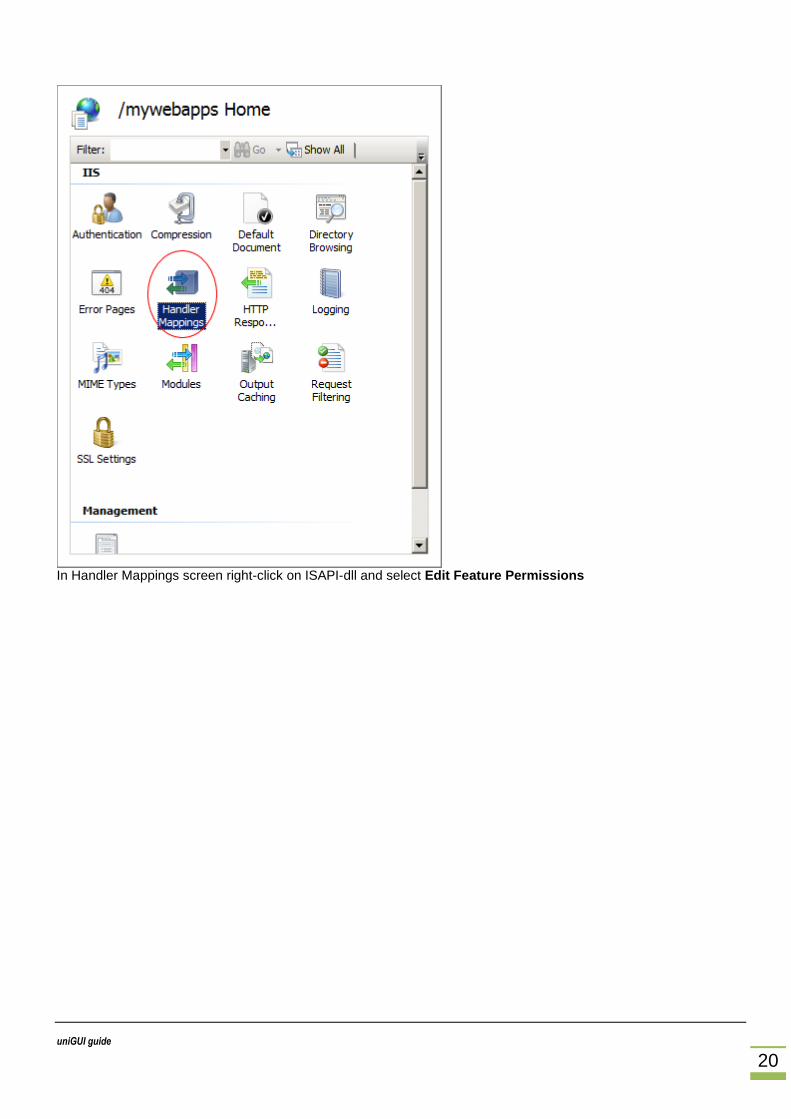
Next step is to adjust the handler mapping for the application you just created.
uniGUI guide
20
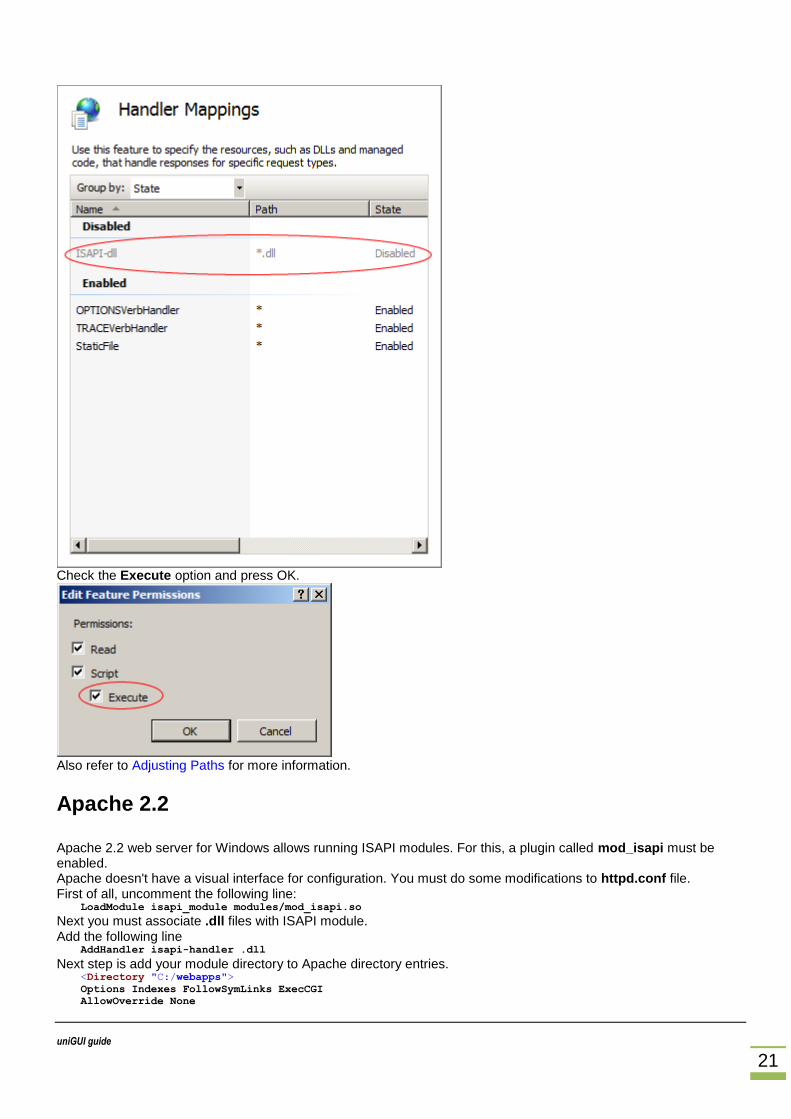
In Handler Mappings screen right-click on ISAPI-dll and select Edit Feature Permissions
uniGUI guide
21
Check the Execute option and press OK.
Also refer to Adjusting Paths for more information.
Apache 2.2 Apache 2.2 web server for Windows allows running ISAPI modules. For this, a plugin called mod_isapi must be enabled. Apache doesn't have a visual interface for configuration. You must do some modifications to httpd.conf file. First of all, uncomment the following line:
LoadModule isapi_module modules/mod_isapi.so Next you must associate .dll files with ISAPI module. Add the following line
AddHandler isapi-handler .dll
Next step is add your module directory to Apache directory entries. <Directory "C:/webapps"> Options Indexes FollowSymLinks ExecCGI AllowOverride None

uniGUI guide
22
Order allow,deny Allow from all </Directory>
Finally create a new Alias for your directory. Alias /mywebapps "C:/webapps"
Be sure to restart your Apache server after making the necessary modifications to httpd.conf file.
Windows Service Windows service is created and deployed like other regular Service applications created using Delphi. To install service simply type following command at command line: MyServiceApp -install
You can start service from Windows service manager or type the following command: net start ServiceName When you create a new project default value for service name is: UniServiceModule You can change it from ServiceModule.pas->UniServiceModule->Name To uninstall service: MyServiceApp -uninstall
Components and other smallness Captcha component by Jason Reid {*******************************************************}
{ }
{ Captcha component for uniGUI }
{ }
{ Copyright (C) 2011 Jason Reid }
{ }
{*******************************************************}
unit Captcha;
interface
uses classes, Graphics, uniImage;
type
TUniCaptcha = class(TUniImage)
private
FChallenge: ShortString;
procedure Render;
procedure Distort(aBitmap: TBitmap);
public
constructor Create(Owner: TComponent); override;
procedure SetChallenge(aChallenge: ShortString);
published
property Challenge: ShortString read FChallenge write FChallenge;
end;
procedure Register;
implementation
constructor TUniCaptcha.Create(Owner: TComponent);
begin
uniGUI guide
23
inherited;
end;
procedure TUniCaptcha.Distort(aBitmap: TBitmap);
var
b: TBitmap; x, y: integer;
begin
b := TBitmap.Create;
try
b.Width := aBitmap.Width;
b.Height := aBitmap.Height;
for x := 0 to aBitmap.Canvas.ClipRect.Right do
begin
for y := 0 to aBitmap.Canvas.ClipRect.Bottom do
begin
b.Canvas.Pixels[x, y + Trunc(sin(x / 4) * 4)] := aBitmap.Canvas.Pixels[x, y];
end;
end;
Picture.Assign(B);
finally
b.Free;
end;
end;
procedure TUniCaptcha.SetChallenge(aChallenge: ShortString);
begin
FChallenge := aChallenge; Render;
end;
procedure TUniCaptcha.render;
var
b: TBitmap;
i: Integer;
begin
b := TBitmap.Create;
try
with b do
begin
b.Width := Self.Width;
b.Height := Self.Height;
for i := 0 to 30 do
begin
Randomize;
Canvas.Pen.Width := Random(5) + 5;
Canvas.Pen.Color := Random(64738) + 64738;
Canvas.Brush.Style := bsFDiagonal;
Canvas.Ellipse(Random(width), Random(Height), Random(width), Random(Height));
end;
Canvas.Font.Color := clBlue;
Canvas.Font.Size := 18;
Canvas.TextOut(10, Trunc(Self.Height / 2), FChallenge);
Canvas.Font.Color := clRed; Canvas.TextOut(8, Trunc(Self.height / 2) -
2, FChallenge);
end;
Distort(B);
finally
b.Free;
end;
end;
procedure Register;
uniGUI guide
24
begin
RegisterComponents('UniCustom', [TUniCaptcha]);
end;
end.
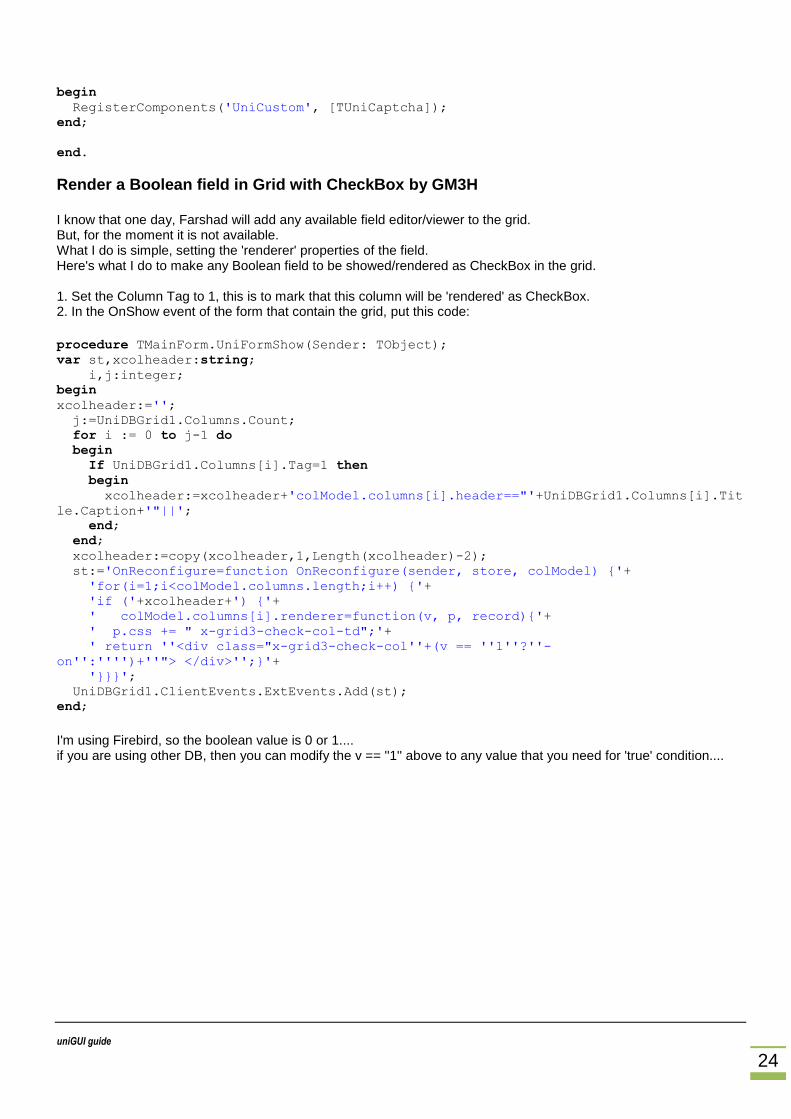
Render a Boolean field in Grid with CheckBox by GM3H I know that one day, Farshad will add any available field editor/viewer to the grid. But, for the moment it is not available. What I do is simple, setting the 'renderer' properties of the field. Here's what I do to make any Boolean field to be showed/rendered as CheckBox in the grid. 1. Set the Column Tag to 1, this is to mark that this column will be 'rendered' as CheckBox. 2. In the OnShow event of the form that contain the grid, put this code:
procedure TMainForm.UniFormShow(Sender: TObject);
var st,xcolheader:string;
i,j:integer;
begin
xcolheader:='';
j:=UniDBGrid1.Columns.Count;
for i := 0 to j-1 do
begin
If UniDBGrid1.Columns[i].Tag=1 then
begin
xcolheader:=xcolheader+'colModel.columns[i].header=="'+UniDBGrid1.Columns[i].Tit
le.Caption+'"||';
end;
end;
xcolheader:=copy(xcolheader,1,Length(xcolheader)-2);
st:='OnReconfigure=function OnReconfigure(sender, store, colModel) {'+
'for(i=1;i<colModel.columns.length;i++) {'+
'if ('+xcolheader+') {'+
' colModel.columns[i].renderer=function(v, p, record){'+
' p.css += " x-grid3-check-col-td";'+
' return ''<div class="x-grid3-check-col''+(v == ''1''?''-
on'':'''')+''"> </div>'';}'+
'}}}';
UniDBGrid1.ClientEvents.ExtEvents.Add(st);
end;
I'm using Firebird, so the boolean value is 0 or 1.... if you are using other DB, then you can modify the v == ''1'' above to any value that you need for 'true' condition....


![Arnold Training Guide [Eng]](https://static.fdocuments.in/doc/165x107/563db9db550346aa9aa08e4b/arnold-training-guide-eng.jpg)


![Peugeot Planet Guide [ENG]](https://static.fdocuments.in/doc/165x107/543fe835afaf9ffb098b47d5/peugeot-planet-guide-eng.jpg)