Uniden Phone
21
UNIDEN CORDLESS TELEPHONES EXI8560 Series
-
Upload
mallardfirst -
Category
Documents
-
view
223 -
download
0
Transcript of Uniden Phone

8/8/2019 Uniden Phone
http://slidepdf.com/reader/full/uniden-phone 1/12
At Uniden, we'll take care o you!
Thank you or purchasing a Uniden product.I you have any questions or problems,
please do not return this product to the place o purchase.
Having Trouble?Our customer care specialists are here to help you! Visit our website atwww.uniden.com or call our Customer Hotline at 1-800-297-1023during regular business hours.*
Need a Part?To order headsets, replacement batteries or other accessories, visit ourwebsite at www.uniden.com or call 1-800-554-3988 during regularbusiness hours.*
Help or our SpecialNeeds Customers
Uniden provides a customer service hotline or accessibility questions. I you have disability and need customer service assistance or i you have anyquestions about how Uniden's products can accommodate persons withdisabilities, please call the accessibility voice/TTY line:1-800-874-9314 (voice or TTY).Accessibility inormation can be ound on our website, www.uniden.com,under the "Accessibility" link. I your call is received outside o our businesshours, leave us a message and we will call you back.
* Central Standard Time. Detailed customer service hours are available at www.uniden.com.
©2007 Uniden America Corporation, Fort Worth, Texas.Printed in China UCZZ01064BZ(0)
UNIDEN
CORDLESS
TELEPHONES
EXI8560 Series

8/8/2019 Uniden Phone
http://slidepdf.com/reader/full/uniden-phone 2/12
1) Installing the Phone
1-1. Choosing the Best LocationTo get the best perormance out o your new phone, put it in the best location:
Near an AC outletand a telephonewall jack.
• Microwave ovens• Refrigerators
• Fluorescentlighting
• Dust• Excessive
moisture
• Other cordlesstelephones
In acentrally-locatedopen area.
PLACE YOUR BASE
• TVs• Other electronics
• Direct sunlight• Extreme temperatures
• Personal computers
• Wireless LANequipment
• Dust• Excessive
moisture
• Areas with
a lot of backgroundnoise
• Shock• Vibration
• Shock• Vibration
TRY TO AVOID
Notes: For maximum rangeKeep both the base and handset antennas ree o obstruction.When the handset is not in use, place the handset in an upright position.Metal and reinorced concrete may aect cordless telephone perormance.
•••
1-2. Plug in the BatteryUse only the Uniden BT-905 rechargeable battery pack supplied with your phone.
1Locate the battery pack,battery cover and the handset.
2Line up the red and black wireson the battery pack connectorwith the sticker in the handset'sbattery compartment.
3Place the cover over thebattery compartment andslide it up into place.
Push the battery connector in firmly.
(You should hear it click into place.)
Red
Black
1-3. Plug in the Base
Don’t put any power cord where people might trip over it or step on it. I a power cord becomeschaed or worn out, it can create a re or electrical hazard.
Note: For optimum battery lie, charge your handset completely beore you connect the telephonecord. The rst time you charge a new battery, allow 15 to 20 hours.
4 Connect the AC adapter to the DC IN 9V jack.
Route the cord through the molded wiring channel.
6
5
Connect the AC adapterto a standard 120VAC wall outlet.DO NOT use an AC outletcontrolled by a wall switch.
To AC outlet
AC adapter(supplied)
To DC IN 9V
4 Connect the AC adapter to the DC IN 9V jack.
Route the cord through the molded wiring channel.
6
5
Connect the AC adapterto a standard 120VAC wall outlet.DO NOT use an AC outletcontrolled by a wall switch.
To AC outlet
AC adapter(supplied)
To DC IN 9V
7 Place the handset in the base.
What if the charge LED doesn'tlight up?
• Check AC adapter connection.• Make sure you are not using
an outlet that's controlled bya wall switch.
Make sure thatthe /in use LEDilluminates.
7 Place the handset in the base.
What if the charge LED doesn'tlight up?
• Check AC adapter connection.• Make sure you are not using
an outlet that's controlled bya wall switch.
Make sure thatthe /in use LEDilluminates.

8/8/2019 Uniden Phone
http://slidepdf.com/reader/full/uniden-phone 3/12
1-4. Connect the Telephone Cord
I you receive high-speed internet servicethrough your telephone line (reerred to as
DSL), you should install a DSL lter betweenthe telephone base and the wall jack. Standardtelephones oten can’t operate correctly withouta DSL lter.
Test the connection
11 Make a quick test call, and then press [END] to hang up.
What if the call doesn't go through?
Try changing the dial mode (see below).
What if there is a lot of static?
Check the sources of interference described in section1-1 on Choosing the best location: is the base nearany of those?
Changing rom tone to pulse dialing (DIAL)Your phone can communicate with the telephone network in two dierent ways: tone dialing or pulse dialing.These days, most phone networks use a method called tone dialing, so your phone comes programmed or tonedialing.I your phone company uses pulse dialing, you need to change your phone’s dial settings. I you don't get a dial
tone or can't connect to the telephone network, ollow the steps below to modiy your phone’s settings:With the phone in standby, press and hold [cid/menu].
Press [ ] to move the pointer to DIAL.
Press [select/channel] to set the phone to pulse dialing.
Press [END] and put the handset back in the base. The handset communicates the new setting to thebase.
Note: I you use pulse dialing and you need to send DTMF tones during a call (i you're using an automatedresponse system, or example), press [ /tone/ ] to temporarily switch to tone dialing. When the call
ends, the phone automatically returns to pulse dialing mode.
Now your phone is ready to use!
1-5. Attach the Belt Clip
To attach the belt clipInsert the tabs on the side o the belt clip into the holes on either side o the handset.Press the belt clip down until it clicks into place. (Tug on the clip to make sure it’ssecure.)
To remove the belt clipGently pull the tabs out o the holes, then slide the belt clip o o the handset.
1)
2)
3)
4)
8Connect the telephone cord to theTEL LINE jack on the rear of the base.
9 Connect the telephone cordto a telephone wall jack.
To telephonewall jack
Telephone cord (supplied)
Note: If the telephone cord does not fit into your telephone wall jack, contact yourlocal phone provider for assistance.
To TEL LINE
Telephonewall jack
Telephone cord
DSL filter
Telephonewall jack
Telephone cord
DSL filter
10 Pick up the handset from the base and press [TALK/flash].You should hear a dial tone, and the display should show TALK.
What if I can't hear a dial tone?
Check the telephone cord connection on the base.
What if the display doesn't show TALK?
Put the handset back in the base for at least five seconds.Make sure the /in use LED flashes.
Talk 0:01

8/8/2019 Uniden Phone
http://slidepdf.com/reader/full/uniden-phone 4/12
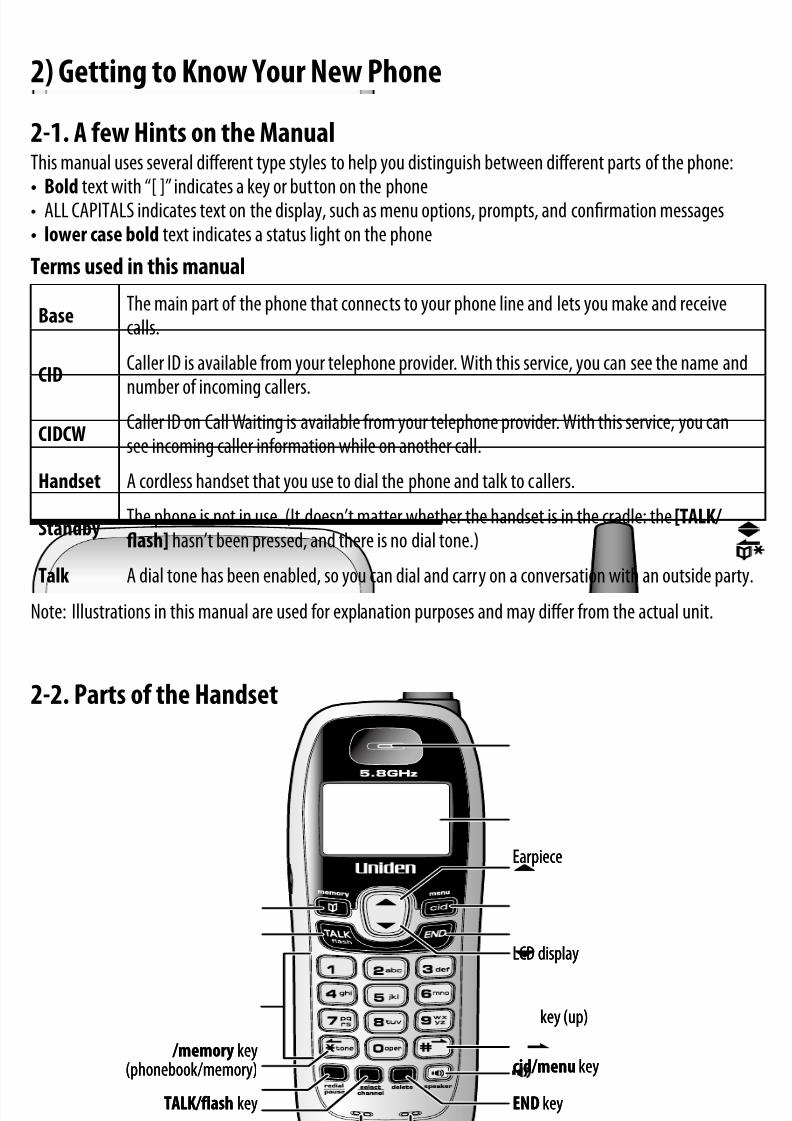
2) Getting to Know Your New Phone
2-1. A ew Hints on the ManualThis manual uses several dierent type styles to help you distinguish between dierent parts o the phone:
Bold text with “[ ]” indicates a key or button on the phoneALL CAPITALS indicates text on the display, such as menu options, prompts, and conrmation messageslower case bold text indicates a status light on the phone
Terms used in this manual
BaseThe main part o the phone that connects to your phone line and lets you make and receivecalls.
CIDCaller ID is available rom your telephone provider. With this service, you can see the name and
number o incoming callers.
CIDCWCaller ID on Call Waiting is available rom your telephone provider. With this service, you cansee incoming caller inormation while on another call.
Handset A cordless handset that you use to dial the phone and talk to callers.
StandbyThe phone is not in use. (It doesn’t matter whether the handset is in the cradle: the [TALK/ fash] hasn’t been pressed, and there is no dial tone.)
Talk A dial tone has been enabled, so you can dial and carry on a conversation with an outside party.
Note: Illustrations in this manual are used or explanation purposes and may dier rom the actual unit.
•••
2-2. Parts o the Handset
Earpiece
LCD display
Twelve-key dial pad
Microphone
/memory key(phonebook/memory)
TALK/flash key
redial/pause key
/tone/ key(*/tone/left)
key (up)
cid/menu key
/speaker key
END key
#/ key (#/right)
delete keyselect/channel key
Charging contacts
key (down)
Earpiece
LCD display
Twelve-key dial pad
Microphone
/memory key(phonebook/memory)
TALK/flash key
redial/pause key
/tone/ key(*/tone/left)
key (up)
cid/menu key
/speaker key
END key
#/ key (#/right)
delete keyselect/channel key
Charging contacts
key (down)
Using the handset menuTo open the handset menu, press and hold [cid/menu] or two seconds.The arrow pointer on the let side o the line shows which menu item iscurrently highlighted. Use [ ] to move the pointer up and [ ] to movethe pointer down.I the phone beeps and stays on the same line, it means you have reachedthe top or bottom o the list.Press [select/channel] to rotate through the available options or thehighlighted menu item.Press [END] to exit the menu.
Note: You can nd detailed inormation on the handset menu in section 3 on
Setting Up Your Phone and section 4 on Using Your Phone.
••
•
•
•
Ringer :Type A
Ring. Vol.:High
Auto Talk :Off
CIDCW :On
Area Code :
Dial :Tone
Language :Eng
Ringer :Type A
Ring. Vol.:High
Auto Talk :Off
CIDCW :On
Area Code :
Dial :Tone
Language :Eng
2-3. Parts o the Base
inusefind hs
find hs key
Charging contacts
/in use LED/Voice mail waiting indicator (flashing)
inusefind hs
find hs key
Charging contacts
/in use LED/Voice mail waiting indicator (flashing)
8/8/2019 Uniden Phone
http://slidepdf.com/reader/full/uniden-phone 5/12
3-1. Activating Caller ID on Call Waiting (CIDCW) You must subscribe to Caller ID service through your local telephone provider to use this eature.Caller ID allows you to see the name and number o the calling party beore you answer the phone. Caller ID onCall Waiting (CIDCW) lets you see the name and number o a call that comes in when you are on the line.
With the phone in standby, press and hold [cid/menu].
Press [ ] to move the pointer to CIDCW.
Press [select/channel] to toggle and turn on Caller ID on Call Waiting.
Press [END] and put the handset back in the base. The handset communicates the new setting to thebase.
3-2. Setting the Display Language (LANGUAGE)The handset menus can use English (ENG, deault), French (FR.) or Spanish (ESP).
With the phone in standby, press and hold [cid/menu].
Press [ ] to move the pointer to LANGUAGE.
Press [select/channel] to select ENG, FR. or ESP.
When the display shows the language you want, use [ ] and [ ] to move the pointer to another menuitem.
OR
I you’re nished, press [END] to return the handset to standby.
3-3. Activating AutoTalk (AUTO TALK)With Auto Talk, you can answer the phone just by picking up the handset rom the base: you don’t have topress any keys. I the handset is already o the base, Auto Talk also lets you answer by pressing any key on thetwelve-key dial pad (instead o just [TALK/fash]).
With the phone in standby, press and hold [cid/menu].
Press [ ] to move the pointer to AUTO TALK.
Press [select/channel] to turn Auto Talk on.
Use [ ] and [ ] to move the pointer to another menu item.
OR
I you’re nished, press [END] to return the handset to standby.
3-4. Setting the Ringer Tone (RINGER)With the phone in standby, press and hold [cid/menu].
Press [select/channel] to rotate through the our available ring tones (A, B, C, and D). As you switch to thenext ring tone, the handset sounds a sample o that ringer.
When you hear the ringer you want, use [ ] and [ ] to move the pointer to another menu item.
OR
I you’re nished, press [END] to return the handset to standby.
The handset will use the new ring tone starting with the next incoming call.
3-5. Setting the Ringer VolumeWith the phone in standby, press and hold [cid/menu].
Press [ ] to move the pointer to RING VOL.
Press [select/channel] to rotate through the three available volume levels (HIGH, LOW, and OFF). As youswitch to the next volume level, the handset sounds a sample o the current ring tone at that level.
When you hear the volume level you want, use [ ] and [ ] to move the pointer to another menu item.
OR
I you’re nished, press [END] to return the handset to standby.
The handset will use the new ringer volume starting with the next incoming call.Note: I you set the ring volume to OFF, the handset won’t ring.
1)
2)
3)
4)
1)
2)
3)
4)
1)
2)
3)
4)
1)
2)
3)
1)
2)
3)
4)
3) Setting Up Your Phone
Your phone has our basic options that you need to set up rst. You should only have to set these options once,and you may not have to change any o them: Dial mode (tone or pulse dialing)
Dial mode (tone or pulse dialing)→ See section 1-4
CIDCW (Caller ID on Call Waiting)
•
•
Language
Auto talk
•
•
You might change two handset-specic options --ringer type and ringer volume -- more oten, depending onthe situation. There’s another option, area code, that you should only set i you can use seven-digit dialing (seesection 5-3 on Using Seven Digits Instead o Ten).
4) Using Your Phone
4-1. Making and Receiving Calls...rom the handset ...rom the handset speaker phone
To make acall...
Pick up the handset.
Press [TALK/fash].
Listen or the dial tone.
Dial the number.
OR
Pick up the handset.
Dial the number.
Press [TALK/fash].
1)
2)
3)
4)
1)
2)
3)
Pick up the handset.
Press [ ].
Listen or the dial tone.
Dial the number.
OR
Pick up the handset.
Dial the number.
Press [ ].
1)
2)
3)
4)
1)
2)
3)
To answer acall...
Pick up the handset. (I AutoTalk is on, thephone automatically answers when you pick itup rom the cradle.)
Press [TALK/fash]. (I Auto Talk is on, you can
also press any key on the twelve-key dial pad.)
1)
2)
Pick up the handset.
Press [ ].
1)
2)
To hang up... Press [END] or return the handset to the cradle.
4-2. Switching a Call to the Handset SpeakerphoneTo switch a normal call to the speakerphone, press [ ] on the handset. To switch back to a normal call, press[ ] again.

8/8/2019 Uniden Phone
http://slidepdf.com/reader/full/uniden-phone 6/12
4-3. Redialing the Last Dialed NumberPick up the handset rom the cradle.
Press [redial/pause].
Press [TALK/fash] or [ ].
1)
2)
3)
Pick up the handset rom the cradle.
Press [TALK/fash] or [ ].
Listen or the dial tone.
Press [redial/pause].
1)
2)
3)
4)
OR
4-4. Adjusting the Speaker VolumeYou can change the speaker volume on the handset earpiece, or the handset speakerphone.When you are on a normal call, press [ ] to make the earpiece louder or [ ] to make it soter.The handset display shows the current volume level or the earpiece.When you are using the speakerphone, use [ ] or [ ] to change the speaker volume. The handset displayshows the current volume level or the handset speakerphone.There are our volume levels: LOW, MEDIUM, HIGH, and MAXIMUM.
Notes:The handset earpiece and the handset speakerphone have separate volume settings.I you hear three quick error beeps, it means the earpiece or speaker is already at the lowest (LOW) or highest(MAXIMUM) volume level.
4-5. Finding the HandsetTo locate the handset, press [nd hs] on the base. The handset will beep or sixty seconds.To cancel paging, press [nd hs] again, press any key on the handset, or put the handset back in the base.
4-6. Muting the RingerWhen the phone is ringing, you can mute the ringer on the handset. Muting stops the ringer or the current callonly: the ringer will sound with the next incoming call. You can only mute the handset ringer i the handset isalready o the cradle when the handset starts ringing. Press [END] to mute the incoming ring.
4-7. Voice Mail Waiting IndicatorVoice Mail Waiting IndicatorI you subscribe to voice mail service through your local telephone company, you can use your cordlesstelephone to access your voice mailbox. The voice mail company will provide you with the access number.
The /in use LED on the base o your phone fashes whenever you have messages waiting in your voice mailbox.
To access your voice mailboxJust dial the access number supplied by your voice mail provider to enter your mailbox. You can program yourvoice mail access number to a speed dial number.I the voice mail waiting indicator remains on ater you have retrieved your messages, press and hold [nd hs] or ve seconds. This will reset the indicator.
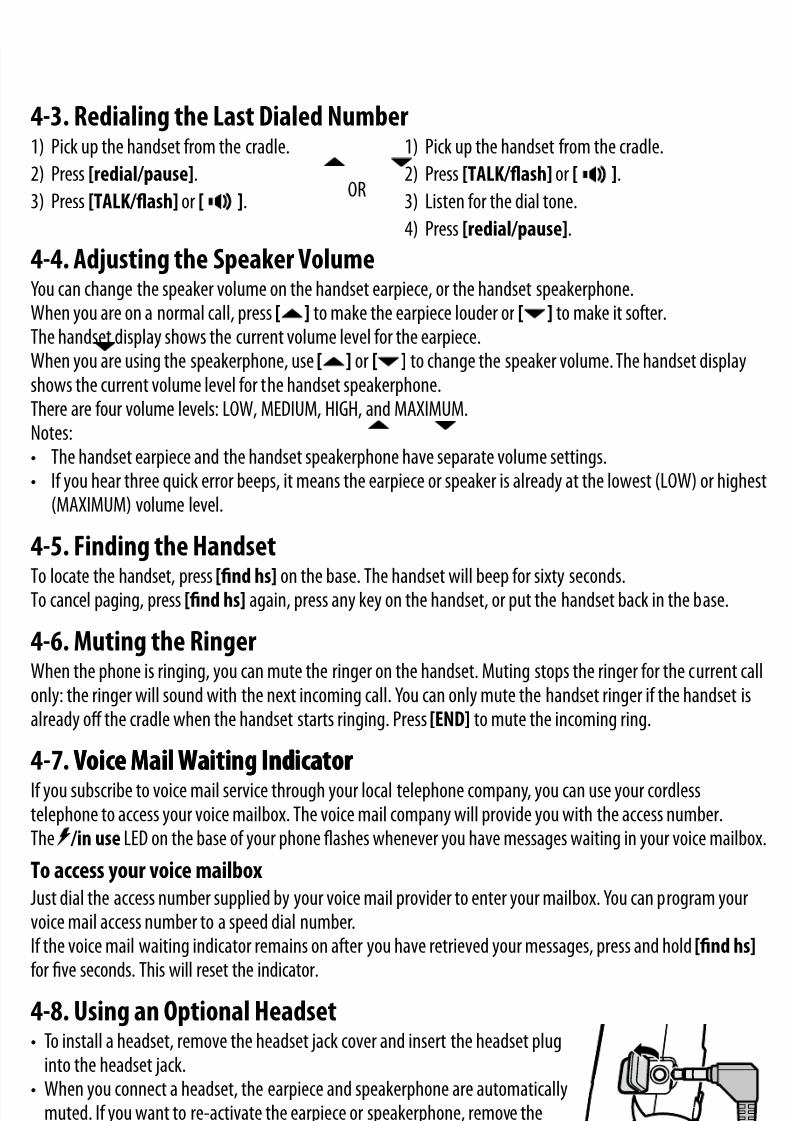
4-8. Using an Optional HeadsetTo install a headset, remove the headset jack cover and insert the headset pluginto the headset jack.When you connect a headset, the earpiece and speakerphone are automaticallymuted. I you want to re-activate the earpiece or speakerphone, remove theheadset plug.You will still make and receive calls as usual: just use your headset to talk to thecaller once the call connects.You can purchase headsets rom our website at www.uniden.com or by calling our Parts Department (See the
back cover page).
••
•
•
•
•
5) Using Caller ID and Call Waiting
I you subscribe to Caller ID rom your phone company, your phone will show you the caller's phone number andname (i available) whenever a call comes in. I you subscribe to both Call Waiting and Caller ID, the phone alsoshows you the name and the number o any call that comes in while you're on the line.
5/11 12:30PM
Jane Smith
214-555-1234
The date and time received
Caller's name
Caller's Phone Number
Note: I you answer a call beore the Caller ID record is received (or example, beore the second ring), the CallerID record will not appear.
The phone stores the Caller ID inormation or up to thirty incoming calls - even unanswered calls. I the phonereceives more Caller ID records than it can store, the oldest record in the list is automatically deleted.For inormation on storing Caller ID records in the phonebook, see section 6-6.
5-1. Reviewing the Caller ID Record ListYou can review the Caller ID list when the handset is in standby or during a call.
Press [cid/menu]. The summary screen displays the total number o CIDrecords along with the number o new CID records (that is, calls that youhaven't reviewed yet).
Use [ ] to scroll through the records rom the latest to the earliest, oruse [ ] to scroll through the records rom the earliest to the latest.
Press [cid/menu] to exit the Caller ID list.
For new Caller ID records, the phone keeps a count o the number o callsreceived rom the same caller (instead o saving the inormation multipletimes). The Caller ID record shows the time and date o the most recent callrom that number, and the number o calls appears next to the received time.The phone only maintains this count or new or “unviewed” records: once youreview that record, the number is cleared.
5-2. Making a Call rom the Caller ID ListWith the phone in standby, press [cid/menu].
Use [ ] or [ ] to nd the Caller ID record you want to call.
I you need to add or delete a “1” rom the displayed phone number, press [1].
What’s this “add or delete a 1” about?Any phone number in the Caller ID records might (or might not!) have a “1” at the ront, depending on howdierent phone companies send the Caller ID inormation.The phone dials the number exactly as it appears in the Caller ID record.I the phone number is a long distance or toll call, but the Caller ID record does not have a “1” in ront o thenumber, press [1] to add it.I the phone number is a local or non-toll call, but the Caller ID record has a “1” in ront o the number, press[1] to delete it.
•
••
•
Press [TALK/fash] or [ ] to dial the number.Note: You can also press [TALK/fash] or [ ] beore you access the Caller ID list. When you come to the
phone number you want to dial, press [select/channel].
1)
2)
3)
1)
2)
3)
4)
Caller ID
New :01Total:17
Caller ID
New :01Total:17
12/30 11:59PM 01
Jane Smith
214-555-1234
12/30 11:59PM 01
Jane Smith
214-555-1234
8/8/2019 Uniden Phone
http://slidepdf.com/reader/full/uniden-phone 7/12
5-3. Using Seven Digits Instead o TenI you can make a local call by dialing only seven digits instead o ten, you can tell the phone to hide your localarea code in the Caller ID list; any calls rom outside your area code will show all ten digits.
Entering your area code
With the phone in standby, press and hold [cid/menu].Press [ ] to move the pointer to select AREA CODE. I an area code was already stored, the handset willdisplay it.
Press [select/channel] to edit the area code.
Use the number keys ([0] – [9]) to enter all three digits o your area code.
I you make a mistake, press [delete] to erase the last digit.
When the number is correct, press [select/channel]. A conrmation tone sounds.
Press [END]. The handset returns to standby.
The phone uses the stored area code as a lter. When a call comes in, the phone compares the incoming areacode to the code programmed in the handset. I the two codes match, the handset hides the area code in theCaller ID list.When you’re in the Caller ID list, you can show the hidden area code by pressing [3]. Press [3] again to hidethe area code.
When you dial rom a Caller ID list or store a Caller ID record in the phonebook, the phone dials or stores thedigits exactly as they appear on the display. I you need to use ten digits, be sure to press [3] to show the areacode beore you dial or store the number. See Section 6-6, Storing Caller ID Records in the Phonebook.
5-4. Deleting Caller ID RecordsI you get an incoming call or page, the operation is canceled.
To delete one Caller ID record To delete all the Caller ID records
With the phone in standby, press [cid/menu].Use [ ] or [ ] to nd the Caller ID record youwant to delete.
Press [delete]. The display asks you to conrm.To delete the record, leave the pointer at YES.Or, i you changed your mind, press [ ] to movethe pointer to NO.Press [select/channel] to conrm.
1)2)
3)4)
5)
With the phone in standby, press [cid/menu].From the CID summary screen, press [delete].The display asks you to conrm.
To delete all the records, use [ ] to move thepointer to YES. Or, i you changed your mind, leavethe pointer at NO.Press [select/channel] to conrm.
1)2)
3)
4)
5-5. Using Call WaitingI you subscribe to Call Waiting and a second call comes in when you are
on the phone, the phone sounds a call waiting tone. I you also have CallerID service, the phone shows the Caller ID inormation or the incomingcall. To put the original call on hold and switch to the waiting call, press[TALK/fash]. Ater a slight pause, you are connected to the new caller. Press[TALK/fash] again to switch back to the original caller.ORTo hang up and answer the new call, press [END]. The phone disconnects the original caller and switches to thenew caller.
1)2)
3)
4)
5)
6)
•
•
Talk 0:54Jane Smith
214-555-1234
Talk 0:54Jane Smith
214-555-1234
6) Using the Phonebook (speed dial memory)
I you enter phone numbers (along with names) into the handset’s phonebook/speed dial memory, you can
dial them with just two key presses.The handset can store ten dierent phonebook entries (corresponding to 0 through 9 on the number keypad).You can use the phonebook to store any number up to twenty digits. This is useul i you have a series o digitsthat you need to enter ater your call connects, such as an access code or account number (See section 6-7 onChain Dialing).When you’re editing the phonebook, you must press a key within thirty seconds or the phone will return to standby.
6-1. Entering a New Number into the Phonebook
With the phone in standby, press [ /memory] to open the phonebooklist.
Enter a number ([0] – [9]) or press [ ] or [ ] to nd a phonebookentry that shows <EMPTY> beside it, and press [select/channel]. Thehandset opens the STORE NAME screen.
Use the letters above the number keys to enter a name or this phonebookentry. Press [select/channel] when you’re nished (or i you don't wantto enter a name). The handset opens the STORE NUMBER screen.
•
••
•
1)
2)
3)
01 Jane Smith02 <Empty>
03 <Empty>
01 Jane Smith02 <Empty>
03 <Empty>
Store Name
。
Store Name
。
The letters above the number appear in order: press the 2 key once or A, twice or B, and three times or C.You can also enter lower case letters and symbols (see the table below or all the available characters andwhat keys to press to enter them).
For example, to enter Mom
Press [6] once to enter M.
Press [#/ ] to move the cursor to theright.
Press [6] six times to enter o.
Press [#/ ] to move the cursor to theright.
Press [6] our times to enter m.New characters are inserted next to the
character highlighted by the blinkingcursor.To enter between characters, move thecursor and enter a new character.Use [ /tone/ ] and [#/ ] to move the cursor to the desired location.To enter two characters controlled by the same key, enter the rst character, move the cursor to the right,then enter the second character.When the cursor is on the end o the digit, press [delete] to delete characters rom last one as needed.
I you made a mistake, move the cursor to the incorrect character and press [delete]. Then enter the correctcharacter.To delete all the characters, press and hold [delete].
1)
2)
3)
4)
5)•
•
••
•
•
•
keys 1 2 3 4 5 6 7 8 9
1A B C a b c 2
D E F d e f 3
G H I g h i 4
J K L j k l 5
M N O m n o 6
P Q R S p q r s 7
T U V t u v 8W X Y Z w x y z 9
* # - & ( ) (blank) 0
Number of times key is pressed
keys 1 2 3 4 5 6 7 8 9
1A B C a b c 2
D E F d e f 3
G H I g h i 4
J K L j k l 5
M N O m n o 6
P Q R S p q r s 7
T U V t u v 8W X Y Z w x y z 9
* # - & ( ) (blank) 0
Number of times key is pressed
Entering text in your phone

8/8/2019 Uniden Phone
http://slidepdf.com/reader/full/uniden-phone 8/12
Use the number keypad to enter the phone number. Press [select/ channel] when you’re nished. The handset sounds a conrmation toneand displays MEMORY STORED.
The number can be up to twenty digits.I this phone number is a long distance call, be sure to include the “1”
in ront o the phone number.I you need the phone to wait beore dialing the next digit (or example, to enter an extension numberor access code), press [redial/pause] to insert a two-second pause between digits. The display showsa P where the phone will pause. You can add as many pauses as you want anywhere in the phonenumber, but each pause does count as a digit.
Ater a ew seconds, the handset goes back to the phonebook list. Use [ ] and [ ] to select anotherphonebook entry.
OR
Press [ /memory] to exit the phonebook. The phone returns to standby.
6-2. Finding Phonebook EntriesI you know the number o the phonebook entry you're looking or:
Press and hold the number key (0 through 9) assigned to that phonebook entry.The handset displays the name and phone number saved or that phonebook entry. I the entry has nonumber, the handset displays : <EMPTY> PRESS SELECT TO EDIT.I the number you picked wasn't the right phonebook entry, just use [ ] and [ ] to scroll through the
phonebook entries. Stop scrolling when you see the phonebook entry you want.I you don't know the number o the phonebook entry you're looking or:
Press [ /memory] to open the phonebook list.Use [ ] and [ ] to scroll through the phonebook entries. Stop scrolling when you see the phonebookentry you want.
6-3. Making a Call rom the PhonebookWith the phone in standby, nd the phonebook entry you want to call (See section 6-2 on Finding Phonebook
Entries). Then press [TALK/fash] or [ ] to dial the number.You can also press [TALK/fash] or [ ] and then nd the phonebook entry you want to call, and press[select/channel].
6-4. Editing a Number in the PhonebookWith the handset in standby, nd the phonebook entry you want to edit (See section 6-2 on FindingPhonebook Entries).
Press [select/channel] to open the MENU screen.
On the MENU screen, use [ ] to move the pointer to EDIT MEMORYXX, and press [select/channel].The handset takes you to the STORE NAME screen rom Step 2 o section 6-1 on Entering a New Number intothe Phonebook: just ollow the same steps rom there.
6-5. Deleting a Number rom the PhonebookWith the handset in standby, nd the phonebook entry you want to delete (See section 6-2 on FindingPhonebook Entries).
Press [select/channel] to open the MENU screen.
On the MENU screen, use [ ] to move the pointer to DELETE MEMORYXX, and press [select/channel]. Thehandset asks you to conrm.
To delete the entry, use [ ] to move the pointer to YES and press [select/channel]. The handset sounds aconrmation tone and goes back to the phonebook list.
OR
I you changed your mind, leave the pointer at NO and press [select/channel]. The handset goes back to thephonebook list.
6-6. Storing Caller ID Records in the PhonebookWith the phone in standby, press [cid/menu].
Use [ ] or [ ] to nd the Caller ID record you want to save.Note: Remember, the phone stores the digits exactly as they appear on the display. I you need to add or delete a
"1" rom the displayed phone number, press [1]. (You can always go back and edit the phone number later.)
Press [ /memory] to open the phonebook.
Find the phonebook entry number you want to use (See section 6-2 on Finding Phonebook Entries).
Press [select/channel] to store the Caller ID inormation to the phonebook and return to the Caller ID list.Note: I this number already has a phonebook entry saved to it, the handset asks i you want to replace theexisting entry. Select YES to replace the existing entry with the new one, or select NO to cancel and keepthe existing entry. The display returns to the Caller ID list.
6-7. Chain DialingI you oten have to enter a series o digits or some type o code number during a call, you can save that codenumber to a phonebook entry. When your call connects, just use the phonebook speed dial to transmit thesaved code number. (This is reerred to as chain dialing.)
Enter the code number (up to twenty digits) into the phonebook (See section 6-1 on Entering a New Numberinto the Phonebook). Be sure to enter the code number into the phonebook exactly as you would enter itduring a call.
During a call, when you hear the prompt that tells you to enter the code number, press [ /memory] toopen the phonebook.
Find the phonebook entry number you want to use (See section 6-2 on Finding Phonebook Entries).
Press [select/channel]. The phone sends the digits o the code number exactly as you saved them in the
phonebook entry.
4)
••
•
5)
•
•
••
1)
2)
3)4)
1)
2)
3)
4)
1)
2)
3)
4)
5)
1)
2)
3)
4)
Store Number
8007303456。
Store Number
8007303456。

8/8/2019 Uniden Phone
http://slidepdf.com/reader/full/uniden-phone 9/12
7) Mounting the Base on a Wall
You can mount the phone on any standard telephone jack wall plate.
1 Route the AC adapter and the telephone
cords through the hole of the wallmount bracket.
2 Connect the AC adapter and thetelephone cords as shown.Remember to route the AC adaptercord through the channel.
3 Line up the four tabs on the wall mount bracket (two at the top andtwo at the bottom) with the four notches on the bottom of the base.Slide the bracket into place.
6 Place the mounting slots over the pins on the wall plate.
7 Slide the base down to lock it into place.
4 Hook the AC adapter cord
into the smaller notch atthe bottom of the bracket,and let the cord hangbelow the bracket.
5 Plug the telephone cordinto the wall jack.Hook both sides of the
telephone cord into thelarger notchORtuck the excess cord into theopen space in the bracket.
Wall plate
Wall plate
To AC outlet
AC adapter (supplied)
To telephonewall jack
Telephone cord (supplied)
Note: To mount the phone directly on the wall, insert two 1 3/8 inch, #10 screws (not supplied) into the wallusing anchors suitable or the wall material. Place the screws 3 15/16 inches apart, and allow 1/8 inch reespace between the wall and screw heads.
To remove the wall-mount bracketAt the bottom o the base, lit up on the release latch andpush the bracket up. Release latchRelease latch
8) Troubleshooting and Maintenance
8-1. Solving Common IssuesI your phone is not perorming to your expectations, please try these simple steps rst. I these steps do notsolve your problem, please call our Customer Hotline. See back cover page or contact inormation.
When you have this problem… Try…
The /in use LED won't turn onwhen the handset is placed in thecradle.
Checking the AC adapter connection.Re-seating the handset in the cradle.Cleaning the charging contacts on the handset (See section 8-8).
•••
The audio sounds weak and/orscratchy.
Moving the handset closer to the base.Moving the handset and/or base away rom metal objects or
appliances and try again.Changing the channel by pressing [select/channel] during a call.This can help eliminate background noise.
••
•
The phone can't make or receivecalls.
Checking the telephone cord connection.Disconnecting the AC adapter. Wait a ew minutes, then reconnect it.Asking your telephone company i they use pulse dialing (See section1-4).
•••
The handset can make calls, but it
doesn’t ring. Making sure the ringer isn’t turned o (see section 3-5).•The handset’s display doesn’t showanything.
Charging the battery or 15-20 hours.Checking the battery pack connection.
••
There’s a lot o static during calls.
Changing the channel by pressing [select/channel] during a call tohelp eliminate background noise.Keeping the handset away rom microwave ovens, computers, remotecontrol toys, wireless microphones, alarm systems, intercoms, roommonitors, uorescent lights, and electrical appliances.Moving the base to a better location (see section 1-1).
•
•
•

8/8/2019 Uniden Phone
http://slidepdf.com/reader/full/uniden-phone 10/12
8-2. Re-registering the HandsetWhen you rst put your handset into the base, it is registered so it can communicate with the base. There maybe some times when you have to re-register your handset to the base:
When you want to change the handset-to-base code.When there is a power ailure that lasts more than one hour.I the handset's battery is completely discharged. (The handset must be recharged or 15 - 20 hours beorere-registering to the base.)Any time you experience difculty connecting to the base to make or receive calls.
To re-register the handset:
Pick up the handset rom the base. Press and hold [nd hs] on the base.
While holding [nd hs], place the handset in the base. The charge/in use LED on the base begins to ash,indicating the base is registering the handset. Wait or at least ve seconds.
Pick up the handset rom the base and press [TALK/fash]. I the display shows TALK, the handset isregistered. I not, place the handset in the base to try again.
Press [END].
8-3. Changing the Handset-to-base CodeThe handset-to-base code prevents other cordless devices rom accidentally connecting to your base. I thebattery pack is completely discharged or removed, the handset-to-base code will be lost. I this happens, a newcode is set automatically the next time the handset is charged in the base. In the rare situation that you suspect
another cordless telephone is using the same code, you can change the code.To change the handset-to-base code, re-register the handset to the base ollowing the instructions in section8-2 on Re-registering the Handset above.
8-4. Traveling Out o RangeDuring a call, as you begin to move your handset too ar rom your base, noise increases. I you pass the rangelimits o the base, your call will terminate within one minute.
8-5. Liquid DamageMoisture and liquid can damage your cordless phone.I the handset or base is exposed to moisture or liquid, but only the exterior plastic housing is aected, wipeo the liquid, and use as normal.I moisture or liquid has entered the plastic housing (i.e. liquid can be heard in the phone or liquid has enteredthe handset battery compartment or vent openings on the base), ollow the steps below:
Handset Base
Remove the battery cover and leave it o or ventilation.Disconnect the battery pack. Leave the battery cover o and thebattery pack disconnected or at least three days.Once the handset is completely dry, reconnect the battery pack andthe battery cover.Recharge the handset's battery pack or 15 to 20 hours beore using.
1)2)
3)
4)
Disconnect the AC adapterrom the base, cutting o electrical power.Disconnect the telephone cordrom the base.Let dry or at least three days.
1)
2)
3)
IMPORTANT:You must unplug the telephone line while recharging the battery pack to avoid charge interruption.
CAUTION!DO NOT use a microwave oven to speed up the drying process. This will cause permanent damage to thehandset, base and the microwave oven. Ater ollowing these steps, i your cordless telephone does not work,please call our Customer Service Hotline. See back cover page or contact inormation.
8-6. SpecicationsThe phone complies with FCC Parts 15 and 68.
Operating temperature 0°C to +50°C (+32°F to +122°F)
AC Adapter
Part number PS-0008
Input Voltage 120V AC 60Hz
Output Voltage 9V DC 210mA
BatteryPart number BT-905
Capacity 600mAh, 3.6V
Frequency921.103102 – 923.787761 MHz5,856.533347 – 5,863.692437MHz
Note: To avoid damage to the phone, use only Uniden PS-0008 and BT-905 with your phone.Specications, eatures, and availability o optional accessories are all subject to change without prior notice.
8-7. Power Failure OperationDuring the period that the power is o, you will not be able to make or receive calls with the telephone.
8-8. Battery Inormation
Average battery lieWith average use, your handset battery provides approximately six hours o talk time and approximatelyourteen days o standby time. You can achieve optimum battery lie and perormance by returning the handsetto the cradle ater each use. When your handset is let o o the cradle, the battery will gradually dischargeeven i the handset is not being used. The actual talk time duration will be reduced in proportion to the amounto time the handset is o the cradle.
•••
•
1)
2)
3)
4)
•
•
When you have this problem… Try…
The handset won’t display anyCaller ID inormation.
Letting incoming calls ring at least twice beore answering.Checking to see i the call was placed through a switchboard.Checking with your telephone service provider to make sure yourCaller ID service is active (See section 5).
•••
The handset is not working.Checking the battery pack connection.Charging the battery or 15-20 hours.Changing the handset-to-base code (See section 8-3).
•••
The handset says “Unavailable”.Moving the handset closer to the base.Making sure the base is plugged in.Changing the handset-to-base code (See section 8-3).
•••
The Voice Message Waiting
Indicator does not work.
Contact your local telephone company to make sure that yourtelephone receives FSK message signaling.
Reset the indicator by pressing and holding [nd hs] or ve seconds.
•
•

8/8/2019 Uniden Phone
http://slidepdf.com/reader/full/uniden-phone 11/12
Low battery alertWhen the battery pack is very low and needs to be charged, the phone isprogrammed to eliminate unctions in order to save power. I the phone is notin use, LOW BATTERY CHARGE HANDSET appears on the LCD, and none o thekeys will operate. During a call, the handset beeps, and the LCD ashes LOW
BATTERY. Complete your conversation as quickly as possible and return thehandset to the cradle or charging.Note: Inormation stored in the phone's memory will be retained or thirty minutes ater the battery pack is
removed. This includes all setup inormation, last number dialed, speed dial memory, and the CID list.
Battery replacement and handlingWhen the operating time becomes short even ater a battery is recharged, please replace the battery. Withnormal usage, your battery should last about one year. To order replacement batteries, please contact Uniden’sParts Department. The contact inormation is listed on the back cover page.
Warning:To avoid the risk o personal injury or property damage rom re or electrical shock, only use the Unidenbattery packs and power adapters specically designated or this product.
Caution:Use only the specied Uniden battery pack (BT-905).Do not remove the battery rom the handset to charge it.Never throw the battery into a re, disassemble it, or heat it.
Do not remove or damage the battery casing.
•••
•
Cleaning the charging contactsTo maintain a good charge, clean the charging contacts on the handsetonce a month. Dampen a cloth with plain water. Gently rub the dampcloth over the charging contacts until all visible dirt is removed. Dry thecontacts thoroughly beore returning the handset to the cradle.
Caution:Do not use paint thinner, alcohol, or other chemical products. Doing so may discolor the surace o thetelephone and damage the nish.
Low Battery
Charge Handset
Low Battery
Charge Handset
ContactsContacts
9) Legal and Warranty Inormation
9-1. Precautions!Beore you read anything else, please note the ollowing:
Warning!Uniden America Corporation DOES NOT represent this unit to be waterproo. To reduce the risk o re,electrical shock, or damage to the unit, DO NOT expose this unit to rain or moisture.
9-2. Rechargeable Nickel-Cadmium Battery Inormation
This equipment contains a rechargeable nickel-cadmium battery.• Cadmium is a chemical known to the State o Caliornia to cause cancer.• The rechargeable nickel-cadmium battery contained in this equipment may explode i disposed o in a re.• Do not short-circuit the battery.• Do not charge the rechargeable nickel-cadmium battery used in this equipment in any charger other than the one designed
to charge this battery as specied in the owner's manual. Using another charger may damage the battery or cause thebattery to explode.
• Rechargeable Nickel-Cadmium Batteries Must Be Recycled or Disposed o Properly
• As part o our commitment to protecting our environment and conserving natural resources, Uniden
voluntarily participates in an RBRC® industry program to collect and recycle used Ni-Cd batterieswithin the United States. Please call 1-800-8-BATTERY or inormation on Ni-Cd battery recycling inyour area. (RBRC® is a registered trademark o the Rechargeable Battery Recycling Corporation.)
9-3. Lead Content Inormation
Warning!The cords on this product and/or accessories contain lead, a chemical known to the State o Caliornia tocause birth deects or other reproductive harm. Wash hands ater handling.
Uniden works to reduce lead content in our PVC coated cords in our products and accessories.
9-4. Important Saety InstructionsWhen using your telephone equipment, basic saety precautions should always be ollowed to reduce the risk o re, electricshock and injury to persons, including the ollowing:1. Do not use this product near water, or example, near a bath tub, wash bowl, kitchen sink or laundry tub, in a wet
basement or near a swimming pool.2. Avoid using a telephone (other than a cordless type) during an electrical storm. There may be a remote risk o electric
shock rom lightning.
3. Do not use the telephone to report a gas leak in the vicinity o the leak.4. Use only the power cord and batteries indicated in this manual. Do not dispose o batteries in a re. They may explode.
Check with local authorities or possible battery disposal instructions.5. Do not disassemble any component o this product.
SAVE THESE INSTRUCTIONS
CAUTION!Risk o explosion i battery is replaced by an incorrect type. Dispose o used batteries according to the instructions. Do notopen or mutilate the battery, and disconnect the battery beore shipping this product.
9-5.The FCC Wants You To KnowThis equipment complies with Part 68 o the FCC rules and the requirements adopted by the ACTA.On the bottom o this equipment is a label that contains, among other inormation, a product identier in the ormat US:AAAEQ##TXXXX. I requested, this number must be provided to the telephone company.An applicable Universal Service Order Codes (USOC) certication or the jacks used in this equipment is provided (i.e., RJ11C)in the packaging with each piece o approved terminal equipment. A plug and jack used to connect this equipment to thepremises wiring and telephone network must comply with the applicable FCC Part 68 rules and requirements adopted by the
ACTA.A compliant telephone cord and modular plug is provided with this product. It is designed to be connected to a compatiblemodular jack that is also compliant. See installation instructions or details.The REN is used to determine the number o devices that may be connected to a telephone line. Excessive RENs on a telephoneline may result in the devices not ringing in response to an incoming call. In most but not all areas, the sum o RENs shouldnot exceed ve (5.0). To be certain o the number o devices that may be connected to a line, as determined by the total RENs,contact the telephone provider. For products approved ater July 23, 2001, the REN or this product is part o the productidentier that has the ormat US:AAAEQ##TXXXX. The digits represented by ## are the REN without a decimal point (e.g., 03 isa REN o 0.3). For earlier products, the REN is separately shown on the label.
I this equipment causes harm to the telephone network, the telephone company will notiy you in advance that temporarydiscontinuance o service may be required. But i advance notice isn't practical, the telephone company will notiy thecustomer as soon as possible. Also, you will be advised o your right to le a complaint with the FCC i you believe it is

8/8/2019 Uniden Phone
http://slidepdf.com/reader/full/uniden-phone 12/12
necessary. The telephone company may make changes in its acilities, equipment, operations or procedures that couldaect the operation o the equipment. I this happens the telephone company will provide advance notice in order oryou to make necessary modications to maintain uninterrupted service. Please ollow instructions or repairing, i any(e.g. battery replacement section); otherwise do not substitute or repair any parts o the device except as specied in thismanual. Connection to party line service is subject to state taris. Contact the state public utility commission, public servicecommission or corporation commission or inormation. This equipment is hearing aid compatible.
Should you experience trouble with this equipment, please contact Uniden customer service at 800-297-1023. I theequipment is causing harm to the telephone network, the telephone company may request that you disconnect theequipment until the problem is resolved.NOTICE: According to telephone company reports, AC electrical surges, typically resulting rom lightning strikes, are verydestructive to telephone equipment connected to AC power sources. To minimize damage rom these types o surges, a surgearrestor is recommended.
Changes or modications to this product not expressly approved by Uniden, or operation o this product in any way other thanas detailed by the owner's manual, could void your authority to operate this product.
This device complies with part 15 o the FCC rules. Operation is subject to the ollowing two conditions: (1) This device maynot cause harmul intererence, and (2) This device must accept any intererence received, including intererence that maycause undesired operation. Privacy o communications may not be ensured when using this phone.
Cordless telephone privacyCordless telephones are radio devices. Communications between the handset and base o your cordless telephone areaccomplished by means o radio waves which are broadcast over the open airways. Because o the inherent physicalproperties o radio waves, your communications can be received by radio receiving devices other than your own cordlesstelephone unit. Consequently, any communications using your cordless telephone may not be private.
9-6. I.C. NoticeTerminal equipmentNOTICE: This equipment meets the applicable Industry Canada Terminal Equipment Technical Specications. This is conrmedby the registration number. The abbreviation, IC, beore the registration number signies that registration was perormedbased on a Declaration o Conormity indicating that Industry Canada technical specications were met. It does not imply thatIndustry Canada approved the equipment.NOTICE: The Ringer Equivalence Number (REN) or this terminal equipment is marked on the equipment itsel. The RENassigned to each terminal equipment provides an indication o the maximum number o terminals allowed to be connected
to a telephone interace. The termination on an interace may consist o any combination o devices subject only to therequirement that the sum o the Ringer Equivalence Numbers o all the devices does not exceed ve.
Radio equipmentThe term "IC:" beore the radio certication number only signies that Industry Canada technical specications were met.Operation is subject to the ollowing two conditions: (1) this device may not cause intererence, and (2) this device mustaccept any intererence, including intererence that may cause undesired operation o the device. "Privacy o communicationsmay not be ensured when using this telephone".
9-7. One Year Limited WarrantyImportant: Evidence o original purchase is required or warranty service. WARRANTOR: UNIDEN AMERICA CORPORATION("Uniden") ELEMENTS OF WARRANTY: Uniden warrants, or one year, to the original retail owner, this Uniden Product to beree rom deects in materials and cratsmanship with only the limitations or exclusions set out below.WARRANTY DURATION: This warranty to the original user shall terminate and be o no urther eect 12 months ater the dateo original retail sale. The warranty is invalid i the Product is (A) damaged or not maintained as reasonable or necessary,(B) modied, altered, or used as part o any conversion kits, subassemblies, or any congurations not sold by Uniden, (C)improperly installed, (D) serviced or repaired by someone other than an authorized Uniden service center or a deect ormalunction covered by this warranty, (E) used in any conjunction with equipment or parts or as part o any system notmanuactured by Uniden, or (F) installed or programmed by anyone other than as detailed by the owner's manual or this
product.STATEMENT OF REMEDY: In the event that the product does not conorm to this warranty at any time while this warranty isin eect, warrantor will either, at its option, repair or replace the deective unit and return it to you without charge or parts,service, or any other cost (except shipping and handling) incurred by warrantor or its representatives in connection with theperormance o this warranty. Warrantor, at its option, may replace the unit with a new or reurbished unit. THE LIMITEDWARRANTY SET FORTH ABOVE IS THE SOLE ANDENTIRE WARRANTY PERTAINING TO THE PRODUCT AND IS IN LIEU OF AND EXCLUDES ALL OTHER WARRANTIES OF ANY NATUREWHATSOEVER, WHETHER EXPRESS, IMPLIED OR ARISING BY OPERATION OF LAW, INCLUDING, BUT NOT LIMITED TO ANYIMPLIED WARRANTIES OF MERCHANTABILITY OR FITNESS FOR A PARTICULAR PURPOSE. THIS WARRANTY DOES NOT COVER OR
PROVIDE FOR THE REIMBURSEMENT OR PAYMENT OF INCIDENTAL OR CONSEQUENTIAL DAMAGES. Some states do not allow thisexclusion or limitation o incidental or consequential damages so the above limitation or exclusion may not apply to you.LEGAL REMEDIES: This warranty gives you specic legal rights, and you may also have other rights which vary rom state tostate. This warranty is void outside the United States o America and Canada. PROCEDURE FOR OBTAINING PERFORMANCEOF WARRANTY: I, ater ollowing the instructions in the owner's manual you are certain that the Product is deective, packthe Product careully (preerably in its original packaging). Disconnect the battery rom the Product and separately securethe battery in its own separate packaging within the shipping carton. The Product should include all parts and accessoriesoriginally packaged with the Product. Include evidence o original purchase and a note describing the deect that has causedyou to return it. The Product should be shipped reight prepaid, by traceable means, to warrantor at:
Uniden America Service4700 Amon Carter Blvd.Fort Worth, TX 76155
May be covered under one or more o the ollowing U.S. patents:4,797,916 5,426,690 5,491,745 5,493,605 5,533,010 5,574,727 5,581,598 5,650,790 5,660,269 5,663,981 5,671,248
5,717,312 5,732,355 5,754,407 5,758,289 5,768,345 5,787,356 5,794,152 5,801,466 5,825,161 5,864,619 5,893,034
5,912,968 5,915,227 5,929,598 5,930,720 5,960,358 5,987,330 6,044,281 6,070,082 6,0760,52 6,125,277 6,253,088
6,314,278 6,321,068 6,418,209 6,618,015 6,671,315 6,714,630 6,782,098 6,788,920 6,788,953 6,839,550 6,889,184
6,901,271 6,907,094 6,914,940 6,940,867 6,953,118 7,023,176 7,030,819 7,146,160 7,203,307 7,206,403Other patents pending.
Uniden® is a registered trademark o Uniden America Corporation.
As an Energy Star® Partner, Uniden has determined that this product or product models meets the EnergyStar® guidelines or energy efciency. Energy Star® is a U.S. registered mark.