
Unicorn Quick Installation Guide...UNICORN components are installed in the dedicated computer, see...
80
UNICORN™ Quick Installation Guide gelifesciences.com
Transcript of Unicorn Quick Installation Guide...UNICORN components are installed in the dedicated computer, see...

Table of Contents
1 Installation overview .............................................................................................. 3
2 Full installation ......................................................................................................... 62.1 STEP 1: Download UNICORN software package ............................................................................ 72.2 STEP 2: Install UNICORN software components ............................................................................ 92.3 STEP 3: Configure e-License ................................................................................................................... 172.4 STEP 4: Configure IP .................................................................................................................................. 252.5 STEP 5: Define a system ........................................................................................................................... 31
3 Custom installation ................................................................................................. 343.1 STEP 1: Download UNICORN software package ............................................................................ 353.2 STEP 2: Install UNICORN Database ..................................................................................................... 383.3 STEP 3: Install Software Licensing Server ......................................................................................... 503.4 STEP 4: Install UNICORN Software ...................................................................................................... 603.5 STEP 5: Configure IP .................................................................................................................................. 693.6 STEP 6: Define a system ........................................................................................................................... 76
4 Troubleshooting ...................................................................................................... 79
Table of Contents
2 UNICORN Quick Installation Guide 29414475 AA

1 Installation overview
About UNICORNUNICORN is a software that can be installed on a computer to control an ÄKTA™ sys-tem connected to that computer. The software has the following components. Thesecomponents are installed one after another.
• UNICORN Database
• UNICORN Software
• Software Licensing Server
Installation typesDepending on whether your computer is only connected to one ÄKTA system or con-nected to other computers controlling ÄKTA systems in a network, UNICORN can beinstalled in the following ways:
• Full installation
• Custom installation
IMPORTANT
If you need to connect your dedicated computer to the internet while connected to the ÄKTA sys-tem (see the illustration below), you need two Network Interface Cards (NICs) installed inyour dedicated computer.
Dedicated computerto control ÄKTA system
ÄKTA system
UNICORN DatabaseUNICORN SoftwareSoftware Licensing server
Internet
Connection to internet
Connection to system
1 Installation overview
UNICORN Quick Installation Guide 29414475 AA 3

General computer specificationsFor information on computer specifications, see http://www.gelifesciences.com/UNI-CORNPCspecifications.
For information about compatibility between UNICORN versions, the supported op-erating systems, database versions, and instrument configuration, see the UNICORNcompatibility matrix at http://www.gelifesciences.com/UNICORNcompatibility.
The following applies:
• A screen resolution of 1280x1024 or higher is recommended. Parts of theUNICORN user interface can not be displayed properly using a lower resolution.
• Changing the default font and changing the font size from 100% in Windows cancause problems in the UNICORN user interface.
• Windows 7 basic color scheme is recommended1.
• Using the Windows 7 Aero color scheme is not recommended.
• Windows power save features must be turned off to avoid conflicts with systemoperations.
• UNICORN is not compatible with the Windows feature High DPI Awareness,which allows the graphic user interface to be scaled. The interface scale must re-main at 100% to avoid issues with clipping and misaligning of parts of theUNICORN user interface. Normally, the scale is set at 100% by default.
Full installation overviewWhen you have only one ÄKTA system, select the Full installation option. All theUNICORN components are installed in the dedicated computer, see the following il-lustration.
Dedicated computerto control ÄKTA system
ÄKTA system
UNICORN DatabaseUNICORN SoftwareSoftware Licensing server
1 UNICORN must be closed when the color scheme is changed.
1 Installation overview
4 UNICORN Quick Installation Guide 29414475 AA

Custom installation overviewSelect the Custom installation option when you have:
• several ÄKTA systems,
• all the dedicated computers connected to your company internet, and
• an additional computer connected to the company internet. This computer iswhere the UNICORN Database and Software Licensing Server will be instal-led.
Note: You may choose to install the UNICORN Database on one computerand the License Server on another.
Dedicated computerto control ÄKTA system 1
Computer for Databaseand Licensing Server
ÄKTA system 1
Dedicated computerto control ÄKTA system 2
ÄKTA system 2
Dedicated computerto control ÄKTA system 3
ÄKTA system 3
Install UNICORN Database and Software Licensing serverin this computer
Install UNICORN Software
in this computer
Install UNICORN Software
in this computer
Install UNICORN Software
in this computer
1 Installation overview
UNICORN Quick Installation Guide 29414475 AA 5

2 Full installation
IMPORTANT
You need an Activation ID to download the UNICORN installation package and to retrieve an e-Li-cense from the GE Healthcare software e-Licensing web site. The activation ID together with the in-formation on the software is sent via e-mail. Contact the GE Healthcare representative if the activa-tion ID is not received.
Internet connection is needed to download the UNICORN installation package and to retrievethe e-License.
Dedicated computerto control ÄKTA system
ÄKTA system
UNICORN DatabaseUNICORN SoftwareSoftware Licensing server
2 Full installation
6 UNICORN Quick Installation Guide 29414475 AA

2.1 STEP 1: Download UNICORN software package
IMPORTANT
Make sure that all the Windows updates are done. Otherwise, the computer might start installingWindows updates during UNICORN installation and significantly delay the installation process.
1 In the computer where UNICORN will be installed, open any web browser.
2 Enter the following address:
https://gelifesciences-fno.flexnetoperations.com/flexnet/operationsportal/showUserLogon.do
3 Follow the steps in the following illustration to log in:
GE Healthcare Life Sciences
Login
With User Name
With Activation ID
Activation ID
Log in2. Enter your Activation ID
1. Select
3. Click
4 Follow the direction in the following illustration:
Click
2 Full installation2.1 STEP 1: Download UNICORN software package
UNICORN Quick Installation Guide 29414475 AA 7

5 Enter the UNICORN page.
Click
6 Select a software version.
Click on your preferred software
7 Download the software.
Click to downloadthe software
The software package will be downloaded in Downloads folder.
2 Full installation2.1 STEP 1: Download UNICORN software package
8 UNICORN Quick Installation Guide 29414475 AA

2.2 STEP 2: Install UNICORN software components
It is assumed that you have downloaded the UNICORN installation package in the computer whereUNICORN will be installed.
1 In the computer where the UNICORN installation package is downloaded, locate the down-loaded installation package.
IMPORTANT
Generally, the installation package is downloaded in the Downloads folder. Move the installa-tion package to C: drive.
2 Double-click the UNICORN_7.x.x.xxx_eDelivery_Portal.exe file.
IMPORTANT
It can take several minutes for the extraction. If you are installing UNICORN 7.3 or earlier re-lease, follow step 3 and 4. For later releases, go to step 4.
If the Open File - Security Warning window appears, click Run.
2 Full installation2.2 STEP 2: Install UNICORN software components
UNICORN Quick Installation Guide 29414475 AA 9

3 If you are installing UNICORN 7.3 or earlier release, follow the steps in the illustration below.
1. Click and Browseto C: drive
2. Click
Please wait for the extraction to finish.
2 Full installation2.2 STEP 2: Install UNICORN software components
10 UNICORN Quick Installation Guide 29414475 AA

4 If you are installing UNICORN 7.4 or later releases, the self-extracting function creates a fold-er with same name as the downloaded file at the same location.
Double-click the UNICORN_7.x.x.xxx_eDelivery_Portal folder.
5 Double-click Setup.exe.
If the Open File - Security Warning window appears, click Run.
6
Click
7 If your computer is missing any software requirements, the installer will install them. Thecomputer can restart several times. After restart, double-click the Setup.exe again, seestep 5.
2 Full installation2.2 STEP 2: Install UNICORN software components
UNICORN Quick Installation Guide 29414475 AA 11

Click
8 Accept the license agreement.
1. Select
2. Click
2 Full installation2.2 STEP 2: Install UNICORN software components
12 UNICORN Quick Installation Guide 29414475 AA

9 Select the installation type.
1. Select Full installation
2. Click
10 Click Next.
Optional: Change the installationlocation
Click
2 Full installation2.2 STEP 2: Install UNICORN software components
UNICORN Quick Installation Guide 29414475 AA 13
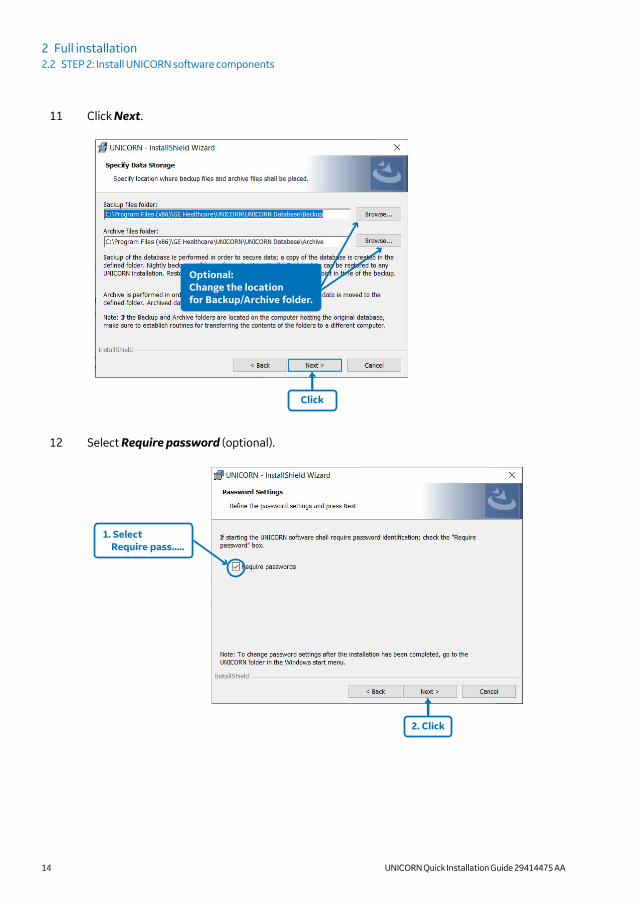
11 Click Next.
Optional: Change the locationfor Backup/Archive folder.
Click
12 Select Require password (optional).
1. Select Require pass.....
2. Click
2 Full installation2.2 STEP 2: Install UNICORN software components
14 UNICORN Quick Installation Guide 29414475 AA

13
IMPORTANT
Enable Column Logbook only if you have license for it.
1. Select Enable Column...
2. Click
14 Please wait ........ this can take several minutes.
15 If the following window appears, the first step for the installation is complete. Go to nextsection to Configure e-License.
Do not close or Exit this window
X
X
2 Full installation2.2 STEP 2: Install UNICORN software components
UNICORN Quick Installation Guide 29414475 AA 15

IMPORTANT
Do not close the UNICORN Installer window (see the illustration above). If you accidentally closeit, perform step 4 of this procedure again.
2 Full installation2.2 STEP 2: Install UNICORN software components
16 UNICORN Quick Installation Guide 29414475 AA

2.3 STEP 3: Configure e-License
IMPORTANT
To configure e-License, you must have the Activation ID and internet connection.
If the dedicated computer is connected to internet and the ÄKTA system (as illustrated below), youcan retrieve the e-License using the dedicated computer. Therefore, make sure that the dedicatedcomputer has internet connection.
Dedicated computerto control ÄKTA system
ÄKTA system
UNICORN DatabaseUNICORN SoftwareSoftware Licensing server
Internet
Connection to internet
Connection to system
2 Full installation2.3 STEP 3: Configure e-License
UNICORN Quick Installation Guide 29414475 AA 17

1 Open the Configuration e-License window as shown below.
2 Follow the steps in the following illustration to configure an e-License:
1. Note down the Ethernet address.
2. Click
Do not Close nowX
IMPORTANT
The Ethernet address stated in the illustration above is an example. Note down the Ethernetaddress that appears on your computer screen.
2 Full installation2.3 STEP 3: Configure e-License
18 UNICORN Quick Installation Guide 29414475 AA

3 Follow the steps in the following illustration to log in:
GE Healthcare Life Sciences
Login
With User Name
With Activation ID
Activation ID
Log in2. Enter your Activation ID
1. Select
3. Click
4 Follow the direction in the following illustration:
Click
2 Full installation2.3 STEP 3: Configure e-License
UNICORN Quick Installation Guide 29414475 AA 19

5 Follow the steps in the following illustration:
1. Select
2.
6 Follow the steps in the following illustration:
1. Fill in the mandatory fields
2. Click
2 Full installation2.3 STEP 3: Configure e-License
20 UNICORN Quick Installation Guide 29414475 AA

7 Follow the following illustrations sequence and the instructions:
1. Click the +
2. Enter theEthernet addressyou have noted instep 2, and thenclick
3. When you seethe Ethernetaddress hereclick Generate
4. Select
2 Full installation2.3 STEP 3: Configure e-License
UNICORN Quick Installation Guide 29414475 AA 21

5. Click....select
6. Select a location tosave the file
Tip:It is recommended to rename the license so that the license can be easily identified later.
8 Go back to the e-License Configuration window.
Click
2 Full installation2.3 STEP 3: Configure e-License
22 UNICORN Quick Installation Guide 29414475 AA

9 Browse to the e-License location.
Locate the license.If the license file is notvisible, click and selecte-License(*.lic)
10 Click Open.
11 Complete the e-License configuration.
Click
2 Full installation2.3 STEP 3: Configure e-License
UNICORN Quick Installation Guide 29414475 AA 23

12 When the following dialog box appears, the configuration is successful.
Click
13 Close the e-License Configuration window.
Click
You have now configured the e-License. Go to next section to Configure IP.
2 Full installation2.3 STEP 3: Configure e-License
24 UNICORN Quick Installation Guide 29414475 AA

2.4 STEP 4: Configure IP
1 Make sure that your dedicated computer is connected to internet and to the ÄKTA system.
2 Click the search icon.
Click
3 Enter ncpa.cpl in the search box, and then press Enter
1. Enterncpa.cpl
2. Right-click and select
Note:
For Windows 7 user, Click Start, enter ncpa.cpl in the search box, and then press Enter.
2 Full installation2.4 STEP 4: Configure IP
UNICORN Quick Installation Guide 29414475 AA 25

IMPORTANT
If you have two Ethernet cards, one Ethernet card is connected to internet (Ethernet in the il-lustration below) and the other (Ethernet 2 in the illustration below) is connected to theÄKTA system. Generally, the ethernet card connected to the internet has the company domainname. For example, in the illustration below, it is logon.ds.ge.com. Ethernet card connected tothe ÄKTA system generally states Unidentified network as seen in the illustration below.
2 Full installation2.4 STEP 4: Configure IP
26 UNICORN Quick Installation Guide 29414475 AA

4 Rename the Ethernet 2 connection to AKTA.
Right-clickand Rename
to AKTA
5 Access the Properties window of the AKTA network connection.
1. Right-click
and then
2. Select
2 Full installation2.4 STEP 4: Configure IP
UNICORN Quick Installation Guide 29414475 AA 27

6 Select Internet Protocol Version 4.
1. Click to selectInternet Protocol Version 4 (TCP/IPv4)
2. Click
7 Enter the IP address and the Subnet mask as shown in the following illustration:
1. Enter IP: 10.1.1.2Subnet: 255.255.255.0Do not enter Default gateway
X
2. Click
2 Full installation2.4 STEP 4: Configure IP
28 UNICORN Quick Installation Guide 29414475 AA

8 Apply the advanced TCP/IP settings as shown in the following illustration:
1. Deselect
2. Enter “25” 3. Click
9 Click OK or Close in all the open dialog boxes.
10 Access the Properties window of the AKTA network connection.
1. Right-click
and then
2. Select
2 Full installation2.4 STEP 4: Configure IP
UNICORN Quick Installation Guide 29414475 AA 29

11 Select the Speed & Duplex property and its intended value as shown in the following illus-tration:
1. Clickto select
2. Clickto select
3. Clickto select
4. Click
2 Full installation2.4 STEP 4: Configure IP
30 UNICORN Quick Installation Guide 29414475 AA

2.5 STEP 5: Define a system
IMPORTANT
You need an Instrument Configuration (IC) to define your system.
The latest IC can be downloaded from the product page of your system. Go to http://www.gelifesciences.com/akta , search for your ÄKTA system on the page. The IC can be found underRELATED DOCUMENTS → SOFTWARE on your ÄKTA system web page.
1 Open the Define System window.
2 Browse to the Instrument Configuration location.
Click and browse to thelocation where the Instrument Configurationis downloaded and unpacked.
2 Full installation2.5 STEP 5: Define a system
UNICORN Quick Installation Guide 29414475 AA 31

3 Open the Instrument Configuration file.
1. Click
2. Click
4 Select the system setup options.
These fields areautomaticallypopulated with default values. Use the drop-down list to change.
Click
2 Full installation2.5 STEP 5: Define a system
32 UNICORN Quick Installation Guide 29414475 AA

5 Follow the steps in the following illustration to configure the system.
1. Type in your preferred system name.This name cannot bechanged later.
2. Enter your ÄKTA systemserial number. This can befound on a sticker at the back of the system.
3. Select
4. Enter 5. Click Test Connection.If the connection is successful,go to
6. Click
6 Close the Define System dialog box.
Click
Now the ÄKTA system is ready for use.
2 Full installation2.5 STEP 5: Define a system
UNICORN Quick Installation Guide 29414475 AA 33
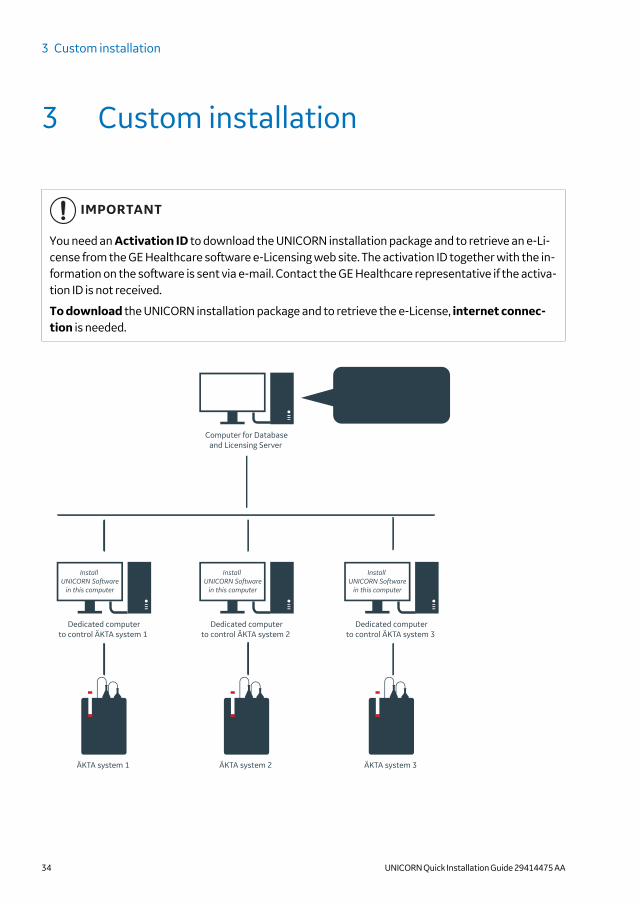
3 Custom installation
IMPORTANT
You need an Activation ID to download the UNICORN installation package and to retrieve an e-Li-cense from the GE Healthcare software e-Licensing web site. The activation ID together with the in-formation on the software is sent via e-mail. Contact the GE Healthcare representative if the activa-tion ID is not received.
To download the UNICORN installation package and to retrieve the e-License, internet connec-tion is needed.
Dedicated computerto control ÄKTA system 1
Computer for Databaseand Licensing Server
ÄKTA system 1
Dedicated computerto control ÄKTA system 2
ÄKTA system 2
Dedicated computerto control ÄKTA system 3
ÄKTA system 3
Install UNICORN Database and Software Licensing serverin this computer
Install UNICORN Software
in this computer
Install UNICORN Software
in this computer
Install UNICORN Software
in this computer
3 Custom installation
34 UNICORN Quick Installation Guide 29414475 AA

3.1 STEP 1: Download UNICORN software package
IMPORTANT
Make sure that all the Windows updates are done. Otherwise, the computer might start installingWindows updates during UNICORN installation and significantly delay the installation process.
1 In the computer where UNICORN Database and Software Licensing server will be instal-led, open any web browser.
Dedicated computerto control ÄKTA system 1
Computer for Databaseand Licensing Server
ÄKTA system 1
Dedicated computerto control ÄKTA system 2
ÄKTA system 2
Dedicated computerto control ÄKTA system 3
ÄKTA system 3
Install UNICORN Database and Software Licensing serverin this computer
Install UNICORN Software
in this computer
Install UNICORN Software
in this computer
Install UNICORN Software
in this computer
2 Enter the following address:
https://gelifesciences-fno.flexnetoperations.com/flexnet/operationsportal/showUserLogon.do
3 Custom installation3.1 STEP 1: Download UNICORN software package
UNICORN Quick Installation Guide 29414475 AA 35

3 Follow the steps in the following illustration to log in:
GE Healthcare Life Sciences
Login
With User Name
With Activation ID
Activation ID
Log in2. Enter your Activation ID
1. Select
3. Click
4 Follow the direction in the following illustration:
Click
5 Enter the UNICORN page.
Click
3 Custom installation3.1 STEP 1: Download UNICORN software package
36 UNICORN Quick Installation Guide 29414475 AA

6 Select a software version.
Click on your preferred software
7 Download the software.
Click to downloadthe software
The software package will be downloaded in Downloads folder.
3 Custom installation3.1 STEP 1: Download UNICORN software package
UNICORN Quick Installation Guide 29414475 AA 37

3.2 STEP 2: Install UNICORN Database
It is assumed that you have downloaded the UNICORN installation package in the computer whereUNICORN will be installed.
1 In the computer where the UNICORN installation package is downloaded, locate the down-loaded installation package.
IMPORTANT
Generally, the installation package is downloaded in the Downloads folder. Move the installa-tion package to C: drive.
2 Double-click the UNICORN_7.x.x.xxx_eDelivery_Portal.exe file.
IMPORTANT
It can take several minutes for the extraction. If you are installing UNICORN 7.3 or earlier re-lease, follow step 3 and 4. For later releases, go to step 4.
If the Open File - Security Warning window appears, click Run.
3 Custom installation3.2 STEP 2: Install UNICORN Database
38 UNICORN Quick Installation Guide 29414475 AA

3 If you are installing UNICORN 7.3 or earlier release, follow the steps in the illustration below.
1. Click and Browseto C: drive
2. Click
Please wait for the extraction to finish.
3 Custom installation3.2 STEP 2: Install UNICORN Database
UNICORN Quick Installation Guide 29414475 AA 39

4 If you are installing UNICORN 7.4 or later releases, the self-extracting function creates a fold-er with same name as the downloaded file at the same location.
Double-click the UNICORN_7.x.x.xxx_eDelivery_Portal folder.
IMPORTANT
If your organization allows you to use USB memory stick, copy the extracted installationpackage into a USB memory stick to simplify the installation process. Otherwise, make surethat the extracted files are accessible from all the related computers for this installation.
5 Double-click Setup.exe.
If the Open File - Security Warning window appears, click Run.
3 Custom installation3.2 STEP 2: Install UNICORN Database
40 UNICORN Quick Installation Guide 29414475 AA

6
Click
7 If your computer is missing any software requirements, the installer will install them. Thecomputer can restart several times. After restart, double-click the Setup.exe again, seestep 5.
Click
3 Custom installation3.2 STEP 2: Install UNICORN Database
UNICORN Quick Installation Guide 29414475 AA 41

8 Accept the license agreement.
1. Select
2. Click
9 Select the installation type.
1. Select Custom installation
2. Click
3 Custom installation3.2 STEP 2: Install UNICORN Database
42 UNICORN Quick Installation Guide 29414475 AA

10 Click Install next to UNICORN Database.
11 Click Next.
Click
3 Custom installation3.2 STEP 2: Install UNICORN Database
UNICORN Quick Installation Guide 29414475 AA 43

12 Click Next.
Click
13 Click Next.
Click
3 Custom installation3.2 STEP 2: Install UNICORN Database
44 UNICORN Quick Installation Guide 29414475 AA
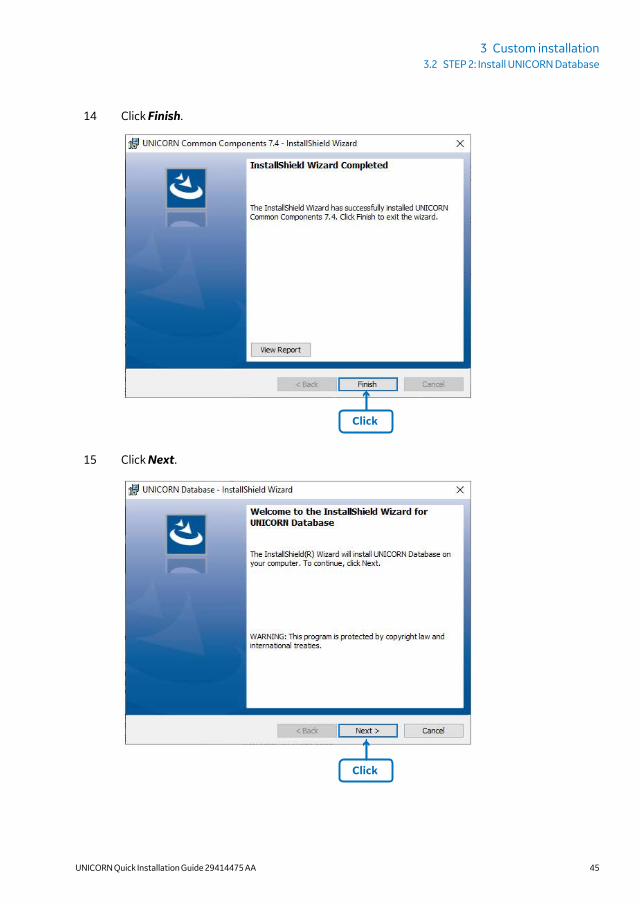
14 Click Finish.
Click
15 Click Next.
Click
3 Custom installation3.2 STEP 2: Install UNICORN Database
UNICORN Quick Installation Guide 29414475 AA 45

16 Click Next.
Click
17 Click Next.
Click
3 Custom installation3.2 STEP 2: Install UNICORN Database
46 UNICORN Quick Installation Guide 29414475 AA

18 Select Require password (optional).
1. Select Require pass.....
2. Click
19
IMPORTANT
Enable Column Logbook only if you have license for it.
1. Select Enable Column...
2. Click
3 Custom installation3.2 STEP 2: Install UNICORN Database
UNICORN Quick Installation Guide 29414475 AA 47

20 Click Install.
Click
21 Please wait ........ this can take several minutes.
22 Click Finish.
Click
3 Custom installation3.2 STEP 2: Install UNICORN Database
48 UNICORN Quick Installation Guide 29414475 AA

23 If the following window appears, the database installation is finished.
Do not close or Exit this window
X
X
24 Follow the steps in the next section STEP 3: Install Software Licensing Server.
IMPORTANT
Do not close the UNICORN Installer window (see the illustration above). If you accidentally closeit, perform step 4 - 10 of this procedure again.
3 Custom installation3.2 STEP 2: Install UNICORN Database
UNICORN Quick Installation Guide 29414475 AA 49

3.3 STEP 3: Install Software Licensing Server
1 Click Install next to Software Licensing Server.
Click
X
X
Do not close or Exit this window
2 Click Next.
Click
3 Custom installation3.3 STEP 3: Install Software Licensing Server
50 UNICORN Quick Installation Guide 29414475 AA

3 Accept the license agreement.
1. Select
2. Click
4 Click Next.
Click
3 Custom installation3.3 STEP 3: Install Software Licensing Server
UNICORN Quick Installation Guide 29414475 AA 51

5 Click Install.
Click
6 Click Finish.
2. Click
1. Select
3 Custom installation3.3 STEP 3: Install Software Licensing Server
52 UNICORN Quick Installation Guide 29414475 AA

7 Note down the Ethernet address.
1. Note down the Ethernet address.
2. Click
Do not Close nowX
IMPORTANT
The Ethernet address stated in the illustration above is an example. Note down the Ethernetaddress appeared on your computer screen.
8 Follow the steps in the following illustration to log in:
GE Healthcare Life Sciences
Login
With User Name
With Activation ID
Activation ID
Log in2. Enter your Activation ID
1. Select
3. Click
3 Custom installation3.3 STEP 3: Install Software Licensing Server
UNICORN Quick Installation Guide 29414475 AA 53

9 Follow the direction in the following illustration:
Click
10 Follow the steps in the following illustration:
1. Select
2.
3 Custom installation3.3 STEP 3: Install Software Licensing Server
54 UNICORN Quick Installation Guide 29414475 AA

11 Follow the steps in the following illustration:
1. Fill in the mandatory fields
2. Click
12 Follow the illustrations sequence and the instructions:
1. Click the +
2. Enter theEthernet addressyou have noted instep 2, and thenclick
3 Custom installation3.3 STEP 3: Install Software Licensing Server
UNICORN Quick Installation Guide 29414475 AA 55

3. When you seethe Ethernetaddress hereclick Generate
4. Select
5. Click....select
6. Select a location tosave the file
Tip:It is recommended to rename the license so that the license can be easily identified later.
3 Custom installation3.3 STEP 3: Install Software Licensing Server
56 UNICORN Quick Installation Guide 29414475 AA
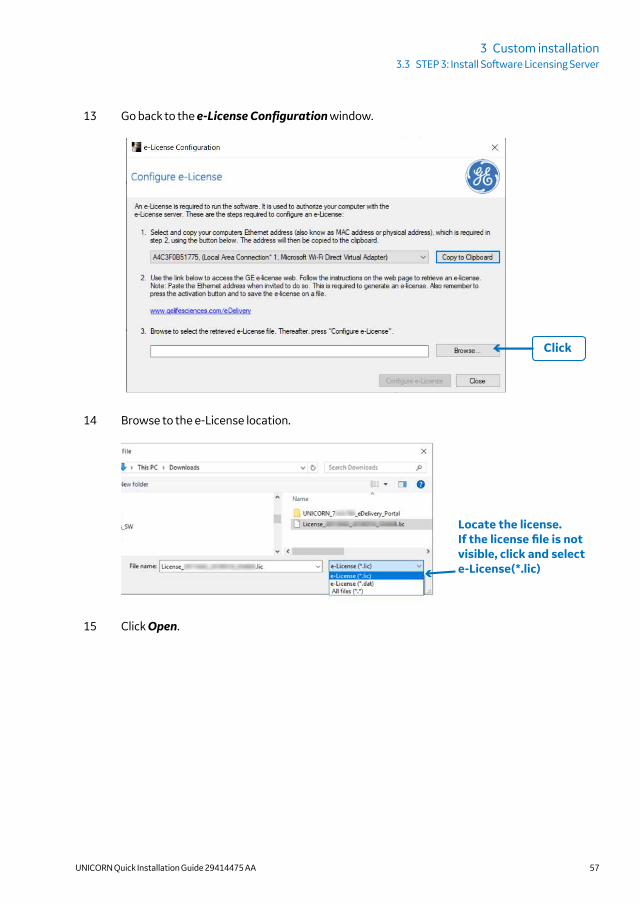
13 Go back to the e-License Configuration window.
Click
14 Browse to the e-License location.
Locate the license.If the license file is notvisible, click and selecte-License(*.lic)
15 Click Open.
3 Custom installation3.3 STEP 3: Install Software Licensing Server
UNICORN Quick Installation Guide 29414475 AA 57

16 Complete the e-License configuration.
Click
17 When the following dialog box appears, the configuration is successful.
Click
3 Custom installation3.3 STEP 3: Install Software Licensing Server
58 UNICORN Quick Installation Guide 29414475 AA

18 Close the e-License Configuration window.
Click
19 The following window confirms that the Software Licensing Server is installed successful-ly.
Do not close or Exit this window
X
X
20 Find out the name of this computer and note down the name.
Tip:
Enter PC info in windows search and press Enter.
3 Custom installation3.3 STEP 3: Install Software Licensing Server
UNICORN Quick Installation Guide 29414475 AA 59

3.4 STEP 4: Install UNICORN Software
IMPORTANT
Perform the following steps in all the dedicated computers controlling your ÄKTA systems (seethe illustration below).
Dedicated computerto control ÄKTA system 1
Computer for Databaseand Licensing Server
ÄKTA system 1
Dedicated computerto control ÄKTA system 2
ÄKTA system 2
Dedicated computerto control ÄKTA system 3
ÄKTA system 3
Install UNICORN Software
in this computer
Install UNICORN Software
in this computer
Install UNICORN Software
in this computer
3 Custom installation3.4 STEP 4: Install UNICORN Software
60 UNICORN Quick Installation Guide 29414475 AA

1 Locate and double-click the UNICORN_7.x.x.xxx_eDelivery_Portal folder.
2 Double-click Setup.exe.
If the Open File - Security Warning window appears, click Run.
3 Click Next.
Click
3 Custom installation3.4 STEP 4: Install UNICORN Software
UNICORN Quick Installation Guide 29414475 AA 61

4 If your computer is missing any software requirements, the installer will install them. Thecomputer can restart several times. After restart, double-click the Setup.exe again, seestep 5.
Click
5 Accept the license agreement.
1. Select
2. Click
3 Custom installation3.4 STEP 4: Install UNICORN Software
62 UNICORN Quick Installation Guide 29414475 AA

6 Select the installation type.
1. Select Custom installation
2. Click
7 Click Install next to UNICORN Software.
3 Custom installation3.4 STEP 4: Install UNICORN Software
UNICORN Quick Installation Guide 29414475 AA 63

8 Click Next.
Click
9 Click Next.
Click
3 Custom installation3.4 STEP 4: Install UNICORN Software
64 UNICORN Quick Installation Guide 29414475 AA

10 Click Next.
Click
11 Enter Database information.
1. Enter the name of the computer where the database is installed
2. Enter the name of the database
3. Click
4. Click 5. Click
3 Custom installation3.4 STEP 4: Install UNICORN Software
UNICORN Quick Installation Guide 29414475 AA 65

12
IMPORTANT
If you have chosen to install the Software Licensing Server on a different computer, en-ter the licensing server name instead of selecting Use same computer as UNICORN Da-tabase computer.
1. Select
2. Click
3 Custom installation3.4 STEP 4: Install UNICORN Software
66 UNICORN Quick Installation Guide 29414475 AA

13 Click Install.
Click
14 Click Finish.
Click
3 Custom installation3.4 STEP 4: Install UNICORN Software
UNICORN Quick Installation Guide 29414475 AA 67

15 The following window confirms that UNICORN Software is installed successfully.
Do not close or Exit this window
X
X
3 Custom installation3.4 STEP 4: Install UNICORN Software
68 UNICORN Quick Installation Guide 29414475 AA

3.5 STEP 5: Configure IP
IMPORTANT
Perform the following steps in all the dedicated computers controlling your ÄKTA systems (seethe illustration below).
Dedicated computerto control ÄKTA system 1
Computer for Databaseand Licensing Server
ÄKTA system 1
Dedicated computerto control ÄKTA system 2
ÄKTA system 2
Dedicated computerto control ÄKTA system 3
ÄKTA system 3
Install UNICORN Software
in this computer
Install UNICORN Software
in this computer
Install UNICORN Software
in this computer
3 Custom installation3.5 STEP 5: Configure IP
UNICORN Quick Installation Guide 29414475 AA 69

1 Make sure that your dedicated computer is connected to internet and also connected to theÄKTA system.
2 Click the search icon.
Click
3 Enter ncpa.cpl in the search box, and then press Enter
1. Enterncpa.cpl
2. Right-click and select
For Windows 7 user, Click Start, enter ncpa.cpl in the search box, and then press Enter.
3 Custom installation3.5 STEP 5: Configure IP
70 UNICORN Quick Installation Guide 29414475 AA

IMPORTANT
If you have two Ethernet cards, one Ethernet card is connected to internet (Ethernet in the illus-tration below) and the other (Ethernet 2 in the illustration below) is connected to the ÄKTAsystem. Generally, the ethernet card connected to the internet has the company domain name. Forexample, in the illustration below, it is logon.ds.ge.com. Ethernet card connected to the ÄKTA sys-tem generally states Unidentified network as seen in the illustration below.
3 Custom installation3.5 STEP 5: Configure IP
UNICORN Quick Installation Guide 29414475 AA 71

4 Rename the Ethernet 2 connection to AKTA.
Right-clickand Rename
to AKTA
5 Access the Properties window of the AKTA network connection.
1. Right-click
and then
2. Select
3 Custom installation3.5 STEP 5: Configure IP
72 UNICORN Quick Installation Guide 29414475 AA

6 Select Internet Protocol Version 4.
1. Click to selectInternet Protocol Version 4 (TCP/IPv4)
2. Click
7 Enter the IP address and the Subnet mask as shown in the following illustration:
1. Enter IP: 10.1.1.2Subnet: 255.255.255.0Do not enter Default gateway
X
2. Click
3 Custom installation3.5 STEP 5: Configure IP
UNICORN Quick Installation Guide 29414475 AA 73
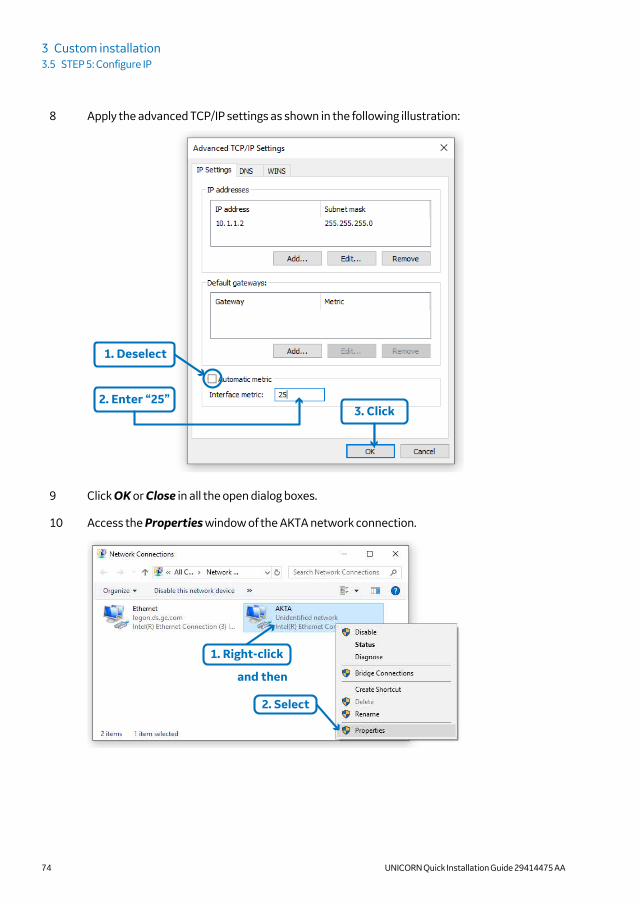
8 Apply the advanced TCP/IP settings as shown in the following illustration:
1. Deselect
2. Enter “25” 3. Click
9 Click OK or Close in all the open dialog boxes.
10 Access the Properties window of the AKTA network connection.
1. Right-click
and then
2. Select
3 Custom installation3.5 STEP 5: Configure IP
74 UNICORN Quick Installation Guide 29414475 AA

11 Select the Speed & Duplex property and its intended value as shown in the following illus-tration:
1. Clickto select
2. Clickto select
3. Clickto select
4. Click
3 Custom installation3.5 STEP 5: Configure IP
UNICORN Quick Installation Guide 29414475 AA 75

3.6 STEP 6: Define a system
IMPORTANT
You need an Instrument Configuration (IC) to define your system.
The latest IC can be downloaded from the product page of your system. Go to http://www.gelifes-ciences.com/akta, search for your ÄKTA system on the page. The IC can be found under RELATEDDOCUMENTS → SOFTWARE on your ÄKTA system web page.
1 Open the Define System window .
Click
2 Browse to the Instrument Configuration location.
Click and browse to thelocation where the Instrument Configurationis downloaded and unpacked.
3 Custom installation3.6 STEP 6: Define a system
76 UNICORN Quick Installation Guide 29414475 AA

3 Open the Instrument Configuration file.
1. Click
2. Click
4 Select the system setup options.
These fields areautomaticallypopulated with default values. Use the drop-down list to change.
Click
3 Custom installation3.6 STEP 6: Define a system
UNICORN Quick Installation Guide 29414475 AA 77

5 Follow the steps in the following illustration to configure the system.
1. Type in your preferred system name.This name cannot bechanged later.
2. Enter your ÄKTA systemserial number. This can befound on a sticker at the back of the system.
3. Select
4. Enter 5. Click Test Connection.If the connection is successful,go to
6. Click
6 Close the Define System dialog box.
Click
Now the ÄKTA system is ready for use.
3 Custom installation3.6 STEP 6: Define a system
78 UNICORN Quick Installation Guide 29414475 AA

4 Troubleshooting
For information on troubleshooting, see UNICORN 7.x Administration and TechnicalManual. This document is available on the GE Healthcare Web.
4 Troubleshooting
UNICORN Quick Installation Guide 29414475 AA 79

GE Healthcare Bio-Sciences AB, Björkgatan 30, 751 84 Uppsala, Sweden
www.gelifesciences.com/unicornGE, the GE Monogram, ÄKTA, and UNICORN are trademarks of General Electric Company.
Windows and Microsoft are registered trademarks of Microsoft Corporation.
All other third party trademarks are the property of their respective owners.
© 2019 General Electric Company
All goods and services are sold subject to the terms and conditions of sale of the company within GE Healthcare whichsupplies them. A copy of these terms and conditions is available on request. Contact your local GE Healthcare representativefor the most current information.
GE Healthcare Europe GmbHMunzinger Strasse 5, D-79111 Freiburg, Germany
GE Healthcare UK LimitedAmersham Place, Little Chalfont, Buckinghamshire, HP7 9NA, UK
GE Healthcare Bio-Sciences Corp.100 Results Way, Marlborough, MA 01752, USA
GE Healthcare Japan CorporationSanken Bldg. 3-25-1, Hyakunincho Shinjuku-ku, Tokyo 169-0073, Japan
For local office contact information, visit www.gelifesciences.com/contact
29414475 AA V:1 09/2019