UNDERWRITING PROCEDURES - pcmplatinum.comUnderwriter/documents/6-10...UNDERWRITING PROCEDURES ......
16
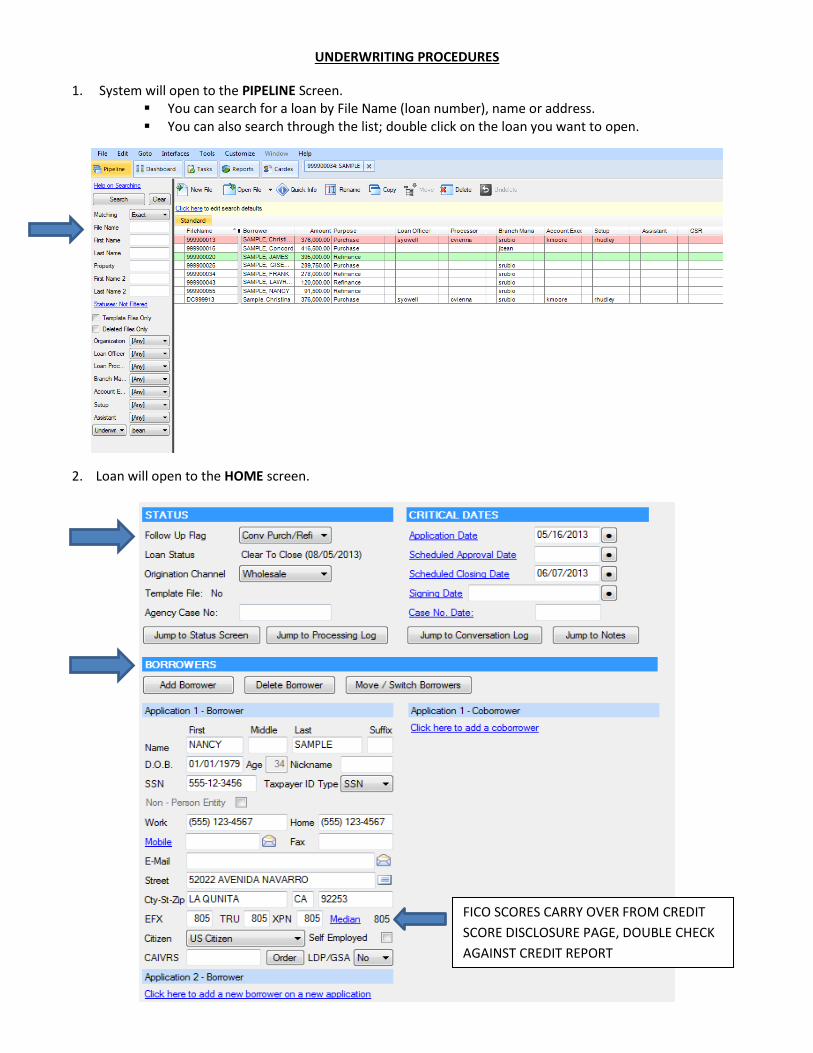
UNDERWRITING PROCEDURES 1. System will open to the PIPELINE Screen. You can search for a loan by File Name (loan number), name or address. You can also search through the list; double click on the loan you want to open. 2. Loan will open to the HOME screen. FICO SCORES CARRY OVER FROM CREDIT SCORE DISCLOSURE PAGE, DOUBLE CHECK AGAINST CREDIT REPORT
Transcript of UNDERWRITING PROCEDURES - pcmplatinum.comUnderwriter/documents/6-10...UNDERWRITING PROCEDURES ......
UNDERWRITING PROCEDURES
1. System will open to the PIPELINE Screen. You can search for a loan by File Name (loan number), name or address. You can also search through the list; double click on the loan you want to open.
2. Loan will open to the HOME screen.
FICO SCORES CARRY OVER FROM CREDIT
SCORE DISCLOSURE PAGE, DOUBLE CHECK
AGAINST CREDIT REPORT

HOME includes: STATUS, CRITICAL DATES, BORROWERS, SUBJECT PROPERTY INFO, REGISTRATION AND LOCK INFO, LOAN INFO
Follow up Flag identifies the loan type; Conventional, FHA, USDA, Jumbo, VA Input Underwriter Name under File Assignments Validate Borrower information, Borrowers Validate Subject Property Info

Validate Loan Info; Check Occupancy type, Purpose of Loan, Refinance Type (limited cash out, cash out-Other, cash out-Home improvement, cash out-Debt consolidation), Loan program code / name, Mortgage Type, Amortization type (360 or 180), Interest rate, Value and Loan amount
You may EDIT Subordinate Financing (also available to enter from UNDERWRITING and ULDD). A new window will open to enter information. Identify if HELOC or Fixed Second.
3. OVERVIEW PANEL ICONS
Detach from Main Window Summary All Borrowers Loan Details of Transaction Home
Status Conversation Log Field Notes 1008 Transmittal Stored Documents Customize Toolbar
4. To access the file /view loan documents go to STORED DOCUMENTS (File cabinet icon). You can pull up the stored documents from the main screen OR in the OVERVIEW panel. The
Overview panel may be detached from the main screen so you can view the file on a second monitor.
Here you can view all documents uploaded for this file. You can view the documents by: a) bundles (see dropdown box next to Stacking Order/Bundle, find UW Checklist Credit Pkg; export as a PDF, Save to computer); b) maneuver through the headings on top of screen (Assets, Credit, Underwriting, etc.). NOTE: if you use this method, open all headings to make sure something wasn’t misfiled.); c) go through list as it is. NOTE: You can change the order of the document list by clicking on Category or Type and selecting Ascending or Descending order).

Preview Off / Preview on: Highlight Document to preview, Choose Preview On: document will open in same window previewing the documents in the highlighted bucket.
BUNDLES

5. 1003 Complete/Edit all 4 pages. Flow follows an actual 1003.
6. UNDERWRITING
Complete AUS Information: DU / LP Version Number, Submission Number, Initial and Final AUS date. After running the AUS, come back into UNDERWRITING and complete Underwriting Method and
Underwriting Details. After reviewing Appraisal, come back into UNDERWRITING Screen and complete Additional Info and
Appraisal expiration date. Loan approval expiration date is also located on this screen. Underwriting Detail: Leave Max Rate BLANK, Doc Type will always be Full for Conventional
Leave blank
DU LP
*Choose DU or LP from the drop down
Approval & Appraisal Expiration dates AUS Initial &
Final dates
Manually enter Recommendation

7. DOC PREP 2 Doc Prep 2 screen mirrors the Mortgage Insurance screen in Datatrac. This is where partial MI
information will be input (see separate workflow for MI entry; LPMI, BPMI, Split MI, Financed MI and Monthly)
8. Run AUS. Go to Interface > FANNIE MAE (Tab on top of screen) or go into FANNIE MAE/FREDDIE MAC Screens. XIS will run the DU straight from the system with no editing in between. To edit the DU before
hitting submit you must enter DU on the Web. XIS – All info will carryover from BytePro to DU; any changes made in DU will also carry back to
BytePro. Findings will automatically be uploaded to stored documents. You must categorize the AUS findings within the stored documents.
Du on the Web – Information will carryover from BytePro to DU but any changes made in DU will not carry back from DU to BytePro. Findings must be saved on your computer and uploaded to stored documents.

** NEW WINDOW
Defaults – area to enter AUS user ID and password as well as Credit Agency information Submit – submission of AUS Validate – you may validate that all fields are complete prior to hitting submit. View Results – view AUS findings Import Debts –
CHOOSE ARM PLAN AS APPLICABLE
DEFAULT ACTION WILL RE-ISSUE EXISTING CREDIT REPORT

9. Go to UNDERWRITING – ADDITIONAL- Input Investor information for Overlays / Exceptions.
10. Complete Data Verify. Go to INTERFACES >Fraud Detection Screen or to FRAUD DETECTION from left hand side.

** NEW WINDOW
Defaults – enter user ID and password View Documents – Choosing this will open the Data Verify website. DV should already be submitted. From
the website you will clear all warnings. Once warnings are cleared the report must be saved to your computer and uploaded to Stored Documents.
Save to computer and upload to file– Save the DV report as a PDF using either CutePDFwriter or DMD PDF Writer. Once saved to your computer upload to BytePro through Stored Documents > New > Import new document(s) from disk. The report uploaded will appear at the bottom of the document list. You must label the report for it to show up in the correct category. Type = Data Verify (category of QC will auto populate. *** You must use the “Fill” button to complete the description or the report will not version. ** NEW WINDOW

11. To add conditions, go to the CONDITION Screen. Standard = default conditions. Ad-HOC = free form. All = all conditions together. Add Standard Conditions from Templates. Other categories are type specific. Checked conditions indicate default or conditions already included on the loan decision.
12. ULDD screen (also see separate workflow). Complete tabs across the top including General, Property, Borrower, Loan Info, MI, and Underwriting tabs.

13. 1008. Complete Condo/ PUD Class and Project Name, Appraisal form (1004, 1025, 1073, etc.), Appraisers
name and license No., enter AUS info, Mid FICO, and 1008 Notes. NOTE: Project Class must be chosen on all loans / properties. “G” to be identified on loans not in a
project. An error will occur while running the AUS if the project class is not entered.

-Choose “Fill AUS Info” button to auto populate the Case ID and AUS Recommendation -Enter Mid FICO score, DOES NOT auto populate -Enter notes / loan summary
14. Entering STATUS. Input status dates. Click on radial button to enter todays date. Status must be identified by choosing the status on the right hand side. **NOTE: Loan approval expiration date is located on the UNDERWRITING screen
YOU MUST IDENTIFY NOTE RATE FOR THE RATE TO PRINT ON THE 1008
7 LINES OF INFORMATION WILL PRINT ON 1008

15. NOTES. Input all necessary notes throughout the loan process. To add a new note, click on “Edit Notes”.
(Example)
ADDITIONAL FILE NOTES
-Field Notes: Field / line specific notes. Right click on field, choose “Edit notes” Conversation Log: Not used; for LO and Processor communication -Audit Log: Field specific changes -Underwriting History: Snapshot of field specific changes

16. Entering STATUS. Input status dates. Click on radial button to enter todays date. Status must be identified by choosing the status on the right hand side. **NOTE: Loan approval expiration date is located on the UNDERWRITING screen
17. Sign off CONDITIONS as reviewed. See Split and Merge workflows and videos located on SharePoint for additional references.
18. EARLY CHECK. Go to Interface Tab – Fannie Mae – Early Check

a. Submit Early Check; status will show as Connecting
b. Pop-up will alert you: Submission successful, click OK i. Choose View Results, Type and Categorize the findings. Choose “Fill” to enter description