
Understanding the Event Loop, Garbage Collection & Native ...E... · Understanding the Event Loop,...
38
NODE.JS UNDER THE HOOD Understanding the Event Loop, Garbage Collection & Native Modules (Second Part of the Node.js at Scale Series) From the Engineers of
Transcript of Understanding the Event Loop, Garbage Collection & Native ...E... · Understanding the Event Loop,...

RisingStack 1
NODE.JS UNDER THE HOOD Understanding the Event Loop, Garbage Collection & Native Modules
(Second Part of the Node.js at Scale Series)
From the Engineers of

RisingStack 2
CHAPTER ONE: THE EVENT LOOP 03
Table of contents
The first chapter helps you to understand how the Node.js event loop works, and how you can leverage it to build fast applications. We’ll also discuss the most common problems you might encounter, and the solutions for them.
CHAPTER TWO: GARBAGE COLLECTION 19
In this chapter, you are going to learn how the Node.js garbage collection works, what happens in the background when you write code and how memory is freed up for you.
CHAPTER THREE: NATIVE MODULES 27
This chapter explains how native Node.js modules work, and how you can use them to increase the performance of your application.

RisingStack 3
CHAPTER ONE: THE EVENT LOOP
The first chapter helps you to understand how the Node.js event
loop works, and how you can leverage it to build fast applications.
We’ll also discuss the most common problems you might encounter,
and the solutions for them.
THE PROBLEM
Most of the backends behind websites don’t need to do complicated
computations. Our programs spend most of their time waiting
for the disk to read & write , or waiting for the wire to transmit our
message and send back the answer.
IO operations can be orders of magnitude slower than data
processing. Take this for example: SSD-s can have a read speed of
200-730 MB/s - at least a high-end one. Reading just one kilobyte
of data would take 1.4 microseconds, but during this time a CPU
clocked at 2GHz could have performed 28 000 of instruction-
processing cycles.
For network communications it can be even worse, just try and ping
google.com
$ ping google.com64 bytes from 172.217.16.174: icmp_seq=0 ttl=52 time=33.017 ms 64 bytes from 172.217.16.174: icmp_seq=1 ttl=52 time=83.376 ms 64 bytes from 172.217.16.174: icmp_seq=2 ttl=52 time=26.552 ms 64 bytes from 172.217.16.174: icmp_seq=3 ttl=52 time=40.153 ms 64 bytes from 172.217.16.174: icmp_seq=4 ttl=52 time=37.291 ms 64 bytes from 172.217.16.174: icmp_seq=5 ttl=52 time=58.692 ms 64 bytes from 172.217.16.174: icmp_seq=6 ttl=52 time=45.245 ms 64 bytes from 172.217.16.174: icmp_seq=7 ttl=52 time=27.846 ms
The average latency is about 44 milliseconds. Just while waiting for
a packet to make a round-trip on the wire, the previously mentioned
processor can perform 88 millions of cycles.

RisingStack 4
THE SOLUTION
Most operational systems provide some kind of an Asynchronous
IO interface, which allows you to start processing data that does
not require the result of the communication, meanwhile the
communication still goes on..
This can be achieved in several ways. Nowadays it is mostly done
by leveraging the possibilities of multithreading at the cost of extra
software complexity. For example reading a file in Java or Python is
a blocking operation. Your program cannot do anything else while it
is waiting for the network / disk communication to finish. All you can
do - at least in Java - is to fire up a different thread then notify your
main thread when the operation has finished.
It is tedious, complicated, but gets the job done. But what about
Node? Well, we are surely facing some problems as Node.js - or
more like V8 - is single-threaded. Our code can only run in one thread.
SIDE NOTE: This is not entirely true. Both Java and Python have async
interfaces, but using them is definitely more difficult than in Node.js.
You might have heard that in a browser, setting
setTimeout(someFunction, 0) can sometimes fix things
magically. But why does setting a timeout to 0, deferring execution
by 0 milliseconds fix anything? Isn’t it the same as simply calling
someFunction immediately? Not really.
First of all, let’s take a look at the call stack, or simply, “stack”. I am
going to make things simple, as we only need to understand the very
basics of the call stack. In case you are familiar how it works, feel
free to jump to the next section.
THE STACK
Whenever you call a functions return address, parameters and local
variables will be pushed to the stack. If you call another function
from the currently running function, its contents will be pushed on
top in the same manner as the previous one - with its return address.
For the sake of simplicity I will say that ‘a function is pushed’ to the
top of the stack from now on, even though it is not exactly correct.

RisingStack 5
Let’s take a look!
function main () { const hypotenuse = getLengthOfHypotenuse(3, 4) console.log(hypotenuse)}
function getLengthOfHypotenuse(a, b) { const squareA = square(a) const squareB = square(b) const sumOfSquares = squareA + squareB return Math.sqrt(sumOfSquares)}
function square(number) { return number * number} main()
main is called first:
then main calls getLengthOfHypotenuse with 3 and 4 as arguments

RisingStack 6
afterwards square is with the value of a
when square returns, it is popped from the stack, and its return value
is assigned to squareA. squareA is added to the stack frame of
getLengthOfHypotenuse
same goes for the next call to square

RisingStack 7
in the next line the expression squareA + squareB is evaluated
then Math.sqrt is called with sumOfSquares
now all is left for getLengthOfHypotenuse is to return the final
value of its calculation

RisingStack 8
the returned value gets assigned to hypotenuse in main
the value of hypotenuse is logged to console
finally, main returns without any value, gets popped from the stack
leaving it empty

RisingStack 9
SIDE NOTE: You saw that local variables are popped from the stack
when the functions execution finishes. It happens only when you work
with simple values such as numbers, strings and booleans. Values
of objects, arrays and such are stored in the heap and your variable
is merely a pointer to them. If you pass on this variable, you will only
pass the said pointer, making these values mutable in different stack
frames. When the function is popped from the stack, only the pointer
to the Object gets popped with leaving the actual value in the heap.
The garbage collector is the guy who takes care of freeing up space
once the objects outlived their usefulness.
ENTER NODE.JS EVENT LOOP
So what happens when we call something like setTimeout,
http.get, process.nextTick, or fs.readFile? Neither of
these things can be found in V8’s code, but they are available in the
Chrome WebApi and the C++ API in case of Node.js. To understand
this, we will have to understand the order of execution a little bit
better.
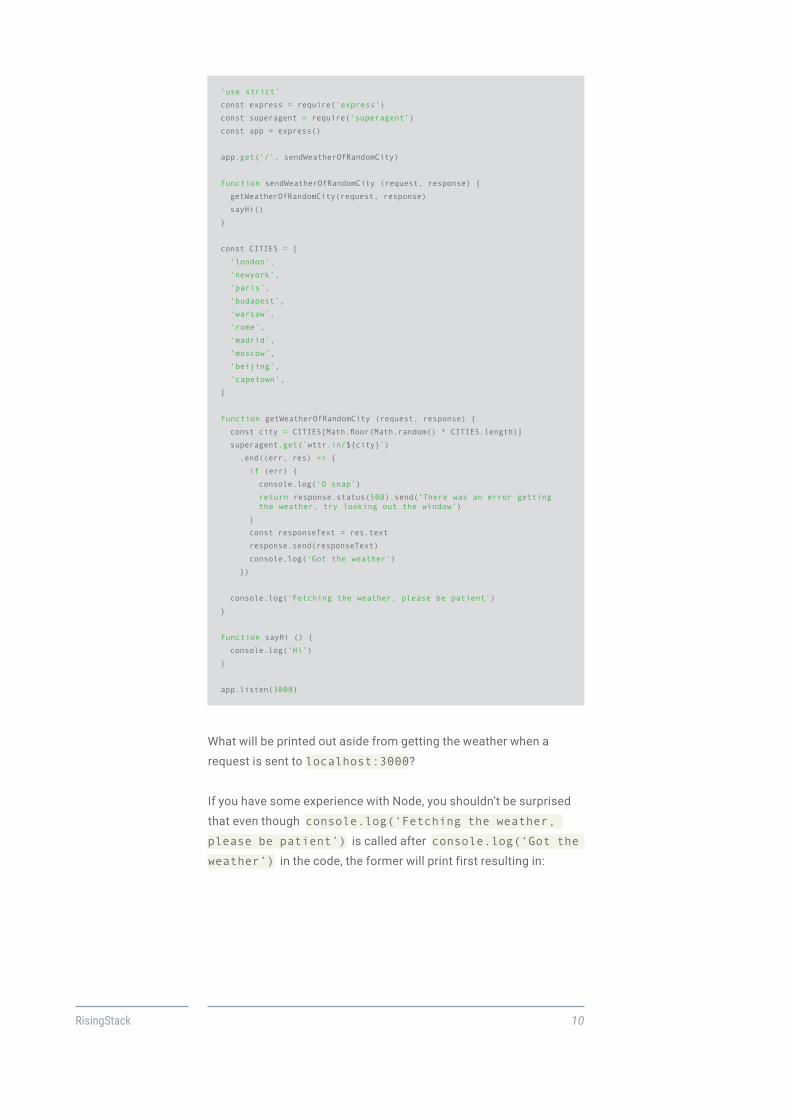
Let’s take a look at a more common Node.js application - a server
listening on localhost:3000/. Upon getting a request, the server
will call wttr.in/<city> to get the weather, print some kind
messages to the console, and it forwards responses to the caller
after recieving them.
RisingStack 10
‘use strict’
const express = require(‘express’)
const superagent = require(‘superagent’)
const app = express()
app.get(‘/’, sendWeatherOfRandomCity)
function sendWeatherOfRandomCity (request, response) {
getWeatherOfRandomCity(request, response)
sayHi()
}
const CITIES = [
‘london’,
‘newyork’,
‘paris’,
‘budapest’,
‘warsaw’,
‘rome’,
‘madrid’,
‘moscow’,
‘beijing’,
‘capetown’,
]
function getWeatherOfRandomCity (request, response) {
const city = CITIES[Math.floor(Math.random() * CITIES.length)]
superagent.get(`wttr.in/${city}`)
.end((err, res) => {
if (err) {
console.log(‘O snap’)
return response.status(500).send(‘There was an error getting the weather, try looking out the window’)
}
const responseText = res.text
response.send(responseText)
console.log(‘Got the weather’)
})
console.log(‘Fetching the weather, please be patient’)
}
function sayHi () {
console.log(‘Hi’)
}
app.listen(3000)
What will be printed out aside from getting the weather when a
request is sent to localhost:3000?
If you have some experience with Node, you shouldn’t be surprised
that even though console.log(‘Fetching the weather,
please be patient’) is called after console.log(‘Got the
weather’) in the code, the former will print first resulting in:

RisingStack 11
Fetching the weather, please be patient Hi Got the weather
What happened? Even though V8 is single-threaded, the underlying
C++ API of Node isn’t. It means that whenever we call something
that is a non-blocking operation, Node will call some code that will
run concurrently with our javascript code under the hood. Once this
hiding thread receives the value it awaits for or throws an error, the
provided callback will be called with the necessary parameters.
SIDE NOTE: The ‘some code’ we mentioned is actually part of
libuv. libuv is the open source library that handles the thread-pool,
doing signaling and all other magic that is needed to make the
asynchronous tasks work. It was originally developed for Node.js but
a lot of other projects use of it by now.
To peek under the hood, we need to introduce two new concepts: the
event loop and the task queue.
TASK QUEUE
Javascript is a single-threaded, event-driven language. This means
that we can attach listeners to events, and when a said event fires,
the listener executes the callback we provided.
Whenever you call setTimeout, http.get or fs.readFile,
Node.js sends these operations to a different thread allowing V8
to keep executing our code. Node also calls the callback when the
counter has run down or the IO / http operation has finished.
These callbacks can enqueue other tasks and those functions
can enqueue others and so on. This way you can read a file while
processing a request in your server, and then make an http call
based on the read contents without blocking other requests from
being handled.
However, we only have one main thread and one call-stack, so in

RisingStack 12
case there is another request being served when the said file is read,
its callback will need to wait for the stack to become empty. The
limbo where callbacks are waiting for their turn to be executed is
called the task queue (or event queue, or message queue). Callbacks
are being called in an infinite loop whenever the main thread has
finished its previous task, hence the name ‘event loop’.
In our previous example it would look something like this:
1. express registers a handler for the ‘request’ event that will be
called when request arrives to ‘/’
2. skips the functions and starts listening on port 3000
3. the stack is empty, waiting for ‘request’ event to fire
4. upon incoming request, the long awaited event fires, express
calls the provided handler sendWeatherOfRandomCity
5. sendWeatherOfRandomCity is pushed to the stack
6. getWeatherOfRandomCity is called and pushed to the stack
7. Math.floor and Math.random are called, pushed to the stack
and popped, a from cities is assigned to city
8. superagent.get is called with ‘wttr.in/${city}’, the
handler is set for the end event.
9. the http request to http://wttr.in/${city} is send to a
background thread, and the execution continues
10. ‘Fetching the weather, please be patient’ is logged
to the console, getWeatherOfRandomCity returns
11. sayHi is called, ‘Hi’ is printed to the console
12. sendWeatherOfRandomCity returns, gets popped from the
stack leaving it empty
13. waiting for http://wttr.in/${city} to send it’s response
once the response has arrived, the end event is fired.
14. the anonymous handler we passed to .end() is called,
gets pushed to the stack with all variables in its closure,
meaning it can see and modify the values of express,
superagent, app, CITIES, request, response, city
and all the functions we have defined
15. response.send() gets called either with 200 or 500
statusCode, but again it is sent to a background thread, so the
response stream is not blocking our execution, anonymous
handler is popped from the stack.

RisingStack 13
So now we can understand why the previously mentioned
setTimeout hack works. Even though we set the counter to zero,
it defers the execution until the current stack and the task queue is
empty, allowing the browser to redraw the UI, or Node to serve other
requests.
MICROTASKS AND MACROTASKS
If this wasn’t enough, we actually have more then one task queue.
One for microtasks and another for macrotasks.
examples of microtasks:
• process.nextTick
• promises
• Object.observe
examples of macrotasks:
• setTimeout
• setInterval
• setImmediate
• I/O
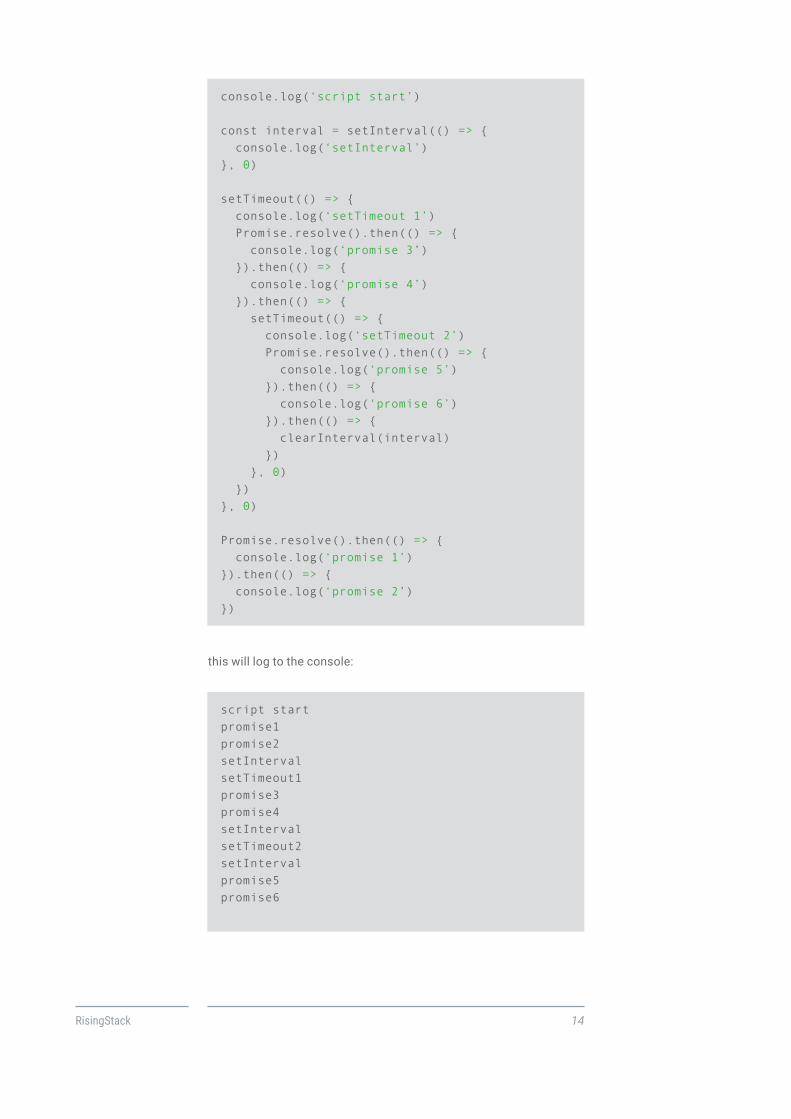
Let’s take a look at the following code (on the next page) :
RisingStack 14
console.log(‘script start’)
const interval = setInterval(() => { console.log(‘setInterval’)}, 0)
setTimeout(() => { console.log(‘setTimeout 1’) Promise.resolve().then(() => { console.log(‘promise 3’) }).then(() => { console.log(‘promise 4’) }).then(() => { setTimeout(() => { console.log(‘setTimeout 2’) Promise.resolve().then(() => { console.log(‘promise 5’) }).then(() => { console.log(‘promise 6’) }).then(() => { clearInterval(interval) }) }, 0) })}, 0)
Promise.resolve().then(() => { console.log(‘promise 1’)}).then(() => { console.log(‘promise 2’)})
this will log to the console:
script start promise1 promise2 setInterval setTimeout1 promise3 promise4 setInterval setTimeout2 setInterval promise5 promise6

RisingStack 15
According to the WHATVG specification, exactly one (macro)task
should get processed from the macrotask queue in one cycle of the
event loop. After said macrotask has finished, all of the available
microtasks will be processed within the same cycle. While these
microtasks are being processed, they can queue more microtasks,
which will all be run one by one, until the microtask queue is
exhausted.
This diagram tries to make the picture a bit clearer:
In our case (on the next page):

RisingStack 16
--- CYCLE 1 ---
1. `setInterval` is scheduled as task
2. `setTimeout 1` is scheduled as task
3. in `Promise.resolve 1` both `then`s are scheduled as microtasks
4. the stack is empty, microtasks are run
Task queue: setInterval, setTimeout 1
--- CYCLE 2 ---
5. the microtask queue is empty, `setInteval`’s handler can be
run, another `setInterval` is scheduled as a task, right behind
`setTimeout 1`
Task queue: setTimeout 1, setInterval
--- CYCLE 3 ---
6. the microtask queue is empty, `setTimeout 1`’s handler can be
run, `promise 3` and `promise 4` are scheduled as microtasks,
7. handlers of `promise 3` and `promise 4` are run `setTimeout 2`
is scheduled as task
Task queue: setInterval, setTimeout 2
--- CYCLE 4 ---
8. the microtask queue is empty, `setInteval`’s handler can be
run, another `setInterval` is scheduled as a task, right behind
`setTimeout`
Task queue: setTimeout 2, setInteval
9. `setTimeout 2`’s handler run, `promise 5` and `promise 6` are
scheduled as microtasks
Now handlers of promise 5 and promise 6 should be run
clearing our interval, but for some strange reason setInterval is
run again. However, if you run this code in Chrome, you will get the
expected behavior.
RisingStack 17
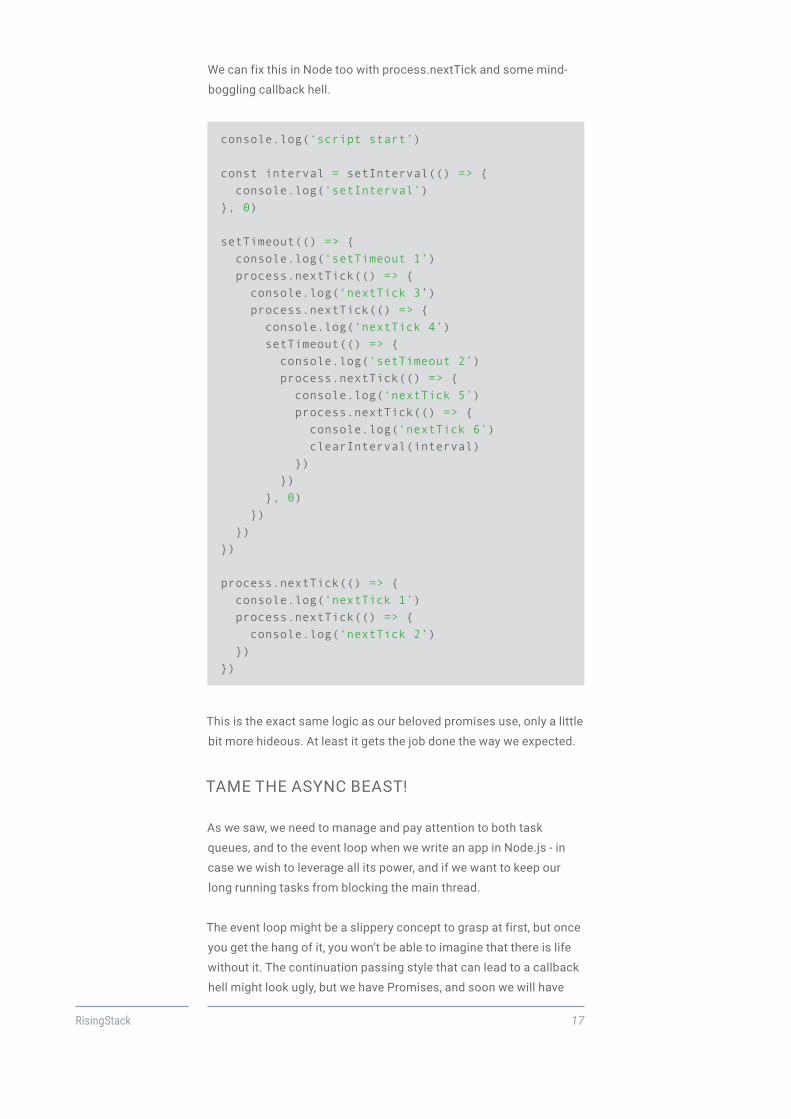
We can fix this in Node too with process.nextTick and some mind-
boggling callback hell.
console.log(‘script start’)
const interval = setInterval(() => { console.log(‘setInterval’)}, 0)
setTimeout(() => { console.log(‘setTimeout 1’) process.nextTick(() => { console.log(‘nextTick 3’) process.nextTick(() => { console.log(‘nextTick 4’) setTimeout(() => { console.log(‘setTimeout 2’) process.nextTick(() => { console.log(‘nextTick 5’) process.nextTick(() => { console.log(‘nextTick 6’) clearInterval(interval) }) }) }, 0) }) })})
process.nextTick(() => { console.log(‘nextTick 1’) process.nextTick(() => { console.log(‘nextTick 2’) })})
This is the exact same logic as our beloved promises use, only a little
bit more hideous. At least it gets the job done the way we expected.
TAME THE ASYNC BEAST!
As we saw, we need to manage and pay attention to both task
queues, and to the event loop when we write an app in Node.js - in
case we wish to leverage all its power, and if we want to keep our
long running tasks from blocking the main thread.
The event loop might be a slippery concept to grasp at first, but once
you get the hang of it, you won’t be able to imagine that there is life
without it. The continuation passing style that can lead to a callback
hell might look ugly, but we have Promises, and soon we will have

RisingStack 18
async-await in our hands... and while we are (a)waiting, you can
simulate async-await using co and/or koa.
One last parting advice:
Knowing how Node.js and V8 handles long running executions, you
can start using it for your own good. You might have heard before
that you should send your long running loops to the task queue. You
can do it by hand or make use of async.js.
Happy coding!
The book continues with Chapter Two on the next page!

RisingStack 19
CHAPTER TWO: GARBAGE COLLECTION
In this chapter, you are going to learn how Node.js garbage
collection works, what happens in the background when you write
code and how memory is freed up for you.
MEMORY MANAGEMENT
IN NODE.JS APPLICATIONS
Every application needs memory to work properly. Memory
management provides ways to dynamically allocate memory chunks
for programs when they request it, and free them when they are no
longer needed - so that they can be reused.
Application-level memory management can be manual or automatic.
The automatic memory management usually involves a garbage
collector.
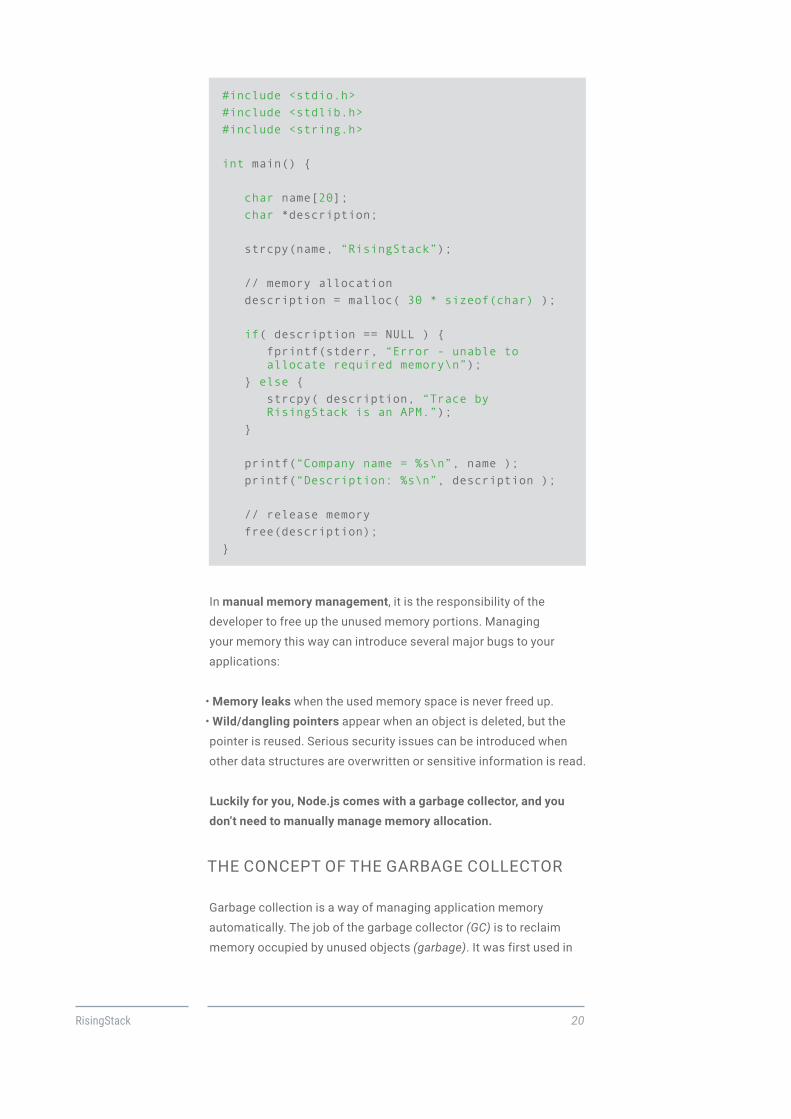
The following code snippet shows how memory can be allocated in
C, using manual memory management (cont. next page) :
RisingStack 20
#include <stdio.h>#include <stdlib.h>#include <string.h>
int main() {
char name[20]; char *description;
strcpy(name, “RisingStack”);
// memory allocation description = malloc( 30 * sizeof(char) );
if( description == NULL ) { fprintf(stderr, “Error - unable to allocate required memory\n”); } else { strcpy( description, “Trace by RisingStack is an APM.”); }
printf(“Company name = %s\n”, name ); printf(“Description: %s\n”, description );
// release memory free(description);}
In manual memory management, it is the responsibility of the
developer to free up the unused memory portions. Managing
your memory this way can introduce several major bugs to your
applications:
• Memory leaks when the used memory space is never freed up.
• Wild/dangling pointers appear when an object is deleted, but the
pointer is reused. Serious security issues can be introduced when
other data structures are overwritten or sensitive information is read.
Luckily for you, Node.js comes with a garbage collector, and you
don’t need to manually manage memory allocation.
THE CONCEPT OF THE GARBAGE COLLECTOR
Garbage collection is a way of managing application memory
automatically. The job of the garbage collector (GC) is to reclaim
memory occupied by unused objects (garbage). It was first used in

RisingStack 21
LISP in 1959, invented by John McCarthy.
The way how the GC knows that objects are no longer in use is that
no other object has references to them.
MEMORY BEFORE THE GARBAGE COLLECTION
The following diagram shows how the memory can look like if you
have objects with references to each other, and with some objects
that have no reference to any objects. These are the objects that can
be collected by a garbage collector run.
MEMORY AFTER THE GARBAGE COLLECTION
Once the garbage collector is run, the objects that are unreachable
gets deleted, and the memory space is freed up.

RisingStack 22
THE ADVANTAGES OF
USING A GARBAGE COLLECTOR
• it prevents wild/dangling pointers bugs,
• it won’t try to free up space that was already freed up,
• it will protect you from some types of memory leaks.
Of course, using a garbage collector doesn’t solve all of your
problems, and it’s not a silver bullet for memory management. Let’s
take a look at things that you should keep in mind!
Things to Keep in Mind When Using a Garbage Collector:
• performance impact - in order to decide what can be freed up, the
GC consumes computing power
• unpredictable stalls - modern GC implementations try to avoid
“stop-the-world” collections
GARBAGE COLLECTION & MEMORY
MANAGEMENT IN PRACTICE
The easiest way of learning is by doing - so I am going to show you
what happens in the memory with different code snippets.
The Stack
The stack contains local variables and pointers to objects on the
heap or pointers defining the control flow of the application.
In the following example, both a and b will be placed on the stack.
function add (a, b) { return a + b}
add(4, 5)
The Heap
The heap is dedicated to store reference type objects, like strings or
objects.

RisingStack 23
The Car object created in the following snippet is placed on the
heap.
function Car (opts) { this.name = opts.name}
const LightningMcQueen = new Car({name: ‘Lightning McQueen’})
After this, the memory would look something like this:
Let’s add more cars, and see how our memory would look like!
function Car (opts) {
this.name = opts.name
}
const LightningMcQueen = new Car({name: ‘Lightning McQueen’})
const SallyCarrera = new Car({name: ‘Sally Carrera’})
const Mater = new Car({name: ‘Mater’})
If the GC would run now, nothing could be freed up, as the root has
a reference to every object. Let’s make it a little bit more interesting,
and add some parts to our cars!
RisingStack 24
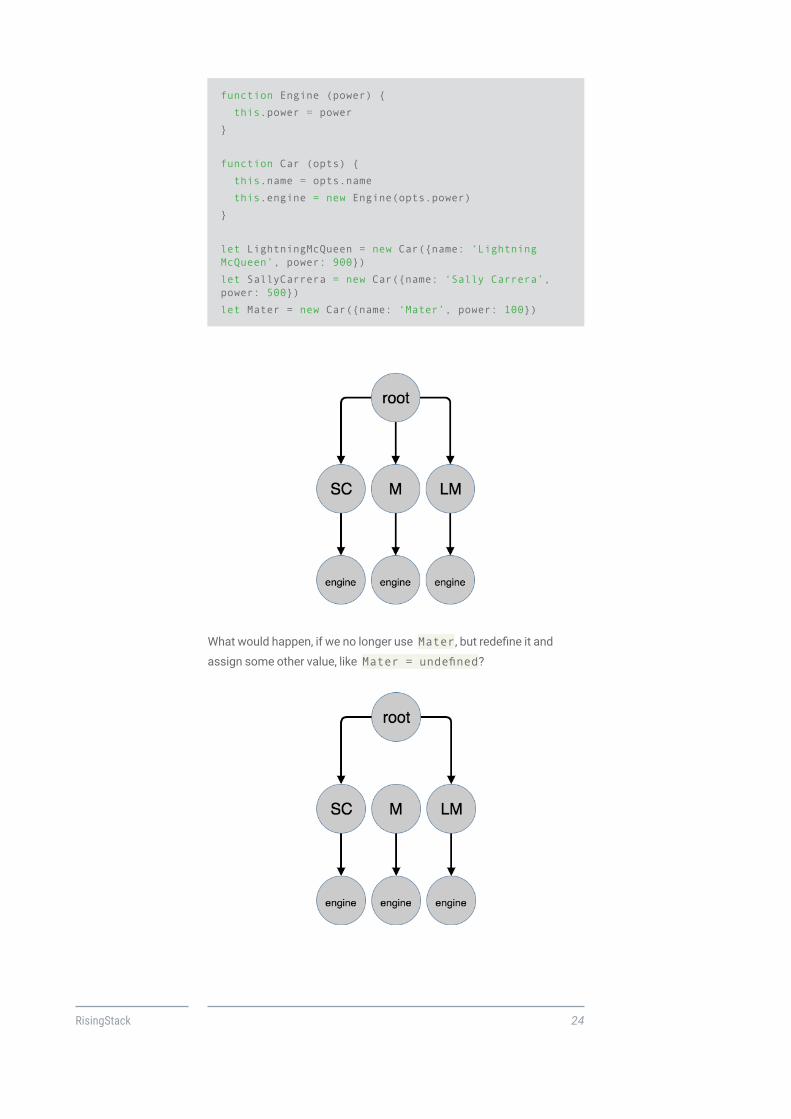
function Engine (power) {
this.power = power
}
function Car (opts) {
this.name = opts.name
this.engine = new Engine(opts.power)
}
let LightningMcQueen = new Car({name: ‘Lightning McQueen’, power: 900})
let SallyCarrera = new Car({name: ‘Sally Carrera’, power: 500})
let Mater = new Car({name: ‘Mater’, power: 100})
What would happen, if we no longer use Mater, but redefine it and
assign some other value, like Mater = undefined?

RisingStack 25
As a result, the original Mater object cannot be reached from the root
object, so on the next garbage collector run it will be freed up:
Now as we understand the basics of what’s the expected behaviour
of the garbage collector, let’s take a look on how it is implemented in
V8!
GARBAGE COLLECTION METHODS
In one of our previous articles we dealt with how the Node.js
garbage collection methods work, so I strongly recommend reading
that article. Here are the most important things you’ll learn there:
New Space and Old Space
The heap has two main segments, the New Space and the Old Space.
The New Space is where new allocations are happening; it is fast to
collect garbage here and has a size of ~1-8MBs. Objects living in the
New Space are called Young Generation.
The Old Space where the objects that survived the collector in the
New Space are promoted into - they are called the Old Generation.
Allocation in the Old Space is fast, however collection is expensive
so it is infrequently performed .
Young Generation
Usually, ~20% of the Young Generation survives into the Old
Generation. Collection in the Old Space will only commence once
it is getting exhausted. To do so the V8 engine uses two different

RisingStack 26
collection algorithms.
Scavenge and Mark-Sweep collection
Scavenge collection is fast and runs on the Young Generation,
however the slower Mark-Sweep collection runs on the Old
Generation.
A REAL-LIFE EXAMPLE - THE METEOR CASE-
STUDY
In 2013, the creators of Meteor announced their findings about a
memory leak they ran into. The problematic code snippet was the
following:
var theThing = null var replaceThing = function () { var originalThing = theThing var unused = function () { if (originalThing) console.log(“hi”) } theThing = { longStr: new Array(1000000).join(‘*’), someMethod: function () { console.log(someMessage) } };};setInterval(replaceThing, 1000)
Well, the typical way that closures are implemented is that every function
object has a link to a dictionary-style object representing its lexical scope.
If both functions defined inside replaceThing actually used originalThing,
it would be important that they both get the same object, even if
originalThing gets assigned to over and over, so both functions share
the same lexical environment. Now, Chrome’s V8 JavaScript engine is
apparently smart enough to keep variables out of the lexical environment
if they aren’t used by any closures - from the Meteor blog.
Further reading:
• Finding a memory leak in Node.js
• JavaScript Garbage Collection Improvements - Orinoco
• memorymanagement.org

RisingStack 27
CHAPTER THREE: NATIVE MODULES
There are times when the performance of JavaScript is not enough,
so you have to depend more on native Node.js modules.
While native extensions are definitely not a beginner topic, we
recommend this chapter for every Node.js developer to get a bit of
knowledge on how they work.
COMMON USE CASES OF
NATIVE NODE.JS MODULES
The knowledge on native modules comes handy when you’re adding
a native extension as a dependency, which you could have done
already!
Just take a look at the list of a few popular modules using native
extensions. You’re using at least one of them, right?
• https://github.com/wadey/node-microtime
• https://github.com/node-inspector
• https://github.com/node-inspector/v8-profiler
• http://www.nodegit.org/
There are a few reasons why one would consider writing native
Node.js modules, these include but not limited to:
• Performance-critical applications: Let’s be honest, Node.js is great
for doing asynchronous I/O operations, but when it comes to real
number-crunching, it’s not that great of a choice.
• Hooking into lower level (e.g.: operating-system) APIs
• Creating a bridge between C or C++ libraries and Node.js
WHAT ARE THE NATIVE MODULES?
Node.js Addons are dynamically-linked shared objects, written in C or
C++, that can be loaded into Node.js using the require() function, and
used just as if they were an ordinary Node.js module.
- From the Node.js documentation

RisingStack 28
This means that (if done right) the quirks of C/C++ can be hidden
from the module’s consumer. What they will see instead is that
your module is a Node.js module - just like if you had written it in
JavaScript.
As we’ve learned from the previous chapters, Node.js runs on the
V8 JavaScript Engine, which is a C program on its own. We can write
code that interacts directly with this C program in its own language,
which is great because we can avoid a lot of expensive serialization
and communication overhead.
Also, in the previous chapter we’ve learnt about the cost of the
Node.js Garbage Collector. Although Garbage Collection can be
completely avoided if you decide to manage memory yourself
(because C/C++ have no GC concept), you’ll create memory issues
much easier.
Writing native extensions requires knowledge on one or more of the
following topics:
• Libuv
• V8
• Node.js internals
All of those have excellent documentation. If you’re getting into this
field, I’d recommend to read them.
Without further ado, let’s begin:
PREREQUISITES
Linux:
• python (v2.7 recommended, v3.x.x is not supported)
• make
• A proper C/C++ compiler toolchain, like GCC
Mac:
• Xcode installed: make sure you not only install it, but you start it at
least once and accept its terms and conditions - otherwise it won’t
work!

RisingStack 29
Windows
• Run cmd.exe as administrator and type npm install
--global --production windows-build-tools
- which will install everything for you.
OR
• Install Visual Studio (it has all the C/C++ build tools preconfigured)
OR
• Use the Linux subsystem provided by the latest Windows build. With
that, follow the LINUX instructions above.
CREATING OUR NATIVE NODE.JS EXTENSION
Let’s create our first file for the native extension. We can either use
the .cc extension that means it’s C with classes, or the .cpp
extension which is the default for C++. The Google Style Guide
recommends .cc, so I’m going to stick with it.
First, let’s see the file in whole, and after that, I’m going to explain it
to you line-by-line!
(Code snippet on the next page!)
RisingStack 30
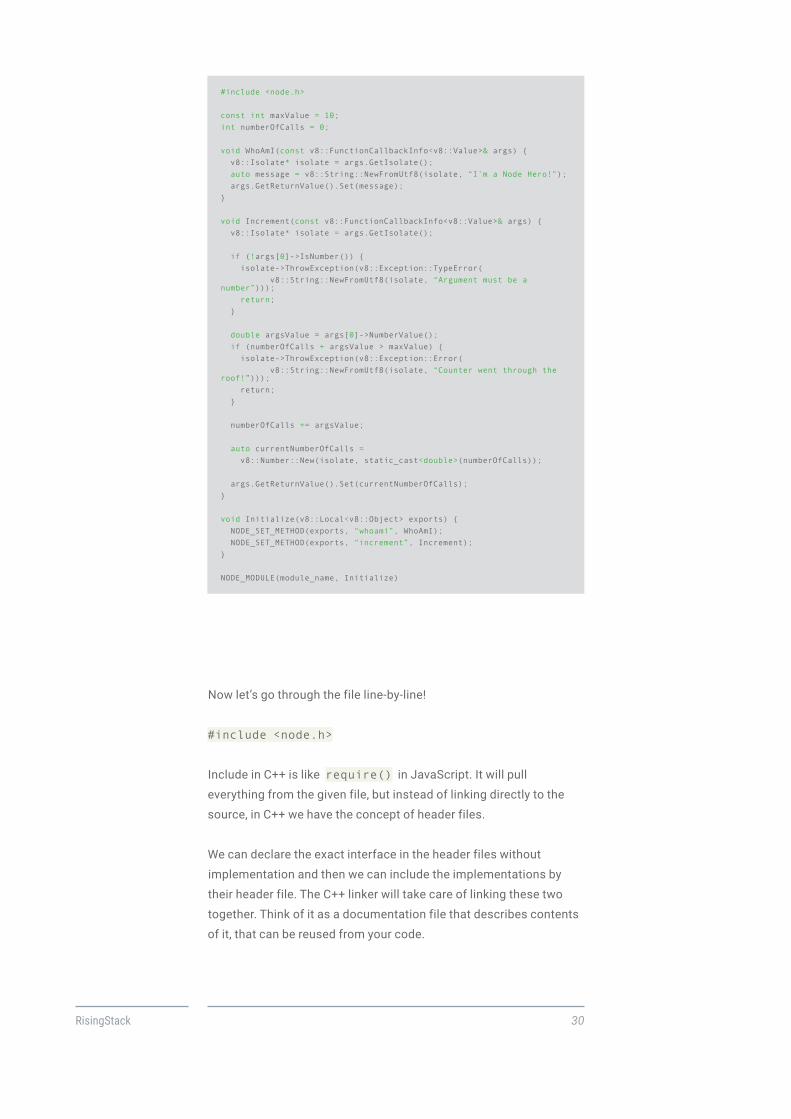
#include <node.h>
const int maxValue = 10; int numberOfCalls = 0;
void WhoAmI(const v8::FunctionCallbackInfo<v8::Value>& args) { v8::Isolate* isolate = args.GetIsolate(); auto message = v8::String::NewFromUtf8(isolate, “I’m a Node Hero!”); args.GetReturnValue().Set(message);}
void Increment(const v8::FunctionCallbackInfo<v8::Value>& args) { v8::Isolate* isolate = args.GetIsolate();
if (!args[0]->IsNumber()) { isolate->ThrowException(v8::Exception::TypeError( v8::String::NewFromUtf8(isolate, “Argument must be a number”))); return; }
double argsValue = args[0]->NumberValue(); if (numberOfCalls + argsValue > maxValue) { isolate->ThrowException(v8::Exception::Error( v8::String::NewFromUtf8(isolate, “Counter went through the roof!”))); return; }
numberOfCalls += argsValue;
auto currentNumberOfCalls = v8::Number::New(isolate, static_cast<double>(numberOfCalls));
args.GetReturnValue().Set(currentNumberOfCalls);}
void Initialize(v8::Local<v8::Object> exports) { NODE_SET_METHOD(exports, “whoami”, WhoAmI); NODE_SET_METHOD(exports, “increment”, Increment);}
NODE_MODULE(module_name, Initialize)
Now let’s go through the file line-by-line!
#include <node.h>
Include in C++ is like require() in JavaScript. It will pull
everything from the given file, but instead of linking directly to the
source, in C++ we have the concept of header files.
We can declare the exact interface in the header files without
implementation and then we can include the implementations by
their header file. The C++ linker will take care of linking these two
together. Think of it as a documentation file that describes contents
of it, that can be reused from your code.
RisingStack 31
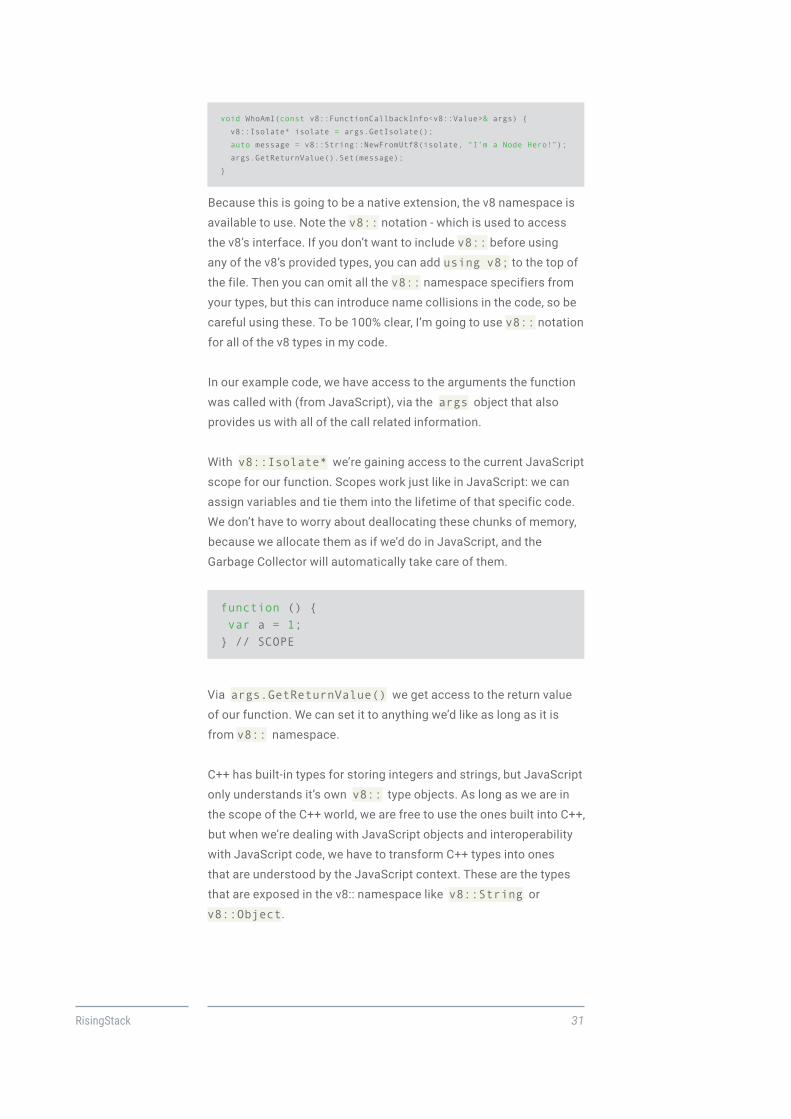
void WhoAmI(const v8::FunctionCallbackInfo<v8::Value>& args) {
v8::Isolate* isolate = args.GetIsolate();
auto message = v8::String::NewFromUtf8(isolate, “I’m a Node Hero!”);
args.GetReturnValue().Set(message);
}
Because this is going to be a native extension, the v8 namespace is
available to use. Note the v8:: notation - which is used to access
the v8’s interface. If you don’t want to include v8:: before using
any of the v8’s provided types, you can add using v8; to the top of
the file. Then you can omit all the v8:: namespace specifiers from
your types, but this can introduce name collisions in the code, so be
careful using these. To be 100% clear, I’m going to use v8:: notation
for all of the v8 types in my code.
In our example code, we have access to the arguments the function
was called with (from JavaScript), via the args object that also
provides us with all of the call related information.
With v8::Isolate* we’re gaining access to the current JavaScript
scope for our function. Scopes work just like in JavaScript: we can
assign variables and tie them into the lifetime of that specific code.
We don’t have to worry about deallocating these chunks of memory,
because we allocate them as if we’d do in JavaScript, and the
Garbage Collector will automatically take care of them.
function () { var a = 1;} // SCOPE
Via args.GetReturnValue() we get access to the return value
of our function. We can set it to anything we’d like as long as it is
from v8:: namespace.
C++ has built-in types for storing integers and strings, but JavaScript
only understands it’s own v8:: type objects. As long as we are in
the scope of the C++ world, we are free to use the ones built into C++,
but when we’re dealing with JavaScript objects and interoperability
with JavaScript code, we have to transform C++ types into ones
that are understood by the JavaScript context. These are the types
that are exposed in the v8:: namespace like v8::String or
v8::Object.
RisingStack 32
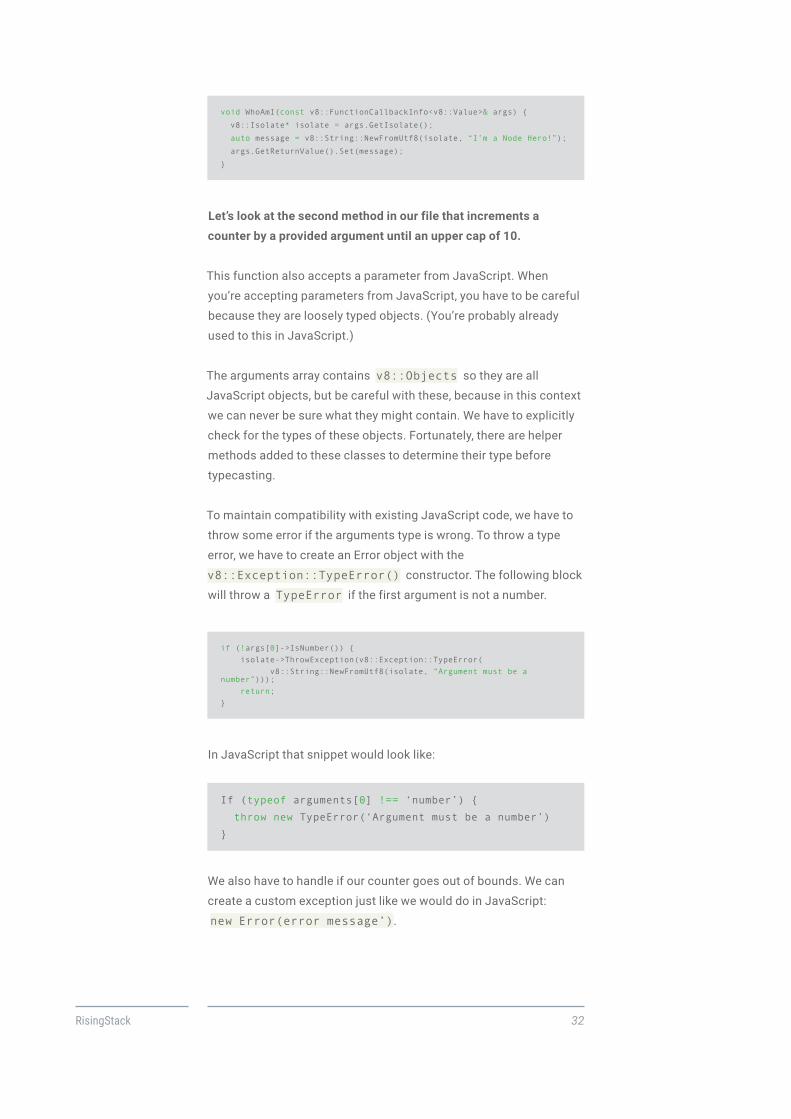
void WhoAmI(const v8::FunctionCallbackInfo<v8::Value>& args) {
v8::Isolate* isolate = args.GetIsolate();
auto message = v8::String::NewFromUtf8(isolate, “I’m a Node Hero!”);
args.GetReturnValue().Set(message);
}
Let’s look at the second method in our file that increments a
counter by a provided argument until an upper cap of 10.
This function also accepts a parameter from JavaScript. When
you’re accepting parameters from JavaScript, you have to be careful
because they are loosely typed objects. (You’re probably already
used to this in JavaScript.)
The arguments array contains v8::Objects so they are all
JavaScript objects, but be careful with these, because in this context
we can never be sure what they might contain. We have to explicitly
check for the types of these objects. Fortunately, there are helper
methods added to these classes to determine their type before
typecasting.
To maintain compatibility with existing JavaScript code, we have to
throw some error if the arguments type is wrong. To throw a type
error, we have to create an Error object with the
v8::Exception::TypeError() constructor. The following block
will throw a TypeError if the first argument is not a number.
if (!args[0]->IsNumber()) { isolate->ThrowException(v8::Exception::TypeError( v8::String::NewFromUtf8(isolate, “Argument must be a number”))); return;}
In JavaScript that snippet would look like:
If (typeof arguments[0] !== ‘number’) {
throw new TypeError(‘Argument must be a number’)
}
We also have to handle if our counter goes out of bounds. We can
create a custom exception just like we would do in JavaScript:
new Error(error message’).

RisingStack 33
In C++ with the v8 api it looks like:
v8::Exception:Error(v8::String::NewFromUtf8(isolate,
“Counter went through the roof!”))); where the isolate
is the current scope that we have to first get the reference via the
v8::Isolate* isolate = args.GetIsolate();.
double argsValue = args[0]->NumberValue();if (numberOfCalls + argsValue > maxValue) { isolate->ThrowException(v8::Exception::Error( v8::String::NewFromUtf8(isolate, “Counter went through the roof!”))); return;}
After we handled everything that could go wrong, we add the
argument to the counter variable that’s available in our C++ scope.
That looks like as if it was JavaScript code. To return the new
value to JavaScript code, first we have to make the conversion
from integer in C++ to v8::Number that we can access from
JavaScript. First we have to cast our integer to double with
static_cast<double>() and we can pass its result to the
v8::Number constructor.
auto currentNumberOfCalls =
v8::Number::New(isolate, static_cast<double>(numberOfCalls));
NODE_SET_METHOD is a macro that we use to assign a method on
the exports object. This is the very same exports object that we’re
used to in JavaScript. That is the equivalent of:
exports.whoami = WhoAmI
In fact, all Node.js addons must export an initialization function
following this pattern:
void Initialize(v8::Local<v8::Object> exports); NODE_MODULE(module_name, Initialize)
All C++ modules have to register themselves into the node module
system. Without these lines, you won’t be able to access your
module from JavaScript. If you accidentally forget to register your
module, it will still compile, but when you’re trying to access it from
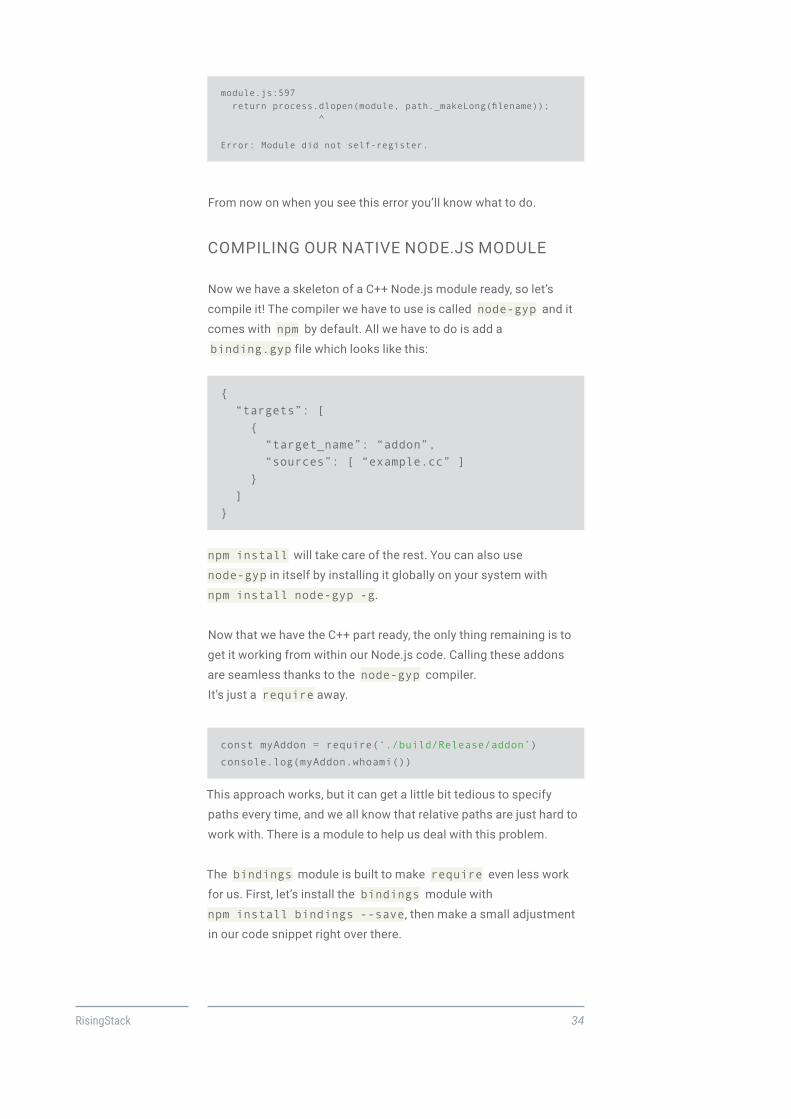
JavaScript you’ll get the following exception:
RisingStack 34
module.js:597 return process.dlopen(module, path._makeLong(filename)); ^
Error: Module did not self-register.
From now on when you see this error you’ll know what to do.
COMPILING OUR NATIVE NODE.JS MODULE
Now we have a skeleton of a C++ Node.js module ready, so let’s
compile it! The compiler we have to use is called node-gyp and it
comes with npm by default. All we have to do is add a
binding.gyp file which looks like this:
{ “targets”: [ { “target_name”: “addon”, “sources”: [ “example.cc” ] } ]}
npm install will take care of the rest. You can also use
node-gyp in itself by installing it globally on your system with
npm install node-gyp -g.
Now that we have the C++ part ready, the only thing remaining is to
get it working from within our Node.js code. Calling these addons
are seamless thanks to the node-gyp compiler.
It’s just a require away.
const myAddon = require(‘./build/Release/addon’)
console.log(myAddon.whoami())
This approach works, but it can get a little bit tedious to specify
paths every time, and we all know that relative paths are just hard to
work with. There is a module to help us deal with this problem.
The bindings module is built to make require even less work
for us. First, let’s install the bindings module with
npm install bindings --save, then make a small adjustment
in our code snippet right over there.

RisingStack 35
We can require the bindings module, and it will expose all the
.node native extensions that we’ve specified in the binding.gyp
files target_name.
const myAddon = require(‘bindings’)(‘addon’) console.log(myAddon.whoami())
These two ways of using the binding is equivalent.
This is how you create native bindings to Node.js and bridge it
to JavaScript code. But there is one small problem: Node.js is
constantly evolving, and the interface just tends to break a lot! This
means that targeting a specific version might not be a good idea
because your addon will go out of date fast.
Think ahead and use Native Abstractions for Node.js (NaN).
The NaN library started out as a third party module written by
independent individuals, but from late 2015 it became an incubated
project of the Node.js foundation.
NaN provides us a layer of abstraction on top of the Node.js API and
creates a common interface on top of all versions. It’s considered a
best practice to use NaN instead of the native Node.js interface, so
you can always stay ahead of the curve.
To use NaN, we have to rewrite parts of our application, but first, let’s
install it with npm install nan --save. First, we have to add the
following lines into the targets field in our bindings.gyp. This will
make it possible to include the NaN header file in our program to use
NaN’s functions.
{
“targets”: [
{
“include_dirs” : [
“<!(node -e \”require(‘nan’)\”)”
],
“target_name”: “addon”,
“sources”: [ “example.cc” ]
}
]
}

RisingStack 36
We can replace some of the v8’s types with NaN’s abstractions
in our sample application. It provides us helper methods on the
call arguments and makes working with v8 types a much better
experience.
The first thing you’ll probably notice is that we don’t have to have
explicit access to the JavaScript’s scope, via the
v8::Isolate* isolate = args.GetIsolate(); NaN handles
that automatically for us. Its types will hide bindings to the current
scope, so we don’t have to bother using them.
#include <nan.h>
const int maxValue = 10; int numberOfCalls = 0;
void WhoAmI(const Nan::FunctionCallbackInfo<v8::Value>& args) { auto message = Nan::New<v8::String>(“I’m a Node Hero!”).ToLocalChecked(); args.GetReturnValue().Set(message);}
void Increment(const Nan::FunctionCallbackInfo<v8::Value>& args) { if (!args[0]->IsNumber()) { Nan::ThrowError(“Argument must be a number”); return; }
double argsValue = args[0]->NumberValue(); if (numberOfCalls + argsValue > maxValue) { Nan::ThrowError(“Counter went through the roof!”); return; }
numberOfCalls += argsValue;
auto currentNumberOfCalls = Nan::New<v8::Number>(numberOfCalls);
args.GetReturnValue().Set(currentNumberOfCalls);}
void Initialize(v8::Local<v8::Object> exports) { exports->Set(Nan::New(“whoami”).ToLocalChecked(), Nan::New<v8::FunctionTemplate>(WhoAmI)->GetFunction()); exports->Set(Nan::New(“increment”).ToLocalChecked(), Nan::New<v8::FunctionTemplate>(Increment)->GetFunction());}
NODE_MODULE(addon, Initialize)
Now we have a working and also idiomatic example of how a
Node.js native extension should look like.
First, we’ve learned about structuring the code, then about
compilation processes, then went through the code itself line by line
to understand every small piece of it. At the end, we looked at NaN’s
provided abstractions over the v8 API.
There is one more small tweak we can make, and that is to use the
provided macros of NaN.

RisingStack 37
Macros are snippets of code that the compiler will expand
when compiling the code. More on macros can be found in this
documentation. We had already been using one of these macros,
NODE_MODULE, but NaN has a few others that we can include as well.
These macros will save us a bit of time when creating our native
extensions.
#include <nan.h>
const int maxValue = 10; int numberOfCalls = 0;
NAN_METHOD(WhoAmI) { auto message = Nan::New<v8::String>(“I’m a Node Hero!”).ToLocalChecked(); info.GetReturnValue().Set(message);}
NAN_METHOD(Increment) { if (!info[0]->IsNumber()) { Nan::ThrowError(“Argument must be a number”); return; }
double infoValue = info[0]->NumberValue(); if (numberOfCalls + infoValue > maxValue) { Nan::ThrowError(“Counter went through the roof!”); return; }
numberOfCalls += infoValue;
auto currentNumberOfCalls = Nan::New<v8::Number>(numberOfCalls);
info.GetReturnValue().Set(currentNumberOfCalls);}
NAN_MODULE_INIT(Initialize) { NAN_EXPORT(target, WhoAmI); NAN_EXPORT(target, Increment);}
NODE_MODULE(addon, Initialize)
The first NAN_METHOD will save us the burden of typing the long
method signature and will include that for us when the compiler
expands this macro. Take note that if you use macros, you’ll have
to use the naming provided by the macro itself - so now instead
of args the arguments object will be called info, so we have to
change that everywhere.
The next macro we used is the NAN_MODULE_INIT which provides
the initialization function, and instead of exports, it named its
argument target so we have to change that one as well.
The last macro is NAN_EXPORT which will set our modules interface.
You can see that we cannot specify the objects keys in this macro, it
will assign them with their respective names.
That would look like this in modern JavaScript:

RisingStack 38
module.exports = { Increment, WhoAmI}
If you’d like to use this with our previous example make sure you
change the function names to uppercase, like this:
‘use strict’
const addon = require(‘./build/Release/addon.node’)
console.log(`native addon whoami: ${addon.WhoAmI()}`)
for (let i = 0; i < 6; i++) { console.log(`native addon increment: ${addon.Increment(i)}`)}
For further documentation refer to Nan’s Github page.
Example Repository
We’ve created a repository with all the code included in this post.
The repository is under GIT version control, and available on GitHub.
Each of the steps have their own branch, master is the first example,
nan is the second one and the final step’s branch is called macros.
Conclusion
I hope you had as much fun following along, as we’ve had writing this
book. We’d highly recommend getting into at least a bit of C/C++ to
understand the lower levels of the platform itself. You’ll surely find
something of your interest. :)
If you enjoyed this book, we recommend to check out our Node.js
Debugging and Monitoring solution called Trace - which helps you
to build even better applications!