Understanding Java Virtual Machine Selection in ... · with your installer is the JVM you installer...
17
© 2010 Flexera Software, Inc. and/or InstallShield Co. Inc. All other brand and product names mentioned herein may be the trademarks and registered trademarks of their respective owners. InstallAnywhere Tips & Tricks ––––––––––––––––––––––––––––––––––––––––––––––––––––––––––––––––––––––––––––– Understanding Java Virtual Machine Selection in InstallAnywhere Introduction The Java virtual machine used to run an InstallAnywhere installer, or any InstallAnywhere-installed Java application, depends largely upon the settings in your InstallAnywhere project and the Java executables available on the end-user's system. The core of JVM selection is performed by InstallAnywhere's LaunchAnywhere technology. LaunchAnywhere launchers are capable of performing their own VM search each time they run. However, it is also possible to • Bundle a VM with the installer to be used by the installer and, optionally, to be used by the launchers your installer deploys. (See "Bundling a VM with Your Installer" and "Customizing Individual Launcher Settings.") • Employ the results of the installer's VM search. The installer's VM search is a customizable scan of the end users system. The results of this search can then be used to configure the launchers the installer deploys. • Include a Choose Java VM panel that allows the end user to choose the bundled VM, choose local VMs that match the installer's VM search, start a VM search in a non-standard directory, or browse for a local Java executable. Basic JVM Selection by LaunchAnywhere Launchers Without any significant changes to an InstallAnywhere project's default settings, Java virtual machine selection is managed exclusively by InstallAnywhere's LaunchAnywhere technology in a fairly straightforward manner. This is true for both the installer's launcher and the launchers for your Java applications provided 1. No Java VM is bundled with the installer 2. No Choose Java VM panel is included in the installer A launcher first attempts to use the VM specified in its current VM property (lax.nl.current.vm). If the VM specified there is either unavailable or invalid, the launcher searches the system for a valid VM. When a LaunchAnywhere launcher must search for a JVM, it scans common system locations for Java executables and uses the first one it finds that matches the criteria in its valid VM list (lax.nl.valid.vm.list). Note: The default value for all launcher's valid VM list only requires a JVM version 1.4 or newer. For information on changing the valid VM list for the installer's launcher, see "Customizing VM Selection Criteria for Running the Installer." For information on changing the valid VM list for a launcher deployed by your installer, see "Customizing Individual Launcher Settings." The Impact of the Bundled VMs, the Installer's VM Search, and the Choose Java VM panel Understanding which JVM a launcher will use becomes more complicated when you choose to do one or more of the following: 1. Include a bundled VM with your installer. (See "Controlling the JVM Used to Run the Installer.") 2. Customize the installer's VM search. (See "Customizing Settings for the Installer's VM Search" and "Customizing JVM Search Paths and Patterns for Unix and Windows.")
Transcript of Understanding Java Virtual Machine Selection in ... · with your installer is the JVM you installer...

© 2010 Flexera Software, Inc. and/or InstallShield Co. Inc. All other brand and product names mentioned herein may be the trademarks and registered trademarks of their respective owners.
InstallAnywhere Tips & Tricks ––––––––––––––––––––––––––––––––––––––––––––––––––––––––––––––––––––––––––––– Understanding Java Virtual Machine Selection in InstallAnywhere
Introduction The Java virtual machine used to run an InstallAnywhere installer, or any InstallAnywhere-installed Java application, depends largely upon the settings in your InstallAnywhere project and the Java executables available on the end-user's system. The core of JVM selection is performed by InstallAnywhere's LaunchAnywhere technology. LaunchAnywhere launchers are capable of performing their own VM search each time they run. However, it is also possible to
• Bundle a VM with the installer to be used by the installer and, optionally, to be used by the launchers your installer deploys. (See "Bundling a VM with Your Installer" and "Customizing Individual Launcher Settings.")
• Employ the results of the installer's VM search. The installer's VM search is a customizable scan of the end users system. The results of this search can then be used to configure the launchers the installer deploys.
• Include a Choose Java VM panel that allows the end user to choose the bundled VM, choose local VMs that match the installer's VM search, start a VM search in a non-standard directory, or browse for a local Java executable.
Basic JVM Selection by LaunchAnywhere Launchers Without any significant changes to an InstallAnywhere project's default settings, Java virtual machine selection is managed exclusively by InstallAnywhere's LaunchAnywhere technology in a fairly straightforward manner. This is true for both the installer's launcher and the launchers for your Java applications provided
1. No Java VM is bundled with the installer 2. No Choose Java VM panel is included in the installer
A launcher first attempts to use the VM specified in its current VM property (lax.nl.current.vm). If the VM specified there is either unavailable or invalid, the launcher searches the system for a valid VM. When a LaunchAnywhere launcher must search for a JVM, it scans common system locations for Java executables and uses the first one it finds that matches the criteria in its valid VM list (lax.nl.valid.vm.list). Note: The default value for all launcher's valid VM list only requires a JVM version 1.4 or newer. For information on changing the valid VM list for the installer's launcher, see "Customizing VM Selection Criteria for Running the Installer." For information on changing the valid VM list for a launcher deployed by your installer, see "Customizing Individual Launcher Settings."
The Impact of the Bundled VMs, the Installer's VM Search, and the Choose Java VM panel Understanding which JVM a launcher will use becomes more complicated when you choose to do one or more of the following:
1. Include a bundled VM with your installer. (See "Controlling the JVM Used to Run the Installer.") 2. Customize the installer's VM search. (See "Customizing Settings for the Installer's VM Search" and
"Customizing JVM Search Paths and Patterns for Unix and Windows.")

© 2010 Flexera Software, Inc. and/or InstallShield Co. Inc. All other brand and product names mentioned herein may be the trademarks and registered trademarks of their respective owners.
3. Include a Choose Java VM panel in your installer. (See "Giving Users a Choice.") For the launchers the installer deploys, the JVM selection process can be much more complex. The JVM selected depends on
• The presence of a bundled VM • The results of the installer's VM search • The presence of a Choose Java VM panel and that panel's configuration • The launcher's Advanced Settings • The Java VMs present on the end user's system
See "Controlling the JVM Used by Launchers You Install" and "Giving Users a Choice" for detailed discussions of these conditions.
When Do JVM Searches Take Place? The installer's launcher, the installer itself, and the installed launchers are all capable of making JVM selection decisions and performing VM searches--some during the install process and some after.
1. When an InstallAnywhere installer without a bundled JVM is executed, the installer's launcher does a "bootstrap" search of the system for a VM that meets the criteria expressed in your project's Installer Valid VM List (Project > Config > Installer Valid VM List). See "Controlling the JVM Used to Run the Installer" for more information.
2. Once the installer is running, it performs a search for a JVM to use with any LaunchAnywhere launchers it will install. The criteria the installer uses for this search depends on VM search settings you provide on the Project > Java task. See "Controlling the JVM Used by Launchers You Install" for details.
3. LaunchAnywhere launchers are also capable of performing an independent JVM search when they are executed. LaunchAnywhere performs this search when it does not get a VM setting from the installer or when specifically set to perform its own search. For information on how the require LaunchAnywhere to perform its own JVM search, see "Customizing Launcher Settings" in the "Controlling the JVM Used by Launchers You Install" section.
Note: The common locations examined during a VM search performed by an InstallAnywhere launcher or a VM search performed by an installer are quite similar.
• On Windows, VM searches are done in directories listed in the PATH environment variable as well as the following registry keys:
o SOFTWARE\JavaSoft\Java Development Kit o SOFTWARE\JavaSoft\Java Runtime Environment o SOFTWARE\IBM\Java2 Runtime Environment o SOFTWARE\IBM\Java Development Kit
• On UNIX, launchers search only the PATH environment variable while the installer VM search includes these paths as well:
o /bin o /usr/bin o /usr/local/bin o /opt o /opt/gnu/bin o /usr/gnu/bin
Controlling the JVM Used to Run the Installer InstallAnywhere installers are Java-based and require a Java virtual Machine (JVM) in order to run. The JVM the installer uses depends on a couple factors:
1. The presence of a bundled VM 2. The criteria in the Installer Valid VM List
If a VM has been bundled with the installer, the installer uses that VM to run.
© 2010 Flexera Software, Inc. and/or InstallShield Co. Inc. All other brand and product names mentioned herein may be the trademarks and registered trademarks of their respective owners.
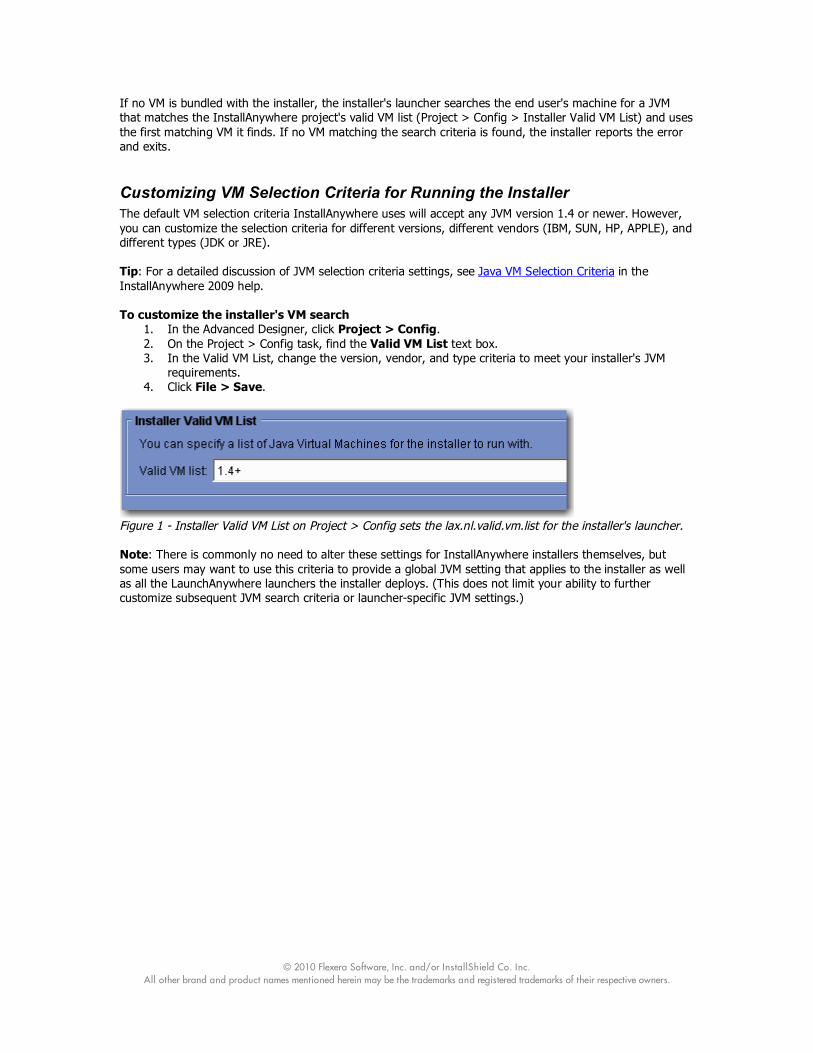
If no VM is bundled with the installer, the installer's launcher searches the end user's machine for a JVM that matches the InstallAnywhere project's valid VM list (Project > Config > Installer Valid VM List) and uses the first matching VM it finds. If no VM matching the search criteria is found, the installer reports the error and exits.
Customizing VM Selection Criteria for Running the Installer The default VM selection criteria InstallAnywhere uses will accept any JVM version 1.4 or newer. However, you can customize the selection criteria for different versions, different vendors (IBM, SUN, HP, APPLE), and different types (JDK or JRE). Tip: For a detailed discussion of JVM selection criteria settings, see Java VM Selection Criteria in the InstallAnywhere 2009 help. To customize the installer's VM search
1. In the Advanced Designer, click Project > Config. 2. On the Project > Config task, find the Valid VM List text box. 3. In the Valid VM List, change the version, vendor, and type criteria to meet your installer's JVM
requirements. 4. Click File > Save.
Figure 1 - Installer Valid VM List on Project > Config sets the lax.nl.valid.vm.list for the installer's launcher. Note: There is commonly no need to alter these settings for InstallAnywhere installers themselves, but some users may want to use this criteria to provide a global JVM setting that applies to the installer as well as all the LaunchAnywhere launchers the installer deploys. (This does not limit your ability to further customize subsequent JVM search criteria or launcher-specific JVM settings.)

© 2010 Flexera Software, Inc. and/or InstallShield Co. Inc. All other brand and product names mentioned herein may be the trademarks and registered trademarks of their respective owners.
Bundling a VM with Your Installer If the Java application your installer deploys has specific JVM requirements, you can bundle a VM pack with your installer to ensure those requirements are met. Without additional customization, the JVM you bundle with your installer is the JVM you installer runs on and the JVM any LaunchAnywhere launchers in your project will use. Tip: For more information on obtaining and bundling VM packs, see Working with VM Packs and Understanding When VM Packs Are Installed in the InstallAnywhere 2009 help. To bundle a VM with your installer
1. In the Advanced Designer, click Project > Build > Build Targets. 2. For the build target that requires a bundled JVM, click the With VM checkbox. 3. Then click the VM to Bundle with Installer list and choose a VM pack. 4. Click File > Save.
Fine-Tuning VM Install and Uninstall Conditions InstallAnywhere allows you to fine-tune how your bundled VMs are handled during the install and uninstall. You can control the conditions under which the VM will be installed and uninstalled as well as the location to which the VM is saved. The controls for this appear in the Project > Java (Bundled Virtual Machine) task of the Advanced Designer.
Figure 2 - Bundled Virtual Machine settings control how the VMs you bundle with your installers are handled during the install.
Controlling When the Bundled JVM is Installed By default, InstallAnywhere installs any JVM you bundle with your installer and uninstalls that JVM if the user uninstalls your product. But the JVM you bundle with your installer need not be installed to be used to run the installer. (The installer is capable of extracting the JVM to a temporary location during the install and then deleted when the installation is complete.) To prevent your bundled JVM from being installed in all cases
• On the Project > Java task, click the Install Bundled Virtual Machine checkbox to deselect that option.
Note: If you deselect Install Bundled Virtual Machine, it will not be possible to allow users to choose the bundled VM in the Choose Java VM panel. The bundled VM, although still available for the installer to use, will not be presented in the Choose Java VM panel.

© 2010 Flexera Software, Inc. and/or InstallShield Co. Inc. All other brand and product names mentioned herein may be the trademarks and registered trademarks of their respective owners.
To install your bundled JVM only when your project includes a LaunchAnywhere launcher • On the Project > Java task, click the Only When Installing a LaunchAnywhere checkbox to
select that option. To install your bundled JVM only when no compatible JVM exists on the target system
• On the Project > Java task, click the Only When a Compatible VM Is Not Found in the System checkbox to select that option.
This approach gives priority to the JVM search. This option refers to the results of the installer's VM—the search the installer performs to find a suitable VM for the launchers the installer deploys. The criteria for this search depend on the VM Search Settings you provide on the Project > Java task. (For more information on these settings, see "Customizing VM Search Settings for Your Launchers" in this document.) In the event that the JVM search succeeds, the installer will not install the bundled JVM. If the search fails to locate a compatible JVM, the installer installs the bundled JVM. To prevent your bundled JVM from being removed during the uninstall
• On the Project > Java task, click the Do Not Remove Bundled VM When Uninstalling checkbox to select this option.
Controlling the Install Location of the JVM The default location to which InstallAnywhere installers store a bundled JVM (when installed) is in a jre subdirectory of the product's install location. This location is set by the default configuration of the VM Install Folder list and text box controls: User Install Folder ($USER_INSTALL_DIR$ magic folder) and jre (subdirectory). If necessary, you can change the magic folder in which the jre subdirectory is created or change the name of the subdirectory in which the bundled JVM is installed. To change the VM Install Folder
• On the Project > Java task, click the VM Install Folder list and choose a magic folder. Note: It is possible to select one of the user-customizable magic folders ($USER_MAGIC_FOLDER_n$) and define the location value of that magic folder with a Set InstallAnywhere Variable action in the Pre-Install task. To change the subdirectory
• On the Project > Java task, select the text (jre, by default) in the VM Install Folder text box and type the name of the subdirectory to which you want the bundled JVM installed.
Note: Users can change the name of the subdirectory in which the bundled JVM is installed but cannot create a multi-level subdirectory structure under the magic folder you choose for VM Install Folder.
© 2010 Flexera, Software Inc. and/or InstallShield Co. Inc. All other brand and product names mentioned herein may be the trademarks and registered trademarks of their respective owners.
Understanding how the JVM selection criteria and bundled VM packs affect you installer is sufficient for most users. However, more advanced users may have complicated JVM requirements:
• They may need to customize the JVM search the installer performs for the launchers it deploys. • They may need to provide their end users with VM selection options--even enabling them to
browse for and select a specific JVM for the launchers to use. • Or they may allow for a variety of JVM options for the installer and its launchers but require strict
JVM criteria for one particular launcher. These more complex JVM selection options are supported by InstallAnywhere and discussed in the remainder of this document.
Controlling the JVM Used by Launchers you Install After an InstallAnywhere installer is launched, it searches for VMs on the end user's system. The intent of this search is to find a JVM suitable for all the LaunchAnywhere launchers your installer deploys. The criteria used for this search can be
• The criteria the installer's launcher uses in the "bootstrap" phase (Project > Config > Installer Valid VM List).
• The criteria expressed in the lax.nl.valid.vm.list property of the launchers in your project. (If more than one launcher exists in you project, the installer searches for a VM that meets all the VM criteria of these launchers.)
• A custom criteria set specifically provided for the project's launchers. (You specify this criteria at Project > Java > VM Search Settings > Use a Specific Valid VM List.)
Note: The installer applies the result of this search to your launchers only when the installer includes a bundled JVM or a Choose Java VM panel. If neither is present, the search results are still available via custom code but are not applied to your project's launchers. On Windows and Unix target systems, InstallAnywhere also supports further refinement of the JVM search paths and search patterns. These describe the locations in which the installer will search for valid VMs and the patterns it uses to recognize Java executables on those platforms. For more information see "Customizing VM Search Paths and Patterns for Unix and Windows" in this section. Every LaunchAnywhere launcher is capable of performing an independent JVM search. For details on configuring a launcher to always perform an independent search and setting criteria for that search, see "Customizing Individual Launcher Settings" in this section.
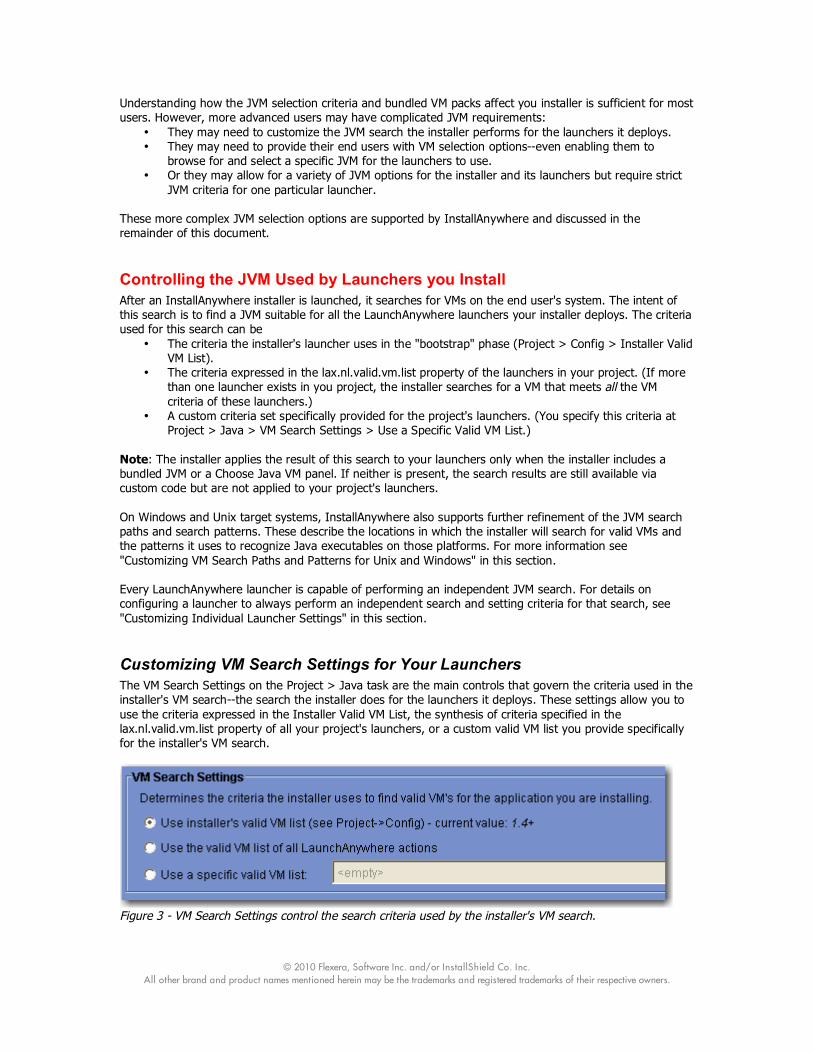
Customizing VM Search Settings for Your Launchers The VM Search Settings on the Project > Java task are the main controls that govern the criteria used in the installer's VM search--the search the installer does for the launchers it deploys. These settings allow you to use the criteria expressed in the Installer Valid VM List, the synthesis of criteria specified in the lax.nl.valid.vm.list property of all your project's launchers, or a custom valid VM list you provide specifically for the installer's VM search.
Figure 3 - VM Search Settings control the search criteria used by the installer's VM search.

© 2010 Flexera Software, Inc. and/or InstallShield Co. Inc. All other brand and product names mentioned herein may be the trademarks and registered trademarks of their respective owners.
Note: This section addresses the configuration of VM Search Settings on the Project > Java task. For information on configuring the lax.nl.valid.vm.list property for individual launchers, see "Customizing Individual Launcher Settings." To use the Installer Valid VM List criteria
• On the Project > Java task, click Use Installer's Valid VM List (See Project->Config) This causes the installer to use the criteria the installer's launcher uses in the "bootstrap" phase. As indicated in the name of the control, the criteria the installer will use to find a valid VM for your project's launchers matches the current value of the Installer Valid VM List on the Project > Config task. To use a synthesis of the criteria specified in the individual launchers included in your project
• On the Project > Java task, click Use the Valid VM List of All LaunchAnywhere Actions. This causes the installer to combine the lax.nl.valid.vm.list property values of all your project's launchers. The installer uses a synthesis of these settings to find a VM that is valid for all your project's launchers. For example, if your project includes three launchers--two using the default 1.4+ criteria but one using SUN 1.5+ the installer's search will require the vendor SUN and the version 1.5+ for all launchers. To use a custom valid vm list for the installer's VM search
1. On the Project > Java task, click Use a Specific Valid VM List. 2. In the related text box, type the JVM search criteria you want the installer to use.
Tip: For a detailed discussion of JVM selection criteria settings, see Java VM Selection Criteria in the InstallAnywhere 2009 help.
Customizing JVM Search Paths and Patterns for Unix and Windows The conventional locations InstallAnywhere installers search on Windows and Unix systems for JVMs are reflected in the default settings on the Project > Platforms > Windows and Project > Platforms > Unix tasks. Likewise, the default Java Executable Patterns settings in these locations reflect the search patterns InstallAnywhere installers use to identify Java executables. InstallAnywhere allows you to customize both the search paths and the java executable patterns your project's installers use. Note: These settings do not directly apply to your project's LaunchAnywhere launchers. They are potentially indirectly applied to your project's Windows and Unix launchers when the launcher's Advanced Settings indicate it will use either the VM Selected by the Installer or by the End User Via the Choose VM Panel or The First VM Found in the System Matching the VM Search Settings Defined Under Project->Java. However, should a LaunchAnywhere launcher perform an independent JVM search or use the VM used by the installer, these custom search paths and Java executable patterns will not be used.
Customizing Windows Search Paths For installers that target Windows systems, you can customize search path settings in the following ways:
• Add, remove, and edit custom search paths. • Add or remove Windows Registry Search and Path Environment Variable Search. • Change the depth-level of subdirectories searched

© 2010 Flexera Software, Inc. and/or InstallShield Co. Inc. All other brand and product names mentioned herein may be the trademarks and registered trademarks of their respective owners.
Figure 4 - Windows JVM Search Paths allow you to customize Windows Search Paths and Java Executable Patterns. To add a search path for Windows systems
1. In the Advanced Designer, click Project > Platforms > Windows. 2. In the Windows JVM Search Paths section, click the Search Paths tab. 3. On the Search Paths customizer, click Add. (This adds a new entry to the Search Paths list.) 4. Click the new blank row of the Search Paths list to place your cursor in the text box. 5. Type the absolute path to the directory you want the installer to search for Java executables. (You
cannot use InstallAnywhere variables or magic folders in the path statement.) Note: By default, new search paths only search the top level of the directory you specify. No subdirectories are searched. See instructions below for information on changing the directory depth of the search. To add Windows Registry Search to the Search Paths list
1. In the Advanced Designer, click Project > Platforms > Windows. 2. In the Windows JVM Search Paths section, click the Search Paths tab. 3. On the Search Paths customizer, click Add Windows Registy. (This adds the Windows Registry
Search to the Search Paths list.) Note: The Windows Registry Search examines standard keys in the Windows registry. Users cannot customize the Windows Registry Search. To add Path Environment Variable Search to the Search Paths list
1. In the Advanced Designer, click Project > Platforms > Windows. 2. In the Windows JVM Search Paths section, click the Search Paths tab. 3. On the Search Paths customizer, click Add Path Environment Variable. (This adds Path
Environment Variable Search to the Search Paths list.) Note: The Path Environment Variable Search scans the top-level of any directories that occur in the PATH environment variable. To remove a search path from Windows systems
1. In the Advanced Designer, click Project > Platforms > Windows. 2. In the Windows JVM Search Paths section, click the Search Paths tab. 3. Click on the entry in the Search Paths list you want to delete and click Remove.
To edit an existing Windows search path
1. In the Advanced Designer, click Project > Platforms > Windows. 2. In the Windows JVM Search Paths section, click the Search Paths tab. 3. In the Search Paths list, click the path you want to change. (This activates the entry and places the
cursor at the end of the path statement.) 4. Enter your path changes.

© 2010 Flexera Software, Inc. and/or InstallShield Co. Inc. All other brand and product names mentioned herein may be the trademarks and registered trademarks of their respective owners.
Note: You cannot edit search path settings for Path Environment Variable Search and Windows Registry Search but you can add or remove them as necessary. To change the directory depth for a Windows search path
1. In the Advanced Designer, click Project > Platforms > Windows. 2. In the Windows JVM Search Paths section, click the Search Paths tab. 3. In the Search Paths list, double-click the Level and choose from Top Level, First Level, or All
Levels. Note: Search paths can be set to search
• Top Level - Only searches within the immediate directory. No subdirectories. • First Level - Searches the immediate directory and its first-level subdirectories. • All Levels - Searches the immediate directory and all subdirectories.
Tip: Searching All Levels results in a very thorough search but can significantly increase the time it takes to perform the search. However, the installer stops searching in any directory as soon as it finds a VM in that directory.
Customizing Unix Search Paths For installers that target Unix systems, you can customize search path settings in the following ways:
• Add, remove, and edit custom search paths. • Add or remove Path Environment Variable Search. • Change the depth-level of subdirectories searched
Figure 5 - Unix JVM Search Paths allows you to customize Unix Search Paths and Java Executable Patterns. To add a search path for Unix systems
1. In the Advanced Designer, click Project > Platforms > Unix. 2. In the Unix JVM Search Paths section, click the Search Paths tab. 3. On the Search Paths customizer, click Add. (This adds a new entry to the Search Paths list.) 4. Click the new blank row of the Search Paths list to place your cursor in the text box. 5. Type the absolute path to the directory you want the installer to search for Java executables. (You
cannot use InstallAnywhere variables or magic folders in the path statement.) Note: By default, new search paths only search the top level of the directory you specify. No subdirectories are searched. See instructions below for information on changing the directory depth of the search. To add Path Environment Variable Search to the Search Paths list
1. In the Advanced Designer, click Project > Platforms > Unix. 2. In the Unix JVM Search Paths section, click the Search Paths tab. 3. On the Search Paths customizer, click Add Path Environment Variable. (This adds Path
Environment Variable Search to the Search Paths list.)
© 2010 Flexera Software, Inc. and/or InstallShield Co. Inc. All other brand and product names mentioned herein may be the trademarks and registered trademarks of their respective owners.
Note: The Path Environment Variable Search scans the top-level of any directories that occur in the PATH environment variable. To remove a search path from Unix systems
1. In the Advanced Designer, click Project > Platforms > Unix. 2. In the Unix JVM Search Paths section, click the Search Paths tab. 3. Click on the entry in the Search Paths list you want to delete and click Remove.
To edit an existing Unix search path
1. In the Advanced Designer, click Project > Platforms > Unix. 2. In the Unix JVM Search Paths section, click the Search Paths tab. 3. In the Search Paths list, click the path you want to change. (This activates the entry and places the
cursor at the end of the path statement.) 4. Enter your path changes.
Note: You cannot edit search path settings for Path Environment Variable Search but you can add or remove it as necessary. To change the directory depth for a Unix search path
1. In the Advanced Designer, click Project > Platforms > Unix. 2. In the Unix JVM Search Paths section, click the Search Paths tab. 3. In the Search Paths list, double-click the Level and choose from Top Level, First Level, or All
Levels. Note: Search paths can be set to search
• Top Level - Only searches within the immediate directory. No subdirectories. • First Level - Searches the immediate directory and its first-level subdirectories. • All Levels - Searches the immediate directory and all subdirectories.
Tip: Searching All Levels results in a very thorough search but can significantly increase the time it takes to perform the search. However, the installer stops searching in any directory as soon as it finds a VM in that directory.
Customizing Windows Search Patterns The default search patterns InstallAnywhere installers use on Windows systems include
• java.exe • bin\java.exe • jre\bin\java.exe
You can add, remove, or edit patterns in the Java Executable Patterns list. Note: Once a pattern matches against any directory, that directory is considered a VM home directory and none of its subdirectories are searched. To add a new search pattern to the Java Executable Patterns list
1. In the Advanced Designer, click Project > Platforms > Windows. 2. In the Windows JVM Search Paths section, click the Java Executable Patterns tab. 3. Click Add, and enter the new search pattern.
To remove a search pattern from the Java Executable Patterns list
1. In the Advanced Designer, click Project > Platforms > Windows. 2. In the Windows JVM Search Paths section, click the Java Executable Patterns tab. 3. Click the search pattern you want to delete and click Remove.
To edit an existing search pattern in the Java Executable Patterns list
1. In the Advanced Designer, click Project > Platforms > Windows. 2. In the Windows JVM Search Paths section, click the Java Executable Patterns tab.

© 2010 Flexera Software, Inc. and/or InstallShield Co. Inc. All other brand and product names mentioned herein may be the trademarks and registered trademarks of their respective owners.
3. Click the search pattern you want to edit and type your changes.
Customizing Unix Search Patterns The default search patterns InstallAnywhere installers use on Unix systems include
• java • bin\java • jre\bin\java
You can add, remove, or edit patterns in the Java Executable Patterns list. Note: Once a pattern matches against any directory, that directory is considered a VM home directory and none of its subdirectories are searched. To add a new search pattern to the Java Executable Patterns list
1. In the Advanced Designer, click Project > Platforms > Unix. 2. In the Unix JVM Search Paths section, click the Java Executable Patterns tab. 3. Click Add, and enter the new search pattern.
To remove a search pattern from the Java Executable Patterns list
1. In the Advanced Designer, click Project > Platforms > Unix. 2. In the Unix JVM Search Paths section, click the Java Executable Patterns tab. 3. Click the search pattern you want to delete and click Remove.
To edit an existing search pattern in the Java Executable Patterns list
1. In the Advanced Designer, click Project > Platforms > Unix. 2. In the Unix JVM Search Paths section, click the Java Executable Patterns tab. 3. Click the search pattern you want to edit and type your changes.
Customizing Individual Launcher Settings InstallAnywhere launchers can also be customized to dictate how their JVMs are set (or not set) by the installer. Typically, a project's launchers acquire their JVM settings from either the installer's VM search (using the criteria set specified in Project > Java > VM Search Settings) or, when provided, the choice the end user makes in the Choose Java VM panel. However, you can configure you InstallAnywhere product such that individual LaunchAnywhere launcher acquires its JVM setting in one of a variety of way. And depending on your project settings and the target system environment, the launcher can
• Use the JVM bundled with the installer • Use the JVM found by the installer's VM search • Use the JVM found by the installer's launcher during the "bootstrap" search (the same JVM that
was used to run the installer when the installer has no bundled JVM) • Use the JVM found by an independent LaunchAnywhere JVM search • Use the JVM identified by an end user's search in a non-standard path • Use the JVM selected by an end user after browsing for a specific Java executable
Note: The last two options require the inclusion of the Choose Java VM panel action in the Pre-Install task. For more information on the use of the Choose Java VM panel, see "Giving End Users a Choice."
Understanding the JVM-Selection Behavior of LaunchAnywhere at Run Time By default, LaunchAnywhere launchers follow the behavior indicated by the first of four Advanced Settings. (You can find the Advanced Settings tab on the Create LaunchAnywhere for Java Application customizer.) The Advanced Settings tab shows the following settings:
1. VM Selected by the Installer or by the End User Via Choose Java VM Panel 2. VM Used by the Installer 3. The First VM Found in the System Matching the VM Search Settings Defined Under Project->Java
© 2010 Flexera Software, Inc. and/or InstallShield Co. Inc. All other brand and product names mentioned herein may be the trademarks and registered trademarks of their respective owners.
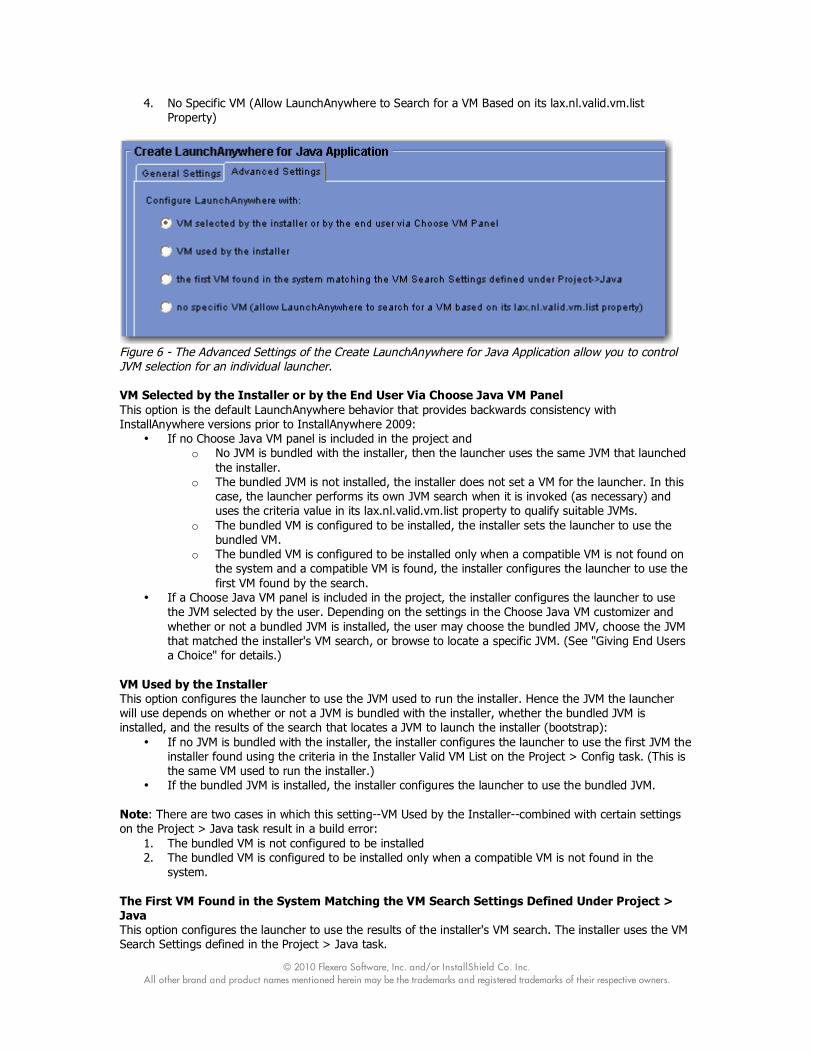
4. No Specific VM (Allow LaunchAnywhere to Search for a VM Based on its lax.nl.valid.vm.list Property)
Figure 6 - The Advanced Settings of the Create LaunchAnywhere for Java Application allow you to control JVM selection for an individual launcher. VM Selected by the Installer or by the End User Via Choose Java VM Panel This option is the default LaunchAnywhere behavior that provides backwards consistency with InstallAnywhere versions prior to InstallAnywhere 2009:
• If no Choose Java VM panel is included in the project and o No JVM is bundled with the installer, then the launcher uses the same JVM that launched
the installer. o The bundled JVM is not installed, the installer does not set a VM for the launcher. In this
case, the launcher performs its own JVM search when it is invoked (as necessary) and uses the criteria value in its lax.nl.valid.vm.list property to qualify suitable JVMs.
o The bundled VM is configured to be installed, the installer sets the launcher to use the bundled VM.
o The bundled VM is configured to be installed only when a compatible VM is not found on the system and a compatible VM is found, the installer configures the launcher to use the first VM found by the search.
• If a Choose Java VM panel is included in the project, the installer configures the launcher to use the JVM selected by the user. Depending on the settings in the Choose Java VM customizer and whether or not a bundled JVM is installed, the user may choose the bundled JMV, choose the JVM that matched the installer's VM search, or browse to locate a specific JVM. (See "Giving End Users a Choice" for details.)
VM Used by the Installer This option configures the launcher to use the JVM used to run the installer. Hence the JVM the launcher will use depends on whether or not a JVM is bundled with the installer, whether the bundled JVM is installed, and the results of the search that locates a JVM to launch the installer (bootstrap):
• If no JVM is bundled with the installer, the installer configures the launcher to use the first JVM the installer found using the criteria in the Installer Valid VM List on the Project > Config task. (This is the same VM used to run the installer.)
• If the bundled JVM is installed, the installer configures the launcher to use the bundled JVM. Note: There are two cases in which this setting--VM Used by the Installer--combined with certain settings on the Project > Java task result in a build error:
1. The bundled VM is not configured to be installed 2. The bundled VM is configured to be installed only when a compatible VM is not found in the
system. The First VM Found in the System Matching the VM Search Settings Defined Under Project > Java This option configures the launcher to use the results of the installer's VM search. The installer uses the VM Search Settings defined in the Project > Java task.
© 2010 Flexera Software, Inc. and/or InstallShield Co. Inc. All other brand and product names mentioned herein may be the trademarks and registered trademarks of their respective owners.
• If a compatible JVM is found on the system, the installer configures the launcher to use the first JVM found in the search.
• If no compatible JVM is found on the system, the launcher receives no VM configuration. As a result, the launcher performs its own JVM search when it is invoked.
Note: For details on how the VM Search Settings are applied to find a JVM, see "Customizing VM Search Criteria for Your Launchers." No Specific VM This option provides no JVM configuration for the launcher from the installer at run time. When you choose this option, the launcher performs its own JVM search when it is invoked and uses its lax.nl.valid.vm.list property to establish valid VM criteria. Note: You can customize the default value (1.4+) of a launcher's lax.nl.valid.vm.list property. To do so, click the Edit Properties button on the General Settings tab of the Create LaunchAnywhere for Java Application customizer. This opens the LaunchAnywhere Properties dialog box. Locate the lax.nl.valid.vm.list property, double-click its value, and edit the text. (For a detailed discussion of JVM selection criteria settings, see Java VM Selection Criteria in the InstallAnywhere 2009 help.) Click OK to close the LaunchAnywhere Properties dialog box.
Giving End Users a Choice In addition to the JVM selection decisions the installer and its launchers make, you can provide your end users with the option to choose a JVM they want your software to use by adding the Choose Java VM panel to your project. The Choose Java VM panel supports the following range of choices for your end users:
• Choose a valid JVM found by the installer's VM search • Choose the bundled JVM (only shown when a JVM is bundled with the installer) • Search for JVM in non-standard locations • Browse for a JVM on the local system
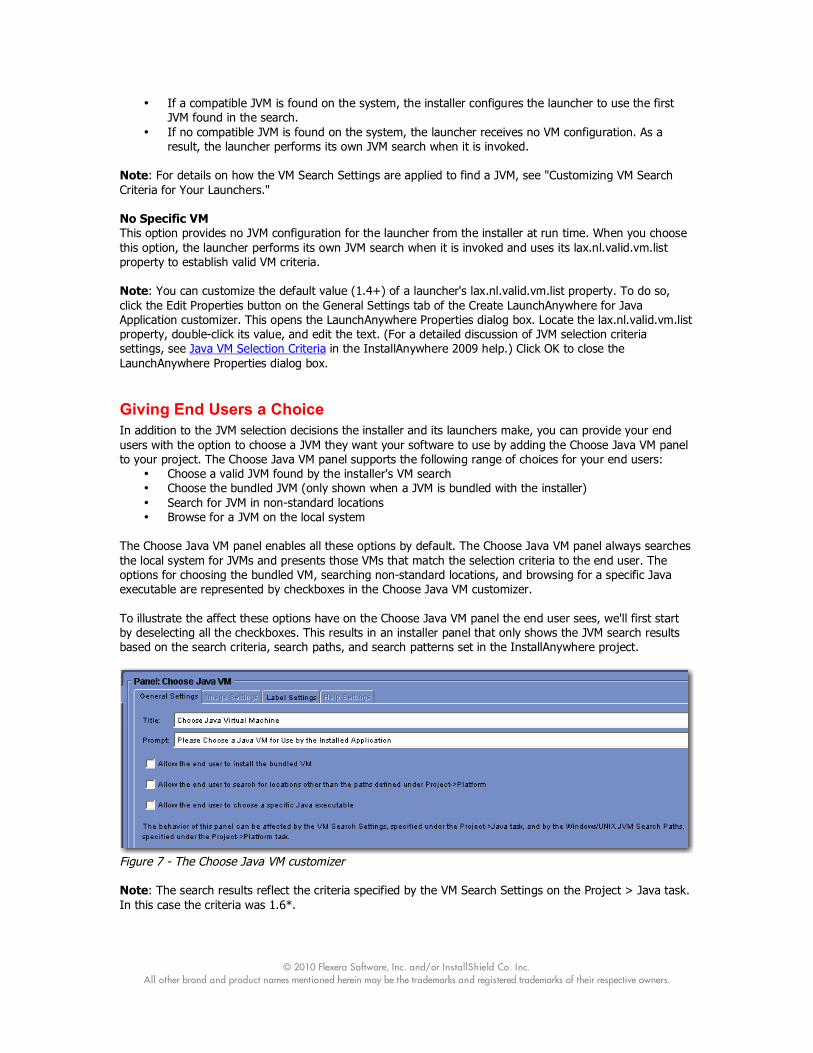
The Choose Java VM panel enables all these options by default. The Choose Java VM panel always searches the local system for JVMs and presents those VMs that match the selection criteria to the end user. The options for choosing the bundled VM, searching non-standard locations, and browsing for a specific Java executable are represented by checkboxes in the Choose Java VM customizer. To illustrate the affect these options have on the Choose Java VM panel the end user sees, we'll first start by deselecting all the checkboxes. This results in an installer panel that only shows the JVM search results based on the search criteria, search paths, and search patterns set in the InstallAnywhere project.
Figure 7 - The Choose Java VM customizer Note: The search results reflect the criteria specified by the VM Search Settings on the Project > Java task. In this case the criteria was 1.6*.

© 2010 Flexera Software, Inc. and/or InstallShield Co. Inc. All other brand and product names mentioned herein may be the trademarks and registered trademarks of their respective owners.
Figure 8 - The Choose Java VM panel showing standard search results only
Allowing Users to Choose the Bundled VM Often setup authors who bundle a JVM with their installer want their end users to be able to choose the bundled JVM during the install. This procedure adds an Install a Java VM Specifically for this Application option to the Choose Java VM panel. When an end user selects that option, the installer configures its launchers to use the bundled JVM.

© 2010 Flexera Software, Inc. and/or InstallShield Co. Inc. All other brand and product names mentioned herein may be the trademarks and registered trademarks of their respective owners.
To allow users to choose the bundled JVM 1. In the Advanced Designer, click the Pre-Install task. 2. In the Pre-Install task, click the Choose Java VM panel. (We're assuming, at this point, a Choose
Java VM panel has already been added and the three checkboxes in that panel's customizer deselected.)
3. In the Choose Java Vm customizer, click the Allow End User to Install the Bundled VM checkbox to activate this option. (This also assumes the project includes a bundled VM for the system on which you are running.)
4. Click File > Save. When you build the project and test an installer that includes a bundled VM the Choose Java VM panel shows both the JVM search results and the Install a Java VM Specifically for this Application option.
Figure 9 - The Choose Java VM panel showing search results and the option to install the bundled VM Note: The Choose Java VM panel never determines whether or not to install the bundled JVM; instead this is something that is determined by the Bundled Virtual Machine settings on the Project > Java task. The Choose Java VM panel provides the option of allowing the launchers the installer deploys to run under the bundled JVM.
Allowing Users to Search for VMs in Non-standard Locations To avoid long wait times, InstallAnywhere installers only search the most common locations for Java executables. (For Windows and Unix installers, you can customize the search paths and search patterns this search uses. See "Customizing VM Search Paths and Patterns for Unix and Windows" for details.) Within the Choose Java VM panel, you can provide users with the option of searching for JVMs in locations other than the most common ones. This process adds a Search Another Location button to the Choose Java VM panel. An end user can click the Search Another Location button and select a folder in which to search for a JVM. (The search criteria you set in your InstallAnywhere project applies to this search as well.) To allow users to search for VMs in non-standard locations
1. In the Advanced Designer, click the Pre-Install task.
© 2010 Flexera Software, Inc. and/or InstallShield Co. Inc. All other brand and product names mentioned herein may be the trademarks and registered trademarks of their respective owners.
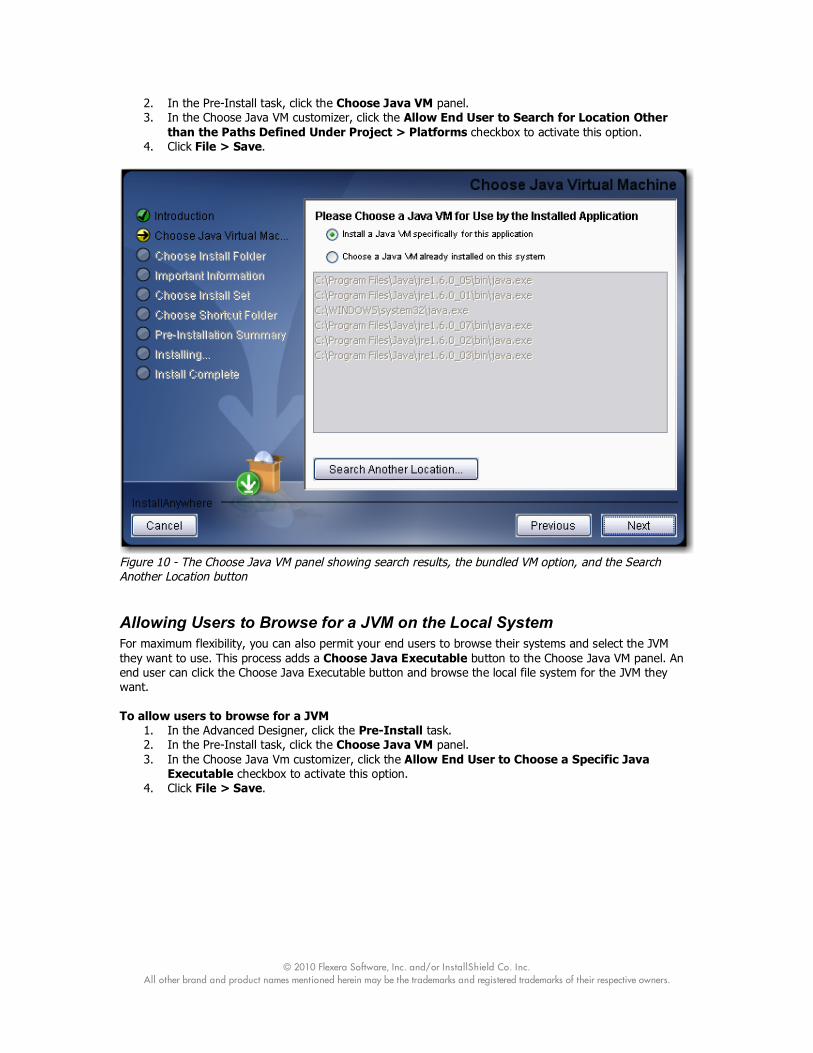
2. In the Pre-Install task, click the Choose Java VM panel. 3. In the Choose Java VM customizer, click the Allow End User to Search for Location Other
than the Paths Defined Under Project > Platforms checkbox to activate this option. 4. Click File > Save.
Figure 10 - The Choose Java VM panel showing search results, the bundled VM option, and the Search Another Location button
Allowing Users to Browse for a JVM on the Local System For maximum flexibility, you can also permit your end users to browse their systems and select the JVM they want to use. This process adds a Choose Java Executable button to the Choose Java VM panel. An end user can click the Choose Java Executable button and browse the local file system for the JVM they want. To allow users to browse for a JVM
1. In the Advanced Designer, click the Pre-Install task. 2. In the Pre-Install task, click the Choose Java VM panel. 3. In the Choose Java Vm customizer, click the Allow End User to Choose a Specific Java
Executable checkbox to activate this option. 4. Click File > Save.

© 2010 Flexera Software, Inc. and/or InstallShield Co. Inc. All other brand and product names mentioned herein may be the trademarks and registered trademarks of their respective owners.
Figure 11 - The Choose Java VM panel showing search results, the bundled VM option, the Search Another Location button, and the Choose Java Executable button.